
۱. قبل از شروع
به بخش چهارم از مجموعه «ساخت عاملهای هوش مصنوعی با ADK» خوش آمدید! در این آزمایشگاه کد عملی، شما آموختههای جلسات قبلی را با هم ترکیب خواهید کرد تا یک عامل تحلیلگر داده ایجاد کنید. این عامل برای تجزیه و تحلیل دادهها، ایجاد بینشهای ارزشمند و خودکارسازی جنبههای کلیدی گردش کار تجزیه و تحلیل دادهها طراحی خواهد شد.
You will empower your agent to explore uploaded files and connect it to enterprise-level databases like Google Cloud BigQuery, using the powerful tools included in the ADK.
همچنین میتوانید از طریق این آدرس کوتاهشده به این آزمایشگاه کد دسترسی پیدا کنید: goo.gle/adk-data-analyst
پیشنیازها
- درک اساسی از مفاهیم هوش مصنوعی مولد
- Basic proficiency in Python programming and comfort using the command line.
- Familiarity with the concepts from the previous codelabs in this series: "The Foundation," and "Empowering with Tools."
آنچه یاد خواهید گرفت
- نحوه ساخت یک عامل تحلیلگر داده کاربردی با استفاده از چارچوب ADK.
- Methods for enabling an agent to analyze data from uploaded documents.
- نحوه اتصال عامل خود به پایگاه داده BigQuery برای تجزیه و تحلیل دادههای سطح سازمانی.
- Techniques for defining your agent's core logic, including its purpose and instructions.
آنچه نیاز دارید
- یک کامپیوتر سالم و یک اتصال اینترنتی قابل اعتماد.
- یک مرورگر، مانند کروم ، برای دسترسی به کنسول ابری گوگل
- ذهنی کنجکاو و مشتاق یادگیری.
۲. مقدمه
In today's data-driven world, the ability to quickly and accurately analyze vast amounts of information is more critical than ever. However, the process of extracting meaningful insights often requires deep technical expertise in areas like SQL, creating a bottleneck that can slow down decision-making. What if you could bridge this gap and interact with complex datasets as easily as having a conversation?
This is where AI agents are changing the game. By acting as an intelligent interface between you and your data, AI agents can understand natural language questions, translate them into technical queries, and deliver actionable insights in seconds.
In this codelab, you will step into the future of data analytics by building a practical Data Analyst Agent using the Agent Development Kit (ADK). You will start by creating a foundational agent and then progressively enhance its capabilities. You will first teach your agent to analyze unstructured data from uploaded documents. Then, you will connect it to a powerful, enterprise-grade data warehouse, Google Cloud BigQuery, to query and analyze a large-scale, real-world healthcare dataset.
در پایان این آموزش، شما نه تنها یک دستیار هوش مصنوعی کاربردی خواهید داشت، بلکه درک کاملی از نحوه ساخت عواملی خواهید داشت که میتوانند وظایف روتین داده را خودکار کنند، تجزیه و تحلیل را تسریع کنند و دسترسی به بینشهای حیاتی را برای شما و تیمتان دموکراتیزه کنند.
۳. پیکربندی سرویسهای ابری گوگل
ایجاد یک پروژه گوگل کلود
To keep all of your work for this codelab organized and separated from other projects, you will begin by creating a new Google Cloud project.
To open the project creation page, click on:
Enter the required information at the project creation page:
- نام پروژه: یک نام دلخواه مانند
genai-workshopوارد کنید. این نام باید بین ۴ تا ۳۰ کاراکتر باشد و فقط میتواند شامل حروف، اعداد، علامت نقل قول، خط فاصله، فاصله یا علامت تعجب باشد. - مکان: این گزینه را روی «بدون سازمان» تنظیم کنید.
- حساب پرداخت: در صورت درخواست، حساب پرداخت آزمایشی پلتفرم ابری گوگل (یا حساب پرداخت فعال دلخواه خود) را انتخاب کنید. اگر این گزینه نمایش داده نشد، ادامه دهید.
شناسه پروژه تولید شده را کپی کنید، بعداً به آن نیاز خواهید داشت. 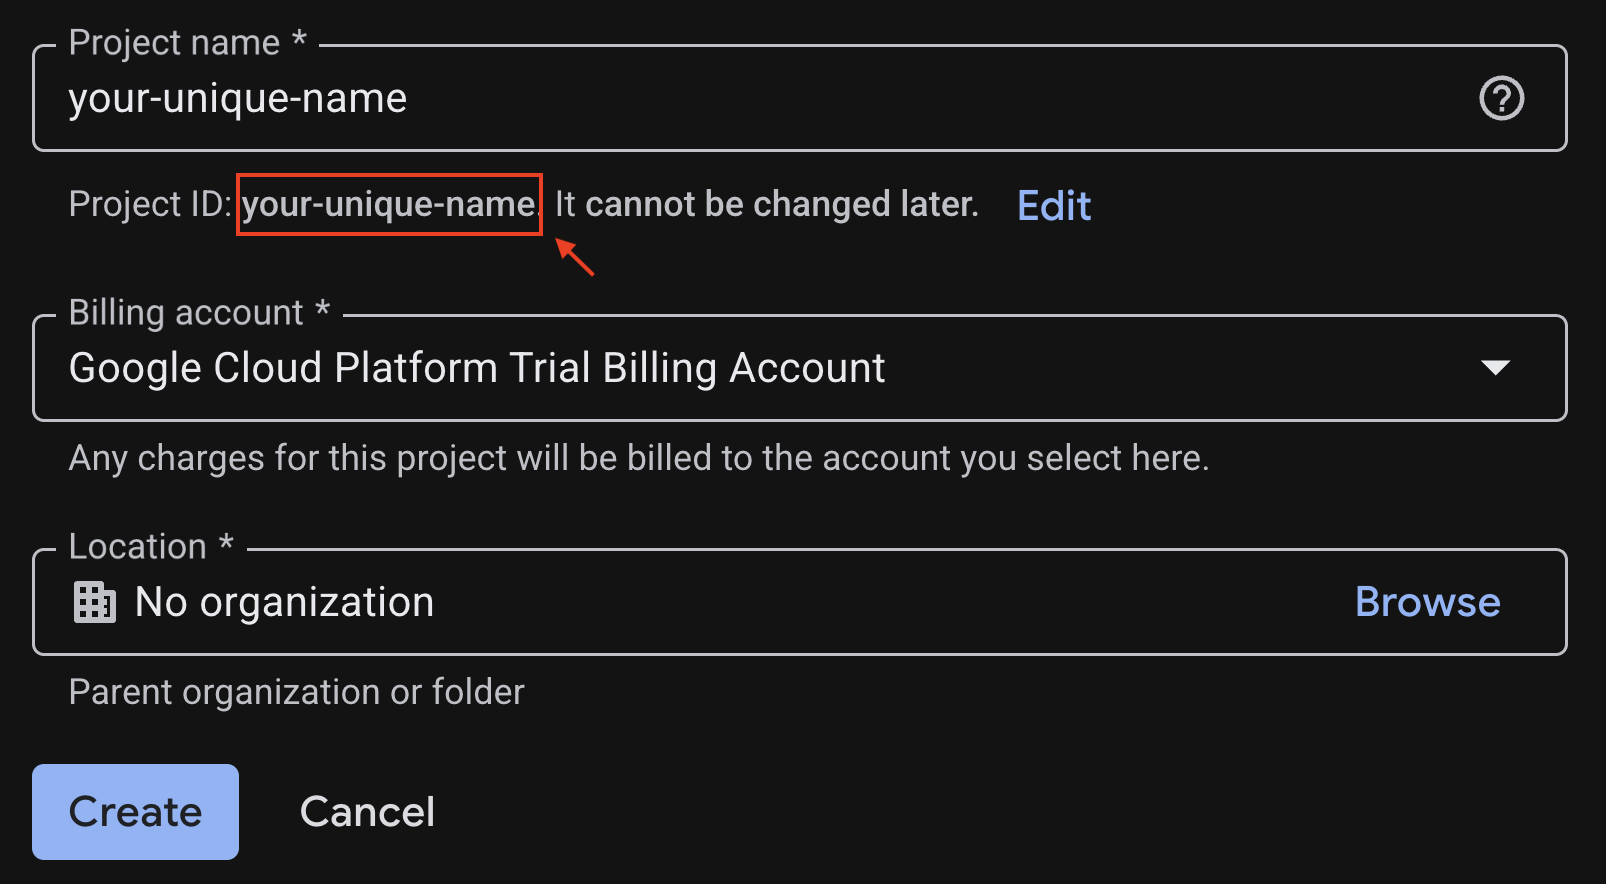
If everything is fine, click on the Create button.
پیکربندی Cloud Shell
Cloud Shell is a pre-configured environment with all the tools you need for this codelab. Once your project is created successfully, do the following steps to set up Cloud Shell .
راه اندازی پوسته ابری
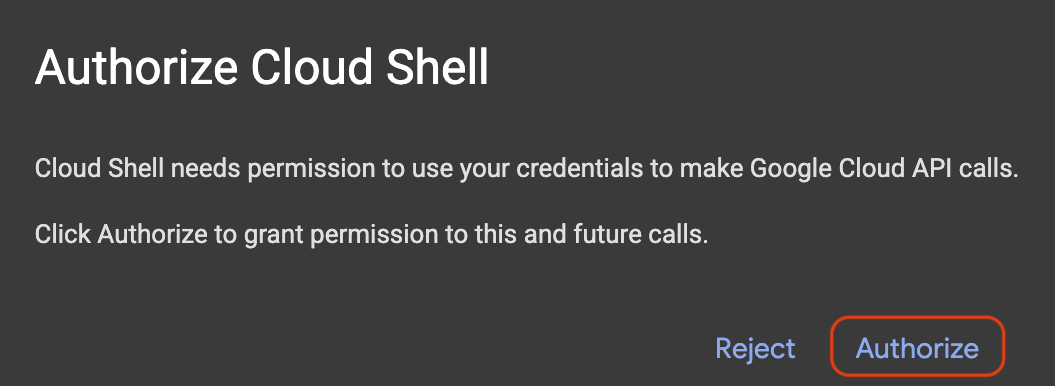
To launch Cloud Shell, click on:
If a popup appears asking for authorization, click on Authorize .
تنظیم شناسه پروژه
Replace replace-with-your-project-id with your actual Project ID from the project creation step above. Execute the following command in the Cloud Shell terminal to set the correct Project ID .
gcloud config set project replace-with-your-project-id
اکنون باید ببینید که پروژه صحیح در ترمینال Cloud Shell انتخاب شده است. شناسه پروژه انتخاب شده با رنگ زرد برجسته شده است.

۳. فعال کردن API های مورد نیاز
To use Google Cloud services, you must first activate their respective APIs for your project. Run the commands below in the Cloud Shell terminal to enable the services for this Codelab:
gcloud services enable \
 aiplatform.googleapis.com \
 bigquery.googleapis.com
If the operation was successful, you'll see Operation/... finished successfully message printed in your terminal.
۴. ایجاد یک محیط مجازی پایتون
در مرحله بعد، یک محیط پایتون ایزوله برای مدیریت وابستگیهای پروژه خود ایجاد کنید.
1. Create project directory and navigate into it:
mkdir -p ai-agents-adk && cd ai-agents-adk
۲. ایجاد و فعالسازی یک محیط مجازی:
uv venv --python 3.12
source .venv/bin/activate
You'll see ( ai-agents-adk ) prefixing your terminal prompt, indicating the virtual environment is active.

۳. حافظه پنهان موجود را حذف کنید
rm -rf ~/.cache
۴. صفحه adk را نصب کنید
uv pip install google-adk --no-cache
۵. پوشه را با نام Cloud Shell Workspace باز کنید.
cd ~
cloudshell workspace ai-agents-adk
۵. یک عامل اولیه ایجاد کنید
With your environment ready, it's time to create your AI agent using a simple ADK command.
۱. یک نماینده ایجاد کنید
در ترمینال خود، دستور زیر را اجرا کنید:
adk create data_analyst_agent
۲. عامل خود را پیکربندی کنید
You will be prompted to configure your agent. Make the following selections:
- یک مدل انتخاب کنید : مدل ۱.
gemini-2.5-flashرا انتخاب کنید. - یک backend انتخاب کنید : گزینه ۲.
Vertex AIرا انتخاب کنید. - Enter Google Cloud project ID : Press Enter to confirm the correct Project ID .
- Enter Google Cloud region : Press Enter to use the default
us-central1.
۳. وب سرور توسعه را شروع کنید
Once the agent is created, start the development web server by running the following command:
adk web --allow_origins "regex:https://.*\.cloudshell\.dev"
You can either Ctrl + Click or Cmd + Click on the link (ie, http://localhost:8000 ) in the terminal or you can
- روی دکمه پیشنمایش وب w کلیک کنید
- تغییر پورت را انتخاب کنید.
- شماره پورت را وارد کنید (مثلاً ۸۰۰۰)
- روی تغییر و پیشنمایش کلیک کنید
You'll then see the chat application-like UI appear in your browser.
۴. با نماینده خود چت کنید
Go ahead and chat with your agent through this interface! Say something like "hello, what can you do?" .
۶. تحلیل دادهها از یک سند
In this section, you will upload a document to the agent and ask questions about its content.
۱. خلاصه کردن سند
Follow these steps to get a summary of the document:
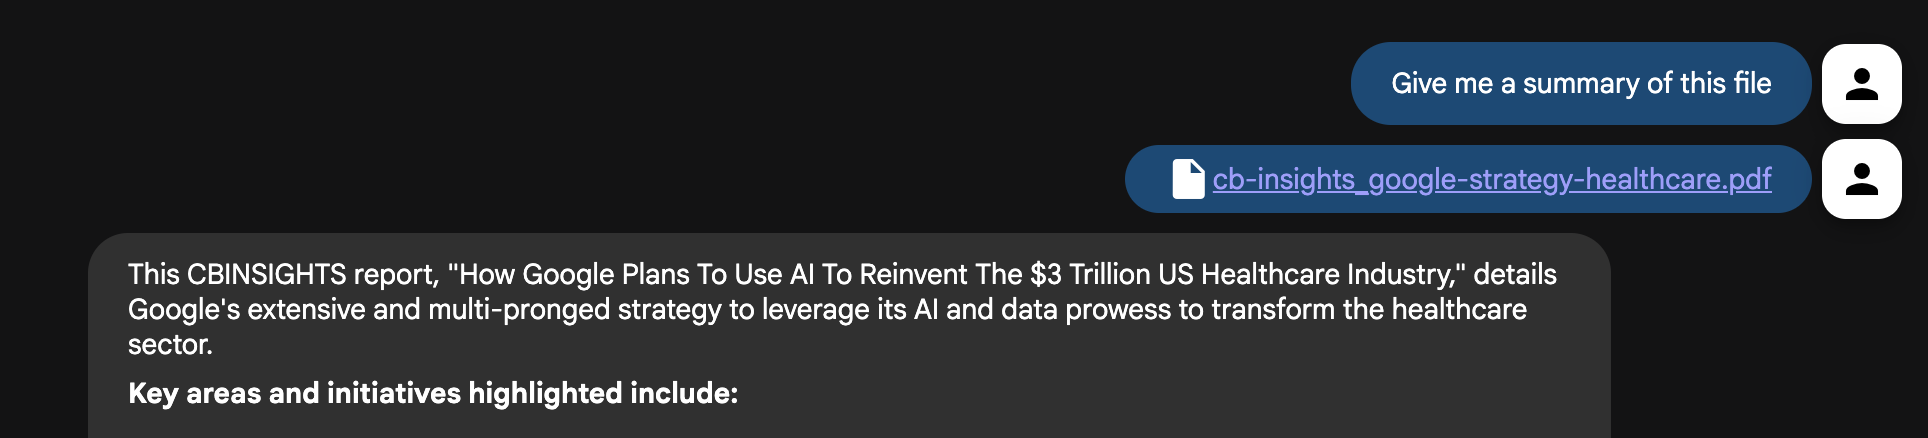
- Download the file about Google's Health Care Strategy .
- Click the upload file button in your agent's UI and select the file you just downloaded.
- In the chat interface, ask the agent to summarize the file: " Give me a summary of this file "
- اینتر را فشار دهید.
You should receive a concise summary of the document's contents.
۲. سوالات جزئیتری بپرسید
Now, try asking more detailed questions to dig deeper into the document:
- What are the primary diseases Google is currently targeting with its AI and data initiatives?
- How is Google planning to improve healthcare data interoperability and break down data silos?
- How is Google Cloud being utilized to support healthcare businesses and researchers?
- What new disease areas is Google potentially exploring next (eg, COPD, cancer, mental health)?
۳. سوالات تکمیلی بپرسید
You can also ask follow up questions like finding out the page refernce number for further investigation:
- Where did you see information about diabetic related information?
- من را به صفحات مرتبط با بیماریها هدایت کنید.
- Where are the interesting charts that I should take a look at?
Challenge : Find a document of your own that you want the agent to analyze and upload it. Ask the agent questions about its content.
7. Combine document insights with live web search
The agent is now an expert on the document, but a powerful analyst also needs access to current, external information. Let's give our agent the ability to search the web.
- In the Cloud Shell terminal, press Ctrl+C to stop the web server.
- Open the
data_analyst_agent/agent.pyfile in the Cloud Shell Editor by executing this command:
cloudshell edit data_analyst_agent/agent.py
- Modify the file to import and add the
google_searchtool:
from google.adk.agents.llm_agent import Agent
from google.adk.tools import google_search

root_agent = Agent(
    model='gemini-2.5-flash',
    name='root_agent',
    description='A helpful assistant for user questions.',
    instruction="""
        First, check the uploaded files for an answer.
        If the information is not in the files, use your tools to search the web.
        Answer user questions to the best of your ability.
    """,
    tools=[
        google_search
    ]
)
- Save the file and restart the web server in your terminal by typing the following command in the terminal:
adk web --allow_origins "regex:https://.*\.cloudshell\.dev"
- In the agent UI, re-upload the
GoogleHealthStrategy.pdffile. - Now, ask a question that requires both the document's context and external information:
The document discusses Google's strategy in healthcare. What are three other major tech companies that are also investing heavily in healthcare AI, and what are their primary focus areas?
The agent will now synthesize information from both the document and a live Google search to give you a comprehensive answer. You can try asking a few questions:
- The document mentions using AI for diabetic retinopathy. What are some of the latest FDA-approved technologies in this area that have been announced in the last year?
- The file mentions partnerships. Can you find any recent news articles or press releases about Google's latest collaborations in the healthcare sector?
Challenge : Try asking similar questions to a document of your own. Something that makes use of a local document and the results from the internet.
۸. دادههای مراقبتهای بهداشتی را با BigQuery تجزیه و تحلیل کنید
Uploading individual documents isn't scalable. In a real-world scenario, data resides in enterprise systems like Google Cloud BigQuery.
Currently, developers building agentic applications often have to build and maintain their own custom tools. This manual process is slow, risky, and creates significant overhead. It forces the developers to handle everything from authentication to error handling instead of focusing on innovation.
کیت توسعه عامل (ADK) شامل ابزارهای شخص ثالث برای تعامل با BigQuery است. برای این تحلیل خاص، شما از مجموعه دادههای عمومی استفاده از Medicare که توسط مراکز خدمات Medicare و Medicaid (CMS) ارائه شده است، استفاده خواهید کرد.
First, let's connect our agent to a massive public healthcare dataset.
- In the Cloud Shell terminal, press Ctrl+C to stop the web server.
- Open the
data_analyst_agent/agent.pyfile in the Cloud Shell Editor by executing this command in the terminal:
cloudshell edit data_analyst_agent/agent.py
- Replace the entire content of the file with the following code to configure the powerful
BigQueryToolset:
import google.auth
from google.adk.agents.llm_agent import Agent
from google.adk.tools import google_search
from google.adk.tools.agent_tool import AgentTool
from google.adk.tools.bigquery import (
    BigQueryToolset,
    BigQueryCredentialsConfig
)
from google.adk.tools.bigquery.config import (
    BigQueryToolConfig,
    WriteMode
)

# Automatically get credentials from the gcloud environment
application_default_credentials, _ = google.auth.default()
credentials_config = BigQueryCredentialsConfig(
    credentials=application_default_credentials
)

# Configure the BigQuery tool
tool_config = BigQueryToolConfig(
    write_mode=WriteMode.ALLOWED,
    application_name='data_analyst_agent'
)

# Create the toolset with the specified configurations
bigquery_toolset = BigQueryToolset(
    credentials_config=credentials_config, bigquery_tool_config=tool_config
)

# Create an agent with google search tool as a search specialist
google_search_agent = Agent(
    model='gemini-2.5-flash',
    name='google_search_agent',
    description='A search agent that uses google search to get latest information about current events, weather, or business hours.',
    instruction='Use google search to answer user questions about real-time, logistical information.',
    tools=[google_search],
)

# Define the final agent with its instructions and tools
root_agent = Agent(
    model="gemini-2.5-flash",
    name="bigquery_agent",
    description=(
        "Agent to answer questions about BigQuery data and execute SQL queries."
    ),
    instruction="""
        You are an expert data analyst agent with access to BigQuery tools.
        When a user asks about a dataset, first use your tools to understand its schema.
        Then, use this knowledge to construct and execute SQL queries to answer the user's questions.
        Always confirm with the user if their question is ambiguous (e.g., for which year?).
    """,
    tools=[
        AgentTool(google_search_agent),
        bigquery_toolset
    ],
)
- Save the file and restart the web server in your terminal by typing the following command in the terminal:
adk web --allow_origins "regex:https://.*\.cloudshell\.dev"
- Now, you can ask your agent to analyze the public Medicare dataset. Start by exploring the data:
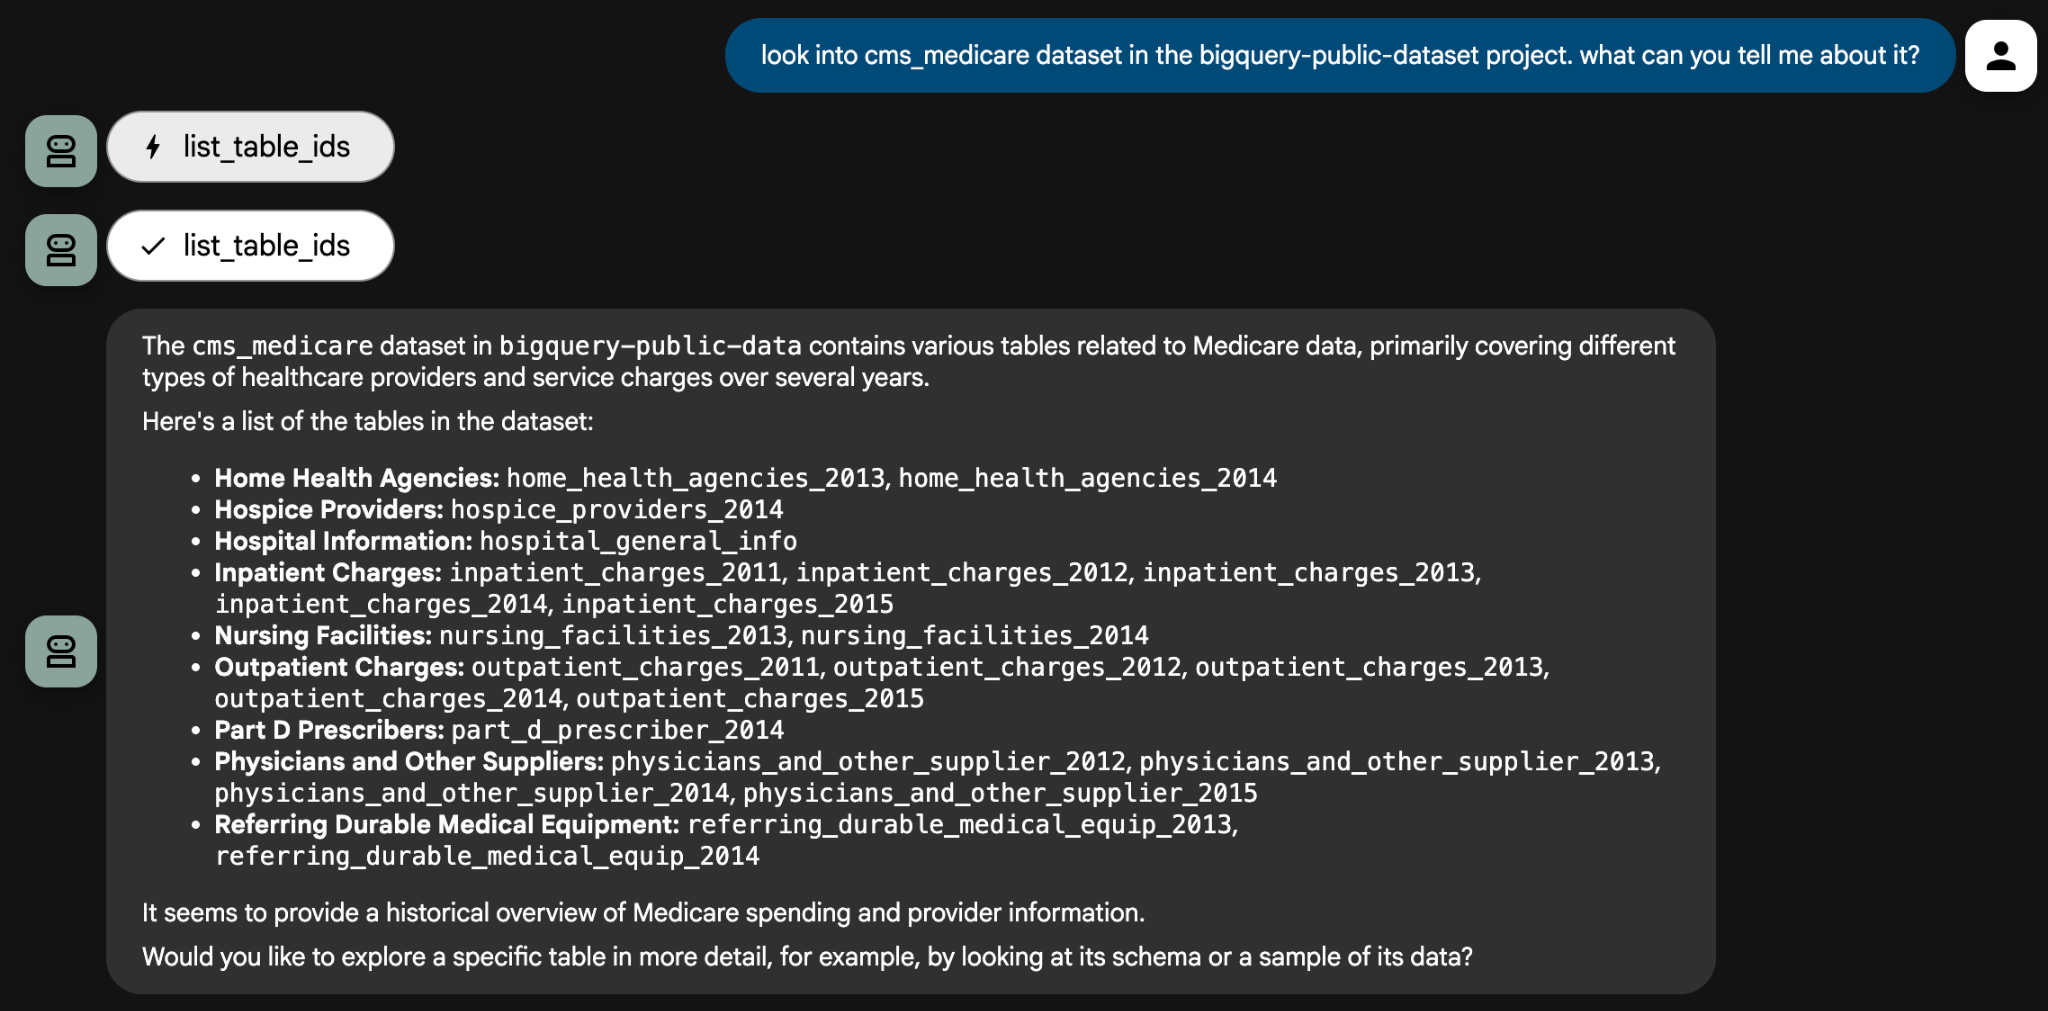
Look into the cms_medicare dataset in the bigquery-public-data project. What can you tell me about it?
عامل از ابزارهای خود برای بررسی مجموعه دادهها و ارائه فهرستی از جداول موجود استفاده خواهد کرد. از آنجا، میتوانید با سوالات تحلیلی خاص، به جزئیات بیشتری بپردازید. عامل ممکن است سوالات شفافسازی بپرسد تا از صحت پرسوجوهایش اطمینان حاصل کند.
For some questions, you will need to provide the Project ID to the agent so that it can use it to create a query. For example:

Here are some example analytical prompts that you can try:
- Using the
inpatient_charges_2015table, what are the top 5 procedures (DRG definitions) by total number of discharges? - What is the average total payment for 'MAJOR JOINT REPLACEMENT' in California (CA)?
- Which state has the highest average covered charges for that same procedure?
That concludes this codelab. You have only scratched the surface of what you can achieve with data agents powered by enterprise data systems. Please feel free to ask any questions you might have about the cms_medicare dataset to your agent.
Challenge: Find another public dataset in BigQuery and use your agent to explore it. You can also create your own dataset with your own data and analyze it privately.
۹. تمیز کردن (اختیاری)
To avoid incurring future charges, you can delete the resources used in this codelab.
۱. عامل را متوقف کنید
In Cloud Shell terminal, press Ctrl+C to stop the adk web process.
۲. حذف فایلهای پروژه
To remove the agent code from your Cloud Shell environment, run the following in the terminal:
cd ~ && rm -rf ai-agents-adk
۳. غیرفعال کردن APIها
To disable the APIs you enabled earlie, run the following in the terminal:
gcloud services disable \
 aiplatform.googleapis.com \
 bigquery.googleapis.com
۴. پروژه را متوقف کنید
If you want to delete the entire Google Cloud project, follow the shutting down projects guide .
۱۰. نتیجهگیری
تبریک! شما با موفقیت یک عامل تحلیلگر داده با استفاده از چارچوب کیت توسعه عامل (ADK) ساختید. این عامل قادر به تجزیه و تحلیل دادهها از منابع مختلف، ایجاد بینش و کمک به خودکارسازی بخشهایی از گردش کار تجزیه و تحلیل دادهها است.
To continue your learning journey, explore these resources:
- Read the official blog post: Announcing the BigQuery Toolset for AI Agents
- Explore the documentation: Visit the official Agent Development Kit (ADK) documentation for new features and advanced guides.
- Browse the code: Check out the ADK GitHub repository .
- Discover more data: Explore the Google Cloud Public Datasets catalog .