
1. 准备工作
欢迎观看“使用 ADK 构建 AI 智能体”系列的第二部分!在此实践 Codelab 中,您将使用各种工具为基本 AI 智能体赋能。
本指南提供了两条入门途径:一条适用于继续学习“使用 ADK 构建 AI 智能体:基础知识”Codelab 的用户,另一条适用于从头开始学习的用户。无论选择哪种方式,您都可以获得必要的代理基础代码,以便开始操作。
在此 Codelab 结束时,您将为个人助理代理配备各种用途的工具,从而更进一步,在后续部分中将其转变为复杂的多代理系统 (MAS)。
前提条件
- 了解生成式 AI 概念
- 基本熟练掌握 Python 编程
- 已完成 Building AI Agents with ADK: The Foundation Codelab 或类似 Codelab
学习内容
- 通过构建自定义 Python 函数作为工具,为智能体赋予新技能。
- 使用 Google 搜索等内置工具将您的代理连接到实时信息。
- 通过为复杂任务创建专用子代理来构建多工具代理。
- 集成 LangChain 等热门 AI 框架中的工具,快速扩展功能。
所需条件
- 一台可正常运行的计算机和稳定的 Wi-Fi 连接
- 浏览器(例如 Chrome),用于访问 Google Cloud 控制台
- 启用了结算功能的 Google Cloud 项目
- 好奇心和学习热情
2. 简介
使用 ADK 构建的基本代理具有强大的 LLM 大脑,但也存在一些限制:它无法访问在训练日期之后创建的信息,也无法与外部服务互动。这就像一位才华横溢、博览群书的助理被锁在没有电话或互联网的图书馆里。为了让代理真正发挥作用,我们需要为其提供工具。
您可以将工具视为让 AI 助理能够访问外部世界:计算器、网络浏览器或对特定公司数据库的访问权限。在 ADK 中,工具是一段模块化代码,可让代理执行特定操作,例如查找实时数据或调用外部 API。使用工具可将其功能扩展到远超简单对话的范围。
ADK 提供三类工具:
- 功能工具:您开发的自定义工具,用于满足应用的独特需求,例如预定义函数和代理。
- 内置工具:框架提供的可直接使用的工具,用于执行常见操作,例如 Google 搜索和代码执行。
- 第三方工具:热门的外部库,例如 Serper 以及 LangChain 和 CrewAI 中的工具。
如需详细了解如何将工具与 ADK 智能体搭配使用,请参阅官方文档。在此 Codelab 中,我们将添加一些工具,将简单的代理转变为功能强大的个人旅游助理。我们开始吧!
3. 入门:基础代理
在为代理配备工具之前,您需要先有一个可供使用的基本代理。选择最适合您进度的学习路线。
路径 A:从基础 Codelab 继续
如果您刚刚完成“使用 ADK 构建 AI 智能体:基础知识”Codelab,那么您已准备就绪。您可以继续在现有的 ai-agents-adk 项目目录中工作。
路径 B:从头开始
如果您直接开始此 Codelab,请完成以下 4 个步骤,以设置环境并创建必要的起始代理。
完成上述步骤后,您就可以开始学习之旅了。
4. 构建用于货币兑换的自定义工具
在此阶段,您应该已经知道如何使用 ADK 构建简单的 AI 代理,并使其在开发界面上运行。
假设您正在为下个月的日本之旅做准备,需要查看当前的货币兑换汇率。向代理提出问题:“新加坡元兑换日元的汇率是多少?”
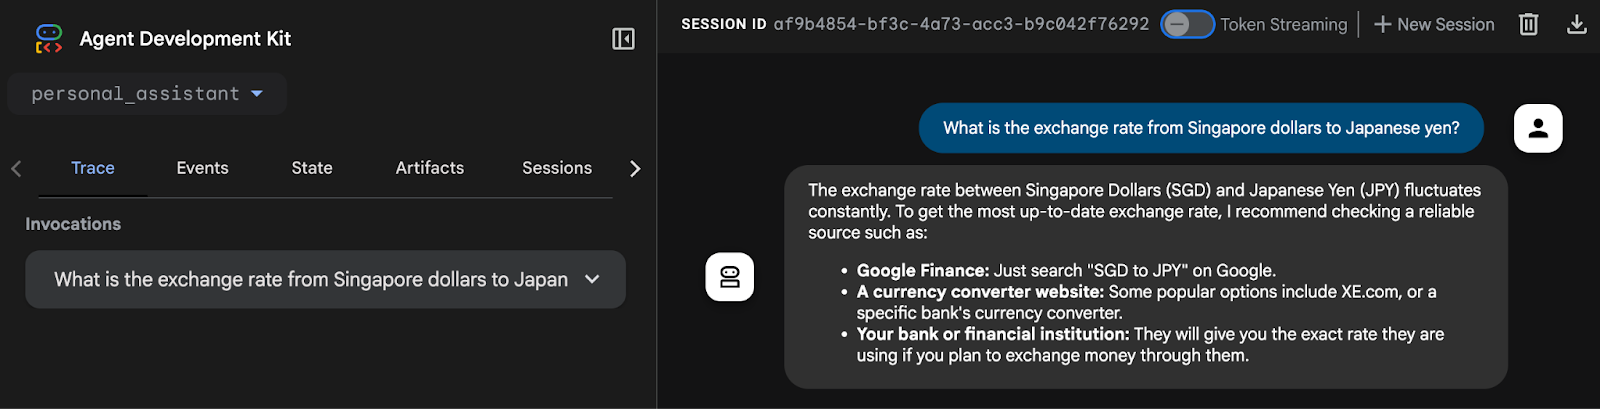
您会看到,该代理无法检索实时汇率。这是因为该代理目前无法访问互联网,也无法连接到外部系统。即使代理回复了一个值,也很难信任该值,因为它很可能是幻觉。
为解决此问题,我们将实现一个 Python 函数,通过 REST API 检索汇率,并将其作为智能体的函数工具集成。
在终端窗口中使用键盘快捷键 Ctrl + C(适用于 Windows/Linux)或 Cmd + C(适用于 macOS)终止正在运行的代理进程。
创建 custom_functions.py 文件**:**
在 personal_assistant 文件夹中创建一个名为 custom_functions.py 的 Python 文件,方法是在终端中输入以下命令.
touch personal_assistant/custom_functions.py
您的文件夹结构应如下所示:
ai-agents-adk/
└── personal_assistant/
    ├── .env
    ├── __init__.py
    ├── agent.py
    └── custom_functions.py
在代码编辑器中打开 custom_functions.py。此文件将包含负责从外部 API 检索汇率数据的 Python 函数。
将以下代码复制并粘贴到其中:
import requests

# define a function to get exchange rate
def get_fx_rate(base: str, target: str):
        """
        Fetches the current exchange rate between two currencies.

        Args:
                base: The base currency (e.g., "SGD").
                target: The target currency (e.g., "JPY").

        Returns:
                The exchange rate information as a json response,
                or None if the rate could not be fetched.
        """
        base_url = "https://hexarate.paikama.co/api/rates/latest"
        api_url = f"{base_url}/{base}?target={target}"

        response = requests.get(api_url)
        if response.status_code == 200:
                return response.json()
现在,修改 agent.py 文件:导入 get_fx_rate 函数并将其分配为 FunctionTool。
更新 agent.py 文件**:**
复制此代码块并替换 agent.py 文件的现有内容:
from google.adk.agents import Agent
from google.adk.tools import FunctionTool

from .custom_functions import get_fx_rate

root_agent = Agent(
    model='gemini-2.5-flash',
    name='root_agent',
    description='A helpful assistant for user questions.',
    instruction='Answer user questions to the best of your knowledge',
    tools=[FunctionTool(get_fx_rate)]
)
更改完成后,输入以下命令,重新启动代理:
uv run adk web
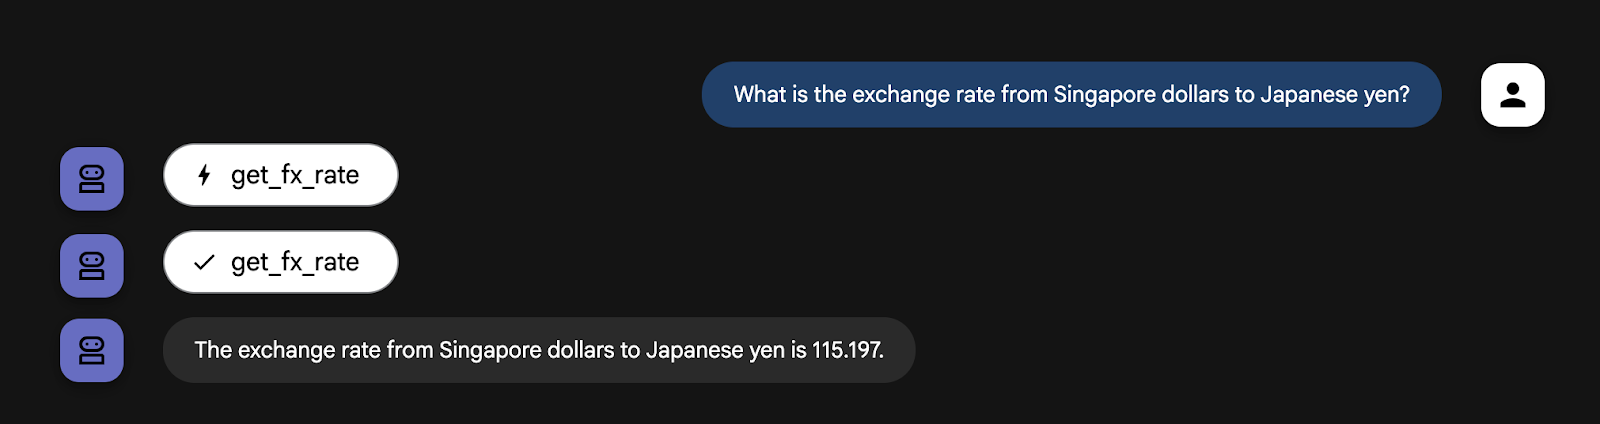
当代理启动后,再次问同样的问题:“新加坡元兑日元的汇率是多少?”
这次,您应该会看到 get_fx_rate 工具提供的实际汇率。
您可以随时提出与货币兑换相关的任何问题。
5. 与内置 Google 搜索工具集成
现在,代理能够提供汇率,下一个任务是获取下个月的天气预报。向代理提出以下问题:“下个月日本东京的天气预报是什么?”

您可能已经猜到,天气预报需要实时信息,而我们的代理没有这些信息。虽然我们可以为每项所需的实时数据编写新的 Python 函数,但添加越来越多的自定义工具很快就会使代理过于复杂且难以管理。
幸运的是,智能体开发套件 (ADK) 提供了一套内置工具,包括可随时使用的 Google 搜索,从而简化了智能体与外部世界的互动方式。我们来为代理添加 Google 搜索工具。
为此,您需要按如下方式修改 agent.py 文件:
from google.adk.agents import Agent
from google.adk.tools import FunctionTool
from google.adk.tools import google_search

from .custom_functions import get_fx_rate

root_agent = Agent(
    model='gemini-2.5-flash',
    name='root_agent',
    description='A helpful assistant for user questions.',
    instruction='Answer user questions to the best of your knowledge',
    tools=[
        FunctionTool(get_fx_rate),
        google_search,
    ]
)
修改完文件后,重启 adk web 实例。以防您忘记,
- 点击终端,然后按 Ctrl + C 或 Cmd + C 停止实例
uv run adk web以启动实例- 尝试问同样的问题:“下个月日本东京的天气预报是什么?”
建议的方法是采用多代理模式:创建一个专门用于执行 Google 搜索的代理。然后,我们将这个新的 Google Search Agent 分配给我们的主要 personal_assistant 作为工具。
创建 custom_agents.py 文件
现在,在 personal_assistant 文件夹中创建一个名为 custom_agents.py 的 Python 文件。
touch personal_assistant/custom_agents.py
现在,您的文件夹结构应如下所示:
ai-agents-adk/
└── personal_assistant/
    ├── .env
    ├── __init__.py
    ├── agent.py
    ├── custom_functions.py
    └── custom_agents.py
此文件将包含专用 google_search_agent 的代码。使用代码编辑器将以下代码复制到 custom_agents.py 文件中。
from google.adk.agents import Agent
from google.adk.tools import google_search


# Create an agent with google search tool as a search specialist
google_search_agent = Agent(
    model='gemini-2.5-flash',
    name='google_search_agent',
    description='A search agent that uses google search to get latest information about current events, weather, or business hours.',
    instruction='Use google search to answer user questions about real-time, logistical information.',
    tools=[google_search],
)
创建文件后,更新 agent.py 文件,如下所示。
更新 agent.py 文件
复制此代码块并替换 agent.py 文件的现有内容:
from google.adk.agents import Agent
from google.adk.tools import FunctionTool
from google.adk.tools import agent_tool

from .custom_functions import get_fx_rate
from .custom_agents import google_search_agent


root_agent = Agent(
    model='gemini-2.5-flash',
    name='root_agent',
    description='A helpful assistant for user questions.',
    tools=[
        FunctionTool(get_fx_rate),
        agent_tool.AgentTool(agent=google_search_agent),
    ]
)
我们来分析一下代码中强大的新模式:
- 新的专家代理:我们定义了一个全新的代理
google_search_agent。请注意其具体说明以及其唯一工具是google_search。他是搜索专家。 agent_tool.AgentTool:这是 ADK 中的一个特殊封装容器。它会获取整个代理 (google_search_agent),并将其打包,使其看起来像一个标准工具,并像一个标准工具一样运行。- 更智能的**
root_agent**:我们的root_agent现在有了一个新工具:agent_tool.AgentTool(agent=google_search_agent)。它不知道如何搜索网络,但知道自己有一个可以委托搜索任务的工具。
请注意,root_agent 中已不再显示指令字段。其指令现在由其可用的工具隐式定义。
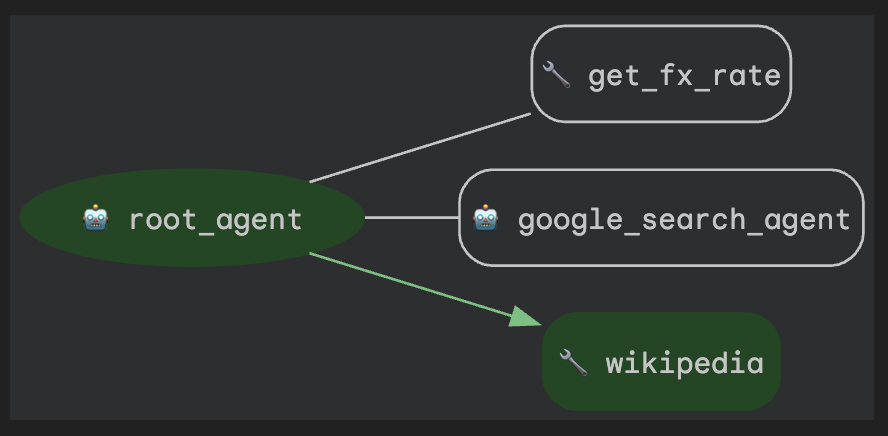
root_agent 已成为编排程序或路由器,其主要工作是了解用户的请求并将其传递给正确的工具,即 get_fx_rate 函数或 google_search_agent。这种去中心化设计是构建复杂且可维护的代理系统的关键。
现在,重新启动
adk web
实例,然后再次向代理提出这个问题:“下个月日本东京的天气预报是什么?”
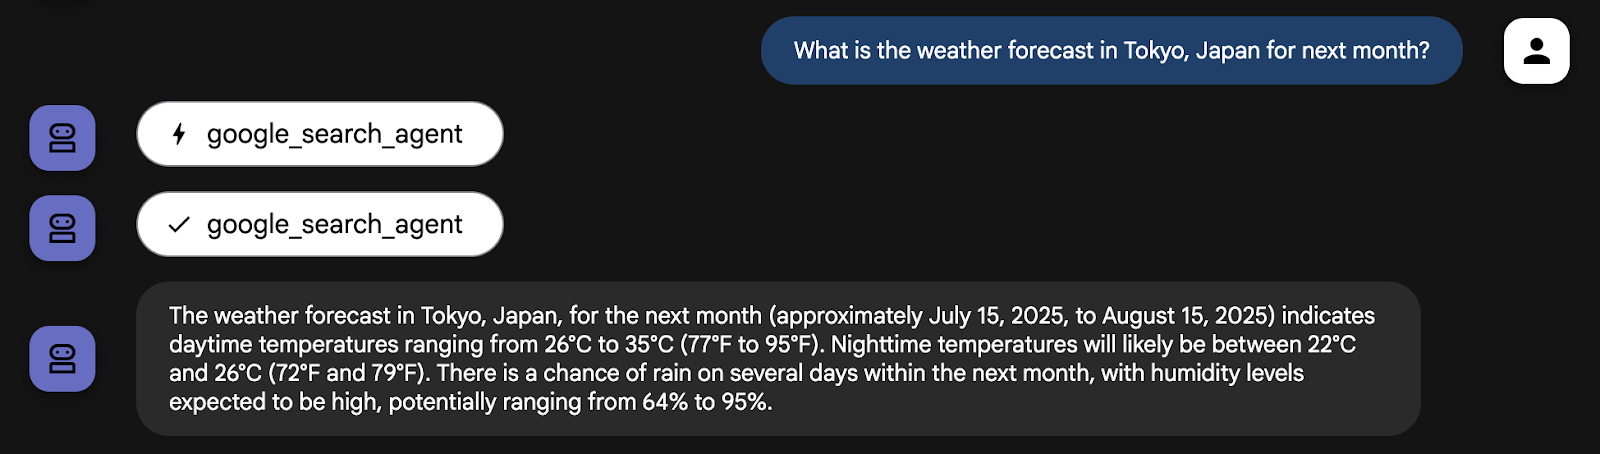
Google 助理现在使用 google_search_agent 获取最新信息
您也可以尝试提出当前汇率方面的问题。智能体现在应该能够针对相应问题使用合适的工具。
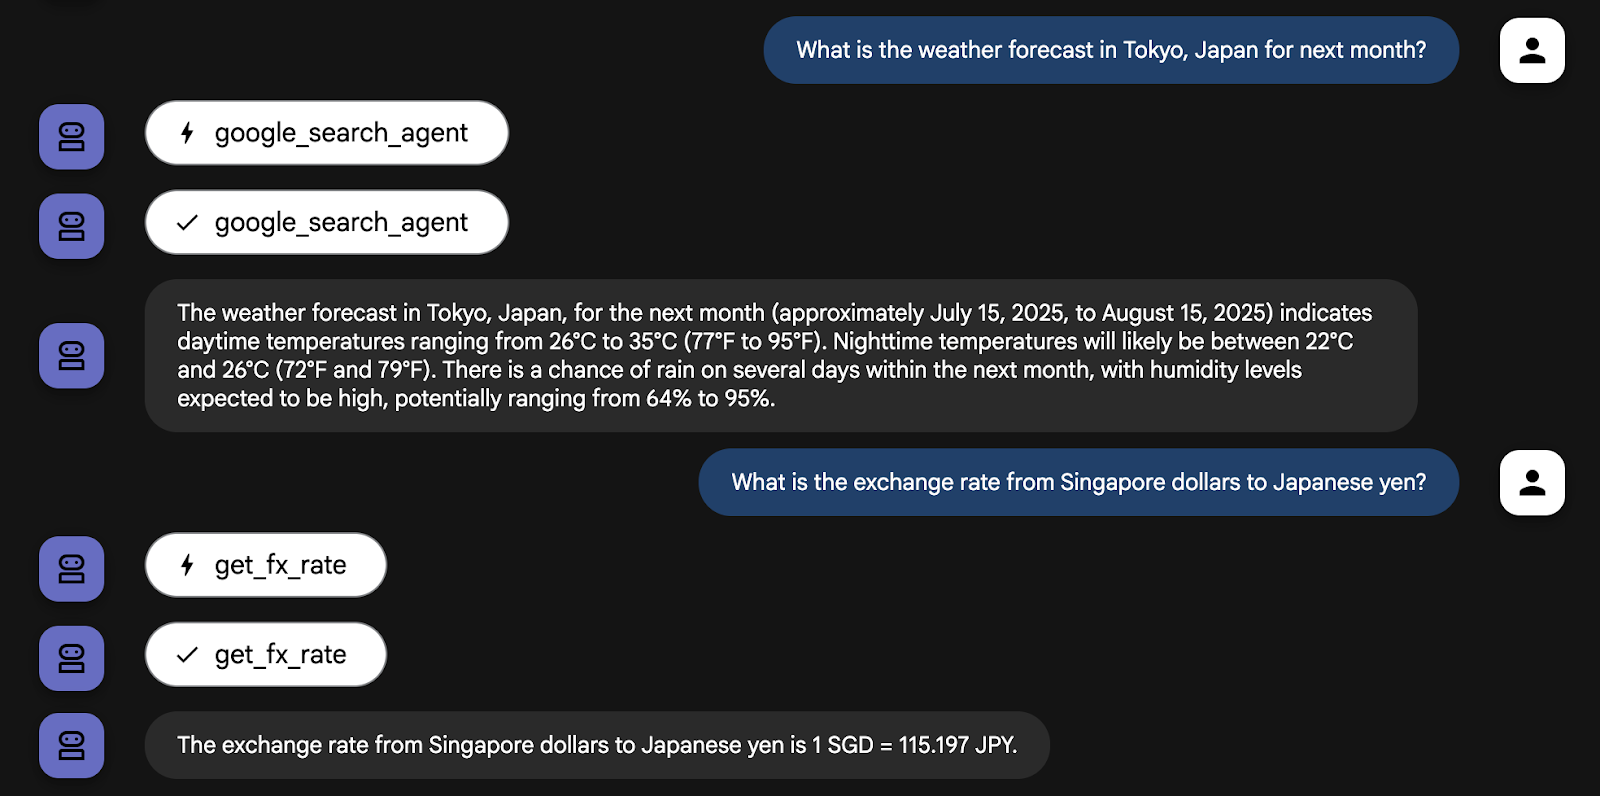
您可以随意向代理提出需要实时信息的问题,并观察代理如何使用其可用的工具处理查询。
6. 利用 LangChain 的 Wikipedia 工具
我们的代理正在成为出色的旅行助理。它可以使用 get_fx_rate 工具处理货币兑换,并使用 google_search_agent 工具管理物流。但一次精彩的旅行不仅仅是后勤保障,还要了解目的地的文化和历史。
虽然 google_search_agent 可以查找文化和历史事实,但来自维基百科等专用来源的信息通常更结构化、更可靠。
幸运的是,ADK 的设计具有高度可扩展性,可让您无缝集成 CrewAI 和 LangChain 等其他 AI 代理框架中的工具。这种互操作性至关重要,因为它可以缩短开发时间,并让您能够重复使用现有工具。对于此用例,我们将利用 LangChain 中的维基百科工具。
首先,停止正在运行的代理进程(按 Ctrl + C 或 Cmd + C),然后在终端中输入以下命令,以将其他库安装到当前的 Python 虚拟环境中。
uv add langchain-community
uv add wikipedia
创建 third_party_tools.py 文件
现在,在 personal_assistant 文件夹中创建一个名为 third_party_tools.py 的 Python 文件。
touch personal_assistant/third_party_tools.py
现在,您的文件夹结构应如下所示:
ai-agents-adk/
└── personal_assistant/
    ├── .env
    ├── __init__.py
    ├── agent.py
    ├── custom_functions.py
    ├── custom_agents.py
    └── third_party_tools.py
此文件将包含 LangChain Wikipedia 工具的实现。使用 Cloud 编辑器将以下代码复制到 third_party_tools.py 中:
from langchain_community.tools import WikipediaQueryRun
from langchain_community.utilities import WikipediaAPIWrapper

# Configure the Wikipedia LangChain tool to act as our cultural guide
langchain_wikipedia_tool = WikipediaQueryRun(
    api_wrapper=WikipediaAPIWrapper(top_k_results=1, doc_content_chars_max=3000)
)

# Give the tool a more specific description for our agent
langchain_wikipedia_tool.description = (
    "Provides deep historical and cultural information on landmarks, concepts, and places."
    "Use this for 'tell me about' or 'what is the history of' type questions."
)
更新 agent.py 文件
现在,使用以下内容更新 agent.py 文件:
from google.adk.agents import Agent
from google.adk.tools import FunctionTool
from google.adk.tools import agent_tool
from google.adk.tools import langchain_tool

from .custom_functions import get_fx_rate
from .custom_agents import google_search_agent
from .third_party_tools import langchain_wikipedia_tool


root_agent = Agent(
    model='gemini-2.5-flash',
    name='root_agent',
    description='A helpful assistant for user questions.',
    tools=[
        FunctionTool(get_fx_rate),
        agent_tool.AgentTool(agent=google_search_agent),
        langchain_tool.LangchainTool(langchain_wikipedia_tool),
    ]
)
现在,重启 adk web 实例,并向代理提出以下问题:“请告诉我一些关于京都历史的信息”。
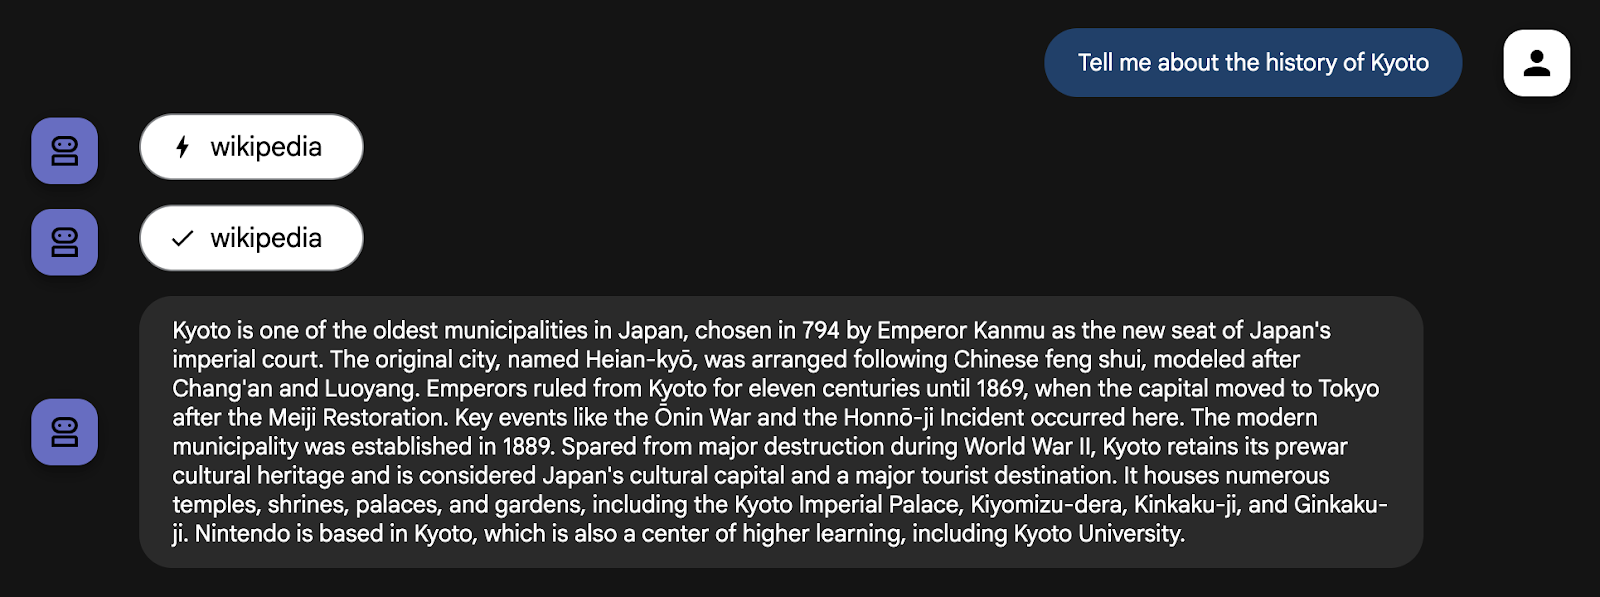
代理正确地将此查询识别为历史查询,并使用其新的 Wikipedia 工具。通过集成第三方工具并为其分配特定角色,您已让代理变得更加智能,并且在旅行规划方面更加实用。
如需确切了解代理如何做出此选择,您可以使用 adk web 界面中的事件检查器。点击“活动”标签页,然后点击最新的 functionCall 活动。
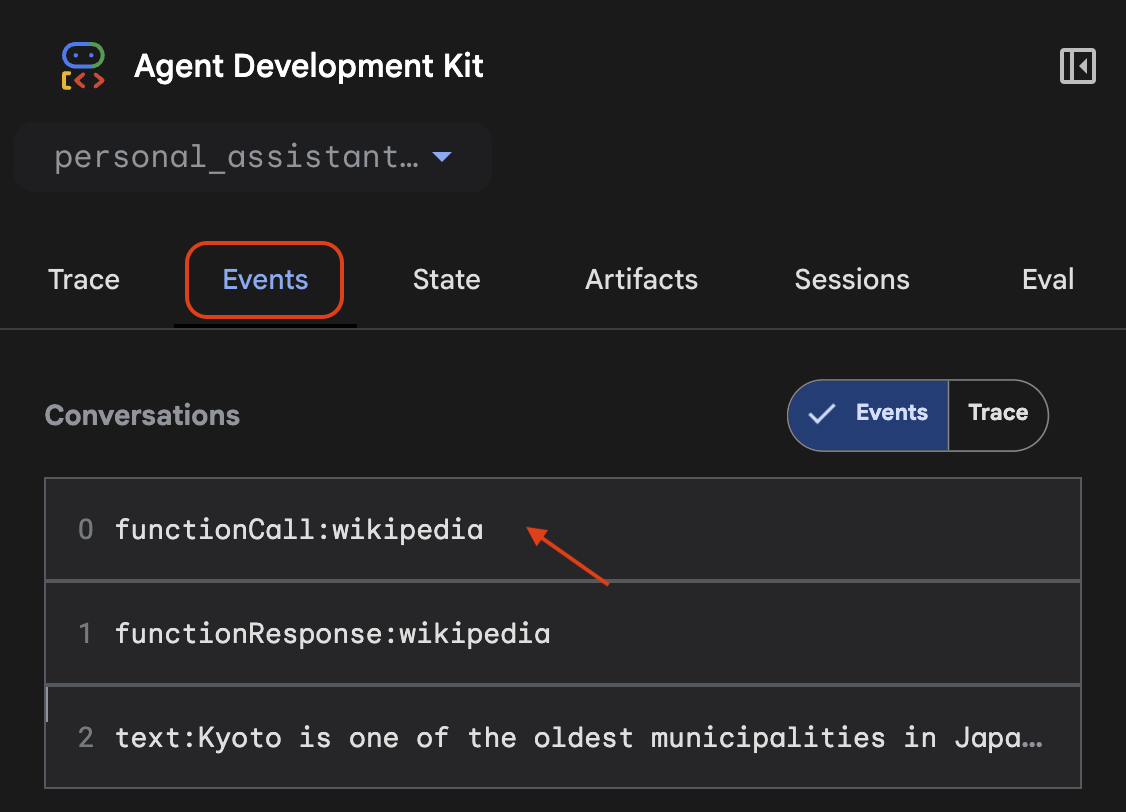
检查器会显示所有可用工具的列表,并突出显示代理执行的工具的 tool_code。
7. 清理(可选)
由于本 Codelab 不涉及任何长时间运行的产品,因此只需在终端中按 Ctrl + C 停止活跃的代理会话(例如终端中的 adk web 实例)即可。
删除代理项目文件夹和文件
如果您只想从 Cloud Shell 环境中移除代码,请使用以下命令:
cd ~
rm -rf ai-agents-adk
停用 Vertex AI API
如需停用之前启用的 Vertex AI API,请运行以下命令:
gcloud services disable aiplatform.googleapis.com
关闭整个 Google Cloud 项目
如果您希望完全关停 Google Cloud 项目,请参阅官方指南,了解详细说明。
8. 总结
恭喜!您已成功为个人助理代理赋予自定义功能和实时 Google 搜索访问权限。请参阅有关将工具与 Google ADK 搭配使用的官方文档。
更重要的是,您已经学习了构建功能强大的智能体的基本架构模式:将专业智能体用作工具。通过创建专用 google_search_agent 并将其提供给 root_agent,您已迈出从构建单个代理到编排简单而强大的多代理系统的第一步。
现在,您已为本系列中的下一个 Codelab 做好充分准备,我们将在其中深入探讨如何编排多个代理和工作流。到时候见!