

1. نظرة عامة
لتلبية طلب سفر يتضمّن قيودًا متعددة (مثل تصميم برنامج رحلة ليوم كامل في كيوتو بميزانية أقل من 100 دولار أمريكي يركّز على المعابد التاريخية والمأكولات المحلية بدون زيارة أي معارض للفن الحديث)، يجب استخراج القيود والبحث عن المعالم السياحية والمطاعم في الوقت نفسه، وتجميع جدول زمني مفصّل، ومراجعة الخطة النهائية. قد يؤدي الاعتماد على وكيل واحد متكامل يتضمّن العديد من الأدوات إلى تخطّي خطوات التحقّق أو مخالفة الاستبعادات، لذا تعمل التنسيقات على تنسيق الوكلاء الفرعيين المتخصّصين من خلال وحدات تحكّم في سير العمل الحتمي.
في هذا الجزء الثالث من سلسلة إنشاء وكلاء الذكاء الاصطناعي باستخدام حزمة تطوير الوكلاء، يمكنك إنشاء مخطِّط رحلات مستقل متعدد الوكلاء على منصة الوكلاء باستخدام وحدات التحكّم في سير العمل في الإصدار 2 من حزمة تطوير الوكلاء (ADK) (SequentialAgent وParallelAgent وLoopAgent). من خلال ثلاث مراحل تدريجية (بدون الحاجة إلى إعداد مساحة العمل في الجزء الأول أو الجزء الثاني)، يمكنك تنسيق ستة وكلاء متخصّصين مستندين إلى gemini-3.8-flash مع حالة جلسة مشتركة (output_key) وتنفيذ google_search متزامن وحلقة تكرارية لتحسين عملية التحقّق من صانع المحتوى.
المتطلبات الأساسية
- فهم مفاهيم الذكاء الاصطناعي التوليدي
- إتقان أساسي للبرمجة بلغة Python
- الإلمام بأساسيات وكلاء الذكاء الاصطناعي وحزمة Google ADK
ما ستتعرّف عليه
- كيفية إنشاء مشروع ADK 2 متعدد الوكلاء من البداية
- كيفية تصميم فريق من الوكلاء المتخصّصين الذين يشاركون حالة الجلسة باستخدام
output_key - كيفية استخدام
SequentialAgentلتنفيذ مهام الوكلاء الفرعيين في مسار حتمي خطوة بخطوة - كيفية استخدام
ParallelAgentلتشغيل وكلاء بحث مستقلين في الوقت نفسه لتقليل وقت الاستجابة - كيفية استخدام ميزة التصعيد في
LoopAgentوToolContextلتنفيذ حلقة تحسين تكرارية بين الصانع والمدقّق - كيفية دمج الأنماط التسلسلية والمتوازية والتكرارية في سير عمل هرمي متعدّد الوكلاء
ما تحتاج إليه
- حساب Google (يُرجى استخدام حساب
@gmail.comشخصي في حال المطالبة برصيد ورشة العمل) - رابط رصيد ورشة العمل من المدرّب (بالإضافة إلى كاميرا الهاتف لمسح رمز الاستجابة السريعة ضوئيًا) أو حساب فوترة نشط على Cloud
- Google Chrome (ننصح باستخدام نافذة تصفّح متخفٍّ لتجنُّب الخلط بين الحسابات الشخصية وحسابات العمل)
2. طلب الحصول على أرصدة Google Cloud (اختياري)
إذا كنت تحضر ورشة عمل تتضمّن رابطًا لرصيد الحدث، يمكنك الحصول على رصيد Google Developer Program لتوفير حساب فوترة بدون بطاقة ائتمان.
طلب رصيد الفعالية
- افتح رابط رصيد ورشة العمل في نافذة التصفّح المتخفي وسجِّل الدخول باستخدام حسابك على "
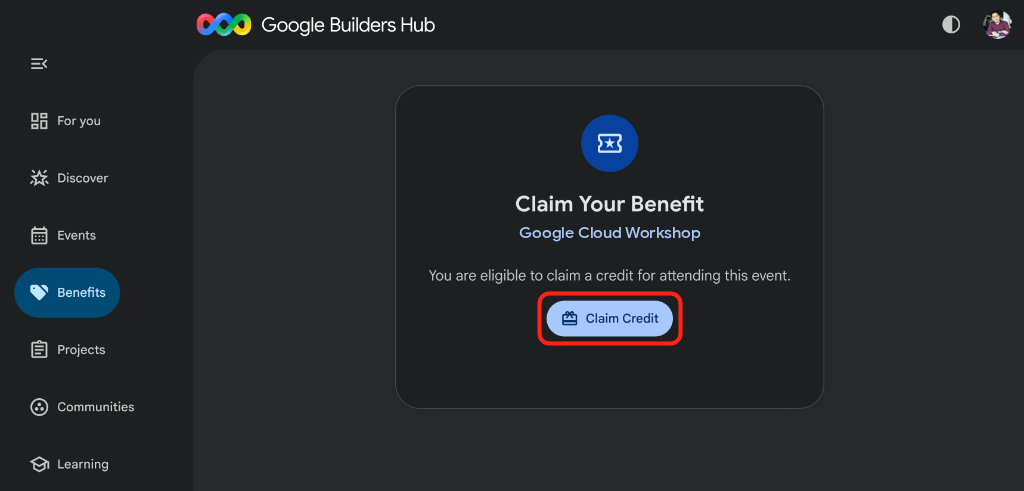
@gmail.com". - في صفحة طلب الاستفادة من الميزة، انقر على طلب الرصيد:
- إذا طُلب منك إنشاء ملف شخصي في Google Developer Program، أكمِل النموذج.
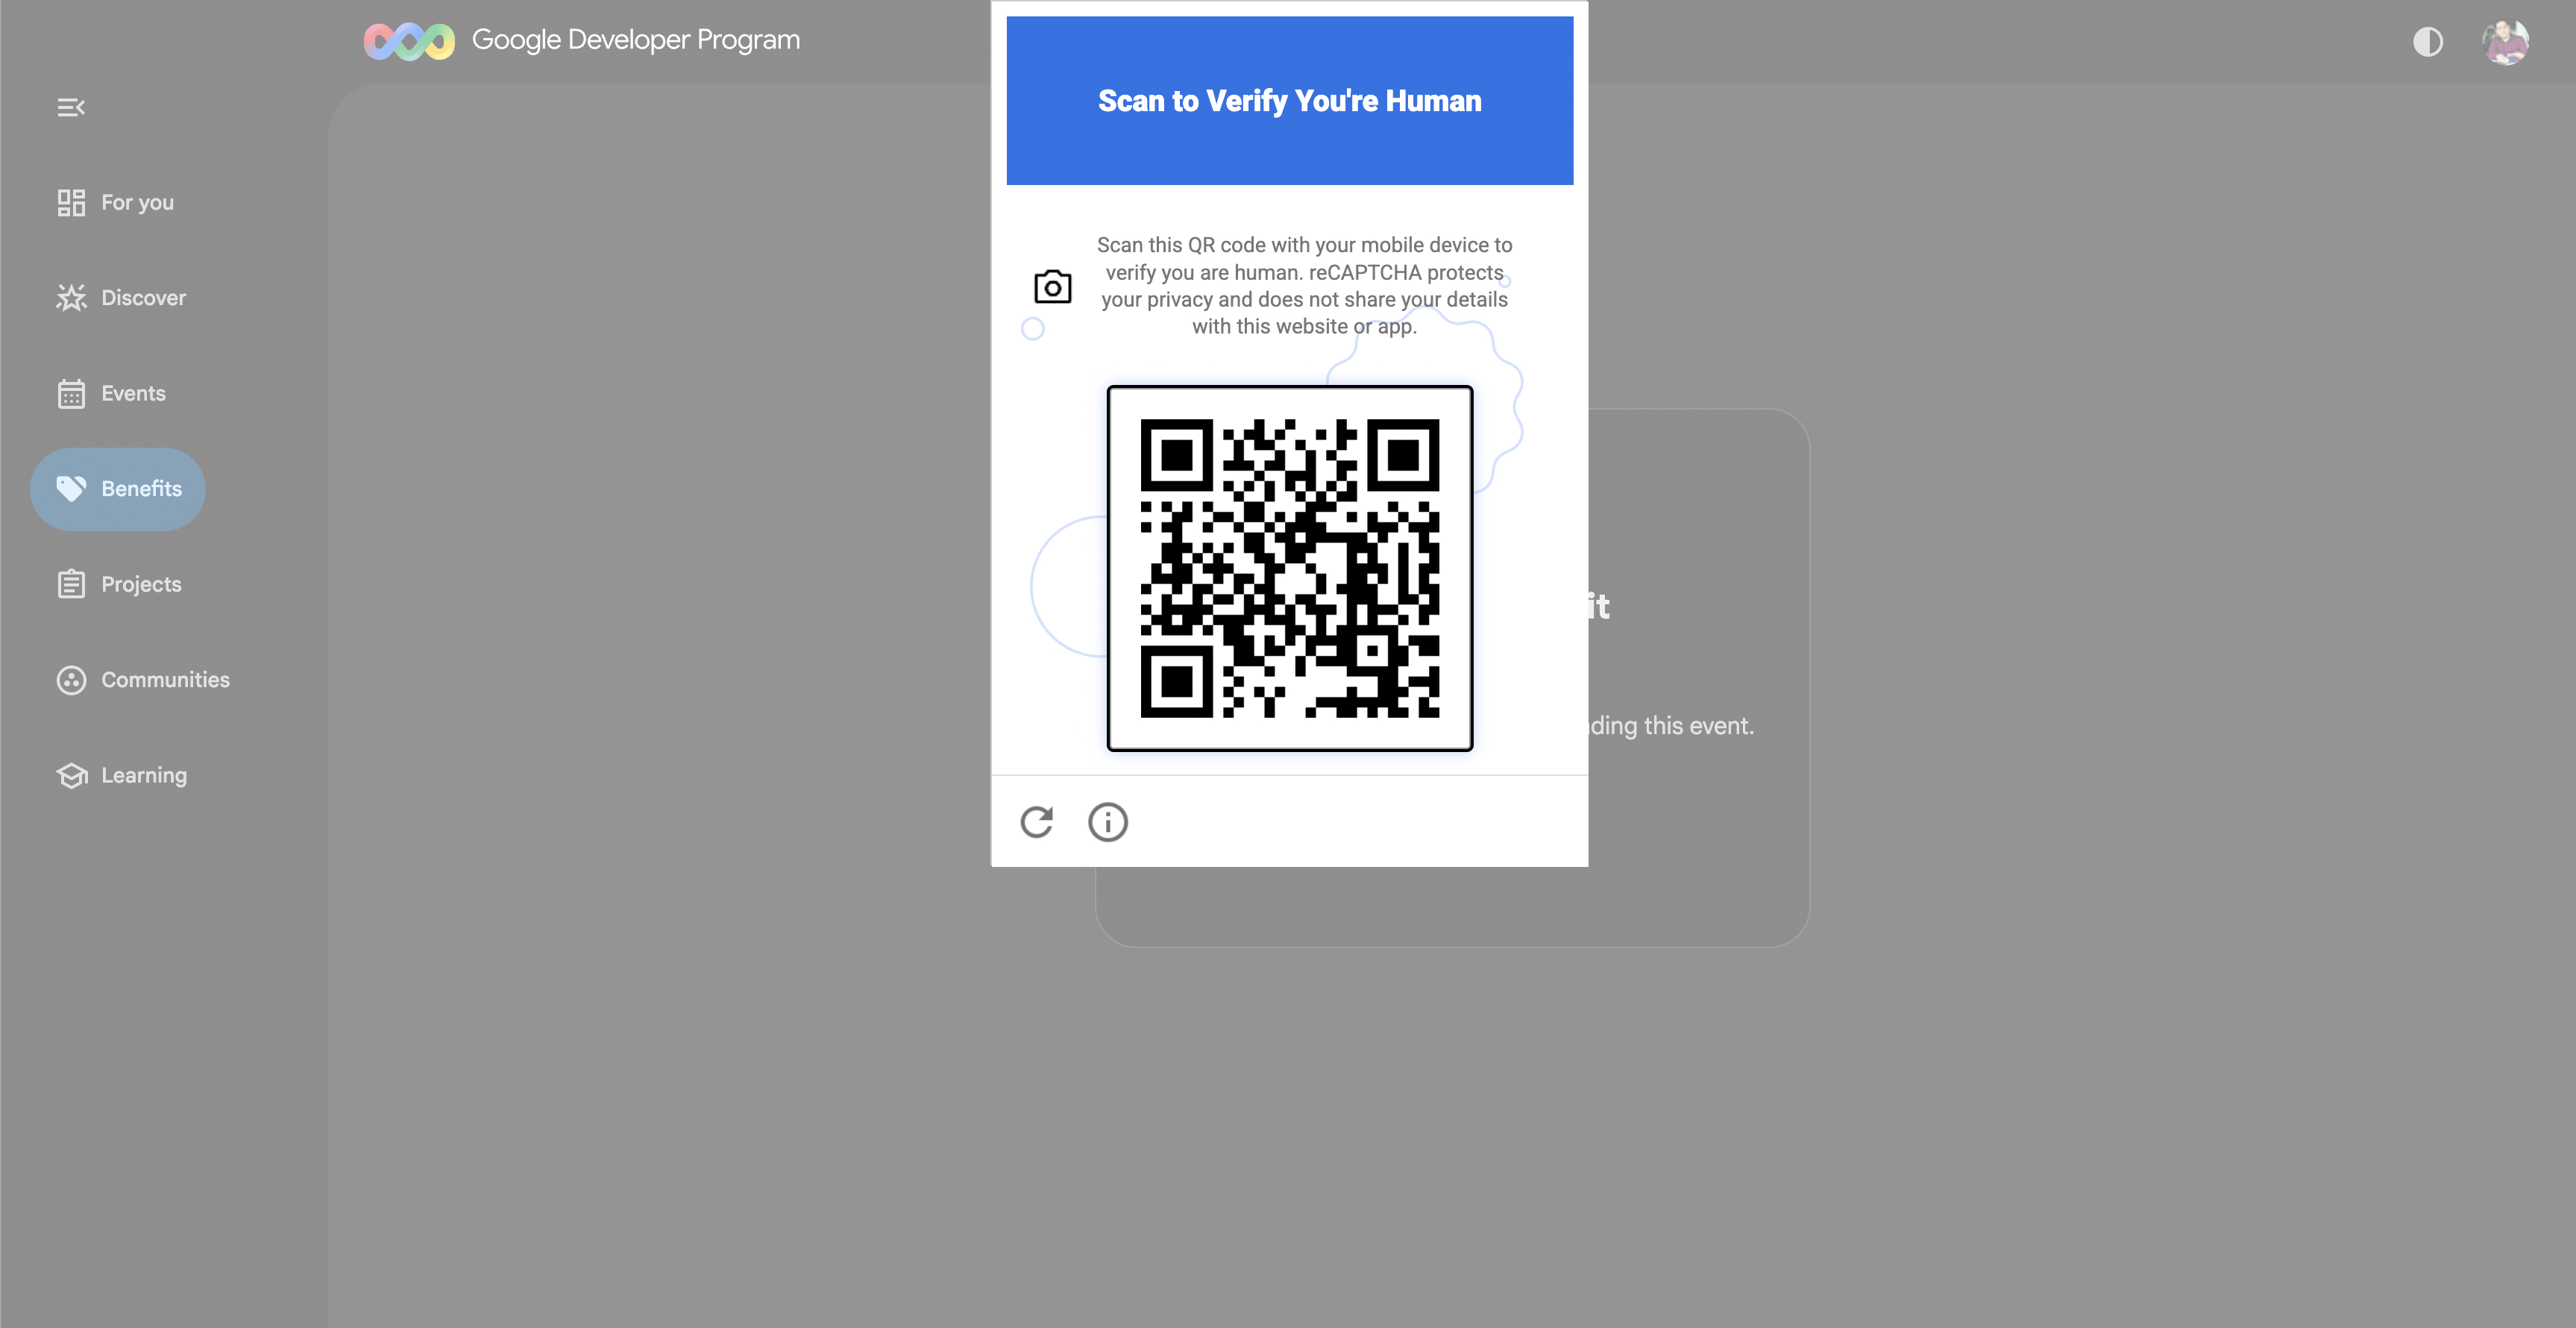
- عند ظهور رسالة يُرجى مسح الرمز ضوئيًا لإثبات أنّك شخص حقيقي، امسح رمز الاستجابة السريعة ضوئيًا باستخدام هاتفك وأكمِل عملية التحقّق (أعِد تحميل الصفحة وانقر على طلب الرصيد مرة أخرى إذا لم يظهر رمز الاستجابة السريعة):
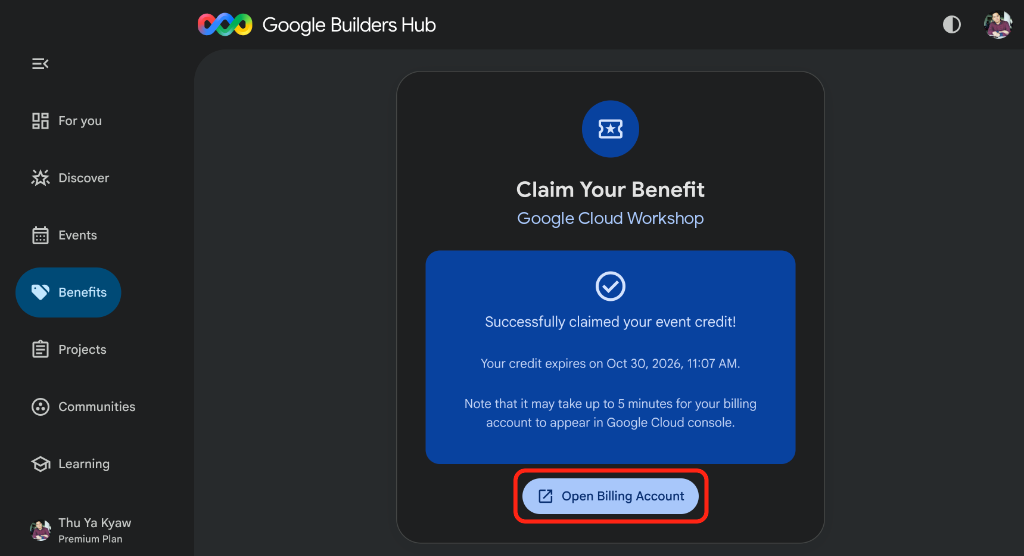
- تأكَّد من ظهور الرسالة تمت المطالبة برصيد الحدث بنجاح، ثم انقر على فتح حساب الفوترة:
🔍 التحقّق من عملك
يستغرق إعداد حساب الفوترة مدة تصل إلى 3 دقائق:
- افتح Google Cloud Billing (أو انسخ عنوان URL في نافذة التصفّح المتخفي) واختَر حسابات الفوترة:
https://console.cloud.google.com/billing
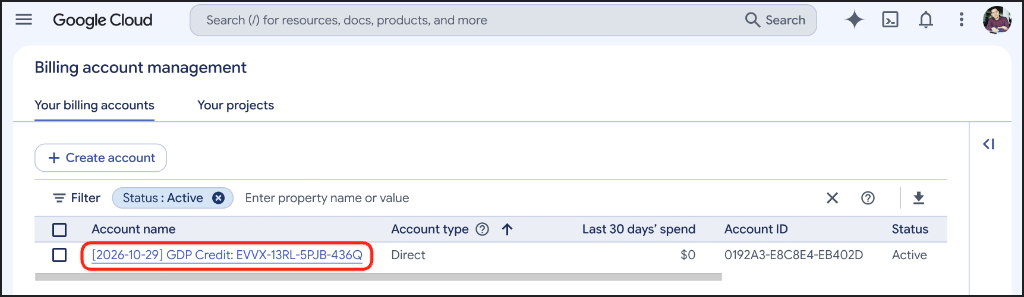
- أعِد تحميل الصفحة إلى أن تظهر حالة حسابك على
GDP Creditعلى أنّها نشط:
3- إنشاء مشروع على Google Cloud (اختياري)
أنشئ مشروعًا مخصّصًا على Google Cloud لتبقى جميع الموارد من هذا الدرس التطبيقي حول الترميز معزولة ويسهل حذفها.
- افتح إنشاء مشروع (أو انسخ عنوان URL في نافذة التصفّح المتخفي):
https://console.cloud.google.com/projectcreate
- أدخِل تفاصيل مشروعك:
- اسم المشروع: على سبيل المثال،
google-cloud-workshop - حساب الفوترة (إذا ظهر): اختَر
GDP Credit(أو حساب الفوترة النشط) - المورد الرئيسي: بدون مؤسسة (أو مؤسستك إذا لزم الأمر)
- اسم المشروع: على سبيل المثال،
- دوِّن رقم تعريف المشروع الذي تم إنشاؤه أسفل اسم المشروع، ثم انقر على إنشاء:
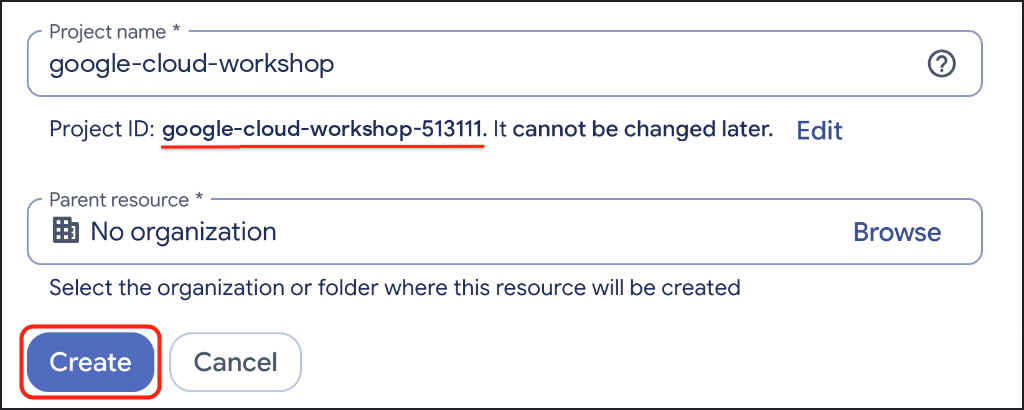
🔍 التحقّق من عملك
انقر على الإشعارات في شريط الأدوات في أعلى يسار الصفحة، ثم انقر على اختيار مشروع بعد الانتهاء من إنشاء المشروع:
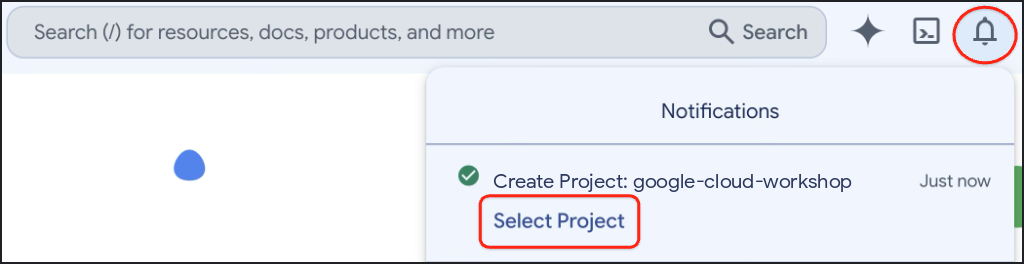
4. إعداد البيئة
اضبط Google Cloud Shell وفعِّل Agent Platform API وأنشئ بيئة افتراضية معزولة في Python 3.12 باستخدام uv.
إعداد Cloud Shell
- انقر على تفعيل Cloud Shell (
>_) في شريط أدوات Google Cloud Console، أو افتح Google Cloud Shell مباشرةً (أو انسخ عنوان URL في نافذة التصفّح المتخفي):
https://shell.cloud.google.com/?show=ide,terminal

- انقر على تفويض إذا طُلب منك ذلك:
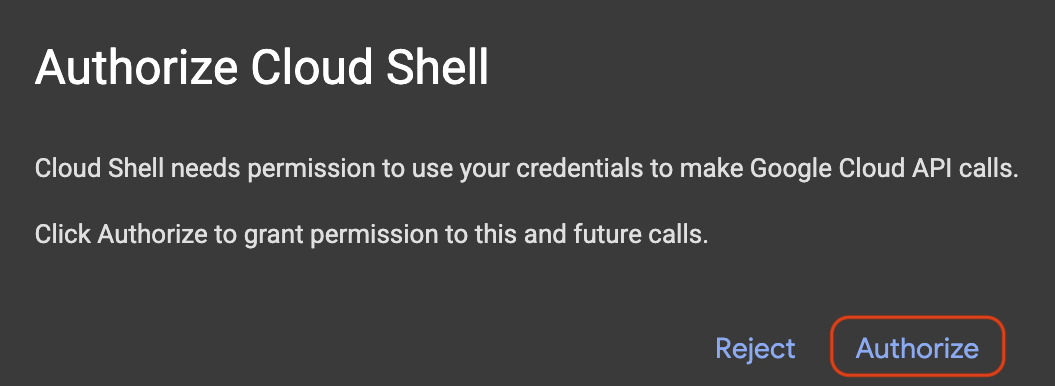
- اختَر رقم تعريف مشروع Google Cloud النشط من القائمة المرقّمة في وحدة التحكّم:
unset CLOUDSDK_CORE_PROJECT
PS3="Select your project (e.g. 1): "
select PROJECT_ID in $(gcloud projects list --format="value(projectId)"); do
  [ -n "$PROJECT_ID" ] && gcloud config set project "$PROJECT_ID" && break
done
من المفترض أن تظهر لك نتيجة مشابهة لما يلي (تطبع المشاريع غير المُصنَّفة أيضًا سطرًا إعلاميًا [environment: untagged]):
1) google-cloud-workshop-4210
2) my-cloud-project-8812
Select your project (e.g. 1): 1
Updated property [core/project].
تأكَّد من ظهور رقم تعريف المشروع الذي اخترته مميّزًا باللون الأصفر في طلب Cloud Shell:
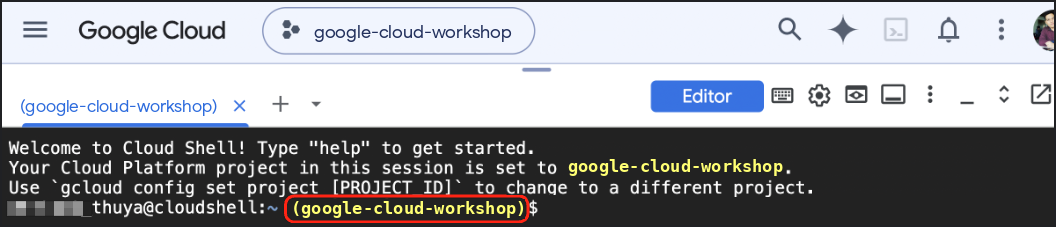
تفعيل واجهات برمجة التطبيقات المطلوبة
فعِّل Agent Platform API لتتمكّن وكلاء ADK من استدعاء نماذج Gemini:
gcloud services enable aiplatform.googleapis.com
من المفترَض أن تظهر لك نتيجة مثل:
Operation "operations/acat.p2-..." finished successfully.
إنشاء بيئة Python افتراضية وتثبيت ADK
أنشِئ مساحة عمل ~/adk-agents وفعِّل بيئة Python 3.12 افتراضية:
cd ~
mkdir -p adk-agents && cd ~/adk-agents

which uv >/dev/null 2>&1 || curl -LsSf https://astral.sh/uv/install.sh | sh
export PATH="$HOME/.local/bin:$PATH"

uv venv .venv --python 3.12
source .venv/bin/activate
تأكَّد من ظهور البادئة (.venv) في بداية طلب Terminal:

ثبِّت ADK 2 داخل البيئة الافتراضية النشطة:
uv pip install --no-cache "google-adk==2.14.0"
🔍 التحقّق من عملك
تحقَّق من إصدار واجهة سطر الأوامر (CLI) المثبَّت في adk:
adk --version
من المفترَض أن تظهر لك نتيجة مثل:
adk, version 2.14.0
5- إنشاء هيكل لوكيل تخطيط الرحلات
بعد تجهيز بيئة العمل، استخدِم الأمر adk create المضمّن في ADK لإنشاء ملفات البدء لحزمة وكيل travel_planner.
إنشاء الحزمة الأساسية
شغِّل adk create من دليل ~/adk-agents:
cd ~/adk-agents
adk create travel_planner
عندما يُطلب منك ذلك في الوحدة الطرفية، حدِّد خيارات الضبط التالية (إذا طُلب منك إدخال Enable telemetry? [Y/n]: عند التشغيل لأول مرة، اضغط على مفتاح Enter أو اكتب n واضغط على مفتاح Enter):
- اختيار نموذج للوكيل الجذر: اكتب
2لاختيارgemini-3.8-flash(يؤدي الخيار1إلى اختيارgemini-3.5-flash) واضغط على مفتاح Enter. - اختيار الخلفية: اكتب
2لاختيار خلفية Agent Platform في Google Cloud (الخيار2في قائمة واجهة سطر الأوامر أدناه) واضغط على مفتاح Enter. - إدخال رقم تعريف مشروع Google Cloud: أكِّد رقم تعريف مشروعك الظاهر بين قوسين بالضغط على مفتاح Enter.
- أدخِل منطقة Google Cloud: اكتب
globalواضغط على مفتاح Enter.
تكتب أداة adk create السمة GOOGLE_GENAI_USE_ENTERPRISE=1 ورقم تعريف المشروع والسمة GOOGLE_CLOUD_LOCATION=global في travel_planner/.env، وبذلك تظل بيانات الاعتماد مضبوطة عند تحديث agent.py لاحقًا.
🔍 التحقّق من عملك
من المفترَض أن تظهر لك نتيجة مثل:
Choose a model for the root agent:
1. gemini-3.5-flash
2. gemini-3.8-flash
3. Other models (fill later)
Choose model (1, 2, 3): 2
1. Google AI
2. Vertex AI
3. Login with Google
Choose a backend (1, 2, 3): 2

You need an existing Google Cloud account and project, check out this link for details:
https://google.github.io/adk-docs/get-started/quickstart/#gemini---google-cloud-vertex-ai

Enter Google Cloud project ID [google-cloud-workshop-4210]:
Enter Google Cloud region [us-central1]: global

Agent created in /home/your_username/adk-agents/travel_planner:
- .env
- .gitignore
- __init__.py
- agent.py

⚠️  WARNING: Secrets (like GOOGLE_API_KEY) are stored in .env.

Next steps:
- Chat with your agent in the terminal: adk run travel_planner
- Or in the browser: adk web .
- Have your coding agent evaluate and deploy it: uvx google-agents-cli setup
  (other install options: https://adk.dev/get-started/agents-cli/)
افتح المجلد الحالي في أداة تعديل الرموز في Cloud Shell لتتمكّن من فحص الملفات وتعديلها جنبًا إلى جنب مع الوحدة الطرفية:
which cloudshell >/dev/null 2>&1 && cloudshell workspace ~/adk-agents || true
cd ~/adk-agents
source .venv/bin/activate
اختبار الوكيل الفردي التلقائي
قبل إنشاء سير عمل متعدد الوكلاء، شغِّل واجهة مستخدم تطوير ADK لملاحظة كيفية استجابة الوكيل الفردي التلقائي لطلب بحث واسع النطاق عن التخطيط للسفر:
cd ~/adk-agents
adk web --allow_origins "*"
افتح واجهة مستخدم التطوير في المتصفّح باستخدام معاينة الويب في Cloud Shell:
- انقر على رمز معاينة الويب في شريط الأدوات أعلى يسار Cloud Shell.
- انقر على تغيير المنفذ، وأدخِل
8000، ثم انقر على تغيير ومعاينة.
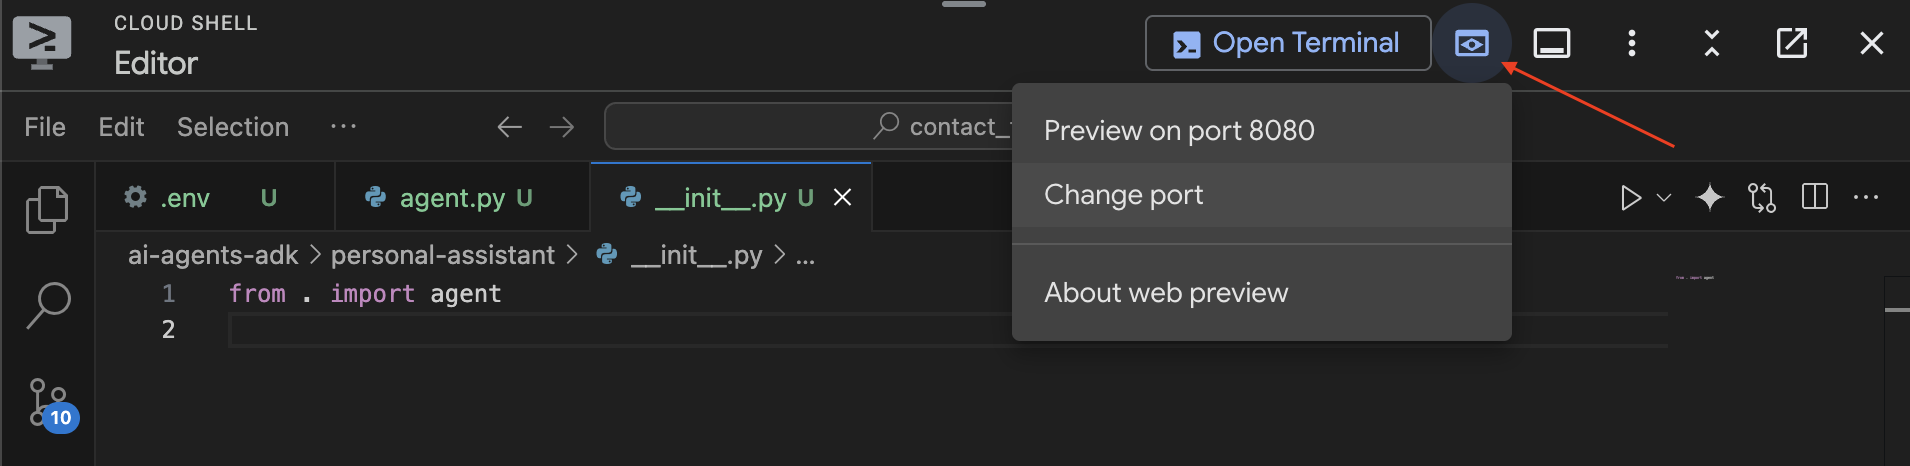
بعد تحميل واجهة المستخدم على الويب في ADK، أرسِل رسالة ترحيب مثل "hello, what can you do?" أو "Help me plan a trip to Japan":
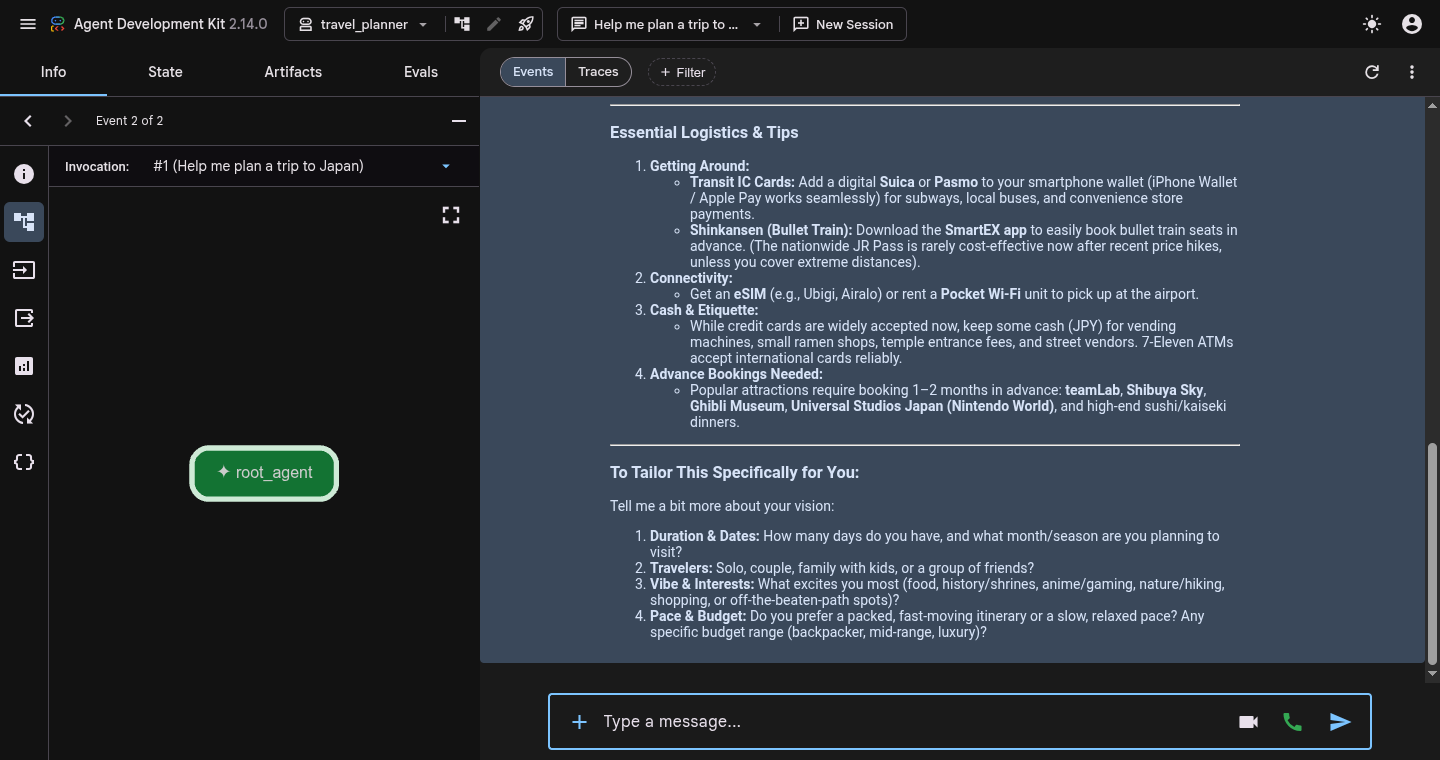
يُرجى ملاحظة أنّ نموذج root_agent الفردي يجيب مباشرةً في خطوة واحدة بدون استخراج تفضيلات منظَّمة أو إجراء بحث مباشر على الويب أو التحقّق من الميزانية.
عند الانتهاء من الاختبار، اضغط على Ctrl + C في وحدة طرفية Cloud Shell لإيقاف خادم adk web والعودة إلى موجه الأوامر.
6. إنشاء سير عمل SequentialAgent
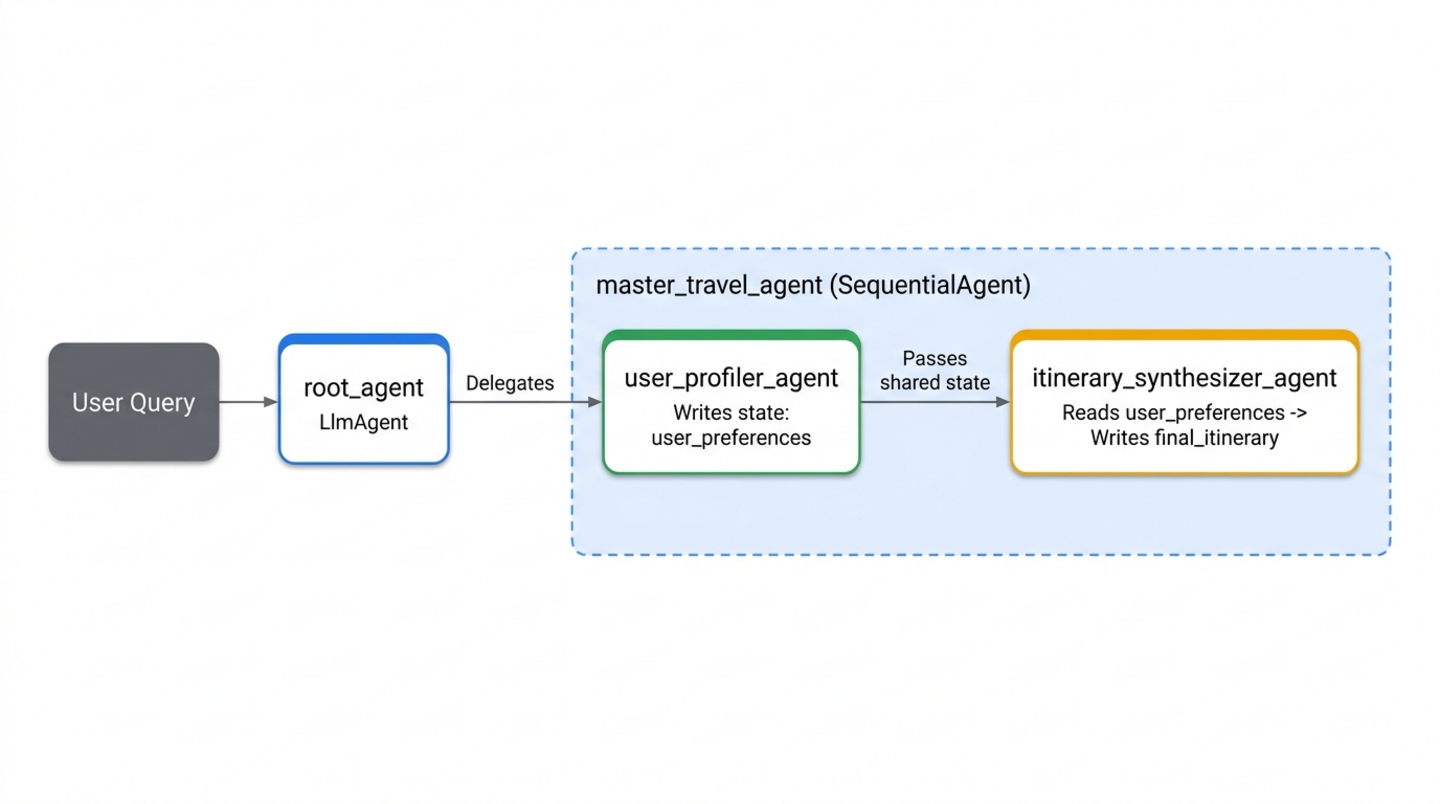
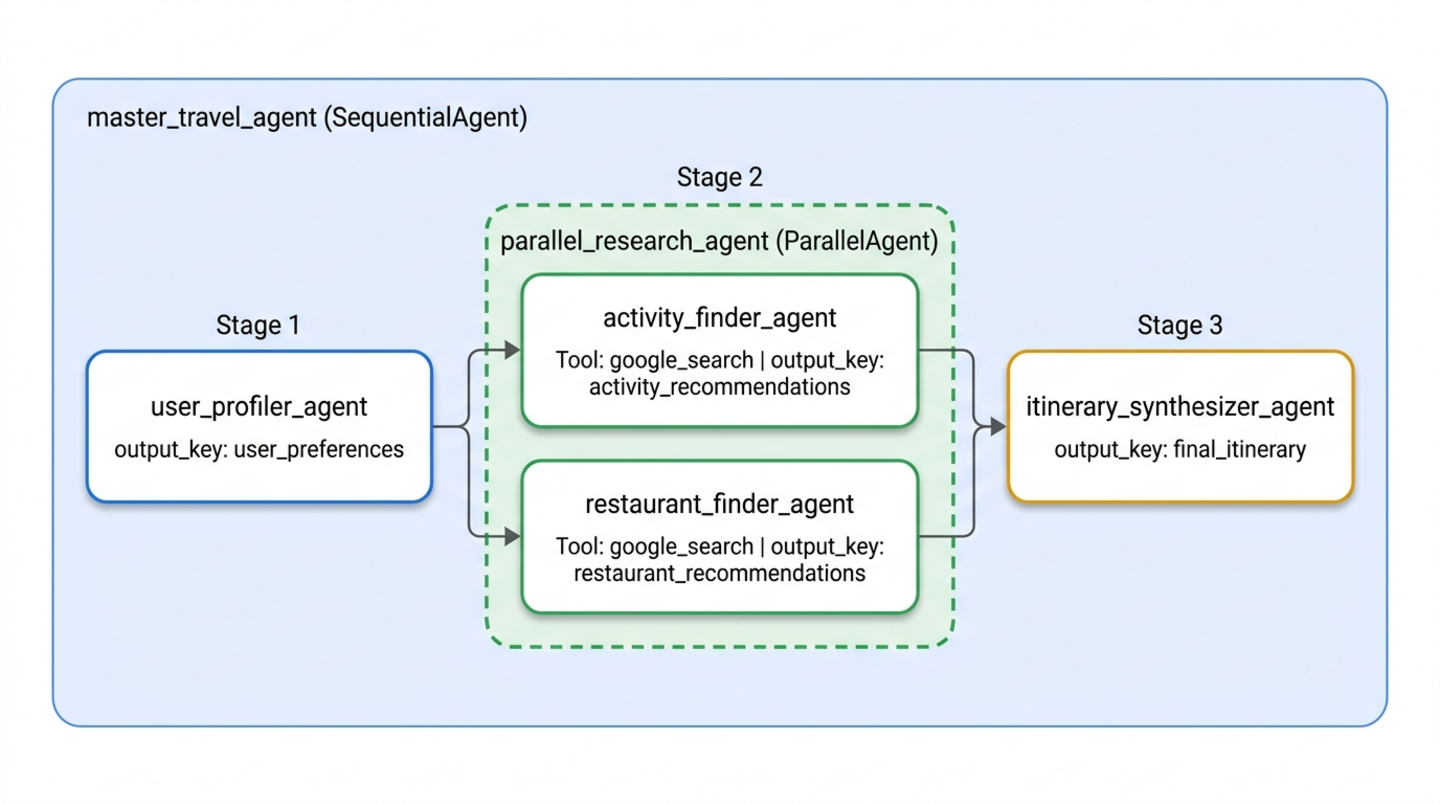
الآن، ستنشئ أول نمط تنظيم: سير عمل خطي مستند إلى SequentialAgent. في المسار التسلسلي، يتم تنفيذ الوكلاء الفرعيين بترتيب صارم. يستخرج المتخصّص الأول المَعلمات المنظَّمة ويحفظها في حالة الجلسة المشتركة باستخدام output_key="user_preferences"، ويقرأ المتخصّص الثاني {user_preferences} من الحالة المشتركة لصياغة برنامج الرحلة.
إنشاء المتخصّصين الأوّليين (specialists.py)
افتح ملفًا جديدًا باسم specialists.py داخل travel_planner/:
cloudshell edit ~/adk-agents/travel_planner/specialists.py
الصِق الرمز التالي في travel_planner/specialists.py لتحديد user_profiler_agent وitinerary_synthesizer_agent (استيراد ToolContext وgoogle_search مسبقًا للخطوات التالية):
from google.adk import Agent
from google.adk.tools import ToolContext, google_search

# --- Specialist 1: The User Profiler ---
user_profiler_agent = Agent(
    name="user_profiler_agent",
    description="Extracts travel preferences and constraints from user input.",
    instruction="""
        Extract destination, duration (default 1 day), budget, interests, and exclusions.
        Return a single JSON object with keys: "destination", "duration", "budget", "interests", "exclusions".
    """,
    output_key="user_preferences",  # Saves output to state['user_preferences']
)

# --- Specialist 2: The Synthesizer ---
itinerary_synthesizer_agent = Agent(
    name="itinerary_synthesizer_agent",
    description="Compiles preferences and research into a final Markdown itinerary.",
    instruction="""
        You are an elite Travel Concierge. Write a Markdown itinerary with an itemized USD and local currency cost breakdown using:
        - User Preferences: {user_preferences}
        - Activities (if available): {activity_recommendations?}
        - Restaurants (if available): {restaurant_recommendations?}
    """,
    output_key="final_itinerary",
)
ربط المسار التسلسلي (workflows.py)
أنشئ ملفًا جديدًا باسم workflows.py داخل travel_planner/ لتنظيم عمل الوكلاء المتخصّصين:
cloudshell edit ~/adk-agents/travel_planner/workflows.py
أضِف تعريف SequentialAgent التالي إلى travel_planner/workflows.py:
from google.adk.agents import SequentialAgent
from .specialists import (
    user_profiler_agent,
    itinerary_synthesizer_agent,
)

# 1. SEQUENTIAL PHASE: A linear two-step workflow
master_travel_agent = SequentialAgent(
    name="master_travel_agent",
    description="Orchestrates the end-to-end travel planning process for trip and itinerary requests.",
    sub_agents=[
        user_profiler_agent,         # Step 1: Extract constraints into user_preferences
        itinerary_synthesizer_agent,  # Step 2: Draft itinerary from user_preferences
    ],
)
ربط سير العمل بـ "root_agent" (agent.py)
يمكنك الآن تسجيل "master_travel_agent" كوكيل فرعي لـ "root_agent". افتح travel_planner/agent.py:
cloudshell edit ~/adk-agents/travel_planner/agent.py
استبدِل محتوى travel_planner/agent.py بالرمز التالي:
from google.adk import Agent
from .workflows import master_travel_agent

MODEL = "gemini-3.8-flash"

root_agent = Agent(
    model=MODEL,
    name="root_agent",
    description="A helpful assistant for user questions.",
    instruction=(
        "Greet the user and delegate any travel or trip planning requests "
        "to master_travel_agent."
    ),
    sub_agents=[master_travel_agent],
)
🔍 التحقّق من عملك
ابدأ واجهة مستخدم الويب الخاصة بـ ADK من الوحدة الطرفية:
cd ~/adk-agents
adk web --allow_origins "*"
افتح "معاينة الويب" (Web Preview) على المنفذ 8000 وأدخِل الطلب:
Help me plan a trip to Kyoto
من المفترض أن تظهر لك نتيجة مشابهة لتدفق التنفيذ التالي في عرض الأحداث:
1. root_agent -> calls transfer_to_agent(agent_name="master_travel_agent")
2. user_profiler_agent -> outputs JSON {"destination": "Kyoto", "duration": "1 day", ...} to state['user_preferences']
3. itinerary_synthesizer_agent -> reads {user_preferences} and outputs the formatted Markdown itinerary
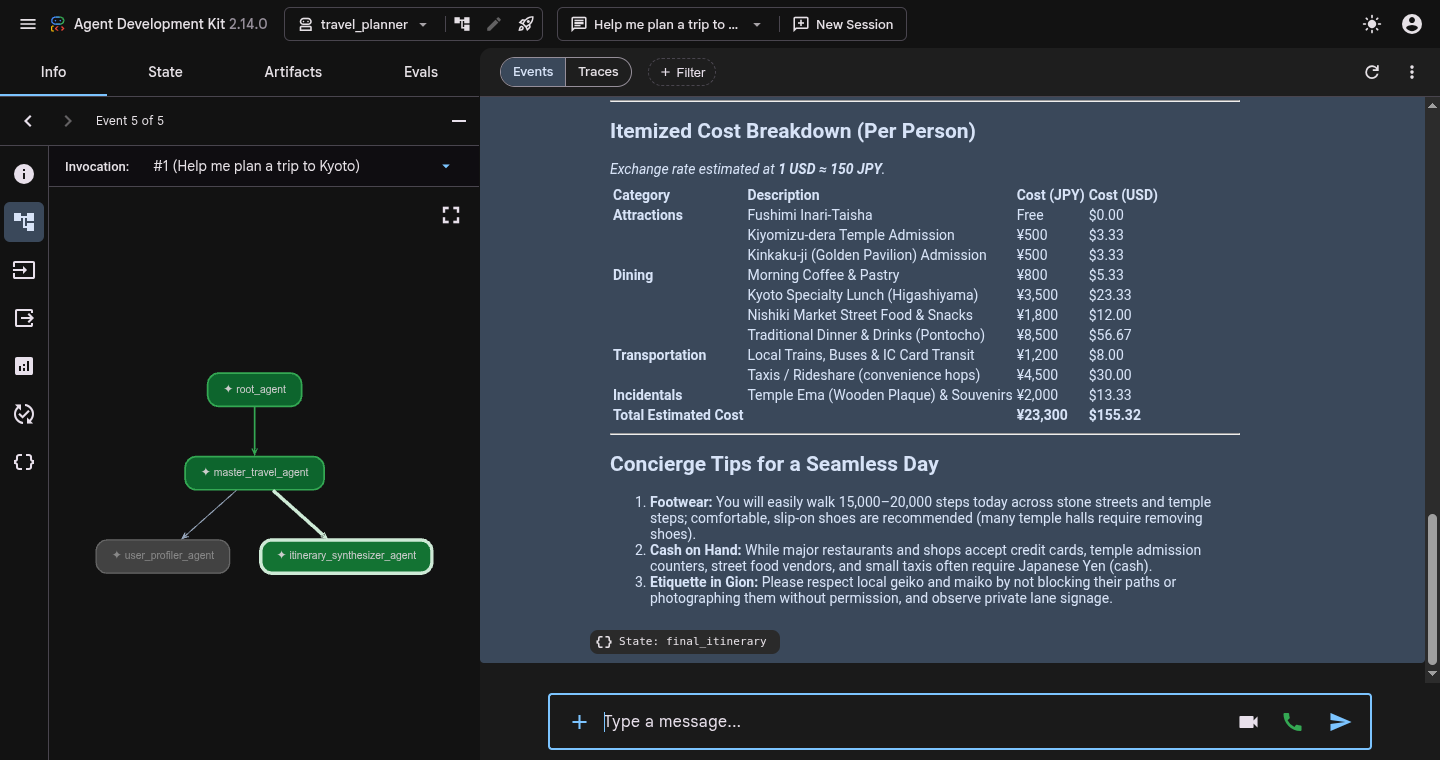
انقر على أي شارة حدث (أو شريحة State: final_itinerary) وانتقِل إلى علامة التبويب الحالة في لوحة الفحص اليمنى للتأكّد من ملء كل من user_preferences وfinal_itinerary في حالة الجلسة.
عند الانتهاء من فحص التتبُّع، اضغط على Ctrl + C في الوحدة الطرفية لإيقاف adk web.
7. إجراء بحث باستخدام ParallelAgent
مع أنّ سير العمل التسلسلي يفصل بوضوح بين استخراج التفضيلات وصياغة برنامج الرحلة، إلا أنّ اقتراحاته لا تزال تعتمد بشكل كامل على المعرفة الثابتة التي اكتسبها النموذج أثناء التدريب. يمكنك الاستناد في برنامج الرحلة إلى بيانات الويب المباشرة من خلال إضافة باحثَين مخصّصَين يستعينان بأداة google_search المضمّنة:
activity_finder_agent: يعثر على 3 معالم جذب محدّدة تتطابق مع وجهة المستخدم واهتماماته، بالإضافة إلى أسعار التذاكر المقدَّرة.-
restaurant_finder_agent: يعثر على 3 مطاعم محلية حاصلة على تقييمات عالية والتكلفة المقدَّرة لكل شخص.
بما أنّ البحث عن المعالم السياحية والبحث عن المطاعم لا يعتمدان على بعضهما، فإنّ تشغيلهما واحدًا تلو الآخر يؤدي إلى إضاعة الوقت. بدلاً من ذلك، ستدمج الباحثَين داخل ParallelAgent (parallel_research_agent) لكي تنفّذ حزمة ADK سيرَي عمل "بحث Google" في الوقت نفسه وتملأ {activity_recommendations?} و{restaurant_recommendations?} قبل التسليم إلى itinerary_synthesizer_agent.
إضافة المتخصّصين في الأبحاث الموازية إلى specialists.py
افتح travel_planner/specialists.py:
cloudshell edit ~/adk-agents/travel_planner/specialists.py
أضِف خبيرَي "بحث Google" التاليَين إلى أسفل travel_planner/specialists.py (أسفل itinerary_synthesizer_agent مباشرةً):
# --- Specialist 3: The Activity Finder ---
activity_finder_agent = Agent(
    name="activity_finder_agent",
    description="Finds 3 attractions matching the user's destination and interests.",
    instruction="""
        Based on {user_preferences}, use google_search to find 3 specific attractions (including budget-friendly options).
        Return a JSON list with keys: "attraction_name", "estimated_cost_local", "estimated_cost_usd", "notes".
    """,
    tools=[google_search],
    output_key="activity_recommendations",
)

# --- Specialist 4: The Restaurant Finder ---
restaurant_finder_agent = Agent(
    name="restaurant_finder_agent",
    description="Finds 3 restaurants matching the destination and budget.",
    instruction="""
        Based on {user_preferences}, use google_search to find 3 highly-rated restaurants across price points.
        Return a JSON list with keys: "restaurant_name", "cuisine", "estimated_cost_local", "estimated_cost_usd".
    """,
    tools=[google_search],
    output_key="restaurant_recommendations",
)
أدخِل ParallelAgent في workflows.py
افتح travel_planner/workflows.py:
cloudshell edit ~/adk-agents/travel_planner/workflows.py
يُرجى تعديل travel_planner/workflows.py لتحديد parallel_research_agent باستخدام ParallelAgent ووضعه بين user_profiler_agent وitinerary_synthesizer_agent:
from google.adk.agents import ParallelAgent, SequentialAgent
from .specialists import (
    activity_finder_agent,
    itinerary_synthesizer_agent,
    restaurant_finder_agent,
    user_profiler_agent,
)

# Parallel branch: Run activity and restaurant research simultaneously
parallel_research_agent = ParallelAgent(
    name="parallel_research_agent",
    description="Runs activity and restaurant research concurrently.",
    sub_agents=[
        activity_finder_agent,
        restaurant_finder_agent,
    ],
)

# Master pipeline: Profile -> Parallel Research -> Synthesize
master_travel_agent = SequentialAgent(
    name="master_travel_agent",
    description="Orchestrates the end-to-end travel planning process for trip and itinerary requests.",
    sub_agents=[
        user_profiler_agent,          # Step 1: Extract constraints
        parallel_research_agent,      # Step 2: Research activities & restaurants in parallel
        itinerary_synthesizer_agent,  # Step 3: Synthesize into an itinerary
    ],
)
🔍 التحقّق من عملك
شغِّل adk web مرة أخرى لاختبار مسار البحث الموازي:
cd ~/adk-agents
adk web --allow_origins "*"
في واجهة مستخدم Web Preview، أرسِل الطلب:
Help me plan a trip to Kyoto focused on historic temples and ramen
من المفترض أن تظهر لك نتيجة مشابهة للتسلسل التالي في عرض الأحداث:
1. user_profiler_agent -> writes state['user_preferences']
2. parallel_research_agent -> fans out concurrently:
   - activity_finder_agent invokes google_search -> writes state['activity_recommendations']
   - restaurant_finder_agent invokes google_search -> writes state['restaurant_recommendations']
3. itinerary_synthesizer_agent -> merges all three state keys into state['final_itinerary']
- طريقة عرض "التتبُّعات": انقر على التتبُّعات في أعلى لوحة المحادثة (بجانب الأحداث) وافحص دورك. ستظهر لك فترات زمنية متداخلة لكل من
activity_finder_agentوrestaurant_finder_agentضمنparallel_research_agent، ما يقلّل من إجمالي وقت الاستجابة للبحث على الويب إلى النصف تقريبًا مقارنةً بتشغيلهما بشكل تسلسلي. - علامة التبويب "الحالة": انقر على علامة التبويب الحالة في لوحة الفحص اليمنى لفحص قاموس الجلسة المباشرة (
user_preferencesوactivity_recommendationsوrestaurant_recommendationsوfinal_itinerary).
عند الانتهاء من الاختبار، اضغط على Ctrl + C في الوحدة الطرفية لإيقاف adk web.
8. تحسين المسودات باستخدام LoopAgent
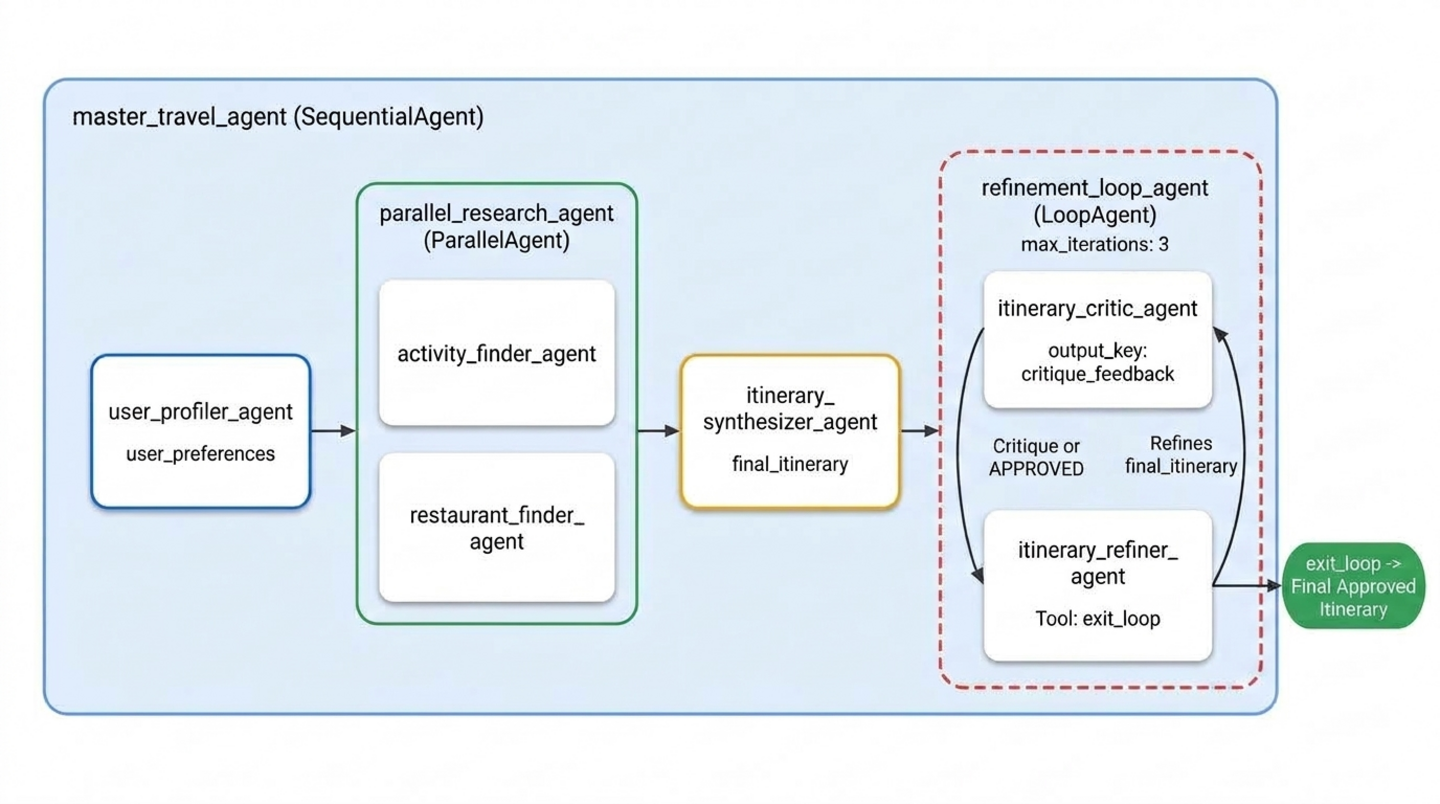
حتى مع نتائج البحث المباشرة، قد تتجاوز المسودة الأولية التي أنشأها itinerary_synthesizer_agent الميزانية الإجمالية للمستخدم أو تتضمّن عن طريق الخطأ فئة مستبعَدة (مثل معرض فنون حديثة عندما طلب المستخدم عدم تضمينه).
لضمان الالتزام بالقيود، عليك إضافة حلقة تحسين صانع-مدقّق في نهاية المسار باستخدام LoopAgent:
itinerary_critic_agent(أداة التحقّق): تدقّق في{final_itinerary}مقارنةً بـ{user_preferences}. يجمع التكاليف المقدَّرة، ويتحقّق من كل قيد سلبي، ويكتب تعليمات مراجعة محدّدة إلىcritique_feedbackأو يردّ بالعبارة الدقيقة"APPROVED".itinerary_refiner_agent(صانع المحتوى / المغادر): يقرأ{critique_feedback}. إذا كان النقد يساوي"APPROVED"، يتم استدعاء أداةexit_loop(tool_context.actions.escalate = True) للخروج منLoopAgentعلى الفور. وإلا، فإنه يراجع{final_itinerary}لإصلاح المشكلات التي تم الإبلاغ عنها ويستبدلfinal_itineraryللتمرير التالي.
إلحاق exit_loop و"الناقد" و"المحسِّن" بـ specialists.py
افتح travel_planner/specialists.py:
cloudshell edit ~/adk-agents/travel_planner/specialists.py
أضِف أداة exit_loop (ToolContext) وitinerary_critic_agent وitinerary_refiner_agent إلى أسفل travel_planner/specialists.py:
def exit_loop(tool_context: ToolContext) -> dict:
    """Call ONLY when the critique is APPROVED to exit the refinement loop."""
    print(f"[Tool Call] exit_loop triggered by {tool_context.agent_name}")
    tool_context.actions.escalate = True
    return {"status": "approved", "message": "Itinerary approved. Exiting refinement loop."}


# --- Specialist 5: The Budget & Constraint Critic (Inside LoopAgent) ---
itinerary_critic_agent = Agent(
    name="itinerary_critic_agent",
    include_contents="none",
    description="Audits the itinerary draft against budget and negative constraints.",
    instruction="""
        Audit Current Itinerary ({final_itinerary}) against User Preferences ({user_preferences}).
        Verify that the USD total stays within the user's budget and no excluded venue types appear.
        If all checks pass, respond EXACTLY with the single word "APPROVED".
        Otherwise, output 1-2 concise revision instructions explaining what to swap or adjust.
    """,
    output_key="critique_feedback",
)

# --- Specialist 6: The Itinerary Refiner / Exiter (Inside LoopAgent) ---
itinerary_refiner_agent = Agent(
    name="itinerary_refiner_agent",
    include_contents="none",
    description="Refines the itinerary from critique feedback, or calls exit_loop when APPROVED.",
    instruction="""
        Review Auditor Critique ({critique_feedback}) for Current Itinerary ({final_itinerary}).
        If the critique is EXACTLY "APPROVED", call `exit_loop` immediately and return the itinerary unchanged.
        Otherwise, revise the draft using {activity_recommendations} and {restaurant_recommendations}
        so all USD budget and exclusion rules pass, and output ONLY the updated Markdown itinerary.
    """,
    tools=[exit_loop],
    output_key="final_itinerary",
)
إضافة "LoopAgent" إلى "workflows.py"
افتح travel_planner/workflows.py:
cloudshell edit ~/adk-agents/travel_planner/workflows.py
عدِّل travel_planner/workflows.py لتضمين itinerary_critic_agent وitinerary_refiner_agent في LoopAgent (max_iterations=3) وإلحاقه كمرحلة رابعة من master_travel_agent:
from google.adk.agents import LoopAgent, ParallelAgent, SequentialAgent
from .specialists import (
    activity_finder_agent,
    itinerary_critic_agent,
    itinerary_refiner_agent,
    itinerary_synthesizer_agent,
    restaurant_finder_agent,
    user_profiler_agent,
)

# Stage 2: Parallel research branch
parallel_research_agent = ParallelAgent(
    name="parallel_research_agent",
    description="Runs activity and restaurant research concurrently.",
    sub_agents=[
        activity_finder_agent,
        restaurant_finder_agent,
    ],
)

# Stage 4: Iterative Maker-Checker refinement loop
refinement_loop_agent = LoopAgent(
    name="refinement_loop_agent",
    description="Iteratively audits and refines the itinerary until constraints and budget are approved.",
    sub_agents=[
        itinerary_critic_agent,
        itinerary_refiner_agent,
    ],
    max_iterations=3,
)

# Master pipeline: Profile -> Parallel Research -> Synthesize -> Refinement Loop
master_travel_agent = SequentialAgent(
    name="master_travel_agent",
    description="Orchestrates the end-to-end travel planning process for trip and itinerary requests.",
    sub_agents=[
        user_profiler_agent,          # Stage 1: Extract constraints
        parallel_research_agent,      # Stage 2: Research activities & restaurants in parallel
        itinerary_synthesizer_agent,  # Stage 3: Draft initial itinerary
        refinement_loop_agent,        # Stage 4: Audit and refine until approved
    ],
)
🔍 التحقّق من عملك
ابدأ adk web لاختبار سير العمل الكامل المتعدّد الوكلاء:
cd ~/adk-agents
adk web --allow_origins "*"
افتح واجهة مستخدم "معاينة الويب" على المنفذ 8000، وابدأ جلسة جديدة، واختبِر النظام بالكامل باستخدام طلب Kyoto المتعدّد القيود:
Design a full-day itinerary for Kyoto with a total budget of $100. My main interests are historical landmarks, temples, and authentic local cuisine. Please do not include any modern art museums or galleries.
من المفترض أن تظهر لك نتيجة مشابهة لتسلسل التنفيذ التالي في عرض الأحداث وسجلّات الوحدة الطرفية:
1. user_profiler_agent -> writes JSON with destination="Kyoto", budget="$100", exclusions=["modern art museums", "galleries"]
2. parallel_research_agent -> runs activity_finder_agent and restaurant_finder_agent in parallel
3. itinerary_synthesizer_agent -> produces initial draft in state['final_itinerary']
4. refinement_loop_agent:
   - itinerary_critic_agent -> audits USD budget and exclusions -> outputs "APPROVED" (or revision notes)
   - itinerary_refiner_agent -> triggers [Tool Call] exit_loop triggered by itinerary_refiner_agent and outputs the approved itinerary
- طريقة عرض الأحداث: انقر على أي شريحة حدث من
itinerary_critic_agentأوitinerary_refiner_agentلفحص حمولتها في علامة التبويب المعلومات على اليمين. عندما يستدعيitinerary_refiner_agentexit_loop، افحص الحدث للاطّلاع علىactions.escalate: true، وهي الإشارة التي تطلب منLoopAgentإيقاف التكرار قبل الوصول إلىmax_iterations=3. - علامة التبويب "الولاية": انقر على علامة التبويب الولاية لمشاهدة تعديل
state['critique_feedback']وstate['final_itinerary']في جميع البطاقات. إذا تجاوزت المسودة الأولية$100 USD، سيتضمّنcritique_feedbackتعليمات المراجعة التي يقدّمها المدقّق في الجولة الأولى قبل أن يضيفfinal_itineraryبدائل أقل تكلفة ويتغيّرcritique_feedbackإلى"APPROVED"في الجولة الثانية.
عند الانتهاء من الاختبار، اضغط على Ctrl + C في الوحدة الطرفية لإيقاف adk web.
9. تَنظيم
حذف ملفات المشروع على جهاز المستخدم
لإزالة دليل مشروع adk-agents والبيئة الافتراضية من مجلد Cloud Shell الرئيسي، نفِّذ ما يلي:
cd ~
rm -rf ~/adk-agents
إيقاف Agent Platform API
إذا لم تعُد بحاجة إلى تفعيل Agent Platform API في مشروعك، يمكنك إيقافها باستخدام gcloud:
gcloud services disable aiplatform.googleapis.com --quiet
حذف مشروع Google Cloud بالكامل (اختياري)
PROJECT_ID=$(gcloud config get-value project)
gcloud projects delete "$PROJECT_ID" --quiet
🔍 التحقّق من عملك
تأكيد إزالة "~/adk-agents":
test ! -d ~/adk-agents && echo "Workspace ~/adk-agents removed"
من المفترَض أن تظهر لك نتيجة مثل:
Workspace ~/adk-agents removed
10. تهانينا
تهانينا! لقد أنشأت نظامًا هرميًا متعدد الوكلاء باستخدام "حزمة تطوير الوكلاء" (ADK) من Google ينسّق فريقًا من ستة وكلاء متخصّصين في مهام سير العمل المتسلسلة والمتوازية والمتكررة.
إنجازاتك
- التواصل المنظَّم بين الوكلاء من خلال حالة الجلسة المشتركة (إدخال نموذج
output_keyو{state_variable}) - تم إنشاء مسار حتمي خطوة بخطوة باستخدام
SequentialAgent - تم تنفيذ وكلاء بحث مستقلين في "بحث Google" في الوقت نفسه باستخدام
ParallelAgent - تم تنفيذ حلقة تحقّق مبرمَجة من صانع المحتوى والمدقّق باستخدام
LoopAgentوtool_context.actions.escalate = True
الخطوات التالية
- انتقِل إلى الجزء الرابع من السلسلة، إنشاء وكلاء الذكاء الاصطناعي باستخدام حزمة ADK: تنظيم سير عمل الرسوم البيانية، لإعادة إنشاء مخطِّط الرحلات هذا باستخدام دورات
WorkflowوJoinNodeوEvent(route=...)الموحّدة والحتمية في ADK 2 - مستندات ADK Workflow Agents الرسمية
- استكشاف الأنظمة المتعددة الوكلاء في ADK
- انضم إلى برنامج GEAR (Gemini Enterprise Agent Ready) وبرنامج الحصول على شهادة للمشاركة في ورش عمل تطبيقية ومسارات تعلُّم