

1. סקירה כללית
כדי למלא בקשה מורכבת לתכנון טיול (למשל, תכנון מסלול של יום שלם בקיוטו בתקציב של פחות מ-100 דולר, שמתמקד במקדשים היסטוריים ובאוכל מקומי, בלי גלריות לאומנות מודרנית), צריך לחלץ את האילוצים, לחקור אטרקציות ומקומות לאכול במקביל, להרכיב לוח זמנים מפורט ולבדוק את התוכנית הסופית. אם מסתמכים על סוכן מונוליטי אחד עם הרבה כלים, יכול להיות שהוא ידלג על שלבי אימות או יפר החרגות. לכן, תזמור מתאם בין סוכני משנה ייעודיים באמצעות בקרים דטרמיניסטיים של תהליכי עבודה.
בחלק השלישי של הסדרה יצירת סוכני AI באמצעות ADK, תיצרו מתכנן נסיעות עצמאי עם כמה סוכנים בפלטפורמת Agent באמצעות בקרי תהליך עבודה (SequentialAgent, ParallelAgent ו-LoopAgent) של ערכה לפיתוח סוכנים (ADK) 2. בשלושה שלבים מתקדמים (בלי צורך להגדיר סביבת עבודה של חלק 1 או חלק 2), תתאמו בין שישה סוכנים מומחים שמופעלים על ידי gemini-3.8-flash עם מצב סשן משותף (output_key), הפעלה בו-זמנית של google_search ולולאת שיפור איטרטיבית של יוצר-בודק.
דרישות מוקדמות
- הבנה של מושגים ב-AI גנרטיבי
- מיומנות בסיסית בתכנות ב-Python
- היכרות עם העקרונות הבסיסיים של סוכני AI ו-Google ADK
מה לומדים
- איך ליצור פרויקט ADK 2 מרובה סוכנים מאפס
- איך לתכנן צוות של סוכנים עם התמחויות שונות שמשתפים את מצב הסשן באמצעות
output_key - איך משתמשים ב-
SequentialAgentכדי להריץ סוכני משנה בצינור עיבוד נתונים דטרמיניסטי, שלב אחר שלב - איך משתמשים ב-
ParallelAgentכדי להריץ סוכני מחקר עצמאיים בו-זמנית כדי לצמצם את זמן האחזור - איך משתמשים בהעברה לטיפול ברמה גבוהה יותר ב-
LoopAgentוב-ToolContextכדי להטמיע לולאת שיפור חזרתית של יוצר-בודק - איך לשלב תבניות של רצף, מקביליות ולולאה בתהליך עבודה היררכי עם כמה סוכנים
מה צריך
- חשבון Google (אם רוצים לקבל קרדיטים על הסדנה, צריך להשתמש בחשבון
@gmail.comאישי) - קישור לקרדיט לסדנה שקיבלתם מהמדריך (וגם מצלמה של טלפון כדי לסרוק את קוד ה-QR) או חשבון פעיל לחיוב ב-Cloud
- Google Chrome (מומלץ להשתמש בחלון פרטי כדי למנוע ערבוב בין החשבון האישי לחשבון לצורכי עבודה)
2. מימוש קרדיטים ב-Google Cloud (אופציונלי)
אם אתם משתתפים בסדנה עם קישור לקרדיט לאירוע, אתם יכולים לממש את הקרדיט של Google Developer Program כדי להקצות חשבון לחיוב בלי כרטיס אשראי.
מימוש שובר הפרסום לאירוע
- פותחים את הקישור לקרדיט לסדנה בחלון פרטי ונכנסים לחשבון
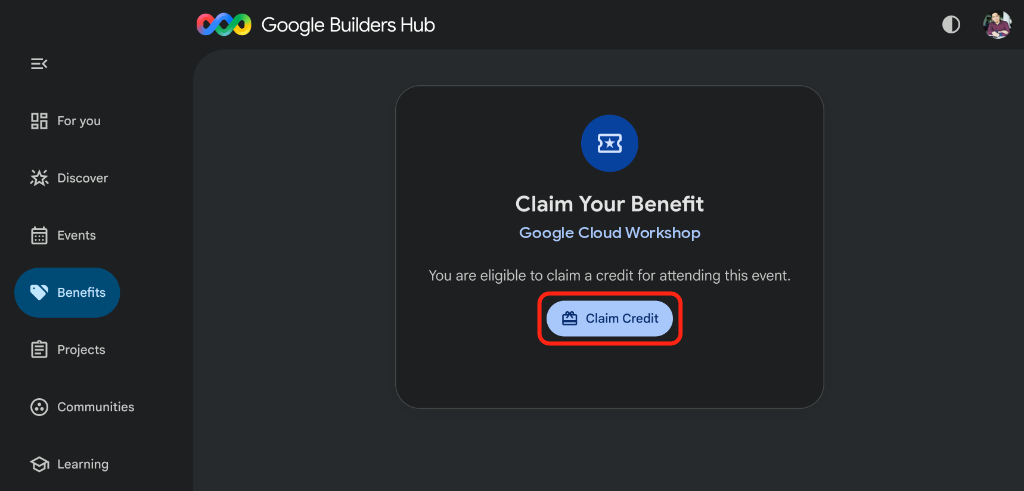
@gmail.com. - בקטע Claim Your Benefit, לוחצים על Claim Credit:
- אם תתבקשו ליצור פרופיל ב-Google Developer Program, מלאו את הטופס.
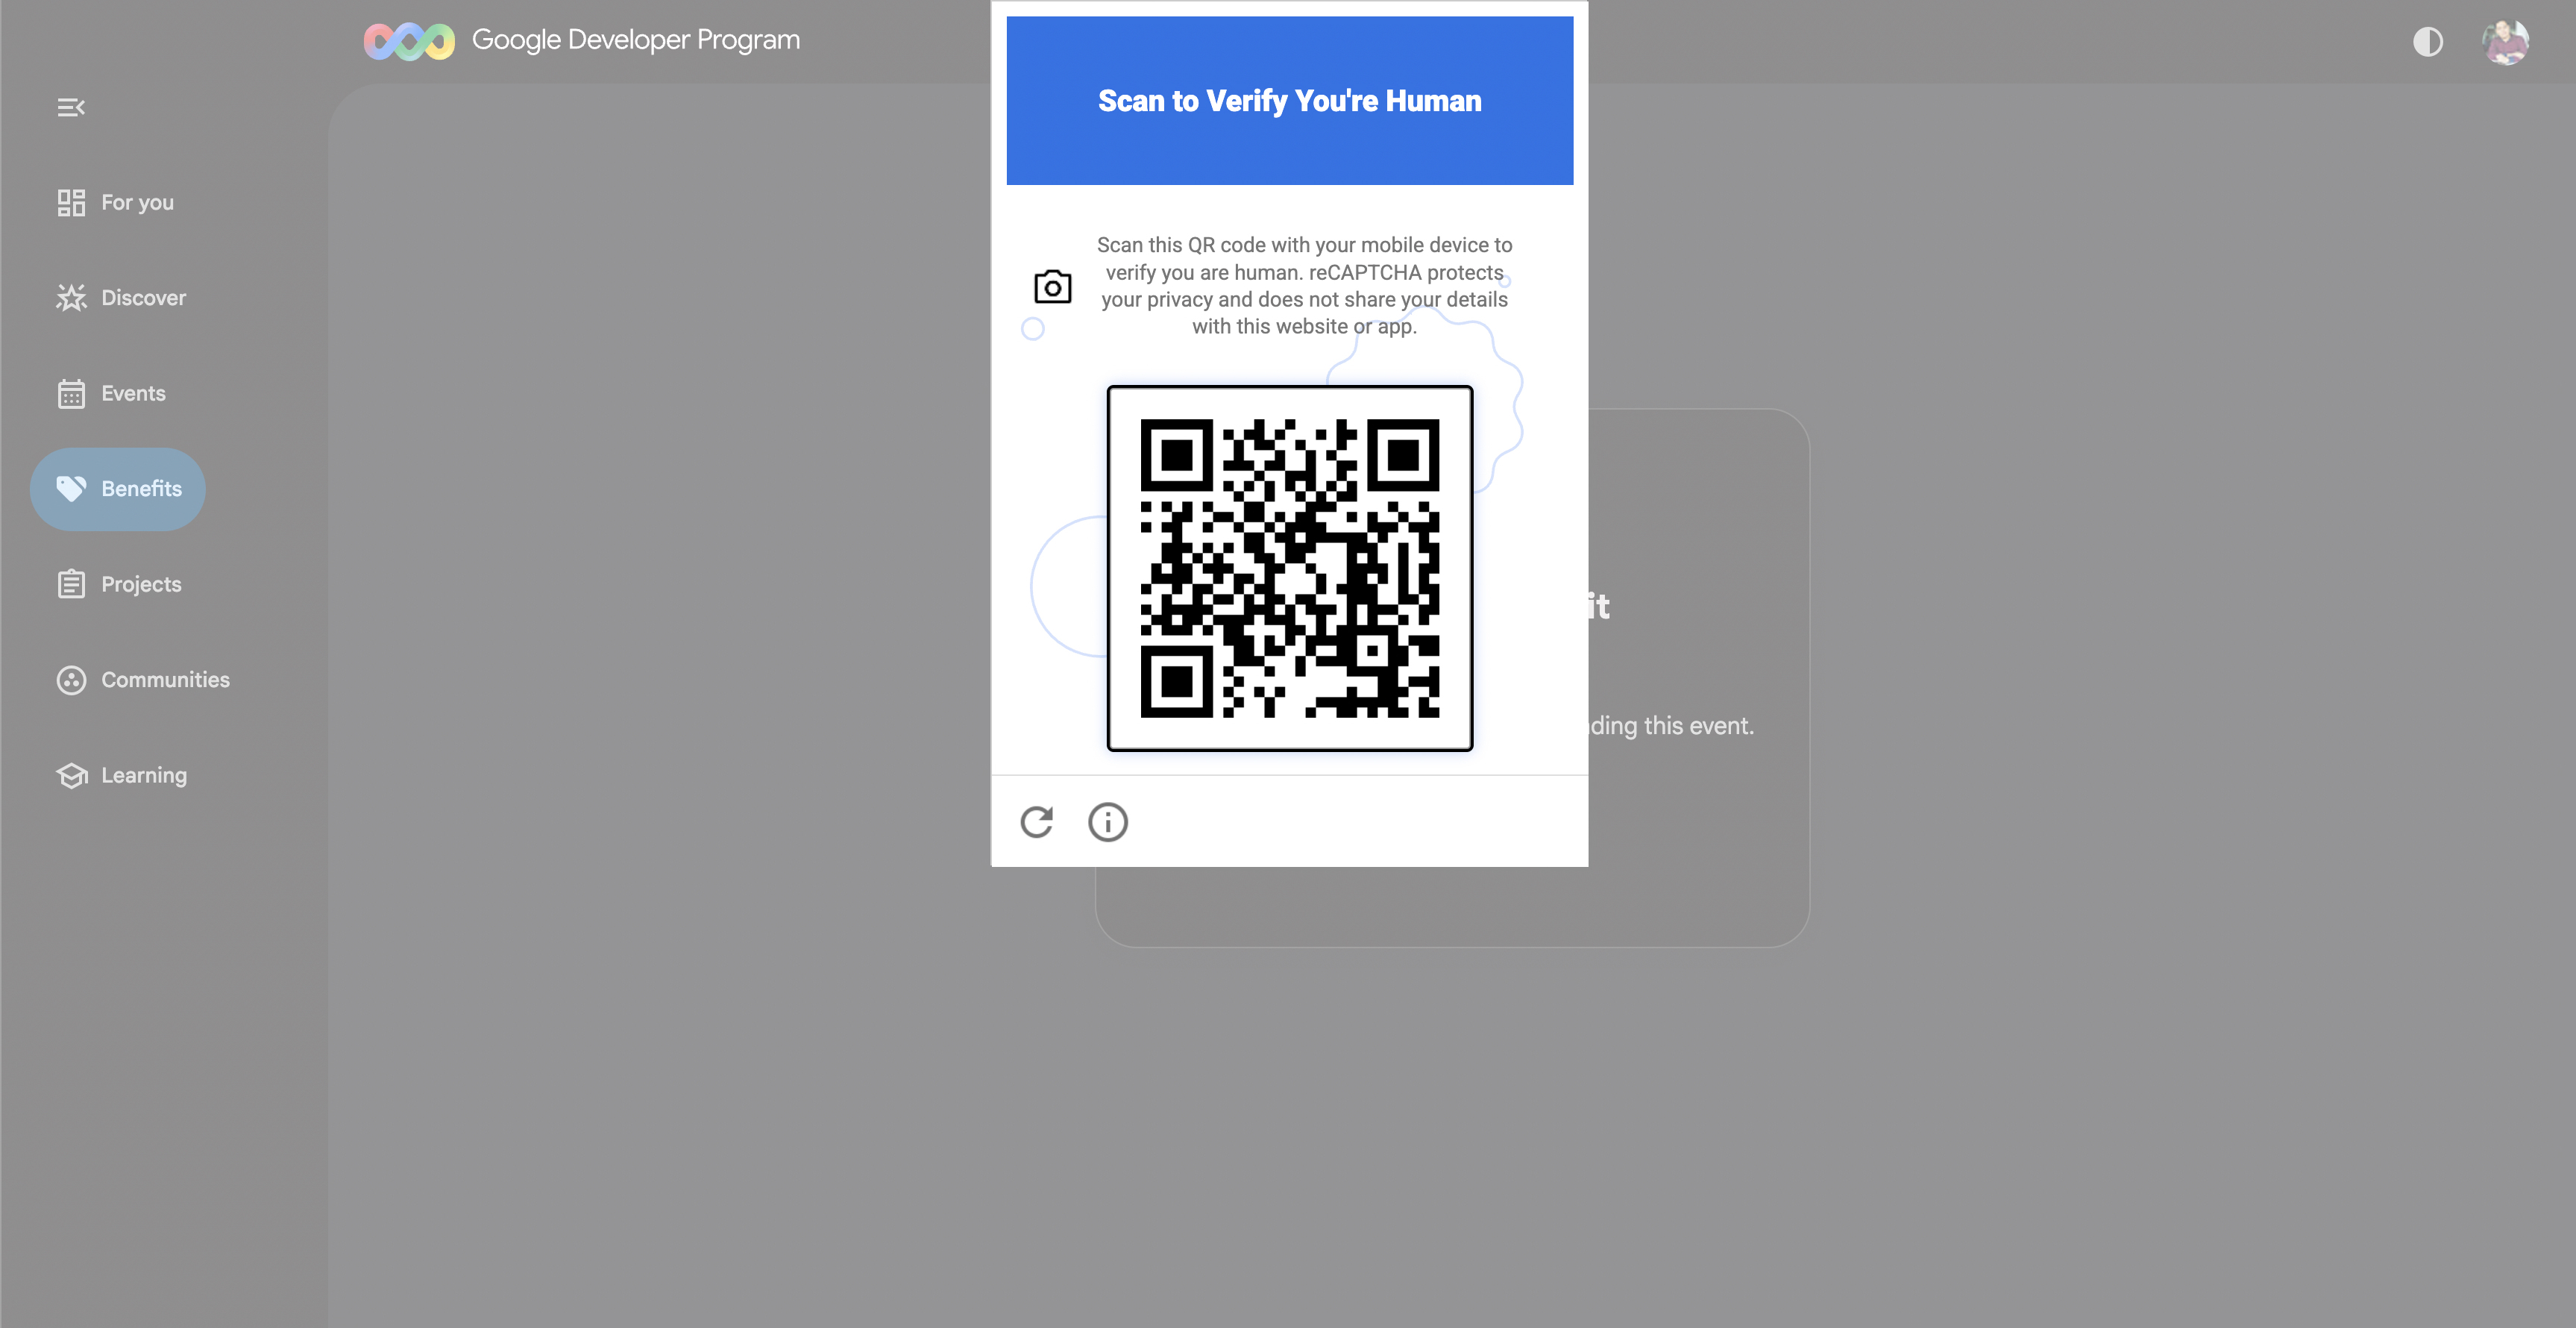
- כשההודעה סריקה כדי לאמת שמדובר באדם אמיתי מופיעה, סורקים את קוד ה-QR באמצעות הטלפון ומשלימים את האימות (אם קוד ה-QR לא מופיע, מרעננים את הדף ולוחצים שוב על מימוש השובר):
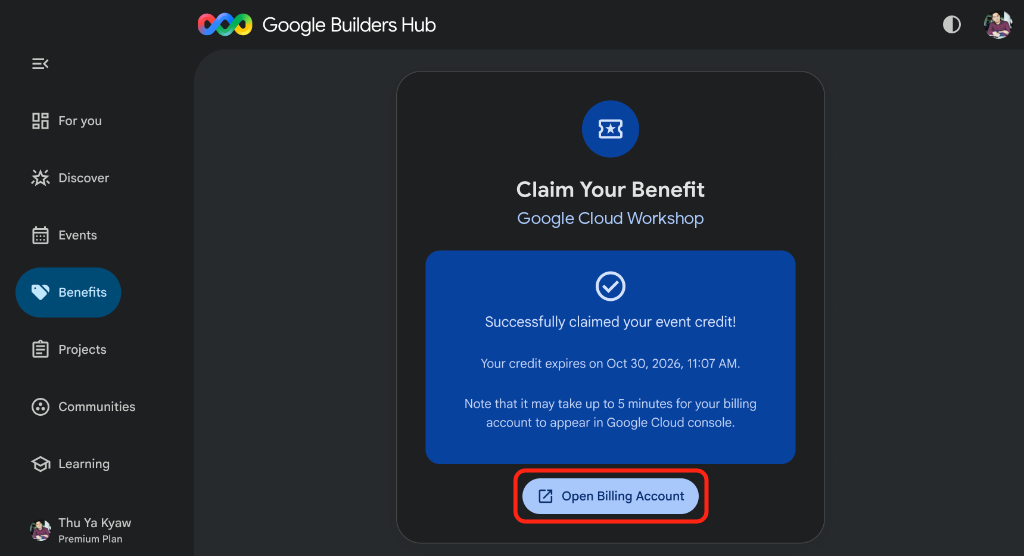
- מוודאים שמופיעה ההודעה Successfully claimed your event credit! ולוחצים על Open Billing Account:
🔍 בדיקת העבודה שלכם
הגדרת החשבון לחיוב נמשכת עד 3 דקות:
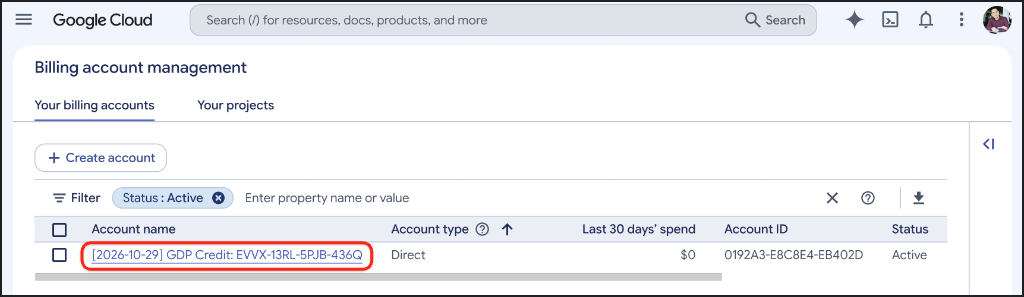
- פותחים את חיוב ב-Cloud (או מעתיקים את כתובת ה-URL לחלון פרטי) ובוחרים באפשרות חשבונות לחיוב:
https://console.cloud.google.com/billing
- מרעננים את הדף עד שמופיע הסטטוס פעיל בחשבון
GDP Credit:
3. יצירת פרויקט ב-Google Cloud (אופציונלי)
יוצרים פרויקט ייעודי ב-Google Cloud כדי שכל המשאבים מה-Codelab הזה יישארו מבודדים ויהיה קל לנקות אותם.
- פותחים את הדף Create a Project (או מעתיקים את כתובת ה-URL לחלון הפרטי):
https://console.cloud.google.com/projectcreate
- ממלאים את פרטי הפרויקט:
- שם הפרויקט: לדוגמה,
google-cloud-workshop - חשבון לחיוב (אם מוצג): בוחרים באפשרות
GDP Credit(או בחשבון הפעיל לחיוב) - משאב הורה: ללא ארגון (או הארגון שלכם, אם נדרש)
- שם הפרויקט: לדוגמה,
- שימו לב ל-מזהה הפרויקט שנוצר מתחת לשם הפרויקט, ואז לחצו על Create:
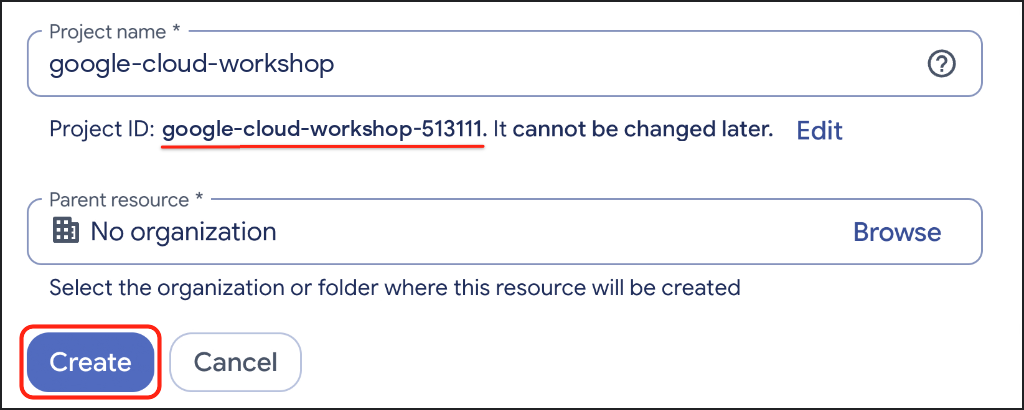
🔍 בדיקת העבודה שלכם
לוחצים על Notifications בסרגל הכלים שבפינה הימנית העליונה, ואז לוחצים על Select Project אחרי שהפרויקט נוצר:
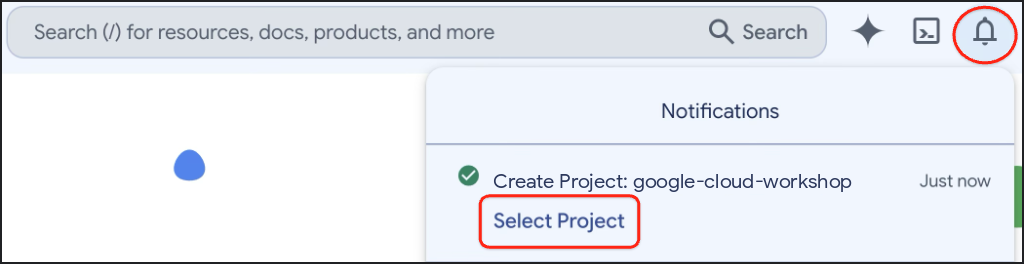
4. הגדרת הסביבה
מגדירים את Google Cloud Shell, מפעילים את Agent Platform API ויוצרים סביבה וירטואלית מבודדת של Python 3.12 באמצעות uv.
הגדרת Cloud Shell
- לוחצים על Activate Cloud Shell (
>_) בסרגל הכלים של מסוף Google Cloud, או פותחים את Google Cloud Shell ישירות (או מעתיקים את כתובת ה-URL לחלון הפרטי):
https://shell.cloud.google.com/?show=ide,terminal

- אם מוצגת בקשה, לוחצים על Authorize:
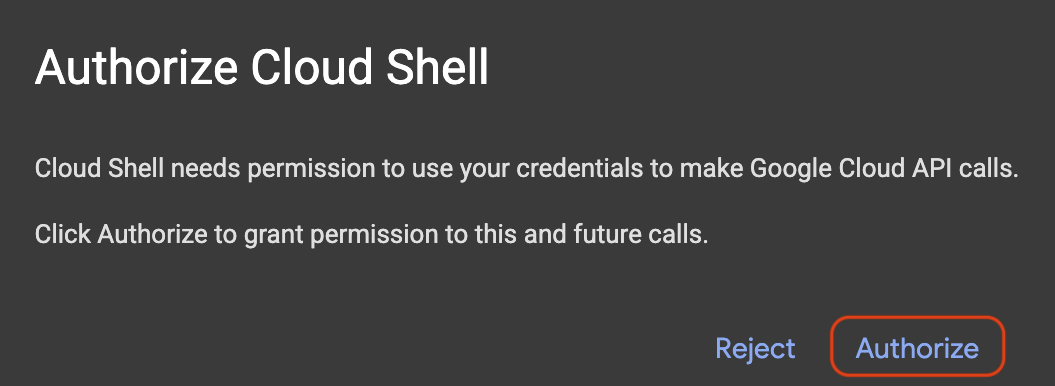
- בוחרים את מזהה הפרויקט הפעיל ב-Google Cloud מהתפריט הממוספר בטרמינל:
unset CLOUDSDK_CORE_PROJECT
PS3="Select your project (e.g. 1): "
select PROJECT_ID in $(gcloud projects list --format="value(projectId)"); do
  [ -n "$PROJECT_ID" ] && gcloud config set project "$PROJECT_ID" && break
done
הפלט אמור להיראות כך (פרויקטים ללא תגים גם מדפיסים שורת מידע של [environment: untagged]):
1) google-cloud-workshop-4210
2) my-cloud-project-8812
Select your project (e.g. 1): 1
Updated property [core/project].
מוודאים שמזהה הפרויקט שבחרתם מופיע מודגש בצהוב בהנחיה של Cloud Shell:
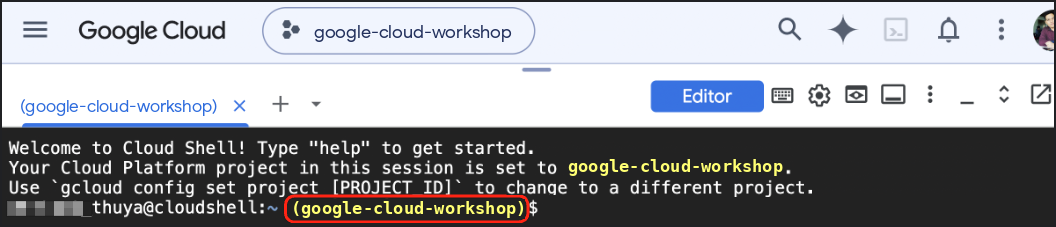
הפעלת ממשקי ה-API הנדרשים
מפעילים את Agent Platform API כדי שהסוכנים ב-ADK יוכלו להפעיל מודלים של Gemini:
gcloud services enable aiplatform.googleapis.com
הפלט אמור להיראות כך:
Operation "operations/acat.p2-..." finished successfully.
יצירת סביבה וירטואלית של Python והתקנת ADK
יוצרים את סביבת העבודה ~/adk-agents ומפעילים סביבה וירטואלית של Python 3.12:
cd ~
mkdir -p adk-agents && cd ~/adk-agents

which uv >/dev/null 2>&1 || curl -LsSf https://astral.sh/uv/install.sh | sh
export PATH="$HOME/.local/bin:$PATH"

uv venv .venv --python 3.12
source .venv/bin/activate
מוודאים שהקידומת (.venv) מופיעה בתחילת ההנחיה בטרמינל:

מתקינים את ADK 2 בסביבה הווירטואלית הפעילה:
uv pip install --no-cache "google-adk==2.14.0"
🔍 בדיקת העבודה שלכם
בודקים את גרסת ה-CLI של adk שהותקנה:
adk --version
הפלט אמור להיראות כך:
adk, version 2.14.0
5. הגדרת הסוכן לתכנון נסיעות
כשהסביבה מוכנה, משתמשים בפקודה המובנית adk create של ADK כדי ליצור את קובצי ההתחלה של חבילת הסוכן travel_planner.
יצירת חבילת ההתחלה
מריצים את adk create מהספרייה ~/adk-agents:
cd ~/adk-agents
adk create travel_planner
כשמופיעה בקשה בטרמינל, בוחרים את אפשרויות ההגדרה הבאות (אם מופיעה בקשה עם Enable telemetry? [Y/n]: בהפעלה הראשונה, לוחצים על Enter או מקלידים n ולוחצים על Enter):
- בחירת מודל לסוכן הבסיס: מקלידים
2כדי לבחור אתgemini-3.8-flash(אפשרות1בוחרת אתgemini-3.5-flash) ולוחצים על Enter. - בחירת קצה עורפי: מקלידים
2כדי לבחור את הקצה העורפי של פלטפורמת הנציגים של Google Cloud (אפשרות2בתפריט ה-CLI שבהמשך) ולוחצים על Enter. - Enter Google Cloud project ID: מאשרים את מזהה הפרויקט שמוצג בסוגריים על ידי הקשה על Enter.
- Enter Google Cloud region: מקלידים
globalולוחצים על Enter.
adk create כותב את GOOGLE_GENAI_USE_ENTERPRISE=1, מזהה הפרויקט ו-GOOGLE_CLOUD_LOCATION=global לתוך travel_planner/.env, כדי שפרטי הכניסה יישארו מוגדרים כשתעדכנו את agent.py בהמשך.
🔍 בדיקת העבודה שלכם
הפלט אמור להיראות כך:
Choose a model for the root agent:
1. gemini-3.5-flash
2. gemini-3.8-flash
3. Other models (fill later)
Choose model (1, 2, 3): 2
1. Google AI
2. Vertex AI
3. Login with Google
Choose a backend (1, 2, 3): 2

You need an existing Google Cloud account and project, check out this link for details:
https://google.github.io/adk-docs/get-started/quickstart/#gemini---google-cloud-vertex-ai

Enter Google Cloud project ID [google-cloud-workshop-4210]:
Enter Google Cloud region [us-central1]: global

Agent created in /home/your_username/adk-agents/travel_planner:
- .env
- .gitignore
- __init__.py
- agent.py

⚠️  WARNING: Secrets (like GOOGLE_API_KEY) are stored in .env.

Next steps:
- Chat with your agent in the terminal: adk run travel_planner
- Or in the browser: adk web .
- Have your coding agent evaluate and deploy it: uvx google-agents-cli setup
  (other install options: https://adk.dev/get-started/agents-cli/)
פותחים את התיקייה הנוכחית בכלי לעריכת קוד של Cloud Shell כדי לבדוק ולערוך קבצים לצד הטרמינל:
which cloudshell >/dev/null 2>&1 && cloudshell workspace ~/adk-agents || true
cd ~/adk-agents
source .venv/bin/activate
בדיקת הנציג היחיד שמוגדר כברירת מחדל
לפני שיוצרים תהליכי עבודה עם כמה סוכנים, מפעילים את ממשק המשתמש לפיתוח ב-ADK כדי לראות איך הסוכן היחיד שמוגדר כברירת מחדל מגיב לשאילתה רחבה בנושא תכנון נסיעות:
cd ~/adk-agents
adk web --allow_origins "*"
פותחים את ממשק המשתמש של הפיתוח בדפדפן באמצעות התצוגה המקדימה באינטרנט של Cloud Shell:
- לוחצים על הסמל Web Preview בסרגל הכלים שבפינה הימנית העליונה של Cloud Shell.
- לוחצים על Change Port, מזינים
8000ולוחצים על Change and Preview.
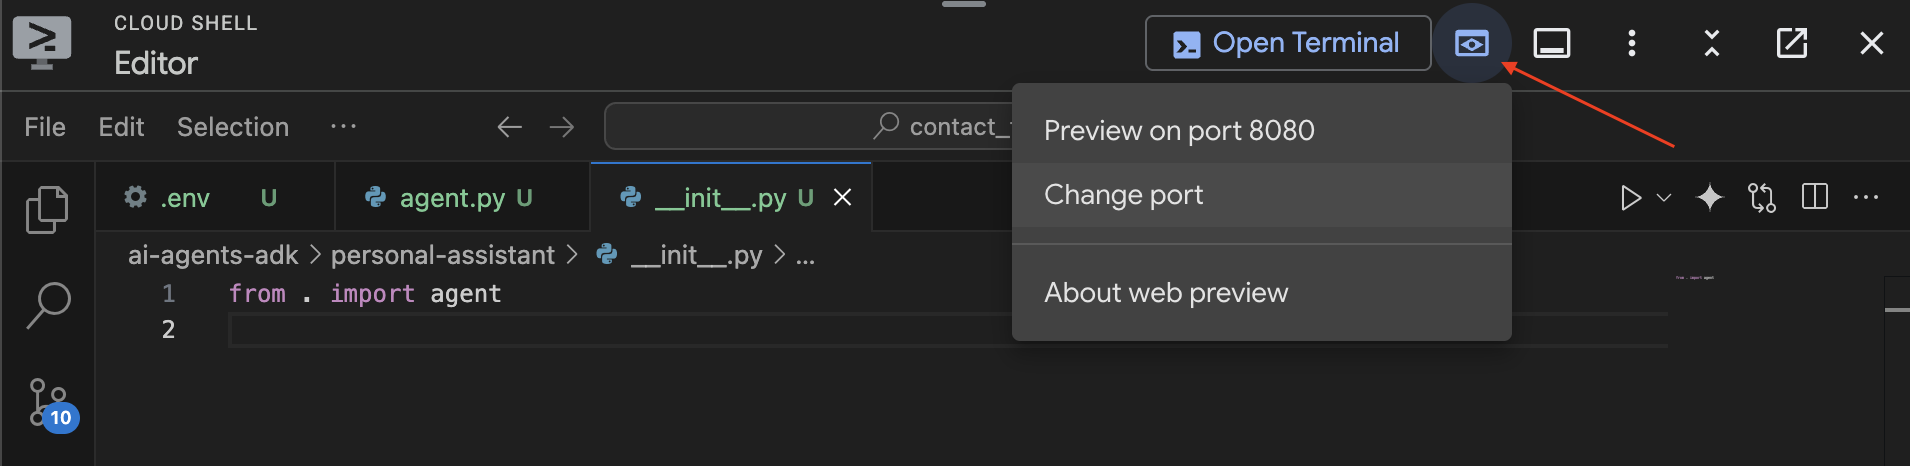
אחרי שממשק המשתמש של ADK Web נטען, שולחים ברכה כמו "hello, what can you do?" או "Help me plan a trip to Japan":
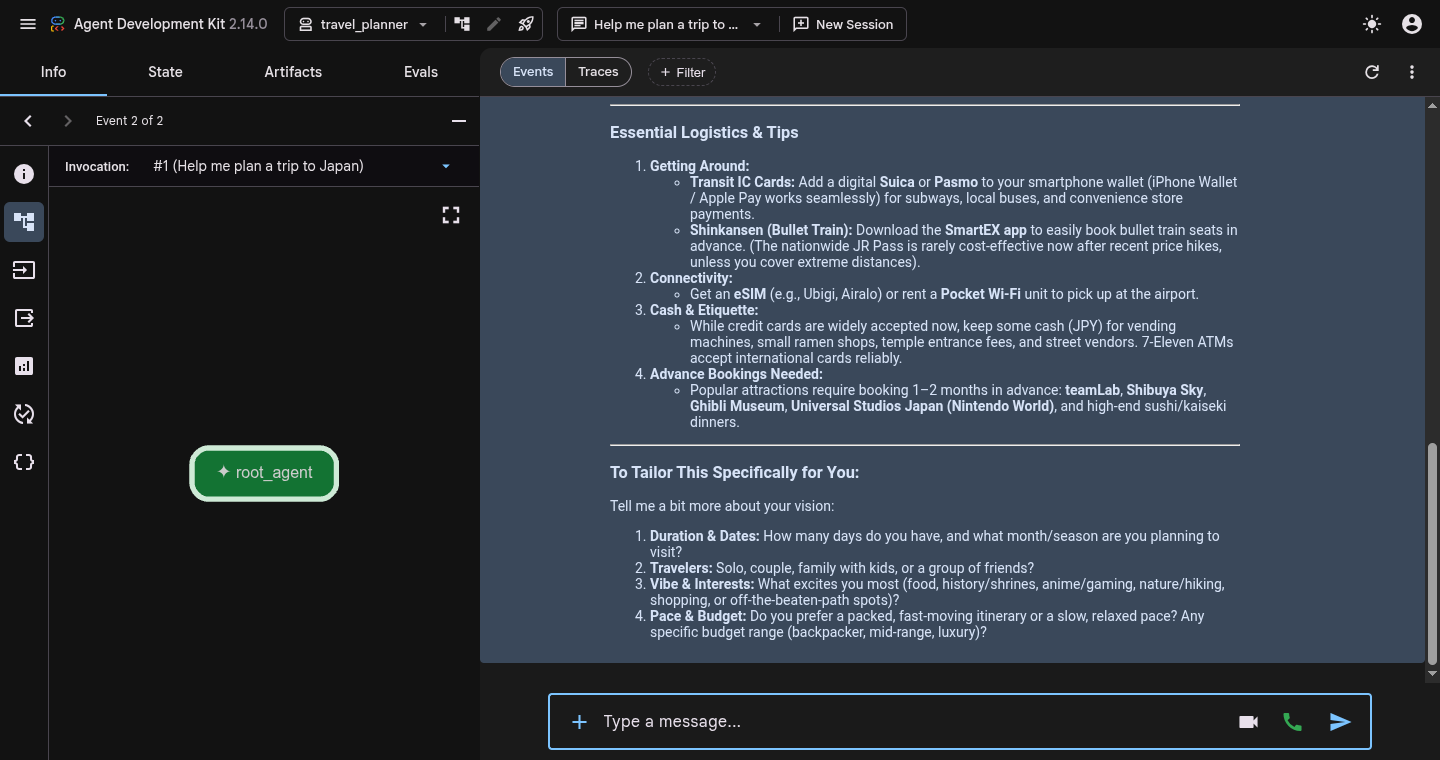
שימו לב ש-root_agent עונה ישירות בסבב אחד בלי חילוץ העדפות מובנה, מחקר באינטרנט בזמן אמת או אימות תקציב.
בסיום הבדיקה, לוחצים על Ctrl + C בטרמינל של Cloud Shell כדי לעצור את השרת adk web ולחזור לשורת הפקודה.
6. יצירת תהליך עבודה של SequentialAgent
עכשיו תיצרו את תבנית התזמור הראשונה שלכם: תהליך עבודה ליניארי שמופעל על ידי SequentialAgent. בצינור עיבוד נתונים רציף, הסוכנים המשניים פועלים בסדר קבוע. המומחה הראשון מחלץ פרמטרים מובְנים ושומר אותם במצב הסשן המשותף באמצעות output_key="user_preferences", והמומחה השני קורא את {user_preferences} ממצב הסשן המשותף כדי לנסח את מסלול הנסיעה.
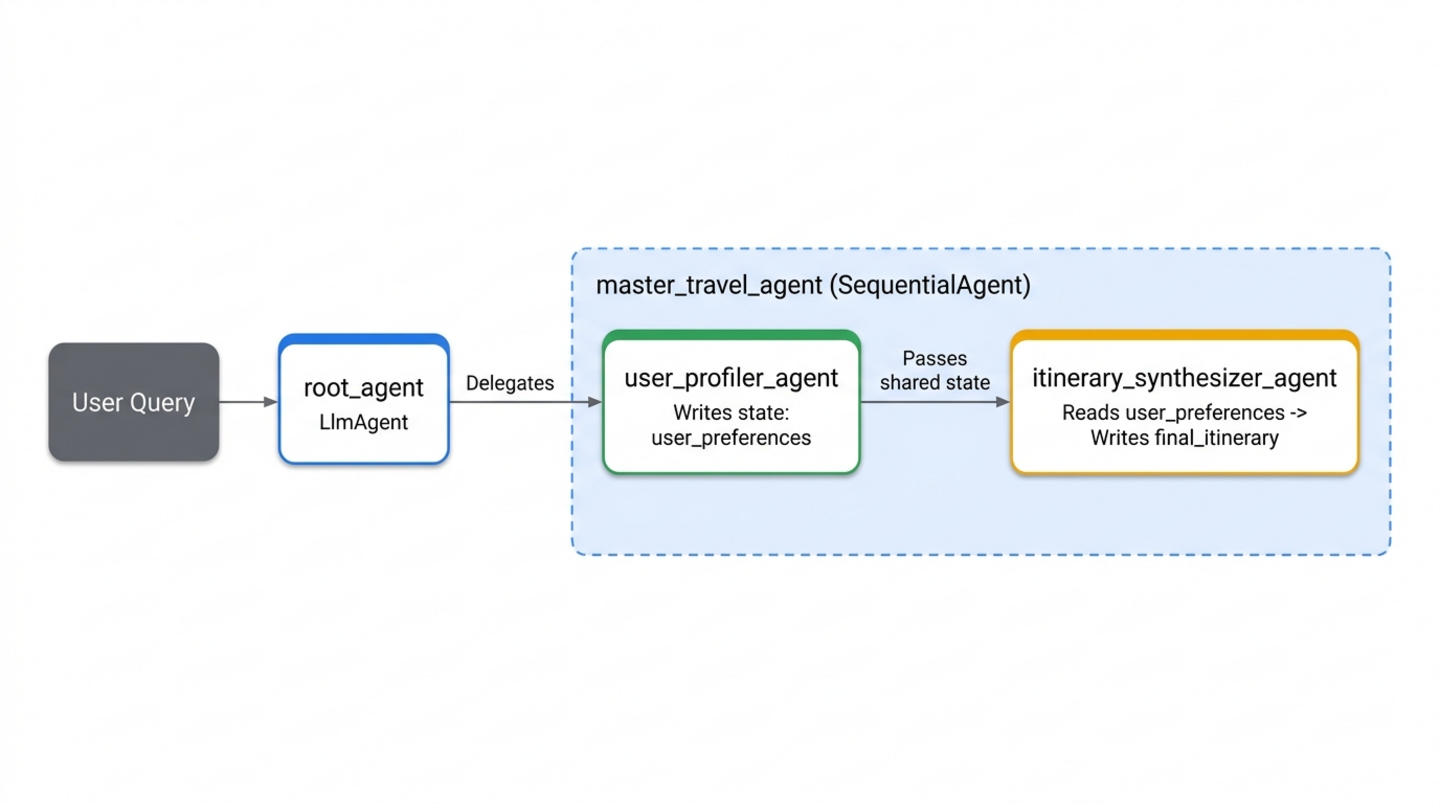
יצירת המומחים הראשונים (specialists.py)
פותחים קובץ חדש בשם specialists.py בתוך travel_planner/:
cloudshell edit ~/adk-agents/travel_planner/specialists.py
מדביקים את הקוד הבא ב-travel_planner/specialists.py כדי להגדיר את user_profiler_agent ואת itinerary_synthesizer_agent (מייבאים את ToolContext ואת google_search מראש לשלבים הבאים):
from google.adk import Agent
from google.adk.tools import ToolContext, google_search

# --- Specialist 1: The User Profiler ---
user_profiler_agent = Agent(
    name="user_profiler_agent",
    description="Extracts travel preferences and constraints from user input.",
    instruction="""
        Extract destination, duration (default 1 day), budget, interests, and exclusions.
        Return a single JSON object with keys: "destination", "duration", "budget", "interests", "exclusions".
    """,
    output_key="user_preferences",  # Saves output to state['user_preferences']
)

# --- Specialist 2: The Synthesizer ---
itinerary_synthesizer_agent = Agent(
    name="itinerary_synthesizer_agent",
    description="Compiles preferences and research into a final Markdown itinerary.",
    instruction="""
        You are an elite Travel Concierge. Write a Markdown itinerary with an itemized USD and local currency cost breakdown using:
        - User Preferences: {user_preferences}
        - Activities (if available): {activity_recommendations?}
        - Restaurants (if available): {restaurant_recommendations?}
    """,
    output_key="final_itinerary",
)
חיבור הצינור הרציף (workflows.py)
יוצרים קובץ חדש בשם workflows.py בתוך travel_planner/ כדי לתזמר את המומחים:
cloudshell edit ~/adk-agents/travel_planner/workflows.py
מוסיפים את ההגדרה הבאה של SequentialAgent ל-travel_planner/workflows.py:
from google.adk.agents import SequentialAgent
from .specialists import (
    user_profiler_agent,
    itinerary_synthesizer_agent,
)

# 1. SEQUENTIAL PHASE: A linear two-step workflow
master_travel_agent = SequentialAgent(
    name="master_travel_agent",
    description="Orchestrates the end-to-end travel planning process for trip and itinerary requests.",
    sub_agents=[
        user_profiler_agent,         # Step 1: Extract constraints into user_preferences
        itinerary_synthesizer_agent,  # Step 2: Draft itinerary from user_preferences
    ],
)
קישור תהליך העבודה אל root_agent (agent.py)
עכשיו צריך לרשום את master_travel_agent כסוכן משנה של root_agent. פותחים את travel_planner/agent.py:
cloudshell edit ~/adk-agents/travel_planner/agent.py
מחליפים את התוכן של travel_planner/agent.py בקוד הבא:
from google.adk import Agent
from .workflows import master_travel_agent

MODEL = "gemini-3.8-flash"

root_agent = Agent(
    model=MODEL,
    name="root_agent",
    description="A helpful assistant for user questions.",
    instruction=(
        "Greet the user and delegate any travel or trip planning requests "
        "to master_travel_agent."
    ),
    sub_agents=[master_travel_agent],
)
🔍 בדיקת העבודה שלכם
מפעילים את ממשק המשתמש של ADK באינטרנט מהטרמינל:
cd ~/adk-agents
adk web --allow_origins "*"
פותחים את התצוגה המקדימה של האינטרנט ביציאה 8000 ומזינים את ההנחיה:
Help me plan a trip to Kyoto
בתצוגה Events אמור להופיע פלט שדומה לתהליך הביצוע הבא:
1. root_agent -> calls transfer_to_agent(agent_name="master_travel_agent")
2. user_profiler_agent -> outputs JSON {"destination": "Kyoto", "duration": "1 day", ...} to state['user_preferences']
3. itinerary_synthesizer_agent -> reads {user_preferences} and outputs the formatted Markdown itinerary
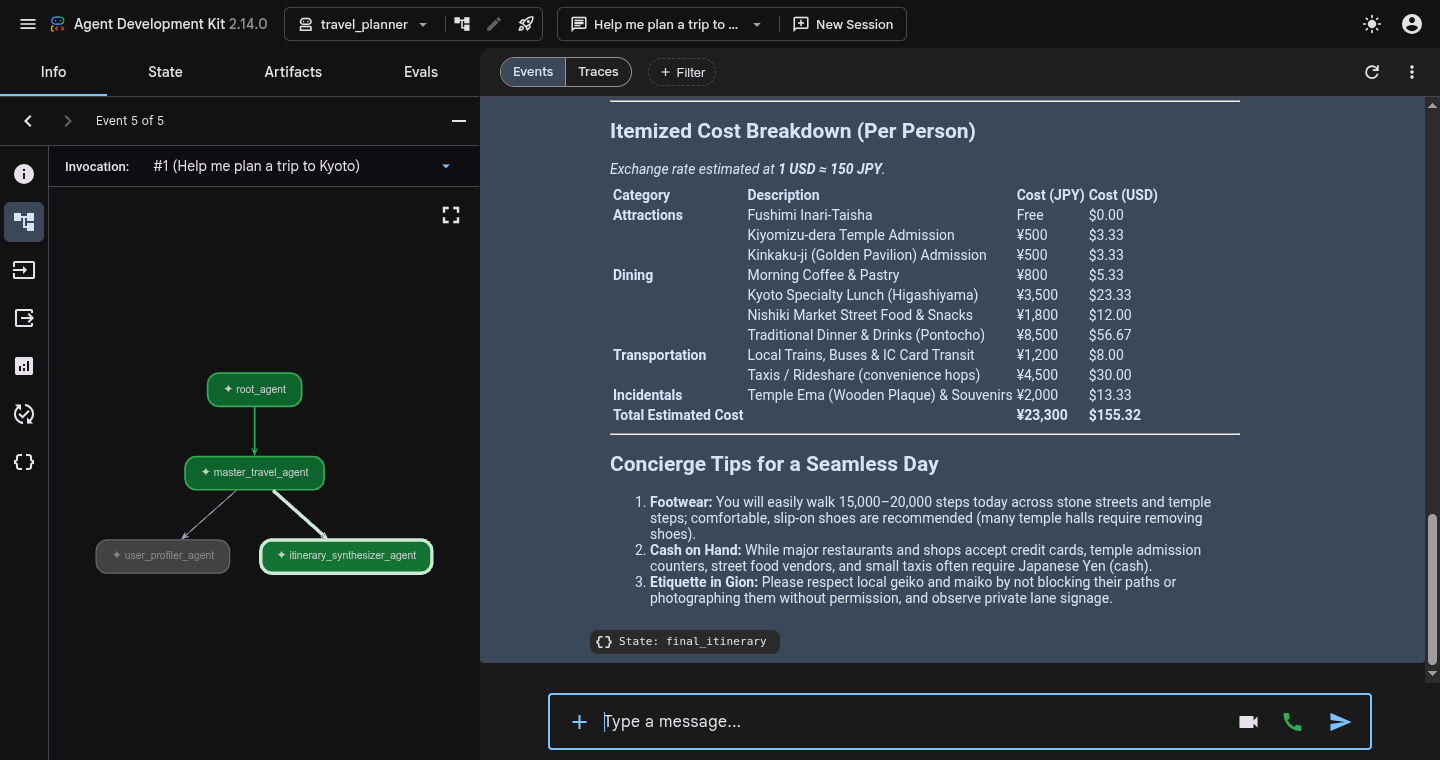
לוחצים על תג אירוע כלשהו (או על הצ'יפ State: final_itinerary) ועוברים לכרטיסייה מצב בחלונית הבדיקה השמאלית כדי לוודא שגם user_preferences וגם final_itinerary מאוכלסים במצב הסשן.
כשמסיימים לבדוק את המעקב, מקישים על Ctrl + C בטרמינל כדי לעצור את adk web.
7. איך עורכים מחקר עם ParallelAgent
למרות שתהליך העבודה הרציף מפריד בצורה נקייה בין חילוץ ההעדפות לבין ניסוח מסלול הנסיעה, ההמלצות שלו עדיין מסתמכות אך ורק על הידע הסטטי של המודל מהאימון. כדי לבסס את מסלול הנסיעה על נתונים עדכניים מהאינטרנט, אתם יכולים להוסיף שני חוקרים ייעודיים שמופעלים על ידי הכלי המובנה google_search:
-
activity_finder_agent: מוצא 3 אטרקציות ספציפיות שמתאימות ליעד ולתחומי העניין של המשתמש, יחד עם מחירי כרטיסים משוערים. -
restaurant_finder_agent: מוצא 3 מסעדות מקומיות עם דירוג גבוה ואת העלות המשוערת לאדם.
מכיוון שהחיפוש של אטרקציות והחיפוש של מסעדות לא תלויים זה בזה, הפעלה שלהם בזה אחר זה מבזבזת זמן. במקום זאת, תעטפו את שני החוקרים בתוך ParallelAgent (parallel_research_agent) כדי ש-ADK יפעיל את שני תהליכי העבודה של חיפוש Google בו-זמנית ויאכלס את {activity_recommendations?} ו-{restaurant_recommendations?} לפני שהוא יעביר את הנתונים אל itinerary_synthesizer_agent.
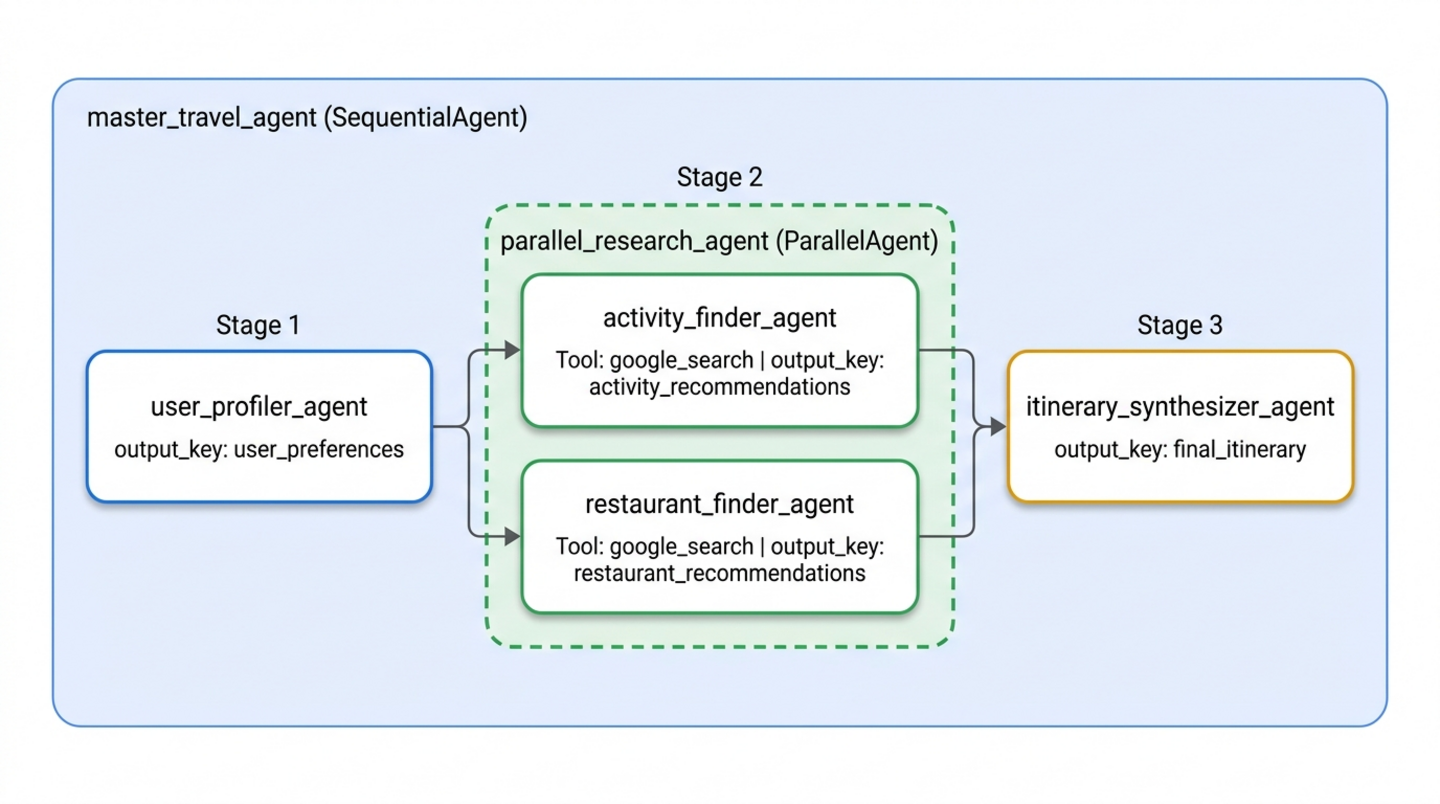
הוספת המומחים למחקר מקביל אל specialists.py
פותחים את travel_planner/specialists.py:
cloudshell edit ~/adk-agents/travel_planner/specialists.py
צריך להוסיף את שני המומחים הבאים לחיפוש Google בתחתית של travel_planner/specialists.py (ממש מתחת ל-itinerary_synthesizer_agent):
# --- Specialist 3: The Activity Finder ---
activity_finder_agent = Agent(
    name="activity_finder_agent",
    description="Finds 3 attractions matching the user's destination and interests.",
    instruction="""
        Based on {user_preferences}, use google_search to find 3 specific attractions (including budget-friendly options).
        Return a JSON list with keys: "attraction_name", "estimated_cost_local", "estimated_cost_usd", "notes".
    """,
    tools=[google_search],
    output_key="activity_recommendations",
)

# --- Specialist 4: The Restaurant Finder ---
restaurant_finder_agent = Agent(
    name="restaurant_finder_agent",
    description="Finds 3 restaurants matching the destination and budget.",
    instruction="""
        Based on {user_preferences}, use google_search to find 3 highly-rated restaurants across price points.
        Return a JSON list with keys: "restaurant_name", "cuisine", "estimated_cost_local", "estimated_cost_usd".
    """,
    tools=[google_search],
    output_key="restaurant_recommendations",
)
הכנסת ParallelAgent אל workflows.py
פותחים את travel_planner/workflows.py:
cloudshell edit ~/adk-agents/travel_planner/workflows.py
מעדכנים את travel_planner/workflows.py כדי להגדיר את parallel_research_agent באמצעות ParallelAgent וממקמים אותו בין user_profiler_agent ל-itinerary_synthesizer_agent:
from google.adk.agents import ParallelAgent, SequentialAgent
from .specialists import (
    activity_finder_agent,
    itinerary_synthesizer_agent,
    restaurant_finder_agent,
    user_profiler_agent,
)

# Parallel branch: Run activity and restaurant research simultaneously
parallel_research_agent = ParallelAgent(
    name="parallel_research_agent",
    description="Runs activity and restaurant research concurrently.",
    sub_agents=[
        activity_finder_agent,
        restaurant_finder_agent,
    ],
)

# Master pipeline: Profile -> Parallel Research -> Synthesize
master_travel_agent = SequentialAgent(
    name="master_travel_agent",
    description="Orchestrates the end-to-end travel planning process for trip and itinerary requests.",
    sub_agents=[
        user_profiler_agent,          # Step 1: Extract constraints
        parallel_research_agent,      # Step 2: Research activities & restaurants in parallel
        itinerary_synthesizer_agent,  # Step 3: Synthesize into an itinerary
    ],
)
🔍 בדיקת העבודה שלכם
מפעילים שוב את adk web כדי לבדוק את צינור עיבוד הנתונים המקביל של המחקר:
cd ~/adk-agents
adk web --allow_origins "*"
בממשק המשתמש של Web Preview, שולחים את ההנחיה:
Help me plan a trip to Kyoto focused on historic temples and ramen
בתצוגה Events אמור להופיע פלט שדומה לרצף הבא:
1. user_profiler_agent -> writes state['user_preferences']
2. parallel_research_agent -> fans out concurrently:
   - activity_finder_agent invokes google_search -> writes state['activity_recommendations']
   - restaurant_finder_agent invokes google_search -> writes state['restaurant_recommendations']
3. itinerary_synthesizer_agent -> merges all three state keys into state['final_itinerary']
- תצוגת המעקבים: לוחצים על מעקבים בחלק העליון של חלונית השיחה (לצד אירועים) ובודקים את התור. בקטע
parallel_research_agent, יופיעו טווחי זמן חופפים שלactivity_finder_agentו-restaurant_finder_agent. כך זמן האחזור הכולל של המחקר באינטרנט יתקצר כמעט בחצי בהשוואה להרצה שלהם ברצף. - הכרטיסייה State: לוחצים על הכרטיסייה State בחלונית הבדיקה השמאלית כדי לבדוק את מילון הסשן הפעיל (
user_preferences,activity_recommendations,restaurant_recommendationsו-final_itinerary).
כשמסיימים את הבדיקה, מקישים על Ctrl + C בטרמינל כדי לעצור את adk web.
8. שיפור טיוטות באמצעות LoopAgent
גם עם תוצאות חיפוש בזמן אמת, יכול להיות שהטיוטה הראשונית שנוצרה על ידי itinerary_synthesizer_agent תחרוג מהתקציב הכולל של המשתמש או תכלול בטעות קטגוריה שהוחרגה (למשל, גלריה לאומנות מודרנית כשהמשתמש ביקש שלא לכלול אותה).
כדי להבטיח עמידה באילוצים, תוסיפו לולאת עידון של יוצר-בודק בסוף צינור עיבוד הנתונים באמצעות LoopAgent:
-
itinerary_critic_agent(הבודק): בודק את{final_itinerary}בהשוואה ל-{user_preferences}. הוא מסכם את העלויות המשוערות, בודק כל אילוץ שלילי, וכותב הוראות ספציפיות לתיקון ל-critique_feedbackאו מגיב בביטוי המדויק"APPROVED". itinerary_refiner_agent(היוצר/היוצא): קורא את{critique_feedback}. אם הביקורת שווה ל-"APPROVED", היא מפעילה את הכליexit_loop(tool_context.actions.escalate = True) כדי לצאת מה-LoopAgentבאופן מיידי. אחרת, הוא משנה את{final_itinerary}כדי לתקן את הבעיות שסומנו ומשכתב אתfinal_itineraryלקראת המעבר הבא.
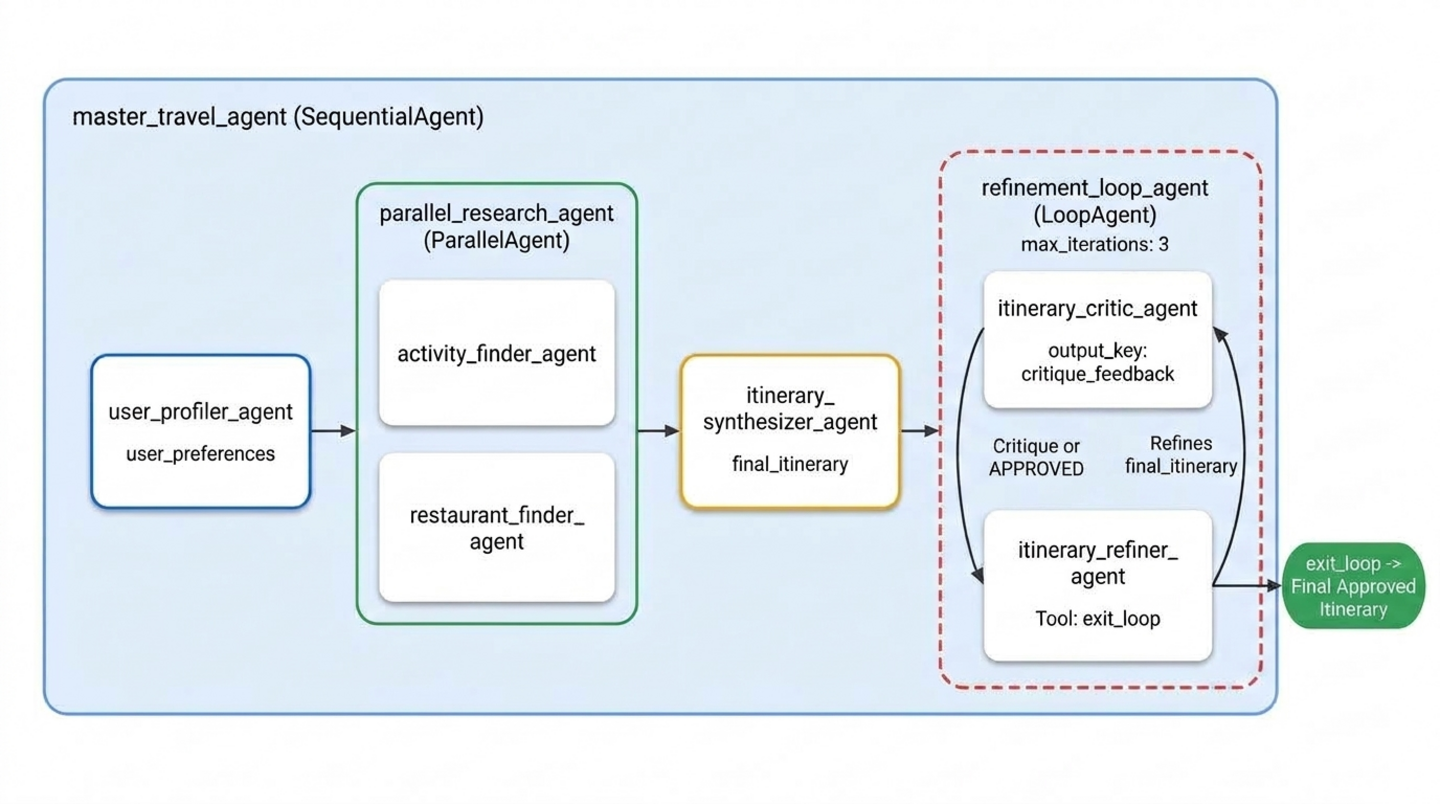
הוספת exit_loop, ביקורת ושיפור ל-specialists.py
פותחים את travel_planner/specialists.py:
cloudshell edit ~/adk-agents/travel_planner/specialists.py
מוסיפים את הכלי exit_loop (ToolContext), itinerary_critic_agent ו-itinerary_refiner_agent לחלק התחתון של travel_planner/specialists.py:
def exit_loop(tool_context: ToolContext) -> dict:
    """Call ONLY when the critique is APPROVED to exit the refinement loop."""
    print(f"[Tool Call] exit_loop triggered by {tool_context.agent_name}")
    tool_context.actions.escalate = True
    return {"status": "approved", "message": "Itinerary approved. Exiting refinement loop."}


# --- Specialist 5: The Budget & Constraint Critic (Inside LoopAgent) ---
itinerary_critic_agent = Agent(
    name="itinerary_critic_agent",
    include_contents="none",
    description="Audits the itinerary draft against budget and negative constraints.",
    instruction="""
        Audit Current Itinerary ({final_itinerary}) against User Preferences ({user_preferences}).
        Verify that the USD total stays within the user's budget and no excluded venue types appear.
        If all checks pass, respond EXACTLY with the single word "APPROVED".
        Otherwise, output 1-2 concise revision instructions explaining what to swap or adjust.
    """,
    output_key="critique_feedback",
)

# --- Specialist 6: The Itinerary Refiner / Exiter (Inside LoopAgent) ---
itinerary_refiner_agent = Agent(
    name="itinerary_refiner_agent",
    include_contents="none",
    description="Refines the itinerary from critique feedback, or calls exit_loop when APPROVED.",
    instruction="""
        Review Auditor Critique ({critique_feedback}) for Current Itinerary ({final_itinerary}).
        If the critique is EXACTLY "APPROVED", call `exit_loop` immediately and return the itinerary unchanged.
        Otherwise, revise the draft using {activity_recommendations} and {restaurant_recommendations}
        so all USD budget and exclusion rules pass, and output ONLY the updated Markdown itinerary.
    """,
    tools=[exit_loop],
    output_key="final_itinerary",
)
הוספת LoopAgent אל workflows.py
פותחים את travel_planner/workflows.py:
cloudshell edit ~/adk-agents/travel_planner/workflows.py
מעדכנים את travel_planner/workflows.py כדי לעטוף את itinerary_critic_agent ו-itinerary_refiner_agent ב-LoopAgent (max_iterations=3) ומוסיפים אותו כשלב הרביעי של master_travel_agent:
from google.adk.agents import LoopAgent, ParallelAgent, SequentialAgent
from .specialists import (
    activity_finder_agent,
    itinerary_critic_agent,
    itinerary_refiner_agent,
    itinerary_synthesizer_agent,
    restaurant_finder_agent,
    user_profiler_agent,
)

# Stage 2: Parallel research branch
parallel_research_agent = ParallelAgent(
    name="parallel_research_agent",
    description="Runs activity and restaurant research concurrently.",
    sub_agents=[
        activity_finder_agent,
        restaurant_finder_agent,
    ],
)

# Stage 4: Iterative Maker-Checker refinement loop
refinement_loop_agent = LoopAgent(
    name="refinement_loop_agent",
    description="Iteratively audits and refines the itinerary until constraints and budget are approved.",
    sub_agents=[
        itinerary_critic_agent,
        itinerary_refiner_agent,
    ],
    max_iterations=3,
)

# Master pipeline: Profile -> Parallel Research -> Synthesize -> Refinement Loop
master_travel_agent = SequentialAgent(
    name="master_travel_agent",
    description="Orchestrates the end-to-end travel planning process for trip and itinerary requests.",
    sub_agents=[
        user_profiler_agent,          # Stage 1: Extract constraints
        parallel_research_agent,      # Stage 2: Research activities & restaurants in parallel
        itinerary_synthesizer_agent,  # Stage 3: Draft initial itinerary
        refinement_loop_agent,        # Stage 4: Audit and refine until approved
    ],
)
🔍 בדיקת העבודה שלכם
מפעילים את adk web כדי לבדוק את תהליך העבודה המלא עם כמה סוכנים:
cd ~/adk-agents
adk web --allow_origins "*"
פותחים את ממשק המשתמש של התצוגה המקדימה באינטרנט ביציאה 8000, מתחילים סשן חדש ובודקים את המערכת המלאה באמצעות ההנחיה הבאה עם כמה אילוצים בקיוטו:
Design a full-day itinerary for Kyoto with a total budget of $100. My main interests are historical landmarks, temples, and authentic local cuisine. Please do not include any modern art museums or galleries.
בתצוגה Events וביומני הטרמינל אמור להופיע פלט שדומה לרצף הביצוע הבא:
1. user_profiler_agent -> writes JSON with destination="Kyoto", budget="$100", exclusions=["modern art museums", "galleries"]
2. parallel_research_agent -> runs activity_finder_agent and restaurant_finder_agent in parallel
3. itinerary_synthesizer_agent -> produces initial draft in state['final_itinerary']
4. refinement_loop_agent:
   - itinerary_critic_agent -> audits USD budget and exclusions -> outputs "APPROVED" (or revision notes)
   - itinerary_refiner_agent -> triggers [Tool Call] exit_loop triggered by itinerary_refiner_agent and outputs the approved itinerary
- תצוגת אירועים: לוחצים על צ'יפ של אירוע כלשהו מ-
itinerary_critic_agentאו מ-itinerary_refiner_agentכדי לבדוק את המטען הייעודי (payload) שלו בכרטיסייה מידע שמימין. כש-itinerary_refiner_agentמפעיל אתexit_loop, בודקים את האירוע כדי לראות אתactions.escalate: true– האות שאומר ל-LoopAgentלהפסיק את החזרה לפני שמגיעים אלmax_iterations=3. - הכרטיסייה State: לוחצים על הכרטיסייה State כדי לראות את העדכון של
state['critique_feedback']ו-state['final_itinerary']בכל המעברים. אם הטיוטה הראשונית חרגה מ-$100 USD,critique_feedbackמכיל את הוראות העריכה של המבקר בסבב הראשון, לפני ש-final_itineraryמתעדכן עם חלופות זולות יותר ו-critique_feedbackמשתנה ל-"APPROVED"בסבב השני.
כשמסיימים את הבדיקה, מקישים על Ctrl + C בטרמינל כדי לעצור את adk web.
9. הסרת המשאבים
מחיקת קובצי הפרויקט המקומיים
כדי להסיר את ספריית הפרויקט adk-agents ואת הסביבה הווירטואלית מתיקיית הבית של Cloud Shell, מריצים את הפקודה:
cd ~
rm -rf ~/adk-agents
השבתת Agent Platform API
אם אתם לא צריכים יותר להפעיל את Agent Platform API בפרויקט, אתם יכולים להשבית אותו באמצעות gcloud:
gcloud services disable aiplatform.googleapis.com --quiet
מחיקת הפרויקט כולו ב-Google Cloud (אופציונלי)
PROJECT_ID=$(gcloud config get-value project)
gcloud projects delete "$PROJECT_ID" --quiet
🔍 בדיקת העבודה שלכם
מוודאים ש-~/adk-agents הוסר:
test ! -d ~/adk-agents && echo "Workspace ~/adk-agents removed"
הפלט אמור להיראות כך:
Workspace ~/adk-agents removed
10. מזל טוב
מעולה! יצרתם מערכת היררכית מרובת סוכנים באמצעות ערכה לפיתוח סוכנים (ADK) של Google, שמתאמת צוות של שישה סוכנים ייעודיים בתהליכי עבודה רציפים, מקבילים ואיטרטיביים.
מה השגתם
- תקשורת מובנית בין סוכנים באמצעות מצב סשן משותף (הזרקת תבניות
output_keyו-{state_variable}) - בניית צינור עיבוד נתונים דטרמיניסטי שלב אחר שלב באמצעות
SequentialAgent - הפעלת סוכני מחקר עצמאיים של חיפוש Google בו-זמנית באמצעות
ParallelAgent - הטמעת לולאת אימות אוטומטית של יוצר-בודק באמצעות
LoopAgentו-tool_context.actions.escalate = True
השלבים הבאים
- כדי לבנות מחדש את מתכנן הנסיעות הזה באמצעות המחזורים הדטרמיניסטיים
Workflow,JoinNodeו-Event(route=...)של ADK 2, המשיכו לחלק 4 בסדרה, יצירת סוכני AI באמצעות ADK: ניהול תהליכי עבודה של תרשימים. - המסמכים הרשמיים של ADK Workflow Agents
- מערכות מרובות סוכנים ב-ADK
- הצטרפו לתוכנית GEAR (Gemini Enterprise Agent Ready) ולתוכנית ההסמכות כדי להשתתף בסדנאות מעשיות ובתוכניות לימודים.