

1. खास जानकारी
यात्रा से जुड़े किसी ऐसे अनुरोध को पूरा करना जिसमें कई शर्तें शामिल हों. जैसे, क्योटो में घूमने के लिए 100 डॉलर से कम में पूरे दिन की यात्रा की योजना बनाना. इसमें ऐतिहासिक मंदिरों और स्थानीय पकवानों पर फ़ोकस करना और मॉडर्न आर्ट गैलरी को शामिल न करना. इसके लिए, ज़रूरी है कि शर्तों को समझा जाए, घूमने की जगहों और खाने-पीने की चीज़ों के बारे में एक साथ रिसर्च की जाए, हर आइटम के हिसाब से शेड्यूल तैयार किया जाए, और फ़ाइनल प्लान की समीक्षा की जाए. कई टूल वाले किसी एक एजेंट पर भरोसा करने से, पुष्टि करने के चरण छूट सकते हैं या पाबंदियों का उल्लंघन हो सकता है. इसलिए, ऑर्केस्ट्रेशन, डिटरमिनिस्टिक वर्कफ़्लो कंट्रोलर के ज़रिए खास सब-एजेंट को कोऑर्डिनेट करता है.
एडीके की मदद से एआई एजेंट बनाना सीरीज़ के इस तीसरे पार्ट में, आपको Agent Platform पर, अपने-आप काम करने वाला और कई एजेंट वाला ट्रैवल प्लानर बनाना होगा. इसके लिए, Agent Development Kit (ADK) 2 के वर्कफ़्लो कंट्रोलर (SequentialAgent, ParallelAgent, और LoopAgent) का इस्तेमाल करना होगा. आपको तीन चरणों में, gemini-3.8-flash की मदद से काम करने वाले छह विशेषज्ञ एजेंट को मैनेज करना होगा. इसके लिए, आपको पार्ट 1 या पार्ट 2 के वर्कस्पेस सेटअप की ज़रूरत नहीं होगी. इन एजेंट को शेयर किए गए सेशन स्टेट (output_key), एक साथ google_search एक्ज़ीक्यूशन, और बार-बार होने वाले मेकर-चेकर रिफ़ाइनमेंट लूप के साथ मैनेज करना होगा.
ज़रूरी शर्तें
- जनरेटिव एआई के सिद्धांतों की जानकारी
- Python प्रोग्रामिंग की बुनियादी जानकारी
- एआई एजेंट की बुनियादी बातों और Google ADK के बारे में जानकारी
आपको ये सब सीखने को मिलेगा
- मल्टी-एजेंट ADK 2 प्रोजेक्ट को नए सिरे से स्कैफ़ोल्ड करने का तरीका
output_keyका इस्तेमाल करके, सेशन की स्थिति शेयर करने वाले खास एजेंट की टीम डिज़ाइन करने का तरीका- डिटरमिनिस्टिक और सिलसिलेवार पाइपलाइन में सब-एजेंट को चलाने के लिए,
SequentialAgentका इस्तेमाल करने का तरीका - कम इंतज़ार के समय के लिए, एक साथ कई इंडिपेंडेंट रिसर्च एजेंट चलाने के लिए
ParallelAgentका इस्तेमाल करने का तरीका LoopAgentऔरToolContextएस्केलेशन का इस्तेमाल करके, मेकर-चेकर रिफ़ाइनमेंट लूप को बार-बार लागू करने का तरीका- क्रम में चलने वाले, एक साथ चलने वाले, और लूप पैटर्न को हैरारकी वाले मल्टी-एजेंट वर्कफ़्लो में कैसे जोड़ा जाए
आपको इन चीज़ों की ज़रूरत पड़ेगी
- एक Google खाता (अगर वर्कशॉप क्रेडिट पर दावा करना है, तो निजी
@gmail.comखाते का इस्तेमाल करें) - आपके इंस्ट्रक्टर से मिला वर्कशॉप क्रेडिट लिंक (साथ ही, क्यूआर कोड स्कैन करने के लिए फ़ोन का कैमरा) या कोई चालू Cloud Billing खाता
- Google Chrome (हमारा सुझाव है कि आप गुप्त विंडो का इस्तेमाल करें, ताकि निजी और ऑफ़िस वाले खाते आपस में मिक्स न हों)
2. Google Cloud क्रेडिट पर दावा करना (ज़रूरी नहीं)
अगर आपको किसी ऐसी वर्कशॉप में हिस्सा लेना है जिसके लिए इवेंट क्रेडिट लिंक दिया गया है, तो Google Developer Program क्रेडिट पर दावा करें. इससे आपको क्रेडिट कार्ड के बिना बिलिंग खाता सेट अप करने में मदद मिलेगी.
इवेंट क्रेडिट पर दावा करना
- वर्कशॉप क्रेडिट के लिंक को गुप्त विंडो में खोलें और अपने
@gmail.comखाते से साइन इन करें. - अपने फ़ायदे पर दावा करें पर जाकर, क्रेडिट पर दावा करें पर क्लिक करें:
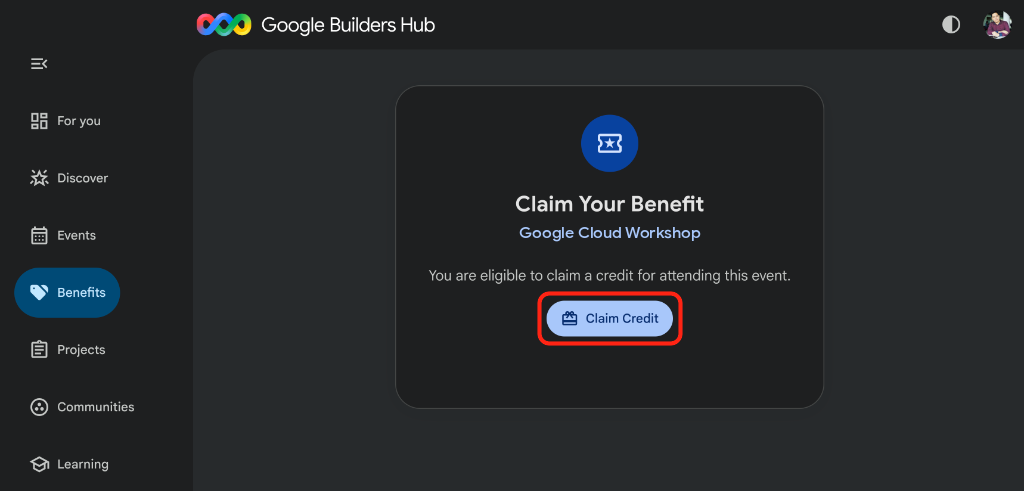
- अगर आपको Google Developer Program प्रोफ़ाइल बनाने के लिए कहा जाए, तो फ़ॉर्म भरें.
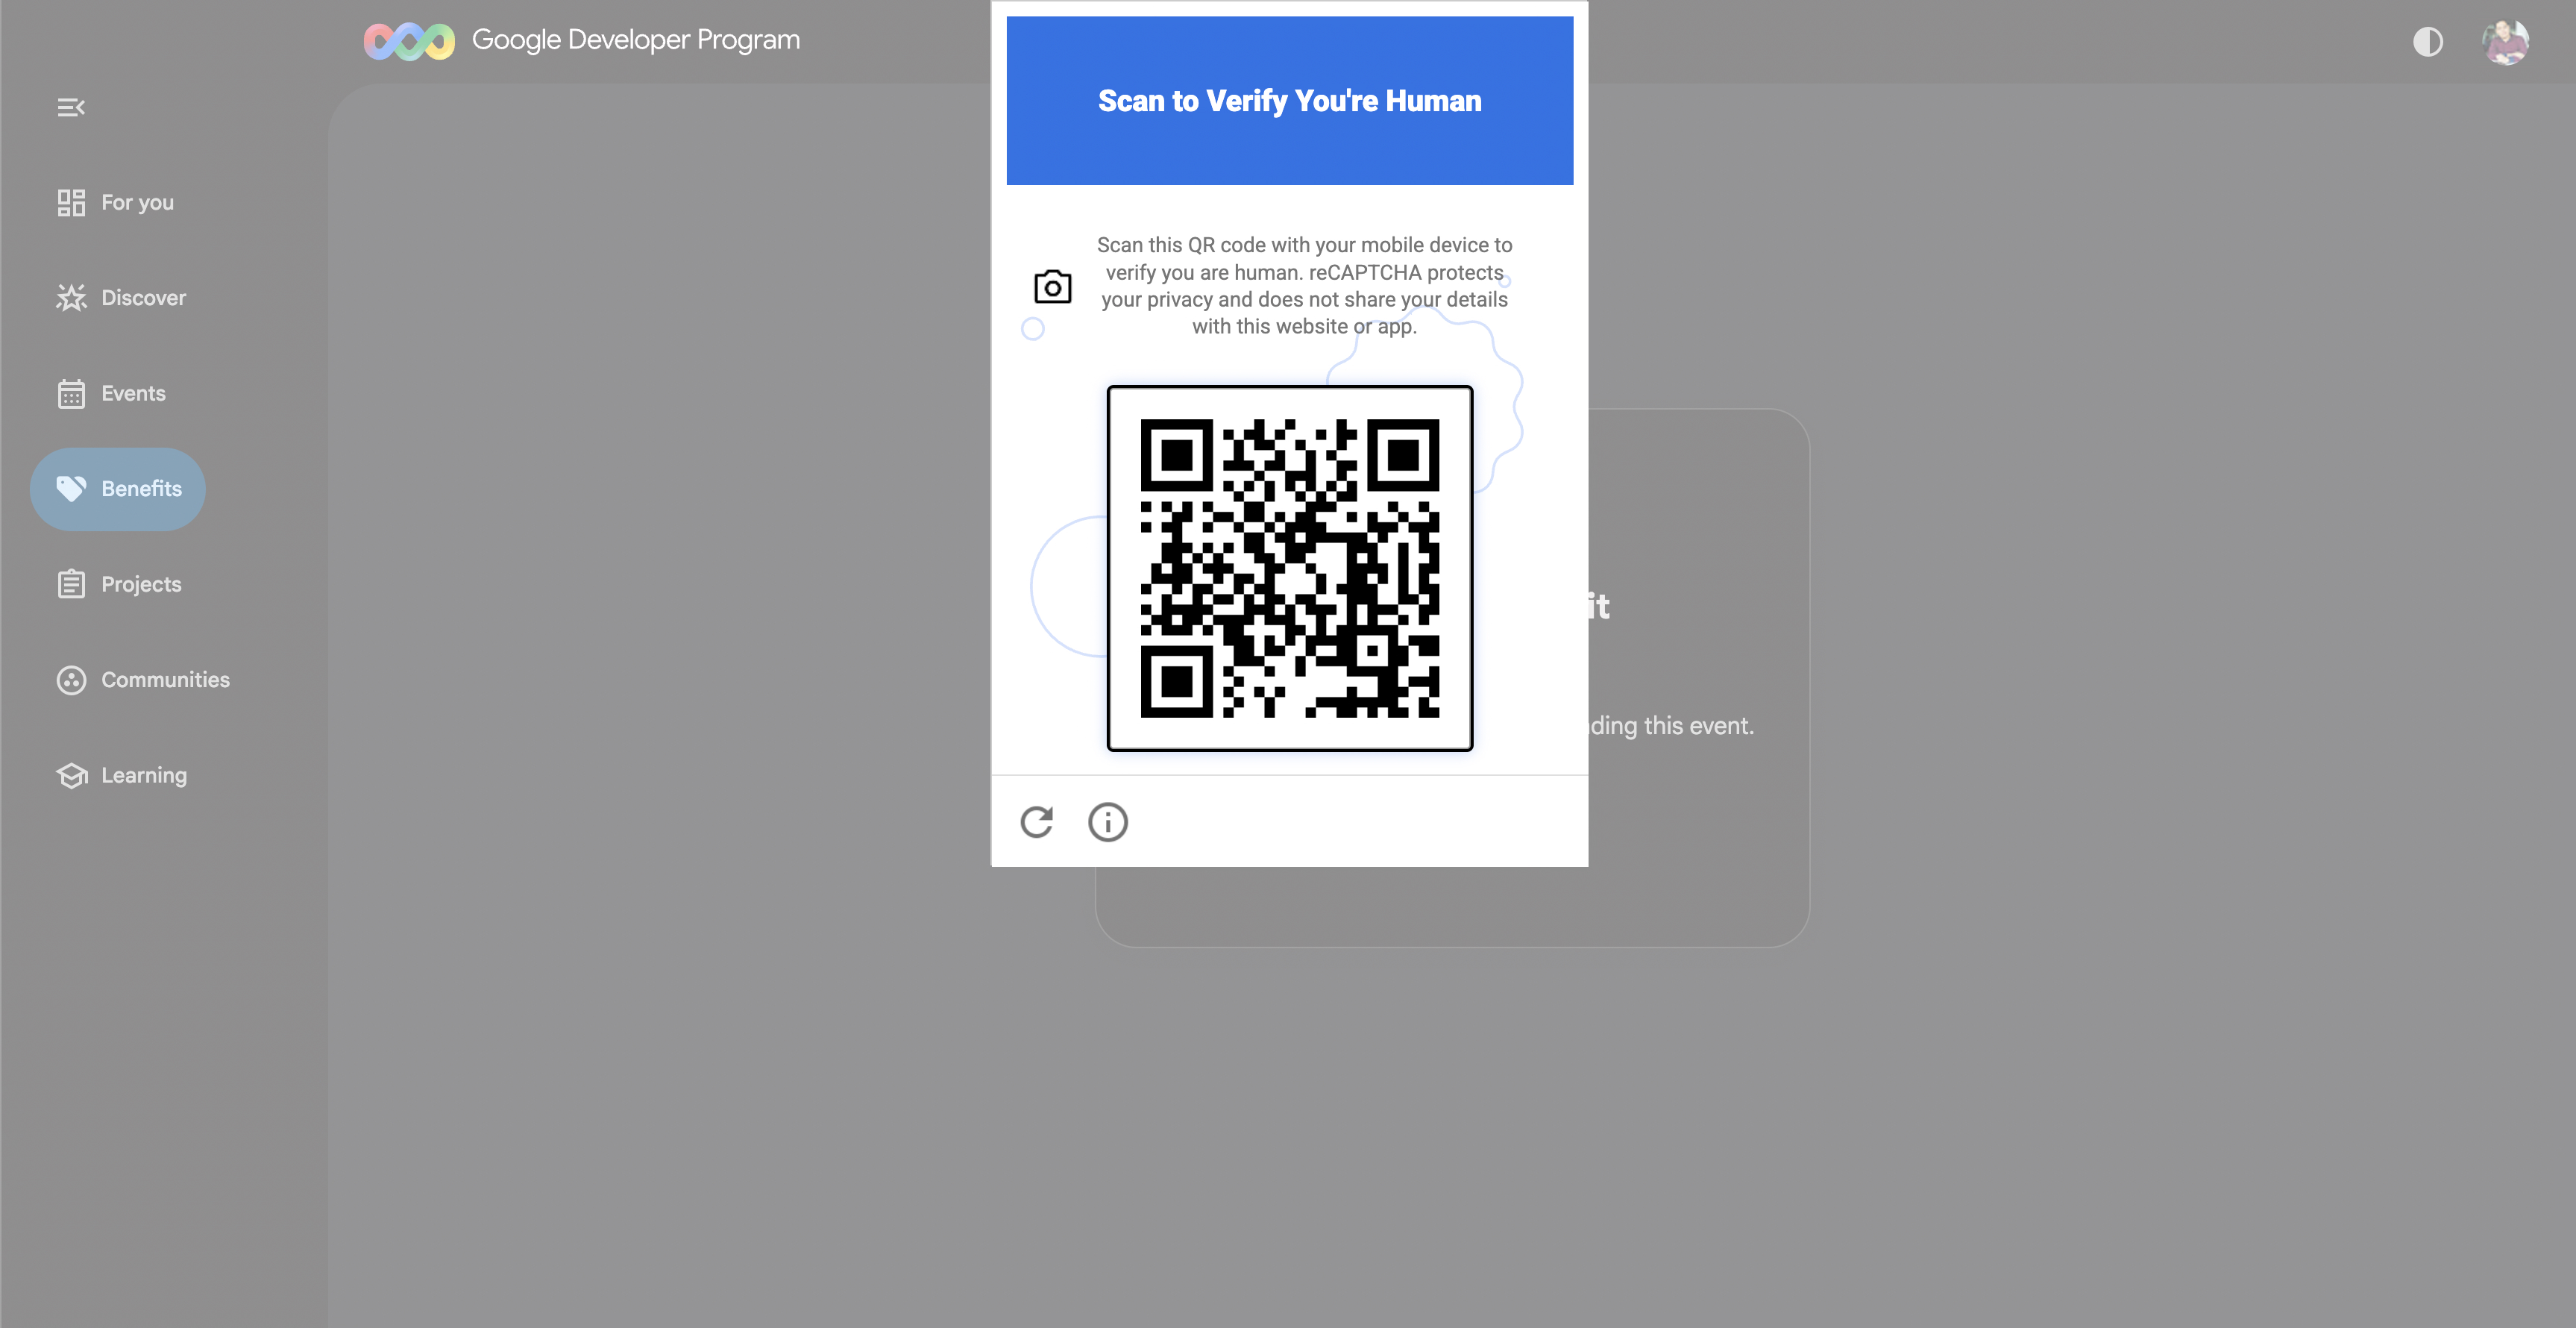
- जब पुष्टि करने के लिए स्कैन करें कि आप इंसान हैं दिखे, तब अपने फ़ोन से क्यूआर कोड स्कैन करें और पुष्टि की प्रक्रिया पूरी करें. अगर क्यूआर कोड नहीं दिखता है, तो पेज को रीफ़्रेश करें और क्रेडिट पर दावा करें पर फिर से क्लिक करें:
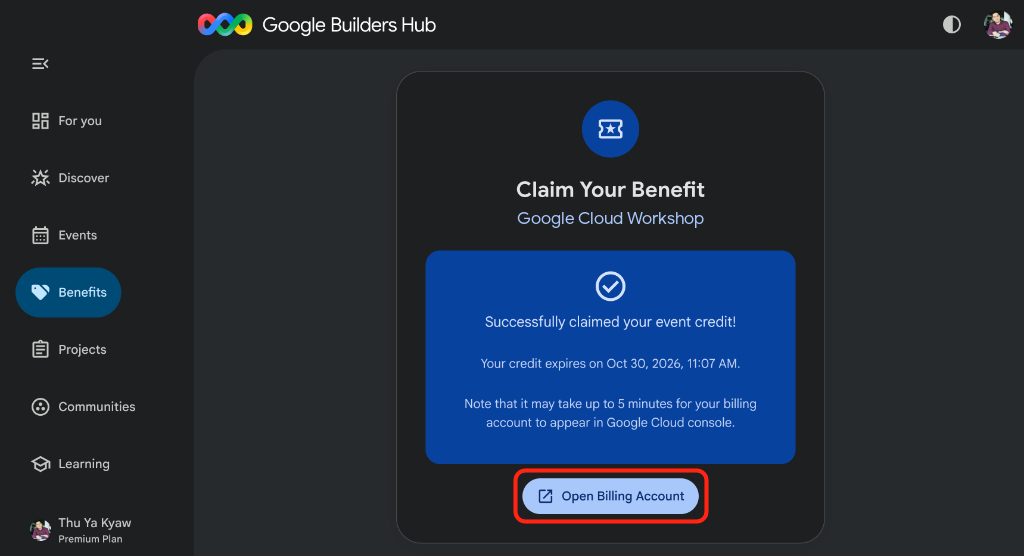
- पुष्टि करें कि इवेंट के लिए क्रेडिट पर दावा कर लिया गया है! मैसेज दिख रहा है. इसके बाद, बिलिंग खाता खोलें पर क्लिक करें:
🔍 अपने काम की जांच करें
बिलिंग खाते को सेटअप करने में तीन मिनट लग सकते हैं:
- Google Cloud Billing खोलें या यूआरएल को गुप्त विंडो में कॉपी करें. इसके बाद, आपके बिलिंग खाते को चुनें:
https://console.cloud.google.com/billing
- पेज को तब तक रीफ़्रेश करें, जब तक आपके
GDP Creditखाते की स्थिति चालू है न दिखने लगे:
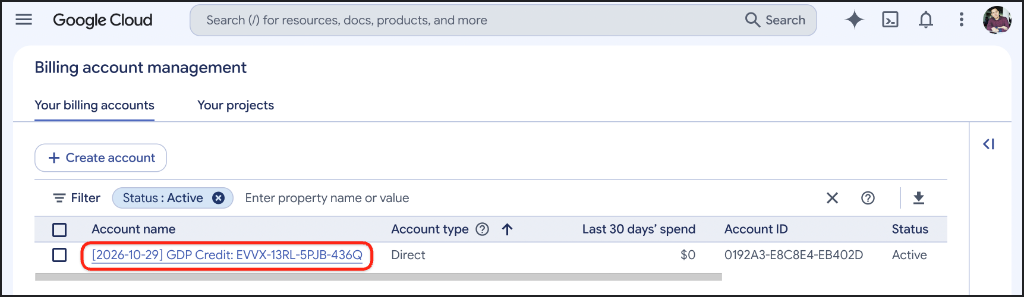
3. Google Cloud प्रोजेक्ट बनाना (ज़रूरी नहीं)
एक खास Google Cloud प्रोजेक्ट बनाएं, ताकि इस कोडलैब के सभी संसाधन अलग रहें और उन्हें आसानी से मिटाया जा सके.
- प्रोजेक्ट बनाएं खोलें या यूआरएल को गुप्त विंडो में कॉपी करें:
https://console.cloud.google.com/projectcreate
- अपने प्रोजेक्ट की जानकारी डालें:
- प्रोजेक्ट का नाम: उदाहरण के लिए,
google-cloud-workshop - बिलिंग खाता (अगर दिख रहा है):
GDP Credit(या अपना चालू बिलिंग खाता) चुनें - पैरंट रिसॉर्स: कोई संगठन नहीं (या ज़रूरत पड़ने पर आपका संगठन)
- प्रोजेक्ट का नाम: उदाहरण के लिए,
- प्रोजेक्ट के नाम के नीचे जनरेट किया गया प्रोजेक्ट आईडी नोट करें. इसके बाद, बनाएं पर क्लिक करें:
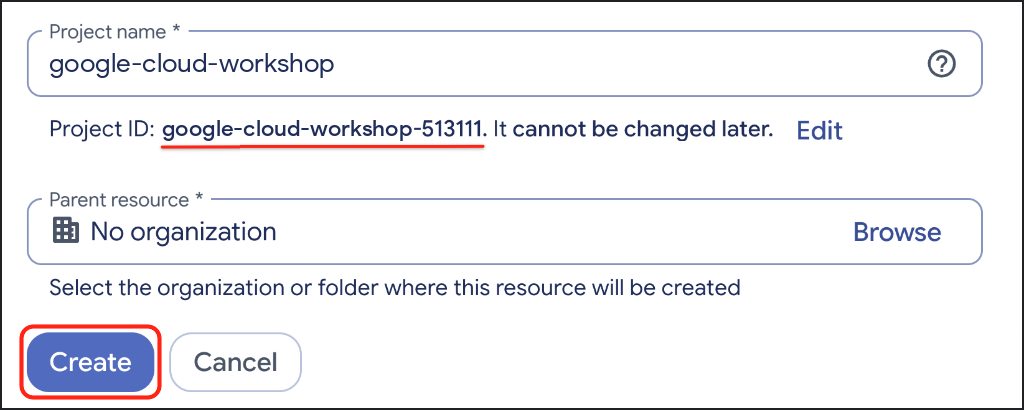
🔍 अपने काम की जांच करें
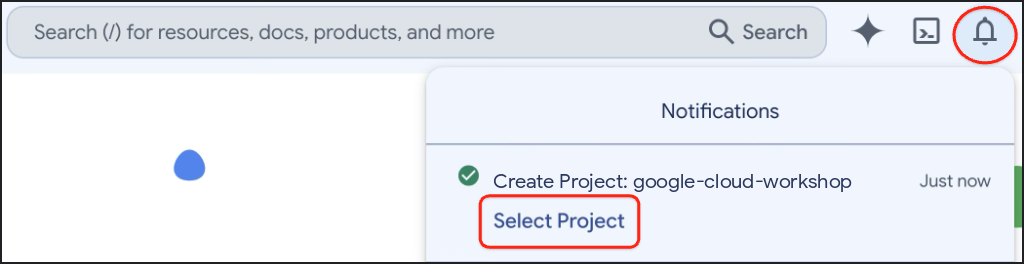
प्रोजेक्ट बन जाने के बाद, सबसे ऊपर दाएं टूलबार में मौजूद सूचनाएं पर क्लिक करें. इसके बाद, प्रोजेक्ट चुनें पर क्लिक करें:
4. अपना एनवायरमेंट सेट अप करने का तरीका
Google Cloud Shell को कॉन्फ़िगर करें, Agent Platform API को चालू करें, और uv की मदद से एक आइसोलेटेड Python 3.12 वर्चुअल एनवायरमेंट बनाएं.
Cloud Shell को कॉन्फ़िगर करना
- Google Cloud console टूलबार में, Cloud Shell चालू करें (
>_) पर क्लिक करें या सीधे Google Cloud Shell खोलें (या यूआरएल को अपनी गुप्त विंडो में कॉपी करें):
https://shell.cloud.google.com/?show=ide,terminal

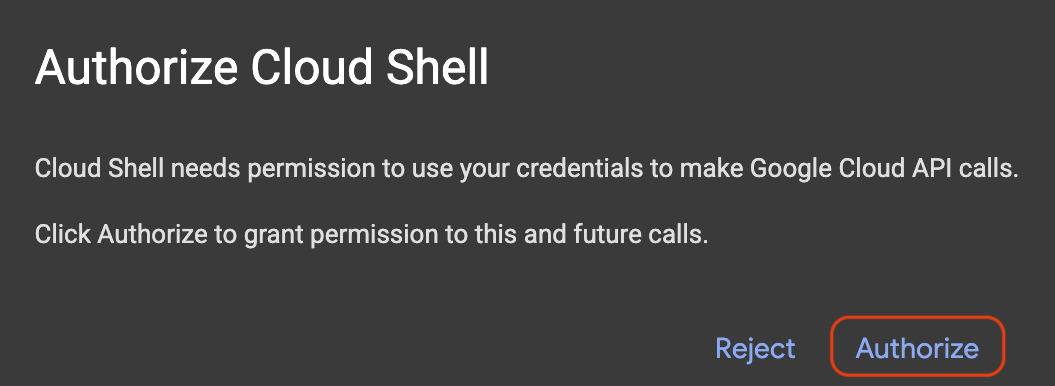
- अगर कहा जाए, तो अनुमति दें पर क्लिक करें:
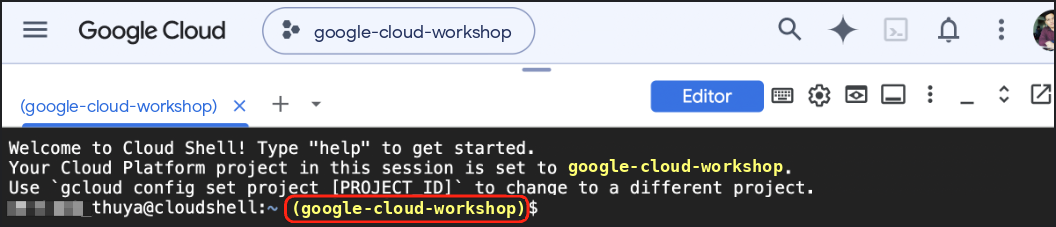
- अपने टर्मिनल में नंबर वाले मेन्यू से, अपना ऐक्टिव Google Cloud प्रोजेक्ट आईडी चुनें:
unset CLOUDSDK_CORE_PROJECT
PS3="Select your project (e.g. 1): "
select PROJECT_ID in $(gcloud projects list --format="value(projectId)"); do
  [ -n "$PROJECT_ID" ] && gcloud config set project "$PROJECT_ID" && break
done
आपको इससे मिलता-जुलता आउटपुट दिखेगा (टैग नहीं किए गए प्रोजेक्ट के लिए, जानकारी देने वाली [environment: untagged] लाइन भी दिखती है):
1) google-cloud-workshop-4210
2) my-cloud-project-8812
Select your project (e.g. 1): 1
Updated property [core/project].
पुष्टि करें कि चुना गया प्रोजेक्ट आईडी, Cloud Shell प्रॉम्प्ट में पीले रंग से हाइलाइट किया गया हो:
ज़रूरी एपीआई चालू करना
Agent Platform API चालू करें, ताकि आपके ADK एजेंट, Gemini मॉडल को कॉल कर सकें:
gcloud services enable aiplatform.googleapis.com
आपको इससे मिलता-जुलता आउटपुट दिखेगा:
Operation "operations/acat.p2-..." finished successfully.
Python वर्चुअल एनवायरमेंट बनाना और ADK इंस्टॉल करना
~/adk-agents फ़ाइल फ़ोल्डर बनाएं और Python 3.12 वर्चुअल एनवायरमेंट चालू करें:
cd ~
mkdir -p adk-agents && cd ~/adk-agents

which uv >/dev/null 2>&1 || curl -LsSf https://astral.sh/uv/install.sh | sh
export PATH="$HOME/.local/bin:$PATH"

uv venv .venv --python 3.12
source .venv/bin/activate
पुष्टि करें कि आपके टर्मिनल प्रॉम्प्ट की शुरुआत में (.venv) प्रीफ़िक्स दिख रहा है:

चालू वर्चुअल एनवायरमेंट में ADK 2 इंस्टॉल करें:
uv pip install --no-cache "google-adk==2.14.0"
🔍 अपने काम की जांच करें
इंस्टॉल किए गए adk सीएलआई वर्शन की पुष्टि करें:
adk --version
आपको इससे मिलता-जुलता आउटपुट दिखेगा:
adk, version 2.14.0
5. यात्रा की योजना बनाने वाले एजेंट को स्कैफ़ोल्ड करना
एनवायरमेंट सेट अप होने के बाद, एडीके के पहले से मौजूद adk create कमांड का इस्तेमाल करके, अपने travel_planner एजेंट पैकेज के लिए स्टार्टर फ़ाइलें जनरेट करें.
स्टार्टर पैकेज जनरेट करो
अपनी ~/adk-agents डायरेक्ट्री से adk create को चलाएं:
cd ~/adk-agents
adk create travel_planner
टर्मिनल में पूछे जाने पर, कॉन्फ़िगरेशन के ये विकल्प चुनें. अगर पहली बार चलाने पर Enable telemetry? [Y/n]: के साथ पूछा जाए, तो Enter दबाएं या n टाइप करें और Enter दबाएं:
- रूट एजेंट के लिए कोई मॉडल चुनें:
gemini-3.8-flashको चुनने के लिए2टाइप करें (विकल्प1,gemini-3.5-flashको चुनता है) और Enter दबाएं. - कोई बैकएंड चुनें: Google Cloud Agent Platform बैकएंड (नीचे दिए गए सीएलआई मेन्यू में विकल्प
2) चुनने के लिए,2टाइप करें. इसके बाद, Enter दबाएं. - Google Cloud प्रोजेक्ट आईडी डालें: ब्रैकेट में दिख रहे अपने प्रोजेक्ट आईडी की पुष्टि करने के लिए, Enter दबाएं.
- Google Cloud का क्षेत्र डालें:
globalटाइप करें और Enter दबाएं.
adk create, GOOGLE_GENAI_USE_ENTERPRISE=1, आपके प्रोजेक्ट आईडी, और GOOGLE_CLOUD_LOCATION=global को travel_planner/.env में लिखता है, ताकि बाद में agent.py को अपडेट करने पर आपके क्रेडेंशियल कॉन्फ़िगर रहें.
🔍 अपने काम की जांच करें
आपको इससे मिलता-जुलता आउटपुट दिखेगा:
Choose a model for the root agent:
1. gemini-3.5-flash
2. gemini-3.8-flash
3. Other models (fill later)
Choose model (1, 2, 3): 2
1. Google AI
2. Vertex AI
3. Login with Google
Choose a backend (1, 2, 3): 2

You need an existing Google Cloud account and project, check out this link for details:
https://google.github.io/adk-docs/get-started/quickstart/#gemini---google-cloud-vertex-ai

Enter Google Cloud project ID [google-cloud-workshop-4210]:
Enter Google Cloud region [us-central1]: global

Agent created in /home/your_username/adk-agents/travel_planner:
- .env
- .gitignore
- __init__.py
- agent.py

⚠️  WARNING: Secrets (like GOOGLE_API_KEY) are stored in .env.

Next steps:
- Chat with your agent in the terminal: adk run travel_planner
- Or in the browser: adk web .
- Have your coding agent evaluate and deploy it: uvx google-agents-cli setup
  (other install options: https://adk.dev/get-started/agents-cli/)
Cloud Shell के कोड एडिटर में मौजूदा फ़ोल्डर खोलें, ताकि आप अपने टर्मिनल के साथ-साथ फ़ाइलों की जांच कर सकें और उनमें बदलाव कर सकें:
which cloudshell >/dev/null 2>&1 && cloudshell workspace ~/adk-agents || true
cd ~/adk-agents
source .venv/bin/activate
डिफ़ॉल्ट सिंगल एजेंट की जांच करना
मल्टी-एजेंट वर्कफ़्लो बनाने से पहले, ADK डेवलपमेंट यूज़र इंटरफ़ेस (यूआई) लॉन्च करें. इससे यह देखा जा सकेगा कि डिफ़ॉल्ट सिंगल एजेंट, यात्रा की योजना बनाने से जुड़ी किसी सामान्य क्वेरी का जवाब कैसे देता है:
cd ~/adk-agents
adk web --allow_origins "*"
Cloud Shell की वेब की झलक सुविधा का इस्तेमाल करके, अपने ब्राउज़र में डेवलपमेंट यूज़र इंटरफ़ेस (यूआई) खोलें:
- Cloud Shell के सबसे ऊपर दाएं टूलबार में मौजूद, वेब की झलक आइकॉन पर क्लिक करें.
- पोर्ट बदलें को चुनें,
8000डालें, और बदलें और झलक देखें पर क्लिक करें.
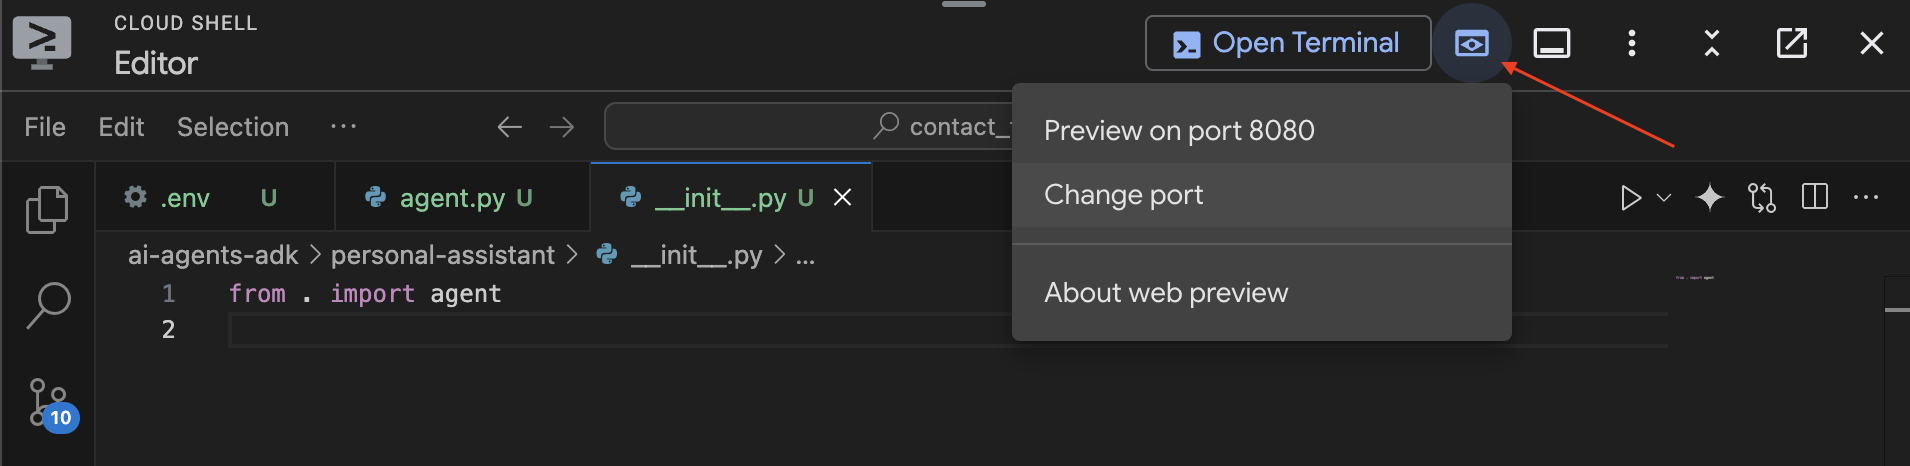
एडीके वेब यूज़र इंटरफ़ेस (यूआई) लोड होने के बाद, "hello, what can you do?" या "Help me plan a trip to Japan" जैसा कोई ग्रीटिंग भेजें:
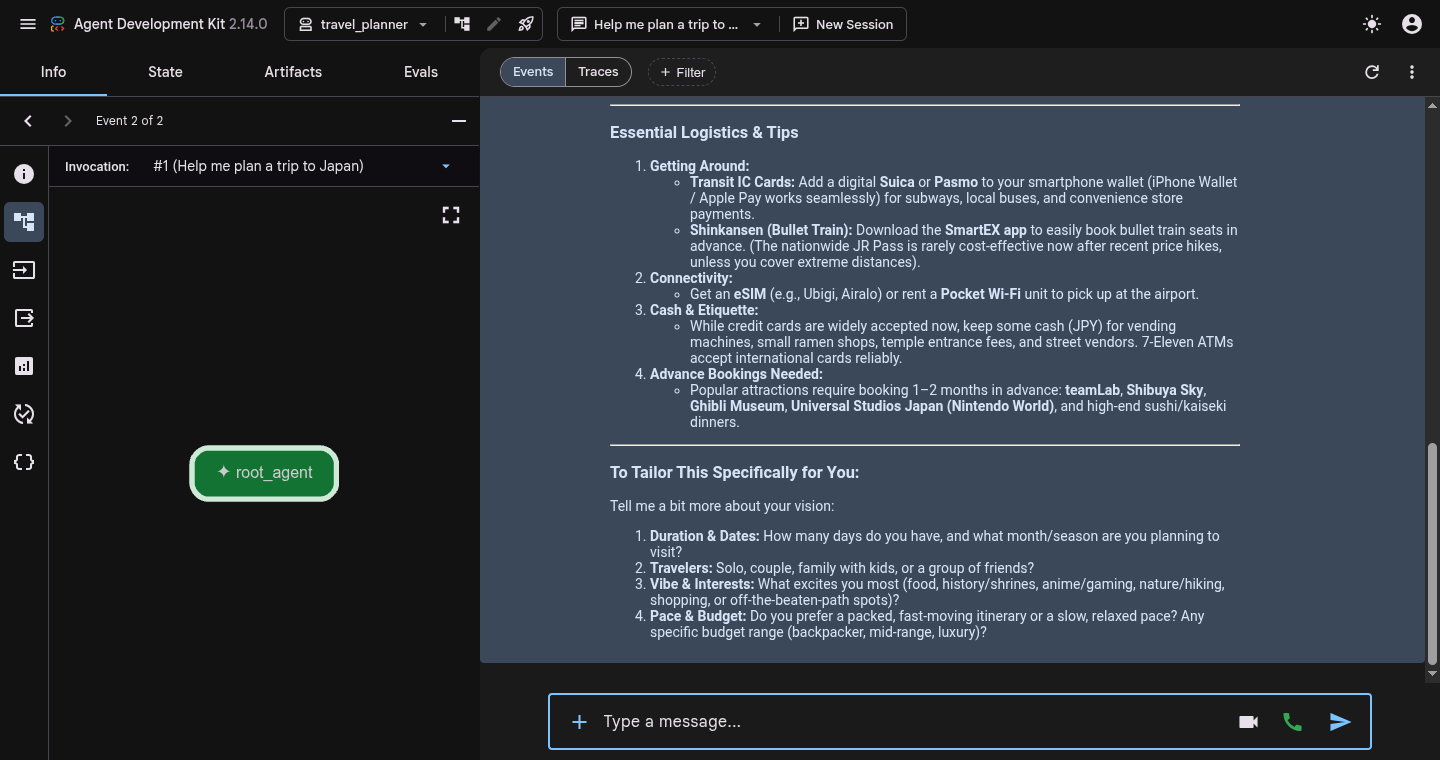
ध्यान दें कि root_agent, स्ट्रक्चर्ड प्राथमिकता एक्सट्रैक्शन, लाइव वेब रिसर्च या बजट की पुष्टि किए बिना, एक ही बार में सीधे जवाब देता है.
जांच पूरी होने के बाद, adk web सर्वर को बंद करने और कमांड प्रॉम्प्ट पर वापस जाने के लिए, Cloud Shell टर्मिनल में Ctrl + C दबाएं.
6. SequentialAgent वर्कफ़्लो बनाना
अब आपको अपना पहला ऑर्केस्ट्रेशन पैटर्न बनाना होगा: SequentialAgent की मदद से काम करने वाला लीनियर वर्कफ़्लो. क्रम में चलने वाली पाइपलाइन में, सब-एजेंट एक तय क्रम में काम करते हैं. पहला स्पेशलिस्ट, स्ट्रक्चर्ड पैरामीटर को एक्सट्रैक्ट करता है और उन्हें output_key="user_preferences" का इस्तेमाल करके, शेयर किए गए सेशन की स्थिति में सेव करता है. इसके बाद, दूसरा स्पेशलिस्ट, यात्रा की योजना बनाने के लिए, शेयर की गई स्थिति से {user_preferences} को पढ़ता है.
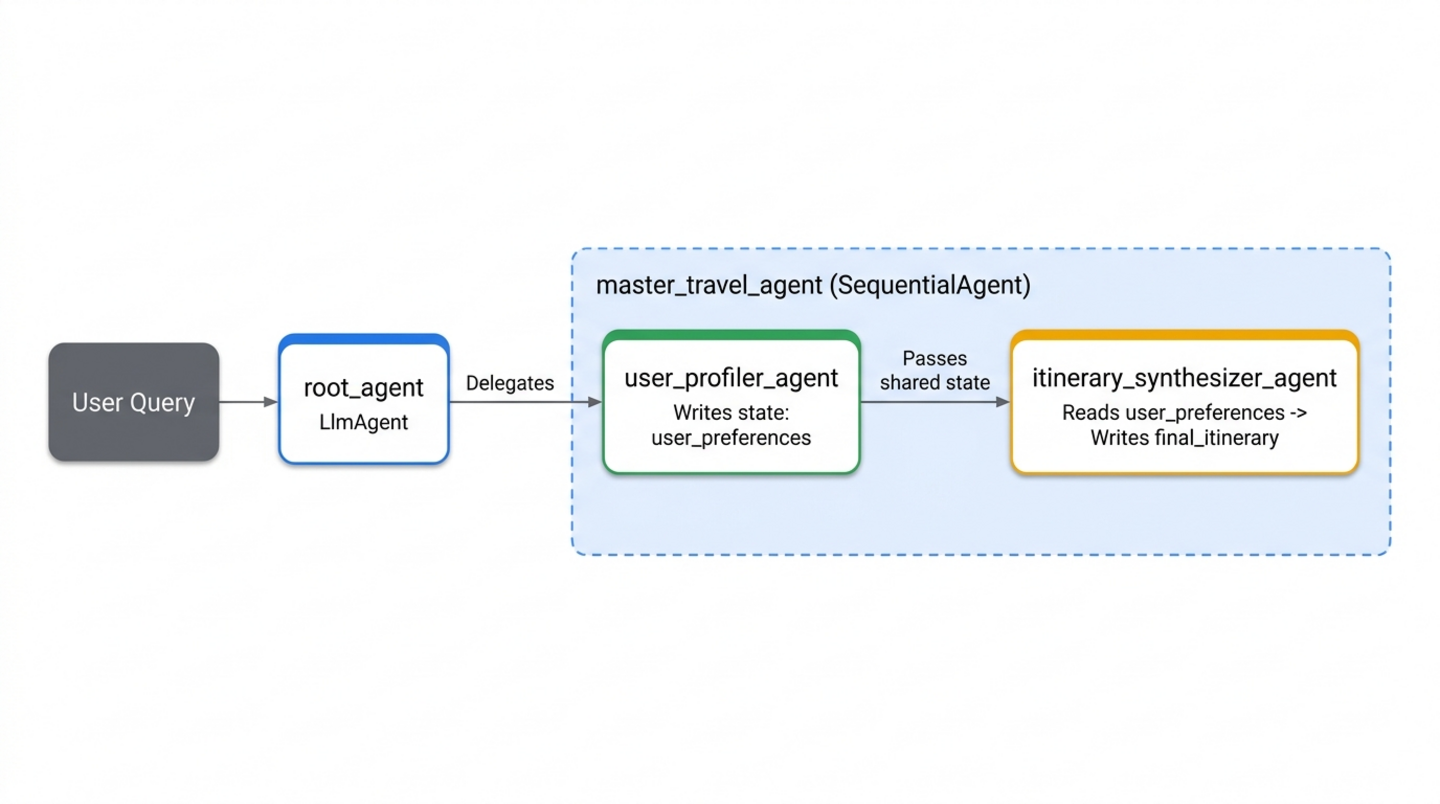
शुरुआती स्पेशलिस्ट बनाना (specialists.py)
travel_planner/ में specialists.py नाम की एक नई फ़ाइल खोलें:
cloudshell edit ~/adk-agents/travel_planner/specialists.py
user_profiler_agent और itinerary_synthesizer_agent को तय करने के लिए, इस कोड को travel_planner/specialists.py में चिपकाएं (अगले चरणों के लिए, ToolContext और google_search को पहले से इंपोर्ट करें):
from google.adk import Agent
from google.adk.tools import ToolContext, google_search

# --- Specialist 1: The User Profiler ---
user_profiler_agent = Agent(
    name="user_profiler_agent",
    description="Extracts travel preferences and constraints from user input.",
    instruction="""
        Extract destination, duration (default 1 day), budget, interests, and exclusions.
        Return a single JSON object with keys: "destination", "duration", "budget", "interests", "exclusions".
    """,
    output_key="user_preferences",  # Saves output to state['user_preferences']
)

# --- Specialist 2: The Synthesizer ---
itinerary_synthesizer_agent = Agent(
    name="itinerary_synthesizer_agent",
    description="Compiles preferences and research into a final Markdown itinerary.",
    instruction="""
        You are an elite Travel Concierge. Write a Markdown itinerary with an itemized USD and local currency cost breakdown using:
        - User Preferences: {user_preferences}
        - Activities (if available): {activity_recommendations?}
        - Restaurants (if available): {restaurant_recommendations?}
    """,
    output_key="final_itinerary",
)
क्रम में चलने वाली पाइपलाइन (workflows.py) को वायर करना
स्पेशलिस्ट एजेंट को मैनेज करने के लिए, travel_planner/ में workflows.py नाम की एक नई फ़ाइल बनाएं:
cloudshell edit ~/adk-agents/travel_planner/workflows.py
travel_planner/workflows.py में SequentialAgent की यह परिभाषा जोड़ें:
from google.adk.agents import SequentialAgent
from .specialists import (
    user_profiler_agent,
    itinerary_synthesizer_agent,
)

# 1. SEQUENTIAL PHASE: A linear two-step workflow
master_travel_agent = SequentialAgent(
    name="master_travel_agent",
    description="Orchestrates the end-to-end travel planning process for trip and itinerary requests.",
    sub_agents=[
        user_profiler_agent,         # Step 1: Extract constraints into user_preferences
        itinerary_synthesizer_agent,  # Step 2: Draft itinerary from user_preferences
    ],
)
वर्कफ़्लो को root_agent (agent.py) से कनेक्ट करें
अब master_travel_agent को root_agent के सब-एजेंट के तौर पर रजिस्टर करें. travel_planner/agent.py खोलें:
cloudshell edit ~/adk-agents/travel_planner/agent.py
travel_planner/agent.py के कॉन्टेंट को इस कोड से बदलें:
from google.adk import Agent
from .workflows import master_travel_agent

MODEL = "gemini-3.8-flash"

root_agent = Agent(
    model=MODEL,
    name="root_agent",
    description="A helpful assistant for user questions.",
    instruction=(
        "Greet the user and delegate any travel or trip planning requests "
        "to master_travel_agent."
    ),
    sub_agents=[master_travel_agent],
)
🔍 अपने काम की जांच करें
अपने टर्मिनल से ADK वेब यूज़र इंटरफ़ेस (यूआई) शुरू करें:
cd ~/adk-agents
adk web --allow_origins "*"
पोर्ट 8000 पर वेब की झलक खोलें और प्रॉम्प्ट डालें:
Help me plan a trip to Kyoto
आपको इवेंट व्यू में, इस एक्ज़ीक्यूशन फ़्लो से मिलता-जुलता आउटपुट दिखेगा:
1. root_agent -> calls transfer_to_agent(agent_name="master_travel_agent")
2. user_profiler_agent -> outputs JSON {"destination": "Kyoto", "duration": "1 day", ...} to state['user_preferences']
3. itinerary_synthesizer_agent -> reads {user_preferences} and outputs the formatted Markdown itinerary
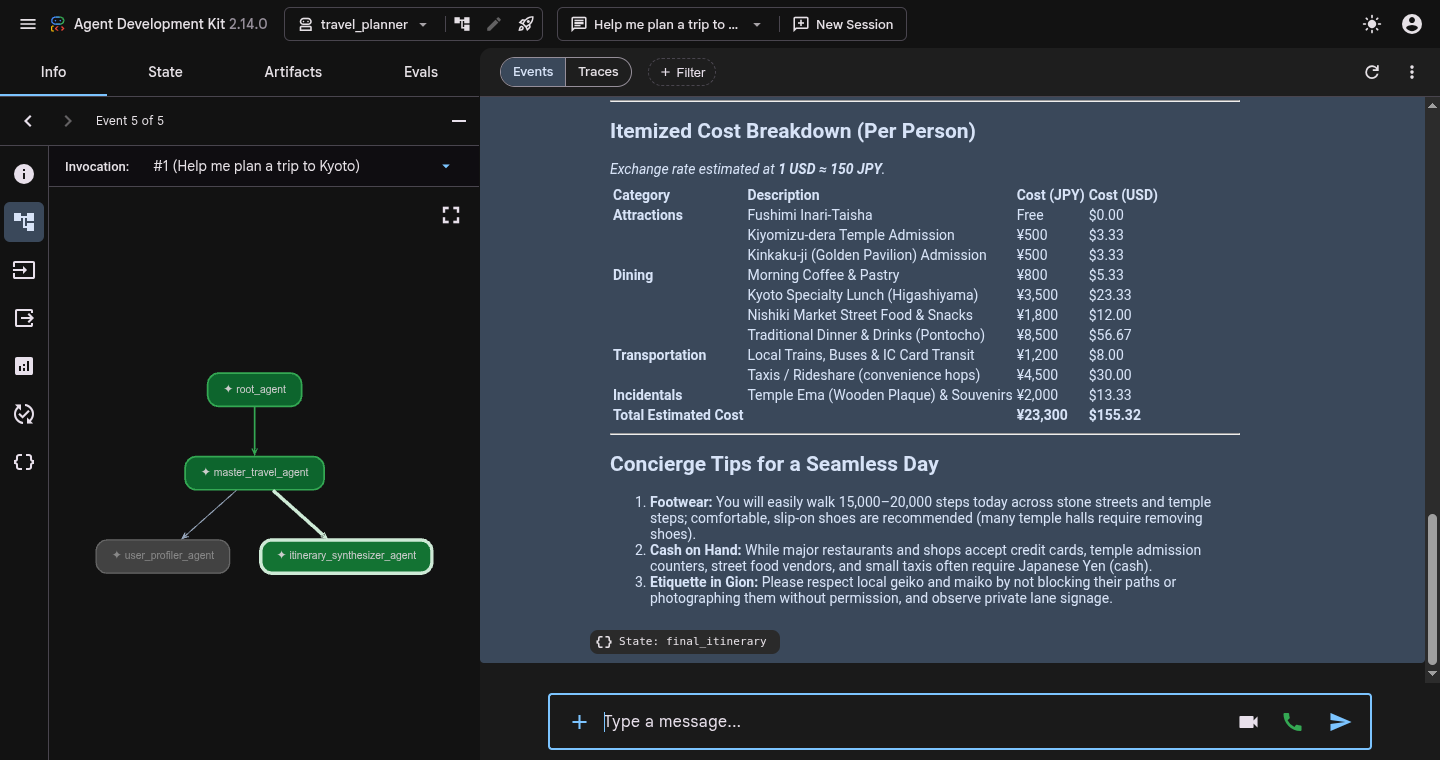
किसी भी इवेंट बैज (या State: final_itinerary चिप) पर क्लिक करें. इसके बाद, बाईं ओर मौजूद इंस्पेक्टर पैनल में स्टेट टैब पर जाएं. इससे यह पुष्टि की जा सकेगी कि सेशन स्टेट में user_preferences और final_itinerary, दोनों मौजूद हैं.
ट्रेस की जांच करने के बाद, adk web को रोकने के लिए अपने टर्मिनल में Ctrl + C दबाएं.
7. ParallelAgent की मदद से रिसर्च करें
क्रम में चलने वाले वर्कफ़्लो में, उपयोगकर्ता की पसंद को अलग करने और यात्रा की योजना बनाने की प्रोसेस को अलग-अलग रखा जाता है. हालांकि, इसके सुझाव अब भी पूरी तरह से मॉडल की ट्रेनिंग के लिए इस्तेमाल किए गए स्टैटिक डेटा पर निर्भर करते हैं. यात्रा की योजना को लाइव वेब डेटा के आधार पर तैयार किया जा सकता है. इसके लिए, पहले से मौजूद google_search टूल की मदद से, दो खास रिसर्चर जोड़े जा सकते हैं:
activity_finder_agent: उपयोगकर्ता की मंज़िल और दिलचस्पी के हिसाब से, घूमने-फिरने की तीन खास जगहों के बारे में जानकारी देता है. साथ ही, टिकट की अनुमानित कीमत भी बताता है.restaurant_finder_agent: अच्छी रेटिंग वाले तीन स्थानीय रेस्टोरेंट और हर व्यक्ति के लिए अनुमानित खर्च की जानकारी ढूँढता है.
घूमने-फिरने की जगहों और रेस्टोरेंट के बारे में रिसर्च करना एक-दूसरे पर निर्भर नहीं करता. इसलिए, इन्हें एक के बाद एक करने से समय बर्बाद होता है. इसके बजाय, दोनों रिसर्चर को ParallelAgent (parallel_research_agent) में रैप किया जाएगा, ताकि एडीके, Google Search के दोनों वर्कफ़्लो को एक साथ चलाए. साथ ही, itinerary_synthesizer_agent को हैंडऑफ़ करने से पहले, {activity_recommendations?} और {restaurant_recommendations?} को पॉप्युलेट करे.
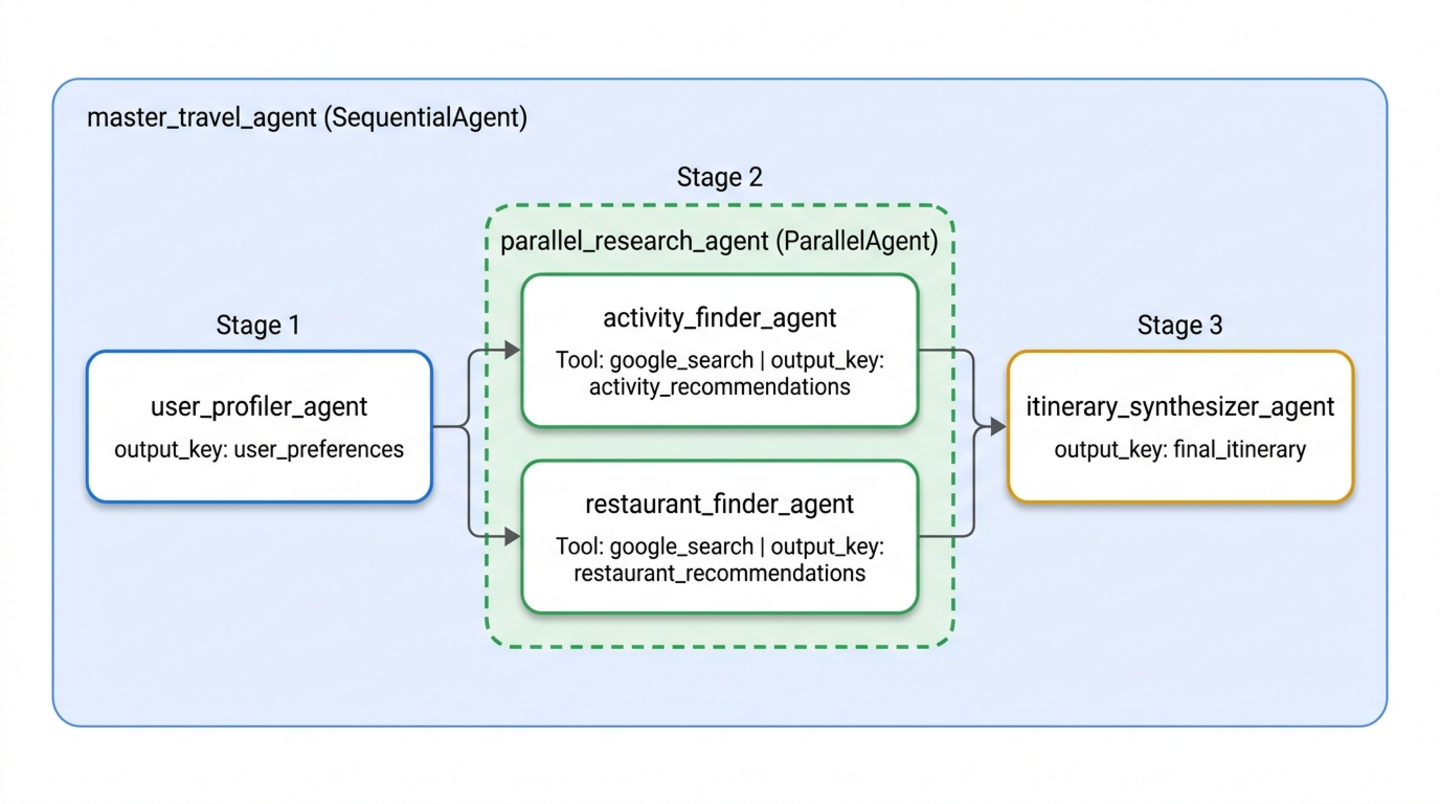
specialists.py में पैरलल रिसर्च स्पेशलिस्ट जोड़ें
travel_planner/specialists.py खोलें:
cloudshell edit ~/adk-agents/travel_planner/specialists.py
Google Search के इन दो विशेषज्ञों को travel_planner/specialists.py के सबसे नीचे (itinerary_synthesizer_agent के ठीक नीचे) जोड़ें:
# --- Specialist 3: The Activity Finder ---
activity_finder_agent = Agent(
    name="activity_finder_agent",
    description="Finds 3 attractions matching the user's destination and interests.",
    instruction="""
        Based on {user_preferences}, use google_search to find 3 specific attractions (including budget-friendly options).
        Return a JSON list with keys: "attraction_name", "estimated_cost_local", "estimated_cost_usd", "notes".
    """,
    tools=[google_search],
    output_key="activity_recommendations",
)

# --- Specialist 4: The Restaurant Finder ---
restaurant_finder_agent = Agent(
    name="restaurant_finder_agent",
    description="Finds 3 restaurants matching the destination and budget.",
    instruction="""
        Based on {user_preferences}, use google_search to find 3 highly-rated restaurants across price points.
        Return a JSON list with keys: "restaurant_name", "cuisine", "estimated_cost_local", "estimated_cost_usd".
    """,
    tools=[google_search],
    output_key="restaurant_recommendations",
)
workflows.py में ParallelAgent डालें
travel_planner/workflows.py खोलें:
cloudshell edit ~/adk-agents/travel_planner/workflows.py
travel_planner/workflows.py को अपडेट करें, ताकि ParallelAgent का इस्तेमाल करके parallel_research_agent को तय किया जा सके. साथ ही, इसे user_profiler_agent और itinerary_synthesizer_agent के बीच रखें:
from google.adk.agents import ParallelAgent, SequentialAgent
from .specialists import (
    activity_finder_agent,
    itinerary_synthesizer_agent,
    restaurant_finder_agent,
    user_profiler_agent,
)

# Parallel branch: Run activity and restaurant research simultaneously
parallel_research_agent = ParallelAgent(
    name="parallel_research_agent",
    description="Runs activity and restaurant research concurrently.",
    sub_agents=[
        activity_finder_agent,
        restaurant_finder_agent,
    ],
)

# Master pipeline: Profile -> Parallel Research -> Synthesize
master_travel_agent = SequentialAgent(
    name="master_travel_agent",
    description="Orchestrates the end-to-end travel planning process for trip and itinerary requests.",
    sub_agents=[
        user_profiler_agent,          # Step 1: Extract constraints
        parallel_research_agent,      # Step 2: Research activities & restaurants in parallel
        itinerary_synthesizer_agent,  # Step 3: Synthesize into an itinerary
    ],
)
🔍 अपने काम की जांच करें
पैरलल रिसर्च पाइपलाइन की जांच करने के लिए, adk web को फिर से लॉन्च करें:
cd ~/adk-agents
adk web --allow_origins "*"
वेब की झलक दिखाने वाले यूज़र इंटरफ़ेस (यूआई) में, यह प्रॉम्प्ट भेजें:
Help me plan a trip to Kyoto focused on historic temples and ramen
आपको इवेंट व्यू में, इस क्रम से मिलता-जुलता आउटपुट दिखेगा:
1. user_profiler_agent -> writes state['user_preferences']
2. parallel_research_agent -> fans out concurrently:
   - activity_finder_agent invokes google_search -> writes state['activity_recommendations']
   - restaurant_finder_agent invokes google_search -> writes state['restaurant_recommendations']
3. itinerary_synthesizer_agent -> merges all three state keys into state['final_itinerary']
- ट्रेस व्यू: बातचीत वाले पैनल में सबसे ऊपर, इवेंट के बगल में मौजूद ट्रेस पर क्लिक करें और अपनी बारी की जांच करें. आपको
parallel_research_agentमेंactivity_finder_agentऔरrestaurant_finder_agentके लिए, ओवरलैप होने वाली टाइमलाइन दिखेंगी. इससे वेब-रिसर्च में लगने वाला कुल समय, क्रम से चलने वाली टाइमलाइन की तुलना में करीब आधा हो जाता है. - स्टेट टैब: लाइव सेशन डिक्शनरी (
user_preferences,activity_recommendations,restaurant_recommendations, औरfinal_itinerary) की जांच करने के लिए, बाईं ओर मौजूद इंस्पेक्टर पैनल में स्टेट टैब पर क्लिक करें.
जांच पूरी होने के बाद, adk web को रोकने के लिए अपने टर्मिनल में Ctrl + C दबाएं.
8. LoopAgent की मदद से ड्राफ़्ट को बेहतर बनाना
लाइव खोज के नतीजों के बावजूद, हो सकता है कि itinerary_synthesizer_agent से जनरेट किया गया शुरुआती ड्राफ़्ट, उपयोगकर्ता के कुल बजट से ज़्यादा हो. इसके अलावा, ऐसा भी हो सकता है कि उसमें गलती से कोई ऐसी कैटगरी शामिल हो जाए जिसे उपयोगकर्ता ने शामिल न करने के लिए कहा हो. जैसे, उपयोगकर्ता ने कहा हो कि उसे मॉडर्न आर्ट गैलरी नहीं देखनी है, लेकिन ड्राफ़्ट में वह शामिल हो.
यह पक्का करने के लिए कि जनरेट किया गया कॉन्टेंट, तय की गई शर्तों के मुताबिक हो, आपको पाइपलाइन के आखिर में मेकर-चेकर रिफ़ाइनमेंट लूप जोड़ना होगा. इसके लिए, LoopAgent का इस्तेमाल करें:
itinerary_critic_agent(The Checker):{user_preferences}के हिसाब से{final_itinerary}का ऑडिट करता है. यह अनुमानित लागतों को जोड़ता है, हर नेगेटिव कंस्ट्रेंट की जांच करता है, औरcritique_feedbackको बदलाव करने के लिए खास निर्देश देता है या सटीक वाक्यांश"APPROVED"के साथ जवाब देता है.itinerary_refiner_agent(The Maker / Exiter): इसमें{critique_feedback}लिखा है. अगर समीक्षा"APPROVED"के बराबर है, तो यहexit_loopटूल (tool_context.actions.escalate = True) को कॉल करता है, ताकिLoopAgentसे तुरंत बाहर निकला जा सके. अगर ऐसा नहीं होता है, तो यह फ़्लैग की गई समस्याओं को ठीक करने के लिए{final_itinerary}में बदलाव करता है. साथ ही, अगले पास के लिएfinal_itineraryको ओवरराइट करता है.
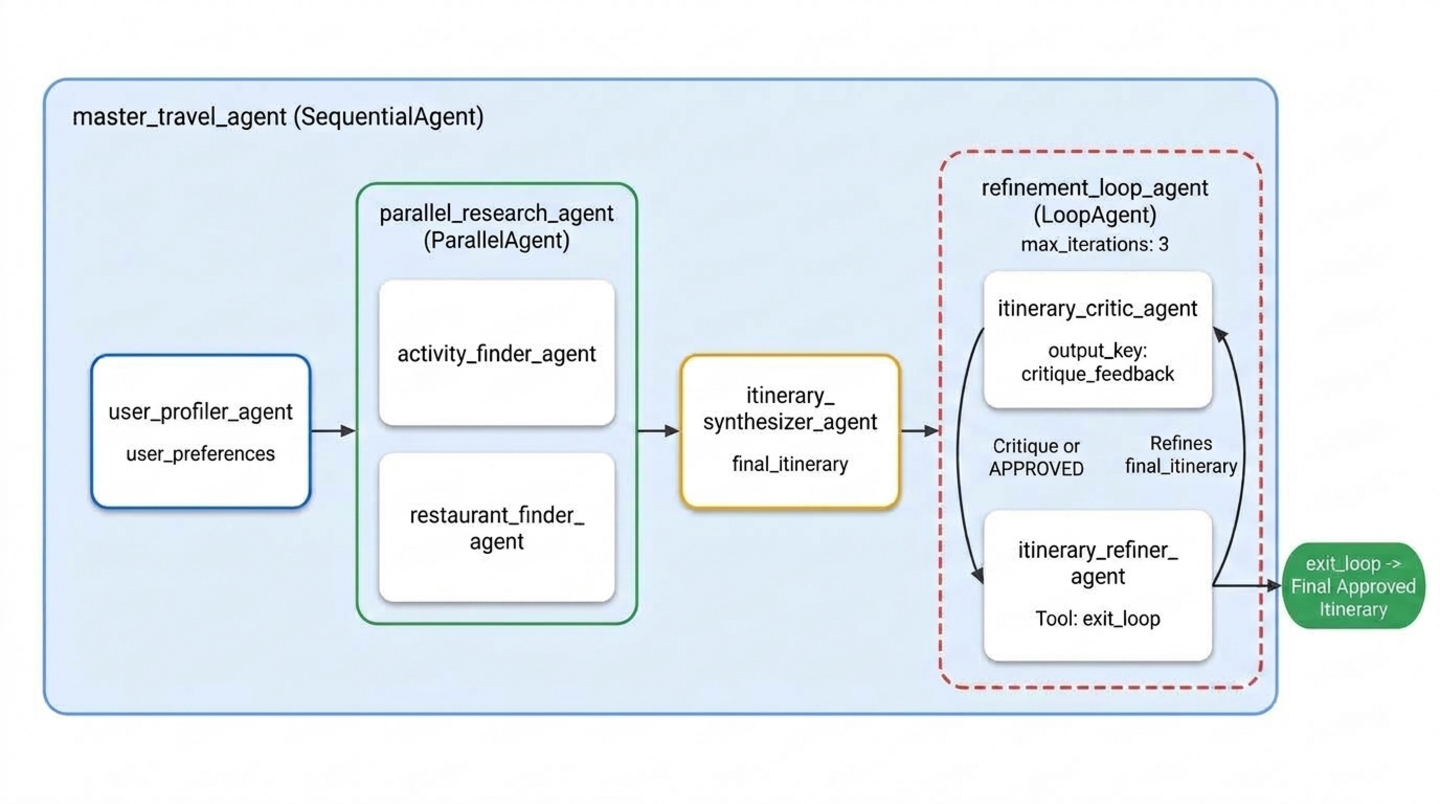
specialists.py में exit_loop, Critic, और Refiner को जोड़ें
travel_planner/specialists.py खोलें:
cloudshell edit ~/adk-agents/travel_planner/specialists.py
travel_planner/specialists.py के सबसे नीचे, exit_loop टूल (ToolContext), itinerary_critic_agent, और itinerary_refiner_agent जोड़ें:
def exit_loop(tool_context: ToolContext) -> dict:
    """Call ONLY when the critique is APPROVED to exit the refinement loop."""
    print(f"[Tool Call] exit_loop triggered by {tool_context.agent_name}")
    tool_context.actions.escalate = True
    return {"status": "approved", "message": "Itinerary approved. Exiting refinement loop."}


# --- Specialist 5: The Budget & Constraint Critic (Inside LoopAgent) ---
itinerary_critic_agent = Agent(
    name="itinerary_critic_agent",
    include_contents="none",
    description="Audits the itinerary draft against budget and negative constraints.",
    instruction="""
        Audit Current Itinerary ({final_itinerary}) against User Preferences ({user_preferences}).
        Verify that the USD total stays within the user's budget and no excluded venue types appear.
        If all checks pass, respond EXACTLY with the single word "APPROVED".
        Otherwise, output 1-2 concise revision instructions explaining what to swap or adjust.
    """,
    output_key="critique_feedback",
)

# --- Specialist 6: The Itinerary Refiner / Exiter (Inside LoopAgent) ---
itinerary_refiner_agent = Agent(
    name="itinerary_refiner_agent",
    include_contents="none",
    description="Refines the itinerary from critique feedback, or calls exit_loop when APPROVED.",
    instruction="""
        Review Auditor Critique ({critique_feedback}) for Current Itinerary ({final_itinerary}).
        If the critique is EXACTLY "APPROVED", call `exit_loop` immediately and return the itinerary unchanged.
        Otherwise, revise the draft using {activity_recommendations} and {restaurant_recommendations}
        so all USD budget and exclusion rules pass, and output ONLY the updated Markdown itinerary.
    """,
    tools=[exit_loop],
    output_key="final_itinerary",
)
LoopAgent को workflows.py में जोड़ें
travel_planner/workflows.py खोलें:
cloudshell edit ~/adk-agents/travel_planner/workflows.py
travel_planner/workflows.py को अपडेट करें, ताकि itinerary_critic_agent और itinerary_refiner_agent को LoopAgent (max_iterations=3) में रैप किया जा सके. साथ ही, इसे master_travel_agent के चौथे चरण के तौर पर जोड़ें:
from google.adk.agents import LoopAgent, ParallelAgent, SequentialAgent
from .specialists import (
    activity_finder_agent,
    itinerary_critic_agent,
    itinerary_refiner_agent,
    itinerary_synthesizer_agent,
    restaurant_finder_agent,
    user_profiler_agent,
)

# Stage 2: Parallel research branch
parallel_research_agent = ParallelAgent(
    name="parallel_research_agent",
    description="Runs activity and restaurant research concurrently.",
    sub_agents=[
        activity_finder_agent,
        restaurant_finder_agent,
    ],
)

# Stage 4: Iterative Maker-Checker refinement loop
refinement_loop_agent = LoopAgent(
    name="refinement_loop_agent",
    description="Iteratively audits and refines the itinerary until constraints and budget are approved.",
    sub_agents=[
        itinerary_critic_agent,
        itinerary_refiner_agent,
    ],
    max_iterations=3,
)

# Master pipeline: Profile -> Parallel Research -> Synthesize -> Refinement Loop
master_travel_agent = SequentialAgent(
    name="master_travel_agent",
    description="Orchestrates the end-to-end travel planning process for trip and itinerary requests.",
    sub_agents=[
        user_profiler_agent,          # Stage 1: Extract constraints
        parallel_research_agent,      # Stage 2: Research activities & restaurants in parallel
        itinerary_synthesizer_agent,  # Stage 3: Draft initial itinerary
        refinement_loop_agent,        # Stage 4: Audit and refine until approved
    ],
)
🔍 अपने काम की जांच करें
मल्टी-एजेंट वाले पूरे वर्कफ़्लो को टेस्ट करने के लिए, adk web को शुरू करें:
cd ~/adk-agents
adk web --allow_origins "*"
पोर्ट 8000 पर वेब की झलक दिखाने वाला यूज़र इंटरफ़ेस (यूआई) खोलें. इसके बाद, नया सेशन शुरू करें और क्योटो से जुड़े कई प्रतिबंधों वाले इस प्रॉम्प्ट के साथ पूरे सिस्टम की जांच करें:
Design a full-day itinerary for Kyoto with a total budget of $100. My main interests are historical landmarks, temples, and authentic local cuisine. Please do not include any modern art museums or galleries.
आपको इवेंट व्यू और टर्मिनल लॉग में, इस तरह के आउटपुट दिखेंगे:
1. user_profiler_agent -> writes JSON with destination="Kyoto", budget="$100", exclusions=["modern art museums", "galleries"]
2. parallel_research_agent -> runs activity_finder_agent and restaurant_finder_agent in parallel
3. itinerary_synthesizer_agent -> produces initial draft in state['final_itinerary']
4. refinement_loop_agent:
   - itinerary_critic_agent -> audits USD budget and exclusions -> outputs "APPROVED" (or revision notes)
   - itinerary_refiner_agent -> triggers [Tool Call] exit_loop triggered by itinerary_refiner_agent and outputs the approved itinerary
- इवेंट व्यू: बाईं ओर मौजूद जानकारी टैब में, किसी इवेंट के पेलोड की जांच करने के लिए,
itinerary_critic_agentयाitinerary_refiner_agentमें से किसी भी इवेंट चिप पर क्लिक करें. जबitinerary_refiner_agent,exit_loopको शुरू करता है, तो इवेंट की जांच करकेactions.escalate: trueदेखें - यह सिग्नल,LoopAgentकोmax_iterations=3तक पहुंचने से पहले, दोहराने की प्रोसेस को रोकने के लिए कहता है. - स्टेट टैब: स्टेट टैब पर क्लिक करके,
state['critique_feedback']औरstate['final_itinerary']के पास से जुड़े अपडेट देखें. अगर शुरुआती ड्राफ़्ट$100 USDसे ज़्यादा का है, तोcritique_feedbackमें ऑडिटर के बदलाव के निर्देश पहले पास पर सेव रहते हैं. इसके बाद,final_itineraryको कम लागत वाले विकल्पों के साथ अपडेट किया जाता है औरcritique_feedbackको दूसरे पास पर"APPROVED"में बदल दिया जाता है.
जांच पूरी होने के बाद, adk web को रोकने के लिए अपने टर्मिनल में Ctrl + C दबाएं.
9. व्यवस्थित करें
लोकल प्रोजेक्ट की फ़ाइलें मिटाना
Cloud Shell के होम फ़ोल्डर से adk-agents प्रोजेक्ट डायरेक्ट्री और वर्चुअल एनवायरमेंट को हटाने के लिए, यह कमांड चलाएं:
cd ~
rm -rf ~/adk-agents
Agent Platform API को बंद करना
अगर आपको अपने प्रोजेक्ट में Agent Platform API की ज़रूरत नहीं है, तो gcloud का इस्तेमाल करके इसे बंद करें:
gcloud services disable aiplatform.googleapis.com --quiet
पूरा Google Cloud प्रोजेक्ट मिटाना (ज़रूरी नहीं)
PROJECT_ID=$(gcloud config get-value project)
gcloud projects delete "$PROJECT_ID" --quiet
🔍 अपने काम की जांच करें
पुष्टि करें कि ~/adk-agents को हटा दिया गया है:
test ! -d ~/adk-agents && echo "Workspace ~/adk-agents removed"
आपको इससे मिलता-जुलता आउटपुट दिखेगा:
Workspace ~/adk-agents removed
10. बधाई हो
बधाई हो! आपने Google Agent Development Kit (ADK) की मदद से, हैरारकी वाला मल्टी-एजेंट सिस्टम बनाया है. यह सिस्टम, क्रम में चलने वाले, एक साथ चलने वाले, और बार-बार चलने वाले लूप वर्कफ़्लो में, छह खास एजेंट की टीम को मैनेज करता है.
आपने क्या-क्या हासिल किया
- शेयर किए गए सेशन स्टेट के ज़रिए, एजेंट के बीच स्ट्रक्चर्ड बातचीत (
output_keyऔर{state_variable}टेंप्लेट इंजेक्शन) SequentialAgentका इस्तेमाल करके, सिलसिलेवार तरीके से काम करने वाली डिटरमिनिस्टिक पाइपलाइन बनाईParallelAgentका इस्तेमाल करके, Google Search के लिए अलग-अलग रिसर्च एजेंट को एक साथ चलाया गयाLoopAgentऔरtool_context.actions.escalate = Trueका इस्तेमाल करके, अपने-आप होने वाली मेकर-चेकर पुष्टि का लूप लागू किया
अगले चरण
- इस सीरीज़ के चौथे पार्ट, ADK की मदद से एआई एजेंट बनाना: ग्राफ़ वर्कफ़्लो को व्यवस्थित करना पर जाएं. इसमें ADK 2 के यूनिफ़ाइड
Workflow,JoinNode, और डिटरमिनिस्टिकEvent(route=...)साइकल की मदद से, इस ट्रैवल प्लानर को फिर से बनाने का तरीका बताया गया है - एडीके वर्कफ़्लो एजेंट से जुड़ा आधिकारिक दस्तावेज़ पढ़ें
- एडीके में मल्टी-एजेंट सिस्टम के बारे में जानें
- प्रैक्टिकल वर्कशॉप और लर्निंग पाथवे के लिए, GEAR (Gemini Enterprise Agent Ready) प्रोग्राम और Get Certified program में शामिल हों