

1. 개요
여러 제약 조건이 있는 여행 요청(예: 현대 미술관을 제외하고 역사적인 사원과 현지 요리에 중점을 둔 100달러 미만의 교토 하루 일정 설계)을 처리하려면 제약 조건을 추출하고, 관광지와 식당을 동시에 조사하고, 항목별 일정을 구성하고, 최종 계획을 검토해야 합니다. 많은 도구를 사용하는 단일 모놀리식 에이전트에 의존하면 확인 단계를 건너뛰거나 제외를 위반할 수 있으므로 조정은 결정론적 워크플로 컨트롤러를 통해 전문화된 하위 에이전트를 조정합니다.
ADK로 AI 에이전트 빌드 시리즈의 세 번째 파트에서는 에이전트 개발 키트(ADK) 2 워크플로 컨트롤러(SequentialAgent, ParallelAgent, LoopAgent)를 사용하여 Agent Platform에서 독립형 멀티 에이전트 여행 플래너를 빌드합니다. 세 가지 단계(파트 1 또는 파트 2 작업공간 설정 필요 없음)에 걸쳐 공유 세션 상태(output_key), 동시 google_search 실행, 반복적인 메이커-체커 미세 조정 루프를 사용하여 gemini-3.8-flash로 구동되는 6개의 전문 에이전트를 조정합니다.
기본 요건
- 생성형 AI 개념에 대한 이해
- Python 프로그래밍에 대한 기본적 숙련도
- AI 에이전트 기초 및 Google ADK에 관한 지식
학습 내용
- 멀티 에이전트 ADK 2 프로젝트를 처음부터 스캐폴딩하는 방법
output_key를 사용하여 세션 상태를 공유하는 전문 에이전트 팀을 설계하는 방법SequentialAgent를 사용하여 결정론적 단계별 파이프라인에서 하위 에이전트를 실행하는 방법ParallelAgent를 사용하여 독립적인 조사 에이전트를 동시에 실행하여 지연 시간을 줄이는 방법LoopAgent및ToolContext에스컬레이션을 사용하여 반복적인 메이커-체커 정제 루프를 구현하는 방법- 순차, 병렬, 루프 패턴을 계층적 멀티 에이전트 워크플로로 결합하는 방법
필요한 항목
- Google 계정(워크숍 크레딧을 신청하는 경우 개인
@gmail.com계정 사용) - 강사가 제공한 워크숍 크레딧 링크(QR 코드를 스캔할 휴대전화 카메라 포함) 또는 활성 Cloud Billing 계정
- Chrome(개인 계정과 직장 계정이 혼합되지 않도록 시크릿 창을 사용하는 것이 좋음)
2. Google Cloud 크레딧 신청(선택사항)
이벤트 크레딧 링크가 있는 워크숍에 참석하는 경우 Google Developer Program 크레딧을 신청하여 신용카드 없이 결제 계정을 프로비저닝하세요.
이벤트 크레딧 신청하기
- 시크릿 창에서 워크숍 크레딧 링크를 열고
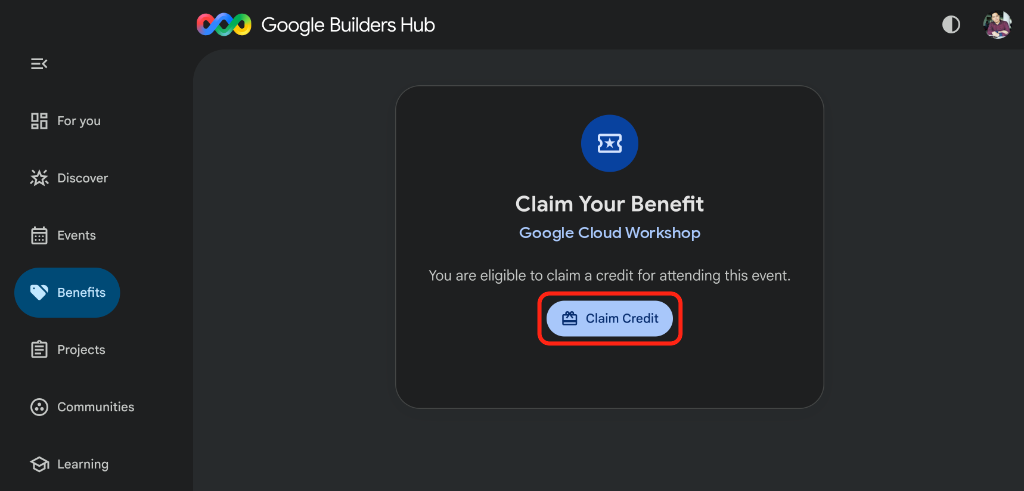
@gmail.com계정으로 로그인합니다. - 혜택 신청에서 크레딧 신청을 클릭합니다.
- Google Developer Program 프로필을 만들라는 메시지가 표시되면 양식을 작성합니다.
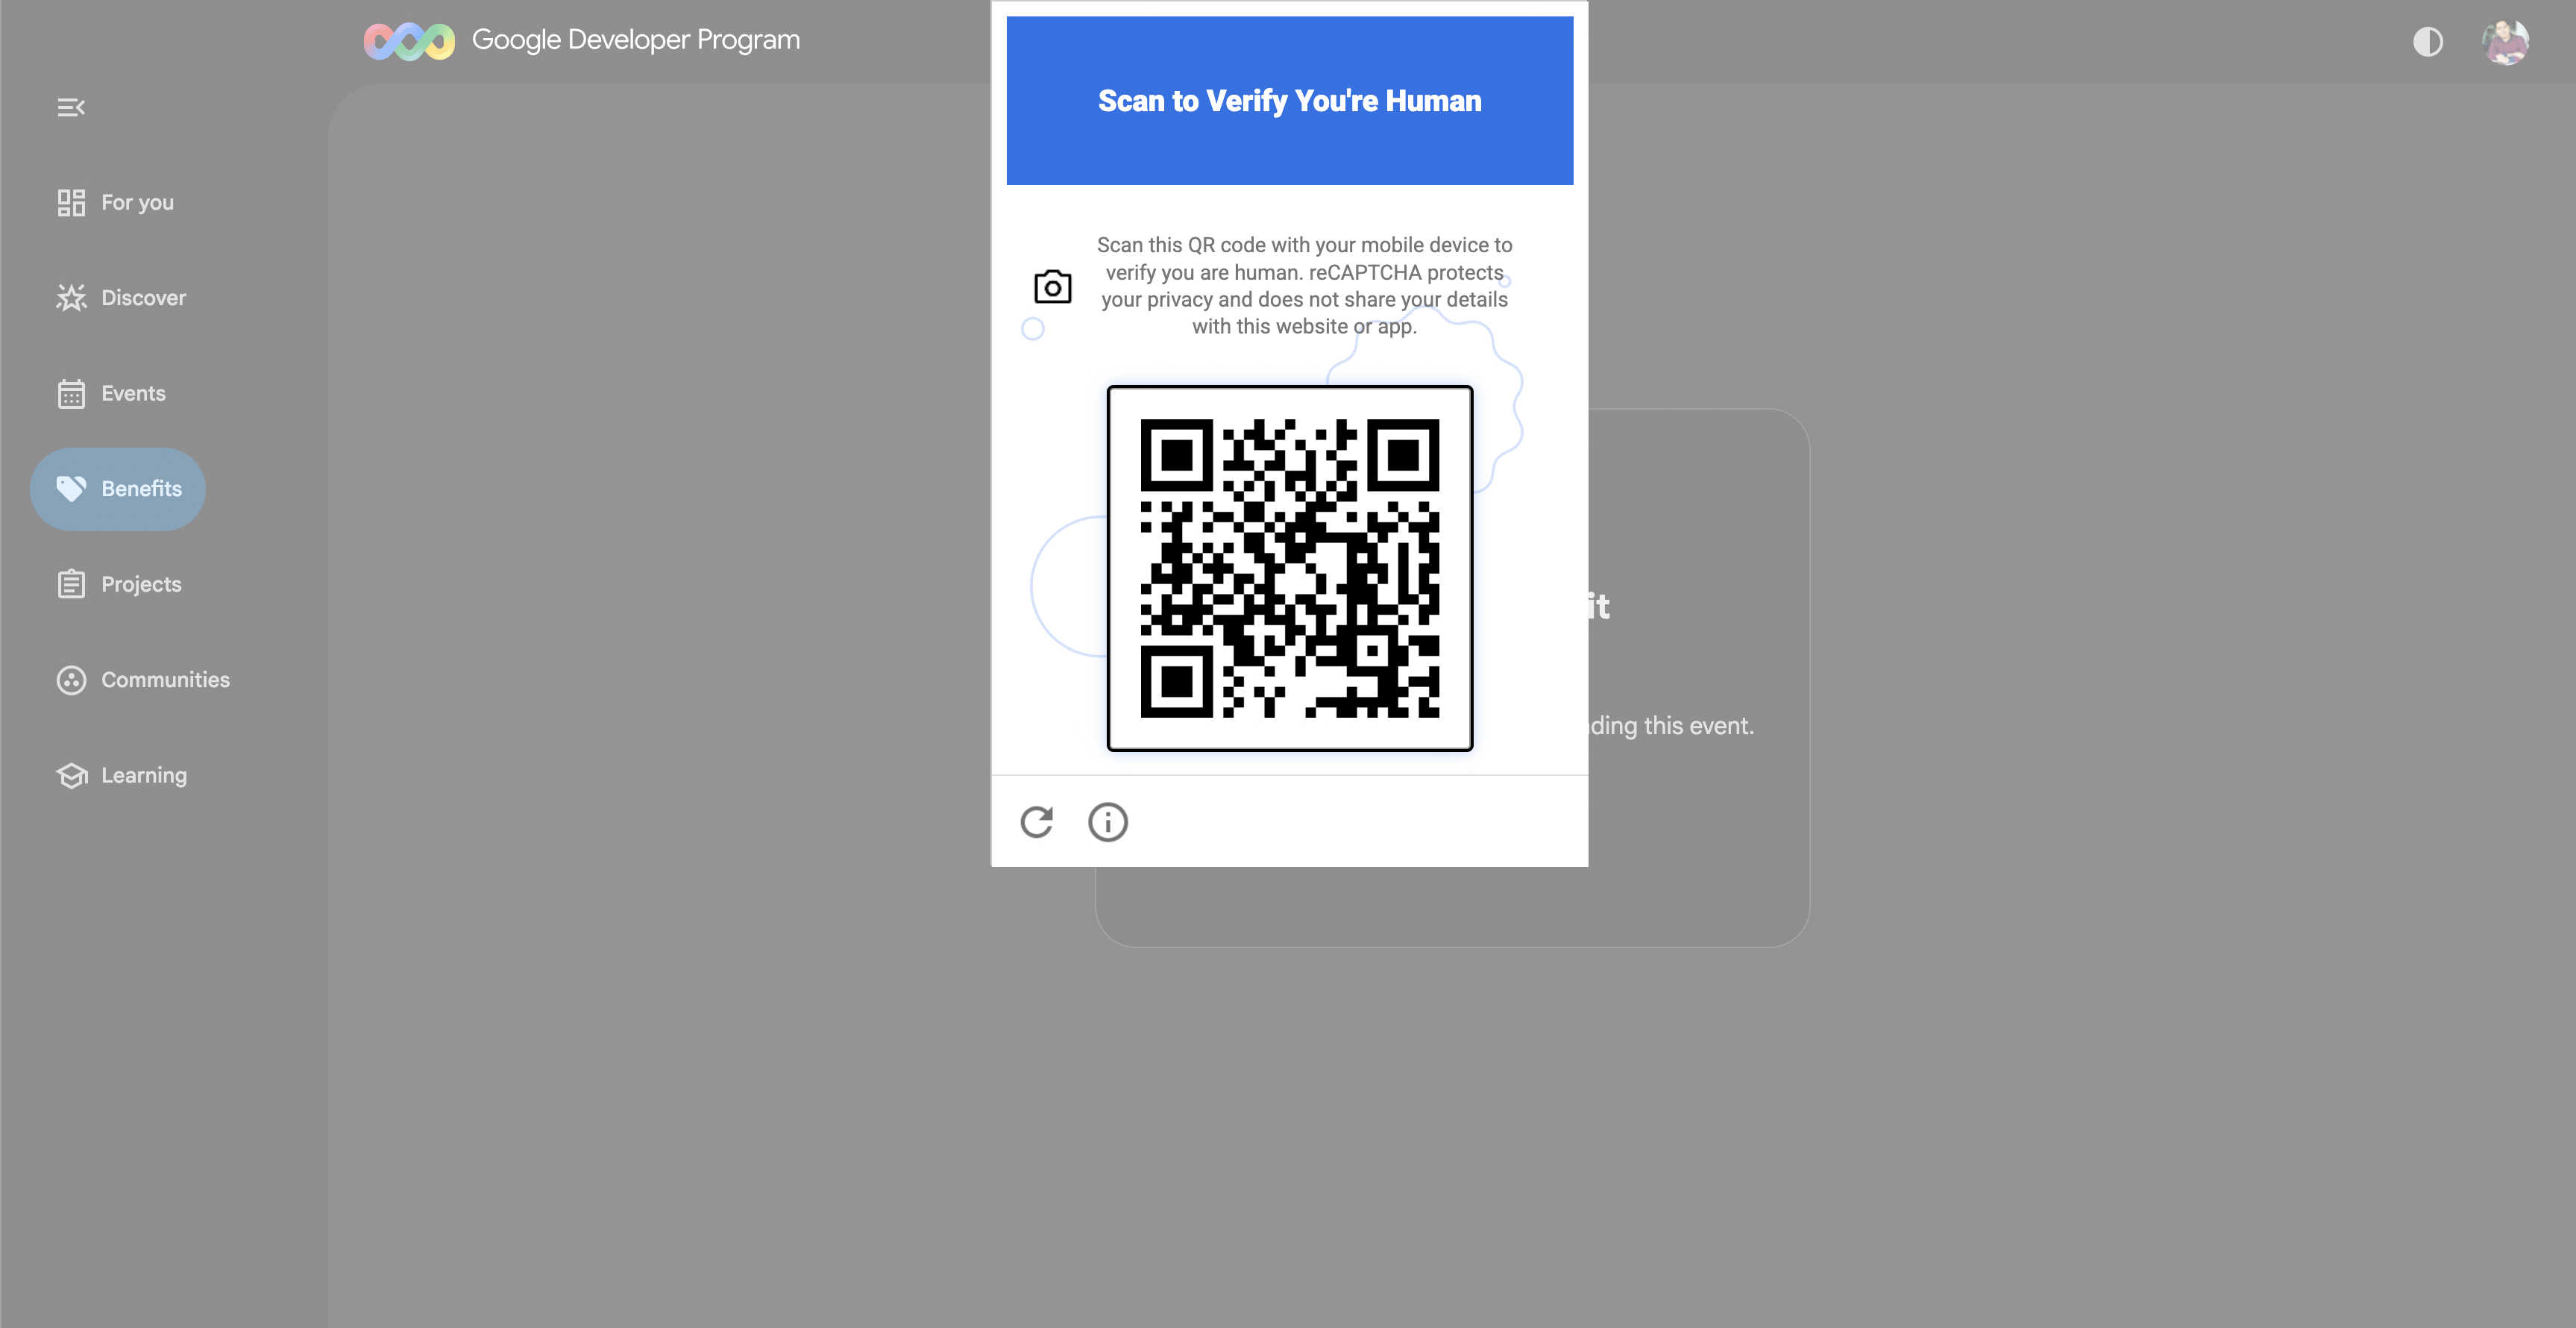
- 스캔하여 사람임을 인증하세요가 표시되면 휴대전화로 QR 코드를 스캔하고 인증을 완료합니다. QR 코드가 표시되지 않으면 새로고침하고 크레딧 신청을 다시 클릭합니다.
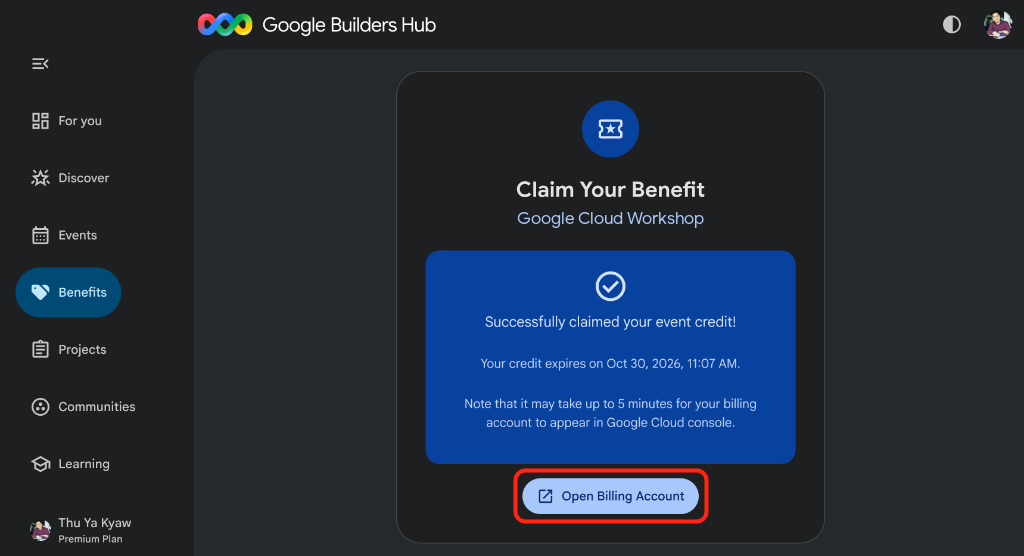
- 이벤트 크레딧을 신청했습니다.가 표시되는지 확인한 후 결제 계정 열기를 클릭합니다.
🔍 작업 확인
결제 계정 설정에는 최대 3분이 소요됩니다.
- Google Cloud Billing을 열거나 URL을 시크릿 창에 복사하고 결제 계정을 선택합니다.
https://console.cloud.google.com/billing
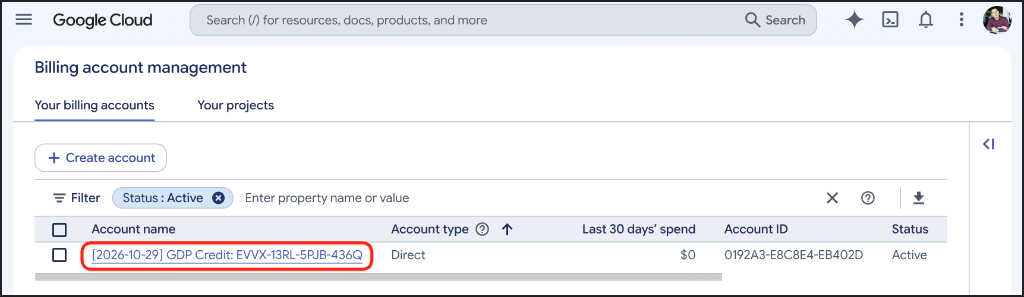
GDP Credit계정에 활성 상태가 표시될 때까지 새로고침합니다.
3. Google Cloud 프로젝트 만들기(선택사항)
이 Codelab의 모든 리소스가 격리되고 쉽게 정리될 수 있도록 전용 Google Cloud 프로젝트를 만듭니다.
- 프로젝트 만들기를 열거나 URL을 시크릿 창에 복사합니다.
https://console.cloud.google.com/projectcreate
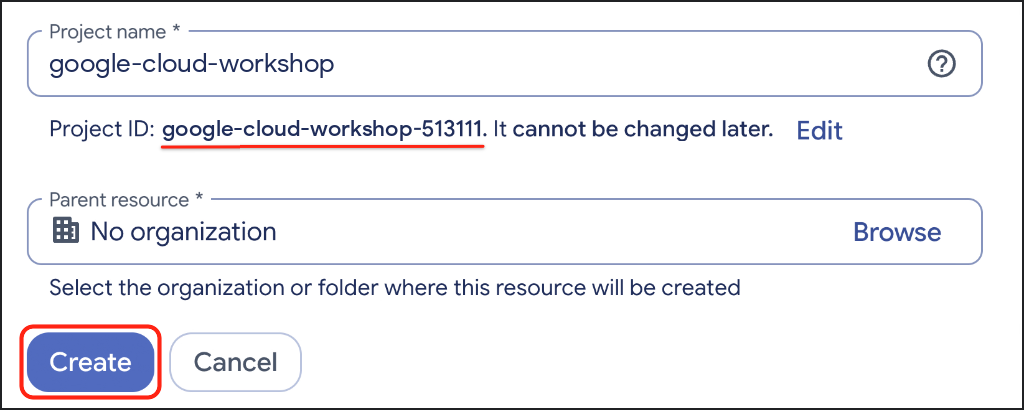
- 프로젝트 세부정보를 입력합니다.
- 프로젝트 이름: 예:
google-cloud-workshop - 결제 계정(표시되는 경우):
GDP Credit(또는 활성 결제 계정)를 선택합니다. - 상위 리소스: 조직 없음(또는 필요한 경우 조직)
- 프로젝트 이름: 예:
- 프로젝트 이름 아래에 생성된 프로젝트 ID를 기록한 후 만들기를 클릭합니다.
🔍 작업 확인
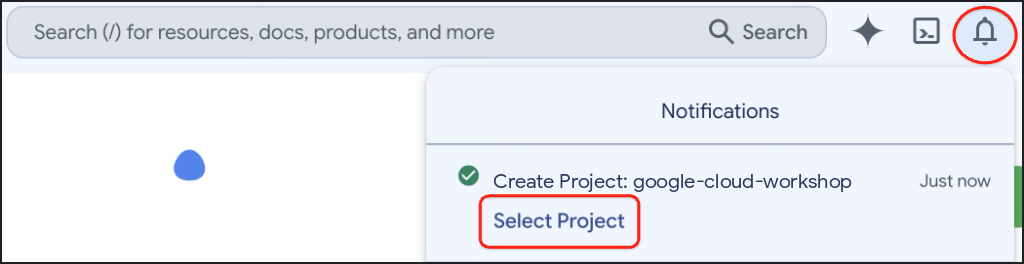
오른쪽 상단 툴바에서 알림을 클릭하고 프로젝트 생성이 완료되면 프로젝트 선택을 클릭합니다.
4. 환경 설정
Google Cloud Shell을 구성하고, Agent Platform API를 사용 설정하고, uv를 사용하여 격리된 Python 3.12 가상 환경을 만듭니다.
Cloud Shell 구성
- Google Cloud 콘솔 툴바에서 Cloud Shell 활성화(
>_)를 클릭하거나 Google Cloud Shell을 직접 열거나 URL을 시크릿 창에 복사합니다.
https://shell.cloud.google.com/?show=ide,terminal

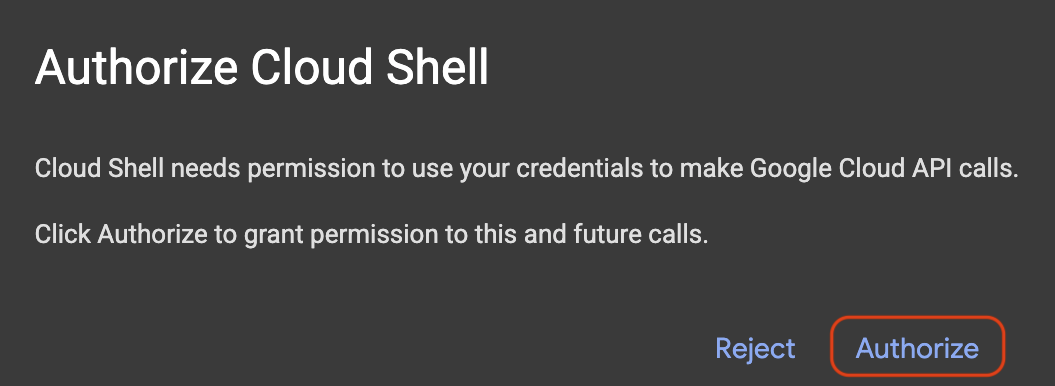
- 메시지가 표시되면 승인을 클릭합니다.
- 터미널의 번호가 매겨진 메뉴에서 활성 Google Cloud 프로젝트 ID를 선택합니다.
unset CLOUDSDK_CORE_PROJECT
PS3="Select your project (e.g. 1): "
select PROJECT_ID in $(gcloud projects list --format="value(projectId)"); do
  [ -n "$PROJECT_ID" ] && gcloud config set project "$PROJECT_ID" && break
done
다음과 비슷한 출력이 표시됩니다. 태그가 지정되지 않은 프로젝트에도 정보 [environment: untagged] 줄이 출력됩니다.
1) google-cloud-workshop-4210
2) my-cloud-project-8812
Select your project (e.g. 1): 1
Updated property [core/project].
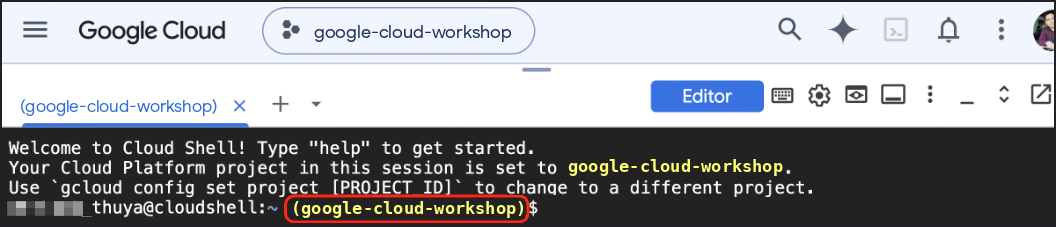
선택한 프로젝트 ID가 Cloud Shell 프롬프트에 노란색으로 강조 표시되는지 확인합니다.
필요한 API 사용 설정
ADK 에이전트가 Gemini 모델을 호출할 수 있도록 Agent Platform API를 사용 설정합니다.
gcloud services enable aiplatform.googleapis.com
다음과 비슷한 출력이 표시됩니다.
Operation "operations/acat.p2-..." finished successfully.
Python 가상 환경을 만들고 ADK 설치
~/adk-agents 작업공간을 만들고 Python 3.12 가상 환경을 활성화합니다.
cd ~
mkdir -p adk-agents && cd ~/adk-agents

which uv >/dev/null 2>&1 || curl -LsSf https://astral.sh/uv/install.sh | sh
export PATH="$HOME/.local/bin:$PATH"

uv venv .venv --python 3.12
source .venv/bin/activate
터미널 프롬프트 시작 부분에 (.venv) 프리픽스가 표시되는지 확인합니다.

활성 가상 환경 내에 ADK 2를 설치합니다.
uv pip install --no-cache "google-adk==2.14.0"
🔍 작업 확인
설치된 adk CLI 버전을 확인합니다.
adk --version
다음과 비슷한 출력이 표시됩니다.
adk, version 2.14.0
5. 여행 플래너 에이전트 스캐폴드
환경이 준비되면 ADK의 기본 제공 adk create 명령어를 사용하여 travel_planner 에이전트 패키지의 시작 파일을 생성합니다.
시작 패키지 생성
~/adk-agents 디렉터리에서 adk create를 실행합니다.
cd ~/adk-agents
adk create travel_planner
터미널에 메시지가 표시되면 다음 구성 옵션을 선택합니다. 처음 실행할 때 Enable telemetry? [Y/n]: 메시지가 표시되면 Enter를 누르거나 n를 입력하고 Enter를 누릅니다.
- 루트 에이전트의 모델 선택:
2을 입력하여gemini-3.8-flash를 선택하고(옵션1는gemini-3.5-flash를 선택함) Enter를 누릅니다. - 백엔드 선택:
2를 입력하여 Google Cloud 에이전트 플랫폼 백엔드(아래 CLI 메뉴의 옵션2)를 선택하고 Enter를 누릅니다. - Google Cloud 프로젝트 ID 입력: Enter를 눌러 대괄호 안에 표시된 프로젝트 ID를 확인합니다.
- Google Cloud 리전 입력:
global를 입력하고 Enter를 누릅니다.
adk create는 GOOGLE_GENAI_USE_ENTERPRISE=1, 프로젝트 ID, GOOGLE_CLOUD_LOCATION=global를 travel_planner/.env에 작성하므로 나중에 agent.py를 업데이트할 때 사용자 인증 정보가 구성된 상태로 유지됩니다.
🔍 작업 확인
다음과 비슷한 출력이 표시됩니다.
Choose a model for the root agent:
1. gemini-3.5-flash
2. gemini-3.8-flash
3. Other models (fill later)
Choose model (1, 2, 3): 2
1. Google AI
2. Vertex AI
3. Login with Google
Choose a backend (1, 2, 3): 2

You need an existing Google Cloud account and project, check out this link for details:
https://google.github.io/adk-docs/get-started/quickstart/#gemini---google-cloud-vertex-ai

Enter Google Cloud project ID [google-cloud-workshop-4210]:
Enter Google Cloud region [us-central1]: global

Agent created in /home/your_username/adk-agents/travel_planner:
- .env
- .gitignore
- __init__.py
- agent.py

⚠️  WARNING: Secrets (like GOOGLE_API_KEY) are stored in .env.

Next steps:
- Chat with your agent in the terminal: adk run travel_planner
- Or in the browser: adk web .
- Have your coding agent evaluate and deploy it: uvx google-agents-cli setup
  (other install options: https://adk.dev/get-started/agents-cli/)
Cloud Shell 코드 편집기에서 현재 폴더를 열어 터미널과 나란히 파일을 검사하고 수정할 수 있습니다.
which cloudshell >/dev/null 2>&1 && cloudshell workspace ~/adk-agents || true
cd ~/adk-agents
source .venv/bin/activate
기본 단일 에이전트 테스트
멀티 에이전트 워크플로를 빌드하기 전에 ADK 개발 UI를 실행하여 기본 단일 에이전트가 광범위한 여행 계획 쿼리에 어떻게 응답하는지 관찰합니다.
cd ~/adk-agents
adk web --allow_origins "*"
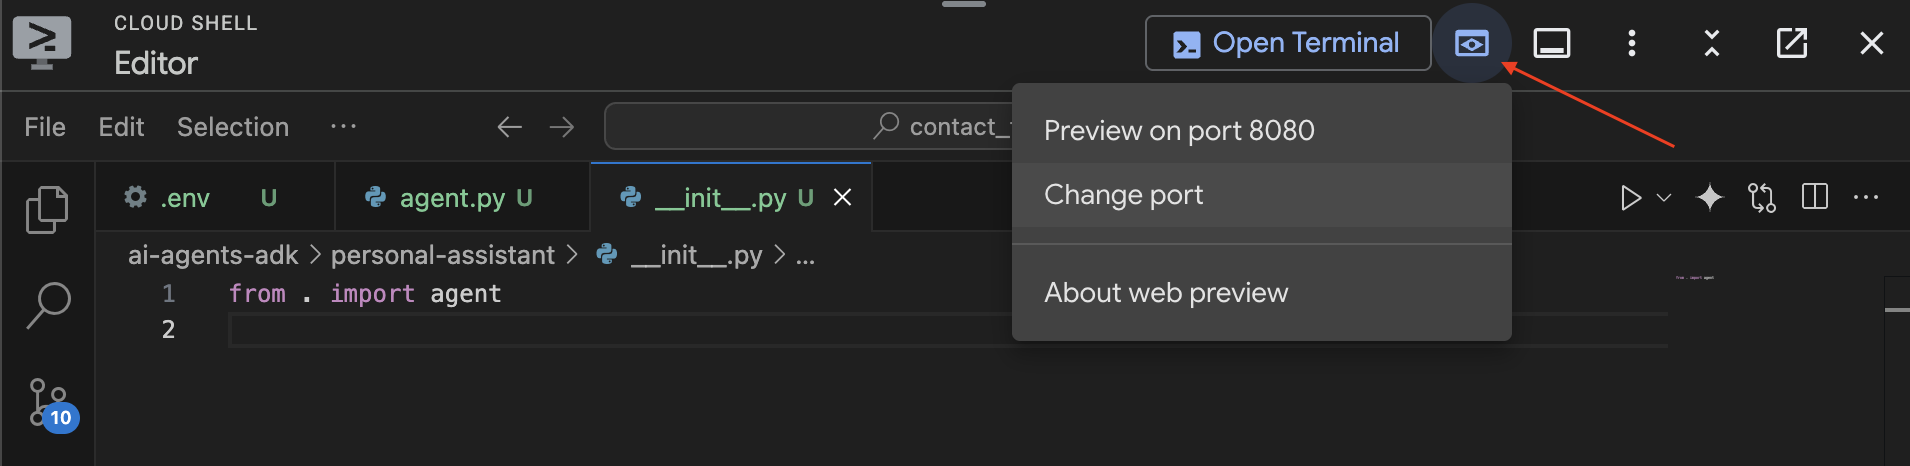
Cloud Shell 웹 미리보기를 사용하여 브라우저에서 개발 UI를 엽니다.
- Cloud Shell의 오른쪽 상단 툴바에서 웹 미리보기 아이콘을 클릭합니다.
- 포트 변경을 선택하고
8000을 입력한 후 변경 및 미리보기를 클릭합니다.
ADK 웹 UI가 로드되면 "hello, what can you do?" 또는 "Help me plan a trip to Japan"과 같은 인사말을 보냅니다.
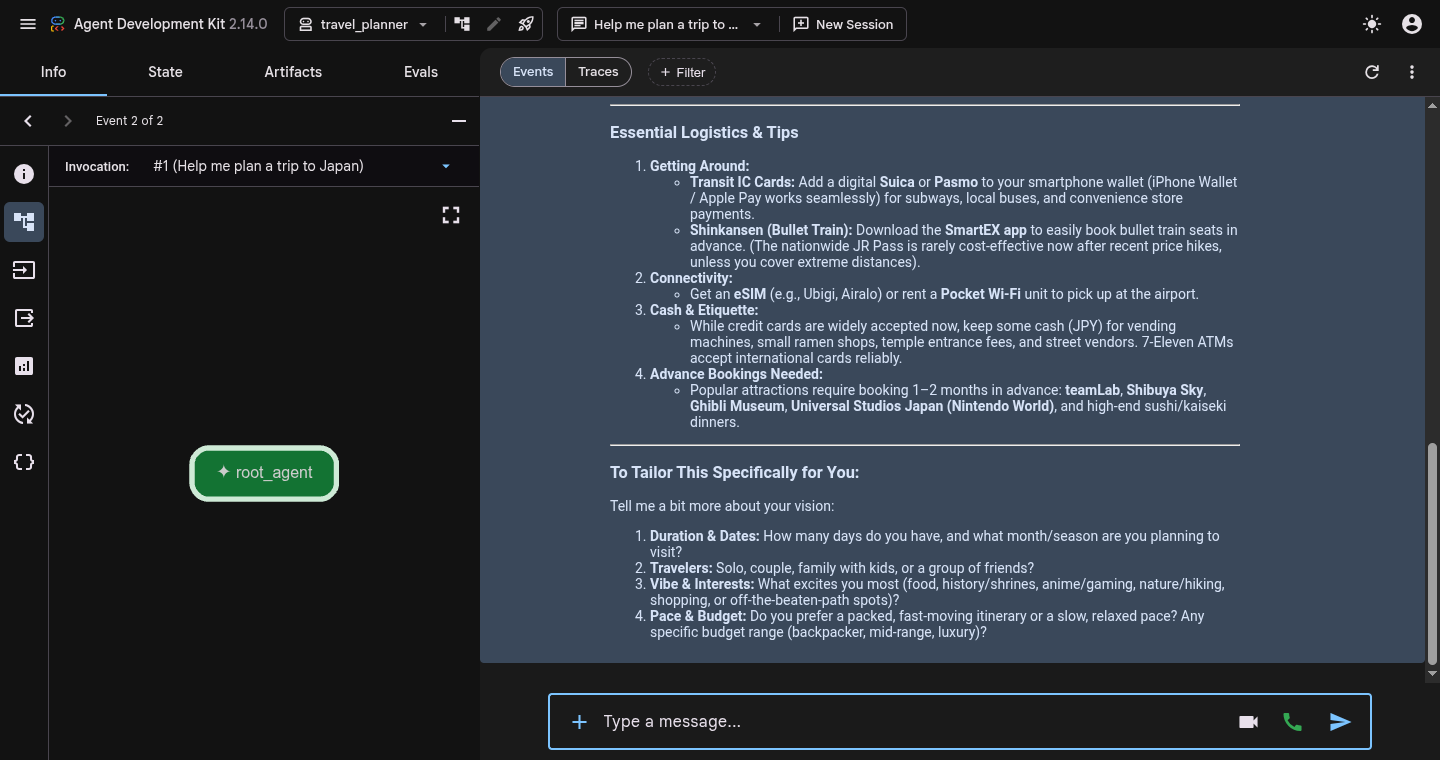
단일 root_agent는 구조화된 환경설정 추출, 실시간 웹 조사, 예산 확인 없이 한 번에 직접 답변합니다.
테스트가 완료되면 Cloud Shell 터미널에서 Ctrl + C를 눌러 adk web 서버를 중지하고 명령 프롬프트로 돌아갑니다.
6. SequentialAgent 워크플로 빌드
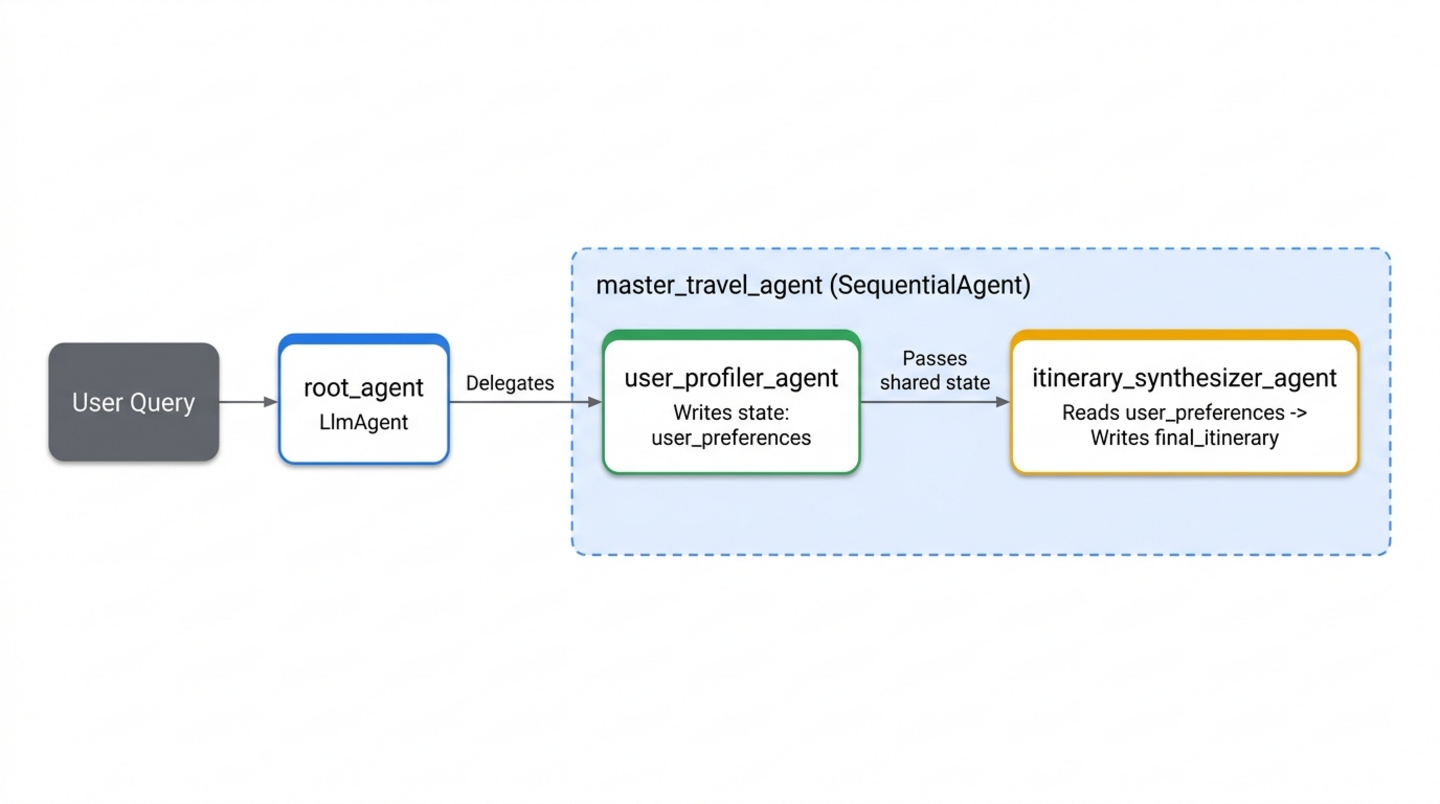
이제 첫 번째 조정 패턴인 SequentialAgent로 구동되는 선형 워크플로를 빌드합니다. 순차적 파이프라인에서는 하위 에이전트가 엄격한 순서로 실행됩니다. 첫 번째 전문가는 구조화된 매개변수를 추출하고 output_key="user_preferences"를 사용하여 공유 세션 상태에 저장하며, 두 번째 전문가는 공유 상태에서 {user_preferences}를 읽어 운항 일정을 작성합니다.
초기 전문가 만들기(specialists.py)
travel_planner/ 내에서 specialists.py라는 새 파일을 엽니다.
cloudshell edit ~/adk-agents/travel_planner/specialists.py
다음 코드를 travel_planner/specialists.py에 붙여넣어 user_profiler_agent 및 itinerary_synthesizer_agent를 정의합니다(다음 단계를 위해 ToolContext 및 google_search를 미리 가져옴).
from google.adk import Agent
from google.adk.tools import ToolContext, google_search

# --- Specialist 1: The User Profiler ---
user_profiler_agent = Agent(
    name="user_profiler_agent",
    description="Extracts travel preferences and constraints from user input.",
    instruction="""
        Extract destination, duration (default 1 day), budget, interests, and exclusions.
        Return a single JSON object with keys: "destination", "duration", "budget", "interests", "exclusions".
    """,
    output_key="user_preferences",  # Saves output to state['user_preferences']
)

# --- Specialist 2: The Synthesizer ---
itinerary_synthesizer_agent = Agent(
    name="itinerary_synthesizer_agent",
    description="Compiles preferences and research into a final Markdown itinerary.",
    instruction="""
        You are an elite Travel Concierge. Write a Markdown itinerary with an itemized USD and local currency cost breakdown using:
        - User Preferences: {user_preferences}
        - Activities (if available): {activity_recommendations?}
        - Restaurants (if available): {restaurant_recommendations?}
    """,
    output_key="final_itinerary",
)
순차 파이프라인 연결(workflows.py)
travel_planner/ 내에 workflows.py라는 새 파일을 만들어 전문가를 조정합니다.
cloudshell edit ~/adk-agents/travel_planner/workflows.py
travel_planner/workflows.py에 다음 SequentialAgent 정의를 추가합니다.
from google.adk.agents import SequentialAgent
from .specialists import (
    user_profiler_agent,
    itinerary_synthesizer_agent,
)

# 1. SEQUENTIAL PHASE: A linear two-step workflow
master_travel_agent = SequentialAgent(
    name="master_travel_agent",
    description="Orchestrates the end-to-end travel planning process for trip and itinerary requests.",
    sub_agents=[
        user_profiler_agent,         # Step 1: Extract constraints into user_preferences
        itinerary_synthesizer_agent,  # Step 2: Draft itinerary from user_preferences
    ],
)
워크플로를 root_agent(agent.py)에 연결
이제 master_travel_agent를 root_agent의 하위 에이전트로 등록합니다. travel_planner/agent.py 열기:
cloudshell edit ~/adk-agents/travel_planner/agent.py
travel_planner/agent.py의 내용을 다음 코드로 바꿉니다.
from google.adk import Agent
from .workflows import master_travel_agent

MODEL = "gemini-3.8-flash"

root_agent = Agent(
    model=MODEL,
    name="root_agent",
    description="A helpful assistant for user questions.",
    instruction=(
        "Greet the user and delegate any travel or trip planning requests "
        "to master_travel_agent."
    ),
    sub_agents=[master_travel_agent],
)
🔍 작업 확인
터미널에서 ADK 웹 UI를 시작합니다.
cd ~/adk-agents
adk web --allow_origins "*"
포트 8000에서 웹 미리보기를 열고 다음 프롬프트를 입력합니다.
Help me plan a trip to Kyoto
이벤트 뷰에 다음 실행 흐름과 유사한 출력이 표시됩니다.
1. root_agent -> calls transfer_to_agent(agent_name="master_travel_agent")
2. user_profiler_agent -> outputs JSON {"destination": "Kyoto", "duration": "1 day", ...} to state['user_preferences']
3. itinerary_synthesizer_agent -> reads {user_preferences} and outputs the formatted Markdown itinerary
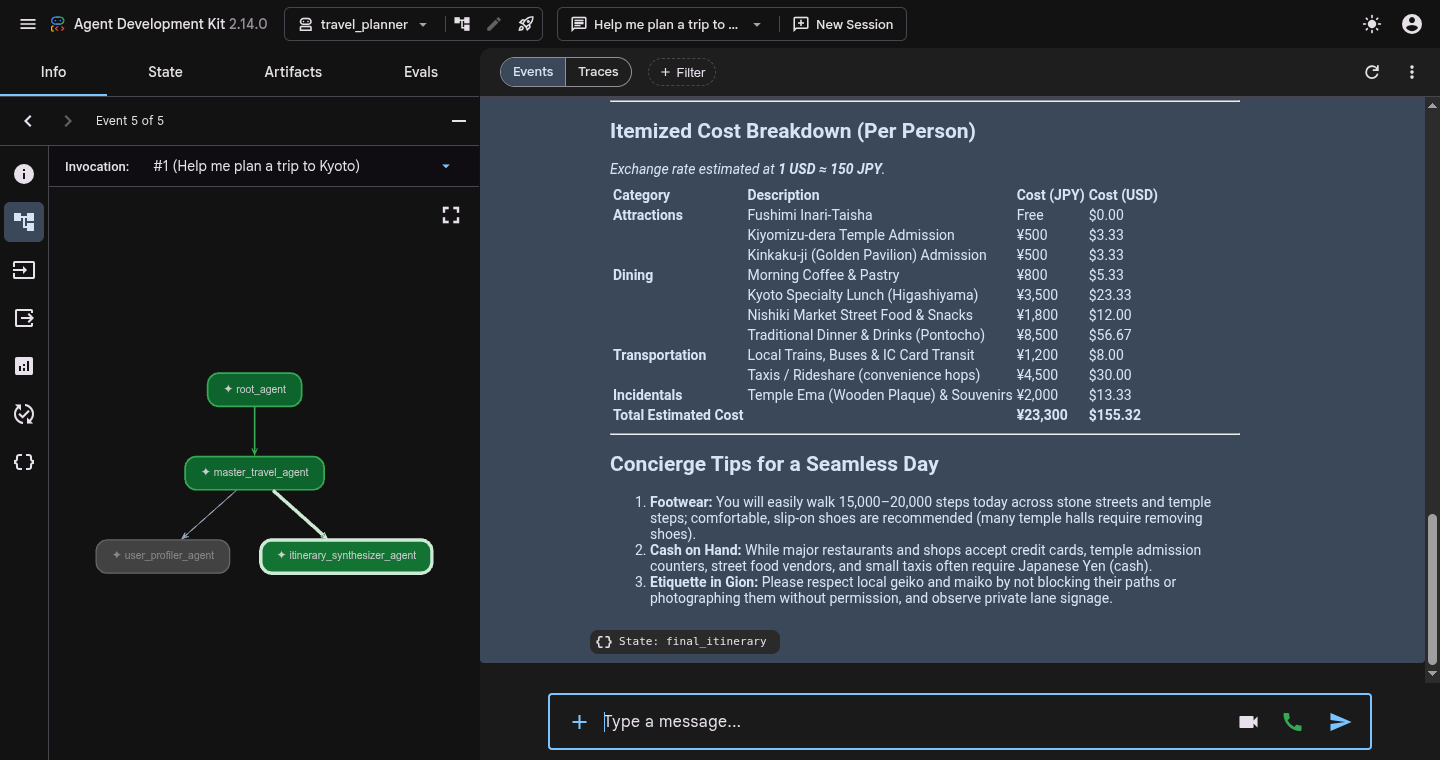
이벤트 배지(또는 State: final_itinerary 칩)를 클릭하고 왼쪽 검사기 패널의 State 탭으로 전환하여 user_preferences 및 final_itinerary가 모두 세션 상태에 채워져 있는지 확인합니다.
trace 검사를 완료하면 터미널에서 Ctrl + C를 눌러 adk web를 중지합니다.
7. ParallelAgent로 조사 실행
순차적 워크플로는 선호도 추출을 여행 일정 초안 작성과 깔끔하게 분리하지만, 추천은 여전히 모델의 정적 학습 지식에만 의존합니다. 기본 제공되는 google_search 도구를 기반으로 하는 전담 연구원 2명을 추가하여 실시간 웹 데이터를 기반으로 여행 일정을 그라운딩할 수 있습니다.
activity_finder_agent: 사용자의 목적지 및 관심분야와 일치하는 특정 명소 3곳을 예상 티켓 가격과 함께 찾습니다.restaurant_finder_agent: 평점이 높은 현지 음식점 3곳과 1인당 예상 비용을 찾습니다.
관광명소 조사와 레스토랑 조사는 서로 종속되지 않으므로 하나씩 차례로 실행하면 시간이 낭비됩니다. 대신 두 연구원을 ParallelAgent(parallel_research_agent) 내에 래핑하여 ADK가 두 Google 검색 워크플로를 동시에 실행하고 {activity_recommendations?} 및 {restaurant_recommendations?}를 채운 후 itinerary_synthesizer_agent에 전달하도록 합니다.
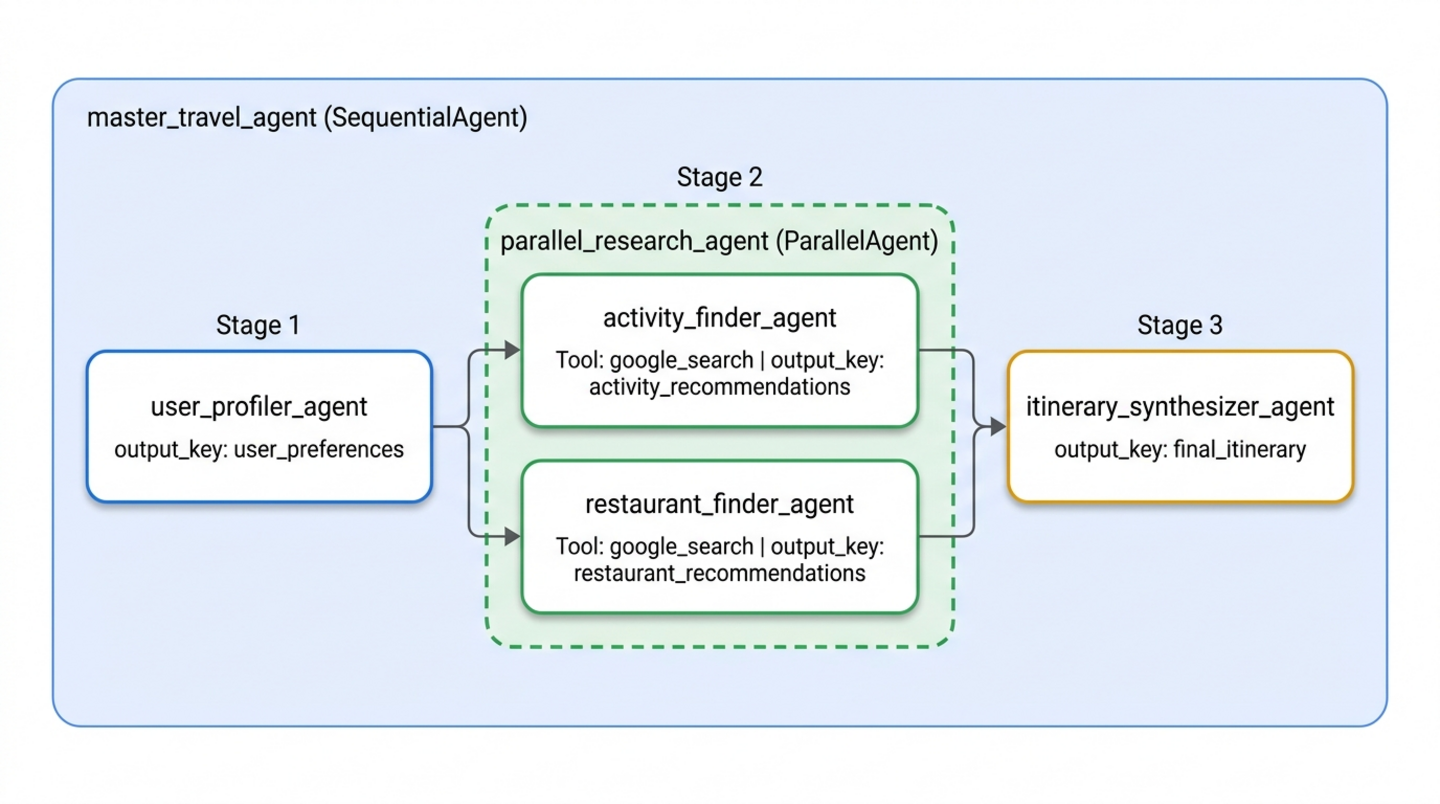
specialists.py에 병렬 연구 전문가 추가
travel_planner/specialists.py 열기:
cloudshell edit ~/adk-agents/travel_planner/specialists.py
다음 두 명의 Google 검색 전문가를 travel_planner/specialists.py의 하단(itinerary_synthesizer_agent 바로 아래)에 추가합니다.
# --- Specialist 3: The Activity Finder ---
activity_finder_agent = Agent(
    name="activity_finder_agent",
    description="Finds 3 attractions matching the user's destination and interests.",
    instruction="""
        Based on {user_preferences}, use google_search to find 3 specific attractions (including budget-friendly options).
        Return a JSON list with keys: "attraction_name", "estimated_cost_local", "estimated_cost_usd", "notes".
    """,
    tools=[google_search],
    output_key="activity_recommendations",
)

# --- Specialist 4: The Restaurant Finder ---
restaurant_finder_agent = Agent(
    name="restaurant_finder_agent",
    description="Finds 3 restaurants matching the destination and budget.",
    instruction="""
        Based on {user_preferences}, use google_search to find 3 highly-rated restaurants across price points.
        Return a JSON list with keys: "restaurant_name", "cuisine", "estimated_cost_local", "estimated_cost_usd".
    """,
    tools=[google_search],
    output_key="restaurant_recommendations",
)
workflows.py에 ParallelAgent 삽입
travel_planner/workflows.py 열기:
cloudshell edit ~/adk-agents/travel_planner/workflows.py
travel_planner/workflows.py을 업데이트하여 ParallelAgent를 사용해 parallel_research_agent을 정의하고 user_profiler_agent와 itinerary_synthesizer_agent 사이에 배치합니다.
from google.adk.agents import ParallelAgent, SequentialAgent
from .specialists import (
    activity_finder_agent,
    itinerary_synthesizer_agent,
    restaurant_finder_agent,
    user_profiler_agent,
)

# Parallel branch: Run activity and restaurant research simultaneously
parallel_research_agent = ParallelAgent(
    name="parallel_research_agent",
    description="Runs activity and restaurant research concurrently.",
    sub_agents=[
        activity_finder_agent,
        restaurant_finder_agent,
    ],
)

# Master pipeline: Profile -> Parallel Research -> Synthesize
master_travel_agent = SequentialAgent(
    name="master_travel_agent",
    description="Orchestrates the end-to-end travel planning process for trip and itinerary requests.",
    sub_agents=[
        user_profiler_agent,          # Step 1: Extract constraints
        parallel_research_agent,      # Step 2: Research activities & restaurants in parallel
        itinerary_synthesizer_agent,  # Step 3: Synthesize into an itinerary
    ],
)
🔍 작업 확인
adk web를 다시 실행하여 병렬 조사 파이프라인을 테스트합니다.
cd ~/adk-agents
adk web --allow_origins "*"
웹 프리뷰 UI에서 다음 프롬프트를 전송합니다.
Help me plan a trip to Kyoto focused on historic temples and ramen
이벤트 뷰에 다음과 비슷한 출력이 표시됩니다.
1. user_profiler_agent -> writes state['user_preferences']
2. parallel_research_agent -> fans out concurrently:
   - activity_finder_agent invokes google_search -> writes state['activity_recommendations']
   - restaurant_finder_agent invokes google_search -> writes state['restaurant_recommendations']
3. itinerary_synthesizer_agent -> merges all three state keys into state['final_itinerary']
- 트레이스 뷰: 대화 창 상단에서 트레이스(이벤트 옆)를 클릭하고 차례를 검사합니다.
parallel_research_agent아래에activity_finder_agent및restaurant_finder_agent의 타임라인 스팬이 겹쳐서 표시되며, 이를 통해 전체 웹 조사 지연 시간이 순차적으로 실행할 때보다 거의 절반으로 줄어듭니다. - 상태 탭: 왼쪽 검사기 패널에서 상태 탭을 클릭하여 실시간 세션 사전(
user_preferences,activity_recommendations,restaurant_recommendations,final_itinerary)을 검사합니다.
테스트가 완료되면 터미널에서 Ctrl + C를 눌러 adk web를 중지합니다.
8. LoopAgent로 초안 수정
실시간 검색 결과를 사용하더라도 itinerary_synthesizer_agent에서 생성한 초기 초안은 사용자의 총 예산을 초과하거나 제외된 카테고리(예: 사용자가 제외를 요청한 현대 미술관)를 실수로 포함할 수 있습니다.
제약 조건 준수를 보장하기 위해 LoopAgent를 사용하여 파이프라인 끝에 메이커-체커 미세 조정 루프를 추가합니다.
itinerary_critic_agent(검사기):{user_preferences}를 기준으로{final_itinerary}를 감사합니다. 예상 비용을 합산하고, 모든 부정적인 제약 조건을 확인하고,critique_feedback에 구체적인 수정 안내를 작성하거나 정확한 문구"APPROVED"로 응답합니다.itinerary_refiner_agent(메이커/이탈자):{critique_feedback}을 읽습니다. 비평이"APPROVED"와 같으면exit_loop도구(tool_context.actions.escalate = True)를 호출하여LoopAgent에서 즉시 벗어납니다. 그렇지 않으면{final_itinerary}를 수정하여 신고된 문제를 해결하고 다음 패스를 위해final_itinerary를 덮어씁니다.
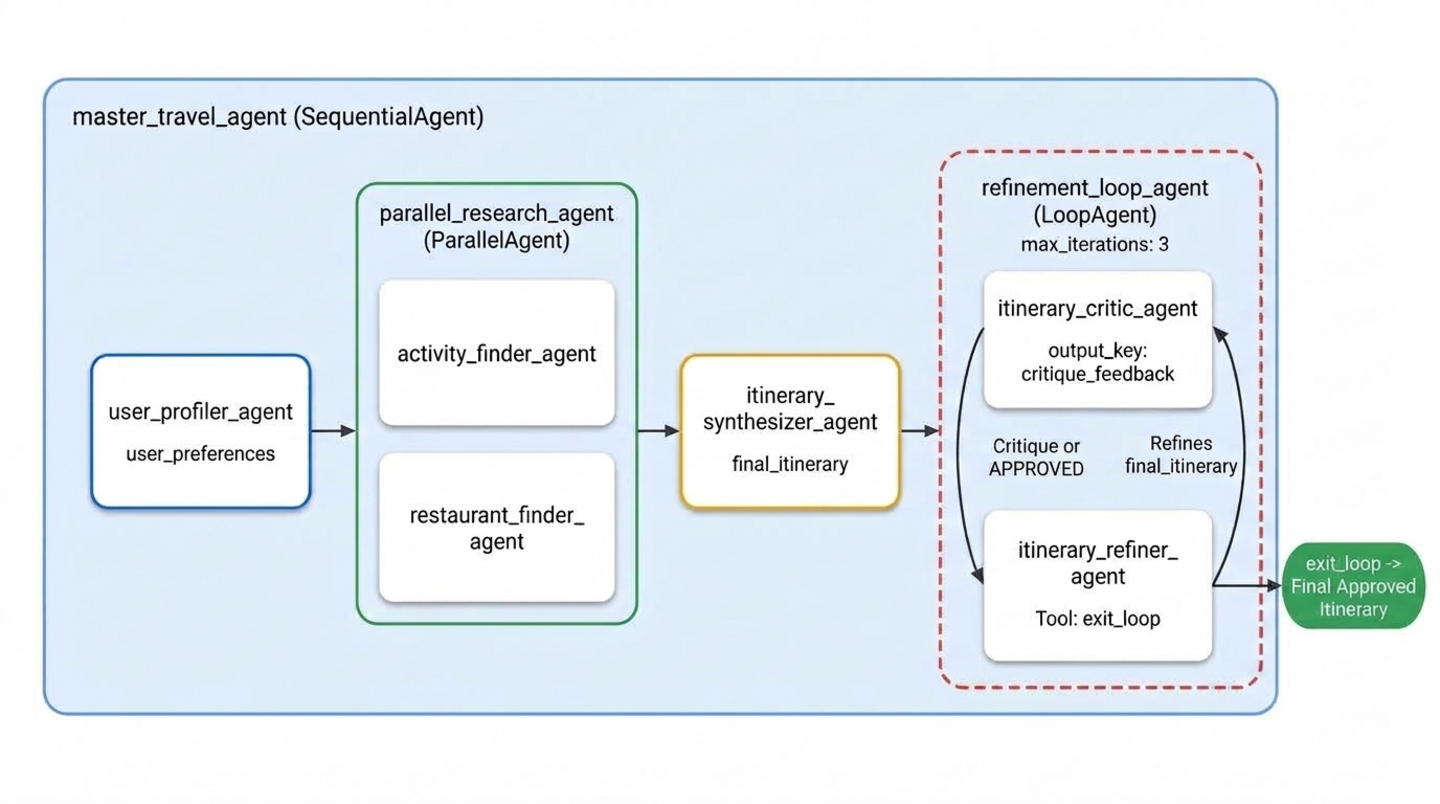
exit_loop, Critic, Refiner를 specialists.py에 추가
travel_planner/specialists.py 열기:
cloudshell edit ~/adk-agents/travel_planner/specialists.py
exit_loop 도구(ToolContext), itinerary_critic_agent, itinerary_refiner_agent를 travel_planner/specialists.py의 하단에 추가합니다.
def exit_loop(tool_context: ToolContext) -> dict:
    """Call ONLY when the critique is APPROVED to exit the refinement loop."""
    print(f"[Tool Call] exit_loop triggered by {tool_context.agent_name}")
    tool_context.actions.escalate = True
    return {"status": "approved", "message": "Itinerary approved. Exiting refinement loop."}


# --- Specialist 5: The Budget & Constraint Critic (Inside LoopAgent) ---
itinerary_critic_agent = Agent(
    name="itinerary_critic_agent",
    include_contents="none",
    description="Audits the itinerary draft against budget and negative constraints.",
    instruction="""
        Audit Current Itinerary ({final_itinerary}) against User Preferences ({user_preferences}).
        Verify that the USD total stays within the user's budget and no excluded venue types appear.
        If all checks pass, respond EXACTLY with the single word "APPROVED".
        Otherwise, output 1-2 concise revision instructions explaining what to swap or adjust.
    """,
    output_key="critique_feedback",
)

# --- Specialist 6: The Itinerary Refiner / Exiter (Inside LoopAgent) ---
itinerary_refiner_agent = Agent(
    name="itinerary_refiner_agent",
    include_contents="none",
    description="Refines the itinerary from critique feedback, or calls exit_loop when APPROVED.",
    instruction="""
        Review Auditor Critique ({critique_feedback}) for Current Itinerary ({final_itinerary}).
        If the critique is EXACTLY "APPROVED", call `exit_loop` immediately and return the itinerary unchanged.
        Otherwise, revise the draft using {activity_recommendations} and {restaurant_recommendations}
        so all USD budget and exclusion rules pass, and output ONLY the updated Markdown itinerary.
    """,
    tools=[exit_loop],
    output_key="final_itinerary",
)
workflows.py에 LoopAgent 추가
travel_planner/workflows.py 열기:
cloudshell edit ~/adk-agents/travel_planner/workflows.py
travel_planner/workflows.py를 업데이트하여 itinerary_critic_agent 및 itinerary_refiner_agent를 LoopAgent(max_iterations=3)로 래핑하고 master_travel_agent의 네 번째 단계로 추가합니다.
from google.adk.agents import LoopAgent, ParallelAgent, SequentialAgent
from .specialists import (
    activity_finder_agent,
    itinerary_critic_agent,
    itinerary_refiner_agent,
    itinerary_synthesizer_agent,
    restaurant_finder_agent,
    user_profiler_agent,
)

# Stage 2: Parallel research branch
parallel_research_agent = ParallelAgent(
    name="parallel_research_agent",
    description="Runs activity and restaurant research concurrently.",
    sub_agents=[
        activity_finder_agent,
        restaurant_finder_agent,
    ],
)

# Stage 4: Iterative Maker-Checker refinement loop
refinement_loop_agent = LoopAgent(
    name="refinement_loop_agent",
    description="Iteratively audits and refines the itinerary until constraints and budget are approved.",
    sub_agents=[
        itinerary_critic_agent,
        itinerary_refiner_agent,
    ],
    max_iterations=3,
)

# Master pipeline: Profile -> Parallel Research -> Synthesize -> Refinement Loop
master_travel_agent = SequentialAgent(
    name="master_travel_agent",
    description="Orchestrates the end-to-end travel planning process for trip and itinerary requests.",
    sub_agents=[
        user_profiler_agent,          # Stage 1: Extract constraints
        parallel_research_agent,      # Stage 2: Research activities & restaurants in parallel
        itinerary_synthesizer_agent,  # Stage 3: Draft initial itinerary
        refinement_loop_agent,        # Stage 4: Audit and refine until approved
    ],
)
🔍 작업 확인
adk web를 시작하여 전체 멀티 에이전트 워크플로를 테스트합니다.
cd ~/adk-agents
adk web --allow_origins "*"
포트 8000에서 웹 프리뷰 UI를 열고 새 세션을 시작한 후 다음 교토 다중 제약 조건 프롬프트를 사용하여 전체 시스템을 테스트합니다.
Design a full-day itinerary for Kyoto with a total budget of $100. My main interests are historical landmarks, temples, and authentic local cuisine. Please do not include any modern art museums or galleries.
Events 뷰 및 터미널 로그에 다음 실행 시퀀스와 유사한 출력이 표시됩니다.
1. user_profiler_agent -> writes JSON with destination="Kyoto", budget="$100", exclusions=["modern art museums", "galleries"]
2. parallel_research_agent -> runs activity_finder_agent and restaurant_finder_agent in parallel
3. itinerary_synthesizer_agent -> produces initial draft in state['final_itinerary']
4. refinement_loop_agent:
   - itinerary_critic_agent -> audits USD budget and exclusions -> outputs "APPROVED" (or revision notes)
   - itinerary_refiner_agent -> triggers [Tool Call] exit_loop triggered by itinerary_refiner_agent and outputs the approved itinerary
- 이벤트 뷰:
itinerary_critic_agent또는itinerary_refiner_agent에서 이벤트 칩을 클릭하여 왼쪽 정보 탭에서 페이로드를 검사합니다.itinerary_refiner_agent가exit_loop를 호출하면 이벤트를 검사하여actions.escalate: true를 확인합니다. 이는max_iterations=3에 도달하기 전에 반복을 중지하도록LoopAgent에 알리는 신호입니다. - 상태 탭: 상태 탭을 클릭하여 패스 전반에서
state['critique_feedback']및state['final_itinerary']업데이트를 확인합니다. 초안이$100 USD를 초과하는 경우critique_feedback는final_itinerary가 저비용 대안으로 업데이트되고critique_feedback가 2단계에서"APPROVED"로 변경되기 전에 1단계에서 감사자의 수정 지침을 보관합니다.
테스트가 완료되면 터미널에서 Ctrl + C를 눌러 adk web를 중지합니다.
9. 삭제
로컬 프로젝트 파일 삭제
Cloud Shell 홈 폴더에서 adk-agents 프로젝트 디렉터리와 가상 환경을 삭제하려면 다음을 실행합니다.
cd ~
rm -rf ~/adk-agents
Agent Platform API 사용 중지
프로젝트에서 Agent Platform API를 더 이상 사용 설정할 필요가 없으면 gcloud를 사용하여 사용 중지합니다.
gcloud services disable aiplatform.googleapis.com --quiet
Google Cloud 프로젝트 전체 삭제(선택사항)
PROJECT_ID=$(gcloud config get-value project)
gcloud projects delete "$PROJECT_ID" --quiet
🔍 작업 확인
~/adk-agents가 삭제되었는지 확인합니다.
test ! -d ~/adk-agents && echo "Workspace ~/adk-agents removed"
다음과 비슷한 출력이 표시됩니다.
Workspace ~/adk-agents removed
10. 축하합니다
수고하셨습니다 Google 에이전트 개발 키트(ADK)를 사용하여 순차, 병렬, 반복 루프 워크플로 전반에서 6개의 전문 에이전트로 구성된 팀을 조정하는 계층적 멀티 에이전트 시스템을 빌드했습니다.
실습한 내용
- 공유 세션 상태를 통한 구조화된 에이전트 간 통신(
output_key및{state_variable}템플릿 삽입) SequentialAgent를 사용하여 결정론적 단계별 파이프라인을 빌드했습니다.ParallelAgent를 사용하여 독립적인 Google 검색 조사 에이전트를 동시에 실행했습니다.LoopAgent및tool_context.actions.escalate = True를 사용하여 자동화된 메이커-체커 인증 루프 구현
다음 단계
- 시리즈의 4부인 ADK를 사용한 AI 에이전트 빌드: 그래프 워크플로 조정으로 이동하여 ADK 2의 통합
Workflow,JoinNode, 결정론적Event(route=...)주기를 사용하여 이 여행 플래너를 다시 빌드합니다. - 공식 ADK 워크플로 에이전트 문서 읽기
- ADK의 멀티 에이전트 시스템 살펴보기
- GEAR(Gemini Enterprise Agent Ready) 프로그램 및 자격증 취득 프로그램에 참여하여 실무 워크숍과 학습 과정을 이용하세요.