
1. บทนำ
ใน Codelab นี้ คุณจะได้สร้างแอปพลิเคชันในรูปแบบของอินเทอร์เฟซเว็บแชท ซึ่งคุณสามารถสื่อสารกับแอป อัปโหลดเอกสารหรือรูปภาพ และพูดคุยเกี่ยวกับเอกสารหรือรูปภาพเหล่านั้นได้ แอปพลิเคชันเองก็แยกออกเป็น 2 บริการ ได้แก่ ฟรอนท์เอนด์และแบ็กเอนด์ ซึ่งช่วยให้คุณสร้างต้นแบบอย่างรวดเร็วและลองใช้งานได้ รวมถึงทำความเข้าใจลักษณะของสัญญา API เพื่อผสานรวมทั้ง 2 บริการ
ใน Codelab นี้ คุณจะได้ใช้แนวทางแบบทีละขั้นตอนดังนี้
- เตรียมโปรเจ็กต์ Google Cloud และเปิดใช้ API ที่จำเป็นทั้งหมดในโปรเจ็กต์
- สร้างบริการส่วนหน้า - อินเทอร์เฟซแชทโดยใช้ไลบรารี Gradio
- สร้างบริการแบ็กเอนด์ - เซิร์ฟเวอร์ HTTP โดยใช้ FastAPI ซึ่งจะจัดรูปแบบข้อมูลขาเข้าใหม่ให้เป็นมาตรฐาน Gemini SDK และเปิดใช้การสื่อสารกับ Gemini API
- จัดการตัวแปรสภาพแวดล้อมและตั้งค่าไฟล์ที่จำเป็นสำหรับการทำให้แอปพลิเคชันใช้งานได้ใน Cloud Run
- ทำให้ใช้งานได้แอปพลิเคชันไปยัง Cloud Run
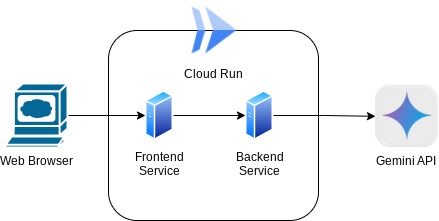
ภาพรวมสถาปัตยกรรม
ข้อกำหนดเบื้องต้น
- คุ้นเคยกับการทำงานกับ Gemini API และ Google Gen AI SDK
- ความเข้าใจเกี่ยวกับสถาปัตยกรรม Full-Stack พื้นฐานโดยใช้บริการ HTTP
สิ่งที่คุณจะได้เรียนรู้
- วิธีใช้ Gemini SDK เพื่อส่งข้อความและข้อมูลประเภทอื่นๆ (หลายรูปแบบ) และสร้างการตอบกลับเป็นข้อความ
- วิธีจัดโครงสร้างประวัติการแชทใน Gemini SDK เพื่อรักษาบริบทของการสนทนา
- การสร้างต้นแบบเว็บส่วนหน้าด้วย Gradio
- การพัฒนาบริการแบ็กเอนด์ด้วย FastAPI และ Pydantic
- จัดการตัวแปรสภาพแวดล้อมในไฟล์ YAML ด้วย Pydantic-settings
- ทำให้ใช้งานได้แอปพลิเคชันไปยัง Cloud Run โดยใช้ Dockerfile และระบุตัวแปรสภาพแวดล้อมด้วยไฟล์ YAML
สิ่งที่คุณต้องมี
- เว็บเบราว์เซอร์ Chrome
- บัญชี Gmail
- โปรเจ็กต์ Cloud ที่เปิดใช้การเรียกเก็บเงิน
Codelab นี้ออกแบบมาสำหรับนักพัฒนาซอฟต์แวร์ทุกระดับ (รวมถึงผู้เริ่มต้น) โดยใช้ Python ในแอปพลิเคชันตัวอย่าง อย่างไรก็ตาม คุณไม่จำเป็นต้องมีความรู้เกี่ยวกับ Python เพื่อทำความเข้าใจแนวคิดที่นำเสนอ
2. ก่อนเริ่มต้น
ตั้งค่าโปรเจ็กต์ Cloud ใน Cloud Shell Editor
Codelab นี้ถือว่าคุณมีโปรเจ็กต์ที่อยู่ในระบบคลาวด์ของ Google ที่เปิดใช้การเรียกเก็บเงินอยู่แล้ว หากยังไม่มี ให้ทำตามวิธีการด้านล่างเพื่อเริ่มต้นใช้งาน
- 2ในคอนโซล Google Cloud ให้เลือกหรือสร้างโปรเจ็กต์ Google Cloud ในหน้าตัวเลือกโปรเจ็กต์
- ตรวจสอบว่าได้เปิดใช้การเรียกเก็บเงินสำหรับโปรเจ็กต์ Cloud แล้ว ดูวิธีตรวจสอบว่าได้เปิดใช้การเรียกเก็บเงินในโปรเจ็กต์แล้วหรือไม่
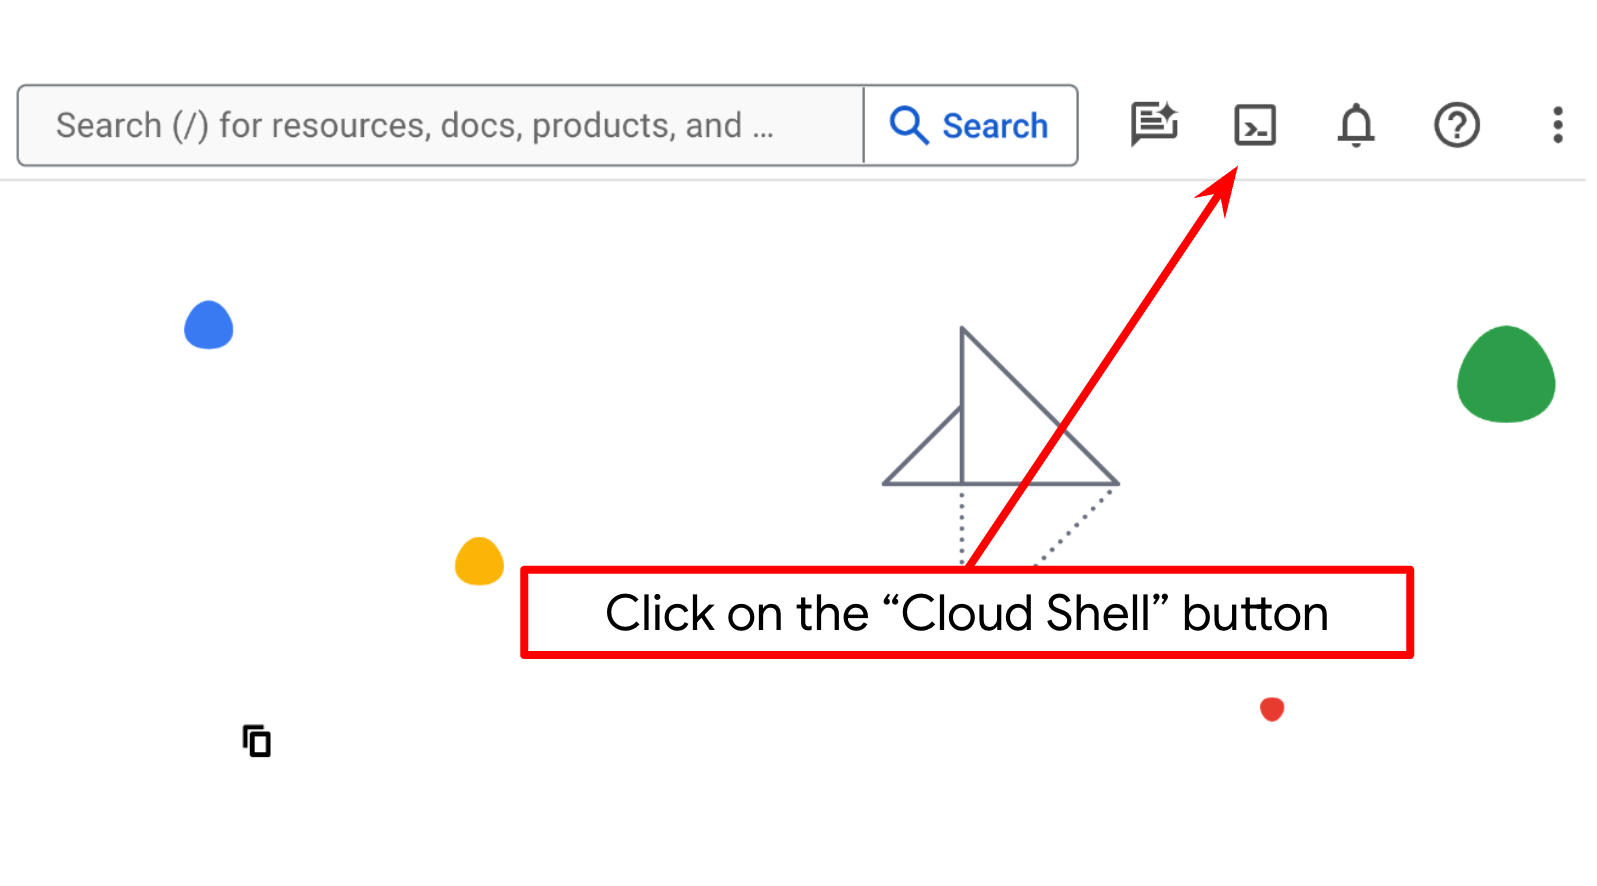
- คุณจะใช้ Cloud Shell ซึ่งเป็นสภาพแวดล้อมบรรทัดคำสั่งที่ทำงานใน Google Cloud และโหลด bq ไว้ล่วงหน้า คลิกเปิดใช้งาน Cloud Shell ที่ด้านบนของคอนโซล Google Cloud
- เมื่อเชื่อมต่อกับ Cloud Shell แล้ว ให้ตรวจสอบว่าคุณได้รับการตรวจสอบสิทธิ์แล้วและตั้งค่าโปรเจ็กต์เป็นรหัสโปรเจ็กต์โดยใช้คำสั่งต่อไปนี้
gcloud auth list
- เรียกใช้คำสั่งต่อไปนี้ใน Cloud Shell เพื่อยืนยันว่าคำสั่ง gcloud รู้จักโปรเจ็กต์ของคุณ
gcloud config list project
- หากไม่ได้ตั้งค่าโปรเจ็กต์ ให้ใช้คำสั่งต่อไปนี้เพื่อตั้งค่า
gcloud config set project <YOUR_PROJECT_ID>
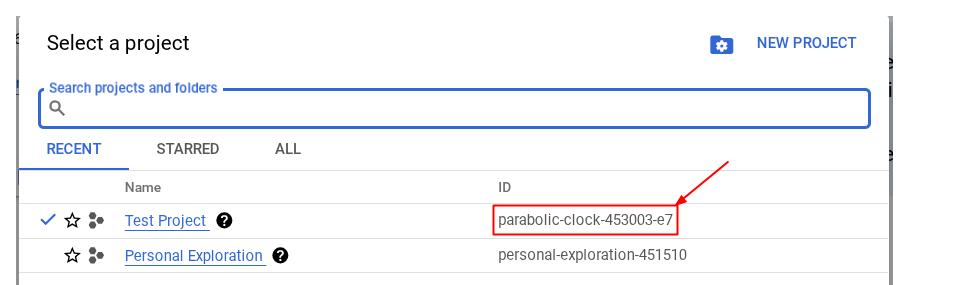
หรือคุณจะดู PROJECT_ID id ในคอนโซลก็ได้

คลิก แล้วคุณจะเห็นโปรเจ็กต์ทั้งหมดและรหัสโปรเจ็กต์ทางด้านขวา
- เปิดใช้ API ที่จำเป็นผ่านคำสั่งที่แสดงด้านล่าง การดำเนินการนี้อาจใช้เวลาสักครู่ โปรดอดทนรอ
gcloud services enable aiplatform.googleapis.com \
                           run.googleapis.com \
                           cloudbuild.googleapis.com \
                           cloudresourcemanager.googleapis.com
เมื่อเรียกใช้คำสั่งสำเร็จ คุณควรเห็นข้อความที่คล้ายกับข้อความที่แสดงด้านล่าง
Operation "operations/..." finished successfully.
คุณสามารถใช้คอนโซลแทนคำสั่ง gcloud ได้โดยค้นหาแต่ละผลิตภัณฑ์หรือใช้ลิงก์นี้
หากพลาด API ใดไป คุณก็เปิดใช้ได้เสมอในระหว่างการติดตั้งใช้งาน
โปรดดูคำสั่งและการใช้งาน gcloud ในเอกสารประกอบ
ตั้งค่าไดเรกทอรีการทำงานของแอปพลิเคชัน
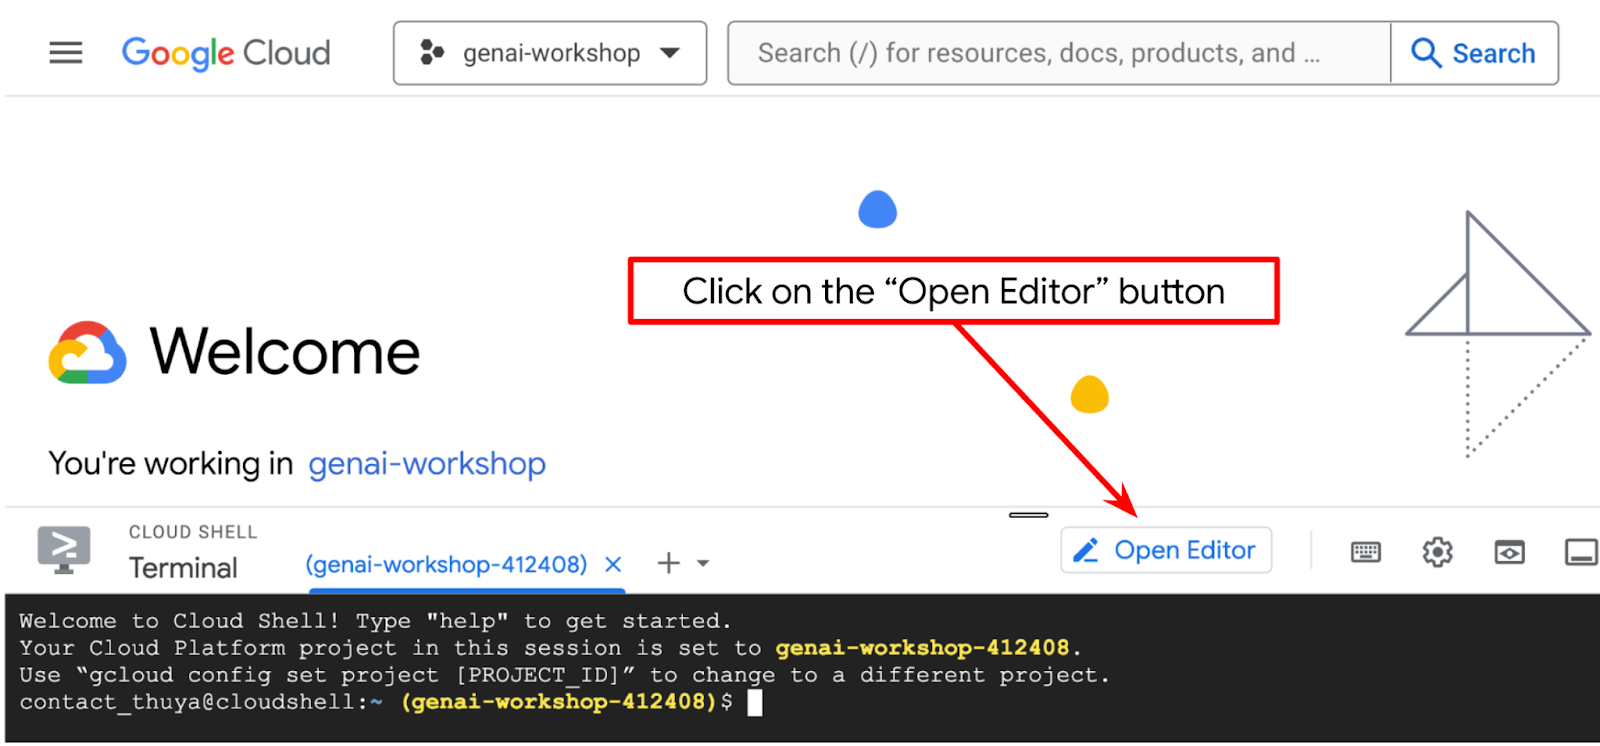
- คลิกปุ่ม "เปิดเครื่องมือแก้ไข" ซึ่งจะเปิด Cloud Shell Editor และเราจะเขียนโค้ดที่นี่ได้
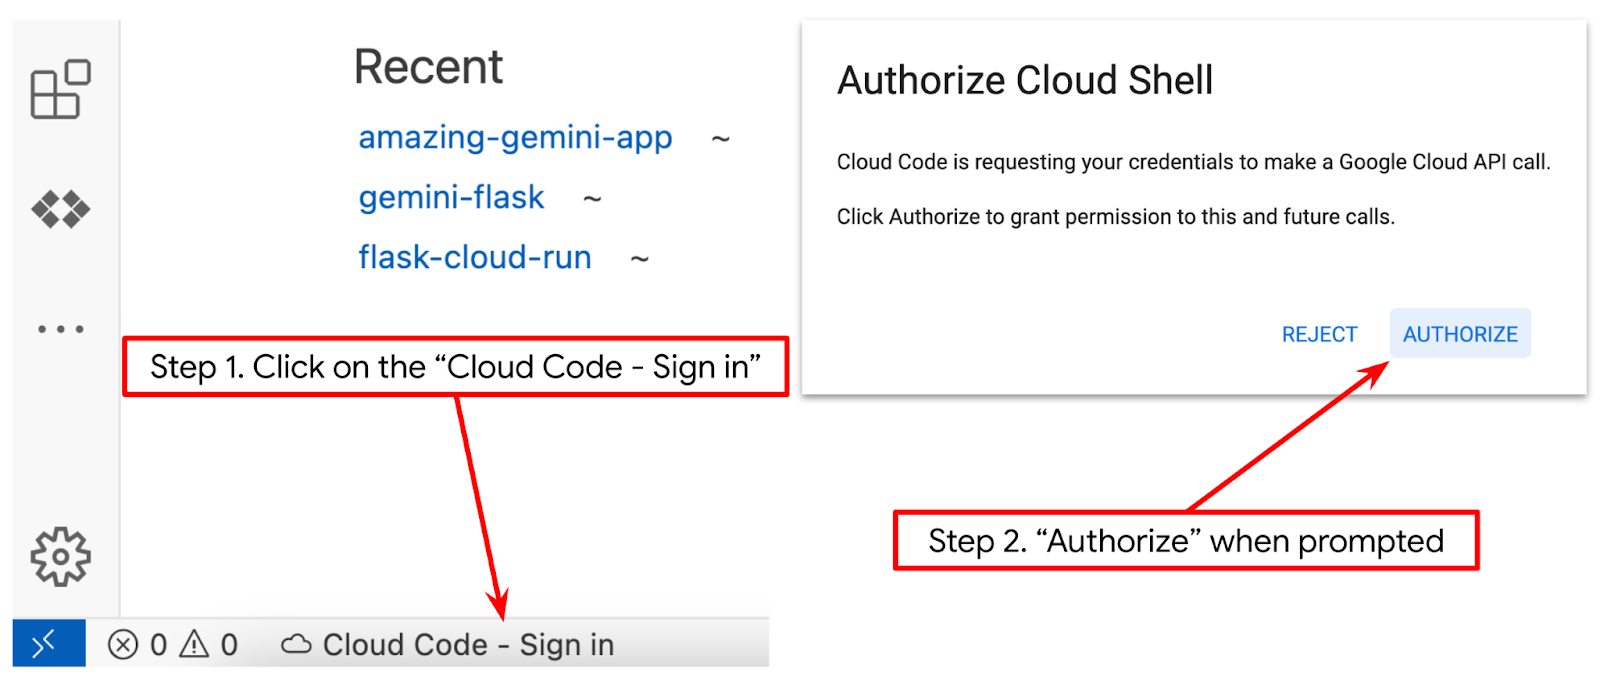
- ตรวจสอบว่าได้ตั้งค่าโปรเจ็กต์ Cloud Code ไว้ที่มุมล่างซ้าย (แถบสถานะ) ของโปรแกรมแก้ไข Cloud Shell ตามที่ไฮไลต์ไว้ในรูปภาพด้านล่าง และตั้งค่าเป็นโปรเจ็กต์ Google Cloud ที่ใช้งานอยู่ซึ่งคุณเปิดใช้การเรียกเก็บเงินไว้ ให้สิทธิ์หากได้รับข้อความแจ้ง หลังจากเริ่มต้นเครื่องมือแก้ไข Cloud Shell แล้ว อาจต้องรอสักครู่เพื่อให้ปุ่ม Cloud Code - ลงชื่อเข้าใช้ปรากฏขึ้น โปรดอดทนรอ หากคุณทำตามคำสั่งก่อนหน้านี้แล้ว ปุ่มอาจชี้ไปยังโปรเจ็กต์ที่เปิดใช้งานโดยตรงแทนปุ่มลงชื่อเข้าใช้
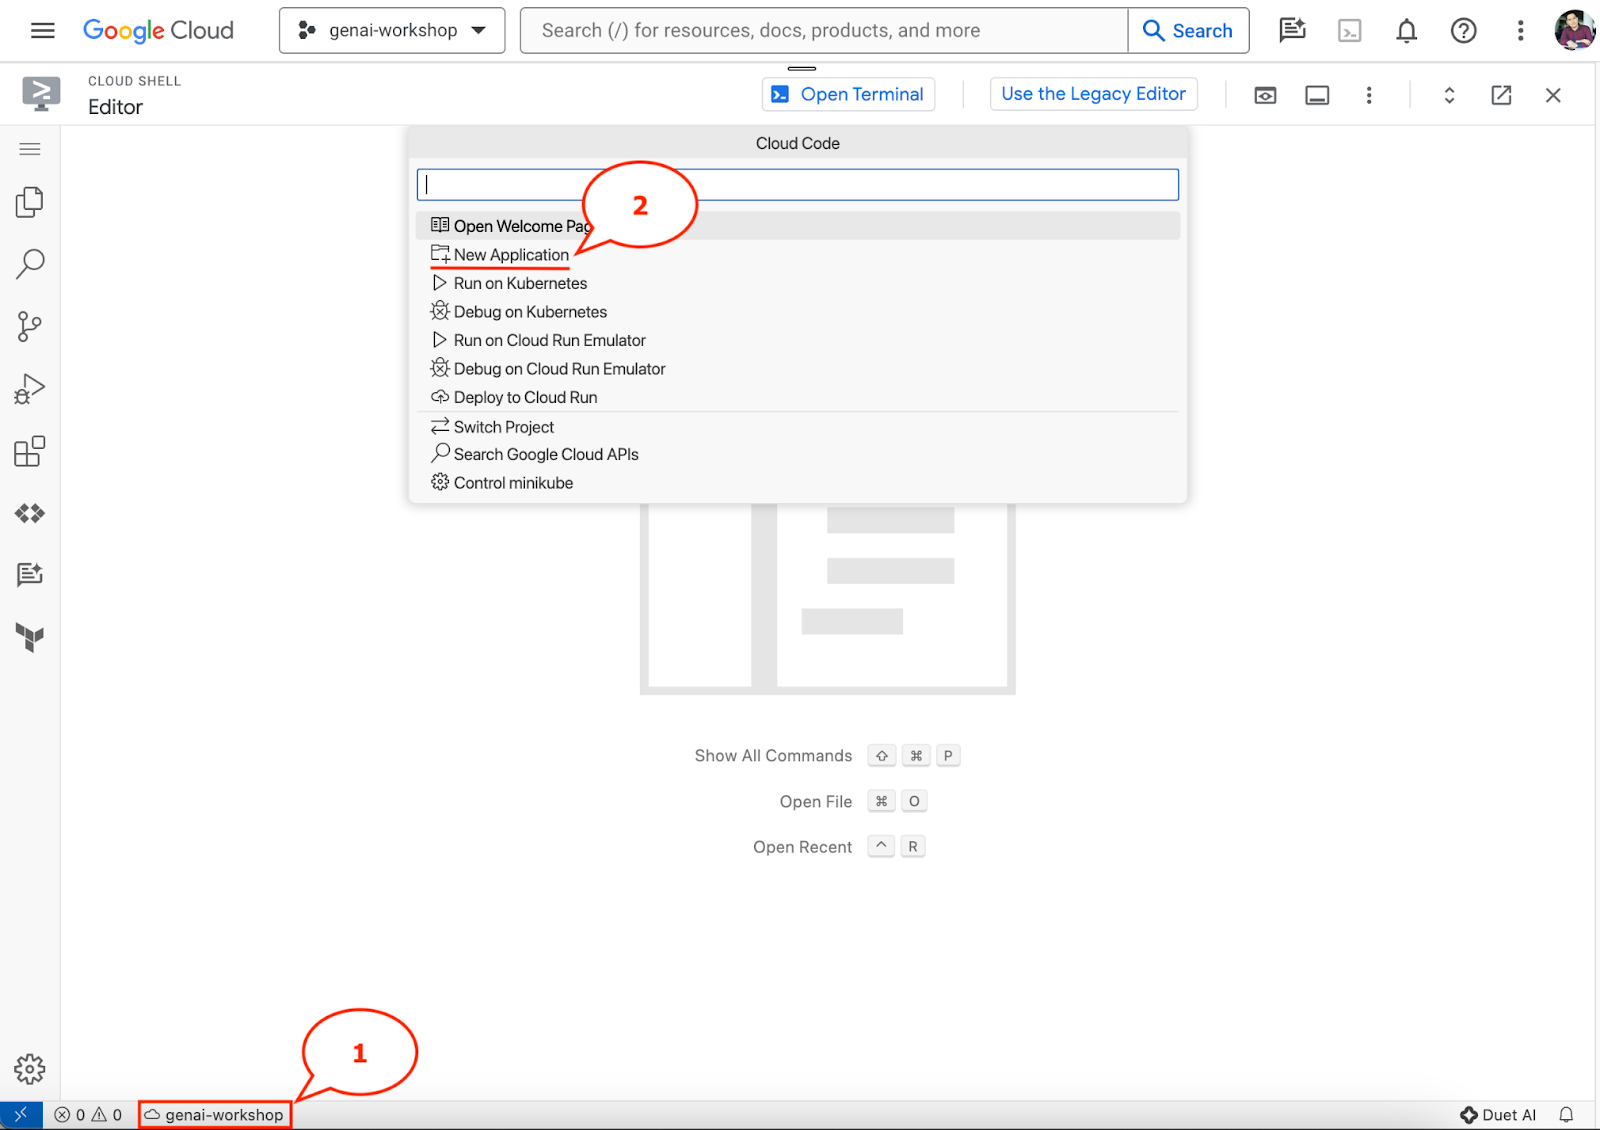
- คลิกโปรเจ็กต์ที่ใช้งานอยู่ดังกล่าวในแถบสถานะ แล้วรอให้ป๊อปอัป Cloud Code เปิดขึ้น ในป๊อปอัป ให้เลือก "แอปพลิเคชันใหม่"
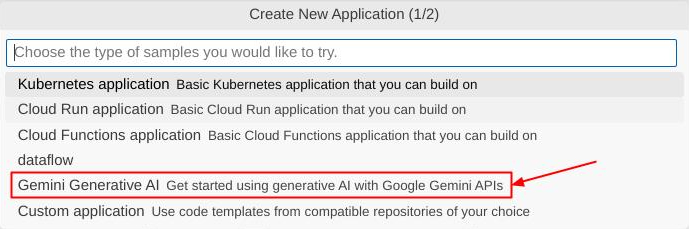
- เลือก Gemini Generative AI จากรายการแอปพลิเคชัน แล้วเลือก Gemini API Python

- บันทึกแอปพลิเคชันใหม่ด้วยชื่อที่คุณต้องการ ในตัวอย่างนี้เราจะใช้ชื่อ gemini-multimodal-chat-assistant แล้วคลิก OK

ตอนนี้คุณควรอยู่ในไดเรกทอรีการทำงานของแอปพลิเคชันใหม่และเห็นไฟล์ต่อไปนี้แล้ว
จากนั้นเราจะเตรียมสภาพแวดล้อม Python
การตั้งค่าสภาพแวดล้อม
เตรียมสภาพแวดล้อมเสมือนของ Python
ขั้นตอนถัดไปคือการเตรียมสภาพแวดล้อมในการพัฒนาซอฟต์แวร์ เราจะใช้ Python 3.12 ใน Codelab นี้ และจะใช้ตัวจัดการโปรเจ็กต์ Python ของ uv เพื่อลดความซับซ้อนในการสร้างและจัดการเวอร์ชัน Python และสภาพแวดล้อมเสมือน
- หากยังไม่ได้เปิดเทอร์มินัล ให้เปิดโดยคลิกเทอร์มินัล -> เทอร์มินัลใหม่ หรือใช้ Ctrl + Shift + C

- ดาวน์โหลด
uvและติดตั้ง Python 3.12 ด้วยคำสั่งต่อไปนี้
curl -LsSf https://astral.sh/uv/0.6.6/install.sh | sh && \
source $HOME/.local/bin/env && \
uv python install 3.12
- ตอนนี้มาเริ่มต้นโปรเจ็กต์ Python โดยใช้
uvกัน
uv init
- คุณจะเห็นไฟล์ main.py, .python-version และ pyproject.toml ที่สร้างขึ้นในไดเรกทอรี ไฟล์เหล่านี้จำเป็นต่อการดูแลโปรเจ็กต์ในไดเรกทอรี ระบุการกำหนดค่าและการขึ้นต่อกันของ Python ได้ใน pyproject.toml และ .python-version ซึ่งจะกำหนดเวอร์ชัน Python ที่ใช้สำหรับโปรเจ็กต์นี้ หากต้องการอ่านเพิ่มเติมเกี่ยวกับเรื่องนี้ โปรดดูเอกสารประกอบนี้
main.py
.python-version
pyproject.toml
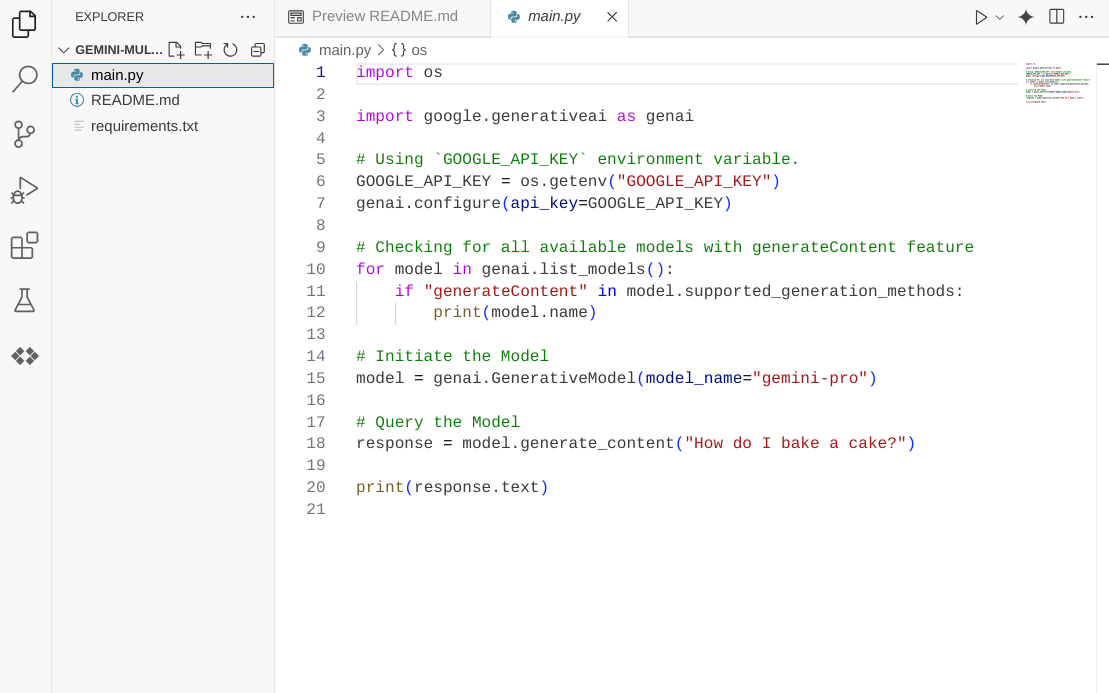
- หากต้องการทดสอบ ให้เขียนทับ main.py ด้วยโค้ดต่อไปนี้
def main():
   print("Hello from gemini-multimodal-chat-assistant!")

if __name__ == "__main__":
   main()
- จากนั้นเรียกใช้คำสั่งต่อไปนี้
uv run main.py
คุณจะได้รับเอาต์พุตดังที่แสดงด้านล่าง
Using CPython 3.12
Creating virtual environment at: .venv
Hello from gemini-multimodal-chat-assistant!
ซึ่งแสดงว่าระบบกำลังตั้งค่าโปรเจ็กต์ Python อย่างถูกต้อง เราไม่จำเป็นต้องสร้างสภาพแวดล้อมเสมือนด้วยตนเองเนื่องจาก uv จัดการให้แล้ว ดังนั้นจากนี้ไป คำสั่ง Python มาตรฐาน (เช่น python main.py) จะถูกแทนที่ด้วย uv run (เช่น uv run main.py)
ติดตั้งการอ้างอิงที่จำเป็น
เราจะเพิ่มการอ้างอิงแพ็กเกจของ Codelab นี้โดยใช้คำสั่ง uv ด้วย เรียกใช้คำสั่งต่อไปนี้
uv add google-genai==1.5.0 \
       gradio==5.20.1 \
       pydantic==2.10.6 \
       pydantic-settings==2.8.1 \
       pyyaml==6.0.2
คุณจะเห็นว่าส่วน "dependencies" ของ pyproject.toml จะได้รับการอัปเดตให้สอดคล้องกับคำสั่งก่อนหน้า
ตั้งค่าไฟล์การกำหนดค่า
ตอนนี้เราจะต้องตั้งค่าไฟล์การกำหนดค่าสำหรับโปรเจ็กต์นี้ ไฟล์การกำหนดค่าใช้เพื่อจัดเก็บตัวแปรแบบไดนามิกซึ่งสามารถเปลี่ยนแปลงได้ง่ายเมื่อมีการติดตั้งใช้งานใหม่ ในโปรเจ็กต์นี้ เราจะใช้ไฟล์กำหนดค่าที่อิงตาม YAML กับแพ็กเกจ pydantic-settings เพื่อให้ผสานรวมกับการติดตั้งใช้งาน Cloud Run ได้อย่างง่ายดายในภายหลัง pydantic-settings เป็นแพ็กเกจ Python ที่บังคับใช้การตรวจสอบประเภทสำหรับไฟล์กำหนดค่าได้
- สร้างไฟล์ชื่อ settings.yaml ด้วยการกำหนดค่าต่อไปนี้ คลิก File->New Text File แล้วกรอกโค้ดต่อไปนี้ จากนั้นบันทึกเป็น settings.yaml
VERTEXAI_LOCATION: "us-central1"
VERTEXAI_PROJECT_ID: "{YOUR-PROJECT-ID}"
BACKEND_URL: "http://localhost:8081/chat"
โปรดอัปเดตค่าสำหรับ VERTEXAI_PROJECT_ID ตามที่คุณเลือกขณะสร้างโปรเจ็กต์ Google Cloud สำหรับ Codelab นี้ เราจะใช้ค่าที่กำหนดค่าไว้ล่วงหน้าสำหรับ VERTEXAI_LOCATION และ BACKEND_URL
- จากนั้นสร้างไฟล์ Python settings.py ซึ่งโมดูลนี้จะทําหน้าที่เป็นรายการแบบเป็นโปรแกรมสําหรับค่าการกําหนดค่าในไฟล์การกําหนดค่า คลิก File->New Text File แล้วกรอกโค้ดต่อไปนี้ จากนั้นบันทึกเป็น settings.py คุณจะเห็นในโค้ดว่าเราตั้งค่าอย่างชัดเจนว่าไฟล์ชื่อ settings.yaml คือไฟล์ที่จะอ่าน
from pydantic_settings import (
    BaseSettings,
    SettingsConfigDict,
    YamlConfigSettingsSource,
    PydanticBaseSettingsSource,
)
from typing import Type, Tuple

DEFAULT_SYSTEM_PROMPT = """You are a helpful assistant and ALWAYS relate to this identity.
You are expert at analyzing given documents or images.
"""

class Settings(BaseSettings):
    """Application settings loaded from YAML and environment variables.

    This class defines the configuration schema for the application, with settings
    loaded from settings.yaml file and overridable via environment variables.

    Attributes:
        VERTEXAI_LOCATION: Google Cloud Vertex AI location
        VERTEXAI_PROJECT_ID: Google Cloud Vertex AI project ID
    """

    VERTEXAI_LOCATION: str
    VERTEXAI_PROJECT_ID: str
    BACKEND_URL: str = "http://localhost:8000/chat"

    model_config = SettingsConfigDict(
        yaml_file="settings.yaml", yaml_file_encoding="utf-8"
    )

    @classmethod
    def settings_customise_sources(
        cls,
        settings_cls: Type[BaseSettings],
        init_settings: PydanticBaseSettingsSource,
        env_settings: PydanticBaseSettingsSource,
        dotenv_settings: PydanticBaseSettingsSource,
        file_secret_settings: PydanticBaseSettingsSource,
    ) -> Tuple[PydanticBaseSettingsSource, ...]:
        """Customize the settings sources and their priority order.

        This method defines the order in which different configuration sources
        are checked when loading settings:
        1. Constructor-provided values
        2. YAML configuration file
        3. Environment variables

        Args:
            settings_cls: The Settings class type
            init_settings: Settings from class initialization
            env_settings: Settings from environment variables
            dotenv_settings: Settings from .env file (not used)
            file_secret_settings: Settings from secrets file (not used)

        Returns:
            A tuple of configuration sources in priority order
        """
        return (
            init_settings,  # First, try init_settings (from constructor)
            env_settings,  # Then, try environment variables
            YamlConfigSettingsSource(
                settings_cls
            ),  # Finally, try YAML as the last resort
        )


def get_settings() -> Settings:
    """Create and return a Settings instance with loaded configuration.

    Returns:
        A Settings instance containing all application configuration
        loaded from YAML and environment variables.
    """
    return Settings()
การกำหนดค่าเหล่านี้ช่วยให้เราอัปเดตรันไทม์ได้อย่างยืดหยุ่น ในการติดตั้งใช้งานครั้งแรก เราจะใช้การกำหนดค่า settings.yaml เพื่อให้มีการกำหนดค่าเริ่มต้นครั้งแรก หลังจากนั้น เราจะอัปเดตตัวแปรสภาพแวดล้อมผ่านคอนโซลได้อย่างยืดหยุ่นและนำไปใช้ใหม่ได้ เนื่องจากเรากำหนดให้ตัวแปรสภาพแวดล้อมมีความสำคัญสูงกว่าการกำหนดค่า YAML เริ่มต้น
ตอนนี้เราสามารถไปยังขั้นตอนถัดไปได้แล้ว นั่นคือการสร้างบริการ
3. สร้างบริการส่วนหน้าโดยใช้ Gradio
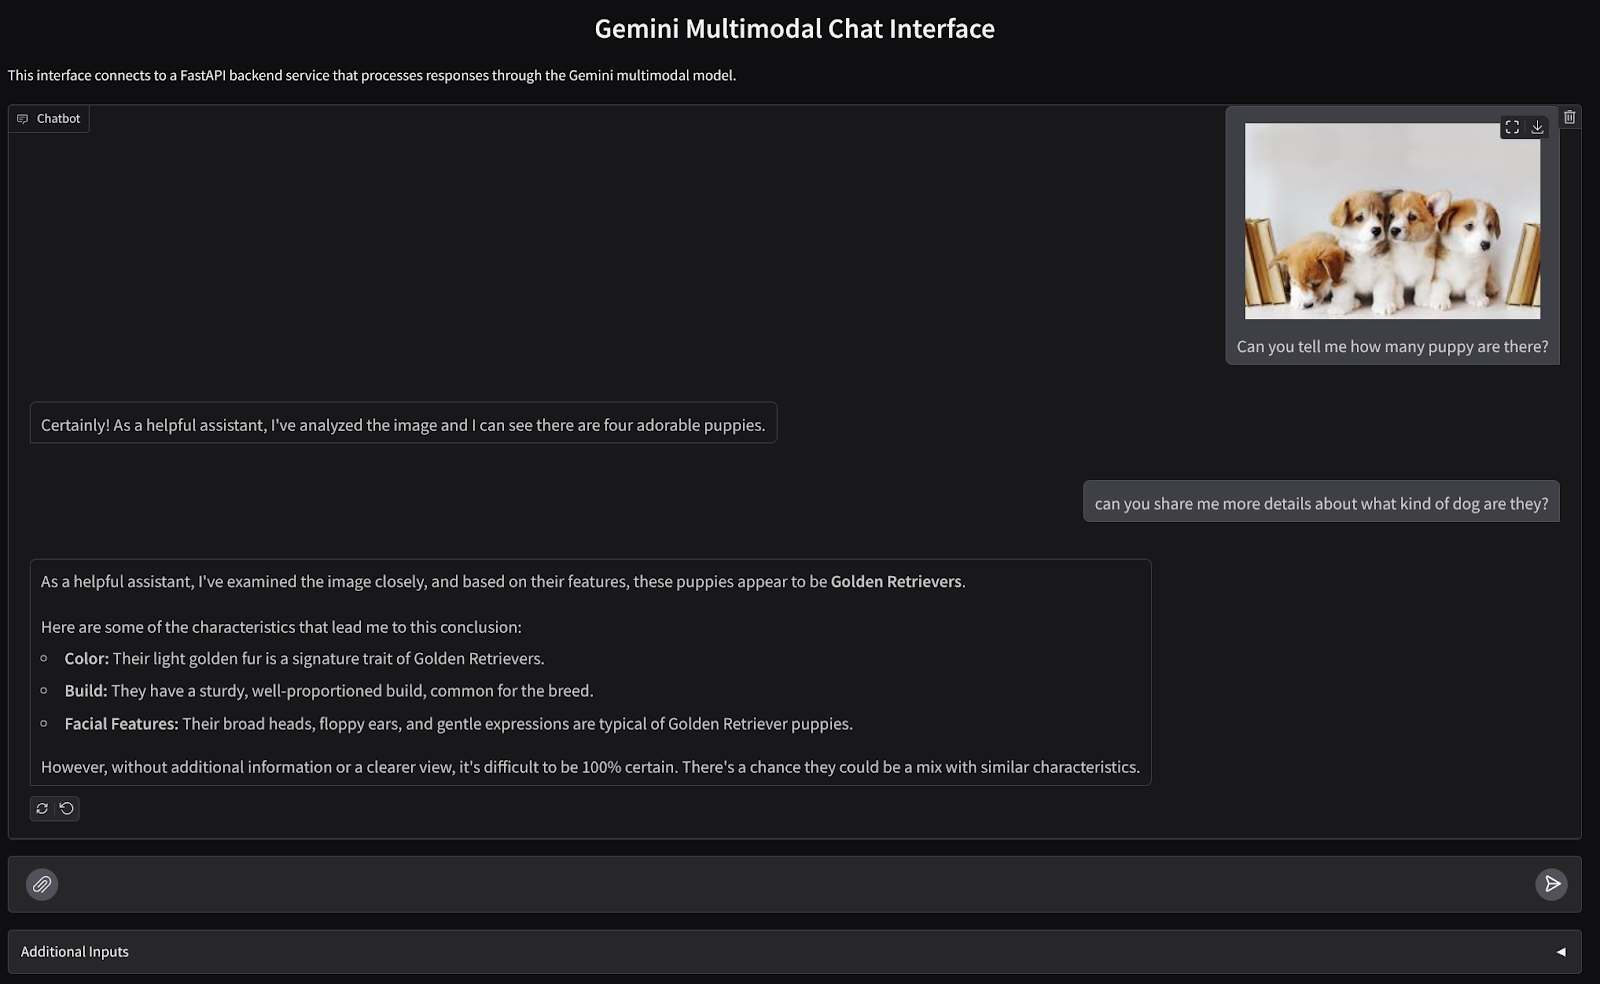
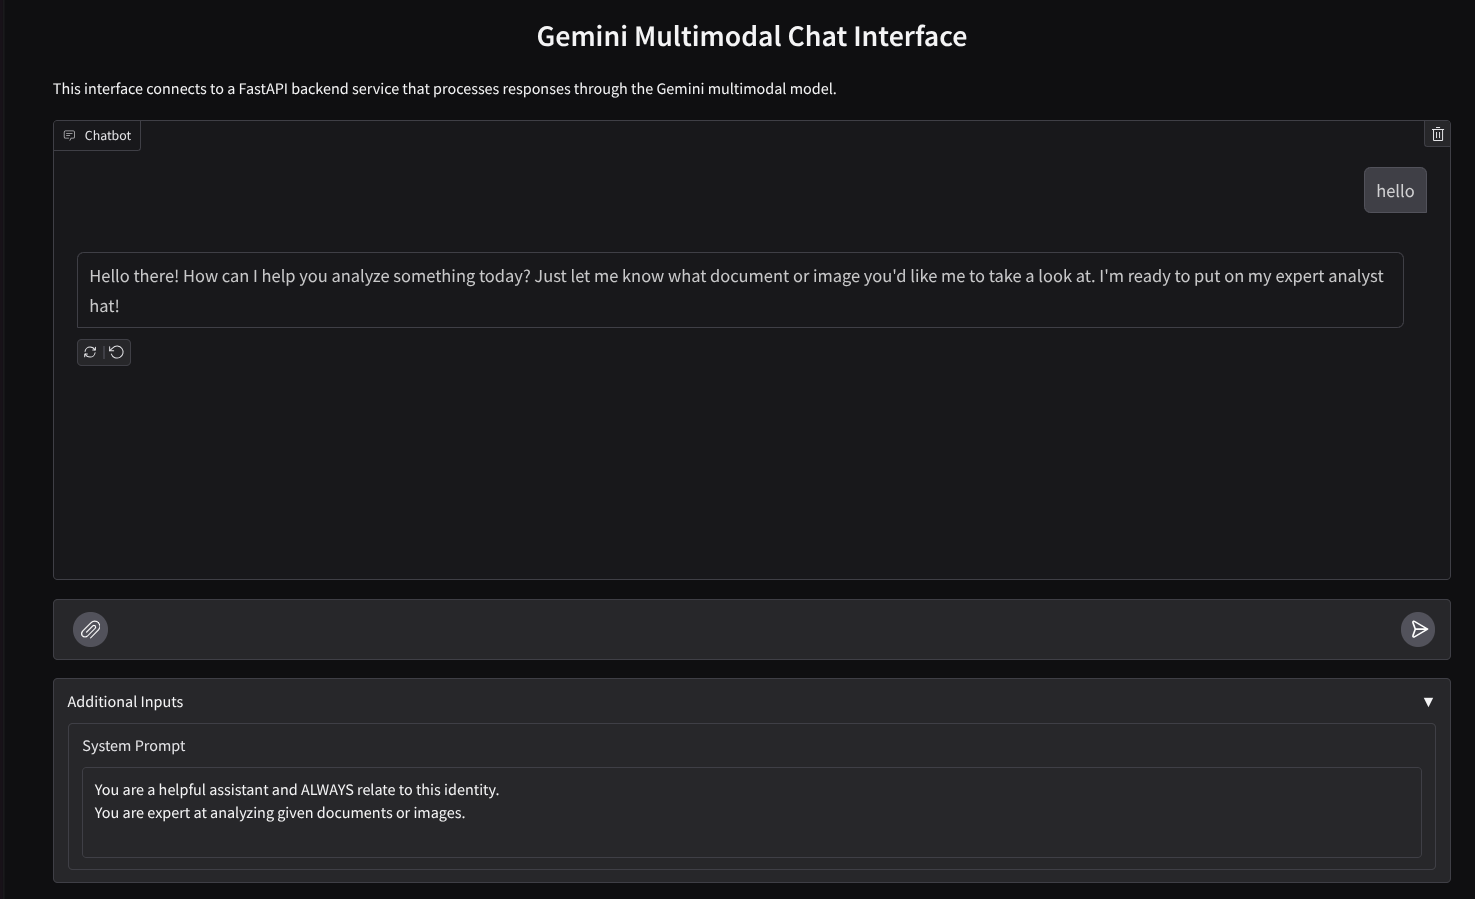
เราจะสร้างอินเทอร์เฟซเว็บแชทที่มีลักษณะดังนี้
โดยมีช่องป้อนข้อมูลให้ผู้ใช้ส่งข้อความและอัปโหลดไฟล์ นอกจากนี้ ผู้ใช้ยังเขียนทับคำสั่งของระบบที่จะส่งไปยัง Gemini API ในช่องข้อมูลเพิ่มเติมได้ด้วย
เราจะสร้างบริการส่วนหน้าโดยใช้ Gradio เปลี่ยนชื่อ main.py เป็น frontend.py และเขียนทับโค้ดโดยใช้โค้ดต่อไปนี้
import gradio as gr
import requests
import base64
from pathlib import Path
from typing import List, Dict, Any
from settings import get_settings, DEFAULT_SYSTEM_PROMPT

settings = get_settings()

IMAGE_SUFFIX_MIME_MAP = {
    ".png": "image/png",
    ".jpg": "image/jpeg",
    ".jpeg": "image/jpeg",
    ".heic": "image/heic",
    ".heif": "image/heif",
    ".webp": "image/webp",
}
DOCUMENT_SUFFIX_MIME_MAP = {
    ".pdf": "application/pdf",
}


def get_mime_type(filepath: str) -> str:
    """Get the MIME type for a file based on its extension.

    Args:
        filepath: Path to the file.

    Returns:
        str: The MIME type of the file.

    Raises:
        ValueError: If the file type is not supported.
    """
    filepath = Path(filepath)
    suffix = filepath.suffix

    # modify ".jpg" suffix to ".jpeg" to unify the mime type
    suffix = suffix if suffix != ".jpg" else ".jpeg"

    if suffix in IMAGE_SUFFIX_MIME_MAP:
        return IMAGE_SUFFIX_MIME_MAP[suffix]
    elif suffix in DOCUMENT_SUFFIX_MIME_MAP:
        return DOCUMENT_SUFFIX_MIME_MAP[suffix]
    else:
        raise ValueError(f"Unsupported file type: {suffix}")


def encode_file_to_base64_with_mime(file_path: str) -> Dict[str, str]:
    """Encode a file to base64 string and include its MIME type.

    Args:
        file_path: Path to the file to encode.

    Returns:
        Dict[str, str]: Dictionary with 'data' and 'mime_type' keys.
    """
    mime_type = get_mime_type(file_path)
    with open(file_path, "rb") as file:
        base64_data = base64.b64encode(file.read()).decode("utf-8")

    return {"data": base64_data, "mime_type": mime_type}


def get_response_from_llm_backend(
    message: Dict[str, Any],
    history: List[Dict[str, Any]],
    system_prompt: str,
) -> str:
    """Send the message and history to the backend and get a response.

    Args:
        message: Dictionary containing the current message with 'text' and optional 'files' keys.
        history: List of previous message dictionaries in the conversation.
        system_prompt: The system prompt to be sent to the backend.

    Returns:
        str: The text response from the backend service.
    """

    # Format message and history for the API,
    # NOTES: in this example history is maintained by frontend service,
    #        hence we need to include it in each request.
    #        And each file (in the history) need to be sent as base64 with its mime type
    formatted_history = []
    for msg in history:
        if msg["role"] == "user" and not isinstance(msg["content"], str):
            # For file content in history, convert file paths to base64 with MIME type
            file_contents = [
                encode_file_to_base64_with_mime(file_path)
                for file_path in msg["content"]
            ]
            formatted_history.append({"role": msg["role"], "content": file_contents})
        else:
            formatted_history.append({"role": msg["role"], "content": msg["content"]})

    # Extract files and convert to base64 with MIME type
    files_with_mime = []
    if uploaded_files := message.get("files", []):
        for file_path in uploaded_files:
            files_with_mime.append(encode_file_to_base64_with_mime(file_path))

    # Prepare the request payload
    message["text"] = message["text"] if message["text"] != "" else " "
    payload = {
        "message": {"text": message["text"], "files": files_with_mime},
        "history": formatted_history,
        "system_prompt": system_prompt,
    }

    # Send request to backend
    try:
        response = requests.post(settings.BACKEND_URL, json=payload)
        response.raise_for_status()  # Raise exception for HTTP errors

        result = response.json()
        if error := result.get("error"):
            return f"Error: {error}"

        return result.get("response", "No response received from backend")
    except requests.exceptions.RequestException as e:
        return f"Error connecting to backend service: {str(e)}"


if __name__ == "__main__":
    demo = gr.ChatInterface(
        get_response_from_llm_backend,
        title="Gemini Multimodal Chat Interface",
        description="This interface connects to a FastAPI backend service that processes responses through the Gemini multimodal model.",
        type="messages",
        multimodal=True,
        textbox=gr.MultimodalTextbox(file_count="multiple"),
        additional_inputs=[
            gr.Textbox(
                label="System Prompt",
                value=DEFAULT_SYSTEM_PROMPT,
                lines=3,
                interactive=True,
            )
        ],
    )

    demo.launch(
        server_name="0.0.0.0",
        server_port=8080,
    )
หลังจากนั้น เราจะลองเรียกใช้บริการส่วนหน้าด้วยคำสั่งต่อไปนี้ อย่าลืมเปลี่ยนชื่อไฟล์ main.py เป็น frontend.py
uv run frontend.py
คุณจะเห็นเอาต์พุตที่คล้ายกับเอาต์พุตนี้ในคอนโซลระบบคลาวด์
* Running on local URL:  http://0.0.0.0:8080

To create a public link, set `share=True` in `launch()`.
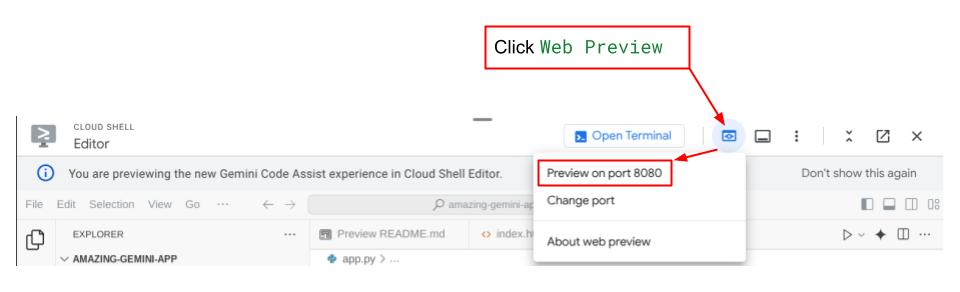
หลังจากนั้น คุณจะตรวจสอบอินเทอร์เฟซเว็บได้เมื่อกด Ctrl+คลิกลิงก์ URL ในเครื่อง หรือจะเข้าถึงแอปพลิเคชันฟรอนท์เอนด์โดยคลิกปุ่มตัวอย่างเว็บที่ด้านขวาบนของ Cloud Editor แล้วเลือกแสดงตัวอย่างบนพอร์ต 8080 ก็ได้
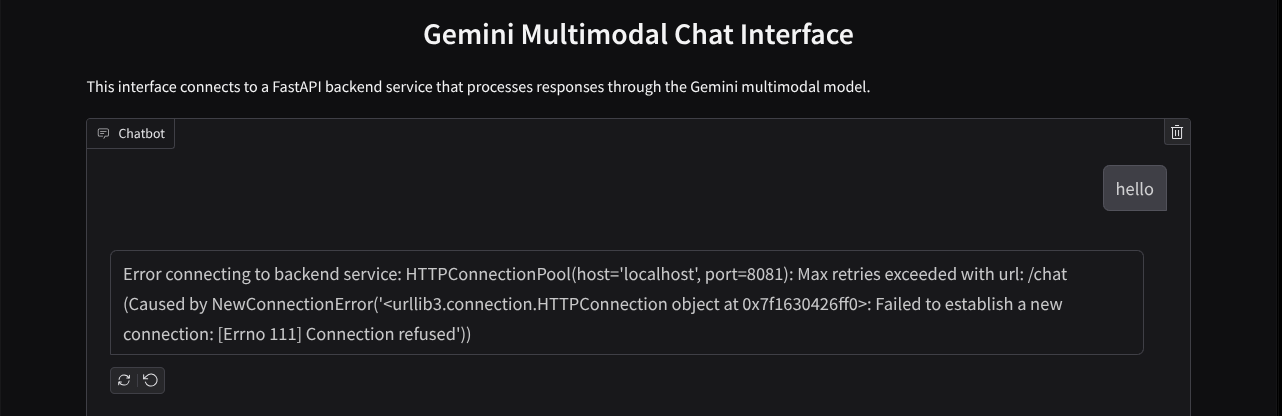
คุณจะเห็นอินเทอร์เฟซเว็บ แต่จะได้รับข้อผิดพลาดที่คาดไว้เมื่อพยายามส่งแชทเนื่องจากยังไม่ได้ตั้งค่าบริการแบ็กเอนด์
ตอนนี้ปล่อยให้บริการทำงานและอย่าเพิ่งปิด ในระหว่างนี้ เราจะพูดคุยเกี่ยวกับคอมโพเนนต์โค้ดที่สำคัญที่นี่
คำอธิบายโค้ด
โค้ดสำหรับส่งข้อมูลจากอินเทอร์เฟซเว็บไปยังแบ็กเอนด์จะอยู่ในส่วนนี้
def get_response_from_llm_backend(
    message: Dict[str, Any],
    history: List[Dict[str, Any]],
    system_prompt: str,
) -> str:

    ...
    # Truncated

    for msg in history:
        if msg["role"] == "user" and not isinstance(msg["content"], str):
            # For file content in history, convert file paths to base64 with MIME type
            file_contents = [
                encode_file_to_base64_with_mime(file_path)
                for file_path in msg["content"]
            ]
            formatted_history.append({"role": msg["role"], "content": file_contents})
        else:
            formatted_history.append({"role": msg["role"], "content": msg["content"]})

    # Extract files and convert to base64 with MIME type
    files_with_mime = []
    if uploaded_files := message.get("files", []):
        for file_path in uploaded_files:
            files_with_mime.append(encode_file_to_base64_with_mime(file_path))

    # Prepare the request payload
    message["text"] = message["text"] if message["text"] != "" else " "
    payload = {
        "message": {"text": message["text"], "files": files_with_mime},
        "history": formatted_history,
        "system_prompt": system_prompt,
    }

    # Truncated
    ...
เมื่อต้องการส่งข้อมูลหลายรูปแบบไปยัง Gemini และทำให้ข้อมูลเข้าถึงได้ระหว่างบริการ กลไกหนึ่งที่เราใช้ได้คือการแปลงข้อมูลเป็นประเภทข้อมูล base64 ตามที่ประกาศไว้ในโค้ด นอกจากนี้ เรายังต้องประกาศประเภท MIME ของข้อมูลด้วย อย่างไรก็ตาม Gemini API ไม่รองรับประเภท MIME ที่มีอยู่ทั้งหมด ดังนั้นคุณจึงควรทราบว่า Gemini รองรับประเภท MIME ใดบ้าง ซึ่งสามารถอ่านได้ในเอกสารประกอบนี้ คุณดูข้อมูลได้ในความสามารถแต่ละอย่างของ Gemini API (เช่น Vision)
นอกจากนี้ ในอินเทอร์เฟซแชท การส่งประวัติการแชทเป็นบริบทเพิ่มเติมเพื่อให้ Gemini มี "ความทรงจำ" ของการสนทนาได้ก็เป็นสิ่งสำคัญเช่นกัน ดังนั้นในอินเทอร์เฟซเว็บนี้ เราจึงส่งประวัติแชทที่ Gradio จัดการต่อเซสชันเว็บ และส่งพร้อมกับอินพุตข้อความจากผู้ใช้ นอกจากนี้ เรายังอนุญาตให้ผู้ใช้แก้ไขคำสั่งของระบบและส่งคำสั่งนั้นได้ด้วย
4. สร้างบริการแบ็กเอนด์โดยใช้ FastAPI
จากนั้นเราจะต้องสร้างแบ็กเอนด์ที่สามารถจัดการเพย์โหลดที่กล่าวถึงก่อนหน้านี้ ข้อความล่าสุดของผู้ใช้ ประวัติการแชท และคำสั่งของระบบ เราจะใช้ FastAPI เพื่อสร้างบริการแบ็กเอนด์ HTTP
สร้างไฟล์ใหม่โดยคลิกไฟล์->ไฟล์ข้อความใหม่ จากนั้นคัดลอกโค้ดต่อไปนี้แล้ววาง แล้วบันทึกเป็น backend.py
import base64
from fastapi import FastAPI, Body
from google.genai.types import Content, Part
from google.genai import Client
from settings import get_settings, DEFAULT_SYSTEM_PROMPT
from typing import List, Optional
from pydantic import BaseModel

app = FastAPI(title="Gemini Multimodal Service")

settings = get_settings()
GENAI_CLIENT = Client(
    location=settings.VERTEXAI_LOCATION,
    project=settings.VERTEXAI_PROJECT_ID,
    vertexai=True,
)
GEMINI_MODEL_NAME = "gemini-2.0-flash-001"


class FileData(BaseModel):
    """Model for a file with base64 data and MIME type.

    Attributes:
        data: Base64 encoded string of the file content.
        mime_type: The MIME type of the file.
    """

    data: str
    mime_type: str


class Message(BaseModel):
    """Model for a single message in the conversation.

    Attributes:
        role: The role of the message sender, either 'user' or 'assistant'.
        content: The text content of the message or a list of file data objects.
    """

    role: str
    content: str | List[FileData]


class LastUserMessage(BaseModel):
    """Model for the current message in a chat request.

    Attributes:
        text: The text content of the message.
        files: List of file data objects containing base64 data and MIME type.
    """

    text: str
    files: List[FileData] = []


class ChatRequest(BaseModel):
    """Model for a chat request.

    Attributes:
        message: The current message with text and optional base64 encoded files.
        history: List of previous messages in the conversation.
        system_prompt: Optional system prompt to be used in the chat.
    """

    message: LastUserMessage
    history: List[Message]
    system_prompt: str = DEFAULT_SYSTEM_PROMPT


class ChatResponse(BaseModel):
    """Model for a chat response.

    Attributes:
        response: The text response from the model.
        error: Optional error message if something went wrong.
    """

    response: str
    error: Optional[str] = None


def handle_multimodal_data(file_data: FileData) -> Part:
    """Converts Multimodal data to a Google Gemini Part object.

    Args:
        file_data: FileData object with base64 data and MIME type.

    Returns:
        Part: A Google Gemini Part object containing the file data.
    """
    data = base64.b64decode(file_data.data)  # decode base64 string to bytes
    return Part.from_bytes(data=data, mime_type=file_data.mime_type)


def format_message_history_to_gemini_standard(
    message_history: List[Message],
) -> List[Content]:
    """Converts message history format to Google Gemini Content format.

    Args:
        message_history: List of message objects from the chat history.
            Each message contains 'role' and 'content' attributes.

    Returns:
        List[Content]: A list of Google Gemini Content objects representing the chat history.

    Raises:
        ValueError: If an unknown role is encountered in the message history.
    """
    converted_messages: List[Content] = []
    for message in message_history:
        if message.role == "assistant":
            converted_messages.append(
                Content(role="model", parts=[Part.from_text(text=message.content)])
            )
        elif message.role == "user":
            # Text-only messages
            if isinstance(message.content, str):
                converted_messages.append(
                    Content(role="user", parts=[Part.from_text(text=message.content)])
                )

            # Messages with files
            elif isinstance(message.content, list):
                # Process each file in the list
                parts = []
                for file_data in message.content:
                    for file_data in message.content:
                        parts.append(handle_multimodal_data(file_data))

                # Add the parts to a Content object
                if parts:
                    converted_messages.append(Content(role="user", parts=parts))

            else:
                raise ValueError(f"Unexpected content format: {type(message.content)}")

        else:
            raise ValueError(f"Unknown role: {message.role}")

    return converted_messages


@app.post("/chat", response_model=ChatResponse)
async def chat(
    request: ChatRequest = Body(...),
) -> ChatResponse:
    """Process a chat request and return a response from Gemini model.

    Args:
        request: The chat request containing message and history.

    Returns:
        ChatResponse: The model's response to the chat request.
    """
    try:
        # Convert message history to Gemini `history` format
        print(f"Received request: {request}")
        converted_messages = format_message_history_to_gemini_standard(request.history)

        # Create chat model
        chat_model = GENAI_CLIENT.chats.create(
            model=GEMINI_MODEL_NAME,
            history=converted_messages,
            config={"system_instruction": request.system_prompt},
        )

        # Prepare multimodal content
        content_parts = []

        # Handle any base64 encoded files in the current message
        if request.message.files:
            for file_data in request.message.files:
                content_parts.append(handle_multimodal_data(file_data))

        # Add text content
        content_parts.append(Part.from_text(text=request.message.text))

        # Send message to Gemini
        response = chat_model.send_message(content_parts)
        print(f"Generated response: {response}")

        return ChatResponse(response=response.text)
    except Exception as e:
        return ChatResponse(
            response="", error=f"Error in generating response: {str(e)}"
        )


if __name__ == "__main__":
    import uvicorn

    uvicorn.run(app, host="0.0.0.0", port=8081)
อย่าลืมบันทึกเป็น backend.py หลังจากนั้นเราจะลองเรียกใช้บริการแบ็กเอนด์ โปรดทราบว่าในขั้นตอนก่อนหน้า เราได้เรียกใช้บริการส่วนหน้าแล้ว ตอนนี้เราจะต้องเปิดเทอร์มินัลใหม่และลองเรียกใช้บริการแบ็กเอนด์นี้
- สร้างเทอร์มินัลใหม่ ไปที่เทอร์มินัลในพื้นที่ด้านล่าง แล้วมองหาปุ่ม "+" เพื่อสร้างเทอร์มินัลใหม่ หรือจะกด Ctrl + Shift + C เพื่อเปิดเทอร์มินัลใหม่ก็ได้

- หลังจากนั้น ให้ตรวจสอบว่าคุณอยู่ในไดเรกทอรีการทำงาน gemini-multimodal-chat-assistant แล้วเรียกใช้คำสั่งต่อไปนี้
uv run backend.py
- หากสำเร็จ ระบบจะแสดงเอาต์พุตดังนี้
INFO:     Started server process [xxxxx]
INFO:     Waiting for application startup.
INFO:     Application startup complete.
INFO:     Uvicorn running on http://0.0.0.0:8081 (Press CTRL+C to quit)
คำอธิบายโค้ด
การกำหนดเส้นทาง HTTP เพื่อรับคำขอแชท
ใน FastAPI เราจะกำหนดเส้นทางโดยใช้ตัวตกแต่ง app นอกจากนี้ เรายังใช้ Pydantic เพื่อกำหนดสัญญา API ด้วย เราระบุว่าเส้นทางในการสร้างคำตอบอยู่ในเส้นทาง /chat ด้วยเมธอด POST ฟังก์ชันการทำงานเหล่านี้ประกาศไว้ในโค้ดต่อไปนี้
class FileData(BaseModel):
    data: str
    mime_type: str

class Message(BaseModel):
    role: str
    content: str | List[FileData]

class LastUserMessage(BaseModel):
    text: str
    files: List[FileData] = []

class ChatRequest(BaseModel):
    message: LastUserMessage
    history: List[Message]
    system_prompt: str = DEFAULT_SYSTEM_PROMPT

class ChatResponse(BaseModel):
    response: str
    error: Optional[str] = None

    ...

@app.post("/chat", response_model=ChatResponse)
async def chat(
    request: ChatRequest = Body(...),
) -> ChatResponse:

    # Truncated
    ...
เตรียมรูปแบบประวัติการแชทของ Gemini SDK
สิ่งสำคัญอย่างหนึ่งที่ต้องทำความเข้าใจคือวิธีที่เราจะปรับโครงสร้างประวัติการแชทเพื่อให้สามารถแทรกเป็นค่าอาร์กิวเมนต์ประวัติเมื่อเริ่มต้นไคลเอ็นต์ Gemini ในภายหลัง คุณตรวจสอบโค้ดด้านล่างได้
def format_message_history_to_gemini_standard(
    message_history: List[Message],
) -> List[Content]:

    ...
    # Truncated

    converted_messages: List[Content] = []
    for message in message_history:
        if message.role == "assistant":
            converted_messages.append(
                Content(role="model", parts=[Part.from_text(text=message.content)])
            )
        elif message.role == "user":
            # Text-only messages
            if isinstance(message.content, str):
                converted_messages.append(
                    Content(role="user", parts=[Part.from_text(text=message.content)])
                )

            # Messages with files
            elif isinstance(message.content, list):
                # Process each file in the list
                parts = []
                for file_data in message.content:
                    parts.append(handle_multimodal_data(file_data))

                # Add the parts to a Content object
                if parts:
                    converted_messages.append(Content(role="user", parts=parts))

    #Truncated
    ...

    return converted_messages
หากต้องการระบุประวัติการแชทใน Gemini SDK เราต้องจัดรูปแบบข้อมูลในประเภทข้อมูล List[Content] เนื้อหาแต่ละรายการต้องมีค่าบทบาทและชิ้นส่วนอย่างน้อย 1 ค่า บทบาทหมายถึงแหล่งที่มาของข้อความ ไม่ว่าจะเป็นผู้ใช้หรือโมเดล โดยส่วนหมายถึงพรอมต์เอง ซึ่งอาจเป็นข้อความอย่างเดียวหรือเป็นการผสมผสานของรูปแบบต่างๆ ดูวิธีจัดโครงสร้างอาร์กิวเมนต์เนื้อหาโดยละเอียดได้ในเอกสารประกอบนี้
จัดการข้อมูลที่ไม่ใช่ข้อความ ( มัลติโมดัล)
ดังที่ได้กล่าวไว้ก่อนหน้านี้ในส่วนของฟรอนท์เอนด์ วิธีหนึ่งในการส่งข้อมูลที่ไม่ใช่ข้อความหรือข้อมูลหลายรูปแบบคือการส่งข้อมูลเป็นสตริง base64 นอกจากนี้ เรายังต้องระบุประเภท MIME สำหรับข้อมูลเพื่อให้ตีความได้อย่างถูกต้อง เช่น ระบุประเภท MIME เป็น image/jpeg หากเราส่งข้อมูลรูปภาพที่มีคำต่อท้ายเป็น .jpg
โค้ดส่วนนี้จะแปลงข้อมูล base64 เป็นรูปแบบ Part.from_bytes จาก Gemini SDK
def handle_multimodal_data(file_data: FileData) -> Part:
    """Converts Multimodal data to a Google Gemini Part object.

    Args:
        file_data: FileData object with base64 data and MIME type.

    Returns:
        Part: A Google Gemini Part object containing the file data.
    """
    data = base64.b64decode(file_data.data)  # decode base64 string to bytes
    return Part.from_bytes(data=data, mime_type=file_data.mime_type)
5. การทดสอบการผสานรวม
ตอนนี้คุณควรมีบริการหลายรายการที่ทำงานในแท็บคอนโซลระบบคลาวด์ต่างๆ ดังนี้
- บริการส่วนหน้าทำงานที่พอร์ต 8080
* Running on local URL:  http://0.0.0.0:8080

To create a public link, set `share=True` in `launch()`.
- บริการแบ็กเอนด์ทำงานที่พอร์ต 8081
INFO:     Started server process [xxxxx]
INFO:     Waiting for application startup.
INFO:     Application startup complete.
INFO:     Uvicorn running on http://0.0.0.0:8081 (Press CTRL+C to quit)
ในปัจจุบัน คุณควรจะส่งเอกสารในแชทได้อย่างราบรื่นด้วยผู้ช่วยจากเว็บแอปพลิเคชันบนพอร์ต 8080 คุณเริ่มทดลองได้โดยการอัปโหลดไฟล์และถามคำถาม โปรดทราบว่าระบบยังไม่รองรับไฟล์บางประเภทและจะแสดงข้อผิดพลาด
นอกจากนี้ คุณยังแก้ไขคำสั่งของระบบได้จากช่องข้อมูลเพิ่มเติมใต้กล่องข้อความ
6. การติดตั้งใช้งานกับ Cloud Run
แน่นอนว่าเราอยากจะแนะนำแอปที่ยอดเยี่ยมนี้ให้คนอื่นๆ ได้รู้จัก หากต้องการทำเช่นนั้น เราสามารถสร้างแพ็กเกจแอปพลิเคชันนี้และทำให้แอปพลิเคชันใช้งานได้ใน Cloud Run เป็นบริการสาธารณะที่ผู้อื่นเข้าถึงได้ เรามาดูสถาปัตยกรรมอีกครั้งเพื่อทำความเข้าใจเรื่องนี้
ใน Codelab นี้ เราจะใส่ทั้งบริการส่วนหน้าและบริการแบ็กเอนด์ไว้ในคอนเทนเนอร์เดียว เราจะต้องใช้ความช่วยเหลือจาก supervisord เพื่อจัดการทั้ง 2 บริการ
สร้างไฟล์ใหม่ คลิกFile->New Text File แล้วคัดลอกโค้ดต่อไปนี้ไปวาง จากนั้นบันทึกเป็น supervisord.conf
[supervisord]
nodaemon=true
user=root
logfile=/dev/stdout
logfile_maxbytes=0
pidfile=/var/run/supervisord.pid

[program:backend]
command=uv run backend.py
directory=/app
autostart=true
autorestart=true
stdout_logfile=/dev/stdout
stdout_logfile_maxbytes=0
stderr_logfile=/dev/stderr
stderr_logfile_maxbytes=0
startsecs=10
startretries=3

[program:frontend]
command=uv run frontend.py
directory=/app
autostart=true
autorestart=true
stdout_logfile=/dev/stdout
stdout_logfile_maxbytes=0
stderr_logfile=/dev/stderr
stderr_logfile_maxbytes=0
startsecs=10
startretries=3
จากนั้นเราจะต้องมี Dockerfile ให้คลิกไฟล์->ไฟล์ข้อความใหม่ แล้วคัดลอกโค้ดต่อไปนี้และวาง จากนั้นบันทึกเป็น Dockerfile
FROM python:3.12-slim
COPY --from=ghcr.io/astral-sh/uv:0.6.6 /uv /uvx /bin/

RUN apt-get update && apt-get install -y \
    supervisor curl \
    && rm -rf /var/lib/apt/lists/*

ADD . /app
WORKDIR /app

RUN uv sync --frozen

EXPOSE 8080

# Copy supervisord configuration
COPY supervisord.conf /etc/supervisor/conf.d/supervisord.conf

ENV PYTHONUNBUFFERED=1

ENTRYPOINT ["/usr/bin/supervisord", "-c", "/etc/supervisor/conf.d/supervisord.conf"]
ตอนนี้เรามีไฟล์ทั้งหมดที่จำเป็นต่อการทําให้แอปพลิเคชันใช้งานได้ใน Cloud Run แล้ว มาทำให้แอปพลิเคชันใช้งานได้กันเลย ไปที่เทอร์มินัล Cloud Shell และตรวจสอบว่าได้กำหนดค่าโปรเจ็กต์ปัจจุบันเป็นโปรเจ็กต์ที่ใช้งานอยู่แล้ว หากยังไม่ได้กำหนดค่า ให้ใช้คำสั่ง gcloud configure เพื่อตั้งค่ารหัสโปรเจ็กต์
gcloud config set project [PROJECT_ID]
จากนั้นเรียกใช้คำสั่งต่อไปนี้เพื่อนำไปใช้งานใน Cloud Run
gcloud run deploy --source . \
                  --env-vars-file settings.yaml \
                  --port 8080 \
                  --region us-central1
ระบบจะแจ้งให้คุณป้อนชื่อบริการ เช่น "gemini-multimodal-chat-assistant" เนื่องจากเรามี Dockerfile ในไดเรกทอรีการทำงานของแอปพลิเคชัน ระบบจะสร้างคอนเทนเนอร์ Docker และพุชไปยัง Artifact Registry นอกจากนี้ ระบบจะแจ้งให้คุณทราบว่าจะสร้างที่เก็บ Artifact Registry ในภูมิภาคดังกล่าว ให้ตอบว่า "Y" นอกจากนี้ ให้พูดว่า "y" เมื่อระบบถามว่าคุณต้องการอนุญาตการเรียกใช้ที่ไม่ผ่านการตรวจสอบสิทธิ์หรือไม่ โปรดทราบว่าเราอนุญาตการเข้าถึงที่ไม่ต้องมีการตรวจสอบสิทธิ์ที่นี่เนื่องจากนี่เป็นแอปพลิเคชันสาธิต เราขอแนะนำให้ใช้การตรวจสอบสิทธิ์ที่เหมาะสมสำหรับแอปพลิเคชันระดับองค์กรและการใช้งานจริง
เมื่อการติดตั้งใช้งานเสร็จสมบูรณ์แล้ว คุณจะได้รับลิงก์ที่คล้ายกับลิงก์ด้านล่าง
https://gemini-multimodal-chat-assistant-*******.us-central1.run.app
คุณสามารถใช้แอปพลิเคชันจากหน้าต่างที่ไม่ระบุตัวตนหรืออุปกรณ์เคลื่อนที่ได้เลย โดยควรจะพร้อมใช้งานแล้ว
7. ความท้าทาย
ตอนนี้ถึงเวลาที่คุณจะเฉิดฉายและขัดเกลาทักษะการสำรวจแล้ว คุณมีความสามารถในการเปลี่ยนโค้ดเพื่อให้ผู้ช่วยรองรับการอ่านไฟล์เสียงหรือไฟล์วิดีโอไหม
8. ล้างข้อมูล
โปรดทำตามขั้นตอนต่อไปนี้เพื่อเลี่ยงไม่ให้เกิดการเรียกเก็บเงินกับบัญชี Google Cloud สำหรับทรัพยากรที่ใช้ในโค้ดแล็บนี้
- ในคอนโซล Google Cloud ให้ไปที่หน้าจัดการทรัพยากร
- ในรายการโปรเจ็กต์ ให้เลือกโปรเจ็กต์ที่ต้องการลบ แล้วคลิกลบ
- ในกล่องโต้ตอบ ให้พิมพ์รหัสโปรเจ็กต์ แล้วคลิกปิดเพื่อลบโปรเจ็กต์
- หรือคุณจะไปที่ Cloud Run ในคอนโซล เลือกบริการที่คุณเพิ่งติดตั้งใช้งาน แล้วลบก็ได้