
1. 简介
在此 Codelab 中,您将构建一个聊天网页界面形式的应用,您可以在其中与该应用进行通信,上传一些文档或图片并讨论它们。该应用本身分为 2 个服务:前端和后端;让您能够构建快速原型并体验其功能,同时了解 API 合约的外观,以便集成这两个服务。
在此 Codelab 中,您将采用以下分步方法:
- 准备 Google Cloud 云项目并在其中启用所有必需的 API
- 构建前端服务 - 使用 Gradio 库的聊天界面
- 构建后端服务 - 使用 FastAPI 的 HTTP 服务器,该服务器会将传入的数据重新格式化为 Gemini SDK 标准,并启用与 Gemini API 的通信
- 管理环境变量并设置将应用部署到 Cloud Run 所需的文件
- 将应用部署到 Cloud Run

架构概览

前提条件
- 能够熟练使用 Gemini API 和 Google Gen AI SDK
- 了解使用 HTTP 服务的基本全栈架构
学习内容
- 如何使用 Gemini SDK 提交文本和其他数据类型(多模态),并生成文本响应
- 如何将聊天记录构建到 Gemini SDK 中,以保持对话上下文
- 使用 Gradio 进行前端 Web 原型设计
- 使用 FastAPI 和 Pydantic 进行后端服务开发
- 使用 Pydantic-settings 管理 YAML 文件中的环境变量
- 使用 Dockerfile 将应用部署到 Cloud Run,并使用 YAML 文件提供环境变量
所需条件
- Chrome 网络浏览器
- Gmail 账号
- 启用了结算功能的 Cloud 项目
此 Codelab 专为各种水平的开发者(包括新手)设计,其示例应用使用的是 Python。不过,您无需了解 Python 即可理解所介绍的概念。
2. 准备工作
在 Cloud Shell 编辑器中设置 Cloud 项目
此 Codelab 假定您已拥有一个启用了结算功能的 Google Cloud 项目。如果您还没有,可以按照以下说明开始操作。
- 2 在 Google Cloud 控制台的项目选择器页面上,选择或创建一个 Google Cloud 项目。
- 确保您的云项目已启用结算功能。了解如何 检查项目是否已启用结算功能 。
- 您将使用 Cloud Shell,这是一个在 Google Cloud 中运行的命令行环境,它预加载了 bq。点击 Google Cloud 控制台顶部的激活 Cloud Shell 。

- 连接到 Cloud Shell 后,您可以使用以下命令检查自己是否已通过身份验证,以及项目是否已设置为您的项目 ID:
gcloud auth list
- 在 Cloud Shell 中运行以下命令,以确认 gcloud 命令了解您的项目。
gcloud config list project
- 如果项目未设置,请使用以下命令进行设置:
gcloud config set project <YOUR_PROJECT_ID>
或者,您也可以在控制台中看到 PROJECT_ID ID

点击该 ID,您将在右侧看到所有项目和项目 ID

- 通过以下命令启用所需的 API。这可能需要几分钟时间,请耐心等待。
gcloud services enable aiplatform.googleapis.com \
                           run.googleapis.com \
                           cloudbuild.googleapis.com \
                           cloudresourcemanager.googleapis.com
成功执行该命令后,您应该会看到类似如下所示的消息:
Operation "operations/..." finished successfully.
除了使用 gcloud 命令之外,您还可以通过控制台搜索每个产品或使用此 链接。
如果缺少任何 API,您始终可以在实现过程中启用它。
如需了解 gcloud 命令和用法,请参阅 文档。
设置应用工作目录
- 点击“打开编辑器”按钮,系统会打开 Cloud Shell 编辑器,您可以在其中编写代码!

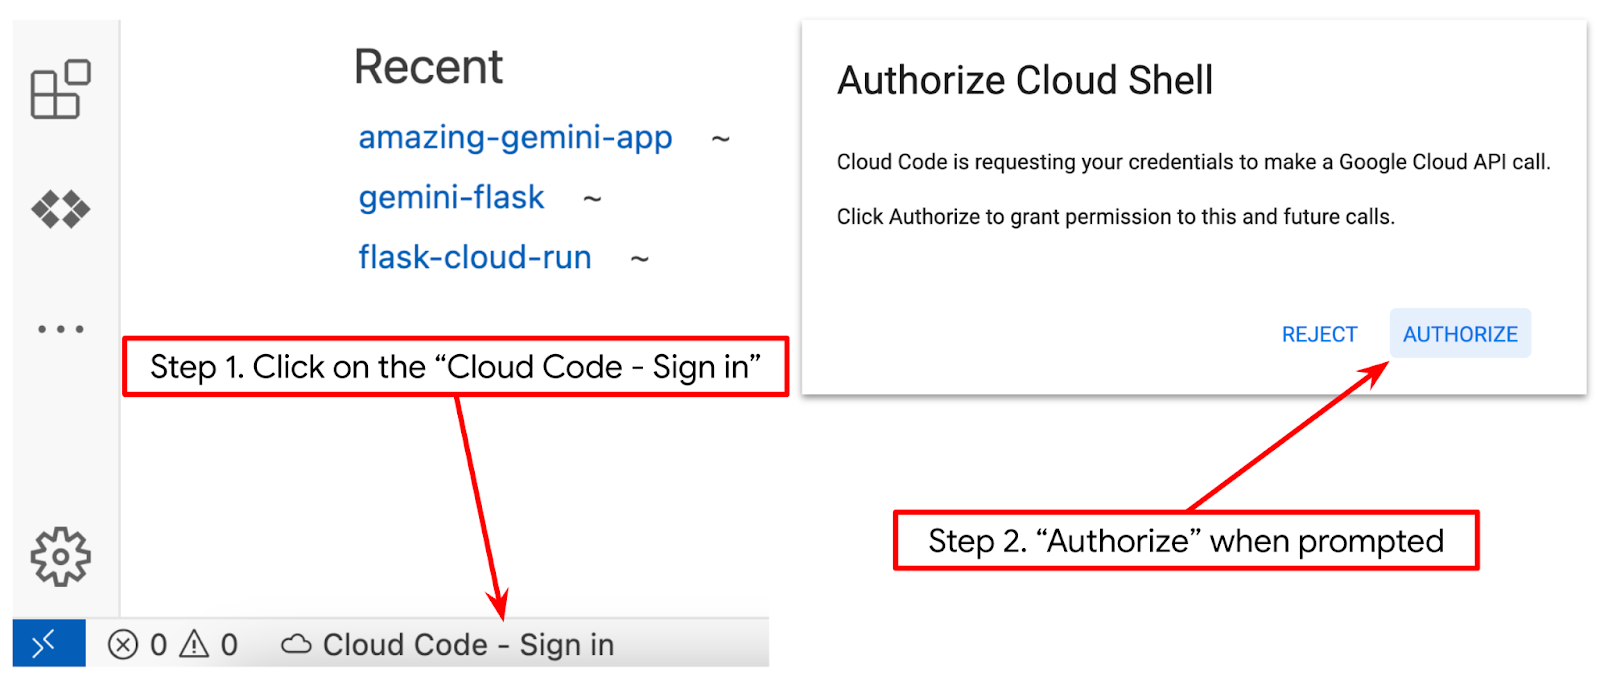
- 确保 Cloud Code 项目已在 Cloud Shell 编辑器的左下角(状态栏)中设置,如以下图片中突出显示的那样,并且已设置为启用了结算功能的有效 Google Cloud 项目。如果看到提示,请点击授权 。初始化 Cloud Shell 编辑器后,可能需要一段时间才会显示 Cloud Code - Sign In 按钮,请耐心等待。如果您已按照之前的命令操作,该按钮也可能会直接指向您已激活的项目,而不是登录按钮
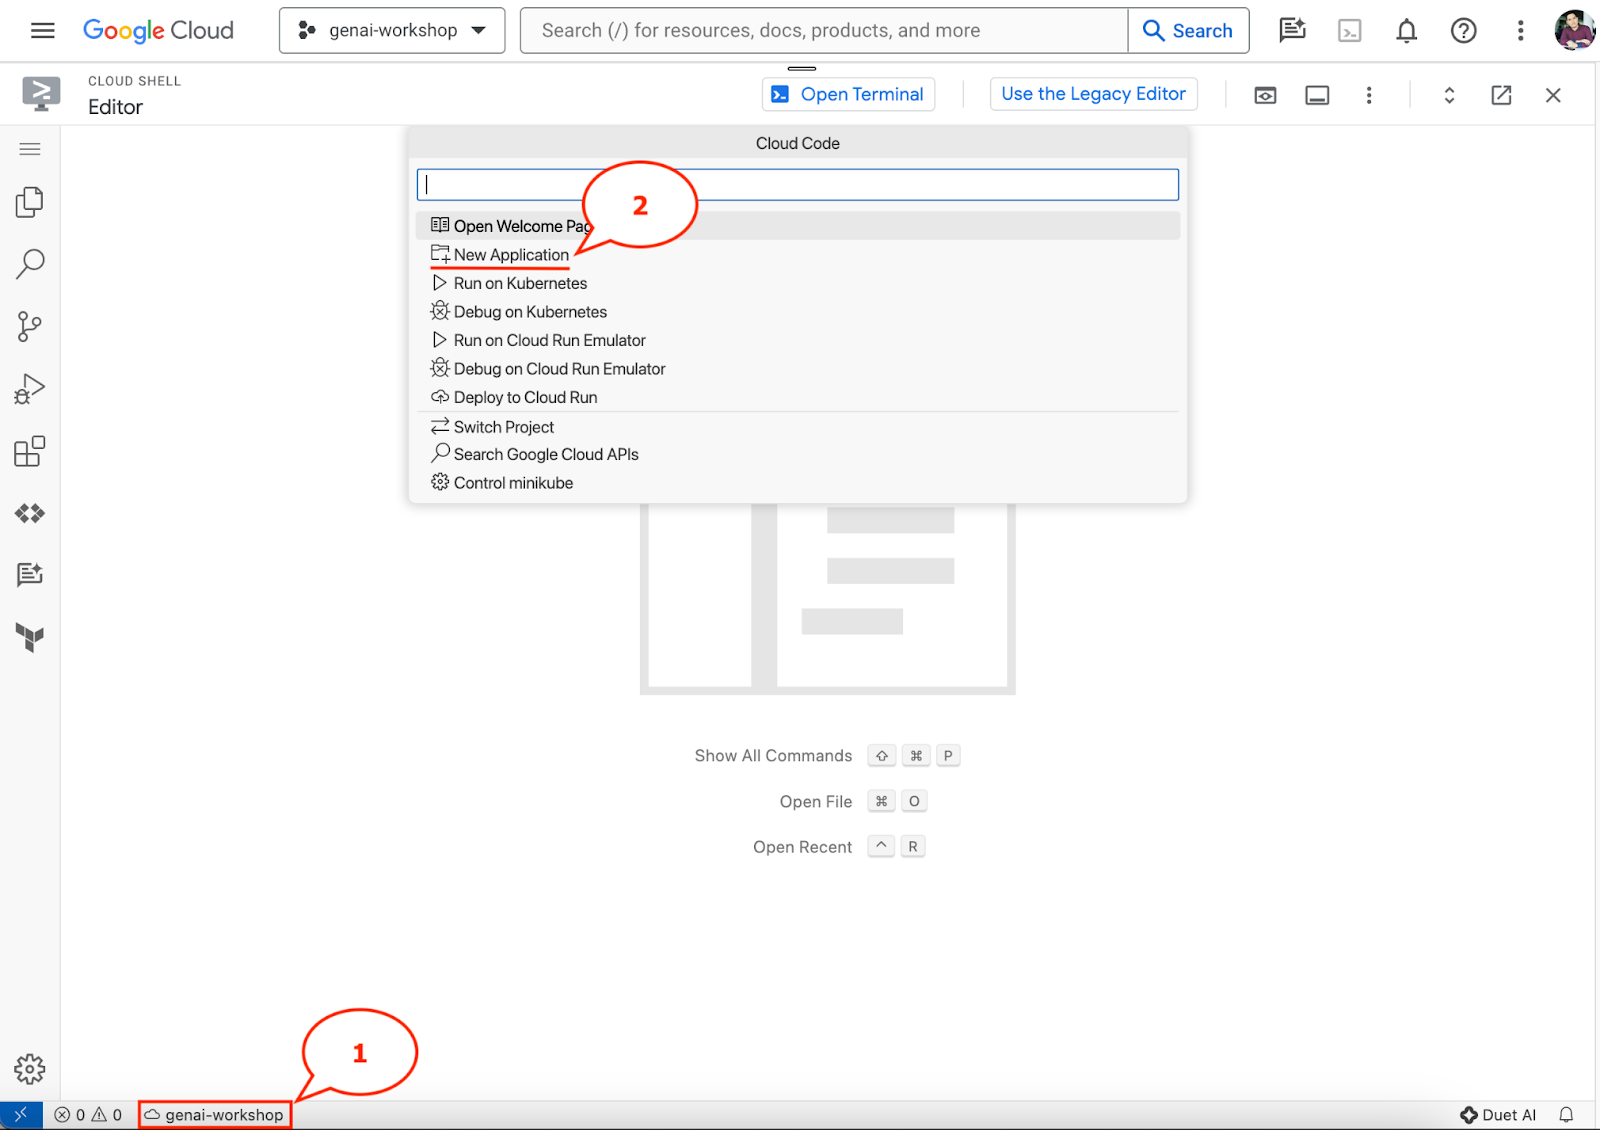
- 点击状态栏中的有效项目,等待 Cloud Code 弹出窗口打开。在弹出窗口中,选择“新建应用”。
- 在应用列表中,选择 Gemini 生成式 AI ,然后选择 Gemini API Python


- 使用您喜欢的名称保存新应用,在此示例中,我们将使用 gemini-multimodal-chat-assistant ,然后点击确定

此时,您应该已进入新的应用工作目录,并看到以下文件

接下来,我们将准备 Python 环境
环境设置
准备 Python 虚拟环境
下一步是准备开发环境。在此 Codelab 中,我们将使用 Python 3.12,并使用 uv Python 项目管理器 来简化创建和管理 Python 版本和虚拟环境的需求
- 如果您尚未打开终端,请依次点击终端 -> 新建终端 ,或使用 Ctrl + Shift + C 打开终端

- 使用以下命令下载
uv并安装 Python 3.12
curl -LsSf https://astral.sh/uv/0.6.6/install.sh | sh && \
source $HOME/.local/bin/env && \
uv python install 3.12
- 现在,我们使用
uv初始化 Python 项目
uv init
- 您会看到目录中创建了 main.py、.python-version 和 pyproject.toml 。这些文件用于在目录中维护项目。您可以在 pyproject.toml 中指定 Python 依赖项和配置,而 .python-version 则标准化了此项目使用的 Python 版本。如需详细了解此内容,您可以参阅此 文档
main.py
.python-version
pyproject.toml
- 如需进行测试,请将 main.py 覆盖为 以下代码
def main():
   print("Hello from gemini-multimodal-chat-assistant!")

if __name__ == "__main__":
   main()
- 然后,运行以下命令
uv run main.py
您将获得如下所示的输出
Using CPython 3.12
Creating virtual environment at: .venv
Hello from gemini-multimodal-chat-assistant!
这表明 Python 项目已正确设置。我们无需手动创建虚拟环境,因为 uv 已经处理了它。因此,从现在开始,标准 Python 命令(例如 python main.py )将替换为 uv run (例如 uv run main.py )。
安装必需的依赖项
我们还将使用 uv 命令添加此 Codelab 软件包依赖项。运行以下命令
uv add google-genai==1.5.0 \
       gradio==5.20.1 \
       pydantic==2.10.6 \
       pydantic-settings==2.8.1 \
       pyyaml==6.0.2
您会看到 pyproject.toml “dependencies”部分将更新以反映之前的命令
设置配置文件
现在,我们需要为此项目设置配置文件。配置文件用于存储动态变量,这些变量可以在重新部署时轻松更改。在此项目中,我们将使用基于 YAML 的配置文件和 pydantic-settings 软件包,以便稍后轻松与 Cloud Run 部署集成。pydantic-settings 是一个 Python 软件包,可以对配置文件强制执行类型检查。
- 创建一个名为 settings.yaml 的文件,其中包含以下配置。点击文件 -> 新建文本文件,然后填写以下代码。然后将其另存为 settings.yaml
VERTEXAI_LOCATION: "us-central1"
VERTEXAI_PROJECT_ID: "{YOUR-PROJECT-ID}"
BACKEND_URL: "http://localhost:8081/chat"
请根据您在创建 Google Cloud 项目时选择的内容,更新 VERTEXAI_PROJECT_ID 的值。对于此 Codelab,我们将使用 VERTEXAI_LOCATION 和 BACKEND_URL 的预配置值。
- 然后,创建 Python 文件 settings.py,此模块将充当配置文件中配置值的程序化入口。点击文件 -> 新建文本文件,然后填写以下代码。然后将其另存为 settings.py 。您可以在代码中看到,我们明确设置了名为 settings.yaml 的文件将是读取的文件
from pydantic_settings import (
    BaseSettings,
    SettingsConfigDict,
    YamlConfigSettingsSource,
    PydanticBaseSettingsSource,
)
from typing import Type, Tuple

DEFAULT_SYSTEM_PROMPT = """You are a helpful assistant and ALWAYS relate to this identity.
You are expert at analyzing given documents or images.
"""

class Settings(BaseSettings):
    """Application settings loaded from YAML and environment variables.

    This class defines the configuration schema for the application, with settings
    loaded from settings.yaml file and overridable via environment variables.

    Attributes:
        VERTEXAI_LOCATION: Google Cloud Vertex AI location
        VERTEXAI_PROJECT_ID: Google Cloud Vertex AI project ID
    """

    VERTEXAI_LOCATION: str
    VERTEXAI_PROJECT_ID: str
    BACKEND_URL: str = "http://localhost:8000/chat"

    model_config = SettingsConfigDict(
        yaml_file="settings.yaml", yaml_file_encoding="utf-8"
    )

    @classmethod
    def settings_customise_sources(
        cls,
        settings_cls: Type[BaseSettings],
        init_settings: PydanticBaseSettingsSource,
        env_settings: PydanticBaseSettingsSource,
        dotenv_settings: PydanticBaseSettingsSource,
        file_secret_settings: PydanticBaseSettingsSource,
    ) -> Tuple[PydanticBaseSettingsSource, ...]:
        """Customize the settings sources and their priority order.

        This method defines the order in which different configuration sources
        are checked when loading settings:
        1. Constructor-provided values
        2. YAML configuration file
        3. Environment variables

        Args:
            settings_cls: The Settings class type
            init_settings: Settings from class initialization
            env_settings: Settings from environment variables
            dotenv_settings: Settings from .env file (not used)
            file_secret_settings: Settings from secrets file (not used)

        Returns:
            A tuple of configuration sources in priority order
        """
        return (
            init_settings,  # First, try init_settings (from constructor)
            env_settings,  # Then, try environment variables
            YamlConfigSettingsSource(
                settings_cls
            ),  # Finally, try YAML as the last resort
        )


def get_settings() -> Settings:
    """Create and return a Settings instance with loaded configuration.

    Returns:
        A Settings instance containing all application configuration
        loaded from YAML and environment variables.
    """
    return Settings()
借助这些配置,我们可以灵活地更新运行时。在初始部署时,我们将依赖 settings.yaml 配置,以便获得第一个默认配置。之后,我们可以通过控制台灵活地更新环境变量并重新部署,因为与默认 YAML 配置相比,我们将环境变量置于更高的优先级
现在,我们可以进入下一步,构建服务
3. 使用 Gradio 构建前端服务
我们将构建一个如下所示的聊天 Web 界面
它包含一个供用户发送文本和上传文件的输入字段。此外,用户还可以在“其他输入”字段中覆盖将发送到 Gemini API 的系统指令
我们将使用 Gradio 构建前端服务。将 main.py 重命名为 frontend.py ,并使用以下代码覆盖该代码
import gradio as gr
import requests
import base64
from pathlib import Path
from typing import List, Dict, Any
from settings import get_settings, DEFAULT_SYSTEM_PROMPT

settings = get_settings()

IMAGE_SUFFIX_MIME_MAP = {
    ".png": "image/png",
    ".jpg": "image/jpeg",
    ".jpeg": "image/jpeg",
    ".heic": "image/heic",
    ".heif": "image/heif",
    ".webp": "image/webp",
}
DOCUMENT_SUFFIX_MIME_MAP = {
    ".pdf": "application/pdf",
}


def get_mime_type(filepath: str) -> str:
    """Get the MIME type for a file based on its extension.

    Args:
        filepath: Path to the file.

    Returns:
        str: The MIME type of the file.

    Raises:
        ValueError: If the file type is not supported.
    """
    filepath = Path(filepath)
    suffix = filepath.suffix

    # modify ".jpg" suffix to ".jpeg" to unify the mime type
    suffix = suffix if suffix != ".jpg" else ".jpeg"

    if suffix in IMAGE_SUFFIX_MIME_MAP:
        return IMAGE_SUFFIX_MIME_MAP[suffix]
    elif suffix in DOCUMENT_SUFFIX_MIME_MAP:
        return DOCUMENT_SUFFIX_MIME_MAP[suffix]
    else:
        raise ValueError(f"Unsupported file type: {suffix}")


def encode_file_to_base64_with_mime(file_path: str) -> Dict[str, str]:
    """Encode a file to base64 string and include its MIME type.

    Args:
        file_path: Path to the file to encode.

    Returns:
        Dict[str, str]: Dictionary with 'data' and 'mime_type' keys.
    """
    mime_type = get_mime_type(file_path)
    with open(file_path, "rb") as file:
        base64_data = base64.b64encode(file.read()).decode("utf-8")

    return {"data": base64_data, "mime_type": mime_type}


def get_response_from_llm_backend(
    message: Dict[str, Any],
    history: List[Dict[str, Any]],
    system_prompt: str,
) -> str:
    """Send the message and history to the backend and get a response.

    Args:
        message: Dictionary containing the current message with 'text' and optional 'files' keys.
        history: List of previous message dictionaries in the conversation.
        system_prompt: The system prompt to be sent to the backend.

    Returns:
        str: The text response from the backend service.
    """

    # Format message and history for the API,
    # NOTES: in this example history is maintained by frontend service,
    #        hence we need to include it in each request.
    #        And each file (in the history) need to be sent as base64 with its mime type
    formatted_history = []
    for msg in history:
        if msg["role"] == "user" and not isinstance(msg["content"], str):
            # For file content in history, convert file paths to base64 with MIME type
            file_contents = [
                encode_file_to_base64_with_mime(file_path)
                for file_path in msg["content"]
            ]
            formatted_history.append({"role": msg["role"], "content": file_contents})
        else:
            formatted_history.append({"role": msg["role"], "content": msg["content"]})

    # Extract files and convert to base64 with MIME type
    files_with_mime = []
    if uploaded_files := message.get("files", []):
        for file_path in uploaded_files:
            files_with_mime.append(encode_file_to_base64_with_mime(file_path))

    # Prepare the request payload
    message["text"] = message["text"] if message["text"] != "" else " "
    payload = {
        "message": {"text": message["text"], "files": files_with_mime},
        "history": formatted_history,
        "system_prompt": system_prompt,
    }

    # Send request to backend
    try:
        response = requests.post(settings.BACKEND_URL, json=payload)
        response.raise_for_status()  # Raise exception for HTTP errors

        result = response.json()
        if error := result.get("error"):
            return f"Error: {error}"

        return result.get("response", "No response received from backend")
    except requests.exceptions.RequestException as e:
        return f"Error connecting to backend service: {str(e)}"


if __name__ == "__main__":
    demo = gr.ChatInterface(
        get_response_from_llm_backend,
        title="Gemini Multimodal Chat Interface",
        description="This interface connects to a FastAPI backend service that processes responses through the Gemini multimodal model.",
        type="messages",
        multimodal=True,
        textbox=gr.MultimodalTextbox(file_count="multiple"),
        additional_inputs=[
            gr.Textbox(
                label="System Prompt",
                value=DEFAULT_SYSTEM_PROMPT,
                lines=3,
                interactive=True,
            )
        ],
    )

    demo.launch(
        server_name="0.0.0.0",
        server_port=8080,
    )
之后,我们可以尝试使用以下命令运行前端服务。别忘了将 main.py 文件重命名为 frontend.py
uv run frontend.py
您将在 Cloud 控制台中看到类似于此的输出
* Running on local URL:  http://0.0.0.0:8080

To create a public link, set `share=True` in `launch()`.
之后,当您 按住 Ctrl 键并点击 本地网址链接时,可以查看 Web 界面。或者,您也可以点击 Cloud 编辑器右上角的 Web 预览 按钮,然后选择在端口 8080 上预览 来访问前端应用

您将看到 Web 界面,但由于后端服务尚未设置,因此在尝试提交聊天时会收到预期错误

现在,让服务运行,暂时不要终止它。与此同时,我们可以在这里讨论重要的代码组件
代码说明
此部分的代码用于将数据从 Web 界面发送到后端
def get_response_from_llm_backend(
    message: Dict[str, Any],
    history: List[Dict[str, Any]],
    system_prompt: str,
) -> str:

    ...
    # Truncated

    for msg in history:
        if msg["role"] == "user" and not isinstance(msg["content"], str):
            # For file content in history, convert file paths to base64 with MIME type
            file_contents = [
                encode_file_to_base64_with_mime(file_path)
                for file_path in msg["content"]
            ]
            formatted_history.append({"role": msg["role"], "content": file_contents})
        else:
            formatted_history.append({"role": msg["role"], "content": msg["content"]})

    # Extract files and convert to base64 with MIME type
    files_with_mime = []
    if uploaded_files := message.get("files", []):
        for file_path in uploaded_files:
            files_with_mime.append(encode_file_to_base64_with_mime(file_path))

    # Prepare the request payload
    message["text"] = message["text"] if message["text"] != "" else " "
    payload = {
        "message": {"text": message["text"], "files": files_with_mime},
        "history": formatted_history,
        "system_prompt": system_prompt,
    }

    # Truncated
    ...
当我们想要将多模态数据发送到 Gemini,并使数据在服务之间可访问时,可以采取的一种机制是将数据转换为代码中声明的 base64 数据类型。我们还需要声明数据的 MIME 类型。不过,Gemini API 无法支持所有现有的 MIME 类型,因此务必了解 Gemini 支持哪些 MIME 类型,您可以在此 文档中了解这些类型。您可以在 Gemini API 的各项功能(例如 Vision)中找到相关信息
此外,在聊天界面中,将聊天记录作为额外的上下文发送给 Gemini,以便为 Gemini 提供对话“记忆”,这一点也很重要。因此,在此 Web 界面中,我们还会发送由 Gradio 管理的每个 Web 会话的聊天记录,并将其与用户输入的消息一起发送。此外,我们还允许用户修改系统指令并发送这些指令
4. 使用 FastAPI 构建后端服务
接下来,我们需要构建后端,该后端可以处理之前讨论的载荷、上一个用户消息、聊天记录 和系统指令 。我们将利用 FastAPI 创建 HTTP 后端服务。
创建新文件,点击文件 -> 新建文本文件 ,然后复制粘贴以下代码并将其另存为 backend.py
import base64
from fastapi import FastAPI, Body
from google.genai.types import Content, Part
from google.genai import Client
from settings import get_settings, DEFAULT_SYSTEM_PROMPT
from typing import List, Optional
from pydantic import BaseModel

app = FastAPI(title="Gemini Multimodal Service")

settings = get_settings()
GENAI_CLIENT = Client(
    location=settings.VERTEXAI_LOCATION,
    project=settings.VERTEXAI_PROJECT_ID,
    vertexai=True,
)
GEMINI_MODEL_NAME = "gemini-2.0-flash-001"


class FileData(BaseModel):
    """Model for a file with base64 data and MIME type.

    Attributes:
        data: Base64 encoded string of the file content.
        mime_type: The MIME type of the file.
    """

    data: str
    mime_type: str


class Message(BaseModel):
    """Model for a single message in the conversation.

    Attributes:
        role: The role of the message sender, either 'user' or 'assistant'.
        content: The text content of the message or a list of file data objects.
    """

    role: str
    content: str | List[FileData]


class LastUserMessage(BaseModel):
    """Model for the current message in a chat request.

    Attributes:
        text: The text content of the message.
        files: List of file data objects containing base64 data and MIME type.
    """

    text: str
    files: List[FileData] = []


class ChatRequest(BaseModel):
    """Model for a chat request.

    Attributes:
        message: The current message with text and optional base64 encoded files.
        history: List of previous messages in the conversation.
        system_prompt: Optional system prompt to be used in the chat.
    """

    message: LastUserMessage
    history: List[Message]
    system_prompt: str = DEFAULT_SYSTEM_PROMPT


class ChatResponse(BaseModel):
    """Model for a chat response.

    Attributes:
        response: The text response from the model.
        error: Optional error message if something went wrong.
    """

    response: str
    error: Optional[str] = None


def handle_multimodal_data(file_data: FileData) -> Part:
    """Converts Multimodal data to a Google Gemini Part object.

    Args:
        file_data: FileData object with base64 data and MIME type.

    Returns:
        Part: A Google Gemini Part object containing the file data.
    """
    data = base64.b64decode(file_data.data)  # decode base64 string to bytes
    return Part.from_bytes(data=data, mime_type=file_data.mime_type)


def format_message_history_to_gemini_standard(
    message_history: List[Message],
) -> List[Content]:
    """Converts message history format to Google Gemini Content format.

    Args:
        message_history: List of message objects from the chat history.
            Each message contains 'role' and 'content' attributes.

    Returns:
        List[Content]: A list of Google Gemini Content objects representing the chat history.

    Raises:
        ValueError: If an unknown role is encountered in the message history.
    """
    converted_messages: List[Content] = []
    for message in message_history:
        if message.role == "assistant":
            converted_messages.append(
                Content(role="model", parts=[Part.from_text(text=message.content)])
            )
        elif message.role == "user":
            # Text-only messages
            if isinstance(message.content, str):
                converted_messages.append(
                    Content(role="user", parts=[Part.from_text(text=message.content)])
                )

            # Messages with files
            elif isinstance(message.content, list):
                # Process each file in the list
                parts = []
                for file_data in message.content:
                    for file_data in message.content:
                        parts.append(handle_multimodal_data(file_data))

                # Add the parts to a Content object
                if parts:
                    converted_messages.append(Content(role="user", parts=parts))

            else:
                raise ValueError(f"Unexpected content format: {type(message.content)}")

        else:
            raise ValueError(f"Unknown role: {message.role}")

    return converted_messages


@app.post("/chat", response_model=ChatResponse)
async def chat(
    request: ChatRequest = Body(...),
) -> ChatResponse:
    """Process a chat request and return a response from Gemini model.

    Args:
        request: The chat request containing message and history.

    Returns:
        ChatResponse: The model's response to the chat request.
    """
    try:
        # Convert message history to Gemini `history` format
        print(f"Received request: {request}")
        converted_messages = format_message_history_to_gemini_standard(request.history)

        # Create chat model
        chat_model = GENAI_CLIENT.chats.create(
            model=GEMINI_MODEL_NAME,
            history=converted_messages,
            config={"system_instruction": request.system_prompt},
        )

        # Prepare multimodal content
        content_parts = []

        # Handle any base64 encoded files in the current message
        if request.message.files:
            for file_data in request.message.files:
                content_parts.append(handle_multimodal_data(file_data))

        # Add text content
        content_parts.append(Part.from_text(text=request.message.text))

        # Send message to Gemini
        response = chat_model.send_message(content_parts)
        print(f"Generated response: {response}")

        return ChatResponse(response=response.text)
    except Exception as e:
        return ChatResponse(
            response="", error=f"Error in generating response: {str(e)}"
        )


if __name__ == "__main__":
    import uvicorn

    uvicorn.run(app, host="0.0.0.0", port=8081)
别忘了将其另存为 backend.py 。之后,我们可以尝试运行后端服务。请注意,在上一步中,我们运行了前端服务,现在我们需要打开新终端并尝试运行此后端服务
- 创建新终端。在底部区域找到终端,然后找到“+”按钮以创建新终端。或者,您可以按 Ctrl + Shift + C 打开新终端

- 之后,确保您位于工作目录 gemini-multimodal-chat-assistant 中,然后运行以下命令
uv run backend.py
- 如果成功,它将显示如下所示的输出
INFO:     Started server process [xxxxx]
INFO:     Waiting for application startup.
INFO:     Application startup complete.
INFO:     Uvicorn running on http://0.0.0.0:8081 (Press CTRL+C to quit)
代码说明
定义 HTTP 路由以接收聊天请求
在 FastAPI 中,我们使用 app 装饰器定义路由。我们还使用 Pydantic 定义 API 合约。我们指定生成响应的路由位于 /chat 路由中,并使用 POST 方法。以下代码中声明了这些功能
class FileData(BaseModel):
    data: str
    mime_type: str

class Message(BaseModel):
    role: str
    content: str | List[FileData]

class LastUserMessage(BaseModel):
    text: str
    files: List[FileData] = []

class ChatRequest(BaseModel):
    message: LastUserMessage
    history: List[Message]
    system_prompt: str = DEFAULT_SYSTEM_PROMPT

class ChatResponse(BaseModel):
    response: str
    error: Optional[str] = None

    ...

@app.post("/chat", response_model=ChatResponse)
async def chat(
    request: ChatRequest = Body(...),
) -> ChatResponse:

    # Truncated
    ...
准备 Gemini SDK 聊天记录格式
需要了解的重要事项之一是我们如何重构聊天记录,以便在稍后初始化 Gemini 客户端时将其作为 history 实参值插入。您可以检查以下代码
def format_message_history_to_gemini_standard(
    message_history: List[Message],
) -> List[Content]:

    ...
    # Truncated

    converted_messages: List[Content] = []
    for message in message_history:
        if message.role == "assistant":
            converted_messages.append(
                Content(role="model", parts=[Part.from_text(text=message.content)])
            )
        elif message.role == "user":
            # Text-only messages
            if isinstance(message.content, str):
                converted_messages.append(
                    Content(role="user", parts=[Part.from_text(text=message.content)])
                )

            # Messages with files
            elif isinstance(message.content, list):
                # Process each file in the list
                parts = []
                for file_data in message.content:
                    parts.append(handle_multimodal_data(file_data))

                # Add the parts to a Content object
                if parts:
                    converted_messages.append(Content(role="user", parts=parts))

    #Truncated
    ...

    return converted_messages
如需将聊天记录提供给 Gemini SDK,我们需要将数据格式化为 List[Content] 数据类型。每个 Content 必须至少具有 role 和 parts 值。role 是指消息的来源,无论是 user 还是 model 。其中,parts 是指提示本身,它可以是纯文本,也可以是不同模态的组合。如需详细了解如何构建 Content 实参,请参阅此 文档
处理非文本(多模态)数据
如前端部分所述,发送非文本或多模态数据的一种方法是将数据作为 base64 字符串发送。我们还需要为数据指定 MIME 类型,以便正确解读数据,例如,如果我们发送带有 .jpg 后缀的图片数据,则提供 image/jpeg MIME 类型。
这部分代码会将 base64 数据转换为 Gemini SDK 中的 Part.from_bytes 格式
def handle_multimodal_data(file_data: FileData) -> Part:
    """Converts Multimodal data to a Google Gemini Part object.

    Args:
        file_data: FileData object with base64 data and MIME type.

    Returns:
        Part: A Google Gemini Part object containing the file data.
    """
    data = base64.b64decode(file_data.data)  # decode base64 string to bytes
    return Part.from_bytes(data=data, mime_type=file_data.mime_type)
5. 集成测试
现在,您应该在不同的 Cloud 控制台标签页中运行多个服务:
- 前端服务在端口 8080 上运行
* Running on local URL:  http://0.0.0.0:8080

To create a public link, set `share=True` in `launch()`.
- 后端服务在端口 8081 上运行
INFO:     Started server process [xxxxx]
INFO:     Waiting for application startup.
INFO:     Application startup complete.
INFO:     Uvicorn running on http://0.0.0.0:8081 (Press CTRL+C to quit)
在当前状态下,您应该能够通过端口 8080 上的 Web 应用与助理无缝地发送文档。您可以上传文件并提出问题,开始进行实验!请注意,某些文件类型尚不受支持 ,并且会引发错误。
您还可以从文本框下方的其他输入 字段中修改系统指令

6. 正在部署到 Cloud Run
现在,我们当然希望向其他人展示这个出色的应用。为此,我们可以将此应用打包并将其部署到 Cloud Run,作为其他人可以访问的公共服务。为此,我们来回顾一下架构
在此 Codelab 中,我们将前端和后端服务都放在 1 个容器中。我们需要借助 supervisord 来管理这两项服务。
创建新文件,点击文件 -> 新建文本文件 ,然后复制粘贴以下代码并将其另存为 supervisord.conf
[supervisord]
nodaemon=true
user=root
logfile=/dev/stdout
logfile_maxbytes=0
pidfile=/var/run/supervisord.pid

[program:backend]
command=uv run backend.py
directory=/app
autostart=true
autorestart=true
stdout_logfile=/dev/stdout
stdout_logfile_maxbytes=0
stderr_logfile=/dev/stderr
stderr_logfile_maxbytes=0
startsecs=10
startretries=3

[program:frontend]
command=uv run frontend.py
directory=/app
autostart=true
autorestart=true
stdout_logfile=/dev/stdout
stdout_logfile_maxbytes=0
stderr_logfile=/dev/stderr
stderr_logfile_maxbytes=0
startsecs=10
startretries=3
接下来,我们需要 Dockerfile,点击文件->新建文本文件, 然后复制粘贴以下代码并将其另存为 Dockerfile
FROM python:3.12-slim
COPY --from=ghcr.io/astral-sh/uv:0.6.6 /uv /uvx /bin/

RUN apt-get update && apt-get install -y \
    supervisor curl \
    && rm -rf /var/lib/apt/lists/*

ADD . /app
WORKDIR /app

RUN uv sync --frozen

EXPOSE 8080

# Copy supervisord configuration
COPY supervisord.conf /etc/supervisor/conf.d/supervisord.conf

ENV PYTHONUNBUFFERED=1

ENTRYPOINT ["/usr/bin/supervisord", "-c", "/etc/supervisor/conf.d/supervisord.conf"]
此时,我们已拥有将应用部署到 Cloud Run 所需的所有文件,现在开始部署。前往 Cloud Shell 终端,确保当前项目已配置为您的有效项目,否则您需要使用 gcloud configure 命令设置项目 ID:
gcloud config set project [PROJECT_ID]
然后,运行以下命令将其部署到 Cloud Run。
gcloud run deploy --source . \
                  --env-vars-file settings.yaml \
                  --port 8080 \
                  --region us-central1
系统会提示您输入服务的名称,例如“gemini-multimodal-chat-assistant”。由于我们的应用工作目录中有 Dockerfile,因此它将构建 Docker 容器并将其推送到 Artifact Registry。系统还会提示您,它将在该区域中创建 Artifact Registry 代码库,请回答“Y”。当系统询问您是否要允许未经身份验证的调用 时,也请回答“y”。请注意,我们在此处允许未经身份验证的访问,因为这是一个演示应用。建议您为企业和生产应用使用适当的身份验证。
部署完成后,您应该会获得类似于以下内容的链接:
https://gemini-multimodal-chat-assistant-*******.us-central1.run.app
继续操作,通过无痕式窗口或移动设备使用您的应用。它应该已上线。
7. 挑战
现在,是时候展现您的才华并磨练您的探索技能了。您是否有能力更改代码,以便助理可以支持读取音频文件或视频文件?
8. 清理
为避免系统因本 Codelab 中使用的资源向您的 Google Cloud 账号收取费用,请按照以下步骤操作: