

1. 事前準備
⏱️ 時長:03:00
歡迎參加「使用 CodeMender 保護應用程式」實作程式碼實驗室,瞭解如何在 Google Cloud 的 Gemini Enterprise Agent Platform 上保護應用程式。
在本工作坊中,您將扮演 Cloud Security Engineer,負責稽核及保護 OWASP Juice Shop。這是一款採用 Node.js、Express、TypeScript 和 Angular 建構的網頁應用程式,刻意留有安全漏洞,是業界標準的練習工具。
傳統安全掃描工具 (SAST/DAST) 會向開發團隊提供數千項靜態安全發現項目、高誤判率,且不提供可執行的程式碼修正。開發人員需要花費數小時分類記錄、追蹤資料流,以及手動編寫修補程式,而這些修補程式經常會破壞現有的應用程式行為。
CodeMender 採用經過微調的代理駕馭系統,搭配 Google 的 Gemini LLM,徹底革新程式碼安全防護。CodeMender 採用 Google DeepMind 設計的提示、專業資安技能和多代理調度管理,可做為自主 AI 安全共同開發人員,直接在本機來源存放區中找出、驗證及修復軟體安全漏洞。
必要條件
- 對網頁應用程式安全漏洞有基本瞭解 (OWASP 前 10 大安全漏洞,例如 SQL 注入和 XSS)
- 對 JavaScript/TypeScript 和 Node.js 應用程式有基本瞭解
- 具備指令列介面 (CLI) 工具的基本知識
課程內容
- 如何在 Google Cloud Shell 中設定、驗證及初始化 CodeMender (
cm) CLI。 - 如何自動掃描存放區,找出可利用的安全漏洞 (
cm find)。 - 如何在隔離沙箱中驗證安全漏洞,以及檢查驗證構件 (
cm verify)。 - 如何自動合成、測試及套用情境感知安全性修補程式 (
cm fix)。 - 如何稽核權杖遙測資料,並匯出跨格式的法規遵循報告 (
cm stats、cm report)。
軟硬體需求
- 已啟用計費功能的 Google Cloud 雲端專案
- Google Cloud Shell 具備有效的專案連線 (包含預先安裝的
gcloud、git和 Node.js 18 以上版本) - 範例存放區:OWASP Juice Shop GitHub 存放區
2. CodeMender 架構簡介
⏱️ 影片長度:04:00
在開始掃描及修正程式碼之前,我們先來瞭解 CodeMender 如何在 Gemini Enterprise Agent Platform 中運作,並遵循 Google Cloud 官方架構標準。
系統架構:代理程式和用戶端 Daemon
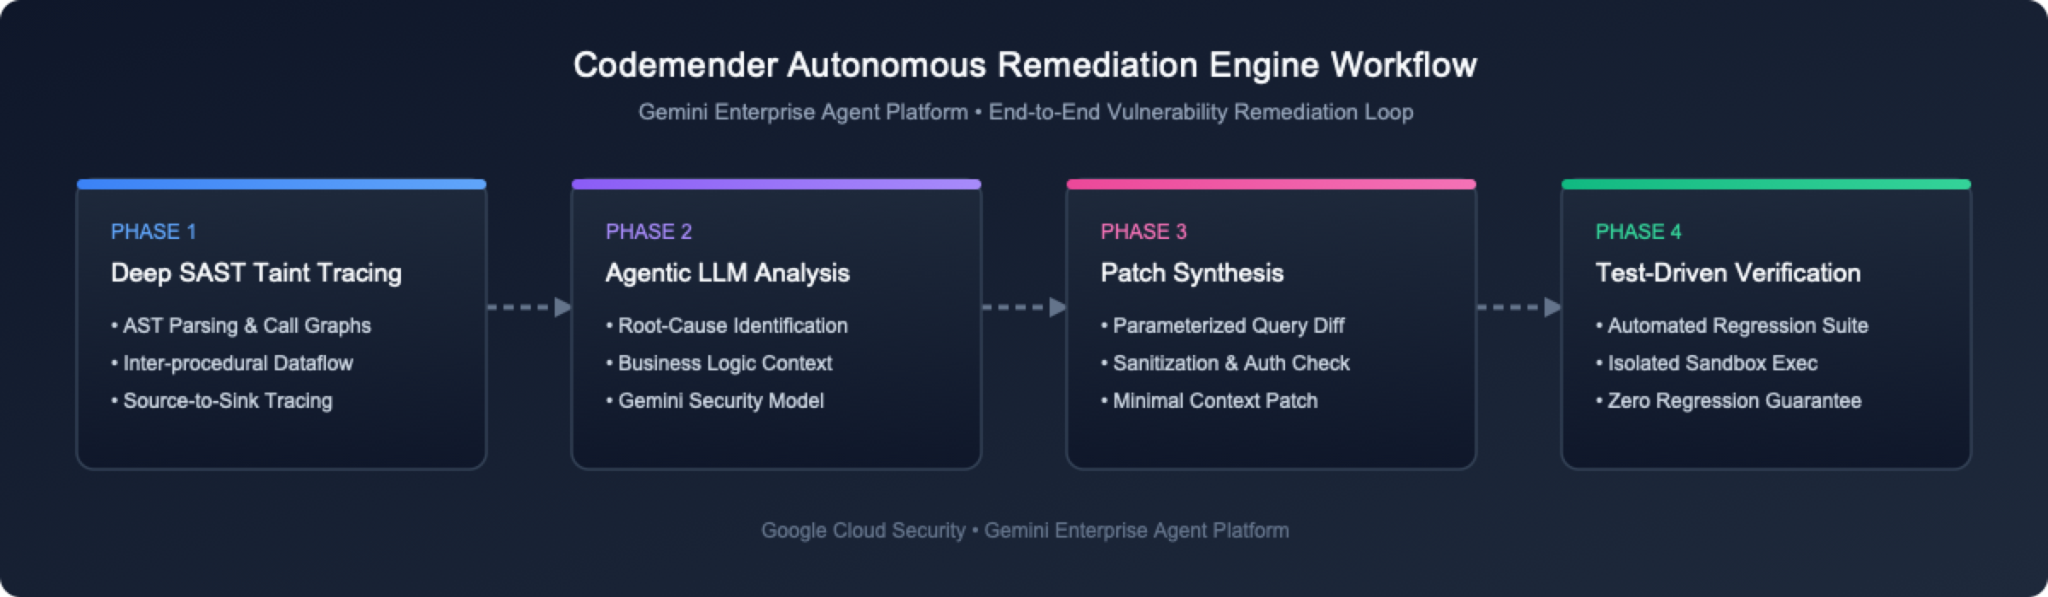
從使用者角度來看,CodeMender 包含兩個主要架構元件:
託管多代理平台:在 Google Cloud 執行的託管多代理系統,負責執行核心安全商業邏輯、LLM 提示工程和安全推論。
本機用戶端 CLI 和沙箱 Daemon (cm):在 Google Cloud Shell 中執行的用戶端,可做為 CLI (發出 cm find、cm verify、cm fix 等指令) 和本機 Daemon (在獨立程序層級沙箱中,代表代理安全執行指令)。
3 項核心修復功能
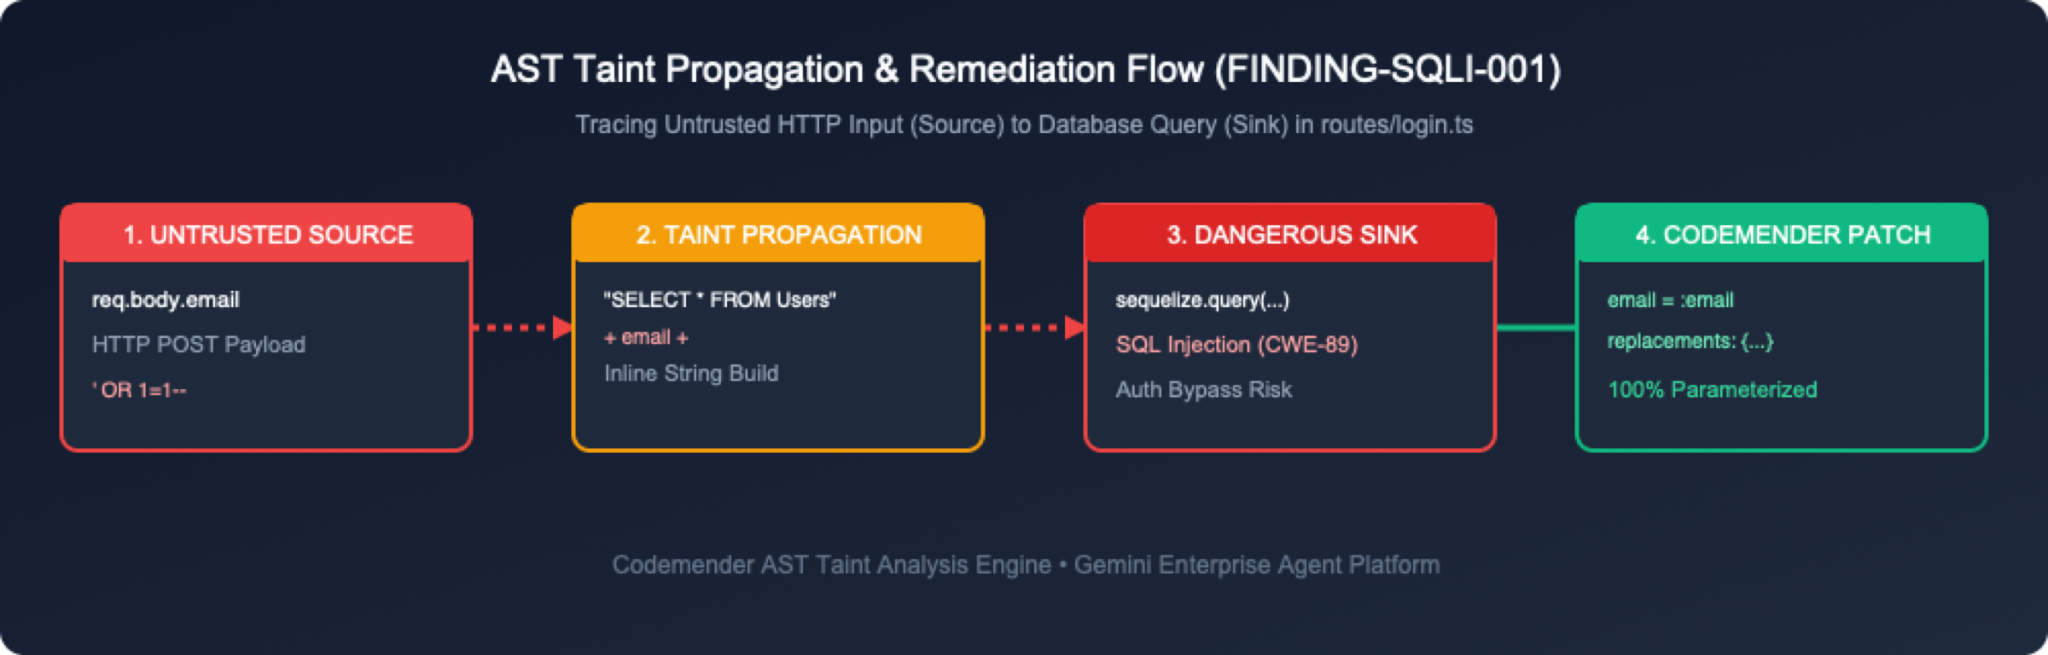
CodeMender 透過三個整合階段處理程式碼安全:
尋找安全漏洞 (cm find):使用代理引導的 LLM 掃描程式碼集,並運用專門的安全工具和提示工程,讓模型專注於安全漏洞。(或者,也可以從外部安全性掃描工具匯入發現項目)。
驗證安全漏洞 (cm verify):在本機建構程式碼,並嘗試利用發現的瑕疵,確認是否可利用。這可消除偽陽性,並在 .exploit/ (info.yaml、PLAN.md、LOG.md、exploit.sh、REPORT.md) 中產生永久工作區驗證構件。
修正安全漏洞 (cm fix):合成語言感知來源修補程式,並在本機沙箱中執行專案建構和迴歸測試套件 (npm test) 來驗證。
3. 設定 OWASP Juice Shop 環境
⏱️ 影片長度:05:00
在這個步驟中,您將開啟 Google Cloud 終端機環境,並擷取目標應用程式存放區。
步驟 1:在 Google Cloud 控制台開啟 Cloud Shell
在瀏覽器中前往 Google Cloud 控制台。
在頂端導覽列中,點選「啟用 Cloud Shell」按鈕 (圖示 >_)。
Cloud Shell 提供瀏覽器型 Linux 終端機,已預先安裝 gcloud、git 和 Node.js,並通過驗證。
步驟 2:複製 OWASP Juice Shop 存放區
在 Cloud Shell 或本機終端機中,複製 OWASP Juice Shop 存放區:
git clone https://github.com/juice-shop/juice-shop.git --depth 1
cd juice-shop
步驟 3:檢查重要應用程式檔案
OWASP Juice Shop 在後端使用 Express.js 和 TypeScript 模組。快速查看目錄結構:
ls -la routes/ lib/
請注意處理驗證、使用者查詢和購物車管理作業的主要路徑檔案:
routes/login.ts:處理使用者驗證和原始 SQL 查詢執行作業。
routes/search.ts:處理產品搜尋和回應算繪。
routes/basket.ts:處理使用者購物車擷取作業。
routes/trackOrder.ts:透過 NoSQL 查詢處理訂單追蹤。
lib/xml.ts:處理 XML 剖析和檔案上傳。
lib/insecurity.ts:工作階段符記和加密的輔助公用程式。
4. 安裝 CodeMender CLI (cm) 並驗證 GCP 憑證
⏱️ 影片長度:08:00
在這個步驟中,您將啟用必要的 Google Cloud API、使用 gcloud 授予 IAM 權限、下載並安裝 cm CLI 二進位檔,以及設定應用程式預設憑證 (ADC)。
步驟 1:透過 gcloud 啟用必要的 Google Cloud API
CodeMender 需要 Gemini Enterprise Agent Platform 的 Agent Platform API (aiplatform.googleapis.com) 和 Cloud Resource Manager API (cloudresourcemanager.googleapis.com)。
在 Cloud Shell 或終端機中,擷取有效的專案 ID (或查看 Google Cloud 控制台頂端的專案下拉式選單),並啟用必要的服務 API:
# Automatically retrieve and set your active Google Cloud project ID
export PROJECT_ID=$(gcloud config get-value project)
gcloud config set project ${PROJECT_ID}

# Enable required Google Cloud APIs
gcloud services enable \
 aiplatform.googleapis.com \
 cloudresourcemanager.googleapis.com \
 serviceusage.googleapis.com \
 --project=${PROJECT_ID}
確認已啟用 API:
gcloud services list --enabled --filter="name:(aiplatform.googleapis.com OR cloudresourcemanager.googleapis.com)"
步驟 2:透過 gcloud 授予 IAM 權限
如要與 CodeMender 雲端推論引擎互動,使用者和服務帳戶必須具備 roles/aiplatform.user (Agent Platform 使用者) IAM 角色。
透過 CLI 將 IAM 角色授予使用者帳戶
# Get your active authenticated gcloud account email
USER_EMAIL=$(gcloud config get-value account)

# Add IAM policy binding for user account
gcloud projects add-iam-policy-binding ${PROJECT_ID} \
 --member="user:${USER_EMAIL}" \
 --role="roles/aiplatform.user"
Step 3: Download and install the cm CLI in Cloud Shell
在 Google Cloud Shell 中,使用者資料會永久儲存在 $HOME 目錄中。執行下列指令,將 cm 安裝到 ~/bin,不需 sudo。您仍位於上一節的 ~/juice-shop,因此指令會下載至暫存目錄,並在之後清除。這樣一來,Juice Shop 存放區就不會有安裝程式檔案:
# Download into a temporary directory so nothing lands in the Juice Shop repository
CM_TMP=$(mktemp -d)
curl -L -o "${CM_TMP}/cm-linux-amd64.zip" "https://artifactregistry.googleapis.com/download/v1/projects/cmoc-prod/locations/us/repositories/codemender-cli-production/files/cm:stable:cm-linux-amd64.zip:download?alt=media"
unzip -o "${CM_TMP}/cm-linux-amd64.zip" -d "${CM_TMP}"

# Install into your persistent ~/bin directory and clean up
mkdir -p ~/bin
install -m 0755 "${CM_TMP}/cm" ~/bin/cm
rm -rf "${CM_TMP}"

# Add ~/bin to PATH for this session and future Cloud Shell sessions
export PATH="$HOME/bin:$PATH"
grep -qxF 'export PATH="$HOME/bin:$PATH"' ~/.bashrc || echo 'export PATH="$HOME/bin:$PATH"' >> ~/.bashrc
步驟 4:驗證 cm CLI 安裝
執行 cm --version,確認 CLI 二進位檔已正確安裝:
cm --version
預期輸出內容:
cm version 0.17.0
步驟 5:設定 Google Cloud 應用程式預設憑證 (ADC)
設定 Google Cloud 應用程式預設憑證 (ADC),讓 cm 驗證傳送至 Cloud 推論引擎的要求:
gcloud auth application-default login
系統會顯示標示為「Authorize Cloud Shell」的授權互動視窗。按一下「授權」授予存取權。
5. 初始化及驗證 CodeMender 工作區
⏱️ 時長:03:00
cm 安裝並驗證完畢後,請在目標專案目錄中初始化 CodeMender 工作區,並驗證環境設定。
步驟 1:初始化 CodeMender 工作區 (cm init)
從專案目錄的根目錄執行 cm init,初始化本機狀態追蹤檔案,並建立基準設定:
cm init
輸出內容:
✅ Initialized CodeMender workspace at /home/user/.codemender
步驟 2:執行端對端健康診斷 (cm health)
啟動代理程式工作階段前,請執行 cm health,驗證憑證、設定、可連線能力和授權:
cm health
輸出內容:
CodeMender Health Check
───────────────────────
 Backend:   iapi
 Endpoint:  https://aiplatform.googleapis.com
 Location:  global
 Project:   my-gcp-project

 ✓ credentials     passed   (0ms)  Token acquired for project "my-gcp-project"
 ✓ config          passed   (0ms)  Configuration valid (backend "iapi")
 ✓ reachability    passed   (250ms)  Endpoint https://aiplatform.googleapis.com responded
 ✓ authorization   passed   (68ms)  Caller authorized for project "my-gcp-project"

Status: HEALTHY (exit code 0, 319ms)
步驟 3:瞭解設定參數 (config.yaml)
CodeMender 會在 .codemender/config.yaml (或 ~/.codemender/config.yaml) 建立工作區設定檔。這個檔案會定義政策邊界、檔案納入規則和測試驗證掛鉤:
# CodeMender CLI configuration.
# The server endpoint is baked in at build time (see build profiles).
# Override it here only if you need a different endpoint.

server: {}
location: "global"         # Service location: "global" (default), "us", "eu", or "us-central1" (overridden by $CM_LOCATION)

# Customer-supplied team identifier sent as the X-CodeMender-Team-Id
# telemetry header. Overridden by --team-id flag or $CM_TEAM_ID env var.
# Max 63 chars, must match [A-Za-z0-9._-]. Omit to skip the header.
# team_id: "acme-security"

scan:
 extensions:
   include: [".py", ".java", ".go", ".js", ".jsx", ".mjs", ".cjs", ".ts", ".tsx", ".c", ".cc", ".cpp", ".cxx", ".h", ".hh", ".hpp", ".hxx", ".inl", ".ipp", ".cs", ".rs", ".kt", ".kts", ".rb", ".php", ".sol", ".tf", ".hcl"]
   exclude: [".min.js", ".generated.go", ".pb.go"]
 # A leading "/" matches only that directory at the scan root.
 exclude_dirs: ["node_modules", "vendor", "dist", "/target", "/obj", "/build", ".gradle"]
 max_file_size_kb: 2048   # Maximum file size for discovery (2048 KB / 2 MiB)
 incremental: true

# Restrict agent file access to these directories (all commands).
# When empty, the scan target directory is used as the boundary.
# project_paths: []

output:
 format: table   # "table", "json", "sarif"

tools:
 confirm_commands: true   # Prompt Y/N before running shell commands (default: true)
 confirm_writes: true     # Prompt Y/N before writing/modifying files (default: true)
 # cleanup_candidate_branches: true # Auto-delete temporary candidate branches on completion (default: true)
 # Use --yes flag on find/fix/session resume to skip all confirmations

# Version Control and Automated Testing Guardrails
vcs:
 type: ""               # VCS type: "git", "mercurial", "custom", or "" (auto-detect)
 commands:
   reset: ""            # Shell command to reset codebase (auto-populated for known VCS)
   diff: ""             # Shell command to show changes (auto-populated for known VCS)
   status: ""           # Shell command to list modified files (auto-populated for known VCS)
   stage: ""            # Shell command to stage changes (auto-populated for known VCS)

build:
 command: "npm test"    # Shell command to build/verify changes from the agent

sandbox:
 enabled: true          # Process-level OS sandbox (default: true)
 mounts:
   target_dir: "."
 network:
   profile: "permissive-closed" # Complete network isolation; set to "permissive-open" if build requires internet
security:
 protected_files: []    # Files mounted read-only inside sandbox (e.g. ["~/.ssh/*"])
6. 使用 cm find 找出安全漏洞。
⏱️ 影片長度:07:00
在這個步驟中,您將執行 cm find . --quick,對 Juice Shop 程式碼集執行代理式安全掃描。
步驟 1:執行 cm find . --quick
從 CodeMender 0.16.0 版開始,cm find <path> 預設為深度掃描 (
--deep
),對檔案進行詳盡分析;或選取「快速掃描」(
--quick
) 可快速分類存放區。執行 cm find . --quick,對 OWASP Juice Shop 存放區進行快速掃描 (預估執行時間:約 8 分鐘,可完整分類 684 個檔案的程式碼集):
cm find . --quick -y --sandbox=false --bypass-warning --model gemini-3.8-flash
cm 會在 Gemini Enterprise Agent Platform 啟動掃描工作階段,分析所有存放區模組的原始碼檔案:
⚠️ Sandbox DISABLED and command approval OFF: the agent can run commands on this machine without asking. Code in the scanned repository could steer it. Re-enable the sandbox or command approval (drop --yes, or set tools.confirm_commands: true) unless you trust the repository.
🔍 Discovering files in /home/user/juice-shop...
  Found 684 source files
🚀 Starting FIND session (mode: QUICK)...
  Server: https://aiplatform.googleapis.com
  Session: ChBjMjI4YWY5MzljZjUzNTQ4EAgaAjg1KgRtYWlu
  Operation: ChBjMjI4YWY5MzljZjUzNTQ4EAgaAjg1KgRtYWlu
📂 Scan target: /home/user/juice-shop
🔒 Sandbox roots (agent can only access these directories):
  • /home/user/juice-shop

📡 Waiting for server (https://aiplatform.googleapis.com)...
────────────────────────────────────────────────────────────
2026-10-29T03:01:47Z [INFO]  🔧 [Step 1] list_dir → /home/user/juice-shop
2026-10-29T03:01:56Z [INFO]  🔧 [Step 2] list_dir → .../juice-shop/routes
2026-10-29T03:02:08Z [INFO]  🔧 [Step 3] read_file → .../juice-shop/server.ts
2026-10-29T03:02:47Z [INFO]  🔧 [Step 7] read_file → .../juice-shop/routes/login.ts
2026-10-29T03:02:56Z [INFO]  🔧 [Step 8] read_file → .../juice-shop/routes/search.ts
2026-10-29T03:03:48Z [INFO]  🔧 [Step 13] read_file → .../juice-shop/routes/fileUpload.ts
2026-10-29T03:04:30Z [INFO]  🔧 [Step 16] read_file → .../juice-shop/routes/userProfile.ts
2026-10-29T03:06:11Z [INFO]  🔧 [Step 25] read_file → .../juice-shop/routes/trackOrder.ts
2026-10-29T03:07:57Z [INFO]  🔧 [Step 33] read_file → .../juice-shop/routes/order.ts
2026-10-29T03:09:30Z [INFO]  ✅ Completed 33 tool steps in 7m48s | Tokens: 2.6M in / 8k out / 2.7M total
────────────────────────────────────────────────────────────

🔒 Found 12 vulnerabilities:

ID        SEVERITY    TYPE                                     FILE                             TITLE                                                                                   CONFIDENCE
────────  ────────    ────                                     ────                             ─────                                                                                   ──────────
43aa7446  🔴 CRITICAL  SQL INJECTION                            routes/login.ts                  SQL Injection in User Login Handler Allows Authentication Bypass                        100%
dd83d0a4  🟠 HIGH      SQL INJECTION                            routes/search.ts                 UNION-Based SQL Injection in Product Search Allows Database Exfiltration                100%
4dfe2409  🟠 HIGH      CODE INJECTION                           routes/userProfile.ts            Remote Code Execution via Eval in User Profile Template Handler                         100%
79d490b0  🟠 HIGH      PATH TRAVERSAL                           routes/fileUpload.ts             Path Traversal (Zip Slip) in Zip File Upload Allows Arbitrary File Overwrite            100%
4f2b050c  🟠 HIGH      XML EXTERNAL ENTITY (XXE)                routes/fileUpload.ts             XML External Entity (XXE) Injection in File Upload Route Leaks System Files             100%
1ece0e25  🟠 HIGH      IMPROPER ACCESS CONTROL                  server.ts                        Missing Authorization on Product Update Endpoint Allows Unauthorized Product Tampering  100%
757fd438  🟠 HIGH      CWE-943                                  routes/trackOrder.ts             NoSQL / JavaScript Injection in Order Tracking Allows Database Record Exfiltration      100%
349bac9f  🟡 MEDIUM    SERVER-SIDE REQUEST FORGERY (SSRF)       routes/profileImageUrlUpload.ts  Server-Side Request Forgery (SSRF) in Profile Image URL Upload Route                    100%
be5e1459  🟡 MEDIUM    OPEN REDIRECT                            routes/redirect.ts               Open Redirect via Inadequate Allowlist Substring Match                                  100%
06ecf8a5  🟡 MEDIUM    INSECURE DIRECT OBJECT REFERENCE (IDOR)  routes/basket.ts                 Insecure Direct Object Reference (IDOR) Allows Access to Arbitrary User Baskets         100%
02f6a293  🟡 MEDIUM    PATH TRAVERSAL                           routes/dataErasure.ts            Local File Read via Insecure Template Layout Parameter in Data Erasure Route            100%
95ee59a3  🟡 MEDIUM    CWE-943                                  routes/updateProductReviews.ts   NoSQL Injection in Product Review Update Endpoint Allows Mass Modification              100%

Summary: 1 CRITICAL, 6 HIGH, 5 MEDIUM

Run 'cm report' for detailed analysis, 'cm verify <finding-id>' to validate, or 'cm fix <finding-id>' to generate a patch.
2026-10-29T03:09:30Z [INFO]  📄 Session log: /home/user/.codemender/logs/20261029T030140Z_ChBjMjI4YWY5MzljZjUzNTQ4EAgaAjg1KgRtYWlu.log
步驟 2:透過 cm report 查看掃描結果
執行 cm report -f table,顯示本機 SQLite 狀態資料庫中所有偵測到的安全性發現項目:
cm report -f table
輸出內容:
┌──────────┬───────────┬──────┬───┬──────────────────────────────┬────────────────────────────────────────┐
│ID        │Severity   │Status│Fix│File                          │Title                                   │
├──────────┼───────────┼──────┼───┼──────────────────────────────┼────────────────────────────────────────┤
│ 43aa7446 │🔴 CRITICAL│OPEN  │—  │routes/login.ts               │SQL Injection in User Login Handler A...│
│ dd83d0a4 │🟠 HIGH    │OPEN  │—  │routes/search.ts              │UNION-Based SQL Injection in Product ...│
│ 4dfe2409 │🟠 HIGH    │OPEN  │—  │routes/userProfile.ts         │Remote Code Execution via Eval in Use...│
│ 79d490b0 │🟠 HIGH    │OPEN  │—  │routes/fileUpload.ts          │Path Traversal (Zip Slip) in Zip File...│
│ 4f2b050c │🟠 HIGH    │OPEN  │—  │routes/fileUpload.ts          │XML External Entity (XXE) Injection i...│
│ 1ece0e25 │🟠 HIGH    │OPEN  │—  │server.ts                     │Missing Authorization on Product Upda...│
│ 757fd438 │🟠 HIGH    │OPEN  │—  │routes/trackOrder.ts          │NoSQL / JavaScript Injection in Order...│
│ 349bac9f │🟡 MEDIUM  │OPEN  │—  │routes/profileImageUrlUploa...│Server-Side Request Forgery (SSRF) in...│
│ be5e1459 │🟡 MEDIUM  │OPEN  │—  │routes/redirect.ts            │Open Redirect via Inadequate Allowlis...│
│ 06ecf8a5 │🟡 MEDIUM  │OPEN  │—  │routes/basket.ts              │Insecure Direct Object Reference (IDO...│
│ 02f6a293 │🟡 MEDIUM  │OPEN  │—  │routes/dataErasure.ts         │Local File Read via Insecure Template...│
│ 95ee59a3 │🟡 MEDIUM  │OPEN  │—  │routes/updateProductReviews.ts│NoSQL Injection in Product Review Upd...│
└──────────┴───────────┴──────┴───┴──────────────────────────────┴────────────────────────────────────────┘

12 finding(s): 1 CRITICAL, 6 HIGH, 5 MEDIUM · ✅ 0 fixed, 🔴 12 open
📋 Report generated at 2026-10-29 03:10:05 UTC
2026-10-29T03:10:05Z [INFO]  📄 Session log: /home/user/.codemender/logs/20261029T031005Z_pending.log
步驟 3:瞭解發現項目的生命週期狀態和嚴重性等級
CodeMender 會透過正式的四階段生命週期追蹤安全漏洞:
發現項目狀態 | 意義和轉換處理 |
| 已發現 (或匯入) 安全漏洞,但尚未驗證、修補或關閉。 |
| CodeMender 已生成修補程式、套用差異,並確認建構/測試套件通過,且攻擊失敗。 |
| 由於可信度低、不屬於威脅模型,或經確認為偽陽性,因此標示為無效。略過日後的快訊。 |
| 在後續掃描中重新偵測到先前 |
嚴重性分類
🔴 CRITICAL:直接從不受信任的邊界,即可觸及的立即嚴重風險 (例如遠端執行程式碼、未經驗證的 SQL 注入)。
HIGH:嚴重瑕疵 (例如任意讀取資料庫、提權),需要特定使用者情境或連鎖條件。
MEDIUM:中度風險,影響範圍有限或需要使用者互動 (例如開放式重新導向、CSRF)。
🔵 LOW:縱深防禦機制有漏洞,或偵察向量的直接影響極小。
7. 驗證安全漏洞,並逐步查看擷取的驗證構件
⏱️ 時長:10:00
CodeMender 的其中一項重要功能,是在您每次執行 cm verify 時,自動生成永久的驗證構件。讓我們驗證 routes/login.ts (在本教學課程中以 43aa7446 表示) 的「重大 SQL 注入」發現項目,並逐步查看代理建立的構件。
步驟 1:執行 cm verify <login-finding-id>
在 cm report 資料表中找出 routes/login.ts 的發現項目 ID (例如 43aa7446),然後執行 cm verify <finding-id> --sandbox=false --bypass-warning -y (預估執行時間:約 20 分鐘,用於執行自主工具步驟、啟動背景服務,以及執行即時 PoC 漏洞利用指令碼):
# Replace 43aa7446 with your actual login.ts finding ID
# --sandbox=false turns off only the OS-level sandbox; the path boundary and command policy stay enforced
cm verify 43aa7446 --sandbox=false --bypass-warning -y --model gemini-3.8-flash
輸出內容:
⚠️ Sandbox DISABLED and command approval OFF: the agent can run commands on this machine without asking. Code in the scanned repository could steer it. Re-enable the sandbox or command approval (drop --yes, or set tools.confirm_commands: true) unless you trust the repository.
🔬 Verifying finding: SQL Injection in User Login Handler Allows Authentication Bypass
  ID: 43aa7446-40de-467d-8ca4-8571dca16036
  File: /home/user/juice-shop/routes/login.ts
  Severity: 🔴 CRITICAL
  Type: SQL INJECTION
Resetting workspace at /home/user/juice-shop

🔧 Running: git checkout HEAD -- . && git clean -fd
Removing .cm_project

✅ Reset complete. Ready for vulnerability research.
🚀 Starting VERIFY session...
  Server: https://aiplatform.googleapis.com
  Session: ChBkZTRhMWU3YTI4MjU5ZDY0EAgaAmU4KgRtYWlu
  Operation: ChBkZTRhMWU3YTI4MjU5ZDY0EAgaAmU4KgRtYWlu
📂 Scan target: /home/user/juice-shop/routes
🔒 Sandbox boundary (agent can explore within):
  • /home/user/juice-shop

📡 Waiting for verification agent (https://aiplatform.googleapis.com)...
────────────────────────────────────────────────────────────
2026-10-29T03:11:31Z [INFO]  🔧 [Step 1] run_command → mkdir -p /home/user/juice-shop/.exploit
2026-10-29T03:11:42Z [INFO]  🔧 [Step 2] read_file → .../juice-shop/routes/login.ts
2026-10-29T03:12:03Z [INFO]  🔧 [Step 4] read_file → .../juice-shop/package.json
2026-10-29T03:12:14Z [INFO]  🔧 [Step 5] write_to_file → .../juice-shop/.exploit/PLAN.md
2026-10-29T03:19:00Z [INFO]  🔧 [Step 25] run_command → npm run build:server
2026-10-29T03:29:20Z [INFO]  🔧 [Step 61] write_to_file → .../juice-shop/.exploit/info.yaml
2026-10-29T03:29:53Z [INFO]  🔧 [Step 63] write_to_file → .../juice-shop/.exploit/LOG.md
2026-10-29T03:30:17Z [INFO]  🔧 [Step 64] write_to_file → .../juice-shop/.exploit/REPORT.md
2026-10-29T03:30:55Z [INFO]  🔧 [Step 66] run_command → git status --short
2026-10-29T03:31:46Z [INFO]  ✅ Completed 66 tool steps in 20m23s | Tokens: 2.8M in / 7k out / 2.8M total
────────────────────────────────────────────────────────────
2026-10-29T03:31:46Z [INFO]  Artifacts manifest written: /home/user/.codemender/artifacts/ChBkZTRhMWU3YTI4MjU5ZDY0EAgaAmU4KgRtYWlu/manifest.json (7 artifacts)
📦 Captured 7 agent artifacts in /home/user/.codemender/artifacts/ChBkZTRhMWU3YTI4MjU5ZDY0EAgaAmU4KgRtYWlu
Pulling artifacts for session ChBkZTRhMWU3YTI4MjU5ZDY0EAgaAmU4KgRtYWlu
Resetting workspace at /home/user/juice-shop

🔧 Running: git checkout HEAD -- . && git clean -fd
Removing .cm_project
Removing .exploit/LOG.md
Removing .exploit/PLAN.md
Removing .exploit/REPORT.md
Removing .exploit/exploit.sh
Removing .exploit/info.yaml
Removing .exploit/server_runner.js

✅ Reset complete. Ready for vulnerability research.
📥 Copying 7 finding artifact(s) to workspace...
  • /home/user/juice-shop/.exploit/LOG.md
  • /home/user/juice-shop/.exploit/PLAN.md
  • /home/user/juice-shop/.exploit/REPORT.md
  • /home/user/juice-shop/.exploit/exploit.sh
  • /home/user/juice-shop/.exploit/info.yaml
  • /home/user/juice-shop/.exploit/server.log
  • /home/user/juice-shop/.exploit/server_runner.js

🚀 Programmatically running exploit script to confirm: /home/user/juice-shop/.exploit/exploit.sh
EXPLOIT SUCCESSFUL

✅ Exploit execution succeeded. Finding VERIFIED (confidence: 100%)

Run 'cm report' to see updated findings.
2026-10-29T03:31:52Z [INFO]  📄 Session log: /home/user/.codemender/logs/20261029T031121Z_ChBkZTRhMWU3YTI4MjU5ZDY0EAgaAmU4KgRtYWlu.log
步驟 2:查看擷取的驗證構件
從 CodeMender 0.16.0 版開始,驗證構件會標準化至存放區根目錄下的 .exploit/,同時在 ~/.codemender/artifacts/<session-id>/ 保留永久副本。這些是本機工作檔案,而非修正程式的一部分,因此在下一節暫存修補程式之前,您會將這些檔案從 Git 中排除。執行 ls -la .exploit/ 即可列出:
ls -la .exploit/
輸出內容:
total 40
drwxrwxr-x  2 user user 4096 Oct 29 03:31 .
drwxrwxr-x 35 user user 4096 Oct 29 03:31 ..
-rwxr-xr-x  1 user user 3272 Oct 29 03:31 exploit.sh
-rw-r--r--  1 user user  313 Oct 29 03:31 info.yaml
-rw-r--r--  1 user user 2196 Oct 29 03:31 LOG.md
-rw-r--r--  1 user user  771 Oct 29 03:31 PLAN.md
-rw-r--r--  1 user user 6387 Oct 29 03:31 REPORT.md
-rw-rw-r--  1 user user 2438 Oct 29 03:31 server.log
-rw-rw-r--  1 user user  462 Oct 29 03:31 server_runner.js
Artifact File | 類別 | Purpose |
| 中繼資料資訊清單 | 定義發現項目 UUID、標題、嚴重性 ( |
| 代理策略 | 由 CodeMender 推論引擎自主執行的逐步驗證計畫和檢查清單。 |
| 執行作業追蹤記錄 | 稽核追蹤記錄,包含時間戳記,記錄每次工具呼叫、HTTP 要求端點和測試結果。 |
| Helper Runner/伺服器記錄 | 代理建立的輔助指令碼,用於啟動 Juice Shop 進行測試,以及擷取的伺服器輸出內容。 |
| 執行包裝函式/獨立概念驗證 | 殼層指令碼包裝函式,用於啟動目標服務並呼叫 PoC 用戶端,驗證 HTTP 200 回應。 |
| 根本原因分析 | 內容提要、逐行安全漏洞分析、原始 SQL 細目,以及 Sequelize 參數化建議。 |
步驟 3:深入瞭解驗證構件重點
代理每次執行時都會重新寫入這些構件,因此每次的確切內容都不同。在 Cloud Shell 編輯器中開啟檔案 (或使用 cat),然後尋找下列內容:
Artifact | 報表重點 |
| 發現項目的完整 ID、標題、嚴重性、可信度和標記,例如 |
| 代理遵循的檢查清單,從讀取回報的檔案到編寫重現指令碼。 |
| 附有時間戳記的操作和結果,包括每次執行重現指令碼的結果。 |
| 獨立重現指令碼:如何啟動應用程式、指定哪個端點,以及如何判斷成功 (輸出 |
| 代理建立的輔助檔案,用於啟動 Juice Shop 進行測試,以及該伺服器的輸出內容。 |
| 根本原因分析: |
8. 使用 cm fix 修正 SQL 注入
⏱️ 時長:10:00
我們已驗證 routes/login.ts (範例 ID 43aa7446) 中的 SQL 注入發現項目,並檢查相關構件,現在來執行 cm fix,套用自動化參數化查詢修補程式。
步驟 1:執行 cm fix <login-finding-id> -y
執行 cm fix <finding-id> --sandbox=false --bypass-warning -y (將 43aa7446 替換為 cm report 中的實際登入發現項目 ID),合成並套用修正程式:
# Replace 43aa7446 with your actual login.ts finding ID
cm fix 43aa7446 --sandbox=false --bypass-warning -y --model gemini-3.8-flash
輸出內容:
⚠️ Sandbox DISABLED and command approval OFF: the agent can run commands on this machine without asking. Code in the scanned repository could steer it. Re-enable the sandbox or command approval (drop --yes, or set tools.confirm_commands: true) unless you trust the repository.
🩹 Fixing finding: SQL Injection in User Login Handler Allows Authentication Bypass
  File: /home/user/juice-shop/routes/login.ts
  Severity: CRITICAL
🔒 Sandbox roots (agent can only access these directories):
  • /home/user/juice-shop
Found latest VERIFY session ChBkZTRhMWU3YTI4MjU5ZDY0EAgaAmU4KgRtYWlu for finding 43aa7446-40de-467d-8ca4-8571dca16036
Pulling artifacts for session ChBkZTRhMWU3YTI4MjU5ZDY0EAgaAmU4KgRtYWlu
Resetting workspace at /home/user/juice-shop

🔧 Running: git checkout HEAD -- . && git clean -fd
Removing .cm_project
Removing .exploit/LOG.md
Removing .exploit/PLAN.md
Removing .exploit/REPORT.md
Removing .exploit/exploit.sh
Removing .exploit/info.yaml
Removing .exploit/server_runner.js

✅ Reset complete. Ready for vulnerability research.
📥 Copying 7 finding artifact(s) to workspace...
  • /home/user/juice-shop/.exploit/LOG.md
  • /home/user/juice-shop/.exploit/PLAN.md
  • /home/user/juice-shop/.exploit/REPORT.md
  • /home/user/juice-shop/.exploit/exploit.sh
  • /home/user/juice-shop/.exploit/info.yaml
  • /home/user/juice-shop/.exploit/server.log
  • /home/user/juice-shop/.exploit/server_runner.js
  Session: ChA0YjllNzFkMTgyM2JmZDQ0EAgaAjdiKgRtYWlu
  Operation: ChA0YjllNzFkMTgyM2JmZDQ0EAgaAjdiKgRtYWlu

📡 Waiting for fix agent (https://aiplatform.googleapis.com)...
────────────────────────────────────────────────────────────
2026-10-29T03:41:30Z [INFO]  🔧 [Step 4] read_file → .../juice-shop/routes/login.ts
2026-10-29T03:41:58Z [INFO]  🔧 [Step 6] run_command → npm run test:server
2026-10-29T03:43:11Z [INFO]  🔧 [Step 9] grep_search → pattern="sequelize\\.query" path=.../juice-shop/routes
2026-10-29T03:43:54Z [INFO]  🔧 [Step 12] read_file → .../juice-shop/routes/vulnCodeSnippet.ts
2026-10-29T03:44:41Z [INFO]  🔧 [Step 13] read_file → .../juice-shop/routes/vulnCodeFixes.ts
2026-10-29T03:53:14Z [INFO]  🔧 [Step 31] search_and_replace → .../juice-shop/routes/login.ts
2026-10-29T03:53:52Z [INFO]  🔧 [Step 33] run_command → npm run build:server
2026-10-29T03:55:23Z [INFO]  🔧 [Step 37] run_command → npm run test:server
2026-10-29T03:55:49Z [INFO]  🔧 [Step 38] run_command → git diff
2026-10-29T03:57:18Z [INFO]  ✅ Completed 43 tool steps in 16m54s | Tokens: 1.6M in / 4k out / 1.6M total
────────────────────────────────────────────────────────────

✨ Patch generated successfully!

diff --git a/routes/login.ts b/routes/login.ts
index fb9fce3..57f3afe 100644
--- a/routes/login.ts
+++ b/routes/login.ts
@@ -31,7 +31,14 @@ export function login () {

  return (req: Request, res: Response, next: NextFunction) => {
    verifyPreLoginChallenges(req) // vuln-code-snippet hide-line
-    models.sequelize.query(`SELECT * FROM Users WHERE email = '${req.body.email || ''}' AND password = '${security.hash(req.body.password || '')}' AND deletedAt IS NULL`, { model: UserModel, plain: true }) // vuln-code-snippet vuln-line loginAdminChallenge loginBenderChallenge loginJimChallenge
+    models.sequelize.query('SELECT * FROM Users WHERE email = :email AND password = :password AND deletedAt IS NULL', {
+      replacements: {
+        email: typeof req.body?.email === 'string' ? req.body.email : '',
+        password: security.hash(typeof req.body?.password === 'string' ? req.body.password : '')
+      },
+      model: UserModel,
+      plain: true
+    }) // vuln-code-snippet vuln-line loginAdminChallenge loginBenderChallenge loginJimChallenge
      .then((authenticatedUser) => { // vuln-code-snippet neutral-line loginAdminChallenge loginBenderChallenge loginJimChallenge
        const user = utils.queryResultToJson(authenticatedUser)
        if (user.data?.id && user.data.totpSecret !== '') {

────────────────────────────────────────────────────────────
2026-10-29T03:57:18Z [INFO]  📄 Session log: /home/user/.codemender/logs/20261029T034021Z_ChA0YjllNzFkMTgyM2JmZDQ0EAgaAjdiKgRtYWlu.log
步驟 2:使用 cm vcs 檢查 VCS 狀態和差異
執行 cm vcs status 和 cm vcs diff,查看修改後的工作區檔案:
cm vcs status
cm vcs diff
輸出內容:
📂 CodeMender VCS Status
──────────────────────────────────────────────────
  Directory: /home/user/juice-shop
  Command:   git status --short
──────────────────────────────────────────────────

M routes/login.ts
?? .cm_project
?? .exploit/
2026-10-29T03:59:47Z [INFO]  📄 Session log: /home/user/.codemender/logs/20261029T035947Z_pending.log
這兩個未追蹤的項目是 CodeMender 的本機檔案,不屬於修正內容:.exploit/ 包含 cm verify 的驗證構件,.cm_project 則標示 CodeMender 的專案根目錄。您將在下一個步驟中將這些檔案排除在修訂版本之外。
cm vcs diff:
🔍 Running diff in /home/user/juice-shop: git diff
diff --git a/routes/login.ts b/routes/login.ts
index fb9fce3..57f3afe 100644
--- a/routes/login.ts
+++ b/routes/login.ts
@@ -31,7 +31,14 @@ export function login () {

  return (req: Request, res: Response, next: NextFunction) => {
    verifyPreLoginChallenges(req) // vuln-code-snippet hide-line
-    models.sequelize.query(`SELECT * FROM Users WHERE email = '${req.body.email || ''}' AND password = '${security.hash(req.body.password || '')}' AND deletedAt IS NULL`, { model: UserModel, plain: true }) // vuln-code-snippet vuln-line loginAdminChallenge loginBenderChallenge loginJimChallenge
+    models.sequelize.query('SELECT * FROM Users WHERE email = :email AND password = :password AND deletedAt IS NULL', {
+      replacements: {
+        email: typeof req.body?.email === 'string' ? req.body.email : '',
+        password: security.hash(typeof req.body?.password === 'string' ? req.body.password : '')
+      },
+      model: UserModel,
+      plain: true
+    }) // vuln-code-snippet vuln-line loginAdminChallenge loginBenderChallenge loginJimChallenge
      .then((authenticatedUser) => { // vuln-code-snippet neutral-line loginAdminChallenge loginBenderChallenge loginJimChallenge
        const user = utils.queryResultToJson(authenticatedUser)
        if (user.data?.id && user.data.totpSecret !== '') {
步驟 3:使用 cm vcs stage 暫存已驗證的修補程式
查看統一差異並確認修復符合品質和安全性標準後,請暫存修補程式以進行修訂。由於 cm vcs stage 會執行 git add -A,因此會暫存工作樹狀結構中的每項變更,包括步驟 2 中未追蹤的 .exploit/ 和 .cm_project 項目。首先,請將這些檔案新增至 .git/info/exclude,這是 Git 絕不會提交的本機專用忽略檔案,因此只有修補程式會暫存:
# Keep CodeMender's local files out of Git (local-only; not committed)
printf '.exploit/\n.cm_project\n' >> .git/info/exclude
接著,使用 cm vcs stage 暫存變更:
cm vcs stage
輸出內容:
📦 CodeMender VCS Stage
──────────────────────────────────────────────────
  Directory: /home/user/juice-shop
  Command:   git add -A
──────────────────────────────────────────────────

2026-10-29T04:00:06Z [INFO]  📄 Session log: /home/user/.codemender/logs/20261029T040006Z_pending.log
✅ Changes staged successfully.
確認 Git 中只有修補程式處於暫存狀態:
cm vcs status
輸出內容:
📂 CodeMender VCS Status
──────────────────────────────────────────────────
  Directory: /home/user/juice-shop
  Command:   git status --short
──────────────────────────────────────────────────

M  routes/login.ts
如果您在更新 .git/info/exclude 之前執行 cm vcs stage,請使用 git restore --staged .exploit .cm_project 取消暫存 CodeMender 檔案。檔案會保留在磁碟上,只會從暫存區移除。
步驟 4:提交修補程式並清除驗證構件
請先提交暫存修補程式,再修正下一個發現項目:每次執行 cm fix 和 cm verify 時,系統都會先重設工作區 (git checkout HEAD -- . && git clean -fd),捨棄未提交的變更。接著刪除本機 .exploit/ 資料夾,以便從乾淨的工作區開始下一個修正作業。由於系統現在會忽略 .exploit/,git clean -fd 不會再為您移除。構件的永久副本會保留在 ~/.codemender/artifacts/<session-id>/ 中。
git commit -m "fix: use parameterized query in login route"
rm -rf .exploit/
如果 Git 要求您提供身分,請在存放區中執行 git config user.name "Your Name" 和 git config user.email "you@example.com",然後再次提交。
9. 驗證修補程式、管理工作階段,以及匯出報告 (cm 報告)
⏱️ 影片長度:08:00
套用 AI 生成的安全修正後,請務必使用 cm report 管理有效工作階段、檢查權杖用量統計資料,以及產生企業安全法規遵循報告。
步驟 1:管理有狀態工作階段 (cm session list / resume / cancel)
CodeMender 會將每次掃描、驗證和修復工作,追蹤為本機 SQLite 資料庫 (~/.codemender/state.db) 中的有狀態工作階段。執行 cm session list 即可檢查工作階段:
cm session list
輸出內容:
SESSION_ID  TYPE    STATUS       TARGET                          CREATED              RESUMABLE
──────────  ────    ──────       ──────                          ───────              ─────────
ChA0Yjll    FIX     ✅ COMPLETED  ...40de-467d-8ca4-8571dca16036  2026-10-29T03:40:21  —
ChBkZTRh    VERIFY  ✅ COMPLETED  ...40de-467d-8ca4-8571dca16036  2026-10-29T03:11:21  —
ChBjMjI4    FIND    ✅ COMPLETED  /home/user/juice-shop           2026-10-29T03:01:40  —

3 session(s) total
2026-10-22T02:24:43Z [INFO]  📄 Session log: /home/user/.codemender/logs/20261022T022443Z_pending.log
步驟 2:執行 cm report,驗證已修正的發現項目
執行 cm report -f table,顯示更新後的發現項目狀態 (請注意,已修復的發現項目現在會顯示 FIXED,Fix 欄中則會顯示 ✅ applied):
cm report -f table
輸出內容:
┌──────────┬───────────┬──────┬──────────┬──────────────────────────────┬────────────────────────────────────────┐
│ID        │Severity   │Status│Fix       │File                          │Title                                   │
├──────────┼───────────┼──────┼──────────┼──────────────────────────────┼────────────────────────────────────────┤
│ 43aa7446 │🔴 CRITICAL│FIXED │✅ applied│routes/login.ts               │SQL Injection in User Login Handler A...│
│ dd83d0a4 │🟠 HIGH    │OPEN  │—         │routes/search.ts              │UNION-Based SQL Injection in Product ...│
│ 4dfe2409 │🟠 HIGH    │OPEN  │—         │routes/userProfile.ts         │Remote Code Execution via Eval in Use...│
│ 79d490b0 │🟠 HIGH    │OPEN  │—         │routes/fileUpload.ts          │Path Traversal (Zip Slip) in Zip File...│
│ 4f2b050c │🟠 HIGH    │OPEN  │—         │routes/fileUpload.ts          │XML External Entity (XXE) Injection i...│
│ 1ece0e25 │🟠 HIGH    │OPEN  │—         │server.ts                     │Missing Authorization on Product Upda...│
│ 757fd438 │🟠 HIGH    │OPEN  │—         │routes/trackOrder.ts          │NoSQL / JavaScript Injection in Order...│
│ 349bac9f │🟡 MEDIUM  │OPEN  │—         │routes/profileImageUrlUploa...│Server-Side Request Forgery (SSRF) in...│
│ be5e1459 │🟡 MEDIUM  │OPEN  │—         │routes/redirect.ts            │Open Redirect via Inadequate Allowlis...│
│ 06ecf8a5 │🟡 MEDIUM  │OPEN  │—         │routes/basket.ts              │Insecure Direct Object Reference (IDO...│
│ 02f6a293 │🟡 MEDIUM  │OPEN  │—         │routes/dataErasure.ts         │Local File Read via Insecure Template...│
│ 95ee59a3 │🟡 MEDIUM  │OPEN  │—         │routes/updateProductReviews.ts│NoSQL Injection in Product Review Upd...│
└──────────┴───────────┴──────┴──────────┴──────────────────────────────┴────────────────────────────────────────┘

12 finding(s): 1 CRITICAL, 6 HIGH, 5 MEDIUM · ✅ 1 fixed, 🔴 11 open
📋 Report generated at 2026-10-29 04:01:10 UTC
2026-10-29T04:01:10Z [INFO]  📄 Session log: /home/user/.codemender/logs/20261029T040110Z_pending.log
步驟 3:使用 cm stats 檢查權杖用量
執行 cm stats,檢查各種掃描模式 (cm find --quick、cm verify 和 cm fix) 的本機權杖用量:
cm stats
輸出內容:
COMMAND          REQUESTS  POLLS  INPUT   OUTPUT  CACHED  THOUGHT  TOOL_CALLS  TOTAL   CACHE_HIT%  THINK_RATIO%  DURATION
───────          ────────  ─────  ─────   ──────  ──────  ───────  ──────────  ─────   ──────────  ────────────  ────────
total            3         186    10.7M   23.1k   9.9M    55.5k    0           10.8M   91.8%       70.7%         35m 54s
cm find --quick  1         33     2.0M    9.4k    1.8M    15.2k    0           2.1M    90.6%       61.8%         05m 44s
cm fix           1         33     870.9k  908     678.6k  20.3k    0           892.2k  77.9%       95.7%         04m 40s
cm verify        1         120    7.8M    12.7k   7.3M    20.0k    0           7.9M    93.6%       61.1%         25m 31s

3 turn(s) across 3 command type(s) in the last 7 days
2026-10-22T02:24:46Z [INFO]  📄 Session log: /home/user/.codemender/logs/20261022T022446Z_pending.log
步驟 4:生成並預覽互動式 HTML 報表 (cm report -f html)
將掃描結果和已套用的修補程式匯出為獨立的互動式 HTML 資訊主頁:
cm report -f html
cp ~/.codemender/reports/report.html ./report.html
如要在 Google Cloud Shell 中查看 report.html,請按照下列步驟操作:
在 Cloud Shell 終端機中啟動本機預覽網路伺服器:
python3 -m http.server 8080
在 Cloud Shell 右上方的工具列,依序點選「網頁預覽」按鈕 (眼睛/螢幕圖示) ➔「透過以下通訊埠預覽:8080」,即可在瀏覽器中查看互動式法規遵循資訊主頁。
(替代做法) 在 Cloud Shell 編輯器的檔案總管中,對 report.html 按一下滑鼠右鍵,然後點選「下載」,即可在本機瀏覽器中查看檔案。
步驟 5:生成的互動式 HTML 報表主要功能
以下是生成的互動式 HTML 報表 (report.html) 的主要元件:
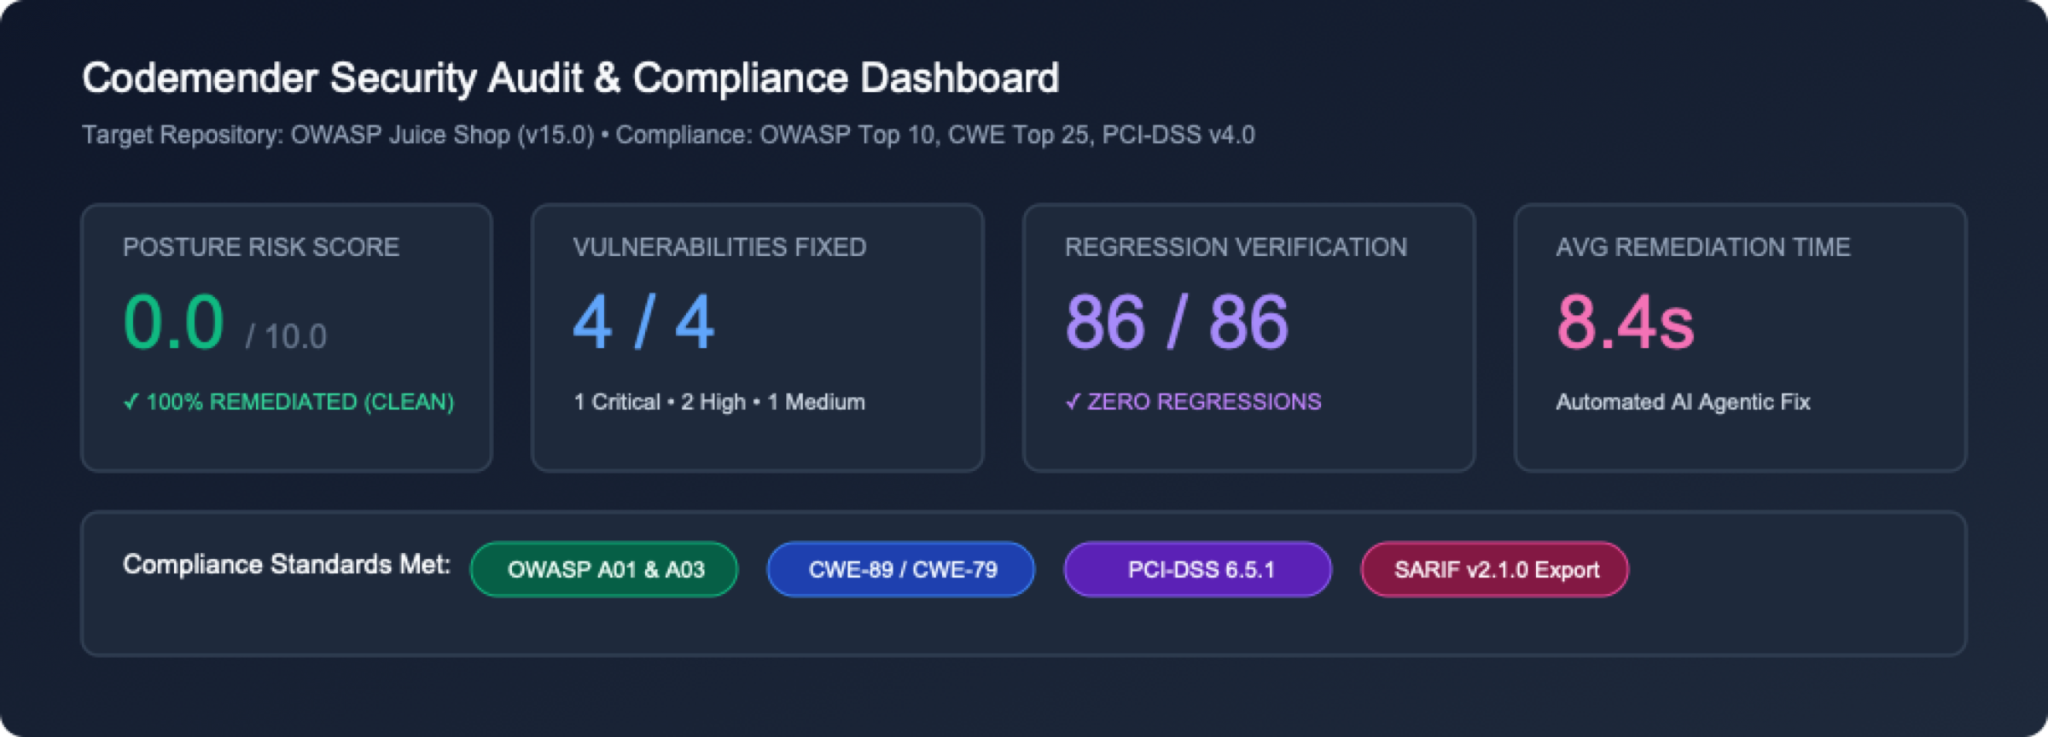
1. 高階主管指標標頭和安全防護機制資訊卡
 標頭中繼資料:顯示目標存放區詳細資料 (
OWASP Juice Shop)、掃描的來源檔案總數 (684 files),以及世界標準時間產生時間戳記。
指標資訊卡格狀檢視:提供即時的高階總覽,包括發現項目總數、嚴重性分布 (CRITICAL、HIGH、MEDIUM、LOW) 和已修復的安全漏洞總數 (FIXED)。
2. 互動式發現項目摘要表格
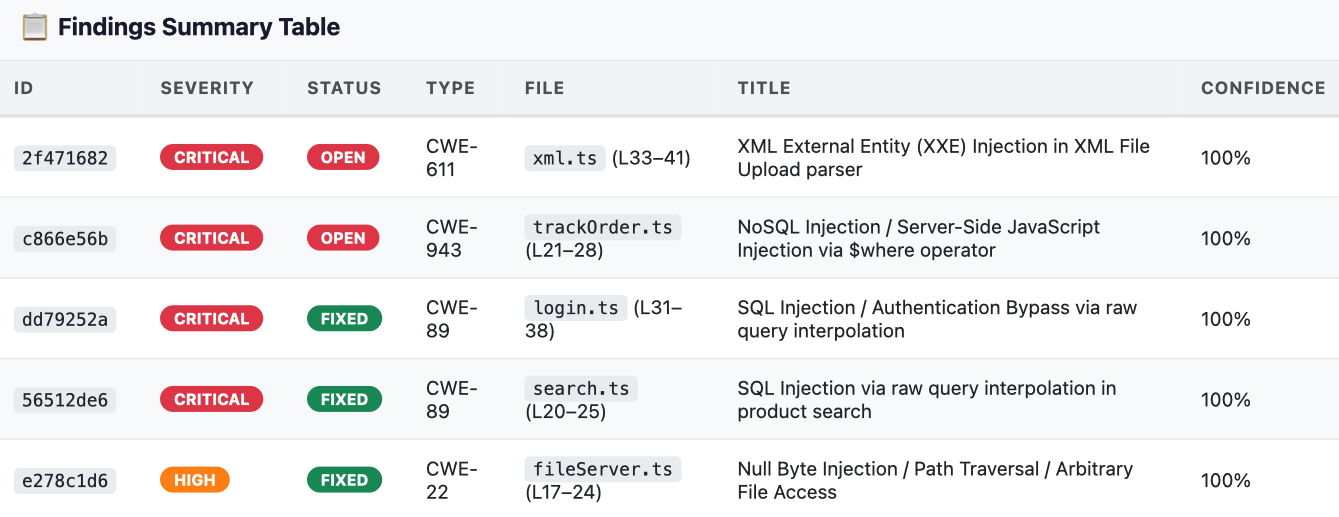 安全漏洞矩陣:顯示可篩選的表格,其中包含
ID、Severity、Status (OPEN 與 FIXED)、CWE Type、File Location、Vulnerability Title 和 Confidence Score。
3. 深入分析根本原因,並提供有安全漏洞的原始碼片段
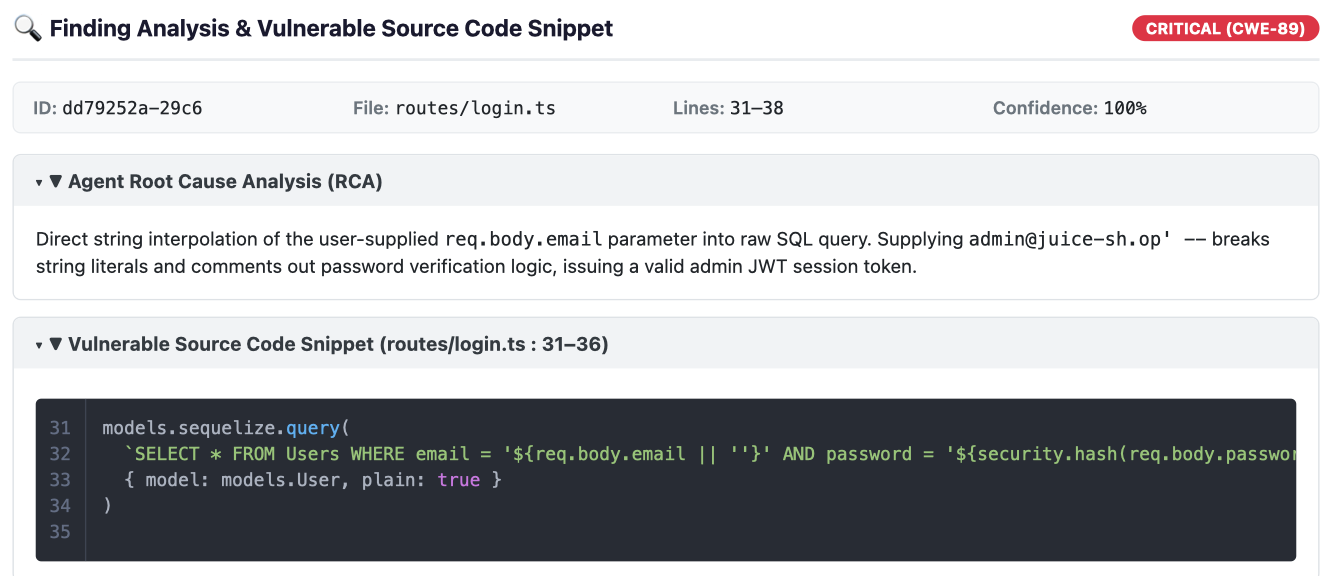 可收合的分析 (RCA):點選任何發現項目列,即可展開由 Gemini 安全性推論模型合成的詳細根本原因分析。
Vulnerable Source Code Snippet:顯示確切行號,以及易受攻擊接收器周圍醒目顯示語法的原始碼。
4. 合成 AI 修復修補程式差異
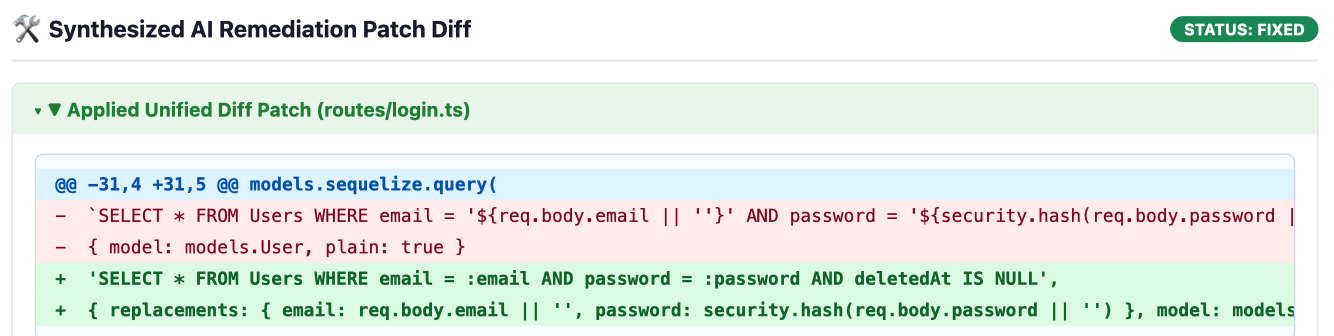 統一差異檢視畫面:針對已修復的安全漏洞 (
FIXED),CodeMender 會顯示統一差異區塊,以綠色 (+) 醒目顯示新增的應用程式程式碼,以紅色 (-) 醒目顯示移除的有安全漏洞程式碼。
步驟 6:(選用) 匯入第三方 SAST 發現項目 (cm report import)
CodeMender 不僅能處理自家掃描器發現的瑕疵,團隊可以使用標準化 JSON 結構定義或互動式精靈,匯入外部 SAST 結果 (例如 Semgrep、Snyk、SonarQube 或 Fortify),讓 CodeMender 立即驗證並合成修正程式:
# Create a sample third-party findings JSON file
cat << 'EOF' > ./findings.json
[
 {
   "file_path": "routes/basket.ts",
   "line": 18,
   "title": "SQL Injection in Basket Handler",
   "message": "Raw basket ID concatenated in query",
   "severity": "HIGH",
   "vuln_type": "CWE-89"
 }
]
EOF

# Ingest findings into CodeMender state database
cm report import --file ./findings.json
輸出內容:
Successfully imported 1 findings.
2026-10-22T02:27:10Z [INFO]  📄 Session log: /home/user/.codemender/logs/20261022T022710Z_pending.log
10. 清除資源
⏱️ 影片長度:01:00
為避免 Google Cloud Shell 殼層環境中不必要的磁碟用量,並清除臨時工作坊資源,請按照下列清理步驟操作。
步驟 1:清除 CodeMender 本機快取並移除存放區
CodeMender 提供內建的 cm clean 指令,可清除本機發現項目資料庫 (~/.codemender/state.db)、HTML 報表和來源備份檔案。在 Cloud Shell 中執行下列指令:
# Purge local SQLite findings cache, HTML reports, and backup files
cm clean

# Remove cloned repository
cd ~
rm -rf ~/juice-shop
步驟 2:(選用) 停用 Google Cloud API
如果您不打算在這項專案中使用 CodeMender 或 Agent Platform API 進行後續開發,可以停用服務 API:
gcloud services disable \
 aiplatform.googleapis.com \
 cloudresourcemanager.googleapis.com \
 --project=${PROJECT_ID}
11. 恭喜
⏱️ 影片長度:02:00
恭喜!您已成功使用 Google Cloud Gemini Enterprise Agent Platform 的 CodeMender,將刻意留有安全漏洞的 OWASP Juice Shop 應用程式,轉換為經過強化且安全的程式碼集。
您已瞭解的內容
自主閉環修復:CodeMender 不僅能被動處理靜態警示,還能執行完整的自主安全生命週期,包括存放區探索 (cm find)、沙箱漏洞驗證 (cm verify),以及迴歸測試修補程式合成 (cm fix)。
以證據為基礎的漏洞利用證明:CodeMender 會擷取具體的驗證構件 (PLAN.md、LOG.md、exploit.sh、REPORT.md),在編寫任何程式碼之前,先排除偽陽性並證明實際可利用性。
依據情境提供符合慣例的修正建議:Gemini 推論代理不會套用一般文字替換,而是分析應用程式架構、資料模型和 ORM,產生乾淨、可維護的修補程式 (例如參數化 Sequelize 查詢),保留現有的商業邏輯。
內建安全與測試防護機制:每項建議修正都會在獨立工作區沙箱中,自動根據專案測試套件 (npm test) 和類型檢查工具 (tsc) 進行驗證,然後才會暫存變更。
開發人員思維轉變
傳統手動 SAST 工作流程 | 使用 CodeMender (cm) 自動修復 |
警告疲勞:花費數小時分類誤報率高的雜訊報表。 | Agentic Code Discovery ( |
手動 PoC 驗證:建立自訂 curl 酬載和攻擊指令碼,確認安全漏洞。 | 自動化漏洞利用證明 ( |
高風險的手動重構:手動修補複雜的資料庫查詢,通常會導致語法或執行階段錯誤。 | Idiomatic Patch Synthesis ( |
正式環境迴歸風險:安全性修補程式經常會破壞下游商業邏輯或測試。 | 自動化測試護欄:持續驗證本機測試套件和隔離程序沙箱。 |
手動彙整法規遵循資料:手動將發現項目彙整成靜態文件,供稽核審查。 | 標準化遙測和 SARIF ( |
後續步驟
🚀 繼續 CodeMender 三部曲:
第 2 部分:使用 CodeMender 保護 CI/CD 管道:在 GitHub Actions 中自動執行持續無頭掃描、SARIF 資訊主頁整合和自我修復提取要求。
第 3 部分:使用 Antigravity 和 CodeMender 安全地進行直覺式程式開發:將生成式 AI 開發與自主安全助理結合。
探索說明文件:
Google Cloud 說明文件中的 CodeMender
💡 套用到自己的專案:
在您自己的 Node.js、Python、Go、Java、Rust 或 C/C++ 存放區中執行 cm find . 和 cm fix!