
1. Introduction
Large Language Models (LLMs) are changing how we build smart applications. But getting these powerful models ready for real-world use can be tricky. They need a lot of computing power, especially graphics cards (GPUs), and smart ways to handle many requests at once. Plus, you want to keep costs down and your application running smoothly without delays.
This Codelab will show you how to tackle these challenges! We'll use two key tools:
- vLLM: Think of this as a super-fast engine for LLMs. It makes your models run much more efficiently, handling more requests at once and reducing memory use.
- Google Cloud Run: This is Google's serverless platform. It's fantastic for deploying applications because it handles all the scaling for you – from zero users to thousands, and back down again. Best of all, Cloud Run now supports GPUs, which are essential for hosting LLMs!
Together, vLLM and Cloud Run offer a powerful, flexible, and cost-effective way to serve your LLMs. In this guide, you'll deploy an open model, making it available as a standard web API.
What you'll learn
- How to choose the right model size and variant for serving.
- How to set up vLLM to serve OpenAI-compatible API endpoints.
- How to containerize the vLLM server with Docker.
- How to push your container image to Google Artifact Registry.
- How to deploy the container to Cloud Run with GPU acceleration.
- How to test your deployed model.
What you'll need
- A browser, such as Chrome, to access the Google Cloud Console
- A reliable internet connection
- A Google Cloud Project with billing enabled
- A Hugging Face Access Token (create one here if you don't have it yet)
- Basic familiarity with Python, Docker, and the command line interface
- A curious mind and eagerness to learn
2. Before You Begin
Setup Google Cloud Project
This codelab requires a Google Cloud Project with an active billing account.
- For instructor-led sessions: If you are in a classroom, your instructor will provide you with the necessary project and billing information. Follow the instructions from your instructor to complete the set up.
- For independent learners: If you are doing this on your own and do not have an existing active billing account, you will need to set up a billing account using your own payment information. Refer to the Google Cloud Billing documentation to create a new billing account and enable it for your project.
Create a Google Cloud project
To keep all of your work for this codelab organized and separated from other projects, you will begin by creating a new Google Cloud project.
To open the project creation page, click on:
Enter the required information at the project creation page:
- Project name - you can input any name you desired (e.g. genai-workshop)
- Location - leave it as No Organization
- Billing account - If this option appears, select "Google Cloud Platform Trial Billing Account" or your own billing account if you prefer. If you do not see this option, you can proceed to the next step.
Copy down the generated Project ID, you will need it later. 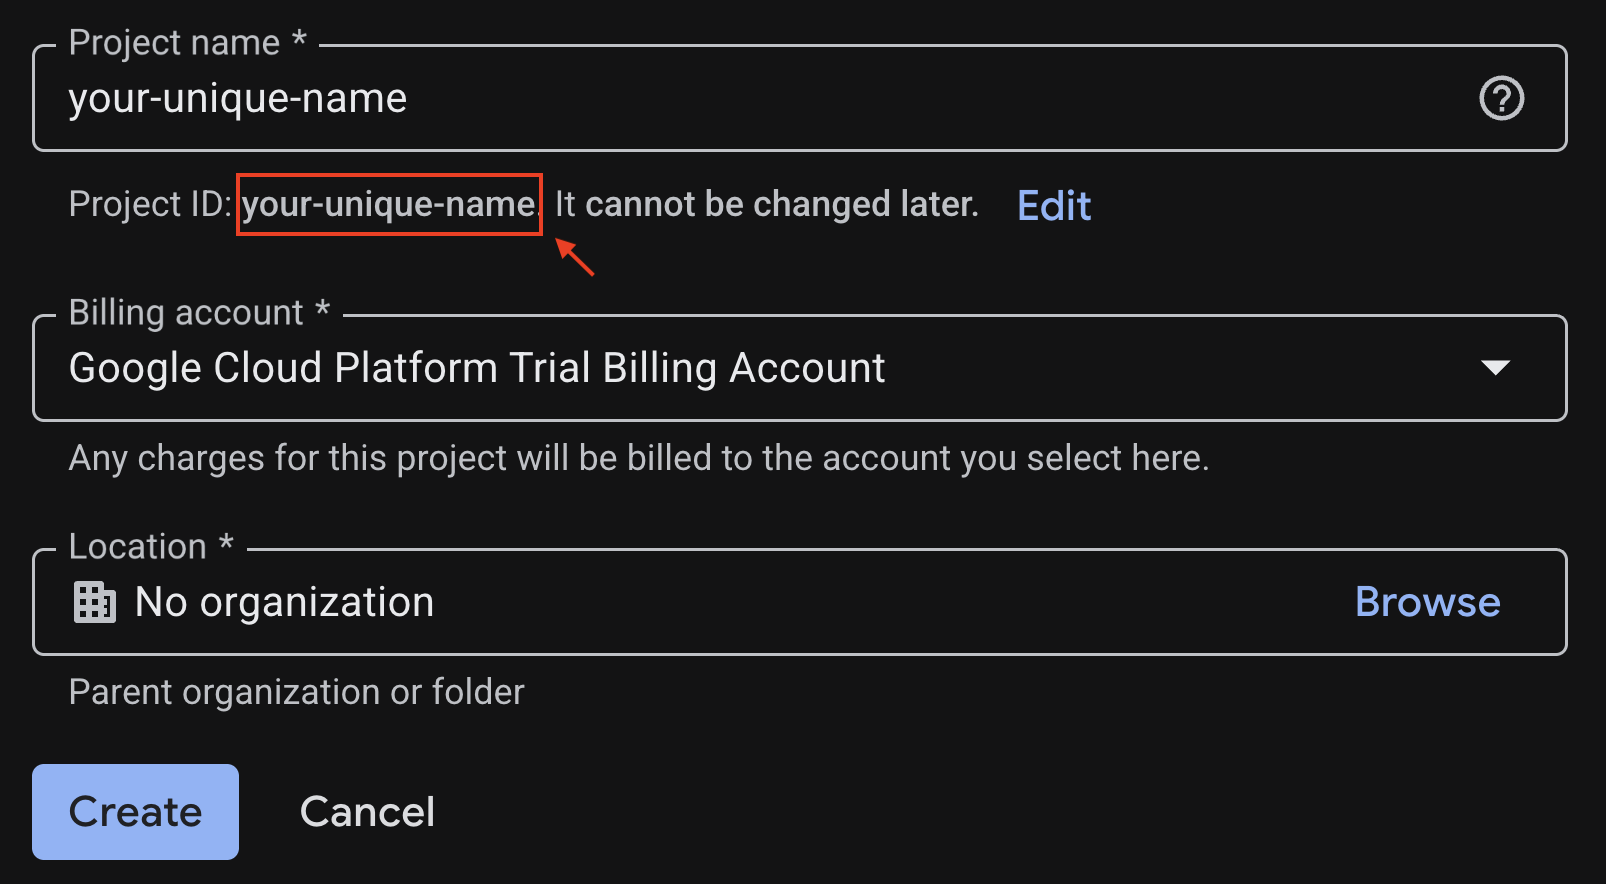
If everything is fine, click on the Create button.
Configure Cloud Shell
Cloud Shell is a pre-configured environment with all the tools you need for this codelab. Once your project is created successfully, do the following steps to set up Cloud Shell.
Launch Cloud Shell
To launch Cloud Shell, click on:
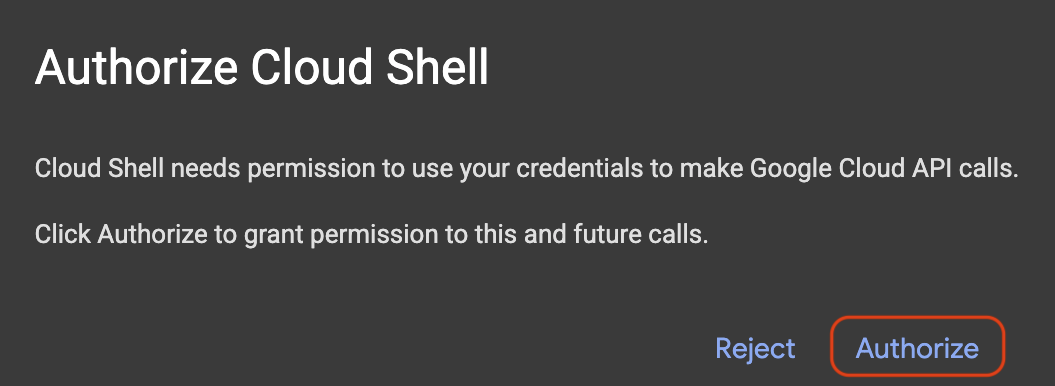
If a popup appears asking for authorization, click on Authorize.
Set Project ID
Replace replace-with-your-project-id with your actual Project ID from the project creation step above. Execute the following command in the Cloud Shell terminal to set the correct Project ID.
gcloud config set project replace-with-your-project-id
You should now see that the correct project is selected within the Cloud Shell terminal. The selected Project ID is highlighted in yellow.

Enable necessary APIs
To use Google Cloud services like Cloud Run, you must first activate their respective APIs for your project. Run the following commands in Cloud Shell to enable the necessary services for this Codelab:
gcloud services enable run.googleapis.com
gcloud services enable cloudbuild.googleapis.com
gcloud services enable secretmanager.googleapis.com
gcloud services enable artifactregistry.googleapis.com
3. Choosing the right model
You can find many open models on websites like Hugging Face Hub and Kaggle. When you want to use one of these models on a service like Google Cloud Run, you need to pick one that fits the resources you have (i.e. NVIDIA L4 GPU).
Beyond just size, remember to consider what the model can actually do. Models aren't all the same; each has its own advantages and disadvantages. For example, some models can handle different types of input (like images and text – known as multimodal capabilities), while others can remember and process more information at once (meaning they have bigger context windows). Often, larger models will have more advanced capabilities like function calling and thinking.
It is also important to check if your desired model is supported by the serving tool (vLLM in this case). You can check all the models that are supported by the vLLM here.
Now, let's explore Gemma 3, which is Google's newest family of openly available Large Language Models (LLMs). Gemma 3 comes in four different scales based on their complexity, measured in parameters: 1 billion, 4 billion, 12 billion, and a hefty 27 billion.
For each of these sizes, you'll find two main types:
- A base (pre-trained) version: This is the foundational model that has learned from a massive amount of data.
- An instruction-tuned version: This version has been further refined to better understand and follow specific instructions or commands.
The larger models (4 billion, 12 billion, and 27 billion parameters) are multimodal, which means they can understand and work with both images and text. The smallest 1 billion parameter variant, however, focuses solely on text.
For this Codelab, we'll use 1 billion variants of Gemma 3: gemma-3-1b-it. Using a smaller model also helps you learn how to work with limited resources, which is important for keeping costs down and making sure your app runs smoothly in the cloud.
4. Environment Variables & Secrets
Create an environment file
Before we proceed, it is a good practice to have all the configurations that you'll use throughout this Codelab in one place. To get started, open your terminal do these steps:
- Create a new folder for this project.
- Navigate into the newly created folder.
- Create an empty .env file within this folder (this file will later hold your environment variables)
Here is the command to perform those steps:
mkdir vllm-gemma3 && cd vllm-gemma3 && cloudshell edit .env
Next, copy the variables listed below and paste them into the .env file you just created.
PROJECT_ID=your_project_id
REGION=your_region

MODEL_PROVIDER=google
MODEL_VARIANT=gemma-3-1b-it
MODEL_NAME=${MODEL_PROVIDER}/${MODEL_VARIANT}

AR_REPO_NAME=vllm-gemma3-repo
SERVICE_NAME=${MODEL_VARIANT}-service
IMAGE_NAME=${REGION}-docker.pkg.dev/${PROJECT_ID}/${AR_REPO_NAME}/${SERVICE_NAME}

SERVICE_ACC_NAME=${SERVICE_NAME}-sa
SERVICE_ACC_EMAIL=${SERVICE_ACC_NAME}@${PROJECT_ID}.iam.gserviceaccount.com
Remember to replace the placeholder values (your_project_id and your_region) with your specific project information. For example (PROJECT_ID=unique-ai-project and REGION=europe-west4). Check out the list of regions that support GPUs on Cloud Run here.
Once .env file is edited and saved, type this command to load those environment variables into the terminal session:
source .env
You can test whether the variables are successfully loaded or not by echoing one of the variables. For example:
echo $SERVICE_NAME
If you get the same value as you assigned in the .env file, the variables are loaded successfully.
Store a secret on Secret Manager
For any sensitive data, including access codes, credentials, and passwords, utilizing a secret manager is the recommended approach.
Before using Gemma 3 models, you must first acknowledge the terms and conditions, as they are gated. You can acknowledge the terms and conditions via Gamma 3 Model Card On Hugging Face Hub.
Once you have the Hugging Face Access Token, head over to Secret Manager page and create a secret by following these instructions
- Headover to Google Cloud Console
- Select the project from the top left dropdown bar
- Search Secret Manager in the search bar and click on that option when appear
When you are that the Secret Manager page:
- Click on +Create Secret button,
- Fill up these information:
- Name: HF_TOKEN
- Secret Value: <your_hf_access_token>
- Click the Create Secret button once you are done.
You should now have the Hugging Face Access Token as a secret on Google Cloud Secret Manager.
You can test your access to the secret by executing the command below in the terminal, that command will retrieve it from Secret Manager:
gcloud secrets versions access latest --secret=HF_TOKEN
You should see your Access Token being retrieved and shown in the terminal window.
Grant secret access to Cloud Build service account
As the secret is now stored securely on Secret Manager,
Run these commands in the terminal to do that:
# Get the project number
PROJECT_NUMBER=$(gcloud projects describe $PROJECT_ID --format='value(projectNumber)')

# Grant Cloud Build access to the Hugging Face Token secret
gcloud secrets add-iam-policy-binding HF_TOKEN \
  --member="serviceAccount:${PROJECT_NUMBER}@cloudbuild.gserviceaccount.com" \
  --role="roles/secretmanager.secretAccessor"
5. Create a service account
To enhance security and manage access effectively in a production setting, services should operate under dedicated service accounts that are strictly limited to the permissions necessary for their specific tasks.
Run this command to create a service account
gcloud iam service-accounts create $SERVICE_ACC_NAME --display-name='Cloud Run vLLM Model Serving SA'
The following command attach the necessary permission
gcloud secrets add-iam-policy-binding HF_TOKEN \
  --member="serviceAccount:${SERVICE_ACC_EMAIL}" \
  --role="roles/secretmanager.secretAccessor"
6. Create an Image on Artifact Registry
This step involves creating a Docker image that includes the model weights and a pre-installed vLLM.
1. Create a docker repository on Artifact Registry
Let's create a Docker repository in Artifact Registry for pushing your built images. Run the following command in the terminal:
gcloud artifacts repositories create ${AR_REPO_NAME} \
  --repository-format docker \
  --location ${REGION}
2. Storing the model
Based on the GPU best practices documentation, you can either store ML models inside container images or optimize loading them from Cloud Storage.
Of course, each approach has its own pros and cons. You can read the documentation to learn more about them. For simplicity, we will just store the model in the container image. You will do that in the next session.
3. Create a Docker file
Create a file named Dockerfile and copy the contents below into it:
FROM vllm/vllm-openai:v0.16.0

ARG MODEL_NAME
ARG HF_TOKEN

ENV HF_HOME=/model-cache
ENV MODEL_NAME=${MODEL_NAME}

# Use the HF_TOKEN argument to log in and download the model
RUN huggingface-cli login --token ${HF_TOKEN} && \
    huggingface-cli download ${MODEL_NAME}

# Prevent vLLM from trying to download the model again at runtime
ENV HF_HUB_OFFLINE=1

EXPOSE 8080

ENTRYPOINT python3 -m vllm.entrypoints.openai.api_server \
    --port ${PORT:-8080} \
    --model ${MODEL_NAME} \
    --gpu-memory-utilization 0.90 \
    ${MAX_MODEL_LEN:+--max-model-len "$MAX_MODEL_LEN"}
4. Create a yaml file for deployment
Next, create a file named cloudbuild.yaml in the same directory. This file defines the steps for Cloud Build to follow. Copy and paste the following content into cloudbuild.yaml:
steps:
- name: 'gcr.io/cloud-builders/docker'
  entrypoint: 'bash'
  args:
  - '-c'
  - |
    docker build \
      --build-arg MODEL_NAME=${_MODEL_NAME} \
      --build-arg HF_TOKEN=$$HF_TOKEN_SECRET \
      -t ${_IMAGE_NAME} .
  secretEnv: ['HF_TOKEN_SECRET']

images:
- '${_IMAGE_NAME}'

availableSecrets:
  secretManager:
  - versionName: projects/${PROJECT_ID}/secrets/HF_TOKEN/versions/latest
    env: 'HF_TOKEN_SECRET'
5. Submit the build to Cloud Build
Copy and paste the following code and run it in the terminal:
gcloud builds submit . \
    --config=cloudbuild.yaml \
    --region=${REGION} \
    --substitutions=_MODEL_NAME=${MODEL_NAME},_IMAGE_NAME=${IMAGE_NAME}
This command uploads your code (the Dockerfile and cloudbuild.yaml), passes your shell variables as substitutions (_MODEL_NAME and _IMAGE_NAME), and starts the build.
Cloud Build will now execute the steps defined in cloudbuild.yaml. You can follow the logs in your terminal or by clicking the link to the build details in the Cloud Console. Once it's finished, the container image will be available in your Artifact Registry repository, ready for deployment.
6. Deploy to Cloud Run
Now you are ready to deploy the service to Cloud Run. Execute this command in the terminal:
gcloud run deploy ${SERVICE_NAME} \
  --image ${IMAGE_NAME} \
  --region ${REGION} \
  --service-account ${SERVICE_ACC_EMAIL} \
  --gpu 1 \
  --gpu-type nvidia-l4 \
  --cpu 4 \
  --memory 16Gi \
  --max-instances 3 \
  --concurrency 80 \
  --no-allow-unauthenticated
7. Test the service
Run the following command in the terminal to create a proxy, so that you can access the service as it is running in localhost:
gcloud run services proxy ${SERVICE_NAME} --region ${REGION}
In a new terminal window, run this curl command in the terminal to test the connection
curl -X POST http://localhost:8080/v1/completions \
-H "Authorization: Bearer $(gcloud auth print-identity-token)" \
-H "Content-Type: application/json" \
-d '{
  "model": "google/gemma-3-1b-it",
  "prompt": "Cloud Run is a ",
  "max_tokens": 128,
  "temperature": 0.90
}'
If you see a similar output as below:
{"id":"cmpl-e96d05d2893d42939c1780d44233defa","object":"text_completion","created":1746870778,"model":"google/gemma-3-1b-it","choices":[{"index":0,"text":"100% managed Kubernetes service. It's a great option for many use cases.\n\nHere's a breakdown of key features and considerations:\n\n* **Managed Kubernetes:** This means Google handles the underlying infrastructure, including scaling, patching, and maintenance. You don't need to worry about managing Kubernetes clusters.\n* **Serverless:** You only pay for the compute time your application actually uses. No charges when your code isn't running.\n* **Scalability:** Cloud Run automatically scales your application based on demand. You can easily scale up or down to handle fluctuating traffic.\n*","logprobs":null,"finish_reason":"length","stop_reason":null,"prompt_logprobs":null}],"usage":{"prompt_tokens":6,"total_tokens":134,"completion_tokens":128,"prompt_tokens_details":null}}
8. Conclusion
Congratulations! You have successfully completed this Codelab. You learned how to:
- Choose an appropriate model size for a target deployment.
- Set up vLLM to serve an OpenAI-compatible API.
- Securely containerize the vLLM server and model weights with Docker.
- Push a container image to Google Artifact Registry.
- Deploy a GPU-accelerated service to Cloud Run.
- Test an authenticated, deployed model.
Feel free to explore deploying other exciting models like Llama, Mistral, or Qwen to continue your learning journey!
9. Clean Up
To avoid incurring future charges, it's important to delete the resources you created. Run the following commands to clean up your project.
1. Delete the Cloud Run service:
gcloud run services delete ${SERVICE_NAME} --region=${REGION} --quiet
2. Delete the Artifact Registry repository:
gcloud artifacts repositories delete ${AR_REPO_NAME} --location=${REGION} --quiet
3. Delete the service account:
gcloud iam service-accounts delete ${SERVICE_ACC_EMAIL} --quiet
4. Delete the secret from Secret Manager:
gcloud secrets delete HF_TOKEN --quiet