
1. Overview
In this codelab, you transition an ADK 2.0 agent from a local development environment into a production-grade deployment. You will use agents-cli to package, verify, and host your graph-based workflow live on Agent Runtime on Google Cloud.
To explore this deployment process, you will build a local prototype of the Ambient Expense Agent from scratch before deploying it to the cloud. (For a deeper dive into designing this agent's core logic, see the foundational codelabs on the Kaggle event site). The Ambient Expense Agent streamlines employee expense reporting by instantly approving standard claims while flagging larger expenses for human-in-the-loop review. Under the hood, it uses an ADK 2.0 graph-based workflow to coordinate these automated approvals and risk analysis steps.
What you'll learn
- How to prepare your local Ambient Expense Agent project for cloud hosting.
- How to scaffold the necessary deployment descriptors and production wrappers.
- How to perform dry-runs and deploy your code directly to Agent Runtime.
- How to monitor your production agent's execution traces using Cloud Trace.
What you'll need
- An active Google Cloud project with billing enabled.
- The gcloud SDK installed and authenticated.
- The uv package manager installed.
- Google Antigravity IDE installed.
Prerequisites
This codelab assumes you are comfortable with:
- Navigating your system using a terminal.
- Basic Python development concepts.
- Fundamental Google Cloud concepts.
2. Set up your Google Cloud Environment
Before deploying, you must configure your Google Cloud project and enable the necessary APIs.
👉 Prompt Antigravity:
Help me set up my Google Cloud environment. Connect to my project
`YOUR_PROJECT_ID` in the global region, authenticate, and enable the necessary
generative platform APIs (aiplatform.googleapis.com, cloudtrace.googleapis.com,
cloudbuild.googleapis.com, agentregistry.googleapis.com).
When Antigravity executes this prompt, it will propose and run the necessary gcloud terminal commands to configure your project and enable the services. During the authentication step, Antigravity will display an authorization URL in the terminal. Click the link to sign in via your web browser and grant access. Once you complete the browser sign-in, Antigravity will resume execution to set your project environment variables and enable the required APIs.
3. Set up Agents CLI & ADK Skills
For Antigravity to build and deploy ADK agents well, it needs the ADK skill set. These are bundled references for the ADK API, project scaffolding, the agents-cli deployment workflow, and evaluation. Installing the agents-cli toolchain also installs these skills into your coding agent, equipping it to manage your agent's full lifecycle from local scaffolding to cloud deployment.
👉 Copy-paste the following prompt to Antigravity:
Install the agents-cli toolchain and its ADK skills so you can help me build
an ADK agent. Run "uvx google-agents-cli setup", then confirm with
"agents-cli info" and tell me which skills are now available.
When Antigravity executes this prompt, it runs uvx google-agents-cli setup in the terminal to install the CLI and its companion skills. It then runs agents-cli info to verify the installation and lists the newly installed domain skills (such as google-agents-cli-deploy and google-agents-cli-workflow) directly in the chat.
4. Create your agent project
With your cloud environment configured and your CLI skills installed, you are ready to generate the local codebase for your agent. In this step, you use Antigravity to scaffold a fully functional Ambient Expense Agent prototype compatible with ADK 2.0.
👉 Prompt Antigravity:
Use Agents CLI to build a local prototype for an ambient expense agent that
streamlines employee expense reporting by instantly approving standard claims
while flagging larger expenses for review. Ensure the graph workflow is
compatible with ADK 2.0 and includes an `auto_approve` node that automatically
approves expenses under $100, and a `review_agent` node that triggers a
human-in-the-loop pause (`RequestInput`) for expenses of $100 or more.
When Antigravity executes this prompt, it leverages the newly installed scaffolding skills to run agents-cli scaffold create expense-agent --adk in the terminal. It will then verify and adjust the generated prototype code to ensure your expense-agent correctly implements the $100 auto-approval threshold and human-in-the-loop review flow within its Agent Development Kit (ADK) graph workflow.
5. Prepare for Production Deployment
Agent Runtime is a fully managed Google Cloud service that lets you deploy, manage, and scale AI agents in production. Agent Runtime handles the operational complexities of hosting, offering a stateful environment with features like session management, long-term memory, and secure code execution sandboxes.
Why Deploy to Agent Runtime?
When building agents locally with Antigravity, your agent runs on your local machine against localhost. While great for rapid prototyping, local agents stop running the moment you close your laptop.
Deploying your agent to Agent Runtime moves your workflow into a fully managed, always-on Google Cloud environment. This establishes a secure, live backend endpoint that remains active 24/7. In the next codelab, you will build a web frontend that connects directly to this cloud endpoint, giving your agent a public URL.
Furthermore, Agent Runtime provides dedicated infrastructure optimized specifically for AI agents—offering built-in capabilities such as:
- Managed Stateful Execution: Built-in session management and long-term memory persistence across conversational turns.
- Secure Sandboxing: Safely executes dynamic tool calls and agent-generated code in isolated environments.
- Enterprise Observability: Out-of-the-box telemetry streaming directly to Cloud Trace and Cloud Logging.
To host your agent on Agent Runtime, you must enhance your local project directory with production descriptors, schemas, and endpoint wrappers.
👉 Prompt Antigravity:
Scaffold the production deployment files for Agent Runtime.
When Antigravity executes this prompt, it runs agents-cli scaffold enhance --deployment-target agent_runtime --yes in your project root. This command scans your directory and automatically generates:
app/agent_runtime_app.py: The production-grade service wrapper.deployment_metadata.json: The layout schema used by Agent Runtime to spin up resources.
Your core agent logic in app/agent.py remains completely untouched and preserved.
6. Packaging and Local Verification
Before initiating a cloud upload, lock your packages and run a local dry-run to identify potential dependency conflicts.
👉 Prompt Antigravity:
Lock my python dependencies and run a dry-run deployment to check for any
configuration or dependency issues.
When Antigravity executes this prompt, it first runs uv lock in the terminal to generate a deterministic lockfile, ensuring consistent library versions in the cloud. It then executes agents-cli deploy --dry-run to verify configuration validity and preview the deployment steps without provisioning cloud resources. You can review the dry-run output in the terminal to confirm all files and settings are correct.
7. Deploy to Agent Runtime
Deploy your Ambient Expense Agent to Agent Runtime.
👉 Prompt Antigravity:
Deploy this agent to Agent Runtime.
When Antigravity executes this prompt, it activates the google-agents-cli-deploy skill and runs agents-cli deploy --project YOUR_PROJECT_ID --region us-west1. The packaging, upload, and Agent Runtime provisioning process typically takes 5–10 minutes. Antigravity will monitor the deployment progress in the terminal, and once completed, it displays your live endpoint URL.
💡 Pro Tip (Manage Timeout Windows): If you prefer not to lock up your terminal during long deployments, you can instruct Antigravity to use the --no-wait flag to start the deployment asynchronously, and check progress later using agents-cli deploy --status.
8. Test your Agent
Once your agent is deployed, you can verify that it automatically approves small expenses, and properly flags for a human-in-the-loop verification for larger expenses.
👉 Prompt Antigravity to verify the live deployed engine:
Test my deployed Agent Runtime engine with two test cases: first a standard
meal expense of $50 to verify automatic approval, and second, a client dinner
expense of $150 to verify that the human-in-the-loop pause is triggered.
Alternatively, you can test your agent manually using the Cloud Console Playground preview. To open the Playground:
- In the Google Cloud Console, use the navigation menu to select Agent Platform > Deployments.
- Select your deployed agent from the deployments list.
- Click the Playground button to open the interactive test chat interface.
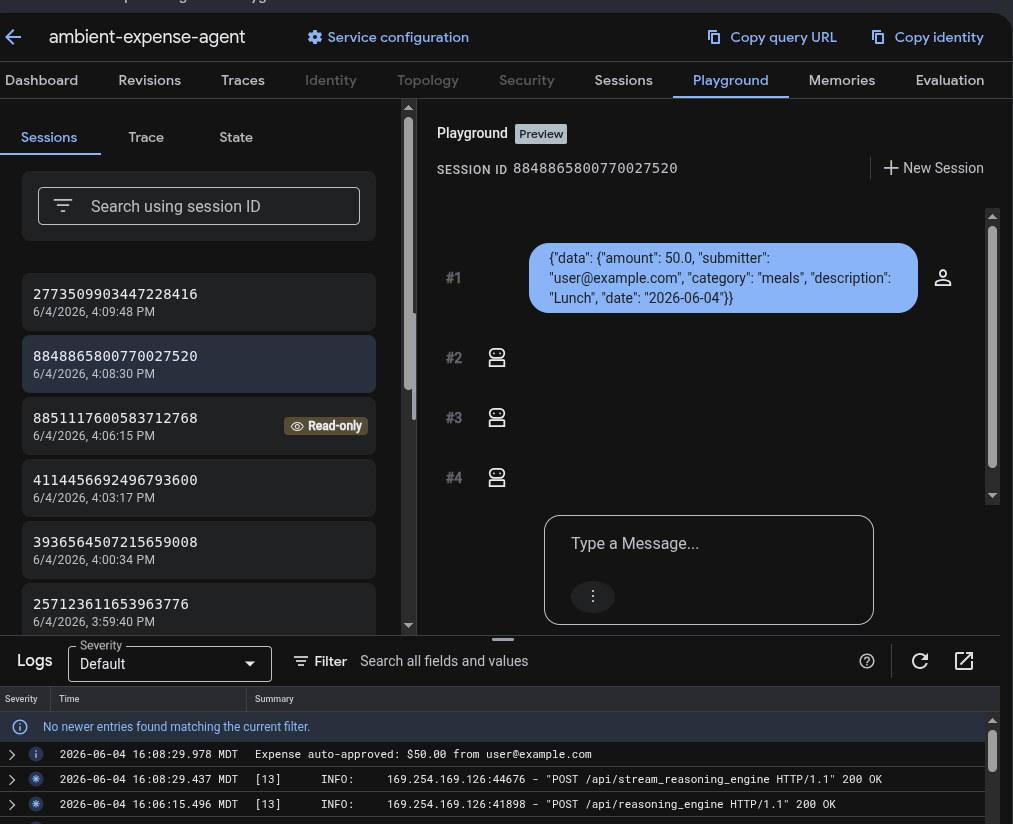
👉 To test the Auto-Approval(<$100), paste the following JSON payload into the chat box:
{"data": {"amount": 50.0, "submitter": "user@example.com", "category": "meals", "description": "Lunch", "date": "2026-06-04"}}
You should receive a JSON response showing the output of the auto_approve node with status "approved".
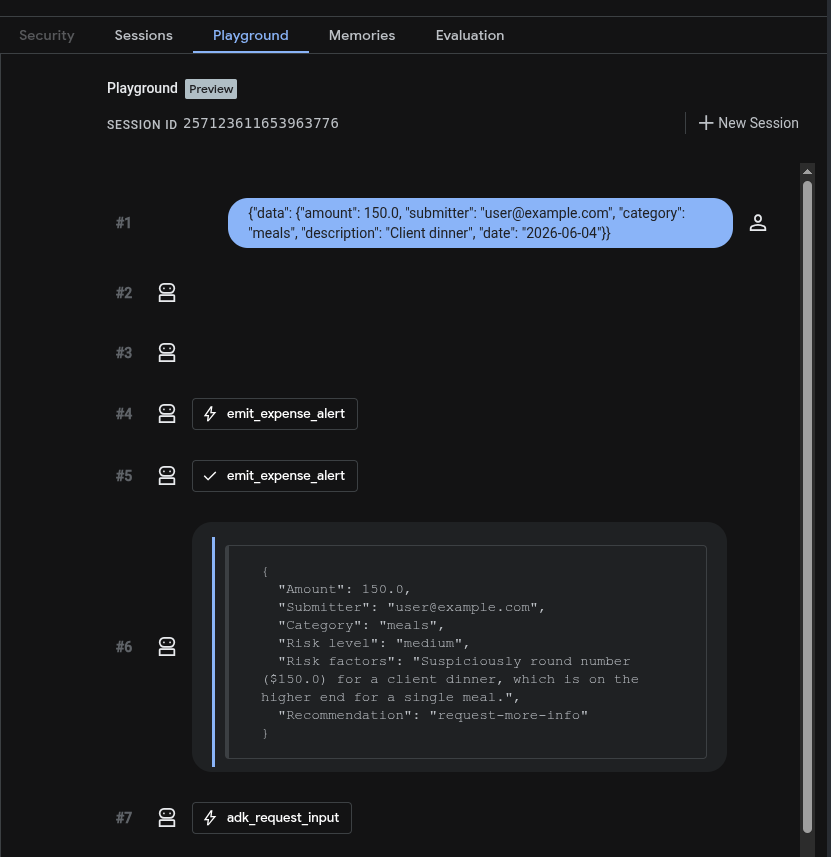
👉 To test the Human-in-the-Loop (HITL) flow, paste the following JSON payload.
{"data": {"amount": 150.0, "submitter": "user@example.com", "category": "meals", "description": "Client dinner", "date": "2026-06-04"}}
This will trigger the review_agent, emit the warning alert, and then pause execution, yielding a RequestInput (Human-in-the-loop) asking for approval.
9. Monitor and Observe your Production Agent
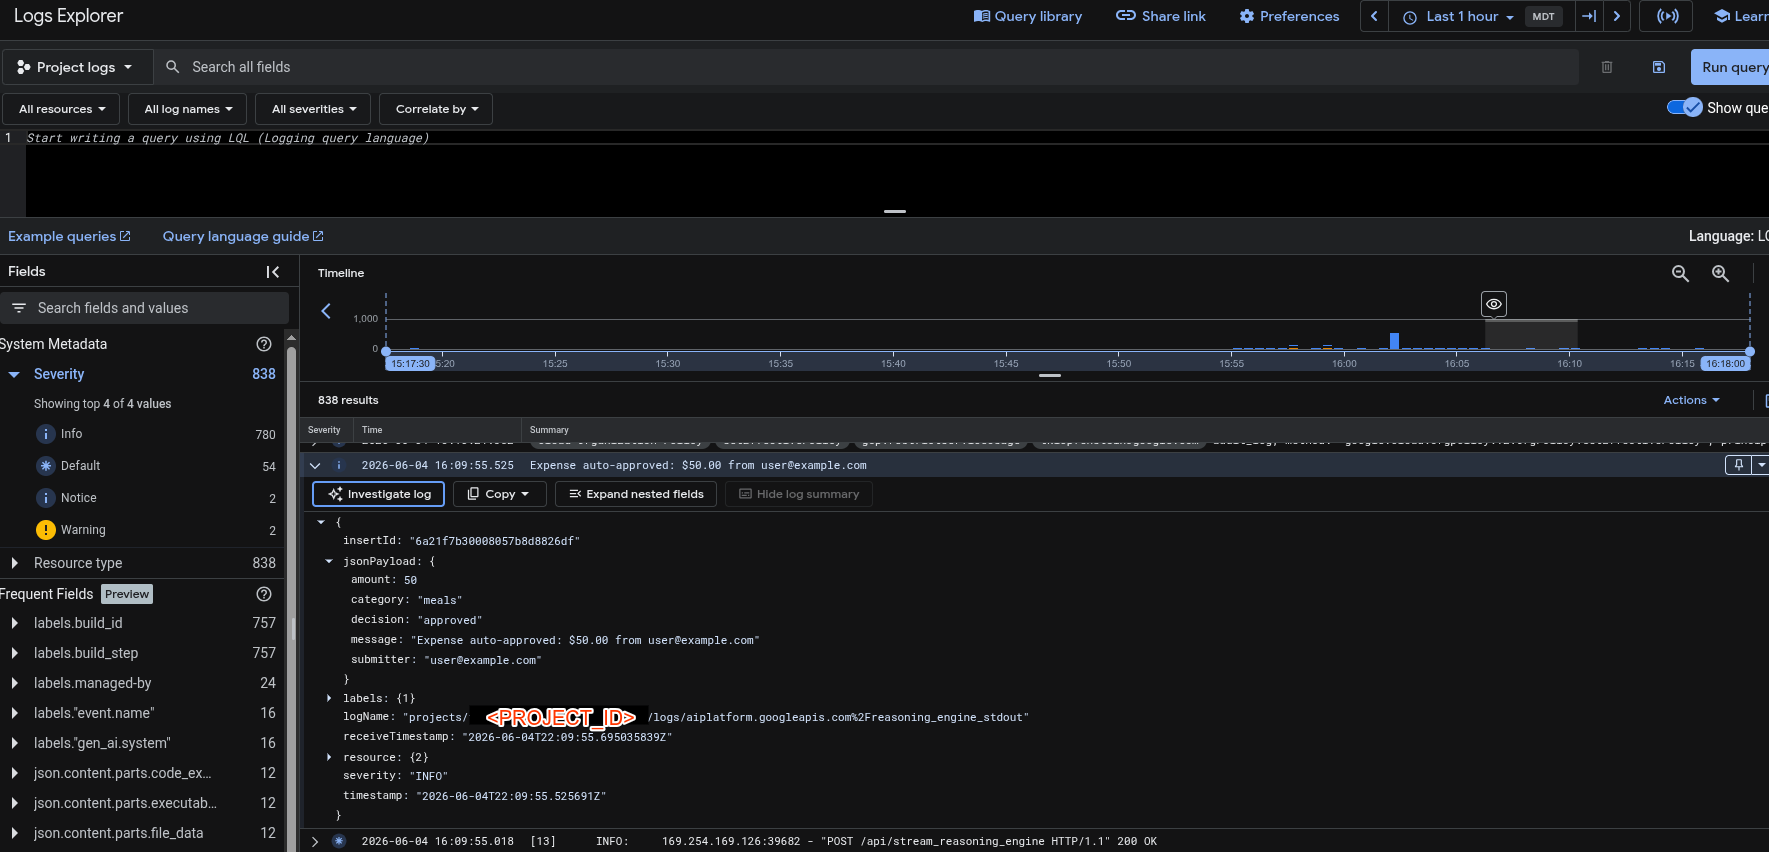
With Agent Runtime, telemetry is automatically wired. Every interaction, model call, and tool execution streams real-time logs and spans to your project.
- Inspect Traces: Open the Cloud Trace Console to audit live transaction maps, model latencies, and tool execution steps.
- Audit Logs: Use Cloud Logging to inspect real-time standard output and diagnostic stack traces.
- Aggregate Analytics: If the
--bq-analyticsflag was enabled during scaffolding, query your logs inside BigQuery using SQL to view approval ratios and conversational turn trends.
The following SQL query provides an example for calculating approval ratios. You can prompt Antigravity to customize this query for your specific project and BigQuery dataset:
SELECT
  COUNTIF(REGEXP_CONTAINS(response_text, r'(?i)approved')) AS approved_count,
  COUNTIF(REGEXP_CONTAINS(response_text, r'(?i)rejected')) AS rejected_count,
  COUNT(1) AS total_processed,
  SAFE_DIVIDE(COUNTIF(REGEXP_CONTAINS(response_text, r'(?i)approved')), COUNT(1)) AS approval_ratio
FROM
  `[YOUR_PROJECT_ID].[YOUR_DATASET_ID].v_agent_response`
WHERE
  agent = 'expense_processor';
10. (Optional) Verify Registration in Agent Registry
To allow other services, developers, or agents in your organization to safely discover and consume your expense agent, it must be registered in the enterprise Agent Registry (Gemini Enterprise).
Because you deployed your agent to Agent Runtime, it is automatically registered in the Agent Registry. Any future updates or deletions of your agent in Agent Runtime will automatically sync to the Agent Registry as well.
👉 Prompt Antigravity to verify your agent's automatic registration:
Verify that my deployed expense agent is automatically registered in the Gemini
Enterprise Agent Registry.
When Antigravity executes this prompt, it runs agents-cli publish gemini-enterprise --list in the terminal. This queries the Agent Registry and lists all registered Gemini Enterprise agents in your project, allowing you to confirm that your Ambient Expense Agent is active and discoverable across your organization.
11. Clean up
To avoid incurring ongoing charges in your Google Cloud account, you must shut down and clean up your deployed resources when you are finished.
👉 Prompt Antigravity:
Clean up all my deployed cloud resources. Use the Agent Runtime ID from
deployment_metadata.json to delete the engine from Vertex AI, remove the local
deployment_metadata.json file, and delete the container image repository from
Artifact Registry.
When Antigravity executes this prompt, it automates the entire resource cleanup process:
- Delete the Deployed Agent: It reads
deployment_metadata.jsonto obtain your remote Agent Runtime ID, then programmatically deletes the live engine instance from Vertex AI. - Clean up Local Workspace: It removes the stale
deployment_metadata.jsonfile from your project root. - Clean up Artifact Registry: It executes
gcloud artifacts docker images deleteto remove the built container images from Artifact Registry, freeing up cloud storage space.
12. Congratulations
Congratulations! You have successfully deployed and verified a production-grade Ambient Expense Agent on Google Cloud.
What you learned
- Google Cloud Setup: Configured project credentials and enabled required platform APIs.
- Tooling & Skills: Installed
agents-cliand loaded ADK companion skills into Antigravity. - Production Scaffolding: Generated Agent Runtime scaffolding for an ADK 2.0 agent.
- Local Verification: Created deterministic lockfiles (
uv lock) and executed dry-run checks. - Cloud Deployment: Hosted your agent live on managed Agent Runtime infrastructure.
- Observability & Analytics: Traced execution in Cloud Trace and analyzed telemetry in BigQuery.
- Enterprise Discovery: Verified automatic registration in the enterprise Agent Registry.
What's Next?
- Perform BigQuery Analytics: Query your agent's telemetry logs in BigQuery to analyze approval ratios and conversational turn trends over time.
- Vibe to Live Codelab: Use Google Antigravity to develop a frontend client on Cloud Run and connect it directly to your live Agent Runtime backend endpoint.
Earn your Kaggle 5-Day AI Agents badge 🎉
Completed this lab as part of Kaggle's 5-Day AI Agents: Intensive Vibe Coding Course with Google? Claim your completion badge: