1. 시작하기 전에
Cloud Firestore 및 Cloud Functions와 같은 서버리스 백엔드 도구는 사용하기는 매우 쉽지만 테스트하기는 어려울 수 있습니다. Firebase 로컬 에뮬레이터 도구 모음을 사용하면 개발 머신에서 이러한 서비스의 로컬 버전을 실행할 수 있으므로 앱을 빠르고 안전하게 개발할 수 있습니다.
기본 요건
- Visual Studio Code, Atom 또는 Sublime Text와 같은 간단한 편집기
- Node.js 10.0.0 이상 (Node.js를 설치하려면 nvm을 사용하고 버전을 확인하려면
node --version실행) - Java 7 이상 (Java를 설치하려면 이 안내를 참조하고 버전을 확인하려면
java -version실행)
실습할 내용
이 Codelab에서는 여러 Firebase 서비스를 기반으로 하는 간단한 온라인 쇼핑 앱을 실행하고 디버그합니다.
- Cloud Firestore: 실시간 기능을 갖춘 전 세계적으로 확장 가능한 서버리스 NoSQL 데이터베이스입니다.
- Cloud Functions: 이벤트 또는 HTTP 요청에 대한 응답으로 실행되는 서버리스 백엔드 코드입니다.
- Firebase 인증: 다른 Firebase 제품과 통합되는 관리형 인증 서비스입니다.
- Firebase 호스팅: 빠르고 안전한 웹 앱 호스팅
앱을 에뮬레이터 도구 모음에 연결하여 로컬 개발을 사용 설정합니다.
또한 다음 내용도 알아봅니다.
- 앱을 에뮬레이터 도구 모음에 연결하는 방법과 다양한 에뮬레이터가 연결되는 방식
- Firebase 보안 규칙의 작동 방식과 로컬 에뮬레이터를 대상으로 Firestore 보안 규칙을 테스트하는 방법입니다.
- Firestore 이벤트에 의해 트리거되는 Firebase 함수를 작성하는 방법과 에뮬레이터 도구 모음을 대상으로 실행되는 통합 테스트를 작성하는 방법
2. 설정
소스 코드 가져오기
이 Codelab에서는 거의 완성된 Fire Store 샘플 버전으로 시작하므로 가장 먼저 소스 코드를 클론해야 합니다.
$ git clone https://github.com/firebase/emulators-codelab.git
그런 다음 Codelab 디렉터리로 이동하여 이 Codelab의 나머지 부분을 작업합니다.
$ cd emulators-codelab/codelab-initial-state
이제 코드를 실행할 수 있도록 종속 항목을 설치합니다. 인터넷 연결이 느린 경우 1~2분 정도 걸릴 수 있습니다.
# Move into the functions directory
$ cd functions

# Install dependencies
$ npm install

# Move back into the previous directory
$ cd ../
Firebase CLI 가져오기
에뮬레이터 도구 모음은 다음 명령어를 사용하여 머신에 설치할 수 있는 Firebase CLI (명령줄 인터페이스)의 일부입니다.
$ npm install -g firebase-tools
그런 다음 CLI가 최신 버전인지 확인합니다. 이 Codelab은 버전 9.0.0 이상에서 작동해야 하지만 이후 버전에는 더 많은 버그 수정이 포함되어 있습니다.
$ firebase --version
9.6.0
Firebase 프로젝트에 연결
Firebase 프로젝트가 없으면 Firebase Console에서 새 Firebase 프로젝트를 만듭니다. 나중에 필요하므로 선택한 프로젝트 ID를 기록해 둡니다.
이제 이 코드를 Firebase 프로젝트에 연결해야 합니다. 먼저 다음 명령어를 실행하여 Firebase CLI에 로그인합니다.
$ firebase login
다음으로 다음 명령어를 실행하여 프로젝트 별칭을 만듭니다. $YOUR_PROJECT_ID를 Firebase 프로젝트의 ID로 바꿉니다.
$ firebase use $YOUR_PROJECT_ID
이제 앱을 실행할 준비가 되었습니다.
3. 에뮬레이터 실행
이 섹션에서는 앱을 로컬에서 실행합니다. 이제 에뮬레이터 도구 모음을 부팅할 차례입니다.
에뮬레이터 시작
Codelab 소스 디렉터리 내에서 다음 명령어를 실행하여 에뮬레이터를 시작합니다.
$ firebase emulators:start --import=./seed
다음과 같은 출력이 표시됩니다.
$ firebase emulators:start --import=./seed
i  emulators: Starting emulators: auth, functions, firestore, hosting
⚠  functions: The following emulators are not running, calls to these services from the Functions emulator will affect production: database, pubsub
i  firestore: Importing data from /Users/samstern/Projects/emulators-codelab/codelab-initial-state/seed/firestore_export/firestore_export.overall_export_metadata
i  firestore: Firestore Emulator logging to firestore-debug.log
i  hosting: Serving hosting files from: public
✔  hosting: Local server: http://127.0.0.1:5000
i  ui: Emulator UI logging to ui-debug.log
i  functions: Watching "/Users/samstern/Projects/emulators-codelab/codelab-initial-state/functions" for Cloud Functions...
✔  functions[calculateCart]: firestore function initialized.

┌─────────────────────────────────────────────────────────────┐
│ ✔  All emulators ready! It is now safe to connect your app. │
│ i  View Emulator UI at http://127.0.0.1:4000                │
└─────────────────────────────────────────────────────────────┘

┌────────────────┬────────────────┬─────────────────────────────────┐
│ Emulator       │ Host:Port      │ View in Emulator UI             │
├────────────────┼────────────────┼─────────────────────────────────┤
│ Authentication │ 127.0.0.1:9099 │ http://127.0.0.1:4000/auth      │
├────────────────┼────────────────┼─────────────────────────────────┤
│ Functions      │ 127.0.0.1:5001 │ http://127.0.0.1:4000/functions │
├────────────────┼────────────────┼─────────────────────────────────┤
│ Firestore      │ 127.0.0.1:8080 │ http://127.0.0.1:4000/firestore │
├────────────────┼────────────────┼─────────────────────────────────┤
│ Hosting        │ 127.0.0.1:5000 │ n/a                             │
└────────────────┴────────────────┴─────────────────────────────────┘
  Emulator Hub running at 127.0.0.1:4400
  Other reserved ports: 4500

Issues? Report them at https://github.com/firebase/firebase-tools/issues and attach the *-debug.log files.
All emulators started 메시지가 표시되면 앱을 사용할 준비가 된 것입니다.
에뮬레이터에 웹 앱 연결
로그의 표를 보면 Cloud Firestore 에뮬레이터는 포트 8080에서 리슨하고 인증 에뮬레이터는 포트 9099에서 리슨하는 것을 확인할 수 있습니다.
┌────────────────┬────────────────┬─────────────────────────────────┐
│ Emulator       │ Host:Port      │ View in Emulator UI             │
├────────────────┼────────────────┼─────────────────────────────────┤
│ Authentication │ 127.0.0.1:9099 │ http://127.0.0.1:4000/auth      │
├────────────────┼────────────────┼─────────────────────────────────┤
│ Functions      │ 127.0.0.1:5001 │ http://127.0.0.1:4000/functions │
├────────────────┼────────────────┼─────────────────────────────────┤
│ Firestore      │ 127.0.0.1:8080 │ http://127.0.0.1:4000/firestore │
├────────────────┼────────────────┼─────────────────────────────────┤
│ Hosting        │ 127.0.0.1:5000 │ n/a                             │
└────────────────┴────────────────┴─────────────────────────────────┘
프런트엔드 코드를 프로덕션이 아닌 에뮬레이터에 연결해 보겠습니다. public/js/homepage.js 파일을 열고 onDocumentReady 함수를 찾습니다. 코드가 표준 Firestore 및 인증 인스턴스에 액세스하는 것을 확인할 수 있습니다.
public/js/homepage.js
  const auth = firebaseApp.auth();
  const db = firebaseApp.firestore();
로컬 에뮬레이터를 가리키도록 db 및 auth 객체를 업데이트해 보겠습니다.
public/js/homepage.js
  const auth = firebaseApp.auth();
  const db = firebaseApp.firestore();

  // ADD THESE LINES
  if (location.hostname === "127.0.0.1") {
    console.log("127.0.0.1 detected!");
    auth.useEmulator("http://127.0.0.1:9099");
    db.useEmulator("127.0.0.1", 8080);
  }
이제 호스팅 에뮬레이터에서 제공하는 로컬 머신에서 앱이 실행 중이면 Firestore 클라이언트는 프로덕션 데이터베이스가 아닌 로컬 에뮬레이터를 가리킵니다.
에뮬레이터 UI 열기
웹브라우저에서 http://127.0.0.1:4000/으로 이동합니다. 에뮬레이터 도구 모음 UI가 표시됩니다.
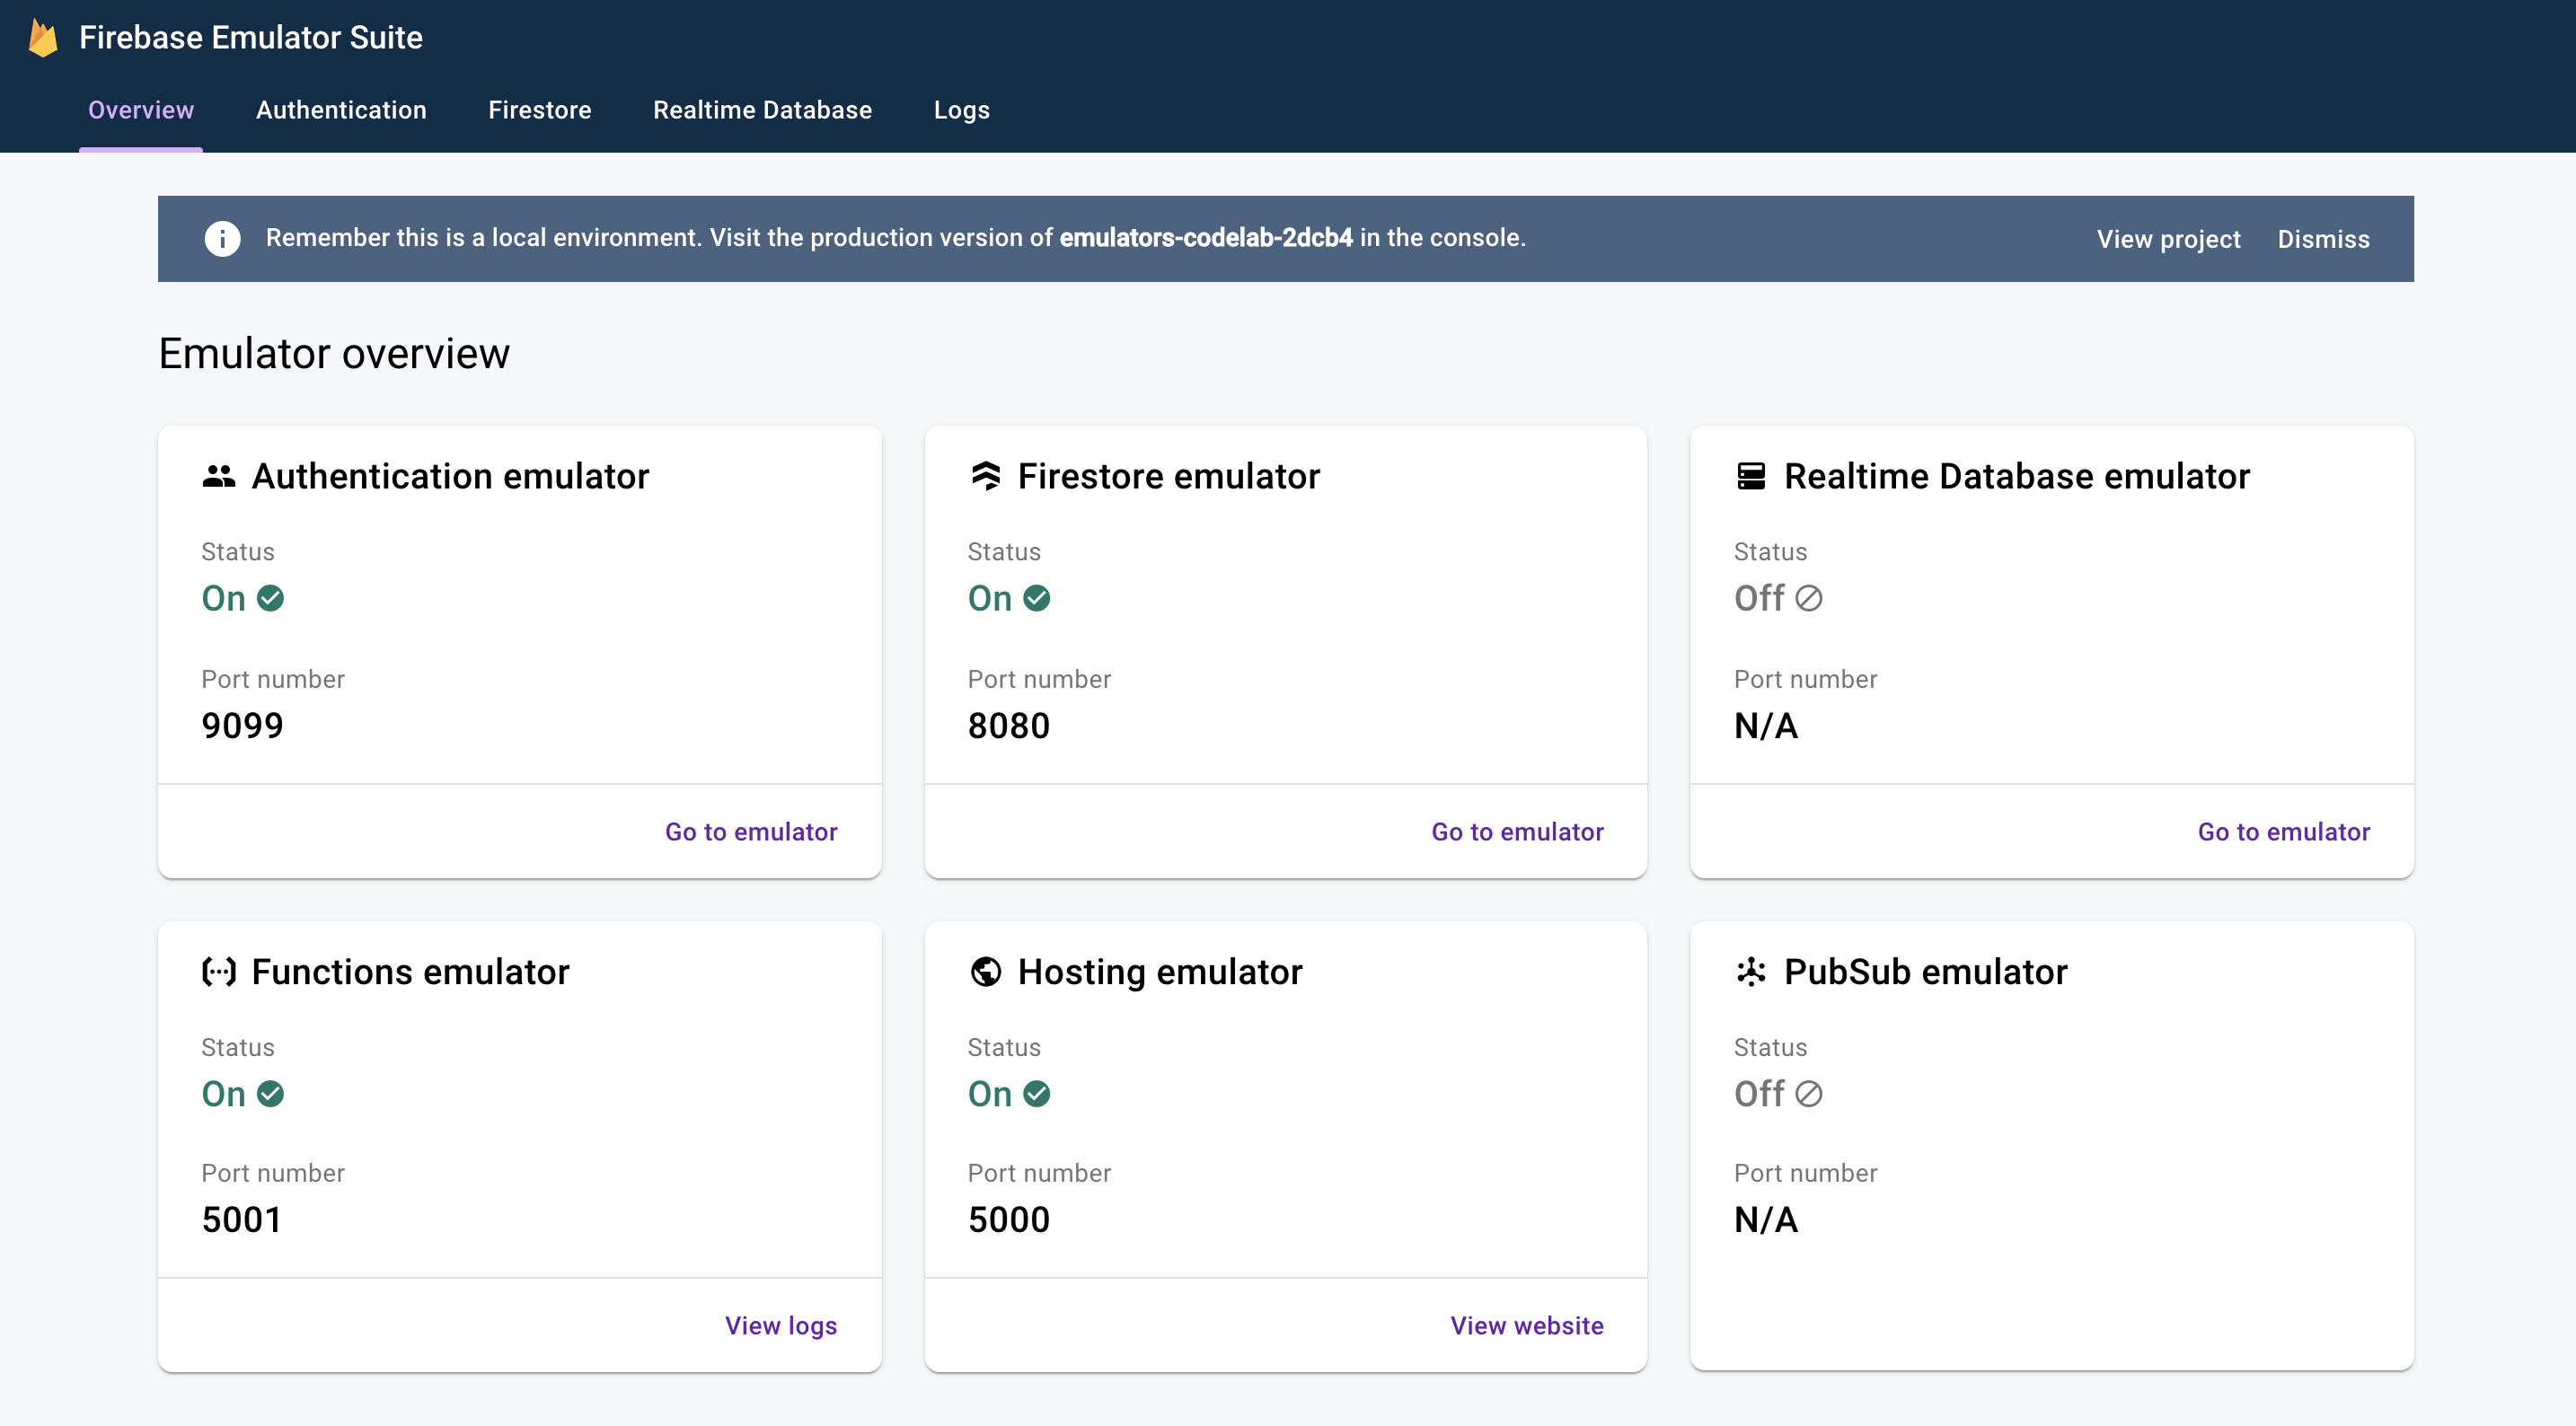
Firestore 에뮬레이터용 UI를 보려면 클릭하세요. --import 플래그로 가져온 데이터로 인해 items 컬렉션에 이미 데이터가 포함되어 있습니다.

4. 앱 실행
앱 열기
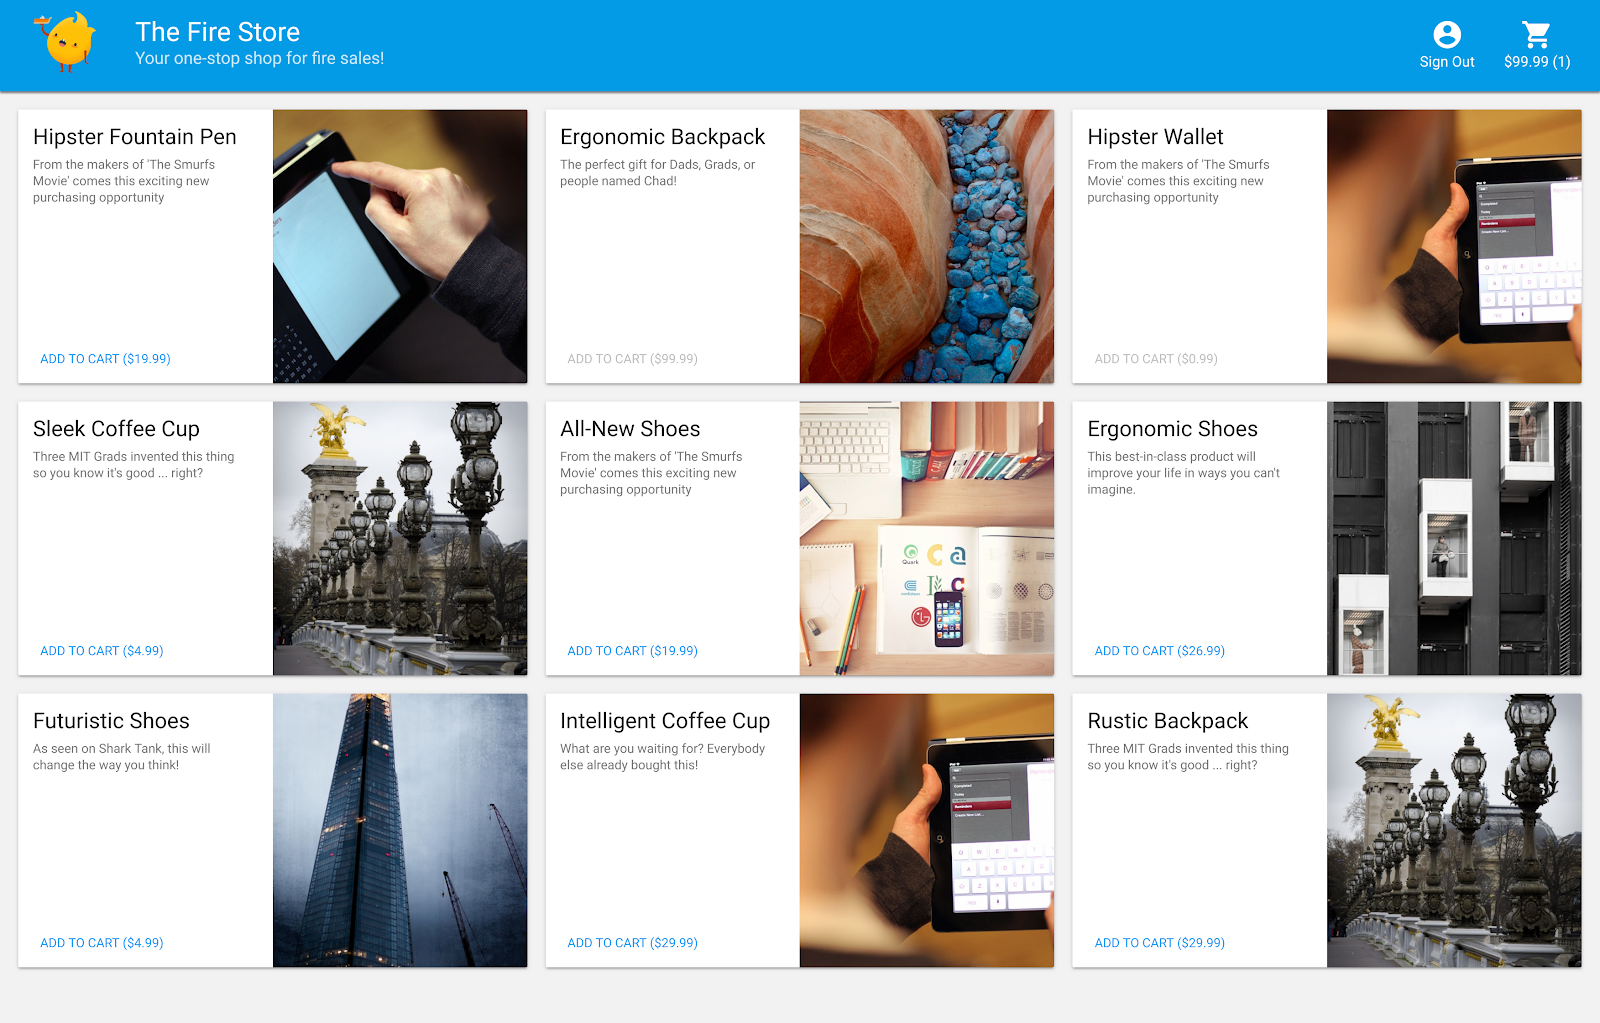
웹브라우저에서 http://127.0.0.1:5000으로 이동하면 컴퓨터에서 로컬로 실행되는 Fire Store가 표시됩니다.

앱 사용하기
홈페이지에서 상품을 선택하고 장바구니에 추가를 클릭합니다. 이 경우 다음과 같은 오류가 발생합니다.
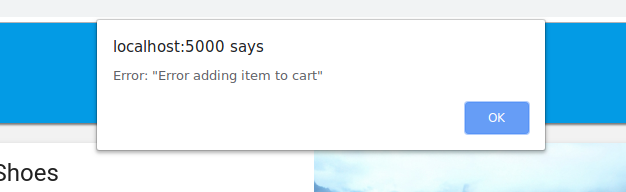
이 버그를 수정해 보겠습니다. 모든 것이 에뮬레이터에서 실행되므로 실험할 수 있고 실제 데이터에 미치는 영향을 걱정할 필요가 없습니다.
5. 앱 디버그
버그 찾기
이제 Chrome 개발자 콘솔을 살펴보겠습니다. Control+Shift+J (Windows, Linux, Chrome OS) 또는 Command+Option+J (Mac)를 눌러 콘솔에서 오류를 확인합니다.

addToCart 메서드에 오류가 있는 것 같습니다. 확인해 보겠습니다. 이 메서드에서 uid라는 항목에 액세스하려고 하는 위치는 어디이며 그 이유는 무엇인가요? null 현재 메서드는 public/js/homepage.js에서 다음과 같습니다.
public/js/homepage.js
  addToCart(id, itemData) {
    console.log("addToCart", id, JSON.stringify(itemData));
    return this.db
      .collection("carts")
      .doc(this.auth.currentUser.uid)
      .collection("items")
      .doc(id)
      .set(itemData);
  }
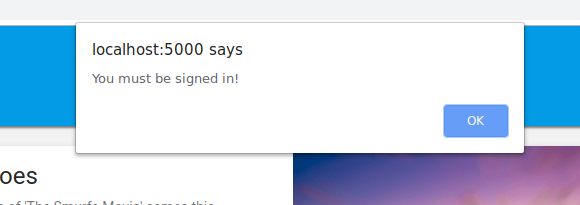
아! 앱에 로그인하지 않았습니다. Firebase 인증 문서에 따르면 로그인하지 않은 경우 auth.currentUser은(는) null입니다. 이를 확인하기 위한 검사를 추가해 보겠습니다.
public/js/homepage.js
  addToCart(id, itemData) {
    // ADD THESE LINES
    if (this.auth.currentUser === null) {
      this.showError("You must be signed in!");
      return;
    }

    // ...
  }
앱 테스트
이제 페이지를 새로고침한 다음 장바구니에 추가를 클릭합니다. 이번에는 더 좋은 오류가 표시됩니다.
하지만 상단 툴바에서 로그인을 클릭한 다음 장바구니에 추가를 다시 클릭하면 장바구니가 업데이트된 것을 확인할 수 있습니다.
하지만 수치가 전혀 정확하지 않은 것 같습니다.

이 버그는 곧 수정될 예정이니 걱정하지 마세요. 먼저 장바구니에 상품을 추가했을 때 실제로 어떤 일이 발생했는지 자세히 살펴보겠습니다.
6. 로컬 함수 트리거
장바구니에 추가를 클릭하면 여러 에뮬레이터와 관련된 이벤트 체인이 시작됩니다. 장바구니에 항목을 추가하면 Firebase CLI 로그에서 다음 메시지가 표시됩니다.
i  functions: Beginning execution of "calculateCart"
i  functions: Finished "calculateCart" in ~1s
이러한 로그와 관찰한 UI 업데이트를 생성하는 과정에서 4가지 주요 이벤트가 발생했습니다.
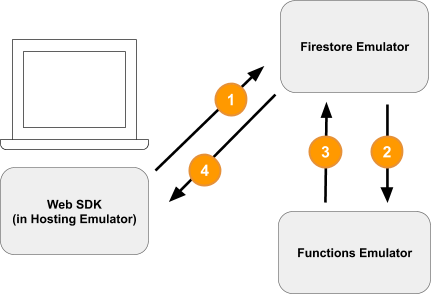
1) Firestore 쓰기 - 클라이언트
새 문서가 Firestore 컬렉션 /carts/{cartId}/items/{itemId}/에 추가됩니다. public/js/homepage.js 내 addToCart 함수에서 이 코드를 확인할 수 있습니다.
public/js/homepage.js
  addToCart(id, itemData) {
    // ...
    console.log("addToCart", id, JSON.stringify(itemData));
    return this.db
      .collection("carts")
      .doc(this.auth.currentUser.uid)
      .collection("items")
      .doc(id)
      .set(itemData);
  }
2) Cloud 함수 트리거
Cloud 함수 calculateCart는 functions/index.js에서 볼 수 있는 onWrite 트리거를 사용하여 장바구니 항목에 발생하는 모든 쓰기 이벤트 (만들기, 업데이트, 삭제)를 리슨합니다.
functions/index.js
exports.calculateCart = functions.firestore
    .document("carts/{cartId}/items/{itemId}")
    .onWrite(async (change, context) => {
      try {
        let totalPrice = 125.98;
        let itemCount = 8;

        const cartRef = db.collection("carts").doc(context.params.cartId);

        await cartRef.update({
          totalPrice,
          itemCount
        });
      } catch(err) {
      }
    }
);
3) Firestore 쓰기 - 관리자
calculateCart 함수는 장바구니에 있는 모든 항목을 읽고 총 수량과 가격을 더한 후 '장바구니' 문서를 새로운 총계로 업데이트합니다 (위의 cartRef.update(...) 참고).
4) Firestore 읽기 - 클라이언트
웹 프런트엔드가 장바구니 변경사항에 대한 업데이트를 수신하도록 구독됩니다. public/js/homepage.js에서 볼 수 있듯이 Cloud 함수가 새로운 총계를 작성하고 UI를 업데이트한 후 실시간 업데이트를 받습니다.
public/js/homepage.js
this.cartUnsub = cartRef.onSnapshot(cart => {
   // The cart document was changed, update the UI
   // ...
});
요약
잘하셨습니다. 완전 로컬 테스트를 위해 서로 다른 세 가지 Firebase 에뮬레이터를 사용하는 완전 로컬 앱을 설정했습니다.

잠시만 기다려 주세요. 다음 섹션에서 학습할 내용은 다음과 같습니다.
- Firebase 에뮬레이터를 사용하는 단위 테스트 작성 방법
- Firebase 에뮬레이터를 사용하여 보안 규칙을 디버그하는 방법
7. 앱 맞춤 보안 규칙 만들기
웹 앱은 데이터를 읽고 쓰지만 지금까지는 보안에 대해 전혀 걱정하지 않았습니다. Cloud Firestore는 '보안 규칙'이라는 시스템을 사용하여 데이터 읽기 및 쓰기 액세스 권한이 있는 사용자를 선언합니다. 에뮬레이터 도구 모음은 이러한 규칙의 프로토타입을 제작하는 좋은 방법입니다.
편집기에서 emulators-codelab/codelab-initial-state/firestore.rules 파일을 엽니다. 규칙에는 다음과 같은 세 가지 기본 섹션이 있습니다.
rules_version = '2';
service cloud.firestore {
  match /databases/{database}/documents {
    // User's cart metadata
    match /carts/{cartID} {
      // TODO: Change these! Anyone can read or write.
      allow read, write: if true;
    }

    // Items inside the user's cart
    match /carts/{cartID}/items/{itemID} {
      // TODO: Change these! Anyone can read or write.
      allow read, write: if true;
    }

    // All items available in the store. Users can read
    // items but never write them.
    match /items/{itemID} {
      allow read: if true;
    }
  }
}
현재 누구나 데이터베이스에서 데이터를 읽고 쓸 수 있습니다. Google은 유효한 작업만 통과하고 민감한 정보가 유출되지 않도록 하고자 합니다.
이 Codelab에서는 최소 권한의 원칙에 따라 모든 사용자가 필요한 모든 액세스 권한을 가지만 그 이상은 가지지 못할 때까지 모든 문서를 잠그고 점진적으로 액세스 권한을 추가합니다. 조건을 false로 설정하여 처음 두 규칙을 업데이트하여 액세스를 거부해 보겠습니다.
rules_version = '2';
service cloud.firestore {
  match /databases/{database}/documents {
    // User's cart metadata
    match /carts/{cartID} {
      // UPDATE THIS LINE
      allow read, write: if false;
    }

    // Items inside the user's cart
    match /carts/{cartID}/items/{itemID} {
      // UPDATE THIS LINE
      allow read, write: if false;
    }

    // All items available in the store. Users can read
    // items but never write them.
    match /items/{itemID} {
      allow read: if true;
    }
  }
}
8. 에뮬레이터 및 테스트 실행
에뮬레이터 시작
명령줄에서 emulators-codelab/codelab-initial-state/에 있는지 확인합니다. 이전 단계에서 에뮬레이터가 계속 실행 중일 수 있습니다. 그러지 않으면 에뮬레이터를 다시 시작합니다.
$ firebase emulators:start --import=./seed
에뮬레이터가 실행되면 에뮬레이터에서 로컬로 테스트를 실행할 수 있습니다.
테스트 실행
명령줄에서 새 터미널 탭의 emulators-codelab/codelab-initial-state/ 디렉터리에서
먼저 함수 디렉터리로 이동합니다 (이 Codelab의 나머지 부분을 진행하겠습니다).
$ cd functions
이제 함수 디렉터리에서 mocha 테스트를 실행하고 출력 상단으로 스크롤합니다.
# Run the tests
$ npm test

> functions@ test .../emulators-codelab/codelab-initial-state/functions
> mocha

  shopping carts
    1) can be created and updated by the cart owner
    2) can be read only by the cart owner

  shopping cart items
    3) can be read only by the cart owner
    4) can be added only by the cart owner

  adding an item to the cart recalculates the cart total.
    - should sum the cost of their items


  0 passing (364ms)
  1 pending
  4 failing
현재 실패 4개가 있습니다. 규칙 파일을 빌드하면서 더 많은 테스트의 통과를 확인하여 진행 상황을 측정할 수 있습니다.
9. 안전한 장바구니 액세스
처음 두 실패는 다음을 테스트하는 '장바구니' 테스트입니다.
- 사용자는 자신의 장바구니를 만들고 업데이트만 할 수 있습니다.
- 사용자는 자신의 장바구니만 읽을 수 있습니다.
functions/test.js
  it('can be created and updated by the cart owner', async () => {
    // Alice can create her own cart
    await firebase.assertSucceeds(aliceDb.doc("carts/alicesCart").set({
      ownerUID: "alice",
      total: 0
    }));

    // Bob can't create Alice's cart
    await firebase.assertFails(bobDb.doc("carts/alicesCart").set({
      ownerUID: "alice",
      total: 0
    }));

    // Alice can update her own cart with a new total
    await firebase.assertSucceeds(aliceDb.doc("carts/alicesCart").update({
      total: 1
    }));

    // Bob can't update Alice's cart with a new total
    await firebase.assertFails(bobDb.doc("carts/alicesCart").update({
      total: 1
    }));
  });

  it("can be read only by the cart owner", async () => {
    // Setup: Create Alice's cart as admin
    await admin.doc("carts/alicesCart").set({
      ownerUID: "alice",
      total: 0
    });

    // Alice can read her own cart
    await firebase.assertSucceeds(aliceDb.doc("carts/alicesCart").get());

    // Bob can't read Alice's cart
    await firebase.assertFails(bobDb.doc("carts/alicesCart").get());
  });
테스트를 통과하도록 하죠. 편집기에서 보안 규칙 파일 firestore.rules를 열고 match /carts/{cartID} 내의 문을 업데이트합니다.
firestore.rules
rules_version = '2';
service cloud.firestore {
    // UPDATE THESE LINES
    match /carts/{cartID} {
      allow create: if request.auth.uid == request.resource.data.ownerUID;
      allow read, update, delete: if request.auth.uid == resource.data.ownerUID;
    }

    // ...
  }
}
이러한 규칙은 이제 장바구니 소유자의 읽기 및 쓰기 액세스만 허용합니다.
Google은 수신 데이터와 사용자의 인증을 확인하기 위해 모든 규칙의 컨텍스트에서 사용할 수 있는 다음 두 가지 객체를 사용합니다.
request객체에는 시도 중인 작업에 대한 데이터와 메타데이터가 포함됩니다.- Firebase 프로젝트가 Firebase 인증을 사용하는 경우
request.auth객체는 요청을 보낸 사용자를 설명합니다.
10. 장바구니 액세스 테스트
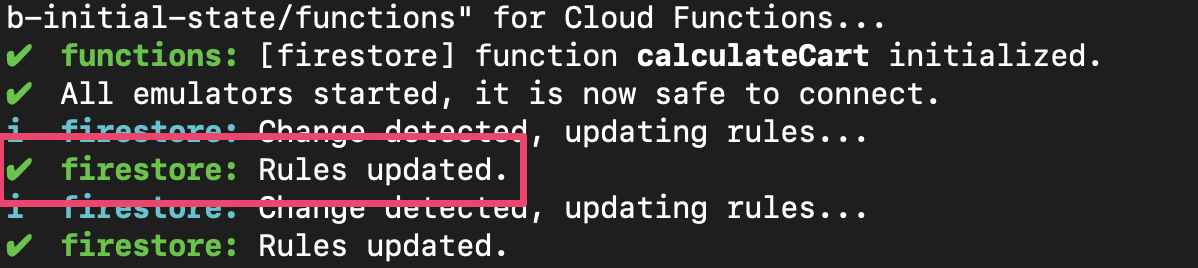
에뮬레이터 도구 모음은 firestore.rules가 저장될 때마다 규칙을 자동으로 업데이트합니다. 에뮬레이터를 실행하는 탭에서 Rules updated 메시지를 살펴보면 에뮬레이터에 규칙이 업데이트되었는지 확인할 수 있습니다.
테스트를 다시 실행하고 처음 두 테스트가 이제 통과하는지 확인합니다.
$ npm test

> functions@ test .../emulators-codelab/codelab-initial-state/functions
> mocha

  shopping carts
    ✓ can be created and updated by the cart owner (195ms)
    ✓ can be read only by the cart owner (136ms)

  shopping cart items
    1) can be read only by the cart owner
    2) can be added only by the cart owner

  adding an item to the cart recalculates the cart total.
    - should sum the cost of their items

  2 passing (482ms)
  1 pending
  2 failing
잘했어요 이제 장바구니에 안전하게 액세스할 수 있습니다. 다음으로 실패한 테스트로 넘어가겠습니다.
11. UI에서 '장바구니에 추가' 흐름 확인
현재 장바구니 소유자는 장바구니에 있는 항목을 읽고 쓰지만 장바구니에 있는 개별 항목을 읽거나 쓸 수는 없습니다. 소유자는 장바구니 문서에 액세스할 수 있지만 장바구니의 상품 하위 컬렉션에는 액세스할 수 없기 때문입니다.
이는 사용자에게 손상된 상태입니다.
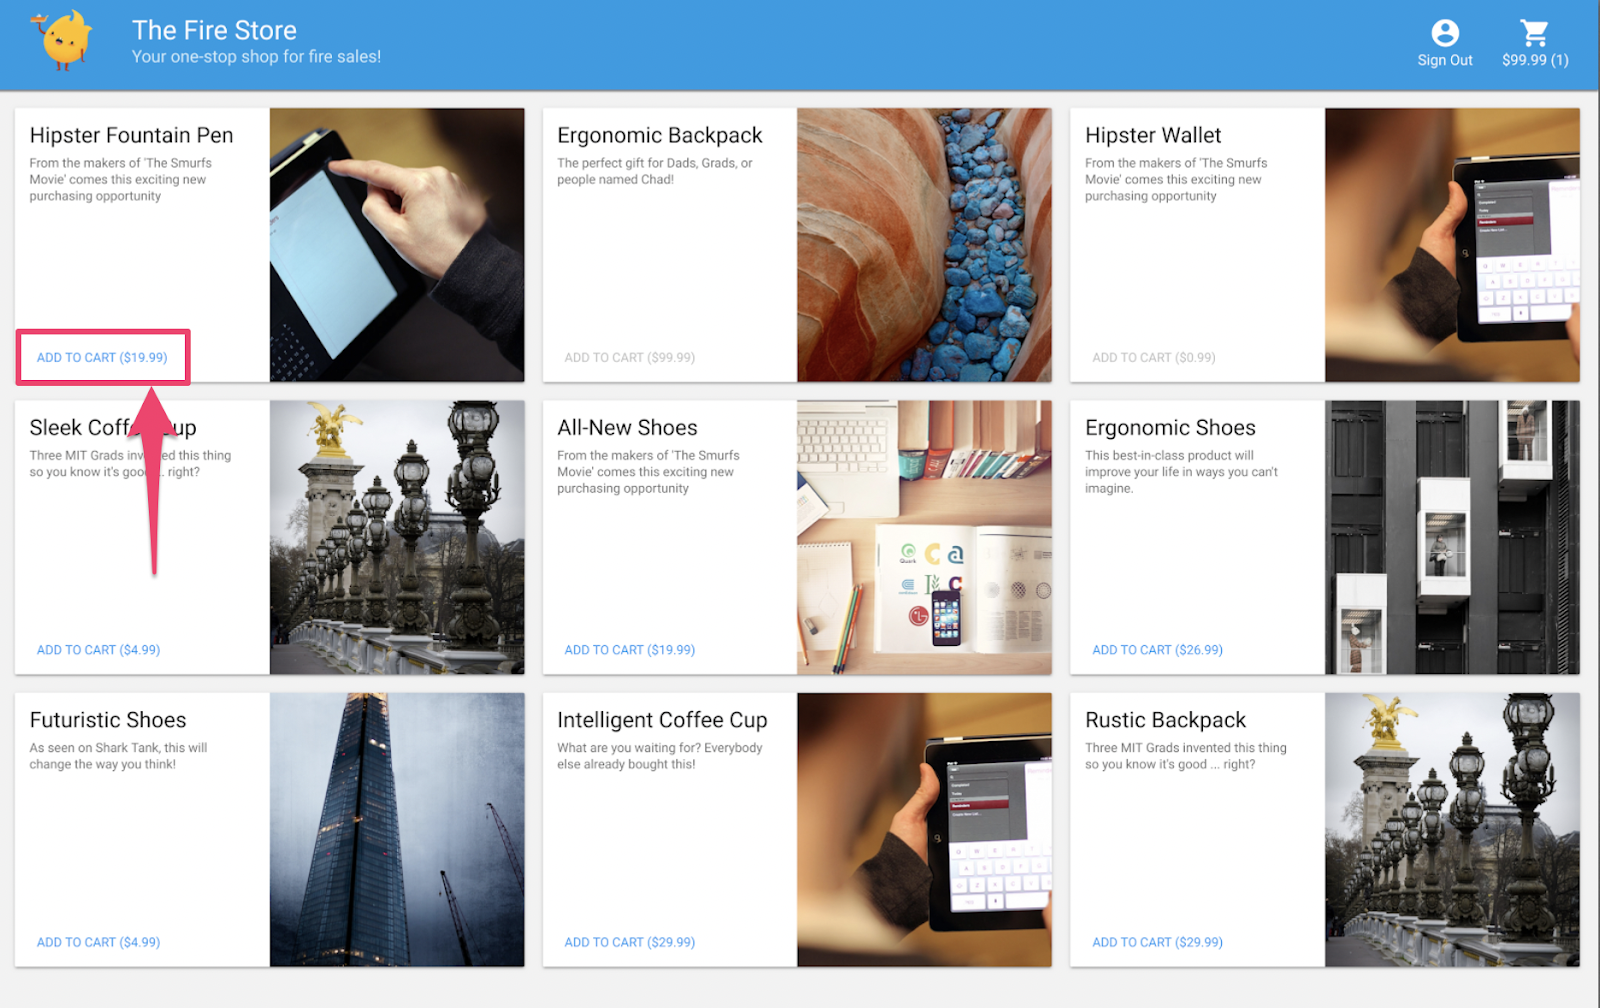
http://127.0.0.1:5000,에서 실행 중인 웹 UI로 돌아가서 장바구니에 상품을 추가해 봅니다. 아직 items 하위 컬렉션에서 생성된 문서에 대한 액세스 권한을 사용자에게 부여하지 않았으므로 디버그 콘솔에 표시되는 Permission Denied 오류가 표시됩니다.
12. 장바구니 항목 액세스 허용
다음 두 가지 테스트는 사용자가 자신의 장바구니에 항목을 추가하거나 장바구니에 있는 항목만 읽을 수 있는지 확인합니다.
  it("can be read only by the cart owner", async () => {
    // Alice can read items in her own cart
    await firebase.assertSucceeds(aliceDb.doc("carts/alicesCart/items/milk").get());

    // Bob can't read items in alice's cart
    await firebase.assertFails(bobDb.doc("carts/alicesCart/items/milk").get())
  });

  it("can be added only by the cart owner",  async () => {
    // Alice can add an item to her own cart
    await firebase.assertSucceeds(aliceDb.doc("carts/alicesCart/items/lemon").set({
      name: "lemon",
      price: 0.99
    }));

    // Bob can't add an item to alice's cart
    await firebase.assertFails(bobDb.doc("carts/alicesCart/items/lemon").set({
      name: "lemon",
      price: 0.99
    }));
  });
따라서 현재 사용자가 장바구니 문서의 ownerUID와 동일한 UID를 가진 경우 액세스를 허용하는 규칙을 작성할 수 있습니다. create, update, delete에 다른 규칙을 지정할 필요가 없으므로 데이터를 수정하는 모든 요청에 적용되는 write 규칙을 사용할 수 있습니다.
항목 하위 컬렉션의 문서 규칙을 업데이트합니다. 조건문의 get는 Firestore의 값(이 경우 장바구니 문서의 ownerUID)을 읽습니다.
rules_version = '2';
service cloud.firestore {
  match /databases/{database}/documents {
    // ...

    // UPDATE THESE LINES
    match /carts/{cartID}/items/{itemID} {
      allow read, write: if get(/databases/$(database)/documents/carts/$(cartID)).data.ownerUID == request.auth.uid;
    }

    // ...
  }
}
13. 장바구니 항목 액세스 테스트
이제 테스트를 다시 실행할 수 있습니다. 출력 상단으로 스크롤하여 더 많은 테스트를 통과하는지 확인합니다.
$ npm test

> functions@ test .../emulators-codelab/codelab-initial-state/functions
> mocha

  shopping carts
    ✓ can be created and updated by the cart owner (195ms)
    ✓ can be read only by the cart owner (136ms)

  shopping cart items
    ✓ can be read only by the cart owner (111ms)
    ✓ can be added only by the cart owner


  adding an item to the cart recalculates the cart total.
    - should sum the cost of their items


  4 passing (401ms)
  1 pending
좋습니다. 이제 모든 테스트를 통과합니다. 대기 중인 테스트가 하나 있지만 몇 단계만 거치면 됩니다.
14. '장바구니에 추가' 과정 다시 확인
웹 프런트엔드 ( http://127.0.0.1:5000)로 돌아가 장바구니에 항목을 추가합니다. 이는 테스트 및 규칙이 클라이언트에서 요구하는 기능과 일치하는지 확인하는 중요한 단계입니다. 지난번 UI를 사용해 보았을 때는 장바구니에 상품을 추가할 수 없었습니다.
firestore.rules가 저장되면 클라이언트가 자동으로 규칙을 새로고침합니다. 장바구니에 상품을 추가해 보세요.
요약
잘하셨습니다. 프로덕션 준비를 위한 필수 단계인 앱의 보안을 개선했습니다. 프로덕션 앱이었다면 이러한 테스트를 지속적 통합 파이프라인에 추가할 수 있습니다. 이렇게 하면 앞으로 다른 사람이 규칙을 수정하더라도 장바구니 데이터가 이러한 액세스 권한을 갖게 될 것이라는 확신을 가질 수 있습니다.

그뿐만이 아닙니다.
계속하다 보면
- Firestore 이벤트에 의해 트리거되는 함수를 작성하는 방법
- 여러 에뮬레이터에서 작동하는 테스트를 만드는 방법
15. Cloud Functions 테스트 설정
지금까지 웹 앱의 프런트엔드와 Firestore 보안 규칙에 중점을 두었습니다. 하지만 이 앱은 Cloud Functions도 사용하여 사용자의 장바구니를 최신 상태로 유지하므로 이 코드도 테스트하려고 합니다.
에뮬레이터 도구 모음을 사용하면 Cloud Functions는 물론 Cloud Firestore 및 기타 서비스를 사용하는 함수까지 쉽게 테스트할 수 있습니다.
편집기에서 emulators-codelab/codelab-initial-state/functions/test.js 파일을 열고 파일의 마지막 테스트로 스크롤합니다. 현재 대기 중으로 표시되어 있습니다.
//  REMOVE .skip FROM THIS LINE
describe.skip("adding an item to the cart recalculates the cart total. ", () => {
  // ...

  it("should sum the cost of their items", async () => {
    ...
  });
});
테스트를 사용 설정하려면 다음과 같이 .skip를 삭제합니다.
describe("adding an item to the cart recalculates the cart total. ", () => {
  // ...

  it("should sum the cost of their items", async () => {
    ...
  });
});
그런 다음 파일 상단에서 REAL_FIREBASE_PROJECT_ID 변수를 찾아 실제 Firebase 프로젝트 ID로 변경합니다.
// CHANGE THIS LINE
const REAL_FIREBASE_PROJECT_ID = "changeme";
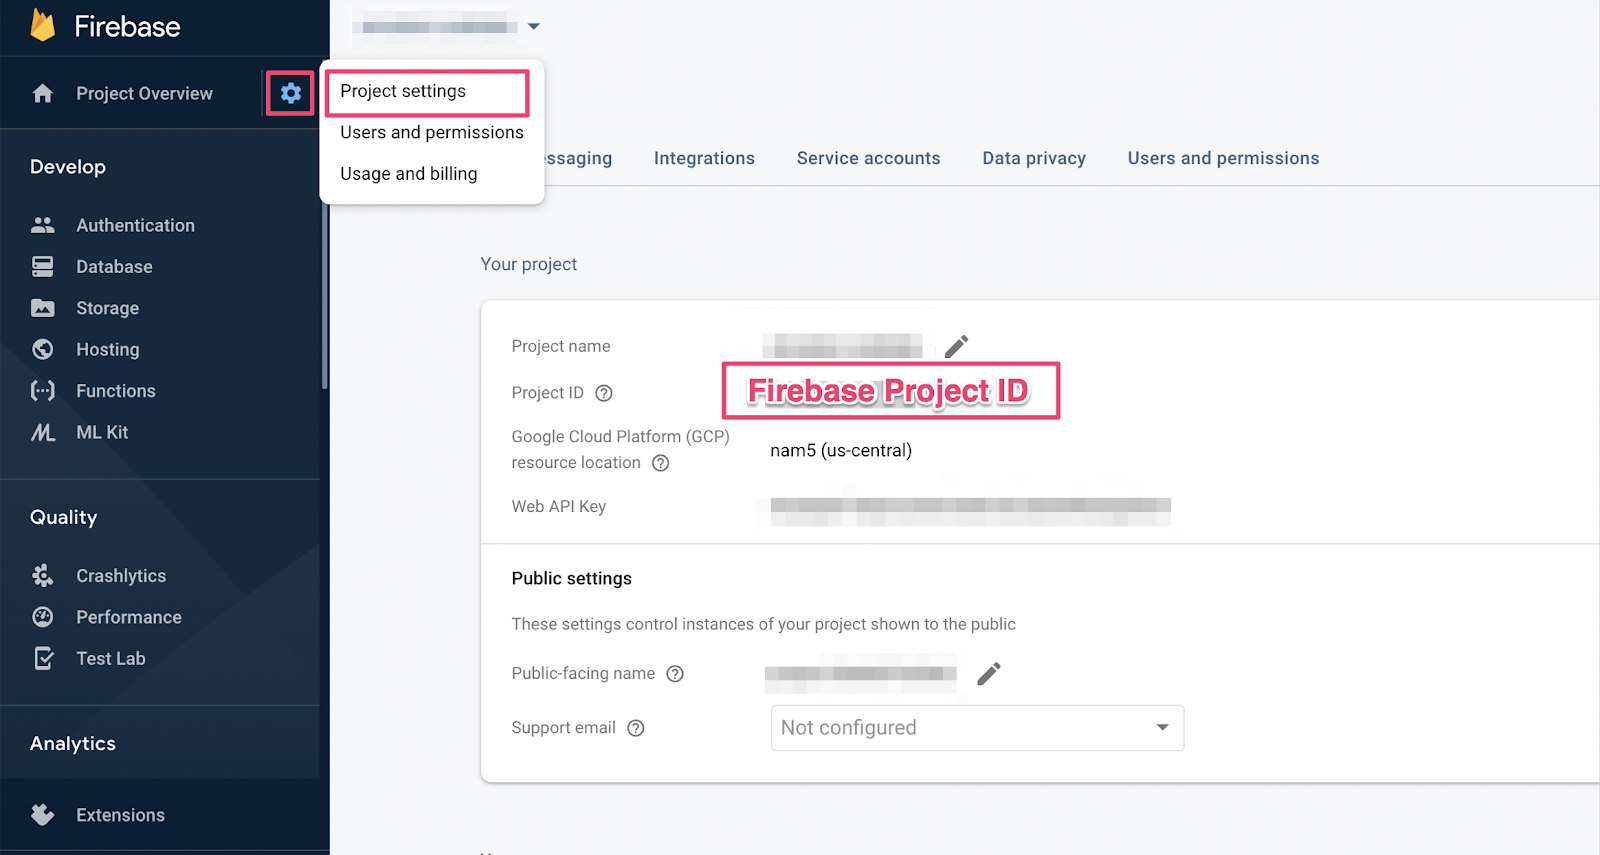
프로젝트 ID를 잊어버린 경우 Firebase Console의 프로젝트 설정에서 Firebase 프로젝트 ID를 찾을 수 있습니다.
16. Functions 테스트 살펴보기
이 테스트는 Cloud Firestore와 Cloud Functions 간의 상호작용을 검증하므로 이전 Codelab의 테스트보다 더 많은 설정이 필요합니다. 이 테스트를 진행하면서 예상되는 결과를 살펴봅시다.
장바구니 만들기
Cloud Functions는 신뢰할 수 있는 서버 환경에서 실행되며 Admin SDK에서 사용하는 서비스 계정 인증을 사용할 수 있습니다 . 먼저 initializeApp 대신 initializeAdminApp를 사용하여 앱을 초기화합니다. 그런 다음 항목을 추가할 장바구니의 DocumentReference를 만들고 장바구니를 초기화합니다.
it("should sum the cost of their items", async () => {
    const db = firebase
        .initializeAdminApp({ projectId: REAL_FIREBASE_PROJECT_ID })
        .firestore();

    // Setup: Initialize cart
    const aliceCartRef = db.doc("carts/alice")
    await aliceCartRef.set({ ownerUID: "alice", totalPrice: 0 });

    ...
  });
함수 트리거
그런 다음 함수를 트리거하기 위해 장바구니 문서의 items 하위 컬렉션에 문서를 추가합니다. 함수에서 발생하는 추가를 테스트하기 위해 두 개의 항목을 추가합니다.
it("should sum the cost of their items", async () => {
    const db = firebase
        .initializeAdminApp({ projectId: REAL_FIREBASE_PROJECT_ID })
        .firestore();

    // Setup: Initialize cart
    const aliceCartRef = db.doc("carts/alice")
    await aliceCartRef.set({ ownerUID: "alice", totalPrice: 0 });

    //  Trigger calculateCart by adding items to the cart
    const aliceItemsRef = aliceCartRef.collection("items");
    await aliceItemsRef.doc("doc1").set({name: "nectarine", price: 2.99});
    await aliceItemsRef.doc("doc2").set({ name: "grapefruit", price: 6.99 });

    ...
    });
  });
테스트 기대치 설정
onSnapshot()를 사용하여 장바구니 문서의 모든 변경사항에 관한 리스너를 등록합니다. onSnapshot()는 리스너 등록을 취소하기 위해 호출할 수 있는 함수를 반환합니다.
이 테스트에서 두 항목을 더하면 9.98달러가 됩니다. 그런 다음 장바구니에 예상 itemCount 및 totalPrice가 있는지 확인합니다. 그렇다면 함수가 작업을 완료한 것입니다.
it("should sum the cost of their items", (done) => {
    const db = firebase
        .initializeAdminApp({ projectId: REAL_FIREBASE_PROJECT_ID })
        .firestore();

    // Setup: Initialize cart
    const aliceCartRef = db.doc("carts/alice")
    aliceCartRef.set({ ownerUID: "alice", totalPrice: 0 });

    //  Trigger calculateCart by adding items to the cart
    const aliceItemsRef = aliceCartRef.collection("items");
    aliceItemsRef.doc("doc1").set({name: "nectarine", price: 2.99});
    aliceItemsRef.doc("doc2").set({ name: "grapefruit", price: 6.99 });

    // Listen for every update to the cart. Every time an item is added to
    // the cart's subcollection of items, the function updates `totalPrice`
    // and `itemCount` attributes on the cart.
    // Returns a function that can be called to unsubscribe the listener.
    await new Promise((resolve) => {
      const unsubscribe = aliceCartRef.onSnapshot(snap => {
        // If the function worked, these will be cart's final attributes.
        const expectedCount = 2;
        const expectedTotal = 9.98;

        // When the `itemCount`and `totalPrice` match the expectations for the
        // two items added, the promise resolves, and the test passes.
        if (snap.data().itemCount === expectedCount && snap.data().totalPrice == expectedTotal) {
          // Call the function returned by `onSnapshot` to unsubscribe from updates
          unsubscribe();
          resolve();
        };
      });
    });
   });
 });
17. 테스트 실행
이전 테스트에서 에뮬레이터가 계속 실행되고 있을 수 있습니다. 시작되지 않으면 에뮬레이터를 시작합니다. 명령줄에서 다음을 실행합니다.
$ firebase emulators:start --import=./seed
새 터미널 탭을 열고 (에뮬레이터가 계속 실행됨) 함수 디렉터리로 이동합니다. 보안 규칙 테스트에서는 이를 열어 둘 수 있습니다.
$ cd functions
이제 단위 테스트를 실행하면 총 5개의 테스트가 표시됩니다.
$ npm test

> functions@ test .../emulators-codelab/codelab-initial-state/functions
> mocha

  shopping cart creation
    ✓ can be created by the cart owner (82ms)

  shopping cart reads, updates, and deletes
    ✓ cart can be read by the cart owner (42ms)

  shopping cart items
    ✓ items can be read by the cart owner (40ms)
    ✓ items can be added by the cart owner

  adding an item to the cart recalculates the cart total.
    1) should sum the cost of their items

  4 passing (2s)
  1 failing
구체적인 실패를 살펴보면 시간 초과 오류인 것 같습니다. 이는 함수가 올바르게 업데이트될 때까지 테스트가 대기 중이지만 실행되지 않기 때문입니다. 이제 테스트를 충족하는 함수를 작성할 준비가 되었습니다.
18. 함수 작성
이 테스트를 수정하려면 functions/index.js의 함수를 업데이트해야 합니다. 이 함수의 일부는 작성되었지만 완전한 것은 아닙니다. 현재 함수는 다음과 같습니다.
// Recalculates the total cost of a cart; triggered when there's a change
// to any items in a cart.
exports.calculateCart = functions
    .firestore.document("carts/{cartId}/items/{itemId}")
    .onWrite(async (change, context) => {
      console.log(`onWrite: ${change.after.ref.path}`);
      if (!change.after.exists) {
        // Ignore deletes
        return;
      }

      let totalPrice = 125.98;
      let itemCount = 8;
      try {

        const cartRef = db.collection("carts").doc(context.params.cartId);

        await cartRef.update({
          totalPrice,
          itemCount
        });
      } catch(err) {
      }
    });
함수는 장바구니 참조를 올바르게 설정하지만 totalPrice 및 itemCount의 값을 계산하는 대신 하드코딩된 값으로 업데이트합니다.
items 하위 컬렉션
새 상수 itemsSnap를 items 하위 컬렉션으로 초기화합니다. 그런 다음 컬렉션의 모든 문서를 반복합니다.
// Recalculates the total cost of a cart; triggered when there's a change
// to any items in a cart.
exports.calculateCart = functions
    .firestore.document("carts/{cartId}/items/{itemId}")
    .onWrite(async (change, context) => {
      console.log(`onWrite: ${change.after.ref.path}`);
      if (!change.after.exists) {
        // Ignore deletes
        return;
      }


      try {
        let totalPrice = 125.98;
        let itemCount = 8;

        const cartRef = db.collection("carts").doc(context.params.cartId);
        // ADD LINES FROM HERE
        const itemsSnap = await cartRef.collection("items").get();

        itemsSnap.docs.forEach(item => {
          const itemData = item.data();
        })
        // TO HERE

        return cartRef.update({
          totalPrice,
          itemCount
        });
      } catch(err) {
      }
    });
totalPrice 및 itemCount 계산
먼저 totalPrice 및 itemCount 값을 0으로 초기화해 보겠습니다.
그런 다음 반복 블록에 로직을 추가합니다. 먼저 상품에 가격이 있는지 확인합니다. 상품 수량을 지정하지 않으면 기본값인 1로 설정합니다. 그런 다음 누계 itemCount에 수량을 추가합니다. 마지막으로 상품 가격과 수량을 곱한 값을 누계 totalPrice에 추가합니다.
// Recalculates the total cost of a cart; triggered when there's a change
// to any items in a cart.
exports.calculateCart = functions
    .firestore.document("carts/{cartId}/items/{itemId}")
    .onWrite(async (change, context) => {
      console.log(`onWrite: ${change.after.ref.path}`);
      if (!change.after.exists) {
        // Ignore deletes
        return;
      }

      try {
        // CHANGE THESE LINES
        let totalPrice = 0;
        let itemCount = 0;

        const cartRef = db.collection("carts").doc(context.params.cartId);
        const itemsSnap = await cartRef.collection("items").get();

        itemsSnap.docs.forEach(item => {
          const itemData = item.data();
          // ADD LINES FROM HERE
          if (itemData.price) {
            // If not specified, the quantity is 1
            const quantity = itemData.quantity ? itemData.quantity : 1;
            itemCount += quantity;
            totalPrice += (itemData.price * quantity);
          }
          // TO HERE
        })

        await cartRef.update({
          totalPrice,
          itemCount
        });
      } catch(err) {
      }
    });
또한 성공 및 오류 상태를 디버그하는 데 도움이 되도록 로깅을 추가할 수 있습니다.
// Recalculates the total cost of a cart; triggered when there's a change
// to any items in a cart.
exports.calculateCart = functions
    .firestore.document("carts/{cartId}/items/{itemId}")
    .onWrite(async (change, context) => {
      console.log(`onWrite: ${change.after.ref.path}`);
      if (!change.after.exists) {
        // Ignore deletes
        return;
      }

      let totalPrice = 0;
      let itemCount = 0;
      try {
        const cartRef = db.collection("carts").doc(context.params.cartId);
        const itemsSnap = await cartRef.collection("items").get();

        itemsSnap.docs.forEach(item => {
          const itemData = item.data();
          if (itemData.price) {
            // If not specified, the quantity is 1
            const quantity = (itemData.quantity) ? itemData.quantity : 1;
            itemCount += quantity;
            totalPrice += (itemData.price * quantity);
          }
        });

        await cartRef.update({
          totalPrice,
          itemCount
        });

        // OPTIONAL LOGGING HERE
        console.log("Cart total successfully recalculated: ", totalPrice);
      } catch(err) {
        // OPTIONAL LOGGING HERE
        console.warn("update error", err);
      }
    });
19. 테스트 재실행
명령줄에서 에뮬레이터가 여전히 실행 중인지 확인하고 테스트를 다시 실행합니다. 에뮬레이터가 함수의 변경사항을 자동으로 포착하므로 에뮬레이터를 다시 시작할 필요가 없습니다. 모든 테스트를 통과해야 합니다.
$ npm test
> functions@ test .../emulators-codelab/codelab-initial-state/functions
> mocha

  shopping cart creation
    ✓ can be created by the cart owner (306ms)

  shopping cart reads, updates, and deletes
    ✓ cart can be read by the cart owner (59ms)

  shopping cart items
    ✓ items can be read by the cart owner
    ✓ items can be added by the cart owner

  adding an item to the cart recalculates the cart total.
    ✓ should sum the cost of their items (800ms)


  5 passing (1s)
잘했어요
20. 홈페이지 UI를 사용하여 사용해 보기
최종 테스트를 위해 웹 앱 ( http://127.0.0.1:5000/)으로 돌아가서 장바구니에 항목을 추가합니다.
장바구니가 올바른 총액으로 업데이트되는지 확인합니다. 좋습니다.
요약
Firebase용 Cloud Functions와 Cloud Firestore 간의 복잡한 테스트 사례를 살펴봤습니다. 테스트를 통과하는 Cloud 함수를 작성했습니다. 또한 새로운 기능이 UI에서 작동하는 것을 확인했습니다. 이 모든 작업을 로컬에서 실행했으며 자체 머신에서 에뮬레이터를 실행했습니다.
또한 로컬 에뮬레이터에서 실행되는 웹 클라이언트를 만들고, 데이터를 보호하기 위해 보안 규칙을 맞춤 설정하고, 로컬 에뮬레이터를 사용하여 보안 규칙을 테스트했습니다.