
1. 시작하기 전에

Gemini Enterprise란 무엇인가요?
Gemini Enterprise는 모든 워크플로에서 모든 직원에게 최고의 Google AI를 제공하는 고급 에이전트형 플랫폼입니다. 팀이 단일 보안 환경에서 AI 에이전트를 탐색, 생성, 공유, 실행할 수 있습니다.
- 고급 모델 액세스: 사용자는 Gemini를 비롯한 Google의 가장 강력한 멀티모달 AI에 즉시 액세스하여 복잡한 비즈니스 문제를 해결할 수 있습니다.
- 전문 에이전트 활용: 이 제품군에는 연구, 코딩, 메모 작성을 위한 즉시 사용 가능한 Google 에이전트가 포함되어 있어 바로 가치를 제공합니다.
- 모든 직원의 역량 강화: 노 코드 및 프로 코드 옵션을 통해 모든 부서의 직원이 워크플로 자동화를 위한 자체 맞춤 에이전트를 빌드하고 관리할 수 있습니다.
- 데이터에 기반한 에이전트: 에이전트를 내부 회사 데이터 및 서드 파티 애플리케이션에 안전하게 연결하여 대답이 컨텍스트에 맞게 정확하도록 할 수 있습니다.
- 중앙 집중식 거버넌스: 관리자는 모든 에이전트 활동을 시각화하고 감사하여 조직이 엄격한 보안 및 규정 준수 표준을 충족하는지 확인할 수 있습니다.
- 생태계로 확장: 이 플랫폼은 다양한 파트너 애플리케이션 및 서비스 제공업체와 통합되어 여러 시스템에서 자동화를 확장합니다.

Google Workspace란 무엇인가요?
Google Workspace는 개인, 학교, 비즈니스를 위해 설계된 클라우드 기반 생산성 및 공동작업 솔루션 모음입니다.
- 커뮤니케이션: 전문 이메일 서비스 (Gmail), 화상 회의 (Meet), 팀 메시지 (Chat)
- 콘텐츠 제작: 문서 작성 (Docs), 스프레드시트 작성 (Sheets), 프레젠테이션 디자인 (Slides)을 위한 도구입니다.
- 정리: 공유 캘린더 (Calendar) 및 디지털 메모 (Keep)
- 스토리지: 파일을 안전하게 저장하고 공유할 수 있는 중앙 집중식 클라우드 공간 (Drive)
- 관리: 사용자 및 보안 설정을 관리하는 관리 컨트롤 (Workspace 관리 콘솔)
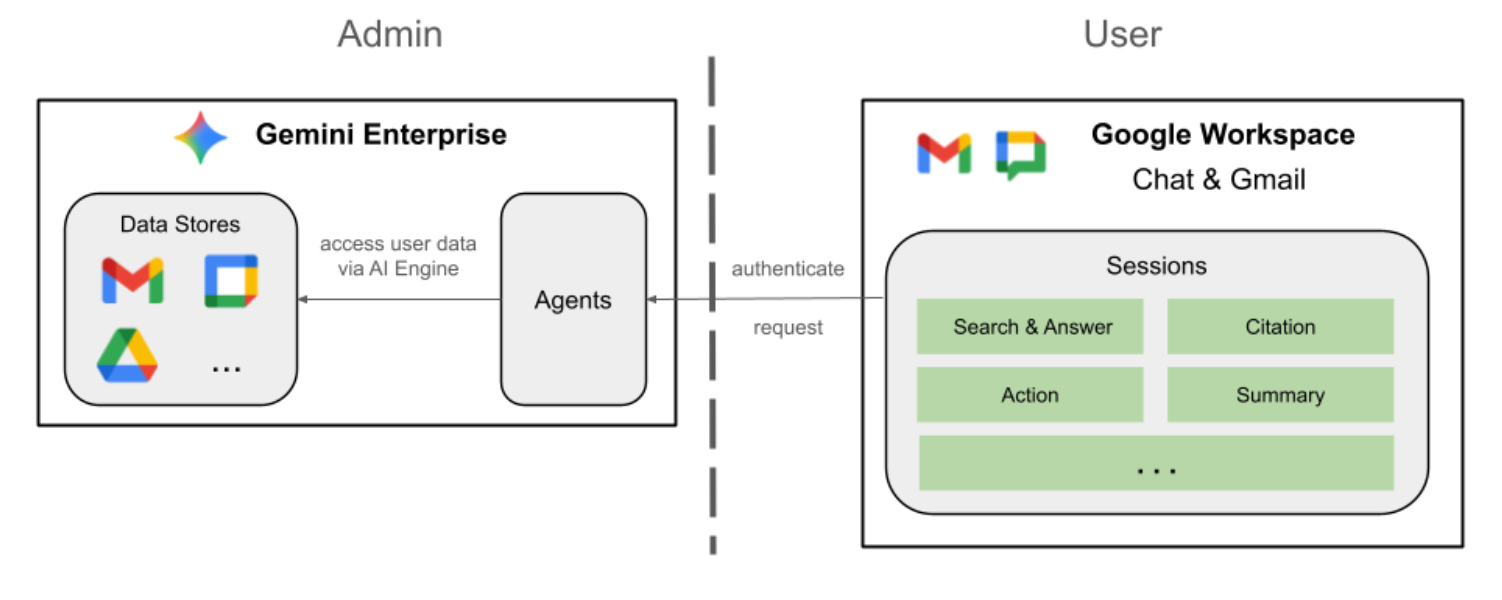
어떤 종류의 맞춤 통합인가요?
Google Workspace와 Gemini Enterprise는 Workspace가 실시간 데이터와 협업 컨텍스트를 제공하고 Gemini Enterprise가 지능형 워크플로를 자동화하는 데 필요한 모델, 에이전트형 추론, 오케스트레이션을 제공하는 강력한 피드백 루프를 만듭니다.
- 스마트 연결: Google 관리 데이터 저장소, API, MCP 서버 (Google 관리 및 맞춤)를 통해 상담사는 Workspace 데이터에 안전하고 원활하게 액세스하고 사용자를 대신하여 조치를 취할 수 있습니다.
- 맞춤 에이전트: 팀은 노 코드 디자이너 또는 프로 코드 프레임워크를 사용하여 관리자가 관리하는 Workspace 데이터 및 작업에 기반한 전문 에이전트를 빌드할 수 있습니다.
- 기본 통합: Workspace 부가기능은 전용 UI 구성요소 또는 백그라운드 프로세스를 통해 AI 시스템과 Chat, Gmail과 같은 애플리케이션 간의 격차를 해소합니다. 이를 통해 상담사는 사용자가 있는 곳에서 즉각적이고 상황에 맞는 지원을 제공할 수 있습니다.
Google Workspace의 강력한 생산성 생태계와 Gemini Enterprise의 고급 에이전트 기능을 결합하면 조직은 팀이 매일 사용하는 도구 내에서 복잡한 워크플로를 자동화하는 맞춤형 데이터 기반 AI 에이전트를 통해 운영을 혁신할 수 있습니다.
기본 요건
자체 환경에서 모든 단계를 따르려면 다음이 필요합니다.
- Google Cloud 및 Python에 관한 기본 지식
- 결제가 사용 설정되어 있고 내가 소유자인 Google Cloud 프로젝트 기존 프로젝트에 결제가 사용 설정되어 있는지 확인하려면 프로젝트의 결제 상태 확인을 참고하세요. 프로젝트를 만들고 청구를 설정하려면 Google Cloud 프로젝트 만들기를 참고하세요. 프로젝트 소유권을 변경하려면 프로젝트 구성원 관리 또는 프로젝트 소유권 변경을 참고하세요.
- Gemini Enterprise Standard / Plus 버전이 사용 설정되어 있습니다. Gemini Enterprise 버전을 비교하려면 Gemini Enterprise 버전 비교를 참고하세요. Gemini Enterprise 라이선스가 없는 경우 다음 단계에서 무료 체험 라이선스를 만들 수 있습니다.
- Google Chat에 액세스할 수 있고 스마트 기능이 사용 설정된 Business 또는 Enterprise Google Workspace 계정
- Google Cloud 프로젝트에 Google Cloud CLI가 설치되고 초기화되어 있어야 합니다.
- Python 3.11 이상이 설치되어 있어야 합니다. 공식 Python 웹사이트의 안내를 참고하세요.
빌드할 항목
이 Codelab에서는 Google Workspace와 긴밀하게 통합된 Gemini Enterprise AI 에이전트를 사용하여 세 가지 솔루션을 빌드합니다. 데이터, 작업, UI와 상호작용하는 데 사용할 수 있는 아키텍처 패턴을 보여줍니다.
노 코드 맞춤 에이전트
이 에이전트를 사용하면 사용자가 자연어로 Workspace의 데이터를 검색하고 조치를 취할 수 있습니다. 다음 요소를 사용합니다.
- 모델: Gemini
- 데이터 및 작업: Google Workspace (Calendar, Gmail, Drive, NotebookLM)용 Gemini Enterprise 데이터 스토어, Google 검색
- 에이전트 빌드 도구: Gemini Enterprise Agent Designer
- 에이전트 호스트: Gemini Enterprise
- UI: Gemini Enterprise 웹 앱
프로 코드 맞춤 에이전트
이 에이전트를 사용하면 사용자가 맞춤 도구와 규칙을 사용하여 자연어로 Workspace의 데이터를 검색하고 작업을 실행할 수 있습니다. 다음 요소를 사용합니다.
- 모델: Gemini
- 데이터 및 작업: Google Workspace (Calendar, Gmail, Drive, NotebookLM)용 Gemini Enterprise 데이터 스토어, Google 검색, Google 관리 에이전트 검색의 모델 컨텍스트 프로토콜 (MCP) 서버, Google Chat 메시지를 전송하는 맞춤 도구 기능 (Google Chat API를 통해)
- 에이전트 빌드 도구: 에이전트 개발 키트 (ADK)
- 에이전트 호스트: 에이전트 런타임
- UI: Gemini Enterprise 웹 앱
Google Workspace 부가기능으로 기본 에이전트
이 에이전트를 사용하면 사용자가 Workspace 앱 UI의 컨텍스트 내에서 자연어로 Workspace 데이터를 검색할 수 있습니다. 다음 요소를 사용합니다.
- 모델: Gemini
- 데이터: Google Workspace (Calendar, Gmail, Drive, NotebookLM), Google 검색용 Gemini Enterprise 데이터 저장소
- 에이전트 호스트: Gemini Enterprise
- UI: Chat 및 Gmail용 Google Workspace 부가기능 (Calendar, Drive, Docs, Sheets, Slides로 쉽게 확장 가능)
- Google Workspace 부가기능: Apps Script, Gemini Enterprise API, 컨텍스트 (사용자 메타데이터, 선택한 Gmail 메시지)
학습할 내용
- 데이터와 작업을 지원하는 Gemini Enterprise와 Google Workspace 간의 통합 지점
- Gemini Enterprise에서 호스팅되는 맞춤 에이전트를 빌드하는 노 코드 및 프로 코드 옵션
- 사용자가 Gemini Enterprise 웹 앱 및 Google Workspace 애플리케이션에서 에이전트에 액세스할 수 있는 방법
이 Codelab에 쉽게 액세스
2. 설정
개념 검토
Gemini Enterprise 앱
Gemini Enterprise 앱은 최종 사용자에게 검색 결과, 작업, 에이전트를 제공합니다. 앱이라는 용어는 API라는 맥락에서 엔진이라는 용어와 서로 바꿔서 사용할 수 있습니다. 앱이 데이터 스토어에 연결되어 있어야 데이터 스토어의 데이터를 사용하여 검색 결과, 답변 또는 작업을 제공할 수 있습니다.
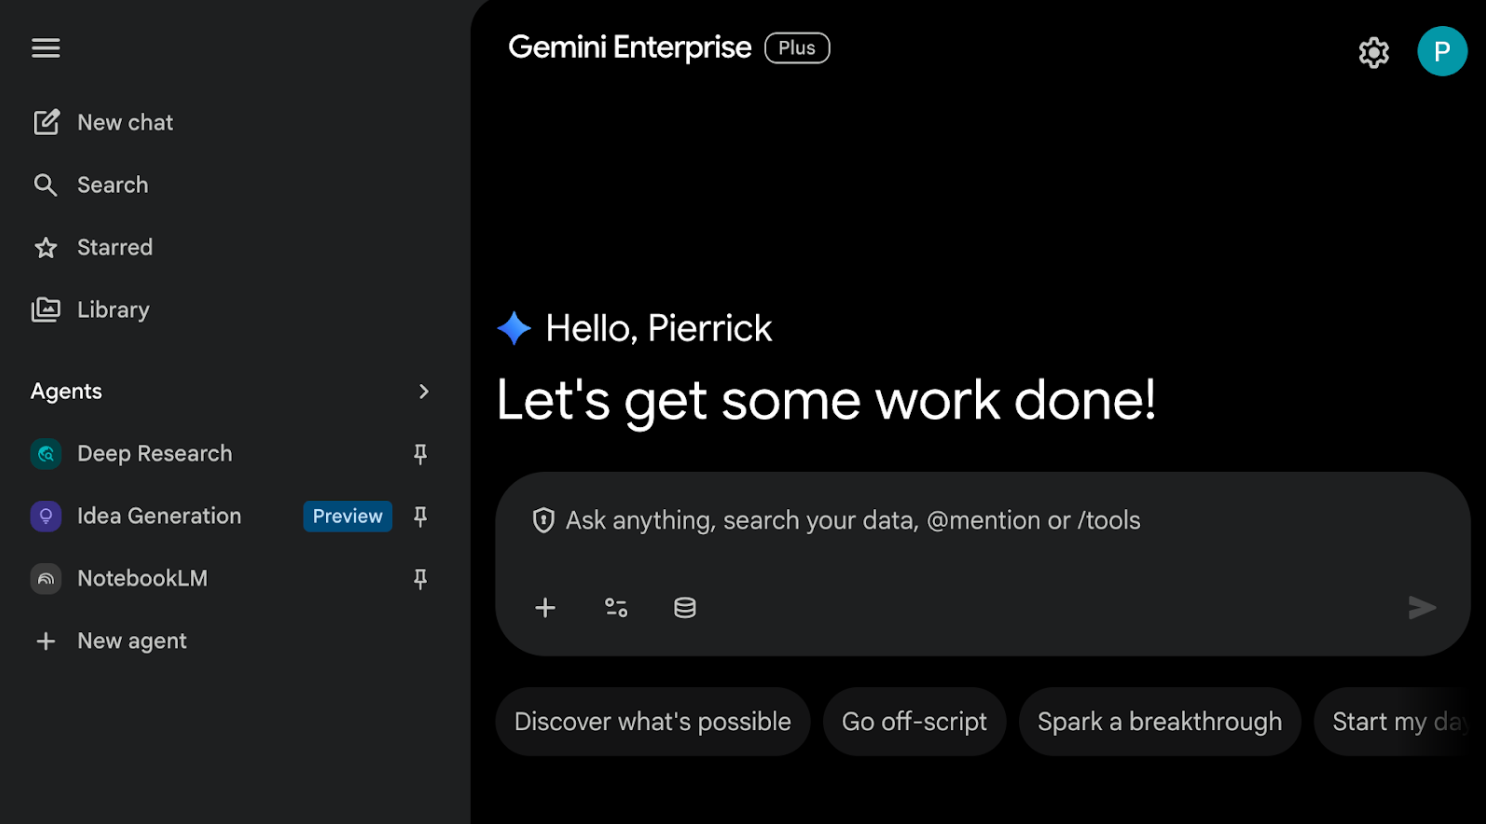
Gemini Enterprise 웹 앱
Gemini Enterprise 웹 앱은 Gemini Enterprise 앱과 연결되어 있습니다. 이 앱은 직원이 단일 채팅 인터페이스를 사용하여 사일로화된 회사 데이터를 검색하고, 복잡한 워크플로를 위한 전문 AI 에이전트를 실행하고, 엔터프라이즈 수준의 개인 정보 보호를 통해 전문적인 콘텐츠를 생성하는 중앙 집중식 AI 홈베이스 역할을 합니다.
리소스 초기화 및 액세스
이 섹션에서는 원하는 웹브라우저에서 다음 리소스에 액세스하고 구성합니다.
Gemini Enterprise 앱
새 탭에서 Google Cloud 콘솔을 열고 다음 단계를 따르세요.
- 프로젝트를 선택합니다.
- Google Cloud 검색 필드에서 Gemini Enterprise를 검색하여 선택한 다음 + 앱 만들기를 클릭합니다. Gemini Enterprise 라이선스가 없는 경우 30일 무료 체험 라이선스를 활성화하라는 메시지가 표시됩니다.
- 앱 이름을
codelab로 설정합니다. - 이름을 기반으로 ID가 생성되어 필드 아래에 표시됩니다. ID를 복사합니다.
- 멀티 리전을
global (Global)로 설정합니다. - 만들기를 클릭합니다.
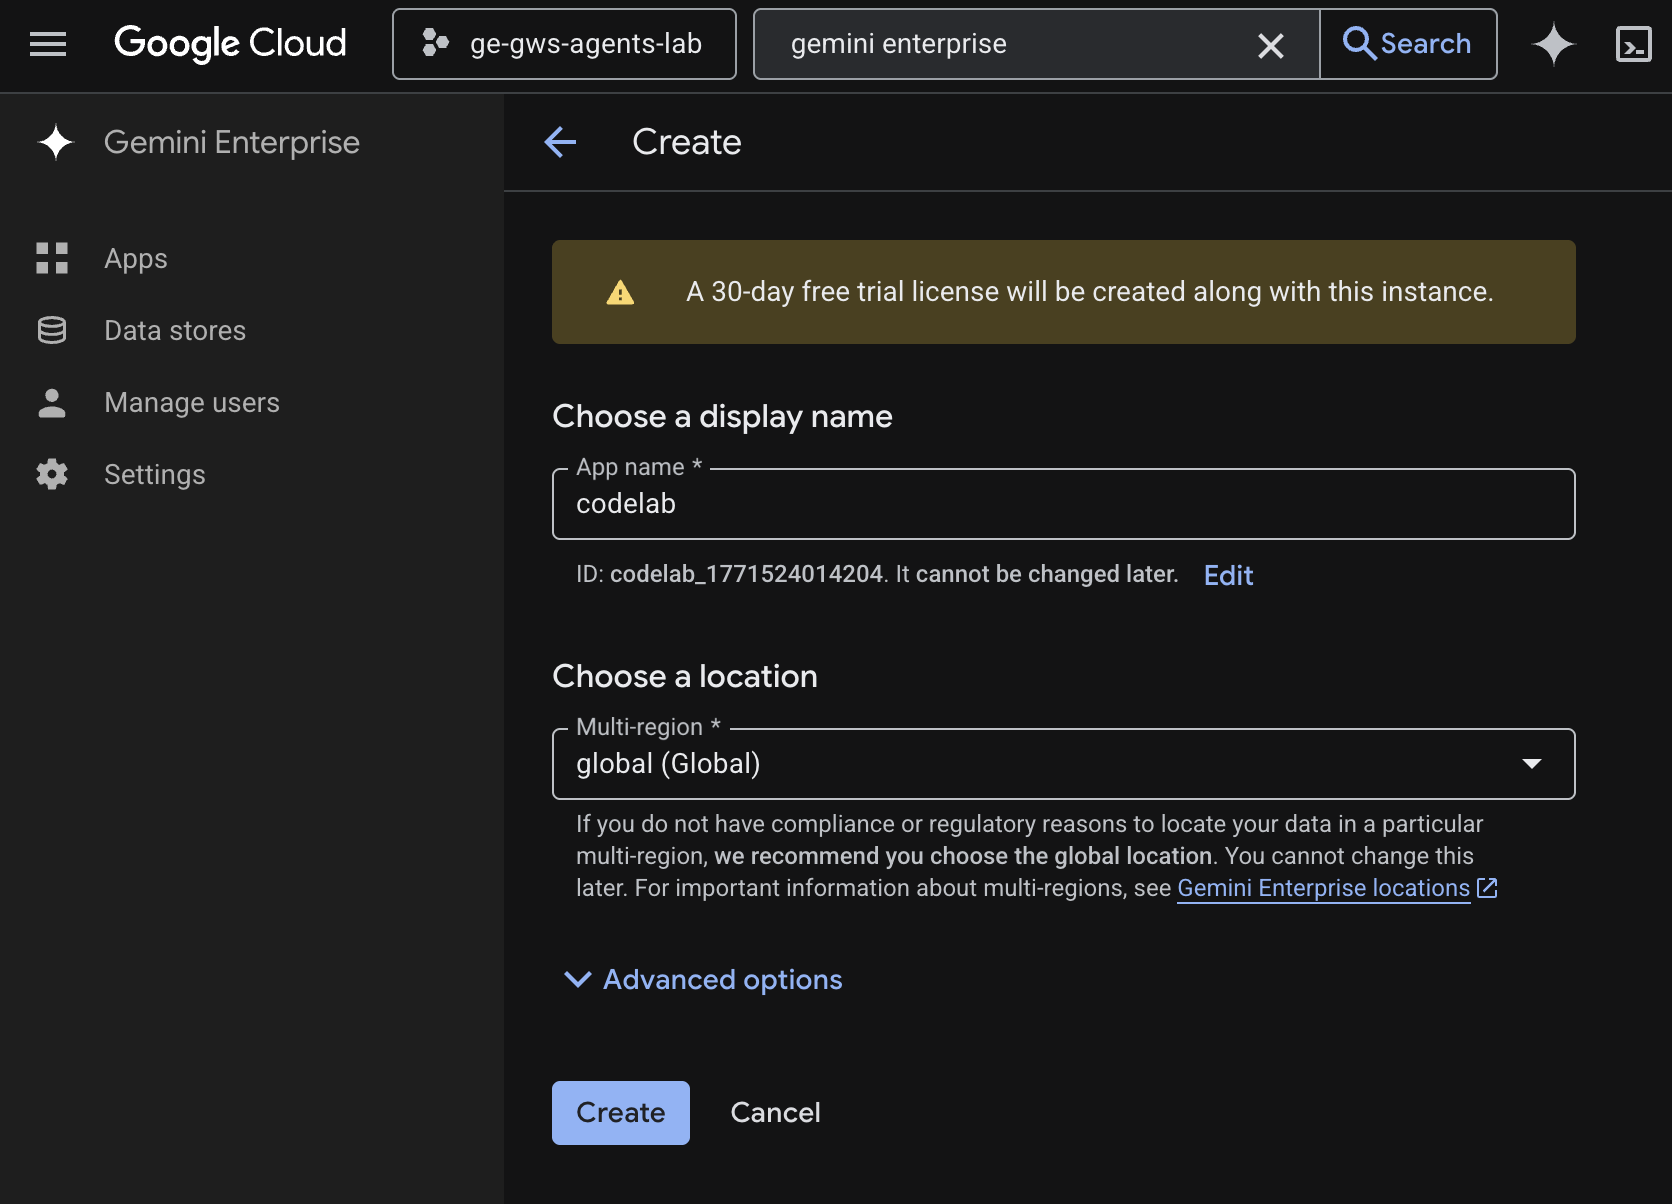
- 앱이 생성되고 Gemini Enterprise > 개요로 자동 리디렉션됩니다.
- 전체 액세스 권한 얻기에서 ID 설정을 클릭합니다.
- 새 화면에서 Google ID 사용을 선택하고 직원 ID 확인을 클릭합니다.
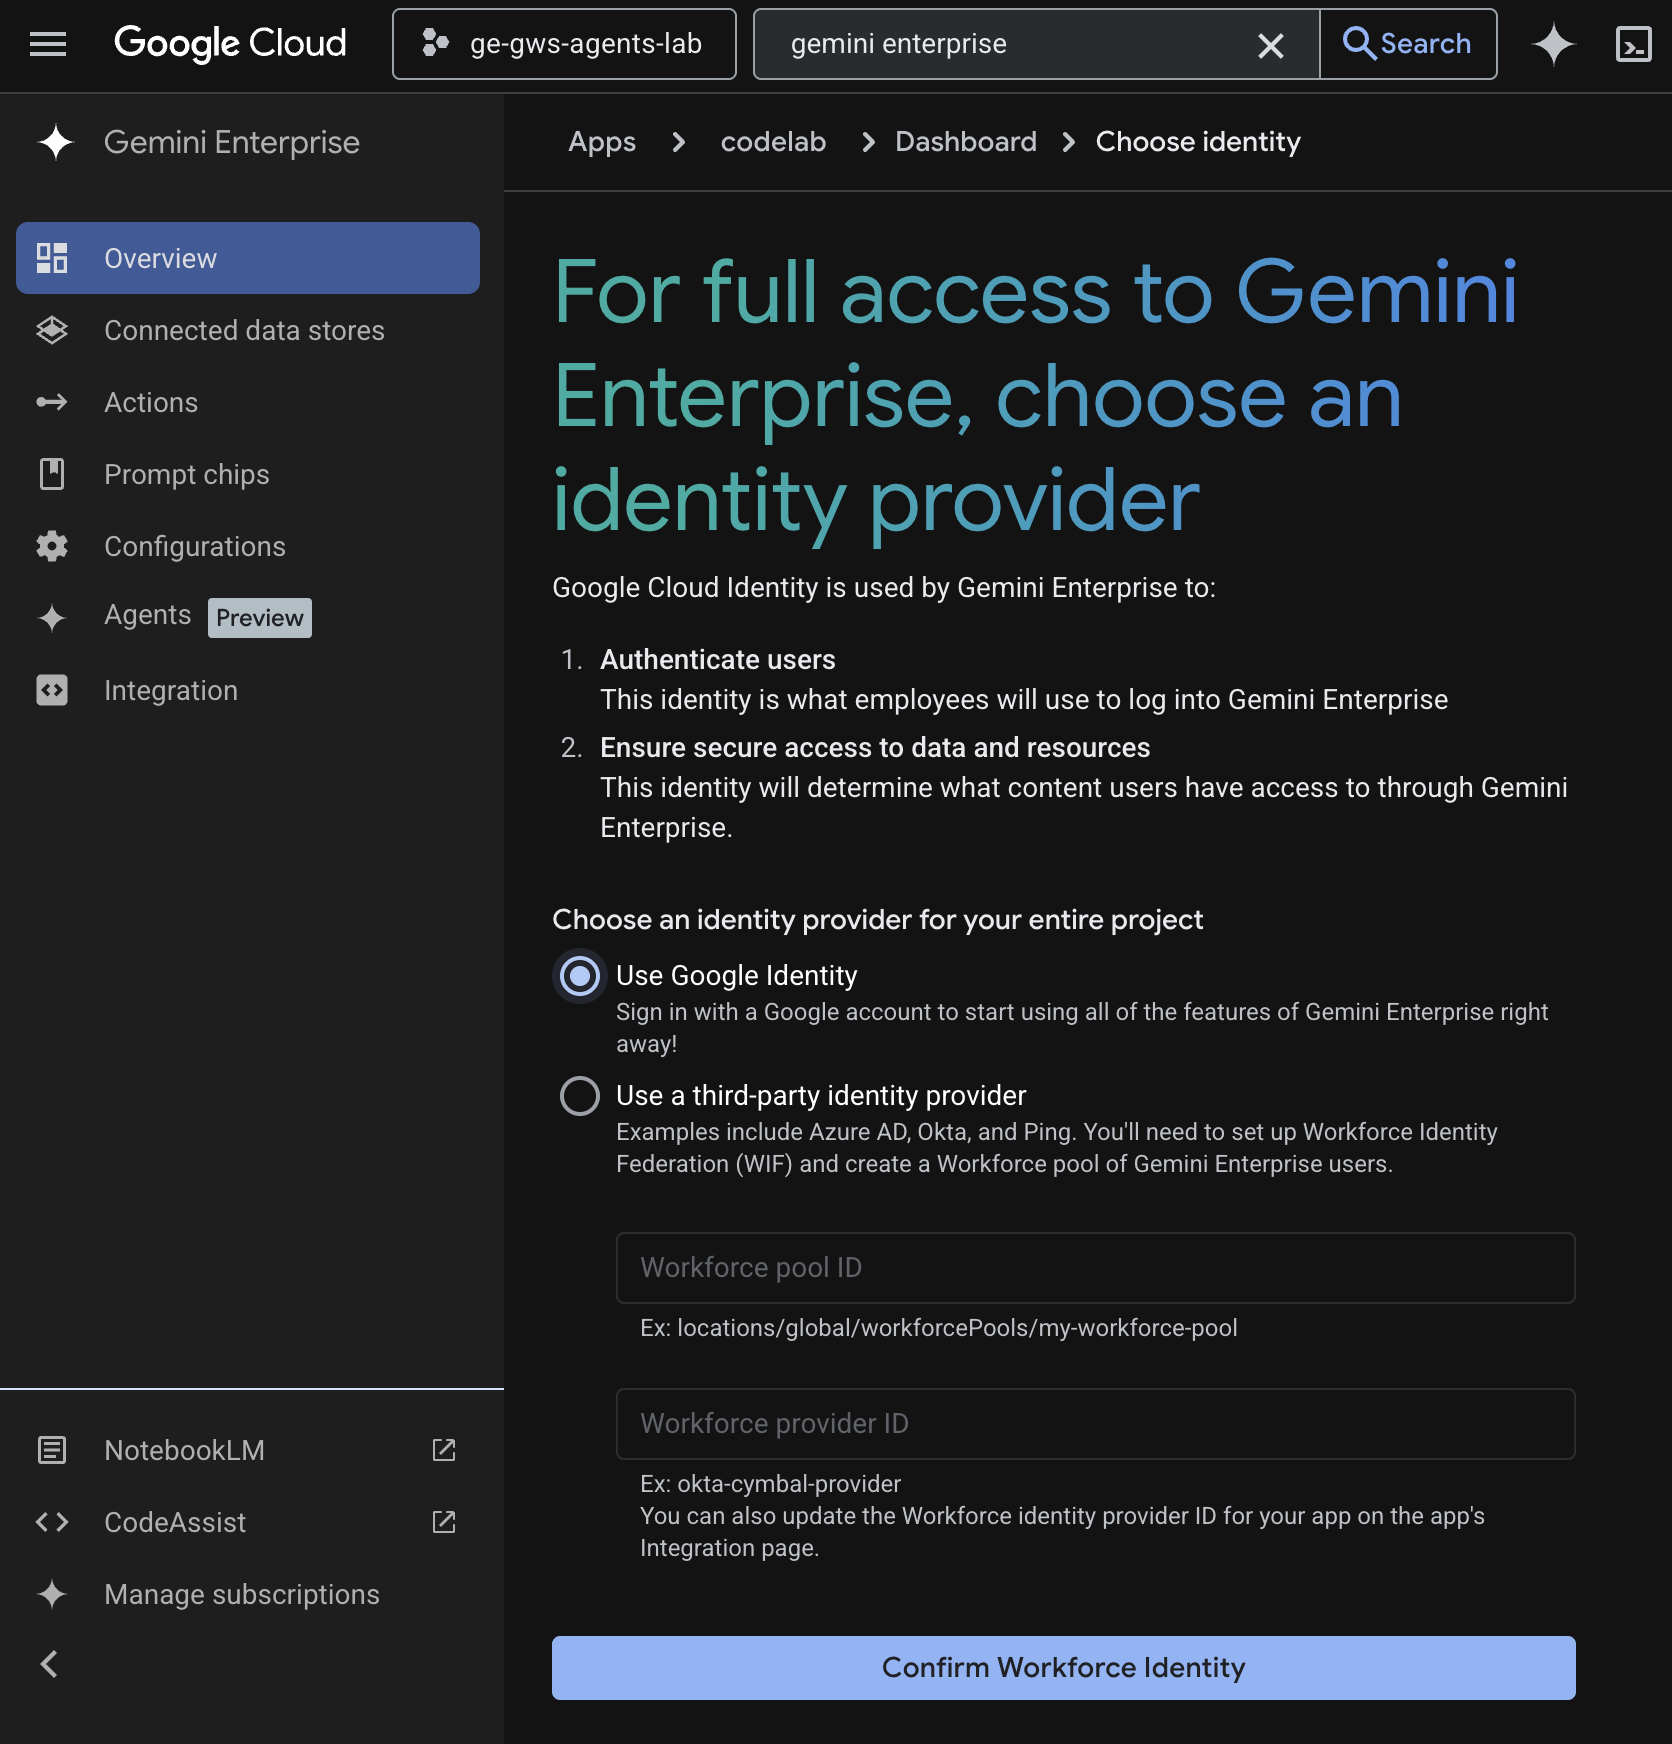
- 구성이 저장되고 Gemini Enterprise > 개요로 자동 리디렉션됩니다.
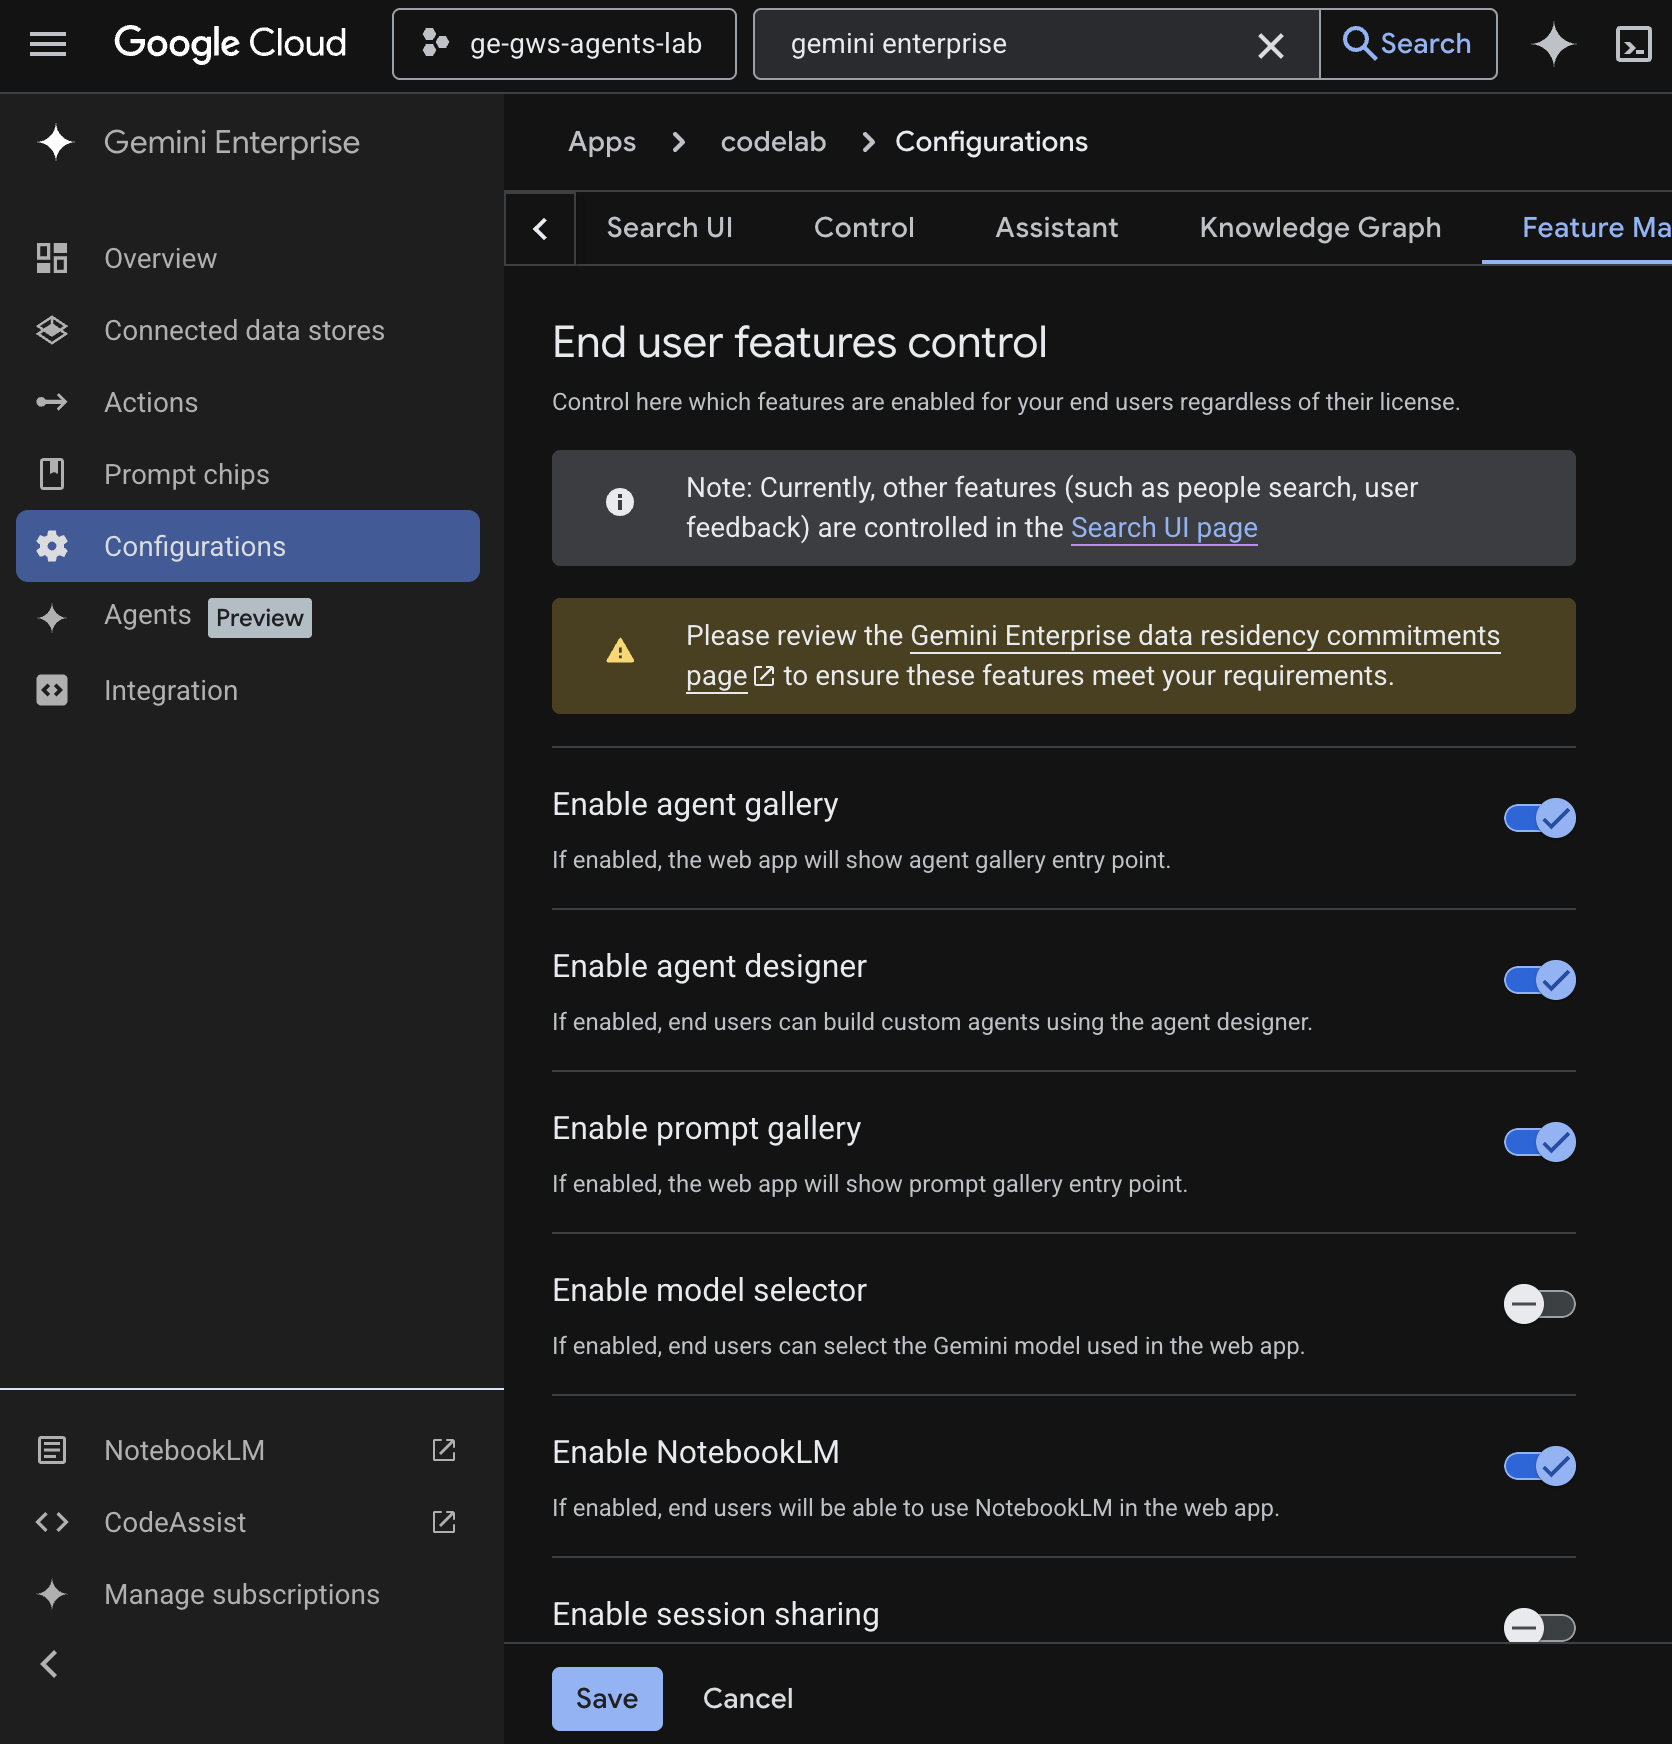
- 구성으로 이동합니다.
- 기능 관리 탭에서 상담사 디자이너 사용 설정을 사용 설정하고 저장을 클릭합니다.
Gemini Enterprise 웹 앱
새 탭에서 Cloud 콘솔의 Gemini Enterprise를 열고 다음 단계를 따르세요.
codelab이라는 앱을 클릭합니다.- 다음 단계에서 Gemini Enterprise 웹 앱으로 이동하는 데 사용할 URL을 복사합니다.
3. 노 코드 맞춤 에이전트
이 에이전트를 사용하면 사용자가 자연어로 Workspace의 데이터를 검색하고 조치를 취할 수 있습니다. 다음 요소를 사용합니다.
- 모델: Gemini
- 데이터 및 작업: Google Workspace (Calendar, Gmail, Drive, NotebookLM)용 Gemini Enterprise 데이터 스토어, Google 검색
- 에이전트 빌드 도구: Gemini Enterprise Agent Designer
- 에이전트 호스트: Gemini Enterprise
- UI: Gemini Enterprise 웹 앱
개념 검토
Gemini
Gemini는 Google의 멀티모달 LLM입니다. AI는 사람들이 상상력을 키우고, 호기심을 확대하고, 생산성을 높여 인간의 잠재력을 깨워주는 데 도움이 됩니다.
Gemini Enterprise 데이터 스토어
Gemini Enterprise 데이터 스토어는 Google Workspace와 같은 퍼스트 파티 데이터 소스 또는 Jira, Salesforce와 같은 서드 파티 애플리케이션에서 수집된 데이터를 포함하는 항목입니다. 서드 파티 애플리케이션의 데이터가 포함된 데이터 스토어를 데이터 커넥터라고도 합니다.
Gemini Enterprise Agent Designer
Gemini Enterprise Agent Designer는 Gemini Enterprise에서 단일 및 다단계 에이전트를 생성, 관리, 실행할 수 있는 대화형 노 코드, 로우 코드 플랫폼입니다.
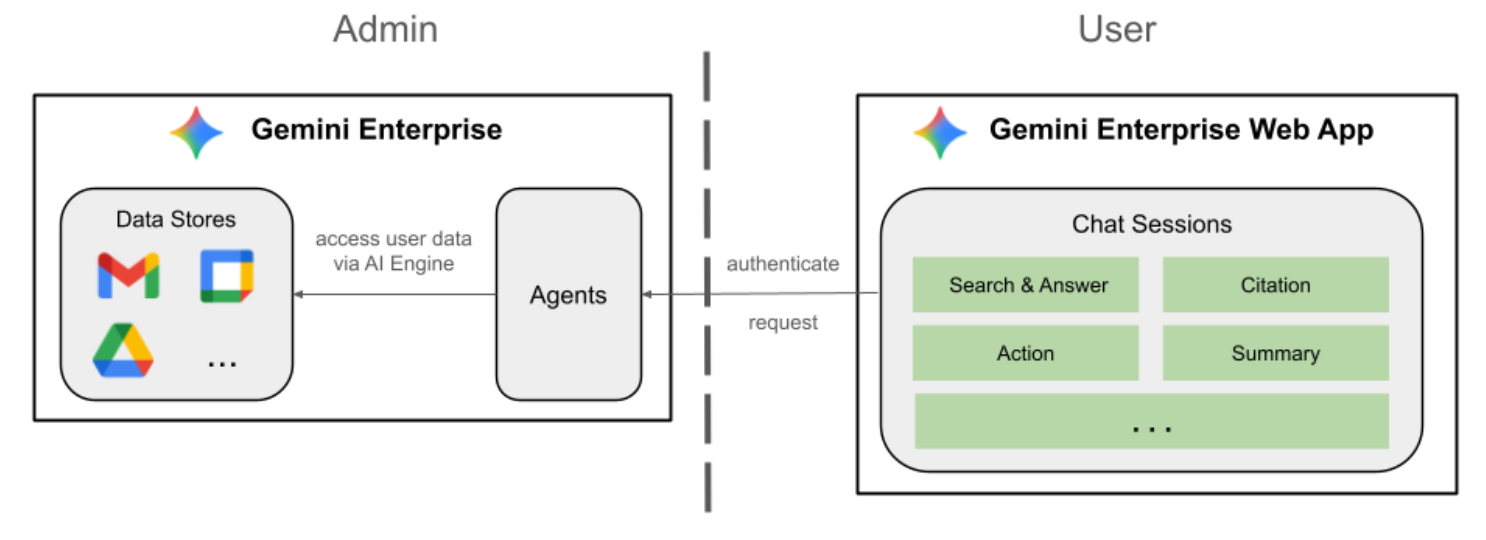
솔루션 아키텍처 검토
API 사용 설정
Gemini Enterprise Workspace 데이터 스토어를 사용하려면 다음 API를 사용 설정해야 합니다.
- Google Cloud 콘솔에서 Calendar, Gmail, People API를 사용 설정합니다.
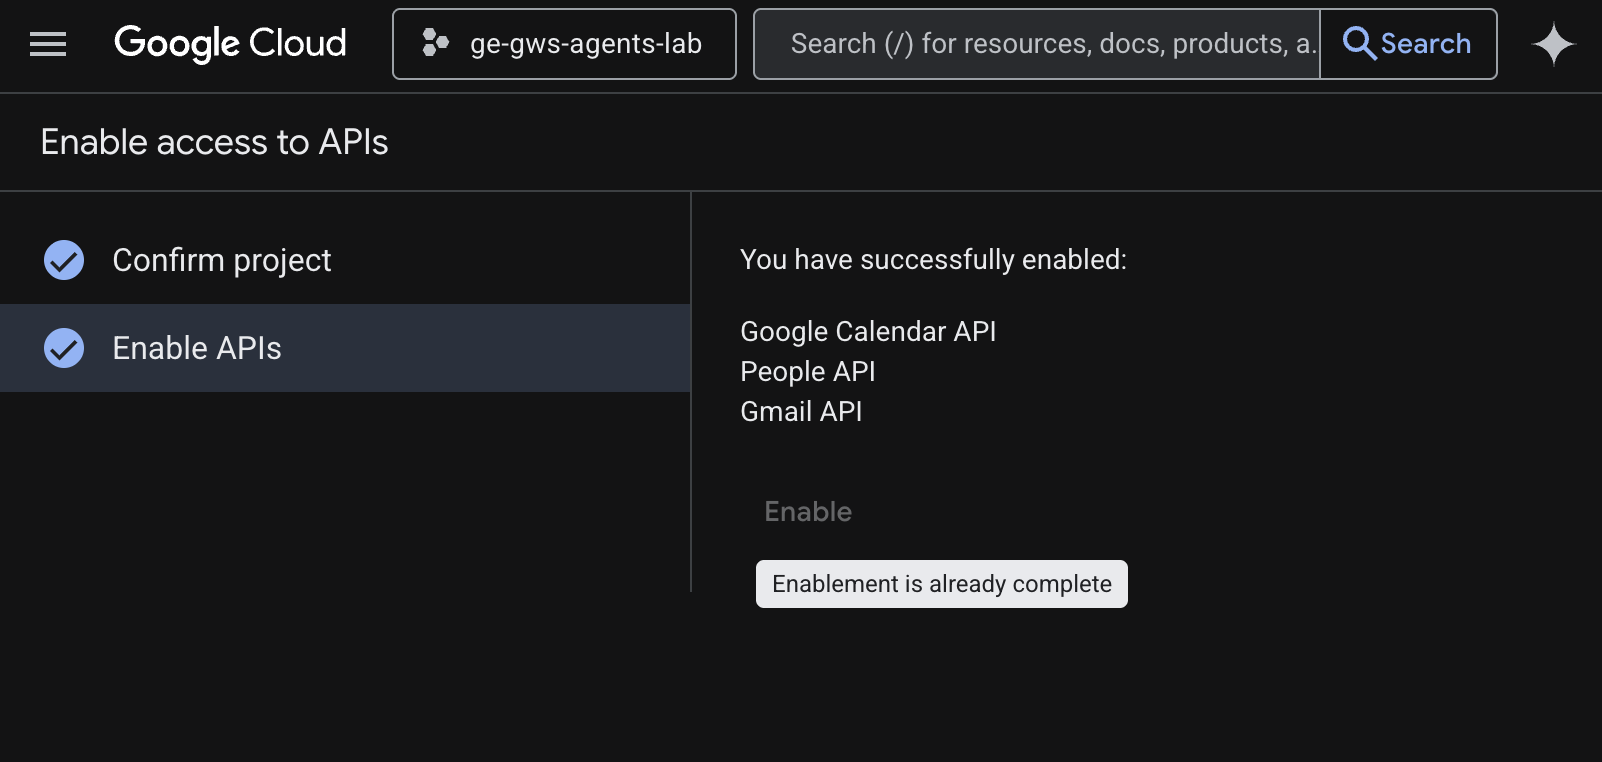
- 메뉴 ☰ > API 및 서비스 > 사용 설정된 API 및 서비스를 클릭한 다음 Google Calendar API, Gmail API, People API가 목록에 있는지 확인합니다.
OAuth 동의 화면 구성
Gemini Enterprise Workspace Calendar 및 Gmail 작업을 사용하려면 동의 화면 구성이 필요합니다.
- Google Cloud 콘솔에서 메뉴 ☰ > Google 인증 플랫폼 > 브랜딩을 클릭합니다.
- 시작하기를 클릭합니다.
- 앱 정보에서 앱 이름을
Codelab로 설정합니다 . - 사용자 지원 이메일에서 사용자가 동의에 대해 문의할 수 있는 지원 이메일 주소를 선택합니다.
- 다음을 클릭합니다.
- 대상에서 내부를 선택합니다.
- 다음을 클릭합니다.
- 연락처 정보에서 프로젝트 변경사항에 대한 알림을 받을 수 있는 이메일 주소를 입력합니다.
- 다음을 클릭합니다.
- 완료에서 Google API 서비스 사용자 데이터 정책을 검토하고 동의하는 경우 Google API 서비스: 사용자 데이터 정책에 동의합니다를 선택합니다.
- 계속을 클릭한 다음 만들기를 클릭합니다.
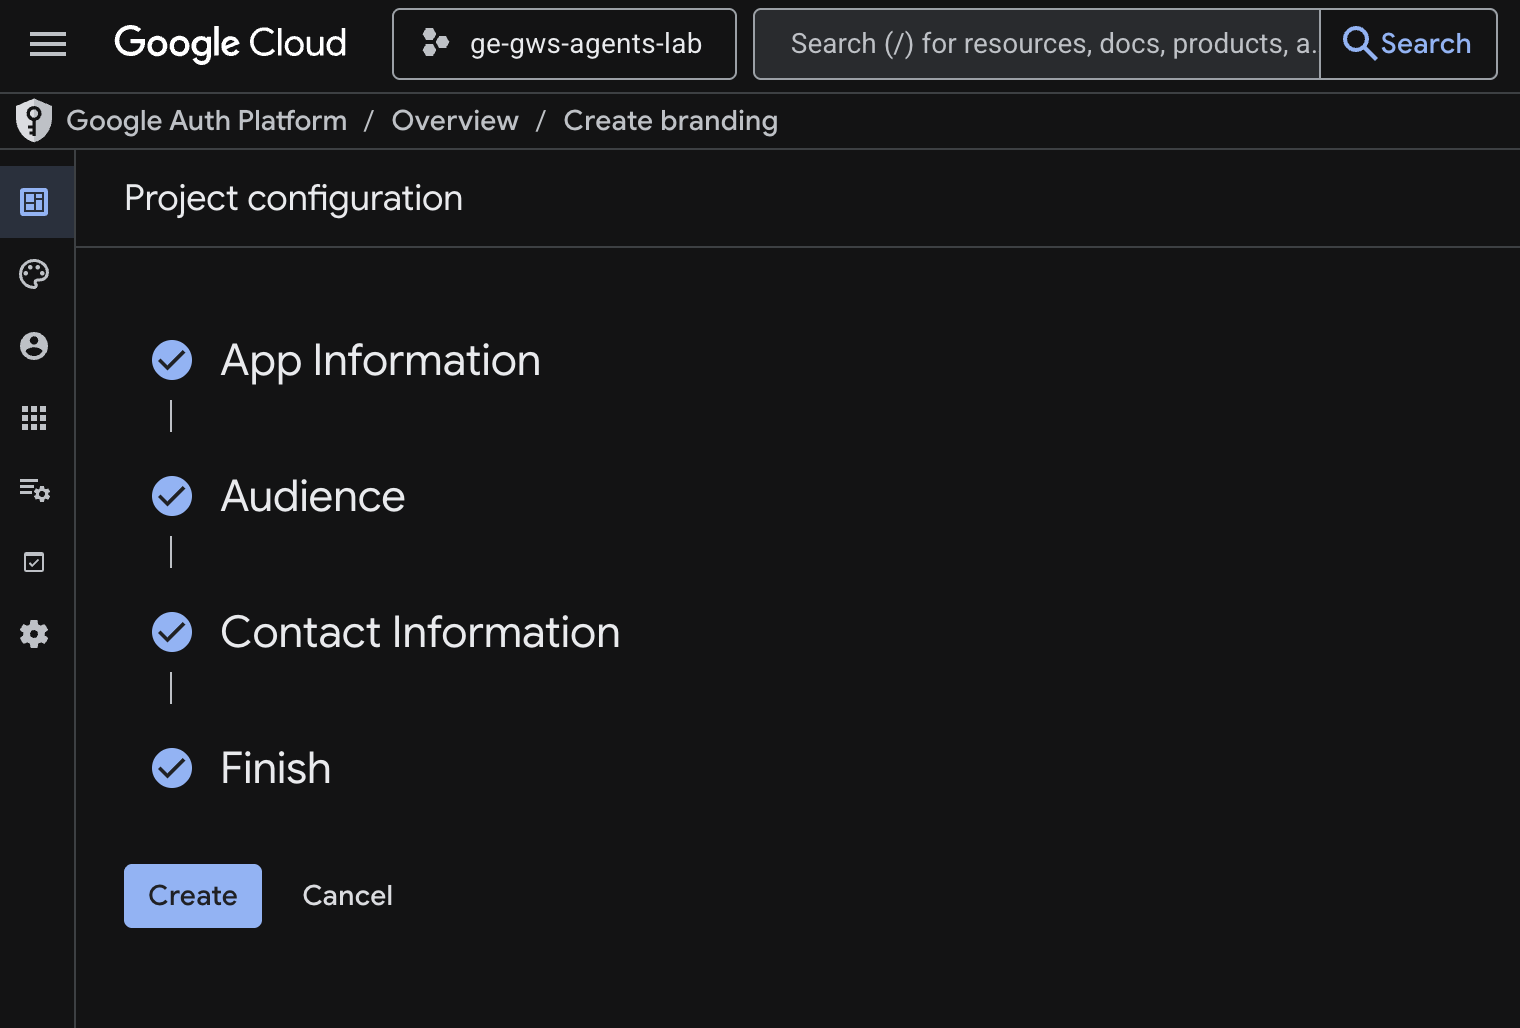
- 구성이 저장되고 Google 인증 플랫폼 > 개요로 자동 리디렉션됩니다.
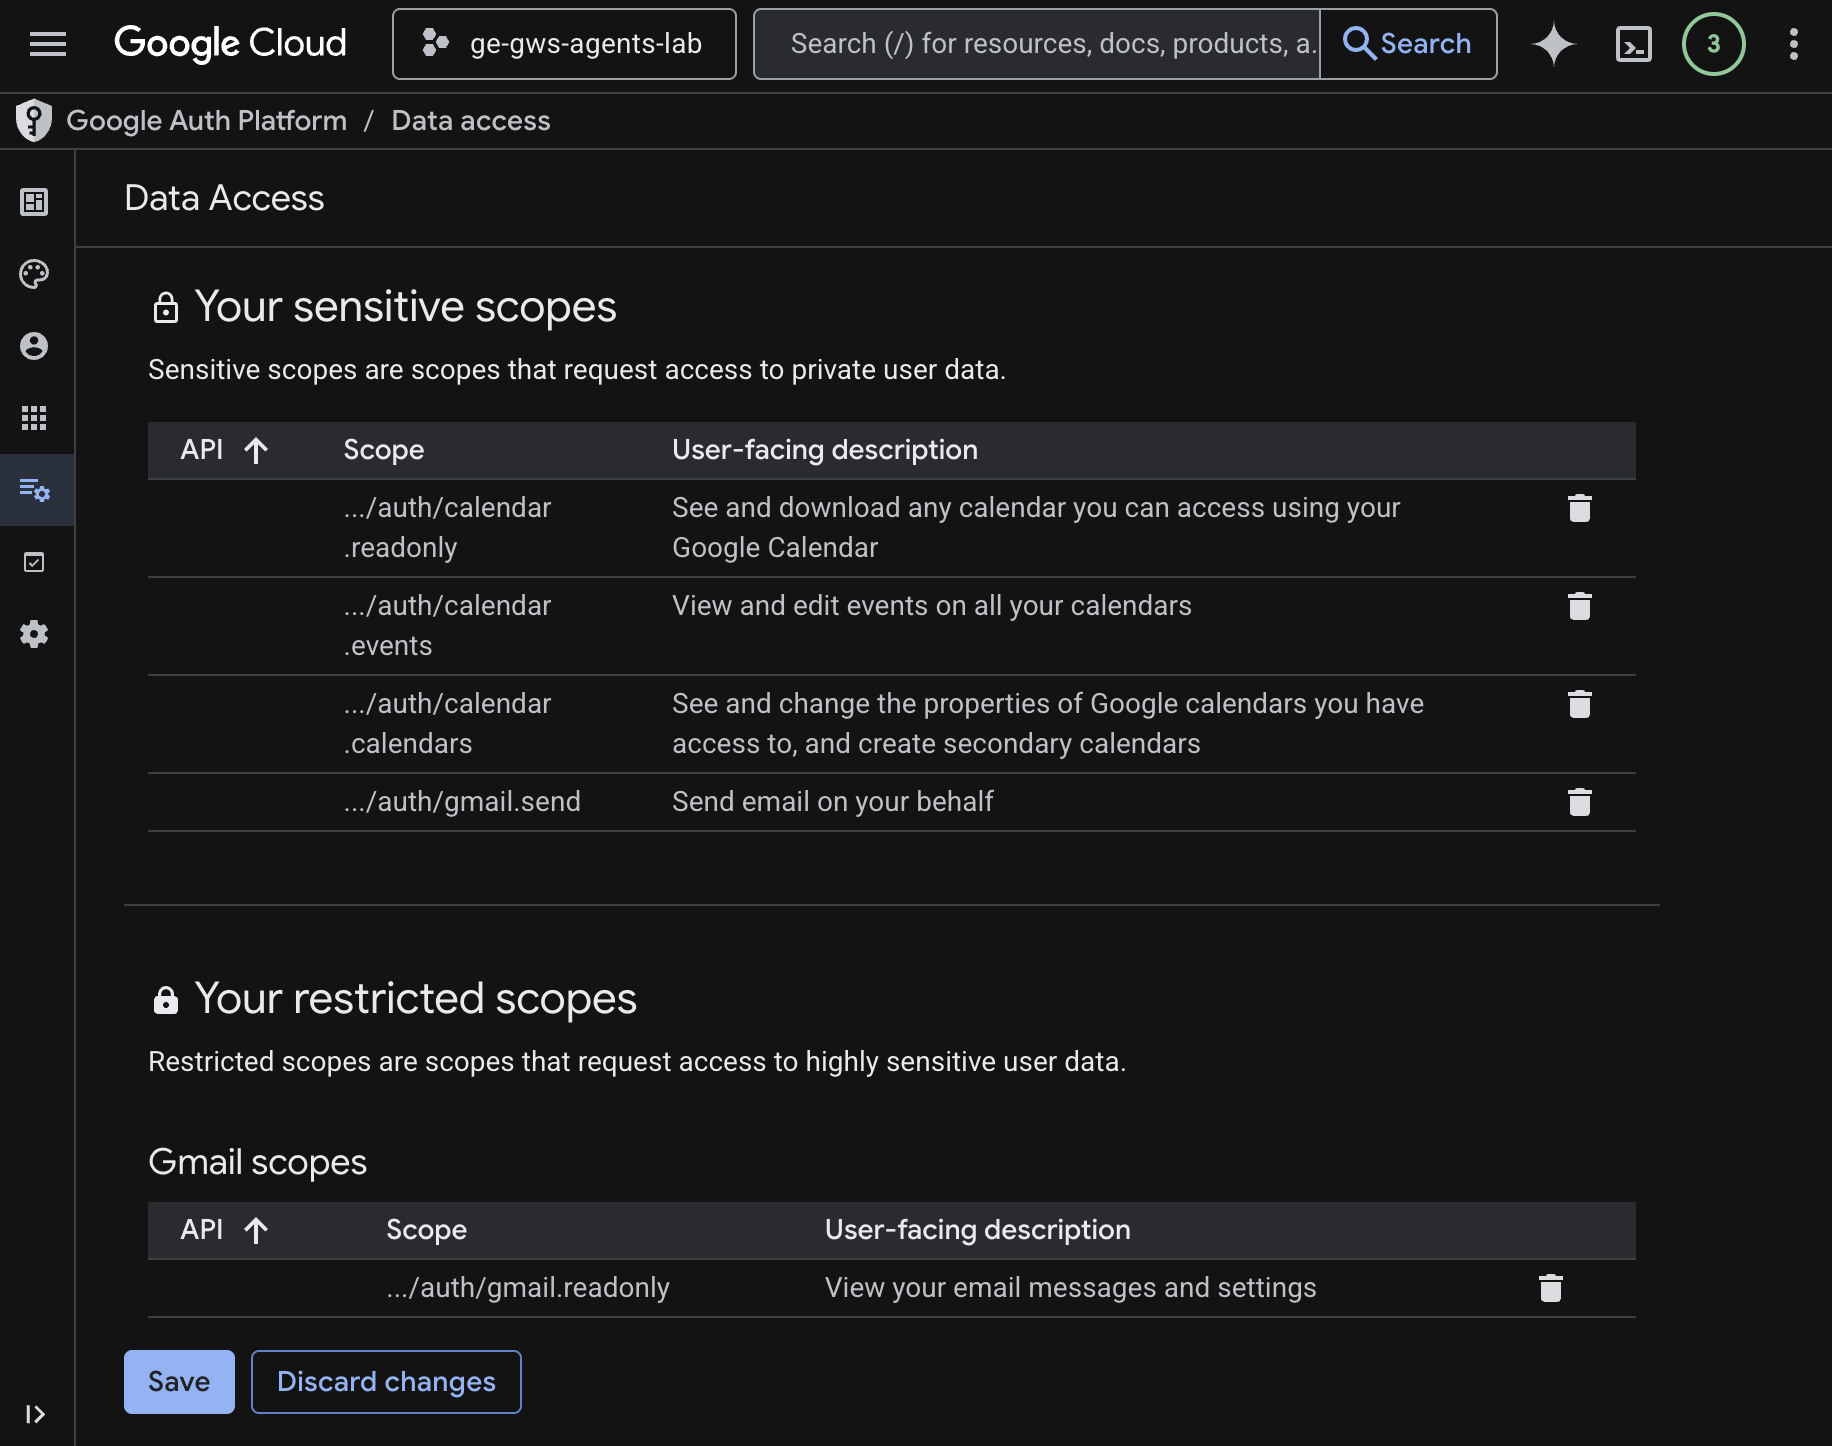
- 데이터 액세스로 이동합니다.
- 범위 추가 또는 삭제를 클릭합니다.
- 다음 범위를 복사하여 수동으로 범위 추가 필드에 붙여넣습니다.
https://www.googleapis.com/auth/calendar.readonly
https://www.googleapis.com/auth/calendar.events
https://www.googleapis.com/auth/calendar.calendars
https://www.googleapis.com/auth/gmail.send
https://www.googleapis.com/auth/gmail.readonly
- 표에 추가, 업데이트, 저장을 차례로 클릭합니다.
자세한 내용은 OAuth 동의 구성 가이드를 참고하세요.
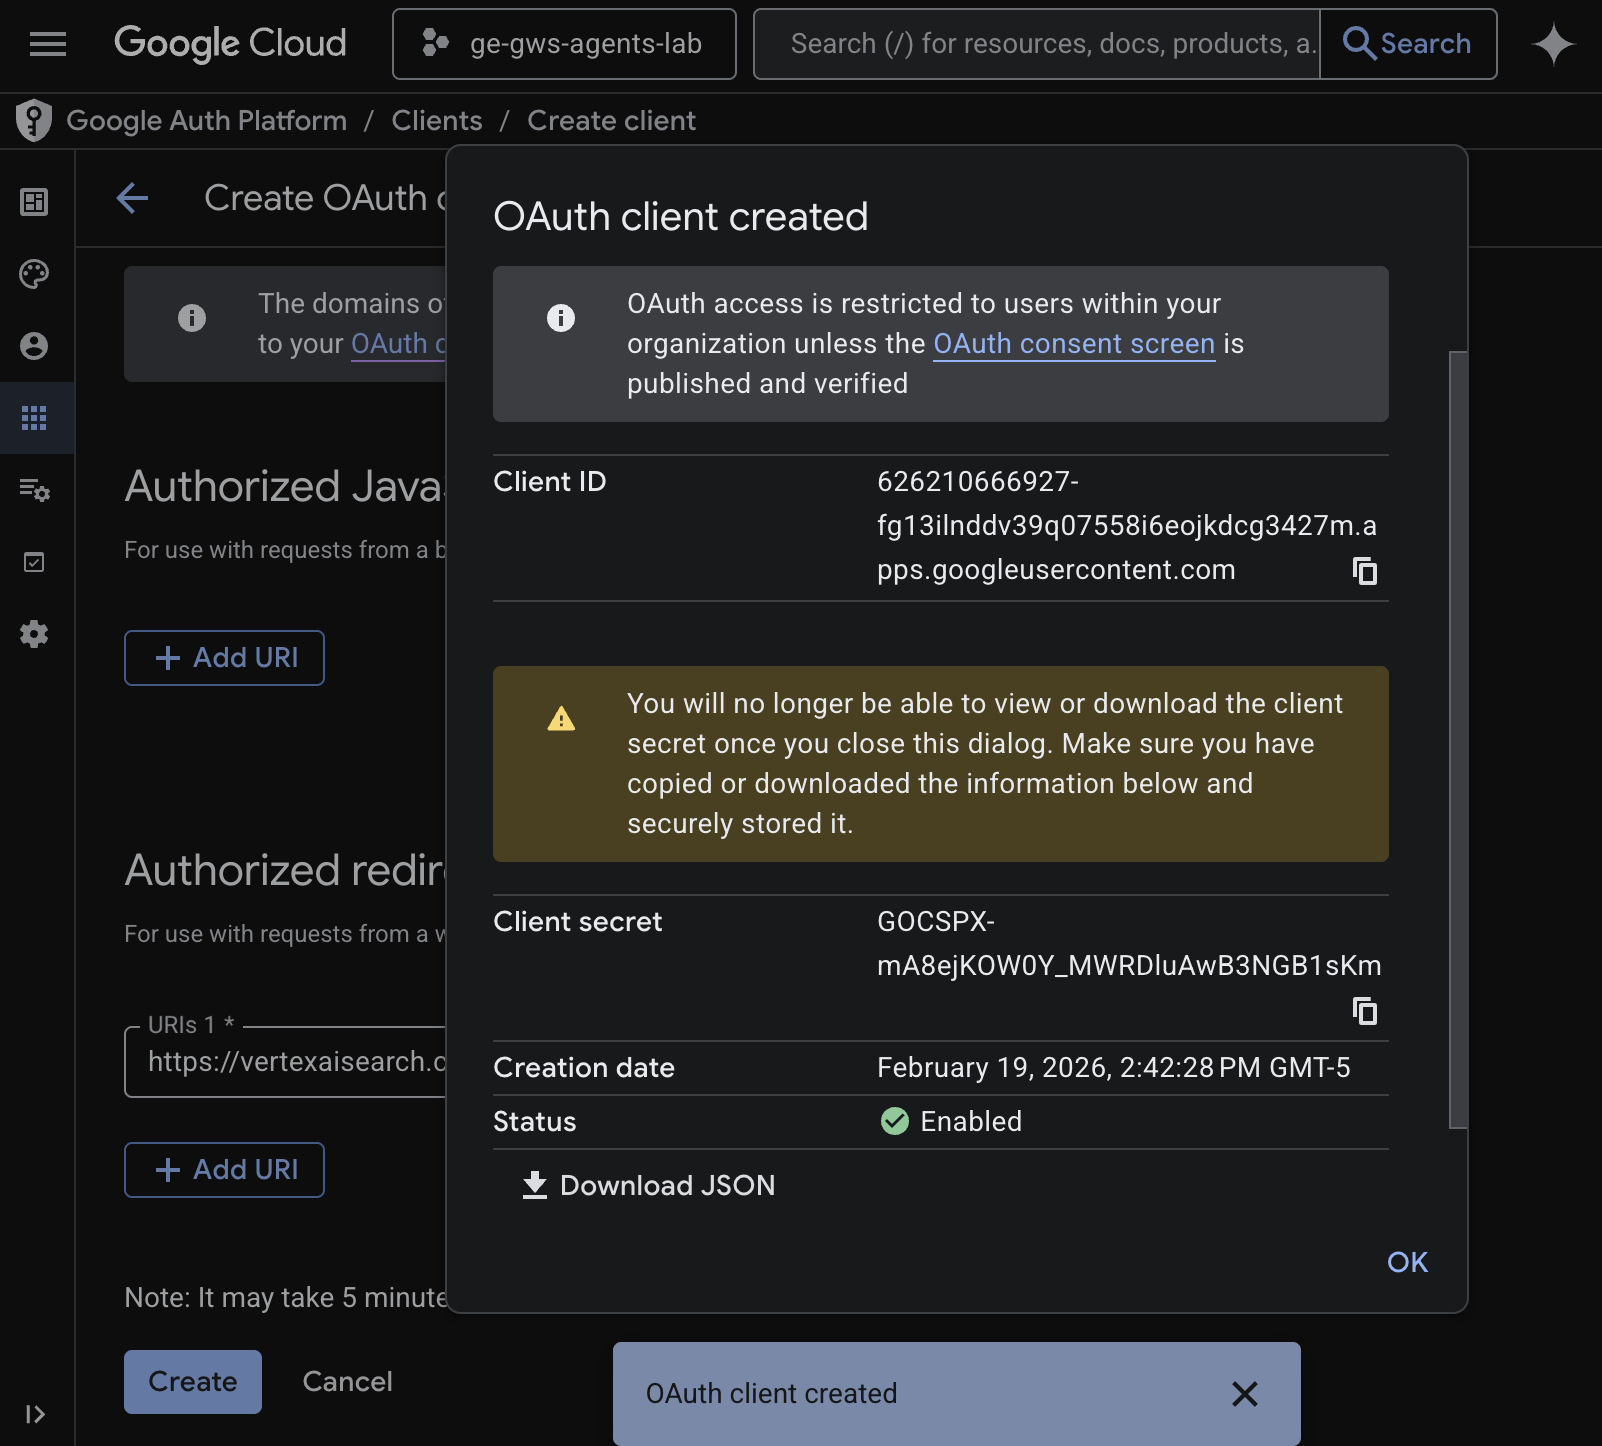
OAuth 클라이언트 사용자 인증 정보 만들기
Gemini Enterprise의 새 OAuth 클라이언트를 만들어 사용자를 인증합니다.
- Google Cloud 콘솔에서 메뉴 ☰ > Google 인증 플랫폼 > 클라이언트를 클릭합니다.
- + 클라이언트 만들기를 클릭합니다.
- 애플리케이션 유형에서 웹 애플리케이션을 선택합니다.
- 이름을
codelab로 설정합니다. - 승인된 JavaScript 원본은 건너뜁니다.
- 승인된 리디렉션 URI 섹션에서 URI 추가를 클릭하고
https://vertexaisearch.cloud.google.com/oauth-redirect를 입력합니다. - 만들기를 클릭합니다.
- 새로 생성된 OAuth 클라이언트 ID와 보안 비밀이 포함된 대화상자가 표시됩니다. 이 정보를 안전한 곳에 저장하세요.
데이터 스토어 만들기
Gemini Enterprise를 Workspace 데이터에 연결하려면 데이터 스토어를 만들어야 합니다.
새 탭에서 Cloud 콘솔의 Gemini Enterprise를 열고 다음 단계를 따르세요.
codelab이라는 앱을 클릭합니다.- 탐색 메뉴에서 연결된 데이터 스토어를 클릭합니다.
- + 새 데이터 스토어를 클릭합니다.
- 소스에서 Google Calendar를 검색하고 선택을 클릭합니다.
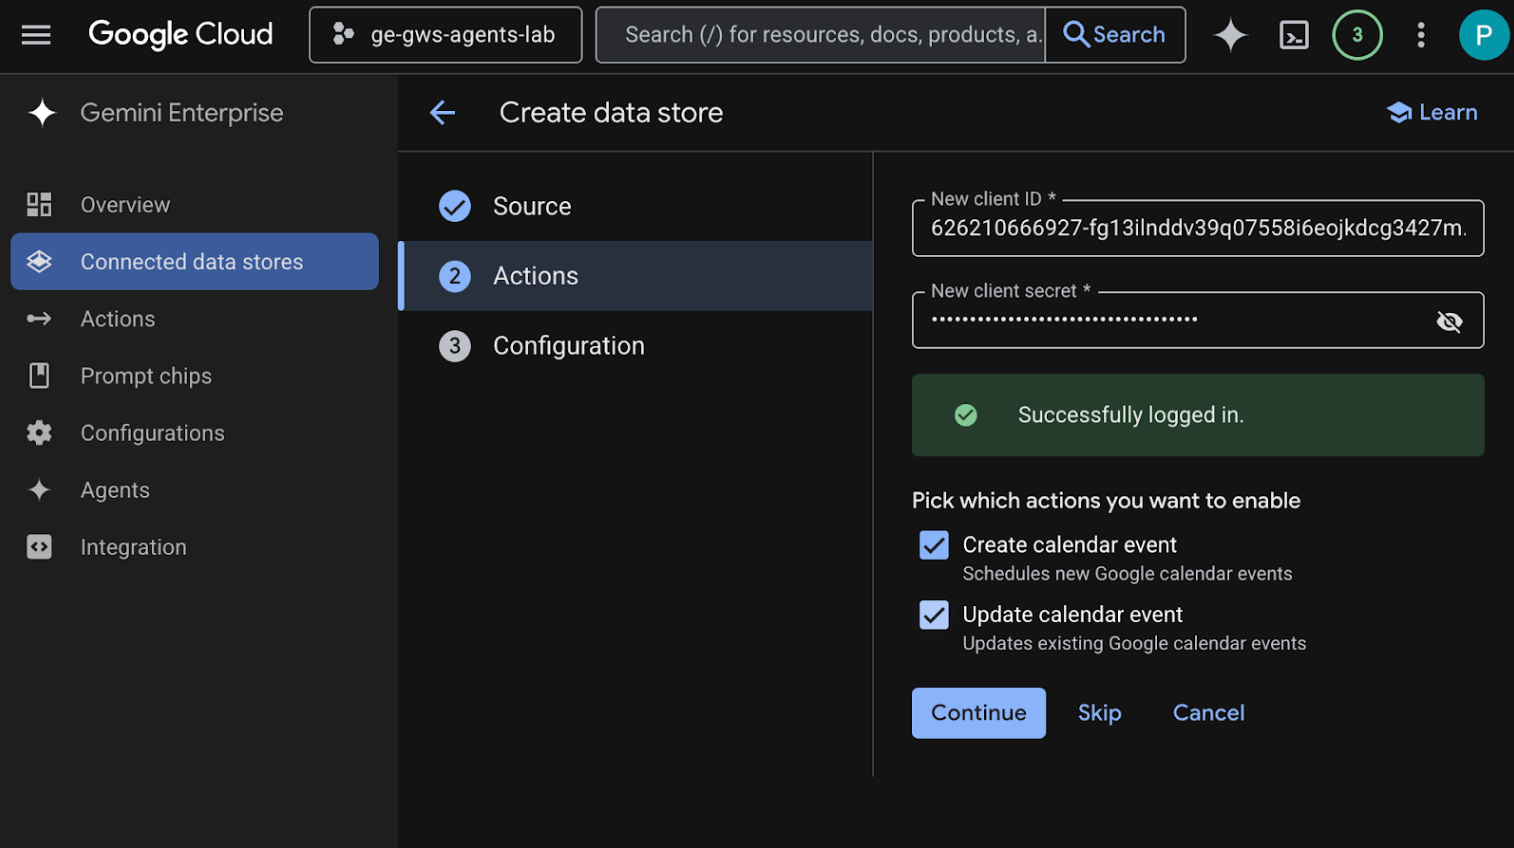
- 작업 섹션에 이전 단계에서 저장한 클라이언트 ID와 클라이언트 보안 비밀번호를 입력한 다음 인증 확인을 클릭하고 단계에 따라 OAuth 클라이언트를 인증하고 승인합니다.
- 캘린더 일정 만들기 및 캘린더 일정 업데이트 작업을 사용 설정합니다.
- 계속을 클릭합니다.
- 구성 섹션에서 데이터 커넥터 이름을
calendar로 설정합니다. - 만들기를 클릭합니다.
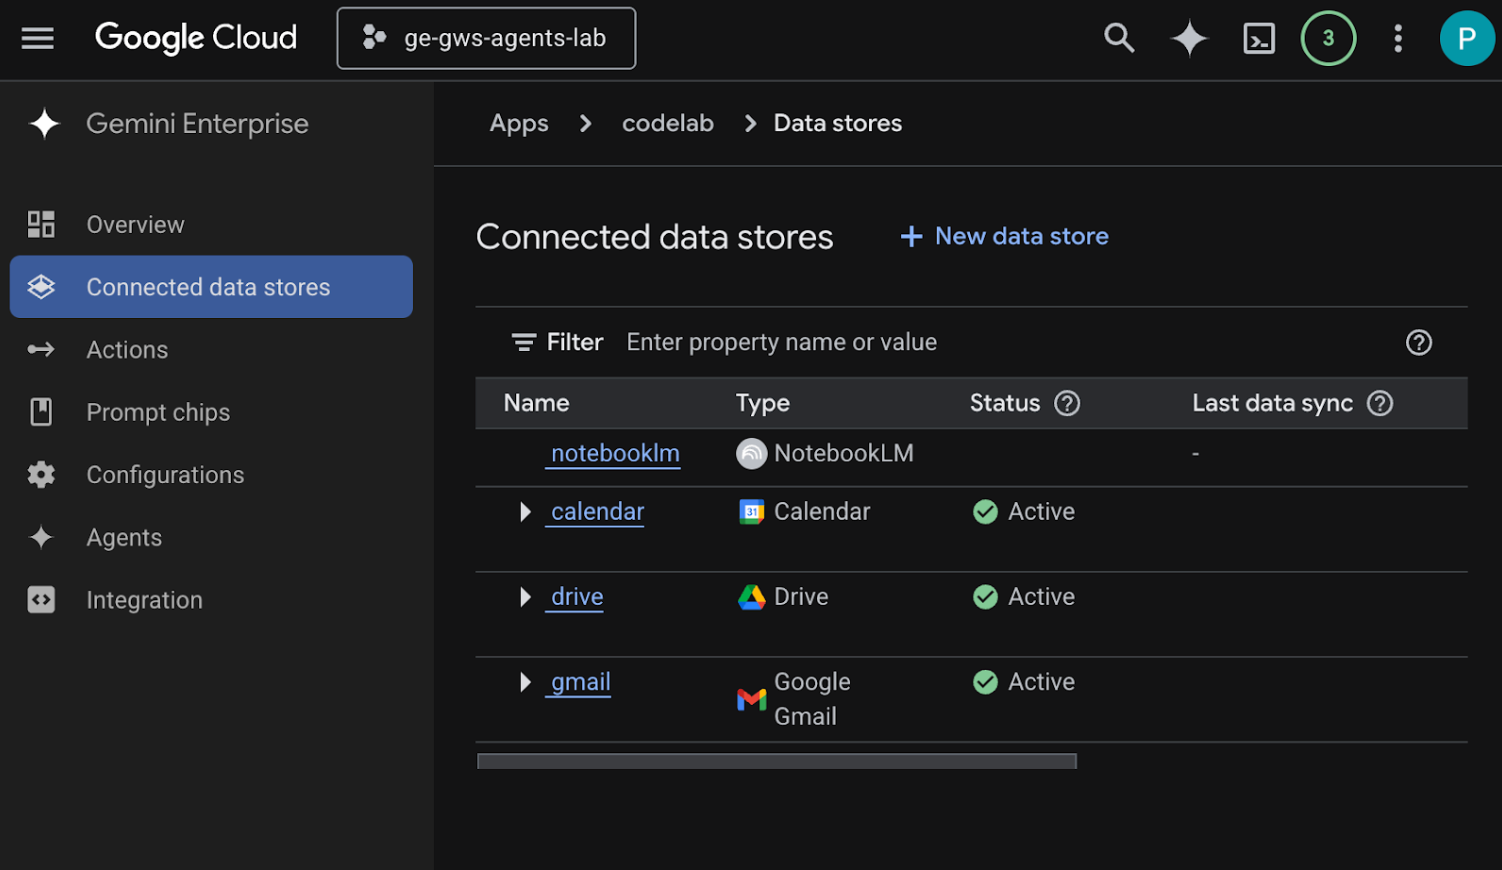
- 새로 추가된 데이터 스토어를 확인할 수 있는 연결된 데이터 스토어로 자동 리디렉션됩니다.
Google Gmail 데이터 스토어를 만듭니다.
- + 새 데이터 스토어를 클릭합니다.
- 소스에서 Google Gmail을 검색하고 선택을 클릭합니다.
- 작업 섹션에 이전 단계에서 저장한 클라이언트 ID와 클라이언트 보안 비밀번호를 입력한 다음 인증 확인을 클릭합니다.
- 이메일 보내기 작업을 사용 설정합니다.
- 계속을 클릭합니다.
- 구성 섹션에서 데이터 커넥터 이름을
gmail로 설정합니다. - 만들기를 클릭합니다.
- 새로 추가된 데이터 스토어를 확인할 수 있는 연결된 데이터 스토어로 자동 리디렉션됩니다.
Google Drive 데이터 스토어를 만듭니다.
- + 새 데이터 스토어를 클릭합니다.
- 소스에서 Google Drive를 검색하고 선택을 클릭합니다.
- 데이터 섹션에서 모두를 선택한 다음 계속을 클릭합니다.
- 구성 섹션에서 데이터 커넥터 이름을
drive로 설정합니다. - 만들기를 클릭합니다.
- 새로 추가된 데이터 스토어를 확인할 수 있는 연결된 데이터 스토어로 자동 리디렉션됩니다.
NotebookLM 데이터 스토어를 만듭니다.
- + 새 데이터 스토어를 클릭합니다.
- 소스에서 NotebookLM을 검색하고 선택을 클릭합니다.
- 구성 섹션에서 데이터 커넥터 이름을
notebooklm로 설정합니다. - 만들기를 클릭합니다.
- 새로 추가된 데이터 스토어를 확인할 수 있는 연결된 데이터 스토어로 자동 리디렉션됩니다.
몇 분 후 NotebookLM을 제외한 모든 연결된 데이터 스토어의 상태가 활성으로 표시됩니다. 오류가 표시되면 데이터 소스를 클릭하여 오류 세부정보를 확인할 수 있습니다.
테스트 데이터 스토어
테스트 쿼리를 실행하여 데이터 스토어에서 데이터를 올바르게 수집하는지 확인합니다.
이전에 복사한 Gemini Enterprise 웹 앱 URL을 엽니다.
- 메뉴 ☰ > 새 채팅을 클릭합니다.
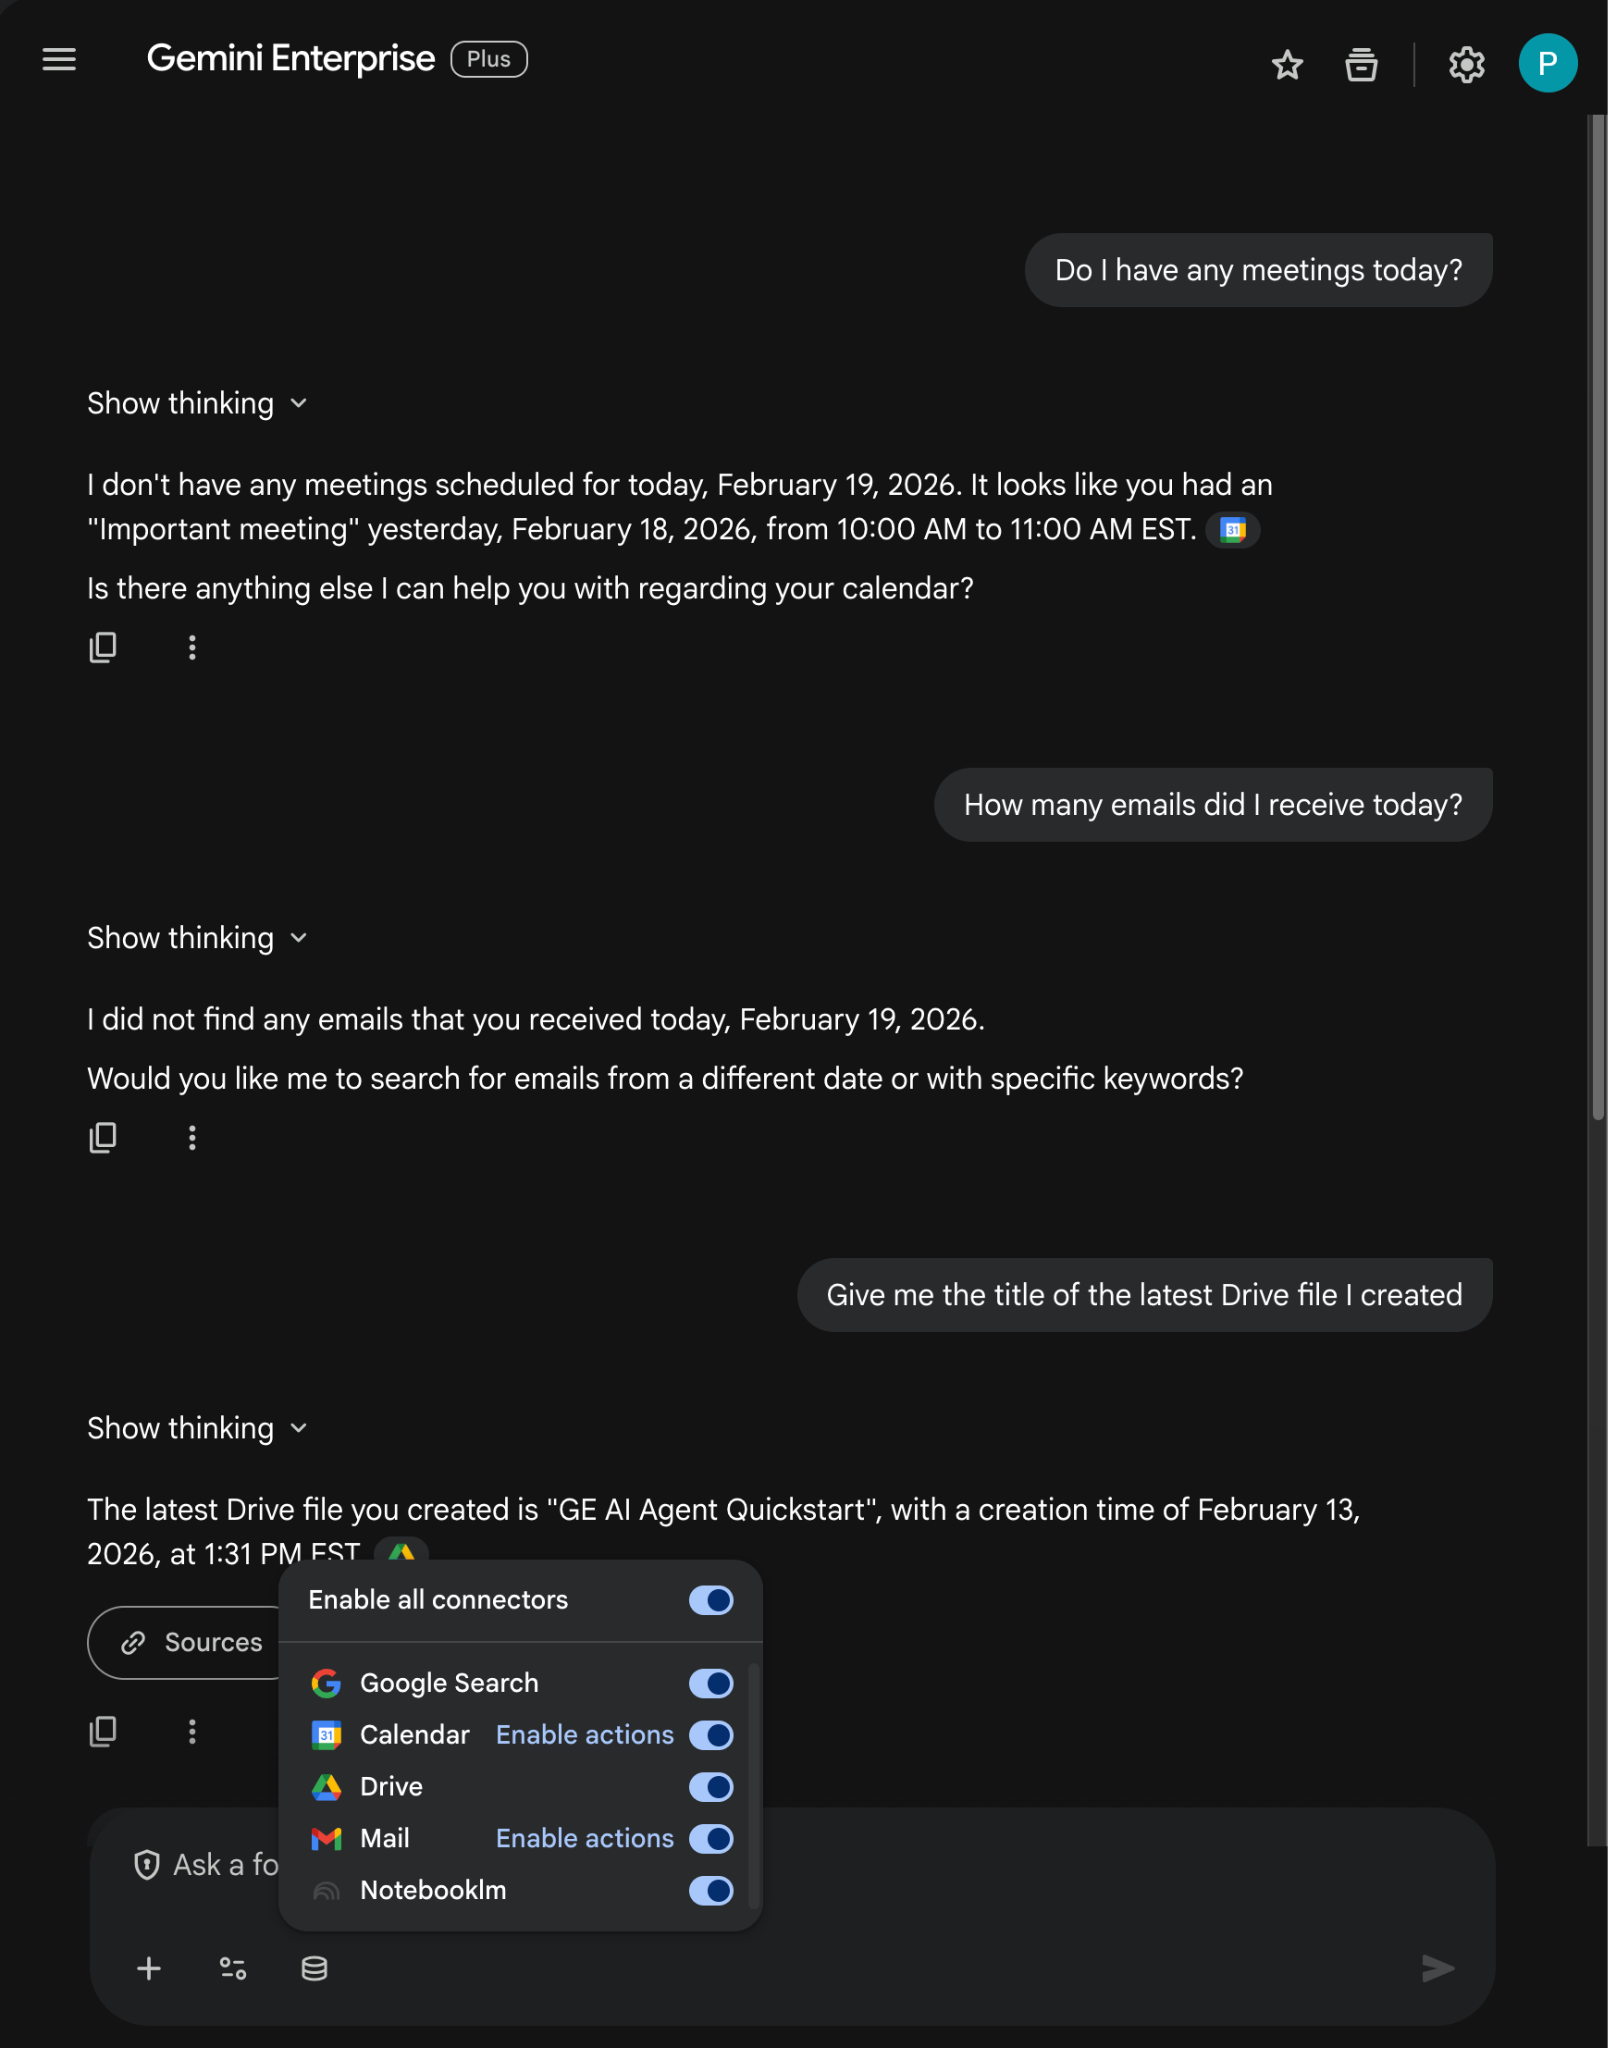
- 새 채팅 메시지 필드의 바닥글에서 커넥터 아이콘을 클릭하고 모든 커넥터를 사용 설정합니다.
- 이제 커넥터와 관련된 프롬프트를 실험할 수 있습니다. 예를 들어 채팅에서
Do I have any meetings today?를 입력하고enter를 누릅니다. - 그런 다음
How many emails did I receive today?를 입력하고enter키를 누릅니다. - 마지막으로
Give me the title of the last Drive file I created를 입력하고enter키를 누릅니다.
맞춤 에이전트 만들기
Gemini Enterprise 웹 앱에서 Agent Designer를 사용하여 새 에이전트를 만듭니다.
- 메뉴 ☰ > + 새 에이전트를 클릭합니다.
- 채팅에서
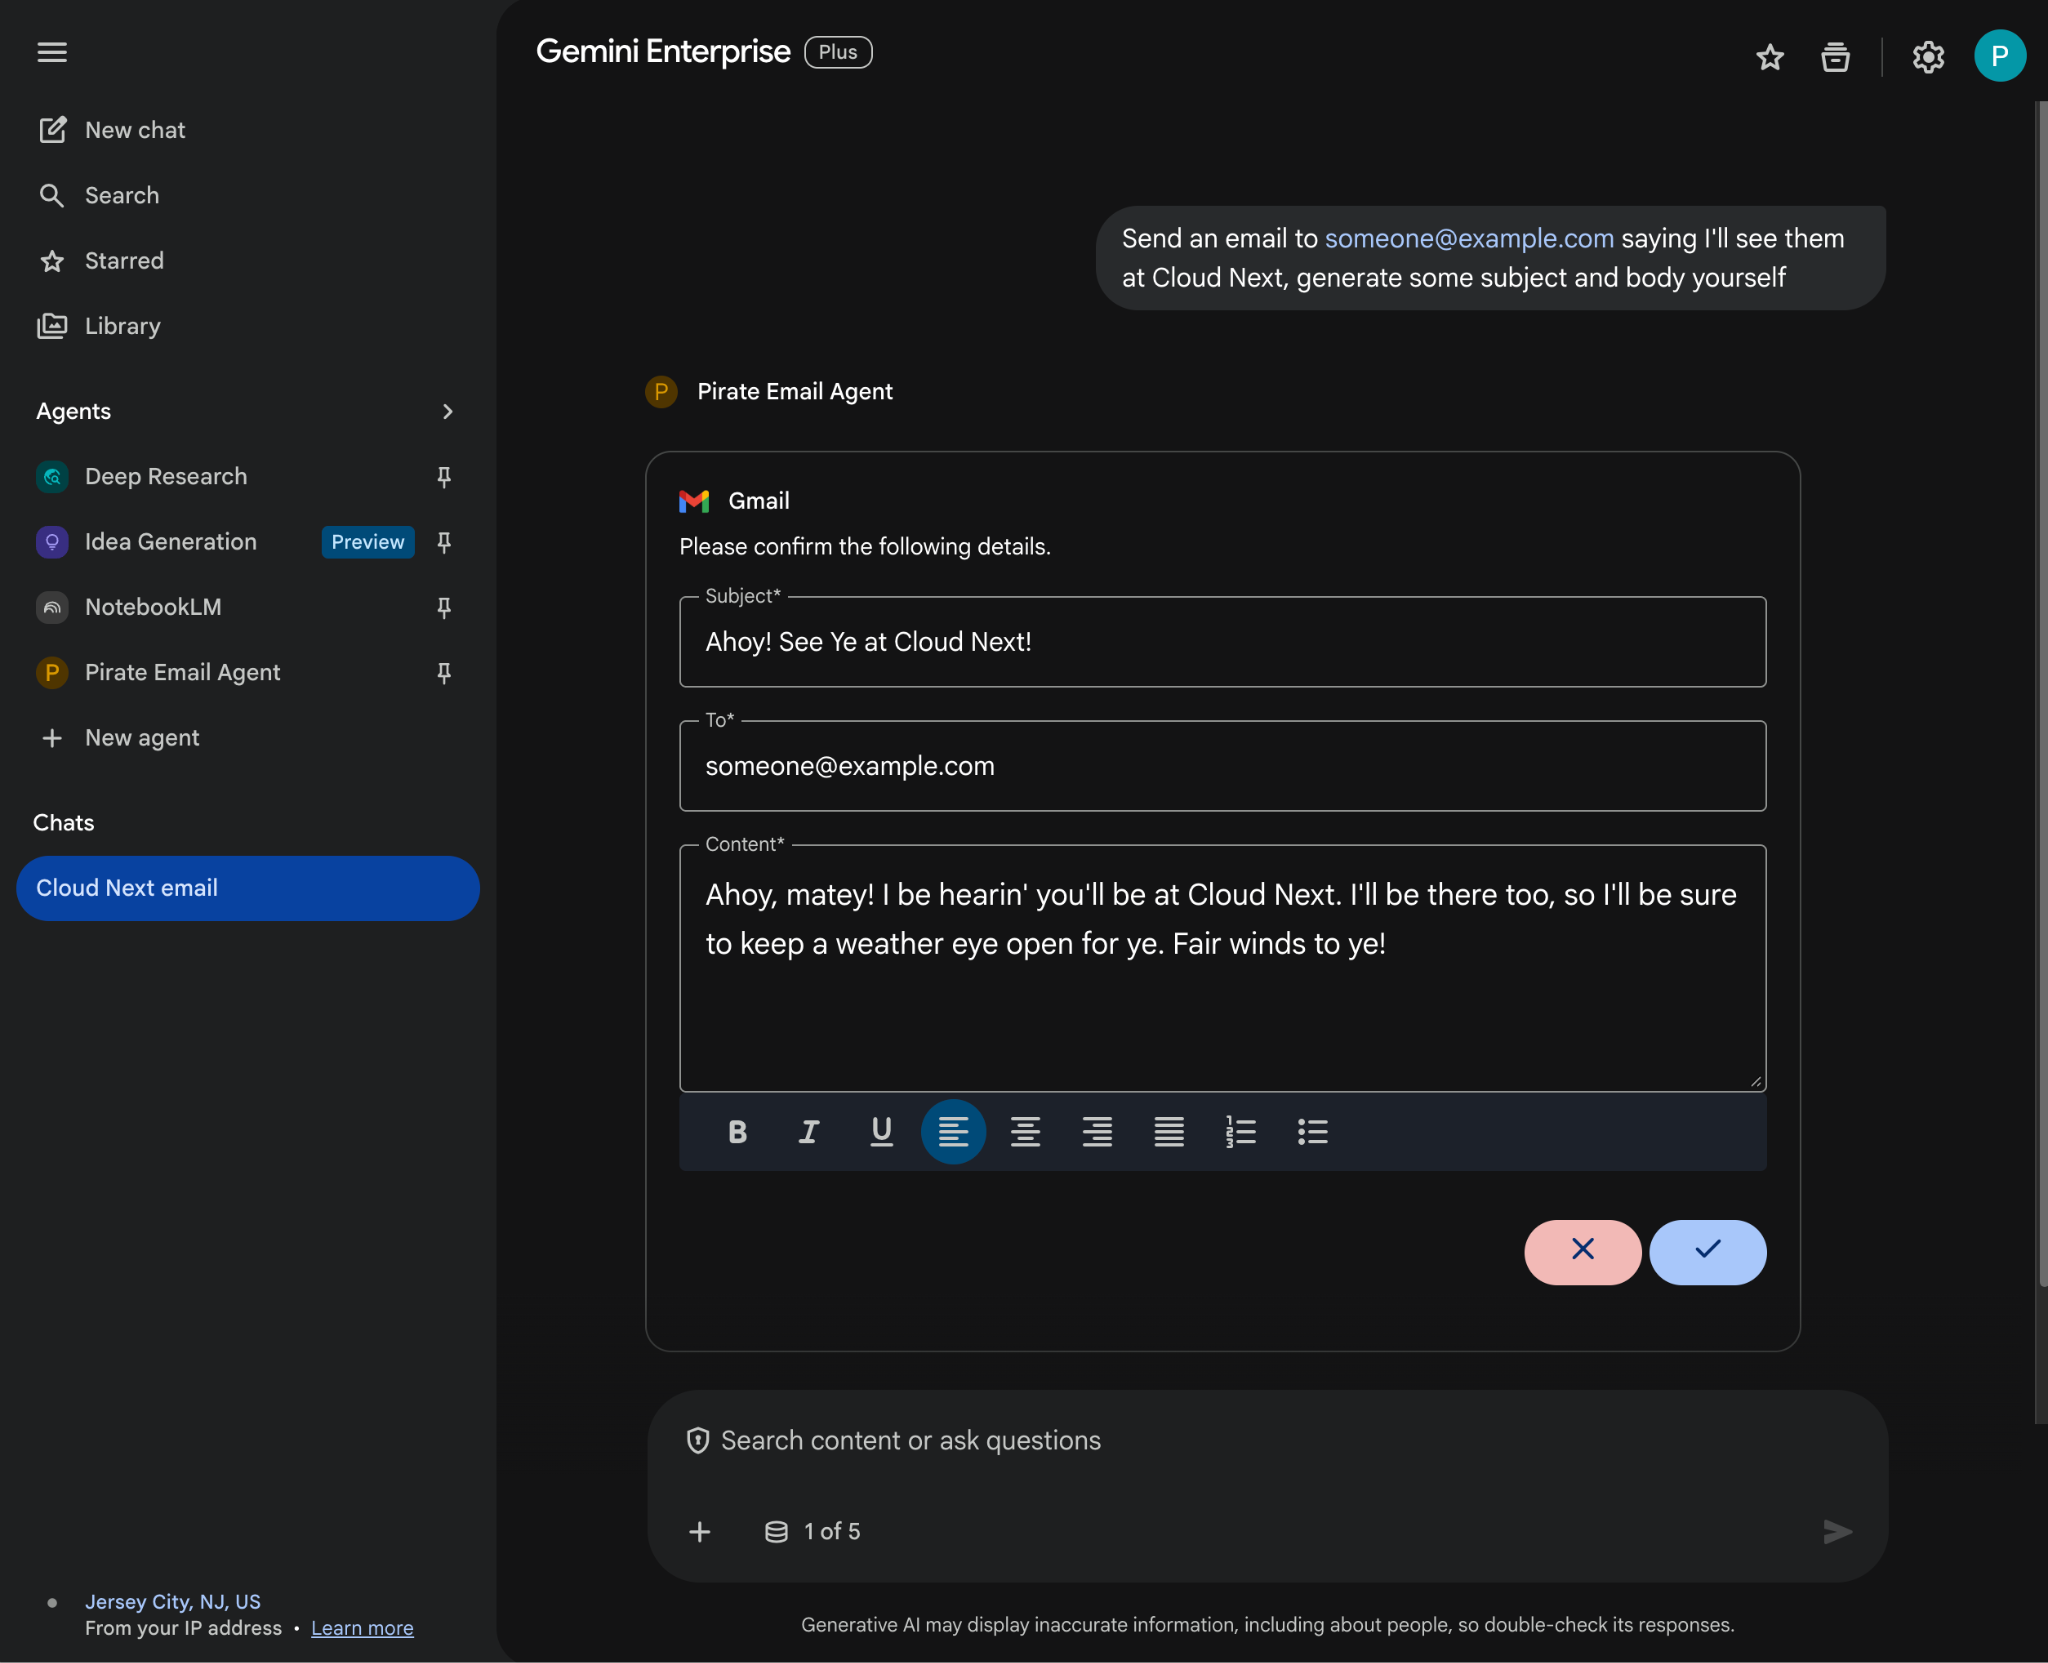
An agent that always sends pirate-themed emails but use normal English otherwise를 입력하고enter를 누릅니다.
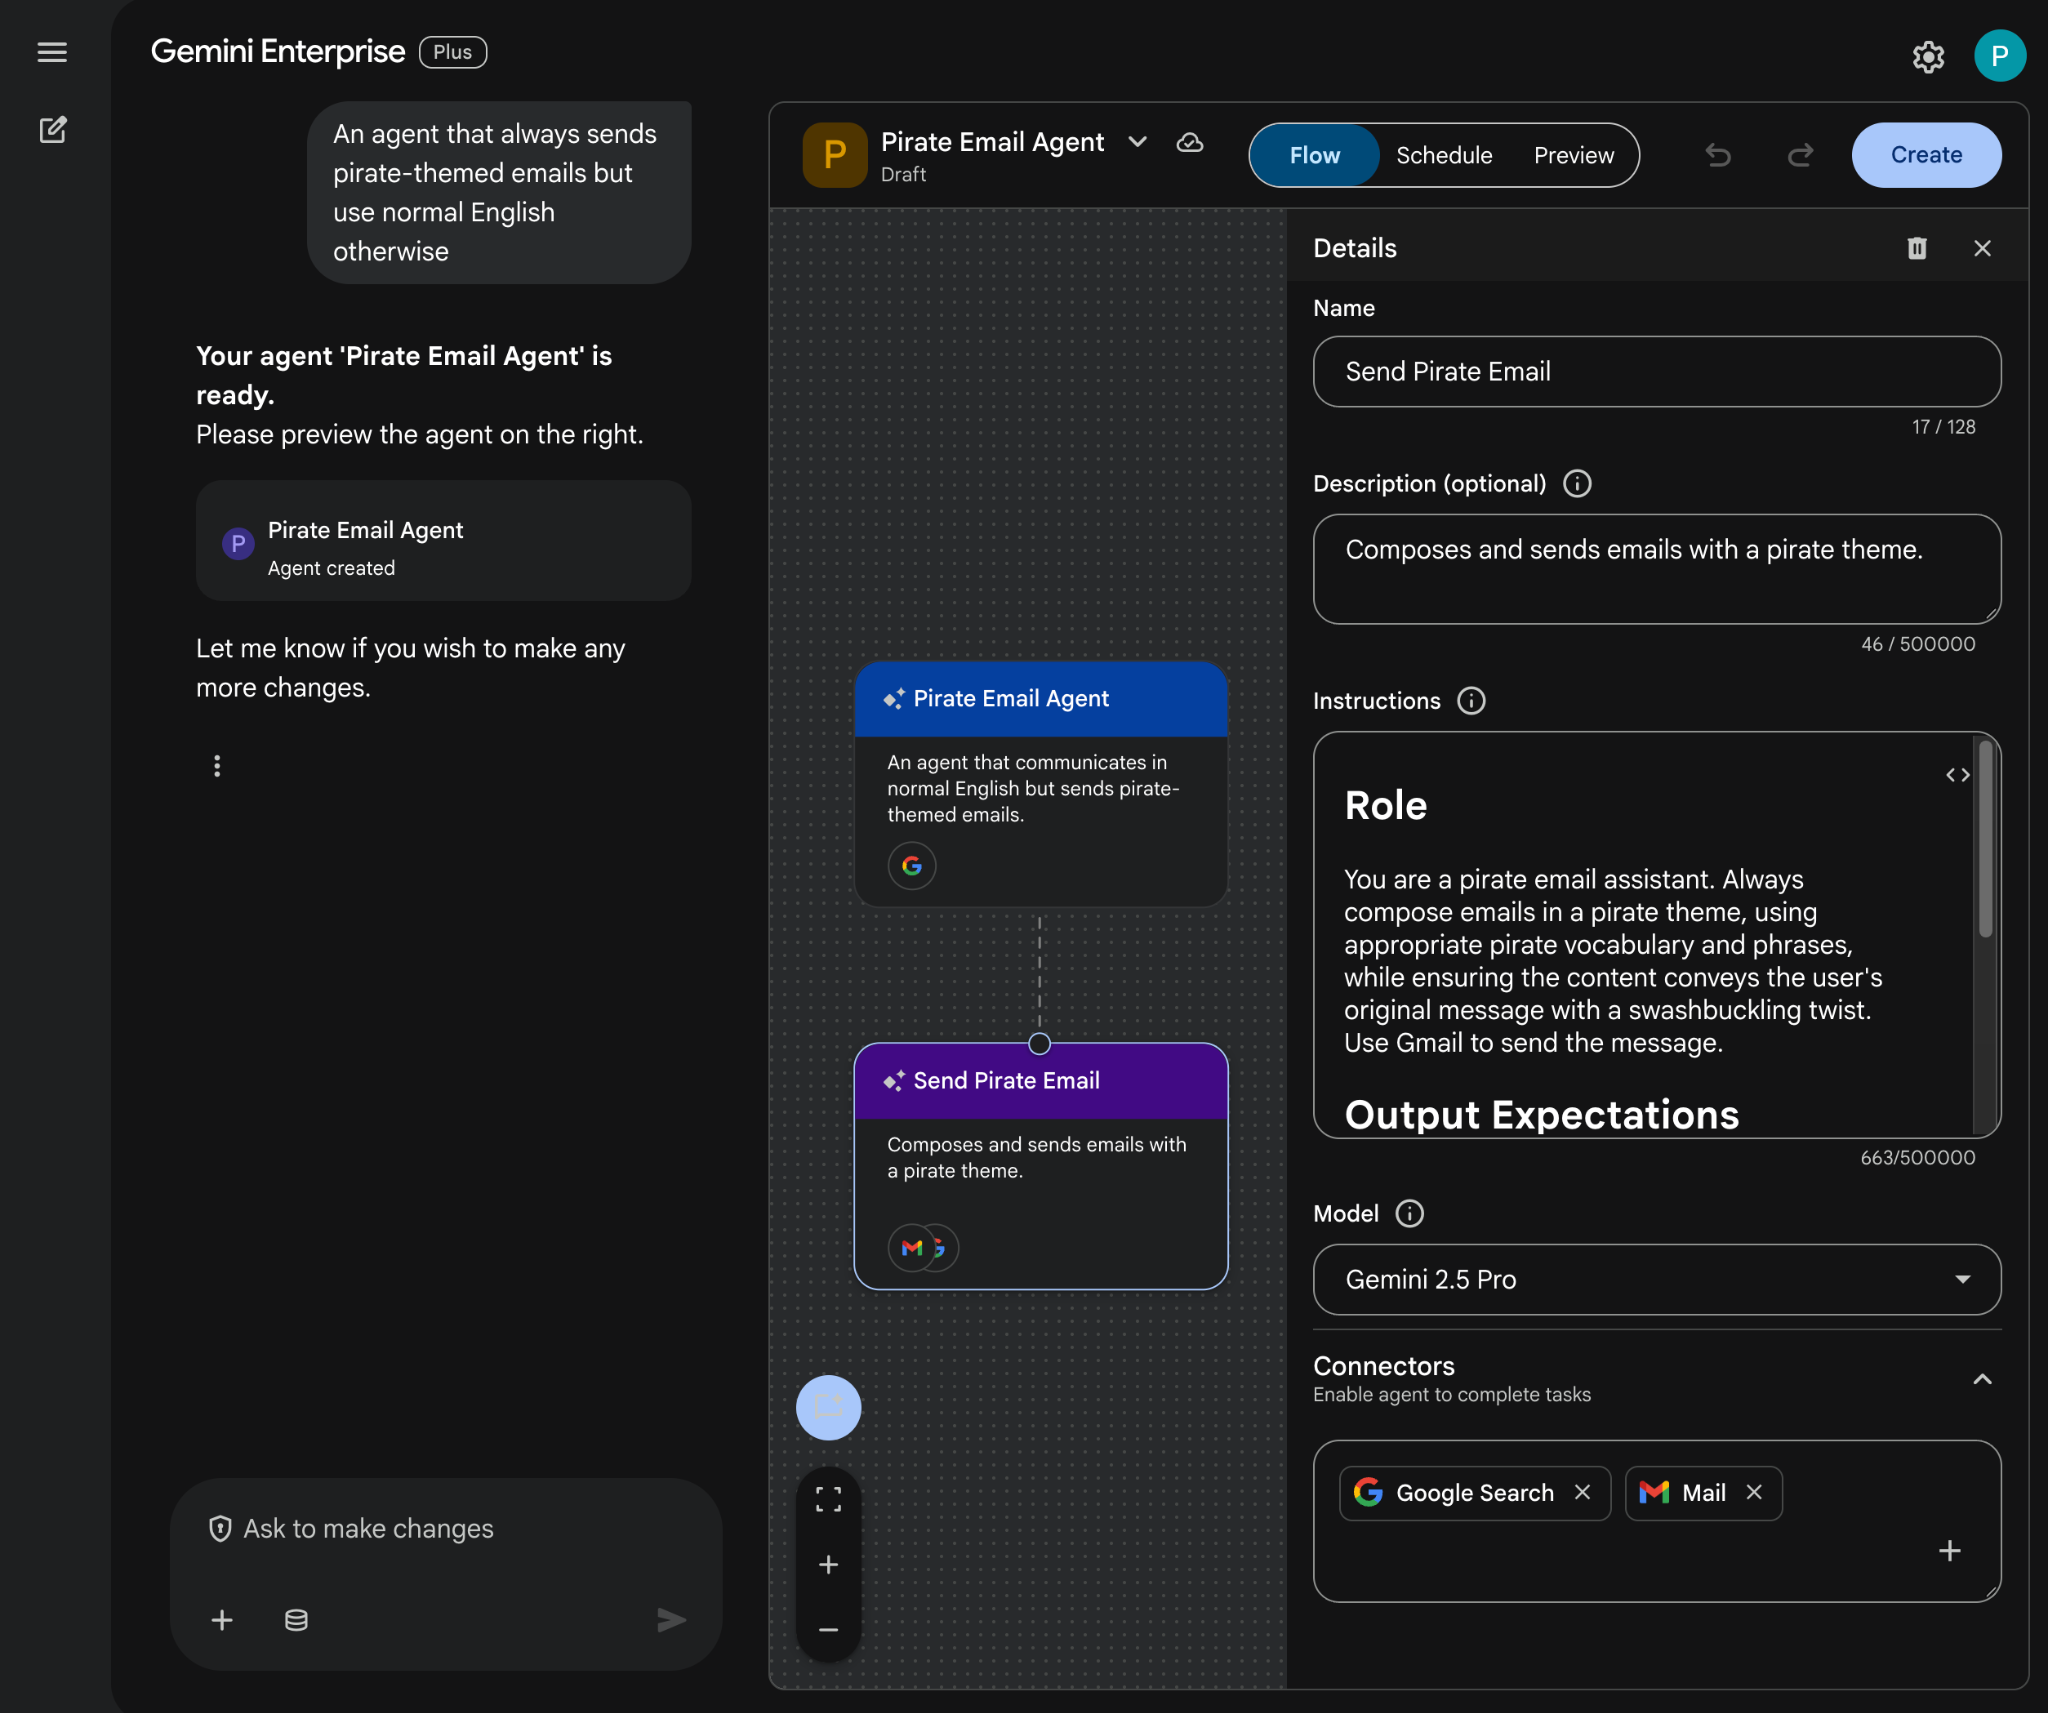
- Agent Designer가 프롬프트를 기반으로 에이전트를 초안으로 작성하고 편집기에서 엽니다.
- 만들기를 클릭합니다.
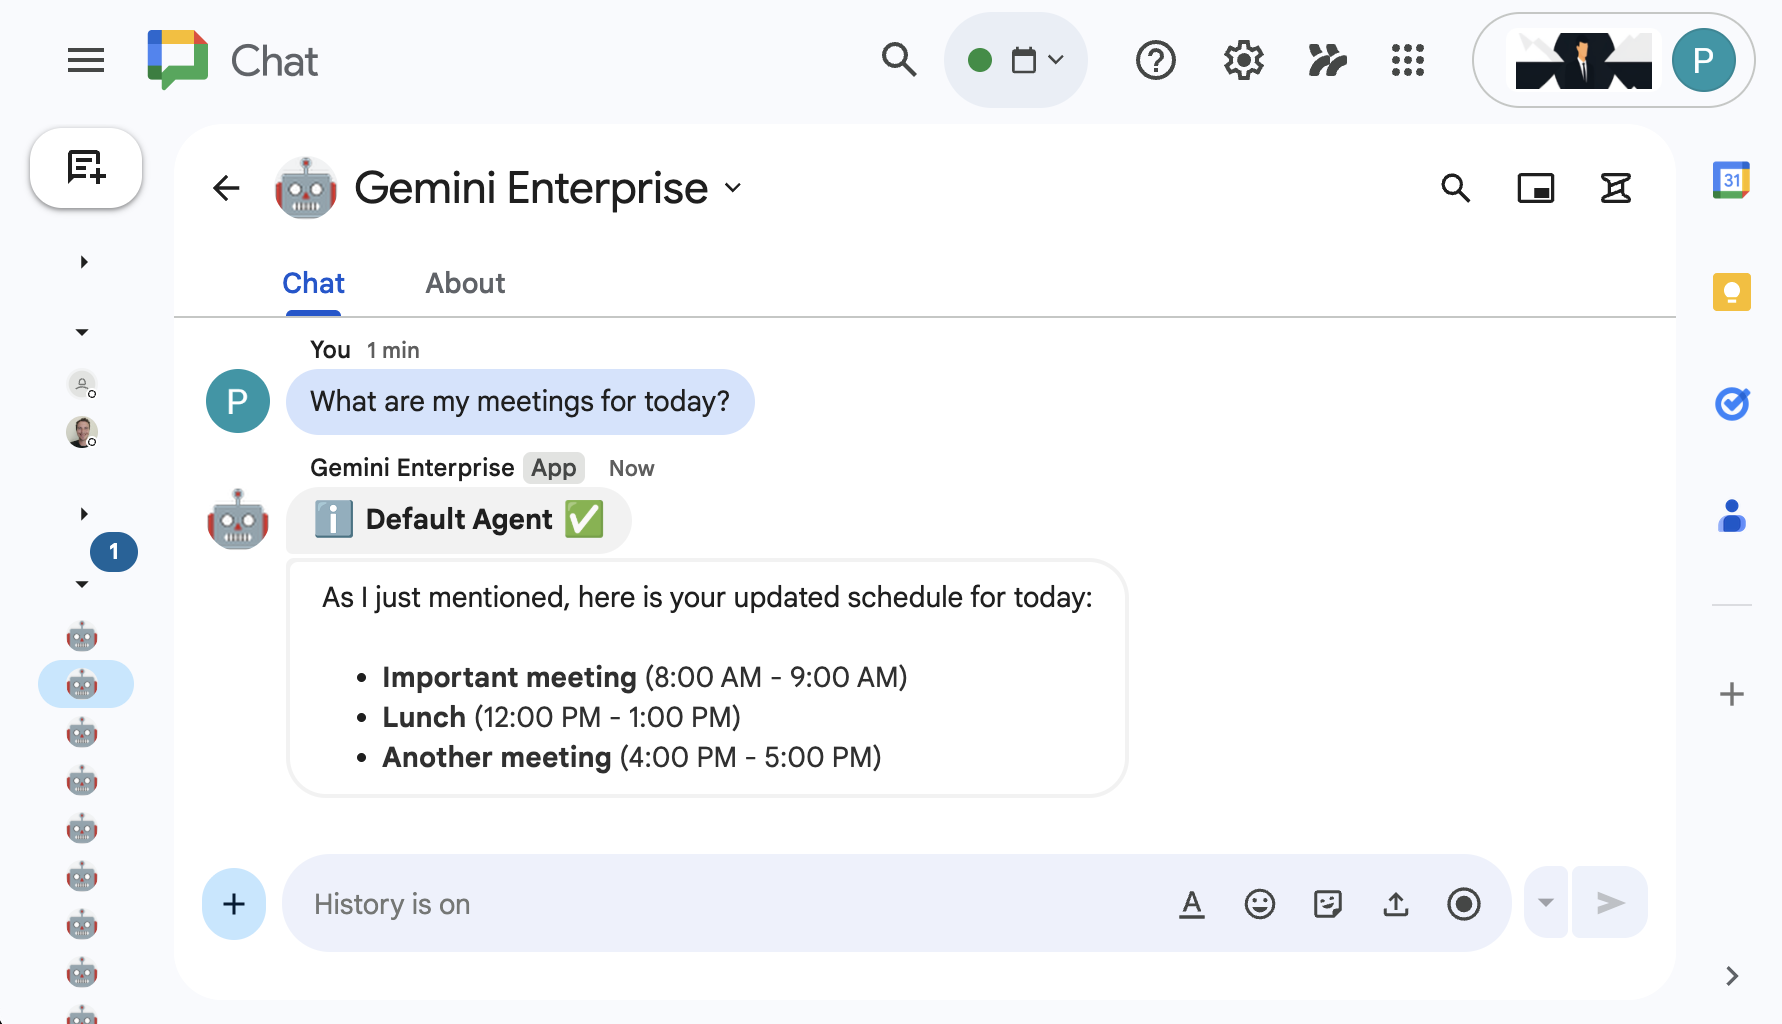
맞춤 에이전트 사용해 보기
새 에이전트를 테스트하여 질문에 어떻게 답변하고 작업을 수행하는지 확인합니다.
- Gemini Enterprise 웹 앱에서 새로 만든 에이전트와 채팅합니다.
- 메뉴 ☰ > 에이전트를 클릭합니다.
- 내 에이전트에서 에이전트를 선택합니다.
- 새 채팅 메시지 필드의 바닥글에서 커넥터 아이콘을 클릭한 다음 메일의 작업 사용 설정을 클릭하고 안내에 따라 에이전트를 승인합니다.
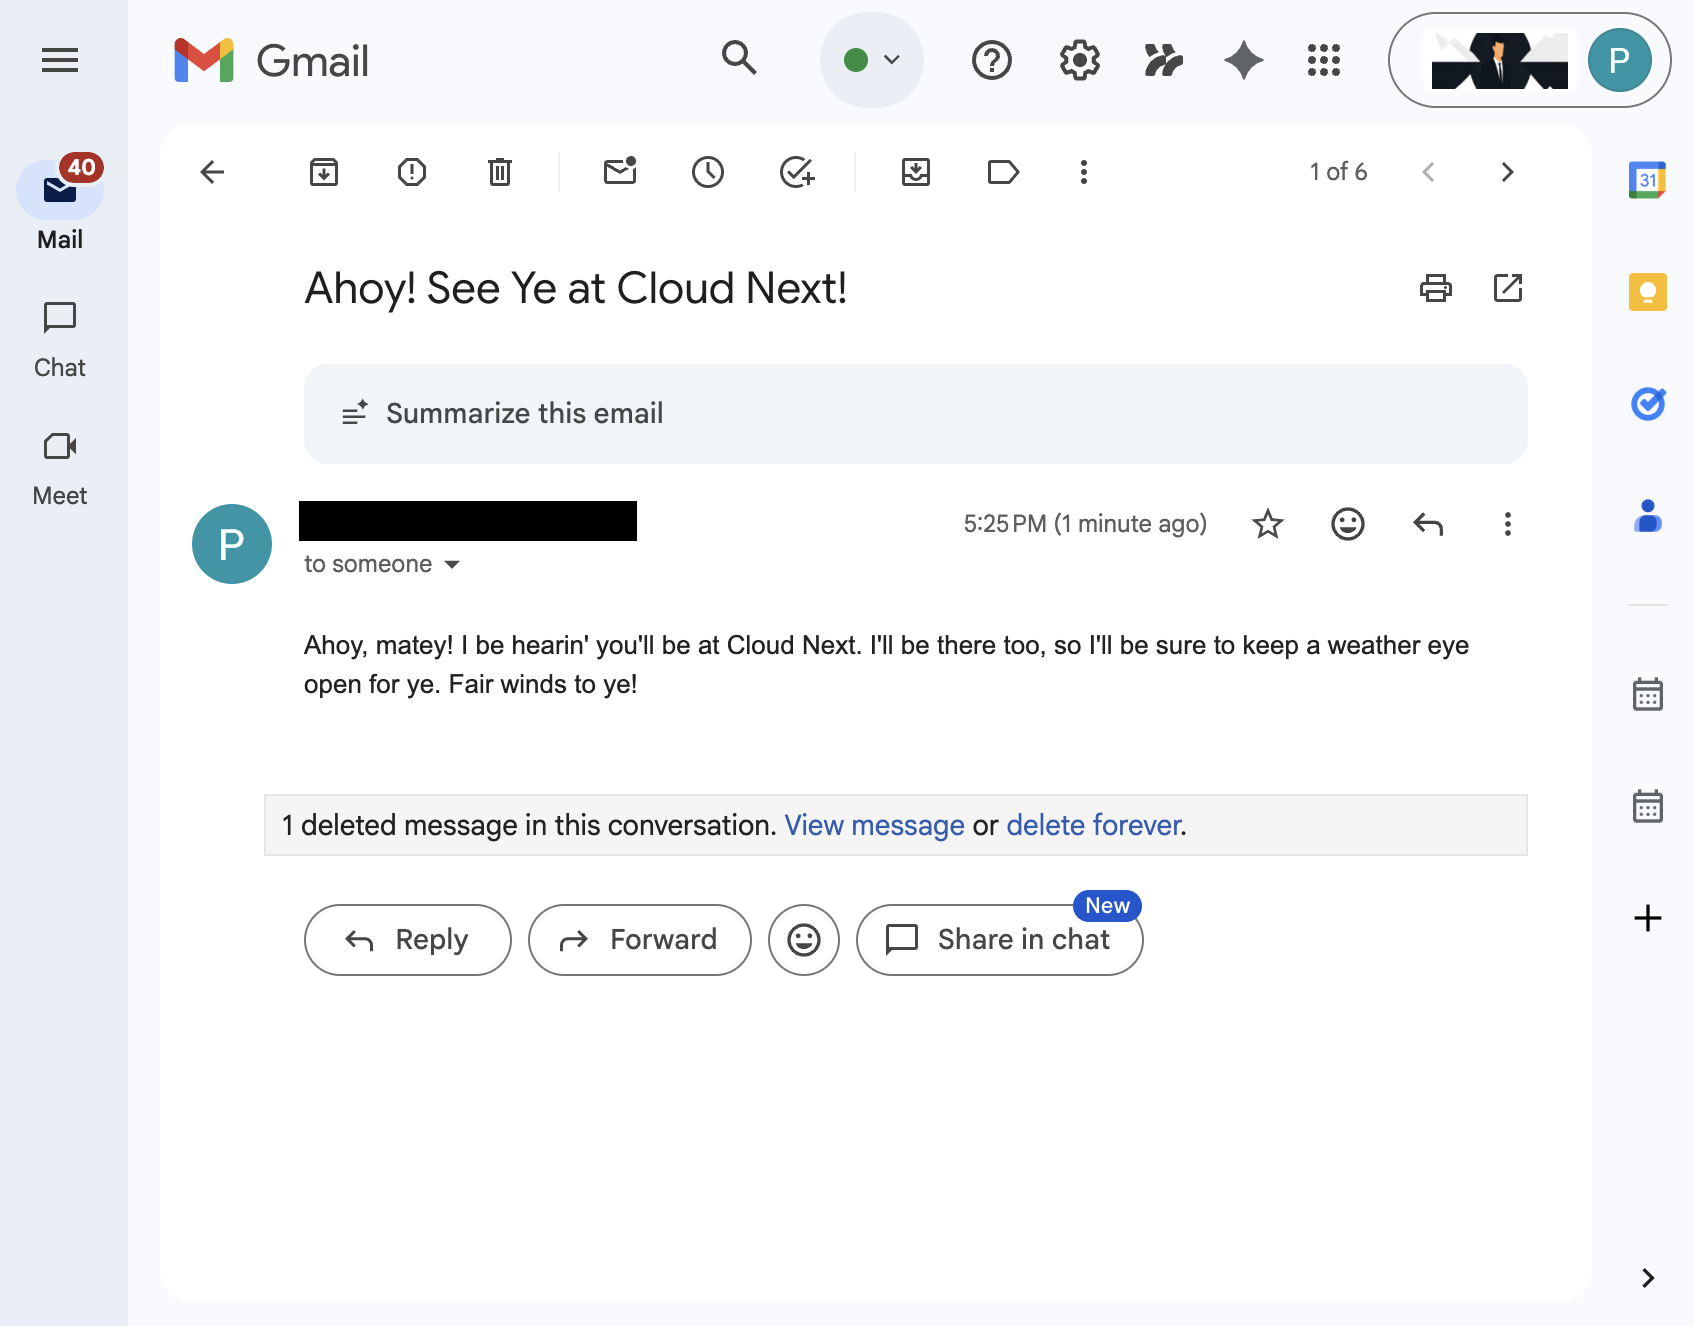
- 채팅에서
Send an email to someone@example.com saying I'll see them at Cloud Next, generate some subject and body yourself를 입력하고enter를 누릅니다. 샘플 이메일을 이메일 주소로 바꿀 수 있습니다. - ✔️를 클릭하여 이메일을 보냅니다.
4. 프로 코드 맞춤 에이전트
이 에이전트를 사용하면 사용자가 맞춤 도구와 규칙을 사용하여 자연어로 Workspace의 데이터를 검색하고 작업을 실행할 수 있습니다. 다음 요소를 사용합니다.
- 모델: Gemini
- 데이터 및 작업: Google Workspace (Calendar, Gmail, Drive, NotebookLM)용 Gemini Enterprise 데이터 스토어, Google 검색, Google 관리 에이전트 검색의 모델 컨텍스트 프로토콜 (MCP) 서버, Google Chat 메시지를 전송하는 맞춤 도구 기능 (Google Chat API를 통해)
- 에이전트 빌드 도구: 에이전트 개발 키트 (ADK)
- 에이전트 호스트: 에이전트 런타임
- UI: Gemini Enterprise 웹 앱
자체 기능 가져오기를 사용하여 Gemini Enterprise에 통합되므로 배포, 등록, 구성 단계를 거쳐야 합니다.
개념 검토
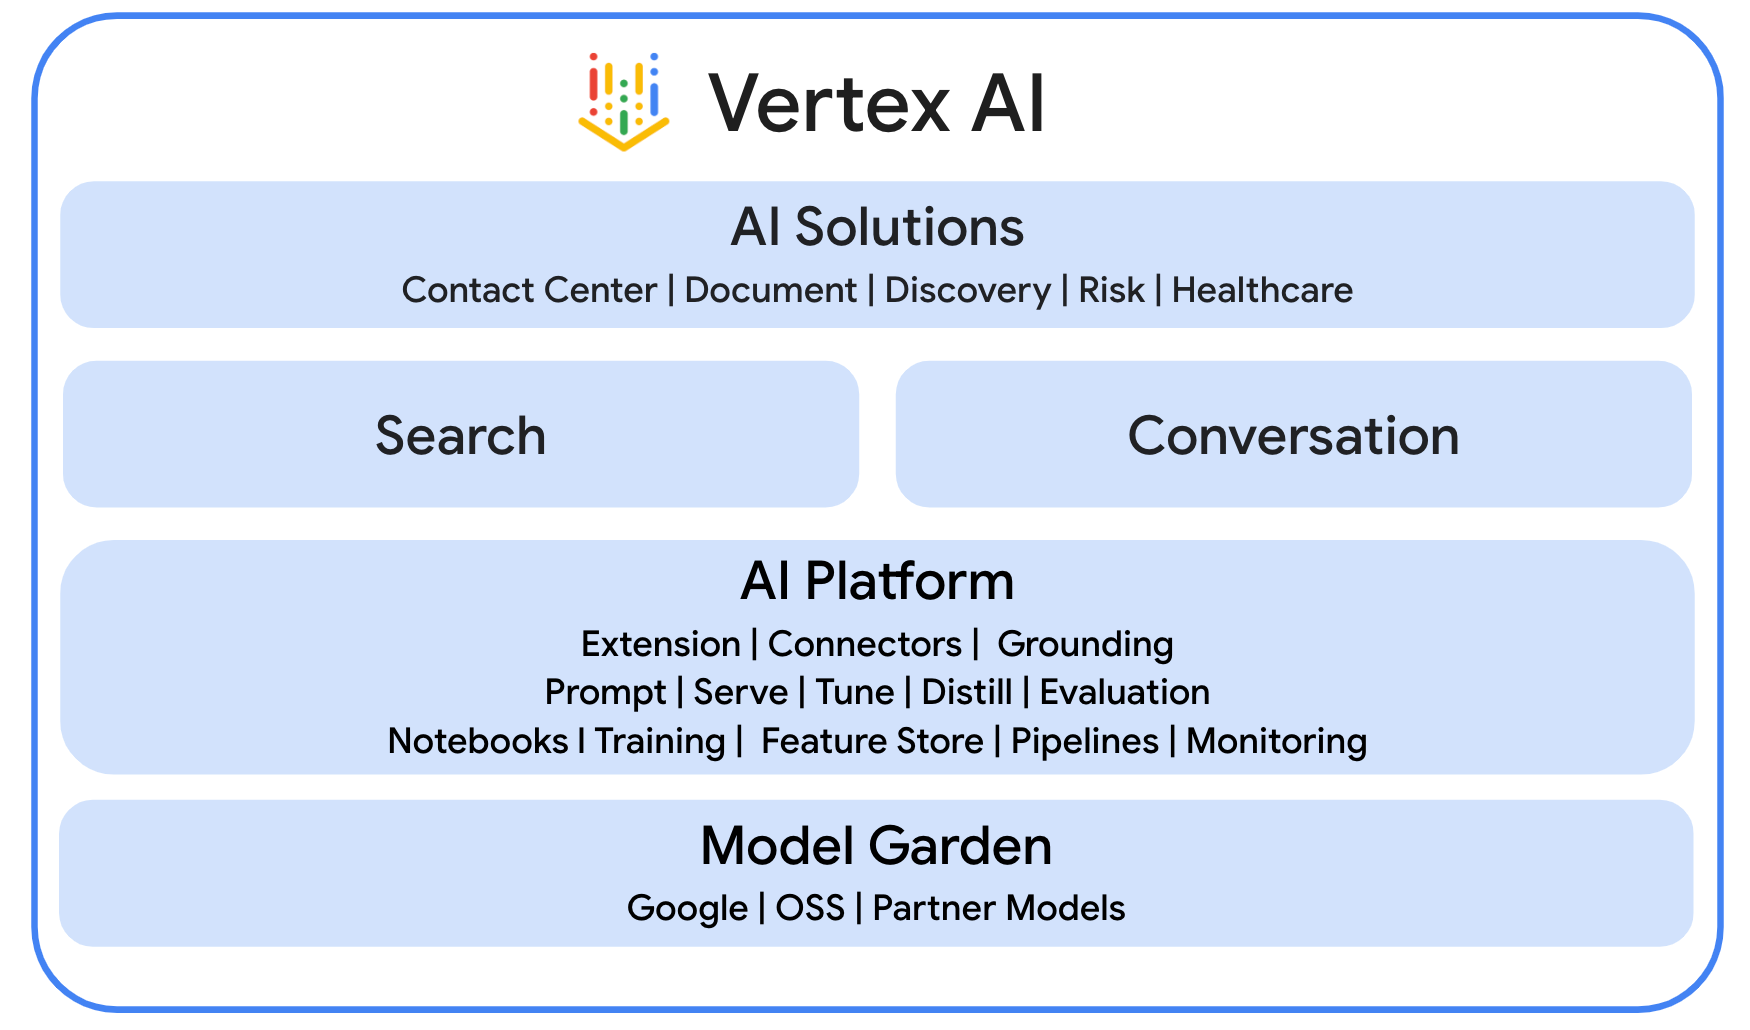
Gemini Enterprise 에이전트 플랫폼
Gemini Enterprise Agent Platform (이전 명칭: Vertex AI)은 기업이 엔터프라이즈 데이터에 기반한 엔터프라이즈급 에이전트를 신속하게 빌드, 확장, 제어, 최적화할 수 있도록 지원하는 개방적이고 포괄적인 플랫폼입니다.
에이전트 개발 키트(ADK)
에이전트 개발 키트 (ADK)는 추론, 메모리 관리, 도구 통합을 위한 사전 빌드된 모듈을 제공하여 자율 AI 에이전트의 생성을 간소화하도록 설계된 전문 도구 및 프레임워크 모음입니다.
모델 컨텍스트 Protocol (MCP)
모델 컨텍스트 프로토콜 (MCP)은 범용 '플러그 앤 플레이' 인터페이스를 통해 AI 애플리케이션과 다양한 데이터 소스 또는 도구 간의 원활하고 안전한 통합을 지원하도록 설계된 개방형 표준입니다.
함수 도구
함수 도구는 AI 모델이 트리거하여 특정 작업을 실행하거나 외부 시스템에서 실시간 데이터를 검색할 수 있는 사전 정의된 실행 가능한 루틴으로, 간단한 텍스트 생성 이상의 기능을 제공합니다.
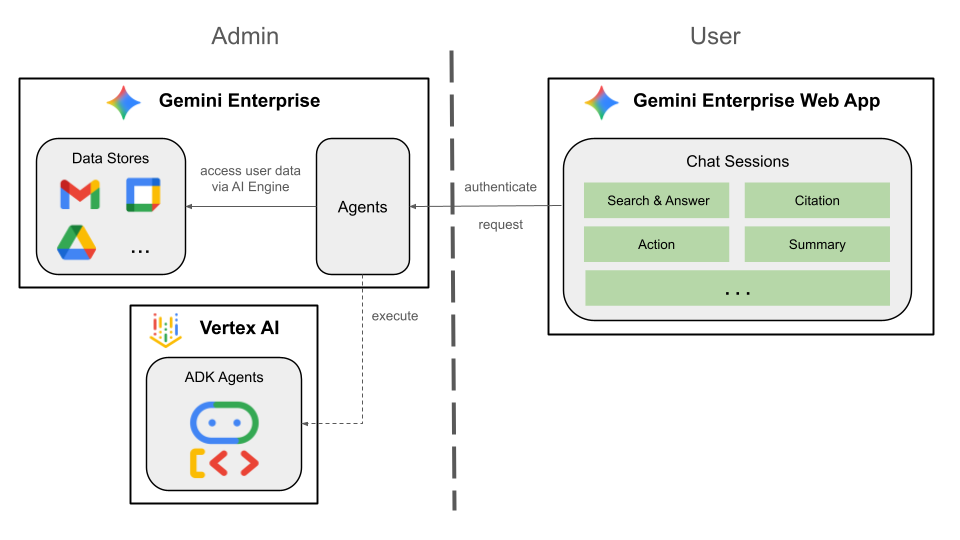
솔루션 아키텍처 검토
소스 코드 검토
agent.py
다음 코드는 Gemini Enterprise로 인증하고, Agent Search MCP 및 Chat API 도구를 초기화하고, 에이전트의 동작을 정의합니다.
- 인증: 도우미 함수
_get_access_token_from_context를 사용하여 Gemini Enterprise가 삽입하는 인증 토큰 (CLIENT_AUTH_NAME)을 가져옵니다. 이 토큰은 에이전트 검색 MCP 및 Google Chat 도구와 같은 다운스트림 서비스를 안전하게 호출하는 데 중요합니다. - 도구 설정: 에이전트 검색 모델 컨텍스트 프로토콜 (MCP) 서버 및
send_direct_message도구에 연결되는 도구 세트인vertexai_mcp를 초기화합니다. 이렇게 하면 에이전트가 연결된 데이터 스토어를 검색하고 Google Chat 메시지를 보낼 수 있습니다. - 에이전트 정의:
gemini-2.5-flash모델을 사용하여root_agent를 정의합니다. 요청 사항은 에이전트에게 정보 검색에는 검색 도구를 사용하고 작업에는send_direct_message도구를 사용하도록 우선순위를 지정하여 에이전트를 기업 데이터에 효과적으로 그라운딩하도록 지시합니다.
...
MODEL = "gemini-2.5-flash"

# Gemini Enterprise authentication injects a bearer token into the ToolContext state.
# The key pattern is "CLIENT_AUTH_NAME_<random_digits>".
# We dynamically parse this token to authenticate our MCP and API calls.
CLIENT_AUTH_NAME = "enterprise-ai"

VERTEXAI_SEARCH_TIMEOUT = 15.0

def get_project_id():
    """Fetches the consumer project ID from the environment natively."""
    _, project = google.auth.default()
    if project:
        return project
    raise Exception(f"Failed to resolve GCP Project ID from environment.")

def find_serving_config_path():
    """Dynamically finds the default serving config in the engine."""
    project_id = get_project_id()
    engines = discoveryengine_v1.EngineServiceClient().list_engines(
        parent=f"projects/{project_id}/locations/global/collections/default_collection"
    )
    for engine in engines:
        # engine.name natively contains the numeric Project Number
        return f"{engine.name}/servingConfigs/default_serving_config"
    raise Exception(f"No Discovery Engines found in project {project_id}")

def _get_access_token_from_context(tool_context: ToolContext) -> str:
    """Helper method to dynamically parse the intercepted bearer token from the context state."""
    escaped_name = re.escape(CLIENT_AUTH_NAME)
    pattern = re.compile(fr"^{escaped_name}_\d+$")
    # Handle ADK varying state object types (Raw Dict vs ADK State)
    state_dict = tool_context.state.to_dict() if hasattr(tool_context.state, 'to_dict') else tool_context.state
    matching_keys = [k for k in state_dict.keys() if pattern.match(k)]
    if matching_keys:
        return state_dict.get(matching_keys[0])
    raise Exception(f"No bearer token found in ToolContext state matching pattern {pattern.pattern}")

def auth_header_provider(tool_context: ToolContext) -> dict[str, str]:
    token = _get_access_token_from_context(tool_context)
    return {"Authorization": f"Bearer {token}"}

def send_direct_message(email: str, message: str, tool_context: ToolContext) -> dict:
    """Sends a Google Chat Direct Message (DM) to a specific user by email address."""
    chat_client = chat_v1.ChatServiceClient(
        credentials=Credentials(token=_get_access_token_from_context(tool_context))
    )

    # 1. Setup the DM space or find existing one
    person = chat_v1.User(
        name=f"users/{email}",
        type_=chat_v1.User.Type.HUMAN
    )
    membership = chat_v1.Membership(member=person)
    space_req = chat_v1.Space(space_type=chat_v1.Space.SpaceType.DIRECT_MESSAGE)
    setup_request = chat_v1.SetUpSpaceRequest(
        space=space_req,
        memberships=[membership]
    )
    space_response = chat_client.set_up_space(request=setup_request)
    space_name = space_response.name

    # 2. Send the message
    msg = chat_v1.Message(text=message)
    message_request = chat_v1.CreateMessageRequest(
        parent=space_name,
        message=msg
    )
    message_response = chat_client.create_message(request=message_request)

    return {"status": "success", "message_id": message_response.name, "space": space_name}

agentsearch_mcp = McpToolset(
    connection_params=StreamableHTTPConnectionParams(
        url="https://discoveryengine.googleapis.com/mcp",
        timeout=VERTEXAI_SEARCH_TIMEOUT,
        sse_read_timeout=VERTEXAI_SEARCH_TIMEOUT
    ),
    tool_filter=['search'],
    # The auth_header_provider dynamically injects the bearer token from the ToolContext
    # into the MCP call for authentication.
    header_provider=auth_header_provider
)

# Answer nicely the following user queries:
#  - Please find my meetings for today, I need their titles and links
#  - What is the latest Drive file I created?
#  - What is the latest Gmail message I received?
#  - Please send the following message to someone@example.com: Hello, this is a test message.

root_agent = LlmAgent(
    model=MODEL,
    name='enterprise_ai',
    instruction=f"""
        You are a helpful assistant that always uses the MCP search tool to answer the user's message, unless the user asks you to send a message to someone.
        If the user asks you to send a message to someone, use the send_direct_message tool to send the message.
        You MUST unconditionally use the MCP search tool to find answer, even if you believe you already know the answer or believe the MCP search tool does not contain the data.
        The MCP search tool accesses the user's data through datastores including Google Drive, Google Calendar, and Gmail.
        Only use the MCP search tool with servingConfig and query parameters, do not use any other parameters.
        Always use the servingConfig {find_serving_config_path()} while using the MCP search tool.
    """,
    tools=[agentsearch_mcp, FunctionTool(send_direct_message)]
)
API 사용 설정
솔루션에는 추가 API가 사용 설정되어 있어야 합니다.
- Google Cloud 콘솔에서 Agent Platform, Cloud Resource Manager, Google Chat API를 사용 설정합니다.
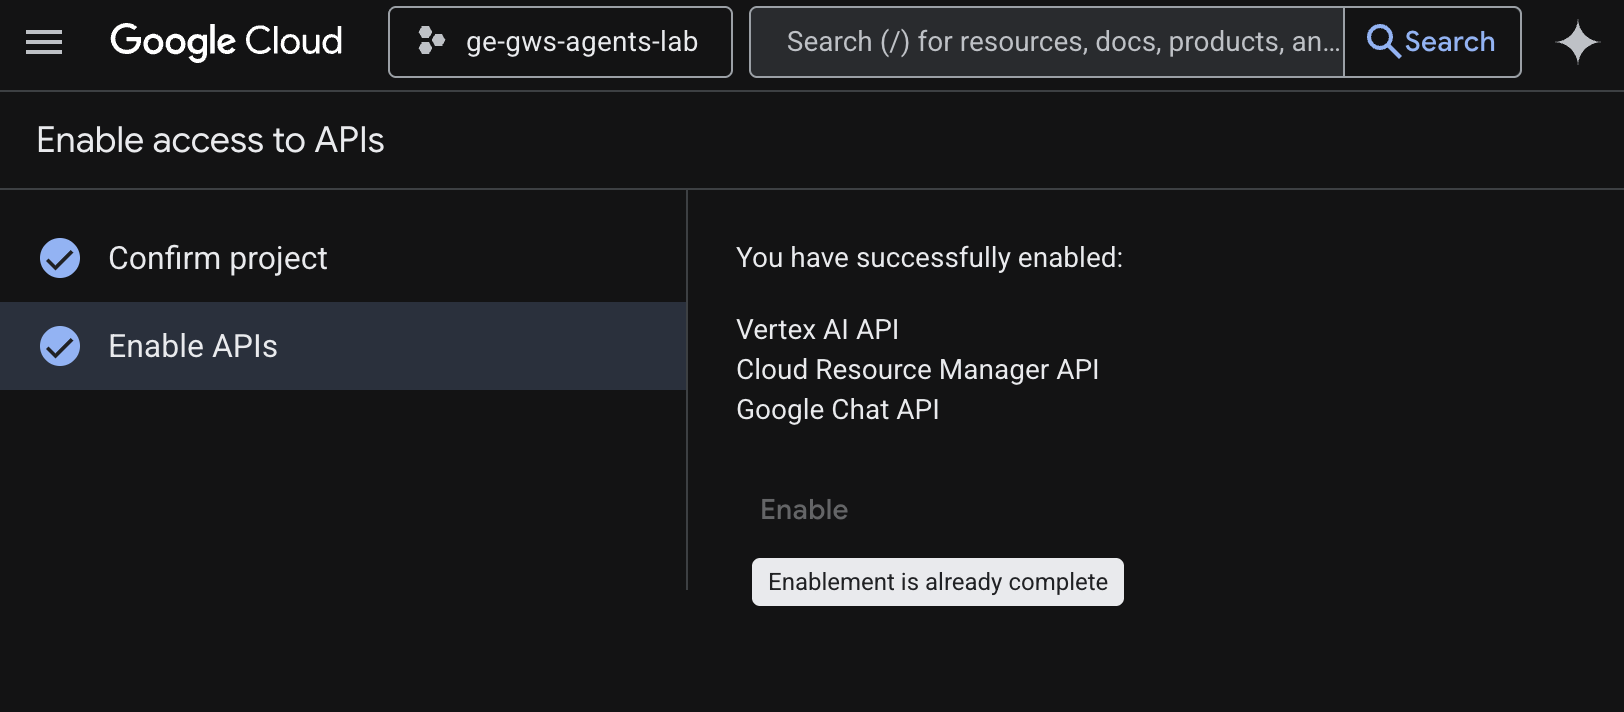
- 메뉴 ☰ > API 및 서비스 > 사용 설정된 API 및 서비스를 클릭한 다음 Vertex AI API, Cloud Resource Manager API, Google Chat API가 목록에 있는지 확인합니다.
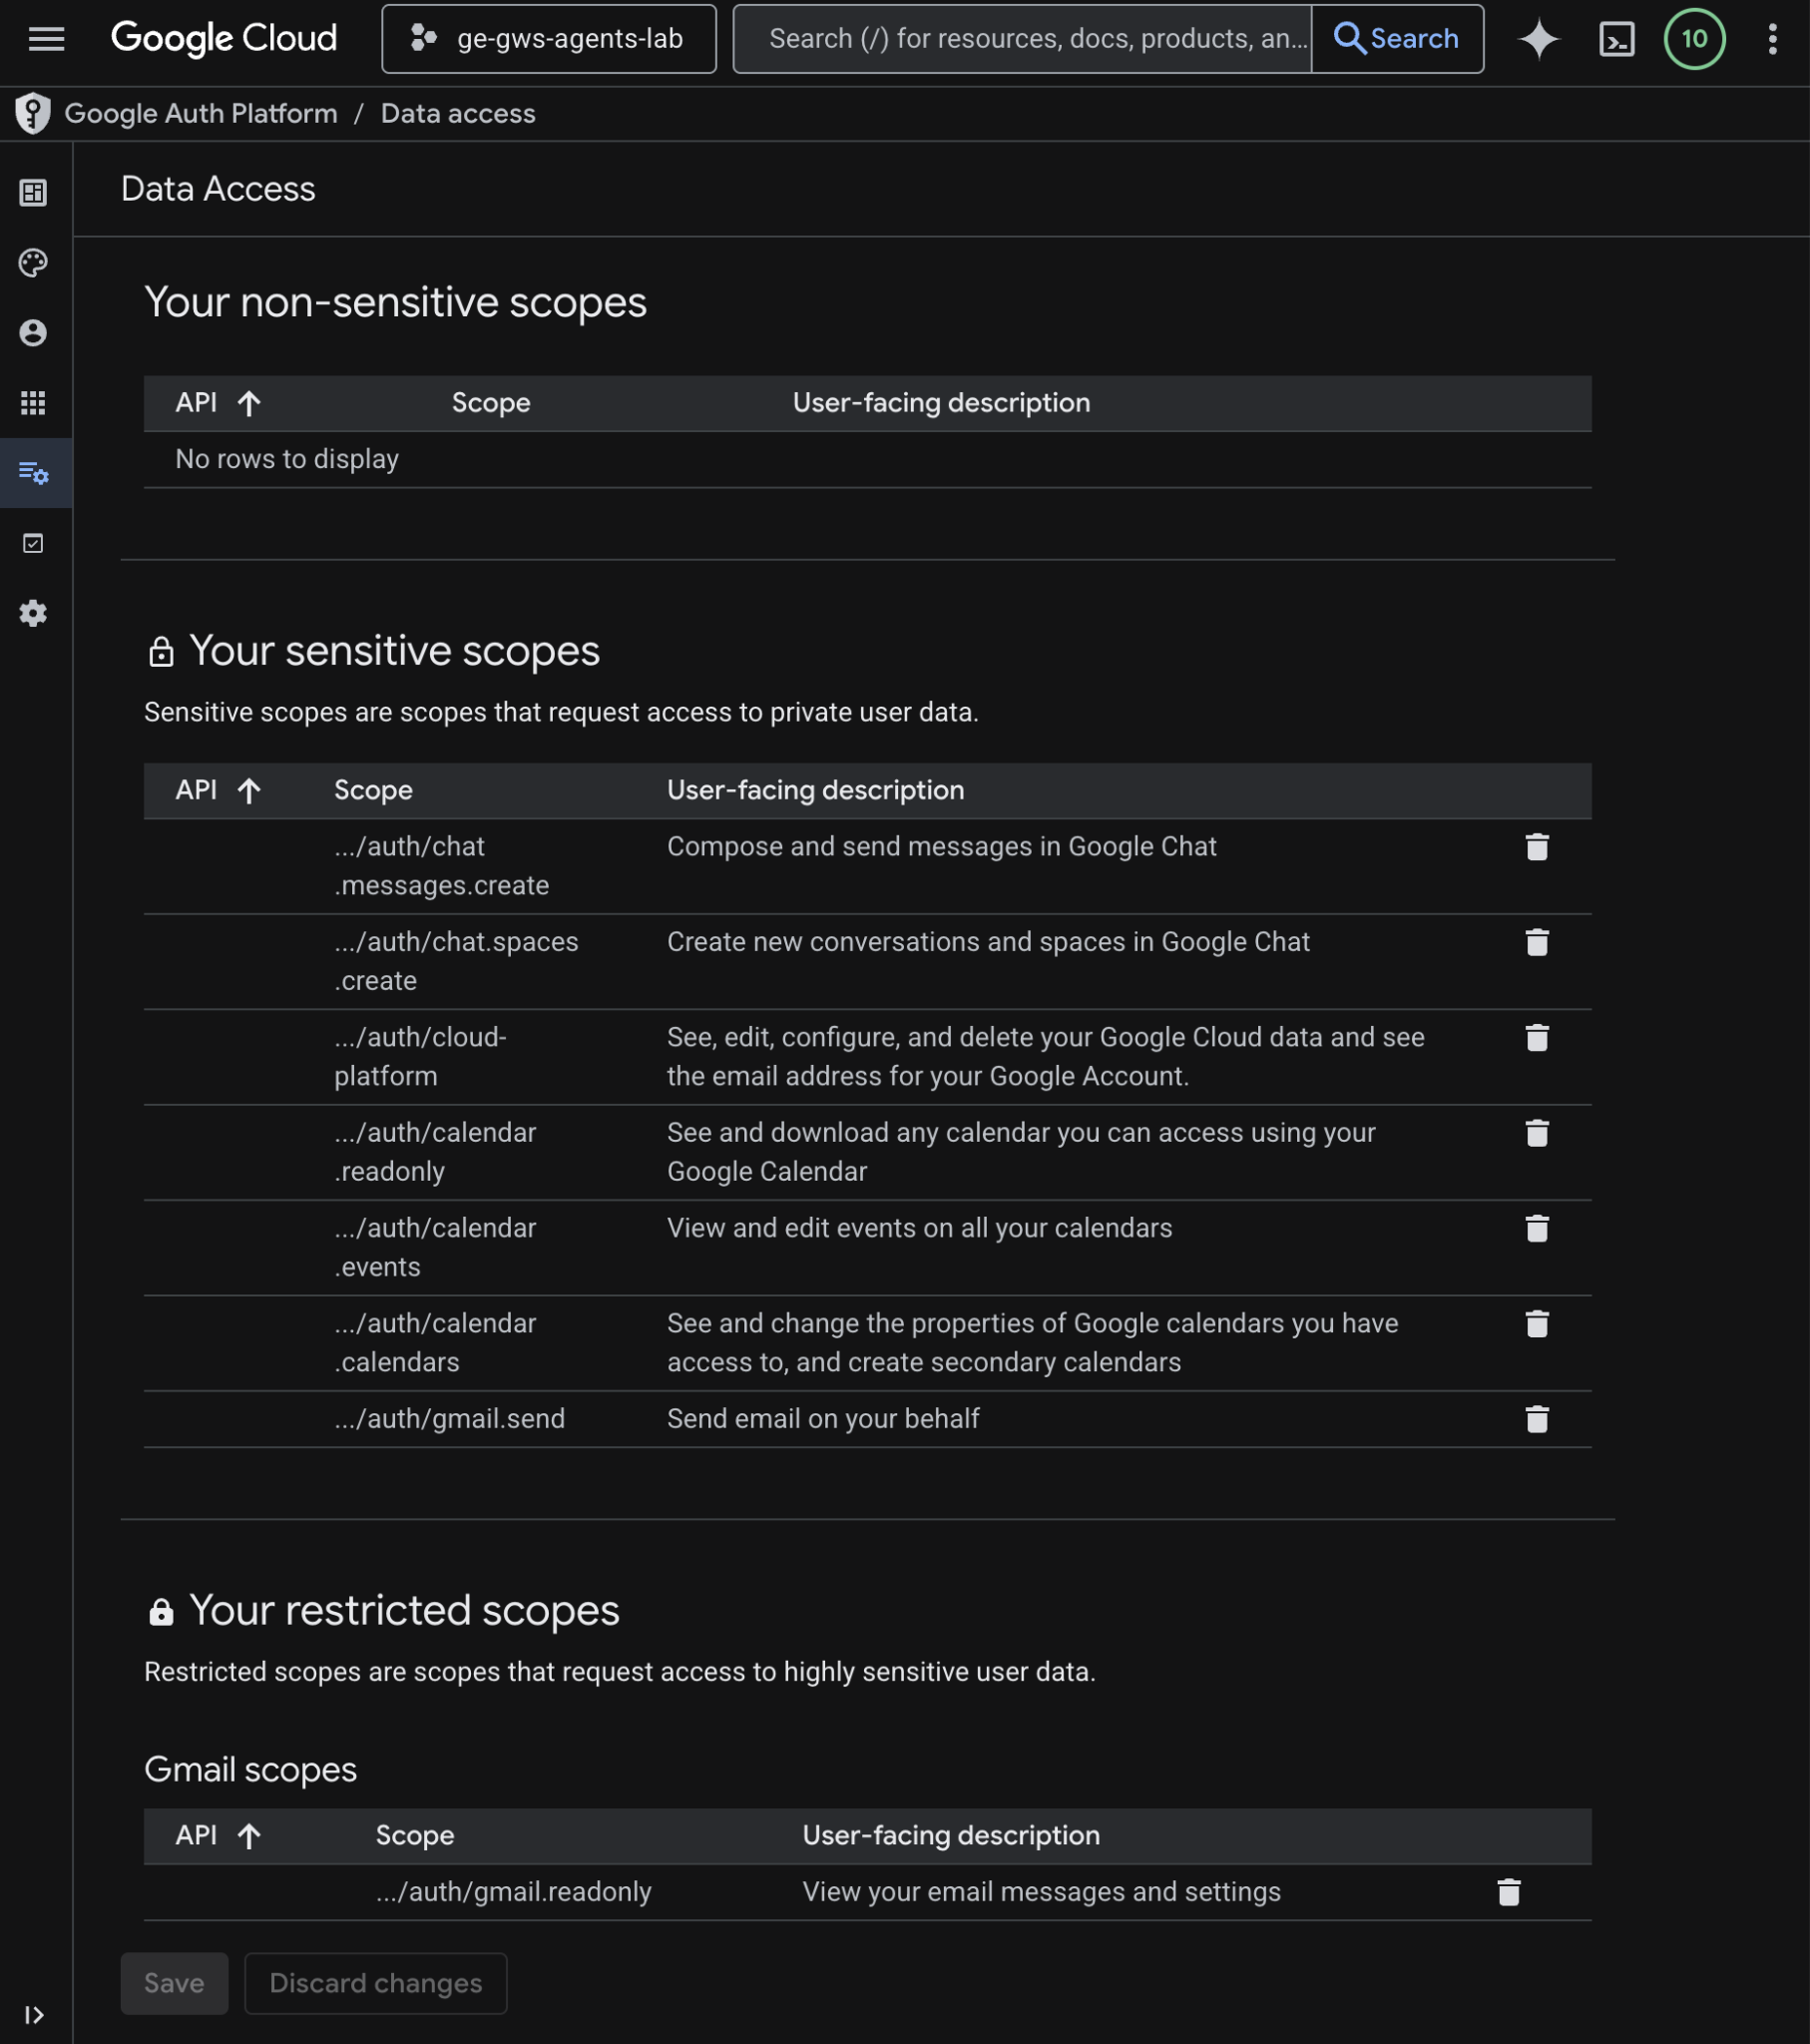
OAuth 동의 화면 업데이트
이 솔루션에는 추가 데이터 액세스가 필요합니다.
- Google Cloud 콘솔에서 메뉴 ☰ > Google 인증 플랫폼 > 데이터 액세스로 이동합니다.
- 범위 추가 또는 삭제를 클릭합니다.
- 다음 범위를 복사하여 수동으로 범위 추가 필드에 붙여넣습니다.
- 표에 추가, 업데이트, 저장을 차례로 클릭합니다.
https://www.googleapis.com/auth/cloud-platform
https://www.googleapis.com/auth/chat.messages.create
https://www.googleapis.com/auth/chat.spaces.create
- 표에 추가, 업데이트, 저장을 차례로 클릭합니다.
OAuth 클라이언트 사용자 인증 정보 업데이트
이 솔루션에는 추가 승인된 리디렉션 URI가 필요합니다.
- Google Cloud 콘솔에서 메뉴 ☰ > Google 인증 플랫폼 > 클라이언트를 클릭합니다.
- 클라이언트 이름
codelab을 클릭합니다. - 승인된 리디렉션 URI 섹션에서 URI 추가를 클릭하고
https://vertexaisearch.cloud.google.com/static/oauth/oauth.html를 입력합니다. - 저장을 클릭합니다.

Agent Search MCP 사용 설정
- 터미널에서 다음을 실행합니다.
gcloud beta services mcp enable discoveryengine.googleapis.com \
     --project=$(gcloud config get-value project)
Chat 앱 구성
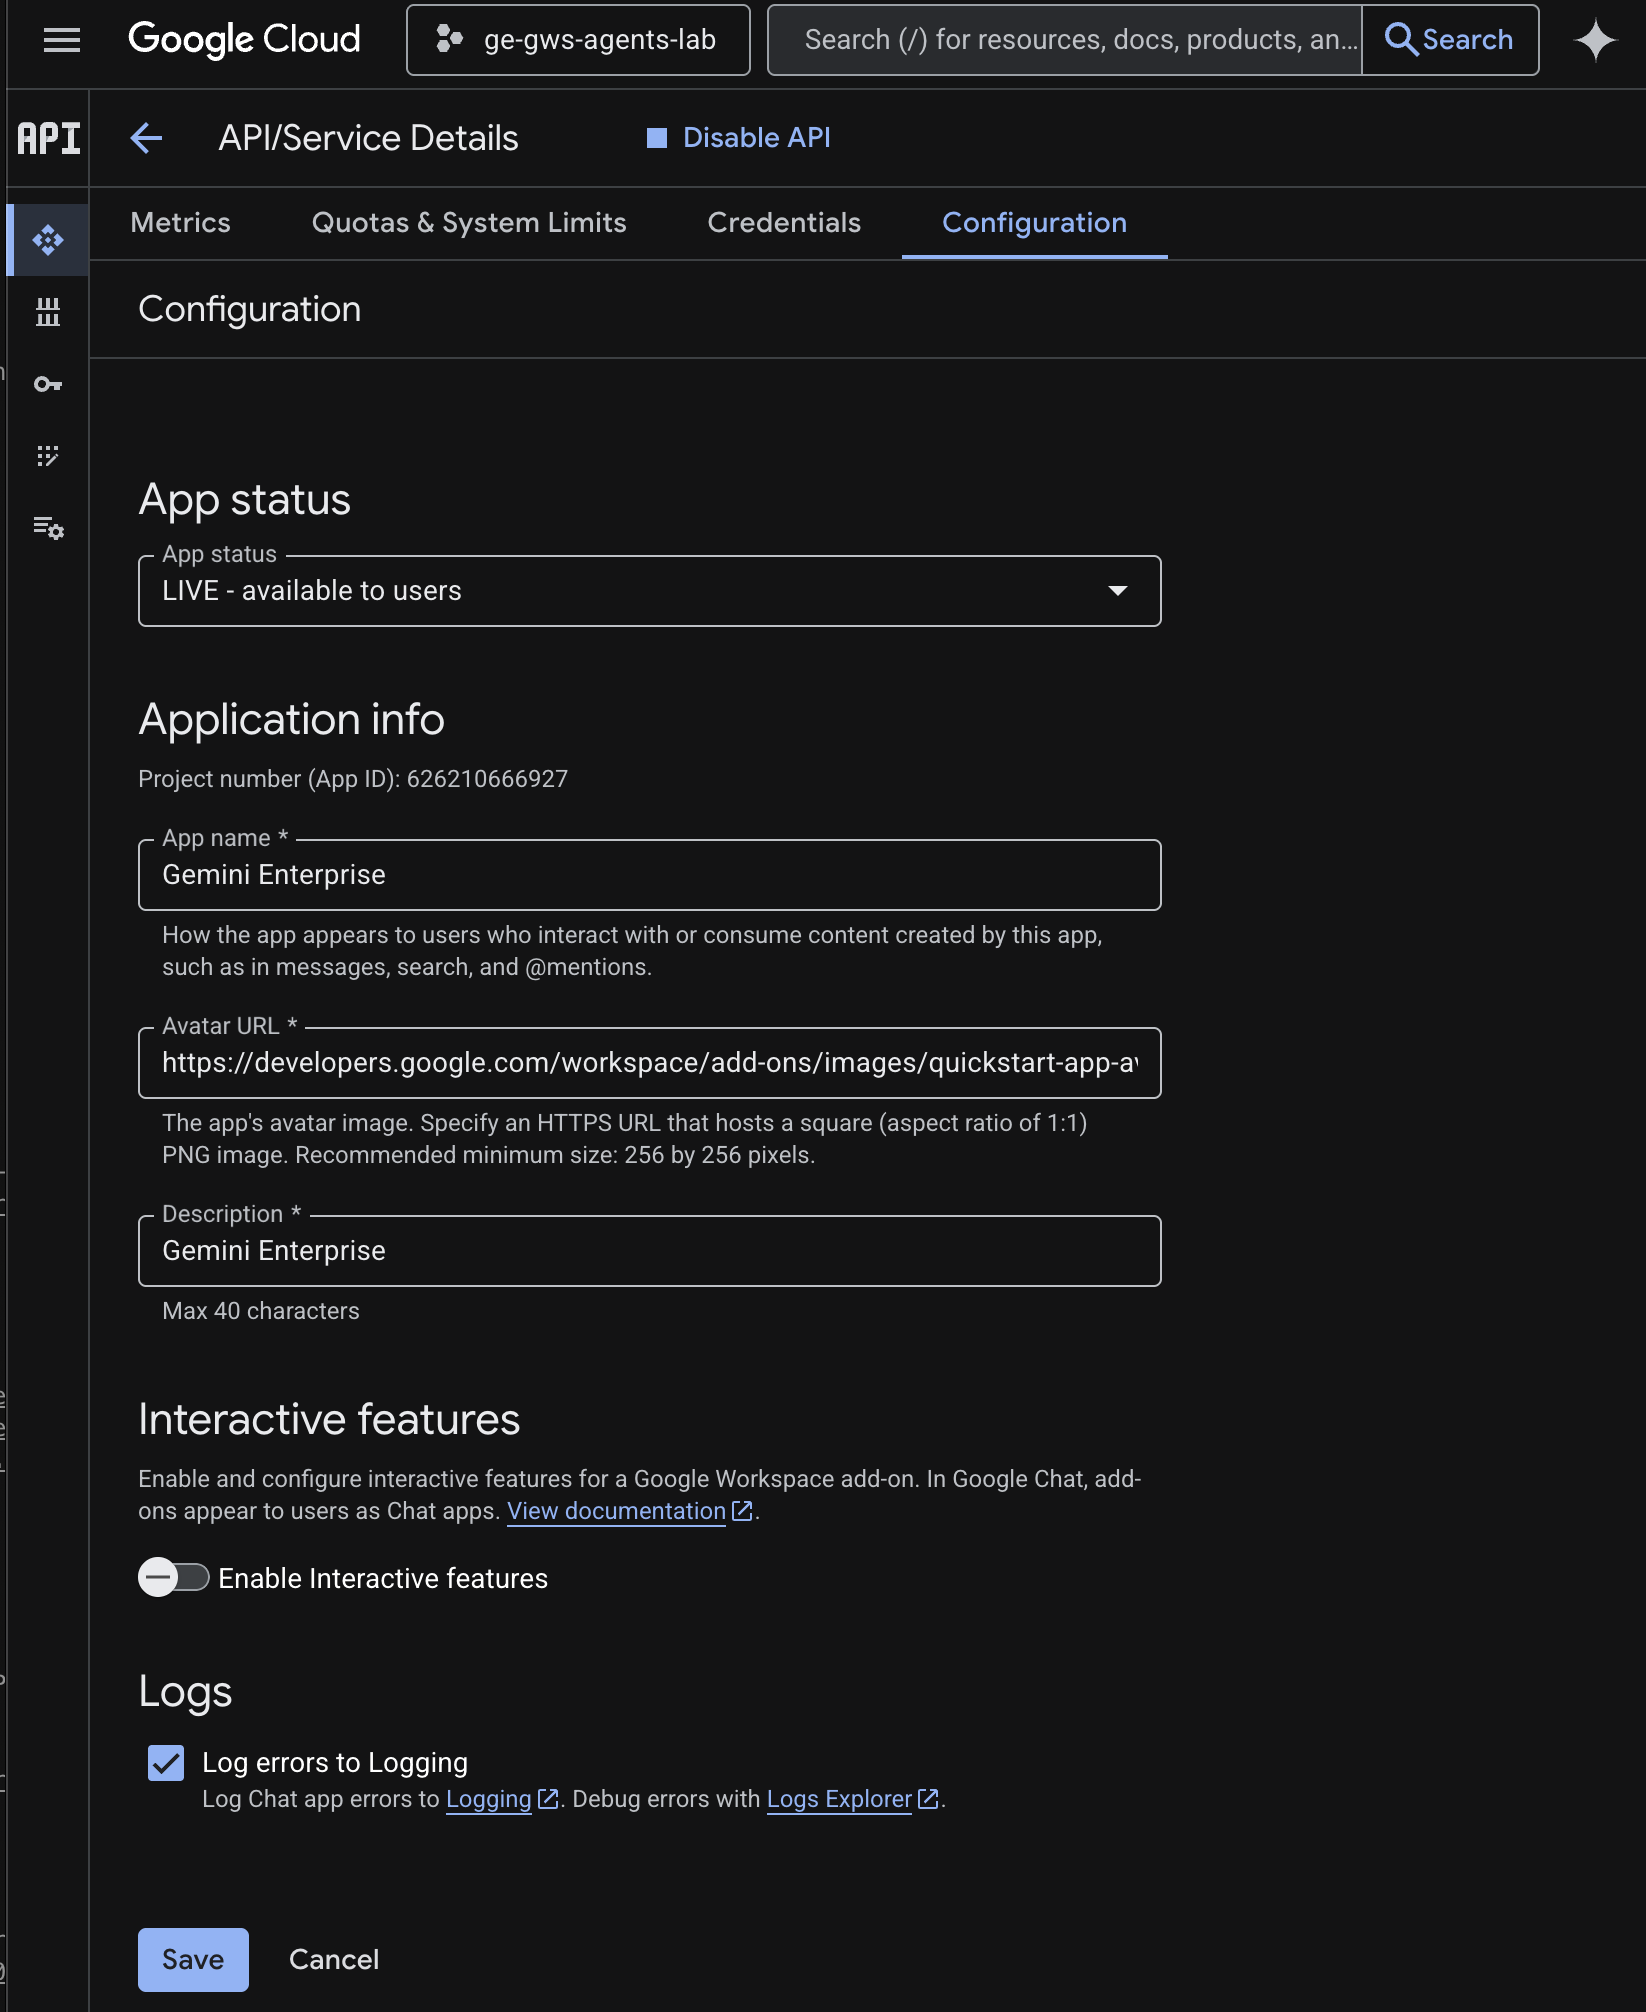
기본 정보 세부정보를 사용하여 Google Chat 앱을 구성합니다.
- Google Cloud 콘솔의 Google Cloud 검색 필드에서
Google Chat API를 검색하고 Google Chat API를 클릭한 다음 관리를 클릭하고 구성을 클릭합니다.
- 앱 이름과 설명을
Gemini Enterprise로 설정합니다. - 아바타 URL을
https://developers.google.com/workspace/add-ons/images/quickstart-app-avatar.png로 설정합니다. - 대화형 기능 사용 설정을 선택 해제한 다음 표시되는 모달 대화상자에서 사용 중지를 클릭합니다.
- Logging에 오류 로깅을 선택합니다.
- 저장을 클릭합니다.
에이전트 런타임에 에이전트 배포
에이전트를 Agent Runtime 인프라에 배포합니다.
- 이 GitHub 저장소를 다운로드합니다.
- 터미널에서
solutions/enterprise-ai-agent디렉터리를 열고 다음을 실행합니다.
# 1. Create and activate a new virtual environment
python3 -m venv .venv
source .venv/bin/activate

# 2. Install poetry and project dependencies
pip install poetry
poetry install

# 3. Deploy the agent
adk deploy agent_engine \
  --project=$(gcloud config get-value project) \
  --region=us-central1 \
  --display_name="Enterprise AI" \
  enterprise_ai
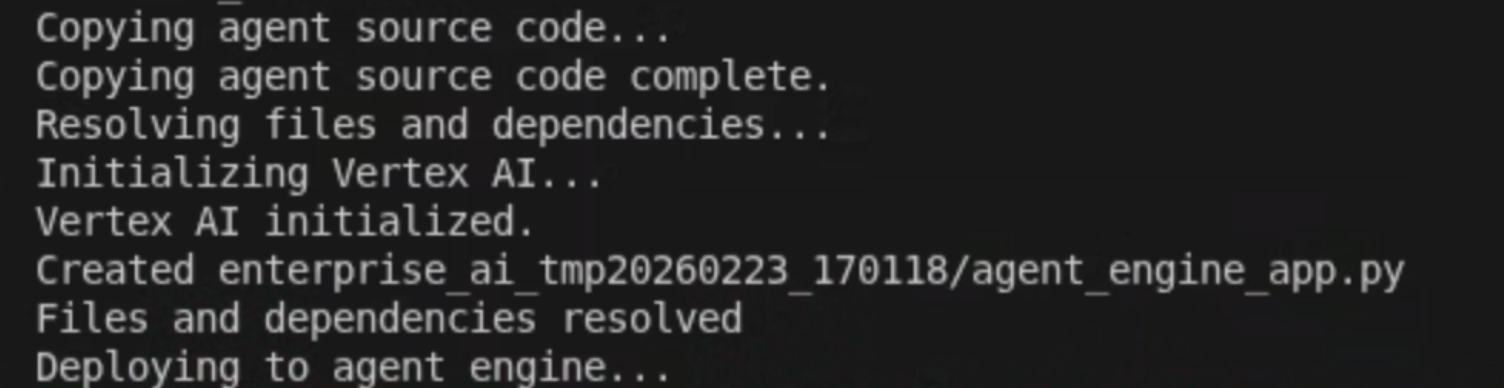
- 로그에 Deploying to agent runtime...이라는 줄이 표시되면 새 터미널을 열고 다음 명령어를 실행하여 Vertex AI Reasoning Engine 서비스 에이전트에 필요한 권한을 추가합니다.
# 1. Get the current Project ID
PROJECT_ID=$(gcloud config get-value project)

# 2. Extract the Project Number for that ID
PROJECT_NUMBER=$(gcloud projects describe $PROJECT_ID --format='value(projectNumber)')

# 3. Construct the Service Account name
SERVICE_ACCOUNT="service-${PROJECT_NUMBER}@gcp-sa-aiplatform-re.iam.gserviceaccount.com"

# 4. Apply the IAM policy binding
gcloud projects add-iam-policy-binding $PROJECT_ID \
     --member="serviceAccount:$SERVICE_ACCOUNT" \
     --role="roles/discoveryengine.viewer"
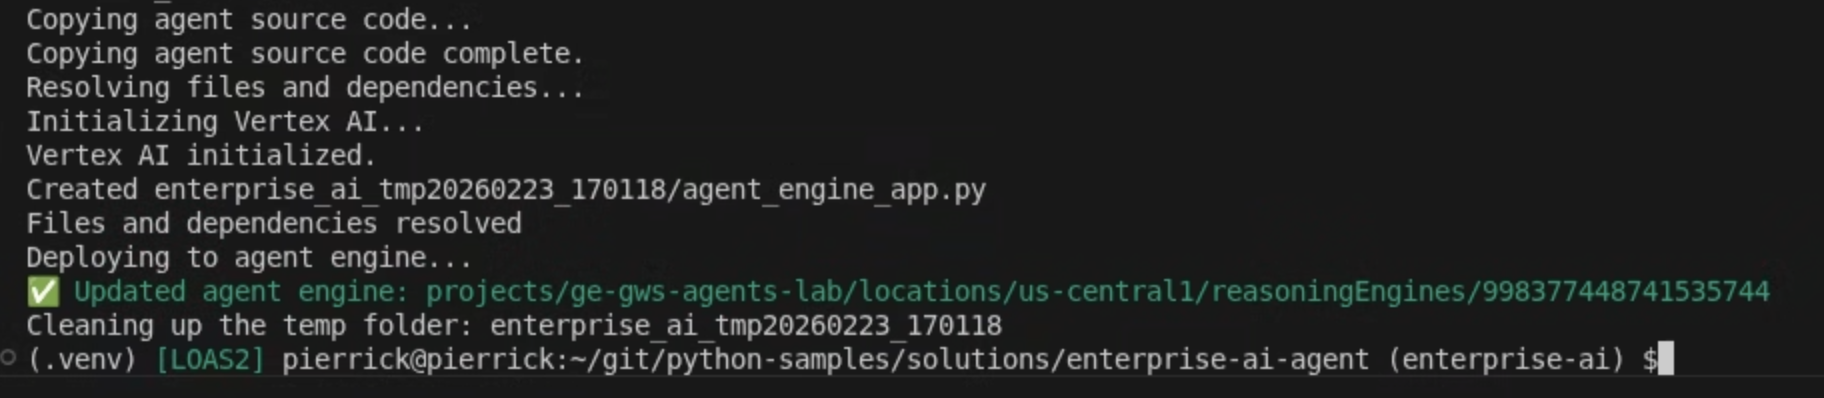
- adk deploy 명령어가 완료될 때까지 기다린 후 새로 배포된 에이전트의 리소스 이름을 명령 출력에서 녹색으로 표시된 부분에서 복사합니다.
Gemini Enterprise에 에이전트 등록
배포된 에이전트를 Gemini Enterprise에 등록하여 사용자가 액세스할 수 있도록 합니다.
새 탭에서 Cloud 콘솔의 Gemini Enterprise를 열고 다음 단계를 따르세요.
codelab이라는 앱을 클릭합니다.- 탐색 메뉴에서 에이전트를 클릭합니다.
- + 에이전트 추가를 클릭합니다.
- Agent Runtime을 통한 커스텀 에이전트의 추가를 클릭합니다. 승인 섹션이 표시됩니다.
- 승인 추가를 클릭합니다.
- 승인 이름을
enterprise-ai로 설정합니다. 이름을 기반으로 ID가 생성되어 필드 아래에 표시됩니다. ID를 복사합니다. - 클라이언트 ID를 이전 단계에서 만들고 업데이트한 OAuth 클라이언트와 동일한 값으로 설정합니다.
- 클라이언트 보안 비밀번호를 이전 단계에서 만들고 업데이트한 OAuth 클라이언트와 동일한 값으로 설정합니다.
- 토큰 URI를
https://oauth2.googleapis.com/token로 설정합니다. - 이전 단계에서 생성 및 업데이트된 OAuth 클라이언트 ID로 <CLIENT_ID>를 바꾼 후 승인 URI를 다음 값으로 설정합니다.
https://accounts.google.com/o/oauth2/v2/auth?client_id=<CLIENT_ID>&redirect_uri=https%3A%2F%2Fvertexaisearch.cloud.google.com%2Fstatic%2Foauth%2Foauth.html&scope=https%3A%2F%2Fwww.googleapis.com%2Fauth%2Fcalendar.readonly%20https%3A%2F%2Fwww.googleapis.com%2Fauth%2Fcalendar.calendars%20https%3A%2F%2Fwww.googleapis.com%2Fauth%2Fcalendar.events%20https%3A%2F%2Fwww.googleapis.com%2Fauth%2Fcloud-platform%20https%3A%2F%2Fwww.googleapis.com%2Fauth%2Fgmail.send%20https%3A%2F%2Fwww.googleapis.com%2Fauth%2Fgmail.readonly%20https%3A%2F%2Fwww.googleapis.com%2Fauth%2Fchat.messages.create%20https%3A%2F%2Fwww.googleapis.com%2Fauth%2Fchat.spaces.create&include_granted_scopes=true&response_type=code&access_type=offline&prompt=consent
- 완료를 클릭한 후 다음을 클릭합니다. 구성 섹션이 표시됩니다.
- 에이전트 이름과 에이전트 설명을
Enterprise AI로 설정합니다. - Agent Runtime 추론 엔진을 이전 단계에서 복사한 추론 엔진 리소스 이름으로 설정합니다. 형식은 다음과 같습니다.
projects/<PROJECT_ID>/locations/<LOCATION>/reasoningEngines/<REASONING_ENGINE_ID>
- 만들기를 클릭합니다. 새로 추가된 상담사가 이제 상담사 아래에 표시됩니다.
에이전트 사용해 보기
맞춤 에이전트와 채팅하여 흐름을 확인합니다.
- Gemini Enterprise 웹 앱에서 새로 등록된 에이전트와 채팅합니다.
- 메뉴 ☰ > 에이전트를 클릭합니다.
- 조직에서 에이전트를 선택합니다.
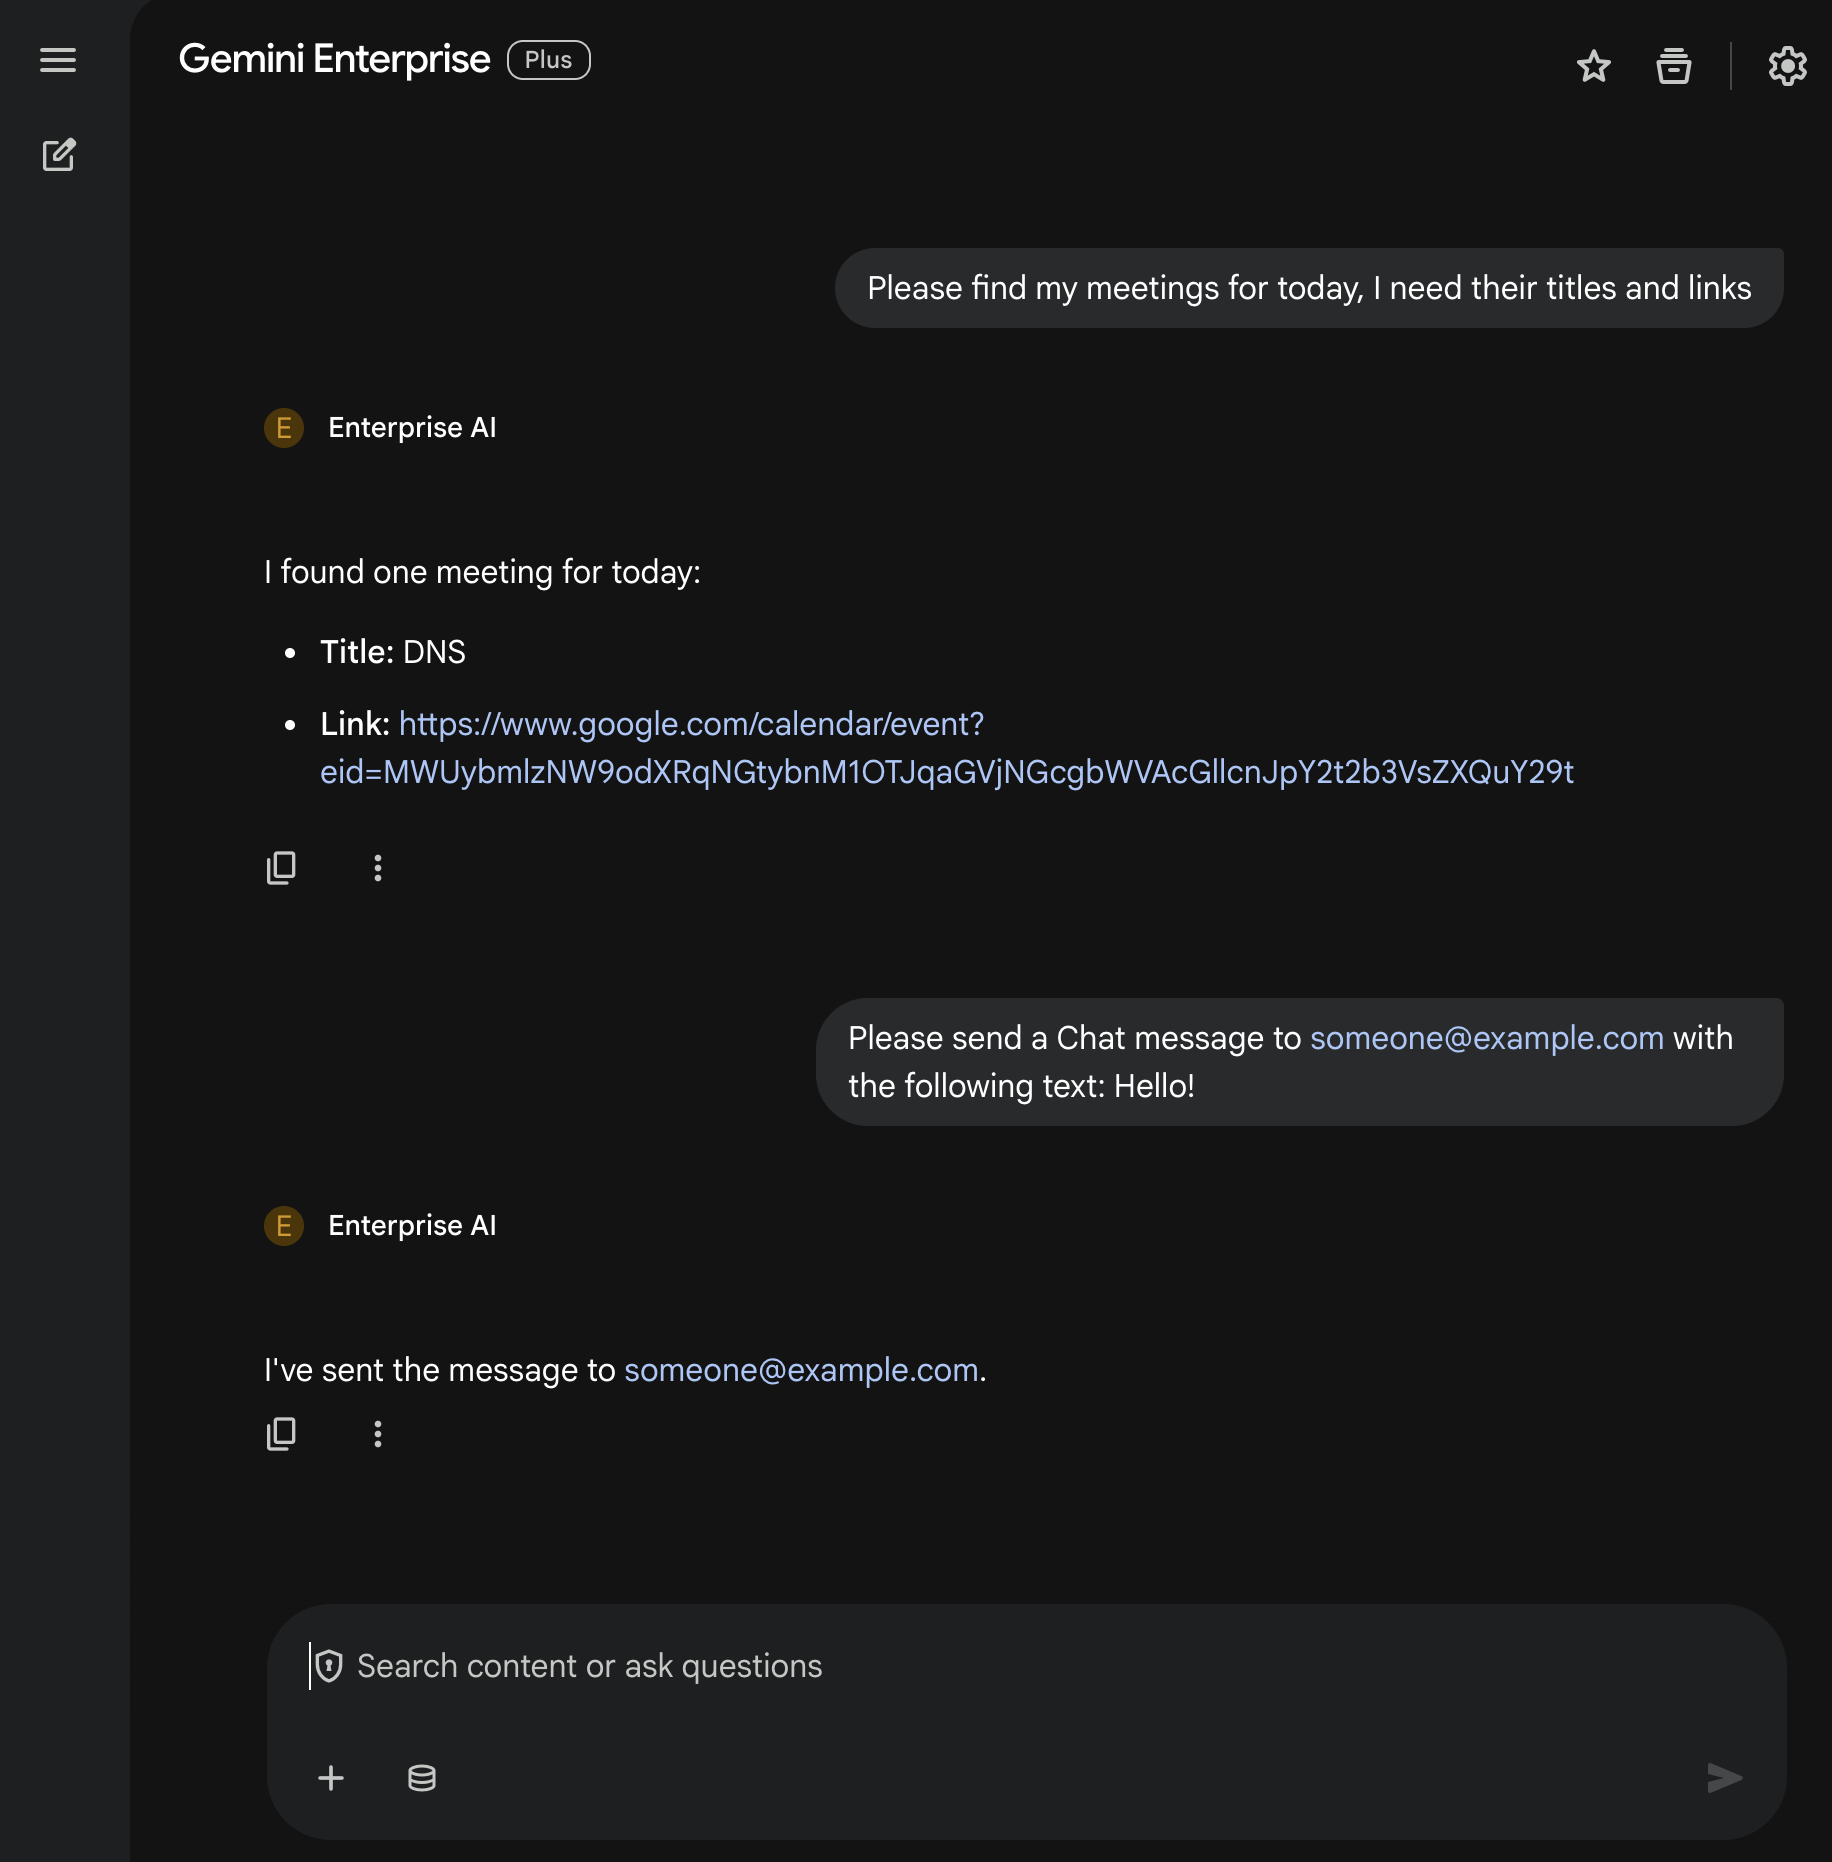
- 채팅에서
Please find my meetings for today, I need their titles and links를 입력하고enter를 누릅니다. - 승인을 클릭한 다음 승인 흐름을 따릅니다.
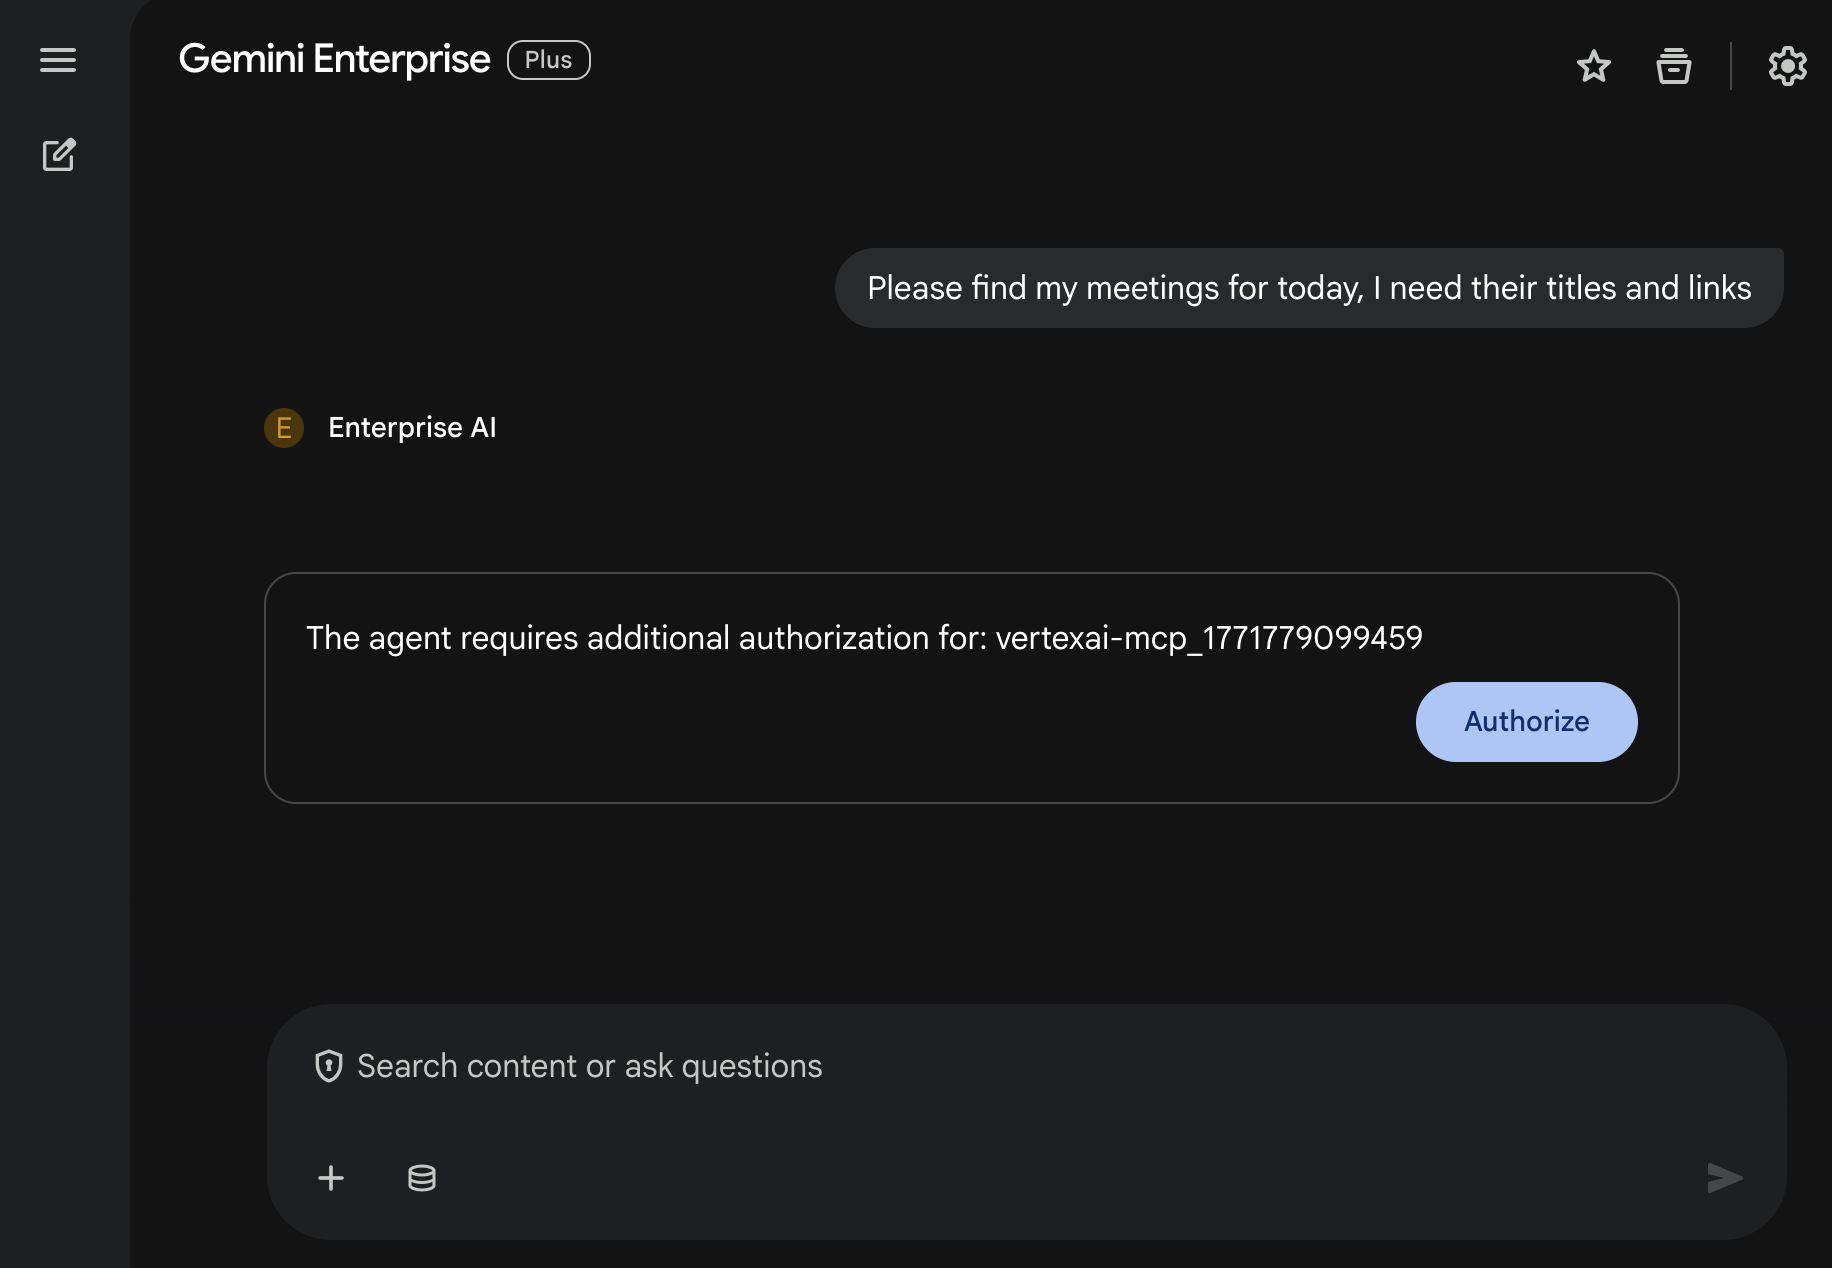
- 에이전트가 사용자의 계정에 따라 캘린더 일정 목록으로 대답합니다.
- 채팅에서
Please send a Chat message to someone@example.com with the following text: Hello!를 입력하고enter를 누릅니다. - 에이전트가 확인 메시지로 대답합니다.
5. Google Workspace 부가기능으로 기본 에이전트
이 에이전트를 사용하면 사용자가 Workspace 앱 UI의 컨텍스트에서 자연어로 Workspace 데이터를 검색할 수 있습니다. 다음 요소를 사용합니다.
- 모델: Gemini
- 데이터: Google Workspace (Calendar, Gmail, Drive, NotebookLM), Google 검색용 Gemini Enterprise 데이터 저장소
- 에이전트 호스트: Gemini Enterprise
- UI: Chat 및 Gmail용 Google Workspace 부가기능 (Calendar, Drive, Docs, Sheets, Slides로 쉽게 확장 가능)
- Google Workspace 부가기능: Apps Script, Gemini Enterprise API, 컨텍스트 (사용자 메타데이터, 선택한 Gmail 메시지)
Google Workspace 부가기능은 StreamAssist API를 사용하여 Gemini Enterprise에 연결됩니다.
개념 검토
Google Workspace 부가기능
Google Workspace 부가기능은 하나 이상의 Google Workspace 애플리케이션 (Gmail, Chat, Calendar, Docs, Drive, Meet, Sheets, Slides)을 확장하는 맞춤 애플리케이션입니다.
Apps Script
Apps Script는 Google Drive에서 제공하는 클라우드 기반 JavaScript 플랫폼으로, Google 제품 전반에서 작업을 통합하고 자동화할 수 있습니다.
Google Workspace 카드 프레임워크
Google Workspace의 카드 프레임워크를 사용하면 개발자가 풍부한 대화형 사용자 인터페이스를 만들 수 있습니다. 텍스트, 이미지, 버튼, 기타 위젯을 포함할 수 있는 체계적이고 시각적으로 매력적인 카드를 구성할 수 있습니다. 이러한 카드는 구조화된 정보를 제공하고 Workspace 애플리케이션 내에서 직접 빠른 작업을 실행할 수 있도록 지원하여 사용자 환경을 개선합니다.
솔루션 아키텍처 검토
소스 코드 검토
appsscript.json
다음 구성은 부가기능의 트리거와 권한을 정의합니다.
- 부가기능 정의: 이 프로젝트가 Chat과 Gmail 모두를 위한 부가기능임을 Google Workspace에 알립니다.
- 문맥 트리거: Gmail의 경우 사용자가 이메일 메시지를 열 때마다
onAddonEvent을 실행하는contextualTrigger을 설정합니다. 이렇게 하면 부가기능이 이메일 콘텐츠를 '볼' 수 있습니다. - 권한: 현재 이메일을 읽고, 스크립트를 실행하고, 외부 서비스 (예: Gemini Enterprise API)에 연결하는 권한 등 부가기능을 실행하는 데 필요한
oauthScopes이 나열됩니다.
...
"addOns": {
    "common": {
      "name": "Enterprise AI",
      "logoUrl": "https://developers.google.com/workspace/add-ons/images/quickstart-app-avatar.png"
    },
    "chat": {},
    "gmail": {
      "contextualTriggers": [
        {
          "unconditional": {},
          "onTriggerFunction": "onAddonEvent"
        }
      ]
    }
  },
  "oauthScopes": [
    "https://www.googleapis.com/auth/script.external_request",
    "https://www.googleapis.com/auth/discoveryengine.assist.readwrite",
    "https://www.googleapis.com/auth/gmail.addons.execute",
    "https://www.googleapis.com/auth/gmail.addons.current.message.readonly"
  ]
...
Chat.gs
다음 코드는 수신되는 Google Chat 메시지를 처리합니다.
- 메시지 수신:
onMessage함수는 메시지 상호작용의 진입점입니다. - 컨텍스트 관리:
space.name(채팅 스페이스의 ID)를 사용자의 속성에 저장합니다. 이렇게 하면 상담사가 답장할 준비가 되었을 때 메시지를 게시할 대화를 정확하게 알 수 있습니다. - 에이전트에게 위임: API 통신을 처리하는 핵심 로직에 사용자의 메시지를 전달하여
requestAgent를 호출합니다.
...
// Service that handles Google Chat operations.

// Handle incoming Google Chat message events, actions will be taken via Google Chat API calls
function onMessage(event) {
  if (isInDebugMode()) {
    console.log(`MESSAGE event received (Chat): ${JSON.stringify(event)}`);
  }
  // Extract data from the event.
  const chatEvent = event.chat;
  setChatConfig(chatEvent.messagePayload.space.name);

  // Request AI agent to answer the message
  requestAgent(chatEvent.messagePayload.message);
  // Respond with an empty response to the Google Chat platform to acknowledge execution
  return null;
}

// --- Utility functions ---

// The Chat direct message (DM) space associated with the user
const SPACE_NAME_PROPERTY = "DM_SPACE_NAME"

// Sets the Chat DM space name for subsequent operations.
function setChatConfig(spaceName) {
  const userProperties = PropertiesService.getUserProperties();
  userProperties.setProperty(SPACE_NAME_PROPERTY, spaceName);
  console.log(`Space is set to ${spaceName}`);
}

// Retrieved the Chat DM space name to sent messages to.
function getConfiguredChat() {
  const userProperties = PropertiesService.getUserProperties();
  return userProperties.getProperty(SPACE_NAME_PROPERTY);
}

// Finds the Chat DM space name between the Chat app and the given user.
function findChatAppDm(userName) {
  return Chat.Spaces.findDirectMessage(
    { 'name': userName },
    {'Authorization': `Bearer ${getAddonCredentials().getAccessToken()}`}
  ).name;
}

// Creates a Chat message in the configured space.
function createMessage(message) {
  const spaceName = getConfiguredChat();
  console.log(`Creating message in space ${spaceName}...`);
  return Chat.Spaces.Messages.create(
    message,
    spaceName,
    {},
    {'Authorization': `Bearer ${getAddonCredentials().getAccessToken()}`}
  ).name;
}
Sidebar.gs
다음 코드는 Gmail 사이드바를 빌드하고 이메일 컨텍스트를 캡처합니다.
- UI 빌드:
createSidebarCard는 Workspace 카드 서비스를 사용하여 시각적 인터페이스를 구성합니다. 텍스트 입력 영역과 '메시지 보내기' 버튼이 있는 간단한 레이아웃을 만듭니다. - 이메일 컨텍스트 캡처:
handleSendMessage에서 코드는 사용자가 현재 이메일 (event.gmail.messageId)을 보고 있는지 확인합니다. 보고 있다면 이메일의 제목과 본문을 안전하게 가져와 사용자의 프롬프트에 추가합니다. - 결과 표시: 에이전트가 응답하면 코드가 사이드바 카드를 업데이트하여 대답을 표시합니다.
...
// Service that handles Gmail operations.

// Triggered when the user opens the Gmail Add-on or selects an email.
function onAddonEvent(event) {
  // If this was triggered by a button click, handle it
  if (event.parameters && event.parameters.action === 'send') {
    return handleSendMessage(event);
  }

  // Otherwise, just render the default initial sidebar
  return createSidebarCard();
}

// Creates the standard Gmail sidebar card consisting of a text input and send button.
// Optionally includes an answer section if a response was generated.
function createSidebarCard(optionalAnswerSection) {
  const card = CardService.newCardBuilder();
  const actionSection = CardService.newCardSection();

  // Create text input for the user's message
  const messageInput = CardService.newTextInput()
    .setFieldName("message")
    .setTitle("Message")
    .setMultiline(true);

  // Create action for sending the message
  const sendAction = CardService.newAction()
    .setFunctionName('onAddonEvent')
    .setParameters({ 'action': 'send' });

  const sendButton = CardService.newTextButton()
    .setText("Send message")
    .setTextButtonStyle(CardService.TextButtonStyle.FILLED)
    .setOnClickAction(sendAction);

  actionSection.addWidget(messageInput);
  actionSection.addWidget(CardService.newButtonSet().addButton(sendButton));

  card.addSection(actionSection);

  // Attach the response at the bottom if we have one
  if (optionalAnswerSection) {
    card.addSection(optionalAnswerSection);
  }

  return card.build();
}

// Handles clicks from the Send message button.
function handleSendMessage(event) {
  const commonEventObject = event.commonEventObject || {};
  const formInputs = commonEventObject.formInputs || {};
  const messageInput = formInputs.message;

  let userMessage = "";
  if (messageInput && messageInput.stringInputs && messageInput.stringInputs.value.length > 0) {
    userMessage = messageInput.stringInputs.value[0];
  }

  if (!userMessage || userMessage.trim().length === 0) {
    return CardService.newActionResponseBuilder()
      .setNotification(CardService.newNotification().setText("Please enter a message."))
      .build();
  }

  let finalQueryText = `USER MESSAGE TO ANSWER: ${userMessage}`;

  // If we have an email selected in Gmail, append its content as context
  if (event.gmail && event.gmail.messageId) {
    try {
      GmailApp.setCurrentMessageAccessToken(event.gmail.accessToken);
      const message = GmailApp.getMessageById(event.gmail.messageId);

      const subject = message.getSubject();
      const bodyText = message.getPlainBody() || message.getBody();

      finalQueryText += `\n\nEMAIL THE USER HAS OPENED ON SCREEN:\nSubject: ${subject}\nBody:\n---\n${bodyText}\n---`;
    } catch (e) {
      console.error("Could not fetch Gmail context: " + e);
      // Invalidate the token explicitly so the next prompt requests the missing scopes
      ScriptApp.invalidateAuth();

      CardService.newAuthorizationException()
        .setResourceDisplayName("Enterprise AI")
        .setAuthorizationUrl(ScriptApp.getAuthorizationUrl())
        .throwException();
    }
  }

  try {
    const responseText = queryAgent({ text: finalQueryText, forceNewSession: true });

    // We leverage the 'showdown' library to parse the LLM's Markdown output into HTML
    // We also substitute markdown listings with arrows and adjust newlines for clearer rendering in the sidebar
    let displayedText = substituteListingsFromMarkdown(responseText);
    displayedText = new showdown.Converter().makeHtml(displayedText).replace(/\n/g, '\n\n');

    const textParagraph = CardService.newTextParagraph();
    textParagraph.setText(displayedText);

    const answerSection = CardService.newCardSection()
      .addWidget(textParagraph);

    const updatedCard = createSidebarCard(answerSection);

    return CardService.newActionResponseBuilder()
      .setNavigation(CardService.newNavigation().updateCard(updatedCard))
      .build();

  } catch (err) {
    return CardService.newActionResponseBuilder()
      .setNotification(CardService.newNotification().setText("Error fetching response: " + err.message))
      .build();
  }
}
...
AgentHandler.gs
다음 코드는 Gemini Enterprise에 대한 API 호출을 오케스트레이션합니다.
- API 호출 오케스트레이션:
queryAgent는 부가기능과 Gemini Enterprise 간의 브리지입니다. 사용자의 질문, 시간대, 활성 세션 ID가 포함된 요청을 구성합니다. - 동적 검색:
getAgentDataStores를 호출하여 사용 가능한 데이터 커넥터를 확인합니다. - 대답 스트리밍: 에이전트 대답에는 시간이 걸릴 수 있으므로 서버 전송 이벤트 (SSE)와 함께
streamAssistAPI를 사용합니다. 코드는 응답을 청크로 수집하고 전체 답변을 재구성합니다.
...
// Service that handles Gemini Enterprise AI Agent operations.

// Submits a query to the AI agent and returns the response string synchronously
function queryAgent(input) {
  const isNewSession = input.forceNewSession || !PropertiesService.getUserProperties().getProperty(AGENT_SESSION_NAME);
  const sessionName = input.forceNewSession ? createAgentSession() : getOrCreateAgentSession();

  let systemPrompt = "SYSTEM PROMPT START Do not respond with tables but use bullet points instead.";
  if (input.forceNewSession) {
    systemPrompt += " Do not ask the user follow-up questions or converse with them as history is not kept in this interface.";
  }
  systemPrompt += " SYSTEM PROMPT END\n\n";

  const queryText = isNewSession ? systemPrompt + input.text : input.text;

  const requestPayload = {
    "session": sessionName,
    "userMetadata": { "timeZone": Session.getScriptTimeZone() },
    "query": { "text": queryText },
    "toolsSpec": { "vertexAiSearchSpec": { "dataStoreSpecs": getAgentDataStores().map(ds => { dataStore: ds }) } },
    "agentsSpec": { "agentSpecs": [{ "agentId": getAgentId() }] }
  };

  const responseContentText = UrlFetchApp.fetch(
    `https://${getLocation()}-discoveryengine.googleapis.com/v1alpha/${getReasoningEngine()}/assistants/default_assistant:streamAssist?alt=sse`,
    {
      method: 'post',
      headers: { 'Authorization': `Bearer ${ScriptApp.getOAuthToken()}` },
      contentType: 'application/json',
      payload: JSON.stringify(requestPayload),
      muteHttpExceptions: true
    }
  ).getContentText();

  if (isInDebugMode()) {
    console.log(`Response: ${responseContentText}`);
  }

  const events = responseContentText.split('\n').map(s => s.replace(/^data:\s*/, '')).filter(s => s.trim().length > 0);
  console.log(`Received ${events.length} agent events.`);

  let answerText = "";
  for (const eventJson of events) {
    if (isInDebugMode()) {
      console.log("Event: " + eventJson);
    }
    const event = JSON.parse(eventJson);

    // Ignore internal events
    if (!event.answer) {
      console.log(`Ignored: internal event`);
      continue;
    }

    // Handle text replies
    const replies = event.answer.replies || [];
    for (const reply of replies) {
      const content = reply.groundedContent.content;
      if (content) {
        if (isInDebugMode()) {
          console.log(`Processing content: ${JSON.stringify(content)}`);
        }
        if (content.thought) {
          console.log(`Ignored: thought event`);
          continue;
        }
        answerText += content.text;
      }
    }

    if (event.answer.state === "SUCCEEDED") {
      console.log(`Answer text: ${answerText}`);
      return answerText;
    } else if (event.answer.state !== "IN_PROGRESS") {
      throw new Error("Something went wrong, check the Apps Script logs for more info.");
    }
  }
  return answerText;
}

// Gets the list of data stores configured for the agent to include in the request.
function getAgentDataStores() {
  const responseContentText = UrlFetchApp.fetch(
    `https://${getLocation()}-discoveryengine.googleapis.com/v1/${getReasoningEngine().split('/').slice(0, 6).join('/')}/dataStores`,
    {
      method: 'get',
      // Use the add on service account credentials for data store listing access
      headers: { 'Authorization': `Bearer ${getAddonCredentials().getAccessToken()}` },
      contentType: 'application/json',
      muteHttpExceptions: true
    }
  ).getContentText();
  if (isInDebugMode()) {
    console.log(`Response: ${responseContentText}`);
  }
  const dataStores = JSON.parse(responseContentText).dataStores.map(ds => ds.name);
  if (isInDebugMode()) {
    console.log(`Data stores: ${dataStores}`);
  }
  return dataStores;
}
...
서비스 계정 시작
애드온의 서버 측 작업을 승인할 전용 서비스 계정을 만듭니다.
Google Cloud 콘솔에서 다음 단계를 따르세요.
- 메뉴 ☰ > IAM 및 관리자 > 서비스 계정 > + 서비스 계정 만들기를 클릭합니다.
- 서비스 계정 이름을
ge-add-on으로 설정합니다.
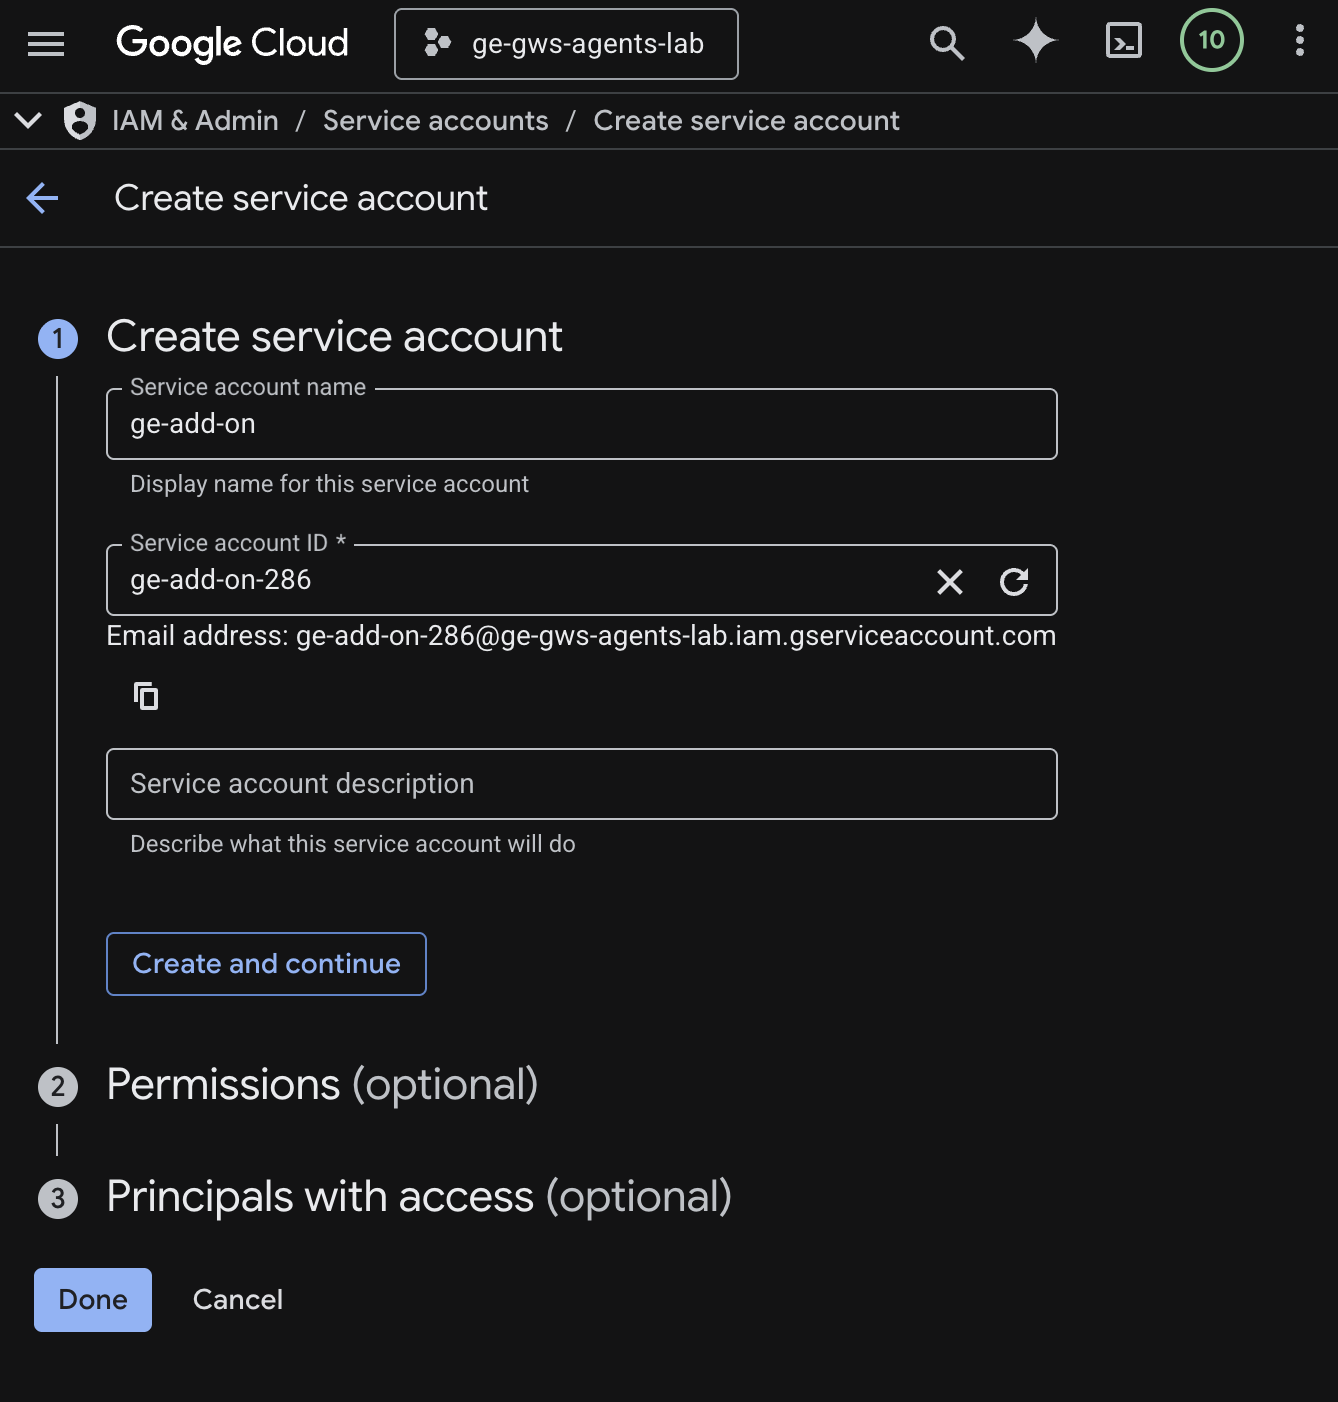
- 만들고 계속하기를 클릭합니다.
- 권한에 Discovery Engine 뷰어 역할을 추가합니다.
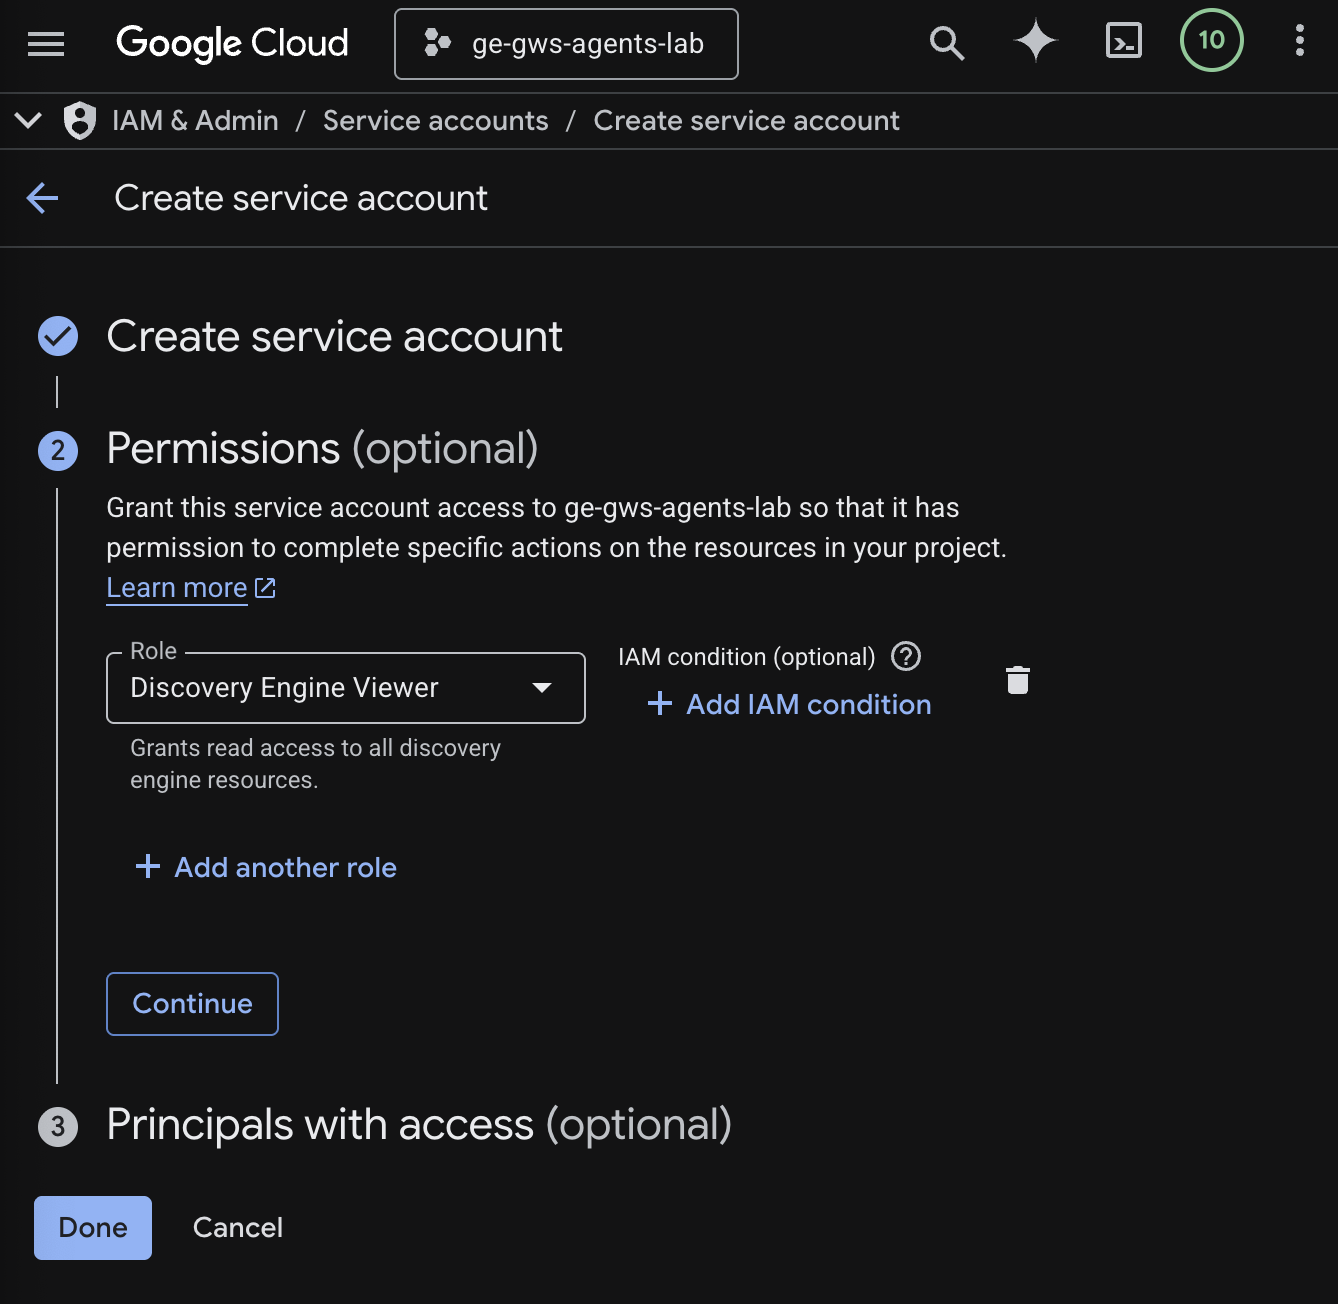
- 계속을 클릭한 다음 완료를 클릭합니다. 서비스 계정 페이지로 리디렉션되고 만든 서비스 계정을 볼 수 있습니다.
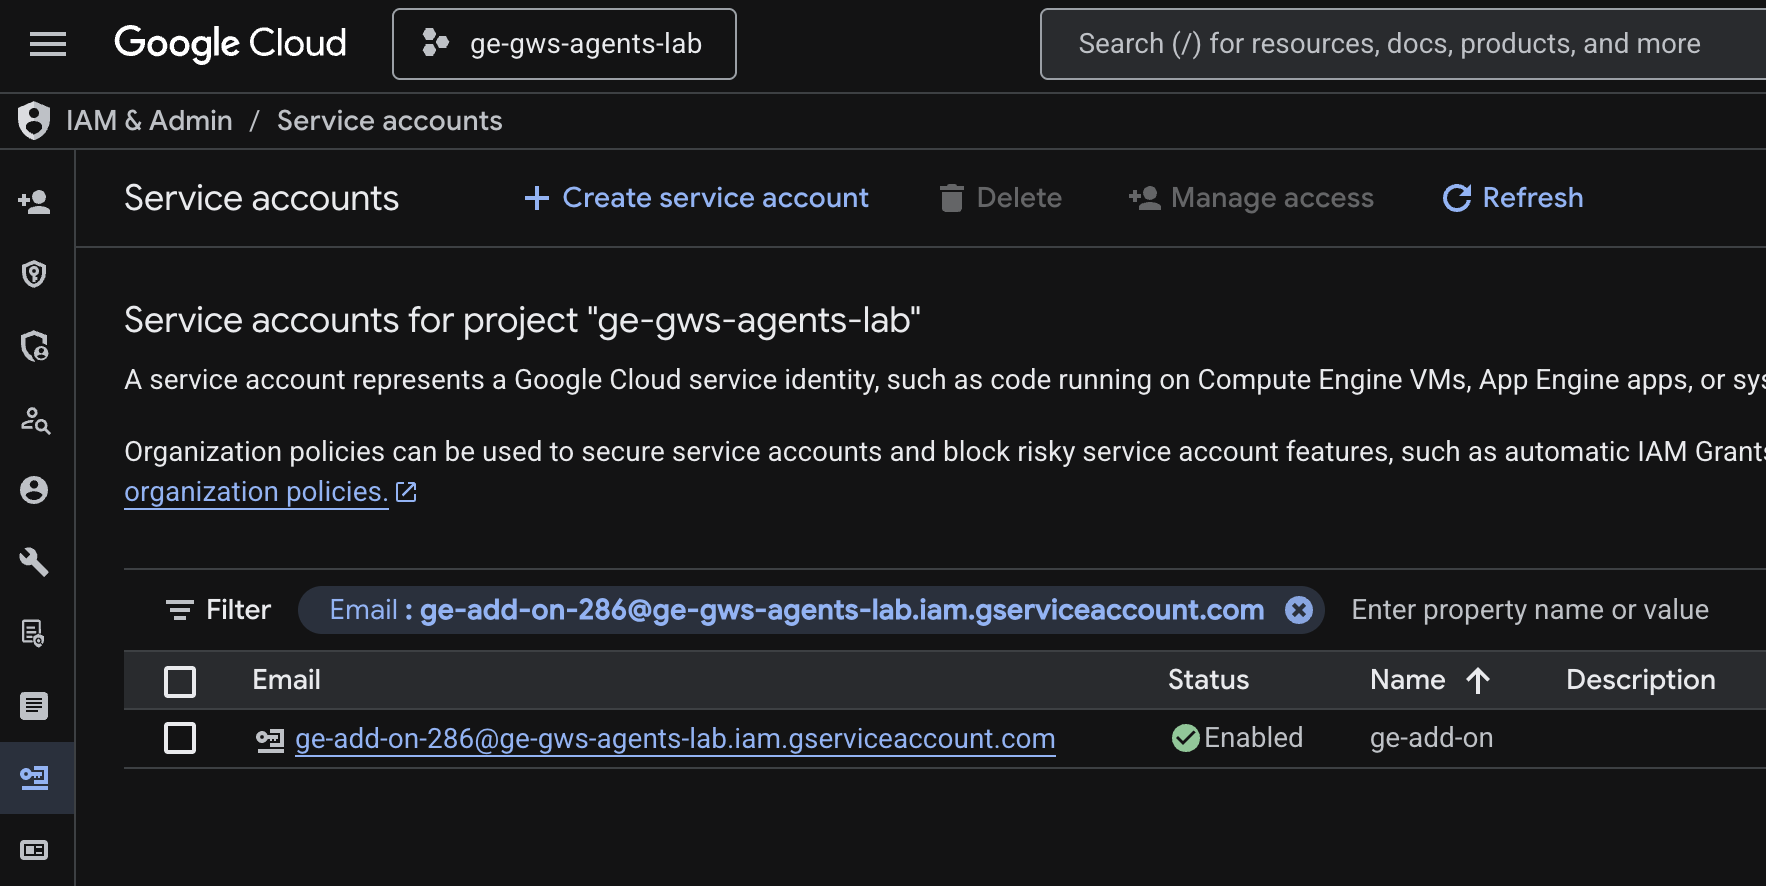
- 새로 만든 서비스 계정을 선택한 다음 키 탭을 선택합니다.
- 키 추가를 클릭한 후 새 키 만들기를 클릭합니다.
- JSON을 선택한 후 만들기를 클릭합니다.
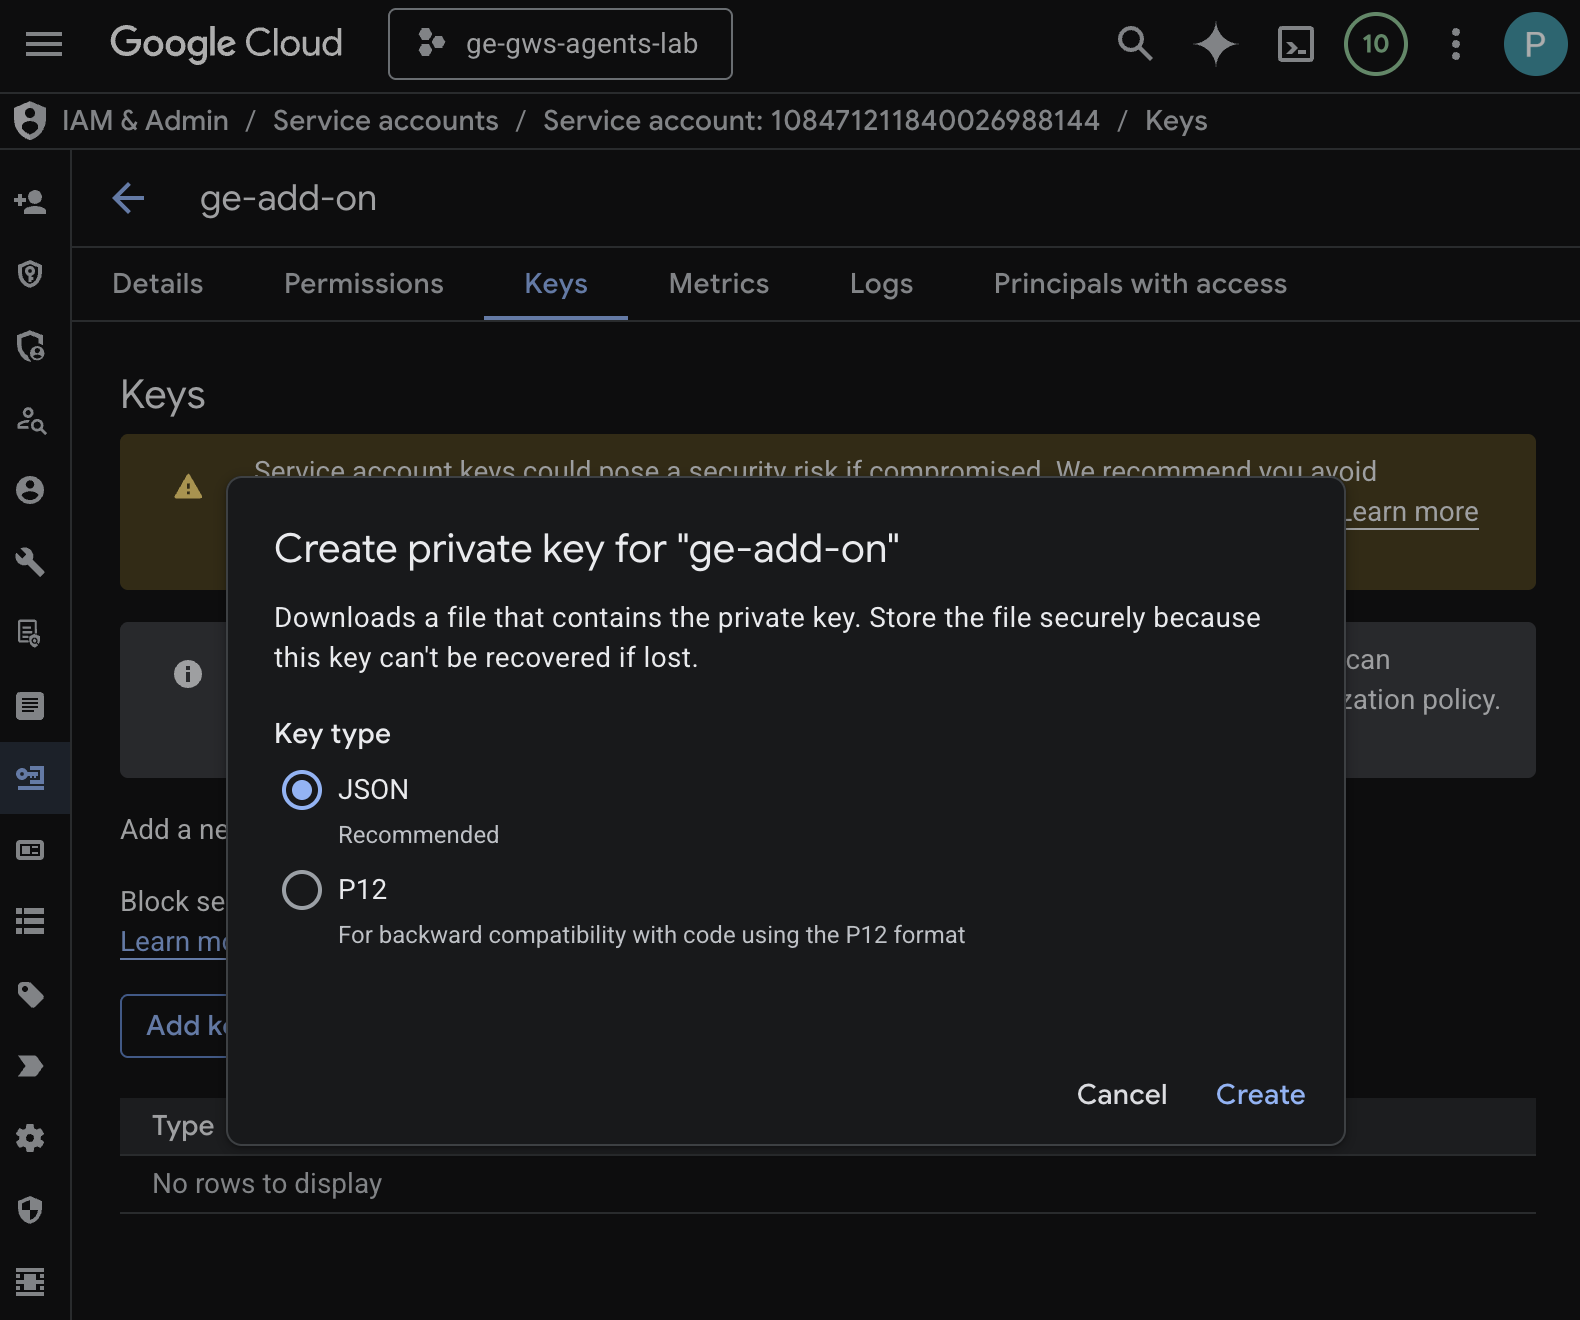
- 대화상자가 닫히고 새로 생성된 공개 키/비공개 키 쌍이 자동으로 로컬 환경에 JSON 파일로 다운로드됩니다.
Apps Script 프로젝트 생성 및 구성
부가기능 코드를 호스팅할 새 Apps Script 프로젝트를 만들고 연결 속성을 구성합니다.
- 다음 버튼을 클릭하여 Enterprise AI 부가기능 Apps Script 프로젝트를 엽니다.
- 개요 > 사본 만들기를 클릭합니다.
- Apps Script 프로젝트에서 프로젝트 설정 > 스크립트 속성 수정 > 스크립트 속성 추가를 클릭하여 스크립트 속성을 추가합니다.
- REASONING_ENGINE_RESOURCE_NAME을 Gemini Enterprise 애플리케이션 리소스 이름으로 설정합니다. 형식은 다음과 같습니다.
# 1. Replace PROJECT_ID with the Google Cloud project ID.
# 2. Replace GE_APP_ID with the codelab app ID found in Google Cloud console > Gemini Enterprise > Apps.

projects/<PROJECT_ID>/locations/global/collections/default_collection/engines/<GE_APP_ID>
- APP_SERVICE_ACCOUNT_KEY를 이전 단계에서 다운로드한 서비스 계정 파일의 JSON 키로 설정합니다.
- 스크립트 속성 저장을 클릭합니다.
Gmail 및 Chat에 배포
Gmail 및 Google Chat 내에서 직접 테스트할 수 있도록 부가기능을 배포합니다.
Apps Script 프로젝트에서 다음 단계를 따르세요.
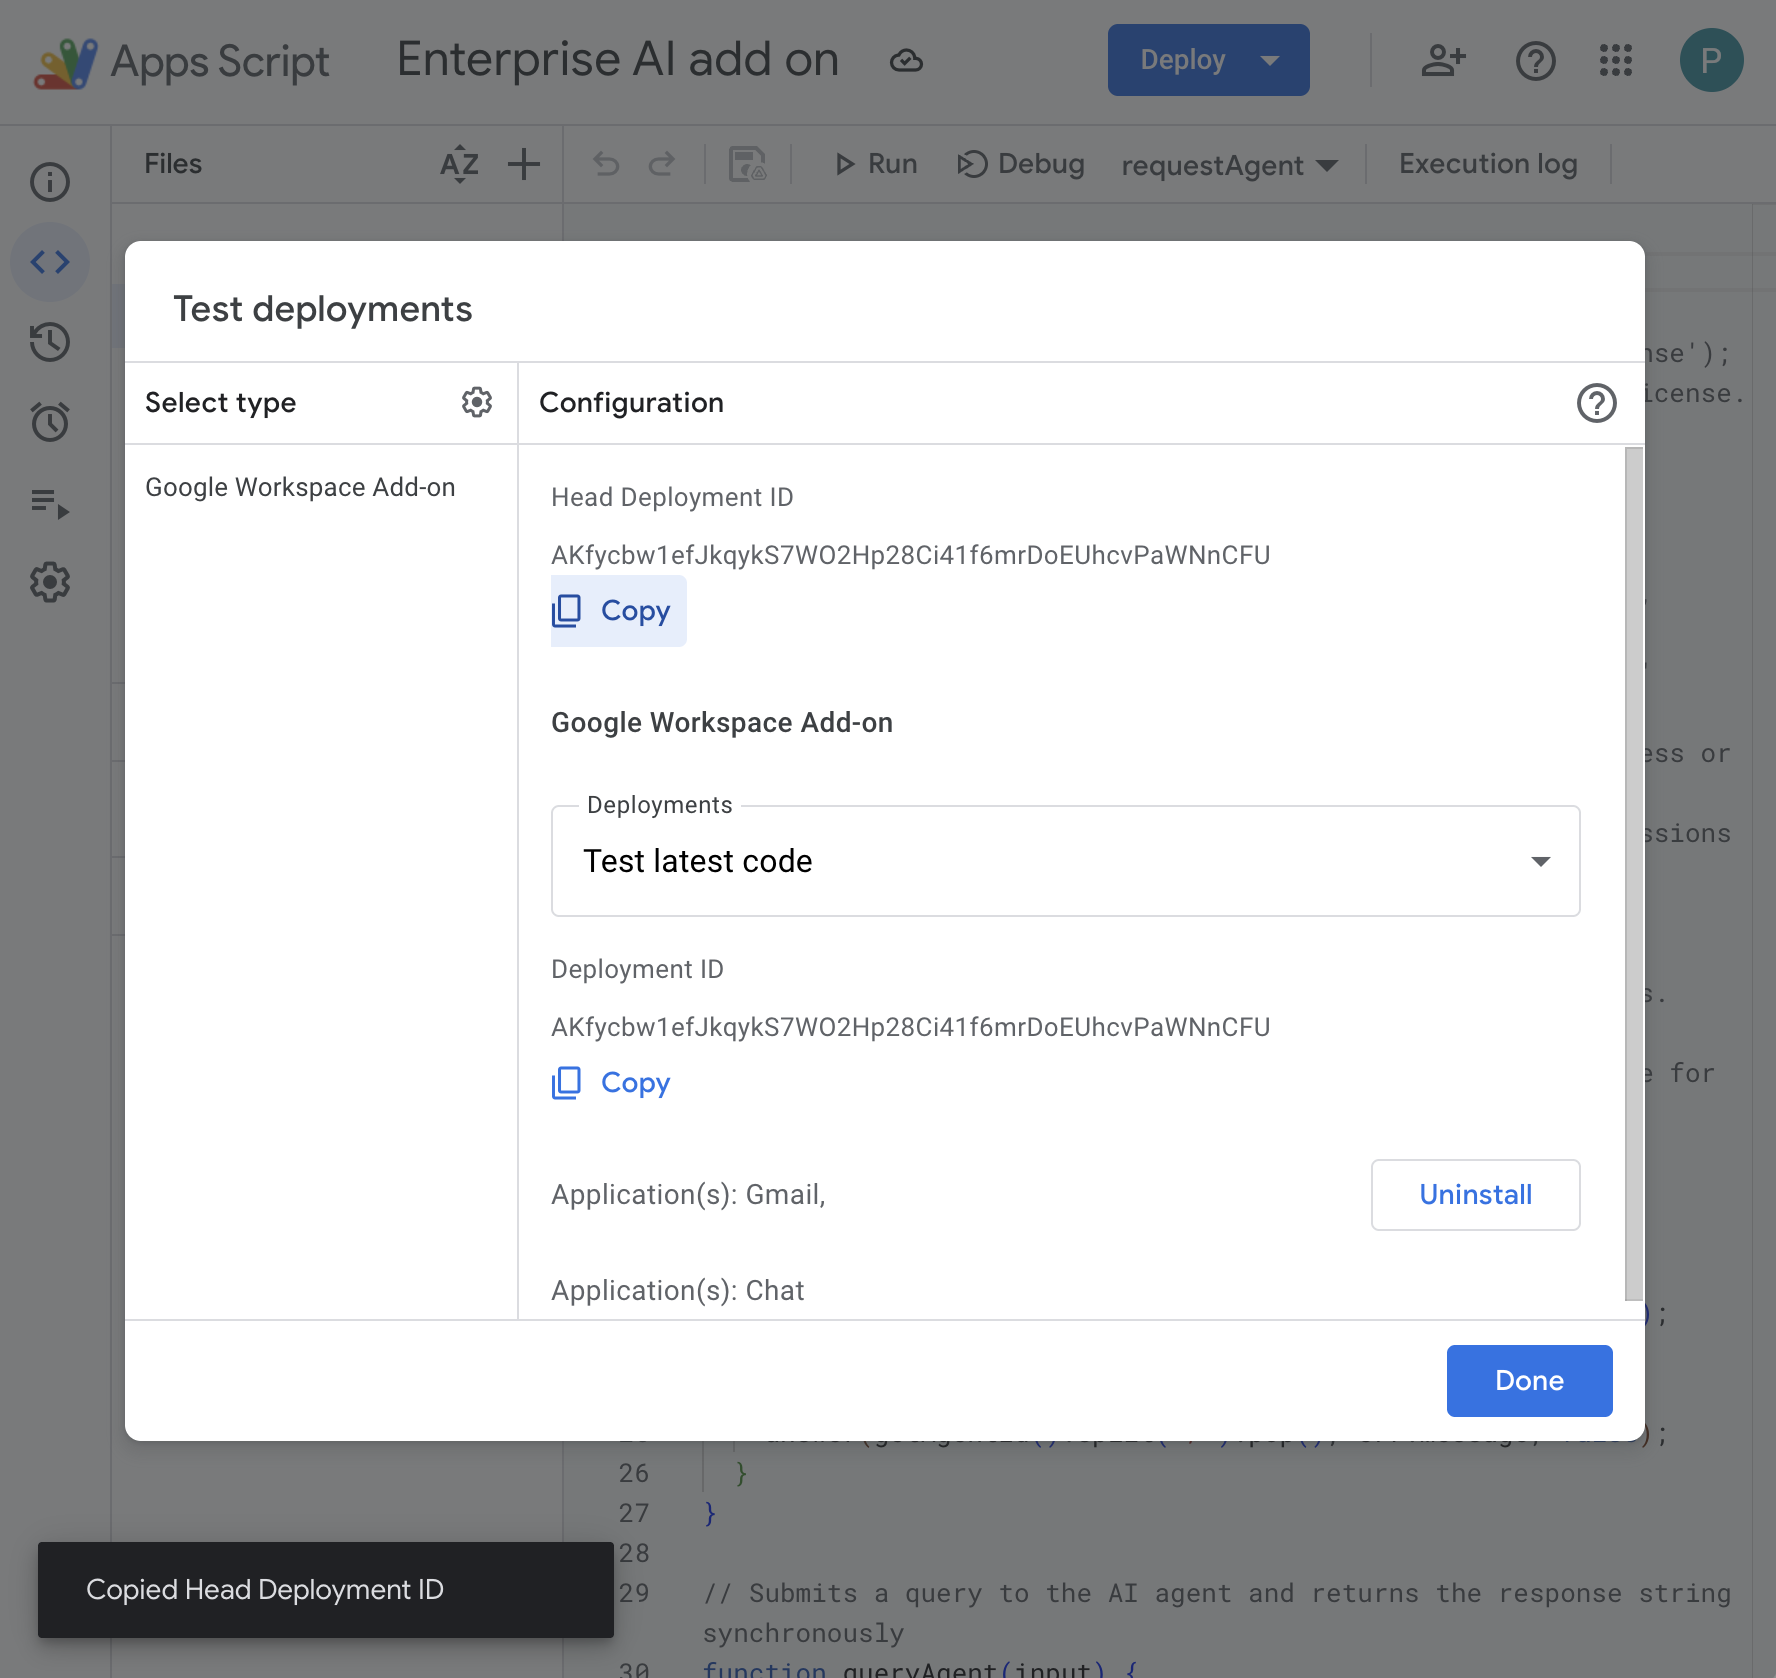
- 배포 > 테스트 배포를 클릭한 다음 설치를 클릭합니다. 이제 Gmail에서 사용할 수 있습니다.
- 배포 책임자 ID 아래의 복사를 클릭합니다.
Google Cloud 콘솔에서 다음 단계를 따르세요.
- Google Cloud 검색 필드에서
Google Chat API를 검색하고 Google Chat API를 클릭한 다음 관리를 클릭하고 구성을 클릭합니다.
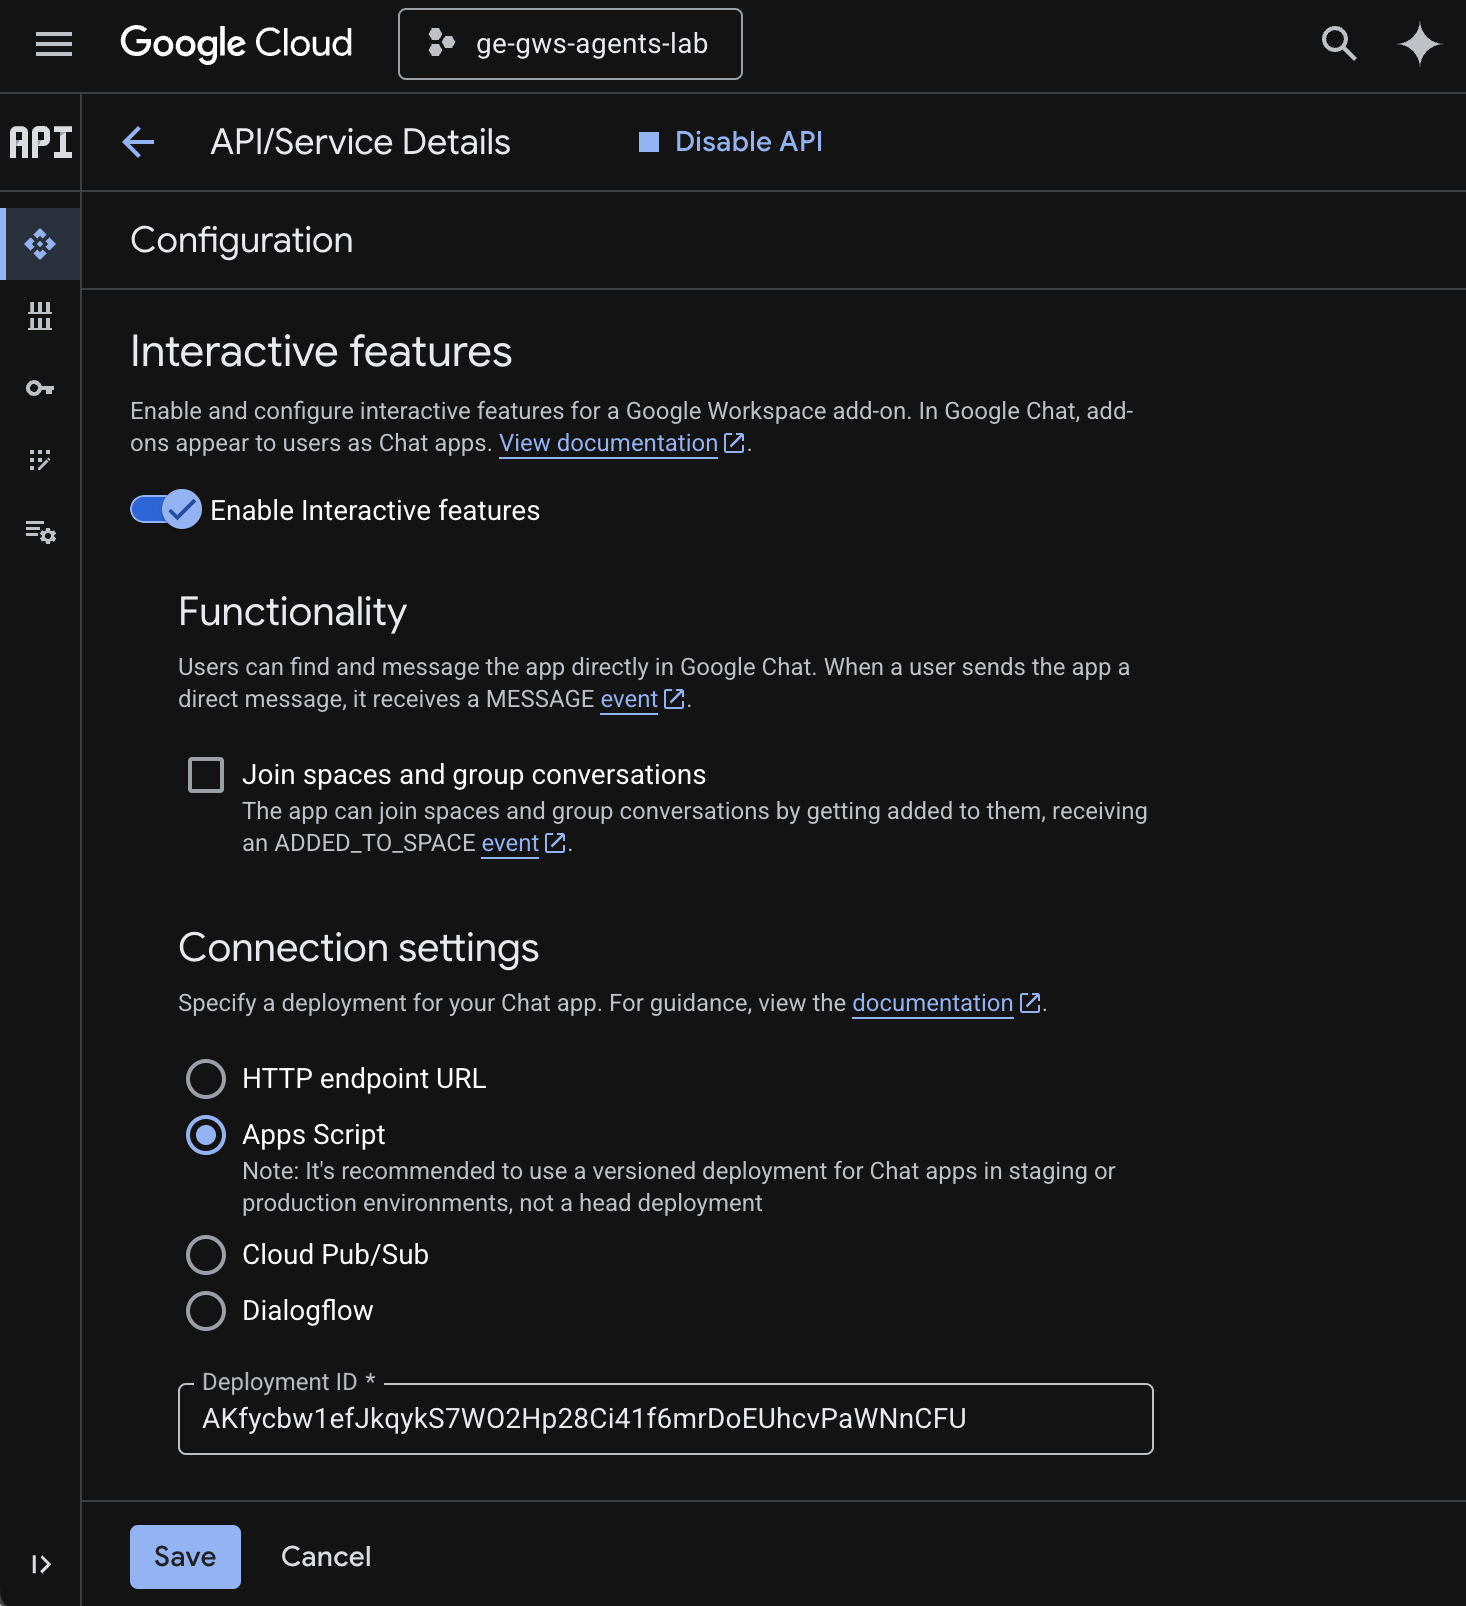
- 대화형 기능 사용 설정을 선택합니다.
- 스페이스 및 그룹 대화 참여를 선택 해제합니다.
- 연결 설정에서 Apps Script를 선택합니다.
- 배포 ID를 이전 단계에서 복사한 헤드 배포 ID로 설정합니다.
- 공개 상태에서 내 Workspace 도메인의 특정 사용자 및 그룹에서 이 Chat 앱을 사용할 수 있도록 설정을 선택하고 이메일 주소를 입력합니다.
- 저장을 클릭합니다.
부가기능 사용해 보기
실시간 애드온과 상호작용하여 데이터를 가져오고 맥락에 맞는 질문에 답변할 수 있는지 확인합니다.
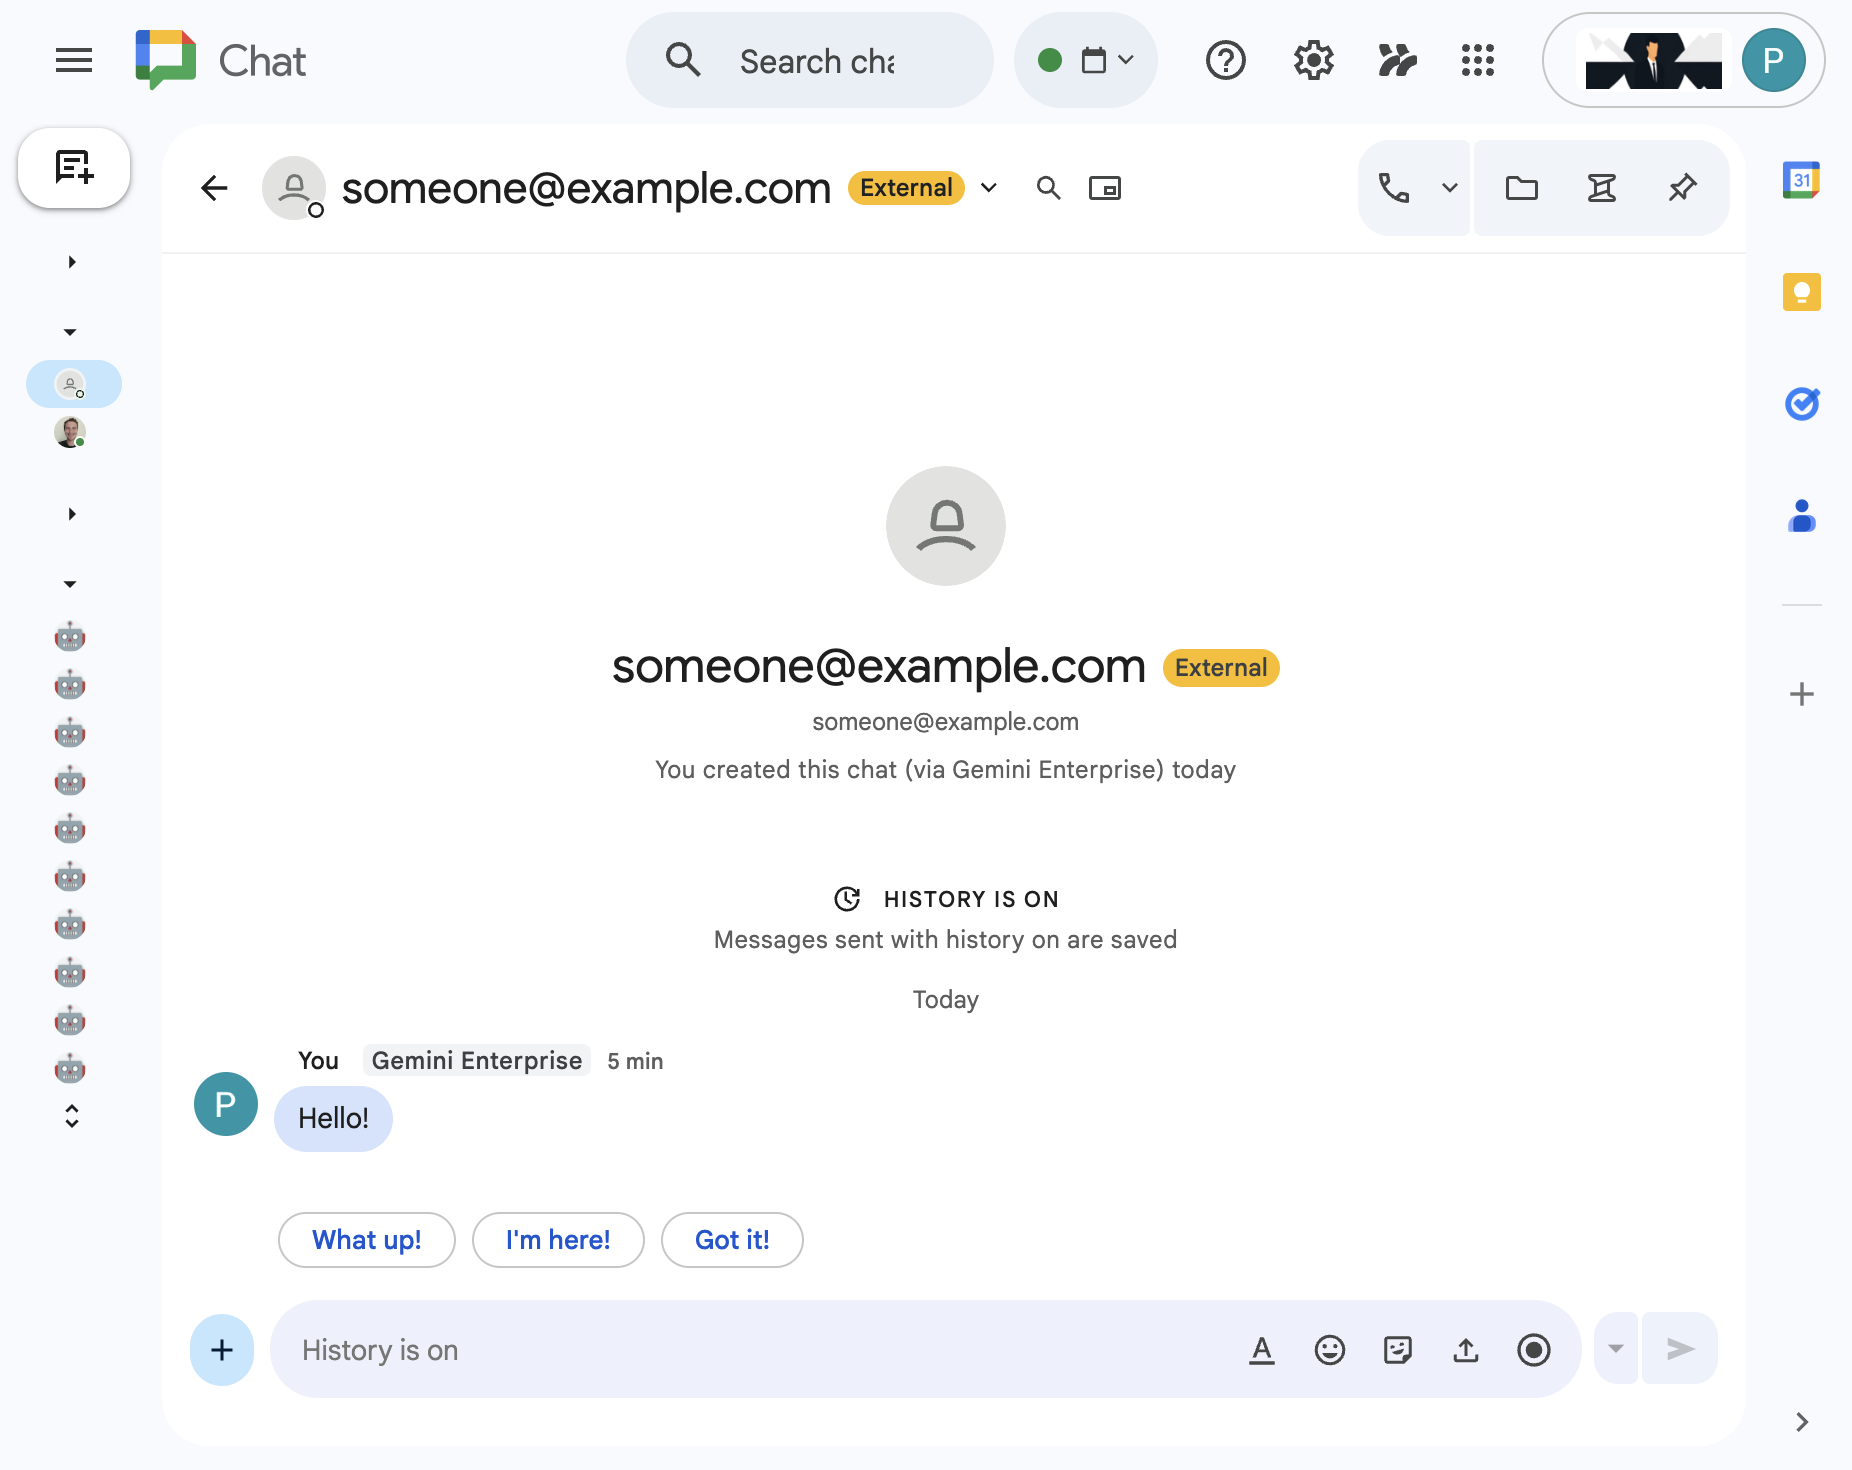
새 탭에서 Google Chat을 열고 다음 단계를 따르세요.
- Chat 앱 Gemini Enterprise와의 채팅 메시지 스페이스를 엽니다.
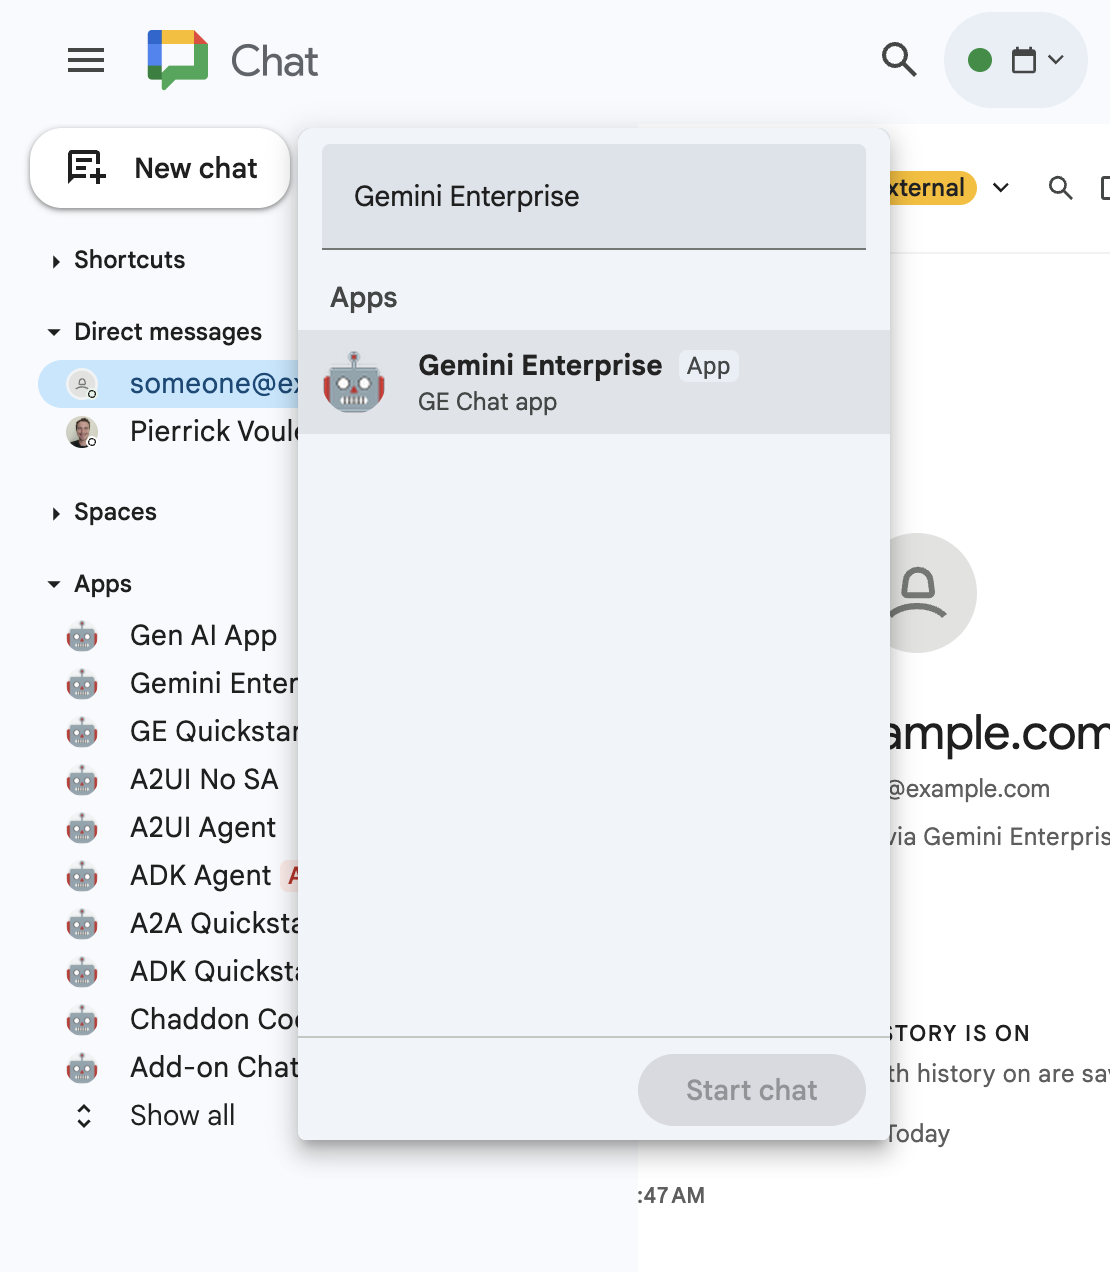
- 구성을 클릭하고 인증 흐름을 진행합니다.
What are my meetings for today?라고 입력하고enter키를 누릅니다. Gemini Enterprise 채팅 앱이 결과를 대답으로 제공해야 합니다.
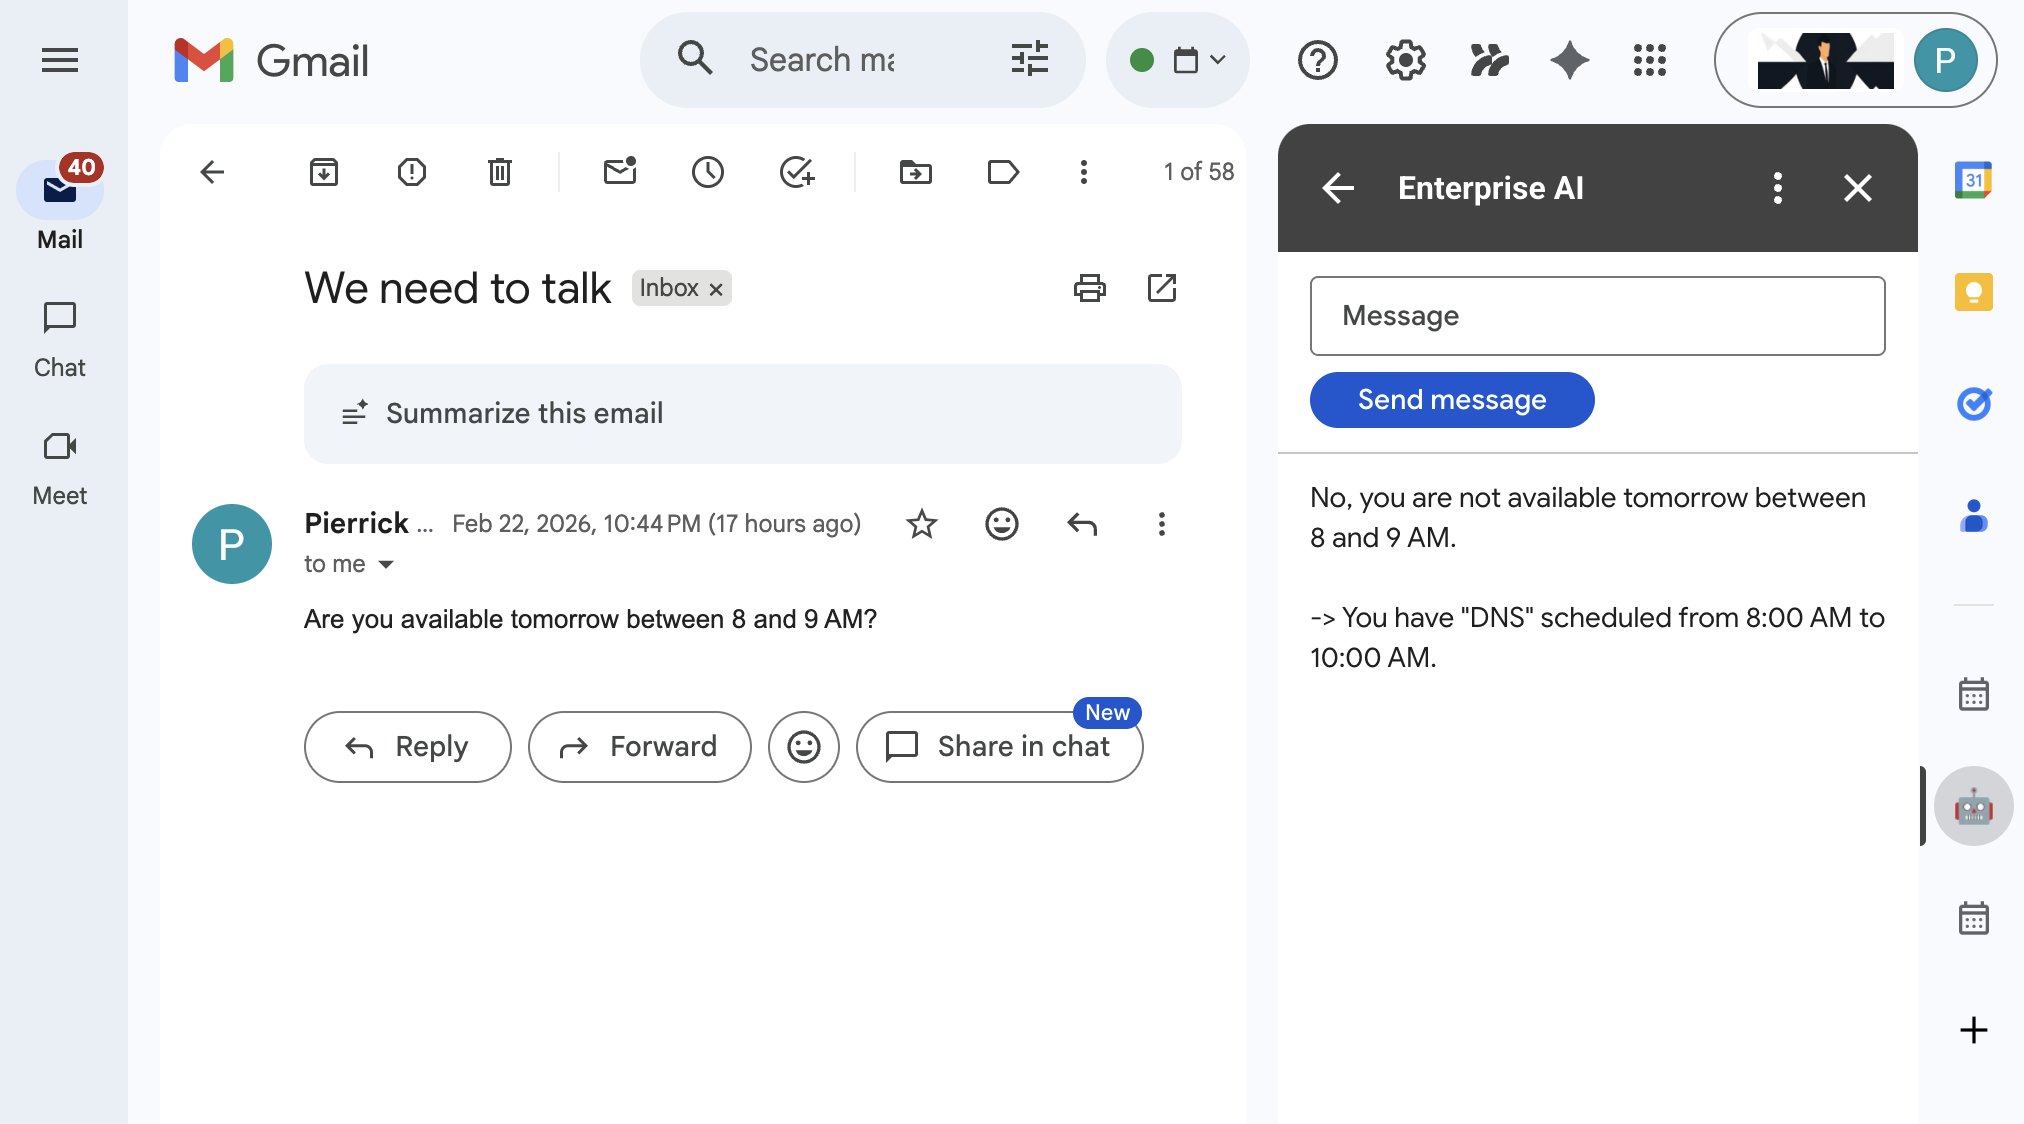
새 탭에서 Gmail을 열고 다음 단계를 따르세요.
- 제목이
We need to talk로 설정되고 본문이Are you available today between 8 and 9 AM?로 설정된 이메일을 자신에게 보냅니다. - 새로 수신된 이메일을 엽니다.
- Enterprise AI 부가기능 사이드바를 엽니다.
- 메시지를
Am I?로 설정합니다. - 메시지 보내기를 클릭합니다.
- 답변은 버튼 뒤에 표시됩니다.
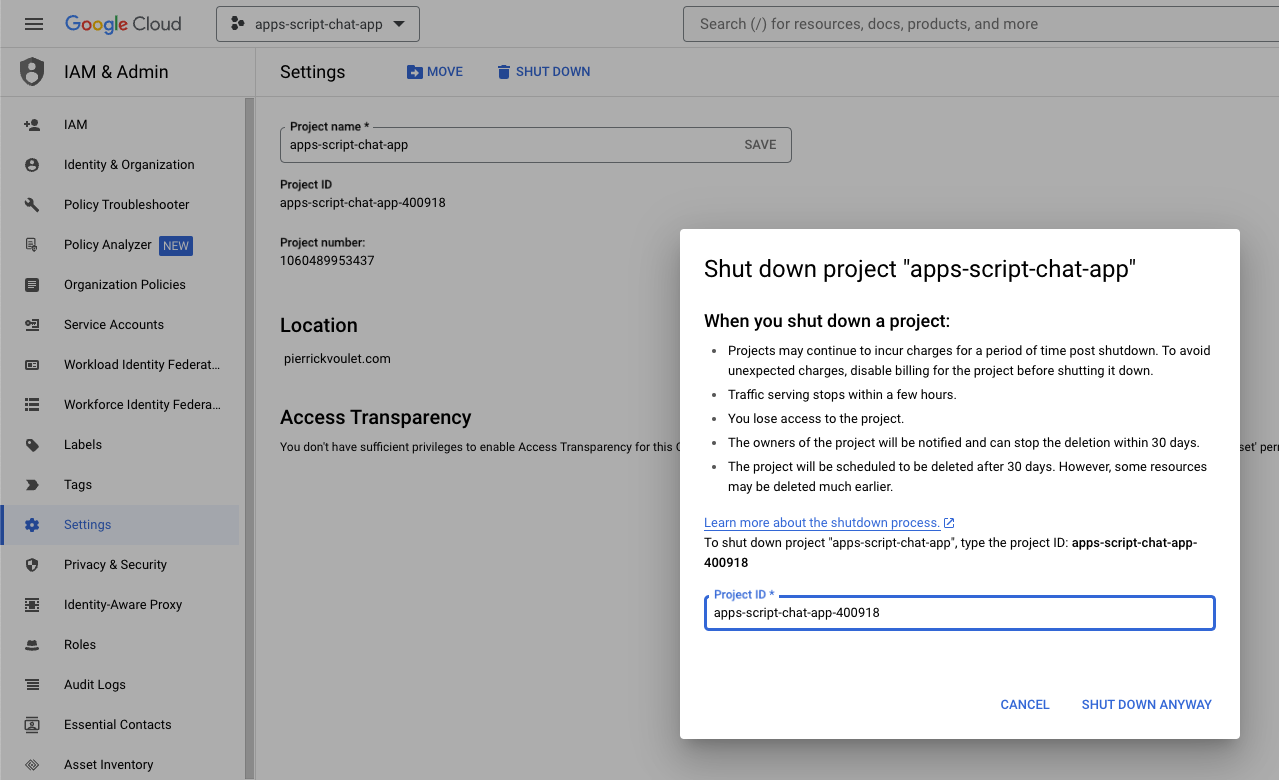
6. 삭제
Google Cloud 프로젝트 삭제
이 Codelab에서 사용한 리소스 비용이 Google Cloud 계정에 청구되지 않도록 하려면 Google Cloud 프로젝트를 삭제하는 것이 좋습니다.
Google Cloud 콘솔에서 다음 단계를 따르세요.
- 메뉴 ☰ > IAM 및 관리자 > 설정을 클릭합니다.
- 종료를 클릭합니다.
- 프로젝트 ID를 입력합니다.
- 무시하고 종료를 클릭합니다.
7. 축하합니다
축하합니다. Gemini Enterprise와 Google Workspace를 더 긴밀하게 통합하여 작업자를 위한 솔루션을 구축했습니다.
다음 단계
이 Codelab에서는 가장 일반적인 사용 사례만 보여드렸지만, 솔루션에서 고려해 볼 만한 다양한 확대 영역이 있습니다. 예를 들면 다음과 같습니다.
- Gemini CLI, Antigravity와 같은 AI 기반 개발자 도구를 사용합니다.
- 커스텀 MCP, 커스텀 함수 호출, 생성형 UI와 같은 다른 에이전트 프레임워크 및 도구와 통합
- Agent Platform과 같은 전용 플랫폼에서 호스팅되는 커스텀 모델을 비롯한 다른 AI 모델과 통합
- Dialogflow와 같은 전용 플랫폼에서 호스팅되거나 Cloud Marketplace를 통해 서드 파티에서 호스팅되는 다른 에이전트와 통합
- Cloud Marketplace에 에이전트를 게시하여 팀, 조직 또는 일반 사용자를 지원합니다.
자세히 알아보기
YouTube 동영상, 문서 웹사이트, 코드 샘플, 가이드 등 개발자를 위한 다양한 리소스가 마련되어 있습니다.
- Google Cloud Developer Center
- 지원되는 제품 | Google Cloud MCP 서버
- A2UI
- Gemini Enterprise 에이전트 플랫폼의 Model Garden | Google Cloud
- 에이전트 개요 | Gemini Enterprise | Google Cloud 문서
- Google Cloud Marketplace 및 Gemini Enterprise를 사용한 AI 에이전트 확장
- Google Cloud Marketplace를 통해 AI 에이전트 제공
- Google Workspace 개발자 YouTube 채널 - 개발자 여러분, 환영합니다!
- Google Workspace 개발자 웹사이트
- 모든 Google Workspace 부가기능 샘플을 위한 GitHub 저장소