
1. Before you begin

What is Gemini Enterprise?
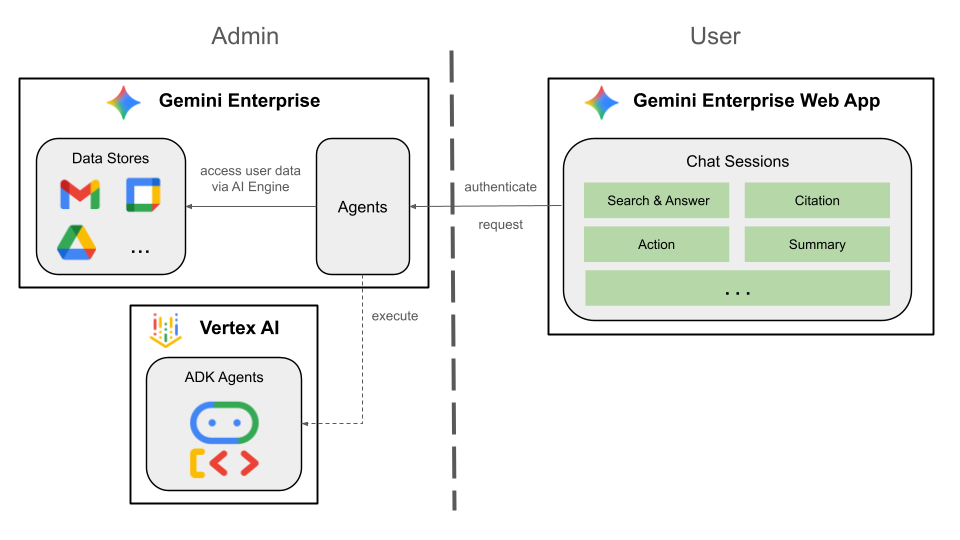
Gemini Enterprise is an advanced agentic platform that brings the best of Google AI to every employee, for every workflow. It empowers teams to discover, create, share, and run AI agents in one secure environment.
- Access advanced models: Users get immediate access to Google's most powerful multimodal AI, including Gemini, to tackle complex business challenges.
- Utilize specialized agents: The suite includes ready-to-use Google agents for research, coding, and note-taking to provide immediate value.
- Empower every employee: No-code and pro-code options allow staff across all departments to build and manage their own custom agents for workflow automation.
- Ground agents in data: Agents can be securely connected to internal company data and third-party applications to ensure their responses are contextually accurate.
- Centralized governance: Administrators can visualize and audit all agent activity to ensure the organization meets strict security and compliance standards.
- Expand with ecosystems: The platform integrates with a wide network of partner applications and service providers to extend automation across different systems.

What is Google Workspace?
Google Workspace is a collection of cloud-based productivity and collaboration solutions designed for individuals, schools, and businesses:
- Communication: Professional email services (Gmail), video conferencing (Meet), and team messaging (Chat).
- Content Creation: Tools for writing documents (Docs), building spreadsheet (Sheets), and designing presentations (Slides).
- Organization: Shared calendars (Calendars) and digital note-taking (Keep).
- Storage: Centralized cloud space for saving and sharing files securely (Drive).
- Management: Administrative controls to manage users and security settings (Workspace Admin Console).
What kind of custom integrations?
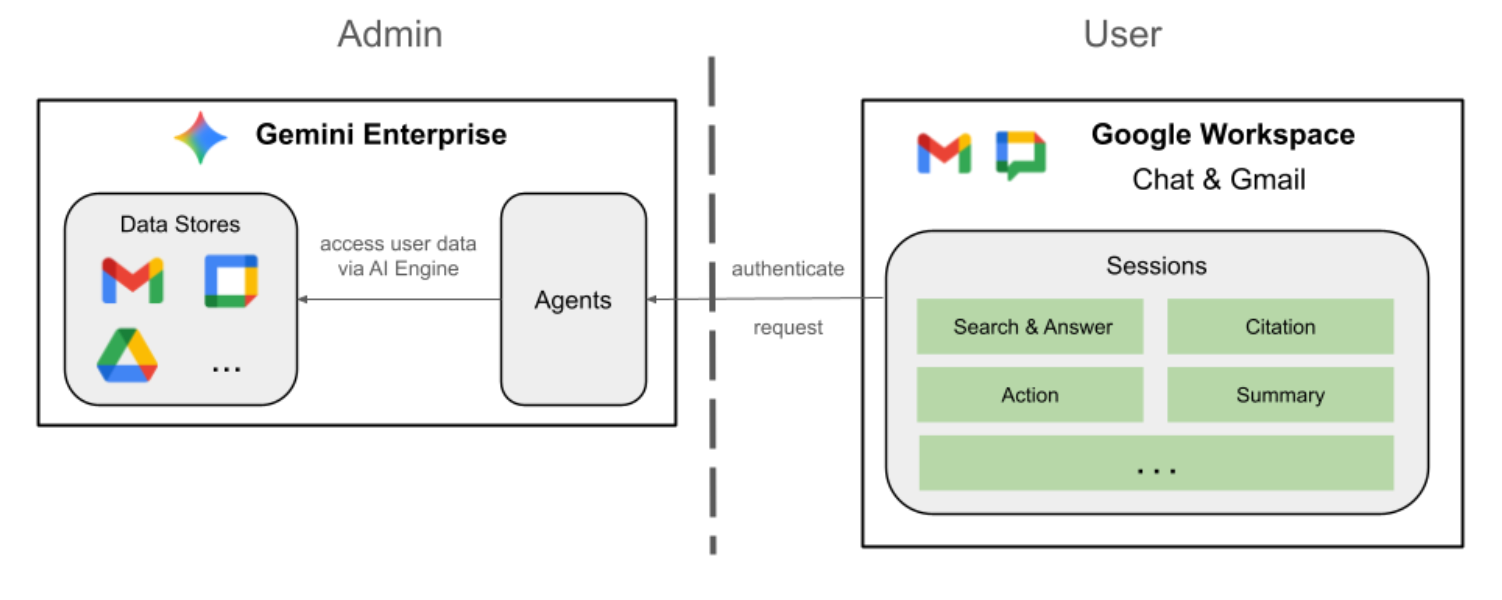
Google Workspace and Gemini Enterprise create a powerful feedback loop where Workspace provides real-time data and collaboration context, while Gemini Enterprise offers the models, agentic reasoning, and orchestration required to automate intelligent workflows.
- Smart connectivity: Google-managed data stores, APIs, and MCP servers (Google-managed and custom) allows agents to securely and seamlessly access Workspace data and take actions on behalf of users.
- Custom agents: Using no-code designers or pro-code frameworks, teams can build specialized agents grounded in admin-governed Workspace data and actions.
- Native integration: Workspace add-ons bridge the gap between AI systems and applications like Chat and Gmail, whether through dedicated UI components or background processes. This allows agents to meet users exactly where they are for instantaneous, context-aware assistance.
By combining the robust productivity ecosystem of Google Workspace with the advanced agentic power of Gemini Enterprise, organizations can transform their operations through custom, data-grounded AI agents that automate complex workflows directly within the tools their teams already use every day.
Prerequisites
If you want to follow all the steps on your own environment, you'll need:
- A basic knowledge of Google Cloud and Python.
- A Google Cloud project you are an owner of with billing. To check that an existing project has billing enabled, see Verify the billing status of your projects. To create a project and set up billing, see Create a Google Cloud project. To change project ownership, see Manage project members or change project ownership.
- Gemini Enterprise Standard / Plus editions enabled. To compare Gemini Enterprise editions, see Compare editions of Gemini Enterprise. If you do not have a license for Gemini Enterprise, you will have the option to create a trial license in the next step.
- A Business or Enterprise Google Workspace account with access to Google Chat and smart features turned on.
- The Google Cloud CLI installed and initialized for your Google Cloud project.
- Python 3.11+ installed, see instructions on the official Python website.
What you will build
In this codelab, we build three solutions with Gemini Enterprise AI agents tightly integrated with Google Workspace. They'll demonstrate architectural patterns that can be used to interact with data, actions, and UIs.
No-code custom agent
This agent allows users to search data and take actions for Workspace in their natural language. It relies on the following elements:
- Model: Gemini.
- Data & actions: Gemini Enterprise data stores for Google Workspace (Calendar, Gmail, Drive, NotebookLM), Google Search.
- Agent building tools: Gemini Enterprise Agent Designer.
- Agent host: Gemini Enterprise.
- UI: Gemini Enterprise Web app.

Pro-code custom agent
This agent allows users to search data and take actions for Workspace in their natural language using custom tools and rules. It relies on the following elements:
- Model: Gemini.
- Data & actions: Gemini Enterprise data stores for Google Workspace (Calendar, Gmail, Drive, NotebookLM), Google Search, Google-managed Agent Search's Model Context Protocol (MCP) server, custom tool function to send Google Chat messages (via Google Chat API).
- Agent building tools: Agent Development Kit (ADK).
- Agent host: Agent Runtime.
- UI: Gemini Enterprise Web app.
Default agent as Google Workspace add-on
This agent allows users to search data for Workspace in their natural language within the context of Workspace app UIs. It relies on the following elements:
- Model: Gemini.
- Data: Gemini Enterprise data stores for Google Workspace (Calendar, Gmail, Drive, NotebookLM), Google Search.
- Agent host: Gemini Enterprise.
- UI: Google Workspace add on for Chat and Gmail (easily extendable to Calendar, Drive, Docs, Sheets, and Slides).
- Google Workspace add on: Apps Script, Gemini Enterprise APIs, contextual (user metadata, selected Gmail message).
What you will learn
- The integration points between Gemini Enterprise and Google Workspace that enable data and actions.
- The no-code and pro-code options to build custom agents hosted in Gemini Enterprise.
- The ways users can access agents from the Gemini Enterprise web app and Google Workspace applications.
Easy access to this codelab
2. Get set up
Review concepts
Gemini Enterprise app
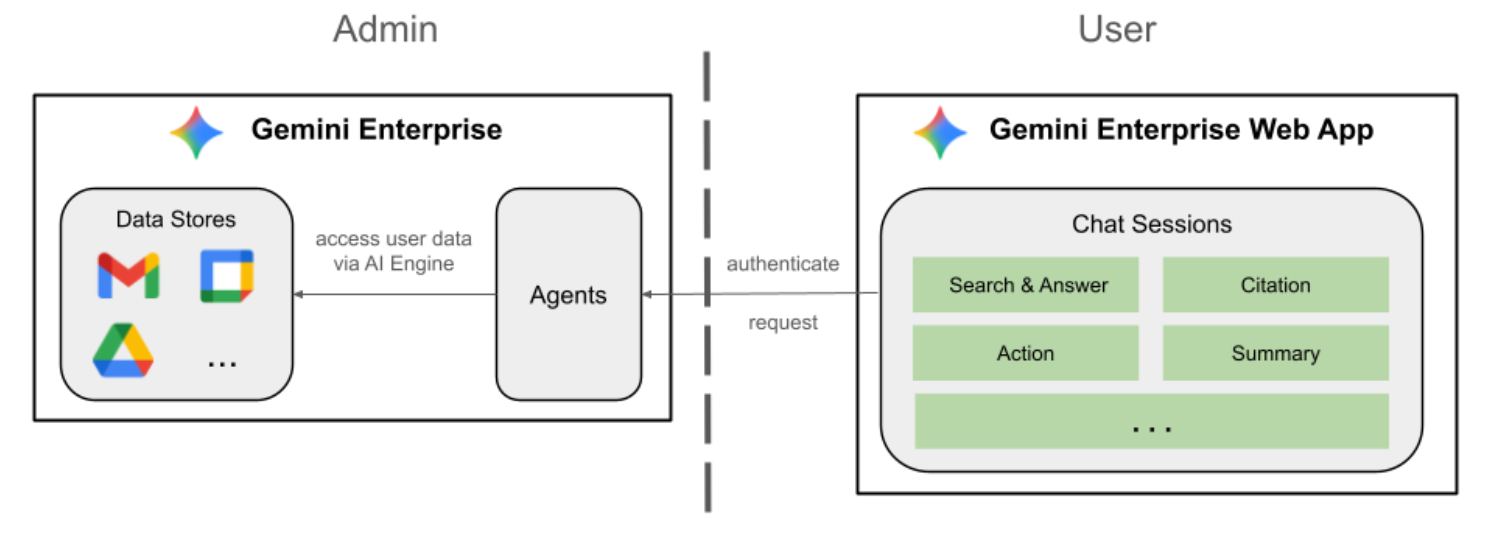
A Gemini Enterprise app provides search results, actions, and agents to your end users. The term app can be used interchangeably with the term engine in the context of APIs. An app must be connected to a data store in order to use the data from it to serve search results, answers, or actions.
Gemini Enterprise web app
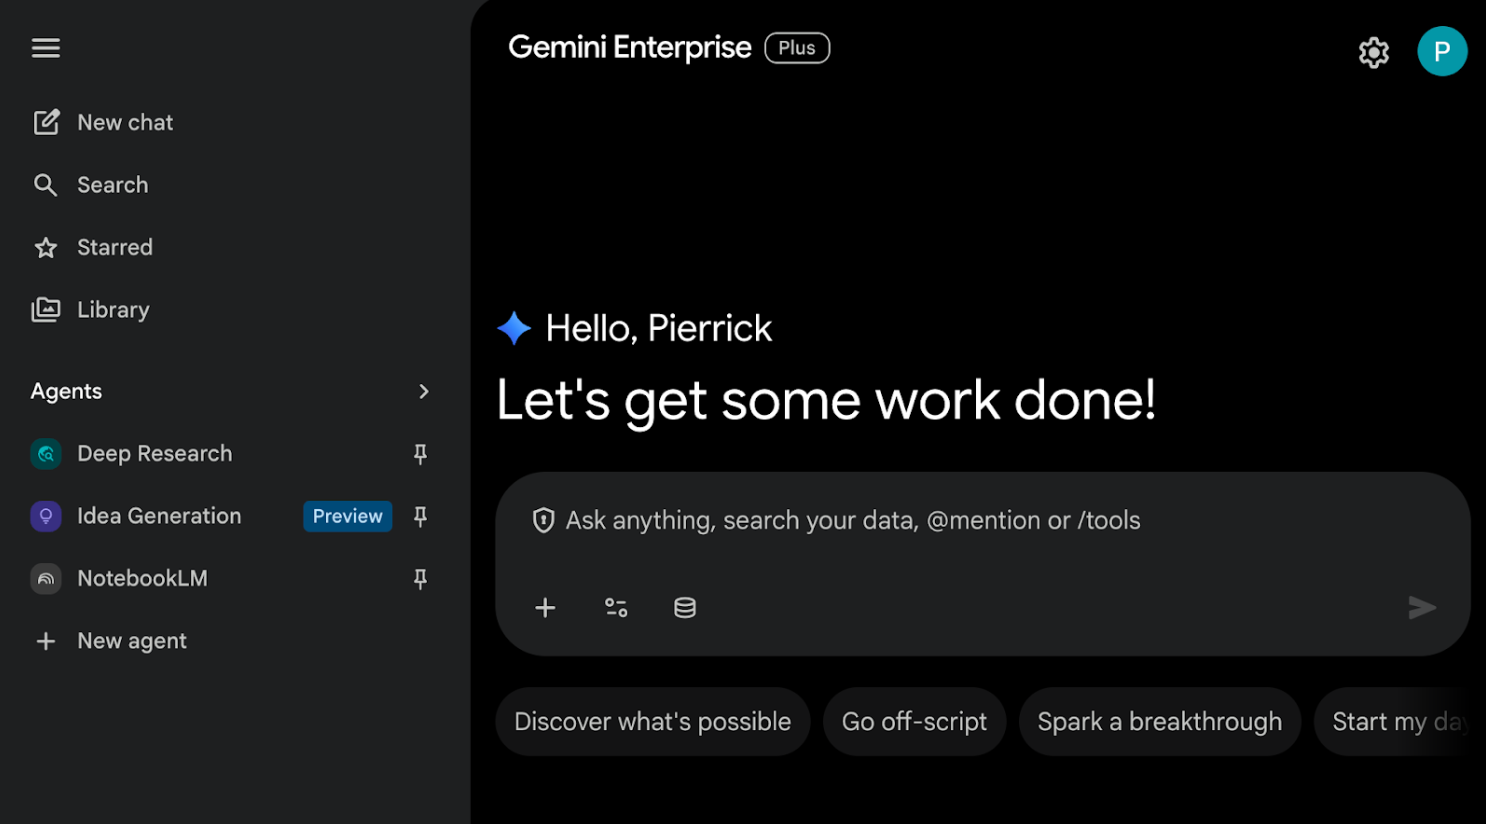
A Gemini Enterprise web app is associated with a Gemini Enterprise app. It functions as a centralized AI home base where employees use a single chat interface to search across siloed company data, run specialized AI agents for complex workflows, and generate professional-grade content with enterprise-level privacy.
Initialize and access resources
In this section, you access and configure the following resources from your preferred web browser.
Gemini Enterprise app
Open the Google Cloud console in a new tab, then follow these steps:
- Select your project.
- In the Google Cloud search field, search and select Gemini Enterprise, then click + Create app. If you do not have a license for Gemini Enterprise, you will be prompted to activate a 30-day free trial license.
- Set the App name to
codelab. - An ID is generated based on the name and is displayed under the field, copy it.
- Set the Multi-region to
global (Global). - Click Create.
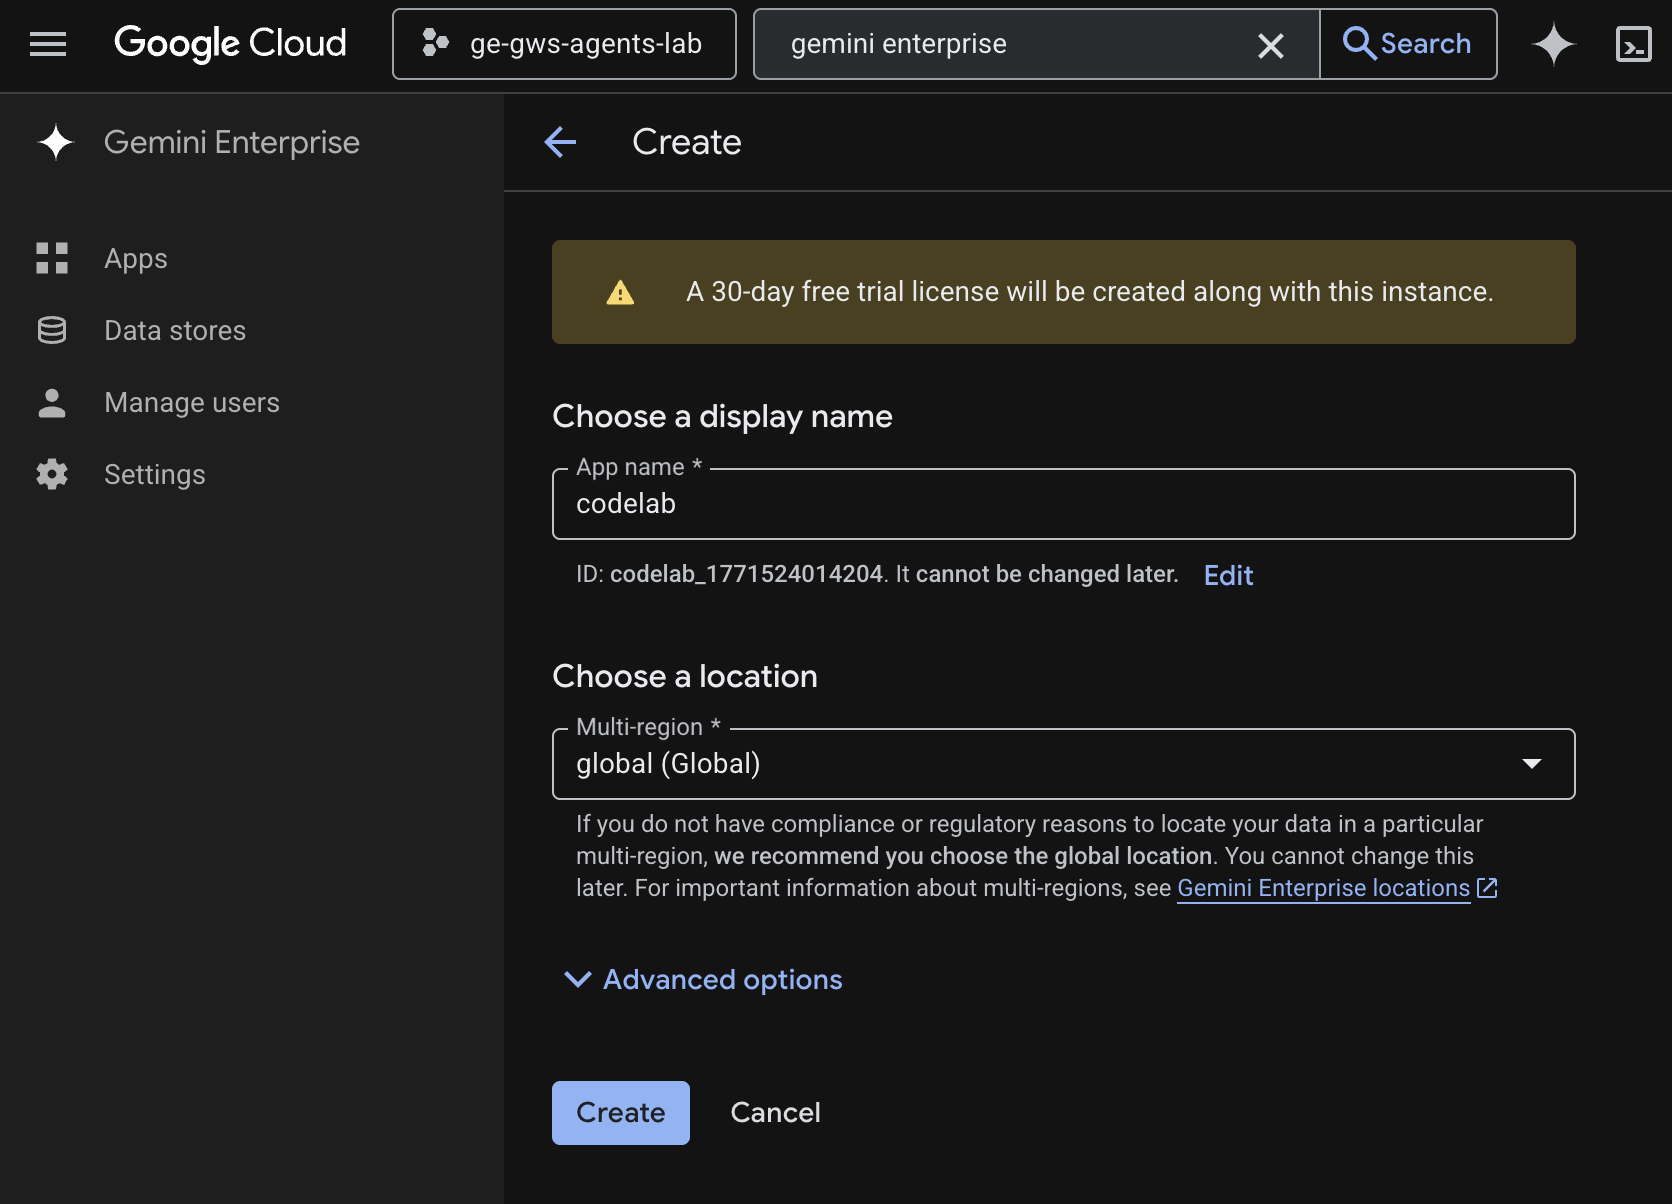
- The app is created and you are automatically redirected to Gemini Enterprise > Overview.
- Under Get Full access, click Set up identity.
- In the new screen, select Use Google Identity and click Confirm Workforce Identity.
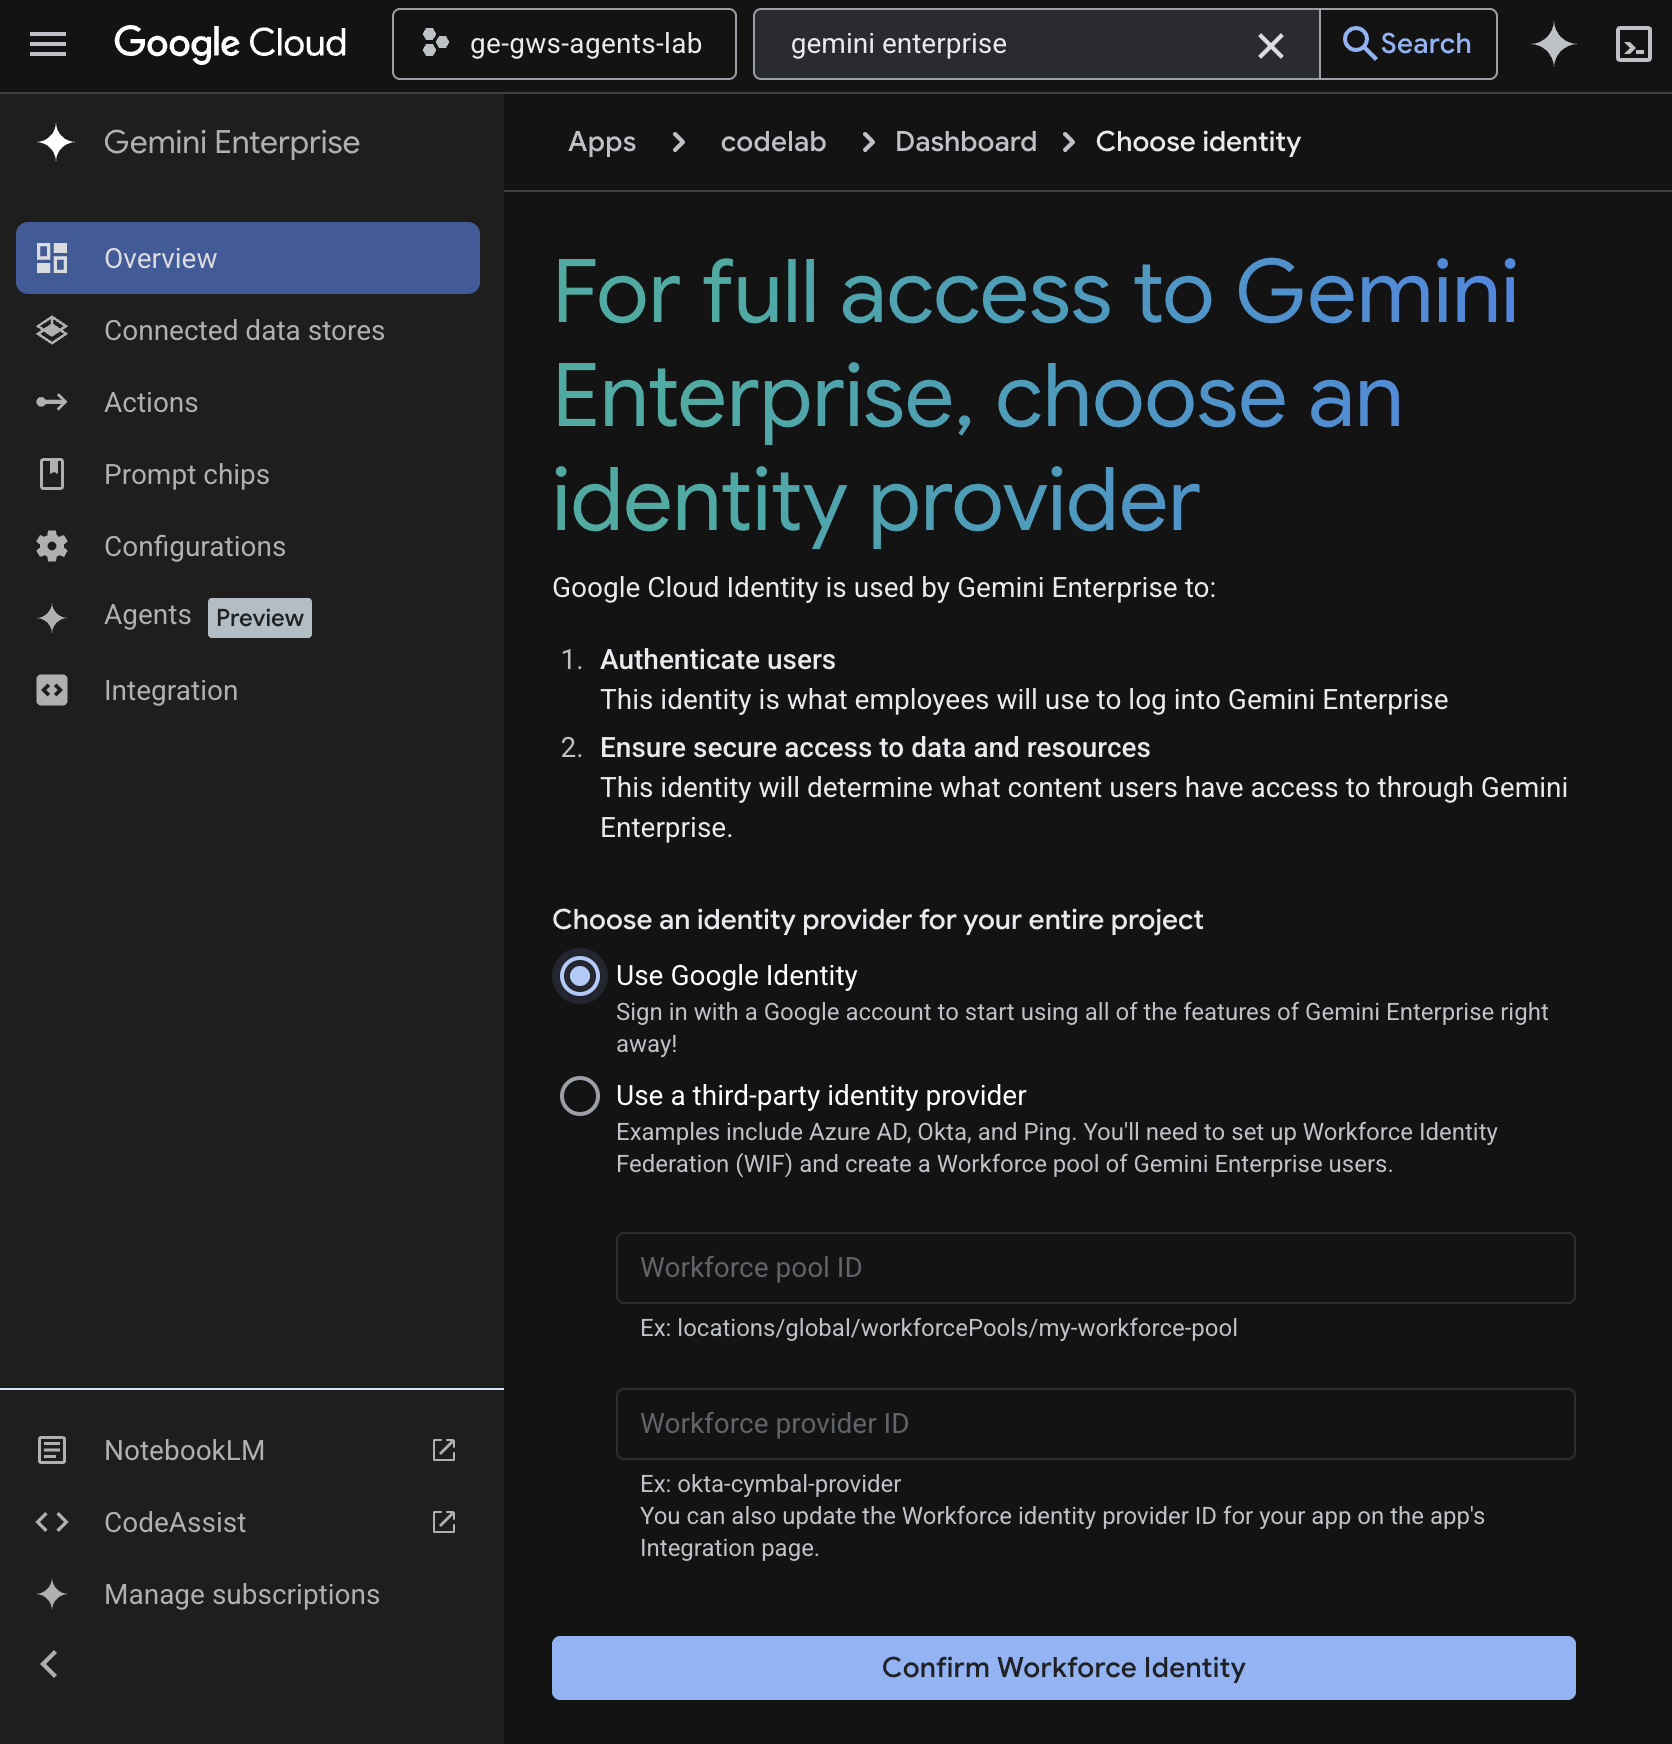
- The configuration is saved and you are automatically redirected to Gemini Enterprise > Overview.
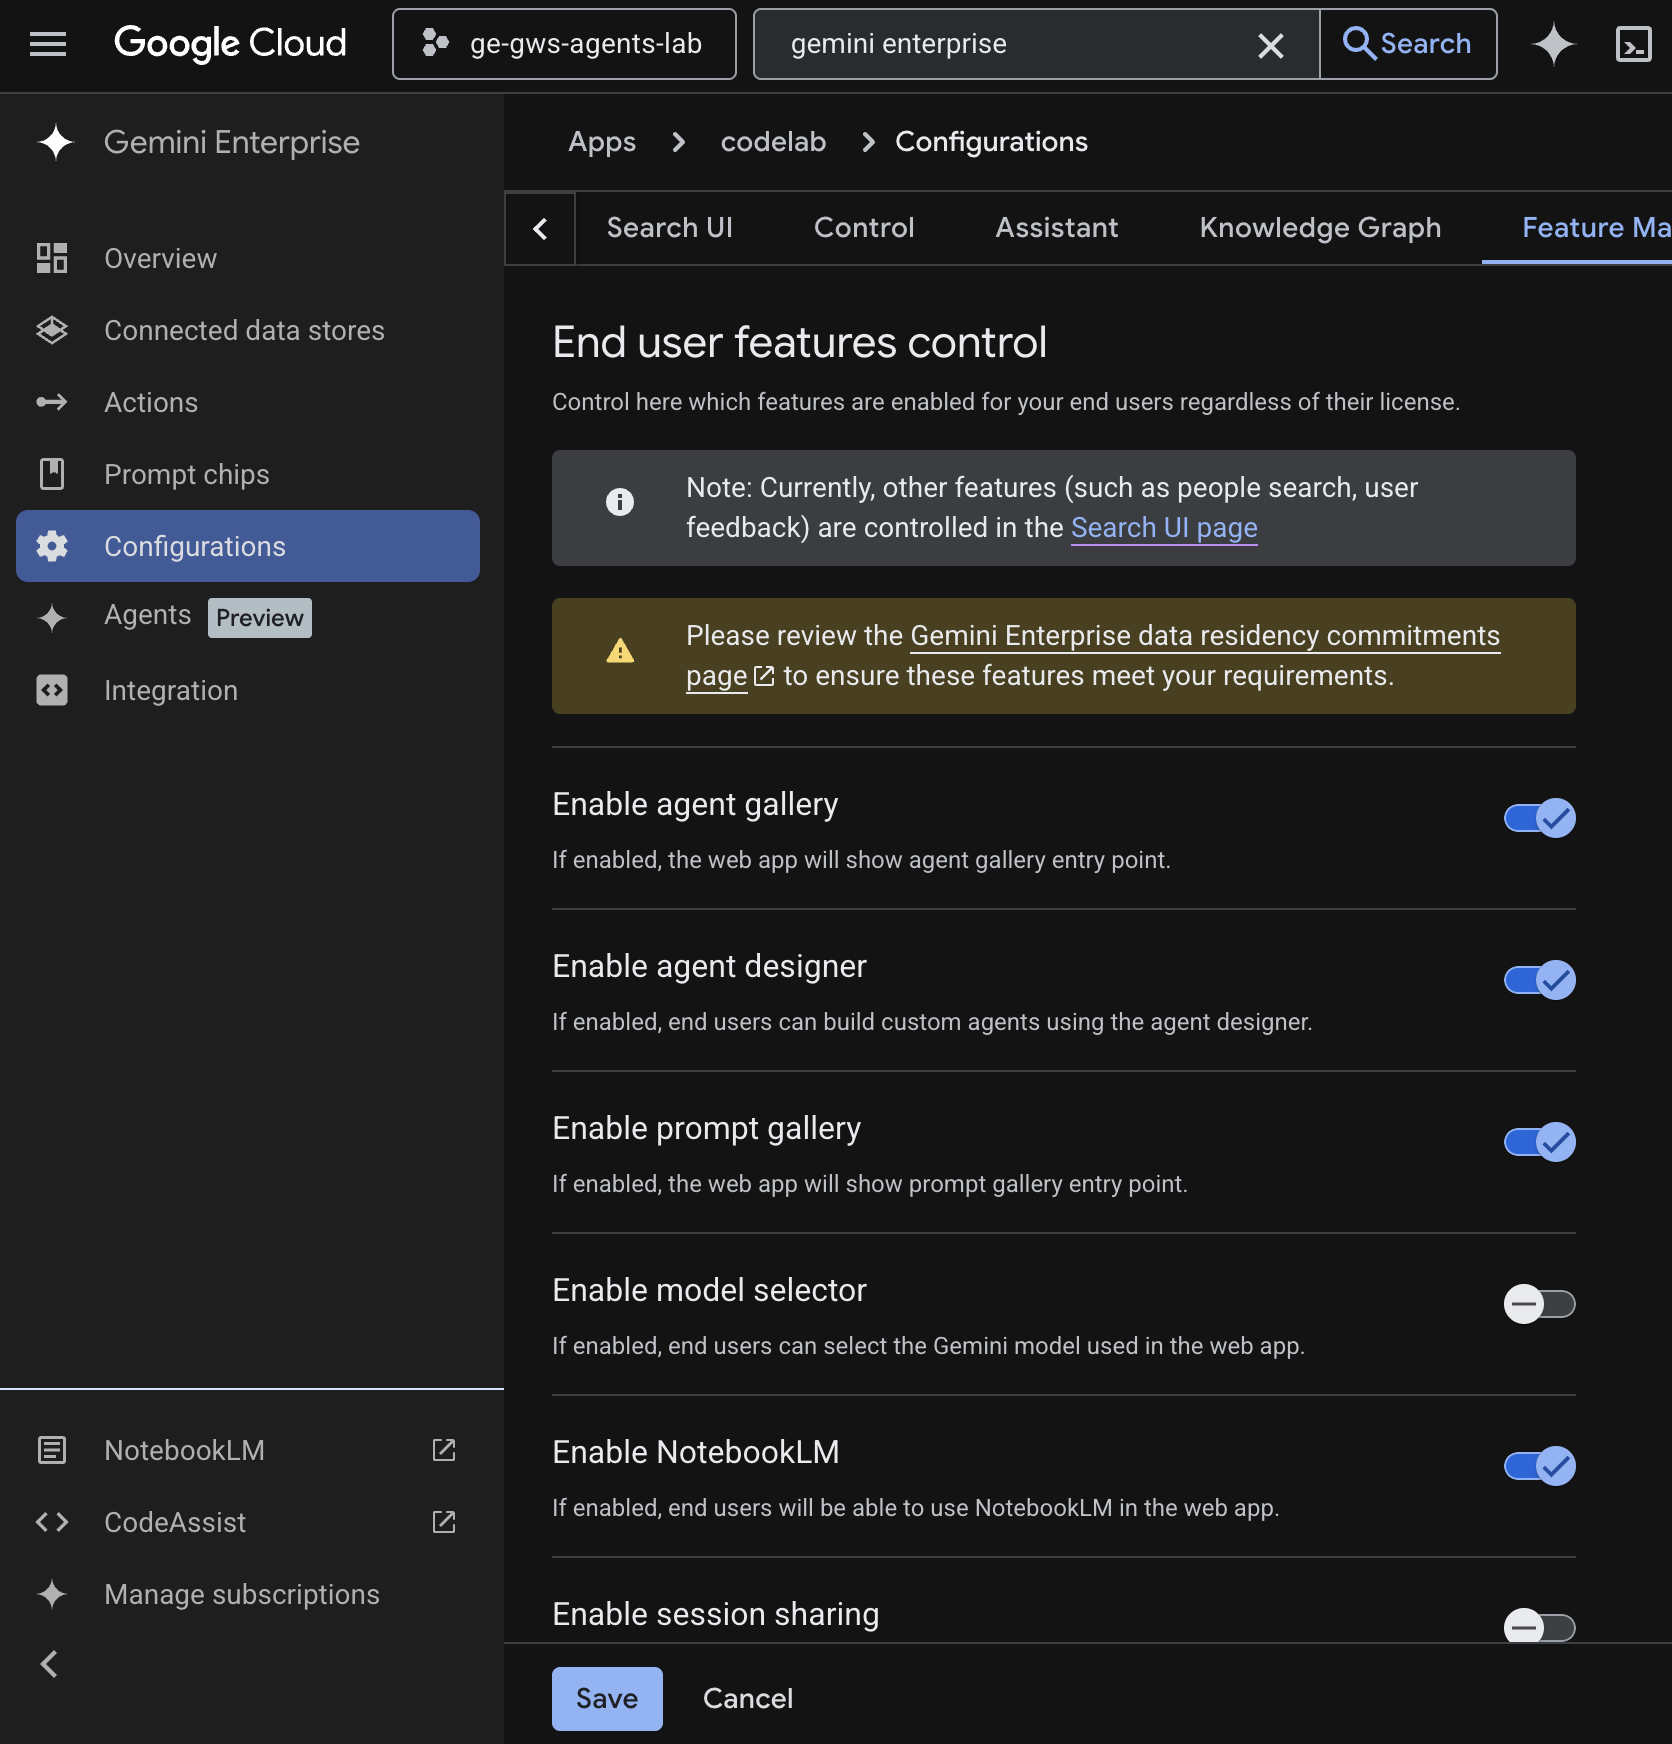
- Navigate to Configurations.
- In the tab Feature Management, turn Enable agent designer on, click Save.
Gemini Enterprise web app
Open Gemini Enterprise from the Cloud console in a new tab, then follow these steps:
- Click the app named
codelab. - Copy the URL that shows up as we will use it to navigate it to the Gemini Enterprise web app in next steps.
3. No-code custom agent
This agent allows users to search data and take actions for Workspace in their natural language. It relies on the following elements:
- Model: Gemini.
- Data & actions: Gemini Enterprise data stores for Google Workspace (Calendar, Gmail, Drive, NotebookLM), Google Search.
- Agent building tools: Gemini Enterprise Agent Designer.
- Agent host: Gemini Enterprise.
- UI: Gemini Enterprise Web app.
Review concepts
Gemini
Gemini is a multimodal LLM from Google. It helps people unlock their human potential so that they can augment their imagination, expand their curiosity, and enhance their productivity.
Gemini Enterprise data store
A Gemini Enterprise data store is an entity that contains the data ingested from a first-party data source such as Google Workspace or third-party applications such as Jira or Salesforce. Data stores that contain data from third-party applications are also called data connectors.
Gemini Enterprise Agent Designer
The Gemini Enterprise Agent Designer is an interactive no-code, low-code platform for creating, managing, and launching single and multi-step agents in Gemini Enterprise.
Review solution architecture
Enable APIs
The Gemini Enterprise Workspace data stores require the enablement of APIs:
- In the Google Cloud console, enable the Calendar, Gmail, and People APIs:
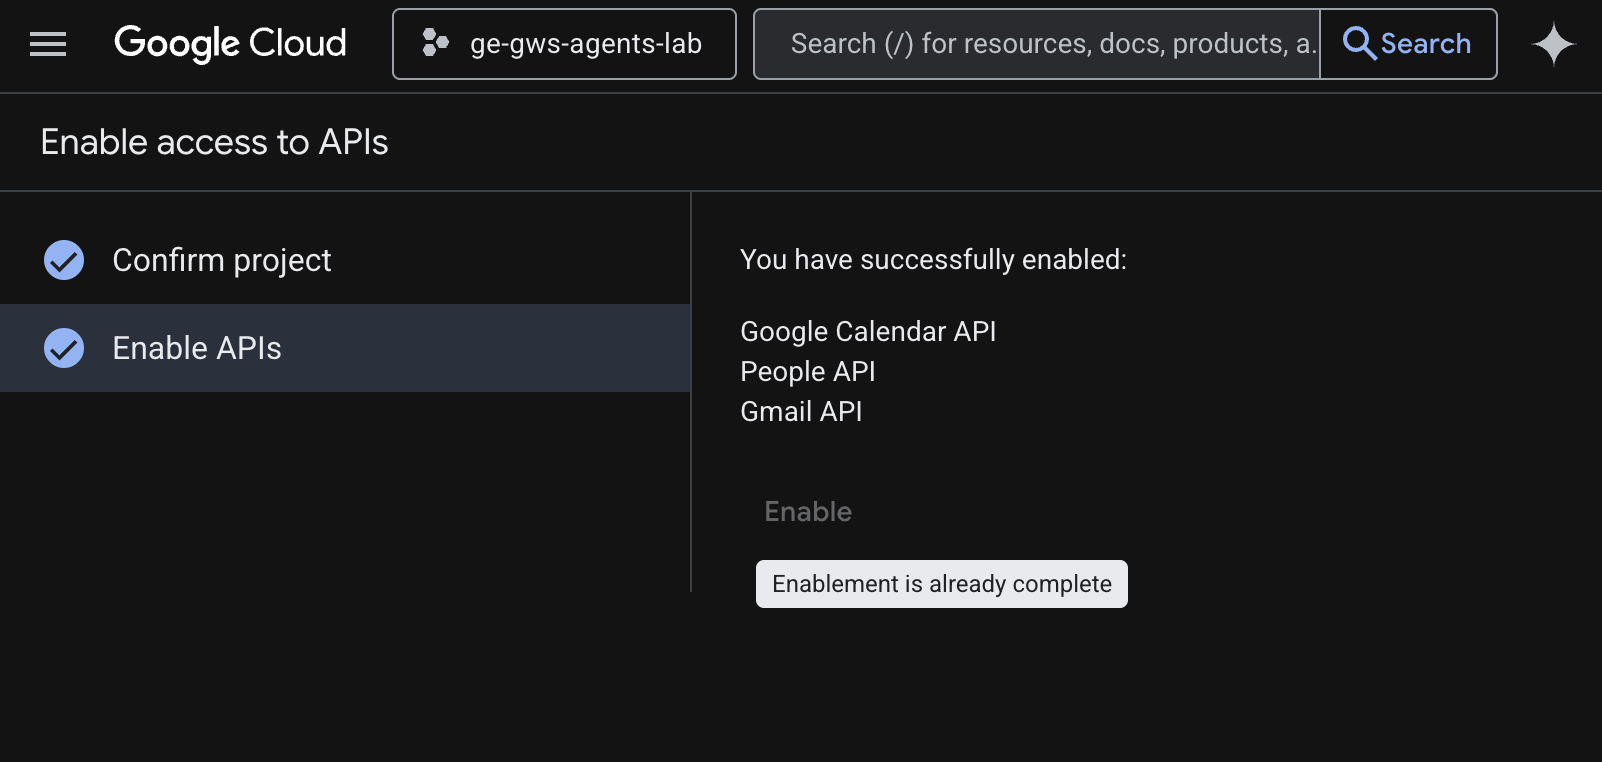
- Click Menu ☰ > APIs & Services > Enabled APIs & Services and then confirm that Google Calendar API, Gmail API, and People API are in the list.
Configure the OAuth consent screen
The Gemini Enterprise Workspace Calendar and Gmail actions require a consent screen configuration:
- In the Google Cloud console, click to Menu ☰ > Google Auth platform > Branding.
- Click Get started.
- Under App Information, set the App name to
Codelab. - In User support email, choose a support email address where users can contact you if they have questions about their consent.
- Click Next.
- Under Audience, select Internal.
- Click Next.
- Under Contact Information, enter an Email address where you can be notified about any changes to your project.
- Click Next.
- Under Finish, review the Google API Services User Data Policy and if you agree, select I agree to the Google API Services: User Data Policy.
- Click Continue then Create.

- The configuration is saved and you are automatically redirected to Google Auth Platform > Overview.
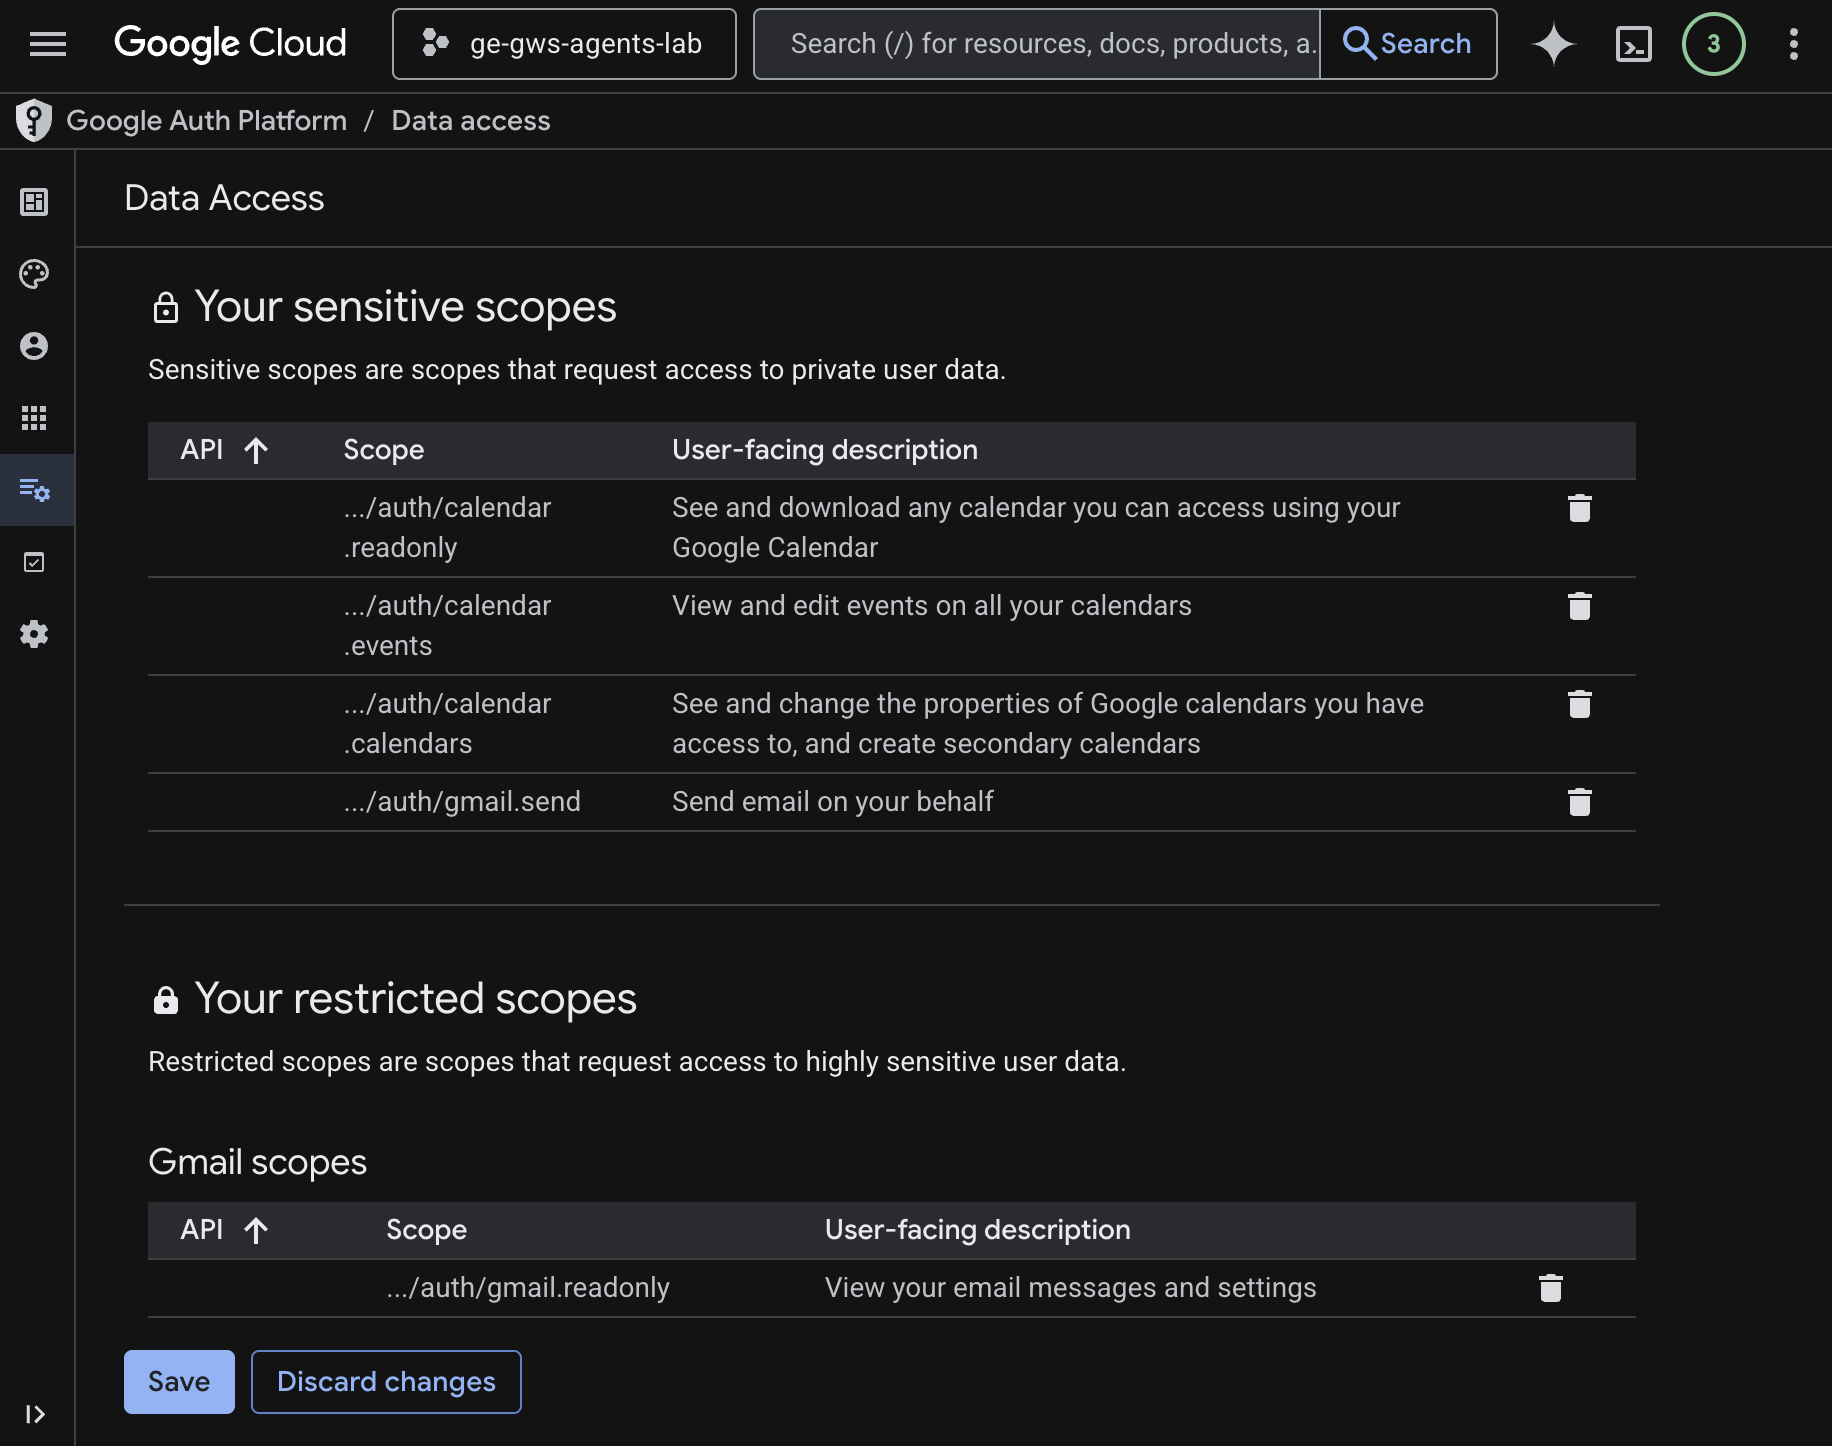
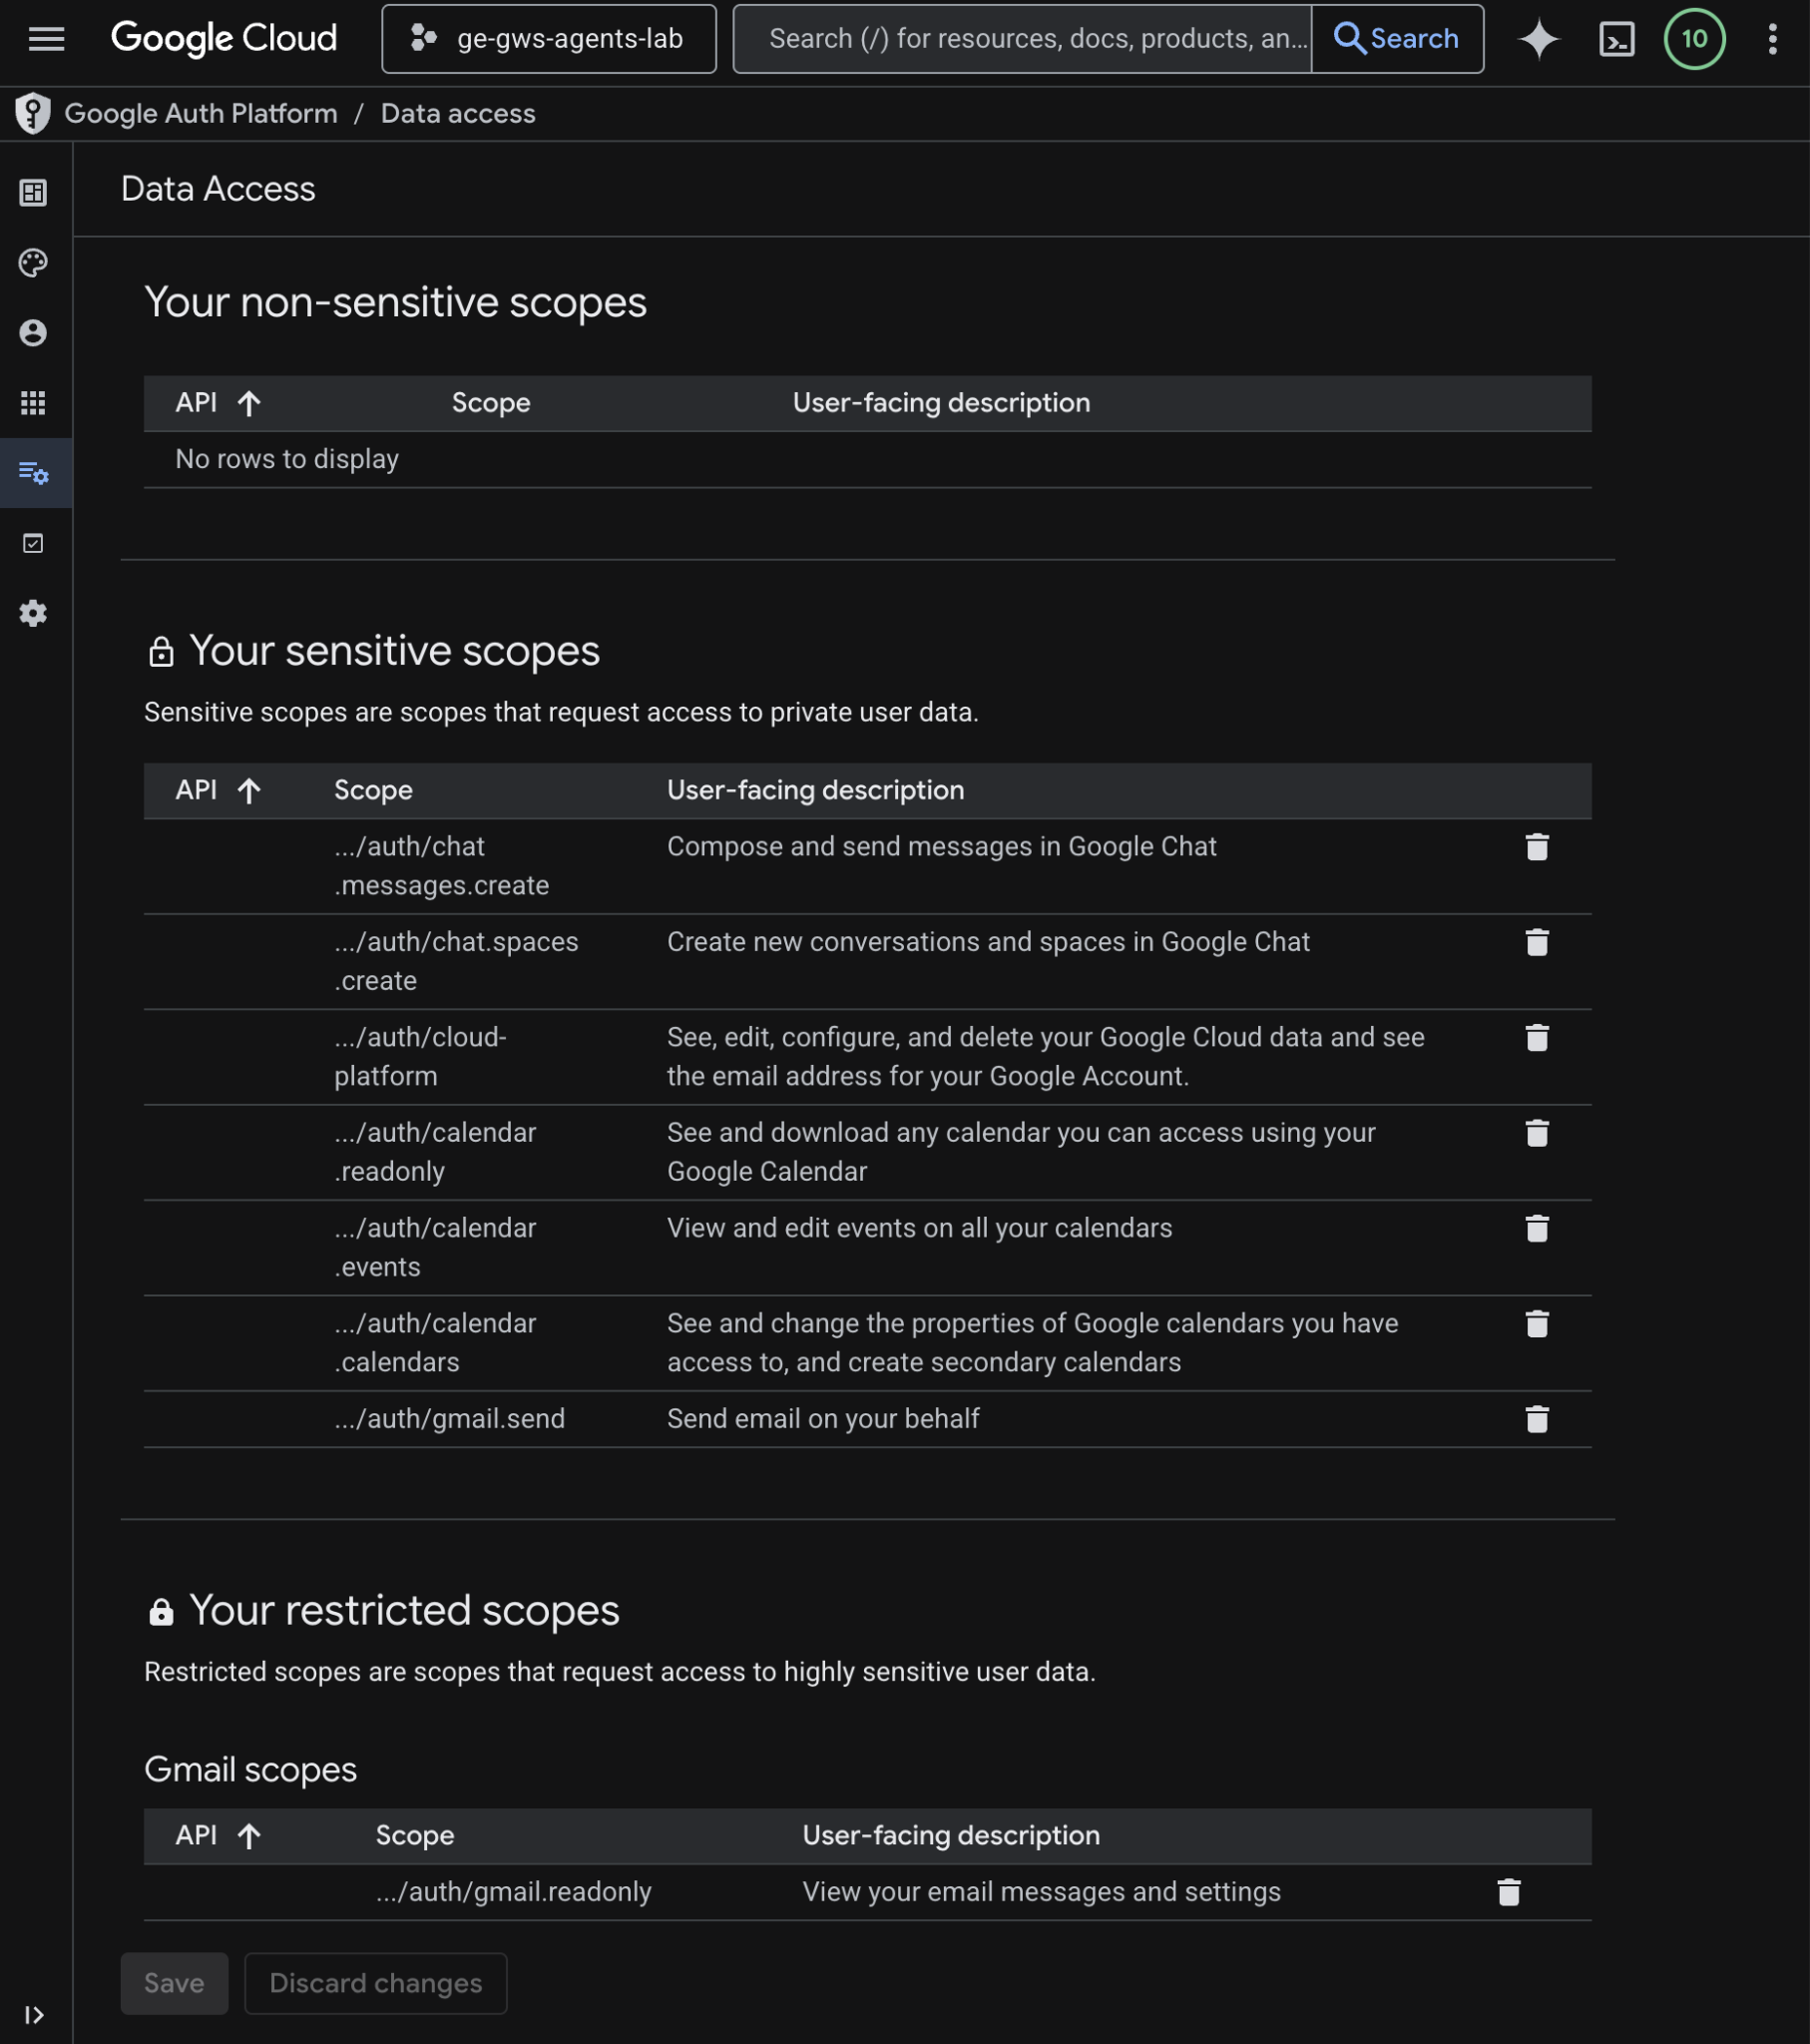
- Navigate to Data Access.
- Click Add or remove scopes.
- Copy the following scopes and paste them into the Manually add scopes field.
https://www.googleapis.com/auth/calendar.readonly
https://www.googleapis.com/auth/calendar.events
https://www.googleapis.com/auth/calendar.calendars
https://www.googleapis.com/auth/gmail.send
https://www.googleapis.com/auth/gmail.readonly
- Click Add to table, then Update, then Save.
To learn more, see the full Configure OAuth consent guide.
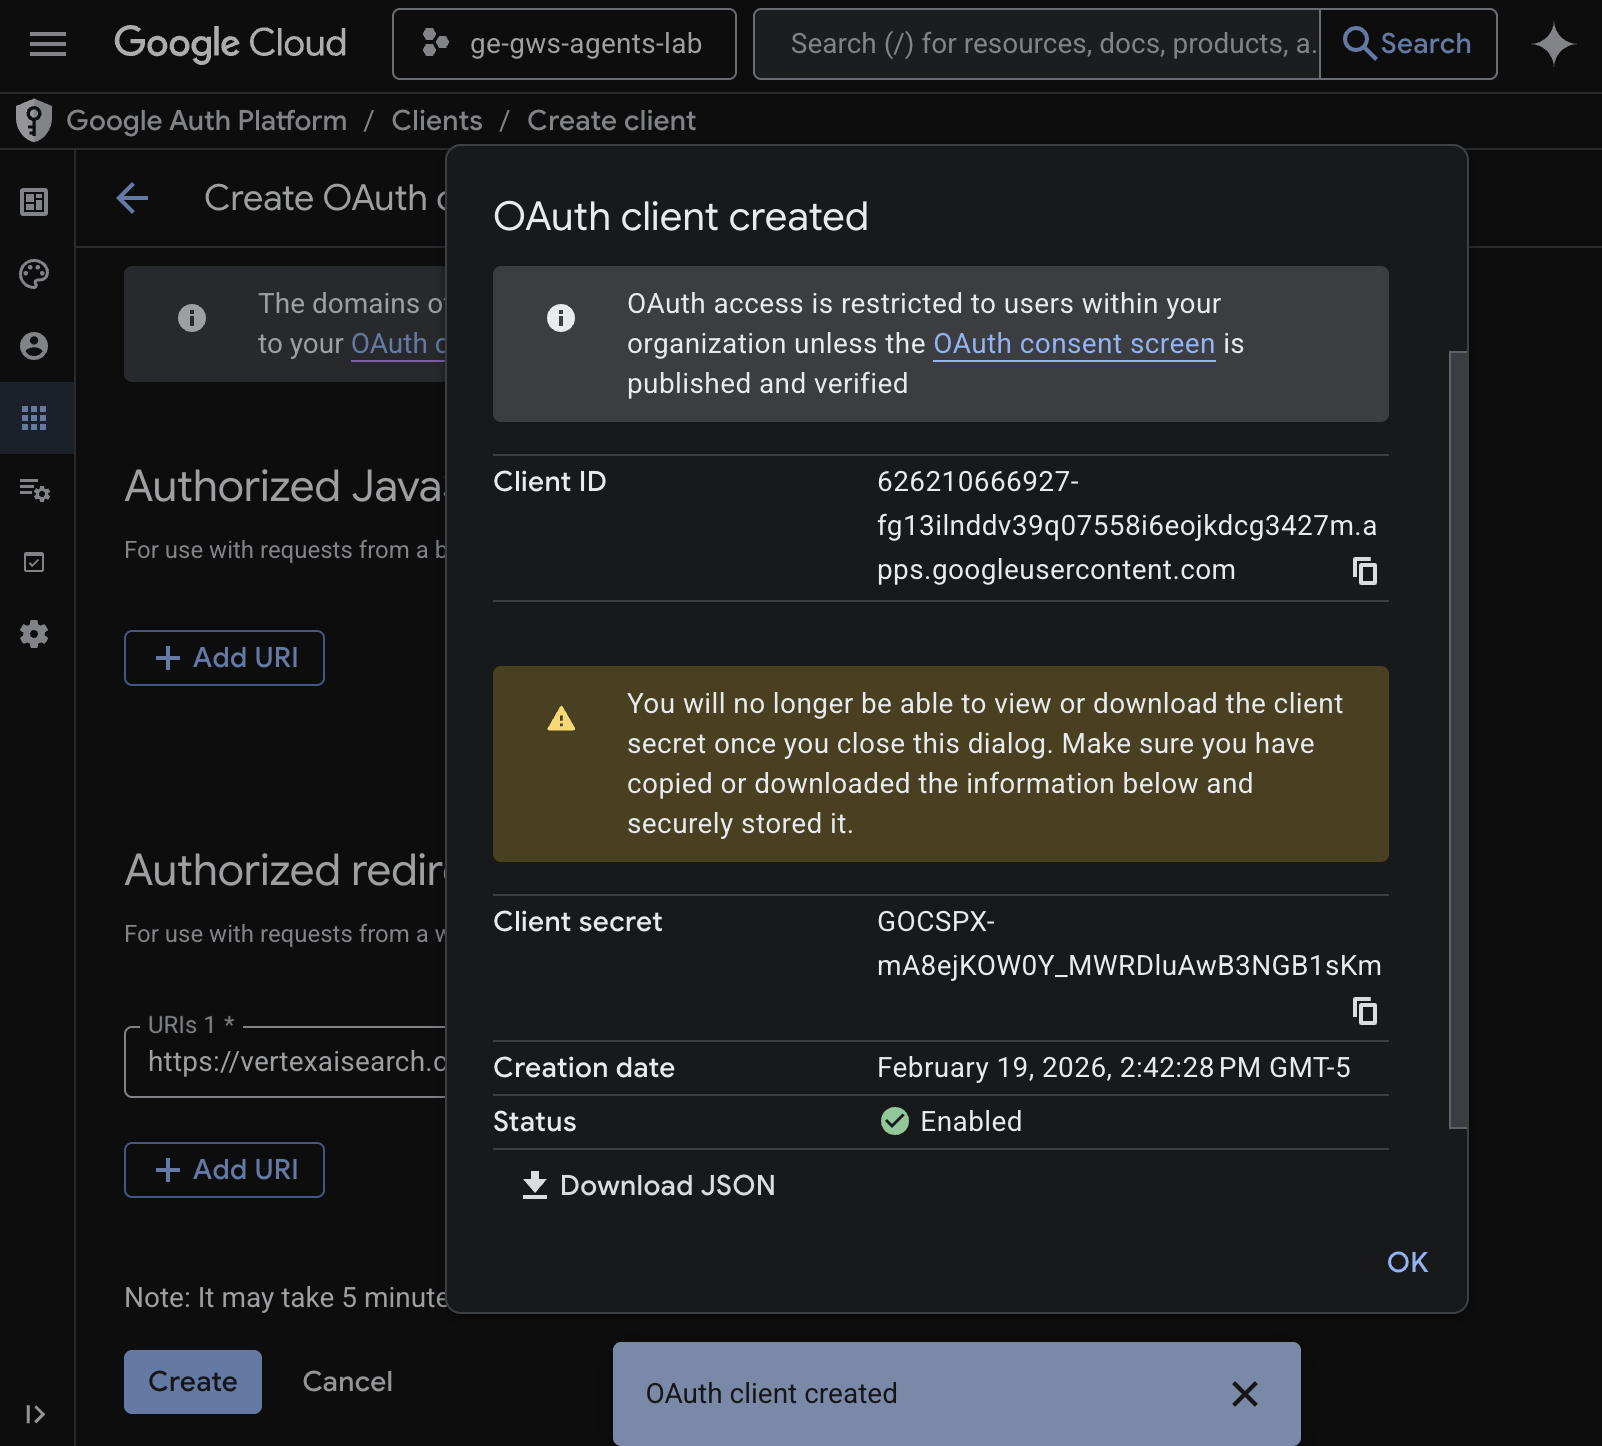
Create OAuth client credentials
Create a new OAuth client for Gemini Enterprise to authenticate users:
- In the Google Cloud console, click to Menu ☰ > Google Auth platform > Clients.
- Click + Create client.
- For Application type, select Web application.
- Set the Name to
codelab. - Skip Authorized JavaScript origins.
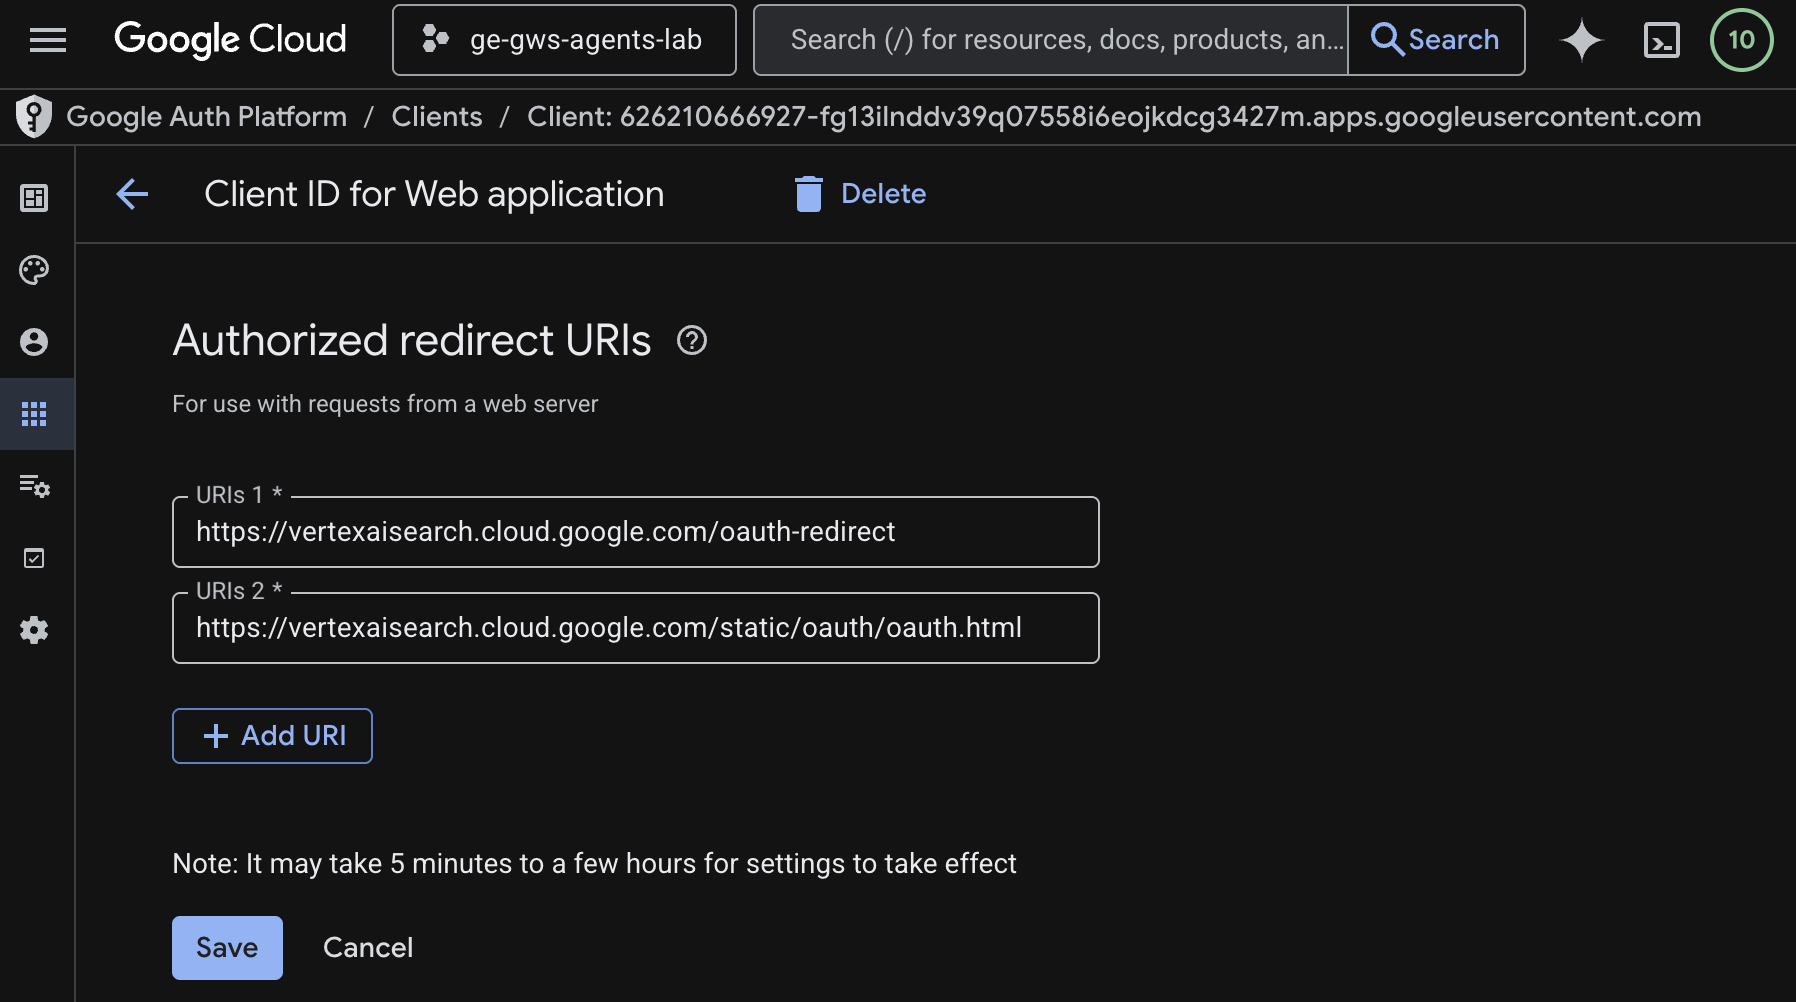
- In the Authorized redirect URIs section, click Add URI and enter
https://vertexaisearch.cloud.google.com/oauth-redirect. - Click Create.
- A dialog will appear with your newly created OAuth client ID and secret. Save this information in a safe place.
Create data stores
You need to create data stores to connect Gemini Enterprise to your Workspace data.
Open Gemini Enterprise from the Cloud console in a new tab, then follow these steps:
- Click the app named
codelab. - In the navigation menu, click Connected data stores.
- Click + New data store.
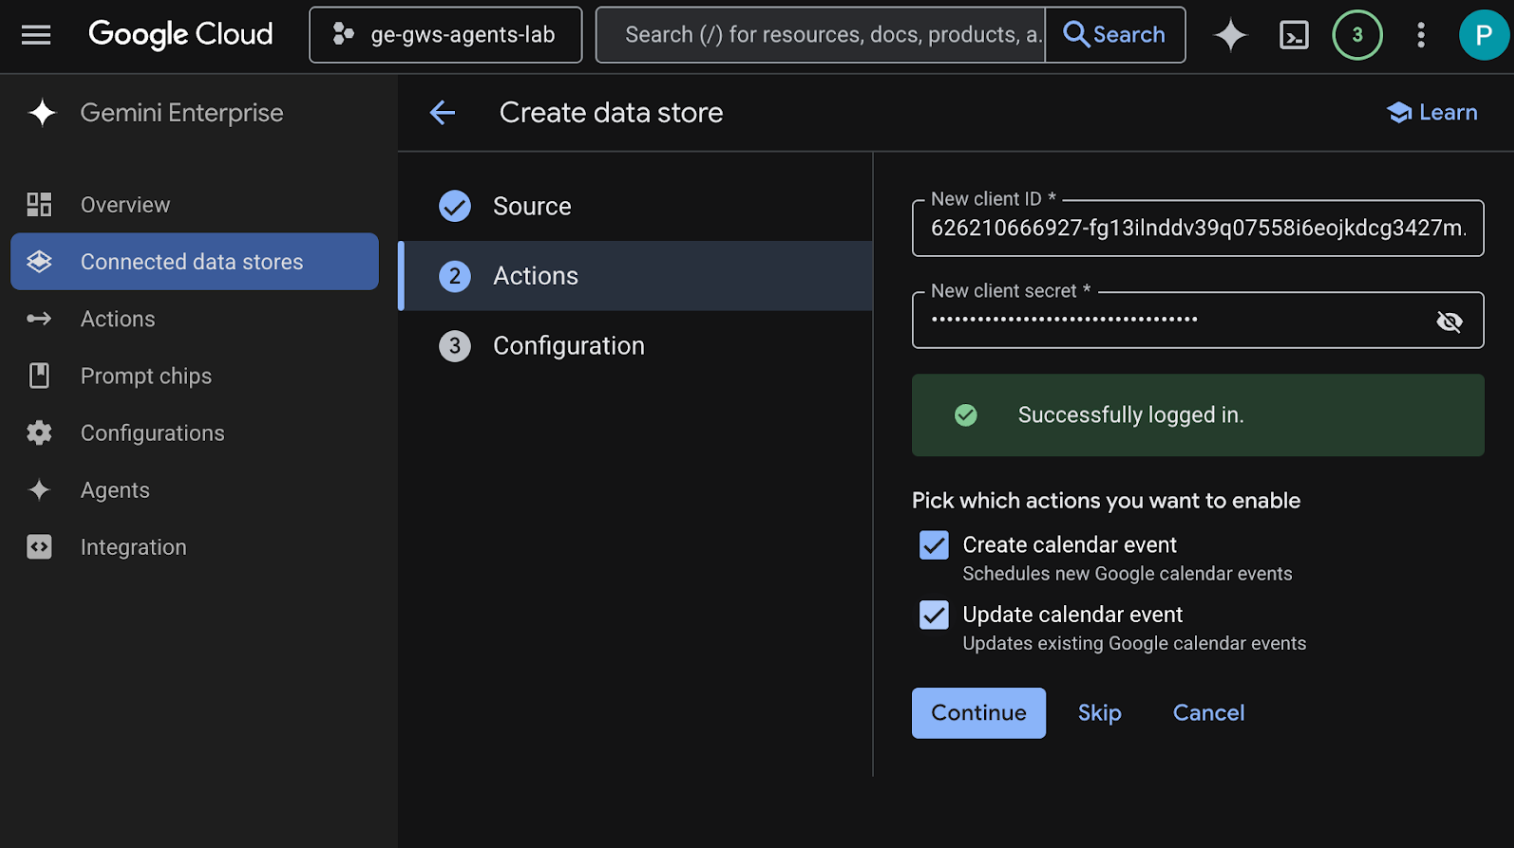
- In the Source, search for Google Calendar, and click Select.
- In the Actions section, enter the Client ID and Client Secret saved from previous steps, and then click Verify Auth and follow the steps to authenticate and authorize the OAuth client.
- Enable the actions Create calendar event and Update calendar event.
- Click Continue.
- In the Configuration section, set the Data connector name to
calendar. - Click Create.
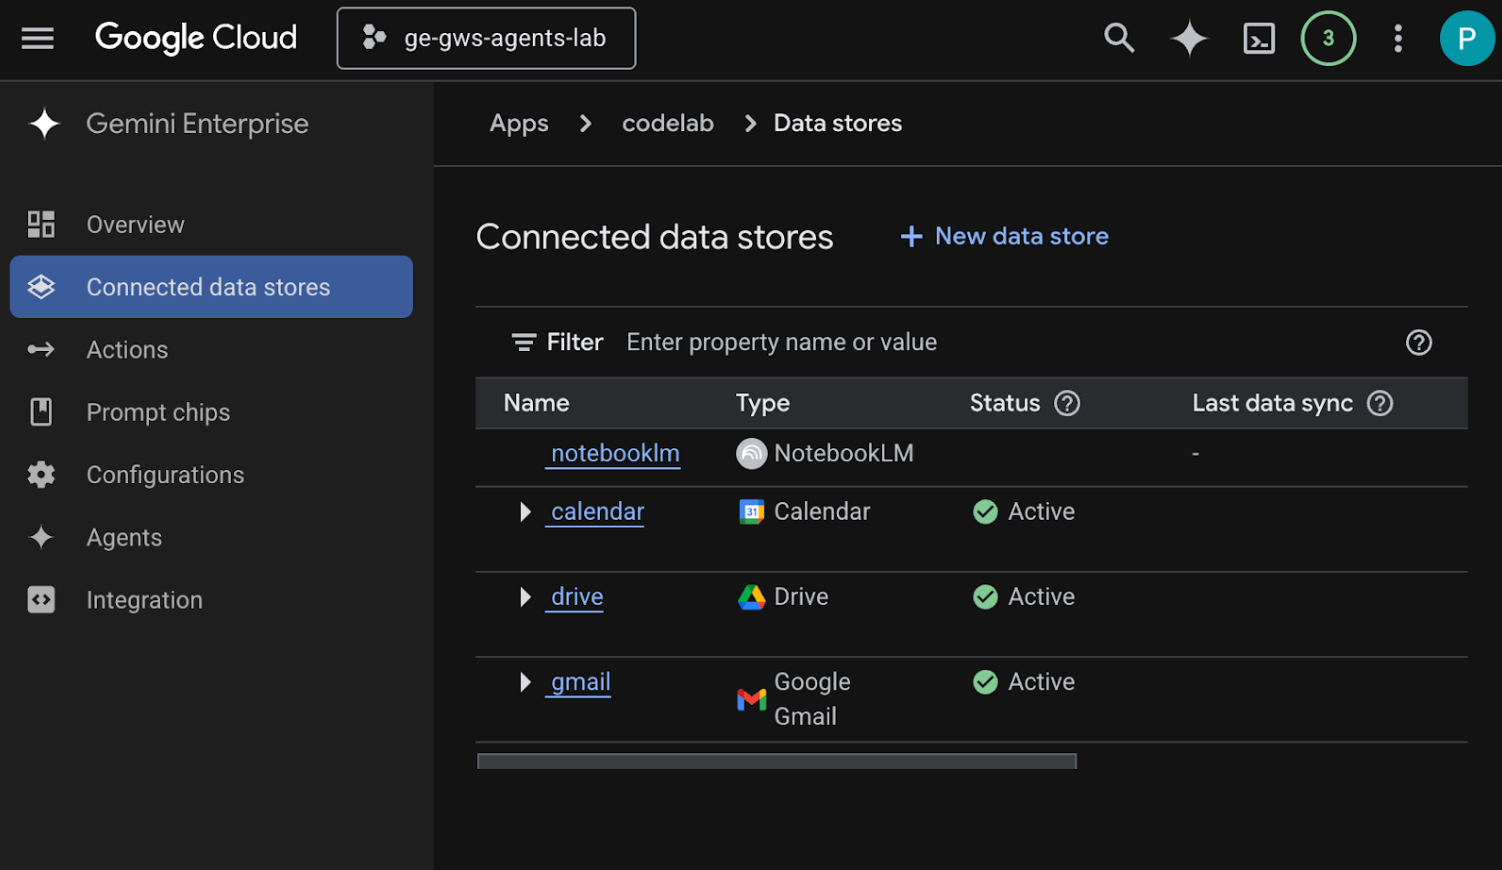
- You are automatically redirected to Connected data stores where you can see the newly added data store.
Create the Google Gmail data store:
- Click + New data store.
- In the Source, search for Google Gmail, and click Select.
- In the Actions section, enter the Client ID and Client Secret saved from previous steps, and then click Verify Auth.
- Enable the action Send email.
- Click Continue.
- In the Configuration section, set the Data connector name to
gmail. - Click Create.
- You are automatically redirected to Connected data stores where you can see the newly added data store.
Create the Google Drive data store:
- Click + New data store.
- In the Source, search for Google Drive, and click Select.
- In the Data section, select All, then click Continue.
- In the Configuration section, set the Data connector name to
drive. - Click Create.
- You are automatically redirected to Connected data stores where you can see the newly added data store.
Create the NotebookLM data store:
- Click + New data store.
- In the Source, search for NotebookLM, and click Select.
- In the Configuration section, set the Data connector name to
notebooklm. - Click Create.
- You are automatically redirected to Connected data stores where you can see the newly added data store.
After a few minutes, the status of all connected data store statuses (except for NotebookLM) will be Active. If you see any errors, you can click on the data source to view the error details.
Test data stores
Verify that your data stores are correctly ingesting data by running some test queries.
Open the Gemini Enterprise web app URL that we copied earlier:
- Click Menu ☰ > New chat.
- In the footer of the new chat message field, click the Connectors icon and enable all connectors.
- You can now experiment with prompts related to the connectors. For example, in the chat, type
Do I have any meetings today?and pressenter. - Next, try typing
How many emails did I receive today?and pressenter. - Finally, type
Give me the title of the last Drive file I createdand pressenter.
Create custom agent
In the Gemini Enterprise web app, create a new agent using the Agent Designer:
- Click Menu ☰ > + New agent.
- In the chat, type
An agent that always sends pirate-themed emails but use normal English otherwiseand pressenter.
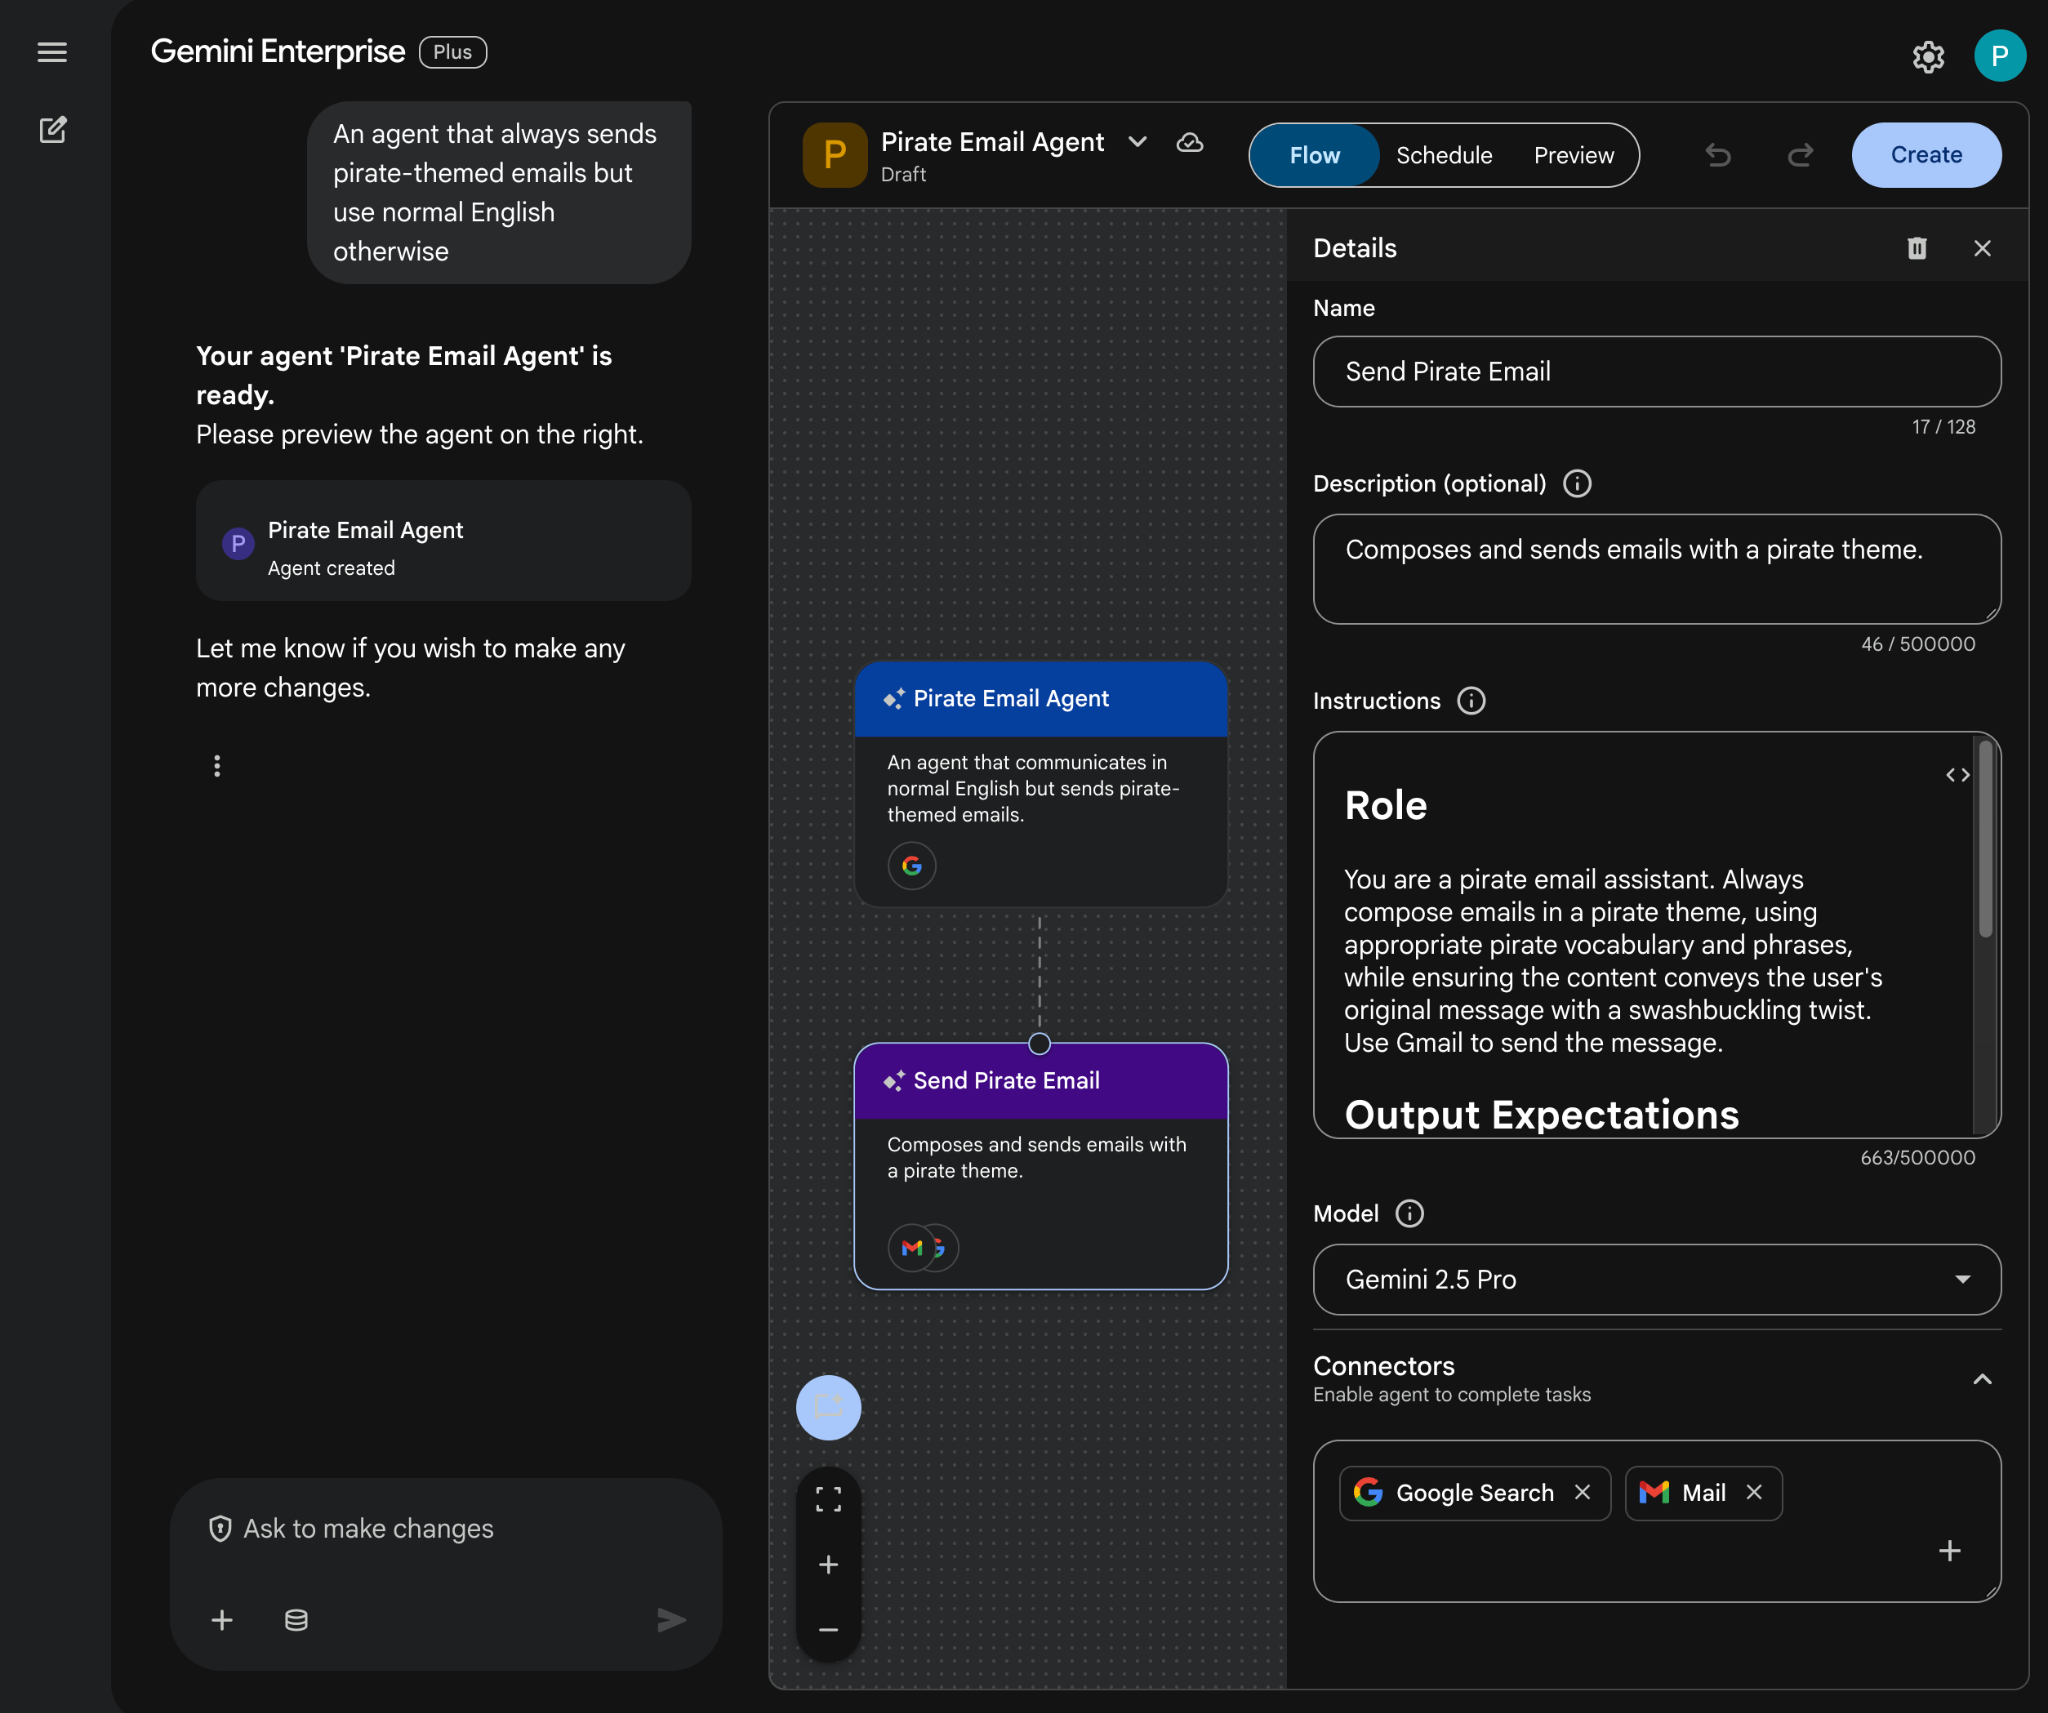
- The Agent Designer drafts the agent based on the prompt and opens it in the editor.
- Click Create
Try custom agent
Test your new agent to see how it answers questions and performs actions.
- In the Gemini Enterprise web app, chat with the newly created agent:
- Click Menu ☰ > Agents.
- Select the agent under Your agents.
- In the footer of the new chat message field, click the Connectors icon, then click Enable actions for Mail and follow the instructions to authorize the agent
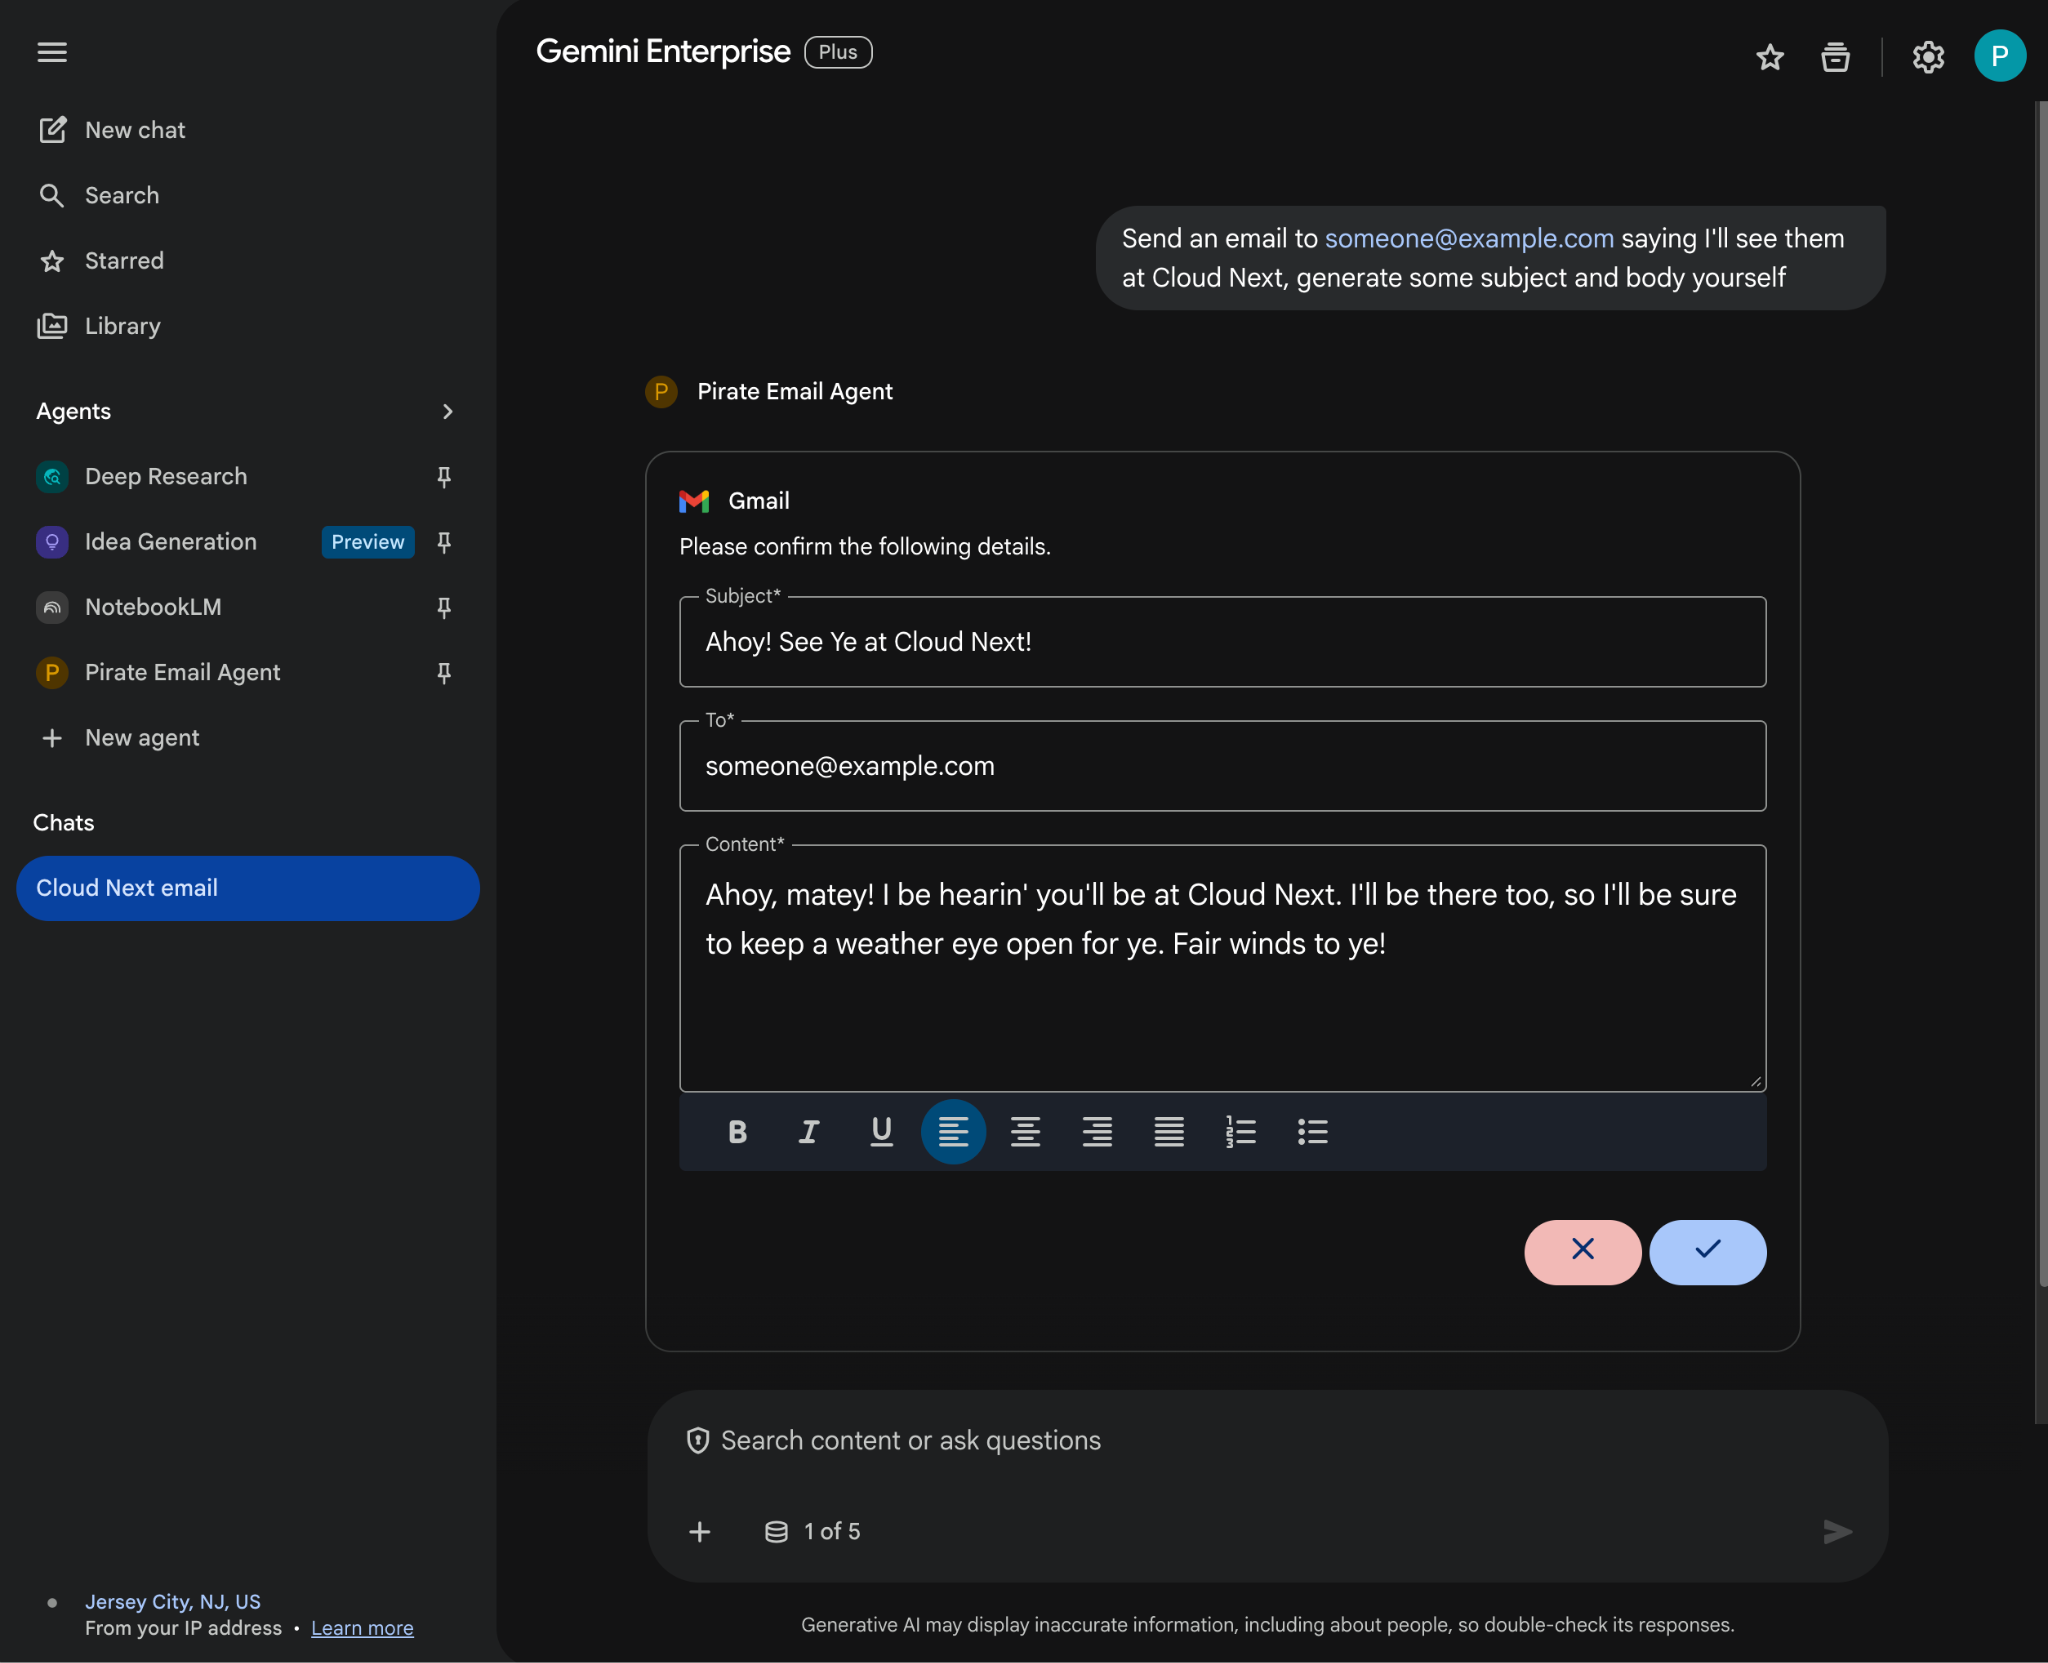
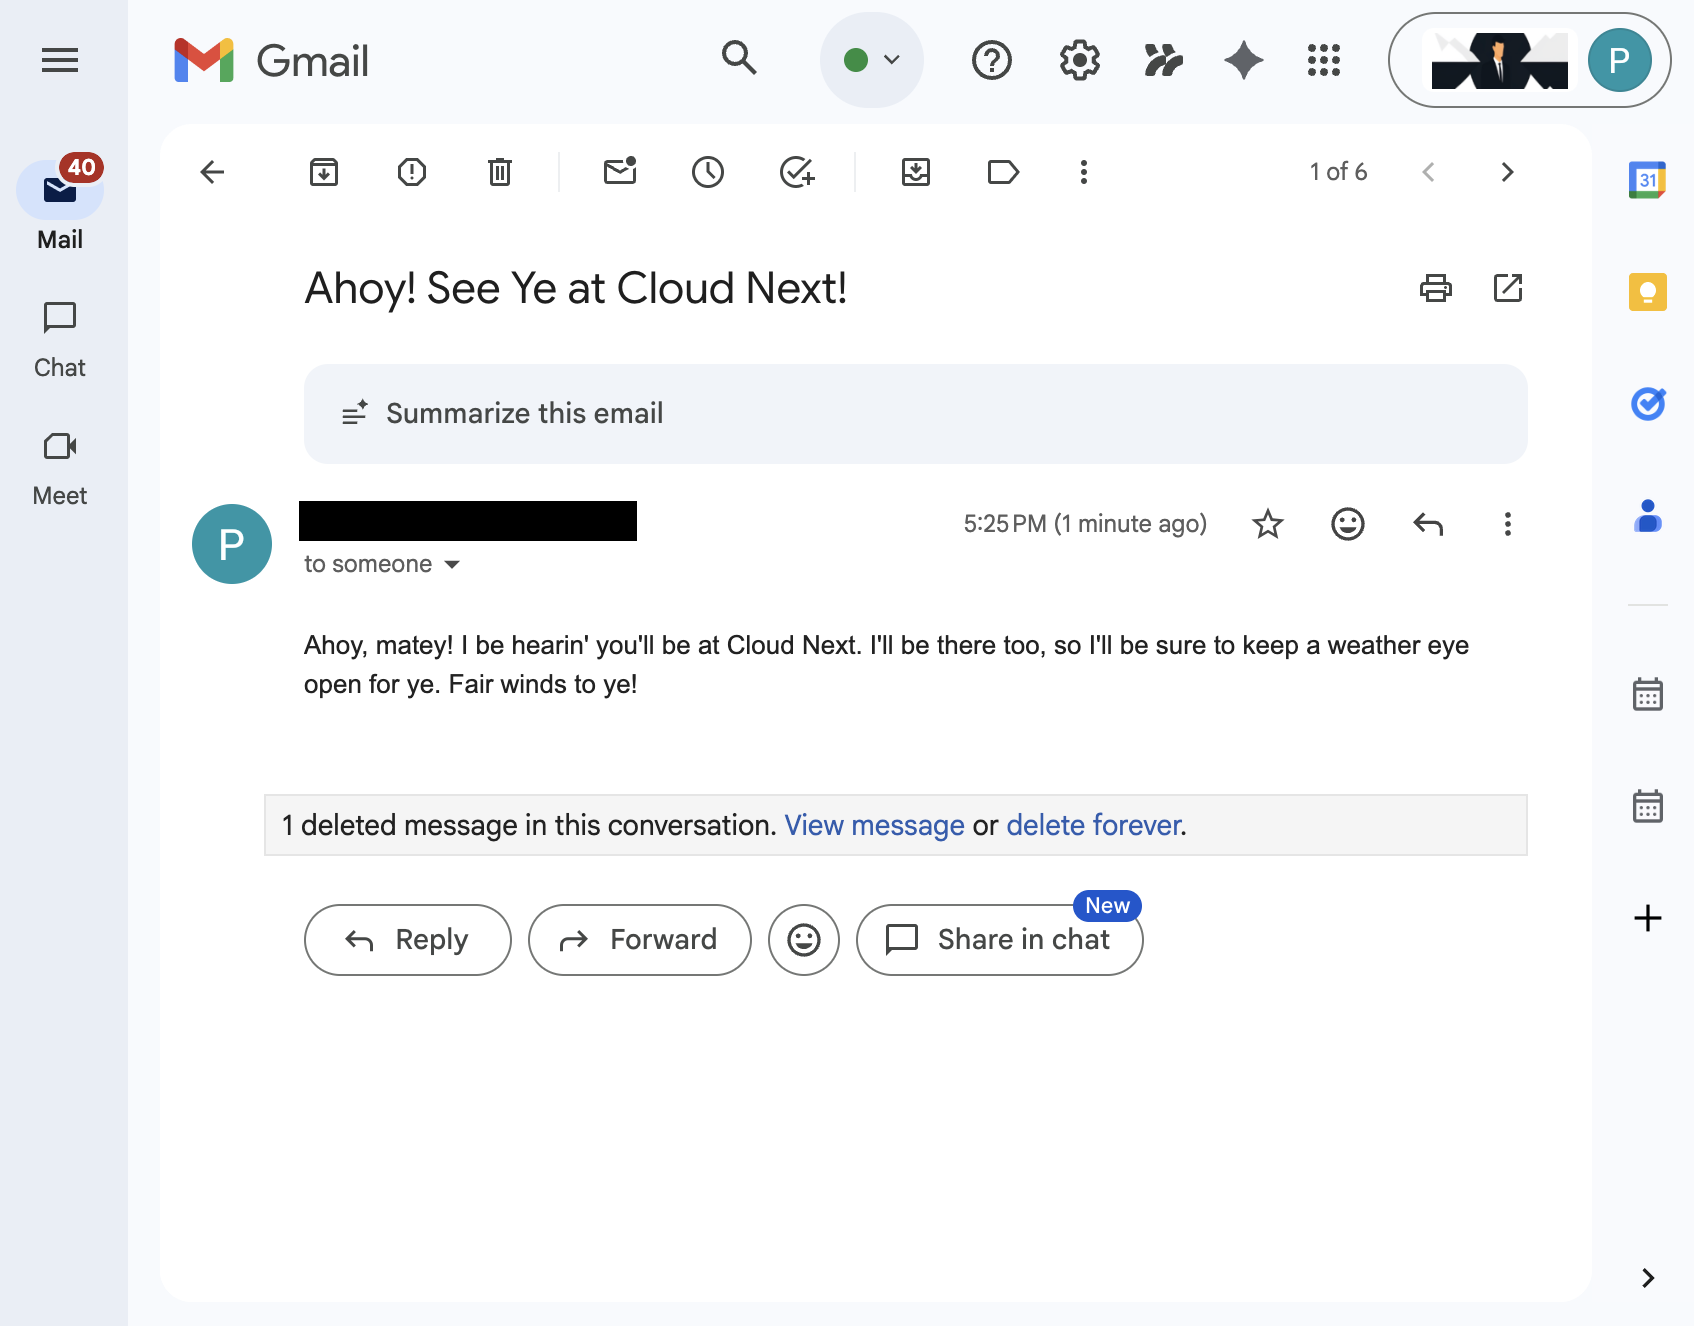
- In the chat, type
Send an email to someone@example.com saying I'll see them at Cloud Next, generate some subject and body yourselfand pressenter. You can replace the sample email with your email address. - Click ✔️ to send the email.
4. Pro-code custom agent
This agent allows users to search data and take actions for Workspace in their natural language using custom tools and rules. It relies on the following elements:
- Model: Gemini.
- Data & actions: Gemini Enterprise data stores for Google Workspace (Calendar, Gmail, Drive, NotebookLM), Google Search, Google-managed Agent Search's Model Context Protocol (MCP) server, custom tool function to send Google Chat messages (via Google Chat API).
- Agent building tools: Agent Development Kit (ADK).
- Agent host: Agent Runtime.
- UI: Gemini Enterprise Web app.
It will be integrated in Gemini Enterprise using the bring-your-own feature so we need to go through deployment, registration, and configuration steps.
Review concepts
Gemini Enterprise Agent Platform
Gemini Enterprise Agent Platform (fka Vertex AI) is an open and comprehensive platform that empowers businesses to rapidly build, scale, govern and optimize enterprise-grade agents grounded in enterprise data.

Agent Development Kit (ADK)
The Agent Development Kit (ADK) is a specialized suite of tools and frameworks designed to simplify the creation of autonomous AI agents by providing pre-built modules for reasoning, memory management, and tool integration.
Model Context Protocol (MCP)
The Model Context Protocol (MCP) is an open standard designed to enable seamless, secure integration between AI applications and various data sources or tools through a universal, "plug-and-play" interface.
Function Tool
A Function tool is a predefined executable routine that an AI model can trigger to perform specific actions or retrieve real-time data from external systems, extending its capabilities beyond simple text generation.
Review solution architecture
Review source code
agent.py
The following code authenticates with Gemini Enterprise, initializes the Agent Search MCP and Chat API tools, and defines the agent's behavior.
- Authentication: It uses a helper function
_get_access_token_from_contextto retrieve the authentication token (CLIENT_AUTH_NAME) that Gemini Enterprise injects. This token is crucial for securely calling downstream services like Agent Search MCP and Google Chat tools. - Tools Setup: It initializes
vertexai_mcp, a toolset that connects to the Agent Search Model Context Protocol (MCP) server, and thesend_direct_messagetool. This gives the agent the ability to search through your connected data stores and send Google Chat messages. - Agent Definition: It defines the
root_agentusing thegemini-2.5-flashmodel. The instructions tell the agent to prioritize using the search tool for information retrieval and thesend_direct_messagetool for actions, effectively grounding the agent in your enterprise data.
...
MODEL = "gemini-2.5-flash"

# Gemini Enterprise authentication injects a bearer token into the ToolContext state.
# The key pattern is "CLIENT_AUTH_NAME_<random_digits>".
# We dynamically parse this token to authenticate our MCP and API calls.
CLIENT_AUTH_NAME = "enterprise-ai"

VERTEXAI_SEARCH_TIMEOUT = 15.0

def get_project_id():
    """Fetches the consumer project ID from the environment natively."""
    _, project = google.auth.default()
    if project:
        return project
    raise Exception(f"Failed to resolve GCP Project ID from environment.")

def find_serving_config_path():
    """Dynamically finds the default serving config in the engine."""
    project_id = get_project_id()
    engines = discoveryengine_v1.EngineServiceClient().list_engines(
        parent=f"projects/{project_id}/locations/global/collections/default_collection"
    )
    for engine in engines:
        # engine.name natively contains the numeric Project Number
        return f"{engine.name}/servingConfigs/default_serving_config"
    raise Exception(f"No Discovery Engines found in project {project_id}")

def _get_access_token_from_context(tool_context: ToolContext) -> str:
    """Helper method to dynamically parse the intercepted bearer token from the context state."""
    escaped_name = re.escape(CLIENT_AUTH_NAME)
    pattern = re.compile(fr"^{escaped_name}_\d+$")
    # Handle ADK varying state object types (Raw Dict vs ADK State)
    state_dict = tool_context.state.to_dict() if hasattr(tool_context.state, 'to_dict') else tool_context.state
    matching_keys = [k for k in state_dict.keys() if pattern.match(k)]
    if matching_keys:
        return state_dict.get(matching_keys[0])
    raise Exception(f"No bearer token found in ToolContext state matching pattern {pattern.pattern}")

def auth_header_provider(tool_context: ToolContext) -> dict[str, str]:
    token = _get_access_token_from_context(tool_context)
    return {"Authorization": f"Bearer {token}"}

def send_direct_message(email: str, message: str, tool_context: ToolContext) -> dict:
    """Sends a Google Chat Direct Message (DM) to a specific user by email address."""
    chat_client = chat_v1.ChatServiceClient(
        credentials=Credentials(token=_get_access_token_from_context(tool_context))
    )

    # 1. Setup the DM space or find existing one
    person = chat_v1.User(
        name=f"users/{email}",
        type_=chat_v1.User.Type.HUMAN
    )
    membership = chat_v1.Membership(member=person)
    space_req = chat_v1.Space(space_type=chat_v1.Space.SpaceType.DIRECT_MESSAGE)
    setup_request = chat_v1.SetUpSpaceRequest(
        space=space_req,
        memberships=[membership]
    )
    space_response = chat_client.set_up_space(request=setup_request)
    space_name = space_response.name

    # 2. Send the message
    msg = chat_v1.Message(text=message)
    message_request = chat_v1.CreateMessageRequest(
        parent=space_name,
        message=msg
    )
    message_response = chat_client.create_message(request=message_request)

    return {"status": "success", "message_id": message_response.name, "space": space_name}

agentsearch_mcp = McpToolset(
    connection_params=StreamableHTTPConnectionParams(
        url="https://discoveryengine.googleapis.com/mcp",
        timeout=VERTEXAI_SEARCH_TIMEOUT,
        sse_read_timeout=VERTEXAI_SEARCH_TIMEOUT
    ),
    tool_filter=['search'],
    # The auth_header_provider dynamically injects the bearer token from the ToolContext
    # into the MCP call for authentication.
    header_provider=auth_header_provider
)

# Answer nicely the following user queries:
#  - Please find my meetings for today, I need their titles and links
#  - What is the latest Drive file I created?
#  - What is the latest Gmail message I received?
#  - Please send the following message to someone@example.com: Hello, this is a test message.

root_agent = LlmAgent(
    model=MODEL,
    name='enterprise_ai',
    instruction=f"""
        You are a helpful assistant that always uses the MCP search tool to answer the user's message, unless the user asks you to send a message to someone.
        If the user asks you to send a message to someone, use the send_direct_message tool to send the message.
        You MUST unconditionally use the MCP search tool to find answer, even if you believe you already know the answer or believe the MCP search tool does not contain the data.
        The MCP search tool accesses the user's data through datastores including Google Drive, Google Calendar, and Gmail.
        Only use the MCP search tool with servingConfig and query parameters, do not use any other parameters.
        Always use the servingConfig {find_serving_config_path()} while using the MCP search tool.
    """,
    tools=[agentsearch_mcp, FunctionTool(send_direct_message)]
)
Enable APIs
The solution requires the enablement of additional APIs:
- In the Google Cloud console, enable the Agent Platform, Cloud Resource Manager, and Google Chat APIs:
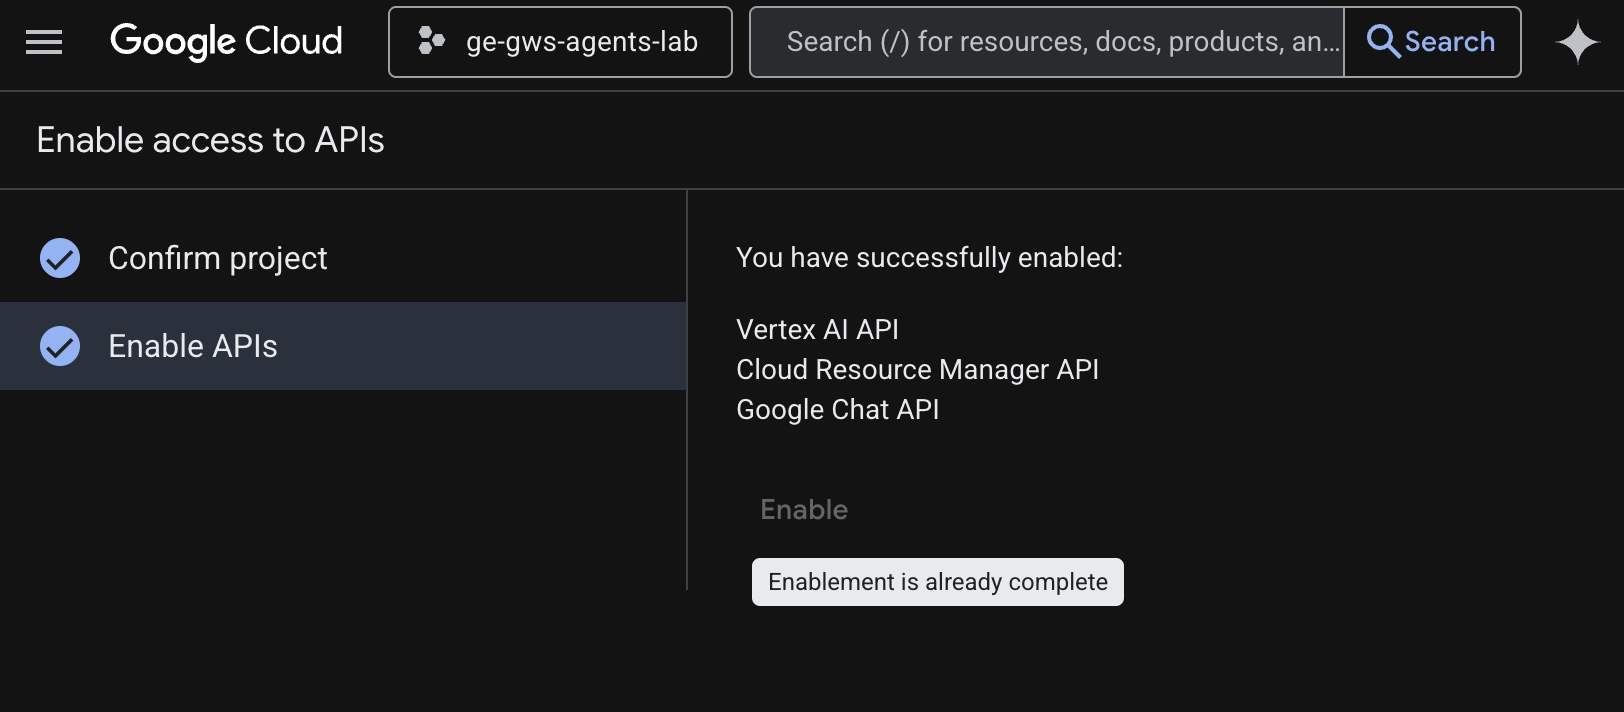
- Click Menu ☰ > APIs & Services > Enabled APIs & Services and then confirm that Vertex AI API, Cloud Resource Manager API, and Google Chat API are in the list.
Update the OAuth consent screen
The solution requires additional data access:
- In the Google Cloud console, click to Menu ☰ > Google Auth platform > Data Access.
- Click Add or remove scopes.
- Copy the following scopes and paste them into the Manually add scopes field.
- Click Add to table, then Update, then Save.
https://www.googleapis.com/auth/cloud-platform
https://www.googleapis.com/auth/chat.messages.create
https://www.googleapis.com/auth/chat.spaces.create
- Click Add to table, then Update, then Save.
Update OAuth client credentials
The solution requires an additional authorized redirect URI:
- In the Google Cloud console, click to Menu ☰ > Google Auth platform > Clients.
- Click on the client name
codelab. - In the Authorized redirect URIs section, click Add URI and enter
https://vertexaisearch.cloud.google.com/static/oauth/oauth.html. - Click Save.
Enable Agent Search MCP
- In a terminal, execute:
gcloud beta services mcp enable discoveryengine.googleapis.com \
     --project=$(gcloud config get-value project)
Configure Chat app
Configure the Google Chat app with its basic informational details.
- In the Google Cloud console, search for
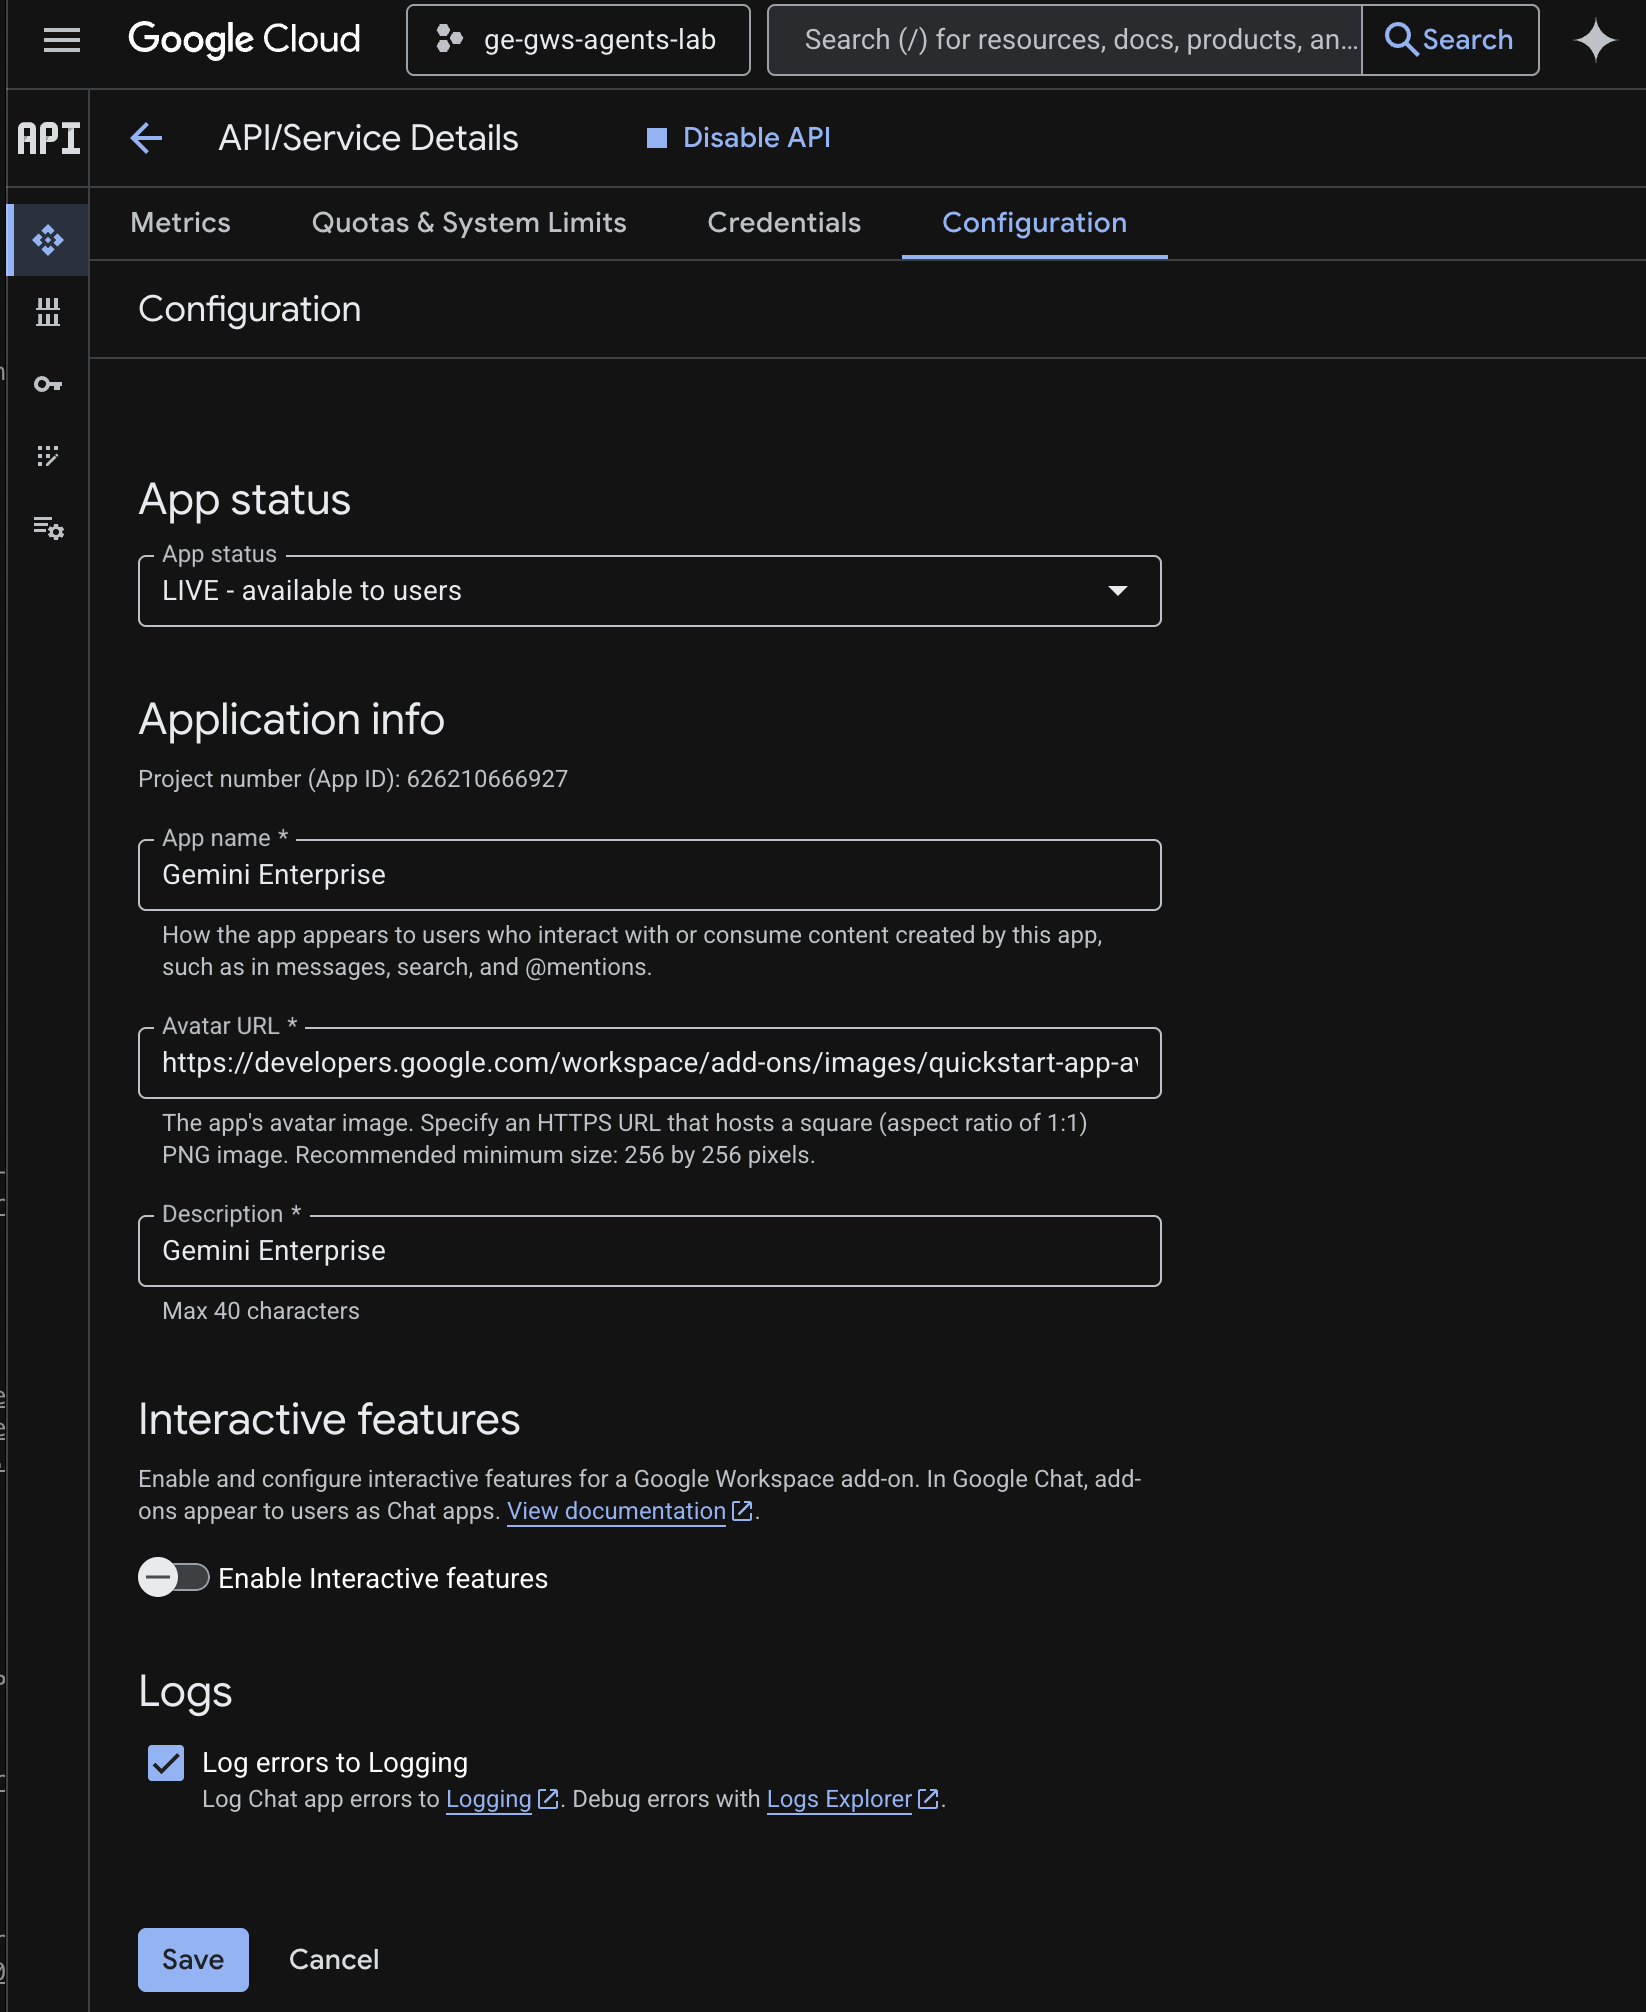
Google Chat APIin the Google Cloud search field, click Google Chat API, click Manage, and click Configuration.
- Set the App name and Description to
Gemini Enterprise. - Set the Avatar URL to
https://developers.google.com/workspace/add-ons/images/quickstart-app-avatar.png. - Unselect Enable Interactive features then click Disable in the appearing modal dialog.
- Select Log errors to Logging.
- Click Save.
Deploy agent In Agent Runtime
Deploy your agent to the Agent Runtime infrastructure.
- Download this GitHub repository.
- In a terminal, open the
solutions/enterprise-ai-agentdirectory then execute:
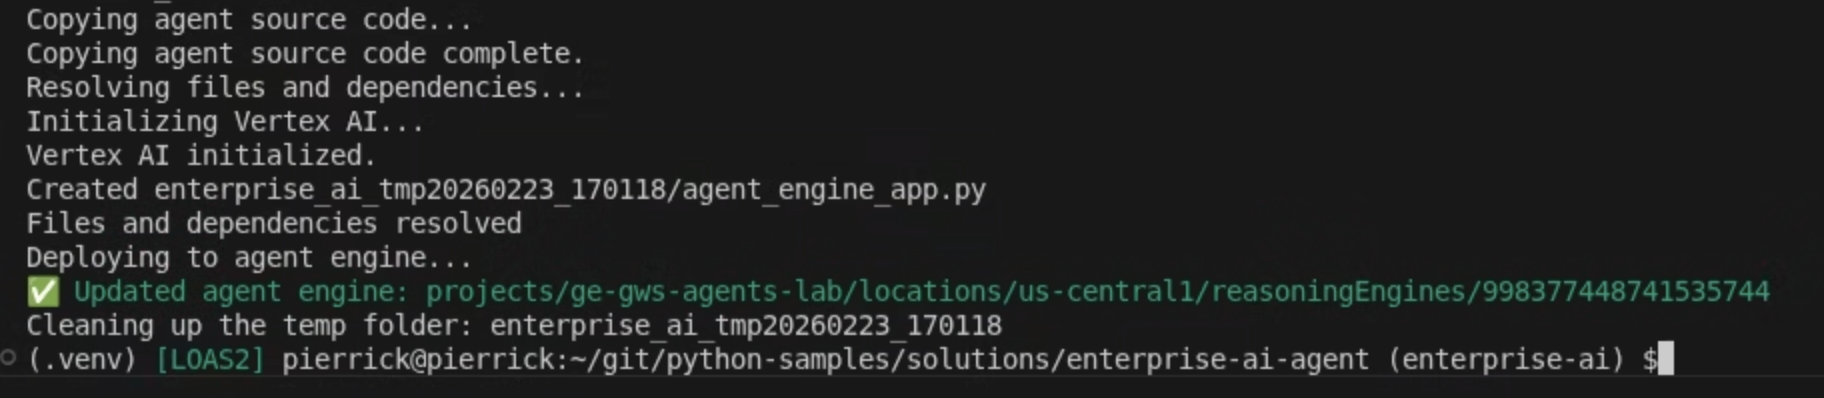
# 1. Create and activate a new virtual environment
python3 -m venv .venv
source .venv/bin/activate

# 2. Install poetry and project dependencies
pip install poetry
poetry install

# 3. Deploy the agent
adk deploy agent_engine \
  --project=$(gcloud config get-value project) \
  --region=us-central1 \
  --display_name="Enterprise AI" \
  enterprise_ai
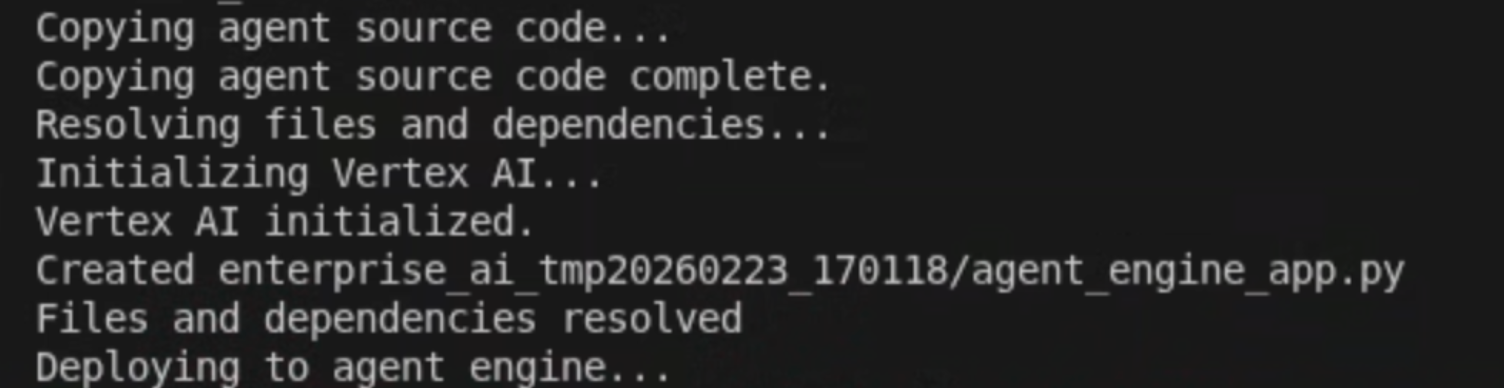
- When you see the line Deploying to agent runtime... in the logs, open a new terminal and execute the following command to add required permissions to Vertex AI Reasoning Engine Service Agent:
# 1. Get the current Project ID
PROJECT_ID=$(gcloud config get-value project)

# 2. Extract the Project Number for that ID
PROJECT_NUMBER=$(gcloud projects describe $PROJECT_ID --format='value(projectNumber)')

# 3. Construct the Service Account name
SERVICE_ACCOUNT="service-${PROJECT_NUMBER}@gcp-sa-aiplatform-re.iam.gserviceaccount.com"

# 4. Apply the IAM policy binding
gcloud projects add-iam-policy-binding $PROJECT_ID \
     --member="serviceAccount:$SERVICE_ACCOUNT" \
     --role="roles/discoveryengine.viewer"
- Wait for the adk deploy command to complete then copy the resource name of the newly deployed agent from the command output in green.
Register agent in Gemini Enterprise
Register your deployed agent with Gemini Enterprise to make it accessible to users.
Open Gemini Enterprise from the Cloud console in a new tab, then follow these steps:
- Click the app named
codelab. - In the navigation menu, click Agents.
- Click + Add agent.
- Click Add for Custom agent via Agent Runtime. The Authorizations section displays.
- Click Add authorization.
- Set the Authorization name to
enterprise-ai. An ID is generated based on the name and is displayed under the field, copy it. - Set the Client ID to the same value as the OAuth client created and updated in previous steps.
- Set the Client secret to the same value as the OAuth client created and updated in previous steps.
- Set the Token URI to
https://oauth2.googleapis.com/token. - Set the Authorization URI to the following value after replacing <CLIENT_ID> with the OAuth client ID created and updated in previous steps.
https://accounts.google.com/o/oauth2/v2/auth?client_id=<CLIENT_ID>&redirect_uri=https%3A%2F%2Fvertexaisearch.cloud.google.com%2Fstatic%2Foauth%2Foauth.html&scope=https%3A%2F%2Fwww.googleapis.com%2Fauth%2Fcalendar.readonly%20https%3A%2F%2Fwww.googleapis.com%2Fauth%2Fcalendar.calendars%20https%3A%2F%2Fwww.googleapis.com%2Fauth%2Fcalendar.events%20https%3A%2F%2Fwww.googleapis.com%2Fauth%2Fcloud-platform%20https%3A%2F%2Fwww.googleapis.com%2Fauth%2Fgmail.send%20https%3A%2F%2Fwww.googleapis.com%2Fauth%2Fgmail.readonly%20https%3A%2F%2Fwww.googleapis.com%2Fauth%2Fchat.messages.create%20https%3A%2F%2Fwww.googleapis.com%2Fauth%2Fchat.spaces.create&include_granted_scopes=true&response_type=code&access_type=offline&prompt=consent
- Click Done then Next. The Configuration section displays.
- Set the Agent name and Agent description to
Enterprise AI. - Set the Agent Runtime reasoning engine to the reasoning engine resource name copied in previous steps. It has the following format:
projects/<PROJECT_ID>/locations/<LOCATION>/reasoningEngines/<REASONING_ENGINE_ID>
- Click Create. The newly added agent is now listed under Agents.
Try agent
Verify the flow by chatting with your custom agent.
- In the Gemini Enterprise web app, chat with the newly registered agent:
- Click Menu ☰ > Agents.
- Select the agent under From your organization.
- In the chat, type
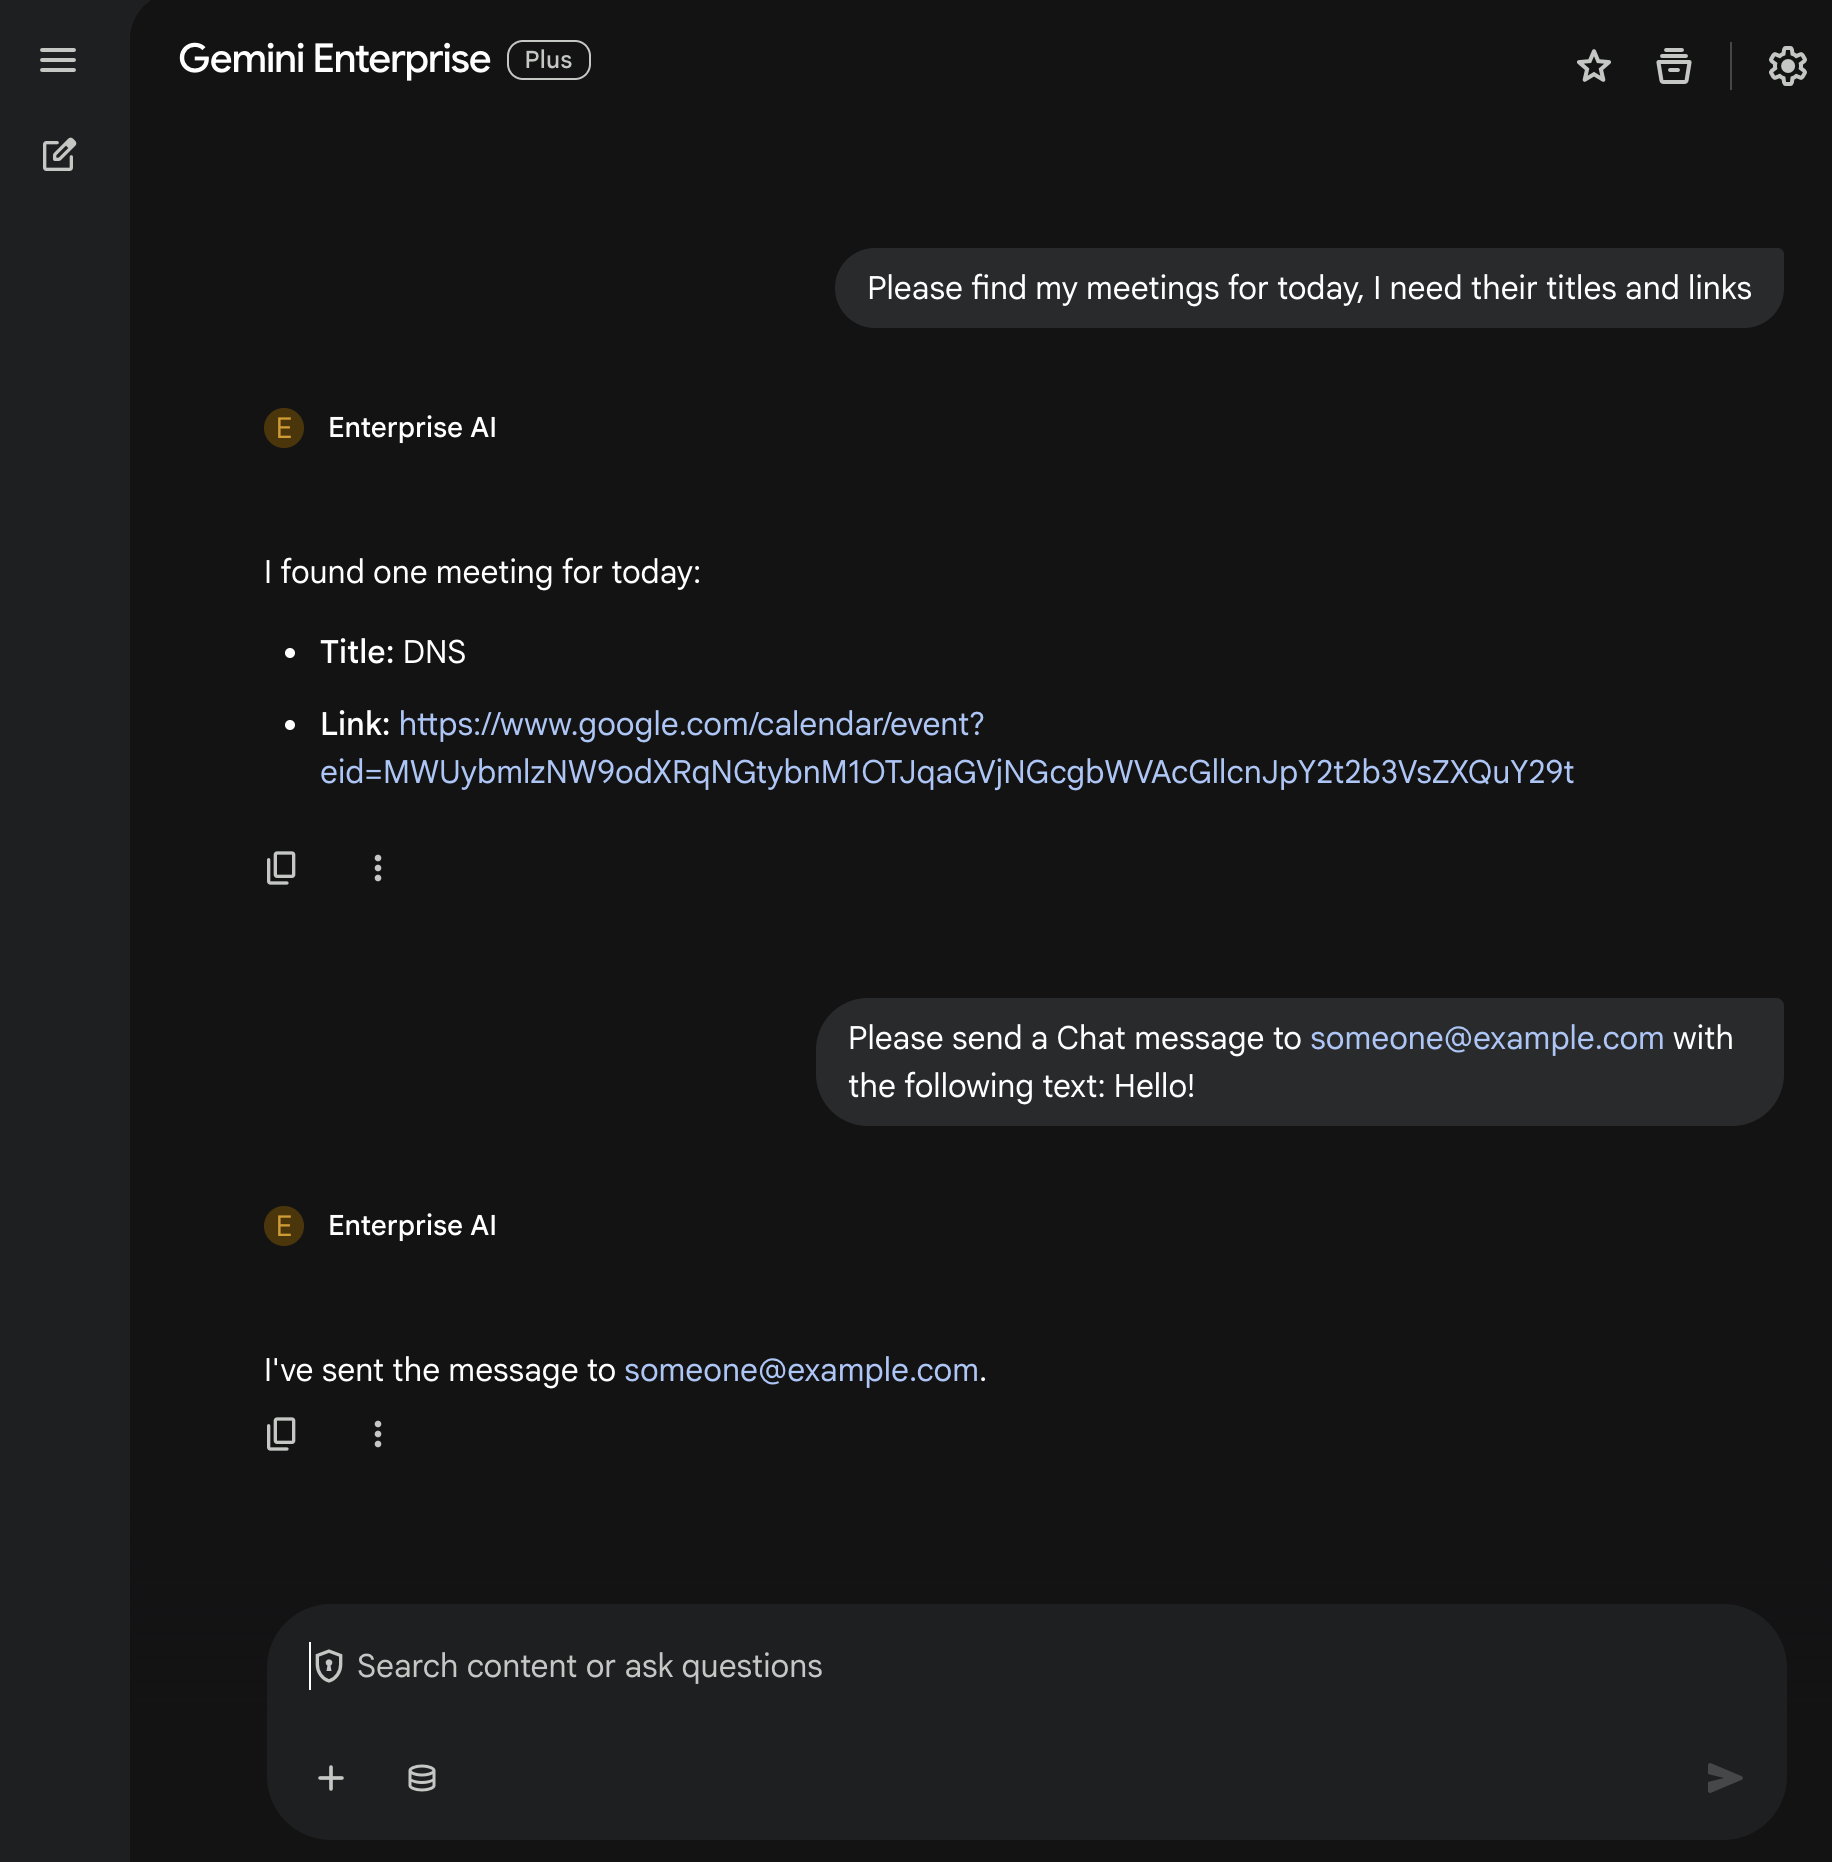
Please find my meetings for today, I need their titles and linksand pressenter. - Click Authorize, then follow the authorization flow.
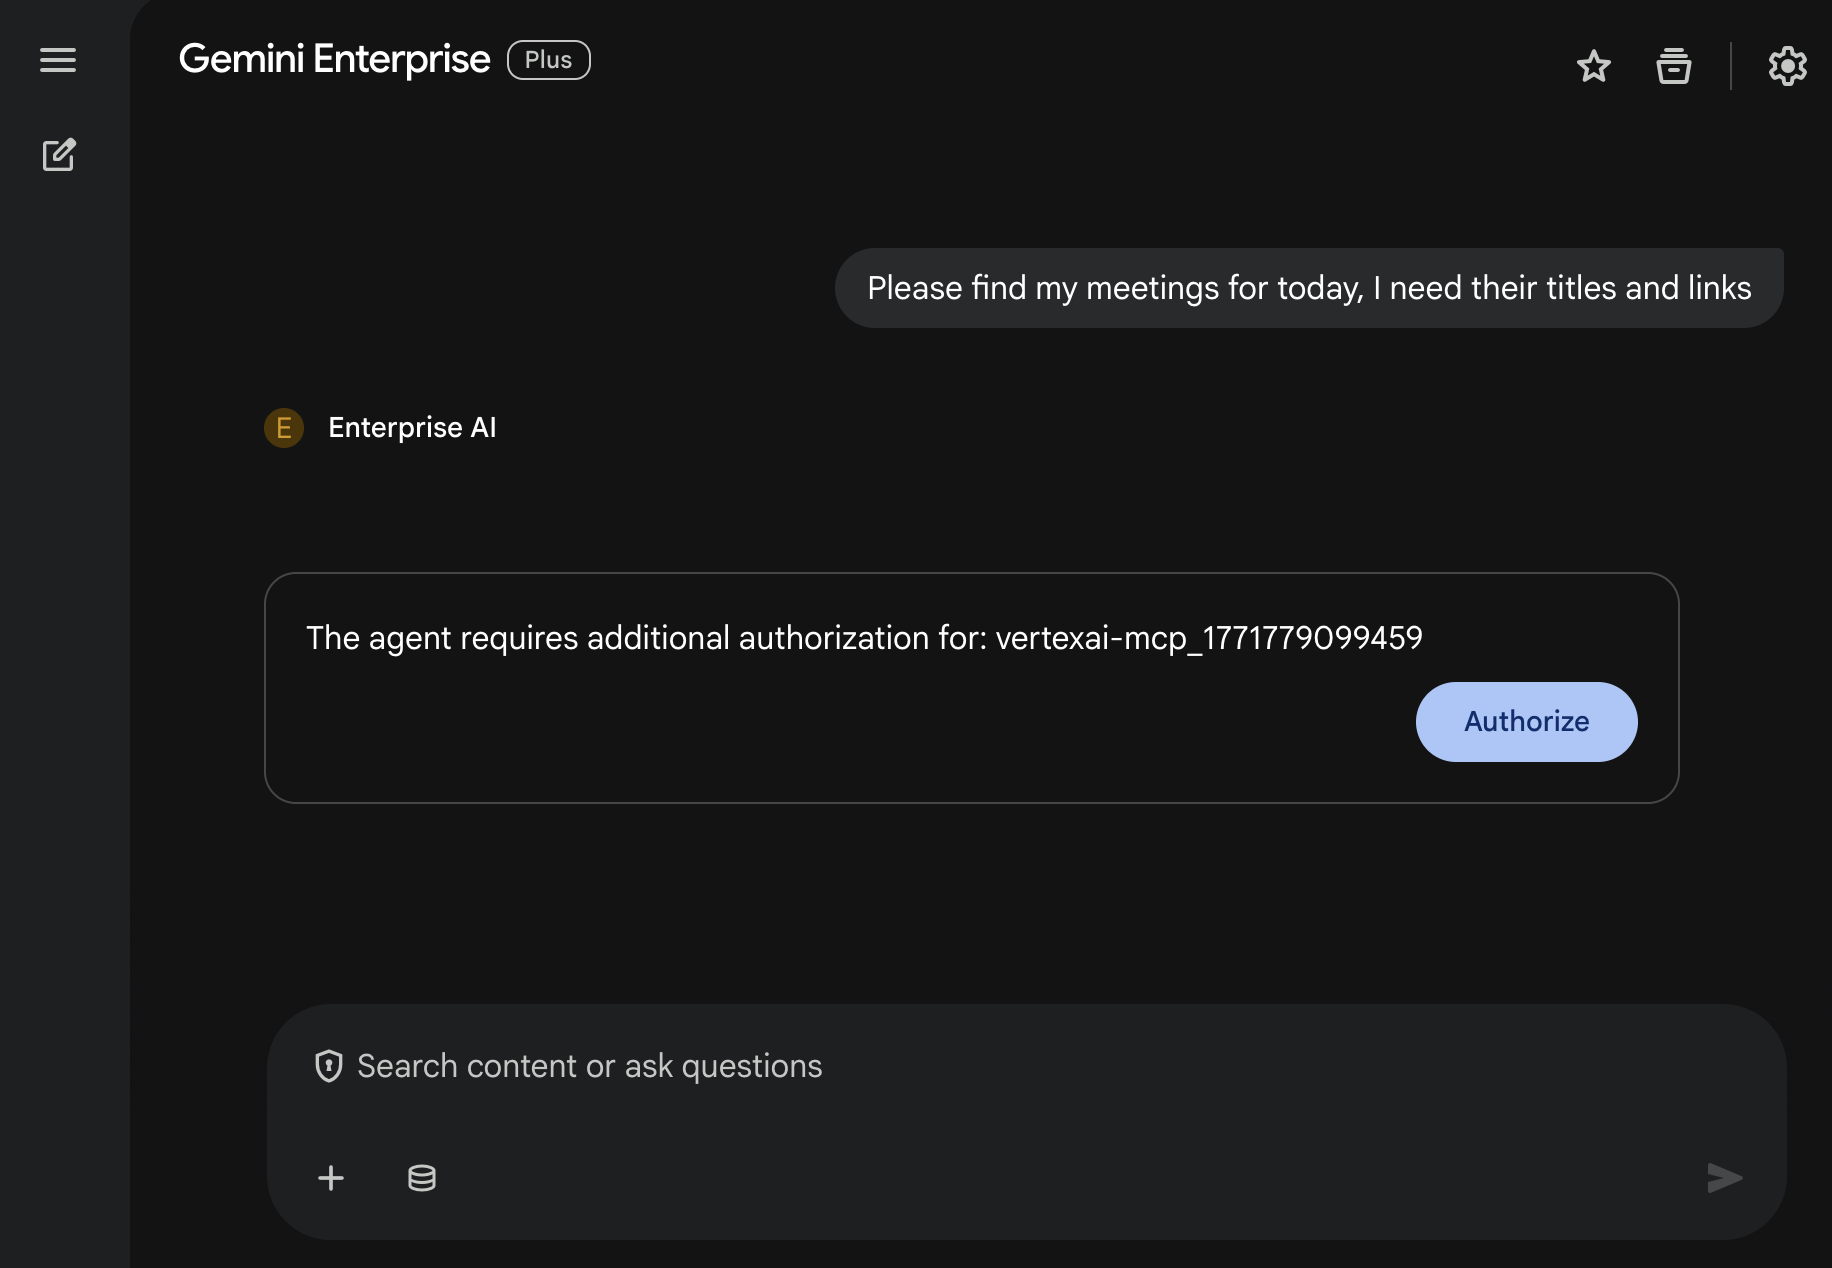
- The agent answers with a list of Calendar events (depending on the user's account).
- In the chat, type
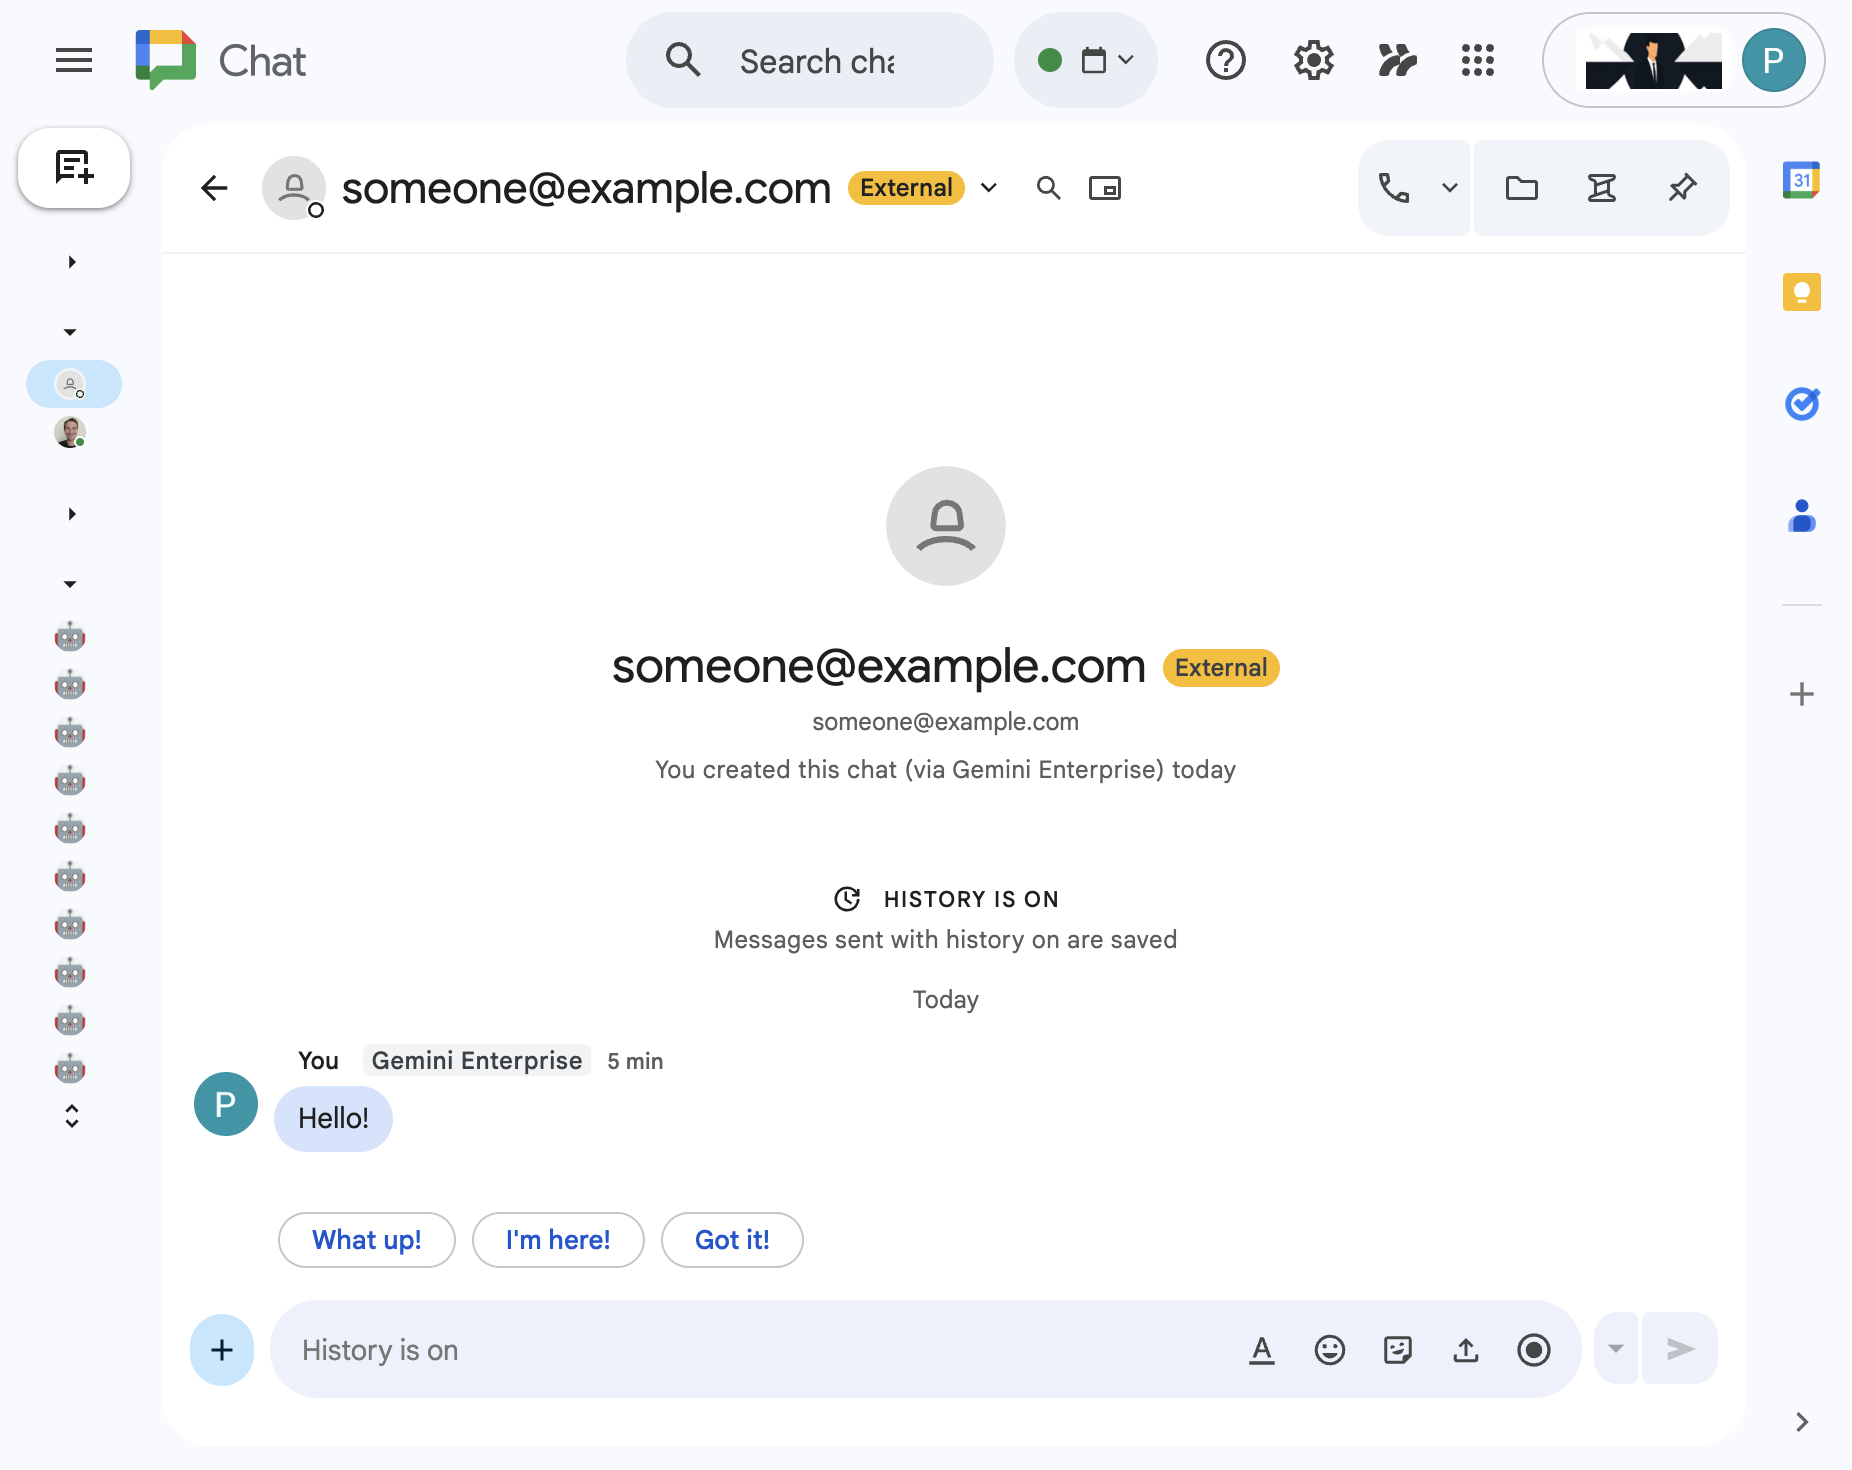
Please send a Chat message to someone@example.com with the following text: Hello!and pressenter. - The agent answers with a confirmation message.
5. Default agent as Google Workspace add-on
This agent allows users to search data for Workspace in their natural language in the context of Workspace app UIs. It relies on the following elements:
- Model: Gemini.
- Data: Gemini Enterprise data stores for Google Workspace (Calendar, Gmail, Drive, NotebookLM), Google Search.
- Agent host: Gemini Enterprise.
- UI: Google Workspace add on for Chat and Gmail (easily extendable to Calendar, Drive, Docs, Sheets, and Slides).
- Google Workspace add on: Apps Script, Gemini Enterprise APIs, contextual (user metadata, selected Gmail message).
The Google Workspace add on will be connected to Gemini Enterprise using the StreamAssist API.
Review concepts
Google Workspace add on
A Google Workspace add on is a customized application that extends one or multiple Google Workspace applications (Gmail, Chat, Calendar, Docs, Drive, Meet, Sheets, and Slides).
Apps Script
Apps Script is a cloud-based JavaScript platform powered by Google Drive that lets you integrate with and automate tasks across Google products.
Google Workspace Card framework
The Card framework in Google Workspace enables developers to create rich, interactive user interfaces. It allows for the construction of organized and visually appealing cards that can include text, images, buttons, and other widgets. These cards enhance user experience by providing structured information and enabling quick actions directly within Workspace applications.
Review solution architecture
Review source code
appsscript.json
The following configuration defines the add-on's triggers and permissions.
- Defines the add-on: It tells Google Workspace that this project is an add-on for both Chat and Gmail.
- Contextual Triggers: For Gmail, it sets up a
contextualTriggerthat firesonAddonEventwhenever a user opens an email message. This allows the add-on to "see" the email content. - Permissions: It lists the
oauthScopesrequired for the add-on to run, such as permissions to read the current email, execute the script, and connect to external services (like Gemini Enterprise APIs).
...
"addOns": {
    "common": {
      "name": "Enterprise AI",
      "logoUrl": "https://developers.google.com/workspace/add-ons/images/quickstart-app-avatar.png"
    },
    "chat": {},
    "gmail": {
      "contextualTriggers": [
        {
          "unconditional": {},
          "onTriggerFunction": "onAddonEvent"
        }
      ]
    }
  },
  "oauthScopes": [
    "https://www.googleapis.com/auth/script.external_request",
    "https://www.googleapis.com/auth/discoveryengine.assist.readwrite",
    "https://www.googleapis.com/auth/gmail.addons.execute",
    "https://www.googleapis.com/auth/gmail.addons.current.message.readonly"
  ]
...
Chat.gs
The following code handles incoming Google Chat messages.
- Receives Messages: The
onMessagefunction is the entry point for message interactions. - Manages Context: It saves the
space.name(the ID of the Chat space) to the user's properties. This ensures that when the agent is ready to reply, it knows exactly which conversation to post the message to. - Delegates to Agent: It calls
requestAgent, passing the user's message to the core logic that handles the API communication.
...
// Service that handles Google Chat operations.

// Handle incoming Google Chat message events, actions will be taken via Google Chat API calls
function onMessage(event) {
  if (isInDebugMode()) {
    console.log(`MESSAGE event received (Chat): ${JSON.stringify(event)}`);
  }
  // Extract data from the event.
  const chatEvent = event.chat;
  setChatConfig(chatEvent.messagePayload.space.name);

  // Request AI agent to answer the message
  requestAgent(chatEvent.messagePayload.message);
  // Respond with an empty response to the Google Chat platform to acknowledge execution
  return null;
}

// --- Utility functions ---

// The Chat direct message (DM) space associated with the user
const SPACE_NAME_PROPERTY = "DM_SPACE_NAME"

// Sets the Chat DM space name for subsequent operations.
function setChatConfig(spaceName) {
  const userProperties = PropertiesService.getUserProperties();
  userProperties.setProperty(SPACE_NAME_PROPERTY, spaceName);
  console.log(`Space is set to ${spaceName}`);
}

// Retrieved the Chat DM space name to sent messages to.
function getConfiguredChat() {
  const userProperties = PropertiesService.getUserProperties();
  return userProperties.getProperty(SPACE_NAME_PROPERTY);
}

// Finds the Chat DM space name between the Chat app and the given user.
function findChatAppDm(userName) {
  return Chat.Spaces.findDirectMessage(
    { 'name': userName },
    {'Authorization': `Bearer ${getAddonCredentials().getAccessToken()}`}
  ).name;
}

// Creates a Chat message in the configured space.
function createMessage(message) {
  const spaceName = getConfiguredChat();
  console.log(`Creating message in space ${spaceName}...`);
  return Chat.Spaces.Messages.create(
    message,
    spaceName,
    {},
    {'Authorization': `Bearer ${getAddonCredentials().getAccessToken()}`}
  ).name;
}
Sidebar.gs
The following code builds the Gmail sidebar and captures email context.
- Builds the UI:
createSidebarCardconstructs the visual interface using the Workspace Card Service. It creates a simple layout with a text input area and a "Send message" button. - Captures Email Context: In
handleSendMessage, the code checks if the user is currently looking at an email (event.gmail.messageId). If they are, it securely fetches the email's subject and body and appends it to the user's prompt. - Displays the Result: Once the agent responds, the code updates the sidebar card to show the reply.
...
// Service that handles Gmail operations.

// Triggered when the user opens the Gmail Add-on or selects an email.
function onAddonEvent(event) {
  // If this was triggered by a button click, handle it
  if (event.parameters && event.parameters.action === 'send') {
    return handleSendMessage(event);
  }

  // Otherwise, just render the default initial sidebar
  return createSidebarCard();
}

// Creates the standard Gmail sidebar card consisting of a text input and send button.
// Optionally includes an answer section if a response was generated.
function createSidebarCard(optionalAnswerSection) {
  const card = CardService.newCardBuilder();
  const actionSection = CardService.newCardSection();

  // Create text input for the user's message
  const messageInput = CardService.newTextInput()
    .setFieldName("message")
    .setTitle("Message")
    .setMultiline(true);

  // Create action for sending the message
  const sendAction = CardService.newAction()
    .setFunctionName('onAddonEvent')
    .setParameters({ 'action': 'send' });

  const sendButton = CardService.newTextButton()
    .setText("Send message")
    .setTextButtonStyle(CardService.TextButtonStyle.FILLED)
    .setOnClickAction(sendAction);

  actionSection.addWidget(messageInput);
  actionSection.addWidget(CardService.newButtonSet().addButton(sendButton));

  card.addSection(actionSection);

  // Attach the response at the bottom if we have one
  if (optionalAnswerSection) {
    card.addSection(optionalAnswerSection);
  }

  return card.build();
}

// Handles clicks from the Send message button.
function handleSendMessage(event) {
  const commonEventObject = event.commonEventObject || {};
  const formInputs = commonEventObject.formInputs || {};
  const messageInput = formInputs.message;

  let userMessage = "";
  if (messageInput && messageInput.stringInputs && messageInput.stringInputs.value.length > 0) {
    userMessage = messageInput.stringInputs.value[0];
  }

  if (!userMessage || userMessage.trim().length === 0) {
    return CardService.newActionResponseBuilder()
      .setNotification(CardService.newNotification().setText("Please enter a message."))
      .build();
  }

  let finalQueryText = `USER MESSAGE TO ANSWER: ${userMessage}`;

  // If we have an email selected in Gmail, append its content as context
  if (event.gmail && event.gmail.messageId) {
    try {
      GmailApp.setCurrentMessageAccessToken(event.gmail.accessToken);
      const message = GmailApp.getMessageById(event.gmail.messageId);

      const subject = message.getSubject();
      const bodyText = message.getPlainBody() || message.getBody();

      finalQueryText += `\n\nEMAIL THE USER HAS OPENED ON SCREEN:\nSubject: ${subject}\nBody:\n---\n${bodyText}\n---`;
    } catch (e) {
      console.error("Could not fetch Gmail context: " + e);
      // Invalidate the token explicitly so the next prompt requests the missing scopes
      ScriptApp.invalidateAuth();

      CardService.newAuthorizationException()
        .setResourceDisplayName("Enterprise AI")
        .setAuthorizationUrl(ScriptApp.getAuthorizationUrl())
        .throwException();
    }
  }

  try {
    const responseText = queryAgent({ text: finalQueryText, forceNewSession: true });

    // We leverage the 'showdown' library to parse the LLM's Markdown output into HTML
    // We also substitute markdown listings with arrows and adjust newlines for clearer rendering in the sidebar
    let displayedText = substituteListingsFromMarkdown(responseText);
    displayedText = new showdown.Converter().makeHtml(displayedText).replace(/\n/g, '\n\n');

    const textParagraph = CardService.newTextParagraph();
    textParagraph.setText(displayedText);

    const answerSection = CardService.newCardSection()
      .addWidget(textParagraph);

    const updatedCard = createSidebarCard(answerSection);

    return CardService.newActionResponseBuilder()
      .setNavigation(CardService.newNavigation().updateCard(updatedCard))
      .build();

  } catch (err) {
    return CardService.newActionResponseBuilder()
      .setNotification(CardService.newNotification().setText("Error fetching response: " + err.message))
      .build();
  }
}
...
AgentHandler.gs
The following code orchestrates the API call to Gemini Enterprise.
- Orchestrates the API Call:
queryAgentis the bridge between your add-on and Gemini Enterprise. It constructs a request that includes the user's query, their timezone, and the active session ID. - Dynamic Discovery: It calls
getAgentDataStoresto find out which data connectors are available. - Streams the Response: Because agent responses can take a moment, it uses the
streamAssistAPI with Server-Sent Events (SSE). The code gathers the response in chunks and reconstructs the full answer.
...
// Service that handles Gemini Enterprise AI Agent operations.

// Submits a query to the AI agent and returns the response string synchronously
function queryAgent(input) {
  const isNewSession = input.forceNewSession || !PropertiesService.getUserProperties().getProperty(AGENT_SESSION_NAME);
  const sessionName = input.forceNewSession ? createAgentSession() : getOrCreateAgentSession();

  let systemPrompt = "SYSTEM PROMPT START Do not respond with tables but use bullet points instead.";
  if (input.forceNewSession) {
    systemPrompt += " Do not ask the user follow-up questions or converse with them as history is not kept in this interface.";
  }
  systemPrompt += " SYSTEM PROMPT END\n\n";

  const queryText = isNewSession ? systemPrompt + input.text : input.text;

  const requestPayload = {
    "session": sessionName,
    "userMetadata": { "timeZone": Session.getScriptTimeZone() },
    "query": { "text": queryText },
    "toolsSpec": { "vertexAiSearchSpec": { "dataStoreSpecs": getAgentDataStores().map(ds => { dataStore: ds }) } },
    "agentsSpec": { "agentSpecs": [{ "agentId": getAgentId() }] }
  };

  const responseContentText = UrlFetchApp.fetch(
    `https://${getLocation()}-discoveryengine.googleapis.com/v1alpha/${getReasoningEngine()}/assistants/default_assistant:streamAssist?alt=sse`,
    {
      method: 'post',
      headers: { 'Authorization': `Bearer ${ScriptApp.getOAuthToken()}` },
      contentType: 'application/json',
      payload: JSON.stringify(requestPayload),
      muteHttpExceptions: true
    }
  ).getContentText();

  if (isInDebugMode()) {
    console.log(`Response: ${responseContentText}`);
  }

  const events = responseContentText.split('\n').map(s => s.replace(/^data:\s*/, '')).filter(s => s.trim().length > 0);
  console.log(`Received ${events.length} agent events.`);

  let answerText = "";
  for (const eventJson of events) {
    if (isInDebugMode()) {
      console.log("Event: " + eventJson);
    }
    const event = JSON.parse(eventJson);

    // Ignore internal events
    if (!event.answer) {
      console.log(`Ignored: internal event`);
      continue;
    }

    // Handle text replies
    const replies = event.answer.replies || [];
    for (const reply of replies) {
      const content = reply.groundedContent.content;
      if (content) {
        if (isInDebugMode()) {
          console.log(`Processing content: ${JSON.stringify(content)}`);
        }
        if (content.thought) {
          console.log(`Ignored: thought event`);
          continue;
        }
        answerText += content.text;
      }
    }

    if (event.answer.state === "SUCCEEDED") {
      console.log(`Answer text: ${answerText}`);
      return answerText;
    } else if (event.answer.state !== "IN_PROGRESS") {
      throw new Error("Something went wrong, check the Apps Script logs for more info.");
    }
  }
  return answerText;
}

// Gets the list of data stores configured for the agent to include in the request.
function getAgentDataStores() {
  const responseContentText = UrlFetchApp.fetch(
    `https://${getLocation()}-discoveryengine.googleapis.com/v1/${getReasoningEngine().split('/').slice(0, 6).join('/')}/dataStores`,
    {
      method: 'get',
      // Use the add on service account credentials for data store listing access
      headers: { 'Authorization': `Bearer ${getAddonCredentials().getAccessToken()}` },
      contentType: 'application/json',
      muteHttpExceptions: true
    }
  ).getContentText();
  if (isInDebugMode()) {
    console.log(`Response: ${responseContentText}`);
  }
  const dataStores = JSON.parse(responseContentText).dataStores.map(ds => ds.name);
  if (isInDebugMode()) {
    console.log(`Data stores: ${dataStores}`);
  }
  return dataStores;
}
...
Initiate service account
Create a dedicated service account to authorize the add-on's server-side operations.
In the Google Cloud console, follow these steps:
- Click Menu ☰ > IAM & Admin > Service Accounts > + Create service account.
- Set Service account name to
ge-add-on.
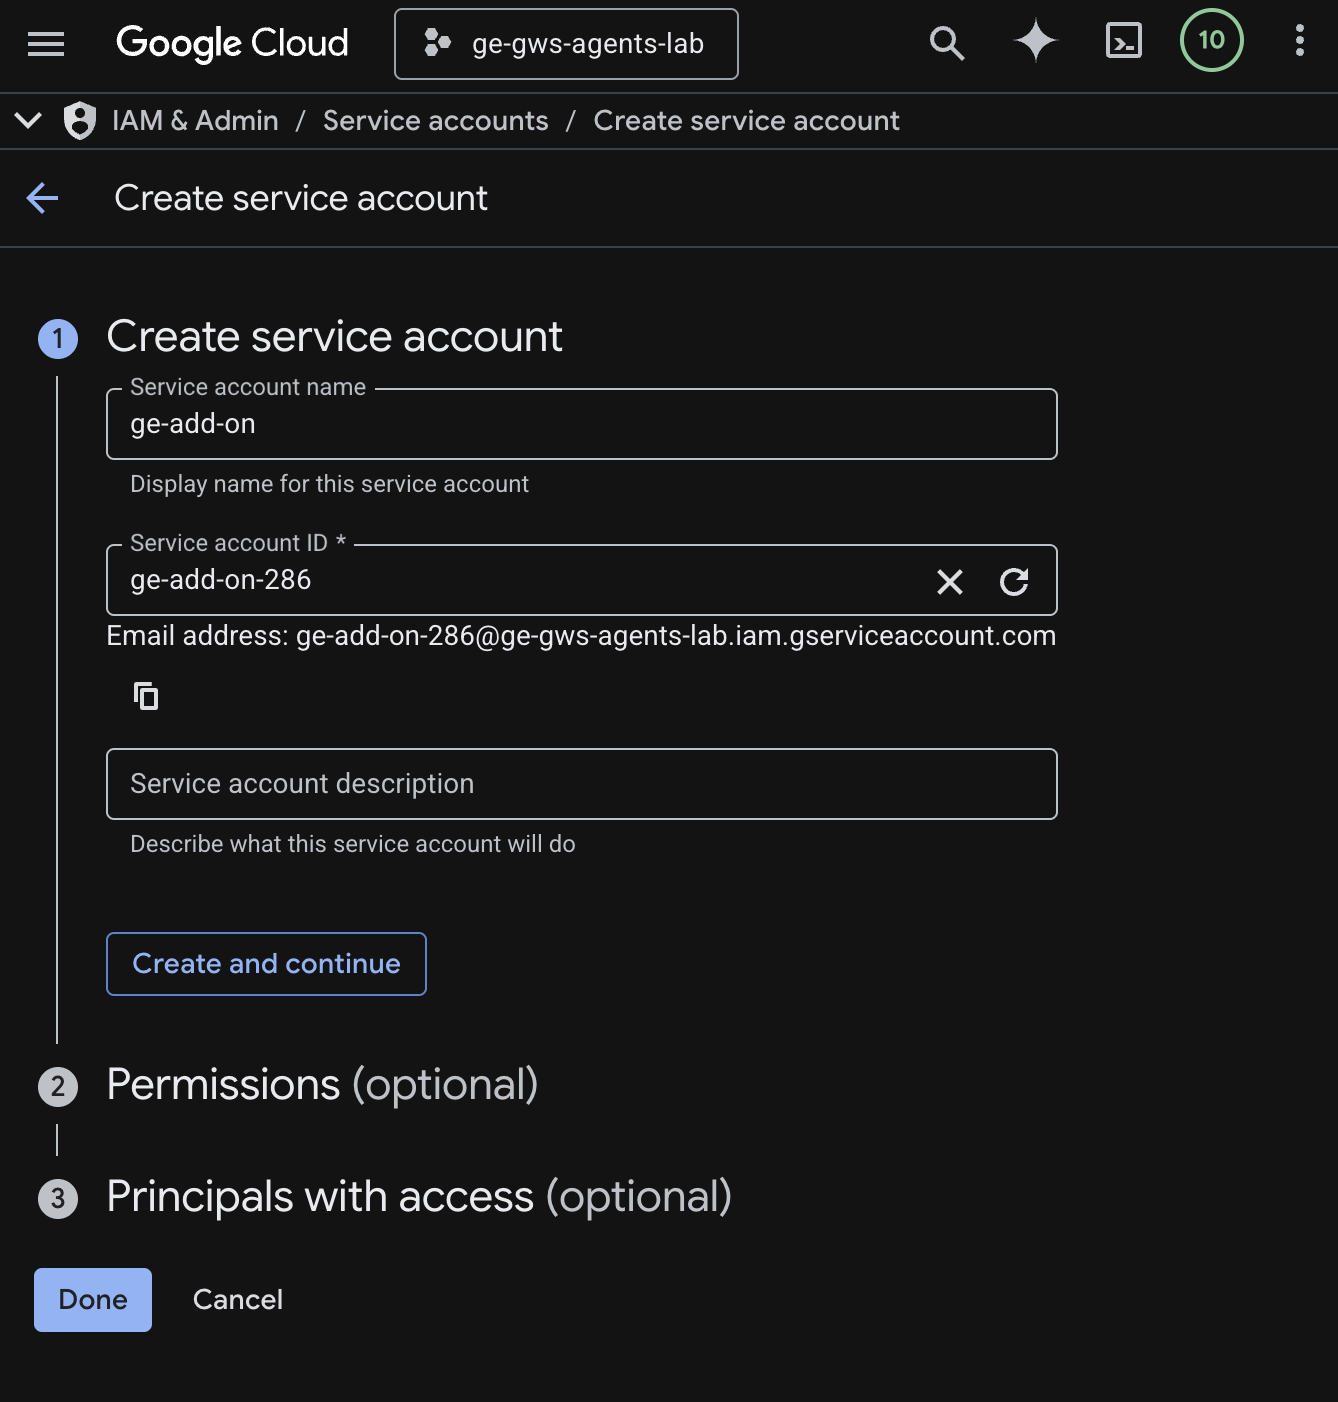
- Click Create and continue.
- Add the role Discovery Engine Viewer in permissions.
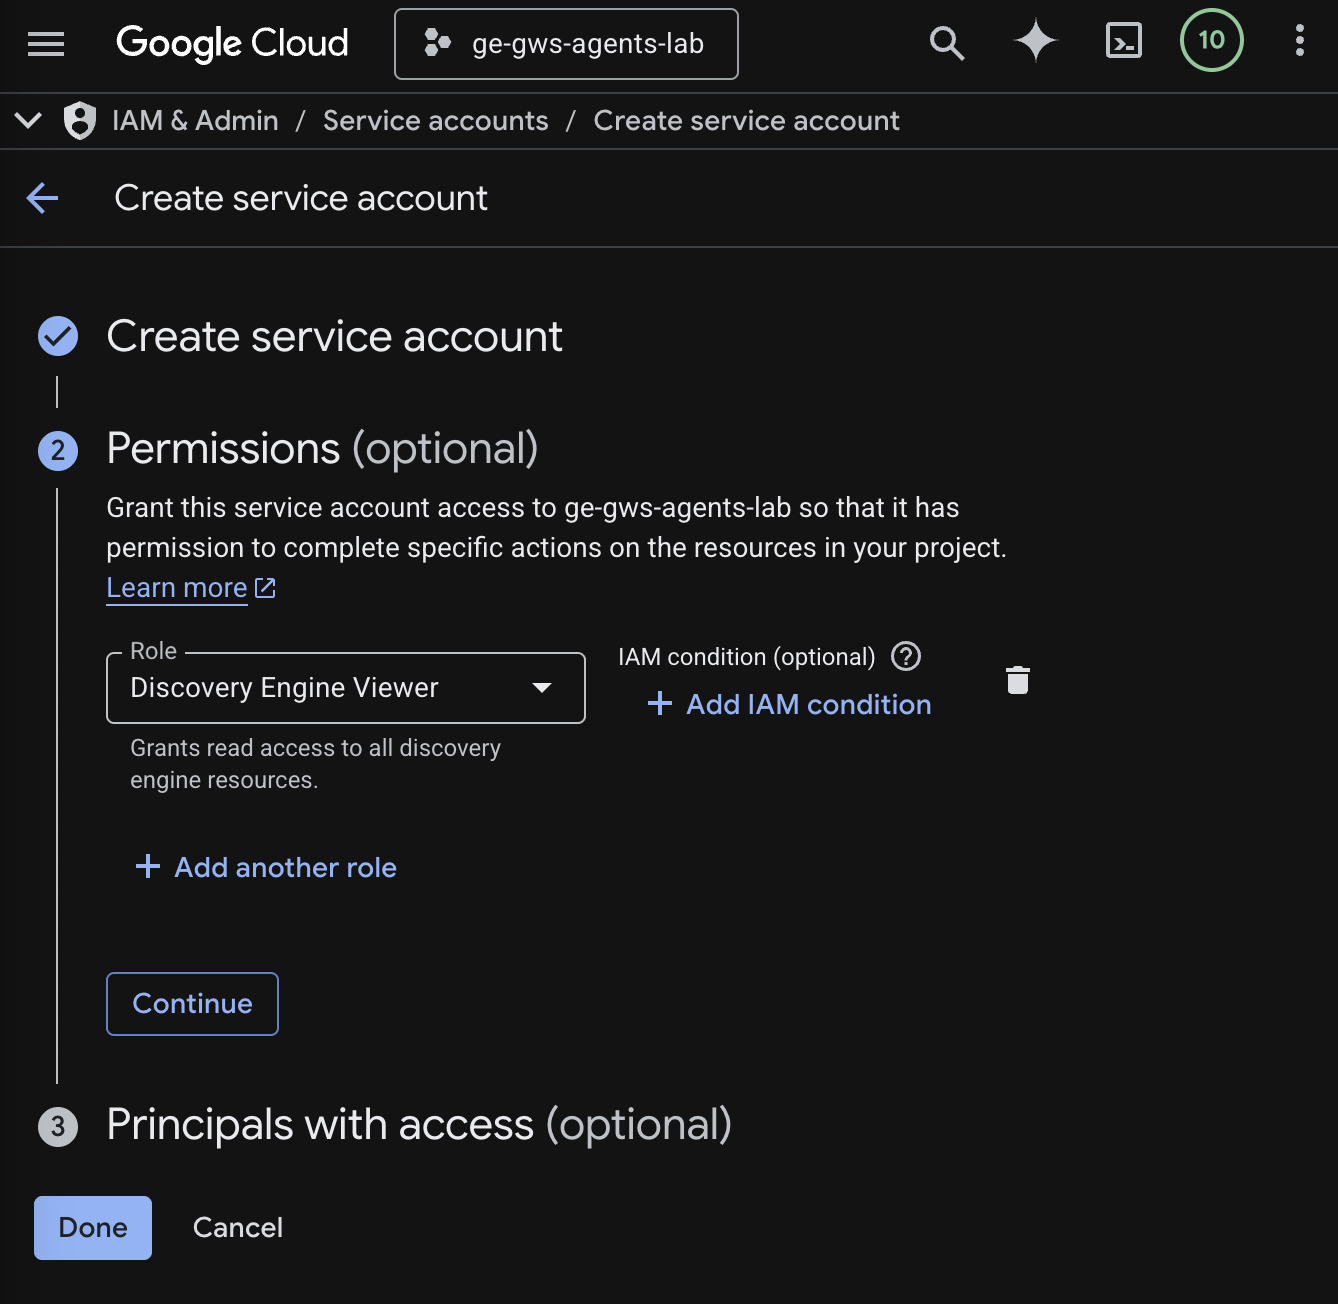
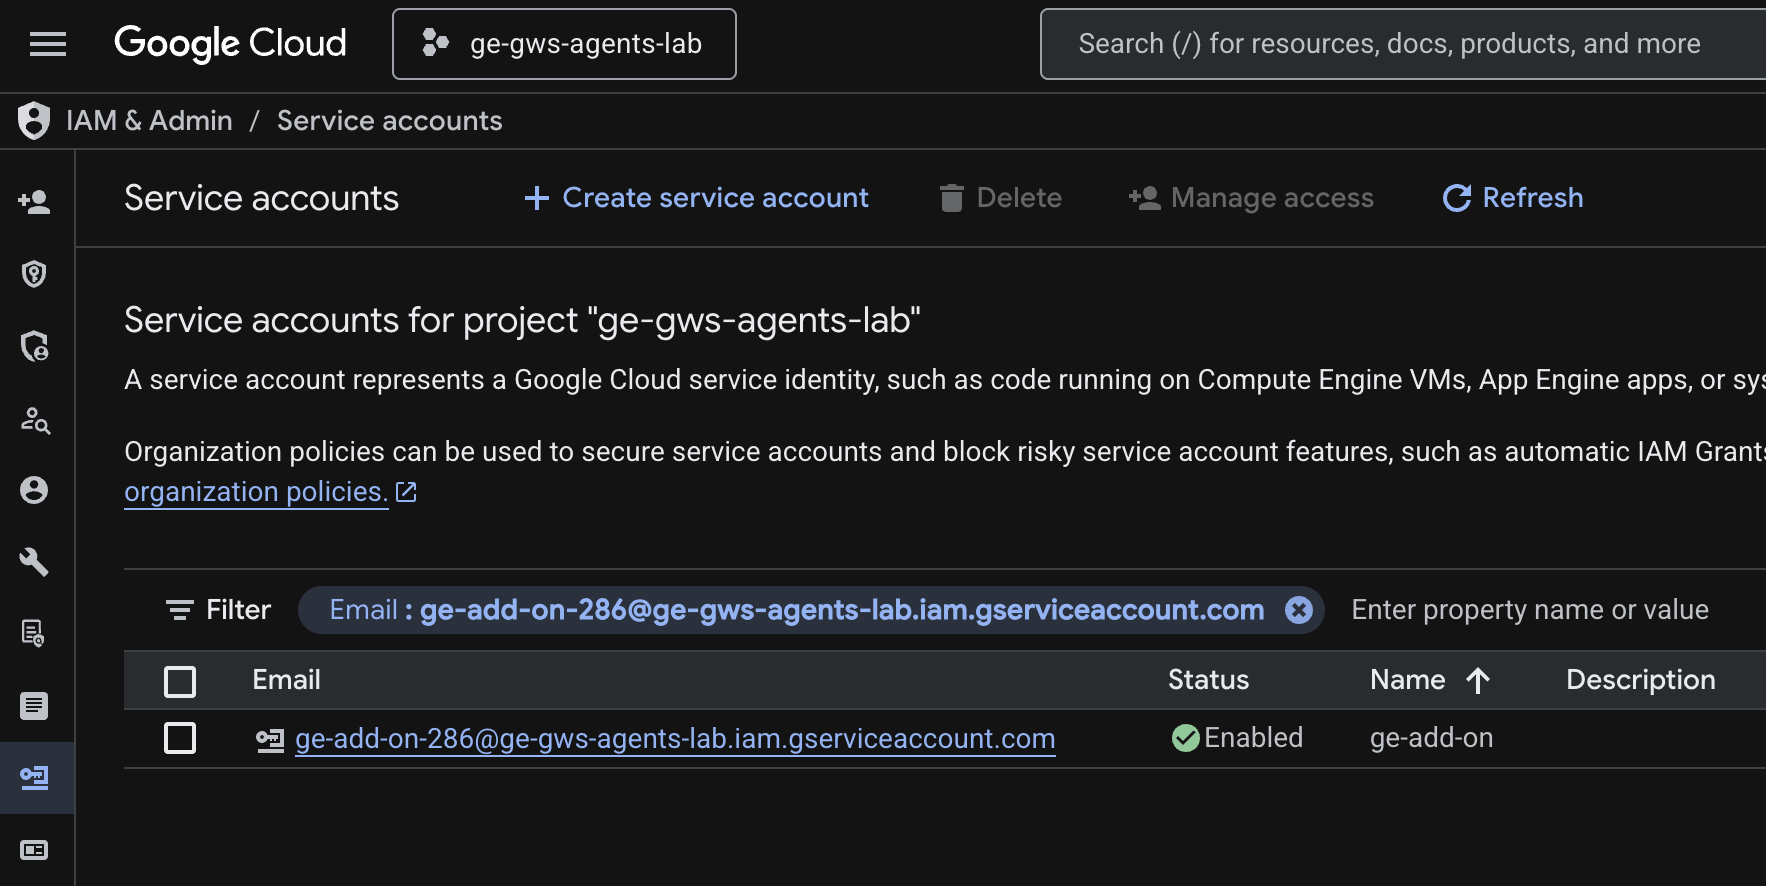
- Click Continue then Done. You're redirected to the Service accounts page and can see the service account that you created.
- Select the newly created service account then the Keys tab.
- Click Add key then Create new key.
- Select JSON then click Create.
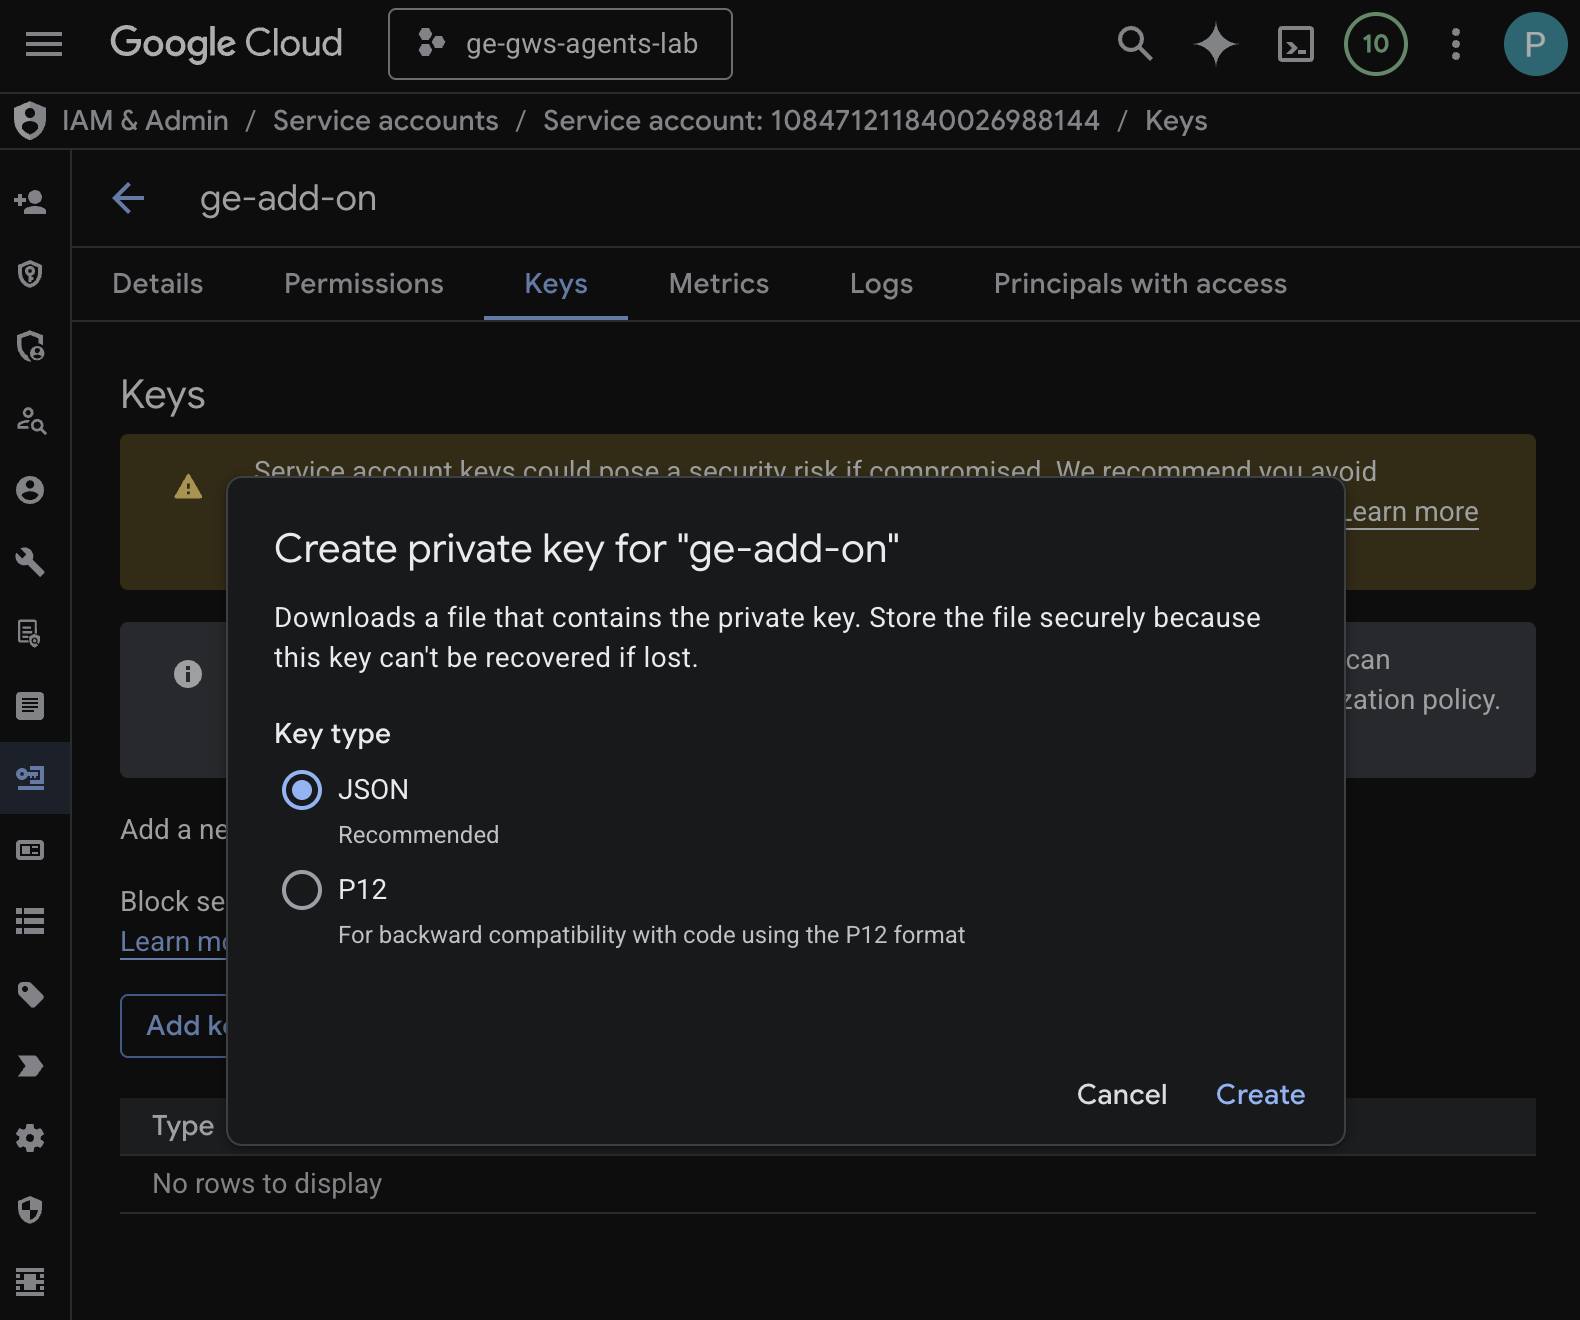
- The dialog closes and your newly created public/private key pair is automatically downloaded to your local environment as a JSON file.
Create and Configure Apps Script Project
Create a new Apps Script project to host the add-on code and configure its connection properties.
- Click the following button to open the Enterprise AI add on Apps Script project:
- Click Overview > Make a copy.
- In your Apps Script project, click Project Settings > Edit script properties > Add script property to add script properties.
- Set REASONING_ENGINE_RESOURCE_NAME to the Gemini Enterprise application resource name. It has the following format:
# 1. Replace PROJECT_ID with the Google Cloud project ID.
# 2. Replace GE_APP_ID with the codelab app ID found in Google Cloud console > Gemini Enterprise > Apps.

projects/<PROJECT_ID>/locations/global/collections/default_collection/engines/<GE_APP_ID>
- Set APP_SERVICE_ACCOUNT_KEY to the JSON key from the service account file downloaded in previous steps.
- Click Save script properties
Deploy to Gmail and Chat
Deploy the add-on to test it directly within Gmail and Google Chat.
In your Apps Script project, follow these steps:
- Click Deploy > Test deployments, then Install. It's now available in Gmail.
- Click Copy under Head Deployment ID.

In the Google Cloud console, follow these steps:
- Search for
Google Chat APIin the Google Cloud search field, click Google Chat API, click Manage, and click Configuration.
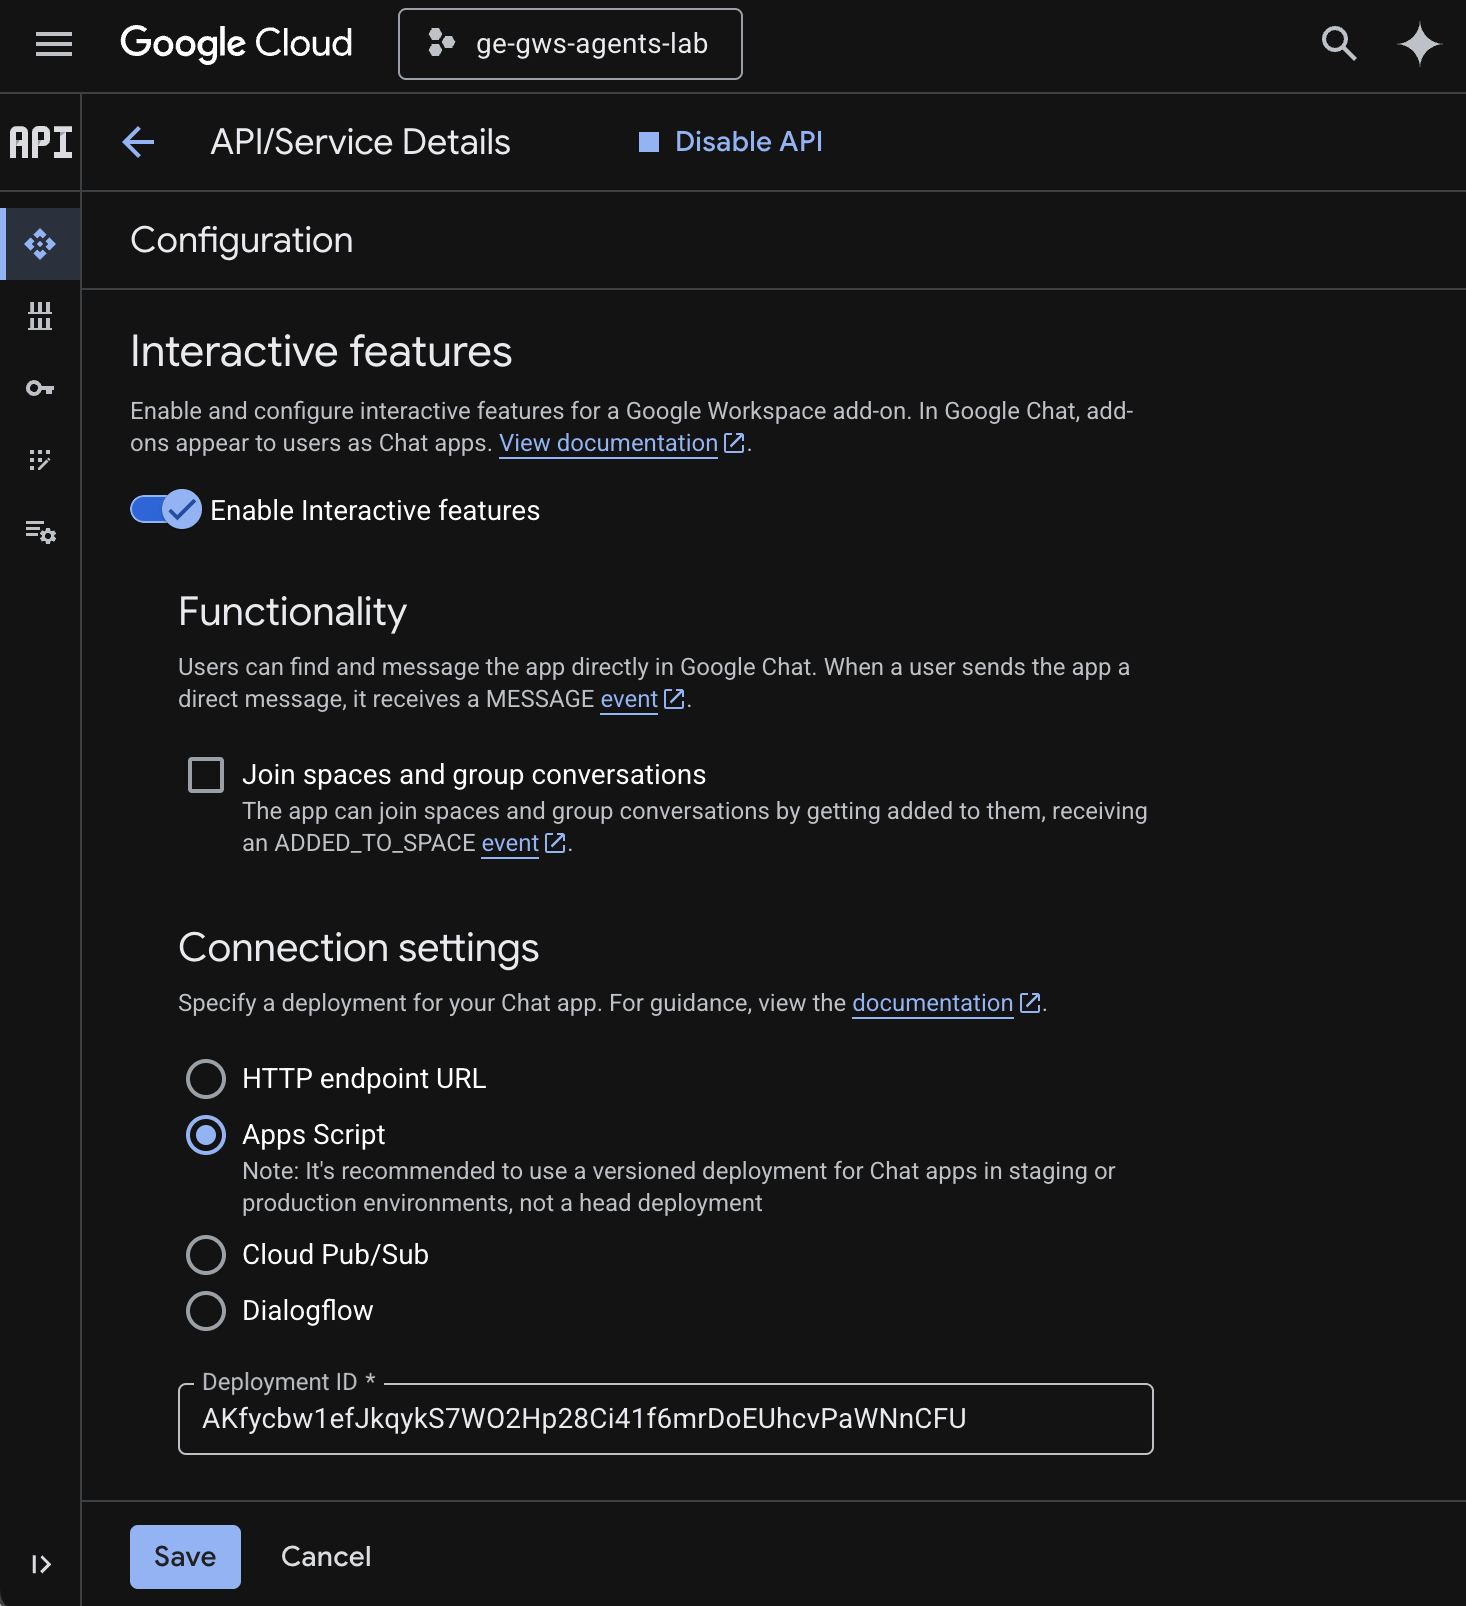
- Select Enable Interactive features.
- Unselect Join spaces and group conversations.
- Under Connection settings, select Apps Script.
- Set Deployment ID to the Head Deployment ID copied in the previous steps.
- Under Visibility, select Make this Chat app available to specific people and groups in Your Workspace Domain and enter your email address.
- Click Save.
Try the Add On
Interact with your live add-on to verify it can fetch data and answer questions in context.
Open Google Chat in a new tab, then follow these steps:
- Open a direct message space with the Chat app Gemini Enterprise.
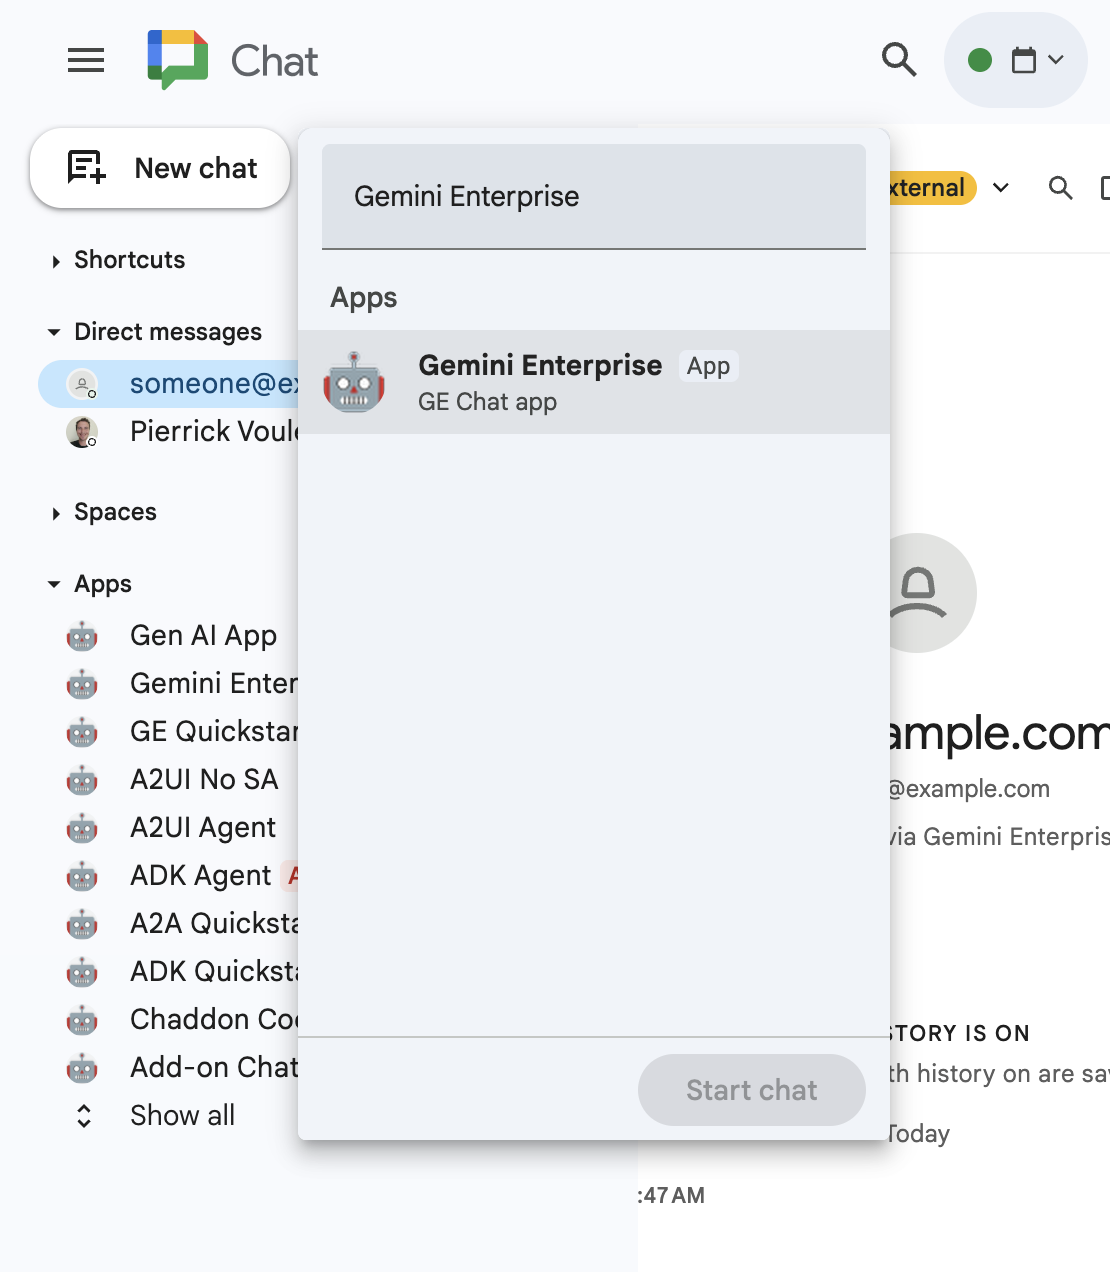
- Click Configure and go through the authentication flow.
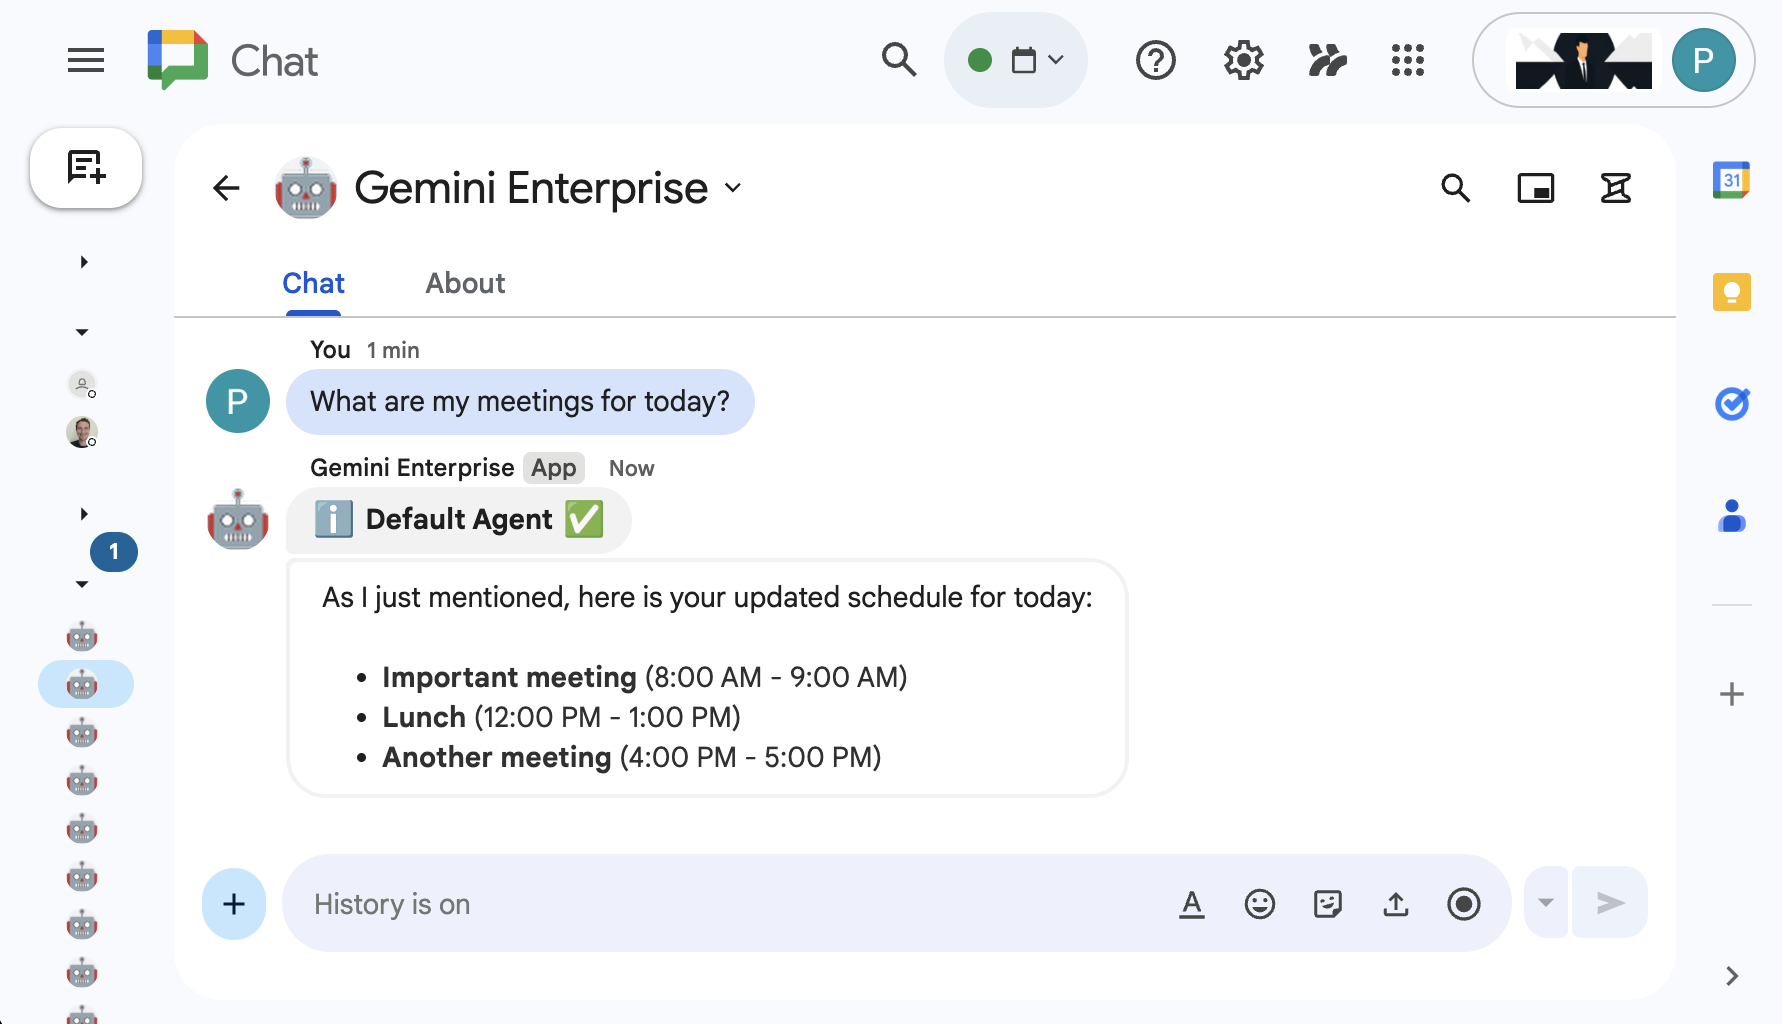
- Type
What are my meetings for today?and pressenter. Gemini Enterprise Chat app should reply with the results.
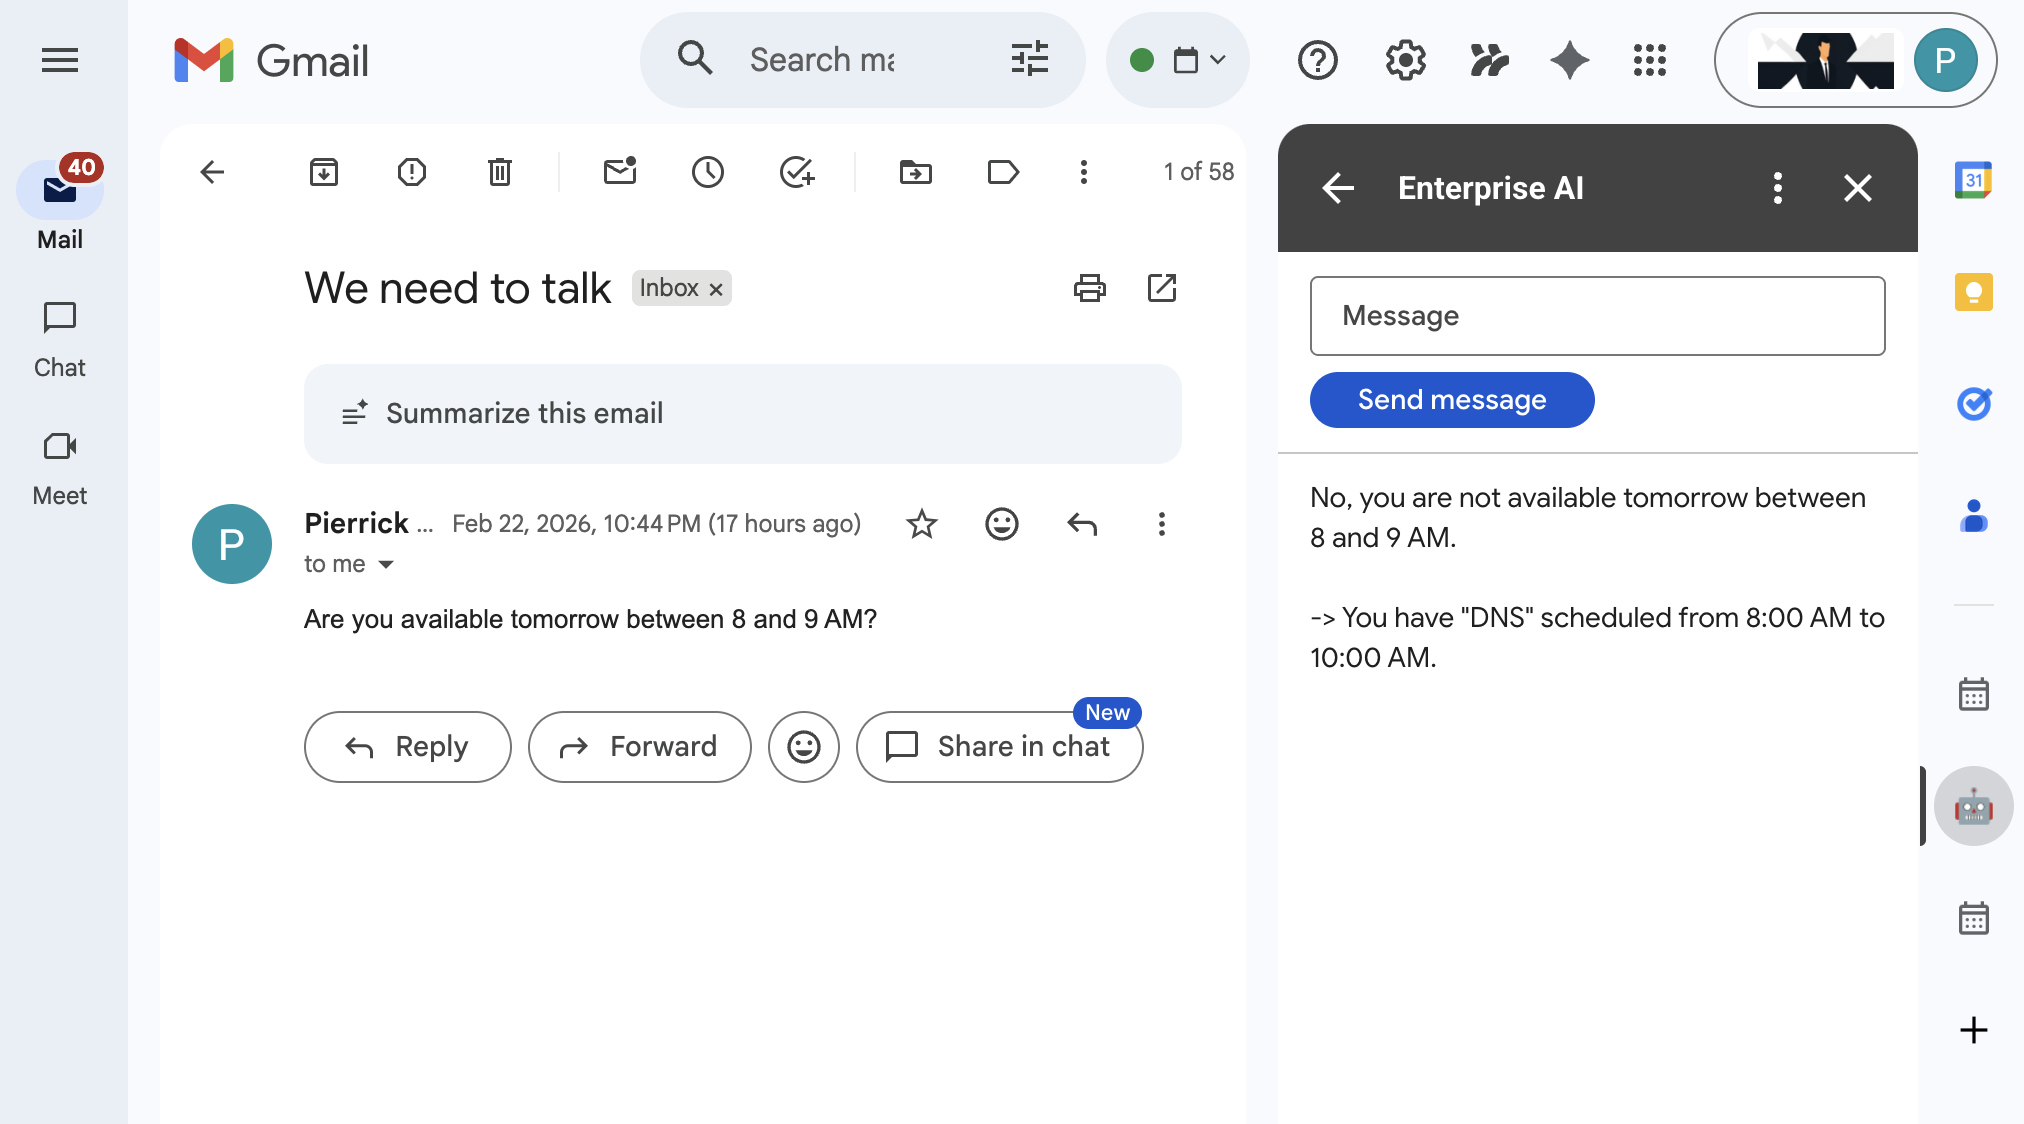
Open Gmail in a new tab, then follow these steps:
- Send yourself an email with the Subject set to
We need to talkand the Body set toAre you available today between 8 and 9 AM? - Open the newly received email message.
- Open the Enterprise AI add on sidebar.
- Set the Message to
Am I? - Click Send message.
- The answer is displayed after the button.
6. Clean up
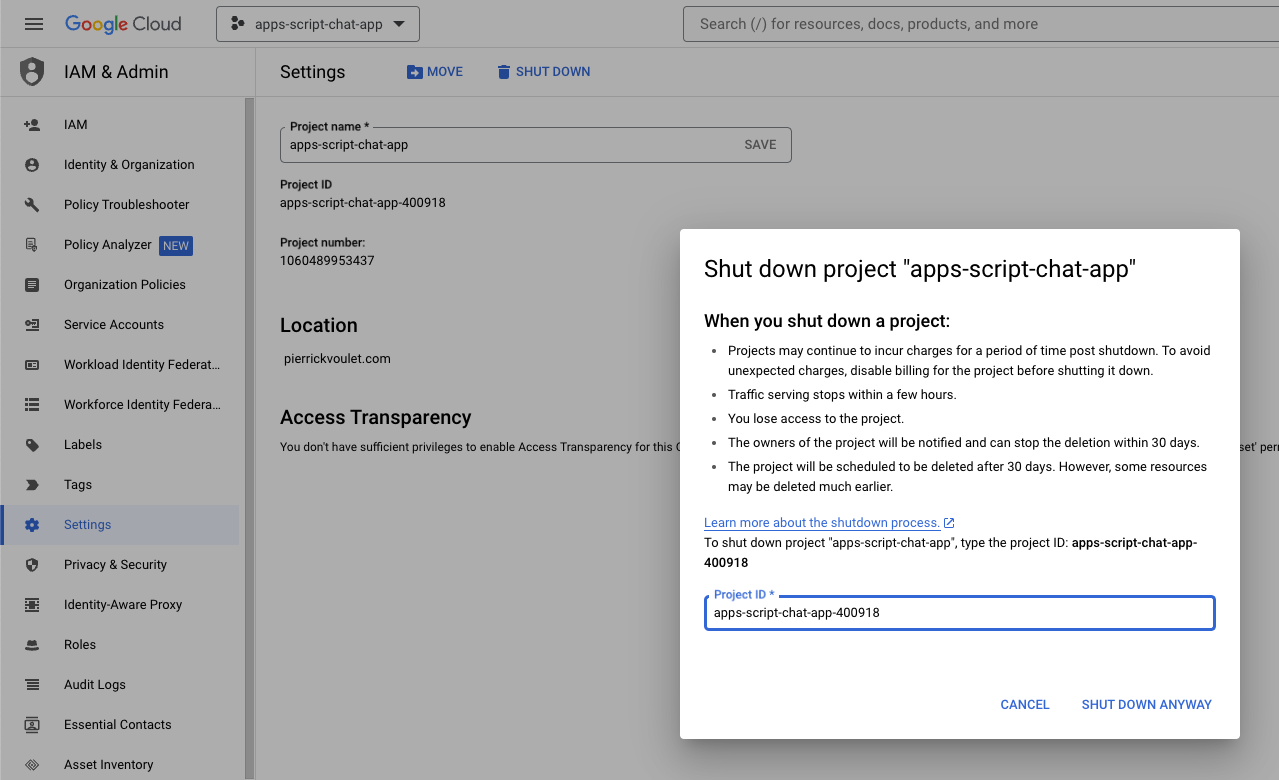
Delete Google Cloud project
To avoid incurring charges to your Google Cloud Account for the resources used in this codelab, we recommend that you delete the Google Cloud project.
In the Google Cloud console, follow these steps:
- Click Menu ☰ > IAM & Admin > Settings.
- Click Shut down.
- Enter the project ID.
- Click Shut down anyway.
7. Congratulations
Congratulations! You built solutions that harness the power of bringing Gemini Enterprise and Google Workspace closer for workers!
What's next?
We only showcase the most typical use cases in this codelab, but there are plenty of expansion areas that you might want to consider in your solutions, such as the following:
- Use AI-empowered developer tools such as Gemini CLI and Antigravity.
- Integrate with other agent frameworks and tools such as custom MCPs, custom function calls, and generative UIs.
- Integrate with other AI models, including customs, hosted in dedicated platforms such as Agent Platform.
- Integrate with other agents, hosted in dedicated platforms such as Dialogflow or by third parties via the Cloud Marketplace.
- Publish agents on the Cloud Marketplace to empower teams, organizations or public users.
Learn more
There are plenty of resources available for developers such as YouTube videos, documentation websites, code samples, and tutorials:
- Google Cloud Developer Center
- Supported products | Google Cloud MCP servers
- A2UI
- Model Garden on Gemini Enterprise Agent Platform | Google Cloud
- Agents overview | Gemini Enterprise | Google Cloud Documentation
- Scaling AI agents with Google Cloud Marketplace and Gemini Enterprise
- Offer AI agents through Google Cloud Marketplace
- Google Workspace Developers YouTube channel - Welcome Developers!
- Google Workspace Developers Website
- GitHub repository for all Google Workspace add on samples