
1. Introduction

Hey everyone! Name's Sparky! So glad you could make it. I've zipped all the way from a GKE cluster in us-central1 to be here today. Welcome to this codelab.
I've spent my whole life scampering through the data streams of Google Cloud, and I've seen it all. I've seen you, the architects and the engineers, building amazing things. But I've also seen you get stuck in the brambles. You know what I'm talking about! That feeling of context switching when you're debugging a pod in GKE. You're jumping between kubectl logs, the GCP console to check the node's health, your IDE to look at the source code that was deployed, and a browser tab with the official Kubernetes docs for pod lifecycle hooks. Each jump is a break in focus!
And the complex tooling! gcloud, kubectl, terraform... each with its own DSL and a mountain of flags. It leads to constant documentation hunting. You end up searching for that one perfect gcloud command with the right combination of --filter and --format flags to get the data you need. It's like trying to find a specific nut in a forest of millions. And don't get me started on the repetitive tasks. I've seen you write the same Dockerfile and cloudbuild.yaml for a new Python service so many times the code probably has deja vu.
Well, I'm here to show you a better way. A secret path through the woods. That's what Gemini CLI is all about!
What is Gemini CLI?
So, what's this magic shortcut I'm so excited about?
Think of Gemini CLI as your personal cloud companion, right inside your terminal. It's a conversation, a partnership! It's context-aware, which is a fancy way of saying it's not just listening, it's understanding. It can read your files, learn your project's conventions—like whether you use tabs or spaces—and figure out what you're trying to do. It's like I can smell the acorns you're trying to gather!
High-Level Architecture (Let's peek under the hood!)
So how does this all work? It's a mix of a few cool things working in harmony:
- A Powerful Language Model: This is the brain! Specifically, it's a large, multimodal model trained by Google. ‘Multimodal' means it doesn't just understand text; it understands the structure and meaning of code. This allows it to reason about your software, not just read it.
- Your Local Context: This is crucial. The Gemini CLI runs as a process on your local machine, with the same permissions as your user account. This means it can access your file system to provide project-specific help. It's not some far-off cloud service guessing about your code; it's right here with you.
- A Tooling Ecosystem: This is how the model interacts with the world. It has a well-defined set of functions it can call—like
read_fileorrun_shell_command. Think of it like a secure API. The model decides what to do and which tool to use, and then it generates atool_codeblock to execute it. This makes its actions predictable and reliable. - Shell Command Execution: This is the real magic! It can run any command in a
bash -c <command>subshell. It captures thestdout,stderr, and theexit code. This is huge! It means Gemini CLI can run a command, check if it failed, and then try to fix it based on the error message. - The Safety Net: This is my favorite part! Before that
tool_codeblock is executed, the CLI client will show you the exact command or code and ask for your confirmation. It's a client-side check, so you have the final say before anything touches your system. You're always the one in charge!
It's not just a chatbot, it's a do-er! An active helper in your coding adventure.
The Key Concept: Declarative vs. Imperative
The biggest, most awesome change is moving from telling the computer how to do something to telling it what you want.
- Imperative (The Old, Thorny Path): You have to give every single step. You have to be an expert in the tool's specific domain language. Like this monster of a command:
gcloud compute instances create my-vm --project=my-project --zone=us-central1-a --machine-type=e2-medium --image-family=debian-11 --image-project=debian-cloud --metadata-from-file startup-script=./startup.sh --tags=http-server,dev - Declarative (The Sparky Shortcut!): You just say what you want in plain English!
Create a new e2-medium VM for my web server in us-central1, run the startup.sh script, and tag it for http traffic.
That's it! Gemini parses your request, maps it to the parameters of the gcloud tool, figures out the correct syntax for each flag, and builds that big scary command for you. It then presents it to you for approval. It's all about letting you be the big-picture thinker, not the command-line flag memorizer.
Extending the Power of Gemini: An Introduction to CLI Extensions
While the Gemini CLI is a powerful tool out-of-the-box, its true potential is unlocked through extensions. Extensions are bundles of prompts, tools, and custom commands that enhance the CLI's functionality, allowing you to tailor it to your specific needs and workflows.
Finding and Installing Extensions
The Gemini CLI has a growing ecosystem of extensions built by both Google and third-party developers. You can browse the official directory of extensions at geminicli.com/extensions.
To install an extension, you can use the gemini extensions install command with the URL of the extension's Git repository. For example, to install the official Cloud SQL for PostgreSQL extension, you would run:
gemini extensions install https://github.com/gemini-cli-extensions/cloud-sql-postgresql
Alright, enough talk! Let's get our paws dirty and actually try this thing!
2. Before you begin

Hey there, future cloud wizards! Sparky, at your service. Before we can start our grand adventure, we need to make sure your workshop environment is ready to go. Think of it as packing our bags with all the right tools and magic acorns before we head into the forest. Follow me!
If you already have a Google Cloud project, you can use Gemini CLI within Google Cloud Shell since it comes pre-installed with Gemini CLI. Alternatively, follow these steps to set it up on your local machine.
Step 1: The Bare Necessities (Prerequisites)
Every good adventurer needs a solid foundation. Before we can install the Gemini CLI, you need a few things already set up on your local machine.
- Google Cloud SDK (
gcloud): This is the main toolkit for Google Cloud. Gemini CLI is a part of this family!
- Check if it's installed: Run
gcloud --version. If you see a version number, you're good to go! - If not installed: Follow the official instructions at cloud.google.com/sdk/docs/install.
- Git: We'll need this to clone the hands-on lab repository.
- Check if it's installed: Run
git --version. - If not installed: You can get it from git-scm.com/downloads.
- GCP Project & Authentication:
- Make sure you have a Google Cloud Project with billing enabled. This is super important!
- Log in to your Google account by running:
gcloud auth login
- Set your project for the session. Find your Project ID from the GCP Console and run:
gcloud config set project YOUR_PROJECT_ID
(Replace YOUR_PROJECT_ID with your actual project ID!)
- Node.js version 20 or higher
Step 2: Get the Magic! (Installing Gemini CLI)
Alright, with the basics out of the way, it's time to get the main event! We'll install Gemini CLI.
Run instantly with npx
# Using npx (no installation required)
npx https://github.com/google-gemini/gemini-cli
Install globally with npm
npm install -g @google/gemini-cli
Install globally with Homebrew (macOS/Linux)
brew install gemini-cli
Check the Gemini Version
gemini --version
You should see a version number. This confirms the installation was successful.
Step 3: Powering Up (Configuration)
Now that Gemini CLI is installed, we need to give it the keys to the kingdom. First, launch it by running the command gemini in the terminal. You should see the following screen:
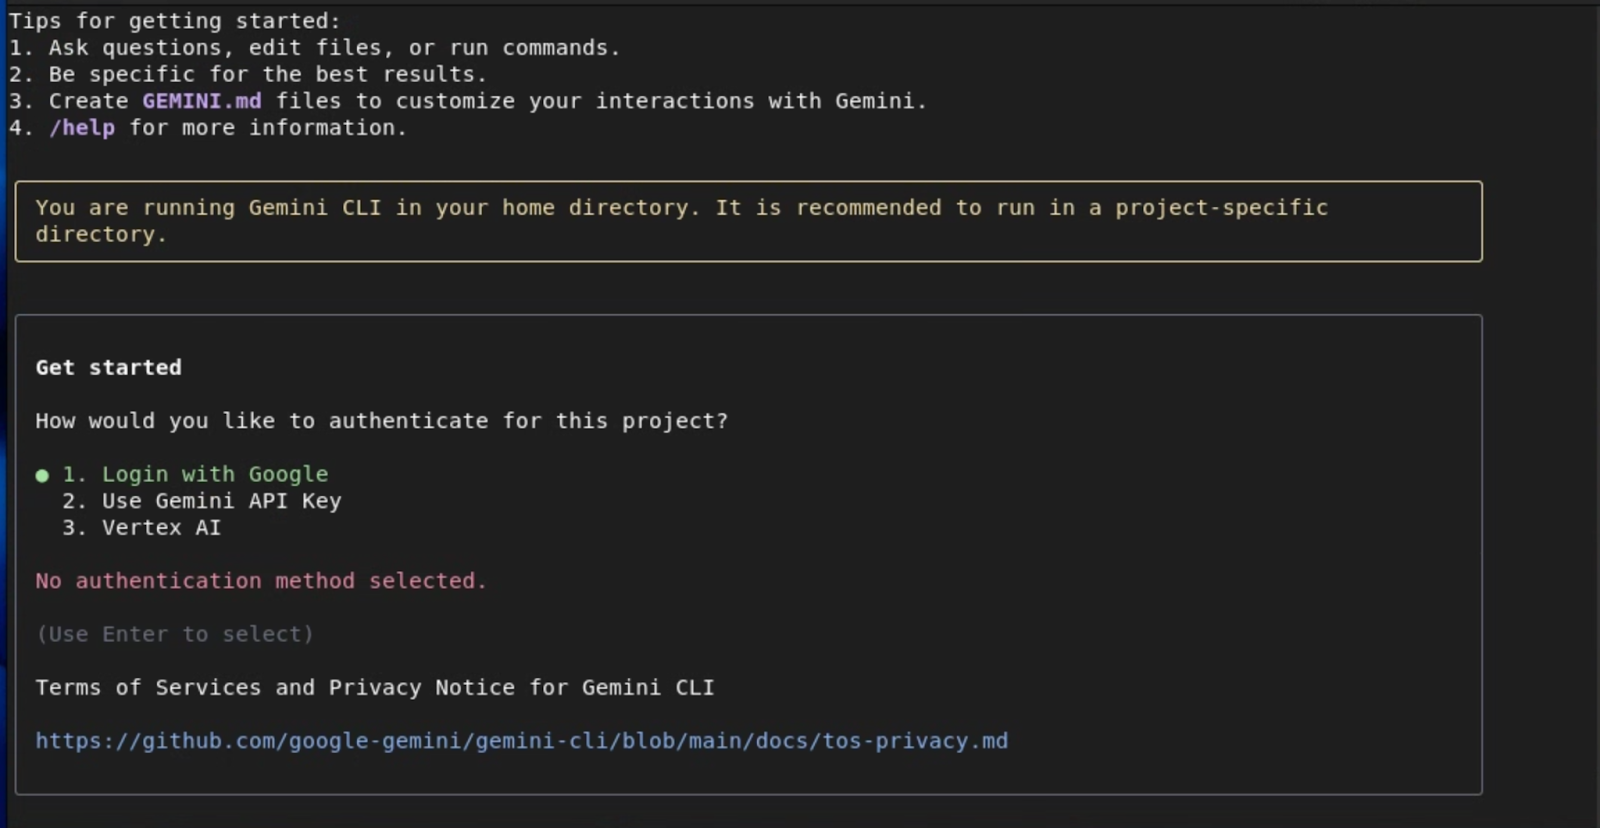
For simplicity, you can authenticate with your Google Account, which gives you access to Gemini 2.5 Pro with 1M token context window and upto 60 requests/min and 1000 requests/day without the need to manage an API key.
If you want access to specific Gemini models or upgrade to higher limits when needed, use Gemini API Key as the authentication method.
For Enterprise teams and Production workloads who already have a Google Project and Billing Account setup, use Vertex AI for advanced security and compliance.
Depending on the option you chose, you will be prompted with the next steps to configure the authentication. Refer to the Gemini CLI documentation for more details on these options.
If you intend to use Google Cloud's Vertex AI platform, first exit Gemini CLI by hitting ctrl+c twice and let's set required environment variables
Regardless of your method of authentication, you'll typically need to set the following variables: GOOGLE_CLOUD_PROJECT and GOOGLE_CLOUD_LOCATION.
To set these variables:
# Replace with your project ID and desired location (e.g., us-central1)
export GOOGLE_CLOUD_PROJECT="YOUR_PROJECT_ID"
export GOOGLE_CLOUD_LOCATION="YOUR_PROJECT_LOCATION"
Now let's log in to Google Cloud:
gcloud auth application-default login
Once you have authenticated with the previous method, launch Gemini CLI again by running the command gemini in the terminal. In the authentication options, select Vertex AI and you should be set.
Step 4: The Spark Test! (Verifying Your Setup)
This is the moment of truth! Let's see if everything is working. Run these commands to make sure all the lights are green.
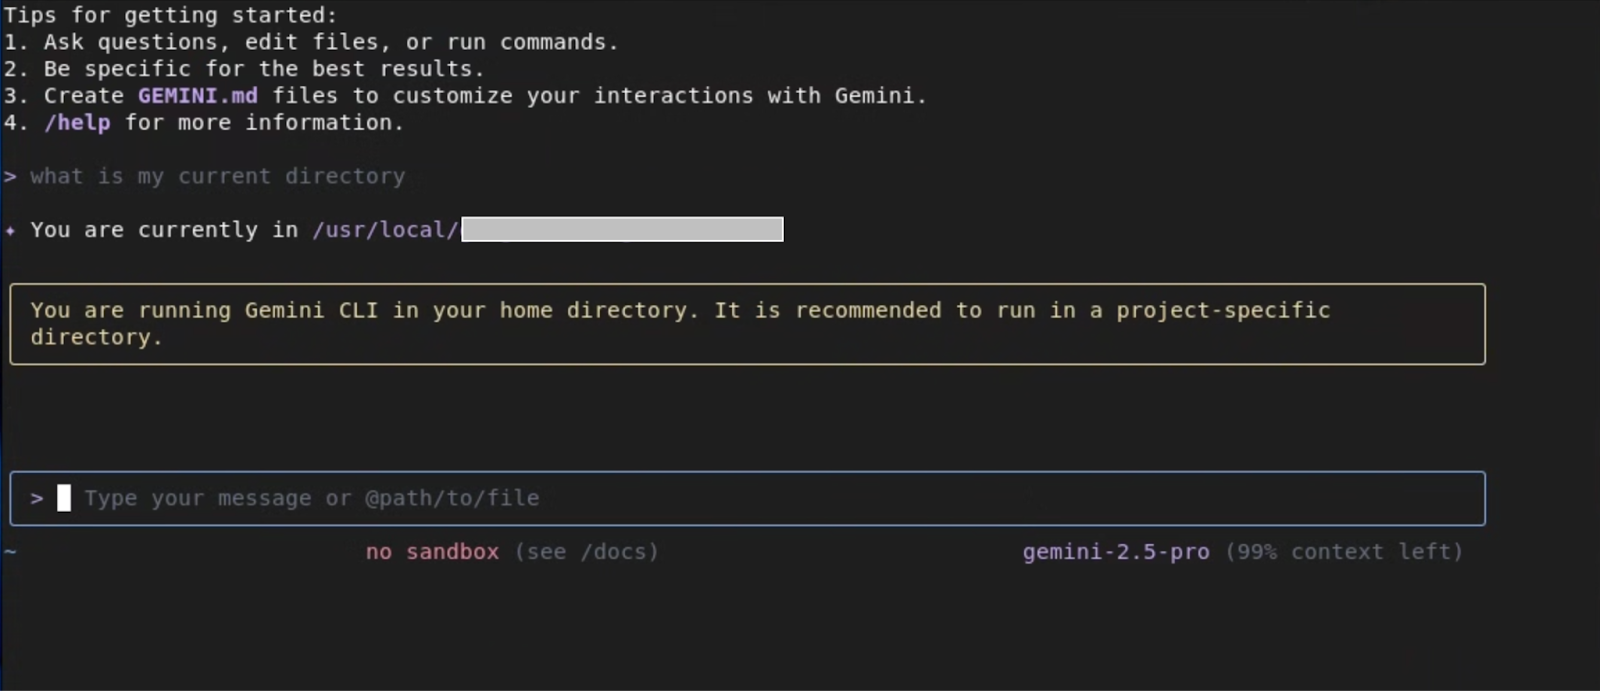
- Enter the following prompt:
What is my current directory?
Gemini CLI should respond by telling you your current working directory. This tests the core language model and shell integration.
- Test GCP Connection:
list my gcs buckets
If you have any GCS buckets, it should list them. If not, it will tell you there are none. This confirms it's connected to your GCP project correctly.
Step 5: Giving it more Superpowers! (Installing Extensions)
Now let's enhance Gemini CLI's capabilities by installing a few extensions that will come in handy later in the Lab.
Cloud Run
gemini extensions install https://github.com/GoogleCloudPlatform/cloud-run-mcp
Gemini CLI Security
gemini extensions install https://github.com/gemini-cli-extensions/security
gcloud
gemini extensions install https://github.com/gemini-cli-extensions/gcloud
Cloud SQL for PostgreSQL
gemini extensions install https://github.com/gemini-cli-extensions/cloud-sql-postgresql
If all those commands worked, you are officially ready for the workshop! Your environment is set up, and you're ready to start unleashing your productivity. See you in the first lab!
3. Core Concepts & Local Workspace Interaction

Okay, ready to get your paws dirty? Now we're going to look at the actual tools in your new Gemini toolbelt. I think of them as my superpowers for exploring and building in the cloud! Let's get a little nerdy about how they work.
Core Capabilities
I group my powers into two buckets: seeing what's out there, and then actually doing stuff!
Understanding Your Environment (My Super-Senses!)
Before you start building a new nest, you gotta check out the tree, right? These tools are for getting the lay of the land.
list_directory: This is my basic ‘sniff around' tool. It's a straightforward wrapper around standard OS-level directory listing. But the cool part is that the model can parse this structured output to make decisions, like choosing to explore a subdirectory namedsrc.glob: This one is my ‘acorn finder'! It uses standard glob patterns—like*,**,?, and[]—that you already know from things like.gitignore. So you can ask, ‘Find all*.pyfiles in theappdirectory' by using the patternapp/**/*.py. It's a powerful way to gather a specific set of files for the model to analyze.search_file_content: This is my x-ray vision! It uses full regular expressions (regex) for its searches, not just simple string matching. This is incredibly powerful. You can ask it to find complex patterns, like ‘Find all Flask routes that use a POST method,' which might generate a regex likeapp\.route\(.*methods=\['POST'\].*\). It returns the file path, line number, and the matching line, giving the model all the context it needs.read_file: Once you've found an interesting file, you'll want to crack it open.read_fileis optimized for this. You can read a whole file, or, for big files, you can use theoffsetandlimitparameters to read it in chunks. This means the model can efficiently scan even huge log files without timing out.
From Understanding to Action (Time to Build!)
Okay, you've explored the terrain. Now it's time to build your nest! These tools let you make changes and get things done.
**write_file**: Need to create a new file from scratch?write_fileis an atomic operation that writes the full content you provide to a specified path. It's perfect for scaffolding new modules or creating aDockerfilefrom scratch based on your project's needs.**replace**: This tool is for surgical changes! It's not just a simple find-and-replace. You provide anold_stringand anew_string. For this to work safely, theold_stringneeds to be a unique snippet from the file, usually with several lines of context before and after the part you're changing. This ensures we're only changing the exact piece of code you intend to.**run_shell_command**: This is the ultimate power-up! It executes the given command in abash -c <command>subshell. The model gets back thestdout,stderr, and theexit code. This is critical for building workflows. The model can run aterraform plan, read the output, and if the plan is successful (exit code 0), it can then ask you if it should apply it.
The Safety Net (My Promise to You!)
Now, running commands can be scary. I get it! That's why the safety net is so important. When the model generates a tool_code block containing a call to run_shell_command or write_file, the Gemini CLI client intercepts it. It shows you the exact command or the full content of the file to be written and gives you a [y/n] prompt. Nothing happens without your explicit approval. You are always in the driver's seat.
4. Exploring a Project

Objective: Use Gemini CLI to understand an unfamiliar codebase without leaving the terminal.
Scenario: You're a new developer, and you need to get up to speed on this project, fast!
Task 0: Setup - Clone the Project!
First things first, we need to get the code! It's hiding in a public repository on GitHub, in a 'tree' called quickpoll. Let's ask Gemini CLI to clone it for us. Before we do that, let's create a working directory and launch Gemini CLI from within the working directory:
mkdir workdir
cd workdir
gemini
Now, type this prompt:
clone the github repository from the URL: https://github.com/gauravkakad-google/quickpoll.git
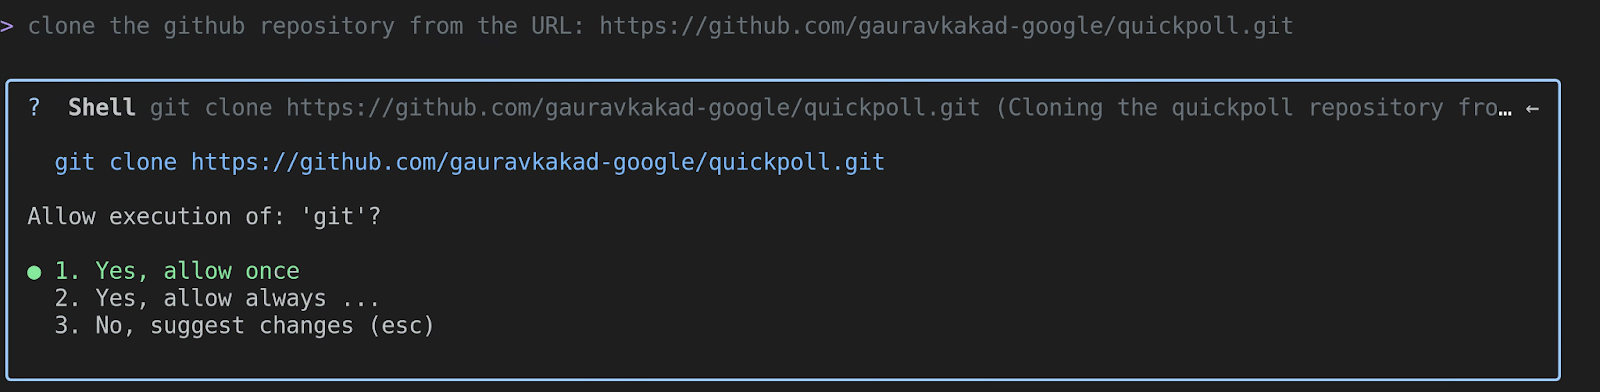
Gemini will understand that ‘clone' means using the git clone command. It will generate a run_shell_command tool call with something like git clone https://github.com/gauravkakad-google/quickpoll.git. Once you approve it, it will download the repository for you.
Now, let's exit Gemini CLI by hitting ctrl+c twice, navigate to the sample repository and launch Gemini CLI again:
cd quickpoll
gemini
Great! Now that we're inside the project tree, we can start exploring!
Task 1: List all the files in the project
Now that we're in, let's map out the whole forest. We want to see every single file. Ask Gemini this:
List all the files in the project.
Gemini will likely use the glob tool with the pattern **/*. This recursively lists every file, giving you a complete manifest of the codebase. It's a great first step to understanding the project's structure.
Task 2: Find all files that import ‘google.cloud.sql.connector'
Okay, I'm curious. Where does this project talk to Google Cloud Storage? Let's do some detective work. Ask this:
Find all files that import the 'google.cloud.sql.connector' library.

Using its search_file_content power, Gemini will find the exact files that contain that import statement. This immediately narrows your focus to the parts of the code that handle Cloud SQL interaction. In this project, it should find backend/main.py.
Task 3: Show me the contents of the main Dockerfile
I see a Dockerfile! That's the blueprint for our container. Let's peek inside. Just ask:
Show me the contents of the main Dockerfile.
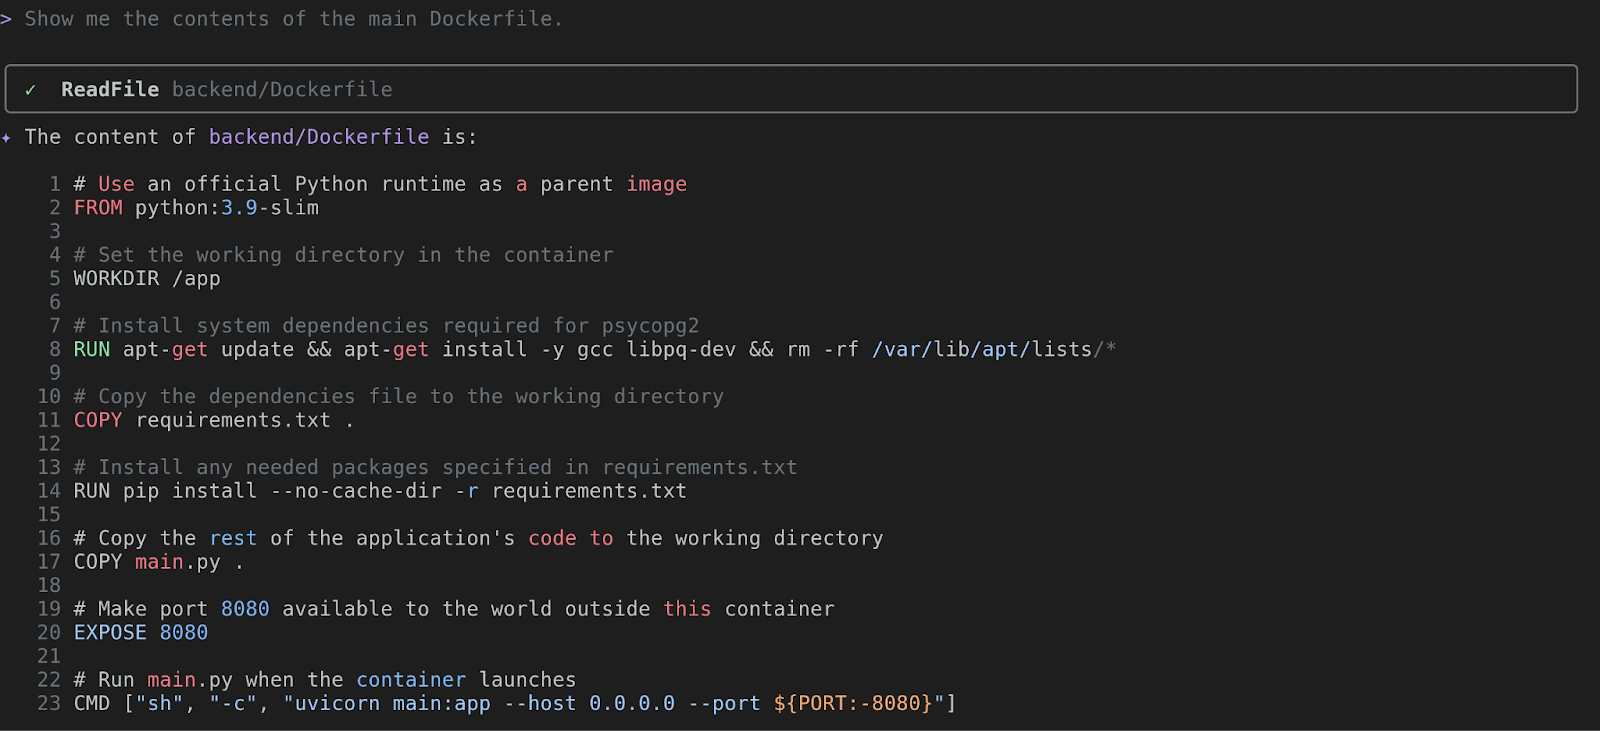
Gemini will use read_file to display the Dockerfile. You can analyze the base image (FROM), the dependencies being installed (RUN pip install...), and the final command (CMD). This tells you about the application's runtime environment.
Task 4: What's the purpose of the main.py file?
Alright, time to look at the heart of the code. Let's ask Gemini to be our guide. Say this:
What's the purpose of the `main.py` file?
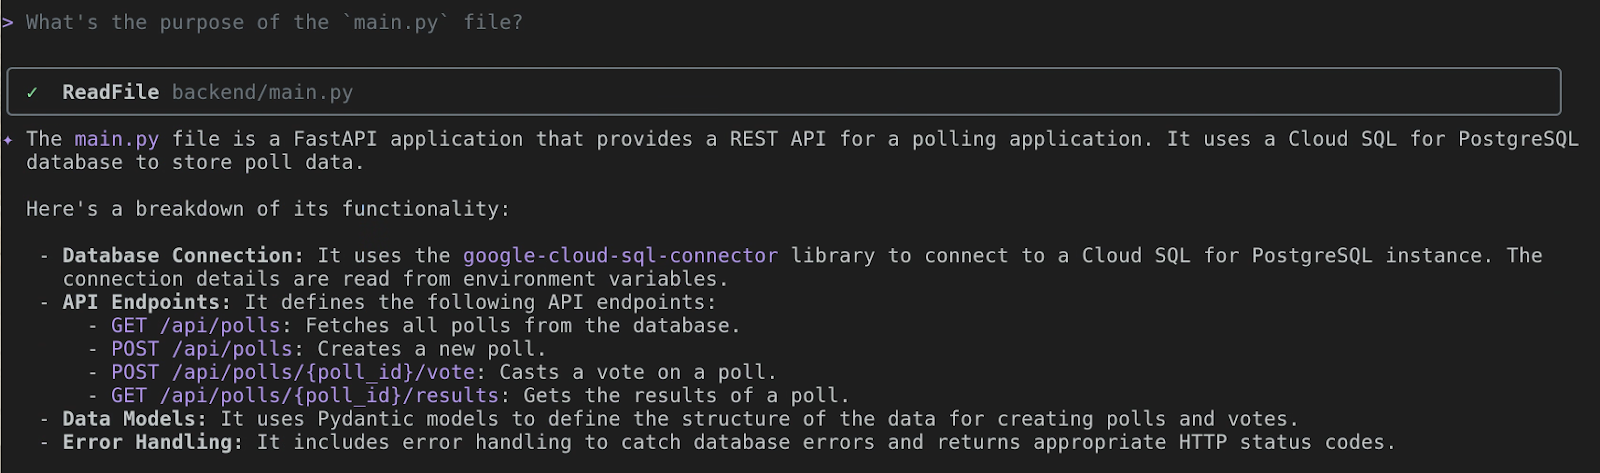
This is where Gemini CLI really shines. It will first call read_file on backend/main.py. Then, its multimodal language model will analyze the Python code. It will identify that it is a FastAPI application that provides a REST API for a polling application. It will then explain the API endpoints and their functionality. It saves you the time of having to read and decipher it all yourself. You can also ask follow up questions to explain some of these functionalities in detail. Pretty neat, huh? Go ahead, give it a go!
5. From Local to Live! Deploying with Cloud Run & Cloud SQL

Alright, cloud adventurer, you've scouted the territory. Now it's time to build your own treehouse in the cloud! We're going to take our quickpoll application and make it a real, live web app that anyone can visit.
Objective: Deploy the quickpoll application to Cloud Run, with a Cloud SQL for PostgreSQL backend.
Task 1: A Sturdy Branch for Our Data (Setting up Cloud SQL)
Every good application needs a place to store its precious acorns... I mean, data! We'll use Cloud SQL for PostgreSQL. It's like a magic, self-tending garden for our database, so we can focus on the fun stuff.
Let's ask Gemini CLI to plant the seed for our database.
Please create a new Cloud SQL for PostgreSQL instance for me in project <myproject>. Call it quickpoll-db and put it in us-central1. Lets use the Development preset for now, and make the root password a-very-secure-password!.
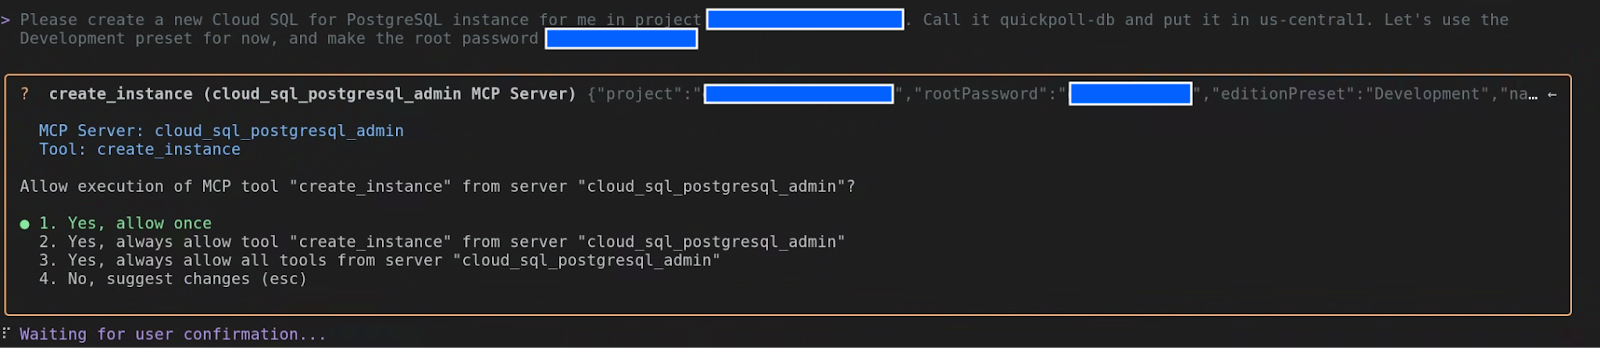
Gemini CLI, using its Cloud SQL extension, will get to work. It will show you the create_instance tool call. Go ahead and approve it!
Once the instance is created, you should an output similar to this:

You can create a .env file with the above environment variable and source it before restarting Gemini CLI, so that it would have access to these variables.
While our instance is growing, let's prepare the soil. We need a database and a user for our app.
In the quickpoll-db instance, create a new database named quickpolldb.
Gemini CLI will use create_database tool in the Cloud SQL for PostgreSQL extension to create the database for you.

Now let's add a user to tend to it:
In the quickpoll-db instance, create a built in user named quickpoll-user with the password another-secure-password!.
This time around, Gemini CLI will use the create_user tool.

Task 2: The Secret Path (Connecting the Backend)
Our backend needs to know the secret path to our new database. Let's peek into backend/main.py to see how it finds its way.
show me how would the backend/main.py connect to the database
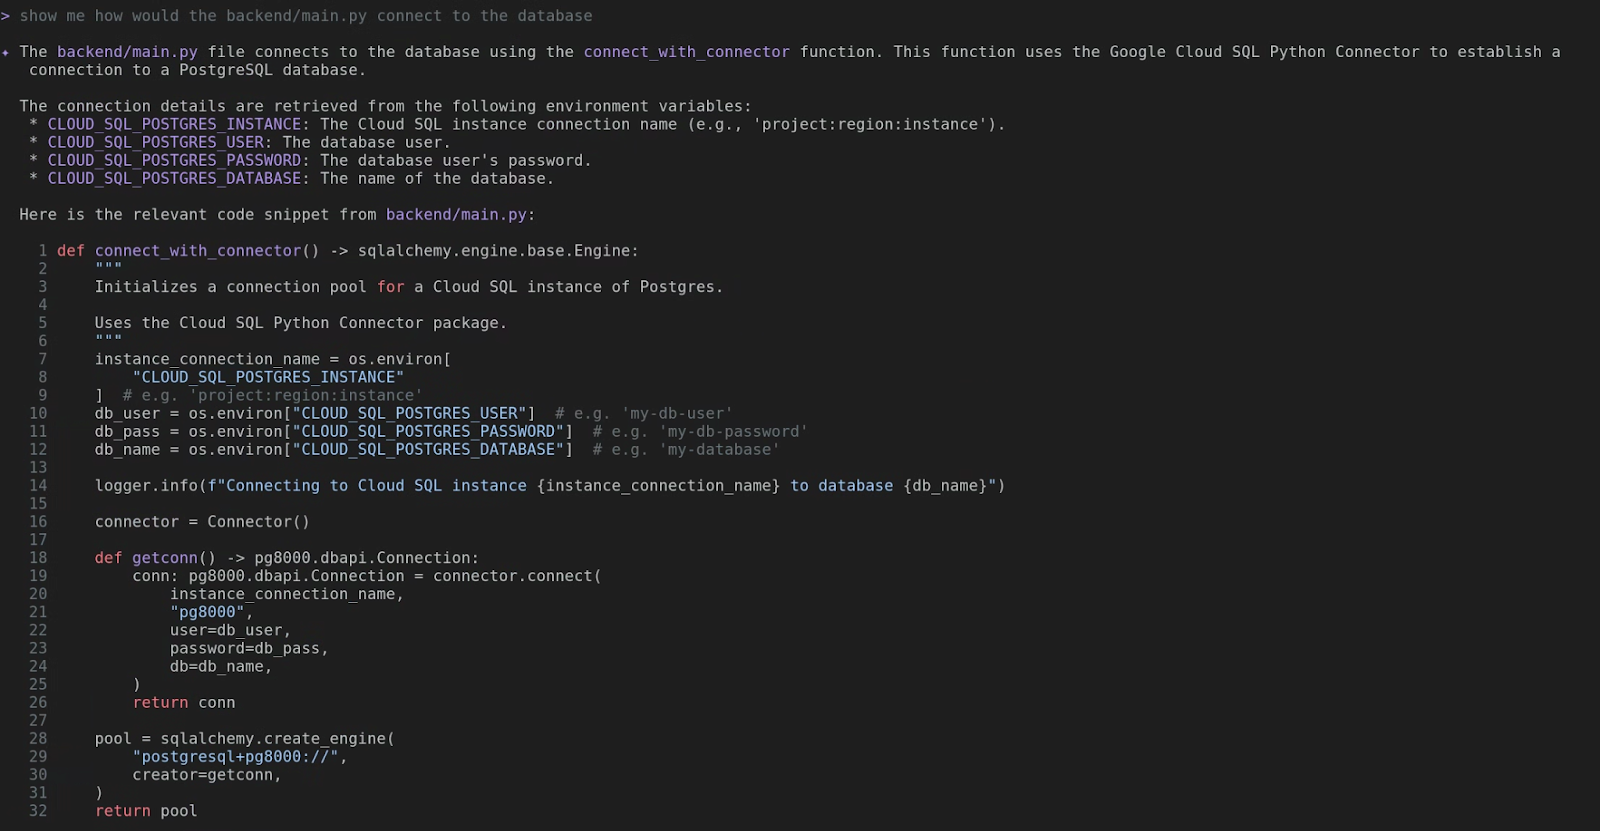
Aha! See that? It uses the Cloud SQL Python Connector and looks for environment variables like CLOUD_SQL_POSTGRES_INSTANCE, CLOUD_SQL_POSTGRES_USER, CLOUD_SQL_POSTGRES_PASSWORD, and CLOUD_SQL_POSTGRES_DATABASE. We'll need to give these to our Cloud Run service.
First, we need the CLOUD_SQL_POSTGRES_INSTANCE. It's like a secret handshake.
What are the details for the Cloud SQL instance quickpoll-db in us-central1?
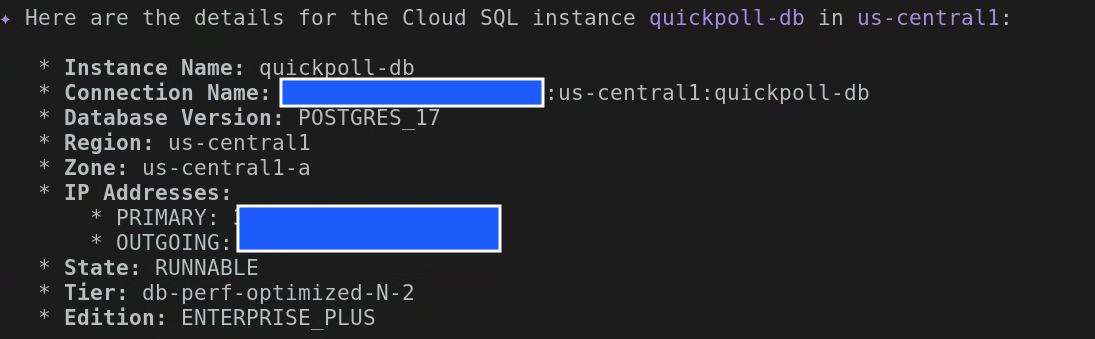
You'll see a bunch of details. Look for the Connection Name and copy that value. It will look something like your-project-id:us-central1:quickpoll-db.
Now before we deploy the application to Cloud Run, let's instantiate the database with the required tables. Since we have create a separate database and a user, let's exit Gemini CLI and update the .env we created earlier with the new values:
export CLOUD_SQL_POSTGRES_USER=quickpoll-user
export CLOUD_SQL_POSTGRES_PASSWORD=password-you-provided
export CLOUD_SQL_POSTGRES_DATABASE=quickpolldb
Now restart Gemini CLI and enter the following:
execute backend/database.sql file on quickpolldb database as quickpolluser in quickpoll-db instance
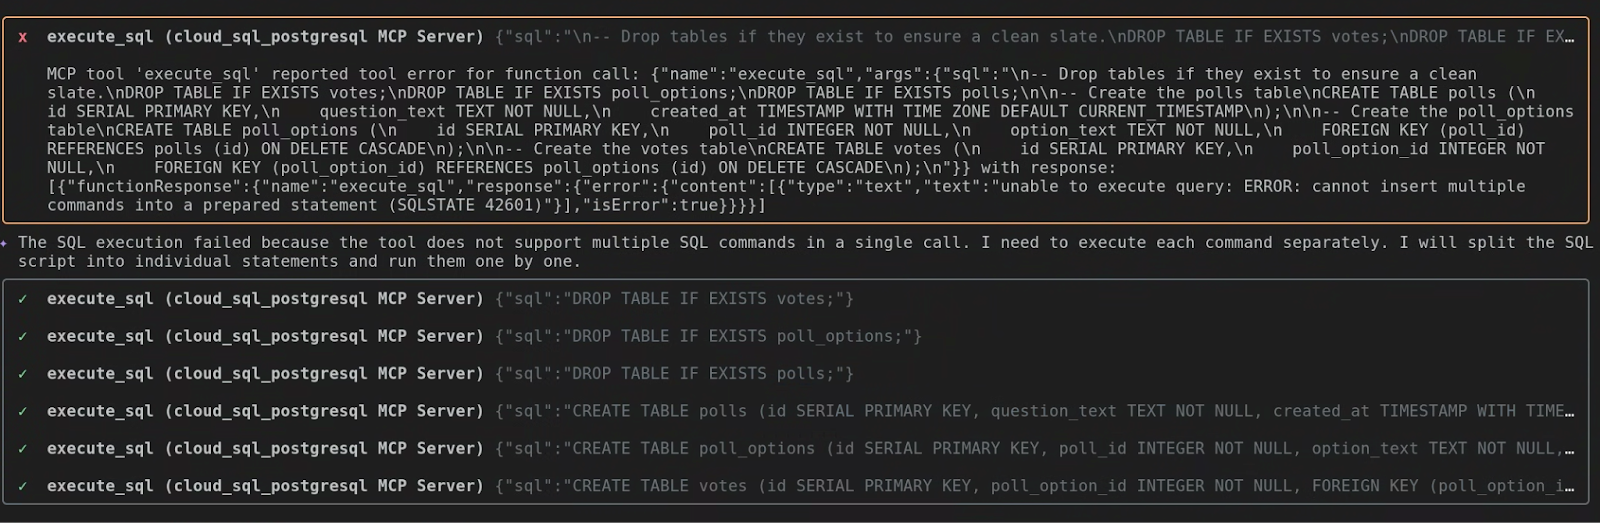
It automatically figured out that the tool execute_sql does not support executing multiple SQL commands in a single call. So, it went ahead and executed each SQL command separately.
Task 3: Backend, Take Flight! (Deploying to Cloud Run)
It's time for our backend to leave the nest! We'll tell Gemini to deploy the backend folder to Cloud Run and give it the secret path to the database.
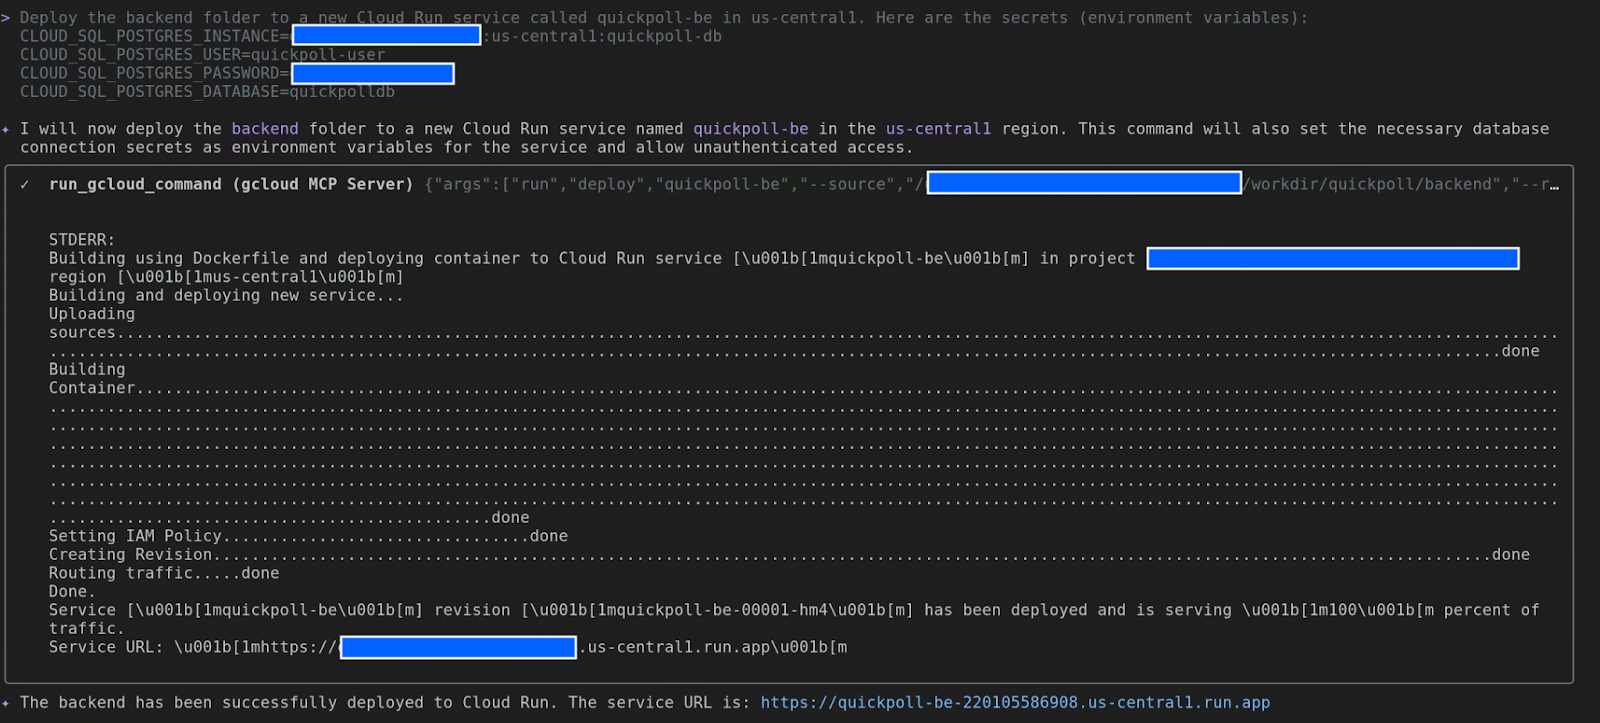
Deploy the backend folder to a new Cloud Run service called quickpoll-be in us-central1. Here are the secrets (environment variables):
CLOUD_SQL_POSTGRES_INSTANCE=your-project-id:us-central1:quickpoll-db
CLOUD_SQL_POSTGRES_USER=quickpoll-user
CLOUD_SQL_POSTGRES_PASSWORD=password-you-provided
CLOUD_SQL_POSTGRES_DATABASE=quickpolldb
Gemini will package up your code, create a container image, and deploy it to Cloud Run. Once it's done, which can be a few minutes, you'll get a URL for your shiny new backend service. Keep that URL handy!
Task 4: The Finishing Touches (Configuring and Deploying the Frontend)
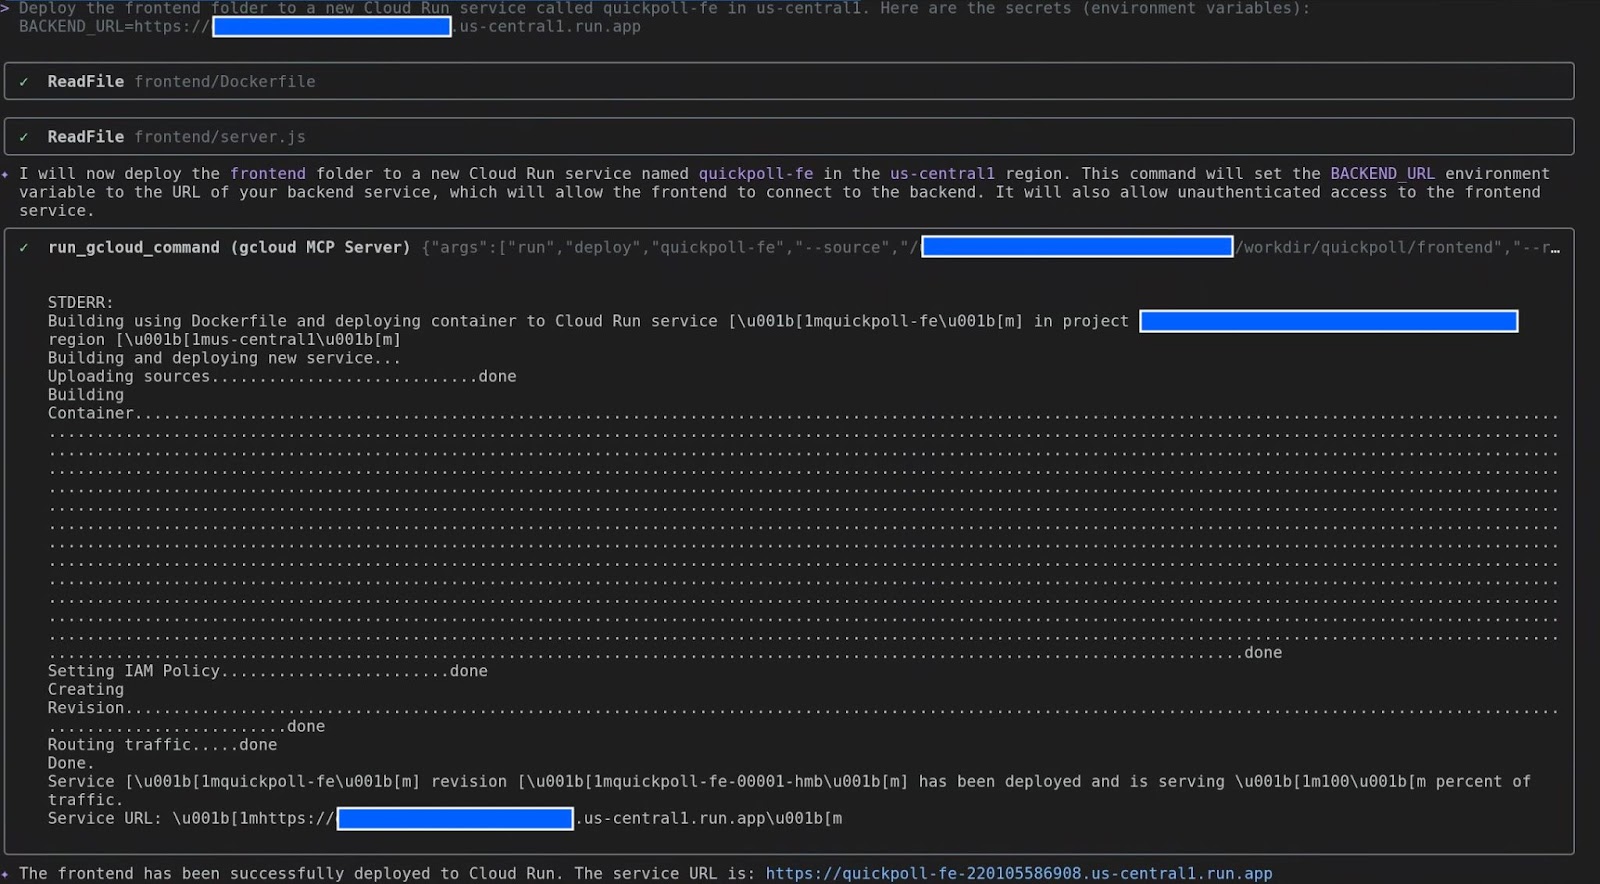
Our frontend is like the friendly face of our application. It needs to know where to find the backend. Let's tell it where to go.
Deploy the frontend folder to a new Cloud Run service called quickpoll-fe in us-central1. Here are the secrets (environment variables):
BACKEND_URL=backend-url
Task 5: The Grand Unveiling!
This is it! The moment of truth! Grab the URL for your quickpoll-fe service and open it in your web browser.
You should see your QuickPoll application, live and ready for action! Go on, create a poll, cast a vote, and see the results update in real-time.
You did it! You took a project from your local machine and brought it to life on Google Cloud. And you did it all from the comfort of your terminal with your trusty sidekick, Gemini CLI.
Now that's what I call productivity!
6. For the Developer - Accelerating the Development Lifecycle

Alright, developers, this is where the real fun begins! We've explored a project, but now it's time to build. I'm going to show you how Gemini can be your ultimate coding partner, helping you go from a simple idea to production-ready code faster than a squirrel can find a nut!
From Idea to Code
Think about the typical development cycle. It's not just writing code, right? It's scaffolding, adding error handling, refactoring, and writing tests. Gemini can help with all of it!
Boilerplate & Repetitive Tasks: No More Copy-Paste!
Okay, you have your basic application functionality. Now you need to add logging and handle potential errors, right? That's usually a lot of repetitive try...except blocks. Not anymore! Let's start by asking Gemini CLI to analyse the code and suggest best practice recommendations for error logging and exception handling:
What are the best practices for error handling and logging that should also be included in this application?
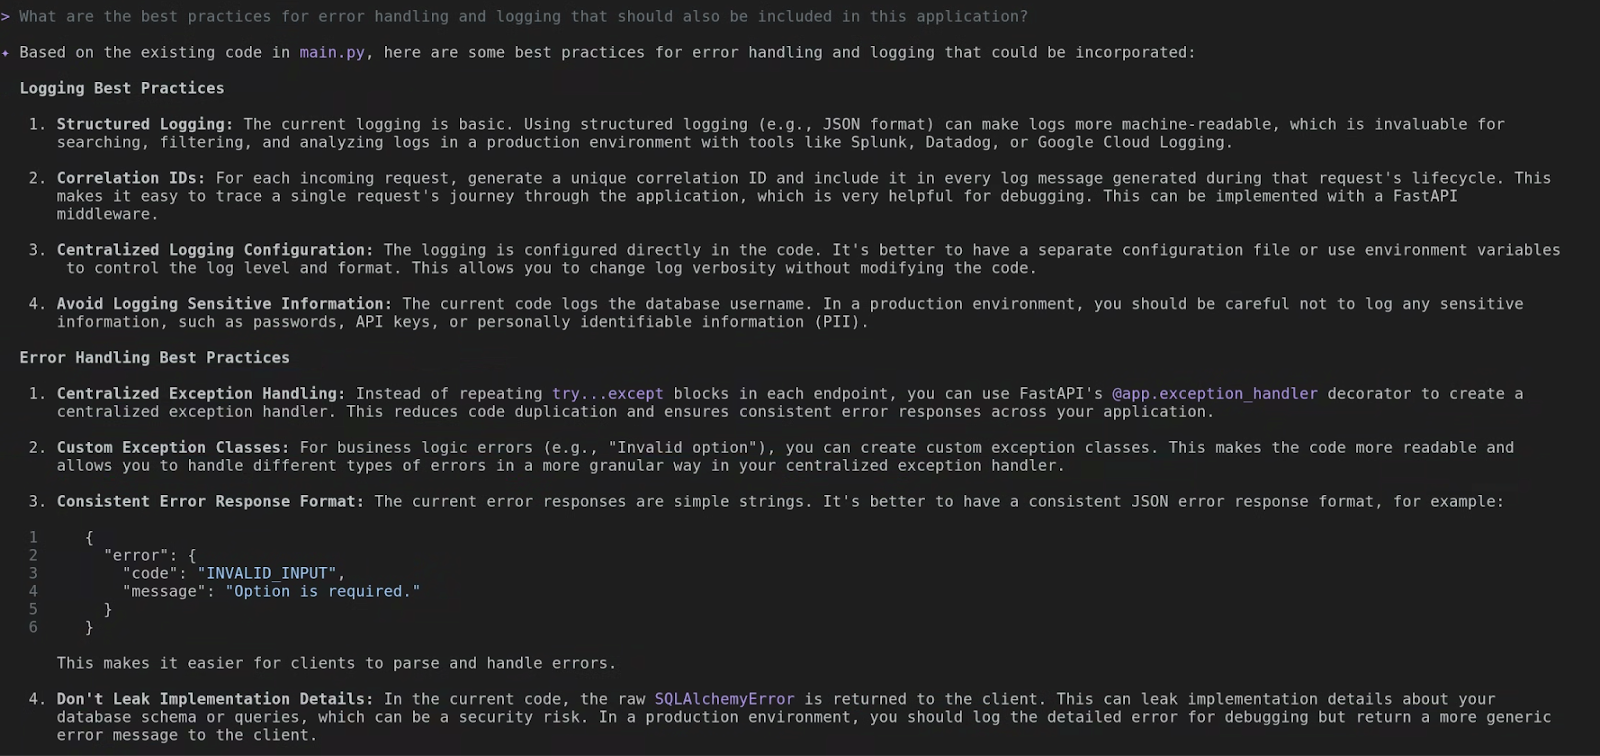
Gemini CLI will analyse the existing file and provide some best practice recommendations. Think of it as an expert assistant that can save your time researching these yourself.
Now, let's ask it to implement these recommendations for you:
please go ahead and implement these in the existing app
The actual output might differ in your case, but in the end you should see the details of the changes it has done. For example, in the below screenshot you can see that it has added structlog to produce JSON-formatted logs, implemented centralised exception handling and improved the way request responses are logged. Think of all the typing you just saved!

Refactoring: Your Personal Code Reviewer
We all want to write clean, efficient code. But sometimes, we're in a hurry. Gemini can act as your personal code reviewer. You can ask it things like:
please perform a comprehensive code review for best practices and security
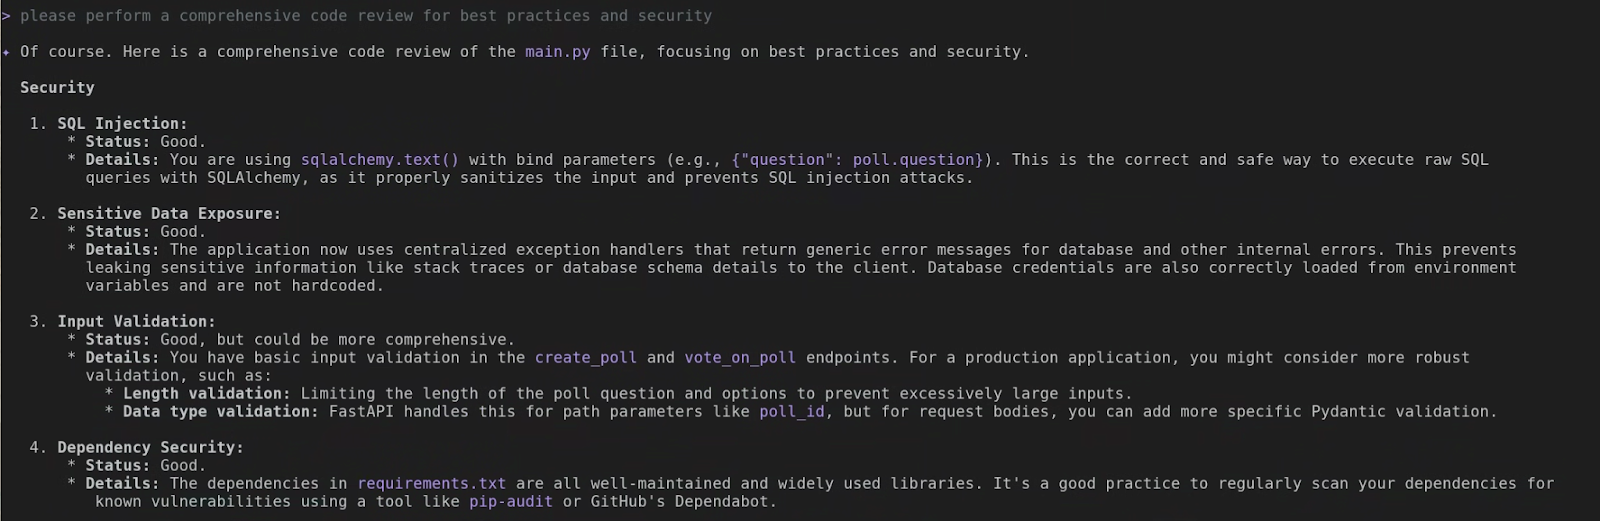
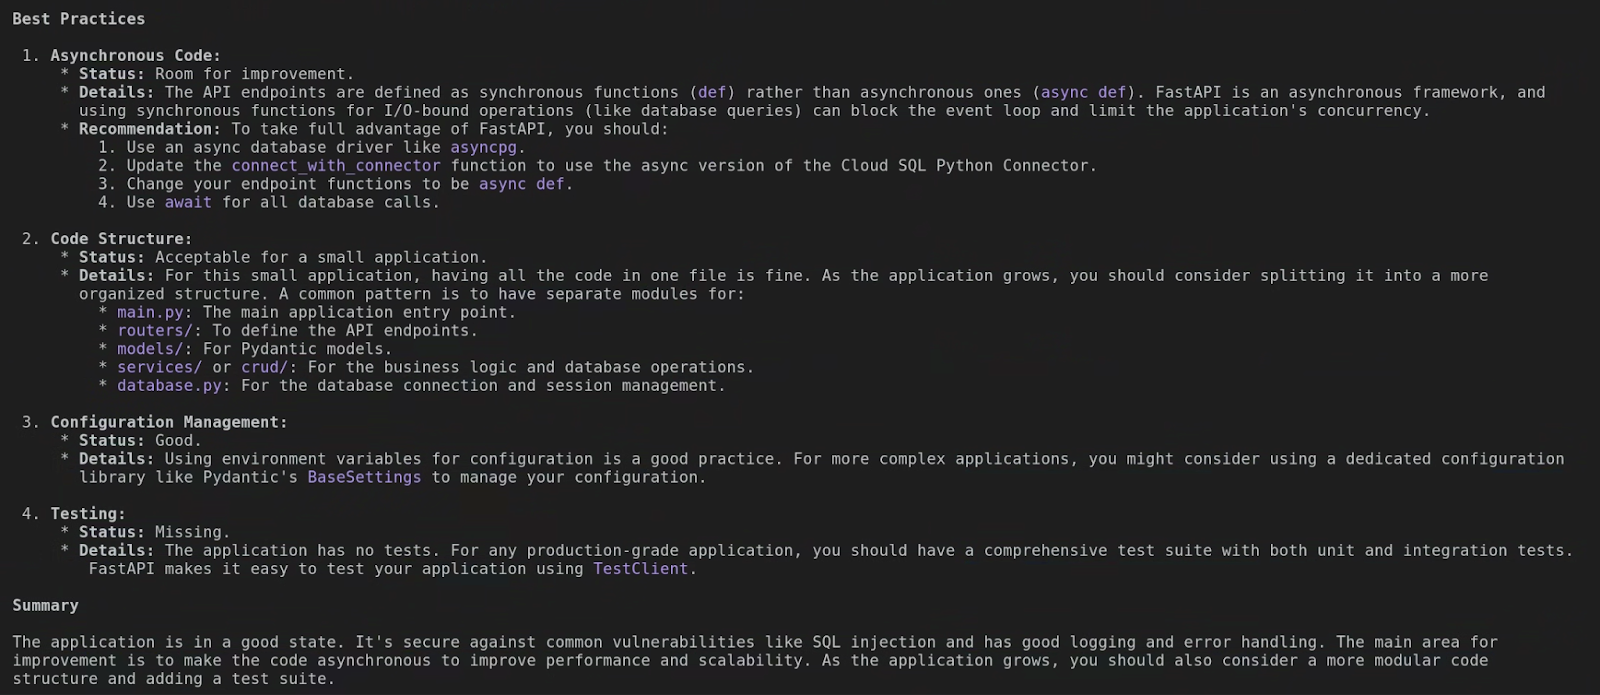
Gemini understands language-specific best practices. Again, the actual output in your case might be different than the screenshots above, but if you read the output you would appreciate the level of details Gemini CLI has gone to to analyse the code. It helps you learn and improve your code at the same time!
Test Generation: The Best Part!
This is my favorite trick! We all know we should write tests, but it can be tedious, especially when you have to mock things. Well, check this out. You can just ask:
Add a test suite to this application

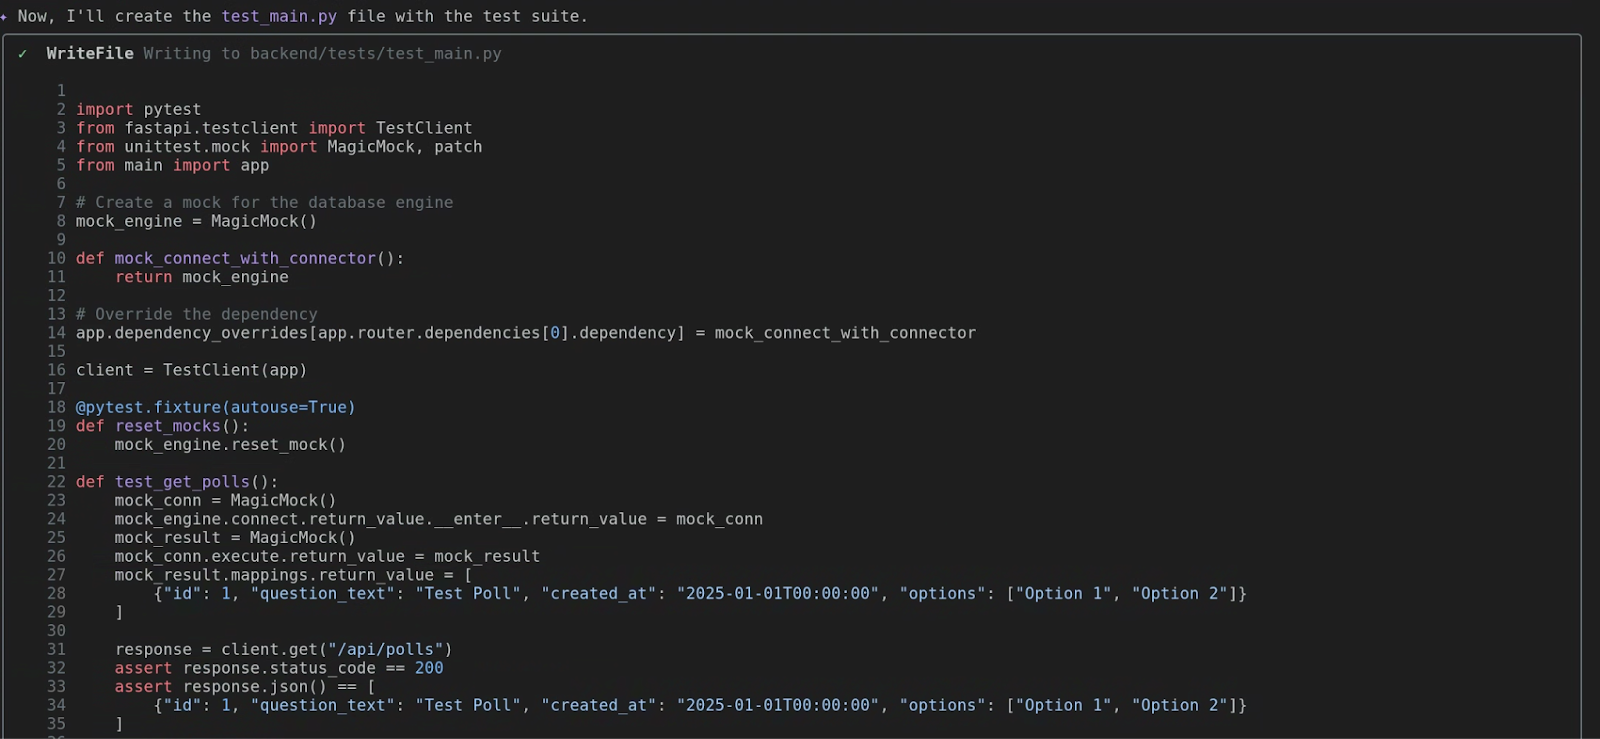

Gemini will analyze your function, identify its inputs and outputs, and figure out what its dependencies are. It will then generate a complete test_main.py file with several test cases, including a ‘happy path' and maybe an error condition. This is a massive productivity boost!
Run the Tests! (A Challenge Task for You)
Now, this is where things get truly exciting! I'm going to leave this part as a challenge for you to explore independently. Feel free to prompt Gemini CLI to execute the test cases it has generated. Then, just sit back and observe the magic unfold!
7. Beyond the Localhost: Integrating with GitHub

We've done some amazing work on our local machine, our own little corner of the forest. But the real power of the cloud is collaboration and connection! It's time to take flight and see how Gemini can interact with the wider world, starting with the biggest tree in the developer forest: GitHub!
Concept: Your Integrated DevOps Assistant
So far, we've used Gemini as a local coding buddy. Now, we're going to upgrade it to a full-blown Integrated DevOps Assistant. This is all thanks to the Model Context Protocol (MCP) integration. It's a fancy name, but it just means Gemini can securely talk to other services on your behalf, and the first one we're going to master is GitHub.
Think about it. How often do you have to leave your terminal to check a pull request, create an issue, or browse a repository on GitHub? That's more context switching! With the github toolset, you can do all of that right here. It turns Gemini into a native interface for GitHub.
The official GitHub MCP Server documentation provides ample guidance on its exposed tools and configuration options. You're free to choose between local or remote operation, as Gemini CLI fully supports both remote MCP Servers.
This tutorial will guide you through setting up the Remote MCP Server option for GitHub. First things first, you'll need a Personal Access Token (PAT) from GitHub.
Once you've got your PAT, it's time to add the MCP Server object to your settings.json file. My complete settings.json is shown below, but you can simply ensure your mcpServers object matches what you see here:
{
  "security": {
    "auth": {
      "selectedType": "vertex-ai"
    }
  },
 "mcpServers": {
    "github": {
      "httpUrl": "https://api.githubcopilot.com/mcp/",
      "headers": {
        "Authorization": "GITHUB_PAT"
      },
      "timeout": 5000
    }
  }
}
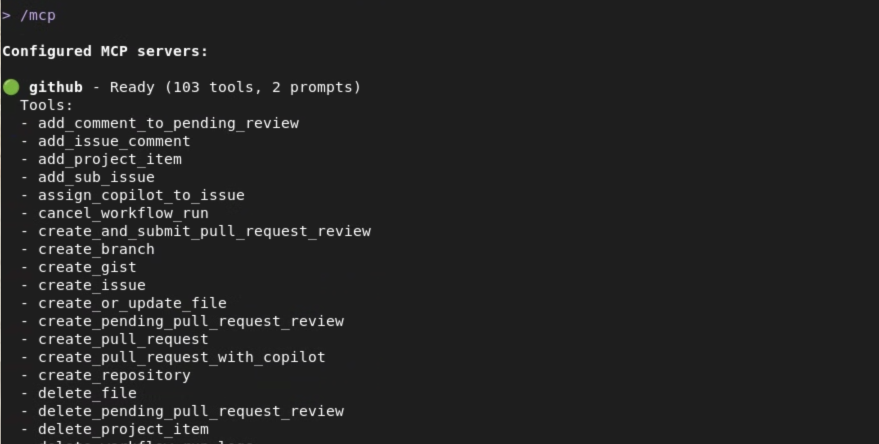
After you've updated your settings.json with the GitHub MCP Server configuration, simply restart Gemini CLI or execute the /mcp refresh command. The screenshot below illuminates the GitHub MCP Server now primed on my system, showcasing the array of potent tools Gemini CLI can now wield with the Model Context Protocol.
Showcase of Key Commands
Gemini comes with a whole new set of superpowers specifically for GitHub. Here are a few of my favorites:
github.list_repositories: Want to see all the repositories in your organization without opening a browser? This is your tool! Just ask, ‘List all the repositories in my org.'github.create_issue: Found a bug? Don't switch windows to create an issue. You can just tell Gemini, ‘Create an issue in thesample-flask-apprepo titled "Fix the login bug" with this description...' and poof, the issue is created.github.get_pull_request: Need to check on a PR? You can ask, ‘Show me the details of PR number 42 in thesample-flask-apprepo.' Gemini will fetch the title, the description, the status, and who the reviewers are.github.get_file_contents: This one is super cool. You can read a file from a remote repository, without having to clone it first! It's great for quickly checking a config file or the README of a project you don't have locally.
8. GitHub Exploration

Enough talk, let's fly! We're going to use our new GitHub powers to explore an organization and a project, all from the comfort of our terminal.
Objective: Use Gemini to explore and understand a project hosted on GitHub.
Scenario: You need to get familiar with a project on GitHub that you haven't worked on before.
Task 1: List Repositories in an Organization
First, let's get a view of all the projects in a GitHub organization. For this lab, you can use your own GitHub username or an organization you belong to. Let's ask Gemini to list them out.
List the repositories in the `[your-org-or-username]` GitHub organization.
(Remember to replace [your-org-or-username] with your actual info!) Gemini will use the github.list_repositories tool and show you a list of all the projects. Awesome!
Task 2: Find a Specific Repository
Okay, you'll see a list of repositories. Now, just like a real developer, you need to scan that list and find the project you're interested in. For our lab, let's pretend we're looking for the quickpoll repository we cloned earlier. You don't need a command for this part—just read the output from the last step and find the repo!
Task 3: List Open Pull Requests
Now that we've identified our target repository, let's see what's happening with it. Are there any open pull requests? Let's ask:
List the open pull requests for the `quickpoll` repository in the `[your-org-or-username]` organization.
Gemini will use the github.list_pull_requests tool, filtering for the open state. It will then list any open PRs, showing you the PR number, the title, and who created it. This is your instant view into the active development of the project. You can try this with a repository that you are actively contributing to and check the results.

Task 4: Investigate a Pull Request
Let's say there's an interesting PR in that list. We want to know more about it! We want to see the description and what files were changed. Pick a PR number from the list (if there are none, you can skip this, but let's imagine there is one!).
Show me the details and files changed in PR number 1 in the `quickpoll` repo.
This is a great example of a multi-step task for Gemini! First, it will likely use github.get_pull_request to fetch the main details—the title, body, author, etc. Then, to get the file changes, it will use a second tool, github.get_pull_request_files. It will then combine all this information into a nice, clean summary for you. You just reviewed a PR without ever leaving your terminal! How amazing is that?!
9. From PRD to Initial Commit

You've learned to explore, to build, and to test. Now, we're going to put it all together in a real-world scenario. This is the moment we turn a plan into a product. We'll go from a Product Requirements Document (PRD) all the way to our first commit. Let's build something amazing!
Objective: Simulate a real-world development task from start to finish, combining local and remote context.
Scenario: You've been assigned a new feature! The requirements are waiting for you in a PRD file inside the project's GitHub repository.
Task 1: Understand - Read the PRD
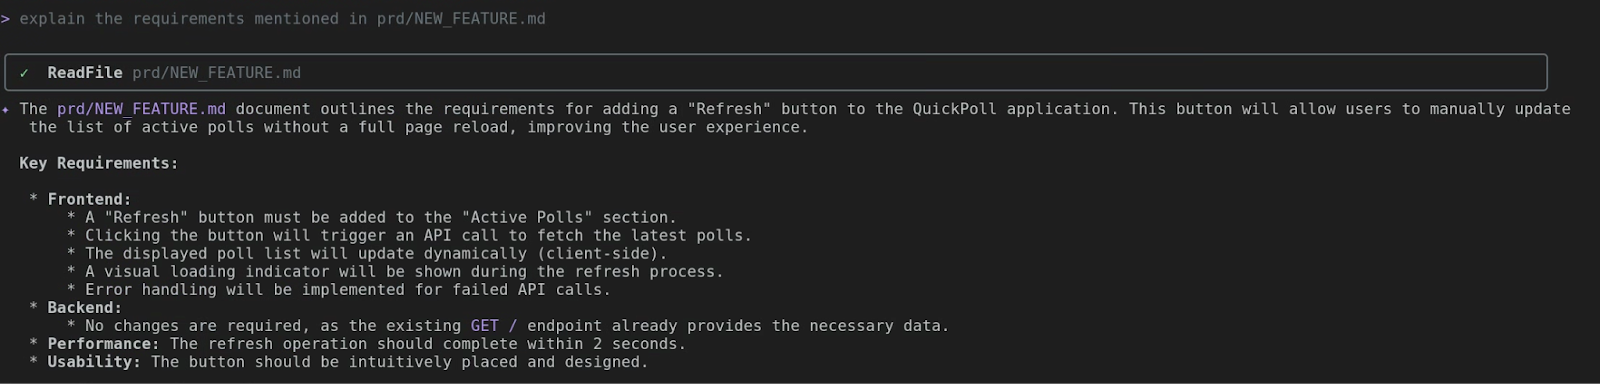
This is the most crucial step! Before you even think about writing a single line of code, you absolutely must grasp the plan. Our new feature's requirements are nestled in the prd/NEW_FEATURE.md file. Let's crack it open and see what's inside.
explain the requirements mentioned in prd/NEW_FEATURE.md
Gemini CLI will employ read_file to showcase the PRD's content. Dive in! It'll outline the new feature: a Refresh button for users to manually update the active polls list. Always consult the blueprint first!
Task 2: Code - Translate Requirements to Reality
This is the magic moment! We'll take the requirements from the PRD and ask Gemini to write the code for us. Let's be specific and tell it exactly what we want.
Implement the changes as per the PRD
Gemini CLI will spring into action, and after a moment, you'll see an output much like this. Our shiny new code now has a cozy home!

Task 3: Verify Your Changes
We've created a new file with new code. The last step for this lab is to deploy the change to Cloud Run and verify.
let's deploy the changes made to frontend to Cloud Run. The existing service on Cloud Run is quickpoll-fe in us-central1.
Notice how that prompt provided additional details, like the existing Cloud Run service name and its deployment region. Being specific helps save time, though Gemini CLI will always prompt you for any missing details if you leave them out.
Should your updated Cloud Run service encounter an error, simply prompt Gemini CLI to debug and rectify the code. Remember, it's your super-powered companion!
10. Congratulations

And that's a wrap! You just completed a full development cycle. You went from a requirement document to a new feature, ready to be committed and pushed. You combined local context, remote context, file system operations, and code generation. You're not just a developer; you're a super-productive cloud architect! Congratulations!