
1. Gemini डेवलपर में आपका स्वागत है!
इस कोडलैब में, कस्टम Gemini Interactions SDK का इस्तेमाल करके, Java में अगली पीढ़ी के एआई ऐप्लिकेशन बनाने का तरीका बताया गया है.
Gemini Interactions API क्या है?
एलएलएम के पारंपरिक एपीआई, स्टेटलेस होते हैं. साथ ही, ये अनुरोध और जवाब पर आधारित होते हैं. मल्टी-टर्न चैट असिस्टेंट या जटिल एजेंटिक लूप बनाने के लिए, डेवलपर को क्लाइंट-साइड ऐप्लिकेशन कोड में बातचीत की स्थिति, इतिहास को छोटा करना, टूल कॉल ऑर्केस्ट्रेशन, और एक्ज़ीक्यूशन लूप को पूरी तरह से मैनेज करना पड़ता था.
Gemini Interactions API, इस जटिलता को सर्वर पर ले जाता है. यह स्टेटफ़ुल, सेशन-आधारित एपीआई है. इसमें Google का इन्फ़्रास्ट्रक्चर, बातचीत के ग्राफ़ को होस्ट और मैनेज करता है. एक इंटरैक्शन, स्टेटफ़ुल सेशन को दिखाता है. इसके साथ इंटरैक्ट करने पर, एपीआई एक रिच और स्ट्रक्चर्ड टाइमलाइन दिखाता है. इसमें पॉलीमोर्फ़िक स्टेप शामिल होते हैं. जैसे:
ThoughtStep: मॉडल की इंटरनल प्रोसेस.ModelOutputStep: मॉडल से जनरेट किया गया टेक्स्ट, ऑडियो या इमेज कॉन्टेंट.ToolCallStep&ToolResultStep: सिस्टम या मॉडल की मदद से टूल को चालू करना.UserInteractionStep: ऐसे पॉइंट जहां सिस्टम, मानवीय इनपुट या अनुमति का अनुरोध करने के लिए रुक जाता है.
मैनेज किए गए एजेंट क्या होते हैं?
ऑटोनॉमस एजेंट को मैनेज करना बहुत मुश्किल होता है. जैसे, लूप को हैंडल करना, फिर से कोशिश करने की लॉजिक को लागू करना, टूल एक्ज़ीक्यूशन एनवायरमेंट को मैनेज करना, और स्टेट मैनेजमेंट को मैनेज करना.
मैनेज किए गए एजेंट, प्लैटफ़ॉर्म लेवल का समाधान है. यह Gemini Interactions API के ज़रिए उपलब्ध कराया जाता है. एजेंट लूप को स्थानीय तौर पर चलाने के बजाय, Google के इन्फ़्रास्ट्रक्चर पर सीधे तौर पर खास एजेंट उपलब्ध कराए जा सकते हैं:
- पहले से मौजूद एजेंट: इस्तेमाल के लिए तैयार खास एजेंट, जैसे कि Deep Research एजेंट. यह एजेंट, वेब पर कई चरणों में रिसर्च करता है, जानकारी इकट्ठा करता है, और पूरी जानकारी वाली रिपोर्ट जनरेट करता है.
- कस्टम मैनेज किए गए एजेंट: ये स्वायत्त इकाइयां होती हैं, जिन्हें आपको तय करना होता है. आपको सिस्टम के लिए निर्देश देने होते हैं. साथ ही, Google Search या Bash एक्ज़ीक्यूशन एनवायरमेंट जैसे टूल अटैच करने होते हैं. इसके अलावा, आपको Cloud Sandbox को कॉन्फ़िगर करना होता है. यह एक सुरक्षित, अलग-थलग, और कंटेनर वाला रनटाइम एनवायरमेंट होता है. इसमें नेटवर्क से बाहर निकलने के नियमों को अपनी ज़रूरत के हिसाब से बनाया जा सकता है. उदाहरण के लिए, सिर्फ़ GitHub जैसे कुछ डोमेन को ऐक्सेस करने की अनुमति देना.
Gemini Interactions Java SDK का इस्तेमाल करके, स्टैंडर्ड Java ऐप्लिकेशन में इन मैनेज किए गए एजेंट को आसानी से बूटस्ट्रैप, कोऑर्डिनेट, और उनके साथ मिलकर काम किया जा सकता है.
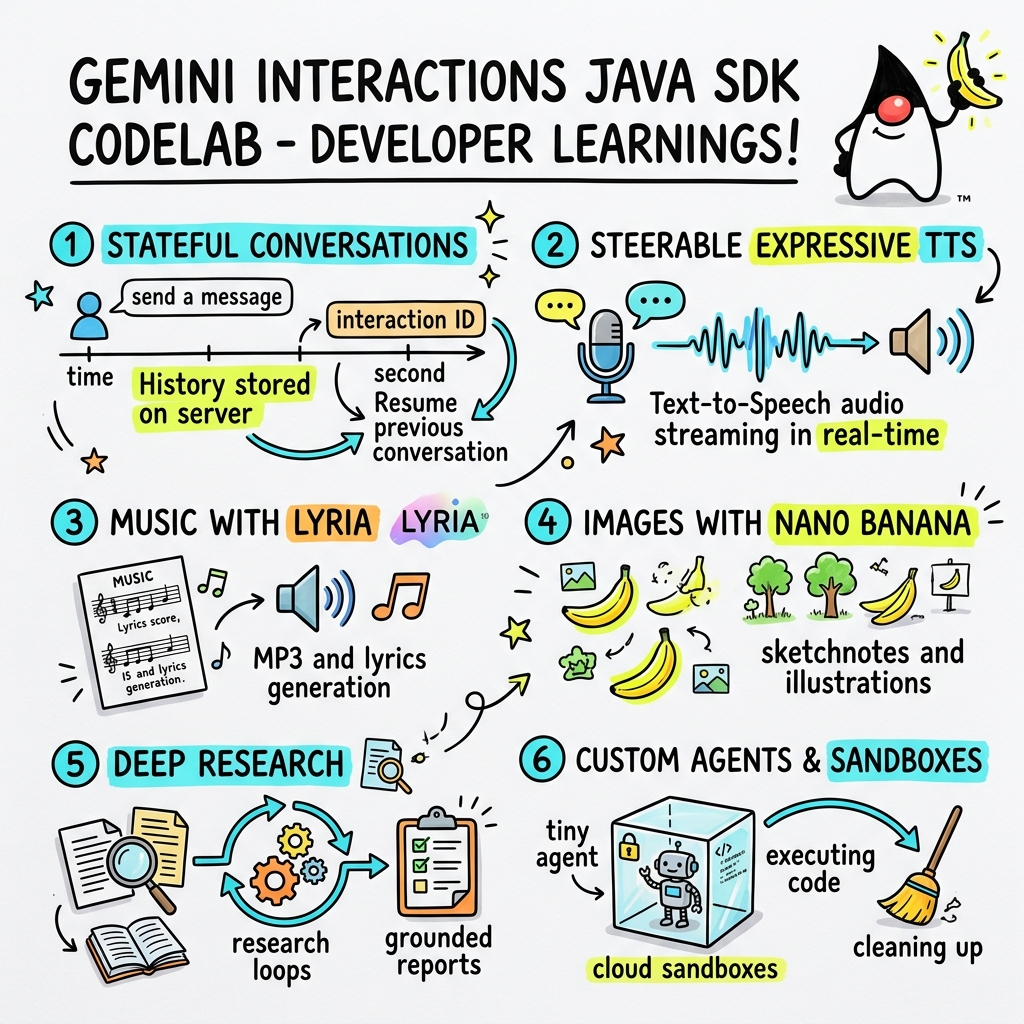
आपको क्या सीखने को मिलेगा
- पॉलीमॉर्फिक
Stepपर आधारित नए आर्किटेक्चर पर नेविगेट करने का तरीका. - स्पीकर पर सीधे तौर पर, एक्सप्रेशन के साथ टीटीएस ऑडियो स्ट्रीम करने का तरीका.
- Lyria की मदद से संगीत (MP3 + बोल) जनरेट करने का तरीका.
- Gemini 3 Pro इमेज की मदद से, विज़ुअल स्केचनोट जनरेट करने का तरीका.
- Collaborative Planning का इस्तेमाल करके, Deep Research एजेंट को कैसे कंट्रोल करें.
- नेटवर्क से बाहर निकलने के नियमों और टूल के साथ कस्टम एजेंट को कैसे उपलब्ध कराएं.
आपको किन चीज़ों की ज़रूरत होगी
- Java 21 या इसके बाद का वर्शन.
- Apache Maven.
- टेक्स्ट एडिटर या आईडीई (IntelliJ IDEA, VS Code वगैरह).
- Gemini API पासकोड (Google AI Studio से).
2. सेटअप: प्रोजेक्ट और एपीआई पासकोड
Maven प्रोजेक्ट बनाना
नीचे दिए गए निर्देश का इस्तेमाल करके, अपने टर्मिनल से एक नया Maven प्रोजेक्ट बूटस्ट्रैप करें:
mvn archetype:generate \
    -DgroupId=com.example \
    -DartifactId=gemini-interactions-demo \
    -DarchetypeGroupId=org.apache.maven.archetypes \
    -DarchetypeArtifactId=maven-archetype-quickstart \
    -DarchetypeVersion=1.5 \
    -DinteractiveMode=false
नई बनाई गई प्रोजेक्ट डायरेक्ट्री में जाएं:
cd gemini-interactions-demo
अपनी pom.xml फ़ाइल खोलें और इसे कॉन्फ़िगर करें:
- Java 21 को टारगेट करने के लिए, Java वर्शन की प्रॉपर्टी अपडेट करें:
<properties> <maven.compiler.source>21</maven.compiler.source> <maven.compiler.target>21</maven.compiler.target> </properties> <dependency> <groupId>io.github.glaforge</groupId> <artifactId>gemini-interactions-api-sdk</artifactId> <version>0.10.1</version> </dependency>
एपीआई पासकोड कॉन्फ़िगर करना
Google AI Studio से Gemini API पासकोड पाएं.
अपने टर्मिनल में, कुंजी को एनवायरमेंट वैरिएबल के तौर पर सेट करें:
macOS / Linux:
export GEMINI_API_KEY="your_actual_api_key"
Windows (Command Prompt):
set GEMINI_API_KEY="your_actual_api_key"
3. Hello World: Navigating the Step Architecture
Interactions API में, पॉलीमोर्फ़िक और चरण-आधारित टाइमलाइन आर्किटेक्चर पेश किया गया है. एपीआई, आउटपुट की एक सामान्य सूची दिखाने के बजाय, टाइप किए गए Step ऑब्जेक्ट (जैसे, ModelOutputStep, ThoughtStep, FunctionCallStep) का क्रम दिखाता है.
इस चरण में, आपको एक आसान इंटरैक्शन लिखना होगा. इससे आपको यह समझने में मदद मिलेगी कि इस स्ट्रक्चर से मॉडल का फ़ाइनल आउटपुट कैसे निकाला जाता है.
HelloInteractions.java बनाएं
यहां दिए गए कॉन्टेंट के साथ src/main/java/com/example/HelloInteractions.java फ़ाइल बनाएं:
package com.example;

import io.github.glaforge.gemini.interactions.GeminiInteractionsClient;
import io.github.glaforge.gemini.interactions.model.*;
import io.github.glaforge.gemini.interactions.model.InteractionParams.ModelInteractionParams;

public class HelloInteractions {
    public static void main(String[] args) {
        // 1. Initialize the client
        GeminiInteractionsClient client = GeminiInteractionsClient.builder()
            .apiKey(System.getenv("GEMINI_API_KEY"))
            .build();

        // 2. Build the request
        ModelInteractionParams request = ModelInteractionParams.builder()
            .model("gemini-3.5-flash")
            .input("Explain the difference between a library and a framework in one sentence.")
            .build();

        // 3. Send request
        Interaction response = client.create(request);

        // 4. Navigate the step-based architecture to get the output
        response.steps().stream()
            .filter(step -> step instanceof Step.ModelOutputStep)
            .map(step -> (Step.ModelOutputStep) step)
            .findFirst()
            .ifPresent(step -> System.out.println(step.content().get(0)));
    }
}
कोड लागू करना
क्लास को कंपाइल और रन करें:
mvn compile exec:java -Dexec.mainClass=com.example.HelloInteractions
4. स्टीयर किया जा सकने वाला ऑडियो: एक्सप्रेशन के साथ टीटीएस की सुविधा को स्ट्रीम करना
Gemini 3.1 Flash में, टेक्स्ट को बोली में बदलने (टीटीएस) की सुविधा जोड़ी गई है. प्रॉम्प्ट का इस्तेमाल करके, आवाज़ की गति, टोन, और माहौल को कंट्रोल किया जा सकता है. साथ ही, वाक्य के बीच में इमोशनल टैग (जैसे कि [excitedly] या [whispers]) का इस्तेमाल किया जा सकता है.
इस चरण में, आपको ऑडियो जनरेट करना होगा. इसके बाद, इसे सीधे अपने स्पीकर पर स्ट्रीम करना होगा.
StreamingDJ.java बनाएं
यहां दिए गए कॉन्टेंट के साथ src/main/java/com/example/StreamingDJ.java फ़ाइल बनाएं:
package com.example;

import io.github.glaforge.gemini.interactions.GeminiInteractionsClient;
import io.github.glaforge.gemini.interactions.model.*;
import io.github.glaforge.gemini.interactions.model.Config.SpeechConfig;
import io.github.glaforge.gemini.interactions.model.InteractionParams.ModelInteractionParams;
import javax.sound.sampled.*;
import java.util.Base64;
import java.util.stream.Stream;

public class StreamingDJ {
    public static void main(String[] args) throws Exception {
        GeminiInteractionsClient client = GeminiInteractionsClient.builder()
            .apiKey(System.getenv("GEMINI_API_KEY"))
            .build();

        // Prompt defining the voice profile and emotional tags
        String prompt = """
            # AUDIO PROFILE: Jaz R.
            ## THE SCENE: London Studio
            ### DIRECTOR'S NOTES
            Accent: Jaz is a DJ from Brixton, London.
            Style: Bouncy, energetic, high-speed delivery.

            #### TRANSCRIPT
            [excitedly] Yes, massive vibes in the studio!
            [whispers] But keep it down, the boss is coming...
            [shouting] Turn this up! Let's go!
            """;

        ModelInteractionParams request = ModelInteractionParams.builder()
            .model("gemini-3.1-flash-tts-preview")
            .input(prompt)
            .responseModalities(Interaction.Modality.AUDIO)
            .speechConfig(new SpeechConfig("Algenib", "en-GB"))
            .stream(true) // Enable streaming
            .build();

        System.out.println("Streaming audio from Gemini...");

        try (Stream<Events> eventStream = client.stream(request)) {
            // Configure the Java Audio System for 24kHz Mono 16-bit PCM
            AudioFormat format = new AudioFormat(24000, 16, 1, true, false);
            DataLine.Info info = new DataLine.Info(SourceDataLine.class, format);

            try (SourceDataLine line = (SourceDataLine) AudioSystem.getLine(info)) {
                line.open(format);
                line.start();

                // Process the stream and play audio chunks as they arrive
                eventStream.forEach(event -> {
                    if (event instanceof Events.StepDelta cd && cd.delta() instanceof Events.AudioDelta audioDelta) {
                        byte[] audioData = Base64.getDecoder().decode(audioDelta.data());
                        line.write(audioData, 0, audioData.length);
                    }
                });
                line.drain();
            }
        }
    }
}
कोड लागू करना
mvn compile exec:java -Dexec.mainClass=com.example.StreamingDJ
आउटपुट सुनना
यहां कोड चलाने पर सुनाई देने वाले ऑडियो का उदाहरण दिया गया है. इसमें Algenib की आवाज़ का इस्तेमाल किया गया है और इमोशनल टैग का इस्तेमाल किया गया है:
5. Lyria 3 की मदद से म्यूज़िक जनरेट करना
DeepMind Lyria 3 मॉडल का इस्तेमाल करके, संगीत और जिंगल जनरेट किए जा सकते हैं. दो तरह के जवाब पाने की सुविधा (AUDIO और TEXT) का अनुरोध करके, जनरेट किया गया ऑडियो (MP3) और गाने के बोल, दोनों को वापस पाया जा सकता है.
MusicGenerator.java बनाएं
यहां दिए गए कॉन्टेंट के साथ src/main/java/com/example/MusicGenerator.java फ़ाइल बनाएं:
package com.example;

import io.github.glaforge.gemini.interactions.GeminiInteractionsClient;
import io.github.glaforge.gemini.interactions.model.*;
import io.github.glaforge.gemini.interactions.model.InteractionParams.ModelInteractionParams;
import io.github.glaforge.gemini.interactions.model.Content.AudioContent;
import java.nio.file.Files;
import java.nio.file.Paths;

public class MusicGenerator {
    public static void main(String[] args) throws Exception {
        GeminiInteractionsClient client = GeminiInteractionsClient.builder()
            .apiKey(System.getenv("GEMINI_API_KEY"))
            .build();

        ModelInteractionParams request = ModelInteractionParams.builder()
            .model("models/lyria-3-clip-preview") // 30-second clip
            .input("An uplifting rock song with acoustic guitars about coding in Java.")
            .responseModalities(
                Interaction.Modality.AUDIO,
                Interaction.Modality.TEXT) // Request both MP3 and Lyrics
            .build();

        System.out.println("Generating music (this might take a moment)...");
        Interaction response = client.create(request);

        // 1. Print the lyrics (TEXT output)
        System.out.println("\n--- Generated Lyrics ---");
        response.steps().stream()
            .filter(step -> step instanceof Step.ModelOutputStep)
            .flatMap(step -> ((Step.ModelOutputStep) step).content().stream())
            .filter(content -> content instanceof Content.TextContent)
            .forEach(content -> System.out.println(((Content.TextContent) content).text()));

        // 2. Save the MP3 (AUDIO output)
        response.steps().stream()
            .filter(step -> step instanceof Step.ModelOutputStep)
            .flatMap(step -> ((Step.ModelOutputStep) step).content().stream())
            .filter(content -> content instanceof AudioContent)
            .map(content -> (AudioContent) content)
            .findFirst()
            .ifPresent(audio -> {
                try {
                    Files.write(Paths.get("coding_song.mp3"), audio.data());
                    System.out.println("\nSuccess: Song saved to coding_song.mp3");
                } catch (Exception e) {
                    e.printStackTrace();
                }
            });
    }
}
कोड लागू करना
mvn compile exec:java -Dexec.mainClass=com.example.MusicGenerator
जनरेट किया गया गाना सुनना
यहां जनरेट की गई MP3 फ़ाइल (coding_song.mp3) दी गई है. इसमें संगीत और गाने के बोल शामिल हैं:
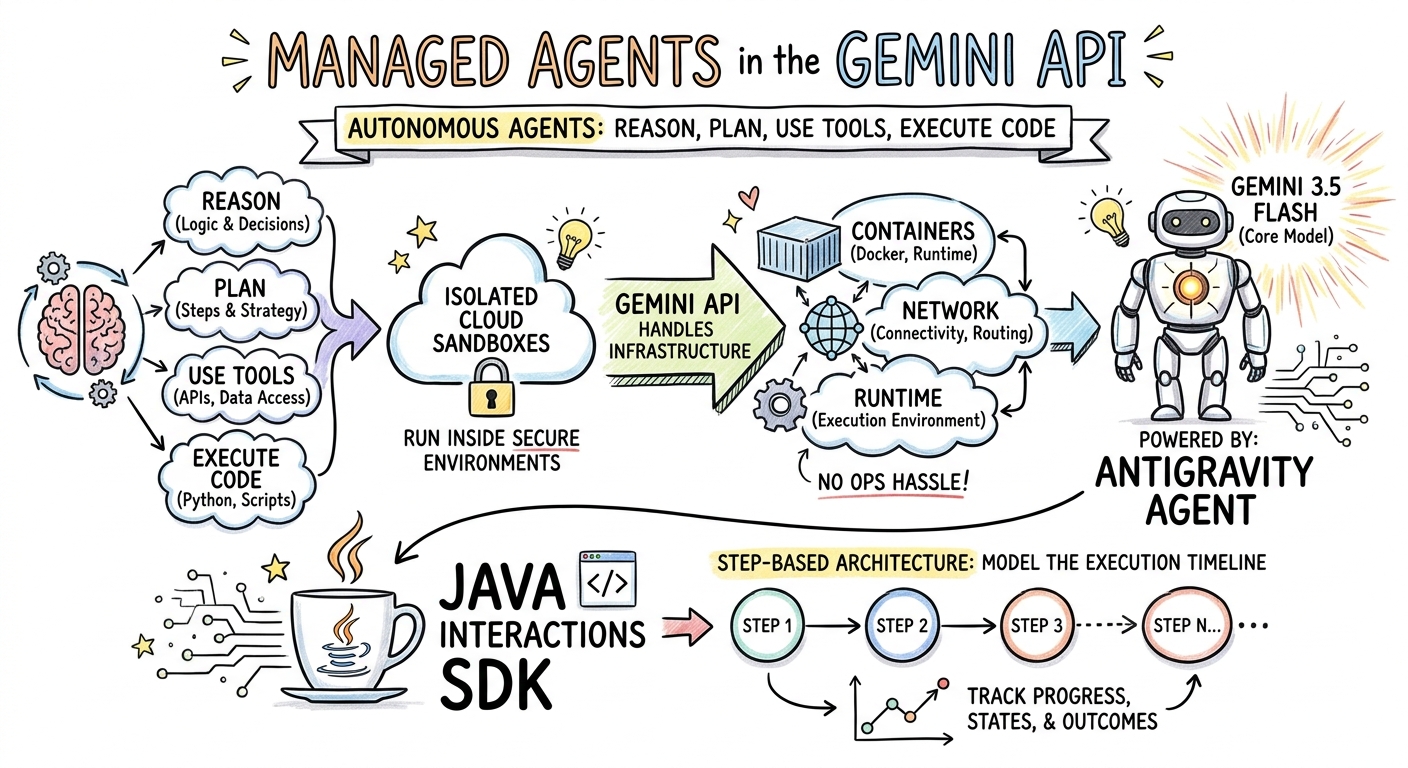
6. स्केचनोट (Nano Banana Pro) की मदद से विज़ुअलाइज़ करना
Gemini 3 Pro Image (इसे Nano Banana Pro भी कहा जाता है) की मदद से इमेज जनरेट की जा सकती हैं. IMAGE मोड का इस्तेमाल करके, टेक्स्ट इनपुट के आधार पर इन्फ़ोग्राफ़िक, डायग्राम या स्केचनोट जनरेट किए जा सकते हैं.
इस चरण में, आपको मैनेज किए जा रहे एजेंट के बारे में किसी लेख की स्केचनोट समरी जनरेट करनी होगी. साथ ही, इसे PNG फ़ाइल के तौर पर सेव करना होगा.
ImageGenerator.java बनाएं
यहां दिए गए कॉन्टेंट के साथ src/main/java/com/example/ImageGenerator.java फ़ाइल बनाएं:
package com.example;

import io.github.glaforge.gemini.interactions.GeminiInteractionsClient;
import io.github.glaforge.gemini.interactions.model.*;
import io.github.glaforge.gemini.interactions.model.InteractionParams.ModelInteractionParams;
import io.github.glaforge.gemini.interactions.model.Content.ImageContent;
import java.nio.file.Files;
import java.nio.file.Paths;

public class ImageGenerator {
    public static void main(String[] args) throws Exception {
        GeminiInteractionsClient client = GeminiInteractionsClient.builder()
            .apiKey(System.getenv("GEMINI_API_KEY"))
            .build();

        String articleSummary = """
            Managed Agents in the Gemini API allow developers to run autonomous agents
            that reason, plan, use tools, and execute code inside isolated cloud sandboxes.
            The Gemini API handles the infrastructure (containers, network, runtime).
            It is powered by the Antigravity agent running on Gemini 3.5 Flash.
            The Java Interactions SDK supports these capabilities, utilizing a Step-based
            architecture to model the execution timeline.
            """;

        ModelInteractionParams request = ModelInteractionParams.builder()
            .model("gemini-3-pro-image-preview")
            .input(String.format("""
                Create a hand-drawn and hand-written sketchnote
                style summary infographic, with a pure white background,
                about the following information:

                %s
                """, articleSummary))
            .responseModalities(Interaction.Modality.IMAGE) // Request IMAGE modality
            .build();

        System.out.println("Generating sketchnote (this might take a moment)...");
        Interaction response = client.create(request);

        // Save the generated image
        response.steps().stream()
            .filter(step -> step instanceof Step.ModelOutputStep)
            .flatMap(step -> ((Step.ModelOutputStep) step).content().stream())
            .filter(content -> content instanceof ImageContent)
            .map(content -> (ImageContent) content)
            .findFirst()
            .ifPresent(image -> {
                try {
                    Files.write(Paths.get("sketchnote.png"), image.data());
                    System.out.println("Success: Sketchnote saved to sketchnote.png");
                } catch (Exception e) {
                    e.printStackTrace();
                }
            });
    }
}
कोड लागू करना
mvn compile exec:java -Dexec.mainClass=com.example.ImageGenerator
जनरेट किया गया स्केचनोट
मॉडल ने यह स्केचनोट (sketchnote.png) जनरेट किया है:
7. स्टीयरिंग एजेंट: साथ मिलकर गहराई से रिसर्च करना
Deep Research एक बेहतरीन एजेंट है. यह रिसर्च से जुड़े कई चरणों वाले टास्क पूरे कर सकता है. हालांकि, इसे तुरंत चलाने के बजाय, मिलकर प्लान बनाने की सुविधा का इस्तेमाल किया जा सकता है. इससे, एजेंट के डेटा इकट्ठा करना शुरू करने से पहले, रिसर्च प्लान की समीक्षा की जा सकती है, उसमें बदलाव किया जा सकता है, और उसे अपने हिसाब से बनाया जा सकता है.
आपको एक से ज़्यादा बार बातचीत करने की सुविधा लागू करनी होगी. इसमें सर्वर-साइड की एक ही स्थिति (previousInteractionId) का इस्तेमाल करके प्लान को बेहतर बनाया जाएगा.
CollaborativeResearch.java बनाएं
यहां दिए गए कॉन्टेंट के साथ src/main/java/com/example/CollaborativeResearch.java फ़ाइल बनाएं:
package com.example;

import io.github.glaforge.gemini.interactions.GeminiInteractionsClient;
import io.github.glaforge.gemini.interactions.model.*;
import io.github.glaforge.gemini.interactions.model.InteractionParams.AgentInteractionParams;
import io.github.glaforge.gemini.interactions.model.Config.DeepResearchAgentConfig;
import io.github.glaforge.gemini.interactions.model.Config.ThinkingSummaries;
import io.github.glaforge.gemini.interactions.model.Config.Visualization;

public class CollaborativeResearch {
    public static void main(String[] args) throws Exception {
        GeminiInteractionsClient client = GeminiInteractionsClient.builder()
            .apiKey(System.getenv("GEMINI_API_KEY"))
            .build();

        String agentModel = "deep-research-preview-04-2026";

        // --- Phase 1: Request a Plan ---
        System.out.println("Phase 1: Requesting research plan...");
        AgentInteractionParams planParams = AgentInteractionParams.builder()
            .agent(agentModel)
            .input("Research the latest generations of Google Cloud TPUs (TPU7x and the 8th generation TPU 8t and TPU 8i).")
            .agentConfig(new DeepResearchAgentConfig(
                "deep-research",
                ThinkingSummaries.AUTO,
                Visualization.AUTO,
                true // TRUE enables collaborative planning
            ))
            .background(true)
            .store(true)
            .build();

        Interaction planInteraction = client.create(planParams);
        planInteraction = waitForCompletion(client, planInteraction.id());

        System.out.println("\n--- Proposed Plan ---");
        printOutputText(planInteraction);

        // --- Phase 2: Refine the Plan ---
        System.out.println("\nPhase 2: Refining research plan...");
        AgentInteractionParams refineParams = AgentInteractionParams.builder()
            .agent(agentModel)
            .input("Focus on comparing the architectural, performance, and scaling differences between the TPU7x generation and the two flavors of the eighth generation: TPU 8t (optimized for training at scale) and TPU 8i (optimized for low-latency reasoning and inference).")
            .agentConfig(new DeepResearchAgentConfig(
                "deep-research",
                ThinkingSummaries.AUTO,
                Visualization.AUTO,
                true // Keep collaborative planning TRUE to iterate
            ))
            .previousInteractionId(planInteraction.id()) // Resume session
            .background(true)
            .store(true)
            .build();

        Interaction refinedInteraction = client.create(refineParams);
        refinedInteraction = waitForCompletion(client, refinedInteraction.id());

        System.out.println("\n--- Refined Plan ---");
        printOutputText(refinedInteraction);

        // --- Phase 3: Approve and Execute ---
        System.out.println("\nPhase 3: Approving plan and starting deep research (this will take a few minutes)...");
        AgentInteractionParams executeParams = AgentInteractionParams.builder()
            .agent(agentModel)
            .input("Plan looks good, execute!")
            .agentConfig(new DeepResearchAgentConfig(
                "deep-research",
                ThinkingSummaries.AUTO,
                Visualization.AUTO,
                false // FALSE approves the plan and executes the research
            ))
            .previousInteractionId(refinedInteraction.id()) // Resume session
            .background(true)
            .store(true)
            .build();

        Interaction finalReport = client.create(executeParams);
        finalReport = waitForCompletion(client, finalReport.id());

        System.out.println("\n--- Final Research Report ---");
        printOutputText(finalReport);
    }

    private static Interaction waitForCompletion(GeminiInteractionsClient client, String id) throws Exception {
        Interaction interaction = client.get(id);
        while (interaction.status() != Interaction.Status.COMPLETED && interaction.status() != Interaction.Status.FAILED) {
            Thread.sleep(5000);
            interaction = client.get(id);
        }
        if (interaction.status() == Interaction.Status.FAILED) {
            throw new RuntimeException("Interaction failed. Status: " + interaction.status());
        }
        return interaction;
    }

    private static void printOutputText(Interaction interaction) {
        interaction.steps().stream()
            .filter(step -> step instanceof Step.ModelOutputStep)
            .flatMap(step -> ((Step.ModelOutputStep) step).content().stream())
            .filter(content -> content instanceof Content.TextContent)
            .forEach(content -> System.out.println(((Content.TextContent) content).text()));
    }
}
कोड लागू करना
mvn compile exec:java -Dexec.mainClass=com.example.CollaborativeResearch
जनरेट की गई रिपोर्ट का आउटपुट
Deep Research एजेंट, पूरी जानकारी वाली व्यवस्थित रिपोर्ट तैयार करेगा. उदाहरण के तौर पर चलाए गए टेस्ट से जनरेट हुई पूरी रिपोर्ट यहां देखी जा सकती है:
जनरेट की गई Deep Research रिपोर्ट (tpu_history_report.md) देखें
8. कस्टम एजेंट और क्लाउड सैंडबॉक्स
डेवलपर के मुश्किल टास्क के लिए, कस्टम एजेंट उपलब्ध कराए जा सकते हैं. आपको सिस्टम के लिए निर्देश तय करने होते हैं. साथ ही, उन्हें टूल (जैसे कि कोड एक्ज़ीक्यूशन/बैश) उपलब्ध कराने होते हैं. इसके अलावा, आपको उनके रिमोट एनवायरमेंट (जैसे कि नेटवर्क से बाहर निकलने के नियम) को कॉन्फ़िगर करना होता है.
इस चरण में, आपको एक ऐसा एजेंट उपलब्ध कराना होगा जिसके पास github.com का सुरक्षित इंटरनेट ऐक्सेस हो. साथ ही, उसे किसी रिपॉज़िटरी को क्लोन करने और उसके क्लाउड सैंडबॉक्स में मौजूद कॉन्फ़िगरेशन फ़ाइलों का विश्लेषण करने के लिए निर्देश देना होगा.
GitHubAnalyzer.java बनाएं
यहां दिए गए कॉन्टेंट के साथ src/main/java/com/example/GitHubAnalyzer.java फ़ाइल बनाएं:
package com.example;

import io.github.glaforge.gemini.interactions.GeminiInteractionsClient;
import io.github.glaforge.gemini.interactions.model.*;
import io.github.glaforge.gemini.interactions.model.InteractionParams.AgentInteractionParams;
import java.util.List;

public class GitHubAnalyzer {
    public static void main(String[] args) throws Exception {
        GeminiInteractionsClient client = GeminiInteractionsClient.builder()
            .apiKey(System.getenv("GEMINI_API_KEY"))
            .build();

        String agentId = "github-analyzer-codelab";

        // 1. Define the Custom Agent with Network Egress and Tools
        Agent customAgent = Agent.builder()
            .id(agentId)
            .description("Clones and analyzes GitHub repos.")
            .baseAgent("antigravity-preview-05-2026")
            .baseEnvironment(new EnvironmentConfig(
                new EnvironmentNetworkEgressAllowlist(List.of(
                    new AllowlistEntry("github.com") // Allow git clone over HTTPS
                )),
                List.of()
            ))
            .systemInstruction("You are an architect. Clone the repo, inspect files, and write a summary.")
            .tools(List.of(
                new AgentTool.CodeExecution(), // Enables terminal bash execution in sandbox
                new AgentTool.GoogleSearch()
            ))
            .build();

        // 2. Provision the Agent
        System.out.println("Provisioning custom agent in the cloud...");
        client.createAgent(customAgent);

        try {
            // 3. Start the Interaction
            AgentInteractionParams params = AgentInteractionParams.builder()
                .agent(agentId)
                .input("Clone https://github.com/glaforge/gemini-interactions-api-sdk and explain its pom.xml structure.")
                .environment("remote") // Crucial: Run in cloud sandbox
                .build();

            System.out.println("Starting clone and analysis (polling status)...");
            Interaction interaction = client.create(params);

            // 4. Poll for completion
            while (interaction.status() != Interaction.Status.COMPLETED) {
                System.out.println("Agent working... Status: " + interaction.status());
                Thread.sleep(5000);
                interaction = client.get(interaction.id());
            }

            // 5. Output the results
            System.out.println("\n--- Architectural Analysis ---");
            interaction.steps().stream()
                .filter(step -> step instanceof Step.ModelOutputStep)
                .flatMap(step -> ((Step.ModelOutputStep) step).content().stream())
                .filter(content -> content instanceof Content.TextContent)
                .forEach(content -> System.out.println(((Content.TextContent) content).text()));

        } finally {
            // 6. Clean up resources
            client.deleteAgent(agentId);
            System.out.println("\nCustom agent resource deleted from cloud.");
        }
    }
}
कोड लागू करना
mvn compile exec:java -Dexec.mainClass=com.example.GitHubAnalyzer
जनरेट किया गया विश्लेषण का आउटपुट
यहां रिपॉज़िटरी को क्लोन करने के बाद, कस्टम एजेंट की बनाई गई आर्किटेक्चरल एनालिसिस रिपोर्ट देखी जा सकती है:
9. बधाई हो!
आपने कोडलैब पूरा कर लिया है. साथ ही, Gemini Interactions SDK का इस्तेमाल करके, Java में कॉम्प्लेक्स, मल्टी-मॉडल, और एजेंटिक वर्कफ़्लो बनाने का तरीका जान लिया है.
आपने क्या-क्या हासिल किया:
- स्टेप आर्किटेक्चर पर नेविगेट किया गया: स्टैंडर्ड मॉडल को क्वेरी करने के लिए, नए पॉलीमॉर्फ़िक स्टेप आर्किटेक्चर का इस्तेमाल किया गया.
- स्ट्रीम किया गया एक्सप्रेसिव टीटीएस: रीयल-टाइम में ऑडियो स्ट्रीम करने के लिए, डायरेक्टर के नोट और इनलाइन इमोशनल टैग का इस्तेमाल किया गया.
- जनरेट किया गया संगीत: Lyria 3 की मदद से जनरेट किए गए MP3 ट्रैक और बोल.
- जनरेट किए गए स्केचनोट: Gemini 3 Pro Image (Nano Banana Pro) का इस्तेमाल करके, विज़ुअल समरी बनाई गई हैं.
- Steered Deep Research: रिसर्च प्लान को बेहतर बनाने के लिए, Collaborative Planning का इस्तेमाल किया गया.
- कस्टम एजेंट उपलब्ध कराए गए: कोड को सुरक्षित तरीके से लागू करने के लिए, कस्टम नेटवर्क इग्रेस कंट्रोल के साथ सैंडबॉक्स वाले एनवायरमेंट बनाए गए.
ज़्यादा जानें:
- GitHub पर, एसडीके के सोर्स कोड और अन्य टेस्ट केस एक्सप्लोर करें: glaforge/gemini-interactions-api-sdk
- Guillaume के ब्लॉग पर, एजेंटिक डिज़ाइन पैटर्न के बारे में ज़्यादा पढ़ें: glaforge.dev