
1. Gemini デベロッパーの皆様へ
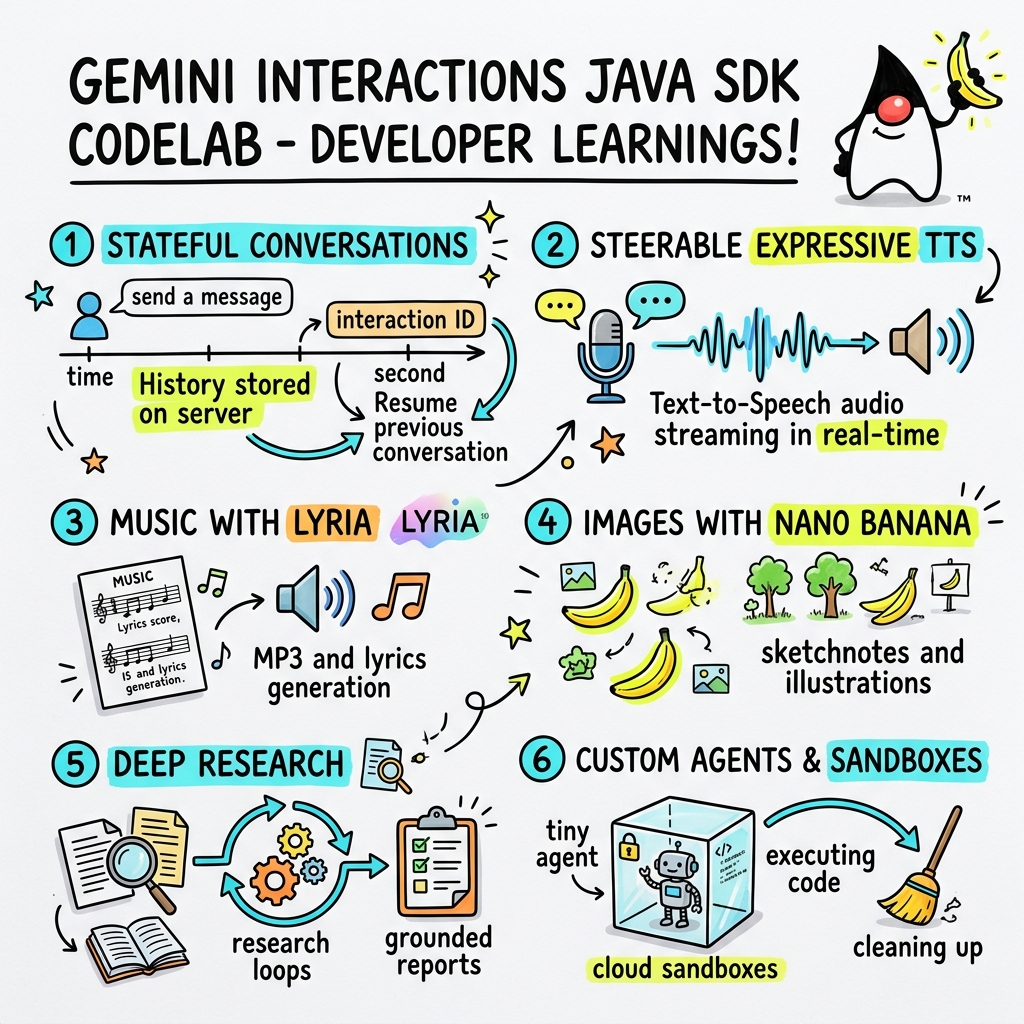
この Codelab では、カスタムの Gemini Interactions SDK を使用して、次世代の AI アプリケーションを Java で構築する方法を学びます。
Gemini Interactions API とは
従来の LLM API はステートレスで、リクエストとレスポンスによって駆動されます。複数ターンのチャット アシスタントや複雑なエージェント ループを構築する場合、デベロッパーはこれまで、会話の状態、履歴の切り捨て、ツール呼び出しのオーケストレーション、実行ループをクライアントサイドのアプリケーション コードで完全に管理する必要がありました。
Gemini Interactions API は、この複雑さをサーバーに移行します。これは、Google のインフラストラクチャが会話グラフをホストして管理する、ステートフルなセッションベースの API です。単一のインタラクション は、ステートフルなセッションを表します。操作すると、API は、次のようなポリモーフィックな ステップ で構成される、リッチで構造化されたタイムラインを返します。
ThoughtStep: モデルの内部推論プロセス。ModelOutputStep: モデルによって生成されたテキスト、音声、画像コンテンツ。ToolCallStepとToolResultStep: システムまたはモデルによって開始されたツールの呼び出し。UserInteractionStep: システムが一時停止して、人間の入力または承認をリクエストするポイント。
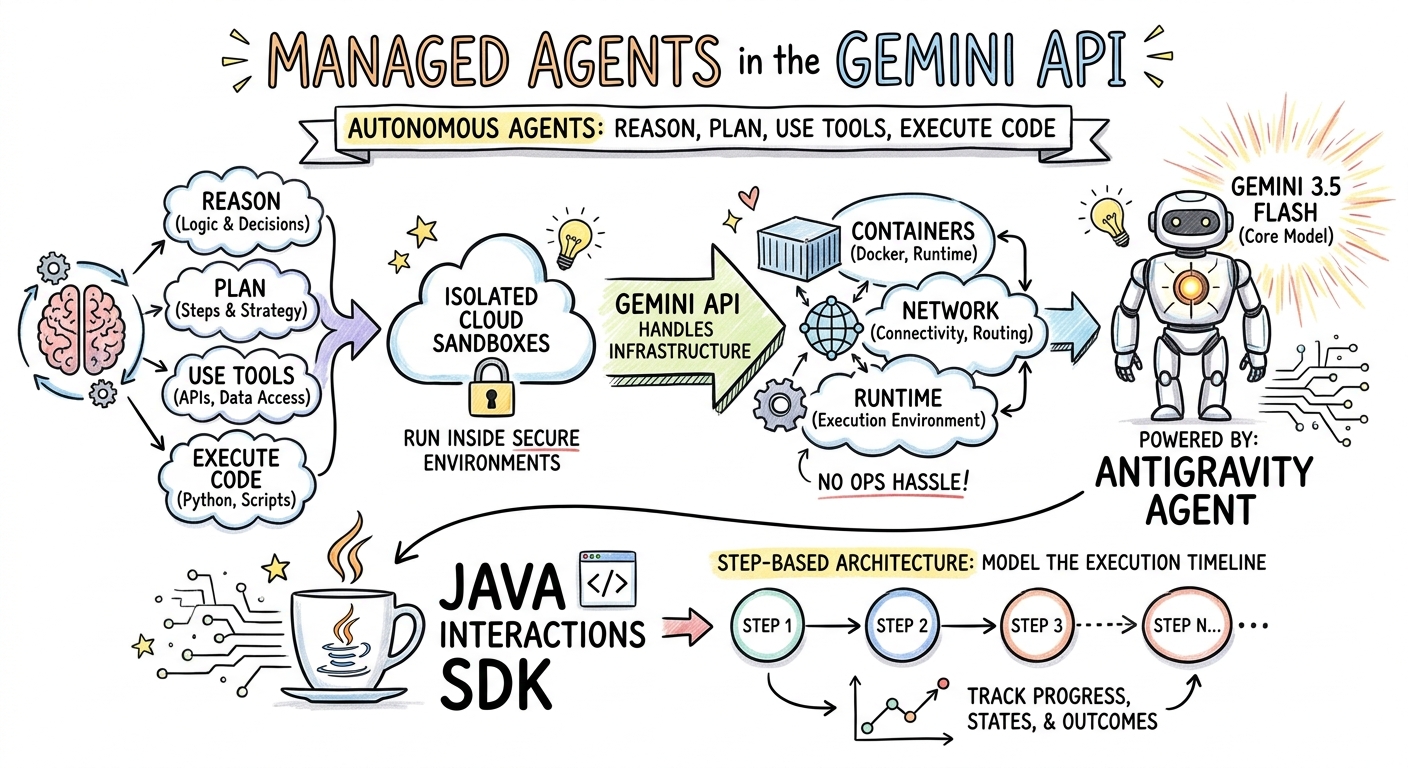
Managed Agents とは
自律型エージェントのオーケストレーション(ループ、再試行ロジック、ツール実行環境、状態管理の処理)は非常に困難です。
Managed Agents は、Gemini Interactions API によって提供されるプラットフォーム レベルのソリューションです。エージェント ループをローカルで実行する代わりに、Google のインフラストラクチャに特殊なエージェントを直接プロビジョニングできます。
- 組み込みエージェント: すぐに使用できる特殊なエージェント。たとえば、Deep Research エージェントは、複数ステップのウェブ検索を実行し、結果を集計して包括的なレポートを生成します。
- カスタム Managed Agents: ユーザーが定義する自律型エンティティ。システム手順を指定し、ツール(Google 検索や Bash 実行環境など)を接続して、Cloud Sandbox を構成します。これは、カスタマイズ可能なネットワーク エグレスルール(GitHub などの特定のドメインへのアクセスのみを許可するなど)を備えた、安全で隔離されたコンテナ化されたランタイム環境です。
Gemini Interactions Java SDK を使用すると、標準の Java アプリケーションでこれらの Managed Agents を簡単にブートストラップ、調整、連携できます。
学習内容
- 新しいポリモーフィックな
Stepベースのアーキテクチャを操作する方法。 - 表現力豊かな TTS 音声をスピーカーに直接ストリーミングする方法。
- Lyria で音楽(MP3 + 歌詞)を生成する方法。
- Gemini 3 Pro Image でビジュアル スケッチノートを生成する方法。
- Collaborative Planning を使用して Deep Research エージェントを操作する方法。
- ネットワーク エグレスルールとツールを使用してカスタム エージェントをプロビジョニングする方法。
必要なもの
- Java 21 以降。
- Apache Maven。
- テキスト エディタまたは IDE(IntelliJ IDEA、VS Code など)。
- Gemini API キー(Google AI Studio から)。
2. 設定: プロジェクトと API キー
Maven プロジェクトを作成する
次のコマンドを使用して、ターミナルから新しい Maven プロジェクトをブートストラップします。
mvn archetype:generate \
    -DgroupId=com.example \
    -DartifactId=gemini-interactions-demo \
    -DarchetypeGroupId=org.apache.maven.archetypes \
    -DarchetypeArtifactId=maven-archetype-quickstart \
    -DarchetypeVersion=1.5 \
    -DinteractiveMode=false
新しく作成したプロジェクト ディレクトリに移動します。
cd gemini-interactions-demo
pom.xml ファイルを開いて構成します。
- Java バージョンのプロパティを更新して、Java 21 をターゲットにします。
<properties> <maven.compiler.source>21</maven.compiler.source> <maven.compiler.target>21</maven.compiler.target> </properties> <dependency> <groupId>io.github.glaforge</groupId> <artifactId>gemini-interactions-api-sdk</artifactId> <version>0.10.1</version> </dependency>
API キーを構成する
Google AI Studio から Gemini API キーを取得します。
ターミナルでキーを環境変数として設定します。
macOS / Linux:
export GEMINI_API_KEY="your_actual_api_key"
Windows(コマンド プロンプト):
set GEMINI_API_KEY="your_actual_api_key"
3. Hello World: ステップ アーキテクチャの操作
Interactions API には、ポリモーフィックなステップベースのタイムライン アーキテクチャが導入されました。API は、出力のフラットなリストを返すのではなく、型付きの Step オブジェクト(ModelOutputStep、ThoughtStep、FunctionCallStep など)のシーケンスを返します。
このステップでは、簡単なインタラクションを作成して、この構造から最終的なモデル出力を抽出する方法を理解します。
HelloInteractions.java を作成する
次の内容でファイル src/main/java/com/example/HelloInteractions.java を作成します。
package com.example;

import io.github.glaforge.gemini.interactions.GeminiInteractionsClient;
import io.github.glaforge.gemini.interactions.model.*;
import io.github.glaforge.gemini.interactions.model.InteractionParams.ModelInteractionParams;

public class HelloInteractions {
    public static void main(String[] args) {
        // 1. Initialize the client
        GeminiInteractionsClient client = GeminiInteractionsClient.builder()
            .apiKey(System.getenv("GEMINI_API_KEY"))
            .build();

        // 2. Build the request
        ModelInteractionParams request = ModelInteractionParams.builder()
            .model("gemini-3.5-flash")
            .input("Explain the difference between a library and a framework in one sentence.")
            .build();

        // 3. Send request
        Interaction response = client.create(request);

        // 4. Navigate the step-based architecture to get the output
        response.steps().stream()
            .filter(step -> step instanceof Step.ModelOutputStep)
            .map(step -> (Step.ModelOutputStep) step)
            .findFirst()
            .ifPresent(step -> System.out.println(step.content().get(0)));
    }
}
コードの実行
クラスをコンパイルして実行します。
mvn compile exec:java -Dexec.mainClass=com.example.HelloInteractions
4. 操作可能な音声: 表現力豊かな TTS のストリーミング
Gemini 3.1 Flash には、操作可能なテキスト読み上げ(TTS)が導入されています。プロンプトを使用して音声のペース、トーン、環境を制御し、文の途中で感情タグ([excitedly] や [whispers] など)を使用できます。
このステップでは、表現力豊かな音声を生成し、スピーカーに直接ストリーミングします。
StreamingDJ.java を作成する
次の内容でファイル src/main/java/com/example/StreamingDJ.java を作成します。
package com.example;

import io.github.glaforge.gemini.interactions.GeminiInteractionsClient;
import io.github.glaforge.gemini.interactions.model.*;
import io.github.glaforge.gemini.interactions.model.Config.SpeechConfig;
import io.github.glaforge.gemini.interactions.model.InteractionParams.ModelInteractionParams;
import javax.sound.sampled.*;
import java.util.Base64;
import java.util.stream.Stream;

public class StreamingDJ {
    public static void main(String[] args) throws Exception {
        GeminiInteractionsClient client = GeminiInteractionsClient.builder()
            .apiKey(System.getenv("GEMINI_API_KEY"))
            .build();

        // Prompt defining the voice profile and emotional tags
        String prompt = """
            # AUDIO PROFILE: Jaz R.
            ## THE SCENE: London Studio
            ### DIRECTOR'S NOTES
            Accent: Jaz is a DJ from Brixton, London.
            Style: Bouncy, energetic, high-speed delivery.

            #### TRANSCRIPT
            [excitedly] Yes, massive vibes in the studio!
            [whispers] But keep it down, the boss is coming...
            [shouting] Turn this up! Let's go!
            """;

        ModelInteractionParams request = ModelInteractionParams.builder()
            .model("gemini-3.1-flash-tts-preview")
            .input(prompt)
            .responseModalities(Interaction.Modality.AUDIO)
            .speechConfig(new SpeechConfig("Algenib", "en-GB"))
            .stream(true) // Enable streaming
            .build();

        System.out.println("Streaming audio from Gemini...");

        try (Stream<Events> eventStream = client.stream(request)) {
            // Configure the Java Audio System for 24kHz Mono 16-bit PCM
            AudioFormat format = new AudioFormat(24000, 16, 1, true, false);
            DataLine.Info info = new DataLine.Info(SourceDataLine.class, format);

            try (SourceDataLine line = (SourceDataLine) AudioSystem.getLine(info)) {
                line.open(format);
                line.start();

                // Process the stream and play audio chunks as they arrive
                eventStream.forEach(event -> {
                    if (event instanceof Events.StepDelta cd && cd.delta() instanceof Events.AudioDelta audioDelta) {
                        byte[] audioData = Base64.getDecoder().decode(audioDelta.data());
                        line.write(audioData, 0, audioData.length);
                    }
                });
                line.drain();
            }
        }
    }
}
コードの実行
mvn compile exec:java -Dexec.mainClass=com.example.StreamingDJ
出力を聴く
コードを実行したときに聞こえる音声の例を次に示します(感情タグ付きの Algenib 音声を使用)。
5. Lyria 3 による音楽生成
DeepMind Lyria 3 モデルを使用すると、音楽やジングルを生成できます。デュアル レスポンス モダリティ(AUDIO と TEXT)をリクエストすると、生成された音声(MP3)と歌詞の両方を取得できます。
MusicGenerator.java を作成する
次の内容でファイル src/main/java/com/example/MusicGenerator.java を作成します。
package com.example;

import io.github.glaforge.gemini.interactions.GeminiInteractionsClient;
import io.github.glaforge.gemini.interactions.model.*;
import io.github.glaforge.gemini.interactions.model.InteractionParams.ModelInteractionParams;
import io.github.glaforge.gemini.interactions.model.Content.AudioContent;
import java.nio.file.Files;
import java.nio.file.Paths;

public class MusicGenerator {
    public static void main(String[] args) throws Exception {
        GeminiInteractionsClient client = GeminiInteractionsClient.builder()
            .apiKey(System.getenv("GEMINI_API_KEY"))
            .build();

        ModelInteractionParams request = ModelInteractionParams.builder()
            .model("models/lyria-3-clip-preview") // 30-second clip
            .input("An uplifting rock song with acoustic guitars about coding in Java.")
            .responseModalities(
                Interaction.Modality.AUDIO,
                Interaction.Modality.TEXT) // Request both MP3 and Lyrics
            .build();

        System.out.println("Generating music (this might take a moment)...");
        Interaction response = client.create(request);

        // 1. Print the lyrics (TEXT output)
        System.out.println("\n--- Generated Lyrics ---");
        response.steps().stream()
            .filter(step -> step instanceof Step.ModelOutputStep)
            .flatMap(step -> ((Step.ModelOutputStep) step).content().stream())
            .filter(content -> content instanceof Content.TextContent)
            .forEach(content -> System.out.println(((Content.TextContent) content).text()));

        // 2. Save the MP3 (AUDIO output)
        response.steps().stream()
            .filter(step -> step instanceof Step.ModelOutputStep)
            .flatMap(step -> ((Step.ModelOutputStep) step).content().stream())
            .filter(content -> content instanceof AudioContent)
            .map(content -> (AudioContent) content)
            .findFirst()
            .ifPresent(audio -> {
                try {
                    Files.write(Paths.get("coding_song.mp3"), audio.data());
                    System.out.println("\nSuccess: Song saved to coding_song.mp3");
                } catch (Exception e) {
                    e.printStackTrace();
                }
            });
    }
}
コードの実行
mvn compile exec:java -Dexec.mainClass=com.example.MusicGenerator
生成された曲を聴く
音楽と歌詞を含む生成された MP3 ファイル(coding_song.mp3)を次に示します。
6. スケッチノート(Nano Banana Pro)でビジュアル化する
Gemini 3 Pro Image(Nano Banana Pro とも呼ばれます)は画像を生成できます。IMAGE モダリティをリクエストすると、テキスト入力に基づいてインフォグラフィック、図、スケッチノートを生成できます。
このステップでは、Managed Agents に関する記事のスケッチノートの要約を生成し、PNG ファイルとして保存します。
ImageGenerator.java を作成する
次の内容でファイル src/main/java/com/example/ImageGenerator.java を作成します。
package com.example;

import io.github.glaforge.gemini.interactions.GeminiInteractionsClient;
import io.github.glaforge.gemini.interactions.model.*;
import io.github.glaforge.gemini.interactions.model.InteractionParams.ModelInteractionParams;
import io.github.glaforge.gemini.interactions.model.Content.ImageContent;
import java.nio.file.Files;
import java.nio.file.Paths;

public class ImageGenerator {
    public static void main(String[] args) throws Exception {
        GeminiInteractionsClient client = GeminiInteractionsClient.builder()
            .apiKey(System.getenv("GEMINI_API_KEY"))
            .build();

        String articleSummary = """
            Managed Agents in the Gemini API allow developers to run autonomous agents
            that reason, plan, use tools, and execute code inside isolated cloud sandboxes.
            The Gemini API handles the infrastructure (containers, network, runtime).
            It is powered by the Antigravity agent running on Gemini 3.5 Flash.
            The Java Interactions SDK supports these capabilities, utilizing a Step-based
            architecture to model the execution timeline.
            """;

        ModelInteractionParams request = ModelInteractionParams.builder()
            .model("gemini-3-pro-image-preview")
            .input(String.format("""
                Create a hand-drawn and hand-written sketchnote
                style summary infographic, with a pure white background,
                about the following information:

                %s
                """, articleSummary))
            .responseModalities(Interaction.Modality.IMAGE) // Request IMAGE modality
            .build();

        System.out.println("Generating sketchnote (this might take a moment)...");
        Interaction response = client.create(request);

        // Save the generated image
        response.steps().stream()
            .filter(step -> step instanceof Step.ModelOutputStep)
            .flatMap(step -> ((Step.ModelOutputStep) step).content().stream())
            .filter(content -> content instanceof ImageContent)
            .map(content -> (ImageContent) content)
            .findFirst()
            .ifPresent(image -> {
                try {
                    Files.write(Paths.get("sketchnote.png"), image.data());
                    System.out.println("Success: Sketchnote saved to sketchnote.png");
                } catch (Exception e) {
                    e.printStackTrace();
                }
            });
    }
}
コードの実行
mvn compile exec:java -Dexec.mainClass=com.example.ImageGenerator
生成されたスケッチノート
モデルによって作成された生成されたスケッチノート(sketchnote.png)を次に示します。
7. エージェントの操作: Collaborative Deep Research
Deep Research は、複数ステップのリサーチ タスクを実行できる強力なエージェントです。ただし、すぐに実行するのではなく、Collaborative Planning を使用して、エージェントがデータの収集を開始する前にリサーチプランを確認、変更、操作できます。
同じサーバーサイドの状態(previousInteractionId)を使用してプランを絞り込む、複数ターンの会話を実装します。
CollaborativeResearch.java を作成する
次の内容でファイル src/main/java/com/example/CollaborativeResearch.java を作成します。
package com.example;

import io.github.glaforge.gemini.interactions.GeminiInteractionsClient;
import io.github.glaforge.gemini.interactions.model.*;
import io.github.glaforge.gemini.interactions.model.InteractionParams.AgentInteractionParams;
import io.github.glaforge.gemini.interactions.model.Config.DeepResearchAgentConfig;
import io.github.glaforge.gemini.interactions.model.Config.ThinkingSummaries;
import io.github.glaforge.gemini.interactions.model.Config.Visualization;

public class CollaborativeResearch {
    public static void main(String[] args) throws Exception {
        GeminiInteractionsClient client = GeminiInteractionsClient.builder()
            .apiKey(System.getenv("GEMINI_API_KEY"))
            .build();

        String agentModel = "deep-research-preview-04-2026";

        // --- Phase 1: Request a Plan ---
        System.out.println("Phase 1: Requesting research plan...");
        AgentInteractionParams planParams = AgentInteractionParams.builder()
            .agent(agentModel)
            .input("Research the latest generations of Google Cloud TPUs (TPU7x and the 8th generation TPU 8t and TPU 8i).")
            .agentConfig(new DeepResearchAgentConfig(
                "deep-research",
                ThinkingSummaries.AUTO,
                Visualization.AUTO,
                true // TRUE enables collaborative planning
            ))
            .background(true)
            .store(true)
            .build();

        Interaction planInteraction = client.create(planParams);
        planInteraction = waitForCompletion(client, planInteraction.id());

        System.out.println("\n--- Proposed Plan ---");
        printOutputText(planInteraction);

        // --- Phase 2: Refine the Plan ---
        System.out.println("\nPhase 2: Refining research plan...");
        AgentInteractionParams refineParams = AgentInteractionParams.builder()
            .agent(agentModel)
            .input("Focus on comparing the architectural, performance, and scaling differences between the TPU7x generation and the two flavors of the eighth generation: TPU 8t (optimized for training at scale) and TPU 8i (optimized for low-latency reasoning and inference).")
            .agentConfig(new DeepResearchAgentConfig(
                "deep-research",
                ThinkingSummaries.AUTO,
                Visualization.AUTO,
                true // Keep collaborative planning TRUE to iterate
            ))
            .previousInteractionId(planInteraction.id()) // Resume session
            .background(true)
            .store(true)
            .build();

        Interaction refinedInteraction = client.create(refineParams);
        refinedInteraction = waitForCompletion(client, refinedInteraction.id());

        System.out.println("\n--- Refined Plan ---");
        printOutputText(refinedInteraction);

        // --- Phase 3: Approve and Execute ---
        System.out.println("\nPhase 3: Approving plan and starting deep research (this will take a few minutes)...");
        AgentInteractionParams executeParams = AgentInteractionParams.builder()
            .agent(agentModel)
            .input("Plan looks good, execute!")
            .agentConfig(new DeepResearchAgentConfig(
                "deep-research",
                ThinkingSummaries.AUTO,
                Visualization.AUTO,
                false // FALSE approves the plan and executes the research
            ))
            .previousInteractionId(refinedInteraction.id()) // Resume session
            .background(true)
            .store(true)
            .build();

        Interaction finalReport = client.create(executeParams);
        finalReport = waitForCompletion(client, finalReport.id());

        System.out.println("\n--- Final Research Report ---");
        printOutputText(finalReport);
    }

    private static Interaction waitForCompletion(GeminiInteractionsClient client, String id) throws Exception {
        Interaction interaction = client.get(id);
        while (interaction.status() != Interaction.Status.COMPLETED && interaction.status() != Interaction.Status.FAILED) {
            Thread.sleep(5000);
            interaction = client.get(id);
        }
        if (interaction.status() == Interaction.Status.FAILED) {
            throw new RuntimeException("Interaction failed. Status: " + interaction.status());
        }
        return interaction;
    }

    private static void printOutputText(Interaction interaction) {
        interaction.steps().stream()
            .filter(step -> step instanceof Step.ModelOutputStep)
            .flatMap(step -> ((Step.ModelOutputStep) step).content().stream())
            .filter(content -> content instanceof Content.TextContent)
            .forEach(content -> System.out.println(((Content.TextContent) content).text()));
    }
}
コードの実行
mvn compile exec:java -Dexec.mainClass=com.example.CollaborativeResearch
生成されたレポート出力
Deep Research エージェントは、包括的で構造化されたレポートを生成します。実行例で生成されたレポートの全文は、こちらで確認できます。
8. カスタム エージェントと Cloud Sandbox
複雑なデベロッパー タスクの場合は、カスタム エージェント をプロビジョニングできます。システム手順を定義し、ツール(コード実行/Bash など)を装備して、リモート環境(ネットワーク エグレスルールなど)を構成します。
このステップでは、github.com への安全なインターネット アクセス権を持つエージェントをプロビジョニングし、リポジトリをクローンして、クラウド サンドボックス内の構成ファイルを分析するように指示します。
GitHubAnalyzer.java を作成する
次の内容でファイル src/main/java/com/example/GitHubAnalyzer.java を作成します。
package com.example;

import io.github.glaforge.gemini.interactions.GeminiInteractionsClient;
import io.github.glaforge.gemini.interactions.model.*;
import io.github.glaforge.gemini.interactions.model.InteractionParams.AgentInteractionParams;
import java.util.List;

public class GitHubAnalyzer {
    public static void main(String[] args) throws Exception {
        GeminiInteractionsClient client = GeminiInteractionsClient.builder()
            .apiKey(System.getenv("GEMINI_API_KEY"))
            .build();

        String agentId = "github-analyzer-codelab";

        // 1. Define the Custom Agent with Network Egress and Tools
        Agent customAgent = Agent.builder()
            .id(agentId)
            .description("Clones and analyzes GitHub repos.")
            .baseAgent("antigravity-preview-05-2026")
            .baseEnvironment(new EnvironmentConfig(
                new EnvironmentNetworkEgressAllowlist(List.of(
                    new AllowlistEntry("github.com") // Allow git clone over HTTPS
                )),
                List.of()
            ))
            .systemInstruction("You are an architect. Clone the repo, inspect files, and write a summary.")
            .tools(List.of(
                new AgentTool.CodeExecution(), // Enables terminal bash execution in sandbox
                new AgentTool.GoogleSearch()
            ))
            .build();

        // 2. Provision the Agent
        System.out.println("Provisioning custom agent in the cloud...");
        client.createAgent(customAgent);

        try {
            // 3. Start the Interaction
            AgentInteractionParams params = AgentInteractionParams.builder()
                .agent(agentId)
                .input("Clone https://github.com/glaforge/gemini-interactions-api-sdk and explain its pom.xml structure.")
                .environment("remote") // Crucial: Run in cloud sandbox
                .build();

            System.out.println("Starting clone and analysis (polling status)...");
            Interaction interaction = client.create(params);

            // 4. Poll for completion
            while (interaction.status() != Interaction.Status.COMPLETED) {
                System.out.println("Agent working... Status: " + interaction.status());
                Thread.sleep(5000);
                interaction = client.get(interaction.id());
            }

            // 5. Output the results
            System.out.println("\n--- Architectural Analysis ---");
            interaction.steps().stream()
                .filter(step -> step instanceof Step.ModelOutputStep)
                .flatMap(step -> ((Step.ModelOutputStep) step).content().stream())
                .filter(content -> content instanceof Content.TextContent)
                .forEach(content -> System.out.println(((Content.TextContent) content).text()));

        } finally {
            // 6. Clean up resources
            client.deleteAgent(agentId);
            System.out.println("\nCustom agent resource deleted from cloud.");
        }
    }
}
コードの実行
mvn compile exec:java -Dexec.mainClass=com.example.GitHubAnalyzer
生成された分析出力
リポジトリのクローン作成後にカスタム エージェントによって生成されたアーキテクチャ分析レポートの全文は、こちらで確認できます。
9. 完了
この Codelab は終了です。Gemini Interactions SDK を使用して、複雑なマルチモーダル エージェント ワークフローを Java で構築する方法を学習しました。
達成したこと:
- ステップ アーキテクチャの操作: 新しいポリモーフィックなステップ アーキテクチャを使用して標準モデルをクエリしました。
- 表現力豊かな TTS のストリーミング: Director's Notes とインラインの感情タグを使用して、音声をリアルタイムでストリーミングしました。
- 音楽の生成: Lyria 3 で MP3 トラックと歌詞を生成しました。
- スケッチノートの生成: Gemini 3 Pro Image(Nano Banana Pro)を使用してビジュアル サマリーを作成しました。
- Deep Research の操作: Collaborative Planning を活用してリサーチプランを絞り込みました。
- カスタム エージェントのプロビジョニング: カスタム ネットワーク エグレス制御を備えたサンドボックス環境を作成して、コードを安全に実行しました。
詳細:
- GitHub で SDK のソースコードとその他のテストケースを確認する: glaforge/gemini-interactions-api-sdk
- Guillaume のブログでエージェント デザイン パターンの詳細を確認する: glaforge.dev