
1. Gemini 개발자 여러분, 환영합니다.
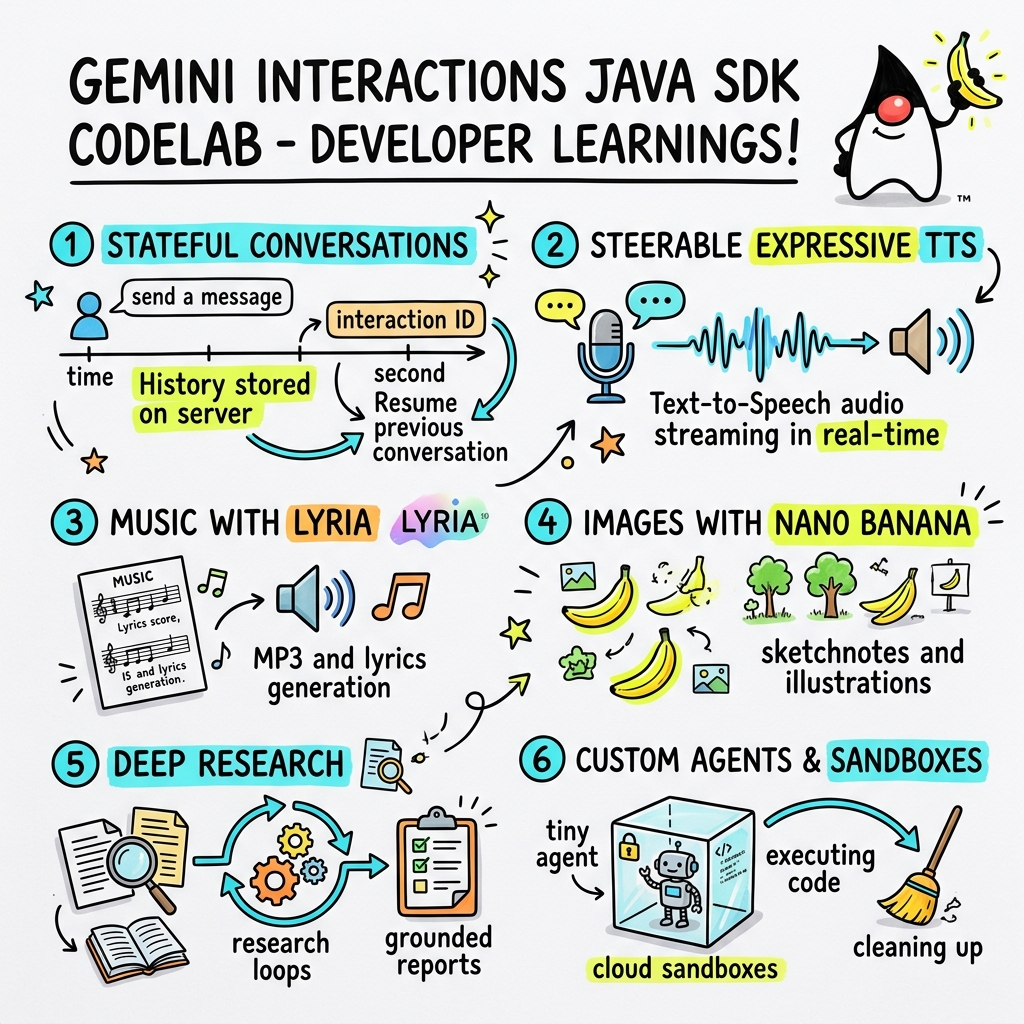
이 Codelab에서는 맞춤 Gemini Interactions SDK 를 사용하여 Java에서 차세대 AI 애플리케이션을 빌드하는 방법을 알아봅니다.
Gemini Interactions API란 무엇인가요?
기존 LLM API는 상태 비저장이며 요청-응답 기반입니다. 멀티턴 채팅 어시스턴트 또는 복잡한 에이전트형 루프를 빌드하기 위해 개발자는 이전부터 클라이언트 측 애플리케이션 코드에서 대화 상태, 기록 자르기, 도구 호출 조정, 실행 루프를 완전히 관리해야 했습니다.
Gemini Interactions API 는 이러한 복잡성을 서버로 이동합니다. Google의 인프라가 대화 그래프를 호스팅하고 관리하는 상태 저장 세션 기반 API입니다. 단일 상호작용 은 상태 저장 세션을 나타냅니다. 상호작용하면 API는 다음과 같은 다형성 단계로 구성된 풍부한 구조화된 타임라인을 반환합니다.
ThoughtStep: 모델의 내부 추론 프로세스입니다.ModelOutputStep: 모델에서 생성한 텍스트, 오디오 또는 이미지 콘텐츠입니다.ToolCallStep및ToolResultStep: 시스템 또는 모델에서 시작한 도구 호출입니다.UserInteractionStep: 시스템이 일시중지하여 사용자 입력 또는 승인을 요청하는 지점입니다.
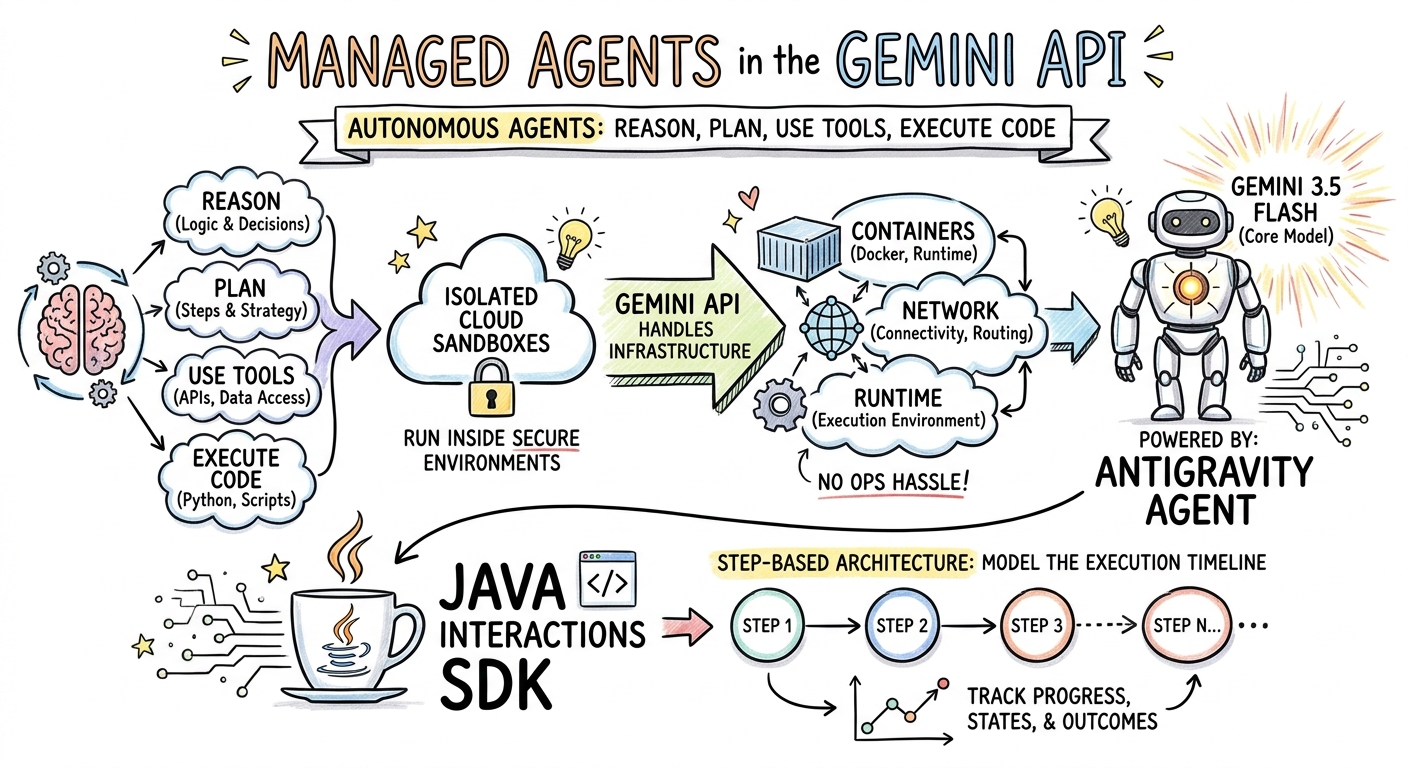
관리형 에이전트란 무엇인가요?
자율 에이전트 오케스트레이션(루프 처리, 재시도 로직, 도구 실행 환경, 상태 관리)은 매우 어렵습니다.
관리형 에이전트 는 Gemini Interactions API에서 제공하는 플랫폼 수준 솔루션입니다. 에이전트 루프를 로컬에서 실행하는 대신 Google의 인프라에서 직접 전문 에이전트를 프로비저닝할 수 있습니다.
- 기본 제공 에이전트: 다단계 웹 리서치를 실행하고, 결과를 집계하고, 포괄적인 보고서를 생성하는 Deep Research 에이전트와 같은 즉시 사용 가능한 전문 에이전트입니다.
- 맞춤 관리형 에이전트: 사용자가 정의하는 자율 항목입니다. 시스템 안내를 제공하고, 도구 (예: Google 검색 또는 Bash 실행 환경)를 연결하고, 맞춤설정 가능한 네트워크 이그레스 규칙 (예: GitHub와 같은 특정 도메인에만 액세스 허용)이 있는 안전하고 격리된 컨테이너화된 런타임 환경인 Cloud Sandbox를 구성합니다.
Gemini Interactions Java SDK를 사용하면 표준 Java 애플리케이션에서 이러한 관리형 에이전트를 쉽게 부트스트랩하고, 조정하고, 공동작업할 수 있습니다.
학습할 내용
- 새로운 다형성
Step기반 아키텍처를 탐색하는 방법 - 표현력이 풍부한 TTS 오디오를 스피커로 직접 스트리밍하는 방법
- Lyria로 음악 (MP3 + 가사)을 생성하는 방법
- Gemini 3 Pro Image로 시각적 스케치노트를 생성하는 방법
- Collaborative Planning을 사용하여 Deep Research 에이전트를 조종하는 방법
- 네트워크 이그레스 규칙 및 도구를 사용하여 맞춤 에이전트를 프로비저닝하는 방법
필요한 항목
- Java 21 이상
- Apache Maven
- 텍스트 편집기 또는 IDE (IntelliJ IDEA, VS Code 등)
- Gemini API 키 (Google AI Studio에서 가져옴)
2. 설정: 프로젝트 및 API 키
Maven 프로젝트 만들기
다음 명령어를 사용하여 터미널에서 새 Maven 프로젝트를 부트스트랩합니다.
mvn archetype:generate \
    -DgroupId=com.example \
    -DartifactId=gemini-interactions-demo \
    -DarchetypeGroupId=org.apache.maven.archetypes \
    -DarchetypeArtifactId=maven-archetype-quickstart \
    -DarchetypeVersion=1.5 \
    -DinteractiveMode=false
새로 만든 프로젝트 디렉터리로 이동합니다.
cd gemini-interactions-demo
pom.xml 파일을 열고 구성합니다.
- Java 21을 타겟팅하도록 Java 버전 속성을 업데이트합니다.
<properties> <maven.compiler.source>21</maven.compiler.source> <maven.compiler.target>21</maven.compiler.target> </properties> <dependency> <groupId>io.github.glaforge</groupId> <artifactId>gemini-interactions-api-sdk</artifactId> <version>0.10.1</version> </dependency>
API 키 구성
Google AI Studio에서 Gemini API 키를 가져옵니다.
터미널에서 키를 환경 변수로 설정합니다.
macOS / Linux:
export GEMINI_API_KEY="your_actual_api_key"
Windows (명령 프롬프트):
set GEMINI_API_KEY="your_actual_api_key"
3. Hello World: 단계 아키텍처 탐색
Interactions API는 다형성 단계 기반 타임라인 아키텍처를 도입했습니다. API는 평면 출력 목록을 반환하는 대신 유형이 지정된 Step 객체 (예: ModelOutputStep, ThoughtStep, FunctionCallStep)의 시퀀스를 반환합니다.
이 단계에서는 간단한 상호작용을 작성하여 이 구조에서 최종 모델 출력을 추출하는 방법을 알아봅니다.
HelloInteractions.java 만들기
다음 콘텐츠로 src/main/java/com/example/HelloInteractions.java 파일을 만듭니다.
package com.example;

import io.github.glaforge.gemini.interactions.GeminiInteractionsClient;
import io.github.glaforge.gemini.interactions.model.*;
import io.github.glaforge.gemini.interactions.model.InteractionParams.ModelInteractionParams;

public class HelloInteractions {
    public static void main(String[] args) {
        // 1. Initialize the client
        GeminiInteractionsClient client = GeminiInteractionsClient.builder()
            .apiKey(System.getenv("GEMINI_API_KEY"))
            .build();

        // 2. Build the request
        ModelInteractionParams request = ModelInteractionParams.builder()
            .model("gemini-3.5-flash")
            .input("Explain the difference between a library and a framework in one sentence.")
            .build();

        // 3. Send request
        Interaction response = client.create(request);

        // 4. Navigate the step-based architecture to get the output
        response.steps().stream()
            .filter(step -> step instanceof Step.ModelOutputStep)
            .map(step -> (Step.ModelOutputStep) step)
            .findFirst()
            .ifPresent(step -> System.out.println(step.content().get(0)));
    }
}
코드 실행
클래스를 컴파일하고 실행합니다.
mvn compile exec:java -Dexec.mainClass=com.example.HelloInteractions
4. 조종 가능한 오디오: 표현력이 풍부한 TTS 스트리밍
Gemini 3.1 Flash는 조종 가능한 텍스트 음성 변환 (TTS)을 도입합니다. 프롬프트를 사용하여 음성의 속도, 톤, 환경을 제어하고 문장 중간에 감정 태그 (예: [excitedly] 또는 [whispers])를 사용할 수 있습니다.
이 단계에서는 표현력이 풍부한 오디오를 생성하고 스피커로 직접 스트리밍합니다.
StreamingDJ.java 만들기
다음 콘텐츠로 src/main/java/com/example/StreamingDJ.java 파일을 만듭니다.
package com.example;

import io.github.glaforge.gemini.interactions.GeminiInteractionsClient;
import io.github.glaforge.gemini.interactions.model.*;
import io.github.glaforge.gemini.interactions.model.Config.SpeechConfig;
import io.github.glaforge.gemini.interactions.model.InteractionParams.ModelInteractionParams;
import javax.sound.sampled.*;
import java.util.Base64;
import java.util.stream.Stream;

public class StreamingDJ {
    public static void main(String[] args) throws Exception {
        GeminiInteractionsClient client = GeminiInteractionsClient.builder()
            .apiKey(System.getenv("GEMINI_API_KEY"))
            .build();

        // Prompt defining the voice profile and emotional tags
        String prompt = """
            # AUDIO PROFILE: Jaz R.
            ## THE SCENE: London Studio
            ### DIRECTOR'S NOTES
            Accent: Jaz is a DJ from Brixton, London.
            Style: Bouncy, energetic, high-speed delivery.

            #### TRANSCRIPT
            [excitedly] Yes, massive vibes in the studio!
            [whispers] But keep it down, the boss is coming...
            [shouting] Turn this up! Let's go!
            """;

        ModelInteractionParams request = ModelInteractionParams.builder()
            .model("gemini-3.1-flash-tts-preview")
            .input(prompt)
            .responseModalities(Interaction.Modality.AUDIO)
            .speechConfig(new SpeechConfig("Algenib", "en-GB"))
            .stream(true) // Enable streaming
            .build();

        System.out.println("Streaming audio from Gemini...");

        try (Stream<Events> eventStream = client.stream(request)) {
            // Configure the Java Audio System for 24kHz Mono 16-bit PCM
            AudioFormat format = new AudioFormat(24000, 16, 1, true, false);
            DataLine.Info info = new DataLine.Info(SourceDataLine.class, format);

            try (SourceDataLine line = (SourceDataLine) AudioSystem.getLine(info)) {
                line.open(format);
                line.start();

                // Process the stream and play audio chunks as they arrive
                eventStream.forEach(event -> {
                    if (event instanceof Events.StepDelta cd && cd.delta() instanceof Events.AudioDelta audioDelta) {
                        byte[] audioData = Base64.getDecoder().decode(audioDelta.data());
                        line.write(audioData, 0, audioData.length);
                    }
                });
                line.drain();
            }
        }
    }
}
코드 실행
mvn compile exec:java -Dexec.mainClass=com.example.StreamingDJ
출력 듣기
다음은 감정 태그가 있는 Algenib 음성을 사용하여 코드를 실행할 때 들리는 오디오의 예입니다.
5. Lyria 3로 음악 생성
DeepMind Lyria 3 모델을 사용하면 음악과 징글을 생성할 수 있습니다. 이중 응답 모드 (AUDIO 및 TEXT)를 요청하면 생성된 오디오 (MP3)와 노래 가사를 모두 가져올 수 있습니다.
MusicGenerator.java 만들기
다음 콘텐츠로 src/main/java/com/example/MusicGenerator.java 파일을 만듭니다.
package com.example;

import io.github.glaforge.gemini.interactions.GeminiInteractionsClient;
import io.github.glaforge.gemini.interactions.model.*;
import io.github.glaforge.gemini.interactions.model.InteractionParams.ModelInteractionParams;
import io.github.glaforge.gemini.interactions.model.Content.AudioContent;
import java.nio.file.Files;
import java.nio.file.Paths;

public class MusicGenerator {
    public static void main(String[] args) throws Exception {
        GeminiInteractionsClient client = GeminiInteractionsClient.builder()
            .apiKey(System.getenv("GEMINI_API_KEY"))
            .build();

        ModelInteractionParams request = ModelInteractionParams.builder()
            .model("models/lyria-3-clip-preview") // 30-second clip
            .input("An uplifting rock song with acoustic guitars about coding in Java.")
            .responseModalities(
                Interaction.Modality.AUDIO,
                Interaction.Modality.TEXT) // Request both MP3 and Lyrics
            .build();

        System.out.println("Generating music (this might take a moment)...");
        Interaction response = client.create(request);

        // 1. Print the lyrics (TEXT output)
        System.out.println("\n--- Generated Lyrics ---");
        response.steps().stream()
            .filter(step -> step instanceof Step.ModelOutputStep)
            .flatMap(step -> ((Step.ModelOutputStep) step).content().stream())
            .filter(content -> content instanceof Content.TextContent)
            .forEach(content -> System.out.println(((Content.TextContent) content).text()));

        // 2. Save the MP3 (AUDIO output)
        response.steps().stream()
            .filter(step -> step instanceof Step.ModelOutputStep)
            .flatMap(step -> ((Step.ModelOutputStep) step).content().stream())
            .filter(content -> content instanceof AudioContent)
            .map(content -> (AudioContent) content)
            .findFirst()
            .ifPresent(audio -> {
                try {
                    Files.write(Paths.get("coding_song.mp3"), audio.data());
                    System.out.println("\nSuccess: Song saved to coding_song.mp3");
                } catch (Exception e) {
                    e.printStackTrace();
                }
            });
    }
}
코드 실행
mvn compile exec:java -Dexec.mainClass=com.example.MusicGenerator
생성된 노래 듣기
다음은 음악과 가사가 포함된 생성된 MP3 파일 (coding_song.mp3)입니다.
6. 스케치노트 (Nano Banana Pro)로 시각화
Gemini 3 Pro Image (Nano Banana Pro라고도 함)는 이미지를 생성할 수 있습니다. IMAGE 모드를 요청하면 텍스트 입력을 기반으로 인포그래픽, 다이어그램 또는 스케치노트를 생성할 수 있습니다.
이 단계에서는 관리형 에이전트에 관한 기사의 스케치노트 요약을 생성하고 PNG 파일로 저장합니다.
ImageGenerator.java 만들기
다음 콘텐츠로 src/main/java/com/example/ImageGenerator.java 파일을 만듭니다.
package com.example;

import io.github.glaforge.gemini.interactions.GeminiInteractionsClient;
import io.github.glaforge.gemini.interactions.model.*;
import io.github.glaforge.gemini.interactions.model.InteractionParams.ModelInteractionParams;
import io.github.glaforge.gemini.interactions.model.Content.ImageContent;
import java.nio.file.Files;
import java.nio.file.Paths;

public class ImageGenerator {
    public static void main(String[] args) throws Exception {
        GeminiInteractionsClient client = GeminiInteractionsClient.builder()
            .apiKey(System.getenv("GEMINI_API_KEY"))
            .build();

        String articleSummary = """
            Managed Agents in the Gemini API allow developers to run autonomous agents
            that reason, plan, use tools, and execute code inside isolated cloud sandboxes.
            The Gemini API handles the infrastructure (containers, network, runtime).
            It is powered by the Antigravity agent running on Gemini 3.5 Flash.
            The Java Interactions SDK supports these capabilities, utilizing a Step-based
            architecture to model the execution timeline.
            """;

        ModelInteractionParams request = ModelInteractionParams.builder()
            .model("gemini-3-pro-image-preview")
            .input(String.format("""
                Create a hand-drawn and hand-written sketchnote
                style summary infographic, with a pure white background,
                about the following information:

                %s
                """, articleSummary))
            .responseModalities(Interaction.Modality.IMAGE) // Request IMAGE modality
            .build();

        System.out.println("Generating sketchnote (this might take a moment)...");
        Interaction response = client.create(request);

        // Save the generated image
        response.steps().stream()
            .filter(step -> step instanceof Step.ModelOutputStep)
            .flatMap(step -> ((Step.ModelOutputStep) step).content().stream())
            .filter(content -> content instanceof ImageContent)
            .map(content -> (ImageContent) content)
            .findFirst()
            .ifPresent(image -> {
                try {
                    Files.write(Paths.get("sketchnote.png"), image.data());
                    System.out.println("Success: Sketchnote saved to sketchnote.png");
                } catch (Exception e) {
                    e.printStackTrace();
                }
            });
    }
}
코드 실행
mvn compile exec:java -Dexec.mainClass=com.example.ImageGenerator
생성된 스케치노트
다음은 모델에서 생성한 스케치노트 (sketchnote.png)입니다.
7. 에이전트 조종: 공동 Deep Research
Deep Research는 다단계 리서치 작업을 실행할 수 있는 강력한 에이전트입니다. 하지만 즉시 실행하는 대신 Collaborative Planning 을 사용하여 에이전트가 데이터 수집을 시작하기 전에 조사 계획서를 검토, 수정, 조종할 수 있습니다.
동일한 서버 측 상태 (previousInteractionId)를 사용하여 계획을 구체화하는 다중 턴 대화를 구현합니다.
CollaborativeResearch.java 만들기
다음 콘텐츠로 src/main/java/com/example/CollaborativeResearch.java 파일을 만듭니다.
package com.example;

import io.github.glaforge.gemini.interactions.GeminiInteractionsClient;
import io.github.glaforge.gemini.interactions.model.*;
import io.github.glaforge.gemini.interactions.model.InteractionParams.AgentInteractionParams;
import io.github.glaforge.gemini.interactions.model.Config.DeepResearchAgentConfig;
import io.github.glaforge.gemini.interactions.model.Config.ThinkingSummaries;
import io.github.glaforge.gemini.interactions.model.Config.Visualization;

public class CollaborativeResearch {
    public static void main(String[] args) throws Exception {
        GeminiInteractionsClient client = GeminiInteractionsClient.builder()
            .apiKey(System.getenv("GEMINI_API_KEY"))
            .build();

        String agentModel = "deep-research-preview-04-2026";

        // --- Phase 1: Request a Plan ---
        System.out.println("Phase 1: Requesting research plan...");
        AgentInteractionParams planParams = AgentInteractionParams.builder()
            .agent(agentModel)
            .input("Research the latest generations of Google Cloud TPUs (TPU7x and the 8th generation TPU 8t and TPU 8i).")
            .agentConfig(new DeepResearchAgentConfig(
                "deep-research",
                ThinkingSummaries.AUTO,
                Visualization.AUTO,
                true // TRUE enables collaborative planning
            ))
            .background(true)
            .store(true)
            .build();

        Interaction planInteraction = client.create(planParams);
        planInteraction = waitForCompletion(client, planInteraction.id());

        System.out.println("\n--- Proposed Plan ---");
        printOutputText(planInteraction);

        // --- Phase 2: Refine the Plan ---
        System.out.println("\nPhase 2: Refining research plan...");
        AgentInteractionParams refineParams = AgentInteractionParams.builder()
            .agent(agentModel)
            .input("Focus on comparing the architectural, performance, and scaling differences between the TPU7x generation and the two flavors of the eighth generation: TPU 8t (optimized for training at scale) and TPU 8i (optimized for low-latency reasoning and inference).")
            .agentConfig(new DeepResearchAgentConfig(
                "deep-research",
                ThinkingSummaries.AUTO,
                Visualization.AUTO,
                true // Keep collaborative planning TRUE to iterate
            ))
            .previousInteractionId(planInteraction.id()) // Resume session
            .background(true)
            .store(true)
            .build();

        Interaction refinedInteraction = client.create(refineParams);
        refinedInteraction = waitForCompletion(client, refinedInteraction.id());

        System.out.println("\n--- Refined Plan ---");
        printOutputText(refinedInteraction);

        // --- Phase 3: Approve and Execute ---
        System.out.println("\nPhase 3: Approving plan and starting deep research (this will take a few minutes)...");
        AgentInteractionParams executeParams = AgentInteractionParams.builder()
            .agent(agentModel)
            .input("Plan looks good, execute!")
            .agentConfig(new DeepResearchAgentConfig(
                "deep-research",
                ThinkingSummaries.AUTO,
                Visualization.AUTO,
                false // FALSE approves the plan and executes the research
            ))
            .previousInteractionId(refinedInteraction.id()) // Resume session
            .background(true)
            .store(true)
            .build();

        Interaction finalReport = client.create(executeParams);
        finalReport = waitForCompletion(client, finalReport.id());

        System.out.println("\n--- Final Research Report ---");
        printOutputText(finalReport);
    }

    private static Interaction waitForCompletion(GeminiInteractionsClient client, String id) throws Exception {
        Interaction interaction = client.get(id);
        while (interaction.status() != Interaction.Status.COMPLETED && interaction.status() != Interaction.Status.FAILED) {
            Thread.sleep(5000);
            interaction = client.get(id);
        }
        if (interaction.status() == Interaction.Status.FAILED) {
            throw new RuntimeException("Interaction failed. Status: " + interaction.status());
        }
        return interaction;
    }

    private static void printOutputText(Interaction interaction) {
        interaction.steps().stream()
            .filter(step -> step instanceof Step.ModelOutputStep)
            .flatMap(step -> ((Step.ModelOutputStep) step).content().stream())
            .filter(content -> content instanceof Content.TextContent)
            .forEach(content -> System.out.println(((Content.TextContent) content).text()));
    }
}
코드 실행
mvn compile exec:java -Dexec.mainClass=com.example.CollaborativeResearch
생성된 보고서 출력
Deep Research 에이전트는 포괄적이고 구조화된 보고서를 생성합니다. 여기에서 실행된 예시에서 생성된 전체 보고서를 볼 수 있습니다.
8. 맞춤 에이전트 및 Cloud Sandbox
복잡한 개발자 작업의 경우 맞춤 에이전트 를 프로비저닝할 수 있습니다. 시스템 안내를 정의하고, 도구 (예: Code Execution/Bash)를 장착하고, 원격 환경 (예: 네트워크 이그레스 규칙)을 구성합니다.
이 단계에서는 github.com에 안전한 인터넷 액세스 권한이 있는 에이전트를 프로비저닝하고 클라우드 샌드박스 내에서 저장소를 클론하고 구성 파일을 분석하도록 에이전트에 지시합니다.
GitHubAnalyzer.java 만들기
다음 콘텐츠로 src/main/java/com/example/GitHubAnalyzer.java 파일을 만듭니다.
package com.example;

import io.github.glaforge.gemini.interactions.GeminiInteractionsClient;
import io.github.glaforge.gemini.interactions.model.*;
import io.github.glaforge.gemini.interactions.model.InteractionParams.AgentInteractionParams;
import java.util.List;

public class GitHubAnalyzer {
    public static void main(String[] args) throws Exception {
        GeminiInteractionsClient client = GeminiInteractionsClient.builder()
            .apiKey(System.getenv("GEMINI_API_KEY"))
            .build();

        String agentId = "github-analyzer-codelab";

        // 1. Define the Custom Agent with Network Egress and Tools
        Agent customAgent = Agent.builder()
            .id(agentId)
            .description("Clones and analyzes GitHub repos.")
            .baseAgent("antigravity-preview-05-2026")
            .baseEnvironment(new EnvironmentConfig(
                new EnvironmentNetworkEgressAllowlist(List.of(
                    new AllowlistEntry("github.com") // Allow git clone over HTTPS
                )),
                List.of()
            ))
            .systemInstruction("You are an architect. Clone the repo, inspect files, and write a summary.")
            .tools(List.of(
                new AgentTool.CodeExecution(), // Enables terminal bash execution in sandbox
                new AgentTool.GoogleSearch()
            ))
            .build();

        // 2. Provision the Agent
        System.out.println("Provisioning custom agent in the cloud...");
        client.createAgent(customAgent);

        try {
            // 3. Start the Interaction
            AgentInteractionParams params = AgentInteractionParams.builder()
                .agent(agentId)
                .input("Clone https://github.com/glaforge/gemini-interactions-api-sdk and explain its pom.xml structure.")
                .environment("remote") // Crucial: Run in cloud sandbox
                .build();

            System.out.println("Starting clone and analysis (polling status)...");
            Interaction interaction = client.create(params);

            // 4. Poll for completion
            while (interaction.status() != Interaction.Status.COMPLETED) {
                System.out.println("Agent working... Status: " + interaction.status());
                Thread.sleep(5000);
                interaction = client.get(interaction.id());
            }

            // 5. Output the results
            System.out.println("\n--- Architectural Analysis ---");
            interaction.steps().stream()
                .filter(step -> step instanceof Step.ModelOutputStep)
                .flatMap(step -> ((Step.ModelOutputStep) step).content().stream())
                .filter(content -> content instanceof Content.TextContent)
                .forEach(content -> System.out.println(((Content.TextContent) content).text()));

        } finally {
            // 6. Clean up resources
            client.deleteAgent(agentId);
            System.out.println("\nCustom agent resource deleted from cloud.");
        }
    }
}
코드 실행
mvn compile exec:java -Dexec.mainClass=com.example.GitHubAnalyzer
생성된 분석 출력
여기에서 저장소를 클론한 후 맞춤 에이전트에서 생성한 전체 아키텍처 분석 보고서를 볼 수 있습니다.
9. 축하합니다.
Codelab을 완료하고 Gemini Interactions SDK를 사용하여 Java에서 복잡한 멀티모달 에이전트 워크플로를 빌드하는 방법을 알아봤습니다.
학습한 내용:
- 단계 아키텍처 탐색: 새로운 다형성 단계 아키텍처를 사용하여 표준 모델을 쿼리했습니다.
- 표현력이 풍부한 TTS 스트리밍: 감독의 메모와 인라인 감정 태그를 사용하여 오디오를 실시간으로 스트리밍했습니다.
- 음악 생성: Lyria 3로 MP3 트랙과 가사를 생성했습니다.
- 스케치노트 생성: Gemini 3 Pro Image (Nano Banana Pro)를 사용하여 시각적 요약을 만들었습니다.
- Deep Research 조종: Collaborative Planning을 활용하여 리서치 계획을 구체화했습니다.
- 맞춤 에이전트 프로비저닝: 코드를 안전하게 실행하기 위해 맞춤 네트워크 이그레스 제어가 있는 샌드박스 환경을 만들었습니다.
자세히 알아보기:
- GitHub에서 SDK 소스 코드 및 추가 테스트 사례 살펴보기: glaforge/gemini-interactions-api-sdk
- Guillaume의 블로그에서 에이전트 디자인 패턴 자세히 알아보기: glaforge.dev