
1. ยินดีต้อนรับ นักพัฒนาแอป Gemini
ใน Codelab นี้ คุณจะได้เรียนรู้วิธีสร้างแอปพลิเคชัน AI ยุคใหม่ใน Java โดยใช้ Gemini Interactions SDK ที่กำหนดเอง
Gemini Interactions API คืออะไร
LLM API แบบดั้งเดิมไม่เก็บสถานะและทำงานตามคำขอและการตอบกลับ หากต้องการสร้างผู้ช่วยแชทแบบหลายรอบหรือลูป Agentic ที่ซับซ้อน นักพัฒนาแอปจะต้องจัดการสถานะการสนทนา การตัดประวัติให้สั้นลง การจัดระเบียบการเรียกใช้เครื่องมือ และลูปการดำเนินการทั้งหมดในโค้ดแอปพลิเคชันฝั่งไคลเอ็นต์
Gemini Interactions API จะย้ายความซับซ้อนนี้ไปยังเซิร์ฟเวอร์ โดยเป็น API ที่มีสถานะและอิงตามเซสชัน ซึ่งโครงสร้างพื้นฐานของ Google จะโฮสต์และจัดการกราฟการสนทนา การโต้ตอบ รายการเดียวแสดงถึงเซสชันที่มีสถานะ เมื่อคุณโต้ตอบกับ API ดังกล่าว API จะแสดงไทม์ไลน์ที่มีโครงสร้างสมบูรณ์ซึ่งประกอบด้วย ขั้นตอน ที่เป็น Polymorphic เช่น
ThoughtStep: กระบวนการให้เหตุผลภายในของโมเดลModelOutputStep: เนื้อหาข้อความ เสียง หรือรูปภาพที่โมเดลสร้างขึ้นToolCallStepและToolResultStep: การเรียกใช้เครื่องมือที่ระบบหรือโมเดลเริ่มต้นUserInteractionStep: จุดที่ระบบหยุดชั่วคราวเพื่อขอข้อมูลจากผู้ใช้หรือการอนุมัติ
Agent ที่ได้รับการจัดการคืออะไร
การจัดระเบียบ Agent แบบอัตโนมัติ (การจัดการลูป ตรรกะการลองใหม่ สภาพแวดล้อมการดำเนินการเครื่องมือ และการจัดการสถานะ) เป็นเรื่องยากอย่างยิ่ง
Agent ที่ได้รับการจัดการ เป็นโซลูชันระดับแพลตฟอร์มที่ Gemini Interactions API มีให้ คุณสามารถจัดเตรียม Agent เฉพาะทางในโครงสร้างพื้นฐานของ Google ได้โดยตรงแทนที่จะเรียกใช้ลูป Agent ในเครื่อง
- Agent ในตัว: Agent เฉพาะทางที่พร้อมใช้งาน เช่น Agent Deep Research ซึ่งทำการค้นหาข้อมูลในเว็บแบบหลายขั้นตอน รวบรวมผลการค้นหา และสร้างรายงานที่ครอบคลุม
- Agent ที่ได้รับการจัดการที่กำหนดเอง: เอนทิตีแบบอัตโนมัติที่คุณกำหนด คุณระบุคำแนะนำของระบบ แนบเครื่องมือ (เช่น Google Search หรือสภาพแวดล้อมการดำเนินการ Bash) และกำหนดค่า Cloud Sandbox ซึ่งเป็นสภาพแวดล้อมรันไทม์ที่ปลอดภัย แยกกัน และเป็นคอนเทนเนอร์ที่มีกฎการออกเครือข่ายที่ปรับแต่งได้ (เช่น อนุญาตให้เข้าถึงเฉพาะโดเมนที่เฉพาะเจาะจง เช่น GitHub)
การใช้ Gemini Interactions Java SDK ช่วยให้คุณเริ่มต้นใช้งาน ประสานงาน และทำงานร่วมกับ Agent ที่ได้รับการจัดการเหล่านี้ในแอปพลิเคชัน Java มาตรฐานได้อย่างง่ายดาย
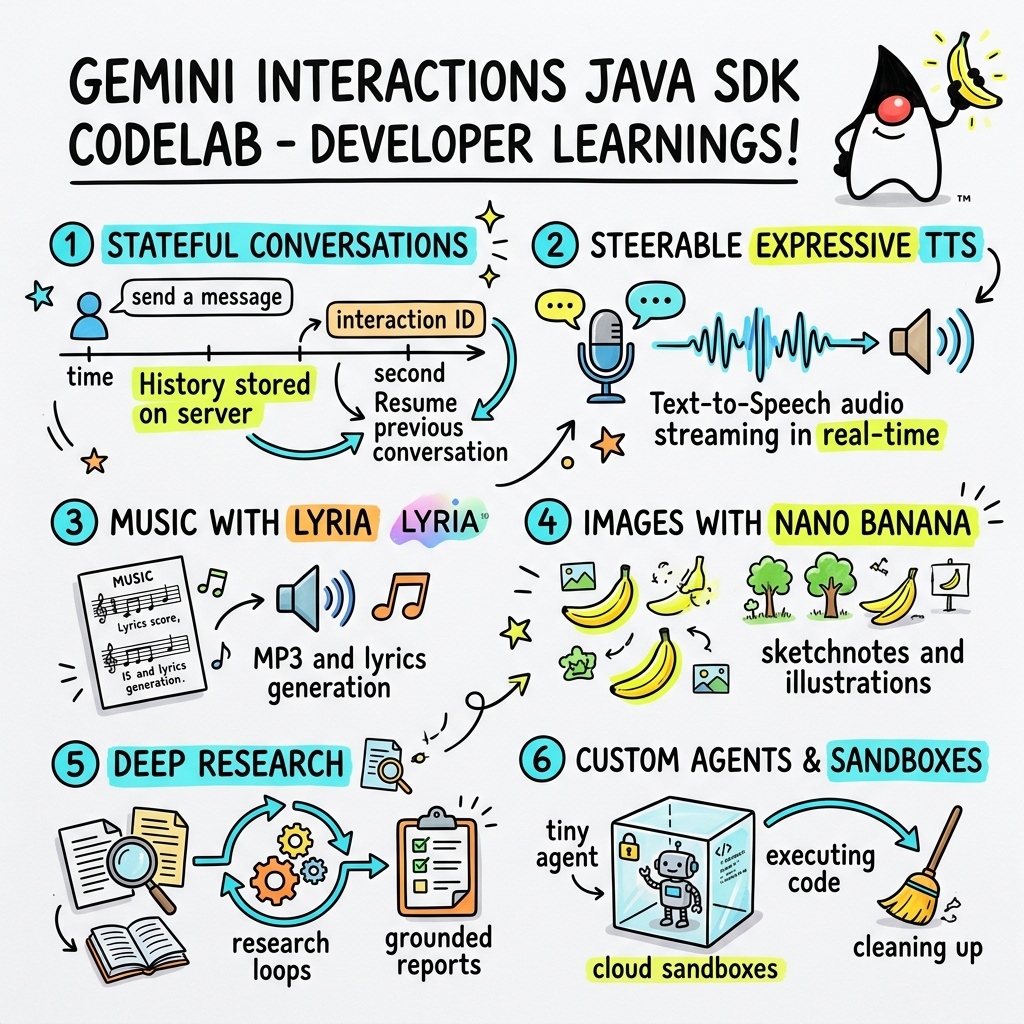
สิ่งที่คุณจะได้เรียนรู้
- วิธีใช้สถาปัตยกรรมใหม่ที่อิงตาม
Stepแบบ Polymorphic - วิธีสตรีมเสียง TTS ที่สื่ออารมณ์ไปยังลำโพงโดยตรง
- วิธีสร้างเพลง (MP3 + เนื้อเพลง) ด้วย Lyria
- วิธีสร้าง Sketchnote ที่เป็นภาพด้วย Gemini 3 Pro Image
- วิธีควบคุม Agent Deep Research โดยใช้การวางแผนร่วมกัน
- วิธีจัดเตรียม Agent ที่กำหนดเองด้วยกฎการออกเครือข่ายและเครื่องมือ
สิ่งที่คุณต้องมี
- Java 21 ขึ้นไป
- Apache Maven
- โปรแกรมแก้ไขข้อความหรือ IDE (IntelliJ IDEA, VS Code ฯลฯ)
- คีย์ Gemini API (จาก Google AI Studio)
2. การตั้งค่า: โปรเจ็กต์และคีย์ API
สร้างโปรเจ็กต์ Maven
เริ่มต้นใช้งานโปรเจ็กต์ Maven ใหม่จากเทอร์มินัลโดยใช้คำสั่งต่อไปนี้
mvn archetype:generate \
    -DgroupId=com.example \
    -DartifactId=gemini-interactions-demo \
    -DarchetypeGroupId=org.apache.maven.archetypes \
    -DarchetypeArtifactId=maven-archetype-quickstart \
    -DarchetypeVersion=1.5 \
    -DinteractiveMode=false
ไปที่ไดเรกทอรีโปรเจ็กต์ที่สร้างขึ้นใหม่
cd gemini-interactions-demo
เปิดไฟล์ pom.xml แล้วกำหนดค่าดังนี้
- อัปเดตพร็อพเพอร์ตี้เวอร์ชัน Java ให้กำหนดเป้าหมายเป็น Java 21
<properties> <maven.compiler.source>21</maven.compiler.source> <maven.compiler.target>21</maven.compiler.target> </properties> - เพิ่มทรัพยากร Dependency ของ SDK ภายในบล็อก
<dependency>
    <groupId>io.github.glaforge</groupId>
    <artifactId>gemini-interactions-api-sdk</artifactId>
    <version>0.10.1</version>
</dependency>
กำหนดค่าคีย์ API
รับคีย์ Gemini API จาก Google AI Studio
ตั้งค่าคีย์เป็นตัวแปรสภาพแวดล้อมในเทอร์มินัล
macOS / Linux
export GEMINI_API_KEY="your_actual_api_key"
Windows (Command Prompt)
set GEMINI_API_KEY="your_actual_api_key"
3. Hello World: การใช้สถาปัตยกรรม Step
Interactions API ได้เปิดตัวสถาปัตยกรรมไทม์ไลน์แบบ Polymorphic ที่อิงตาม Step โดย API จะแสดงลำดับออบเจ็กต์ที่พิมพ์ Step (เช่น ModelOutputStep, ThoughtStep, FunctionCallStep) แทนที่จะแสดงรายการเอาต์พุตแบบแบน
ในขั้นตอนนี้ คุณจะเขียนการโต้ตอบอย่างง่ายเพื่อทำความเข้าใจวิธีแยกเอาต์พุตโมเดลสุดท้ายออกจากโครงสร้างนี้
สร้าง HelloInteractions.java
สร้างไฟล์ src/main/java/com/example/HelloInteractions.java ที่มีเนื้อหาต่อไปนี้
package com.example;

import io.github.glaforge.gemini.interactions.GeminiInteractionsClient;
import io.github.glaforge.gemini.interactions.model.*;
import io.github.glaforge.gemini.interactions.model.InteractionParams.ModelInteractionParams;

public class HelloInteractions {
    public static void main(String[] args) {
        // 1. Initialize the client
        GeminiInteractionsClient client = GeminiInteractionsClient.builder()
            .apiKey(System.getenv("GEMINI_API_KEY"))
            .build();

        // 2. Build the request
        ModelInteractionParams request = ModelInteractionParams.builder()
            .model("gemini-3.5-flash")
            .input("Explain the difference between a library and a framework in one sentence.")
            .build();

        // 3. Send request
        Interaction response = client.create(request);

        // 4. Navigate the step-based architecture to get the output
        response.steps().stream()
            .filter(step -> step instanceof Step.ModelOutputStep)
            .map(step -> (Step.ModelOutputStep) step)
            .findFirst()
            .ifPresent(step -> System.out.println(step.content().get(0)));
    }
}
เรียกใช้โค้ด
คอมไพล์และเรียกใช้คลาส
mvn compile exec:java -Dexec.mainClass=com.example.HelloInteractions
4. เสียงที่ควบคุมได้: การสตรีม TTS ที่สื่ออารมณ์
Gemini 3.1 Flash ได้เปิดตัว Text-to-Speech (TTS) ที่ควบคุมได้ คุณสามารถควบคุมจังหวะ น้ำเสียง และสภาพแวดล้อมของเสียงโดยใช้พรอมต์ รวมถึงใช้แท็กอารมณ์ (เช่น [excitedly] หรือ [whispers]) กลางประโยค
ในขั้นตอนนี้ คุณจะสร้างเสียงที่สื่ออารมณ์และสตรีมไปยังลำโพงโดยตรง
สร้าง StreamingDJ.java
สร้างไฟล์ src/main/java/com/example/StreamingDJ.java ที่มีเนื้อหาต่อไปนี้
package com.example;

import io.github.glaforge.gemini.interactions.GeminiInteractionsClient;
import io.github.glaforge.gemini.interactions.model.*;
import io.github.glaforge.gemini.interactions.model.Config.SpeechConfig;
import io.github.glaforge.gemini.interactions.model.InteractionParams.ModelInteractionParams;
import javax.sound.sampled.*;
import java.util.Base64;
import java.util.stream.Stream;

public class StreamingDJ {
    public static void main(String[] args) throws Exception {
        GeminiInteractionsClient client = GeminiInteractionsClient.builder()
            .apiKey(System.getenv("GEMINI_API_KEY"))
            .build();

        // Prompt defining the voice profile and emotional tags
        String prompt = """
            # AUDIO PROFILE: Jaz R.
            ## THE SCENE: London Studio
            ### DIRECTOR'S NOTES
            Accent: Jaz is a DJ from Brixton, London.
            Style: Bouncy, energetic, high-speed delivery.

            #### TRANSCRIPT
            [excitedly] Yes, massive vibes in the studio!
            [whispers] But keep it down, the boss is coming...
            [shouting] Turn this up! Let's go!
            """;

        ModelInteractionParams request = ModelInteractionParams.builder()
            .model("gemini-3.1-flash-tts-preview")
            .input(prompt)
            .responseModalities(Interaction.Modality.AUDIO)
            .speechConfig(new SpeechConfig("Algenib", "en-GB"))
            .stream(true) // Enable streaming
            .build();

        System.out.println("Streaming audio from Gemini...");

        try (Stream<Events> eventStream = client.stream(request)) {
            // Configure the Java Audio System for 24kHz Mono 16-bit PCM
            AudioFormat format = new AudioFormat(24000, 16, 1, true, false);
            DataLine.Info info = new DataLine.Info(SourceDataLine.class, format);

            try (SourceDataLine line = (SourceDataLine) AudioSystem.getLine(info)) {
                line.open(format);
                line.start();

                // Process the stream and play audio chunks as they arrive
                eventStream.forEach(event -> {
                    if (event instanceof Events.StepDelta cd && cd.delta() instanceof Events.AudioDelta audioDelta) {
                        byte[] audioData = Base64.getDecoder().decode(audioDelta.data());
                        line.write(audioData, 0, audioData.length);
                    }
                });
                line.drain();
            }
        }
    }
}
เรียกใช้โค้ด
mvn compile exec:java -Dexec.mainClass=com.example.StreamingDJ
ฟังเอาต์พุต
นี่คือตัวอย่างเสียงที่คุณจะได้ยินเมื่อเรียกใช้โค้ด (โดยใช้เสียง Algenib ที่มีแท็กอารมณ์)
5. การสร้างเพลงด้วย Lyria 3
คุณสามารถสร้างเพลงและจิงเกิลได้โดยใช้โมเดล DeepMind Lyria 3 การขอรูปแบบการตอบกลับแบบคู่ (AUDIO และ TEXT) ช่วยให้คุณดึงทั้งเสียงที่สร้างขึ้น (MP3) และเนื้อเพลงได้
สร้าง MusicGenerator.java
สร้างไฟล์ src/main/java/com/example/MusicGenerator.java ที่มีเนื้อหาต่อไปนี้
package com.example;

import io.github.glaforge.gemini.interactions.GeminiInteractionsClient;
import io.github.glaforge.gemini.interactions.model.*;
import io.github.glaforge.gemini.interactions.model.InteractionParams.ModelInteractionParams;
import io.github.glaforge.gemini.interactions.model.Content.AudioContent;
import java.nio.file.Files;
import java.nio.file.Paths;

public class MusicGenerator {
    public static void main(String[] args) throws Exception {
        GeminiInteractionsClient client = GeminiInteractionsClient.builder()
            .apiKey(System.getenv("GEMINI_API_KEY"))
            .build();

        ModelInteractionParams request = ModelInteractionParams.builder()
            .model("models/lyria-3-clip-preview") // 30-second clip
            .input("An uplifting rock song with acoustic guitars about coding in Java.")
            .responseModalities(
                Interaction.Modality.AUDIO,
                Interaction.Modality.TEXT) // Request both MP3 and Lyrics
            .build();

        System.out.println("Generating music (this might take a moment)...");
        Interaction response = client.create(request);

        // 1. Print the lyrics (TEXT output)
        System.out.println("\n--- Generated Lyrics ---");
        response.steps().stream()
            .filter(step -> step instanceof Step.ModelOutputStep)
            .flatMap(step -> ((Step.ModelOutputStep) step).content().stream())
            .filter(content -> content instanceof Content.TextContent)
            .forEach(content -> System.out.println(((Content.TextContent) content).text()));

        // 2. Save the MP3 (AUDIO output)
        response.steps().stream()
            .filter(step -> step instanceof Step.ModelOutputStep)
            .flatMap(step -> ((Step.ModelOutputStep) step).content().stream())
            .filter(content -> content instanceof AudioContent)
            .map(content -> (AudioContent) content)
            .findFirst()
            .ifPresent(audio -> {
                try {
                    Files.write(Paths.get("coding_song.mp3"), audio.data());
                    System.out.println("\nSuccess: Song saved to coding_song.mp3");
                } catch (Exception e) {
                    e.printStackTrace();
                }
            });
    }
}
เรียกใช้โค้ด
mvn compile exec:java -Dexec.mainClass=com.example.MusicGenerator
ฟังเพลงที่สร้างขึ้น
นี่คือไฟล์ MP3 ที่สร้างขึ้น (coding_song.mp3) ซึ่งมีเพลงและเนื้อเพลง
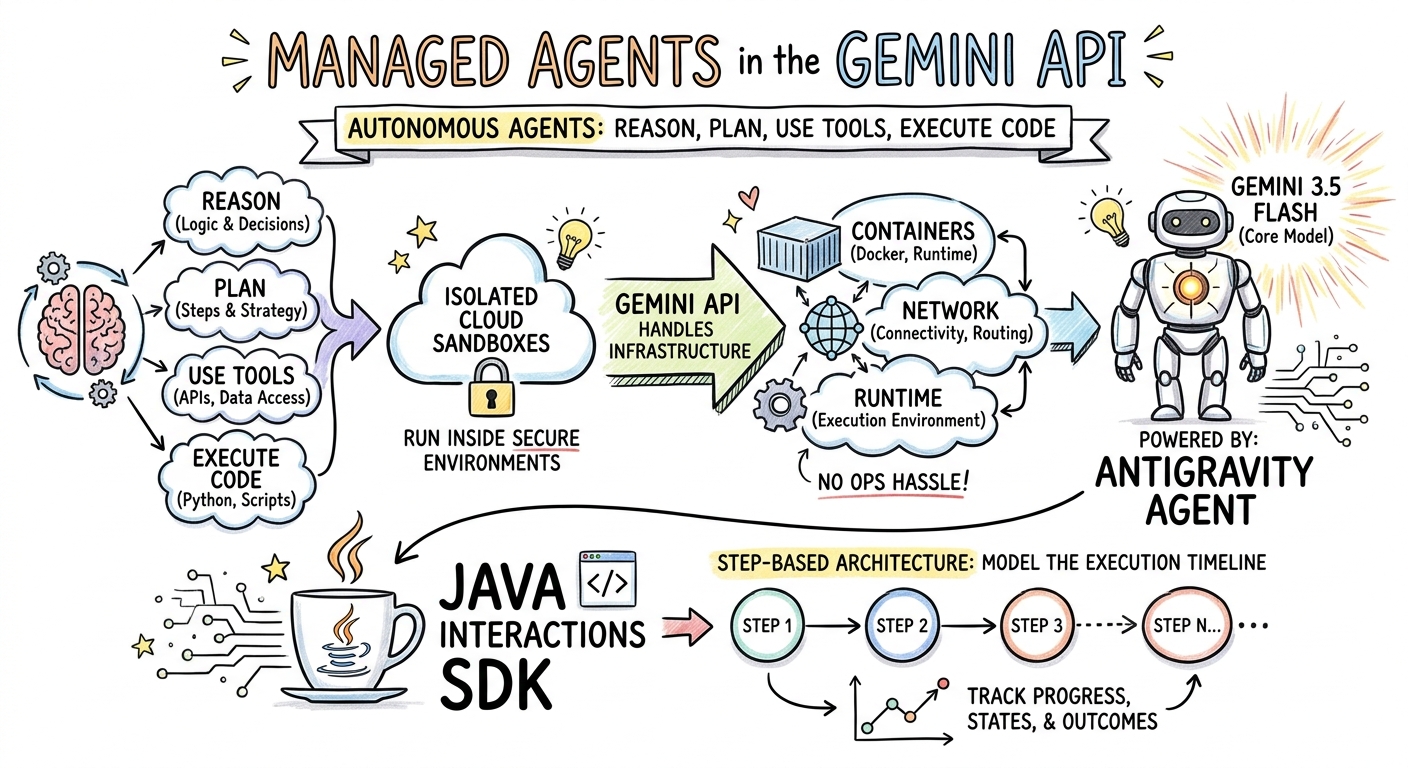
6. การแสดงภาพด้วย Sketchnote (Nano Banana Pro)
Gemini 3 Pro Image (หรือที่เรียกว่า Nano Banana Pro) สามารถสร้างรูปภาพได้ การขอรูปแบบ IMAGE ช่วยให้คุณสร้างอินโฟกราฟิก ไดอะแกรม หรือ Sketchnote ตามอินพุตข้อความได้
ในขั้นตอนนี้ คุณจะสร้าง Sketchnote สรุปบทความเกี่ยวกับ Agent ที่ได้รับการจัดการและบันทึกเป็นไฟล์ PNG
สร้าง ImageGenerator.java
สร้างไฟล์ src/main/java/com/example/ImageGenerator.java ที่มีเนื้อหาต่อไปนี้
package com.example;

import io.github.glaforge.gemini.interactions.GeminiInteractionsClient;
import io.github.glaforge.gemini.interactions.model.*;
import io.github.glaforge.gemini.interactions.model.InteractionParams.ModelInteractionParams;
import io.github.glaforge.gemini.interactions.model.Content.ImageContent;
import java.nio.file.Files;
import java.nio.file.Paths;

public class ImageGenerator {
    public static void main(String[] args) throws Exception {
        GeminiInteractionsClient client = GeminiInteractionsClient.builder()
            .apiKey(System.getenv("GEMINI_API_KEY"))
            .build();

        String articleSummary = """
            Managed Agents in the Gemini API allow developers to run autonomous agents
            that reason, plan, use tools, and execute code inside isolated cloud sandboxes.
            The Gemini API handles the infrastructure (containers, network, runtime).
            It is powered by the Antigravity agent running on Gemini 3.5 Flash.
            The Java Interactions SDK supports these capabilities, utilizing a Step-based
            architecture to model the execution timeline.
            """;

        ModelInteractionParams request = ModelInteractionParams.builder()
            .model("gemini-3-pro-image-preview")
            .input(String.format("""
                Create a hand-drawn and hand-written sketchnote
                style summary infographic, with a pure white background,
                about the following information:

                %s
                """, articleSummary))
            .responseModalities(Interaction.Modality.IMAGE) // Request IMAGE modality
            .build();

        System.out.println("Generating sketchnote (this might take a moment)...");
        Interaction response = client.create(request);

        // Save the generated image
        response.steps().stream()
            .filter(step -> step instanceof Step.ModelOutputStep)
            .flatMap(step -> ((Step.ModelOutputStep) step).content().stream())
            .filter(content -> content instanceof ImageContent)
            .map(content -> (ImageContent) content)
            .findFirst()
            .ifPresent(image -> {
                try {
                    Files.write(Paths.get("sketchnote.png"), image.data());
                    System.out.println("Success: Sketchnote saved to sketchnote.png");
                } catch (Exception e) {
                    e.printStackTrace();
                }
            });
    }
}
เรียกใช้โค้ด
mvn compile exec:java -Dexec.mainClass=com.example.ImageGenerator
Sketchnote ที่สร้างขึ้น
นี่คือ Sketchnote (sketchnote.png) ที่โมเดลสร้างขึ้น
7. การควบคุม Agent: Deep Research แบบร่วมมือ
Deep Research เป็น Agent ที่มีประสิทธิภาพซึ่งสามารถทำงานวิจัยแบบหลายขั้นตอนได้ อย่างไรก็ตาม คุณสามารถใช้การวางแผนร่วมกัน เพื่อตรวจสอบ แก้ไข และควบคุมแผนการค้นคว้าข้อมูลก่อนที่ Agent จะเริ่มรวบรวมข้อมูล แทนที่จะเรียกใช้ทันที
คุณจะใช้การสนทนาแบบหลายรอบที่ใช้สถานะฝั่งเซิร์ฟเวอร์เดียวกัน (previousInteractionId) เพื่อปรับแต่งแผน
สร้าง CollaborativeResearch.java
สร้างไฟล์ src/main/java/com/example/CollaborativeResearch.java ที่มีเนื้อหาต่อไปนี้
package com.example;

import io.github.glaforge.gemini.interactions.GeminiInteractionsClient;
import io.github.glaforge.gemini.interactions.model.*;
import io.github.glaforge.gemini.interactions.model.InteractionParams.AgentInteractionParams;
import io.github.glaforge.gemini.interactions.model.Config.DeepResearchAgentConfig;
import io.github.glaforge.gemini.interactions.model.Config.ThinkingSummaries;
import io.github.glaforge.gemini.interactions.model.Config.Visualization;

public class CollaborativeResearch {
    public static void main(String[] args) throws Exception {
        GeminiInteractionsClient client = GeminiInteractionsClient.builder()
            .apiKey(System.getenv("GEMINI_API_KEY"))
            .build();

        String agentModel = "deep-research-preview-04-2026";

        // --- Phase 1: Request a Plan ---
        System.out.println("Phase 1: Requesting research plan...");
        AgentInteractionParams planParams = AgentInteractionParams.builder()
            .agent(agentModel)
            .input("Research the latest generations of Google Cloud TPUs (TPU7x and the 8th generation TPU 8t and TPU 8i).")
            .agentConfig(new DeepResearchAgentConfig(
                "deep-research",
                ThinkingSummaries.AUTO,
                Visualization.AUTO,
                true // TRUE enables collaborative planning
            ))
            .background(true)
            .store(true)
            .build();

        Interaction planInteraction = client.create(planParams);
        planInteraction = waitForCompletion(client, planInteraction.id());

        System.out.println("\n--- Proposed Plan ---");
        printOutputText(planInteraction);

        // --- Phase 2: Refine the Plan ---
        System.out.println("\nPhase 2: Refining research plan...");
        AgentInteractionParams refineParams = AgentInteractionParams.builder()
            .agent(agentModel)
            .input("Focus on comparing the architectural, performance, and scaling differences between the TPU7x generation and the two flavors of the eighth generation: TPU 8t (optimized for training at scale) and TPU 8i (optimized for low-latency reasoning and inference).")
            .agentConfig(new DeepResearchAgentConfig(
                "deep-research",
                ThinkingSummaries.AUTO,
                Visualization.AUTO,
                true // Keep collaborative planning TRUE to iterate
            ))
            .previousInteractionId(planInteraction.id()) // Resume session
            .background(true)
            .store(true)
            .build();

        Interaction refinedInteraction = client.create(refineParams);
        refinedInteraction = waitForCompletion(client, refinedInteraction.id());

        System.out.println("\n--- Refined Plan ---");
        printOutputText(refinedInteraction);

        // --- Phase 3: Approve and Execute ---
        System.out.println("\nPhase 3: Approving plan and starting deep research (this will take a few minutes)...");
        AgentInteractionParams executeParams = AgentInteractionParams.builder()
            .agent(agentModel)
            .input("Plan looks good, execute!")
            .agentConfig(new DeepResearchAgentConfig(
                "deep-research",
                ThinkingSummaries.AUTO,
                Visualization.AUTO,
                false // FALSE approves the plan and executes the research
            ))
            .previousInteractionId(refinedInteraction.id()) // Resume session
            .background(true)
            .store(true)
            .build();

        Interaction finalReport = client.create(executeParams);
        finalReport = waitForCompletion(client, finalReport.id());

        System.out.println("\n--- Final Research Report ---");
        printOutputText(finalReport);
    }

    private static Interaction waitForCompletion(GeminiInteractionsClient client, String id) throws Exception {
        Interaction interaction = client.get(id);
        while (interaction.status() != Interaction.Status.COMPLETED && interaction.status() != Interaction.Status.FAILED) {
            Thread.sleep(5000);
            interaction = client.get(id);
        }
        if (interaction.status() == Interaction.Status.FAILED) {
            throw new RuntimeException("Interaction failed. Status: " + interaction.status());
        }
        return interaction;
    }

    private static void printOutputText(Interaction interaction) {
        interaction.steps().stream()
            .filter(step -> step instanceof Step.ModelOutputStep)
            .flatMap(step -> ((Step.ModelOutputStep) step).content().stream())
            .filter(content -> content instanceof Content.TextContent)
            .forEach(content -> System.out.println(((Content.TextContent) content).text()));
    }
}
เรียกใช้โค้ด
mvn compile exec:java -Dexec.mainClass=com.example.CollaborativeResearch
เอาต์พุตรายงานที่สร้างขึ้น
Agent Deep Research จะสร้างรายงานที่มีโครงสร้างและครอบคลุม คุณสามารถดูรายงานฉบับเต็มที่สร้างขึ้นโดยการเรียกใช้ตัวอย่างได้ที่นี่
8. Agent ที่กำหนดเองและ Cloud Sandbox
คุณสามารถจัดเตรียมAgent ที่กำหนดเอง สำหรับงานที่ซับซ้อนของนักพัฒนาแอป โดยกำหนดคำแนะนำของระบบ ติดตั้งเครื่องมือ (เช่น การดำเนินการโค้ด/Bash) และกำหนดค่าสภาพแวดล้อมระยะไกล (เช่น กฎการออกเครือข่าย)
ในขั้นตอนนี้ คุณจะจัดเตรียม Agent ที่มีการเข้าถึงอินเทอร์เน็ตที่ปลอดภัยไปยัง github.com และสั่งให้โคลนที่เก็บและวิเคราะห์ไฟล์การกำหนดค่าภายใน Cloud Sandbox
สร้าง GitHubAnalyzer.java
สร้างไฟล์ src/main/java/com/example/GitHubAnalyzer.java ที่มีเนื้อหาต่อไปนี้
package com.example;

import io.github.glaforge.gemini.interactions.GeminiInteractionsClient;
import io.github.glaforge.gemini.interactions.model.*;
import io.github.glaforge.gemini.interactions.model.InteractionParams.AgentInteractionParams;
import java.util.List;

public class GitHubAnalyzer {
    public static void main(String[] args) throws Exception {
        GeminiInteractionsClient client = GeminiInteractionsClient.builder()
            .apiKey(System.getenv("GEMINI_API_KEY"))
            .build();

        String agentId = "github-analyzer-codelab";

        // 1. Define the Custom Agent with Network Egress and Tools
        Agent customAgent = Agent.builder()
            .id(agentId)
            .description("Clones and analyzes GitHub repos.")
            .baseAgent("antigravity-preview-05-2026")
            .baseEnvironment(new EnvironmentConfig(
                new EnvironmentNetworkEgressAllowlist(List.of(
                    new AllowlistEntry("github.com") // Allow git clone over HTTPS
                )),
                List.of()
            ))
            .systemInstruction("You are an architect. Clone the repo, inspect files, and write a summary.")
            .tools(List.of(
                new AgentTool.CodeExecution(), // Enables terminal bash execution in sandbox
                new AgentTool.GoogleSearch()
            ))
            .build();

        // 2. Provision the Agent
        System.out.println("Provisioning custom agent in the cloud...");
        client.createAgent(customAgent);

        try {
            // 3. Start the Interaction
            AgentInteractionParams params = AgentInteractionParams.builder()
                .agent(agentId)
                .input("Clone https://github.com/glaforge/gemini-interactions-api-sdk and explain its pom.xml structure.")
                .environment("remote") // Crucial: Run in cloud sandbox
                .build();

            System.out.println("Starting clone and analysis (polling status)...");
            Interaction interaction = client.create(params);

            // 4. Poll for completion
            while (interaction.status() != Interaction.Status.COMPLETED) {
                System.out.println("Agent working... Status: " + interaction.status());
                Thread.sleep(5000);
                interaction = client.get(interaction.id());
            }

            // 5. Output the results
            System.out.println("\n--- Architectural Analysis ---");
            interaction.steps().stream()
                .filter(step -> step instanceof Step.ModelOutputStep)
                .flatMap(step -> ((Step.ModelOutputStep) step).content().stream())
                .filter(content -> content instanceof Content.TextContent)
                .forEach(content -> System.out.println(((Content.TextContent) content).text()));

        } finally {
            // 6. Clean up resources
            client.deleteAgent(agentId);
            System.out.println("\nCustom agent resource deleted from cloud.");
        }
    }
}
เรียกใช้โค้ด
mvn compile exec:java -Dexec.mainClass=com.example.GitHubAnalyzer
เอาต์พุตการวิเคราะห์ที่สร้างขึ้น
คุณสามารถดูรายงานการวิเคราะห์สถาปัตยกรรมฉบับเต็มที่ Agent ที่กำหนดเองสร้างขึ้นหลังจากโคลนที่เก็บได้ที่นี่
9. ยินดีด้วย
คุณทำ Codelab นี้เสร็จสมบูรณ์แล้วและได้เรียนรู้วิธีสร้างเวิร์กโฟลว์ที่ซับซ้อน หลายรูปแบบ และ Agentic ใน Java โดยใช้ Gemini Interactions SDK
สิ่งที่คุณทำสำเร็จ
- ใช้สถาปัตยกรรม Step: ใช้สถาปัตยกรรม Step แบบ Polymorphic ใหม่เพื่อค้นหาโมเดลมาตรฐาน
- สตรีม TTS ที่สื่ออารมณ์: ใช้หมายเหตุของผู้กำกับและแท็กอารมณ์แบบอินไลน์เพื่อสตรีมเสียงแบบเรียลไทม์
- สร้างเพลง: สร้างแทร็ก MP3 และเนื้อเพลงด้วย Lyria 3
- สร้าง Sketchnote: สร้างสรุปที่เป็นภาพโดยใช้ Gemini 3 Pro Image (Nano Banana Pro)
- ควบคุม Deep Research: ใช้การวางแผนร่วมกันเพื่อปรับแต่งแผนการวิจัย
- จัดเตรียม Agent ที่กำหนดเอง: สร้างสภาพแวดล้อม Sandbox ที่มีการควบคุมการออกเครือข่ายที่กำหนดเองเพื่อดำเนินการโค้ดอย่างปลอดภัย
ดูข้อมูลเพิ่มเติม
- สำรวจซอร์สโค้ด SDK และกรณีทดสอบเพิ่มเติมใน GitHub: glaforge/gemini-interactions-api-sdk
- อ่านเพิ่มเติมเกี่ยวกับรูปแบบการออกแบบ Agentic ในบล็อกของ Guillaume: glaforge.dev