
1. 欢迎,Gemini 开发者!
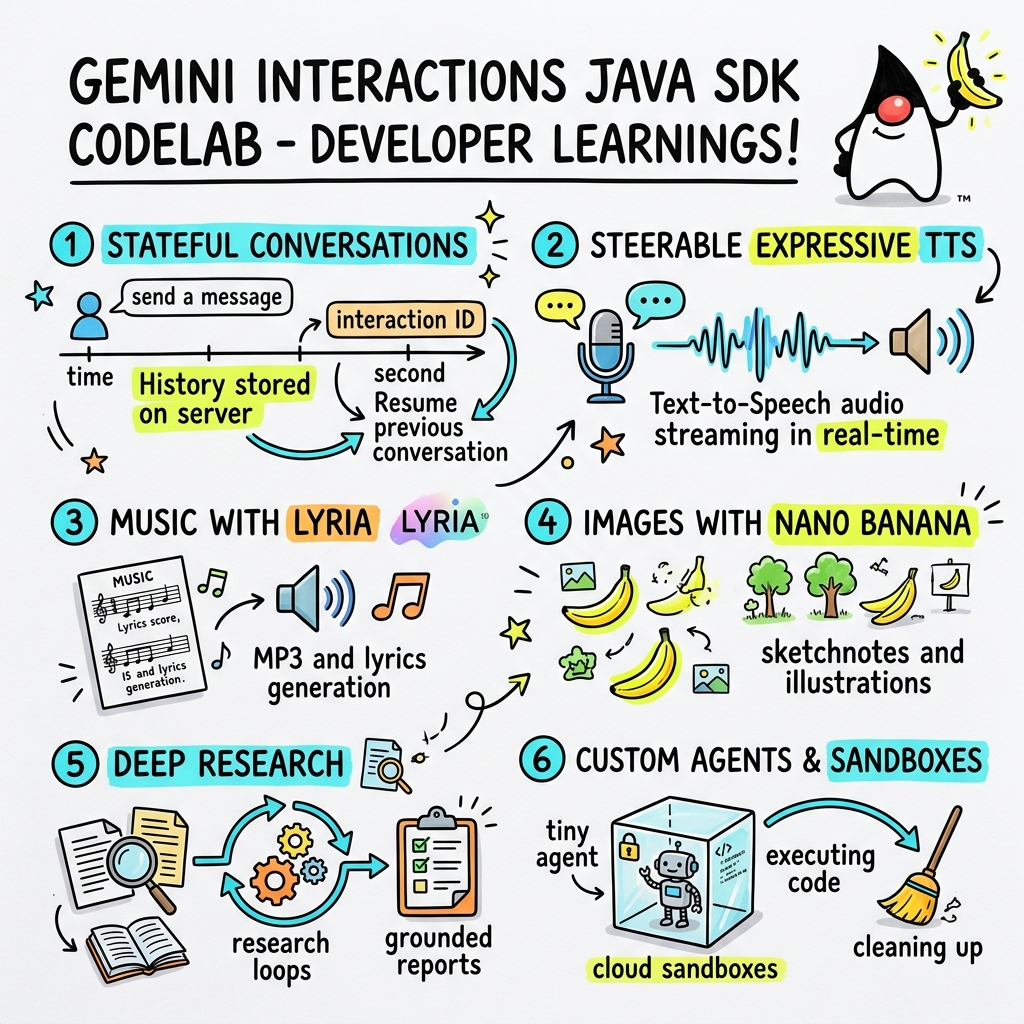
在此 Codelab 中,您将学习如何使用自定义 Gemini Interactions SDK 在 Java 中构建新一代 AI 应用。
什么是 Gemini Interactions API?
传统的 LLM API 是无状态的,并且由请求-响应驱动。为了构建多轮对话助理或复杂的智能体循环,开发者过去必须完全在客户端应用代码中管理对话状态、历史记录截断、工具调用编排和执行循环。
Gemini Interactions API 将这种复杂性转移到服务器。它是一个有状态的基于会话的 API,Google 的基础架构托管并管理对话图。单个 Interaction 表示一个有状态的会话。当您与之互动时,该 API 会返回一个丰富的结构化时间轴,其中包含多态的 Step,例如:
ThoughtStep:模型的内部推理过程。ModelOutputStep:模型生成的文本、音频或图片内容。ToolCallStep和ToolResultStep:系统或模型发起的工具调用。UserInteractionStep:系统暂停以请求人工输入或审批的点。
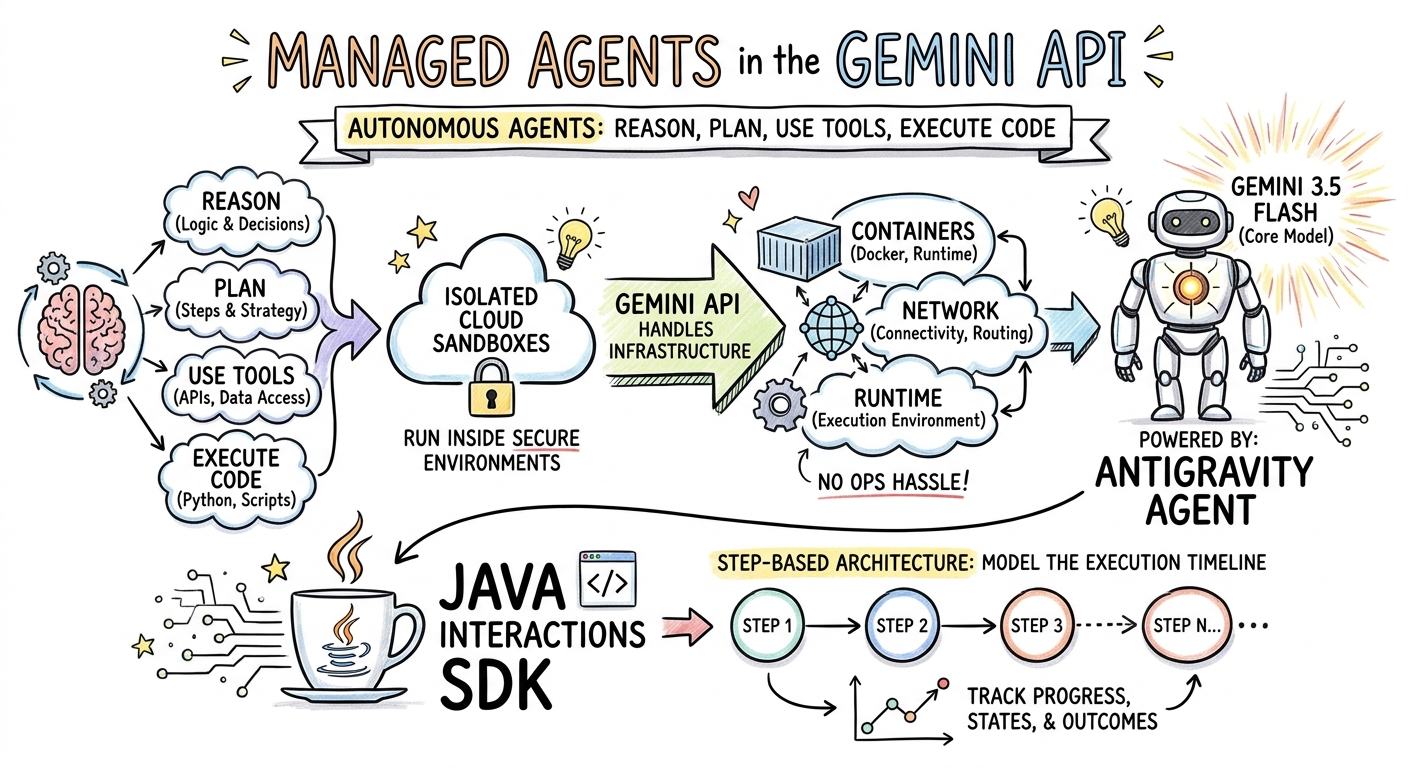
什么是受管理的代理?
编排自主智能体(处理循环、重试逻辑、工具执行环境和状态管理)非常困难。
托管式智能体是 Gemini Interactions API 提供的一项平台级解决方案。您无需在本地运行代理循环,而是可以直接在 Google 的基础设施上预配专用代理:
- 内置智能体:随时可用的专业智能体,例如 Deep Research 智能体,可执行多步网络研究、汇总研究结果并生成综合报告。
- 自定义受管代理:由您定义的自主实体。您提供系统指令,附加工具(例如 Google 搜索或 Bash 执行环境),并配置 Cloud Sandbox - 一个安全、隔离且容器化的运行时环境,具有可自定义的网络出站流量规则(例如,仅允许访问特定网域,如 GitHub)。
借助 Gemini Interactions Java SDK,您可以在标准 Java 应用中轻松启动、协调和协作使用这些受管理的代理。
学习内容
- 如何了解基于新的多态
Step的架构。 - 如何将富有表现力的 TTS 音频直接传输到扬声器。
- 如何使用 Lyria 生成音乐(MP3 + 歌词)。
- 如何使用 Gemini 3 Pro Image 生成视觉笔记。
- 如何使用协作式规划来引导 Deep Research 智能体。
- 如何使用网络出站规则和工具预配自定义代理。
所需条件
- Java 21 或更高版本。
- Apache Maven。
- 文本编辑器或 IDE(IntelliJ IDEA、VS Code 等)。
- Gemini API 密钥(来自 Google AI Studio)。
2. 设置:项目和 API 密钥
创建 Maven 项目
在终端中使用以下命令启动新的 Maven 项目:
mvn archetype:generate \
    -DgroupId=com.example \
    -DartifactId=gemini-interactions-demo \
    -DarchetypeGroupId=org.apache.maven.archetypes \
    -DarchetypeArtifactId=maven-archetype-quickstart \
    -DarchetypeVersion=1.5 \
    -DinteractiveMode=false
进入新创建的项目目录:
cd gemini-interactions-demo
打开 pom.xml 文件并进行配置:
- 更新 Java 版本属性以定位到 Java 21:
<properties> <maven.compiler.source>21</maven.compiler.source> <maven.compiler.target>21</maven.compiler.target> </properties> - 在
<dependency>
    <groupId>io.github.glaforge</groupId>
    <artifactId>gemini-interactions-api-sdk</artifactId>
    <version>0.10.1</version>
</dependency>
配置 API 密钥
从 Google AI Studio 获取 Gemini API 密钥。
在终端中将密钥设置为环境变量:
macOS / Linux:
export GEMINI_API_KEY="your_actual_api_key"
Windows(命令提示符):
set GEMINI_API_KEY="your_actual_api_key"
3. Hello World:浏览步进架构
Interactions API 引入了多态的基于步骤的时间轴架构。该 API 不会返回扁平的输出列表,而是返回一系列类型化的 Step 对象(例如 ModelOutputStep、ThoughtStep、FunctionCallStep)。
在此步骤中,您将编写一个简单的互动,了解如何从此结构中提取最终模型输出。
创建“HelloInteractions.java”
创建包含以下内容的文件 src/main/java/com/example/HelloInteractions.java:
package com.example;

import io.github.glaforge.gemini.interactions.GeminiInteractionsClient;
import io.github.glaforge.gemini.interactions.model.*;
import io.github.glaforge.gemini.interactions.model.InteractionParams.ModelInteractionParams;

public class HelloInteractions {
    public static void main(String[] args) {
        // 1. Initialize the client
        GeminiInteractionsClient client = GeminiInteractionsClient.builder()
            .apiKey(System.getenv("GEMINI_API_KEY"))
            .build();

        // 2. Build the request
        ModelInteractionParams request = ModelInteractionParams.builder()
            .model("gemini-3.5-flash")
            .input("Explain the difference between a library and a framework in one sentence.")
            .build();

        // 3. Send request
        Interaction response = client.create(request);

        // 4. Navigate the step-based architecture to get the output
        response.steps().stream()
            .filter(step -> step instanceof Step.ModelOutputStep)
            .map(step -> (Step.ModelOutputStep) step)
            .findFirst()
            .ifPresent(step -> System.out.println(step.content().get(0)));
    }
}
运行代码
编译并运行该类:
mvn compile exec:java -Dexec.mainClass=com.example.HelloInteractions
4. 可控音频:流式传输富有表现力的 TTS
Gemini 3.1 Flash 引入了可控的 Text-to-Speech (TTS)。您可以使用提示控制语音的语速、音调和环境,还可以在句子中间使用情感标记(例如 [excitedly] 或 [whispers])。
在此步骤中,您将生成富有表现力的音频并将其直接流式传输到扬声器。
创建“StreamingDJ.java”
创建包含以下内容的文件 src/main/java/com/example/StreamingDJ.java:
package com.example;

import io.github.glaforge.gemini.interactions.GeminiInteractionsClient;
import io.github.glaforge.gemini.interactions.model.*;
import io.github.glaforge.gemini.interactions.model.Config.SpeechConfig;
import io.github.glaforge.gemini.interactions.model.InteractionParams.ModelInteractionParams;
import javax.sound.sampled.*;
import java.util.Base64;
import java.util.stream.Stream;

public class StreamingDJ {
    public static void main(String[] args) throws Exception {
        GeminiInteractionsClient client = GeminiInteractionsClient.builder()
            .apiKey(System.getenv("GEMINI_API_KEY"))
            .build();

        // Prompt defining the voice profile and emotional tags
        String prompt = """
            # AUDIO PROFILE: Jaz R.
            ## THE SCENE: London Studio
            ### DIRECTOR'S NOTES
            Accent: Jaz is a DJ from Brixton, London.
            Style: Bouncy, energetic, high-speed delivery.

            #### TRANSCRIPT
            [excitedly] Yes, massive vibes in the studio!
            [whispers] But keep it down, the boss is coming...
            [shouting] Turn this up! Let's go!
            """;

        ModelInteractionParams request = ModelInteractionParams.builder()
            .model("gemini-3.1-flash-tts-preview")
            .input(prompt)
            .responseModalities(Interaction.Modality.AUDIO)
            .speechConfig(new SpeechConfig("Algenib", "en-GB"))
            .stream(true) // Enable streaming
            .build();

        System.out.println("Streaming audio from Gemini...");

        try (Stream<Events> eventStream = client.stream(request)) {
            // Configure the Java Audio System for 24kHz Mono 16-bit PCM
            AudioFormat format = new AudioFormat(24000, 16, 1, true, false);
            DataLine.Info info = new DataLine.Info(SourceDataLine.class, format);

            try (SourceDataLine line = (SourceDataLine) AudioSystem.getLine(info)) {
                line.open(format);
                line.start();

                // Process the stream and play audio chunks as they arrive
                eventStream.forEach(event -> {
                    if (event instanceof Events.StepDelta cd && cd.delta() instanceof Events.AudioDelta audioDelta) {
                        byte[] audioData = Base64.getDecoder().decode(audioDelta.data());
                        line.write(audioData, 0, audioData.length);
                    }
                });
                line.drain();
            }
        }
    }
}
运行代码
mvn compile exec:java -Dexec.mainClass=com.example.StreamingDJ
聆听输出
以下是一个音频示例,展示了运行代码时您会听到的内容(使用带有情感标记的 Algenib 语音):
5. 使用 Lyria 3 生成音乐
借助 DeepMind Lyria 3 模型,您可以生成音乐和铃声。通过请求双重响应模态(AUDIO 和 TEXT),您可以同时检索生成的音频 (MP3) 和歌词。
创建“MusicGenerator.java”
创建包含以下内容的文件 src/main/java/com/example/MusicGenerator.java:
package com.example;

import io.github.glaforge.gemini.interactions.GeminiInteractionsClient;
import io.github.glaforge.gemini.interactions.model.*;
import io.github.glaforge.gemini.interactions.model.InteractionParams.ModelInteractionParams;
import io.github.glaforge.gemini.interactions.model.Content.AudioContent;
import java.nio.file.Files;
import java.nio.file.Paths;

public class MusicGenerator {
    public static void main(String[] args) throws Exception {
        GeminiInteractionsClient client = GeminiInteractionsClient.builder()
            .apiKey(System.getenv("GEMINI_API_KEY"))
            .build();

        ModelInteractionParams request = ModelInteractionParams.builder()
            .model("models/lyria-3-clip-preview") // 30-second clip
            .input("An uplifting rock song with acoustic guitars about coding in Java.")
            .responseModalities(
                Interaction.Modality.AUDIO,
                Interaction.Modality.TEXT) // Request both MP3 and Lyrics
            .build();

        System.out.println("Generating music (this might take a moment)...");
        Interaction response = client.create(request);

        // 1. Print the lyrics (TEXT output)
        System.out.println("\n--- Generated Lyrics ---");
        response.steps().stream()
            .filter(step -> step instanceof Step.ModelOutputStep)
            .flatMap(step -> ((Step.ModelOutputStep) step).content().stream())
            .filter(content -> content instanceof Content.TextContent)
            .forEach(content -> System.out.println(((Content.TextContent) content).text()));

        // 2. Save the MP3 (AUDIO output)
        response.steps().stream()
            .filter(step -> step instanceof Step.ModelOutputStep)
            .flatMap(step -> ((Step.ModelOutputStep) step).content().stream())
            .filter(content -> content instanceof AudioContent)
            .map(content -> (AudioContent) content)
            .findFirst()
            .ifPresent(audio -> {
                try {
                    Files.write(Paths.get("coding_song.mp3"), audio.data());
                    System.out.println("\nSuccess: Song saved to coding_song.mp3");
                } catch (Exception e) {
                    e.printStackTrace();
                }
            });
    }
}
运行代码
mvn compile exec:java -Dexec.mainClass=com.example.MusicGenerator
聆听生成的歌曲
以下是生成的包含音乐和歌词的 MP3 文件 (coding_song.mp3):
6. 使用 Sketchnotes 直观呈现内容 (Nano Banana Pro)
Gemini 3 Pro Image(也称为 Nano Banana Pro)可以生成图片。通过请求 IMAGE 模态,您可以根据文本输入生成信息图、图表或速记笔记。
在此步骤中,您将生成一篇关于受管代理的文章的速记摘要,并将其保存为 PNG 文件。
创建“ImageGenerator.java”
创建包含以下内容的文件 src/main/java/com/example/ImageGenerator.java:
package com.example;

import io.github.glaforge.gemini.interactions.GeminiInteractionsClient;
import io.github.glaforge.gemini.interactions.model.*;
import io.github.glaforge.gemini.interactions.model.InteractionParams.ModelInteractionParams;
import io.github.glaforge.gemini.interactions.model.Content.ImageContent;
import java.nio.file.Files;
import java.nio.file.Paths;

public class ImageGenerator {
    public static void main(String[] args) throws Exception {
        GeminiInteractionsClient client = GeminiInteractionsClient.builder()
            .apiKey(System.getenv("GEMINI_API_KEY"))
            .build();

        String articleSummary = """
            Managed Agents in the Gemini API allow developers to run autonomous agents
            that reason, plan, use tools, and execute code inside isolated cloud sandboxes.
            The Gemini API handles the infrastructure (containers, network, runtime).
            It is powered by the Antigravity agent running on Gemini 3.5 Flash.
            The Java Interactions SDK supports these capabilities, utilizing a Step-based
            architecture to model the execution timeline.
            """;

        ModelInteractionParams request = ModelInteractionParams.builder()
            .model("gemini-3-pro-image-preview")
            .input(String.format("""
                Create a hand-drawn and hand-written sketchnote
                style summary infographic, with a pure white background,
                about the following information:

                %s
                """, articleSummary))
            .responseModalities(Interaction.Modality.IMAGE) // Request IMAGE modality
            .build();

        System.out.println("Generating sketchnote (this might take a moment)...");
        Interaction response = client.create(request);

        // Save the generated image
        response.steps().stream()
            .filter(step -> step instanceof Step.ModelOutputStep)
            .flatMap(step -> ((Step.ModelOutputStep) step).content().stream())
            .filter(content -> content instanceof ImageContent)
            .map(content -> (ImageContent) content)
            .findFirst()
            .ifPresent(image -> {
                try {
                    Files.write(Paths.get("sketchnote.png"), image.data());
                    System.out.println("Success: Sketchnote saved to sketchnote.png");
                } catch (Exception e) {
                    e.printStackTrace();
                }
            });
    }
}
运行代码
mvn compile exec:java -Dexec.mainClass=com.example.ImageGenerator
生成的涂鸦笔记
以下是模型生成的涂鸦笔记 (sketchnote.png):
7. Steering Agents:协作式深度研究
Deep Research 是一款强大的智能体,可执行多步骤研究任务。不过,您可以使用协作规划来查看、修改和引导研究计划,然后再让智能体开始收集数据,而不是立即运行。
您将实现一个多轮对话,该对话使用相同的服务器端状态 (previousInteractionId) 来优化方案。
创建“CollaborativeResearch.java”
创建包含以下内容的文件 src/main/java/com/example/CollaborativeResearch.java:
package com.example;

import io.github.glaforge.gemini.interactions.GeminiInteractionsClient;
import io.github.glaforge.gemini.interactions.model.*;
import io.github.glaforge.gemini.interactions.model.InteractionParams.AgentInteractionParams;
import io.github.glaforge.gemini.interactions.model.Config.DeepResearchAgentConfig;
import io.github.glaforge.gemini.interactions.model.Config.ThinkingSummaries;
import io.github.glaforge.gemini.interactions.model.Config.Visualization;

public class CollaborativeResearch {
    public static void main(String[] args) throws Exception {
        GeminiInteractionsClient client = GeminiInteractionsClient.builder()
            .apiKey(System.getenv("GEMINI_API_KEY"))
            .build();

        String agentModel = "deep-research-preview-04-2026";

        // --- Phase 1: Request a Plan ---
        System.out.println("Phase 1: Requesting research plan...");
        AgentInteractionParams planParams = AgentInteractionParams.builder()
            .agent(agentModel)
            .input("Research the latest generations of Google Cloud TPUs (TPU7x and the 8th generation TPU 8t and TPU 8i).")
            .agentConfig(new DeepResearchAgentConfig(
                "deep-research",
                ThinkingSummaries.AUTO,
                Visualization.AUTO,
                true // TRUE enables collaborative planning
            ))
            .background(true)
            .store(true)
            .build();

        Interaction planInteraction = client.create(planParams);
        planInteraction = waitForCompletion(client, planInteraction.id());

        System.out.println("\n--- Proposed Plan ---");
        printOutputText(planInteraction);

        // --- Phase 2: Refine the Plan ---
        System.out.println("\nPhase 2: Refining research plan...");
        AgentInteractionParams refineParams = AgentInteractionParams.builder()
            .agent(agentModel)
            .input("Focus on comparing the architectural, performance, and scaling differences between the TPU7x generation and the two flavors of the eighth generation: TPU 8t (optimized for training at scale) and TPU 8i (optimized for low-latency reasoning and inference).")
            .agentConfig(new DeepResearchAgentConfig(
                "deep-research",
                ThinkingSummaries.AUTO,
                Visualization.AUTO,
                true // Keep collaborative planning TRUE to iterate
            ))
            .previousInteractionId(planInteraction.id()) // Resume session
            .background(true)
            .store(true)
            .build();

        Interaction refinedInteraction = client.create(refineParams);
        refinedInteraction = waitForCompletion(client, refinedInteraction.id());

        System.out.println("\n--- Refined Plan ---");
        printOutputText(refinedInteraction);

        // --- Phase 3: Approve and Execute ---
        System.out.println("\nPhase 3: Approving plan and starting deep research (this will take a few minutes)...");
        AgentInteractionParams executeParams = AgentInteractionParams.builder()
            .agent(agentModel)
            .input("Plan looks good, execute!")
            .agentConfig(new DeepResearchAgentConfig(
                "deep-research",
                ThinkingSummaries.AUTO,
                Visualization.AUTO,
                false // FALSE approves the plan and executes the research
            ))
            .previousInteractionId(refinedInteraction.id()) // Resume session
            .background(true)
            .store(true)
            .build();

        Interaction finalReport = client.create(executeParams);
        finalReport = waitForCompletion(client, finalReport.id());

        System.out.println("\n--- Final Research Report ---");
        printOutputText(finalReport);
    }

    private static Interaction waitForCompletion(GeminiInteractionsClient client, String id) throws Exception {
        Interaction interaction = client.get(id);
        while (interaction.status() != Interaction.Status.COMPLETED && interaction.status() != Interaction.Status.FAILED) {
            Thread.sleep(5000);
            interaction = client.get(id);
        }
        if (interaction.status() == Interaction.Status.FAILED) {
            throw new RuntimeException("Interaction failed. Status: " + interaction.status());
        }
        return interaction;
    }

    private static void printOutputText(Interaction interaction) {
        interaction.steps().stream()
            .filter(step -> step instanceof Step.ModelOutputStep)
            .flatMap(step -> ((Step.ModelOutputStep) step).content().stream())
            .filter(content -> content instanceof Content.TextContent)
            .forEach(content -> System.out.println(((Content.TextContent) content).text()));
    }
}
运行代码
mvn compile exec:java -Dexec.mainClass=com.example.CollaborativeResearch
生成的报告输出
Deep Research 智能体将生成一份全面的结构化报告。您可以点击此处查看示例运行生成的完整报告:
8. 自定义代理和云沙盒
对于复杂的开发者任务,您可以预配自定义智能体。您可以定义其系统指令、为其配备工具(例如代码执行/Bash),并配置其远程环境(例如网络出站流量规则)。
在此步骤中,您将预配一个可安全访问 github.com 的代理,并指示该代理克隆一个代码库,然后在其云沙盒中分析该代码库的配置文件。
创建“GitHubAnalyzer.java”
创建包含以下内容的文件 src/main/java/com/example/GitHubAnalyzer.java:
package com.example;

import io.github.glaforge.gemini.interactions.GeminiInteractionsClient;
import io.github.glaforge.gemini.interactions.model.*;
import io.github.glaforge.gemini.interactions.model.InteractionParams.AgentInteractionParams;
import java.util.List;

public class GitHubAnalyzer {
    public static void main(String[] args) throws Exception {
        GeminiInteractionsClient client = GeminiInteractionsClient.builder()
            .apiKey(System.getenv("GEMINI_API_KEY"))
            .build();

        String agentId = "github-analyzer-codelab";

        // 1. Define the Custom Agent with Network Egress and Tools
        Agent customAgent = Agent.builder()
            .id(agentId)
            .description("Clones and analyzes GitHub repos.")
            .baseAgent("antigravity-preview-05-2026")
            .baseEnvironment(new EnvironmentConfig(
                new EnvironmentNetworkEgressAllowlist(List.of(
                    new AllowlistEntry("github.com") // Allow git clone over HTTPS
                )),
                List.of()
            ))
            .systemInstruction("You are an architect. Clone the repo, inspect files, and write a summary.")
            .tools(List.of(
                new AgentTool.CodeExecution(), // Enables terminal bash execution in sandbox
                new AgentTool.GoogleSearch()
            ))
            .build();

        // 2. Provision the Agent
        System.out.println("Provisioning custom agent in the cloud...");
        client.createAgent(customAgent);

        try {
            // 3. Start the Interaction
            AgentInteractionParams params = AgentInteractionParams.builder()
                .agent(agentId)
                .input("Clone https://github.com/glaforge/gemini-interactions-api-sdk and explain its pom.xml structure.")
                .environment("remote") // Crucial: Run in cloud sandbox
                .build();

            System.out.println("Starting clone and analysis (polling status)...");
            Interaction interaction = client.create(params);

            // 4. Poll for completion
            while (interaction.status() != Interaction.Status.COMPLETED) {
                System.out.println("Agent working... Status: " + interaction.status());
                Thread.sleep(5000);
                interaction = client.get(interaction.id());
            }

            // 5. Output the results
            System.out.println("\n--- Architectural Analysis ---");
            interaction.steps().stream()
                .filter(step -> step instanceof Step.ModelOutputStep)
                .flatMap(step -> ((Step.ModelOutputStep) step).content().stream())
                .filter(content -> content instanceof Content.TextContent)
                .forEach(content -> System.out.println(((Content.TextContent) content).text()));

        } finally {
            // 6. Clean up resources
            client.deleteAgent(agentId);
            System.out.println("\nCustom agent resource deleted from cloud.");
        }
    }
}
运行代码
mvn compile exec:java -Dexec.mainClass=com.example.GitHubAnalyzer
生成的分析输出
克隆代码库后,您可以在此处查看自定义代理生成的完整架构分析报告:
9. 恭喜!
您已完成此 Codelab,并学习了如何使用 Gemini Interactions SDK 在 Java 中构建复杂的多模态智能体工作流。
学习成果:
- 浏览了步数架构:使用新的多态步数架构查询标准模型。
- 流式传输的富有表现力的 TTS:使用导演注释和内嵌情感标记来实时流式传输音频。
- 生成的音乐:使用 Lyria 3 生成的 MP3 曲目和歌词。
- 生成的 Sketchnote:使用 Gemini 3 Pro Image (Nano Banana Pro) 创建的视觉摘要。
- 引导式 Deep Research:利用协作式规划来完善研究计划。
- 已配置的自定义智能体:创建具有自定义网络出站流量控制功能的沙盒环境,以安全地执行代码。
了解详情:
- 在 GitHub 上探索 SDK 源代码和更多测试用例:glaforge/gemini-interactions-api-sdk
- 如需详细了解代理设计模式,请访问 Guillaume 的博客:glaforge.dev