
1. 歡迎使用 Gemini 開發人員版!
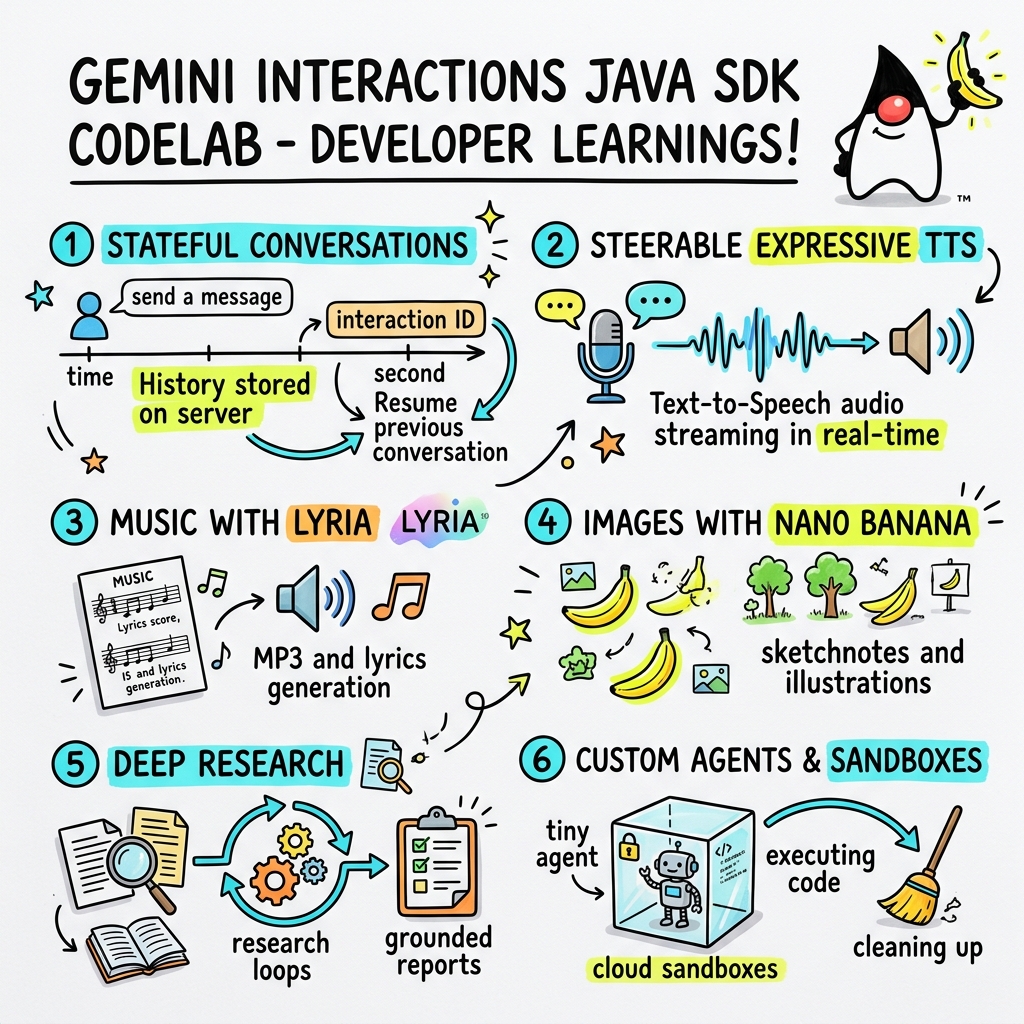
在本程式碼研究室中,您將瞭解如何使用自訂 Gemini Interactions SDK,以 Java 建構新一代 AI 應用程式。
什麼是 Gemini Interactions API?
傳統 LLM API 是無狀態的,且由要求/回應驅動。如要建構多輪對話助理或複雜的代理迴圈,開發人員過去必須完全在用戶端應用程式程式碼中管理對話狀態、記錄截斷、工具呼叫自動化調度管理和執行迴圈。
Gemini Interactions API 會將這項複雜性轉移至伺服器。這項 API 以工作階段為基礎,且具有狀態,Google 的基礎架構會代管及管理對話圖表。單一互動代表具有狀態的工作階段。與這項 API 互動時,API 會傳回豐富的結構化時間軸,其中包含多型步驟,例如:
ThoughtStep:模型的內部推理過程。ModelOutputStep:模型生成的文字、音訊或圖片內容。ToolCallStep和ToolResultStep:系統或模型啟動的工具呼叫。UserInteractionStep:系統暫停並要求人工輸入或核准的點。
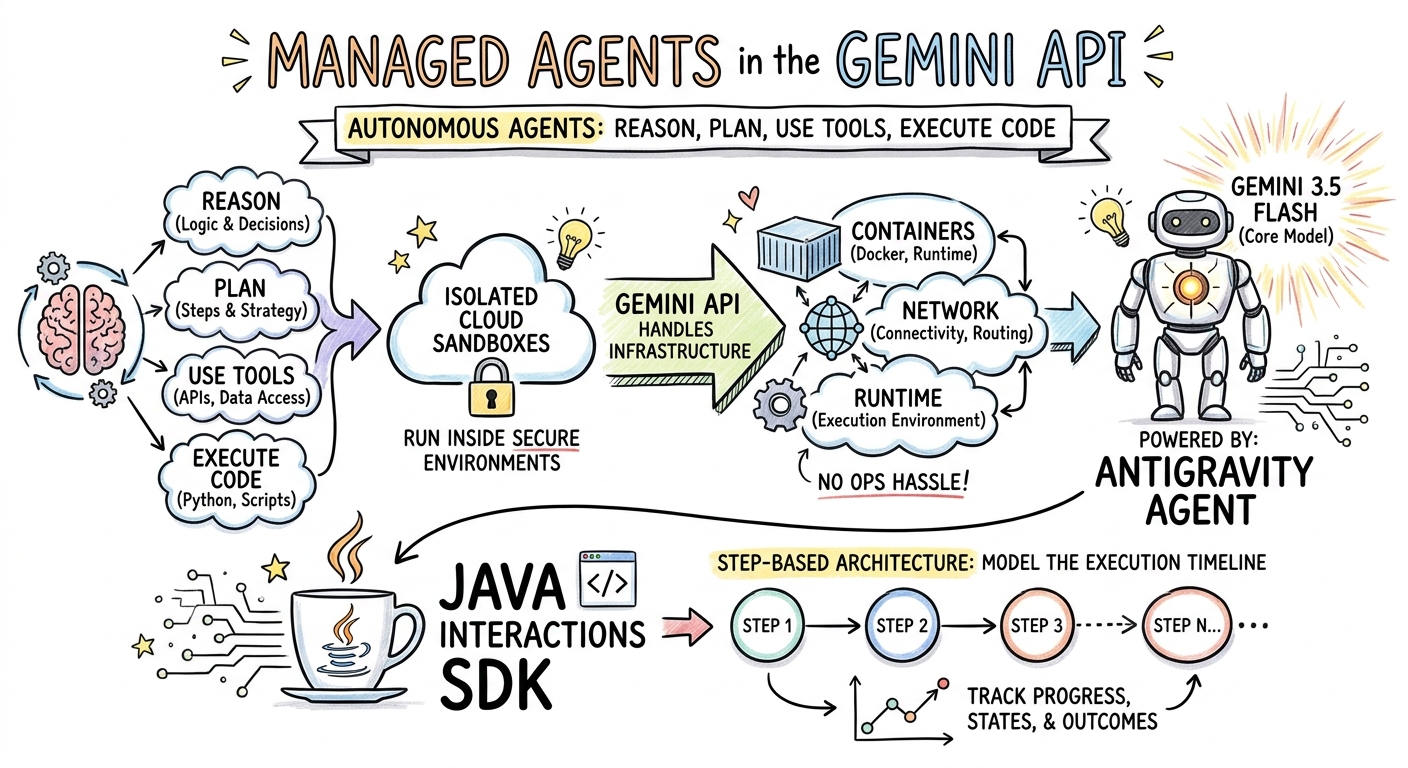
什麼是受管理代理?
自動調度管理自主代理 (處理迴圈、重試邏輯、工具執行環境和狀態管理) 極為困難。
受管理代理是 Gemini Interactions API 提供的平台層級解決方案。您可以在 Google 基礎架構上直接佈建專用代理程式,不必在本機執行代理程式迴圈:
- 內建代理:現成可用的專業代理,例如 Deep Research 代理,可執行多步驟網路研究、彙整結果,並生成詳盡的報告。
- 自訂管理型代理:您定義的自主實體。您提供系統指令、附加工具 (例如 Google 搜尋或 Bash 執行環境),並設定 Cloud Sandbox,也就是安全、獨立且以容器化的執行階段環境,並可自訂網路輸出規則 (例如僅允許存取 GitHub 等特定網域)。
使用 Gemini Interactions Java SDK,您可以在標準 Java 應用程式中,輕鬆啟動、協調及協作這些受管理代理程式。
課程內容
- 如何瀏覽新的多型
Step架構。 - 如何直接將富有表現力的 TTS 音訊串流至音箱。
- 如何使用 Lyria 生成音樂 (MP3 + 歌詞)。
- 如何使用 Gemini 3 Pro Image 生成視覺化手繪筆記。
- 如何使用協作規劃功能引導 Deep Research 代理程式。
- 如何使用網路輸出規則和工具,佈建自訂代理程式。
軟硬體需求
- Java 21 以上版本。
- Apache Maven。
- 文字編輯器或 IDE (IntelliJ IDEA、VS Code 等)。
- Gemini API 金鑰 (來自 Google AI Studio)。
2. 設定:專案和 API 金鑰
建立 Maven 專案
使用下列指令,從終端機啟動新的 Maven 專案:
mvn archetype:generate \
    -DgroupId=com.example \
    -DartifactId=gemini-interactions-demo \
    -DarchetypeGroupId=org.apache.maven.archetypes \
    -DarchetypeArtifactId=maven-archetype-quickstart \
    -DarchetypeVersion=1.5 \
    -DinteractiveMode=false
前往新建立的專案目錄:
cd gemini-interactions-demo
開啟 pom.xml 檔案並進行設定:
- 更新 Java 版本屬性,以指定 Java 21:
<properties> <maven.compiler.source>21</maven.compiler.source> <maven.compiler.target>21</maven.compiler.target> </properties> - 在
<dependency>
    <groupId>io.github.glaforge</groupId>
    <artifactId>gemini-interactions-api-sdk</artifactId>
    <version>0.10.1</version>
</dependency>
設定 API 金鑰
從 Google AI Studio 取得 Gemini API 金鑰。
在終端機中將金鑰設為環境變數:
macOS / Linux:
export GEMINI_API_KEY="your_actual_api_key"
Windows (命令提示字元):
set GEMINI_API_KEY="your_actual_api_key"
3. Hello World:瀏覽 Step 架構
互動 API 導入了多型、以步驟為基礎的時間軸架構。API 不會傳回輸出內容的扁平清單,而是傳回一連串的型別 Step 物件 (例如 ModelOutputStep、ThoughtStep、FunctionCallStep)。
在這個步驟中,您將編寫簡單的互動,瞭解如何從這個結構擷取最終模型輸出內容。
建立「HelloInteractions.java」
建立 src/main/java/com/example/HelloInteractions.java 檔案,並加入以下內容:
package com.example;

import io.github.glaforge.gemini.interactions.GeminiInteractionsClient;
import io.github.glaforge.gemini.interactions.model.*;
import io.github.glaforge.gemini.interactions.model.InteractionParams.ModelInteractionParams;

public class HelloInteractions {
    public static void main(String[] args) {
        // 1. Initialize the client
        GeminiInteractionsClient client = GeminiInteractionsClient.builder()
            .apiKey(System.getenv("GEMINI_API_KEY"))
            .build();

        // 2. Build the request
        ModelInteractionParams request = ModelInteractionParams.builder()
            .model("gemini-3.5-flash")
            .input("Explain the difference between a library and a framework in one sentence.")
            .build();

        // 3. Send request
        Interaction response = client.create(request);

        // 4. Navigate the step-based architecture to get the output
        response.steps().stream()
            .filter(step -> step instanceof Step.ModelOutputStep)
            .map(step -> (Step.ModelOutputStep) step)
            .findFirst()
            .ifPresent(step -> System.out.println(step.content().get(0)));
    }
}
執行程式碼
編譯並執行類別:
mvn compile exec:java -Dexec.mainClass=com.example.HelloInteractions
4. 可控音訊:串流播放富有表現力的 TTS
Gemini 3.1 Flash 推出可操控的文字轉語音 (TTS) 功能。你可以使用提示詞控制語音的語速、語氣和環境,並在句子中插入情緒標記 (例如 [excitedly] 或 [whispers])。
在這個步驟中,您將生成富有表現力的音訊,並直接串流至音箱。
建立「StreamingDJ.java」
建立 src/main/java/com/example/StreamingDJ.java 檔案,並加入以下內容:
package com.example;

import io.github.glaforge.gemini.interactions.GeminiInteractionsClient;
import io.github.glaforge.gemini.interactions.model.*;
import io.github.glaforge.gemini.interactions.model.Config.SpeechConfig;
import io.github.glaforge.gemini.interactions.model.InteractionParams.ModelInteractionParams;
import javax.sound.sampled.*;
import java.util.Base64;
import java.util.stream.Stream;

public class StreamingDJ {
    public static void main(String[] args) throws Exception {
        GeminiInteractionsClient client = GeminiInteractionsClient.builder()
            .apiKey(System.getenv("GEMINI_API_KEY"))
            .build();

        // Prompt defining the voice profile and emotional tags
        String prompt = """
            # AUDIO PROFILE: Jaz R.
            ## THE SCENE: London Studio
            ### DIRECTOR'S NOTES
            Accent: Jaz is a DJ from Brixton, London.
            Style: Bouncy, energetic, high-speed delivery.

            #### TRANSCRIPT
            [excitedly] Yes, massive vibes in the studio!
            [whispers] But keep it down, the boss is coming...
            [shouting] Turn this up! Let's go!
            """;

        ModelInteractionParams request = ModelInteractionParams.builder()
            .model("gemini-3.1-flash-tts-preview")
            .input(prompt)
            .responseModalities(Interaction.Modality.AUDIO)
            .speechConfig(new SpeechConfig("Algenib", "en-GB"))
            .stream(true) // Enable streaming
            .build();

        System.out.println("Streaming audio from Gemini...");

        try (Stream<Events> eventStream = client.stream(request)) {
            // Configure the Java Audio System for 24kHz Mono 16-bit PCM
            AudioFormat format = new AudioFormat(24000, 16, 1, true, false);
            DataLine.Info info = new DataLine.Info(SourceDataLine.class, format);

            try (SourceDataLine line = (SourceDataLine) AudioSystem.getLine(info)) {
                line.open(format);
                line.start();

                // Process the stream and play audio chunks as they arrive
                eventStream.forEach(event -> {
                    if (event instanceof Events.StepDelta cd && cd.delta() instanceof Events.AudioDelta audioDelta) {
                        byte[] audioData = Base64.getDecoder().decode(audioDelta.data());
                        line.write(audioData, 0, audioData.length);
                    }
                });
                line.drain();
            }
        }
    }
}
執行程式碼
mvn compile exec:java -Dexec.mainClass=com.example.StreamingDJ
聆聽輸出內容
以下是執行程式碼時會聽到的音訊範例 (使用 Algenib 語音和情緒標記):
5. 使用 Lyria 3 生成音樂
你可以使用 DeepMind Lyria 3 模型生成音樂和鈴聲。要求雙重回覆模式 (AUDIO 和 TEXT) 後,即可同時擷取生成的音訊 (MP3) 和歌詞。
建立「MusicGenerator.java」
建立 src/main/java/com/example/MusicGenerator.java 檔案,並加入以下內容:
package com.example;

import io.github.glaforge.gemini.interactions.GeminiInteractionsClient;
import io.github.glaforge.gemini.interactions.model.*;
import io.github.glaforge.gemini.interactions.model.InteractionParams.ModelInteractionParams;
import io.github.glaforge.gemini.interactions.model.Content.AudioContent;
import java.nio.file.Files;
import java.nio.file.Paths;

public class MusicGenerator {
    public static void main(String[] args) throws Exception {
        GeminiInteractionsClient client = GeminiInteractionsClient.builder()
            .apiKey(System.getenv("GEMINI_API_KEY"))
            .build();

        ModelInteractionParams request = ModelInteractionParams.builder()
            .model("models/lyria-3-clip-preview") // 30-second clip
            .input("An uplifting rock song with acoustic guitars about coding in Java.")
            .responseModalities(
                Interaction.Modality.AUDIO,
                Interaction.Modality.TEXT) // Request both MP3 and Lyrics
            .build();

        System.out.println("Generating music (this might take a moment)...");
        Interaction response = client.create(request);

        // 1. Print the lyrics (TEXT output)
        System.out.println("\n--- Generated Lyrics ---");
        response.steps().stream()
            .filter(step -> step instanceof Step.ModelOutputStep)
            .flatMap(step -> ((Step.ModelOutputStep) step).content().stream())
            .filter(content -> content instanceof Content.TextContent)
            .forEach(content -> System.out.println(((Content.TextContent) content).text()));

        // 2. Save the MP3 (AUDIO output)
        response.steps().stream()
            .filter(step -> step instanceof Step.ModelOutputStep)
            .flatMap(step -> ((Step.ModelOutputStep) step).content().stream())
            .filter(content -> content instanceof AudioContent)
            .map(content -> (AudioContent) content)
            .findFirst()
            .ifPresent(audio -> {
                try {
                    Files.write(Paths.get("coding_song.mp3"), audio.data());
                    System.out.println("\nSuccess: Song saved to coding_song.mp3");
                } catch (Exception e) {
                    e.printStackTrace();
                }
            });
    }
}
執行程式碼
mvn compile exec:java -Dexec.mainClass=com.example.MusicGenerator
聆聽生成的歌曲
以下是生成的 MP3 檔案 (coding_song.mp3),內含音樂和歌詞:
6. 使用 Sketchnotes 視覺化呈現 (Nano Banana Pro)
Gemini 3 Pro Image (又稱 Nano Banana Pro) 可生成圖片。只要要求 IMAGE 模態,就能根據文字輸入內容生成資訊圖表、示意圖或手繪筆記。
在這個步驟中,您將生成一篇有關 Managed Agents 的文章的筆記摘要,並儲存為 PNG 檔案。
建立「ImageGenerator.java」
建立 src/main/java/com/example/ImageGenerator.java 檔案,並加入以下內容:
package com.example;

import io.github.glaforge.gemini.interactions.GeminiInteractionsClient;
import io.github.glaforge.gemini.interactions.model.*;
import io.github.glaforge.gemini.interactions.model.InteractionParams.ModelInteractionParams;
import io.github.glaforge.gemini.interactions.model.Content.ImageContent;
import java.nio.file.Files;
import java.nio.file.Paths;

public class ImageGenerator {
    public static void main(String[] args) throws Exception {
        GeminiInteractionsClient client = GeminiInteractionsClient.builder()
            .apiKey(System.getenv("GEMINI_API_KEY"))
            .build();

        String articleSummary = """
            Managed Agents in the Gemini API allow developers to run autonomous agents
            that reason, plan, use tools, and execute code inside isolated cloud sandboxes.
            The Gemini API handles the infrastructure (containers, network, runtime).
            It is powered by the Antigravity agent running on Gemini 3.5 Flash.
            The Java Interactions SDK supports these capabilities, utilizing a Step-based
            architecture to model the execution timeline.
            """;

        ModelInteractionParams request = ModelInteractionParams.builder()
            .model("gemini-3-pro-image-preview")
            .input(String.format("""
                Create a hand-drawn and hand-written sketchnote
                style summary infographic, with a pure white background,
                about the following information:

                %s
                """, articleSummary))
            .responseModalities(Interaction.Modality.IMAGE) // Request IMAGE modality
            .build();

        System.out.println("Generating sketchnote (this might take a moment)...");
        Interaction response = client.create(request);

        // Save the generated image
        response.steps().stream()
            .filter(step -> step instanceof Step.ModelOutputStep)
            .flatMap(step -> ((Step.ModelOutputStep) step).content().stream())
            .filter(content -> content instanceof ImageContent)
            .map(content -> (ImageContent) content)
            .findFirst()
            .ifPresent(image -> {
                try {
                    Files.write(Paths.get("sketchnote.png"), image.data());
                    System.out.println("Success: Sketchnote saved to sketchnote.png");
                } catch (Exception e) {
                    e.printStackTrace();
                }
            });
    }
}
執行程式碼
mvn compile exec:java -Dexec.mainClass=com.example.ImageGenerator
生成的筆記
以下是模型生成的筆記 (sketchnote.png):
7. 指導代理:協作式深入研究
Deep Research 是一項強大的代理,可執行多步驟研究工作。不過,您可以先使用「協同規劃」功能,在代理程式開始收集資料前,查看、修改及引導研究計畫。
您將實作多輪對話,使用相同的伺服器端狀態 (previousInteractionId) 來修正計畫。
建立「CollaborativeResearch.java」
建立 src/main/java/com/example/CollaborativeResearch.java 檔案,並加入以下內容:
package com.example;

import io.github.glaforge.gemini.interactions.GeminiInteractionsClient;
import io.github.glaforge.gemini.interactions.model.*;
import io.github.glaforge.gemini.interactions.model.InteractionParams.AgentInteractionParams;
import io.github.glaforge.gemini.interactions.model.Config.DeepResearchAgentConfig;
import io.github.glaforge.gemini.interactions.model.Config.ThinkingSummaries;
import io.github.glaforge.gemini.interactions.model.Config.Visualization;

public class CollaborativeResearch {
    public static void main(String[] args) throws Exception {
        GeminiInteractionsClient client = GeminiInteractionsClient.builder()
            .apiKey(System.getenv("GEMINI_API_KEY"))
            .build();

        String agentModel = "deep-research-preview-04-2026";

        // --- Phase 1: Request a Plan ---
        System.out.println("Phase 1: Requesting research plan...");
        AgentInteractionParams planParams = AgentInteractionParams.builder()
            .agent(agentModel)
            .input("Research the latest generations of Google Cloud TPUs (TPU7x and the 8th generation TPU 8t and TPU 8i).")
            .agentConfig(new DeepResearchAgentConfig(
                "deep-research",
                ThinkingSummaries.AUTO,
                Visualization.AUTO,
                true // TRUE enables collaborative planning
            ))
            .background(true)
            .store(true)
            .build();

        Interaction planInteraction = client.create(planParams);
        planInteraction = waitForCompletion(client, planInteraction.id());

        System.out.println("\n--- Proposed Plan ---");
        printOutputText(planInteraction);

        // --- Phase 2: Refine the Plan ---
        System.out.println("\nPhase 2: Refining research plan...");
        AgentInteractionParams refineParams = AgentInteractionParams.builder()
            .agent(agentModel)
            .input("Focus on comparing the architectural, performance, and scaling differences between the TPU7x generation and the two flavors of the eighth generation: TPU 8t (optimized for training at scale) and TPU 8i (optimized for low-latency reasoning and inference).")
            .agentConfig(new DeepResearchAgentConfig(
                "deep-research",
                ThinkingSummaries.AUTO,
                Visualization.AUTO,
                true // Keep collaborative planning TRUE to iterate
            ))
            .previousInteractionId(planInteraction.id()) // Resume session
            .background(true)
            .store(true)
            .build();

        Interaction refinedInteraction = client.create(refineParams);
        refinedInteraction = waitForCompletion(client, refinedInteraction.id());

        System.out.println("\n--- Refined Plan ---");
        printOutputText(refinedInteraction);

        // --- Phase 3: Approve and Execute ---
        System.out.println("\nPhase 3: Approving plan and starting deep research (this will take a few minutes)...");
        AgentInteractionParams executeParams = AgentInteractionParams.builder()
            .agent(agentModel)
            .input("Plan looks good, execute!")
            .agentConfig(new DeepResearchAgentConfig(
                "deep-research",
                ThinkingSummaries.AUTO,
                Visualization.AUTO,
                false // FALSE approves the plan and executes the research
            ))
            .previousInteractionId(refinedInteraction.id()) // Resume session
            .background(true)
            .store(true)
            .build();

        Interaction finalReport = client.create(executeParams);
        finalReport = waitForCompletion(client, finalReport.id());

        System.out.println("\n--- Final Research Report ---");
        printOutputText(finalReport);
    }

    private static Interaction waitForCompletion(GeminiInteractionsClient client, String id) throws Exception {
        Interaction interaction = client.get(id);
        while (interaction.status() != Interaction.Status.COMPLETED && interaction.status() != Interaction.Status.FAILED) {
            Thread.sleep(5000);
            interaction = client.get(id);
        }
        if (interaction.status() == Interaction.Status.FAILED) {
            throw new RuntimeException("Interaction failed. Status: " + interaction.status());
        }
        return interaction;
    }

    private static void printOutputText(Interaction interaction) {
        interaction.steps().stream()
            .filter(step -> step instanceof Step.ModelOutputStep)
            .flatMap(step -> ((Step.ModelOutputStep) step).content().stream())
            .filter(content -> content instanceof Content.TextContent)
            .forEach(content -> System.out.println(((Content.TextContent) content).text()));
    }
}
執行程式碼
mvn compile exec:java -Dexec.mainClass=com.example.CollaborativeResearch
產生的報表輸出內容
Deep Research 代理會生成詳盡的結構化報告。如要查看範例執行的完整報告,請按這裡:
8. 自訂代理程式和 Cloud 沙箱
如要執行複雜的開發人員工作,可以佈建自訂代理程式。您可以定義系統指令、為其配備工具 (例如程式碼執行/Bash),以及設定遠端環境 (例如網路輸出規則)。
在這個步驟中,您將佈建可安全存取網際網路的代理程式,並指示該代理程式複製存放區,以及分析雲端沙箱中的設定檔。github.com
建立「GitHubAnalyzer.java」
建立 src/main/java/com/example/GitHubAnalyzer.java 檔案,並加入以下內容:
package com.example;

import io.github.glaforge.gemini.interactions.GeminiInteractionsClient;
import io.github.glaforge.gemini.interactions.model.*;
import io.github.glaforge.gemini.interactions.model.InteractionParams.AgentInteractionParams;
import java.util.List;

public class GitHubAnalyzer {
    public static void main(String[] args) throws Exception {
        GeminiInteractionsClient client = GeminiInteractionsClient.builder()
            .apiKey(System.getenv("GEMINI_API_KEY"))
            .build();

        String agentId = "github-analyzer-codelab";

        // 1. Define the Custom Agent with Network Egress and Tools
        Agent customAgent = Agent.builder()
            .id(agentId)
            .description("Clones and analyzes GitHub repos.")
            .baseAgent("antigravity-preview-05-2026")
            .baseEnvironment(new EnvironmentConfig(
                new EnvironmentNetworkEgressAllowlist(List.of(
                    new AllowlistEntry("github.com") // Allow git clone over HTTPS
                )),
                List.of()
            ))
            .systemInstruction("You are an architect. Clone the repo, inspect files, and write a summary.")
            .tools(List.of(
                new AgentTool.CodeExecution(), // Enables terminal bash execution in sandbox
                new AgentTool.GoogleSearch()
            ))
            .build();

        // 2. Provision the Agent
        System.out.println("Provisioning custom agent in the cloud...");
        client.createAgent(customAgent);

        try {
            // 3. Start the Interaction
            AgentInteractionParams params = AgentInteractionParams.builder()
                .agent(agentId)
                .input("Clone https://github.com/glaforge/gemini-interactions-api-sdk and explain its pom.xml structure.")
                .environment("remote") // Crucial: Run in cloud sandbox
                .build();

            System.out.println("Starting clone and analysis (polling status)...");
            Interaction interaction = client.create(params);

            // 4. Poll for completion
            while (interaction.status() != Interaction.Status.COMPLETED) {
                System.out.println("Agent working... Status: " + interaction.status());
                Thread.sleep(5000);
                interaction = client.get(interaction.id());
            }

            // 5. Output the results
            System.out.println("\n--- Architectural Analysis ---");
            interaction.steps().stream()
                .filter(step -> step instanceof Step.ModelOutputStep)
                .flatMap(step -> ((Step.ModelOutputStep) step).content().stream())
                .filter(content -> content instanceof Content.TextContent)
                .forEach(content -> System.out.println(((Content.TextContent) content).text()));

        } finally {
            // 6. Clean up resources
            client.deleteAgent(agentId);
            System.out.println("\nCustom agent resource deleted from cloud.");
        }
    }
}
執行程式碼
mvn compile exec:java -Dexec.mainClass=com.example.GitHubAnalyzer
生成的分析輸出內容
複製存放區後,您可以在這裡查看自訂代理程式產生的完整架構分析報告:
9. 恭喜!
您已完成本程式碼研究室,並瞭解如何使用 Gemini Interactions SDK,在 Java 中建構複雜的多模態代理工作流程。
您達成的成就:
- 瀏覽步驟架構:使用新的多型步驟架構查詢標準模型。
- 串流式自然語音:使用導演附註和內嵌情緒標記,即時串流音訊。
- 生成的音樂:使用 Lyria 3 生成的 MP3 樂曲和歌詞。
- 生成的筆記:使用 Gemini 3 Pro Image (Nano Banana Pro) 建立視覺摘要。
- Deep Research:運用協作規劃功能,修正研究計畫。
- 佈建的自訂代理:建立沙箱環境,並自訂網路輸出控制項,安全地執行程式碼。
瞭解詳情:
- 在 GitHub 上探索 SDK 原始碼和更多測試案例:glaforge/gemini-interactions-api-sdk
- 如要進一步瞭解代理程式設計模式,請參閱 Guillaume 的網誌:glaforge.dev