
1. 簡介
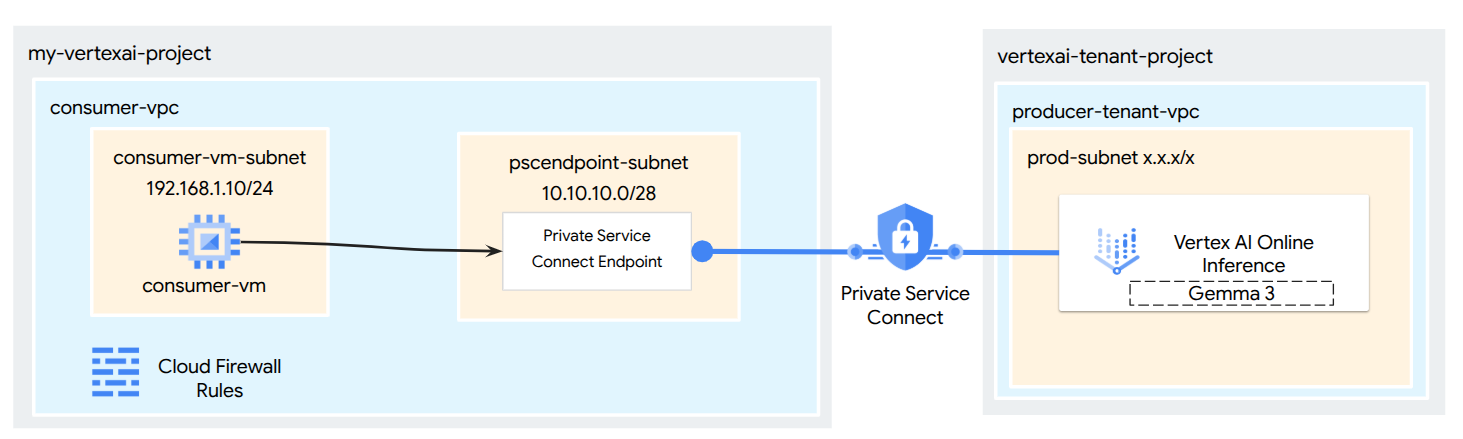
運用 Private Service Connect (PSC),為從 Vertex AI Model Garden 部署的模型建立高度安全的私密存取機制。這個方法不會公開端點,而是將模型部署至只能在虛擬私有雲 (VPC) 內存取的私人 Vertex AI 端點。
Private Service Connect 會在虛擬私有雲中建立具有內部 IP 位址的端點,直接連線至 Google 管理的 Vertex AI 服務,該服務會代管您的模型。這樣一來,虛擬私有雲和地端部署環境中的應用程式 (透過 Cloud VPN 或 Interconnect) 就能使用私人 IP 傳送推論要求。
最重要的是,虛擬私有雲和 Vertex AI 私人端點之間的所有網路流量都會保留在 Google 的專屬網路上,完全與公開網際網路隔離。此外,這項私人連線在傳輸過程中會使用 TLS 加密機制保護安全。這項端對端加密功能可確保預測要求和模型回覆受到保護,進而提升資料機密性和完整性。透過 PSC 進行網路隔離,並採用 TLS 加密,可為線上預測提供安全無虞的環境,減少延遲並大幅提升資安態勢。
建構項目
在本教學課程中,您將從 Model Garden 下載 Gemma 3,並以私人端點的形式,透過 Private Service Connect 存取 Vertex AI Online Inference 中代管的 Gemma 3。端對端設定包括:
- Model Garden 模型:從 Vertex AI Model Garden 選取 Gemma 3,並部署至 Private Service Connect 端點。
- Private Service Connect:您會在虛擬私有雲 (VPC) 中設定用戶端端點,其中包含您網路中的內部 IP 位址。
- 安全連線至 Vertex AI:PSC 端點會以 Vertex AI 為私人模型部署自動產生的服務附件為目標。這會建立私人連線,確保虛擬私有雲和提供模型端點之間的流量不會經過公用網際網路。
- 虛擬私有雲中的用戶端設定:您會在虛擬私有雲中設定用戶端 (例如 Compute Engine VM),使用 PSC 端點的內部 IP 位址,將推論要求傳送至已部署的模型。
- 驗證 TLS 加密:從虛擬私有雲中的用戶端 VM,使用標準工具 ( openssl s_client) 連線至 PSC 端點的內部 IP 位址。這個步驟可讓您檢查握手詳細資料和顯示的伺服器憑證,確認與 Vertex AI 服務的通訊管道確實使用 TLS 加密。
完成後,您將擁有可正常運作的範例,以私密方式提供 Model Garden 模型,且只能從指定虛擬私有雲網路內存取。
課程內容
在本教學課程中,您將瞭解如何從 Vertex AI Model Garden 部署模型,並使用 Private Service Connect (PSC),從虛擬私有雲 (VPC) 安全地存取模型。透過這種方式,虛擬私有雲 (消費者) 中的應用程式就能以私密方式連線至 Vertex AI 模型端點 (生產端服務),不必經過公開網際網路。
具體來說,您將學到:
- 瞭解 Vertex AI 的 PSC:瞭解 PSC 如何建立私密且安全的消費者與供應商連線。您的 VPC 可以使用內部 IP 位址存取已部署的 Model Garden 模型。
- 使用私密存取權部署模型:瞭解如何為 Model Garden 模型設定 Vertex AI 端點,以使用 PSC,將其設為私密端點。
- 服務附件的角色:將模型部署至私有 Vertex AI 端點時,Google Cloud 會在 Google 管理的租戶專案中自動建立服務附件。這項服務連結會向消費者網路公開提供模型服務。
- 在虛擬私有雲中建立 PSC 端點:
- 如何從已部署的 Vertex AI 端點詳細資料取得專屬服務附件 URI。
- 如何在虛擬私有雲中選定子網路內預留內部 IP 位址。
- 如何在虛擬私有雲中建立轉送規則,做為 PSC 端點,並以 Vertex AI 服務連結為目標。這個端點可透過保留的內部 IP 存取模型。
- 建立私人連線:虛擬私有雲中的 PSC 端點如何連線至服務附件,安全地將您的網路橋接至 Vertex AI 服務。
- 私下傳送推論要求:如何從虛擬私有雲內的資源 (例如 Compute Engine VM) 將預測要求傳送至 PSC 端點的內部 IP 位址。
- 驗證:測試並確認您可以透過私有連線,從虛擬私有雲成功將推論要求傳送至已部署的 Model Garden 模型。
- 驗證 TLS 加密:說明如何使用虛擬私有雲用戶端 (例如 Compute Engine VM) 內的工具,透過 TLS 連線至 PSC 端點的內部 IP 位址。
完成這項操作後,您就能從 Model Garden 代管模型,且只能透過私人網路基礎架構存取。
軟硬體需求
Google Cloud 專案
IAM 權限
- AI Platform 管理員 (roles/ml.Admin)
- Compute 網路管理員 (roles/compute.networkAdmin)
- Compute 執行個體管理員 (roles/compute.instanceAdmin)
- Compute 安全管理員 (roles/compute.securityAdmin)
- DNS 管理員 (roles/dns.admin)
- 受 IAP 保護的通道使用者 (roles/iap.tunnelResourceAccessor)
- 記錄管理員 (roles/logging.admin)
- Notebooks 管理員 (roles/notebooks.admin)
- 專案 IAM 管理員 (roles/resourcemanager.projectIamAdmin)
- 服務帳戶管理員 (roles/iam.serviceAccountAdmin)
- 服務使用情形管理員 (roles/serviceusage.serviceUsageAdmin)
2. 事前準備
更新專案以支援教學課程
本教學課程會使用 $variables,協助您在 Cloud Shell 中實作 gcloud 設定。
在 Cloud Shell 中執行下列操作:
gcloud config list project
gcloud config set project [YOUR-PROJECT-ID]
projectid=[YOUR-PROJECT-ID]
echo $projectid
啟用 API
在 Cloud Shell 中執行下列操作:
gcloud services enable "compute.googleapis.com"
gcloud services enable "aiplatform.googleapis.com"
gcloud services enable "serviceusage.googleapis.com"
gcloud services enable dns.googleapis.com
3. 部署模型
請按照下列步驟,從 Model Garden 部署模型:
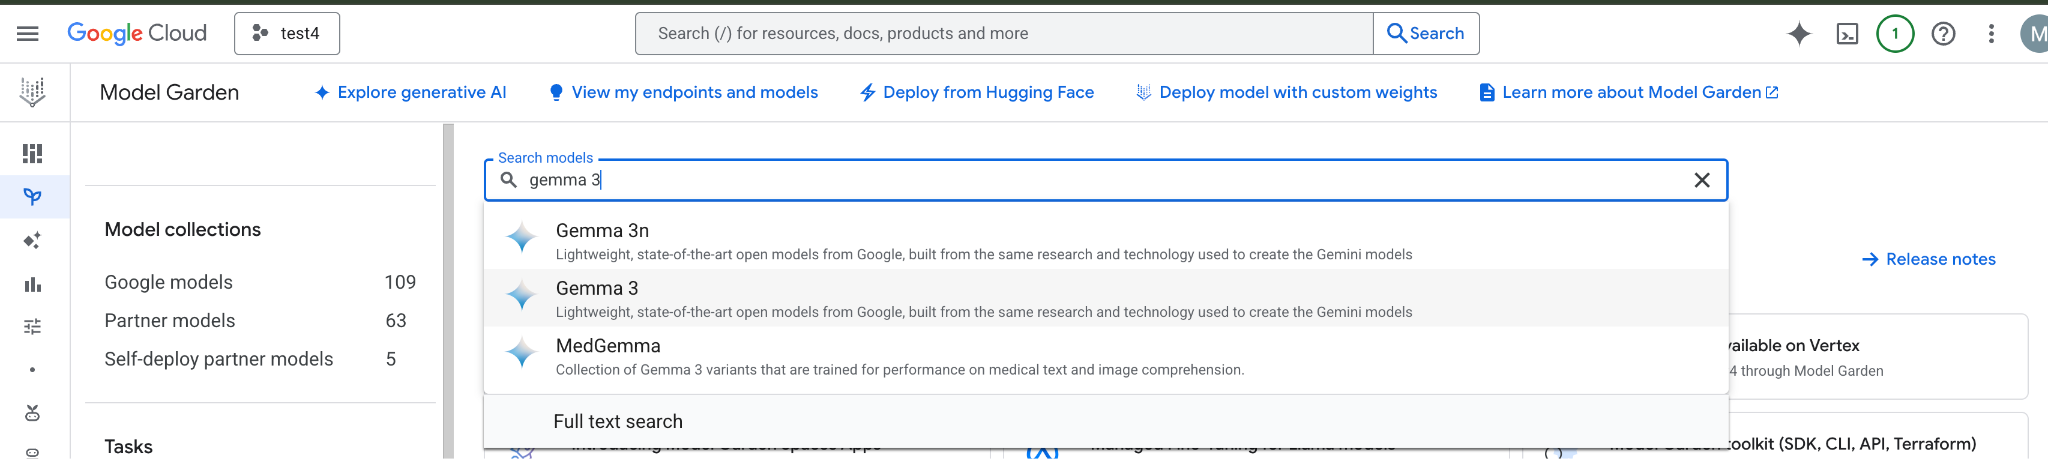
在 Google Cloud 控制台中,前往 Model Garden,然後搜尋並選取 Gemma 3
按一下「部署模型」,然後選取「Vertex AI」
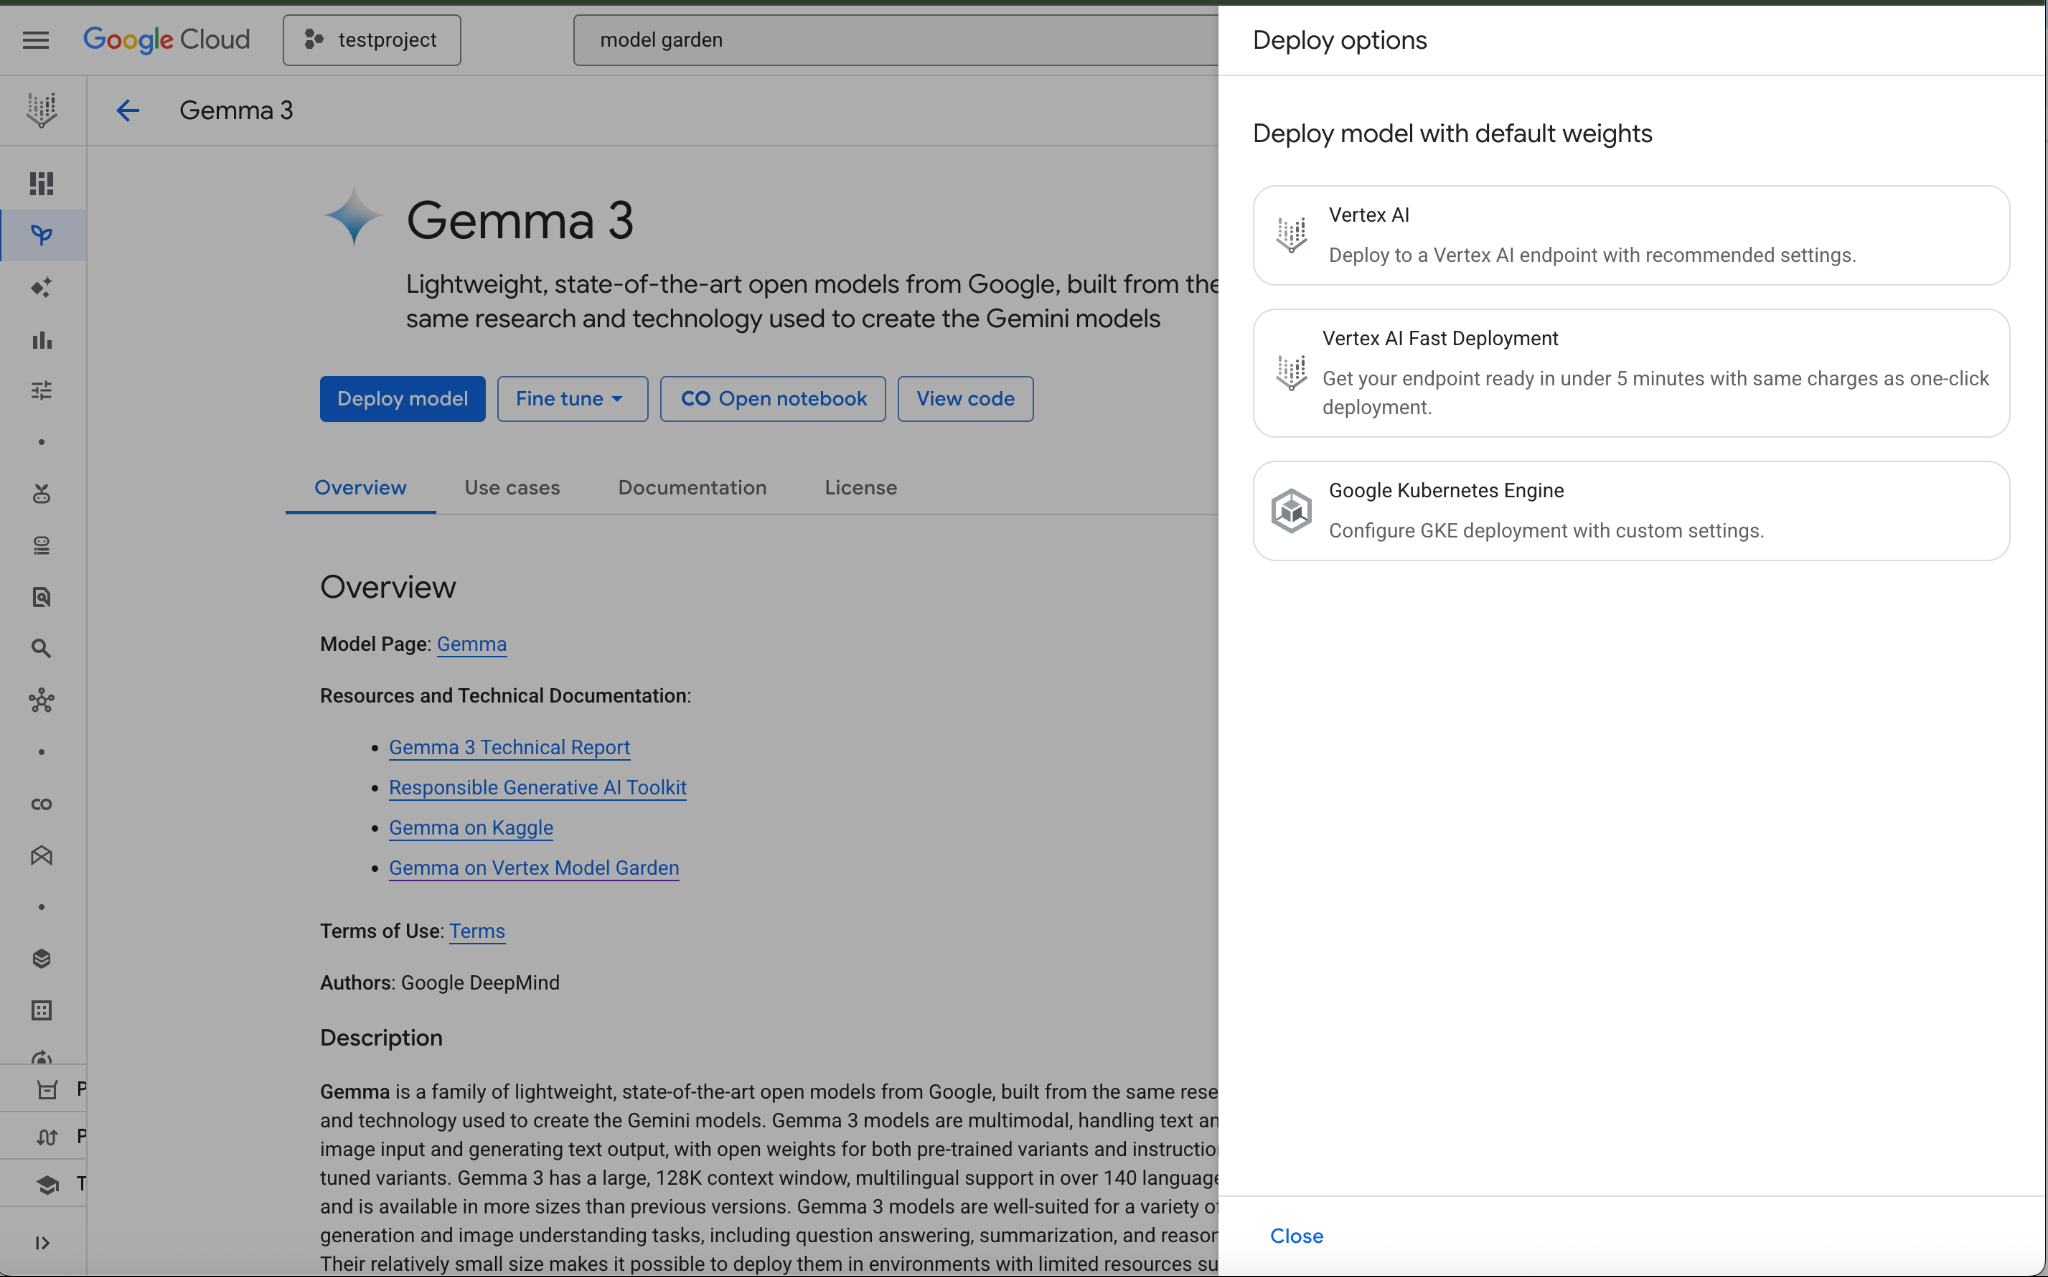
在「部署設定」部分底部選取「編輯設定」
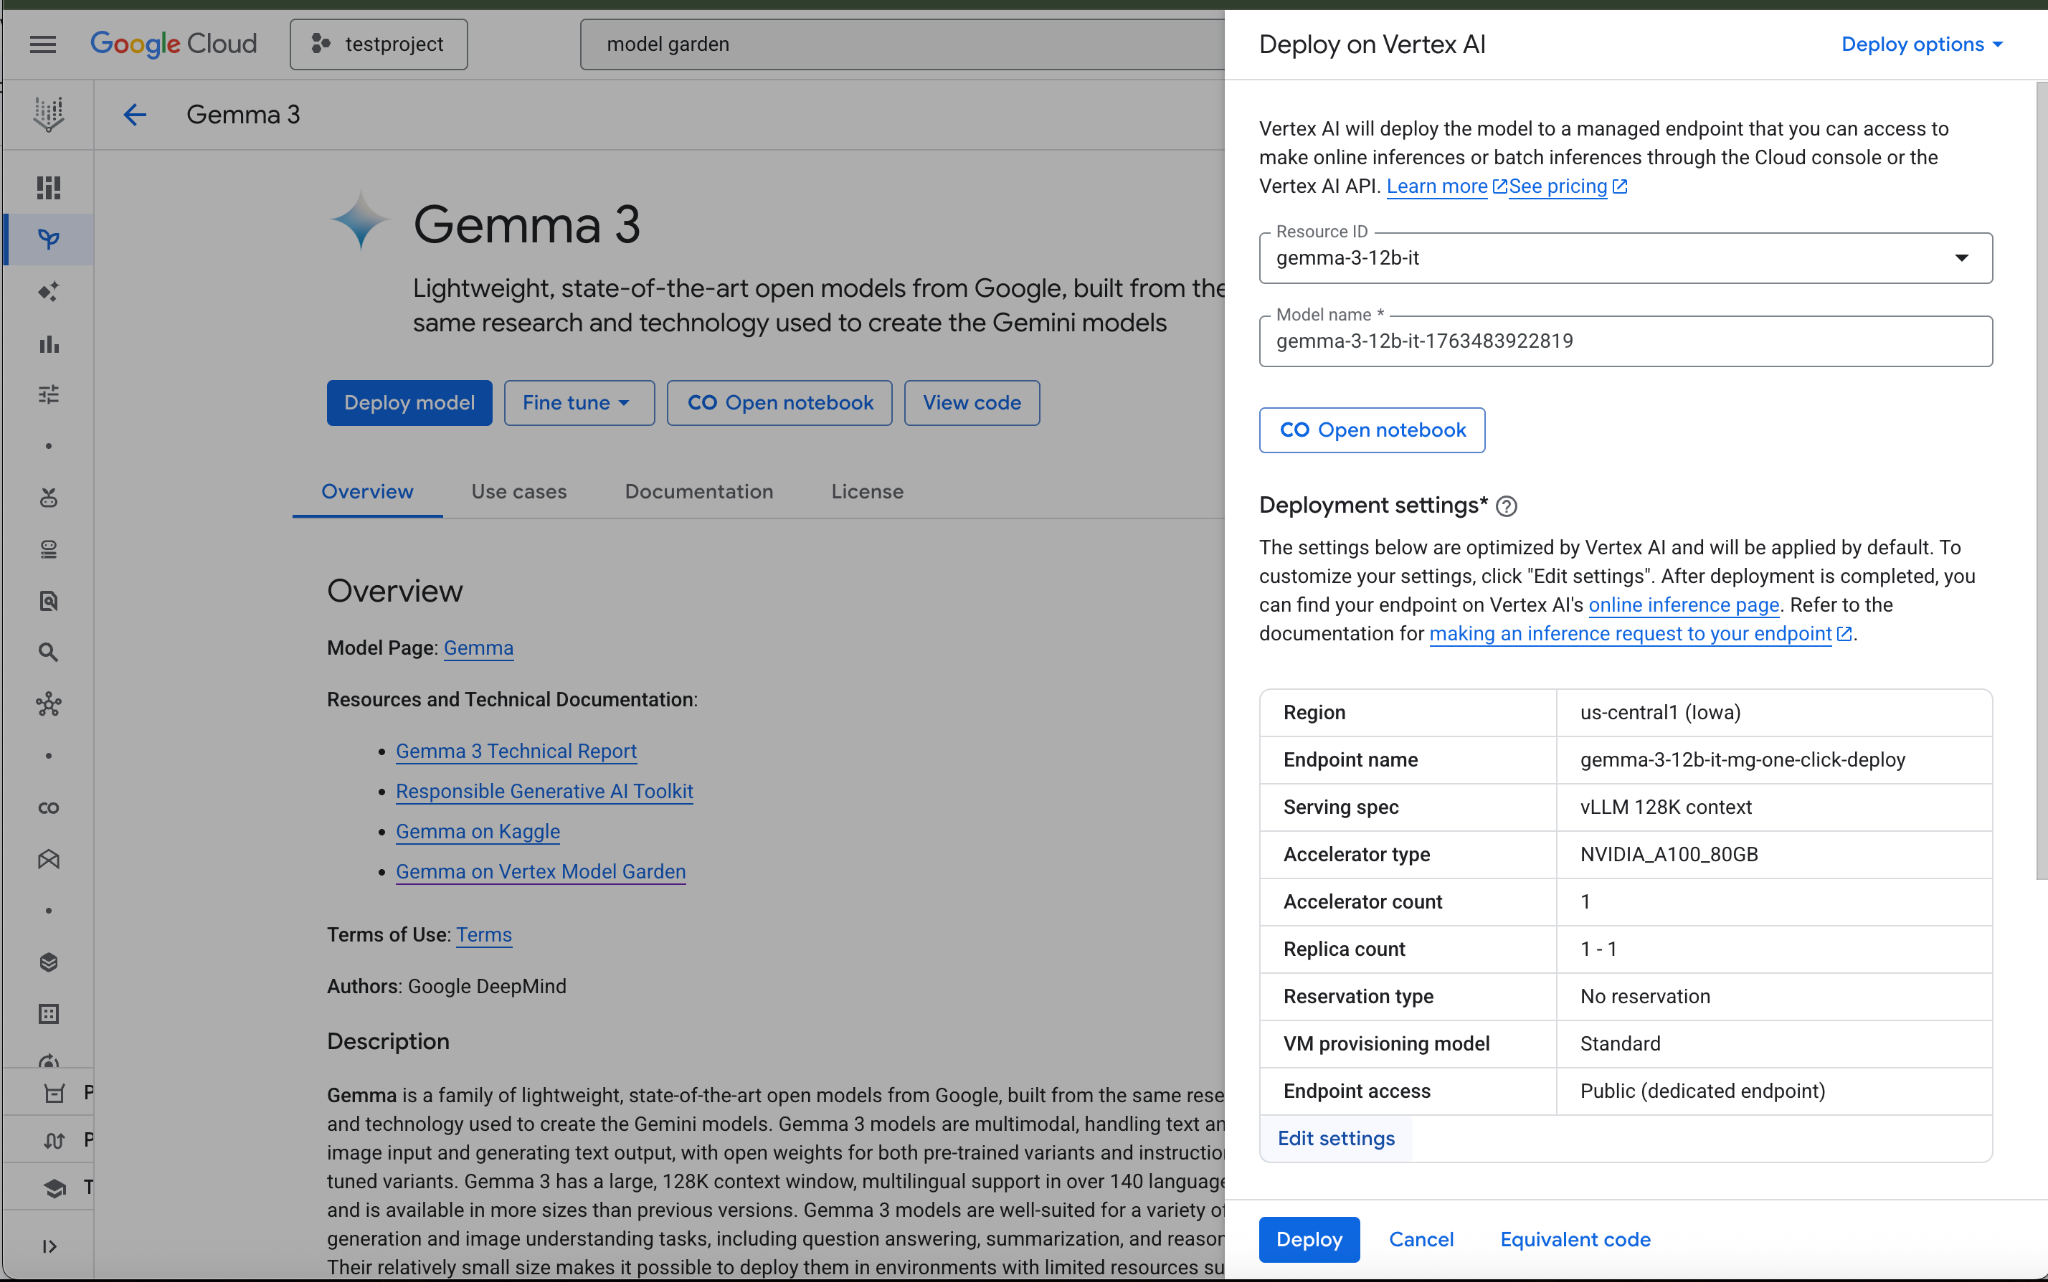
在「Deploy on Vertex AI」窗格中,確認「Endpoint Access」已設為「Private Service Connect」,然後選取專案。
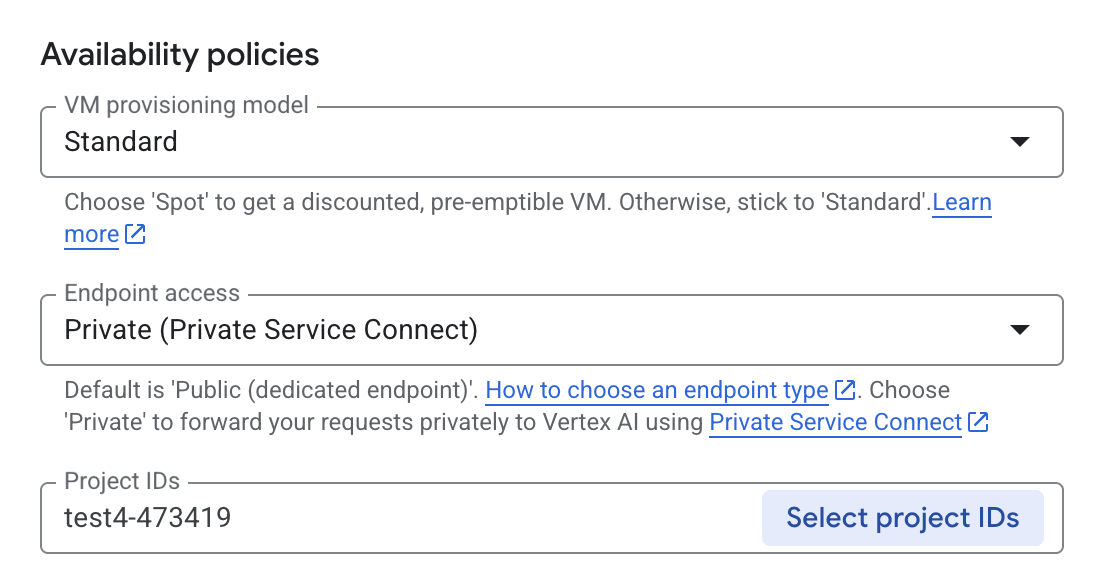
其他選項均保留預設值,然後選取底部的「Deploy」(部署),並查看通知中的部署狀態。

在 Model Garden 中,選取提供 Gemma 3 模型和端點的區域 (us-central1)。模型部署作業大約需要 5 分鐘。
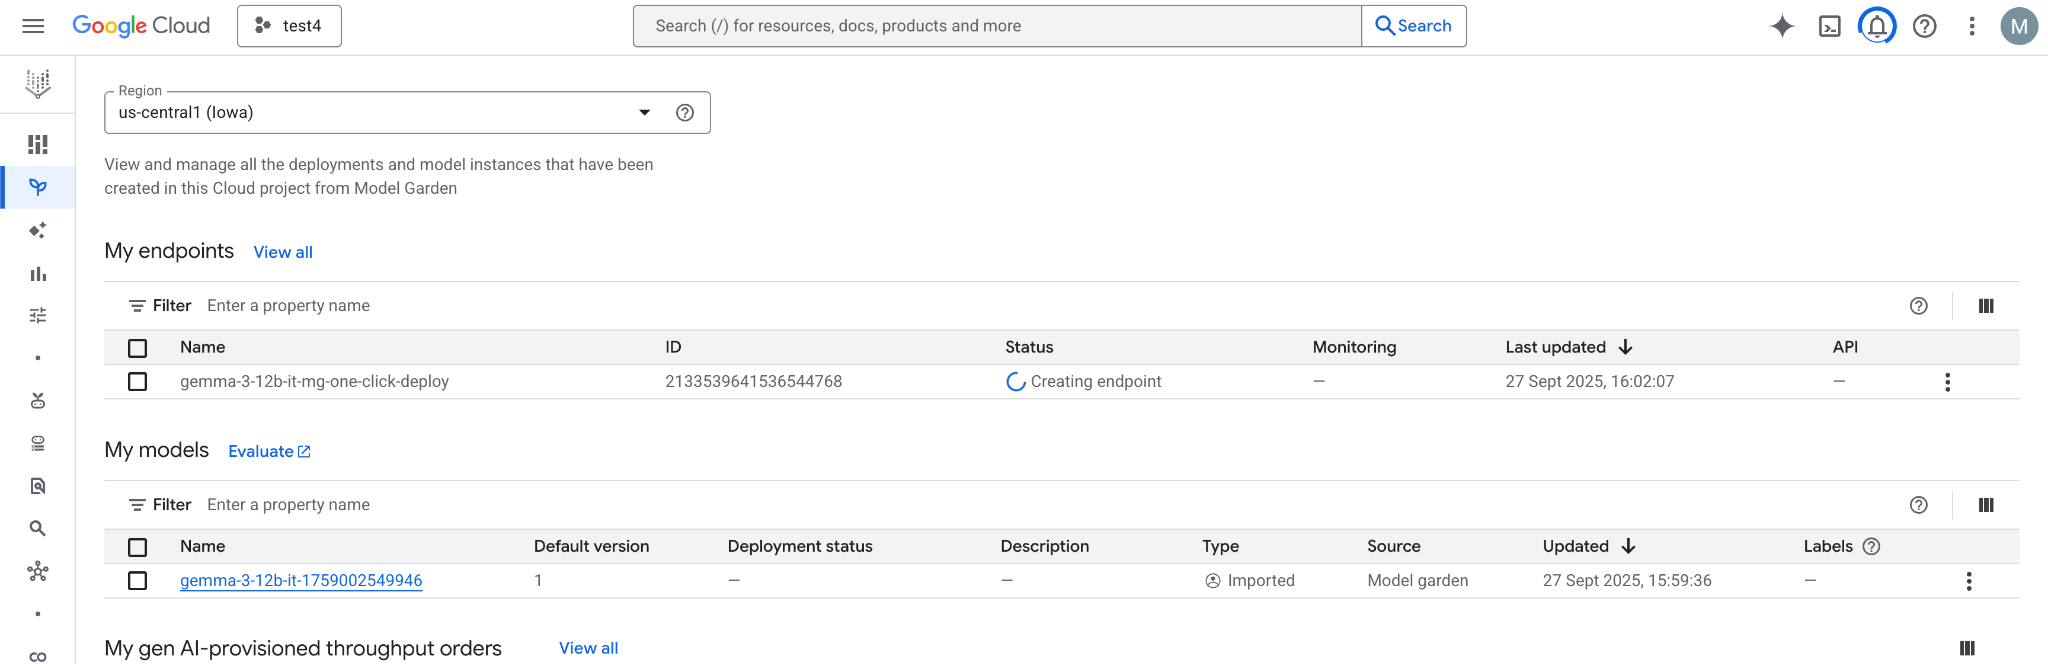
完成後,端點會在 30 分鐘內轉換為「有效」

選取端點,取得並記下端點 ID。
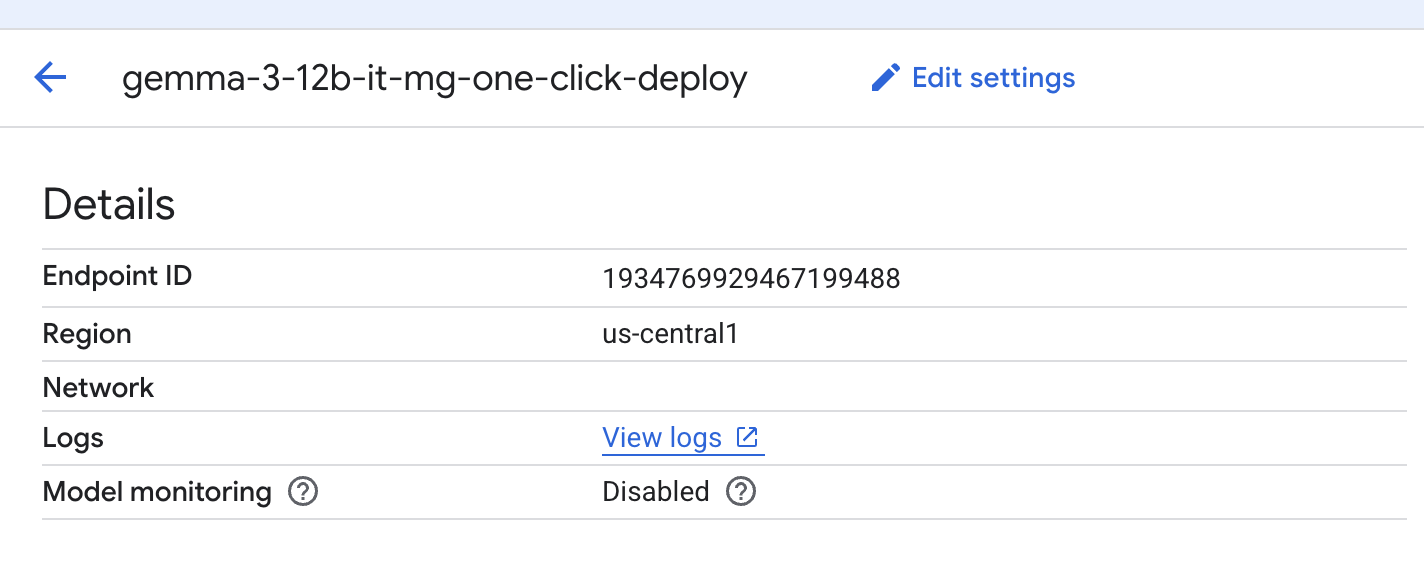
選取端點以擷取端點 ID,並更新變數。在顯示的範例中,ID 為 1934769929467199488。
在 Cloud Shell 中執行下列操作:
endpointID=<Enter_Your_Endpoint_ID>
region=us-central1
請執行下列步驟,取得 Private Service Connect 服務連結 URI。部署 PSC 取用端點時,取用端會使用這個 URI 字串。
在 Cloud Shell 中使用端點 ID/區域變數,然後發出下列指令:
gcloud ai endpoints describe $endpointID --region=$region | grep -i serviceAttachment:
範例如下:
user@cloudshell:$ gcloud ai endpoints describe 1934769929467199488 --region=us-central1 | grep -i serviceAttachment:

Using endpoint [https://us-central1-aiplatform.googleapis.com/]
    serviceAttachment: projects/o9457b320a852208e-tp/regions/us-central1/serviceAttachments/gkedpm-52065579567eaf39bfe24f25f7981d
將 serviceAttachment 後的內容複製到名為「Service_attachment」的變數中,稍後建立 PSC 連線時會用到。
user@cloudshell:$ Service_attachment=<Enter_Your_ServiceAttachment>
4. 消費者設定
建立消費者虛擬私有雲
在 Cloud Shell 中執行下列操作:
gcloud compute networks create consumer-vpc --project=$projectid --subnet-mode=custom
建立消費者 VM 子網路
在 Cloud Shell 中執行下列操作:
gcloud compute networks subnets create consumer-vm-subnet --project=$projectid --range=192.168.1.0/24 --network=consumer-vpc --region=$region --enable-private-ip-google-access
在 Cloud Shell 中建立 PSC 端點子網路,並執行下列操作:
gcloud compute networks subnets create pscendpoint-subnet --project=$projectid --range=10.10.10.0/28 --network=consumer-vpc --region=$region
5. 啟用 IAP
如要允許 IAP 連線至您的 VM 執行個體,請根據以下條件建立防火牆規則:
- 套用至所有您希望能透過 IAP 存取的 VM 執行個體。
- 允許來自 IP 範圍 35.235.240.0/20 的輸入流量。這個範圍包含 IAP 用於 TCP 轉送的所有 IP 位址。
在 Cloud Shell 中,建立 IAP 防火牆規則。
gcloud compute firewall-rules create ssh-iap-consumer \
    --network consumer-vpc \
    --allow tcp:22 \
    --source-ranges=35.235.240.0/20
6. 建立消費者 VM 執行個體
在 Cloud Shell 中,建立取用者 VM 執行個體 consumer-vm。
gcloud compute instances create consumer-vm \
    --project=$projectid \
    --machine-type=e2-micro \
    --image-family debian-11 \
    --no-address \
    --shielded-secure-boot \
    --image-project debian-cloud \
    --zone us-central1-a \
    --subnet=consumer-vm-subnet
7. Private Service Connect 端點
消費者會在虛擬私有雲中,使用內部 IP 位址建立消費者端點 (轉送規則)。這個 PSC 端點的目標是供應商的服務連結。消費者虛擬私有雲或混合式網路中的用戶端可以將流量傳送至這個內部 IP 位址,以連線至生產者的服務。
為消費者端點保留 IP 位址。
在 Cloud Shell 中建立轉送規則。
gcloud compute addresses create psc-address \
    --project=$projectid \
    --region=$region \
    --subnet=pscendpoint-subnet \
    --addresses=10.10.10.6
確認 IP 位址已保留。
在 Cloud Shell 中,列出保留的 IP 位址。
gcloud compute addresses list
您應該會看到預留的 10.10.10.6 IP 位址。

指定您在上一個步驟「部署模型」一節中擷取的服務連結 URI (target-service-attachment),建立消費者端點。
在 Cloud Shell 中,說明網路附件。
 gcloud compute forwarding-rules create psc-consumer-ep \
    --network=consumer-vpc \
    --address=psc-address \
    --region=$region \
    --target-service-attachment=$Service_attachment \
    --project=$projectid
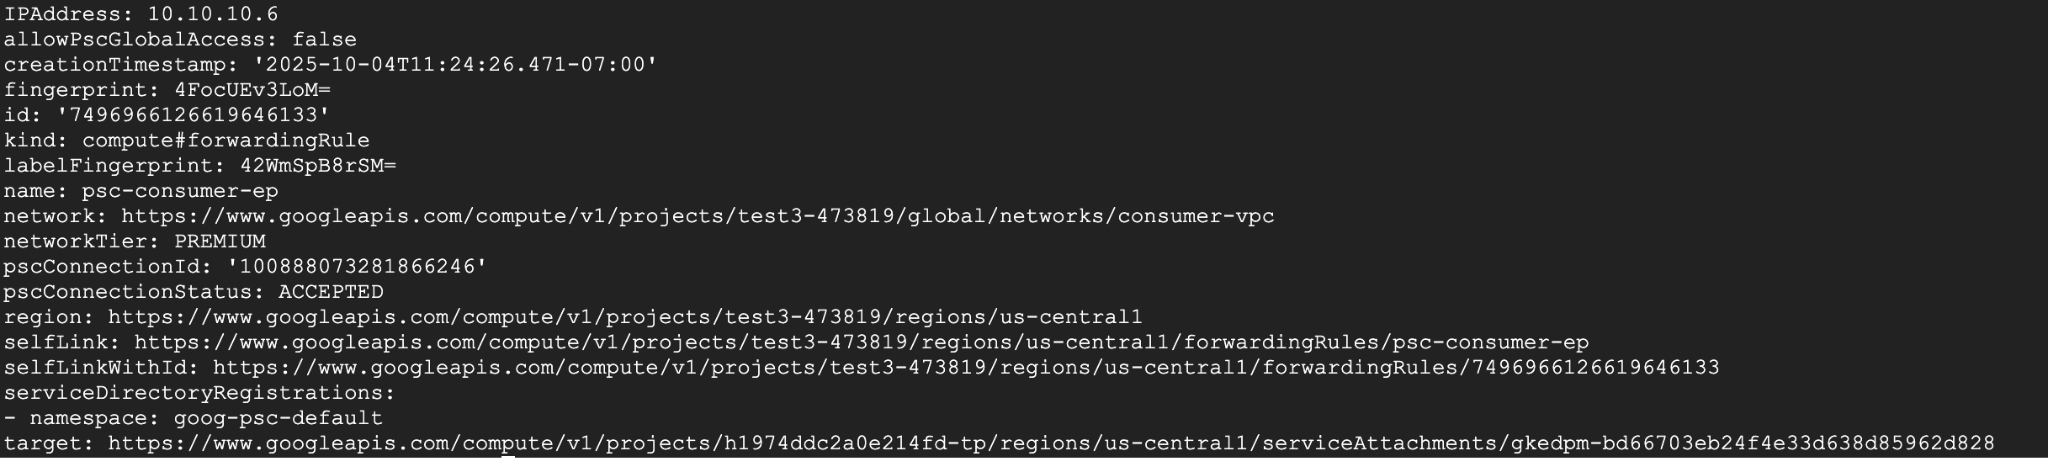
確認服務連結接受端點。
在 Cloud Shell 中執行下列操作:
gcloud compute forwarding-rules describe psc-consumer-ep \
    --project=$projectid \
    --region=$region
在回應中,確認 pscConnectionStatus 欄位顯示「ACCEPTED」狀態
8. 設定透過 TLS 連線至 Vertex HTTPS 端點
建立 DNS 私人區域,即可取得線上推論結果,不必指定 IP 位址。
在 Cloud Shell 中執行下列操作:
DNS_NAME_SUFFIX="prediction.p.vertexai.goog."

gcloud dns managed-zones create vertex \
--project=$projectid \
--dns-name=$DNS_NAME_SUFFIX \
--networks=consumer-vpc \
--visibility=private \
--description="A DNS zone for Vertex AI endpoints using Private Service Connect."
建立 A 記錄,將網域對應至 PSC IP 位址。
在 Cloud Shell 中執行下列操作:
gcloud dns record-sets create "*.prediction.p.vertexai.goog." \
  --zone=vertex \
  --type=A \
  --ttl=300 \
  --rrdatas="10.10.10.6"
建立 Cloud Router 執行個體,這是 NAT 執行個體的必要條件。
在 Cloud Shell 中執行下列操作:
gcloud compute routers create consumer-cr \
--region=$region --network=consumer-vpc \
--asn=65001
建立 Cloud NAT 執行個體,用於下載 openssl 和 dnsutils 套件。
在 Cloud Shell 中執行下列操作:
gcloud compute routers nats create consumer-nat-gw \
  --router=consumer-cr \
  --region=$region \
  --nat-all-subnet-ip-ranges \
  --auto-allocate-nat-external-ips
透過 SSH (控制台) 連線至 Consumer VM。在 Cloud Shell 中執行下列操作:
gcloud compute ssh --zone "us-central1-a" "consumer-vm" --tunnel-through-iap --project "$projectid"
更新下列套件、安裝 OpenSSL,以及安裝 DNS 公用程式
在 Cloud Shell 中執行下列操作:
sudo apt update
sudo apt install openssl
sudo apt-get install -y dnsutils
您會在下一個步驟中使用專案編號。如要取得專案編號,請在 Cloud Shell 執行下列指令,並將編號放入變數中:
在 Cloud Shell 中執行下列操作:
gcloud projects describe $projectid --format="value(projectNumber)"
Example Output: 549538389202
projectNumber=549538389202
您需要在接下來的幾個步驟中定義其他變數,請先從 Cloud Shell 擷取這些變數(ENDPOINT_ID、REGION、VERTEX_AI_PROJECT_ID),然後在 VM 中建立相同的變數。
在 Cloud Shell 中執行下列操作:
echo $projectNumber
echo $projectid
echo $region
echo $endpointID
輸出內容範例如下:
549538389202
test4-473419
Us-central1
1934769929467199s
在消費者 VM 中新增這些變數,如下列範例所示:
projectNumber=1934769929467199488
projectid=test4-473419
region=us-central1
endpointID=1934769929467199488
在 VM 的主目錄中執行下列指令,下載 Vertex AI 憑證。這個指令會建立名為 vertex_certificate.crt 的檔案。
sudo openssl s_client -showcerts -connect $endpointID-$region-$projectNumber.prediction.p.vertexai.goog:443 </dev/null | openssl x509 -outform pem -out vertex_certificate.crt
Output should look like below, error is expected.

將憑證移至系統信任存放區。
sudo mv vertex_certificate.crt /usr/local/share/ca-certificates
更新憑證管理工具。
sudo update-ca-certificates
更新後應如下所示。
user@linux-vm:~$ sudo update-ca-certificates
Updating certificates in /etc/ssl/certs...
1 added, 0 removed; done.
Running hooks in /etc/ca-certificates/update.d...
Done.
9. 從消費者 VM 進行最終測試
在 Consumer VM 上,使用應用程式預設憑證重新驗證,並指定 Vertex AI 範圍:
gcloud auth application-default login
--scopes=https://www.googleapis.com/auth/cloud-platform
在 Consumer VM 中執行下列 curl 指令,使用提示詞「What weighs more 1 pound of feathers or rocks?」(一磅羽毛和一磅石頭哪個比較重?) 測試 Gemini 模型預測功能。
curl -v -X POST -H "Authorization: Bearer $(gcloud auth application-default print-access-token)" -H "Content-Type: application/json" https://$endpointID-$region-$projectNumber.prediction.p.vertexai.goog/v1/projects/$projectid/locations/$region/endpoints/$endpointID/chat/completions -d '{"model": "google/gemma-3-12b-it", "messages": [{"role": "user","content": "What weighs more 1 pound of feathers or rocks?"}] }'
最終結果 - 成功!
您應該會在輸出內容底部看到 Gemma 3 的預測結果,這表示您已透過 PSC 端點私下存取 API 端點
 Connection #0 to host 10.10.10.6 left intact
{"id":"chatcmpl-9e941821-65b3-44e4-876c-37d81baf62e0","object":"chat.completion","created":1759009221,"model":"google/gemma-3-12b-it","choices":[{"index":0,"message":{"role":"assistant","reasoning_content":null,"content":"This is a classic trick question! They weigh the same. One pound is one pound, regardless of the material. 😊\n\n\n\n","tool_calls":[]},"logprobs":null,"finish_reason":"stop","stop_reason":106}],"usage":{"prompt_tokens":20,"total_tokens":46,"completion_tokens":26,"prompt_tokens_details":null},"prompt_logprobs":null
10. 清理
在 Cloud Shell 中刪除教學課程元件。
Get Deployed Model ID first with this command, you will need it to delete the Endpoint ID:

gcloud ai endpoints describe $endpointID \
  --region=$region \
  --project=$projectid \
  --format="table[no-heading](deployedModels.id)"

Example Output: 7389140900875599872

Put it in a Variable:

deployedModelID=7389140900875599872

Run following Commands:

gcloud ai endpoints undeploy-model $endpointID --deployed-model-id=$deployedModelID --region=$region --quiet

gcloud ai endpoints delete $endpointID --project=$projectid --region=$region --quiet

Run Following command to get $MODEL_ID to delete Model:

gcloud ai models list --project=$projectid --region=$region

Example Output:

Using endpoint [https://us-central1-aiplatform.googleapis.com/]
MODEL_ID: gemma-3-12b-it-1768409471942
DISPLAY_NAME: gemma-3-12b-it-1768409471942

Put MODEL_ID value in a variable:

MODEL_ID=gemma-3-12b-it-1768409471942

Run the follow command to delete Model:

gcloud ai models delete $MODEL_ID --project=$projectid --region=$region --quiet

Clean up rest of the lab:
gcloud compute instances delete consumer-vm --zone=us-central1-a --quiet

gcloud compute forwarding-rules delete psc-consumer-ep --region=$region --project=$projectid --quiet

gcloud compute addresses delete psc-address --region=$region --project=$projectid --quiet

gcloud compute networks subnets delete pscendpoint-subnet consumer-vm-subnet --region=$region --quiet

gcloud compute firewall-rules delete ssh-iap-consumer --project=$projectid

gcloud compute routers delete consumer-cr --region=$region

gcloud compute networks delete consumer-vpc --project=$projectid --quiet
11. 恭喜
恭喜!您已成功設定並驗證,透過 Private Service Connect 端點,以私密方式存取 Vertex AI Prediction 上代管的 Gemma 3 API,並將從 Vertex AI 取得的自行簽署憑證部署至 VM 信任存放區。
您已建立消費者基礎架構,包括預留內部 IP 位址、在虛擬私有雲中設定 Private Service Connect 端點 (轉送規則),以及設定與自行簽署憑證 *prediction.p.vertexai.goog 相符的私人 DNS。這個端點會以與已部署的 Gemma 3 模型相關聯的服務附件為目標,安全地連線至 Vertex AI 服務。
這項設定可確保虛擬私有雲或連線網路中的應用程式,能使用內部 IP 位址和憑證,以私密方式與 Gemma 3 API 互動。所有流量都會保留在 Google 網路中,絕不會經過公開網際網路。