
1. Overview
In the high-stakes world of regulated, mission-critical industries, organizations face a massive paradox: How do you adopt cutting-edge AI to optimize production when your cyber security policies mandate that your data can never touch the public internet? Intranets and the public Internet are strictly separated, and they never touch. While modern manufacturing desperately needs predictive AI to prevent catastrophic equipment failures and optimize yield, sending sensitive telemetry logs, patented alloy recipes, or ERP data to a public cloud API is by practice a non-starter. So, if the data cannot go to the cloud, the cloud must come to the data.
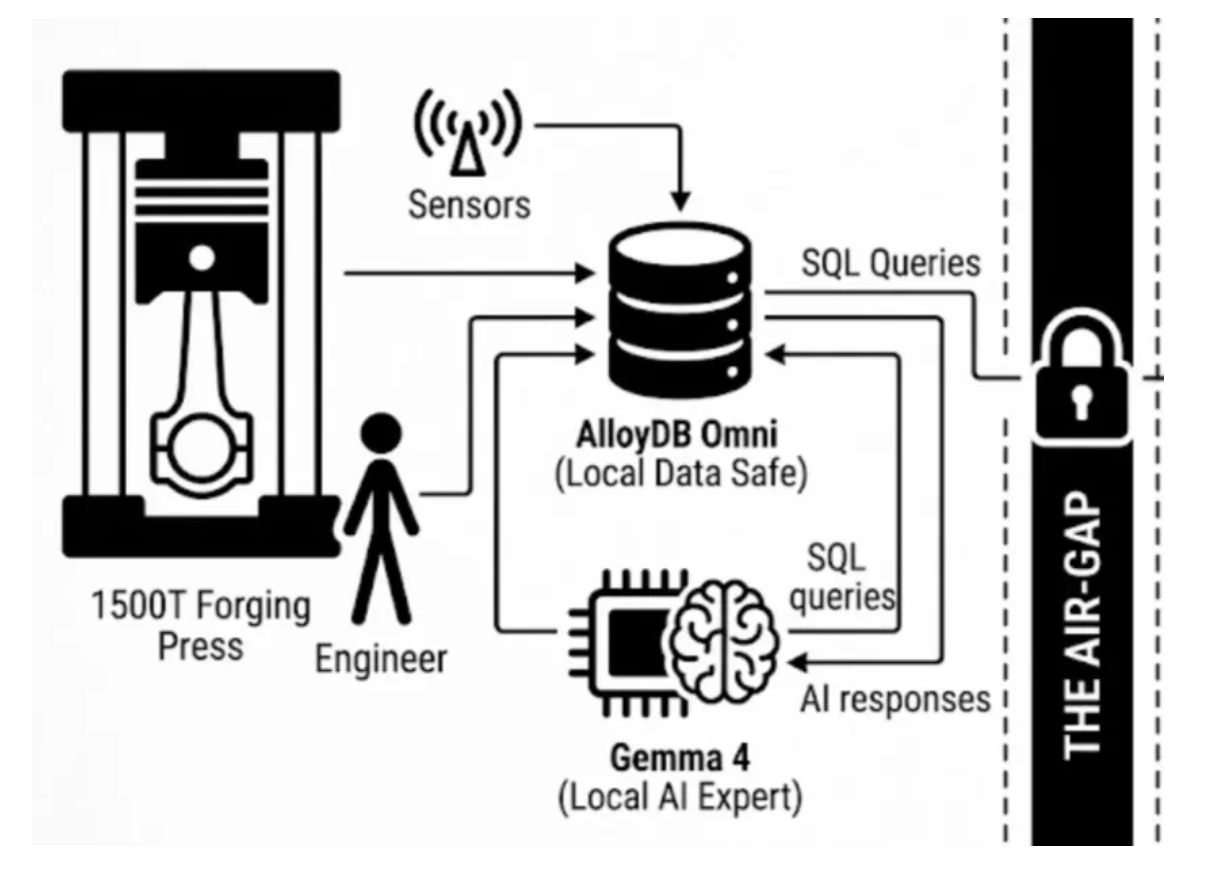
In this codelab, we'll bring Google Cloud's most advanced data and AI tools directly into disconnected, highly secure environments with Gemma 4 and AlloyDB Omni.
AlloyDB Omni: The Ultimate Data Safe
Think of AlloyDB Omni as a high-performance vault. It is a containerized, enterprise-grade database that you download and run entirely on your own secure Intranet.
- Seamless Integration: It connects directly to the manufacturing sensors (like a VIM or heavy press) and local ERPs (like Oracle R12).
- AI-Ready Storage: It safely stores top-secret process sheets using vector embeddings for AI search (pgvector).
- Performance: It drastically outperforms standard PostgreSQL for both heavy transactional workloads and analytical AI processing.
Local AI Experts: Gemma, TimesFM, TabFM
Instead of using remote APIs, you can download open-weights models and run them natively on your local hardware with zero API leakage.
- Gemma: Google's open-weights LLM acts as your R&D expert. It can securely read historical logs or analyze complex, patented alloy recipes to predict mechanical properties.
- TimesFM (The Numerical Forecaster): Because LLMs can sometimes hallucinate numbers, heavy machinery requires a dedicated Time-Series Foundation Model. TimesFM accurately predicts long-term numerical horizons (up to 16,000 data points), reading vibration and temperature logs to forecast exact equipment failure curves — entirely offline.
- TabFM (The Tabular Reasoner): While LLMs handle text and TimesFM handles numerical trends, TabFM specializes in reasoning over structured table data. You can run it securely on-premise to perform complex analyses and answer questions directly from dense, multi-column ERP or CRM Data without needing to write complex SQL joins.
Use Case
Predictive maintenance on a 1500-Ton Forging Press:
Unplanned downtime on this massive machinery halts production, wasting immense time and critical materials. Conversely, scheduled maintenance often replaces expensive parts too early, wasting budget. We need to move from reactive to predictive maintenance without breaking the air-gap.
What you'll learn
In this codelab:
- You will use AlloyDB Omni to securely capture vibration and temperature sensor data locally, you can add more parameters to make it more realistic and useful.
- You will learn to use Gemma to analyze the trends against historical failure logs.
- You will build a system that predicts failures and mock-triggers Asset Management work orders in your ERP automatically.
We rely on Docker to provision both the local LLM and AlloyDB Omni. The beauty of this approach is its simplicity: AlloyDB Omni can automatically manage its own internal ML-Agent process.
Requirements
- Basic familiarity with SQL.
- A standard Linux VM (e.g., Ubuntu 22.04) or a local machine (macOS/Windows) with Docker installed.
2. Start the Local LLM (Gemma 4)
We'll use Ollama to host Gemma locally. Create a Dockerfile to configure the Ollama instance:
- From your local machine, run the following commands in a terminal, one by one:
mkdir -p gemma4-ollama && cd gemma4-ollama
cat << 'EOF' > Dockerfile
FROM ollama/ollama:latest
ENV OLLAMA_HOST=0.0.0.0:8080
ENV OLLAMA_MODELS=/root/.ollama
ENV MODEL=gemma4:e2b
RUN ollama serve & sleep 5 && ollama pull $MODEL
ENTRYPOINT ["ollama", "serve"]
EOF
- Build and run the container on the host network:
docker build -t gemma4-local .

docker run --network host -d -p 8080:8080 --name gemma4-ollama-instance gemma4-local
- You can test it out using the command:
curl -X POST http://localhost:8080/api/generate -d '{
  "model": "gemma4:e2b",
  "prompt": "Hello! Explain Gemma 4 in a few sentences."
}'
3. Install and Start AlloyDB Omni
Next, spin up the AlloyDB Omni database container, also on the host network:
docker run -d \
  --name my-omni \
  --network host \
  -e POSTGRES_PASSWORD=omni \
  gcr.io/alloydb-omni/alloydbomni:18
If it couldn't find the AlloyDB Omni image from your Google Cloud project, try authenticating by running the command before you execute the docker run command above:
gcloud auth login
Once auth is complete, try running the docker run command again.
4. Enable the Internal ML-Agent
By default, AlloyDB Omni's ML integration features are turned off. We need to modify the postgresql.conf file inside the container to enable the internal ML-Agent process and the AI query engine.
Execute this single command to append the necessary flags:
docker exec -it my-omni sh -c "cat << EOF >> /var/lib/postgresql/data/postgresql.conf
omni_enable_ml_agent_process = 'on'
google_ml_integration.enable_model_support = 'on'
google_ml_integration.enable_ai_query_engine = 'on'
EOF"
Restart the container to apply the changes:
docker restart my-omni
You can start testing queries by starting psql using the command:
docker exec -it my-omni psql -U postgres
5. Route AI to the Local LLM
Once connected to the database via psql (docker exec -it my-omni psql -U postgres), you can register your local, off-grid model. Instead of calling out to the internet, route the model_request_url to your local Ollama server running on port 8080.
Run the following SQL statements from the psql prompt in the terminal:
CREATE EXTENSION IF NOT EXISTS google_ml_integration CASCADE;

CALL google_ml.create_model(
    model_id => 'gemma4:e2b',
    model_request_url => 'http://localhost:8080/api/generate',
    model_provider => 'custom',
    model_type => 'generic'
);
You can now invoke predictions securely from within SQL:
SELECT google_ml.predict_row(
    'gemma4:e2b',
    '{"model": "gemma4:e2b", "prompt": "Why is the sky blue?", "stream": false}'
)->'response';
Output:
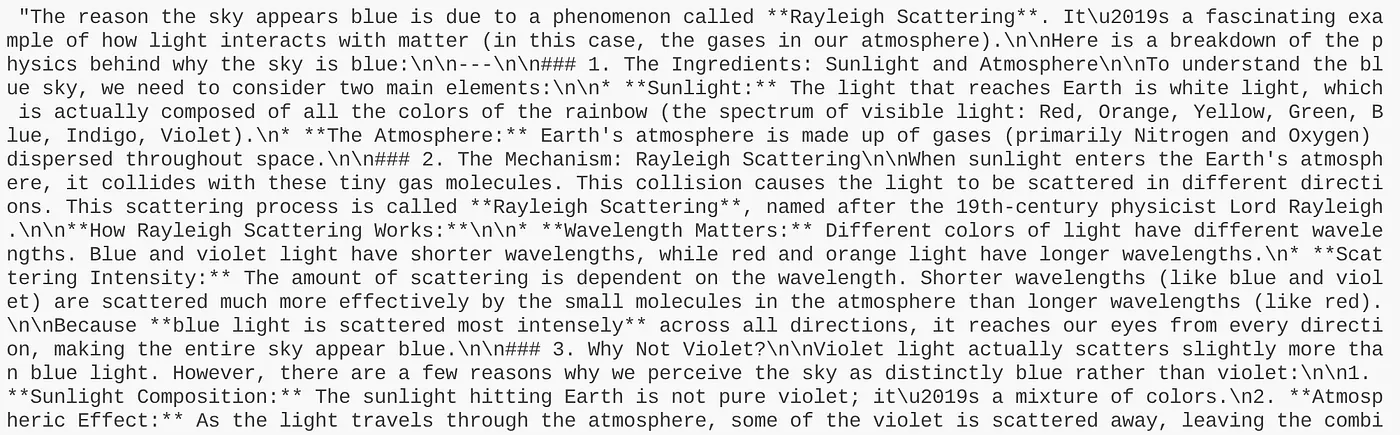
Now that we have tested it out on a generic test case, let's bring our use case data into the picture.
6. Create Schema and Ingest Data
Now let's build on our use case by creating the schema and data required to demonstrate.
Run the following SQL statements from the psql prompt in the terminal:
-- ==============================================================================
-- 1. Setup the Schema for the 1500T Forging Press
-- ==============================================================================
CREATE TABLE IF NOT EXISTS forging_press_logs (
    log_id SERIAL PRIMARY KEY,
    timestamp TIMESTAMP NOT NULL DEFAULT NOW(),
    cycle_id VARCHAR(50) NOT NULL,
    hyd_pressure_bar NUMERIC(5,2),
    oil_temp_c NUMERIC(5,2),
    vib_z_rms NUMERIC(5,2)
);

-- Clean up any existing data if running multiple times
TRUNCATE TABLE forging_press_logs;

-- ==============================================================================
-- 2. Generate 1,000 Records of Simulated Data
-- ==============================================================================
-- 99% of data is 'Normal'
INSERT INTO forging_press_logs (cycle_id, hyd_pressure_bar, oil_temp_c, vib_z_rms)
SELECT
    'C-' || LPAD(i::text, 5, '0'),
    280.0 + (random() * 10 - 5), -- Pressure around 280
    42.0 + (random() * 5),       -- Temp around 42-47
    1.8 + (random() * 0.5)       -- Vib Z around 1.8-2.3
FROM generate_series(1, 990) AS i;

-- 1% of data is 'Anomalous' (Hydraulic pressure drop & vibration spike)
INSERT INTO forging_press_logs (cycle_id, hyd_pressure_bar, oil_temp_c, vib_z_rms)
SELECT
    'C-' || LPAD((990 + i)::text, 5, '0'),
    250.0 + (random() * 5),      -- Pressure dropping
    55.0 + (random() * 5),       -- Temp rising
    5.0 + (random() * 1.5)       -- High vibration
FROM generate_series(1, 10) AS i;

-- ==============================================================================
-- 3. Run the AI Prediction via AlloyDB Omni
-- ==============================================================================
-- Ensure the model is registered (assuming 'gemma4:e2b' is running locally on port 8080)
CREATE EXTENSION IF NOT EXISTS google_ml_integration CASCADE;

DO $$
BEGIN
    CALL google_ml.create_model(
        model_id => 'gemma4:e2b',
        model_request_url => 'http://localhost:8080/api/generate',
        model_provider => 'custom',
        model_type => 'generic'
    );
EXCEPTION WHEN OTHERS THEN
    -- Ignore error if model already exists
END $$;

-- Query the most recent 5 potentially anomalous records and ask Gemma for an analysis
SELECT
    cycle_id,
    hyd_pressure_bar,
    vib_z_rms,
    google_ml.predict_row(
        model_id => 'gemma4:e2b',
        request_body => json_build_object(
            'model', 'gemma4:e2b',
            'stream', false,
            'prompt', 'You are an industrial engineer. Analyze this sensor data from a 1500T forging press: Pressure=' || hyd_pressure_bar || ' bar, Vibration=' || vib_z_rms || ' mm/s. Normal pressure is ~280 bar and normal vibration is ~2.0 mm/s. Does this indicate a hydraulic failure? Answer in one short sentence.'
        )
    )->>'response' AS ai_analysis
FROM
    forging_press_logs
WHERE
    hyd_pressure_bar < 260 OR vib_z_rms > 4.5
ORDER BY
    timestamp DESC
LIMIT 5;
Running the above statements one by one should lead to our result here:
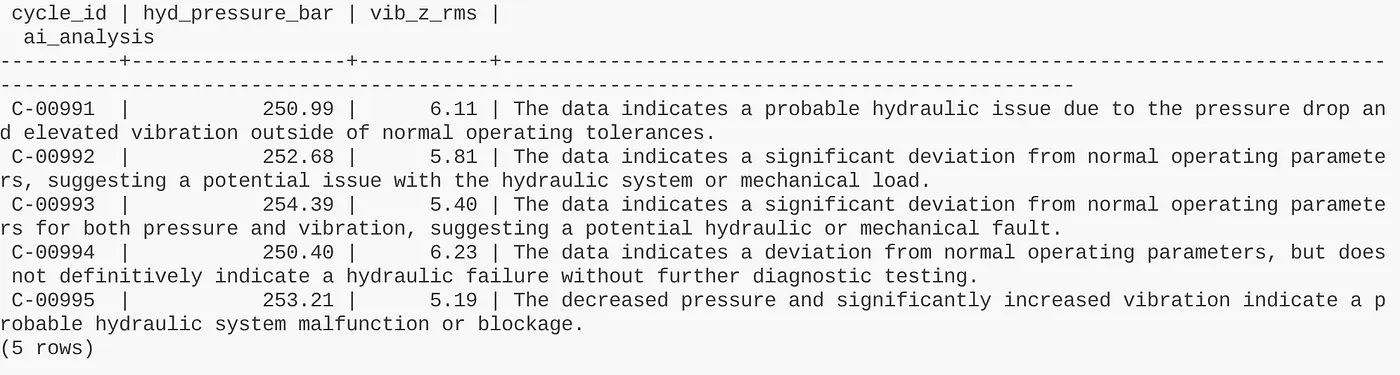
Now that we have our data ready, let's move to building the predictive maintenance dashboard!
7. Building a Live Streaming Dashboard
To truly visualize this architecture, you can easily wire this up to a Python Flask dashboard which is a web application.
Instead of manually running SQL queries, a lightweight Flask backend streams the live sensor telemetry to an HTML dashboard. During normal operations, the dashboard simply plots the graphs.
But when the backend detects an anomaly (e.g., pressure drops), the Python code instantly triggers the google_ml.predict_row() function inside AlloyDB. AlloyDB seamlessly forwards the context to your local Gemma model, and the AI's diagnostic insight flashes on the dashboard in real-time.
💡 Codelab Tip: To exit the database container and return to your host command line, type \q and press Enter (or open a new terminal tab). Then, proceed to run the Flask application commands below.
To do this:
- Go to your development environment / code editor and open the terminal
- Run the following command
pip install flask psycopg2-binary
- Clone the code repo in your project directory by running the following command in your Cloud Shell Terminal:
git clone https://github.com/AbiramiSukumaran/gemma4-alloydb-omni-demo
- Navigate into the project folder:
cd gemma4-alloydb-omni-demo
- Run the application:
python3 app.py
Open the web browser or click the link to the app running in your localhost.
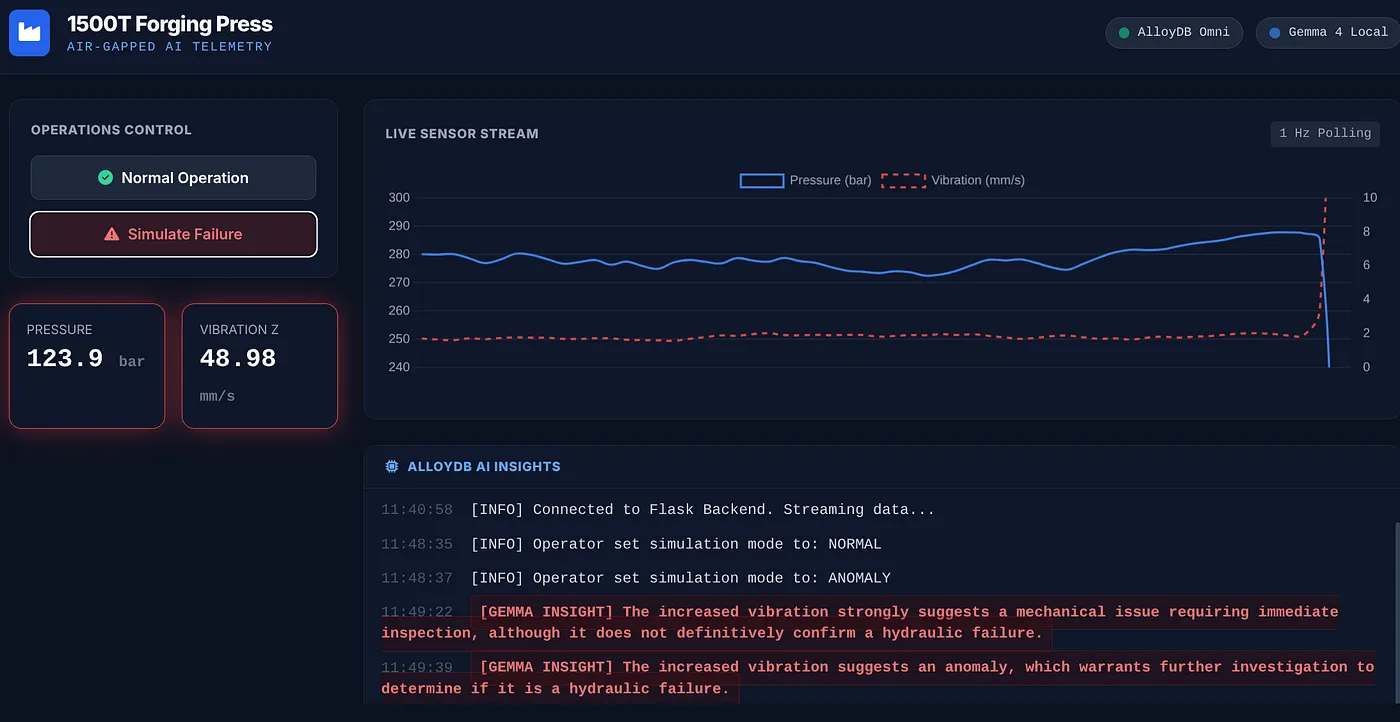
What the Live Dashboard Represents
The Flask application acts as a real-time monitoring dashboard for the 1500-Ton Forging Press, visualizing how a completely offline, air-gapped system handles predictive maintenance:
- Continuous Telemetry Stream: The dashboard plots real-time vibration (mm/s) and hydraulic pressure (bar) logs, updating dynamically to simulate active factory floor operations.
- On-the-Fly Database Anomalies: When a sensor dips below the threshold (e.g., pressure drops below 260 bar), the Python backend flags the event and immediately calls the
google_ml.predict_row()function inside AlloyDB Omni. - Localized AI Diagnostics: AlloyDB Omni forwards the real-time context to your local Gemma 4 model. Gemma acts as an on-premise industrial expert, analyzing the telemetry and printing a diagnostic alert (e.g., "Warning: Pressure drop and high vibration indicate a potential hydraulic seal failure") directly on the dashboard.
- Zero Leakage: All computation, databases, graphs, and AI reasoning execute entirely on your local host with zero internet connectivity required.
8. Path to Production
To scale this architecture from a local prototype to a production-grade factory floor deployment without sacrificing air-gapped security, you can choose from two standard, on-premise installation tracks:
Production VMs & Bare-Metal (Non-Containerized):
For environments where containerization isn't preferred or where deep integration with the host operating system is required by security policy, you can deploy using the official AlloyDB Omni RPM package. Assisted by the AlloyDB Omni Red Hat RPM orchestrator, this deployment brings low-latency performance, SELinux compliance, and automated High Availability (HA) directly to your local RHEL or Rocky Linux VMs entirely offline.
Production Kubernetes & HA:
If your factory infrastructure utilizes local orchestration, you can deploy AlloyDB Omni on Kubernetes . Utilizing the official AlloyDB Omni Kubernetes Operator, you can declaratively deploy a robust database cluster with synchronous standby replicas, automated local backups, and dedicated read-only endpoints.
9. Congratulations!
For defense manufacturing and such air-gapped industries, the choice is no longer between strict security and technological innovation. By deploying containerized databases, specialized proxy models, and open-weights AI on sovereign hardware, you can turn your factory floor into an intelligent, predictive powerhouse — all while keeping your digital moat completely intact.