
1. Introduction
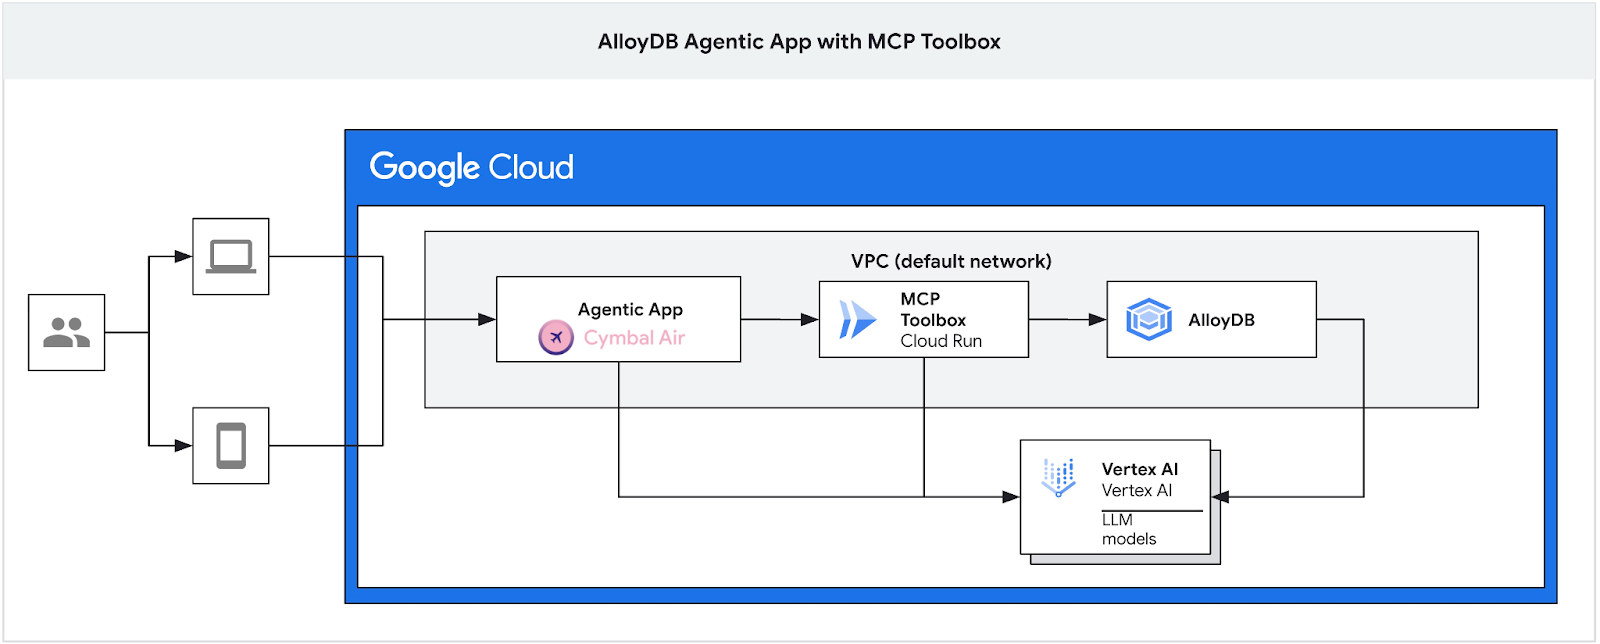
In this codelab, you will learn how to create an AlloyDB cluster, deploy the MCP toolbox, and configure it to use AlloyDB as a data source. You'll then build a sample interactive RAG application that uses the deployed toolbox to ground its requests.
You can get more information about the MCP Toolbox on the documentation page and the sample Cymbal Air application here.
This lab is part of a lab collection dedicated to AlloyDB AI features. You can read more on the AlloyDB AI page in documentation and see other labs.
Prerequisites
- A basic understanding of the Google Cloud Console
- Basic skills in command line interface and Google Cloud shell
What you'll learn
- How to deploy AlloyDB Cluster with Vertex AI integration
- How to connect to the AlloyDB
- How to configure and deploy MCP Tooolbox Service
- How to deploy a sample application using the deployed service
What you'll need
- A Google Cloud Account and Google Cloud Project
- A web browser such as Chrome
2. Setup and Requirements
Self-paced environment setup
- Sign-in to the Google Cloud Console and create a new project or reuse an existing one. If you don't already have a Gmail or Google Workspace account, you must create one.

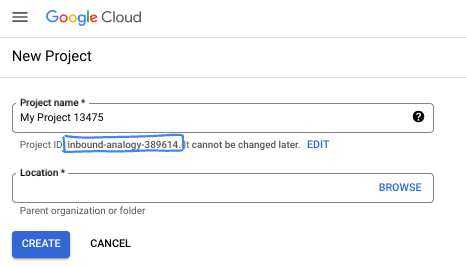
- The Project name is the display name for this project's participants. It is a character string not used by Google APIs. You can always update it.
- The Project ID is unique across all Google Cloud projects and is immutable (cannot be changed after it has been set). The Cloud Console auto-generates a unique string; usually you don't care what it is. In most codelabs, you'll need to reference your Project ID (typically identified as
PROJECT_ID). If you don't like the generated ID, you might generate another random one. Alternatively, you can try your own, and see if it's available. It can't be changed after this step and remains for the duration of the project. - For your information, there is a third value, a Project Number, which some APIs use. Learn more about all three of these values in the documentation.
- Next, you'll need to enable billing in the Cloud Console to use Cloud resources/APIs. Running through this codelab won't cost much, if anything at all. To shut down resources to avoid incurring billing beyond this tutorial, you can delete the resources you created or delete the project. New Google Cloud users are eligible for the $300 USD Free Trial program.
Start Cloud Shell
While Google Cloud can be operated remotely from your laptop, in this codelab you will be using Google Cloud Shell, a command line environment running in the Cloud.
From the Google Cloud Console, click the Cloud Shell icon on the top right toolbar:

It should only take a few moments to provision and connect to the environment. When it is finished, you should see something like this:

This virtual machine is loaded with all the development tools you'll need. It offers a persistent 5GB home directory, and runs on Google Cloud, greatly enhancing network performance and authentication. All of your work in this codelab can be done within a browser. You do not need to install anything.
3. Before you begin
Enable API
Output:
Inside Cloud Shell, make sure that your project ID is setup:
Usually the project ID is shown in parentheses in the command prompt in the cloud shell as it is shown in the picture:

gcloud config set project [YOUR-PROJECT-ID]
Then set the PROJECT_ID environment variable to your Google Cloud project ID:
PROJECT_ID=$(gcloud config get-value project)
Enable all necessary services:
gcloud services enable alloydb.googleapis.com \
                       compute.googleapis.com \
                       cloudresourcemanager.googleapis.com \
                       servicenetworking.googleapis.com \
                       vpcaccess.googleapis.com \
                       aiplatform.googleapis.com \
                       cloudbuild.googleapis.com \
                       artifactregistry.googleapis.com \
                       run.googleapis.com \
                       iam.googleapis.com \
                       secretmanager.googleapis.com
Expected output
student@cloudshell:~ (gleb-test-short-004)$ gcloud services enable alloydb.googleapis.com \
                       compute.googleapis.com \
                       cloudresourcemanager.googleapis.com \
                       servicenetworking.googleapis.com \
                       vpcaccess.googleapis.com \
                       aiplatform.googleapis.com \
                       cloudbuild.googleapis.com \
                       artifactregistry.googleapis.com \
                       run.googleapis.com \
                       iam.googleapis.com \
                       secretmanager.googleapis.com
Operation "operations/acf.p2-404051529011-664c71ad-cb2b-4ab4-86c1-1f3157d70ba1" finished successfully.
4. Deploy AlloyDB Cluster
Create AlloyDB cluster and primary instance. The following procedure describes how to create an AlloyDB cluster and instance using Google Cloud SDK. If you prefer the console approach you can follow the documentation here.
Before creating an AlloyDB cluster we need an available private IP range in our VPC to be used by the future AlloyDB instance. If we don't have it then we need to create it, assign it to be used by internal Google services and after that we will be able to create the cluster and instance.
Create private IP range
We need to configure Private Service Access configuration in our VPC for AlloyDB. The assumption here is that we have the "default" VPC network in the project and it is going to be used for all actions.
Create the private IP range:
gcloud compute addresses create psa-range \
    --global \
    --purpose=VPC_PEERING \
    --prefix-length=24 \
    --description="VPC private service access" \
    --network=default
Create private connection using the allocated IP range:
gcloud services vpc-peerings connect \
    --service=servicenetworking.googleapis.com \
    --ranges=psa-range \
    --network=default
Expected console output:
student@cloudshell:~ (test-project-402417)$ gcloud compute addresses create psa-range \
    --global \
    --purpose=VPC_PEERING \
    --prefix-length=24 \
    --description="VPC private service access" \
    --network=default
Created [https://www.googleapis.com/compute/v1/projects/test-project-402417/global/addresses/psa-range].

student@cloudshell:~ (test-project-402417)$ gcloud services vpc-peerings connect \
    --service=servicenetworking.googleapis.com \
    --ranges=psa-range \
    --network=default
Operation "operations/pssn.p24-4470404856-595e209f-19b7-4669-8a71-cbd45de8ba66" finished successfully.

student@cloudshell:~ (test-project-402417)$
Create AlloyDB Cluster
In this section we are creating an AlloyDB cluster in the us-central1 region.
Define password for the postgres user. You can define your own password or use a random function to generate one
export PGPASSWORD=`openssl rand -hex 12`
Expected console output:
student@cloudshell:~ (test-project-402417)$ export PGPASSWORD=`openssl rand -hex 12`
Note the PostgreSQL password for future use.
echo $PGPASSWORD
You will need that password in the future to connect to the instance as the postgres user. I suggest writing it down or copying it somewhere to be able to use later.
Expected console output:
student@cloudshell:~ (test-project-402417)$ echo $PGPASSWORD
bbefbfde7601985b0dee5723
Create a Free Trial Cluster
If you haven't been using AlloyDB before you can create a free trial cluster:
Define region and AlloyDB cluster name. We are going to use us-central1 region and alloydb-aip-01 as a cluster name:
export REGION=us-central1
export ADBCLUSTER=alloydb-aip-01
Run command to create the cluster:
gcloud alloydb clusters create $ADBCLUSTER \
    --password=$PGPASSWORD \
    --network=default \
    --region=$REGION \
    --subscription-type=TRIAL
Expected console output:
export REGION=us-central1
export ADBCLUSTER=alloydb-aip-01
gcloud alloydb clusters create $ADBCLUSTER \
    --password=$PGPASSWORD \
    --network=default \
    --region=$REGION \
    --subscription-type=TRIAL
Operation ID: operation-1697655441138-6080235852277-9e7f04f5-2012fce4
Creating cluster...done.
Create an AlloyDB primary instance for our cluster in the same cloud shell session. If you are disconnected you will need to define the region and cluster name environment variables again.
gcloud alloydb instances create $ADBCLUSTER-pr \
    --instance-type=PRIMARY \
    --cpu-count=8 \
    --region=$REGION \
    --cluster=$ADBCLUSTER
Expected console output:
student@cloudshell:~ (test-project-402417)$ gcloud alloydb instances create $ADBCLUSTER-pr \
    --instance-type=PRIMARY \
    --cpu-count=8 \
    --region=$REGION \
    --availability-type ZONAL \
    --cluster=$ADBCLUSTER
Operation ID: operation-1697659203545-6080315c6e8ee-391805db-25852721
Creating instance...done.
Create AlloyDB Standard Cluster
If it is not your first AlloyDB cluster in the project proceed with creation of a standard cluster.
Define region and AlloyDB cluster name. We are going to use us-central1 region and alloydb-aip-01 as a cluster name:
export REGION=us-central1
export ADBCLUSTER=alloydb-aip-01
Run command to create the cluster:
gcloud alloydb clusters create $ADBCLUSTER \
    --password=$PGPASSWORD \
    --network=default \
    --region=$REGION
Expected console output:
export REGION=us-central1
export ADBCLUSTER=alloydb-aip-01
gcloud alloydb clusters create $ADBCLUSTER \
    --password=$PGPASSWORD \
    --network=default \
    --region=$REGION
Operation ID: operation-1697655441138-6080235852277-9e7f04f5-2012fce4
Creating cluster...done.
Create an AlloyDB primary instance for our cluster in the same cloud shell session. If you are disconnected you will need to define the region and cluster name environment variables again.
gcloud alloydb instances create $ADBCLUSTER-pr \
    --instance-type=PRIMARY \
    --cpu-count=2 \
    --region=$REGION \
    --cluster=$ADBCLUSTER
Expected console output:
student@cloudshell:~ (test-project-402417)$ gcloud alloydb instances create $ADBCLUSTER-pr \
    --instance-type=PRIMARY \
    --cpu-count=2 \
    --region=$REGION \
    --availability-type ZONAL \
    --cluster=$ADBCLUSTER
Operation ID: operation-1697659203545-6080315c6e8ee-391805db-25852721
Creating instance...done.
Grant Necessary Permissions to AlloyDB
Add Vertex AI permissions to the AlloyDB service agent.
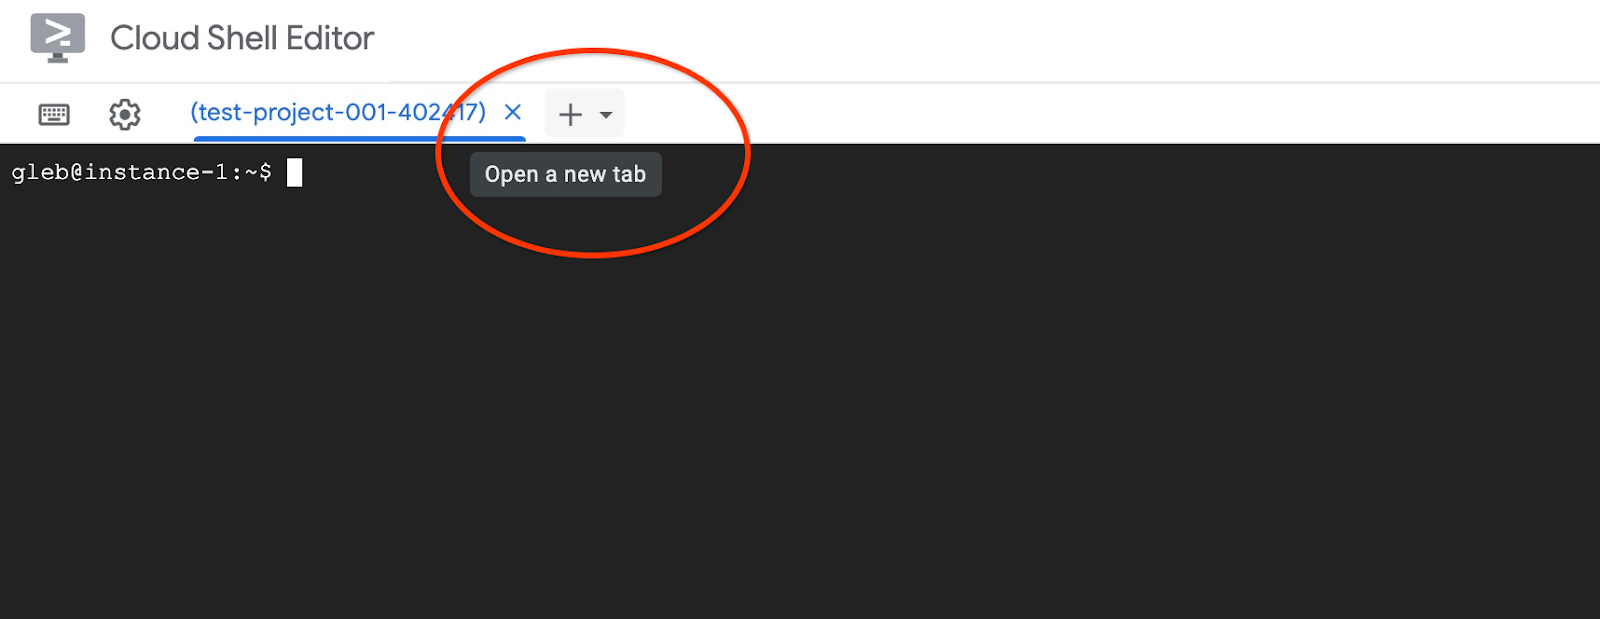
Open another Cloud Shell tab using the sign "+" at the top.
In the new cloud shell tab execute:
PROJECT_ID=$(gcloud config get-value project)
gcloud projects add-iam-policy-binding $PROJECT_ID \
  --member="serviceAccount:service-$(gcloud projects describe $PROJECT_ID --format="value(projectNumber)")@gcp-sa-alloydb.iam.gserviceaccount.com" \
  --role="roles/aiplatform.user"
Expected console output:
student@cloudshell:~ (test-project-001-402417)$ PROJECT_ID=$(gcloud config get-value project)
Your active configuration is: [cloudshell-11039]
student@cloudshell:~ (test-project-001-402417)$ gcloud projects add-iam-policy-binding $PROJECT_ID \
  --member="serviceAccount:service-$(gcloud projects describe $PROJECT_ID --format="value(projectNumber)")@gcp-sa-alloydb.iam.gserviceaccount.com" \
  --role="roles/aiplatform.user"
Updated IAM policy for project [test-project-001-402417].
bindings:
- members:
  - serviceAccount:service-4470404856@gcp-sa-alloydb.iam.gserviceaccount.com
  role: roles/aiplatform.user
- members:
...
etag: BwYIEbe_Z3U=
version: 1
Close the tab by either execution command "exit" in the tab:
exit
5. Prepare GCE Virtual Machine
We are going to use a Google Compute Engine (GCE) VM as our platform to work with the database and deploy different parts of the sample application. Using a VM gives us more flexibility in installed components and direct access to the private AlloyDB IP for data preparation steps.
Create Service Account
Since we will use our VM to deploy the MCP Toolbox as a service and deploy or host the sample application, the first step is to create a Google Service Account (GSA). The GSA will be used by the GCE VM, and we will need to grant it the necessary privileges to work with other services.
In the Cloud Shell execute:
PROJECT_ID=$(gcloud config get-value project)
gcloud iam service-accounts create compute-aip --project $PROJECT_ID

gcloud projects add-iam-policy-binding $PROJECT_ID \
  --member="serviceAccount:compute-aip@$PROJECT_ID.iam.gserviceaccount.com" \
  --role="roles/cloudbuild.builds.editor"

gcloud projects add-iam-policy-binding $PROJECT_ID \
  --member="serviceAccount:compute-aip@$PROJECT_ID.iam.gserviceaccount.com" \
  --role="roles/artifactregistry.admin"

gcloud projects add-iam-policy-binding $PROJECT_ID \
  --member="serviceAccount:compute-aip@$PROJECT_ID.iam.gserviceaccount.com" \
  --role="roles/storage.admin"

gcloud projects add-iam-policy-binding $PROJECT_ID \
  --member="serviceAccount:compute-aip@$PROJECT_ID.iam.gserviceaccount.com" \
  --role="roles/run.admin"

gcloud projects add-iam-policy-binding $PROJECT_ID \
  --member="serviceAccount:compute-aip@$PROJECT_ID.iam.gserviceaccount.com" \
  --role="roles/iam.serviceAccountUser"

gcloud projects add-iam-policy-binding $PROJECT_ID \
  --member="serviceAccount:compute-aip@$PROJECT_ID.iam.gserviceaccount.com" \
  --role="roles/alloydb.viewer"

gcloud projects add-iam-policy-binding $PROJECT_ID \
  --member="serviceAccount:compute-aip@$PROJECT_ID.iam.gserviceaccount.com" \
  --role="roles/alloydb.client"

gcloud projects add-iam-policy-binding $PROJECT_ID \
  --member="serviceAccount:compute-aip@$PROJECT_ID.iam.gserviceaccount.com" \
  --role="roles/aiplatform.user"

gcloud projects add-iam-policy-binding $PROJECT_ID \
  --member="serviceAccount:compute-aip@$PROJECT_ID.iam.gserviceaccount.com" \
  --role="roles/serviceusage.serviceUsageConsumer"

gcloud projects add-iam-policy-binding $PROJECT_ID \
    --member serviceAccount:compute-aip@$PROJECT_ID.iam.gserviceaccount.com \
    --role roles/secretmanager.admin
Deploy GCE VM
Create a GCE VM in the same region and VPC as the AlloyDB cluster.
In Cloud Shell execute:
ZONE=us-central1-a
PROJECT_ID=$(gcloud config get-value project)
gcloud compute instances create instance-1 \
    --zone=$ZONE \
    --create-disk=auto-delete=yes,boot=yes,image=projects/debian-cloud/global/images/$(gcloud compute images list --filter="family=debian-12 AND family!=debian-12-arm64" --format="value(name)") \
    --scopes=https://www.googleapis.com/auth/cloud-platform \
    --service-account=compute-aip@$PROJECT_ID.iam.gserviceaccount.com
Expected console output:
student@cloudshell:~ (test-project-402417)$ ZONE=us-central1-a
PROJECT_ID=$(gcloud config get-value project)
gcloud compute instances create instance-1 \
    --zone=$ZONE \
    --create-disk=auto-delete=yes,boot=yes,image=projects/debian-cloud/global/images/$(gcloud compute images list --filter="family=debian-12 AND family!=debian-12-arm64" --format="value(name)") \
    --scopes=https://www.googleapis.com/auth/cloud-platform \
    --service-account=compute-aip@$PROJECT_ID.iam.gserviceaccount.com
Your active configuration is: [cloudshell-10282]
Created [https://www.googleapis.com/compute/v1/projects/gleb-test-short-002-470613/zones/us-central1-a/instances/instance-1].
NAME: instance-1
ZONE: us-central1-a
MACHINE_TYPE: n1-standard-1
PREEMPTIBLE:
INTERNAL_IP: 10.128.0.2
EXTERNAL_IP: 34.28.55.32
STATUS: RUNNING
Install Postgres Client
Install the PostgreSQL client software on the deployed VM
Connect to the VM:
gcloud compute ssh instance-1 --zone=us-central1-a
Expected console output:
student@cloudshell:~ (test-project-402417)$ gcloud compute ssh instance-1 --zone=us-central1-a
Updating project ssh metadata...working..Updated [https://www.googleapis.com/compute/v1/projects/test-project-402417].
Updating project ssh metadata...done.
Waiting for SSH key to propagate.
Warning: Permanently added 'compute.5110295539541121102' (ECDSA) to the list of known hosts.
Linux instance-1 5.10.0-26-cloud-amd64 #1 SMP Debian 5.10.197-1 (2023-09-29) x86_64

The programs included with the Debian GNU/Linux system are free software;
the exact distribution terms for each program are described in the
individual files in /usr/share/doc/*/copyright.

Debian GNU/Linux comes with ABSOLUTELY NO WARRANTY, to the extent
permitted by applicable law.
student@instance-1:~$
Install the software running command inside the VM:
sudo apt-get update
sudo apt-get install --yes postgresql-client
Expected console output:
student@instance-1:~$ sudo apt-get update
sudo apt-get install --yes postgresql-client
Get:1 file:/etc/apt/mirrors/debian.list Mirrorlist [30 B]
Get:4 file:/etc/apt/mirrors/debian-security.list Mirrorlist [39 B]
Hit:7 https://packages.cloud.google.com/apt google-compute-engine-bookworm-stable InRelease
Get:8 https://packages.cloud.google.com/apt cloud-sdk-bookworm InRelease [1652 B]
Get:2 https://deb.debian.org/debian bookworm InRelease [151 kB]
Get:3 https://deb.debian.org/debian bookworm-updates InRelease [55.4 kB]
...redacted...
update-alternatives: using /usr/share/postgresql/15/man/man1/psql.1.gz to provide /usr/share/man/man1/psql.1.gz (psql.1.gz) in auto mode
Setting up postgresql-client (15+248) ...
Processing triggers for man-db (2.11.2-2) ...
Processing triggers for libc-bin (2.36-9+deb12u7) ...
Connect to the AlloyDB Instance
Connect to the primary instance from the VM using psql.
Continue with the opened SSH session to your VM. If you have been disconnected then connect again using the same command as above.
Use the previously noted $PGASSWORD and the cluster name to connect to AlloyDB from the GCE VM:
export PGPASSWORD=<Noted password>
PROJECT_ID=$(gcloud config get-value project)
REGION=us-central1
ADBCLUSTER=alloydb-aip-01
INSTANCE_IP=$(gcloud alloydb instances describe $ADBCLUSTER-pr --cluster=$ADBCLUSTER --region=$REGION --format="value(ipAddress)")
psql "host=$INSTANCE_IP user=postgres sslmode=require"
Expected console output:
student@instance-1:~$ PROJECT_ID=$(gcloud config get-value project)
REGION=us-central1
ADBCLUSTER=alloydb-aip-01
INSTANCE_IP=$(gcloud alloydb instances describe $ADBCLUSTER-pr --cluster=$ADBCLUSTER --region=$REGION --format="value(ipAddress)")
psql "host=$INSTANCE_IP user=postgres sslmode=require"
psql (15.13 (Debian 15.13-0+deb12u1), server 16.8)
WARNING: psql major version 15, server major version 16.
         Some psql features might not work.
SSL connection (protocol: TLSv1.3, cipher: TLS_AES_256_GCM_SHA384, compression: off)
Type "help" for help.

postgres=>
Exit from the psql session keeping the SSH connection up:
exit
Expected console output:
postgres=> exit
student@instance-1:~$
6. Initialize the database
We are going to use our client VM as a platform to populate our database with data and host our application. The first step is to create a database and populate it with data.
Create Database
Create a database with the name "assistantdemo".
In the GCE VM session execute:
psql "host=$INSTANCE_IP user=postgres" -c "CREATE DATABASE assistantdemo"
Expected console output:
student@instance-1:~$ psql "host=$INSTANCE_IP user=postgres" -c "CREATE DATABASE assistantdemo"
CREATE DATABASE
student@instance-1:~$
Prepare Python Environment
To continue we are going to use prepared Python scripts from GitHub repository but before doing that we need to install the required software.
In the GCE VM execute:
sudo apt install -y python3.11-venv git
python3 -m venv .venv
source .venv/bin/activate
pip install --upgrade pip
Expected console output:
student@instance-1:~$ sudo apt install -y python3.11-venv git
python3 -m venv .venv
source .venv/bin/activate
pip install --upgrade pip
Reading package lists... Done
Building dependency tree... Done
Reading state information... Done
The following additional packages will be installed:
  git-man liberror-perl patch python3-distutils python3-lib2to3 python3-pip-whl python3-setuptools-whl
Suggested packages:
  git-daemon-run | git-daemon-sysvinit git-doc git-email git-gui gitk gitweb git-cvs git-mediawiki git-svn ed diffutils-doc
The following NEW packages will be installed:
  git git-man liberror-perl patch python3-distutils python3-lib2to3 python3-pip-whl python3-setuptools-whl python3.11-venv
0 upgraded, 9 newly installed, 0 to remove and 2 not upgraded.
Need to get 12.4 MB of archives.
After this operation, 52.2 MB of additional disk space will be used.
Get:1 file:/etc/apt/mirrors/debian.list Mirrorlist [30 B]
...redacted...
Installing collected packages: pip
  Attempting uninstall: pip
    Found existing installation: pip 23.0.1
    Uninstalling pip-23.0.1:
      Successfully uninstalled pip-23.0.1
Successfully installed pip-24.0
(.venv) student@instance-1:~$
Verify Python version.
In the GCE VM execute:
python -V
Expected console output:
(.venv) student@instance-1:~$ python -V
Python 3.11.2
(.venv) student@instance-1:~$
Install MCP Toolbox Locally
MCP Toolbox for Databases (later in the text MCP toolbox or toolbox) is an open source MCP server working with different data sources. It helps you to develop tools faster by providing a level of abstraction for different data sources and adding features like authentication and connection pooling. You can read about all the features on the official page.
We are going to use the MCP toolbox to initiate our sample dataset and later to be used as MCP server to handle data source requests from our application during Retrieval Augmented Generation (RAG) flow.
Let's install the MCP toolbox locally to populate the assistantdemo database.
In the GCE VM execute:
export VERSION=1.0.0
curl -O https://storage.googleapis.com/mcp-toolbox-for-databases/v$VERSION/linux/amd64/toolbox
chmod +x toolbox
Expected console output:
(.venv) student@instance-1:~$ export VERSION=1.0.0
curl -O https://storage.googleapis.com/mcp-toolbox-for-databases/v$VERSION/linux/amd64/toolbox
chmod +x toolbox
  % Total    % Received % Xferd  Average Speed   Time    Time     Time  Current
                                 Dload  Upload   Total   Spent    Left  Speed
100  133M  100  133M    0     0   158M      0 --:--:-- --:--:-- --:--:--  158M
Run Toolbox for Data Initialization
In the GCE VM execute:
Export environment variables for database population:
export ALLOYDB_POSTGRES_PROJECT=$(gcloud config get-value project)
export ALLOYDB_POSTGRES_REGION="us-central1"
export ALLOYDB_POSTGRES_CLUSTER="alloydb-aip-01"
export ALLOYDB_POSTGRES_INSTANCE="alloydb-aip-01-pr"
export ALLOYDB_POSTGRES_DATABASE="assistantdemo"
export ALLOYDB_POSTGRES_USER="postgres"
export ALLOYDB_POSTGRES_PASSWORD=$PGPASSWORD
export ALLOYDB_POSTGRES_IP_TYPE="private"
Start toolbox for the database initiation. It will start the process locally which will help you to connect seamlessly to the destination database on AlloyDB to fill it up with sample data.
./toolbox --prebuilt alloydb-postgres
Expected console output. You should see in the last line of the output - "Server ready to serve!":
student@instance-1:~$ cexport ALLOYDB_POSTGRES_PROJECT=$PROJECT_ID
export ALLOYDB_POSTGRES_REGION="us-central1"
export ALLOYDB_POSTGRES_CLUSTER="alloydb-aip-01"
export ALLOYDB_POSTGRES_INSTANCE="alloydb-aip-01-pr"
export ALLOYDB_POSTGRES_DATABASE="assistantdemo"
export ALLOYDB_POSTGRES_USER="postgres"
export ALLOYDB_POSTGRES_PASSWORD=$PGPASSWORD
export ALLOYDB_POSTGRES_IP_TYPE="private"
student@instance-1:~$ ./toolbox --prebuilt alloydb-postgres
2025-09-02T18:30:58.957655886Z INFO "Using prebuilt tool configuration for alloydb-postgres"
2025-09-02T18:30:59.507306664Z INFO "Initialized 1 sources."
2025-09-02T18:30:59.50748379Z INFO "Initialized 0 authServices."
2025-09-02T18:30:59.507618807Z INFO "Initialized 2 tools."
2025-09-02T18:30:59.507726704Z INFO "Initialized 2 toolsets."
2025-09-02T18:30:59.508258894Z INFO "Server ready to serve!"
Do not exit or close this tab of the Cloud Shell until data population is complete.
Populate Database
Open another Cloud Shell tab using the sign "+" at the top.
And connect to the instance-1 VM:
gcloud compute ssh instance-1 --zone=us-central1-a
Expected console output:
student@cloudshell:~ (test-project-402417)$ gcloud compute ssh instance-1 --zone=us-central1-a
Linux instance-1 6.1.0-37-cloud-amd64 #1 SMP PREEMPT_DYNAMIC Debian 6.1.140-1 (2025-05-22) x86_64

The programs included with the Debian GNU/Linux system are free software;
the exact distribution terms for each program are described in the
individual files in /usr/share/doc/*/copyright.

Debian GNU/Linux comes with ABSOLUTELY NO WARRANTY, to the extent
permitted by applicable law.
Last login: Tue Sep  2 21:44:07 2025 from 35.229.111.9
student@instance-1:~$
Clone the GitHub repository with the code for the retrieval service and sample application.
In the GCE VM execute:
git clone https://github.com/GoogleCloudPlatform/cymbal-air-toolbox-demo.git
Expected console output:
student@instance-1:~$ git clone  https://github.com/GoogleCloudPlatform/cymbal-air-toolbox-demo.git
Cloning into 'cymbal-air-toolbox-demo'...
remote: Enumerating objects: 3481, done.
remote: Counting objects: 100% (47/47), done.
remote: Compressing objects: 100% (41/41), done.
remote: Total 3481 (delta 16), reused 7 (delta 5), pack-reused 3434 (from 3)
Receiving objects: 100% (3481/3481), 57.96 MiB | 6.04 MiB/s, done.
Resolving deltas: 100% (2549/2549), done.
student@instance-1:~
Please pay attention if you have any errors.
Prepare Python environment and install requirement packages:
source .venv/bin/activate
cd cymbal-air-toolbox-demo
pip install -r requirements.txt
Set Python path to the repository root folder and run script to populate the database with the sample dataset. The first command is adding a path to our Python modules to our environment and the second command is populating our database with the data.
export PYTHONPATH=$HOME/cymbal-air-toolbox-demo
python data/run_database_init.py
Expected console output(redacted). You should see "database init done" at the end:
student@instance-1:~$ source .venv/bin/activate
(.venv) student@instance-1:~$
(.venv) student@instance-1:~$ cd cymbal-air-toolbox-demo/
(.venv) student@instance-1:~/cymbal-air-toolbox-demo$ pip install -r requirements.txt
python run_database_init.py
Collecting fastapi==0.115.0 (from -r requirements.txt (line 1))
  Downloading fastapi-0.115.0-py3-none-any.whl.metadata (27 kB)
Collecting google-auth==2.40.3 (from -r requirements.txt (line 2))
  Downloading google_auth-2.40.3-py2.py3-none-any.whl.metadata (6.2 kB)
Collecting google-cloud-aiplatform==1.97.0 (from google-cloud-aiplatform[evaluation]==1.97.0->-r requirements.txt (line 3))
  Downloading google_cloud_aiplatform-1.97.0-py2.py3-none-any.whl.metadata (36 kB)
Collecting itsdangerous==2.2.0 (from -r requirements.txt (line 4))
  Downloading itsdangerous-2.2.0-py3-none-any.whl.metadata (1.9 kB)
Collecting jinja2==3.1.5 (from -r requirements.txt (line 5))
  Downloading jinja2-3.1.5-py3-none-any.whl.metadata (2.6 kB)
Collecting langchain-community==0.3.25 (from -r requirements.txt (line 6))
  Downloading langchain_community-0.3.25-py3-none-any.whl.metadata (2.9 kB)
Collecting langchain==0.3.25 (from -r requirements.txt (line 7))
...

(.venv) student@instance-1:~/cymbal-air-toolbox-demo$
(.venv) student@instance-1:~/cymbal-air-toolbox-demo$ export PYTHONPATH=$HOME/cymbal-air-toolbox-demo
python data/run_database_init.py
Airports table initialized
Amenities table initialized
Flights table initialized
Tickets table initialized
Policies table initialized
database init done.
(.venv) student@instance-1:~/cymbal-air-toolbox-demo$
You can close this tab now.
In the VM session execute:
exit
And in the Cloud Shell session press ctrl+d or execute :
exit
In the first tab with running MCP Toolbox press ctrl+c in to exit from the toolbox running session.
The database has been populated with sample data for the application.
You can verify it by connecting to the database and checking the number of rows in the airports table. You can use the psql utility as we've used before or AlloyDB Studio . here is how you can check it using psql
In the ssh session to instance-1 VM execute:
export PGPASSWORD=<Noted AlloyDB password>
REGION=us-central1
ADBCLUSTER=alloydb-aip-01
INSTANCE_IP=$(gcloud alloydb instances describe $ADBCLUSTER-pr --cluster=$ADBCLUSTER --region=$REGION --format="value(ipAddress)")
psql "host=$INSTANCE_IP user=postgres dbname=assistantdemo" -c "SELECT COUNT(*) FROM airports"
Expected console output:
student@instance-1:~$ REGION=us-central1
ADBCLUSTER=alloydb-aip-01
INSTANCE_IP=$(gcloud alloydb instances describe $ADBCLUSTER-pr --cluster=$ADBCLUSTER --region=$REGION --format="value(ipAddress)")
psql "host=$INSTANCE_IP user=postgres dbname=assistantdemo" -c "SELECT COUNT(*) FROM airports"
 count
-------
  7698
(1 row)
The database is ready and we can move on to MCP Toolbox deployment.
7. Deploy the MCP Toolbox to Cloud Run
Now we can deploy the MCP Toolbox to Cloud Run. There are different ways how the MCP toolbox can be deployed. The simplest way is to run it from the command line but if we want to have it as a scalable and reliable service then Cloud Run is a better solution.
Prepare Client ID
To use booking functionality of the application we need to prepare OAuth 2.0 Client ID using Cloud Console. Without it we cannot sign into the application with our Google credentials to make a booking and record the booking to the database.
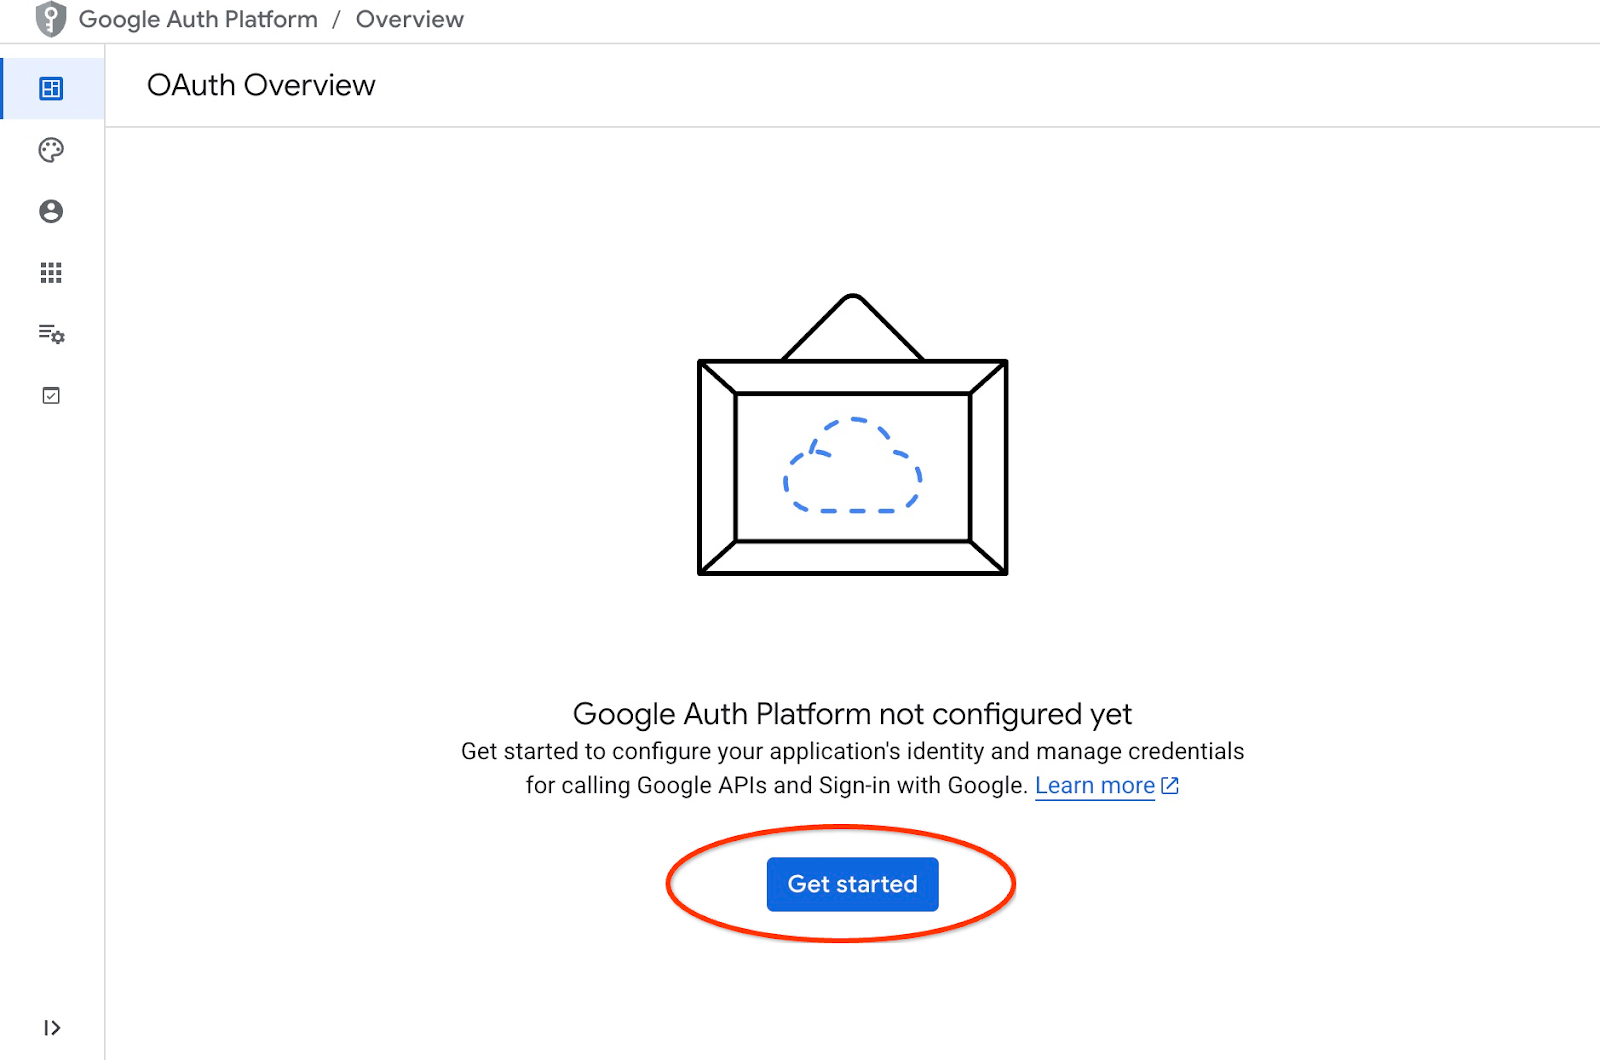
In the Cloud Console go to the APIs and Services and click on "OAuth consent screen". Here is a link to the page. It will open the Oauth Overview page where we click Get Started.
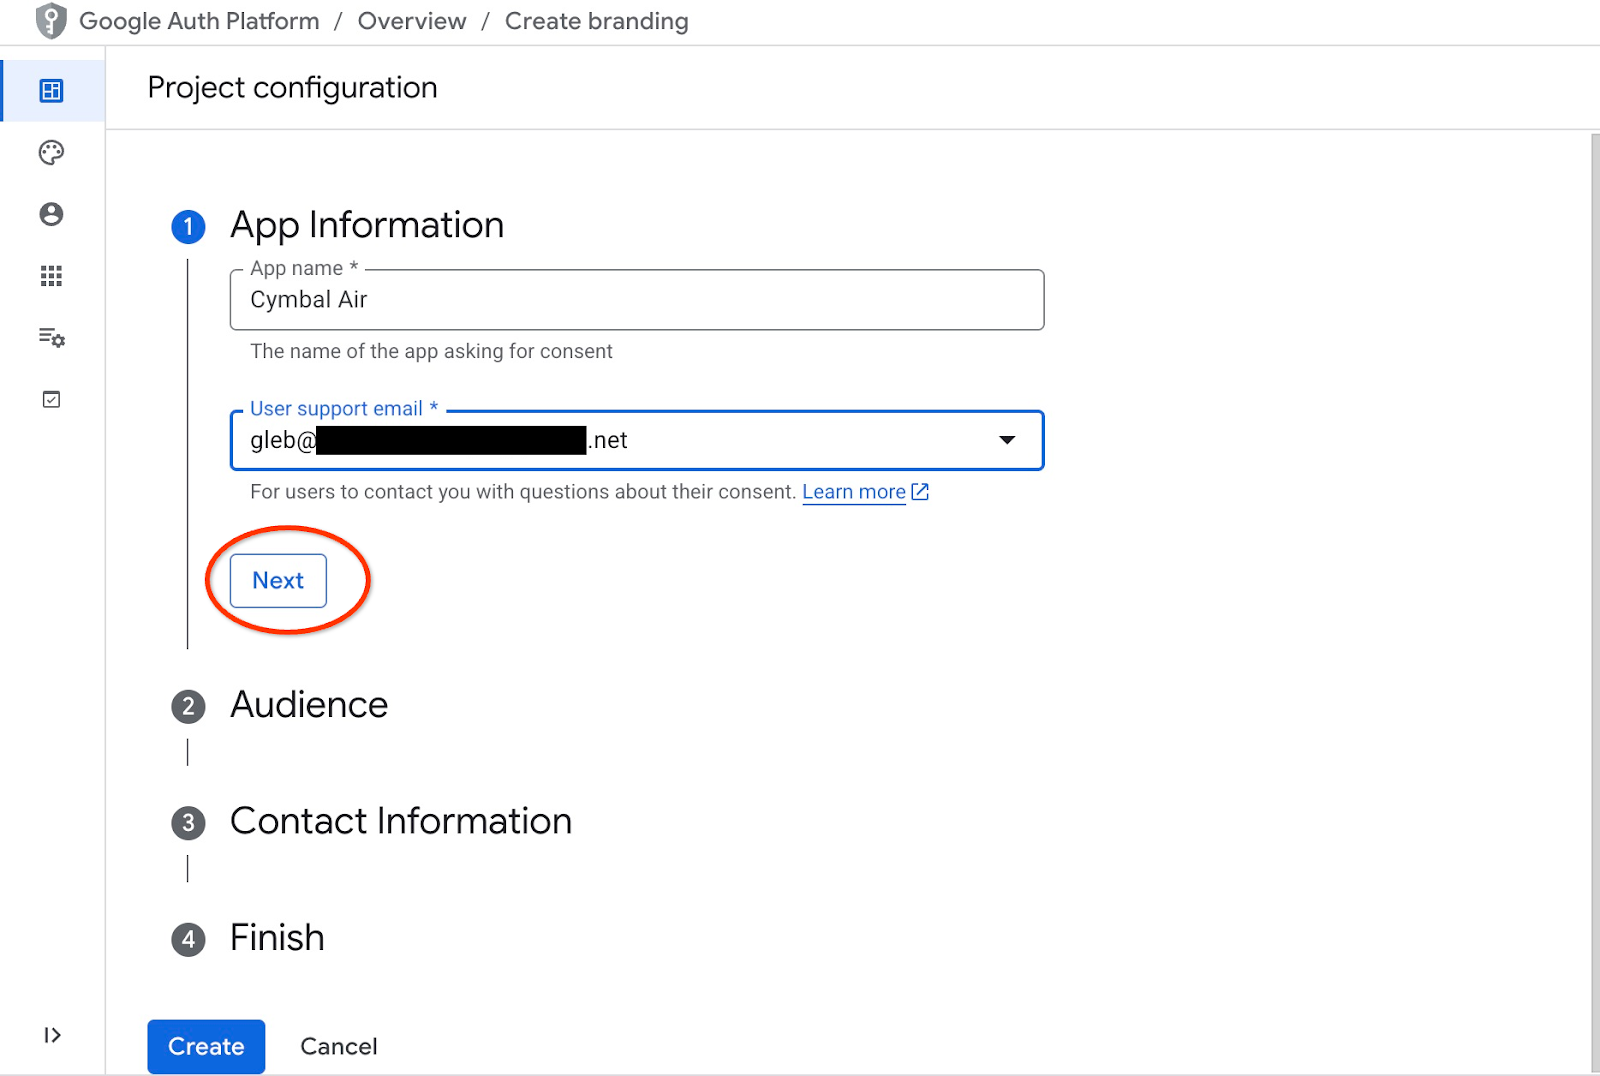
On the next page we provide the application name, user support email and click Next.
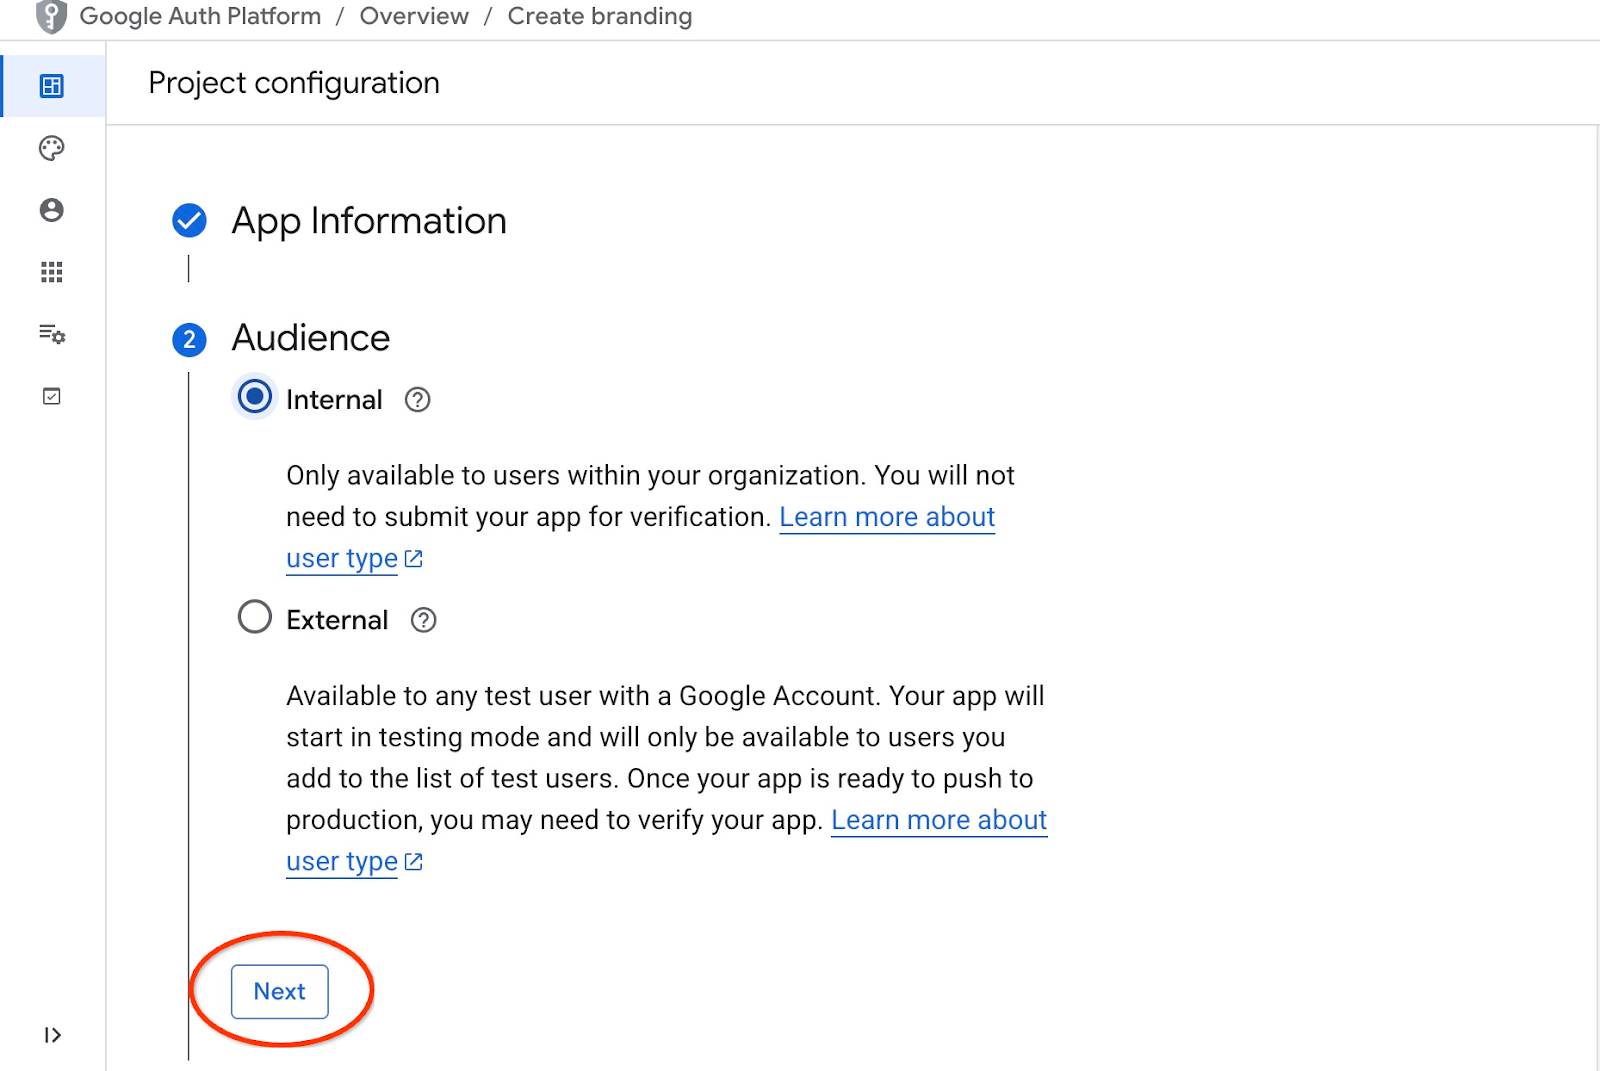
On the next screen we choose Internal for our application and click Next again.
Then again we provide contact email and click Next
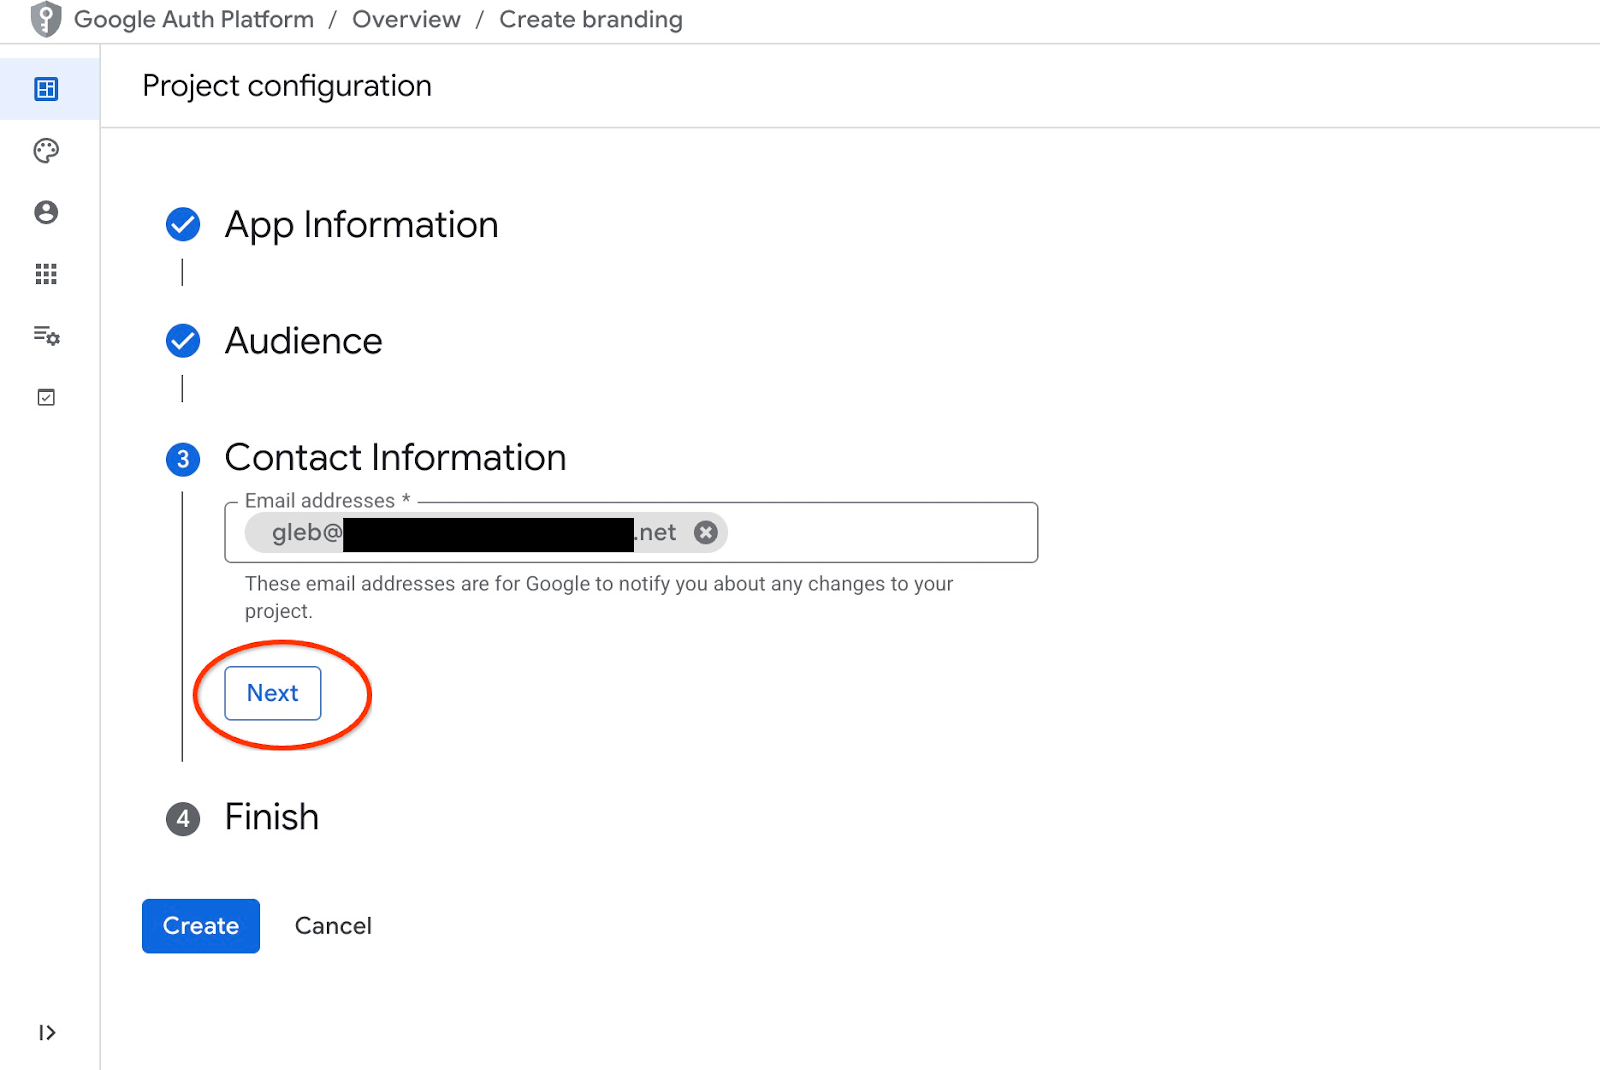
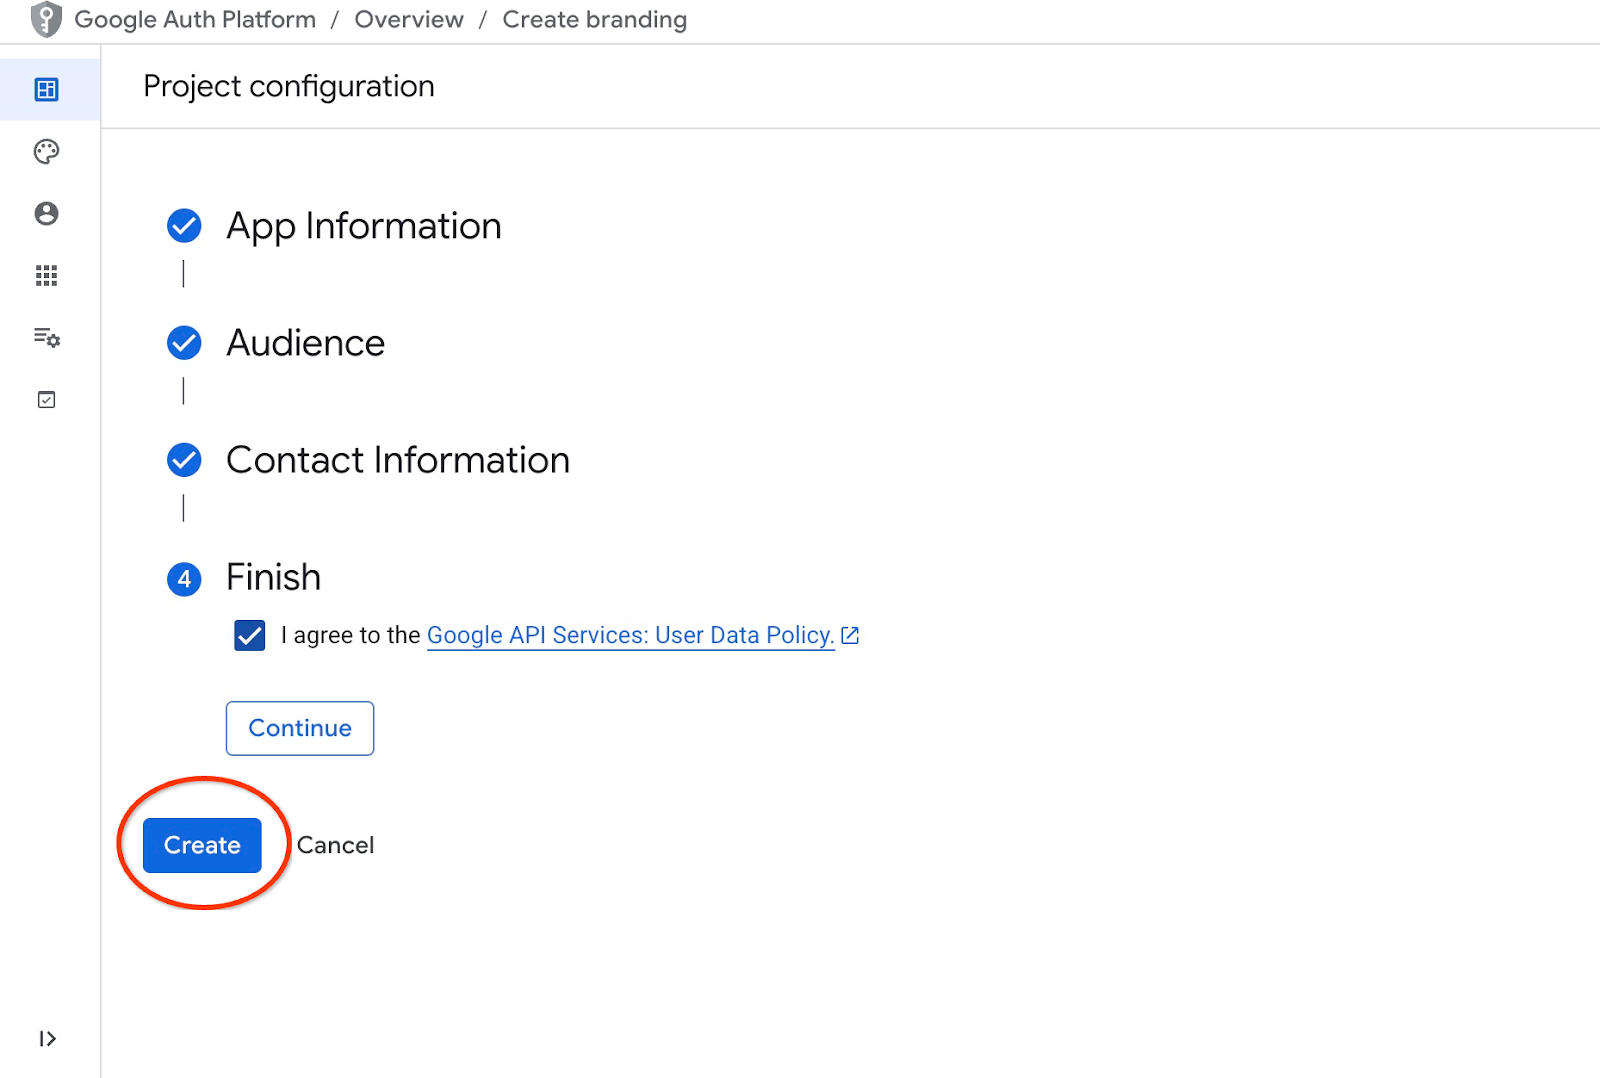
Then we agree with Google API services policies and push the Create button.
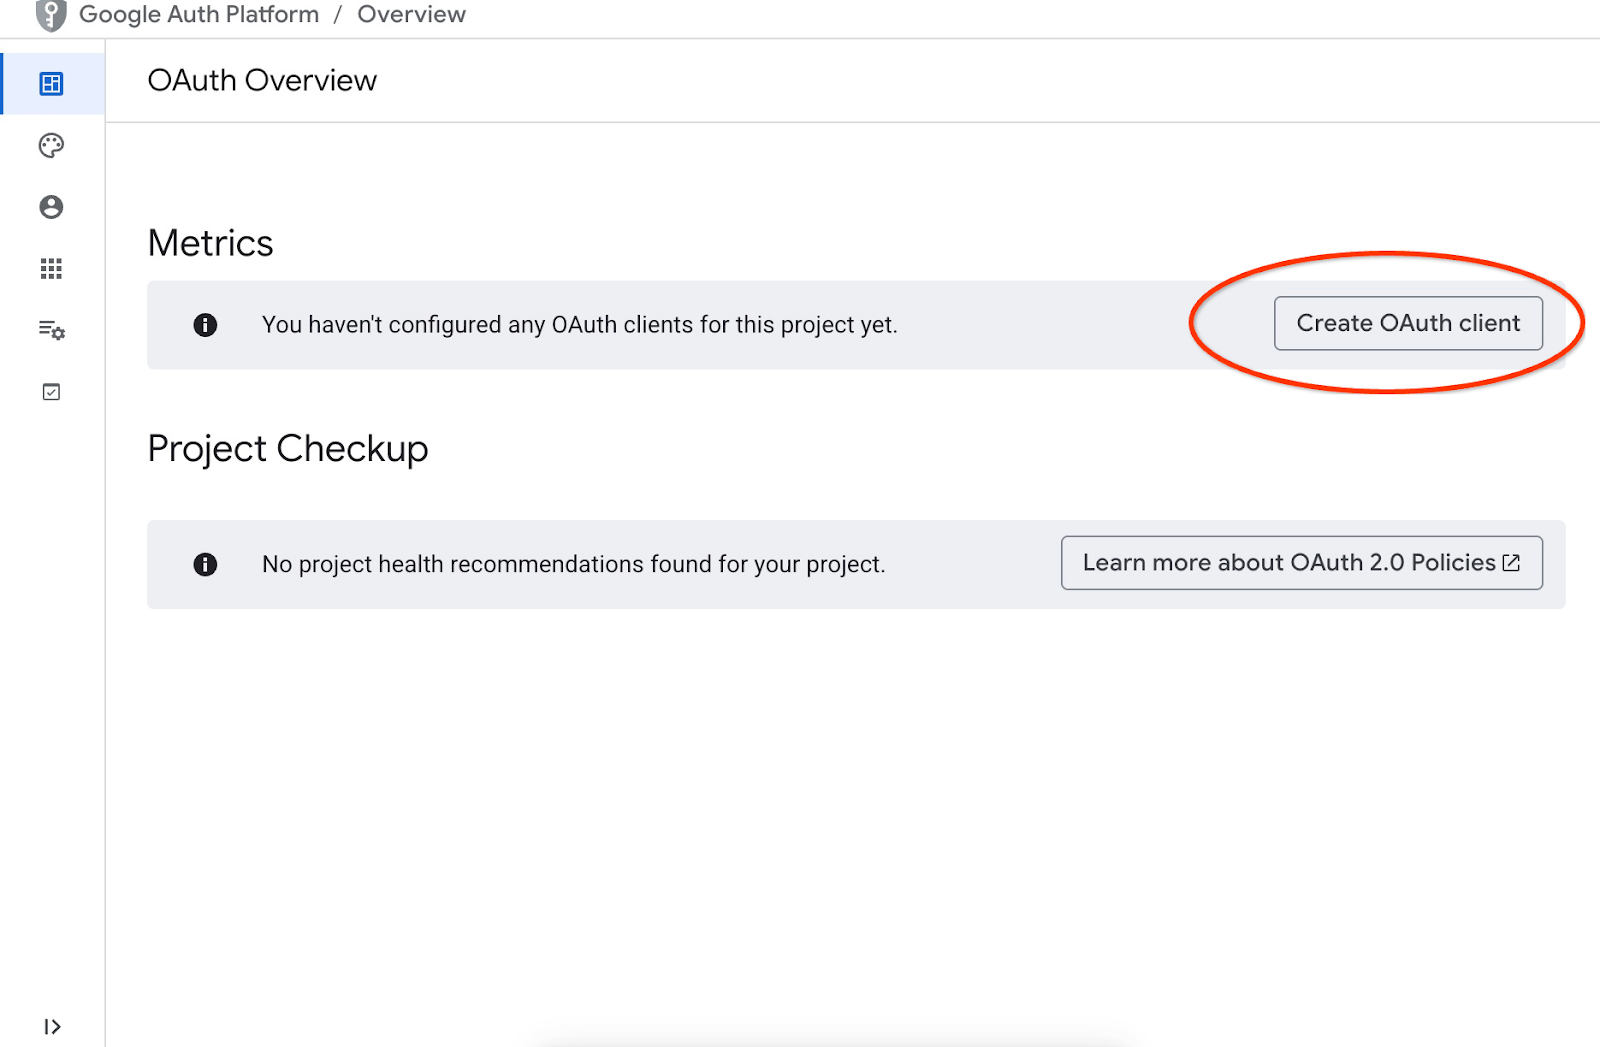
It will lead us to the page where we can create an OAuth client.
On the screen we choose "Web Application" from the dropdown menu, put "Cymbal Air" as application and push the Add URI button.
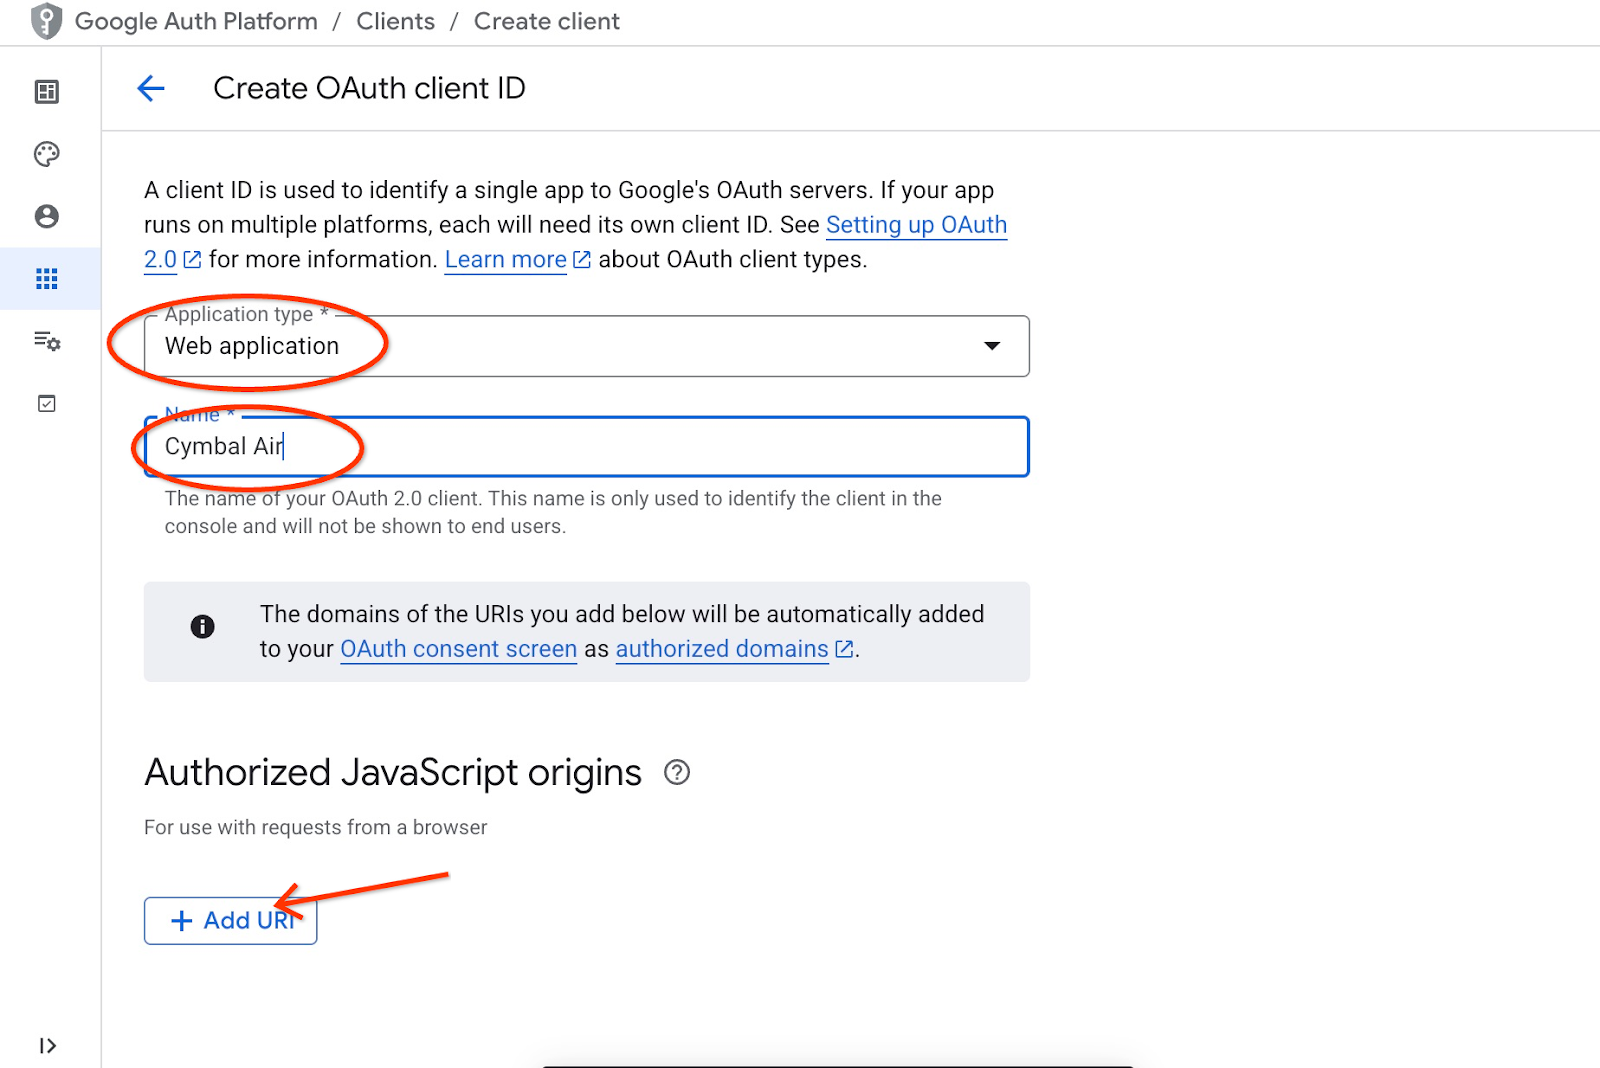
The URIs represent trusted sources for the application and they depend on where you are trying to reach the application from. We put "http://localhost:8081" as authorized URI and "http://localhost:8081/login/google" as redirect URI. Those values would work if you put in your browser "http://localhost:8081" as a URI for connection. For example, when you connect through an SSH tunnel from your computer for example. I will show you how to do it later.
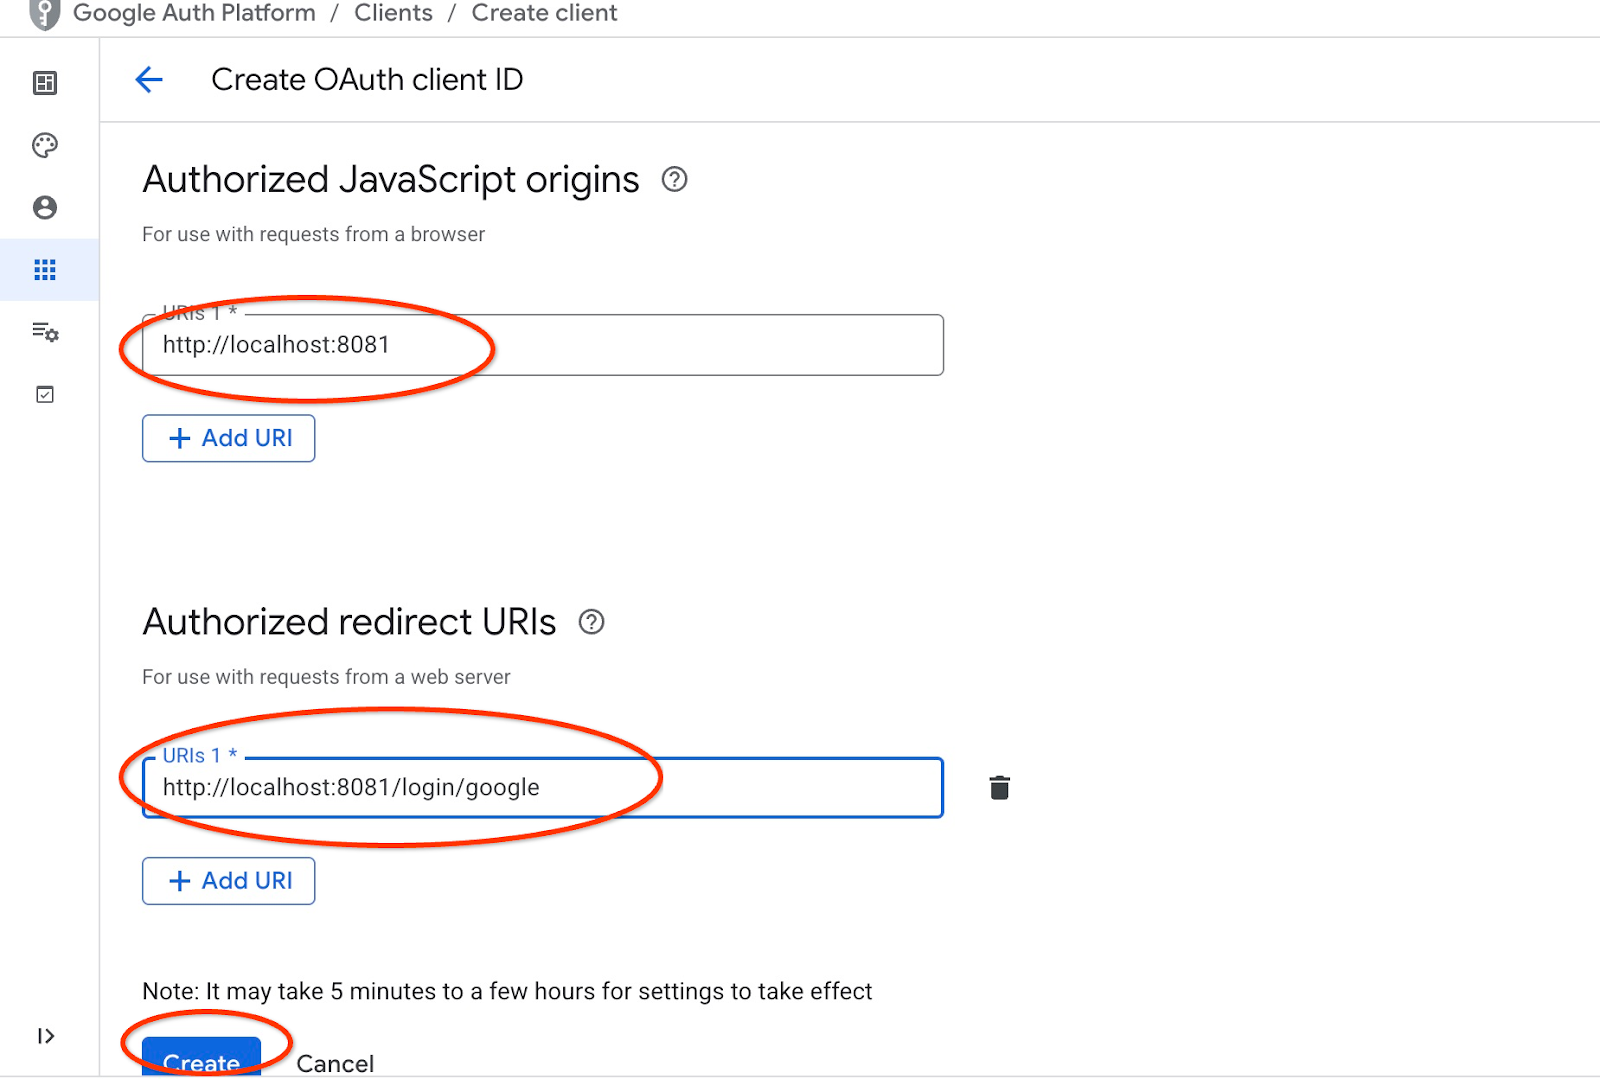
After pushing the "Create" button you get a popup window with your clients credentials. And the credentials will be recorded in the system. You always can copy the client ID to be used when you start your application.
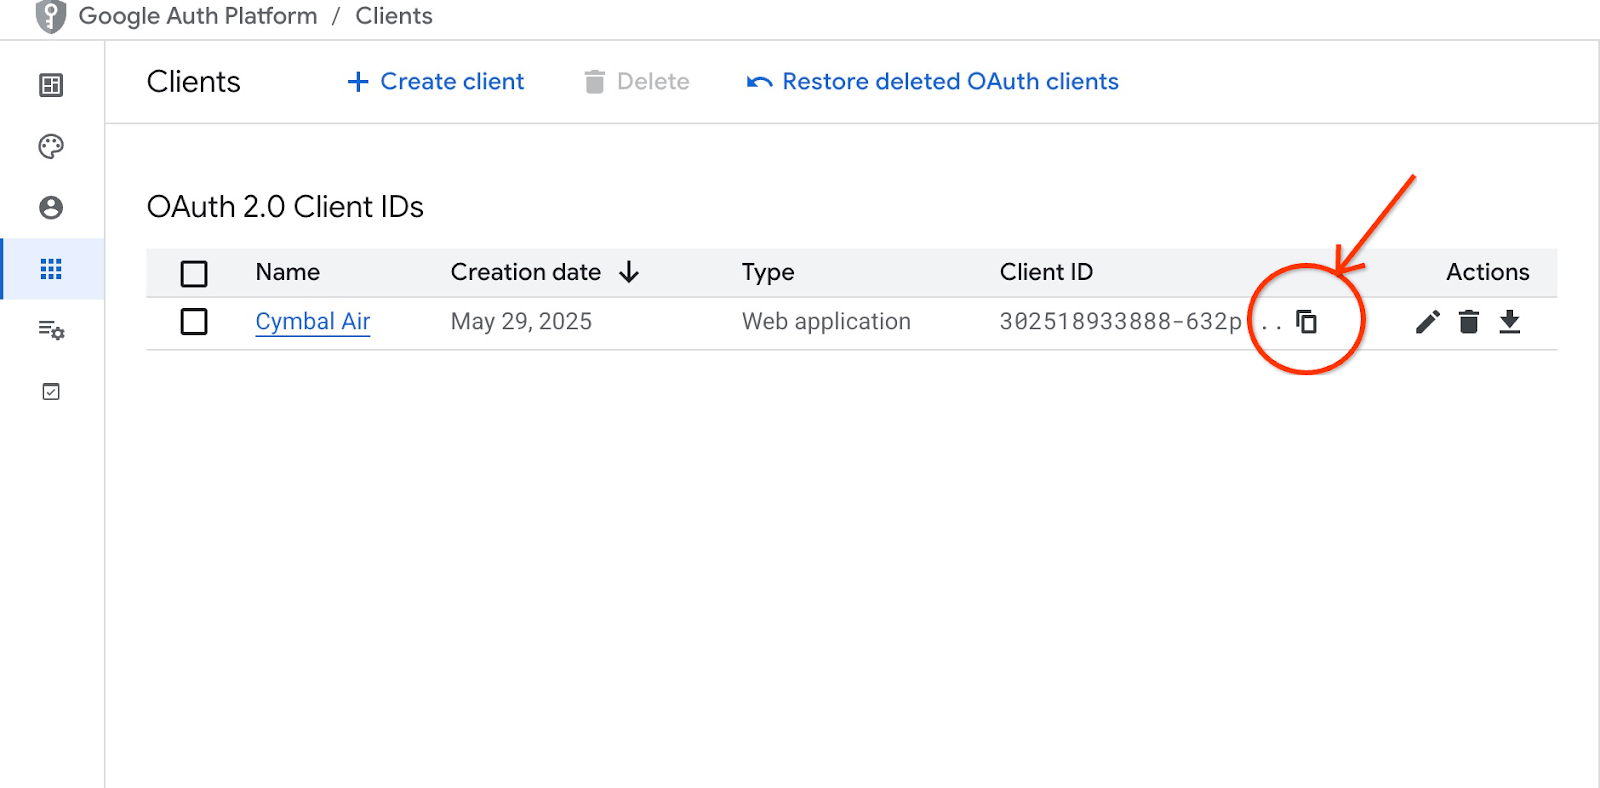
Later you will see where you provide that client ID.
Create Service Account
We need a dedicated service account for our Cloud Run service with all required privileges. For our service we need access to AlloyDB and Cloud Secret Manager. As for the name for the service account we are going to use toolbox-identity.
Open another Cloud Shell tab using the sign "+" at the top.
In the new cloud shell tab execute:
export PROJECT_ID=$(gcloud config get-value project)
gcloud iam service-accounts create toolbox-identity

gcloud projects add-iam-policy-binding $PROJECT_ID \
  --member="serviceAccount:toolbox-identity@$PROJECT_ID.iam.gserviceaccount.com" \
  --role="roles/alloydb.client"
gcloud projects add-iam-policy-binding $PROJECT_ID \
  --member="serviceAccount:toolbox-identity@$PROJECT_ID.iam.gserviceaccount.com" \
  --role="roles/serviceusage.serviceUsageConsumer"
gcloud projects add-iam-policy-binding $PROJECT_ID \
  --member="serviceAccount:toolbox-identity@$PROJECT_ID.iam.gserviceaccount.com" \
  --role="roles/secretmanager.secretAccessor"
Please pay attention if you have any errors. The command is supposed to create a service account for cloud run service and grant privileges to work with secret manager, database and Vertex AI.
Close the tab by either pressing ctrl+d or executing command "exit" in the tab:
exit
Prepare MCP Toolbox Configuration
Prepare configuration file for the MCP Toolbox. You can read about all configuration options in the documentation but here we are going to use the sample tools.yaml file and replace some values such as cluster and instance name, AlloyDB password and the project id by our actual values.
Export AlloyDB Password:
export PGPASSWORD=<noted AlloyDB password>
Export client ID we prepared in the previous step:
export CLIENT_ID=<noted OAuth 2.0 client ID for our application>
Prepare configuration file.
PROJECT_ID=$(gcloud config get-value project)
ADBCLUSTER=alloydb-aip-01
sed -e "s/project: retrieval-app-testing/project: $(gcloud config get-value project)/g" \
-e "s/cluster: my-alloydb-cluster/cluster: $ADBCLUSTER/g" \
-e "s/instance: my-alloydb-instance/instance: $ADBCLUSTER-pr/g" \
-e "s/password: postgres/password: $PGPASSWORD\\n    ipType: private/g" \
-e "s/^ *clientId: .*/    clientId: $CLIENT_ID/g" \
cymbal-air-toolbox-demo/tools.yaml >~/tools.yaml
If you look into the file section defining the target data source you will see that we also added a line to use private IP for connection.
sources:
  my-pg-instance:
    kind: alloydb-postgres
    project: gleb-test-short-003-471020
    region: us-central1
    cluster: alloydb-aip-01
    instance: alloydb-aip-01-pr
    database: assistantdemo
    user: postgres
    password: L23F...
    ipType: private
authServices:
  my_google_service:
    kind: google
    clientId: 96828*******-***********.apps.googleusercontent.com
Create a secret using the tools.yaml configuration as a source.
In the VM ssh console execute:
gcloud secrets create tools --data-file=tools.yaml
Expected console output:
student@instance-1:~$ gcloud secrets create tools --data-file=tools.yaml
Created version [1] of the secret [tools].
Deploy the MCP Toolbox as a Cloud Run Service
Now everything is ready to deploy the MCP Toolbox as a service to Cloud Run. For local testing you can run "./toolbox –tools-file=./tools.yaml" but if we want our application to run in the cloud the deployment in Cloud Run makes much more sense.
In the VM SSH session execute:
export IMAGE=us-central1-docker.pkg.dev/database-toolbox/toolbox/toolbox:latest
gcloud run deploy toolbox \
    --image $IMAGE \
    --service-account toolbox-identity \
    --region us-central1 \
    --set-secrets "/app/tools.yaml=tools:latest" \
    --args="--tools-file=/app/tools.yaml","--address=0.0.0.0","--port=8080" \
    --network default \
    --subnet default \
    --no-allow-unauthenticated
Expected console output:
student@instance-1:~$ export IMAGE=us-central1-docker.pkg.dev/database-toolbox/toolbox/toolbox:latest
gcloud run deploy toolbox \
    --image $IMAGE \
    --service-account toolbox-identity \
    --region us-central1 \
    --set-secrets "/app/tools.yaml=tools:latest" \
    --args="--tools-file=/app/tools.yaml","--address=0.0.0.0","--port=8080" \
    --network default \
    --subnet default \
    --no-allow-unauthenticated
Deploying container to Cloud Run service [toolbox] in project [gleb-test-short-002-470613] region [us-central1]
✓ Deploying new service... Done.
  ✓ Creating Revision...
  ✓ Routing traffic...
Done.
Service [toolbox] revision [toolbox-00001-l9c] has been deployed and is serving 100 percent of traffic.
Service URL: https://toolbox-868691532292.us-central1.run.app

student@instance-1:~$
Verify The Service
Now we can check if the service is up and we can access the endpoint. We use gcloud utility to get the retrieval service endpoint and the authentication token. Alternatively you can check the service URI in the cloud console.
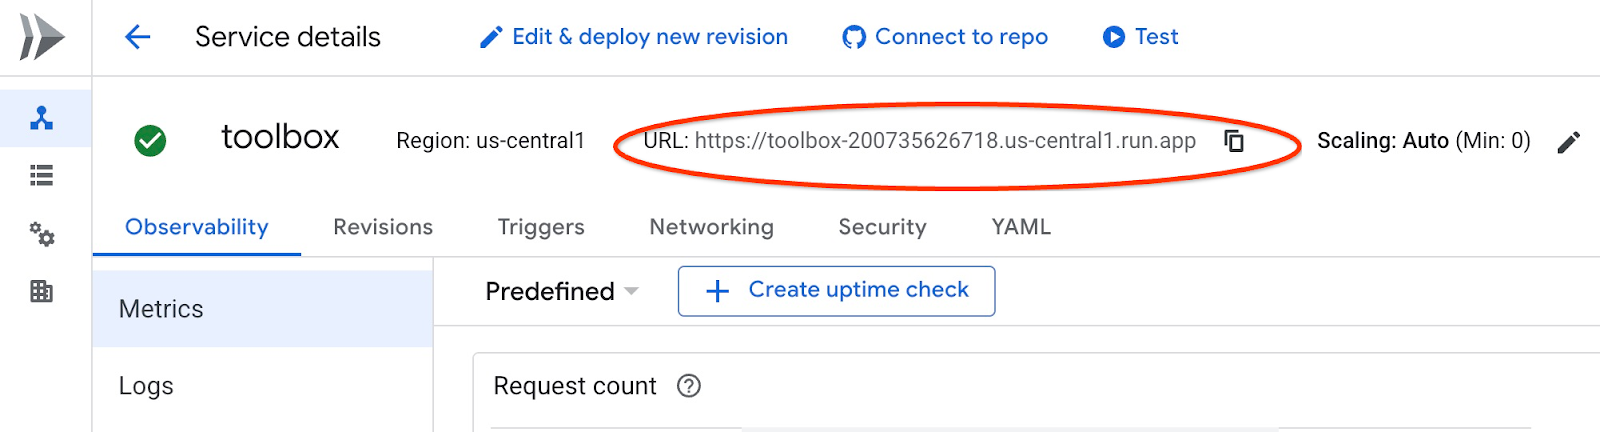
You can copy the value and replace in the curl command the "$(gcloud run services list –filter="(toolbox)" –format="value(URL)" part .
Here is how to get the URL dynamically from the command line:
curl -H "Authorization: Bearer $(gcloud auth print-identity-token)" $(gcloud run services list --filter="(toolbox)" --format="value(URL)")
Expected console output:
student@instance-1:~$ curl -H "Authorization: Bearer $(gcloud auth print-identity-token)" $(gcloud  run services list --filter="(toolbox)" --format="value(URL)")
🧰 Hello, World! 🧰student@instance-1:~$
If we see the "Hello World" message it means our service is up and serving the requests.
8. Deploy Sample Application
Now when we have the retrieval service up and running we can deploy a sample application. The application represents an online airport assistant which can give you information about flights, airports and even book a flight based on the flights and airport data from our database.
The application can be deployed locally, on a VM in the cloud or any other service like Cloud Run or Kubernetes. Here we are going to show how to deploy it on the VM first.
Prepare the environment
We continue to work on our VM using the same SSH session. To run our application we need some Python modules and we have already added them when we initiated our database earlier. Let's switch to our Python virtual environment and change our location to the app directory.
In the VM SSH session execute:
source ~/.venv/bin/activate
cd cymbal-air-toolbox-demo
Expected output (redacted):
student@instance-1:~$ source ~/.venv/bin/activate
cd cymbal-air-toolbox-demo
(.venv) student@instance-1:~/cymbal-air-toolbox-demo$
Run Assistant Application
Before starting the application we need to set up some environment variables. The basic functionality of the application such as query flights and airport amenities requires only TOOLBOX_URL which points application to the retrieval service. We can get it using the gcloud command .
In the VM SSH session execute:
export TOOLBOX_URL=$(gcloud run services list --filter="(toolbox)" --format="value(URL)")
Expected output (redacted):
student@instance-1:~/cymbal-air-toolbox-demo$ export BASE_URL=$(gcloud run services list --filter="(toolbox)" --format="value(URL)")
To use more advanced capabilities of the application like booking and changing flights we need to sign-in to the application using our Google account and for that purpose we need to provide CLIENT_ID environment variable using the OAuth client ID from the Prepare Client ID chapter:
export CLIENT_ID=215....apps.googleusercontent.com
Expected output (redacted):
student@instance-1:~/cymbal-air-toolbox-demo$ export CLIENT_ID=215....apps.googleusercontent.com
And now we can run our application:
python run_app.py
Expected output:
student@instance-1:~/cymbal-air-toolbox-demo/llm_demo$ python run_app.py
INFO:     Started server process [2900]
INFO:     Waiting for application startup.
Loading application...
INFO:     Application startup complete.
INFO:     Uvicorn running on http://0.0.0.0:8081 (Press CTRL+C to quit)
Connect to the Application
You have several ways to connect to the application running on the VM. For example you can open port 8081 on the VM using firewall rules in the VPC or create a load balancer with public IP. Here we are going to use a SSH tunnel to the VM translating the local port 8080 to the VM port 8081.
Connecting From Local Machine
When we want to connect from a local machine we need to run a SSH tunnel. It can be done using gcloud compute ssh:
gcloud compute ssh instance-1 --zone=us-central1-a -- -L 8081:localhost:8081
Expected output:
student-macbookpro:~ student$ gcloud compute ssh instance-1 --zone=us-central1-a -- -L 8080:localhost:8081
Warning: Permanently added 'compute.7064281075337367021' (ED25519) to the list of known hosts.
Linux instance-1.us-central1-c.c.gleb-test-001.internal 6.1.0-21-cloud-amd64 #1 SMP PREEMPT_DYNAMIC Debian 6.1.90-1 (2024-05-03) x86_64

The programs included with the Debian GNU/Linux system are free software;
the exact distribution terms for each program are described in the
individual files in /usr/share/doc/*/copyright.

Debian GNU/Linux comes with ABSOLUTELY NO WARRANTY, to the extent
permitted by applicable law.
student@instance-1:~$
Now we can open the browser and use http://localhost:8081 to connect to our application. We should see the application screen.
Connecting From Cloud Shell
Alternatively we can use Google Cloud Shell to connect. Open another Cloud Shell tab using the sign "+" at the top.
In the new tab get the origin and redirect URI for your web client executing the gcloud command:
echo "origin:"; echo "https://8080-$WEB_HOST"; echo "redirect:"; echo "https://8080-$WEB_HOST/login/google"
Here is the expected output:
student@cloudshell:~ echo "origin:"; echo "https://8080-$WEB_HOST"; echo "redirect:"; echo "https://8080-$WEB_HOST/login/google"
origin:
https://8080-cs-35704030349-default.cs-us-east1-rtep.cloudshell.dev
redirect:
https://8080-cs-35704030349-default.cs-us-east1-rtep.cloudshell.dev/login/google
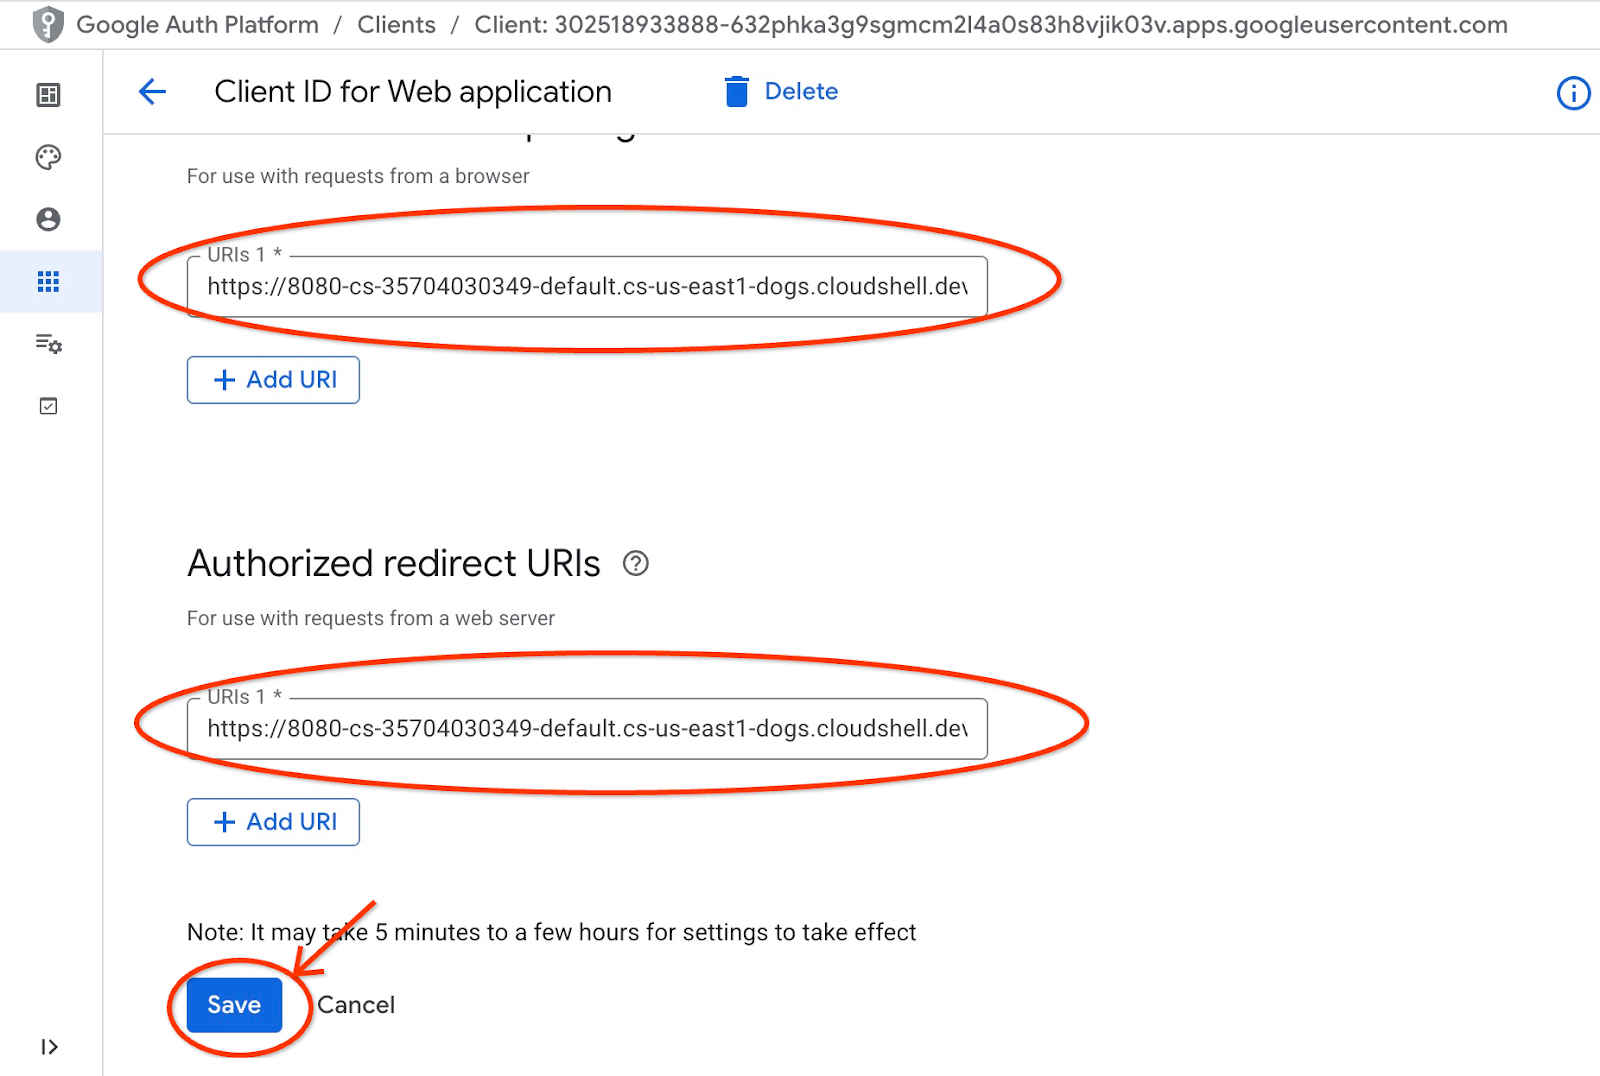
And use the origin and the redirect of URIs as the "Authorized JavaScript origins" and "Authorized redirect URIs" for our credentials created in the "Prepare Client ID" chapter replacing or adding to the originally provided http://localhost:8080 values.
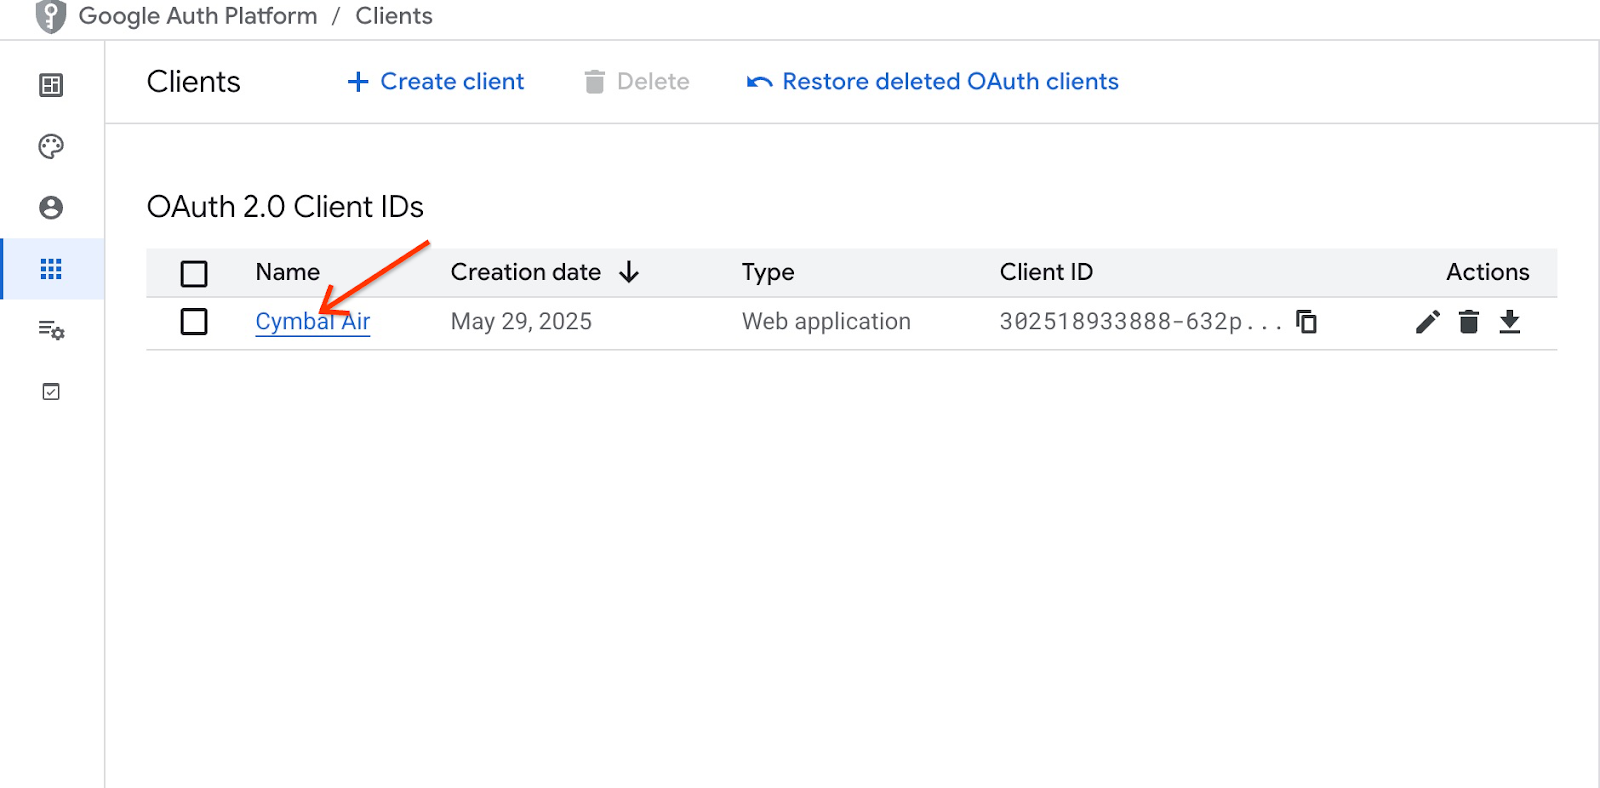
Click on "Cymbal Air" on the OAuth 2.0 client IDs page.
Put the origin and redirect URIs for the Cloud Shell and push the Save button.
In the new cloud shell tab start the tunnel to your VM by executing the gcloud command:
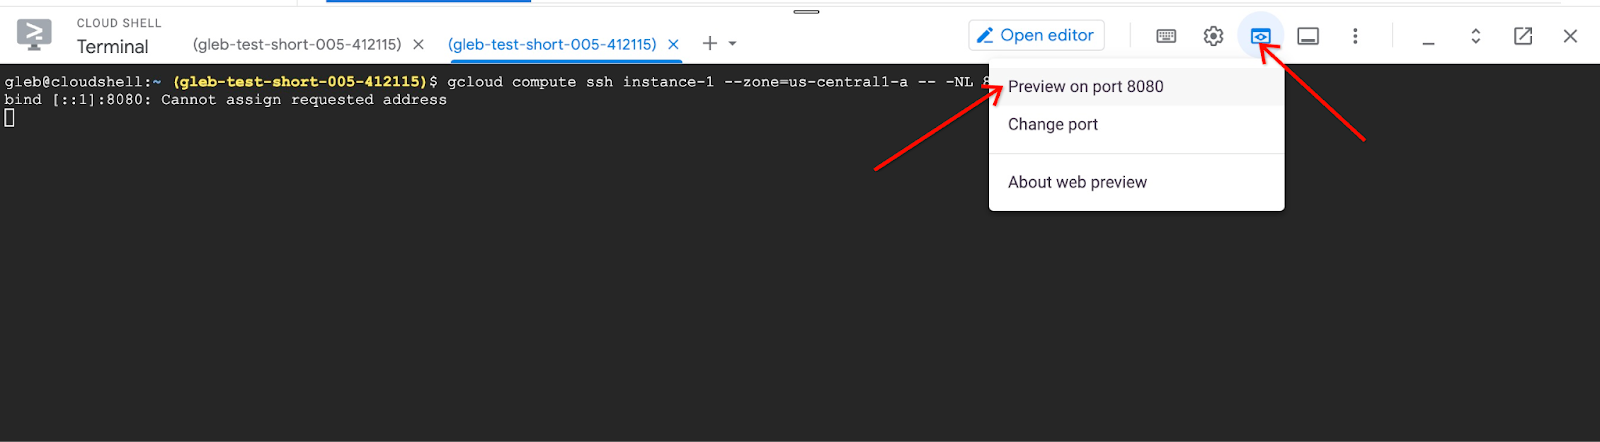
gcloud compute ssh instance-1 --zone=us-central1-a -- -L 8080:localhost:8081
If it will show an error "Cannot assign requested address" - please ignore it.
Here is the expected output:
student@cloudshell:~ gcloud compute ssh instance-1 --zone=us-central1-a -- -L 8080:localhost:8081
bind [::1]:8081: Cannot assign requested address
inux instance-1.us-central1-a.c.gleb-codelive-01.internal 6.1.0-21-cloud-amd64 #1 SMP PREEMPT_DYNAMIC Debian 6.1.90-1 (2024-05-03) x86_64

The programs included with the Debian GNU/Linux system are free software;
the exact distribution terms for each program are described in the
individual files in /usr/share/doc/*/copyright.

Debian GNU/Linux comes with ABSOLUTELY NO WARRANTY, to the extent
permitted by applicable law.
Last login: Sat May 25 19:15:46 2024 from 35.243.235.73
student@instance-1:~$
It opens port 8080 on your cloud shell which can be used for the "Web preview".
Click on the "Web preview" button on the right top of your Cloud Shell and from the drop down menu choose "Preview on port 8080"
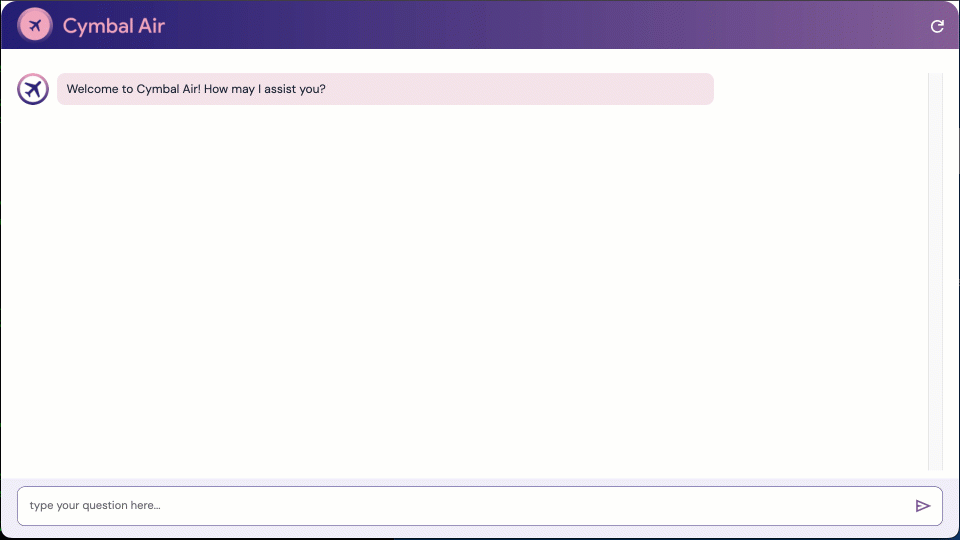
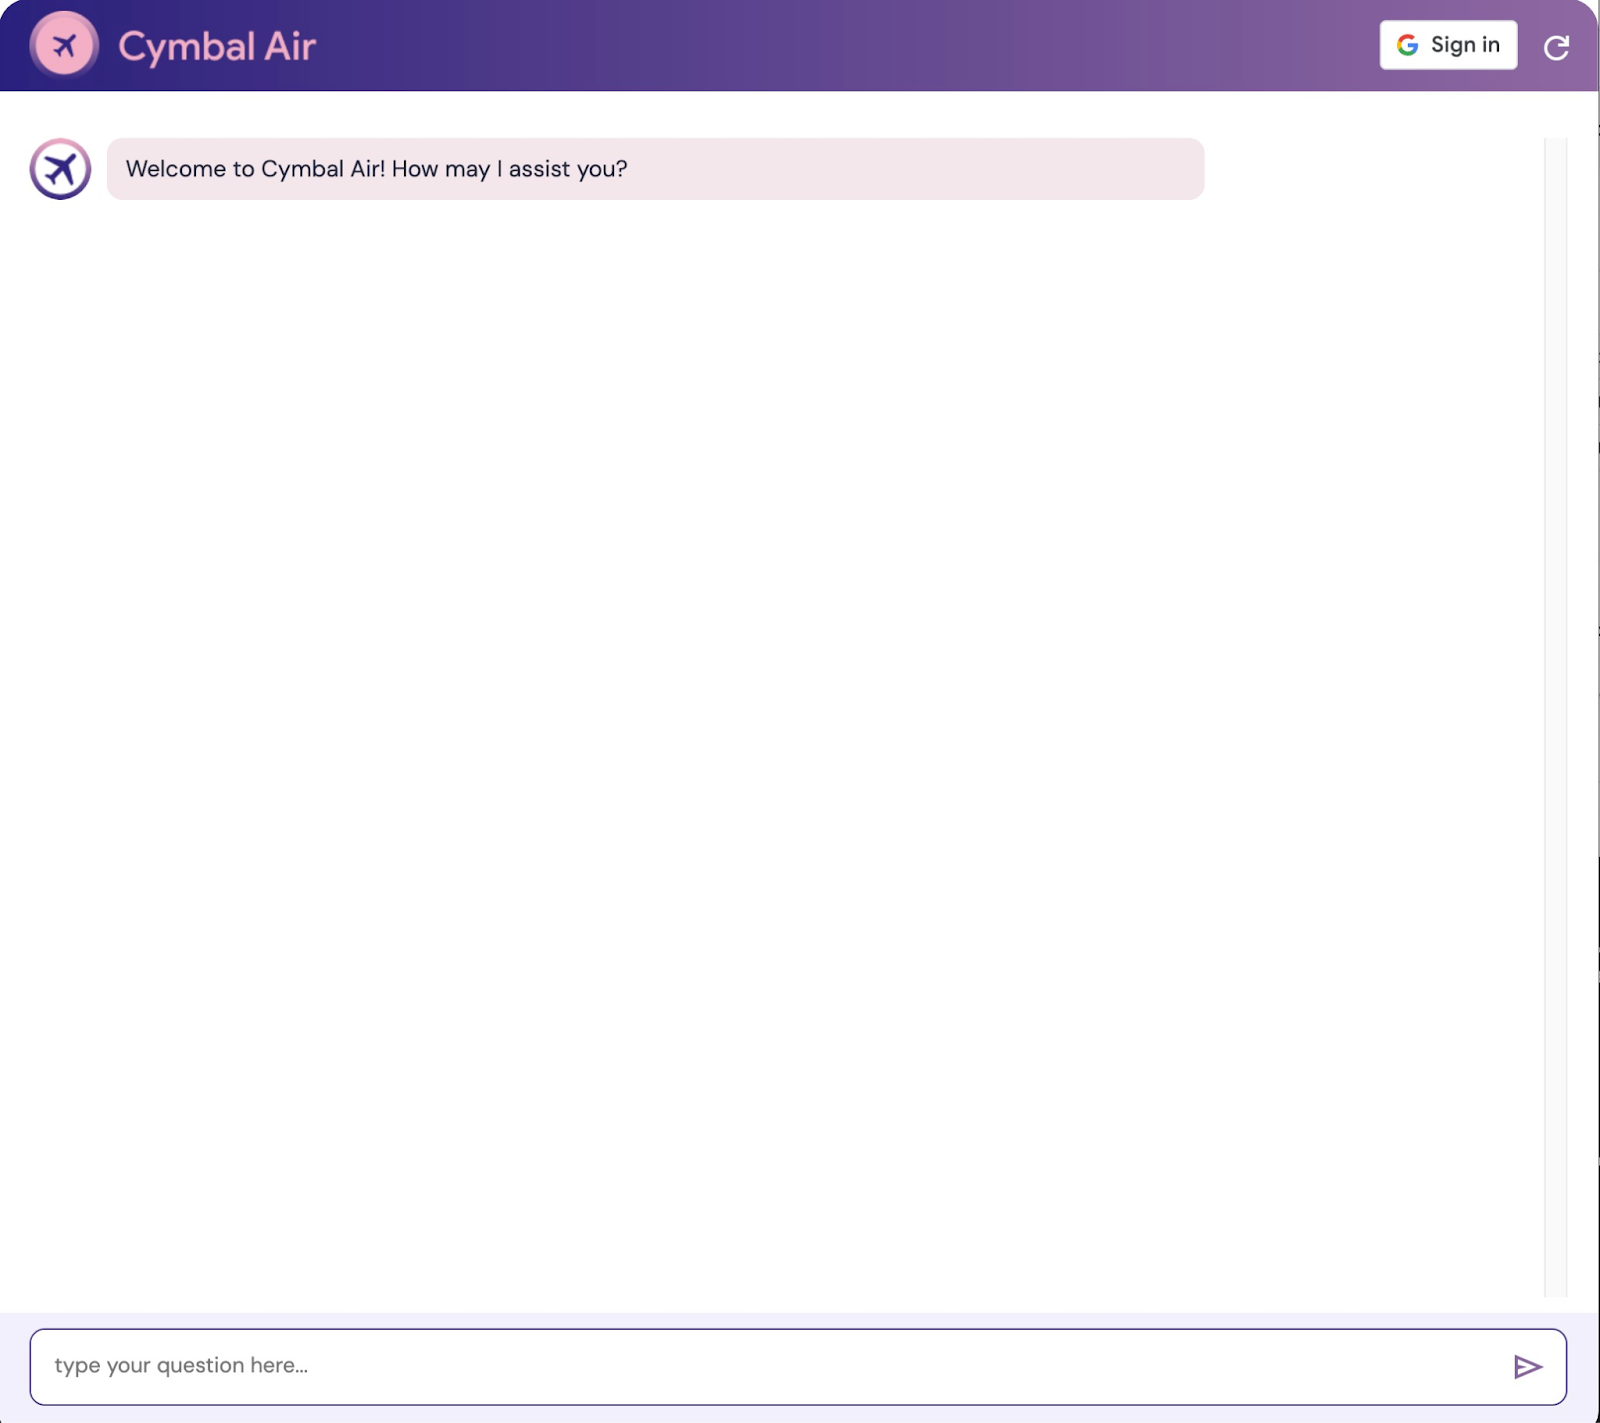
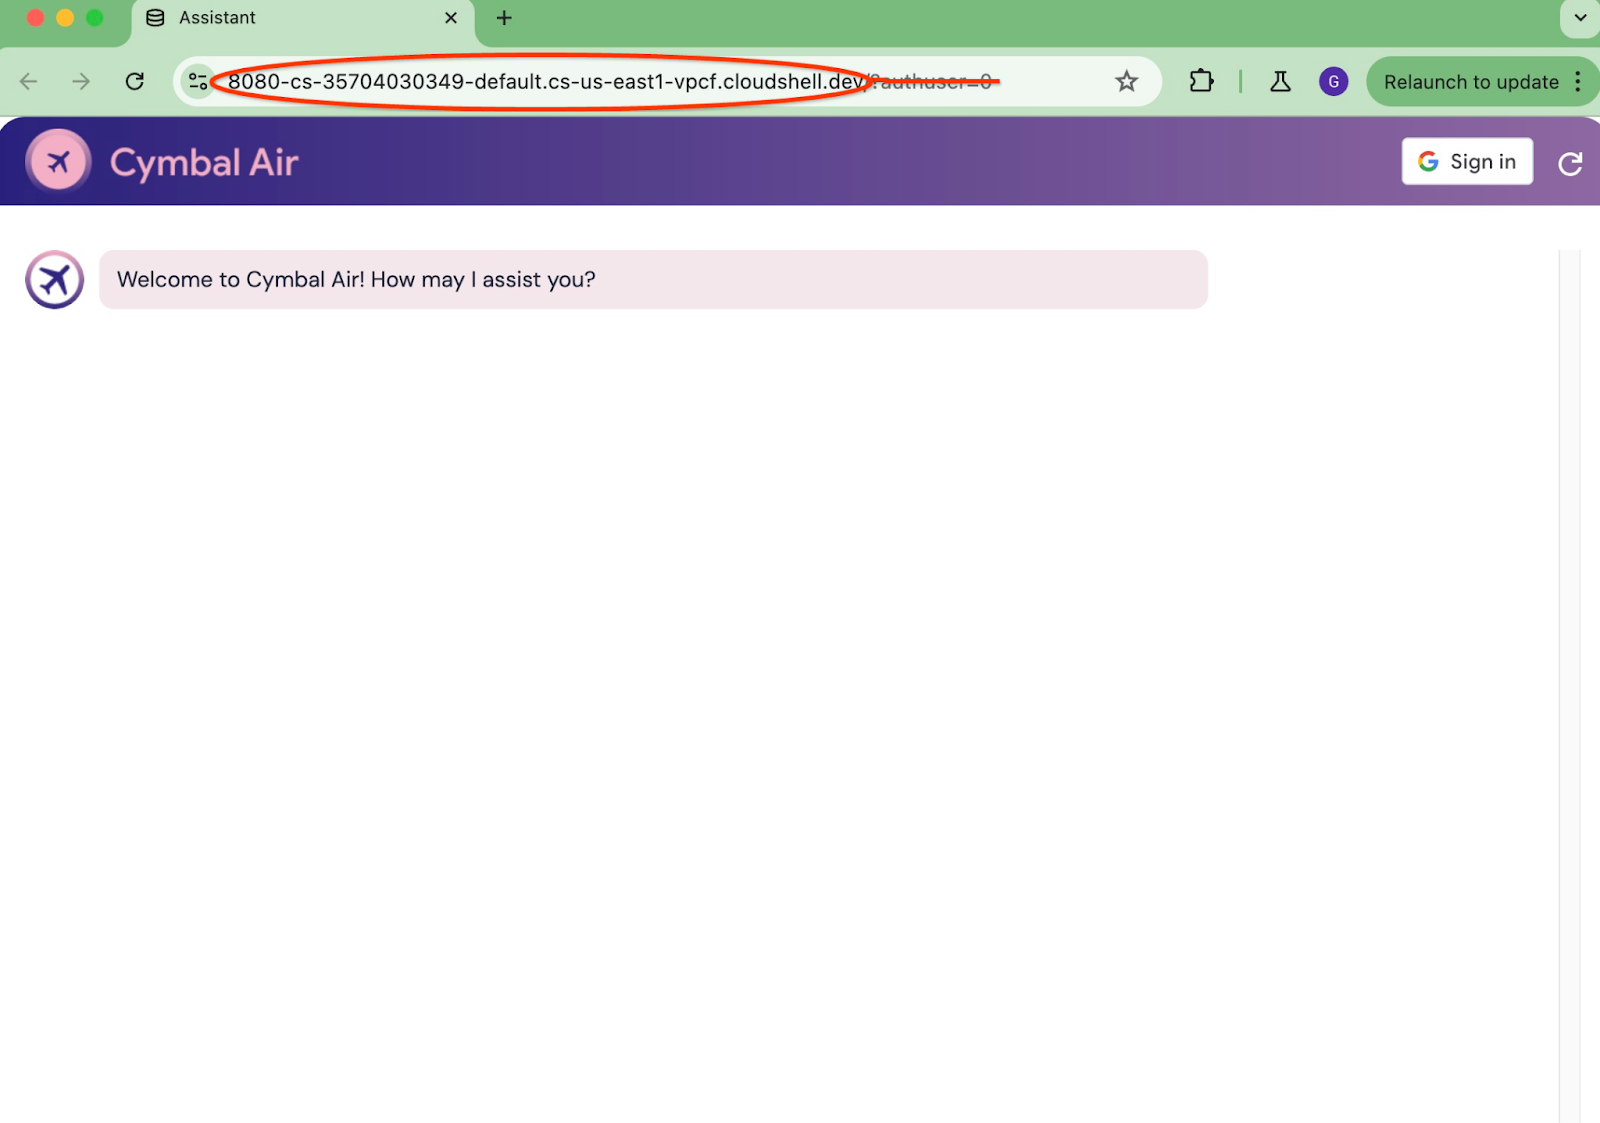
It opens a new tab in your web browser with the application interface. You should be able to see the "Cymbal Air Customer Service Assistant" page.
Sign into the Application
When everything is set up and your application is open we can use the "Sign in" button at the top right of our application screen to provide our credentials. That is optional and required only if you want to try booking functionality of the application.
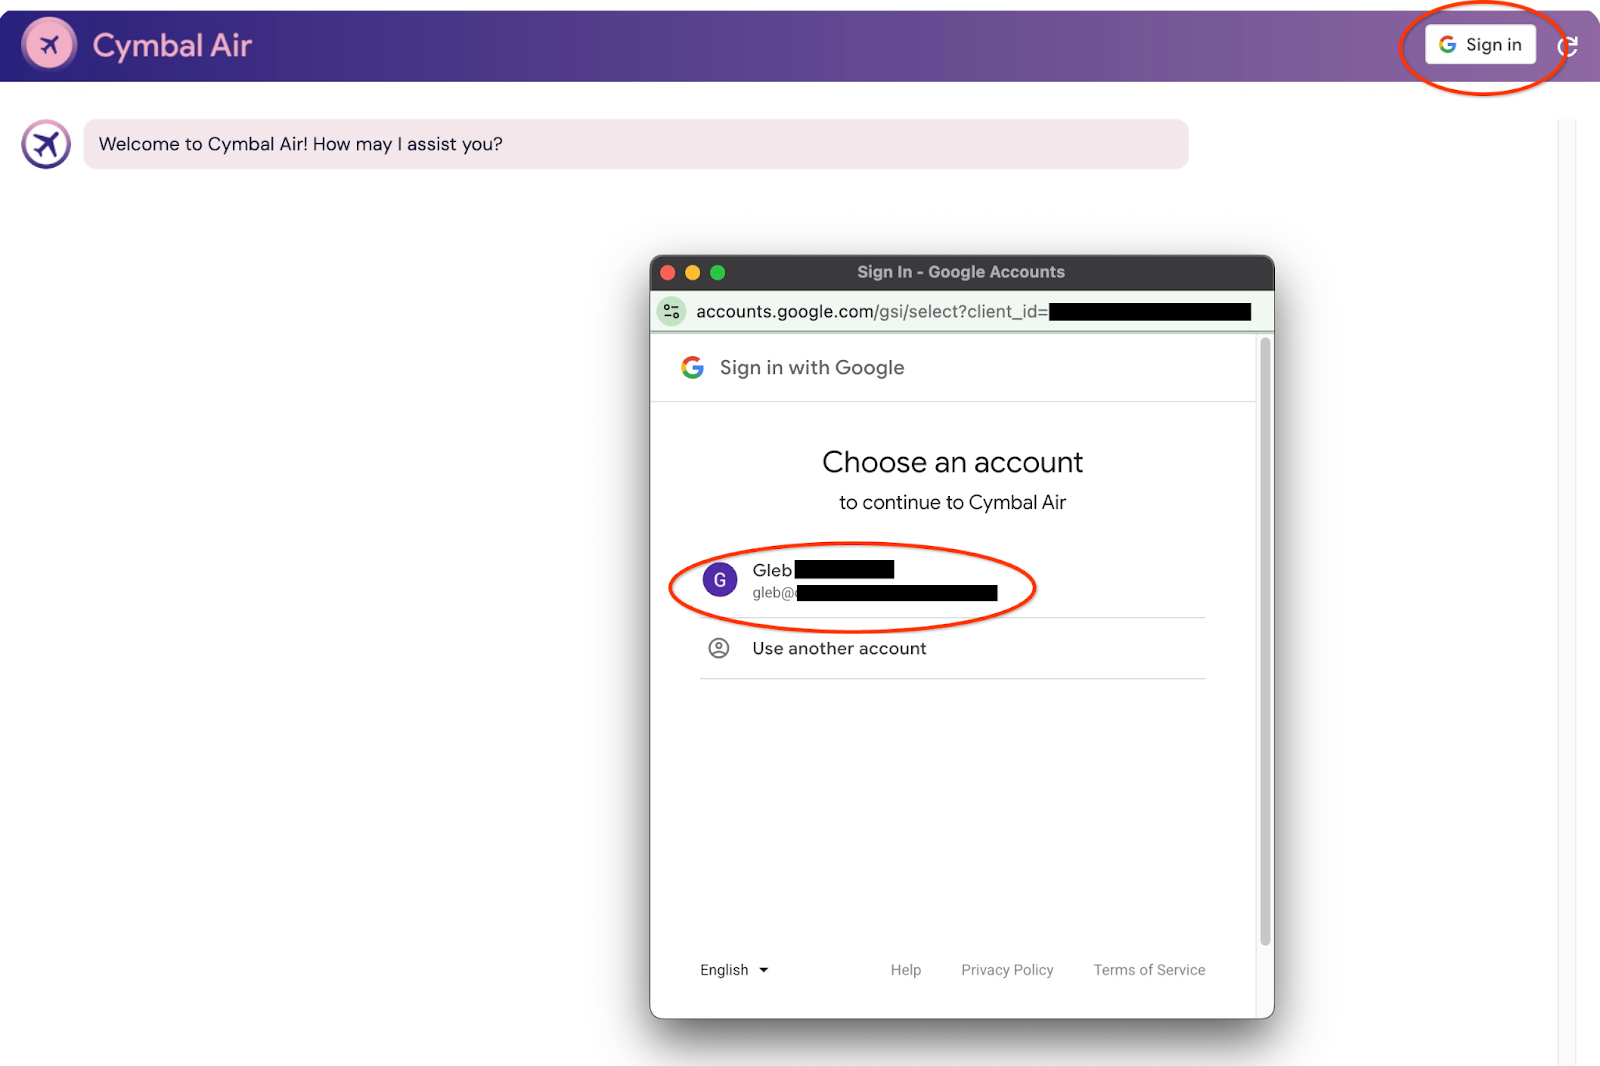
It will open a pop-up window where we can choose our credentials.
After signing in the application is ready and you can start to post your requests into the field at the bottom of the window.
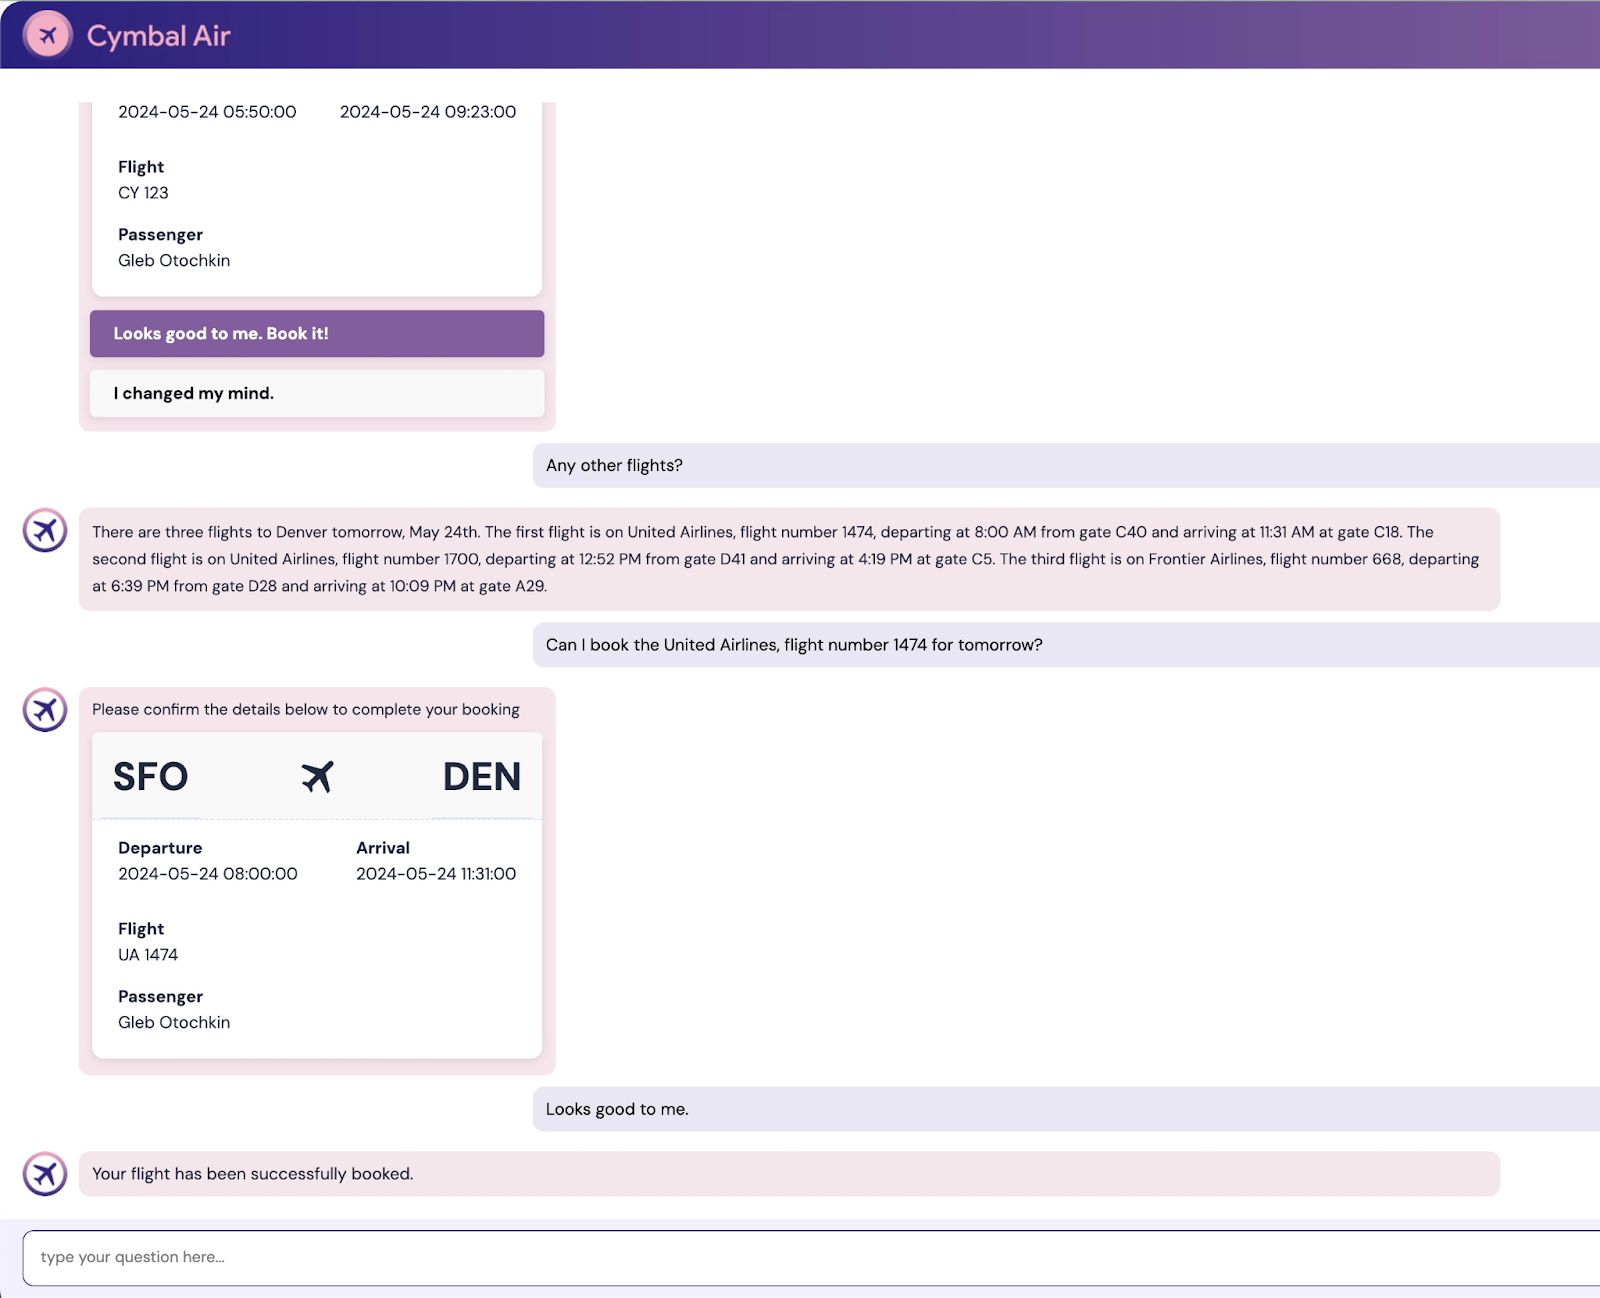
This demo showcases the Cymbal Air customer service assistant. Cymbal Air is a fictional passenger airline. The assistant is an AI chatbot that helps travelers to manage flights and look up information about Cymbal Air's hub at San Francisco International Airport (SFO).
Without signing in (without CLIENT_ID) it can help answer users questions like:
When is the next flight to Denver?
Are there any luxury shops around gate C28?
Where can I get coffee near gate A6?
Where can I buy a gift?
Please find a flight from SFO to Denver departing today
When you are signed in to the application you can try other capabilities like booking flights or check if the seat assigned to you is a window or aisle seat.
The application uses the latest Google foundation models to generate responses and augment it by information about flights and amenities from the operational AlloyDB database. You can read more about this demo application on the Github page of the project.
9. Clean up environment
Now when all tasks are completed we can clean up our environment
Delete Cloud Run Service
In Cloud Shell execute:
gcloud run services delete toolbox --region us-central1
Expected console output:
student@cloudshell:~ (gleb-test-short-004)$ gcloud run services delete retrieval-service --region us-central1
Service [retrieval-service] will be deleted.

Do you want to continue (Y/n)?  Y

Deleting [retrieval-service]...done.
Deleted service [retrieval-service].
Delete the Service Account for cloud run service
In Cloud Shell execute:
PROJECT_ID=$(gcloud config get-value project)
gcloud iam service-accounts delete toolbox-identity@$PROJECT_ID.iam.gserviceaccount.com --quiet
Expected console output:
student@cloudshell:~ (gleb-test-short-004)$ PROJECT_ID=$(gcloud config get-value project)
Your active configuration is: [cloudshell-222]
student@cloudshell:~ (gleb-test-short-004)$ gcloud iam service-accounts delete retrieval-identity@$PROJECT_ID.iam.gserviceaccount.com --quiet
deleted service account [retrieval-identity@gleb-test-short-004.iam.gserviceaccount.com]
student@cloudshell:~ (gleb-test-short-004)$
Destroy the AlloyDB instances and cluster when you are done with the lab.
Delete AlloyDB cluster and all instances
If you've used the trial version of AlloyDB. Do not delete the trial cluster if you have plans to test other labs and resources using the trial cluster. You will not be able to create another trial cluster in the same project.
The cluster is destroyed with option force which also deletes all the instances belonging to the cluster.
In the cloud shell define the project and environment variables if you've been disconnected and all the previous settings are lost:
gcloud config set project <your project id>
export REGION=us-central1
export ADBCLUSTER=alloydb-aip-01
export PROJECT_ID=$(gcloud config get-value project)
Delete the cluster:
gcloud alloydb clusters delete $ADBCLUSTER --region=$REGION --force
Expected console output:
student@cloudshell:~ (test-project-001-402417)$ gcloud alloydb clusters delete $ADBCLUSTER --region=$REGION --force
All of the cluster data will be lost when the cluster is deleted.

Do you want to continue (Y/n)?  Y

Operation ID: operation-1697820178429-6082890a0b570-4a72f7e4-4c5df36f
Deleting cluster...done.
Delete AlloyDB Backups
Delete all AlloyDB backups for the cluster:
for i in $(gcloud alloydb backups list --filter="CLUSTER_NAME: projects/$PROJECT_ID/locations/$REGION/clusters/$ADBCLUSTER" --format="value(name)" --sort-by=~createTime) ; do gcloud alloydb backups delete $(basename $i) --region $REGION --quiet; done
Expected console output:
student@cloudshell:~ (test-project-001-402417)$ for i in $(gcloud alloydb backups list --filter="CLUSTER_NAME: projects/$PROJECT_ID/locations/$REGION/clusters/$ADBCLUSTER" --format="value(name)" --sort-by=~createTime) ; do gcloud alloydb backups delete $(basename $i) --region $REGION --quiet; done
Operation ID: operation-1697826266108-60829fb7b5258-7f99dc0b-99f3c35f
Deleting backup...done.
Now we can destroy our VM
Delete GCE VM
In Cloud Shell execute:
export GCEVM=instance-1
export ZONE=us-central1-a
gcloud compute instances delete $GCEVM \
    --zone=$ZONE \
    --quiet
Expected console output:
student@cloudshell:~ (test-project-001-402417)$ export GCEVM=instance-1
export ZONE=us-central1-a
gcloud compute instances delete $GCEVM \
    --zone=$ZONE \
    --quiet
Deleted
Delete the Service Account for GCE VM and The Retrieval service
In Cloud Shell execute:
PROJECT_ID=$(gcloud config get-value project)
gcloud iam service-accounts delete compute-aip@$PROJECT_ID.iam.gserviceaccount.com --quiet
Expected console output:
student@cloudshell:~ (gleb-test-short-004)$ PROJECT_ID=$(gcloud config get-value project)
gcloud iam service-accounts delete compute-aip@$PROJECT_ID.iam.gserviceaccount.com --quiet
Your active configuration is: [cloudshell-222]
deleted service account [compute-aip@gleb-test-short-004.iam.gserviceaccount.com]
student@cloudshell:~ (gleb-test-short-004)$
10. Congratulations
Congratulations for completing the codelab.
What we've covered
- How to deploy AlloyDB Cluster
- How to connect to the AlloyDB
- How to configure and deploy MCP Toolbox Service
- How to deploy a sample application using the deployed service
11. Survey
Output: