
1. はじめに
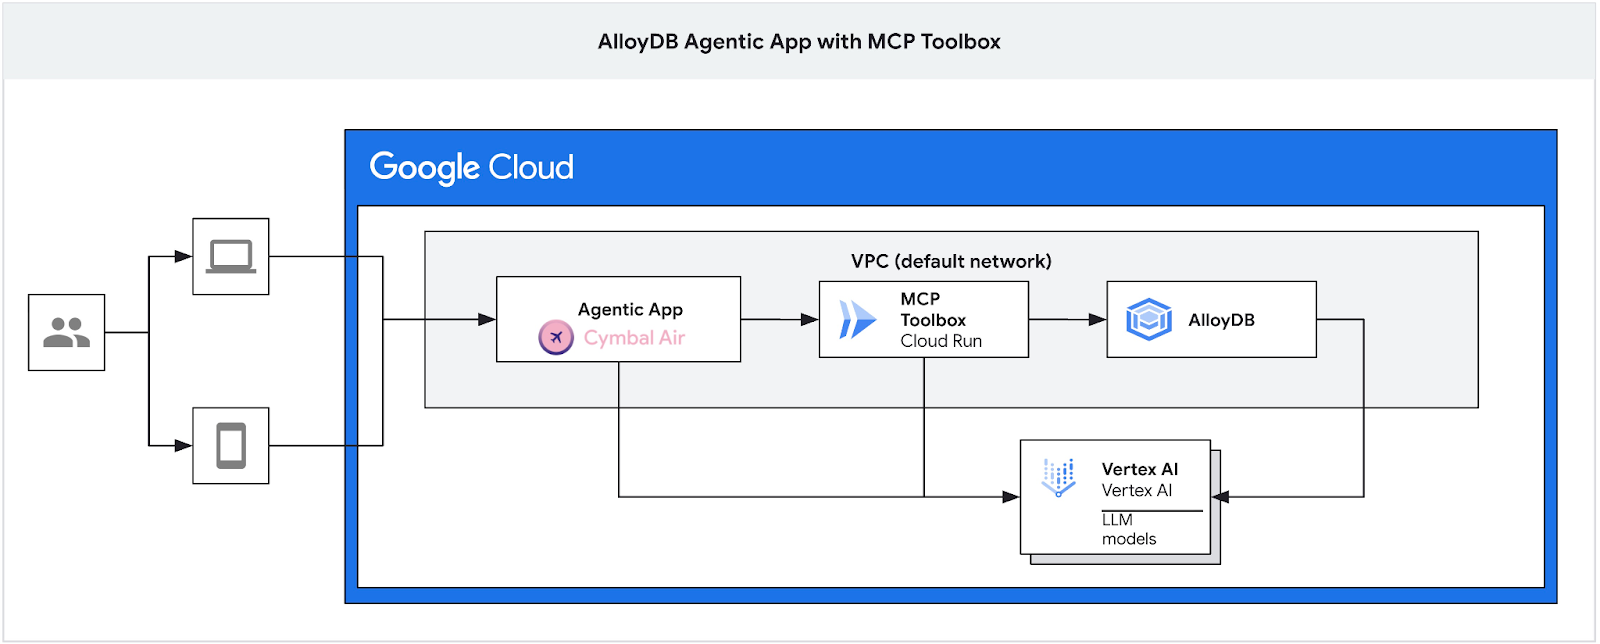
この Codelab では、AlloyDB クラスタを作成し、MCP ツールボックスをデプロイして、AlloyDB をデータソースとして使用するように構成する方法を学習します。次に、デプロイしたツールボックスを使用してリクエストをグラウンディングするインタラクティブな RAG サンプル アプリケーションを構築します。
MCP ツールボックスの詳細については、ドキュメント ページをご覧ください。サンプル Cymbal Air アプリケーションについては、こちらをご覧ください。
このラボは、AlloyDB AI 機能専用のラボ コレクションの一部です。ドキュメントの AlloyDB AI ページで詳細を確認し、他のラボをご覧ください。
前提条件
- Google Cloud コンソールの基本的な知識
- コマンドライン インターフェースと Google Cloud Shell の基本的なスキル
学習内容
- Vertex AI との統合を使用して AlloyDB クラスタをデプロイする方法
- AlloyDB に接続する方法
- MCP ツールボックス サービスを構成してデプロイする方法
- デプロイされたサービスを使用してサンプル アプリケーションをデプロイする方法
必要なもの
- Google Cloud アカウントと Google Cloud プロジェクト
- ウェブブラウザ(Chrome など)
2. 設定と要件
セルフペース型の環境設定
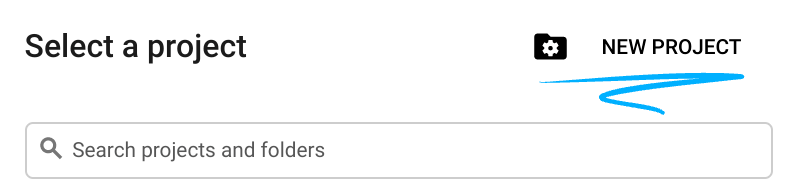
- Google Cloud Console にログインして、プロジェクトを新規作成するか、既存のプロジェクトを再利用します。Gmail アカウントも Google Workspace アカウントもまだお持ちでない場合は、アカウントを作成してください。

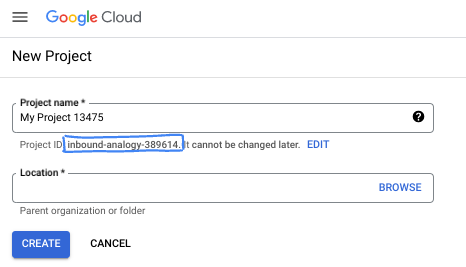
- プロジェクト名は、このプロジェクトの参加者に表示される名称です。Google API では使用されない文字列です。いつでも更新できます。
- プロジェクト ID は、すべての Google Cloud プロジェクトにおいて一意でなければならず、不変です(設定後は変更できません)。Cloud コンソールでは一意の文字列が自動生成されます。通常は、この内容を意識する必要はありません。ほとんどの Codelab では、プロジェクト ID(通常は
PROJECT_IDと識別されます)を参照する必要があります。生成された ID が好みではない場合は、ランダムに別の ID を生成できます。または、ご自身で試して、利用可能かどうかを確認することもできます。このステップ以降は変更できず、プロジェクトを通して同じ ID になります。 - なお、3 つ目の値として、一部の API が使用するプロジェクト番号があります。これら 3 つの値について詳しくは、こちらのドキュメントをご覧ください。
- 次に、Cloud のリソースや API を使用するために、Cloud コンソールで課金を有効にする必要があります。この Codelab の操作をすべて行って、費用が生じたとしても、少額です。このチュートリアルの終了後に請求が発生しないようにリソースをシャットダウンするには、作成したリソースを削除するか、プロジェクトを削除します。Google Cloud の新規ユーザーは、300 米ドル分の無料トライアル プログラムをご利用いただけます。
Cloud Shell を起動する
Google Cloud はノートパソコンからリモートで操作できますが、この Codelab では、Google Cloud Shell(Cloud 上で動作するコマンドライン環境)を使用します。
Google Cloud Console で、右上のツールバーにある Cloud Shell アイコンをクリックします。

プロビジョニングと環境への接続にはそれほど時間はかかりません。完了すると、次のように表示されます。

この仮想マシンには、必要な開発ツールがすべて用意されています。永続的なホーム ディレクトリが 5 GB 用意されており、Google Cloud で稼働します。そのため、ネットワークのパフォーマンスと認証機能が大幅に向上しています。この Codelab での作業はすべて、ブラウザ内から実行できます。インストールは不要です。
3. はじめに
API を有効にする
出力:
Cloud Shell で、プロジェクト ID が設定されていることを確認します。
通常、プロジェクト ID は、次の図に示すように、Cloud Shell のコマンド プロンプトのかっこ内に表示されます。

gcloud config set project [YOUR-PROJECT-ID]
次に、PROJECT_ID 環境変数を Google Cloud プロジェクト ID に設定します。
PROJECT_ID=$(gcloud config get-value project)
必要なサービスをすべて有効にします。
gcloud services enable alloydb.googleapis.com \
                       compute.googleapis.com \
                       cloudresourcemanager.googleapis.com \
                       servicenetworking.googleapis.com \
                       vpcaccess.googleapis.com \
                       aiplatform.googleapis.com \
                       cloudbuild.googleapis.com \
                       artifactregistry.googleapis.com \
                       run.googleapis.com \
                       iam.googleapis.com \
                       secretmanager.googleapis.com
想定される出力
student@cloudshell:~ (gleb-test-short-004)$ gcloud services enable alloydb.googleapis.com \
                       compute.googleapis.com \
                       cloudresourcemanager.googleapis.com \
                       servicenetworking.googleapis.com \
                       vpcaccess.googleapis.com \
                       aiplatform.googleapis.com \
                       cloudbuild.googleapis.com \
                       artifactregistry.googleapis.com \
                       run.googleapis.com \
                       iam.googleapis.com \
                       secretmanager.googleapis.com
Operation "operations/acf.p2-404051529011-664c71ad-cb2b-4ab4-86c1-1f3157d70ba1" finished successfully.
4. AlloyDB クラスタをデプロイする
AlloyDB クラスタとプライマリ インスタンスを作成します。次の手順では、Google Cloud SDK を使用して AlloyDB クラスタとインスタンスを作成する方法について説明します。コンソールを使用する場合は、こちらのドキュメントをご覧ください。
AlloyDB クラスタを作成する前に、将来の AlloyDB インスタンスで使用する VPC で使用可能なプライベート IP 範囲が必要です。ない場合は、作成して内部の Google サービスで使用されるように割り当てる必要があります。その後、クラスタとインスタンスを作成できます。
プライベート IP 範囲を作成する
AlloyDB の VPC でプライベート サービス アクセスを構成する必要があります。ここでは、プロジェクトに「デフォルト」の VPC ネットワークがあり、すべてのアクションで使用されることを前提としています。
プライベート IP 範囲を作成します。
gcloud compute addresses create psa-range \
    --global \
    --purpose=VPC_PEERING \
    --prefix-length=24 \
    --description="VPC private service access" \
    --network=default
割り振られた IP 範囲を使用してプライベート接続を作成します。
gcloud services vpc-peerings connect \
    --service=servicenetworking.googleapis.com \
    --ranges=psa-range \
    --network=default
想定されるコンソール出力:
student@cloudshell:~ (test-project-402417)$ gcloud compute addresses create psa-range \
    --global \
    --purpose=VPC_PEERING \
    --prefix-length=24 \
    --description="VPC private service access" \
    --network=default
Created [https://www.googleapis.com/compute/v1/projects/test-project-402417/global/addresses/psa-range].

student@cloudshell:~ (test-project-402417)$ gcloud services vpc-peerings connect \
    --service=servicenetworking.googleapis.com \
    --ranges=psa-range \
    --network=default
Operation "operations/pssn.p24-4470404856-595e209f-19b7-4669-8a71-cbd45de8ba66" finished successfully.

student@cloudshell:~ (test-project-402417)$
AlloyDB クラスタを作成する
このセクションでは、us-central1 リージョンに AlloyDB クラスタを作成します。
postgres ユーザーのパスワードを定義します。独自のパスワードを定義することも、ランダム関数を使用してパスワードを生成することもできます。
export PGPASSWORD=`openssl rand -hex 12`
想定されるコンソール出力:
student@cloudshell:~ (test-project-402417)$ export PGPASSWORD=`openssl rand -hex 12`
後で使用できるように PostgreSQL のパスワードをメモしておきます。
echo $PGPASSWORD
このパスワードは、後で postgres ユーザーとしてインスタンスに接続するために必要になります。後で使用できるように、書き留めておくか、どこかにコピーしておくことをおすすめします。
想定されるコンソール出力:
student@cloudshell:~ (test-project-402417)$ echo $PGPASSWORD
bbefbfde7601985b0dee5723
無料トライアル クラスタを作成する
AlloyDB を使用したことがない場合は、無料のトライアル クラスタを作成できます。
リージョンと AlloyDB クラスタ名を定義します。ここでは、us-central1 リージョンと alloydb-aip-01 をクラスタ名として使用します。
export REGION=us-central1
export ADBCLUSTER=alloydb-aip-01
コマンドを実行してクラスタを作成します。
gcloud alloydb clusters create $ADBCLUSTER \
    --password=$PGPASSWORD \
    --network=default \
    --region=$REGION \
    --subscription-type=TRIAL
想定されるコンソール出力:
export REGION=us-central1
export ADBCLUSTER=alloydb-aip-01
gcloud alloydb clusters create $ADBCLUSTER \
    --password=$PGPASSWORD \
    --network=default \
    --region=$REGION \
    --subscription-type=TRIAL
Operation ID: operation-1697655441138-6080235852277-9e7f04f5-2012fce4
Creating cluster...done.
同じ Cloud Shell セッションで、クラスタの AlloyDB プライマリ インスタンスを作成します。切断された場合は、リージョンとクラスタ名の環境変数を再度定義する必要があります。
gcloud alloydb instances create $ADBCLUSTER-pr \
    --instance-type=PRIMARY \
    --cpu-count=8 \
    --region=$REGION \
    --cluster=$ADBCLUSTER
想定されるコンソール出力:
student@cloudshell:~ (test-project-402417)$ gcloud alloydb instances create $ADBCLUSTER-pr \
    --instance-type=PRIMARY \
    --cpu-count=8 \
    --region=$REGION \
    --availability-type ZONAL \
    --cluster=$ADBCLUSTER
Operation ID: operation-1697659203545-6080315c6e8ee-391805db-25852721
Creating instance...done.
AlloyDB Standard クラスタを作成する
プロジェクトで最初の AlloyDB クラスタでない場合は、標準クラスタの作成に進みます。
リージョンと AlloyDB クラスタ名を定義します。ここでは、us-central1 リージョンと alloydb-aip-01 をクラスタ名として使用します。
export REGION=us-central1
export ADBCLUSTER=alloydb-aip-01
コマンドを実行してクラスタを作成します。
gcloud alloydb clusters create $ADBCLUSTER \
    --password=$PGPASSWORD \
    --network=default \
    --region=$REGION
想定されるコンソール出力:
export REGION=us-central1
export ADBCLUSTER=alloydb-aip-01
gcloud alloydb clusters create $ADBCLUSTER \
    --password=$PGPASSWORD \
    --network=default \
    --region=$REGION
Operation ID: operation-1697655441138-6080235852277-9e7f04f5-2012fce4
Creating cluster...done.
同じ Cloud Shell セッションで、クラスタの AlloyDB プライマリ インスタンスを作成します。切断された場合は、リージョンとクラスタ名の環境変数を再度定義する必要があります。
gcloud alloydb instances create $ADBCLUSTER-pr \
    --instance-type=PRIMARY \
    --cpu-count=2 \
    --region=$REGION \
    --cluster=$ADBCLUSTER
想定されるコンソール出力:
student@cloudshell:~ (test-project-402417)$ gcloud alloydb instances create $ADBCLUSTER-pr \
    --instance-type=PRIMARY \
    --cpu-count=2 \
    --region=$REGION \
    --availability-type ZONAL \
    --cluster=$ADBCLUSTER
Operation ID: operation-1697659203545-6080315c6e8ee-391805db-25852721
Creating instance...done.
AlloyDB に必要な権限を付与する
AlloyDB サービス エージェントに Vertex AI 権限を追加します。
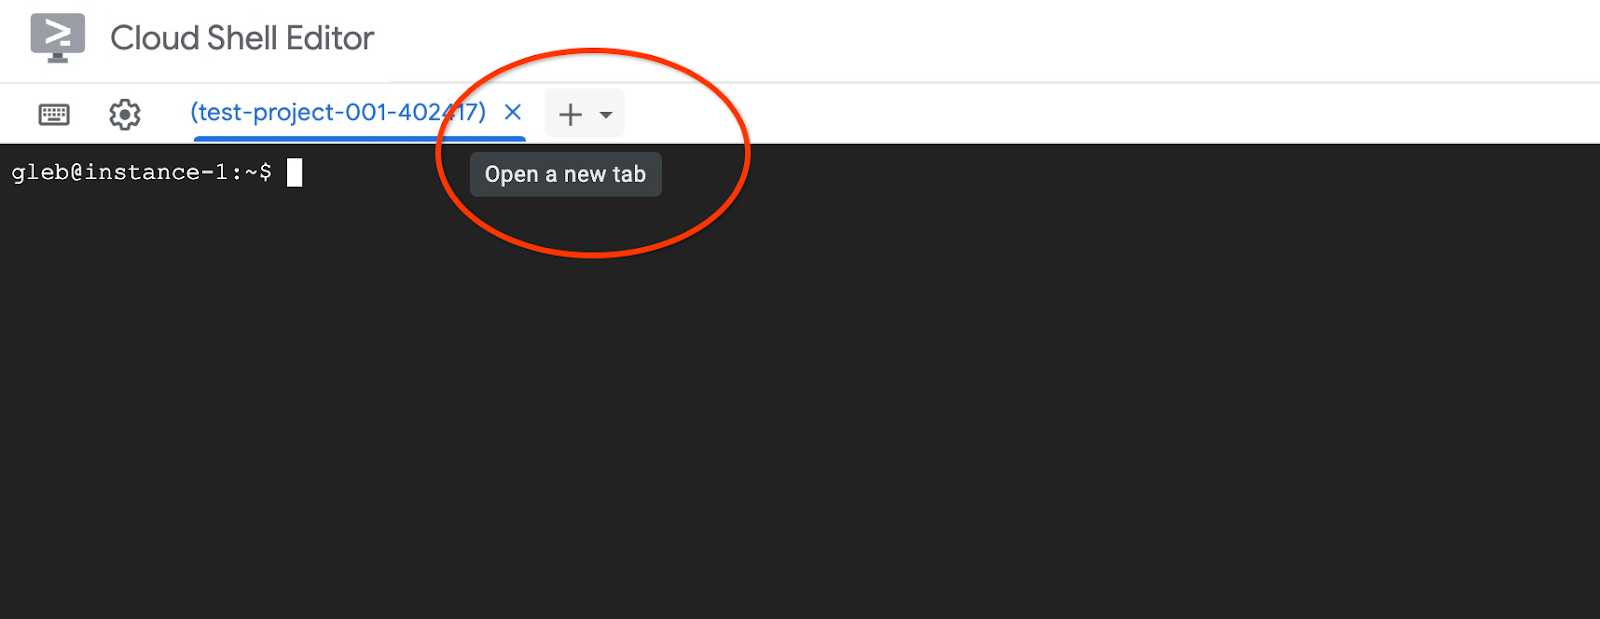
上部の「+」記号を選択して、別の Cloud Shell タブを開きます。
新しい Cloud Shell タブで、次のコマンドを実行します。
PROJECT_ID=$(gcloud config get-value project)
gcloud projects add-iam-policy-binding $PROJECT_ID \
  --member="serviceAccount:service-$(gcloud projects describe $PROJECT_ID --format="value(projectNumber)")@gcp-sa-alloydb.iam.gserviceaccount.com" \
  --role="roles/aiplatform.user"
想定されるコンソール出力:
student@cloudshell:~ (test-project-001-402417)$ PROJECT_ID=$(gcloud config get-value project)
Your active configuration is: [cloudshell-11039]
student@cloudshell:~ (test-project-001-402417)$ gcloud projects add-iam-policy-binding $PROJECT_ID \
  --member="serviceAccount:service-$(gcloud projects describe $PROJECT_ID --format="value(projectNumber)")@gcp-sa-alloydb.iam.gserviceaccount.com" \
  --role="roles/aiplatform.user"
Updated IAM policy for project [test-project-001-402417].
bindings:
- members:
  - serviceAccount:service-4470404856@gcp-sa-alloydb.iam.gserviceaccount.com
  role: roles/aiplatform.user
- members:
...
etag: BwYIEbe_Z3U=
version: 1
タブに実行コマンド「exit」を入力して、タブを閉じます。
exit
5. GCE 仮想マシンを準備する
Google Compute Engine(GCE)VM をプラットフォームとして使用し、データベースを操作してサンプル アプリケーションのさまざまな部分をデプロイします。VM を使用すると、インストールするコンポーネントの柔軟性が高まり、データ準備の手順でプライベート AlloyDB IP に直接アクセスできます。
サービス アカウントを作成する
VM を使用して MCP Toolbox をサービスとしてデプロイし、サンプル アプリケーションをデプロイまたはホストするため、最初のステップとして Google サービス アカウント(GSA)を作成します。GSA は GCE VM で使用されます。他のサービスと連携するために必要な権限を GSA に付与する必要があります。
Cloud Shell で、次のコマンドを実行します。
PROJECT_ID=$(gcloud config get-value project)
gcloud iam service-accounts create compute-aip --project $PROJECT_ID

gcloud projects add-iam-policy-binding $PROJECT_ID \
  --member="serviceAccount:compute-aip@$PROJECT_ID.iam.gserviceaccount.com" \
  --role="roles/cloudbuild.builds.editor"

gcloud projects add-iam-policy-binding $PROJECT_ID \
  --member="serviceAccount:compute-aip@$PROJECT_ID.iam.gserviceaccount.com" \
  --role="roles/artifactregistry.admin"

gcloud projects add-iam-policy-binding $PROJECT_ID \
  --member="serviceAccount:compute-aip@$PROJECT_ID.iam.gserviceaccount.com" \
  --role="roles/storage.admin"

gcloud projects add-iam-policy-binding $PROJECT_ID \
  --member="serviceAccount:compute-aip@$PROJECT_ID.iam.gserviceaccount.com" \
  --role="roles/run.admin"

gcloud projects add-iam-policy-binding $PROJECT_ID \
  --member="serviceAccount:compute-aip@$PROJECT_ID.iam.gserviceaccount.com" \
  --role="roles/iam.serviceAccountUser"

gcloud projects add-iam-policy-binding $PROJECT_ID \
  --member="serviceAccount:compute-aip@$PROJECT_ID.iam.gserviceaccount.com" \
  --role="roles/alloydb.viewer"

gcloud projects add-iam-policy-binding $PROJECT_ID \
  --member="serviceAccount:compute-aip@$PROJECT_ID.iam.gserviceaccount.com" \
  --role="roles/alloydb.client"

gcloud projects add-iam-policy-binding $PROJECT_ID \
  --member="serviceAccount:compute-aip@$PROJECT_ID.iam.gserviceaccount.com" \
  --role="roles/aiplatform.user"

gcloud projects add-iam-policy-binding $PROJECT_ID \
  --member="serviceAccount:compute-aip@$PROJECT_ID.iam.gserviceaccount.com" \
  --role="roles/serviceusage.serviceUsageConsumer"

gcloud projects add-iam-policy-binding $PROJECT_ID \
    --member serviceAccount:compute-aip@$PROJECT_ID.iam.gserviceaccount.com \
    --role roles/secretmanager.admin
GCE VM をデプロイする
AlloyDB クラスタと同じリージョンと VPC に GCE VM を作成します。
Cloud Shell で、次のコマンドを実行します。
ZONE=us-central1-a
PROJECT_ID=$(gcloud config get-value project)
gcloud compute instances create instance-1 \
    --zone=$ZONE \
    --create-disk=auto-delete=yes,boot=yes,image=projects/debian-cloud/global/images/$(gcloud compute images list --filter="family=debian-12 AND family!=debian-12-arm64" --format="value(name)") \
    --scopes=https://www.googleapis.com/auth/cloud-platform \
    --service-account=compute-aip@$PROJECT_ID.iam.gserviceaccount.com
想定されるコンソール出力:
student@cloudshell:~ (test-project-402417)$ ZONE=us-central1-a
PROJECT_ID=$(gcloud config get-value project)
gcloud compute instances create instance-1 \
    --zone=$ZONE \
    --create-disk=auto-delete=yes,boot=yes,image=projects/debian-cloud/global/images/$(gcloud compute images list --filter="family=debian-12 AND family!=debian-12-arm64" --format="value(name)") \
    --scopes=https://www.googleapis.com/auth/cloud-platform \
    --service-account=compute-aip@$PROJECT_ID.iam.gserviceaccount.com
Your active configuration is: [cloudshell-10282]
Created [https://www.googleapis.com/compute/v1/projects/gleb-test-short-002-470613/zones/us-central1-a/instances/instance-1].
NAME: instance-1
ZONE: us-central1-a
MACHINE_TYPE: n1-standard-1
PREEMPTIBLE:
INTERNAL_IP: 10.128.0.2
EXTERNAL_IP: 34.28.55.32
STATUS: RUNNING
Postgres クライアントをインストールする
デプロイされた VM に PostgreSQL クライアント ソフトウェアをインストールします。
VM に接続します。
gcloud compute ssh instance-1 --zone=us-central1-a
想定されるコンソール出力:
student@cloudshell:~ (test-project-402417)$ gcloud compute ssh instance-1 --zone=us-central1-a
Updating project ssh metadata...working..Updated [https://www.googleapis.com/compute/v1/projects/test-project-402417].
Updating project ssh metadata...done.
Waiting for SSH key to propagate.
Warning: Permanently added 'compute.5110295539541121102' (ECDSA) to the list of known hosts.
Linux instance-1 5.10.0-26-cloud-amd64 #1 SMP Debian 5.10.197-1 (2023-09-29) x86_64

The programs included with the Debian GNU/Linux system are free software;
the exact distribution terms for each program are described in the
individual files in /usr/share/doc/*/copyright.

Debian GNU/Linux comes with ABSOLUTELY NO WARRANTY, to the extent
permitted by applicable law.
student@instance-1:~$
VM 内でソフトウェア実行コマンドをインストールします。
sudo apt-get update
sudo apt-get install --yes postgresql-client
想定されるコンソール出力:
student@instance-1:~$ sudo apt-get update
sudo apt-get install --yes postgresql-client
Get:1 file:/etc/apt/mirrors/debian.list Mirrorlist [30 B]
Get:4 file:/etc/apt/mirrors/debian-security.list Mirrorlist [39 B]
Hit:7 https://packages.cloud.google.com/apt google-compute-engine-bookworm-stable InRelease
Get:8 https://packages.cloud.google.com/apt cloud-sdk-bookworm InRelease [1652 B]
Get:2 https://deb.debian.org/debian bookworm InRelease [151 kB]
Get:3 https://deb.debian.org/debian bookworm-updates InRelease [55.4 kB]
...redacted...
update-alternatives: using /usr/share/postgresql/15/man/man1/psql.1.gz to provide /usr/share/man/man1/psql.1.gz (psql.1.gz) in auto mode
Setting up postgresql-client (15+248) ...
Processing triggers for man-db (2.11.2-2) ...
Processing triggers for libc-bin (2.36-9+deb12u7) ...
AlloyDB インスタンスに接続する
psql を使用して VM からプライマリ インスタンスに接続します。
VM への SSH セッションは開いたままにします。接続が切断された場合は、上記と同じコマンドを使用して再度接続します。
先ほどメモした $PGASSWORD とクラスタ名を使用して、GCE VM から AlloyDB に接続します。
export PGPASSWORD=<Noted password>
PROJECT_ID=$(gcloud config get-value project)
REGION=us-central1
ADBCLUSTER=alloydb-aip-01
INSTANCE_IP=$(gcloud alloydb instances describe $ADBCLUSTER-pr --cluster=$ADBCLUSTER --region=$REGION --format="value(ipAddress)")
psql "host=$INSTANCE_IP user=postgres sslmode=require"
想定されるコンソール出力:
student@instance-1:~$ PROJECT_ID=$(gcloud config get-value project)
REGION=us-central1
ADBCLUSTER=alloydb-aip-01
INSTANCE_IP=$(gcloud alloydb instances describe $ADBCLUSTER-pr --cluster=$ADBCLUSTER --region=$REGION --format="value(ipAddress)")
psql "host=$INSTANCE_IP user=postgres sslmode=require"
psql (15.13 (Debian 15.13-0+deb12u1), server 16.8)
WARNING: psql major version 15, server major version 16.
         Some psql features might not work.
SSL connection (protocol: TLSv1.3, cipher: TLS_AES_256_GCM_SHA384, compression: off)
Type "help" for help.

postgres=>
SSH 接続を維持したまま psql セッションを終了します。
exit
想定されるコンソール出力:
postgres=> exit
student@instance-1:~$
6. データベースを初期化する
クライアント VM をプラットフォームとして使用し、データベースにデータを入力してアプリケーションをホストします。最初のステップは、データベースを作成してデータを入力することです。
データベースを作成する
「assistantdemo」という名前のデータベースを作成します。
GCE VM セッションで、次のコマンドを実行します。
psql "host=$INSTANCE_IP user=postgres" -c "CREATE DATABASE assistantdemo"
想定されるコンソール出力:
student@instance-1:~$ psql "host=$INSTANCE_IP user=postgres" -c "CREATE DATABASE assistantdemo"
CREATE DATABASE
student@instance-1:~$
Python 環境を準備する
次は GitHub リポジトリから準備した Python スクリプトを使用しますが、その前に必要なソフトウェアをインストールする必要があります。
GCE VM で次のコマンドを実行します。
sudo apt install -y python3.11-venv git
python3 -m venv .venv
source .venv/bin/activate
pip install --upgrade pip
想定されるコンソール出力:
student@instance-1:~$ sudo apt install -y python3.11-venv git
python3 -m venv .venv
source .venv/bin/activate
pip install --upgrade pip
Reading package lists... Done
Building dependency tree... Done
Reading state information... Done
The following additional packages will be installed:
  git-man liberror-perl patch python3-distutils python3-lib2to3 python3-pip-whl python3-setuptools-whl
Suggested packages:
  git-daemon-run | git-daemon-sysvinit git-doc git-email git-gui gitk gitweb git-cvs git-mediawiki git-svn ed diffutils-doc
The following NEW packages will be installed:
  git git-man liberror-perl patch python3-distutils python3-lib2to3 python3-pip-whl python3-setuptools-whl python3.11-venv
0 upgraded, 9 newly installed, 0 to remove and 2 not upgraded.
Need to get 12.4 MB of archives.
After this operation, 52.2 MB of additional disk space will be used.
Get:1 file:/etc/apt/mirrors/debian.list Mirrorlist [30 B]
...redacted...
Installing collected packages: pip
  Attempting uninstall: pip
    Found existing installation: pip 23.0.1
    Uninstalling pip-23.0.1:
      Successfully uninstalled pip-23.0.1
Successfully installed pip-24.0
(.venv) student@instance-1:~$
Python のバージョンを確認します。
GCE VM で次のコマンドを実行します。
python -V
想定されるコンソール出力:
(.venv) student@instance-1:~$ python -V
Python 3.11.2
(.venv) student@instance-1:~$
MCP ツールボックスをローカルにインストールする
データベース向け MCP ツールボックス(以降、MCP ツールボックスまたはツールボックス)は、さまざまなデータソースで動作するオープンソースの MCP サーバーです。さまざまなデータソースの抽象化レベルを提供し、認証や接続プーリングなどの機能を追加することで、ツールの開発を迅速に行うことができます。すべての機能については、公式ページをご覧ください。
MCP ツールボックスを使用してサンプル データセットを初期化し、後で MCP サーバーとして使用して、検索拡張生成(RAG)フロー中にアプリケーションからのデータソース リクエストを処理します。
MCP ツールボックスをローカルにインストールして、assistantdemo データベースにデータを入力しましょう。
GCE VM で次のコマンドを実行します。
export VERSION=1.0.0
curl -O https://storage.googleapis.com/mcp-toolbox-for-databases/v$VERSION/linux/amd64/toolbox
chmod +x toolbox
想定されるコンソール出力:
(.venv) student@instance-1:~$ export VERSION=1.0.0
curl -O https://storage.googleapis.com/mcp-toolbox-for-databases/v$VERSION/linux/amd64/toolbox
chmod +x toolbox
  % Total    % Received % Xferd  Average Speed   Time    Time     Time  Current
                                 Dload  Upload   Total   Spent    Left  Speed
100  133M  100  133M    0     0   158M      0 --:--:-- --:--:-- --:--:--  158M
データ初期化用のツールボックスを実行する
GCE VM で次のコマンドを実行します。
データベースの入力用の環境変数をエクスポートします。
export ALLOYDB_POSTGRES_PROJECT=$(gcloud config get-value project)
export ALLOYDB_POSTGRES_REGION="us-central1"
export ALLOYDB_POSTGRES_CLUSTER="alloydb-aip-01"
export ALLOYDB_POSTGRES_INSTANCE="alloydb-aip-01-pr"
export ALLOYDB_POSTGRES_DATABASE="assistantdemo"
export ALLOYDB_POSTGRES_USER="postgres"
export ALLOYDB_POSTGRES_PASSWORD=$PGPASSWORD
export ALLOYDB_POSTGRES_IP_TYPE="private"
データベースの初期化のためにツールボックスを起動します。このプロセスはローカルで開始され、AlloyDB の宛先データベースにシームレスに接続してサンプルデータを入力するのに役立ちます。
./toolbox --prebuilt alloydb-postgres
想定されるコンソール出力。出力の最後の行に「Server ready to serve!」と表示されます。
student@instance-1:~$ cexport ALLOYDB_POSTGRES_PROJECT=$PROJECT_ID
export ALLOYDB_POSTGRES_REGION="us-central1"
export ALLOYDB_POSTGRES_CLUSTER="alloydb-aip-01"
export ALLOYDB_POSTGRES_INSTANCE="alloydb-aip-01-pr"
export ALLOYDB_POSTGRES_DATABASE="assistantdemo"
export ALLOYDB_POSTGRES_USER="postgres"
export ALLOYDB_POSTGRES_PASSWORD=$PGPASSWORD
export ALLOYDB_POSTGRES_IP_TYPE="private"
student@instance-1:~$ ./toolbox --prebuilt alloydb-postgres
2025-09-02T18:30:58.957655886Z INFO "Using prebuilt tool configuration for alloydb-postgres"
2025-09-02T18:30:59.507306664Z INFO "Initialized 1 sources."
2025-09-02T18:30:59.50748379Z INFO "Initialized 0 authServices."
2025-09-02T18:30:59.507618807Z INFO "Initialized 2 tools."
2025-09-02T18:30:59.507726704Z INFO "Initialized 2 toolsets."
2025-09-02T18:30:59.508258894Z INFO "Server ready to serve!"
データの入力が完了するまで、Cloud Shell のこのタブを終了または閉じないでください。
データベースにデータを入力する
上部の「+」記号を選択して、別の Cloud Shell タブを開きます。
instance-1 VM に接続します。
gcloud compute ssh instance-1 --zone=us-central1-a
想定されるコンソール出力:
student@cloudshell:~ (test-project-402417)$ gcloud compute ssh instance-1 --zone=us-central1-a
Linux instance-1 6.1.0-37-cloud-amd64 #1 SMP PREEMPT_DYNAMIC Debian 6.1.140-1 (2025-05-22) x86_64

The programs included with the Debian GNU/Linux system are free software;
the exact distribution terms for each program are described in the
individual files in /usr/share/doc/*/copyright.

Debian GNU/Linux comes with ABSOLUTELY NO WARRANTY, to the extent
permitted by applicable law.
Last login: Tue Sep  2 21:44:07 2025 from 35.229.111.9
student@instance-1:~$
Retrieval サービスとサンプル アプリケーションのコードを含む GitHub リポジトリのクローンを作成します。
GCE VM で次のコマンドを実行します。
git clone https://github.com/GoogleCloudPlatform/cymbal-air-toolbox-demo.git
想定されるコンソール出力:
student@instance-1:~$ git clone  https://github.com/GoogleCloudPlatform/cymbal-air-toolbox-demo.git
Cloning into 'cymbal-air-toolbox-demo'...
remote: Enumerating objects: 3481, done.
remote: Counting objects: 100% (47/47), done.
remote: Compressing objects: 100% (41/41), done.
remote: Total 3481 (delta 16), reused 7 (delta 5), pack-reused 3434 (from 3)
Receiving objects: 100% (3481/3481), 57.96 MiB | 6.04 MiB/s, done.
Resolving deltas: 100% (2549/2549), done.
student@instance-1:~
エラーが発生した場合は、ご注意ください。
Python 環境を準備し、要件パッケージをインストールします。
source .venv/bin/activate
cd cymbal-air-toolbox-demo
pip install -r requirements.txt
Python パスをリポジトリのルートフォルダに設定し、スクリプトを実行してサンプル データセットをデータベースに入力します。最初のコマンドは、Python モジュールへのパスを環境に追加し、2 番目のコマンドはデータベースにデータを取り込みます。
export PYTHONPATH=$HOME/cymbal-air-toolbox-demo
python data/run_database_init.py
想定されるコンソール出力(秘匿化済み)。最後に「database init done」と表示されます。
student@instance-1:~$ source .venv/bin/activate
(.venv) student@instance-1:~$
(.venv) student@instance-1:~$ cd cymbal-air-toolbox-demo/
(.venv) student@instance-1:~/cymbal-air-toolbox-demo$ pip install -r requirements.txt
python run_database_init.py
Collecting fastapi==0.115.0 (from -r requirements.txt (line 1))
  Downloading fastapi-0.115.0-py3-none-any.whl.metadata (27 kB)
Collecting google-auth==2.40.3 (from -r requirements.txt (line 2))
  Downloading google_auth-2.40.3-py2.py3-none-any.whl.metadata (6.2 kB)
Collecting google-cloud-aiplatform==1.97.0 (from google-cloud-aiplatform[evaluation]==1.97.0->-r requirements.txt (line 3))
  Downloading google_cloud_aiplatform-1.97.0-py2.py3-none-any.whl.metadata (36 kB)
Collecting itsdangerous==2.2.0 (from -r requirements.txt (line 4))
  Downloading itsdangerous-2.2.0-py3-none-any.whl.metadata (1.9 kB)
Collecting jinja2==3.1.5 (from -r requirements.txt (line 5))
  Downloading jinja2-3.1.5-py3-none-any.whl.metadata (2.6 kB)
Collecting langchain-community==0.3.25 (from -r requirements.txt (line 6))
  Downloading langchain_community-0.3.25-py3-none-any.whl.metadata (2.9 kB)
Collecting langchain==0.3.25 (from -r requirements.txt (line 7))
...

(.venv) student@instance-1:~/cymbal-air-toolbox-demo$
(.venv) student@instance-1:~/cymbal-air-toolbox-demo$ export PYTHONPATH=$HOME/cymbal-air-toolbox-demo
python data/run_database_init.py
Airports table initialized
Amenities table initialized
Flights table initialized
Tickets table initialized
Policies table initialized
database init done.
(.venv) student@instance-1:~/cymbal-air-toolbox-demo$
このタブは閉じることができます。
VM セッションで、次のコマンドを実行します。
exit
Cloud Shell セッションで、Ctrl+d キーを押すか、次のコマンドを実行します。
exit
MCP ツールボックスが実行されている最初のタブで、ctrl+c キーを押して、ツールボックスの実行セッションを終了します。
データベースにアプリケーションのサンプルデータが入力されました。
データベースに接続して airports テーブルの行数を確認することで、検証できます。以前に使用した psql ユーティリティまたは AlloyDB Studio を使用できます。psql を使用して確認する方法は次のとおりです。
instance-1 VM への SSH セッションで、次のコマンドを実行します。
export PGPASSWORD=<Noted AlloyDB password>
REGION=us-central1
ADBCLUSTER=alloydb-aip-01
INSTANCE_IP=$(gcloud alloydb instances describe $ADBCLUSTER-pr --cluster=$ADBCLUSTER --region=$REGION --format="value(ipAddress)")
psql "host=$INSTANCE_IP user=postgres dbname=assistantdemo" -c "SELECT COUNT(*) FROM airports"
想定されるコンソール出力:
student@instance-1:~$ REGION=us-central1
ADBCLUSTER=alloydb-aip-01
INSTANCE_IP=$(gcloud alloydb instances describe $ADBCLUSTER-pr --cluster=$ADBCLUSTER --region=$REGION --format="value(ipAddress)")
psql "host=$INSTANCE_IP user=postgres dbname=assistantdemo" -c "SELECT COUNT(*) FROM airports"
 count
-------
  7698
(1 row)
データベースの準備ができたので、MCP ツールボックスのデプロイに進みます。
7. MCP ツールボックスを Cloud Run にデプロイする
これで、MCP ツールボックスを Cloud Run にデプロイできるようになりました。MCP ツールボックスのデプロイ方法にはさまざまなものがあります。最も簡単な方法はコマンドラインから実行することですが、スケーラブルで信頼性の高いサービスとして実行する場合は、Cloud Run の方が適しています。
クライアント ID を準備する
アプリの予約機能を使用するには、Cloud Console を使用して OAuth 2.0 クライアント ID を準備する必要があります。これがないと、Google 認証情報でアプリケーションにログインして予約を行い、予約をデータベースに記録することができません。
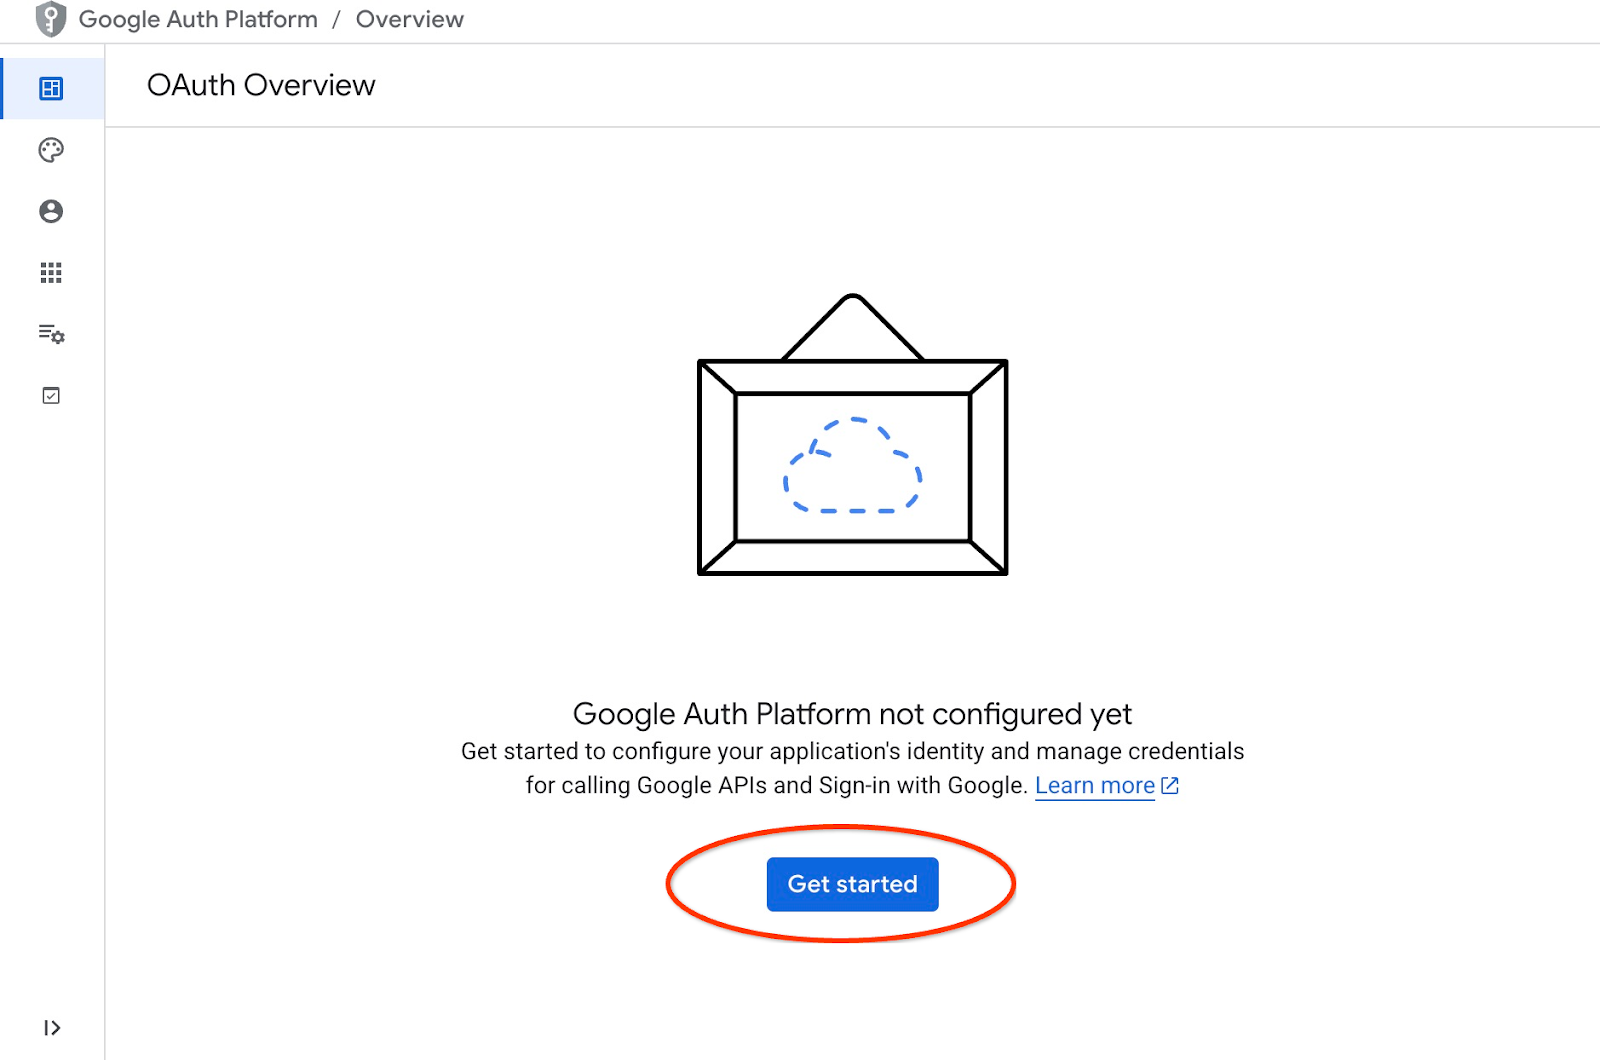
Cloud コンソールで [API とサービス] に移動し、[OAuth 同意画面] をクリックします。ページへのリンクはこちらです。Oauth の概要ページが開くので、[始める] をクリックします。
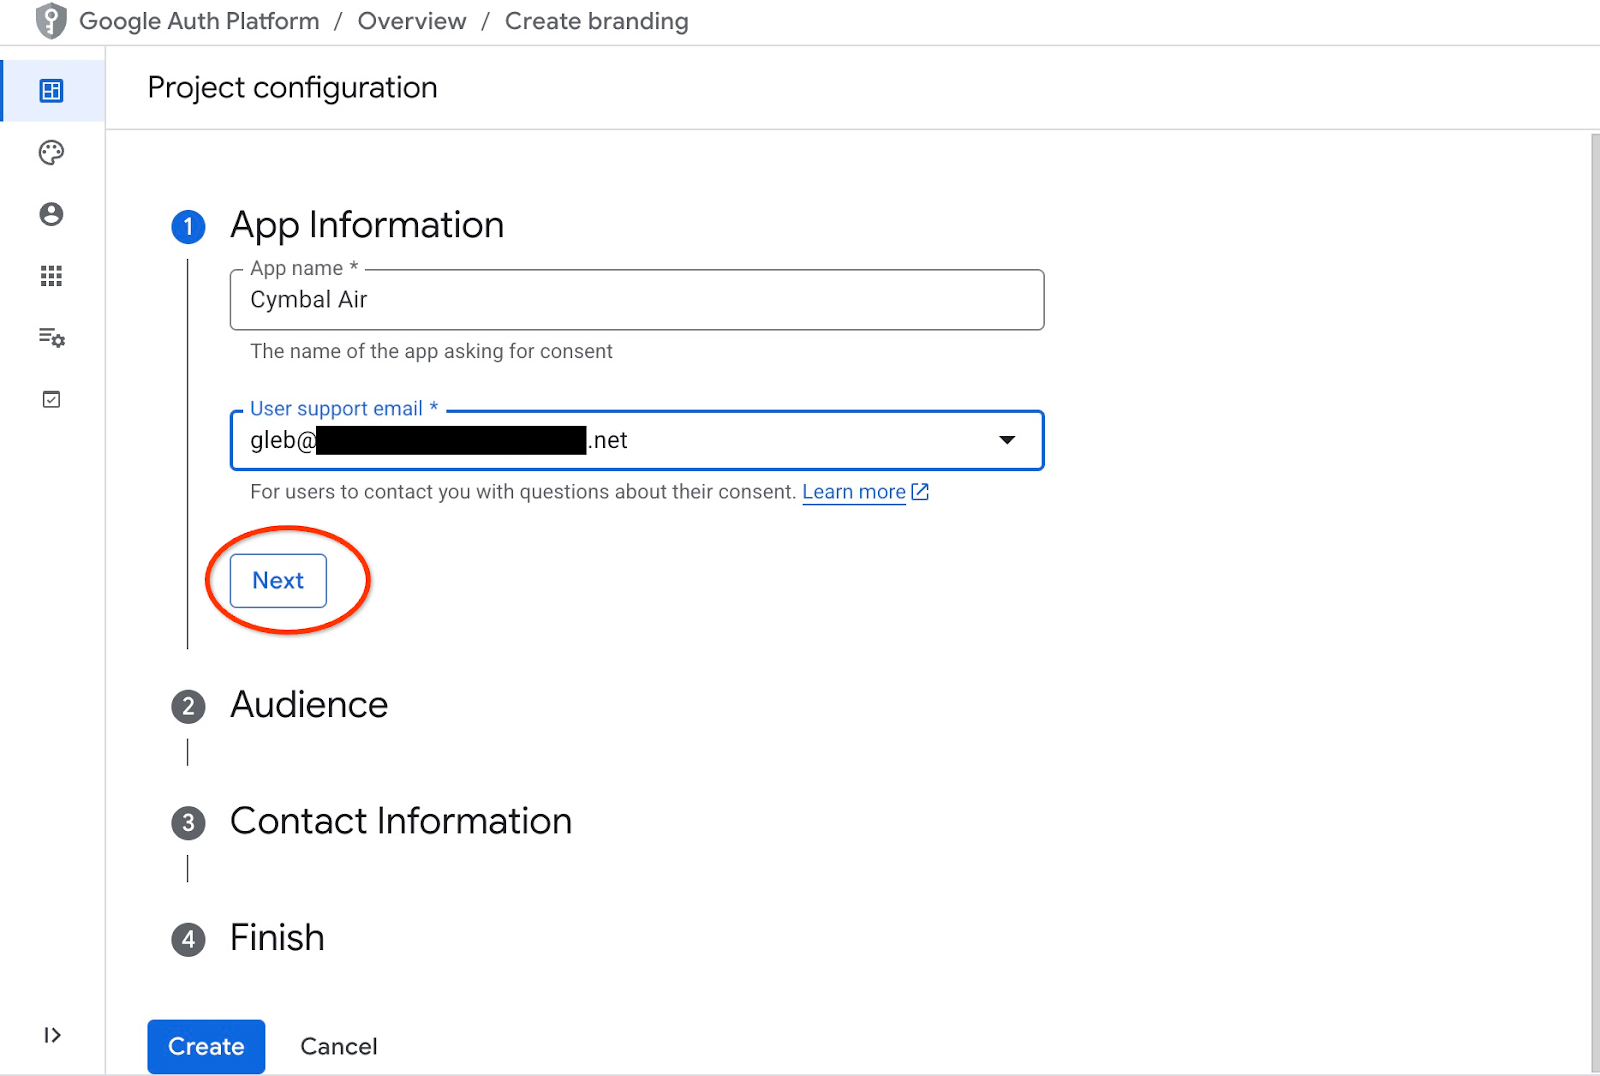
次のページで、アプリケーション名とユーザー サポートのメールアドレスを入力し、[次へ] をクリックします。
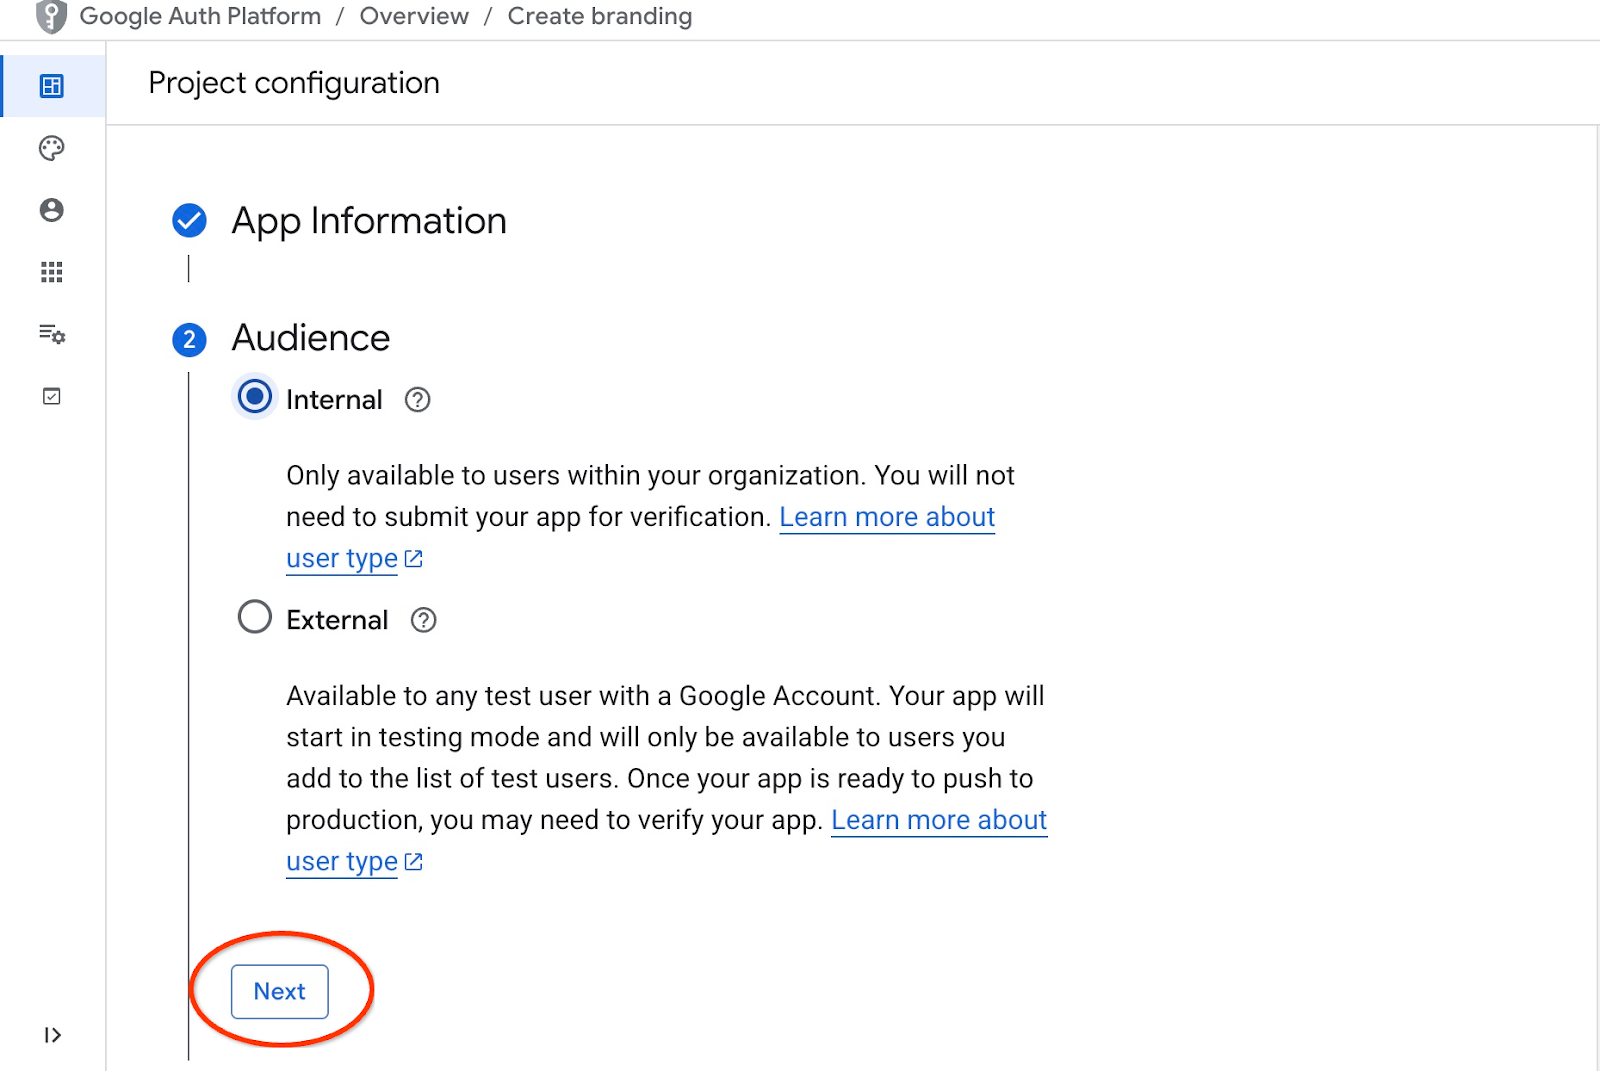
次の画面で、アプリケーションに [内部] を選択し、[次へ] をもう一度クリックします。
連絡先メールアドレスを再度入力して、[次へ] をクリックします。
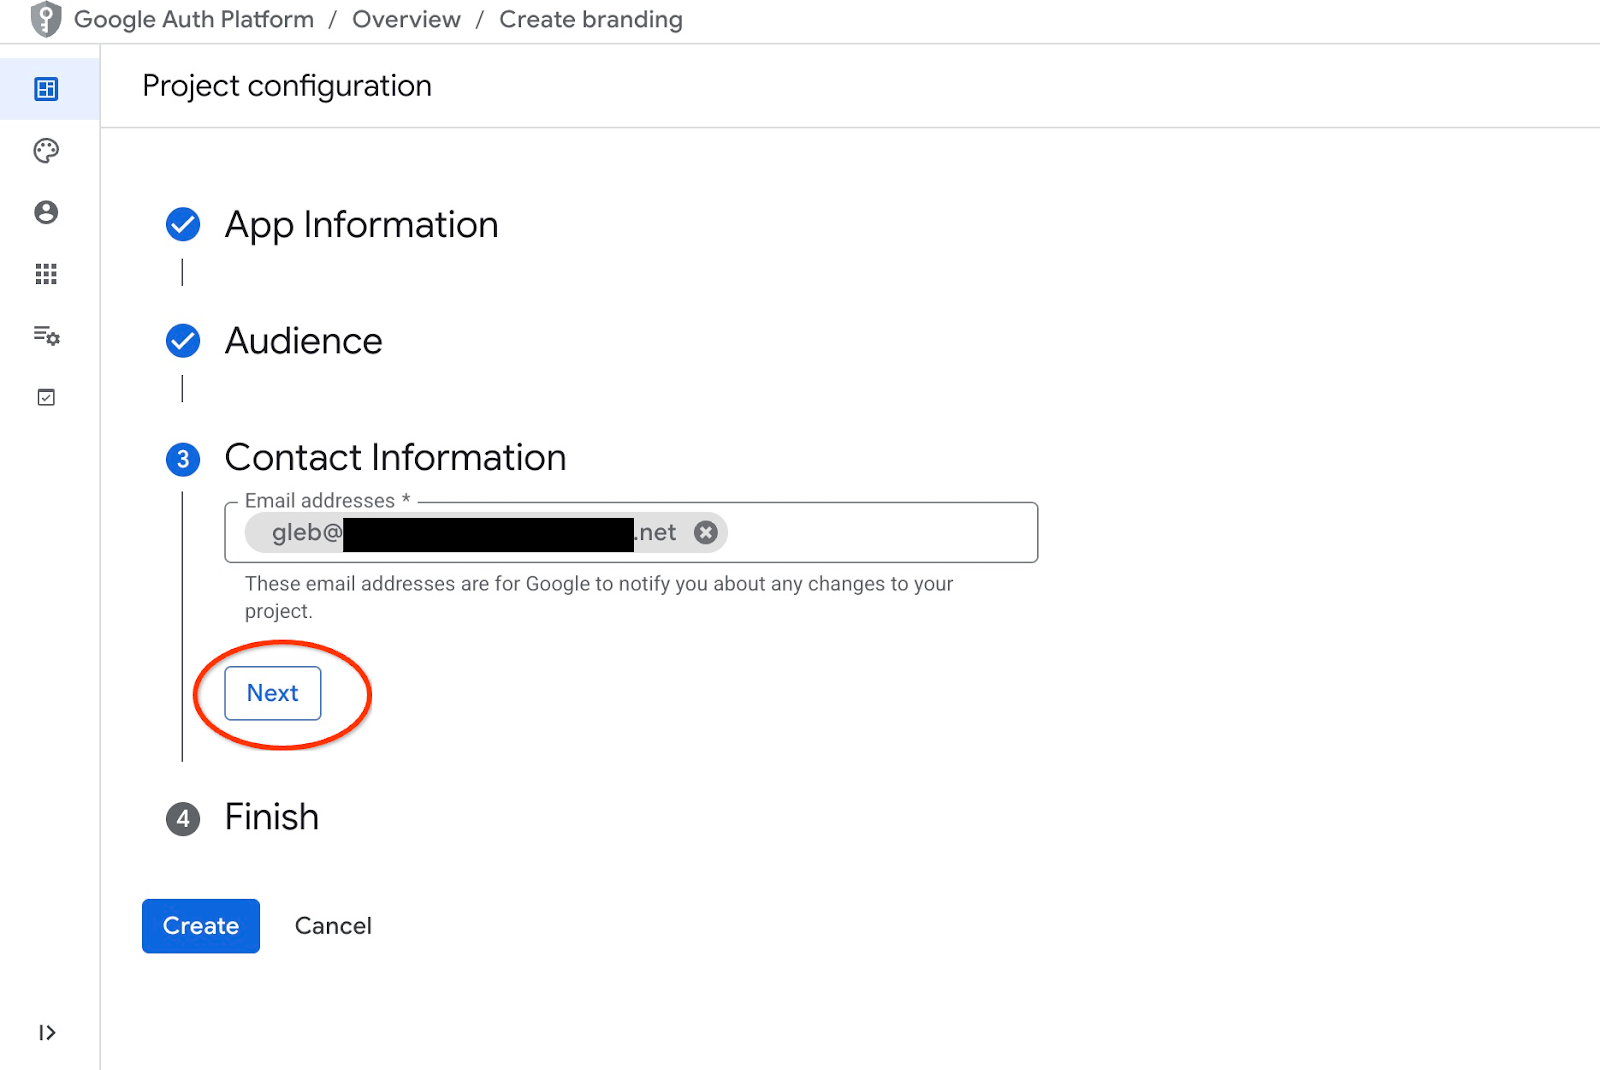
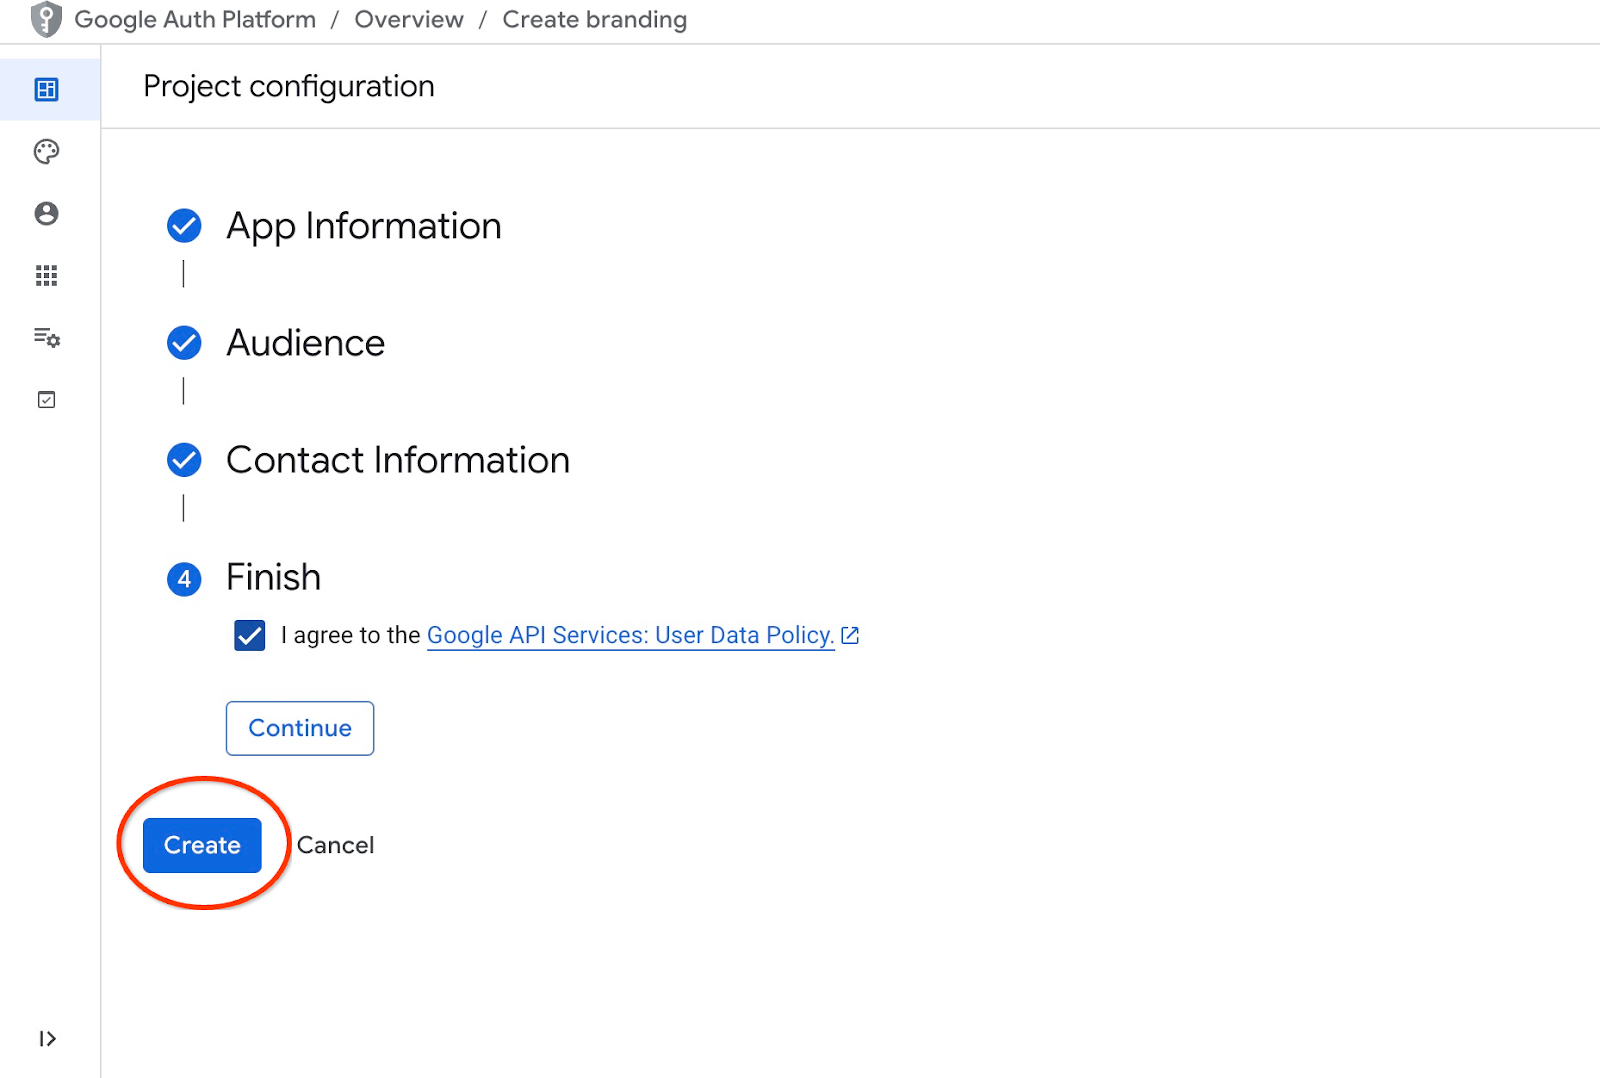
次に、Google API サービスのポリシーに同意し、[作成] ボタンを押します。
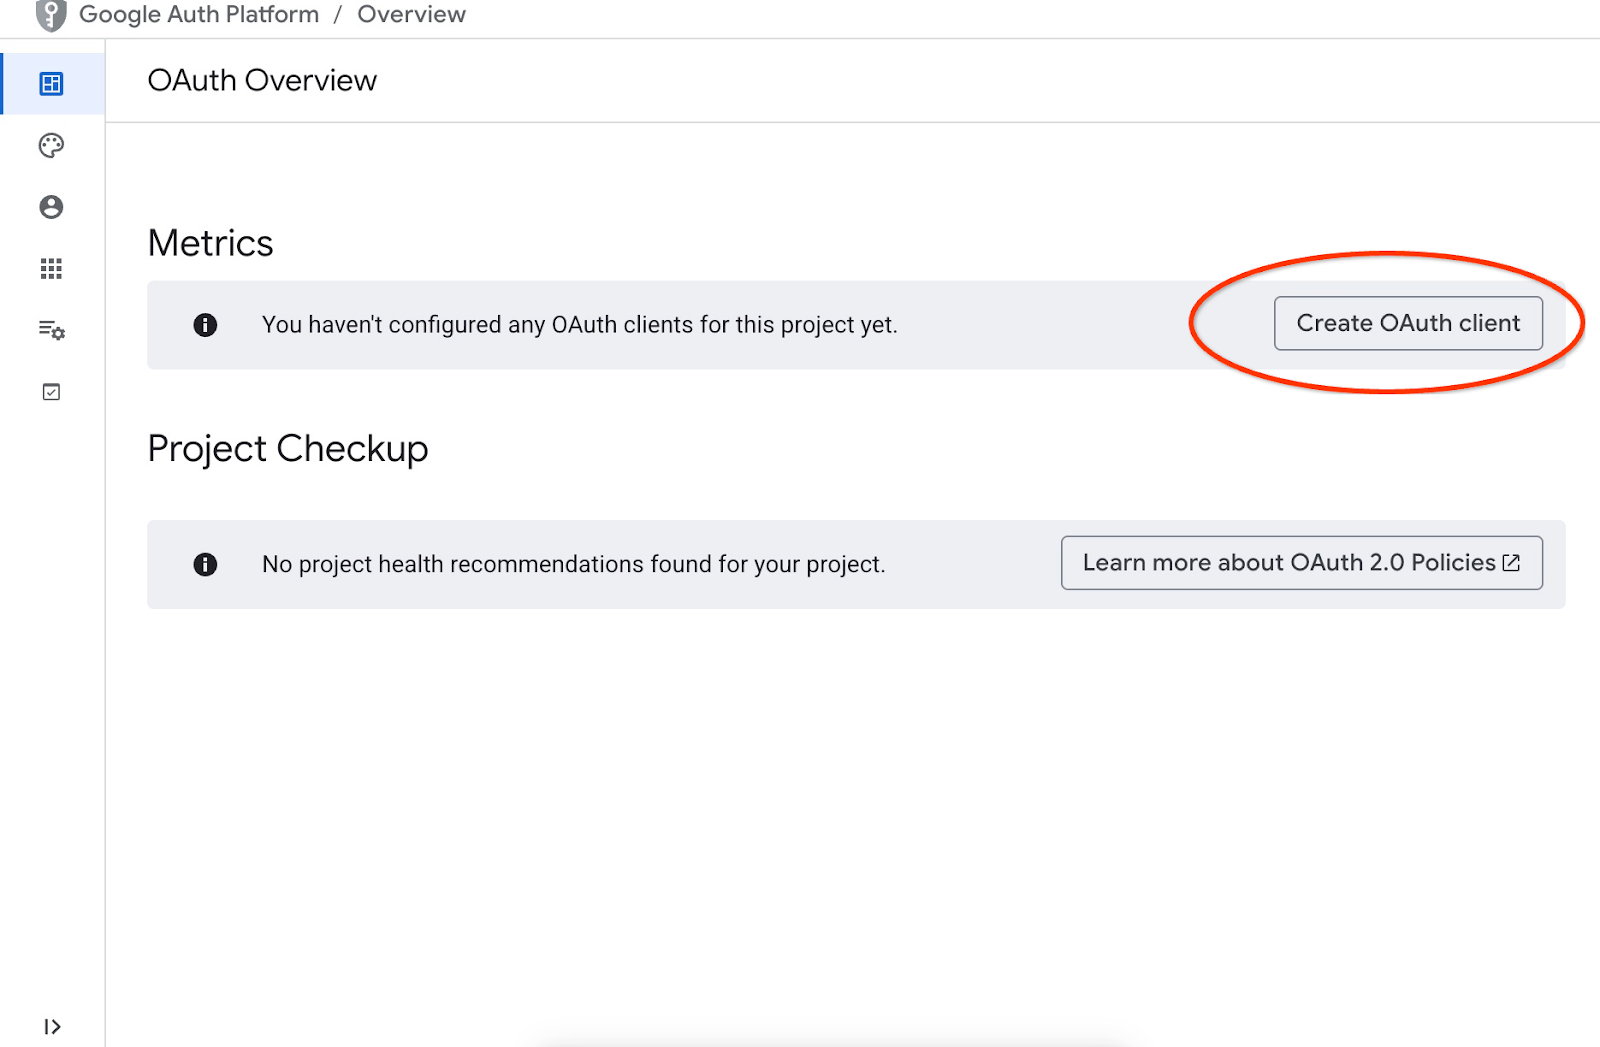
OAuth クライアントを作成できるページに移動します。
画面で、プルダウン メニューから [Web Application] を選択し、アプリケーションとして「Cymbal Air」と入力して、[Add URI] ボタンを押します。
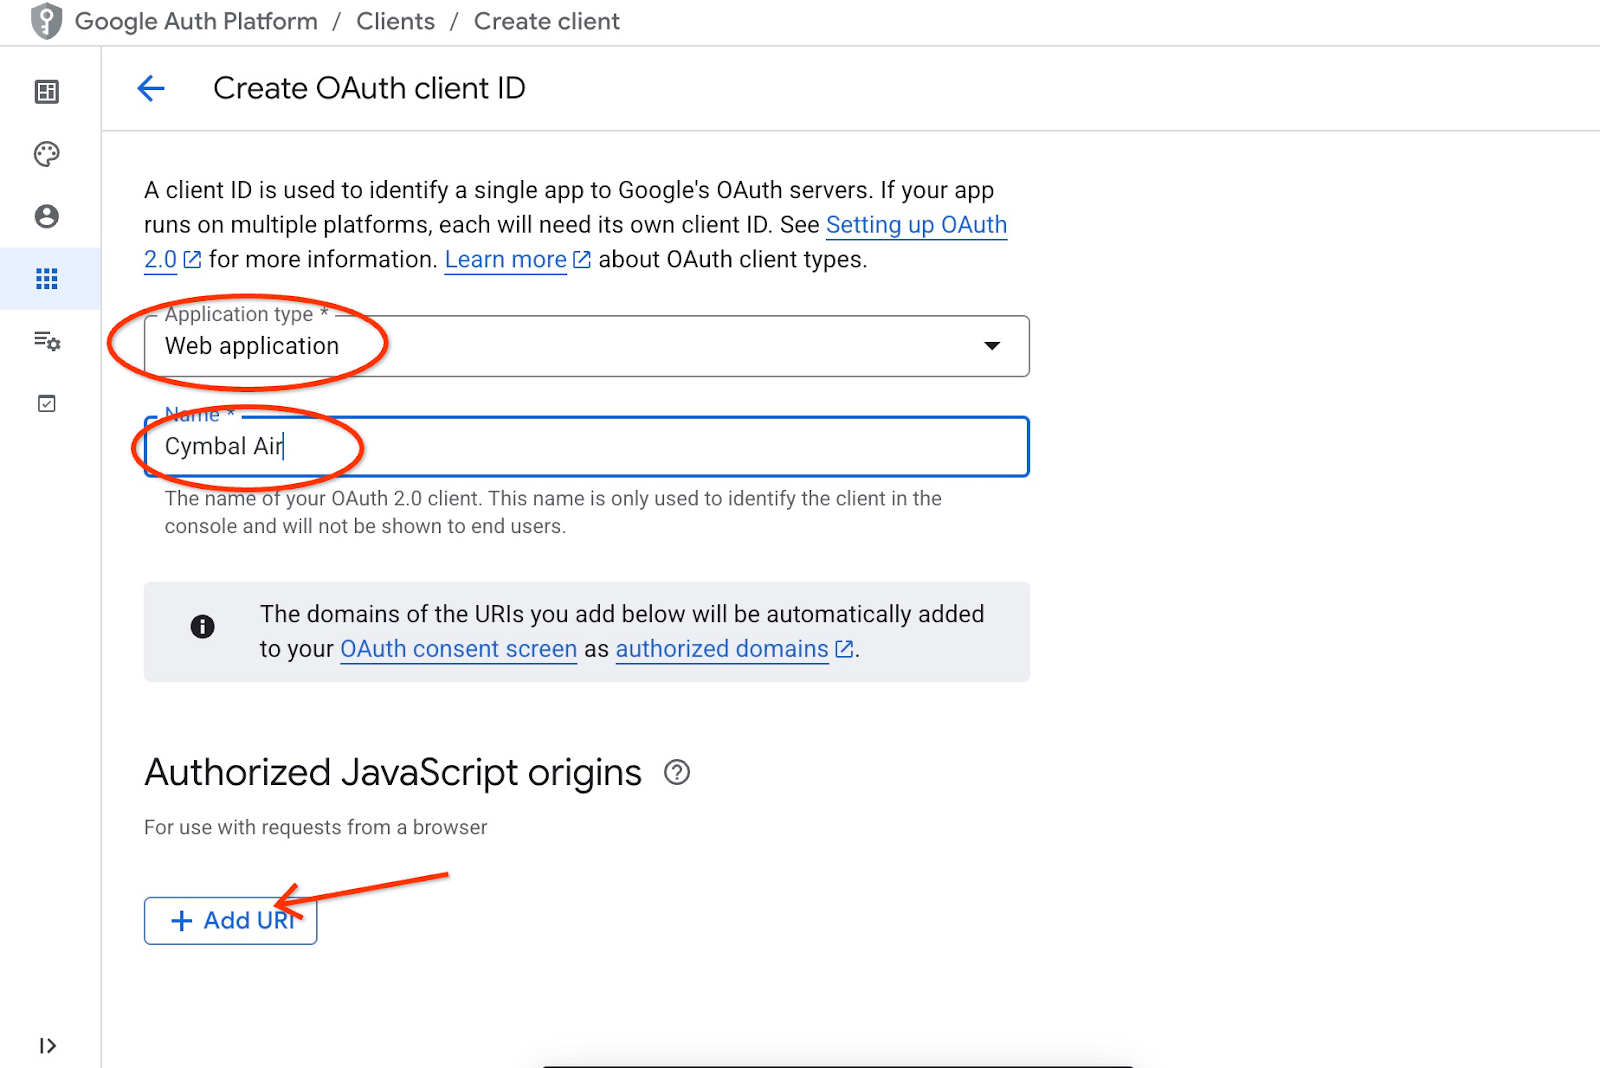
URI はアプリケーションの信頼できるソースを表し、アプリケーションにアクセスしようとしている場所によって異なります。承認済みの URI として「http://localhost:8081」、リダイレクト URI として「http://localhost:8081/login/google」を設定します。ブラウザで接続の URI として「http://localhost:8081」を入力すると、これらの値が機能します。たとえば、パソコンから SSH トンネル経由で接続する場合などです。その方法については後ほど説明します。
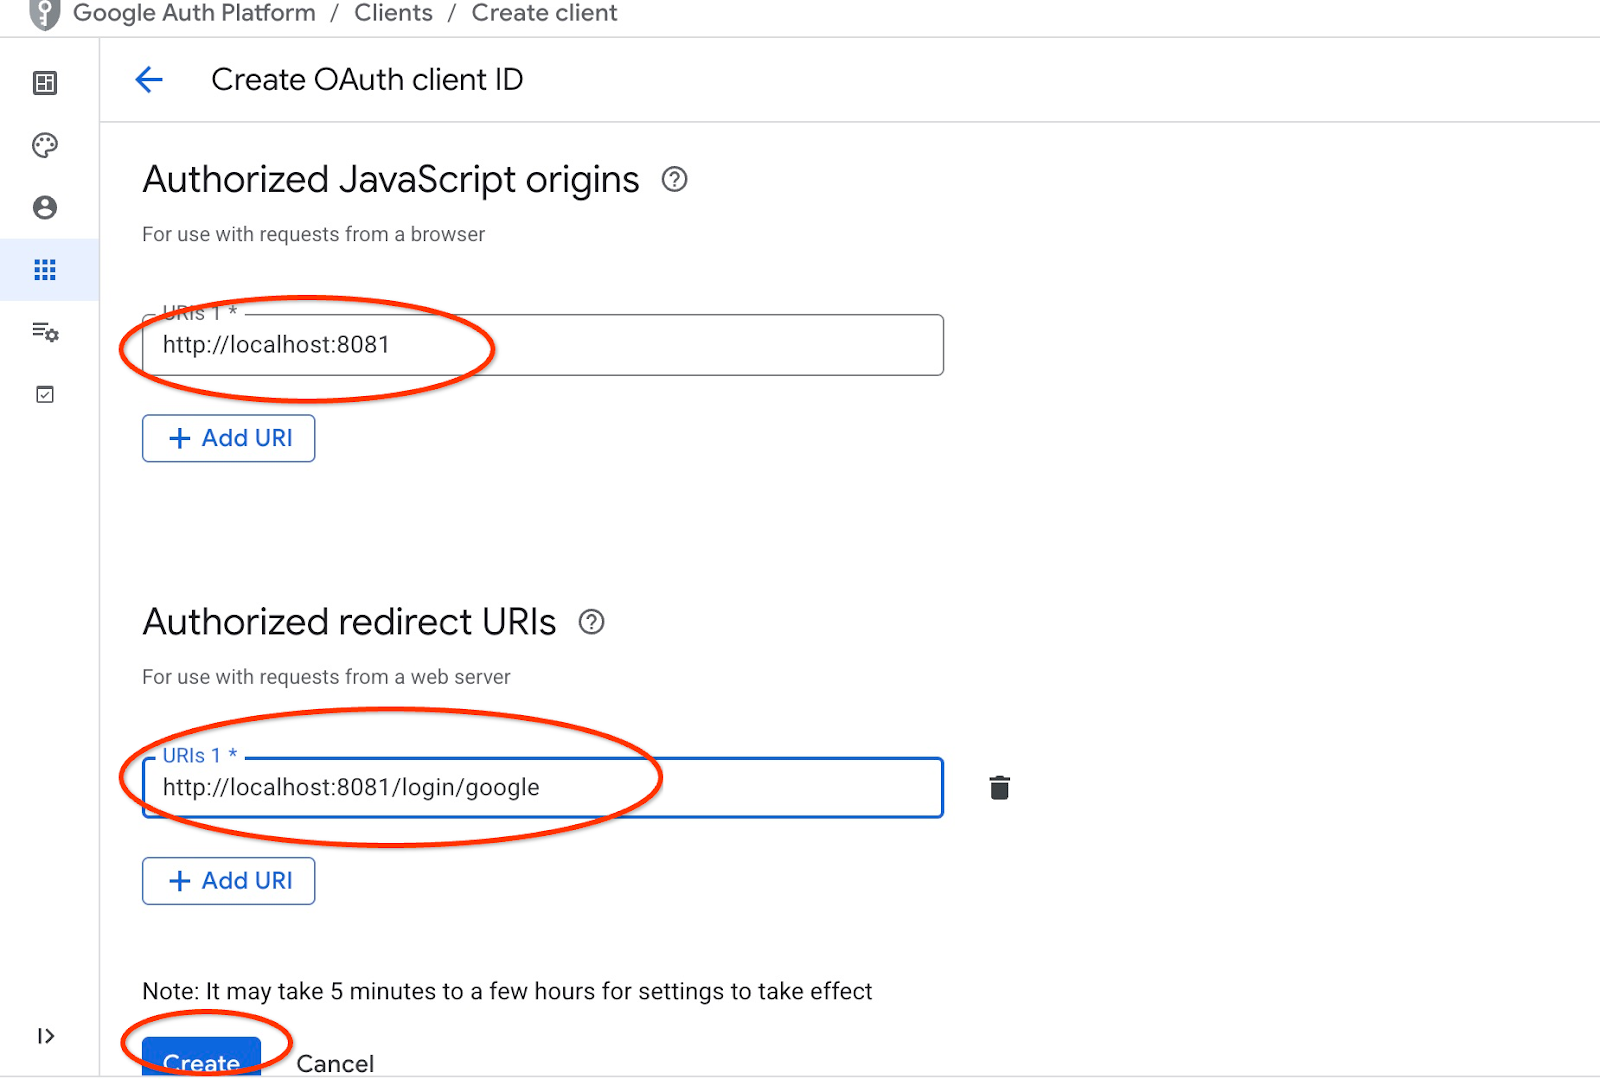
[作成] ボタンを押すと、クライアントの認証情報を含むポップアップ ウィンドウが表示されます。認証情報はシステムに記録されます。アプリケーションの起動時に使用するクライアント ID は、いつでもコピーできます。
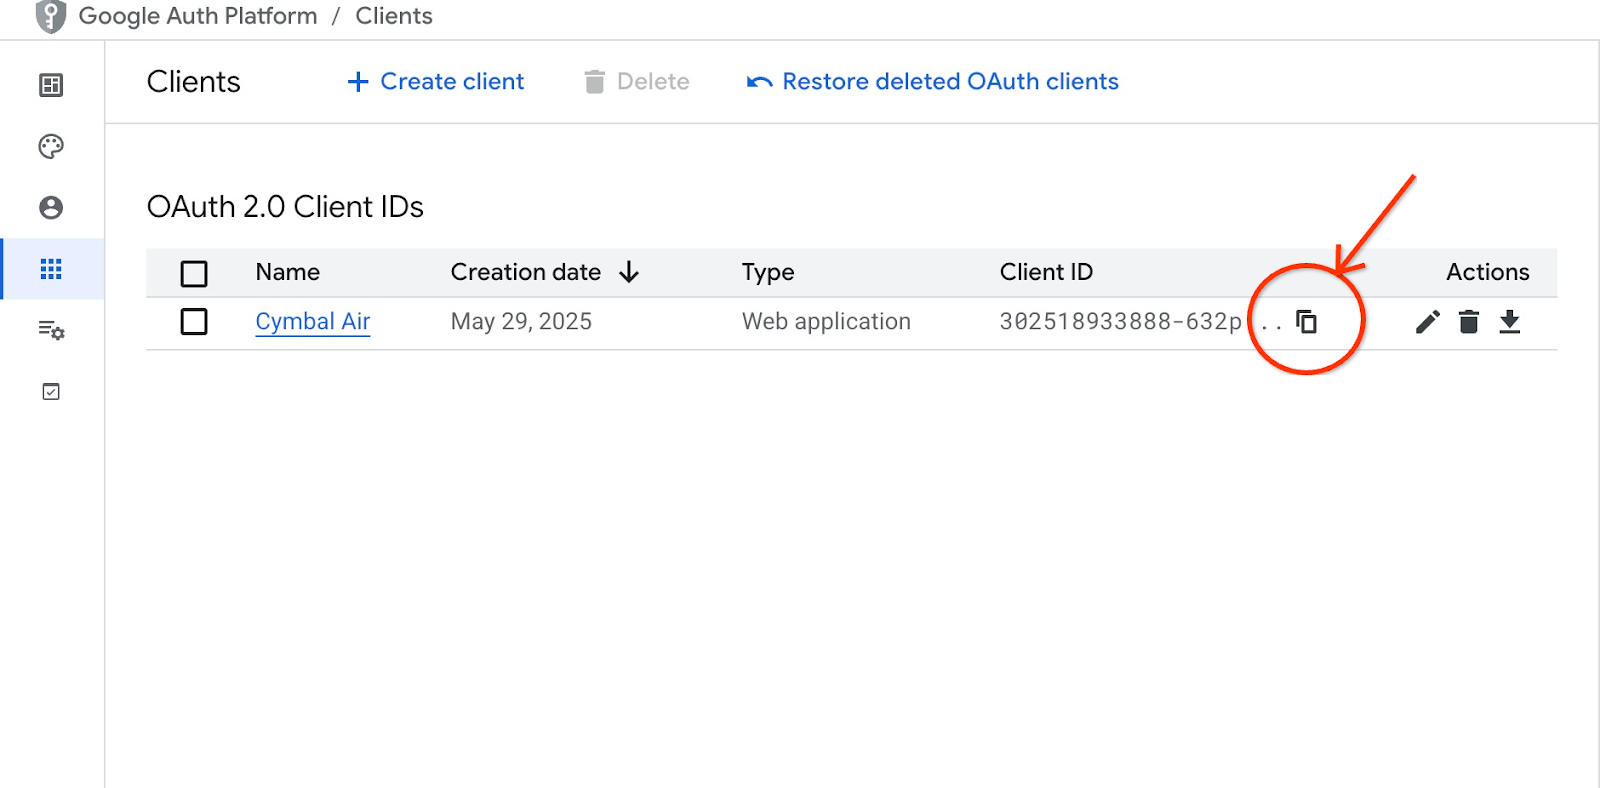
クライアント ID を指定する場所については、後ほど説明します。
サービス アカウントを作成する
必要なすべての権限を持つ Cloud Run サービス専用のサービス アカウントが必要です。サービスでは、AlloyDB と Cloud Secret Manager へのアクセスが必要です。サービス アカウントの名前は toolbox-identity を使用します。
上部の「+」記号を選択して、別の Cloud Shell タブを開きます。
新しい Cloud Shell タブで、次のコマンドを実行します。
export PROJECT_ID=$(gcloud config get-value project)
gcloud iam service-accounts create toolbox-identity

gcloud projects add-iam-policy-binding $PROJECT_ID \
  --member="serviceAccount:toolbox-identity@$PROJECT_ID.iam.gserviceaccount.com" \
  --role="roles/alloydb.client"
gcloud projects add-iam-policy-binding $PROJECT_ID \
  --member="serviceAccount:toolbox-identity@$PROJECT_ID.iam.gserviceaccount.com" \
  --role="roles/serviceusage.serviceUsageConsumer"
gcloud projects add-iam-policy-binding $PROJECT_ID \
  --member="serviceAccount:toolbox-identity@$PROJECT_ID.iam.gserviceaccount.com" \
  --role="roles/secretmanager.secretAccessor"
エラーが発生した場合は、ご注意ください。このコマンドは、Cloud Run サービスのサービス アカウントを作成し、シークレット マネージャー、データベース、Vertex AI を操作する権限を付与することを目的としています。
Ctrl+D キーを押すか、タブに実行コマンド「exit」を入力して、タブを閉じます。
exit
MCP ツールボックスの構成を準備する
MCP ツールボックスの構成ファイルを準備します。すべての構成オプションについては、ドキュメントをご覧ください。ここでは、サンプル tools.yaml ファイルを使用して、クラスタ名やインスタンス名、AlloyDB パスワード、プロジェクト ID などの値を実際の値に置き換えます。
AlloyDB パスワードをエクスポート:
export PGPASSWORD=<noted AlloyDB password>
前のステップで準備したクライアント ID をエクスポートします。
export CLIENT_ID=<noted OAuth 2.0 client ID for our application>
構成ファイルを準備します。
PROJECT_ID=$(gcloud config get-value project)
ADBCLUSTER=alloydb-aip-01
sed -e "s/project: retrieval-app-testing/project: $(gcloud config get-value project)/g" \
-e "s/cluster: my-alloydb-cluster/cluster: $ADBCLUSTER/g" \
-e "s/instance: my-alloydb-instance/instance: $ADBCLUSTER-pr/g" \
-e "s/password: postgres/password: $PGPASSWORD\\n    ipType: private/g" \
-e "s/^ *clientId: .*/    clientId: $CLIENT_ID/g" \
cymbal-air-toolbox-demo/tools.yaml >~/tools.yaml
ターゲット データソースを定義するファイル セクションを見ると、接続にプライベート IP を使用する行も追加されていることがわかります。
sources:
  my-pg-instance:
    kind: alloydb-postgres
    project: gleb-test-short-003-471020
    region: us-central1
    cluster: alloydb-aip-01
    instance: alloydb-aip-01-pr
    database: assistantdemo
    user: postgres
    password: L23F...
    ipType: private
authServices:
  my_google_service:
    kind: google
    clientId: 96828*******-***********.apps.googleusercontent.com
tools.yaml 構成をソースとして使用してシークレットを作成します。
VM ssh コンソールで、次のコマンドを実行します。
gcloud secrets create tools --data-file=tools.yaml
想定されるコンソール出力:
student@instance-1:~$ gcloud secrets create tools --data-file=tools.yaml
Created version [1] of the secret [tools].
MCP ツールボックスを Cloud Run サービスとしてデプロイする
これで、MCP ツールボックスをサービスとして Cloud Run にデプロイする準備が整いました。ローカル テストでは「./toolbox –tools-file=./tools.yaml」を実行できますが、アプリケーションをクラウドで実行する場合は、Cloud Run へのデプロイがはるかに合理的です。
VM SSH セッションで、次のコマンドを実行します。
export IMAGE=us-central1-docker.pkg.dev/database-toolbox/toolbox/toolbox:latest
gcloud run deploy toolbox \
    --image $IMAGE \
    --service-account toolbox-identity \
    --region us-central1 \
    --set-secrets "/app/tools.yaml=tools:latest" \
    --args="--tools-file=/app/tools.yaml","--address=0.0.0.0","--port=8080" \
    --network default \
    --subnet default \
    --no-allow-unauthenticated
想定されるコンソール出力:
student@instance-1:~$ export IMAGE=us-central1-docker.pkg.dev/database-toolbox/toolbox/toolbox:latest
gcloud run deploy toolbox \
    --image $IMAGE \
    --service-account toolbox-identity \
    --region us-central1 \
    --set-secrets "/app/tools.yaml=tools:latest" \
    --args="--tools-file=/app/tools.yaml","--address=0.0.0.0","--port=8080" \
    --network default \
    --subnet default \
    --no-allow-unauthenticated
Deploying container to Cloud Run service [toolbox] in project [gleb-test-short-002-470613] region [us-central1]
✓ Deploying new service... Done.
  ✓ Creating Revision...
  ✓ Routing traffic...
Done.
Service [toolbox] revision [toolbox-00001-l9c] has been deployed and is serving 100 percent of traffic.
Service URL: https://toolbox-868691532292.us-central1.run.app

student@instance-1:~$
サービスを確認する
これで、サービスが稼働しており、エンドポイントにアクセスできるかどうかを確認できます。gcloud ユーティリティを使用して、検索サービスのエンドポイントと認証トークンを取得します。また、Cloud コンソールでサービス URI を確認することもできます。
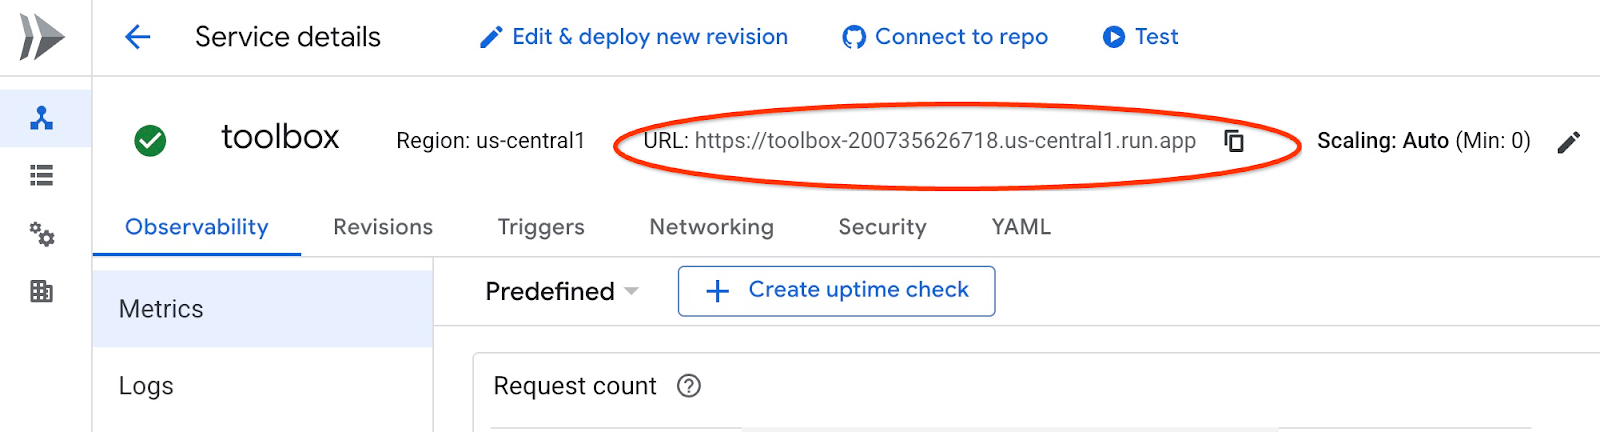
値をコピーして、curl コマンドの "$(gcloud run services list –filter="(toolbox)" –format="value(URL)" の部分を置き換えます。
コマンドラインから URL を動的に取得する方法は次のとおりです。
curl -H "Authorization: Bearer $(gcloud auth print-identity-token)" $(gcloud run services list --filter="(toolbox)" --format="value(URL)")
想定されるコンソール出力:
student@instance-1:~$ curl -H "Authorization: Bearer $(gcloud auth print-identity-token)" $(gcloud  run services list --filter="(toolbox)" --format="value(URL)")
🧰 Hello, World! 🧰student@instance-1:~$
「Hello World」というメッセージが表示されたら、サービスが稼働し、リクエストを処理していることを意味します。
8. サンプル アプリケーションをデプロイする
検索サービスが稼働したので、サンプル アプリケーションをデプロイできます。このアプリケーションは、オンライン空港アシスタントを表しています。このアシスタントは、データベースのフライトと空港のデータに基づいて、フライトや空港に関する情報を提供したり、フライトを予約したりできます。
アプリケーションは、ローカル、クラウド内の VM、Cloud Run や Kubernetes などの他のサービスにデプロイできます。ここでは、まず VM にデプロイする方法について説明します。
環境を準備する
同じ SSH セッションを使用して、引き続き VM で作業します。アプリケーションを実行するには、いくつかの Python モジュールが必要です。これらのモジュールは、データベースを初期化したときにすでに追加されています。Python 仮想環境に切り替えて、場所をアプリ ディレクトリに変更しましょう。
VM SSH セッションで、次のコマンドを実行します。
source ~/.venv/bin/activate
cd cymbal-air-toolbox-demo
想定される出力(秘匿化済み):
student@instance-1:~$ source ~/.venv/bin/activate
cd cymbal-air-toolbox-demo
(.venv) student@instance-1:~/cymbal-air-toolbox-demo$
アシスタント アプリケーションを実行する
アプリケーションを起動する前に、いくつかの環境変数を設定する必要があります。フライトや空港の設備について尋ねるなど、アプリケーションの基本的な機能を使用するには、アプリケーションが検索サービスを指す TOOLBOX_URL のみが必要です。これは gcloud コマンドを使用して取得できます。
VM SSH セッションで、次のコマンドを実行します。
export TOOLBOX_URL=$(gcloud run services list --filter="(toolbox)" --format="value(URL)")
想定される出力(秘匿化済み):
student@instance-1:~/cymbal-air-toolbox-demo$ export BASE_URL=$(gcloud run services list --filter="(toolbox)" --format="value(URL)")
フライトの予約や変更など、アプリの高度な機能を使用するには、Google アカウントを使用してアプリにログインする必要があります。そのためには、OAuth クライアント ID を使用して CLIENT_ID 環境変数を指定する必要があります。OAuth クライアント ID については、クライアント ID の準備の章をご覧ください。
export CLIENT_ID=215....apps.googleusercontent.com
想定される出力(秘匿化済み):
student@instance-1:~/cymbal-air-toolbox-demo$ export CLIENT_ID=215....apps.googleusercontent.com
これで、アプリケーションを実行できるようになりました。
python run_app.py
予想される出力:
student@instance-1:~/cymbal-air-toolbox-demo/llm_demo$ python run_app.py
INFO:     Started server process [2900]
INFO:     Waiting for application startup.
Loading application...
INFO:     Application startup complete.
INFO:     Uvicorn running on http://0.0.0.0:8081 (Press CTRL+C to quit)
アプリケーションに接続する
VM で実行されているアプリケーションに接続するには、いくつかの方法があります。たとえば、VPC のファイアウォール ルールを使用して VM でポート 8081 を開いたり、パブリック IP を使用してロードバランサを作成したりできます。ここでは、ローカルポート 8080 を VM ポート 8081 に変換する VM への SSH トンネルを使用します。
ローカルマシンからの接続
ローカルマシンから接続する場合は、SSH トンネルを実行する必要があります。これは、gcloud compute ssh を使用して行うことができます。
gcloud compute ssh instance-1 --zone=us-central1-a -- -L 8081:localhost:8081
予想される出力:
student-macbookpro:~ student$ gcloud compute ssh instance-1 --zone=us-central1-a -- -L 8080:localhost:8081
Warning: Permanently added 'compute.7064281075337367021' (ED25519) to the list of known hosts.
Linux instance-1.us-central1-c.c.gleb-test-001.internal 6.1.0-21-cloud-amd64 #1 SMP PREEMPT_DYNAMIC Debian 6.1.90-1 (2024-05-03) x86_64

The programs included with the Debian GNU/Linux system are free software;
the exact distribution terms for each program are described in the
individual files in /usr/share/doc/*/copyright.

Debian GNU/Linux comes with ABSOLUTELY NO WARRANTY, to the extent
permitted by applicable law.
student@instance-1:~$
これで、ブラウザを開いて http://localhost:8081 を使用してアプリケーションに接続できます。アプリケーション画面が表示されます。

Cloud Shell から接続する
また、Google Cloud Shell を使用して接続することもできます。上部の「+」記号を選択して、別の Cloud Shell タブを開きます。
新しいタブで、gcloud コマンドを実行してウェブ クライアントのオリジンとリダイレクト URI を取得します。
echo "origin:"; echo "https://8080-$WEB_HOST"; echo "redirect:"; echo "https://8080-$WEB_HOST/login/google"
想定される出力は次のとおりです。
student@cloudshell:~ echo "origin:"; echo "https://8080-$WEB_HOST"; echo "redirect:"; echo "https://8080-$WEB_HOST/login/google"
origin:
https://8080-cs-35704030349-default.cs-us-east1-rtep.cloudshell.dev
redirect:
https://8080-cs-35704030349-default.cs-us-east1-rtep.cloudshell.dev/login/google
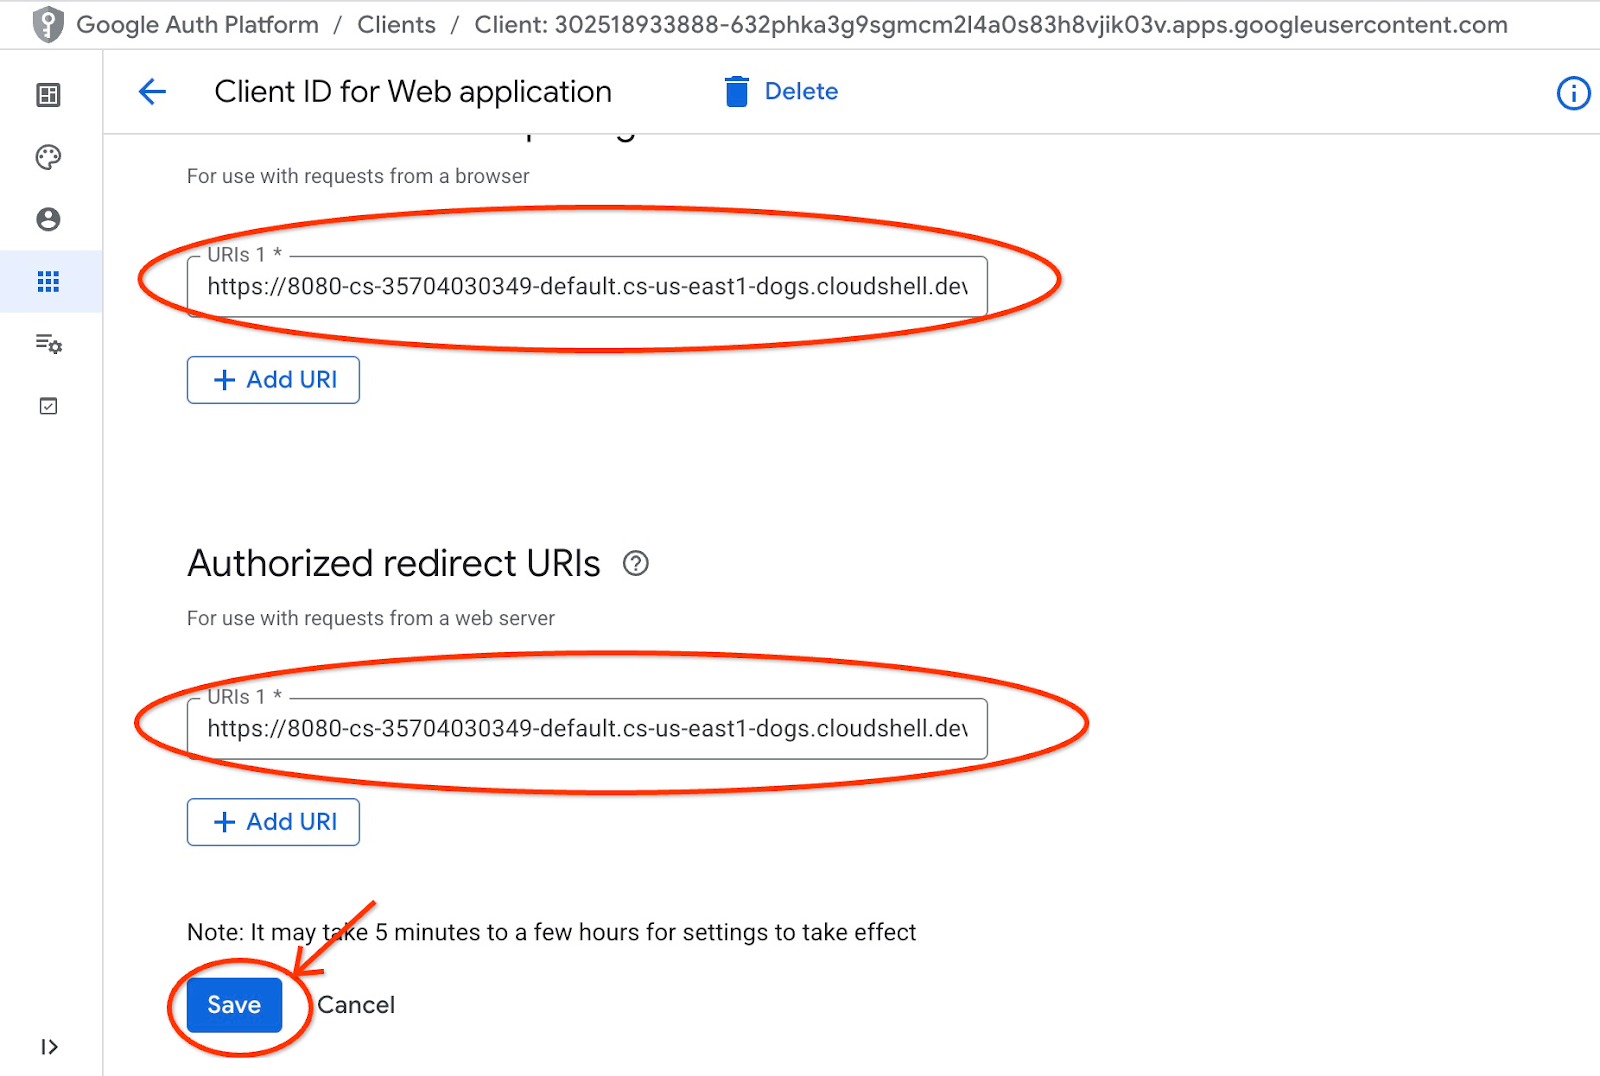
また、URI のオリジンとリダイレクトを「クライアント ID の準備」の章で作成した認証情報の「承認済みの JavaScript 生成元」と「承認済みのリダイレクト URI」として使用し、元々提供されていた http://localhost:8080 の値を置き換えるか、追加します。
OAuth 2.0 クライアント ID ページで [Cymbal Air] をクリックします。
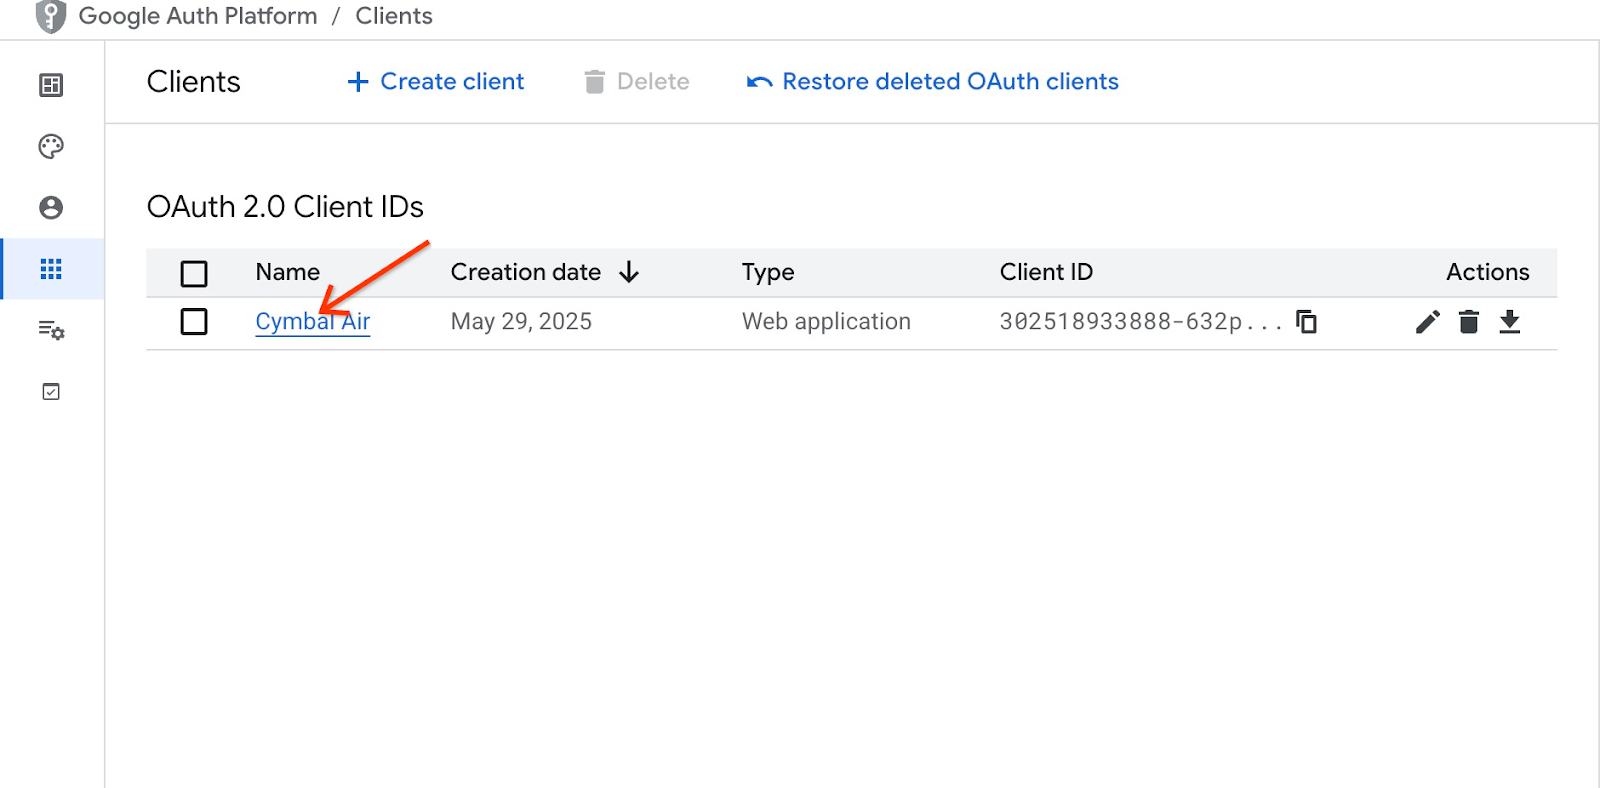
Cloud Shell のオリジンとリダイレクト URI を入力し、[保存] ボタンをクリックします。
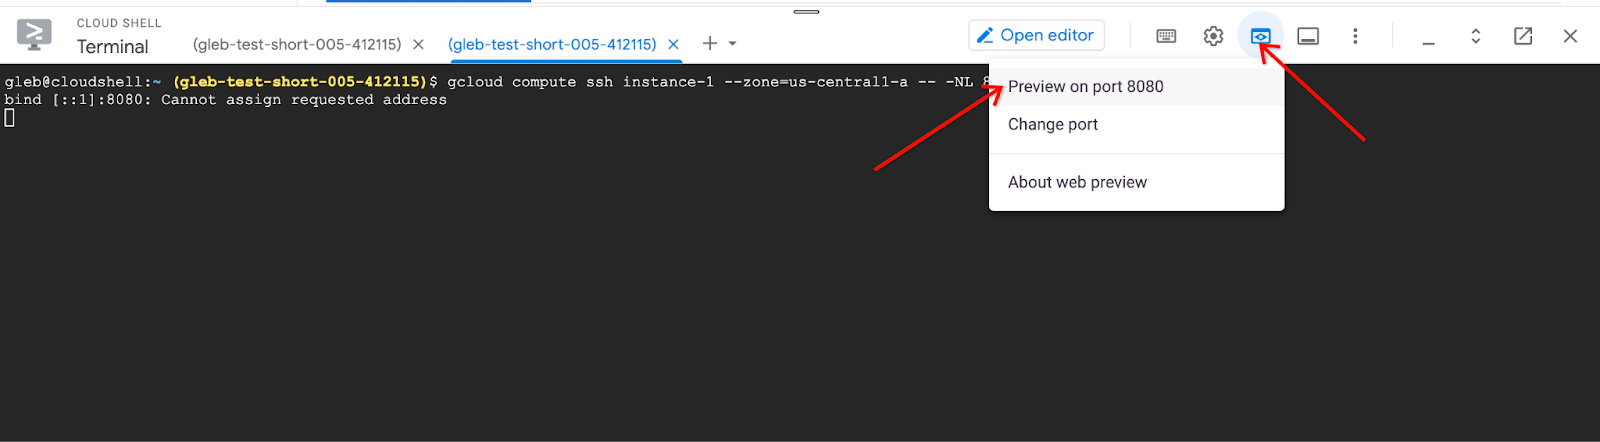
新しい Cloud Shell タブで、gcloud コマンドを実行して VM へのトンネリングを開始します。
gcloud compute ssh instance-1 --zone=us-central1-a -- -L 8080:localhost:8081
「Cannot assign requested address」エラーが表示されますが、無視してください。
想定される出力は次のとおりです。
student@cloudshell:~ gcloud compute ssh instance-1 --zone=us-central1-a -- -L 8080:localhost:8081
bind [::1]:8081: Cannot assign requested address
inux instance-1.us-central1-a.c.gleb-codelive-01.internal 6.1.0-21-cloud-amd64 #1 SMP PREEMPT_DYNAMIC Debian 6.1.90-1 (2024-05-03) x86_64

The programs included with the Debian GNU/Linux system are free software;
the exact distribution terms for each program are described in the
individual files in /usr/share/doc/*/copyright.

Debian GNU/Linux comes with ABSOLUTELY NO WARRANTY, to the extent
permitted by applicable law.
Last login: Sat May 25 19:15:46 2024 from 35.243.235.73
student@instance-1:~$
Cloud Shell でポート 8080 が開き、「ウェブでプレビュー」に使用できます。
Cloud Shell の右上にある [ウェブでプレビュー] ボタンをクリックし、プルダウン メニューから [ポート 8080 でプレビュー] を選択します。
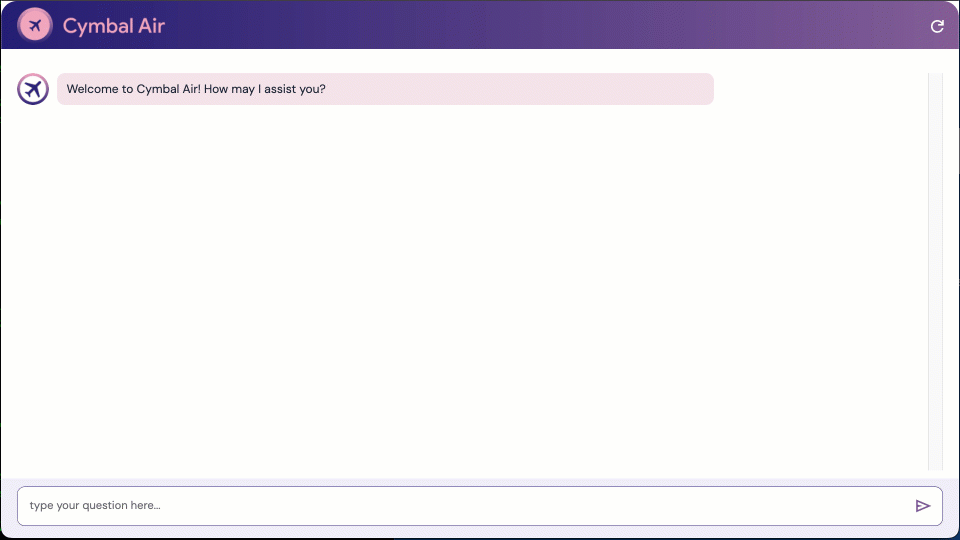
ウェブブラウザで新しいタブが開き、アプリケーションのインターフェースが表示されます。[Cymbal Air Customer Service Assistant] ページが表示されます。
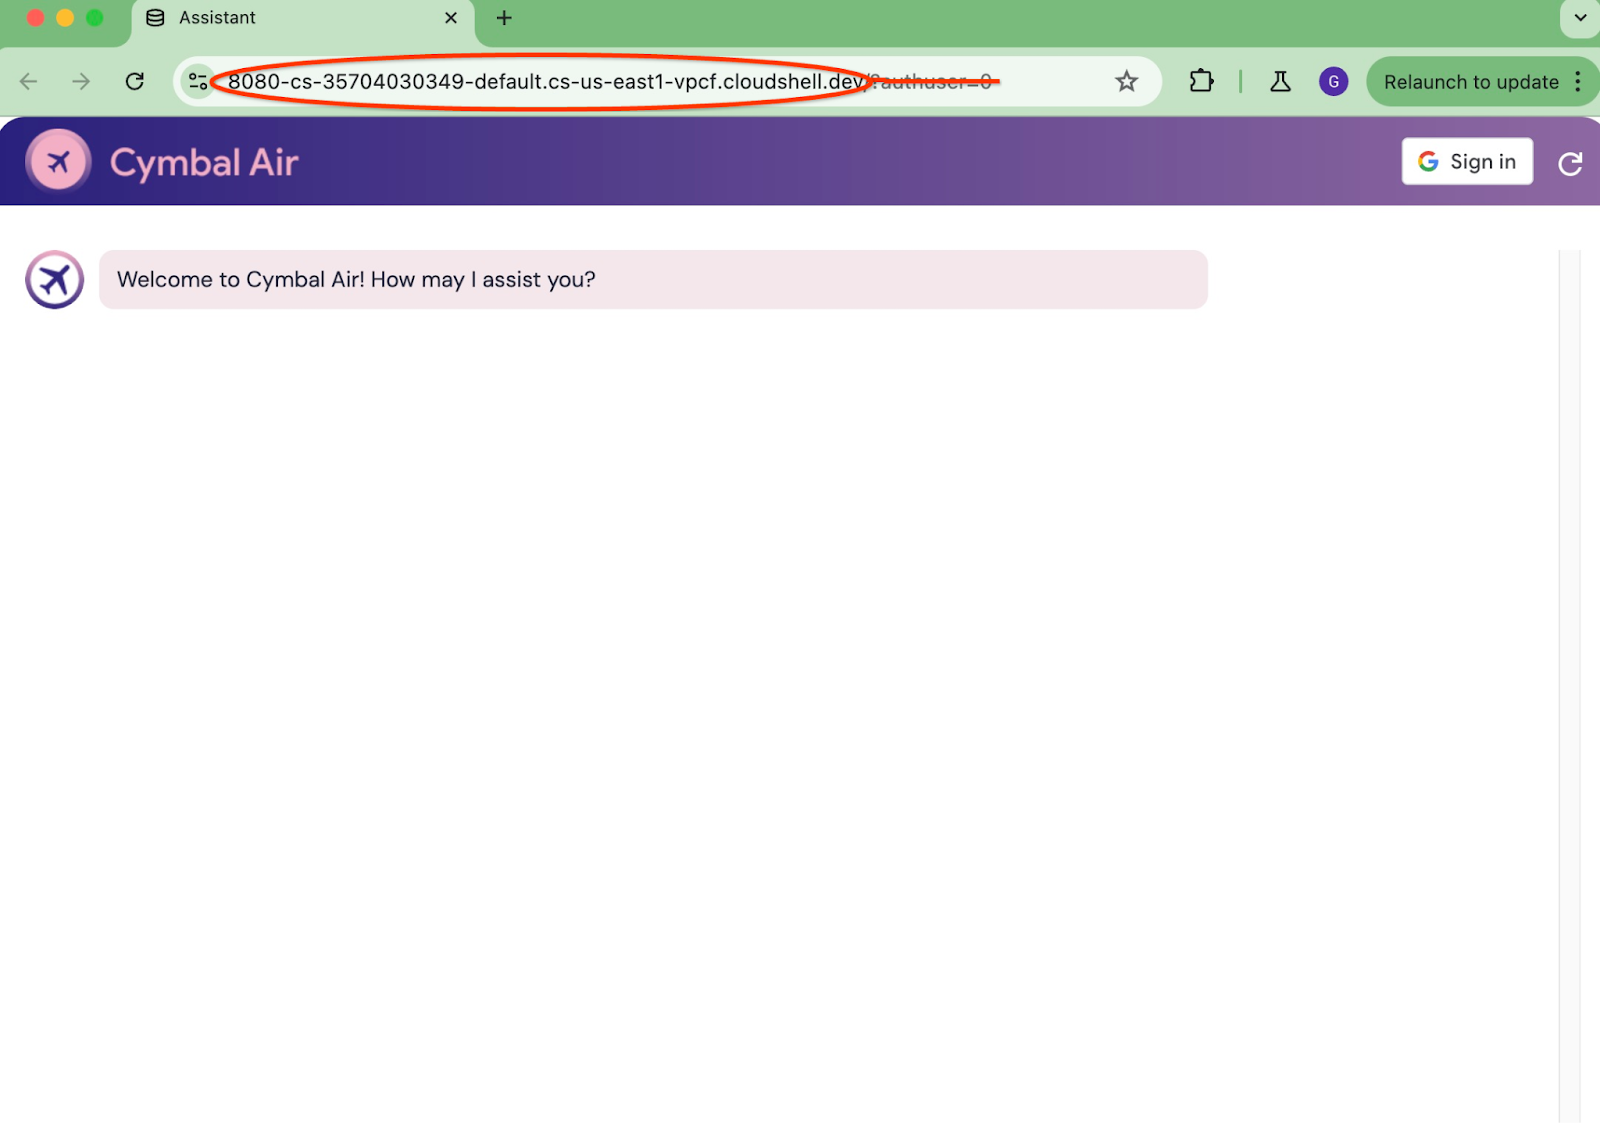
アプリケーションにログインする
すべてが設定され、アプリケーションが開いたら、アプリケーション画面の右上にある [ログイン] ボタンを使用して認証情報を入力します。これは省略可能で、アプリケーションの予約機能を試す場合にのみ必要です。
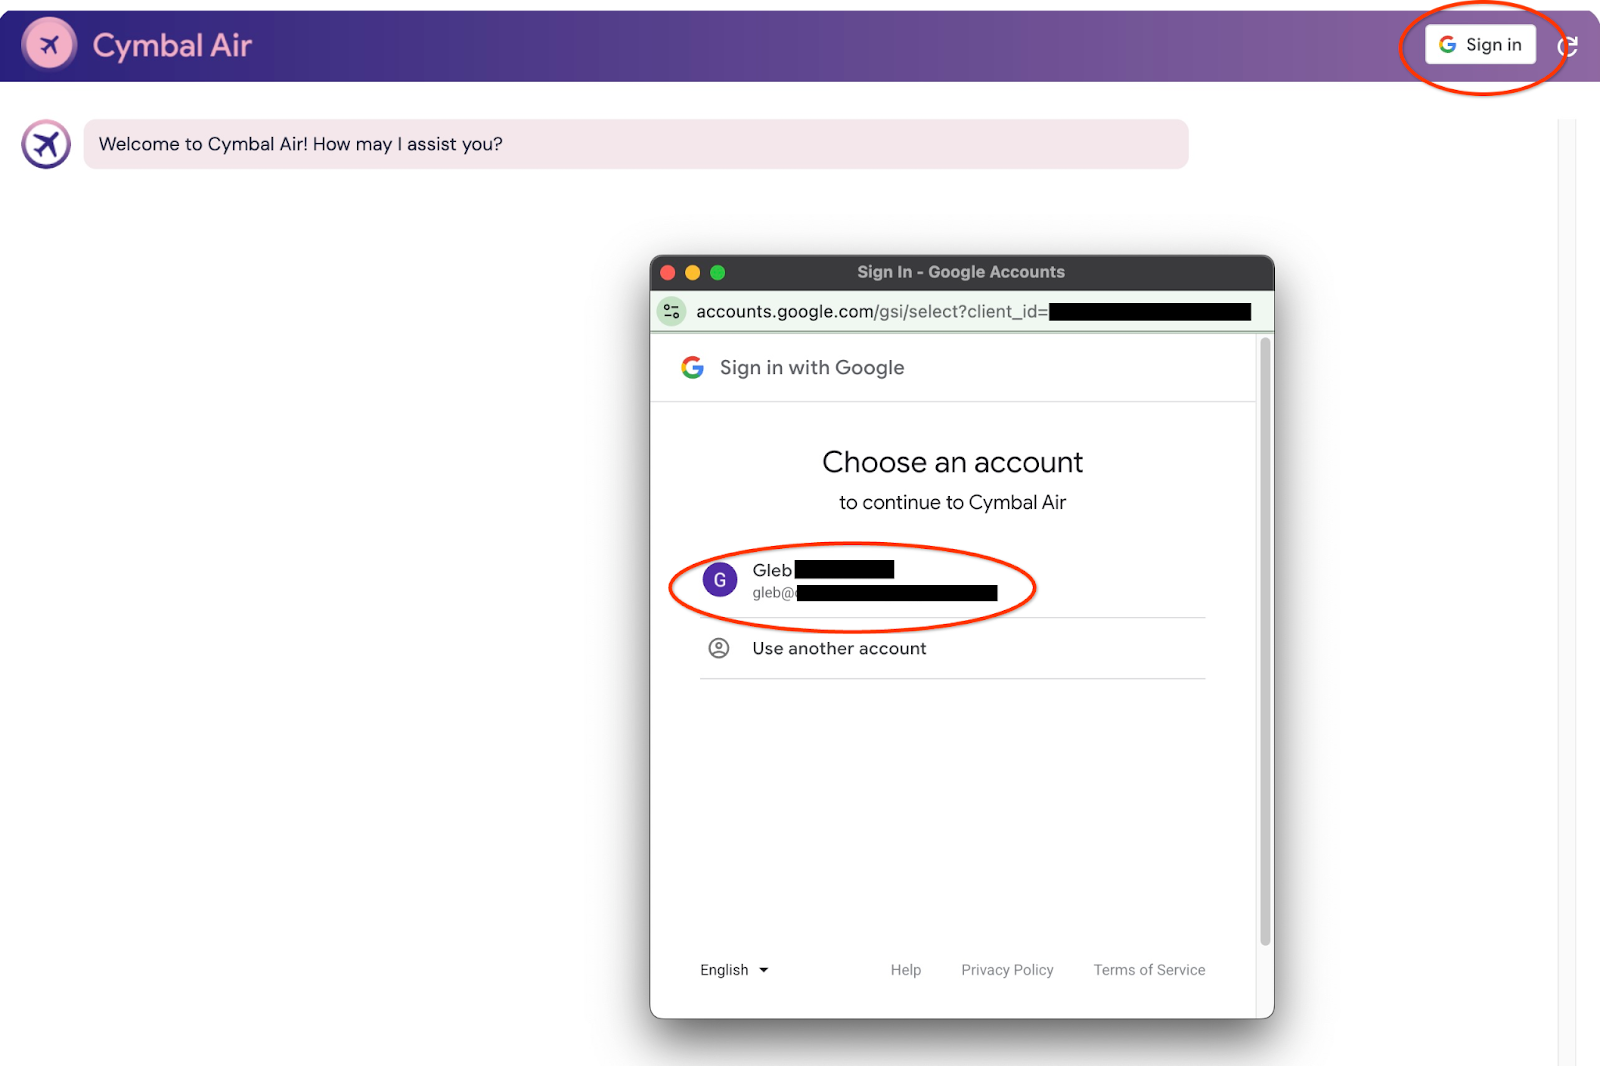
ポップアップ ウィンドウが開き、認証情報を選択できます。
ログインすると、アプリケーションの準備が完了し、ウィンドウの下部にあるフィールドにリクエストを投稿できるようになります。
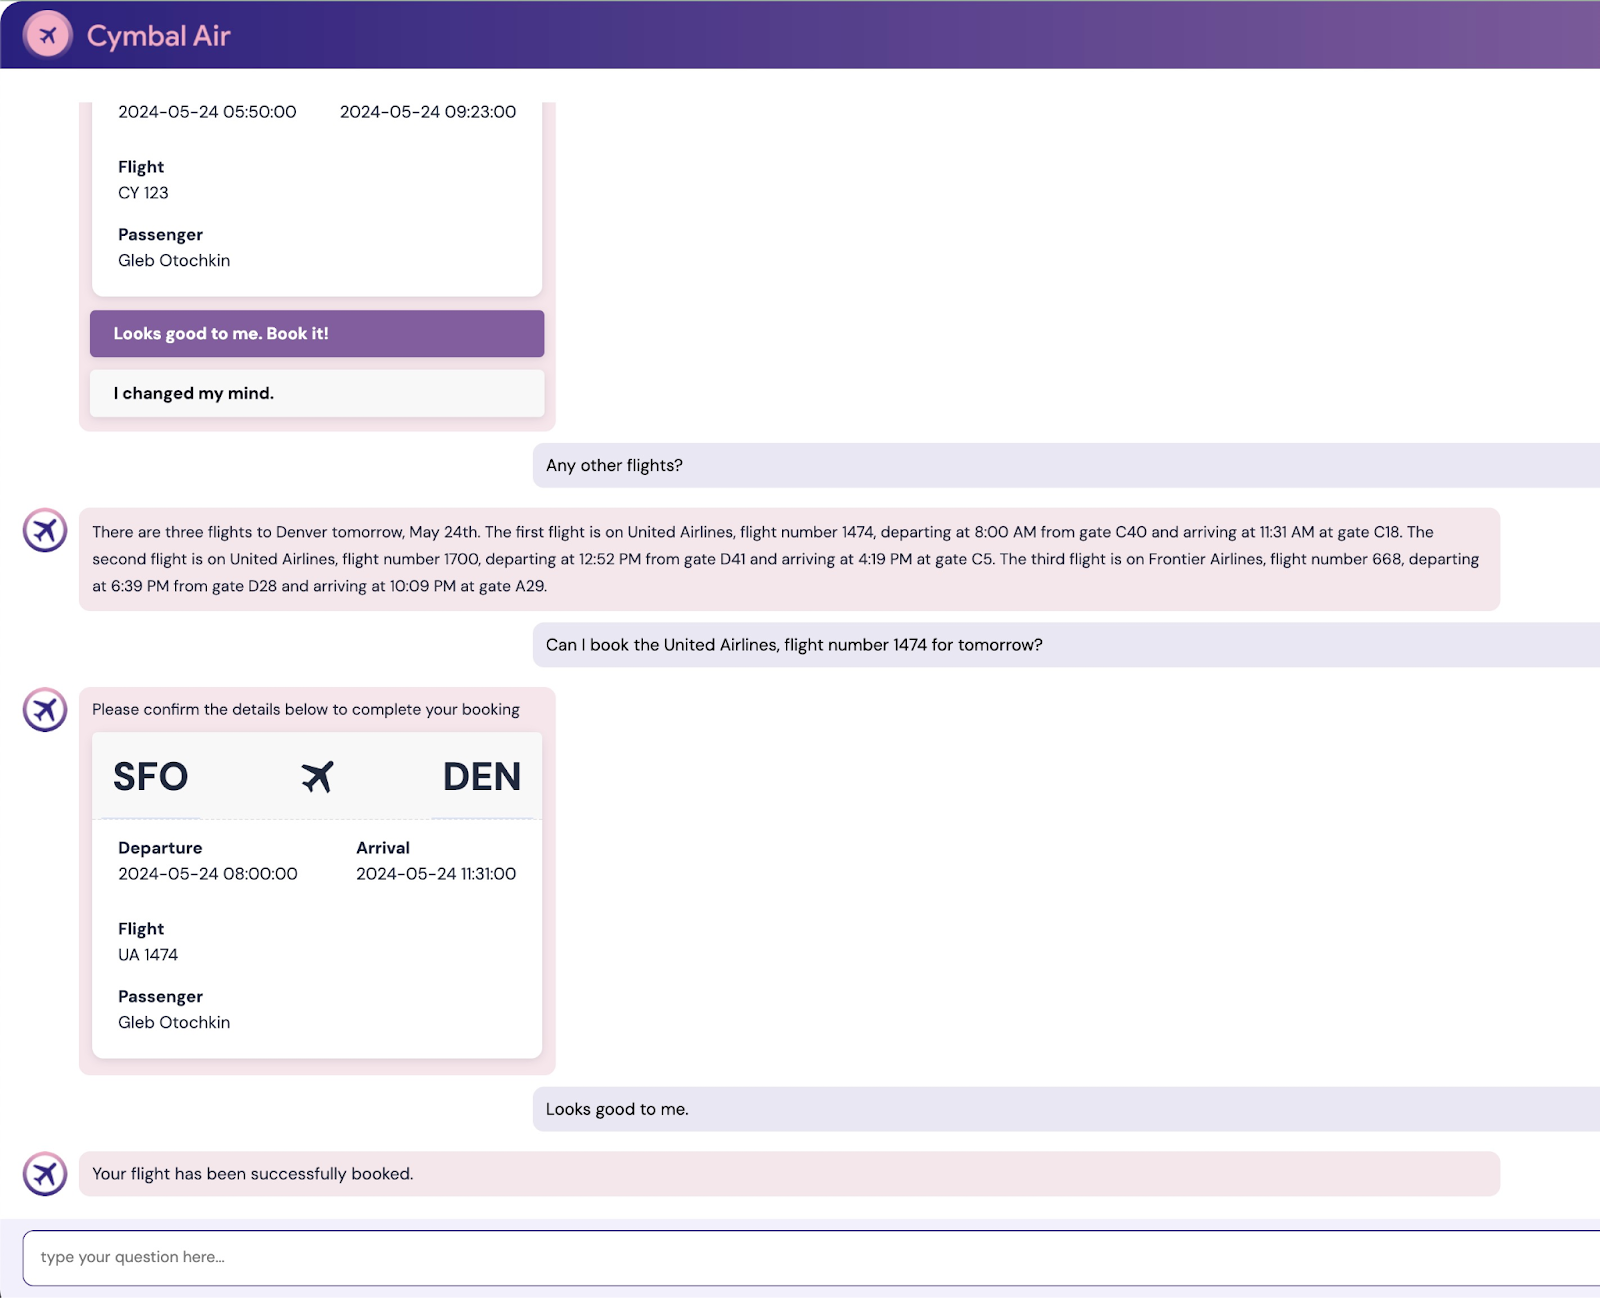
このデモでは、Cymbal Air のカスタマー サービス アシスタントを紹介します。Cymbal Air は架空の航空会社です。このアシスタントは、旅行者がフライトを管理したり、サンフランシスコ国際空港(SFO)にある Cymbal Air のハブに関する情報を検索したりできるようにする AI の chatbot です。
ログインせずに(CLIENT_ID なしで)、次のようなユーザーの疑問の解決に役立ちます。
デンバー行きの次のフライトはいつですか?
C28 ゲートの周辺に高級ショップはありますか?
A6 ゲート付近でコーヒーを飲める場所はどこですか?
ギフトはどこで購入できますか?
サンフランシスコ発デンバー行きの本日出発のフライトを探してください
アプリにログインすると、フライトの予約や、割り当てられた座席が窓側か通路側かを確認するなどの機能を利用できます。
このアプリケーションは、最新の Google 基盤モデルを使用して、レスポンスを生成し、運用中の AlloyDB データベースのフライトと設備に関する情報で拡張しています。このデモ アプリケーションについて詳しくは、プロジェクトの GitHub ページをご覧ください。
9. 環境をクリーンアップする
これですべてのタスクが完了したので、環境をクリーンアップできます。
Cloud Run サービスを削除する
Cloud Shell で、次のコマンドを実行します。
gcloud run services delete toolbox --region us-central1
想定されるコンソール出力:
student@cloudshell:~ (gleb-test-short-004)$ gcloud run services delete retrieval-service --region us-central1
Service [retrieval-service] will be deleted.

Do you want to continue (Y/n)?  Y

Deleting [retrieval-service]...done.
Deleted service [retrieval-service].
Cloud Run サービスのサービス アカウントを削除します。
Cloud Shell で、次のコマンドを実行します。
PROJECT_ID=$(gcloud config get-value project)
gcloud iam service-accounts delete toolbox-identity@$PROJECT_ID.iam.gserviceaccount.com --quiet
想定されるコンソール出力:
student@cloudshell:~ (gleb-test-short-004)$ PROJECT_ID=$(gcloud config get-value project)
Your active configuration is: [cloudshell-222]
student@cloudshell:~ (gleb-test-short-004)$ gcloud iam service-accounts delete retrieval-identity@$PROJECT_ID.iam.gserviceaccount.com --quiet
deleted service account [retrieval-identity@gleb-test-short-004.iam.gserviceaccount.com]
student@cloudshell:~ (gleb-test-short-004)$
ラボの終了時に AlloyDB インスタンスとクラスタを破棄します。
AlloyDB クラスタとすべてのインスタンスを削除する
AlloyDB の試用版を使用した場合。トライアル クラスタを使用して他のラボやリソースをテストする予定がある場合は、トライアル クラスタを削除しないでください。同じプロジェクトに別のトライアル クラスタを作成することはできません。
クラスタは force オプションで破棄され、クラスタに属するすべてのインスタンスも削除されます。
接続が切断され、以前の設定がすべて失われた場合は、Cloud Shell でプロジェクトと環境変数を定義します。
gcloud config set project <your project id>
export REGION=us-central1
export ADBCLUSTER=alloydb-aip-01
export PROJECT_ID=$(gcloud config get-value project)
クラスタを削除します。
gcloud alloydb clusters delete $ADBCLUSTER --region=$REGION --force
想定されるコンソール出力:
student@cloudshell:~ (test-project-001-402417)$ gcloud alloydb clusters delete $ADBCLUSTER --region=$REGION --force
All of the cluster data will be lost when the cluster is deleted.

Do you want to continue (Y/n)?  Y

Operation ID: operation-1697820178429-6082890a0b570-4a72f7e4-4c5df36f
Deleting cluster...done.
AlloyDB バックアップを削除する
クラスタの AlloyDB バックアップをすべて削除します。
for i in $(gcloud alloydb backups list --filter="CLUSTER_NAME: projects/$PROJECT_ID/locations/$REGION/clusters/$ADBCLUSTER" --format="value(name)" --sort-by=~createTime) ; do gcloud alloydb backups delete $(basename $i) --region $REGION --quiet; done
想定されるコンソール出力:
student@cloudshell:~ (test-project-001-402417)$ for i in $(gcloud alloydb backups list --filter="CLUSTER_NAME: projects/$PROJECT_ID/locations/$REGION/clusters/$ADBCLUSTER" --format="value(name)" --sort-by=~createTime) ; do gcloud alloydb backups delete $(basename $i) --region $REGION --quiet; done
Operation ID: operation-1697826266108-60829fb7b5258-7f99dc0b-99f3c35f
Deleting backup...done.
これで、VM を破棄できます。
GCE VM を削除する
Cloud Shell で、次のコマンドを実行します。
export GCEVM=instance-1
export ZONE=us-central1-a
gcloud compute instances delete $GCEVM \
    --zone=$ZONE \
    --quiet
想定されるコンソール出力:
student@cloudshell:~ (test-project-001-402417)$ export GCEVM=instance-1
export ZONE=us-central1-a
gcloud compute instances delete $GCEVM \
    --zone=$ZONE \
    --quiet
Deleted
GCE VM と Retrieval サービスのサービス アカウントを削除します。
Cloud Shell で、次のコマンドを実行します。
PROJECT_ID=$(gcloud config get-value project)
gcloud iam service-accounts delete compute-aip@$PROJECT_ID.iam.gserviceaccount.com --quiet
想定されるコンソール出力:
student@cloudshell:~ (gleb-test-short-004)$ PROJECT_ID=$(gcloud config get-value project)
gcloud iam service-accounts delete compute-aip@$PROJECT_ID.iam.gserviceaccount.com --quiet
Your active configuration is: [cloudshell-222]
deleted service account [compute-aip@gleb-test-short-004.iam.gserviceaccount.com]
student@cloudshell:~ (gleb-test-short-004)$
10. 完了
以上で、この Codelab は完了です。
学習した内容
- AlloyDB クラスタをデプロイする方法
- AlloyDB に接続する方法
- MCP ツールボックス サービスを構成してデプロイする方法
- デプロイされたサービスを使用してサンプル アプリケーションをデプロイする方法
11. アンケート
出力: