
1. 簡介
在本程式碼研究室中,您將瞭解如何建立 AlloyDB 叢集、部署 MCP Toolbox,以及設定使用 AlloyDB 做為資料來源。接著,您將建構範例互動式 RAG 應用程式,並使用部署的 Toolbox 驗證要求。
如要進一步瞭解 MCP Toolbox,請參閱說明文件頁面,以及這裡的 Cymbal Air 範例應用程式。
本實驗室是 AlloyDB AI 功能專屬實驗室系列的一部分。如要瞭解詳情,請參閱說明文件中的 AlloyDB AI 頁面,並查看其他實驗室。
必要條件
- Google Cloud 控制台的基本知識
- 指令列介面和 Google Cloud Shell 的基本技能
課程內容
- 如何部署整合 Vertex AI 的 AlloyDB 叢集
- 如何連線至 AlloyDB
- 如何設定及部署 MCP Toolbox 服務
- 如何使用已部署的服務部署範例應用程式
軟硬體需求
- Google Cloud 帳戶和 Google Cloud 專案
- 網路瀏覽器,例如 Chrome
2. 設定和需求
自修實驗室環境設定
- 登入 Google Cloud 控制台,然後建立新專案或重複使用現有專案。如果沒有 Gmail 或 Google Workspace 帳戶,請先建立帳戶。

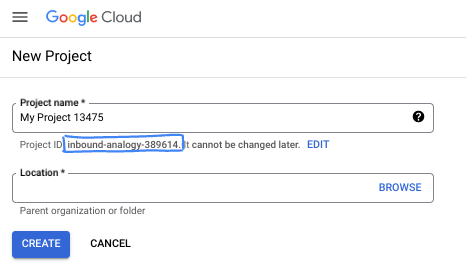
- 專案名稱是這個專案參與者的顯示名稱。這是 Google API 未使用的字元字串。你隨時可以更新。
- 專案 ID 在所有 Google Cloud 專案中都是不重複的,而且設定後即無法變更。Cloud 控制台會自動產生專屬字串,通常您不需要在意該字串為何。在大多數程式碼研究室中,您需要參照專案 ID (通常標示為
PROJECT_ID)。如果您不喜歡產生的 ID,可以產生另一個隨機 ID。你也可以嘗試使用自己的名稱,看看是否可用。完成這個步驟後就無法變更,且專案期間會維持不變。 - 請注意,有些 API 會使用第三個值,也就是「專案編號」。如要進一步瞭解這三種值,請參閱說明文件。
- 接著,您需要在 Cloud 控制台中啟用帳單,才能使用 Cloud 資源/API。完成本程式碼研究室的費用不高,甚至可能完全免費。如要關閉資源,避免在本教學課程結束後繼續產生費用,請刪除您建立的資源或專案。Google Cloud 新使用者可參加價值$300 美元的免費試用計畫。
啟動 Cloud Shell
雖然可以透過筆電遠端操作 Google Cloud,但在本程式碼研究室中,您將使用 Google Cloud Shell,這是可在雲端執行的指令列環境。
在 Google Cloud 控制台中,點選右上工具列的 Cloud Shell 圖示:

佈建並連線至環境的作業需要一些時間才能完成。完成後,您應該會看到如下的內容:

這部虛擬機器搭載各種您需要的開發工具,並提供永久的 5GB 主目錄,而且可在 Google Cloud 運作,大幅提升網路效能並強化驗證功能。您可以在瀏覽器中完成本程式碼研究室的所有作業。您不需要安裝任何軟體。
3. 事前準備
啟用 API
輸出內容:
在 Cloud Shell 中,確認專案 ID 已設定完畢:
通常專案 ID 會顯示在 Cloud Shell 的命令提示字元中,並以半形括號括住,如圖片所示:

gcloud config set project [YOUR-PROJECT-ID]
然後將 PROJECT_ID 環境變數設為 Google Cloud 專案 ID:
PROJECT_ID=$(gcloud config get-value project)
啟用所有必要服務:
gcloud services enable alloydb.googleapis.com \
                       compute.googleapis.com \
                       cloudresourcemanager.googleapis.com \
                       servicenetworking.googleapis.com \
                       vpcaccess.googleapis.com \
                       aiplatform.googleapis.com \
                       cloudbuild.googleapis.com \
                       artifactregistry.googleapis.com \
                       run.googleapis.com \
                       iam.googleapis.com \
                       secretmanager.googleapis.com
預期的輸出內容:
student@cloudshell:~ (gleb-test-short-004)$ gcloud services enable alloydb.googleapis.com \
                       compute.googleapis.com \
                       cloudresourcemanager.googleapis.com \
                       servicenetworking.googleapis.com \
                       vpcaccess.googleapis.com \
                       aiplatform.googleapis.com \
                       cloudbuild.googleapis.com \
                       artifactregistry.googleapis.com \
                       run.googleapis.com \
                       iam.googleapis.com \
                       secretmanager.googleapis.com
Operation "operations/acf.p2-404051529011-664c71ad-cb2b-4ab4-86c1-1f3157d70ba1" finished successfully.
4. 部署 AlloyDB 叢集
建立 AlloyDB 叢集和主要執行個體。下列程序說明如何使用 Google Cloud SDK 建立 AlloyDB 叢集和執行個體。如要使用控制台方法,請參閱這份說明文件。
建立 AlloyDB 叢集前,我們需要虛擬私有雲中可用的私人 IP 範圍,供日後的 AlloyDB 執行個體使用。如果沒有,我們就必須建立,並指派給內部 Google 服務使用,之後才能建立叢集和執行個體。
建立私人 IP 範圍
我們需要為 AlloyDB 在虛擬私有雲中設定私人服務連線。這裡的假設是專案中具有「預設」虛擬私有雲網路,且所有動作都會使用該網路。
建立私人 IP 範圍:
gcloud compute addresses create psa-range \
    --global \
    --purpose=VPC_PEERING \
    --prefix-length=24 \
    --description="VPC private service access" \
    --network=default
使用分配的 IP 範圍建立私人連線:
gcloud services vpc-peerings connect \
    --service=servicenetworking.googleapis.com \
    --ranges=psa-range \
    --network=default
預期的控制台輸出內容:
student@cloudshell:~ (test-project-402417)$ gcloud compute addresses create psa-range \
    --global \
    --purpose=VPC_PEERING \
    --prefix-length=24 \
    --description="VPC private service access" \
    --network=default
Created [https://www.googleapis.com/compute/v1/projects/test-project-402417/global/addresses/psa-range].

student@cloudshell:~ (test-project-402417)$ gcloud services vpc-peerings connect \
    --service=servicenetworking.googleapis.com \
    --ranges=psa-range \
    --network=default
Operation "operations/pssn.p24-4470404856-595e209f-19b7-4669-8a71-cbd45de8ba66" finished successfully.

student@cloudshell:~ (test-project-402417)$
建立 AlloyDB 叢集
在本節中,我們將在 us-central1 區域建立 AlloyDB 叢集。
定義 postgres 使用者的密碼。您可以自行定義密碼,也可以使用隨機函式產生密碼
export PGPASSWORD=`openssl rand -hex 12`
預期的控制台輸出內容:
student@cloudshell:~ (test-project-402417)$ export PGPASSWORD=`openssl rand -hex 12`
請記下 PostgreSQL 密碼,以供日後使用。
echo $PGPASSWORD
日後以 postgres 使用者身分連線至執行個體時,需要使用該密碼。建議您將這組號碼寫下來或複製到某處,以供日後使用。
預期的控制台輸出內容:
student@cloudshell:~ (test-project-402417)$ echo $PGPASSWORD
bbefbfde7601985b0dee5723
建立免費試用叢集
如果您先前未使用過 AlloyDB,可以建立免費試用叢集:
定義區域和 AlloyDB 叢集名稱。我們將使用 us-central1 區域,並以 alloydb-aip-01 做為叢集名稱:
export REGION=us-central1
export ADBCLUSTER=alloydb-aip-01
執行指令來建立叢集:
gcloud alloydb clusters create $ADBCLUSTER \
    --password=$PGPASSWORD \
    --network=default \
    --region=$REGION \
    --subscription-type=TRIAL
預期的控制台輸出內容:
export REGION=us-central1
export ADBCLUSTER=alloydb-aip-01
gcloud alloydb clusters create $ADBCLUSTER \
    --password=$PGPASSWORD \
    --network=default \
    --region=$REGION \
    --subscription-type=TRIAL
Operation ID: operation-1697655441138-6080235852277-9e7f04f5-2012fce4
Creating cluster...done.
在同一個 Cloud Shell 工作階段中,為叢集建立 AlloyDB 主要執行個體。如果連線中斷,您需要再次定義區域和叢集名稱環境變數。
gcloud alloydb instances create $ADBCLUSTER-pr \
    --instance-type=PRIMARY \
    --cpu-count=8 \
    --region=$REGION \
    --cluster=$ADBCLUSTER
預期的控制台輸出內容:
student@cloudshell:~ (test-project-402417)$ gcloud alloydb instances create $ADBCLUSTER-pr \
    --instance-type=PRIMARY \
    --cpu-count=8 \
    --region=$REGION \
    --availability-type ZONAL \
    --cluster=$ADBCLUSTER
Operation ID: operation-1697659203545-6080315c6e8ee-391805db-25852721
Creating instance...done.
建立 AlloyDB Standard 叢集
如果這不是專案中的第一個 AlloyDB 叢集,請繼續建立標準叢集。
定義區域和 AlloyDB 叢集名稱。我們將使用 us-central1 區域,並以 alloydb-aip-01 做為叢集名稱:
export REGION=us-central1
export ADBCLUSTER=alloydb-aip-01
執行指令來建立叢集:
gcloud alloydb clusters create $ADBCLUSTER \
    --password=$PGPASSWORD \
    --network=default \
    --region=$REGION
預期的控制台輸出內容:
export REGION=us-central1
export ADBCLUSTER=alloydb-aip-01
gcloud alloydb clusters create $ADBCLUSTER \
    --password=$PGPASSWORD \
    --network=default \
    --region=$REGION
Operation ID: operation-1697655441138-6080235852277-9e7f04f5-2012fce4
Creating cluster...done.
在同一個 Cloud Shell 工作階段中,為叢集建立 AlloyDB 主要執行個體。如果連線中斷,您需要再次定義區域和叢集名稱環境變數。
gcloud alloydb instances create $ADBCLUSTER-pr \
    --instance-type=PRIMARY \
    --cpu-count=2 \
    --region=$REGION \
    --cluster=$ADBCLUSTER
預期的控制台輸出內容:
student@cloudshell:~ (test-project-402417)$ gcloud alloydb instances create $ADBCLUSTER-pr \
    --instance-type=PRIMARY \
    --cpu-count=2 \
    --region=$REGION \
    --availability-type ZONAL \
    --cluster=$ADBCLUSTER
Operation ID: operation-1697659203545-6080315c6e8ee-391805db-25852721
Creating instance...done.
授予 AlloyDB 必要權限
將 Vertex AI 權限新增至 AlloyDB 服務代理。
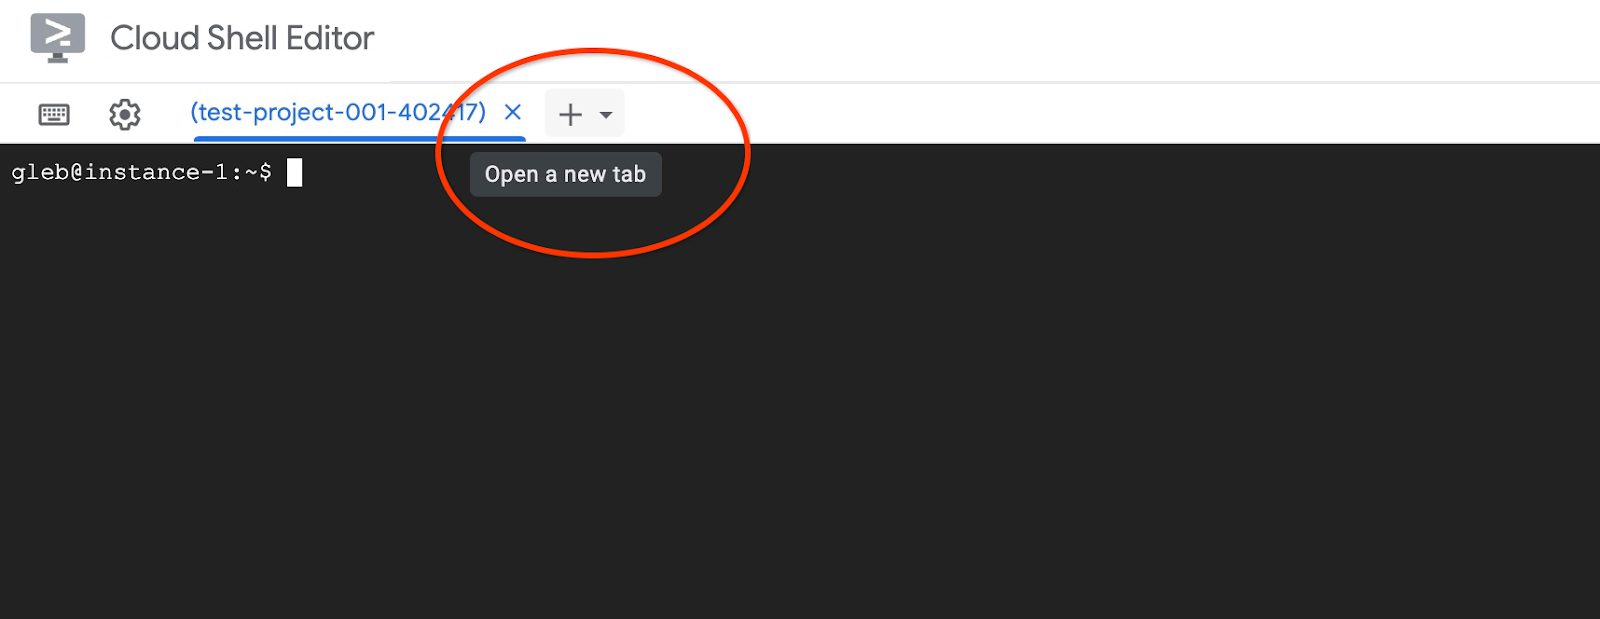
使用頂端的「+」符號開啟另一個 Cloud Shell 分頁。
在新開啟的 Cloud Shell 分頁中執行下列指令:
PROJECT_ID=$(gcloud config get-value project)
gcloud projects add-iam-policy-binding $PROJECT_ID \
  --member="serviceAccount:service-$(gcloud projects describe $PROJECT_ID --format="value(projectNumber)")@gcp-sa-alloydb.iam.gserviceaccount.com" \
  --role="roles/aiplatform.user"
預期的控制台輸出內容:
student@cloudshell:~ (test-project-001-402417)$ PROJECT_ID=$(gcloud config get-value project)
Your active configuration is: [cloudshell-11039]
student@cloudshell:~ (test-project-001-402417)$ gcloud projects add-iam-policy-binding $PROJECT_ID \
  --member="serviceAccount:service-$(gcloud projects describe $PROJECT_ID --format="value(projectNumber)")@gcp-sa-alloydb.iam.gserviceaccount.com" \
  --role="roles/aiplatform.user"
Updated IAM policy for project [test-project-001-402417].
bindings:
- members:
  - serviceAccount:service-4470404856@gcp-sa-alloydb.iam.gserviceaccount.com
  role: roles/aiplatform.user
- members:
...
etag: BwYIEbe_Z3U=
version: 1
在分頁中執行「exit」指令,關閉分頁:
exit
5. 準備 GCE 虛擬機器
我們將使用 Google Compute Engine (GCE) VM 做為平台,處理資料庫並部署範例應用程式的不同部分。使用 VM 可讓我們更彈性地安裝元件,並直接存取私人的 AlloyDB IP,以進行資料準備步驟。
建立服務帳戶
由於我們會使用 VM 部署 MCP Toolbox 做為服務,並部署或代管範例應用程式,因此第一步是建立 Google 服務帳戶 (GSA)。GCE VM 會使用 GSA,因此我們必須授予 GSA 必要權限,才能與其他服務搭配運作。
在 Cloud Shell 中執行下列指令:
PROJECT_ID=$(gcloud config get-value project)
gcloud iam service-accounts create compute-aip --project $PROJECT_ID

gcloud projects add-iam-policy-binding $PROJECT_ID \
  --member="serviceAccount:compute-aip@$PROJECT_ID.iam.gserviceaccount.com" \
  --role="roles/cloudbuild.builds.editor"

gcloud projects add-iam-policy-binding $PROJECT_ID \
  --member="serviceAccount:compute-aip@$PROJECT_ID.iam.gserviceaccount.com" \
  --role="roles/artifactregistry.admin"

gcloud projects add-iam-policy-binding $PROJECT_ID \
  --member="serviceAccount:compute-aip@$PROJECT_ID.iam.gserviceaccount.com" \
  --role="roles/storage.admin"

gcloud projects add-iam-policy-binding $PROJECT_ID \
  --member="serviceAccount:compute-aip@$PROJECT_ID.iam.gserviceaccount.com" \
  --role="roles/run.admin"

gcloud projects add-iam-policy-binding $PROJECT_ID \
  --member="serviceAccount:compute-aip@$PROJECT_ID.iam.gserviceaccount.com" \
  --role="roles/iam.serviceAccountUser"

gcloud projects add-iam-policy-binding $PROJECT_ID \
  --member="serviceAccount:compute-aip@$PROJECT_ID.iam.gserviceaccount.com" \
  --role="roles/alloydb.viewer"

gcloud projects add-iam-policy-binding $PROJECT_ID \
  --member="serviceAccount:compute-aip@$PROJECT_ID.iam.gserviceaccount.com" \
  --role="roles/alloydb.client"

gcloud projects add-iam-policy-binding $PROJECT_ID \
  --member="serviceAccount:compute-aip@$PROJECT_ID.iam.gserviceaccount.com" \
  --role="roles/aiplatform.user"

gcloud projects add-iam-policy-binding $PROJECT_ID \
  --member="serviceAccount:compute-aip@$PROJECT_ID.iam.gserviceaccount.com" \
  --role="roles/serviceusage.serviceUsageConsumer"

gcloud projects add-iam-policy-binding $PROJECT_ID \
    --member serviceAccount:compute-aip@$PROJECT_ID.iam.gserviceaccount.com \
    --role roles/secretmanager.admin
部署 GCE VM
在與 AlloyDB 叢集相同的區域和 VPC 中建立 GCE VM。
在 Cloud Shell 中執行下列指令:
ZONE=us-central1-a
PROJECT_ID=$(gcloud config get-value project)
gcloud compute instances create instance-1 \
    --zone=$ZONE \
    --create-disk=auto-delete=yes,boot=yes,image=projects/debian-cloud/global/images/$(gcloud compute images list --filter="family=debian-12 AND family!=debian-12-arm64" --format="value(name)") \
    --scopes=https://www.googleapis.com/auth/cloud-platform \
    --service-account=compute-aip@$PROJECT_ID.iam.gserviceaccount.com
預期的控制台輸出內容:
student@cloudshell:~ (test-project-402417)$ ZONE=us-central1-a
PROJECT_ID=$(gcloud config get-value project)
gcloud compute instances create instance-1 \
    --zone=$ZONE \
    --create-disk=auto-delete=yes,boot=yes,image=projects/debian-cloud/global/images/$(gcloud compute images list --filter="family=debian-12 AND family!=debian-12-arm64" --format="value(name)") \
    --scopes=https://www.googleapis.com/auth/cloud-platform \
    --service-account=compute-aip@$PROJECT_ID.iam.gserviceaccount.com
Your active configuration is: [cloudshell-10282]
Created [https://www.googleapis.com/compute/v1/projects/gleb-test-short-002-470613/zones/us-central1-a/instances/instance-1].
NAME: instance-1
ZONE: us-central1-a
MACHINE_TYPE: n1-standard-1
PREEMPTIBLE:
INTERNAL_IP: 10.128.0.2
EXTERNAL_IP: 34.28.55.32
STATUS: RUNNING
安裝 Postgres 用戶端
在已部署的 VM 上安裝 PostgreSQL 用戶端軟體
連線至 VM:
gcloud compute ssh instance-1 --zone=us-central1-a
預期的控制台輸出內容:
student@cloudshell:~ (test-project-402417)$ gcloud compute ssh instance-1 --zone=us-central1-a
Updating project ssh metadata...working..Updated [https://www.googleapis.com/compute/v1/projects/test-project-402417].
Updating project ssh metadata...done.
Waiting for SSH key to propagate.
Warning: Permanently added 'compute.5110295539541121102' (ECDSA) to the list of known hosts.
Linux instance-1 5.10.0-26-cloud-amd64 #1 SMP Debian 5.10.197-1 (2023-09-29) x86_64

The programs included with the Debian GNU/Linux system are free software;
the exact distribution terms for each program are described in the
individual files in /usr/share/doc/*/copyright.

Debian GNU/Linux comes with ABSOLUTELY NO WARRANTY, to the extent
permitted by applicable law.
student@instance-1:~$
在 VM 內執行下列指令,安裝軟體:
sudo apt-get update
sudo apt-get install --yes postgresql-client
預期的控制台輸出內容:
student@instance-1:~$ sudo apt-get update
sudo apt-get install --yes postgresql-client
Get:1 file:/etc/apt/mirrors/debian.list Mirrorlist [30 B]
Get:4 file:/etc/apt/mirrors/debian-security.list Mirrorlist [39 B]
Hit:7 https://packages.cloud.google.com/apt google-compute-engine-bookworm-stable InRelease
Get:8 https://packages.cloud.google.com/apt cloud-sdk-bookworm InRelease [1652 B]
Get:2 https://deb.debian.org/debian bookworm InRelease [151 kB]
Get:3 https://deb.debian.org/debian bookworm-updates InRelease [55.4 kB]
...redacted...
update-alternatives: using /usr/share/postgresql/15/man/man1/psql.1.gz to provide /usr/share/man/man1/psql.1.gz (psql.1.gz) in auto mode
Setting up postgresql-client (15+248) ...
Processing triggers for man-db (2.11.2-2) ...
Processing triggers for libc-bin (2.36-9+deb12u7) ...
連線至 AlloyDB 執行個體
使用 psql 從 VM 連線至主要執行個體。
繼續使用已開啟的 VM SSH 工作階段。如果連線中斷,請使用上述相同指令重新連線。
使用先前記下的 $PGASSWORD 和叢集名稱,從 GCE VM 連線至 AlloyDB:
export PGPASSWORD=<Noted password>
PROJECT_ID=$(gcloud config get-value project)
REGION=us-central1
ADBCLUSTER=alloydb-aip-01
INSTANCE_IP=$(gcloud alloydb instances describe $ADBCLUSTER-pr --cluster=$ADBCLUSTER --region=$REGION --format="value(ipAddress)")
psql "host=$INSTANCE_IP user=postgres sslmode=require"
預期的控制台輸出內容:
student@instance-1:~$ PROJECT_ID=$(gcloud config get-value project)
REGION=us-central1
ADBCLUSTER=alloydb-aip-01
INSTANCE_IP=$(gcloud alloydb instances describe $ADBCLUSTER-pr --cluster=$ADBCLUSTER --region=$REGION --format="value(ipAddress)")
psql "host=$INSTANCE_IP user=postgres sslmode=require"
psql (15.13 (Debian 15.13-0+deb12u1), server 16.8)
WARNING: psql major version 15, server major version 16.
         Some psql features might not work.
SSL connection (protocol: TLSv1.3, cipher: TLS_AES_256_GCM_SHA384, compression: off)
Type "help" for help.

postgres=>
退出 psql 工作階段,但保持 SSH 連線:
exit
預期的控制台輸出內容:
postgres=> exit
student@instance-1:~$
6. 初始化資料庫
我們將使用用戶端 VM 做為平台,在資料庫中填入資料並代管應用程式。第一步是建立資料庫並填入資料。
建立資料庫
建立名為「assistantdemo」的資料庫。
在 GCE VM 工作階段中執行下列指令:
psql "host=$INSTANCE_IP user=postgres" -c "CREATE DATABASE assistantdemo"
預期的控制台輸出內容:
student@instance-1:~$ psql "host=$INSTANCE_IP user=postgres" -c "CREATE DATABASE assistantdemo"
CREATE DATABASE
student@instance-1:~$
準備 Python 環境
接下來,我們將使用 GitHub 存放區中準備好的 Python 指令碼,但在此之前,我們需要安裝必要的軟體。
在 GCE VM 中執行:
sudo apt install -y python3.11-venv git
python3 -m venv .venv
source .venv/bin/activate
pip install --upgrade pip
預期的控制台輸出內容:
student@instance-1:~$ sudo apt install -y python3.11-venv git
python3 -m venv .venv
source .venv/bin/activate
pip install --upgrade pip
Reading package lists... Done
Building dependency tree... Done
Reading state information... Done
The following additional packages will be installed:
  git-man liberror-perl patch python3-distutils python3-lib2to3 python3-pip-whl python3-setuptools-whl
Suggested packages:
  git-daemon-run | git-daemon-sysvinit git-doc git-email git-gui gitk gitweb git-cvs git-mediawiki git-svn ed diffutils-doc
The following NEW packages will be installed:
  git git-man liberror-perl patch python3-distutils python3-lib2to3 python3-pip-whl python3-setuptools-whl python3.11-venv
0 upgraded, 9 newly installed, 0 to remove and 2 not upgraded.
Need to get 12.4 MB of archives.
After this operation, 52.2 MB of additional disk space will be used.
Get:1 file:/etc/apt/mirrors/debian.list Mirrorlist [30 B]
...redacted...
Installing collected packages: pip
  Attempting uninstall: pip
    Found existing installation: pip 23.0.1
    Uninstalling pip-23.0.1:
      Successfully uninstalled pip-23.0.1
Successfully installed pip-24.0
(.venv) student@instance-1:~$
確認 Python 版本。
在 GCE VM 中執行:
python -V
預期的控制台輸出內容:
(.venv) student@instance-1:~$ python -V
Python 3.11.2
(.venv) student@instance-1:~$
在本機安裝 MCP Toolbox
MCP Toolbox for Databases (下文簡稱 MCP 工具箱或工具箱) 是可與不同資料來源搭配使用的開放原始碼 MCP 伺服器。這項服務可為不同資料來源提供抽象層級,並新增驗證和連線集區等功能,協助您更快開發工具。如要瞭解所有功能,請參閱官方頁面。
我們將使用 MCP Toolbox 啟動範例資料集,稍後也會將其做為 MCP 伺服器,在檢索增強生成 (RAG) 流程中處理應用程式的資料來源要求。
我們在本機安裝 MCP Toolbox,以填入 assistantdemo 資料庫。
在 GCE VM 中執行:
export VERSION=1.0.0
curl -O https://storage.googleapis.com/mcp-toolbox-for-databases/v$VERSION/linux/amd64/toolbox
chmod +x toolbox
預期的控制台輸出內容:
(.venv) student@instance-1:~$ export VERSION=1.0.0
curl -O https://storage.googleapis.com/mcp-toolbox-for-databases/v$VERSION/linux/amd64/toolbox
chmod +x toolbox
  % Total    % Received % Xferd  Average Speed   Time    Time     Time  Current
                                 Dload  Upload   Total   Spent    Left  Speed
100  133M  100  133M    0     0   158M      0 --:--:-- --:--:-- --:--:--  158M
執行資料初始化工具箱
在 GCE VM 中執行:
匯出資料庫填入作業的環境變數:
export ALLOYDB_POSTGRES_PROJECT=$(gcloud config get-value project)
export ALLOYDB_POSTGRES_REGION="us-central1"
export ALLOYDB_POSTGRES_CLUSTER="alloydb-aip-01"
export ALLOYDB_POSTGRES_INSTANCE="alloydb-aip-01-pr"
export ALLOYDB_POSTGRES_DATABASE="assistantdemo"
export ALLOYDB_POSTGRES_USER="postgres"
export ALLOYDB_POSTGRES_PASSWORD=$PGPASSWORD
export ALLOYDB_POSTGRES_IP_TYPE="private"
啟動工具箱,開始初始化資料庫。這項程序會在本地啟動,協助您順暢連線至 AlloyDB 上的目的地資料庫,並填入範例資料。
./toolbox --prebuilt alloydb-postgres
預期的控制台輸出內容。輸出內容的最後一行應為「Server ready to serve!」:
student@instance-1:~$ cexport ALLOYDB_POSTGRES_PROJECT=$PROJECT_ID
export ALLOYDB_POSTGRES_REGION="us-central1"
export ALLOYDB_POSTGRES_CLUSTER="alloydb-aip-01"
export ALLOYDB_POSTGRES_INSTANCE="alloydb-aip-01-pr"
export ALLOYDB_POSTGRES_DATABASE="assistantdemo"
export ALLOYDB_POSTGRES_USER="postgres"
export ALLOYDB_POSTGRES_PASSWORD=$PGPASSWORD
export ALLOYDB_POSTGRES_IP_TYPE="private"
student@instance-1:~$ ./toolbox --prebuilt alloydb-postgres
2025-09-02T18:30:58.957655886Z INFO "Using prebuilt tool configuration for alloydb-postgres"
2025-09-02T18:30:59.507306664Z INFO "Initialized 1 sources."
2025-09-02T18:30:59.50748379Z INFO "Initialized 0 authServices."
2025-09-02T18:30:59.507618807Z INFO "Initialized 2 tools."
2025-09-02T18:30:59.507726704Z INFO "Initialized 2 toolsets."
2025-09-02T18:30:59.508258894Z INFO "Server ready to serve!"
資料填入完成前,請勿退出或關閉這個 Cloud Shell 分頁。
填充資料庫
使用頂端的「+」符號開啟另一個 Cloud Shell 分頁。
然後連線至 instance-1 VM:
gcloud compute ssh instance-1 --zone=us-central1-a
預期的控制台輸出內容:
student@cloudshell:~ (test-project-402417)$ gcloud compute ssh instance-1 --zone=us-central1-a
Linux instance-1 6.1.0-37-cloud-amd64 #1 SMP PREEMPT_DYNAMIC Debian 6.1.140-1 (2025-05-22) x86_64

The programs included with the Debian GNU/Linux system are free software;
the exact distribution terms for each program are described in the
individual files in /usr/share/doc/*/copyright.

Debian GNU/Linux comes with ABSOLUTELY NO WARRANTY, to the extent
permitted by applicable law.
Last login: Tue Sep  2 21:44:07 2025 from 35.229.111.9
student@instance-1:~$
複製 GitHub 存放區,其中包含擷取服務和範例應用程式的程式碼。
在 GCE VM 中執行:
git clone https://github.com/GoogleCloudPlatform/cymbal-air-toolbox-demo.git
預期的控制台輸出內容:
student@instance-1:~$ git clone  https://github.com/GoogleCloudPlatform/cymbal-air-toolbox-demo.git
Cloning into 'cymbal-air-toolbox-demo'...
remote: Enumerating objects: 3481, done.
remote: Counting objects: 100% (47/47), done.
remote: Compressing objects: 100% (41/41), done.
remote: Total 3481 (delta 16), reused 7 (delta 5), pack-reused 3434 (from 3)
Receiving objects: 100% (3481/3481), 57.96 MiB | 6.04 MiB/s, done.
Resolving deltas: 100% (2549/2549), done.
student@instance-1:~
如有任何錯誤,請留意。
準備 Python 環境並安裝必要套件:
source .venv/bin/activate
cd cymbal-air-toolbox-demo
pip install -r requirements.txt
將 Python 路徑設為存放區根資料夾,然後執行指令碼,使用範例資料集填入資料庫。第一個指令會將路徑新增至環境中的 Python 模組,第二個指令則會用資料填入資料庫。
export PYTHONPATH=$HOME/cymbal-air-toolbox-demo
python data/run_database_init.py
預期的控制台輸出內容(已遮蓋)。最後應該會看到「database init done」:
student@instance-1:~$ source .venv/bin/activate
(.venv) student@instance-1:~$
(.venv) student@instance-1:~$ cd cymbal-air-toolbox-demo/
(.venv) student@instance-1:~/cymbal-air-toolbox-demo$ pip install -r requirements.txt
python run_database_init.py
Collecting fastapi==0.115.0 (from -r requirements.txt (line 1))
  Downloading fastapi-0.115.0-py3-none-any.whl.metadata (27 kB)
Collecting google-auth==2.40.3 (from -r requirements.txt (line 2))
  Downloading google_auth-2.40.3-py2.py3-none-any.whl.metadata (6.2 kB)
Collecting google-cloud-aiplatform==1.97.0 (from google-cloud-aiplatform[evaluation]==1.97.0->-r requirements.txt (line 3))
  Downloading google_cloud_aiplatform-1.97.0-py2.py3-none-any.whl.metadata (36 kB)
Collecting itsdangerous==2.2.0 (from -r requirements.txt (line 4))
  Downloading itsdangerous-2.2.0-py3-none-any.whl.metadata (1.9 kB)
Collecting jinja2==3.1.5 (from -r requirements.txt (line 5))
  Downloading jinja2-3.1.5-py3-none-any.whl.metadata (2.6 kB)
Collecting langchain-community==0.3.25 (from -r requirements.txt (line 6))
  Downloading langchain_community-0.3.25-py3-none-any.whl.metadata (2.9 kB)
Collecting langchain==0.3.25 (from -r requirements.txt (line 7))
...

(.venv) student@instance-1:~/cymbal-air-toolbox-demo$
(.venv) student@instance-1:~/cymbal-air-toolbox-demo$ export PYTHONPATH=$HOME/cymbal-air-toolbox-demo
python data/run_database_init.py
Airports table initialized
Amenities table initialized
Flights table initialized
Tickets table initialized
Policies table initialized
database init done.
(.venv) student@instance-1:~/cymbal-air-toolbox-demo$
現在可以關閉這個分頁了。
在 VM 工作階段中執行下列指令:
exit
在 Cloud Shell 工作階段中,按下 Ctrl+D 鍵或執行下列指令:
exit
在執行 MCP Toolbox 的第一個分頁中,按下 Ctrl+C 鍵,即可結束執行中的 Toolbox 工作階段。
資料庫已填入應用程式的範例資料。
您可以連線至資料庫,並檢查 airports 資料表中的列數,藉此進行驗證。您可以使用先前使用的 psql 公用程式,或 AlloyDB Studio。以下說明如何使用 psql 檢查
在 instance-1 VM 的 SSH 工作階段中執行下列指令:
export PGPASSWORD=<Noted AlloyDB password>
REGION=us-central1
ADBCLUSTER=alloydb-aip-01
INSTANCE_IP=$(gcloud alloydb instances describe $ADBCLUSTER-pr --cluster=$ADBCLUSTER --region=$REGION --format="value(ipAddress)")
psql "host=$INSTANCE_IP user=postgres dbname=assistantdemo" -c "SELECT COUNT(*) FROM airports"
預期的控制台輸出內容:
student@instance-1:~$ REGION=us-central1
ADBCLUSTER=alloydb-aip-01
INSTANCE_IP=$(gcloud alloydb instances describe $ADBCLUSTER-pr --cluster=$ADBCLUSTER --region=$REGION --format="value(ipAddress)")
psql "host=$INSTANCE_IP user=postgres dbname=assistantdemo" -c "SELECT COUNT(*) FROM airports"
 count
-------
  7698
(1 row)
資料庫已準備就緒,接下來可以部署 MCP Toolbox。
7. 將 MCP Toolbox 部署至 Cloud Run
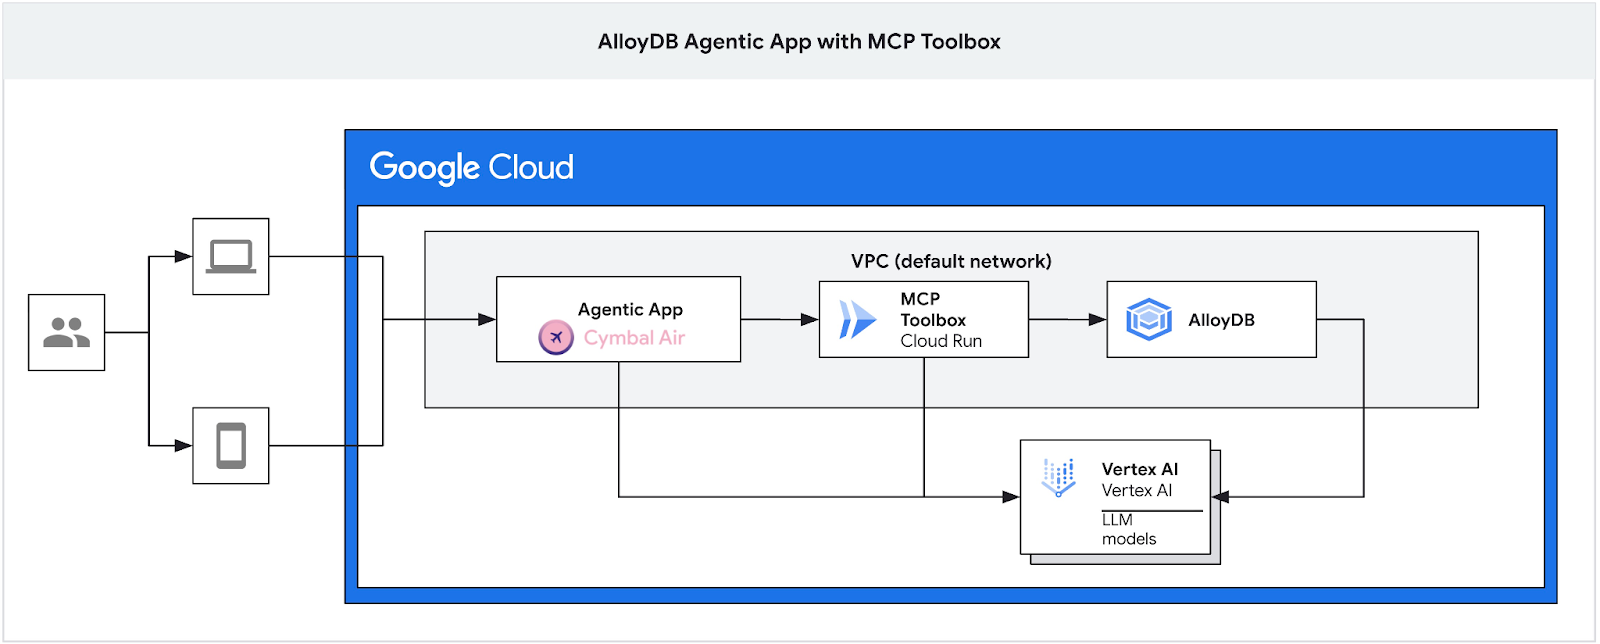
現在我們可以將 MCP Toolbox 部署至 Cloud Run。MCP 工具箱的部署方式有很多種,最簡單的方法是從指令列執行,但如果想將其做為可擴充且可靠的服務,Cloud Run 會是更好的解決方案。
準備用戶端 ID
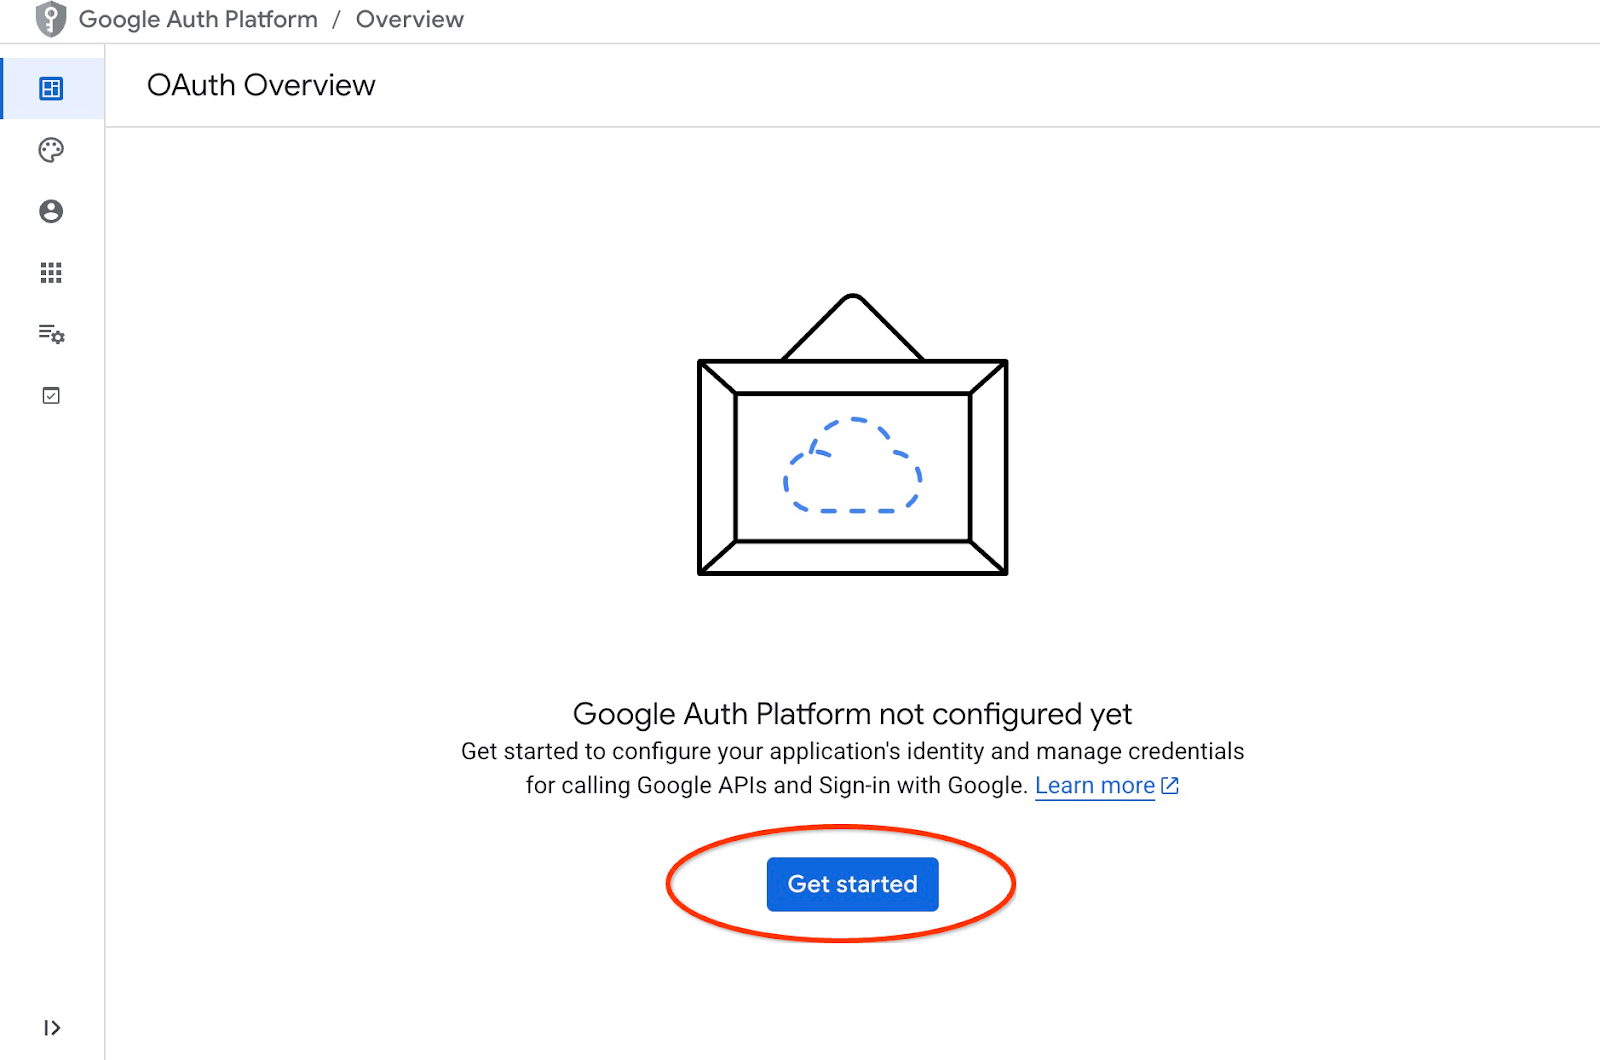
如要使用應用程式的預訂功能,我們需要使用 Cloud 控制台準備 OAuth 2.0 用戶端 ID。如果沒有這項權限,我們就無法使用 Google 憑證登入應用程式來預訂行程,也無法將預訂記錄儲存到資料庫。
在 Cloud 控制台中,前往「API 和服務」,然後按一下「OAuth 同意畫面」。這是該頁面的連結。系統會開啟 OAuth 總覽頁面,請點選「開始使用」。
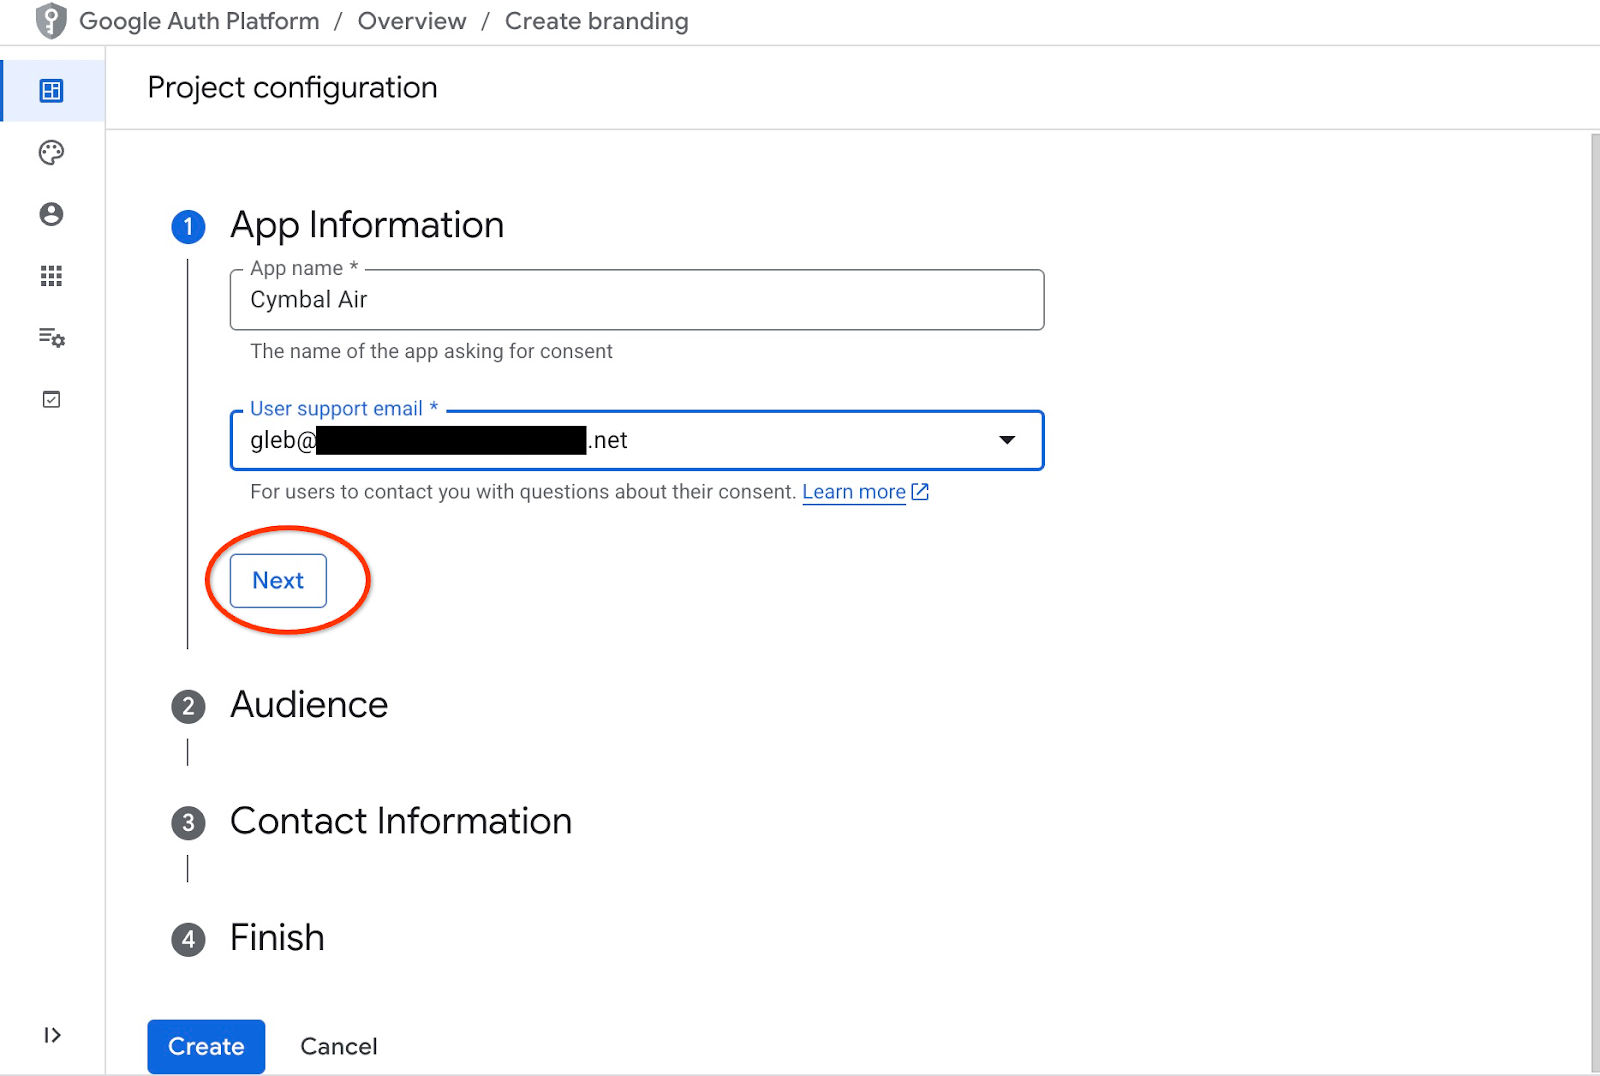
在下一個頁面中,我們會提供應用程式名稱、使用者支援電子郵件,然後按一下「下一步」。
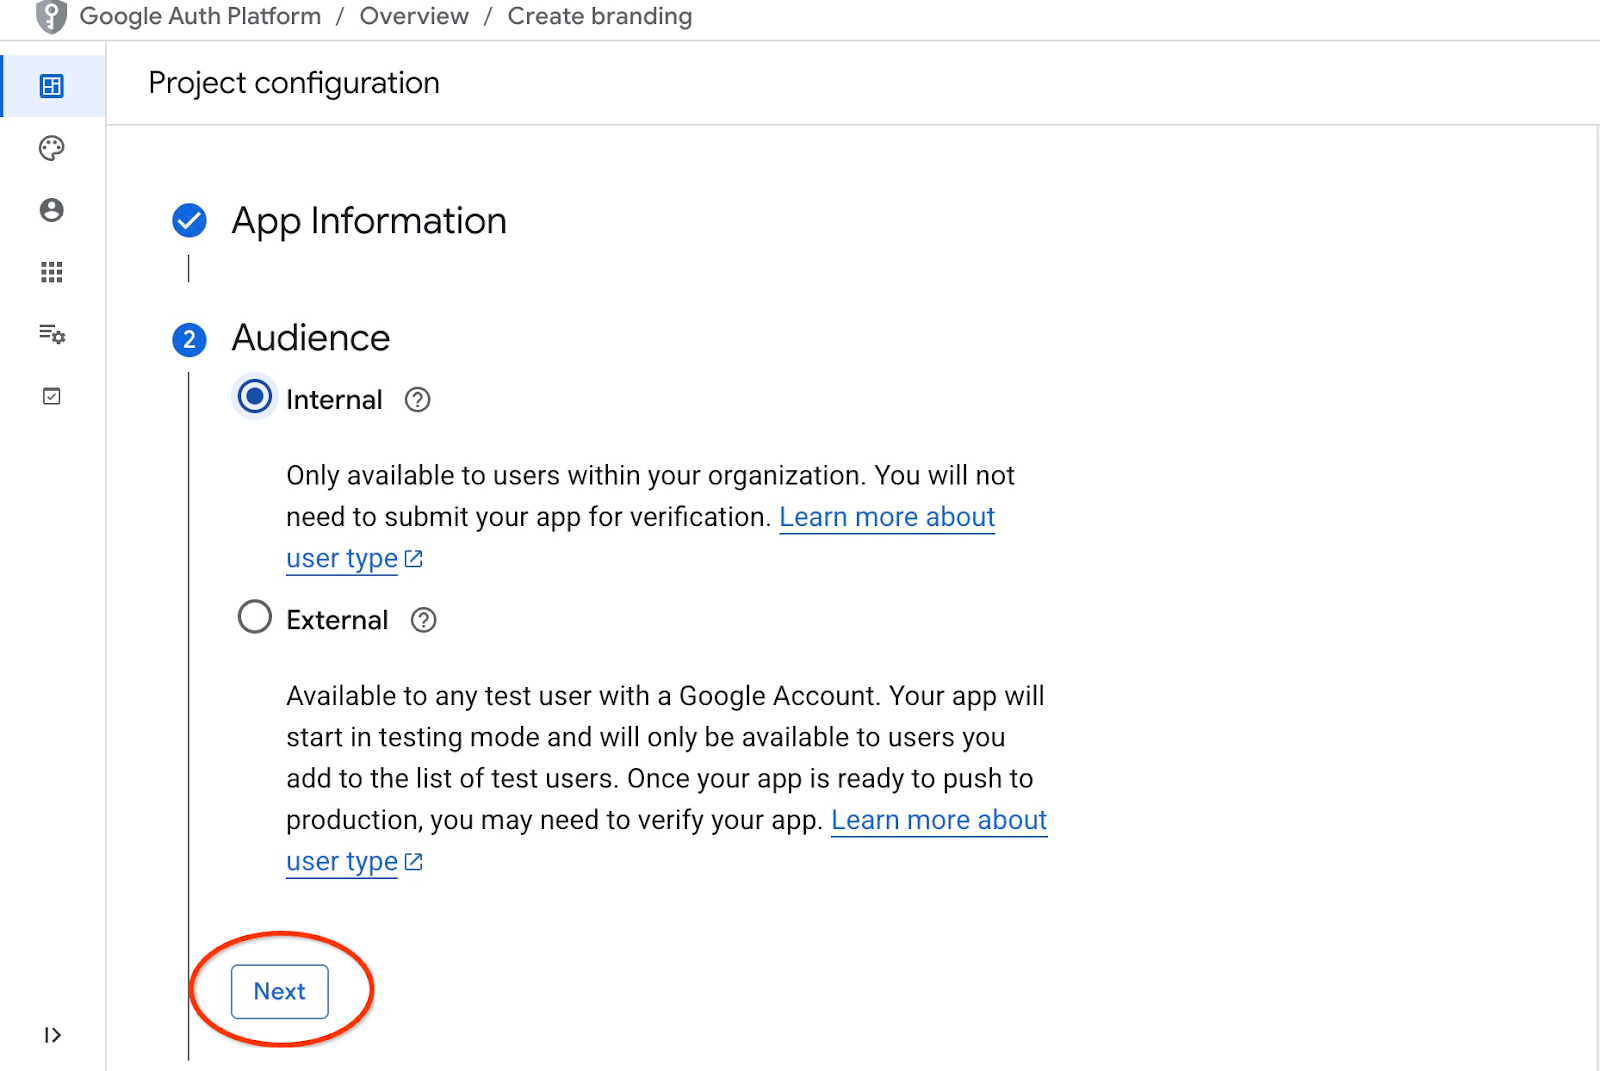
在下一個畫面中,我們為應用程式選擇「內部」,然後再次點選「下一步」。
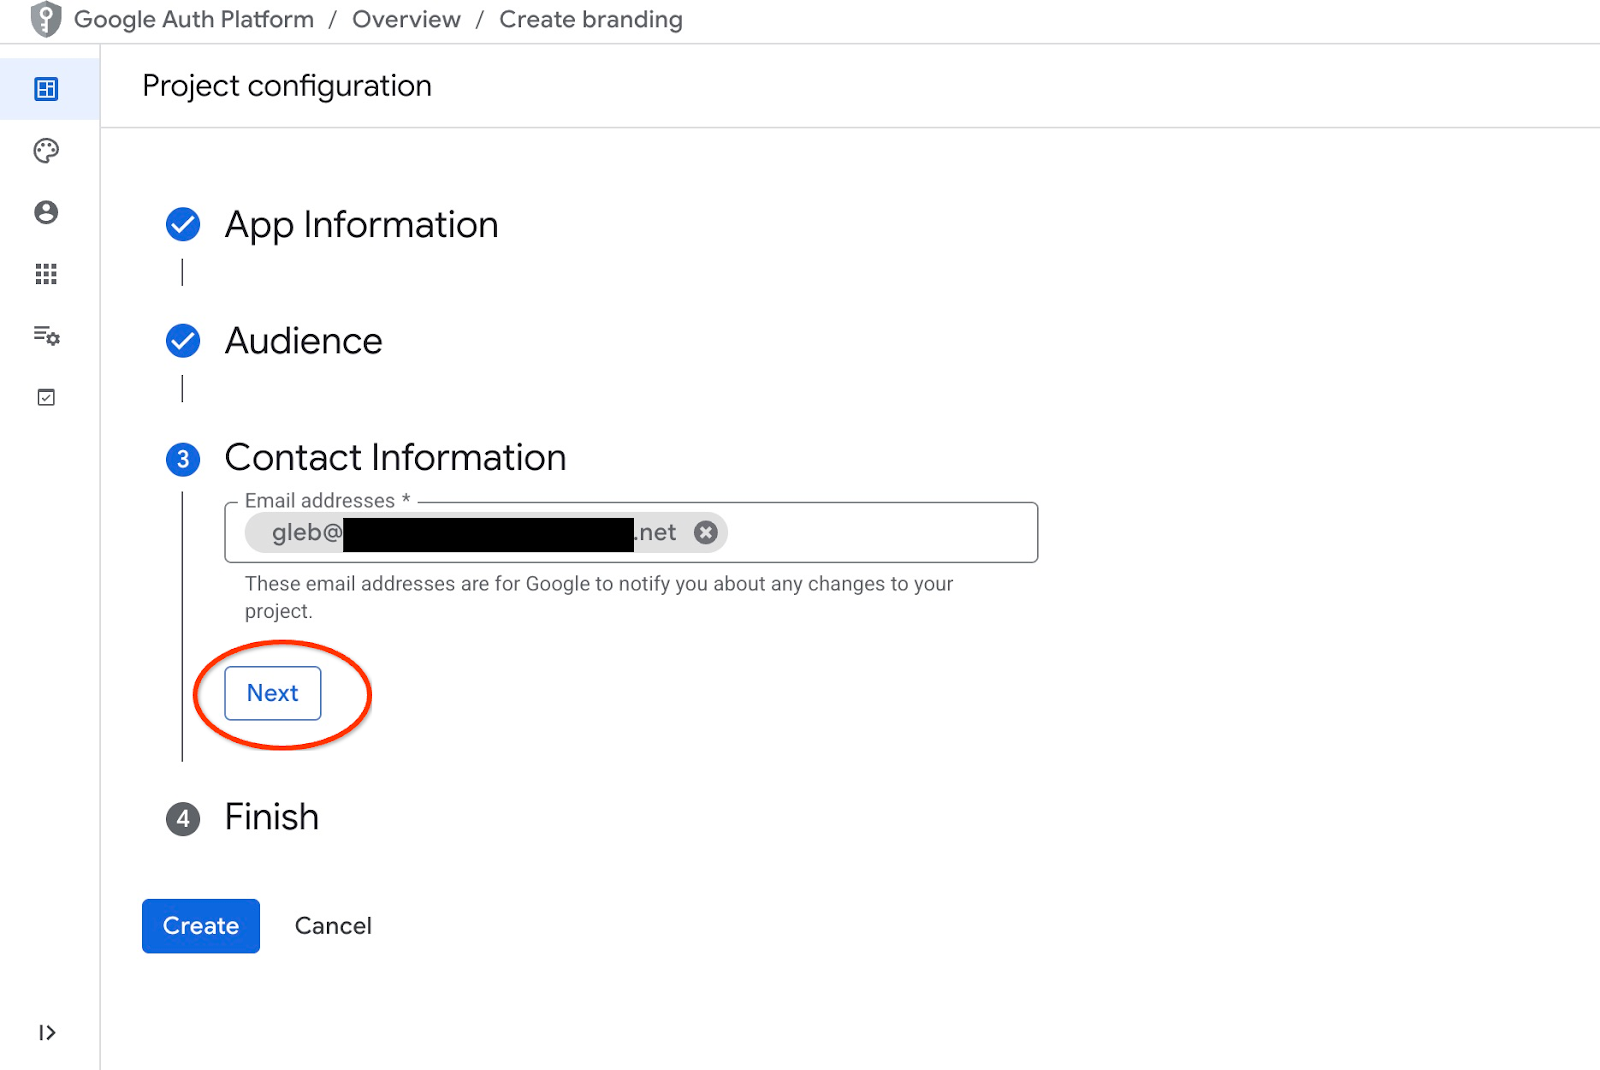
然後再次提供聯絡電子郵件地址,並按一下「下一步」
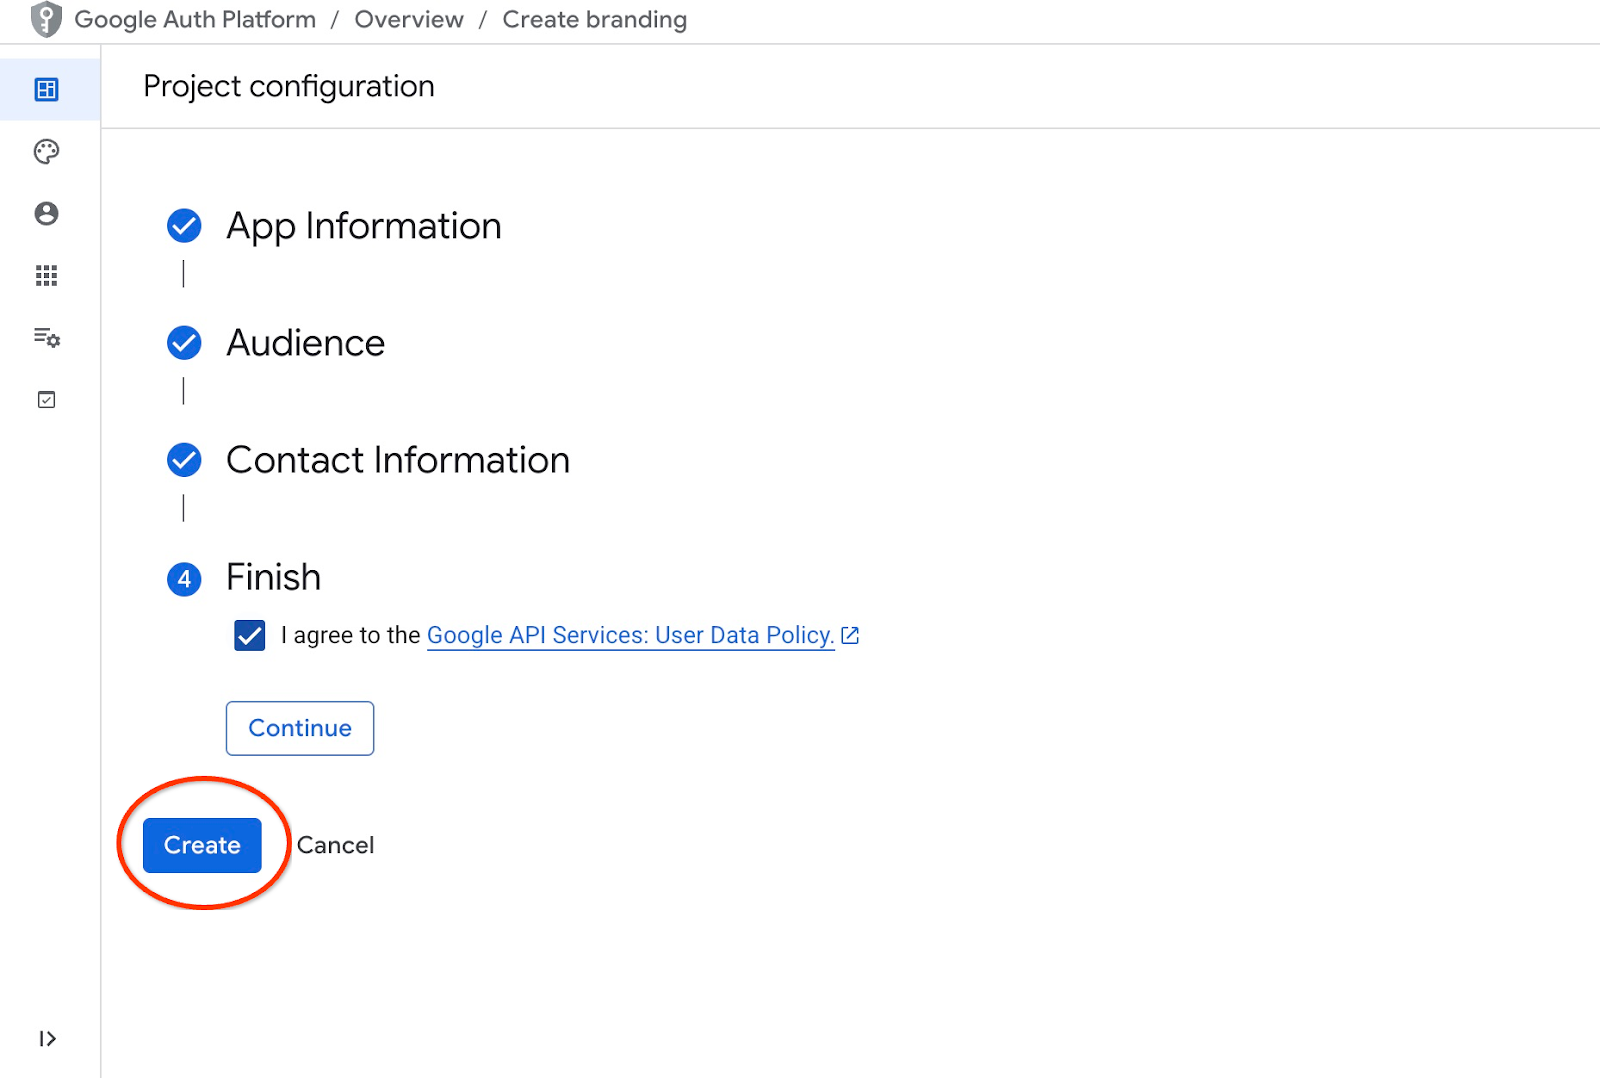
接著,我們同意 Google API 服務政策,然後按下「建立」按鈕。
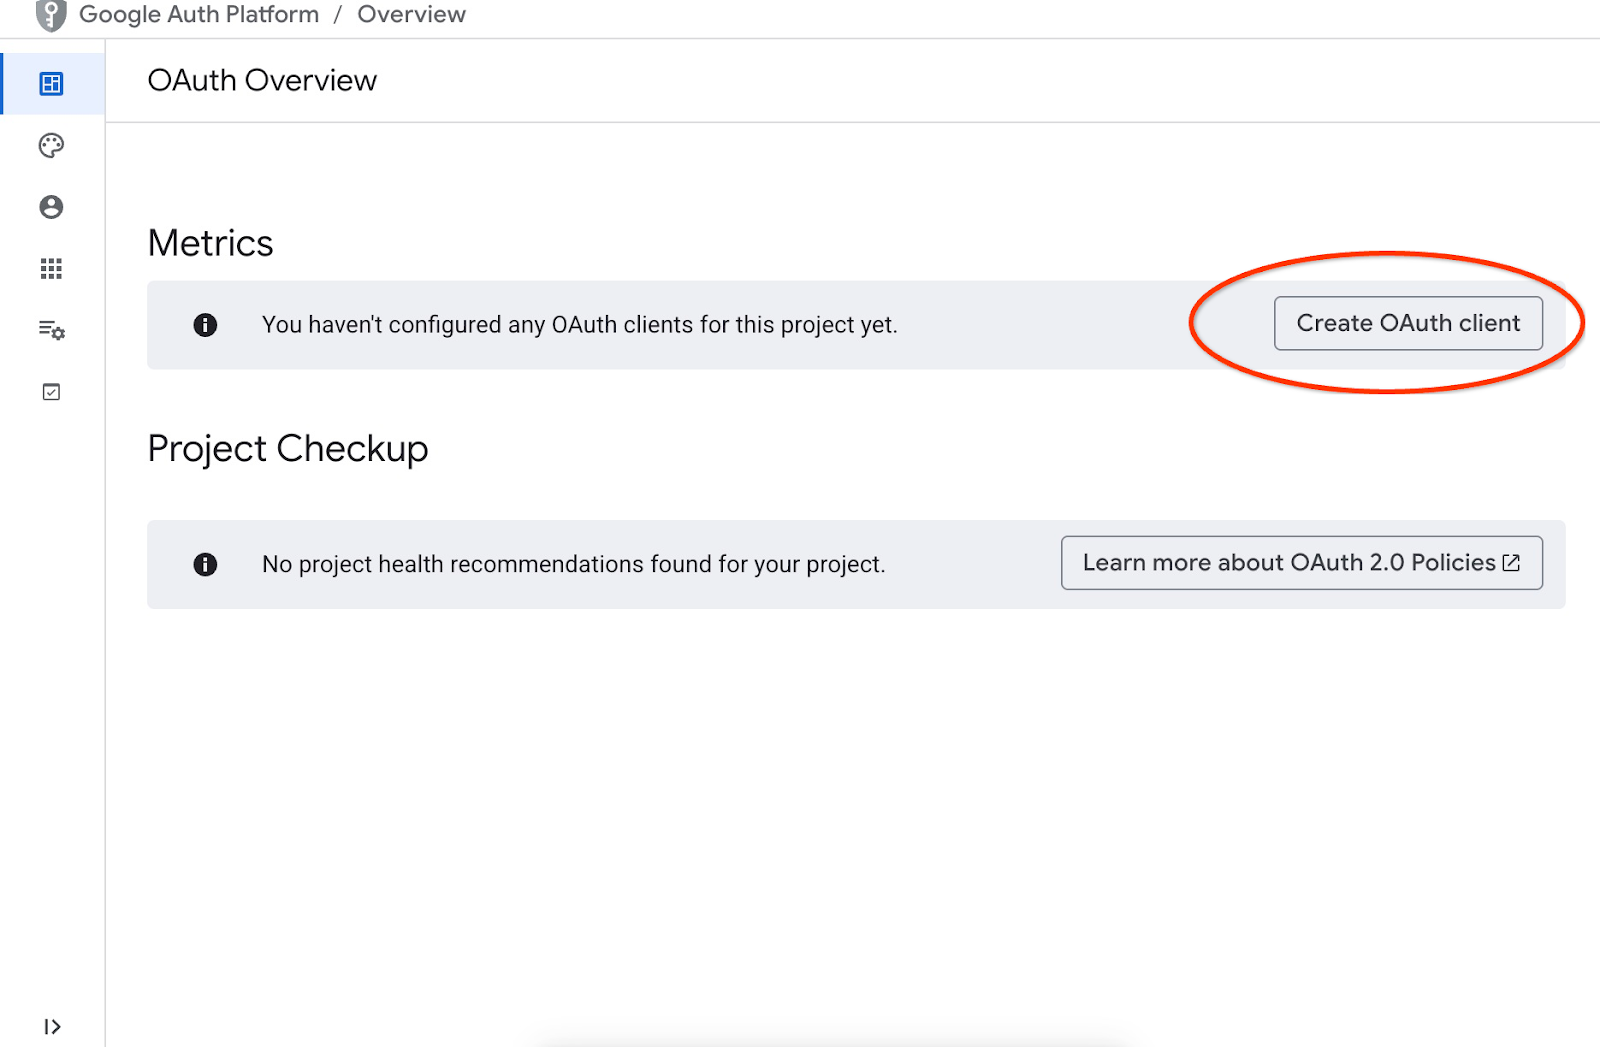
這會將我們帶往可建立 OAuth 用戶端的頁面。
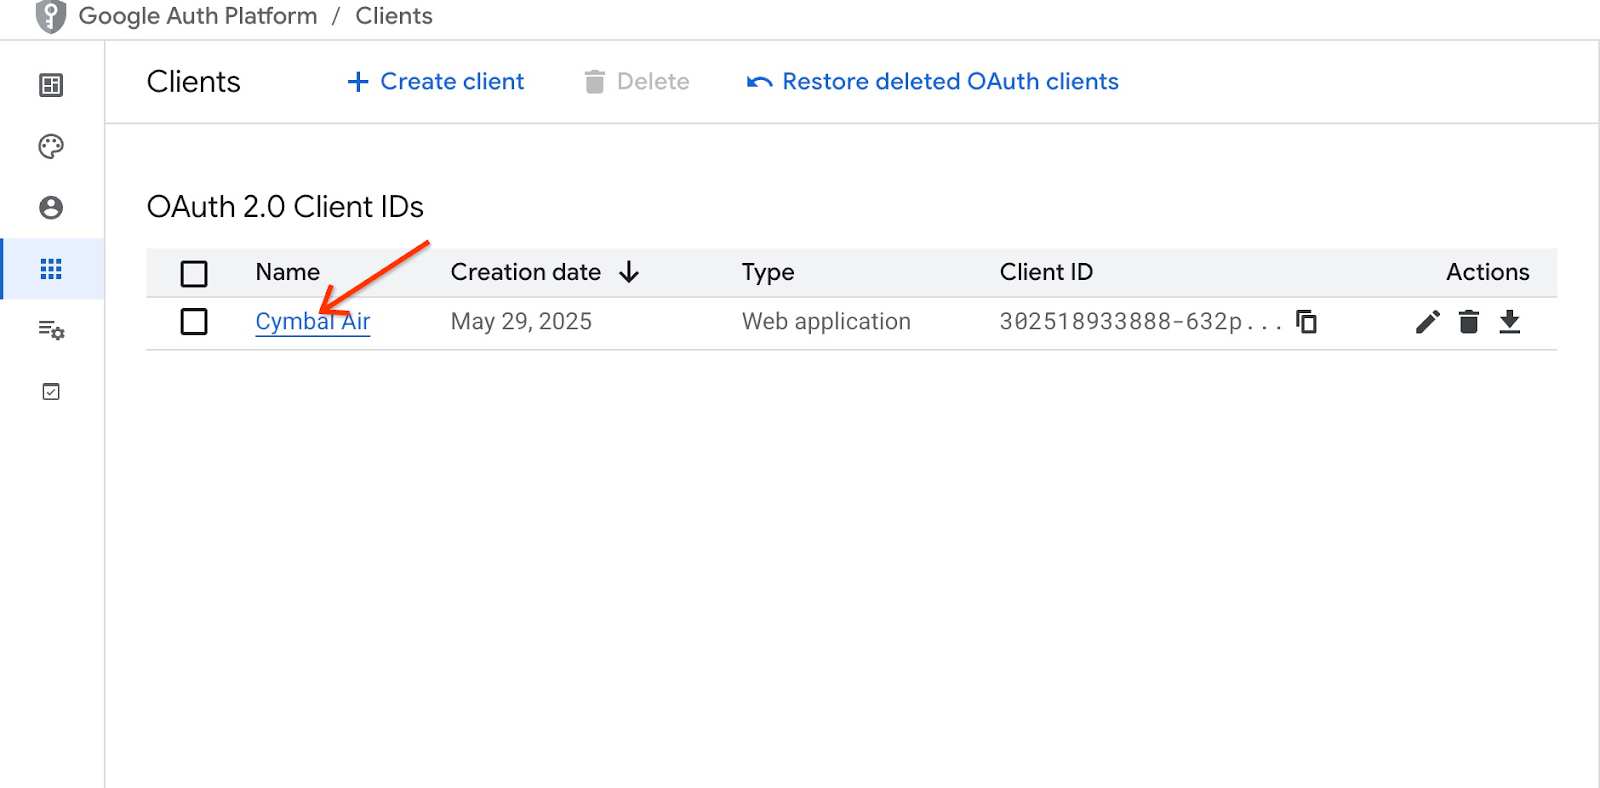
在畫面上,從下拉式選單中選擇「網頁應用程式」,將「Cymbal Air」設為應用程式,然後按下「新增 URI」按鈕。
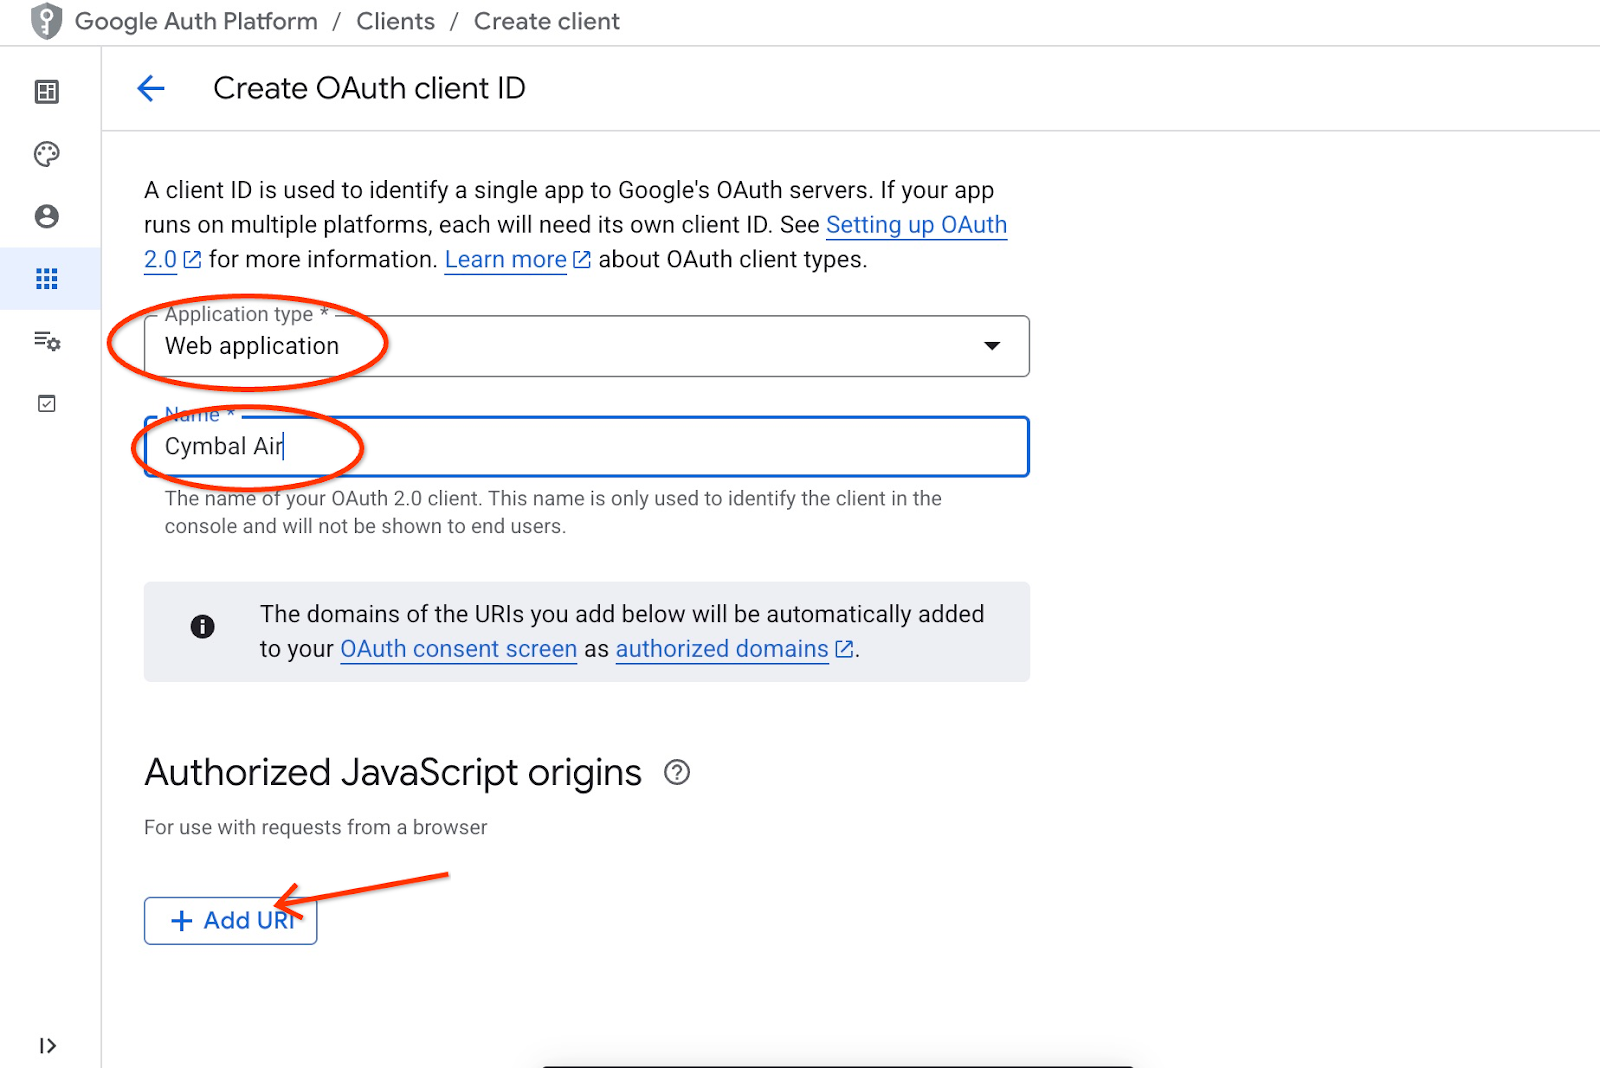
URI 代表應用程式的信任來源,取決於您嘗試從何處連線至應用程式。我們將「http://localhost:8081」設為已授權的 URI,並將「http://localhost:8081/login/google」設為重新導向 URI。如果您在瀏覽器中輸入「http://localhost:8081」做為連線的 URI,這些值就會正常運作。舉例來說,從電腦透過 SSH 通道連線時,稍後會說明如何操作。
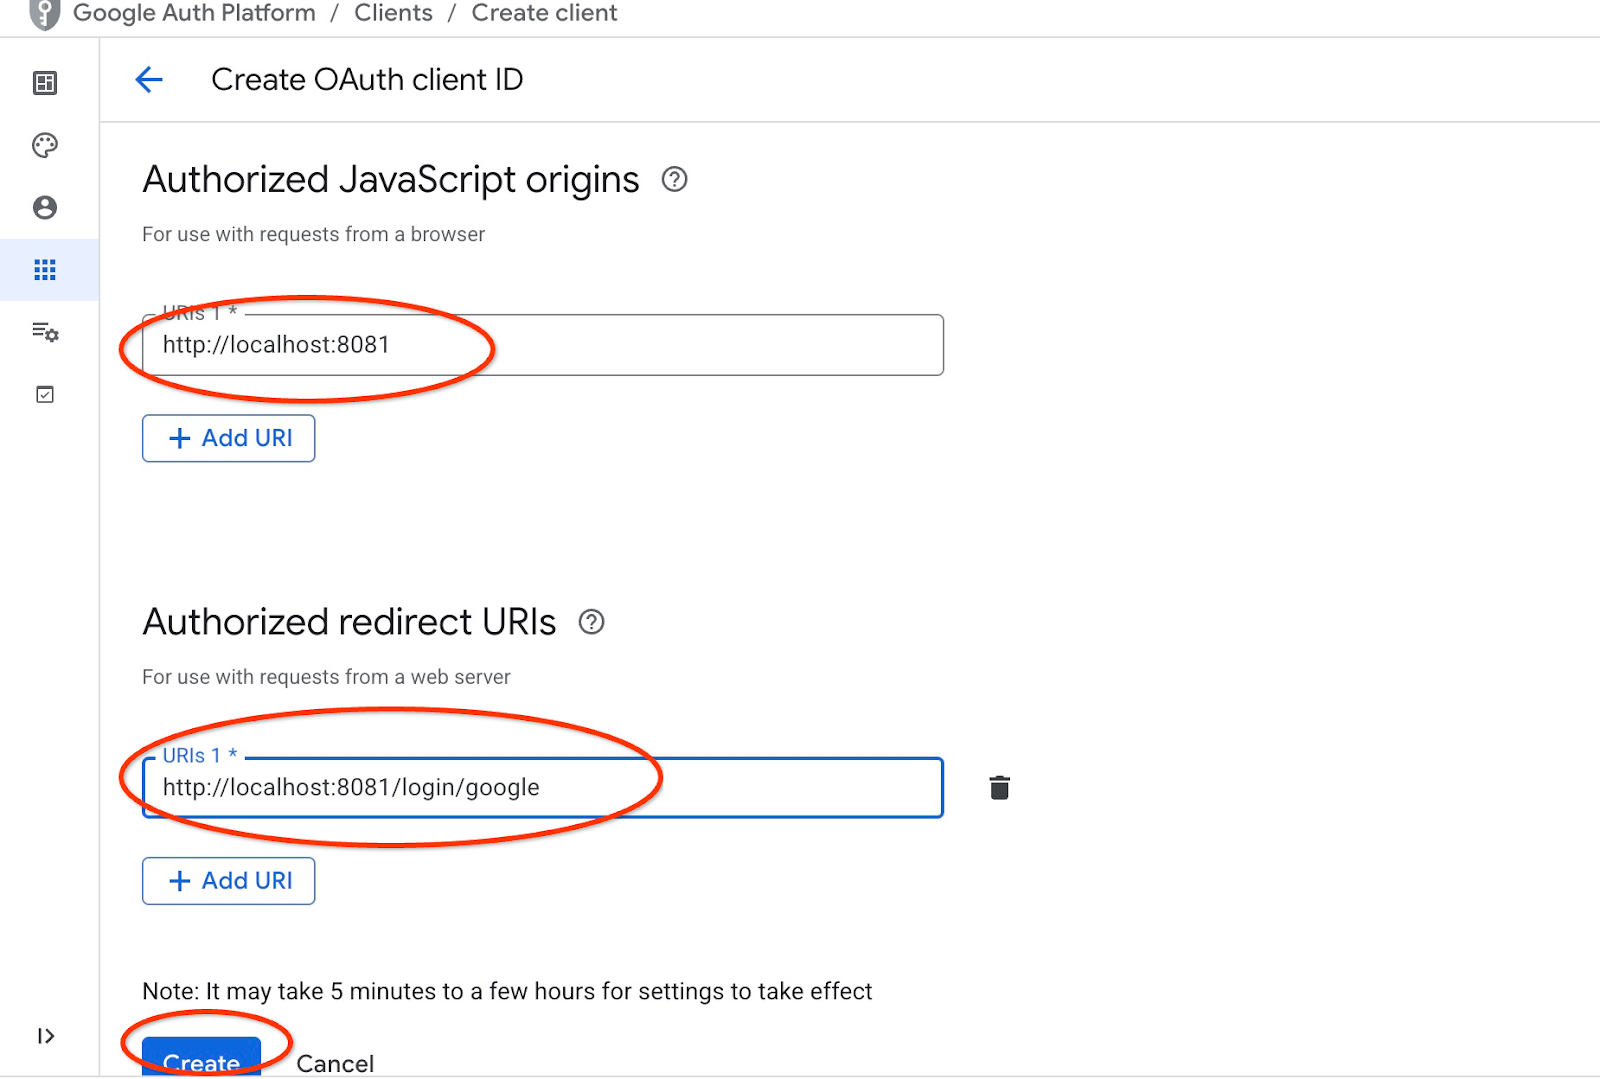
按下「建立」按鈕後,系統會顯示彈出式視窗,內含用戶端憑證。系統會記錄這些憑證。您隨時可以複製用戶端 ID,以便在啟動應用程式時使用。
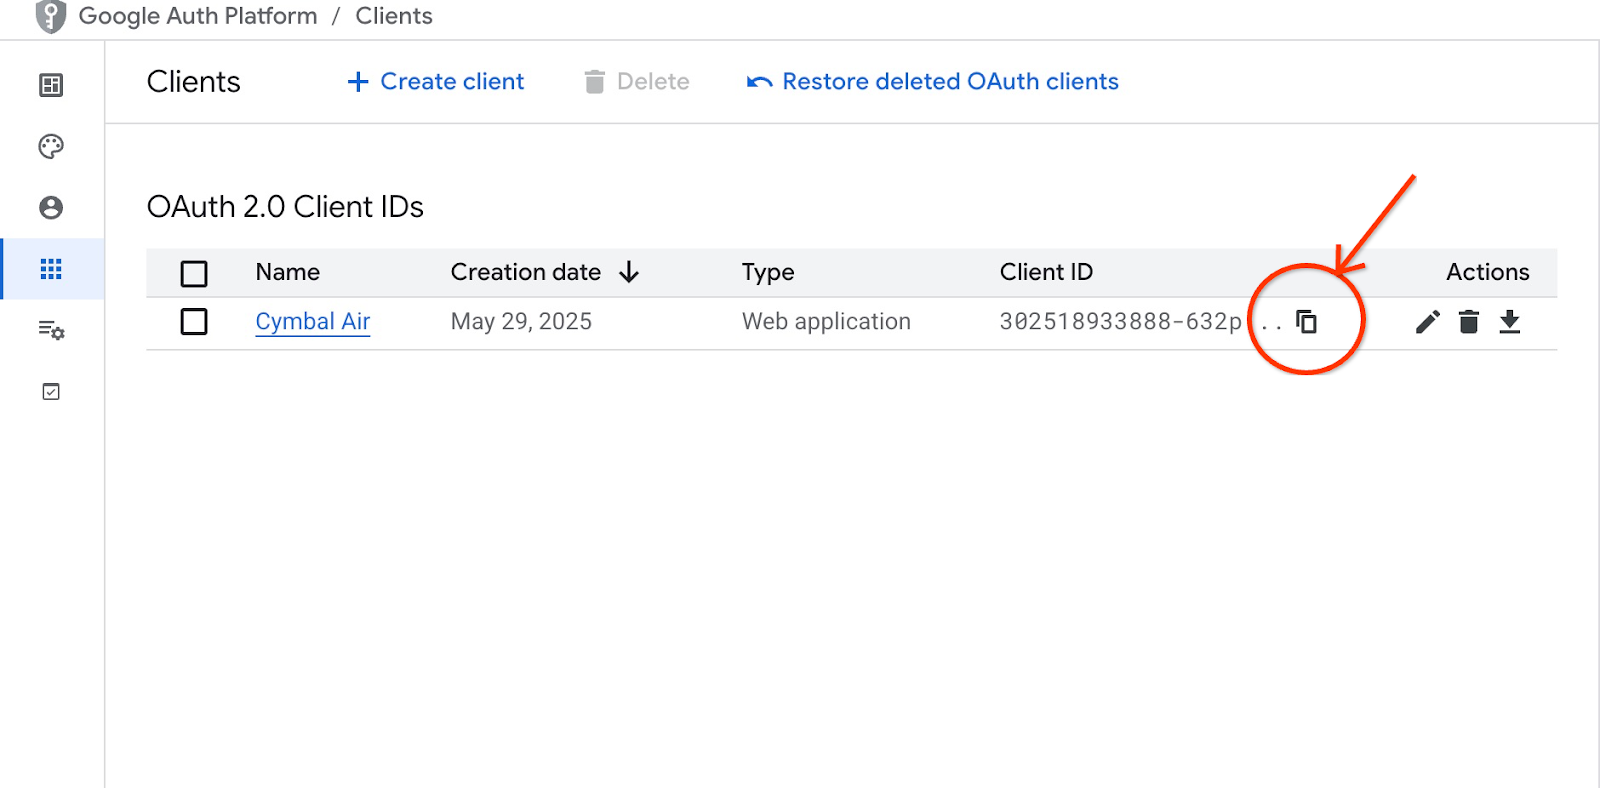
稍後您會看到提供該用戶端 ID 的位置。
建立服務帳戶
我們需要 Cloud Run 服務的專屬服務帳戶,並具備所有必要權限。我們的服務需要存取 AlloyDB 和 Cloud Secret Manager。至於服務帳戶的名稱,我們將使用 toolbox-identity。
使用頂端的「+」符號開啟另一個 Cloud Shell 分頁。
在新開啟的 Cloud Shell 分頁中執行下列指令:
export PROJECT_ID=$(gcloud config get-value project)
gcloud iam service-accounts create toolbox-identity

gcloud projects add-iam-policy-binding $PROJECT_ID \
  --member="serviceAccount:toolbox-identity@$PROJECT_ID.iam.gserviceaccount.com" \
  --role="roles/alloydb.client"
gcloud projects add-iam-policy-binding $PROJECT_ID \
  --member="serviceAccount:toolbox-identity@$PROJECT_ID.iam.gserviceaccount.com" \
  --role="roles/serviceusage.serviceUsageConsumer"
gcloud projects add-iam-policy-binding $PROJECT_ID \
  --member="serviceAccount:toolbox-identity@$PROJECT_ID.iam.gserviceaccount.com" \
  --role="roles/secretmanager.secretAccessor"
如有任何錯誤,請留意。這個指令應該會為 Cloud Run 服務建立服務帳戶,並授予使用 Secret Manager、資料庫和 Vertex AI 的權限。
按下 Ctrl + D 鍵或在分頁中執行「exit」指令,即可關閉分頁:
exit
準備 MCP Toolbox 設定
準備 MCP Toolbox 的設定檔。如要瞭解所有設定選項,請參閱說明文件,但這裡我們要使用範例 tools.yaml 檔案,並將叢集和執行個體名稱、AlloyDB 密碼和專案 ID 等值替換為實際值。
匯出 AlloyDB 密碼:
export PGPASSWORD=<noted AlloyDB password>
匯出上一步準備的用戶端 ID:
export CLIENT_ID=<noted OAuth 2.0 client ID for our application>
準備設定檔。
PROJECT_ID=$(gcloud config get-value project)
ADBCLUSTER=alloydb-aip-01
sed -e "s/project: retrieval-app-testing/project: $(gcloud config get-value project)/g" \
-e "s/cluster: my-alloydb-cluster/cluster: $ADBCLUSTER/g" \
-e "s/instance: my-alloydb-instance/instance: $ADBCLUSTER-pr/g" \
-e "s/password: postgres/password: $PGPASSWORD\\n    ipType: private/g" \
-e "s/^ *clientId: .*/    clientId: $CLIENT_ID/g" \
cymbal-air-toolbox-demo/tools.yaml >~/tools.yaml
如果您查看定義目標資料來源的檔案部分,會發現我們也新增了一行,用於透過私人 IP 進行連線。
sources:
  my-pg-instance:
    kind: alloydb-postgres
    project: gleb-test-short-003-471020
    region: us-central1
    cluster: alloydb-aip-01
    instance: alloydb-aip-01-pr
    database: assistantdemo
    user: postgres
    password: L23F...
    ipType: private
authServices:
  my_google_service:
    kind: google
    clientId: 96828*******-***********.apps.googleusercontent.com
以 tools.yaml 設定做為來源,建立密鑰。
在 VM 的 SSH 控制台中執行下列指令:
gcloud secrets create tools --data-file=tools.yaml
預期的控制台輸出內容:
student@instance-1:~$ gcloud secrets create tools --data-file=tools.yaml
Created version [1] of the secret [tools].
將 MCP Toolbox 部署為 Cloud Run 服務
現在一切就緒,可以將 MCP Toolbox 部署為 Cloud Run 服務。如要進行本機測試,可以執行「./toolbox –tools-file=./tools.yaml」,但如果想在雲端執行應用程式,在 Cloud Run 中部署會更有意義。
在 VM SSH 工作階段中執行下列指令:
export IMAGE=us-central1-docker.pkg.dev/database-toolbox/toolbox/toolbox:latest
gcloud run deploy toolbox \
    --image $IMAGE \
    --service-account toolbox-identity \
    --region us-central1 \
    --set-secrets "/app/tools.yaml=tools:latest" \
    --args="--tools-file=/app/tools.yaml","--address=0.0.0.0","--port=8080" \
    --network default \
    --subnet default \
    --no-allow-unauthenticated
預期的控制台輸出內容:
student@instance-1:~$ export IMAGE=us-central1-docker.pkg.dev/database-toolbox/toolbox/toolbox:latest
gcloud run deploy toolbox \
    --image $IMAGE \
    --service-account toolbox-identity \
    --region us-central1 \
    --set-secrets "/app/tools.yaml=tools:latest" \
    --args="--tools-file=/app/tools.yaml","--address=0.0.0.0","--port=8080" \
    --network default \
    --subnet default \
    --no-allow-unauthenticated
Deploying container to Cloud Run service [toolbox] in project [gleb-test-short-002-470613] region [us-central1]
✓ Deploying new service... Done.
  ✓ Creating Revision...
  ✓ Routing traffic...
Done.
Service [toolbox] revision [toolbox-00001-l9c] has been deployed and is serving 100 percent of traffic.
Service URL: https://toolbox-868691532292.us-central1.run.app

student@instance-1:~$
驗證服務
現在我們可以檢查服務是否已啟動,以及是否能存取端點。我們使用 gcloud 公用程式取得擷取服務端點和驗證權杖。或者,您也可以在 Cloud Console 中查看服務 URI。
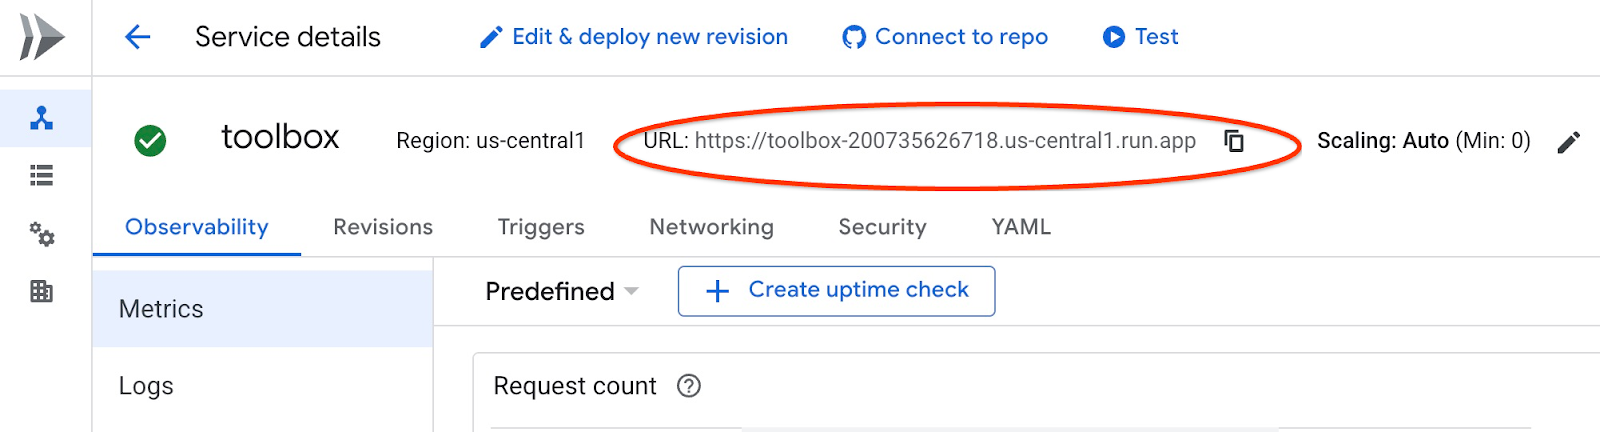
您可以複製該值,並在 curl 指令中取代 "$(gcloud run services list –filter="(toolbox)" –format="value(URL)" 部分。
以下說明如何從指令列動態取得網址:
curl -H "Authorization: Bearer $(gcloud auth print-identity-token)" $(gcloud run services list --filter="(toolbox)" --format="value(URL)")
預期的控制台輸出內容:
student@instance-1:~$ curl -H "Authorization: Bearer $(gcloud auth print-identity-token)" $(gcloud  run services list --filter="(toolbox)" --format="value(URL)")
🧰 Hello, World! 🧰student@instance-1:~$
看到「Hello World」訊息時,表示服務已啟用並能處理要求。
8. 部署範例應用程式
現在檢索服務已啟動並執行,我們可以部署範例應用程式。這個應用程式代表線上機場助理,可根據資料庫中的航班和機場資料,提供航班和機場資訊,甚至預訂航班。
應用程式可部署在本機、雲端 VM 或任何其他服務 (例如 Cloud Run 或 Kubernetes)。我們將先示範如何在 VM 上部署。
準備環境
我們將繼續使用相同的 SSH 工作階段處理 VM。如要執行應用程式,我們需要一些 Python 模組,而我們在稍早啟動資料庫時已新增這些模組。讓我們切換至 Python 虛擬環境,並將位置變更為應用程式目錄。
在 VM SSH 工作階段中執行下列指令:
source ~/.venv/bin/activate
cd cymbal-air-toolbox-demo
預期輸出內容 (已遮蓋):
student@instance-1:~$ source ~/.venv/bin/activate
cd cymbal-air-toolbox-demo
(.venv) student@instance-1:~/cymbal-air-toolbox-demo$
執行助理應用程式
啟動應用程式前,需先設定一些環境變數。應用程式的基本功能 (例如查詢航班和機場設施) 只需要 TOOLBOX_URL,這個變數會將應用程式指向檢索服務。我們可以使用 gcloud 指令取得這項資訊。
在 VM SSH 工作階段中執行下列指令:
export TOOLBOX_URL=$(gcloud run services list --filter="(toolbox)" --format="value(URL)")
預期輸出內容 (已遮蓋):
student@instance-1:~/cymbal-air-toolbox-demo$ export BASE_URL=$(gcloud run services list --filter="(toolbox)" --format="value(URL)")
如要使用應用程式的進階功能 (例如預訂及變更航班),我們必須使用 Google 帳戶登入應用程式,因此需要使用「準備用戶端 ID」一章中的 OAuth 用戶端 ID,提供 CLIENT_ID 環境變數:
export CLIENT_ID=215....apps.googleusercontent.com
預期輸出內容 (已遮蓋):
student@instance-1:~/cymbal-air-toolbox-demo$ export CLIENT_ID=215....apps.googleusercontent.com
現在可以執行應用程式:
python run_app.py
預期輸出內容:
student@instance-1:~/cymbal-air-toolbox-demo/llm_demo$ python run_app.py
INFO:     Started server process [2900]
INFO:     Waiting for application startup.
Loading application...
INFO:     Application startup complete.
INFO:     Uvicorn running on http://0.0.0.0:8081 (Press CTRL+C to quit)
連線至應用程式
您可以透過多種方式連線至 VM 上執行的應用程式。舉例來說,您能在虛擬私有雲使用防火牆規則,開啟 VM 的 8081 通訊埠,或是建立具有公開 IP 的負載平衡器。這裡我們將使用 SSH 通道連線至 VM,將本機通訊埠 8080 連至 VM 通訊埠 8081。
從本機電腦連線
如要從本機連線,我們需要執行 SSH 通道。您可以使用 gcloud compute ssh 執行這項操作:
gcloud compute ssh instance-1 --zone=us-central1-a -- -L 8081:localhost:8081
預期輸出內容:
student-macbookpro:~ student$ gcloud compute ssh instance-1 --zone=us-central1-a -- -L 8080:localhost:8081
Warning: Permanently added 'compute.7064281075337367021' (ED25519) to the list of known hosts.
Linux instance-1.us-central1-c.c.gleb-test-001.internal 6.1.0-21-cloud-amd64 #1 SMP PREEMPT_DYNAMIC Debian 6.1.90-1 (2024-05-03) x86_64

The programs included with the Debian GNU/Linux system are free software;
the exact distribution terms for each program are described in the
individual files in /usr/share/doc/*/copyright.

Debian GNU/Linux comes with ABSOLUTELY NO WARRANTY, to the extent
permitted by applicable law.
student@instance-1:~$
現在可以開啟瀏覽器,並使用 http://localhost:8081 連線至應用程式。我們應該會看到應用程式畫面。
從 Cloud Shell 連線
或者,我們可以使用 Google Cloud Shell 連線。使用頂端的「+」符號開啟另一個 Cloud Shell 分頁。
在新分頁中執行 gcloud 指令,取得 Web 用戶端的來源和重新導向 URI:
echo "origin:"; echo "https://8080-$WEB_HOST"; echo "redirect:"; echo "https://8080-$WEB_HOST/login/google"
預期的輸出內容如下:
student@cloudshell:~ echo "origin:"; echo "https://8080-$WEB_HOST"; echo "redirect:"; echo "https://8080-$WEB_HOST/login/google"
origin:
https://8080-cs-35704030349-default.cs-us-east1-rtep.cloudshell.dev
redirect:
https://8080-cs-35704030349-default.cs-us-east1-rtep.cloudshell.dev/login/google
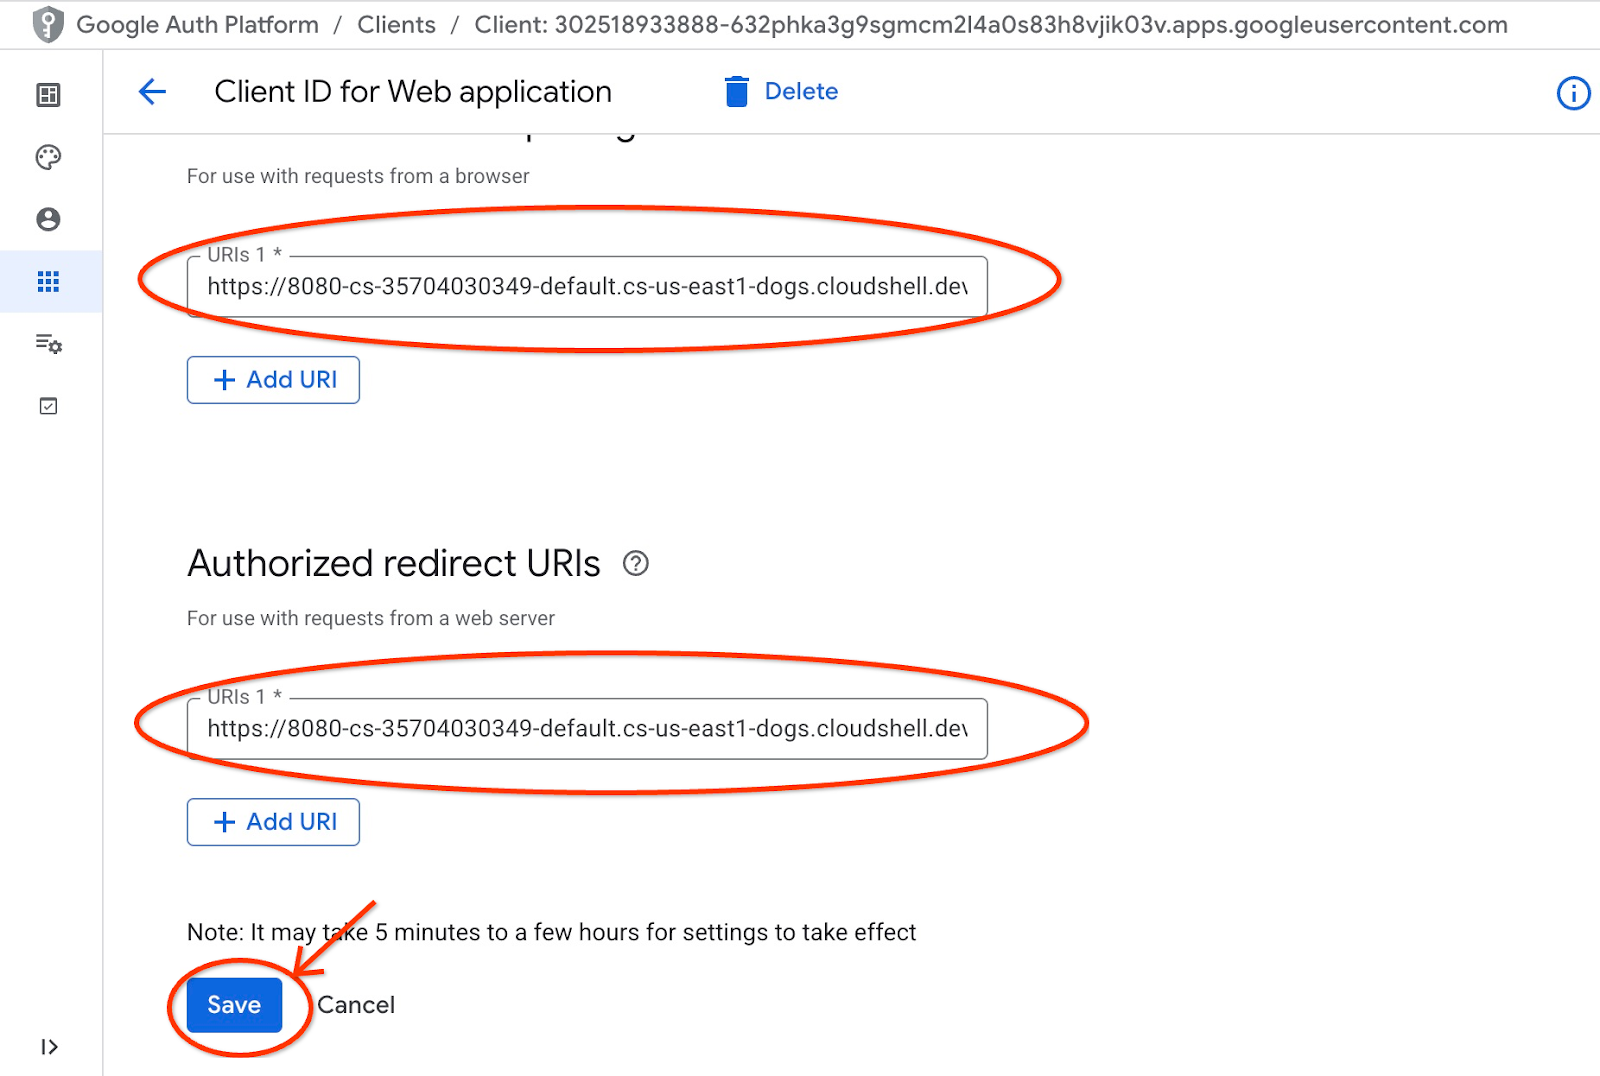
並使用來源和重新導向 URI 做為「準備用戶端 ID」一章中建立憑證的「已授權的 JavaScript 來源」和「已授權的重新導向 URI」,取代或新增原始提供的 http://localhost:8080 值。
在「OAuth 2.0 用戶端 ID」頁面,按一下「Cymbal Air」。
輸入 Cloud Shell 的來源和重新導向 URI,然後按下「儲存」按鈕。
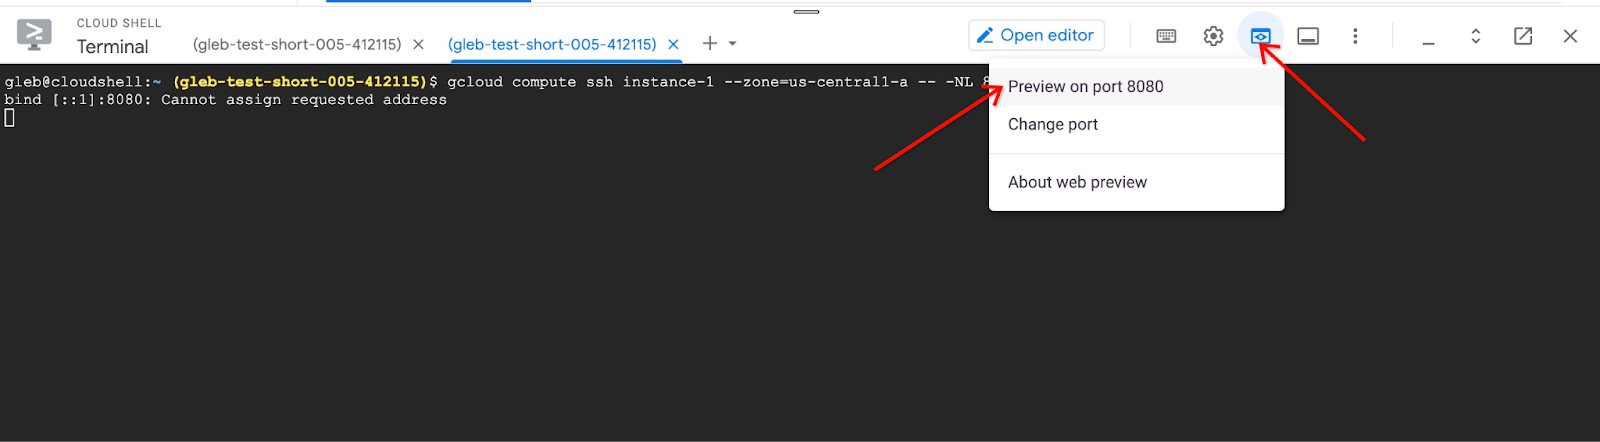
在新開啟的 Cloud Shell 分頁中,執行 gcloud 指令,啟動連往 VM 的通道:
gcloud compute ssh instance-1 --zone=us-central1-a -- -L 8080:localhost:8081
如果系統顯示「Cannot assign requested address」錯誤訊息,請忽略。
預期的輸出內容如下:
student@cloudshell:~ gcloud compute ssh instance-1 --zone=us-central1-a -- -L 8080:localhost:8081
bind [::1]:8081: Cannot assign requested address
inux instance-1.us-central1-a.c.gleb-codelive-01.internal 6.1.0-21-cloud-amd64 #1 SMP PREEMPT_DYNAMIC Debian 6.1.90-1 (2024-05-03) x86_64

The programs included with the Debian GNU/Linux system are free software;
the exact distribution terms for each program are described in the
individual files in /usr/share/doc/*/copyright.

Debian GNU/Linux comes with ABSOLUTELY NO WARRANTY, to the extent
permitted by applicable law.
Last login: Sat May 25 19:15:46 2024 from 35.243.235.73
student@instance-1:~$
這會在 Cloud Shell 中開啟通訊埠 8080,可用於「網頁預覽」。
按一下 Cloud Shell 右上方的「網頁預覽」按鈕,然後從下拉式選單中選擇「透過以下通訊埠預覽:8080」
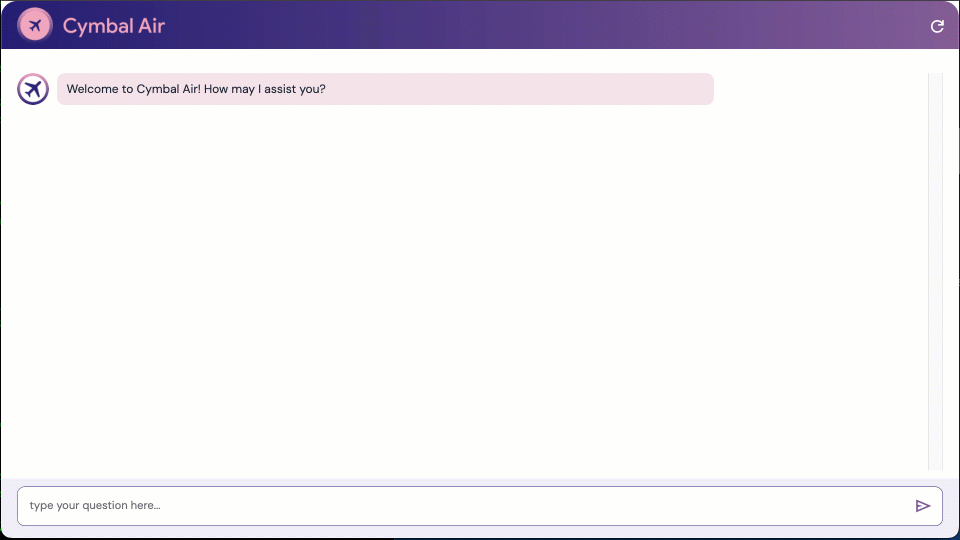
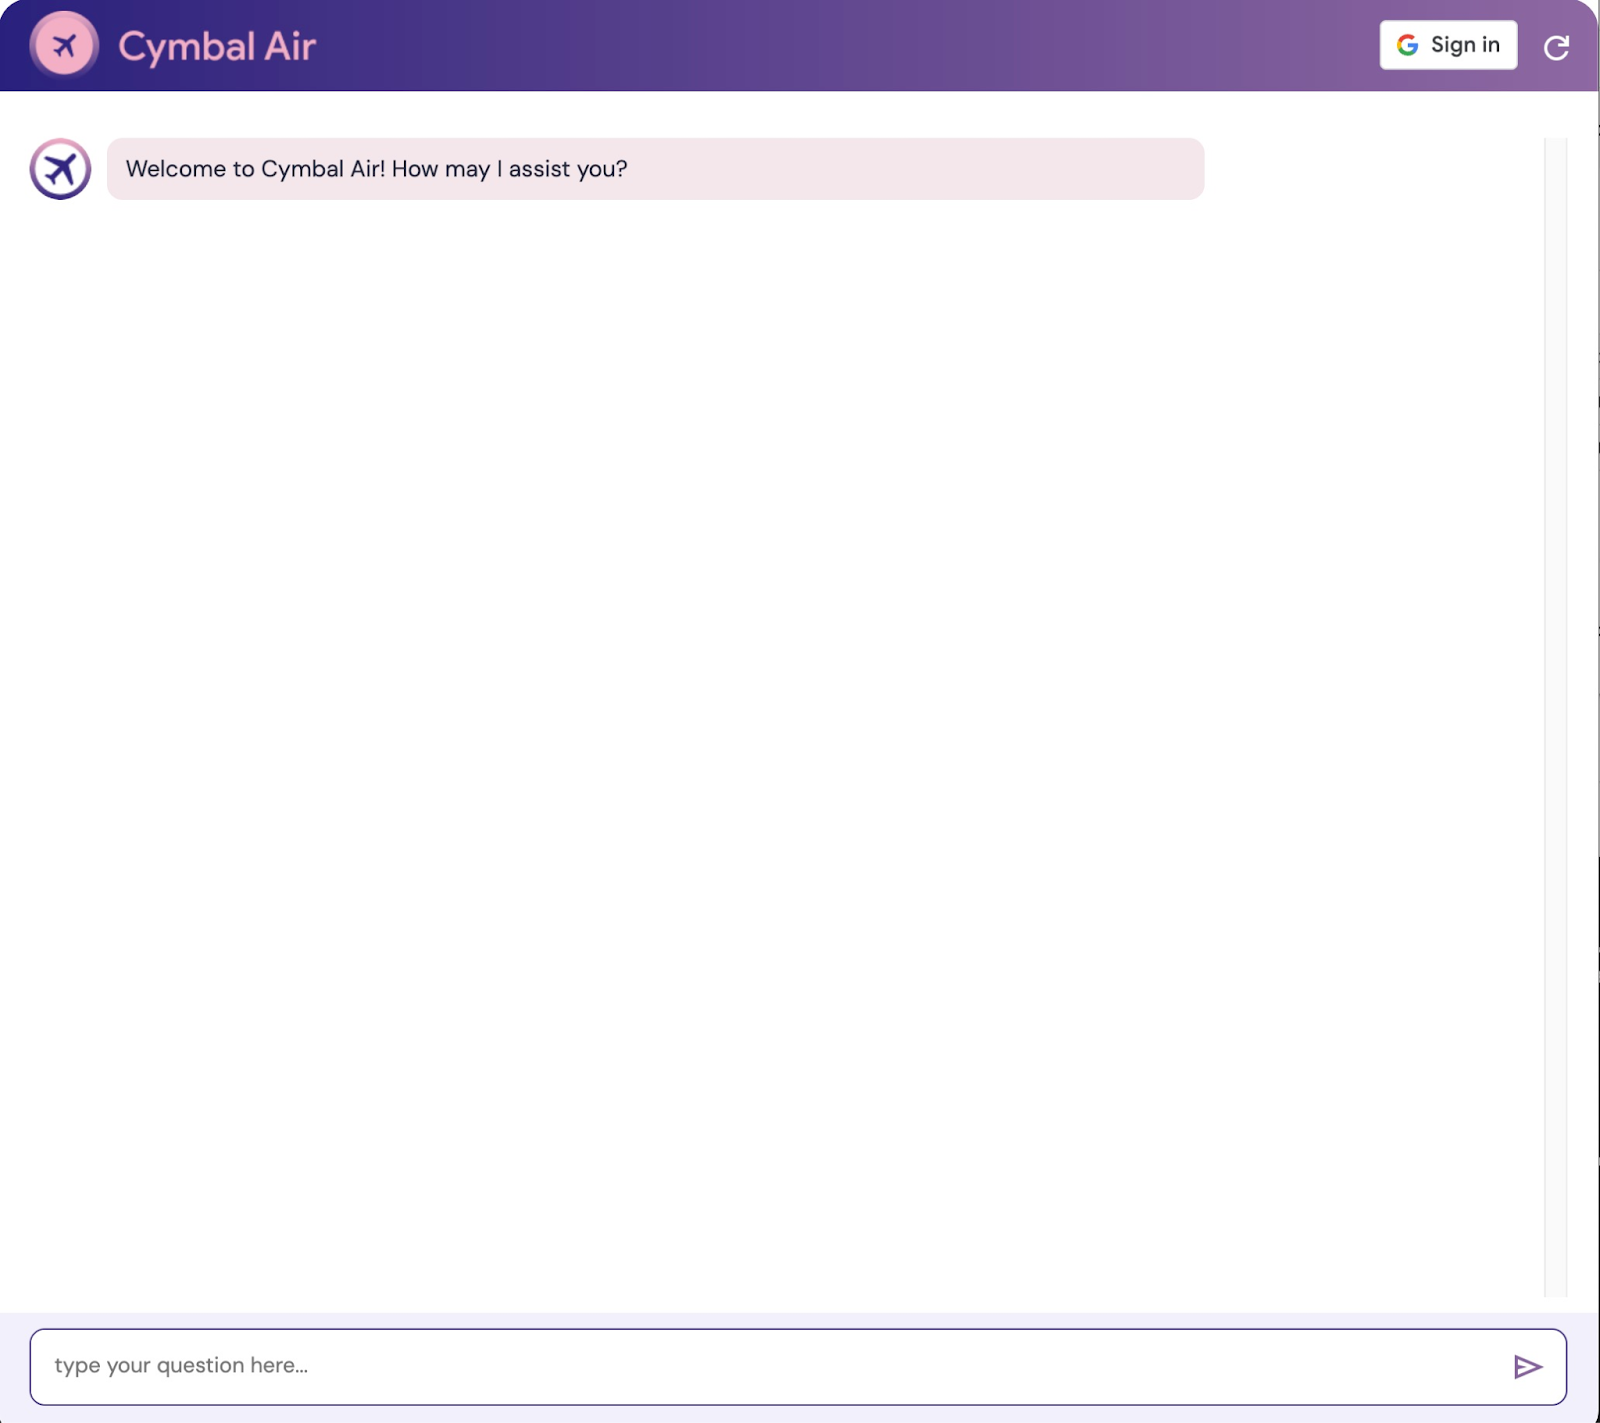
網路瀏覽器會開啟新分頁,顯示應用程式介面。您應該會看到「Cymbal Air Customer Service Assistant」頁面。
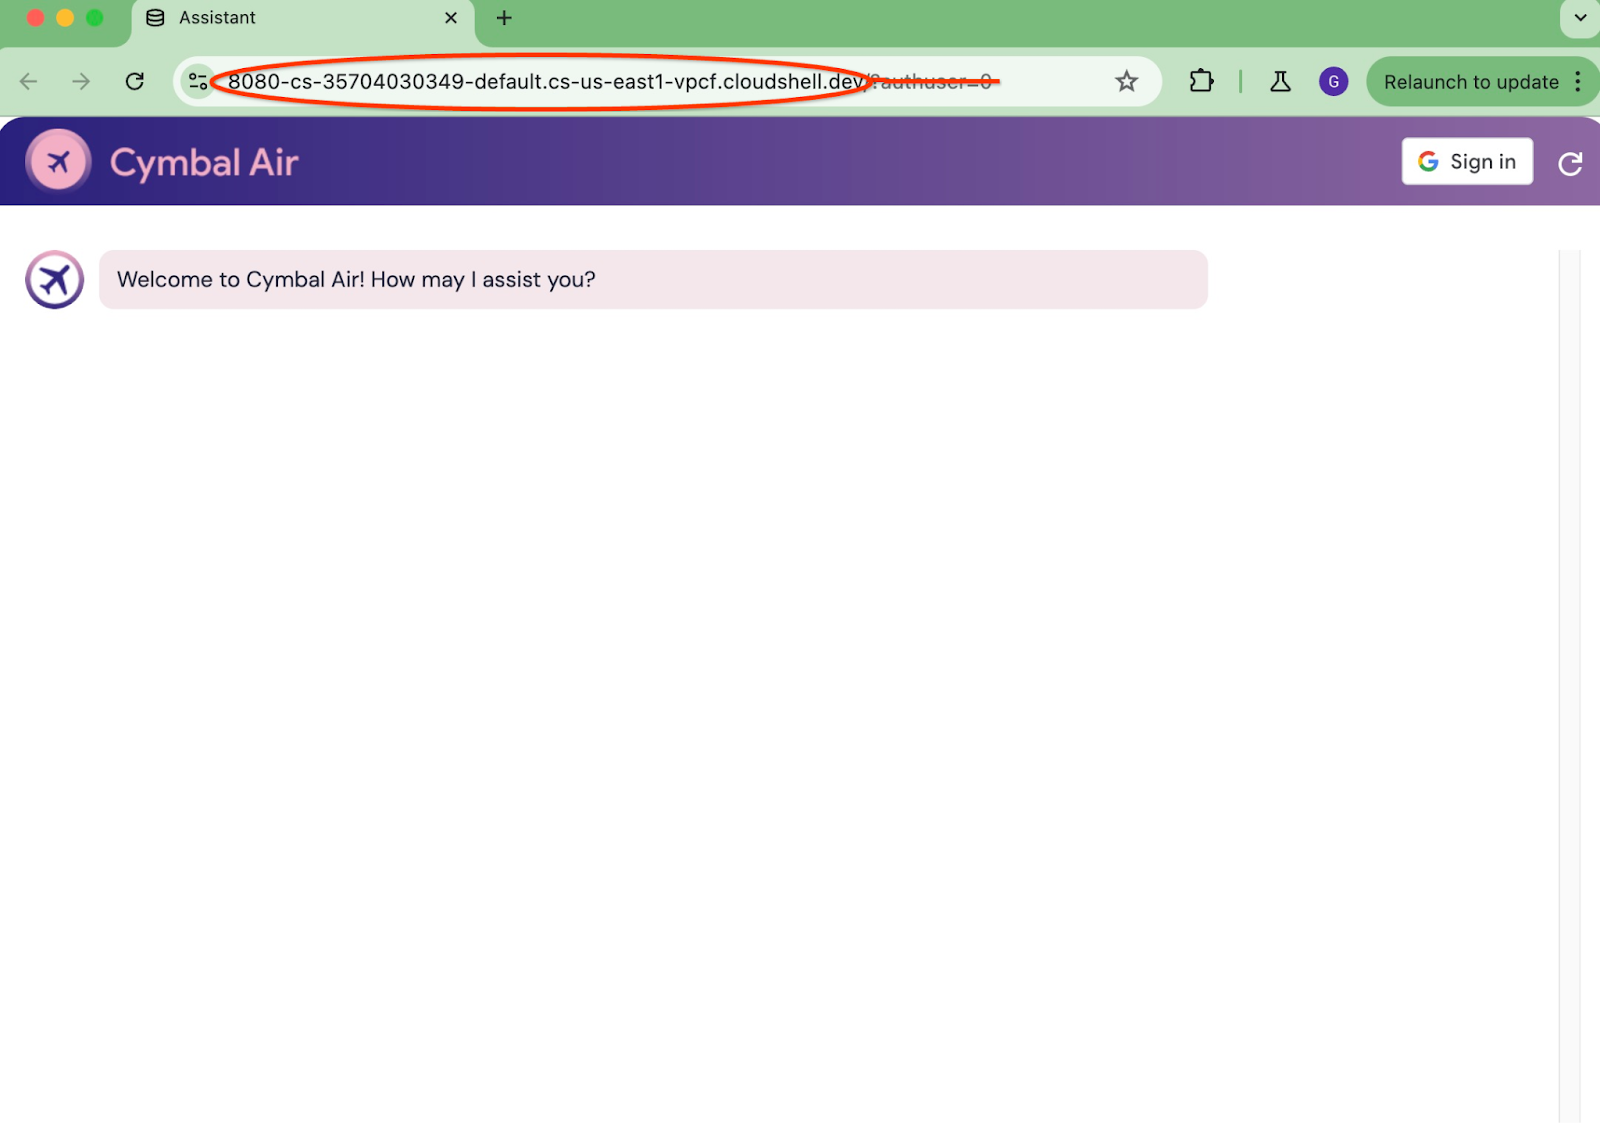
登入應用程式
一切設定完成並開啟應用程式後,我們可以使用應用程式畫面右上方的「登入」按鈕提供憑證。這是選用步驟,只有在想試用應用程式的預訂功能時才需要。
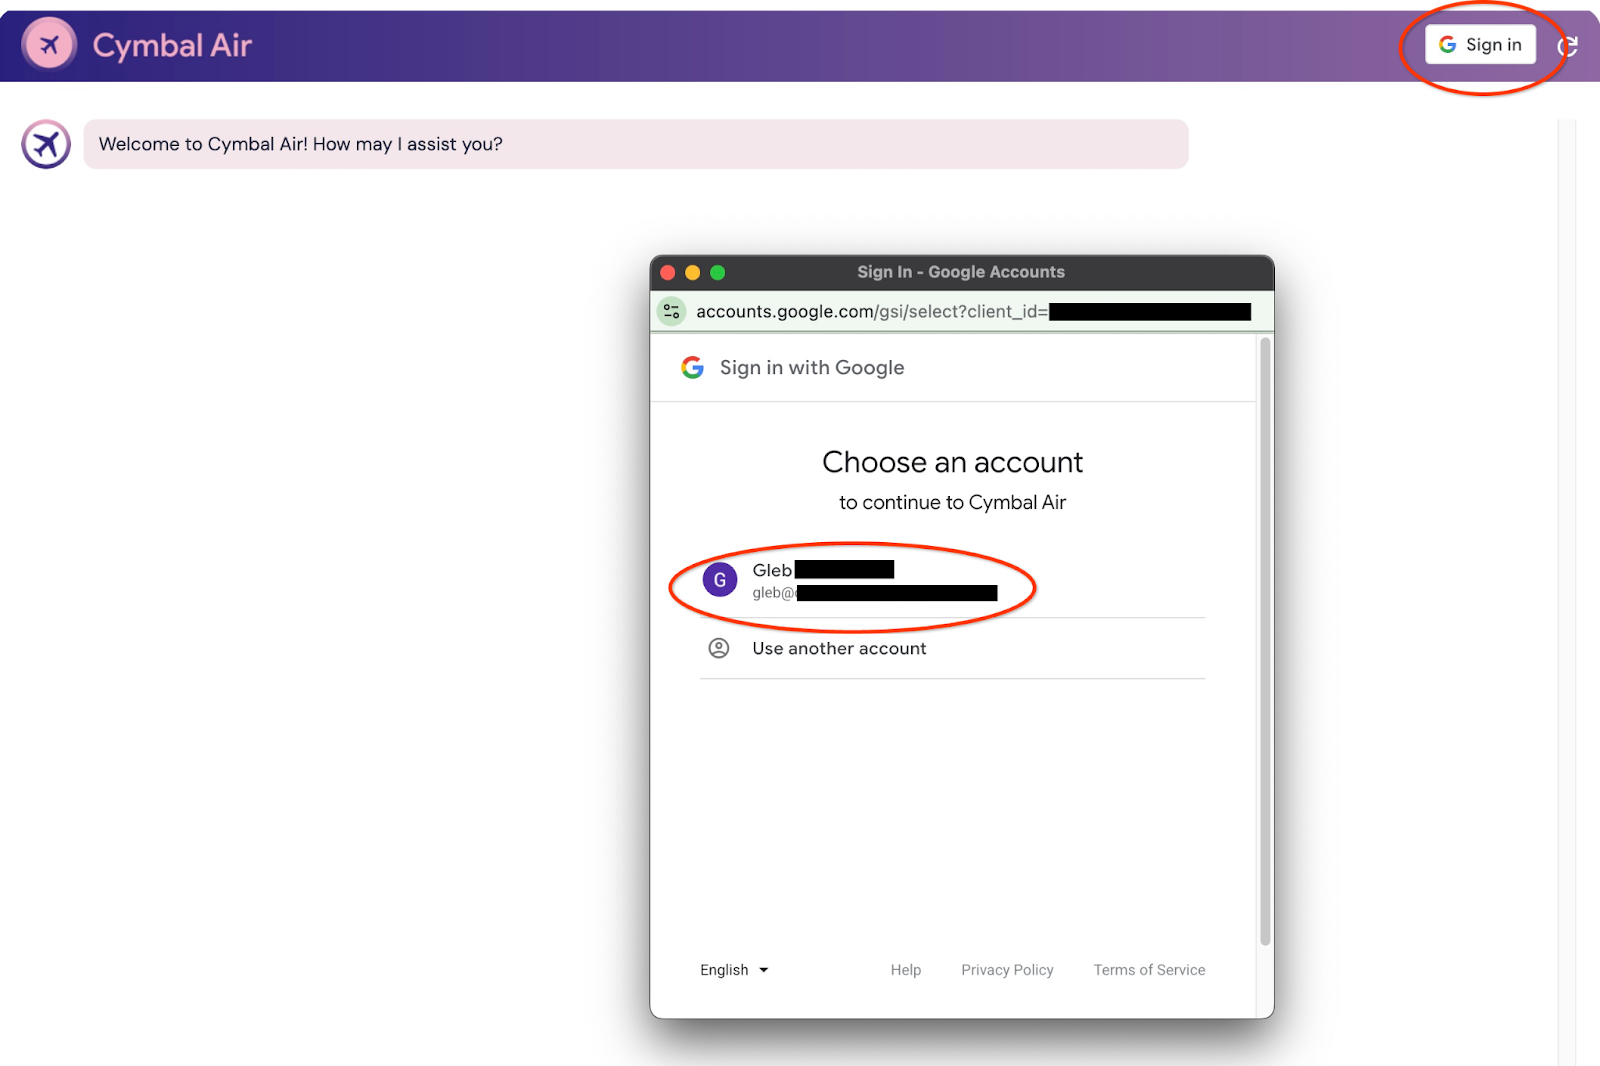
系統會開啟彈出式視窗,讓我們選擇憑證。
登入後,應用程式即可使用,您可以在視窗底部的欄位中開始發布要求。
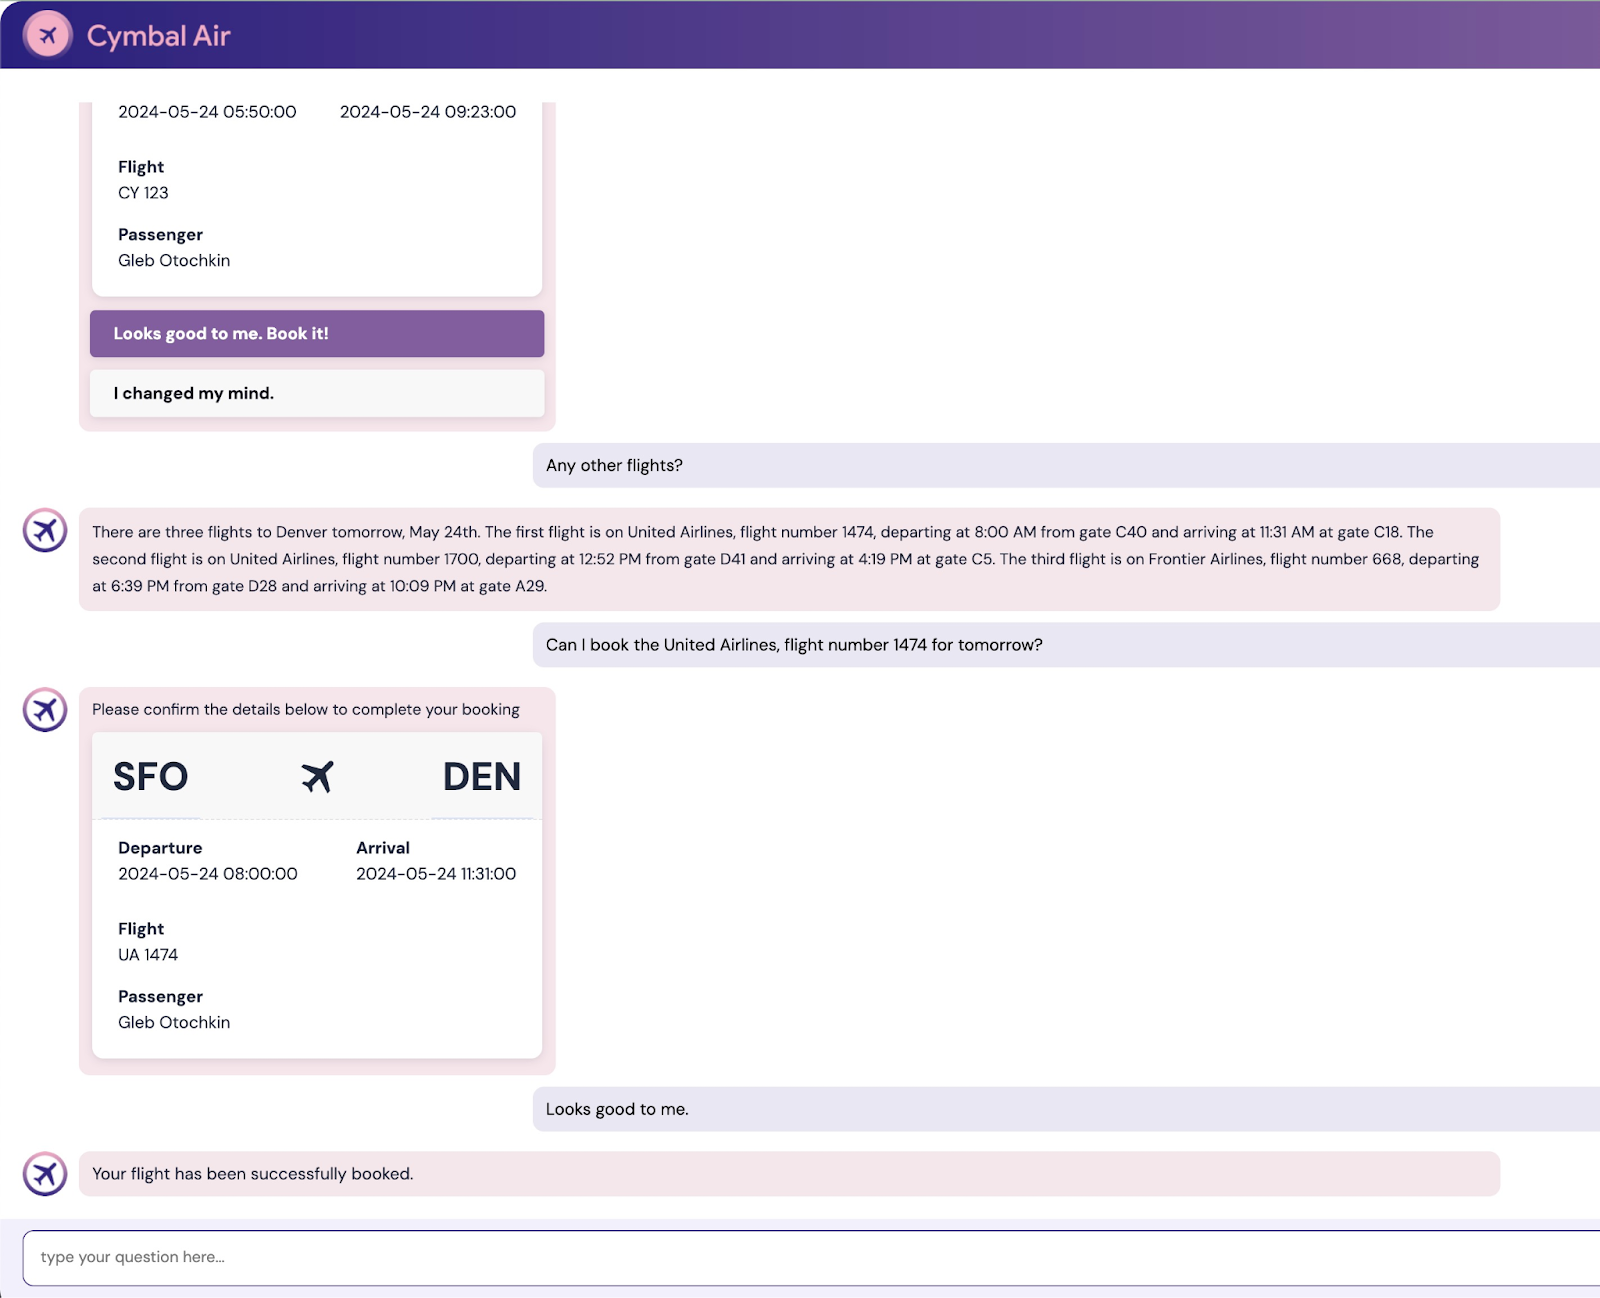
這個示範影片展示了 Cymbal Air 客服助理。Cymbal Air 是虛構的客運航空公司,這項助理是 AI 聊天機器人,可協助旅客管理航班,並查詢舊金山國際機場 (SFO) Cymbal Air 樞紐的相關資訊。
不登入 (不使用 CLIENT_ID) 時,可協助回答使用者的問題,例如:
下一個飛往丹佛的航班是什麼時候?
C28 登機門附近有哪些精品店?
在 A6 登機門附近哪裡可以買到咖啡?
哪裡可以購買禮物?
請尋找今天從舊金山飛往丹佛的航班
登入應用程式後,你還可以嘗試其他功能,例如預訂航班,或查看分配到的座位是否為靠窗或靠走道座位。
該應用程式會使用最新 Google 基礎模型生成回覆,並從運作中的 AlloyDB 資料庫檢索航班和設施資訊,再於回覆中提供。如要進一步瞭解這個示範應用程式,請前往專案的 Github 頁面。
9. 清理環境
現在所有工作都已完成,我們可以清理環境
刪除 Cloud Run 服務
在 Cloud Shell 中執行下列指令:
gcloud run services delete toolbox --region us-central1
預期的控制台輸出內容:
student@cloudshell:~ (gleb-test-short-004)$ gcloud run services delete retrieval-service --region us-central1
Service [retrieval-service] will be deleted.

Do you want to continue (Y/n)?  Y

Deleting [retrieval-service]...done.
Deleted service [retrieval-service].
刪除 Cloud Run 服務的服務帳戶
在 Cloud Shell 中執行下列指令:
PROJECT_ID=$(gcloud config get-value project)
gcloud iam service-accounts delete toolbox-identity@$PROJECT_ID.iam.gserviceaccount.com --quiet
預期的控制台輸出內容:
student@cloudshell:~ (gleb-test-short-004)$ PROJECT_ID=$(gcloud config get-value project)
Your active configuration is: [cloudshell-222]
student@cloudshell:~ (gleb-test-short-004)$ gcloud iam service-accounts delete retrieval-identity@$PROJECT_ID.iam.gserviceaccount.com --quiet
deleted service account [retrieval-identity@gleb-test-short-004.iam.gserviceaccount.com]
student@cloudshell:~ (gleb-test-short-004)$
完成實驗室後,請銷毀 AlloyDB 執行個體和叢集。
刪除 AlloyDB 叢集和所有執行個體
如果您使用過 AlloyDB 試用版,如果您打算使用試用叢集測試其他實驗室和資源,請勿刪除試用叢集。您無法在同一個專案中建立其他試用叢集。
使用 force 選項終止叢集,這也會刪除叢集中的所有執行個體。
如果連線中斷,且所有先前的設定都遺失,請在 Cloud Shell 中定義專案和環境變數:
gcloud config set project <your project id>
export REGION=us-central1
export ADBCLUSTER=alloydb-aip-01
export PROJECT_ID=$(gcloud config get-value project)
刪除叢集:
gcloud alloydb clusters delete $ADBCLUSTER --region=$REGION --force
預期的控制台輸出內容:
student@cloudshell:~ (test-project-001-402417)$ gcloud alloydb clusters delete $ADBCLUSTER --region=$REGION --force
All of the cluster data will be lost when the cluster is deleted.

Do you want to continue (Y/n)?  Y

Operation ID: operation-1697820178429-6082890a0b570-4a72f7e4-4c5df36f
Deleting cluster...done.
刪除 AlloyDB 備份
刪除叢集的所有 AlloyDB 備份:
for i in $(gcloud alloydb backups list --filter="CLUSTER_NAME: projects/$PROJECT_ID/locations/$REGION/clusters/$ADBCLUSTER" --format="value(name)" --sort-by=~createTime) ; do gcloud alloydb backups delete $(basename $i) --region $REGION --quiet; done
預期的控制台輸出內容:
student@cloudshell:~ (test-project-001-402417)$ for i in $(gcloud alloydb backups list --filter="CLUSTER_NAME: projects/$PROJECT_ID/locations/$REGION/clusters/$ADBCLUSTER" --format="value(name)" --sort-by=~createTime) ; do gcloud alloydb backups delete $(basename $i) --region $REGION --quiet; done
Operation ID: operation-1697826266108-60829fb7b5258-7f99dc0b-99f3c35f
Deleting backup...done.
現在可以刪除 VM 了
刪除 GCE VM
在 Cloud Shell 中執行下列指令:
export GCEVM=instance-1
export ZONE=us-central1-a
gcloud compute instances delete $GCEVM \
    --zone=$ZONE \
    --quiet
預期的控制台輸出內容:
student@cloudshell:~ (test-project-001-402417)$ export GCEVM=instance-1
export ZONE=us-central1-a
gcloud compute instances delete $GCEVM \
    --zone=$ZONE \
    --quiet
Deleted
刪除 GCE VM 和擷取服務的服務帳戶
在 Cloud Shell 中執行下列指令:
PROJECT_ID=$(gcloud config get-value project)
gcloud iam service-accounts delete compute-aip@$PROJECT_ID.iam.gserviceaccount.com --quiet
預期的控制台輸出內容:
student@cloudshell:~ (gleb-test-short-004)$ PROJECT_ID=$(gcloud config get-value project)
gcloud iam service-accounts delete compute-aip@$PROJECT_ID.iam.gserviceaccount.com --quiet
Your active configuration is: [cloudshell-222]
deleted service account [compute-aip@gleb-test-short-004.iam.gserviceaccount.com]
student@cloudshell:~ (gleb-test-short-004)$
10. 恭喜
恭喜您完成本程式碼研究室。
涵蓋內容
- 如何部署 AlloyDB 叢集
- 如何連線至 AlloyDB
- 如何設定及部署 MCP Toolbox 服務
- 如何使用已部署的服務部署範例應用程式
11. 問卷調查
輸出內容: