
1. Introduction
Gemini CLI is an open-source, AI-powered agent for your terminal that brings the power of Gemini models directly to your command line. While powerful on its own, its true potential is unlocked through Gemini CLI Extensions.
Extensions are the official and standardized way to augment the Gemini CLI's capabilities. Before Extensions, customizing the CLI often involved manually editing configuration files like settings.json, a process that could be "messy and error-prone".
Think of an extension as a "shipping container" for Gemini CLI customizations. It is a self-contained, versionable, and easily distributable package that bundles all the components needed to teach Gemini a new set of skills. This "shipping container" can include :
- MCP Server Configurations: These connect Gemini to external tools and APIs, like the Google Cloud APIs or third-party services.
- Context Files (GEMINI.md): These are "playbooks" that provide the model with specific instructions and guidelines on how to use the new tools effectively.
- Custom Slash Commands (.toml files): These encapsulate complex, multi-step prompts into simple, easy-to-use commands, like /deploy.
- Tool Restrictions (excludeTools): These can disable built-in tools to create a safer or more focused environment.
The core value of Extensions is transforming Gemini CLI from a personal assistant into a scalable, enterprise-ready platform. A team can package its entire cloud stack into a single extension, allowing new developers to get productive with one command.
In this codelab, you will learn how to use this powerful ecosystem. You will not author an extension, but you will install and use four different extensions to add application deployment, security analysis, data analytics, and infrastructure-as-code capabilities to your terminal.
What you'll do
- Install and configure the Gemini CLI and its Google Cloud prerequisites.
- Browse the official Gemini CLI Extensions Gallery to find Extensions.
- Use the
gemini extensionscommand-line interface to install, list, and manage Extensions. - Explore a few Gemini CLI Extensions
What you'll learn
- What Gemini CLI Extensions are and why they are the standard for customizing the CLI.
- How to find and install Extensions from the Extensions Gallery or a GitHub URL.
- The function of key management commands:
gemini extensions install,gemini extensions list, andgemini extensions update. - Installing and using a couple of Gemini CLI Extensions
What you'll need
- Chrome web browser
- A Gmail account
- A Cloud Project with billing enabled
This codelab is designed for users and developers of all levels (including beginners). You are expected to have some familiarity with Gemini CLI, though steps will be provided to install Gemini CLI from scratch. If you'd like to familiarize yourself with Gemini CLI, try out the codelab: Hands-on with Gemini CLI.
2. Before you begin
Create a project
- In the Google Cloud Console, on the project selector page, select or create a Google Cloud project.
- Make sure that billing is enabled for your Cloud project. Learn how to check if billing is enabled on a project.
- You'll use Cloud Shell, a command-line environment running in Google Cloud that comes preloaded with bq. Click Activate Cloud Shell at the top of the Google Cloud console.

- Once connected to Cloud Shell, you check that you're already authenticated and that the project is set to your project ID using the following command:
gcloud auth list
- Run the following command in Cloud Shell to confirm that the gcloud command knows about your project.
gcloud config list project
- If your project is not set, use the following command to set it:
gcloud config set project <YOUR_PROJECT_ID>
- Enable the required APIs via the command shown below. This could take a few minutes, so please be patient.
gcloud services enable cloudresourcemanager.googleapis.com \
                       servicenetworking.googleapis.com \
                       run.googleapis.com \
                       cloudbuild.googleapis.com \
On successful execution of the command, you should see a message similar to the one shown below:
Operation "operations/..." finished successfully.
If any API is missed, you can always enable it during the course of the implementation.
Refer documentation for gcloud commands and usage.Before you do the setup and run Gemini CLI, let us create a folder that you will be using as our home folder for all the projects that you may create inside of it. This is a starting point for the Gemini CLI to work with, though it will also reference some other folders on your system and which you will come to later, as needed.
Go ahead and create a sample folder (gemini-cli-projects) and navigate to that via the commands shown below. If you prefer to use some other folder name, please do so.
mkdir gemini-cli-projects
Let's navigate to that folder:
cd gemini-cli-projects
You can directly launch Gemini CLI via the gemini command in a new Cloud Shell terminal or it would have already been launched in a separate Cloud Shell terminal.
Our first interaction with Gemini CLI
We need to ensure that all is well with our Gemini CLI environment, so we can give our first prompt as shown below:
Give me a famous quote on Artificial Intelligence and who said that?
You will notice that our query resulted in a GoogleSearch tool (an in-built tool in Gemini CLI) that got invoked. In other words, you have already exercised one of Gemini CLIs powerful in-built tools namely GoogleSearch that grounds its responses based on information that it gets from the web. You should receive a response for your query.
Let's get started with Extensions next.
3. What is an Extension?
An extension is a self-contained, versionable, and easily distributable package. Think of it as the "shipping container" for your Gemini CLI customizations, bundling everything needed for a specific workflow into a single, neat package.

An extension can bundle any combination of:
- Custom slash commands (your .toml files).
- MCP server configurations (which previously lived in settings.json).
- Context files (GEMINI.md) to provide specific instructions and guidelines to the model.
- Tool restrictions (excludeTools) to create a safer, more focused environment.
Why Use Extensions? The Core Benefits
Adopting Extensions for your customizations provides several powerful advantages:
- One-Command Installation: This is key. Instead of a multi-step manual setup, a user can install a complete, complex toolset with a single command:
gemini extensions install <URL>orgemini extensions install --path=some/local/path. The <URL> in the above command could be the Github URL where you have hosted the extension. - Simplified Distribution: Sharing your work becomes as easy as sharing a single Git repository URL. No more passing around individual files and configuration snippets.
- Versioning and Dependency Management: Because Extensions are typically hosted in Git repositories, you get version control for free. There is a
gemini extensions update commandto update an extension to a latest version. - Discoverability and Ecosystem: Extensions are the foundation for a rich and open ecosystem, much like the marketplaces for VS Code or Chrome. The Extension mechanism could form the foundation of a future marketplace where these Extensions are available for review, download and more, in true community style.
The introduction of the extension framework is a clear signal that Gemini CLI is evolving from a powerful standalone tool into a true extensible platform.
4. Understanding Extensions fundamentals
This section covers the user-facing parts of the extension ecosystem: finding Extensions and managing them.
Explore the Extensions Gallery
The Extensions Gallery is the central marketplace for discovering all official Google-built and third-party extensions:
- Open the following URL in your browser:
https://geminicli.com/extensions/browse/. - This gallery is the discoverability engine for the ecosystem. You can see Extensions from companies like GitHub, Redis, and DynaTrace, showing the breadth of available tools.
- Scroll down and find the extension card for Cloud Run.
- Notice that the card provides a description, the author (Google), and a one-click
Copy installcommand button. This is the simplest way to get the installation command for an extension.
Gemini CLI Extensions - Management Commands
The gemini extensions command is your entry point for managing your local Extensions.
Run it in your terminal to see the list of available commands.

The commands are straightforward (install/uninstall, list, update, enable/disable, etc) and we will be using some of these commands in this codelab.
Check Your Current State
Before we install anything, let's check our "clean slate."
- Run the
gemini extensions listcommand: - You should see the following output, confirming that no Extensions are installed yet.
No extensions installed.
5. The Cloud Run Extension (Deploying an App)
The Cloud Run extension available in the Gemini CLI Extensions gallery is a MCP Server that allows us to deploy our applications to Cloud Run.
The Cloud Run Extension card from the Extensions gallery is shown below:
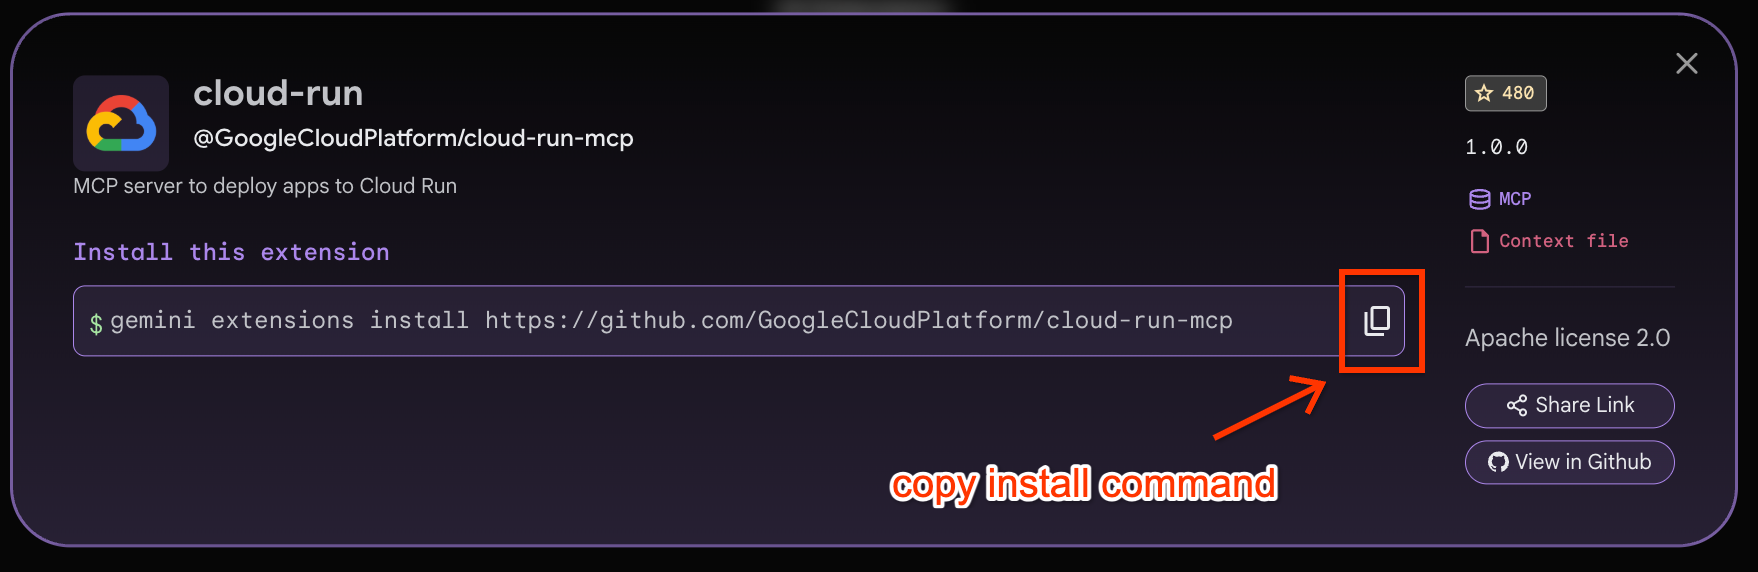
Let's first install the Cloud Run Extension by clicking on the Copy install command as shown above. Then paste that command in the Cloud Shell terminal (it should be similar to the following):
gemini extensions install https://github.com/GoogleCloudPlatform/cloud-run-mcp
On running the above command, you would see a confirmation required from you. Go ahead and give it your approval. The Cloud Run Extension should then install successfully.
Installing extension "cloud-run".
**Extensions may introduce unexpected behavior. Ensure you have investigated the extension source and trust the author.**
This extension will run the following MCP servers:
  * cloud-run (local): npx -y @google-cloud/cloud-run-mcp
This extension will append info to your gemini.md context using gemini-extension/GEMINI.md
Do you want to continue? [Y/n]: Y
Extension "cloud-run" installed successfully and enabled.
If you now execute the gemini extensions list command, you should see the Cloud Run extension installed as shown below:
✓ cloud-run (1.0.0)
 Path: <HOME_FOLDER>/.gemini/extensions/cloud-run
 Source: https://github.com/GoogleCloudPlatform/cloud-run-mcp (Type: github-release)
 Release tag: v1.5.0
 Enabled (User): true
 Enabled (Workspace): true
 Context files:
  <HOME_FOLDER>/.gemini/extensions/cloud-run/gemini-extension/GEMINI.md
 MCP servers:
  cloud-run
If you launch Gemini CLI now and execute the /mcp command, you will see the following:

Now let's get back to the Cloud Shell and try to deploy an application. For that we will first need to have a simple application to deploy to Cloud Run. Follow the steps given below:
Ensure that you are in the folder that we created earlier i.e. gemini-cli-projects. Create another folder inside of this named gemini-cloud-run and navigate into it.
mkdir gemini-cloud-run

cd gemini-cloud-run
Now create two files in this folder (app.py and requirements.txt file), the contents of which are given below:
app.py
from flask import Flask
app = Flask(__name__)
@app.route('/')
def hello_world():
  return 'Hello from Gemini and Cloud Run!'
if __name__ == "__main__":
  app.run(debug=True, host='0.0.0.0', port=8080)
requirements.txt
Flask
gunicorn
Now launch Gemini CLI from the gemini-cloud-run folder and once the terminal is ready, give the following prompt:
/deploy --project="PROJECT_ID" --location="PROJECT_LOCATION" --name="SERVICE_NAME"
You will need to specify the PROJECT_ID (Google Cloud project ID), the PROJECT_LOCATION and the SERVICE_NAME. If you do not give this, Cloud Run command invokes the appropriate tools to help you choose them.
As part of the process, it will select the right tool from the Cloud Run MCP Server Extension that we installed. For e.g. you should see a message like this:
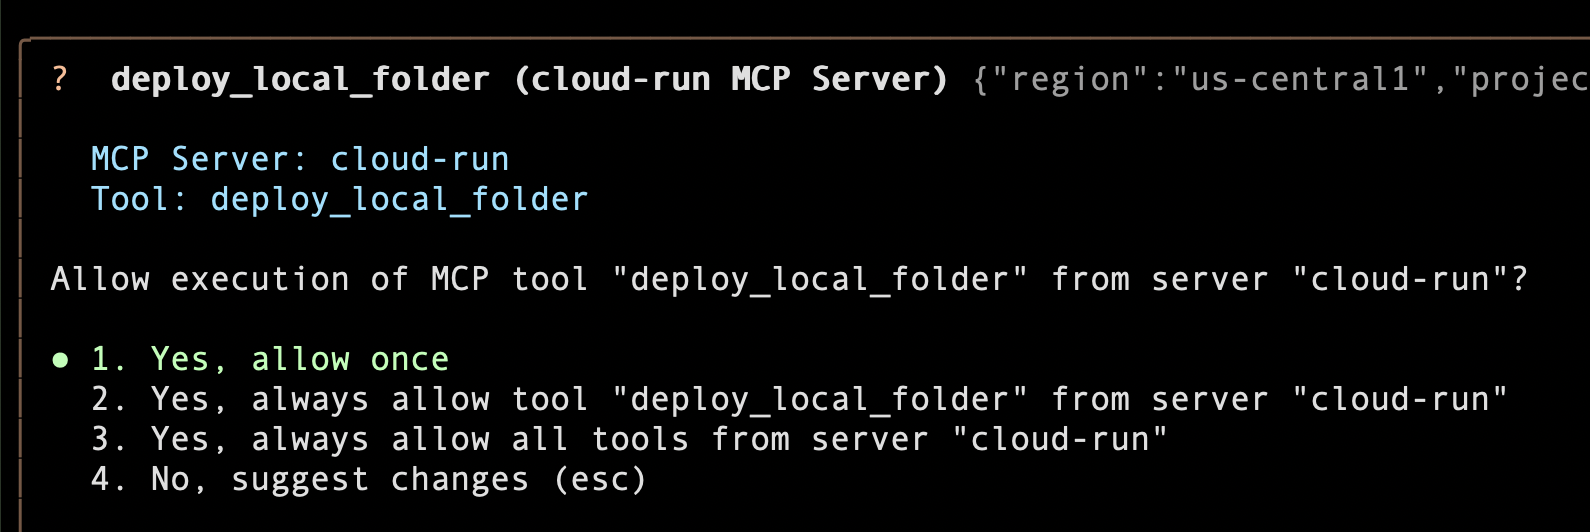
Go ahead and allow the tool to be used.
That's it! Gemini CLI now has all the information that it needs along with your permission to execute the tools. It will now execute the entire deployment pipeline: building the Docker image, pushing it to Artifact Registry, configuring and deploying a new Cloud Run service.
After a few moments (actually make that 2–3 minutes), you will see a success message with a Service URL. A sample run is shown below:
The Cloud Run service SERVICE_NAME has been deployed from the current folder in project PROJECT_ID.
  You can view the service in the Cloud Console: https://console.cloud.google.com/run/detail/PROJECT_LOCATION/SERVICE_NAME?project=PROJECT_ID
  The service is accessible at: https://SERVICE_NAME-SOME-ID.a.run.app
Go ahead and click that link. You should see the Flask app serving the home page:

This shows you the power of a Gemini CLI Extension (Cloud Run in this case), where it completely encapsulated the complexity of the gcloud CLI commands and simply took care of all the details for you.
Feel free to explore other tools in the Cloud Run MCP Server.
6. The BigQuery Extension (Analyzing large datasets)
To follow along you will need:
- Google Cloud project with the BigQuery API enabled.
- IAM Permissions:
- BigQuery User (roles/bigquery.user)
- Run this command to set your
BIGQUERY_PROJECTenvironment variable. This is the project that will execute the BigQuery jobs, not necessarily the project where your data lives (though they could indeed be one and the same)
export BIGQUERY_PROJECT=<YOUR_GCP_PROJECT_ID>
- Install the BigQuery Data Analytics extension via the command below. Do give it your permission to install. On successful installation, you will now have 2 Extensions installed in your setup :
cloud-runandbigquery-data-analytics.
gemini extensions install https://github.com/gemini-cli-extensions/bigquery-data-analytics
- Let's launch Gemini CLI again via the following command::
gemini
The Gemini CLI should launch in your terminal: 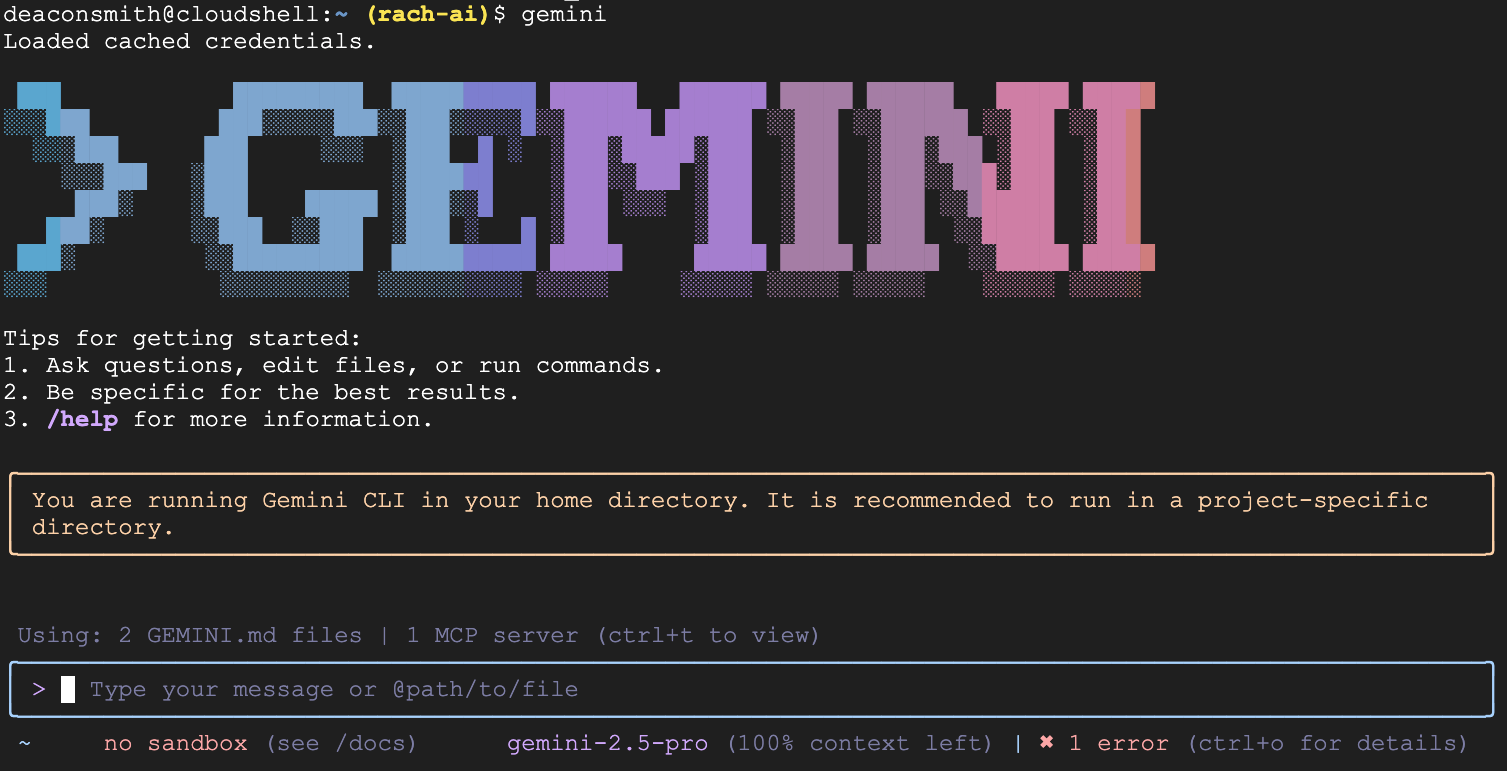
The following commands should be entered into the Gemini CLI terminal.
- Confirm that the BigQuery extension is installed and ready to go by entering the below slash command:
/extensions list
You should see the bigquery-data-analytics extension listed too.

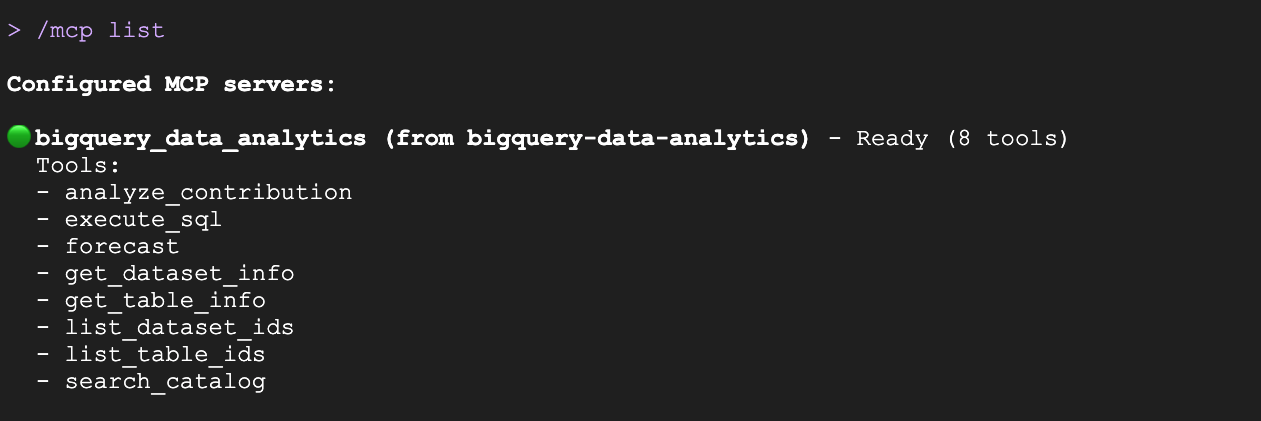
- Run the below command to check out the available tools
/mcp list
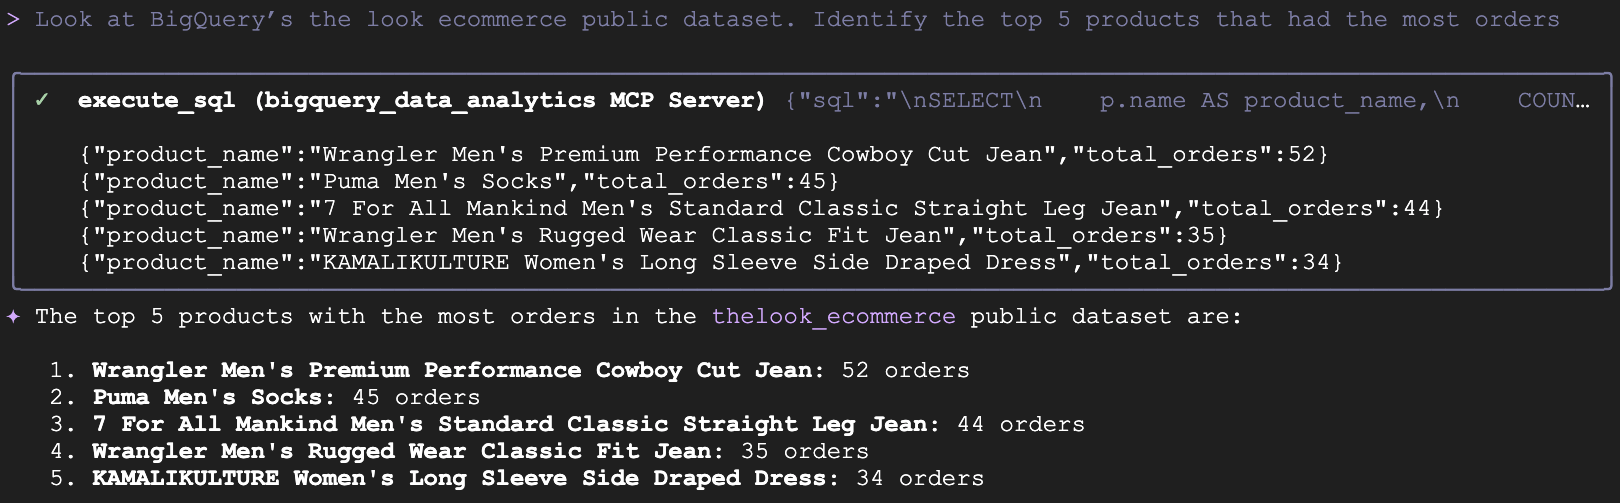
- Let's ask a basic analytics question about the public BigQuery dataset: the look ecommerce. This dataset has data on customers, products and orders for a fictional clothing ecommerce site. Enter this prompt in the Gemini CLI:
Look at BigQuery's the look ecommerce public dataset. Identify the top 5 products that had the most orders.
- Gemini CLI will ask whether you're happy to allow the execution of the BigQuery tools. To continue, select the third option:
Yes, always allow all tools from server "bigquery_data_analytics".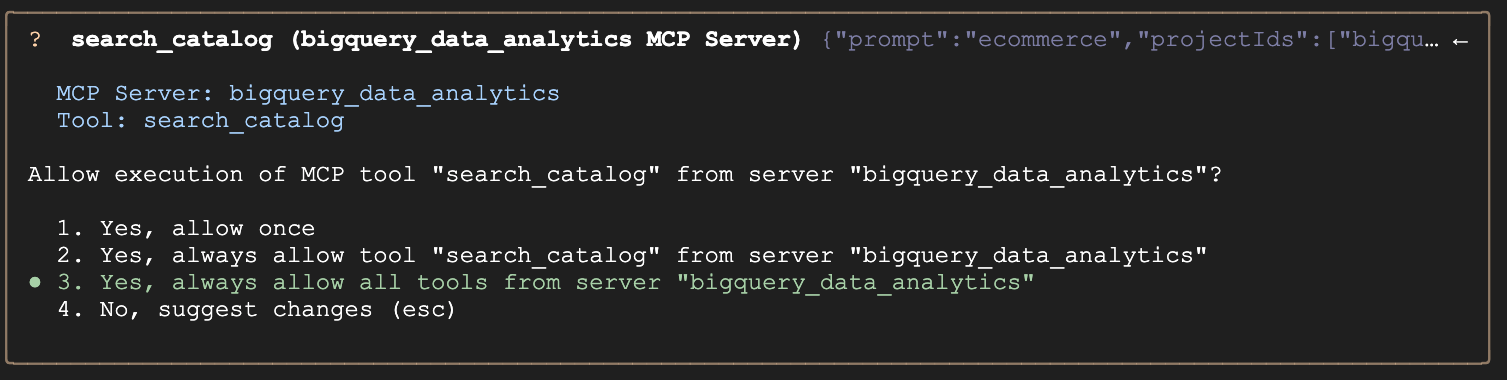
- Under the hood, Gemini will generate the appropriate SQL query, invoke the
execute_sqltool and return a natural language response alongside your data:
- Now, we'll ask Gemini to forecast what the return rate of products will be based on historical data. For this command, Gemini CLI should not attempt to generate some verbose SQL to create this forecast, it should invoke the
forecasttool from the MCP server, which will use BigQuery's AI.Forecast under the hood:
Forecast what the return rate will be next month.
- You should see a response like this:

7. The Google Workspace Extension (Everyday workflows)
The Google Workspace Extension is available as a MCP Server that integrates with Google Workspace applications like Docs, Chat, Calendar, Drive and more. A key feature of this extension is its local execution model. The MCP Server runs on the user's machine, not in the cloud. It uses the user's own OAuth credentials to communicate directly with Google APIs.
A quick warning: Gemini cannot distinguish between your commands and the text inside an email. This allows attackers to hide malicious instructions in incoming messages that can trick Gemini into stealing, modifying, or deleting your data without your consent. Be careful, please!
The Google Workspace Extension card from the Extensions gallery is shown below:
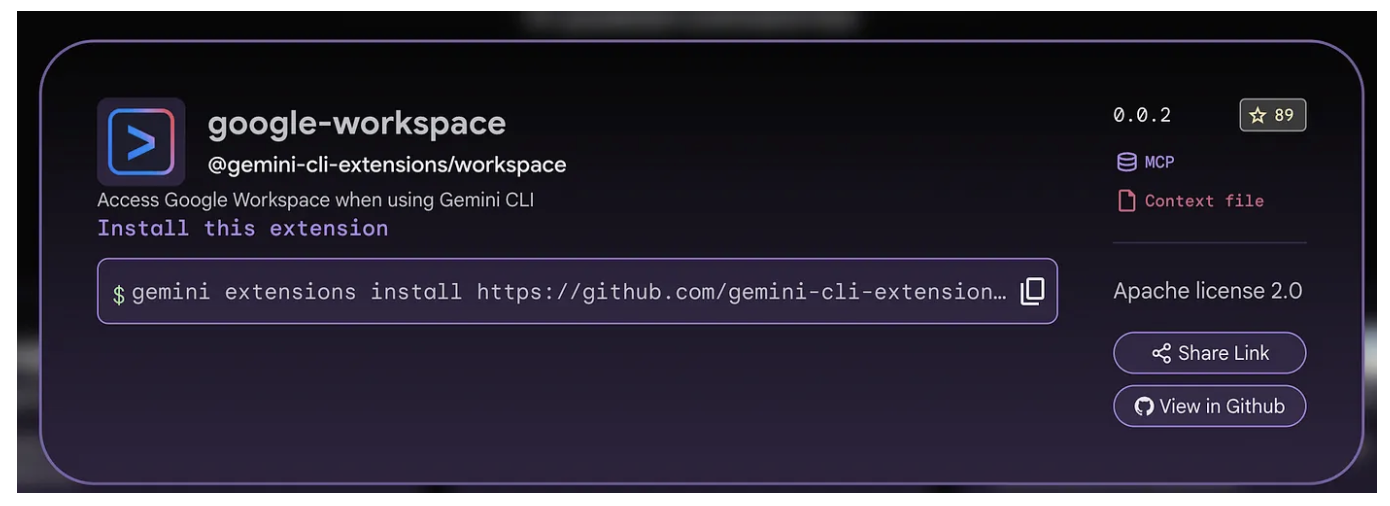
To install the Google Workspace Extension, click on the Copy button and paste that command in the Cloud Shell terminal (it should be similar to the following):
gemini extensions install https://github.com/gemini-cli-extensions/workspace
On running the above command, you would see a confirmation required from you. Go ahead and give it your approval. The Google Workspace Extension should then install successfully.
If you now execute the gemini extensions list command, you should see the Google Workspace extension installed as shown below (or similar output):
✓ google-workspace (v0.0.3)
 ID: 40be7ad1253320a38aba2f107f21349b41a458416fd4616550c832ff1d3b7dce
 name: a1f88ed96997755f9cd591bb26d8e1087e5969979caabe19fcde7b3544ea1a1e
 Path: /Users/romin/.gemini/extensions/google-workspace
 Source: https://github.com/gemini-cli-extensions/workspace (Type: github-release)
 Release tag: v0.0.3
 Enabled (User): true
 Enabled (Workspace): true
 Context files:
  /Users/romin/.gemini/extensions/google-workspace/WORKSPACE-Context.md
 MCP servers:
  google-workspace
If you launch Gemini CLI now, you will have to do the most important step in the setup process for this extension and that is authentication. Unlike a simple script that might use a static API key, the Workspace Extension acts as an authorized agent on behalf of the user, requiring access to sensitive scopes (Drive, Mail, Calendar).
The extension initiates an OAuth 2.0 flow. Choose your account and then Google displays a list of permissions (Scopes) the extension is requesting. These are extensive and include key ones as shown below:
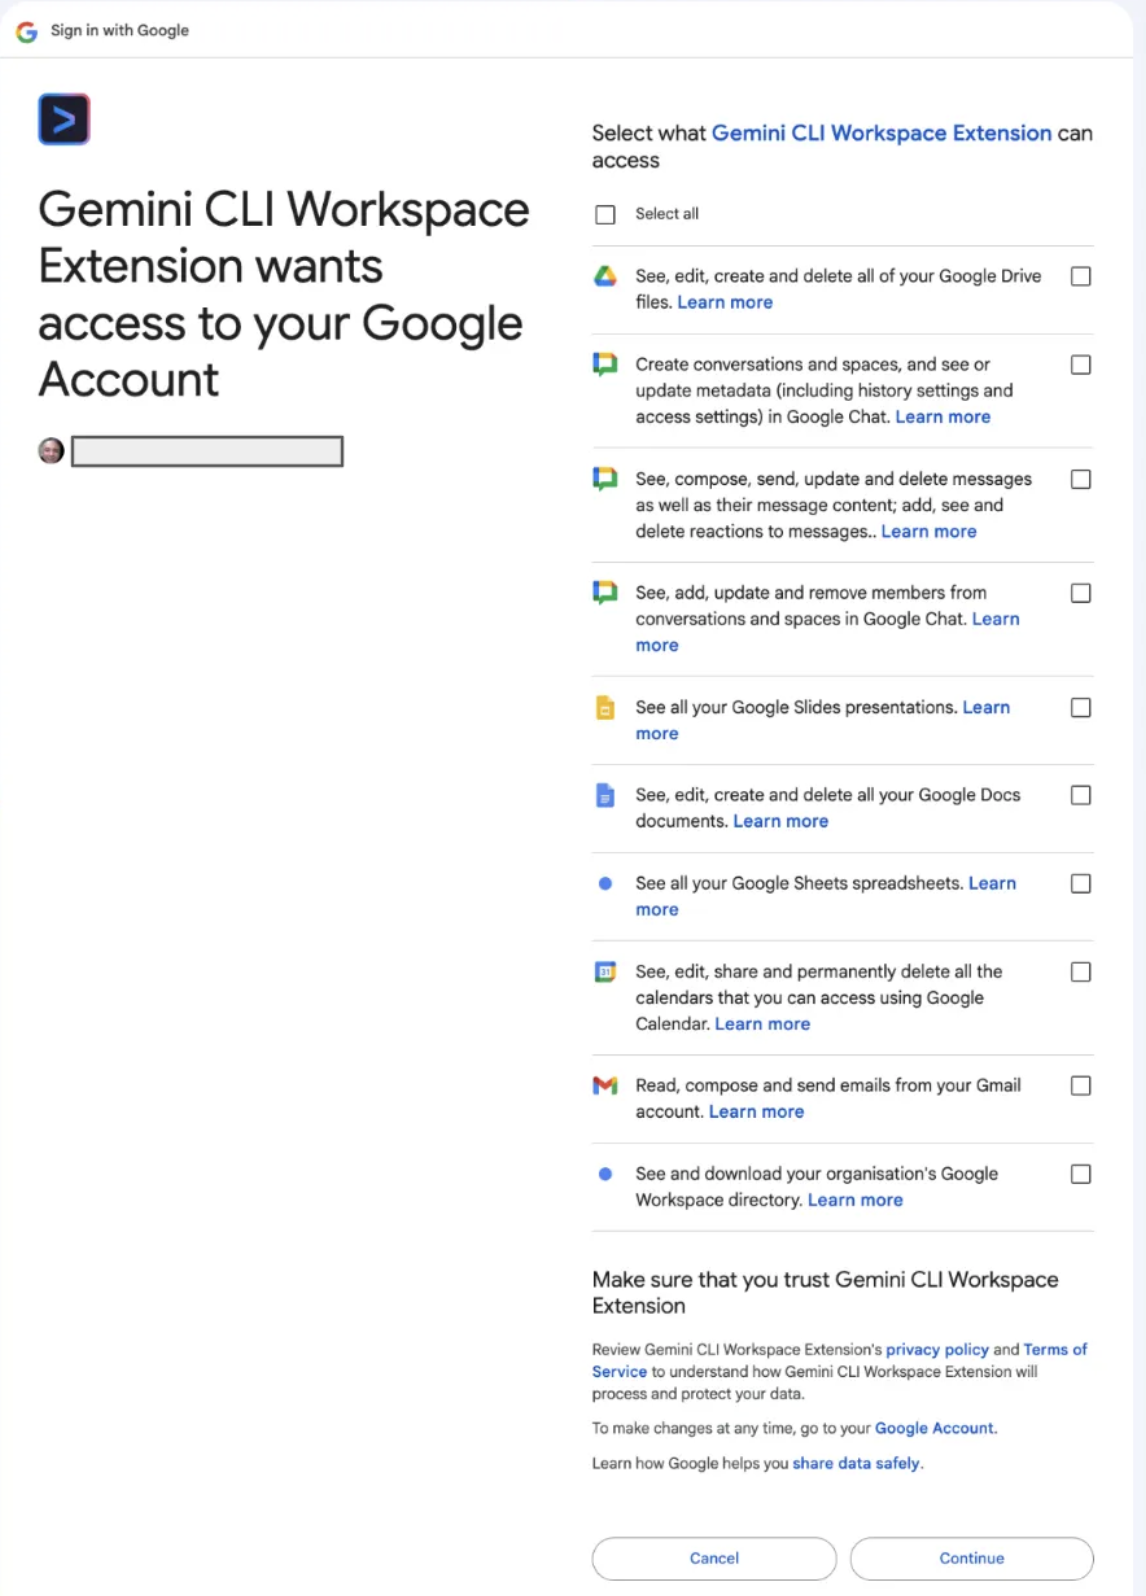
Once you complete this OAuth 2.0 dance, you are all set.
You can check if the extension has been successfully installed by launching Gemini and then using the /mcp list command. This should show that the extension is installed and the commands have been exposed as MCP tools. A screenshot of this is shown below:
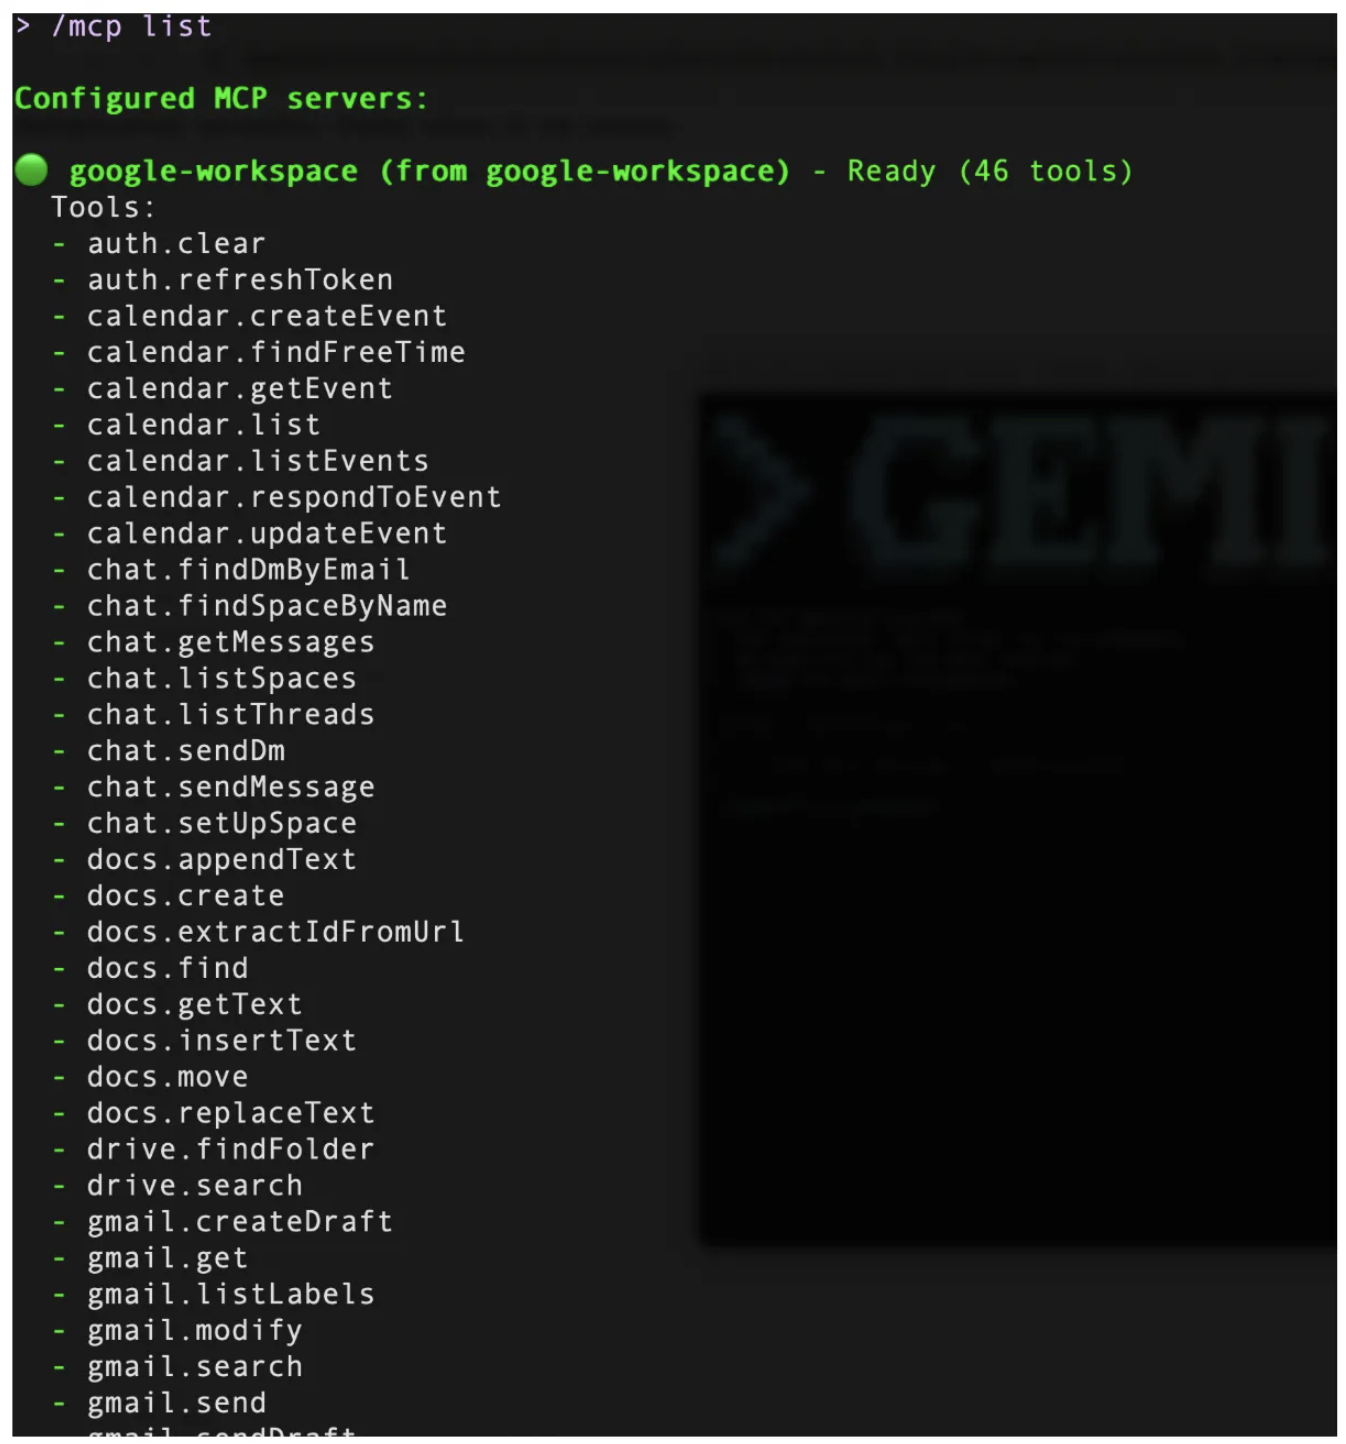
Workspace Tools
The extension maps specific Google Workspace API endpoints to "Tools" that the LLM can invoke. These tools are not random; they are curated to cover the primary modalities of knowledge work:
- File Management (Drive)
- Document Authoring (Docs)
- Time Management (Calendar)
- Communication (Gmail/Chat)
Let's look at some examples that you can try out based on the different tools that are available. To test out these tools, it is expected that you have a few emails in your connected Gmail account, Calendar schedule, files in Google Drive, etc.
Drive and Docs : The Knowledge Base
If you have a design doc or an interesting document in your Google Drive, you can try to search and summarize the document with a sample prompt like this:
Search for <DOC_NAME> in Google Drive
Once the document(s) are found, Gemini CLI will list down the document along with their Document Id. You can then ask it to summarize the document as follows:
Summarize <DOC_ID> for me
Let's do an activity that we typically do when we need some information. We search the web and then put relevant information in a Google Doc.
Think of a prompt like this one:
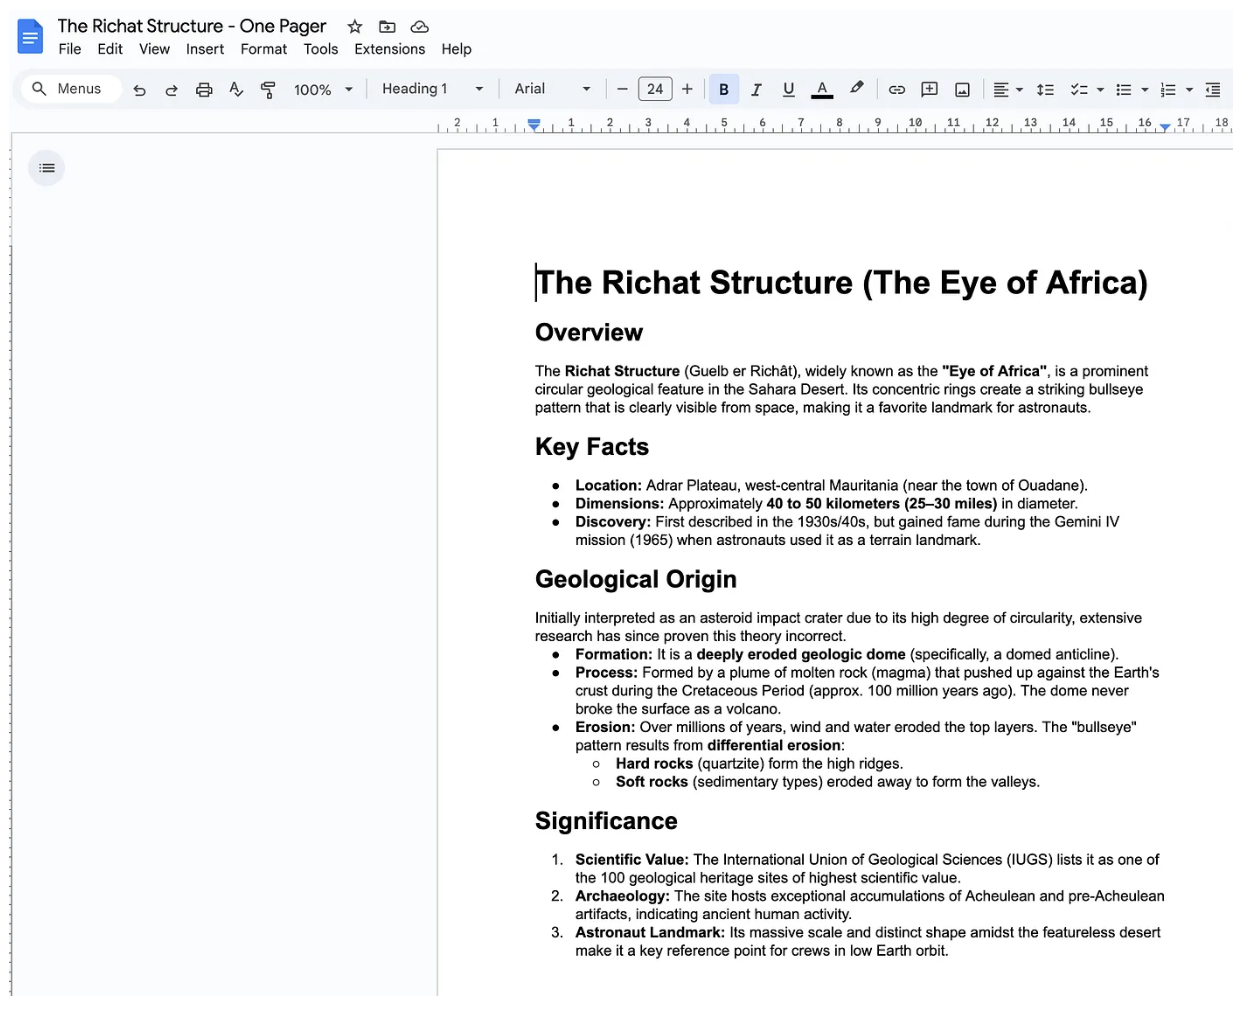
Lookup information on The Richat Structure (Eye of Africa) and create a 1-pager document for me with relevant information about
This prompt first results in Gemini CLI executing the Google Search tool to retrieve the information from the web and once it gets the information, it will synthesize that information into a 1-page document as we requested and create a new Google Doc in Google Drive.
Do visit Google Drive for your account and check out the document that it created. The document below is from a sample run.
Calendar
Use the calendar tools available in the extension to make it function as an executive assistant that manages your time.
You can choose to use the /calendar:get-schedule or just use natural language queries to get the information.
Let's start with the absolute basics to find out what your schedule looks like for today. Give the following prompt and notice that it accessed your calendar for today and gave your calendar events setup for the day (Ensure that you do have a few events set up on your calendar for the day).
What does my schedule look like for today?
You can then try out the following:
Ask for a specific slot of time from your schedule for the day and if you are happy with the slots that it presented, you can even ask it to create an event for the day. Try it out.
Communications: Gmail and Chat
You can use the /gmail:search tool to search emails and allow retrieving context from email threads.
For e.g. if you have specific email that you receive weekly or from some team, etc – try to search for those emails via a prompt like this:
/gmail:search "Project Phoenix updates"
You can then ask it to summarize the specific mail and sent it to a Google Chat space too, via a prompt like this:
Send a chat message to <SPACE_NAME> and highlight the key points from the email.
The above are just some examples. Consider more complex workflows as follows:
Find the 'Project Phoenix Design Doc' in Drive,
read the section on API authentication,
and help me scaffold the middleware based on those specs.
Send a message to the ‘Core Eng' chat space letting them know the deployment is starting now.
The best way to use extensions like this is to try them out with your own files, calendar, gmail, etc and come up with flows that you wanted to automate or simply have a better way to avoid context switching and save your time.
8. Further exploration
This completes our codelab in which we covered what Gemini CLI Extensions are, basic commands to work with them and we explored a couple of Extensions : cloud-run and bigquery-data-analytics Extensions.
Visit the Gemini Extensions Gallery at https://geminicli.com/extensions/ to explore the currently available Extensions (over 100+ at the time of writing) that are available today for your use. Each of the Extensions card contains information, the type of Extension it is (MCP, Context, etc) along with its GitHub repository link and a command to install the extension in your environment.

9. Congratulations
Congratulations, you've successfully understood Gemini CLI Extensions and how to install and use various Gemini CLI Extensions.