
1. Overview
AI agents are rapidly growing in popularity, revolutionizing task automation and decision-making with their ability to operate autonomously, learn, and interact with their environment to achieve goals.
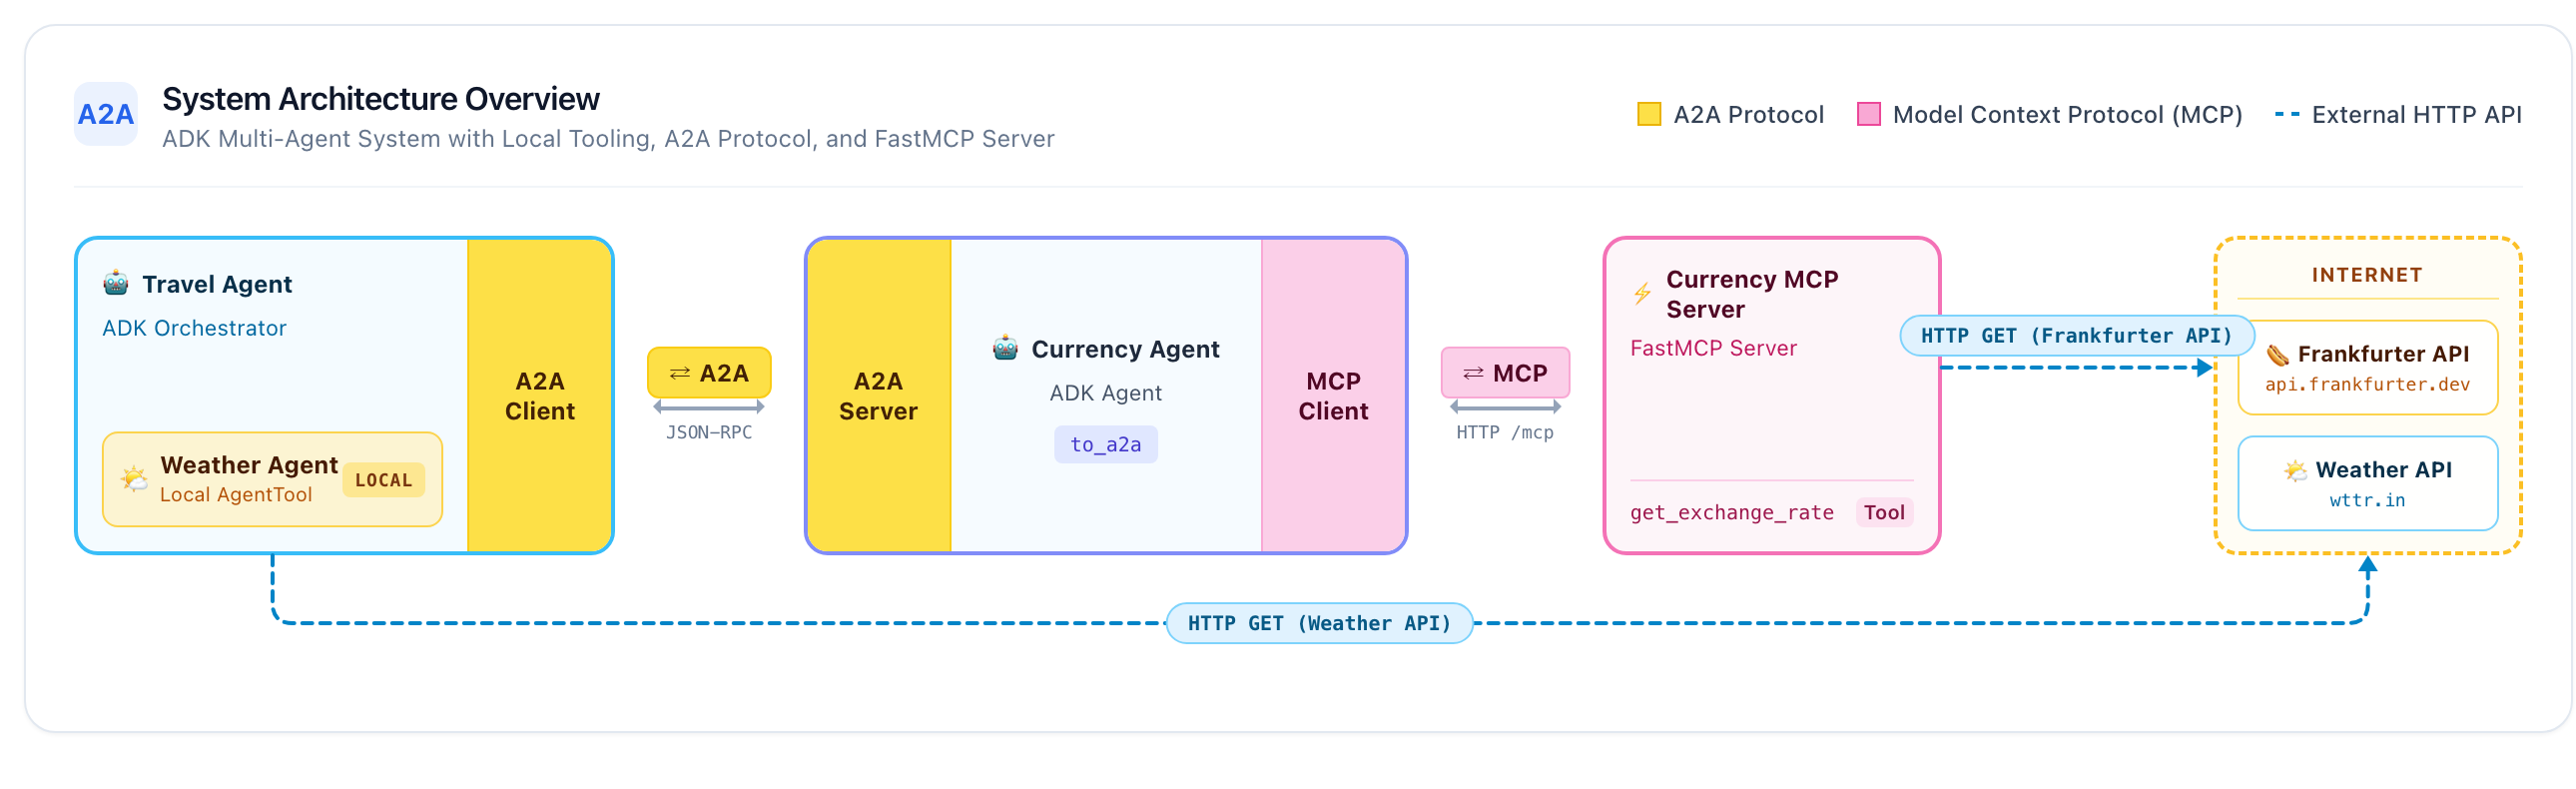
This codelab will help you get started by building an end-to-end multi-agent system. You'll build a currency MCP server, build a currency agent that consumes the MCP server and is exposed over the Agent2Agent (A2A) protocol, build a travel agent with an in-process weather subagent that consumes the currency agent over A2A, and finally deploy all services to Cloud Run.
Core Technologies
Model Context Protocol (MCP)
Model Context Protocol (MCP) is an open protocol that standardizes how applications provide context and tools to LLMs. Think of MCP like a USB-C port for AI applications: it provides a standardized way to connect AI models to external data sources, APIs, and tools.
In this codelab, the currency_mcp_server exposes a get_exchange_rate tool over Streamable HTTP (/mcp), backed by the public Frankfurter API.
Agent Development Kit (ADK)
Agent Development Kit (ADK) is a flexible orchestration framework for developing and deploying AI agents. ADK is model-agnostic, deployment-agnostic, and built for compatibility with other frameworks. ADK makes agent development feel like standard software engineering, making it easy to create, test, and orchestrate complex agentic workflows.
ADK handles user conversations, serves the interactive Web UI, connects to MCP tools via McpToolset, and manages A2A communications.
Agent2Agent (A2A) Protocol
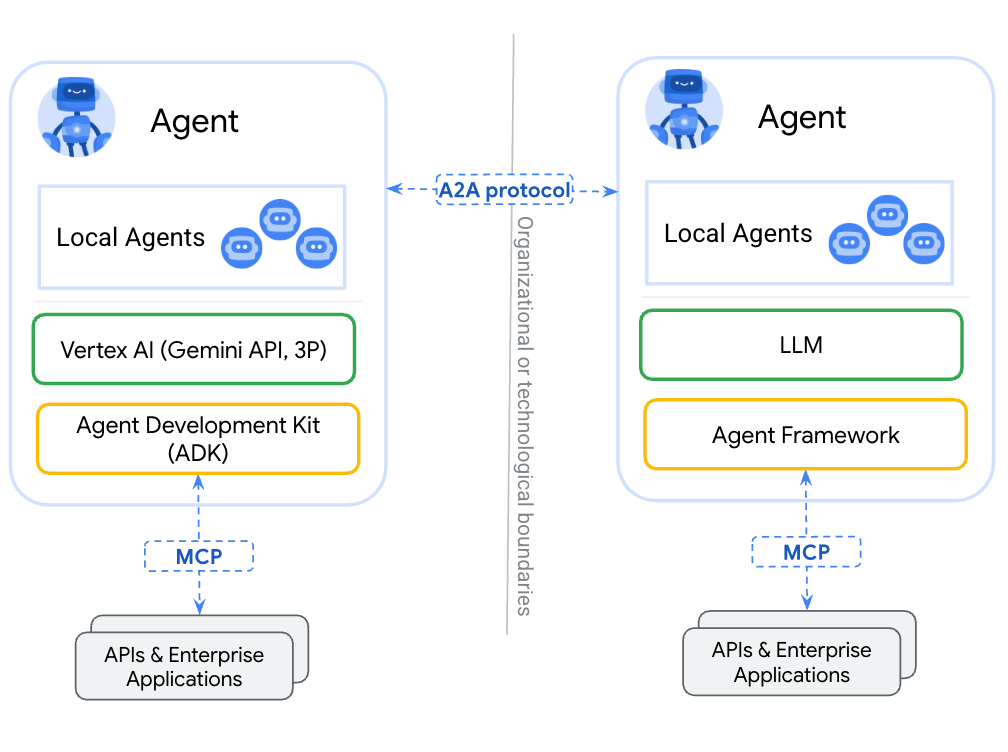
The Agent2Agent (A2A) Protocol is an open standard designed to enable communication and collaboration between AI agents. Just like how MCP standardizes agent-to-tool connections, A2A standardizes agent-to-agent collaboration! In a world where agents are built across diverse frameworks, hosting environments, and organizations, A2A provides a common language for discovery and task delegation.
ADK exposes currency_agent as an A2A service (to_a2a) and allows travel_agent to consume it remotely as an AgentTool (RemoteA2aAgent).
Local Subagents vs. Remote A2A Agents
This architecture highlights a crucial pattern in multi-agent design:
- Local Agent Tool (
weather_agent): Runs in-process within the orchestrator as anAgentTool, with zero network latency or protocol serialization overhead. - Remote Agent Tool (
currency_agent): Runs as an independent microservice, called across the network via the A2A protocol.
What you'll learn
- How to create and test a local MCP server using FastMCP over Streamable HTTP
- How to build an Agent with ADK that uses MCP tools (
McpToolset) - How to expose an ADK agent as an A2A server (
to_a2a) - How to test an A2A server using the A2A Python Client (
a2a.client) - How to build an orchestrator agent that combines local subagent tools with remote A2A agents
- How to run and test the complete multi-agent system locally with the ADK Web UI
- How to containerize and deploy all three components to Google Cloud Run
- (Optional) How to secure all three Cloud Run services with least-privilege service accounts and OIDC ID token authentication
What you'll need
- A browser, such as Chrome.
- A Google Cloud project with billing enabled.
2. Before you begin
Create a project
If you don't have a Google Cloud project, create one.
In the Google Cloud Console, on the project selector page, select or create a Google Cloud project.
Also make sure that billing is enabled for your Cloud project. Learn how to check if billing is enabled on a project.
Activate Cloud Shell
Google Cloud Shell is an interactive, browser-based development environment provided directly within the Google Cloud Console. It's the easiest way to get started with Google Cloud without needing to install tools locally.
Activate Cloud Shell by clicking this link. You can toggle between Cloud Shell Terminal (for running cloud commands) and Editor (for viewing files) by clicking on the corresponding button in Cloud Shell.
Once connected to Cloud Shell, verify that you're authenticated:
gcloud auth list
Confirm that the gcloud command knows about your project:
gcloud config list project
Set your project ID:
export PROJECT_ID=<YOUR_GOOGLE_CLOUD_PROJECT_ID>
gcloud config set project $PROJECT_ID
Enable Cloud APIs
Enable the required APIs for Cloud Run, Cloud Build, Artifact Registry, and Vertex AI:
gcloud services enable run.googleapis.com \
                       cloudbuild.googleapis.com \
                       artifactregistry.googleapis.com \
                       aiplatform.googleapis.com
Get the code
Clone the repository and navigate to the python directory:
git clone https://github.com/meteatamel/getting-started-mcp-a2a-adk.git
cd getting-started-mcp-a2a-adk/python
Install dependencies with uv
uv is a fast Python package and project manager that comes pre-installed in Cloud Shell.
The Python directory is structured as a unified uv
Workspace. Install all dependencies across all workspace members (currency_mcp_server, currency_agent, and travel_agent) into a single virtual environment by running:
uv sync
Configure environment variables
Create a .env file in the python directory configured to use Gemini on Google Cloud:
echo "GOOGLE_GENAI_USE_ENTERPRISE=TRUE" >> .env \
&& echo "GOOGLE_CLOUD_PROJECT=$PROJECT_ID" >> .env \
&& echo "GOOGLE_CLOUD_LOCATION=global" >> .env
3. Create the Currency MCP Server
Before creating your agents, you will first explore the MCP server that exposes the currency conversion tool.
An MCP server lets you write lightweight programs to expose capabilities as tools. An agent (or multiple agents) can then access these tools using the standardized Model Context Protocol.
The FastMCP Python package can be leveraged to create an MCP server that exposes a single tool called get_exchange_rate. The get_exchange_rate tool calls the Frankfurter API to get the current exchange rate between two currencies.
The code for the MCP server is located in currency_mcp_server/server.py:
import asyncio
import logging
import os

import httpx
from fastmcp import FastMCP

logger = logging.getLogger(__name__)
logging.basicConfig(format="[%(levelname)s]: %(message)s", level=logging.INFO)

mcp = FastMCP("Currency MCP Server 💵")


@mcp.tool()
def get_exchange_rate(
    currency_from: str = "USD",
    currency_to: str = "EUR",
    currency_date: str = "latest",
):
    """Use this to get current exchange rate.

    Args:
        currency_from: The currency to convert from (e.g., "USD").
        currency_to: The currency to convert to (e.g., "EUR").
        currency_date: The date for the exchange rate or "latest". Defaults to "latest".

    Returns:
        A dictionary containing the exchange rate data, or an error message if the request fails.
    """
    logger.info(
        f"--- 🛠️ Tool: get_exchange_rate called for converting {currency_from} to {currency_to} ---"
    )
    try:
        response = httpx.get(
            f"https://api.frankfurter.dev/v1/{currency_date}",
            params={"from": currency_from, "to": currency_to},
        )
        response.raise_for_status()

        data = response.json()
        if "rates" not in data:
            logger.error(f"❌ rates not found in response: {data}")
            return {"error": "Invalid API response format."}
        logger.info(f"✅ API response: {data}")
        return data
    except httpx.HTTPError as e:
        logger.error(f"❌ API request failed: {e}")
        return {"error": f"API request failed: {e}"}
    except ValueError:
        logger.error("❌ Invalid JSON response from API")
        return {"error": "Invalid JSON response from API."}


if __name__ == "__main__":
    port = int(os.getenv("PORT", 8080))
    logger.info(f"🚀 MCP server started on port {port}")
    # Could also use 'sse' transport, host="0.0.0.0" required for Cloud Run.
    asyncio.run(
        mcp.run_async(
            transport="http",
            host="0.0.0.0",
            port=port,
        )
    )
Start the MCP server locally
Start the MCP server in your terminal:
uv run python currency_mcp_server/server.py
The server starts on port 8080 with the Streamable HTTP endpoint available at /mcp (http://localhost:8080/mcp).
Test the MCP server
Open a second terminal window (leaving the MCP server running in the first), navigate to the python folder (cd getting-started-mcp-a2a-adk/python), and run the test script:
uv run python currency_mcp_server/test_server.py
The test script connects to the MCP endpoint using FastMCP's Client, lists the tools, and invokes get_exchange_rate:
Connecting to MCP server at: http://localhost:8080/mcp
--- 🛠️  Tool found: get_exchange_rate ---
--- 🪛  Calling get_exchange_rate tool for USD to EUR ---
--- ✅  Success: {"amount":1.0,"base":"USD","date":"2026-09-29","rates":{"EUR":0.84919}} ---
Awesome! You have a working MCP server exposing a live currency tool. Keep this terminal open for the next steps.
4. Create the Currency Agent with ADK
Now it is time to create the Currency Agent using Agent Development Kit (ADK).
ADK provides built-in support for MCP tools through the McpToolset class. The Currency Agent connects to our MCP server using StreamableHTTPConnectionParams.
Take a look at the currency agent definition in currency_agent/agent.py:
import logging
import os
from urllib.parse import urlparse

from dotenv import load_dotenv
from google.adk.agents import LlmAgent
from google.adk.a2a.utils.agent_to_a2a import to_a2a
from google.adk.tools.mcp_tool import McpToolset, StreamableHTTPConnectionParams

try:
    from currency_agent.auth import get_mcp_http_client_factory
except ImportError:
    from auth import get_mcp_http_client_factory

logger = logging.getLogger(__name__)
logging.basicConfig(format="[%(levelname)s]: %(message)s", level=logging.INFO)

load_dotenv()

SYSTEM_INSTRUCTION = (
    "You are a specialized assistant for currency conversions. "
    "Your sole purpose is to use the 'get_exchange_rate' tool to answer questions about currency exchange rates. "
    "If the user asks about anything other than currency conversion or exchange rates, "
    "politely state that you cannot help with that topic and can only assist with currency-related queries. "
    "Do not attempt to answer unrelated questions or use tools for other purposes."
)

mcp_server_url = os.getenv("MCP_SERVER_URL", "http://localhost:8080/mcp")
if not mcp_server_url.endswith("/mcp"):
    mcp_server_url = f"{mcp_server_url.rstrip('/')}/mcp"

logger.info(f"--- 🔧 Loading MCP tools from MCP Server at {mcp_server_url}... ---")
logger.info("--- 🤖 Creating ADK Currency Agent... ---")

root_agent = LlmAgent(
    model="gemini-3.8-flash",
    name="currency_agent",
    description="An agent that can help with currency conversions",
    instruction=SYSTEM_INSTRUCTION,
    tools=[
        McpToolset(
            connection_params=StreamableHTTPConnectionParams(
                url=mcp_server_url,
                # Uncomment to enable Cloud Run IAM authentication:
                # httpx_client_factory=get_mcp_http_client_factory(mcp_server_url),
            )
        )
    ],
)
Notice how McpToolset automatically discovers and loads the get_exchange_rate tool directly from the running MCP server over HTTP.
Test the Currency Agent with ADK Web UI
You can test the agent in isolation using ADK's development web interface. In your second terminal, run:
uv run adk web --allow_origins "*" currency_agent
Click Web Preview in Cloud Shell (port 8000) to open the ADK Web UI.
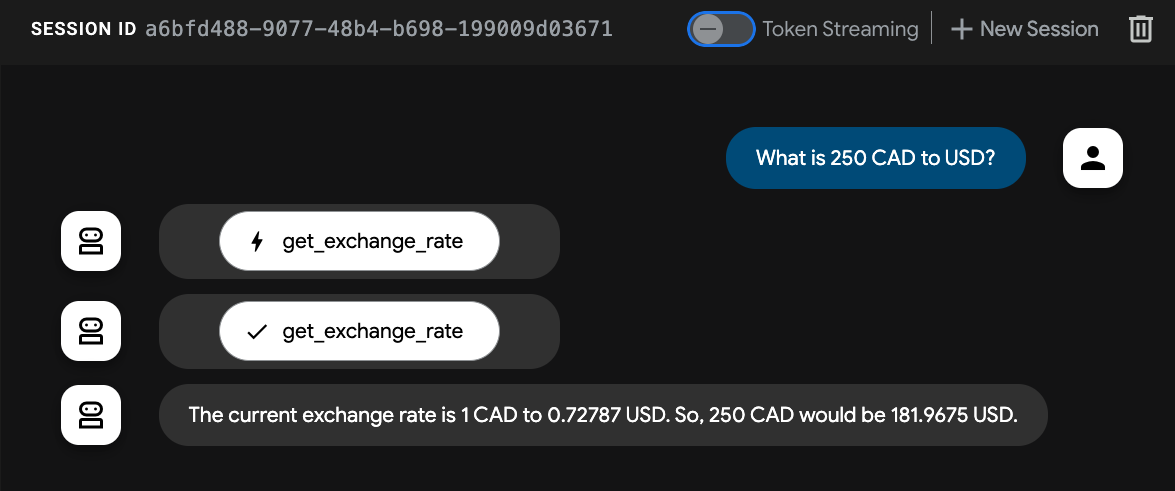
Ask the agent:
"What is 250 USD in EUR?"
You'll see the agent invoke the get_exchange_rate MCP tool and return the converted amount. Stop the adk web process using Ctrl+C before proceeding.
5. Agent2Agent (A2A) Protocol
The Agent2Agent (A2A) Protocol is an open standard designed to enable communication and collaboration between AI agents.
In modern multi-agent systems, agents are often built using different frameworks (ADK, LangChain, CrewAI, AutoGen) and deployed on different infrastructure. A2A breaks down these silos by defining a standardized communication contract.
Key Concepts of A2A
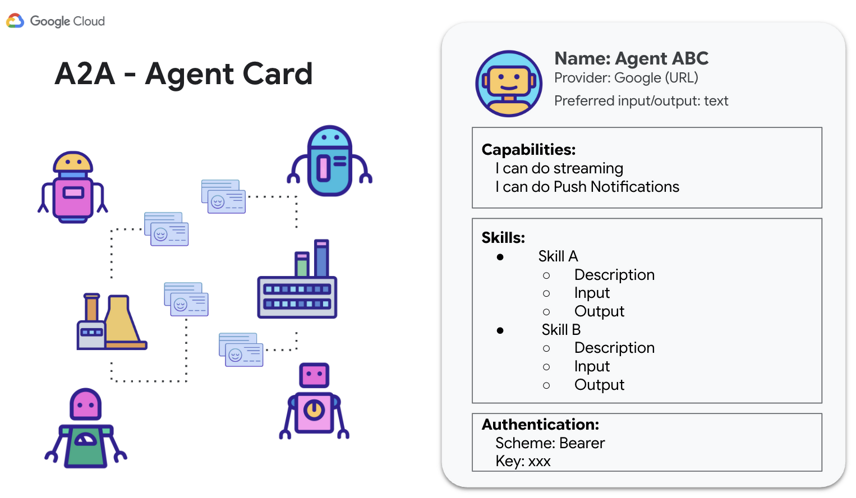
- Agent Discovery (Agent Card): Every A2A-compliant agent advertises its capabilities, supported I/O modes, authentication requirements, and skills via a standard JSON file hosted at
/.well-known/agent-card.json. - Agent Skills (
AgentSkill): Specific capabilities or tools that the agent can execute. Other agents read these skills to decide when to delegate tasks. - JSON-RPC Communication: Agents exchange structured messages, tasks, and artifacts over standard transports such as HTTP JSON-RPC 2.0.
In the next step, you'll expose our ADK Currency Agent as an A2A server so other agents can discover it and delegate currency conversion tasks to it!
6. Expose the Currency Agent as an A2A Server
ADK makes turning any LlmAgent into an A2A-compatible server effortless with the to_a2a() utility function.
Review the bottom portion of currency_agent/agent.py:
# Make the agent A2A-compatible
PORT = int(os.getenv("PORT", 8081))
AGENT_URL = os.getenv("AGENT_URL")

if AGENT_URL:
    parsed = urlparse(AGENT_URL)
    protocol = parsed.scheme or "https"
    host = parsed.hostname
    port = parsed.port or 443
else:
    protocol = "http"
    host = "localhost"
    port = PORT

a2a_app = to_a2a(root_agent, host=host, port=port, protocol=protocol)

if __name__ == "__main__":
    import uvicorn

    logger.info(f"🚀 Starting currency_agent on port {PORT}")
    uvicorn.run(a2a_app, host="0.0.0.0", port=PORT)
The to_a2a() helper automatically:
- Inspects the
LlmAgent's tools and instructions. - Generates an A2A
AgentCarddescribing its skills (e.g.currency_agent-get_exchange_rate). - Wraps the agent in a FastAPI application (
a2a_app) supporting JSON-RPC endpoints. - Dynamically configures the advertised
urlin the Agent Card based onAGENT_URL(or localhost).
Start the Currency Agent A2A Server
In your second terminal, start the currency agent:
uv run python currency_agent/agent.py
The server starts on port 8081:
[INFO]: --- 🔧 Loading MCP tools from MCP Server at http://localhost:8080/mcp... ---
[INFO]: --- 🤖 Creating ADK Currency Agent... ---
[INFO]: 🚀 Starting currency_agent on port 8081
INFO:     Started server process
INFO:     Waiting for application startup.
INFO:     Application startup complete.
INFO:     Uvicorn running on http://0.0.0.0:8081 (Press CTRL+C to quit)
Inspect the Agent Card
Open a third terminal in Cloud Shell (or use Web Preview on port 8081) and inspect the Agent Card endpoint (http://localhost:8081/.well-known/agent-card.json):
curl -s http://localhost:8081/.well-known/agent-card.json | jq .
You will see the auto-generated JSON metadata:
{
  "name": "currency_agent",
  "description": "An agent that can help with currency conversions",
  "supportedInterfaces": [
    {
      "url": "http://localhost:8081",
      "protocolBinding": "JSONRPC",
      "protocolVersion": "1.0"
    }
  ],
  "version": "0.0.1",
  "capabilities": {
    "streaming": true
  },
  "defaultInputModes": [
    "text/plain"
  ],
  "defaultOutputModes": [
    "text/plain"
  ],
  "skills": [
    {
      "id": "currency_agent",
      "name": "model",
      "description": "An agent that can help with currency conversions",
      "tags": [
        "llm"
      ]
    },
    {
      "id": "currency_agent-get_exchange_rate",
      "name": "get_exchange_rate",
      "description": "Use this to get current exchange rate.",
      "tags": [
        "llm",
        "tools"
      ]
    }
  ]
}
Test with the A2A Client
In your third terminal, navigate to the python folder (cd getting-started-mcp-a2a-adk/python) and test the A2A endpoint using the dedicated A2A test client script:
uv run python currency_agent/test_a2aclient.py
The client resolves the agent card using A2ACardResolver and dispatches a JSON-RPC message:
🔄 Fetching the agent card at http://localhost:8081
✅ Successfully fetched the agent card
====================================================
                     AgentCard
====================================================
Name        : currency_agent
Description : An agent that can help with currency conversions
Interfaces  : [0] http://localhost:8081  (JSONRPC 1.0)
Skills      : currency_agent, currency_agent-get_exchange_rate
====================================================
🔄 Initializing a non-streaming client
Sending request: "how much is 100 USD in GBP?"
Response:
100 USD is currently equal to approximately 73.37 GBP...
The Currency Agent is now operating as a fully functional A2A server!
7. Build the Travel Agent
Now you will build the orchestrating Travel Agent. This agent showcases how an ADK agent can effortlessly combine two different tool paradigms:
- Local Agent Tool (
weather_agent): An in-process ADK subagent running in the same Python runtime, avoiding any network or serialization latency. - Remote Agent Tool (
currency_agent): An external agent connected over the network via the A2A protocol usingRemoteA2aAgent.
                    +-----------------------------+
                    |        travel_agent         |
                    | (Orchestrator with Web UI)  |
                    +--------------+--------------+
                                   |
             +---------------------+---------------------+
             | (In-process call)                         | (A2A Network Hop)
             v                                           v
+-------------------------+                 +-------------------------+
|   weather_agent         |                 |   currency_agent        |
|  (Local AgentTool)      |                 |  (Remote A2A Agent)     |
|  Calls wttr.in API      |                 |  Calls Currency MCP Svc |
+-------------------------+                 +-------------------------+
1. The Local Weather Subagent
Take a look at travel_agent/subagents/weather_agent.py:
import logging
import httpx
from google.adk.agents import LlmAgent

logger = logging.getLogger(__name__)

SYSTEM_INSTRUCTION = (
    "You are a specialized assistant for providing weather forecasts and conditions for travel destinations. "
    "Your sole purpose is to use the 'get_weather' tool to fetch weather information. "
    "Provide clear, concise summaries of current weather conditions, temperatures, and forecasts to help travelers pack and plan."
)


def get_weather(location: str = "London") -> dict:
    """Gets the current weather and forecast for a given location or city."""
    logger.info(f"--- 🌤️ Tool: get_weather called for {location} ---")
    try:
        response = httpx.get(
            f"https://wttr.in/{location}?format=j1",
            headers={"User-Agent": "curl/7.68.0"},
            timeout=8.0,
        )
        response.raise_for_status()
        data = response.json()
        current = data["current_condition"][0]
        return {
            "location": location,
            "condition": current.get("weatherDesc", [{}])[0].get("value", "Unknown"),
            "temperature_celsius": f"{current.get('temp_C', 'N/A')}°C",
            "temperature_fahrenheit": f"{current.get('temp_F', 'N/A')}°F",
            "humidity": f"{current.get('humidity', 'N/A')}%",
            "wind_speed_kmph": f"{current.get('windspeedKmph', 'N/A')} km/h",
        }
    except Exception as e:
        logger.warning(f"⚠️ Weather lookup failed: {e}. Returning simulated estimate.")
        return {
            "location": location,
            "condition": "Partly Cloudy",
            "temperature_celsius": "20°C",
            "temperature_fahrenheit": "68°F",
            "humidity": "55%",
            "wind_speed_kmph": "10 km/h",
            "note": f"Live data unavailable ({e}); showing estimated conditions.",
        }


weather_agent = LlmAgent(
    model="gemini-3.8-flash",
    name="weather_agent",
    description="A local specialist agent that provides current weather reports and forecasts for travel destinations.",
    instruction=SYSTEM_INSTRUCTION,
    tools=[get_weather],
)
The weather agent is an LlmAgent with a function tool that fetches real-time weather from wttr.in with a resilient fallback.
2. The Travel Agent Orchestrator
Now look at travel_agent/agent.py:
import logging
import os

from dotenv import load_dotenv
from google.adk.agents import LlmAgent
from google.adk.agents.remote_a2a_agent import AGENT_CARD_WELL_KNOWN_PATH, RemoteA2aAgent
from google.adk.tools.agent_tool import AgentTool

try:
    from travel_agent.subagents.weather_agent import weather_agent
    from travel_agent.auth import get_a2a_http_client
except ImportError:
    from subagents.weather_agent import weather_agent
    from auth import get_a2a_http_client

logger = logging.getLogger(__name__)
logging.basicConfig(format="[%(levelname)s]: %(message)s", level=logging.INFO)

load_dotenv()

SYSTEM_INSTRUCTION = (
    "You are a helpful travel assistant. You help users plan trips, recommend places, "
    "and answer travel-related questions.\n\n"
    "- Whenever a user asks about currency exchange rates or money conversions, "
    "delegate the request to the 'currency_agent' tool.\n"
    "- Whenever a user asks about the weather, climate, or forecasts for a destination, "
    "delegate the request to the 'weather_agent' tool."
)

CURRENCY_AGENT_URL = os.getenv("CURRENCY_AGENT_URL", "http://localhost:8081").rstrip("/")

logger.info(
    "--- 🔗 Connecting to Remote A2A Currency Agent at %s... ---",
    CURRENCY_AGENT_URL,
)

currency_remote_agent = RemoteA2aAgent(
    name="currency_agent",
    agent_card=f"{CURRENCY_AGENT_URL}{AGENT_CARD_WELL_KNOWN_PATH}",
    description="An agent that can help with currency conversions and exchange rates.",
    # Uncomment to enable Cloud Run IAM authentication:
    # httpx_client=get_a2a_http_client(CURRENCY_AGENT_URL),
)

logger.info("--- 🤖 Creating ADK Travel Agent... ---")

root_agent = LlmAgent(
    model="gemini-3.8-flash",
    name="travel_agent",
    description="A travel assistant that can help plan trips, check weather forecasts via the local weather agent, and convert currencies via the remote currency agent.",
    instruction=SYSTEM_INSTRUCTION,
    tools=[
        AgentTool(agent=currency_remote_agent),
        AgentTool(agent=weather_agent),
    ],
)

if __name__ == "__main__":
    import uvicorn
    from google.adk.cli.fast_api import get_fast_api_app

    PORT = int(os.getenv("PORT", 8082))
    logger.info(f"🚀 Starting travel_agent Web UI on port {PORT}")
    app = get_fast_api_app(web=True, allow_origins=["*"], agents_dir=os.path.dirname(__file__) or ".")
    uvicorn.run(app, host="0.0.0.0", port=PORT)
Key highlights:
RemoteA2aAgentfetches the Currency Agent's card fromhttp://localhost:8081/.well-known/agent-card.json.- Both
currency_remote_agentandweather_agentare wrapped using ADK'sAgentTool. - Running
travel_agent/agent.pydirectly boots the ADK Web UI on port8082usingget_fast_api_app(web=True).
8. Run and Test the Multi-Agent System Locally
You now have all three components ready! Let's run and test the complete system locally in Cloud Shell.
Running all three services
Ensure the services are running across three separate terminal tabs in Cloud Shell (from the getting-started-mcp-a2a-adk/python directory) in the following order:
Terminal 1 (Currency MCP Server):
uv run python currency_mcp_server/server.py
(Running on port 8080)
Terminal 2 (Currency A2A Agent):
uv run python currency_agent/agent.py
(Running on port 8081)
Terminal 3 (Travel Agent with Web UI):
uv run python travel_agent/agent.py
(Running on port 8082)
Test via the ADK Web UI
Click Web Preview in Cloud Shell and select Change port to preview port 8082.
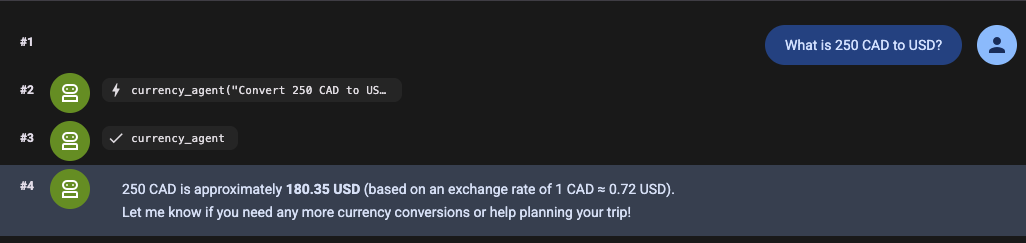
Ask the Travel Agent a compound question requiring both tools:
"I'm planning a trip to London. What is the weather like and how much is 200 EUR in GBP?"
Watch the execution flow:
- The Travel Agent receives the request in the Web UI.
- It delegates the weather question in-process to the local
weather_agent, which fetches current conditions fromwttr.in. - It delegates the currency conversion over the A2A protocol to
currency_agenton port 8081. - The
currency_agentcalls thecurrency_mcp_serveron port 8080 over MCP to fetch the exchange rate. - All results are synthesized and returned to you in a unified, helpful answer!
Test via the Command Line
You can also test queries directly from the CLI without opening Web Preview:
uv run adk run travel_agent "What is the weather in London and how much is 100 USD in EUR?"
Now that everything works seamlessly in Cloud Shell, let's deploy the entire system to Google Cloud Run!
9. Deploy the Multi-Agent System to Cloud Run
Each component has its own Dockerfile and self-contained pyproject.toml so it can be built and deployed independently to Cloud Run.
Using gcloud, you will deploy each service and automatically wire their URLs together.
Set environment variables
Set your Cloud project ID and target region:
export PROJECT_ID=<YOUR_GOOGLE_CLOUD_PROJECT_ID>
export REGION=europe-west1
Step 1: Deploy the Currency MCP Server
Deploy the MCP server directly from source:
# 1. Deploy MCP server
gcloud run deploy currency-mcp-server \
  --source currency_mcp_server \
  --region $REGION \
  --allow-unauthenticated

# 2. Capture the deployed MCP server URL
MCP_SERVER_URL=$(gcloud run services describe currency-mcp-server --region $REGION --format='value(status.url)')/mcp
echo "MCP Server URL: $MCP_SERVER_URL"
Step 2: Deploy the Currency Agent
Since currency-agent's public URL is assigned on its first deployment, deploy the service first, capture its URL, and update its AGENT_URL environment variable so its A2A Agent Card advertises the correct public HTTPS address:
# 1. Deploy Currency Agent connected to the deployed MCP Server
gcloud run deploy currency-agent \
  --source currency_agent \
  --region $REGION \
  --allow-unauthenticated \
  --update-env-vars MCP_SERVER_URL="$MCP_SERVER_URL",GOOGLE_GENAI_USE_ENTERPRISE="true",GOOGLE_CLOUD_PROJECT="$PROJECT_ID",GOOGLE_CLOUD_LOCATION="global"

# 2. Capture its assigned Cloud Run URL
CURRENCY_AGENT_URL=$(gcloud run services describe currency-agent --region $REGION --format='value(status.url)')
echo "Currency Agent URL: $CURRENCY_AGENT_URL"

# 3. Update AGENT_URL so the agent advertises its public HTTPS endpoint in its Agent Card
gcloud run services update currency-agent \
  --region $REGION \
  --update-env-vars AGENT_URL="$CURRENCY_AGENT_URL"
Step 3: Deploy the Travel Agent
Now deploy the Travel Agent, configuring it with the CURRENCY_AGENT_URL:
# 1. Deploy Travel Agent (with ADK Web UI) connected to Currency Agent
gcloud run deploy travel-agent \
  --source travel_agent \
  --region $REGION \
  --allow-unauthenticated \
  --update-env-vars CURRENCY_AGENT_URL="$CURRENCY_AGENT_URL",GOOGLE_GENAI_USE_ENTERPRISE="true",GOOGLE_CLOUD_PROJECT="$PROJECT_ID",GOOGLE_CLOUD_LOCATION="global"

# 2. Capture its assigned Cloud Run URL
TRAVEL_AGENT_URL=$(gcloud run services describe travel-agent --region $REGION --format='value(status.url)')
echo "Travel Agent URL: $TRAVEL_AGENT_URL"
10. Test the Multi-Agent System in Cloud Run
With all three microservices deployed, let's verify each layer in Cloud Run.
1. Test the remote MCP server
Test the deployed Cloud Run MCP server from Cloud Shell:
MCP_SERVER_URL="$MCP_SERVER_URL" uv run python currency_mcp_server/test_server.py
You should see the tool listed and successfully invoked on Cloud Run.
2. Test the Currency Agent over A2A
Test the deployed Currency Agent using the A2A test client:
AGENT_URL="$CURRENCY_AGENT_URL" uv run python currency_agent/test_a2aclient.py
The client will fetch the remote Agent Card from Cloud Run and exchange messages over HTTPS JSON-RPC.
3. Test the Travel Agent Web UI in Cloud Run
Open $TRAVEL_AGENT_URL in your browser!
The complete ADK Web UI is served directly from Cloud Run. Try asking:
"I'm planning a trip to Tokyo. What is the weather like and how much is 500 USD in JPY?"
[Browser]
   │
   ▼ (HTTPS)
[Cloud Run: travel-agent]
   ├──> Local in-process tool: weather_agent (wttr.in)
   └──> A2A JSON-RPC (HTTPS)
           │
           ▼
        [Cloud Run: currency-agent]
           └──> MCP Streamable HTTP (HTTPS)
                   │
                   ▼
                [Cloud Run: currency-mcp-server] (Frankfurter API)
All three services scale independently on serverless infrastructure, communicating seamlessly via open protocols!
11. (Optional) Secure All Cloud Run Services with IAM
So far, all three Cloud Run services were deployed with --allow-unauthenticated for quick testing. In a production multi-agent architecture, internal MCP servers and A2A agents should never be publicly accessible—each service should run under its own least-privilege identity and authenticate downstream calls using Google-signed OpenID Connect (OIDC) ID tokens.
In this optional step, you will:
- Create dedicated, least-privilege Service Accounts for each service.
- Uncomment OIDC ID token authentication in
currency_agentandtravel_agentusing Cloud Shell Editor. - Lock down all three Cloud Run services (
--no-allow-unauthenticated) with hop-by-hoproles/run.invokerIAM permissions. - Test the locked-down multi-agent system from Cloud Shell and Web Preview.
[Cloud Shell / Web Preview]
   │  gcloud run services proxy / gcloud auth print-identity-token
   │  IAM: Your Google Cloud user -> roles/run.invoker on travel-agent
   ▼
[Cloud Run: travel-agent]  (Identity: travel-agent-sa + roles/aiplatform.user)
   │  Authorization: Bearer <OIDC ID Token for currency-agent>
   │  IAM: travel-agent-sa -> roles/run.invoker on currency-agent
   ▼
[Cloud Run: currency-agent]  (Identity: currency-agent-sa + roles/aiplatform.user)
   │  Authorization: Bearer <OIDC ID Token for currency-mcp-server>
   │  IAM: currency-agent-sa -> roles/run.invoker on currency-mcp-server
   ▼
[Cloud Run: currency-mcp-server]  (Identity: currency-mcp-sa, zero project roles)
Step 1: Create Least-Privilege Service Accounts
Instead of sharing the default Compute Engine service account, create a dedicated service account for each microservice:
gcloud iam service-accounts create currency-mcp-sa \
  --display-name="Currency MCP Server SA"

gcloud iam service-accounts create currency-agent-sa \
  --display-name="Currency Agent SA"

gcloud iam service-accounts create travel-agent-sa \
  --display-name="Travel Agent SA"
Grant roles/aiplatform.user only to currency-agent-sa and travel-agent-sa so they can call Gemini on Vertex AI (currency-mcp-sa only calls the public Frankfurter API and needs zero project roles):
gcloud projects add-iam-policy-binding $PROJECT_ID \
  --member="serviceAccount:currency-agent-sa@$PROJECT_ID.iam.gserviceaccount.com" \
  --role="roles/aiplatform.user"

gcloud projects add-iam-policy-binding $PROJECT_ID \
  --member="serviceAccount:travel-agent-sa@$PROJECT_ID.iam.gserviceaccount.com" \
  --role="roles/aiplatform.user"
Step 2: Inspect auth.py and Uncomment OIDC Authentication
The repository includes a small auth.py helper inside both currency_agent/ and travel_agent/. Open Cloud Shell Editor and take a look at python/currency_agent/auth.py:
class GoogleIdTokenAuth(httpx.Auth):
    """Attaches a Google-signed OIDC ID token to outgoing Cloud Run HTTP requests."""

    def __init__(self, target_url: str):
        parsed = urlparse(target_url)
        # Cloud Run OIDC audience must be the root service origin (without /mcp)
        self.audience = f"{parsed.scheme}://{parsed.netloc}"
        self._creds = None

    def auth_flow(self, request: httpx.Request):
        if self._creds is None:
            self._creds = id_token.fetch_id_token_credentials(self.audience)
        if not self._creds.valid:
            self._creds.refresh(Request())
        request.headers["Authorization"] = f"Bearer {self._creds.token}"
        yield request
Notice three key details:
- Automatic token refresh: Cloud Run OIDC ID tokens expire after 1 hour. Using an
httpx.Authflow refreshes expired tokens automatically per HTTP request without dropping the active MCP or A2A client session. - Root URL audience: Even though
MCP_SERVER_URLends with/mcp, Cloud Run requires the OIDC tokenaudienceto be the root service origin (https://currency-mcp-server-...run.app). - Local-dev friendly:
get_mcp_http_client_factory()andget_a2a_http_client()only attach OIDC auth forhttps://URLs, sohttp://localhostdevelopment continues working unchanged.
1. Uncomment MCP auth in currency_agent/agent.py
In Cloud Shell Editor, open python/currency_agent/agent.py and uncomment the httpx_client_factory line inside StreamableHTTPConnectionParams:
    tools=[
        McpToolset(
            connection_params=StreamableHTTPConnectionParams(
                url=mcp_server_url,
                # Uncomment to enable Cloud Run IAM authentication:
                httpx_client_factory=get_mcp_http_client_factory(mcp_server_url),
            )
        )
    ],
2. Uncomment A2A auth in travel_agent/agent.py
Next, open python/travel_agent/agent.py and uncomment the httpx_client line inside RemoteA2aAgent (which uses that client for both fetching /.well-known/agent-card.json and sending JSON-RPC messages):
currency_remote_agent = RemoteA2aAgent(
    name="currency_agent",
    agent_card=f"{CURRENCY_AGENT_URL}{AGENT_CARD_WELL_KNOWN_PATH}",
    description="An agent that can help with currency conversions and exchange rates.",
    # Uncomment to enable Cloud Run IAM authentication:
    httpx_client=get_a2a_http_client(CURRENCY_AGENT_URL),
)
Step 3: Lock Down All Three Cloud Run Services & Grant Invoker Roles
Switch back to the Cloud Shell Terminal (cd ~/getting-started-mcp-a2a-adk/python) to lock down all three services.
1. Lock down currency-mcp-server
Since currency_mcp_server has no code changes, update its service account and remove public allUsers access in place, then grant currency-agent-sa permission to invoke it:
# Attach dedicated service account
gcloud run services update currency-mcp-server \
  --region $REGION \
  --service-account="currency-mcp-sa@$PROJECT_ID.iam.gserviceaccount.com"

# Remove public unauthenticated access
gcloud run services remove-iam-policy-binding currency-mcp-server \
  --region $REGION \
  --member="allUsers" \
  --role="roles/run.invoker"

# Allow currency-agent to invoke currency-mcp-server
gcloud run services add-iam-policy-binding currency-mcp-server \
  --region $REGION \
  --member="serviceAccount:currency-agent-sa@$PROJECT_ID.iam.gserviceaccount.com" \
  --role="roles/run.invoker"
2. Redeploy and lock down currency-agent
Redeploy currency-agent with your uncommented auth line, --no-allow-unauthenticated, and currency-agent-sa, then grant travel-agent-sa permission to invoke it:
gcloud run deploy currency-agent \
  --source currency_agent \
  --region $REGION \
  --no-allow-unauthenticated \
  --service-account="currency-agent-sa@$PROJECT_ID.iam.gserviceaccount.com"

# Allow travel-agent to invoke currency-agent
gcloud run services add-iam-policy-binding currency-agent \
  --region $REGION \
  --member="serviceAccount:travel-agent-sa@$PROJECT_ID.iam.gserviceaccount.com" \
  --role="roles/run.invoker"
3. Redeploy and lock down travel-agent
Redeploy travel-agent with your uncommented auth line, --no-allow-unauthenticated, and travel-agent-sa:
gcloud run deploy travel-agent \
  --source travel_agent \
  --region $REGION \
  --no-allow-unauthenticated \
  --service-account="travel-agent-sa@$PROJECT_ID.iam.gserviceaccount.com"
Finally, grant your Google Cloud user account roles/run.invoker so you can test the services from Cloud Shell:
USER_EMAIL=$(gcloud config get-value account)

for SERVICE in currency-mcp-server currency-agent travel-agent; do
  gcloud run services add-iam-policy-binding $SERVICE \
    --region $REGION \
    --member="user:$USER_EMAIL" \
    --role="roles/run.invoker"
done
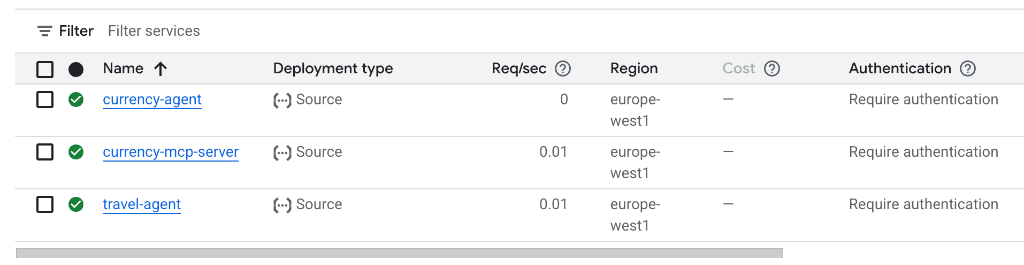
In the Cloud Run Console, you can see that all three services now show Require authentication:
Step 4: Verify Unauthenticated Requests Are Blocked
Confirm that calling the services without an identity token is now rejected.
- Check the Agent Card endpoint with
curl:
curl -i "$CURRENCY_AGENT_URL/.well-known/agent-card.json"
You should see an HTTP 403 Forbidden response from Google Frontend rejecting the unauthenticated call.
- Run
test_server.pywithoutID_TOKEN:
MCP_SERVER_URL="$MCP_SERVER_URL" uv run python currency_mcp_server/test_server.py
Without an identity token, the MCP client connection fails:
Connecting to MCP server at: https://currency-mcp-server-...run.app/mcp
...
mcp.shared.exceptions.MCPError: Server returned an error response
- Run
test_a2aclient.pywithoutID_TOKEN:
AGENT_URL="$CURRENCY_AGENT_URL" uv run python currency_agent/test_a2aclient.py
Without an identity token, fetching the Agent Card fails with HTTP 403:
🔄 Fetching the agent card at https://currency-agent-...run.app
--- ❌ An error occurred: Failed to fetch agent card from https://currency-agent-...run.app/.well-known/agent-card.json (HTTP 403): Client error '403 Forbidden' for url 'https://currency-agent-...run.app/.well-known/agent-card.json'
Step 5: Test Authenticated Access End-to-End
1. Test the MCP server and A2A agent from Cloud Shell
Both test scripts read an optional ID_TOKEN environment variable. Generate an identity token with gcloud and test both services:
ID_TOKEN=$(gcloud auth print-identity-token) \
  MCP_SERVER_URL="$MCP_SERVER_URL" \
  uv run python currency_mcp_server/test_server.py
ID_TOKEN=$(gcloud auth print-identity-token) \
  AGENT_URL="$CURRENCY_AGENT_URL" \
  uv run python currency_agent/test_a2aclient.py
Both tests succeed—and behind the scenes, currency-agent now authenticates to currency-mcp-server automatically using currency-agent-sa's OIDC ID token!
2. Access the Authenticated Travel Agent Web UI
Because web browsers do not automatically attach Cloud Run IAM bearer tokens, start the Cloud Run authentication proxy in Cloud Shell:
gcloud run services proxy travel-agent --region $REGION --port 8080
Click Web Preview in Cloud Shell, select Preview on port 8080, and ask:
"I'm planning a trip to Tokyo. What is the weather like and how much is 500 USD in JPY?"
Your request now flows through the authenticated proxy to travel-agent, across an IAM-authenticated A2A call to currency-agent, and down to an IAM-authenticated MCP call on currency-mcp-server! Press Ctrl+C in Cloud Shell when finished to stop the proxy.
12. Congratulations & Clean Up
What you've accomplished
Congratulations! You have built and deployed a production-grade multi-agent system:
- Model Context Protocol (MCP): Created a FastMCP server exposing live API tools over Streamable HTTP.
- Agent Development Kit (ADK): Built modular agents using
LlmAgent, connected MCP tools withMcpToolset, and hosted the ADK Web UI. - Agent2Agent (A2A) Protocol: Exposed an agent as an A2A service (
to_a2a), published Agent Cards (agent-card.json), and consumed remote agents usingRemoteA2aAgent. - Multi-Agent Architecture: Combined local in-process subagents (
weather_agent) with distributed remote agents (currency_agent). - Cloud Run Serverless Deployment & IAM Security: Containerized and deployed all three services with automated configuration wiring, and optionally locked them down with least-privilege service accounts and OIDC ID token authentication.
For the full code (including both the Python and Java implementations) and future updates, visit the getting-started-mcp-a2a-adk repository.
Clean up
To avoid incurring charges to your Google Cloud account for the Cloud Run services created in this codelab:
Delete the deployed Cloud Run services:
gcloud run services delete currency-mcp-server --region $REGION --quiet
gcloud run services delete currency-agent --region $REGION --quiet
gcloud run services delete travel-agent --region $REGION --quiet
If you completed the optional IAM authentication step, also delete the custom service accounts:
gcloud iam service-accounts delete currency-mcp-sa@$PROJECT_ID.iam.gserviceaccount.com --quiet
gcloud iam service-accounts delete currency-agent-sa@$PROJECT_ID.iam.gserviceaccount.com --quiet
gcloud iam service-accounts delete travel-agent-sa@$PROJECT_ID.iam.gserviceaccount.com --quiet
Alternatively, if you created a dedicated project for this codelab, you can shut down the entire project:
gcloud projects delete $PROJECT_ID