
1. Introduction
Google Antigravity is an agentic development platform that is designed to help you develop in this era of agents. Antigravity serves as your AI agents' central command center, providing a unified platform to launch, monitor, and orchestrate their activities.
In this codelab, we will first learn about Agent Skills, a lightweight, open format for extending AI agent capabilities with specialized knowledge and workflows. You will be able to learn what Agent Skills are, their benefits and how they are constructed. You will then build multiple Agent Skills ranging from a Git formatter, template generator, tool code scaffolding and more, all usable within Antigravity.
Prerequisites:
- Antigravity installed and configured.
- Basic understanding of Google Antigravity. It is recommended to complete the codelab: Getting Started with Google Antigravity.
2. Why Skills
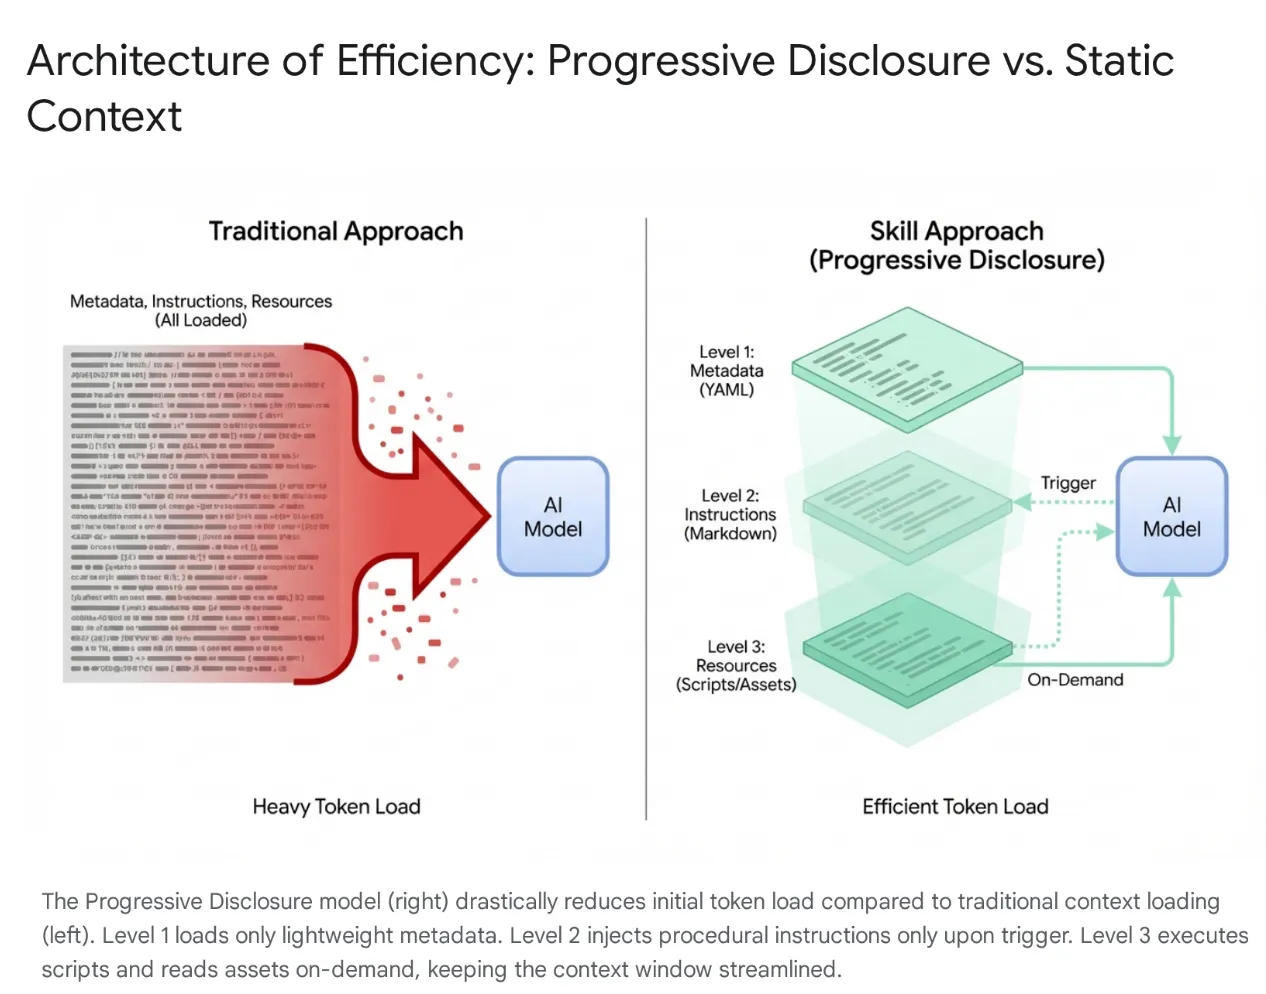
Modern AI agents have evolved from simple listeners to complex reasoners that integrate with local file systems and external tools (via MCP servers). However, indiscriminately loading an agent with entire codebases and hundreds of tools leads to Context Saturation and "Tool Bloat." Even with large context windows, dumping 40–50k tokens of unused tools into active memory causes high latency, financial waste, and "context rot," where the model becomes confused by irrelevant data.
The Solution: Agent Skills
To solve this, Anthropic introduced Agent Skills, shifting the architecture from monolithic context loading to Progressive Disclosure. Instead of forcing the model to "memorize" every specific workflow (like database migrations or security audits) at the start of a session, these capabilities are packaged into modular, discoverable units.
How It Works
The model is initially exposed only to a lightweight "menu" of metadata. It loads the heavy procedural knowledge (instructions and scripts) only when the user's intent specifically matches a skill. This ensures that a developer asking to refactor authentication middleware gets security context without loading unrelated CSS pipelines, keeping the context lean, fast, and cost-effective.
3. Agent Skills and Antigravity
In the Antigravity ecosystem, the Skills act as specialized training modules that bridge the gap between the generalist models and your specific context. They allow the agent to "equip" a defined set of instructions and protocols—such as database migration standards or security checks—only when a relevant task is requested. By dynamically loading these execution protocols, Skills effectively transform the AI from a generic programmer into a specialist that rigorously adheres to an organization's codified best practices and safety standards.
What is a Skill in Antigravity?
In the context of Google Antigravity, a Skill is a directory-based package containing a definition file (SKILL.md) and optional supporting assets (scripts, references, templates).
It is a mechanism for on-demand capability extension.
- On-Demand: Unlike a System Prompt (which is always loaded), a Skill is only loaded into the agent's context when the agent determines it is relevant to the user's current request. This optimizes the context window and prevents the agent from being distracted by irrelevant instructions. In large projects with dozens of tools, this selective loading is crucial for performance and reasoning accuracy.
- Capability Extension: Skills can do more than just instruct; they can execute. By bundling Python or Bash scripts, a Skill can give the agent the ability to perform complex, multi-step actions on the local machine or external networks without the user needing to manually run commands. This transforms the agent from a text generator into a tool user.
Skills v/s the Ecosystem (Tools, Rules and Workflows)
While Model Context Protocol (MCP) functions as the agent's "hands"—providing heavy-duty, persistent connections to external systems like GitHub or PostgreSQL—Skills act as the "brains" that direct them.
MCP handles the stateful infrastructure, whereas Skills are lightweight, ephemeral task definitions that package the methodology for using those tools. This serverless approach allows agents to execute ad-hoc tasks (like generating changelogs or migrations) without the operational overhead of running persistent processes, loading the context only when the task is active and releasing it immediately after.
Skills are agent-triggered: the model automatically detects the user's intent and dynamically equips the specific expertise required. This architecture allows for powerful composability; for example, a global Rule can enforce the use of a "Safe-Migration" Skill during database changes, or a single Workflow can orchestrate multiple Skills to build a robust deployment pipeline.
4. Creating Skills
Creating a Skill in Antigravity follows a specific directory structure and file format. This standardization ensures that skills are portable and that the agent can reliably parse and execute them. The design is intentionally simple, relying on widely understood formats like Markdown and YAML, lowering the barrier to entry for developers wishing to extend their IDE's capabilities.
Directory Structure
A typical Skill directory looks like this:
my-skill/
├── SKILL.md # The definition file
├── scripts/ # [Optional] Python, Bash, or Node scripts
     ├── run.py
     └── util.sh
├── references/ # [Optional] Documentation or templates
     └── api-docs.md
└── assets/ # [Optional] Static assets (images, logos)
This structure separates concerns effectively. The logic (scripts) is separated from the instruction (SKILL.md) and the knowledge (references), mirroring standard software engineering practices.
The SKILL.md Definition File
The SKILL.md file is the brain of the Skill. It tells the agent what the skill is, when to use it, and how to execute it.
It consists of two parts:
- YAML Frontmatter
- Markdown Body.
YAML Frontmatter
This is the metadata layer. It is the only part of the skill that is indexed by the agent's high-level router. When a user sends a prompt, the agent semantic-matches the prompt against the description fields of all available skills.
---
name: database-inspector
description: Use this skill when the user asks to query the database, check table schemas, or inspect user data in the local PostgreSQL instance.
---
Key Fields:
- name: This is not mandatory. Must be unique within the scope. Lowercase, hyphens allowed (e.g.,
postgres-query,pr-reviewer). If it's not provided, it will default to the directory name. - description: This is mandatory and the most important field. It functions as the "trigger phrase." It must be descriptive enough for the LLM to recognize semantic relevance. A vague description like "Database tools" is insufficient. A precise description like "Executes read-only SQL queries against the local PostgreSQL database to retrieve user or transaction data. Use this for debugging data states" ensures the skill is picked up correctly.
The Markdown Body
The body contains the instructions. This is "prompt engineering" persisted to a file. When the skill is activated, this content is injected into the agent's context window.
The body should include:
- Goal: A clear statement of what the skill achieves.
- Instructions: Step-by-step logic.
- Examples: Few-shot examples of inputs and outputs to guide the model's performance.
- Constraints: "Do not" rules (e.g., "Do not run DELETE queries").
Example SKILL.md Body:
Database Inspector

Goal
To safely query the local database and provide insights on the current data state.

Instructions
- Analyze the user's natural language request to understand the data need.
- Formulate a valid SQL query.
 - CRITICAL: Only SELECT statements are allowed.
- Use the script scripts/query_runner.py to execute the SQL.
 - Command: python scripts/query_runner.py "SELECT * FROM..."
- Present the results in a Markdown table.

Constraints
- Never output raw user passwords or API keys.
- If the query returns > 50 rows, summarize the data instead of listing it all.
Script Integration
One of the most powerful features of Skills is the ability to delegate execution to scripts. This allows the agent to perform actions that are difficult or impossible for an LLM to do directly (like binary execution, complex mathematical calculation, or interacting with legacy systems).
Scripts are placed in the scripts/ subdirectory. The SKILL.md references them by relative path.
5. Authoring Skills
The goal of this section is to build out Skills that integrate into Antigravity and progressively show various features like resources / scripts / etc.
You can download the Skills from the Github repo here: https://github.com/rominirani/antigravity-skills.
Before we understand how each of these skills were built, let us see how we configure them and make them available within the Antigravity suite of products. The folders below are applicable at the time of publishing this lab.
Using Antigravity or Antigravity CLI
Skills can be defined at two scopes, allowing for both project-specific and user-specific i.e. global skills.:
- Global Scope (
~/.gemini/config/skills/): Available across all Antigravity products (Antigravity, Antigravity IDE, Antigravity CLI) and projects. These skills are available across all projects on the user's machine. This is suitable for general utilities like "Format JSON," "Generate UUIDs," "Review Code Style," or integration with personal productivity tools. - Project/Workspace Scope (
<project-root>/.agents/skills/): This would make the skill available only within a specific project. This is ideal for project-specific scripts, such as deployment to a specific environment, database management for that app, or generating boilerplate code for a proprietary framework.
Installing the Skills in either Antigravity or Antigravity CLI
For this tutorial, all we need to do is the following steps (you can do it your way too):
Step 1: Do a git clone of https://github.com/rominirani/antigravity-skills
Step 2: Now depending on whether you are using Antigravity or Antigravity CLI, you can navigate into the antigravity-skills/skills_tutorial folder.
Step 3: You will find a set of skills, packaged into their respective folders. Copy the following 4 folders:
git-commit-formatterlicense-header-adderdatabase-schema-validatorjson-to-pydantic
into the targeted skills folder for the product (project scope or global scope).
Step 4: If you are using Antigravity or Antigravity CLI , copy it to the <project-root>/.agents/skills/ (project scope).
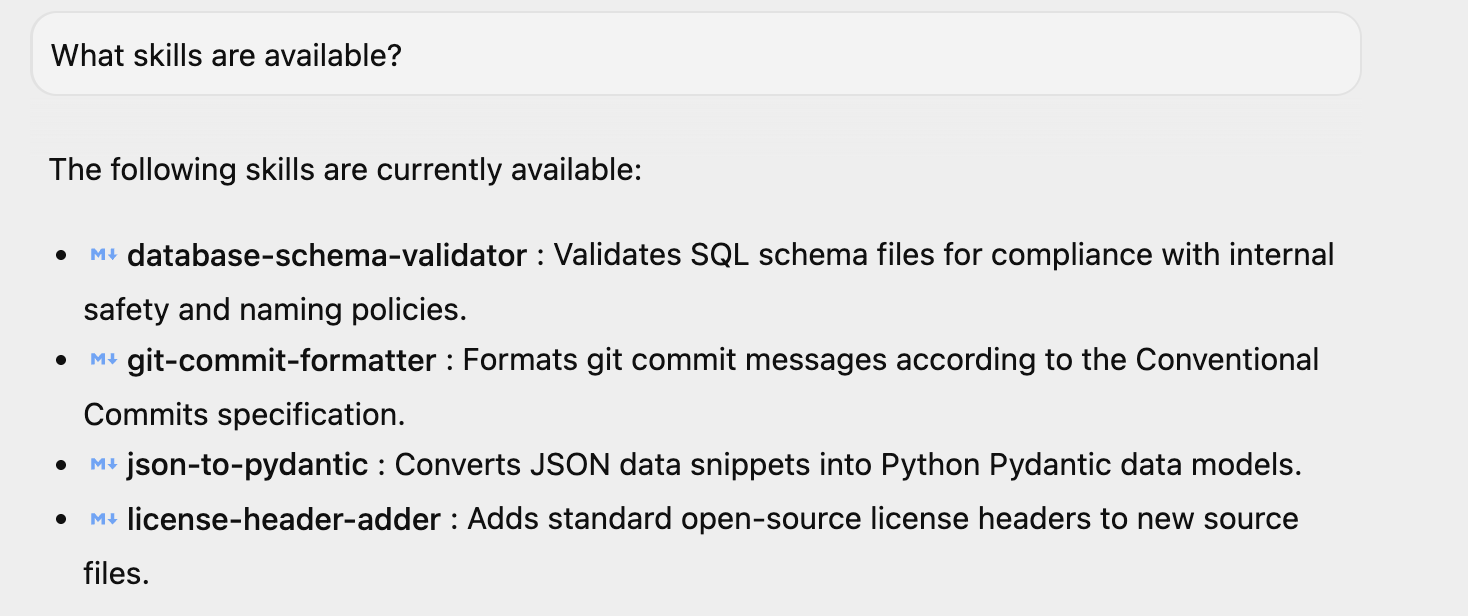
If you have launched Antigravity, you can ask a simple question "What skills are available?" and it responds with the same. You can see the 4 skills that are listed there. You might have additional skills too, if you have installed them in your environment.
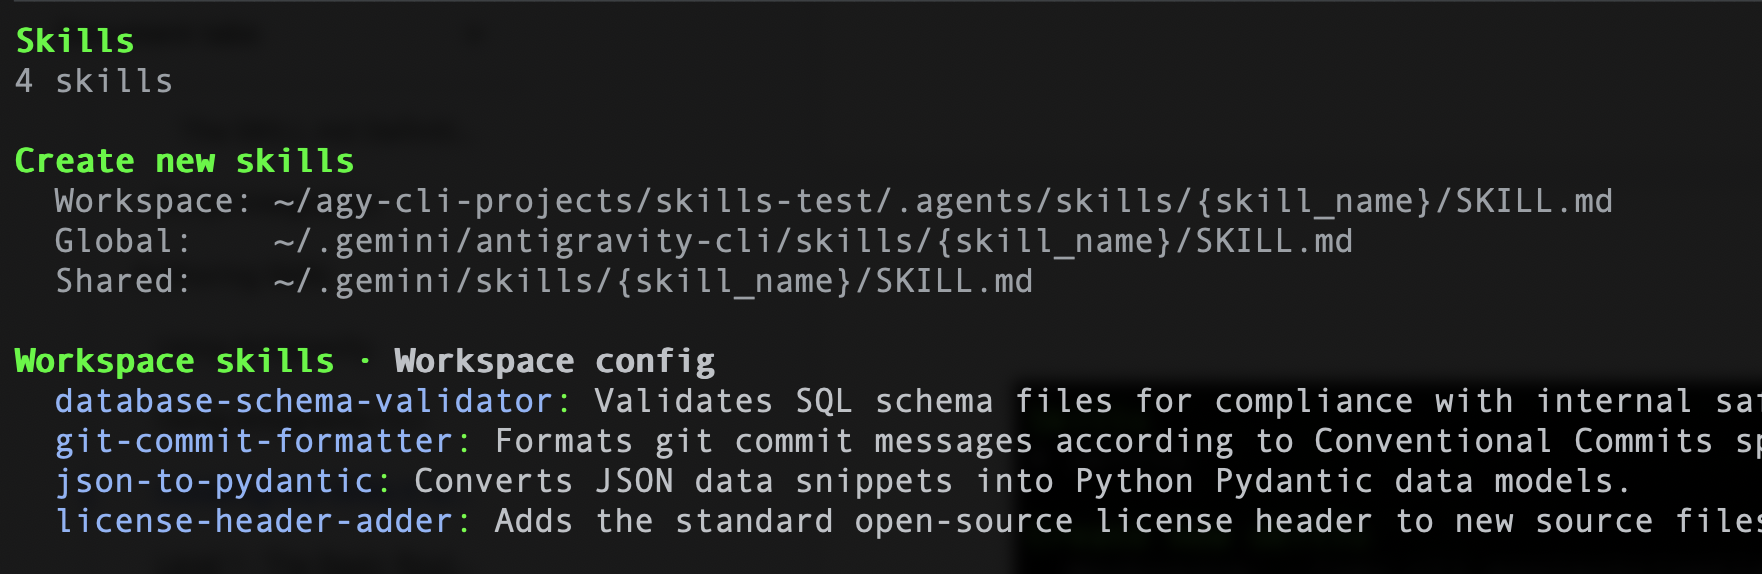
Similarly, if you are using Antigravity CLI, you can give the following command /skills and it should list the 4 skills. A sample is shown below:
Now that we know how to set up the skills, let's go into each of the Skills and understand how they were constructed. You could use these templates to create your own skills too.
Level 1 : The Basic Router ( git-commit-formatter )
Let's consider this as the "Hello World" of Skills.
Developers often write lazy commit messages e.g. "wip", "fix bug", "updates". Enforcing "Conventional Commits" manually is tedious and often forgotten. Let's implement a Skill that enforces the Conventional Commits specification. By simply instructing the agent on the rules, we allow it to act as the enforcer.
git-commit-formatter/
└── SKILL.md  (Instructions only)
The SKILL.md file is shown below:
---
name: git-commit-formatter
description: Formats git commit messages according to Conventional Commits specification. Use this when the user asks to commit changes or write a commit message.
---

Git Commit Formatter Skill

When writing a git commit message, you MUST follow the Conventional Commits specification.

Format
`<type>[optional scope]: <description>`

Allowed Types
- **feat**: A new feature
- **fix**: A bug fix
- **docs**: Documentation only changes
- **style**: Changes that do not affect the meaning of the code (white-space, formatting, etc)
- **refactor**: A code change that neither fixes a bug nor adds a feature
- **perf**: A code change that improves performance
- **test**: Adding missing tests or correcting existing tests
- **chore**: Changes to the build process or auxiliary tools and libraries such as documentation generation

Instructions
1. Analyze the changes to determine the primary `type`.
2. Identify the `scope` if applicable (e.g., specific component or file).
3. Write a concise `description` in an imperative mood (e.g., "add feature" not "added feature").
4. If there are breaking changes, add a footer starting with `BREAKING CHANGE:`.

Example
`feat(auth): implement login with google`
How to Run This Example in Antigravity
The steps below assume that you have Git available on your local machine and setup correctly.
Assuming that you have launched Antigravity or Antigravity CLI, follow these steps:
Step 1: Set Up a Test Git Repository
Ask the agent to set up a clean, isolated directory for testing Git operations.
Your prompt:
Create a folder named git_test in the workspace, initialize a git repository inside it, and create an initial file auth.py with def login(): pass. Stage this file and make an initial commit.
The agent will create the directory, initialize the repository, stage the file, and commit it with a message like "initial commit".
Step 2: Make a Code Change
Tell the agent to modify the code so there is a change to commit.
Your prompt:
In the git_test folder, modify auth.py to add Google Login functionality.
The agent will edit the file to add a new feature, preparing it for the commit phase.
Step 3: Stage and Commit the Changes
Trigger the git-commit-formatter skill by asking the agent to stage the changes and create a commit.
Your prompt:
Stage the changes in the git_test folder and commit them. Make sure to format the commit message using the Conventional Commits skill.
The agent will run git add auth.py, analyze the diff to determine that a new feature was added to the auth module, and formulate a conventional commit message like feat(auth): implement google login before running git commit.
Step 4: Verify the Git Log
Ask the agent to retrieve the git history so you can confirm that the formatted commit was successfully recorded.
Your prompt:
Show me the git log in the git_test folder.
The agent will run git log -n 5 and return the output showing the formatted commit message.
Level 2: Asset Utilization (license-header-adder)
This is the "Reference" pattern.
Every source file in a corporate project might need a specific 20-line Apache 2.0 license header. Putting this static text directly into the prompt (or SKILL.md) is wasteful. It consumes tokens every time the skill is indexed, and the model might "hallucinate" typos in legal text. It is a good practice to offload the static text to a plain text file in a resources/ folder. The skill instructs the agent to read this file only when needed.
You will find the files in the license-header-adder folder in the skills directory.
license-header-adder/
├── SKILL.md
└── resources/
   └── HEADER_TEMPLATE.txt  (The heavy text)
The SKILL.md file is shown below:
---
name: license-header-adder
description: Adds the standard open-source license header to new source files. Use involves creating new code files that require copyright attribution.
---

# License Header Adder Skill

This skill ensures that all new source files have the correct copyright header.

## Instructions

1. **Read the Template**:
  First, read the content of the header template file located at `resources/HEADER_TEMPLATE.txt`.

2. **Prepend to File**:
  When creating a new file (e.g., `.py`, `.java`, `.js`, `.ts`, `.go`), prepend the `target_file` content with the template content.

3. **Modify Comment Syntax**:
  - For C-style languages (Java, JS, TS, C++), keep the `/* ... */` block as is.
  - For Python, Shell, or YAML, convert the block to use `#` comments.
  - For HTML/XML, use `<!-- ... -->`.
How to Run This Example in Antigravity
Assuming that you have launched Antigravity or Antigravity CLI, follow these steps:
Step 1: Create the Python File with Sample Code
Your Prompt:
Create a new file my_script.py with the following python code:

def hello():
   print("Hello, World!")
What Happened (Explanation): The agent invoked a file-writing tool (write_to_file) to create a new file named my_script.py directly in your active workspace directory and wrote the basic Python function to it. Additionally, the prompt triggered the license-header-adder skill. The agent located and read the license template file (HEADER_TEMPLATE.txt), modified the comment style from C-style block comments (/* ... */) to Python-style comments (#), and prepended it to the top of the file using the replace_file_content tool.
Step 2: Verify the File Contents
Take a look at the my_script.py file. It will contain the license header at the top.
Level 3: Learning by Example (json-to-pydantic)
The "Few-Shot" pattern.
Converting loose data (like a JSON API response) to strict code (like Pydantic models) involves dozens of decisions. How should we name the classes? Should we use Optional? snake_case or camelCase? Writing out these 50 rules in English is tedious and error-prone.
LLMs are pattern-matching engines.
Authoring your skill with a golden example (Input -> Output) is often more effective than verbose instructions.
Go to the json-to-pydantic/folder that contains the skill files, as shown below:
json-to-pydantic/
├── SKILL.md
└── examples/
   ├── input_data.json   (The Before State)
   └── output_model.py   (The After State)
The SKILL.md file is shown below:
---
name: json-to-pydantic
description: Converts JSON data snippets into Python Pydantic data models.
---

# JSON to Pydantic Skill

This skill helps convert raw JSON data or API responses into structured, strongly-typed Python classes using Pydantic.

Instructions

1. **Analyze the Input**: Look at the JSON object provided by the user.
2. **Infer Types**:
  - `string` -> `str`
  - `number` -> `int` or `float`
  - `boolean` -> `bool`
  - `array` -> `List[Type]`
  - `null` -> `Optional[Type]`
  - Nested Objects -> Create a separate sub-class.

3. **Follow the Example**:
  Review `examples/` to see how to structure the output code. notice how nested dictionaries like `preferences` are extracted into their own class.

  - Input: `examples/input_data.json`
  - Output: `examples/output_model.py`

Style Guidelines
- Use `PascalCase` for class names.
- Use type hints (`List`, `Optional`) from `typing` module.
- If a field can be missing or null, default it to `None`.
In the /examples folder , there is the JSON file and the output file i.e. Python file. Both of them are shown below:
input_data.json
{
   "user_id": 12345,
   "username": "jdoe_88",
   "is_active": true,
   "preferences": {
       "theme": "dark",
       "notifications": [
           "email",
           "push"
       ]
   },
   "last_login": "2024-03-15T10:30:00Z",
   "meta_tags": null
}
output_model.py
from pydantic import BaseModel, Field
from typing import List, Optional

class Preferences(BaseModel):
   theme: str
   notifications: List[str]

class User(BaseModel):
   user_id: int
   username: str
   is_active: bool
   preferences: Preferences
   last_login: Optional[str] = None
   meta_tags: Optional[List[str]] = None
How to Run This Example in Antigravity
Assuming that you have launched Antigravity or Antigravity CLI, follow these steps:
Step 1: Create the JSON File with Sample Data
Ask the agent to create a new file product.json containing the raw JSON payload.
Your Prompt:
Create a new file product.json with the following JSON:

{
 "product": "Widget",
 "cost": 10.99,
 "stock": null
}
Step 2: Convert the JSON to a Pydantic Model
Trigger the json-to-pydantic skill to convert the JSON data into a structured Pydantic class.
Your Prompt:
Convert the JSON in product.json to a Pydantic model and save it to product_model.py.
Step 3: Verify the Output
Take a look at the product_model.py file. It will contain the completed Pydantic model.
Level 4: Procedural Logic (database-schema-validator)
This is the "Tool Use" Pattern.
If you ask an LLM "Is this schema safe?", it might say all is well, even if a critical primary key is missing, simply because the SQL looks correct.
Let's delegate this check to a deterministic Script. Our database-schema-validator skill will route the agent to run a Python script that we wrote. The script provides binary (True/False) truth.
database-schema-validator/
├── SKILL.md
└── scripts/
   └── validate_schema.py  (The Validator)
The SKILL.md file is shown below:
---
name: database-schema-validator
description: Validates SQL schema files for compliance with internal safety and naming policies.
---

# Database Schema Validator Skill

This skill ensures that all SQL files provided by the user comply with our strict database standards.

Policies Enforced
1. **Safety**: No `DROP TABLE` statements.
2. **Naming**: All tables must use `snake_case`.
3. **Structure**: Every table must have an `id` column as PRIMARY KEY.

Instructions

1. **Do not read the file manually** to check for errors. The rules are complex and easily missed by eye.
2. **Run the Validation Script**:
  Use the `run_command` tool to execute the python script provided in the `scripts/` folder against the user's file.

  `python scripts/validate_schema.py <path_to_user_file>`

3. **Interpret Output**:
  - If the script returns **exit code 0**: Tell the user the schema looks good.
  - If the script returns **exit code 1**: Report the specific error messages printed by the script to the user and suggest fixes.
The validate_schema.py file is shown below:
import sys
import re

def validate_schema(filename):
   """
   Validates a SQL schema file against internal policy:
   1. Table names must be snake_case.
   2. Every table must have a primary key named 'id'.
   3. No 'DROP TABLE' statements allowed (safety).
   """
   try:
       with open(filename, 'r') as f:
           content = f.read()

       lines = content.split('\n')
       errors = []

       # Check 1: No DROP TABLE
       if re.search(r'DROP TABLE', content, re.IGNORECASE):
           errors.append("ERROR: 'DROP TABLE' statements are forbidden.")

       # Check 2 & 3: CREATE TABLE checks
       table_defs = re.finditer(r'CREATE TABLE\s+(?P<name>\w+)\s*\((?P<body>.*?)\);', content, re.DOTALL | re.IGNORECASE)

       for match in table_defs:
           table_name = match.group('name')
           body = match.group('body')

           # Snake case check
           if not re.match(r'^[a-z][a-z0-9_]*$', table_name):
               errors.append(f"ERROR: Table '{table_name}' must be snake_case.")

           # Primary key check
           if not re.search(r'\bid\b.*PRIMARY KEY', body, re.IGNORECASE):
               errors.append(f"ERROR: Table '{table_name}' is missing a primary key named 'id'.")

       if errors:
           for err in errors:
               print(err)
           sys.exit(1)
       else:
           print("Schema validation passed.")
           sys.exit(0)

   except FileNotFoundError:
       print(f"Error: File '{filename}' not found.")
       sys.exit(1)

if __name__ == "__main__":
   if len(sys.argv) != 2:
       print("Usage: python validate_schema.py <schema_file>")
       sys.exit(1)

   validate_schema(sys.argv[1])
How to Run This Example in Antigravity
Assuming that you have launched Antigravity or Antigravity CLI, follow these steps:
Step 1: Create the JSON File with Sample Data
Ask the agent to create a new file bad_schema.sql containing multiple policy violations.
Your Prompt:
Create a new file bad_schema.sql with the following SQL:

DROP TABLE IF EXISTS legacy_users;

CREATE TABLE userProfile (
    id INT PRIMARY KEY,
    bio TEXT
);

CREATE TABLE posts (
    title TEXT,
    content TEXT,
    created_at TIMESTAMP
);

CREATE TABLE comments (
    id INT PRIMARY KEY,
    post_id INT,
    body TEXT
);
The above schema file violates all three policies: it uses a forbidden DROP TABLE statement, uses camelCase for the userProfile table name, and forgets the id primary key in the posts table.
Step 2: Validate the SQL Schema
Trigger the database-schema-validator skill to run the Python validator script against your file.
Your prompt:
Validate bad_schema.sql using the database-schema-validator skill.
Step 3: Verify the Output
The agent will report the failure and display the specific errors found by the script directly in the chat. The sample output is shown below:
Suggested Fixes:
Remove the line DROP TABLE IF EXISTS legacy_users; as dropping tables is forbidden by safety policy.
Rename the table userProfile to use snake_case (e.g., user_profile).
Add a primary key column named id to the posts table definition.
6. The Developer Toolkit (Agents CLI Skills)
The "Action & Lifecycle" Pattern.
Developing AI agents involves repetitive lifecycle tasks: scaffolding boilerplate files, configuring local runtime environments, running test prompts, and starting interactive playgrounds.
Instead of forcing your coding assistant to guess directory structures or write boilerplate agent configuration from scratch, Agents CLI Skills packages this lifecycle expertise into specific agent skills.
The Agent CLI (Command Line Interface) skills bring streamlined, developer-centric automation directly into your terminal, bridging the gap between raw code and autonomous execution. While the Agent Development Kit (ADK) focuses on the programmatic framework, giving you the SDKs, APIs, and structural blueprints to build and orchestrate AI agents, the Agent CLI skills provide the operational muscle. It allows developers to scaffold, test, and deploy agents locally with rapid feedback loops, completely bypassing heavy UI overhead.
Optionally, when mapped to Google Cloud, Agent CLI skills act as a direct pipeline to enterprise-grade infrastructure. Instead of clicking through consoles, you can use CLI commands to instantly package agent workflows, manage access permissions, and deploy them into Google Cloud ecosystems (like Vertex AI or Cloud Run). This turns what used to be complex cloud architecture tasks into simple, reproducible terminal commands, making it much easier to integrate autonomous agents into existing CI/CD deployment pipelines.
How to Install
Ensure you have Python 3.11+, Node.js, and the uv package manager installed. Then, run the setup command in your terminal:
uvx google-agents-cli setup
This command installs the agents-cli binary and registers its specialized skills for scaffolding and evaluation within your coding assistant's environment.
Note: The skills will be installed in the ~/.agents/skills folder, which is visible to Antigravity. If you would like to see these skills in Antigravity CLI, you will have to move them to the ~/.gemini/antigravity-cli/skills folder (global scope).
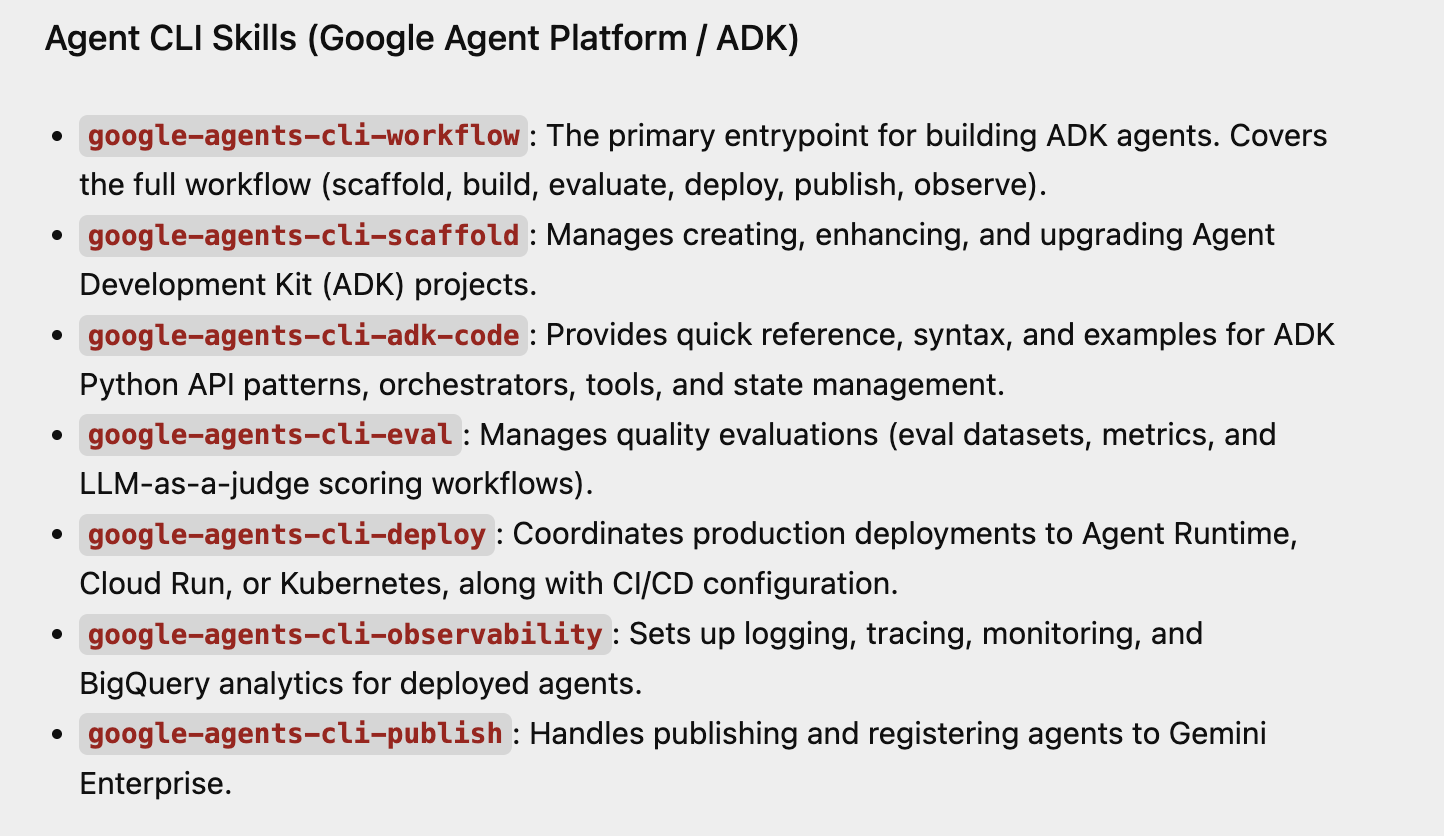
You can check that the Skills have been loaded in Antigravity by simply asking about which skills are available. A sample response is shown below, for the Agent CLI Skills that we have just installed.
Step-by-Step Walkthrough
Once uvx google-agents-cli setup is complete, you can spin up, interact with, and test an AI agent entirely on your local machine.
Step 1: Scaffold and Initialize a New Agent Project
Run the creation command to scaffold a standardized layout. Once created, you must install its project dependencies before running any execution tasks.
# 1. Create a lightweight prototype project structure
agents-cli create weather-assistant --prototype --yes

# 2. Move into the directory and install required ADK dependencies
cd weather-assistant
agents-cli install
What happens behind the scenes: This creates a clean workspace featuring app/agent.py (your core code), pyproject.toml (package metadata), and agents-cli-manifest.yaml (project tracker).
Step 2: Run a Local Test Query
Execute a rapid, direct command-line test against your agent. Ensure you have your GEMINI_API_KEY exported in your terminal if you aren't using Google Cloud's ADC (Application Default Credentials). You can get a Gemini API Key from here. Once you have the key, export it in your terminal via the following command:
export GEMINI_API_KEY="YOUR_GEMINI_API_KEY"
Give the following command in your terminal:
agents-cli run "How are you?"
What happens behind the scenes: The CLI initializes the Agent Development Kit (ADK) lifecycle entirely in memory on your terminal. It securely routes the prompt through your local credentials and logs the live streaming response directly back into your command line.
Step 3: Start the Interactive Web Playground
Launch the built-in, local web-based playground to interact with your agent visually.
agents-cli playground
What happens behind the scenes: The CLI fires up an ADK web UI server, typically accessible at http://localhost:8080 or fallback http://127.0.0.1:8000, complete with hot-reloading. From the web interface select app in the Select an app dropdown at the top and interact with the agent in the conversational interface on the right side of the web application.
7. Installing Agent Skills using npx skills
npx skills is a command-line tool developed by Vercel Labs that acts as a package manager for AI agents (like Antigravity, Claude Code, GitHub Copilot, Cursor, and Cline). It is the CLI for the open agent skills ecosystem.
If you are looking to download and install Agent Skills using the npx skills package, do note that it places the Skills in the ~/.agents/skills folder. While it mentions that tools like Antigravity will pick up the skills from this folder, please note that at the time of writing, Antigravity picks it up from this folder but Antigravity CLI does not. As mentioned earlier, you will need to copy these skills installed in ~/.agents/skills folder, to either the project or global scope for skills folders in Antigravity CLI i.e.
- Project Scope: Located in
<project-root>/.agent/skills/. - Global Scope: Located in
~/.gemini/antigravity-cli/skills/.
8. Congratulations
Congratulations! You have successfully used Google Antigravity to build your first Agent skill, configured it and added custom capabilities to it.
You also managed to configure a set of Agent Skills, at both project and global scopes, bringing customized tools to life!.
You are now ready to let Antigravity handle the heavy lifting on your own projects and write code your way.
Earn your Kaggle 5-Day AI Agents badge
Completed this lab as part of Kaggle's 5-Day AI Agents: Intensive Vibe Coding Course with Google? Claim your completion badge: Get the 5-Day AI Agents badge.
9. Reference docs
- Codelab : Getting Started with Google Antigravity
- Official Site : https://antigravity.google/
- Documentation: https://antigravity.google/docs
- Download : https://antigravity.google/download
- Antigravity Skills documentation: https://antigravity.google/docs/skills