
1. 简介
Google Antigravity 是一款智能体式开发平台,旨在帮助您在智能体时代进行开发。Antigravity 是 AI 智能体的中央指挥中心,提供了一个统一的平台来启动、监控和编排其活动。
在此 Codelab 中,我们将首先了解 Agent Skills,这是一种轻量级开放格式,可用于利用专业知识和工作流来扩展 AI 智能体功能。您将能够了解智能体技能是什么、其优势以及如何构建。然后,您将构建多个代理技能,包括 Git 格式化程序、模板生成器、工具代码基架等,所有这些技能都可以在 Antigravity 中使用。
前提条件:
- 已安装并配置 Antigravity。
- 对 Google Antigravity 有基本的了解。建议您先完成 Codelab:Google Antigravity 使用入门。
2. 技能的优势
现代 AI 智能体已从简单的监听器发展为复杂的推理器,可与本地文件系统和外部工具(通过 MCP 服务器)集成。不过,如果随意为智能体加载整个代码库和数百种工具,会导致上下文饱和和“工具膨胀”。即使上下文窗口很大,将 4-5 万个未使用的工具令牌转储到活跃内存中也会导致高延迟、资金浪费和“上下文腐烂”,即模型会被无关数据混淆。
解决方案:智能体技能
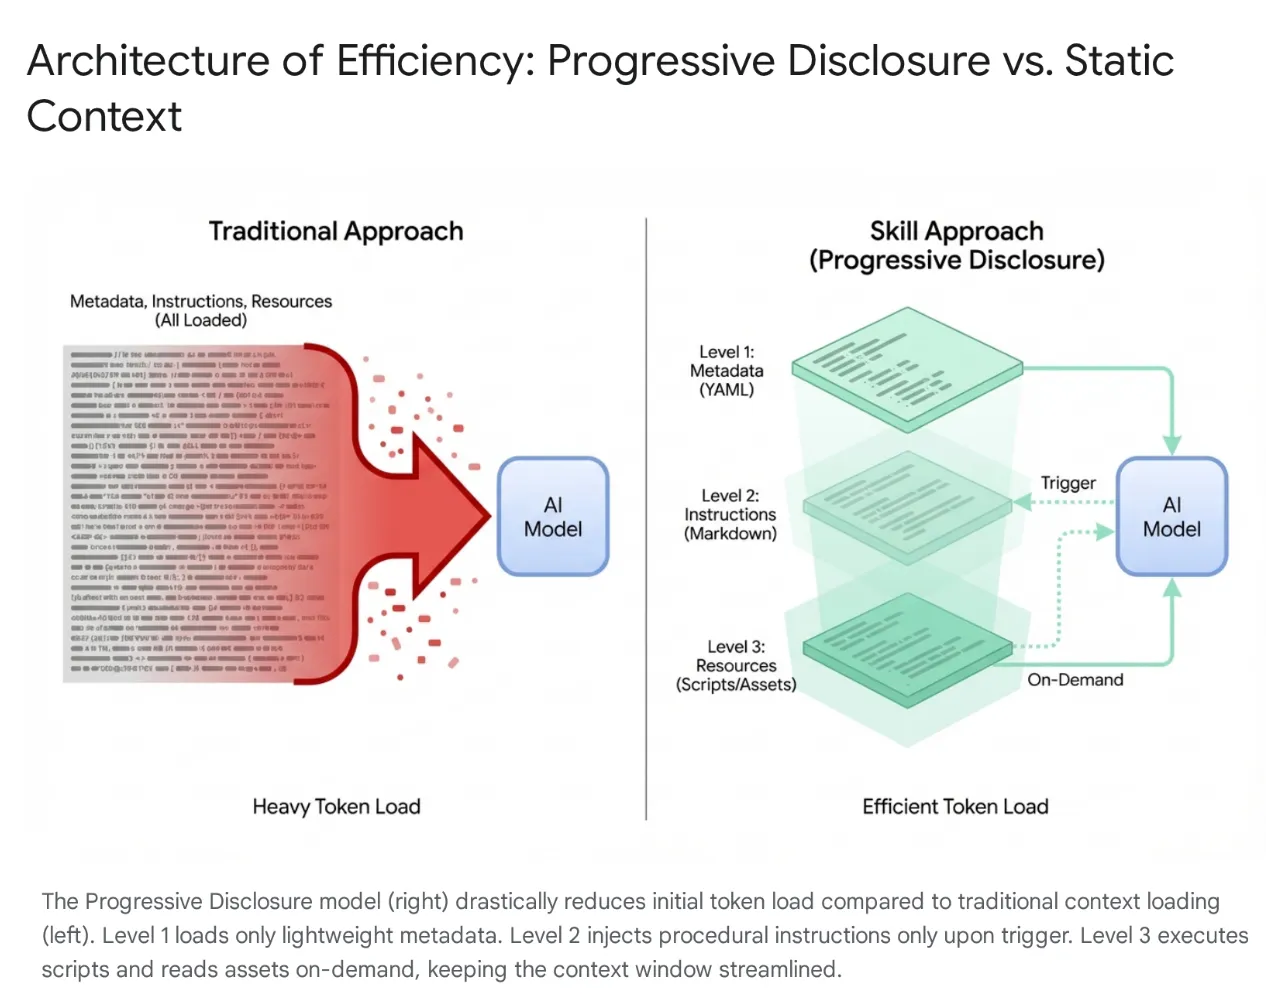
为解决此问题,Anthropic 推出了智能体技能,将架构从整体式上下文加载转变为渐进式披露。这些功能被打包成模块化、可发现的单元,而不是在会话开始时强制模型“记住”每个特定的工作流(例如数据库迁移或安全审核)。
工作方式
模型最初只会接触到轻量级的元数据“菜单”。仅当用户意图与技能完全匹配时,才会加载繁琐的程序性知识(指令和脚本)。这样可确保请求重构身份验证中间件的开发者获得安全上下文,而无需加载无关的 CSS 流水线,从而保持上下文精简、快速且经济高效。
3. Agent Skills 和 Antigravity
在 Antigravity 生态系统中,技能充当专门的训练模块,可弥合通用模型与您的特定上下文之间的差距。它们允许代理仅在请求相关任务时“配备”一组已定义的指令和协议,例如数据库迁移标准或安全检查。通过动态加载这些执行协议,技能可有效地将 AI 从通用程序员转变为严格遵守组织编纂的最佳实践和安全标准的专家。
Antigravity 中的技能是什么?
在 Google Antigravity 的背景下,技能是指基于目录的软件包,其中包含定义文件 (SKILL.md) 和可选的支持资源(脚本、参考资料、模板)。
它是一种按需扩展功能的机制。
- 按需:与始终加载的系统提示不同,技能仅在代理确定其与用户的当前请求相关时才加载到代理的上下文中。这样可以优化上下文窗口,防止代理受到无关指令的干扰。在包含数十种工具的大型项目中,这种选择性加载对于性能和推理准确性至关重要。
- 功能扩展:技能不仅可以发出指令,还可以执行操作。通过捆绑 Python 或 Bash 脚本,技能可以让代理在本地机器或外部网络上执行复杂的多步操作,而无需用户手动运行命令。这会将智能体从文本生成工具转变为工具用户。
技能与生态系统(工具、规则和工作流)
虽然 Model Context Protocol (MCP) 充当智能体的“手”,可提供与 GitHub 或 PostgreSQL 等外部系统的持久连接,但技能充当“大脑”,可指导智能体执行操作。
MCP 处理有状态的基础设施,而技能是轻量级、短暂的任务定义,用于封装使用这些工具的方法。这种无服务器方法可让代理执行临时任务(例如生成更改日志或迁移),而无需运行持久进程的运营开销,并且仅在任务处于活动状态时加载上下文,并在任务完成后立即释放上下文。
技能是由代理触发的:模型会自动检测用户意图,并动态配备所需的特定专业知识。此架构可实现强大的可组合性;例如,全局规则可以在数据库更改期间强制使用“安全迁移”技能,或者单个工作流可以编排多个技能来构建强大的部署流水线。
4. 创建技能
在 Antigravity 中创建技能需要遵循特定的目录结构和文件格式。这种标准化可确保技能的可移植性,并确保代理能够可靠地解析和执行技能。该设计有意采用简单的方式,依赖于 Markdown 和 YAML 等广为人知的格式,从而降低了希望扩展 IDE 功能的开发者的入门门槛。
目录结构
典型的技能目录如下所示:
my-skill/
├── SKILL.md # The definition file
├── scripts/ # [Optional] Python, Bash, or Node scripts
     ├── run.py
     └── util.sh
├── references/ # [Optional] Documentation or templates
     └── api-docs.md
└── assets/ # [Optional] Static assets (images, logos)
这种结构可有效分离关注点。逻辑 (scripts) 与指令 (SKILL.md) 和知识 (references) 分开,这与标准软件工程实践相符。
SKILL.md 定义文件
SKILL.md 文件是技能的核心。它会告诉智能体技能是什么、何时使用以及如何执行。
它由两部分组成:
- YAML 前言
- Markdown 正文。
YAML 前言
这是元数据层。它是技能中唯一会被代理的高级路由器编入索引的部分。当用户发送提示时,代理会根据所有可用技能的说明字段对提示进行语义匹配。
---
name: database-inspector
description: Use this skill when the user asks to query the database, check table schemas, or inspect user data in the local PostgreSQL instance.
---
关键字段:
- name:此属性不是必需的。在相应范围内必须是唯一的。小写,允许使用连字符(例如
postgres-query、pr-reviewer)。如果未提供,则默认为目录名称。 - 说明:此字段为必填字段,也是最重要的字段。它充当“触发短语”。它必须具有足够的描述性,以便 LLM 识别语义相关性。“数据库工具”之类的模糊说明是不够的。精确的说明,例如“针对本地 PostgreSQL 数据库执行只读 SQL 查询,以检索用户或交易数据。使用此技能调试数据状态”确保技能被正确识别。
Markdown 正文
正文包含指令。这是保存到文件中的“提示工程”。当技能被激活时,此内容会被注入到代理的上下文窗口中。
正文应包含:
- 目标:清晰说明技能的用途。
- 说明:分步逻辑。
- 示例:用于引导模型表现的输入和输出少样本示例。
- 限制:“不得”规则(例如“不得运行 DELETE 查询”)。
SKILL.md 正文示例:
Database Inspector

Goal
To safely query the local database and provide insights on the current data state.

Instructions
- Analyze the user's natural language request to understand the data need.
- Formulate a valid SQL query.
 - CRITICAL: Only SELECT statements are allowed.
- Use the script scripts/query_runner.py to execute the SQL.
 - Command: python scripts/query_runner.py "SELECT * FROM..."
- Present the results in a Markdown table.

Constraints
- Never output raw user passwords or API keys.
- If the query returns > 50 rows, summarize the data instead of listing it all.
脚本集成
技能最强大的功能之一是能够将执行委托给脚本。这样,代理就可以执行 LLM 难以或无法直接执行的操作(例如二进制执行、复杂的数学计算或与旧版系统互动)。
脚本放置在 scripts/ 子目录中。SKILL.md 通过相对路径引用它们。
5. 创作技能
本部分的目标是构建集成到 Antigravity 中的技能,并逐步展示各种功能,例如资源/脚本等。
您可以从以下 GitHub 代码库下载技能:https://github.com/rominirani/antigravity-skills。
在了解每项技能的构建方式之前,我们先来看看如何在 Antigravity 产品套件中配置这些技能并使其可供使用。以下文件夹适用于发布此实验时。
使用 Antigravity 或 Antigravity CLI
技能可以在两个范围内定义,从而实现项目专用技能和用户专用技能(即全局技能)。
- 全局范围 (
~/.gemini/config/skills/):适用于所有 Antigravity 产品(Antigravity、Antigravity IDE、Antigravity CLI)和项目。这些技能可在用户机器上的所有项目中使用。这适用于“格式化 JSON”“生成 UUID”“检查代码样式”等通用实用程序,或与个人效率工具集成。 - 项目/工作区范围 (
<project-root>/.agents/skills/):这会使技能仅在特定项目内可用。此功能非常适合项目专用脚本,例如部署到特定环境、管理相应应用的数据库,或为专有框架生成样板代码。
在 Antigravity 或 Antigravity CLI 中安装技能
在本教程中,我们只需执行以下步骤(您也可以按照自己的方式操作):
第 1 步:对 https://github.com/rominirani/antigravity-skills 执行 git clone
第 2 步:现在,根据您使用的是 Antigravity 还是 Antigravity CLI,您可以进入 antigravity-skills/skills_tutorial 文件夹。
第 3 步:您会看到一组技能,这些技能已打包到各自的文件夹中。复制以下 4 个文件夹:
git-commit-formatterlicense-header-adderdatabase-schema-validatorjson-to-pydantic
到产品的目标技能文件夹(项目范围或全局范围)。
第 4 步:如果您使用的是 Antigravity 或 Antigravity CLI,请将其复制到 <project-root>/.agents/skills/(项目范围)。
如果您已启动 Antigravity,可以问一个简单的问题“有哪些技能可用?”,它会回答同样的问题。您可以看到其中列出了 4 项技能。如果您已在环境中安装其他技能,则可能还会有其他技能。

同样,如果您使用的是 Antigravity CLI,可以运行以下命令 /skills,它应该会列出 4 项技能。示例 如下所示:
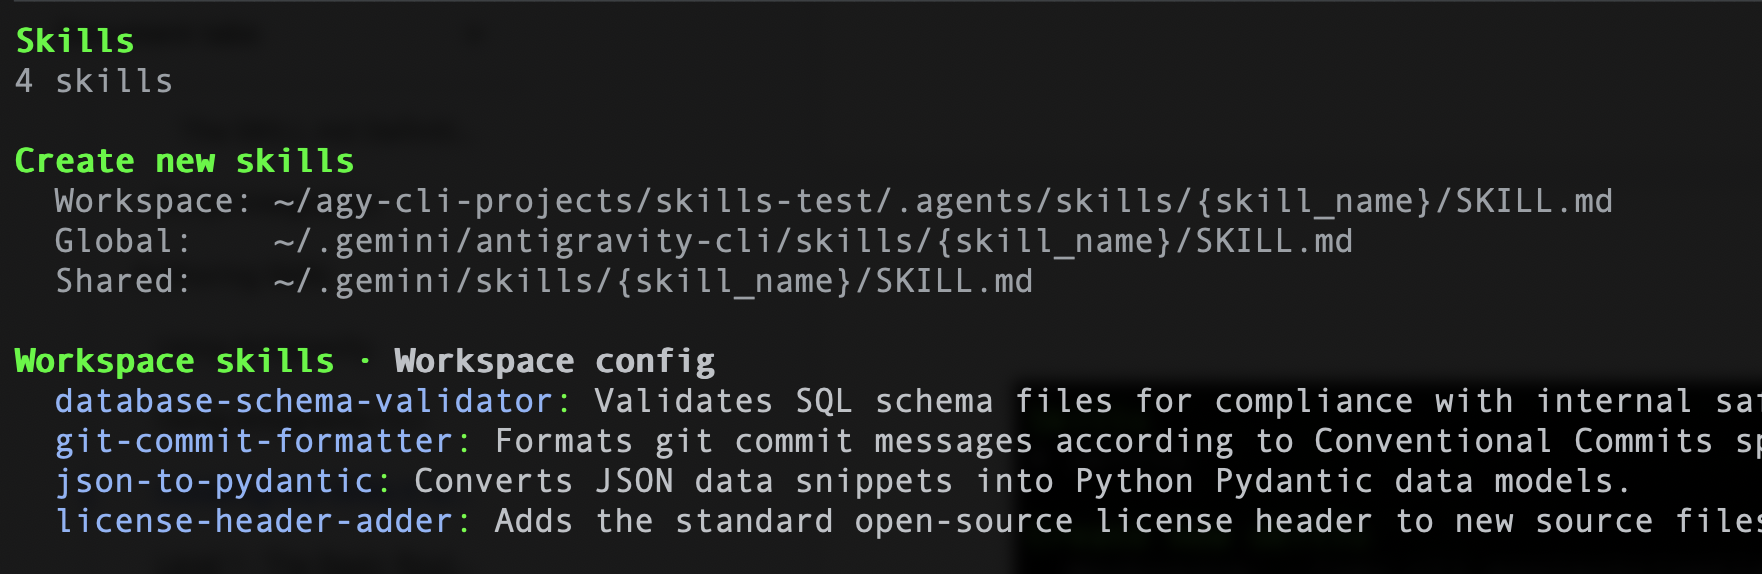
现在我们已经了解如何设置技能,接下来将详细介绍每项技能,并了解它们的构建方式。您也可以使用这些模板来创建自己的技能。
级别 1:基本路由器 ( git-commit-formatter)
我们不妨将此视为技能的“Hello World”。
开发者通常会编写懒惰的提交消息,例如“wip”“修复 bug”“更新”。手动强制执行“常规提交”既繁琐又容易忘记。让我们实现一项强制执行 Conventional Commits 规范的技能。只需向智能体说明规则,即可让其充当执行者。
git-commit-formatter/
└── SKILL.md  (Instructions only)
SKILL.md 文件如下所示:
---
name: git-commit-formatter
description: Formats git commit messages according to Conventional Commits specification. Use this when the user asks to commit changes or write a commit message.
---

Git Commit Formatter Skill

When writing a git commit message, you MUST follow the Conventional Commits specification.

Format
`<type>[optional scope]: <description>`

Allowed Types
- **feat**: A new feature
- **fix**: A bug fix
- **docs**: Documentation only changes
- **style**: Changes that do not affect the meaning of the code (white-space, formatting, etc)
- **refactor**: A code change that neither fixes a bug nor adds a feature
- **perf**: A code change that improves performance
- **test**: Adding missing tests or correcting existing tests
- **chore**: Changes to the build process or auxiliary tools and libraries such as documentation generation

Instructions
1. Analyze the changes to determine the primary `type`.
2. Identify the `scope` if applicable (e.g., specific component or file).
3. Write a concise `description` in an imperative mood (e.g., "add feature" not "added feature").
4. If there are breaking changes, add a footer starting with `BREAKING CHANGE:`.

Example
`feat(auth): implement login with google`
如何在 Antigravity 中运行此示例
以下步骤假定您已在本地机器上安装 Git 并正确设置。
假设您已启动 Antigravity 或 Antigravity CLI,请按以下步骤操作:
第 1 步:设置测试 Git 代码库
让代理设置一个干净的隔离目录,用于测试 Git 操作。
您的提示:
Create a folder named git_test in the workspace, initialize a git repository inside it, and create an initial file auth.py with def login(): pass. Stage this file and make an initial commit.
代理将创建目录、初始化代码库、暂存文件,并使用“initial commit”之类的消息提交文件。
第 2 步:更改代码
让代理修改代码,以便提交更改。
您的提示:
In the git_test folder, modify auth.py to add Google Login functionality.
代理将修改文件以添加新功能,从而为提交阶段做好准备。
第 3 步:暂存并提交更改
通过让代理暂存更改并创建提交来触发 git-commit-formatter 技能。
您的提示:
Stage the changes in the git_test folder and commit them. Make sure to format the commit message using the Conventional Commits skill.
代理将运行 git add auth.py,分析 diff(差异比较)以确定已向 auth 模块添加新功能,并制定常规提交消息(如 feat(auth): implement google login),然后再运行 git commit。
第 4 步:验证 Git 日志
让客服人员检索 Git 历史记录,以便您确认格式化的提交已成功记录。
您的提示:
Show me the git log in the git_test folder.
代理将运行 git log -n 5 并返回显示格式化提交消息的输出。
第 2 级:资源利用率 (license-header-adder)
这是“参考”模式。
公司项目中的每个源文件可能都需要一个特定的 20 行 Apache 2.0 许可标头。直接将此静态文本放入提示(或 SKILL.md)中会浪费资源。每次为技能编制索引时,模型都会消耗令牌,并且可能会在法律文本中“幻觉”出拼写错误。最好将静态文本分流到 resources/ 文件夹中的纯文本文件中。该技能会指示代理仅在需要时读取此文件。
您会在 skills 目录的 license-header-adder 文件夹中找到这些文件。
license-header-adder/
├── SKILL.md
└── resources/
   └── HEADER_TEMPLATE.txt  (The heavy text)
SKILL.md 文件如下所示:
---
name: license-header-adder
description: Adds the standard open-source license header to new source files. Use involves creating new code files that require copyright attribution.
---

# License Header Adder Skill

This skill ensures that all new source files have the correct copyright header.

## Instructions

1. **Read the Template**:
  First, read the content of the header template file located at `resources/HEADER_TEMPLATE.txt`.

2. **Prepend to File**:
  When creating a new file (e.g., `.py`, `.java`, `.js`, `.ts`, `.go`), prepend the `target_file` content with the template content.

3. **Modify Comment Syntax**:
  - For C-style languages (Java, JS, TS, C++), keep the `/* ... */` block as is.
  - For Python, Shell, or YAML, convert the block to use `#` comments.
  - For HTML/XML, use `<!-- ... -->`.
如何在 Antigravity 中运行此示例
假设您已启动 Antigravity 或 Antigravity CLI,请按以下步骤操作:
第 1 步:创建包含示例代码的 Python 文件
您的提示:
Create a new file my_script.py with the following python code:

def hello():
   print("Hello, World!")
发生了什么(说明):代理调用了文件写入工具 (write_to_file),以在您的有效工作区目录中直接创建一个名为 my_script.py 的新文件,并将基本的 Python 函数写入该文件。此外,该提示还触发了 license-header-adder 技能。智能体找到并读取了许可模板文件 (HEADER_TEMPLATE.txt),将注释样式从 C 样式块注释 (/* ... */) 修改为 Python 样式注释 (#),并使用 replace_file_content 工具将其添加到文件顶部。
第 2 步:验证文件内容
查看 my_script.py 文件。它将在顶部包含许可标头。
第 3 级:通过示例学习 (json-to-pydantic)
“少样本”模式。
将松散数据(例如 JSON API 响应)转换为严格代码(例如 Pydantic 模型)需要做出数十项决策。我们应该如何命名这些类?我们是否应该使用 Optional?snake_case还是camelCase?用英语写出这 50 条规则既繁琐又容易出错。
LLM 是模式匹配引擎。
使用黄金示例(Input -> Output)创作技能通常比使用冗长的说明更有效。
前往包含技能文件的 json-to-pydantic/ 文件夹,如下所示:
json-to-pydantic/
├── SKILL.md
└── examples/
   ├── input_data.json   (The Before State)
   └── output_model.py   (The After State)
SKILL.md 文件如下所示:
---
name: json-to-pydantic
description: Converts JSON data snippets into Python Pydantic data models.
---

# JSON to Pydantic Skill

This skill helps convert raw JSON data or API responses into structured, strongly-typed Python classes using Pydantic.

Instructions

1. **Analyze the Input**: Look at the JSON object provided by the user.
2. **Infer Types**:
  - `string` -> `str`
  - `number` -> `int` or `float`
  - `boolean` -> `bool`
  - `array` -> `List[Type]`
  - `null` -> `Optional[Type]`
  - Nested Objects -> Create a separate sub-class.

3. **Follow the Example**:
  Review `examples/` to see how to structure the output code. notice how nested dictionaries like `preferences` are extracted into their own class.

  - Input: `examples/input_data.json`
  - Output: `examples/output_model.py`

Style Guidelines
- Use `PascalCase` for class names.
- Use type hints (`List`, `Optional`) from `typing` module.
- If a field can be missing or null, default it to `None`.
在 /examples 文件夹中,包含 JSON 文件和输出文件(即 Python 文件)。这两种情况如下所示:
input_data.json
{
   "user_id": 12345,
   "username": "jdoe_88",
   "is_active": true,
   "preferences": {
       "theme": "dark",
       "notifications": [
           "email",
           "push"
       ]
   },
   "last_login": "2024-03-15T10:30:00Z",
   "meta_tags": null
}
output_model.py
from pydantic import BaseModel, Field
from typing import List, Optional

class Preferences(BaseModel):
   theme: str
   notifications: List[str]

class User(BaseModel):
   user_id: int
   username: str
   is_active: bool
   preferences: Preferences
   last_login: Optional[str] = None
   meta_tags: Optional[List[str]] = None
如何在 Antigravity 中运行此示例
假设您已启动 Antigravity 或 Antigravity CLI,请按以下步骤操作:
第 1 步:创建包含示例数据的 JSON 文件
让代理创建一个包含原始 JSON 载荷的新文件 product.json。
您的提示:
Create a new file product.json with the following JSON:

{
 "product": "Widget",
 "cost": 10.99,
 "stock": null
}
第 2 步:将 JSON 转换为 Pydantic 模型
触发 json-to-pydantic 技能,将 JSON 数据转换为结构化的 Pydantic 类。
您的提示:
Convert the JSON in product.json to a Pydantic model and save it to product_model.py.
第 3 步:验证输出
查看 product_model.py 文件。它将包含已完成的 Pydantic 模型。
级别 4:过程逻辑 (database-schema-validator)
这是“工具使用”模式。
如果您向 LLM 询问“此架构是否安全?”,即使缺少关键的主键,它也可能会回答一切正常,仅仅是因为 SQL 看起来正确无误。
我们将此检查委托给确定性脚本。我们的 database-schema-validator 技能将引导代理运行我们编写的 Python 脚本。该脚本提供二元(True/False)真实值。
database-schema-validator/
├── SKILL.md
└── scripts/
   └── validate_schema.py  (The Validator)
SKILL.md 文件如下所示:
---
name: database-schema-validator
description: Validates SQL schema files for compliance with internal safety and naming policies.
---

# Database Schema Validator Skill

This skill ensures that all SQL files provided by the user comply with our strict database standards.

Policies Enforced
1. **Safety**: No `DROP TABLE` statements.
2. **Naming**: All tables must use `snake_case`.
3. **Structure**: Every table must have an `id` column as PRIMARY KEY.

Instructions

1. **Do not read the file manually** to check for errors. The rules are complex and easily missed by eye.
2. **Run the Validation Script**:
  Use the `run_command` tool to execute the python script provided in the `scripts/` folder against the user's file.

  `python scripts/validate_schema.py <path_to_user_file>`

3. **Interpret Output**:
  - If the script returns **exit code 0**: Tell the user the schema looks good.
  - If the script returns **exit code 1**: Report the specific error messages printed by the script to the user and suggest fixes.
validate_schema.py 文件如下所示:
import sys
import re

def validate_schema(filename):
   """
   Validates a SQL schema file against internal policy:
   1. Table names must be snake_case.
   2. Every table must have a primary key named 'id'.
   3. No 'DROP TABLE' statements allowed (safety).
   """
   try:
       with open(filename, 'r') as f:
           content = f.read()

       lines = content.split('\n')
       errors = []

       # Check 1: No DROP TABLE
       if re.search(r'DROP TABLE', content, re.IGNORECASE):
           errors.append("ERROR: 'DROP TABLE' statements are forbidden.")

       # Check 2 & 3: CREATE TABLE checks
       table_defs = re.finditer(r'CREATE TABLE\s+(?P<name>\w+)\s*\((?P<body>.*?)\);', content, re.DOTALL | re.IGNORECASE)

       for match in table_defs:
           table_name = match.group('name')
           body = match.group('body')

           # Snake case check
           if not re.match(r'^[a-z][a-z0-9_]*$', table_name):
               errors.append(f"ERROR: Table '{table_name}' must be snake_case.")

           # Primary key check
           if not re.search(r'\bid\b.*PRIMARY KEY', body, re.IGNORECASE):
               errors.append(f"ERROR: Table '{table_name}' is missing a primary key named 'id'.")

       if errors:
           for err in errors:
               print(err)
           sys.exit(1)
       else:
           print("Schema validation passed.")
           sys.exit(0)

   except FileNotFoundError:
       print(f"Error: File '{filename}' not found.")
       sys.exit(1)

if __name__ == "__main__":
   if len(sys.argv) != 2:
       print("Usage: python validate_schema.py <schema_file>")
       sys.exit(1)

   validate_schema(sys.argv[1])
如何在 Antigravity 中运行此示例
假设您已启动 Antigravity 或 Antigravity CLI,请按以下步骤操作:
第 1 步:创建包含示例数据的 JSON 文件
让智能体创建一个包含多项违规政策的新文件 bad_schema.sql。
您的提示:
Create a new file bad_schema.sql with the following SQL:

DROP TABLE IF EXISTS legacy_users;

CREATE TABLE userProfile (
    id INT PRIMARY KEY,
    bio TEXT
);

CREATE TABLE posts (
    title TEXT,
    content TEXT,
    created_at TIMESTAMP
);

CREATE TABLE comments (
    id INT PRIMARY KEY,
    post_id INT,
    body TEXT
);
上述架构文件违反了所有三项政策:它使用了禁止的 DROP TABLE 语句,为 userProfile 表名称使用了 camelCase,并且忘记了 posts 表中的 id 主键。
第 2 步:验证 SQL 架构
触发 database-schema-validator 技能,针对您的文件运行 Python 验证器脚本。
您的提示:
Validate bad_schema.sql using the database-schema-validator skill.
第 3 步:验证输出
代理会报告失败情况,并直接在对话中显示脚本发现的具体错误。示例输出如下所示:
Suggested Fixes:
Remove the line DROP TABLE IF EXISTS legacy_users; as dropping tables is forbidden by safety policy.
Rename the table userProfile to use snake_case (e.g., user_profile).
Add a primary key column named id to the posts table definition.
6. 开发者工具包(Agents CLI 技能)
“操作和生命周期”模式。
开发 AI 智能体涉及重复的生命周期任务:搭建基架样板文件、配置本地运行时环境、运行测试提示和启动交互式 Playground。
Agents CLI Skills 将这种生命周期专业知识打包到特定的代理技能中,而不是强迫编码助理猜测目录结构或从头开始编写样板代理配置。
智能体 CLI(命令行界面)技能可将以开发者为中心的精简自动化功能直接引入您的终端,从而弥合原始代码与自主执行之间的差距。智能体开发套件 (ADK) 侧重于程序化框架,为您提供用于构建和编排 AI 智能体的 SDK、API 和结构蓝图,而智能体 CLI 技能则提供操作能力。它使开发者能够通过快速反馈循环在本地搭建、测试和部署智能体,完全绕过繁重的界面开销。
(可选)当映射到 Google Cloud 时,Agent CLI 技能可充当企业级基础设施的直接管道。您可以使用 CLI 命令立即打包代理工作流、管理访问权限,并将其部署到 Google Cloud 生态系统(例如 Vertex AI 或 Cloud Run),而无需点击控制台。这会将以前复杂的云架构任务转变为简单、可重现的终端命令,从而更轻松地将自主代理集成到现有的 CI/CD 部署流水线中。
如何安装
确保您已安装 Python 3.11+、Node.js 和 uv 软件包管理系统。然后,在终端中运行设置命令:
uvx google-agents-cli setup
此命令会安装 agents-cli 二进制文件,并在编码助理的环境中注册其用于基架和评估的专业技能。
注意:技能将安装在 ~/.agents/skills 文件夹中,Antigravity 可以看到该文件夹。如果您想在 Antigravity CLI 中看到这些技能,则必须将它们移至 ~/.gemini/antigravity-cli/skills 文件夹(全局范围)。
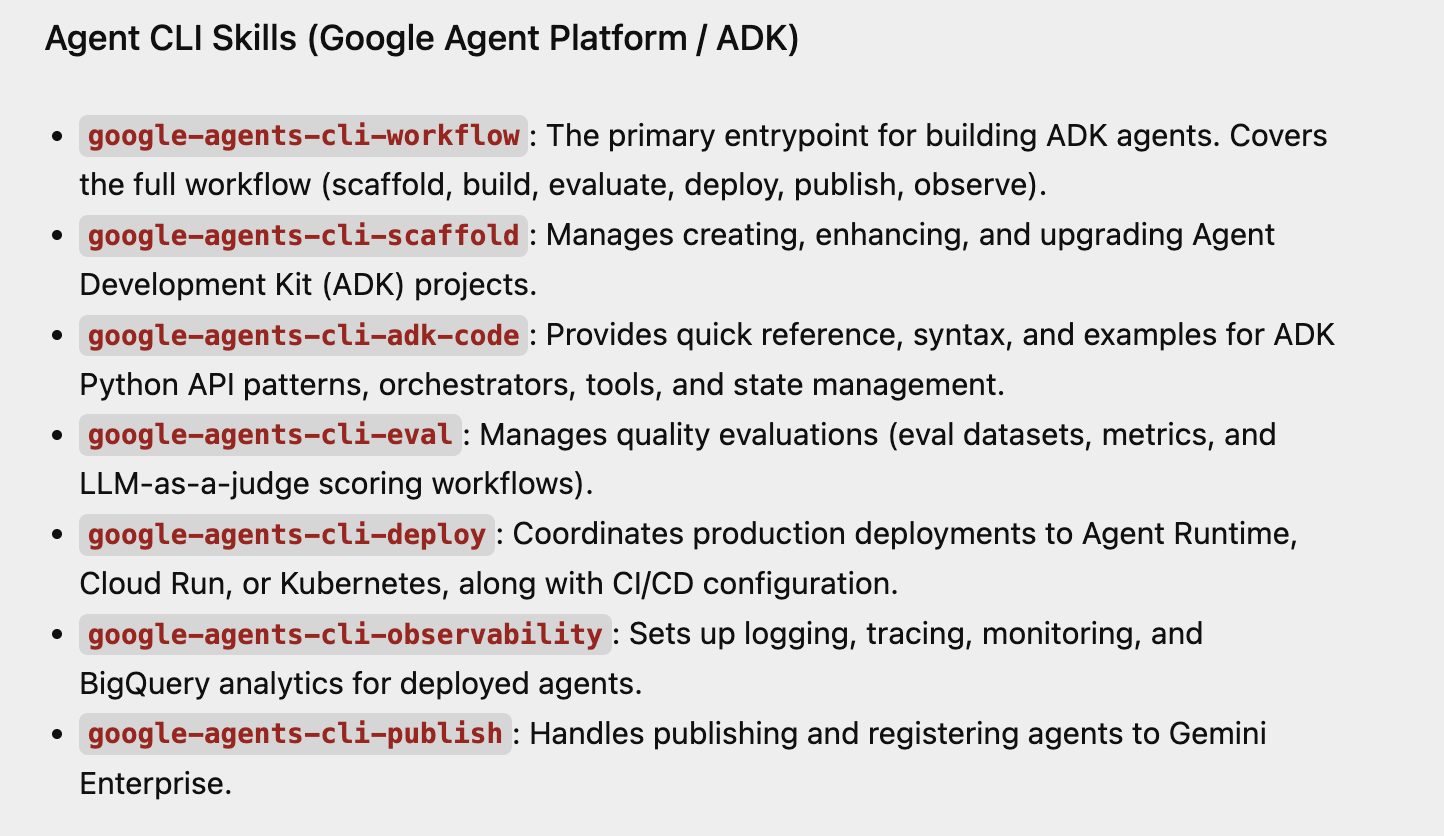
您只需询问哪些技能可用,即可检查技能是否已在 Antigravity 中加载。下面显示了我们刚刚安装的 Agent CLI Skills 的示例响应。
分步演示
完成 uvx google-agents-cli setup 后,您就可以完全在本地机器上启动 AI 智能体、与其互动并进行测试。
第 1 步:搭建并初始化新的智能体项目
运行创建命令以搭建标准化布局。创建后,您必须先安装其项目依赖项,然后才能运行任何执行任务。
# 1. Create a lightweight prototype project structure
agents-cli create weather-assistant --prototype --yes

# 2. Move into the directory and install required ADK dependencies
cd weather-assistant
agents-cli install
幕后发生的情况:这会创建一个包含 app/agent.py(您的核心代码)、pyproject.toml(软件包元数据)和 agents-cli-manifest.yaml(项目跟踪器)的干净工作区。
第 2 步:运行本地测试查询
针对您的代理执行快速、直接的命令行测试。如果您未使用 Google Cloud 的 ADC(应用默认凭证),请确保您已在终端中导出 GEMINI_API_KEY。您可以点击此处获取 Gemini API 密钥。获得密钥后,您可以通过以下命令在终端中导出密钥:
export GEMINI_API_KEY="YOUR_GEMINI_API_KEY"
在终端中运行以下命令:
agents-cli run "How are you?"
幕后发生的情况:CLI 在终端上完全在内存中初始化智能体开发套件 (ADK) 生命周期。它会通过您的本地凭据安全地路由提示,并将直播响应直接记录回命令行。
第 3 步:启动交互式网页 Playground
启动内置的本地基于 Web 的平台,以直观方式与智能体互动。
agents-cli playground
幕后发生的情况:CLI 会启动一个 ADK Web 界面服务器,通常可通过 http://localhost:8080 或备用 http://127.0.0.1:8000 访问,并支持热重载。在 Web 界面中,从顶部的选择应用下拉菜单中选择 app,然后在 Web 应用右侧的对话界面中与智能体互动。
7. 使用 npx skills 安装代理技能
npx skills 是 Vercel Labs 开发的一款命令行工具,可作为 AI 代理(如 Antigravity、Claude Code、GitHub Copilot、Cursor 和 Cline)的软件包管理器。它是开放式智能体技能生态系统的 CLI。
如果您打算使用 npx skills 软件包下载并安装代理技能,请注意,该软件包会将技能放置在 ~/.agents/skills 文件夹中。虽然文档中提到 Antigravity 等工具会从该文件夹中获取技能,但请注意,在撰写本文时,Antigravity 会从该文件夹中获取技能,但 Antigravity CLI 不会。如前所述,您需要将安装在 ~/.agents/skills 文件夹中的这些技能复制到 Antigravity CLI 中的技能文件夹的项目或全局范围,即
- 项目范围:位于
<project-root>/.agent/skills/中。 - 全球范围:位于
~/.gemini/antigravity-cli/skills/。
8. 恭喜
恭喜!您已成功使用 Google Antigravity 构建了您的第一个代理技能,并对其进行了配置,还向其中添加了自定义功能。
您还成功配置了一组代理技能(包括项目级和全局级),从而实现了自定义工具!
现在,您可以让 Antigravity 在您自己的项目中承担繁重的工作,并以自己的方式编写代码。
赢取 Kaggle 5 天 AI 智能体徽章
您是否已完成本实验,并参加了 Kaggle 的“5 天 AI 智能体:Google 氛围编程强化课程”?领取完成徽章:获得 5 天 AI 智能体徽章。