
1. Introduction
Google Workspace is where work happens. From drafting reports in Docs to crunching data in Sheets and collaborating in Gmail and Meet.
Now imagine if your Docs, Sheets, and Gmail weren't just tools, but collaborators.
With the help of Google's Agent Development Kit (ADK) and Gemini Enterprise Agent Platform, that's no longer just an idea but we will use these frameworks to build an intelligent agent, deploy the agent at scale, and integrate it seamlessly into our Google Workspace tools, enabling a new era of agentic productivity.
In this codelab, you will employ a step by step approach as follows:
- Develop the AI Facts Checker Agent using Agent Development Kit.
- Deploy the Agent in Gemini Enterprise Agent Platform, a fully managed environment to running Agents at scale.
- Integrate this Agent into Google Doc to perform fact checking for the text in the document.
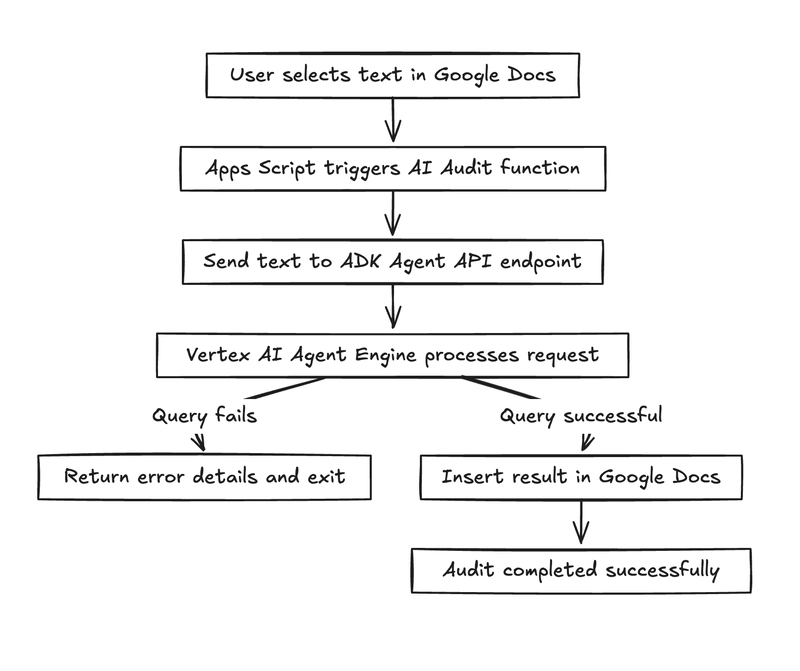
A conceptual diagram that explains how the final solution works is shown below:
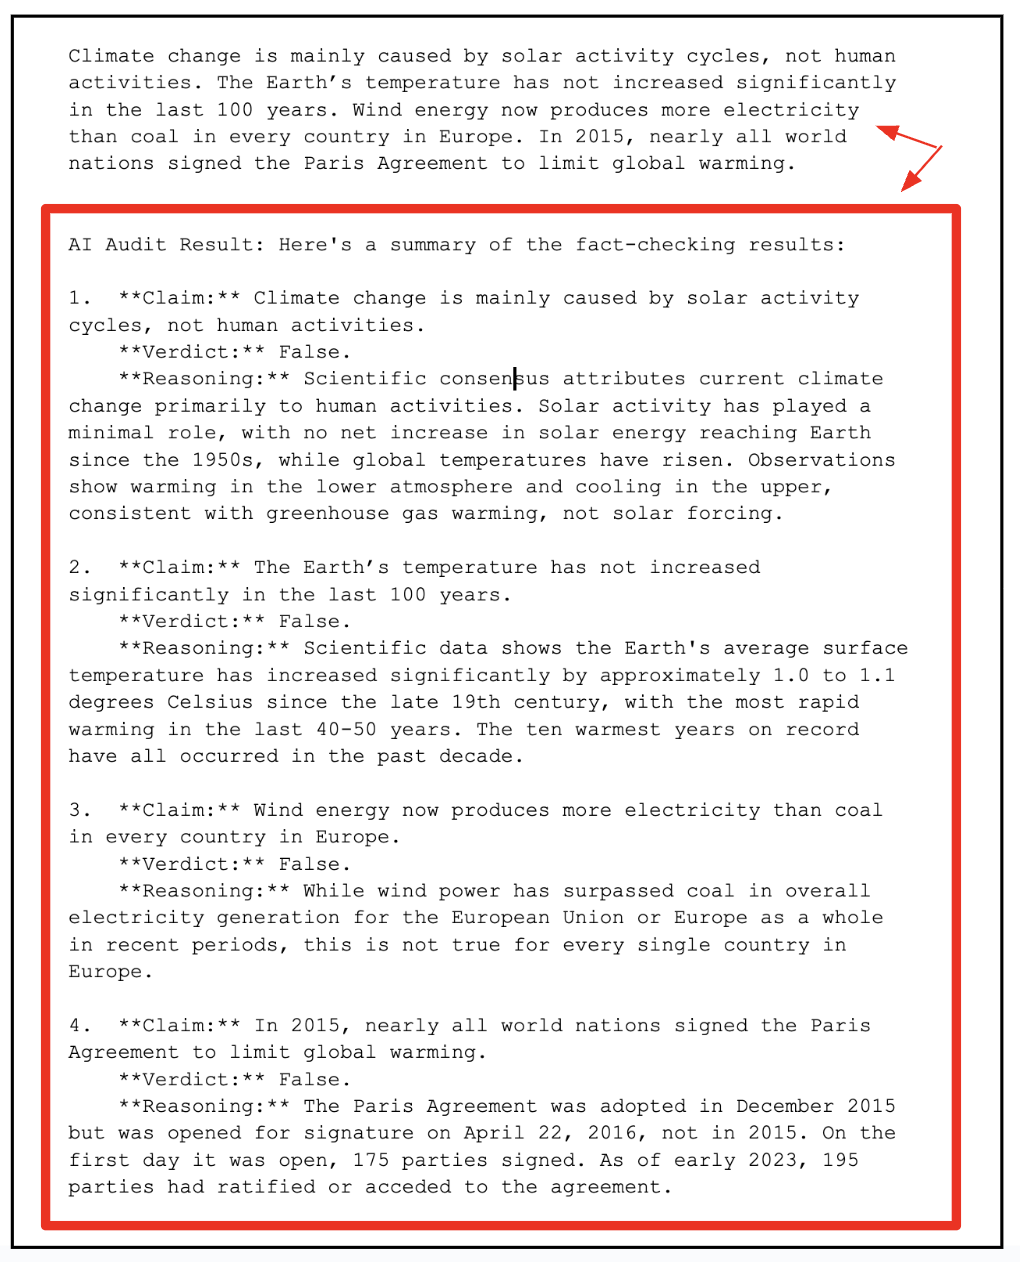
Here is a final output of how the Fact Check Agent works inside of a Google Doc, where there was an original text containing some statements and it does a fact check for each of the statements in the document. The output bound in the box with the red corner is the output from the Agent.
What you'll do
- Design, Build and Deploy an Agent that will perform fact checking inside a Google Doc.
What you'll learn
- Develop an Agent using Agent Development Kit (AK).
- Test out the Agent locally and deploy it on Gemini Enterprise Agent Platform.
- Integrate the Agent into a Google Workspace document (Google Doc).
What you'll need
- Chrome web browser
- A Gmail account
- A Cloud Project with billing enabled
This codelab, designed for developers of all levels (including beginners), uses Python and Apps Script in its sample code. However, knowledge of these programming languages is not a pre-requisite and basic code reading capability will be sufficient to understand the concepts presented.
2. Before you begin
Create a project
- In the Google Cloud Console, on the project selector page, select or create a Google Cloud project.
- Make sure that billing is enabled for your Cloud project. Learn how to check if billing is enabled on a project .
- You'll use Cloud Shell, a command-line environment running in Google Cloud that comes preloaded with bq. Click Activate Cloud Shell at the top of the Google Cloud console.

- Once connected to Cloud Shell, you check that you're already authenticated and that the project is set to your project ID using the following command:
gcloud auth list
- Run the following command in Cloud Shell to confirm that the gcloud command knows about your project.
gcloud config list project
- If your project is not set, use the following command to set it:
gcloud config set project <YOUR_PROJECT_ID>
- Enable the required APIs via the command shown below. This could take a few minutes, so please be patient.
gcloud services enable cloudresourcemanager.googleapis.com \
                       servicenetworking.googleapis.com \
                       aiplatform.googleapis.com \
                       discoveryengine.googleapis.com
On successful execution of the command, you should see a message similar to the one shown below:
Operation "operations/..." finished successfully.
If any API is missed, you can always enable it during the course of the implementation.
Refer documentation for gcloud commands and usage.
3. Building the ADK Agent
Let'a create the ADK agent (Document Fact Checker Agent), an AI based Auditor that fact checks text, inspired by Google's Fact-Check custom function sample. Unlike the sample's single-step approach, our agent uses multi-step reasoning to extract claims, verify them with google_search, and output structured JSON.
Step 1 : Install the Agent Development Kit
Open a new terminal tab in Cloud Shell and create a folder named my-agents as follows. Navigate to the my-agents folder too.
mkdir workspace-agents
cd workspace-agents
Now, let's create a virtual Python environment using venv as follows:
python -m venv .venv
Activate the virtual environment as follows:
source .venv/bin/activate
Install the ADK as follows:
pip install google-adk
You will now be able to invoke the adk utility as follows.
adk
It will show you a list of commands.
$ adk
Usage: adk [OPTIONS] COMMAND [ARGS]...

  Agent Development Kit CLI tools.

Options:
  --version  Show the version and exit.
  --help     Show this message and exit.

Commands:
  api_server   Starts a FastAPI server for agents.
  conformance  Conformance testing tools for ADK.
  create       Creates a new app in the current folder with prepopulated agent template.
  deploy       Deploys agent to hosted environments.
  eval         Evaluates an agent given the eval sets.
  eval_set     Manage Eval Sets.
  run          Runs an interactive CLI for a certain agent.
  web          Starts a FastAPI server with Web UI for agents.
Step 2 : Develop the Document Fact Checker Agent using ADK
We are now going to use adk to create a scaffolding for our agent via the adk create command with an app name **(docfactcheckeragent)**as given below.
adk create docfactcheckeragent
Follow the steps and select the following:
- Gemini model for choosing a model for the root agent.
- Choose Vertex AI for the backend.
- Your default Google Project Id and region will be displayed. Select the default itself.
Choose a model for the root agent:
1. gemini-2.5-flash
2. Other models (fill later)

Choose model (1, 2): 1
1. Google AI
2. Vertex AI
Choose a backend (1, 2): 2

You need an existing Google Cloud account and project, check out this link for details:
https://google.github.io/adk-docs/get-started/quickstart/#gemini---google-cloud-vertex-ai

Enter Google Cloud project ID [YOUR_PROJECT_ID]:
Enter Google Cloud region [us-central1]:

Agent created in <YOUR_HOME_FOLDER>/workspace-agents/docfactcheckeragent:
- .env
- __init__.py
- agent.py
Observe the folder in which a default template and required files for the Agent have been created.
First up is the .env file. The contents of which are shown below:
GOOGLE_GENAI_USE_VERTEXAI=1
GOOGLE_CLOUD_PROJECT=YOUR_GOOGLE_PROJECT_ID
GOOGLE_CLOUD_LOCATION=YOUR_GOOGLE_PROJECT_REGION
The values indicate that we will be using Gemini via Vertex AI along with the respective values for the Google Cloud Project Id and location.
Then we have the __init__.py file that marks the folder as a module and has a single statement that imports the agent from the agent.py file.
from . import agent
Finally, there is the agent.py file. You will need to replace the contents on this agent.py file with the code shown below:
from google.adk.agents import Agent
from google.adk.tools import google_search

root_agent = Agent(
    name='ai_auditor',
    model='gemini-2.5-flash',
    description="Fact-checks statements from a document and provides citations.",
    instruction="""
You are an AI Auditor specialized in factual verification and evidence-based reasoning.
Your goal is to analyze text from a Google Doc, identify verifiable factual claims, and produce a concise, source-backed audit report.

### 🔍 TASK FLOW

1. **Extract Claims**
   - Analyze the input text and identify factual claims that can be objectively verified.
   - A factual claim is any statement that can be proven true or false with external evidence.
   - Skip opinions, vague generalizations, or speculative language.
   - List each claim as a string in a JSON array.

2. **Verify Claims**
   - For each extracted claim:
     - Use the `google_search` tool to find relevant, credible results.
     - Evaluate at least the top 3 relevant URLs to determine the claim's accuracy.
     - Cross-check multiple sources when possible to ensure confidence.

3. **Classify Findings**
   - For each claim, determine one of the following verdicts:
     - ✅ **True:** Supported by multiple reputable sources.
     - ⚠️ **Misleading / Partially True:** Contains partially correct or context-dependent information.
     - ❌ **False:** Contradicted by credible evidence.
     - ❓ **Unverifiable:** Insufficient information to confirm or deny.
   - Provide a **confidence score (0–100)** reflecting the strength of evidence.

4. **Record Evidence**
   - For each claim, include:
     - The **verdict**
     - **Reasoning summary** (1–2 sentences)
     - **List of citation URLs** used for verification

5. **Summarize Results**
   - Compile a final report including:
     - Total number of claims analyzed
     - Distribution of verdicts (True / False / Misleading / Unverifiable)
     - Brief overall conclusion (e.g., "Most claims are accurate but some lack supporting evidence.")

### 🧾 OUTPUT FORMAT

Return your final response in structured JSON format as follows:

{
  "claims": [
    {
      "claim": "...",
      "verdict": "True | False | Misleading | Unverifiable",
      "confidence": 0-100,
      "reasoning": "...",
      "sources": ["https://...", "https://..."]
    }
  ],
  "summary": {
    "total_claims": X,
    "verdict_breakdown": {
      "True": X,
      "False": X,
      "Misleading": X,
      "Unverifiable": X
    },
    "overall_summary": "..."
  }
}

### 🧠 ADDITIONAL INSTRUCTIONS
- Always prefer authoritative domains (.gov, .edu, .org, or major media).
- Avoid low-quality or user-generated content as primary sources.
- Be concise, accurate, and transparent about uncertainty.
    """,
    tools=[google_search],  # Only use the search tool
)
The key points for the above source code are:
- We define the AI agent by giving it a name, followed by the model, description and a very detailed instruction set.
- The instruction set is the most important part that defines how exactly the agent should think and operate. This structure mirrors how professional fact-checkers work - turning the AI into an autonomous auditing pipeline.
- Once done with this agent declaration, we move to giving the agent access to real-world information via the
Google Search tool. Instead of relying on pre-trained data, the agent can perform live searches, evaluate results, and provide up-to-date citations.
That's what makes this system agentic . The model doesn't just generate answers, it takes action (using tools) to verify information.
Step 3 : Test the Agent locally
From the existing terminal window and give the following command. Ensure that you are in the parent folder (workspace-agents) containing the docfactcheckeragent folder.
adk web
If you are running the above command in Cloud Shell, suggest that you use the following:
adk web --allow_origins "regex:https://.*\.cloudshell\.dev"
A sample execution is shown below:
INFO:     Started server process [1478]
INFO:     Waiting for application startup.

+-----------------------------------------------------------------------------+
| ADK Web Server started                                                      |
|                                                                             |
| For local testing, access at http://127.0.0.1:8000.                         |
+-----------------------------------------------------------------------------+

INFO:     Application startup complete.
INFO:     Uvicorn running on http://127.0.0.1:8000 (Press CTRL+C to quit)
Click on the last link and it should bring up a web console to test out the Agent. Our first interaction is fundamental: understanding what the agent can actually do. This tests the agent's ability to summarize its description and instruction text.

The agent provides a concise summary of its abilities, drawing from its description and instruction set.
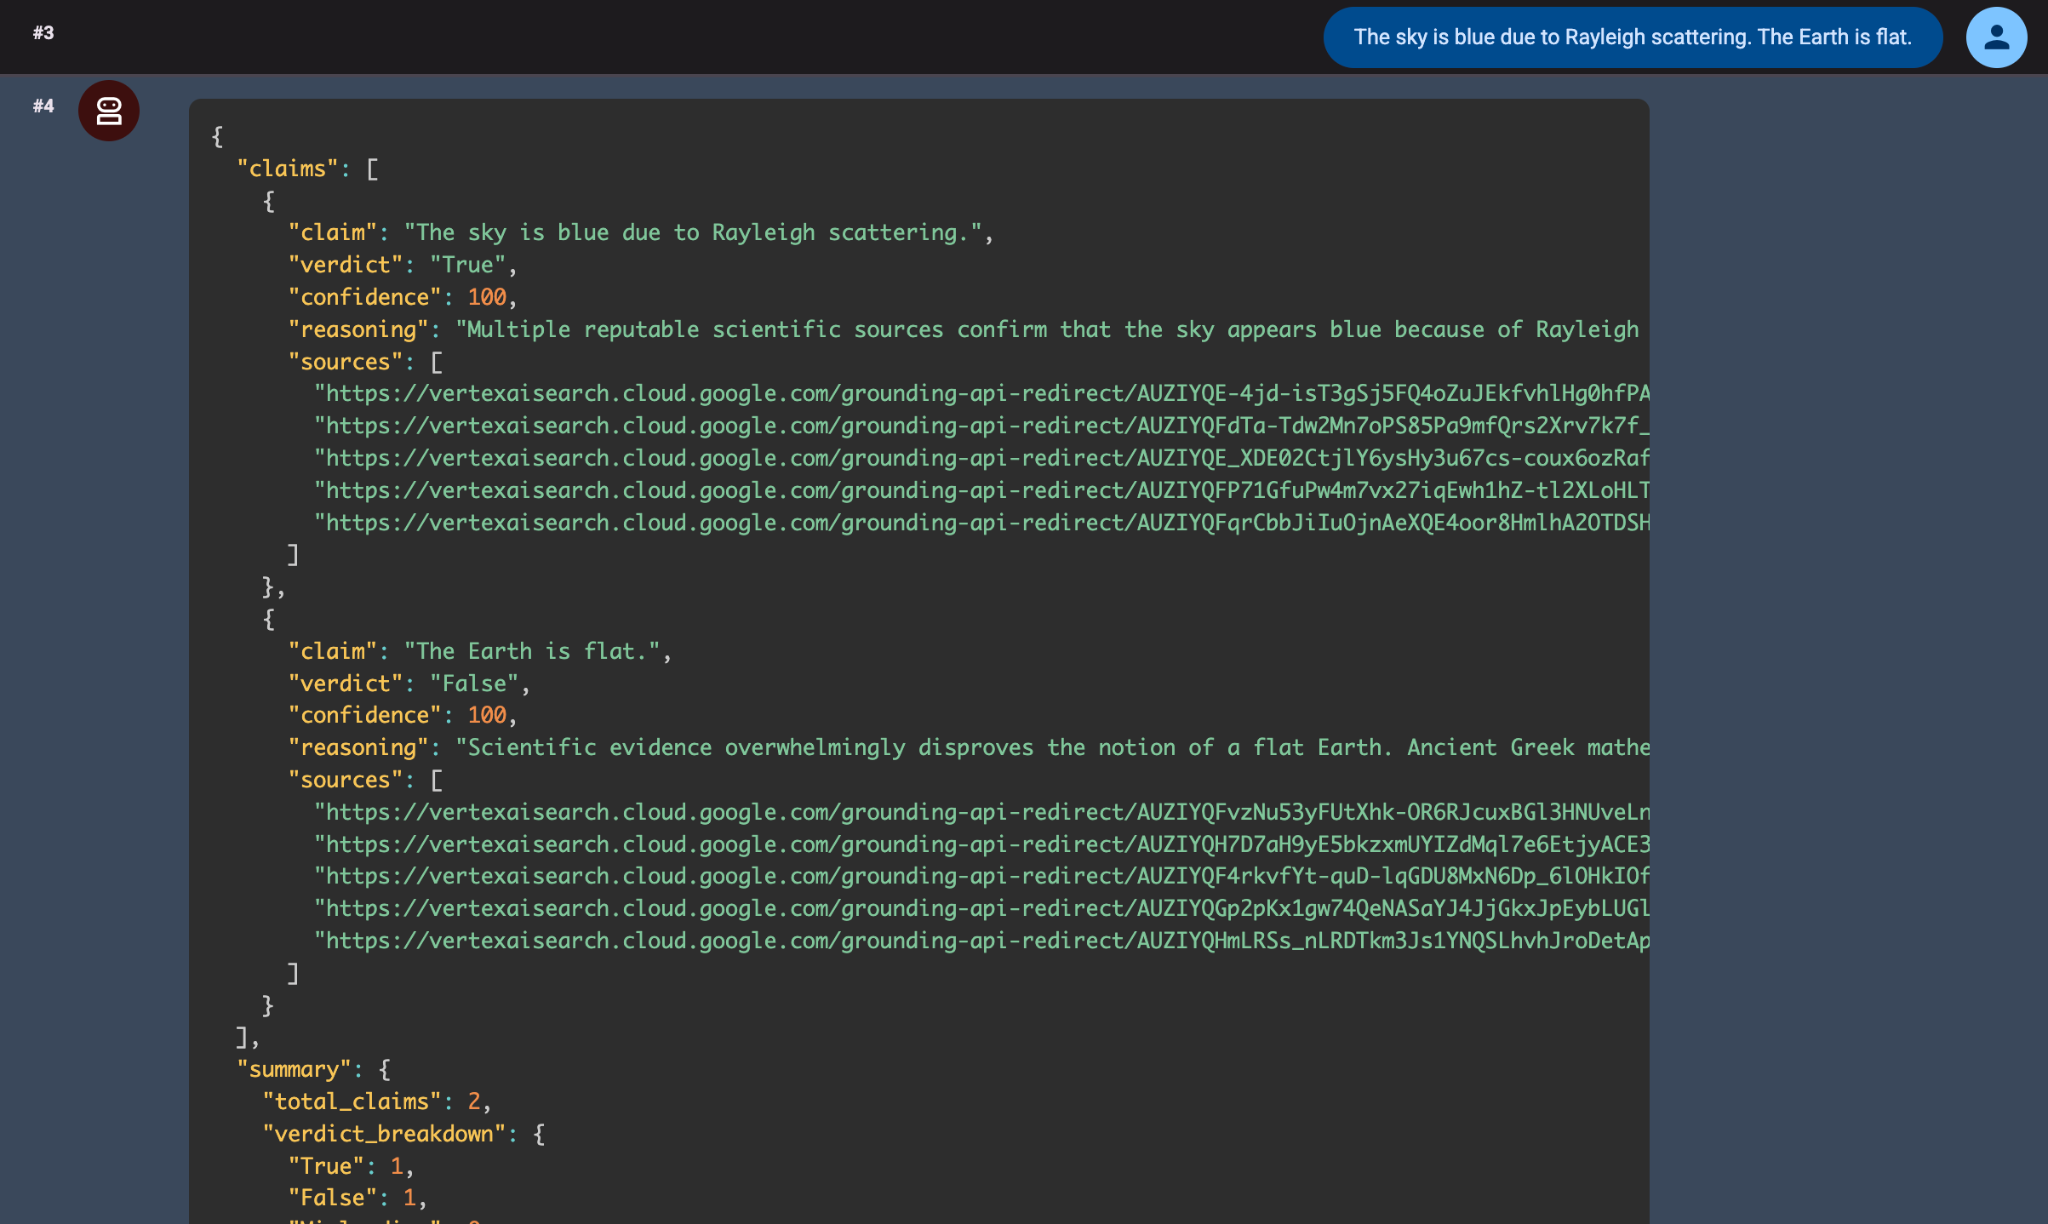
We then provide it with two statements (The sky is blue due to Rayleigh scattering. The Earth is flat.) and it successfully audits the contents and gives back a well structured JSON response.
Under the hood:
- The
google_searchtool fetches relevant pages from the web. - The Gemini 2.5 Flash model parses those snippets and classifies truthfulness.
- The ADK handles reasoning orchestration and ensures step-by-step logic is followed.
This local test phase helps validate our agent's workflow before you deploy it on Gemini Enterprise Agent Platform, where it can be connected to Google Workspace tools like Docs or Sheets.
In summary, we built a powerful AI Auditor Agent using Google's Agent Development Kit (ADK). Our agent could read text, identify factual claims, search credible sources (using the google_search tool), and return a clear verdict.
We built and tested everything locally through the ADK web interface and saw how the agent analysed a statement like:
The sky is blue due to Rayleigh scattering. The Earth is flat.
The agent verified one claim as true and flagged the other as false, a small but apt proof that our local setup works perfectly.
Now it's time to take the next big step - moving from local to cloud. Let's do that next.
4. Deploying the Agent to Gemini Enterprise Agent Platform
A real agent isn't just something you test on your laptop, it's something you can run at scale, integrate with other systems, and deploy for production across your apps.
Why Deploy?
Here are some good reasons to deploy your Agents into the cloud.
- Scalability: Handle high-volume requests without local runtime limits.
- Reliability: Built-in monitoring and auto-scaling, with fixes like the October 18, 2025 ADK tool config update.
- Integration-Ready: Expose an API endpoint for seamless Workspace calls.
Why Gemini Enterprise Agent Platform?
Think of Gemini Enterprise Agent Platform as the home for your deployed ADK agents - a managed environment built for reliability, scalability, and integration.
It gives your agent:
- Persistent state and memory
- Integrated tool execution (e.g., Google Search, Vertex AI Models)
- Secure API endpoints for external calls
- Logging and observability through Cloud Logging
- Native support for multi-agent orchestration
In short , you write once with ADK, and then scale it up using Gemini Enterprise Agent Platform.
Step 1 : Setting up for Deployment
We need to do a few things before we deploy the agent to Gemini Enterprise Agent Platform. We provide a requirements.txt file, so that all the dependencies required to run the Agent code is available to the Gemini Enterprise Agent Platform runtime environment.
create the following requirements.txt file in the root folder (docfactcheckeragent/) folder and the contents of which are shown below:
google-cloud-aiplatform
google-adk
requests
Step 2 : Deploy the Agent
The next step is to deploy your agent to the Gemini Enterprise Agent Platform using the adk deploy command.
adk deploy agent_engine \
    --project=YOUR_PROJECT_ID \
    --region=YOUR_PROJECT_REGION \
    --display_name "Doc Fact Checker" \
    docfactcheckeragent/
This should kick off a process to deploy our agent into Gemini Enterprise Agent Platform. The process is time consuming and can be expected to take approximately 5-8 minutes. At a high level, here is what is happening:
- Agent creation begins and the ADK CLI packages your code, uploads it to a Cloud Storage bucket, and triggers Gemini Enterprise Agent Platform to create a new Gemini Enterprise Agent Platform instance.
- Completion message : Once the deployment is complete, you'll see a confirmation message in the terminal with your Reasoning Engine ID. A sample of which is shown below:
Files and dependencies resolved
Deploying to agent engine...
✅ Created agent engine: projects/PROJECT_NUMBER/locations/LOCATION/reasoningEngines/REASONING_ENGINE_ID
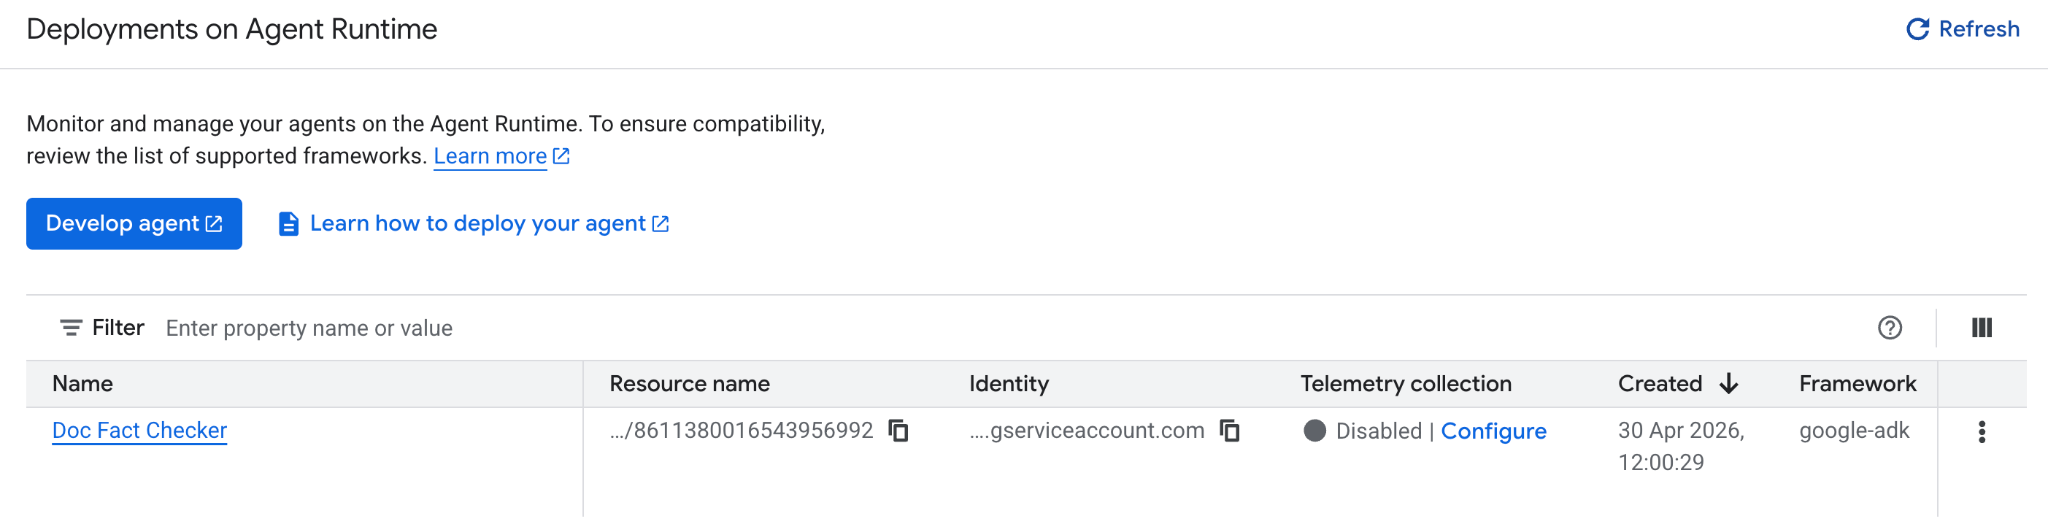
Step 3 : Verify the Agent in Cloud Console (Gemini Enterprise Agent Platform)
After the deployment is complete, go to Agent Platform → Agents → Deployment section of your Google Cloud console. You should see your deployed agent listed in the console as shown below:
🎉 That's it! Your agent is now live on Gemini Enterprise Agent Platform and ready to be integrated into Google Workspace or tested directly.
Step 4 : Testing your deployment Agent
Congratulations . Your agent is now live on Gemini Enterprise Agent Platform! The next step is to test that it's deployed correctly and responding to requests.
There are a few different ways to do this, depending on how you prefer to work:
- Through the Google Cloud Console: A visual interface to view, manage, and test your deployed agents directly.
- Using the REST API (cURL): Ideal for developers who want to manually send requests and inspect responses.
- With the Vertex AI SDK for Python: A more programmatic option to integrate testing into your development workflow.
Each approach gives you insight into how your agent behaves once deployed i.e. whether it's processing queries, handling sessions, or returning responses.
Your AI Auditor is now a cloud-powered agent, deployed to Gemini Enterprise Agent Platform, ready to fact-check at scale with google_search. It's transformed into a reliable, API-driven digital teammate, churning out JSON like:
{ "claims": [{"claim": "The sky is blue...", "verdict": "True", "confidence": 95}] }
We will directly test this out in the next section, where we will integrate the agent inside of a Google doc and validate the facts stated in the document.
5. Integrate Fact Checker Agent into Google Docs
In this section, we'll connect everything together - bringing your deployed agent inside Google Docs. With a few lines of Apps Script, you'll transform a standard Google Doc into an AI-assisted editor that can analyze and fact-check content automatically using your deployed agent.
Step 1: Set Up Your Google Docs Environment
Start by opening a new or existing Google Document (docs.new).
The Google Doc we are using for this tutorial contains the following contents (you can use that or your own content that you plan to fact check):
Climate change is mainly caused by solar activity cycles, not human activities. The Earth's temperature has not increased significantly in the last 100 years. Wind energy now produces more electricity than coal in every country in Europe. In 2015, nearly all world nations signed the Paris Agreement to limit global warming.
Step 2: Set Up Your Apps Script project and files
You'll need two files in your Apps Script project for this setup:
AIVertex.gs– handles all communication with Vertex AI and the ADK Agent.Code.gs– controls the Google Docs interface, menus, and document actions.
From the menu, go to Extensions -> Apps Script to open the editor. We'll use this space to connect to the deployed ADK Agent. You will find a Code.gs file already created and you will need to replace its content with the Code.gs code provided in the next section.
Let's go through each one.
AIVertex.gs
Create a new file via the + sign next to the Files section on the left, select it as Script and copy the following contents into it.
const LOCATION = PropertiesService.getScriptProperties().getProperty('LOCATION');
const GEMINI_MODEL_ID = PropertiesService.getScriptProperties().getProperty('GEMINI_MODEL_ID');
const REASONING_ENGINE_ID = PropertiesService.getScriptProperties().getProperty('REASONING_ENGINE_ID');
const SERVICE_ACCOUNT_KEY = PropertiesService.getScriptProperties().getProperty('SERVICE_ACCOUNT_KEY');

const credentials = credentialsForVertexAI();

/**
 * @param {string} statement The statement to fact-check.
 */
function requestLlmAuditorAdkAiAgent(statement) {
  return UrlFetchApp.fetch(
    `https://${LOCATION}-aiplatform.googleapis.com/v1/projects/${credentials.projectId}/locations/${LOCATION}/reasoningEngines/${REASONING_ENGINE_ID}:streamQuery?alt=sse`,
    {
      method: 'post',
      headers: { 'Authorization': `Bearer ${credentials.accessToken}` },
      contentType: 'application/json',
      muteHttpExceptions: true,
      payload: JSON.stringify({
        "class_method": "async_stream_query",
        "input": {
          "user_id": "google_sheets_custom_function_fact_check",
          "message": statement,
        }
      })
    }
  ).getContentText();
}

/**
 * @param {string} prompt The Gemini prompt to use.
 */
function requestOutputFormatting(prompt) {
  const response = UrlFetchApp.fetch(
    `https://${LOCATION}-aiplatform.googleapis.com/v1/projects/${credentials.projectId}/locations/${LOCATION}/publishers/google/models/${GEMINI_MODEL_ID}:generateContent`,
    {
      method: 'post',
      headers: { 'Authorization': `Bearer ${credentials.accessToken}` },
      contentType: 'application/json',
      muteHttpExceptions: true,
      payload: JSON.stringify({
        "contents": [{
          "role": "user",
          "parts": [{ "text": prompt }]
        }],
        "generationConfig": { "temperature": 0.1, "maxOutputTokens": 2048 },
        "safetySettings": [
          {
            "category": "HARM_CATEGORY_HARASSMENT",
            "threshold": "BLOCK_NONE"
          },
          {
            "category": "HARM_CATEGORY_HATE_SPEECH",
            "threshold": "BLOCK_NONE"
          },
          {
            "category": "HARM_CATEGORY_SEXUALLY_EXPLICIT",
            "threshold": "BLOCK_NONE"
          },
          {
            "category": "HARM_CATEGORY_DANGEROUS_CONTENT",
            "threshold": "BLOCK_NONE"
          }
        ]
      })
    }
  );
  return JSON.parse(response).candidates[0].content.parts[0].text
}

/**
 * Gets credentials required to call Vertex API using a Service Account.
 * Requires use of Service Account Key stored with project.
 *
 * @return {!Object} Containing the Google Cloud project ID and the access token.
 */
function credentialsForVertexAI() {
  const credentials = SERVICE_ACCOUNT_KEY;
  if (!credentials) {
    throw new Error("service_account_key script property must be set.");
  }

  const parsedCredentials = JSON.parse(credentials);

  const service = OAuth2.createService("Vertex")
    .setTokenUrl('https://oauth2.googleapis.com/token')
    .setPrivateKey(parsedCredentials['private_key'])
    .setIssuer(parsedCredentials['client_email'])
    .setPropertyStore(PropertiesService.getScriptProperties())
    .setScope("https://www.googleapis.com/auth/cloud-platform");
  return {
    projectId: parsedCredentials['project_id'],
    accessToken: service.getAccessToken(),
  }
}
Remember to save the file.
This file does the following:
- Authenticates securely to Vertex AI using a Service Account key. It invokes your deployed ADK Agent to analyze or fact-check the document text.
- Uses Gemini for smart response formatting , making the results human-readable.
Code.gs
/**
 * Adds a custom menu in Google Docs to run the AI Audit directly.
 */
function onOpen() {
  DocumentApp.getUi()
    .createMenu('AI Audit Tools')
    .addItem('Run AI Audit', 'runAuditAndInsert')
    .addToUi();
}

/**
 * Returns the entire text content of the document.
 */
function getDocumentText() {
  const doc = DocumentApp.getActiveDocument();
  const body = doc.getBody();
  let text = body.getText();
  return text.trim();
}

/**
 * Runs the AI Audit and inserts the result as text at the end of the document.
 */
function runAuditAndInsert() {
  const docText = getDocumentText();
  const result = runAudit(docText);

  if (result) {
    const doc = DocumentApp.getActiveDocument();
    const body = doc.getBody();
    // Append the audit result as a new paragraph at the end of the document
    body.appendParagraph('AI Audit Result: ' + result);
  }
}

/**
 * Runs the AI Audit using ADK Agent and Gemini formatting.
 */
function runAudit(docText) {
  console.log('[INFO] Starting AI audit process...');
  if (!docText) {
    console.log('[WARN] No text in document.');
    return '⚠️ The document is empty. Please add some text to audit.';
  }

  // Check for excessive document length to avoid token limits
  if (docText.length > 10000) {
    console.log('[WARN] Document too long.');
    return '⚠️ Document exceeds 10,000 characters. Please shorten the text.';
  }

  console.log('[STEP] Sending text to ADK Agent...');
  const rawAudit = requestLlmAuditorAdkAiAgent(docText);

  // Check if rawAudit is an error message
  if (rawAudit.startsWith('ERROR:')) {
    console.error('[ERROR] ADK Agent returned error:', rawAudit);
    return rawAudit;
  }

  console.log('[STEP] Formatting AI response...');
  let formatted;
  try {
    formatted = requestOutputFormatting(
      `Here is a fact-checking result: ${rawAudit}.
       Summarize it. Keep the main verdict and reasoning. Remove markdown and make it concise.`
    );
  } catch (error) {
    console.error('[ERROR] Formatting failed:', error.toString());
    return `ERROR: Failed to format audit result - ${error.toString()}`;
  }

  console.log('[SUCCESS] Audit completed successfully.');
  console.log('[RESULT] Final Output:', formatted);
  return formatted;
}
This file connects your Docs UI with the ADK logic above. It lets you trigger the audit directly from a custom Docs menu. At a high level it does the following:
- Adds a custom menu in Google Docs called AI Audit Tools.
- Grabs your document text and sends it to your ADK Agent for analysis.
- Displays the AI-generated audit results back into the document.
Step 3 : Create Service Account
When you integrate Agent calling functionality into a Google Doc, we need to provide an identity to the Google Doc, such that it has the correct role to invoke the Agent that is deployed in Gemini Enterprise Agent Platform. For this purpose, we will be using a Service Account that will have the correct role: roles/aiplatform.user.
In Cloud Shell, run the following script, step by step:
export PROJECT_ID="YOUR_PROJECT_ID"
export SA_NAME="docfactcheckeragentsa"

gcloud iam service-accounts create $SA_NAME \
  --project=$PROJECT_ID \
  --display-name="Doc Fact Checker Agent Service Account"

gcloud projects add-iam-policy-binding $PROJECT_ID \
--member="serviceAccount:${SA_NAME}@${PROJECT_ID}.iam.gserviceaccount.com" \
  --role="roles/aiplatform.user"

gcloud projects add-iam-policy-binding $PROJECT_ID \
--member="serviceAccount:${SA_NAME}@${PROJECT_ID}.iam.gserviceaccount.com" \
  --role="roles/iam.serviceAccountTokenCreator"
This will create the service account with the correct permissions.
We'll generate a JSON key for the service account. This is what your Apps Script project will use to authenticate. The steps to get the key are:
- In the Google Cloud console, go to IAM & Admin > Service Accounts.
- Click the specific service account that you just created.
- Go to the Keys tab.
- Click Add Key → Create New Key.
- Select JSON, then click Create.
- A JSON file will download automatically, you should keep that safe. You'll paste its content into your script properties in the next section.
Step 4 : Add Script properties
Go back to the Apps Script editor in Google Doc.
To connect your script to your deployed resources, go to Project Settings → Script Properties → Add Script Property.
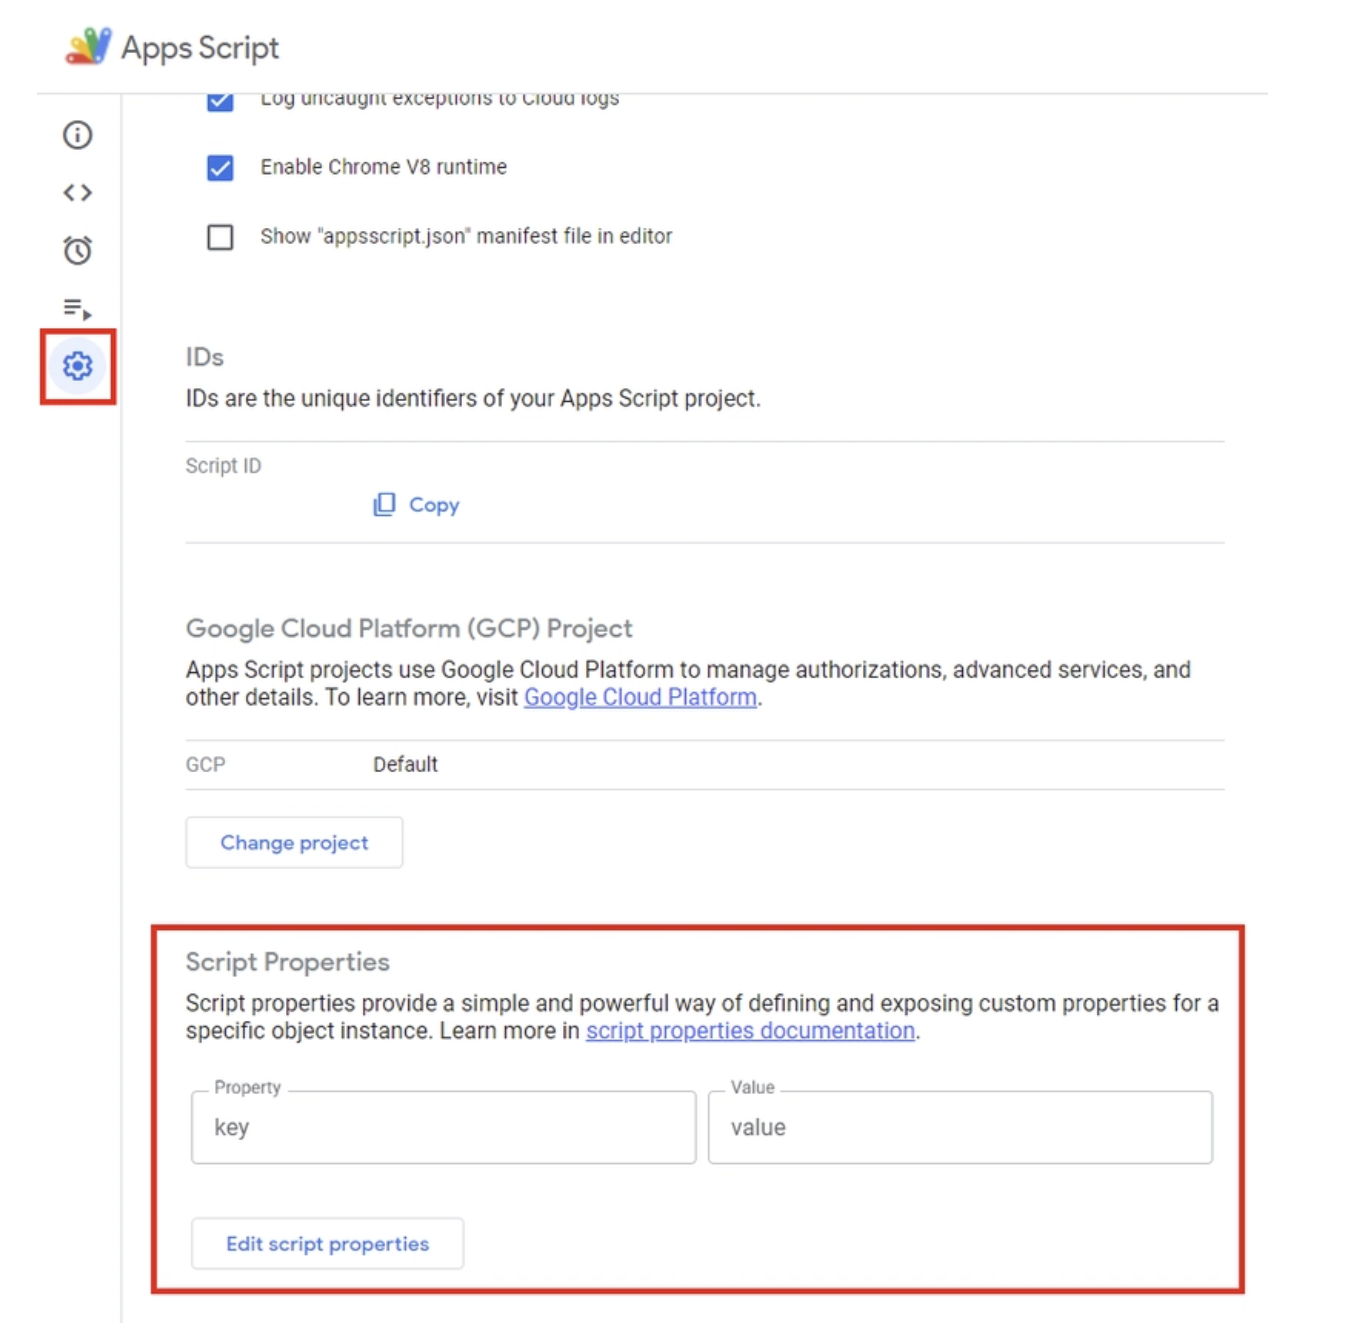
Add the following to your Script Properties:
LOCATION: The region of your Vertex AI deployment. E.g.us-central1GEMINI_MODEL_ID: Gemini model to use. Use the value:gemini-2.5-flashREASONING_ENGINE_ID: The deployed ADK Agent ID. This can be obtained from the Gemini Enterprise Agent Platform option in the console from your specific Agent that you deployed. You will see a resource name for the Agent deployed. The Agent ID is the last numeric value in the resource name (i.e. theRESOURCE_ID). For e.g.projects/SOME_ID/locations/REGION/reasoningEngines/RESOURCE_IDSERVICE_ACCOUNT_KEY: Copy the entire content for the JSON key that you downloaded for the Service Account that we created in the previous step.
Click Save script properties.
Step 5 : Add the OAuth2 library
Our Apps Script project needs the OAuth2 library for authenticating API calls.
To add it:
- Go to
Services → Libraries - Click
Add a Library - Enter the Script ID:
1B7FSrk5Zi6L1rSxxTDgDEUsPzlukDsi4KGuTMorsTQHhGBzBkMun4iDF
Step 6 : Test the Fact Checker Doc Agent in Google Docs
We are at the final step to test the agent inside of Google Docs. For this do the following:
- In the Apps Script editor, run the
onOpen()function once. This will add a new AI Audit Tools menu in Google Docs. - Return to your Doc. You will see an additional menu item in the main menu titled
AI Audit Tools. Click on that and thenRun AI Audit.
Here is a sample run:
6. Cleanup
To avoid ongoing charges to your Google Cloud account, it's important to delete the resources we created during this workshop.
If you do not need the Agent to be deployed in Gemini Enterprise Agent Platform anymore, you can delete it via the steps given below:
- Navigate to the Gemini Enterprise Agent Platform page in the Google Cloud Console.
- Locate the agent you wish to delete from the list of deployed agents.
- Click the three-dot menu (more actions) next to the agent's name.
- Select Delete from the dropdown menu.
- Confirm the deletion by clicking Delete agent in the confirmation dialog.
As a good practice, delete the service account too.
gcloud iam service-accounts delete ${SA_NAME}@${PROJECT_ID}.iam.gserviceaccount.com
7. Congratulations
You've now deployed your AI Agent, connected it to Google Docs, and seen it in action - analyzing, reasoning, and summarizing right where your content lives. What we've built here isn't just a standalone demo. It's the foundation for intelligent, agent-driven collaboration inside Google Workspace.
By combining ADK's reasoning capabilities with Gemini's generative models, we've effectively turned Google Docs into a living, thinking assistant - one that can read, audit, and refine your text with context.
The same blueprint extends naturally across Sheets, Slides, Drive, and Gmail. Imagine agents that:
- Audit financial data and flag inconsistencies in Sheets
- Auto-generate pitch decks and summaries in Slides
- Label and organize documents intelligently in Drive
- Or even draft and fact-check emails directly in Gmail
This demonstration lays the groundwork for building agentic workflows that integrate seamlessly into your daily Workspace tools, turning static documents into dynamic AI collaborators.