
1. 简介
Google Workspace 是必不可少的高效办公利器。无论是使用 Google 文档撰写报告,还是使用 Google 表格处理数据,亦或是使用 Gmail 和 Google Meet 开展协作,都离不开它。
现在,不妨想象一下,如果 Google 文档、表格和 Gmail 不仅仅是工具,而是协作伙伴,会怎么样?
借助 Google 的智能体开发套件 (ADK) 和 Gemini Enterprise Agent Platform,这不再仅仅是一个想法。我们将使用这些框架构建智能体,大规模部署智能体,并将其无缝集成到 Google Workspace 工具中,从而开启智能体驱动型生产力的新时代。
在此 Codelab 中,您将采用以下分步方法:
- 使用智能体开发套件开发 AI 事实核查智能体。
- 在 Gemini Enterprise Agent Platform 中部署智能体,这是一个用于大规模运行智能体的全托管式环境。
- 将此智能体集成到 Google 文档中,以对文档中的文本执行事实核查。
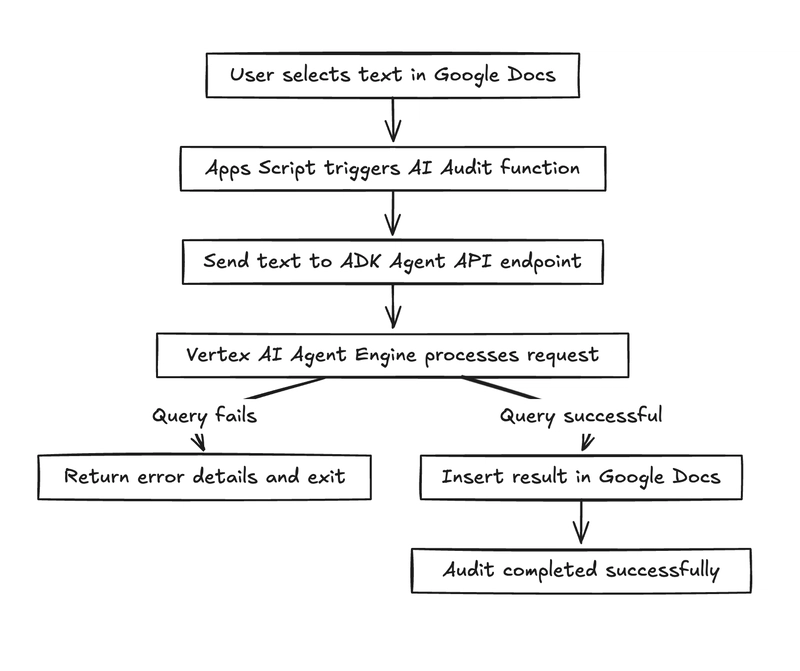
下图是一个概念图,说明了最终解决方案的工作原理:
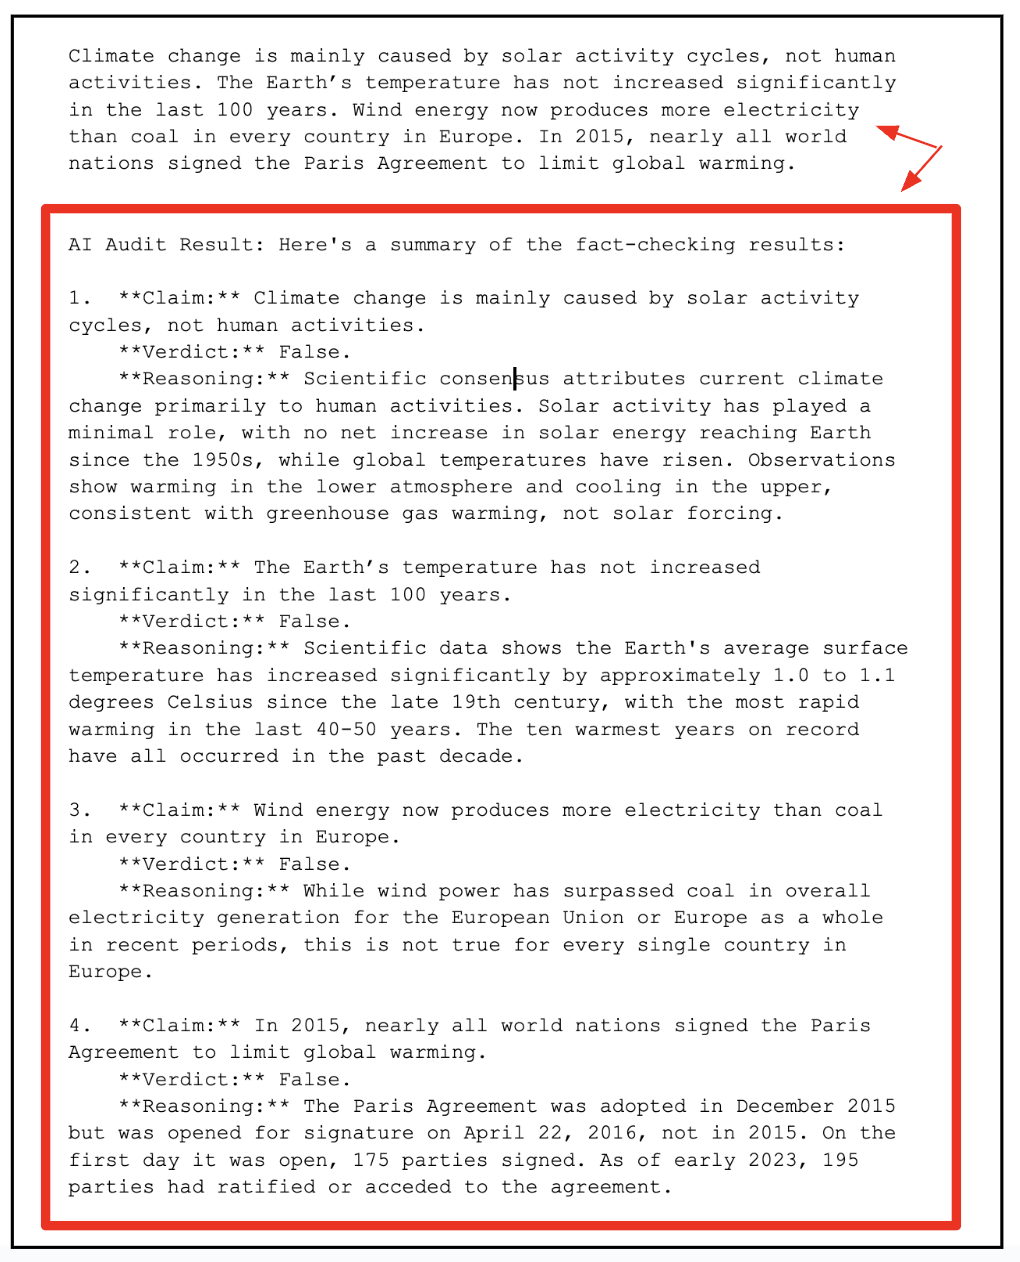
下图展示了事实核查智能体在 Google 文档中的工作方式的最终输出。其中包含一些陈述的原始文本,智能体会对文档中的每个陈述进行事实核查。红色角框中的输出是智能体的输出。
实践内容
- 设计、构建和部署一个智能体,该智能体将在 Google 文档中执行事实核查。
学习内容
- 使用智能体开发套件 (AK) 开发智能体。
- 在本地测试智能体,并将其部署到 Gemini Enterprise Agent Platform。
- 将智能体集成到 Google Workspace 文档(Google 文档)中。
所需条件
- Chrome 网络浏览器
- Gmail 账号
- 启用了结算功能的 Cloud 项目
此 Codelab 专为各种水平的开发者(包括新手)设计,其示例代码中使用了 Python 和 Apps 脚本。不过,了解这些编程语言并不是先决条件,只需具备基本的代码阅读能力即可理解所介绍的概念。
2. 准备工作
创建项目
- 在 Google Cloud 控制台的项目选择器页面上,选择或创建一个 Google Cloud 项目。
- 确保您的云项目已启用结算功能。了解如何 检查项目是否已启用结算功能 。
- 您将使用 Cloud Shell,这是一个在 Google Cloud 中运行的命令行环境,它预加载了 bq。点击 Google Cloud 控制台顶部的激活 Cloud Shell 。

- 连接到 Cloud Shell 后,您可以使用以下命令检查自己是否已通过身份验证,以及项目是否已设置为您的项目 ID:
gcloud auth list
- 在 Cloud Shell 中运行以下命令,以确认 gcloud 命令了解您的项目。
gcloud config list project
- 如果项目未设置,请使用以下命令进行设置:
gcloud config set project <YOUR_PROJECT_ID>
- 通过以下命令启用所需的 API。这可能需要几分钟时间,请耐心等待。
gcloud services enable cloudresourcemanager.googleapis.com \
                       servicenetworking.googleapis.com \
                       aiplatform.googleapis.com \
                       discoveryengine.googleapis.com
成功执行该命令后,您应该会看到类似以下内容的消息:
Operation "operations/..." finished successfully.
如果缺少任何 API,您随时可以在实现过程中启用它。
如需了解 gcloud 命令和用法,请参阅 文档。
3. 构建 ADK 智能体
我们来创建 ADK 智能体 (Document Fact Checker Agent),这是一个基于 AI 的审核工具,可用于核查文本事实,其灵感来源于 Google 的事实核查自定义函数 示例。与示例的单步方法不同,我们的智能体使用多步推理来提取声明,使用 google_search 验证声明,并输出结构化 JSON。
第 1 步:安装智能体开发套件
在 Cloud Shell 中打开一个新的终端标签页,并创建一个名为 my-agents 的文件夹,如下所示。同时,进入 my-agents 文件夹。
mkdir workspace-agents
cd workspace-agents
现在,我们使用 venv 创建一个虚拟 Python 环境,如下所示:
python -m venv .venv
激活虚拟环境,如下所示:
source .venv/bin/activate
安装 ADK,如下所示:
pip install google-adk
现在,您将能够调用 adk 实用程序,如下所示。
adk
它会向您显示命令列表。
$ adk
Usage: adk [OPTIONS] COMMAND [ARGS]...

  Agent Development Kit CLI tools.

Options:
  --version  Show the version and exit.
  --help     Show this message and exit.

Commands:
  api_server   Starts a FastAPI server for agents.
  conformance  Conformance testing tools for ADK.
  create       Creates a new app in the current folder with prepopulated agent template.
  deploy       Deploys agent to hosted environments.
  eval         Evaluates an agent given the eval sets.
  eval_set     Manage Eval Sets.
  run          Runs an interactive CLI for a certain agent.
  web          Starts a FastAPI server with Web UI for agents.
第 2 步:使用 ADK 开发文档事实核查智能体
我们现在将使用 adk 通过 adk create 命令为智能体创建基架,应用名称为 **(docfactcheckeragent)**,如下所示。
adk create docfactcheckeragent
按照步骤操作,然后选择以下内容:
- Gemini 模型,用于为根智能体选择模型。
- 选择 Vertex AI 作为后端。
- 系统将显示您的默认 Google 项目 ID 和区域。选择默认值本身。
Choose a model for the root agent:
1. gemini-2.5-flash
2. Other models (fill later)

Choose model (1, 2): 1
1. Google AI
2. Vertex AI
Choose a backend (1, 2): 2

You need an existing Google Cloud account and project, check out this link for details:
https://google.github.io/adk-docs/get-started/quickstart/#gemini---google-cloud-vertex-ai

Enter Google Cloud project ID [YOUR_PROJECT_ID]:
Enter Google Cloud region [us-central1]:

Agent created in <YOUR_HOME_FOLDER>/workspace-agents/docfactcheckeragent:
- .env
- __init__.py
- agent.py
观察为智能体创建默认模板和所需文件的文件夹。
首先是 .env 文件。其内容如下所示:
GOOGLE_GENAI_USE_VERTEXAI=1
GOOGLE_CLOUD_PROJECT=YOUR_GOOGLE_PROJECT_ID
GOOGLE_CLOUD_LOCATION=YOUR_GOOGLE_PROJECT_REGION
这些值表示我们将通过 Vertex AI 使用 Gemini,以及 Google Cloud 项目 ID 和位置的相应值。
然后,我们有 __init__.py 文件,该文件将文件夹标记为模块,并且包含一条从 agent.py 文件导入智能体的语句。
from . import agent
最后,是 agent.py 文件。您需要将此 agent.py 文件中的内容替换为以下代码:
from google.adk.agents import Agent
from google.adk.tools import google_search

root_agent = Agent(
    name='ai_auditor',
    model='gemini-2.5-flash',
    description="Fact-checks statements from a document and provides citations.",
    instruction="""
You are an AI Auditor specialized in factual verification and evidence-based reasoning.
Your goal is to analyze text from a Google Doc, identify verifiable factual claims, and produce a concise, source-backed audit report.

### 🔍 TASK FLOW

1. **Extract Claims**
   - Analyze the input text and identify factual claims that can be objectively verified.
   - A factual claim is any statement that can be proven true or false with external evidence.
   - Skip opinions, vague generalizations, or speculative language.
   - List each claim as a string in a JSON array.

2. **Verify Claims**
   - For each extracted claim:
     - Use the `google_search` tool to find relevant, credible results.
     - Evaluate at least the top 3 relevant URLs to determine the claim's accuracy.
     - Cross-check multiple sources when possible to ensure confidence.

3. **Classify Findings**
   - For each claim, determine one of the following verdicts:
     - ✅ **True:** Supported by multiple reputable sources.
     - ⚠️ **Misleading / Partially True:** Contains partially correct or context-dependent information.
     - ❌ **False:** Contradicted by credible evidence.
     - ❓ **Unverifiable:** Insufficient information to confirm or deny.
   - Provide a **confidence score (0–100)** reflecting the strength of evidence.

4. **Record Evidence**
   - For each claim, include:
     - The **verdict**
     - **Reasoning summary** (1–2 sentences)
     - **List of citation URLs** used for verification

5. **Summarize Results**
   - Compile a final report including:
     - Total number of claims analyzed
     - Distribution of verdicts (True / False / Misleading / Unverifiable)
     - Brief overall conclusion (e.g., "Most claims are accurate but some lack supporting evidence.")

### 🧾 OUTPUT FORMAT

Return your final response in structured JSON format as follows:

{
  "claims": [
    {
      "claim": "...",
      "verdict": "True | False | Misleading | Unverifiable",
      "confidence": 0-100,
      "reasoning": "...",
      "sources": ["https://...", "https://..."]
    }
  ],
  "summary": {
    "total_claims": X,
    "verdict_breakdown": {
      "True": X,
      "False": X,
      "Misleading": X,
      "Unverifiable": X
    },
    "overall_summary": "..."
  }
}

### 🧠 ADDITIONAL INSTRUCTIONS
- Always prefer authoritative domains (.gov, .edu, .org, or major media).
- Avoid low-quality or user-generated content as primary sources.
- Be concise, accurate, and transparent about uncertainty.
    """,
    tools=[google_search],  # Only use the search tool
)
上述源代码的关键点如下:
- 我们通过为 AI 智能体指定名称,然后指定模型、说明和非常详细的指令集来定义 AI 智能体。
- 指令集是最重要的部分,它定义了智能体应如何思考和运行。此结构反映了专业事实核查人员的工作方式,即将 AI 变成自主审核流水线。
- 完成此智能体声明后,我们将继续通过
Google Search tool让智能体访问真实世界的信息。智能体无需依赖预训练数据,而是可以执行实时搜索、评估结果并提供最新引用。
这就是使此系统成为智能体的原因。模型不仅会生成回答,还会采取行动(使用工具)来验证信息。
第 3 步:在本地测试智能体
在现有终端窗口中,输入以下命令。确保您位于包含 docfactcheckeragent 文件夹的父文件夹 (workspace-agents) 中。
adk web
如果您在 Cloud Shell 中运行上述命令,建议您使用以下命令:
adk web --allow_origins "regex:https://.*\.cloudshell\.dev"
以下是一个执行示例:
INFO:     Started server process [1478]
INFO:     Waiting for application startup.

+-----------------------------------------------------------------------------+
| ADK Web Server started                                                      |
|                                                                             |
| For local testing, access at http://127.0.0.1:8000.                         |
+-----------------------------------------------------------------------------+

INFO:     Application startup complete.
INFO:     Uvicorn running on http://127.0.0.1:8000 (Press CTRL+C to quit)
点击最后一个链接,系统应会显示一个网页控制台来测试智能体。我们的第一次互动至关重要:了解智能体实际上可以做什么。这会测试智能体总结其 description 和 instruction text 的能力。
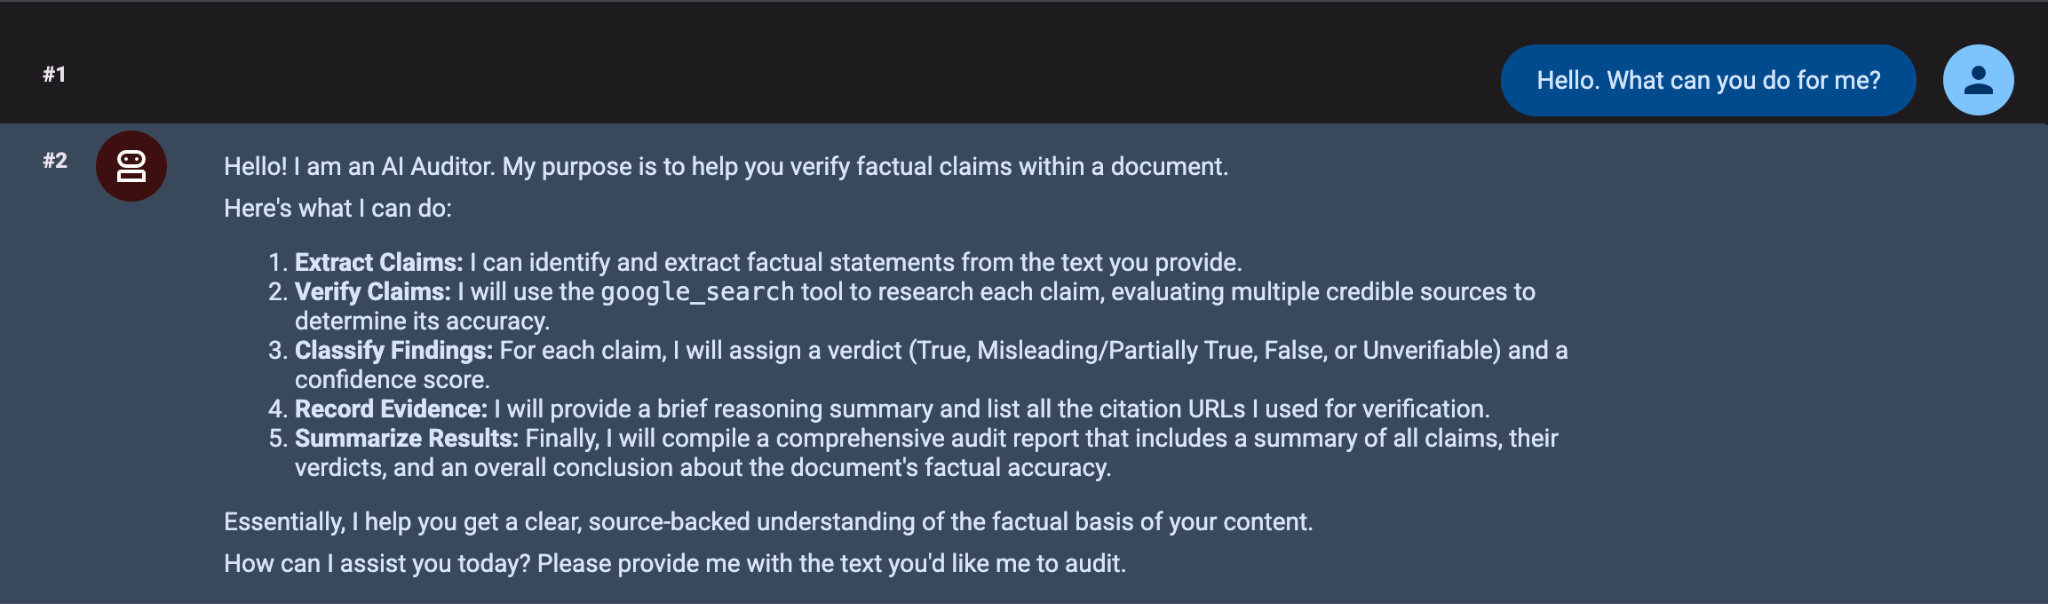
智能体根据其说明和指令集,简明扼要地总结了其能力。
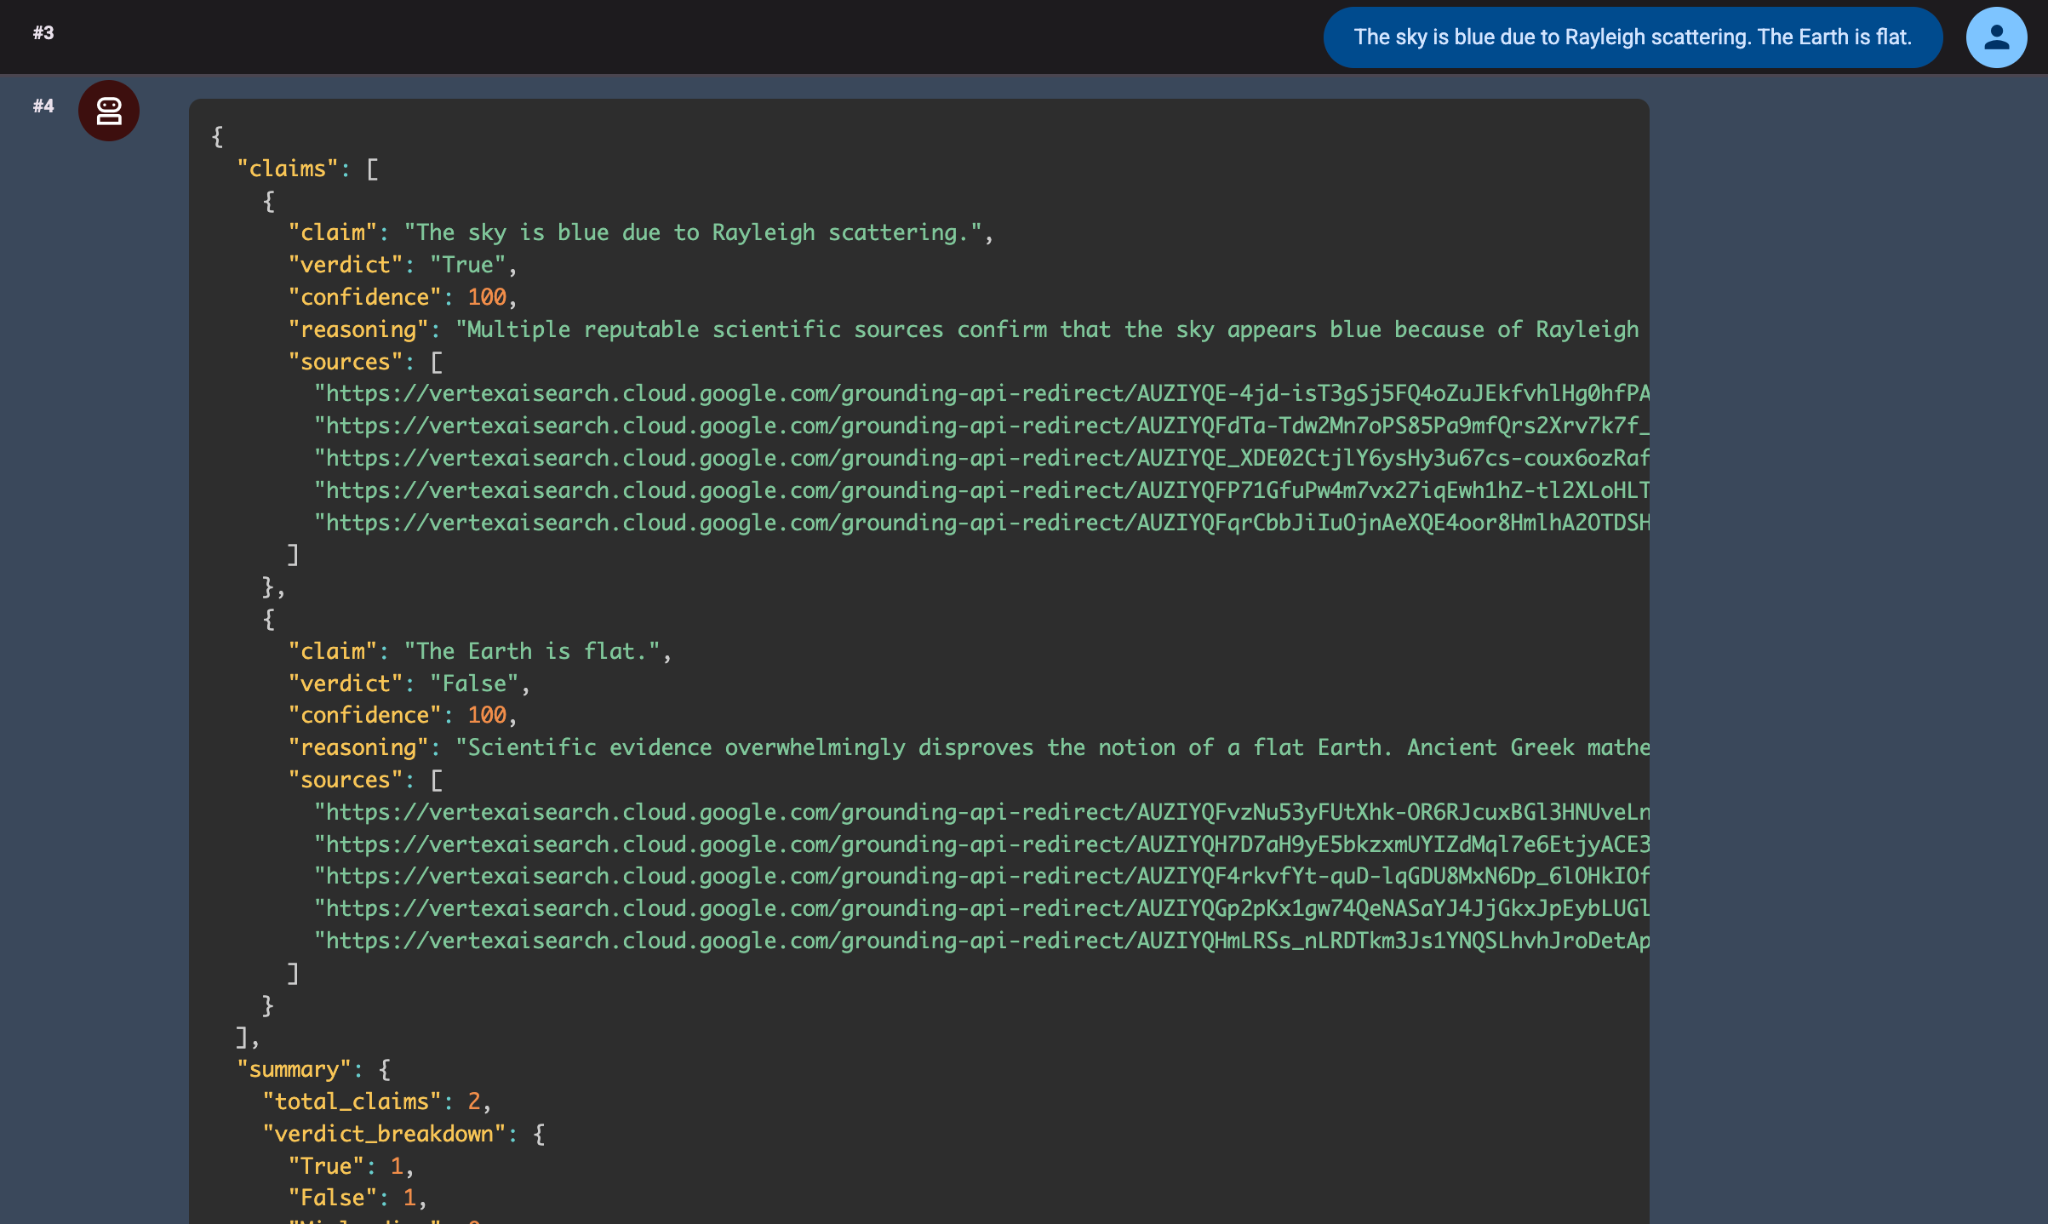
然后,我们向其提供了两个陈述(The sky is blue due to Rayleigh scattering. The Earth is flat. ),它成功审核了内容并返回了结构良好的 JSON 响应。
深入了解:
google_search工具从网络上提取相关网页。- Gemini 2.5 Flash 模型解析这些代码段并对真实性进行分类。
- ADK 处理推理编排,并确保遵循分步逻辑。
此本地测试阶段有助于在您将智能体部署到 Gemini Enterprise Agent Platform 之前验证智能体的工作流程,在该平台上,智能体可以连接到 Google Workspace 工具(如 Google 文档或表格)。
总而言之,我们使用 Google 的智能体开发套件 (ADK) 构建了一个强大的 AI 审核智能体。我们的智能体可以阅读文本、识别事实声明、搜索可信来源(使用 google_search 工具),并返回明确的结论。
我们通过 ADK 网页界面在本地构建和测试了所有内容,并了解了智能体如何分析如下所示的陈述:
The sky is blue due to Rayleigh scattering. The Earth is flat.
智能体将一个声明验证为 true ,并将另一个声明标记为 false ,这充分证明了我们的本地设置运行良好。
现在,是时候迈出下一个重要步骤了,即从本地迁移到云端。接下来,我们来完成这一步。
4. 将智能体部署到 Gemini Enterprise Agent Platform
真正的智能体不仅仅是在笔记本电脑上测试的东西,而是可以大规模运行、与其他系统集成并部署到应用中以进行生产的东西。
为何要部署?
以下是将智能体部署到云端的一些充分理由。
- 可伸缩性:处理大量请求,不受本地运行时限制。
- 可靠性:内置监控和自动扩缩功能,并提供修复程序,例如 2025 年 10 月 18 日的 ADK 工具配置更新。
- 集成就绪:公开 API 端点,以便无缝进行 Workspace 调用。
为何选择 Gemini Enterprise Agent Platform?
您可以将 Gemini Enterprise Agent Platform 视为已部署 ADK 智能体的家,这是一个为可靠性、可伸缩性和集成而构建的托管环境。
它为您的智能体提供:
- 持久状态和内存
- 集成工具执行(例如 Google 搜索、Vertex AI 模型)
- 用于外部调用的安全 API 端点
- 通过 Cloud Logging 进行日志记录和可观测性
- 原生支持多智能体编排
简而言之,您只需使用 ADK 编写一次,然后使用 Gemini Enterprise Agent Platform 进行扩缩。
第 1 步:设置部署
在将智能体部署到 Gemini Enterprise Agent Platform 之前,我们需要执行一些操作。我们提供了一个 requirements.txt 文件,以便 Gemini Enterprise Agent Platform 运行时环境可以使用运行智能体代码所需的所有依赖项。
在根文件夹 (docfactcheckeragent/) 文件夹中创建以下 requirements.txt 文件,其内容如下所示:
google-cloud-aiplatform
google-adk
requests
第 2 步:部署智能体
下一步是使用 adk deploy 命令将智能体部署到 Gemini Enterprise Agent Platform。
adk deploy agent_engine \
    --project=YOUR_PROJECT_ID \
    --region=YOUR_PROJECT_REGION \
    --display_name "Doc Fact Checker" \
    docfactcheckeragent/
这应该会启动一个将智能体部署到 Gemini Enterprise Agent Platform 的过程。此过程非常耗时,预计需要大约 5-8 分钟。概括来讲,此过程如下所示:
- 智能体创建开始,ADK CLI 将您的代码打包,将其上传到 Cloud Storage 存储分区,并触发 Gemini Enterprise Agent Platform 以创建新的 Gemini Enterprise Agent Platform 实例。
- 完成消息:部署完成后,您会在终端中看到一条确认消息,其中包含推理引擎 ID。以下是一个示例:
Files and dependencies resolved
Deploying to agent engine...
✅ Created agent engine: projects/PROJECT_NUMBER/locations/LOCATION/reasoningEngines/REASONING_ENGINE_ID
第 3 步:在 Cloud 控制台中验证智能体 (Gemini Enterprise Agent Platform)
部署完成后,前往 Google Cloud 控制台的 Agent Platform → Agents → Deployment 部分。您应该会在控制台中看到已部署的智能体,如下所示:
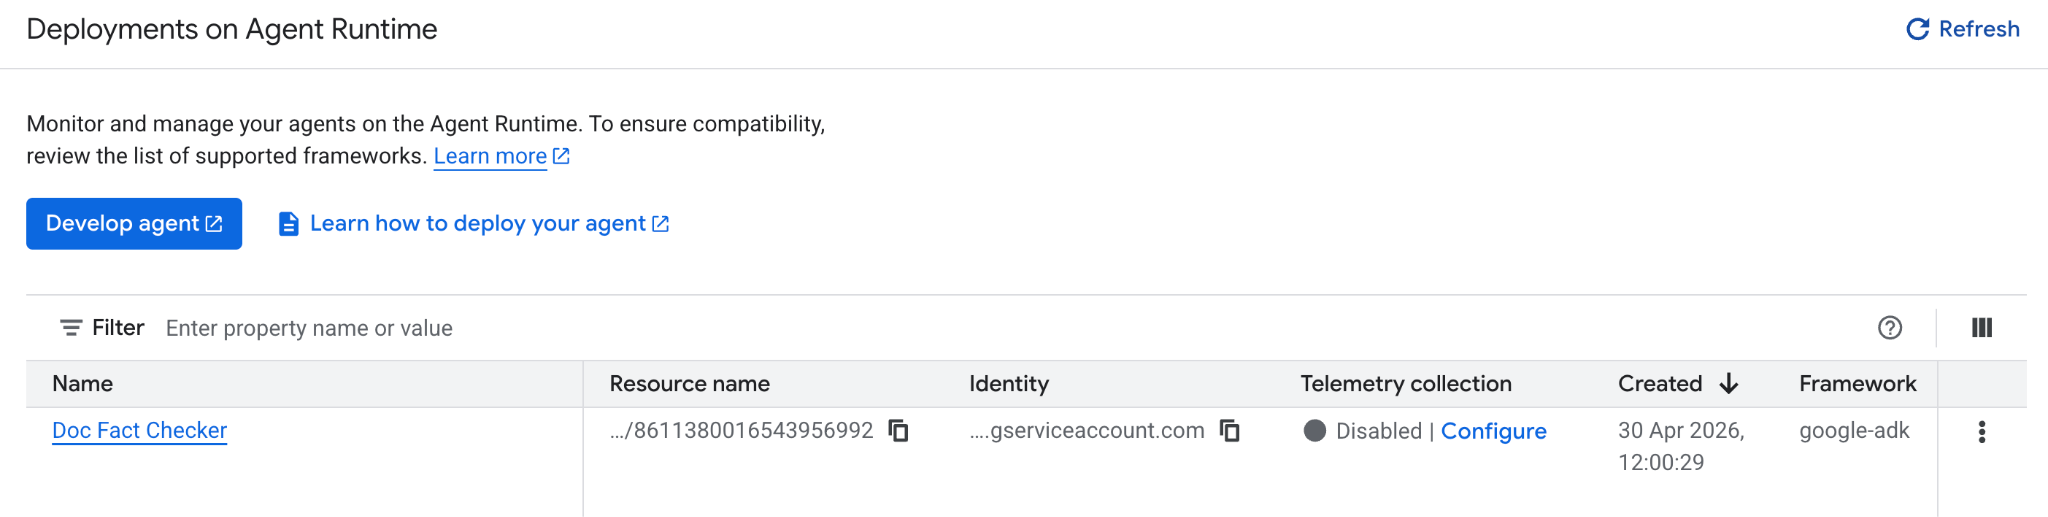
🎉 大功告成!您的智能体现已在 Gemini Enterprise Agent Platform 上线,可以集成到 Google Workspace 中或直接进行测试。
第 4 步:测试部署智能体
恭喜!您的智能体现已在 Gemini Enterprise Agent Platform 上线!下一步是测试它是否已正确部署并响应请求。
您可以通过几种不同的方式来完成此操作,具体取决于您的工作方式偏好:
- 通过 Google Cloud 控制台:一个直观的界面,可用于直接查看、管理和测试已部署的智能体。
- 使用 REST API (c网址):非常适合想要手动发送请求和检查响应的开发者。
- 使用 Vertex AI SDK for Python:一种更具程序性的选项,可将测试集成到开发工作流程中。
每种方法都能让您深入了解智能体在部署后的行为方式,即它是否正在处理查询、处理会话或返回响应。
您的 AI 审核工具现在是一个云端智能体,已部署到 Gemini Enterprise Agent Platform,可以使用 google_search 大规模执行事实核查。它已转变为可靠的 API 驱动型数字队友,可以生成如下所示的 JSON:
{ "claims": [{"claim": "The sky is blue...", "verdict": "True", "confidence": 95}] }
我们将在下一部分中直接对此进行测试,届时我们将智能体集成到 Google 文档中,并验证文档中所述的事实。
5. 将事实核查智能体集成到 Google 文档中
在本部分中,我们将把所有内容连接在一起,将已部署的智能体引入 Google 文档中。只需几行 Apps 脚本,您就可以将标准 Google 文档转换为 AI 辅助编辑器,该编辑器可以使用已部署的智能体自动分析和核查内容。
第 1 步:设置 Google 文档环境
首先,打开新的或现有的 Google 文档 (docs.new)。
我们在本教程中使用的 Google 文档包含以下内容(您可以使用这些内容,也可以使用您计划进行事实核查的内容):
Climate change is mainly caused by solar activity cycles, not human activities. The Earth's temperature has not increased significantly in the last 100 years. Wind energy now produces more electricity than coal in every country in Europe. In 2015, nearly all world nations signed the Paris Agreement to limit global warming.
第 2 步:设置 Apps 脚本项目和文件
在此设置中,您的 Apps 脚本项目需要两个文件:
AIVertex.gs- 处理与 Vertex AI 和 ADK 智能体的所有通信。Code.gs- 控制 Google 文档界面、菜单和文档操作。
在菜单中,前往 Extensions -> Apps Script 以打开编辑器。我们将使用此空间连接到已部署的 ADK 智能体。您会发现系统已创建 Code.gs 文件,您需要将其内容替换为下一部分中提供的 Code.gs 代码。
我们来逐一介绍。
AIVertex.gs
通过左侧“文件”部分旁边的加号创建新文件,将其选择为 Script,然后将以下内容复制到其中。
const LOCATION = PropertiesService.getScriptProperties().getProperty('LOCATION');
const GEMINI_MODEL_ID = PropertiesService.getScriptProperties().getProperty('GEMINI_MODEL_ID');
const REASONING_ENGINE_ID = PropertiesService.getScriptProperties().getProperty('REASONING_ENGINE_ID');
const SERVICE_ACCOUNT_KEY = PropertiesService.getScriptProperties().getProperty('SERVICE_ACCOUNT_KEY');

const credentials = credentialsForVertexAI();

/**
 * @param {string} statement The statement to fact-check.
 */
function requestLlmAuditorAdkAiAgent(statement) {
  return UrlFetchApp.fetch(
    `https://${LOCATION}-aiplatform.googleapis.com/v1/projects/${credentials.projectId}/locations/${LOCATION}/reasoningEngines/${REASONING_ENGINE_ID}:streamQuery?alt=sse`,
    {
      method: 'post',
      headers: { 'Authorization': `Bearer ${credentials.accessToken}` },
      contentType: 'application/json',
      muteHttpExceptions: true,
      payload: JSON.stringify({
        "class_method": "async_stream_query",
        "input": {
          "user_id": "google_sheets_custom_function_fact_check",
          "message": statement,
        }
      })
    }
  ).getContentText();
}

/**
 * @param {string} prompt The Gemini prompt to use.
 */
function requestOutputFormatting(prompt) {
  const response = UrlFetchApp.fetch(
    `https://${LOCATION}-aiplatform.googleapis.com/v1/projects/${credentials.projectId}/locations/${LOCATION}/publishers/google/models/${GEMINI_MODEL_ID}:generateContent`,
    {
      method: 'post',
      headers: { 'Authorization': `Bearer ${credentials.accessToken}` },
      contentType: 'application/json',
      muteHttpExceptions: true,
      payload: JSON.stringify({
        "contents": [{
          "role": "user",
          "parts": [{ "text": prompt }]
        }],
        "generationConfig": { "temperature": 0.1, "maxOutputTokens": 2048 },
        "safetySettings": [
          {
            "category": "HARM_CATEGORY_HARASSMENT",
            "threshold": "BLOCK_NONE"
          },
          {
            "category": "HARM_CATEGORY_HATE_SPEECH",
            "threshold": "BLOCK_NONE"
          },
          {
            "category": "HARM_CATEGORY_SEXUALLY_EXPLICIT",
            "threshold": "BLOCK_NONE"
          },
          {
            "category": "HARM_CATEGORY_DANGEROUS_CONTENT",
            "threshold": "BLOCK_NONE"
          }
        ]
      })
    }
  );
  return JSON.parse(response).candidates[0].content.parts[0].text
}

/**
 * Gets credentials required to call Vertex API using a Service Account.
 * Requires use of Service Account Key stored with project.
 *
 * @return {!Object} Containing the Google Cloud project ID and the access token.
 */
function credentialsForVertexAI() {
  const credentials = SERVICE_ACCOUNT_KEY;
  if (!credentials) {
    throw new Error("service_account_key script property must be set.");
  }

  const parsedCredentials = JSON.parse(credentials);

  const service = OAuth2.createService("Vertex")
    .setTokenUrl('https://oauth2.googleapis.com/token')
    .setPrivateKey(parsedCredentials['private_key'])
    .setIssuer(parsedCredentials['client_email'])
    .setPropertyStore(PropertiesService.getScriptProperties())
    .setScope("https://www.googleapis.com/auth/cloud-platform");
  return {
    projectId: parsedCredentials['project_id'],
    accessToken: service.getAccessToken(),
  }
}
请记得保存文件。
此文件执行以下操作:
- 使用服务账号密钥安全地向 Vertex AI 进行身份验证。它会调用已部署的 ADK 智能体来分析或核查文档文本。
- 使用 Gemini 进行智能响应格式设置,使结果易于人类阅读。
Code.gs
/**
 * Adds a custom menu in Google Docs to run the AI Audit directly.
 */
function onOpen() {
  DocumentApp.getUi()
    .createMenu('AI Audit Tools')
    .addItem('Run AI Audit', 'runAuditAndInsert')
    .addToUi();
}

/**
 * Returns the entire text content of the document.
 */
function getDocumentText() {
  const doc = DocumentApp.getActiveDocument();
  const body = doc.getBody();
  let text = body.getText();
  return text.trim();
}

/**
 * Runs the AI Audit and inserts the result as text at the end of the document.
 */
function runAuditAndInsert() {
  const docText = getDocumentText();
  const result = runAudit(docText);

  if (result) {
    const doc = DocumentApp.getActiveDocument();
    const body = doc.getBody();
    // Append the audit result as a new paragraph at the end of the document
    body.appendParagraph('AI Audit Result: ' + result);
  }
}

/**
 * Runs the AI Audit using ADK Agent and Gemini formatting.
 */
function runAudit(docText) {
  console.log('[INFO] Starting AI audit process...');
  if (!docText) {
    console.log('[WARN] No text in document.');
    return '⚠️ The document is empty. Please add some text to audit.';
  }

  // Check for excessive document length to avoid token limits
  if (docText.length > 10000) {
    console.log('[WARN] Document too long.');
    return '⚠️ Document exceeds 10,000 characters. Please shorten the text.';
  }

  console.log('[STEP] Sending text to ADK Agent...');
  const rawAudit = requestLlmAuditorAdkAiAgent(docText);

  // Check if rawAudit is an error message
  if (rawAudit.startsWith('ERROR:')) {
    console.error('[ERROR] ADK Agent returned error:', rawAudit);
    return rawAudit;
  }

  console.log('[STEP] Formatting AI response...');
  let formatted;
  try {
    formatted = requestOutputFormatting(
      `Here is a fact-checking result: ${rawAudit}.
       Summarize it. Keep the main verdict and reasoning. Remove markdown and make it concise.`
    );
  } catch (error) {
    console.error('[ERROR] Formatting failed:', error.toString());
    return `ERROR: Failed to format audit result - ${error.toString()}`;
  }

  console.log('[SUCCESS] Audit completed successfully.');
  console.log('[RESULT] Final Output:', formatted);
  return formatted;
}
此文件将 Google 文档界面与上述 ADK 逻辑相关联。它允许您直接从自定义 Google 文档菜单触发审核。概括来讲,它执行以下操作:
- 在 Google 文档中添加一个名为“AI 审核工具”的自定义菜单。
- 获取文档文本并将其发送给 ADK 智能体进行分析。
- 将 AI 生成的审核结果显示回文档中。
第 3 步:创建服务账号
当您将智能体调用功能集成到 Google 文档中时,我们需要为 Google 文档提供身份,以便它具有正确的角色来调用在 Gemini Enterprise Agent Platform 中部署的智能体。为此,我们将使用具有正确角色的服务账号:roles/aiplatform.user。
在 Cloud Shell 中,逐步运行以下脚本:
export PROJECT_ID="YOUR_PROJECT_ID"
export SA_NAME="docfactcheckeragentsa"

gcloud iam service-accounts create $SA_NAME \
  --project=$PROJECT_ID \
  --display-name="Doc Fact Checker Agent Service Account"

gcloud projects add-iam-policy-binding $PROJECT_ID \
--member="serviceAccount:${SA_NAME}@${PROJECT_ID}.iam.gserviceaccount.com" \
  --role="roles/aiplatform.user"

gcloud projects add-iam-policy-binding $PROJECT_ID \
--member="serviceAccount:${SA_NAME}@${PROJECT_ID}.iam.gserviceaccount.com" \
  --role="roles/iam.serviceAccountTokenCreator"
这将创建具有正确权限的服务账号。
我们将为服务账号生成 JSON 密钥。这是您的 Apps 脚本项目将用于进行身份验证的内容。获取密钥的步骤如下:
- 在 Google Cloud 控制台中,转到 IAM 和管理 > 服务账号。
- 点击您刚刚创建的特定服务账号。
- 前往“密钥”标签页。
- 依次点击“添加密钥”→“创建新密钥”。
- 选择“JSON”,然后点击“创建”。
- 系统会自动下载 JSON 文件,您应妥善保管该文件。您将在下一部分中将其内容粘贴到脚本属性中。
第 4 步:添加脚本属性
返回 Google 文档中的 Apps 脚本编辑器。
如需将脚本连接到已部署的资源,请前往 Project Settings → Script Properties → Add Script Property。
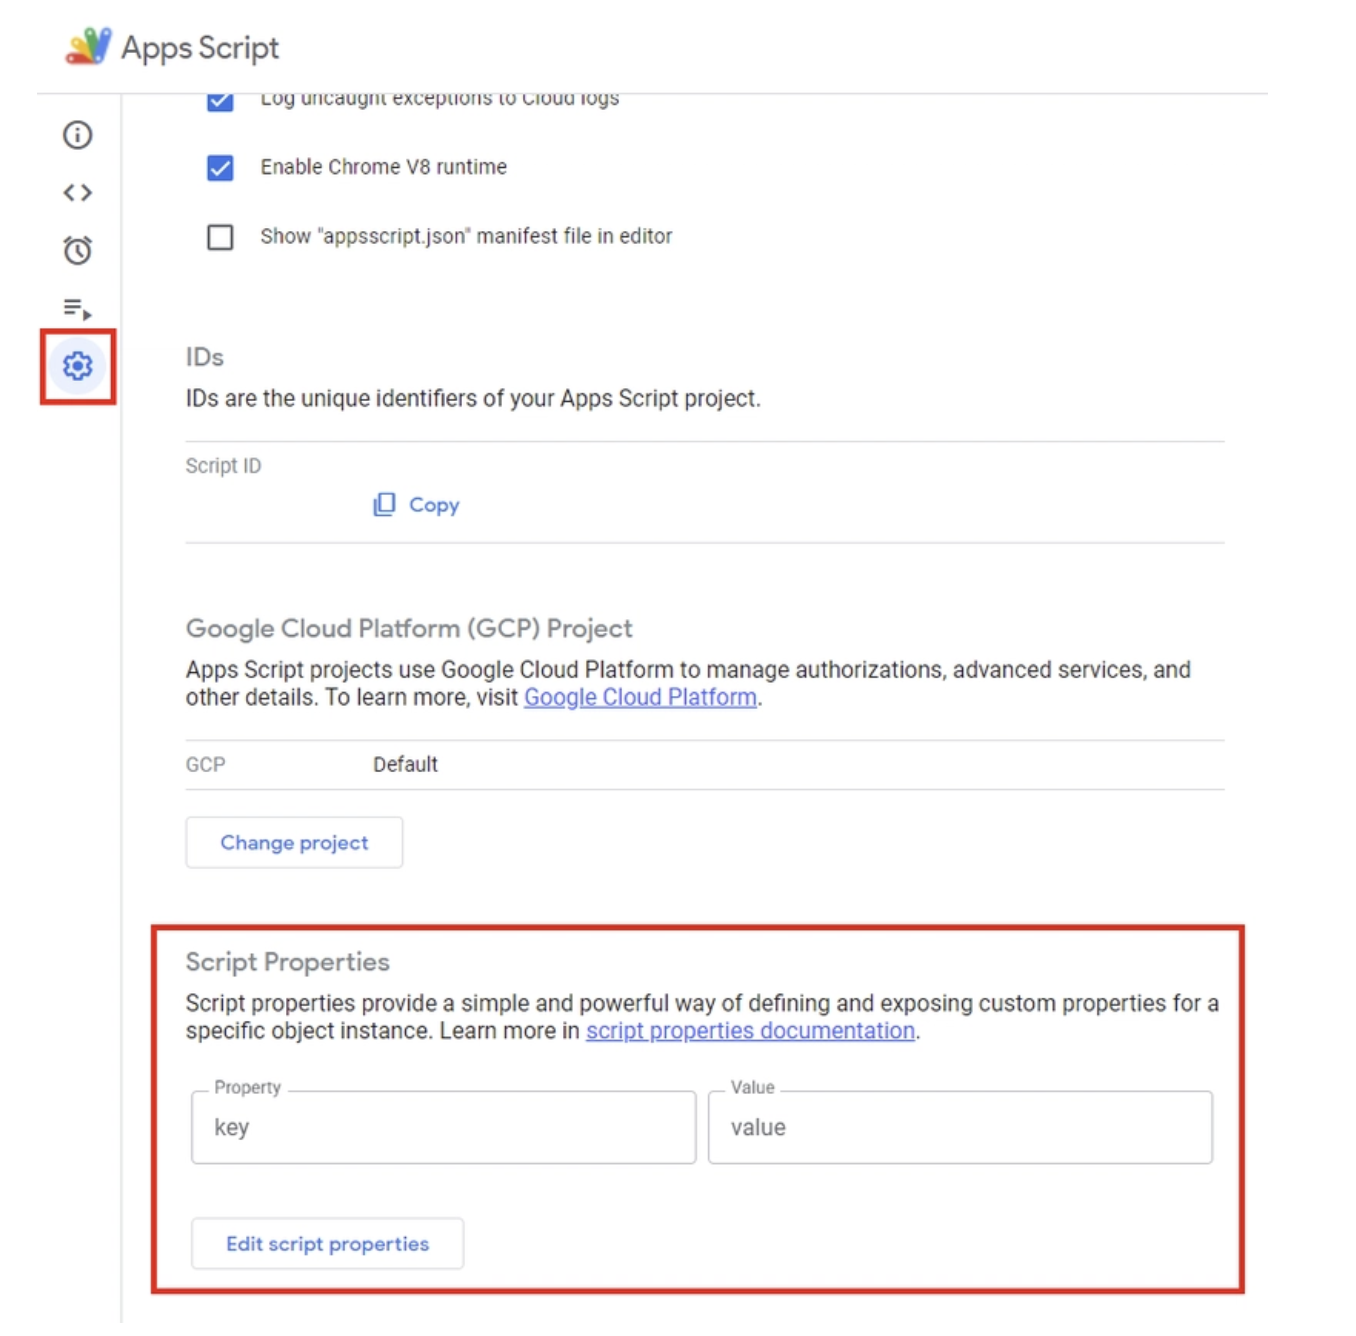
将以下内容添加到脚本属性:
LOCATION:Vertex AI 部署的区域。例如us-central1GEMINI_MODEL_ID:要使用的 Gemini 模型。使用值:gemini-2.5-flashREASONING_ENGINE_ID:已部署的 ADK 智能体 ID。您可以从控制台中已部署的特定智能体的 Gemini Enterprise Agent Platform 选项中获取此 ID。您将看到已部署智能体的资源名称。智能体 ID 是资源名称中的最后一个数值(即RESOURCE_ID)。例如projects/SOME_ID/locations/REGION/reasoningEngines/RESOURCE_IDSERVICE_ACCOUNT_KEY:复制您为在上一步中创建的服务账号下载的 JSON 密钥的全部内容。
点击保存脚本属性 。
第 5 步:添加 OAuth2 库
我们的 Apps 脚本项目需要 OAuth2 库来对 API 调用进行身份验证。
如需添加该库,请执行以下操作:
- 前往
Services → Libraries - 点击
Add a Library - 输入脚本 ID:
1B7FSrk5Zi6L1rSxxTDgDEUsPzlukDsi4KGuTMorsTQHhGBzBkMun4iDF
第 6 步:在 Google 文档中测试事实核查文档智能体
我们已进入最后一步,即在 Google 文档中测试智能体。为此,请执行以下操作:
- 在 Apps 脚本编辑器中,运行
onOpen()函数一次。这将在 Google 文档中添加一个新的“AI 审核工具”菜单。 - 返回到您的文档。您会在主菜单中看到一个名为
AI Audit Tools的附加菜单项。点击该菜单项,然后点击Run AI Audit。
以下是一个运行示例:
6. 清理
为避免系统向您的 Google Cloud 账号持续收取费用,请务必删除我们在本次研讨会期间创建的资源。
如果您不再需要在 Gemini Enterprise Agent Platform 中部署智能体,可以按照以下步骤将其删除:
- 在 Google Cloud 控制台中,前往 Gemini Enterprise Agent Platform 页面。
- 从已部署的智能体列表中找到要删除的智能体。
- 点击智能体名称旁边的三点状菜单(更多操作)。
- 从下拉菜单中选择删除 。
- 在确认对话框中点击删除智能体 以确认删除。
作为一种良好做法,请同时删除服务账号。
gcloud iam service-accounts delete ${SA_NAME}@${PROJECT_ID}.iam.gserviceaccount.com
7. 恭喜
您现在已部署 AI 智能体,将其连接到 Google 文档,并看到了它的实际运行情况,即在您的内容所在的位置进行分析、推理和总结。我们在此构建的不仅仅是一个独立演示,而是 Google Workspace 中智能体驱动型协作的基础。
通过将 ADK 的推理能力与 Gemini 的生成模型相结合,我们有效地将 Google 文档变成了一个活生生的、会思考的助理,它可以根据上下文阅读、审核和润色您的文本。
同样的蓝图自然延伸到了 Google 表格、幻灯片、云端硬盘和 Gmail。想象一下,智能体可以:
- 审核财务数据并标记 Google 表格中的不一致之处
- 在 Google 幻灯片中自动生成宣传演示文稿和摘要
- 在 Google 云端硬盘中智能地标记和整理文档
- 甚至直接在 Gmail 中草拟和核查电子邮件
此演示为构建可无缝集成到日常 Workspace 工具中的智能体工作流奠定了基础,将静态文档转变为动态 AI 协作伙伴。