
1. 簡介
Google Workspace 是工作平台首選。從在 Google 文件中草擬報告,到在試算表中處理資料,以及在 Gmail 和 Meet 中協作。
現在想像一下,如果 Google 文件、試算表和 Gmail 不只是工具,而是協作者,會是什麼情況?
在 Google Agent Development Kit (ADK) 和 Gemini Enterprise Agent Platform 的協助下,這不再只是構想,我們將使用這些架構建構智慧型代理、大規模部署代理,並將其無縫整合至 Google Workspace 工具,開創代理式生產力的新時代。
在本程式碼研究室中,您將逐步完成下列操作:
- 使用 Agent Development Kit 開發 AI 事實查核代理。
- 在 Gemini Enterprise Agent Platform 中部署代理,這個全代管環境可大規模執行代理。
- 將這個 Agent 整合到 Google 文件,對文件中的文字執行事實查核。
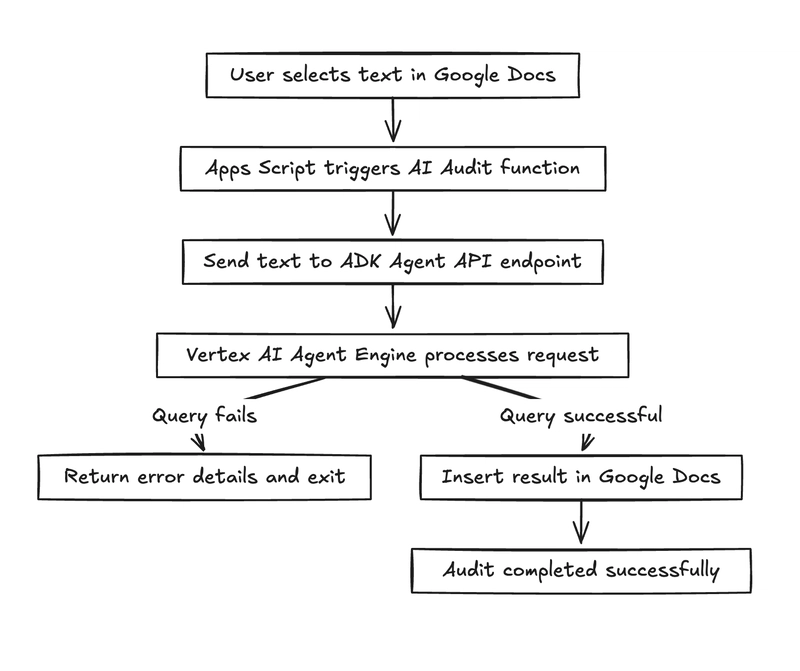
下圖是概念圖,說明最終解決方案的運作方式:
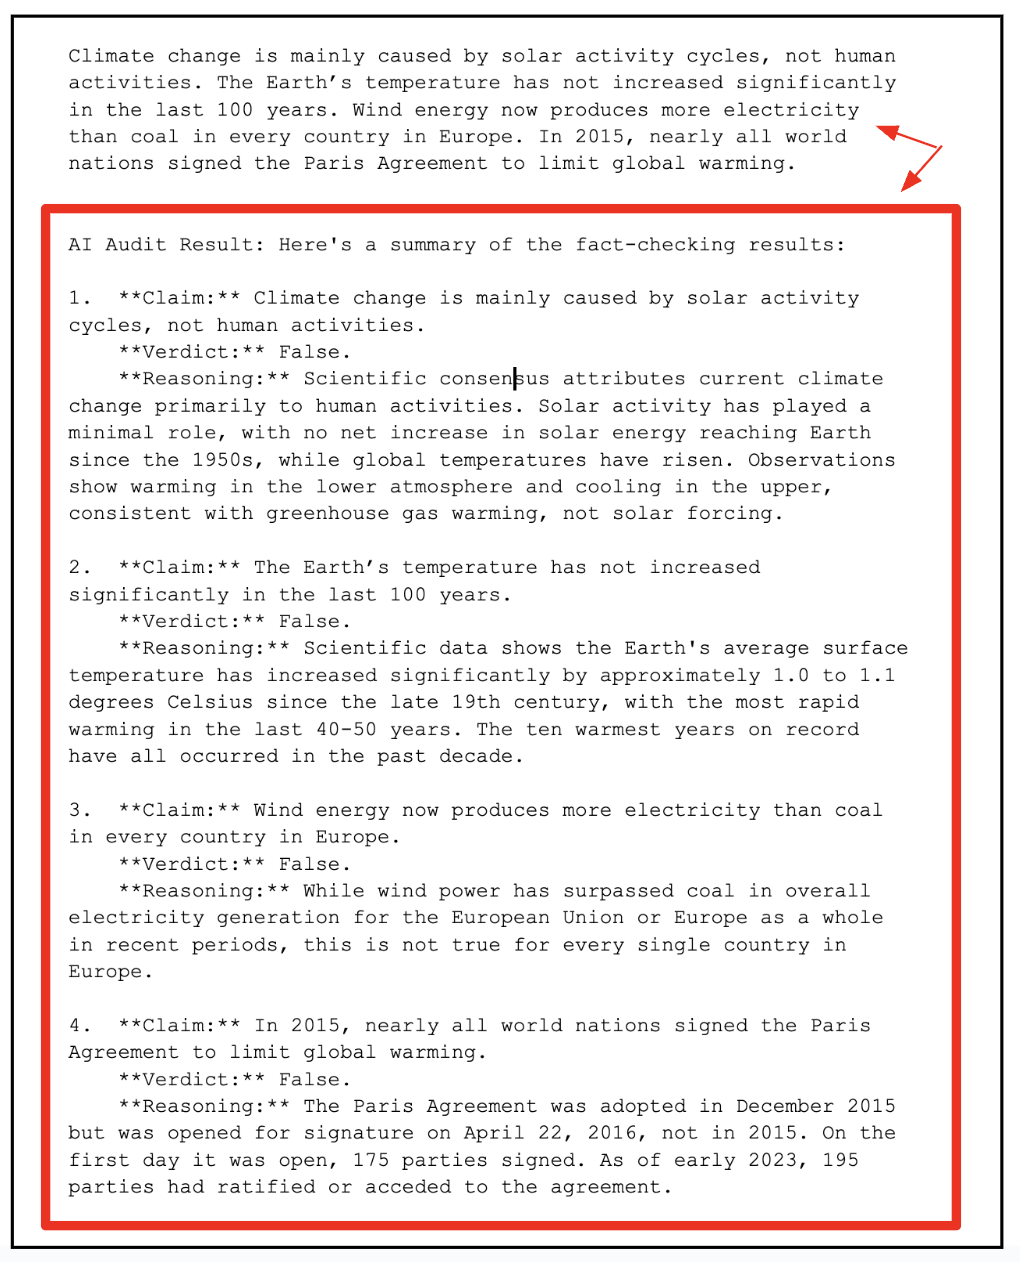
以下是事實查核代理程式在 Google 文件中的最終輸出內容,其中包含原始文字和一些陳述句,並針對文件中的每個陳述句進行事實查核。紅色角落方塊中的輸出內容是 Agent 的輸出內容。
執行步驟
- 設計、建構及部署代理程式,在 Google 文件中執行事實查核。
課程內容
- 使用 Agent Development Kit (AK) 開發代理。
- 在本機測試 Agent,並部署至 Gemini Enterprise Agent Platform。
- 將代理程式整合至 Google Workspace 文件 (Google 文件)。
軟硬體需求
- Chrome 網路瀏覽器
- Gmail 帳戶
- 已啟用計費功能的 Cloud 專案
本程式碼研究室適合各種程度的開發人員 (包括初學者),程式碼範例使用 Python 和 Apps Script。不過,您不必具備這些程式設計語言的知識,只要有基本的程式碼解讀能力,就足以瞭解課程中介紹的概念。
2. 事前準備
建立專案
- 在 Google Cloud 控制台的專案選取器頁面中,選取或建立 Google Cloud 專案。
- 確認 Cloud 專案已啟用計費功能。瞭解如何檢查專案是否已啟用計費功能。
- 您將使用 Cloud Shell,這是 Google Cloud 中執行的指令列環境,預先載入了 bq。按一下 Google Cloud 控制台頂端的「啟用 Cloud Shell」。

- 連至 Cloud Shell 後,請使用下列指令確認驗證已完成,專案也已設為獲派的專案 ID:
gcloud auth list
- 在 Cloud Shell 中執行下列指令,確認 gcloud 指令已瞭解您的專案。
gcloud config list project
- 如果未設定專案,請使用下列指令來設定:
gcloud config set project <YOUR_PROJECT_ID>
- 透過下列指令啟用必要的 API。這可能需要幾分鐘的時間,請耐心等候。
gcloud services enable cloudresourcemanager.googleapis.com \
                       servicenetworking.googleapis.com \
                       aiplatform.googleapis.com \
                       discoveryengine.googleapis.com
成功執行指令後,您應該會看到類似下方的訊息:
Operation "operations/..." finished successfully.
如果遺漏任何 API,您隨時可以在導入過程中啟用。
如要瞭解 gcloud 指令和用法,請參閱說明文件。
3. 建構 ADK 代理
讓我們建立 ADK 代理程式 (Document Fact Checker Agent),也就是以 AI 為基礎的稽核員,可根據 Google 的事實查核自訂函式範例查核文字。與範例的單一步驟方法不同,我們的代理程式會使用多步驟推論來擷取聲明、使用 google_search 驗證聲明,並輸出結構化 JSON。
步驟 1:安裝 Agent Development Kit
在 Cloud Shell 中開啟新的終端機分頁,然後建立名為 my-agents 的資料夾,如下所示。前往 my-agents 資料夾。
mkdir workspace-agents
cd workspace-agents
現在,讓我們使用 venv 建立虛擬 Python 環境,如下所示:
python -m venv .venv
按照下列步驟啟動虛擬環境:
source .venv/bin/activate
請按照下列步驟安裝 ADK:
pip install google-adk
現在可以按照下列方式叫用 adk 公用程式。
adk
系統會顯示指令清單。
$ adk
Usage: adk [OPTIONS] COMMAND [ARGS]...

  Agent Development Kit CLI tools.

Options:
  --version  Show the version and exit.
  --help     Show this message and exit.

Commands:
  api_server   Starts a FastAPI server for agents.
  conformance  Conformance testing tools for ADK.
  create       Creates a new app in the current folder with prepopulated agent template.
  deploy       Deploys agent to hosted environments.
  eval         Evaluates an agent given the eval sets.
  eval_set     Manage Eval Sets.
  run          Runs an interactive CLI for a certain agent.
  web          Starts a FastAPI server with Web UI for agents.
步驟 2:使用 ADK 開發文件事實查核代理
我們現在要使用 adk,透過 adk create 指令,為代理程式建立架構,並使用下列應用程式名稱 **(docfactcheckeragent)**。
adk create docfactcheckeragent
按照步驟選取下列項目:
- Gemini 模型,用於為根代理程式選擇模型。
- 選擇 Vertex AI 做為後端。
- 畫面上會顯示預設的 Google 專案 ID 和區域。選取預設值本身。
Choose a model for the root agent:
1. gemini-2.5-flash
2. Other models (fill later)

Choose model (1, 2): 1
1. Google AI
2. Vertex AI
Choose a backend (1, 2): 2

You need an existing Google Cloud account and project, check out this link for details:
https://google.github.io/adk-docs/get-started/quickstart/#gemini---google-cloud-vertex-ai

Enter Google Cloud project ID [YOUR_PROJECT_ID]:
Enter Google Cloud region [us-central1]:

Agent created in <YOUR_HOME_FOLDER>/workspace-agents/docfactcheckeragent:
- .env
- __init__.py
- agent.py
觀察系統為 Agent 建立預設範本和必要檔案的資料夾。
首先是 .env 檔案。內容如下所示:
GOOGLE_GENAI_USE_VERTEXAI=1
GOOGLE_CLOUD_PROJECT=YOUR_GOOGLE_PROJECT_ID
GOOGLE_CLOUD_LOCATION=YOUR_GOOGLE_PROJECT_REGION
這些值表示我們將透過 Vertex AI 使用 Gemini,以及 Google Cloud 專案 ID 和位置的相應值。
接著是 __init__.py 檔案,這個檔案會將資料夾標示為模組,並包含從 agent.py 檔案匯入代理程式的單一陳述式。
from . import agent
最後是 agent.py 檔案。您需要將這個 agent.py 檔案的內容替換為下列程式碼:
from google.adk.agents import Agent
from google.adk.tools import google_search

root_agent = Agent(
    name='ai_auditor',
    model='gemini-2.5-flash',
    description="Fact-checks statements from a document and provides citations.",
    instruction="""
You are an AI Auditor specialized in factual verification and evidence-based reasoning.
Your goal is to analyze text from a Google Doc, identify verifiable factual claims, and produce a concise, source-backed audit report.

### 🔍 TASK FLOW

1. **Extract Claims**
   - Analyze the input text and identify factual claims that can be objectively verified.
   - A factual claim is any statement that can be proven true or false with external evidence.
   - Skip opinions, vague generalizations, or speculative language.
   - List each claim as a string in a JSON array.

2. **Verify Claims**
   - For each extracted claim:
     - Use the `google_search` tool to find relevant, credible results.
     - Evaluate at least the top 3 relevant URLs to determine the claim's accuracy.
     - Cross-check multiple sources when possible to ensure confidence.

3. **Classify Findings**
   - For each claim, determine one of the following verdicts:
     - ✅ **True:** Supported by multiple reputable sources.
     - ⚠️ **Misleading / Partially True:** Contains partially correct or context-dependent information.
     - ❌ **False:** Contradicted by credible evidence.
     - ❓ **Unverifiable:** Insufficient information to confirm or deny.
   - Provide a **confidence score (0–100)** reflecting the strength of evidence.

4. **Record Evidence**
   - For each claim, include:
     - The **verdict**
     - **Reasoning summary** (1–2 sentences)
     - **List of citation URLs** used for verification

5. **Summarize Results**
   - Compile a final report including:
     - Total number of claims analyzed
     - Distribution of verdicts (True / False / Misleading / Unverifiable)
     - Brief overall conclusion (e.g., "Most claims are accurate but some lack supporting evidence.")

### 🧾 OUTPUT FORMAT

Return your final response in structured JSON format as follows:

{
  "claims": [
    {
      "claim": "...",
      "verdict": "True | False | Misleading | Unverifiable",
      "confidence": 0-100,
      "reasoning": "...",
      "sources": ["https://...", "https://..."]
    }
  ],
  "summary": {
    "total_claims": X,
    "verdict_breakdown": {
      "True": X,
      "False": X,
      "Misleading": X,
      "Unverifiable": X
    },
    "overall_summary": "..."
  }
}

### 🧠 ADDITIONAL INSTRUCTIONS
- Always prefer authoritative domains (.gov, .edu, .org, or major media).
- Avoid low-quality or user-generated content as primary sources.
- Be concise, accurate, and transparent about uncertainty.
    """,
    tools=[google_search],  # Only use the search tool
)
上述原始碼的重點如下:
- 我們為 AI 代理命名,然後提供模型、說明和非常詳細的指令集,藉此定義 AI 代理。
- 指令集是最重要的部分,可定義代理程式的思考和運作方式。這種結構與專業事實查核人員的工作方式類似,可將 AI 變成自主稽核管線。
- 完成這項代理程式宣告後,我們接著透過
Google Search tool授予代理程式存取現實世界資訊的權限。代理程式不會依賴預先訓練的資料,而是執行即時搜尋、評估結果,並提供最新的引文。
這就是這個系統的代理性質。模型不只會生成答案,還會採取行動 (使用工具) 驗證資訊。
步驟 3:在本機測試代理
在現有的終端機視窗中輸入下列指令。確認您位於包含 docfactcheckeragent 資料夾的上層資料夾 (workspace-agents) 中。
adk web
如果您在 Cloud Shell 中執行上述指令,建議您使用下列指令:
adk web --allow_origins "regex:https://.*\.cloudshell\.dev"
執行範例如下所示:
INFO:     Started server process [1478]
INFO:     Waiting for application startup.

+-----------------------------------------------------------------------------+
| ADK Web Server started                                                      |
|                                                                             |
| For local testing, access at http://127.0.0.1:8000.                         |
+-----------------------------------------------------------------------------+

INFO:     Application startup complete.
INFO:     Uvicorn running on http://127.0.0.1:8000 (Press CTRL+C to quit)
按一下最後一個連結,系統應會開啟網頁控制台,供您測試代理程式。第一次互動非常重要,因為我們要瞭解代理程式的實際功能。這項互動會測試代理程式的description和instruction text摘要能力。
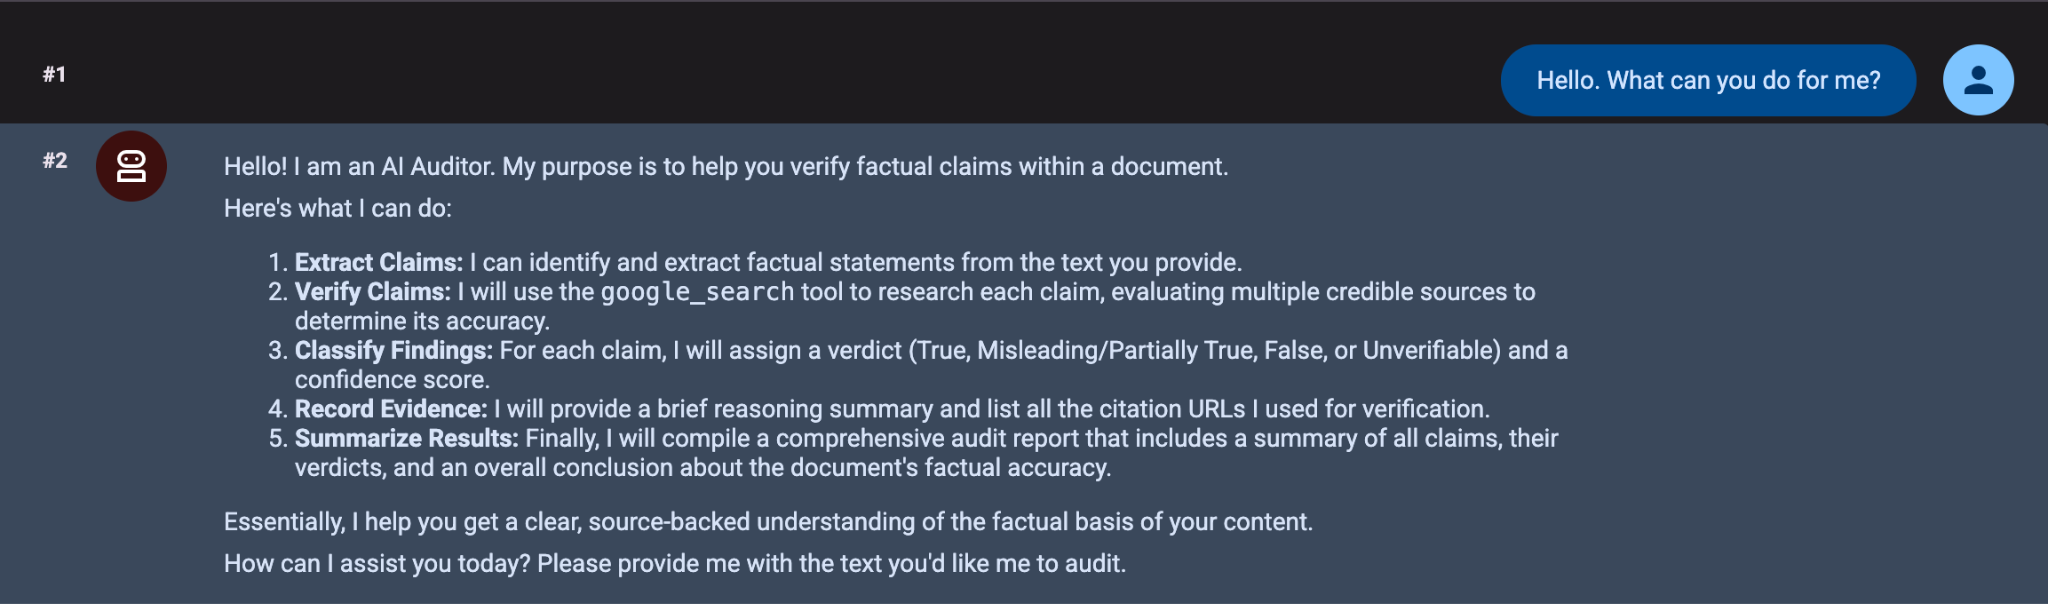
代理程式會根據說明和指令集,簡要說明自身能力。
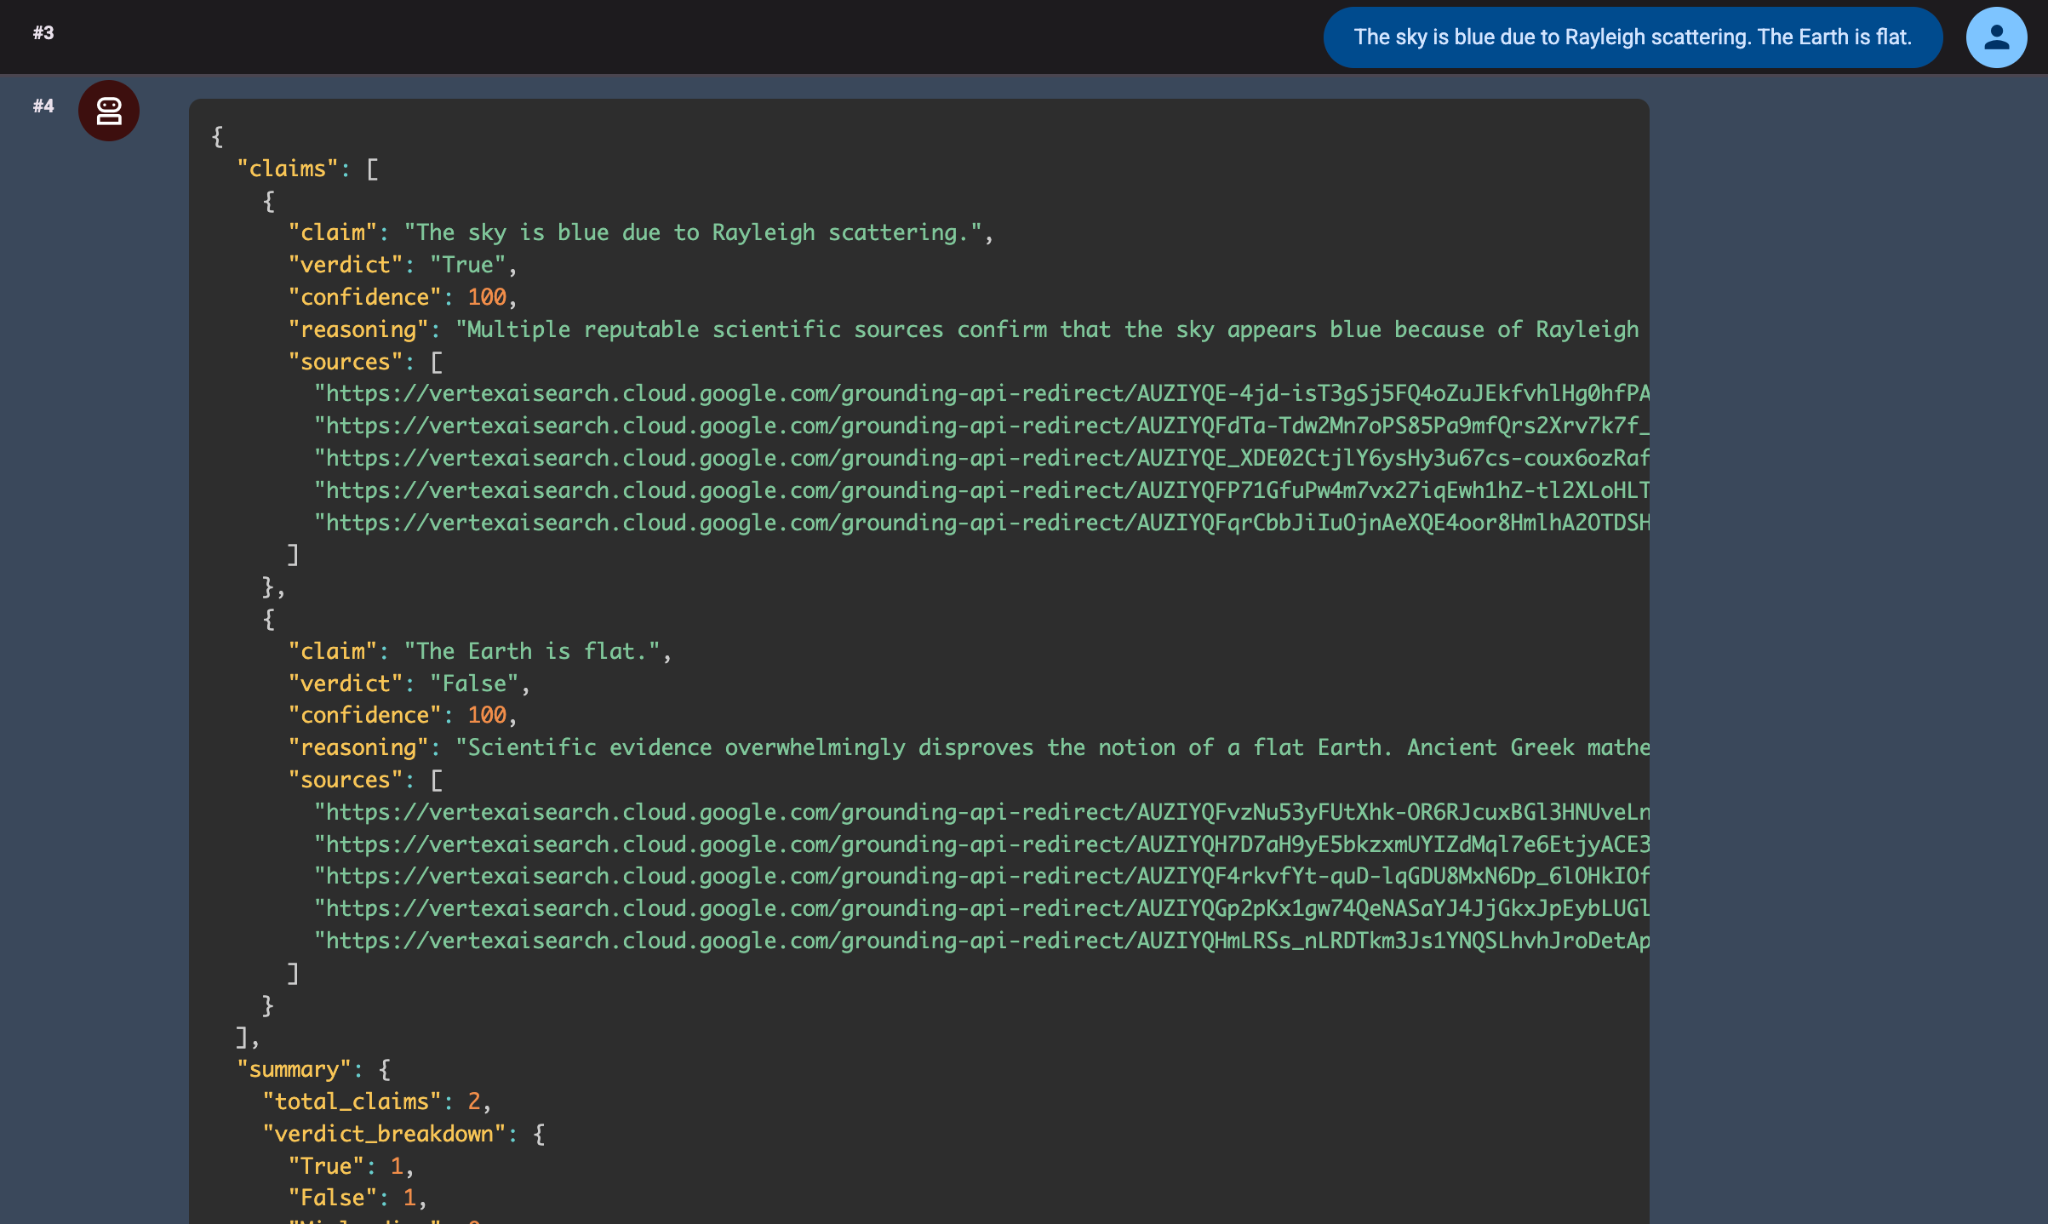
接著,我們提供兩項陳述內容 (The sky is blue due to Rayleigh scattering. The Earth is flat.),模型就會成功稽核內容,並傳回結構良好的 JSON 回應。
幕後運作方式:
- 這項
google_search工具會從網路上擷取相關網頁。 - Gemini 2.5 Flash 模型會剖析這些摘要,並分類其真實性。
- ADK 會處理推論自動化調度管理,並確保遵循逐步邏輯。
在 Gemini Enterprise Agent Platform 上部署代理程式之前,請先進行這項本機測試,驗證代理程式的工作流程,確保代理程式可連結至 Google Workspace 工具,例如 Google 文件或試算表。
總而言之,我們使用 Google 的 Agent Development Kit (ADK) 建構了強大的 AI 稽核代理。我們的代理程式可以閱讀文字、識別事實陳述、搜尋可信來源 (使用 google_search 工具),並傳回明確的判決。
我們透過 ADK 網頁介面在本機建構及測試所有項目,並瞭解代理程式如何分析以下陳述內容:
The sky is blue due to Rayleigh scattering. The Earth is flat.
代理程式將一項聲明驗證為 true,另一項則標示為 false,這項小而精確的證據證明我們的本機設定運作正常。
現在該邁出下一步,從本機轉移到雲端。接下來就來瞭解如何進行這項操作。
4. 將 Agent 部署至 Gemini Enterprise Agent Platform
真正的代理程式不只是在筆電上測試的項目,而是可大規模執行、與其他系統整合,並部署至應用程式的正式版。
為何要部署?
以下列舉將 Agent 部署至雲端的好處。
- 可擴充性:處理大量要求,不受本機執行階段限制。
- 穩定性:內建監控和自動調整資源配置功能,並提供修正內容,例如 2025 年 10 月 18 日的 ADK 工具設定更新。
- 整合就緒:公開 API 端點,以便順暢呼叫 Workspace。
為何選擇 Gemini Enterprise Agent Platform?
您可以將 Gemini Enterprise Agent Platform 視為已部署 ADK 代理的家,這個受管理環境專為可靠性、可擴充性和整合而建構。
這項功能可讓代理人:
- 持續性狀態和記憶體
- 整合工具執行 (例如 Google 搜尋、Vertex AI 模型)
- 確保外部呼叫的 API 端點安全
- 透過 Cloud Logging 記錄及觀測
- 原生支援多代理自動化調度管理
簡而言之,您只要使用 ADK 編寫一次,然後就能透過 Gemini Enterprise Agent Platform 擴充。
步驟 1:設定部署作業
將代理程式部署到 Gemini Enterprise Agent Platform 之前,我們需要完成幾項作業。我們提供 requirements.txt 檔案,讓 Gemini Enterprise Agent Platform 執行階段環境可使用執行 Agent 程式碼所需的所有依附元件。
在根資料夾 (docfactcheckeragent/) 中建立下列 requirements.txt 檔案,內容如下所示:
google-cloud-aiplatform
google-adk
requests
步驟 2:部署代理
接下來,請使用 adk deploy 指令,將代理部署至 Gemini Enterprise Agent Platform。
adk deploy agent_engine \
    --project=YOUR_PROJECT_ID \
    --region=YOUR_PROJECT_REGION \
    --display_name "Doc Fact Checker" \
    docfactcheckeragent/
這會啟動將代理程式部署到 Gemini Enterprise Agent Platform 的程序。這項程序相當耗時,預計需要 5 到 8 分鐘。大致來說,會發生下列情況:
- 系統會開始建立代理,ADK CLI 會將程式碼封裝、上傳至 Cloud Storage bucket,並觸發 Gemini Enterprise Agent Platform 建立新的 Gemini Enterprise Agent Platform 執行個體。
- 完成訊息:部署完成後,終端機上會顯示確認訊息和 Reasoning Engine ID。範例如下所示:
Files and dependencies resolved
Deploying to agent engine...
✅ Created agent engine: projects/PROJECT_NUMBER/locations/LOCATION/reasoningEngines/REASONING_ENGINE_ID
步驟 3:在 Cloud 控制台 (Gemini Enterprise Agent Platform) 中驗證 Agent
部署完成後,請前往 Google Cloud 控制台的「Agent Platform」→「Agents」→「Deployment」部分。您應該會在控制台中看到已部署的代理程式,如下所示:
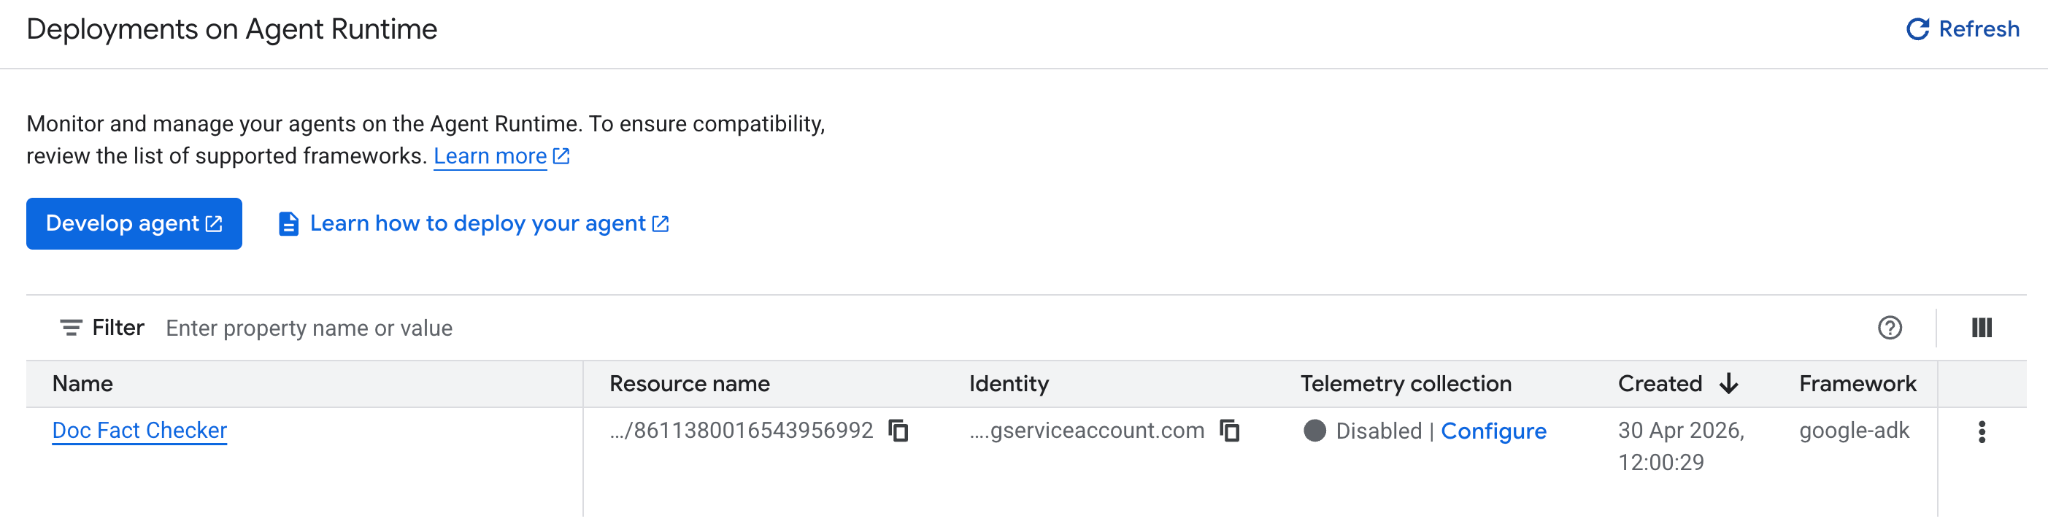
🎉 大功告成!您的代理現已在 Gemini Enterprise Agent Platform 上線,可整合至 Google Workspace 或直接測試。
步驟 4:測試部署代理程式
恭喜!您的代理程式現已在 Gemini Enterprise Agent Platform 上線!下一步是測試模型是否已正確部署,並能回應要求。
您可以透過幾種方式達成上述目的,視您的工作習慣而定:
- 透過 Google Cloud 控制台:直接查看、管理及測試已部署的代理程式。
- 使用 REST API (cURL):適合想手動傳送要求及檢查回應的開發人員。
- 使用 Python 適用的 Vertex AI SDK:以程式輔助方式將測試整合至開發工作流程。
每種方法都能讓您深入瞭解代理程式部署後的行為,例如是否正在處理查詢、處理工作階段或傳回回應。
您的 AI 稽核員現在是雲端輔助代理,已部署至 Gemini Enterprise Agent Platform,可使用 google_search 大規模查證事實。並轉換為可靠的 API 驅動數位隊友,產生類似以下的 JSON:
{ "claims": [{"claim": "The sky is blue...", "verdict": "True", "confidence": 95}] }
我們將在下一節直接測試這項功能,將代理程式整合至 Google 文件,並驗證文件中陳述的事實。
5. 將事實查核代理程式整合至 Google 文件
在本節中,我們會將所有內容連結在一起,將已部署的代理程式帶進 Google 文件。只要幾行 Apps Script 程式碼,就能將標準 Google 文件轉換為 AI 輔助編輯器,使用已部署的代理程式自動分析及查證內容。
步驟 1:設定 Google 文件環境
首先,請開啟新的或現有的 Google 文件 (docs.new)。
本教學課程使用的 Google 文件包含下列內容 (您可以使用這些內容,也可以使用自己打算進行事實查核的內容):
Climate change is mainly caused by solar activity cycles, not human activities. The Earth's temperature has not increased significantly in the last 100 years. Wind energy now produces more electricity than coal in every country in Europe. In 2015, nearly all world nations signed the Paris Agreement to limit global warming.
步驟 2:設定 Apps Script 專案和檔案
如要進行這項設定,您需要在 Apps Script 專案中建立兩個檔案:
AIVertex.gs:處理與 Vertex AI 和 ADK 代理的所有通訊。Code.gs:控制 Google 文件介面、選單和文件動作。
在選單中前往 Extensions -> Apps Script 開啟編輯器。我們會使用這個空間連線至已部署的 ADK 代理程式。您會發現系統已建立 Code.gs 檔案,您需要將其內容替換為下一節提供的 Code.gs 程式碼。
讓我們逐一瞭解。
AIVertex.gs
在左側「檔案」部分旁邊,按一下「+」符號建立新檔案,並選取 Script,然後將下列內容複製到檔案中。
const LOCATION = PropertiesService.getScriptProperties().getProperty('LOCATION');
const GEMINI_MODEL_ID = PropertiesService.getScriptProperties().getProperty('GEMINI_MODEL_ID');
const REASONING_ENGINE_ID = PropertiesService.getScriptProperties().getProperty('REASONING_ENGINE_ID');
const SERVICE_ACCOUNT_KEY = PropertiesService.getScriptProperties().getProperty('SERVICE_ACCOUNT_KEY');

const credentials = credentialsForVertexAI();

/**
 * @param {string} statement The statement to fact-check.
 */
function requestLlmAuditorAdkAiAgent(statement) {
  return UrlFetchApp.fetch(
    `https://${LOCATION}-aiplatform.googleapis.com/v1/projects/${credentials.projectId}/locations/${LOCATION}/reasoningEngines/${REASONING_ENGINE_ID}:streamQuery?alt=sse`,
    {
      method: 'post',
      headers: { 'Authorization': `Bearer ${credentials.accessToken}` },
      contentType: 'application/json',
      muteHttpExceptions: true,
      payload: JSON.stringify({
        "class_method": "async_stream_query",
        "input": {
          "user_id": "google_sheets_custom_function_fact_check",
          "message": statement,
        }
      })
    }
  ).getContentText();
}

/**
 * @param {string} prompt The Gemini prompt to use.
 */
function requestOutputFormatting(prompt) {
  const response = UrlFetchApp.fetch(
    `https://${LOCATION}-aiplatform.googleapis.com/v1/projects/${credentials.projectId}/locations/${LOCATION}/publishers/google/models/${GEMINI_MODEL_ID}:generateContent`,
    {
      method: 'post',
      headers: { 'Authorization': `Bearer ${credentials.accessToken}` },
      contentType: 'application/json',
      muteHttpExceptions: true,
      payload: JSON.stringify({
        "contents": [{
          "role": "user",
          "parts": [{ "text": prompt }]
        }],
        "generationConfig": { "temperature": 0.1, "maxOutputTokens": 2048 },
        "safetySettings": [
          {
            "category": "HARM_CATEGORY_HARASSMENT",
            "threshold": "BLOCK_NONE"
          },
          {
            "category": "HARM_CATEGORY_HATE_SPEECH",
            "threshold": "BLOCK_NONE"
          },
          {
            "category": "HARM_CATEGORY_SEXUALLY_EXPLICIT",
            "threshold": "BLOCK_NONE"
          },
          {
            "category": "HARM_CATEGORY_DANGEROUS_CONTENT",
            "threshold": "BLOCK_NONE"
          }
        ]
      })
    }
  );
  return JSON.parse(response).candidates[0].content.parts[0].text
}

/**
 * Gets credentials required to call Vertex API using a Service Account.
 * Requires use of Service Account Key stored with project.
 *
 * @return {!Object} Containing the Google Cloud project ID and the access token.
 */
function credentialsForVertexAI() {
  const credentials = SERVICE_ACCOUNT_KEY;
  if (!credentials) {
    throw new Error("service_account_key script property must be set.");
  }

  const parsedCredentials = JSON.parse(credentials);

  const service = OAuth2.createService("Vertex")
    .setTokenUrl('https://oauth2.googleapis.com/token')
    .setPrivateKey(parsedCredentials['private_key'])
    .setIssuer(parsedCredentials['client_email'])
    .setPropertyStore(PropertiesService.getScriptProperties())
    .setScope("https://www.googleapis.com/auth/cloud-platform");
  return {
    projectId: parsedCredentials['project_id'],
    accessToken: service.getAccessToken(),
  }
}
請記得儲存檔案。
這個檔案會執行下列作業:
- 使用服務帳戶金鑰安全地向 Vertex AI 進行驗證。這項功能會叫用已部署的 ADK 代理程式,分析或查證文件文字。
- 使用 Gemini 進行智慧回覆格式設定,讓結果更容易閱讀。
Code.gs
/**
 * Adds a custom menu in Google Docs to run the AI Audit directly.
 */
function onOpen() {
  DocumentApp.getUi()
    .createMenu('AI Audit Tools')
    .addItem('Run AI Audit', 'runAuditAndInsert')
    .addToUi();
}

/**
 * Returns the entire text content of the document.
 */
function getDocumentText() {
  const doc = DocumentApp.getActiveDocument();
  const body = doc.getBody();
  let text = body.getText();
  return text.trim();
}

/**
 * Runs the AI Audit and inserts the result as text at the end of the document.
 */
function runAuditAndInsert() {
  const docText = getDocumentText();
  const result = runAudit(docText);

  if (result) {
    const doc = DocumentApp.getActiveDocument();
    const body = doc.getBody();
    // Append the audit result as a new paragraph at the end of the document
    body.appendParagraph('AI Audit Result: ' + result);
  }
}

/**
 * Runs the AI Audit using ADK Agent and Gemini formatting.
 */
function runAudit(docText) {
  console.log('[INFO] Starting AI audit process...');
  if (!docText) {
    console.log('[WARN] No text in document.');
    return '⚠️ The document is empty. Please add some text to audit.';
  }

  // Check for excessive document length to avoid token limits
  if (docText.length > 10000) {
    console.log('[WARN] Document too long.');
    return '⚠️ Document exceeds 10,000 characters. Please shorten the text.';
  }

  console.log('[STEP] Sending text to ADK Agent...');
  const rawAudit = requestLlmAuditorAdkAiAgent(docText);

  // Check if rawAudit is an error message
  if (rawAudit.startsWith('ERROR:')) {
    console.error('[ERROR] ADK Agent returned error:', rawAudit);
    return rawAudit;
  }

  console.log('[STEP] Formatting AI response...');
  let formatted;
  try {
    formatted = requestOutputFormatting(
      `Here is a fact-checking result: ${rawAudit}.
       Summarize it. Keep the main verdict and reasoning. Remove markdown and make it concise.`
    );
  } catch (error) {
    console.error('[ERROR] Formatting failed:', error.toString());
    return `ERROR: Failed to format audit result - ${error.toString()}`;
  }

  console.log('[SUCCESS] Audit completed successfully.');
  console.log('[RESULT] Final Output:', formatted);
  return formatted;
}
這個檔案會將 Google 文件 UI 連接至上述 ADK 邏輯。您可以透過自訂 Google 文件選單直接觸發稽核。大致來說,這項服務會執行下列操作:
- 在 Google 文件中新增名為「AI 稽核工具」的自訂選單。
- 擷取文件文字並傳送至 ADK 代理程式進行分析。
- 將 AI 生成的稽核結果顯示回文件中。
步驟 3:建立服務帳戶
將 Agent 呼叫功能整合至 Google 文件時,我們需要為 Google 文件提供身分,確保該身分具備正確的角色,可叫用部署在 Gemini Enterprise Agent Platform 中的 Agent。為此,我們將使用具備正確角色的服務帳戶:roles/aiplatform.user。
在 Cloud Shell 中,逐步執行下列指令碼:
export PROJECT_ID="YOUR_PROJECT_ID"
export SA_NAME="docfactcheckeragentsa"

gcloud iam service-accounts create $SA_NAME \
  --project=$PROJECT_ID \
  --display-name="Doc Fact Checker Agent Service Account"

gcloud projects add-iam-policy-binding $PROJECT_ID \
--member="serviceAccount:${SA_NAME}@${PROJECT_ID}.iam.gserviceaccount.com" \
  --role="roles/aiplatform.user"

gcloud projects add-iam-policy-binding $PROJECT_ID \
--member="serviceAccount:${SA_NAME}@${PROJECT_ID}.iam.gserviceaccount.com" \
  --role="roles/iam.serviceAccountTokenCreator"
這會建立具備正確權限的服務帳戶。
系統會為服務帳戶產生 JSON 金鑰。Apps Script 專案會使用這項資訊進行驗證。取得金鑰的步驟如下:
- 在 Google Cloud 控制台中,依序前往「IAM 與管理」>「服務帳戶」。
- 按一下您剛建立的特定服務帳戶。
- 前往「金鑰」分頁。
- 依序點按「新增金鑰」→「建立新的金鑰」。
- 選取「JSON」,然後按一下「建立」。
- 系統會自動下載 JSON 檔案,請妥善保管。您會在下一節將內容貼到指令碼屬性中。
步驟 4:新增指令碼屬性
返回 Google 文件的 Apps Script 指令碼編輯器。
如要將指令碼連結至已部署的資源,請前往 Project Settings → Script Properties → Add Script Property。
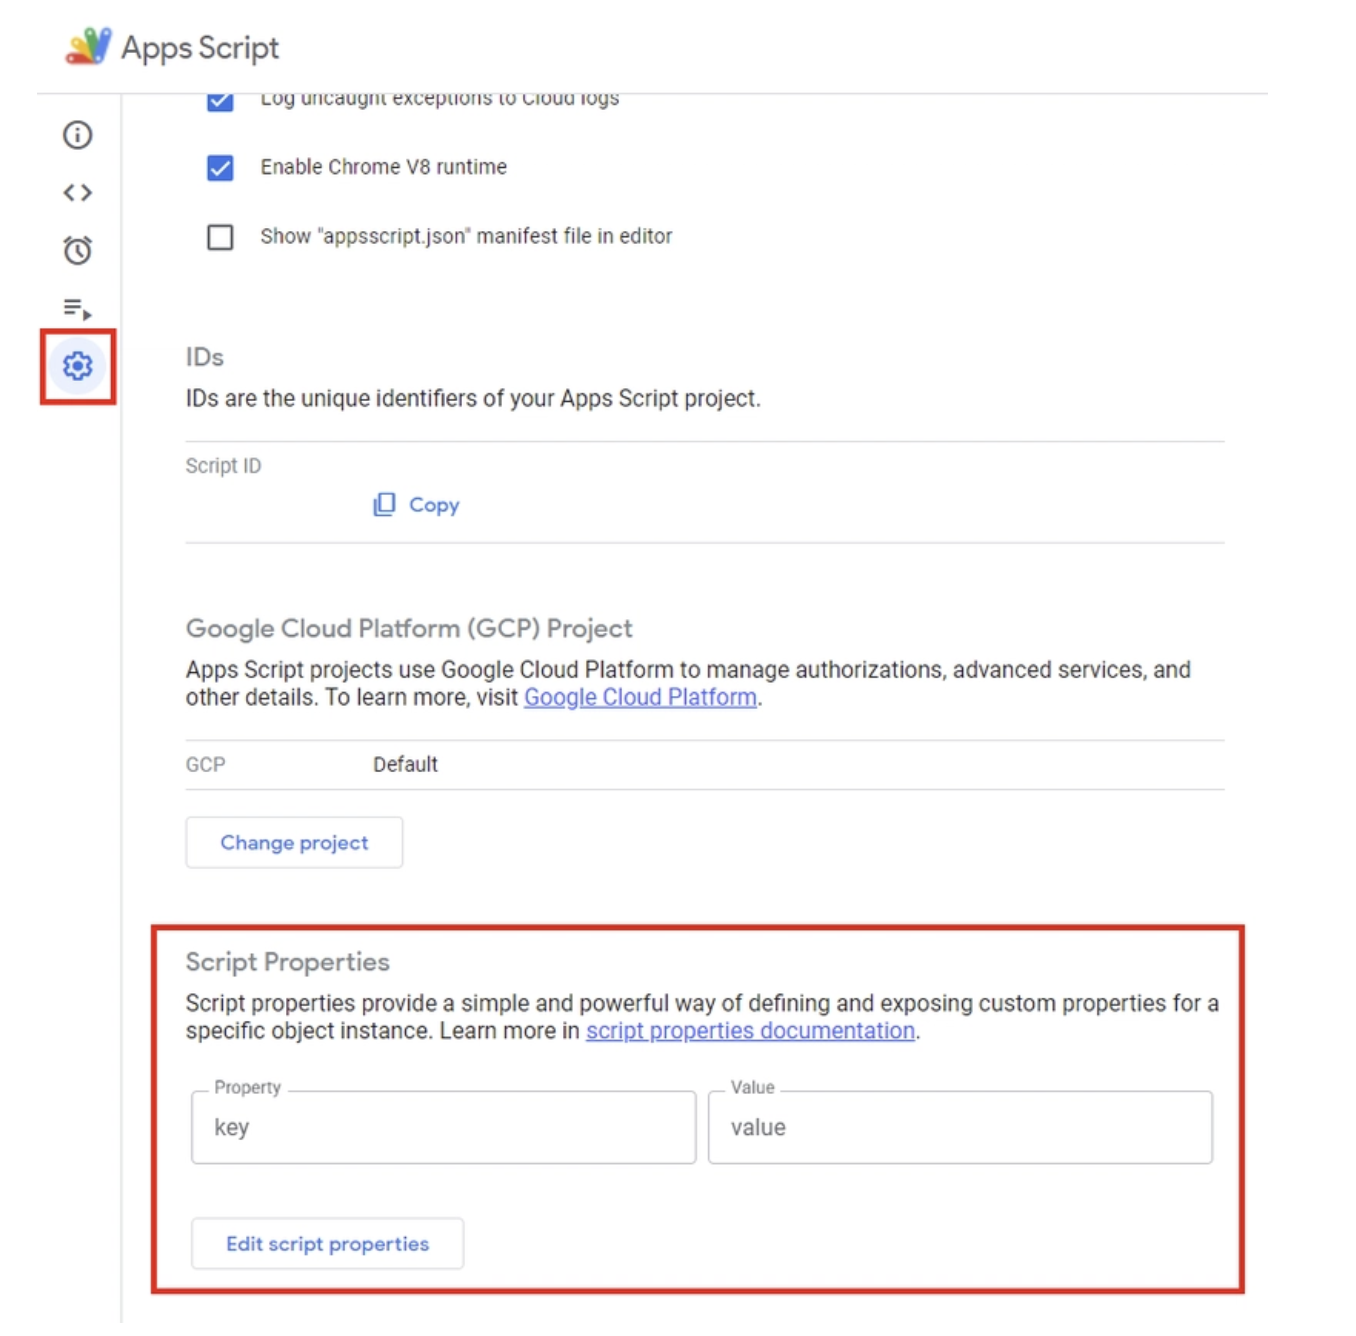
在指令碼屬性中新增下列內容:
LOCATION:Vertex AI 部署作業的區域。例如:us-central1GEMINI_MODEL_ID:要使用的 Gemini 模型。使用值:gemini-2.5-flashREASONING_ENGINE_ID:已部署的 ADK 代理程式 ID。您可以從部署的特定代理,透過控制台中的 Gemini Enterprise Agent Platform 選項取得這項資訊。您會看到已部署代理的資源名稱,代理程式 ID 是資源名稱中的最後一個數值 (即RESOURCE_ID)。例如:projects/SOME_ID/locations/REGION/reasoningEngines/RESOURCE_IDSERVICE_ACCOUNT_KEY:複製您為上一個步驟建立的服務帳戶下載的 JSON 金鑰完整內容。
按一下「儲存指令碼屬性」。
步驟 5:新增 OAuth2 程式庫
我們的 Apps Script 專案需要 OAuth2 程式庫,才能驗證 API 呼叫。
如要新增,請按照下列步驟操作:
- 前往
Services → Libraries - 按一下
Add a Library。 - 輸入指令碼 ID:
1B7FSrk5Zi6L1rSxxTDgDEUsPzlukDsi4KGuTMorsTQHhGBzBkMun4iDF
步驟 6:在 Google 文件中測試 Fact Checker Doc Agent
我們即將完成最後一個步驟,在 Google 文件中測試代理程式。請按照下列步驟操作:
- 在 Apps Script 指令碼編輯器中,執行
onOpen()函式一次。Google 文件中會新增「AI 稽核工具」選單。 - 返回 Google 文件。您會在主選單中看到名為
AI Audit Tools的額外選單項目。按一下該圖示,然後點選Run AI Audit。
以下是執行範例:
6. 清除
為避免系統持續向您的 Google Cloud 帳戶收費,請務必刪除我們在研討會期間建立的資源。
如果不再需要在 Gemini Enterprise Agent Platform 中部署代理程式,可以按照下列步驟刪除:
- 前往 Google Cloud 控制台的「Gemini Enterprise Agent Platform」頁面。
- 在已部署的代理程式清單中,找出要刪除的代理程式。
- 按一下代理程式名稱旁邊的三點選單 (更多動作)。
- 從下拉式選單中選取「刪除」。
- 在確認對話方塊中按一下「刪除代理程式」,確認刪除動作。
建議您也刪除服務帳戶。
gcloud iam service-accounts delete ${SA_NAME}@${PROJECT_ID}.iam.gserviceaccount.com
7. 恭喜
您已部署 AI 代理程式、將其連結至 Google 文件,並瞭解代理程式的運作方式,包括在內容所在位置進行分析、推理和摘要。我們在這裡建構的內容不只是獨立的示範。這是 Google Workspace 內建的智慧型代理程式協作功能基礎。
我們結合 ADK 的推論能力和 Gemini 的生成模型,將 Google 文件變成會思考的智慧助理,可根據脈絡讀取、稽核及修正文字。
同樣的藍圖自然也適用於試算表、簡報、雲端硬碟和 Gmail。想像一下,代理程式可以:
- 稽核財務資料並標記 Google 試算表中的不一致之處
- 在 Google 簡報中自動生成簡報和摘要
- 在雲端硬碟中智慧標記及整理文件
- 甚至直接在 Gmail 中草擬及查核電子郵件內容
這項示範將為您奠定基礎,建構可完美整合至日常 Workspace 工具的代理式工作流程,將靜態文件轉變為動態 AI 協作者。