
1. Introduction
In this codelab, you will learn how to use the Model Context Protocol (MCP) to connect Gemini Enterprise apps to Google Workspace apps. MCP is an open standard that enables AI models to securely use tools provided by remote servers. You will set up Gemini Enterprise apps to interact with Gmail, Google Drive, Google Docs, Google Sheets, Google Slides, Google Calendar, Google Chat, and the People API without writing any code!
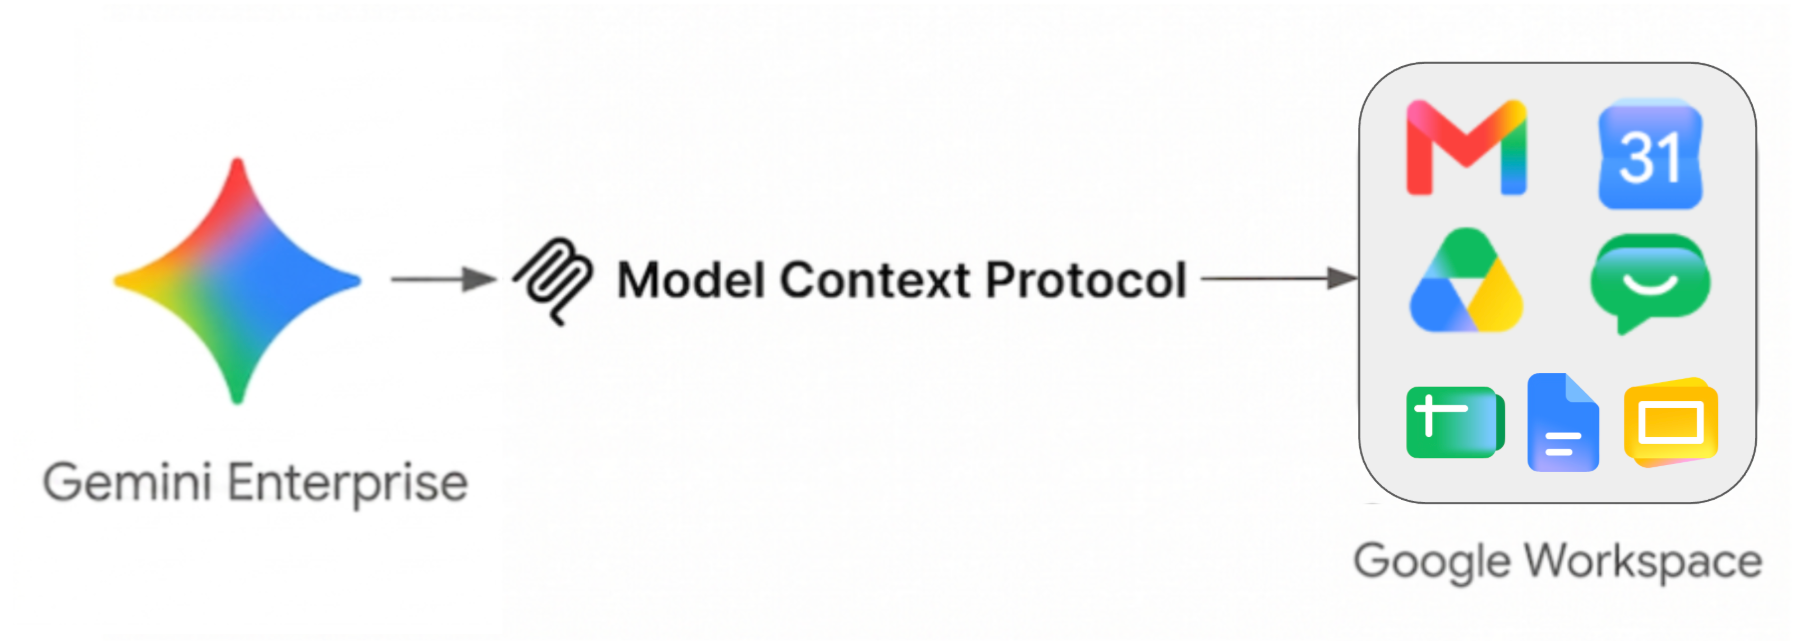
What you'll do
- Enable Google Workspace MCP services in your Google Cloud project.
- Create and configure a Gemini Enterprise app to access these MCP services.
- Test the integration with fun and useful prompts that interact with your Google Workspace data.
What you'll need
- A web browser such as Chrome.
- A Google Cloud project enrolled in the Google Workspace Developer Preview Program
- A Google Cloud account with
Organization Policy Administratorrole. - A Google Cloud project you are an owner of with billing. To check that an existing project has billing enabled, see Verify the billing status of your projects. To create a project and set up billing, see Create a Google Cloud project. To change project ownership, see Manage project members or change project ownership.
- Gemini Enterprise Standard / Plus editions enabled. To compare Gemini Enterprise editions, see Compare editions of Gemini Enterprise. If you do not have a license for Gemini Enterprise, you will have the option to create a trial license in the next step.
- A Business or Enterprise Google Workspace account with access to Google Chat and smart features turned on.
Easy access to this codelab
2. Before you begin
Initialize the Gemini Enterprise app
In the Google Cloud console, follow these steps:
- Select your project.
- In the Google Cloud search field, search and select Gemini Enterprise, then click + Create app. If you do not have a license for Gemini Enterprise, you will be prompted to activate a 30-day free trial license.
- Set the App name to
codelab. - Set the Multi-region to
global (Global). - Click Create.
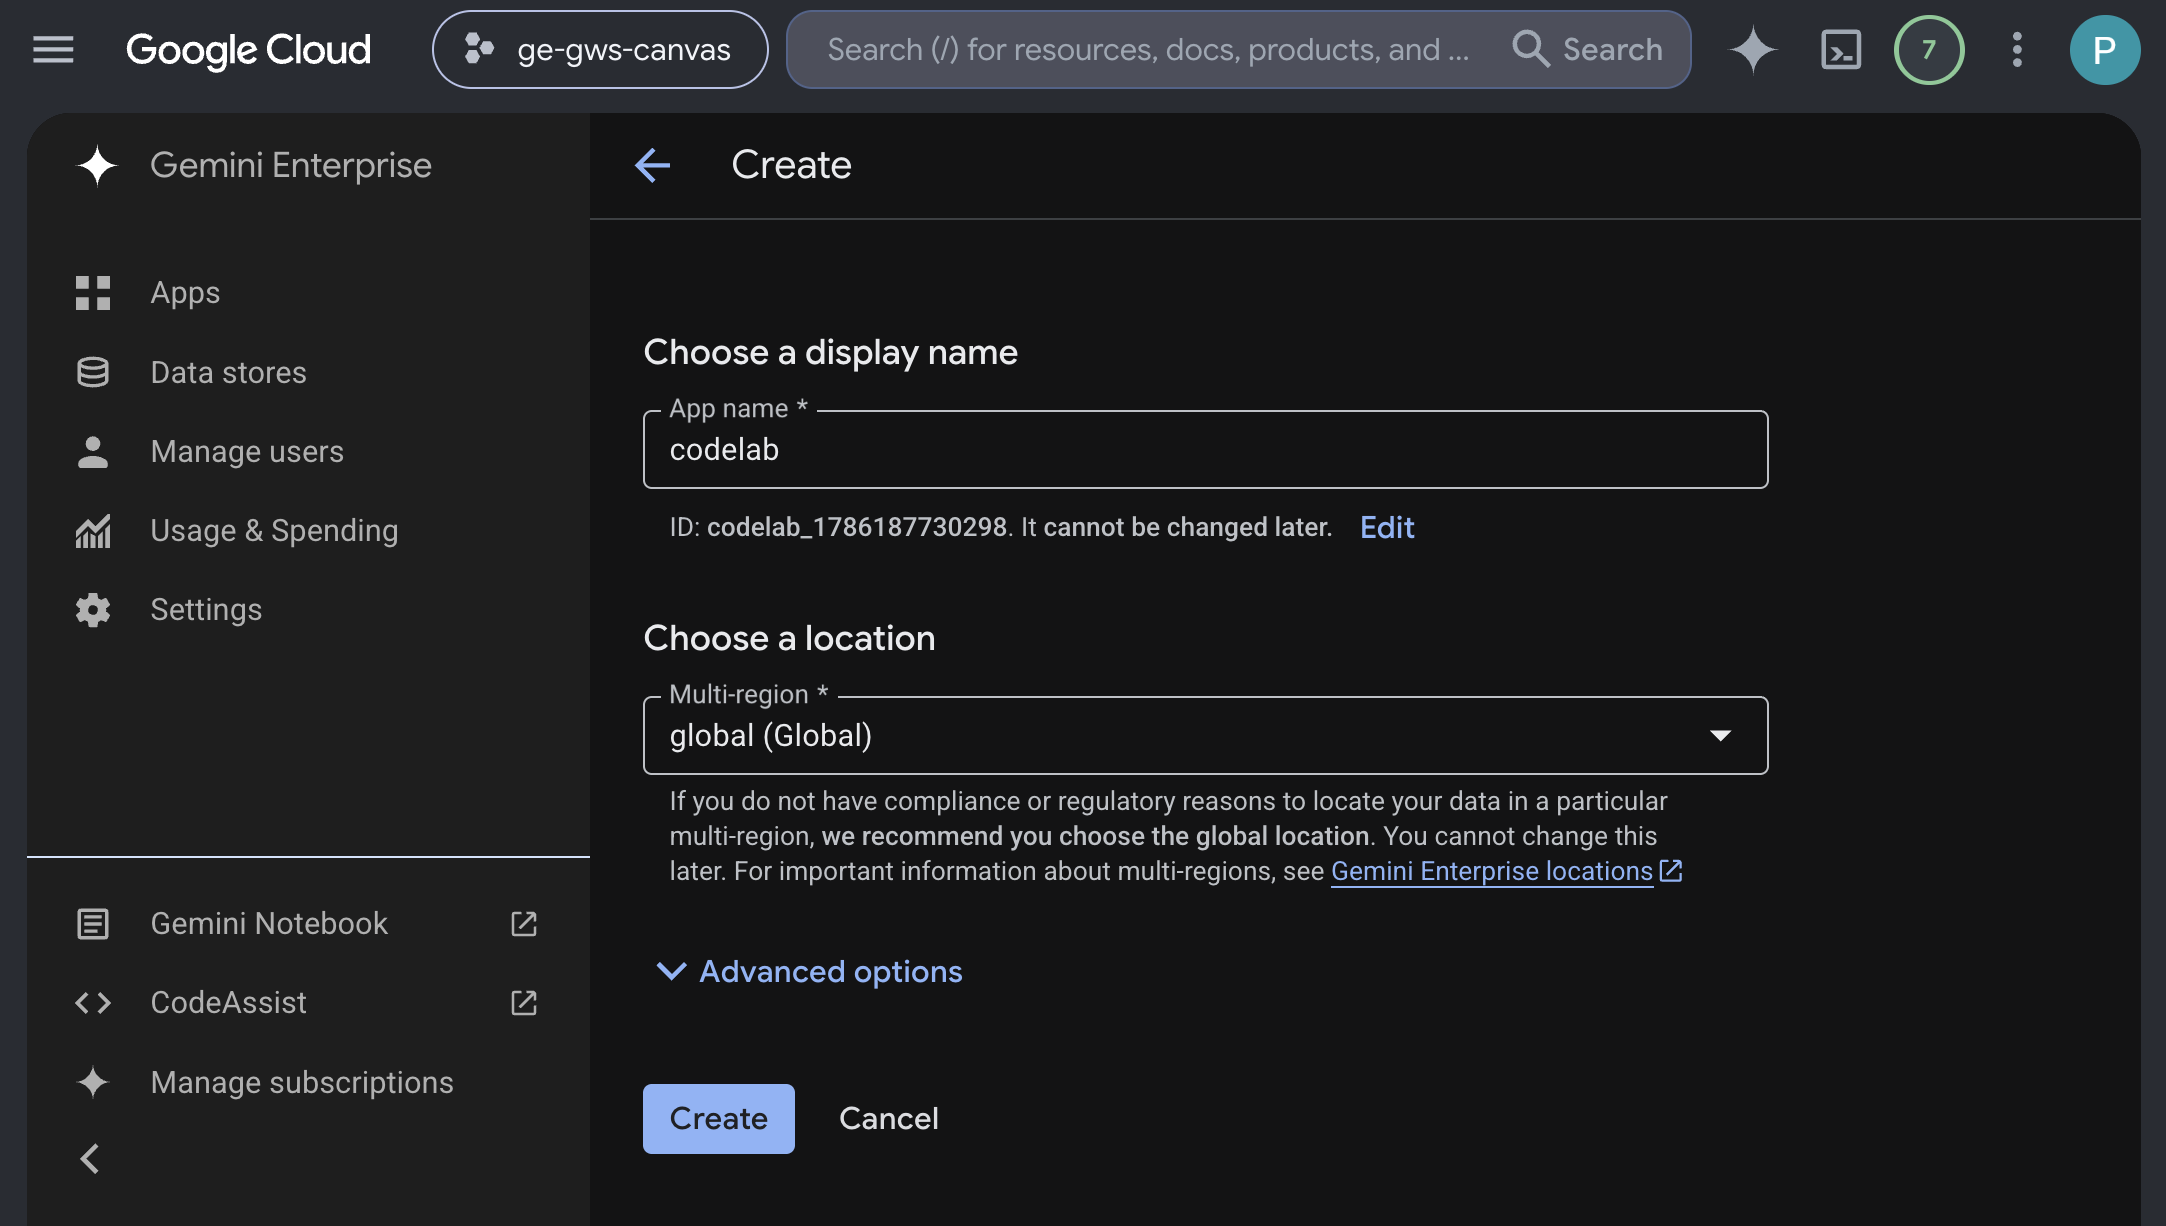
- The app is created and you are automatically redirected to Gemini Enterprise > Overview.
- Under Complete your setup, click Set up identity.
- In the new screen, select Use Google Identity and click Confirm Workforce Identity.
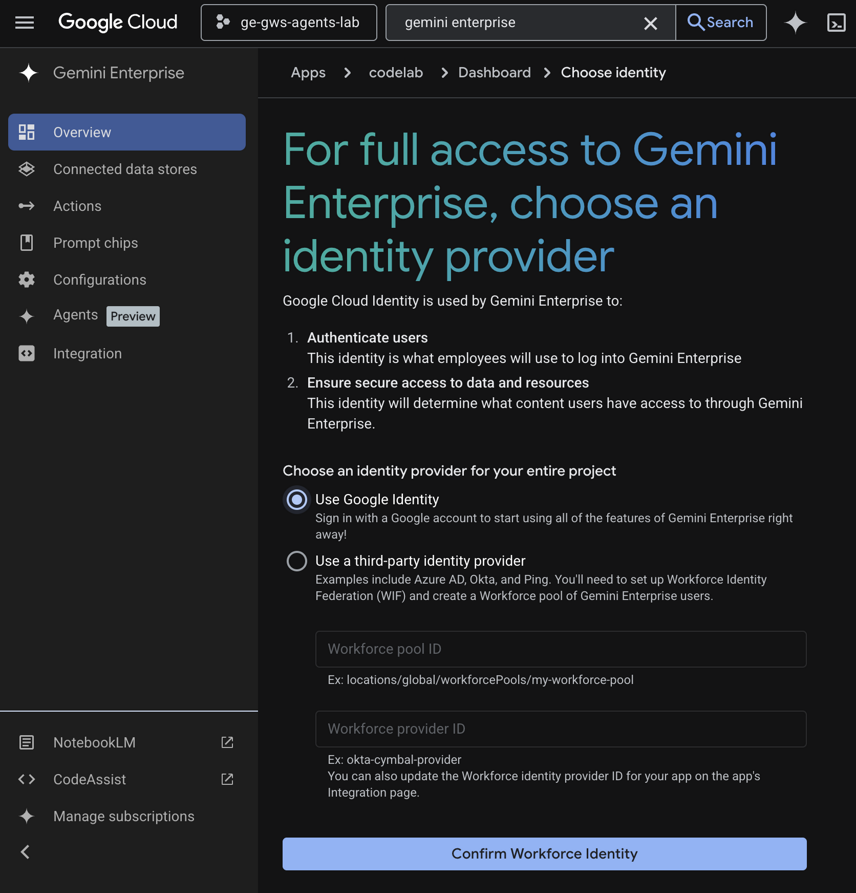
- The configuration is saved and you are automatically redirected to Gemini Enterprise > Overview.
Disable the Custom MCP Server Organization Policy
By default, Gemini Enterprise blocks the creation of Custom MCP data stores using a managed organization policy constraint.
To create Custom MCP server data stores, you must override the existing managed organization policy constraint. In the Google Cloud console, follow these steps:
- Go to the Organization Policies page.
- In the Filter field, enter
Disable custom mcp server connector for gemini enterprise. - Click the policy name to navigate to the policy details page.
- Click Manage Policy.
- Select the option to Override parent's policy.
- Add a new rule and set the enforcement toggle to OFF.
- Click Set Policy.
Enable the APIs
To use the Google Workspace MCP servers, you must enable the standard Google Workspace APIs.
Enable MCP Services
Next, enable the Google Workspace MCP services.
Configure the Chat App
To use the Google Chat MCP server, you must configure a Chat app in your Google Cloud project.
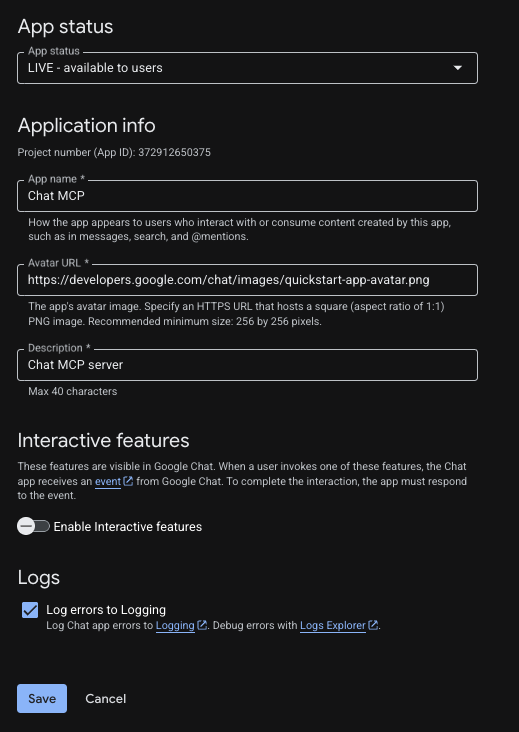
- In the Google Cloud console, search for Google Chat API, and click Google Chat API > Manage > Configuration.
- Set up the Chat app:
- In App name field, enter
Chat MCP. - In Avatar URL field, enter
https://developers.google.com/chat/images/quickstart-app-avatar.png. - In Description, enter
Chat MCP server. - Under Functionality, turn off Enable interactive features.
- Under Logs, select Log errors to Logging.
- In App name field, enter
- Click Save.
3. Configure OAuth Consent and Client
The Google Workspace MCP servers use OAuth 2.0 for secure authentication and authorization. You must configure an OAuth consent screen and create a Web application client.
Set up the OAuth Consent Screen
You must configure the consent screen first.
- In the Google Cloud console, go to Google Auth Platform > Branding. Click Get Started if not configured.
- Configure App Information:
- App name:
Google Workspace MCP Servers - User support email: Select your email.
- App name:
- Configure Audience: Select Internal (or External if Internal is not available).
- Configure Contact Information: Enter your email address.
- Review and agree to the User Data Policy, then click Create.
- If you selected External, go to Audience and add your email under Test users.
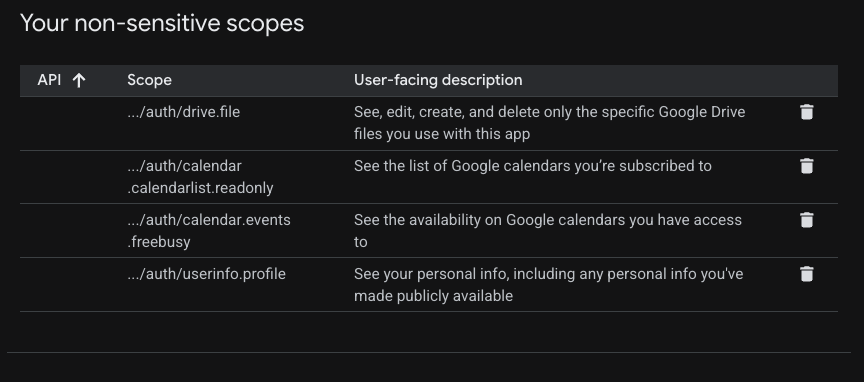
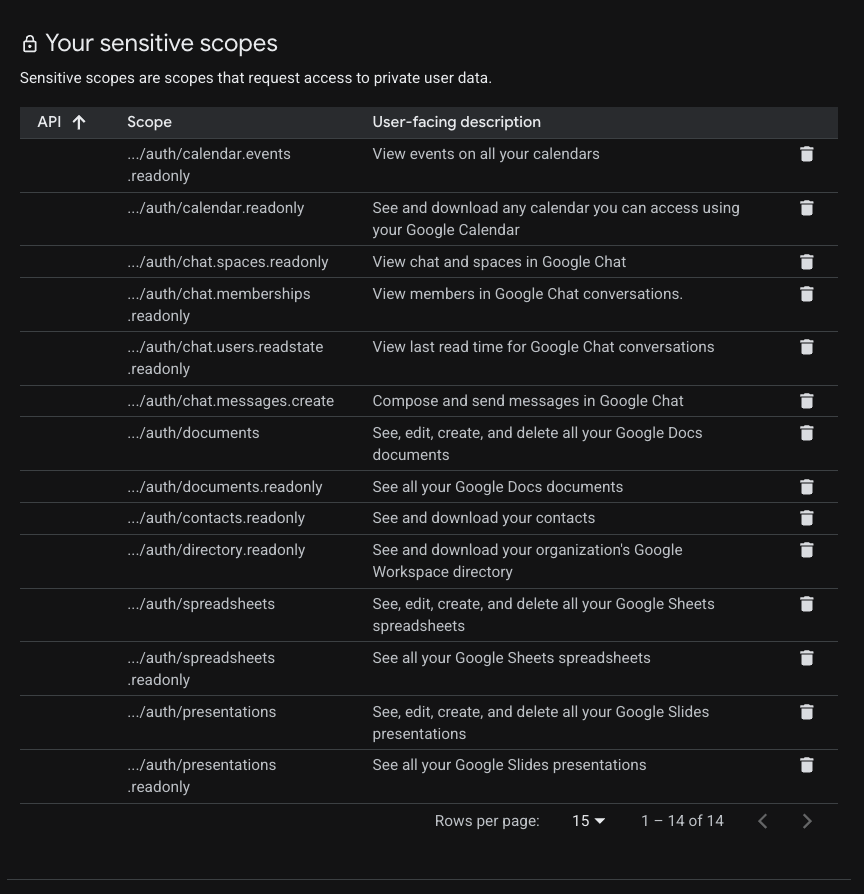
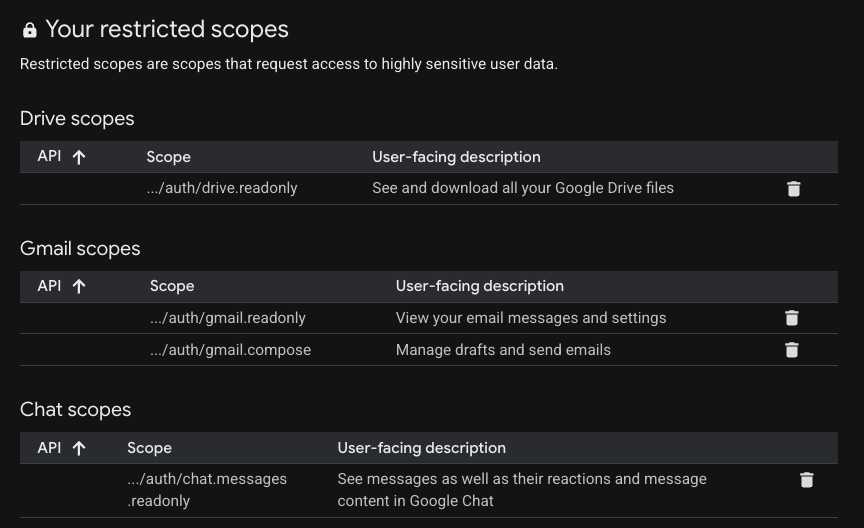
- Go to Data Access > Add or Remove Scopes. Under Manually add scopes, add the following for the servers you want to use:
- Universal:
https://www.googleapis.com/auth/gmail.readonly,https://www.googleapis.com/auth/drive.readonly,https://www.googleapis.com/auth/calendar.readonly,https://www.googleapis.com/auth/chat.messages.readonly - Gmail:
https://www.googleapis.com/auth/gmail.readonly,https://www.googleapis.com/auth/gmail.compose - Google Drive:
https://www.googleapis.com/auth/drive.readonly,https://www.googleapis.com/auth/drive.file - Google Docs:
https://www.googleapis.com/auth/drive.readonly,https://www.googleapis.com/auth/drive.file,https://www.googleapis.com/auth/documents.readonly,https://www.googleapis.com/auth/documents - Google Sheets:
https://www.googleapis.com/auth/drive.readonly,https://www.googleapis.com/auth/drive.file,https://www.googleapis.com/auth/spreadsheets.readonly,https://www.googleapis.com/auth/spreadsheets - Google Slides:
https://www.googleapis.com/auth/drive.readonly,https://www.googleapis.com/auth/drive.file,https://www.googleapis.com/auth/presentations.readonly,https://www.googleapis.com/auth/presentations - Google Calendar:
https://www.googleapis.com/auth/calendar.calendarlist.readonly,https://www.googleapis.com/auth/calendar.events.freebusy,https://www.googleapis.com/auth/calendar.events.readonly - Google Chat:
https://www.googleapis.com/auth/chat.spaces.readonly,https://www.googleapis.com/auth/chat.memberships.readonly,https://www.googleapis.com/auth/chat.messages.readonly,https://www.googleapis.com/auth/chat.messages.create,https://www.googleapis.com/auth/chat.users.readstate.readonly - People API:
https://www.googleapis.com/auth/directory.readonly,https://www.googleapis.com/auth/userinfo.profile,https://www.googleapis.com/auth/contacts.readonly
- Universal:
- Click Add to Table, then Update, and finally Save.
Create an OAuth Client ID
- Go to Google Auth Platform > Clients > Create Client.
- Select Web application as the application type.
- Name it
codelab. - Under Authorized redirect URIs, click + Add URI then enter
https://vertexaisearch.cloud.google.com/oauth-redirect. - Click Create and copy the Client ID and Client Secret. You will need these in the next step.
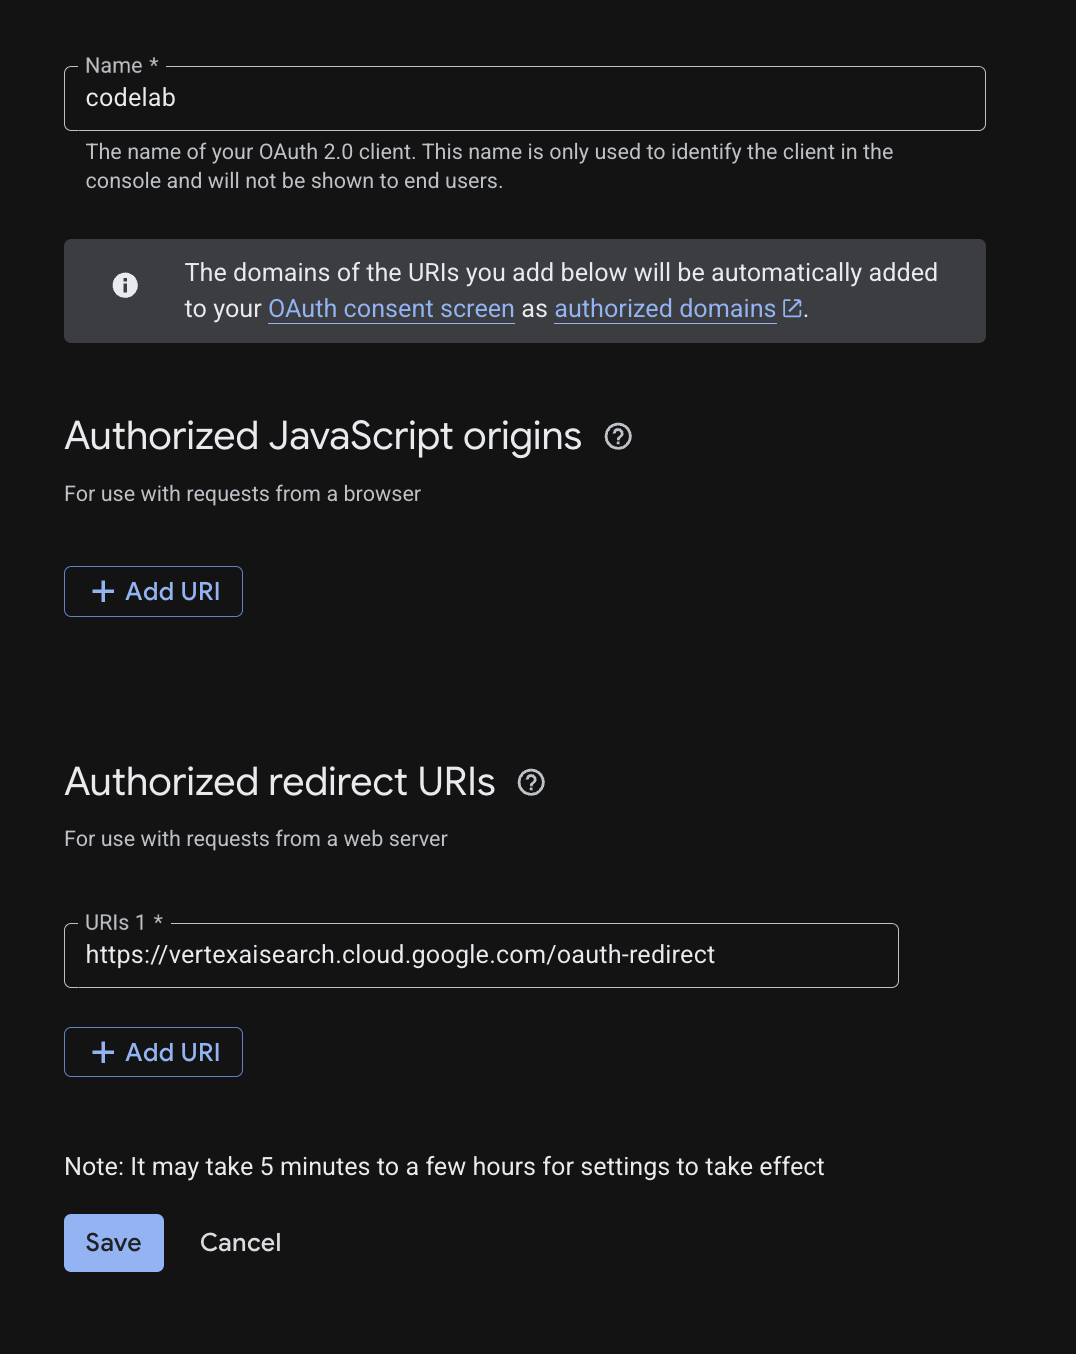
4. Configure the Gemini Enterprise app
Now let's configure the Gemini Enterprise app to use these endpoints as custom MCP server connectors.
Universal
Open Gemini Enterprise from the Cloud console, then follow these steps:
- Click the app named
codelab. - In the navigation menu, click Connected data stores.
- Click + New data store.
- In the Source, search for Custom MCP Server, and click Add MCP server.
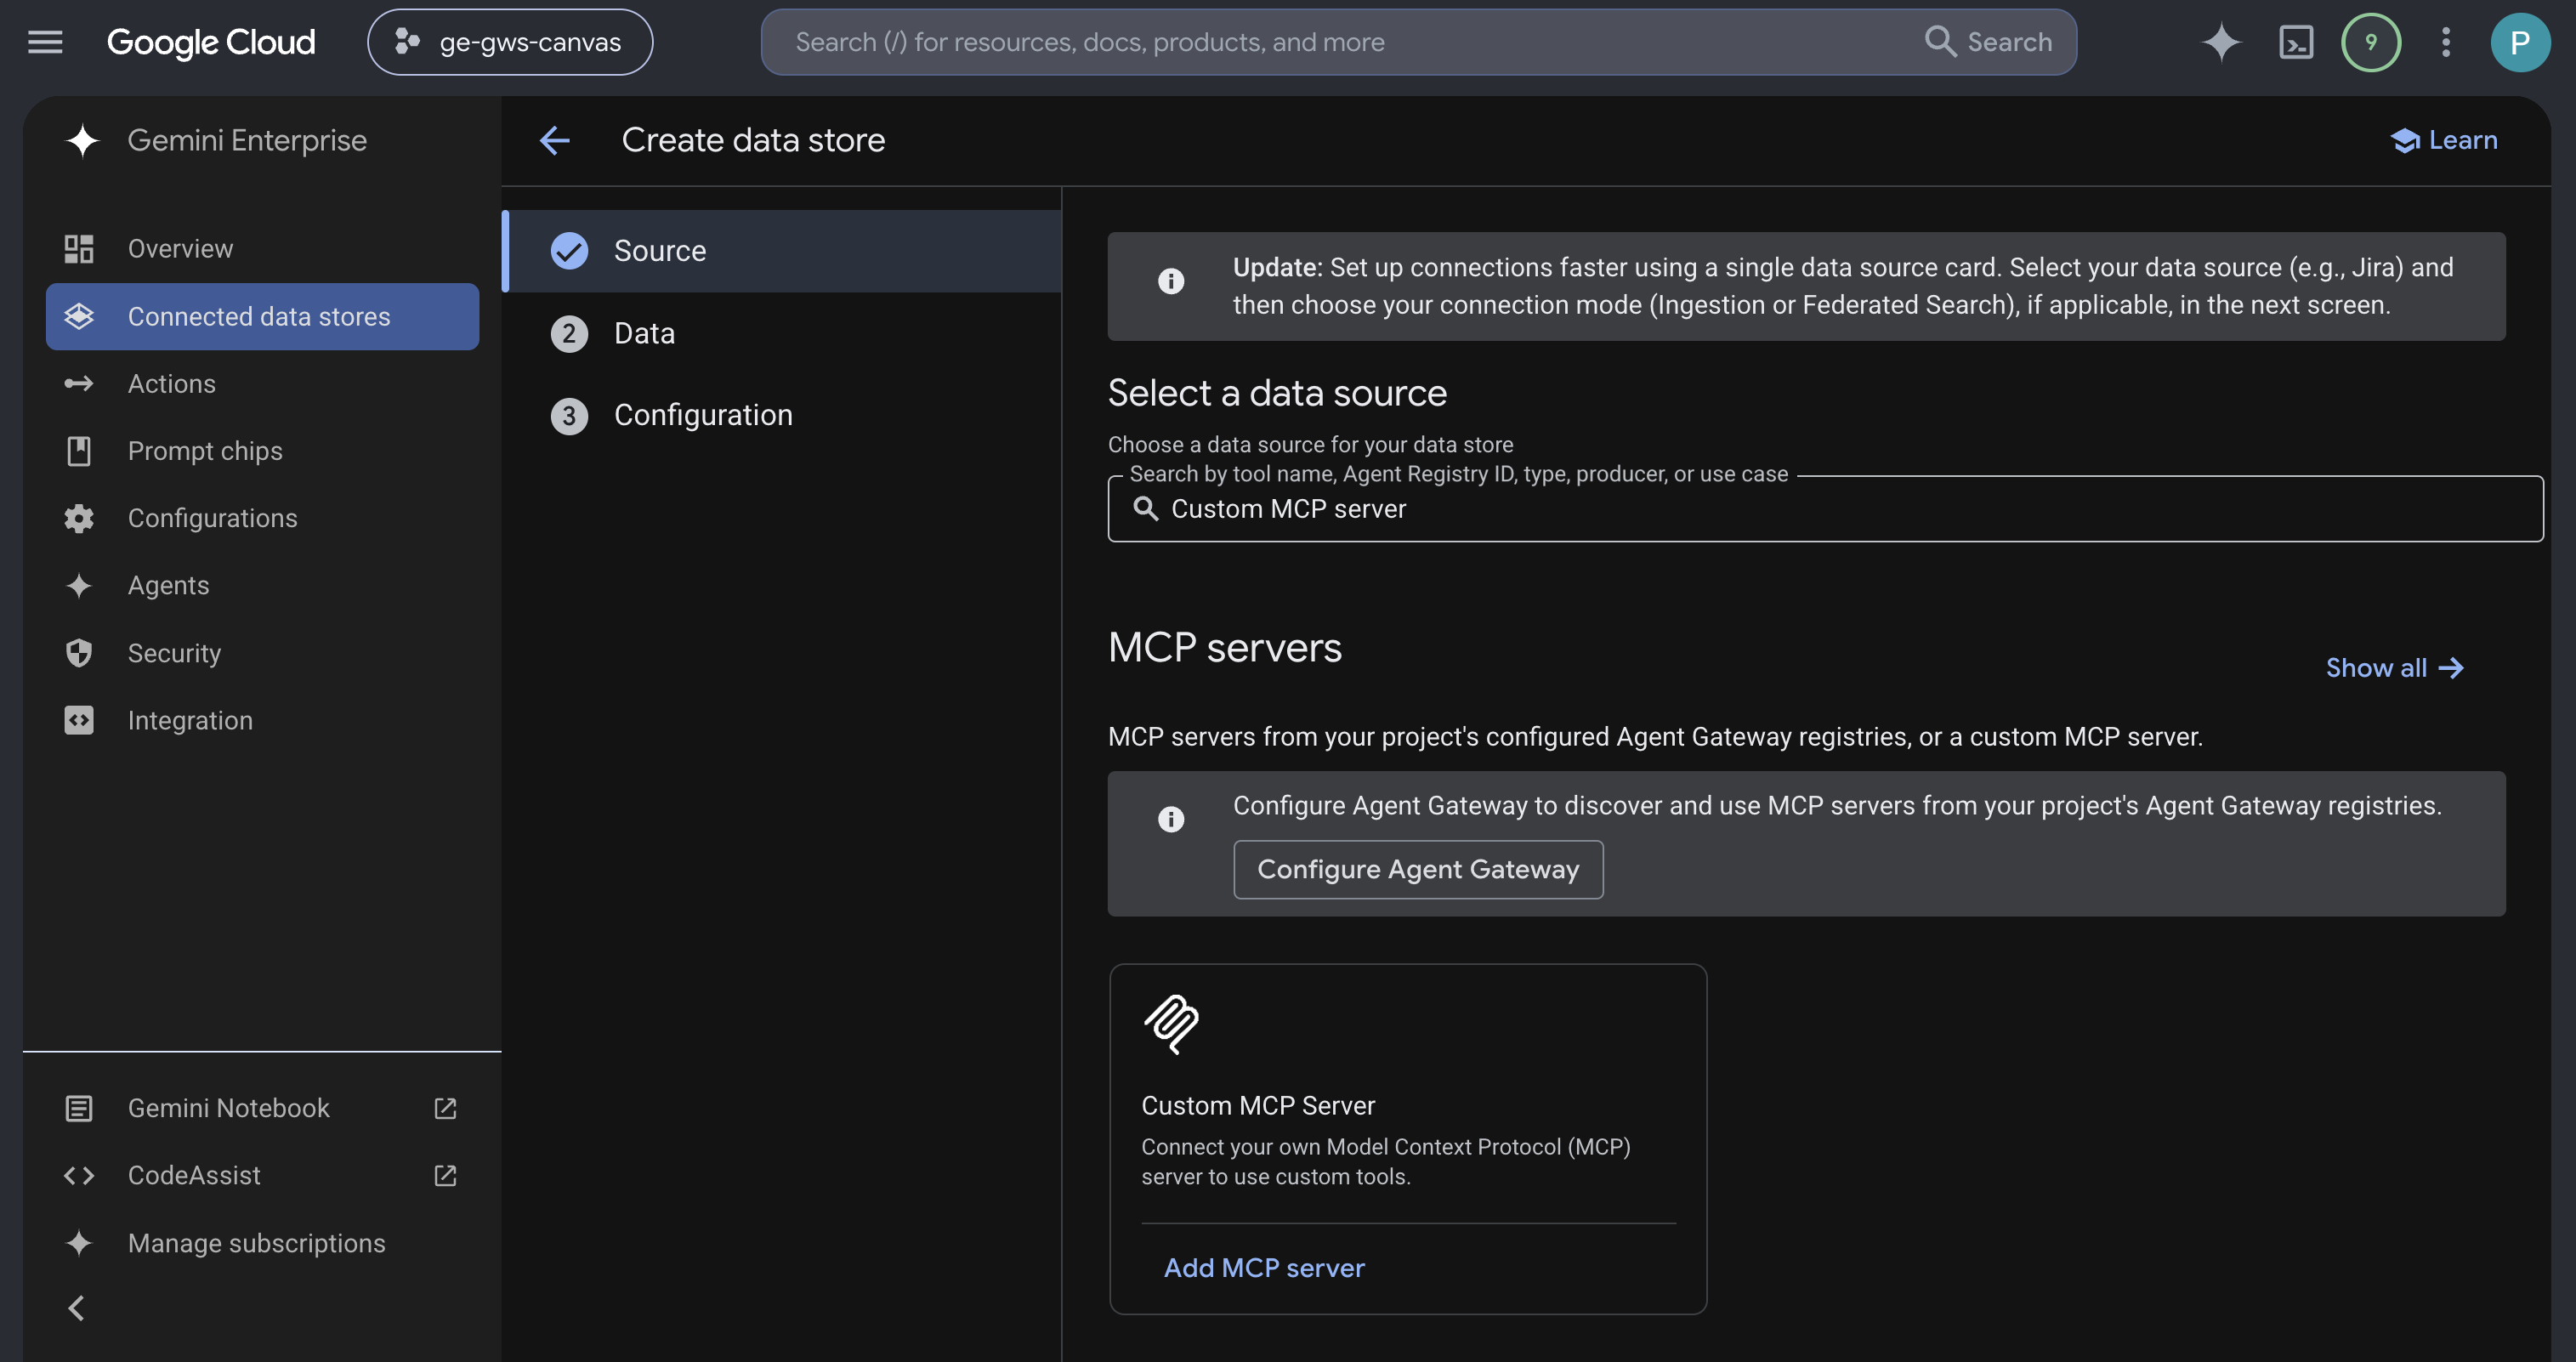
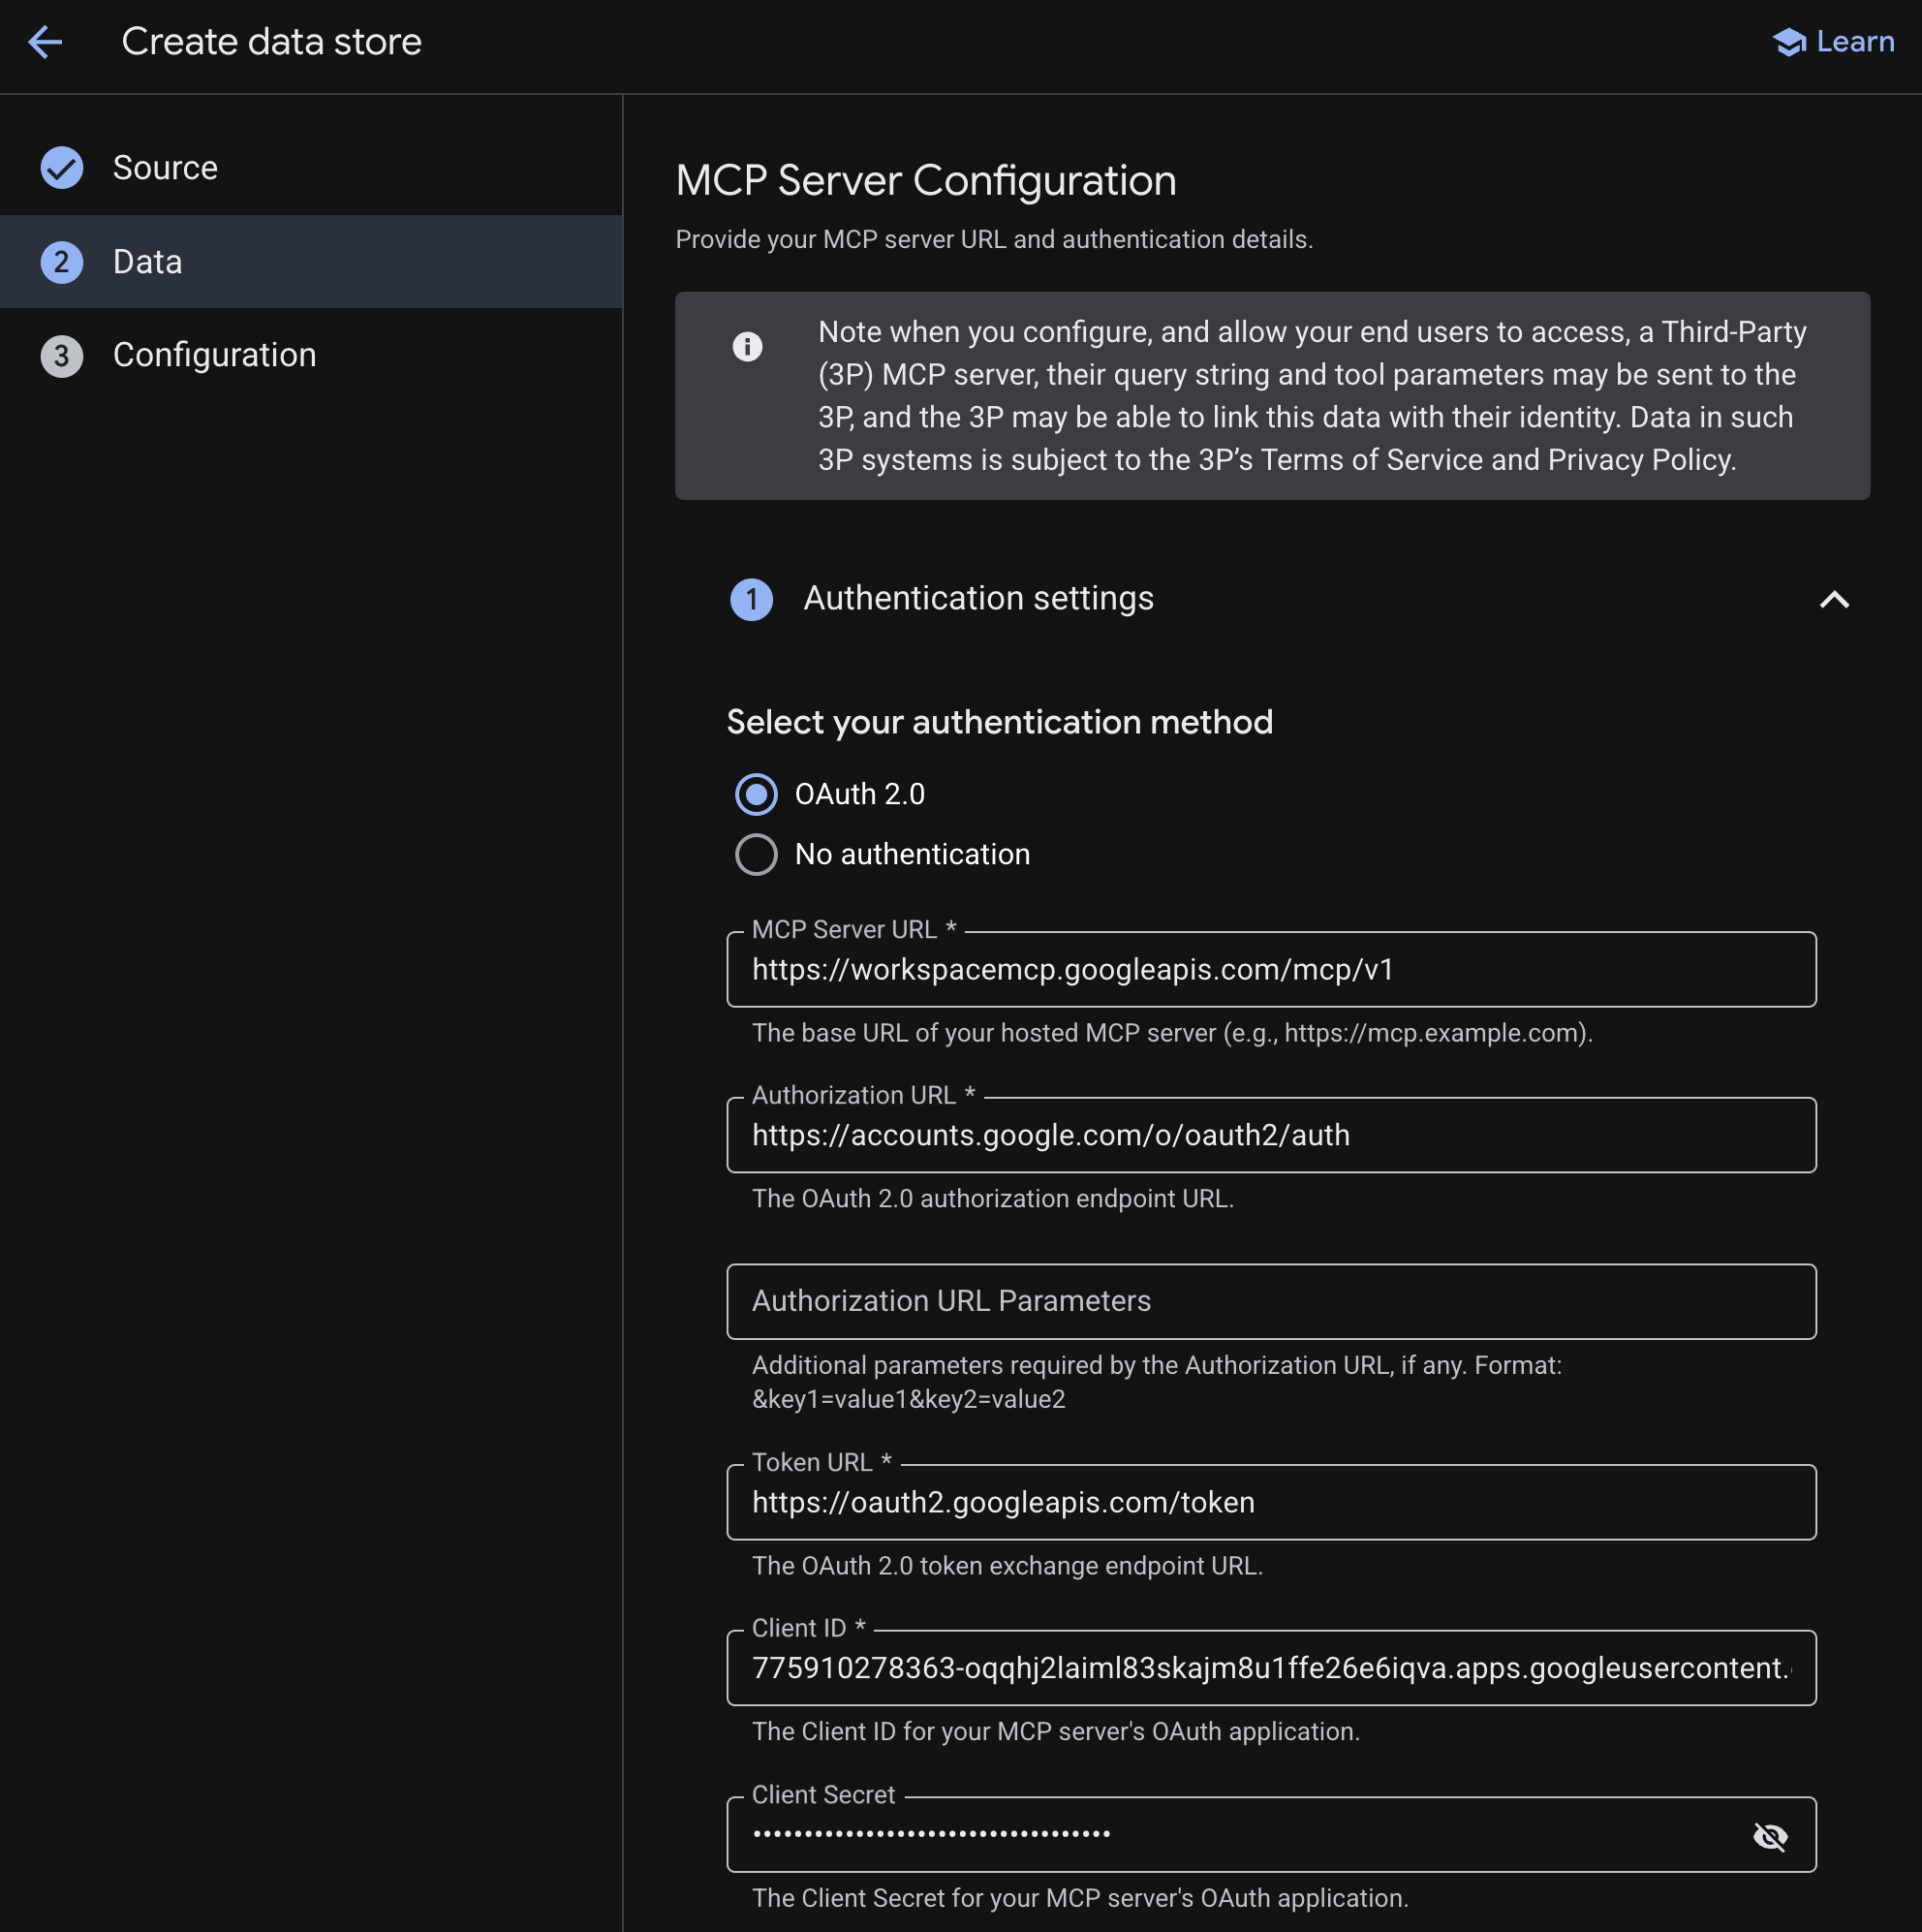
- In the Data section:
- Set the MCP Server URL to
https://workspacemcp.googleapis.com/mcp/v1. - Set the Authorization URL to
https://accounts.google.com/o/oauth2/auth. - Set the Token URL to
https://oauth2.googleapis.com/token. - Set the Client ID and Client Secret to the values saved from previous steps.
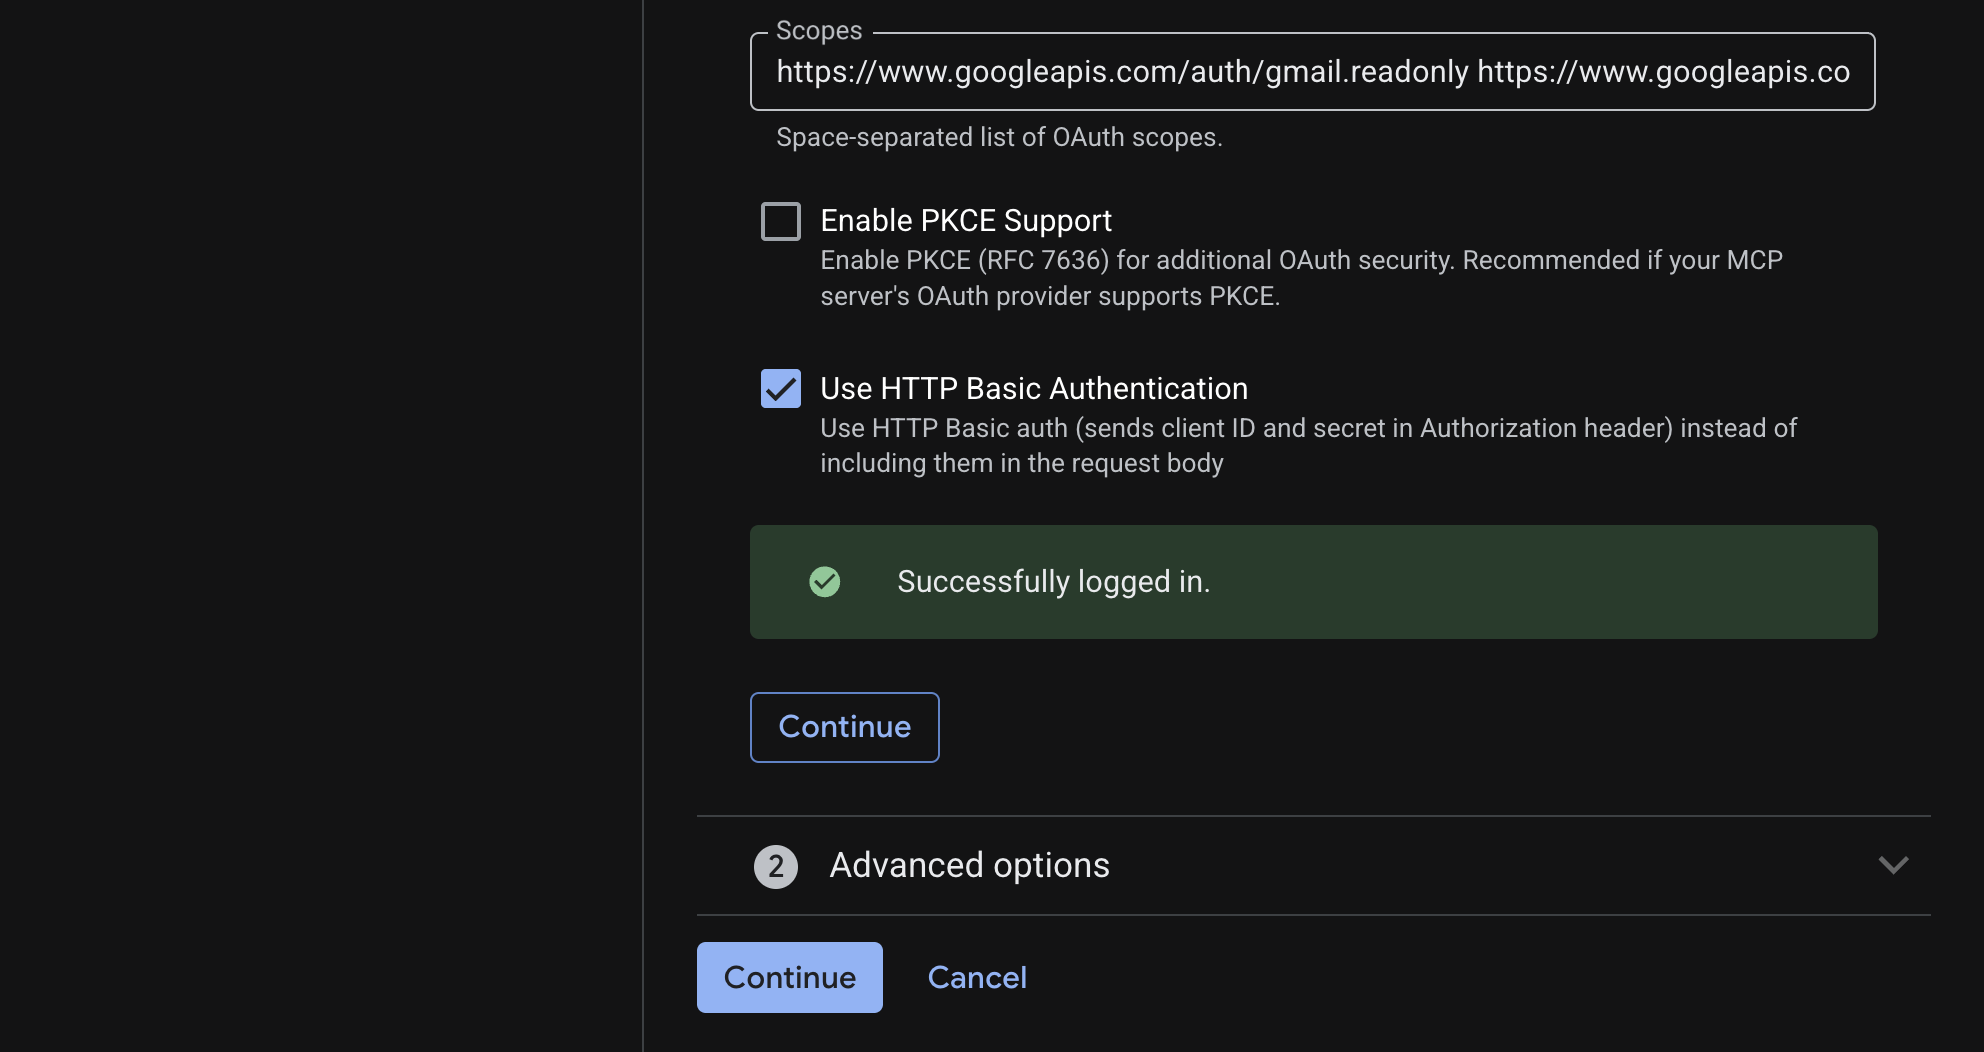
- Set the scopes to
https://www.googleapis.com/auth/gmail.readonly https://www.googleapis.com/auth/drive.readonly https://www.googleapis.com/auth/calendar.readonly https://www.googleapis.com/auth/chat.messages.readonly. - Click Verify Auth and follow the steps to authenticate and authorize the OAuth client.
- Click Continue then Continue.
- Set the MCP Server URL to
- In the Configuration section, set the Data connector name to
gws-mcp-universal. - Click Create.
- You are automatically redirected to the newly created data store configuration page.
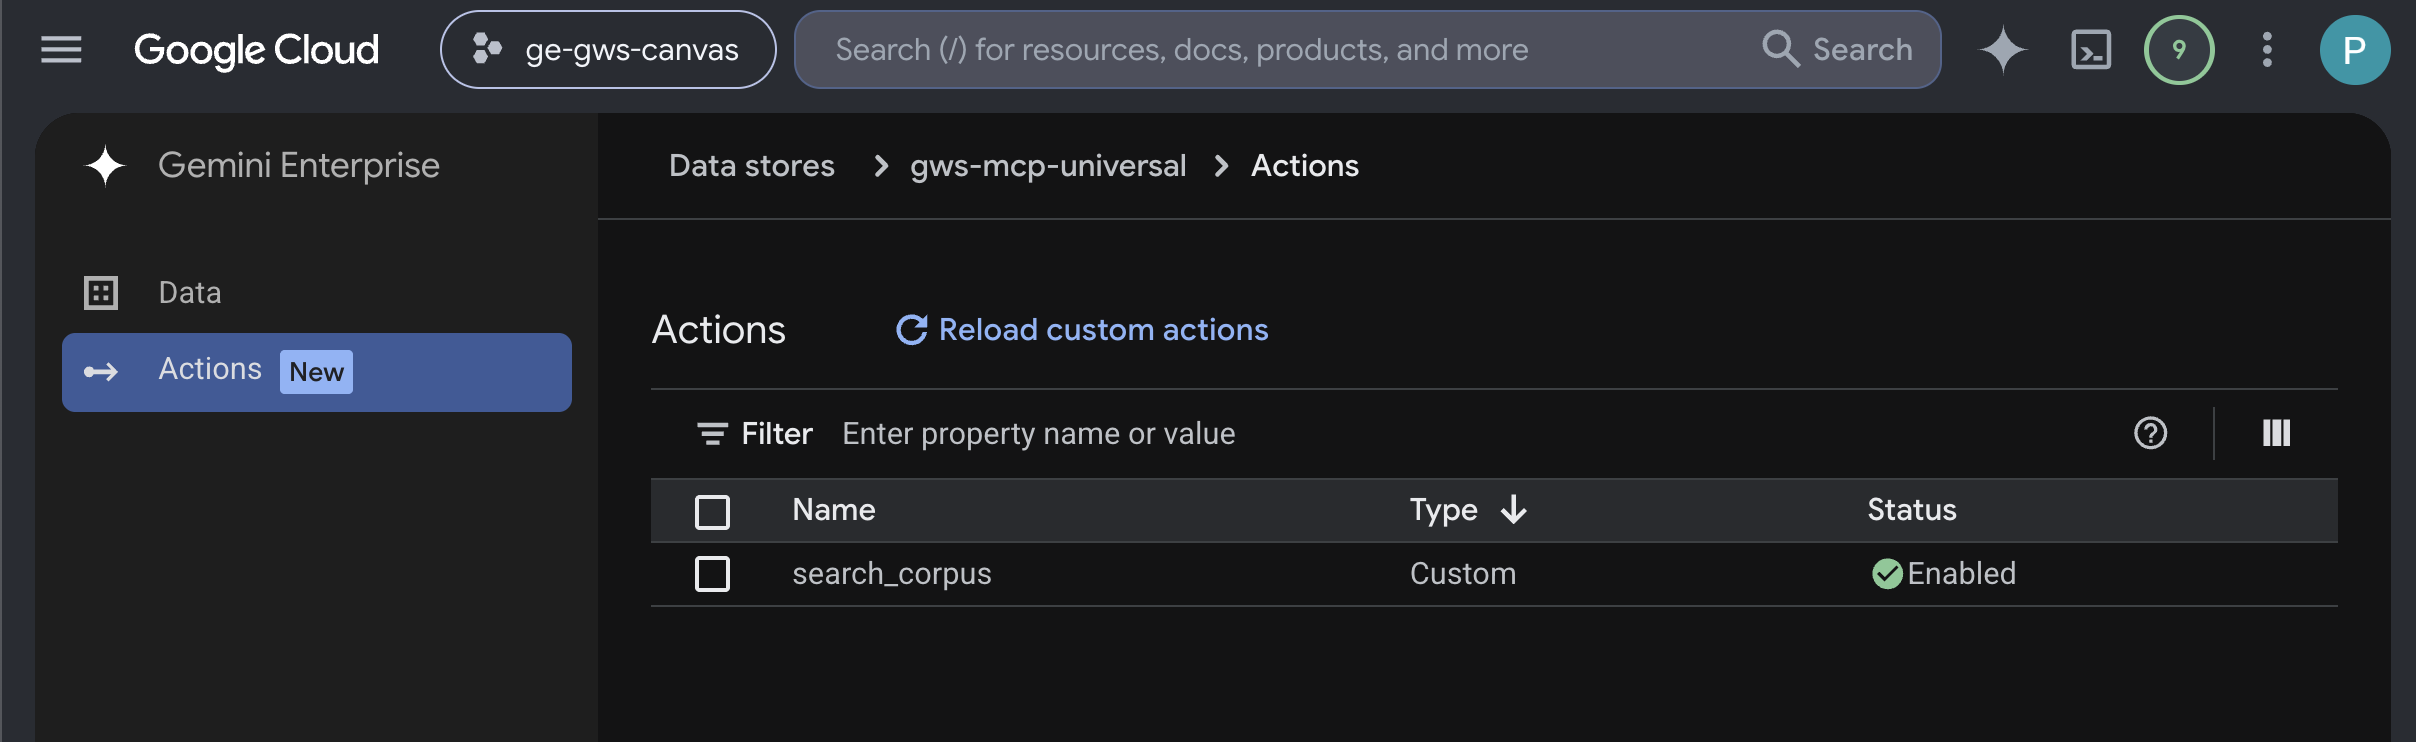
- Navigate to Actions.
- Click Reload custom actions, select all, and click Enable actions.
Gmail
Follow the same steps as previously done for Google Calendar with the Data connector name set to gws-mcp-gmail in the Configuration section, and with the following values set in the Data section:
- Set the MCP Server URL to
https://gmailmcp.googleapis.com/mcp/v1. - Set the scopes to
https://www.googleapis.com/auth/gmail.readonly https://www.googleapis.com/auth/gmail.compose.
Google Drive
Follow the same steps as previously done for Google Calendar with the Data connector name set to gws-mcp-drive in the Configuration section, and with the following values set in the Data section:
- Set the MCP Server URL to
https://drivemcp.googleapis.com/mcp/v1. - Set the scopes to
https://www.googleapis.com/auth/drive.readonly https://www.googleapis.com/auth/drive.file.
Google Docs
Follow the same steps as previously done for Google Calendar with the Data connector name set to gws-mcp-docs in the Configuration section, and with the following values set in the Data section:
- Set the MCP Server URL to
https://docsmcp.googleapis.com/mcp/v1. - Set the scopes to
https://www.googleapis.com/auth/drive.readonly https://www.googleapis.com/auth/drive.file https://www.googleapis.com/auth/documents.readonly https://www.googleapis.com/auth/documents.
Google Sheets
Follow the same steps as previously done for Google Calendar with the Data connector name set to gws-mcp-sheets in the Configuration section, and with the following values set in the Data section:
- Set the MCP Server URL to
https://sheetsmcp.googleapis.com/mcp/v1. - Set the scopes to
https://www.googleapis.com/auth/drive.readonly https://www.googleapis.com/auth/drive.file https://www.googleapis.com/auth/spreadsheets.readonly https://www.googleapis.com/auth/spreadsheets.
Google Slides
Follow the same steps as previously done for Google Calendar with the Data connector name set to gws-mcp-slides in the Configuration section, and with the following values set in the Data section:
- Set the MCP Server URL to
https://slidesmcp.googleapis.com/mcp/v1. - Set the scopes to
https://www.googleapis.com/auth/drive.readonly https://www.googleapis.com/auth/drive.file https://www.googleapis.com/auth/presentations.readonly https://www.googleapis.com/auth/presentations.
Google Calendar
Follow the same steps as previously done for Google Calendar with the Data connector name set to gws-mcp-calendar in the Configuration section, and with the following values set in the Data section:
- Set the MCP Server URL to
https://calendarmcp.googleapis.com/mcp/v1. - Set the scopes to
https://www.googleapis.com/auth/calendar.calendarlist.readonly https://www.googleapis.com/auth/calendar.events.freebusy https://www.googleapis.com/auth/calendar.events.readonly.
Google Chat
Follow the same steps as previously done for Google Calendar with the Data connector name set to gws-mcp-chat in the Configuration section, and with the following values set in the Data section:
- Set the MCP Server URL to
https://chatmcp.googleapis.com/mcp/v1. - Set the scopes to
https://www.googleapis.com/auth/chat.spaces.readonly https://www.googleapis.com/auth/chat.memberships.readonly https://www.googleapis.com/auth/chat.messages.readonly https://www.googleapis.com/auth/chat.messages.create https://www.googleapis.com/auth/chat.users.readstate.readonly.
People API
Follow the same steps as previously done for Google Calendar with the Data connector name set to gws-mcp-people-api in the Configuration section, and with the following values set in the Data section:
- Set the MCP Server URL to
https://people.googleapis.com/mcp/v1. - Set the scopes to
https://www.googleapis.com/auth/directory.readonly https://www.googleapis.com/auth/userinfo.profile https://www.googleapis.com/auth/contacts.readonly.
Check status
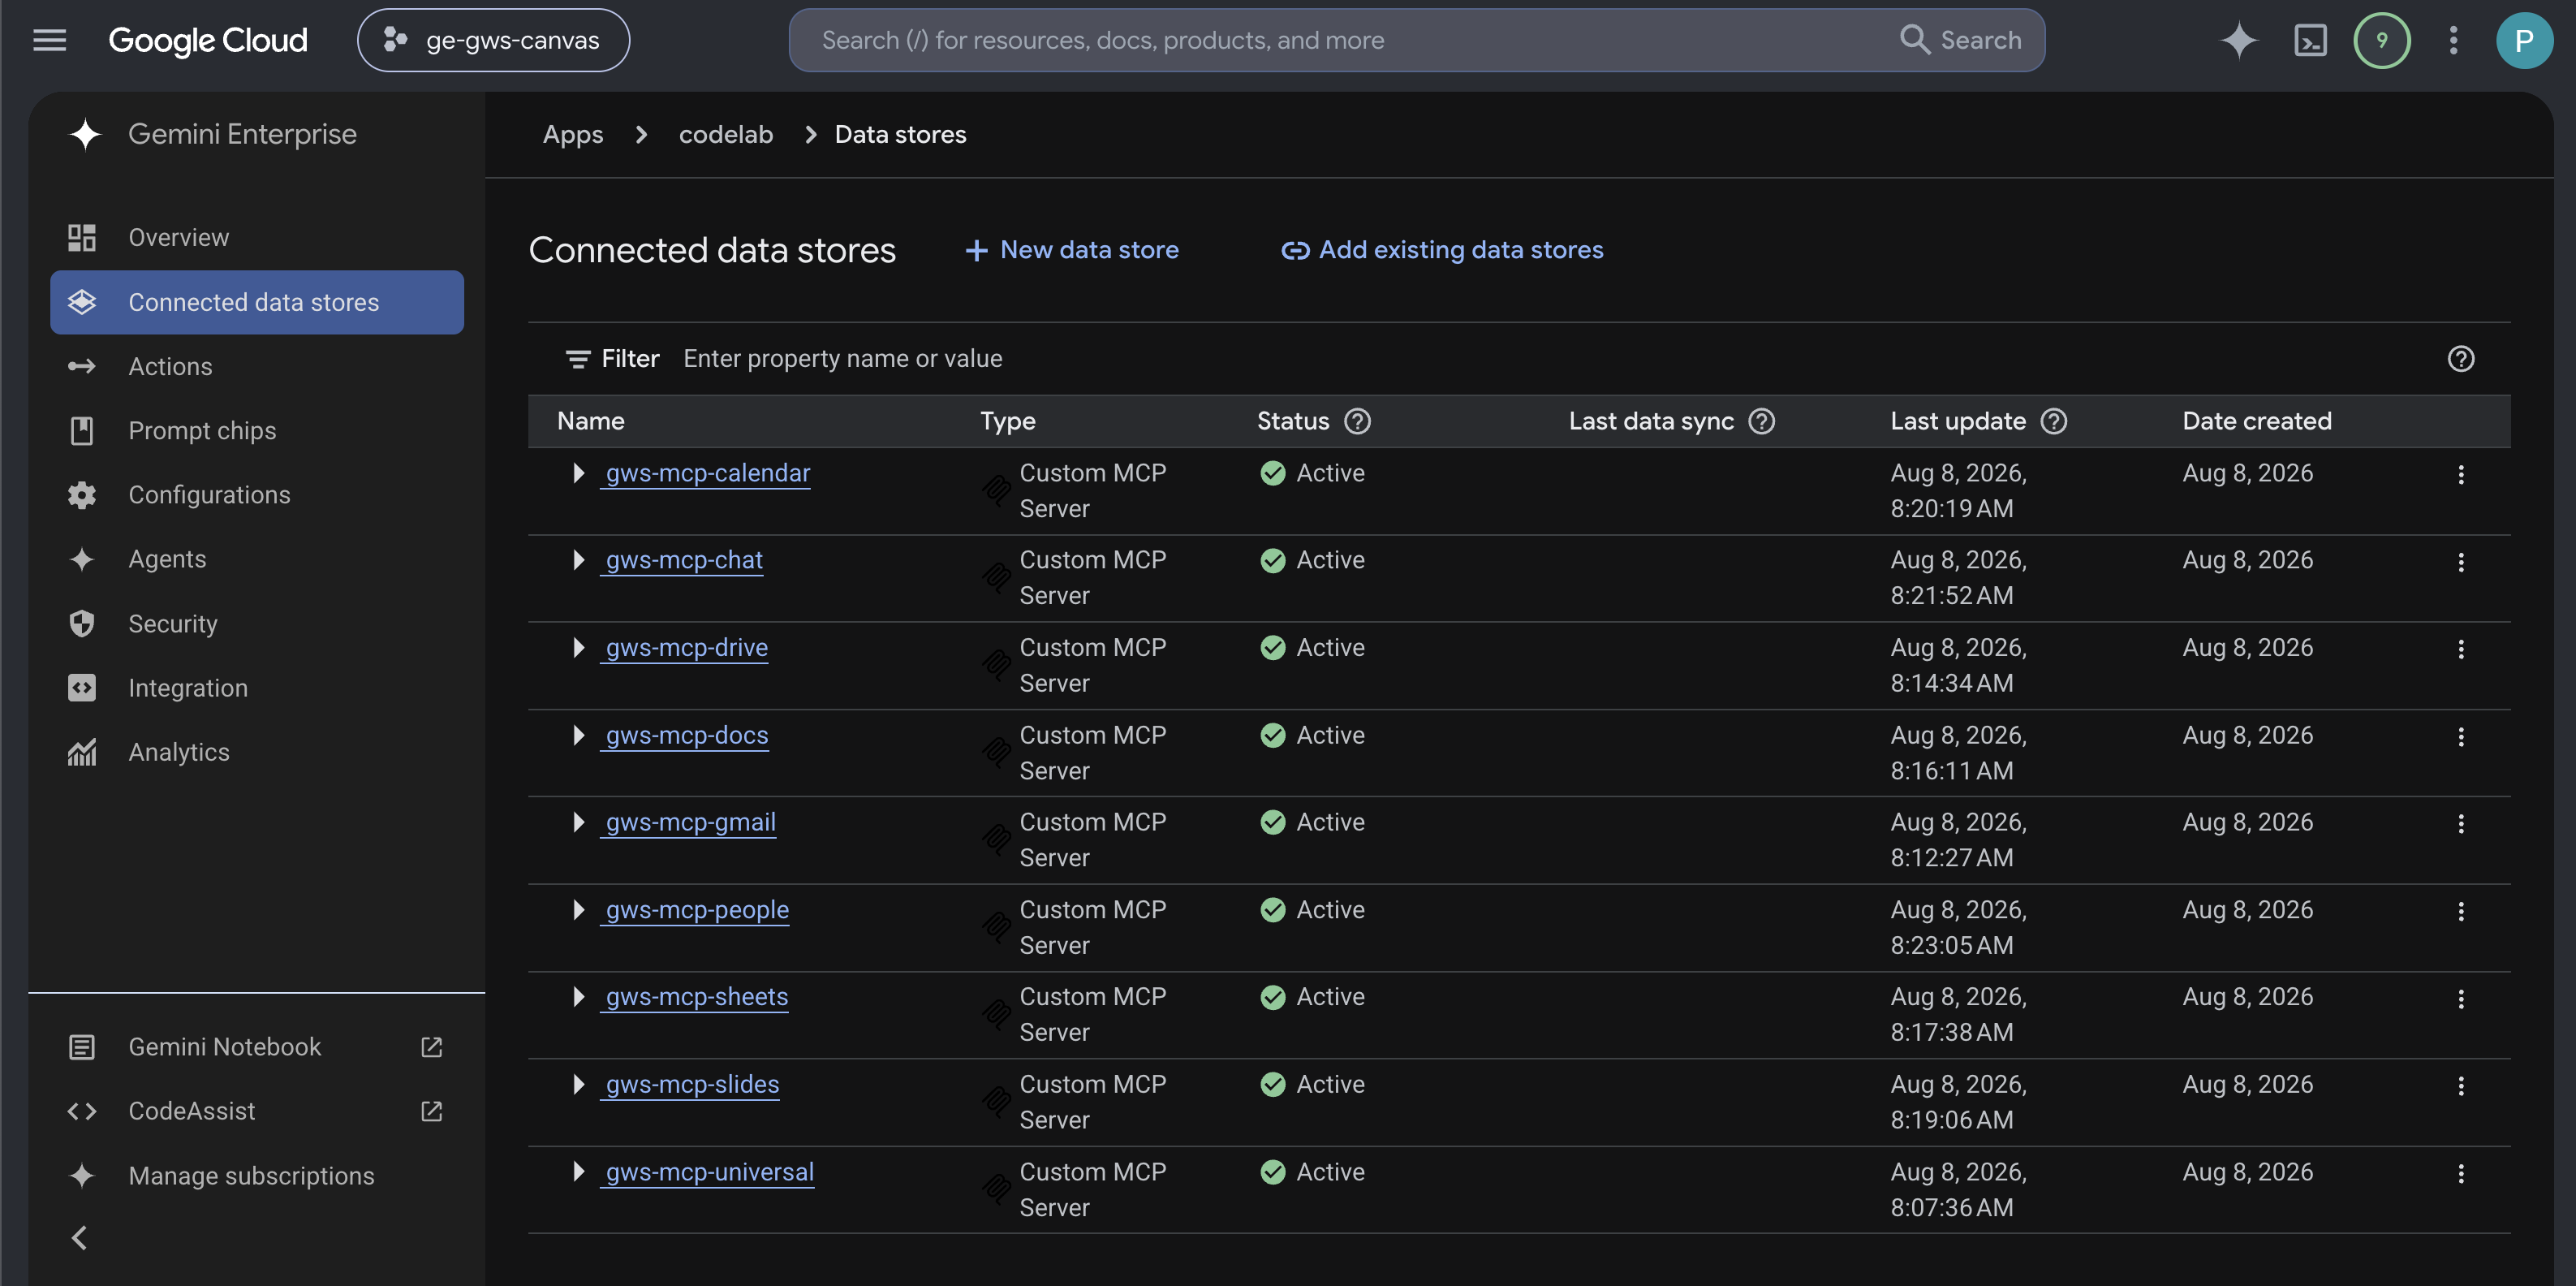
After a few minutes, the status of the connectors will be Active. If you see any errors, you can click the data source to view the error details.
5. Test tools
Now you can interact with your Google Workspace data using natural language. Here are some example prompts for each service.
Initialize the Gemini Enterprise web app
Open Gemini Enterprise from the Cloud console in a new tab, then follow these steps:
- Click the app named
codelab. - Click the URL displayed to open the Gemini Enterprise web app in a new tab.
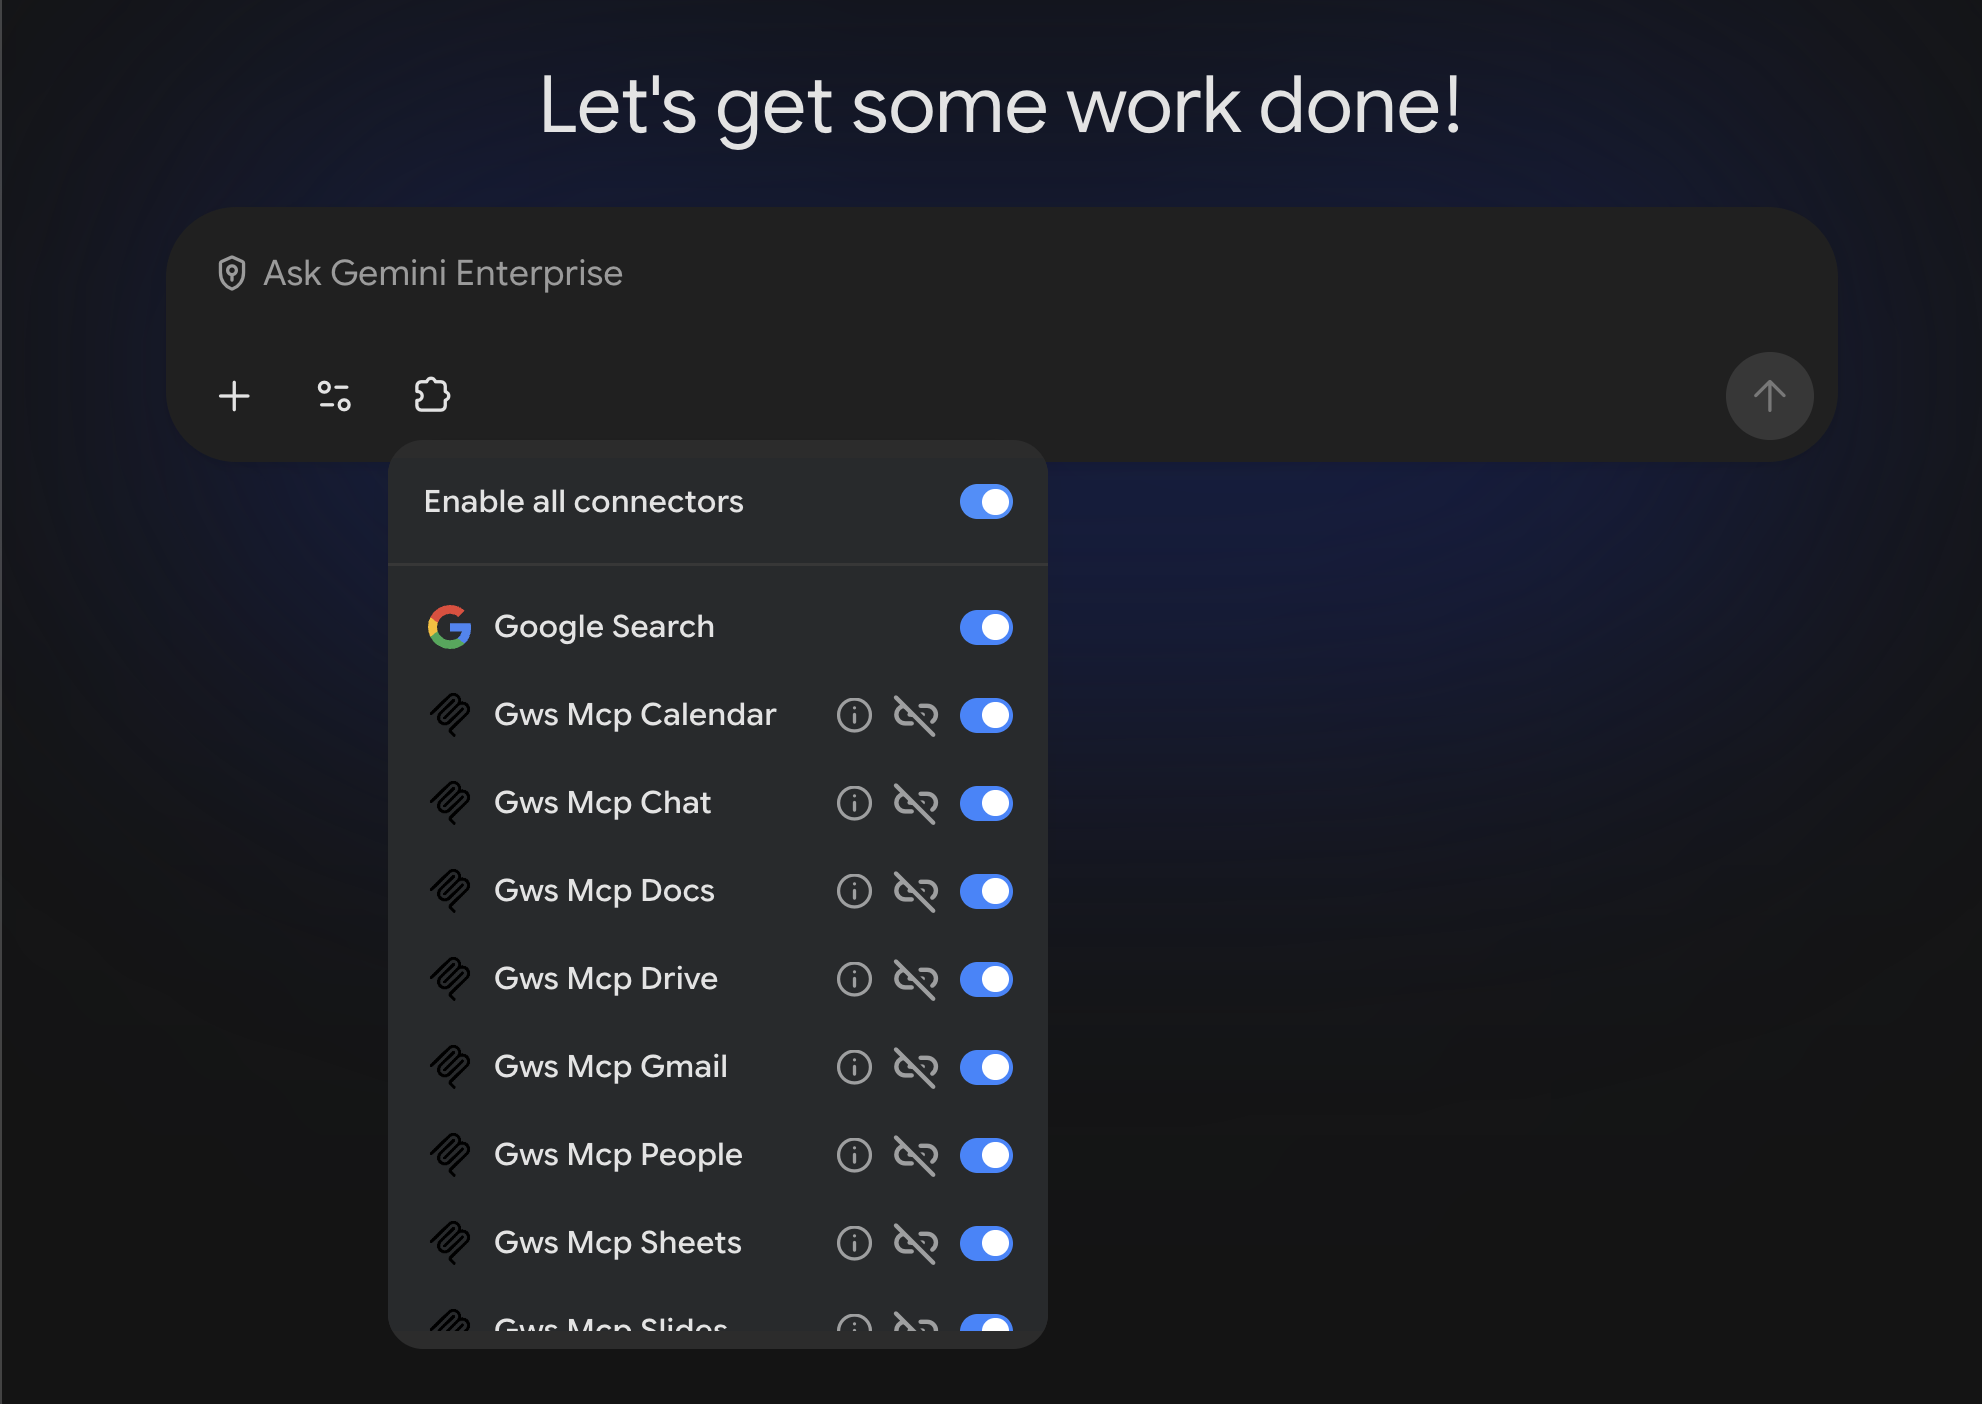
- In the footer of the new chat message field, click the Connectors icon then authorize them all.
Universal
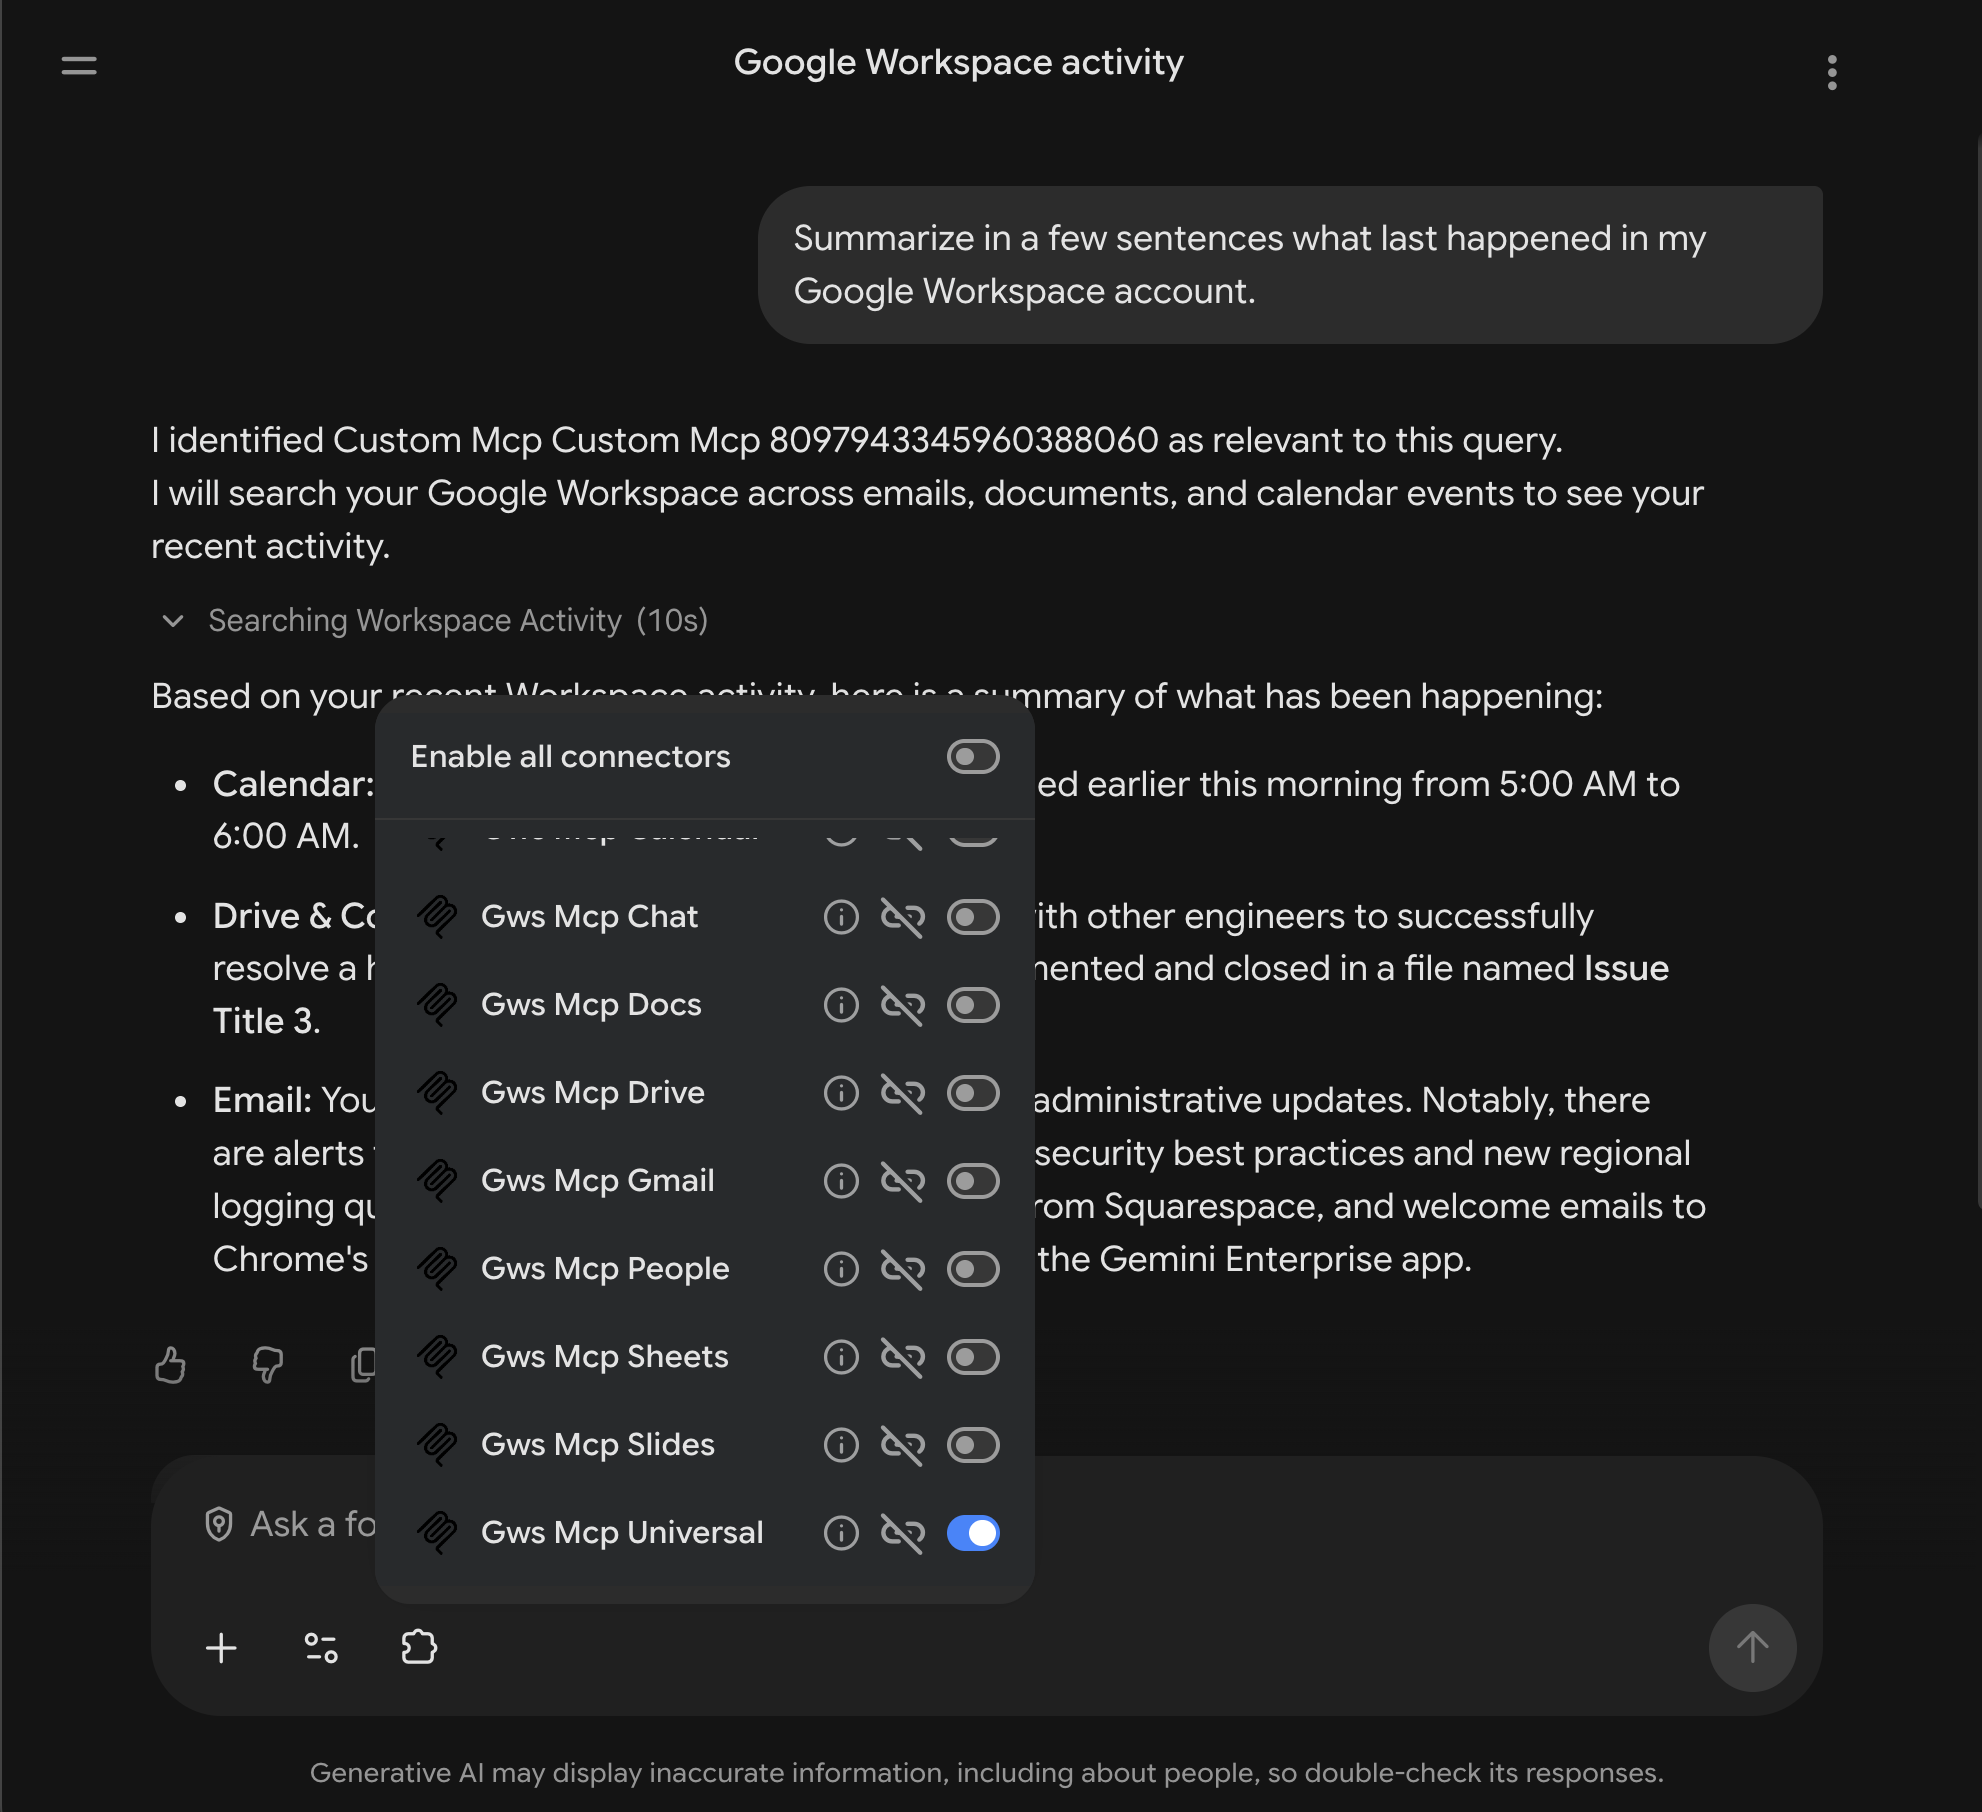
Try searching across different products:
- "Summarize in a few sentences what last happened in my Google Workspace account."
- "Find anything related to [PROJECT_NAME] across my email, docs, and chat messages."
- "When is my next meeting about the marketing plan, and what are the latest notes and chat messages on it?"
Gmail
Try searching or managing your emails:
- "Summarize the last 5 emails I received."
- "Draft an email to ‘[EMAIL_ADDRESS]' requesting an update on the ‘[PROJECT_NAME]' project."
Google Drive
Try searching or reading files:
- "Search for files on my Google Drive that contain ‘[KEYWORD]'."
- "List the most recent documents I edited."
- "Read the content of my ‘[FILE_NAME]' doc and summarize the main goals."
Google Docs, Sheets, Slides
Try searching your Drive resources:
- "Show me the structural contents of Google Doc [DOCS_TITLE]."
- "Read sheet Sheet1 from Google Sheet [SHEETS_TITLE]"
- "Show me the verbalized layout of Google Slides [SLIDES_TITLE]."
Google Calendar
Try searching your schedule:
- "What are my upcoming meetings this week?"
- "Do I have any free time tomorrow afternoon?"
Google Chat
Try searching for messages:
- "Look for messages containing ‘[KEYWORD]' in ‘[SPACE_NAME]'"
People API
Try searching your profile or contacts:
- "According to my Google profile, what is my name?"
- "Find contact info for ‘[NAME]'."
Combining Multiple Services
The true power of MCP is realized when orchestrating tasks across multiple services. Try these prompts that demonstrate cross-service capabilities:
- "Search for files in Drive related to ‘[PROJECT_NAME] milestone updates', summarize their content, find the email address for ‘[NAME]', and create a Gmail draft to them with the summary."
Explore More Tools
These are just a few examples of what you can do. To see the full list of tools available for each service and try them out, refer to the Supported Products section of the official documentation.
6. Clean up
Delete Google Cloud project
To avoid incurring charges to your Google Cloud Account for the resources used in this codelab, we recommend that you delete the Google Cloud project.
In the Google Cloud console, follow these steps:
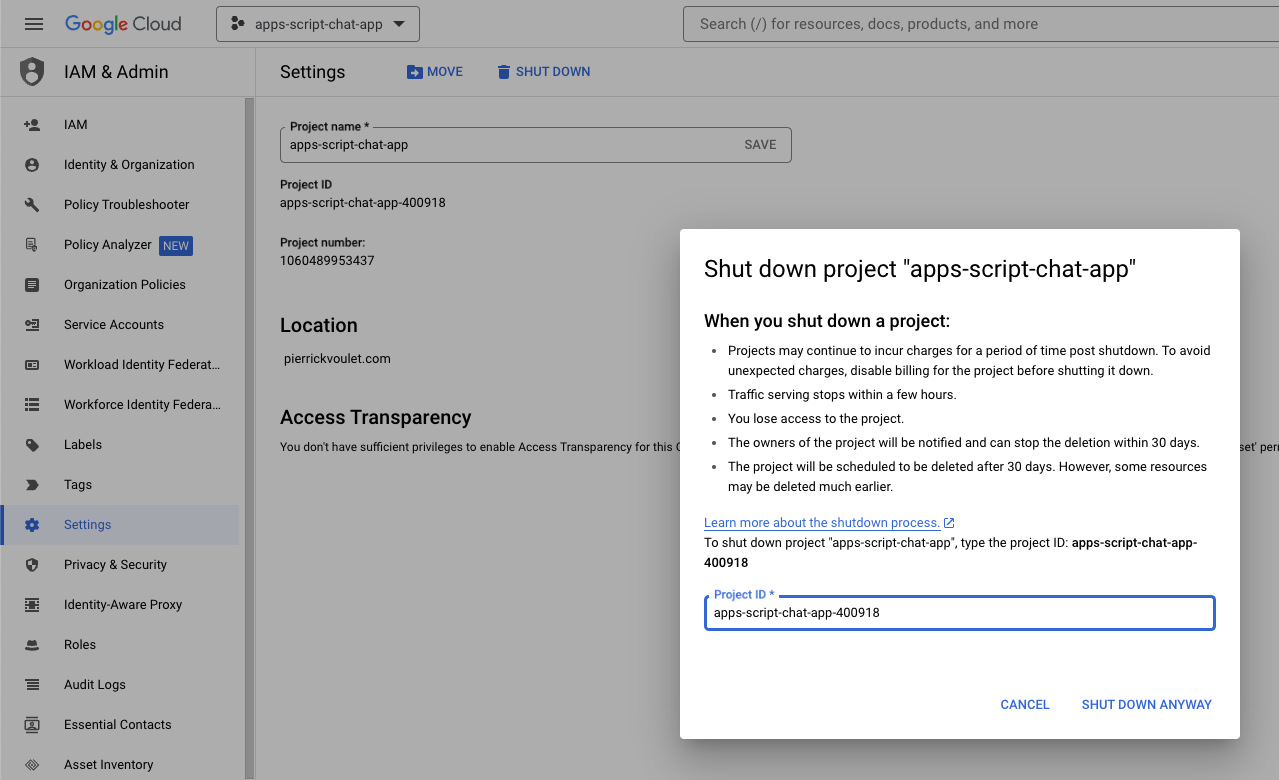
- Click Menu ☰ > IAM & Admin > Settings.
- Click Shut down.
- Enter the project ID.
- Click Shut down anyway.
7. Congratulations
Congratulations! You have successfully configured and tested the official Google Workspace MCP servers in Gemini Enterprise apps.