
1. Introduction
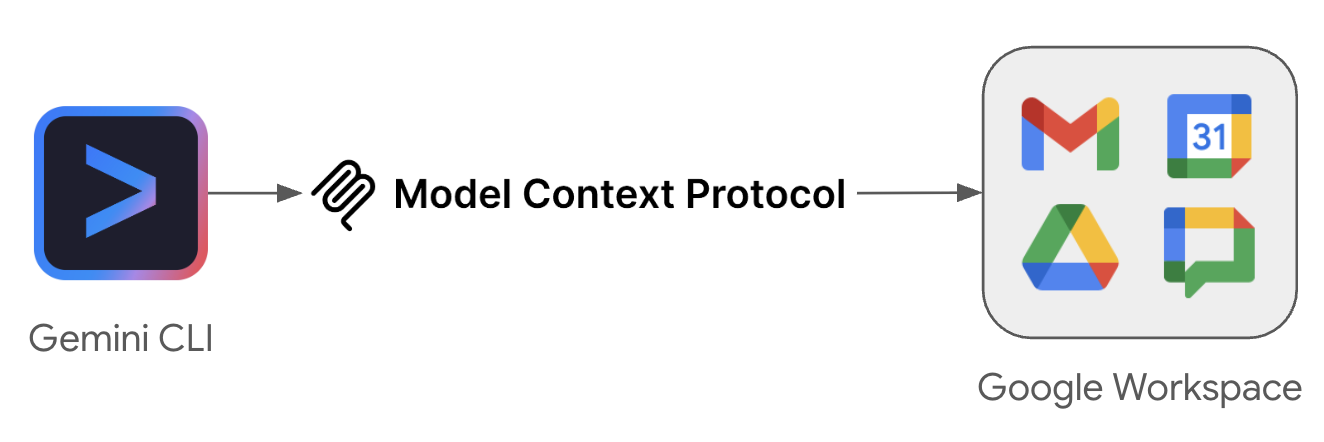
In this codelab, you will learn how to use the Model Context Protocol (MCP) to connect the Gemini CLI to your Google Workspace data. MCP is an open standard that enables AI models to securely use tools provided by remote servers. You will use the Gemini CLI as your client to interact with Gmail, Google Drive, Google Calendar, Google Chat, and the People API without writing any code!
What you'll do
- Enable Google Workspace MCP services in your Google Cloud project.
- Configure the Gemini CLI to use these MCP services.
- Test the integration with fun and useful prompts that interact with your Google Workspace data.
What you'll need
- A web browser such as Chrome
- A Google Cloud project
- A Google Workspace account
- Gemini CLI installed on your local machine
This codelab will take approximately 30 minutes to complete.
Easy access to this codelab
2. Before you begin
Create or Select a Google Cloud project
In the Google Cloud Console, select or create a Google Cloud project.
Enable the APIs
To use the Google Workspace MCP servers, you must enable the standard Google Workspace APIs. While some MCP servers operate independently, others still require the underlying standard API to be enabled:
- Gmail and Chat still require their standard APIs.
- Drive requires the standard API for certain tools.
- Calendar does not require the standard API to be enabled.
- The People API handles both standard access and MCP functionality, so it does not have a separate MCP service to enable.
Enable MCP Services
Next, enable the dedicated MCP services for the products.
Configure the Chat App
To use the Google Chat MCP server, you must configure a Chat app in your Google Cloud project.
- In the Google Cloud console, search for Google Chat API, and click Google Chat API > Manage > Configuration.
- Set up the Chat app:
- In App name field, enter
Chat MCP. - In Avatar URL field, enter
https://developers.google.com/chat/images/quickstart-app-avatar.png. - In Description, enter
Chat MCP server. - Under Functionality, turn off Enable interactive features.
- Under Logs, select Log errors to Logging.
- In App name field, enter
- Click Save.
3. Configure OAuth Consent and Client
The Google Workspace MCP servers use OAuth 2.0 for secure authentication. You must configure an OAuth consent screen and create a Desktop application client.
Set up the OAuth Consent Screen
The Google Workspace MCP servers use OAuth 2.0 for authentication. You must configure the consent screen first.
- In the Google Cloud console, go to Google Auth Platform > Branding. Click Get Started if not configured.
- Configure App Information:
- App name:
Google Workspace MCP Servers - User support email: Select your email.
- App name:
- Configure Audience: Select Internal (or External if Internal is not available).
- Configure Contact Information: Enter your email address.
- Review and agree to the User Data Policy, then click Create.
- If you selected External, go to Audience and add your email under Test users.
- Go to Data Access > Add or Remove Scopes. Under Manually add scopes, add the following for the servers you want to use:
- Google Calendar:
https://www.googleapis.com/auth/calendar.calendarlist.readonly,https://www.googleapis.com/auth/calendar.events.freebusy,https://www.googleapis.com/auth/calendar.events.readonly - Google Chat:
https://www.googleapis.com/auth/chat.spaces.readonly,https://www.googleapis.com/auth/chat.memberships.readonly,https://www.googleapis.com/auth/chat.messages.readonly,https://www.googleapis.com/auth/chat.users.readstate.readonly - Google Drive:
https://www.googleapis.com/auth/drive.readonly,https://www.googleapis.com/auth/drive.file - Gmail:
https://www.googleapis.com/auth/gmail.readonly,https://www.googleapis.com/auth/gmail.compose - People API:
https://www.googleapis.com/auth/directory.readonly,https://www.googleapis.com/auth/userinfo.profile,https://www.googleapis.com/auth/contacts.readonly
- Google Calendar:
- Click Add to Table, then Update, and finally Save.
Create an OAuth Client ID
- Go to Google Auth Platform > Clients > Create Client.
- Select Desktop app as the application type.
- Name it
Gemini CLI. - Click Create and copy the Client ID and Client Secret. You will need these in the next step.
4. Configure Gemini CLI
Now let's configure the Gemini CLI to use these endpoints. If you don't have Gemini CLI installed, follow the installation instructions on the Gemini CLI website.
Create the configuration file
Open or create ~/.gemini/settings.json in your home directory and add the following configuration. Replace placeholders with your OAuth credentials.
{
  "mcpServers": {
    "calendar": {
      "httpUrl": "https://calendarmcp.googleapis.com/mcp/v1",
      "oauth": {
        "enabled": true,
        "clientId": "<YOUR_CLIENT_ID>",
        "clientSecret": "<YOUR_CLIENT_SECRET>",
        "scopes": [
          "https://www.googleapis.com/auth/calendar.calendarlist.readonly",
          "https://www.googleapis.com/auth/calendar.events.freebusy",
          "https://www.googleapis.com/auth/calendar.events.readonly"
        ]
      }
    },
    "chat": {
      "httpUrl": "https://chatmcp.googleapis.com/mcp/v1",
      "oauth": {
        "enabled": true,
        "clientId": "<YOUR_CLIENT_ID>",
        "clientSecret": "<YOUR_CLIENT_SECRET>",
        "scopes": [
          "https://www.googleapis.com/auth/chat.spaces.readonly",
          "https://www.googleapis.com/auth/chat.memberships.readonly",
          "https://www.googleapis.com/auth/chat.messages.readonly",
          "https://www.googleapis.com/auth/chat.users.readstate.readonly"
        ]
      }
    },
    "drive": {
      "httpUrl": "https://drivemcp.googleapis.com/mcp/v1",
      "oauth": {
        "enabled": true,
        "clientId": "<YOUR_CLIENT_ID>",
        "clientSecret": "<YOUR_CLIENT_SECRET>",
        "scopes": [
          "https://www.googleapis.com/auth/drive.readonly",
          "https://www.googleapis.com/auth/drive.file"
        ]
      }
    },
    "gmail": {
      "httpUrl": "https://gmailmcp.googleapis.com/mcp/v1",
      "oauth": {
        "enabled": true,
        "clientId": "<YOUR_CLIENT_ID>",
        "clientSecret": "<YOUR_CLIENT_SECRET>",
        "scopes": [
          "https://www.googleapis.com/auth/gmail.readonly",
          "https://www.googleapis.com/auth/gmail.compose"
        ]
      }
    },
    "people": {
      "httpUrl": "https://people.googleapis.com/mcp/v1",
      "oauth": {
        "enabled": true,
        "clientId": "<YOUR_CLIENT_ID>",
        "clientSecret": "<YOUR_CLIENT_SECRET>",
        "scopes": [
          "https://www.googleapis.com/auth/directory.readonly",
          "https://www.googleapis.com/auth/userinfo.profile",
          "https://www.googleapis.com/auth/contacts.readonly"
        ]
      }
    }
  }
}
5. Authenticate and Verify MCP Servers
Before you can use the MCP servers, you must authenticate and verify they are connected.
Start Gemini CLI
Run the following command in your terminal to start the Gemini CLI:
gemini
Authenticate
Authenticate with the services you want to test by running the corresponding command in the Gemini CLI. You only need to authenticate with the services you plan to use in this codelab.
Calendar
/mcp auth calendar
Chat
/mcp auth chat
Drive
/mcp auth drive
Gmail
/mcp auth gmail
People
/mcp auth people
Follow the prompts in your browser to authorize each service.
Verify Connection
Verify that the tools are loaded and ready:
/mcp list
You should see output indicating that the services are Ready with their tools listed.
6. Test MCP Servers
Now you can interact with your Google Workspace data using natural language. Here are some example prompts for each service.
Google Calendar
Try asking Gemini about your schedule:
- "What are my upcoming meetings this week?"
- "Do I have any free time tomorrow afternoon?"
Google Chat
Try asking Gemini to search for messages:
- "Look for messages containing ‘[KEYWORD]' in ‘[SPACE_NAME]'"
Google Drive
Try asking Gemini to find or read files:
- "Search for files on my Google Drive that contain ‘[KEYWORD]'."
- "List the most recent documents I edited."
- "Read the content of my ‘[FILE_NAME]' doc and summarize the main goals."
Gmail
Try asking Gemini to search or manage your emails:
- "Summarize the last 5 emails I received."
- "Draft an email to ‘[EMAIL_ADDRESS]' requesting an update on the ‘[PROJECT_NAME]' project."
People API
Try asking Gemini about your profile or contacts:
- "According to my Google profile, what is my name?"
- "Find contact info for ‘[NAME]'."
Combining Multiple Services
The true power of MCP is realized when Gemini orchestrates tasks across multiple services. Try these prompts that demonstrate cross-service capabilities:
- "Search for files in Drive related to ‘[PROJECT_NAME] milestone updates', summarize their content, find the email address for ‘[NAME]', and create a Gmail draft to them with the summary."
Explore More Tools
These are just a few examples of what you can do. To see the full list of tools available for each service and try them out, refer to the Supported Products section of the official documentation.
7. Clean up
To clean up your project without deleting it, you can disable the APIs and MCP services you enabled:
- In the Google Cloud Console, go to the API & Services Dashboard.
- Click on each of the Google Workspace and MCP APIs you enabled (e.g., Calendar MCP, Chat MCP) and click Disable API.
Delete the OAuth client credentials in the Google Auth Platform console if you no longer plan to use them.
8. Congratulations
Congratulations! You have successfully configured and tested the official Google Workspace MCP servers using the Gemini CLI.
What you've learned
- How to enable Google Workspace MCP services in Google Cloud.
- How to configure an OAuth client for MCP.
- How to use the Gemini CLI to interact with Google Workspace data using standard tools.