
1. Introduction
Generative AI models are powerful reasoners, but they lack institutional context. If an executive asks an AI agent, "What is our Q1 revenue?", the agent might find dozens of tables named "revenue" across your data lake. Some are rigorous financial reports, others are real-time marketing estimates, and many are likely deprecated sandboxes.
Without explicit grounding, an AI agent will select a table based on simple name similarity, leading to "convincingly wrong" answers derived from unverified data.
This codelab is part of a two-part series exploring how to build a governance-aware AI agent.
In this first part, you will build a data foundation. You will set up a realistic, "messy" data lake in BigQuery, apply rigid metadata tags (Knowledge Catalog aspects) to differentiate valid data from noise, and use the Antigravity (AGY) CLI to locally test whether the agent strictly follows your data governance rules.
You can read the second part of this series, which covers how to deploy the local agent prototype into a secure, enterprise-grade web application using the Model Context Protocol (MCP) and Cloud Run. 👉 Read Part 2
What you'll learn
- Deploy a realistic, multi-tiered data lake using a setup script.
- Design and register custom metadata templates (aspect types) in Knowledge Catalog to distinguish official data products from raw sandbox tables.
- Verify data governance rules locally using the AGY CLI before writing any application code.
What you'll need
- A Google Cloud project with billing enabled.
- Access to Google Cloud Shell (the AGY CLI is pre-installed in Cloud Shell).
- Basic understanding and familiarity with BigQuery and Knowledge Catalog.
Key concepts
- Knowledge Catalog: The unified metadata management service. We use it to enrich technical metadata (schemas) with business context (governance).
- Aspect Type: A structured metadata template. Unlike free-text tags, Aspects enforce strong typing (enums, booleans), making them reliable for machines to evaluate.
2. Setup and requirements
Start Cloud Shell
While Google Cloud can be operated remotely from your laptop, in this codelab you will be using Google Cloud Shell, a command line environment running in the Cloud.
From the Google Cloud Console, click the Cloud Shell icon on the top right toolbar:

It should only take a few moments to provision and connect to the environment. When it is finished, you should see something like this:

This virtual machine is loaded with all the development tools you'll need. It offers a persistent 5GB home directory, and runs on Google Cloud, greatly enhancing network performance and authentication. All of your work in this codelab can be done within a browser. You do not need to install anything.
Initialize environment
Open Cloud Shell and set your project variables to ensure all commands target the correct infrastructure.
export PROJECT_ID=$(gcloud config get-value project)
gcloud config set project $PROJECT_ID
export REGION="us-central1"
Enable APIs
Enable the necessary Google Cloud services to execute the following instruction.
gcloud services enable \
  bigquery.googleapis.com \
  dataplex.googleapis.com
Clone the repository
Get the infrastructure code and automation scripts from the GitHub repository. To save disk space in Cloud Shell, we will only download the specific folder needed for this lab.
# Perform a shallow clone to get only the latest repository structure without the full history
git clone --depth 1 --filter=blob:none --sparse https://github.com/GoogleCloudPlatform/devrel-demos.git
cd devrel-demos
# Specify and download only the folder we need for this lab
git sparse-checkout set data-analytics/governance-context
cd data-analytics/governance-context
Build the "messy" data lake
Real-world data environments are rarely clean. To simulate reality, we need a mix of "official" data marts and untrusted "sandbox" tables.
We will use a setup script to deploy the BigQuery datasets and tables.
- Make the setup script executable and run it. This will create three BigQuery datasets (
finance_mart,marketing_prod,analyst_sandbox) and populate their tables with sample data.
chmod +x ./setup_bq_tables.sh
./setup_bq_tables.sh
Checkpoint: You now have a fully populated, but completely un-governed, data lake. To an AI, every table looks exactly the same.
3. Creating the data governance template (aspect type)
Now, we will define some data governance rules. In Knowledge Catalog, this is done by creating an aspect type, which is a reusable, strongly-typed metadata template.
We will register this template using the gcloud CLI so you can see how it is defined.
Inspect the aspect schema
Output the contents of aspect_template.json to see the schema definition.
cat aspect_template.json
It will show you the following JSON structure:
{
  "name": "OfficialDataProductSpec",
  "type": "record",
  "recordFields": [
    {
      "name": "product_tier",
      "type": "enum",
      "enumValues": [
        { "name": "GOLD_CRITICAL", "index": 1 },
        { "name": "SILVER_STANDARD", "index": 2 },
        { "name": "BRONZE_ADHOC", "index": 3 }
      ],
      ...
    },
    {
      "name": "is_certified",
      "type": "bool",
      ...
    }
  ]
}
Notice how this schema enforces strict data types, such as enum for the criticality tier (GOLD_CRITICAL, SILVER_STANDARD, BRONZE_ADHOC) and a bool for is_certified. This ensures the metadata remains structured and machine-readable.
Register the aspect type
Run the following gcloud command to register this template in your Knowledge Catalog registry.
gcloud dataplex aspect-types create official-data-product-spec \
    --location="${REGION}" \
    --project="${PROJECT_ID}" \
    --description="Defines the comprehensive profile of a data product for governance agents." \
    --display-name="Official Data Product Spec" \
    --metadata-template-file-name="aspect_template.json"
4. Apply governance
This is the critical engineering step. Currently, the table finance_mart.fin_monthly_closing_internal and analyst_sandbox.tmp_data_dump_v2_final_real look identical to an LLM. They are just objects with columns.
As a governance engineer, you must attach an aspect (a certified metadata label) to these tables to differentiate them. In a real enterprise, you would automate this via CI/CD pipelines. We will simulate that automation with scripts.
Generate governance payloads
Knowledge Catalog aspect keys must be globally unique (prefixed with your project ID). The ./generate_payloads.sh script will dynamically generate the YAML metadata files.
chmod +x ./generate_payloads.sh
./generate_payloads.sh
Output:
This creates a folder "./aspect_payloads" containing 4 YAML files, defining the governance scenarios (Gold/Internal, Gold/Public, Silver/Realtime, Bronze/Sandbox).
Apply aspects with the CLI
Before running the script, let's look at what we are actually applying to demystify the process. Run the following command to see the structure of the internal finance payload:
cat aspect_payloads/fin_internal.yaml
It will show you the following contents.
your-project-id.us-central1.official-data-product-spec:
  data:
    product_tier: GOLD_CRITICAL
    data_domain: FINANCE
    usage_scope: INTERNAL_ONLY
    update_frequency: DAILY_BATCH
    is_certified: true
Notice how this YAML explicitly defines the business context, such as setting the is_certified: true flag and assigning the GOLD_CRITICAL tier. Giving the LLM clear, structured rules to evaluate instead of just guessing based on table names.
Now, run the application script. This iterates through the BigQuery tables and executes the gcloud dataplex entries update command to attach this rigid metadata.
chmod +x ./apply_governance.sh
./apply_governance.sh
Verification (optional)
Before proceeding, verify that the metadata was correctly applied in the console.
- Open the Knowledge Catalog page in Google Cloud Console. If you do not see "Knowledge Catalog" in the left-hand navigation menu, use the Search bar at the top of the Google Cloud console window, type "Knowledge Catalog", and select the result under "Top results" or "Products & Pages".
- Search for
fin_monthly_closing_internal. You should see the BigQuery table listed in the results. Click on the table name to enter its details page.
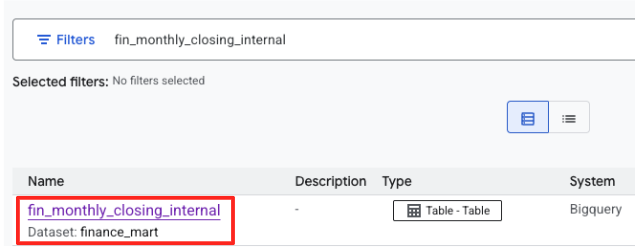
- On the table's details page, look for the "Optional tags and aspects" section located on the bottom.
- You will find the
official-data-product-specaspect. Confirm that the values match the "Gold Internal" scenario we applied.
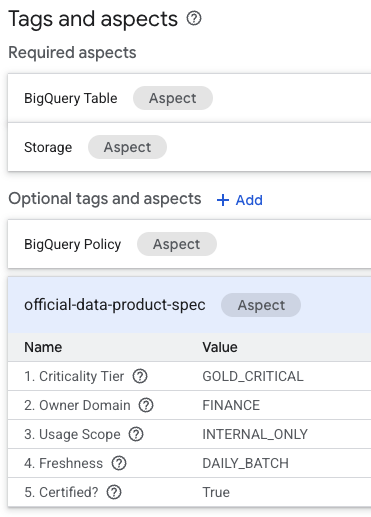
You have now confirmed that technically identical BigQuery tables (fin_monthly_closing_internal and tmp_data_dump_v2_final_real) are logically differentiated by machine-readable metadata.
5. Configure and prototype the agent
Before building an application (which we will do in Part 2), we will verify our data governance logic locally. We need to install the Knowledge Catalog plugin and configure the Agent Skill.
Install the extension
In Cloud Shell, install the Knowledge Catalog plugin. It will ask you for confirmation and your setup details.
export DATAPLEX_PROJECT="${PROJECT_ID}"

agy plugin install https://github.com/gemini-cli-extensions/dataplex
Inspect the agent skill
The agent skill is a static, reusable definition file located in .agents/skills/knowledge_catalog_governance/SKILL.md. It contains the logic that translates abstract human rules (e.g., "I need safe data") into strict technical lookups.
Inspect the file to understand the algorithm we are teaching the AI:
cat .agents/skills/knowledge_catalog_governance/SKILL.md
Note that it explicitly instructs the model to follow a strict Phase 1 (Metadata Verification) and Phase 2 (Query Execution) loop. The model must discover and verify the metadata before constructing any SQL.
Start the agent and test scenarios
Start the AGY CLI session. It will automatically discover and load the skill from the .agents/skills directory.
agy
Note: You may see multiple context files being loaded. This is normal. The CLI loads the local skill for this project's specific rules, plus the default instructions for the Knowledge Catalog plugin itself.
Verify installation
Type /mcp to confirm the Knowledge Catalog plugin is active. You should see knowledge-catalog listed as an active plugin with its available tools.
/mcp
Expected output:
MCP Servers
...
>  ✓ knowledge-catalog  Tools: search_entries, lookup_context, lookup_entry
Test scenarios (prototyping)
Paste the following prompts into the running agent session one by one to verify it adheres to your rules.
- Scenario A (certify the CFO's data):
"We are preparing the deck for an internal Board of Directors meeting next week. I need the numbers to be absolutely finalized, trustworthy, and kept strictly confidential. Which table is safe to use?"
Expected: The agent automatically discovers your active project and region from its tools, queries fin_monthly_closing_internal because it semantically matches GOLD_CRITICAL (accurate) and INTERNAL_ONLY (board meeting) in its Aspect, and recommends it.
- Scenario B (public disclosure):
"I need to share our quarterly financial summary with an external consulting firm. It is critical that we do not leak any raw or internal metrics. Which dataset is officially scrubbed and explicitly approved for external sharing?"
Expected: The agent must bypass the monthly internal table and strictly select fin_quarterly_public_report because it is the only asset tagged EXTERNAL_READY.
- Scenario C (operational needs):
"My dashboard needs to show what's happening right now with our ad spend. I can't wait for the overnight load. What do you recommend?"
Expected: The agent selects mkt_realtime_campaign_performance because it identifies the REALTIME_STREAMING update frequency, prioritizing that over the GOLD_CRITICAL tier of the finance data.
- Scenario D (sandbox experimentation):
"I'm just playing around with some new ML models and need a lot of raw data. It doesn't need to be perfect, just a sandbox environment."
Expected: The agent selects tmp_data_dump_v2_final_real because it semantically matches BRONZE_ADHOC (raw data) and is_certified: false (sandbox environment) in its Aspect.
(To exit the AGY session, type /exit or /quit)
6. Congratulations! What's next?
You have successfully built a governed data foundation and proven that an AI can strictly follow your metadata rules using a local CLI prototype!
Now, you have reached a checkpoint. Please choose your next step:
Option A: I want to continue to Part 2 right now!
If you are ready to turn this local prototype into a secure, production-grade web application using the Model Context Protocol (MCP) and Cloud Run:
Option B: I will do Part 2 later or I only wanted to complete Part 1.
If you want to stop for today and avoid cloud costs, you should clean up your resources.
Don't worry! In Part 2, we will provide a "Fast-Track Script" that will completely rebuild this Part 1 environment for you in just 2 minutes so you can pick up exactly where you left off.
👉 Proceed to the cleanup section.
7. Clean up (for option B only)
If you are stopping here, destroy the resources to avoid incurring charges.
Destroy the data lake
If you are currently in the AGY CLI session, exit the session by pressing Ctrl+C twice or typing /quit. Then, run the following commands:
chmod +x ./cleanup_data_lake.sh
./cleanup_data_lake.sh
Uninstall the AGY CLI plugin and remove local files
agy plugin uninstall dataplex
cd ~
rm -rf ~/devrel-demos