

1. 簡介
本程式碼研究室是系列課程的第二部分,探討如何建構具備治理意識的 AI 代理程式。
(您可以閱讀本系列的第一部分,瞭解如何註冊 Knowledge Catalog 構面類型、將構面套用至 BigQuery 資料表,以及透過 AGY CLI 在本機測試規則,建立資料基礎。👉 閱讀第 1 部分)
不過,在本機 CLI 中測試只是第一步。如要將這項功能推廣至全公司,您需要集中式安全防護、標準化的 AI 工具連線,以及適當的應用程式架構,以便自動調度代理程式的邏輯,並提供熟悉的即時通訊介面。
在第二部分中,您將解決這些挑戰,並擴大規模以供正式環境使用。您不必部署自訂 MCP 伺服器,而是直接將代理連線至 Google 代管的 Knowledge Catalog MCP 伺服器。接著,您會使用 Google 的Agent Development Kit (ADK) 建構實際的代理程式應用程式、從本機代理程式技能載入控管規則,並部署至 Cloud Run,完成專業的網頁 UI
。
使用者與 ADK UI 互動時,會發生下列情況:
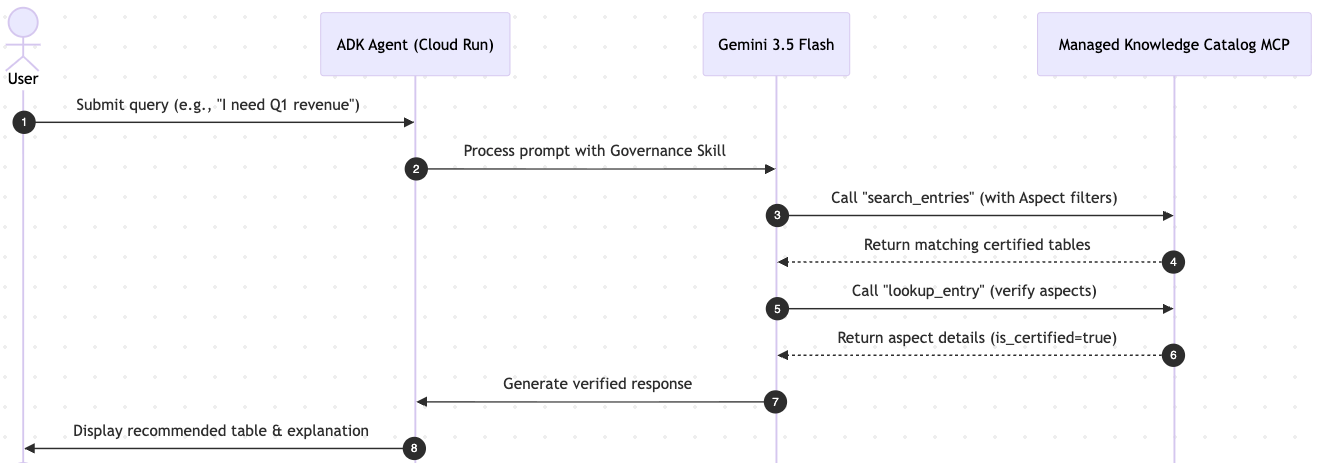
課程內容
- 如何使用 Model Context Protocol (MCP),將 AI 代理與 Google Cloud 資料互動的方式標準化。
- ADK 代理如何連線至 Google 代管的 Knowledge Catalog MCP 伺服器。
- 如何從共用代理程式技能動態載入控管規則。
- 如何將代理程式部署至 Cloud Run,並執行 ADK 的內建網路測試區。
軟硬體需求
- 已啟用計費功能的 Google Cloud 專案。
- 存取 Google Cloud Shell。
- 對 Cloud Run、IAM 服務帳戶和 Python 有基本瞭解。
- 在第 1 部分建立的 BigQuery 資料集和 Knowledge Catalog 層面。(如果已刪除,請別擔心,我們會在下方提供快速建立這些檔案的指令碼!)
核心概念
- Model Context Protocol (MCP):MCP 就像 AI 代理的「通用 USB-C 傳輸線」,MCP 提供標準做法,讓 AI 安全地連結至企業資料工具 (例如知識目錄和 BigQuery),不必為每個 AI 模型編寫自訂 API 整合程式碼。
- Agent Development Kit (ADK):Google 打造的彈性開放原始碼架構,旨在簡化 AI 代理的端對端開發作業。這項功能會將軟體工程原理套用至代理程式建立作業,讓您調度管理複雜工具、管理狀態,並輕鬆啟動內建的開發人員 UI,進行測試及部署。
- Gemini Enterprise Agent Platform(GEAP):企業級主機和自動調度管理環境,可在 Google Cloud 上部署 AI 代理。
2. 設定和需求條件
啟動 Cloud Shell
雖然可以透過筆電遠端操作 Google Cloud,但在本程式碼研究室中,您將使用 Google Cloud Shell,這是可在雲端執行的指令列環境。
在 Google Cloud 控制台中,點選右上角工具列的 Cloud Shell 圖示:

佈建並連線至環境的作業需要一些時間才能完成。完成後,您應該會看到如下的內容:

這部虛擬機器搭載各種您需要的開發工具,並提供永久的 5GB 主目錄,而且可在 Google Cloud 運作,大幅提升網路效能並強化驗證功能。您可以在瀏覽器中完成本程式碼研究室的所有作業。您不需要安裝任何軟體。
初始化環境
開啟 Cloud Shell 並設定專案變數,確保所有指令都以正確的基礎架構為目標。
export PROJECT_ID=$(gcloud config get-value project)
gcloud config set project $PROJECT_ID
export REGION="us-central1"
啟用必要的 API
啟用管理資料基礎、執行 Vertex AI 模型,以及在 Cloud Run 上代管 ADK 代理程式所需的最少 Google Cloud API 組合。
gcloud services enable \
    dataplex.googleapis.com \
    bigquery.googleapis.com \
    aiplatform.googleapis.com \
    run.googleapis.com \
    artifactregistry.googleapis.com \
    cloudbuild.googleapis.com
檢查點:繼續或重建?
由於這是第 2 部分,代理程式需要第 1 部分的受管理資料才能運作。請選擇你的路徑:
路徑 A:我剛完成第 1 部分,資源仍在執行中
太好了!前往工作目錄,即可繼續操作。
cd ~/devrel-demos/data-analytics/governance-context
路徑 B:我略過第 1 部分,或刪除資源 (已清理)
沒問題!我們在下方提供「快速通道」指令區塊。這會自動重建 BigQuery 資料湖泊、註冊構面類型,並套用控管中繼資料,與第 1 部分的做法完全相同。
# 1. Clone the repo and navigate to the working directory
git clone --depth 1 --filter=blob:none --sparse https://github.com/GoogleCloudPlatform/devrel-demos.git
cd devrel-demos
git sparse-checkout set data-analytics/governance-context
cd data-analytics/governance-context

# 2. Rebuild the BigQuery datasets and tables
chmod +x ./setup_bq_tables.sh
./setup_bq_tables.sh

# 3. Register the Knowledge Catalog aspect type
gcloud dataplex aspect-types create official-data-product-spec \
    --location="${REGION}" \
    --project="${PROJECT_ID}" \
    --metadata-template-file-name="aspect_template.json"

# 4. Generate and apply aspects (governance rules)
chmod +x ./generate_payloads.sh ./apply_governance.sh
./generate_payloads.sh
./apply_governance.sh
3. 集中式資料控制層 (代管 MCP)
在實際的企業環境中,您需要安全且集中式的資料控制層。我們不會建構及部署自訂 MCP 伺服器容器至 Cloud Run,而是直接將代理連結至 Google 管理的 Knowledge Catalog MCP 伺服器。
使用這個受管理端點可達到下列目標:
- 免維護:您不必管理 MCP 伺服器的容器、資源調度或修補。
- 標準化:代理會使用 Model Context Protocol (SSE 傳輸) 連線至標準且安全的 Google API 端點。
- 受控範圍:MCP 伺服器只會公開必要的中繼資料工具 (
search_entries、lookup_context、lookup_entry),強制執行唯讀的治理優先推論迴圈。
您可透過下列安全網址存取 Google 代管的 Knowledge Catalog MCP 伺服器:
https://dataplex.googleapis.com/mcp
由於這是 Google 第一方 API,代理程式必須使用標準的 Google Cloud OAuth2 存取權杖 (而非 ID 權杖) 進行驗證。我們會在應用程式程式碼中自動處理這項驗證。
4. 使用 ADK 建構代理後端
您擁有安全無虞的代管資料控制層。現在 AI 代理需要框架來協調其邏輯,例如處理使用者輸入內容、決定何時呼叫 MCP 伺服器,以及格式化輸出內容。
我們將使用 Google 的 Agent Development Kit (ADK)。ADK 是以程式碼為優先的架構,可自動將代理邏輯封裝至 FastAPI 後端,並提供內建網頁介面,方便您立即測試。
在 Cloud Shell 編輯器中開啟代理程式程式碼
與其將整個檔案傾印到終端機,不如在 Cloud Shell 編輯器中開啟檔案,方便您檢查、編輯及瞭解程式碼。
在終端機中執行下列指令,並查看編輯器中的程式碼結構。這個應用程式是使用 Google 的 Agent Development Kit (ADK) 建構而成:
cd ~/devrel-demos/data-analytics/governance-context/mcp_server

# Copy the governance skill directory inside the application bundle so it packages during Cloud Run deployment
mkdir -p skills
cp -r ../.agents/skills/knowledge-catalog-governance skills/

cloudshell edit agent.py
(注意:頂端的 agent.py 包含樣板程式碼,可處理 Google Cloud OAuth2 驗證和權杖重新整理,確保代理程式能安全地與 Google 管理的 Knowledge Catalog API 通訊)。
1. 載入原生技能
如要建構高度最佳化的代理程式,我們會使用 ADK 的原生 load_skill_from_dir,從外部代理程式技能目錄載入控管指令。這種做法可實現漸進式揭露:
- L1 中繼資料:代理程式只會在啟動時載入技能名稱和說明。有了這個最少量的內容,LLM 就能判斷何時該使用技能,而不必預先耗用大量權杖。
- L2 指令:只有在模型判定相關時,系統才會在執行階段動態擷取
SKILL.md內的完整指令集。
base_dir = Path(__file__).parent
governance_skill = load_skill_from_dir(
    base_dir / "skills" / "knowledge-catalog-governance"
)

# Bundle the skill and MCP tools together into a SkillToolset
governance_skill_toolset = skill_toolset.SkillToolset(
    skills=[governance_skill],
    additional_tools=[tools]
)
2. 代理自動化調度管理
您可以將多個代理連結在一起,藉此自動調度管理複雜的代理行為。我們定義的 SequentialAgent 工作流程包含兩個專用代理:
governance_researcher:配備governance_skill_toolset和 Knowledge Catalog MCPtools。這項服務會檢查查詢是否屬於資料目錄和法規遵循範圍,然後使用注入系統指令的環境變數查詢 Knowledge Catalog。compliance_formatter:負責將原始 JSON 中繼資料搜尋結果轉換為乾淨的回應,或在要求超出範圍時,清楚說明範圍界線。
# 1. Researcher Agent (has access to the encapsulated SkillToolset)
governance_researcher = LlmAgent(
    name="governance_researcher",
    model=model_name,
    description="Dynamically interprets metadata schema (Booleans/Enums) and searches for assets using strict syntax.",
    instruction=f"""
    You are a governance researcher. Your job is to verify Knowledge Catalog metadata rules and find compliant assets for the user's query.

    YOUR ACTIVE ENVIRONMENT CONTEXT:
    - Google Cloud Project ID: {project_id}
    - Location (Region): {location}

    YOUR WORKFLOW:
    1. First, check if the user query is related to data analytics assets, database tables, or data compliance.
       - If YES: Call `load_skill` with `name="knowledge-catalog-governance"` to load the rules, then use search/lookup tools to locate a certified compliant table.
       - If NO (e.g., general chit-chat, unrelated tasks): Skip skill loading and output a JSON object indicating it is out of scope:
         {"error": "out_of_scope", "message": "The query does not pertain to data catalog search or governance compliance."}
    2. Populate the required projectId and location parameters in tool calls with the active environment parameters.
    3. Return the verified table's metadata in JSON format as your final research output.
    """,
    tools=[governance_skill_toolset, tools],
    output_key="research_data"
)

# 2. Formatter Agent (formats the output or explains out-of-scope errors)
compliance_formatter = LlmAgent(
    name="compliance_formatter",
    model=model_name,
    description="Formats the JSON research data into a helpful response for the user.",
    instruction="""
    You are the **Intelligent Data Governance Specialist**.
    Your job is to explain the findings of the governance research clearly to the user.

    **YOUR GOAL:**
    1. If the researcher found a matching table (valid JSON with table metadata):
       - Explain the logical connection between the User's Request, the Governance Schema (translated criteria), and the Recommended Table.
       - Use the following RESPONSE TEMPLATE:
         - **Analysis:** "I analyzed the metadata schema and translated your request into the following technical criteria:..."
         - **Recommendation:** "Based on this, I recommend the following table:"
           - **Table:** [Insert Table Name]
           - **Description:** [Insert Table Description]
         - **Verification:** "This asset is a verified match because: [Explain the verification details]."
    2. If the researcher returned an 'out_of_scope' error or no matching tables were found:
       - Apologize politely and explain that no data asset currently matches the strict governance criteria defined in `official-data-product-spec`.
       - Clearly state what domain of questions this agent is certified to answer (e.g., Data Catalog Search and Data Governance compliance).
    """
)

# 3. Orchestrated Workflow (Exported as root_agent)
root_agent = SequentialAgent(
    name="governance_workflow",
    description="Workflow to learn metadata rules, search with strict syntax, and recommend assets.",
    sub_agents=[
        governance_researcher,
        compliance_formatter,
    ]
)
設定執行階段變數
如要執行代理程式,我們必須告知代理程式代管 MCP 伺服器的位置,並設定專案和區域。我們會將這些變數儲存到 .env 檔案,ADK 會在執行階段讀取該檔案。
執行下列指令來產生 .env 檔案。請注意,MCP_SERVER_URL 會直接指向 Google 管理的 Knowledge Catalog API 端點:
export MCP_SERVER_URL="https://dataplex.googleapis.com/mcp"

echo MCP_SERVER_URL=$MCP_SERVER_URL > .env
echo GOOGLE_GENAI_USE_VERTEXAI=1 >> .env
echo GOOGLE_CLOUD_PROJECT=$PROJECT_ID >> .env
echo GOOGLE_CLOUD_LOCATION=$REGION >> .env
5. 在本機執行及測試代理
將服務專員部署至雲端之前,請先在 Cloud Shell 中於本機運作執行,確認服務專員的行為。由於代理程式依附於多個 Python 套件 (包括 Google Cloud Logging 和 ADK 程式庫),我們會設定本機虛擬環境來安裝這些依附元件。
在 Cloud Shell 中於本機執行代理程式時,代理程式會自動使用您現用的 Google Cloud 使用者憑證,因此已具備存取 Vertex AI 和 Knowledge Catalog 的必要權限。
- 前往
mcp_server目錄、建立虛擬環境,然後安裝依附元件:
cd ~/devrel-demos/data-analytics/governance-context/mcp_server

# Create a virtual environment using uv
uv venv
source .venv/bin/activate

# Install the dependencies listed in requirements.txt
uv pip install -r requirements.txt
- 在終端機中啟動互動式即時通訊工作階段:
adk run .
- 課程開始後,系統會顯示提示。輸入查詢,測試代理的控管邏輯:
I need the Q1 revenue summary for our internal board meeting.
代理程式會處理您的要求、透過受管理的 MCP 伺服器查詢知識目錄,並直接在終端機輸出建議和推理過程。
- 如要結束互動式工作階段,請輸入
exit或quit(或按下Ctrl+C)。結束後,您可以停用虛擬環境:
deactivate
6. 將代理部署至正式環境
您已在本機驗證代理程式,現在可以將其部署至 Google Cloud,供正式環境使用。
建立服務帳戶
為確保安全,部署的代理程式不應以您的個人憑證執行。我們會為代理建立個別身分 (knowledge-catalog-agent-sa),並遵守最低權限原則。
執行下列指令,建立服務帳戶:
export AGENT_SA=knowledge-catalog-agent-sa
export AGENT_SERVICE_ACCOUNT="${AGENT_SA}@${PROJECT_ID}.iam.gserviceaccount.com"

gcloud iam service-accounts create ${AGENT_SA} \
    --display-name="Service Account for Knowledge Catalog Agent"
授予權限
即使代理程式將控管檢查委派給 MCP 伺服器,仍需要基本權限才能運作。
gcloud projects add-iam-policy-binding $PROJECT_ID \
  --member="serviceAccount:$AGENT_SERVICE_ACCOUNT" \
  --role="roles/aiplatform.user"

gcloud projects add-iam-policy-binding $PROJECT_ID \
  --member="serviceAccount:$AGENT_SERVICE_ACCOUNT" \
  --role="roles/dataplex.catalogAdmin"

gcloud projects add-iam-policy-binding $PROJECT_ID \
  --member="serviceAccount:$AGENT_SERVICE_ACCOUNT" \
  --role="roles/bigquery.dataViewer"

gcloud projects add-iam-policy-binding $PROJECT_ID \
  --member="serviceAccount:$AGENT_SERVICE_ACCOUNT" \
  --role="roles/mcp.toolUser"

gcloud projects add-iam-policy-binding $PROJECT_ID \
  --member="serviceAccount:$AGENT_SERVICE_ACCOUNT" \
  --role="roles/viewer"
部署至 Cloud Run
最後,我們將代理程式部署至 Cloud Run。下列指令會使用目前目錄中的 Dockerfile 建構容器映像檔、上傳至 Artifact Registry,並部署至 Cloud Run。這項作業會在 1 至 3 分鐘內完成。
gcloud run deploy knowledge-catalog-agent \
  --source . \
  --project=$PROJECT_ID \
  --region=$REGION \
  --service-account=$AGENT_SERVICE_ACCOUNT \
  --allow-unauthenticated \
  --clear-base-image \
  --labels created-by=adk
這項指令完成後,會輸出「服務網址」 (例如 https://knowledge-catalog-agent-xyz.run.app)。按一下該連結,即可開啟完全受控的生成式 AI Chat 介面。
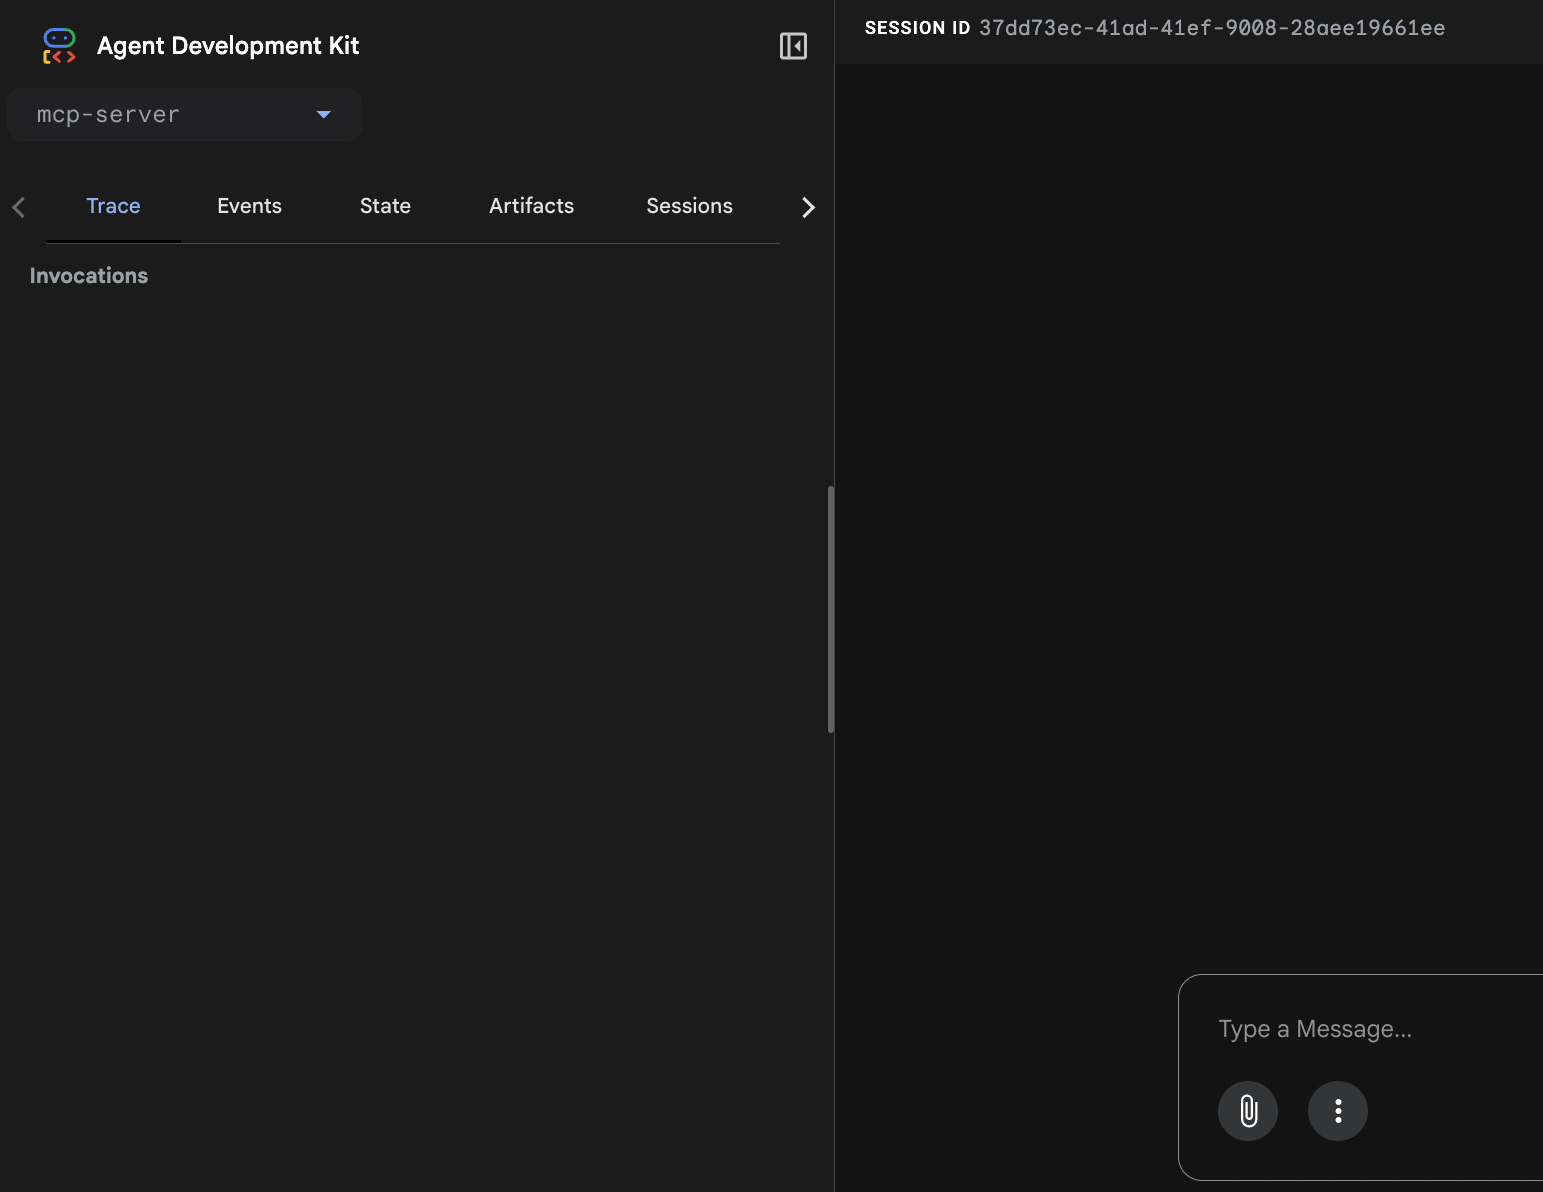
7. 測試真人服務專員
現在代理程式已上線,請測試控管情境。邏輯保持不變,但您現在與已部署的 ADK Web Playground 互動,該平台會將內部狀態和工具執行作業視覺化。
在瀏覽器中開啟上一步產生的服務網址 (例如 https://knowledge-catalog-agent-xyz.run.app)。貼上下列提示詞:
"My dashboard needs to show what's happening right now with our ad spend. I can't wait for the overnight load. What do you recommend?"
在開發人員 UI 中觀察代理的推論過程:
- 意圖辨識:代理程式會剖析「現在」和「等不及過夜」。
- 中繼資料查詢:使用查詢
[PROJECT_ID].us-central1.official-data-product-spec.update_frequency=REALTIME_STREAMING呼叫 MCP 工具 search_entries。 - 選取:這表示資料表
mkt_realtime_campaign_performance符合這些條件。 - 回覆:服務專員建議使用即時表。
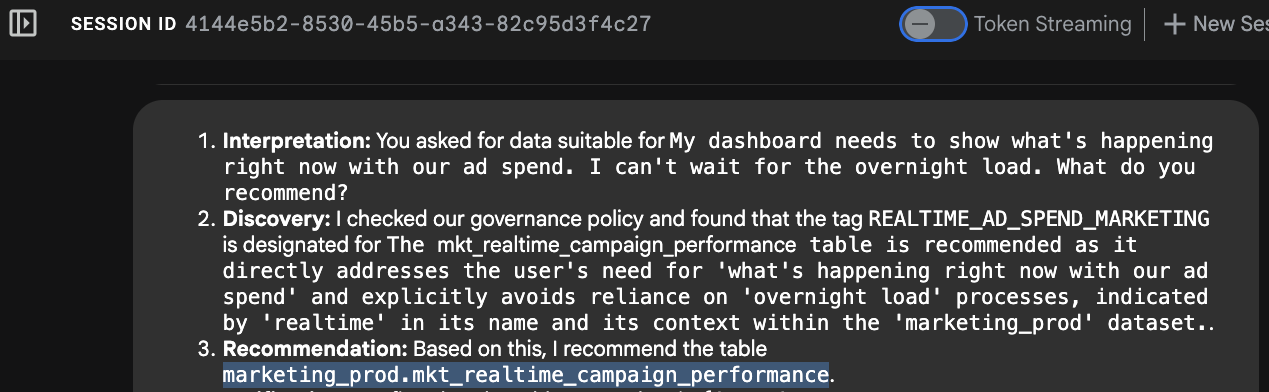
重要性:
如果沒有這類治理中繼資料,LLM 可能會因為 fin_monthly_closing_internal 資料表有名為「ad_spend」的資料欄,就建議使用該資料表,而忽略資料已過時 24 小時的事實。中繼資料內容可避免發生業務錯誤。
您也可以測試「董事會會議」提示,瞭解代理程式如何根據資料產品層級層面,透視不同的資料表:
"We are preparing the deck for an internal Board of Directors meeting next week. I need the numbers to be absolutely finalized, trustworthy, and kept strictly confidential. Which table is safe to use?"
8. 清理
如要避免系統向您的 Google Cloud 帳戶收費,請按照下列步驟操作,刪除本程式碼研究室建立的所有基礎架構。
刪除資料湖泊
使用清除指令碼來拆除 BigQuery 資料表、資料集和 Knowledge Catalog 方面定義。
cd ~/devrel-demos/data-analytics/governance-context
chmod +x ./cleanup_data_lake.sh
./cleanup_data_lake.sh
刪除 Cloud Run 服務
移除運算資源,停止為執行中的容器支付任何費用。
gcloud run services delete knowledge-catalog-agent --region=$REGION --quiet
清理建構構件和暫存儲存空間
部署 ADK 代理程式時,系統會自動建構容器映像檔,並將原始碼上傳至暫時的 Cloud Storage 值區。
移除 Artifact Registry 存放區和 Cloud Storage 暫存值區:
# Delete the repository used for the agent build
gcloud artifacts repositories delete cloud-run-source-deploy \
    --location=$REGION \
    --quiet

# Delete the staging bucket created by Cloud Run source deploy
gcloud storage rm --recursive gs://run-sources-${PROJECT_ID}-${REGION}
刪除身分和權限
請先移除 IAM 政策繫結,再刪除服務帳戶。
# Remove IAM roles granted to the Agent Service Account
gcloud projects remove-iam-policy-binding $PROJECT_ID \
  --member="serviceAccount:$AGENT_SERVICE_ACCOUNT" \
  --role="roles/aiplatform.user" --quiet

gcloud projects remove-iam-policy-binding $PROJECT_ID \
  --member="serviceAccount:$AGENT_SERVICE_ACCOUNT" \
  --role="roles/dataplex.catalogViewer" --quiet

gcloud projects remove-iam-policy-binding $PROJECT_ID \
  --member="serviceAccount:$AGENT_SERVICE_ACCOUNT" \
  --role="roles/mcp.toolUser" --quiet

gcloud projects remove-iam-policy-binding $PROJECT_ID \
  --member="serviceAccount:$AGENT_SERVICE_ACCOUNT" \
  --role="roles/bigquery.dataViewer" --quiet

# Delete the Service Account
gcloud iam service-accounts delete $AGENT_SERVICE_ACCOUNT --quiet
移除本機設定
最後,清理 Cloud Shell 中的本機設定檔和環境變數。
# Uninstall the AGY CLI plugin
agy plugin uninstall dataplex

# Remove local repository files and unset variables
cd ~
rm -rf ~/devrel-demos
unset MCP_SERVER_URL
unset AGENT_SERVICE_ACCOUNT
9. 恭喜!
您已成功部署端對端、具備管理意識的生成式 AI 代理程式。
在本程式碼研究室的兩部分中,您已超越簡單的提示工程,實作強大的正式環境就緒架構。將資料治理視為 GenAI 的先決條件,建立系統化方法,防止模型擷取未經認證或捏造的資料。
重點整理
- 透過中繼資料進行確定性 AI:您使用 Google 管理的 Knowledge Catalog MCP 伺服器強制執行嚴格的推論迴圈,而非依賴 LLM 根據資料欄名稱猜測正確的資料表,迫使模型先驗證資料認證,再推薦資料表。
- 分離式架構:前端代理不需要包含資料庫邏輯,只需要透過 MCP 標準進行通訊。也就是說,您可以在同一個受控後端中,插入任何未來的 AI 模型或用戶端。
- 分散權責:您已隔離 IAM 身分,並套用最小權限原則。面向使用者的 ADK 代理程式只能呼叫模型和進行 API 路由。
- 以程式碼為優先的代理調度管理:您使用 Google Agent Development Kit (ADK),將 Python 代理邏輯立即包裝成可擴充的 FastAPI 後端,並利用內建的開發人員 UI,將代理的內部工具執行作業視覺化及偵錯。
後續步驟
- Knowledge Catalog 基礎治理程式碼實驗室:先掌握 Knowledge Catalog 的資料治理基礎知識,再新增 AI 層。
- Agent Development Kit (ADK) 文件:閱讀官方文件,瞭解如何使用 ADK 建構及部署代理。
- 深入瞭解 MCP:請參閱官方 MCP 規格,瞭解如何為內部企業 API 建構自訂伺服器。