
1. Introduction
In a modern enterprise Data Cloud, where data lives across various physical storage systems, there is a massive architectural challenge of fragmented security.
How do you ensure that sensitive data (like financial transaction amounts) is protected consistently when data is physically stored in open-source formats like Parquet on Google Cloud storage and queried by multiple different engines, such as BigQuery SQL or Apache Spark?
In this codelab, you will build a Governed Data Lakehouse architecture that solves these problems using Apache Iceberg tables, BigQuery, and Knowledge Catalog. You will use Infrastructure as Code (IaC) to define zero-trust security policies and how they are dynamically enforced across different compute engines.
Prerequisites
- A Google Cloud project with billing enabled.
- Basic understanding of SQL, IAM, and Cloud Storage concepts.
What you'll learn
- How to create Google Cloud Lakehouse tables for Apache Iceberg in BigQuery where Cloud Storage natively holds the data.
- How to enforce centralized data policies using Policy Tags for column-level security and data masking.
- How to decouple physical storage access from logical data access using Cloud resource connection.
- How to enforce Zero-Trust compute delegation using Managed Service for Apache Spark to ensure open-source engines cannot bypass governance.
- How to visualize automated Data Lineage.
Architecture overview: Universal governance on Iceberg
To achieve fine-grained access control (like column-level security and data masking) on open-source data formats, you must establish a strict and unified security architecture.
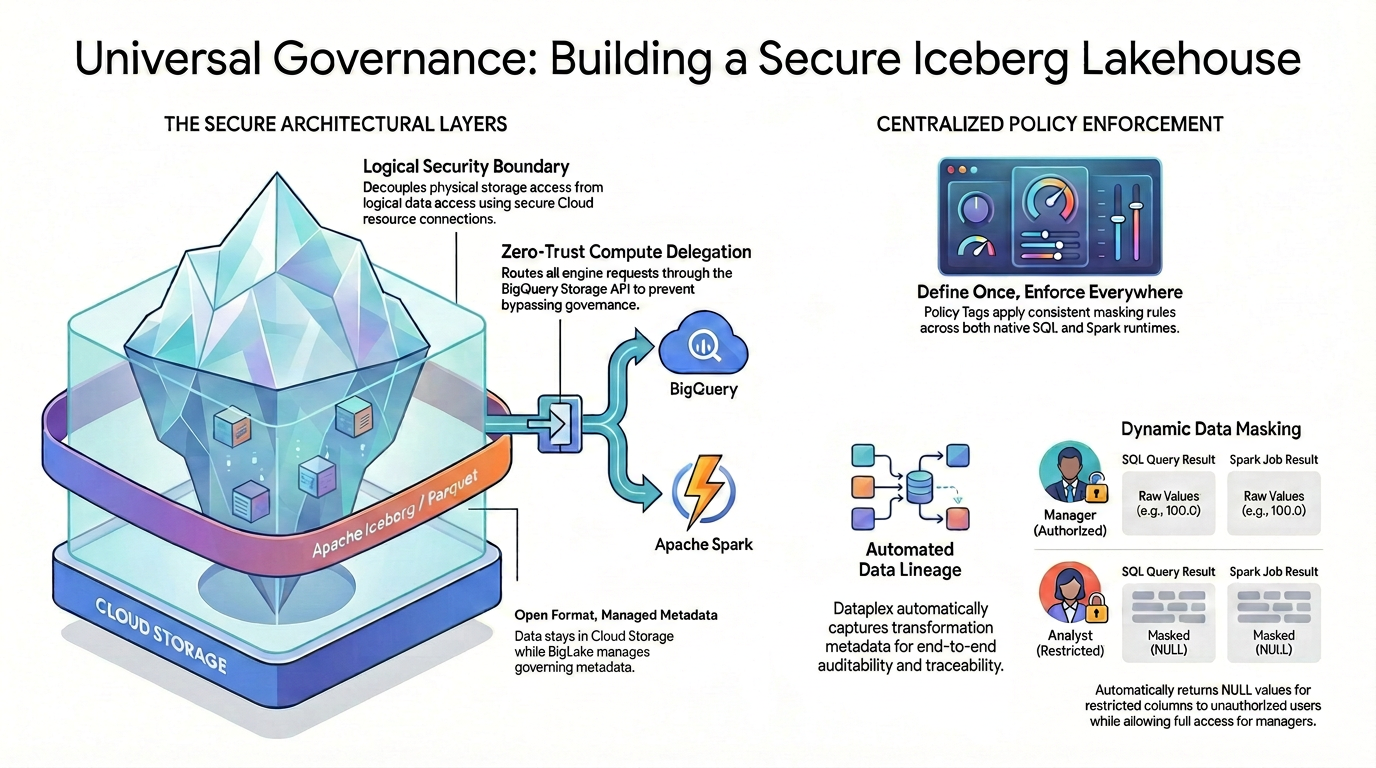
As illustrated in the diagram, this governed lakehouse pattern relies on two main pillars to solve the fragmented security challenge:
🛡️ The Secure Architectural Layers (Left)
Instead of allowing users or external engines to access Cloud Storage directly—which only supports broad bucket-level security: you build a secure foundation.
- Open format, managed metadata: The data physically stays in Cloud Storage using the open Apache Iceberg (Parquet) format, while Lakehouse seamlessly manages the governing metadata.
- Logical security boundary: You decouple physical storage access from logical data access using a secure Cloud resource connection. End users are never granted direct physical IAM access to the raw GCS files.
- Zero-trust compute delegation: To ensure no execution engine can bypass the governance rules, all data read requests are strictly routed through the BigQuery Storage API. This applies whether the query originates from native BigQuery SQL or open-source Apache Spark.
🎯 Centralized Policy Enforcement (Right)
With the secure foundation in place, Knowledge Catalog acts as the unified brain for governance:
- Define once, enforce everywhere: You define your Policy Tags in Knowledge Catalog just once, and the architecture applies consistent masking rules universally across all supported execution runtimes.
- Dynamic data masking: When data is queried, the system evaluates the user's identity on the fly. While authorized users will see the raw, unmasked values (e.g., 100.0) in both SQL and Spark, restricted users will automatically receive masked NULL values for restricted columns across both engines.
- Automated data lineage: As data flows and transforms, Knowledge Catalog automatically captures transformation metadata, providing built-in end-to-end auditability and traceability without requiring custom logging code.
2. Setup and requirements
Start Cloud Shell
While Google Cloud can be operated remotely from your laptop, in this codelab you will be using Google Cloud Shell, a command line environment running in the Cloud.
From the Google Cloud Console, click the Cloud Shell icon on the top right toolbar:

It should only take a few moments to provision and connect to the environment. When it is finished, you should see something like this:

This virtual machine is loaded with all the development tools you'll need. It offers a persistent 5GB home directory, and runs on Google Cloud, greatly enhancing network performance and authentication. All of your work in this codelab can be done within a browser. You do not need to install anything.
Initialize environment
Open Cloud Shell and set your project variables to ensure all commands target the correct infrastructure.
export PROJECT_ID=$(gcloud config get-value project)
export REGION="us-central1"
export ICEBERG_BUCKET="iceberg-retail-demo-${PROJECT_ID}"
export DATASET_ID="lakehouse_retail_demo"
export CONN_NAME="iceberg-bq-conn-demo"
Then define our two personas.
export USER_ANALYST="retail-analyst-demo"
export EMAIL_ANALYST="${USER_ANALYST}@${PROJECT_ID}.iam.gserviceaccount.com"

export USER_MANAGER="retail-manager-demo"
export EMAIL_MANAGER="${USER_MANAGER}@${PROJECT_ID}.iam.gserviceaccount.com"
export CURRENT_USER=$(gcloud config get-value account)
Enable APIs
Enable the necessary Google Cloud services.
gcloud services enable \
  bigquery.googleapis.com \
  bigqueryconnection.googleapis.com \
  datacatalog.googleapis.com \
  bigquerydatapolicy.googleapis.com \
  datalineage.googleapis.com \
  dataplex.googleapis.com \
  dataproc.googleapis.com \
  storage-component.googleapis.com
Download the Codelab source code
To avoid cluttering your Cloud Shell, you will perform a sparse checkout to download only the necessary Python scripts for this codelab from the Google Cloud DevRel repository.
# Shallow clone without full history
git clone --depth 1 --filter=blob:none --sparse https://github.com/GoogleCloudPlatform/devrel-demos.git
cd devrel-demos

# Download only the specific folder
git sparse-checkout set data-analytics/governed-lakehouse
cd data-analytics/governed-lakehouse
Create storage
Create the bucket to hold the highly secure governed Iceberg data.
gcloud storage buckets create gs://${ICEBERG_BUCKET} --location=${REGION}
Prepare identities & security
Configure the cloud resource connection. This is the only entity that holds the permanent physical IAM keys to read the raw Iceberg files.
# Create the BigQuery connection
bq mk --connection \
    --connection_type=CLOUD_RESOURCE \
    --location=${REGION} \
    ${CONN_NAME}

# Retrieve the connection's automatically generated Service Account
export BQ_CONN_SVC_ACCT=$(bq show --format=json --connection ${REGION}.${CONN_NAME} \
    | jq -r '.cloudResource.serviceAccountId')

# Grant Storage Object Admin to the connection for the Iceberg bucket
gcloud storage buckets add-iam-policy-binding gs://${ICEBERG_BUCKET} \
    --member="serviceAccount:${BQ_CONN_SVC_ACCT}" \
    --role="roles/storage.objectAdmin" \
    --quiet
Next, set up the user personas. Users are granted logical access, not physical storage access. To prevent errors caused by IAM propagation delays, you will create the accounts first, wait a few seconds, and then assign their roles.
echo "Creating Service Accounts..."
for USER in "${USER_ANALYST}" "${USER_MANAGER}"; do
    gcloud iam service-accounts create ${USER} --display-name="Lakehouse ${USER}"
done

echo "⏳ Waiting 15 seconds for IAM propagation..."
sleep 15

echo "Granting IAM Roles to Service Accounts..."
for USER in "${USER_ANALYST}" "${USER_MANAGER}"; do
    EMAIL="${USER}@${PROJECT_ID}.iam.gserviceaccount.com"

    # Allow Cloud Shell to impersonate them for testing
    gcloud iam service-accounts add-iam-policy-binding ${EMAIL} \
        --member="user:${CURRENT_USER}" \
        --role="roles/iam.serviceAccountTokenCreator" \
        --quiet

    # Allow logical viewing of the catalog, querying, and running Dataproc jobs
    for ROLE in "roles/datacatalog.viewer" "roles/bigquery.dataViewer" "roles/bigquery.user" "roles/bigquery.connectionUser" "roles/serviceusage.serviceUsageConsumer" "roles/dataproc.worker"; do
        gcloud projects add-iam-policy-binding ${PROJECT_ID} \
            --member="serviceAccount:${EMAIL}" \
            --role="${ROLE}" \
            --quiet
    done
done

# Grant the Manager data creation rights
gcloud projects add-iam-policy-binding ${PROJECT_ID} \
    --member="serviceAccount:${EMAIL_MANAGER}" \
    --role="roles/bigquery.dataEditor" \
    --quiet

echo "✅ Identity and Security setup completed!"
3. Create native Iceberg tables via Lakehouse
You will use Lakehouse's native capabilities to create the managed Iceberg tables.
Create the BigQuery Dataset
First, create a BigQuery dataset to logically group our Iceberg tables.
echo "Creating BigQuery Dataset..."
bq mk --location=${REGION} --dataset ${PROJECT_ID}:${DATASET_ID}
Create the Iceberg tables
Next, run the following commands to create the tables. Notice the OPTIONS block where we specify table_format = 'ICEBERG' and map it directly to our Cloud Storage bucket and connection.
echo "Creating Iceberg tables..."

# Inventory table
bq query --use_legacy_sql=false \
"CREATE OR REPLACE TABLE \`${PROJECT_ID}.${DATASET_ID}.inventory\` (
    product_id INT64,
    product_name STRING,
    stock_count INT64
)
WITH CONNECTION \`${REGION}.${CONN_NAME}\`
OPTIONS (
    file_format = 'PARQUET',
    table_format = 'ICEBERG',
    storage_uri = 'gs://${ICEBERG_BUCKET}/inventory/'
);"

# Transactions table
bq query --use_legacy_sql=false \
"CREATE OR REPLACE TABLE \`${PROJECT_ID}.${DATASET_ID}.transactions\` (
    id INT64,
    item STRING,
    amount FLOAT64,
    transaction_date DATE
)
WITH CONNECTION \`${REGION}.${CONN_NAME}\`
OPTIONS (
    file_format = 'PARQUET',
    table_format = 'ICEBERG',
    storage_uri = 'gs://${ICEBERG_BUCKET}/transactions/'
);"
Populate the tables with data
Finally, insert sample data into the newly created Iceberg tables.
echo "Inserting data into Iceberg tables..."

# Insert into Inventory table
bq query --use_legacy_sql=false \
"INSERT INTO \`${PROJECT_ID}.${DATASET_ID}.inventory\` (product_id, product_name, stock_count)
VALUES (101, 'Widget A', 500), (102, 'Widget B', 250), (103, 'Widget C', 800);"

# Insert into Transactions table
bq query --use_legacy_sql=false \
"INSERT INTO \`${PROJECT_ID}.${DATASET_ID}.transactions\` (id, item, amount, transaction_date)
VALUES
    (1, 'Widget A', 100.0, DATE '2024-01-01'),
    (2, 'Widget B', 150.0, DATE '2024-01-02'),
    (3, 'Widget C', 50.0, DATE '2024-01-03');"
You now have two fully functioning Iceberg tables. Lakehouse manages the metadata, but the physical Parquet files reside securely in your GCS bucket!
Simulate an ETL Pipeline
In a real-world scenario, raw data is often aggregated into summary tables for business reporting. Let's act as a data engineer and create a daily sales summary table from our raw transactions data.
(Note: run this step now so that Google Cloud has enough time to process the background metadata. You will discover why this is important later in the codelab!)
echo "Creating transactions summary table..."
bq query --use_legacy_sql=false \
"CREATE TABLE \`${PROJECT_ID}.${DATASET_ID}.transactions_summary\` AS
 SELECT transaction_date, SUM(amount) as total_sales, COUNT(id) as transaction_count
 FROM \`${PROJECT_ID}.${DATASET_ID}.transactions\`
 GROUP BY transaction_date;"
4. Centralized governance: Define policies using Python
In a production environment, configuring governance policies through the UI is difficult to scale and maintain. Instead, it is highly recommended to use Infrastructure as Code (IaC).
In this section, you will use the Google Cloud Python SDK to programmatically create and enforce your Zero-Trust governance rules step-by-step.
Set up the Python Environment
First, let's set up an isolated Python environment (venv) to avoid library conflicts and install the required Google Cloud SDKs.
Run the following commands in Cloud Shell:
# Create and activate a virtual environment
python3 -m venv lakehouse_env
source lakehouse_env/bin/activate

# Install required Knowledge Catalog and BigQuery governance libraries
pip install google-cloud-datacatalog google-cloud-bigquery-datapolicies google-cloud-bigquery --quiet

echo "✅ Python environment is ready!"
Create the Taxonomy and Policy Tag
A Taxonomy is a logical container, and a Policy Tag is the specific label you will attach to our sensitive column. To enforce column-level security, you first need a logical container (a Taxonomy) and a specific label (a Policy Tag).
If you look inside 1_create_taxonomy.py, you will see the following core logic:
# Create Taxonomy with Fine-Grained Access Control enabled
taxonomy = datacatalog_v1.Taxonomy(
    display_name="BusinessCritical",
    activated_policy_types=[datacatalog_v1.Taxonomy.PolicyType.FINE_GRAINED_ACCESS_CONTROL]
)
created_taxonomy = client.create_taxonomy(parent=parent, taxonomy=taxonomy)

# Create Policy Tag inside the Taxonomy
policy_tag = datacatalog_v1.PolicyTag(display_name="RestrictedFinancial")
created_policy_tag = client.create_policy_tag(parent=created_taxonomy.name, policy_tag=policy_tag)
By explicitly setting the FINE_GRAINED_ACCESS_CONTROL policy type, you transform a standard metadata tag into a strict zero-trust security boundary. Any column with this tag will deny access to all users by default.
Run the script to create the resources:
python 1_create_taxonomy.py
Configure the Masking Rule (Data Policy)
Now, you define what happens when someone without privileges queries the tagged column. You will create a Data Policy that forces the value to return as NULL and attach this rule to the Analyst persona.
Inside 2_create_masking.py, the script dynamically looks up the Policy Tag ID you just created and applies a data policy:
# Define a Masking Policy that always returns NULL
data_policy = bigquery_datapolicies_v1.DataPolicy(
    data_policy_id="mask_financial_null",
    policy_tag=policy_tag_id,
    data_policy_type=bigquery_datapolicies_v1.DataPolicy.DataPolicyType.DATA_MASKING_POLICY,
    data_masking_policy=bigquery_datapolicies_v1.DataMaskingPolicy(
        predefined_expression=bigquery_datapolicies_v1.DataMaskingPolicy.PredefinedExpression.ALWAYS_NULL
    )
)

# ... (Policy creation code) ...

# Bind the Masked Reader role to the Analyst
iam_policy.bindings.add(
    role="roles/bigquerydatapolicy.maskedReader",
    members=[f"serviceAccount:{analyst_email}"]
)
This code programmatically creates a rule that forces the underlying values to return as NULL. It then assigns the maskedReader IAM role specifically to the Analyst persona, ensuring they only see the masked version of the data.
Run the script to configure the masking rule:
python 2_create_masking.py
Grant Fine-Grained Access
Because of our zero-trust setup, no one can read the tagged column right now. You must explicitly grant access to the manager and your personal account.
Inside 3_grant_access.py, you modify the IAM policy of the Policy Tag itself:
# Grant original data read access
iam_policy.bindings.add(
    role="roles/datacatalog.categoryFineGrainedReader",
    members=[f"serviceAccount:{manager_email}", f"user:{current_user}"]
)
client.set_iam_policy(request=iam_policy_pb2.SetIamPolicyRequest(resource=policy_tag_id, policy=iam_policy))
Adding the categoryFineGrainedReader role allows these specific principals to bypass the masking rules and read the raw, unmasked data.
Run the script to grant access:
python 3_grant_access.py
Attach the Policy Tag to the BigQuery Table
Finally, you must attach this logical Policy Tag to our physical Iceberg table schema.
Take a look at 4_attach_tag.py. The script fetches the BigQuery table schema, iterates through the fields, and attaches the tag specifically to the amount column:
new_schema =[]
for field in table.schema:
    if field.name == 'amount':
        # Wrap the Policy Tag ID and attach it to the column
        policy_tags_list = bigquery.PolicyTagList(names=[policy_tag_id])
        new_field = bigquery.SchemaField(
            name=field.name, field_type=field.field_type, mode=field.mode,
            description=field.description, policy_tags=policy_tags_list
        )
        new_schema.append(new_field)
    else:
        new_schema.append(field)

# Update the table schema in BigQuery
table.schema = new_schema
client.update_table(table, ["schema"])
When this schema update is applied, Lakehouse instantly bridges our Knowledge Catalog logical tags down to the physical Parquet files stored in your Cloud Storage bucket.
Run the script to update the table schema:
python 4_attach_tag.py
5. Verify Knowledge Catalog Policies
It's time to test if our centralized governance works. You will test this across two different engines to prove that Knowledge Catalog policies are universally enforced.
Verify using BigQuery native SQL
First, you will use Cloud Shell to assume the identity of our two personas and query the table using BigQuery's native SQL engine.
Test as the Manager (Privileged user):
# Impersonate the manager
gcloud config set auth/impersonate_service_account ${EMAIL_MANAGER}

# Query the transactions table
bq query --use_legacy_sql=false "SELECT * FROM \`${PROJECT_ID}.${DATASET_ID}.transactions\`"
Since the manager has the Fine-Grained Reader role, it will show the raw amount values
+----+----------+--------+------------------+
| id |   item   | amount | transaction_date |
+----+----------+--------+------------------+
|  1 | Widget A |  100.0 |       2024-01-01 |
|  3 | Widget C |   50.0 |       2024-01-03 |
|  2 | Widget B |  150.0 |       2024-01-02 |
+----+----------+--------+------------------+
Test as the analyst (Restricted user):
gcloud config set auth/impersonate_service_account ${EMAIL_ANALYST}

bq query --use_legacy_sql=false "SELECT * FROM \`${PROJECT_ID}.${DATASET_ID}.transactions\`"
Because of the Knowledge Catalog masking rule, the amount column returns as NULL for every row.
+----+----------+--------+------------------+
| id |   item   | amount | transaction_date |
+----+----------+--------+------------------+
|  1 | Widget A |   NULL |       2024-01-01 |
|  3 | Widget C |   NULL |       2024-01-03 |
|  2 | Widget B |   NULL |       2024-01-02 |
+----+----------+--------+------------------+
Restore your identity
Clean up your Cloud Shell authentication state to return to your admin user.
# Unset impersonation
gcloud config unset auth/impersonate_service_account
Verify using Apache Spark (Compute delegation)
What if a Data Scientist uses Apache Spark to read this table? If Spark reads the physical GCS Parquet files directly, the Knowledge Catalog masking rules are entirely bypassed because Cloud Storage only understands bucket-level permissions.
To prevent this, you enforce compute delegation using the Spark-BigQuery Connector. This connector acts as a secure bridge, routing the Spark read requests through the BigQuery Storage API so that Knowledge Catalog governance rules are dynamically evaluated before any data is sent to the Spark cluster.
Take a look at the core logic inside the read_transactions.py script you downloaded:
# Reading data via Compute Delegation (Knowledge Catalog policies are applied dynamically here)
df = spark.read \
    .format("bigquery") \
    .option("table", f"{project_id}.{dataset_id}.{table_name}") \
    .load()

print("\n=== 📊 Data Preview ===")
df.show(truncate=False)
Notice that we are not pointing Spark to the gs:// path of the Iceberg files. By specifying .format("bigquery"), the BigQuery Storage API intercepts the read request, checks the identity of the user running the Spark job, applies the Knowledge Catalog masking rules, and only returns the authorized data back to the Spark DataFrame.
Upload this PySpark script to your Cloud Storage bucket so Managed Apache Spark can access it:
# Upload script to GCS
gsutil cp read_transactions.py gs://${ICEBERG_BUCKET}/scripts/read_transactions.py
Run Spark as the manager:
You will use Managed Apache Spark. This managed service allows you to run Spark workloads directly without the need to provision, configure, or manage dedicated clusters.
echo "🚀 Submitting Managed Apache Spark Job as [MANAGER]..."
gcloud dataproc batches submit pyspark gs://${ICEBERG_BUCKET}/scripts/read_transactions.py \
    --project=${PROJECT_ID} \
    --region=${REGION} \
    --service-account=${EMAIL_MANAGER} \
    --version=2.3 \
    -- ${PROJECT_ID} ${DATASET_ID} \
    --format="value(name)"
Look at the job output logs in the terminal. Because the manager has the Fine-Grained Reader role, Spark successfully retrieves the raw, unmasked amounts.
=== 📊 Data Preview ===
+---+--------+------+-------------------+
|id |item    |amount|transaction_date   |
+---+--------+------+-------------------+
|1  |Widget A|100.0 |2024-01-01         |
|2  |Widget B|150.0 |2024-01-02         |
|3  |Widget C|50.0  |2024-01-03         |
+---+--------+------+-------------------+
Run Spark as the analyst:
Now, submit the exact same Spark job, but this time impersonate the analyst persona.
echo "🚀 Submitting Managed Apache Spark Job as [ANALYST]..."
gcloud dataproc batches submit pyspark gs://${ICEBERG_BUCKET}/scripts/read_transactions.py \
    --project=${PROJECT_ID} \
    --region=${REGION} \
    --service-account=${EMAIL_ANALYST} \
    --version=2.3 \
    -- ${PROJECT_ID} ${DATASET_ID} \
    --format="value(name)"
Check the logs again. Even though the analyst ran the exact same Spark code, the BigQuery Storage API intercepted the request and enforced the Knowledge Catalog policy. The analyst's Spark DataFrame displays null for the amounts!
=== 📊 Data Preview ===
+---+--------+------+-------------------+
|id |item    |amount|transaction_date   |
+---+--------+------+-------------------+
|1  |Widget A|null  |2024-01-01         |
|2  |Widget B|null  |2024-01-02         |
|3  |Widget C|null  |2024-01-03         |
+---+--------+------+-------------------+
Architectural Trade-offs: BigQuery SQL vs. Spark
You just proved that the result is identical regardless of the engine! The Knowledge Catalog policy was successfully enforced. But in production, which should you use?
- BigQuery SQL: Great for workflows where SQL is the desired engine and runs computations directly in place. It is ideal for fast analytics and Business Intelligence.
- Apache Spark: Allows for more complex workloads by virtue of using Python, making it well-suited for advanced Machine Learning pipelines or legacy Hadoop code.
The Key Takeaway: No matter which engine is used, by enforcing compute delegation, the centralized zero-trust governance layer can never be bypassed!
6. Automated data lineage
In any enterprise data architecture, knowing exactly where your data comes from and how it has been altered is critical for compliance, debugging, and establishing trust. This concept is known as Data Lineage. It answers fundamental questions like: "If a manager is looking at a daily sales report, which raw tables were used to calculate those numbers?"
Traditionally, tracking this lifecycle requires data engineers to manually write custom logging code or use complex third-party tools to parse SQL scripts. However, in a governed Google Cloud Lakehouse, this tracking is built-in and entirely hands-off.
Remember the transactions_summary table you created from the raw transactions table earlier in the codelab? When BigQuery executed that CREATE TABLE AS SELECT statement, the compute engine automatically captured the transformation metadata and sent it to Knowledge Catalog. Let's see the result.
Visualize the lineage
- In the Google Cloud Console, navigate to Knowledge Catalog > Search.
- Type
lakehouse_retail_demo.transactionsin the search bar and click on the table. - Click on the Lineage tab.
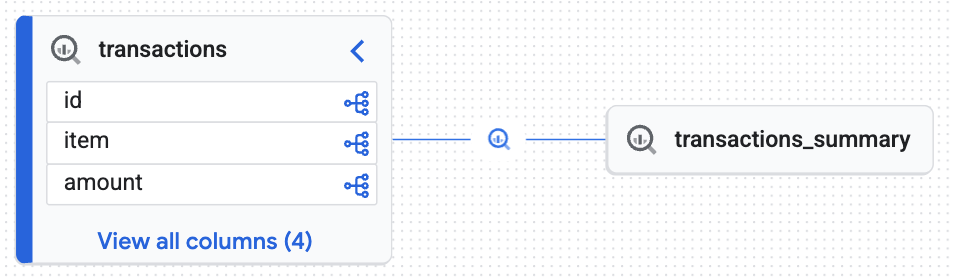
You will see an interactive graph generated by the Knowledge Engine proving that the target table (transactions_summary) was derived from the raw governed Iceberg table (transactions). You achieved end-to-end traceability essential for data auditing.
7. Clean up
To avoid incurring charges to your Google Cloud account for the resources used in this codelab, follow these steps.
Remove Knowledge Catalog governance resources
Before deleting the BigQuery dataset or Cloud Storage bucket, you must remove the logical governance rules. If you look inside the cleanup_governance.py script from the repository, you will see the following teardown sequence:
# 1. Delete Data Policy
data_policy_name = f"{parent_loc}/dataPolicies/mask_financial_null"
dp_client.delete_data_policy(name=data_policy_name)

# 2. Find and Delete Taxonomy (This auto-deletes child Policy Tags)
taxonomies = catalog_client.list_taxonomies(parent=parent_loc)
taxonomy_id = next((t.name for t in taxonomies if t.display_name == "BusinessCritical"), None)
catalog_client.delete_taxonomy(name=taxonomy_id)
The order here is critical. The script first deletes the Data Policy (masking rule) because it relies on the Policy Tag. Once the policy is removed, deleting the parent Taxonomy will automatically cascade and delete all underlying Policy Tags without triggering resource dependency errors.
Run the Python cleanup script:
python cleanup_governance.py
Remove identities, storage, and compute assets
Now that the governance layer is detached, you can safely delete the BigQuery tables, Cloud Storage buckets, Service Accounts, and the local Python environment.
Copy and run the following comprehensive cleanup block in your Cloud Shell:
echo "Deleting Service Accounts and Impersonation Bindings..."
export CURRENT_USER=$(gcloud config get-value account)

for USER in "${USER_ANALYST}" "${USER_MANAGER}"; do
    EMAIL="${USER}@${PROJECT_ID}.iam.gserviceaccount.com"

    # Remove impersonation binding
    gcloud iam service-accounts remove-iam-policy-binding ${EMAIL} \
        --member="user:${CURRENT_USER}" \
        --role="roles/iam.serviceAccountTokenCreator" \
        --quiet > /dev/null 2>&1

    # Delete the Service Account
    gcloud iam service-accounts delete ${EMAIL} --quiet
done

echo "Removing BigQuery Dataset and Tables..."
bq rm -f ${DATASET_ID}.transactions_summary
bq rm -f ${DATASET_ID}.transactions
bq rm -f ${DATASET_ID}.inventory
bq rm -f -d ${DATASET_ID}

echo "Removing BigQuery Cloud Resource Connection..."
bq rm --connection --location=${REGION} ${CONN_NAME}

echo "Removing Iceberg Cloud Storage Bucket..."
gcloud storage rm --recursive gs://${ICEBERG_BUCKET} --quiet

echo "Removing Auto-generated Dataproc Staging & Temp Buckets..."
for BUCKET in $(gcloud storage ls | grep -E "gs://dataproc-(staging|temp)-${REGION}"); do
    gcloud storage rm --recursive $BUCKET --quiet
done

echo "Deactivating and removing the local Python environment..."
deactivate
cd ../..
rm -rf devrel-demos

echo "✅ Clean up completed successfully!"
By completing these steps, you have ensured no orphaned resources or hidden policies remain in your project.
8. Congratulations!
You have successfully implemented a fully governed, discoverable Data Lakehouse.
You learned that:
- Native Iceberg integration: Lakehouse can natively manage open-source Iceberg tables while storing the physical files securely in Cloud Storage.
- Compute delegation for security: By routing queries through the BigQuery Storage API, you enforced fine-grained dynamic masking on physical files that natively cannot restrict partial access.
- Engine-Agnostic Governance: Policy Tags allows you to define rules once and have them universally enforced whether queried via native SQL or Apache Spark runtimes.
- Data discoverability: The Knowledge Engine automatically tracked data lineage, providing essential enterprise auditability.
What's next?
- Explore advanced access control: To implement more complex security scenarios, review the official documentation on customizing Lakehouse with additional features.
- Govern unstructured data for GenAI: Discover Object Tables. Extend this exact Secure bridge pattern to unstructured files (PDFs, images) in Cloud Storage, establishing a secure, governed data foundation for Gemini Enterprise Agent Engine and RAG pipelines.