
1. Overview
In today's competitive retail landscape, empowering customers to find exactly what they're looking for, quickly and intuitively, is paramount. Traditional keyword-based search often falls short, struggling with nuanced queries and vast product catalogs. This codelab unveils a sophisticated retail search application built on AlloyDB, AlloyDB AI, leveraging cutting-edge Vector Search, scaNN indexing, faceted filters, and intelligent Adaptive filtering, reranking to deliver a dynamic, hybrid search experience at an enterprise scale.
Now we already have the foundational understanding of 3 things:
- What contextual search means for your agent and how to accomplish that using Vector Search.
- We also deep-dove into attaining Vector Search within the scope of your data, that is within your database itself (all of Google Cloud Databases support that, if you didn't already know!).
- We went one step further than the rest of the world in telling you how to accomplish such a light-weight Vector Search RAG capability with high performance and quality with AlloyDB Vector Search capability powered by ScaNN index.
If you haven't gone through those basic, intermediate and slightly advanced RAG experiments, I would encourage you to read those 3 here, here and here in the listed order.
The Challenge
Going Beyond Filters, Keywords and Contextual Matching: A simple keyword search might return thousands of results, many irrelevant. The ideal solution needs to understand the intent behind the query, combine it with precise filter criteria (like brand, material, or price), and present the most relevant items in milliseconds. This demands a powerful, flexible, and scalable search infrastructure. Sure we have come a long way from keyword search into contextual matches and similarity searches. But imagine a customer searching for "a comfortable, stylish, waterproof jacket for hiking in the spring." while simultaneously applying filters and your application is not just returning quality responses, but is also high-performant and the sequence of all this is dynamically chosen by your database.
Objective
To address this by integrating
- Contextual Search (Vector Search): Understanding the semantic meaning of queries and product descriptions
- Faceted Filtering: Enabling users to refine results with specific attributes
- Hybrid Approach: Seamlessly blending contextual search with structured filtering
- Advanced Optimization: Leveraging specialized indexing, adaptive filtering, and reranking for speed and relevance
- Generative AI-driven Quality Control: Incorporating LLM validation for superior result quality.
Let's break down the architecture and implementation journey.
What you'll build
A Retail Search Application
As part of this, you will:
- Create an AlloyDB instance and table for ecommerce dataset
- Set up embeddings and Vector Search
- Create metadata index and ScaNN index
- Implement advanced Vector Search in AlloyDB using ScaNN's inline filtering method
- Set up Faceted Filters and Hybrid Search in a single query
- Refine query relevance with reranking and recall (optional)
- Evaluate query response with Gemini (optional)
- MCP Toolbox for Databases and Application Layer
- Application Development (Java) with Faceted Search
Requirements
2. Before you begin
Create a project
- In the Google Cloud Console, on the project selector page, select or create a Google Cloud project.
- Make sure that billing is enabled for your Cloud project. Learn how to check if billing is enabled on a project .
- You'll use Cloud Shell, a command-line environment running in Google Cloud. Click Activate Cloud Shell at the top of the Google Cloud console.

- Once connected to Cloud Shell, you check that you're already authenticated and that the project is set to your project ID using the following command:
gcloud auth list
- Run the following command in Cloud Shell to confirm that the gcloud command knows about your project.
gcloud config list project
- If your project is not set, use the following command to set it:
gcloud config set project <YOUR_PROJECT_ID>
- Enable the required APIs: Follow the link and enable the APIs.
Alternatively you can use the gcloud command for this. Refer documentation for gcloud commands and usage.
3. Database setup
In this lab we'll use AlloyDB as the database for the ecommerce data. It uses clusters to hold all of the resources, such as databases and logs. Each cluster has a primary instance that provides an access point to the data. Tables will hold the actual data.
Let's create an AlloyDB cluster, instance and table where the ecommerce dataset will be loaded.
Create a cluster and instance
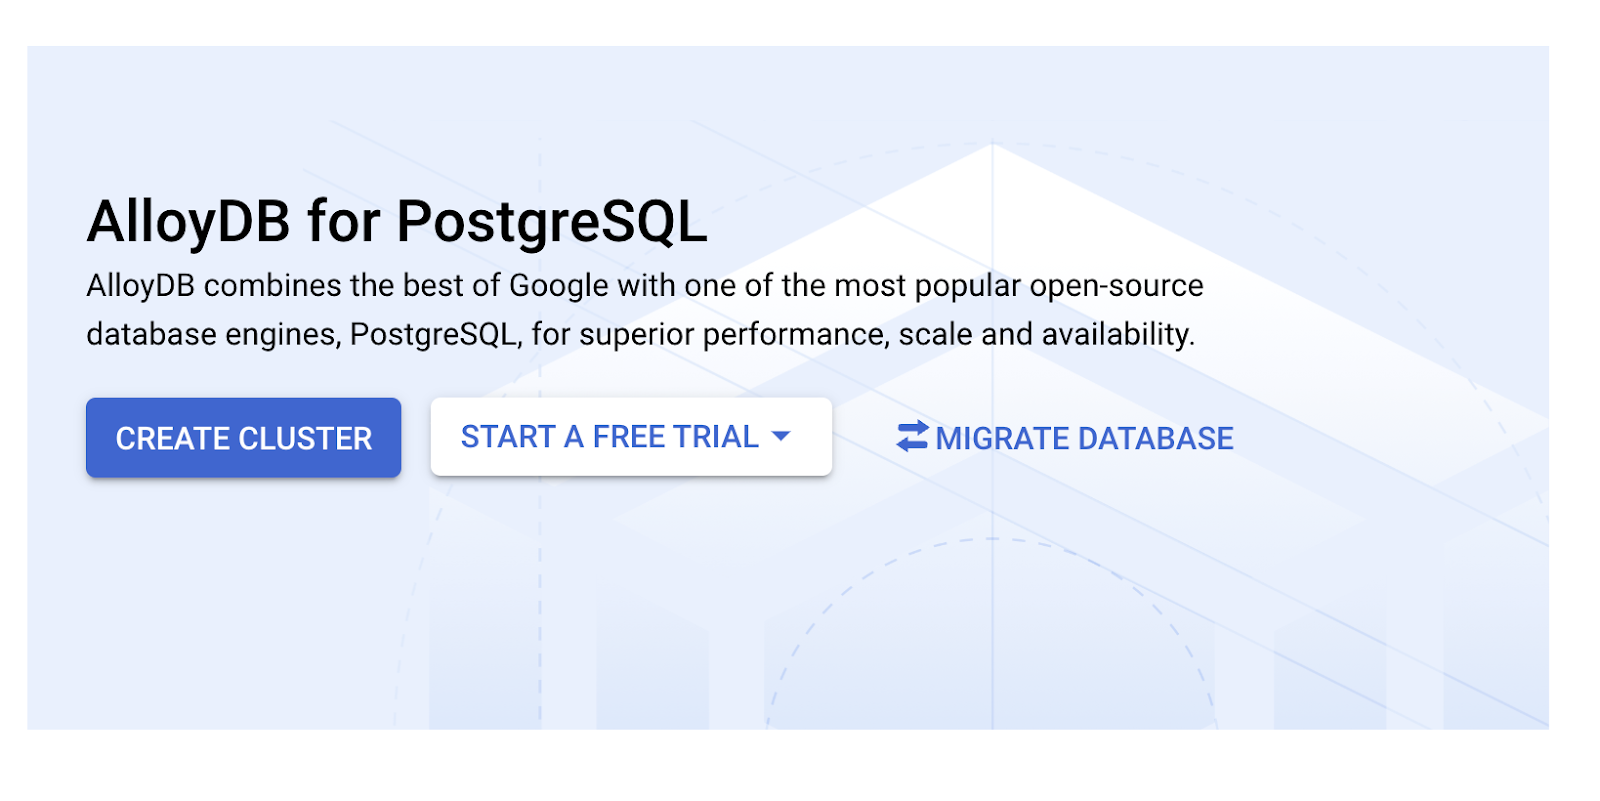
- Navigate the AlloyDB page in the Cloud Console. An easy way to find most pages in Cloud Console is to search for them using the search bar of the console.
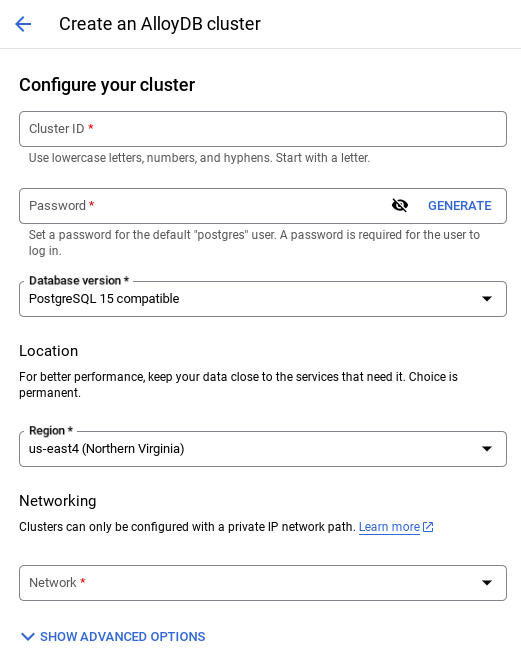
- Select CREATE CLUSTER from that page:
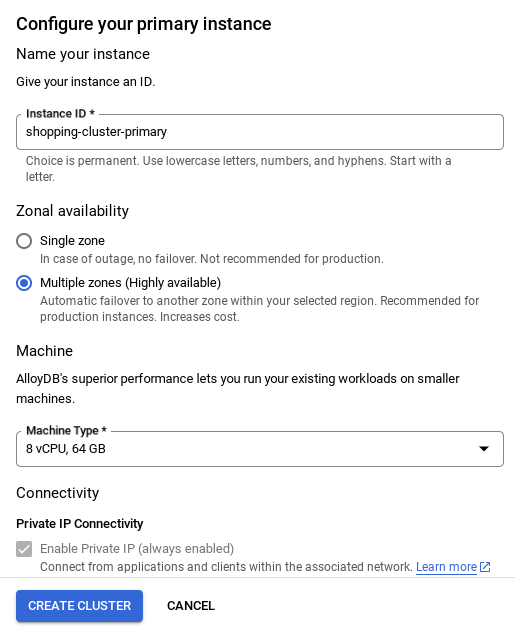
- You'll see a screen like the one below. Create a cluster and instance with the following values (Make sure the values match in case you are cloning the application code from the repo):
- cluster id: "
vector-cluster" - password: "
alloydb" - PostgreSQL 15 / latest recommended
- Region: "
us-central1" - Networking: "
default"
- When you select the default network, you'll see a screen like the one below.
Select SET UP CONNECTION.
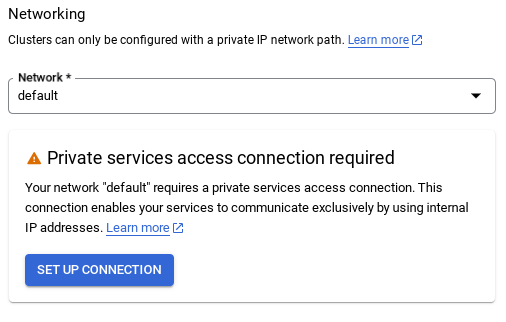
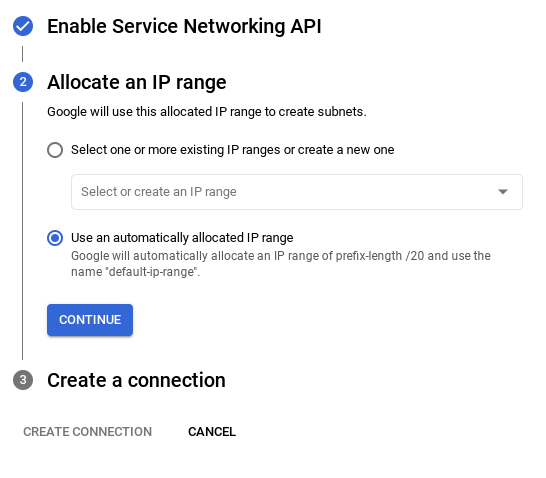
- From there, select "Use an automatically allocated IP range" and Continue. After reviewing the information, select CREATE CONNECTION.
- Once your network is set up, you can continue to create your cluster. Click CREATE CLUSTER to complete setting up of the cluster as shown below:
IMPORTANT NOTE:
- Make sure to change the instance id (which you can find at the time of configuration of the cluster / instance) to **
vector-instance**. If you cannot change it, remember to use your instance id in all the upcoming references. - Note that the Cluster creation will take around 10 minutes. Once it is successful, you should see a screen that shows the overview of your cluster you just created.
4. Data ingestion
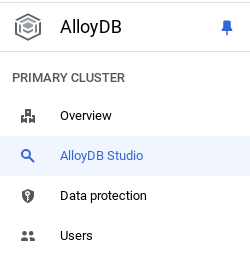
Now it's time to add a table with the data about the store. Navigate to AlloyDB, select the primary cluster and then AlloyDB Studio:
You may need to wait for your instance to finish being created. Once it is, sign into AlloyDB using the credentials you created when you created the cluster. Use the following data for authenticating to PostgreSQL:
- Username : "
postgres" - Database : "
postgres" - Password : "
alloydb"
Once you have authenticated successfully into AlloyDB Studio, SQL commands are entered in the Editor. You can add multiple Editor windows using the plus to the right of the last window.
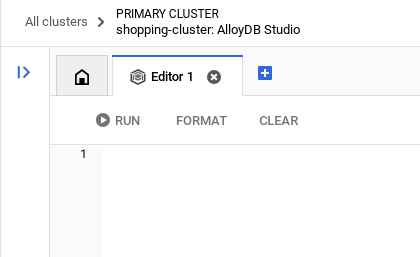
You'll enter commands for AlloyDB in editor windows, using the Run, Format, and Clear options as necessary.
Enable Extensions
For building this app, we will use the extensions pgvector and google_ml_integration. The pgvector extension allows you to store and search vector embeddings. The google_ml_integration extension provides functions you use to access Vertex AI prediction endpoints to get predictions in SQL. Enable these extensions by running the following DDLs:
CREATE EXTENSION IF NOT EXISTS google_ml_integration CASCADE;
CREATE EXTENSION IF NOT EXISTS vector;
If you would like to check the extensions that have been enabled on your database, run this SQL command:
select extname, extversion from pg_extension;
Create a table
You can create a table using the DDL statement below in the AlloyDB Studio:
CREATE TABLE apparels (
  id BIGINT,
  category VARCHAR(100),
  sub_category VARCHAR(50),
  uri VARCHAR(200),
  gsutil_uri VARCHAR(200),
  image VARCHAR(100),
  content VARCHAR(2000),
  pdt_desc VARCHAR(5000),
  color VARCHAR(2000),
  gender VARCHAR(200),
  embedding vector(768),
  img_embeddings vector(1408),
  additional_specification VARCHAR(100000));
The embedding column will allow storage for the vector values of the text.
Grant Permission
Run the below statement to grant execute on the "embedding" function:
GRANT EXECUTE ON FUNCTION embedding TO postgres;
Grant Vertex AI User ROLE to the AlloyDB service account
From Google Cloud IAM console, grant the AlloyDB service account (that looks like this: service-<<PROJECT_NUMBER>>@gcp-sa-alloydb.iam.gserviceaccount.com) access to the role "Vertex AI User". PROJECT_NUMBER will have your project number.
Alternatively you can run the below command from the Cloud Shell Terminal:
PROJECT_ID=$(gcloud config get-value project)


gcloud projects add-iam-policy-binding $PROJECT_ID \
  --member="serviceAccount:service-$(gcloud projects describe $PROJECT_ID --format="value(projectNumber)")@gcp-sa-alloydb.iam.gserviceaccount.com" \
--role="roles/aiplatform.user"
Load data into the database
- Copy the
insertquery statements from theinsert scripts sqlin the sheet to the mentioned above to the editor. You can copy 10-50 insert statements for a quick demo of this use case. There is a selected list of inserts here in this "Selected Inserts 25-30 rows" tab.
Link to data can be found in this github repo file.
- Click Run. The results of your query appear in the Results table.
IMPORTANT NOTE:
Make sure to copy only 25-50 records to insert and make sure it is from a range of category, sub_category, color, gender types.
5. Create Embeddings for the data
The true innovation in modern search lies in understanding meaning, not just keywords. This is where embeddings and vector search come into play.
We transformed product descriptions and user queries into high-dimensional numerical representations called "embeddings" using pre-trained language models. These embeddings capture the semantic meaning, allowing us to find products that are "similar in meaning" rather than just containing matching words. Initially, we experimented with direct vector similarity search on these embeddings to establish a baseline, demonstrating the power of semantic understanding even before performance optimizations.
The embedding column will allow storage for the vector values of the product description text. The img_embeddings column will allow storage of image embeddings (multimodal). This way you can also use text against image distance based search. But we'll only use text embeddings in this lab.
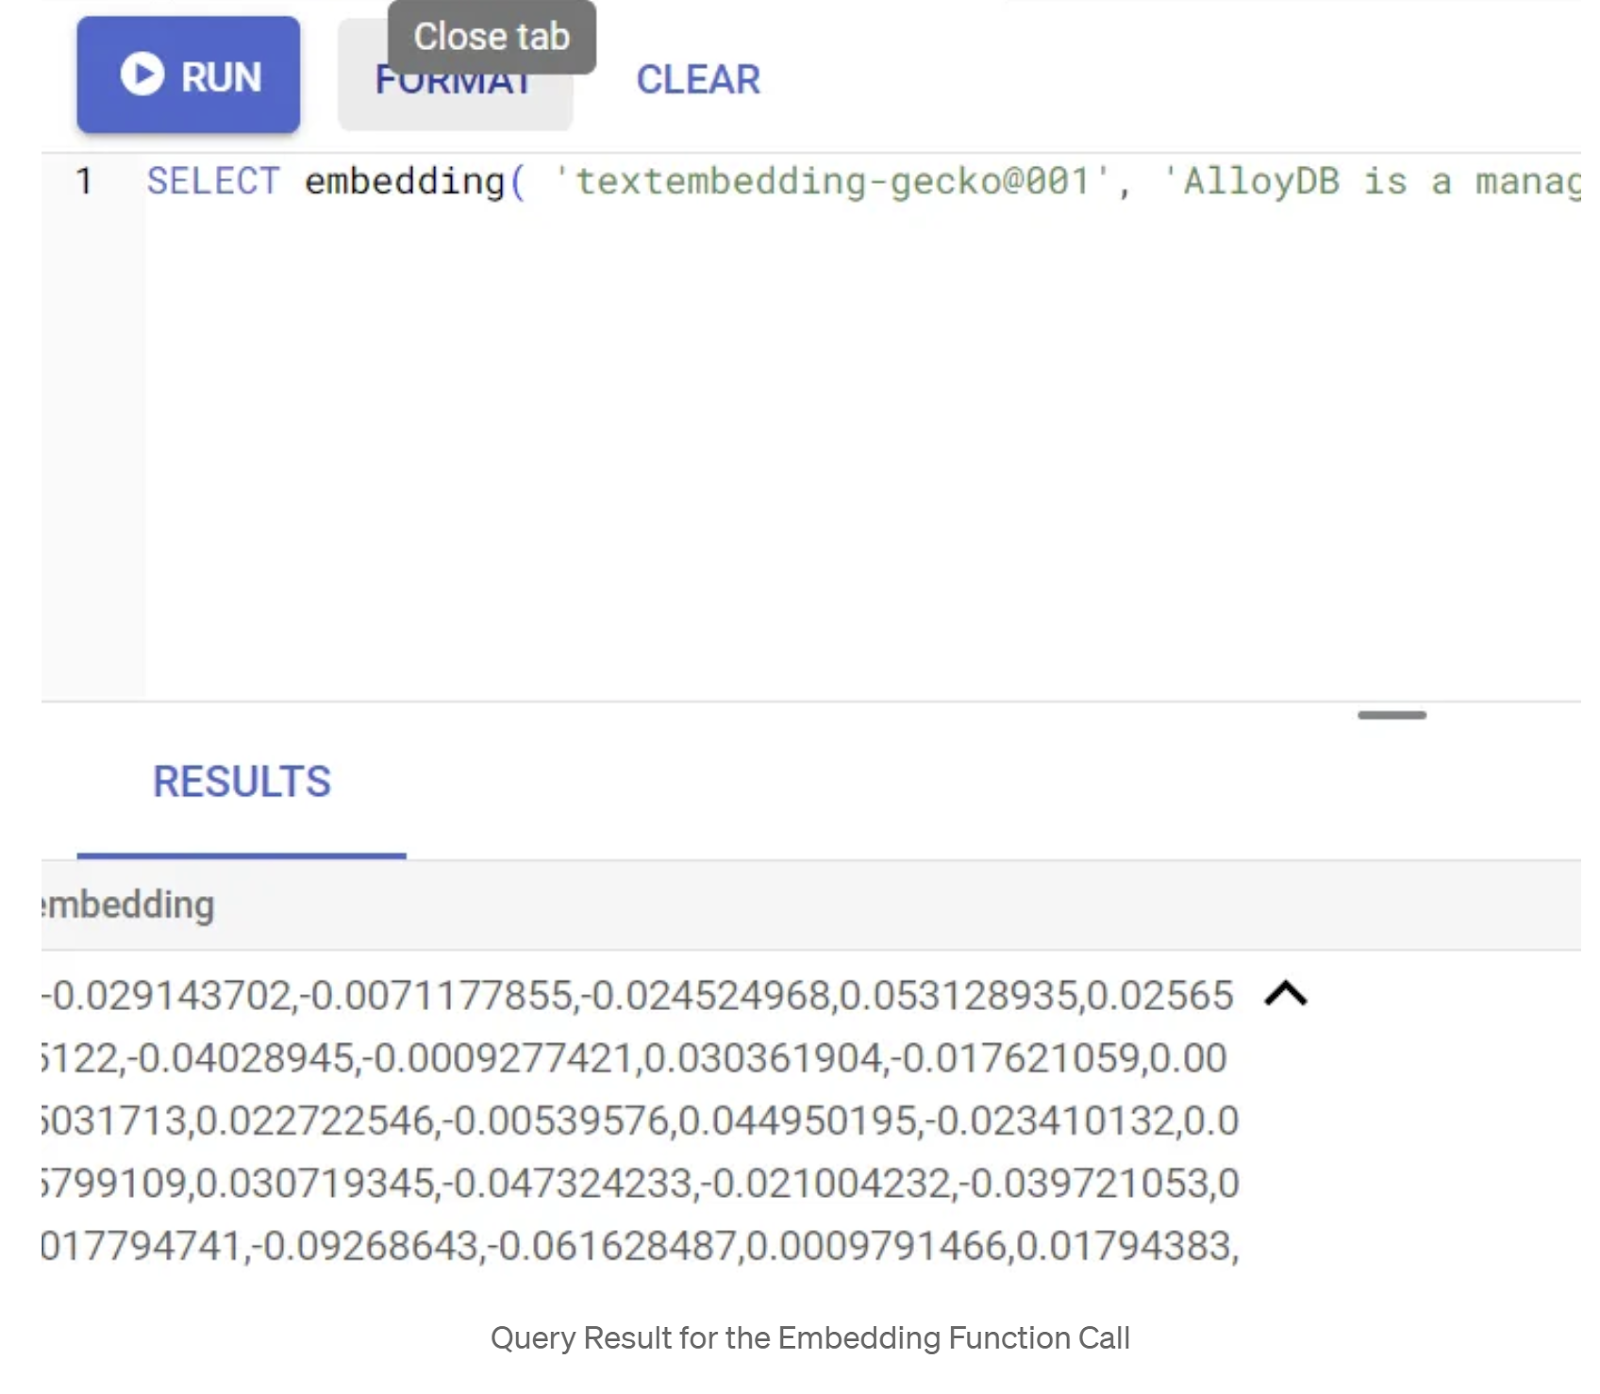
SELECT embedding('text-embedding-005', 'AlloyDB is a managed, cloud-hosted SQL database service.');
This should return the embeddings vector, that looks like an array of floats, for the sample text in the query. Looks like this:
Update the abstract_embeddings Vector field
Run the below DML to update the content description in the table with the corresponding embeddings:
UPDATE apparels SET embedding = embedding('text-embedding-005',pdt_desc)::vector
WHERE pdt_desc IS NOT NULL;
You may have trouble generating more than a few embeddings (say 20-25 max) if you are using a trial credit billing account for Google Cloud. So limit the number of rows in the insert script.
If you want to generate image embeddings (for performing multimodal contextual search) run the below update as well:
update apparels set img_embeddings = ai.image_embedding(
  model_id => 'multimodalembedding@001',
  image => gsutil_uri,
  mimetype => 'image/jpg')
where gsutil_uri is not null
6. Perform Advanced RAG with AlloyDB's new Features
Now that the table, data, embeddings are all ready, let's perform the real time Vector Search for the user search text. You can test this by running the query below:
SELECT id, content, uri, category, sub_category,color,gender
FROM apparels
ORDER BY embedding <=> embedding('text-embedding-005','T-shirt with round neck')::vector limit 10 ;
In this query, we are comparing the text embedding of the user entered search "T-shirt with round neck" against the text embeddings of all product descriptions in the apparels table (stored in the column named "embedding") using the cosine similarity distance function (represented by the symbol "<=>". We are converting the embedding method's result to vector type to make it compatible with the vectors stored in the database. LIMIT 10 represents that we are selecting the 10 closest matches of the search text.
AlloyDB takes Vector Search RAG to the next level:
For an enterprise-scale solution, raw vector search isn't enough. Performance is critical.
ScaNN (Scalable Nearest Neighbors) Index
To achieve ultra-fast approximate nearest neighbor (ANN) search, we enabled the scaNN index in AlloyDB. ScaNN, a state-of-the-art approximate nearest neighbor search algorithm developed by Google Research, is designed for efficient vector similarity search at scale. It significantly speeds up queries by efficiently pruning the search space and using quantization techniques, offering up to 4x faster vector queries than other indexing methods and a smaller memory footprint. Read more about it here and here.
Let's enable the extension and create the indexes:
CREATE EXTENSION IF NOT EXISTS alloydb_scann;
Creating indexes for both text embedding and image embeddings fields (in case you want to use image embeddings in your search):
CREATE INDEX apparels_index ON apparels
USING scann (embedding cosine)
WITH (num_leaves=32);

CREATE INDEX apparels_img_index ON apparels
USING scann (img_embeddings cosine)
WITH (num_leaves=32);
Metadata Indexes
While scaNN handles vector indexing, traditional B-tree or GIN indexes were meticulously set up on structured attributes (like category, sub category, styling, color, etc.). These indexes are crucial for the efficiency of faceted filtering. Run the below statements to set up metadata indexes:
CREATE INDEX idx_category ON apparels (category);

CREATE INDEX idx_sub_category ON apparels (sub_category);

CREATE INDEX idx_color ON apparels (color);

CREATE INDEX idx_gender ON apparels (gender);
IMPORTANT NOTE:
Since you may have inserted only 25-50 records, indexes (ScaNN or any index for that matter) will not be effective.
Inline Filtering
A common challenge in vector search is combining it with structured filters (e.g., "red shoes"). AlloyDB's inline filtering optimizes this. Instead of post-filtering results from a broad vector search, inline filtering applies filter conditions during the vector search process itself, drastically improving performance and accuracy for filtered vector searches.
Refer to this documentation to learn more about the need for Inline Filtering. Also learn about filtered vector search for performance optimization of vector search here. Now if you want to enable inline filtering for your application, run the following statement from your editor:
SET scann.enable_inline_filtering = on;
Inline filtering is best for cases with medium selectivity. As AlloyDB searches through the vector index, it only computes distances for vectors that match the metadata filtering conditions (your functional filters in a query usually handled in the WHERE clause). This massively improves performance for these queries complementing the advantages of post-filter or pre-filter.
Adaptive Filtering
To further optimize performance, AlloyDB's adaptive filtering dynamically chooses the most efficient filtering strategy (inline or pre-filtering) during query execution. It analyzes query patterns and data distributions to ensure optimal performance without manual intervention, especially beneficial for filtered vector searches where it automatically switches between vector and metadata index usage. To enable adaptive filtering, use the scann.enable_preview_features flag.
When adaptive filtering triggers a switch from inline filtering to pre-filtering during execution, the query plan dynamically changes.
SET scann.enable_preview_features = on;
IMPORTANT NOTE: You might not be able to run the above statement without restarting the instance, if you encounter error — better enable the enable_preview_features flag from the database flags section of your instance.
Faceted Filters using all the Indexes
Faceted search allows users to refine results by applying multiple filters based on specific attributes or "facets" (e.g., brand, price, size, customer rating). Our application integrates these facets seamlessly with the vector search. A single query can now combine natural language (contextual search) with multiple faceted selections, dynamically leveraging both vector and traditional indexes. This provides a truly dynamic hybrid searching capability, allowing users to drill down into results precisely.
In our application, since we have already created all the metadata indexes, we are all set for the faceted filter usage in the web by addressing that directly using SQL queries:
SELECT id, content, uri, category, sub_category,color,gender
FROM apparels
WHERE category = ANY($1) and sub_Category = ANY($2) and color = ANY($3) and gender = ANY($4)
ORDER BY embedding <=> embedding('text-embedding-005',$5)::vector limit 10 ;
In this query, we are performing hybrid search — incorporating both
- Faceted filtering in the WHERE clause and
- Vector Search in the ORDER BY clause using the cosine similarity method.
$1, $2, $3 and $4 represent the faceted filter values in an array and $5 represents the user search text. Replace $1 to $4 with faceted filter values of your choice like below:
category = ANY([‘Apparel', ‘Footwear'])
Replace $5 with a search text of your choice, say, "Polo T-Shirts".
IMPORTANT NOTE: If you don't have the indexes because of the limited set of records you have inserted, you won't see the performance impact. But in a full production dataset you will observe that the execution time is reduced significantly for the same Vector Search using the Inline Filtering infused ScaNN index on the Vector Search has made this possible!!!
Next, let's evaluate the recall for this ScaNN enabled Vector Search.
Reranking
Even with advanced search, initial results might need a final polish. It is a critical step that reorders the initial search results to improve relevance. After the initial hybrid search provides a set of candidate products, a more sophisticated (and often computationally heavier) model applies a finer-grained relevance score. This ensures that the top results presented to the user are the most pertinent, significantly enhancing the search quality. We continually evaluate recall to measure how well the system retrieves all relevant items for a given query, refining our models to maximize the likelihood of a customer finding what they need.
Before you use this in your application, make sure you have all the prerequisites met:
- Verify that the google_ml_integration extension is installed.
- Verify that the google_ml_integration.enable_model_support flag is set to on.
- Integrate with Vertex AI.
- Enable the Discovery Engine API.
- Get the required roles to use ranking models.
And then you can use the following query in our application to rerank the hybrid-searched result set:
WITH initial_ranking AS (
SELECT id,content, pdt_desc, uri, category, sub_category,color,gender,
ROW_NUMBER() OVER () AS ref_number
FROM apparels
    order by embedding <=>embedding('text-embedding-005', 'Pink top')::vector),
reranked_results AS (
            SELECT index, score from
            ai.rank(
              model_id => 'semantic-ranker-default-003',
              search_string => 'Pink top',
              documents => (SELECT ARRAY_AGG(pdt_desc ORDER BY ref_number) FROM initial_ranking)
            )
)
SELECT id,content, pdt_desc, uri, category, sub_category,color,gender, score
FROM initial_ranking, reranked_results
WHERE initial_ranking.ref_number = reranked_results.index
ORDER BY reranked_results.score DESC
limit 25;
In this query, we are performing RERANKING of the product result set of contextual search that is addressed in the ORDER BY clause using the cosine similarity method. ‘Pink top' is the text the user is searching for.
IMPORTANT NOTE: Some of you may not have access to Reranking yet, so I have excluded it from the application code, but if you wish to include it, you can follow the sample we covered above.
Recall Evaluator
Recall in similarity search is the percentage of relevant instances that were retrieved from a search, i.e. the number of true positives. This is the most common metric used for measuring search quality. One source of recall loss comes from the difference between approximate nearest neighbor search, or aNN, and k (exact) nearest neighbor search, or kNN. Vector indexes like AlloyDB's ScaNN implement aNN algorithms, allowing you to speed up vector search on large datasets in exchange for a small tradeoff in recall. Now, AlloyDB provides you with the ability to measure this tradeoff directly in the database for individual queries and ensure that it is stable over time. You can update query and index parameters in response to this information to achieve better results and performance.
What is the logic behind recall of search results?
In the context of vector search, recall refers to the percentage of vectors that the index returns which are true nearest neighbors. For example, if a nearest neighbor query for the 20 nearest neighbors returns 19 of the ground truth nearest neighbors, then the recall is 19/20x100 = 95%. Recall is the metric used for search quality, and is defined as the percentage of the returned results that are objectively closest to the query vectors.
You can find the recall for a vector query on a vector index for a given configuration using the evaluate_query_recall function. This function lets you tune your parameters to achieve the vector query recall results that you want.
IMPORTANT NOTE:
If you are facing permission denied error on HNSW index in the following steps, skip this entire recall evaluation section for now. It might have to do with access restrictions at this point as it is just released at the time this codelab is documented.
- Set the Enable Index Scan flag on the ScaNN Index & HNSW index:
SET scann.enable_indexscan = on
SET hnsw.enable_index_scan = on
- Run the following query in AlloyDB Studio:
SELECT
  *
FROM
  evaluate_query_recall($$
SELECT id,content, pdt_desc, uri, category, sub_category,color,gender
FROM
apparels
    order by embedding <=> embedding('text-embedding-005', 'skirts for women')::vector
  LIMIT 25 $$,
    '{"scann.num_leaves_to_search":1, "scann.pre_reordering_num_neighbors":10}',
    ARRAY['scann']);
The evaluate_query_recall function takes in the query as a parameter and returns its recall. I'm using the same query that I used to check performance as the function input query. I have added SCaNN as the index method. For more parameter options refer to the documentation.
The recall for this Vector Search query we have been using:
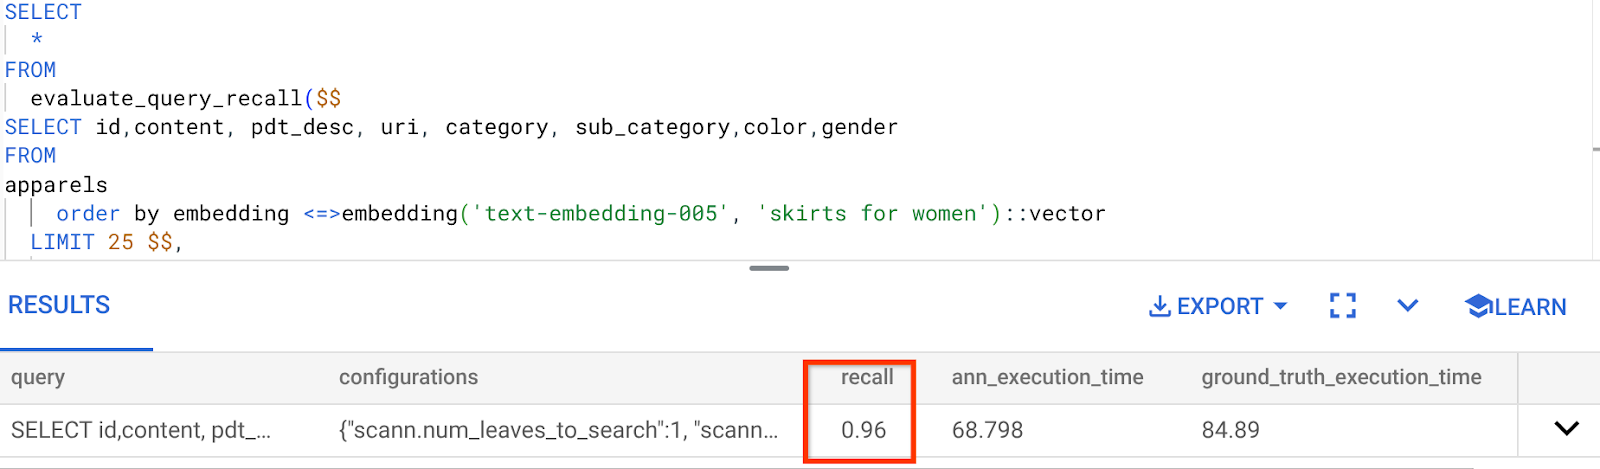
I see that the RECALL is 96%. Now in this case the recall is really good. But if it was an unacceptable value, then you can use this information to change the index parameters, methods and query parameters and improve my recall for this Vector Search!
Test it with modified query & index parameters
Now let's test the query by modifying the query parameters based on the recall received.
- Modifying the index parameters:
For this test, I'm going to use "L2 Distance" instead of "Cosine" similarity distance function.
Very Important Note: "How do we know this query uses COSINE similarity?" you ask. You can identify the distance function by the use of "<=>" to represent Cosine distance.
Docs link for Vector Search distance functions.
The previous query uses Cosine Similarity distance function whereas now we are going to try L2 Distance. But for that we should also ensure that the underlying ScaNN index also uses the L2 Distance Function. Now let's create an index with a different distance function query: L2 distance: <->
drop index apparels_index;

CREATE INDEX apparels_index ON apparels
USING scann (embedding L2)
WITH (num_leaves=32);
The drop index statement is just to ensure there is no unnecessary index on the table.
Now, I can execute the following query to evaluate the RECALL after changing the distance function of my Vector Search functionality.
[AFTER] Query that uses L2 Distance Function:
SELECT
  *
FROM
  evaluate_query_recall($$
SELECT id,content, pdt_desc, uri, category, sub_category,color,gender
FROM
apparels
    order by embedding <-> embedding('text-embedding-005', 'skirts for women')::vector
  LIMIT 25 $$,
    '{"scann.num_leaves_to_search":1, "scann.pre_reordering_num_neighbors":10}',
    ARRAY['scann']);
You can see the difference / transformation in the recall value for the updated index.
There are other parameters you can change in the index, like num_leaves etc. based on the desired recall value and the dataset your application uses.
LLM Validation of Vector Search Results
To achieve the highest quality controlled search, we incorporated an optional layer of LLM validation. Large Language Models can be used to assess the relevance and coherence of search results, especially for complex or ambiguous queries. This can involve:
Semantic Verification:
An LLM cross-referencing results against query intent.
Logical Filtering:
Using an LLM to apply complex business logic or rules that are hard to encode in traditional filters, further refining the product list based on nuanced criteria.
Quality Assurance:
Automatically identifying and flagging less relevant results for human review or model refinement.
This is how we have accomplished that in AlloyDB AI features:
WITH
          apparels_temp as (
                  SELECT id,content, pdt_desc, uri, category, sub_category,color,gender
                  FROM apparels
                 -- where category = ANY($1) and sub_category = ANY($2) and color = ANY($3) and gender = ANY($4)
                      order by embedding <=> embedding('text-embedding-005', $5)::vector
                  limit 25
          ),
          prompt AS (
          SELECT 'You are a friendly advisor helping to filter whether a product match' || pdt_desc || 'is reasonably (not necessarily 100% but contextually in agreement) related to the customer''s request: ' || $5 || '. Respond only in YES or NO. Do not add any other text.'
          AS prompt_text, *
          from apparels_temp
          )
          ,
          response AS (
          SELECT id,content,pdt_desc,uri,
                  json_array_elements(ml_predict_row('projects/abis-345004/locations/us-central1/publishers/google/models/gemini-1.5-pro:streamGenerateContent',
                  json_build_object('contents',
                  json_build_object('role',
                  'user',
                  'parts',
                  json_build_object('text', prompt_text)))))->'candidates'->0->'content'->'parts'->0->'text' AS resp
          FROM
                  prompt)
          SELECT id, content,uri,replace(replace(resp::text,'\n',''),'"','') as result
          FROM
                  response where replace(replace(resp::text,'\n',''),'"','') in ('YES', 'NO')
                  limit 10;
The underlying query is the same query that we have seen in the faceted search, hybrid search and reranking sections. Now in this query we have incorporated a layer of GEMINI evaluation of the Reranked result set represented by the ml_predict_row construct. I have commented out the faceted filters, but feel free to include items of your choice in an array for placeholders $1 to $4. Replace $5 with whatever text you want to search on, say, "Pink top, no floral pattern".
7. MCP Toolbox for Databases and Application Layer
Behind the scenes, robust tooling and a well-structured application ensure smooth operation.
The MCP (Model Context Protocol) Toolbox for Databases simplifies the integration of Generative AI and Agentic tools with AlloyDB. It acts as an open-source server that streamlines connection pooling, authentication, and the secure exposure of database functionalities to AI agents or other applications.
In our application we have used MCP Toolbox for Databases as an abstraction layer for all our intelligent hybrid search queries.
Follow the steps below to set up, deploy Toolbox for our use case:
You can see that one of the databases supported by MCP Toolbox for Databases is AlloyDB and since we have already provisioned that in the previous section, let's go ahead and set up Toolbox.
- Navigate to your Cloud Shell Terminal and make sure your project is selected and shown in the terminal's prompt. Run the below command from your Cloud Shell Terminal to navigate into your project directory:
mkdir toolbox-tools

cd toolbox-tools
- Run the below command to download and install toolbox in your new folder:
# see releases page for other versions
export VERSION=0.7.0
curl -O https://storage.googleapis.com/mcp-toolbox-for-databases/v$VERSION/linux/amd64/toolbox
chmod +x toolbox
- Navigate to the Cloud Shell Editor (for code edit mode) and in the project root folder, add a file called "tools.yaml".
sources:
    alloydb:
        kind: "alloydb-postgres"
        project: "<<YOUR_PROJECT_ID>>"
        region: "us-central1"
        cluster: "vector-cluster"
        instance: "vector-instance"
        database: "postgres"
        user: "postgres"
        password: "alloydb"


tools:
        <<tools go here... Refer to the github repo file>>
Make sure to replace the Tools.yaml script with the code from this repo file.
Let's understand tools.yaml:
Sources represent your different data sources that a tool can interact with. A source represents a data source that a tool can interact with. You can define Sources as a map in the sources section of your tools.yaml file. Typically, a source configuration will contain any information needed to connect with and interact with the database.
Tools define actions an agent can take – such as reading and writing to a source. A tool represents an action your agent can take, such as running a SQL statement. You can define Tools as a map in the tools section of your tools.yaml file. Typically, a tool will require a source to act on.
For more details on configuring your tools.yaml, refer to this documentation.
- Run the following command (from the mcp-toolbox folder) to start the server:
./toolbox --tools-file "tools.yaml"
Now if you open the server in a web preview mode on the cloud, you should be able to see the Toolbox server up and running with your new tool named get-order-data.
The MCP Toolbox Server runs by default on port 5000. Let us use Cloud Shell to test this out.
Click on Web Preview in Cloud Shell as shown below:
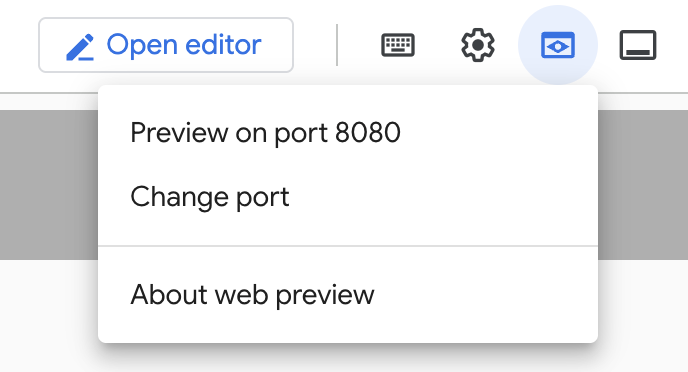
Click on Change port and set the port to 5000 as shown below and click on Change and Preview.
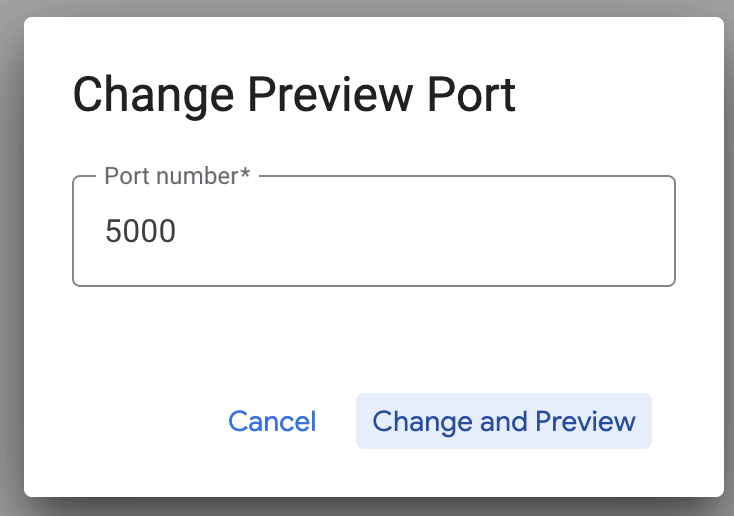
This should bring the output:

- Let's deploy our Toolbox to Cloud Run:
First up, we can start with the MCP Toolbox server and host it on Cloud Run. This would then give us a public endpoint that we can integrate with any other application and/or the Agent applications too. The instructions for hosting this on Cloud Run is given here. We shall go through the key steps now.
- Launch a new Cloud Shell Terminal or use an existing Cloud Shell Terminal. Go to the project folder where the toolbox binary and tools.yaml are present, in this case toolbox-tools, in case you're not already inside it:
cd toolbox-tools
- Set the PROJECT_ID variable to point to your Google Cloud Project Id.
export PROJECT_ID="<<YOUR_GOOGLE_CLOUD_PROJECT_ID>>"
- Enable these Google Cloud services
gcloud services enable run.googleapis.com \
                       cloudbuild.googleapis.com \
                       artifactregistry.googleapis.com \
                       iam.googleapis.com \
                       secretmanager.googleapis.com
- Let's create a separate service account that will be acting as the identity for the Toolbox service that we will be deploying on Google Cloud Run.
gcloud iam service-accounts create toolbox-identity
- We are also ensuring that this service account has the correct roles i.e. ability to access Secret Manager and talk to AlloyDB
gcloud projects add-iam-policy-binding $PROJECT_ID \
   --member serviceAccount:toolbox-identity@$PROJECT_ID.iam.gserviceaccount.com \
   --role roles/secretmanager.secretAccessor

gcloud projects add-iam-policy-binding $PROJECT_ID \
   --member serviceAccount:toolbox-identity@$PROJECT_ID.iam.gserviceaccount.com \
   --role roles/alloydb.client

gcloud projects add-iam-policy-binding $PROJECT_ID \
   --member serviceAccount:toolbox-identity@$PROJECT_ID.iam.gserviceaccount.com \
   --role roles/serviceusage.serviceUsageConsumer
- We will upload the tools.yaml file as a secret:
gcloud secrets create tools --data-file=tools.yaml
If you already have a secret and want to update the secret version, execute the following:
gcloud secrets versions add tools --data-file=tools.yaml
- Set an environment variable to the container image that you want to use for Cloud Run:
export IMAGE=us-central1-docker.pkg.dev/database-toolbox/toolbox/toolbox:latest
- The last step in the familiar deployment command to Cloud Run:
gcloud run deploy toolbox \
--image $IMAGE \
--service-account toolbox-identity \
--region us-central1 \
--set-secrets "/app/tools.yaml=tools:latest" \
--args="--tools-file=/app/tools.yaml","--address=0.0.0.0","--port=8080" \
--allow-unauthenticated \
--labels dev-tutorial=codelab-alloydb-search-toolbox
This should start the process of deploying the Toolbox Server with our configured tools.yaml to Cloud Run. On successful deployment, you should see a message similar to the following:
Deploying container to Cloud Run service [toolbox] in project [YOUR_PROJECT_ID] region [us-central1]
OK Deploying new service... Done.
  OK Creating Revision...
  OK Routing traffic...
  OK Setting IAM Policy...
Done.
Service [toolbox] revision [toolbox-00001-zsk] has been deployed and is serving 100 percent of traffic.
Service URL: https://toolbox-<SOME_ID>.us-central1.run.app
You are all set to use your newly deployed tool in your agentic application!!!
Accessing the Tools in the Toolbox Server
Once the Toolbox is deployed, we will create a Python Cloud Run Functions shim to interact with the deployed Toolbox server. This is because currently Toolbox does not have a Java SDK, so we created a Python shim to interact with the server. Here is the source code for that Cloud Run Function.
You have to create and deploy this Cloud Run Function in order to be able to access the toolbox tools we just created and deployed in the previous steps:
- In the Google Cloud console, go to the Cloud Run page
- Click Write a function.
- In the Service name field, enter a name to describe your function. Service names must only begin with a letter, and contain up to 49 characters or less, including letters, numbers, or hyphens. Service names can't end with hyphens, and must be unique per region and project. A service name cannot be changed later and is publicly visible. (Enter retail-product-search-quality)
- In the Region list, use the default value, or select the region where you want to deploy your function. (Choose us-central1)
- In the Runtime list, use the default value, or select a runtime version. (Choose Python 3.11)
- In Authentication section, choose "Allow public access"
- Click "Create" button
- The function is created and loads with a template main.py and requirements.txt
- Replace that with the files: main.py and requirements.txt from this project's repo
- Deploy the function and you should get an end point for your Cloud Run Function
Your endpoint should look like this (or something similar):
Cloud Run Function Endpoint for accessing the toolbox: "https://retail-product-search-quality-<<YOUR_PROJECT_NUMBER>>.us-central1.run.app"
For ease of completion within the timeline (for the hands-on instructor-lead sessions) the project number for the endpoint will be shared at the time of the hands-on session.
IMPORTANT NOTE:
Alternatively you can also implement the database part directly as part of your application code or the Cloud Run Function.
8. Application Development (Java) with Faceted Search
Finally, all these powerful backend components are brought to life through the application layer. Developed in Java, the application provides the user interface for interacting with the search system. It orchestrates the queries to AlloyDB, handles the display of faceted filters, manages user selections, and presents the reranked, validated search results in a seamless and intuitive manner.
- You can start by navigating to your Cloud Shell Terminal and cloning the repository:
git clone https://github.com/AbiramiSukumaran/faceted_searching_retail
- Navigate to the Cloud Shell Editor, where you can see the newly created folder faceted_searching_retail
- Delete the following as those steps are already completed in the previous sections:
- Delete the folder Cloud_Run_Function
- Delete the file db_script.sql
- Delete the file tools.yaml
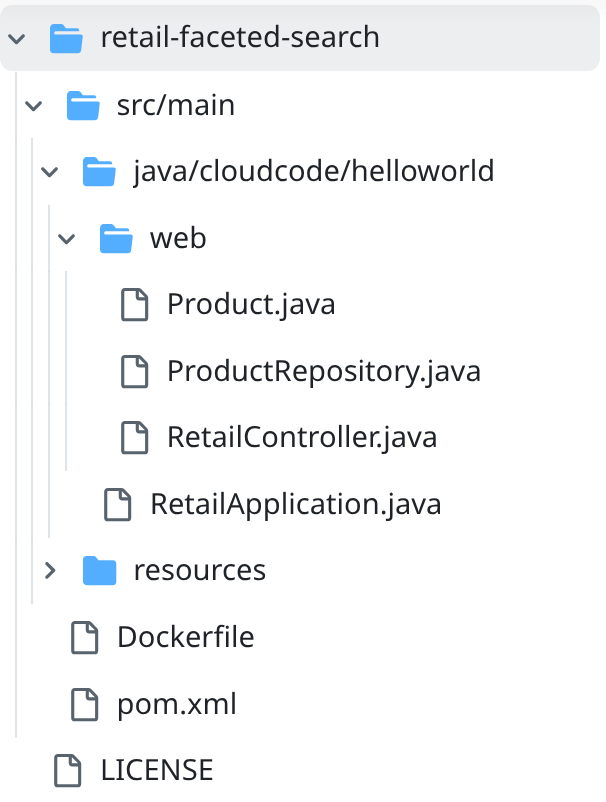
- Navigate into the project folder retail-faceted-search and you should see the project structure:
- In the file ProductRepository.java you have to modify the TOOLBOX_ENDPOINT variable with the endpoint from your Cloud Run Function (deployed) or take the endpoint from the hands-on speaker.
Search for the following line of code and replace it with your endpoint:
public static final String TOOLBOX_ENDPOINT = "https://retail-product-search-quality-<<YOUR_PROJECT_NUMBER>>.us-central1.run.app";
- Make sure the Dockerfile and pom.xml are up to your project configuration (no change needed unless you have explicitly changed any version or configuration.
- In the Cloud Shell Terminal make sure you are inside your main folder and within the project folder (faceted_searching_retail / retail-faceted-search). Use the following commands to ensure that unless you are already in the right folder in the terminal:
cd faceted_searching_retail

cd retail-faceted-search
- Package, build and test your application locally:
mvn package

mvn spring-boot:run
You should be able to view your application by clicking on "Preview on port 8080" in the Cloud Shell Terminal as shown below:
9. Deploy to Cloud Run: ***IMPORTANT STEP
In the Cloud Shell Terminal make sure you are inside your main folder and within the project folder (faceted_searching_retail / retail-faceted-search). Use the following commands to ensure that unless you are already in the right folder in the terminal:
cd faceted_searching_retail

cd retail-faceted-search
Once you are sure you are in the project folder, run the following command:
gcloud run deploy retail-search --source . \
--region us-central1 \
--allow-unauthenticated \
--labels dev-tutorial=codelab-alloydb-hybrid-search
Once deployed, you should receive a deployed Cloud Run Endpoint that looks like this:
https://retail-search-**********-uc.a.run.app/
10. Demo
Let's see it all come together in action:
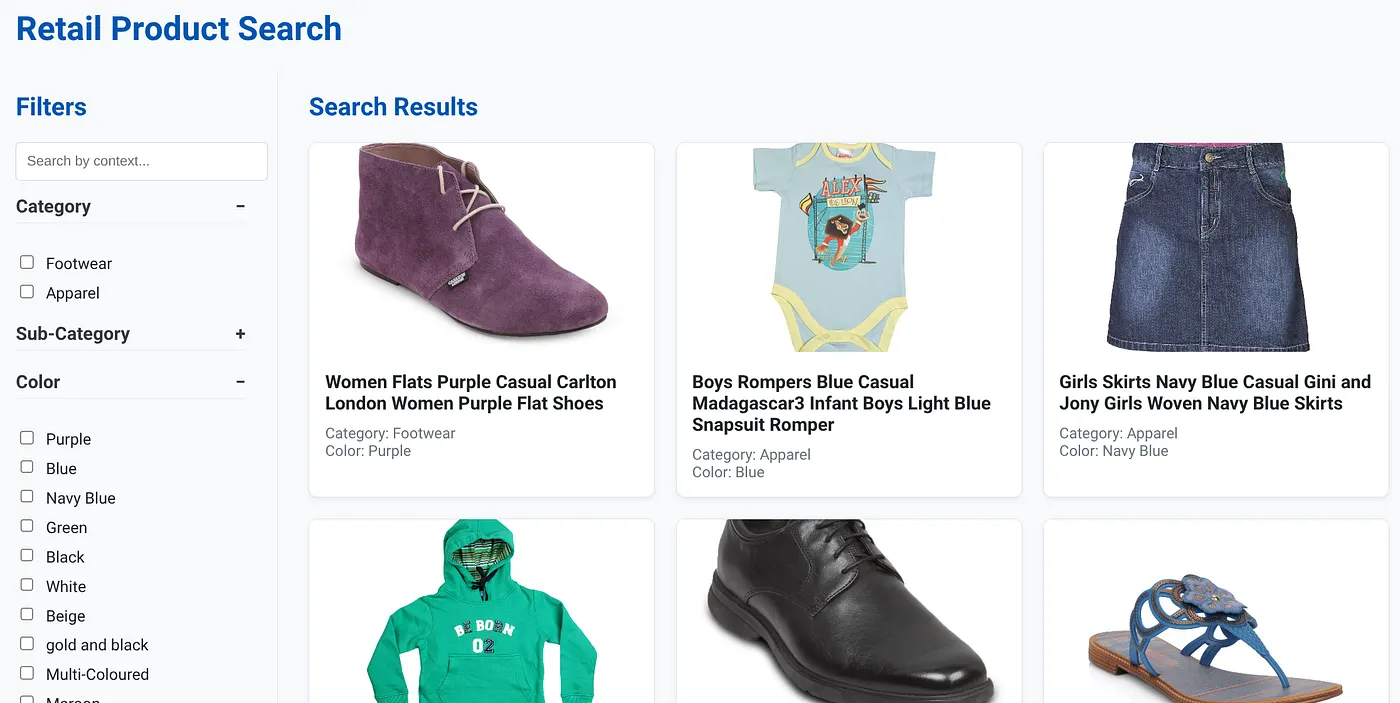
The above image shows the landing page for the dynamic hybrid search app.
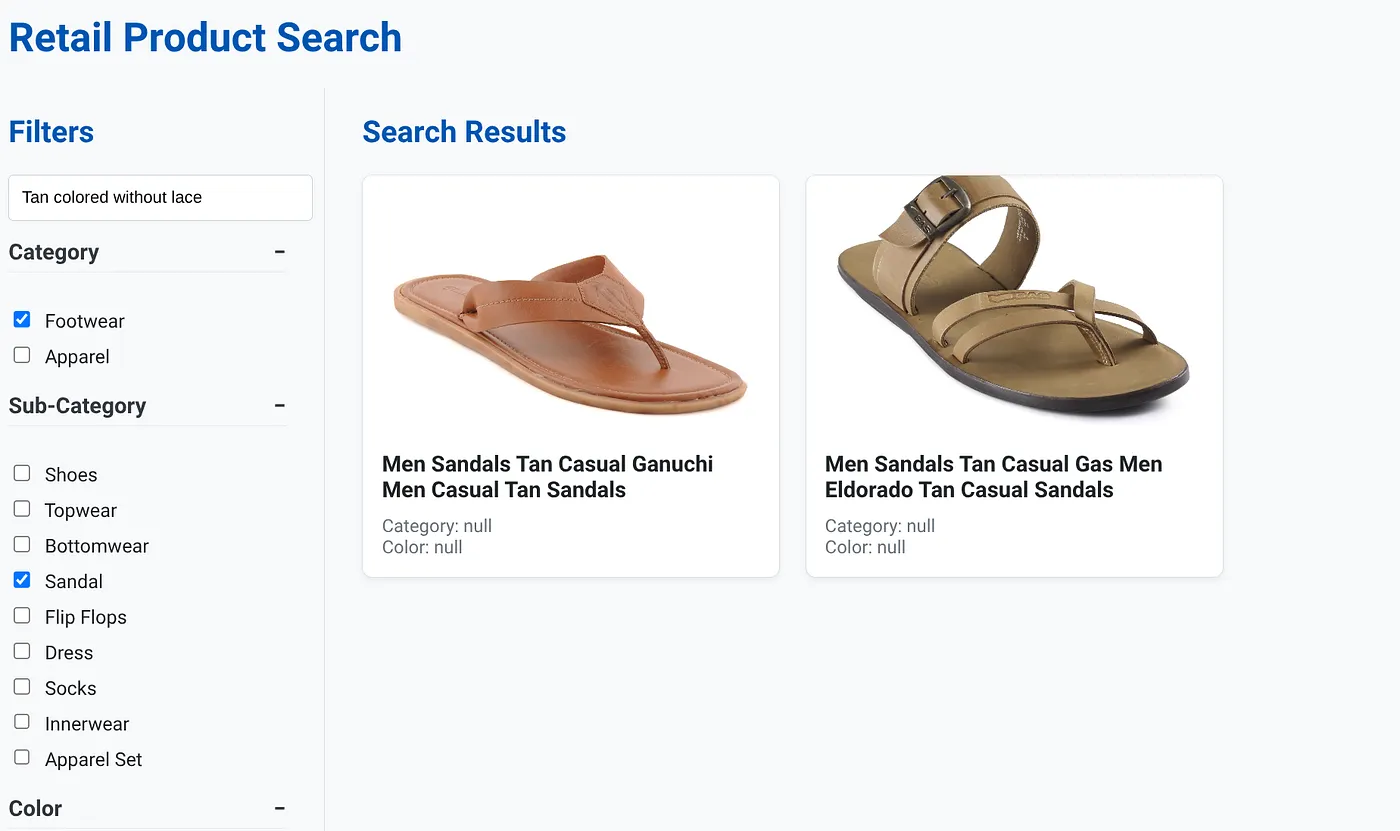
The above image has the search results for "Tan colored without lace" . The Faceted filters selected are: Footwear, Sandal.
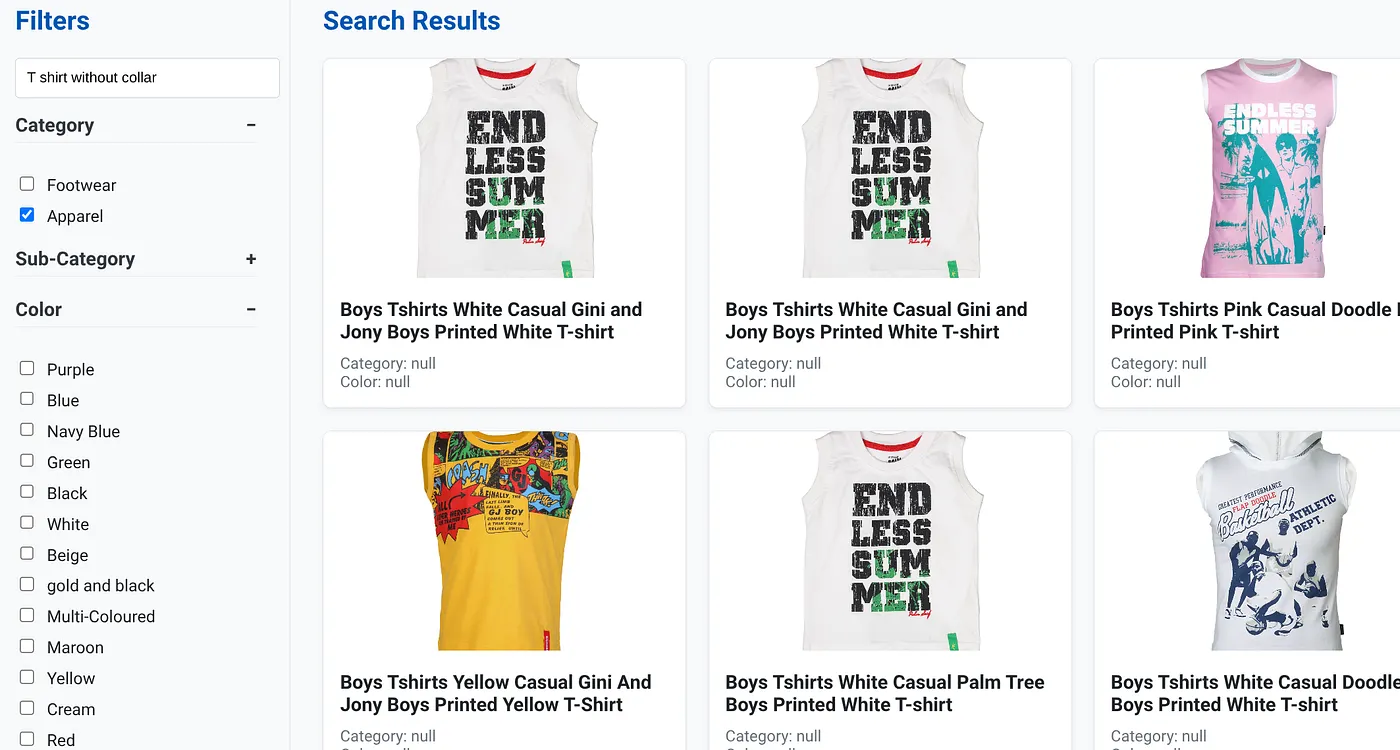
The above image shows the search results for "T shirt without collar" . Faceted filters: Apparel
You can now incorporate more generative and agentic features to make this application actionable.
Try it out so you're inspired to build on your own!!!
11. Clean up
To avoid incurring charges to your Google Cloud account for the resources used in this post, follow these steps:
- In the Google Cloud console, go to the resource manager page.
- In the project list, select the project that you want to delete, and then click Delete.
- In the dialog, type the project ID, and then click Shut down to delete the project.
- Alternatively, you can just delete the AlloyDB cluster (change the location in this hyperlink if you didn't choose us-central1 for the cluster at the time of configuration) that we just created for this project by clicking the DELETE CLUSTER button.
12. Congratulations
Congratulations! You have successfully built and deployed a HYBRID SEARCH APP with ALLOYDB on CLOUD RUN!!!
Why This Matters for businesses:
This dynamic hybrid search application, powered by AlloyDB AI, offers significant advantages for enterprise retail and other businesses:
Superior Relevance: By combining contextual (vector) search with precise faceted filtering and intelligent reranking, customers receive highly relevant results, leading to increased satisfaction and conversions.
Scalability: AlloyDB's architecture and scaNN indexing are designed to handle massive product catalogs and high query volumes, crucial for growing e-commerce businesses.
Performance: Faster query responses, even for complex hybrid searches, ensure a smooth user experience and minimize abandonment rates.
Future-Proofing: The integration of AI capabilities (embeddings, LLM validation) positions the application for future advancements in personalized recommendations, conversational commerce, and intelligent product discovery.
Simplified Architecture: Integrating vector search directly within AlloyDB eliminates the need for separate vector databases or complex synchronization, simplifying development and maintenance.
Let's say a user typed in a natural language query like "eco-friendly running shoes for women with high arch support."
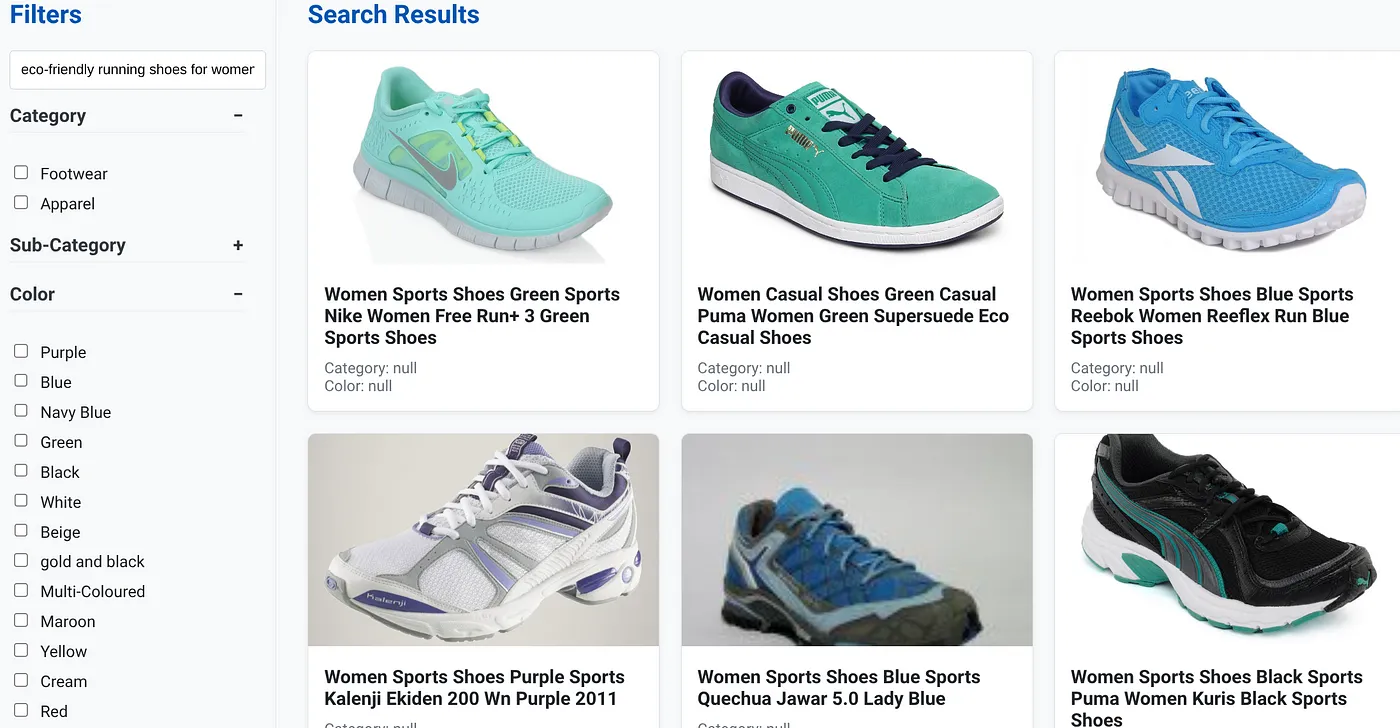
while simultaneously, the user applies faceted filters for "Category: <<>>" "Color: <<>>," and say "Price: $100-$150":
- The system instantly returns a refined list of products, semantically aligned with the natural language and precisely matching the chosen filters.
- Behind the scenes, the scaNN index accelerates the vector search, inline and adaptive filtering ensure performance with combined criteria, and reranking presents the optimal results at the top.
- The speed and accuracy of the results clearly illustrate the power of combining these technologies for a truly intelligent retail search experience.
Building a next-generation retail search application requires moving beyond conventional methods and by using the power of AlloyDB, Vertex AI, Vector Search with scaNN indexing, dynamic faceted filtering, reranking, and LLM validation, we can deliver an unparalleled customer experience that drives engagement and boosts sales. This robust, scalable, and intelligent solution demonstrates how modern database capabilities, infused with AI, are reshaping the future of retail!!!