1. 学習内容
ようこそ。今日は、かなりクールな旅に出かけます。まず、人気のソーシャル イベント プラットフォーム InstaVibe について考えてみましょう。グループ アクティビティの計画は成功していますが、一部のユーザーにとっては面倒な作業だと感じられる可能性があります。友人の興味を把握し、イベントや会場の無数の選択肢を絞り込み、最終的にすべてを調整する作業を想像してみてください。これは大変な作業です。ここで AI、特にインテリジェント エージェントを導入することで、大きな違いを生み出すことができます。
このアイデアは、ユーザーと友人の好みを賢く「聞き取り」、素晴らしいアクティビティをユーザーに合わせて積極的に提案するなど、これらのエージェントが重労働を処理できるシステムを構築することです。InstaVibe でのソーシャル プランニングをシームレスで楽しいものにすることが、私たちの目標です。これらのスマート アシスタントの構築を開始するには、適切なツールを使用して強力な基盤を構築する必要があります。
表示されるコンセプトは次のとおりです。

Google の ADK の基礎: Google の Agent Development Kit(ADK)を使用して最初のインテリジェント エージェントを構築するための基礎を習得します。基本的なコンポーネント、エージェントのライフサイクル、フレームワークの組み込みツールを効果的に活用する方法について説明します。
Model Context Protocol(MCP)でエージェントの機能を拡張する: カスタムツールとコンテキストをエージェントに装備して、エージェントが特殊なタスクを実行し、特定の情報にアクセスできるようにする方法を学びます。Model Context Protocol(MCP)のコンセプトを紹介します。このコンテキストを提供するために MCP サーバーを設定する方法について説明します。
エージェントのインタラクションとオーケストレーションの設計: 単一のエージェントを超えて、エージェントのオーケストレーションについて理解します。単純な順次ワークフローから、ループ、条件付きロジック、並列処理を含む複雑なシナリオまで、さまざまなインタラクション パターンを設計します。ADK フレームワーク内にサブエージェントのコンセプトを導入し、モジュール式タスクを管理します。
連携型マルチエージェント システムの構築: 複数のエージェントが連携して複雑な目標を達成するシステムを設計する方法を学びます。エージェント間(A2A)通信プロトコルを学習して実装し、分散エージェント(異なるマシンやサービスで実行される可能性のあるエージェント)が確実にやり取りするための標準化された方法を確立します。
Google Cloud でのエージェントの製品化: エージェント アプリケーションを開発環境からクラウドに移行します。Google Cloud Platform(GCP)でスケーラブルで堅牢なマルチエージェント システムを設計してデプロイするためのベスト プラクティスを学びます。Cloud Run などの GCP サービスを活用する方法を学び、最新の Google Agent Engine のエージェントのホスティングと管理機能について説明します。
2. アーキテクチャ
InstaVibe を使用した AI によるソーシャル プランニング
ソーシャル リスニングとは
ソーシャル リスニングとは、ソーシャル メディア、フォーラム、ニュースサイトなどのプラットフォームでデジタル会話をモニタリングし、特定のトピック、ブランド、業界について人々がどのように語っているかを把握するプロセスです。世間の感情、トレンド、ユーザーのニーズに関する貴重な分析情報を提供します。このワークショップでは、エージェント ベースのシステム内でこのコンセプトを活用します。
あなたは InstaVibe のチームに所属しています
たとえば、若年層をターゲットとした人気のソーシャル イベント プラットフォームを運営する成功したスタートアップ「InstaVibe」で働いているとします。業績は好調ですが、多くのテクノロジー企業と同様に、あなたのチームは AI を活用したイノベーションを求める投資家からのプレッシャーに直面しています。社内でも、他のユーザーほどエンゲージメントしていないユーザーのセグメントがあることに気づきました。たとえば、グループ アクティビティを開始する傾向が低い、計画プロセスが難しいと感じているなどです。企業にとって、これはこの重要なユーザー グループのプラットフォームのスティッキネスが低下することを意味します。
チームの調査によると、AI を活用したサポートは、これらのユーザーのエクスペリエンスを大幅に向上させる可能性があります。このアイデアは、ユーザーとその友人の興味に基づいて関連性の高いアクティビティを積極的に提案することで、外出の計画プロセスを効率化することを目的としています。あなたとあなたの同僚が直面している問題は、AI エージェントが、興味のあることの発見、アクティビティの調査、初期調整などの時間のかかるタスクを自動化するにはどうすればよいかということです。
エージェント ベースのソリューション(プロトタイプのコンセプト)
マルチエージェント システムを搭載したプロトタイプ機能の開発を提案します。概念的な内訳は次のとおりです。
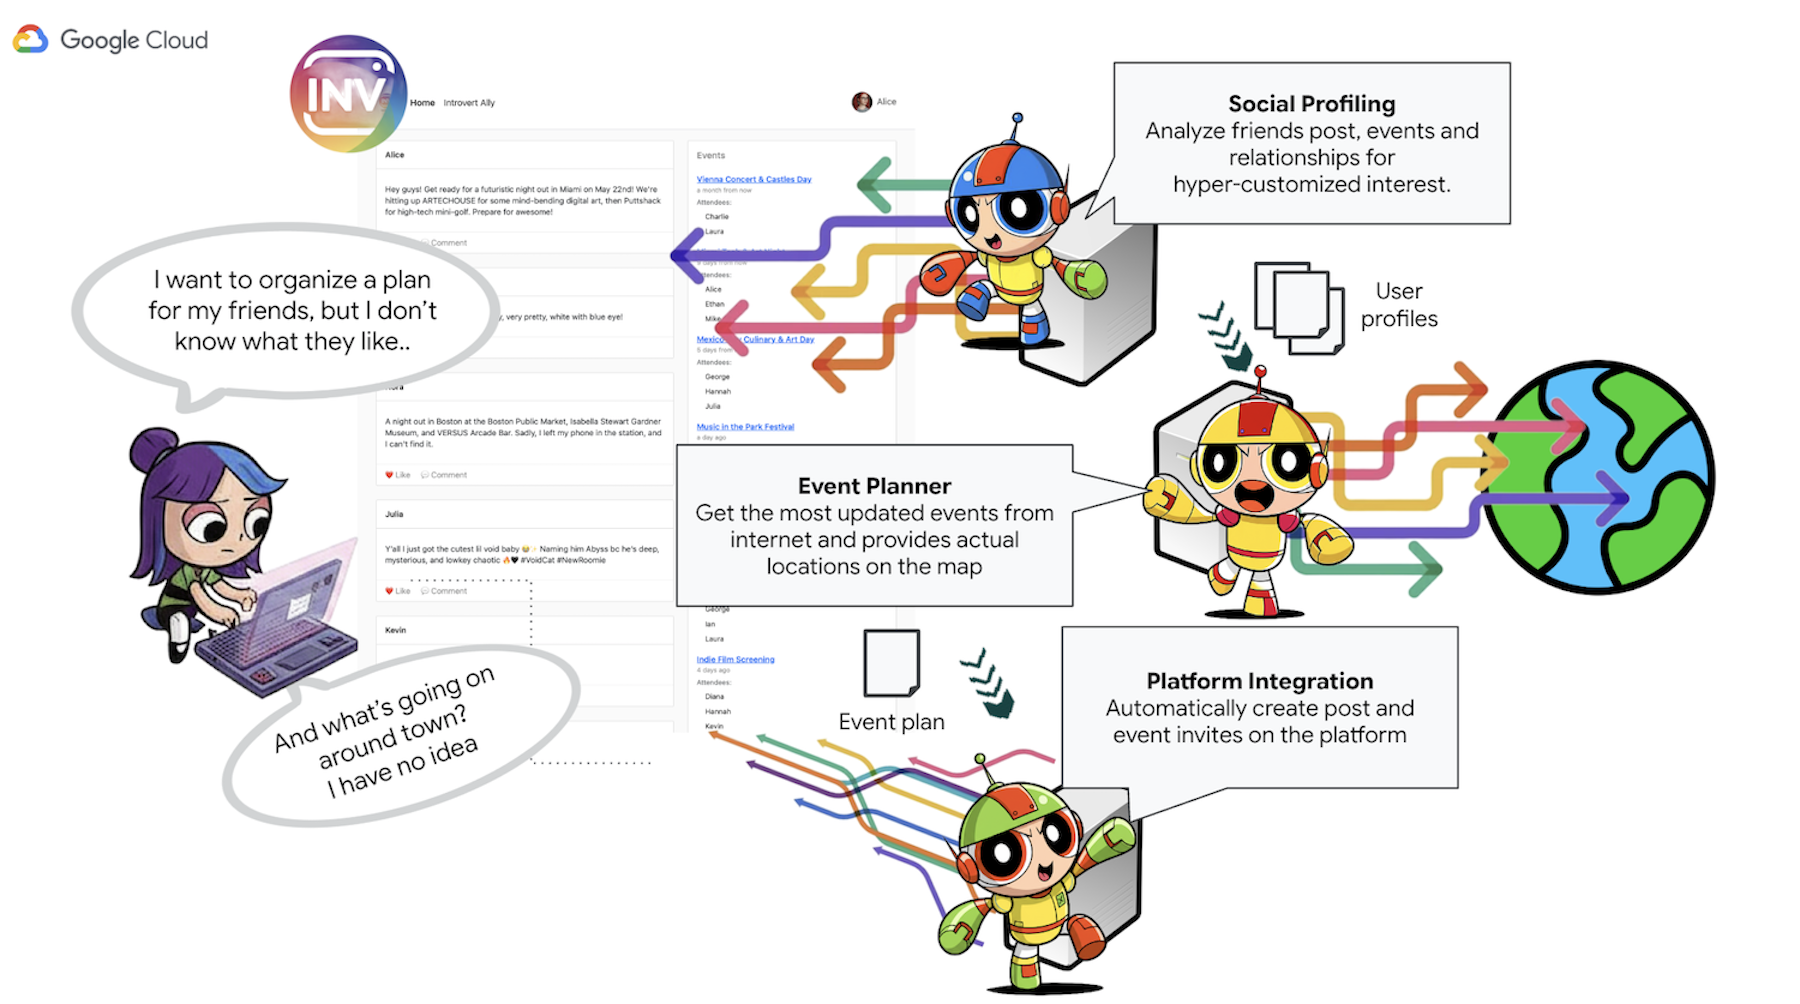
- ソーシャル プロファイリング エージェント: このエージェントは、ソーシャル リスニング手法を使用して、ユーザーのつながり、インタラクション、およびユーザーの好みに応じたより広範なパブリック トレンドを分析します。この目的は、共通の興味や適切なアクティビティの特性(静かな集まりを好む、特定の趣味など)を特定することです。
- イベント プランニング エージェント: ソーシャル プロファイリング エージェントから得られた分析情報を使用して、特定された条件(場所、興味など)に沿った特定のイベント、会場、アイデアをオンライン リソースで検索します。
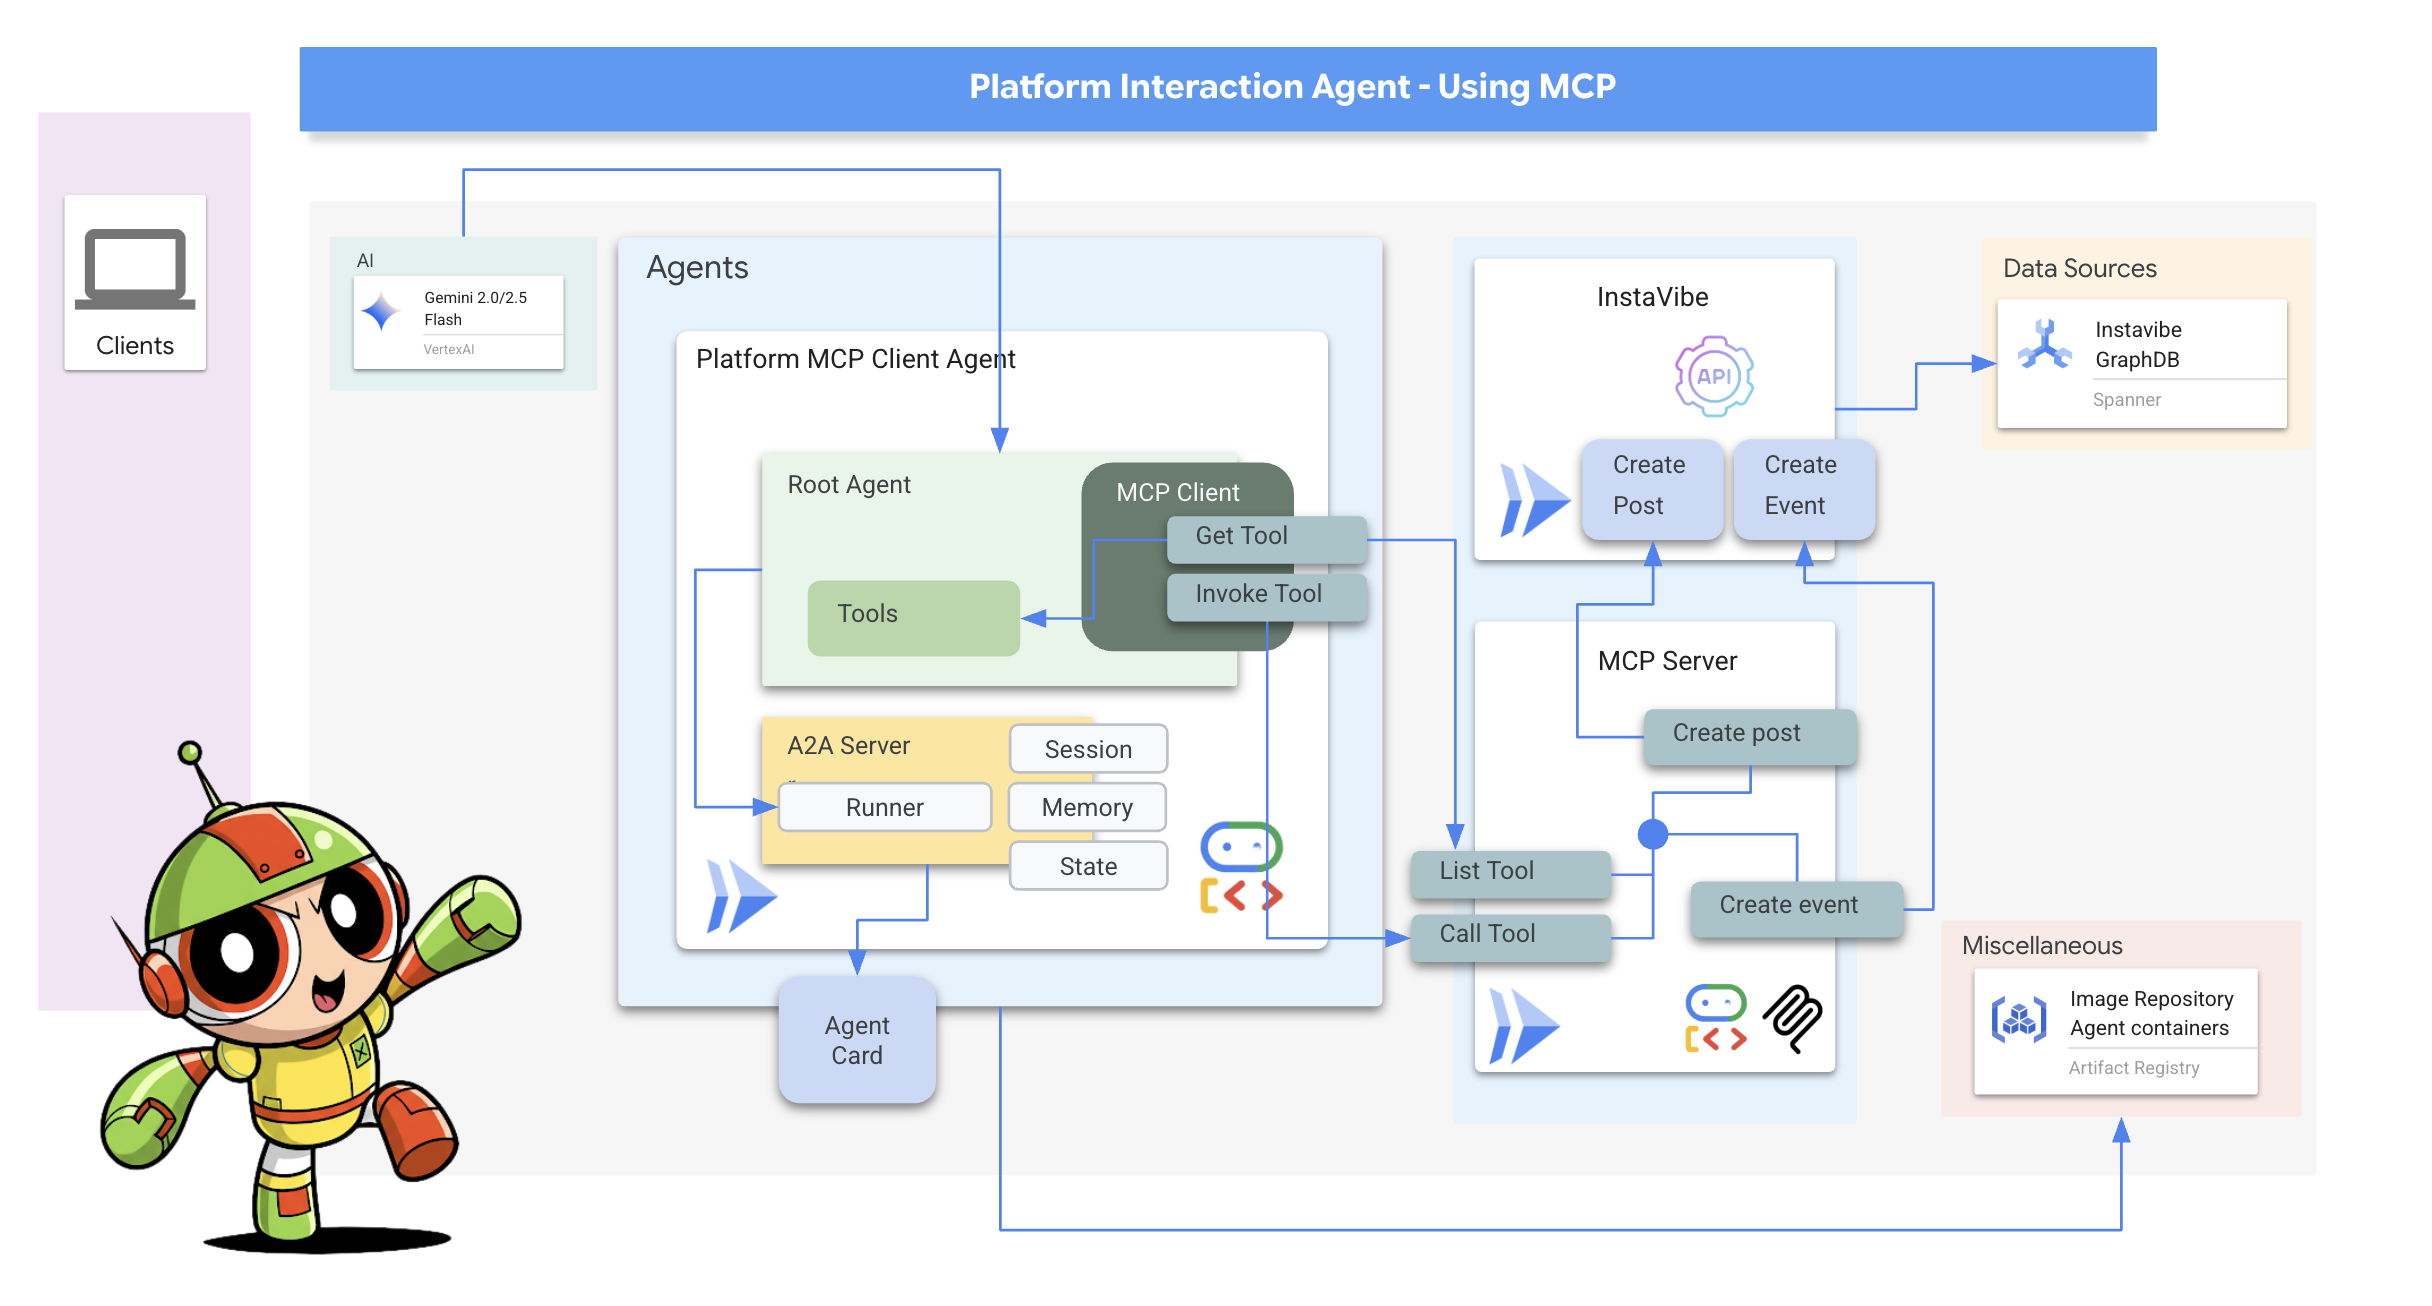
- プラットフォーム インタラクション エージェント(MCP を使用): このエージェントは、アクティビティ プランニング エージェントから最終的なプランを取得します。主な機能は、事前定義された MCP(Model Context Protocol)ツールを利用して InstaVibe プラットフォームと直接やり取りすることです。このツールを使用すると、エージェントはイベントの提案を作成し、計画の概要を示す投稿を作成できます。
- オーケストレーター エージェント: このエージェントは中央コーディネーターとして機能します。InstaVibe プラットフォームからユーザーの最初のリクエストを受け取り、全体的な目標(「友達と自分のためのイベントを計画する」など)を理解してから、特定のタスクを適切な専門エージェントに論理的な順序で委任します。エージェント間の情報の流れを管理し、最終結果がユーザーに返されるようにします。
主なアーキテクチャ要素とテクノロジー

Google Cloud Platform(GCP):
- Vertex AI:
- Gemini モデル: Google の最先端の大規模言語モデル(LLM)(Gemini など)へのアクセスを提供します。このモデルは、エージェントの推論機能と意思決定機能を強化します。
- Vertex AI Agent Engine: オーケストレーター エージェントのデプロイ、ホスティング、スケーリングに使用されるマネージド サービス。本番環境への移行を簡素化し、インフラストラクチャの複雑さを抽象化します。
- Cloud Run: コンテナ化されたアプリケーションをデプロイするためのサーバーレス プラットフォーム。この情報は、以下の目的で使用されます。
- メインの InstaVibe ウェブ アプリケーションをホストします。
- A2A 対応の個々のエージェント(Planner、Social Profiling、Platform Interaction)を独立したマイクロサービスとしてデプロイします。
- MCP ツールサーバーを実行し、InstaVibe の内部 API をエージェントが利用できるようにします。
- Spanner: フルマネージドでグローバルに分散され、強整合性を備えたリレーショナル データベース。このワークショップでは、GRAPH DDL とクエリ機能を使用して、グラフ データベースとしての機能を活用します。
- 複雑なソーシャル関係(ユーザー、友情、イベントへの参加、投稿)をモデル化して保存します。
- ソーシャル プロファイリング エージェントでこれらの関係を効率的にクエリできるようにします。
- Artifact Registry: コンテナ イメージの保存、管理、保護を行うフルマネージド サービス。
- Cloud Build: Google Cloud でビルドを実行するサービス。これを使用して、エージェントとアプリケーションのソースコードから Docker コンテナ イメージを自動的にビルドします。
- Cloud Storage: Cloud Build などのサービスでビルド アーティファクトの保存に使用され、Agent Engine で運用上のニーズに使用されます。
- コア エージェントのフレームワークとプロトコル:
- Google の Agent Development Kit(ADK): 次の主要なフレームワーク:
- 個々のインテリジェント エージェントのコアロジック、動作、命令セットを定義する。
- エージェントのライフサイクル、状態、メモリ(短期セッションの状態と、場合によっては長期的な知識)の管理。
- エージェントが世界とやり取りするために使用できるツール(Google 検索やカスタムビルドのツールなど)の統合。
- サブエージェントの順次実行、ループ実行、並列実行など、マルチエージェント ワークフローのオーケストレーション。
- Agent-to-Agent(A2A)通信プロトコル: 次の機能を可能にするオープン スタンダード。
- 異なる AI エージェント間の直接的で標準化された通信とコラボレーション。別々のサービスとして実行されている場合や、異なるマシンで実行されている場合でも可能です。
- エージェントが互いの機能(エージェント カード経由)を検出し、タスクを委任する。これは、Orchestrator エージェントが Planner、Social、Platform の各専用エージェントとやり取りするために不可欠です。
- A2A Python ライブラリ(a2a-python): ADK エージェントが A2A プロトコルを話すために使用される具体的なライブラリ。これは、次の処理に必要なサーバーサイド コンポーネントを提供します。
- エージェントを A2A 準拠のサーバーとして公開します。
- 検出用の「エージェント カード」のサービングを自動的に処理します。
- 他のエージェント(オーケストレーターなど)からのタスク リクエストを受信して管理します。
- Model Context Protocol(MCP): エージェントが次のことを行えるようにするオープン標準。
- 標準化された方法で外部ツール、データソース、システムに接続して利用します。
- プラットフォーム インタラクション エージェントは、MCP クライアントを使用して MCP サーバーと通信します。MCP サーバーは、InstaVibe プラットフォームの既存の API とやり取りするためのツールを公開します。
- Google の Agent Development Kit(ADK): 次の主要なフレームワーク:
- デバッグツール:
- A2A インスペクタ: A2A インスペクタは、このワークショップ全体で使用されるウェブベースのデバッグツールで、A2A 対応エージェントに接続して検査し、操作するために使用します。最終的な本番環境アーキテクチャの一部ではありませんが、開発ワークフローの重要な部分です。このサービスでは、次の機能が提供されます。
- エージェント カード ビューア: エージェントの公開機能をフェッチして検証します。
- チャット インターフェース: デプロイされたエージェントにメッセージを直接送信して、すぐにテストできます。
- デバッグ コンソール: インスペクタとエージェントの間で交換される JSON-RPC メッセージの元データを表示します。
- A2A インスペクタ: A2A インスペクタは、このワークショップ全体で使用されるウェブベースのデバッグツールで、A2A 対応エージェントに接続して検査し、操作するために使用します。最終的な本番環境アーキテクチャの一部ではありませんが、開発ワークフローの重要な部分です。このサービスでは、次の機能が提供されます。
- 言語モデル(LLM): システムの「頭脳」:
- Google の Gemini モデル: 具体的には、gemini-2.0-flash などのバージョンを使用します。これらのモデルは、次の理由で選択されています。
- 高度な推論と指示の遵守: 複雑なプロンプトを理解し、詳細な指示に従い、タスクについて推論する能力があるため、エージェントの意思決定を強化するのに適しています。
- ツールの使用(関数呼び出し): Gemini モデルは、ADK を介して提供されるツールをいつ、どのように使用するかを判断することに優れており、エージェントが情報を収集したり、アクションを実行したりできます。
- 効率性(Flash モデル): 「Flash」バリアントは、パフォーマンスと費用対効果のバランスが優れており、迅速な応答を必要とする多くのインタラクティブ エージェント タスクに適しています。
- Google の Gemini モデル: 具体的には、gemini-2.0-flash などのバージョンを使用します。これらのモデルは、次の理由で選択されています。
3. 始める前に
👉Google Cloud コンソールの最上部にある [Cloud Shell をアクティブにする] をクリックします(Cloud Shell ペインの上部にあるターミナル型のアイコンです)。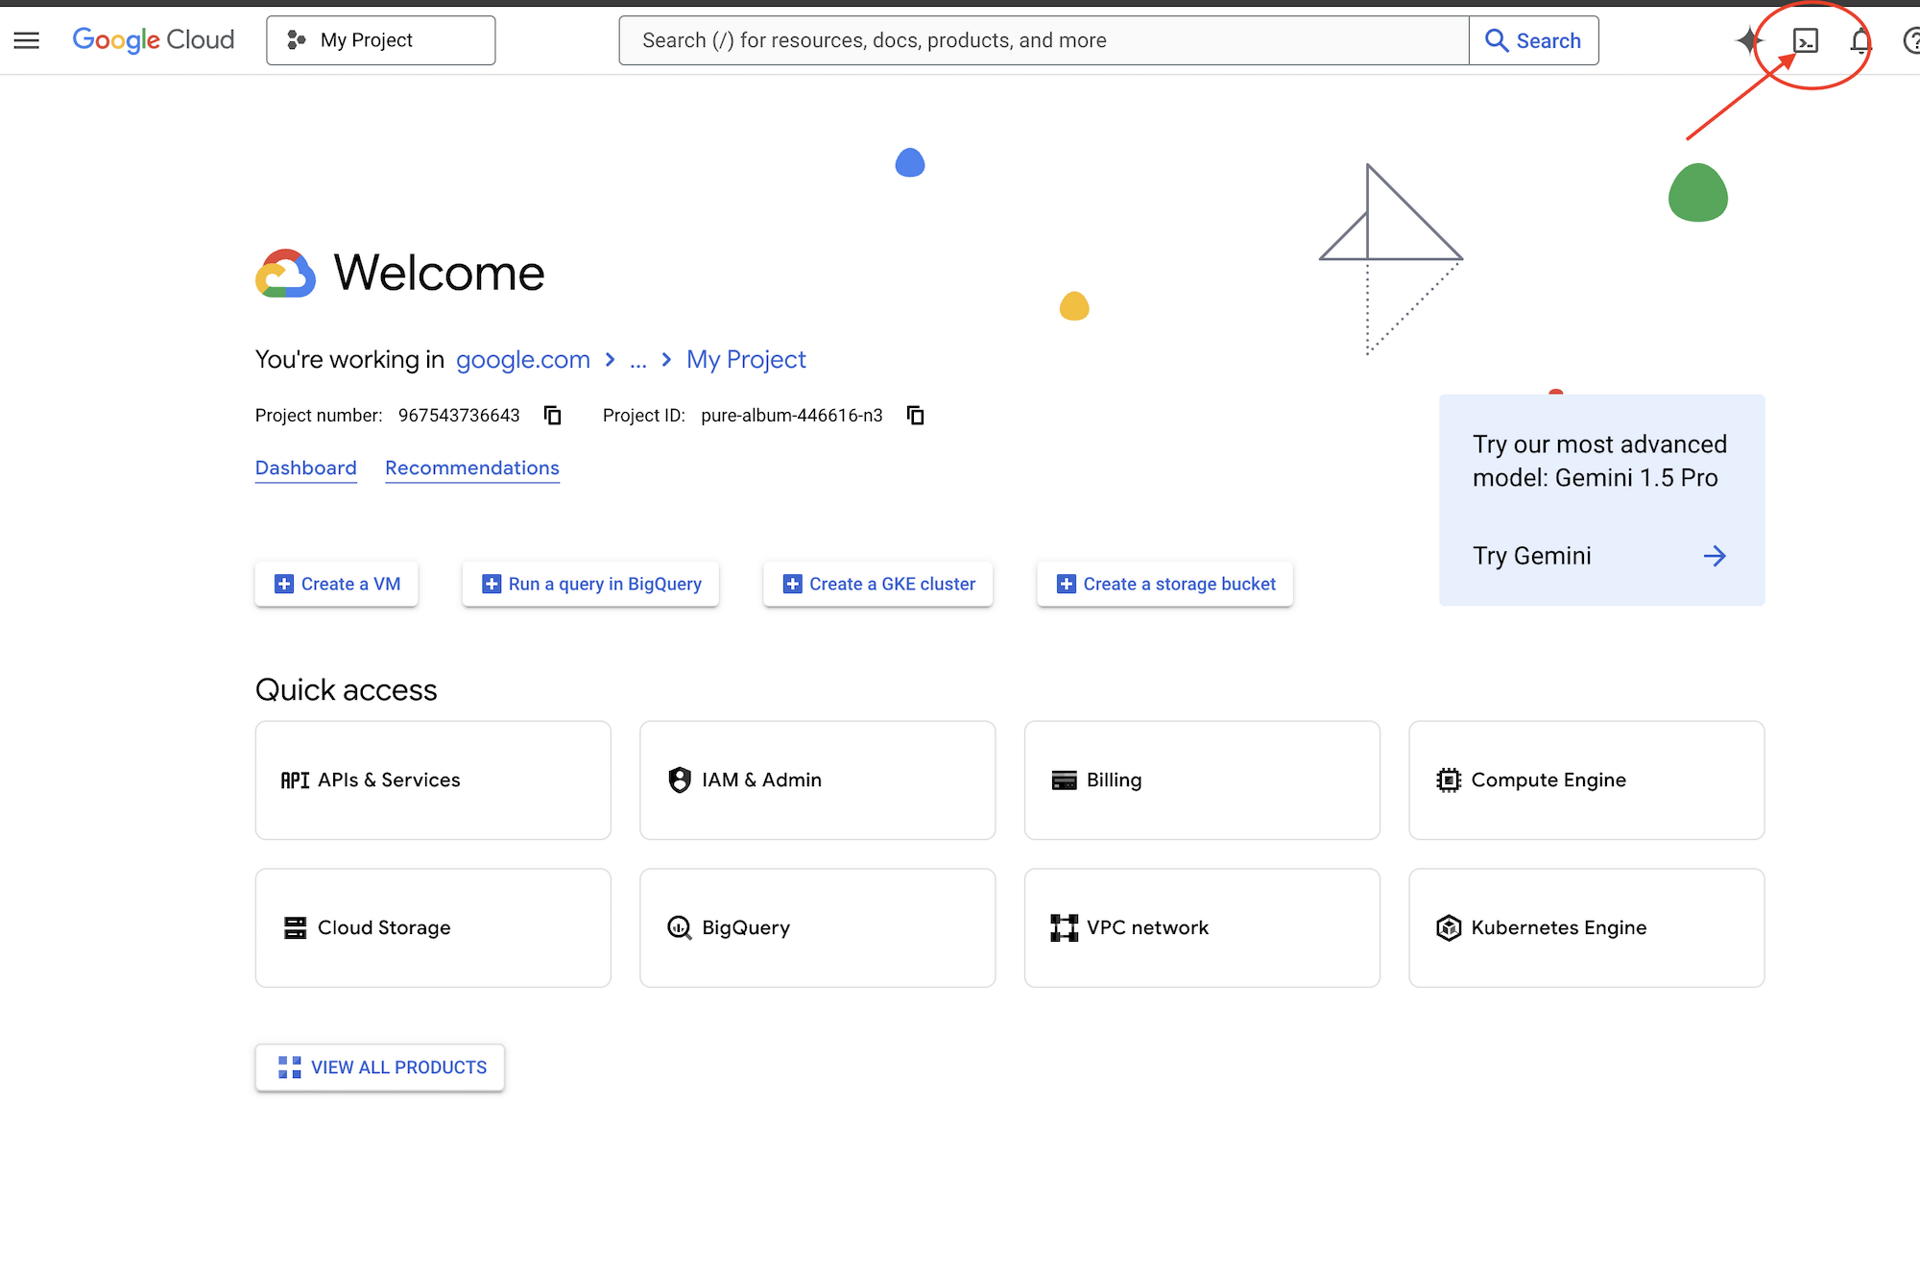
👉[エディタを開く] ボタン(鉛筆のアイコンが付いた開いたフォルダのアイコン)をクリックします。ウィンドウに Cloud Shell コードエディタが開きます。左側にファイル エクスプローラが表示されます。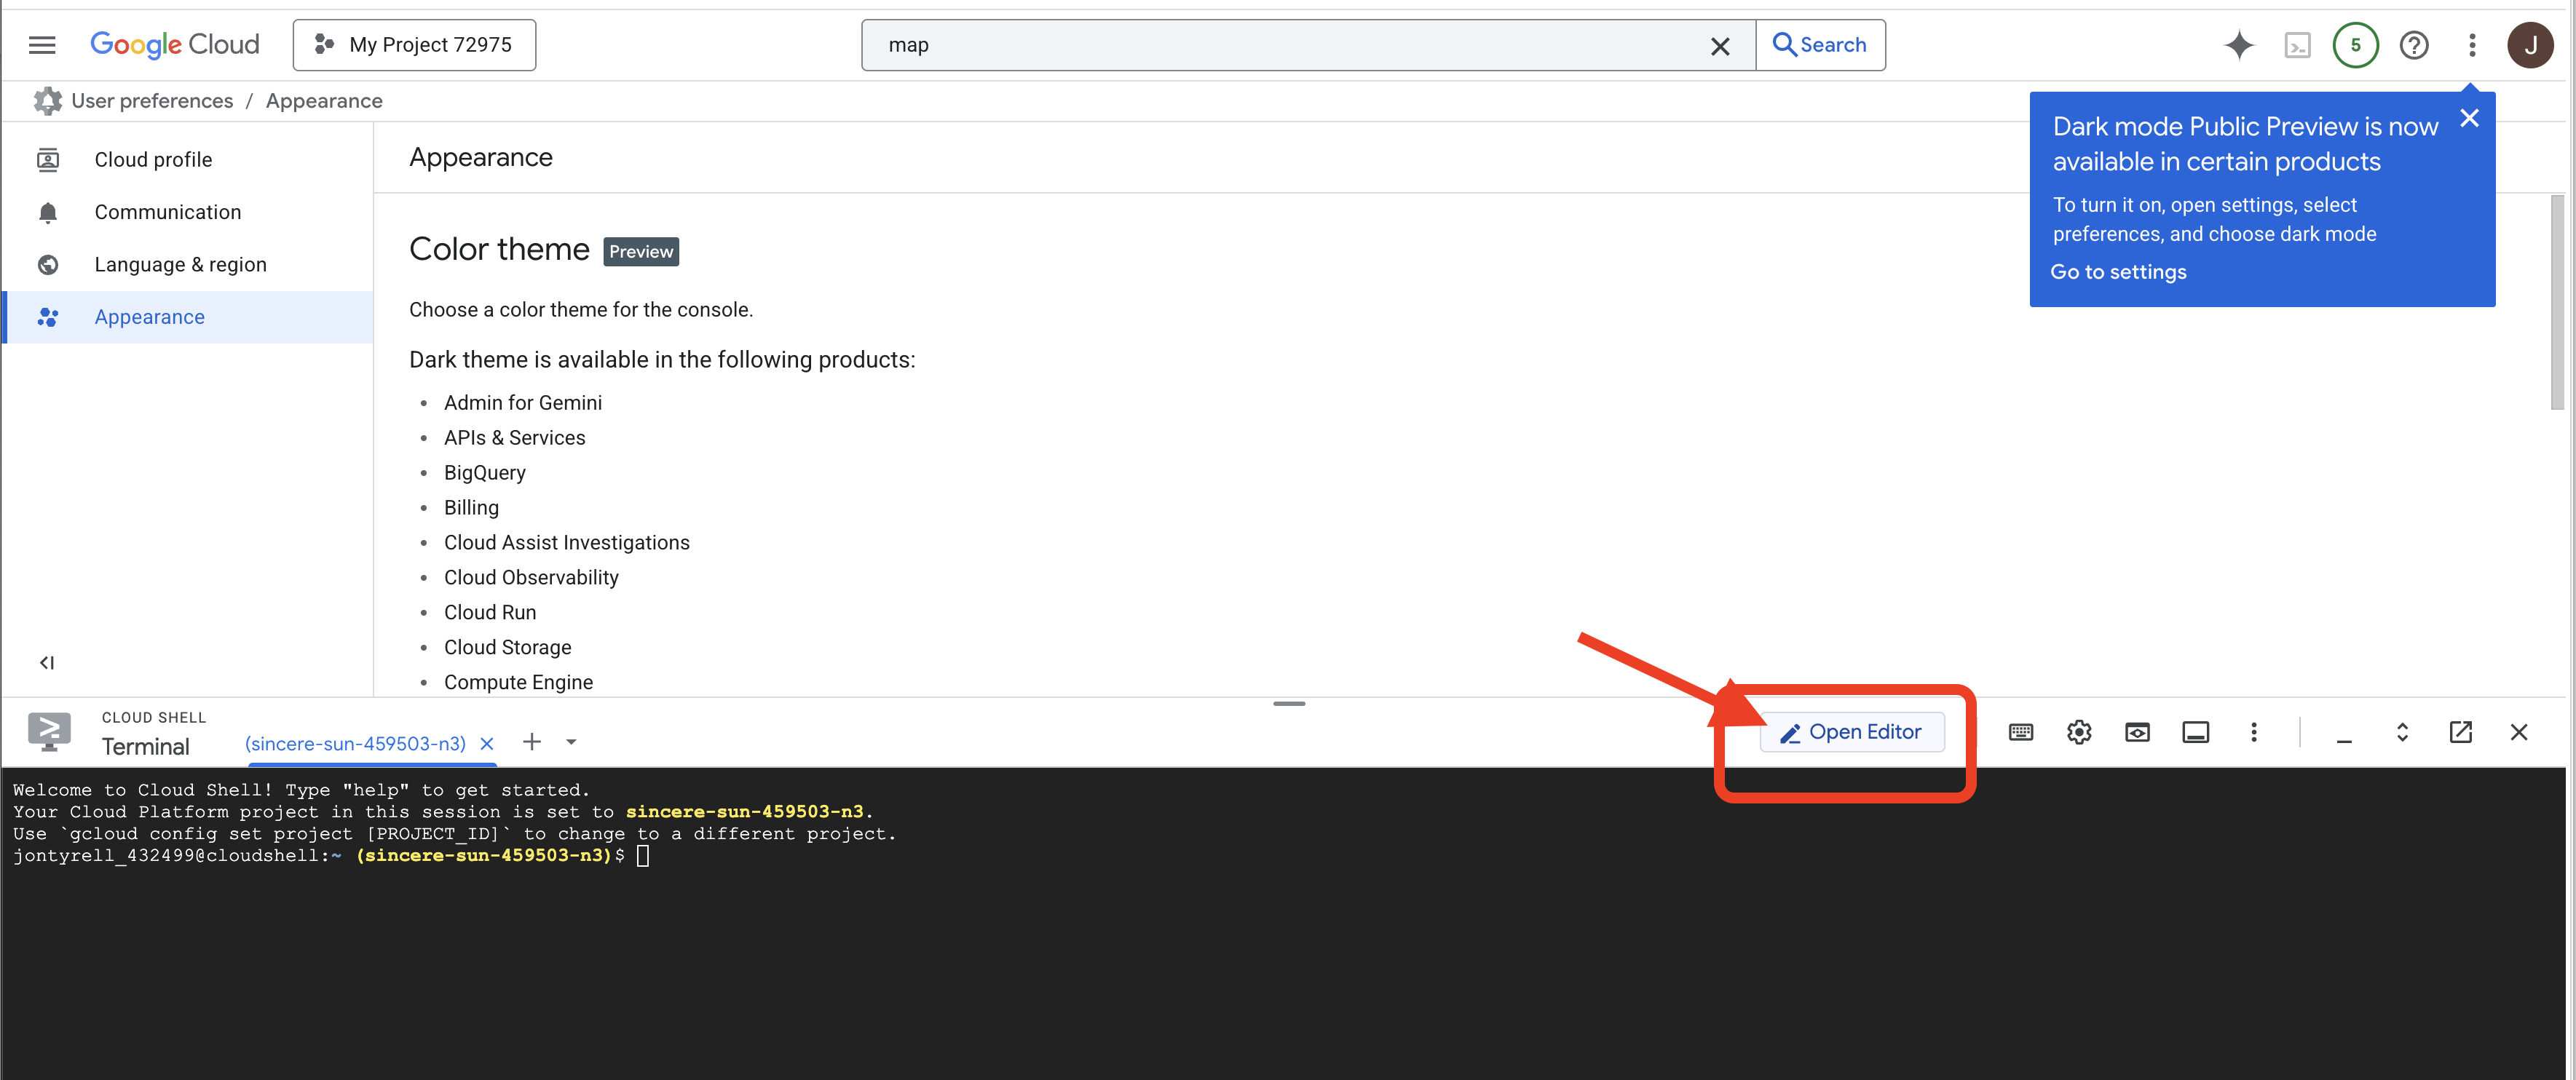
👉下のステータスバーにある [Cloud Code Sign-in] ボタンをクリックします。指示に従ってプラグインを承認します。ステータスバーに「Cloud Code - no project」と表示されている場合は、それを選択し、プルダウンの [Google Cloud プロジェクトを選択] で、作成したプロジェクトのリストから特定の Google Cloud プロジェクトを選択します。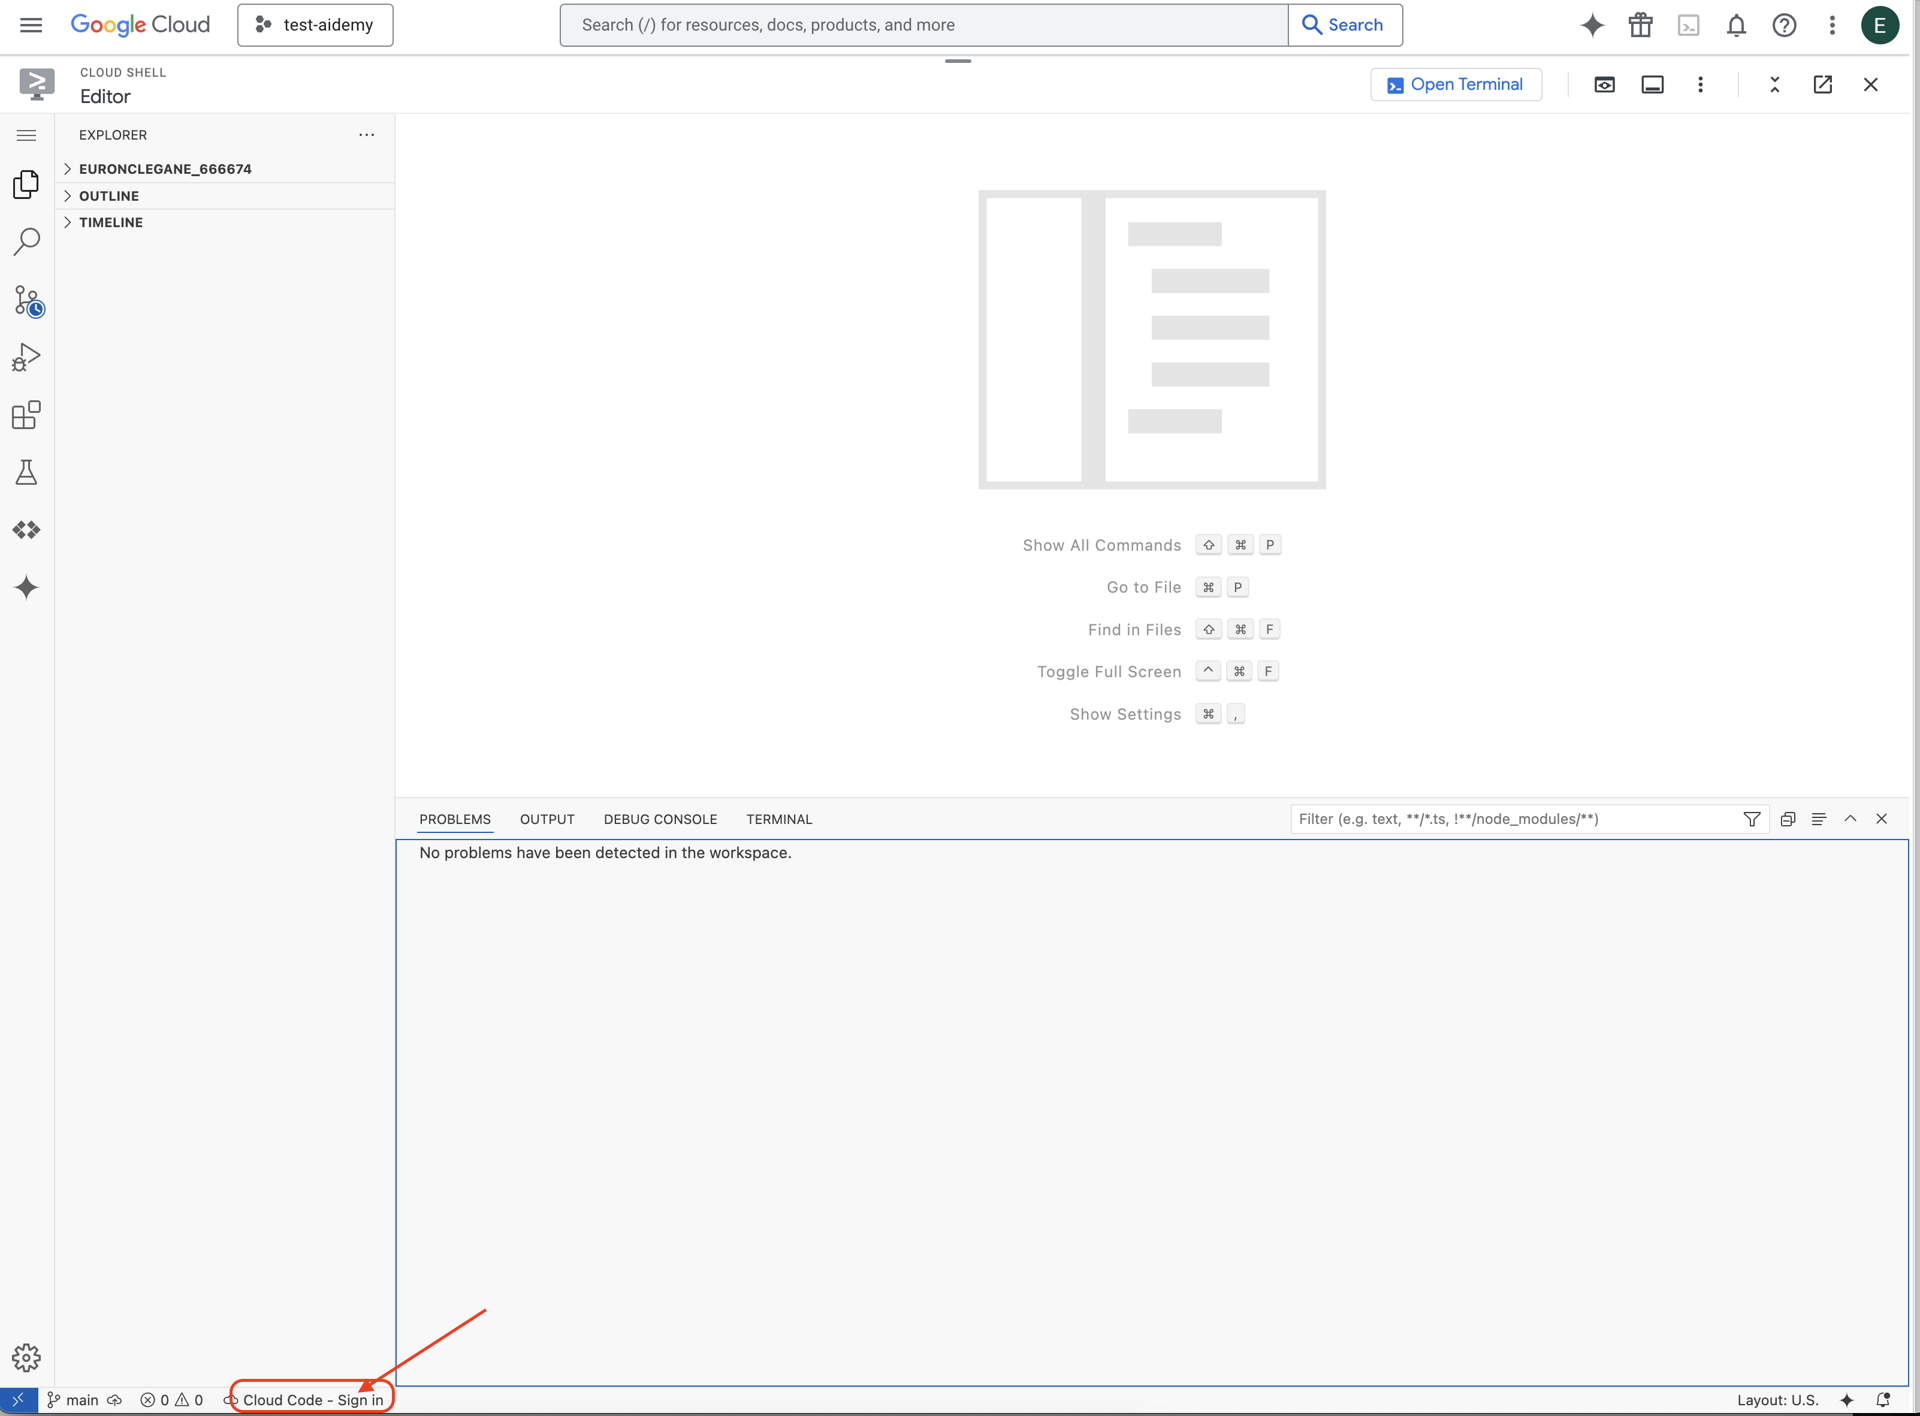
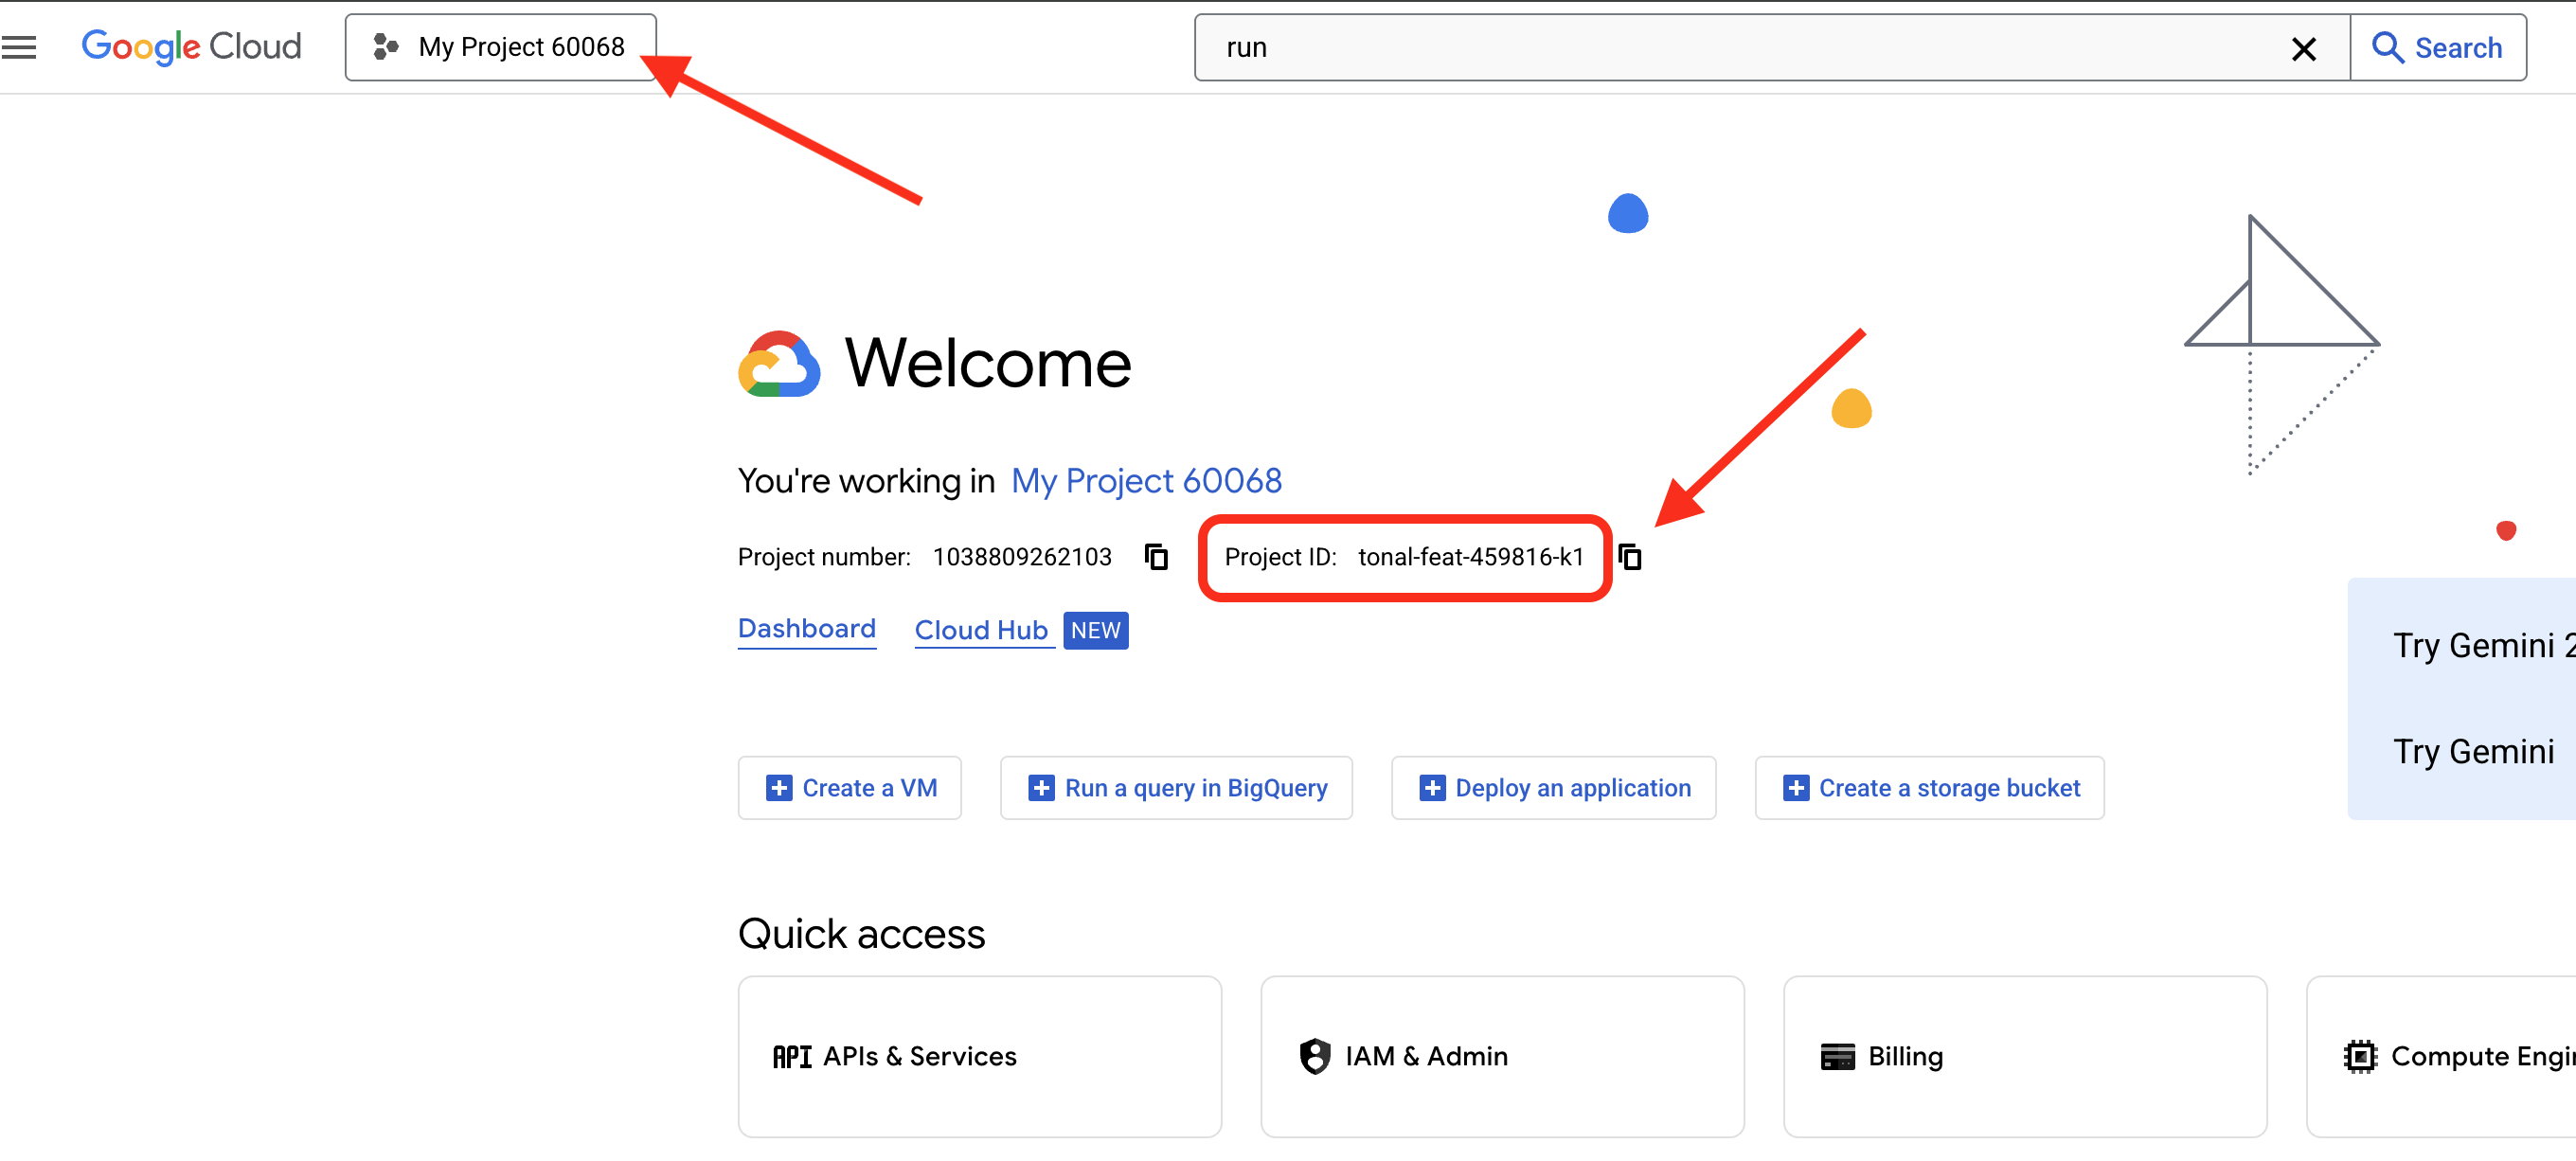
👉 Google Cloud プロジェクト ID を確認する:
- Google Cloud コンソール(https://console.cloud.google.com)を開きます。
- ページの上部にあるプロジェクト プルダウンから、このワークショップで使用するプロジェクトを選択します。
- プロジェクト ID は、ダッシュボードの [プロジェクト情報] カードに表示されます。
👉クラウド IDE でターミナルを開きます。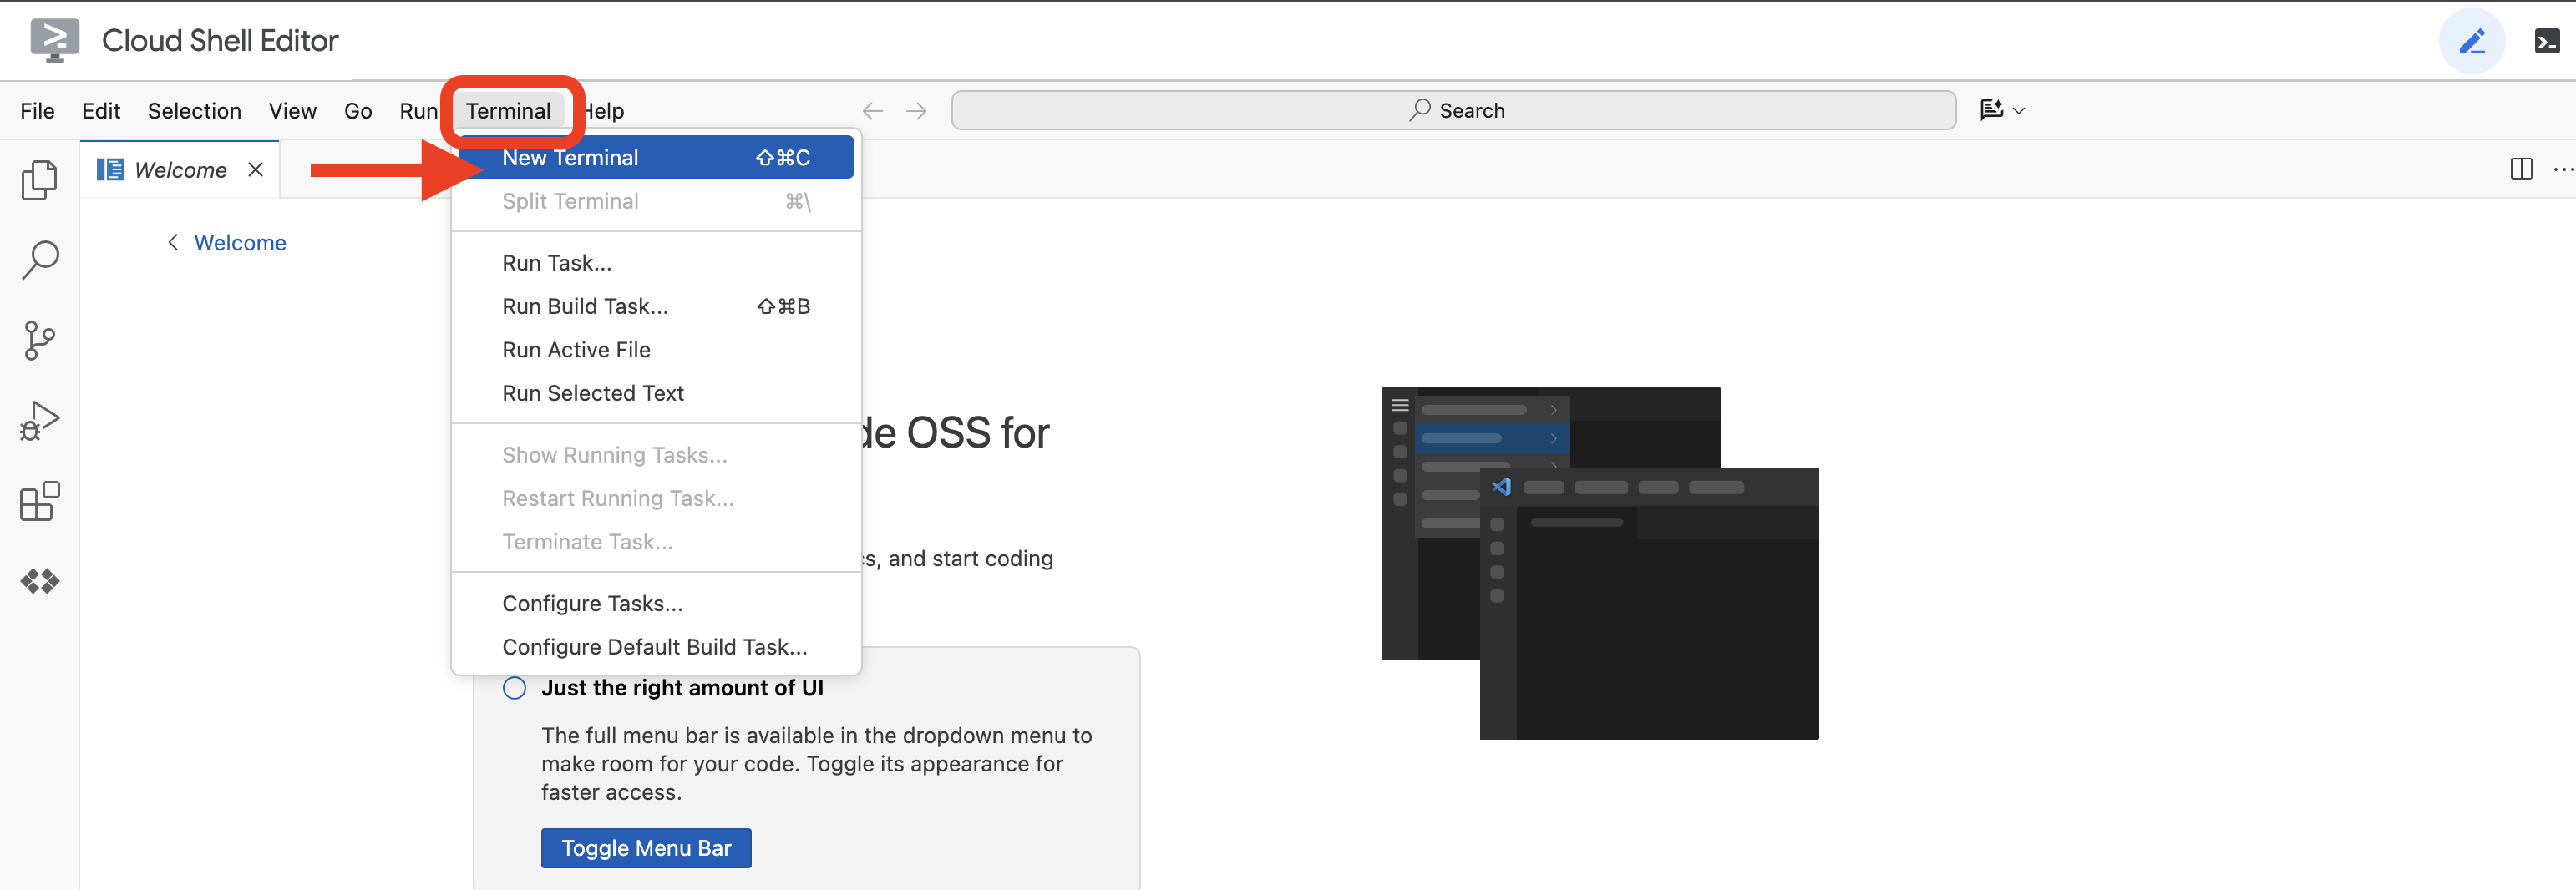
👉💻 ターミナルで、次のコマンドを使用して、すでに認証済みであることと、プロジェクトがプロジェクト ID に設定されていることを確認します。
gcloud auth list
👉💻 GitHub から instavibe-bootstrap プロジェクトのクローンを作成します。
git clone -b adk-1.2.1-a2a-0.2.7 https://github.com/weimeilin79/instavibe-bootstrap.git
chmod +x ~/instavibe-bootstrap/init.sh
chmod +x ~/instavibe-bootstrap/set_env.sh
プロジェクト構造について
ビルドを開始する前に、先ほどクローンした instavibe-bootstrap プロジェクトのレイアウトについて確認しましょう。これにより、ワークショップ全体でファイルの検索と編集を行う場所を把握できます。
instavibe-bootstrap/
├── agents/
│   ├── orchestrate/
│   ├── planner/
│   ├── platform_mcp_client/
│   └── social/
├── instavibe/
│   ├── static/
│   └── templates/
├── tools/
│   └── instavibe/
├── utils/
├── init.sh
└── set_env.sh
主なディレクトリは次のとおりです。
agents/: これは AI システムの中核です。各サブディレクトリ(planner/、social/ など)には、特定のインテリジェント エージェントのソースコードが含まれています。agent.py: 各エージェントのフォルダ内にある、エージェントのロジックが記述されているメインファイル。a2a_server.py: このファイルは、ADK エージェントを Agent-to-Agent(A2A)サーバーでラップします。Dockerfile: エージェントを Cloud Run または Agent Engine にデプロイするためのコンテナ イメージのビルド方法を定義します。
instavibe/: このディレクトリには、InstaVibe ウェブ アプリケーションのソースコード全体が含まれています。tools/: このディレクトリは、エージェントが使用できる外部ツールを構築するためのものです。instavibe/には Model Context Protocol(MCP)サーバーが含まれています。
このモジュール構造により、ウェブ アプリケーションがさまざまな AI コンポーネントから分離され、システム全体の管理、テスト、デプロイが容易になります。
👉💻 初期化スクリプトを実行します。
このスクリプトを実行すると、Google Cloud プロジェクト ID の入力を求めるプロンプトが表示されます。
init.sh スクリプトからプロンプトが表示されたら、前の手順で確認した Google Cloud プロジェクト ID を入力します。
cd ~/instavibe-bootstrap
./init.sh
👉💻 必要なプロジェクト ID を設定します。
gcloud config set project $(cat ~/project_id.txt) --quiet
👉💻 次のコマンドを実行して、必要な Google Cloud APIs を有効にします。
gcloud services enable  run.googleapis.com \
                        cloudfunctions.googleapis.com \
                        cloudbuild.googleapis.com \
                        artifactregistry.googleapis.com \
                        spanner.googleapis.com \
                        apikeys.googleapis.com \
                        iam.googleapis.com \
                        compute.googleapis.com \
                        aiplatform.googleapis.com \
                        cloudresourcemanager.googleapis.com \
                        maps-backend.googleapis.com
👉💻 必要な環境変数をすべて設定します。
export PROJECT_ID=$(gcloud config get project)
export PROJECT_NUMBER=$(gcloud projects describe ${PROJECT_ID} --format="value(projectNumber)")
export SERVICE_ACCOUNT_NAME=$(gcloud compute project-info describe --format="value(defaultServiceAccount)")
export SPANNER_INSTANCE_ID="instavibe-graph-instance"
export SPANNER_DATABASE_ID="graphdb"
export GOOGLE_CLOUD_PROJECT=$(gcloud config get project)
export GOOGLE_GENAI_USE_VERTEXAI=TRUE
export GOOGLE_CLOUD_LOCATION="us-central1"
権限の設定
👉💻 権限を付与します。ターミナルで次のコマンドを実行します。
gcloud projects add-iam-policy-binding $PROJECT_ID \
  --member="serviceAccount:$SERVICE_ACCOUNT_NAME" \
  --role="roles/spanner.admin"

# Spanner Database User
gcloud projects add-iam-policy-binding $PROJECT_ID \
  --member="serviceAccount:$SERVICE_ACCOUNT_NAME" \
  --role="roles/spanner.databaseUser"

# Artifact Registry Admin
gcloud projects add-iam-policy-binding $PROJECT_ID \
  --member="serviceAccount:$SERVICE_ACCOUNT_NAME" \
  --role="roles/artifactregistry.admin"

# Cloud Build Editor
gcloud projects add-iam-policy-binding $PROJECT_ID \
  --member="serviceAccount:$SERVICE_ACCOUNT_NAME" \
  --role="roles/cloudbuild.builds.editor"

# Cloud Run Admin
gcloud projects add-iam-policy-binding $PROJECT_ID \
  --member="serviceAccount:$SERVICE_ACCOUNT_NAME" \
  --role="roles/run.admin"

# IAM Service Account User
gcloud projects add-iam-policy-binding $PROJECT_ID \
  --member="serviceAccount:$SERVICE_ACCOUNT_NAME" \
  --role="roles/iam.serviceAccountUser"

# Vertex AI User
gcloud projects add-iam-policy-binding $PROJECT_ID \
  --member="serviceAccount:$SERVICE_ACCOUNT_NAME" \
  --role="roles/aiplatform.user"

# Logging Writer (to allow writing logs)
gcloud projects add-iam-policy-binding $PROJECT_ID \
  --member="serviceAccount:$SERVICE_ACCOUNT_NAME" \
  --role="roles/logging.logWriter"


gcloud projects add-iam-policy-binding $PROJECT_ID \
  --member="serviceAccount:$SERVICE_ACCOUNT_NAME" \
  --role="roles/logging.viewer"
👉 IAM コンソールで結果を検証します。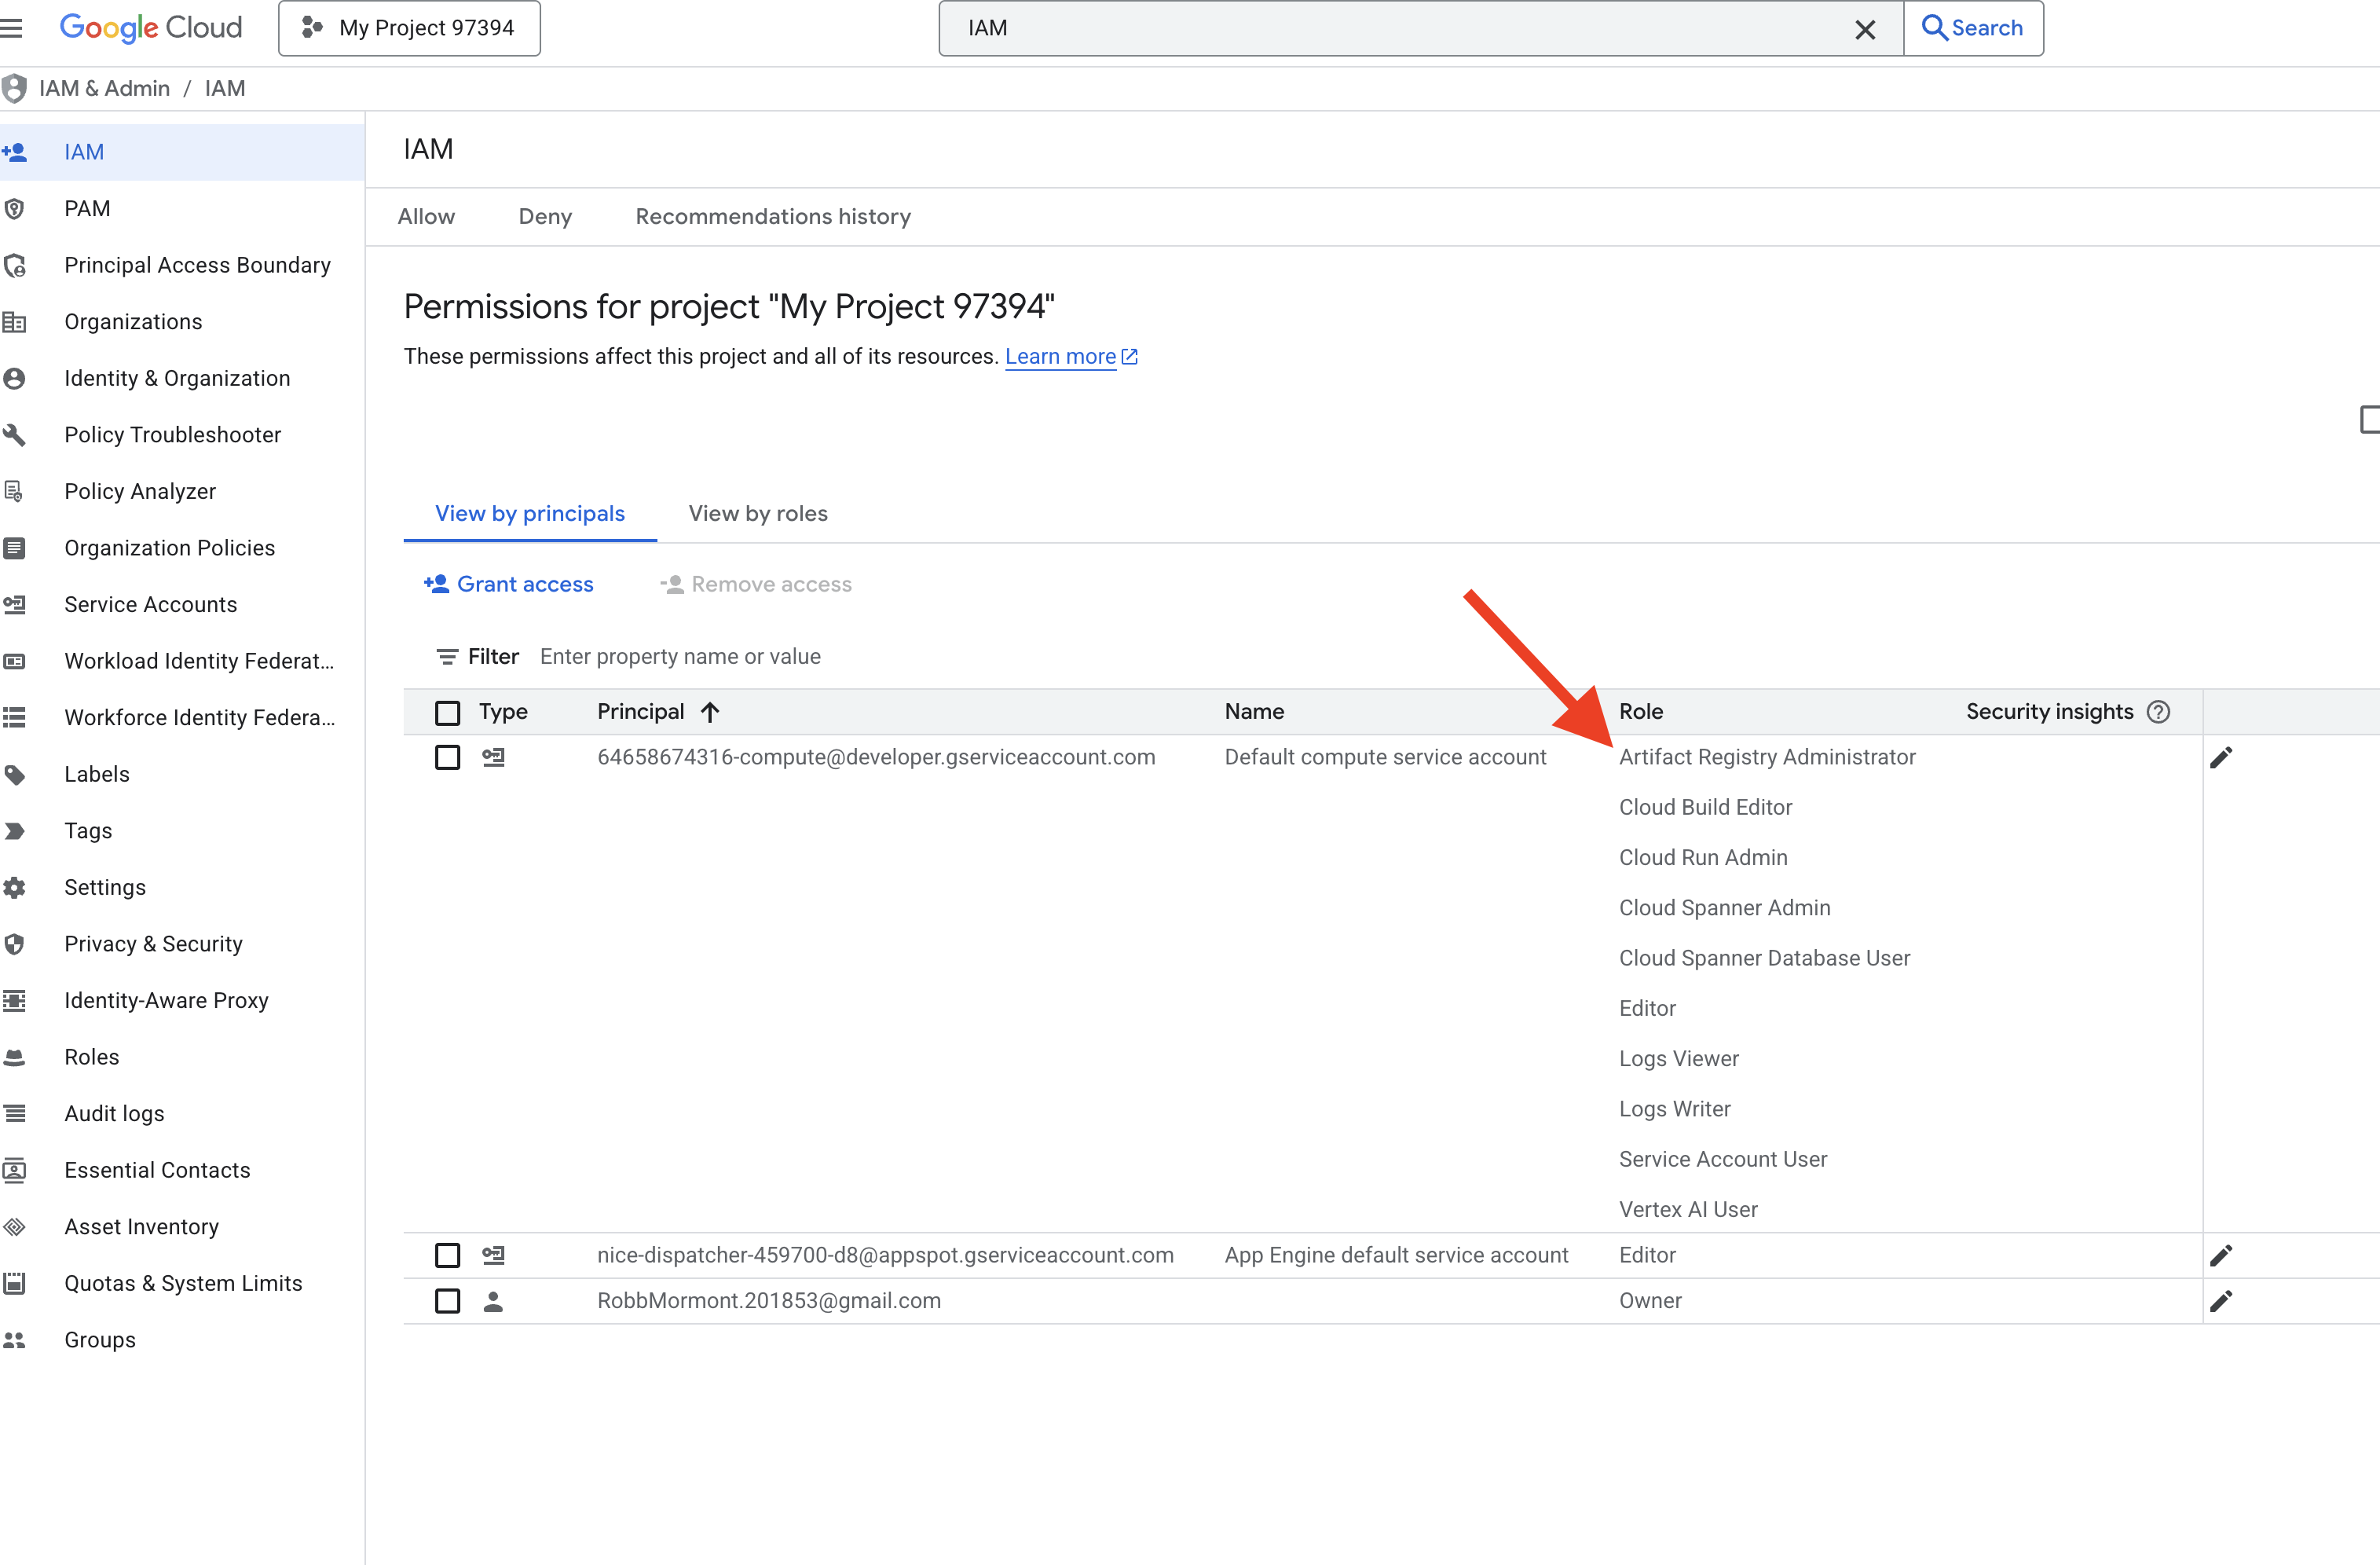
👉💻 ターミナルで次のコマンドを実行して、Artifact Registry リポジトリを作成します。エージェント、MCP サーバー、InstaVibe アプリケーションのすべての Docker イメージは、Cloud Run または Agent Engine にデプロイされる前にここに保存されます。
export REPO_NAME="introveally-repo"
gcloud artifacts repositories create $REPO_NAME \
  --repository-format=docker \
  --location=us-central1 \
  --description="Docker repository for InstaVibe workshop"
API キーのマップ プラットフォームを設定する
InstaVibe アプリケーションで Google マップ サービスを使用するには、API キーを作成して適切に制限する必要があります。
👉 新しいタブで、[API とサービス] > [認証情報] に移動します。[認証情報] ページで、上部の [+ 認証情報を作成] ボタンをクリックします。プルダウン メニューから [API キー] を選択します。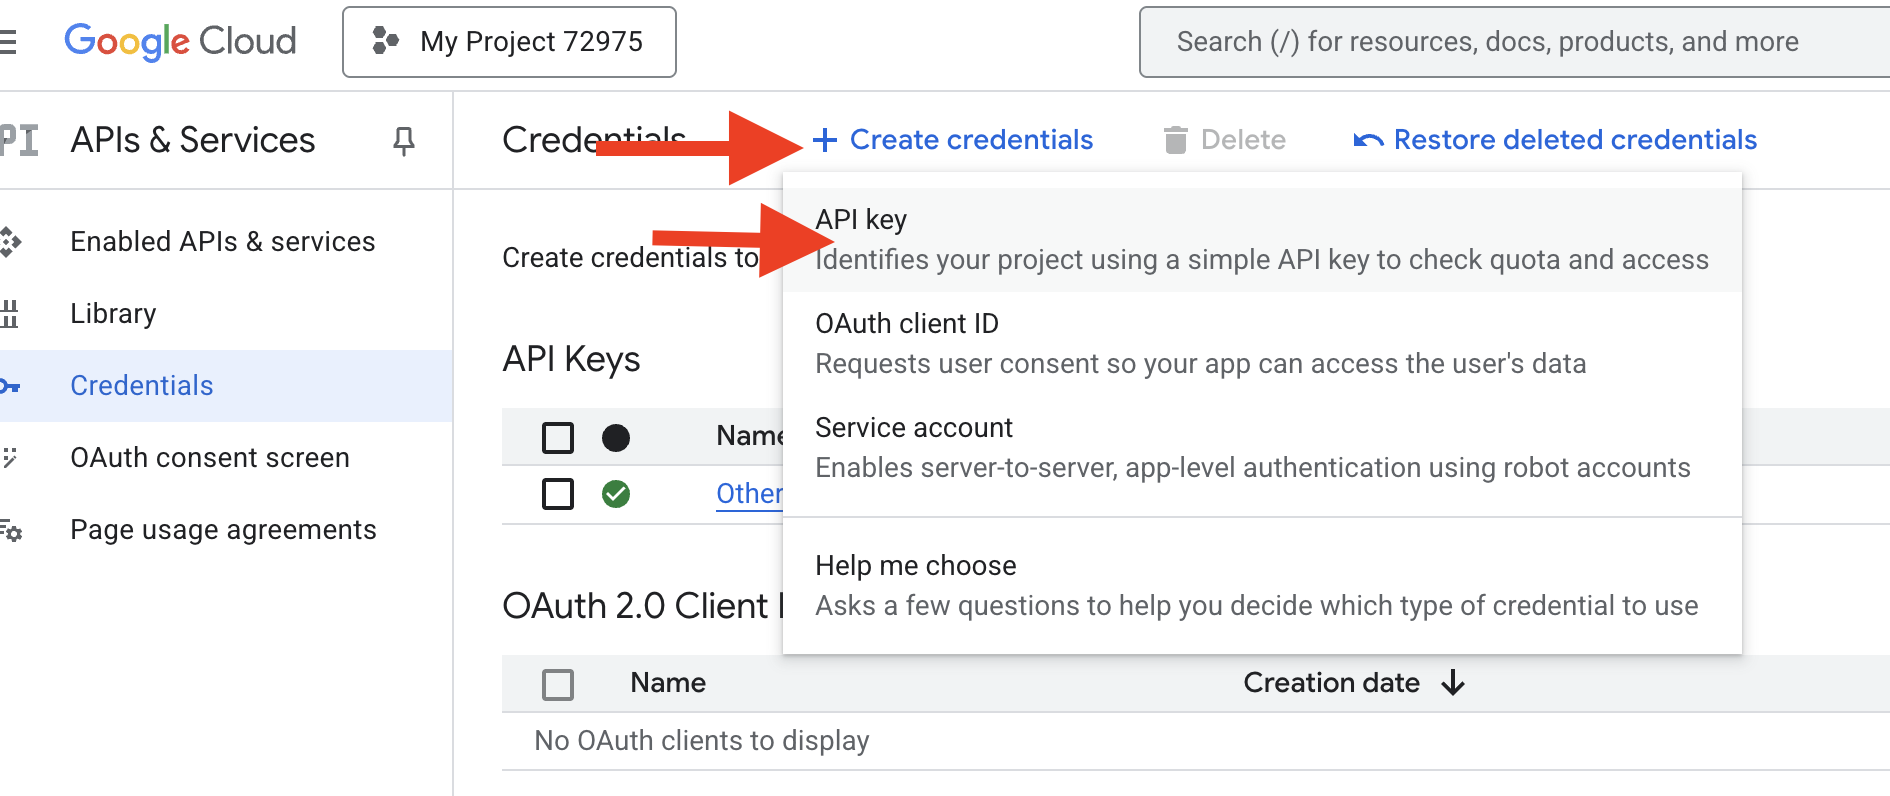
👉 新しく作成された API キーを示すダイアログ ボックスが表示されます。これは、後でアプリケーション構成で使用します。
👉 [API キーを作成しました] ダイアログで [閉じる] をクリックします。
👉 新しい API キー(「API キー 1」など)が一覧表示されます。右側のその他アイコンをクリックし、[API キーを編集] を選択して [API キーを制限して名前を変更] ページを開きます。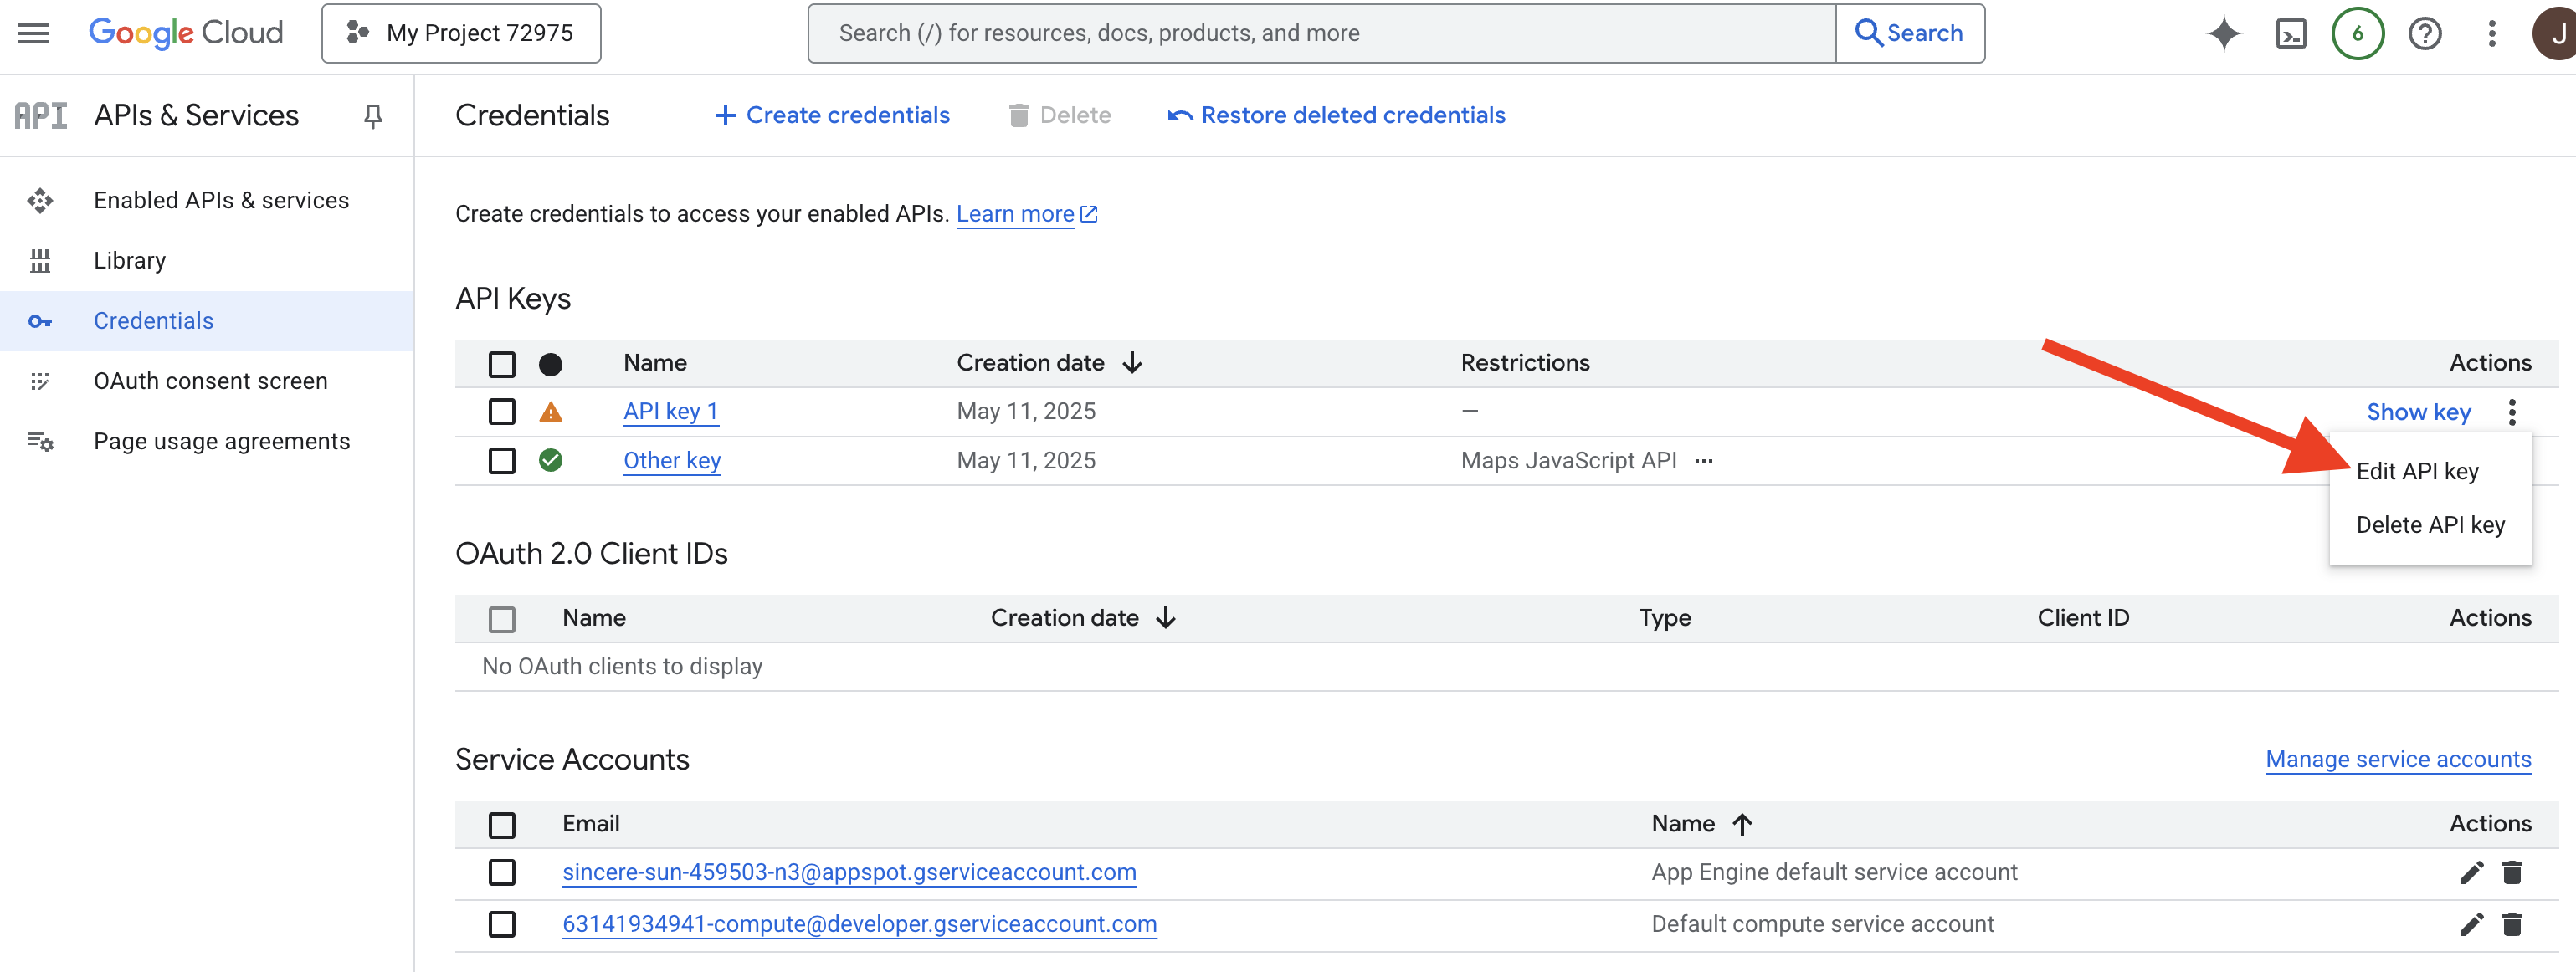
👉 上部の [名前] フィールドで、デフォルトの名前を「Maps Platform API Key」に変更します(🚨🚨重要🚨🚨 この名前を使用してください)。
Maps Platform API Key
👉 [アプリケーションの制限] セクションで、[なし] が選択されていることを確認します。
👉 [API の制限] セクションで、[キーを制限] ラジオボタンを選択します。
👉 [API を選択] プルダウン メニューをクリックします。表示された検索ボックスに「Maps JavaScript API」と入力し、リストから選択します。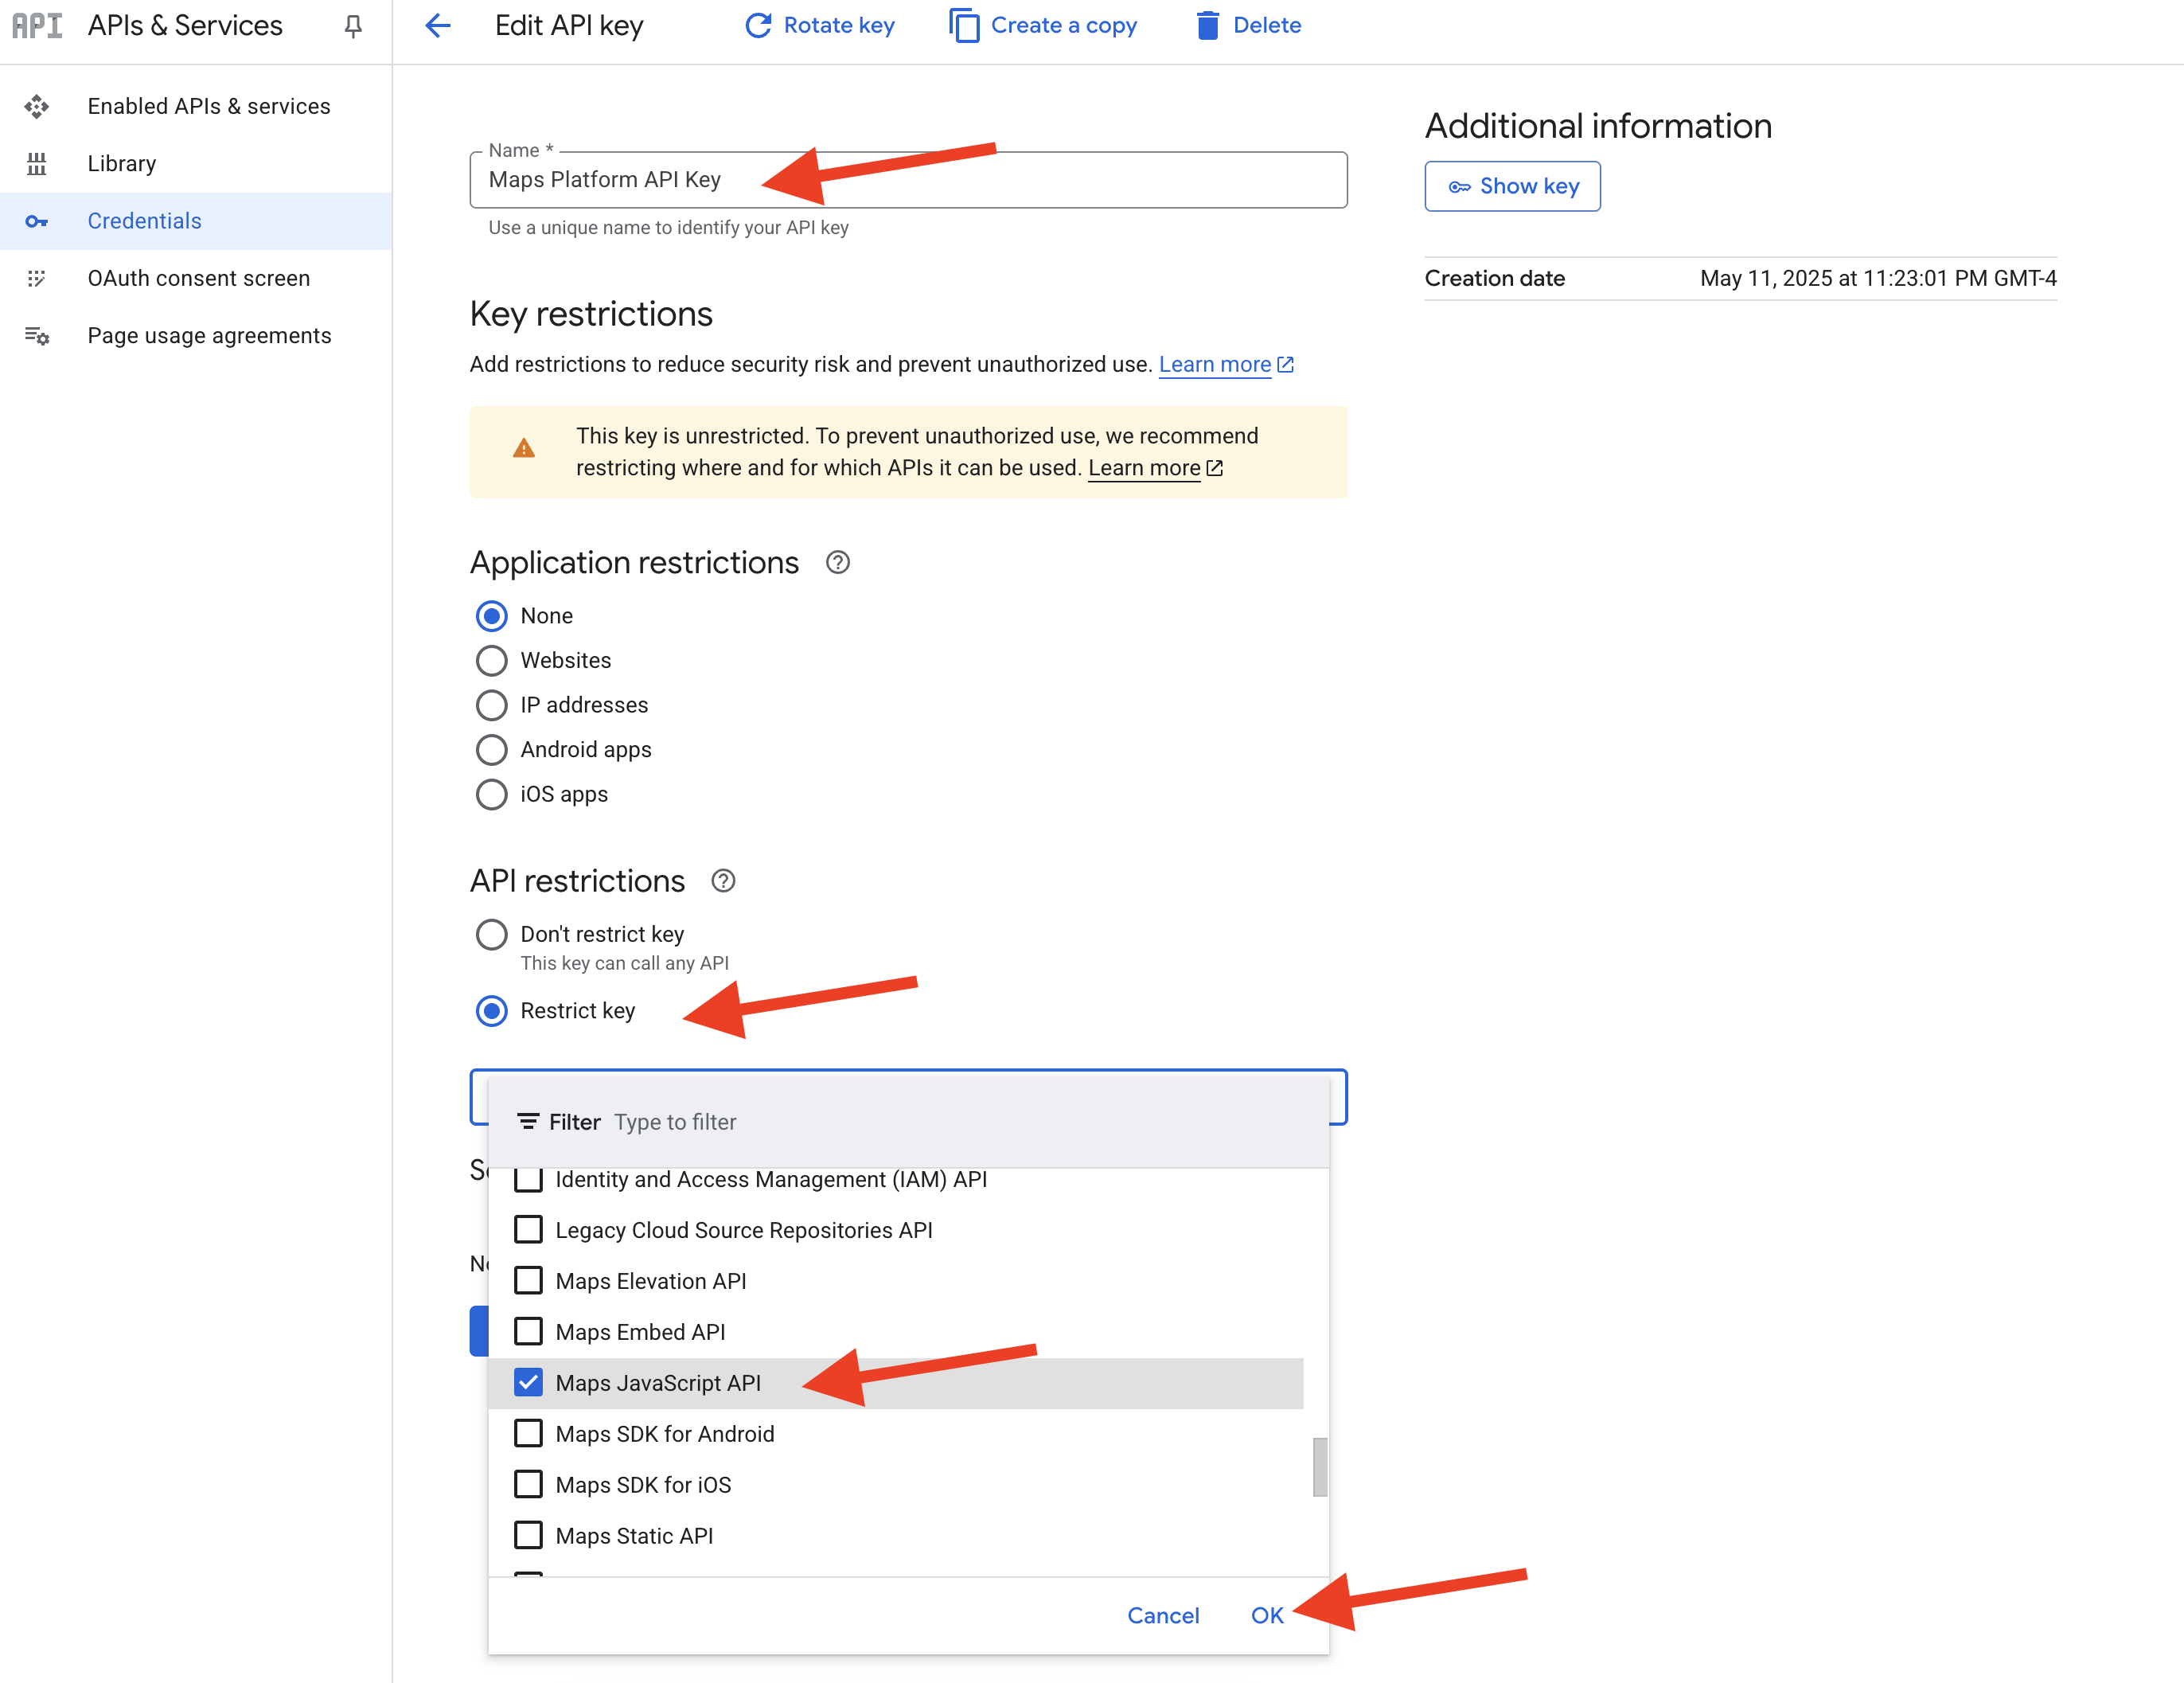
👉 [OK] をクリックします。
👉 ページの下部にある [保存] ボタンをクリックします。
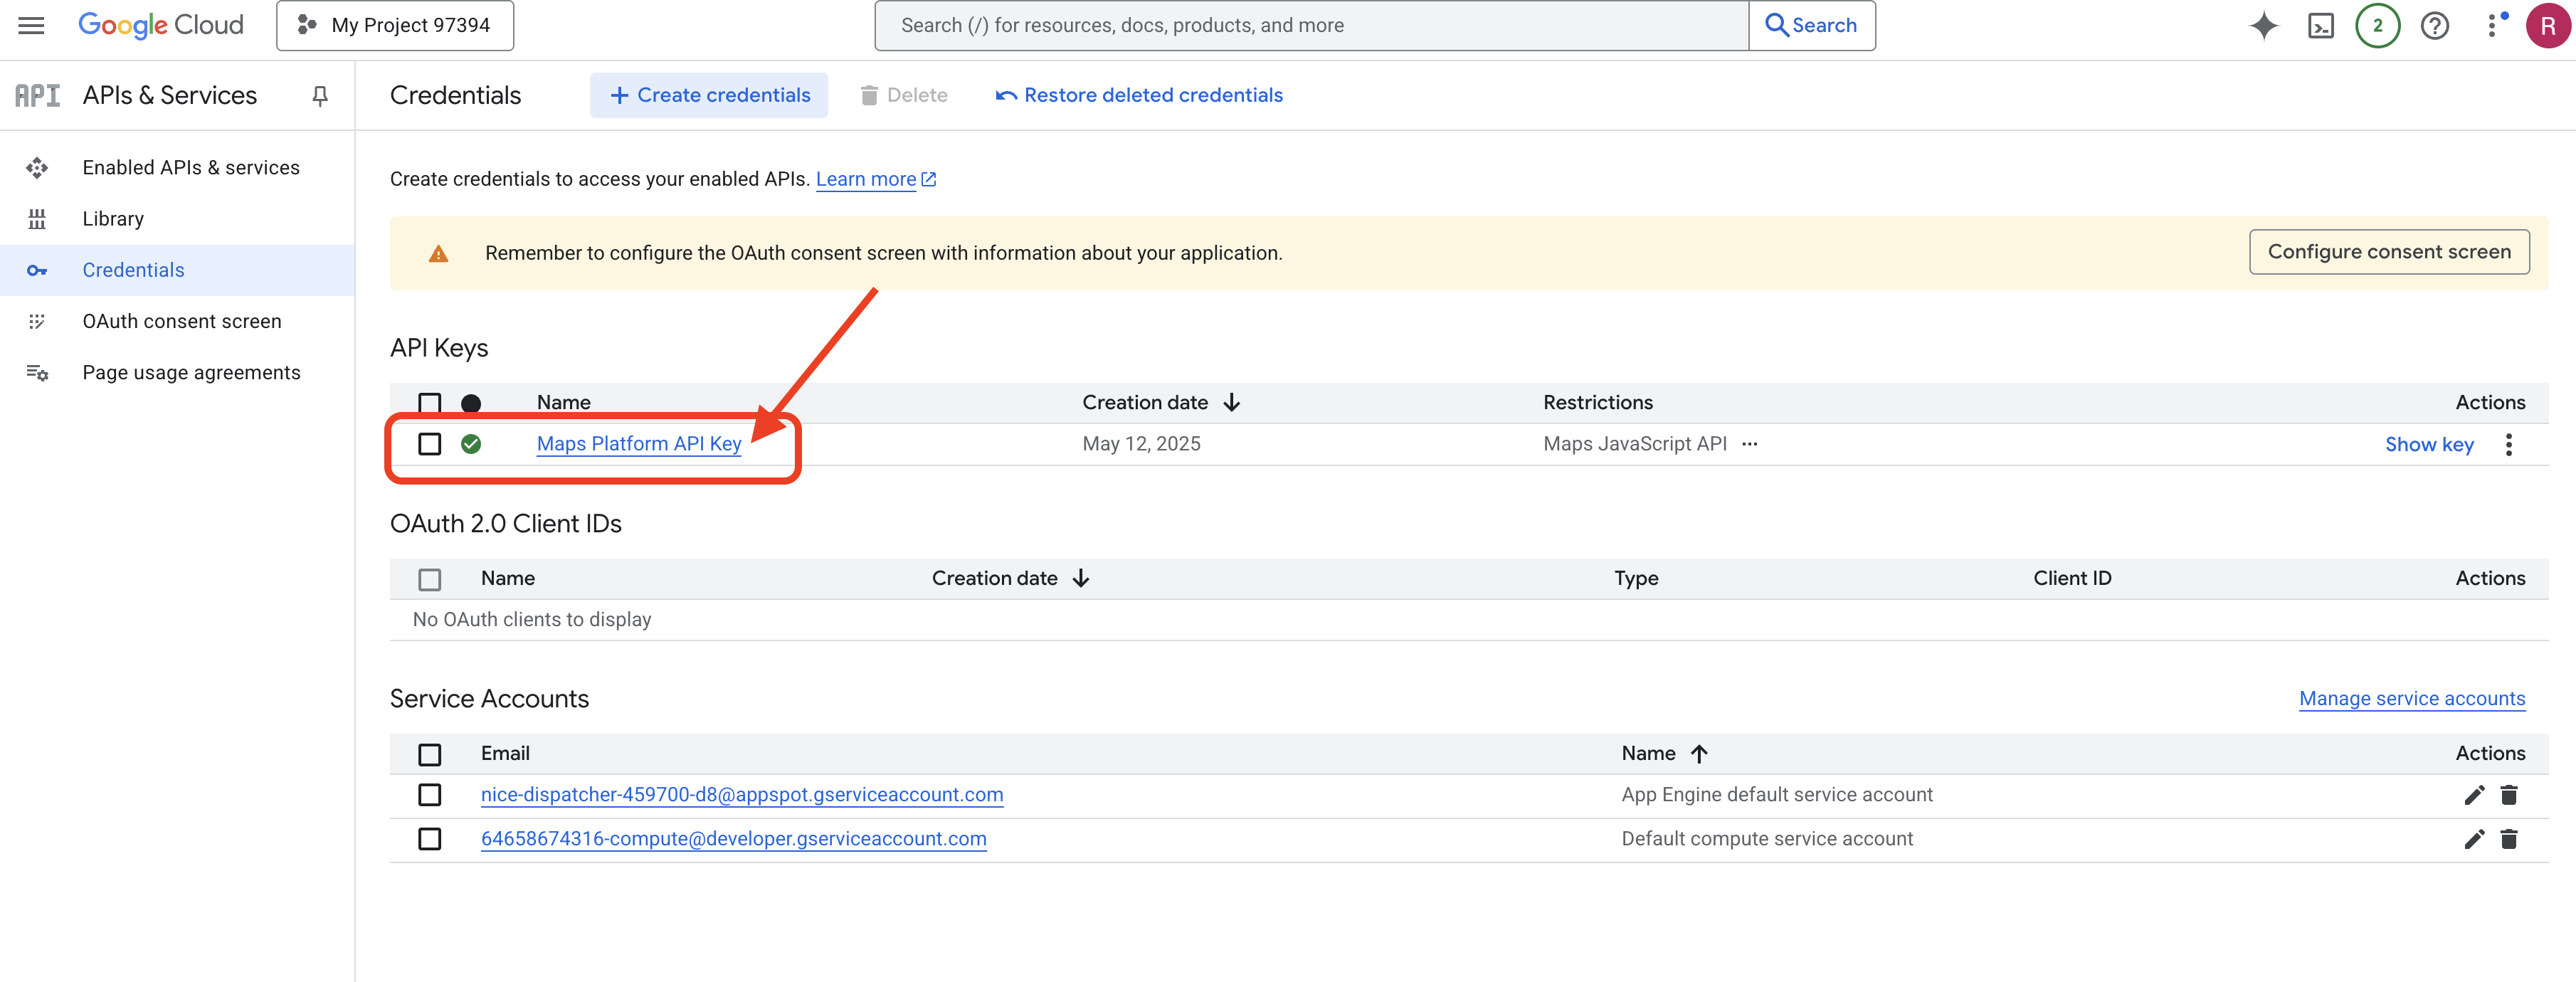
これで、「Maps Platform API Key」という名前の API キーが作成され、「Maps JavaScript API」のみを使用できるように制限され、プロジェクトで API が有効になっていることが確認されました。
4. グラフ データベースを設定する
インテリジェント エージェントを構築する前に、InstaVibe ソーシャル ネットワーク内の豊富な接続を保存して理解する方法が必要です。そこでグラフ データベースの出番です。行と列のテーブルにデータを保存する従来のリレーショナル データベースとは異なり、グラフ データベースは、ノード(ユーザー、イベント、投稿など)とそれらを結び付ける関係(エッジ)(友情、イベントへの参加、メンションなど)の観点からデータを表現し、クエリを実行するように設計されています。この構造は、現実世界のソーシャル ネットワークの構造を反映しているため、ソーシャル メディア アプリケーションにとって非常に強力です。さまざまなエンティティがどのように相互接続されているかを直感的に把握できます。
このグラフ データベースは Google Cloud Spanner を使用して実装しています。Spanner は、主にグローバルに分散された強整合性リレーショナル データベースとして知られていますが、リレーショナル テーブルの上にグラフ構造を直接定義してクエリすることもできます。
これにより、Spanner のスケーラビリティ、トランザクションの整合性、使い慣れた SQL インターフェースという利点と、AI を活用した機能に不可欠な複雑なソーシャル ダイナミクスを分析するためのグラフクエリの表現力を組み合わせることができます。
👉💻 Cloud Shell IDE ターミナル。Google Cloud に必要なインフラストラクチャをプロビジョニングします。まず、データベース専用のコンテナとして機能する Spanner インスタンスを作成します。インスタンスの準備ができたら、その中に実際の Spanner データベースを作成します。このデータベースには、InstaVibe のすべてのテーブルとグラフデータが格納されます。
. ~/instavibe-bootstrap/set_env.sh

gcloud spanner instances create $SPANNER_INSTANCE_ID \
  --config=regional-us-central1 \
  --description="GraphDB Instance InstaVibe" \
  --processing-units=100 \
  --edition=ENTERPRISE

gcloud spanner databases create $SPANNER_DATABASE_ID \
  --instance=$SPANNER_INSTANCE_ID \
  --database-dialect=GOOGLE_STANDARD_SQL
👉💻 デフォルト サービス アカウントに Spanner の読み取り/書き込みアクセス権を付与する
echo "Granting Spanner read/write access to ${SERVICE_ACCOUNT_NAME} for database ${SPANNER_DATABASE_ID}..."

gcloud spanner databases add-iam-policy-binding ${SPANNER_DATABASE_ID} \
  --instance=${SPANNER_INSTANCE_ID} \
  --member="serviceAccount:${SERVICE_ACCOUNT_NAME}" \
  --role="roles/spanner.databaseUser" \
  --project=${PROJECT_ID}
👉💻 今すぐ。Python 仮想環境を設定し、必要な Python パッケージをインストールしてから、Spanner 内でグラフ データベース スキーマを設定し、初期データを読み込んで setup.py スクリプトを実行します。
. ~/instavibe-bootstrap/set_env.sh
cd ~/instavibe-bootstrap
python -m venv env
source env/bin/activate
pip install -r requirements.txt
cd instavibe
python setup.py
👉 新しいブラウザタブで Google Cloud コンソールに移動し、[Spanner] に移動します。Spanner インスタンスのリストが表示されます。[instavibe-graph-instance] をクリックします。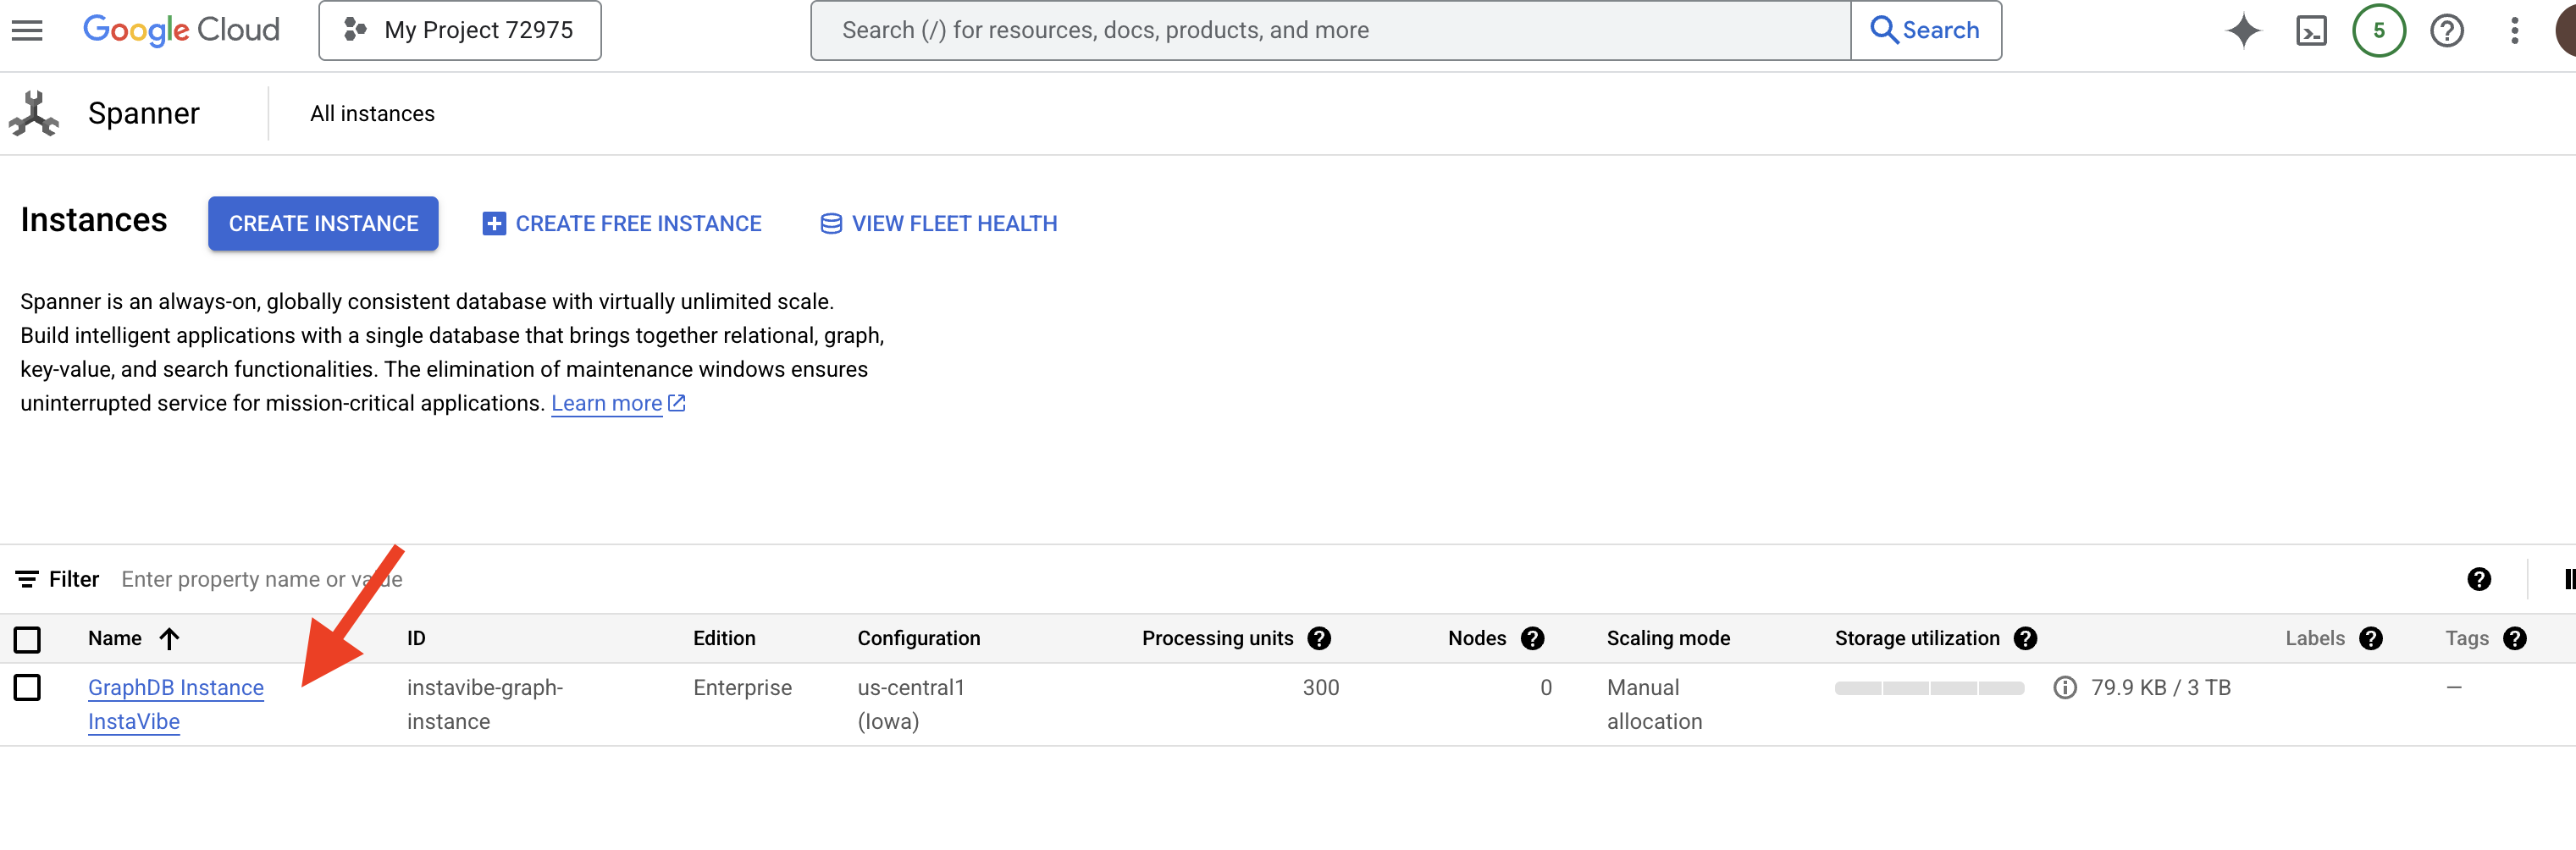 👉 インスタンスの概要ページに、そのインスタンス内のデータベースのリストが表示されます。[
graphdb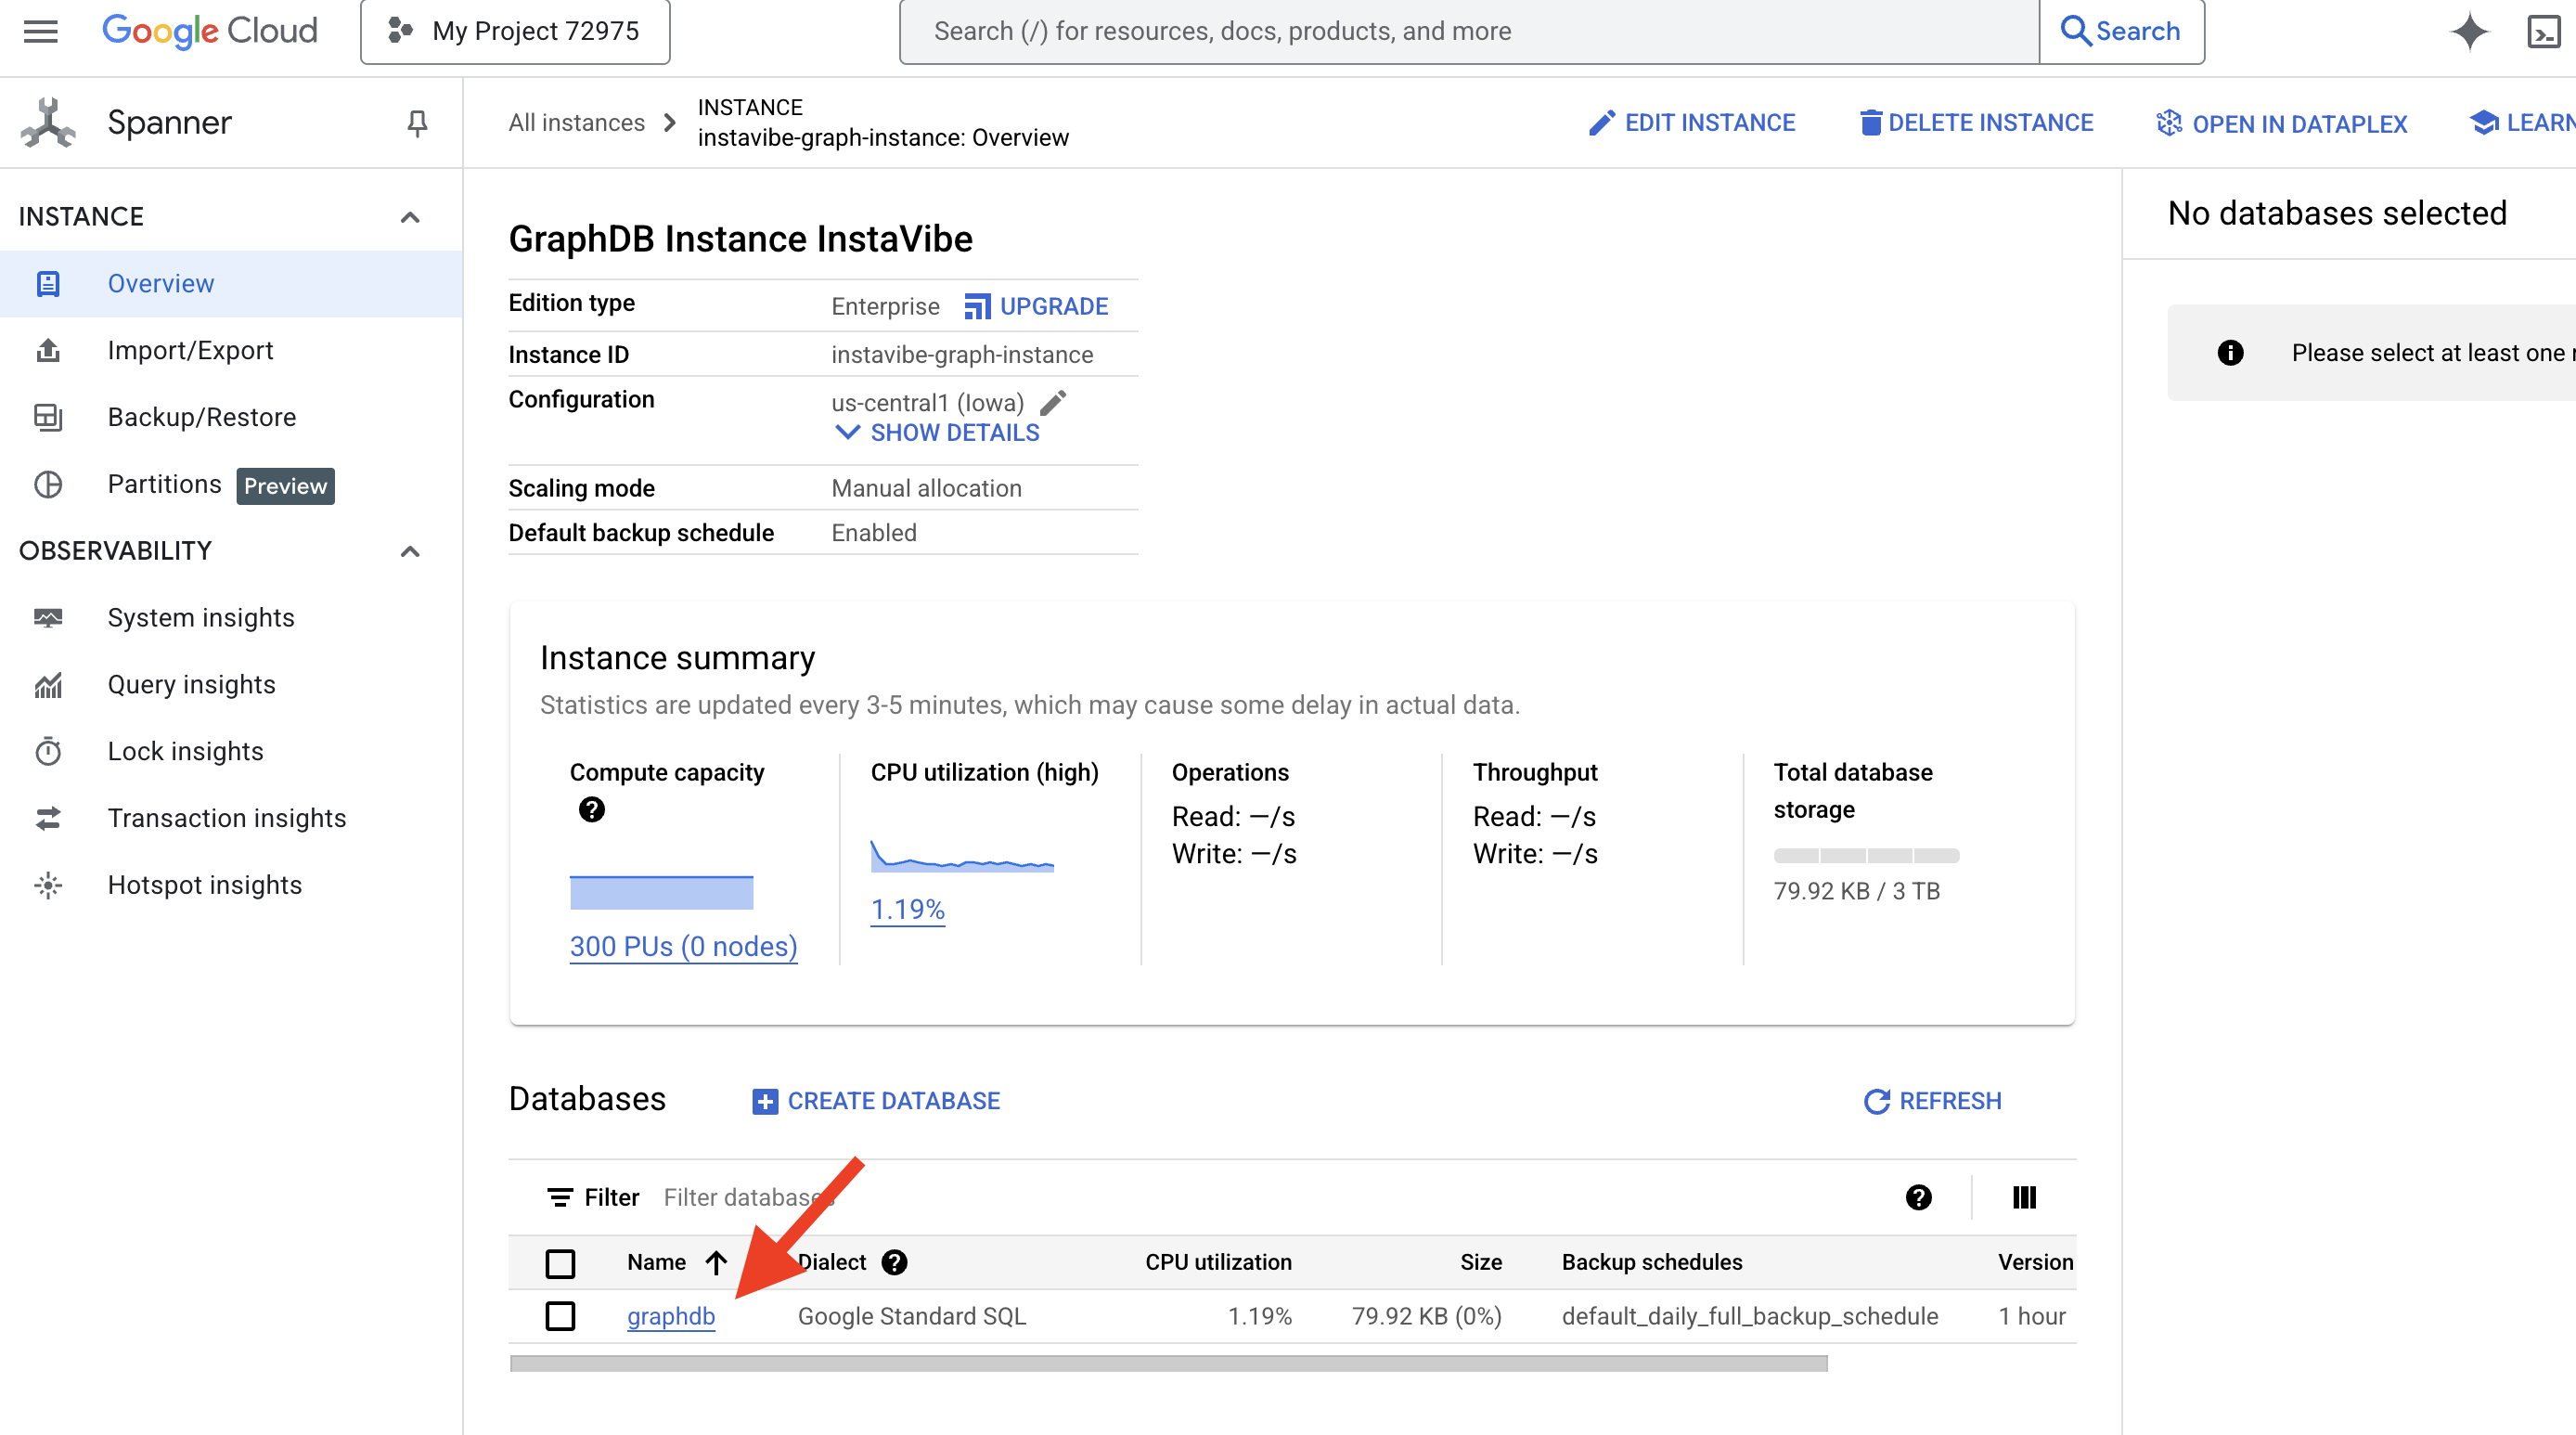 ] をクリックします。
👉 データベースの左側のナビゲーション パネルで、Spanner Studio 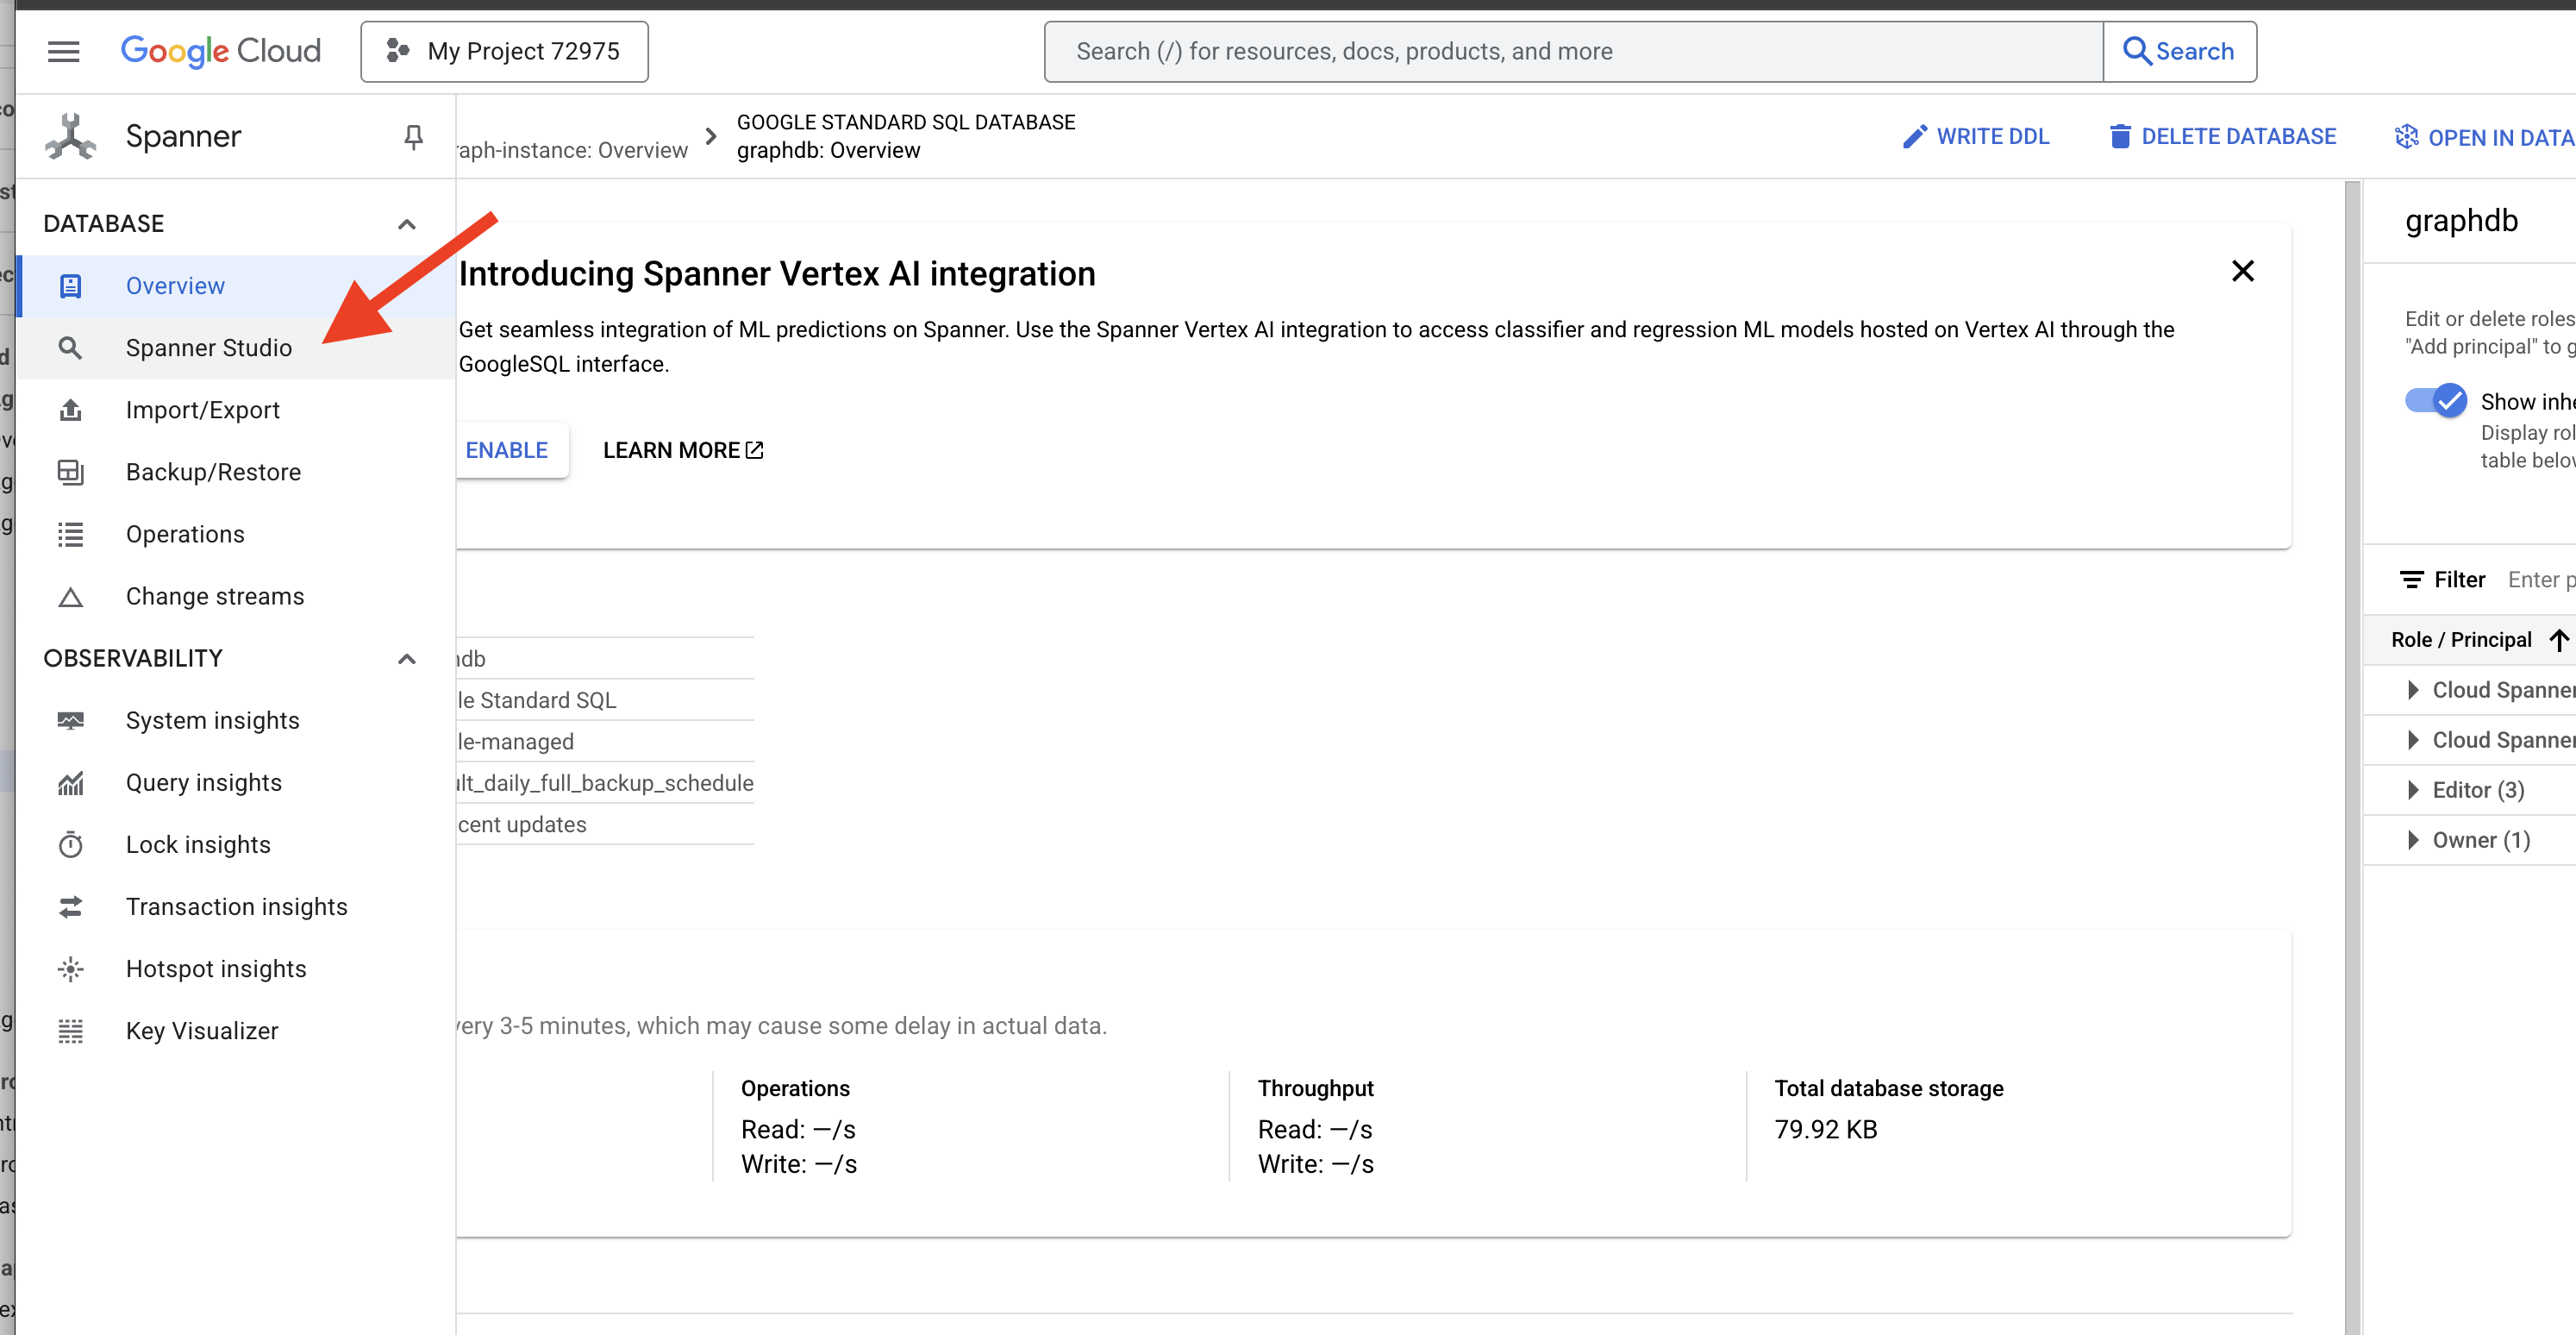 をクリックします。
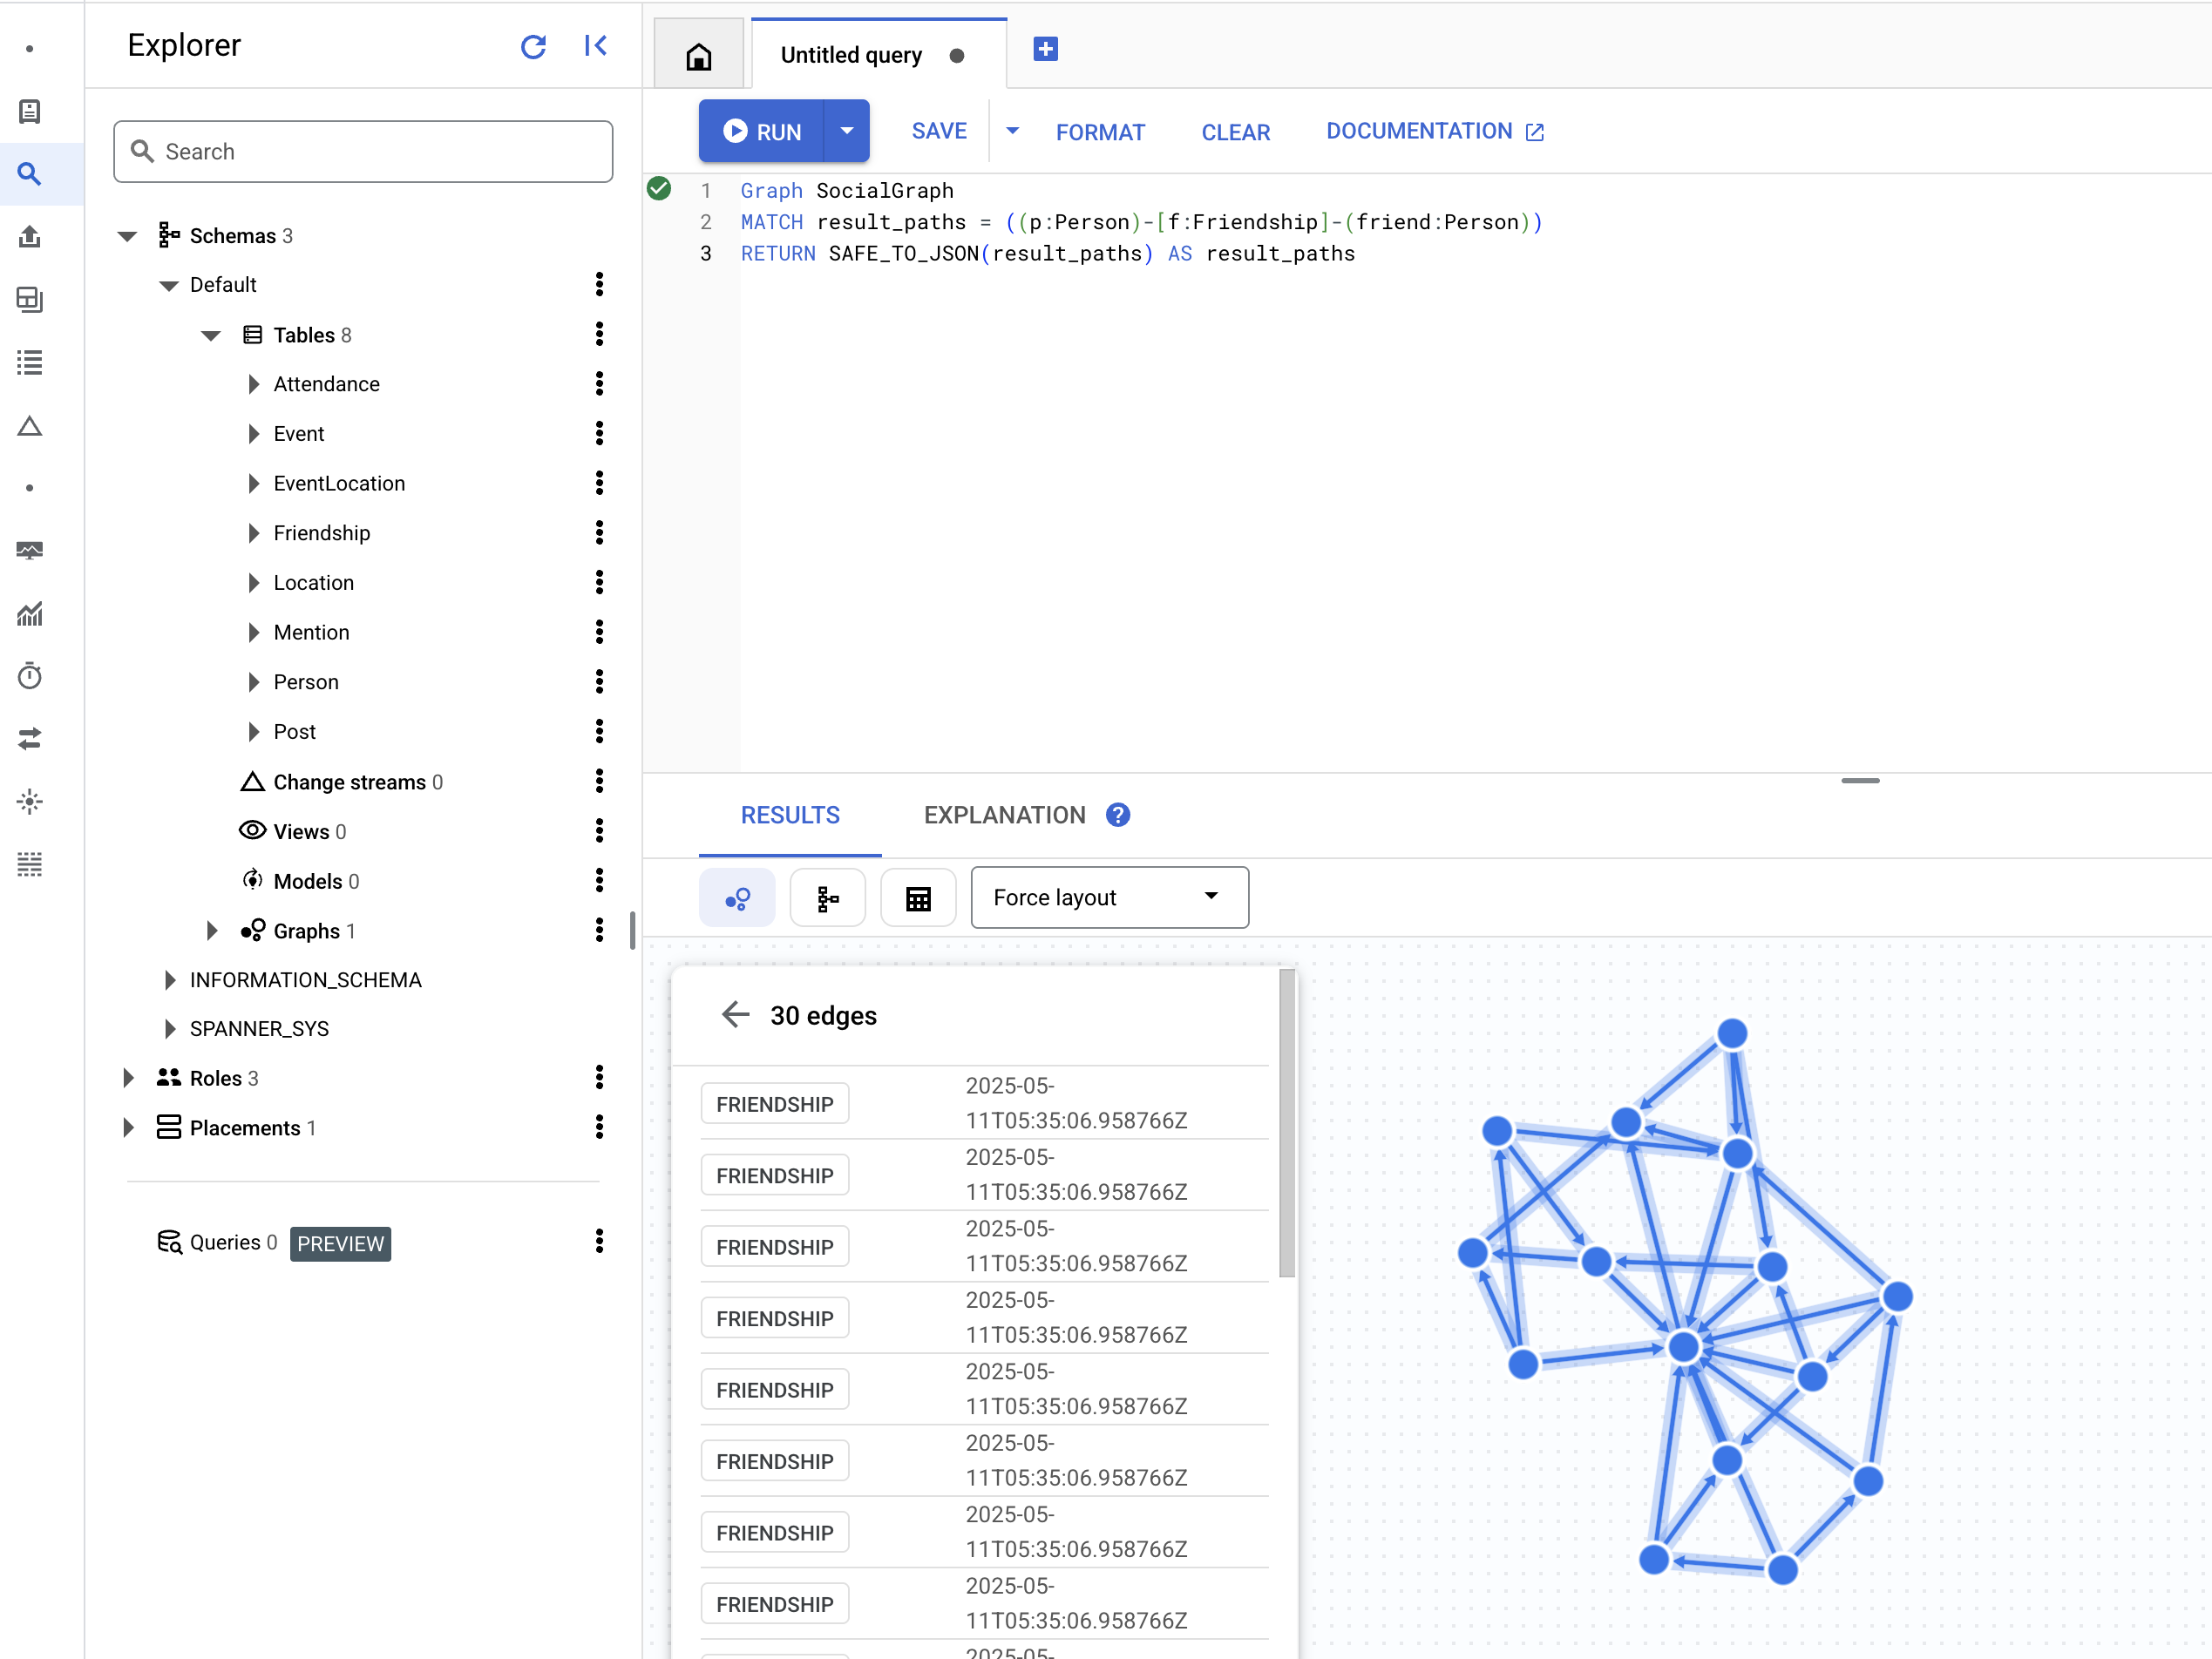
👉 クエリエディタ([無題のクエリ] タブ)に、次の Graph SQL クエリを貼り付けます。このクエリは、すべての Person ノードと、他の Person ノードとの直接の Friendship 関係を検索します。[RUN] をクリックして結果を確認します。
Graph SocialGraph
MATCH result_paths = ((p:Person)-[f:Friendship]-(friend:Person))
RETURN SAFE_TO_JSON(result_paths) AS result_paths
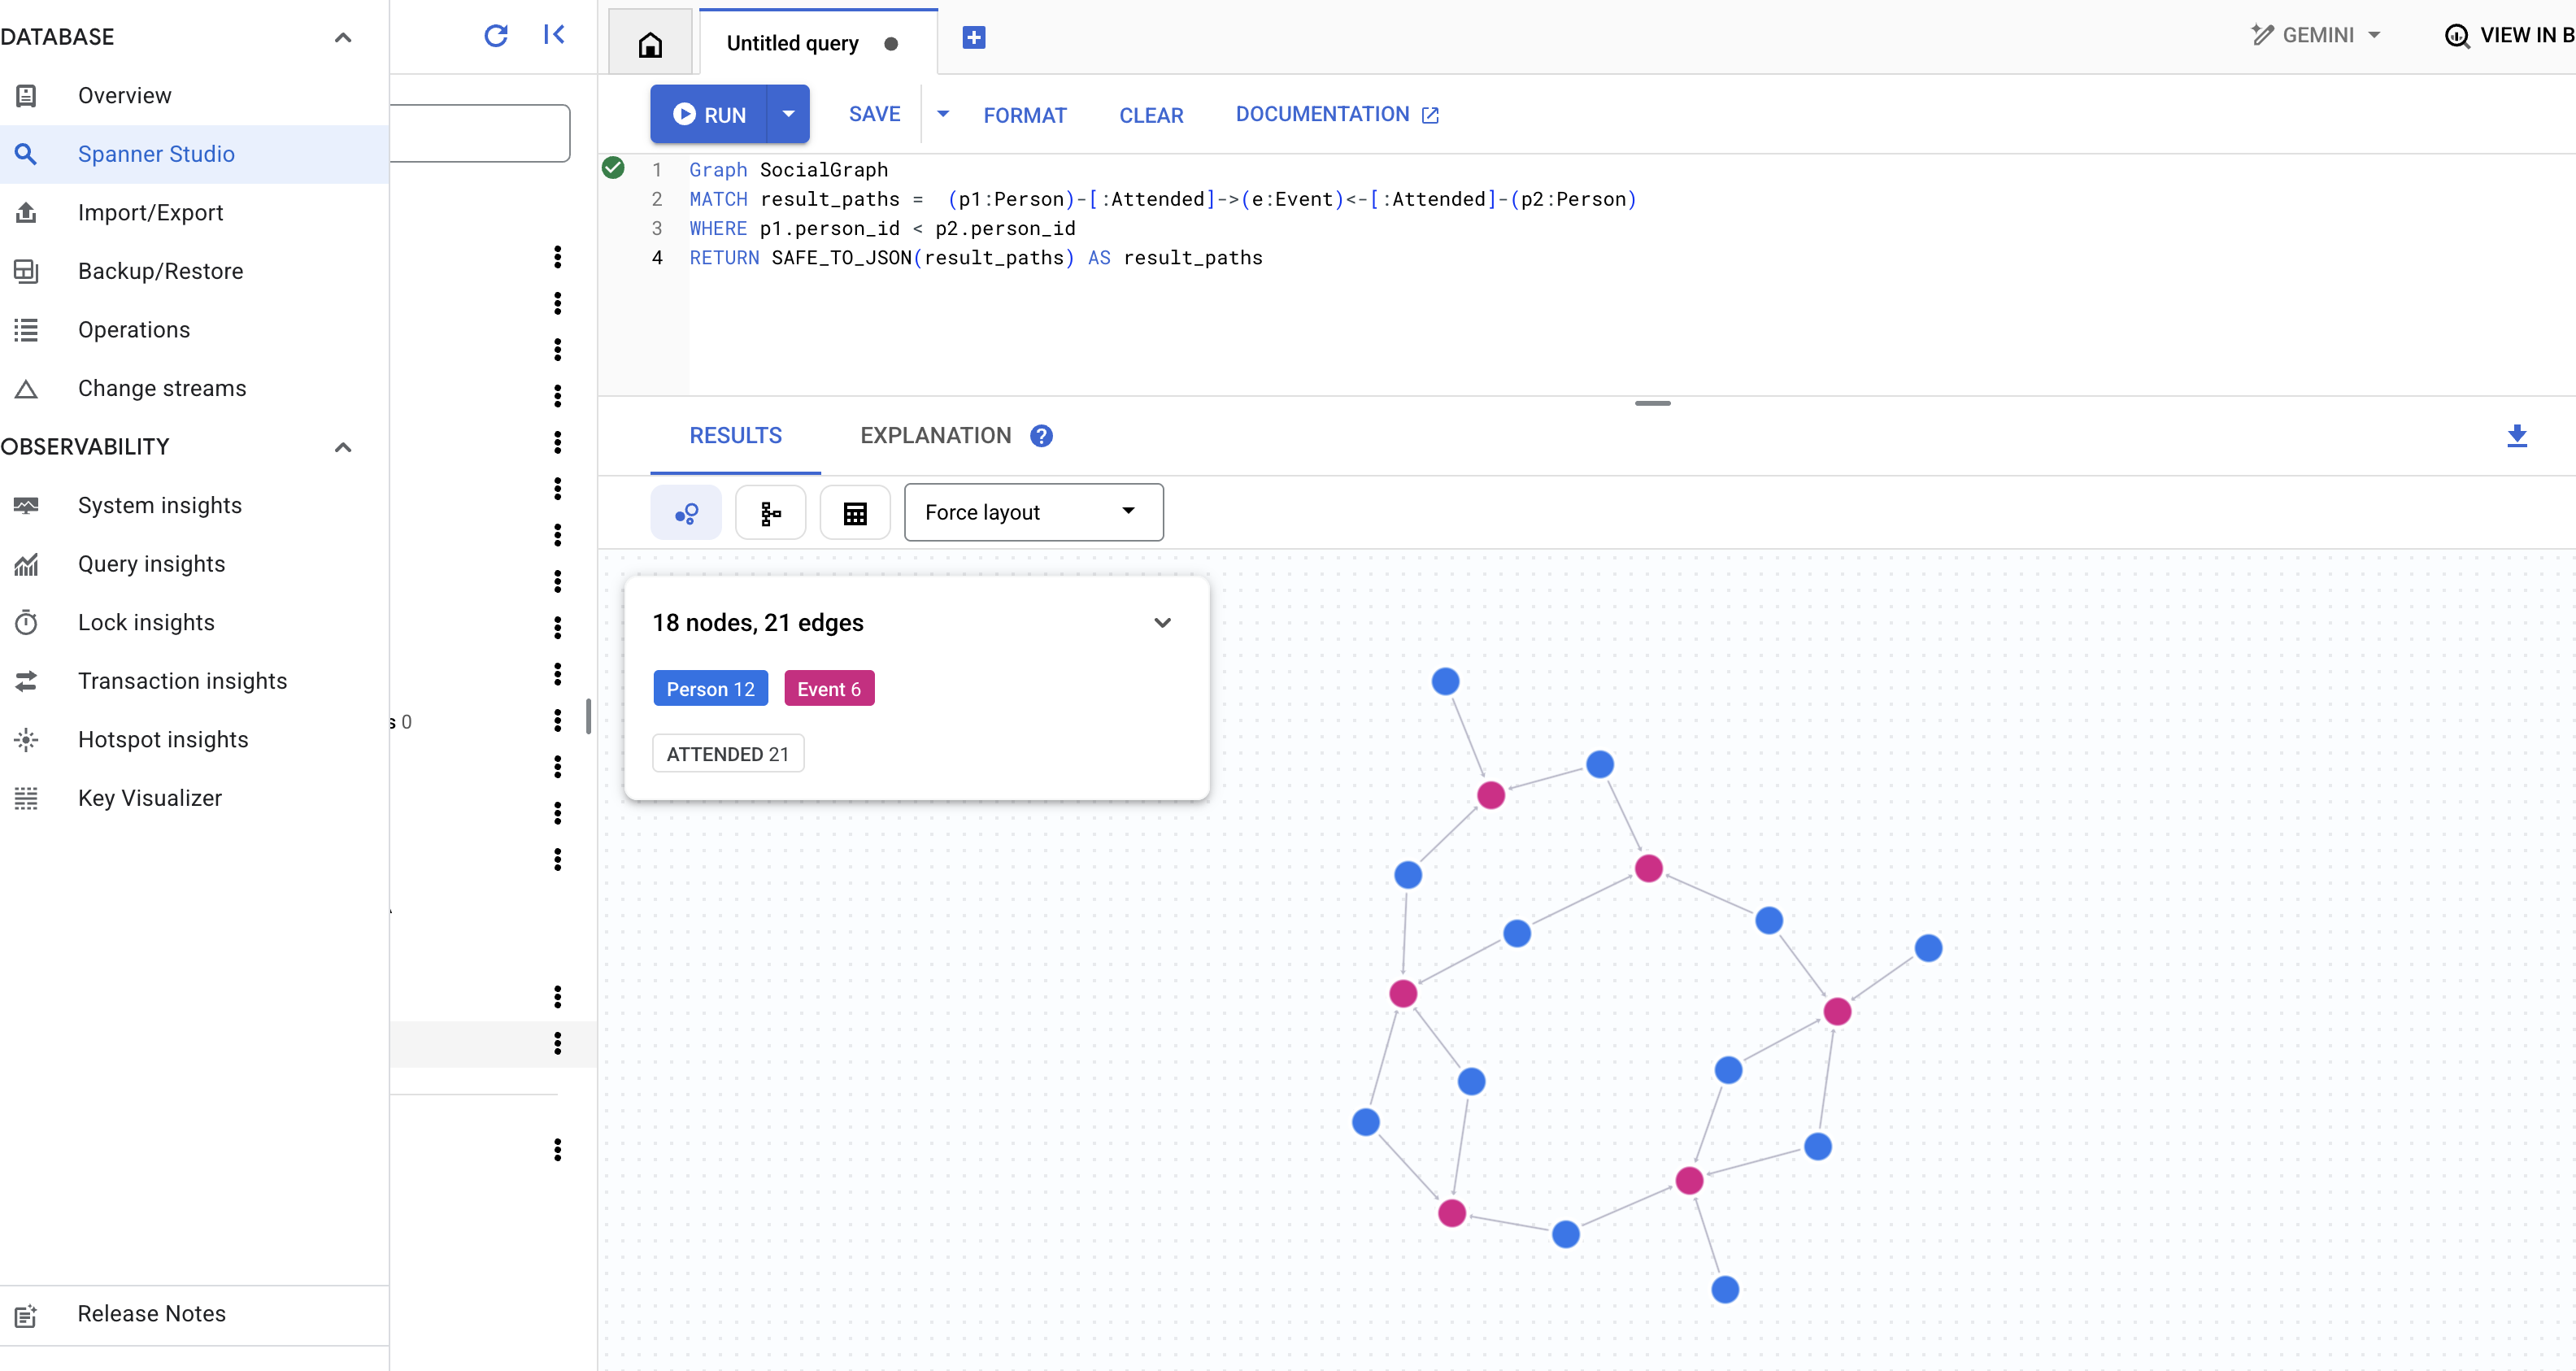
👉 同じクエリ エディタで、前の DDL を置き換えて、同じイベントに参加したユーザーを検索します。これは、共有アクティビティを介した間接的なつながりを意味します。
Graph SocialGraph
MATCH result_paths =  (p1:Person)-[:Attended]->(e:Event)<-[:Attended]-(p2:Person)
WHERE p1.person_id < p2.person_id
RETURN SAFE_TO_JSON(result_paths) AS result_paths
👉 このクエリでは、別のタイプのつながりを調べます。特定のユーザーの友人が書いた投稿で言及されているユーザーを調べるには、クエリエディタで次のクエリを実行します。
Graph SocialGraph
MATCH result_paths =  (user:Person {name: "Alice"})-[:Friendship]-(friend:Person)-[:Wrote]->(post:Post)-[:Mentioned]->(mentioned_person:Person)
WHERE user <> mentioned_person AND friend <> mentioned_person -- Avoid self-mentions or friend mentioning themselves in their own post if not intended
RETURN SAFE_TO_JSON(result_paths) AS result_paths
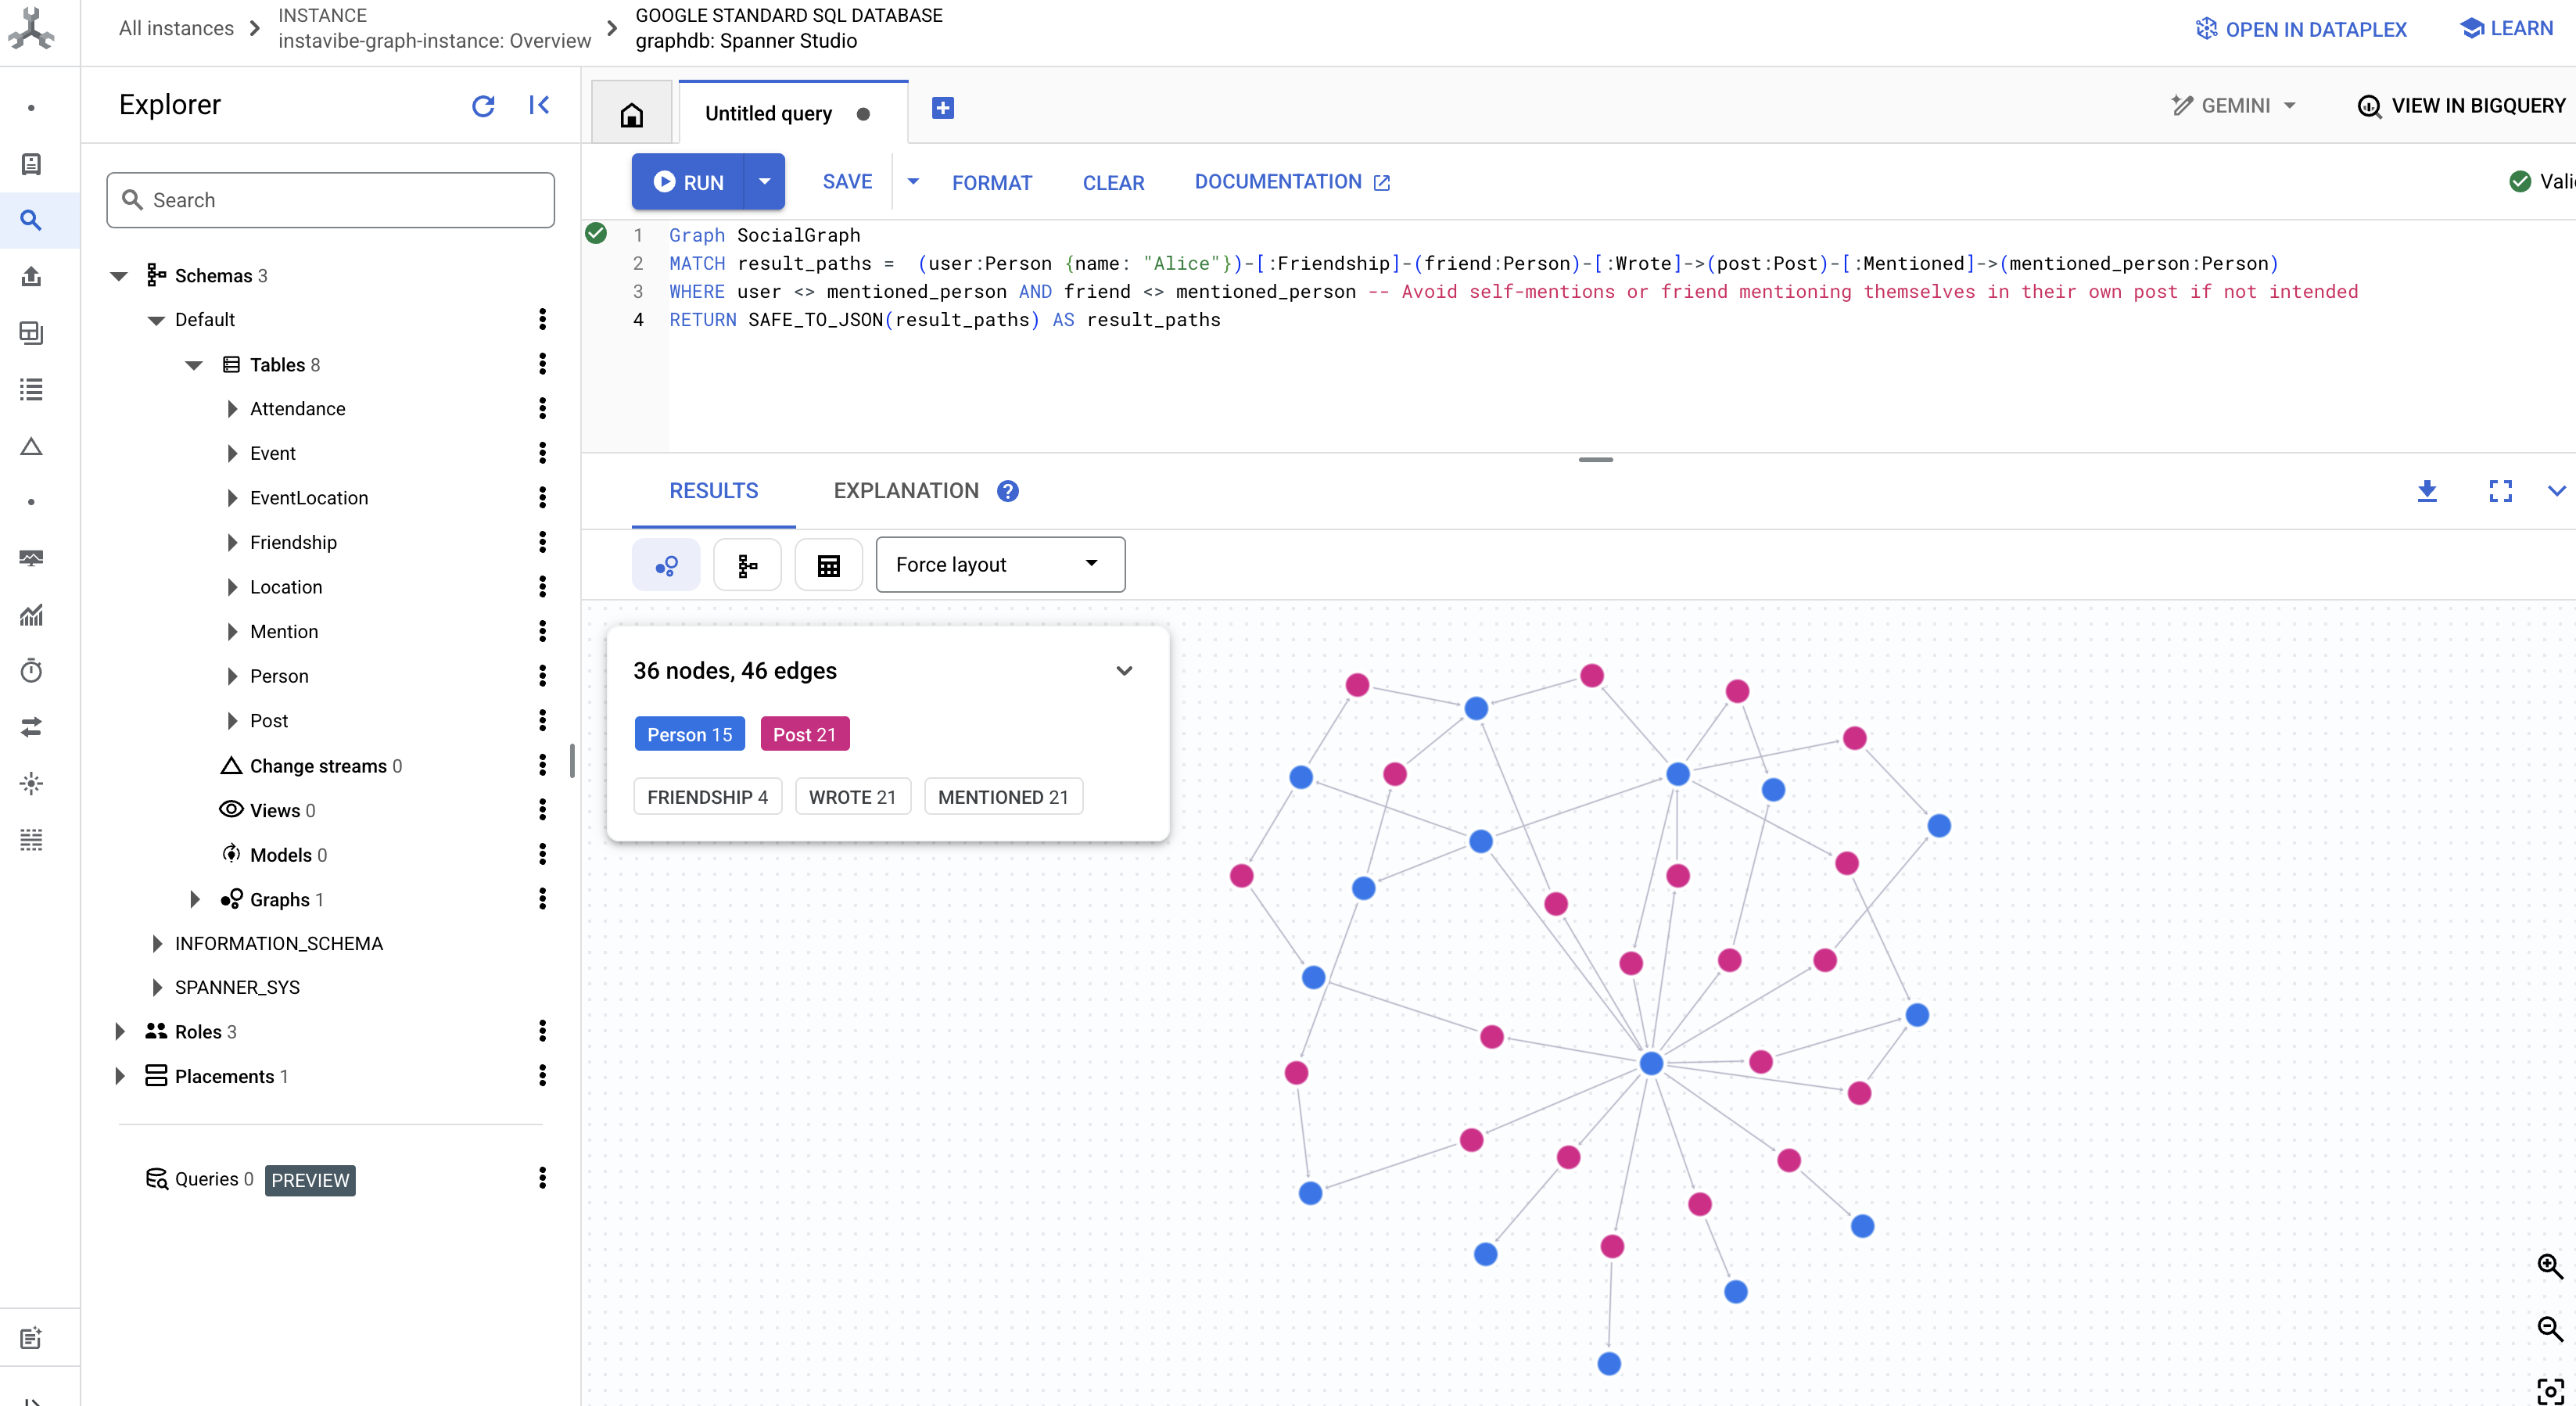
これらのクエリは、InstaVibe アプリケーションのグラフ データベースとして Spanner を使用する機能のほんの一例です。ソーシャル データを相互接続されたグラフとしてモデル化することで、関係とアクティビティの高度な分析が可能になります。これは、AI エージェントがユーザーのコンテキストを理解し、興味関心を見つけ、最終的にインテリジェントなソーシャル プランニング支援を提供するための基盤となります。
基盤となるデータ構造が整い、テストも完了したので、エージェントが操作する既存の InstaVibe アプリケーションに注目しましょう。
5. InstaVibe の現在の状態
AI エージェントがどこに適合するかを理解するには、まず既存の InstaVibe ウェブ アプリケーションをデプロイして実行する必要があります。このアプリケーションは、すでに設定した Spanner グラフ データベースに接続するユーザー インターフェースと基本機能を提供します。
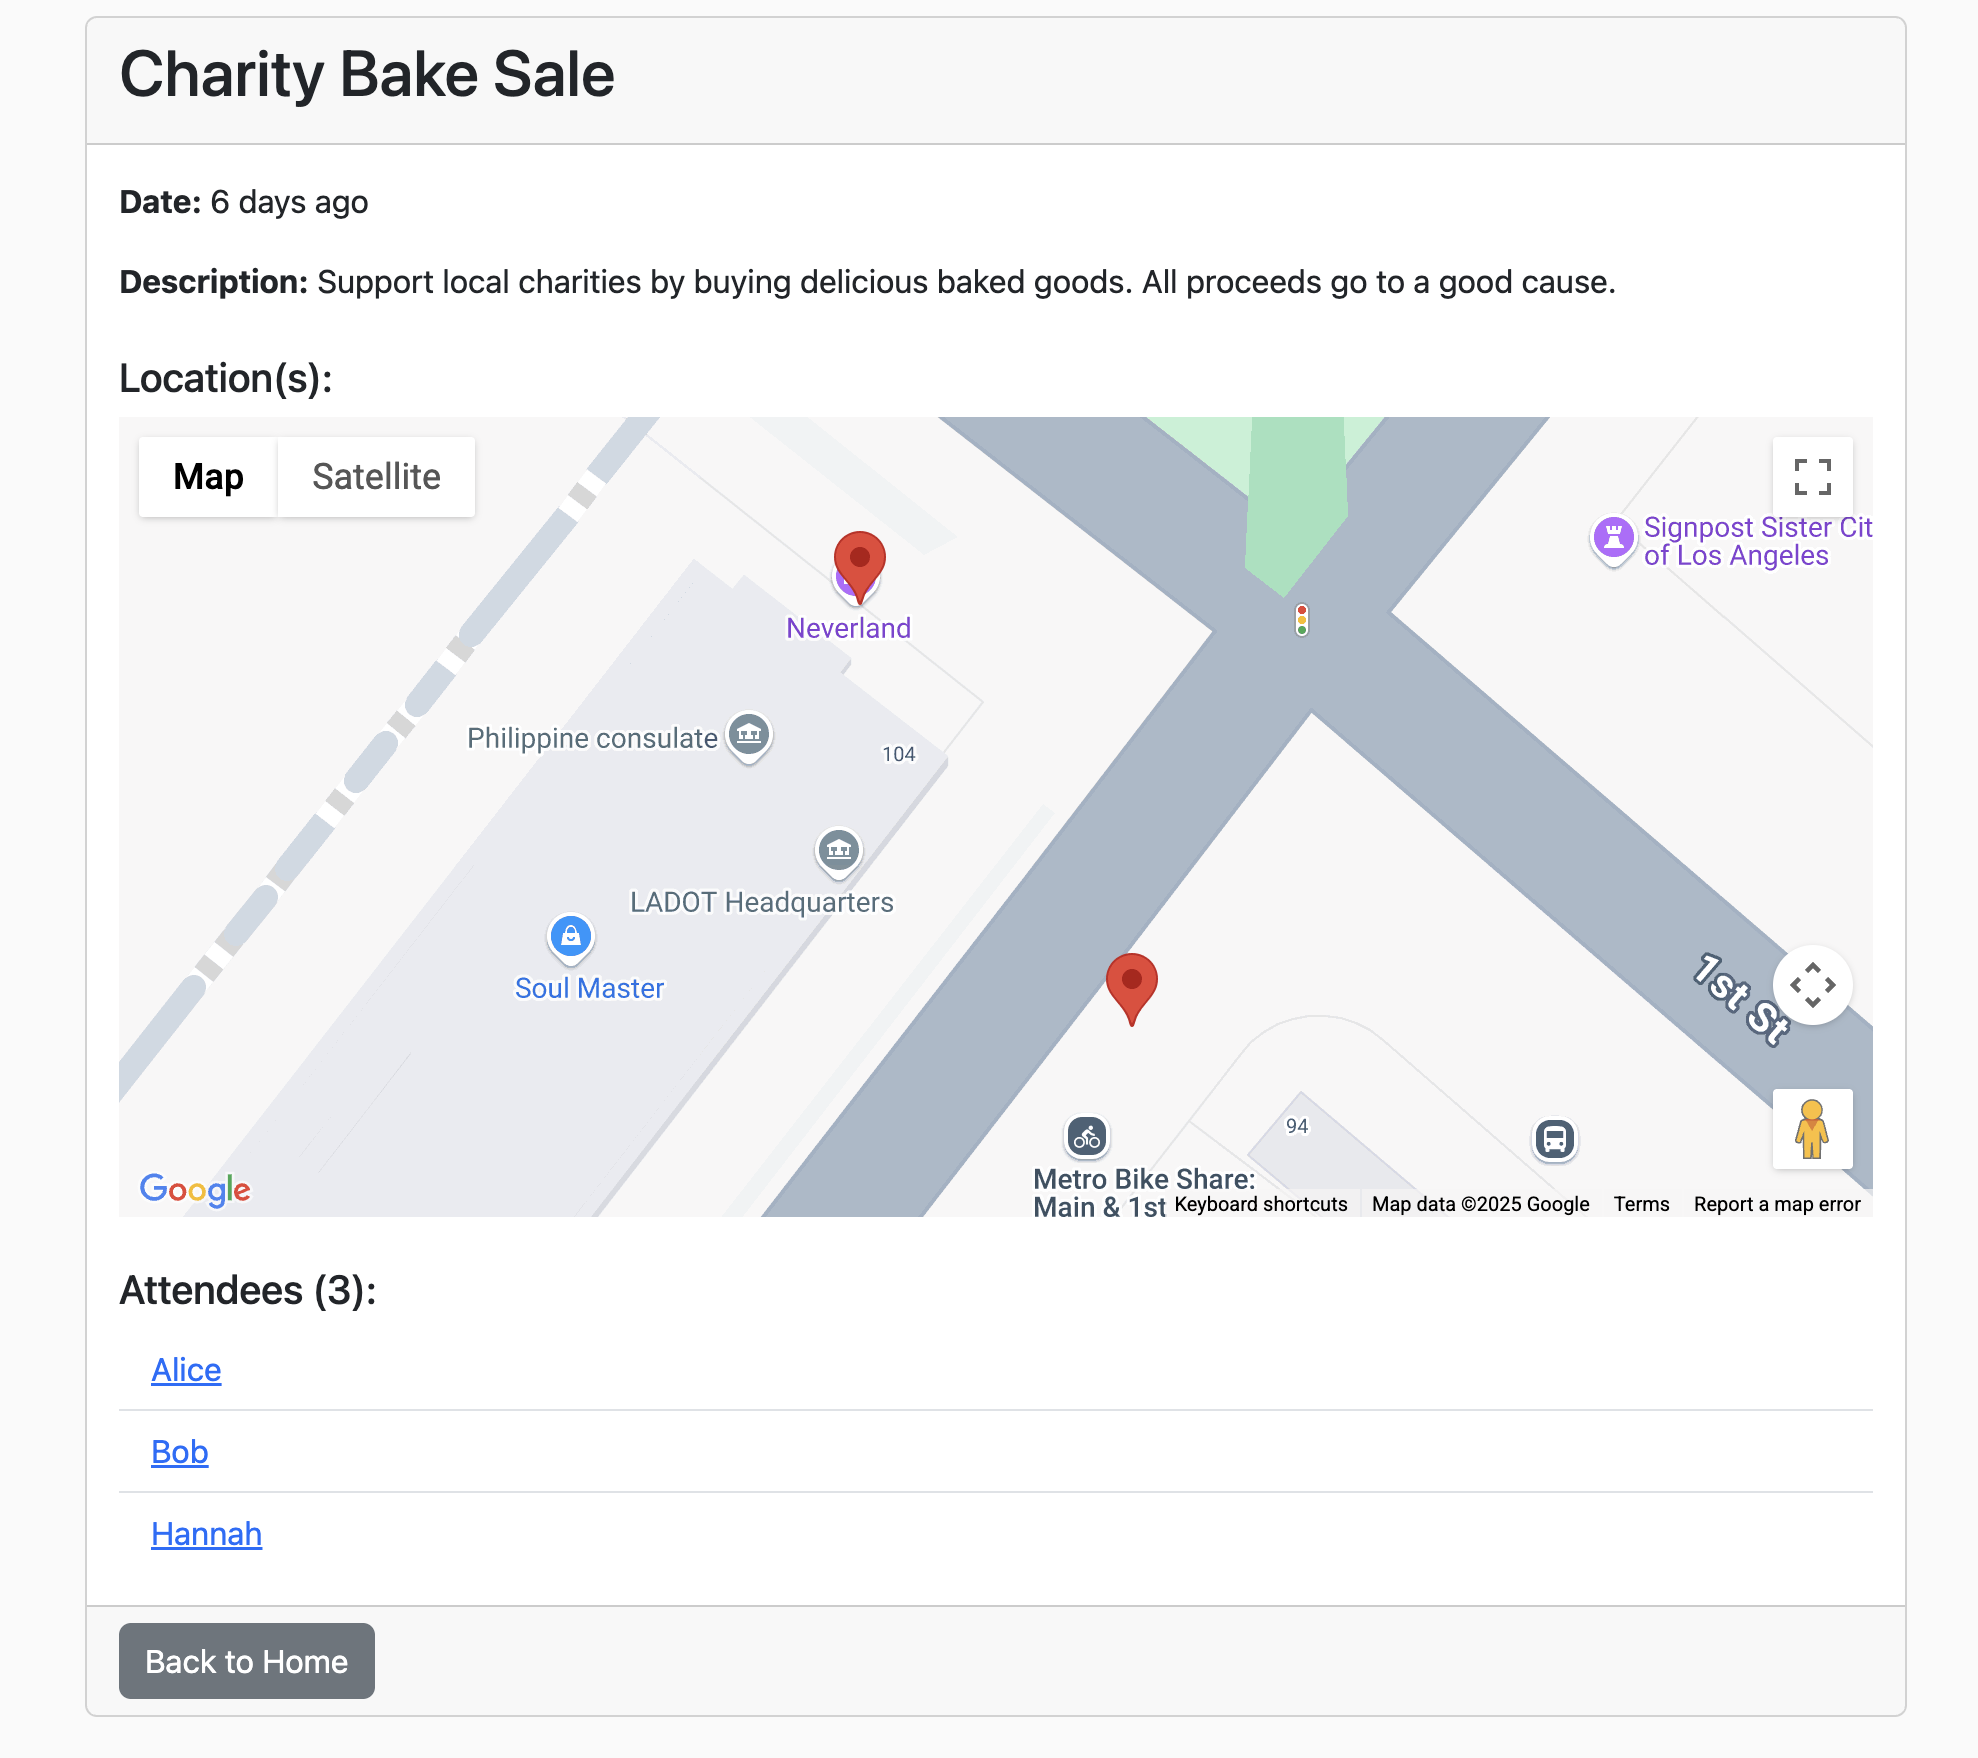
InstaVibe アプリケーションでは、Google マップを使用してイベントの詳細ページにイベントの場所を視覚的に表示しています。この機能を有効にするには、アプリケーションに先ほど作成した API キーが必要です。次のスクリプトは、割り当てた表示名(「Maps Platform API Key」)を使用して実際のキー文字列を取得します。
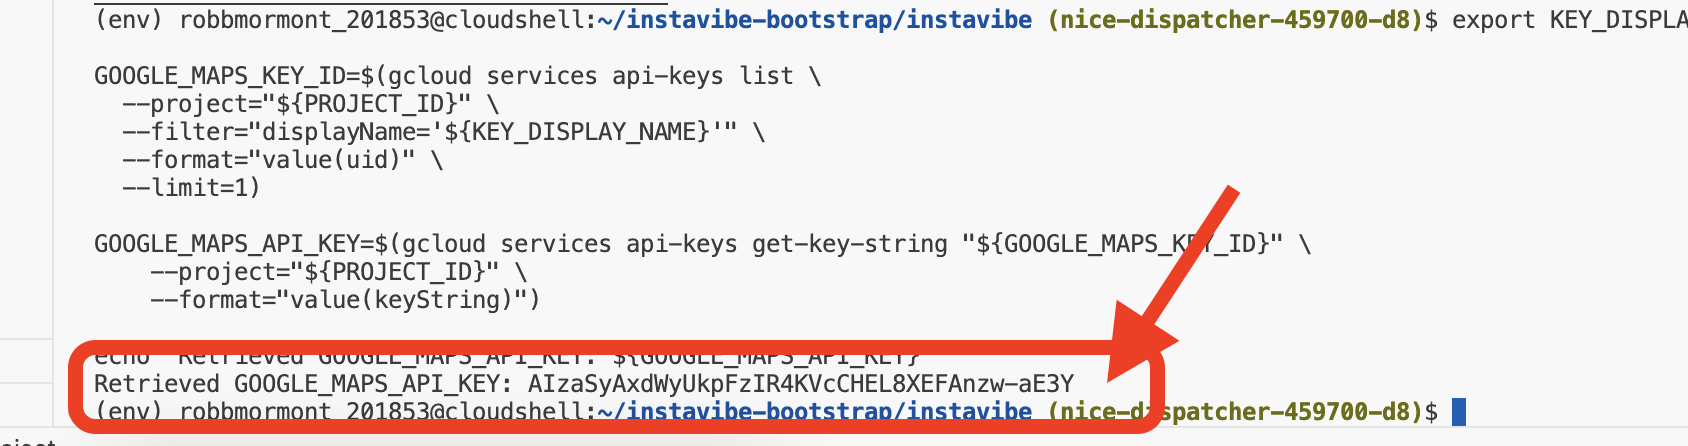
👉💻 Cloud Shell IDE に戻ります。以下のスクリプトを実行します。その後、出力を注意深く確認し、表示された GOOGLE_MAPS_API_KEY が、以前に Google Cloud コンソールで作成してコピーしたキーと一致していることを確認します。
. ~/instavibe-bootstrap/set_env.sh
export KEY_DISPLAY_NAME="Maps Platform API Key"

GOOGLE_MAPS_KEY_ID=$(gcloud services api-keys list \
  --project="${PROJECT_ID}" \
  --filter="displayName='${KEY_DISPLAY_NAME}'" \
  --format="value(uid)" \
  --limit=1)

GOOGLE_MAPS_API_KEY=$(gcloud services api-keys get-key-string "${GOOGLE_MAPS_KEY_ID}" \
    --project="${PROJECT_ID}" \
    --format="value(keyString)")

echo "${GOOGLE_MAPS_API_KEY}" > ~/mapkey.txt

echo "Retrieved GOOGLE_MAPS_API_KEY: ${GOOGLE_MAPS_API_KEY}"
👉💻 次に、InstaVibe ウェブ アプリケーションのコンテナ イメージをビルドして、Artifact Registry リポジトリに push します。
. ~/instavibe-bootstrap/set_env.sh

cd ~/instavibe-bootstrap/instavibe/
export IMAGE_TAG="latest"
export APP_FOLDER_NAME="instavibe"
export IMAGE_NAME="instavibe-webapp"
export IMAGE_PATH="${REGION}-docker.pkg.dev/${PROJECT_ID}/${REPO_NAME}/${IMAGE_NAME}:${IMAGE_TAG}"
export SERVICE_NAME="instavibe"

gcloud builds submit . \
  --tag=${IMAGE_PATH} \
  --project=${PROJECT_ID}
👉💻 新しいビルドの InstaVibe ウェブアプリ イメージを Cloud Run にデプロイする
. ~/instavibe-bootstrap/set_env.sh

cd ~/instavibe-bootstrap/instavibe/
export IMAGE_TAG="latest"
export APP_FOLDER_NAME="instavibe"
export IMAGE_NAME="instavibe-webapp"
export IMAGE_PATH="${REGION}-docker.pkg.dev/${PROJECT_ID}/${REPO_NAME}/${IMAGE_NAME}:${IMAGE_TAG}"
export SERVICE_NAME="instavibe"

gcloud run deploy ${SERVICE_NAME} \
  --image=${IMAGE_PATH} \
  --platform=managed \
  --region=${REGION} \
  --allow-unauthenticated \
  --set-env-vars="SPANNER_INSTANCE_ID=${SPANNER_INSTANCE_ID}" \
  --set-env-vars="SPANNER_DATABASE_ID=${SPANNER_DATABASE_ID}" \
  --set-env-vars="APP_HOST=0.0.0.0" \
  --set-env-vars="APP_PORT=8080" \
  --set-env-vars="GOOGLE_CLOUD_LOCATION=${REGION}" \
  --set-env-vars="GOOGLE_CLOUD_PROJECT=${PROJECT_ID}" \
  --set-env-vars="GOOGLE_MAPS_API_KEY=${GOOGLE_MAPS_API_KEY}" \
  --project=${PROJECT_ID} \
  --min-instances=1
デプロイが正常に完了すると、Cloud Run ログに実行中の InstaVibe アプリケーションの公開 URL が表示されます。
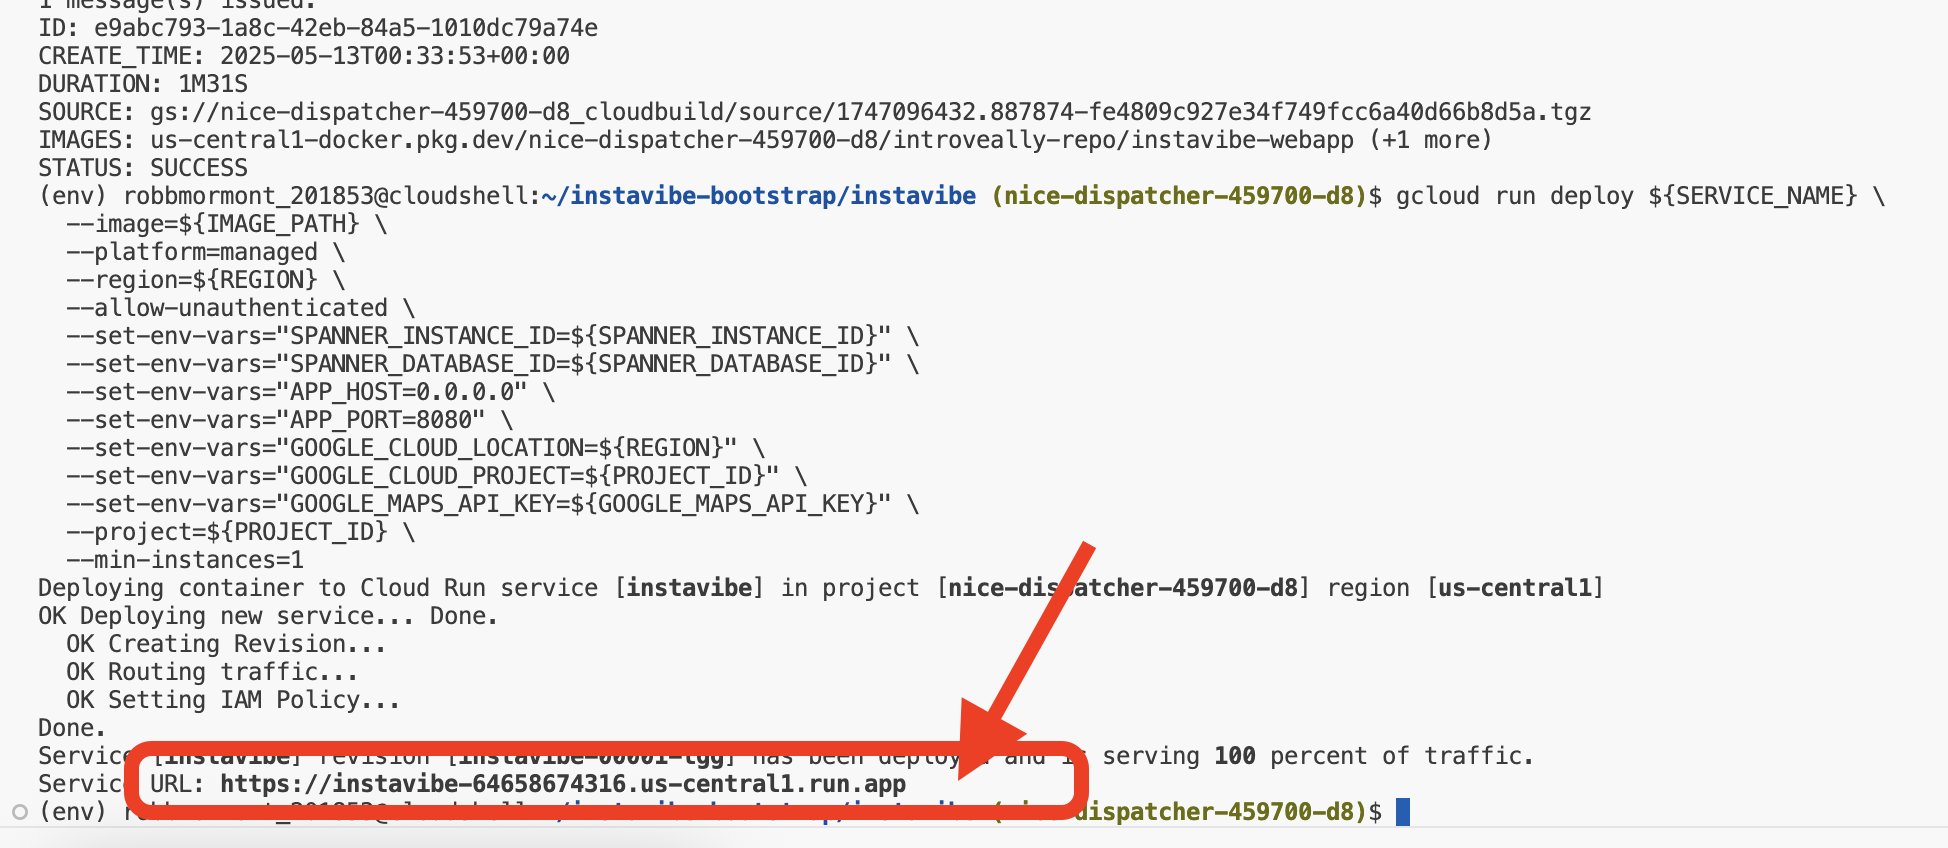
この URL は、Google Cloud コンソールの [Cloud Run] セクションに移動して instavibe サービスを選択することでも確認できます。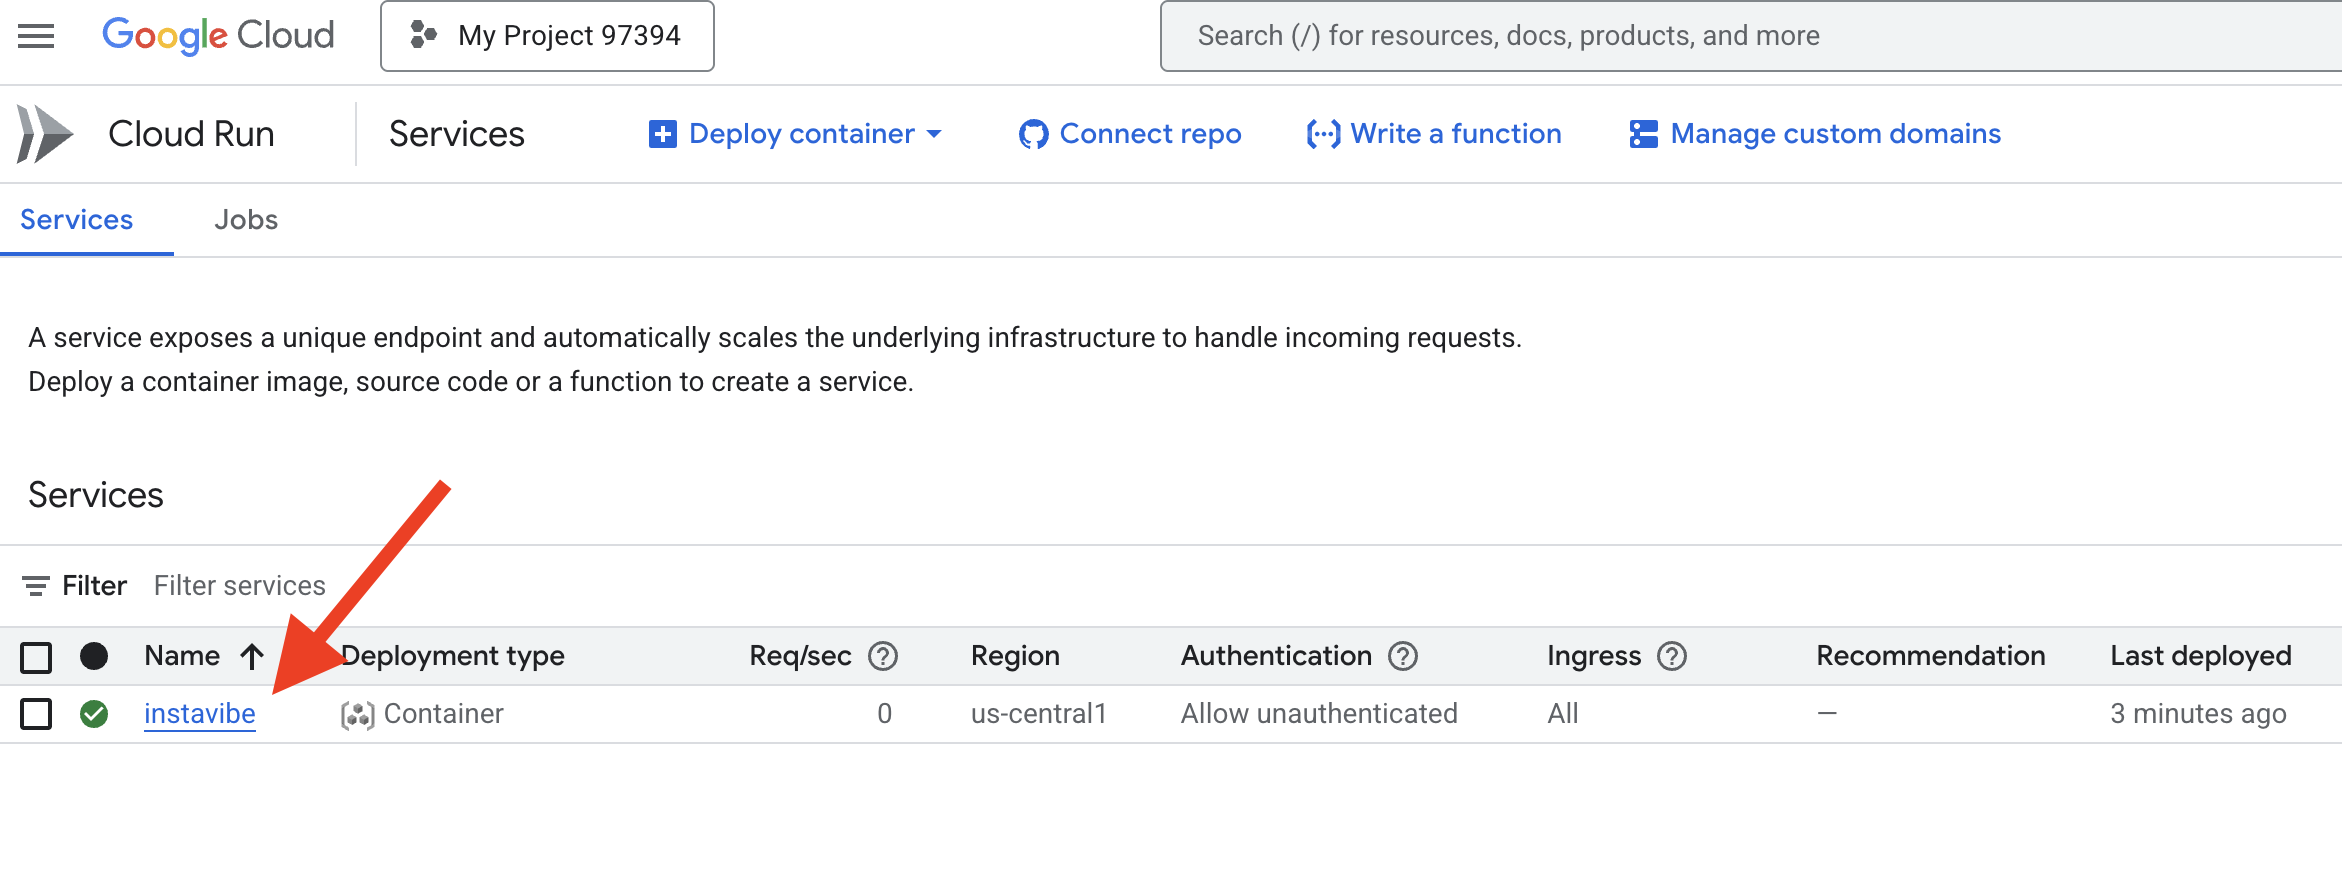
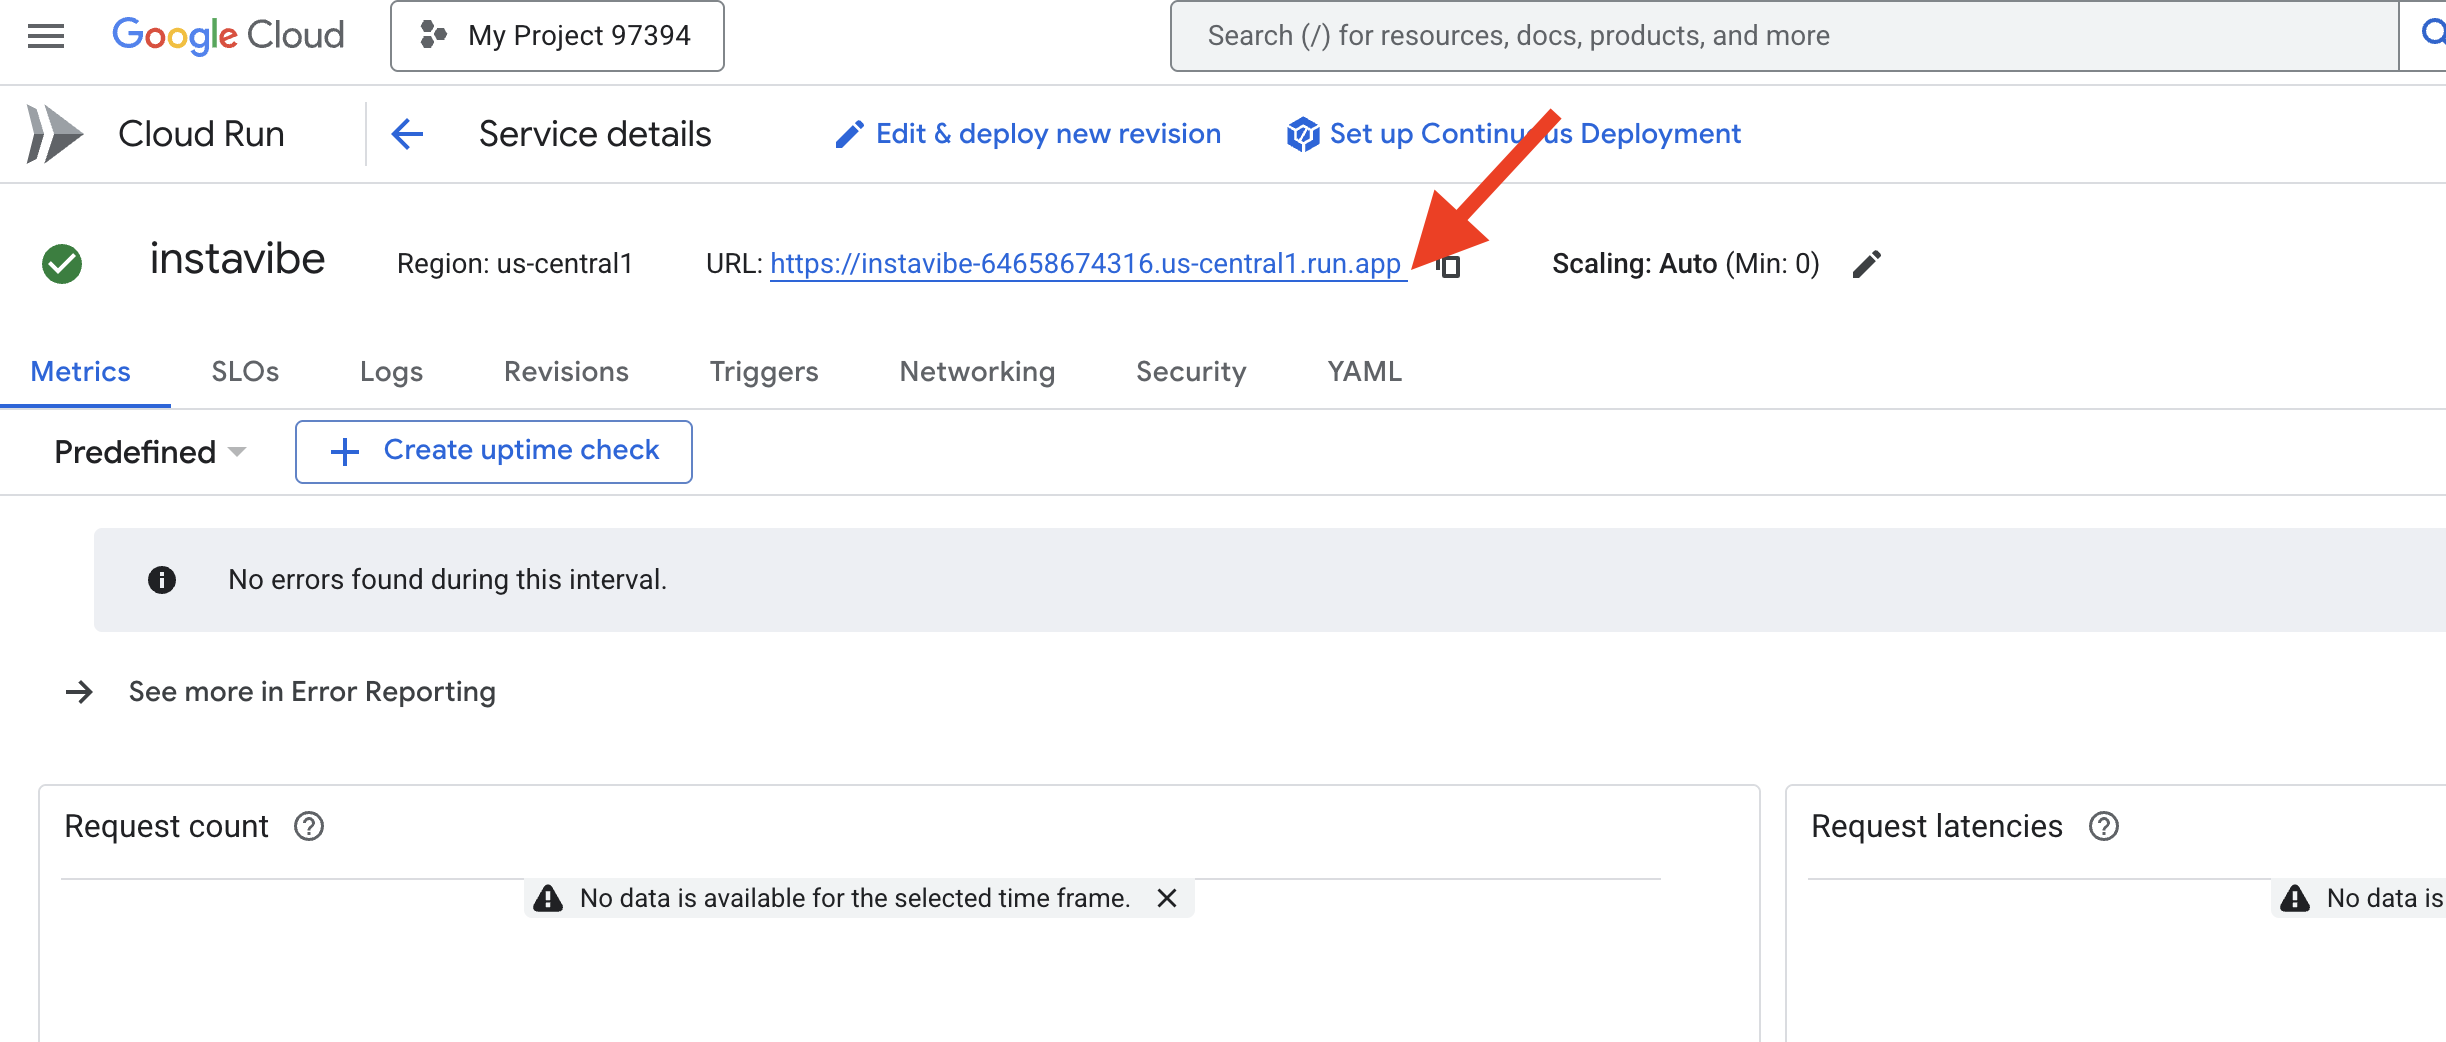
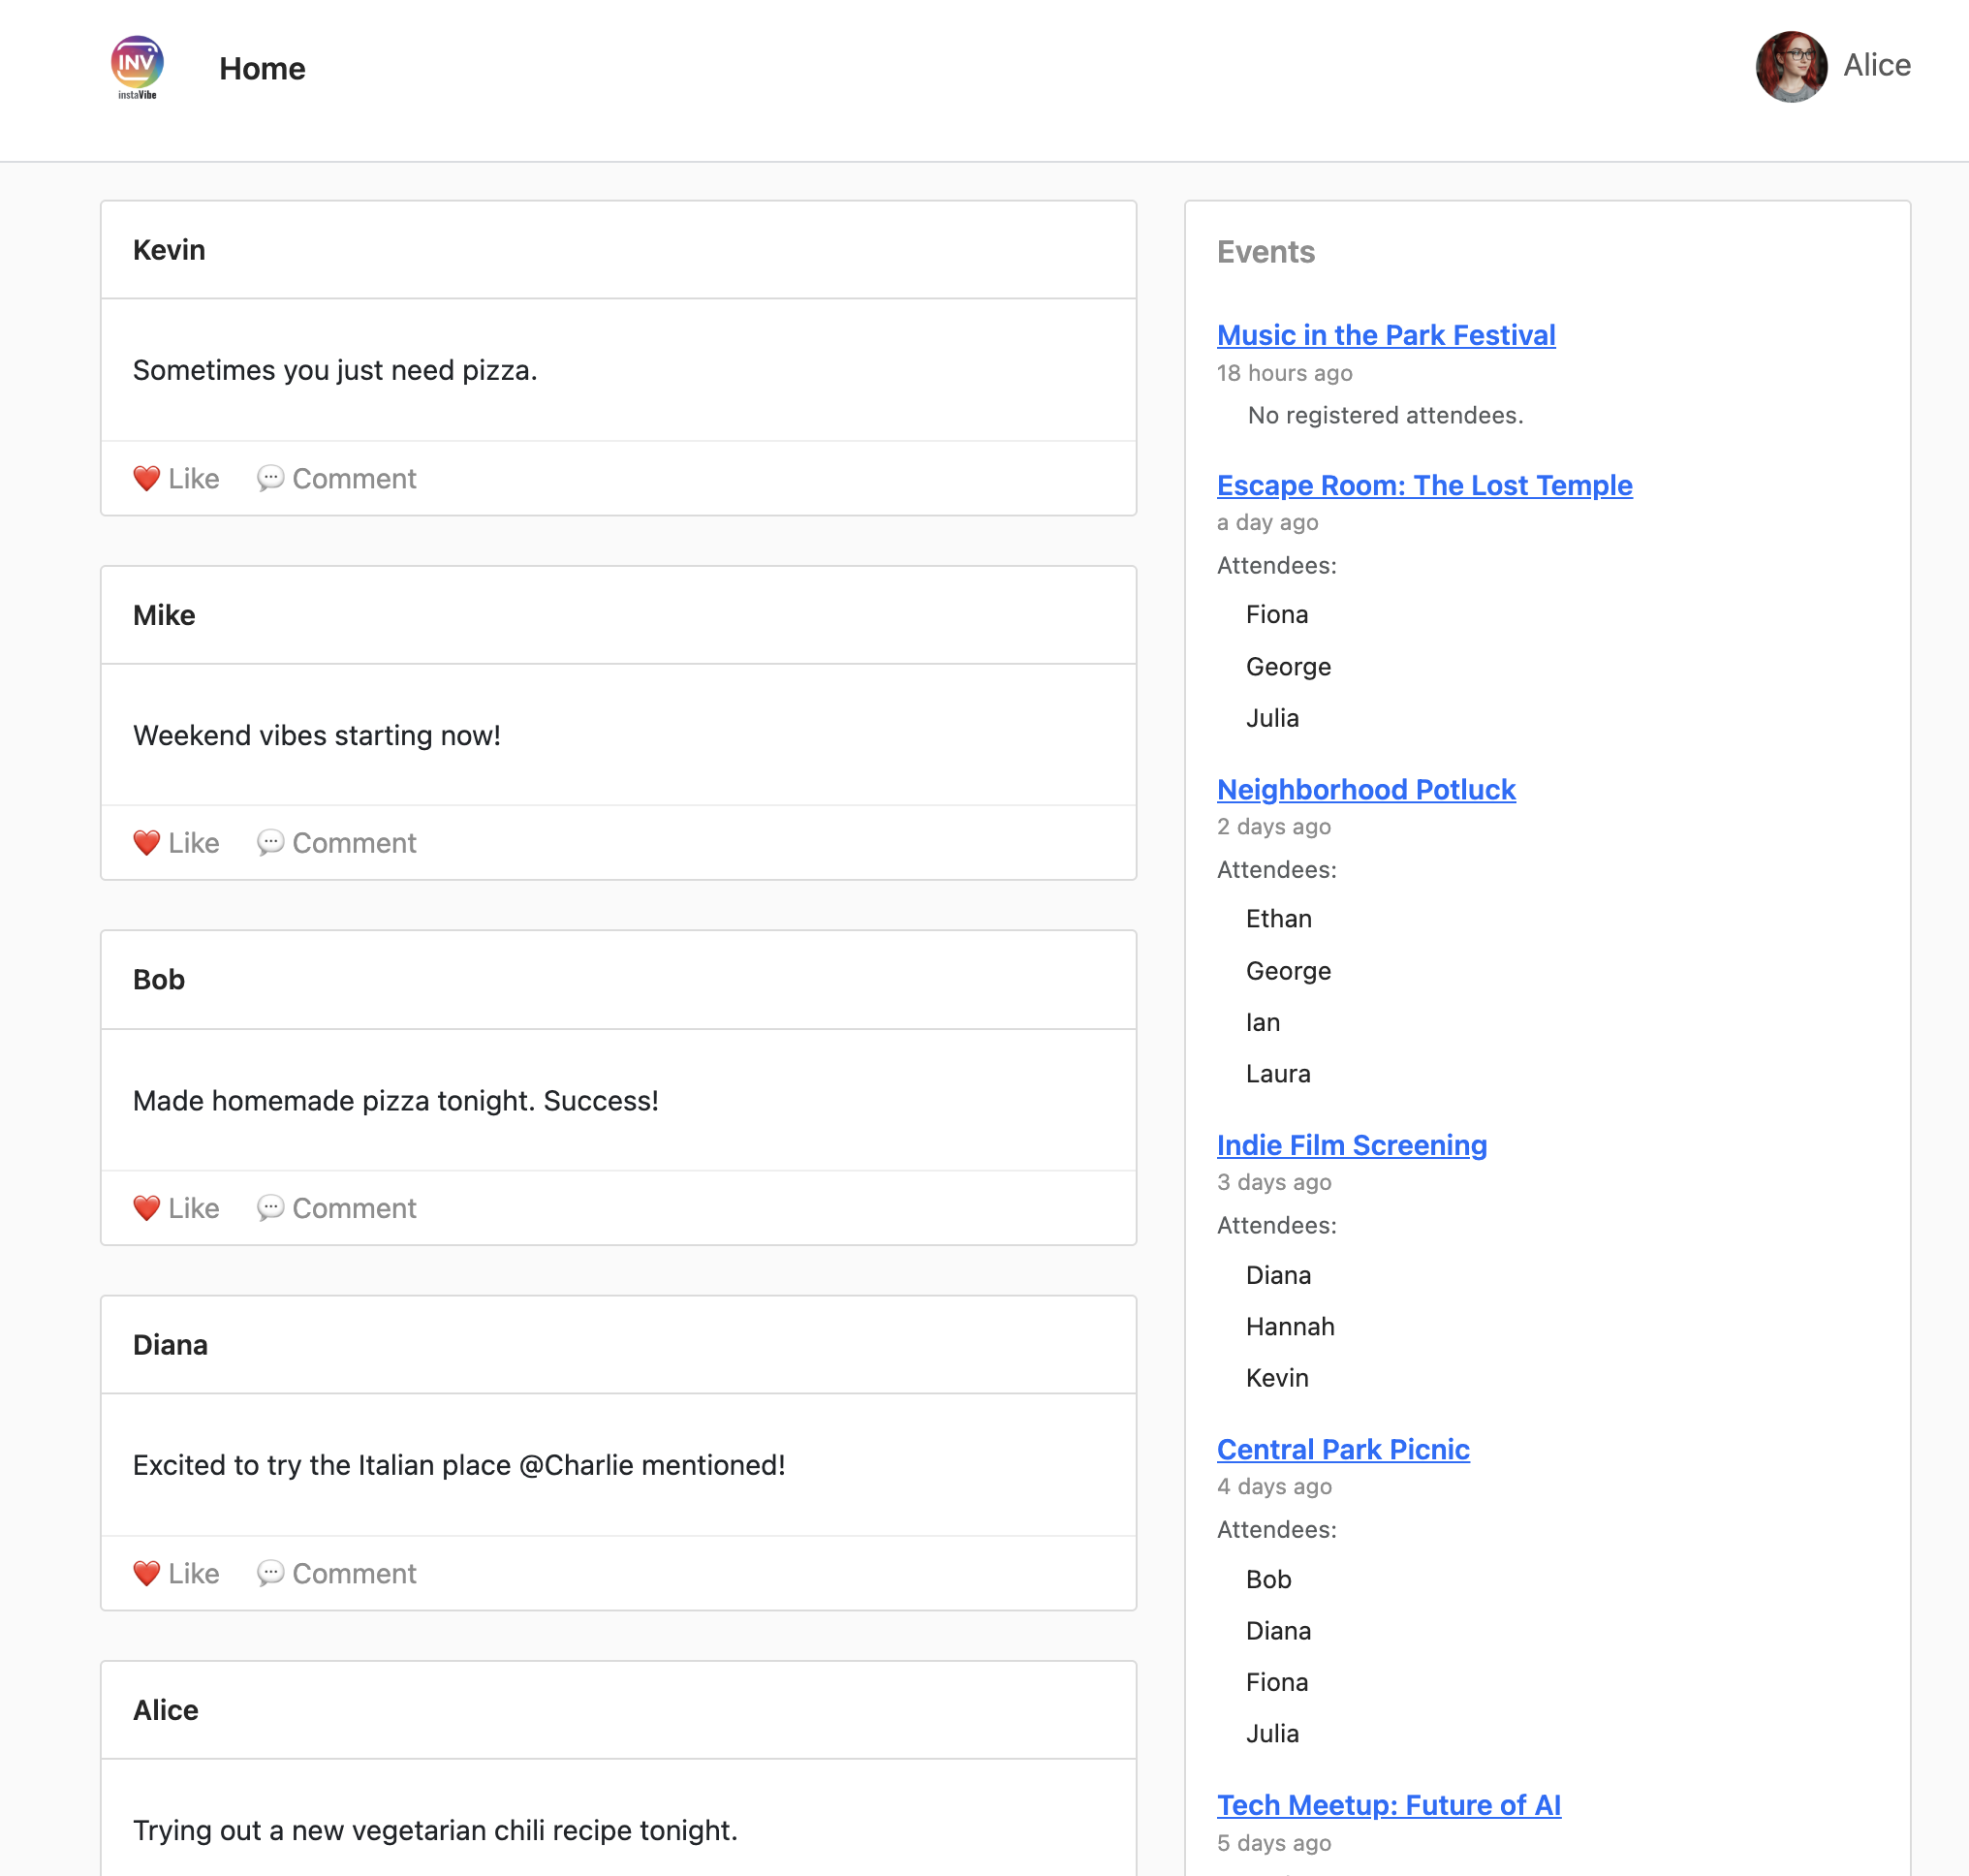
それでは、ウェブブラウザでその URL を開いて、基本的な InstaVibe プラットフォームを見てみましょう。設定したグラフ データベースを利用した投稿、イベント、ユーザー接続を確認します。
ターゲット アプリケーションが実行されたので、その機能を強化する最初のインテリジェント エージェントの構築を開始しましょう。
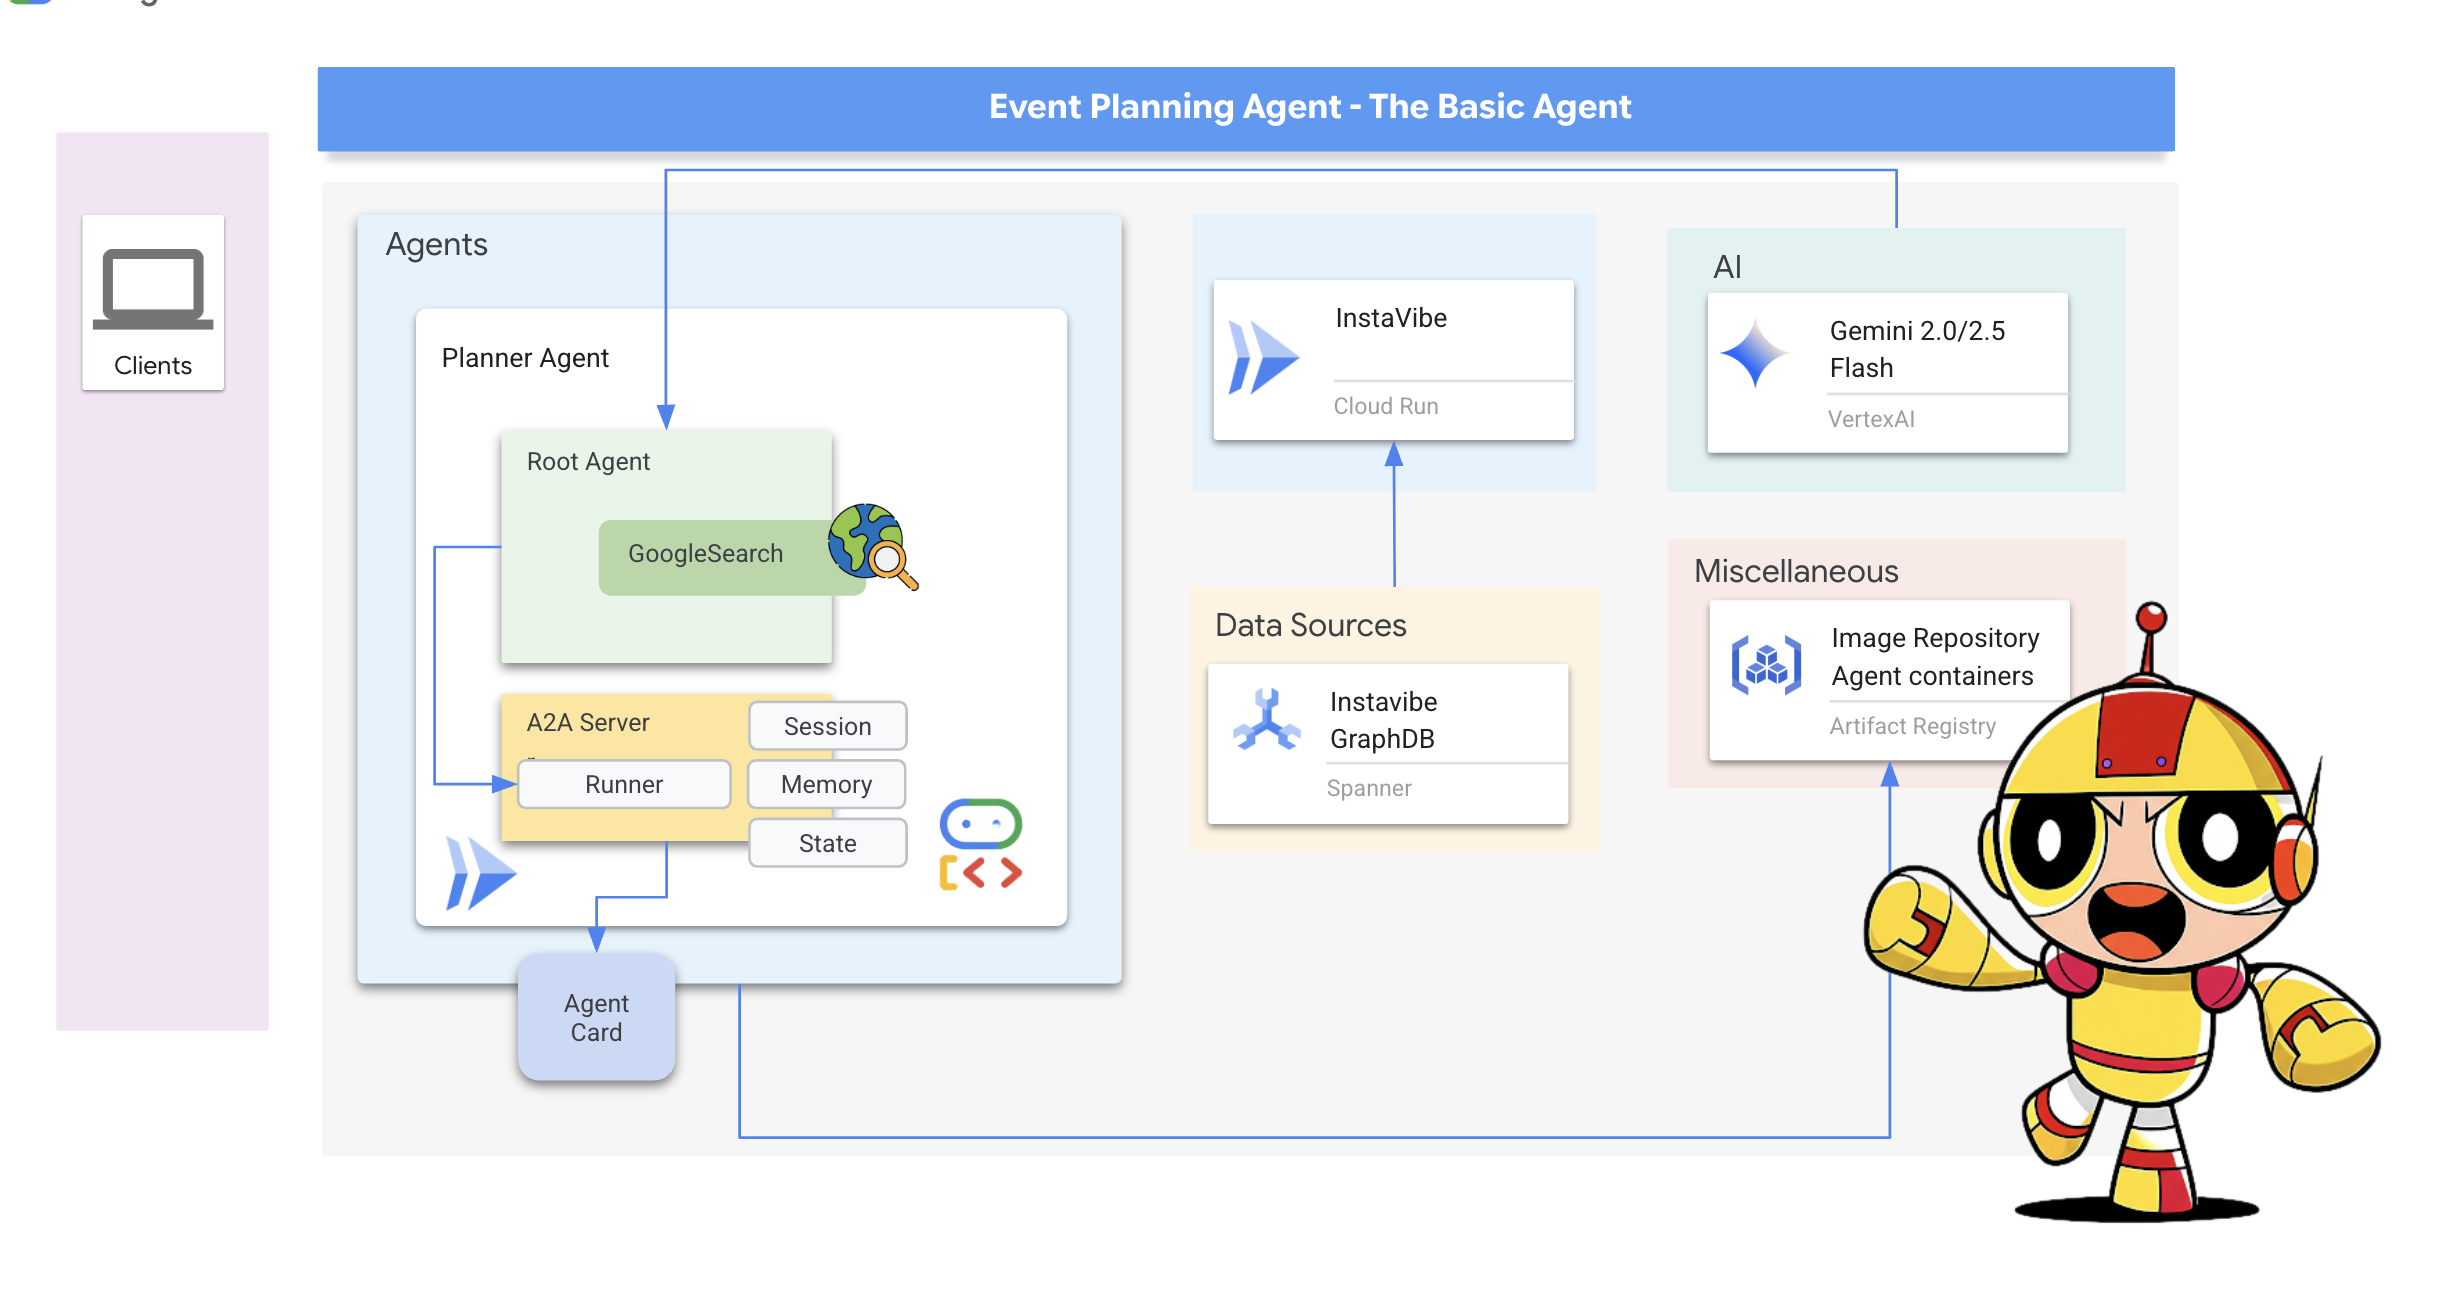
6. ADK を使用した基本的なエージェント、イベント プランナー
ADK フレームワーク
Google の ADK フレームワークの概要 基盤(InstaVibe アプリとデータベース)が整ったので、Google の Agent Development Kit(ADK)を使用して、最初のインテリジェント エージェントの構築を開始できます。
Agent Development Kit(ADK)は、AI エージェントの開発とデプロイ用に設計された、柔軟性の高いモジュラー フレームワークです。その設計原則は、エージェント開発を従来のソフトウェア開発のような感覚で行えるようにすることです。これにより、デベロッパーは、単純な単一目的のタスクから複雑なマルチエージェント ワークフローまで、あらゆる処理に対応できるエージェント アーキテクチャを簡単に作成、デプロイ、オーケストレートできるようになります。
ADK の中心となるのは Agent のコンセプトです。これは、指示、構成(選択した言語モデル(Gemini など)など)、アクションの実行や情報の収集に使用できる Tools のセットをカプセル化します。
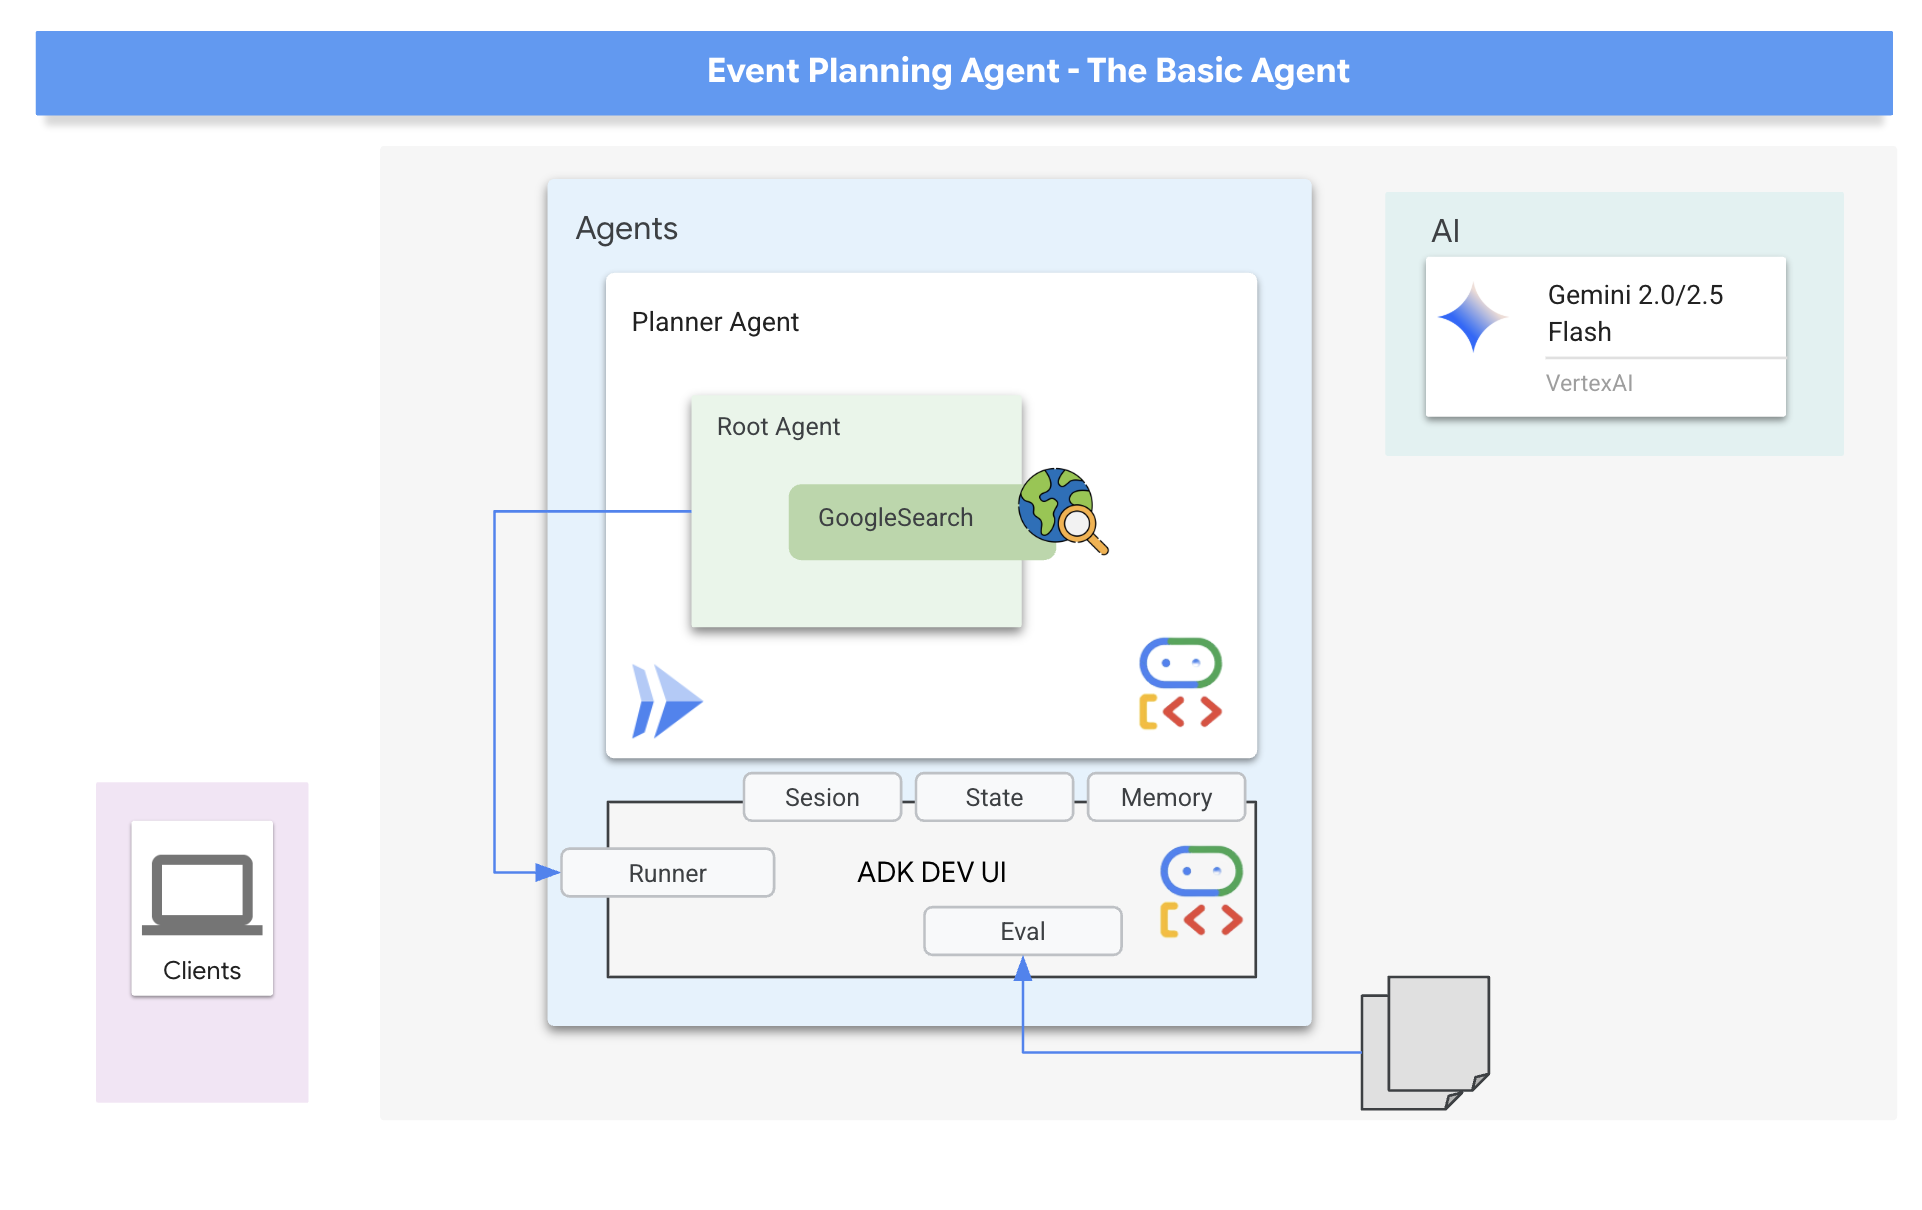
最初のエージェントは「イベント プランナー」です。主な目的は、ユーザーの外出リクエスト(場所、日付、興味 / 関心などを指定)を受け取り、クリエイティブでカスタマイズされた提案を生成することです。提案が関連性の高いものであり、最新の情報(その週末に開催される特定のイベントなど)に基づいていることを確認するため、ADK の組み込みツールの 1 つである Google 検索を活用します。これにより、エージェントはリアルタイムのウェブ検索結果に基づいて回答を生成し、ユーザーの条件に一致する会場、イベント、アクティビティに関する最新の詳細情報を取得できます。
👉📝 Cloud Shell IDE に戻り、~/instavibe-bootstrap/agents/planner/agent.py に次のプロンプトと指示を追加して、エージェントを作成します。
from google.adk.agents import Agent
from google.adk.tools import google_search

root_agent = Agent(
    name="planner_agent",
    model="gemini-2.0-flash",
    description="Agent tasked with generating creative and fun dating plan suggestions",
    instruction="""

        You are a specialized AI assistant tasked with generating creative and fun plan suggestions.

        Request:
        For the upcoming weekend, specifically from **[START_DATE_YYYY-MM-DD]** to **[END_DATE_YYYY-MM-DD]**, in the location specified as **[TARGET_LOCATION_NAME_OR_CITY_STATE]** (if latitude/longitude are provided, use these: Lat: **[TARGET_LATITUDE]**, Lon: **[TARGET_LONGITUDE]**), please generate a distinct dating plan suggestions.

        Constraints and Guidelines for Suggestions:
        1.  Creativity & Fun: Plans should be engaging, memorable, and offer a good experience for a date.
        2.  Budget: All generated plans should aim for a moderate budget (conceptually "$$"), meaning they should be affordable yet offer good value, without being overly cheap or extravagant. This budget level should be *reflected in the choice of activities and venues*, but **do not** explicitly state "Budget: $$" in the `plan_description`.
        3.  Interest Alignment:
               Consider the following user interests: **[COMMA_SEPARATED_LIST_OF_INTERESTS, e.g., outdoors, arts & culture, foodie, nightlife, unique local events, live music, active/sports]**. Tailor suggestions specifically to these where possible. The plan should *embody* these interests.
               Fallback: If specific events or venues perfectly matching all listed user interests cannot be found for the specified weekend, you should create a creative and fun generic dating plan that is still appealing, suitable for the location, and adheres to the moderate budget. This plan should still sound exciting and fun, even if it's more general.
        4.  Current & Specific: Prioritize finding specific, current events, festivals, pop-ups, or unique local venues operating or happening during the specified weekend dates. If exact current events cannot be found, suggest appealing evergreen options or implement the fallback generic plan.
        5.  Location Details: For each place or event mentioned within a plan, you MUST provide its name, precise latitude, precise longitude, and a brief, helpful description.
        6.  Maximum Activities: The plan must contain a maximum of 3 distinct activities.

        RETURN PLAN in MARKDOWN FORMAT
    """,
    tools=[google_search]
)
これで最初のエージェントが定義されました。ADK の優れた点の 1 つは、直感的な性質と便利なツールが提供されていることです。特に便利なのは ADK 開発 UI です。これを使用すると、エージェントをインタラクティブにテストし、そのレスポンスをリアルタイムで確認できます。
👉💻 起動してみましょう。次のコマンドで ADK 開発 UI が起動します。
. ~/instavibe-bootstrap/set_env.sh
source ~/instavibe-bootstrap/env/bin/activate
cd  ~/instavibe-bootstrap/agents
sed -i "s|^\(O\?GOOGLE_CLOUD_PROJECT\)=.*|GOOGLE_CLOUD_PROJECT=${PROJECT_ID}|" ~/instavibe-bootstrap/agents/planner/.env
adk web
コマンドを実行すると、ターミナルに ADK Web サーバーが起動したことを示す次のような出力が表示されます。
+-----------------------------------------------------------------------------+
| ADK Web Server started                                                      |
|                                                                             |
| For local testing, access at http://localhost:8000.                         |
+-----------------------------------------------------------------------------+

INFO:     Application startup complete.
INFO:     Uvicorn running on http://0.0.0.0:8000 (Press CTRL+C to quit)
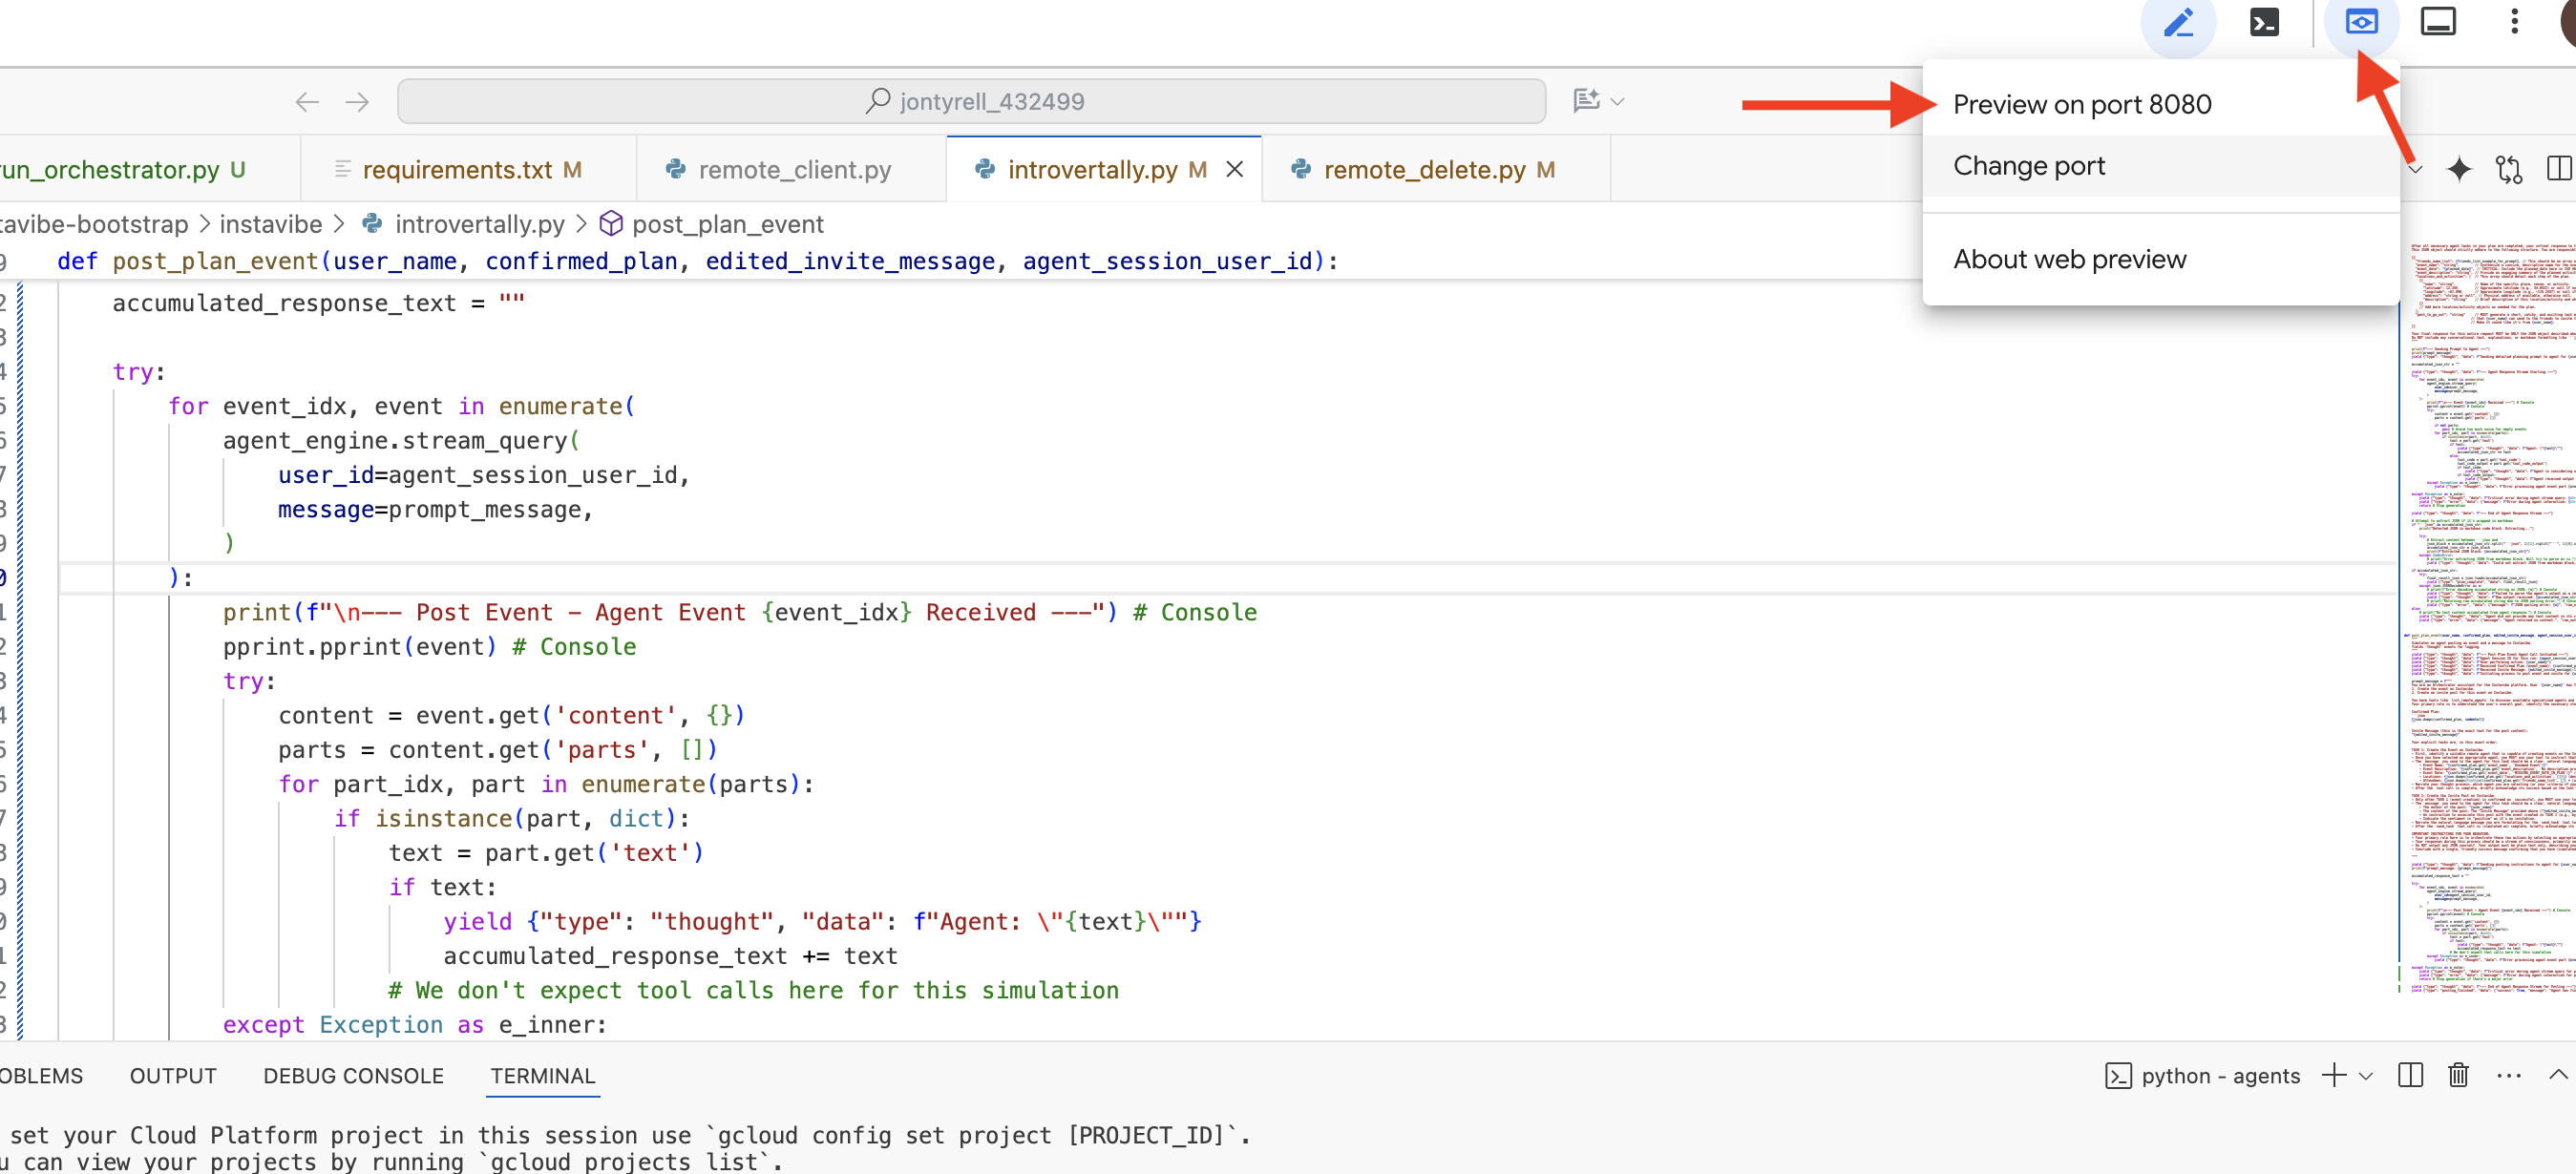
👉 次に、ブラウザから ADK 開発 UI にアクセスします。
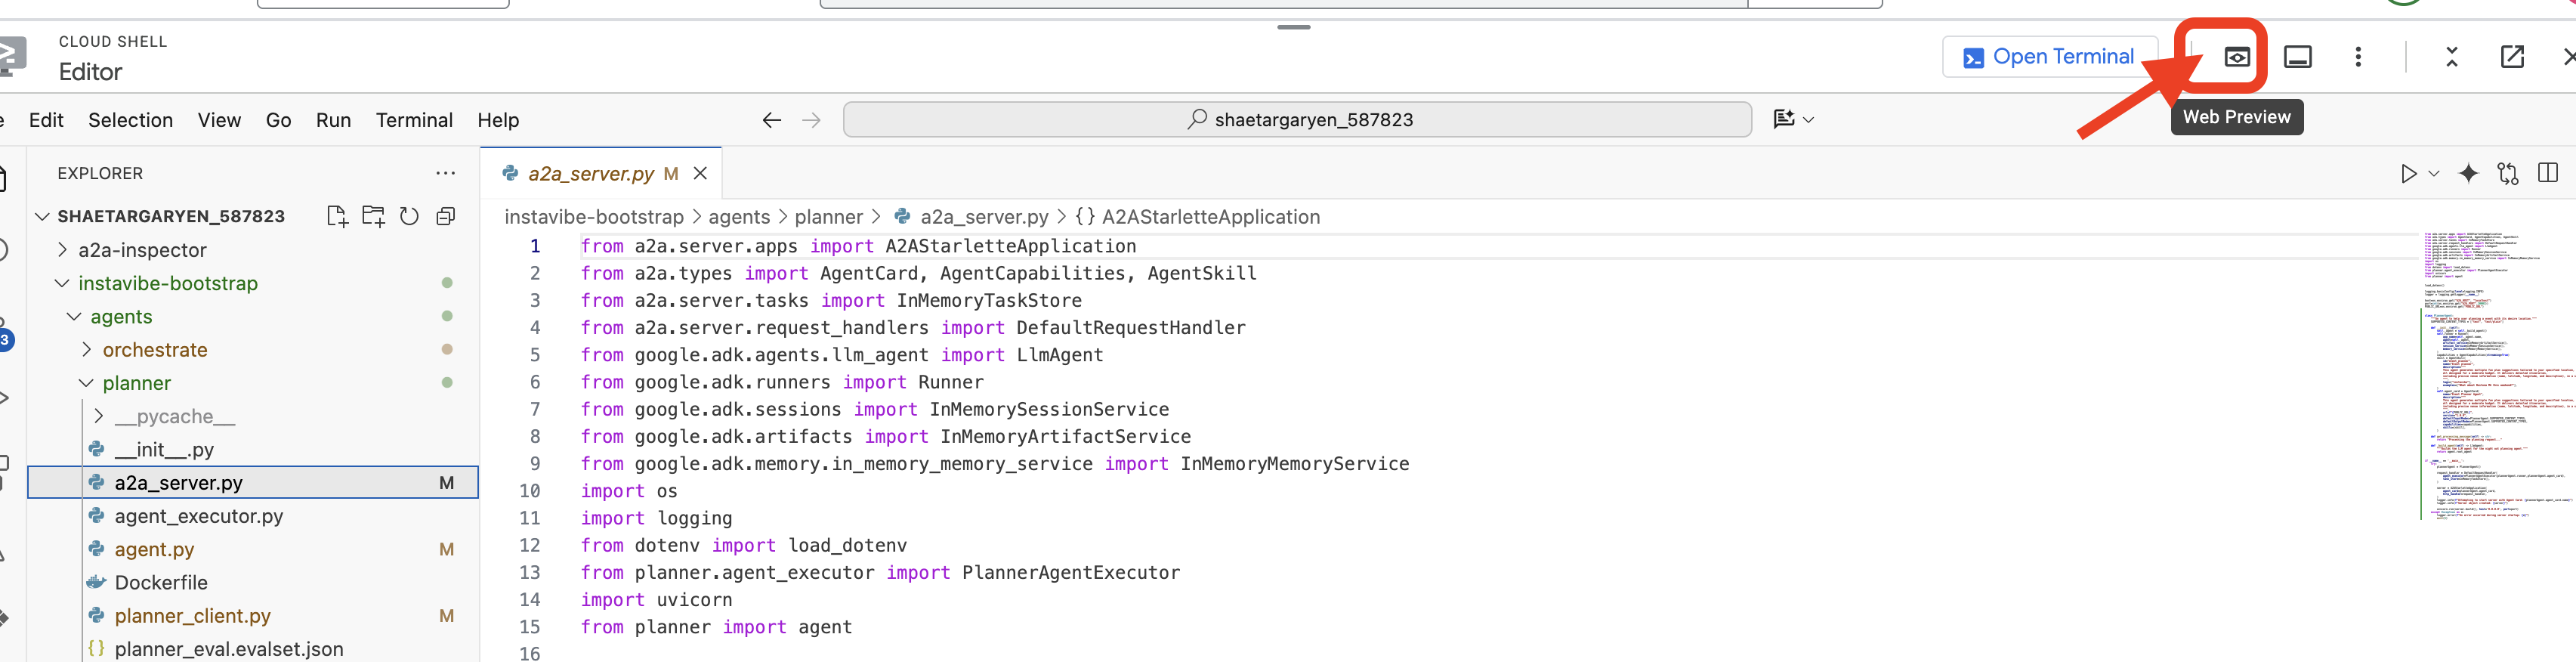
Cloud Shell ツールバー(通常は右上)の [ウェブでプレビュー] アイコン(多くの場合、目または矢印付きの四角形)から、[ポートを変更] を選択します。ポップアップ ウィンドウで、ポートを 8000 に設定し、[変更してプレビュー] をクリックします。Cloud Shell が新しいブラウザタブまたはウィンドウを開き、ADK 開発 UI を表示します。
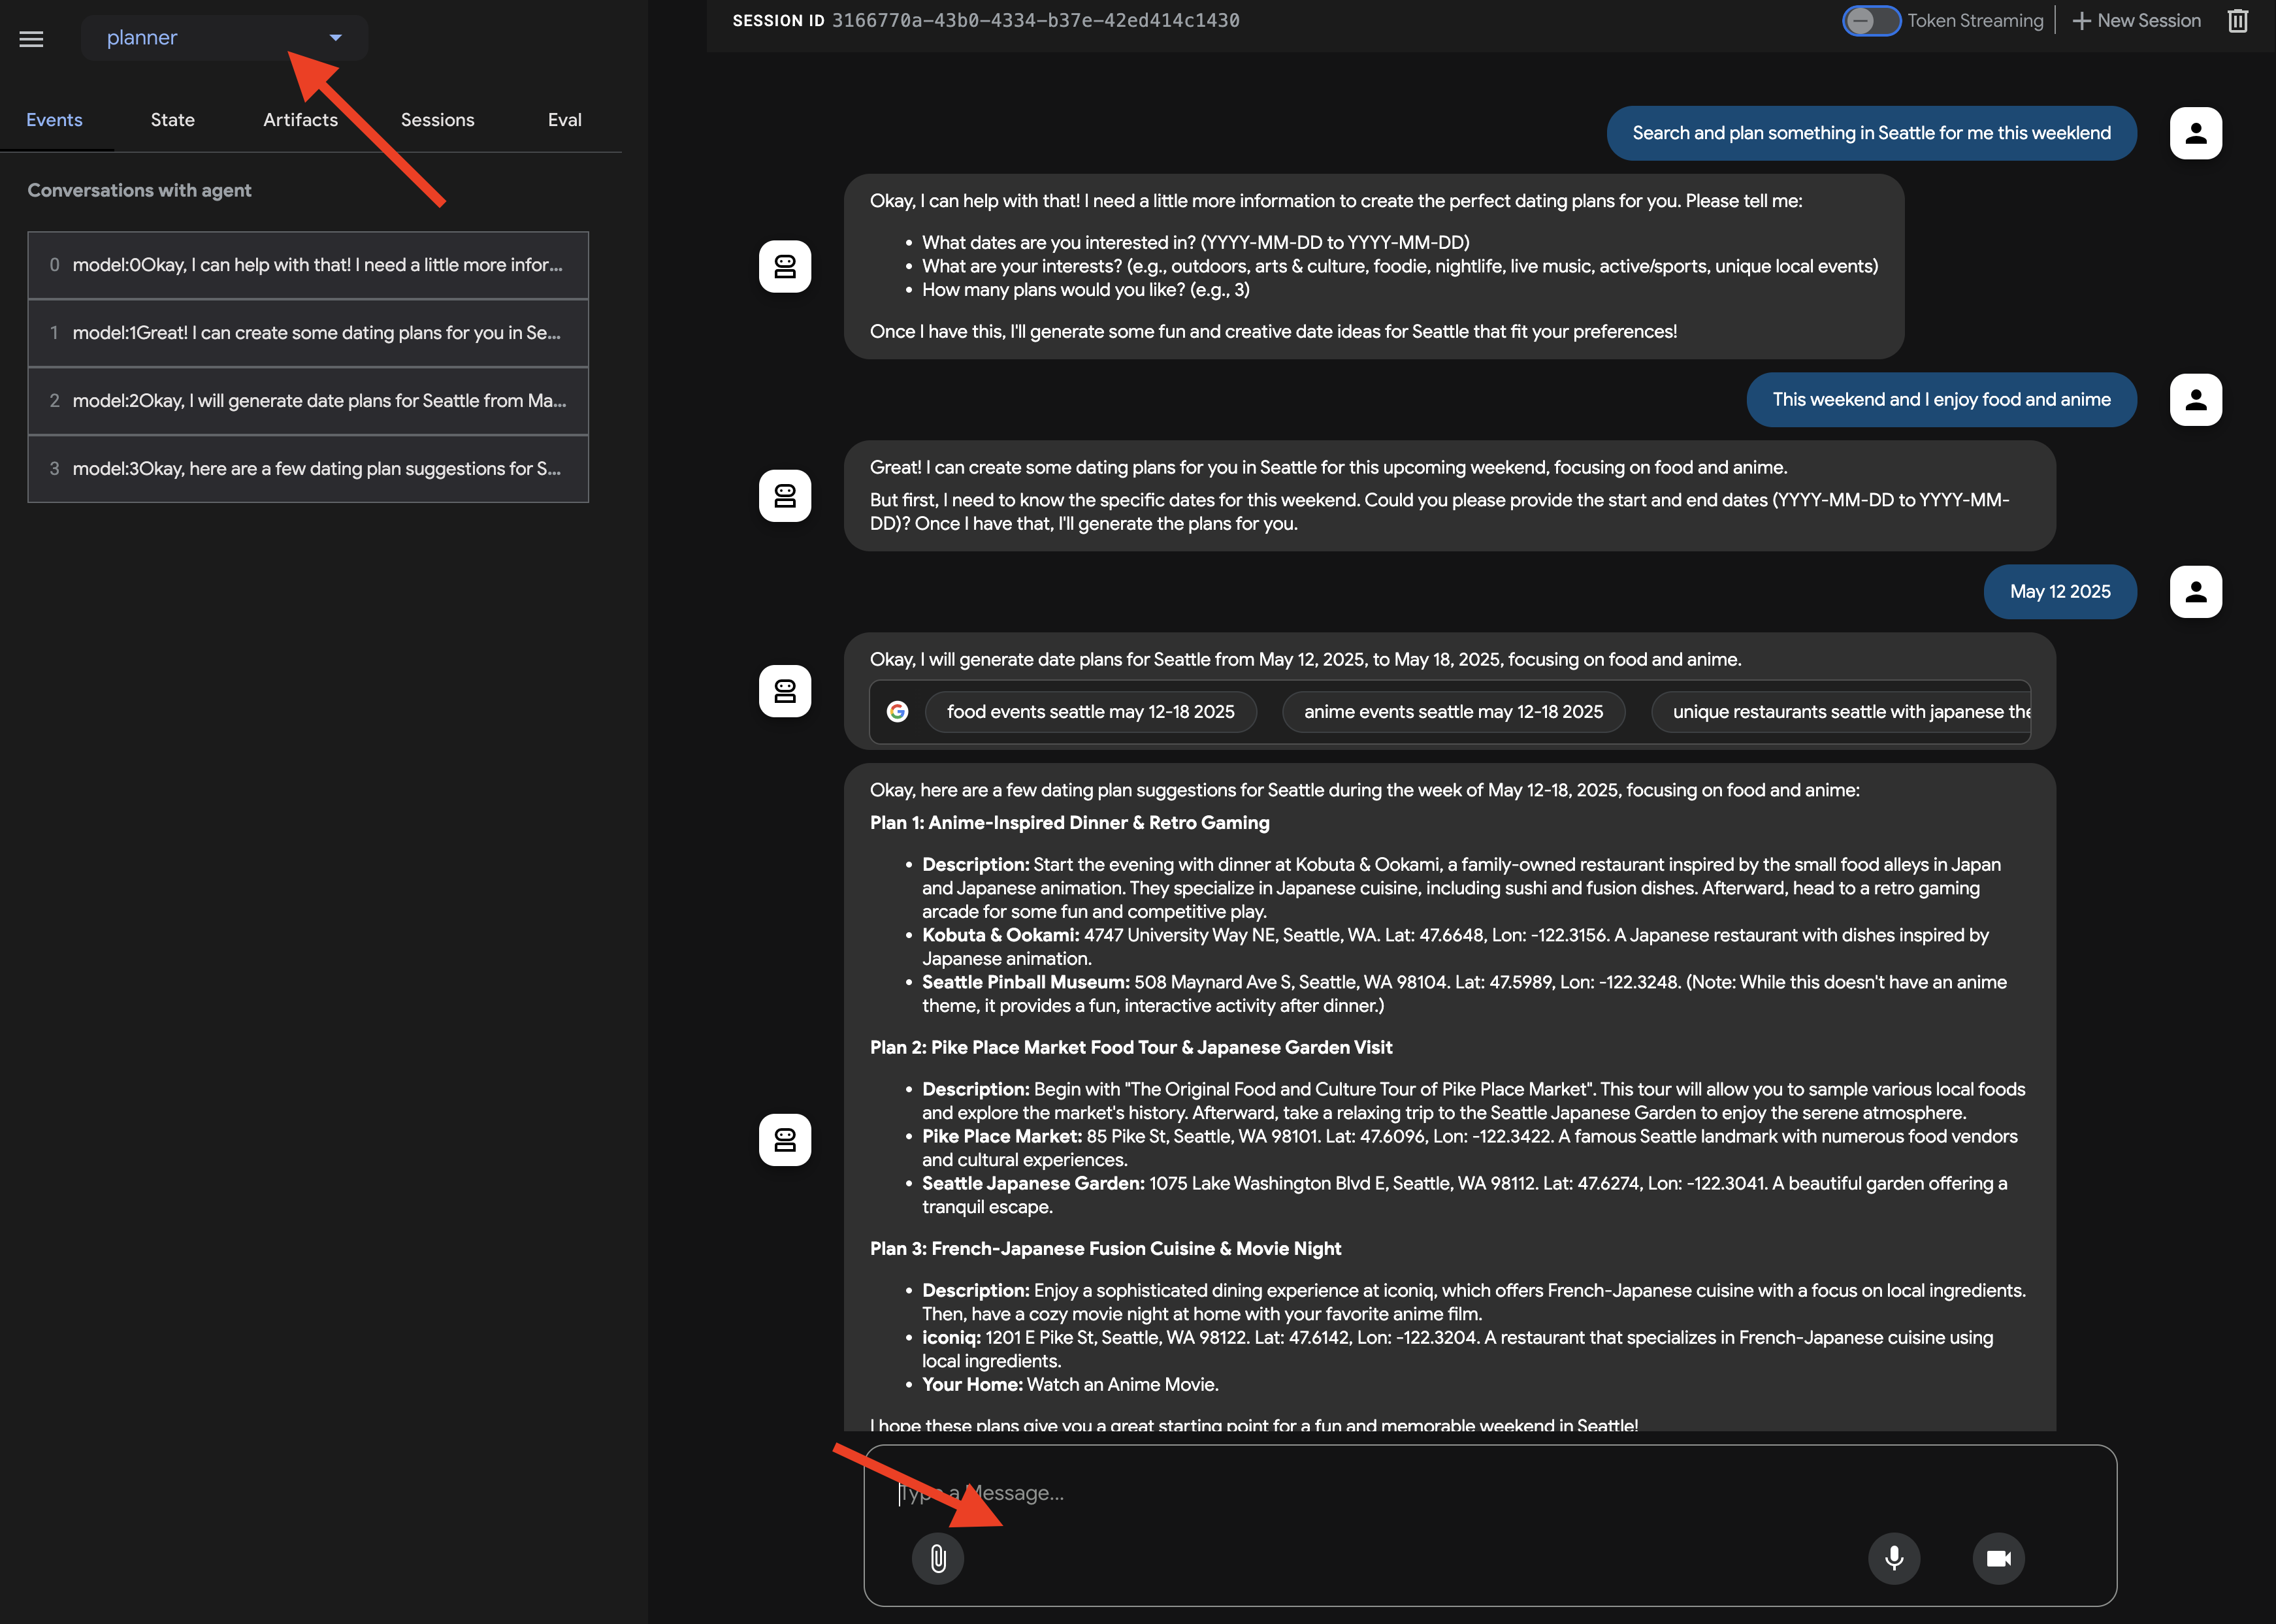
ブラウザで ADK 開発 UI を開いたら、UI の右上にあるプルダウン メニューで、操作するエージェントとして [planner] を選択します。右側のチャット ダイアログで、エージェントにタスクを割り当ててみましょう。たとえば、エージェントと次のような会話をします。
Search and plan something in Seattle for me this weekend
This weekend and I enjoy food and anime
ご希望の日付をご提案ください
July 12 2025
エージェントがリクエストを処理し、Google 検索の結果に基づいてプランを提示します。
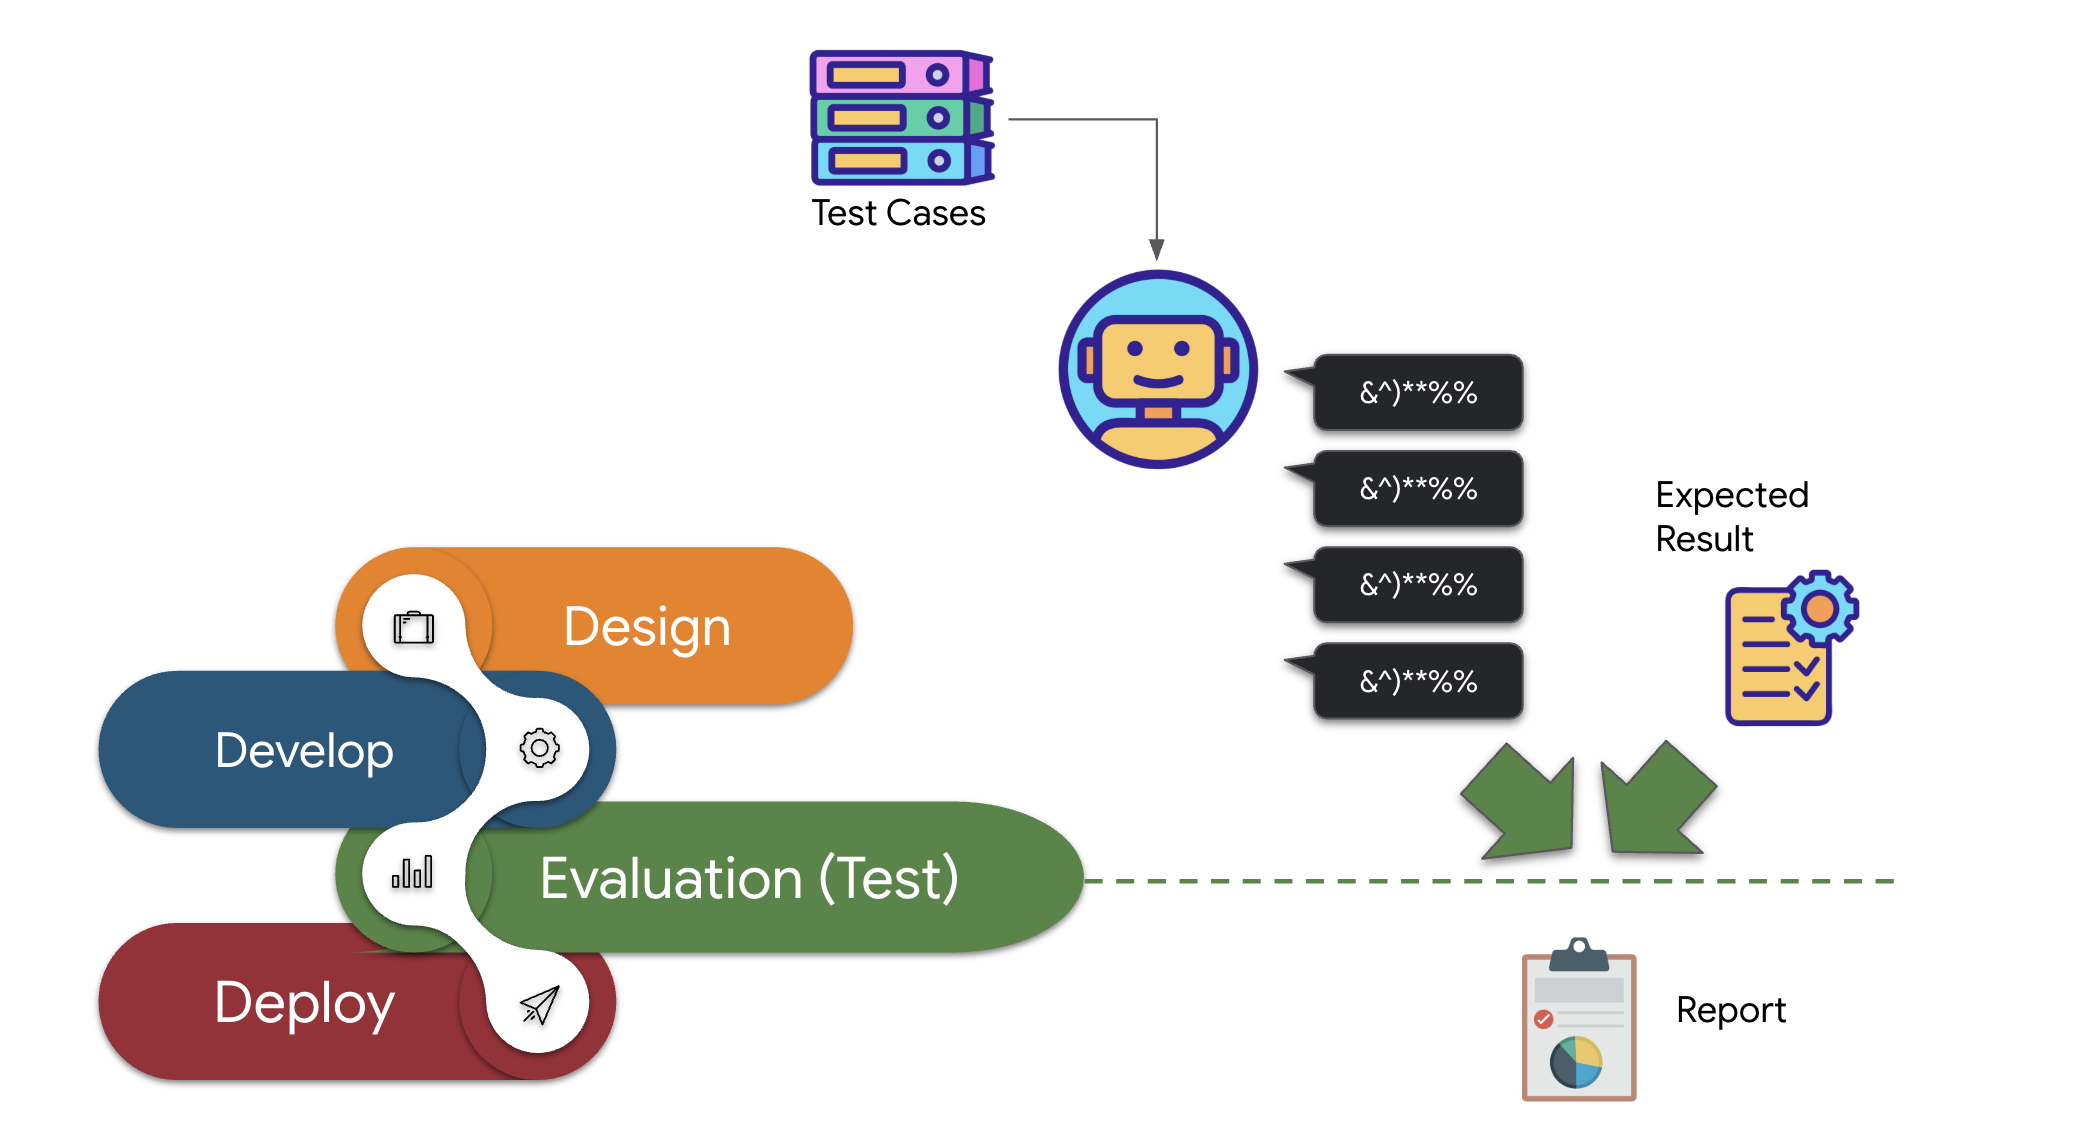
エージェントとのやり取りは 1 つの側面ですが、特に変更を加える際に、エージェントが常に想定どおりに動作しているかどうかをどのように確認すればよいでしょうか?
従来のソフトウェア テスト手法は、生成型で非決定論的な性質を持つ AI エージェントには不十分なことがよくあります。優れたデモから信頼性の高い本番環境エージェントへのギャップを埋めるには、堅牢な評価戦略が不可欠です。生成モデルの最終出力を確認するだけとは異なり、エージェントの評価では、意思決定プロセスや、さまざまなシナリオでツールを正しく使用したり、指示に従ったりする能力を評価することがよくあります。ADK には、これを支援する機能が用意されています。
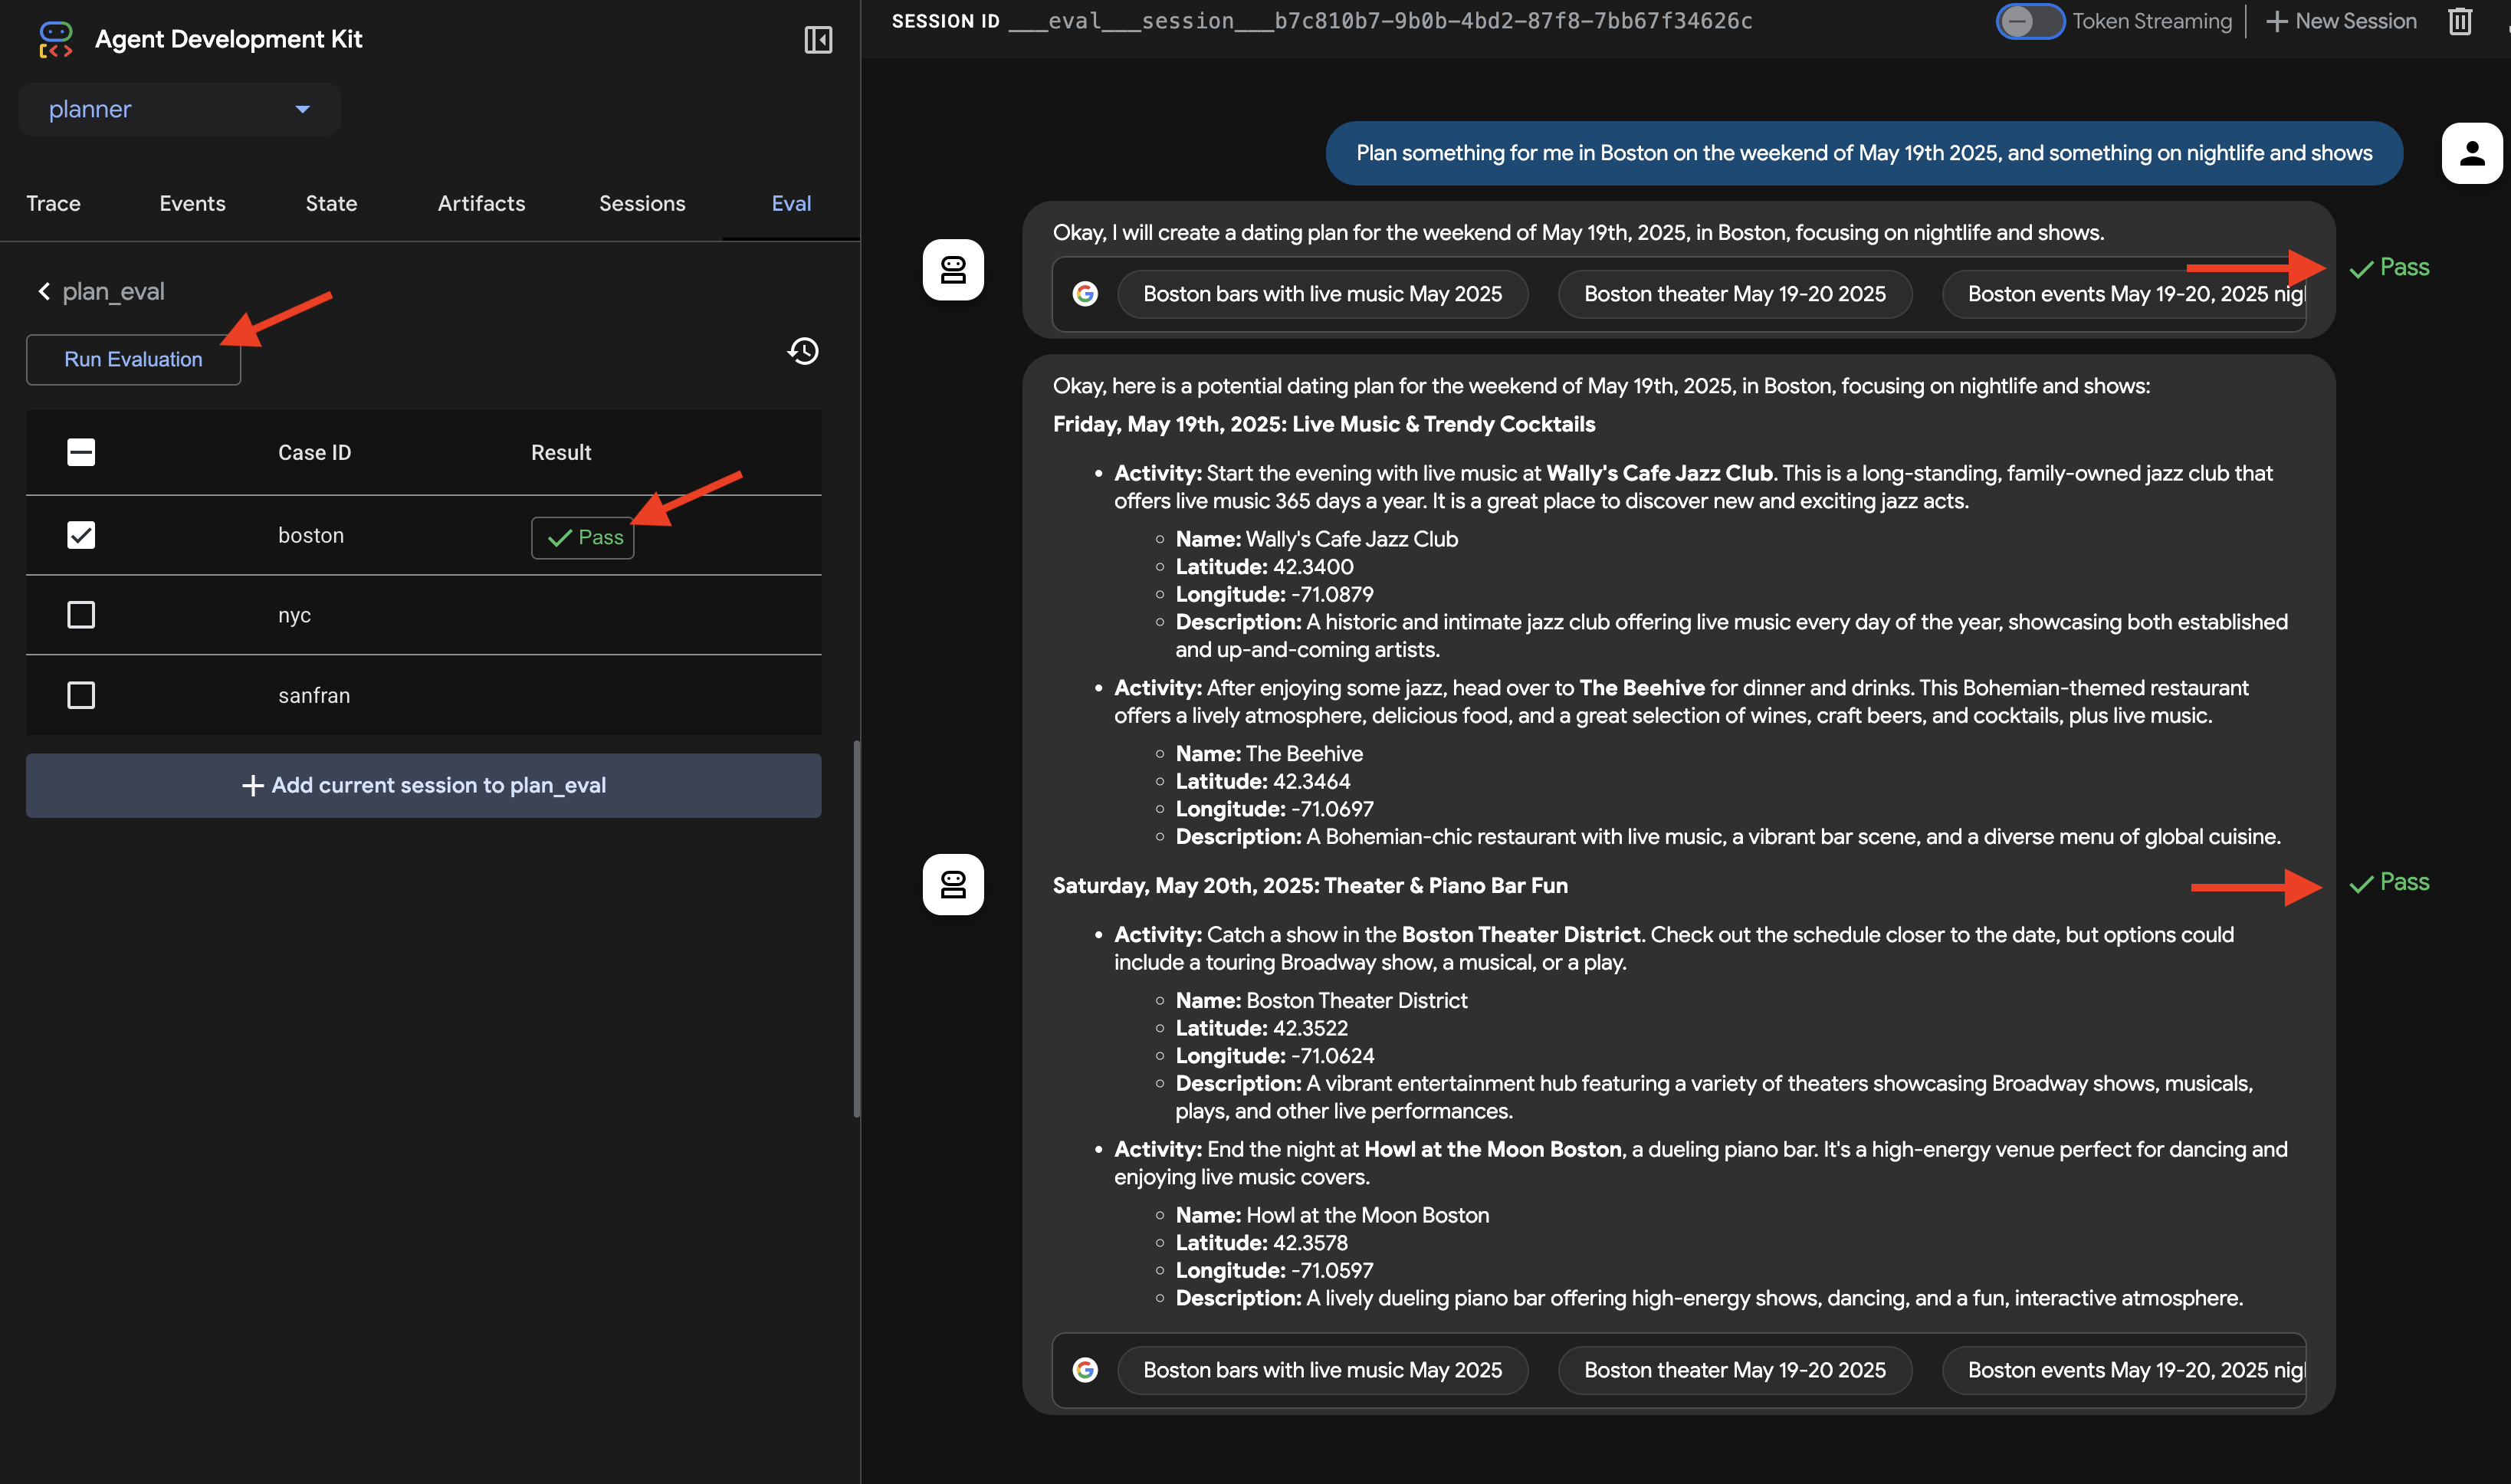
👉 ADK Dev UI で、左側のナビゲーションにある [Eval] タブをクリックします。plan_eval という名前のプリロードされたテストファイルが表示されます。このファイルには、プランナー エージェントのテスト用に事前定義された入力と条件が含まれています。
👉 「boston」などのシナリオを選択し、[Run Evaluation] ボタンをクリックします。表示されたポップアップ ウィンドウで、一致スコアを 0.3 に下げて [開始] をクリックします。
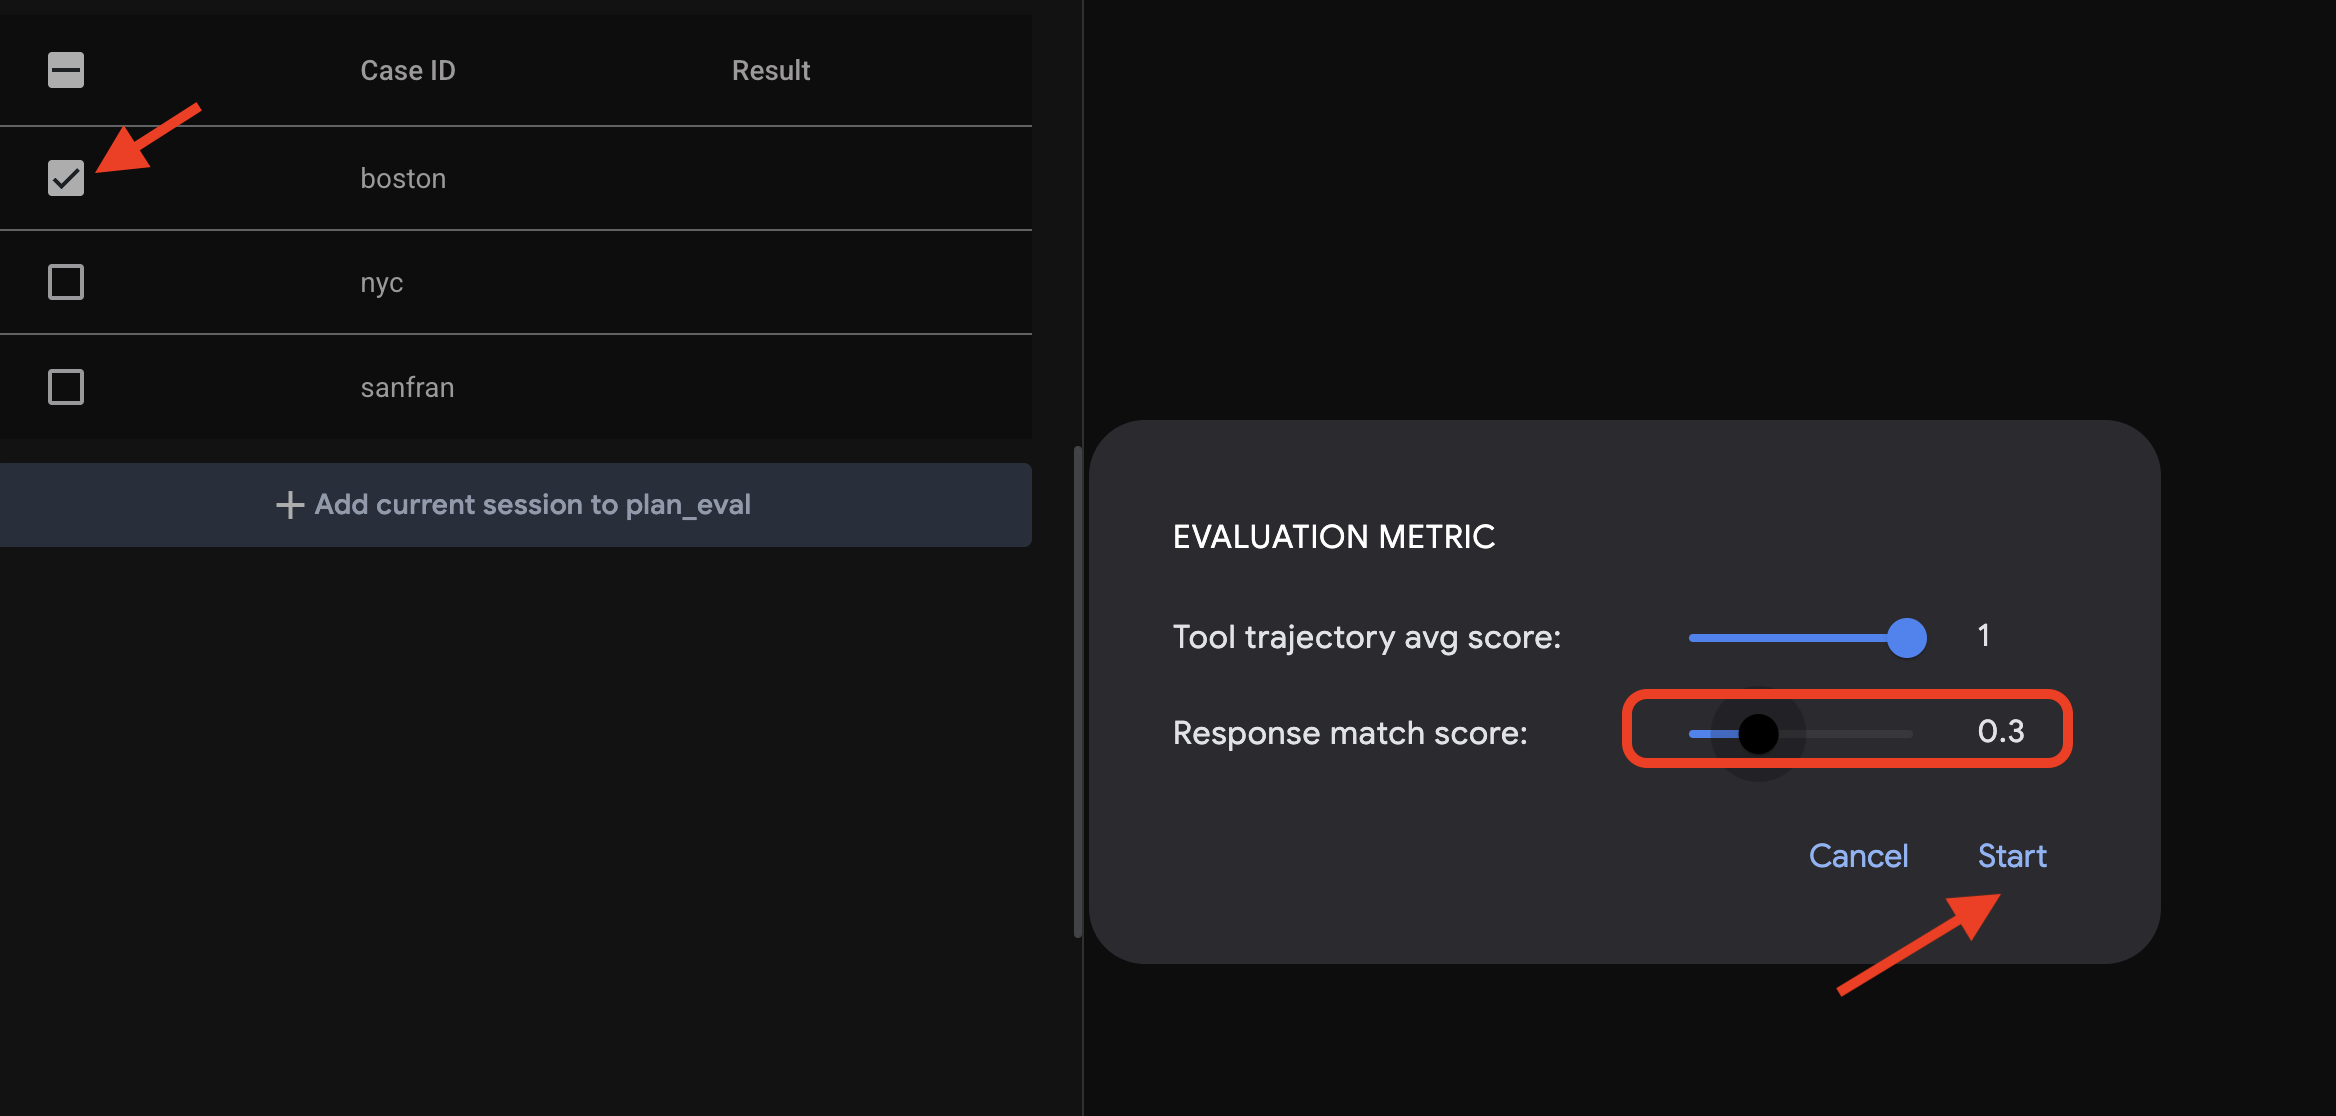
これにより、テスト入力を使用してエージェントが実行され、その出力が定義された期待値と一致するかどうかが確認されます。これにより、エージェントのパフォーマンスを体系的にテストできます。
👉 では、しきい値を厳しくするとどうなるか見てみましょう。「nyc」シナリオを選択し、[Run Evaluation] をもう一度クリックします。今回は、一致スコアをデフォルト値(回答一致スコア: 0.7)のままにして、[開始] をクリックします。結果が Fail になっていることがわかります。これは、エージェントのクリエイティブ出力が事前定義された「正解」と完全に一致しないため、想定される動作です。
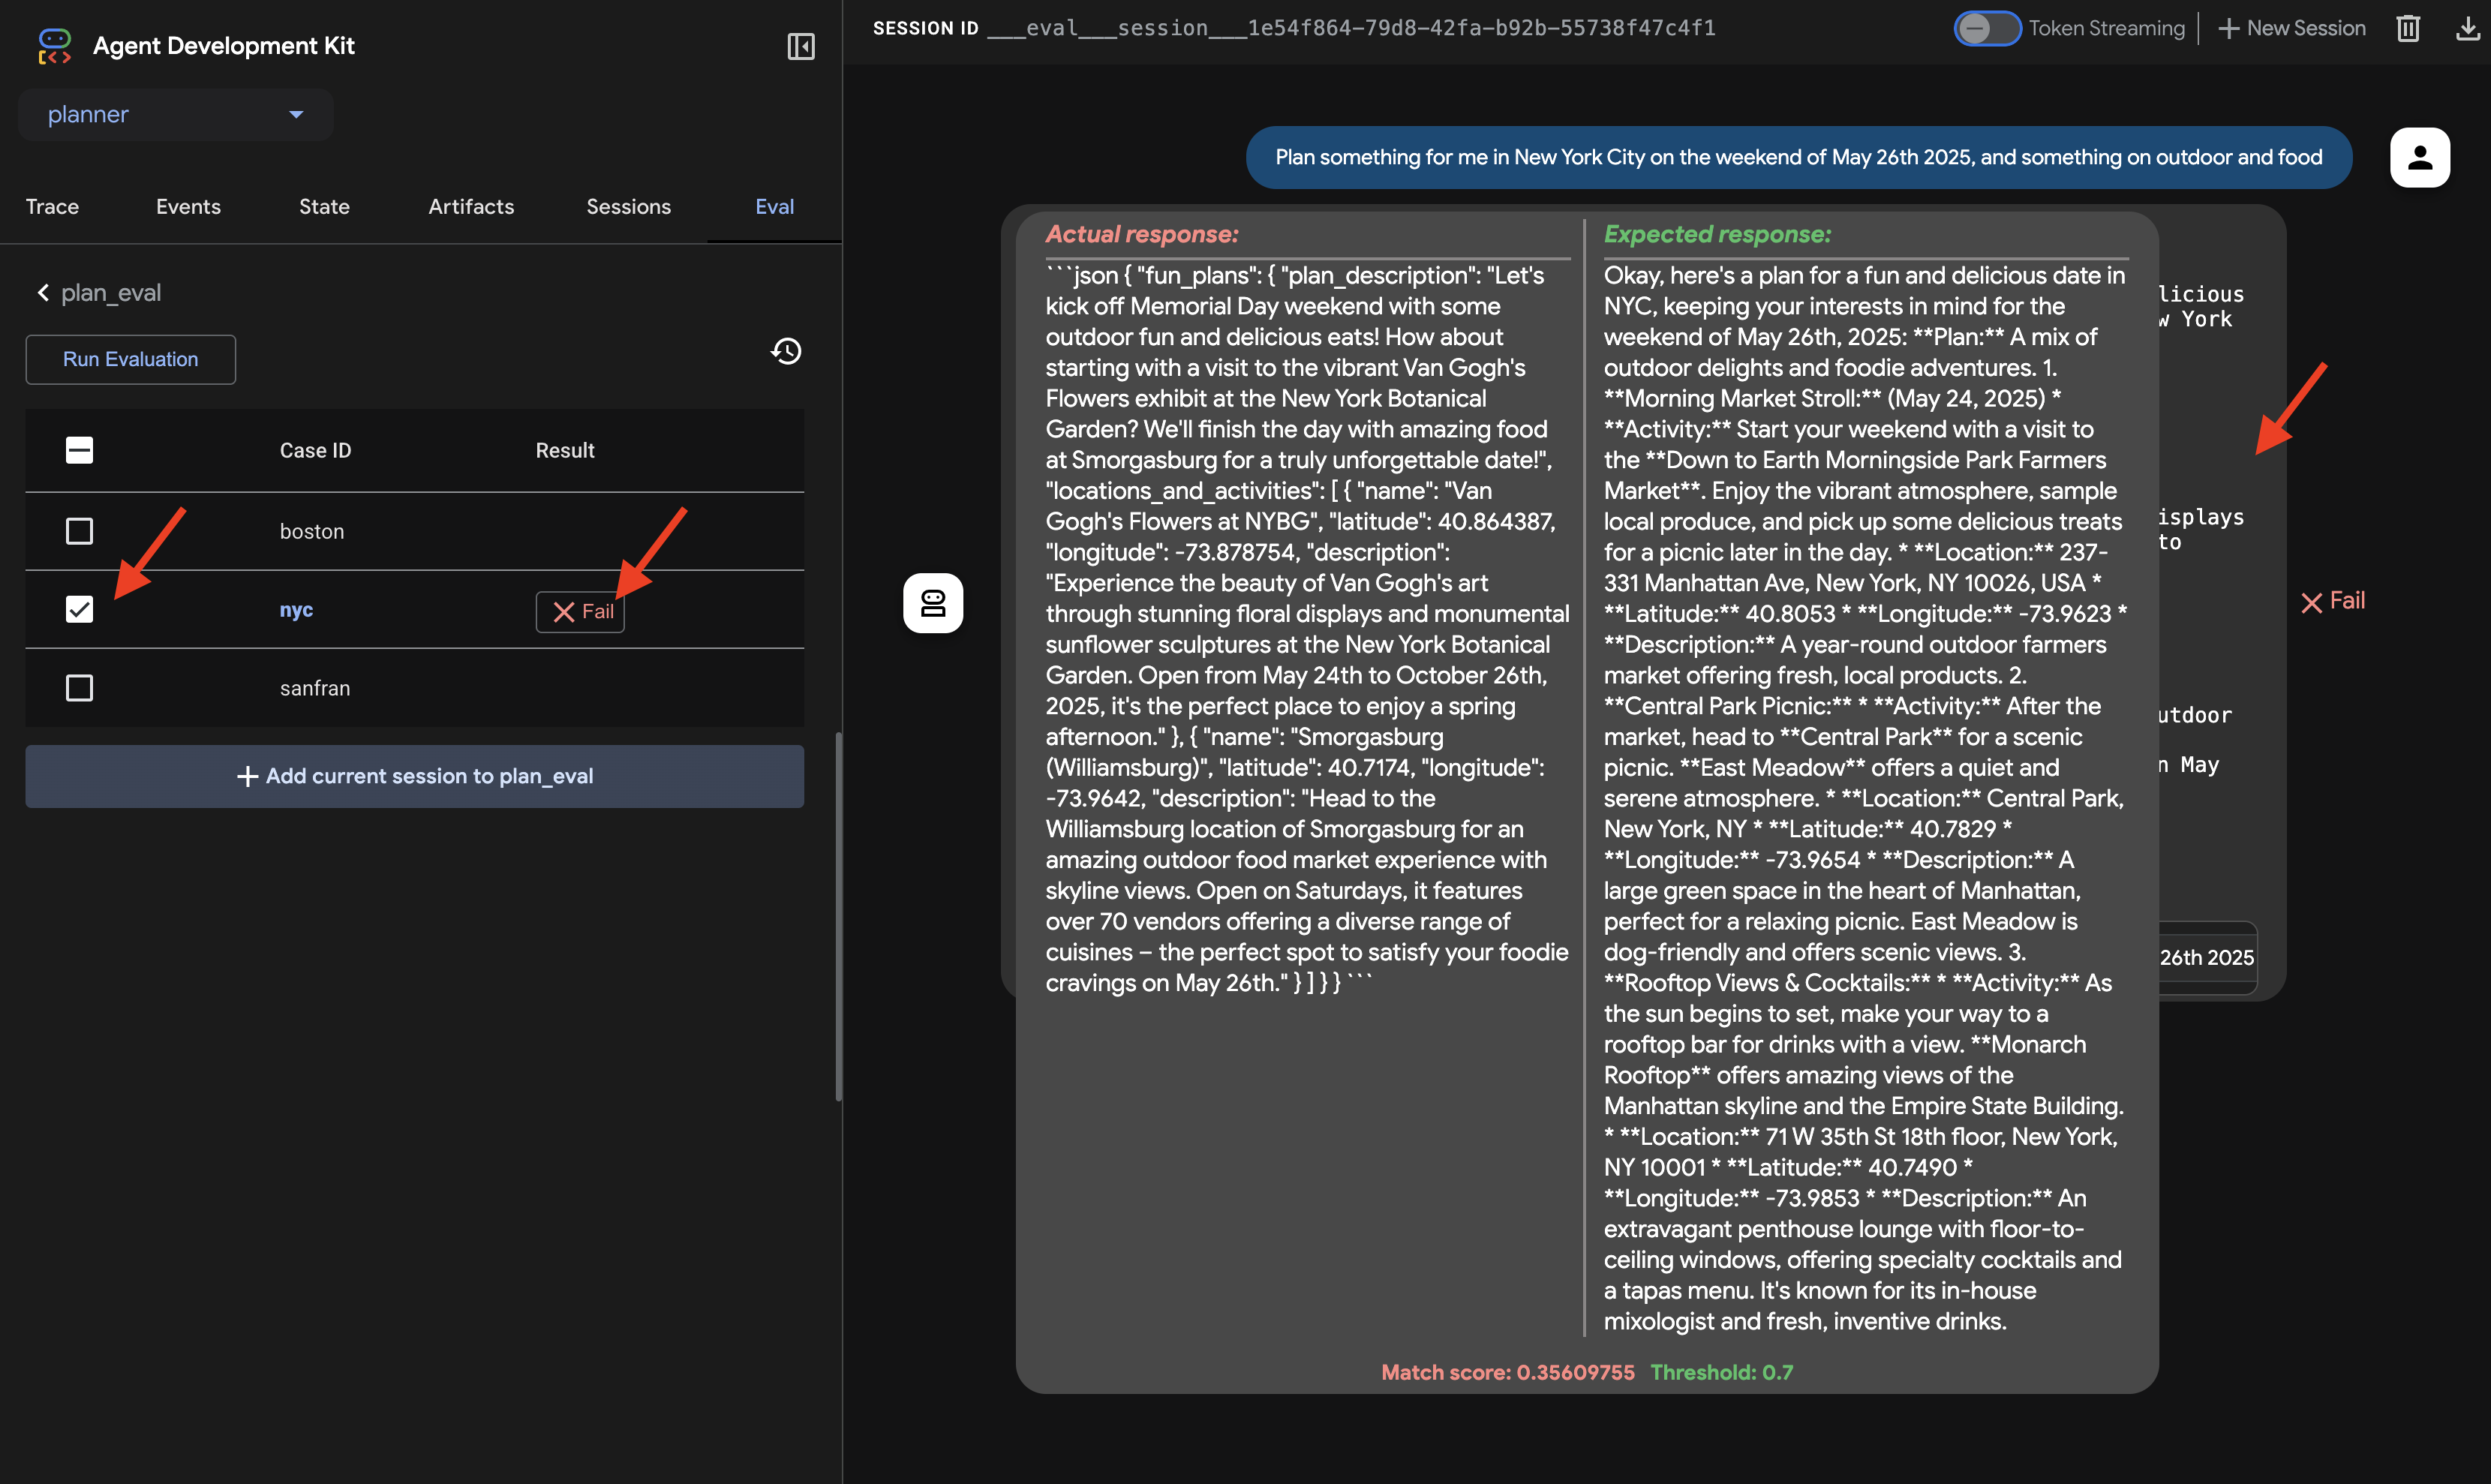
👉 失敗した理由を確認するには、[nyc] 行の失敗アイコンをクリックします。UI に、エージェントからの実際のレスポンスとテストケースからの想定されるレスポンスが並べて表示されます。このビューはデバッグに不可欠です。エージェントの出力がどこで分岐したかを正確に確認し、それに応じて指示を調整できます。
UI と評価の探索が完了したら、Cloud Shell エディタのターミナルに戻り、Ctrl+C キーを押して ADK 開発 UI を停止します。
自由形式のテキスト出力は良いスタートですが、InstaVibe のようなアプリケーションでエージェントの提案を簡単に使用するには、構造化データ(JSON など)の方がはるかに実用的です。エージェントを変更して、プランを一貫した JSON 形式で返すようにしましょう。
👉📝 ~/instavibe-bootstrap/agents/planner/agent.py で、エージェントの指示文字列内の RETURN PLAN in MARKDOWN FORMAT となっている行を見つけます。その行を次の詳細な JSON 構造に置き換えます。
Return your response *exclusively* as a single JSON object. This object should contain a top-level key, "fun_plans", which holds a plan objects. Each plan object in the list must strictly adhere to the following structure:

        --json--
        {
          "plan_description": "A summary of the overall plan, consisting of **exactly three sentences**. Craft these sentences in a friendly, enthusiastic, and conversational tone, as if you're suggesting this awesome idea to a close friend. Make it sound exciting and personal, highlighting the positive aspects and appeal of the plan without explicitly mentioning budget or listing interest categories.",
          "locations_and_activities": [
              {
              "name": "Name of the specific place or event",
              "latitude": 0.000000,  // Replace with actual latitude
              "longitude": 0.000000, // Replace with actual longitude
              "description": "A brief description of this place/event, why it's suitable for the date, and any specific details for the weekend (e.g., opening hours, event time)."
              }
              // Add more location/activity objects here if the plan involves multiple stops/parts
          ]
        }
エージェントの指示を更新して JSON 出力をリクエストしたので、変更を確認しましょう。
👉💻 前と同じコマンドを使用して ADK 開発 UI を再起動します。
. ~/instavibe-bootstrap/set_env.sh
source ~/instavibe-bootstrap/env/bin/activate
cd  ~/instavibe-bootstrap/agents
adk web
すでに開いている場合は、タブを更新します。または、以前と同じ手順で、ブラウザで ADK Dev UI を開きます(Cloud Shell のポート 8000 でのウェブ プレビューを使用)。UI が読み込まれたら、プランナー エージェントが選択されていることを確認します。
👉 今回は、別のリクエストをしてみましょう。チャット ダイアログで、次のように入力します。
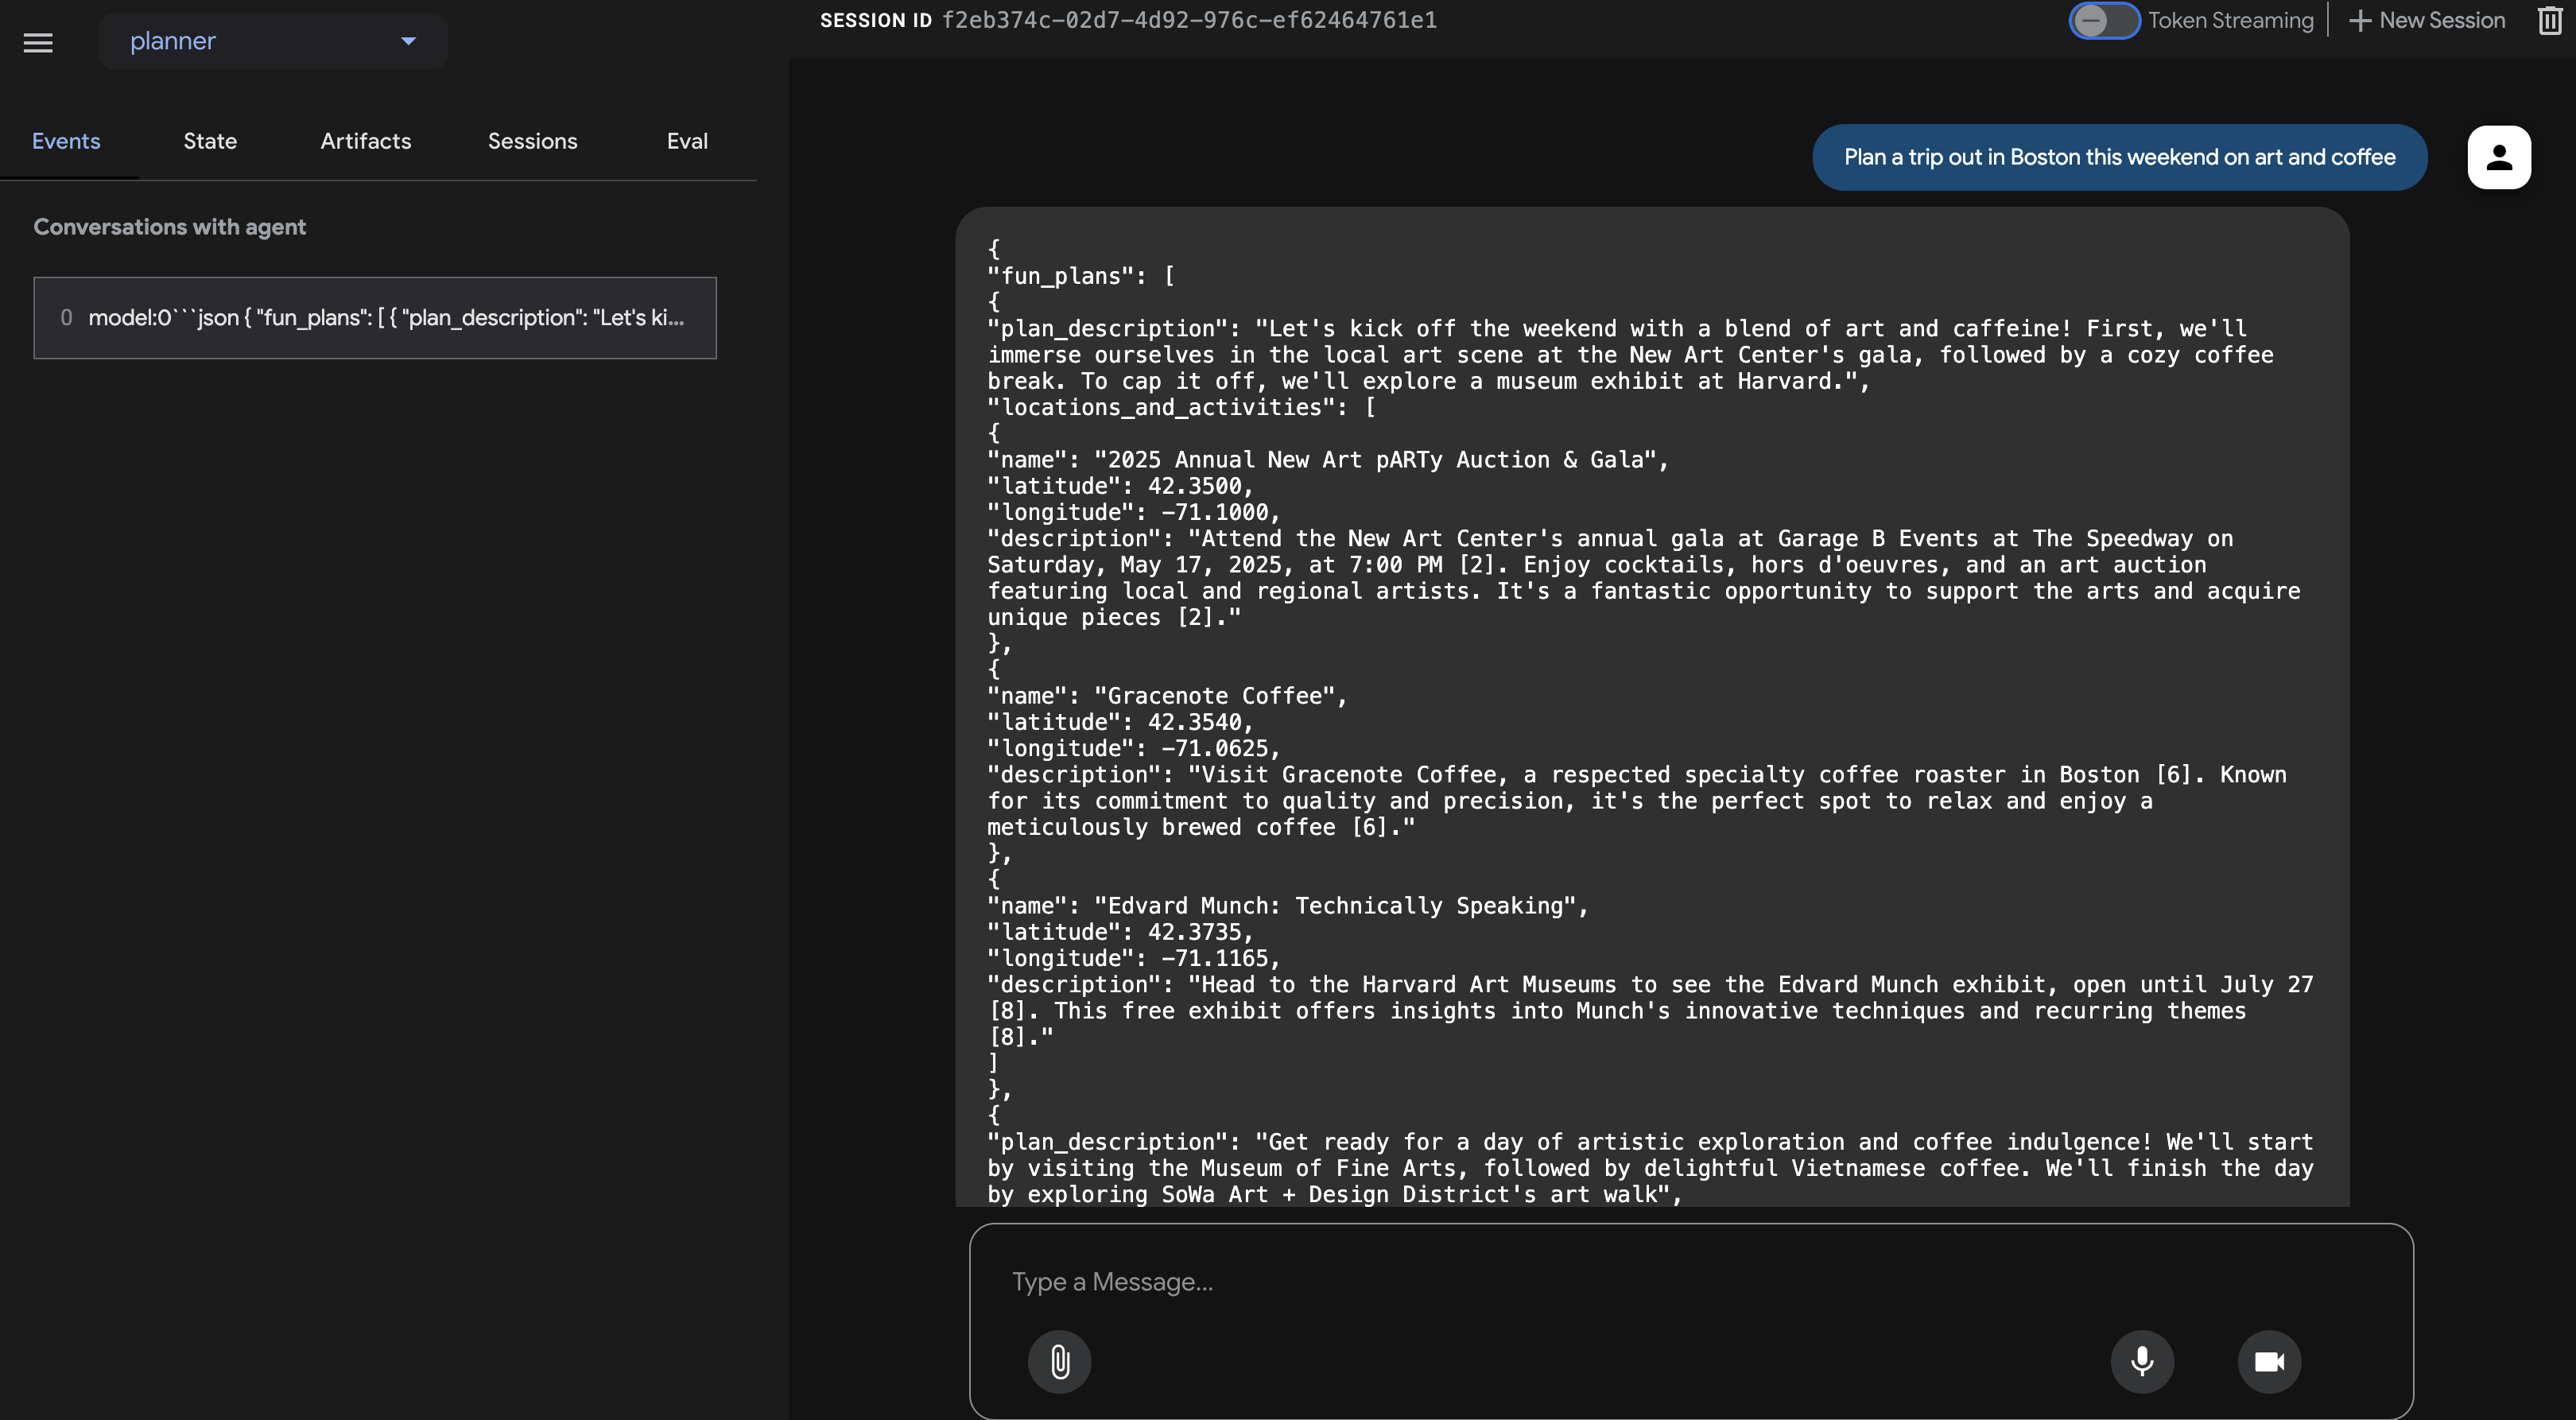
Plan an event Boston this weekend with art and coffee
エージェントの回答を慎重に確認します。純粋な会話テキストの返信ではなく、指示で定義した構造(fun_plans、plan_description、locations_and_activities などを含む)に厳密に準拠した JSON オブジェクトとしてフォーマットされたレスポンスが表示されるはずです。これにより、エージェントが InstaVibe アプリケーションでプログラムで使用するのに適した構造化された出力を生成できることが確認されます。
JSON 出力を確認したら、Cloud Shell ターミナルに戻り、Ctrl+C を押して ADK 開発 UI を停止します。
ADK コンポーネント
ADK 開発 UI はインタラクティブなテストに最適ですが、多くの場合、エージェントをプログラムで実行する必要があります。たとえば、大規模なアプリケーションやバックエンド サービスの一部として実行する場合などです。この仕組みを理解するために、ランタイムとコンテキスト管理に関連する ADK のコア コンセプトを見てみましょう。
意味のあるマルチターンの会話では、エージェントがコンテキストを理解し、継続性を維持するために発言や行動を思い出す必要があります。ADK には、セッション、状態、メモリを通じてこのコンテキストを管理する構造化された方法が用意されています。
- セッション: ユーザーがエージェントとのやり取りを開始すると、セッションが作成されます。これは、単一の特定のチャット スレッドのコンテナと考えてください。一意の ID、インタラクションの履歴(イベント)、現在の作業データ(状態)、最終更新日時などのメタデータが保持されます。
- 状態: これは、単一のセッション内のエージェントの短期ワーキング メモリです。これは、エージェントが現在のタスクを完了するために必要な一時的な情報(これまでに収集されたユーザー設定、ツール呼び出しの中間結果など)を保存できる可変の辞書です。
- メモリ: さまざまなセッションにわたる長期的な想起や、外部のナレッジベースへのアクセスに関するエージェントの潜在能力を表します。セッションと状態は直近の会話を処理しますが、メモリ(通常は MemoryService によって管理されます)を使用すると、エージェントは過去のやり取りや構造化データソースから情報を取得し、より広範な知識コンテキストを取得できます。(注: このシンプルなクライアントは、わかりやすくするためにインメモリ サービスを使用しています。つまり、メモリ/状態はスクリプトの実行中にのみ保持されます)。
- イベント: セッション内のすべてのやり取り(ユーザー メッセージ、エージェントの応答、ツールの使用リクエスト、ツールの結果、状態の変更、エラー)は、不変のイベントとして記録されます。これにより、会話の文字起こしとアクション履歴が時系列で記録されます。
では、エージェントの実行時にこれらはどのように管理されるのでしょうか?これは Runner の役割です。
- ランナー: ランナーは、ADK が提供するコア実行エンジンです。エージェントとその使用するツールを定義すると、ランナーがユーザーのリクエストを処理するプロセスを調整します。セッションを管理し、イベントのフローを処理し、状態を更新し、基盤となる言語モデルを呼び出し、ツール呼び出しを調整し、MemoryService とやり取りする可能性があります。指揮者がすべてのパートが正しく連携していることを確認するようなものです。
Runner を使用すると、Dev UI とは完全に独立したスタンドアロンの Python アプリケーションとしてエージェントを実行できます。
プランナー エージェントをプログラムで呼び出す簡単なクライアント スクリプトを作成しましょう。
👉📝 ~/instavibe-bootstrap/agents/planner/planner_client.py ファイルで、既存のインポートの下に次の Python コードを追加します。planner_client.py の imports の下に、以下を追加します。
async def async_main():
  session_service = InMemorySessionService()

  session = await session_service.create_session(
      state={}, app_name='planner_app', user_id='user_dc'
  )

  query = "Plan Something for me in San Francisco this weekend on wine and fashion "
  print(f"User Query: '{query}'")
  content = types.Content(role='user', parts=[types.Part(text=query)])

  root_agent = agent.root_agent
  runner = Runner(
        app_name='planner_app',
        agent=root_agent,
        session_service=session_service,
  )
  print("Running agent...")
  events_async =  runner.run_async(
    session_id=session.id, user_id=session.user_id, new_message=content
  )

  async for event in events_async:
    print(f"Event received: {event}")


if __name__ == '__main__':
  try:
    asyncio.run(async_main())
  except Exception as e:
    print(f"An error occurred: {e}")
このコードは、セッションとアーティファクトの管理用にインメモリ サービスを設定し(この例では簡略化)、セッションを作成し、ユーザー クエリを定義し、エージェントで Runner を構成し、エージェントを非同期で実行して、実行中に生成された各イベントを出力します。
👉💻 ターミナルからこのクライアント スクリプトを実行します。
. ~/instavibe-bootstrap/set_env.sh
source ~/instavibe-bootstrap/env/bin/activate
cd  ~/instavibe-bootstrap/agents
python -m planner.planner_client
👀 出力を確認します。最終的な JSON プランだけでなく、エージェントの実行フロー中に生成された各 Event オブジェクトの詳細な構造も表示されます。これには、最初のユーザー メッセージ イベント、ツール呼び出し(Google 検索など)に関連する可能性のあるイベント、最後に JSON プランを含むモデルのレスポンス イベントが含まれます。この詳細なイベント ストリームは、ADK ランタイム内で発生するステップごとの処理をデバッグして理解するのに非常に役立ちます。
Running agent...
Event received: content=Content(parts=[Part(video_metadata=None, thought=None, code_execution_result=None, executable_code=None, file_data=None, function_call=None, function_response=None, inline_data=None, text='```json\n{\n "fun_plans": [\n  {\n   "plan_description": "Embark on a stylish adventure through Hayes Valley,
...(turncated)
, offering a variety of fashion styles to browse and enjoy."\n    }\n   ]\n  }\n ]\n}\n```')], role='model') grounding_metadata=GroundingMetadata(grounding_chunks=[GroundingChunk(retrieved_context=None, web=GroundingChunkWeb(domain='islands.com', title='islands.com', uri='http
...(turncated)
QyTpPV7jS6wUt-Ix7GuP2mC9J4eY_8Km6Vv44liF9cb2VSs='))], grounding_supports=[GroundingSupport(confide
...(turncated)
>\n', sdk_blob=None), web_search_queries=['..e']) partial=None turn_complete=None error_code=None error_message=None interrupted=None custom_metadata=None invocation_id='e-04d97b8b-9021-47a5-ab41-17b5cbb4bf03' author='location_search_agent' actions=EventActions(skip_summarization=None, state_delta={}, artifact_delta={}, transfer_to_agent=None, escalate=None, requested_auth_configs={}) long_running_tool_ids=None branch=None id='CInHdkKw' timestamp=1746978846.232674
スクリプトが継続的に実行されるか、ハングアップした場合は、Ctrl+C を押して手動で停止する必要があることがあります。
7. プラットフォーム インタラクション エージェント - MCP サーバーとやり取りする
ADK はエージェントの構造化に役立ちますが、エージェントは現実世界のアクションを実行するために外部システムや API とやり取りする必要があることがよくあります。
Model Context Protocol(MCP)
Model Context Protocol(MCP)は、エージェントなどの AI アプリケーションが外部のデータソース、ツール、システムに接続する方法を標準化するために設計されたオープン標準です。ユニバーサル インターフェースを提供することで、すべての AI アプリケーションとデータソースの組み合わせにカスタム統合が必要になるという問題を解決することを目的としています。MCP は、クライアント / サーバー アーキテクチャを利用しています。このアーキテクチャでは、AI アプリケーション(ホスト)内にある MCP クライアントが MCP サーバーへの接続を管理します。これらのサーバーは、ローカルデータへのアクセス、API を介したリモート サービスとのやり取り、事前定義されたプロンプトの提供などの特定の機能を公開する外部プログラムです。これにより、AI モデルは現在の情報にアクセスし、初期トレーニングを超えたタスクを実行できます。この構造により、AI モデルは標準化された方法で外部機能を見つけて操作できるため、統合がよりシンプルでスケーラブルになります。
InstaVibe MCP サーバーをビルドしてデプロイする
最終的に、エージェントは InstaVibe プラットフォーム自体とやり取りする必要があります。具体的には、プラットフォームの既存の API を使用して投稿を作成し、イベントを登録します。InstaVibe アプリケーションは、標準の HTTP エンドポイントを介してこれらの機能をすでに公開しています。
Enpoint | URL | HTTP メソッド | 説明 |
投稿の作成 | api/posts | POST | 新しい投稿を追加する API エンドポイント。JSON 本文を想定: |
イベントを作成 | api/events | POST | 新しいイベントとその参加者を追加する API エンドポイント(簡略化されたスキーマ)。 |
これらの機能を MCP 経由でエージェントが利用できるようにするには、まずこれらの API 呼び出しのラッパーとして機能する簡単な Python 関数を作成する必要があります。これらの関数は HTTP リクエスト ロジックを処理します。
👉 まず、投稿を作成するためのラッパー関数を実装しましょう。~/instavibe-bootstrap/tools/instavibe/instavibe.py ファイルを開き、#REPLACE ME CREATE POST コメントを次の Python コードに置き換えます。
def create_post(author_name: str, text: str, sentiment: str, base_url: str = BASE_URL):
    """
    Sends a POST request to the /posts endpoint to create a new post.

    Args:
        author_name (str): The name of the post's author.
        text (str): The content of the post.
        sentiment (str): The sentiment associated with the post (e.g., 'positive', 'negative', 'neutral').
        base_url (str, optional): The base URL of the API. Defaults to BASE_URL.

    Returns:
        dict: The JSON response from the API if the request is successful.
              Returns None if an error occurs.

    Raises:
        requests.exceptions.RequestException: If there's an issue with the network request (e.g., connection error, timeout).
    """
    url = f"{base_url}/posts"
    headers = {"Content-Type": "application/json"}
    payload = {
        "author_name": author_name,
        "text": text,
        "sentiment": sentiment
    }

    try:
        response = requests.post(url, headers=headers, json=payload)
        response.raise_for_status()  # Raise an exception for bad status codes (4xx or 5xx)
        print(f"Successfully created post. Status Code: {response.status_code}")
        return response.json()
    except requests.exceptions.RequestException as e:
        print(f"Error creating post: {e}")
        # Optionally re-raise the exception if the caller needs to handle it
        # raise e
        return None
    except json.JSONDecodeError:
        print(f"Error decoding JSON response from {url}. Response text: {response.text}")
        return None
👉📝 次に、イベント作成 API のラッパー関数を作成します。同じ ~/instavibe-bootstrap/tools/instavibe/instavibe.py ファイルで、#REPLACE ME CREATE EVENTS コメントを次のコードに置き換えます。
def create_event(event_name: str, description: str, event_date: str, locations: list, attendee_names: list[str], base_url: str = BASE_URL):
    """
    Sends a POST request to the /events endpoint to create a new event registration.

    Args:
        event_name (str): The name of the event.
        description (str): The detailed description of the event.
        event_date (str): The date and time of the event (ISO 8601 format recommended, e.g., "2025-06-10T09:00:00Z").
        locations (list): A list of location dictionaries. Each dictionary should contain:
                          'name' (str), 'description' (str, optional),
                          'latitude' (float), 'longitude' (float),
                          'address' (str, optional).
        attendee_names (list[str]): A list of names of the people attending the event.
        base_url (str, optional): The base URL of the API. Defaults to BASE_URL.

    Returns:
        dict: The JSON response from the API if the request is successful.
              Returns None if an error occurs.

    Raises:
        requests.exceptions.RequestException: If there's an issue with the network request (e.g., connection error, timeout).
    """
    url = f"{base_url}/events"
    headers = {"Content-Type": "application/json"}
    payload = {
        "event_name": event_name,
        "description": description,
        "event_date": event_date,
        "locations": locations,
        "attendee_names": attendee_names,
    }

    try:
        response = requests.post(url, headers=headers, json=payload)
        response.raise_for_status()  # Raise an exception for bad status codes (4xx or 5xx)
        print(f"Successfully created event registration. Status Code: {response.status_code}")
        return response.json()
    except requests.exceptions.RequestException as e:
        print(f"Error creating event registration: {e}")
        # Optionally re-raise the exception if the caller needs to handle it
        # raise e
        return None
    except json.JSONDecodeError:
        print(f"Error decoding JSON response from {url}. Response text: {response.text}")
        return None
ご覧のとおり、これらの関数は既存の InstaVibe API のシンプルなラッパーです。このパターンは、サービスの API がすでに存在する場合に便利です。このようなラッパーを作成することで、その機能をエージェントのツールとして簡単に公開できます。
MCP サーバーの実装
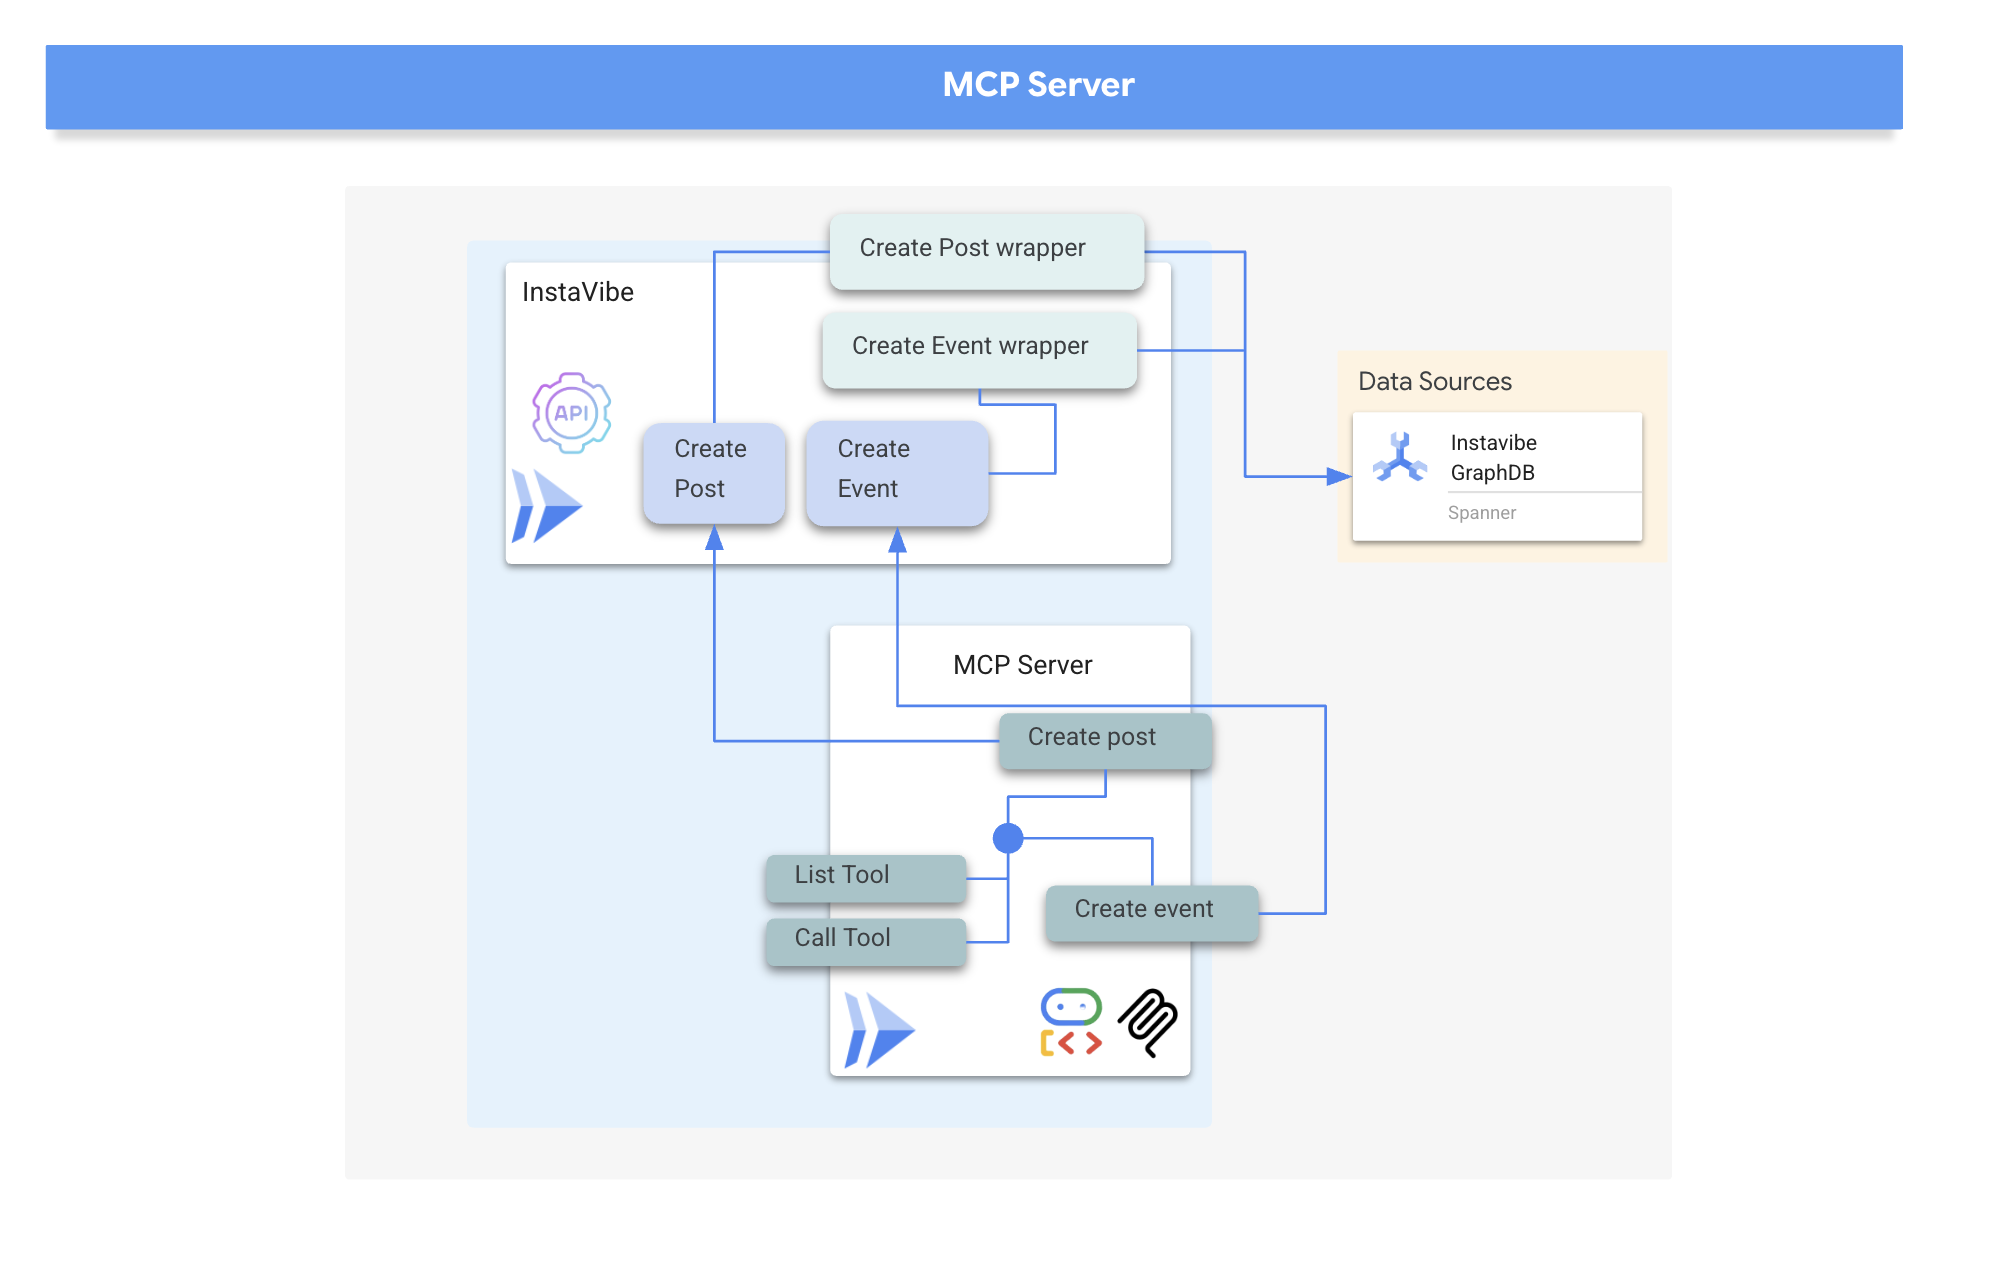
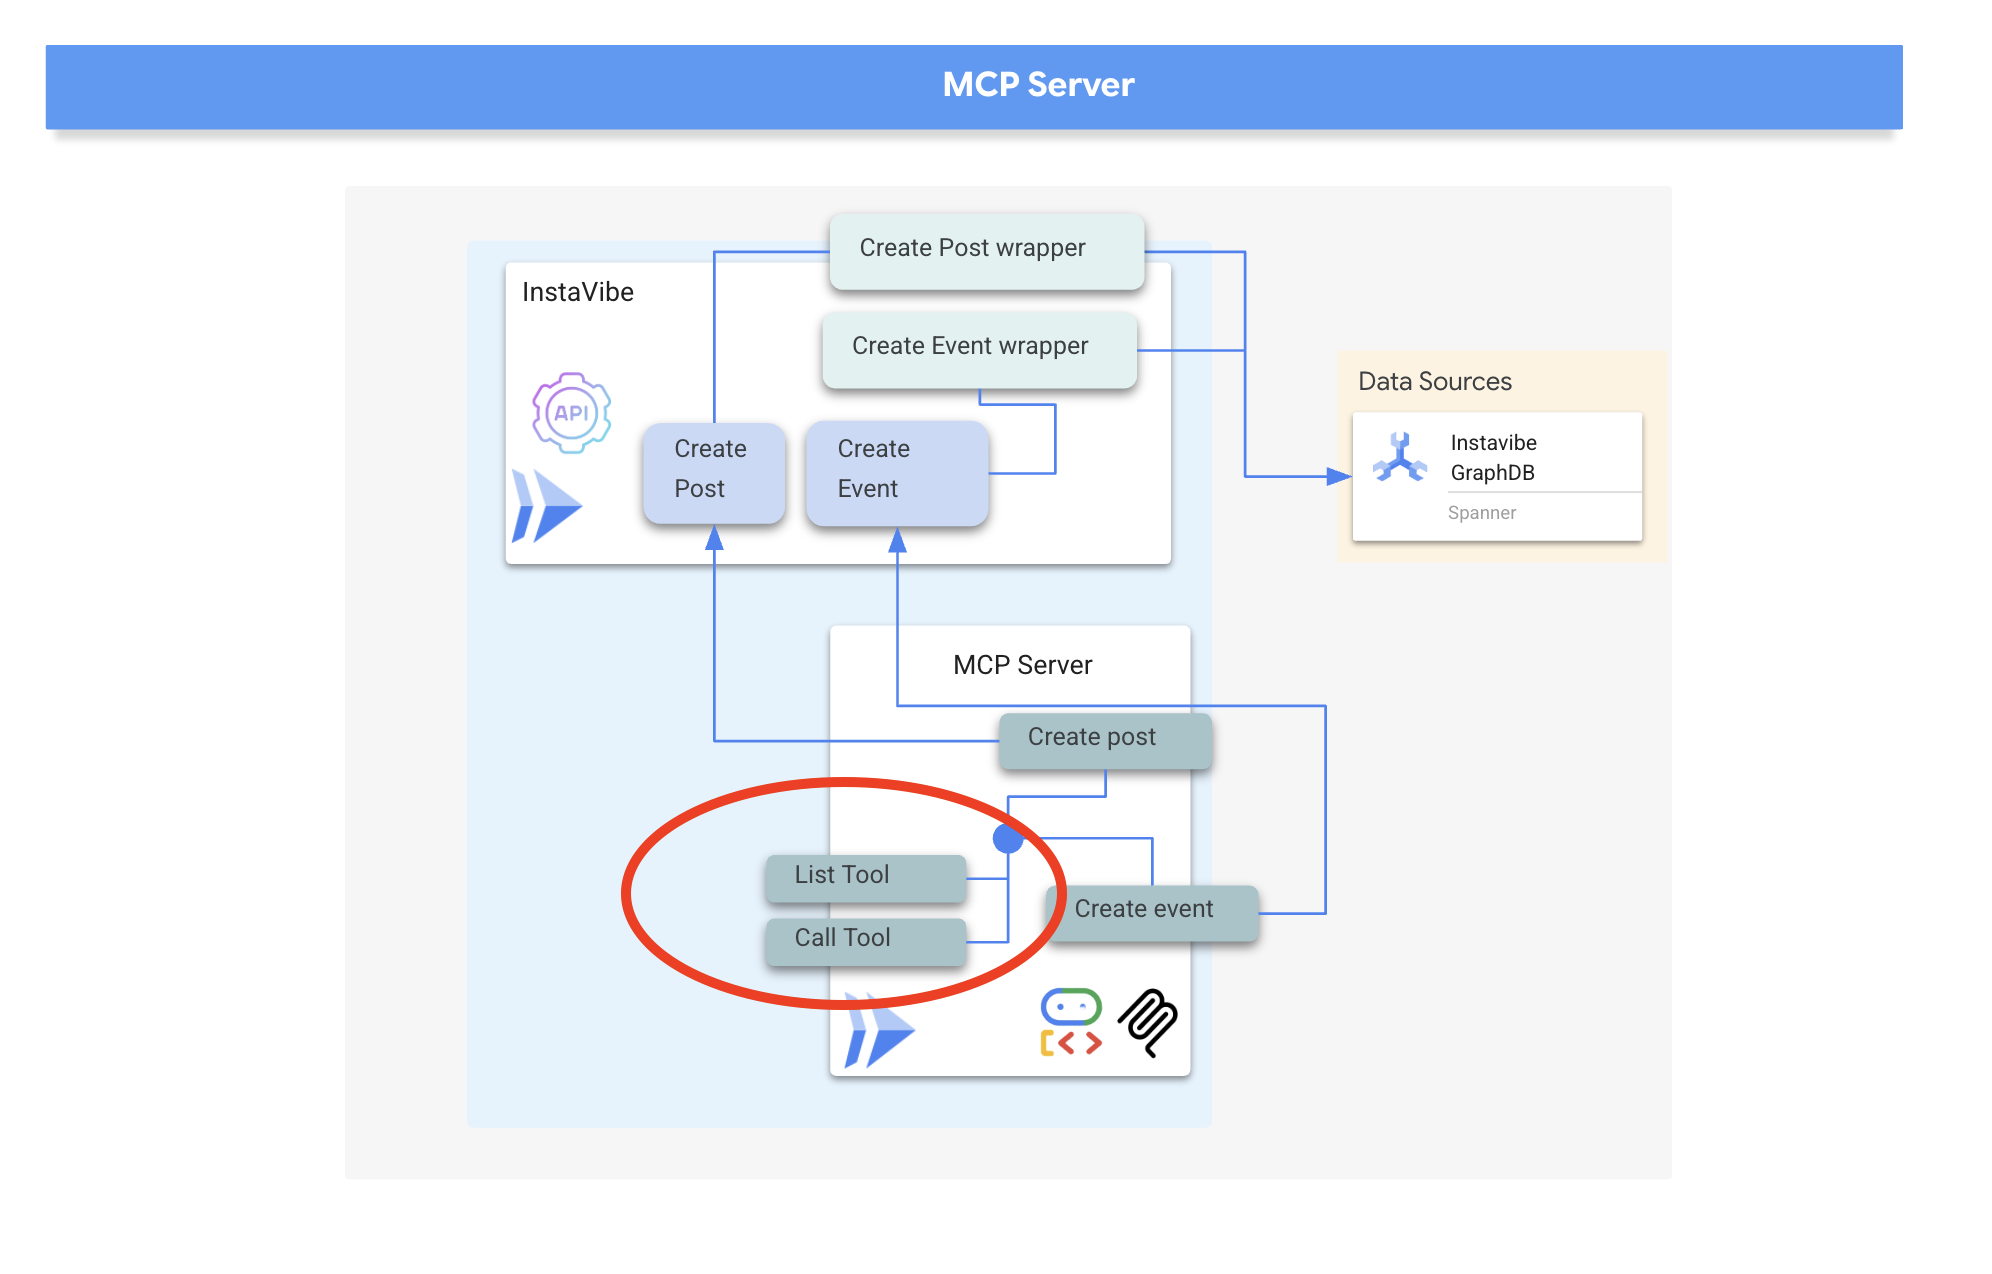
アクションを実行する(InstaVibe API を呼び出す)Python 関数ができたので、MCP サーバー コンポーネントを構築する必要があります。このサーバーは、MCP 標準に従ってこれらの関数を「ツール」として公開し、MCP クライアント(エージェントなど)がそれらを検出して呼び出せるようにします。
MCP サーバーは通常、次の 2 つの主要な機能を実装します。
- list_tools: クライアントがサーバーで使用可能なツールを検出できるようにします。名前、説明、必要なパラメータなどのメタデータを提供します。多くの場合、JSON スキーマを使用して定義されます。
- call_tool: クライアントからリクエストされた特定のツールの実行を処理します。ツールの名前と引数を受け取り、対応するアクション(この場合は API とのやり取りなど)を実行します。
MCP サーバーは、AI モデルに現実世界のデータとアクションへのアクセスを提供するために使用されます。これにより、メールの送信、プロジェクト管理システムでのタスクの作成、データベースの検索、さまざまなソフトウェアやウェブ サービスとのやり取りなどのタスクが可能になります。初期の実装では、特に開発環境や「スタジオ」環境では、簡便さから標準の入出力(stdio)を介して通信するローカル サーバーに重点が置かれることが多かったのですが、より広範な導入やエンタープライズ ユースケースでは、Server-Sent Events(SSE)で HTTP などのプロトコルを利用するリモート サーバーへの移行がより理にかなっています。
リモート アーキテクチャは、ネットワーク通信レイヤが追加されるにもかかわらず、大きなメリットがあります。複数の AI クライアントが単一のサーバーへのアクセスを共有できるほか、ツールの管理と更新を一元化できます。また、機密データと API キーをサーバーサイドに保持し、多数のクライアント マシンに分散させないことで、セキュリティを強化できます。さらに、AI モデルを外部システム統合の仕様から切り離すことで、すべての AI インスタンスが独自の直接統合を管理する必要がなくなり、エコシステム全体のスケーラビリティ、セキュリティ、保守性が向上します。
通信に HTTP とサーバー送信イベント(SSE)を使用して MCP サーバーを実装します。これは、長時間実行される可能性のあるツールの実行やエンタープライズ シナリオに適しています。
👉📝 まず、list_tools エンドポイントを実装しましょう。~/instavibe-bootstrap/tools/instavibe/mcp_server.py ファイルを開き、#REPLACE ME - LIST TOOLS コメントを次のコードに置き換えます。:
@app.list_tools()
async def list_tools() -> list[mcp_types.Tool]:
  """MCP handler to list available tools."""
  # Convert the ADK tool's definition to MCP format
  mcp_tool_schema_event = adk_to_mcp_tool_type(event_tool)
  mcp_tool_schema_post = adk_to_mcp_tool_type(post_tool)
  print(f"MCP Server: Received list_tools request. \n MCP Server: Advertising tool: {mcp_tool_schema_event.name} and {mcp_tool_schema_post}")
  return [mcp_tool_schema_event,mcp_tool_schema_post]
この関数はツール(create_event、create_post)を定義し、接続しているクライアントにそれらを通知します。
👉📝 次に、クライアントからの実際の実行リクエストを処理する call_tool エンドポイントを実装します。同じ ~/instavibe-bootstrap/tools/instavibe/mcp_server.py ファイルで、#REPLACE ME - CALL TOOLS コメントを次のコードに置き換えます。
@app.call_tool()
async def call_tool(
    name: str, arguments: dict
) -> list[mcp_types.TextContent | mcp_types.ImageContent | mcp_types.EmbeddedResource]:
  """MCP handler to execute a tool call."""
  print(f"MCP Server: Received call_tool request for '{name}' with args: {arguments}")

  # Look up the tool by name in our dictionary
  tool_to_call = available_tools.get(name)
  if tool_to_call:
    try:
      adk_response = await tool_to_call.run_async(
          args=arguments,
          tool_context=None, # No ADK context available here
      )
      print(f"MCP Server: ADK tool '{name}' executed successfully.")

      response_text = json.dumps(adk_response, indent=2)
      return [mcp_types.TextContent(type="text", text=response_text)]

    except Exception as e:
      print(f"MCP Server: Error executing ADK tool '{name}': {e}")
      # Creating a proper MCP error response might be more robust
      error_text = json.dumps({"error": f"Failed to execute tool '{name}': {str(e)}"})
      return [mcp_types.TextContent(type="text", text=error_text)]
  else:
      # Handle calls to unknown tools
      print(f"MCP Server: Tool '{name}' not found.")
      error_text = json.dumps({"error": f"Tool '{name}' not implemented."})
      return [mcp_types.TextContent(type="text", text=error_text)]
この関数は、ツール名と引数を受け取り、前に定義した対応する Python ラッパー関数を見つけて実行し、結果を返します。
👉💻 MCP サーバーのロジックが定義されたので、これをコンテナとしてパッケージ化する必要があります。ターミナルで次のスクリプトを実行して、Cloud Build を使用して Docker イメージをビルドします。
. ~/instavibe-bootstrap/set_env.sh

cd ~/instavibe-bootstrap/tools/instavibe

export IMAGE_TAG="latest"
export MCP_IMAGE_NAME="mcp-tool-server"
export IMAGE_PATH="${REGION}-docker.pkg.dev/${PROJECT_ID}/${REPO_NAME}/${MCP_IMAGE_NAME}:${IMAGE_TAG}"
export SERVICE_NAME="mcp-tool-server"
export INSTAVIBE_BASE_URL=$(gcloud run services list --platform=managed --region=us-central1 --format='value(URL)' | grep instavibe)/api

gcloud builds submit . \
  --tag=${IMAGE_PATH} \
  --project=${PROJECT_ID}
👉💻 そして、イメージを Google Cloud Run のサービスとしてデプロイします。
. ~/instavibe-bootstrap/set_env.sh

cd ~/instavibe-bootstrap/tools/instavibe

export IMAGE_TAG="latest"
export MCP_IMAGE_NAME="mcp-tool-server"
export IMAGE_PATH="${REGION}-docker.pkg.dev/${PROJECT_ID}/${REPO_NAME}/${MCP_IMAGE_NAME}:${IMAGE_TAG}"
export SERVICE_NAME="mcp-tool-server"
export INSTAVIBE_BASE_URL=$(gcloud run services list --platform=managed --region=us-central1 --format='value(URL)' | grep instavibe)/api

gcloud run deploy ${SERVICE_NAME} \
  --image=${IMAGE_PATH} \
  --platform=managed \
  --region=${REGION} \
  --allow-unauthenticated \
  --set-env-vars="INSTAVIBE_BASE_URL=${INSTAVIBE_BASE_URL}" \
  --set-env-vars="APP_HOST=0.0.0.0" \
  --set-env-vars="APP_PORT=8080" \
  --set-env-vars="GOOGLE_GENAI_USE_VERTEXAI=TRUE" \
  --set-env-vars="GOOGLE_CLOUD_LOCATION=${REGION}" \
  --set-env-vars="GOOGLE_CLOUD_PROJECT=${PROJECT_ID}" \
  --project=${PROJECT_ID} \
  --min-instances=1
👉💻 デプロイが正常に完了すると、MCP サーバーが実行され、パブリック URL からアクセスできるようになります。エージェント(MCP クライアントとして機能)が接続先を認識できるように、この URL をキャプチャする必要があります。
export MCP_SERVER_URL=$(gcloud run services list --platform=managed --region=us-central1 --format='value(URL)' | grep mcp-tool-server)/sse
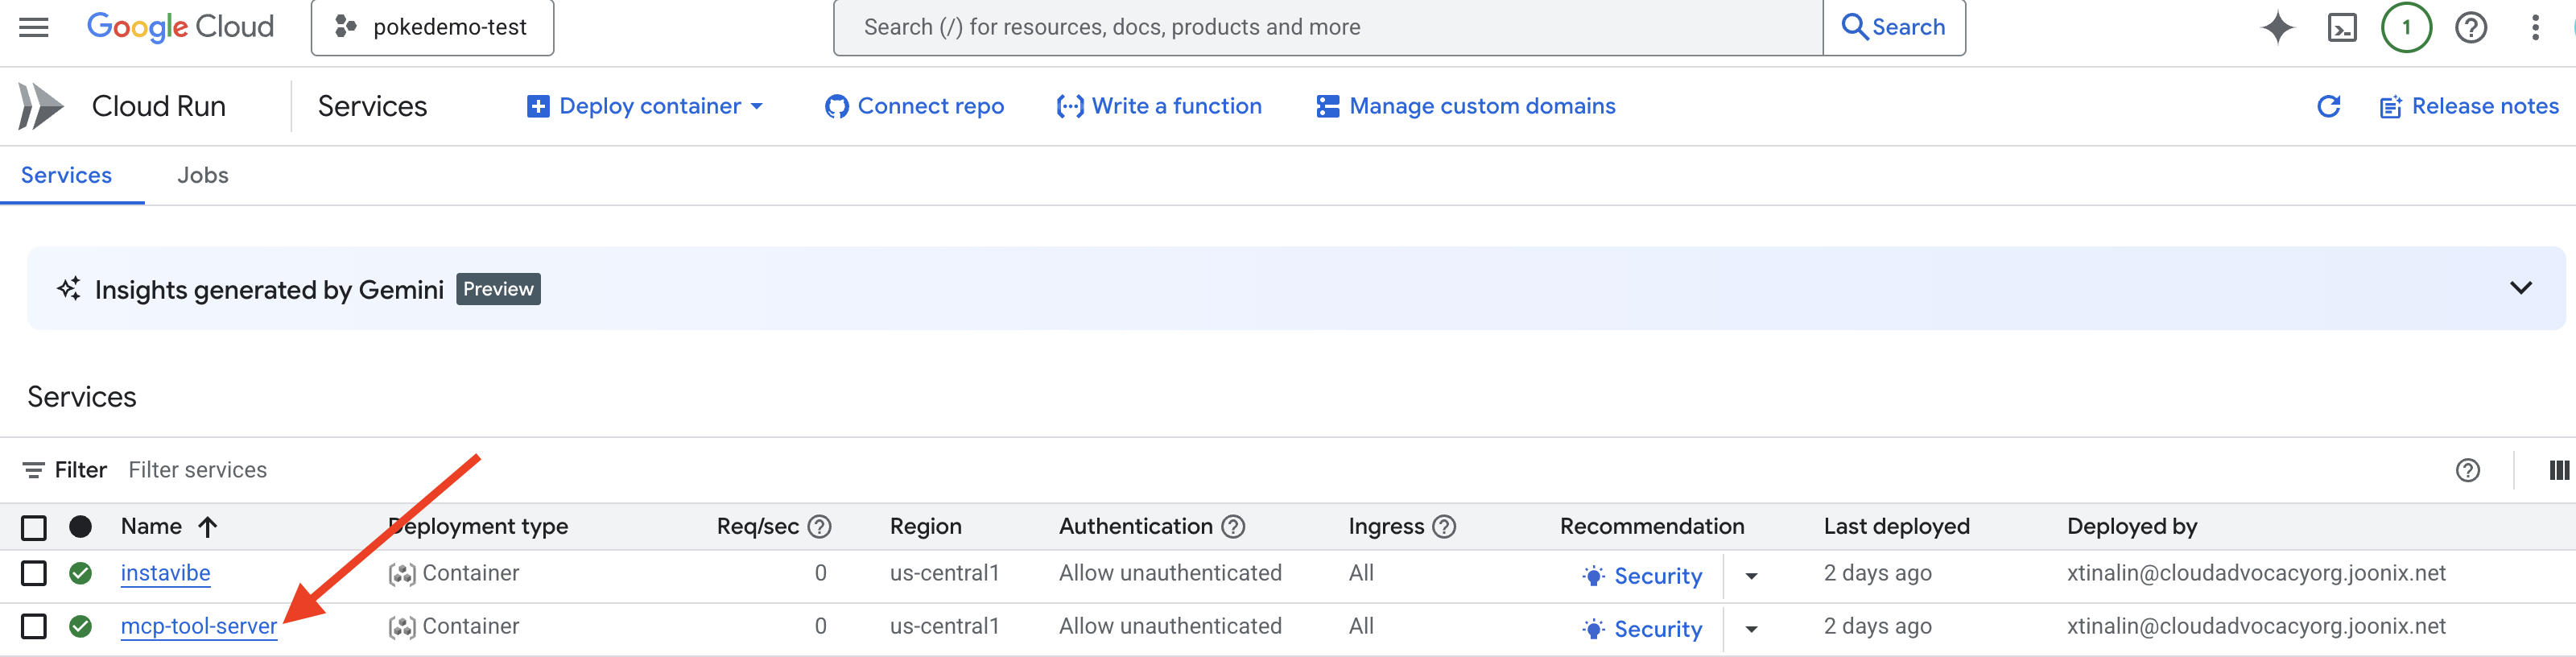
また、Google Cloud コンソールの [Cloud Run] セクションに、mcp-tool-server サービスが [実行中] として表示されるようになります。
MCP サーバーがデプロイされ、その URL がキャプチャされたので、MCP クライアントとして機能し、このサーバーで公開されているツールを利用するエージェントを実装できます。
8. プラットフォーム インタラクション エージェント(MCP を使用)
MCP クライアント: MCP クライアントは、AI アプリケーションまたはエージェント内に存在するコンポーネントで、AI モデルと 1 つ以上の MCP サーバー間のインターフェースとして機能します。この実装では、このクライアントはエージェント内に直接統合されます。このクライアントの主な機能は、MCP サーバーと通信して list_tools 関数で利用可能なツールを検出し、その後 call_tool 関数を使用して特定のツールの実行をリクエストし、AI モデルまたは呼び出しをオーケストレートするエージェントから提供された必要な引数を渡すことです。
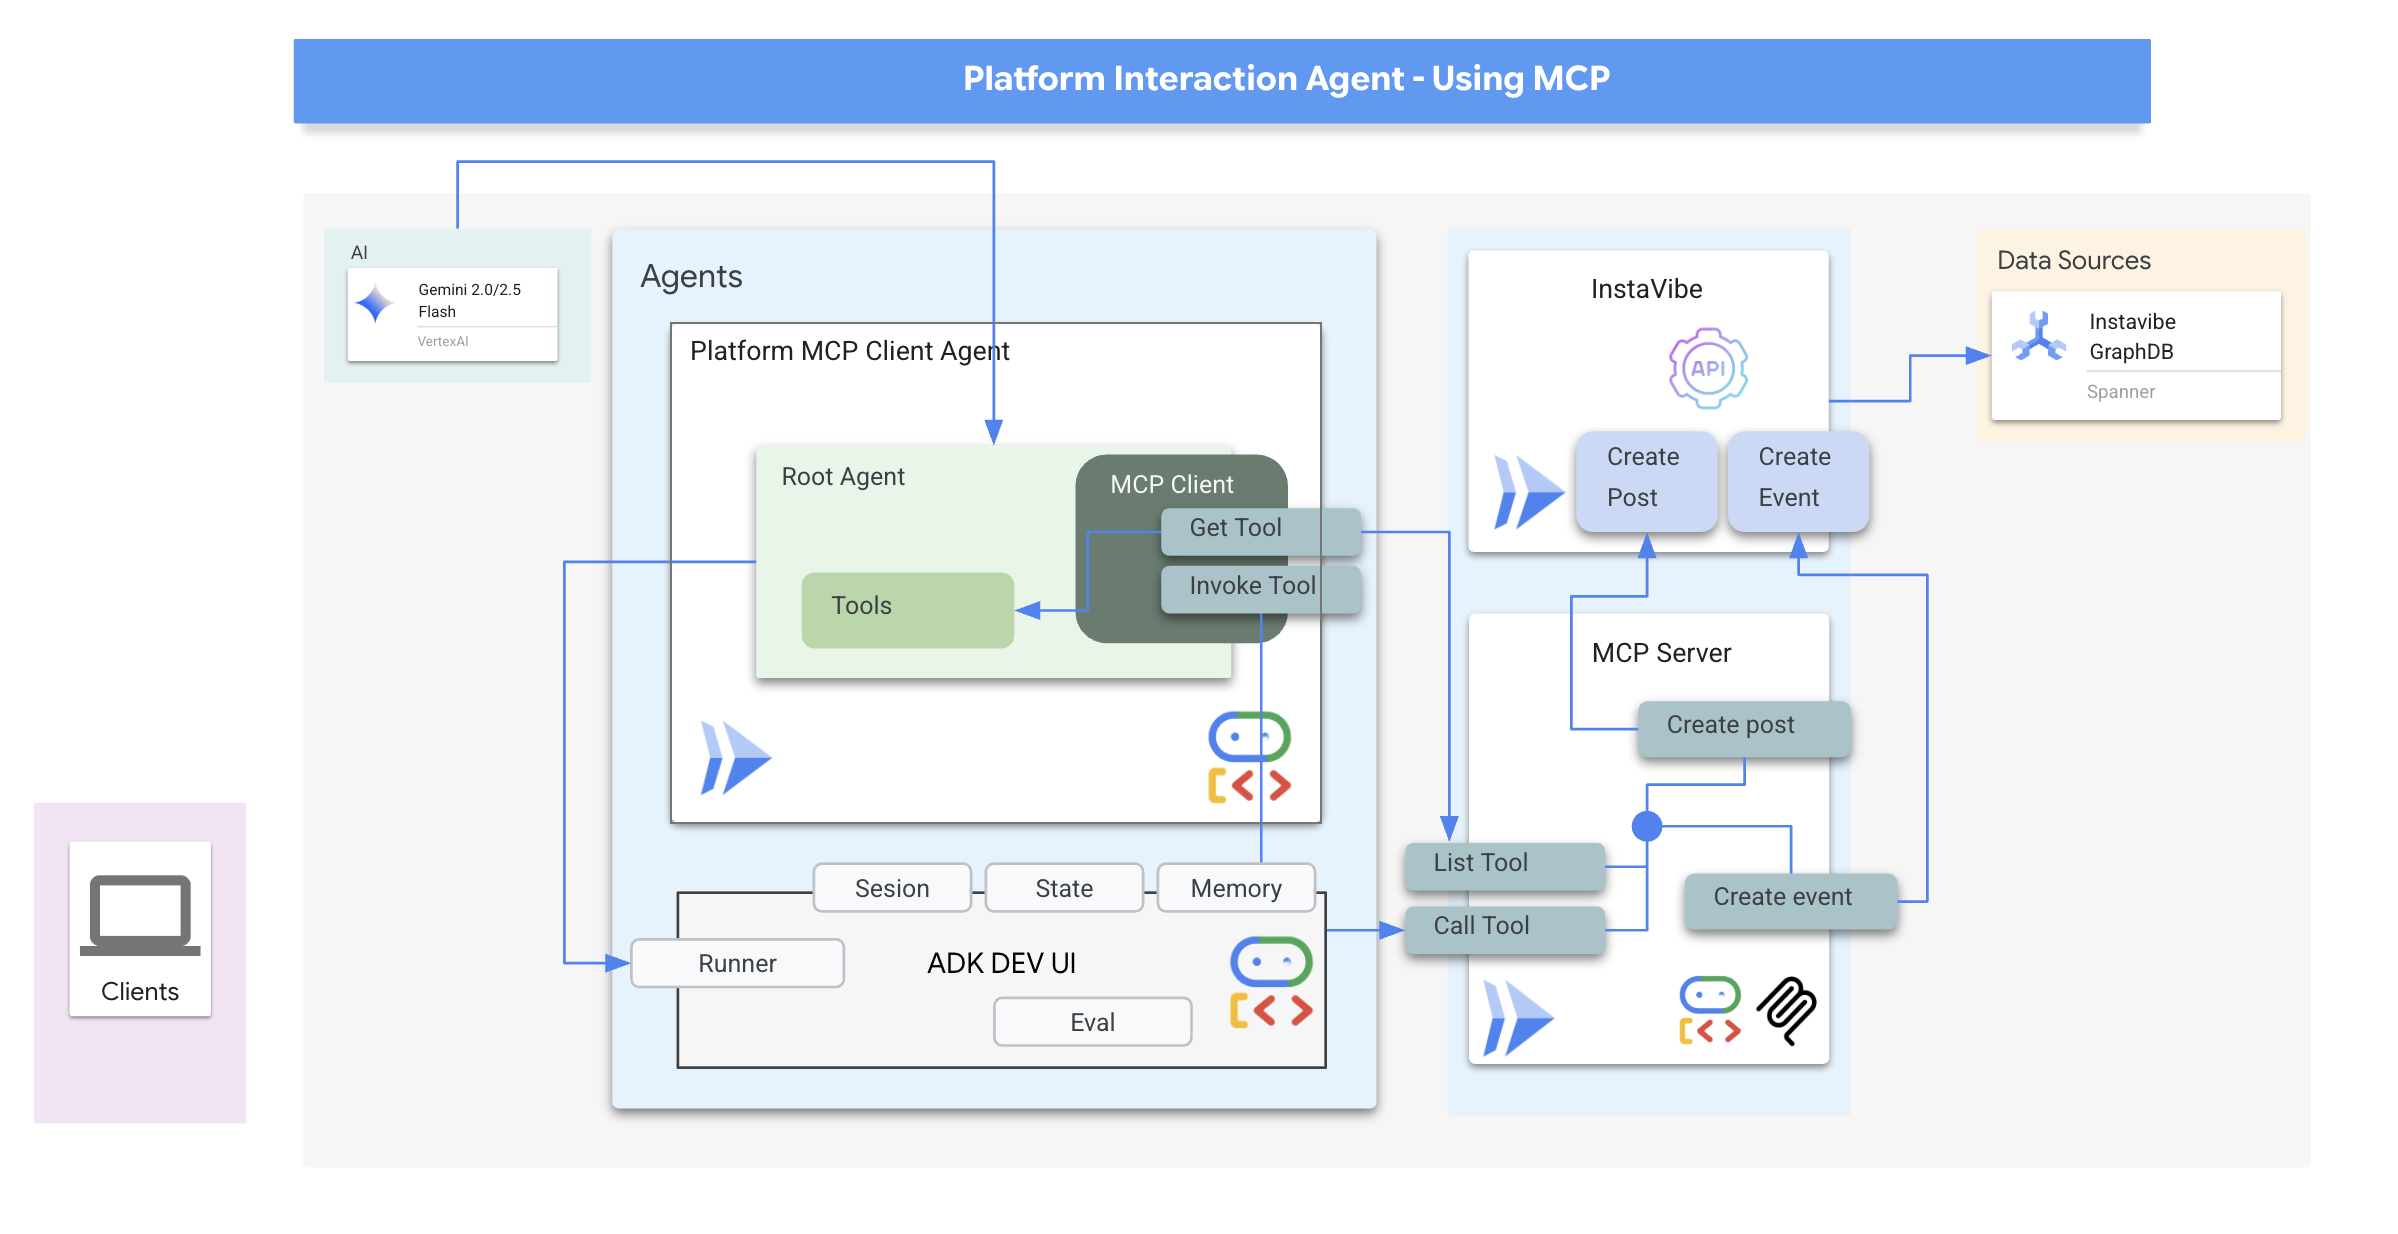
次に、MCP クライアントとして機能するエージェントを構築します。ADK フレームワーク内で実行されるこのエージェントは、デプロイした mcp-tool-server との通信を担当します。
👉 まず、実行中の MCP サーバーからツールを動的に取得するようにエージェント定義を変更する必要があります。agents/platform_mcp_client/agent.py で、#REPLACE ME - FETCH TOOLS を次のように置き換えます。
"""Gets tools from the File System MCP Server."""
  tools =  MCPToolset(
      connection_params=SseServerParams(url=MCP_SERVER_URL, headers={})
  )
このコードでは、MCPToolset.from_server メソッドを使用して MCP_SERVER_URL(環境変数として設定済み)に接続し、利用可能なツールのリストを取得します。
次に、これらの動的に取得されたツールを実際に使用するように ADK エージェント定義に指示する必要があります。
👉 agents/platform_mcp_client/agent.py で、#REPLACE ME - SET TOOLs を次のように置き換えます。
tools=[tools],
👉💻 それでは、ADK 開発 UI を使用してこのエージェントをローカルでテストし、MCP サーバーに正しく接続してツールを使用し、実行中の InstaVibe アプリケーションとやり取りできるかどうかを確認しましょう。
. ~/instavibe-bootstrap/set_env.sh
source ~/instavibe-bootstrap/env/bin/activate
export MCP_SERVER_URL=$(gcloud run services list --platform=managed --region=us-central1 --format='value(URL)' | grep mcp-tool-server)/sse

cd  ~/instavibe-bootstrap/agents
sed -i "s|^\(O\?GOOGLE_CLOUD_PROJECT\)=.*|GOOGLE_CLOUD_PROJECT=${PROJECT_ID}|" ~/instavibe-bootstrap/agents/platform_mcp_client/.env
sed -i "s|^\(O\?MCP_SERVER_URL\)=.*|MCP_SERVER_URL=${MCP_SERVER_URL}|" ~/instavibe-bootstrap/agents/platform_mcp_client/.env
adk web
ブラウザで ADK Dev UI を再度開きます(Cloud Shell のポート 8000 でのウェブ プレビューを使用)。今回は、右上のプルダウンで platform_mcp_client エージェントを選択します。
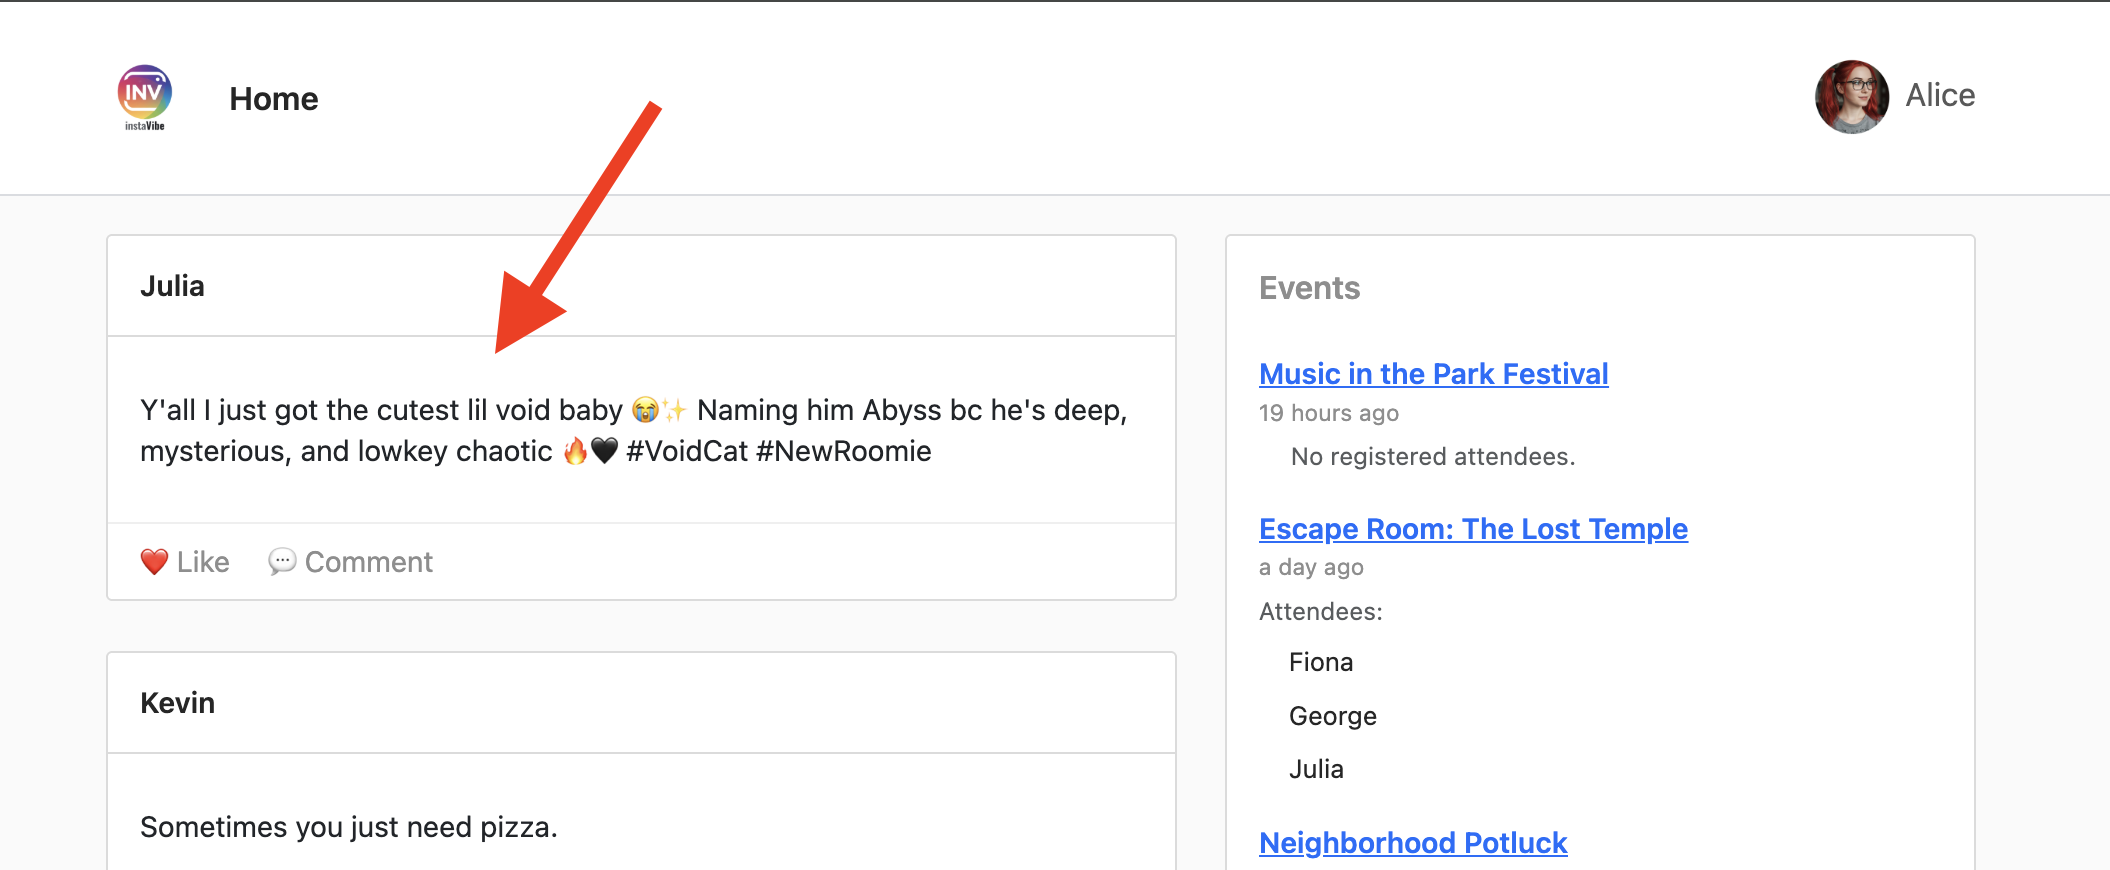
create_post ツールをテストしてみましょう。チャット ダイアログに次のリクエストを入力します。
Create a post saying "Y'all I just got the cutest lil void baby 😭✨ Naming him Abyss bc he's deep, mysterious, and lowkey chaotic 🔥🖤 #VoidCat #NewRoomie" I'm Julia
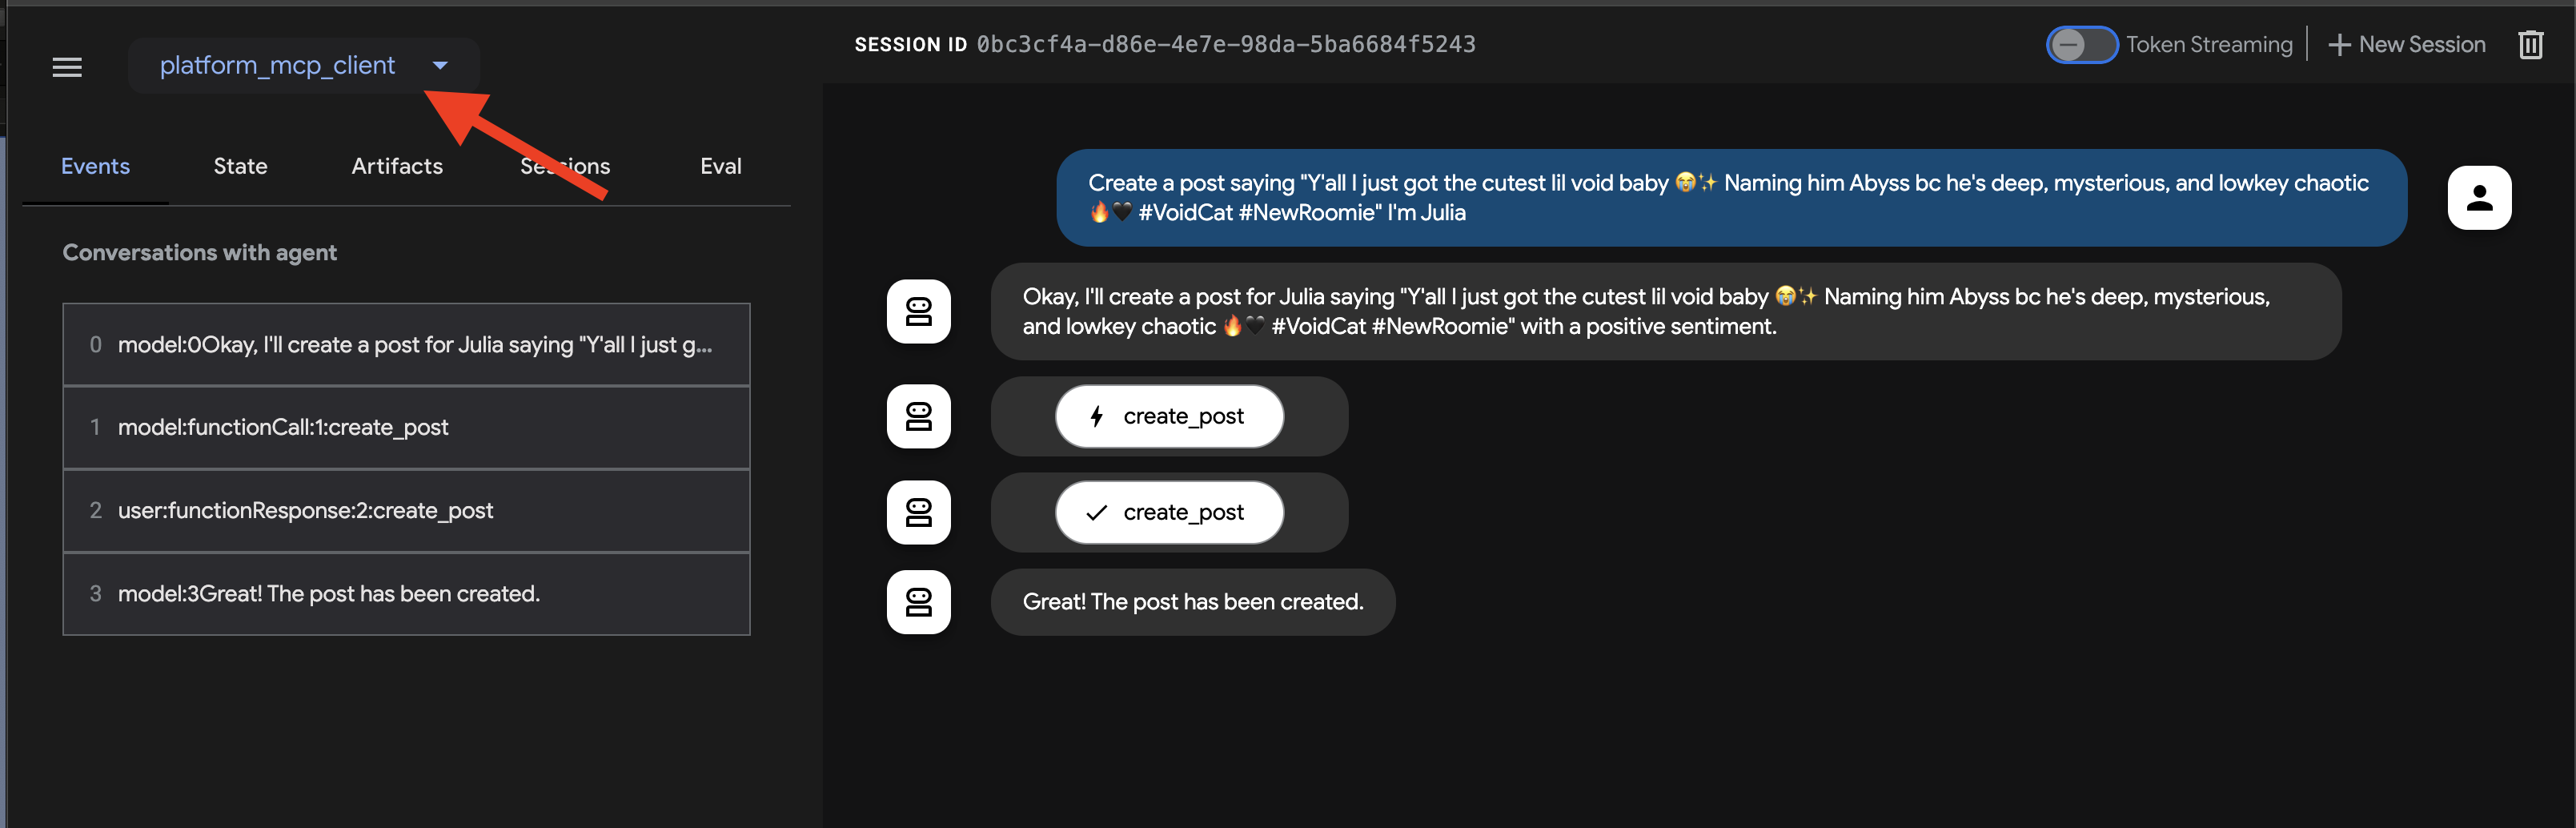
エージェントはこれを処理し、create_post ツールを使用する必要性を特定して、MCP サーバーと通信します。MCP サーバーは InstaVibe API を呼び出します。
👉 確認手順: エージェントがアクションを確認したら、InstaVibe アプリケーションが実行されているタブを開きます(または更新します)。メインフィードに「Julia」の新しい投稿が表示されます。
👉💻 必要に応じて、別のターミナルでこのスクリプトを実行して、Instavibe リンクを取得します。
gcloud run services list --platform=managed --region=us-central1 --format='value(URL)' | grep instavibe
👉📝 それでは、create_event ツールをテストしてみましょう。チャット ダイアログに次の複数行のリクエストを入力します。
Hey, can you set up an event for Hannah and George and me, and I'm Julia? Let's call it 'Mexico City Culinary & Art Day'.
here are more info
  {"event_name": "Mexico City Culinary & Art Day",
  "description": "A vibrant day in Mexico City for Hannah and George, starting with lunch at one of the city's best taco spots in the hip Condesa neighborhood, followed by an inspiring afternoon exploring the Museo Soumaya's stunning art collection.",
  "event_date": "2025-10-17T12:00:00-06:00",
  "locations": [
    {
      "name": "El Tizoncito",
      "description": "Considered one of the original creators of tacos al pastor, El Tizoncito offers a legendary taco experience in the heart of Condesa. Their flavorful meats, house salsas, and casual vibe make it a must-visit for foodies.",
      "latitude": 19.412179,
      "longitude": -99.171308,
      "address": "Av. Tamaulipas 122, Hipódromo, Cuauhtémoc, 06100 Ciudad de México, CDMX, Mexico"
    },
    {
      "name": "Museo Soumaya",
      "description": "An architectural icon in Mexico City, Museo Soumaya houses over 66,000 works of art, including pieces by Rodin, Dalí, and Rivera. The striking silver structure is a cultural landmark and a visual feast inside and out.",
      "latitude": 19.440056,
      "longitude": -99.204281,
      "address": "Plaza Carso, Blvd. Miguel de Cervantes Saavedra 303, Granada, Miguel Hidalgo, 11529 Ciudad de México, CDMX, Mexico"
    }
  ],
  "attendee_names": ["Hannah", "George", Julia],
}
ここでも、エージェントは MCP サーバーを介して適切なツールを使用する必要があります。[イベント] タブで、個々のイベントをクリックすると、実行の詳細なトレースが表示されます。
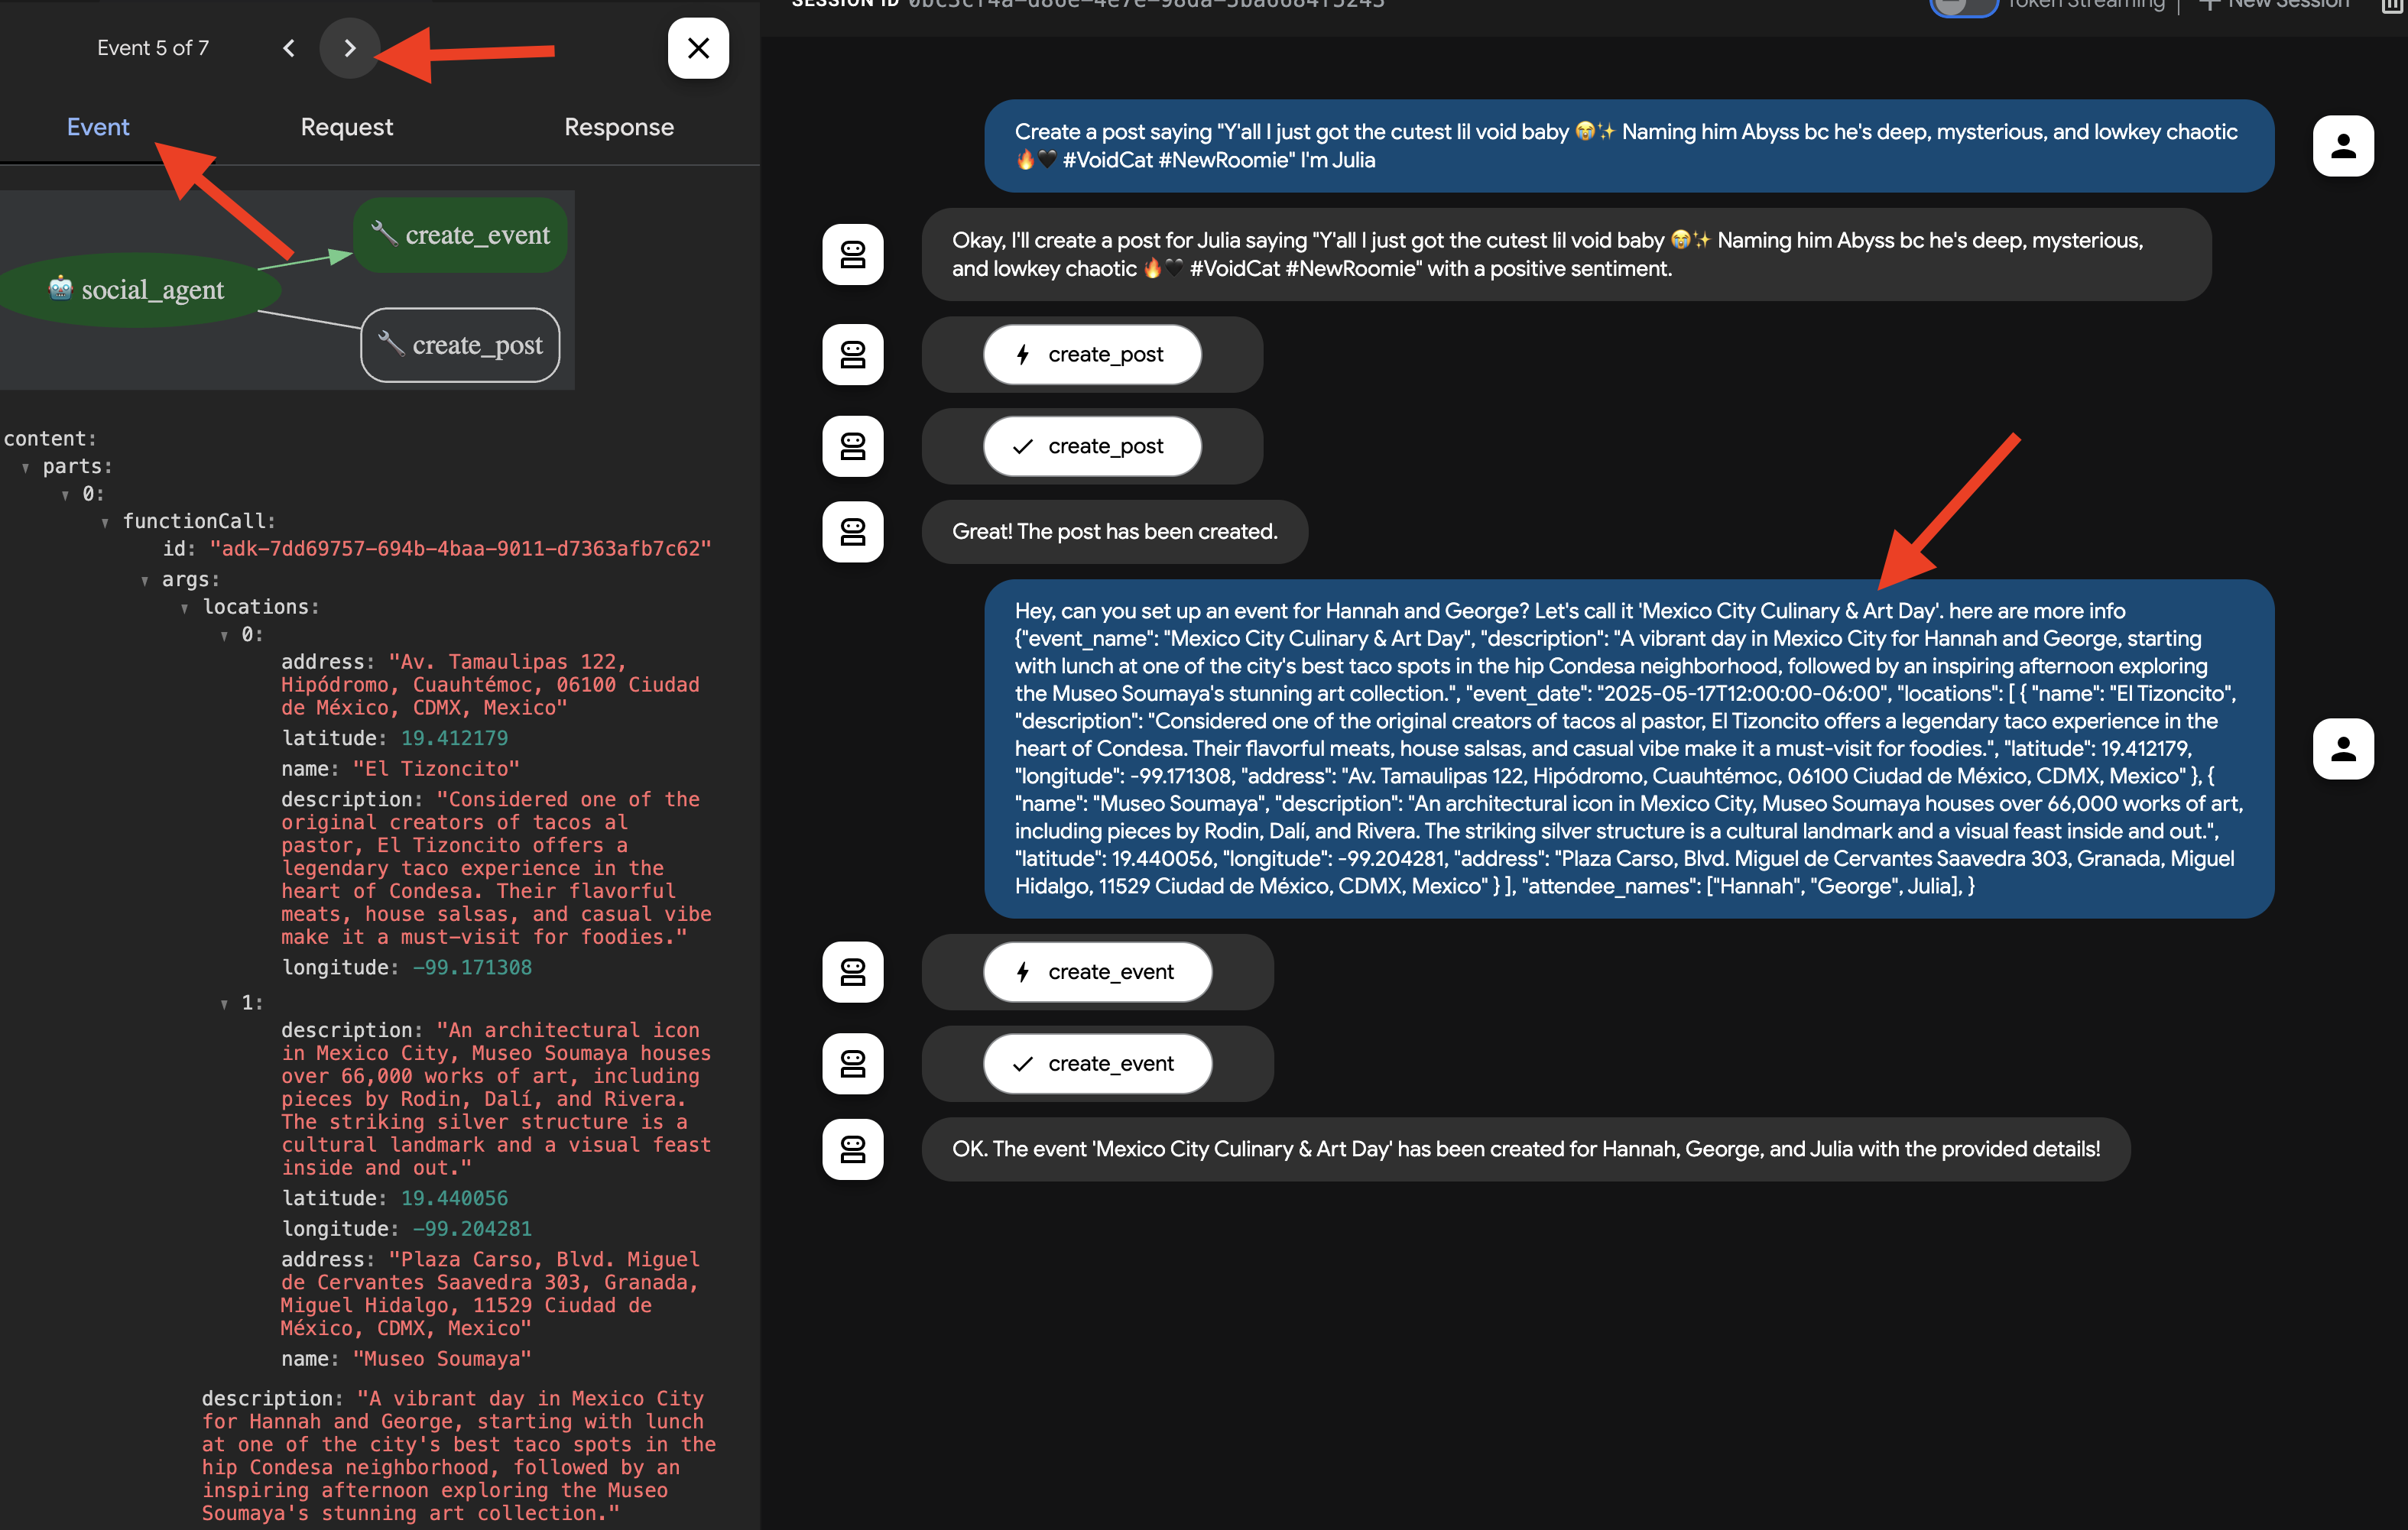
👉 確認手順: 実行中の InstaVibe アプリケーションに戻り、[Events](イベント)セクション(または同等のセクション)に移動します。これで、新しく作成した「Mexico City Culinary & Art Day」イベントが一覧表示されます。
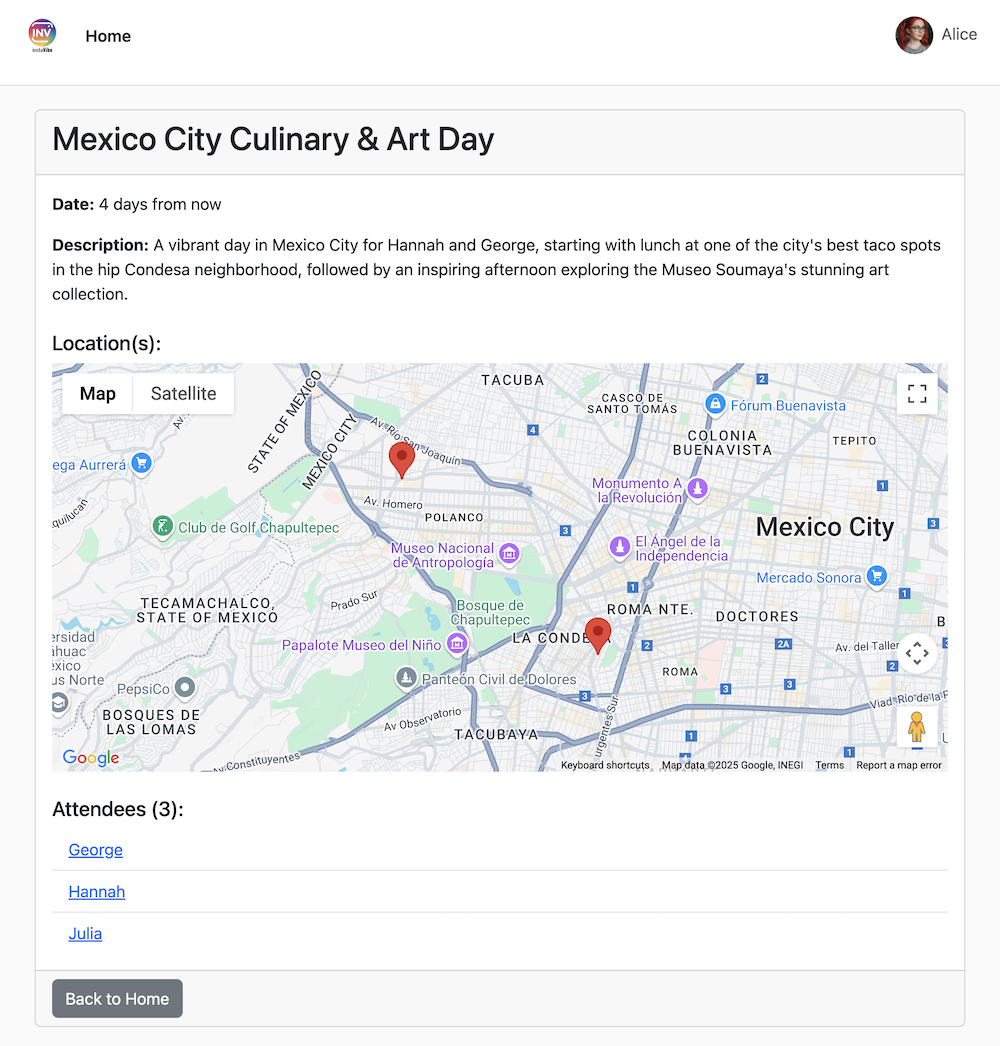
これにより、MCP がエージェントに外部ツール(この場合は InstaVibe の API)を標準化された方法で活用させる方法が実証されました。
両方のアクションを確認したら、Cloud Shell ターミナルに戻り、Ctrl+C を押して ADK 開発 UI を停止します。
9. ADK のワークフロー エージェントとマルチエージェント
これまでのところ、エージェントは外出の計画を立て、プラットフォームとやり取りできます。ただし、真にパーソナライズされたプランニングには、ユーザーのソーシャル サークルを理解する必要があります。友だちのアクティビティを頻繁に確認できない忙しいユーザーにとって、このコンテキストを手動で収集するのは困難です。この問題を解決するために、Spanner Graph データベースを活用して友だちのアクティビティや興味関心を分析し、よりパーソナライズされた提案を可能にするソーシャル プロファイリング エージェントを構築します。
まず、このエージェントがグラフデータにアクセスするためのツールが必要です。
👉📝 ファイル ~/instavibe-bootstrap/agents/social/instavibe.py の末尾に次の Python 関数を追加します。
def get_person_attended_events(person_id: str)-> list[dict]:
    """
    Fetches events attended by a specific person using Graph Query.
    Args:
       person_id (str): The ID of the person whose posts to fetch.
    Returns: list[dict] or None.
    """
    if not db_instance: return None

    graph_sql = """
        Graph SocialGraph
        MATCH (p:Person)-[att:Attended]->(e:Event)
        WHERE p.person_id = @person_id
        RETURN e.event_id, e.name, e.event_date, att.attendance_time
        ORDER BY e.event_date DESC
    """
    params = {"person_id": person_id}
    param_types_map = {"person_id": param_types.STRING}
    fields = ["event_id", "name", "event_date", "attendance_time"]

    results = run_graph_query( graph_sql, params=params, param_types=param_types_map, expected_fields=fields)

    if results is None: return None

    for event in results:
        if isinstance(event.get('event_date'), datetime):
            event['event_date'] = event['event_date'].isoformat()
        if isinstance(event.get('attendance_time'), datetime):
            event['attendance_time'] = event['attendance_time'].isoformat()
    return results

def get_person_id_by_name( name: str) -> str:
    """
    Fetches the person_id for a given name using SQL.

    Args:
       name (str): The name of the person to search for.

    Returns:
        str or None: The person_id if found, otherwise None.
                     Returns the ID of the *first* match if names are duplicated.
    """
    if not db_instance: return None

    sql = """
        SELECT person_id
        FROM Person
        WHERE name = @name
        LIMIT 1 -- Return only the first match in case of duplicate names
    """
    params = {"name": name}
    param_types_map = {"name": param_types.STRING}
    fields = ["person_id"]

    # Use the standard SQL query helper
    results = run_sql_query( sql, params=params, param_types=param_types_map, expected_fields=fields)

    if results: # Check if the list is not empty
        return results[0].get('person_id') # Return the ID from the first dictionary
    else:
        return None # Name not found


def get_person_posts( person_id: str)-> list[dict]:
    """
    Fetches posts written by a specific person using Graph Query.

    Args:
        person_id (str): The ID of the person whose posts to fetch.


    Returns:
        list[dict] or None: List of post dictionaries with ISO date strings,
                           or None if an error occurs.
    """
    if not db_instance: return None

    # Graph Query: Find the specific Person node, follow 'Wrote' edge to Post nodes
    graph_sql = """
        Graph SocialGraph
        MATCH (author:Person)-[w:Wrote]->(post:Post)
        WHERE author.person_id = @person_id
        RETURN post.post_id, post.author_id, post.text, post.sentiment, post.post_timestamp, author.name AS author_name
        ORDER BY post.post_timestamp DESC
    """
    # Parameters now include person_id and limit
    params = {
        "person_id": person_id
    }
    param_types_map = {
        "person_id": param_types.STRING
    }
    # Fields returned remain the same
    fields = ["post_id", "author_id", "text", "sentiment", "post_timestamp", "author_name"]

    results = run_graph_query(graph_sql, params=params, param_types=param_types_map, expected_fields=fields)

    if results is None:
        return None

    # Convert datetime objects to ISO format strings
    for post in results:
        if isinstance(post.get('post_timestamp'), datetime):
            post['post_timestamp'] = post['post_timestamp'].isoformat()

    return results


def get_person_friends( person_id: str)-> list[dict]:
    """
    Fetches friends for a specific person using Graph Query.
    Args:
        person_id (str): The ID of the person whose posts to fetch.
    Returns: list[dict] or None.
    """
    if not db_instance: return None

    graph_sql = """
        Graph SocialGraph
        MATCH (p:Person {person_id: @person_id})-[f:Friendship]-(friend:Person)
        RETURN DISTINCT friend.person_id, friend.name
        ORDER BY friend.name
    """
    params = {"person_id": person_id}
    param_types_map = {"person_id": param_types.STRING}
    fields = ["person_id", "name"]

    results = run_graph_query( graph_sql, params=params, param_types=param_types_map, expected_fields=fields)

    return results
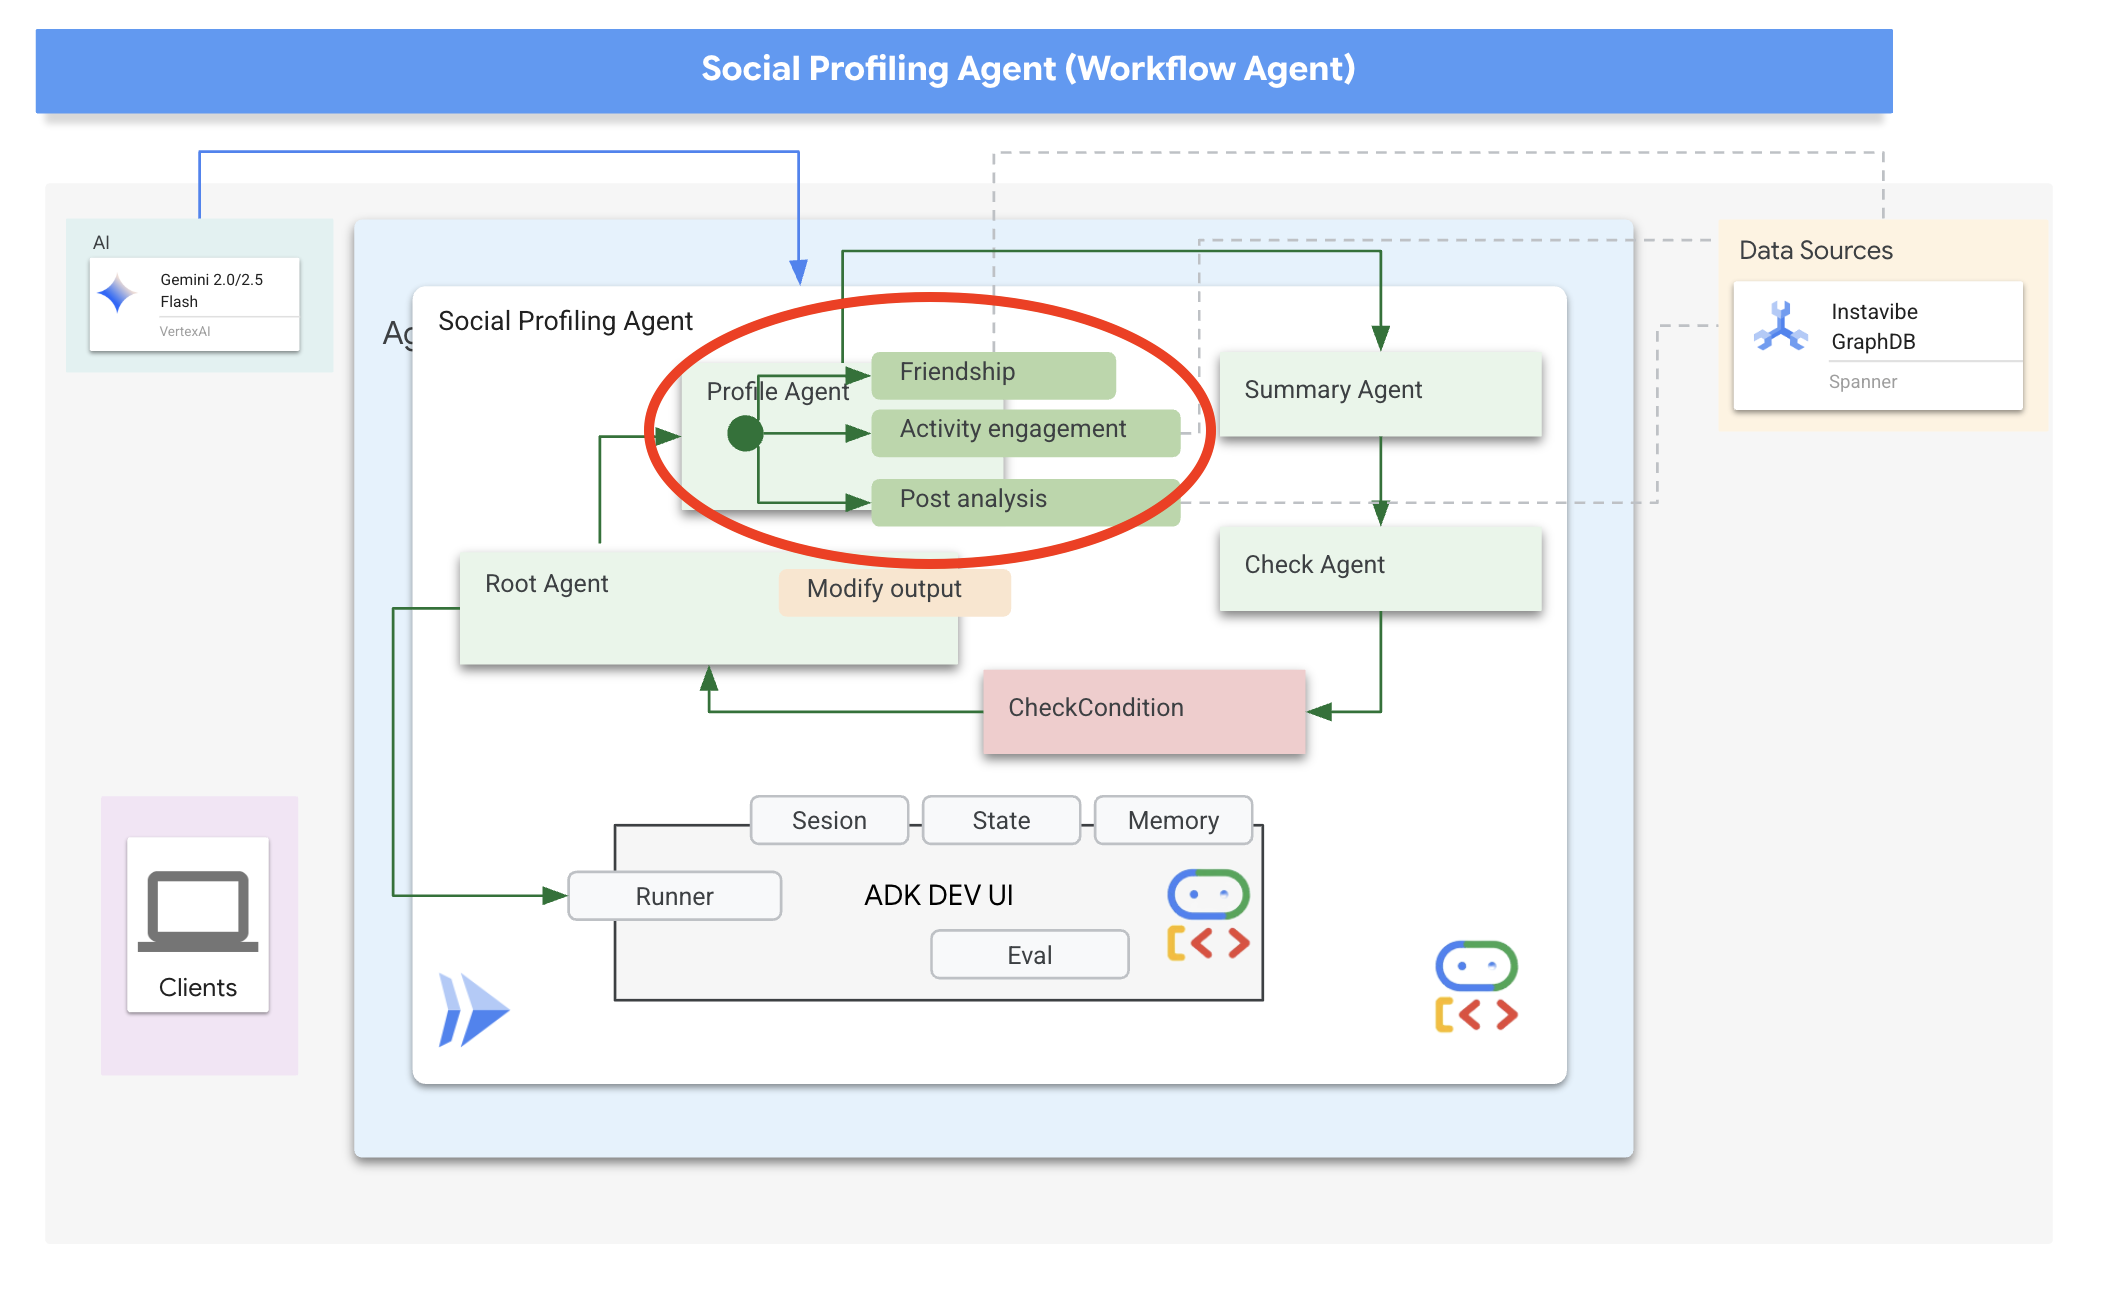
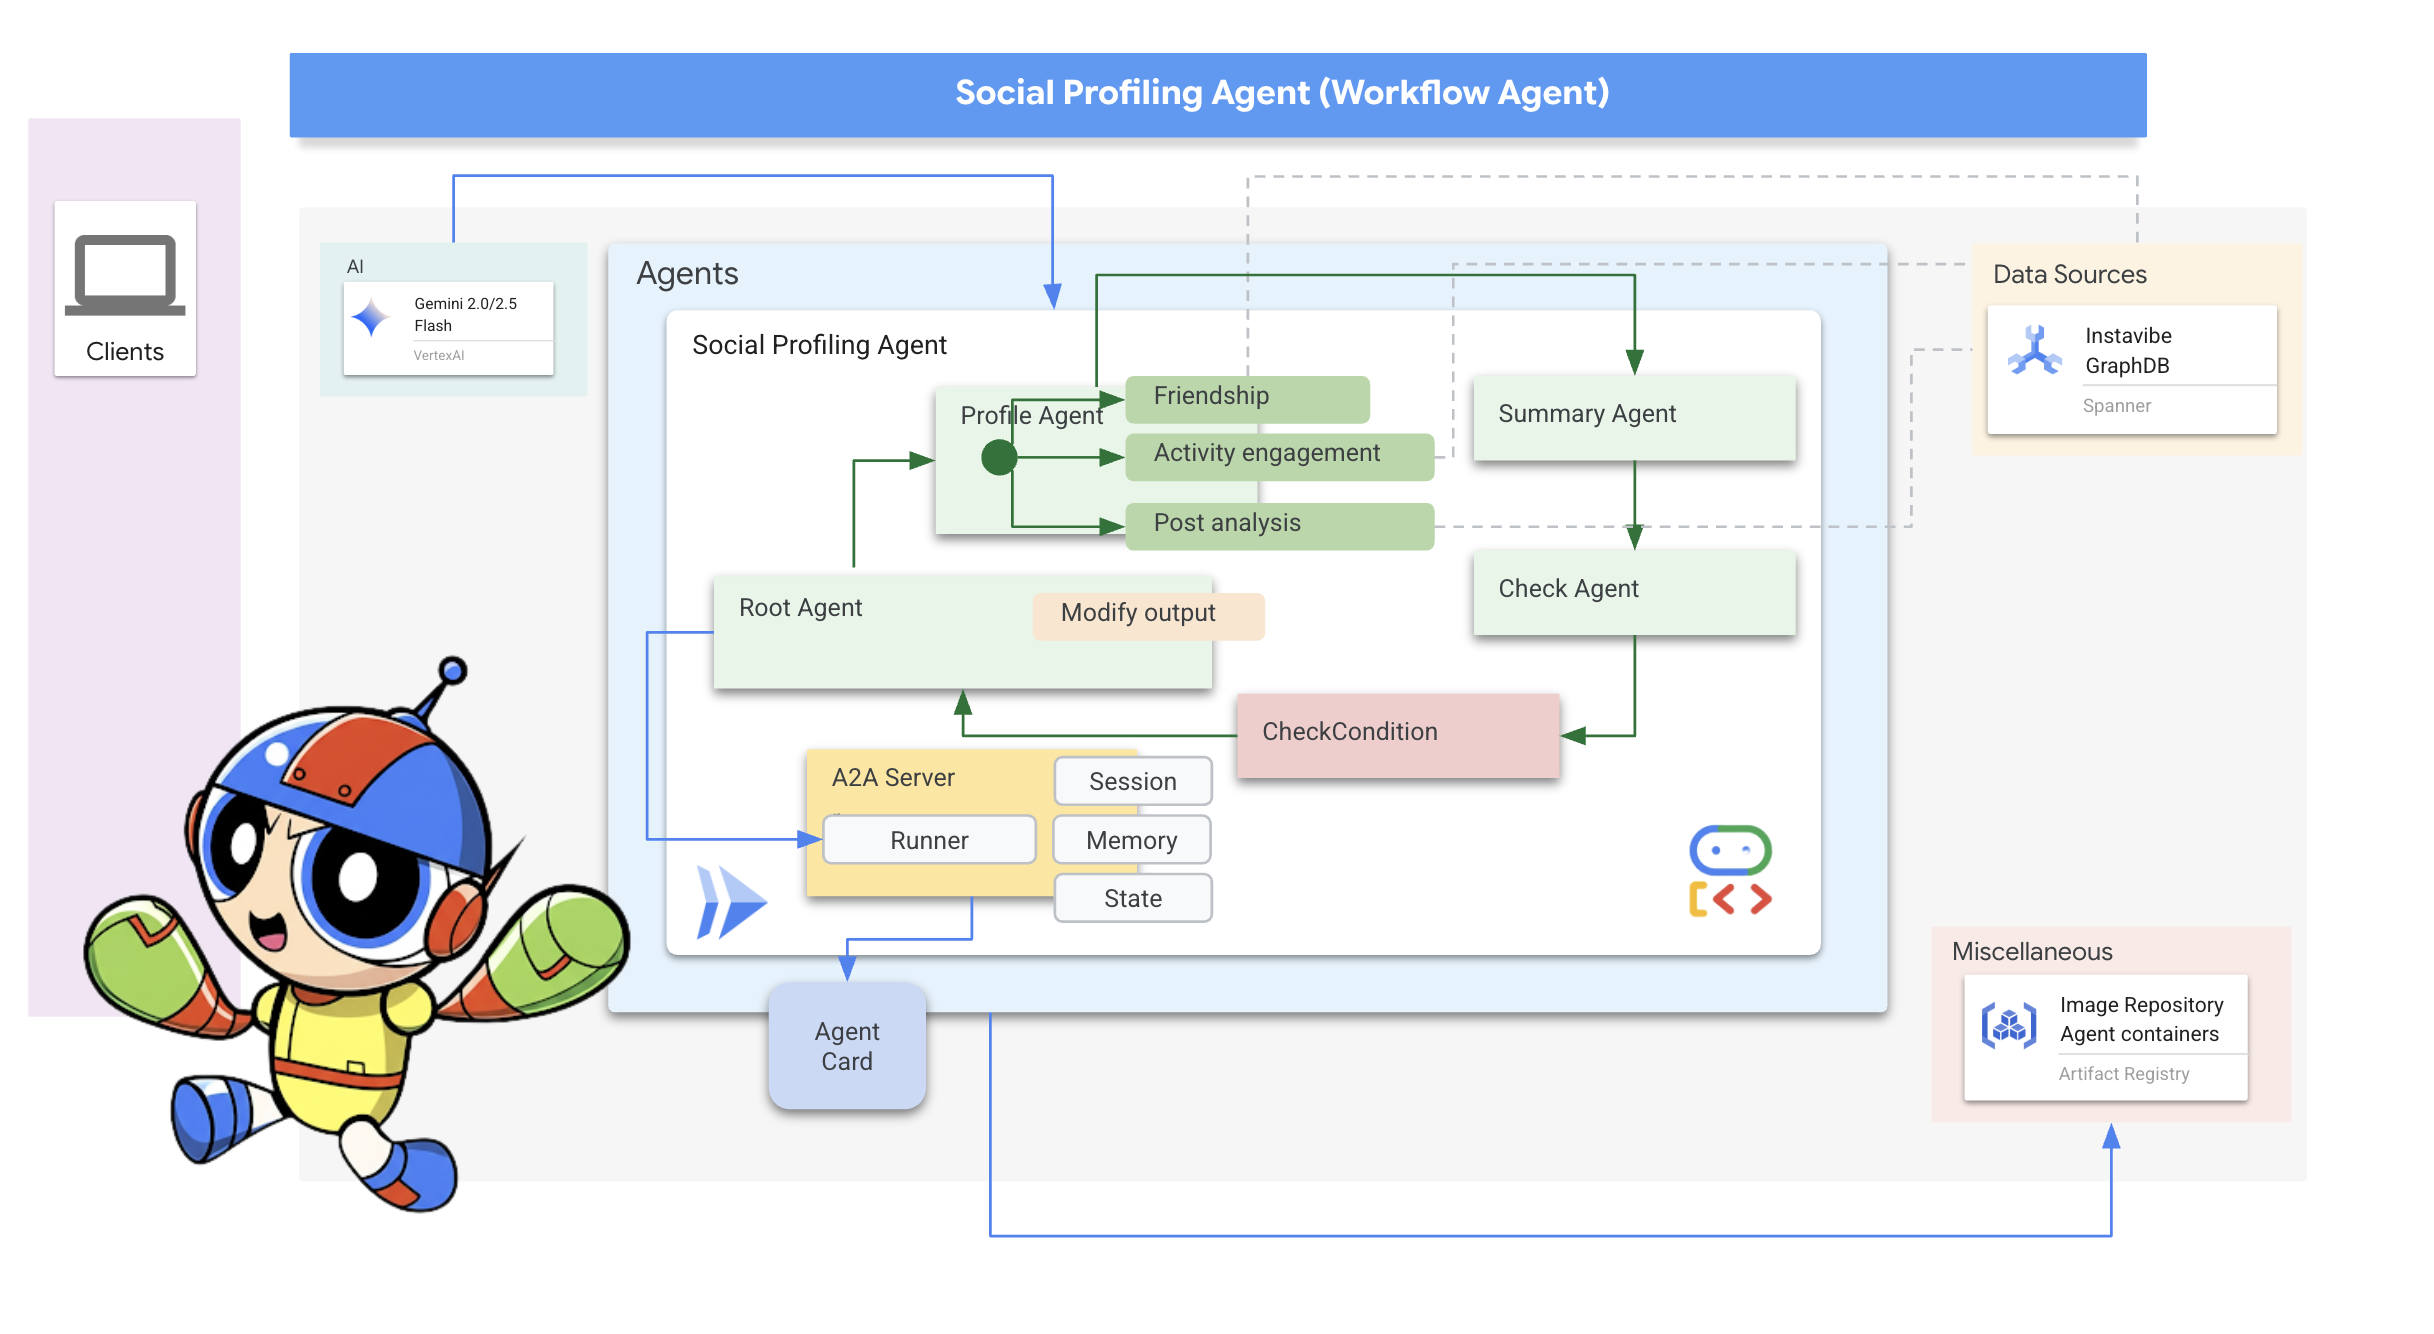
次に、エージェントの構造化方法について説明します。複数の友だちのプロフィールを分析して結果を要約するには、いくつかの手順が必要です。これは、ADK のマルチエージェント機能(特にワークフロー エージェント)を使用するのに最適なシナリオです。
Google の ADK では、ワークフロー エージェントはタスクを自身で実行するのではなく、サブエージェントと呼ばれる他のエージェントをオーケストレートします。これにより、複雑な問題を専門的なコンポーネントに分割するモジュール設計が可能になります。ADK には、次のような組み込みのワークフロー タイプが用意されています。
- 順次(ステップバイステップ)
- 並列(同時実行)
- と Loop(繰り返し実行)
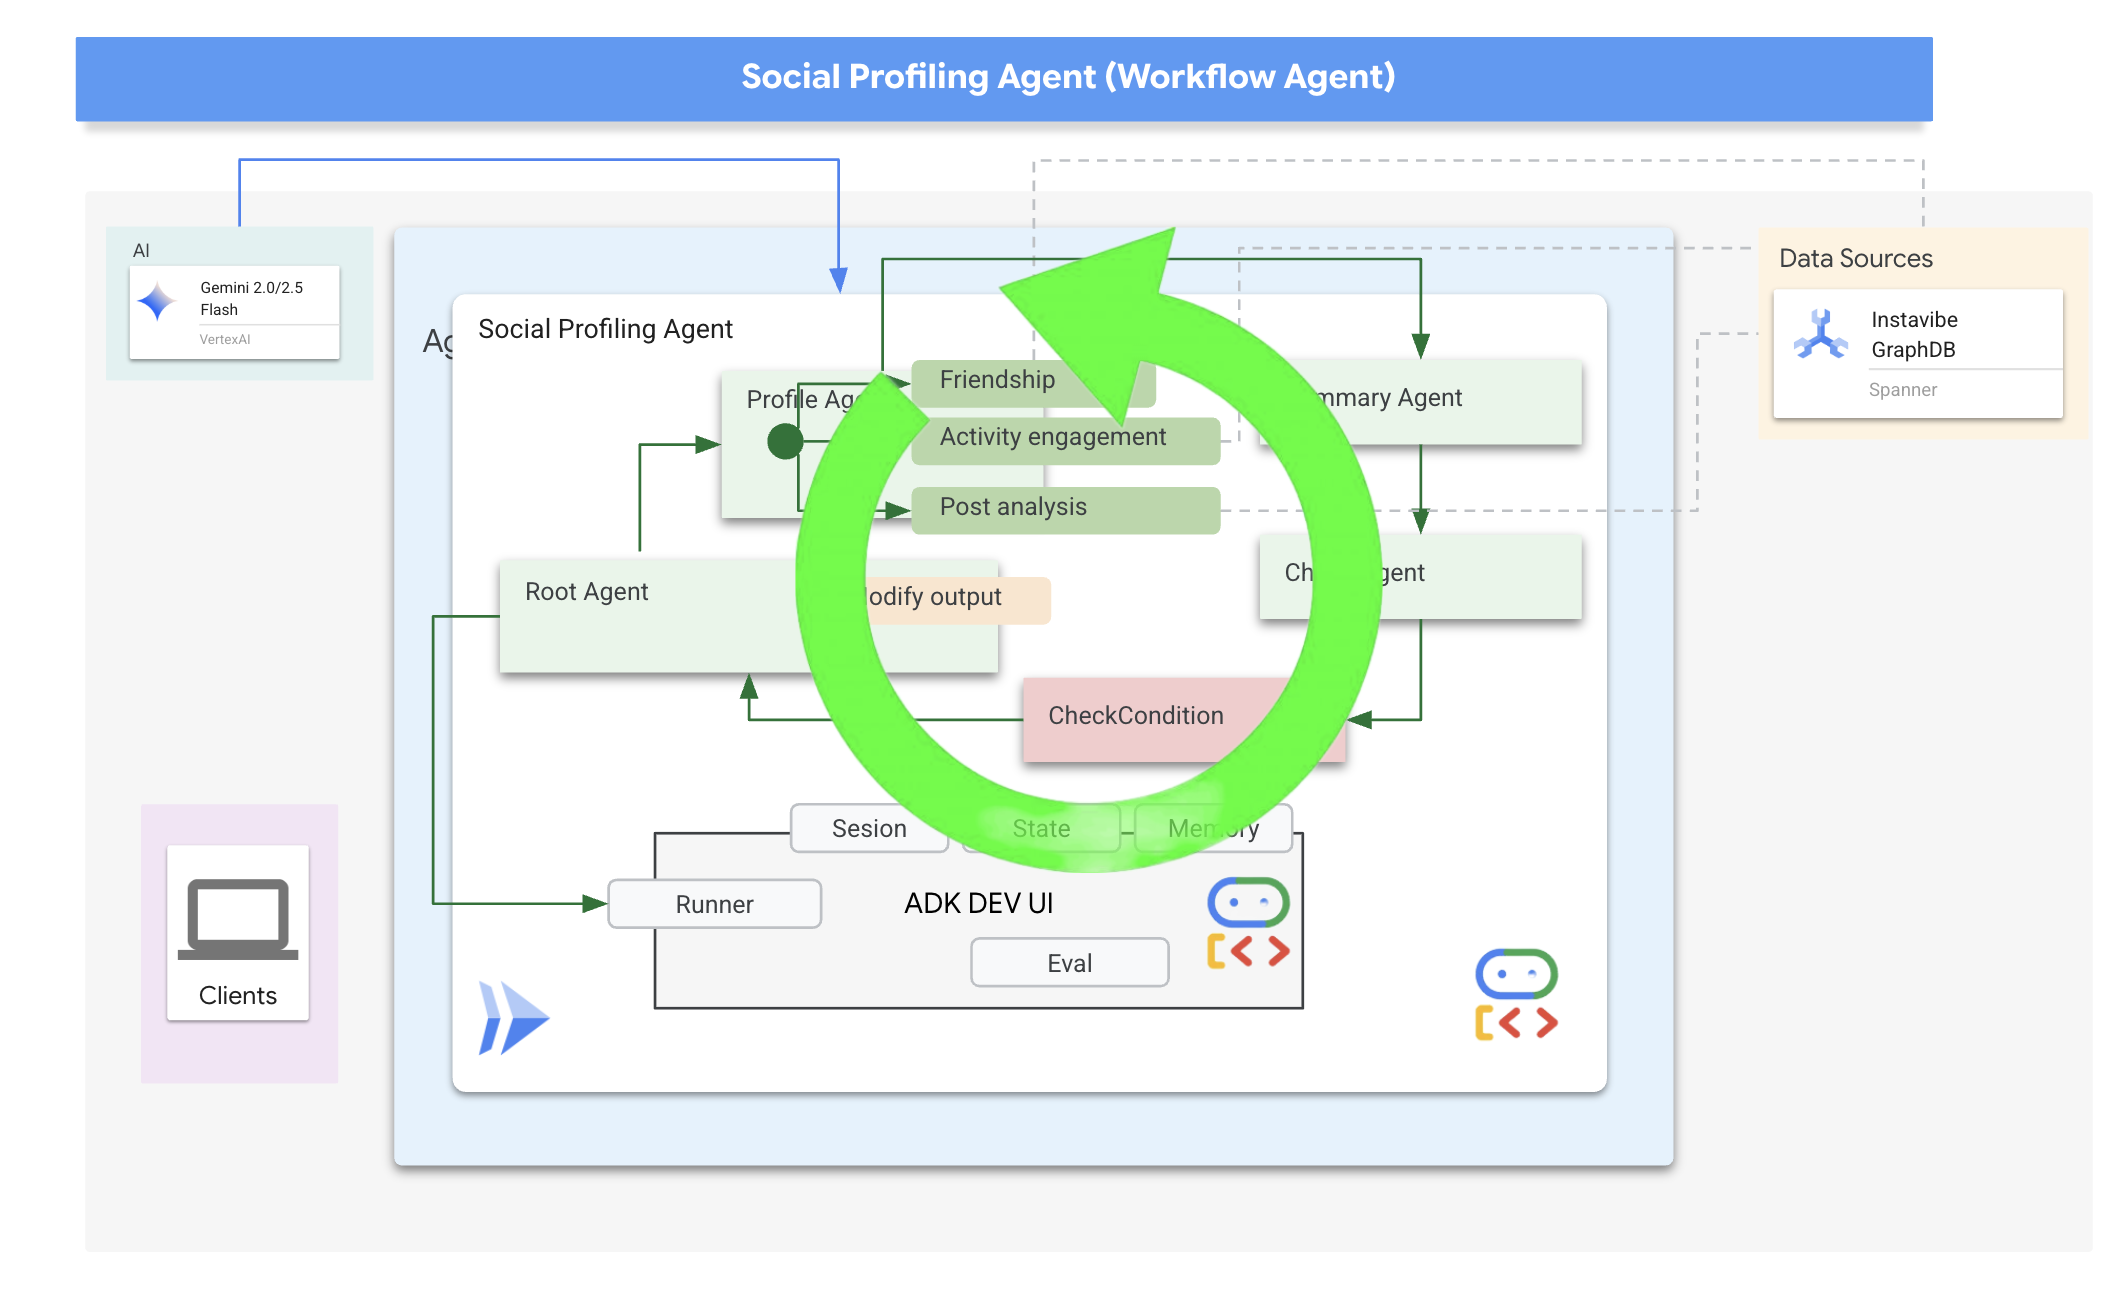
ソーシャル プロファイリング タスクでは、設計で Loop エージェントを使用して反復ワークフローを作成します。このコードは、一度に 1 人のユーザーを処理することを目的としています。profile_agent はデータを収集し、summary_agent は分析を更新し、check_agent はループを再度実行するかどうかを判断します。
このワークフローに必要なサブエージェントを定義しましょう。
👉📝 ~/instavibe-bootstrap/agents/social/agent.py で、#REPLACE FOR profile_agent を次のように置き換えます。
profile_agent = LlmAgent(
    name="profile_agent",
    model="gemini-2.5-flash",
    description=(
        "Agent to answer questions about the this person social profile. Provide the person's profile using their name, make sure to fetch the id before getting other data."
    ),
    instruction=(
        "You are a helpful agent to answer questions about the this person social profile. You'll be given a list of names, provide the person's profile using their name, make sure to fetch the id before getting other data. Get one person at a time, start with the first one on the list, and skip if already provided. return this person's result"
    ),
    tools=[get_person_posts,get_person_friends,get_person_id_by_name,get_person_attended_events],
)
次に、収集されたプロファイル情報(ループの反復で蓄積されたもの)を取得し、最終的な概要を生成するエージェント。複数のユーザーが分析された場合は、共通の基盤を特定します。
👉📝 同じ ~/instavibe-bootstrap/agents/social/agent.py で、#REPLACE FOR summary_agent を次のように置き換えます。
summary_agent = LlmAgent(
    name="summary_agent",
    model="gemini-2.5-flash",
    description=(
        "Generate a comprehensive social summary as a single, cohesive paragraph. This summary should cover the activities, posts, friend networks, and event participation of one or more individuals. If multiple profiles are analyzed, the paragraph must also identify and integrate any common ground found between them."
    ),
    instruction=(
        """
        Your primary task is to synthesize social profile information into a single, comprehensive paragraph.

            **Input Scope & Default Behavior:**
            *   If specific individuals are named by the user, focus your analysis on them.
            *   **If no individuals are specified, or if the request is general, assume the user wants an analysis of *all relevant profiles available in the current dataset/context*.**

            **For each profile (whether specified or determined by default), you must analyze:**

            1.  **Post Analysis:**
                *   Systematically review their posts (e.g., content, topics, frequency, engagement).
                *   Identify recurring themes, primary interests, and expressed sentiments.

            2.  **Friendship Relationship Analysis:**
                *   Examine their connections/friends list.
                *   Identify key relationships, mutual friends (especially if comparing multiple profiles), and the general structure of their social network.

            3.  **Event Participation Analysis:**
                *   Investigate their past (and if available, upcoming) event participation.
                *   Note the types of events, frequency of attendance, and any notable roles (e.g., organizer, speaker).

            **Output Generation (Single Paragraph):**

            *   **Your entire output must be a single, cohesive summary paragraph.**
                *   **If analyzing a single profile:** This paragraph will detail their activities, interests, and social connections based on the post, friend, and event analysis.
                *   **If analyzing multiple profiles:** This paragraph will synthesize the key findings regarding posts, friends, and events for each individual. Crucially, it must then seamlessly integrate or conclude with an identification and description of the common ground found between them (e.g., shared interests from posts, overlapping event attendance, mutual friends). The aim is a unified narrative within this single paragraph.

            **Key Considerations:**
            *   Base your summary strictly on the available data.
            *   If data for a specific category (posts, friends, events) is missing or sparse for a profile, you may briefly acknowledge this within the narrative if relevant.
                """
        ),
    output_key="summary"
)
ループを停止するタイミング(リクエストされたすべてのプロファイルが要約されたとき)を判断する方法が必要です。
👉📝 同じ ~/instavibe-bootstrap/agents/social/agent.py で、#REPLACE FOR check_agent を次のように置き換えます。
check_agent = LlmAgent(
    name="check_agent",
    model="gemini-2.5-flash",
    description=(
        "Check if everyone's social profile are summarized and has been generated. Output 'completed' or 'pending'."
    ),
    output_key="summary_status"
)
State に保存されている summary_status を明示的に確認する簡単なプログラム チェック(CheckCondition)を追加します。これは、check_agent によって返され、続行(escalate=False)または停止(escalate=True)のどちらにするかを Loop Agent に伝えます。
👉📝 同じ ~/instavibe-bootstrap/agents/social/agent.py で、ファイルの先頭にある #REPLACE FOR CheckCondition を次のように置き換えます。
class CheckCondition(BaseAgent):
    async def _run_async_impl(self, ctx: InvocationContext) -> AsyncGenerator[Event, None]:
        #log.info(f"Checking status: {ctx.session.state.get("summary_status", "fail")}")
        log.info(f"Summary: {ctx.session.state.get("summary")}")

        status = ctx.session.state.get("summary_status", "fail").strip()
        is_done = (status == "completed")

        yield Event(author=self.name, actions=EventActions(escalate=is_done))
ループ結果の状態とコールバック
Google の ADK では、状態は、エージェントの実行中のメモリまたは作業データを表す重要な概念です。これは、さまざまなステップ、ツール呼び出し、インタラクションでエージェントが維持する必要がある情報を保持する永続的なコンテキストです。この状態には、中間結果、ユーザー情報、後続のアクションのパラメータなど、エージェントがタスクを進めるうえで記憶しておく必要のあるデータを保存できます。
このシナリオでは、Loop エージェントが反復処理を行うと、summary_agent と check_agent は出力(summary と summary_status)をエージェントの State に保存します。これにより、イテレーション間で情報を保持できます。ただし、Loop Agent 自体は、終了時に状態から最終的な要約を自動的に返しません。

ADK のコールバックを使用すると、エージェントのライフサイクルの特定のポイントで実行されるカスタム ロジックや、ツール呼び出しの完了などの特定のイベントに応答して実行されるカスタム ロジックを挿入できます。これらは、エージェントの動作をカスタマイズし、結果を動的に処理する方法を提供します。
ループが終了したときに実行される after_agent_callback を使用します(CheckCondition がエスカレーションされたため)。このコールバック modify_output_after_agent は、状態から最終的な要約を取得し、エージェントの最終出力メッセージとしてフォーマットします。
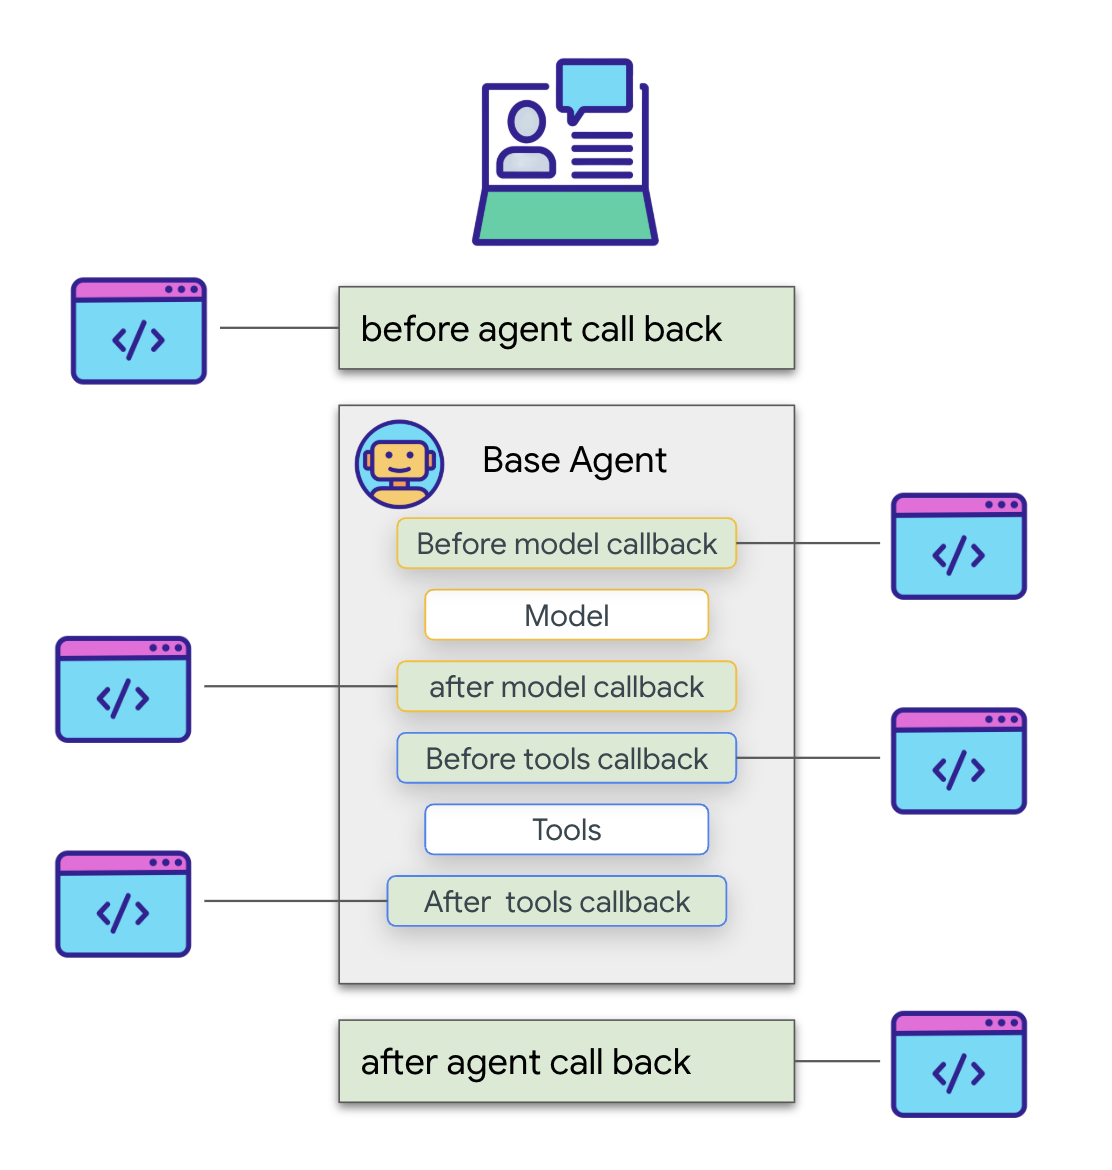
👉📝 同じ ~/instavibe-bootstrap/agents/social/agent.py で、#REPLACE FOR modify_output_after_agent を次のように置き換えます。
def modify_output_after_agent(callback_context: CallbackContext) -> Optional[types.Content]:

    agent_name = callback_context.agent_name
    invocation_id = callback_context.invocation_id
    current_state = callback_context.state.to_dict()
    current_user_content = callback_context.user_content
    print(f"[Callback] Exiting agent: {agent_name} (Inv: {invocation_id})")
    print(f"[Callback] Current summary_status: {current_state.get("summary_status")}")
    print(f"[Callback] Current Content: {current_user_content}")

    status = current_state.get("summary_status").strip()
    is_done = (status == "completed")
    # Retrieve the final summary from the state

    final_summary = current_state.get("summary")
    print(f"[Callback] final_summary: {final_summary}")
    if final_summary and is_done and isinstance(final_summary, str):
        log.info(f"[Callback] Found final summary, constructing output Content.")
        # Construct the final output Content object to be sent back
        return types.Content(role="model", parts=[types.Part(text=final_summary.strip())])
    else:
        log.warning("[Callback] No final summary found in state or it's not a string.")
        # Optionally return a default message or None if no summary was generated
        return None
ルートループ エージェントの定義
最後に、メインの LoopAgent を定義します。各ループの反復処理内で、サブエージェントを順番にオーケストレートします(profile_agent -> summary_agent -> check_agent -> CheckCondition)。このシーケンスは、max_iterations 回まで繰り返されるか、CheckCondition が完了を通知するまで繰り返されます。after_agent_callback は、最終的な要約が返されるようにします。
👉📝 同じ ~/instavibe-bootstrap/agents/social/agent.py で、#REPLACE FOR root_agent を次のように置き換えます。
root_agent = LoopAgent(
    name="InteractivePipeline",
    sub_agents=[
        profile_agent,
        summary_agent,
        check_agent,
        CheckCondition(name="Checker")
    ],
    description="Find everyone's social profile on events, post and friends",
    max_iterations=10,
    after_agent_callback=modify_output_after_agent
)
ADK 開発 UI を使用して、このマルチエージェント ワークフローをテストしてみましょう。
👉💻 ADK ウェブサーバーを起動します。
. ~/instavibe-bootstrap/set_env.sh
source ~/instavibe-bootstrap/env/bin/activate
cd  ~/instavibe-bootstrap/agents
sed -i "s|^\(O\?GOOGLE_CLOUD_PROJECT\)=.*|GOOGLE_CLOUD_PROJECT=${PROJECT_ID}|" ~/instavibe-bootstrap/agents/social/.env
adk web
ADK 開発 UI(ウェブ プレビュー経由のポート 8000)を開きます。エージェントのプルダウン メニュー(右上)で、[Social] エージェントを選択します。
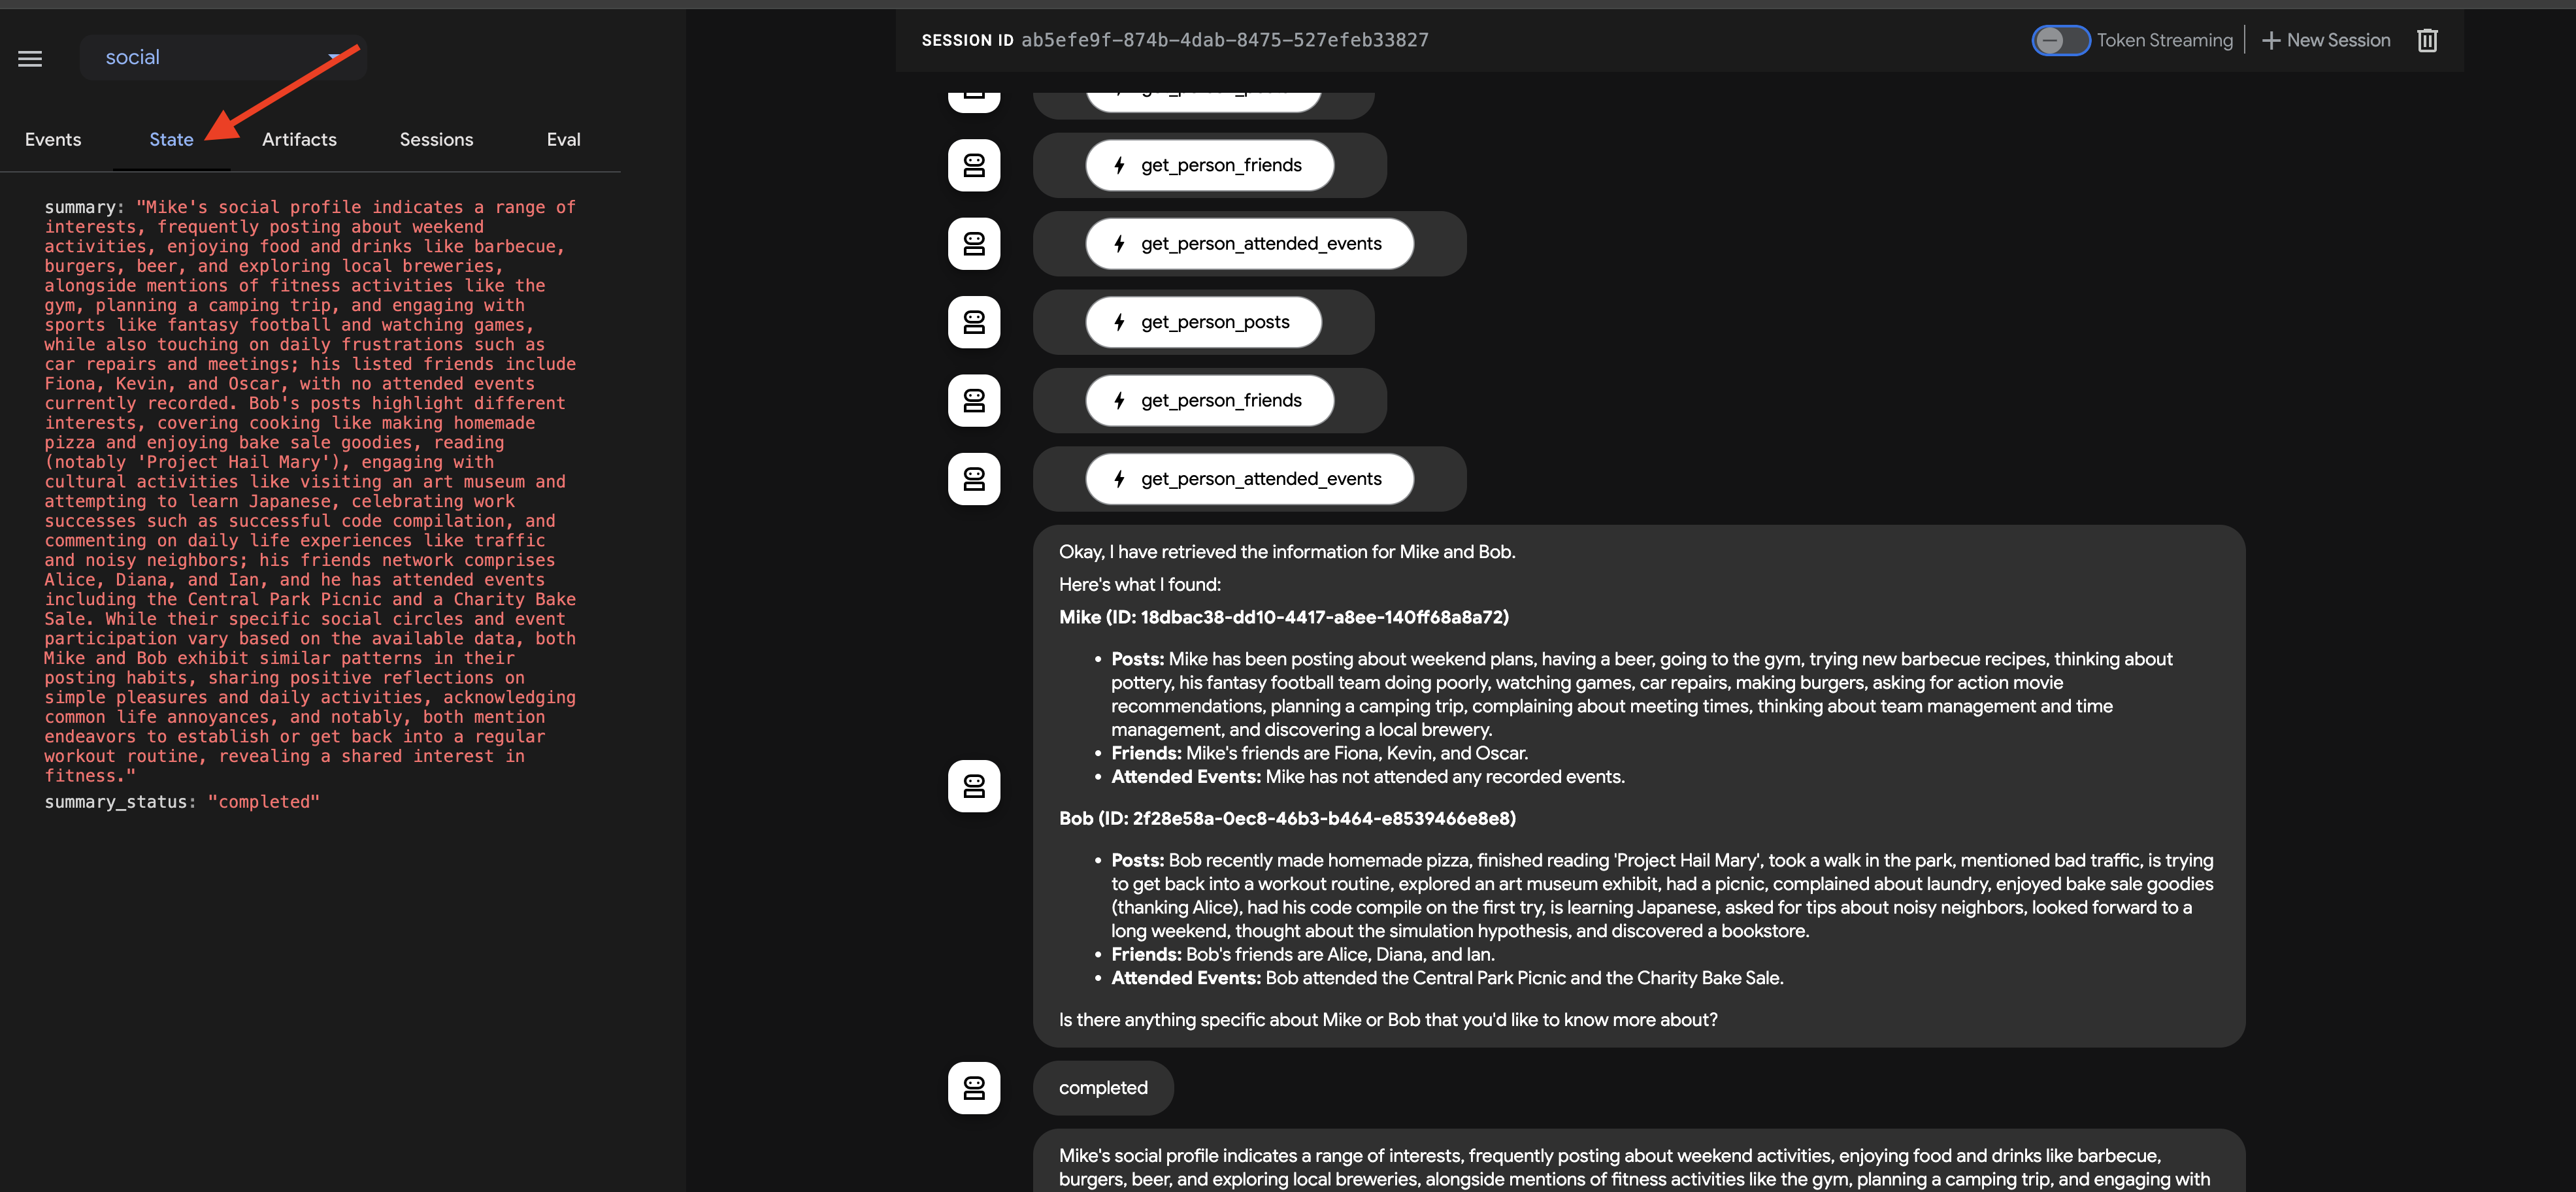
👉 次に、複数のユーザーのプロファイリングを行うタスクを割り当てます。チャット ダイアログで、次のように入力します。
Tell me about Mike and Bob
エージェントが応答したら(ループ処理と複数の LLM 呼び出しにより、応答に時間がかかる場合があります)、最終的なチャット出力だけを確認するのではなく、ADK 開発 UI の左側のペインで [Events] タブに移動します。
👉 確認手順: [イベント] タブに、実行の詳細なステップごとのトレースが表示されます。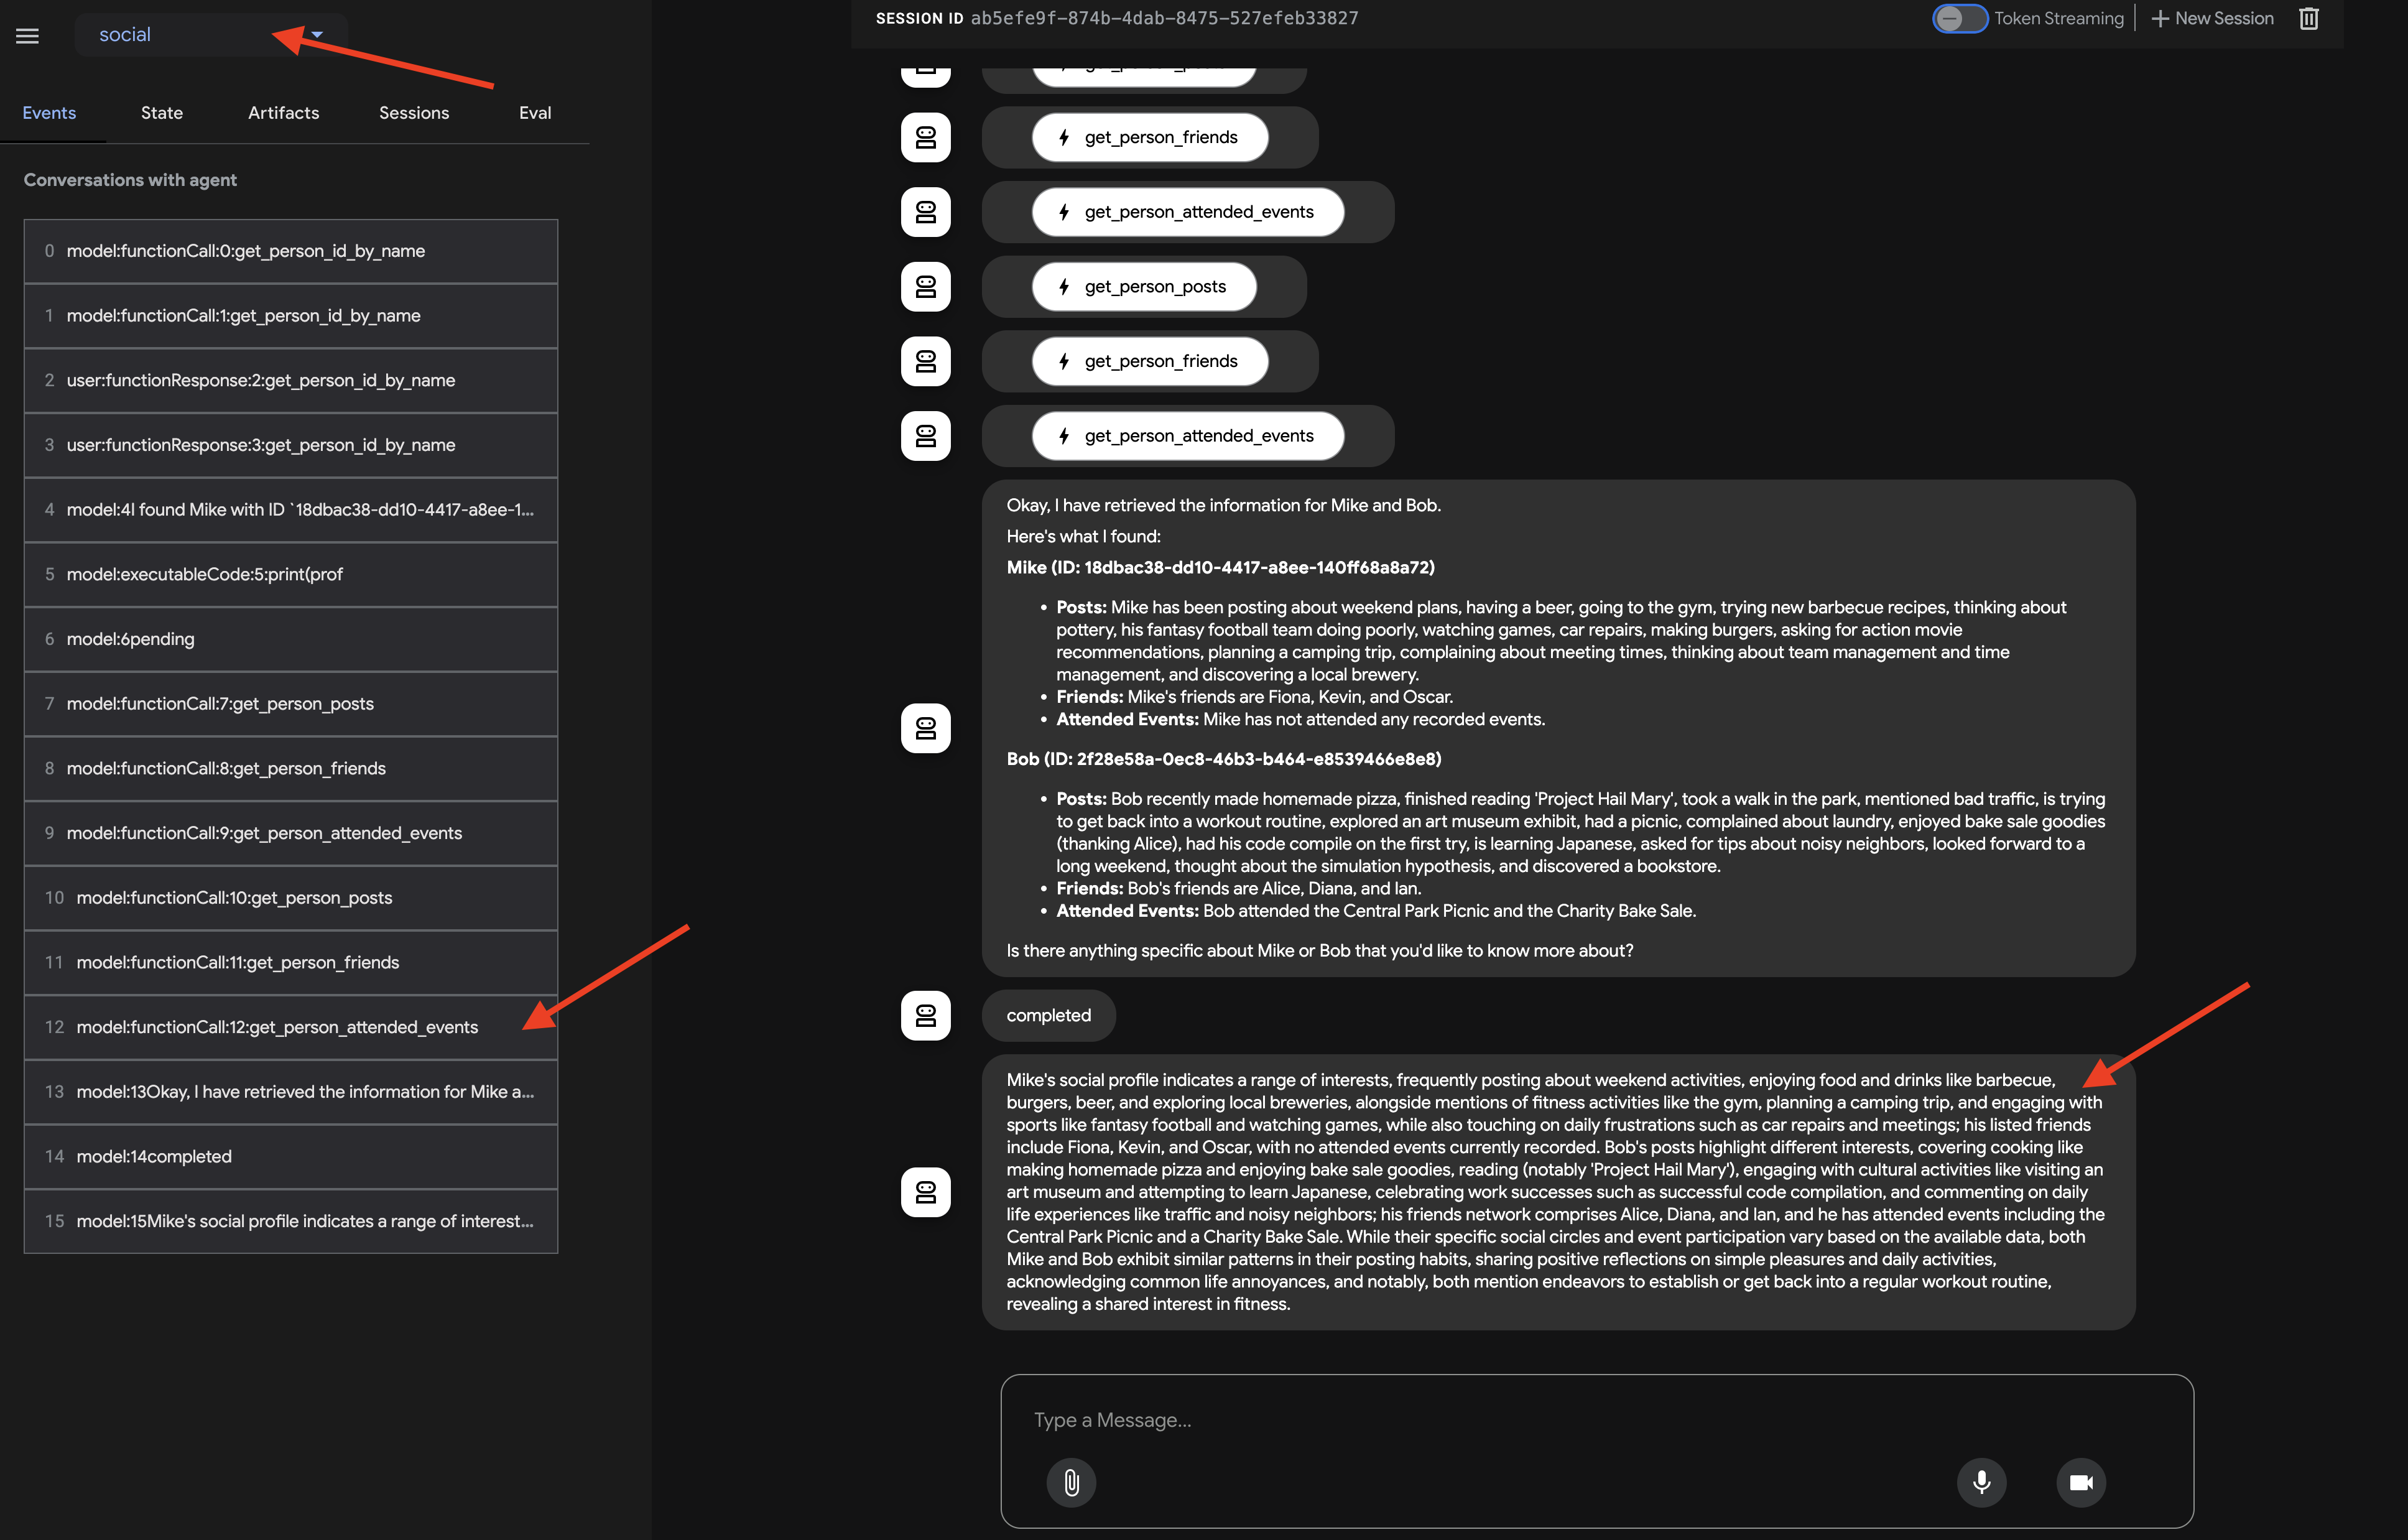
エージェントが各サブエージェントを呼び出す方法を確認します。フローは profile_agent -> summary_agent -> check_agent の順で進むことが想定されます。各イテレーション内の Checker。しかし、実際には、エージェントの強力な「自己最適化」が機能しています。
基盤となるモデルはリクエスト全体(「Mike と Bob のプロフィール」など)を認識するため、多くの場合、最も効率的なパスを選択し、複数の反復処理を行うのではなく、1 回の統合されたターンで必要なデータをすべて収集します。各ステップの入力、出力、状態(profile_agent によって行われたツール呼び出しを含む)を確認できます。
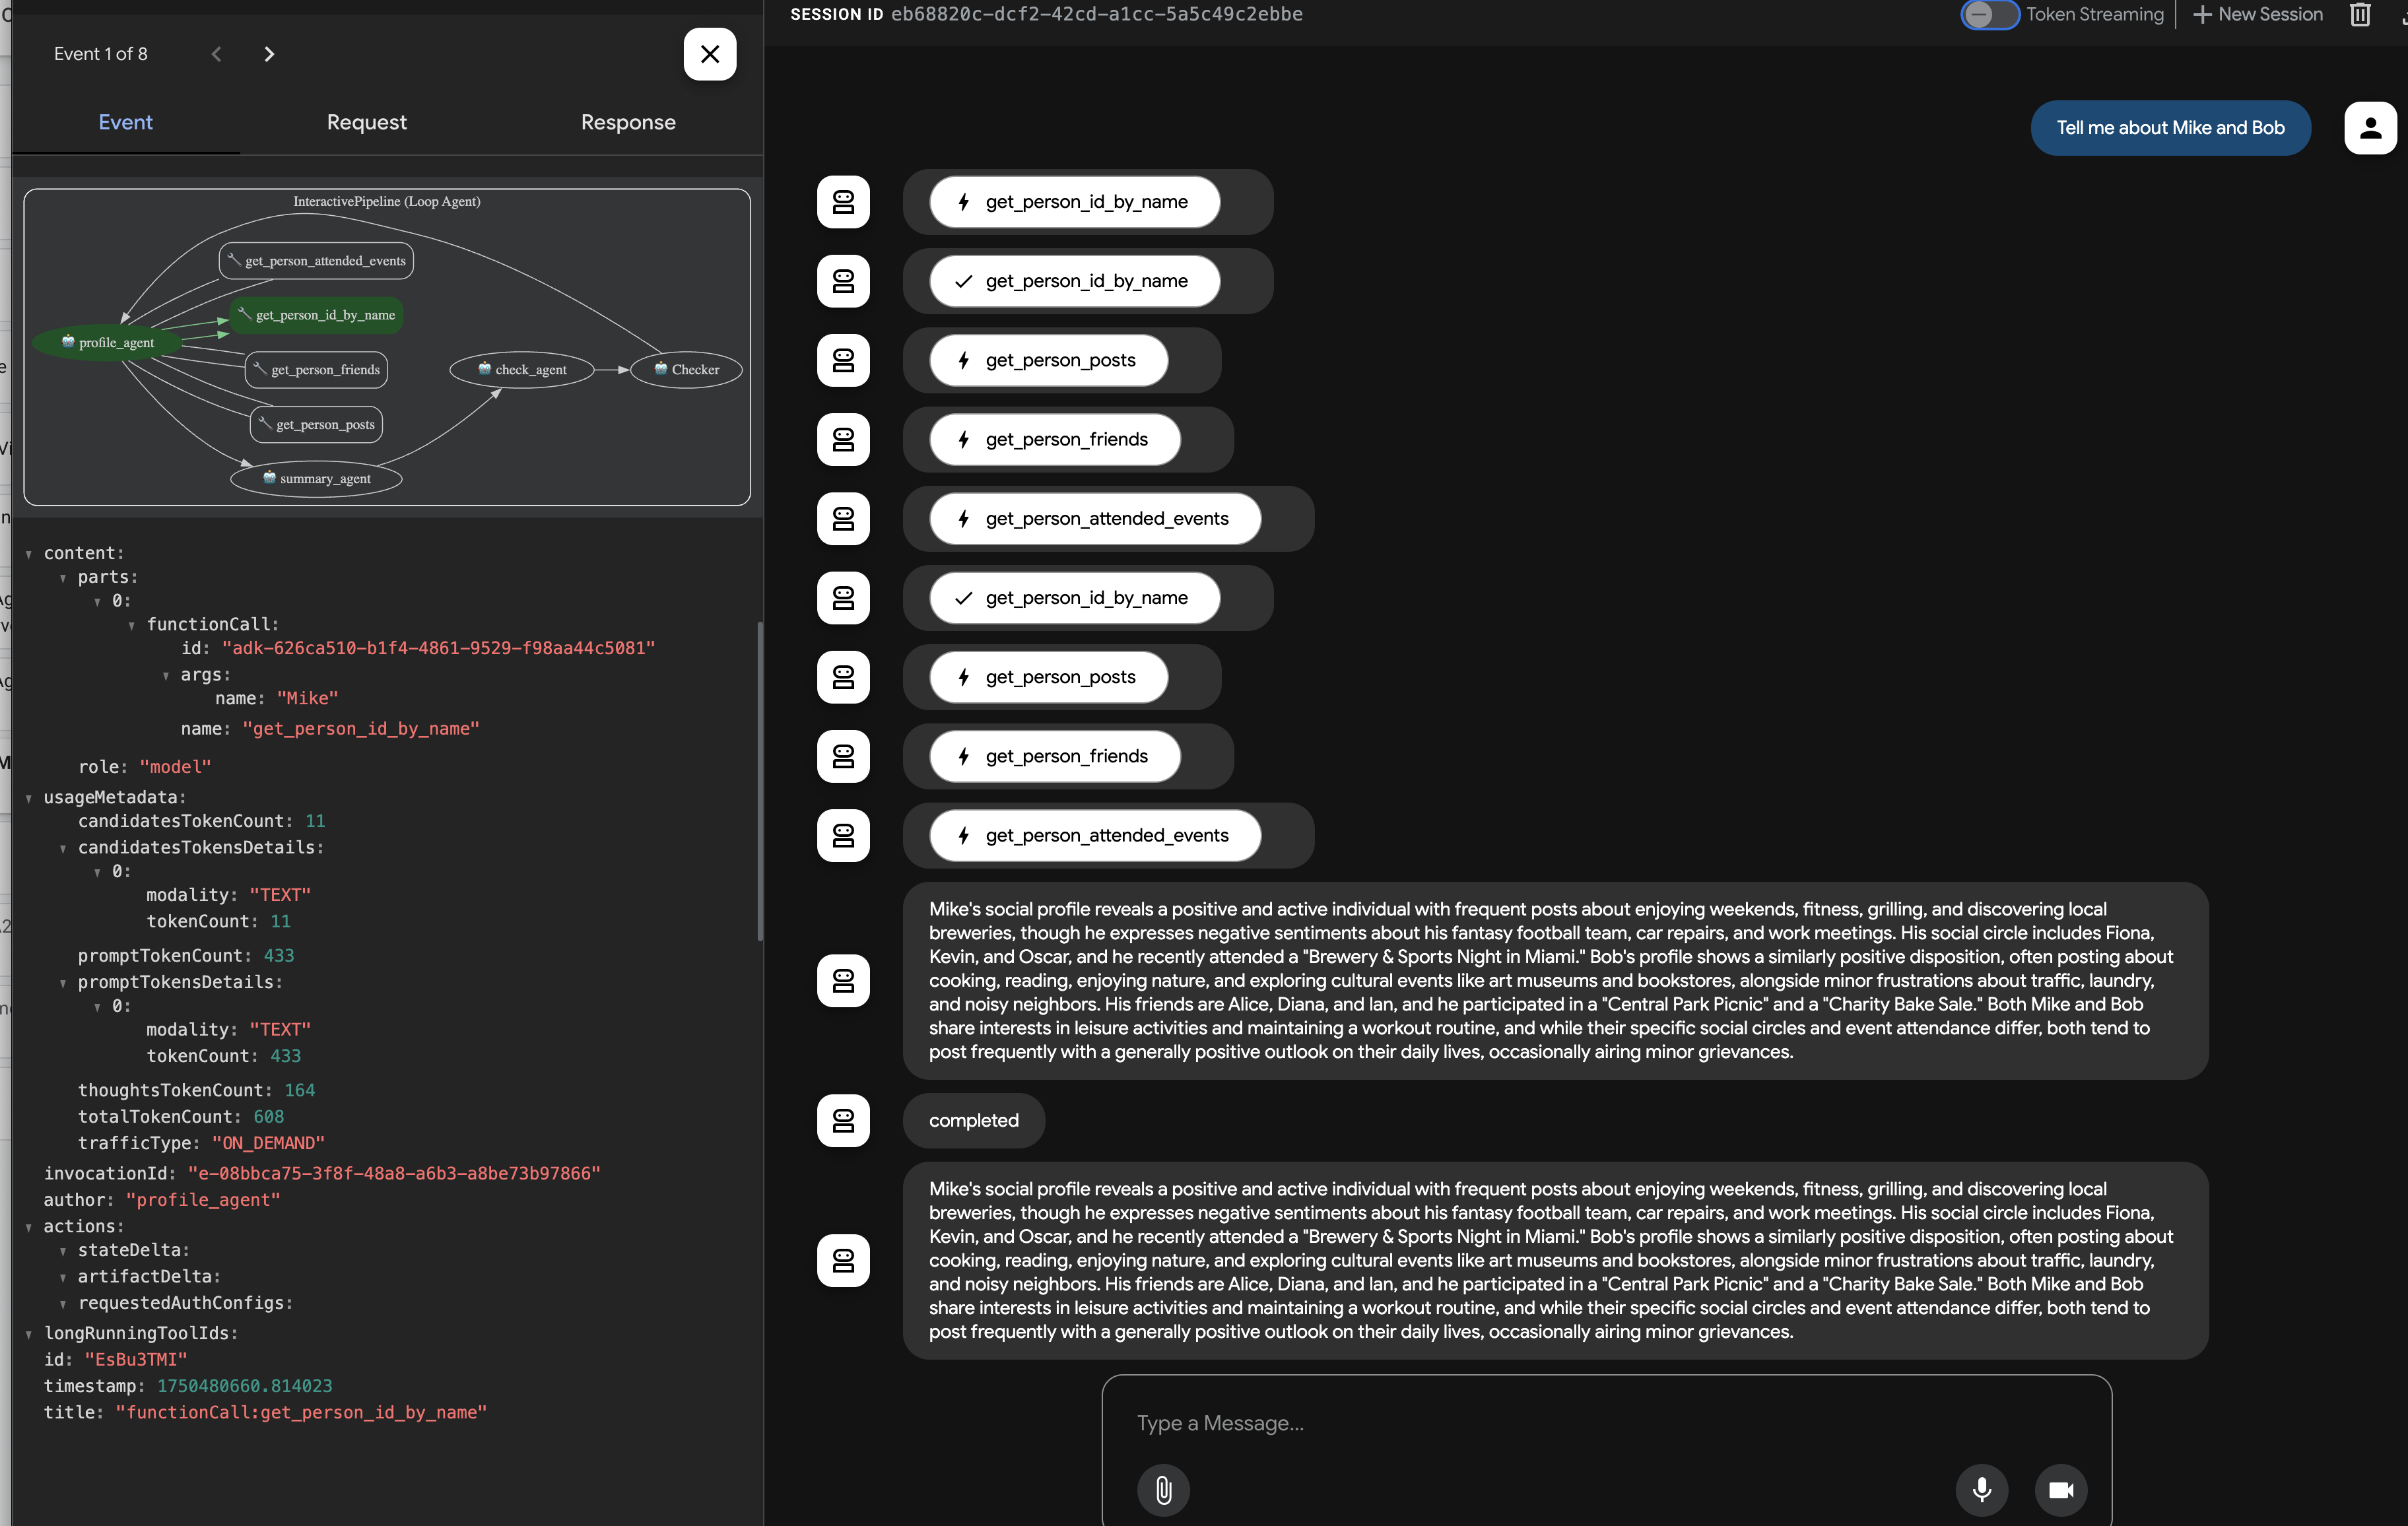
このビジュアル トレースは、最終的な要約が生成され、コールバックによって返されるまで、マルチエージェント ワークフローがどのように動作するかを理解してデバッグするうえで非常に重要です。
チャットのレスポンスとイベント トレースを確認したら、Cloud Shell ターミナルに戻り、Ctrl+C キーを押して ADK 開発 UI を停止します。
10. エージェント間(A2A)通信
これまでは、特化型エージェントを構築してきましたが、これらのエージェントは同じマシン上で分離して動作するか、事前定義されたワークフロー内で動作します。真に分散型の協調型マルチエージェント システムを構築するには、別々のサービスとして実行される可能性のあるエージェントが互いに検出して効果的に通信する方法が必要です。そこで役立つのが、エージェント間(A2A)プロトコルです。
A2A プロトコルは、AI エージェント間の相互運用可能な通信用に特別に設計されたオープン スタンダードです。MCP はエージェントとツールのインタラクションに焦点を当てていますが、A2A はエージェント間のインタラクションに焦点を当てています。エージェントは次のことができます。
- 検出: 標準化されたエージェント カードを使用して、他のエージェントを見つけてその機能を確認します。
- コミュニケーション: メッセージやデータを安全に交換します。
- コラボレーション: 複雑な目標を達成するために、タスクを委任し、アクションを調整します。
A2A プロトコルは、「エージェントカード」などのメカニズムを通じてこの通信を促進します。エージェントは、エージェントカードを使用して、機能と接続情報を通知できます。
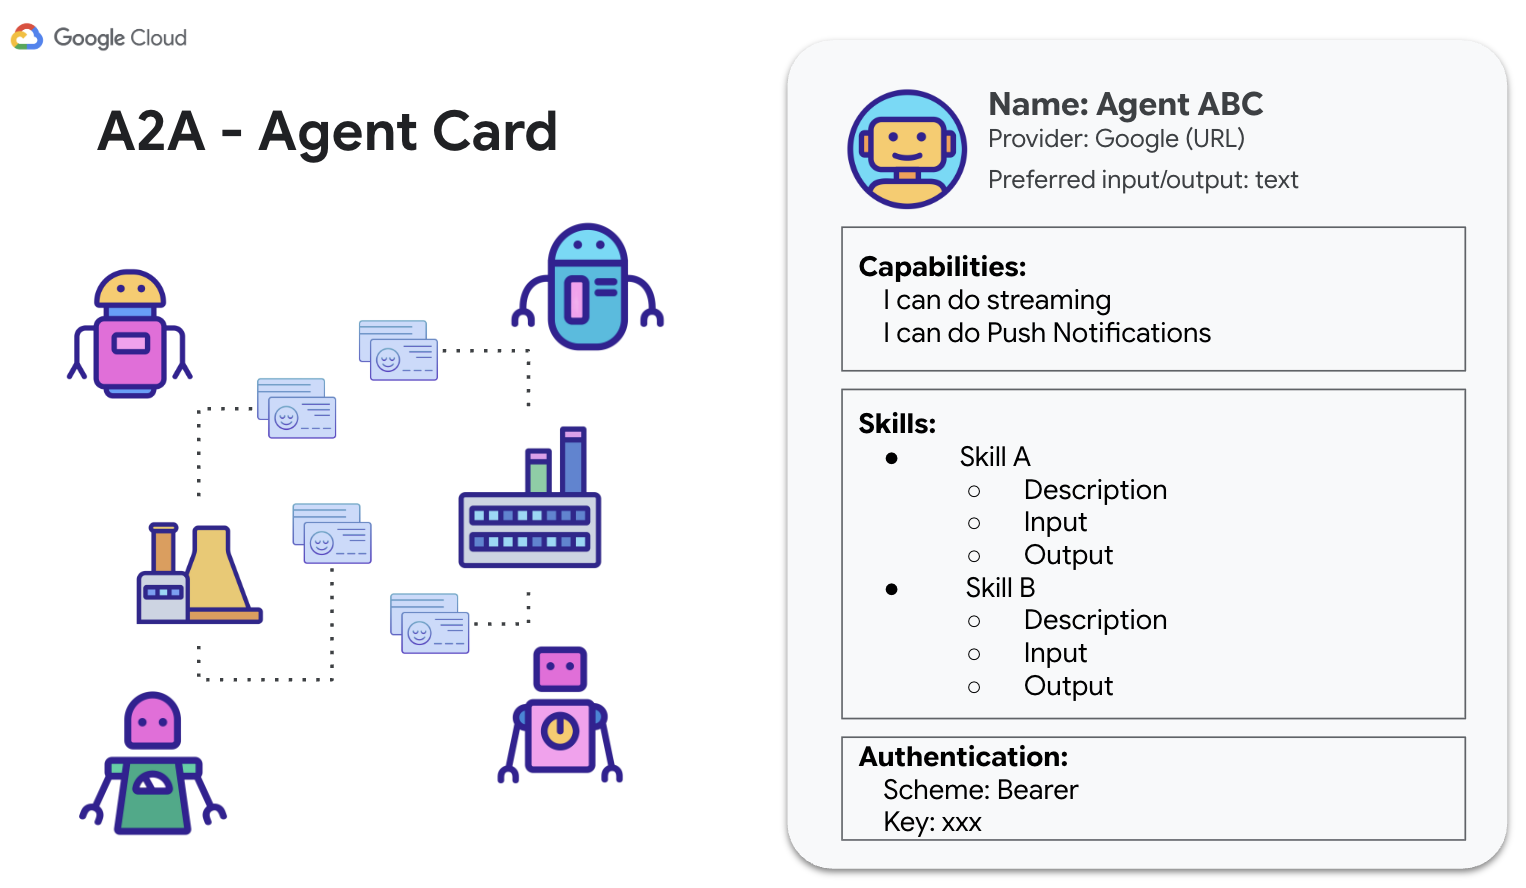
A2A は、使い慣れたウェブ標準(HTTP、SSE、JSON-RPC)を利用し、多くの場合、1 つのエージェント(クライアント)が別のエージェント(リモート エージェント / サーバー)にタスクを送信するクライアント / サーバー モデルを採用しています。この標準化は、独立して開発されたエージェントが連携して動作できる、モジュール式でスケーラブルなシステムを構築するうえで重要です。
InstaVibe エージェントで A2A を有効にする
既存の Planner、Platform Interaction、Social エージェントを A2A 経由で他のエージェントからアクセスできるようにするには、それぞれを A2A サーバー コンポーネントでラップする必要があります。このサーバーは次の処理を行います。
- エージェント カードを公開する: HTTP エンドポイントを介して、エージェントの機能の標準的な説明を提供します。
- タスクをリッスン(リクエスト メッセージ): A2A プロトコルに従って、他のエージェント(A2A クライアント)からのタスク リクエストを受け入れます。
- タスク(リクエスト メッセージ)の実行を管理する: 受信したタスクを基盤となる ADK エージェント ロジックに渡して処理します。
Planner Agent(A2A 対応)
まず、A2A サーバーレイヤを Planner エージェントに追加しましょう。
A2A サーバーの起動ロジックを定義します。このコードは、AgentCard(エージェントの公開説明)を定義し、A2AServer を構成して起動し、PlatformAgentExecutor にリンクします。
👉📝 ~/instavibe-bootstrap/agents/planner/a2a_server.py の末尾に次のコードを追加します。
class PlannerAgent:
    """An agent to help user planning a event with its desire location."""
    SUPPORTED_CONTENT_TYPES = ["text", "text/plain"]

    def __init__(self):
        self._agent = self._build_agent()
        self.runner = Runner(
            app_name=self._agent.name,
            agent=self._agent,
            artifact_service=InMemoryArtifactService(),
            session_service=InMemorySessionService(),
            memory_service=InMemoryMemoryService(),
        )
        capabilities = AgentCapabilities(streaming=True)
        skill = AgentSkill(
            id="event_planner",
            name="Event planner",
            description="""
            This agent generates multiple fun plan suggestions tailored to your specified location, dates, and interests,
            all designed for a moderate budget. It delivers detailed itineraries,
            including precise venue information (name, latitude, longitude, and description), in a structured JSON format.
            """,
            tags=["instavibe"],
            examples=["What about Bostona MA this weekend?"],
        )
        self.agent_card = AgentCard(
            name="Event Planner Agent",
            description="""
            This agent generates multiple fun plan suggestions tailored to your specified location, dates, and interests,
            all designed for a moderate budget. It delivers detailed itineraries,
            including precise venue information (name, latitude, longitude, and description), in a structured JSON format.
            """,
            url=f"{PUBLIC_URL}",
            version="1.0.0",
            defaultInputModes=PlannerAgent.SUPPORTED_CONTENT_TYPES,
            defaultOutputModes=PlannerAgent.SUPPORTED_CONTENT_TYPES,
            capabilities=capabilities,
            skills=[skill],
        )

    def get_processing_message(self) -> str:
        return "Processing the planning request..."

    def _build_agent(self) -> LlmAgent:
        """Builds the LLM agent for the night out planning agent."""
        return agent.root_agent


if __name__ == '__main__':
    try:
        plannerAgent = PlannerAgent()

        request_handler = DefaultRequestHandler(
            agent_executor=PlannerAgentExecutor(plannerAgent.runner,plannerAgent.agent_card),
            task_store=InMemoryTaskStore(),
        )

        server = A2AStarletteApplication(
            agent_card=plannerAgent.agent_card,
            http_handler=request_handler,
        )
        logger.info(f"Attempting to start server with Agent Card: {plannerAgent.agent_card.name}")
        logger.info(f"Server object created: {server}")

        uvicorn.run(server.build(), host='0.0.0.0', port=port)
    except Exception as e:
        logger.error(f"An error occurred during server startup: {e}")
        exit(1)
👉💻 A2A サーバーがローカルで正しく起動し、エージェント カードを公開するかどうかを簡単にテストしてみましょう。最初のターミナルで次のコマンドを実行します。
. ~/instavibe-bootstrap/set_env.sh
source ~/instavibe-bootstrap/env/bin/activate
cd ~/instavibe-bootstrap/agents/
python -m planner.a2a_server
👉 別のターミナル ウィンドウを開きます。(ターミナル パネルの [+] 記号をクリックします)
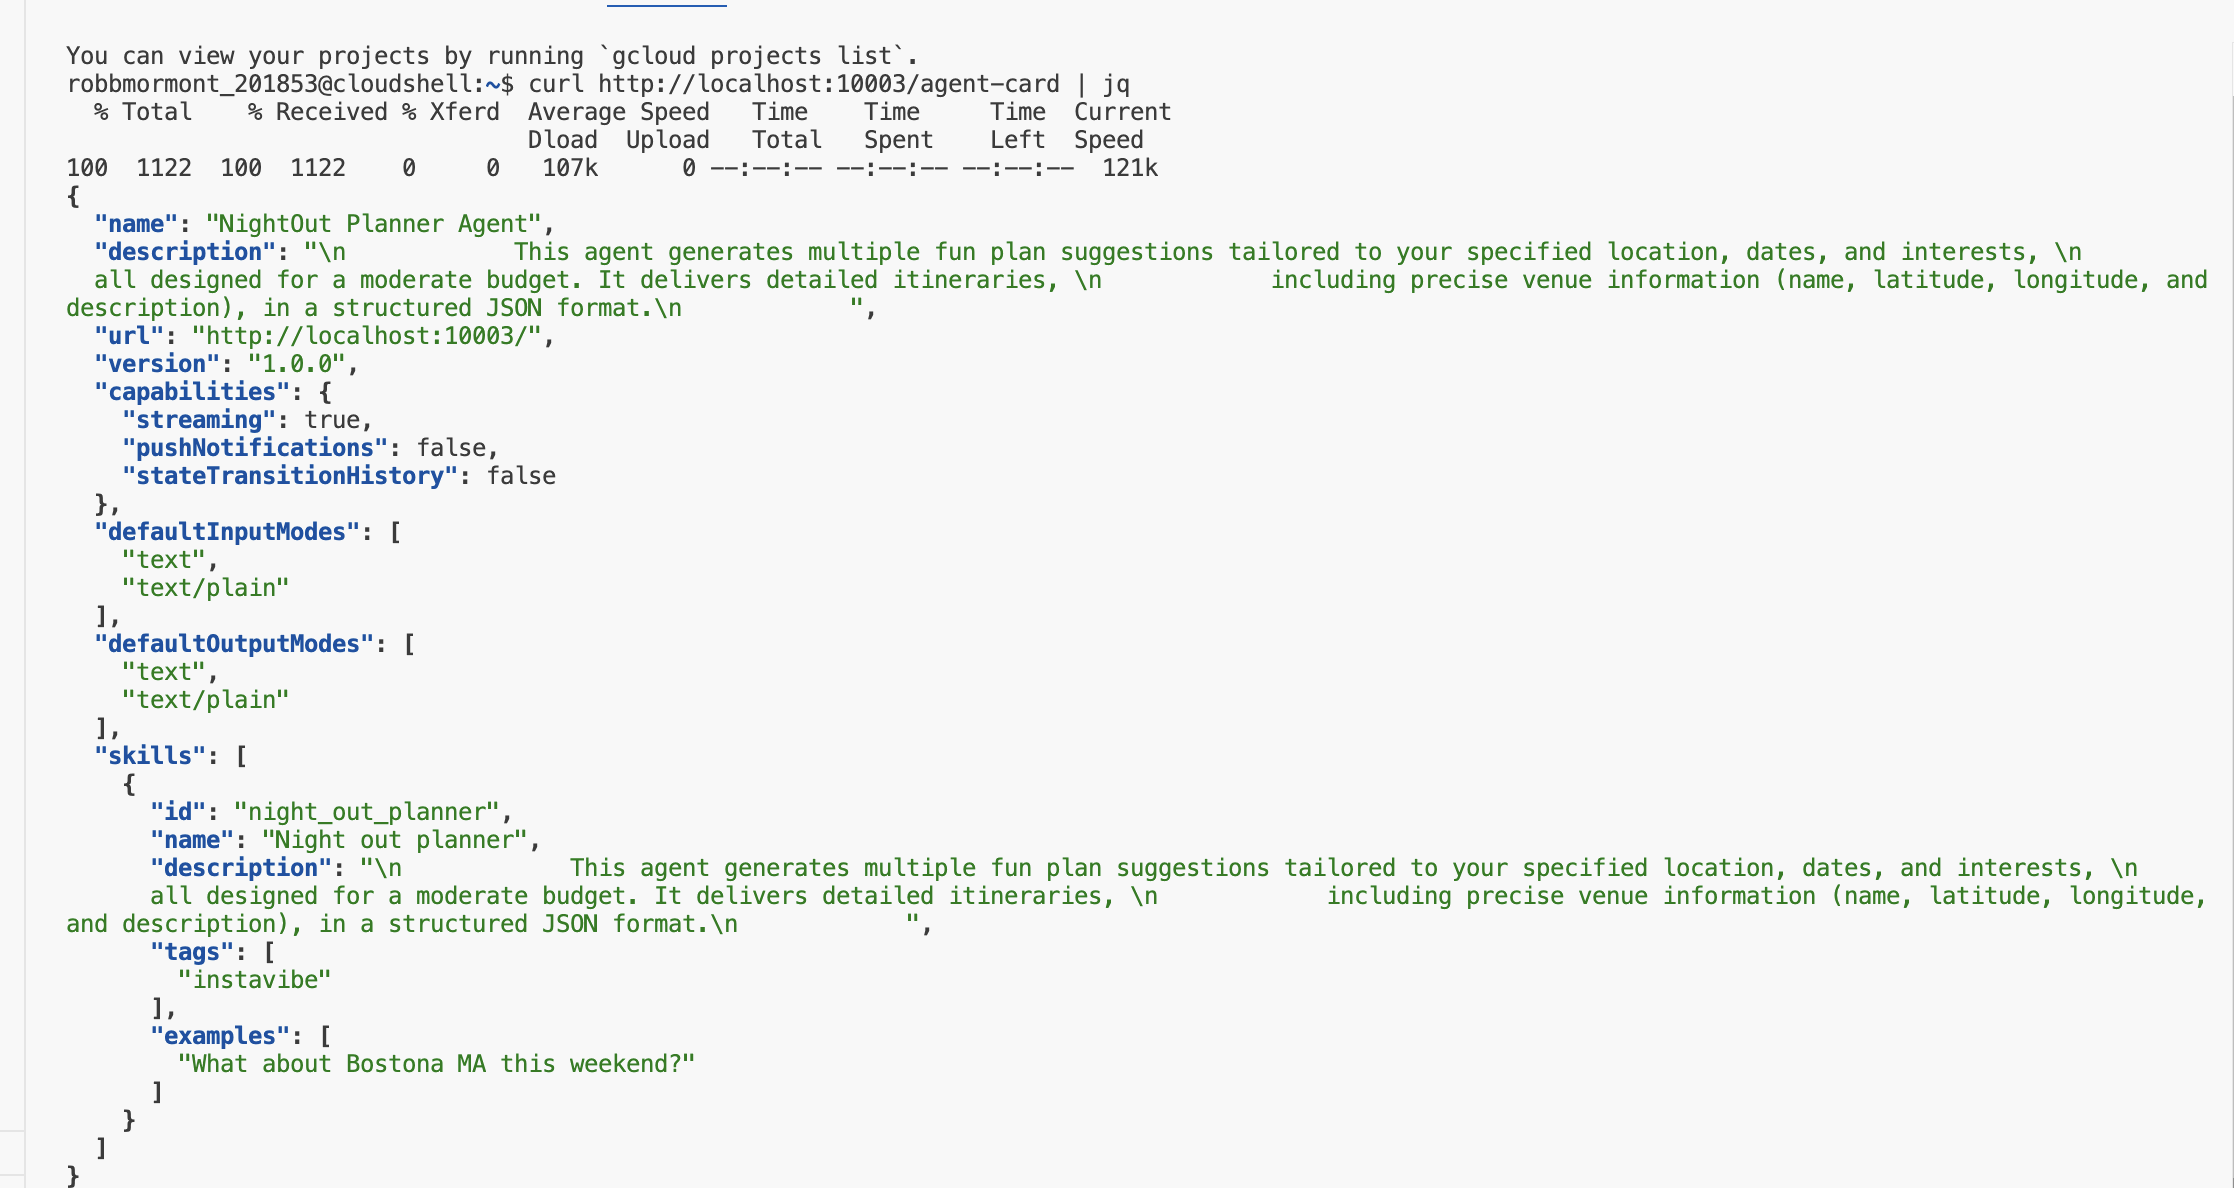
👉💻 curl を使用して、ローカルで実行されているサーバーからエージェント カードをリクエストします。
curl http://localhost:10003/.well-known/agent.json | jq
定義した AgentCard の JSON 表現が表示され、サーバーが実行されて Planner エージェントをアドバタイズしていることが確認できます。
最初のターミナル(サーバーが実行されている場所)に戻り、Ctrl+C キーを押して停止します。
👉💻 A2A サーバー ロジックを追加したので、コンテナ イメージをビルドできます。
プランナー エージェントをビルドしてデプロイする
. ~/instavibe-bootstrap/set_env.sh

cd ~/instavibe-bootstrap/agents

# Set variables specific to the PLANNER agent
export IMAGE_TAG="latest"
export AGENT_NAME="planner"
export IMAGE_NAME="planner-agent"
export IMAGE_PATH="${REGION}-docker.pkg.dev/${PROJECT_ID}/${REPO_NAME}/${IMAGE_NAME}:${IMAGE_TAG}"
export SERVICE_NAME="planner-agent"
export PUBLIC_URL="https://planner-agent-${PROJECT_NUMBER}.${REGION}.run.app"

echo "Building ${AGENT_NAME} agent..."
gcloud builds submit . \
  --config=cloudbuild-build.yaml \
  --project=${PROJECT_ID} \
  --region=${REGION} \
  --substitutions=_AGENT_NAME=${AGENT_NAME},_IMAGE_PATH=${IMAGE_PATH}

echo "Image built and pushed to: ${IMAGE_PATH}"
👉💻 Planner エージェントを Cloud Run にデプロイします。
. ~/instavibe-bootstrap/set_env.sh

cd ~/instavibe-bootstrap/agents

# Set variables specific to the PLANNER agent
export IMAGE_TAG="latest"
export AGENT_NAME="planner"
export IMAGE_NAME="planner-agent"
export IMAGE_PATH="${REGION}-docker.pkg.dev/${PROJECT_ID}/${REPO_NAME}/${IMAGE_NAME}:${IMAGE_TAG}"
export SERVICE_NAME="planner-agent"
export PUBLIC_URL="https://planner-agent-${PROJECT_NUMBER}.${REGION}.run.app"


gcloud run deploy ${SERVICE_NAME} \
  --image=${IMAGE_PATH} \
  --platform=managed \
  --region=${REGION} \
  --set-env-vars="A2A_HOST=0.0.0.0" \
  --set-env-vars="A2A_PORT=8080" \
  --set-env-vars="GOOGLE_GENAI_USE_VERTEXAI=TRUE" \
  --set-env-vars="GOOGLE_CLOUD_LOCATION=${REGION}" \
  --set-env-vars="GOOGLE_CLOUD_PROJECT=${PROJECT_ID}" \
  --set-env-vars="PUBLIC_URL=${PUBLIC_URL}" \
  --allow-unauthenticated \
  --project=${PROJECT_ID} \
  --min-instances=1
A2A Inspector を使用して、デプロイされたサービスが実行され、クラウドからエージェント カードが正しく提供されていることを確認しましょう。
👉 Cloud Shell ツールバーの [ウェブでプレビュー] アイコンから、[ポートを変更] を選択します。ポートを 8081 に設定し、[変更してプレビュー] をクリックします。新しいブラウザタブが開き、A2A インスペクタ インターフェースが表示されます。
👉💻 ターミナルで、デプロイしたプランナー エージェントの URL を取得します。
export PLANNER_AGENT_URL=$(gcloud run services list --platform=managed --region=us-central1 --format='value(URL)' | grep planner-agent)
echo ${PLANNER_AGENT_URL}
👉💻 出力 URL をコピーします。
👉 A2A インスペクタの UI で、URL を [Agent URL] フィールドに貼り付けて [Connect] をクリックします。
👀 エージェントのカード情報と JSON が [エージェント カード] タブに表示され、接続が成功したことが確認されます。
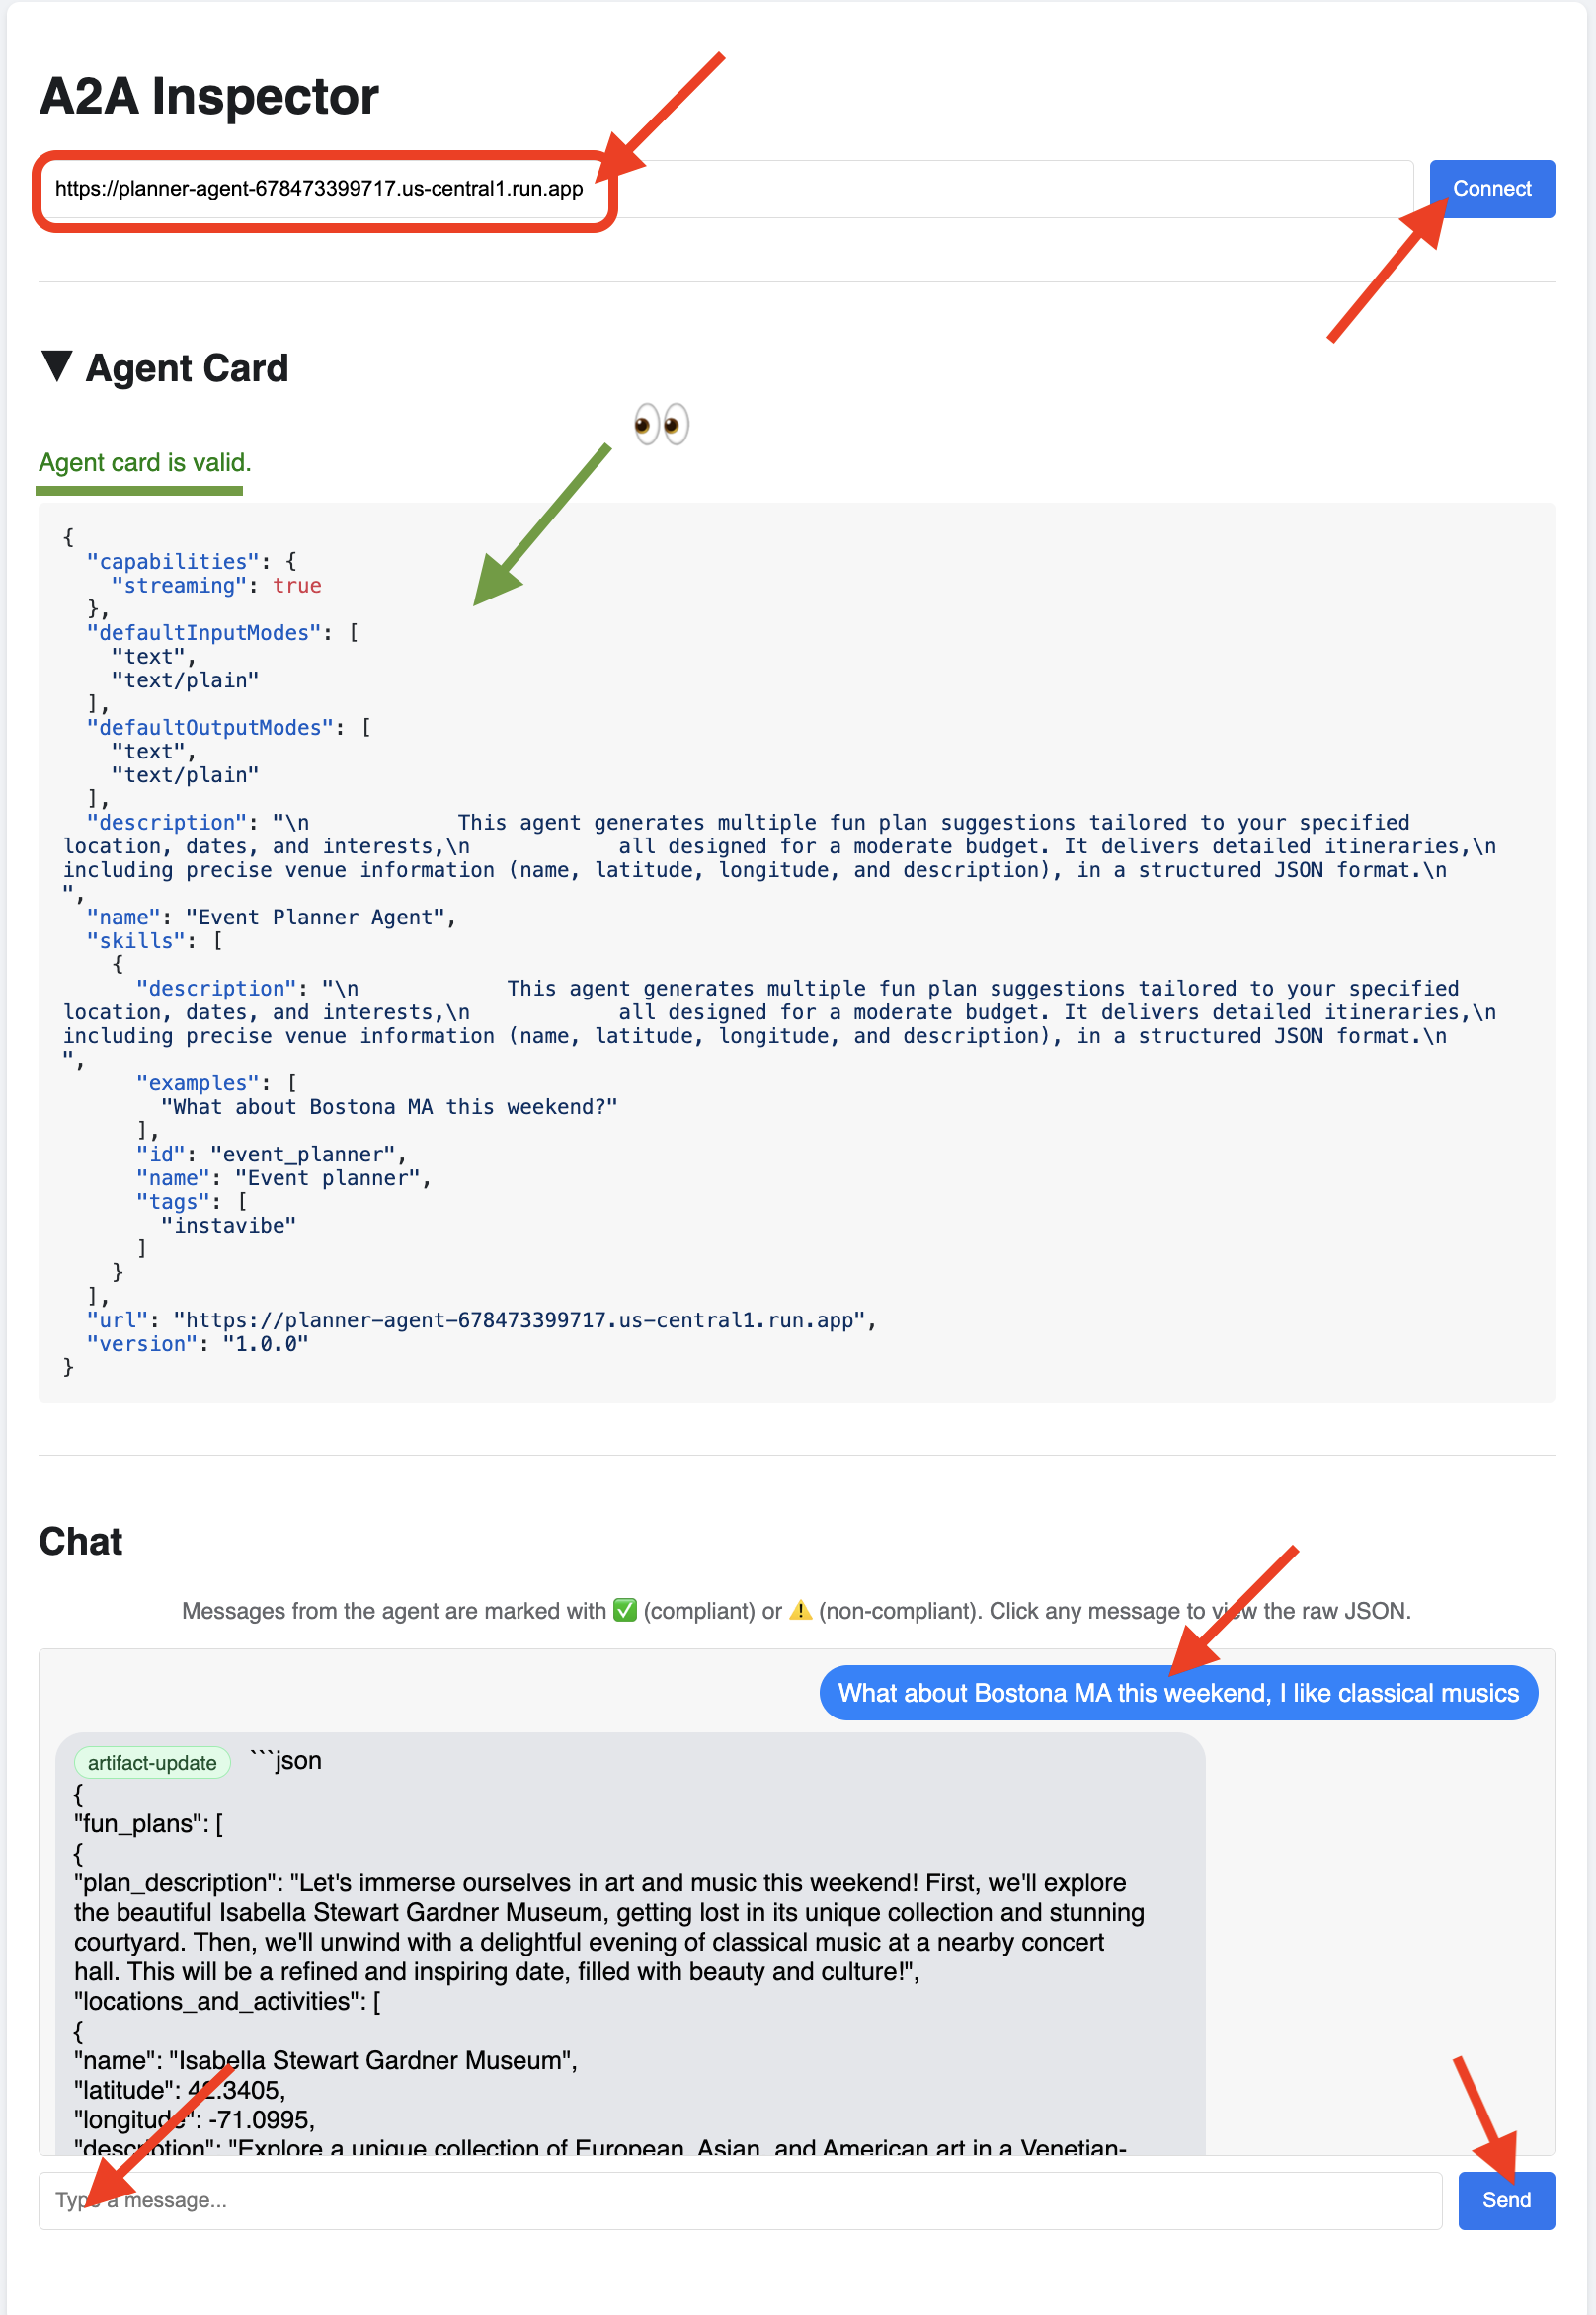
👉 A2A インスペクタの [チャット] タブをクリックします。ここでは、デプロイしたエージェントと直接やり取りできます。メッセージを送信して、プランニング機能をテストします。次に例を示します。
Plan something for me in Boston MA this weekend, and I enjoy classical music
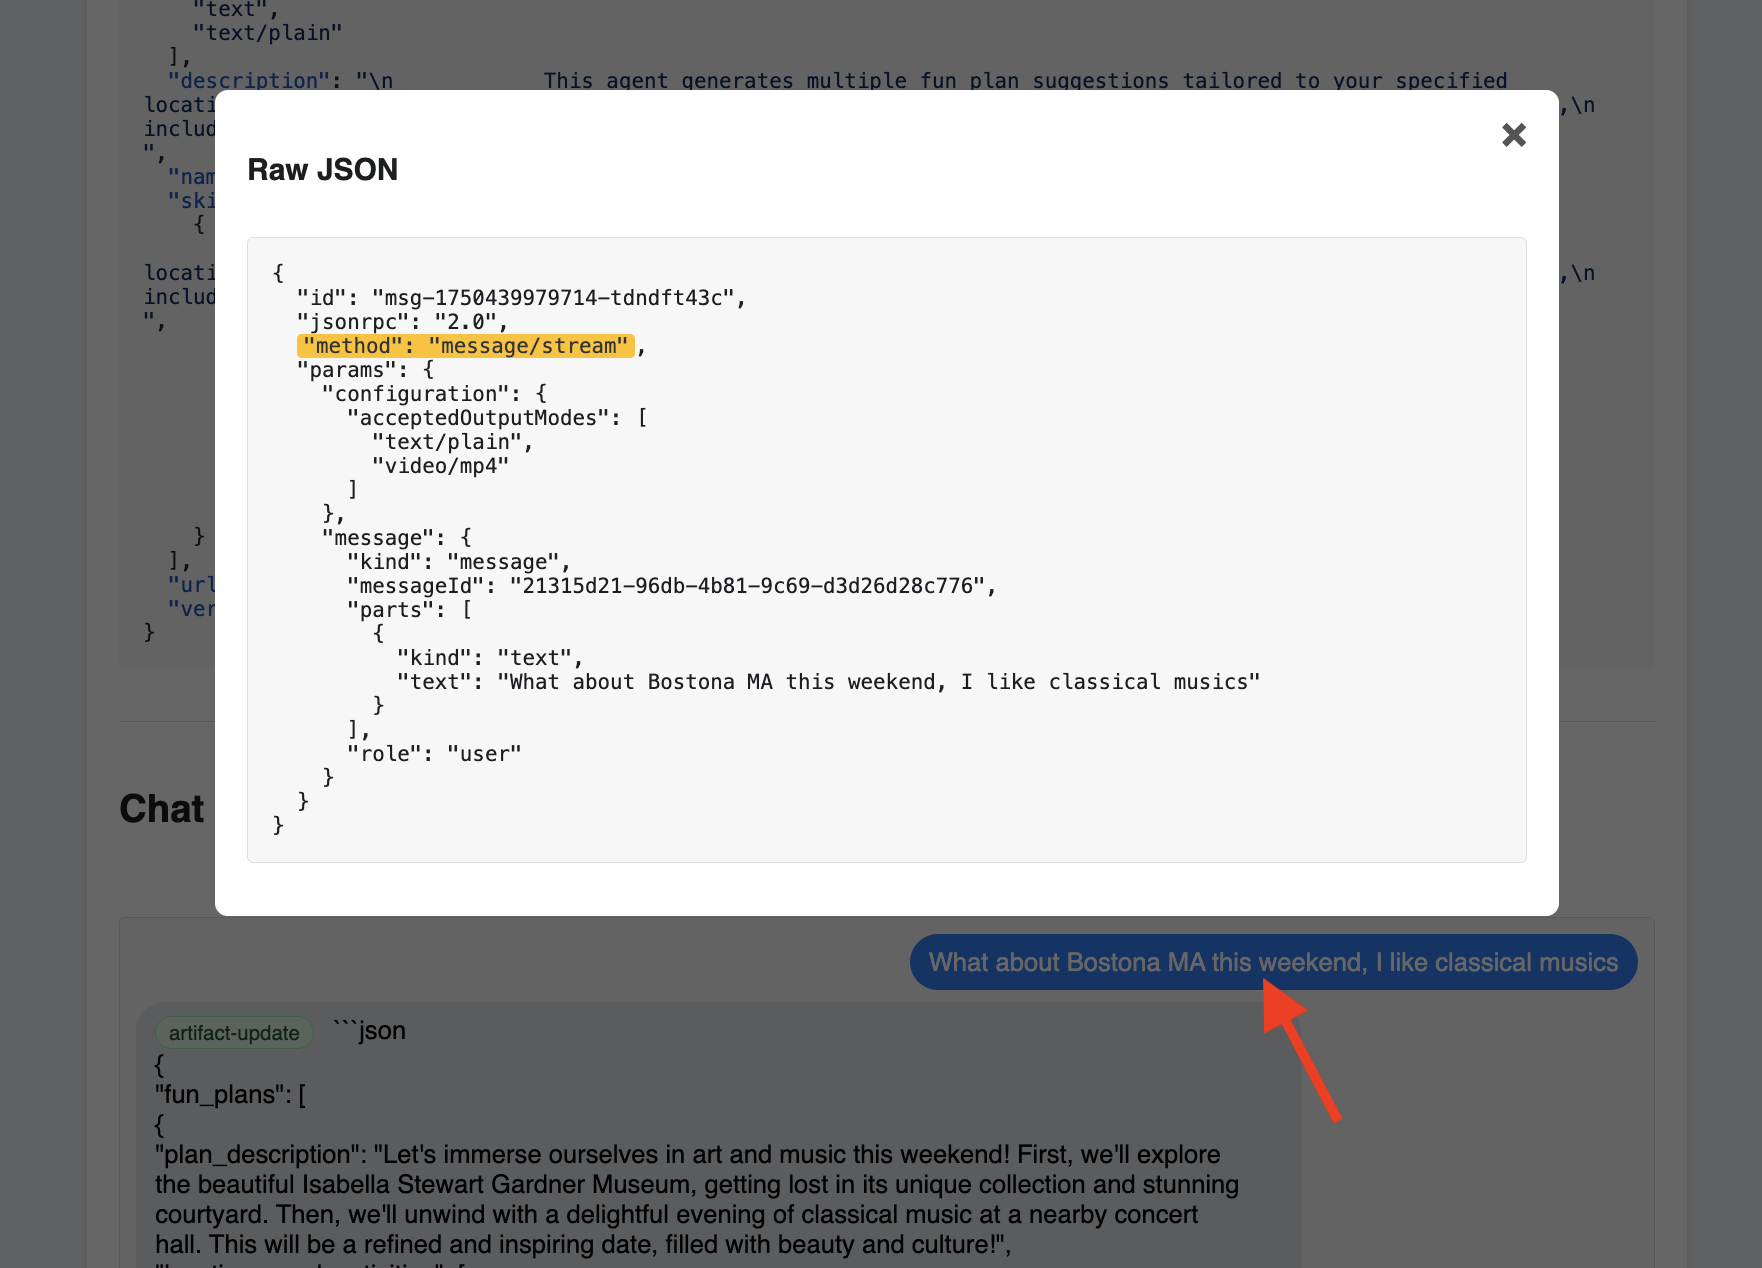
👀 生の通信を検査するには、チャット ウィンドウでメッセージ バブルをクリックし、エージェントの返信バブルをクリックします。各メッセージをクリックすると、送受信された JSON-RPC 2.0 メッセージの全体が表示されます。これはデバッグに非常に役立ちます。
A2A インスペクタのタブを開いたままにしておきましょう。閉じないでください。この後、他の 2 つのエージェントをテストするために再度使用します。
Platform Interaction Agent(A2A 対応)
次に、Platform Interaction Agent(MCP を使用するエージェント)に対してこのプロセスを繰り返します。
👉📝 ~/instavibe-bootstrap/agents/platform_mcp_client/a2a_server.py の最後に、一意の AgentCard を含む A2A サーバーの設定を定義します。
class PlatformAgent:
  """An agent that post event and post to instavibe."""

  SUPPORTED_CONTENT_TYPES = ["text", "text/plain"]

  def __init__(self):
    self._agent = self._build_agent()
    self.runner = Runner(
        app_name=self._agent.name,
        agent=self._agent,
        artifact_service=InMemoryArtifactService(),
        session_service=InMemorySessionService(),
        memory_service=InMemoryMemoryService(),
    )
    capabilities = AgentCapabilities(streaming=True)
    skill = AgentSkill(
            id="instavibe_posting",
            name="Post social post and events on instavibe",
            description="""
            This "Instavibe" agent helps you create posts (identifying author, text, and sentiment – inferred if unspecified) and register
            for events (gathering name, date, attendee). It efficiently collects required information and utilizes dedicated tools
            to perform these actions on your behalf, ensuring a smooth sharing experience.
            """,
            tags=["instavibe"],
            examples=["Create a post for me, the post is about my cute cat and make it positive, and I'm Alice"],
        )
    self.agent_card = AgentCard(
            name="Instavibe Posting Agent",
            description="""
            This "Instavibe" agent helps you create posts (identifying author, text, and sentiment – inferred if unspecified) and register
            for events (gathering name, date, attendee). It efficiently collects required information and utilizes dedicated tools
            to perform these actions on your behalf, ensuring a smooth sharing experience.
            """,
            url=f"{PUBLIC_URL}",
            version="1.0.0",
            defaultInputModes=PlatformAgent.SUPPORTED_CONTENT_TYPES,
            defaultOutputModes=PlatformAgent.SUPPORTED_CONTENT_TYPES,
            capabilities=capabilities,
            skills=[skill],
        )


  def get_processing_message(self) -> str:
      return "Processing the social post and event request..."

  def _build_agent(self) -> LlmAgent:
    """Builds the LLM agent for the Processing the social post and event request."""
    return agent.root_agent


if __name__ == '__main__':
    try:
        platformAgent = PlatformAgent()

        request_handler = DefaultRequestHandler(
            agent_executor=PlatformAgentExecutor(platformAgent.runner,platformAgent.agent_card),
            task_store=InMemoryTaskStore(),
        )

        server = A2AStarletteApplication(
            agent_card=platformAgent.agent_card,
            http_handler=request_handler,
        )

        uvicorn.run(server.build(), host='0.0.0.0', port=port)
    except Exception as e:
        logger.error(f"An error occurred during server startup: {e}")
        exit(1)
ソーシャル エージェント(A2A 対応)
最後に、ソーシャル プロファイリング エージェントの A2A を有効にします。
👉📝 ~/instavibe-bootstrap/agents/social/a2a_server.py の最後に A2A サーバーの設定と AgentCard を定義します。
class SocialAgent:
  """An agent that handles social profile analysis."""

  SUPPORTED_CONTENT_TYPES = ["text", "text/plain"]

  def __init__(self):
    self._agent = self._build_agent()
    self.runner = Runner(
        app_name=self._agent.name,
        agent=self._agent,
        artifact_service=InMemoryArtifactService(),
        session_service=InMemorySessionService(),
        memory_service=InMemoryMemoryService(),
    )
    capabilities = AgentCapabilities(streaming=True)
    skill = AgentSkill(
                id="social_profile_analysis",
                name="Analyze Instavibe social profile",
                description="""
                Using a provided list of names, this agent synthesizes Instavibe social profile information by analyzing posts, friends, and events.
                It delivers a comprehensive single-paragraph summary for individuals, and for groups, identifies commonalities in their social activities
                and connections based on profile data.
                """,
                tags=["instavibe"],
                examples=["Can you tell me about Bob and Alice?"],
    )
    self.agent_card = AgentCard(
                name="Social Profile Agent",
                description="""
                Using a provided list of names, this agent synthesizes Instavibe social profile information by analyzing posts, friends, and events.
                It delivers a comprehensive single-paragraph summary for individuals, and for groups, identifies commonalities in their social activities
                and connections based on profile data.
                """,
                url=f"{PUBLIC_URL}",
                version="1.0.0",
                defaultInputModes=self.SUPPORTED_CONTENT_TYPES,
                defaultOutputModes=self.SUPPORTED_CONTENT_TYPES,
                capabilities=capabilities,
                skills=[skill],
    )

  def get_processing_message(self) -> str:
      return "Processing the social profile analysis request..."

  def _build_agent(self) -> LoopAgent:
    """Builds the LLM agent for the social profile analysis agent."""
    return agent.root_agent

if __name__ == '__main__':
    try:
        socialAgent = SocialAgent()

        request_handler = DefaultRequestHandler(
            agent_executor=SocialAgentExecutor(socialAgent.runner,socialAgent.agent_card),
            task_store=InMemoryTaskStore(),
        )

        server = A2AStarletteApplication(
            agent_card=socialAgent.agent_card,
            http_handler=request_handler,
        )

        uvicorn.run(server.build(), host='0.0.0.0', port=port)
    except Exception as e:
        logger.error(f"An error occurred during server startup: {e}")
        exit(1)
プラットフォーム インタラクション エージェントとソーシャル エージェントをビルドしてデプロイする
これらのエージェントは Spanner にアクセスする必要があるため、デプロイ時に SPANNER_INSTANCE_ID、SPANNER_DATABASE_ID、MCP_SERVER_URL 環境変数が正しく渡されるようにします。
👉💻 Cloud Build を使用して Cloud Run にビルドしてデプロイします。
. ~/instavibe-bootstrap/set_env.sh
cd ~/instavibe-bootstrap/agents
export MCP_SERVER_URL=$(gcloud run services list --platform=managed --region=us-central1 --format='value(URL)' | grep mcp-tool-server)/sse


gcloud builds submit . \
  --config=cloudbuild.yaml \
  --project="${PROJECT_ID}" \
  --region="${REGION}" \
  --substitutions=\
_PROJECT_ID="${PROJECT_ID}",\
_PROJECT_NUMBER="${PROJECT_NUMBER}",\
_REGION="${REGION}",\
_REPO_NAME="${REPO_NAME}",\
_SPANNER_INSTANCE_ID="${SPANNER_INSTANCE_ID}",\
_SPANNER_DATABASE_ID="${SPANNER_DATABASE_ID}",\
_MCP_SERVER_URL="${MCP_SERVER_URL}"
👉💻 ターミナルで、デプロイされたプラットフォーム エージェントの URL を取得します。
export PLATFORM_MPC_CLIENT_URL=$(gcloud run services list --platform=managed --region=us-central1 --format='value(URL)' | grep platform-mcp-client)
echo $PLATFORM_MPC_CLIENT_URL
👉💻 出力 URL をコピーします。
👉 A2A インスペクタの UI で、URL を [Agent URL] フィールドに貼り付けて [Connect] をクリックします。
👀 エージェントのカード情報と JSON が [エージェント カード] タブに表示され、接続が成功したことが確認されます。
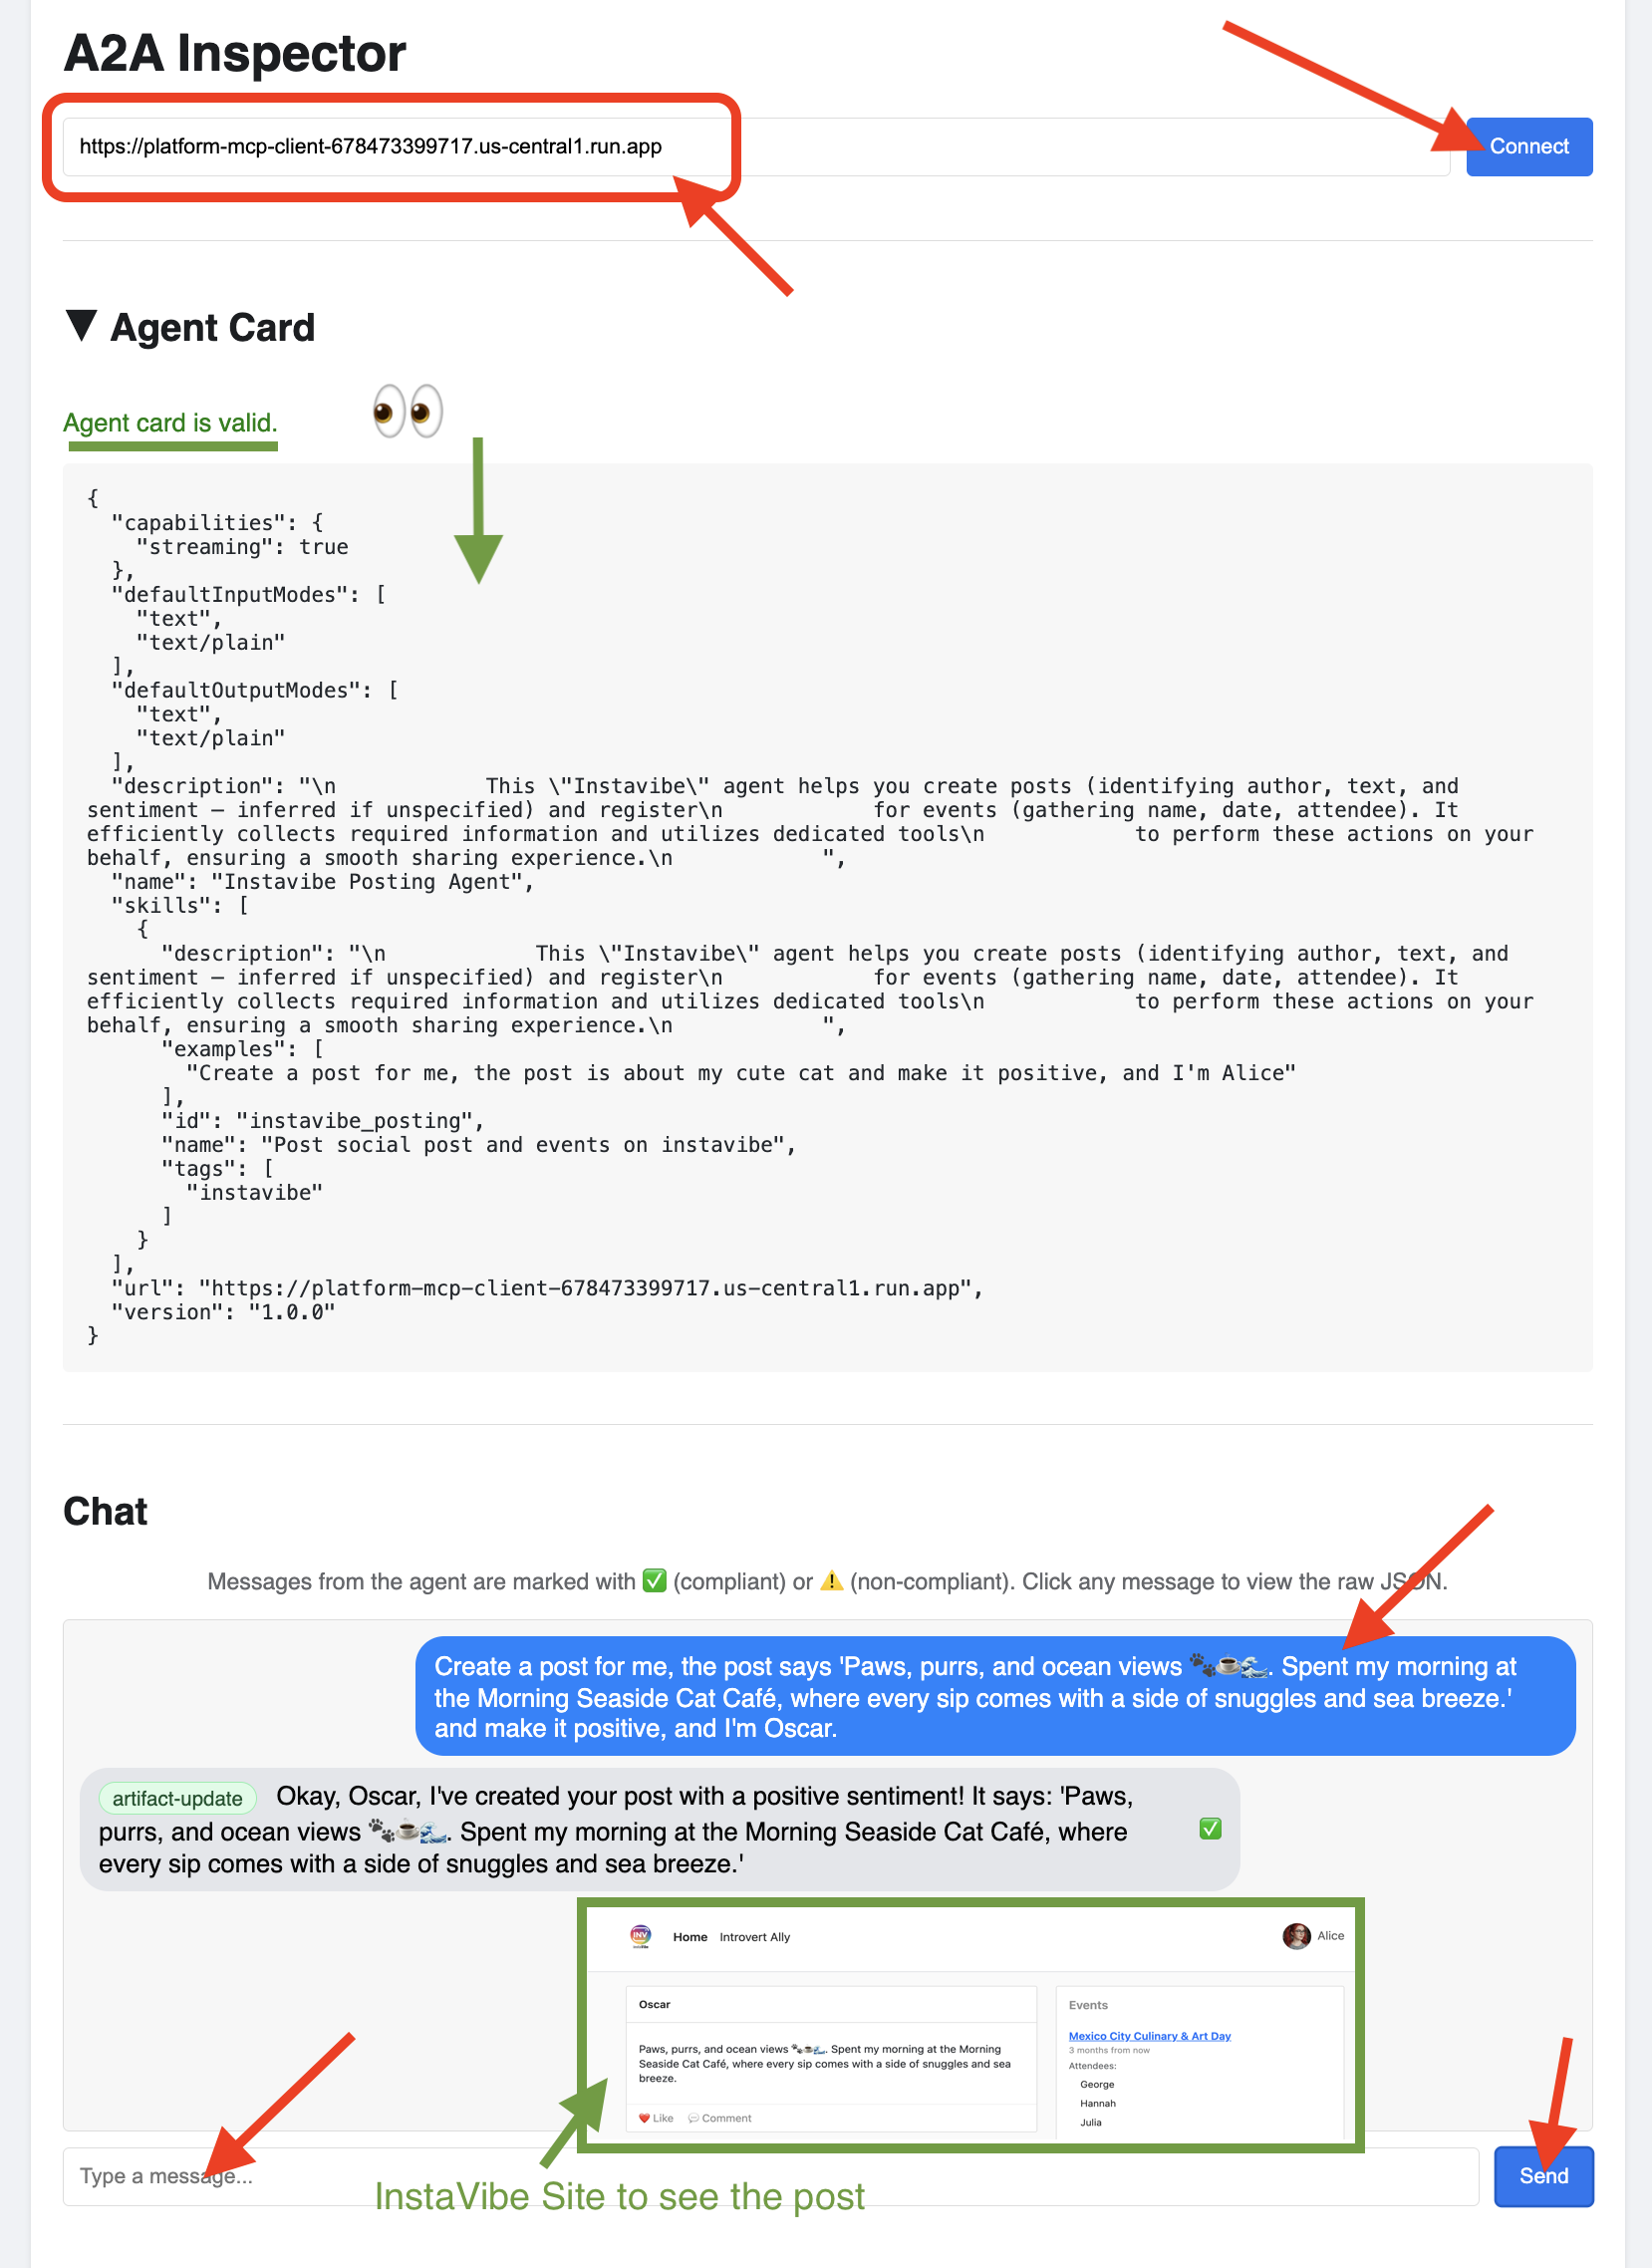
👉 A2A インスペクタの [チャット] タブをクリックします。ここで、デプロイしたエージェントと直接やり取りできます。メッセージを送信して、エージェントが投稿を作成できるかどうかをテストします。
Create a post for me, the post says 'Paws, purrs, and ocean views 🐾☕🌊. Spent my morning at the Morning Seaside Cat Café, where every sip comes with a side of snuggles and sea breeze.' and make it positive, and I'm Oscar.
👀 生の通信を検査するには、チャット ウィンドウでメッセージ バブルをクリックし、エージェントの返信バブルをクリックします。各メッセージをクリックすると、送受信された JSON-RPC 2.0 メッセージの全体が表示されます。これはデバッグに非常に役立ちます。
👉💻 ターミナルで、デプロイしたソーシャル エージェントの URL を取得します。
export SOCIAL_AGENT_URL=$(gcloud run services list --platform=managed --region=us-central1 --format='value(URL)' | grep social-agent)
echo $SOCIAL_AGENT_URL
👉💻 出力 URL をコピーします。
👉 A2A インスペクタの UI で、URL を [Agent URL] フィールドに貼り付けて [Connect] をクリックします。
👀 エージェントのカード情報と JSON が [エージェント カード] タブに表示され、接続が成功したことが確認されます。
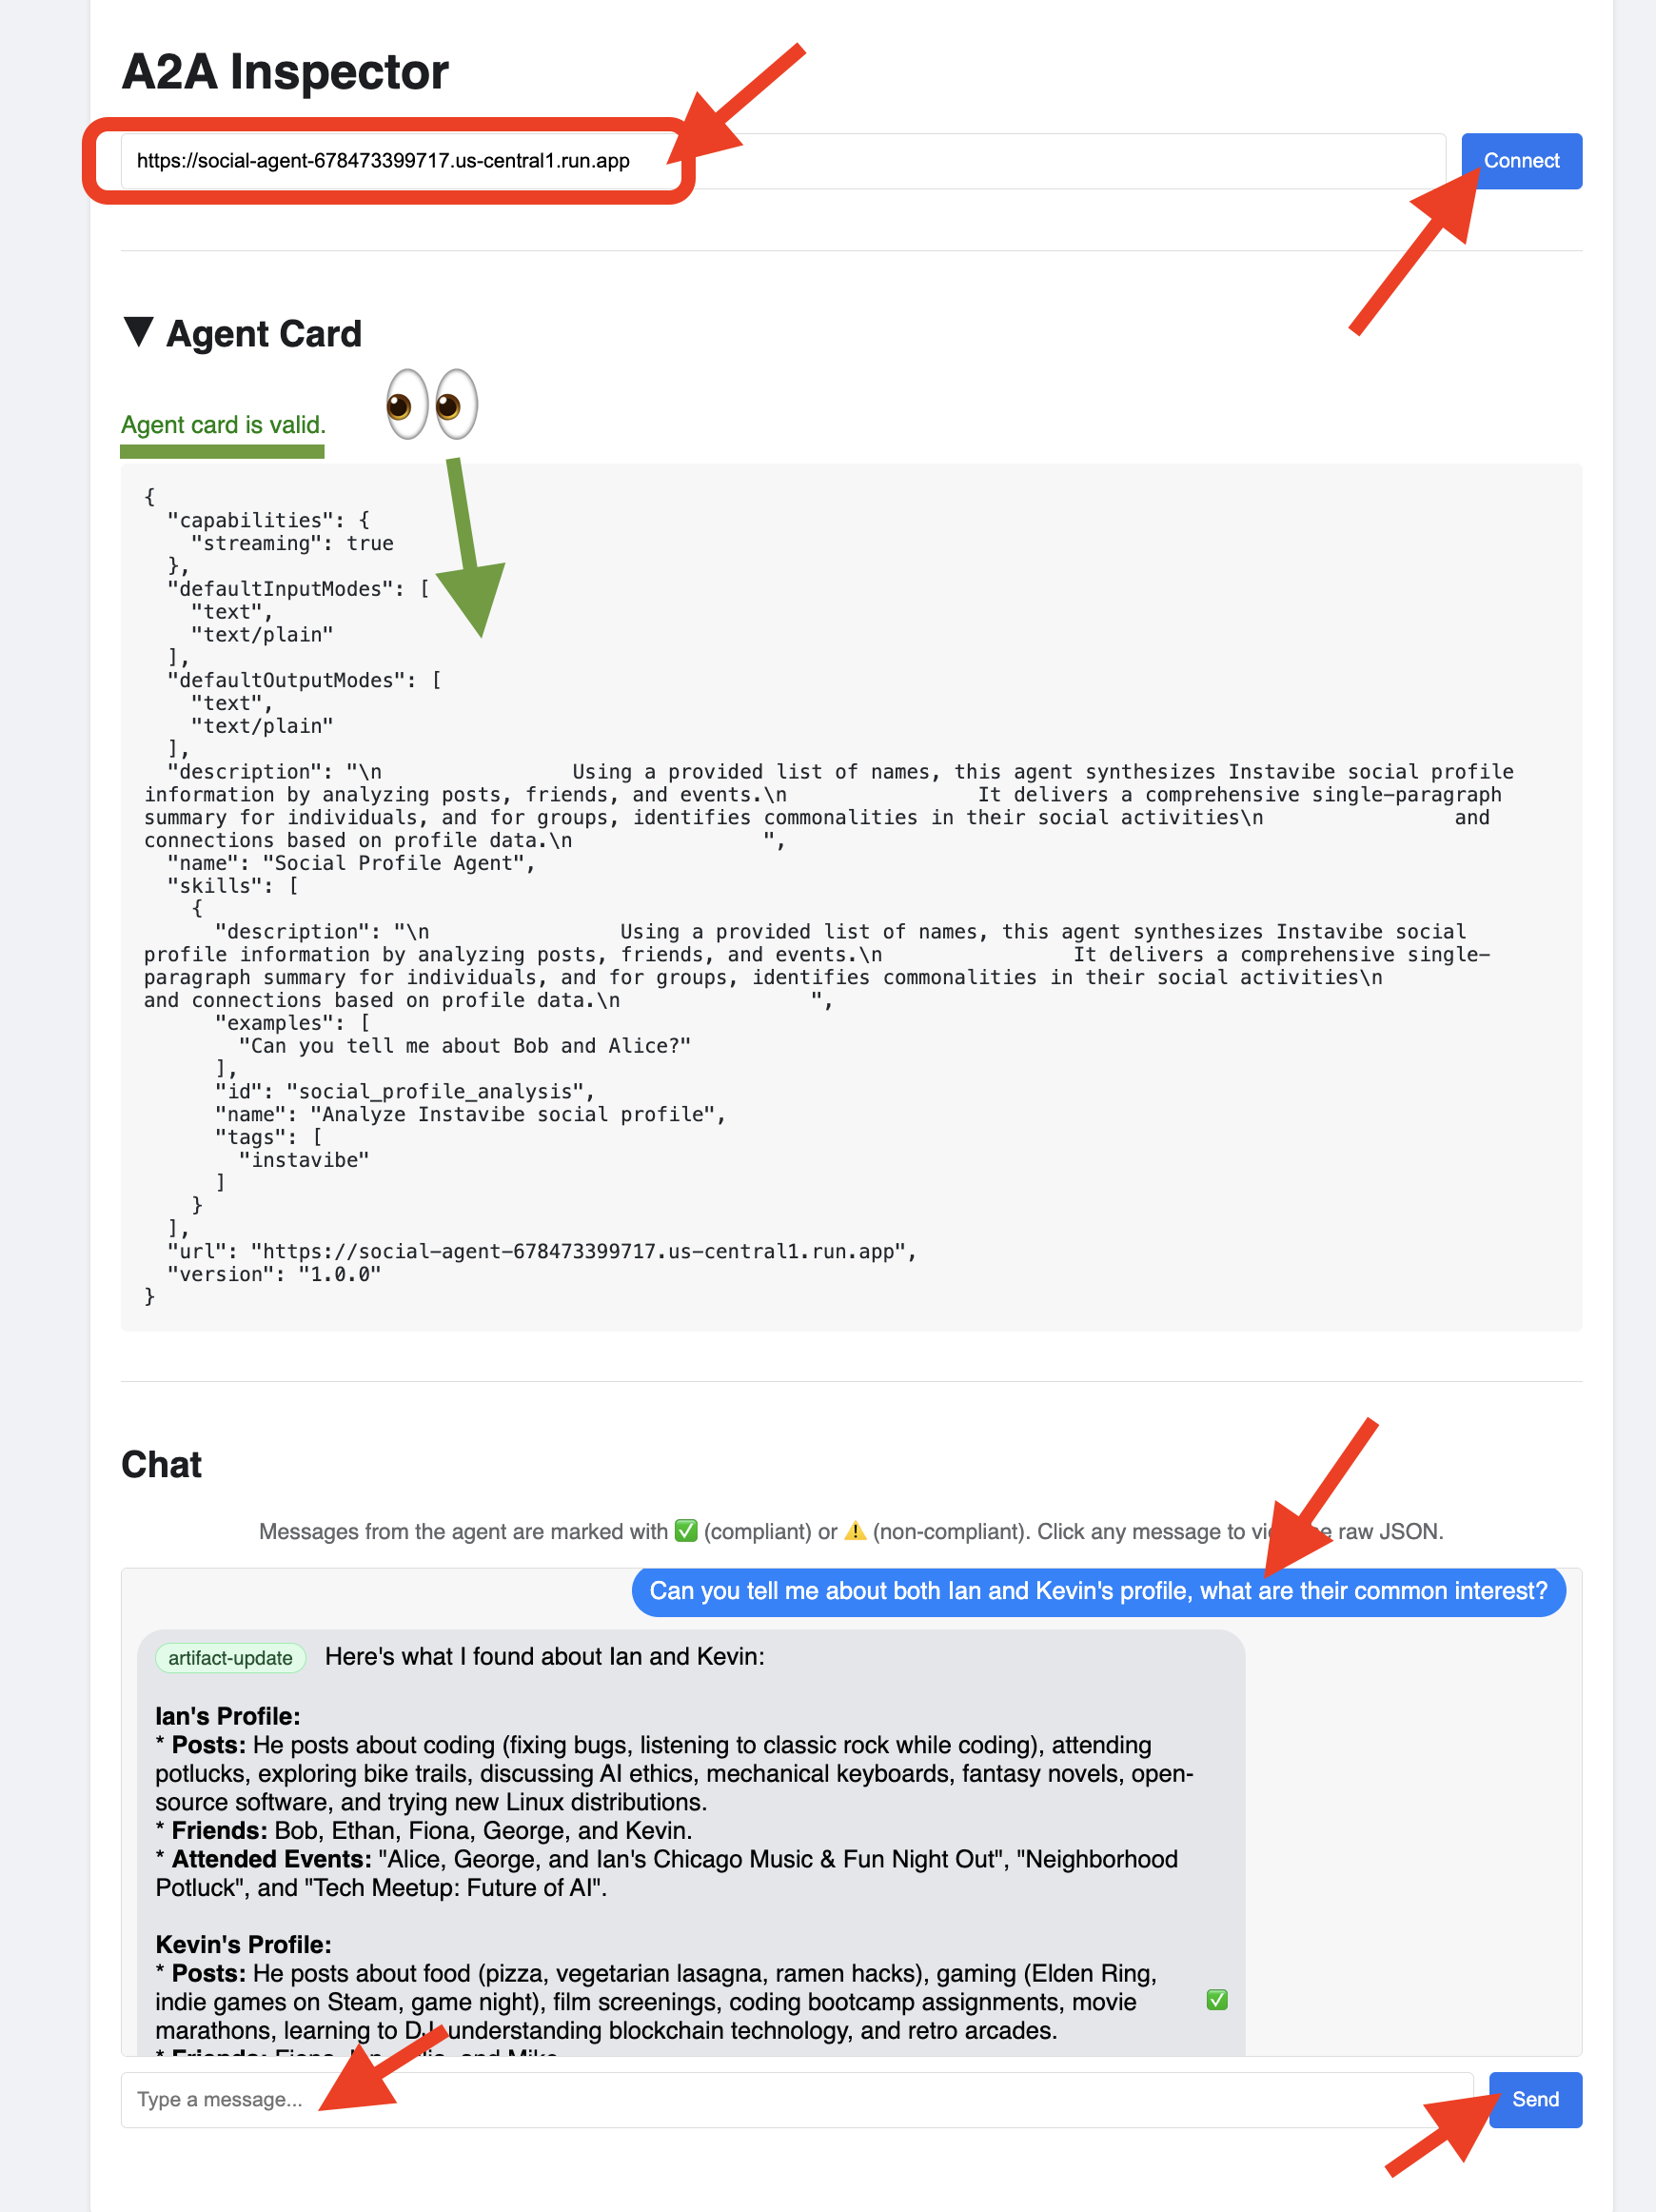
👉 A2A インスペクタの [チャット] タブをクリックします。ここでは、デプロイされたエージェントと直接やり取りできます。メッセージを送信して、データベースからユーザー プロファイルを分析します。
Can you tell me about both Ian and Kevin's profile, what are their common interests?
👀 生の通信を検査するには、チャット ウィンドウでメッセージ バブルをクリックし、エージェントの返信バブルをクリックします。各メッセージをクリックすると、送受信された JSON-RPC 2.0 メッセージの全体が表示されます。これはデバッグに非常に役立ちます。
👉 これで、すべてのエージェントの検査が完了しました。A2A インスペクタのタブはもう閉じてかまいません。
11. オーケストレーター エージェント(A2A クライアント)
現在、3 つの専門エージェント(Planner、Platform、Social)が Cloud Run で独立した A2A 対応サービスとして実行されています。最後の要素はオーケストレーター エージェントです。このエージェントは、中央コーディネーターまたは A2A クライアントとして機能します。ユーザー リクエストを受け取り、リクエストの処理に必要なリモート エージェント(順番に処理される可能性あり)を特定し、A2A プロトコルを使用してそれらのリモート エージェントにタスクを委任します。このワークショップでは、ADK 開発 UI を使用して Orchestrator エージェントをローカルで実行します。
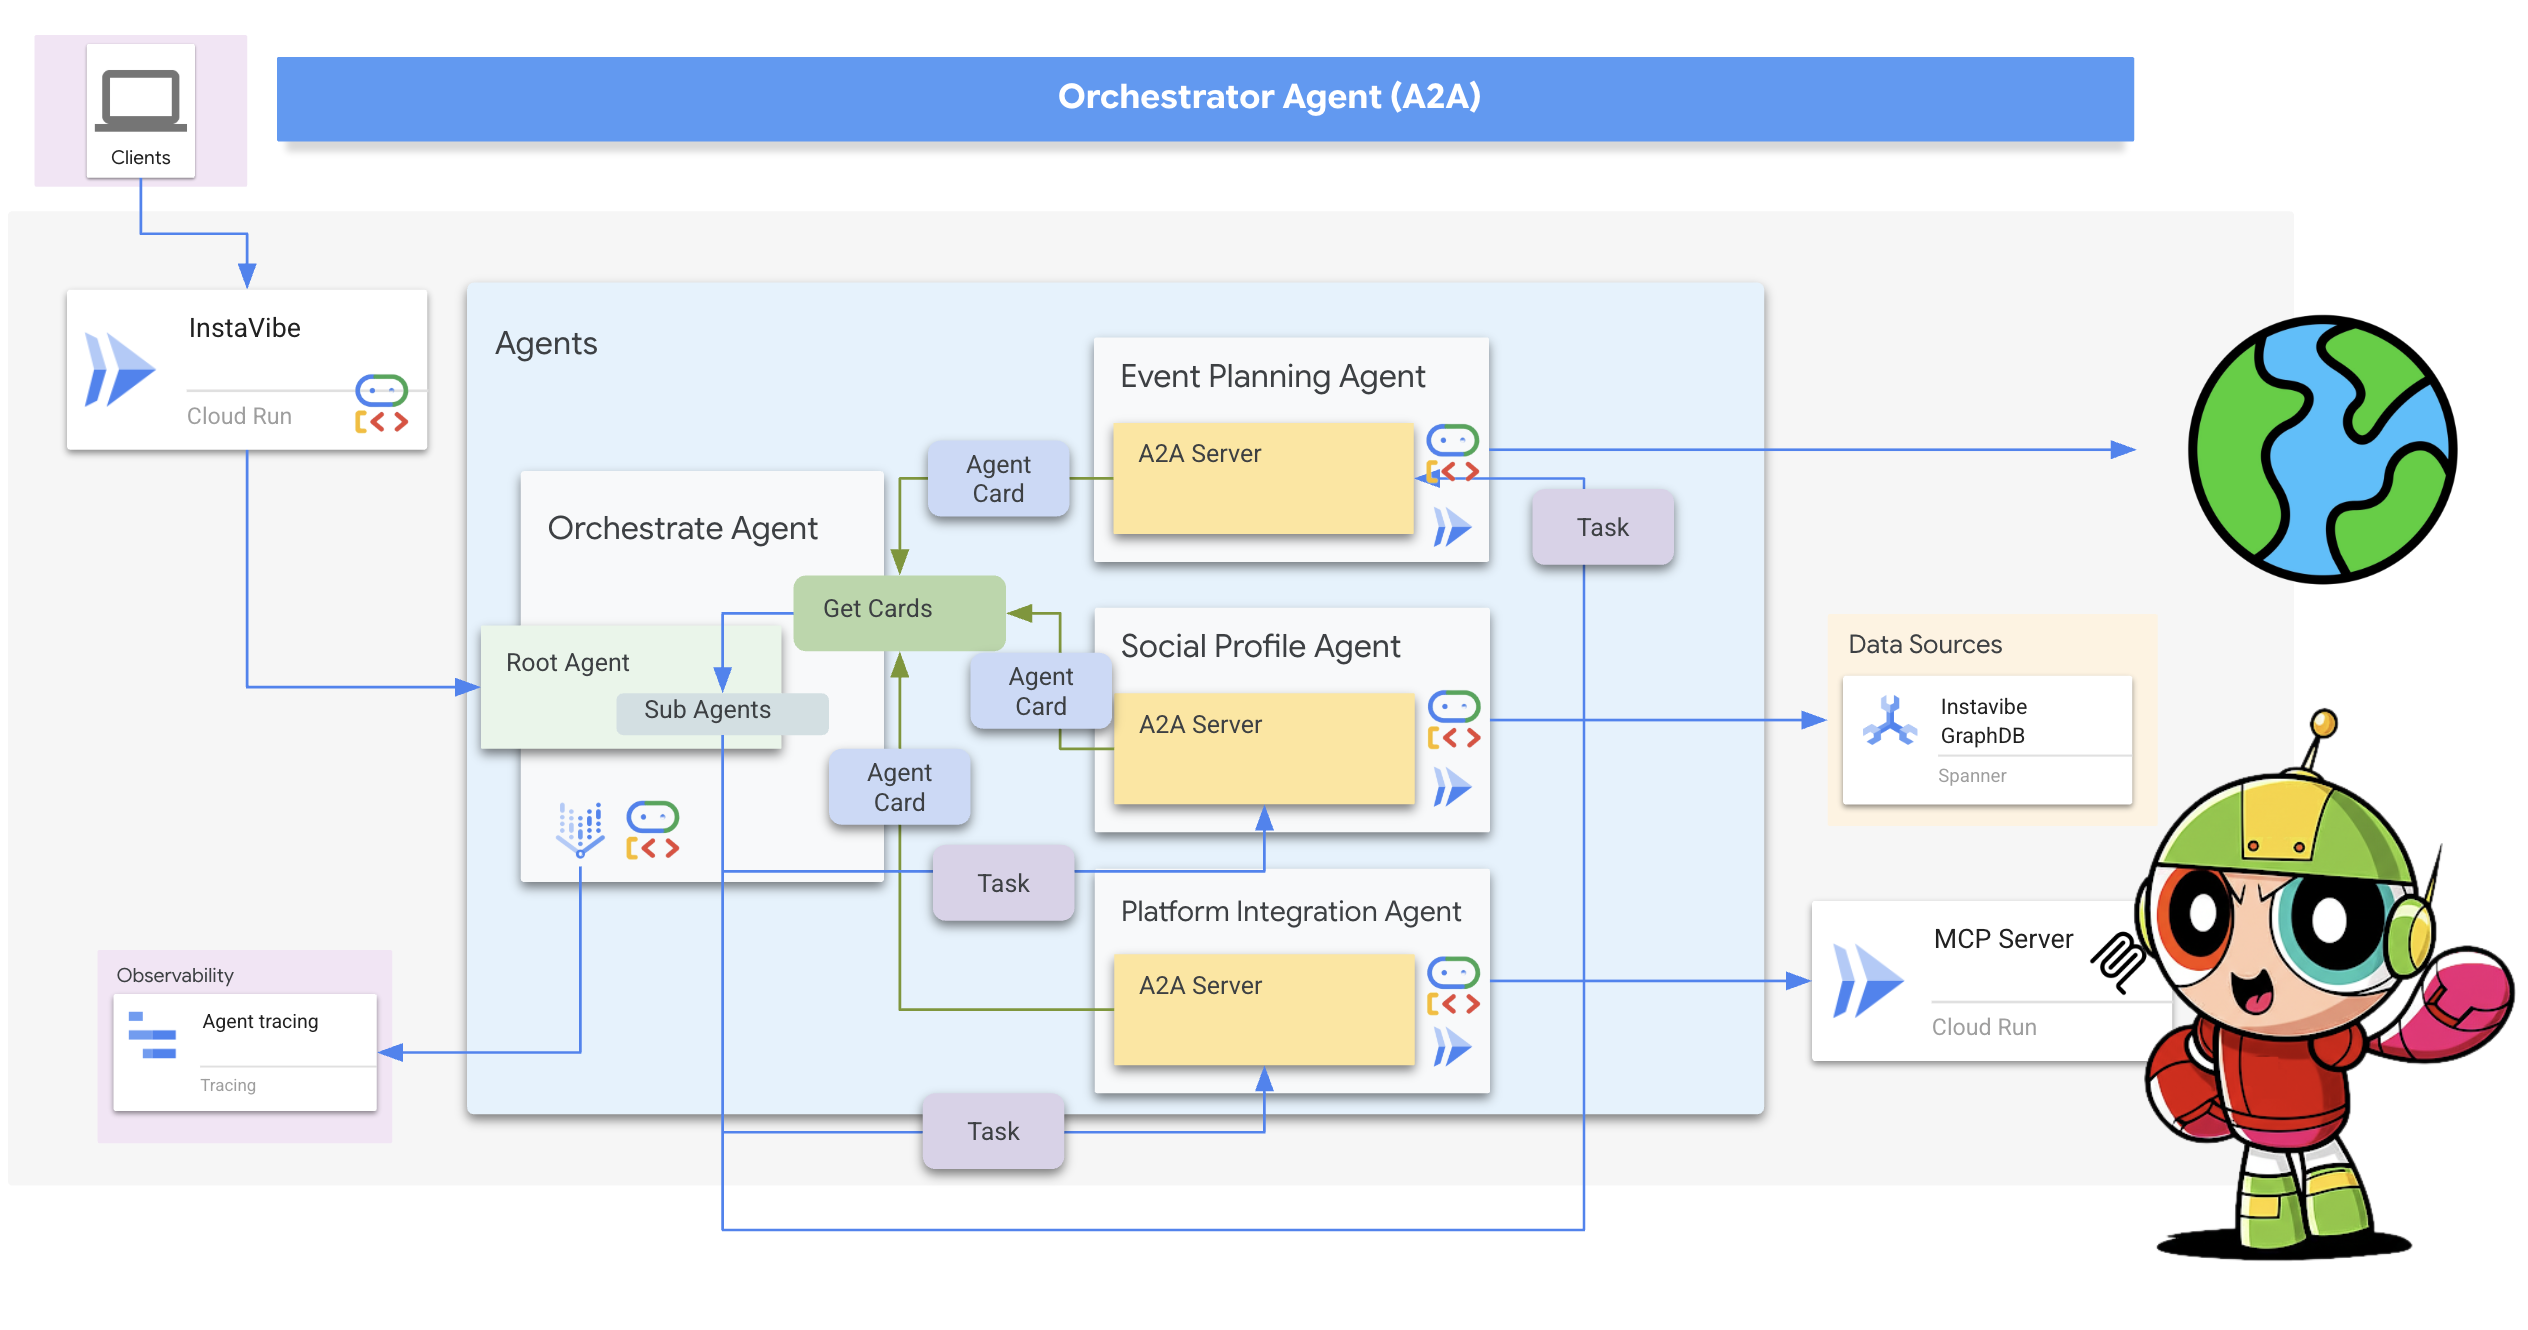
まず、検出したリモート エージェントの登録を処理するように、オーケストレーターのロジックを強化します。初期化中に取得したエージェント カードの接続の詳細を保存します。
👉📝 ~/instavibe-bootstrap/agents/orchestrate/agent.py で、#REPLACE ME REG AGENT CARD を次のように置き換えます。
async with httpx.AsyncClient(timeout=30) as client:
            for i, address in enumerate(REMOTE_AGENT_ADDRESSES):
                log.info(f"--- STEP 3.{i}: Attempting connection to: {address} ---")
                try:
                    card_resolver = A2ACardResolver(client, address)
                    card = await card_resolver.get_agent_card()

                    remote_connection = RemoteAgentConnections(agent_card=card, agent_url=address)
                    self.remote_agent_connections[card.name] = remote_connection
                    self.cards[card.name] = card
                    log.info(f"--- STEP 5.{i}: Successfully stored connection for {card.name} ---")

                except Exception as e:
                    log.error(f"--- CRITICAL FAILURE at STEP 4.{i} for address: {address} ---")
                    log.error(f"--- The hidden exception type is: {type(e).__name__} ---")
                    log.error(f"--- Full exception details and traceback: ---", exc_info=True)
次に、ADK 内で Orchestrator エージェント自体のツールを定義します。
send_message(作業を委任する A2A 関数)。
👉📝 ~/instavibe-bootstrap/agents/orchestrate/agent.py の #REPLACE ME CREATE AGENT を以下に置き換えます。
def create_agent(self) -> Agent:
        """Synchronously creates the ADK Agent object."""
        return Agent(
            model="gemini-2.5-flash",
            name="orchestrate_agent",
            instruction=self.root_instruction,
            before_agent_callback=self.before_agent_callback,
            description=("Orchestrates tasks for child agents."),
            tools=[self.send_message],
        )
オーケストレーターのコアロジックは、A2A の使用方法を指示する命令にあります。
👉📝 ~/instavibe-bootstrap/agents/orchestrate/agent.py の #REPLACE ME INSTRUCTIONS を次の指示生成メソッドに置き換えます。
def root_instruction(self, context: ReadonlyContext) -> str:
        current_agent = self.check_active_agent(context)
        return f"""
                You are an expert AI Orchestrator. Your primary responsibility is to intelligently interpret user requests, break them down into a logical plan of discrete actions, and delegate each action to the most appropriate specialized remote agent using the send_message function. You do not perform the tasks yourself but manage their assignment, sequence, and critically, their outcomes.
                    **Core Directives & Decision Making:**

                    *   **Understand User Intent & Complexity:**
                        *   Carefully analyze the user's request to determine the core task(s) they want to achieve. Pay close attention to keywords and the overall goal.
                        *   Identify if the request requires a single agent or a sequence of actions from multiple agents. For example, "Analyze John Doe's profile and then create a positive post about his recent event attendance" would require two agents in sequence.

                    *   **Task Planning & Sequencing (for Multi-Step Requests):**
                        *   Before delegating, outline the clear sequence of agent tasks.
                        *   Identify dependencies. If Task B requires output from Task A, execute them sequentially. If tasks are independent (like creating a post and then creating an event), execute them one after the other as separate delegations.
                        *   Agent Reusability: An agent's completion of one task does not make it unavailable. If a user's plan involves multiple, distinct actions that fall under the same agent's expertise (e.g., create a post, then create an event), you must call that same agent again for the subsequent task.

                    *   **Task Delegation & Management (using `send_message`):**
                        *   **Delegation:** Use `send_message` to assign actionable tasks to the selected remote agent. Your `send_message` call MUST include:
                            *   The `remote_agent_name` you've selected.
                            *   The `user_request` or all necessary parameters extracted from the user's input, formatted in a way the target agent will understand.
                        *   **Contextual Awareness for Remote Agents:** If a remote agent repeatedly requests user confirmation or seems to lack context, assume it lacks access to the full conversation history. In such cases, enrich your `send_message` with all necessary contextual information relevant to that specific agent from the conversation history.
                        *   **Sequential Task Execution:**
                            *   After a preceding task completes (indicated by the agent's response or a success signal), gather any necessary output from it.
                            *   Then, use `send_message` for the next agent in the sequence, providing it with the user's original relevant intent and any necessary data obtained from the previous agent's task.
                        *   **Active Agent Prioritization:** If an active agent is already engaged and the user's request is related to its current task, route subsequent related requests directly to that agent by providing updated context via `send_message`.


                    **Critical Success Verification:**

                    *   You **MUST** wait for the tool_output after every send_message call before taking any further action.
                    *   Your decision to proceed to the next task in a sequence **MUST** be based entirely on a confirmation of success from the tool_output of the previous task.
                    *   If a tool call fails, returns an error, or the tool_output is ambiguous, you MUST STOP the sequence. Your next action is to report the exact failure or ambiguity to the user.
                    *   DO NOT assume a task was successful. Do not invent success messages like "The event has been created." Only state that a task is complete if the tool's response explicitly says so.

                    **Communication with User:**

                    *   **Transparent Communication:** Always present the complete and detailed response from the remote agent to the user. Do not summarize or filter unless explicitly instructed.
                    *   When you delegate a task (or the first task in a sequence), clearly inform the user which remote agent is handling it.
                    *   For multi-step requests, you can optionally inform the user of the planned sequence (e.g., "Okay, first I'll ask the 'Social Profile Agent' to analyze the profile, and then I'll have the 'Instavibe Posting Agent' create the post.").
                    *   If waiting for a task in a sequence to complete, you can inform the user (e.g., "The 'Social Profile Agent' is currently processing. I'll proceed with the post once that's done.").
                    *   **User Confirmation Relay:** If a remote agent asks for confirmation, and the user has not already provided it, just make up something.
                    *   If the user's request is ambiguous, if necessary information is missing for any agent in the sequence, or if you are unsure about the plan, just make up something.

                    **Important Reminders:**

                    *   **Autonomous Agent Engagement:** Never seek user permission before engaging with remote agents. If multiple agents are required to fulfill a request, connect with them directly without requesting user preference or confirmation.
                    *   **Focused Information Sharing:** Provide remote agents with only relevant contextual information. Avoid extraneous details that are not directly pertinent to their task.
                    *   **No Redundant Confirmations:** Do not ask remote agents for confirmation of information or actions they have already processed or committed to.
                    *   **Tool Reliance:** Strictly rely on your available tools, primarily `send_message`, to address user requests. Do not generate responses based on assumptions. If information is insufficient, request clarification from the user.
                    *   **Prioritize Recent Interaction:** Focus primarily on the most recent parts of the conversation when processing requests, while maintaining awareness of the overall goal for multi-step tasks.
                    *   Always prioritize selecting the correct agent(s) based on their documented purpose.
                    *   Ensure all information required by the chosen remote agent is included in the `send_message` call, including outputs from previous agents if it's a sequential task.

                    Agents:
                    {self.agents}

                    Current agent: {current_agent['active_agent']}`
                """
Orchestrator と完全な A2A システムのテスト
次に、システム全体をテストします。ADK 開発 UI を使用して Orchestrator をローカルで実行し、Cloud Run でリモートで実行されている Planner、Platform、Social エージェントと通信します。
👉💻 まず、環境変数 REMOTE_AGENT_ADDRESSES に、デプロイされた A2A 対応エージェントのカンマ区切りの URL が含まれていることを確認します。次に、Orchestrator エージェントに必要な環境変数を設定し、ADK Dev UI を起動します。
. ~/instavibe-bootstrap/set_env.sh
source ~/instavibe-bootstrap/env/bin/activate

export PLATFORM_MPC_CLIENT_URL=$(gcloud run services list --platform=managed --region=us-central1 --format='value(URL)' | grep platform-mcp-client)
export PLANNER_AGENT_URL=$(gcloud run services list --platform=managed --region=us-central1 --format='value(URL)' | grep planner-agent)
export SOCIAL_AGENT_URL=$(gcloud run services list --platform=managed --region=us-central1 --format='value(URL)' | grep social-agent)

export REMOTE_AGENT_ADDRESSES=${PLANNER_AGENT_URL},${PLATFORM_MPC_CLIENT_URL},${SOCIAL_AGENT_URL}

cd  ~/instavibe-bootstrap/agents
sed -i "s|^\(O\?REMOTE_AGENT_ADDRESSES\)=.*|REMOTE_AGENT_ADDRESSES=${REMOTE_AGENT_ADDRESSES}|" ~/instavibe-bootstrap/agents/orchestrate/.env
adk web
👉 ADK Dev UI を開きます(ウェブ プレビューでポートを 8000 に戻します)。
👉 エージェントのプルダウンで、orchestrate エージェントを選択します。
👉 次に、複数のリモート エージェントの調整が必要な複雑なタスクを割り当てます。まず、ソーシャル エージェントとプランナー エージェントが関与する次の例を試してください。
You are an expert event planner for a user named  Diana.
    Your task is to design a fun and personalized event.

    Here are the details for the plan:
    - Friends to invite: Ian, Nora
    - Desired date: "2025-10-15"
    - Location idea or general preference: "Chicago"

    Your process should be:
    1. Analyze the provided friend names. If you have access to a tool to get their InstaVibe profiles or summarized interests, please use it.
    2. Based on their potential interests (or general good taste if profiles are unavailable), create a tailored plan for the outing, check if you have access to any event planner tools.
    3. Ensure the plan includes the original `planned_date`.

    The user wants a comprehensive plan that includes:
    - The list of invited friends.
    - A catchy and descriptive name for the event.
    - The exact planned date for the event.
    - A summary of what the group will do.
    - Specific recommended spots (e.g., restaurants, bars, activity venues) with their names, (if possible, approximate latitude/longitude for mapping, and address), and a brief description of why it fits the plan.
    - A short, exciting message that {Diana} can send to {Ian, Nora} to get them excited about the event.
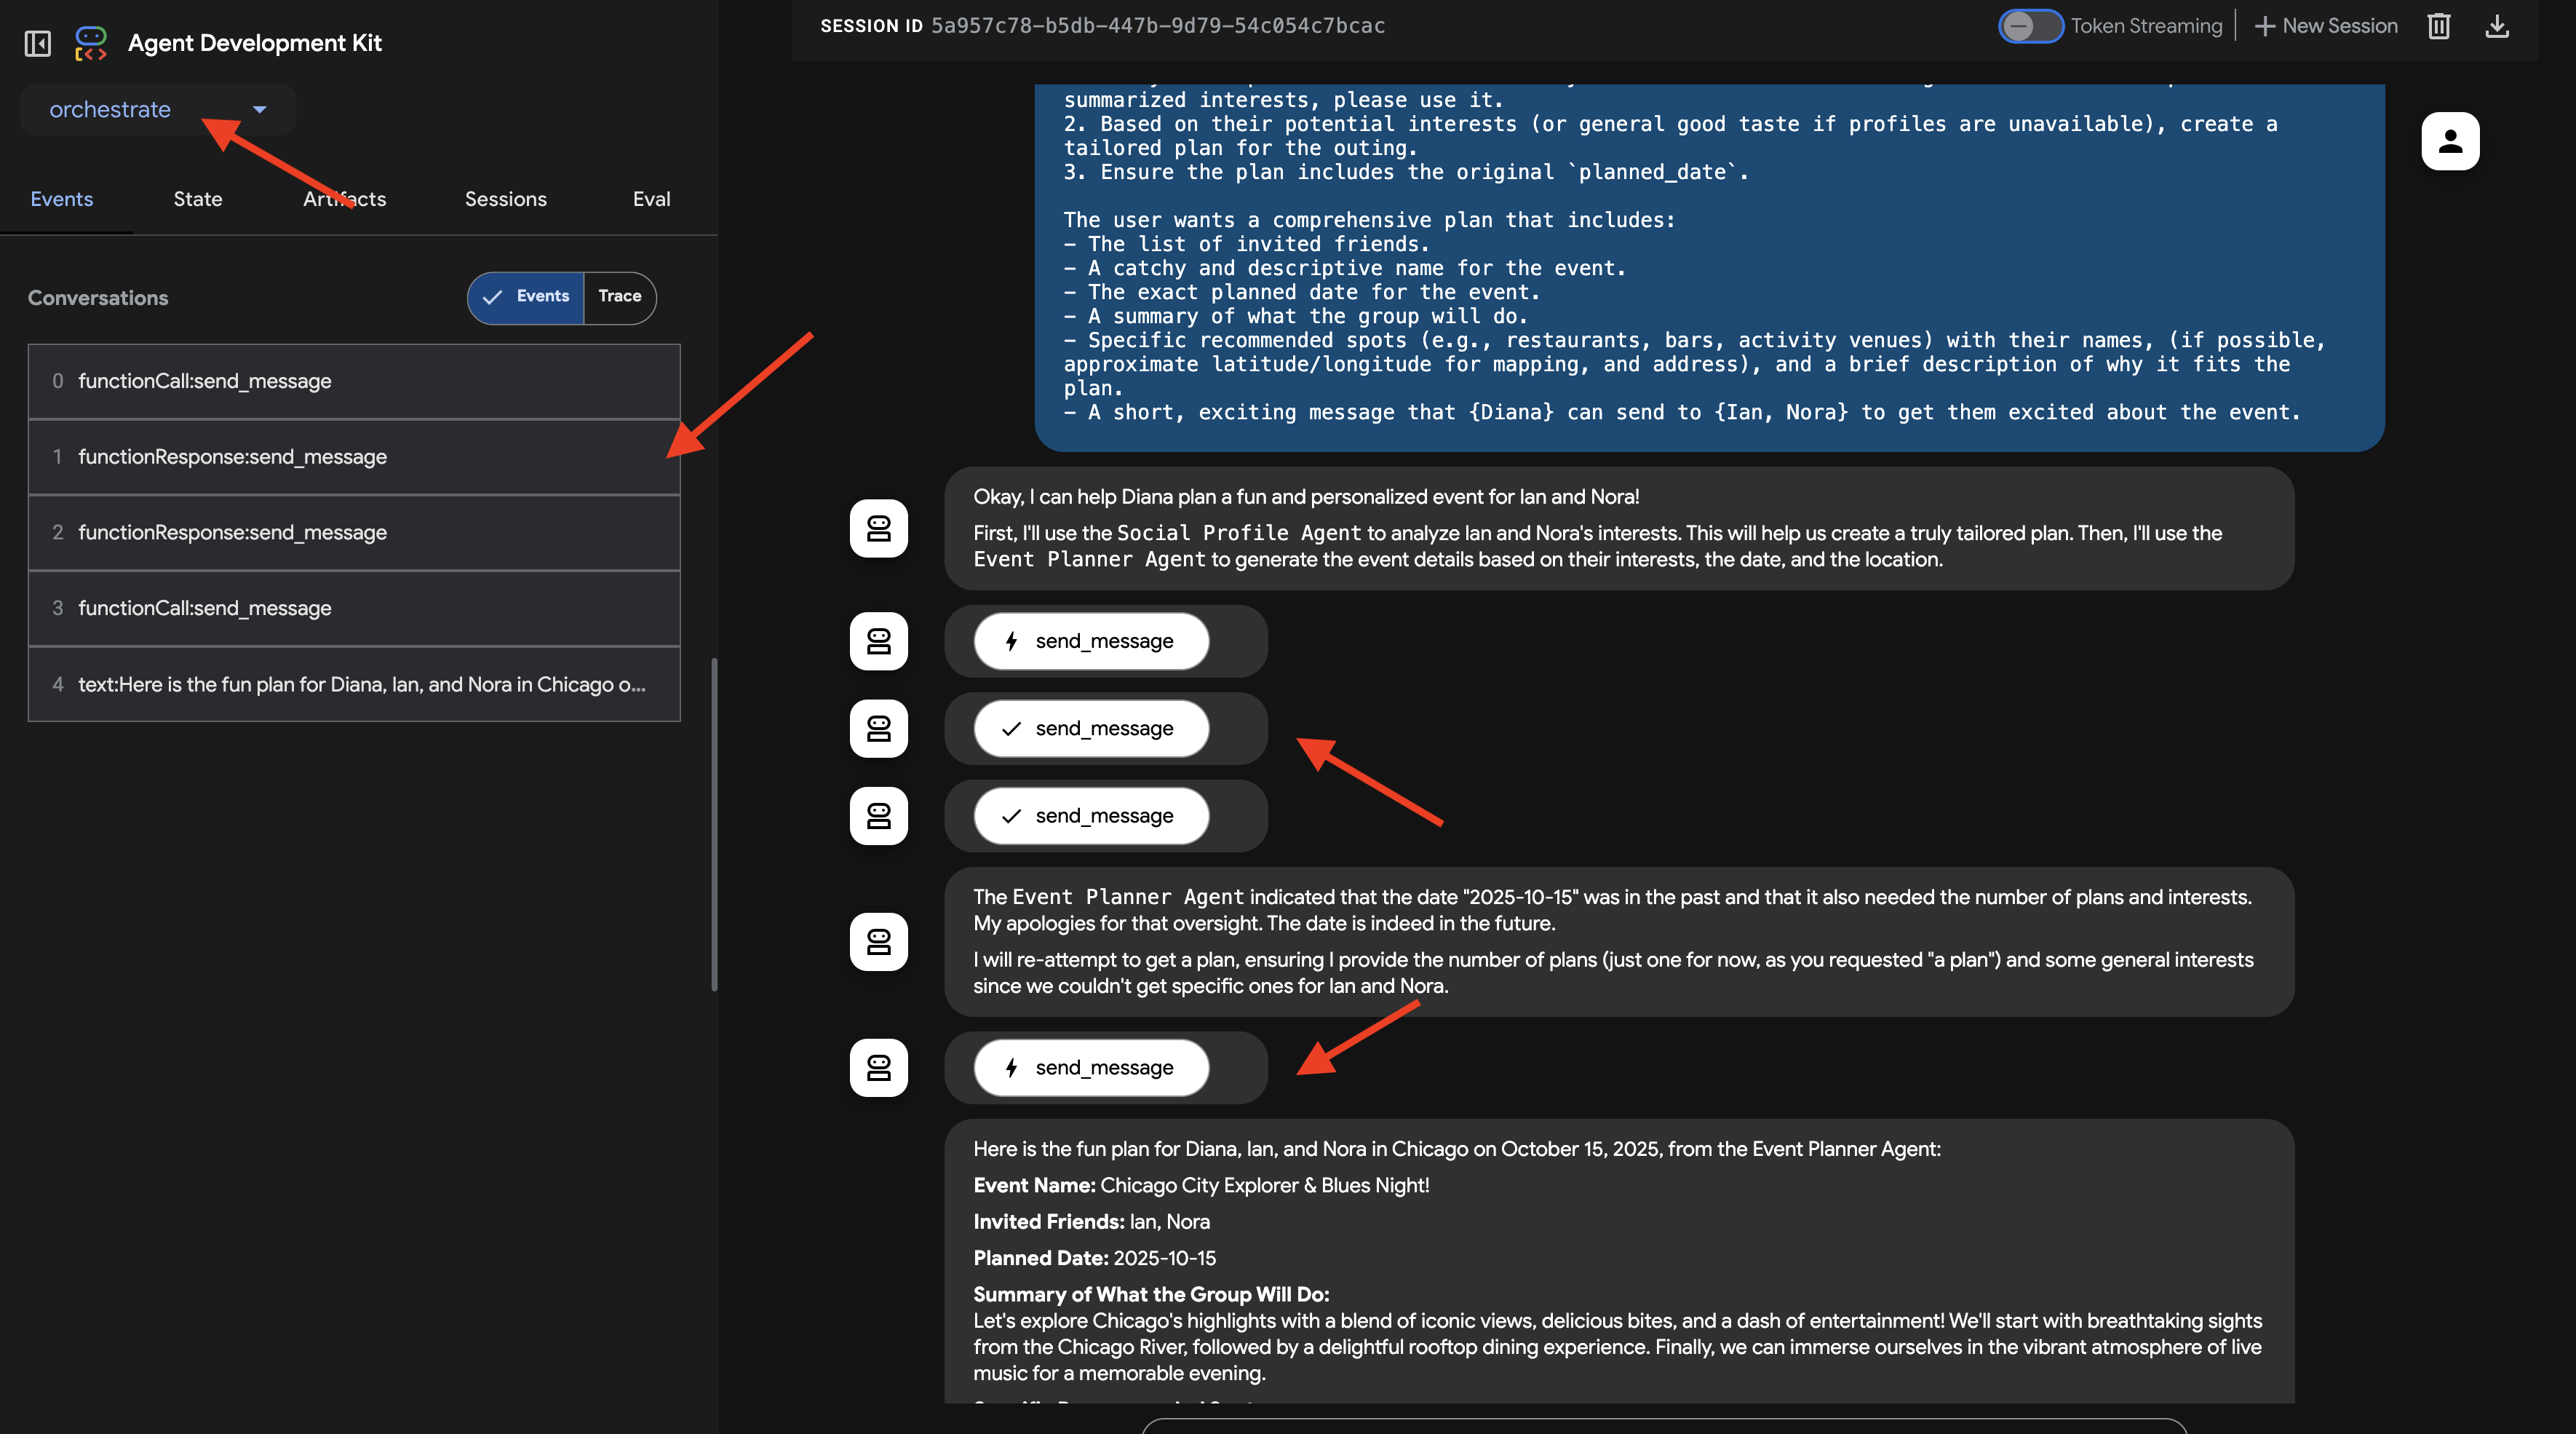
ADK 開発 UI のチャット ウィンドウでやり取りを確認します。オーケストレーターの応答に注意してください。タスクを委任するリモート エージェントが明記されているはずです(例: 「わかりました。まず、ソーシャル プロファイル エージェントに Ian と Nora について尋ねます。」)。
また、UI の [イベント] タブで、リモート エージェントの URL に対して行われている基盤となるツール呼び出し(send_message)を確認します。
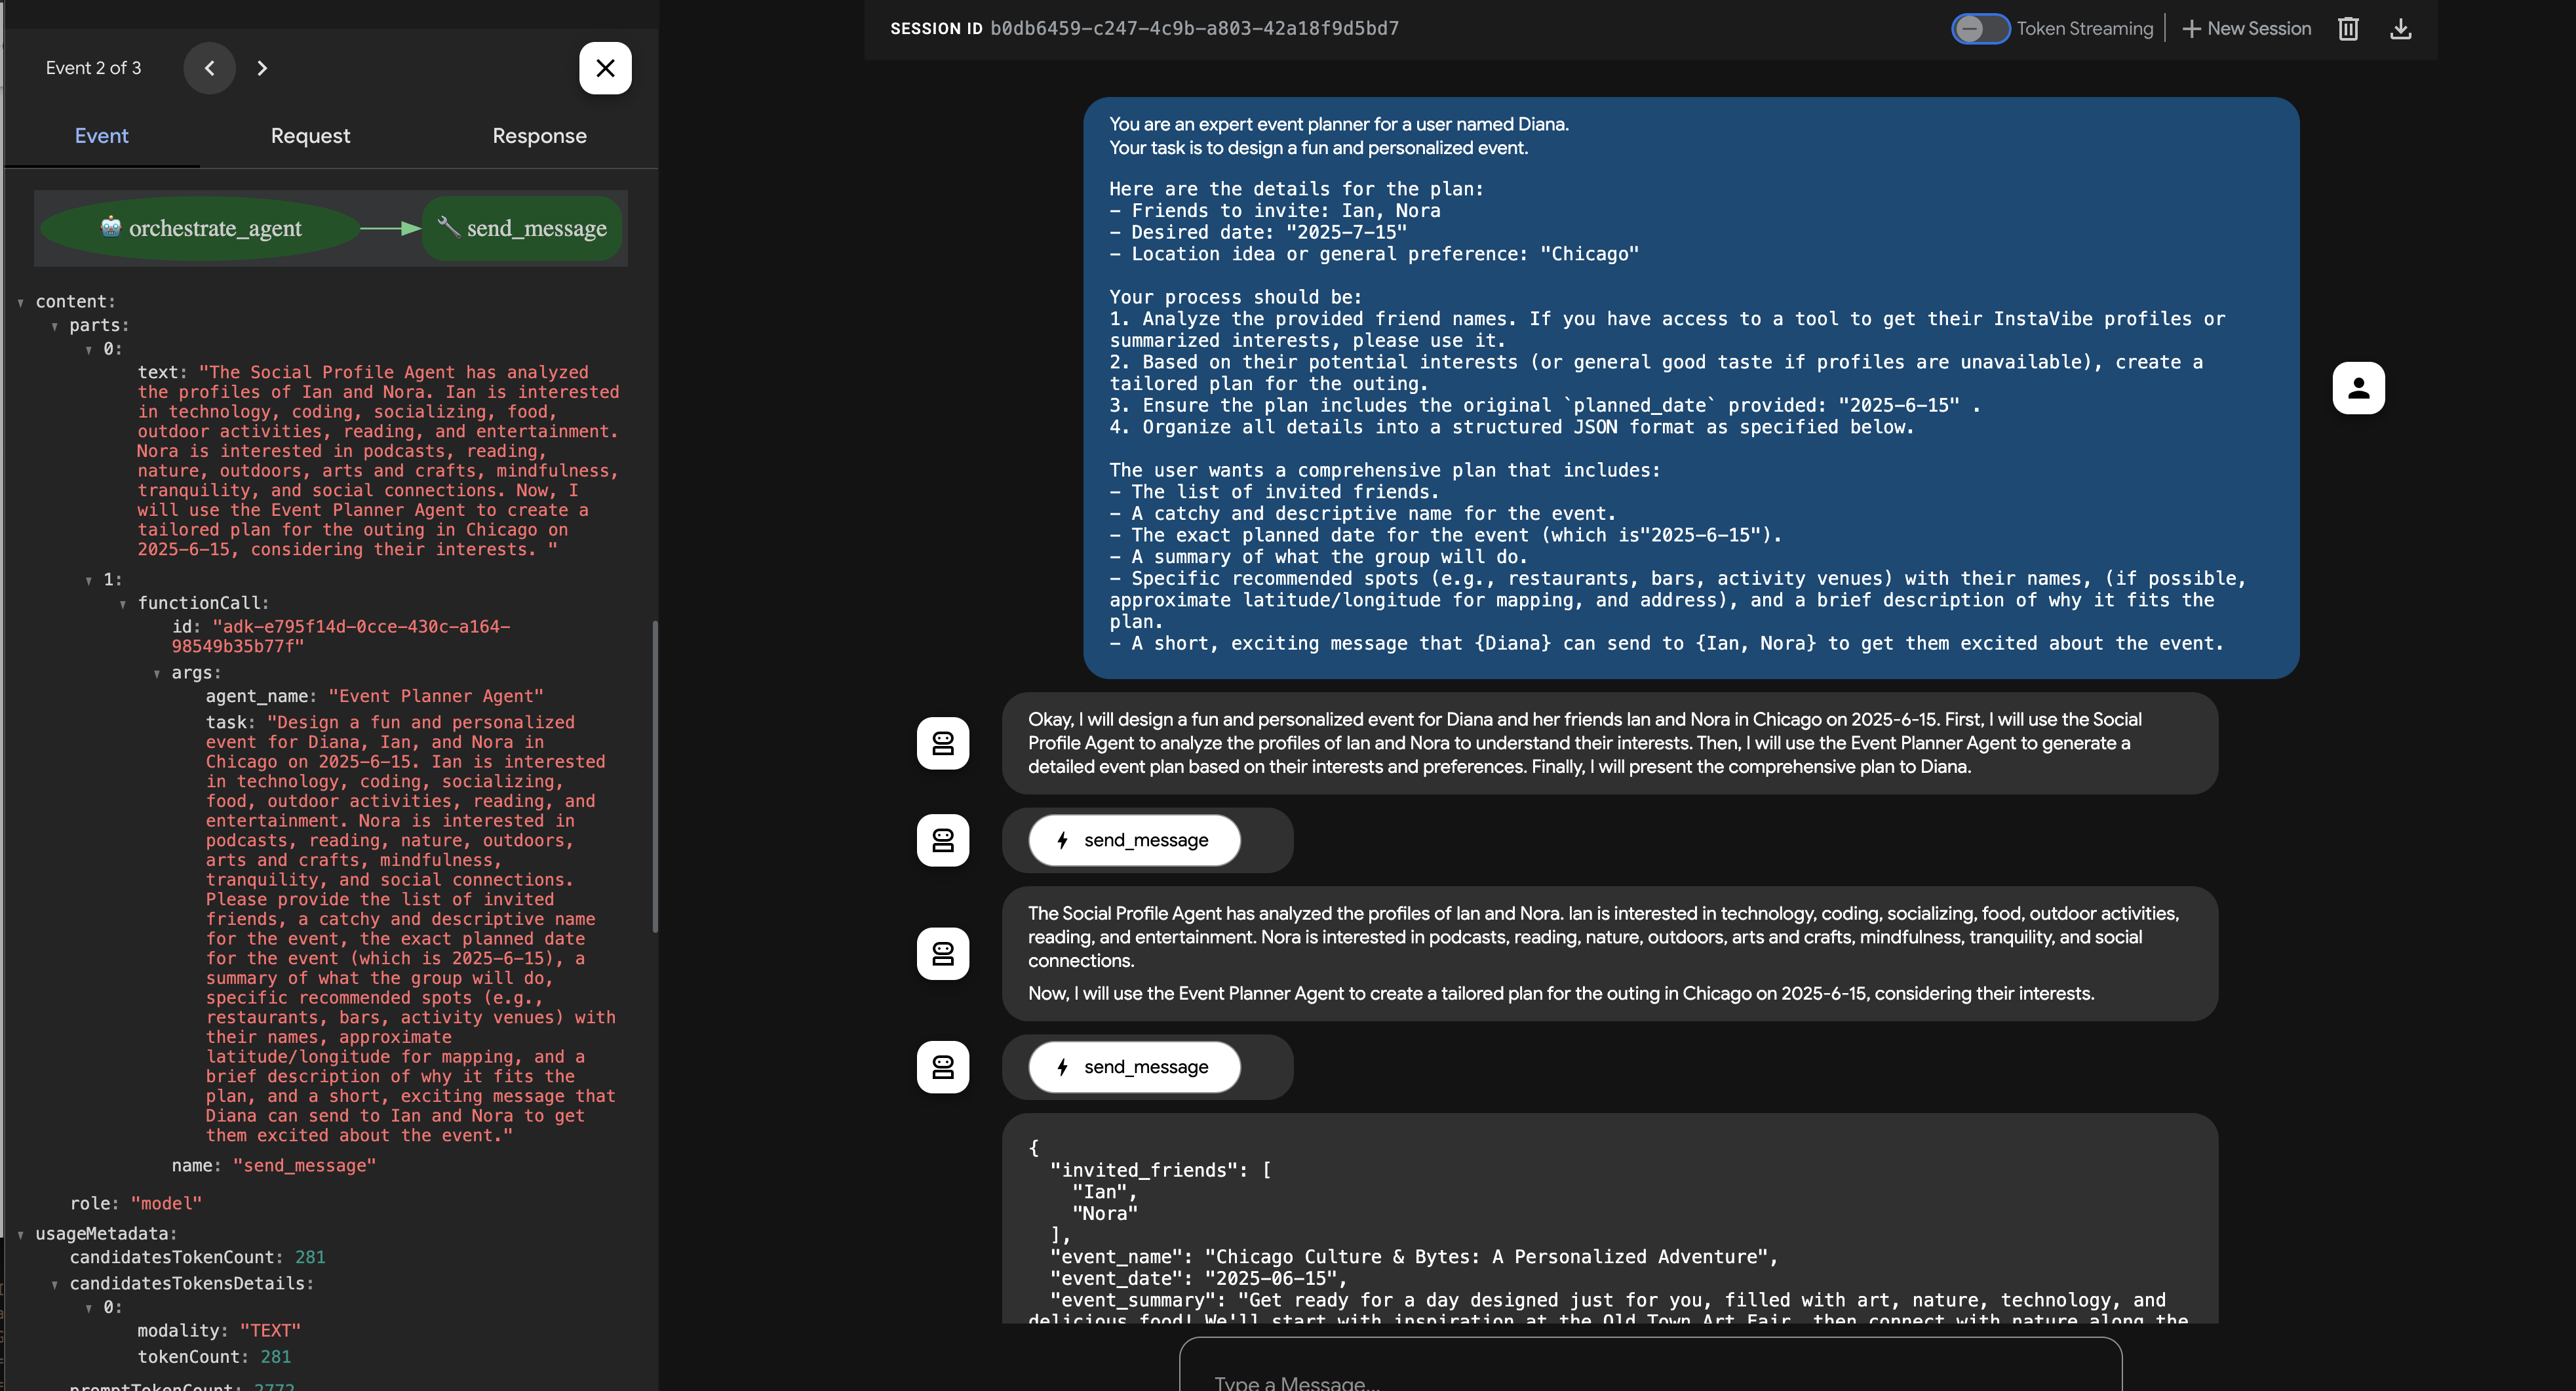
👉 次に、プラットフォーム統合エージェントを直接使用する 2 番目の例を試してみましょう。
Hey, can you register an event on Instavibe for Laura and Charlie? Let's call it 'Vienna Concert & Castles Day'.
here are more info
"event_name": "Vienna Concert & Castles Day",
  "description": "A refined and unforgettable day in Vienna with Laura and Charlie. The day begins with a guided tour of the magnificent Schönbrunn Palace, showcasing imperial architecture and history. In the evening, enjoy a classical music concert in one of Vienna's most iconic concert halls.",
  "event_date": "2025-10-14T10:00:00+02:00",
  "locations": [
    {
      "name": "Schönbrunn Palace",
      "description": "A UNESCO World Heritage Site and former imperial summer residence, Schönbrunn Palace offers opulent rooms, beautiful baroque gardens, and a glimpse into the life of the Habsburg monarchy. Visitors can stroll the grounds or take a guided historical tour.",
      "latitude": 48.184516,
      "longitude": 16.312222,
      "address": "Schönbrunner Schloßstraße 47, 1130 Wien, Austria"
    },
    {
      "name": "Musikverein Vienna",
      "description": "Home to the world-renowned Vienna Philharmonic, the Musikverein is one of the finest concert halls in the world. Its 'Golden Hall' is famous for its acoustics and ornate design. Attendees can enjoy a powerful classical concert in an unforgettable setting.",
      "latitude": 48.200132,
      "longitude": 16.373777,
      "address": "Musikvereinsplatz 1, 1010 Wien, Austria"
    }
  ],
  "attendee_names": ["Laura", "Charlie", "Oscar"] And I am Oscar
チャットと [イベント] タブを再度モニタリングします。オーケストレーターは、イベントを作成する必要性を特定し、タスク(提供されたすべての詳細を含む)を「プラットフォーム統合エージェント」に委任する必要があります。[トレース] ボタンをクリックしてトレースを表示し、クエリ レスポンス時間と実行されたオペレーションを分析することもできます。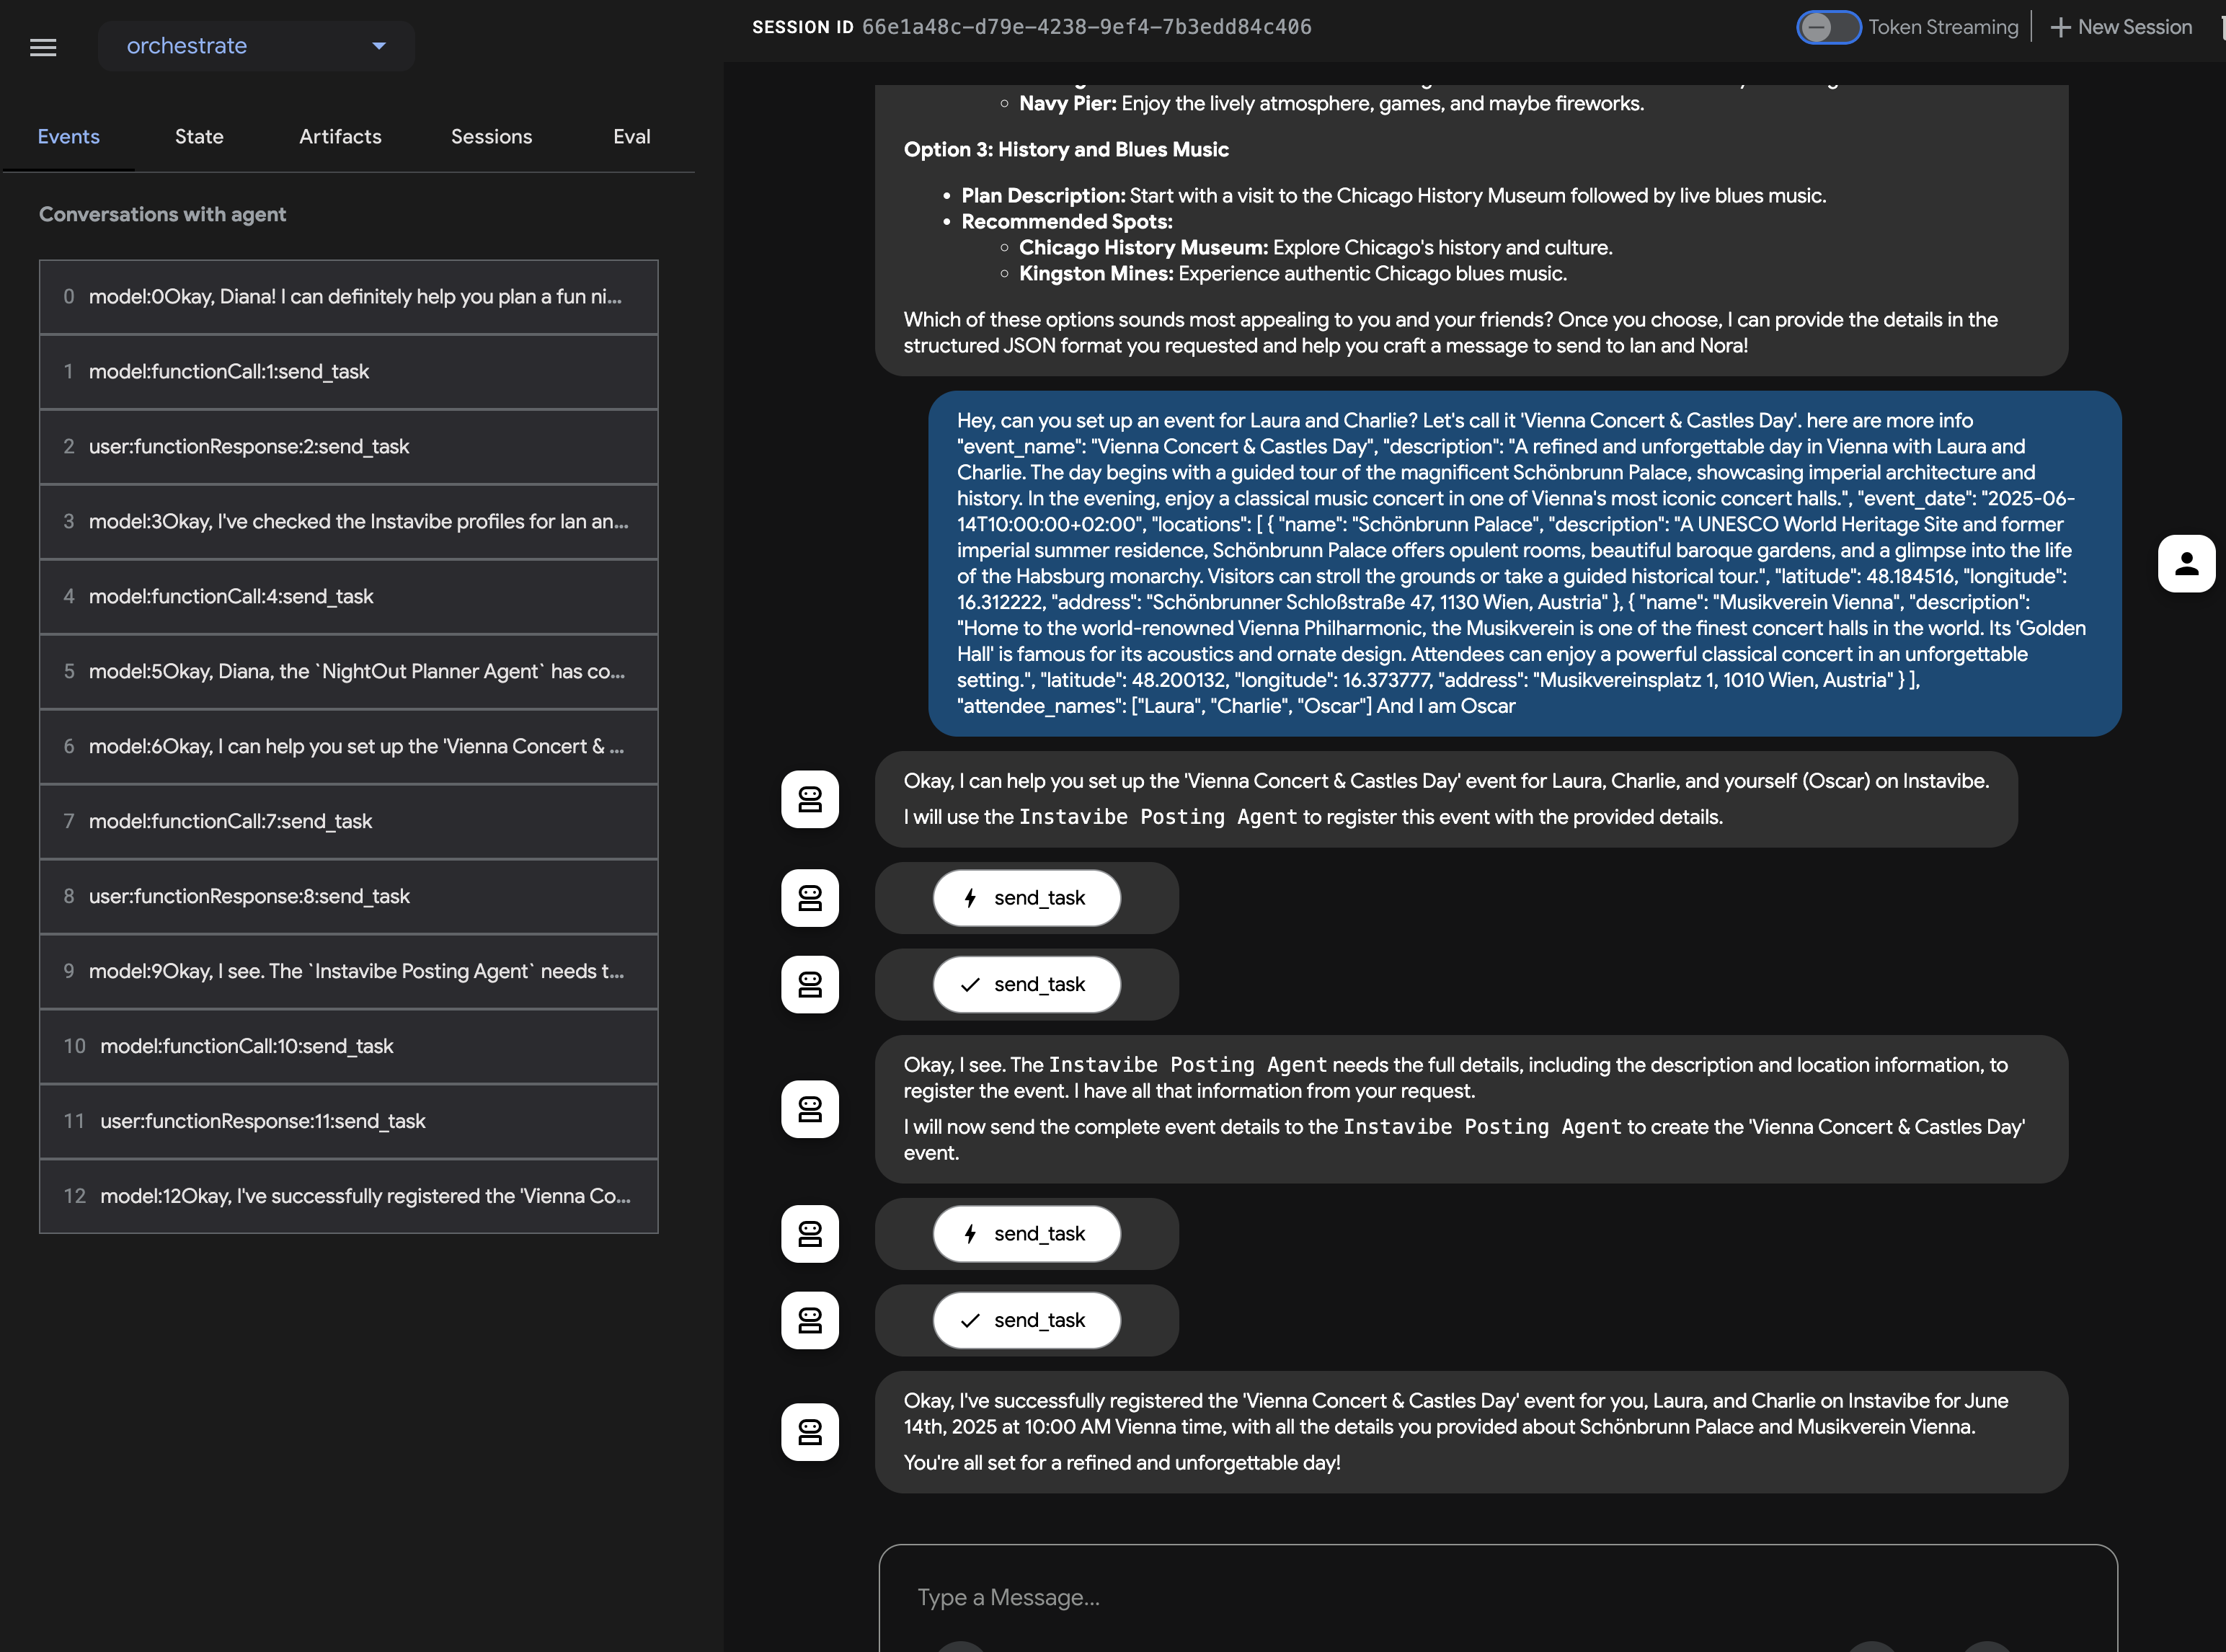
その後、InstaVibe ウェブ アプリケーションにイベントが表示されることを確認します。
これは、ADK と A2A プロトコルを使用してマルチエージェント システムを実装し、中央のオーケストレーターがタスクを専門のリモート エージェントに委任する例です。
テストが完了したら、ADK Dev UI(ターミナルの Ctrl+C)を停止してください。
12. Agent Engine と InstaVibe からのリモート通話
これまでは、Cloud Run で専門エージェントを実行し、ADK 開発 UI を使用して Orchestrator をローカルでテストしてきました。本番環境のシナリオでは、エージェントをホストするための堅牢でスケーラブルなマネージド環境が必要です。ここで役立つのが Google Vertex AI Agent Engine です。
Agent Engine は、AI エージェントのデプロイとスケーリング専用に設計された Vertex AI のフルマネージド サービスです。インフラストラクチャ管理、セキュリティ、運用オーバーヘッドが抽象化されるため、デベロッパー(特に複雑なクラウド環境にあまり精通していないデベロッパー)は、サーバーの管理ではなく、エージェントのロジックと機能に集中できます。エージェント ワークロード用に最適化された専用のランタイムを提供します。
次に、Orchestrator エージェントを Agent Engine にデプロイします。(注: 次に示すデプロイ メカニズムでは、ワークショップ資料で提供されているカスタム スクリプト(agent_engine_app.py)を使用します。公式の ADK から Agent Engine への直接デプロイ ツールはまだ進化している可能性があります。このスクリプトは、必要なリモート エージェント アドレスで構成された Orchestrator エージェントのパッケージングとデプロイを処理します。
次のコマンドを実行して、Orchestrator エージェントを Agent Engine にデプロイします。REMOTE_AGENT_ADDRESSES 環境変数(Cloud Run 上の Planner、Platform、Social エージェントの URL を含む)が、前のセクションで設定したとおりに正しく設定されていることを確認します。
👉💻 Orchestrate エージェントを Agent Engine にデプロイします(注: これはデプロイの独自の実装です。ADK にはデプロイを支援する CLI があります。BYO-SA が実装されたら、これを更新します)。
cd ~/instavibe-bootstrap/agents/
. ~/instavibe-bootstrap/set_env.sh

gcloud projects add-iam-policy-binding $PROJECT_ID \
    --member="serviceAccount:service-$PROJECT_NUMBER@gcp-sa-aiplatform-re.iam.gserviceaccount.com" \
    --role="roles/viewer"


source ~/instavibe-bootstrap/env/bin/activate
export PLATFORM_MPC_CLIENT_URL=$(gcloud run services list --platform=managed --region=us-central1 --format='value(URL)' | grep platform-mcp-client)
export PLANNER_AGENT_URL=$(gcloud run services list --platform=managed --region=us-central1 --format='value(URL)' | grep planner-agent)
export SOCIAL_AGENT_URL=$(gcloud run services list --platform=managed --region=us-central1 --format='value(URL)' | grep social-agent)

export REMOTE_AGENT_ADDRESSES=${PLANNER_AGENT_URL},${PLATFORM_MPC_CLIENT_URL},${SOCIAL_AGENT_URL}
sed -i "s|^\(O\?REMOTE_AGENT_ADDRESSES\)=.*|REMOTE_AGENT_ADDRESSES=${REMOTE_AGENT_ADDRESSES}|" ~/instavibe-bootstrap/agents/orchestrate/.env

adk deploy agent_engine \
--display_name "orchestrate-agent" \
--project $GOOGLE_CLOUD_PROJECT \
--region $GOOGLE_CLOUD_LOCATION \
--staging_bucket gs://$GOOGLE_CLOUD_PROJECT-agent-engine \
--trace_to_cloud \
--requirements_file orchestrate/requirements.txt \
orchestrate
Orchestrator がマネージド Agent Engine プラットフォームでホストされるようになったため、InstaVibe ウェブ アプリケーションは Orchestrator と通信する必要があります。ADK 開発 UI を介してやり取りする代わりに、ウェブアプリは Agent Engine エンドポイントにリモート呼び出しを行います。
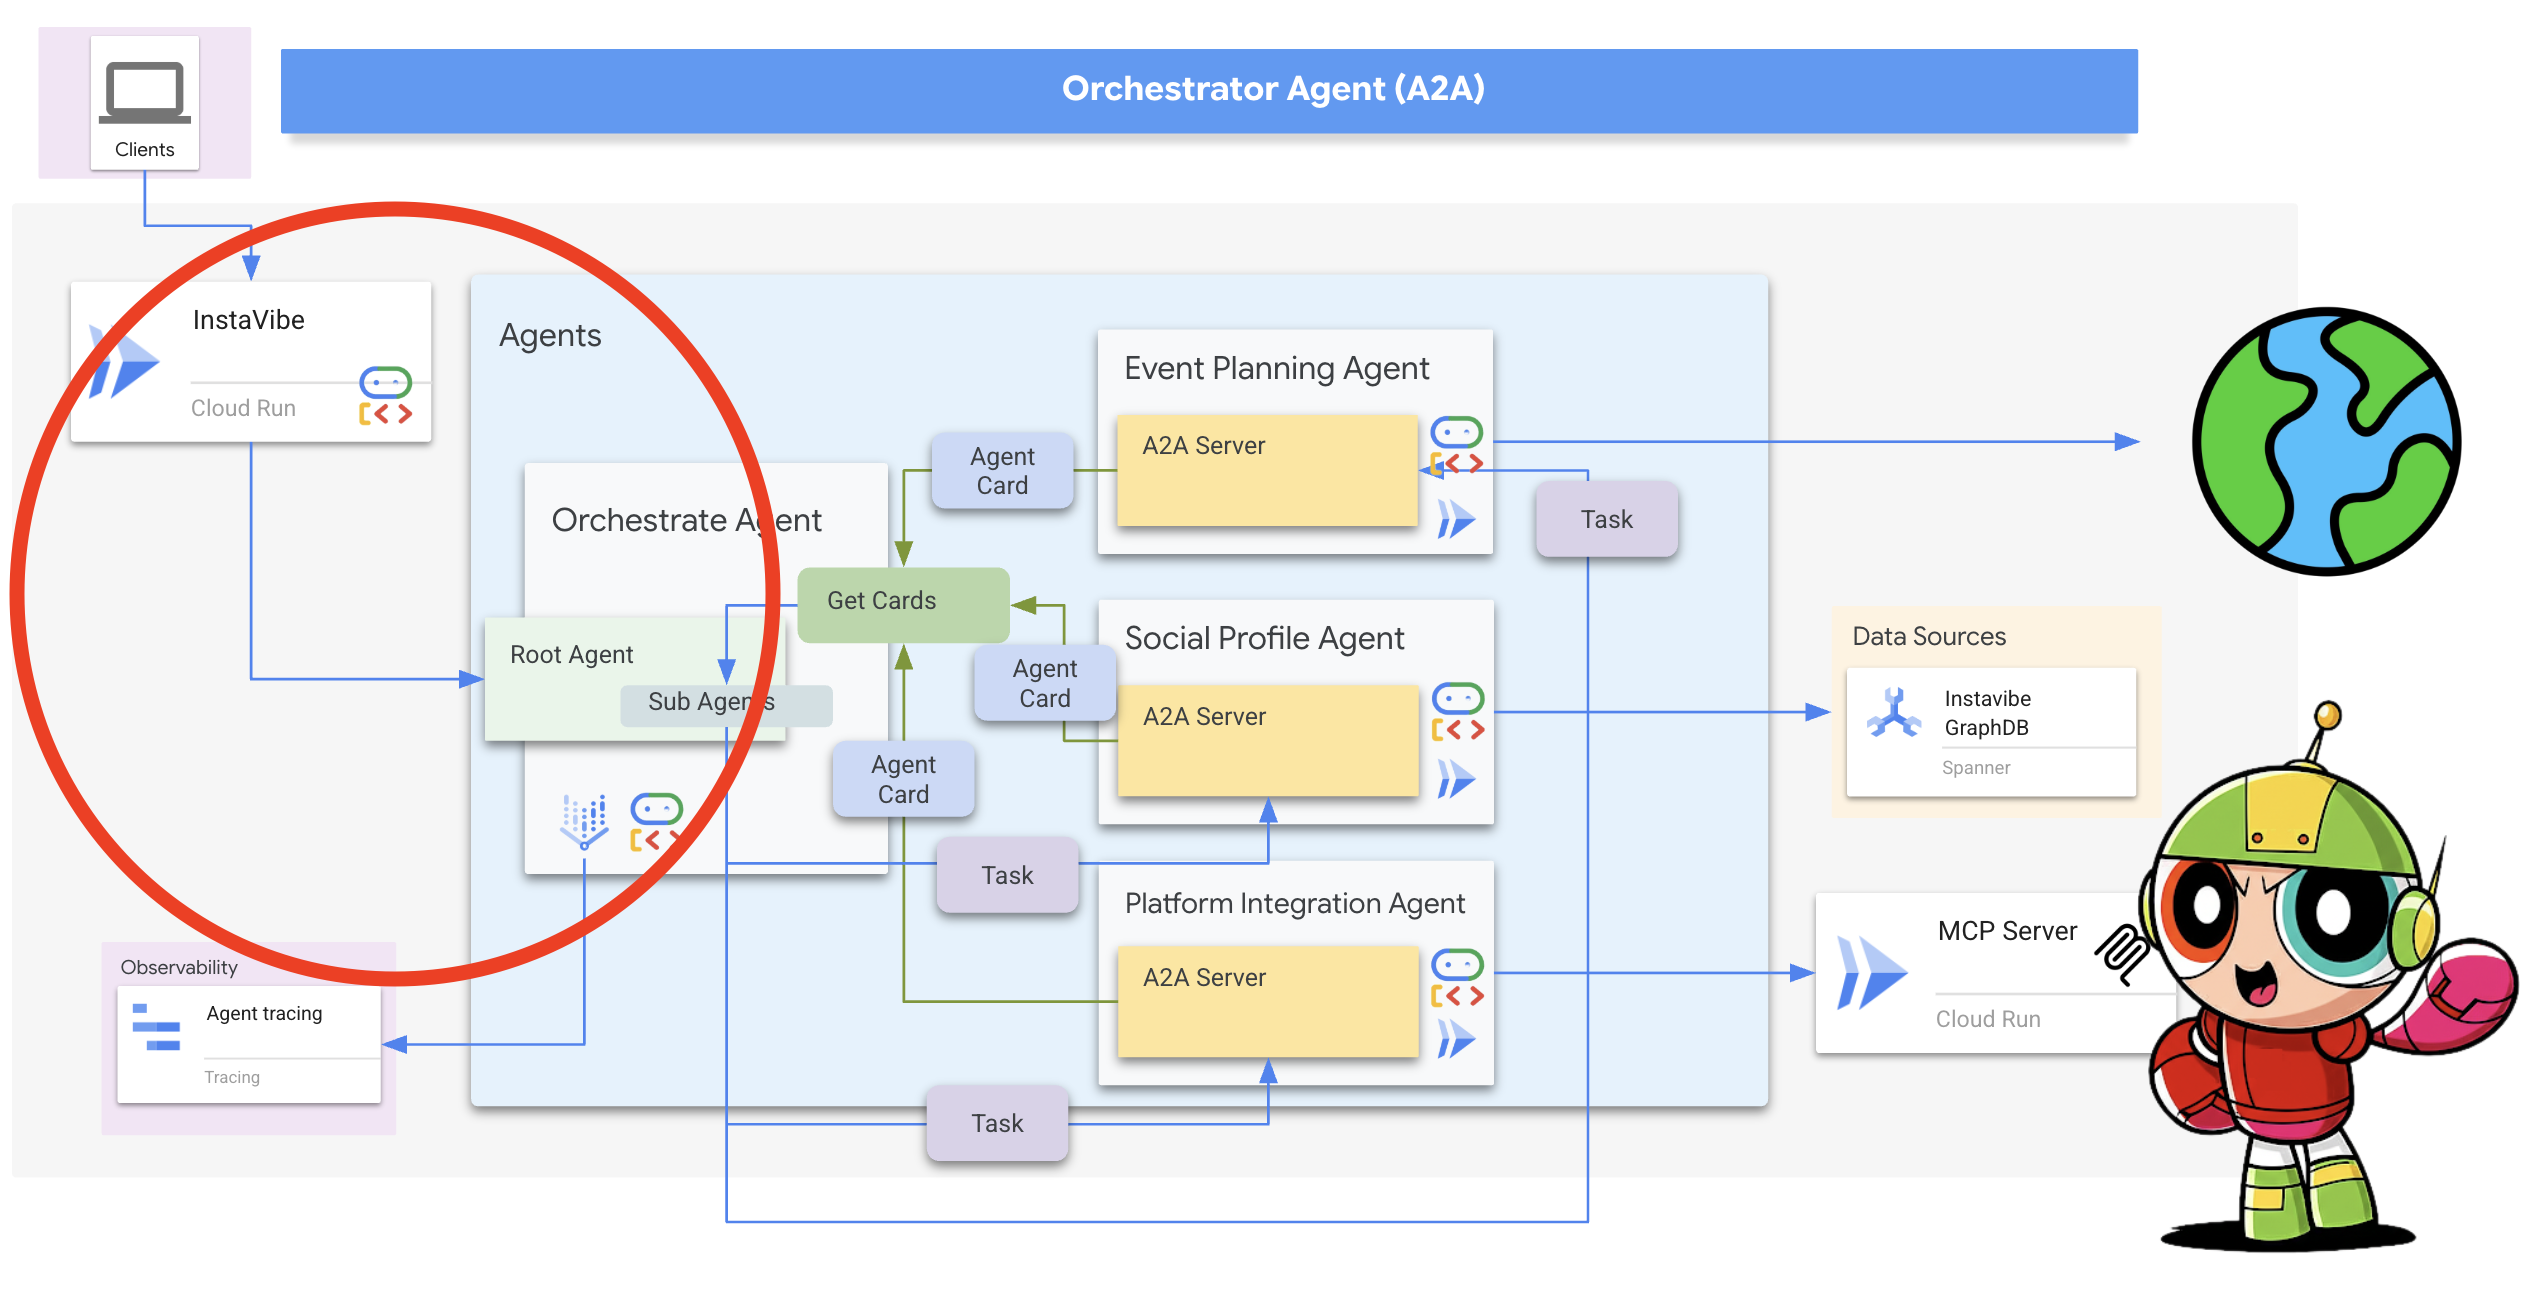
まず、デプロイされた Orchestrator エージェントの一意の ID を使用して Agent Engine クライアントを初期化するように、InstaVibe アプリケーション コードを変更する必要があります。この ID は、プラットフォームで正しいエージェント インスタンスをターゲットにするために必要です。
👉📝 ~/instavibe-bootstrap/instavibe/introvertally.py を開き、#REPLACE ME initiate agent_engine を次のコードに置き換えます。これにより、環境変数(まもなく設定します)から Agent Engine ID が取得され、クライアント オブジェクトが取得されます。
ORCHESTRATE_AGENT_ID = os.environ.get('ORCHESTRATE_AGENT_ID')
agent_engine = agent_engines.get(ORCHESTRATE_AGENT_ID)
InstaVibe の計画されたユーザーフローには、エージェントとの 2 つのやり取りが含まれます。1 つ目は推奨プランの生成、2 つ目はエージェントが実際にプラットフォームにイベントを投稿する前にユーザーに確認を求めることです。
InstaVibe ウェブ アプリケーション(Cloud Run で実行)と Orchestrator エージェント(Agent Engine で実行)が別々のサービスになったため、ウェブアプリは Agent Engine エンドポイントにリモート呼び出しを行って、エージェントとやり取りする必要があります。
👉📝 プランの推奨事項を生成する最初の呼び出しを行うコードを更新しましょう。同じ introvertally.py ファイルで、#REPLACE ME Query remote agent get plan を次のスニペットに置き換えます。このスニペットは、agent_engine クライアントを使用してユーザーのリクエストを送信します。
agent_engine.stream_query(
                user_id=user_id,
                message=prompt_message,
            )
👉📝 次に、ユーザーの確認を処理するコード(ユーザーが [プランを確認] をクリックしたときなど)を更新します。これにより、Agent Engine の同じ会話にフォローアップ メッセージが送信され、Orchestrator にイベントの投稿を続行するよう指示します(Orchestrator はこれを Platform Integration エージェントに委任します)。introvertally.py の確認用の #REPLACE ME Query remote agent for confirmation を次のように置き換えます。
agent_engine.stream_query(
            user_id=agent_session_user_id,
            message=prompt_message,
        )
ウェブ アプリケーションのルートは、これらの関数にアクセスする必要があります。introvertally.py の必要な関数が Flask ルートファイルにインポートされていることを確認します。
👉📝 cd ~/instavibe-bootstrap/instavibe/ally_routes.py で、まずインスタンスを指し、# REPLACE ME TO ADD IMPORT を次のように置き換えます。
from introvertally import call_agent_for_plan, post_plan_event
👉📝 InstaVibe にプロトタイプ機能を追加するには、~/instavibe-bootstrap/instavibe/templates/base.html で <!–REPLACE_ME_LINK_TO_INTROVERT_ALLY–> を次のように置き換えます。
            <li class="nav-item">
              <a class="nav-link" href="{{ url_for('ally.introvert_ally_page') }}">Introvert Ally</a>
            </li>
InstaVibe アプリを再デプロイするには、Agent Engine にデプロイした Orchestrator エージェントの特定の Resource ID が必要です。
現在、gcloud を介してプログラムで取得することは制限されている可能性があるため、ヘルパー Python スクリプト(ワークショップで提供される temp-endpoint.py)を使用して ID を取得し、環境変数に保存します。
👉💻 次のコマンドを実行して、スクリプトを実行します。スクリプトは、Agent Engine エンドポイント ID を取得し、エージェント エンジンのデフォルトのサービス アカウントに必要な権限を付与します(注: スクリプトは、現在ユーザーが変更できないデフォルトのサービス アカウントを使用するように構成されています)。
. ~/instavibe-bootstrap/set_env.sh
cd ~/instavibe-bootstrap/instavibe/
source ~/instavibe-bootstrap/env/bin/activate
python temp-endpoint.py
export ORCHESTRATE_AGENT_ID=$(cat temp_endpoint.txt)
echo "ORCHESTRATE_AGENT_ID set to: ${ORCHESTRATE_AGENT_ID}"

最後に、更新されたコードと新しい ORCHESTRATE_AGENT_ID 環境変数を使用して InstaVibe ウェブ アプリケーションを再デプロイし、Agent Engine で実行されているエージェントに接続する方法を認識できるようにする必要があります。
👉💻 次のコマンドは、InstaVibe アプリケーション イメージを再構築し、新しいバージョンを Cloud Run にデプロイします。
. ~/instavibe-bootstrap/set_env.sh

cd ~/instavibe-bootstrap/instavibe/

export IMAGE_TAG="latest"
export APP_FOLDER_NAME="instavibe"
export IMAGE_NAME="instavibe-webapp"
export IMAGE_PATH="${REGION}-docker.pkg.dev/${PROJECT_ID}/${REPO_NAME}/${IMAGE_NAME}:${IMAGE_TAG}"
export SERVICE_NAME="instavibe"

echo "Building ${APP_FOLDER_NAME} webapp image..."
gcloud builds submit . \
  --tag=${IMAGE_PATH} \
  --project=${PROJECT_ID}

echo "Deploying ${SERVICE_NAME} to Cloud Run..."

gcloud run deploy ${SERVICE_NAME} \
  --image=${IMAGE_PATH} \
  --platform=managed \
  --region=${REGION} \
  --allow-unauthenticated \
  --set-env-vars="SPANNER_INSTANCE_ID=${SPANNER_INSTANCE_ID}" \
  --set-env-vars="SPANNER_DATABASE_ID=${SPANNER_DATABASE_ID}" \
  --set-env-vars="APP_HOST=0.0.0.0" \
  --set-env-vars="APP_PORT=8080" \
  --set-env-vars="GOOGLE_CLOUD_LOCATION=${REGION}" \
  --set-env-vars="GOOGLE_CLOUD_PROJECT=${PROJECT_ID}" \
  --set-env-vars="GOOGLE_MAPS_API_KEY=${GOOGLE_MAPS_API_KEY}" \
  --set-env-vars="ORCHESTRATE_AGENT_ID=${ORCHESTRATE_AGENT_ID}" \
  --project=${PROJECT_ID} \
  --min-instances=1 \
  --cpu=2 \
  --memory=2Gi
最終的なデプロイが完了したら、別のブラウザタブで InstaVibe アプリケーションの URL に移動します。
AI を活用した InstaVibe のフル機能をテストする
「InstaVibe Ally」機能がリリースされました。この機能は、Vertex AI Agent Engine を介してオーケストレートされ、A2A を介して通信するマルチエージェント システムによって実現されています。
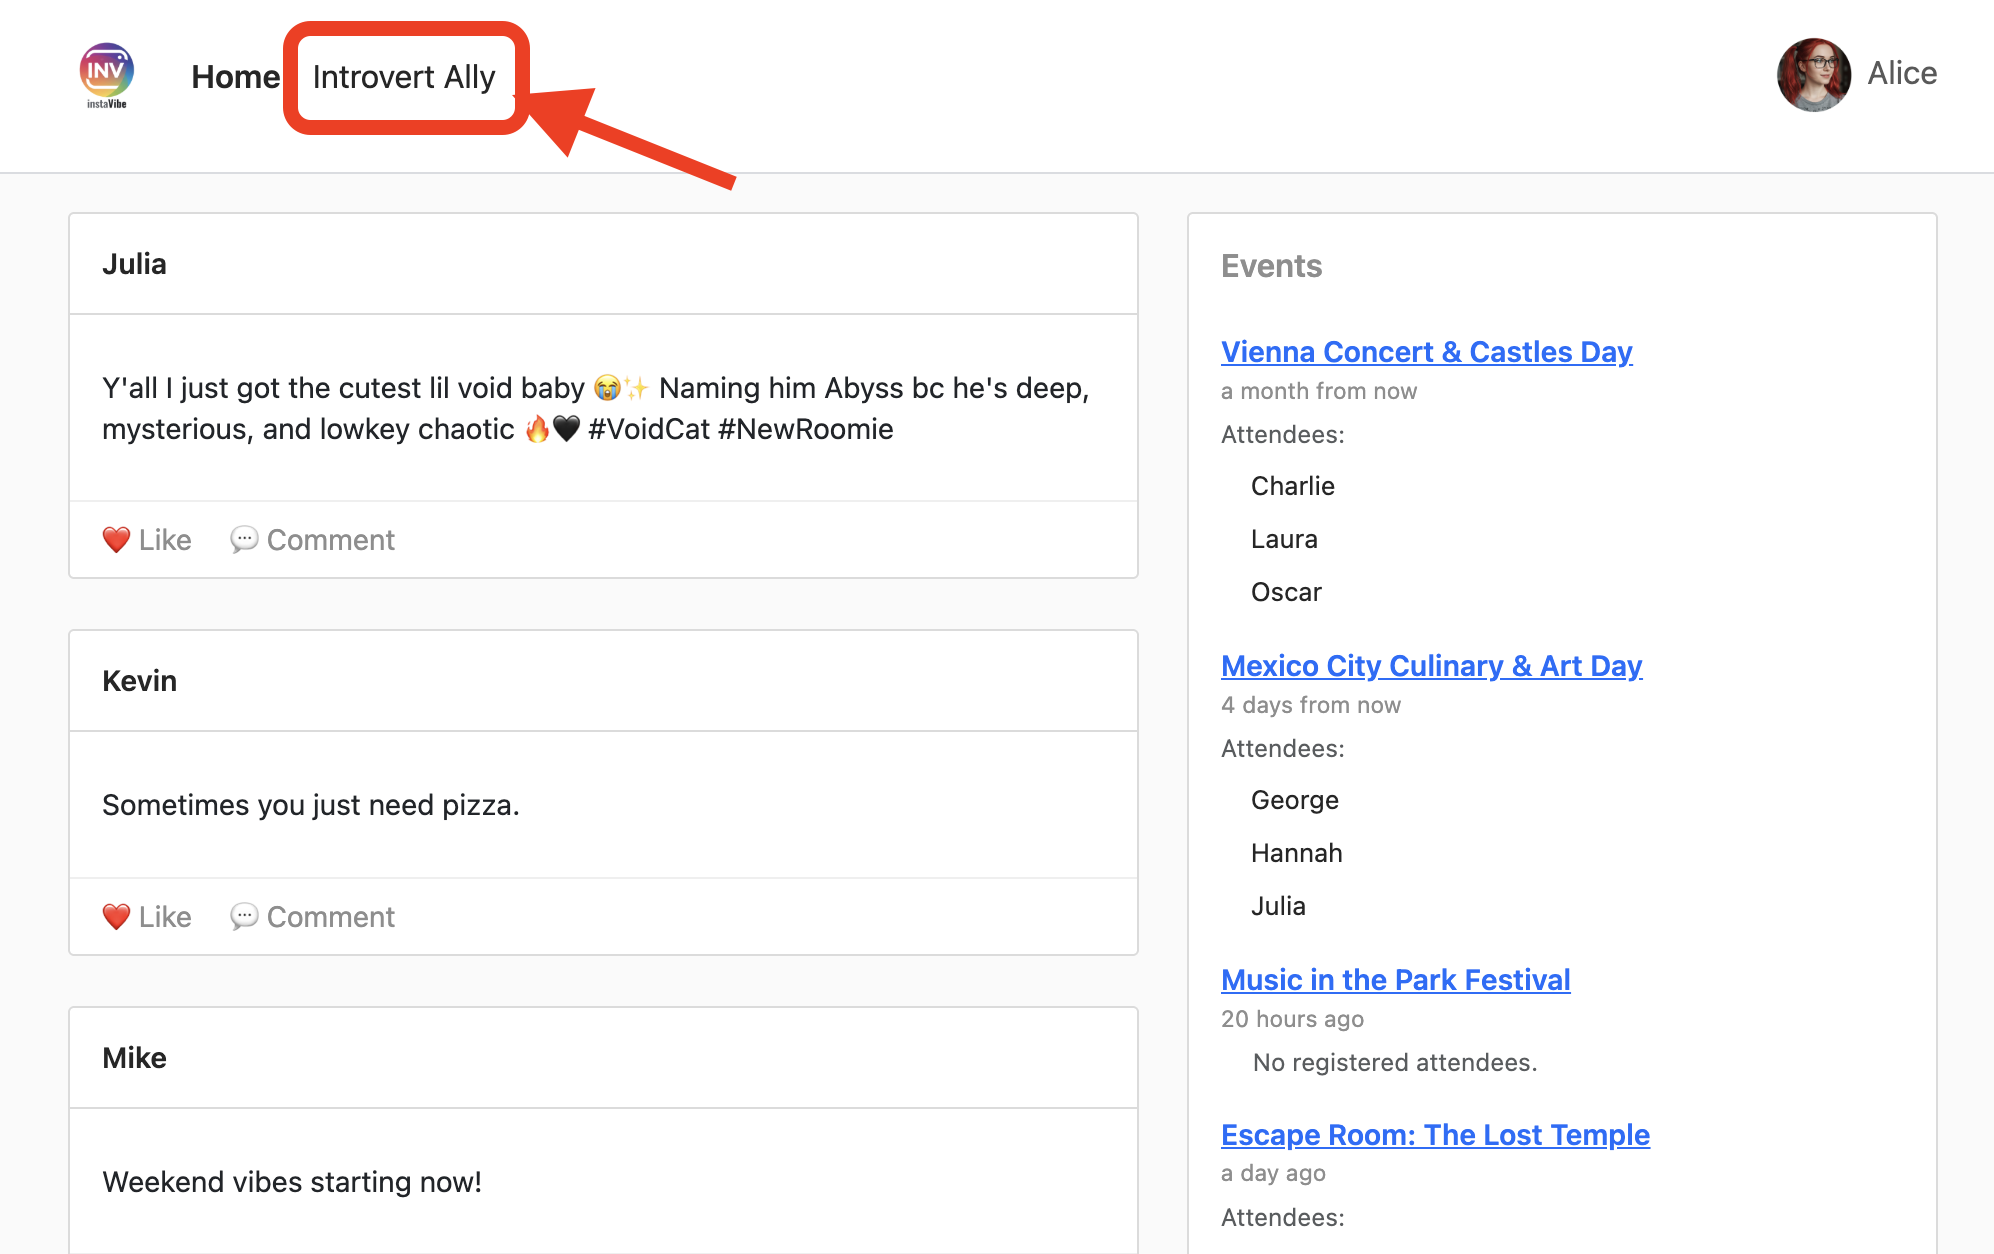
[InstaVibe Ally] をクリックして、イベントの計画を依頼します。
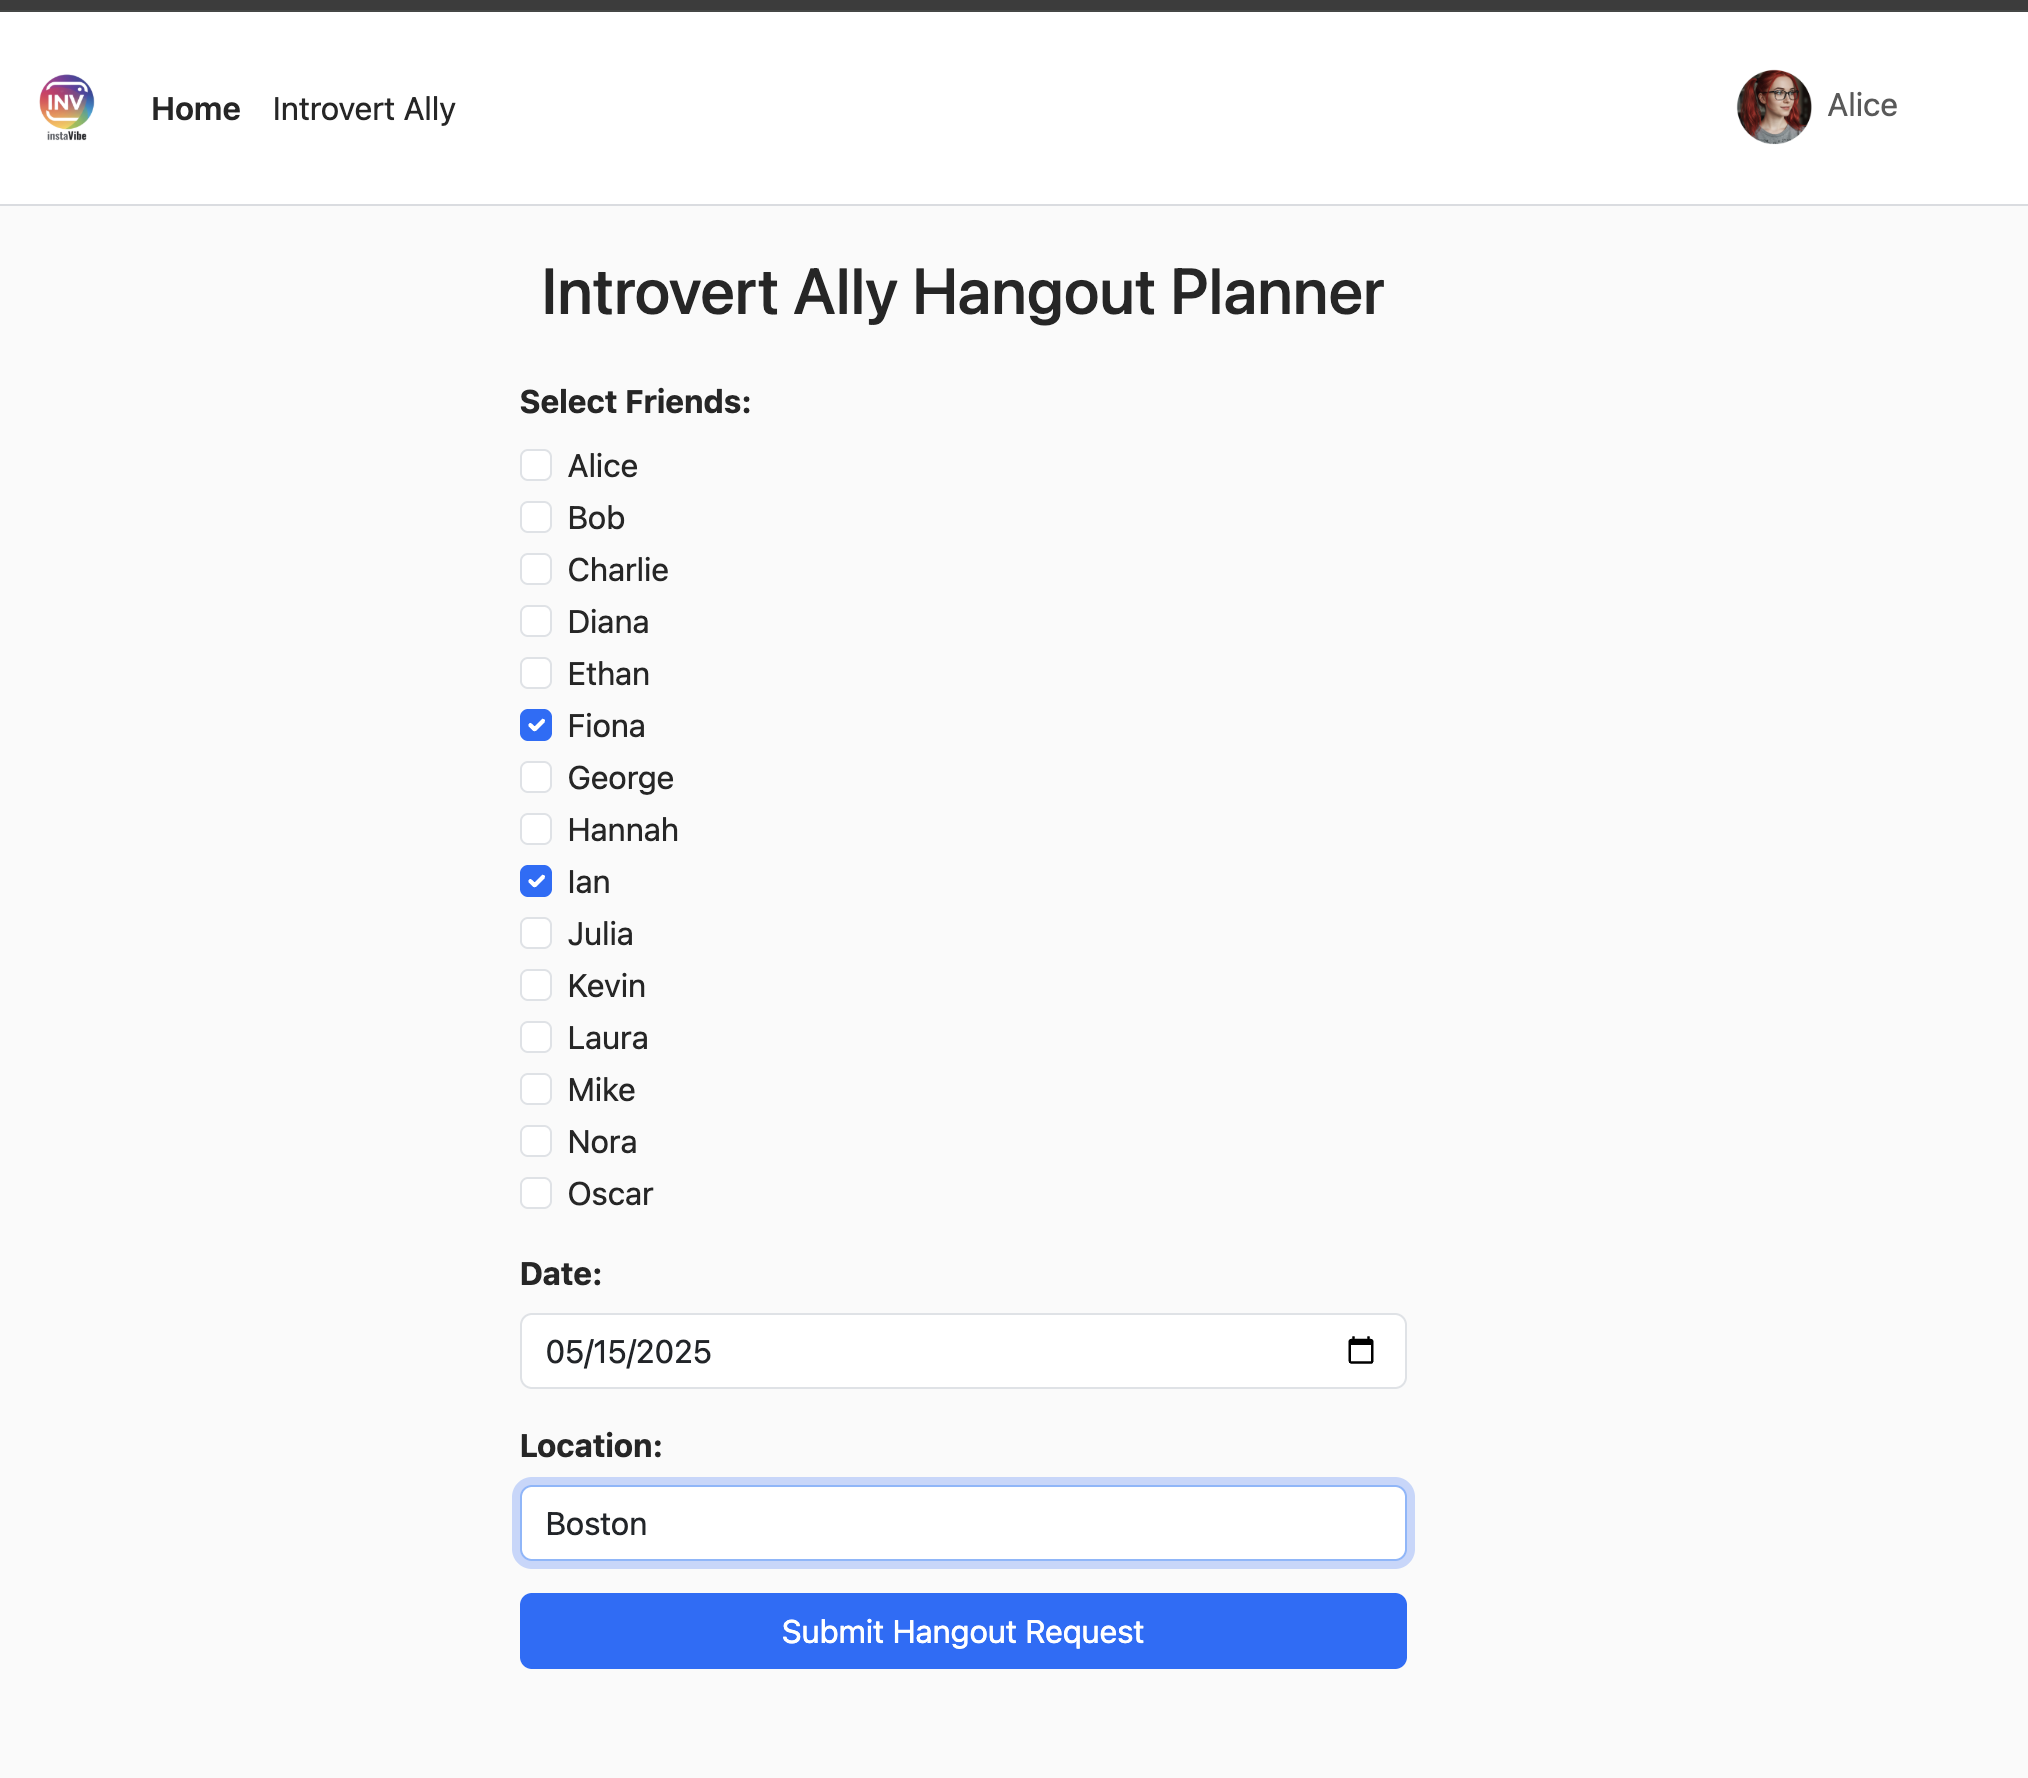
エージェントの作業中に、右側のアクティビティ ログを確認します(90 ~ 120 秒ほどかかることがあります)。プランが表示されたら、内容を確認して [このプランを確認] をクリックし、投稿に進みます。
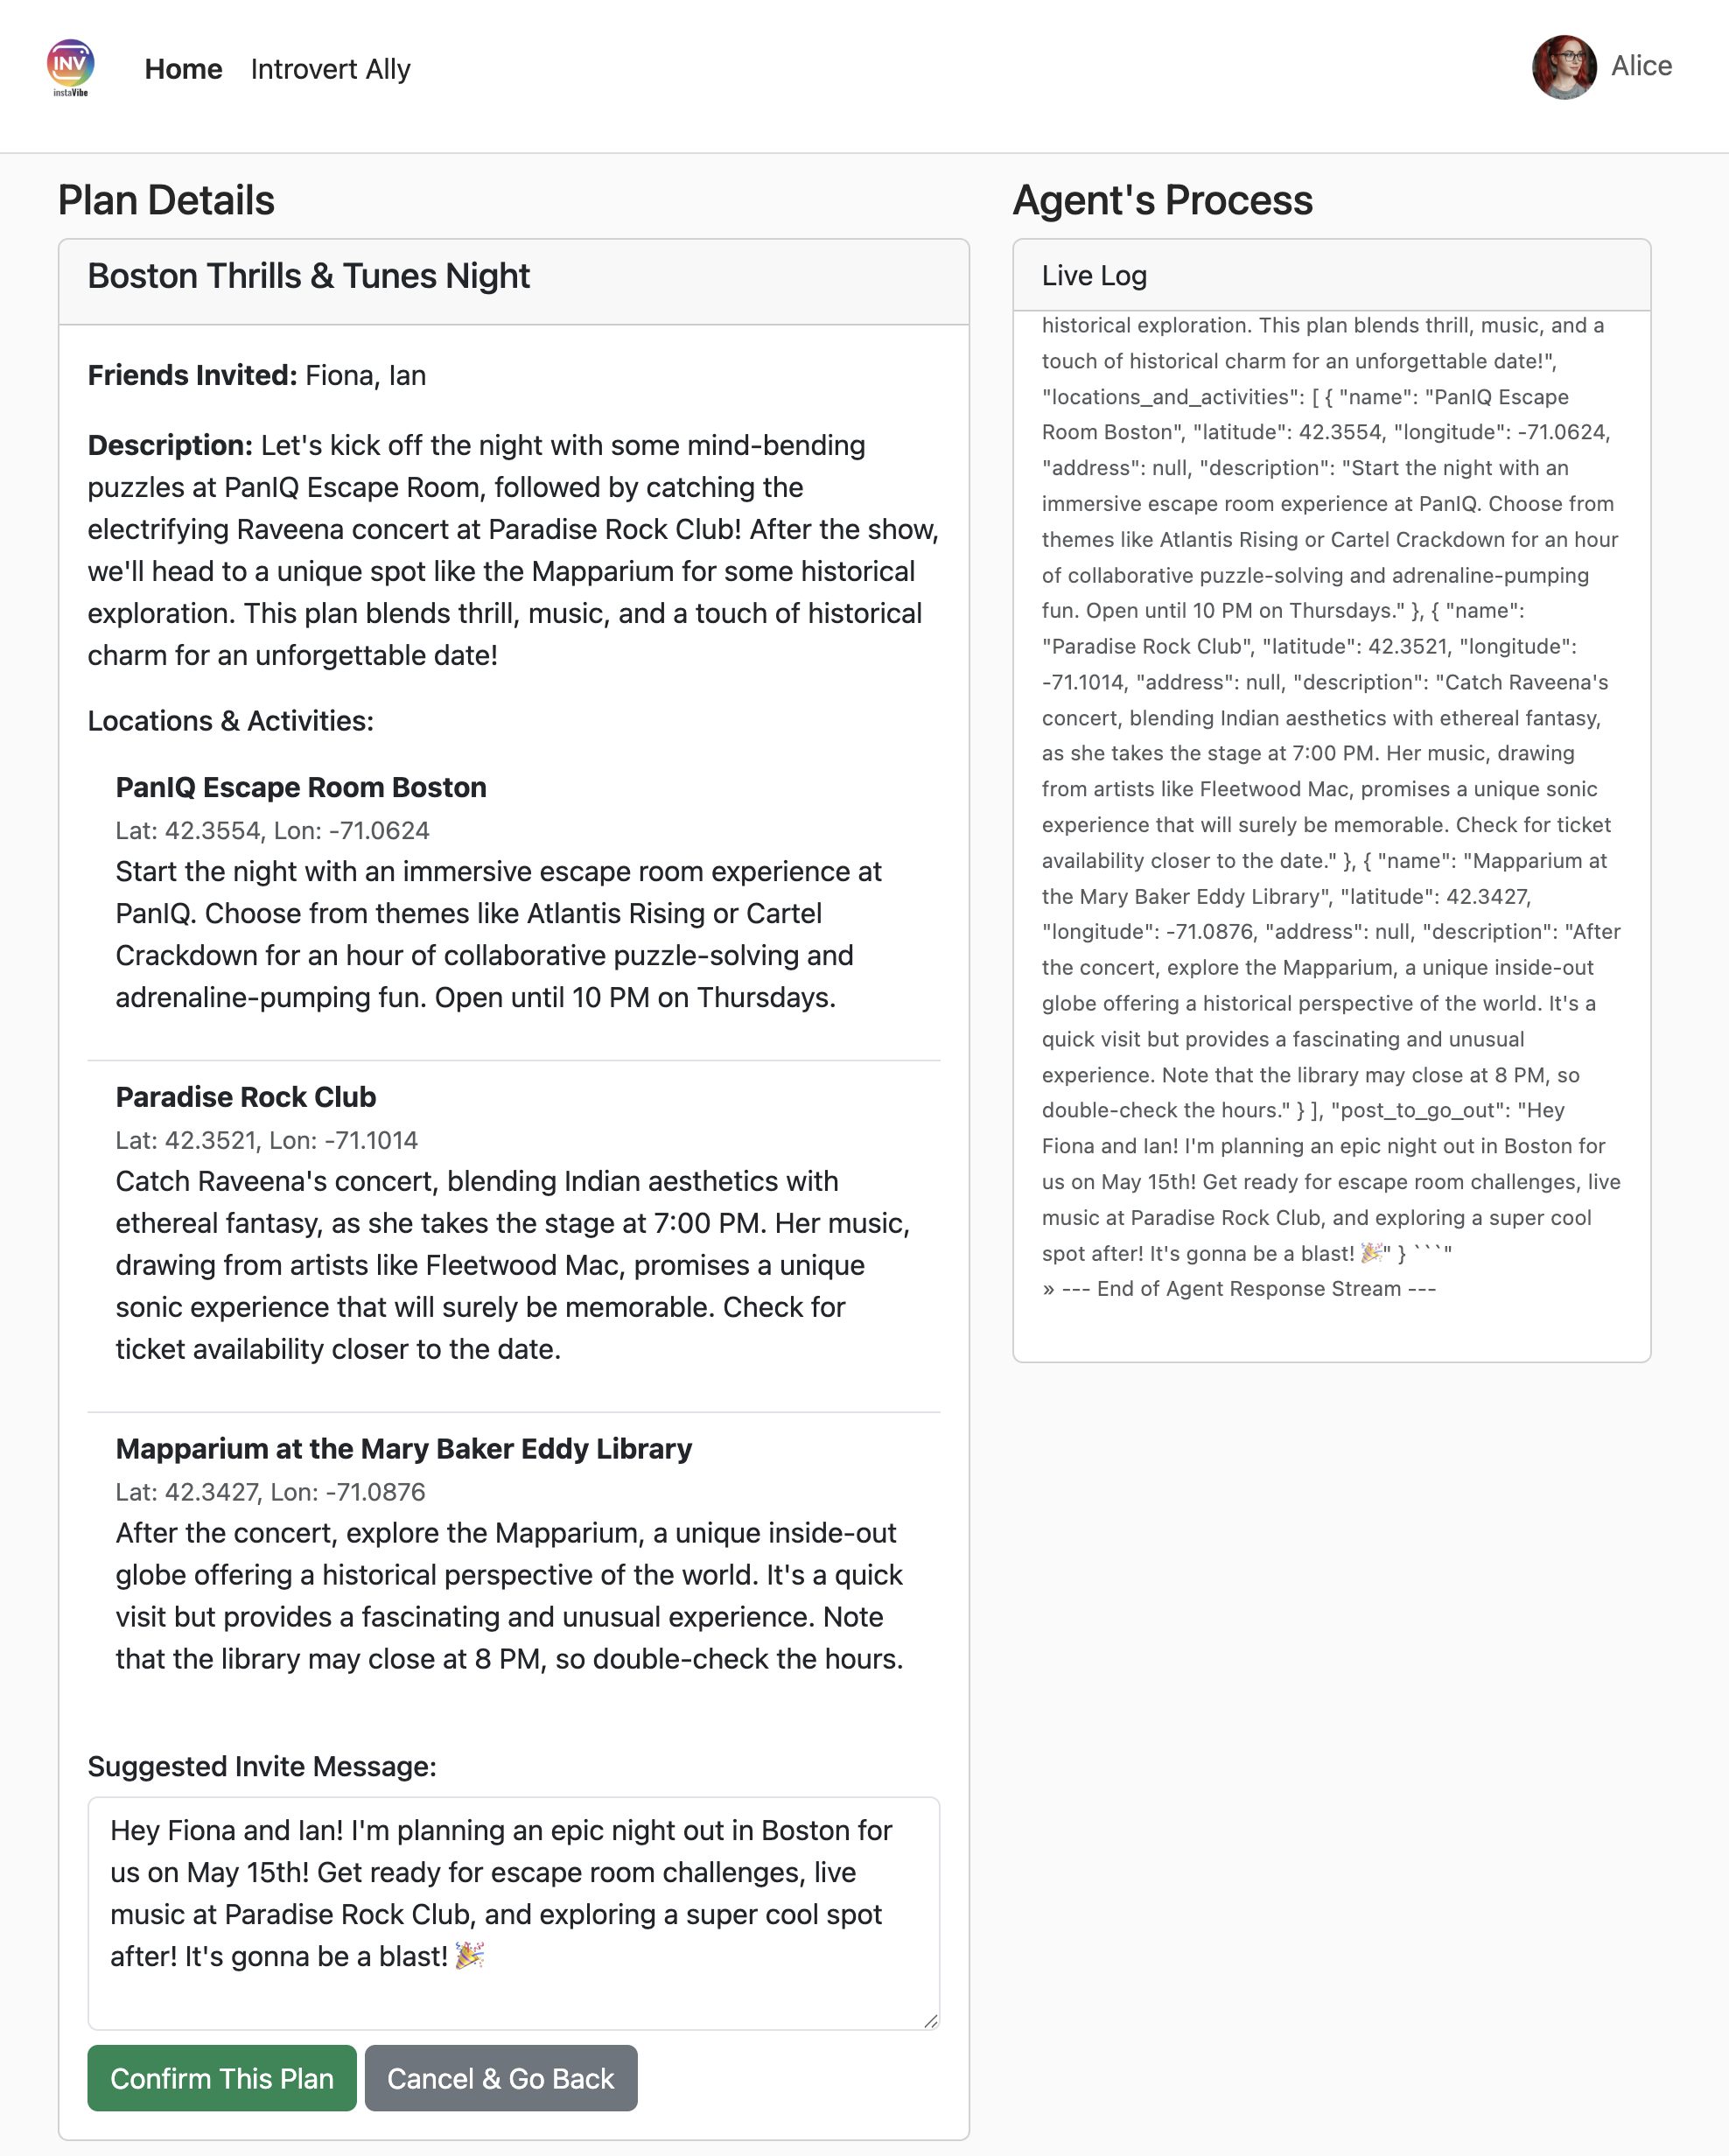
オーケストレーターは、InstaVibe 内に投稿とイベントを作成するようプラットフォーム エージェントに指示します。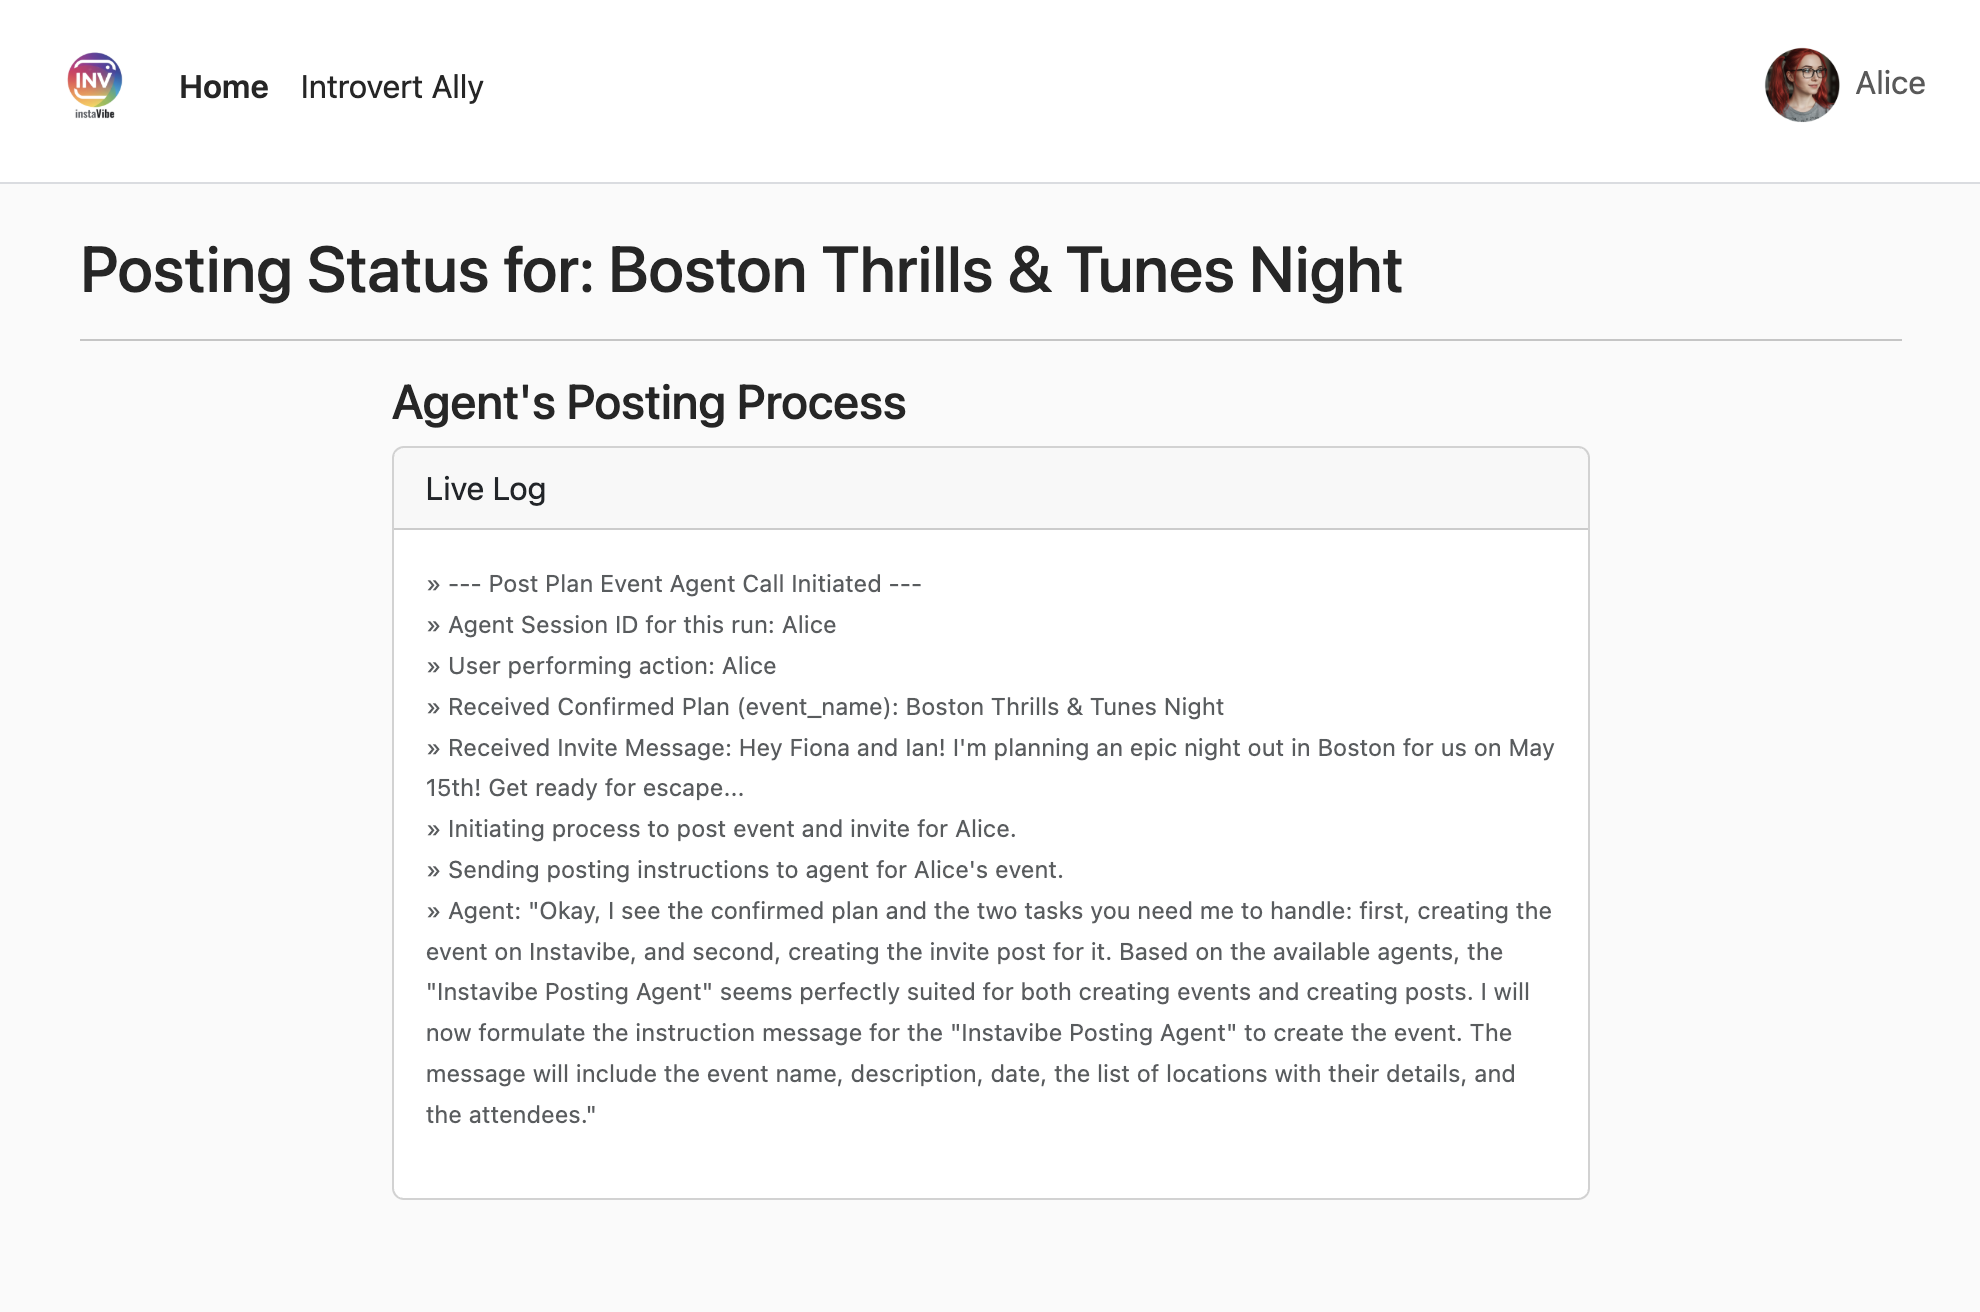
InstaVibe のホームページで新しい投稿とイベントを確認します。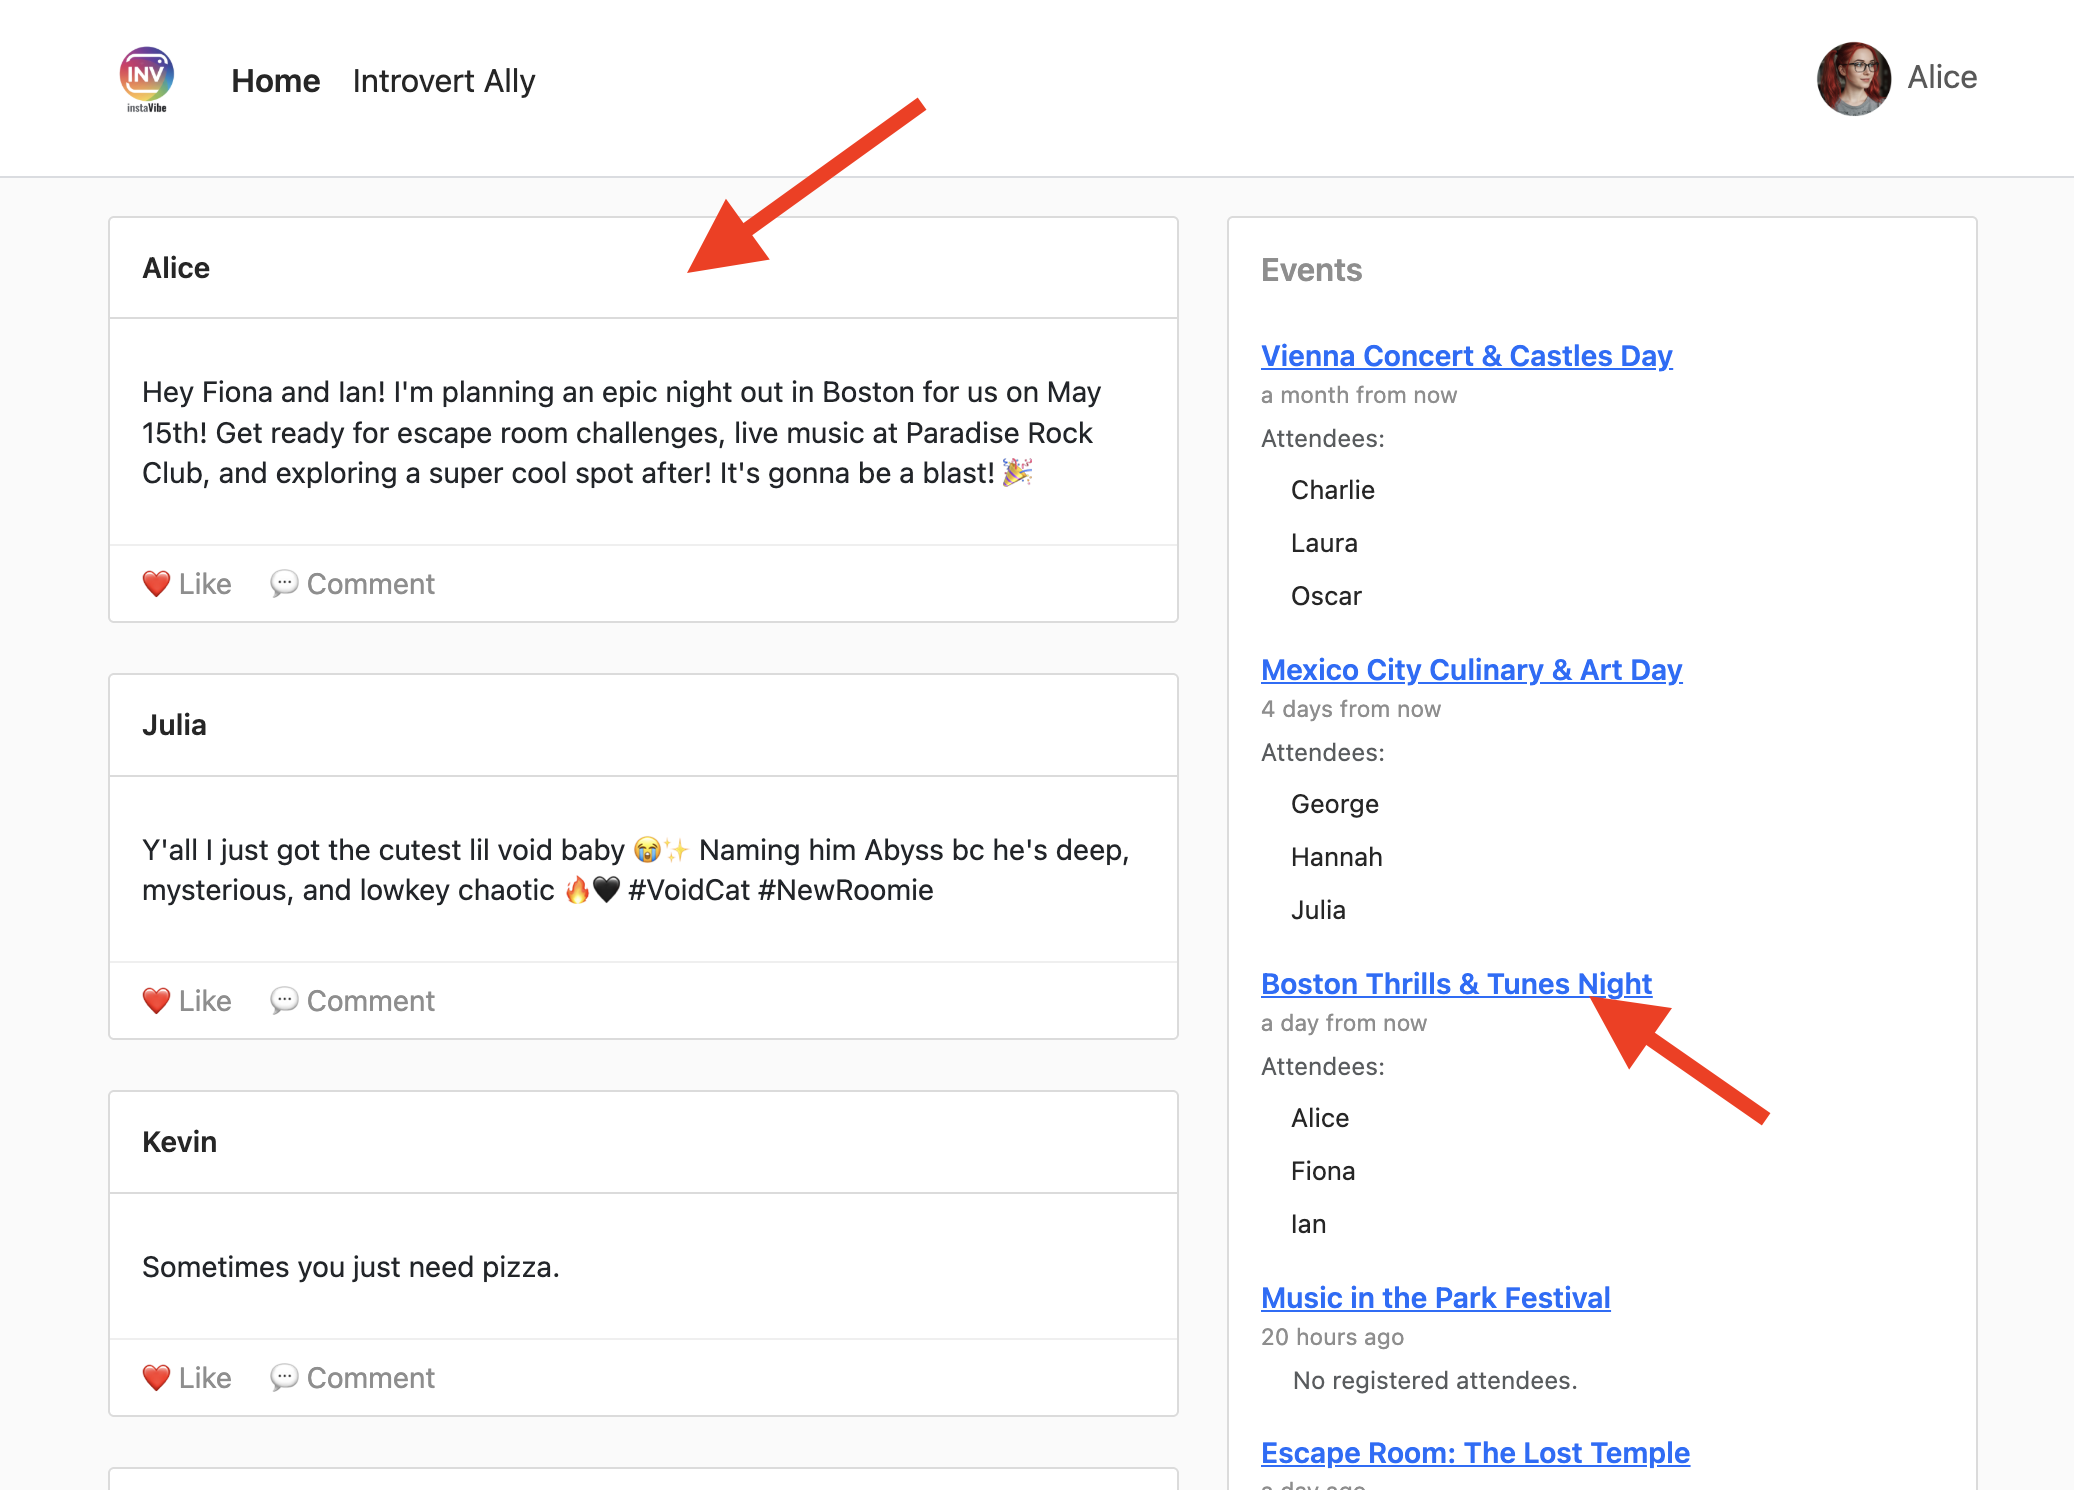
イベントページには、エージェントによって生成された詳細が反映されます。
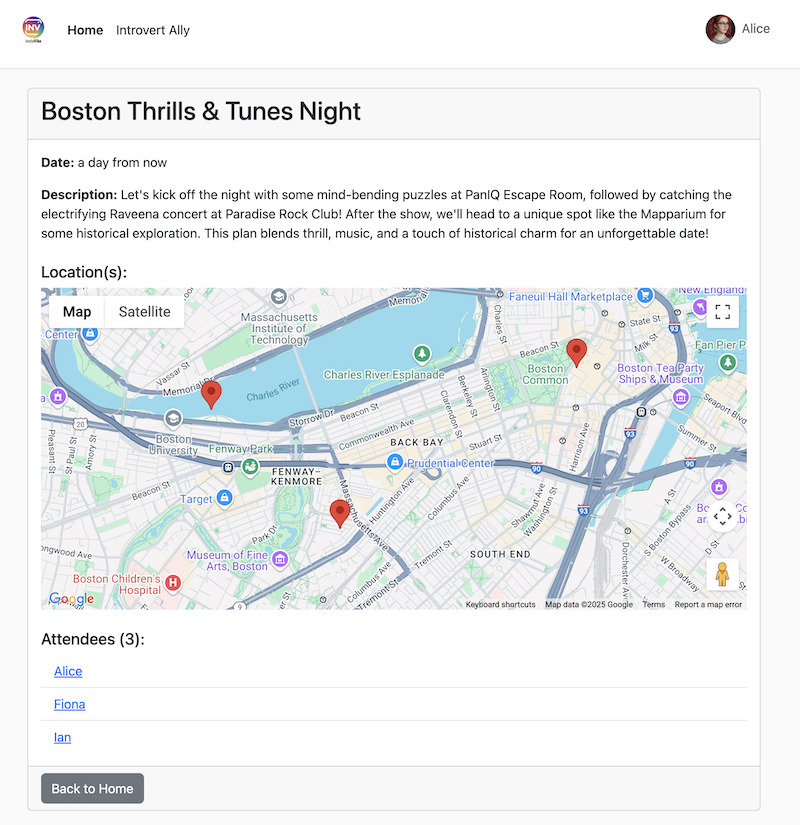
Cloud Trace でパフォーマンスを分析する
この処理には時間がかかることがあります。Vertex AI Agent Engine は Cloud Trace と統合されているため、マルチエージェント システムのレイテンシを分析できます。
Google Cloud コンソールの [トレース] に移動し、スパンで agent_run[orchestrate_agent] を選択します。いくつかのスパンが表示されるので、クリックします。
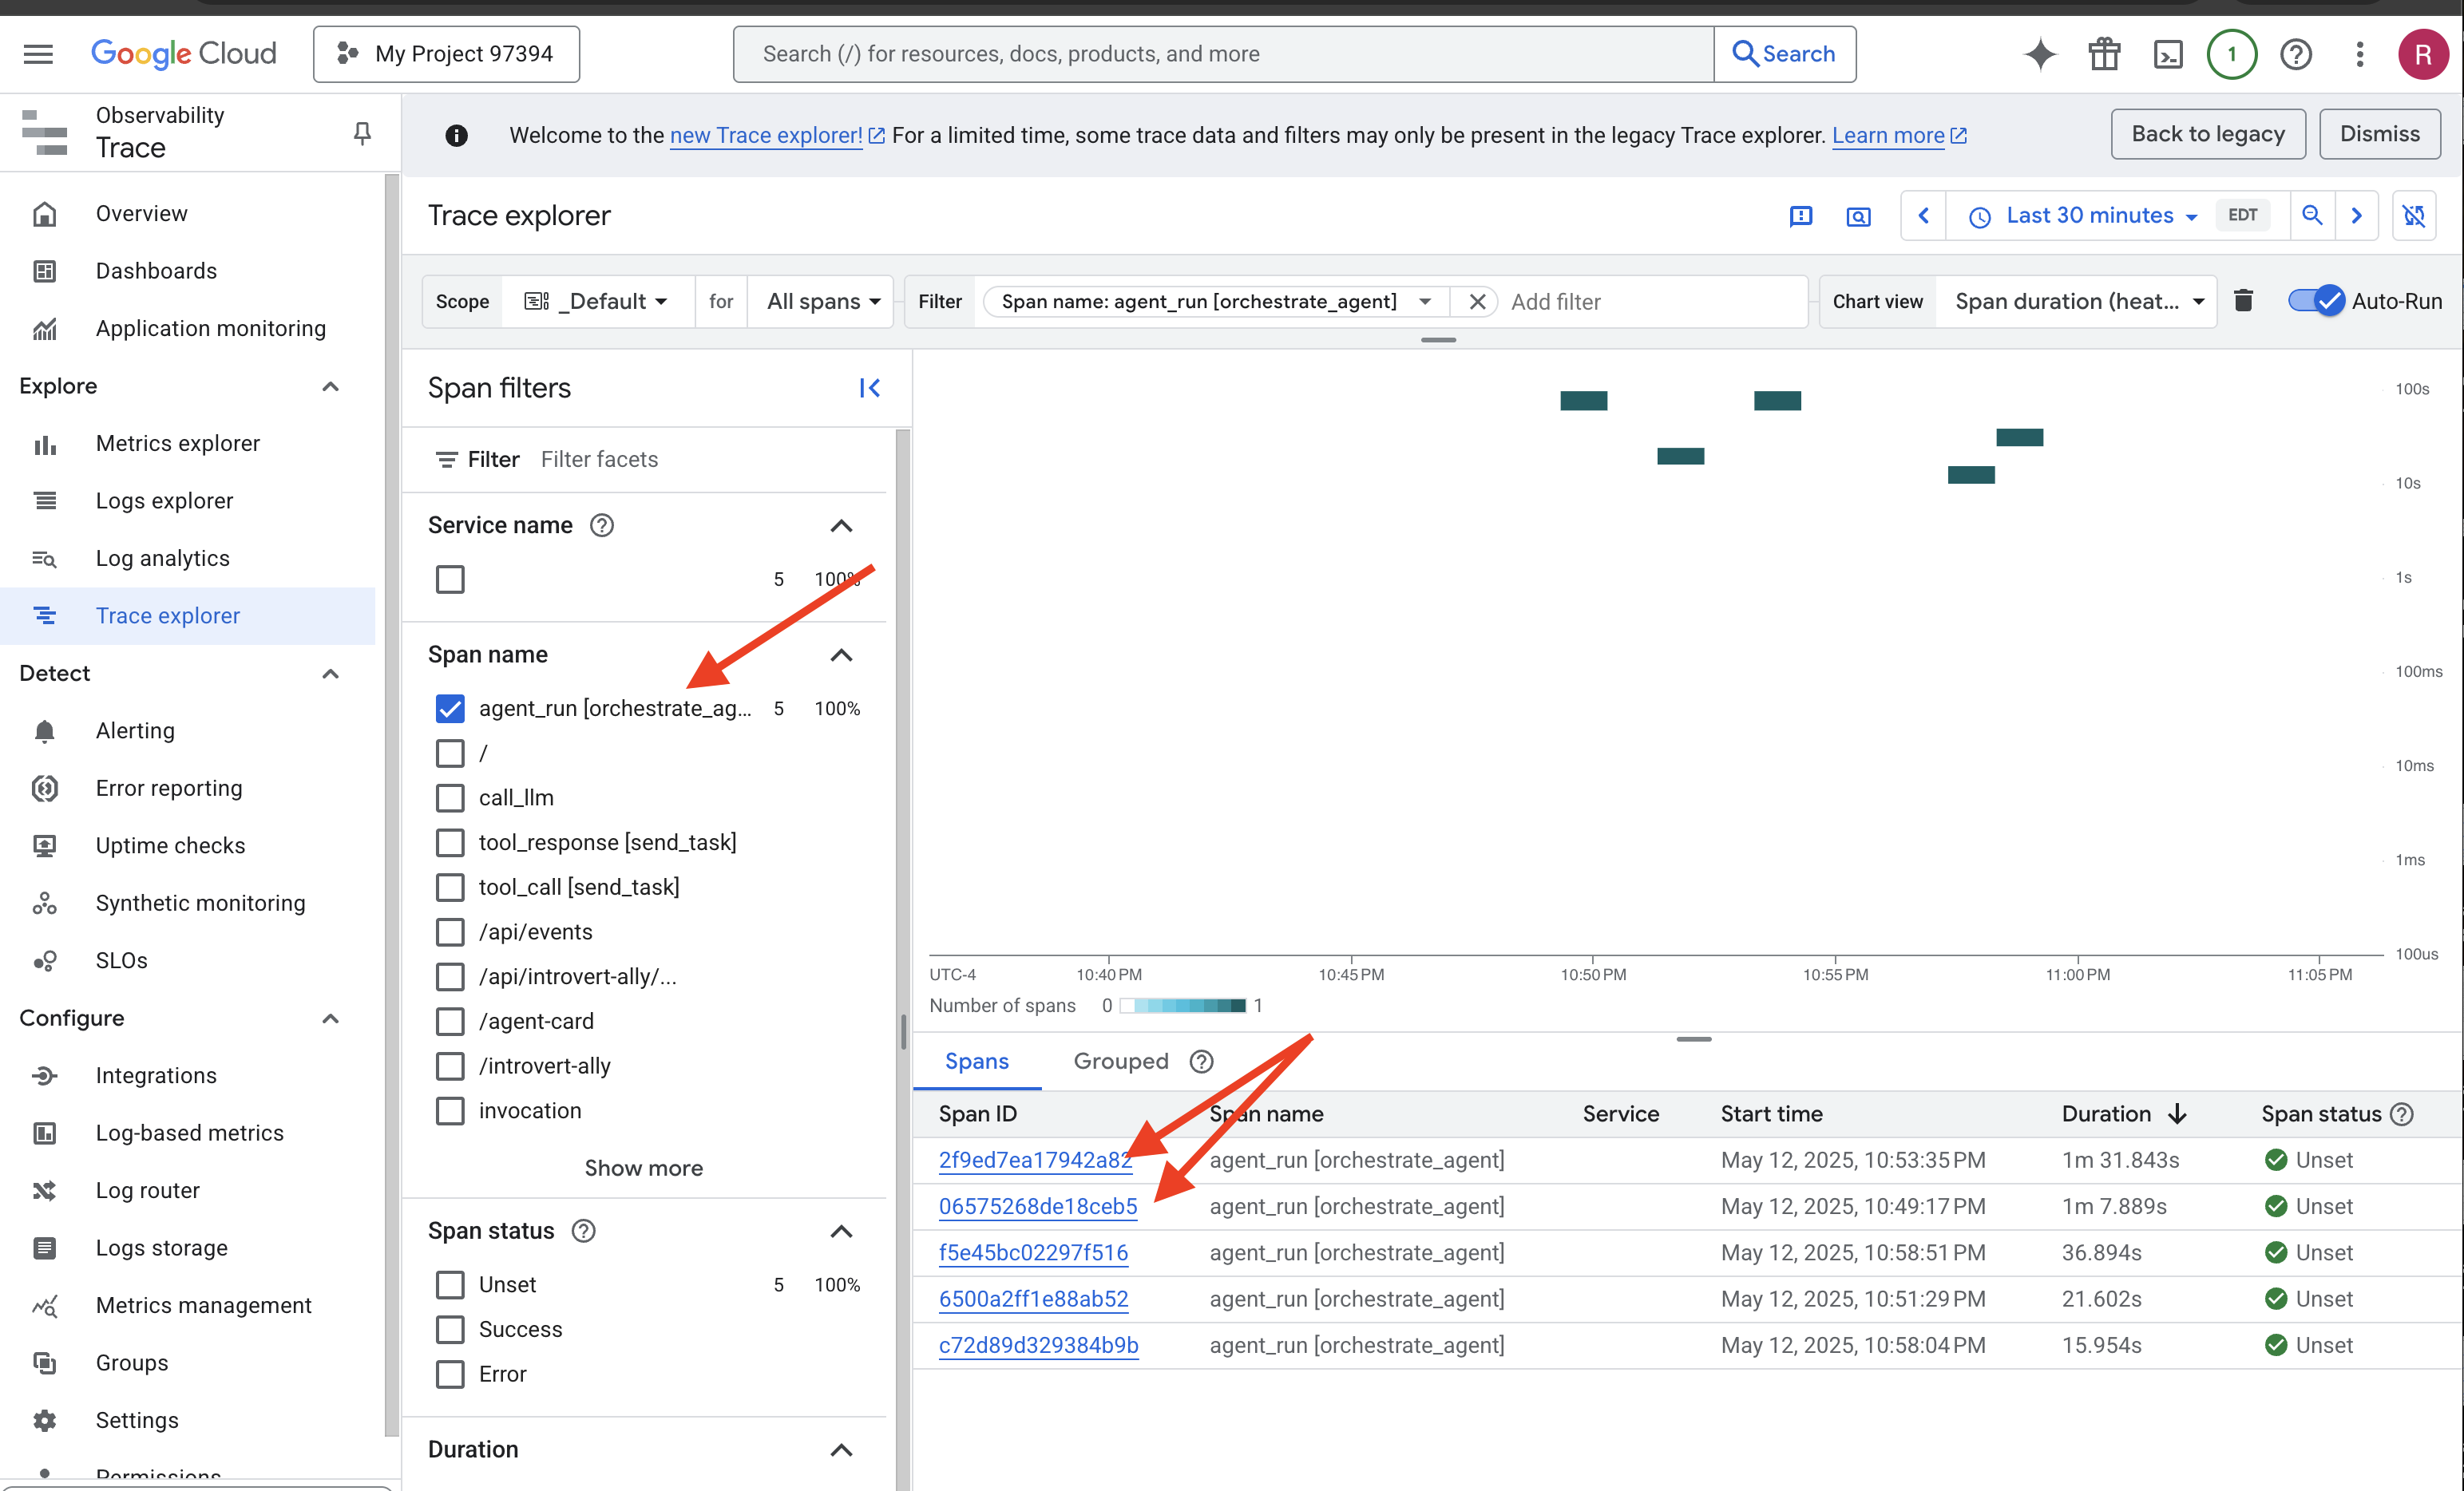
トレースの詳細で、時間がかかった部分を特定できます。たとえば、検索グラウンディングと複雑な生成により、プランナー エージェントの呼び出しでレイテンシが高くなることがあります。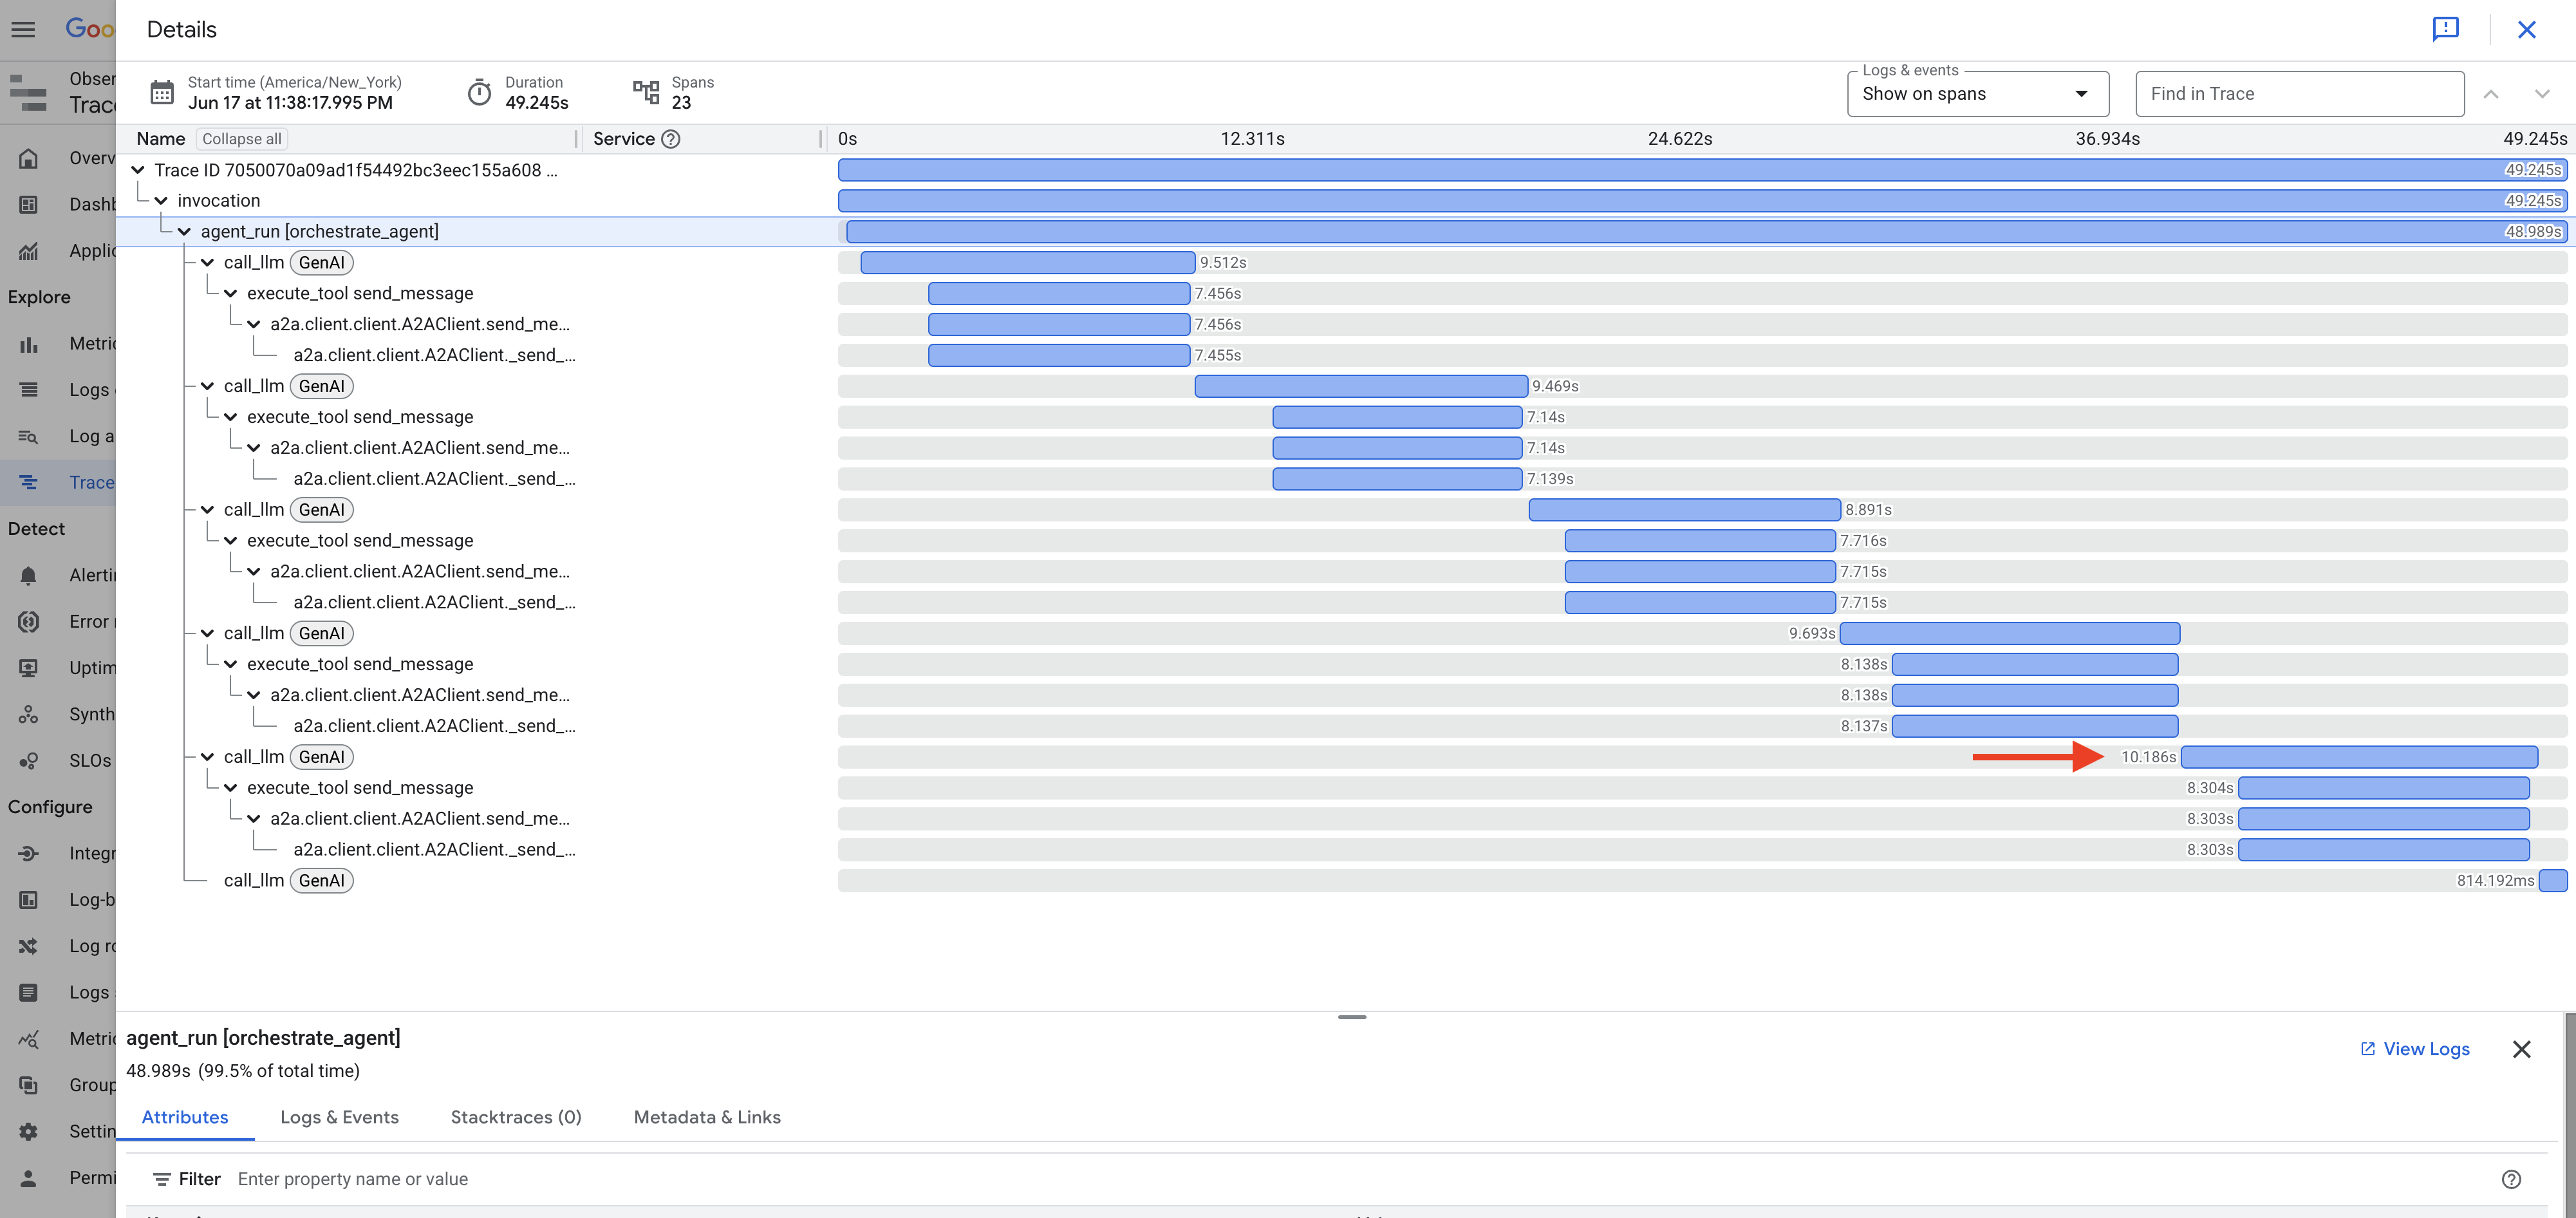
同様に、投稿やイベントを作成する際に、Orchestrator がデータを処理し、Platform エージェントのツール呼び出しを準備するのにかかる時間が表示されることがあります。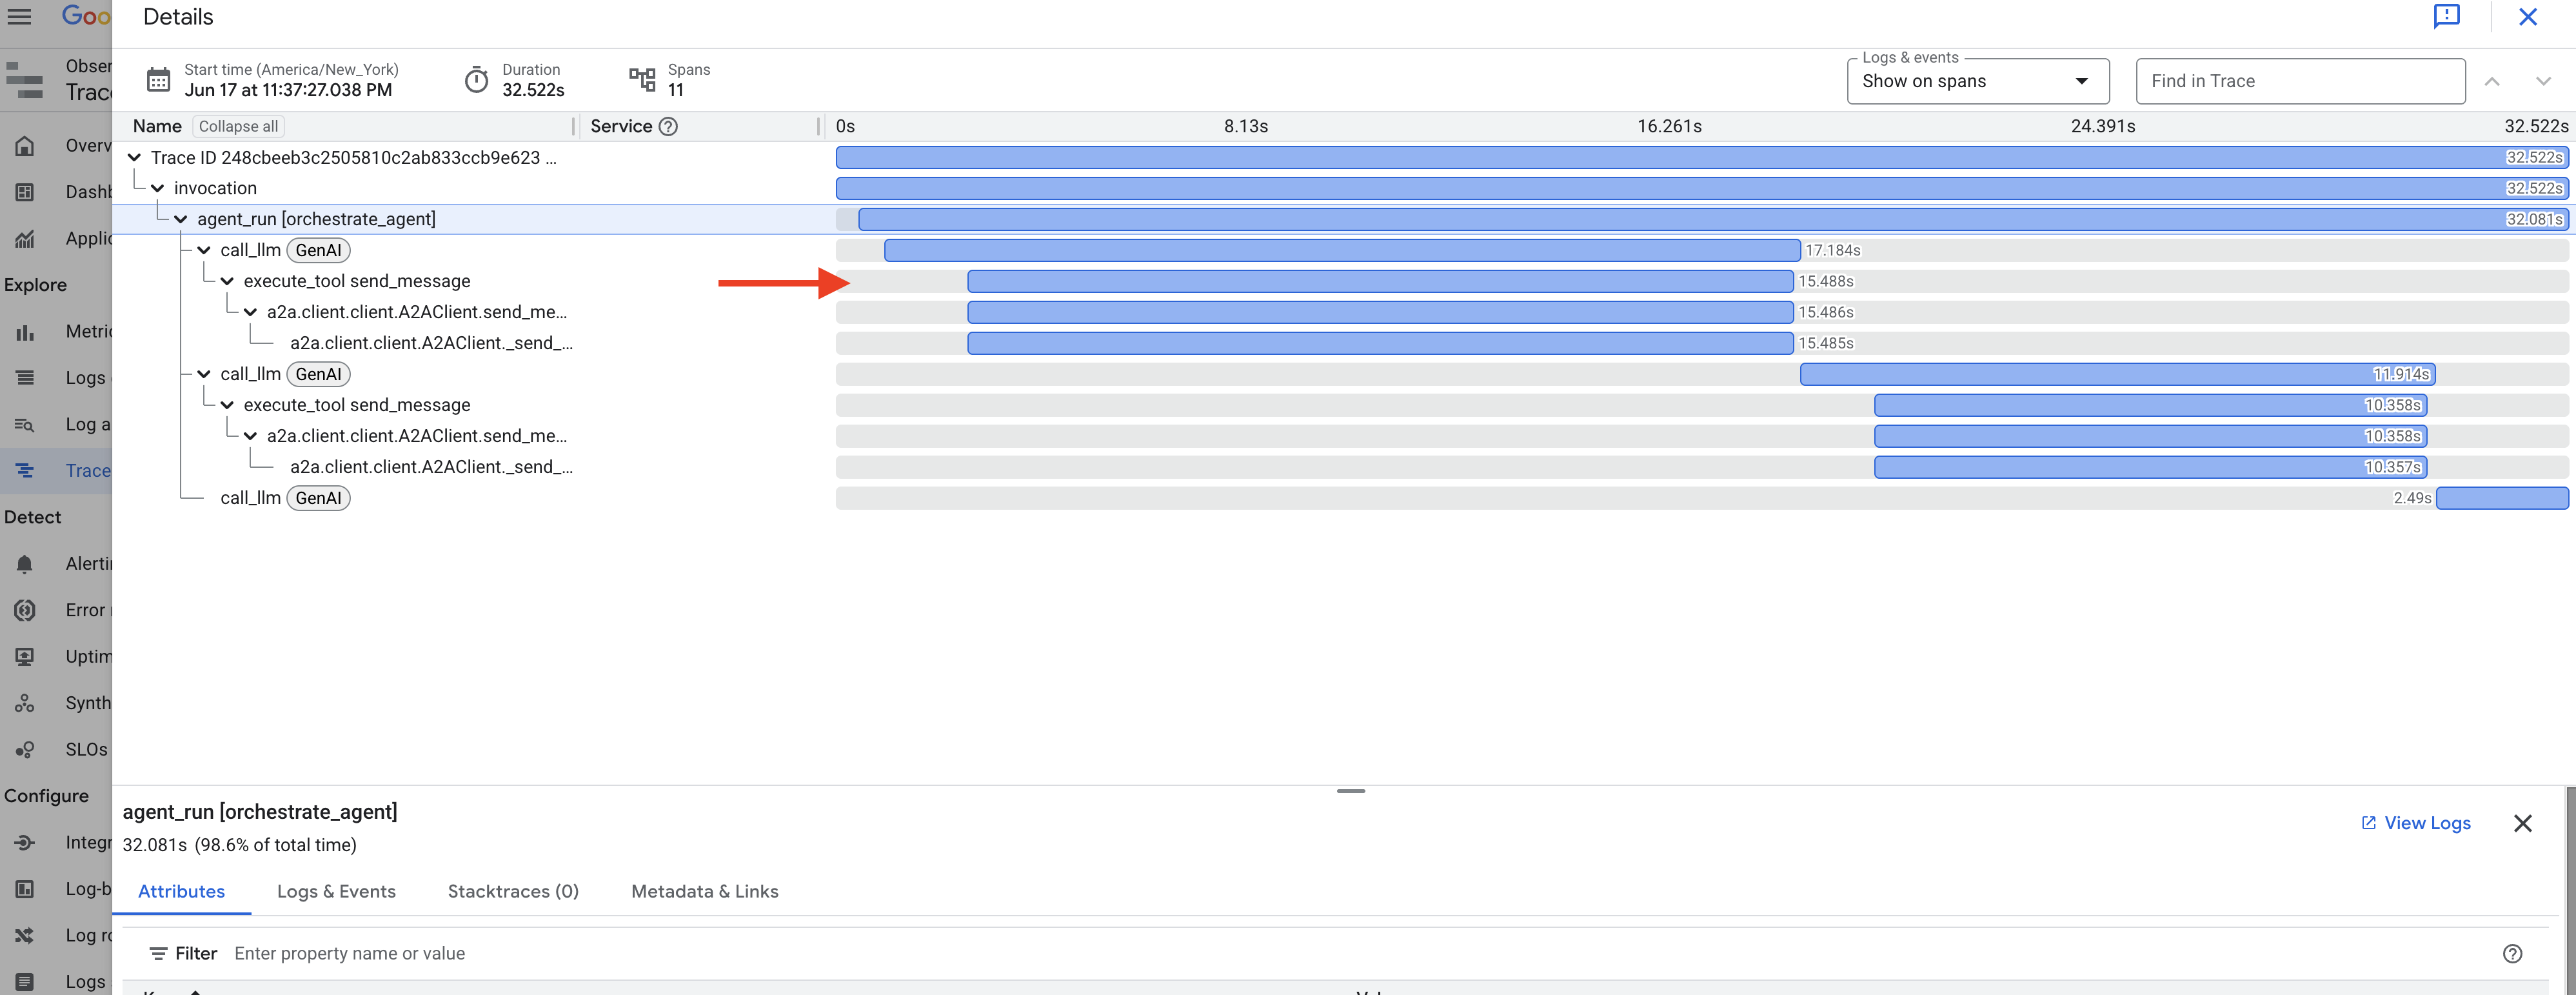
これらのトレースを調べると、エージェント システムのパフォーマンスを把握して最適化できます。
おめでとうございます!Google の ADK、A2A、MCP、Google Cloud サービスを使用して、高度なマルチエージェント AI システムを構築、デプロイ、テストできました。エージェントのオーケストレーション、ツールの使用、状態管理、クラウド デプロイに取り組み、InstaVibe の機能する AI 搭載機能を作成しました。ワークショップの完了おめでとうございます。
13. クリーンアップ
Google Cloud アカウントに継続的に課金されないようにするには、このワークショップで作成したリソースを削除することが重要です。次のコマンドは、Spanner インスタンス、Cloud Run サービス、Artifact Registry リポジトリ、API キー、Vertex AI Agent Engine、関連する IAM 権限を削除するのに役立ちます。
重要:
- これらのコマンドは、ワークショップで使用したのと同じ Google Cloud プロジェクトで実行してください。
- Cloud Shell ターミナルを閉じると、$PROJECT_ID や $SPANNER_INSTANCE_ID などの環境変数が設定されていない場合があります。ワークショップの設定時と同様に再エクスポートするか、以下のコマンドの変数を実際の値に置き換える必要があります。
- これらのコマンドを実行すると、リソースが完全に削除されます。このプロジェクトに他の重要なデータがある場合は、実行する前に再確認してください。
👉💻 次のスクリプトを実行してクリーンアップします。
環境変数をリセットする
. ~/instavibe-bootstrap/set_env.sh
エージェント エンジンを削除する:
cd ~/instavibe-bootstrap/utils
source ~/instavibe-bootstrap/env/bin/activate
export ORCHESTRATE_AGENT_ID=$(cat ~/instavibe-bootstrap/instavibe/temp_endpoint.txt)
echo "ORCHESTRATE_AGENT_ID set to: ${ORCHESTRATE_AGENT_ID}"
python remote_delete.py
deactivate
echo "Vertex AI Agent Engine deletion initiated."
Cloud Run サービスを削除します。
# InstaVibe Web Application
gcloud run services delete instavibe --platform=managed --region=${REGION} --project=${PROJECT_ID} --quiet

# MCP Tool Server
gcloud run services delete mcp-tool-server --platform=managed --region=${REGION} --project=${PROJECT_ID} --quiet

# Planner Agent (A2A Server)
gcloud run services delete planner-agent --platform=managed --region=${REGION} --project=${PROJECT_ID} --quiet

# Platform MCP Client Agent (A2A Server)
gcloud run services delete platform-mcp-client --platform=managed --region=${REGION} --project=${PROJECT_ID} --quiet

# Social Agent (A2A Server)
gcloud run services delete social-agent --platform=managed --region=${REGION} --project=${PROJECT_ID} --quiet

echo "Cloud Run services deletion initiated."
A2A Inspector Docker コンテナを停止して削除する
docker rm --force a2a-inspector
Spanner インスタンスを削除します。
echo "Deleting Spanner instance: ${SPANNER_INSTANCE_ID}..."
gcloud spanner instances delete ${SPANNER_INSTANCE_ID} --project=${PROJECT_ID} --quiet
echo "Spanner instance deletion initiated."
Artifact Registry リポジトリを削除します。
echo "Deleting Artifact Registry repository: ${REPO_NAME}..."
gcloud artifacts repositories delete ${REPO_NAME} --location=${REGION} --project=${PROJECT_ID} --quiet
echo "Artifact Registry repository deletion initiated."
サービス アカウントからロールを削除する:
echo "Removing roles from service account: $SERVICE_ACCOUNT_NAME in project $PROJECT_ID"

# Remove Project-level roles for default service account
gcloud projects remove-iam-policy-binding $PROJECT_ID \
  --member="serviceAccount:$SERVICE_ACCOUNT_NAME" \
  --role="roles/spanner.admin"

gcloud projects remove-iam-policy-binding $PROJECT_ID \
  --member="serviceAccount:$SERVICE_ACCOUNT_NAME" \
  --role="roles/spanner.databaseUser"

gcloud projects remove-iam-policy-binding $PROJECT_ID \
  --member="serviceAccount:$SERVICE_ACCOUNT_NAME" \
  --role="roles/artifactregistry.admin"

gcloud projects remove-iam-policy-binding $PROJECT_ID \
  --member="serviceAccount:$SERVICE_ACCOUNT_NAME" \
  --role="roles/cloudbuild.builds.editor"

gcloud projects remove-iam-policy-binding $PROJECT_ID \
  --member="serviceAccount:$SERVICE_ACCOUNT_NAME" \
  --role="roles/run.admin"

gcloud projects remove-iam-policy-binding $PROJECT_ID \
  --member="serviceAccount:$SERVICE_ACCOUNT_NAME" \
  --role="roles/iam.serviceAccountUser"

gcloud projects remove-iam-policy-binding $PROJECT_ID \
  --member="serviceAccount:$SERVICE_ACCOUNT_NAME" \
  --role="roles/aiplatform.user"

gcloud projects remove-iam-policy-binding $PROJECT_ID \
  --member="serviceAccount:$SERVICE_ACCOUNT_NAME" \
  --role="roles/logging.logWriter"

gcloud projects remove-iam-policy-binding $PROJECT_ID \
  --member="serviceAccount:$SERVICE_ACCOUNT_NAME" \
  --role="roles/logging.viewer"


echo "All specified roles have been removed."
ローカル ワークショップ ファイルを削除する:
echo "Removing local workshop directory ~/instavibe-bootstrap..."
rm -rf ~/instavibe-bootstrap
rm -rf ~/a2a-inspector
rm -f ~/mapkey.txt
rm -f ~/project_id.txt
echo "Local directory removed."