1. Чему вы научитесь
Добро пожаловать! Сегодня мы отправимся в довольно интересное путешествие. Давайте начнем с популярной платформы для организации социальных мероприятий InstaVibe. Несмотря на ее успех, мы знаем, что для некоторых пользователей планирование групповых мероприятий может показаться рутиной. Представьте, что вы пытаетесь выяснить, чем интересуются ваши друзья, затем просматриваете бесконечные варианты мероприятий или мест проведения и, наконец, координируете все это. Это очень сложно! Именно здесь мы можем использовать искусственный интеллект, а точнее, интеллектуальных агентов, чтобы действительно изменить ситуацию.
Идея заключается в создании системы, в которой эти агенты смогут брать на себя основную работу, например, умело «слушать», чтобы понять предпочтения пользователей и их друзей, а затем активно предлагать фантастические, индивидуально подобранные мероприятия. Наша цель — превратить планирование социальных мероприятий на InstaVibe в нечто удобное и приятное. Чтобы начать создавать этих умных помощников, нам необходимо заложить прочную основу с помощью подходящих инструментов.
Вот концепция, которую вы увидите:
Основы работы с ADK от Google: Освойте основы создания своего первого интеллектуального агента с помощью комплекта разработки агентов (ADK) от Google. Разберитесь в основных компонентах, жизненном цикле агента и в том, как эффективно использовать встроенные инструменты фреймворка.
Расширение возможностей агентов с помощью протокола контекста модели (MCP): научитесь наделять своих агентов пользовательскими инструментами и контекстом, позволяющими им выполнять специализированные задачи и получать доступ к конкретной информации. Познакомьтесь с концепцией протокола контекста модели (MCP). Вы узнаете, как настроить MCP-сервер для предоставления этого контекста.
Проектирование взаимодействия и оркестровки агентов: выйдите за рамки отдельных агентов и поймите оркестровку агентов. Разрабатывайте шаблоны взаимодействия, начиная от простых последовательных рабочих процессов и заканчивая сложными сценариями, включающими циклы, условную логику и параллельную обработку. Введите концепцию субагентов в рамках фреймворка ADK для управления модульными задачами.
Создание систем, основанных на взаимодействии нескольких агентов: узнайте, как проектировать системы, в которых множество агентов сотрудничают для достижения сложных целей. Изучите и внедрите протокол связи «агент-агент» (A2A), создав стандартизированный способ надежного взаимодействия распределенных агентов (возможно, работающих на разных машинах или сервисах).
Внедрение агентов в производство на платформе Google Cloud: переведите ваши агентские приложения из среды разработки в облако. Изучите лучшие практики проектирования и развертывания масштабируемых и надежных многоагентных систем на платформе Google Cloud Platform (GCP). Получите представление об использовании сервисов GCP, таких как Cloud Run, и изучите возможности новейшего Google Agent Engine для размещения и управления вашими агентами.
2. Архитектура
Социальное планирование на основе искусственного интеллекта с помощью InstaVibe
Что такое социальный мониторинг?
Социальный мониторинг — это процесс отслеживания цифровых разговоров на различных платформах, таких как социальные сети, форумы и новостные сайты, с целью понимания того, что люди говорят о той или иной теме, бренде или отрасли. Он предоставляет ценную информацию об общественном мнении, тенденциях и потребностях пользователей. На этом семинаре мы применим эту концепцию в рамках системы на основе агентов.
Вы в команде InstaVibe
Представьте, что вы работаете в InstaVibe, успешном стартапе с популярной платформой для организации социальных мероприятий, ориентированной на молодежь. Дела идут хорошо, но, как и во многих технологических компаниях, ваша команда испытывает давление со стороны инвесторов, требующих внедрения инноваций с использованием ИИ. Внутри компании вы также заметили сегмент пользователей, которые проявляют меньшую активность, чем другие – возможно, они менее склонны инициировать групповые мероприятия или считают процесс планирования сложным. Для вашей компании это означает снижение лояльности к платформе среди этой важной группы пользователей.
Исследования вашей команды показывают, что помощь на основе ИИ может значительно улучшить опыт этих пользователей. Идея заключается в том, чтобы упростить процесс планирования социальных мероприятий, заблаговременно предлагая подходящие варианты, основанные на интересах пользователя и его друзей. Вопрос, стоящий перед вами и вашими коллегами: как агенты ИИ могут автоматизировать часто трудоемкие задачи по выявлению интересов, поиску вариантов досуга и, возможно, первоначальной координации?
Решение на основе агентов (прототип концепции)
Вы предлагаете разработать прототип функции, работающей на основе многоагентной системы. Вот концептуальное описание:
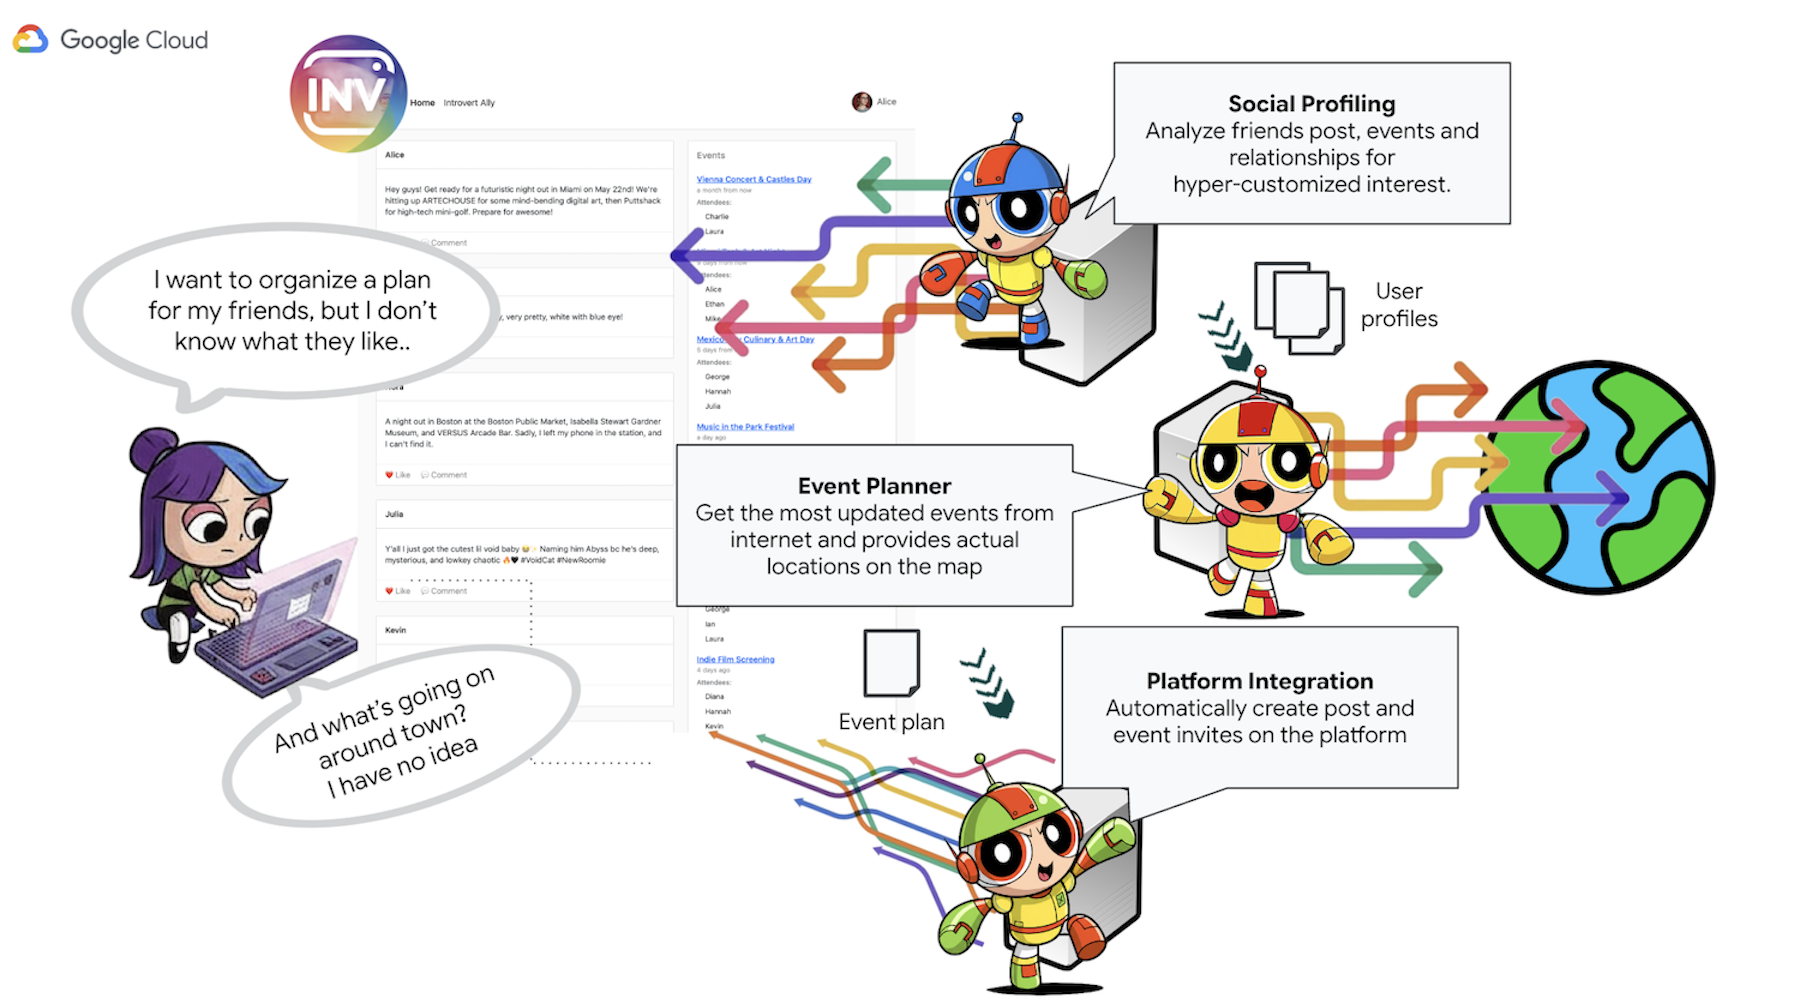
- Агент социального профилирования : Этот агент использует методы социального мониторинга для анализа связей пользователей, их взаимодействий и, возможно, более широких общественных тенденций, связанных с предпочтениями пользователя. Его цель — выявить общие интересы и подходящие характеристики деятельности (например, предпочтения в отношении тихих мероприятий, определенные хобби).
- Агент по организации мероприятий : Используя данные, полученные от Агента по профилированию в социальных сетях, этот агент ищет в онлайн-ресурсах конкретные мероприятия, места проведения или идеи, соответствующие заданным критериям (например, местоположение, интересы).
- Агент взаимодействия с платформой (использующий MCP) : Этот агент получает окончательный план от Агента планирования мероприятий. Его ключевая функция — прямое взаимодействие с платформой InstaVibe с помощью предварительно определенного инструмента MCP (Model Context Protocol). Этот инструмент предоставляет агенту возможность составлять предложения по мероприятиям и создавать публикации с описанием плана.
- Агент-оркестратор : Этот агент выступает в роли центрального координатора. Он получает первоначальный запрос пользователя от платформы InstaVibe, понимает общую цель (например, «спланировать мероприятие для меня и моих друзей»), а затем делегирует конкретные задачи соответствующим специализированным агентам в логической последовательности. Он управляет потоком информации между агентами и обеспечивает доставку конечного результата пользователю.
Ключевые архитектурные элементы и технологии
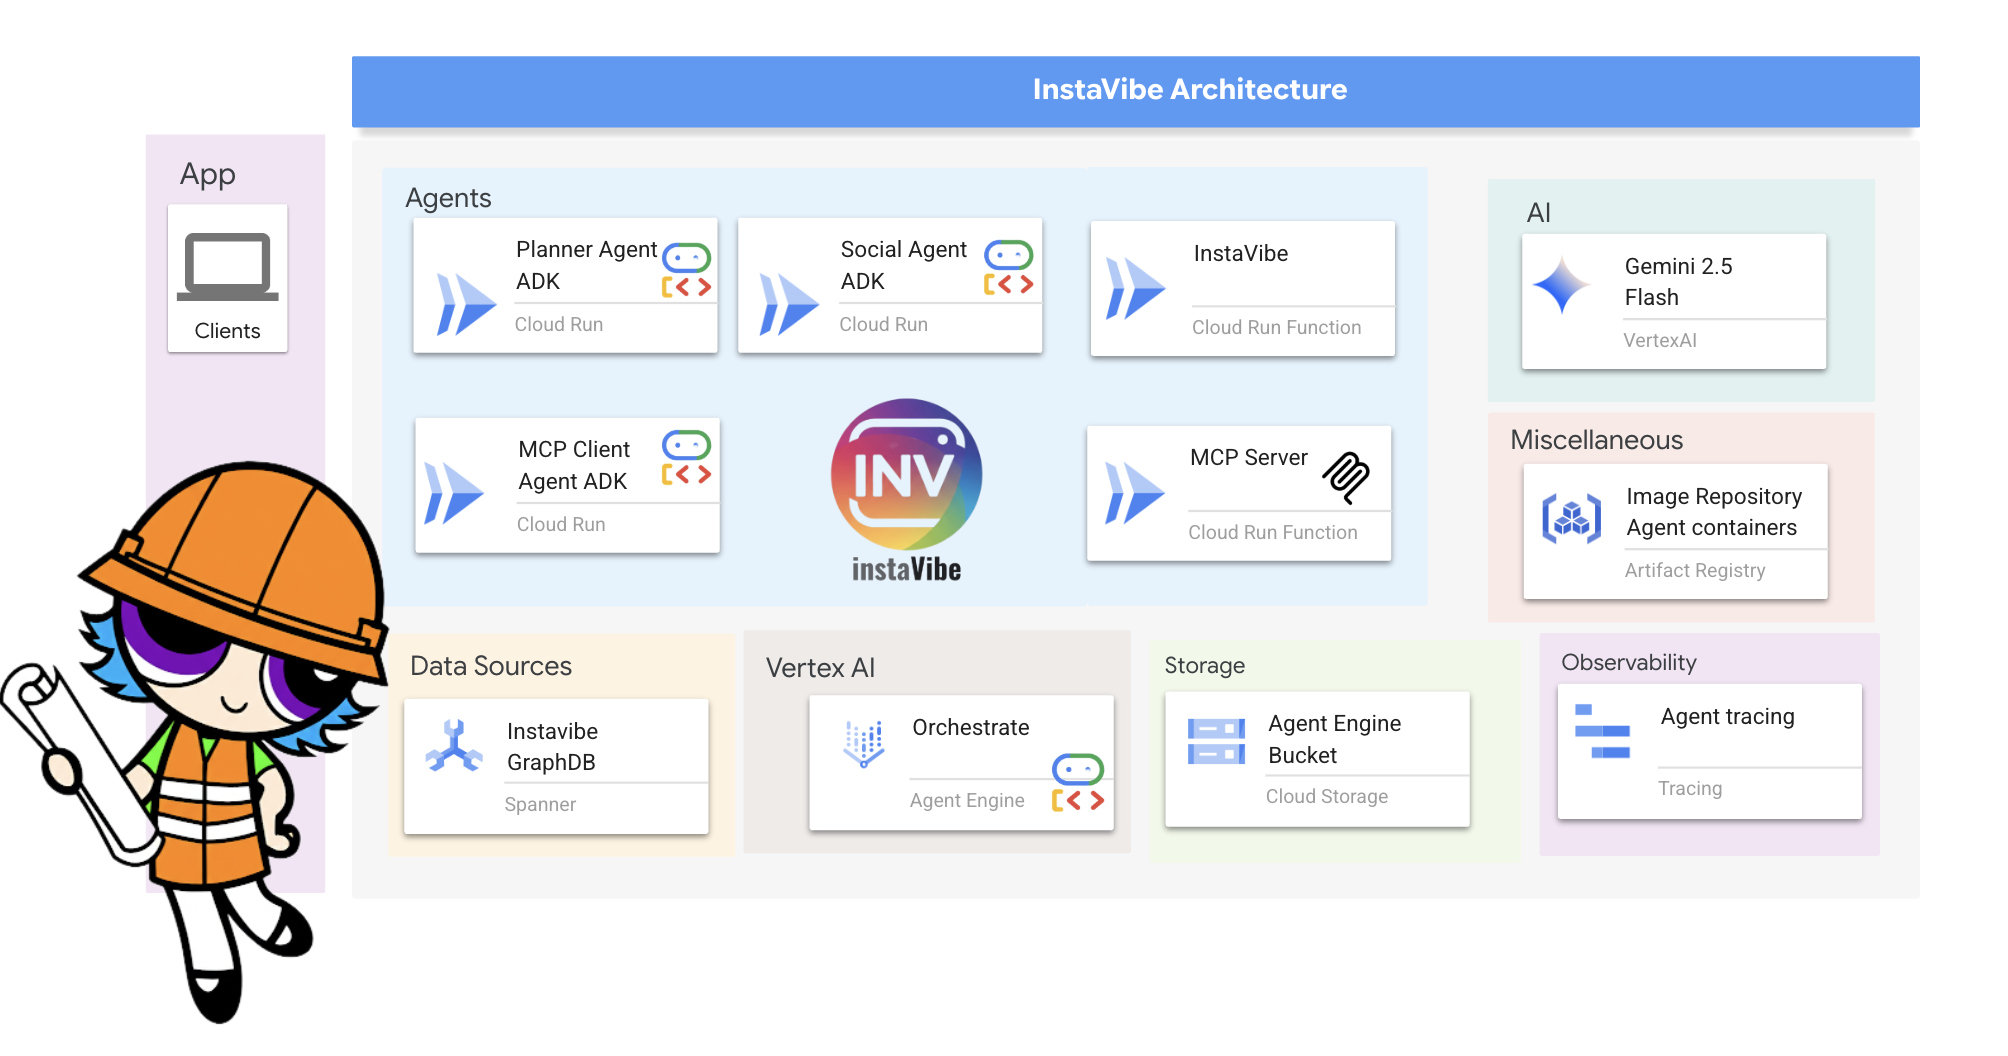
Платформа Google Cloud (GCP):
- Vertex AI :
- Gemini Models: Предоставляет доступ к передовым большим языковым моделям (LLM) Google, таким как Gemini, которые лежат в основе способностей наших агентов к рассуждению и принятию решений.
- Vertex AI Agent Engine: управляемый сервис, используемый для развертывания, размещения и масштабирования нашего агента-оркестратора, упрощающий внедрение в производство и абстрагирующий от сложностей инфраструктуры.
- Cloud Run : бессерверная платформа для развертывания контейнеризированных приложений. Мы используем её для:
- Разместите основное веб-приложение InstaVibe.
- Разверните отдельные агенты с поддержкой A2A (Планировщик, Социальное профилирование, Взаимодействие с платформой) в виде независимых микросервисов.
- Запустите сервер инструментов MCP, чтобы сделать внутренние API InstaVibe доступными для агентов.
- Spanner : полностью управляемая, глобально распределенная и строго согласованная реляционная база данных. На этом семинаре мы используем ее возможности как графовой базы данных, применяя функции GRAPH DDL и запросов для:
- Моделирование и хранение сложных социальных взаимосвязей (пользователи, дружеские отношения, посещение мероприятий, публикации).
- Обеспечьте эффективное выполнение запросов к этим взаимосвязям для агентов социального профилирования.
- Реестр артефактов : полностью управляемый сервис для хранения, управления и защиты образов контейнеров.
- Cloud Build : сервис, который выполняет сборки в Google Cloud. Мы используем его для автоматической сборки образов контейнеров Docker из исходного кода нашего агента и приложения.
- Облачное хранилище : используется такими сервисами, как Cloud Build, для хранения артефактов сборки, а также Agent Engine для своих операционных нужд.
- Основные структуры и протоколы агентов :
- Комплект разработки агентов Google (ADK) : основная платформа для:
- Определение основной логики, поведения и наборов инструкций для отдельных интеллектуальных агентов.
- Управление жизненным циклом, состоянием и памятью агентов (кратковременное состояние сессии и потенциально долговременные знания).
- Интеграция инструментов (таких как поиск Google или специально разработанные инструменты), которые агенты могут использовать для взаимодействия с окружающим миром.
- Организация многоагентных рабочих процессов, включая последовательное, циклическое и параллельное выполнение подагентов.
- Протокол связи между агентами (A2A) : открытый стандарт, обеспечивающий:
- Прямая, стандартизированная связь и взаимодействие между различными агентами ИИ, даже если они работают как отдельные сервисы или на разных машинах.
- Агенты могут узнавать о возможностях друг друга (с помощью карточек агентов) и делегировать задачи. Это крайне важно для взаимодействия нашего агента-оркестратора со специализированными агентами-планировщиками, агентами социальных сетей и платформ.
- Библиотека A2A Python (a2a-python) : конкретная библиотека, используемая для обеспечения взаимодействия наших агентов ADK с протоколом A2A. Она предоставляет компоненты на стороне сервера, необходимые для:
- Предоставьте нашим агентам доступ в качестве серверов, совместимых с протоколом A2A.
- Автоматически обрабатывать отправку "карточки агента" для обнаружения.
- Принимать и обрабатывать входящие запросы на выполнение задач от других агентов (например, от Orchestrator).
- Протокол контекста модели (MCP) : открытый стандарт, позволяющий агентам:
- Устанавливайте и используйте внешние инструменты, источники данных и системы стандартизированным способом.
- Наш агент взаимодействия с платформой использует клиент MCP для связи с сервером MCP, который, в свою очередь, предоставляет инструменты для взаимодействия с существующими API платформы InstaVibe.
- Комплект разработки агентов Google (ADK) : основная платформа для:
- Инструменты отладки :
- A2A Inspector : A2A Inspector — это веб-инструмент отладки, используемый на протяжении всего этого семинара для подключения, проверки и взаимодействия с нашими агентами, поддерживающими A2A. Хотя он не является частью окончательной производственной архитектуры, он является важной частью нашего рабочего процесса разработки. Он предоставляет:
- Программа просмотра карточек агентов: для получения и проверки общедоступных возможностей агента.
- Интерфейс онлайн-чата: для отправки сообщений непосредственно развернутому агенту для немедленного тестирования.
- Консоль отладки: для просмотра необработанных сообщений JSON-RPC, которыми обмениваются инспектор и агент.
- A2A Inspector : A2A Inspector — это веб-инструмент отладки, используемый на протяжении всего этого семинара для подключения, проверки и взаимодействия с нашими агентами, поддерживающими A2A. Хотя он не является частью окончательной производственной архитектуры, он является важной частью нашего рабочего процесса разработки. Он предоставляет:
- Языковые модели (LLM) : «мозг» системы:
- Модели Google Gemini: В частности, мы используем версии gemini-2.0-flash . Эти модели выбраны по следующим причинам:
- Развитие навыков логического мышления и выполнения инструкций: их способность понимать сложные подсказки, следовать подробным инструкциям и рассуждать о задачах делает их подходящими для принятия решений агентами.
- Использование инструментов (вызов функций): Модели Gemini превосходно определяют, когда и как использовать инструменты, предоставляемые через ADK, позволяя агентам собирать информацию или выполнять действия.
- Эффективность (Flash-модели): Варианты «Flash» обеспечивают хороший баланс производительности и экономичности, подходящие для многих задач интерактивных агентов, требующих быстрой реакции.
- Модели Google Gemini: В частности, мы используем версии gemini-2.0-flash . Эти модели выбраны по следующим причинам:
3. Прежде чем начать
👉Нажмите «Активировать Cloud Shell» в верхней части консоли Google Cloud (это значок терминала в верхней части панели Cloud Shell). 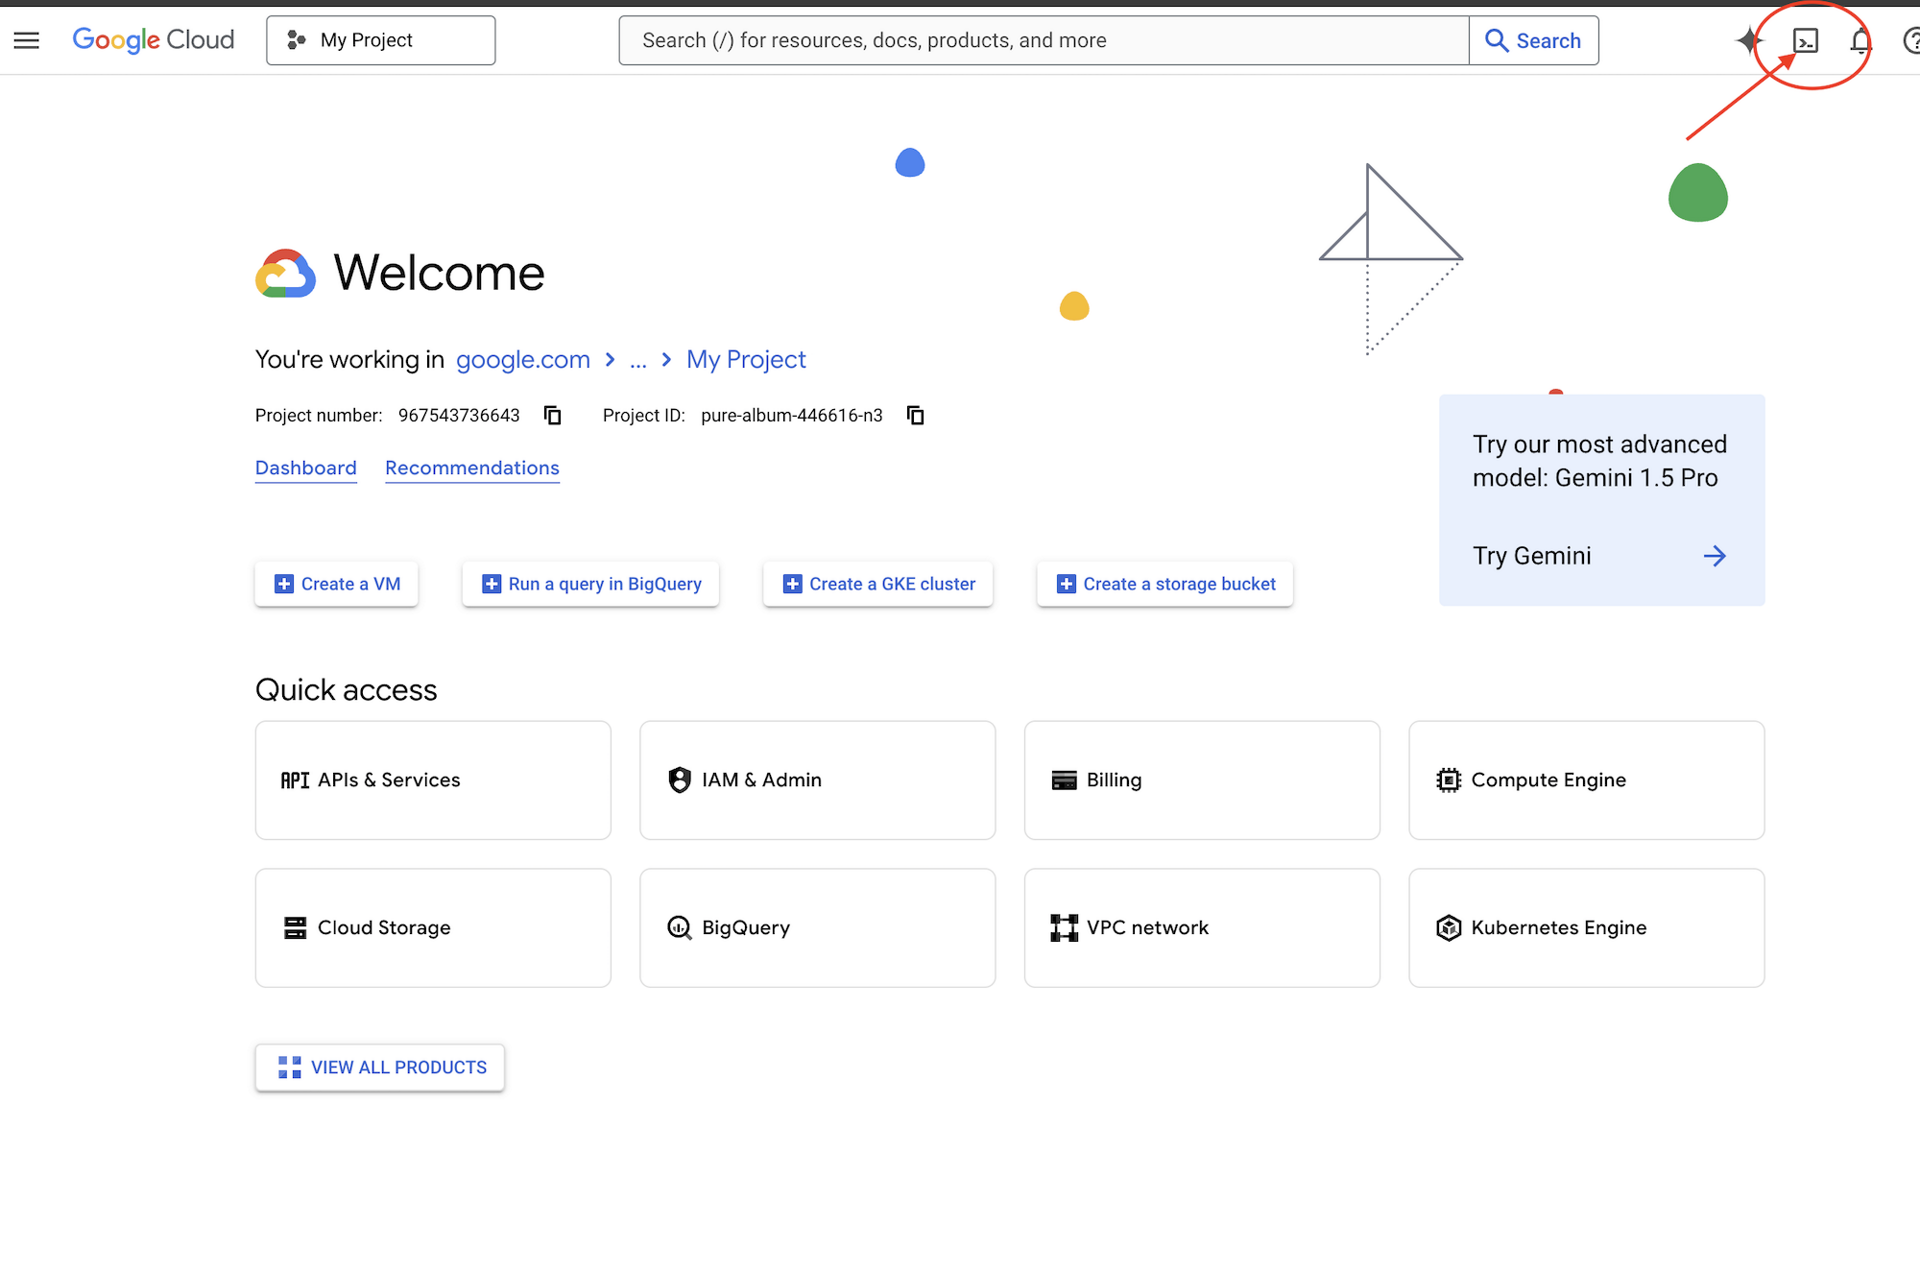
👉Нажмите на кнопку «Открыть редактор » (она выглядит как открытая папка с карандашом). Это откроет редактор кода Cloud Shell в окне. Слева вы увидите файловый менеджер. 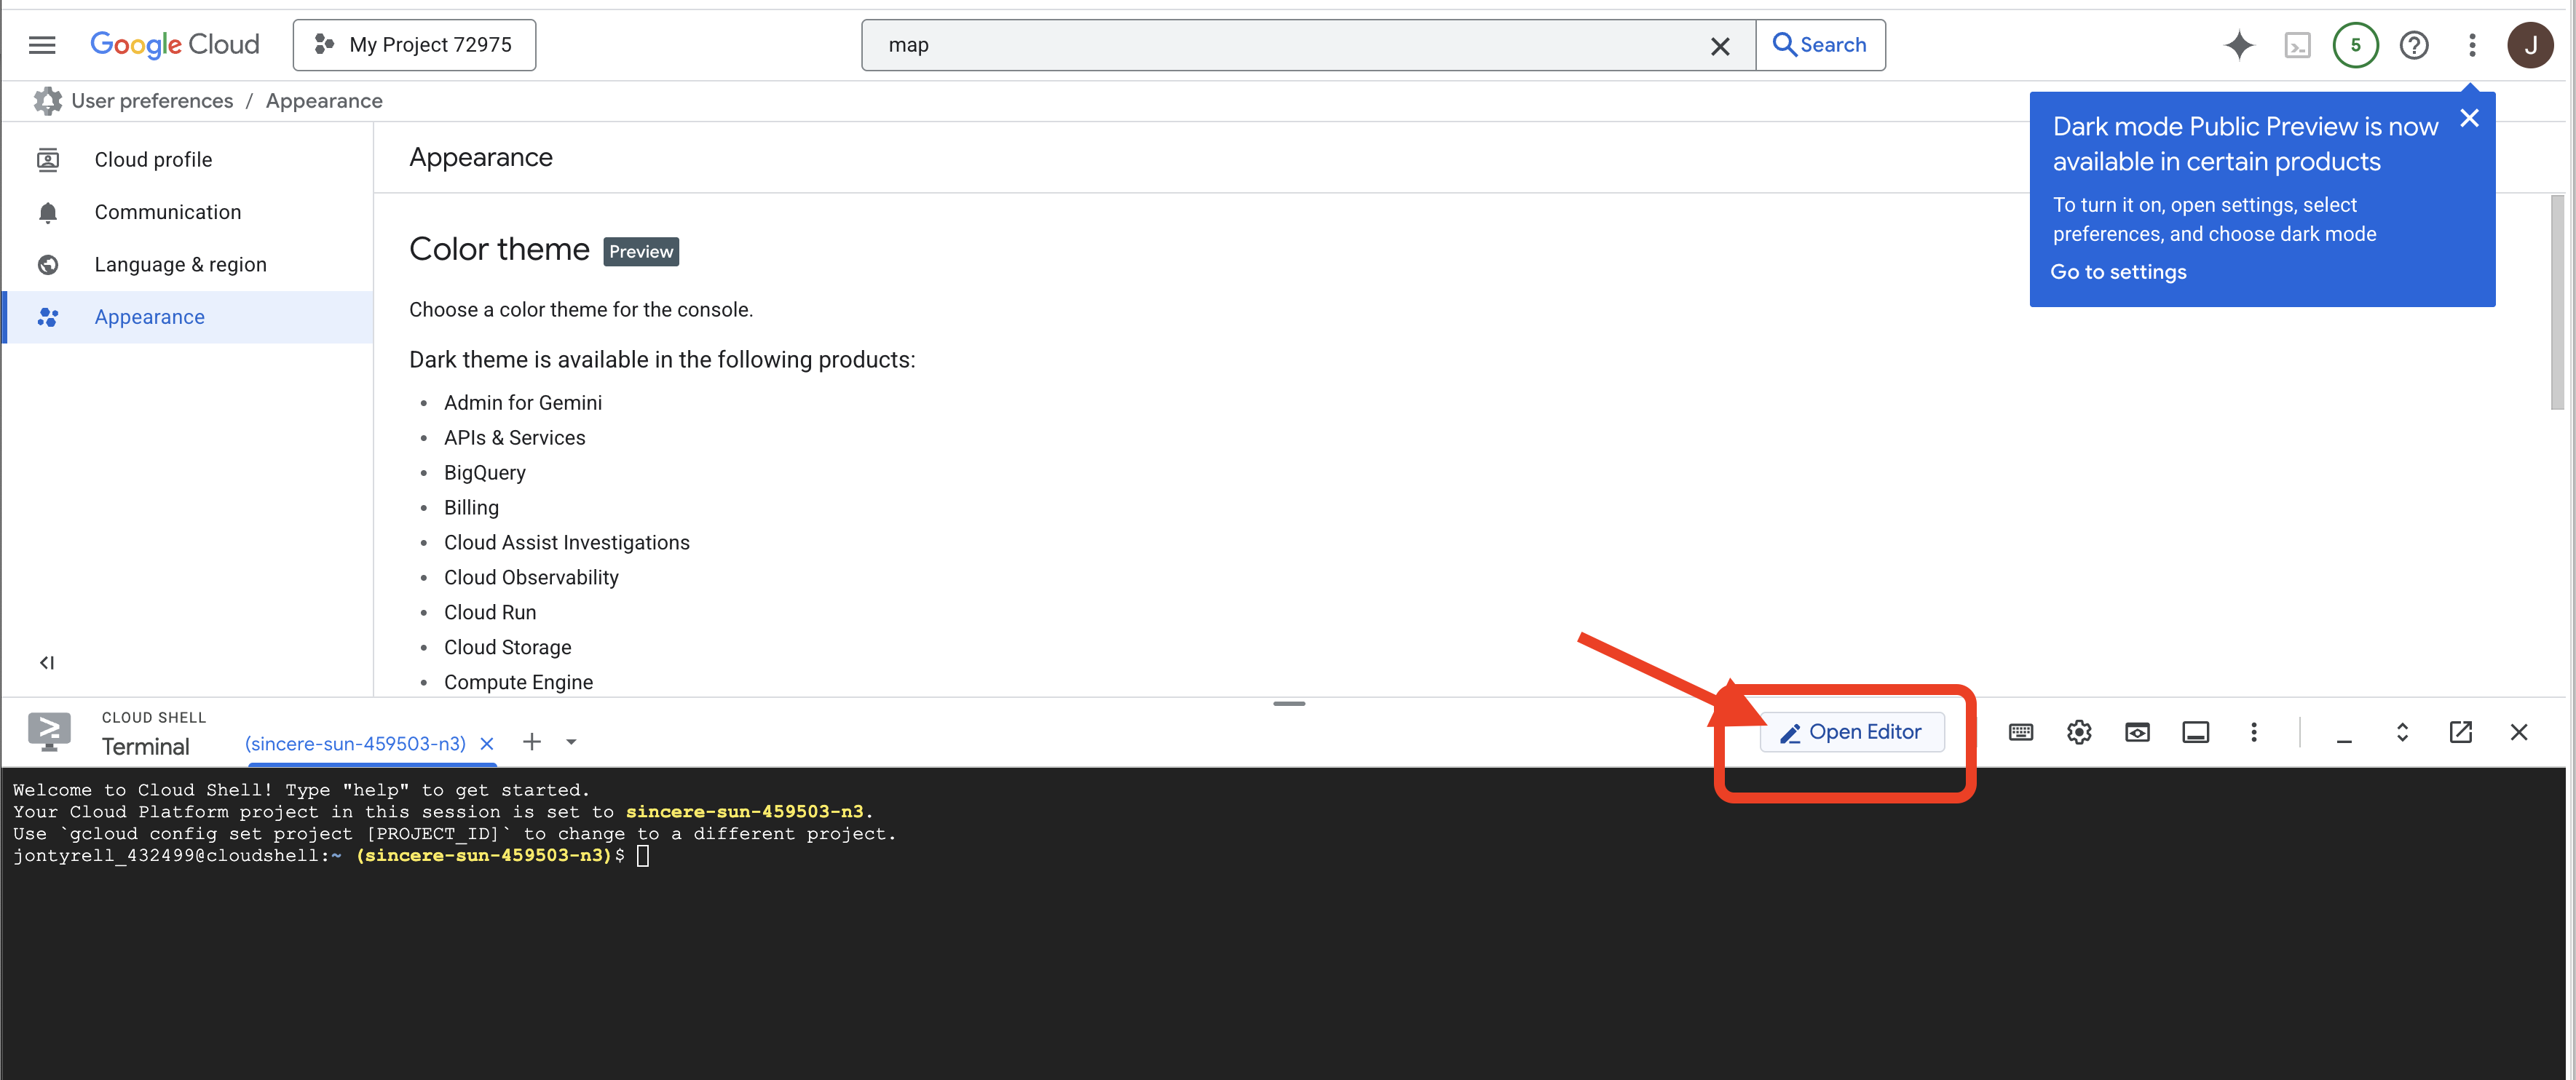
👉Нажмите на кнопку « Вход в Cloud Code» в нижней строке состояния, как показано на рисунке. Авторизуйте плагин в соответствии с инструкциями. Если в строке состояния отображается «Cloud Code — нет проекта », выберите его, затем в раскрывающемся списке «Выберите проект Google Cloud» выберите конкретный проект Google Cloud из списка созданных вами проектов. 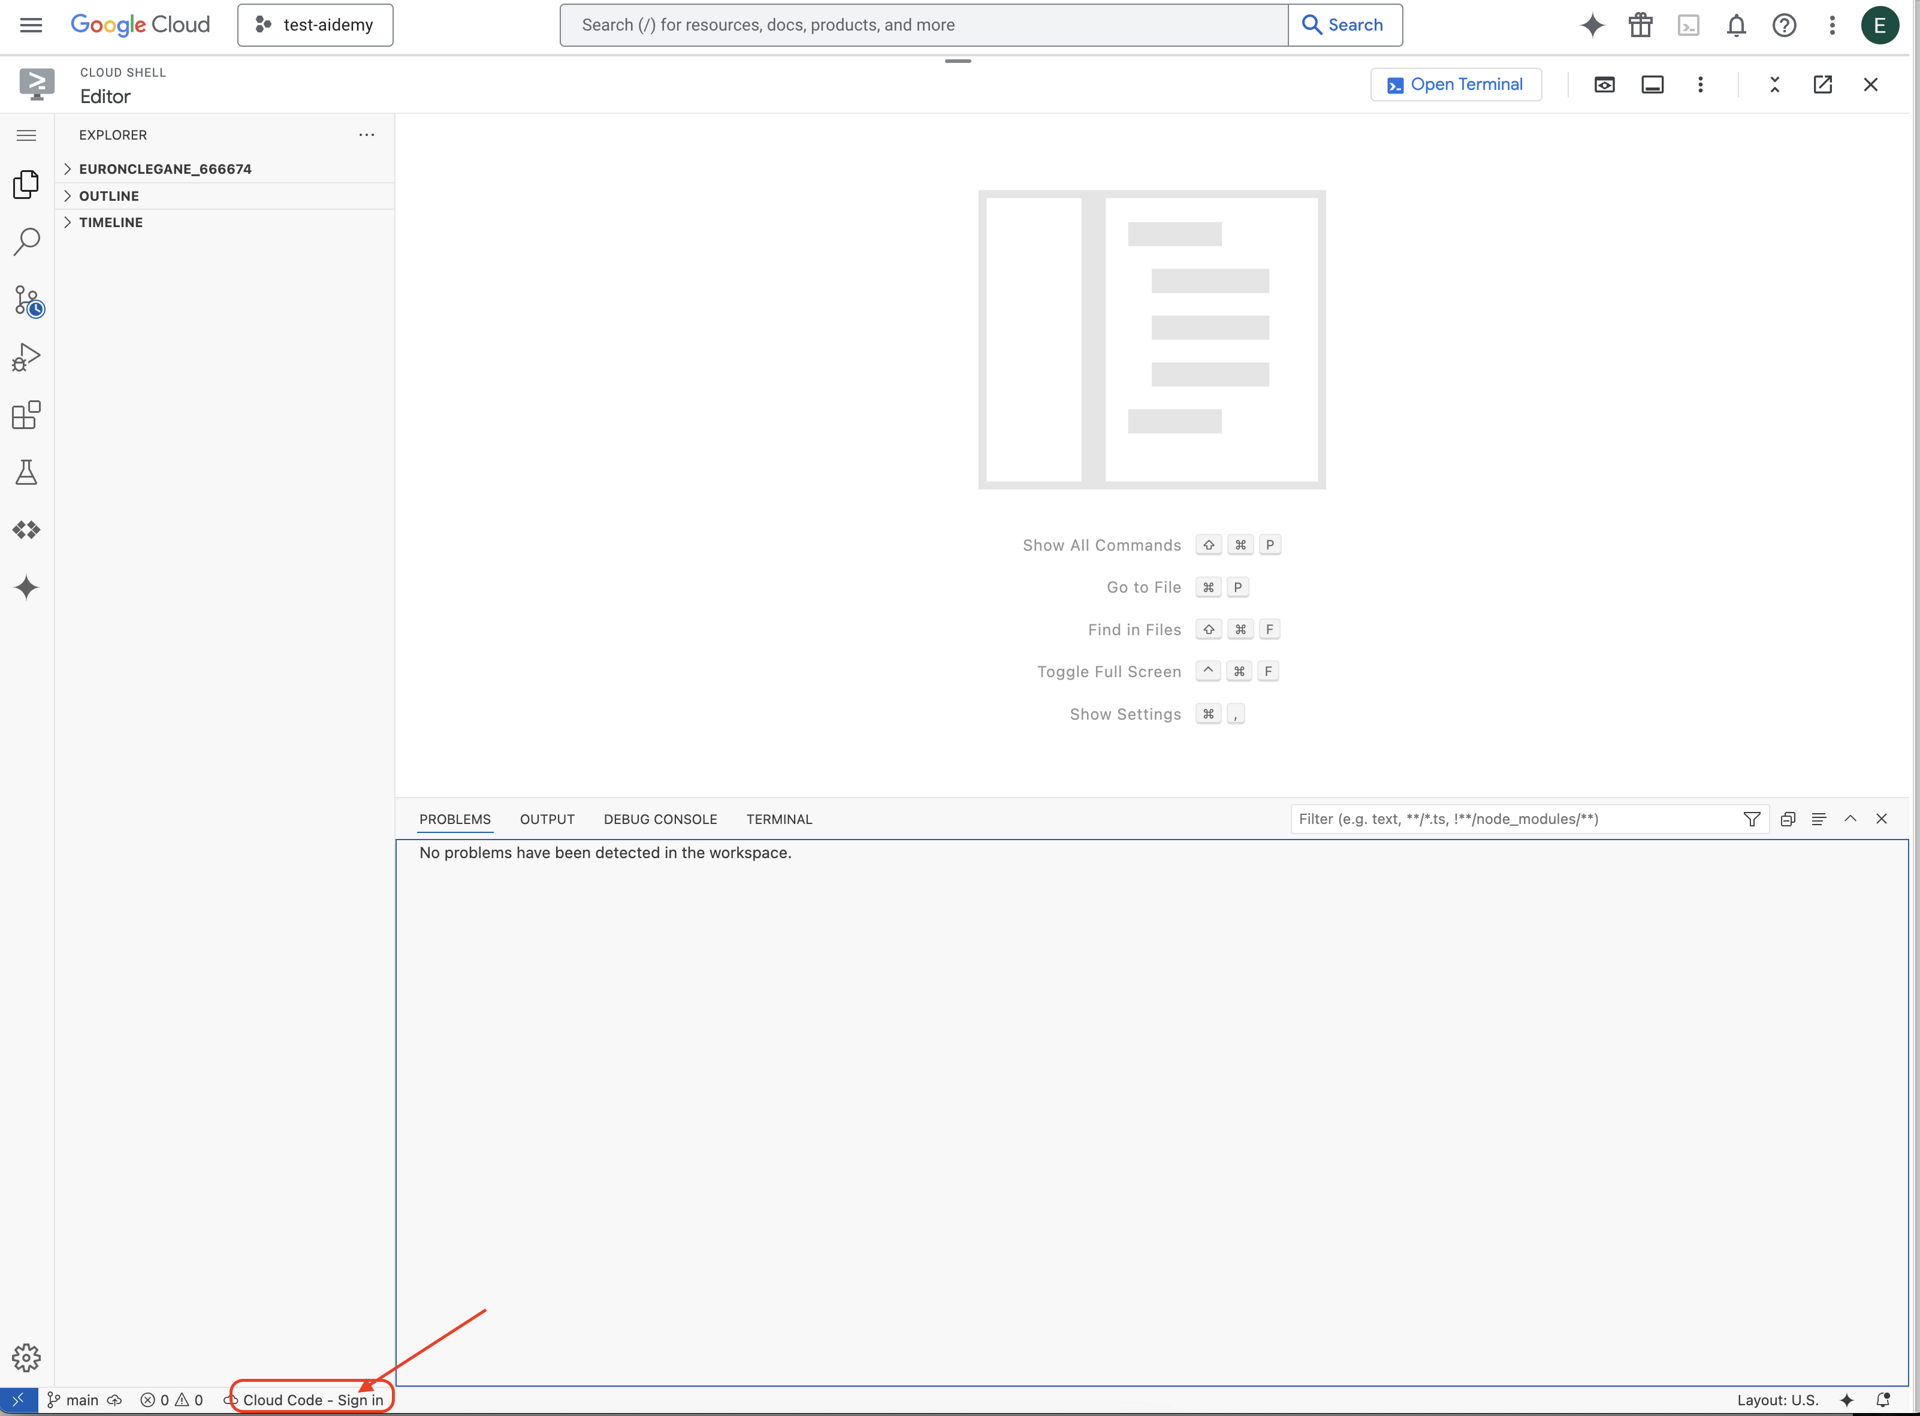
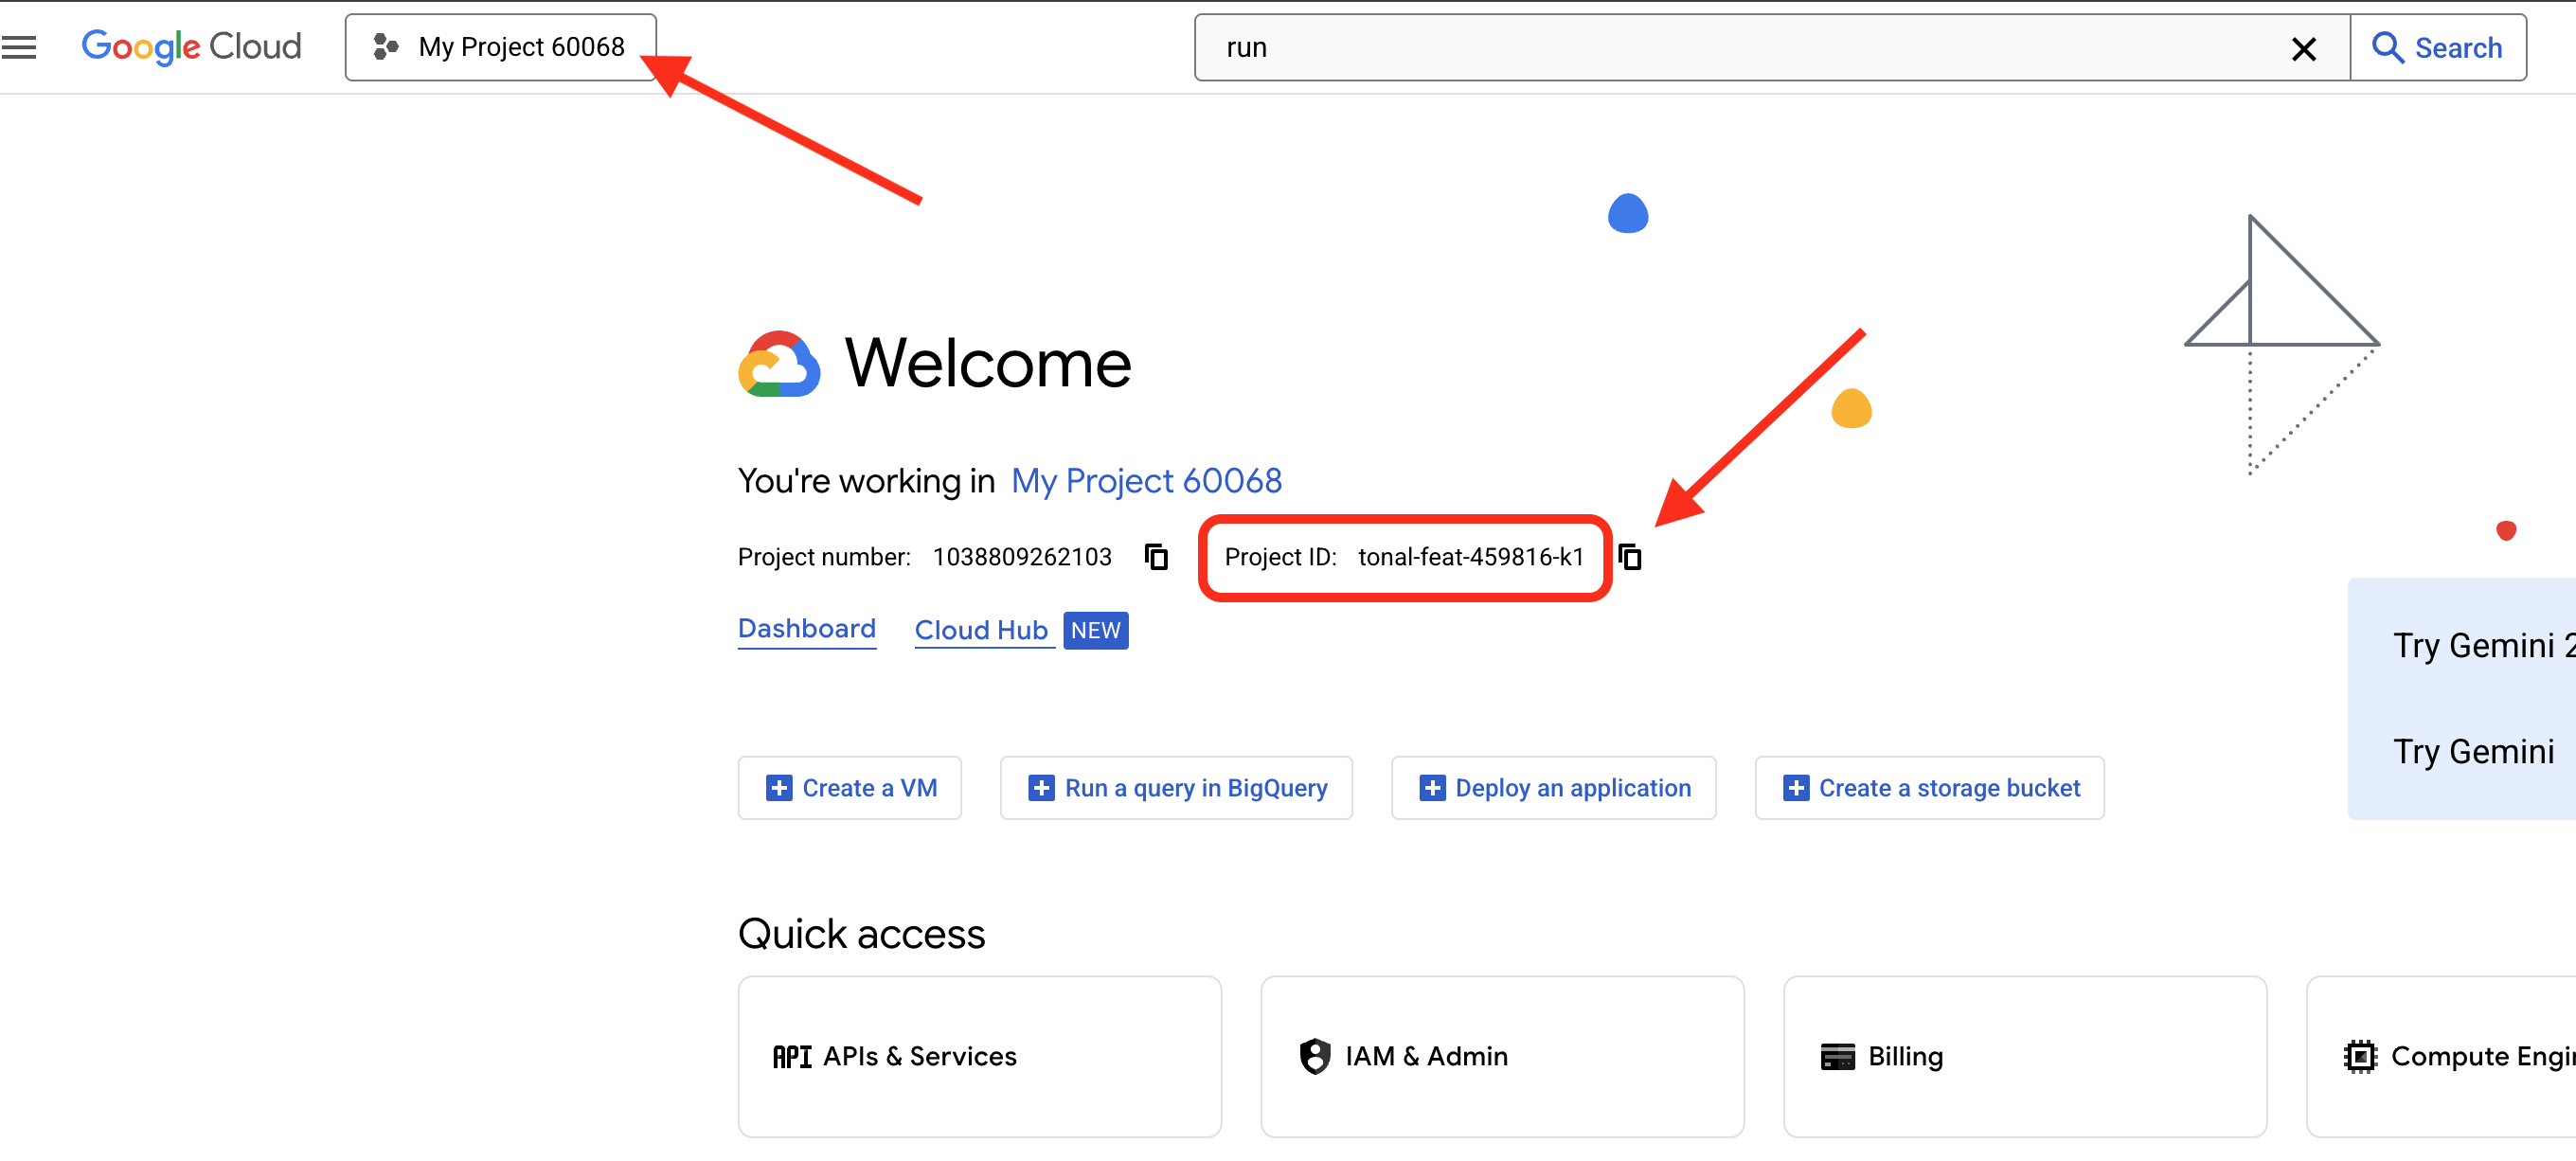
👉 Найдите идентификатор своего проекта Google Cloud :
- Откройте консоль Google Cloud: https://console.cloud.google.com
- Выберите проект, который вы хотите использовать для этого мастер-класса, из выпадающего списка проектов в верхней части страницы.
- Идентификатор вашего проекта отображается в карточке с информацией о проекте на панели управления.
👉Откройте терминал в облачной IDE, 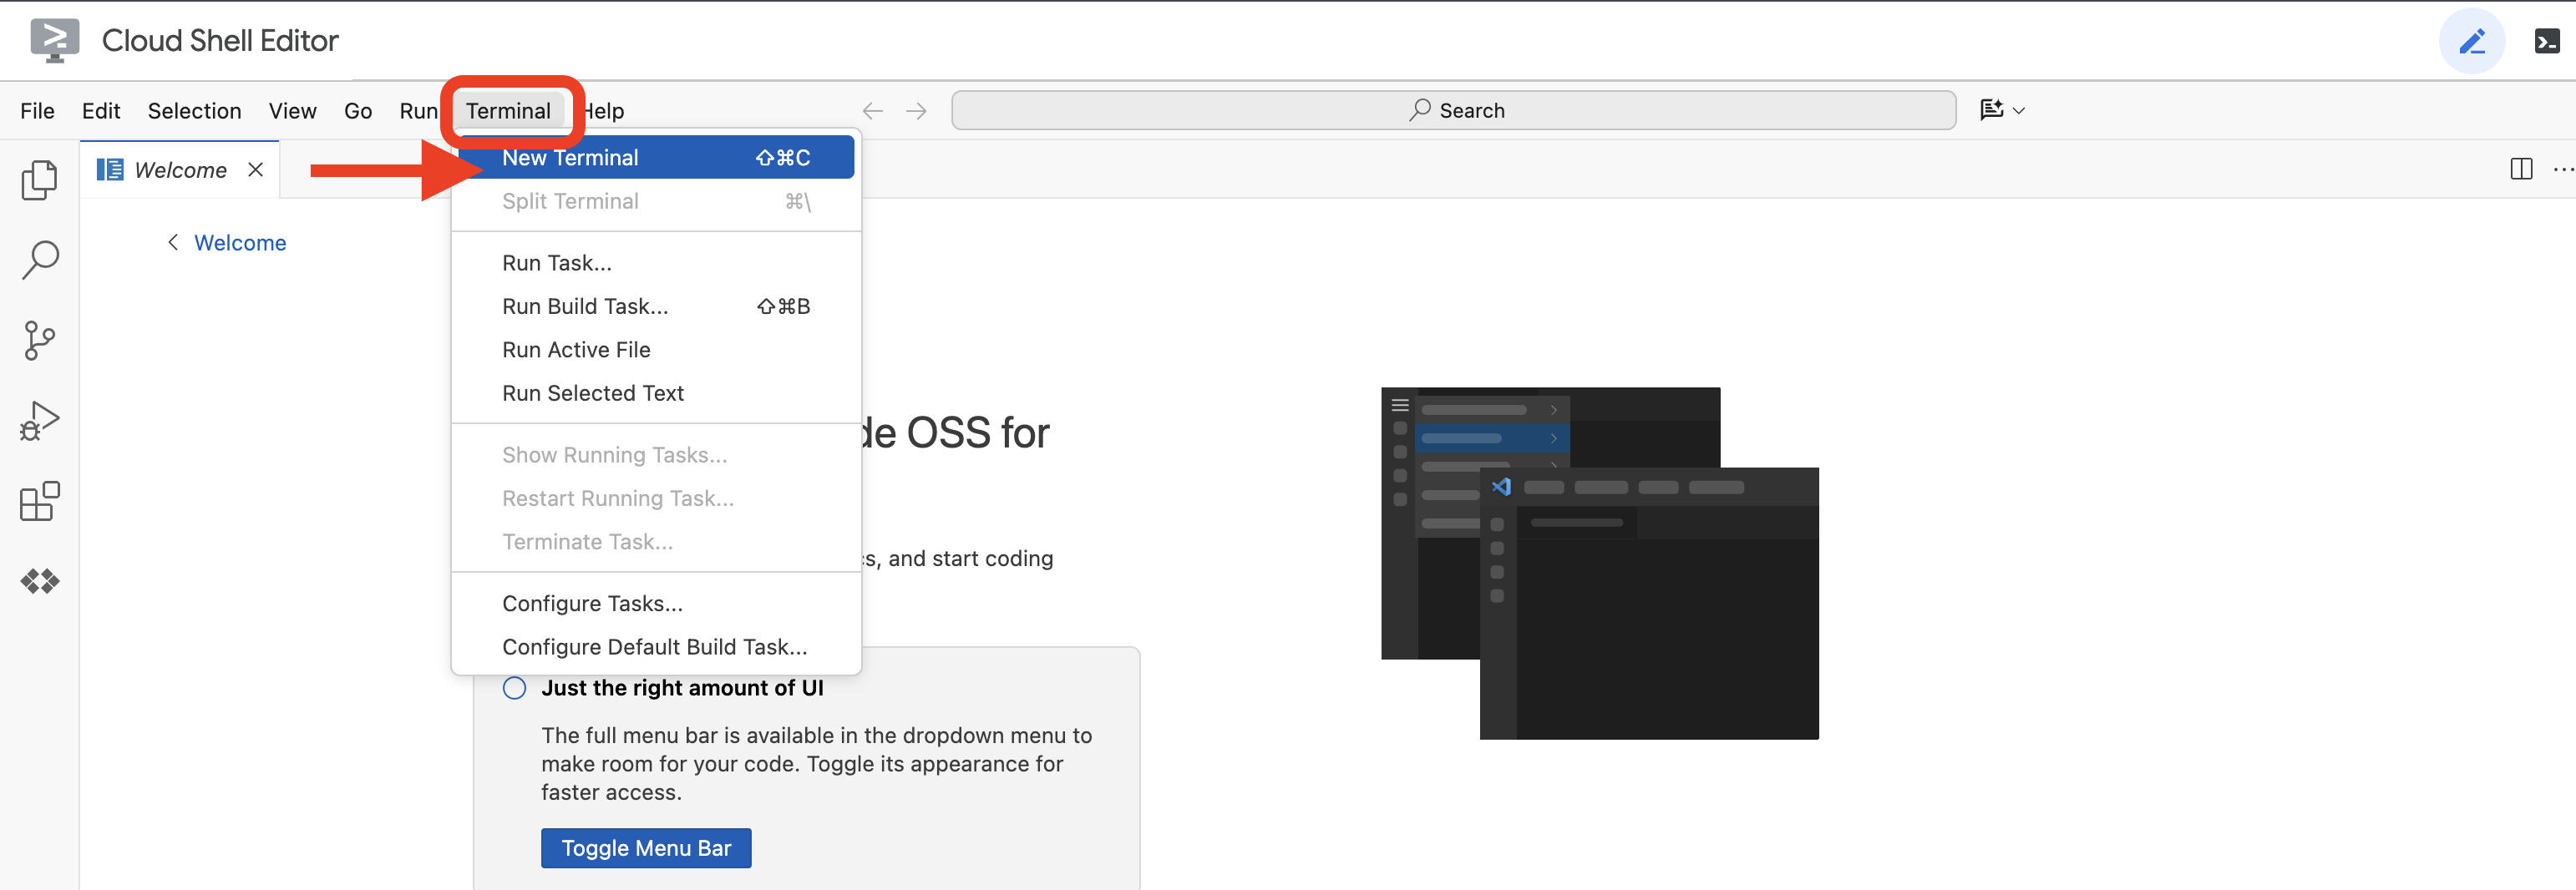
👉💻 В терминале убедитесь, что вы уже авторизованы и что проект настроен на ваш идентификатор проекта, используя следующую команду:
gcloud auth list
👉💻 Клонируйте проект instavibe-bootstrap с GitHub:
git clone -b adk-1.2.1-a2a-0.2.7 https://github.com/weimeilin79/instavibe-bootstrap.git
chmod +x ~/instavibe-bootstrap/init.sh
chmod +x ~/instavibe-bootstrap/set_env.sh
Понимание структуры проекта
Прежде чем начать разработку, давайте на мгновение разберемся в структуре проекта instavibe-bootstrap который вы только что клонировали. Это поможет вам понять, где искать и редактировать файлы в рамках мастерской.
instavibe-bootstrap/
├── agents/
│   ├── orchestrate/
│   ├── planner/
│   ├── platform_mcp_client/
│   └── social/
├── instavibe/
│   ├── static/
│   └── templates/
├── tools/
│   └── instavibe/
├── utils/
├── init.sh
└── set_env.sh
Вот список основных каталогов:
-
agents/: Это сердце нашей системы искусственного интеллекта. Каждая подпапка (planner/, social/ и т. д.) содержит исходный код для конкретного интеллектуального агента.-
agent.py: Этот файл, расположенный в папке каждого агента, является основным файлом, содержащим логику работы агента. -
a2a_server.py: Этот файл объединяет агент ADK с сервером взаимодействия между агентами (A2A). -
Dockerfile: Определяет способ сборки образа контейнера для развертывания агента в Cloud Run или Agent Engine.
-
-
instavibe/: В этой директории находится весь исходный код веб-приложения InstaVibe. -
tools/: Эта директория предназначена для создания внешних инструментов, которые могут использовать наши агенты.-
instavibe/содержит сервер протокола контекста модели (MCP).
-
Эта модульная структура отделяет веб-приложение от различных компонентов искусственного интеллекта, что упрощает управление, тестирование и развертывание всей системы.
👉💻 Запустите скрипт инициализации:
Этот скрипт предложит вам ввести идентификатор вашего проекта Google Cloud .
При появлении соответствующего запроса в скрипте init.sh введите идентификатор проекта Google Cloud, найденный на предыдущем шаге:
cd ~/instavibe-bootstrap
./init.sh
👉💻 Укажите необходимый идентификатор проекта:
gcloud config set project $(cat ~/project_id.txt) --quiet
👉💻 Выполните следующую команду, чтобы включить необходимые API Google Cloud:
gcloud services enable  run.googleapis.com \
                        cloudfunctions.googleapis.com \
                        cloudbuild.googleapis.com \
                        artifactregistry.googleapis.com \
                        spanner.googleapis.com \
                        apikeys.googleapis.com \
                        iam.googleapis.com \
                        compute.googleapis.com \
                        aiplatform.googleapis.com \
                        cloudresourcemanager.googleapis.com \
                        maps-backend.googleapis.com
👉💻 Установите все необходимые переменные окружения:
export PROJECT_ID=$(gcloud config get project)
export PROJECT_NUMBER=$(gcloud projects describe ${PROJECT_ID} --format="value(projectNumber)")
export SERVICE_ACCOUNT_NAME=$(gcloud compute project-info describe --format="value(defaultServiceAccount)")
export SPANNER_INSTANCE_ID="instavibe-graph-instance"
export SPANNER_DATABASE_ID="graphdb"
export GOOGLE_CLOUD_PROJECT=$(gcloud config get project)
export GOOGLE_GENAI_USE_VERTEXAI=TRUE
export GOOGLE_CLOUD_LOCATION="us-central1"
Настройка разрешений
👉💻 Предоставьте права доступа. В терминале выполните команду:
gcloud projects add-iam-policy-binding $PROJECT_ID \
  --member="serviceAccount:$SERVICE_ACCOUNT_NAME" \
  --role="roles/spanner.admin"

# Spanner Database User
gcloud projects add-iam-policy-binding $PROJECT_ID \
  --member="serviceAccount:$SERVICE_ACCOUNT_NAME" \
  --role="roles/spanner.databaseUser"

# Artifact Registry Admin
gcloud projects add-iam-policy-binding $PROJECT_ID \
  --member="serviceAccount:$SERVICE_ACCOUNT_NAME" \
  --role="roles/artifactregistry.admin"

# Cloud Build Editor
gcloud projects add-iam-policy-binding $PROJECT_ID \
  --member="serviceAccount:$SERVICE_ACCOUNT_NAME" \
  --role="roles/cloudbuild.builds.editor"

# Cloud Run Admin
gcloud projects add-iam-policy-binding $PROJECT_ID \
  --member="serviceAccount:$SERVICE_ACCOUNT_NAME" \
  --role="roles/run.admin"

# IAM Service Account User
gcloud projects add-iam-policy-binding $PROJECT_ID \
  --member="serviceAccount:$SERVICE_ACCOUNT_NAME" \
  --role="roles/iam.serviceAccountUser"

# Vertex AI User
gcloud projects add-iam-policy-binding $PROJECT_ID \
  --member="serviceAccount:$SERVICE_ACCOUNT_NAME" \
  --role="roles/aiplatform.user"

# Logging Writer (to allow writing logs)
gcloud projects add-iam-policy-binding $PROJECT_ID \
  --member="serviceAccount:$SERVICE_ACCOUNT_NAME" \
  --role="roles/logging.logWriter"


gcloud projects add-iam-policy-binding $PROJECT_ID \
  --member="serviceAccount:$SERVICE_ACCOUNT_NAME" \
  --role="roles/logging.viewer"
👉 Проверьте результат в консоли IAM 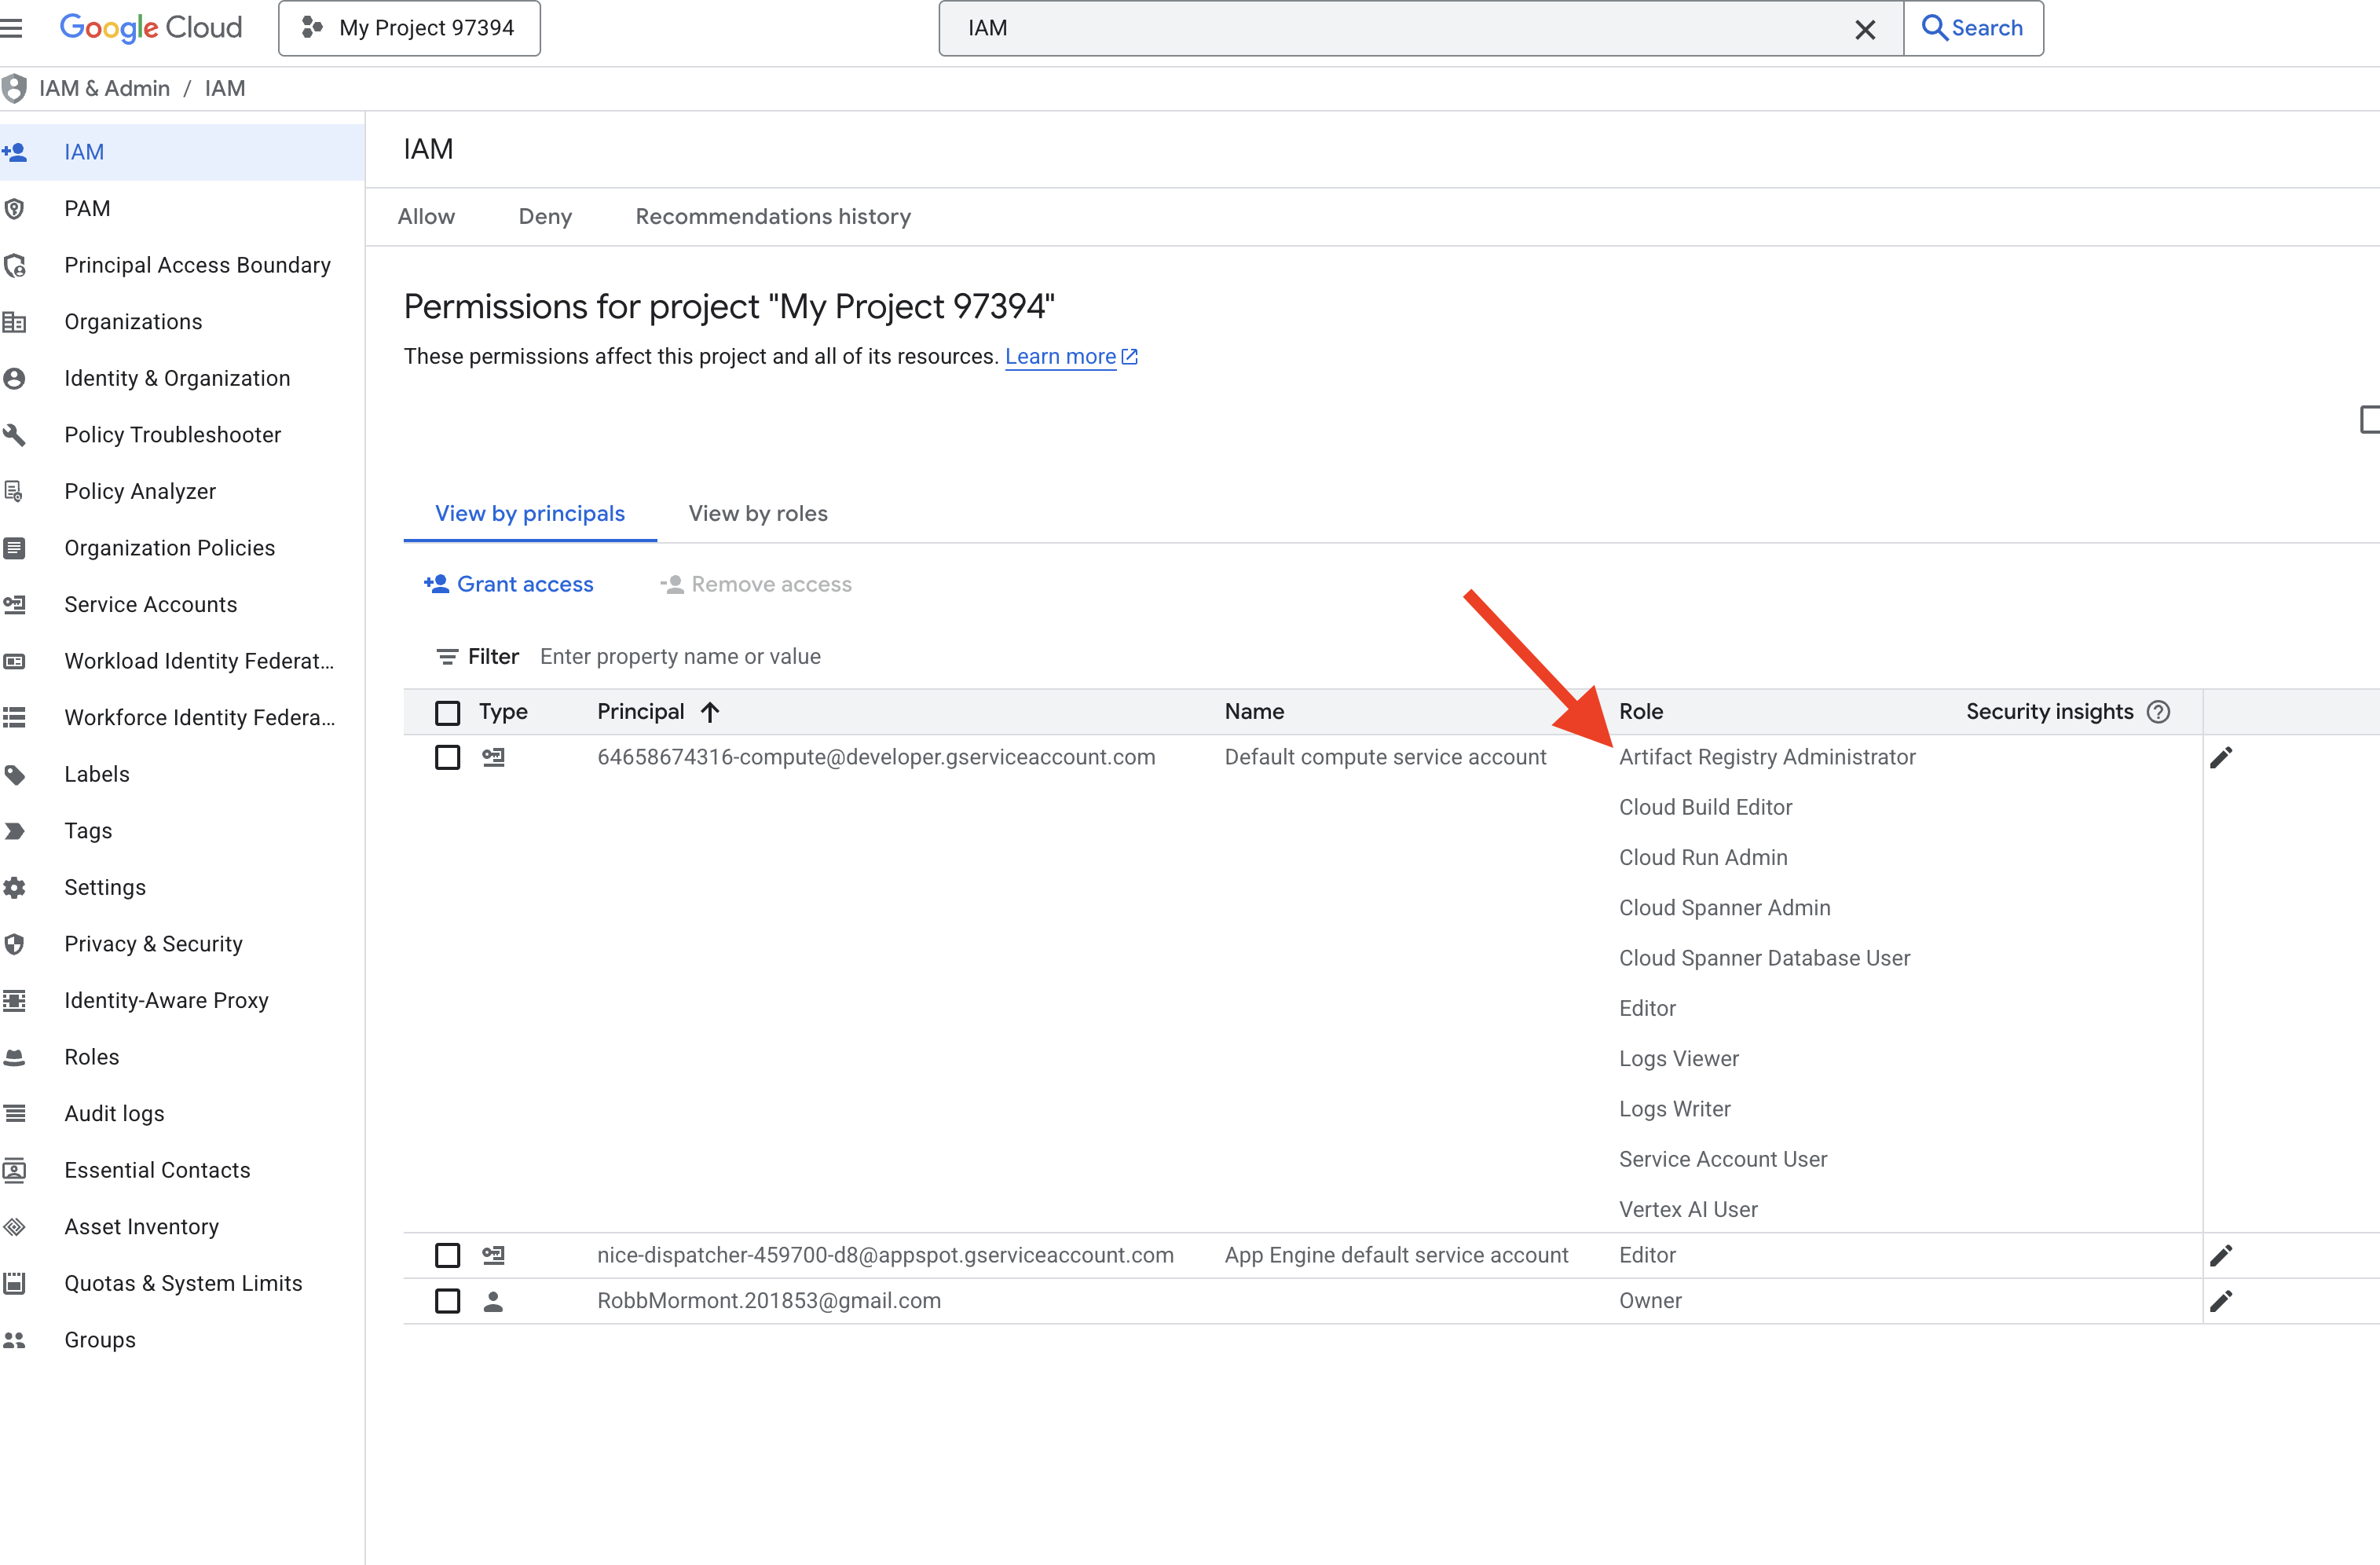
👉💻 Выполните следующие команды в терминале, чтобы создать репозиторий Artifact Registry . Все образы Docker для наших агентов, сервера MCP и приложения InstaVibe хранятся здесь перед развертыванием в Cloud Run или Agent Engine.
export REPO_NAME="introveally-repo"
gcloud artifacts repositories create $REPO_NAME \
  --repository-format=docker \
  --location=us-central1 \
  --description="Docker repository for InstaVibe workshop"
Настройка платформы карт для ключей API
Для использования сервисов Google Maps в вашем приложении InstaVibe вам необходимо создать ключ API и соответствующим образом ограничить его доступ.
👉 В новой вкладке перейдите в раздел API и сервисы > Учетные данные . На странице «Учетные данные» нажмите кнопку «+ СОЗДАТЬ УЧЕТНЫЕ ДАННЫЕ» вверху. Выберите «Ключ API» из выпадающего меню. 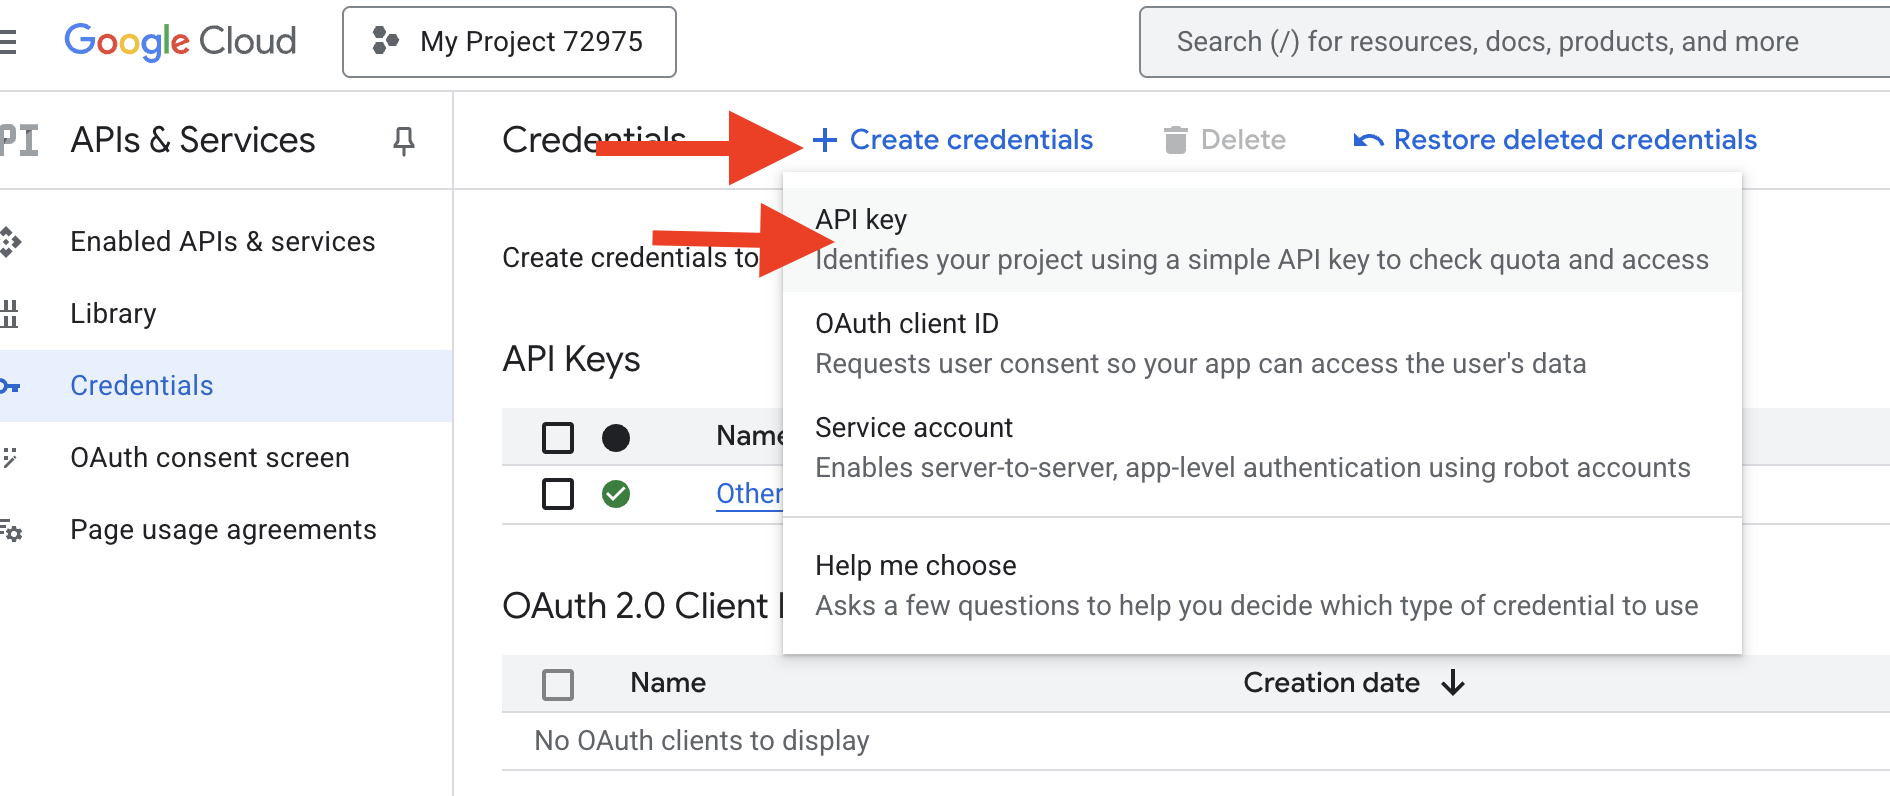
👉 Появится диалоговое окно с вашим новым API-ключом. Он понадобится вам позже для настройки приложения.
👉 Нажмите кнопку ЗАКРЫТЬ в диалоговом окне "Создан ключ API".
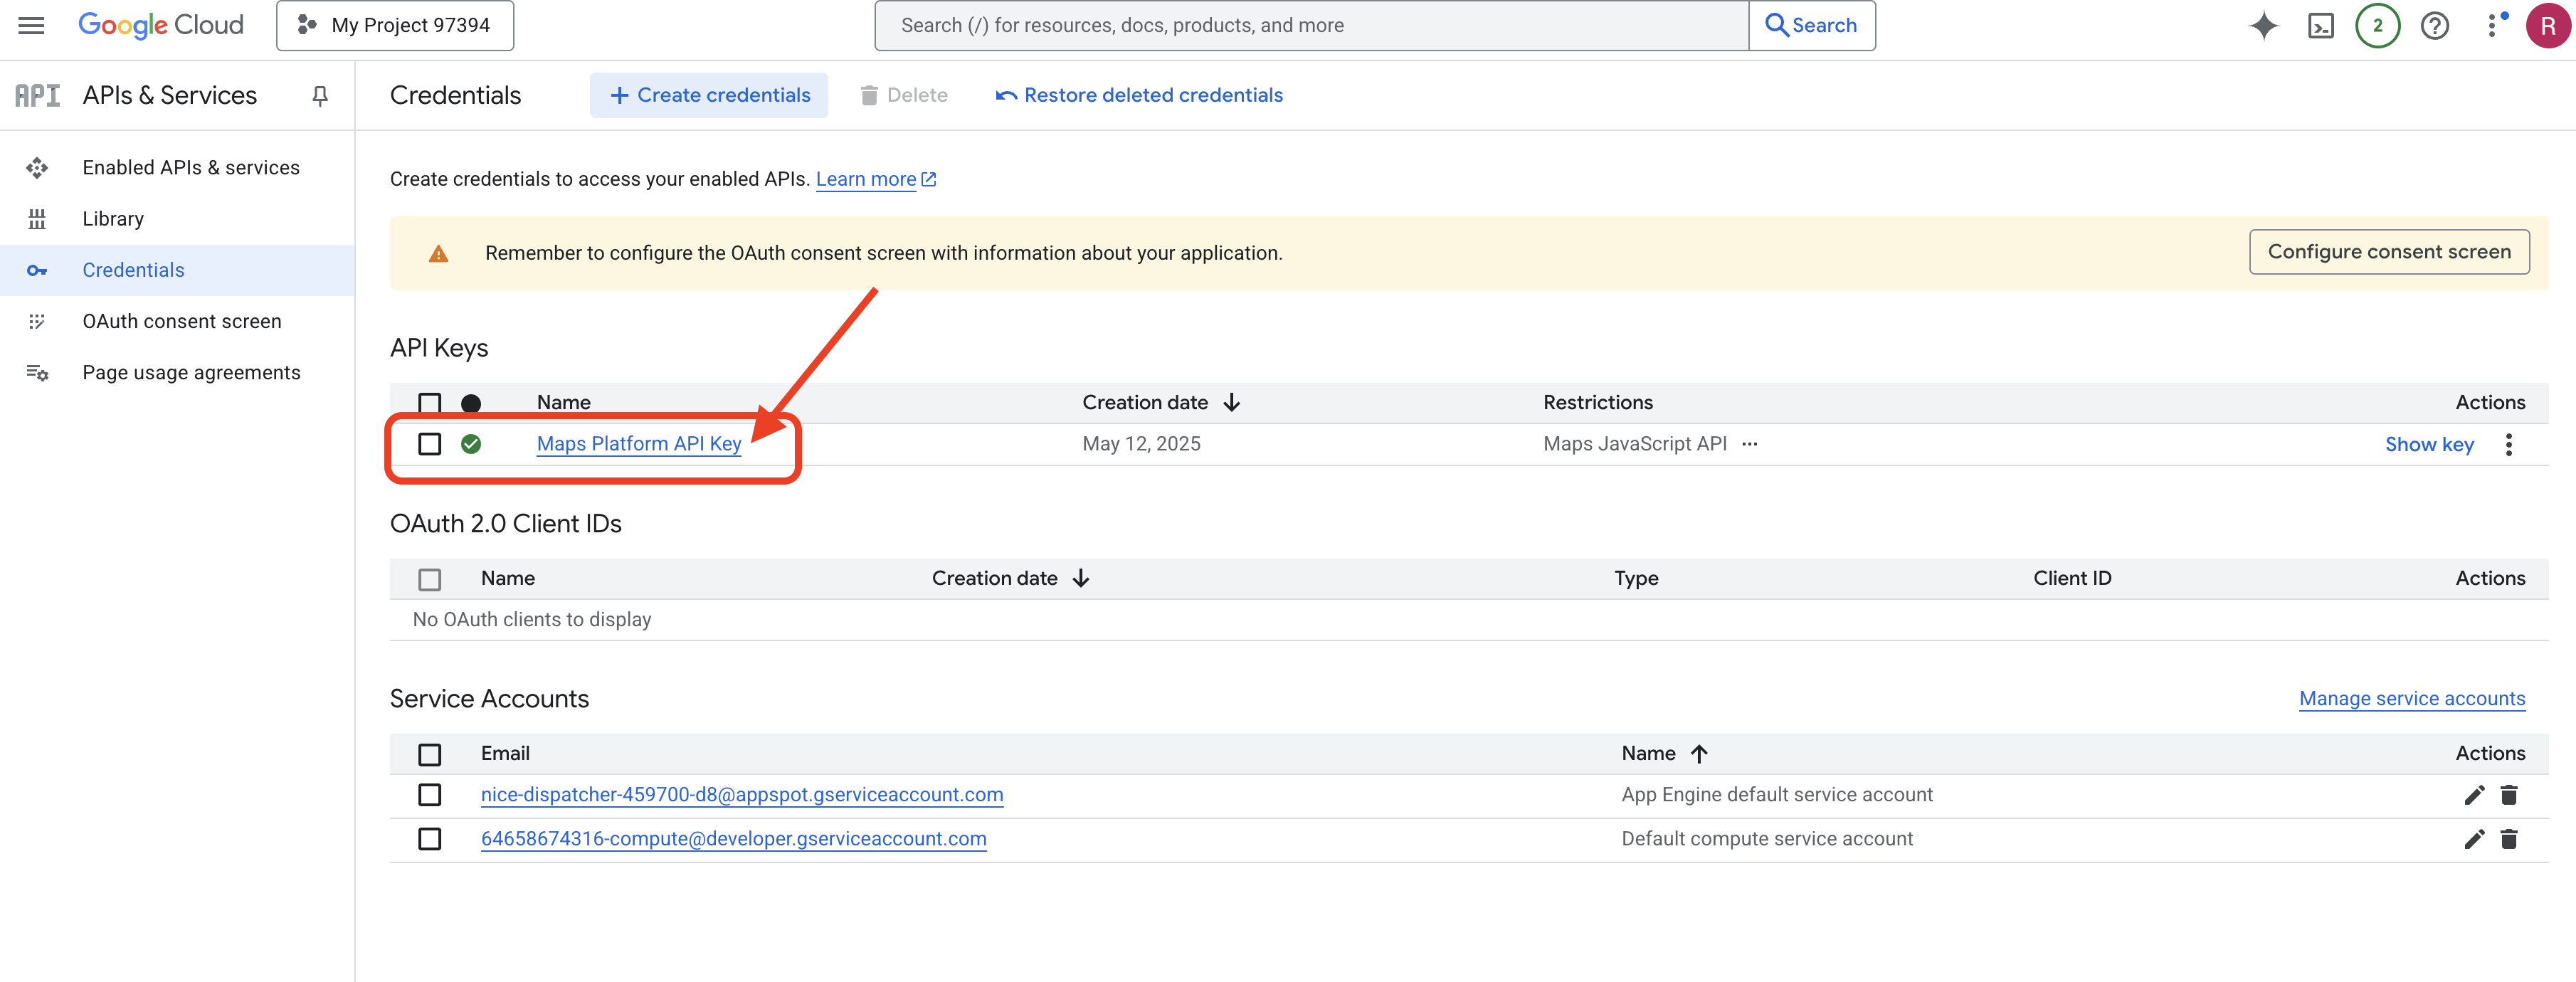
👉 Вы увидите свой новый ключ API (например, «Ключ API 1»). Нажмите на три точки справа и выберите «Редактировать ключ API », чтобы открыть страницу «Ограничить и переименовать ключ API». 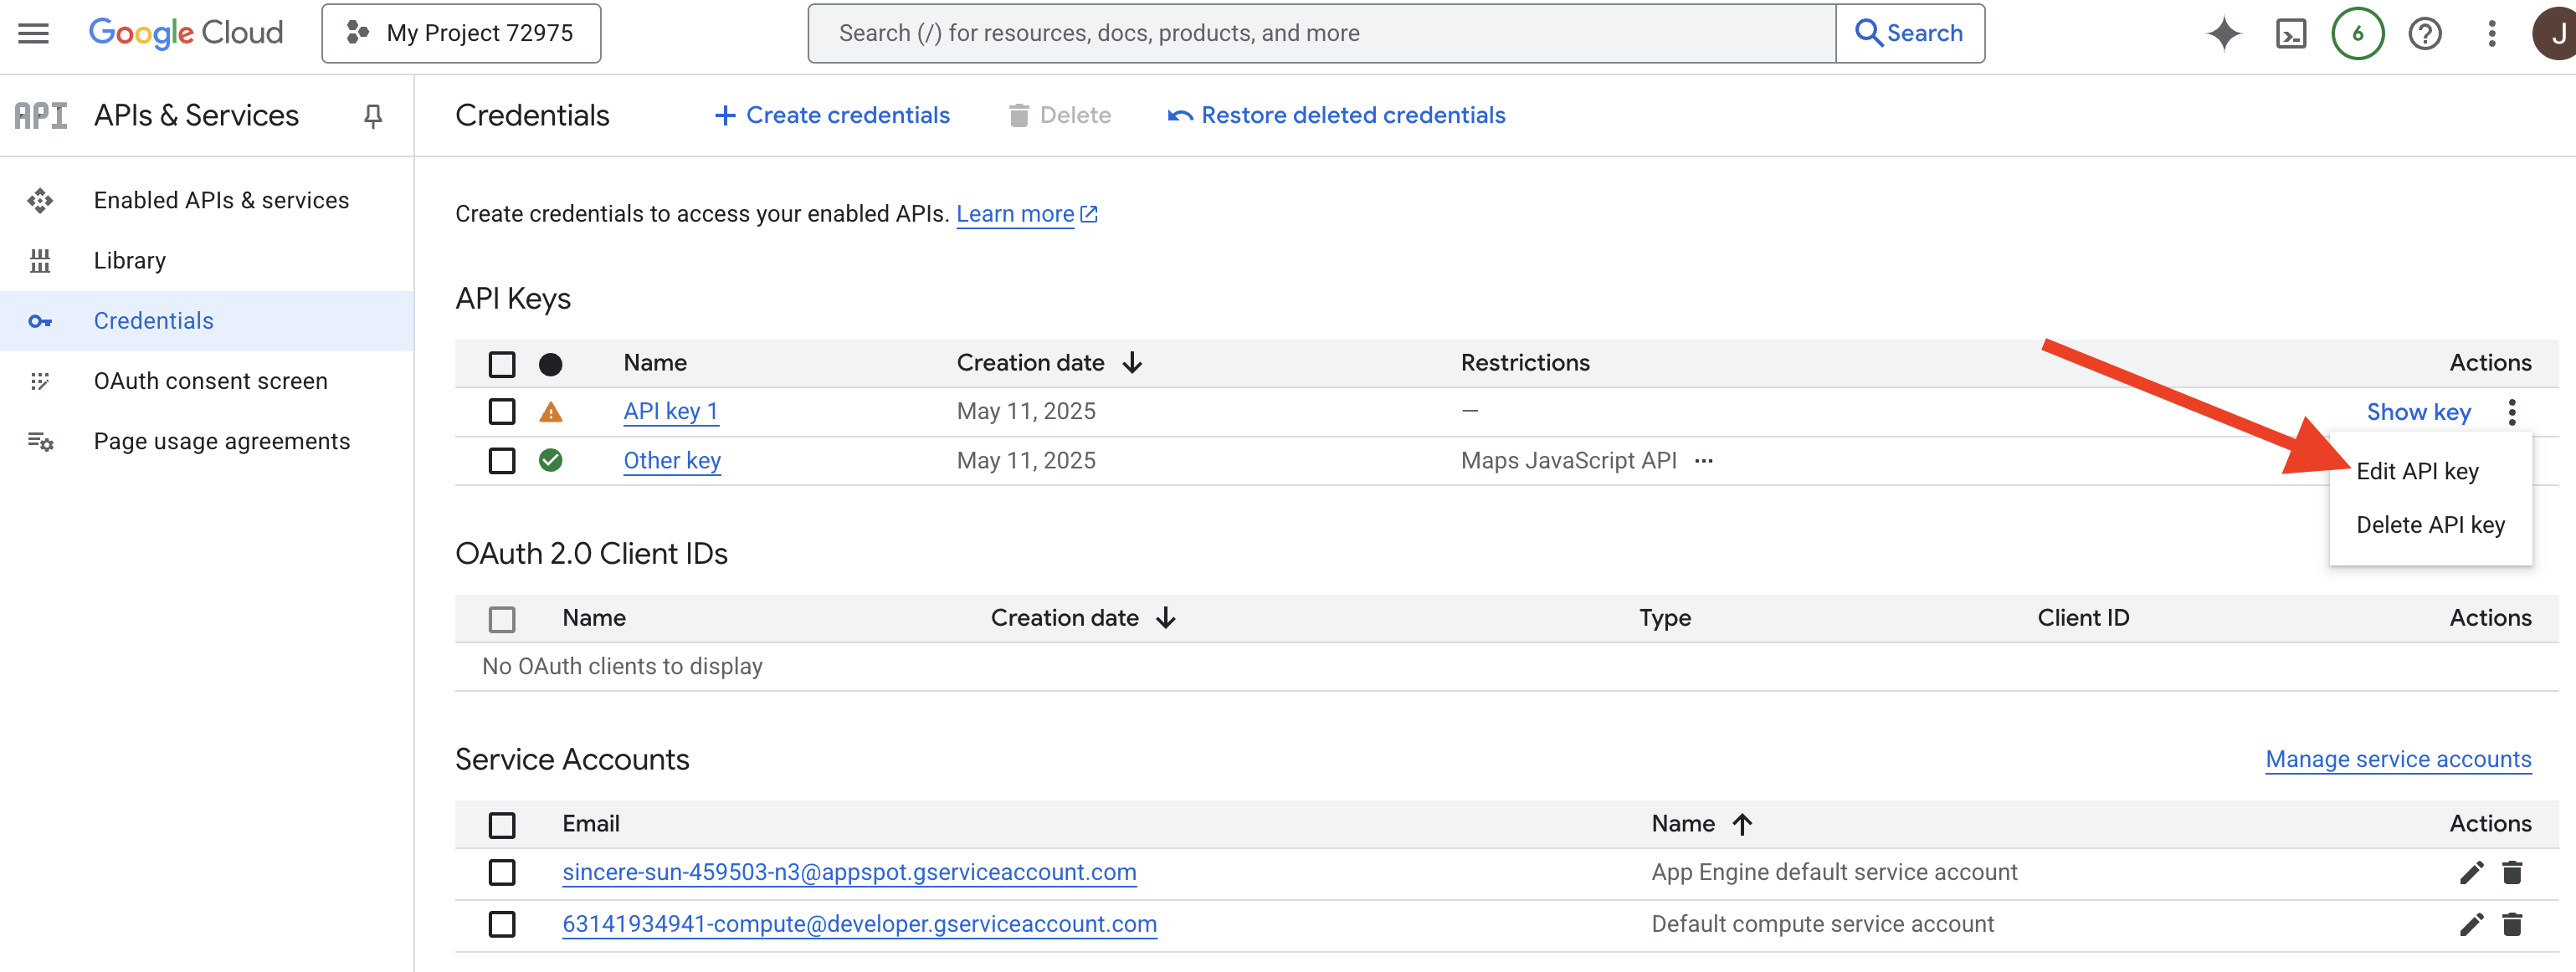
👉 В поле «Имя» вверху измените имя по умолчанию на: Ключ API платформы карт (🚨🚨ВАЖНО🚨🚨 Пожалуйста, используйте это имя!)
Maps Platform API Key
👉 В разделе «Ограничения приложения» убедитесь, что выбрано «Нет» .
👉 В разделе «Ограничения API» выберите переключатель «Ограничить ключ».
👉 Щелкните раскрывающееся меню «Выбрать API». В появившемся поле поиска введите Maps JavaScript API и выберите его из списка. 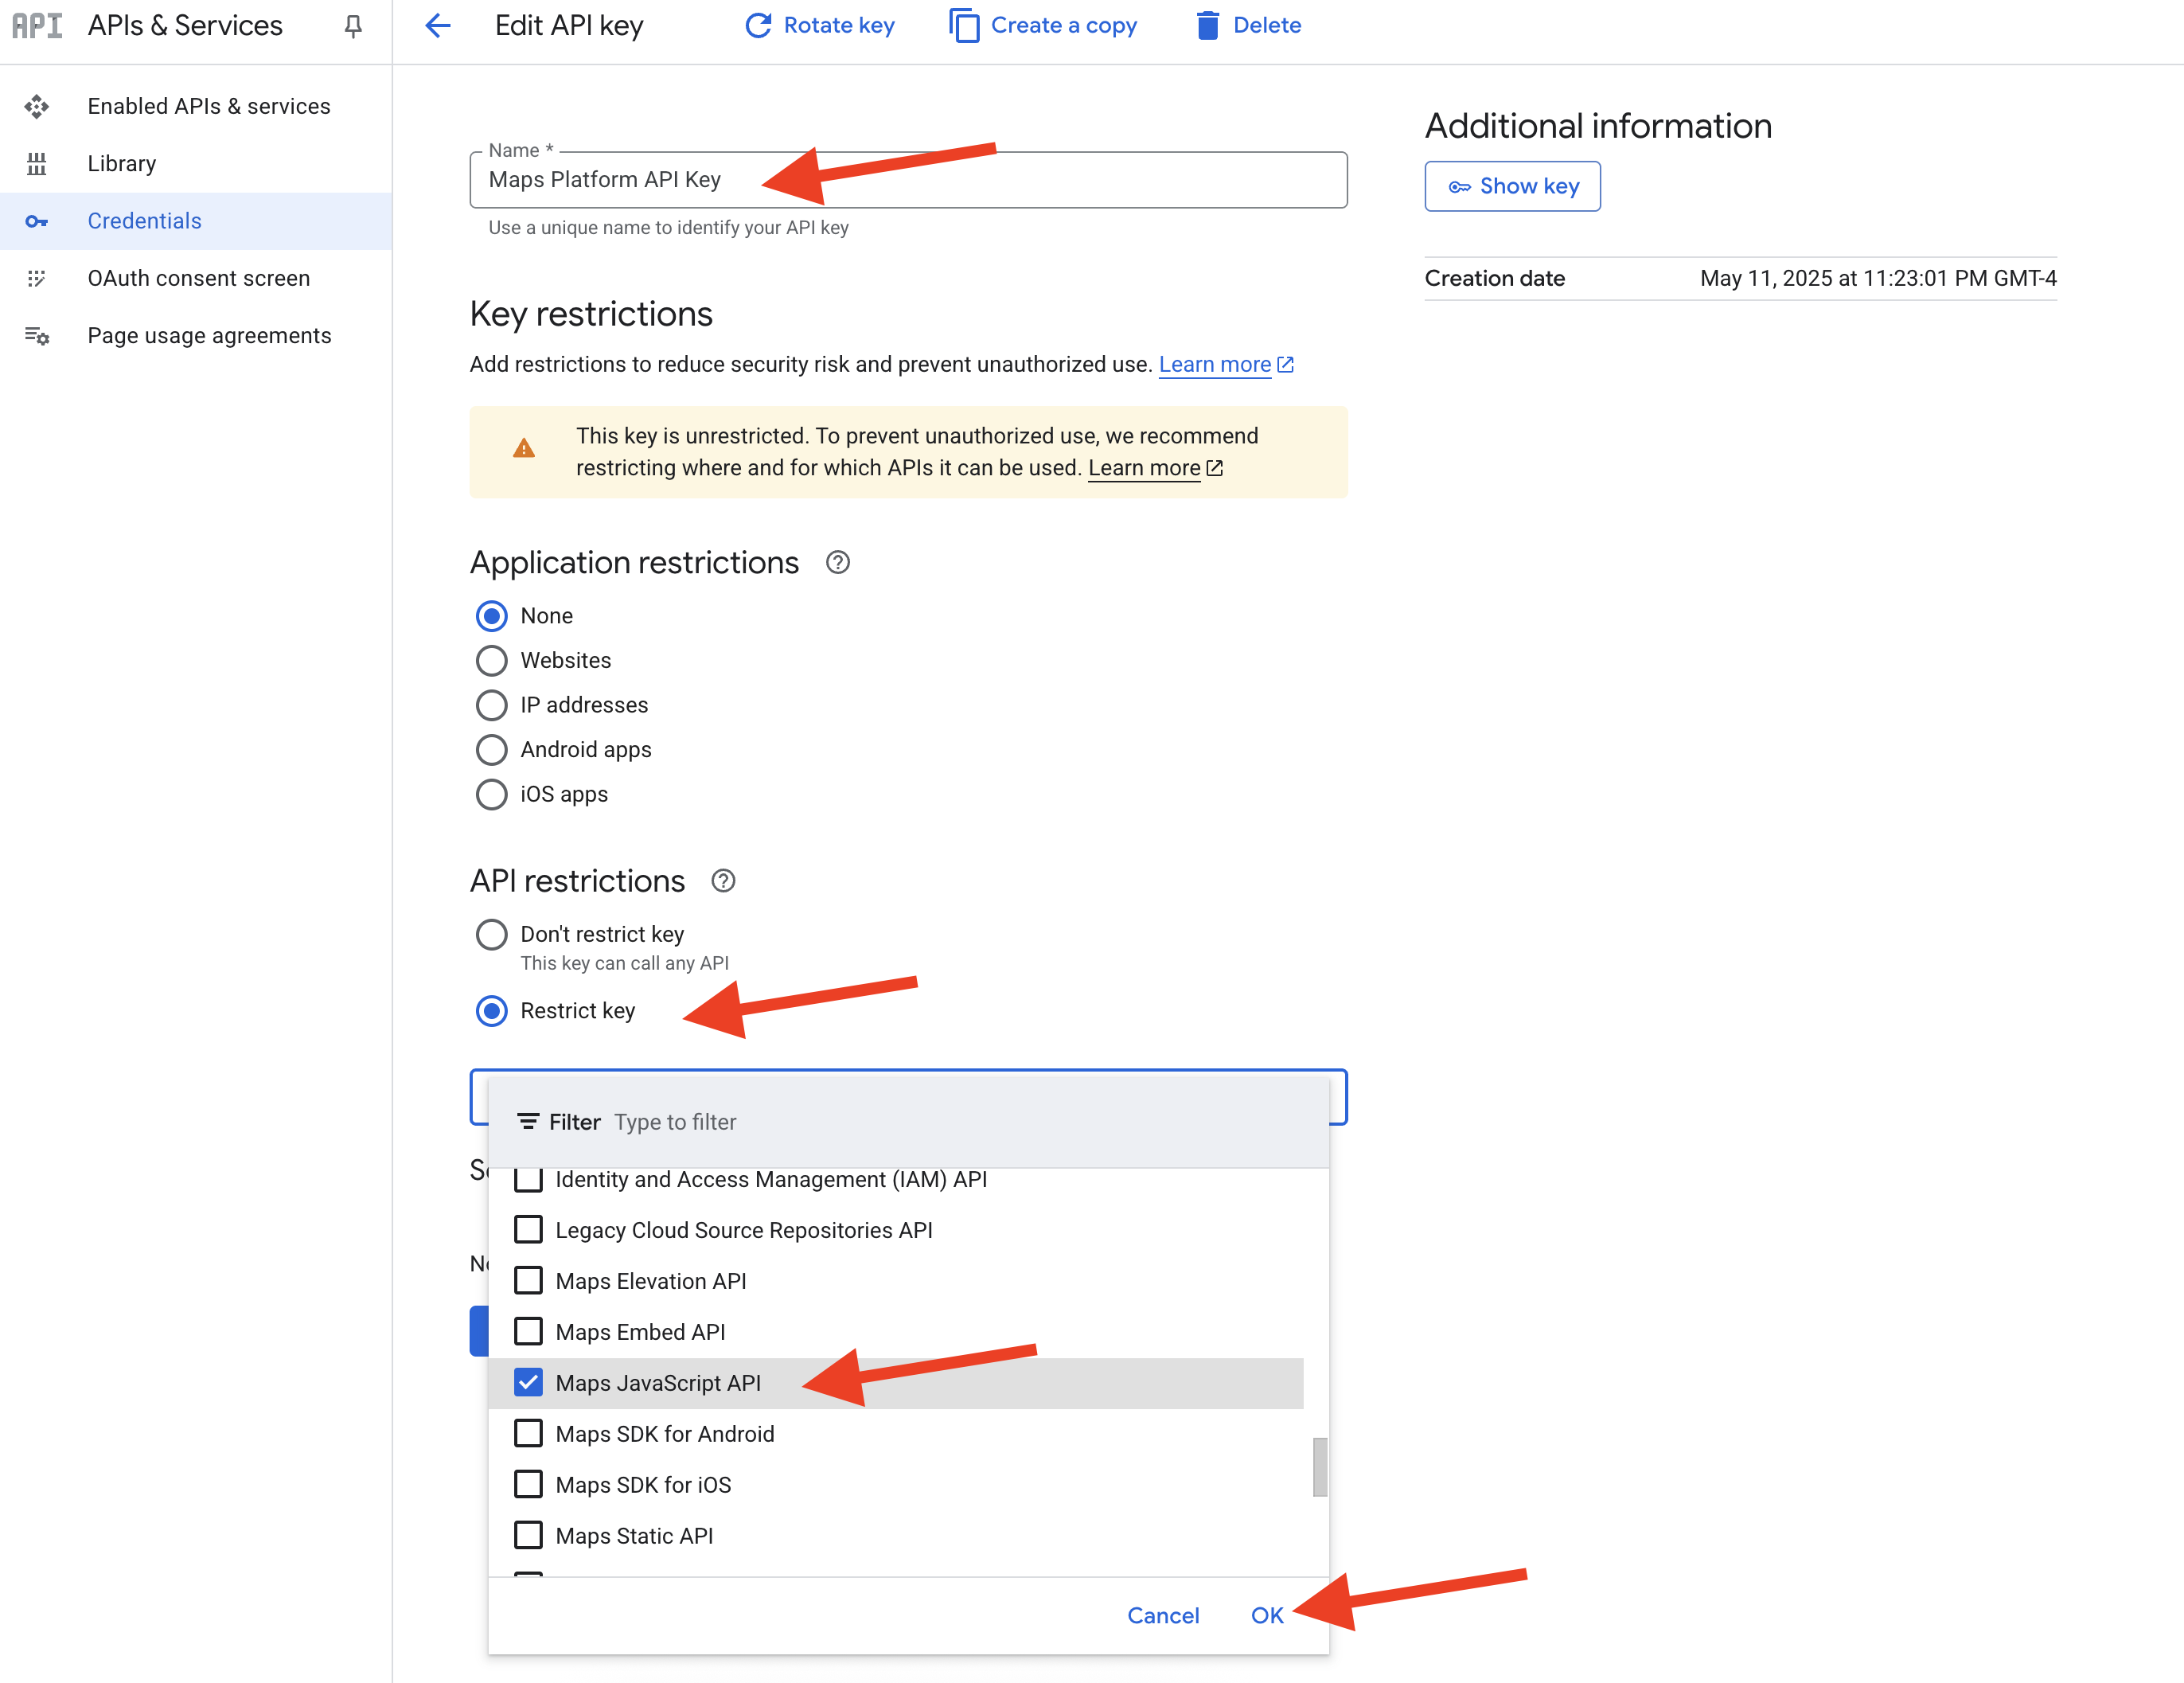
👉 Нажмите ОК.
👉 Нажмите кнопку СОХРАНИТЬ внизу страницы.
Вы успешно создали ключ API с именем "Maps Platform API Key", ограничили его использование только для "Maps JavaScript API" и убедились, что API включен для вашего проекта.
4. Настройка базы данных Graph
Прежде чем создавать интеллектуальных агентов, нам нужен способ хранения и анализа сложных связей внутри нашей социальной сети InstaVibe. Именно здесь на помощь приходит графовая база данных. В отличие от традиционных реляционных баз данных, которые хранят данные в таблицах строк и столбцов, графовая база данных специально разработана для представления и запроса данных в виде узлов (таких как люди, события или публикации) и связей (ребер), которые их соединяют (например, дружба, посещение мероприятий или упоминания). Эта структура невероятно мощна для приложений социальных сетей, поскольку она отражает структуру реальных социальных сетей, что делает интуитивно понятным изучение взаимосвязей между различными сущностями.
Мы внедряем эту графовую базу данных, используя Google Cloud Spanner. Хотя Spanner в первую очередь известен как глобально распределенная, строго согласованная реляционная база данных, он также позволяет нам определять и запрашивать графовые структуры непосредственно поверх наших реляционных таблиц.
Это позволяет нам объединить преимущества масштабируемости, транзакционной согласованности и привычного SQL-интерфейса Spanner с выразительными возможностями запросов к графам для анализа сложных социальных взаимодействий, имеющих решающее значение для наших функций, основанных на искусственном интеллекте.
👉💻 В терминале Cloud Shell IDE подготовьте необходимую инфраструктуру в Google Cloud. Начнем с создания экземпляра Spanner, который будет выступать в качестве выделенного контейнера для наших баз данных. После того, как экземпляр будет готов, мы создадим внутри него саму базу данных Spanner, в которой будут храниться все наши таблицы и данные графов для InstaVibe:
. ~/instavibe-bootstrap/set_env.sh

gcloud spanner instances create $SPANNER_INSTANCE_ID \
  --config=regional-us-central1 \
  --description="GraphDB Instance InstaVibe" \
  --processing-units=100 \
  --edition=ENTERPRISE

gcloud spanner databases create $SPANNER_DATABASE_ID \
  --instance=$SPANNER_INSTANCE_ID \
  --database-dialect=GOOGLE_STANDARD_SQL
👉💻 Предоставьте Spanner права на чтение/запись для учетной записи службы по умолчанию.
echo "Granting Spanner read/write access to ${SERVICE_ACCOUNT_NAME} for database ${SPANNER_DATABASE_ID}..."

gcloud spanner databases add-iam-policy-binding ${SPANNER_DATABASE_ID} \
  --instance=${SPANNER_INSTANCE_ID} \
  --member="serviceAccount:${SERVICE_ACCOUNT_NAME}" \
  --role="roles/spanner.databaseUser" \
  --project=${PROJECT_ID}
👉💻 Теперь мы настроим виртуальное окружение Python, установим необходимые пакеты Python, затем настроим схему графовой базы данных в Spanner, загрузим в неё начальные данные и запустим скрипт setup.py .
. ~/instavibe-bootstrap/set_env.sh
cd ~/instavibe-bootstrap
python -m venv env
source env/bin/activate
pip install -r requirements.txt
cd instavibe
python setup.py
👉 В новой вкладке браузера перейдите в консоль Google Cloud, выберите Spanner , и вы увидите список ваших экземпляров Spanner. Щелкните по instavibe-graph-instance . 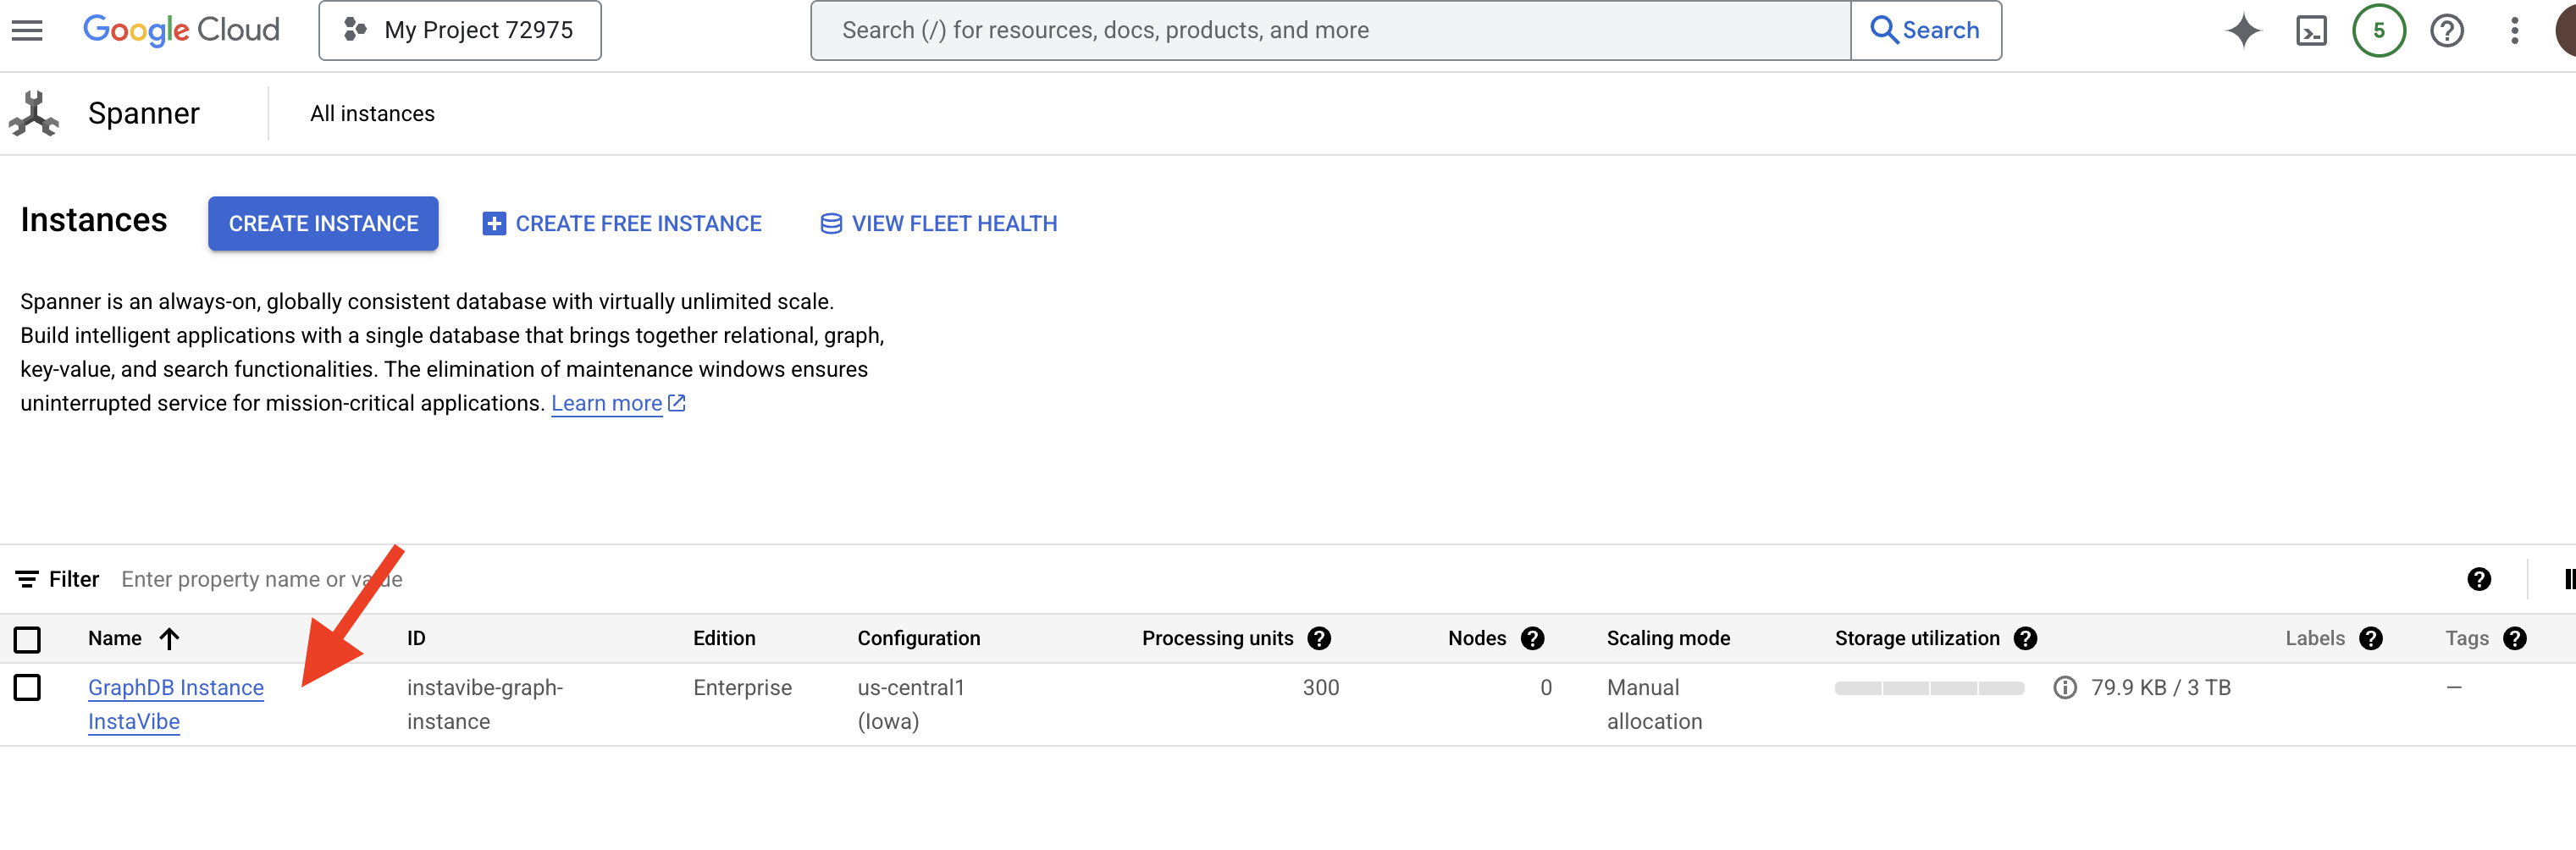 👉 На странице обзора экземпляра вы увидите список баз данных в этом экземпляре. Нажмите на
 graphdb 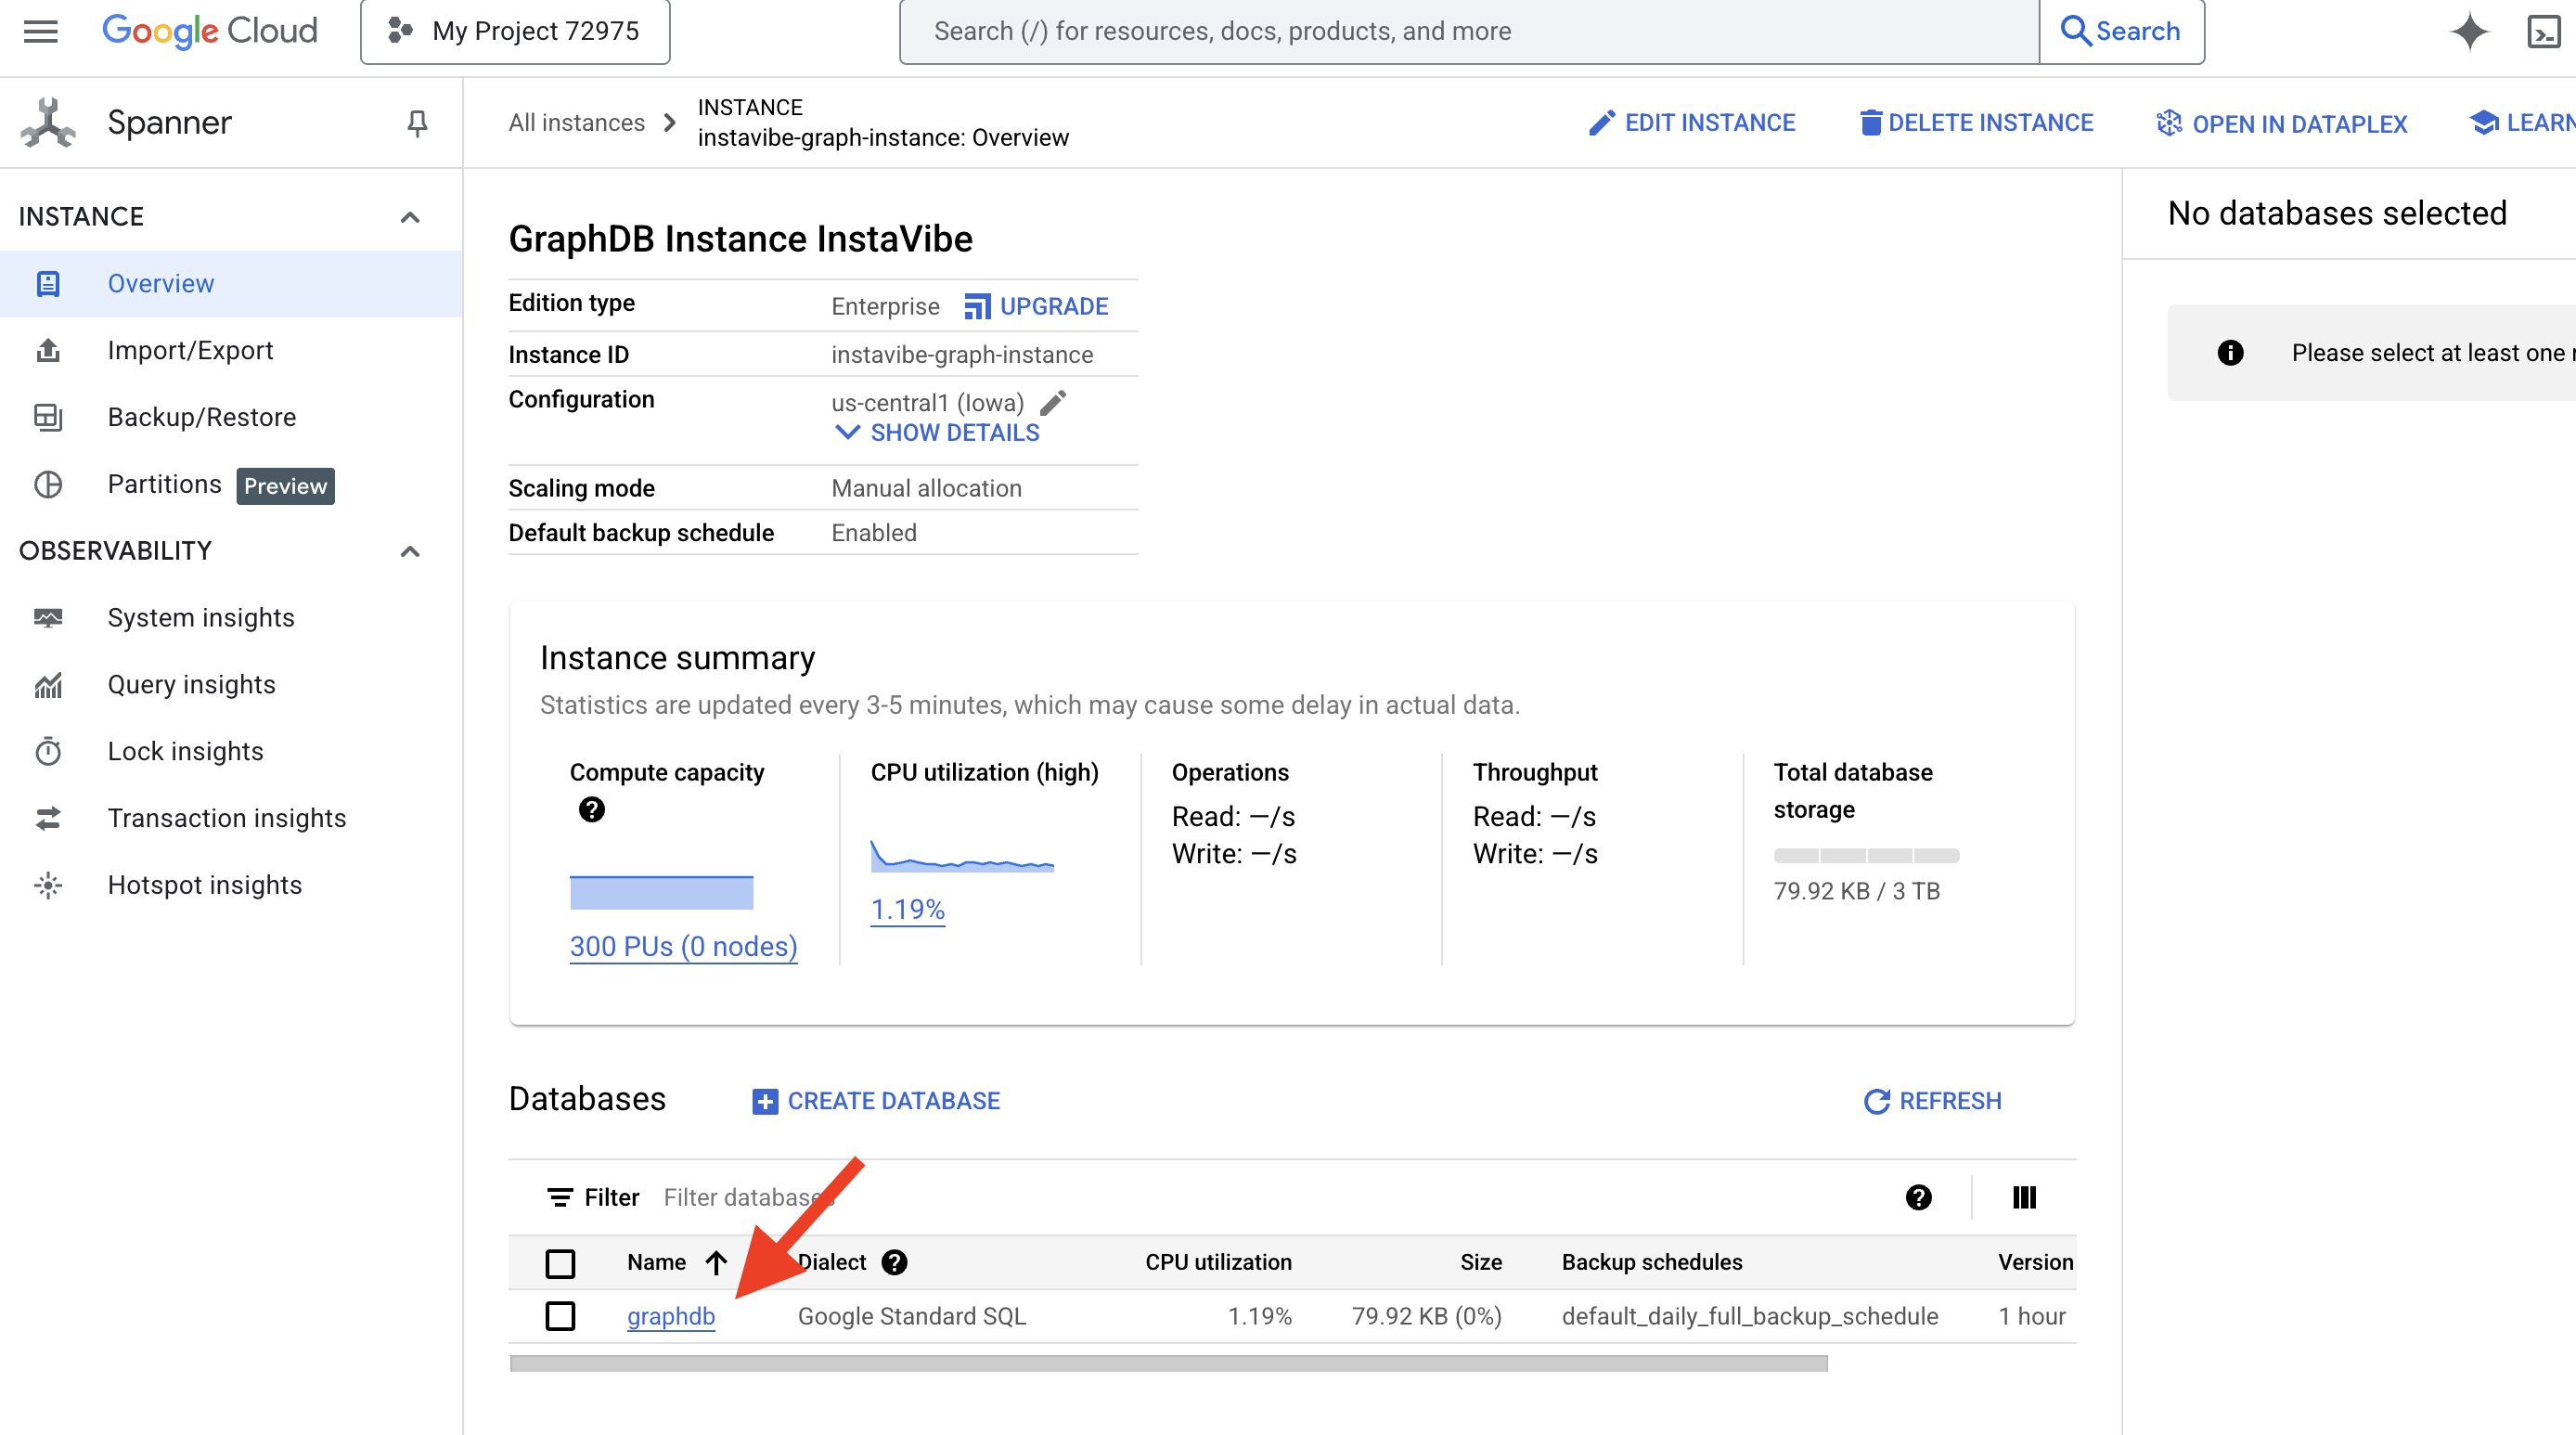
👉 В левой панели навигации вашей базы данных нажмите на Spanner Studio 
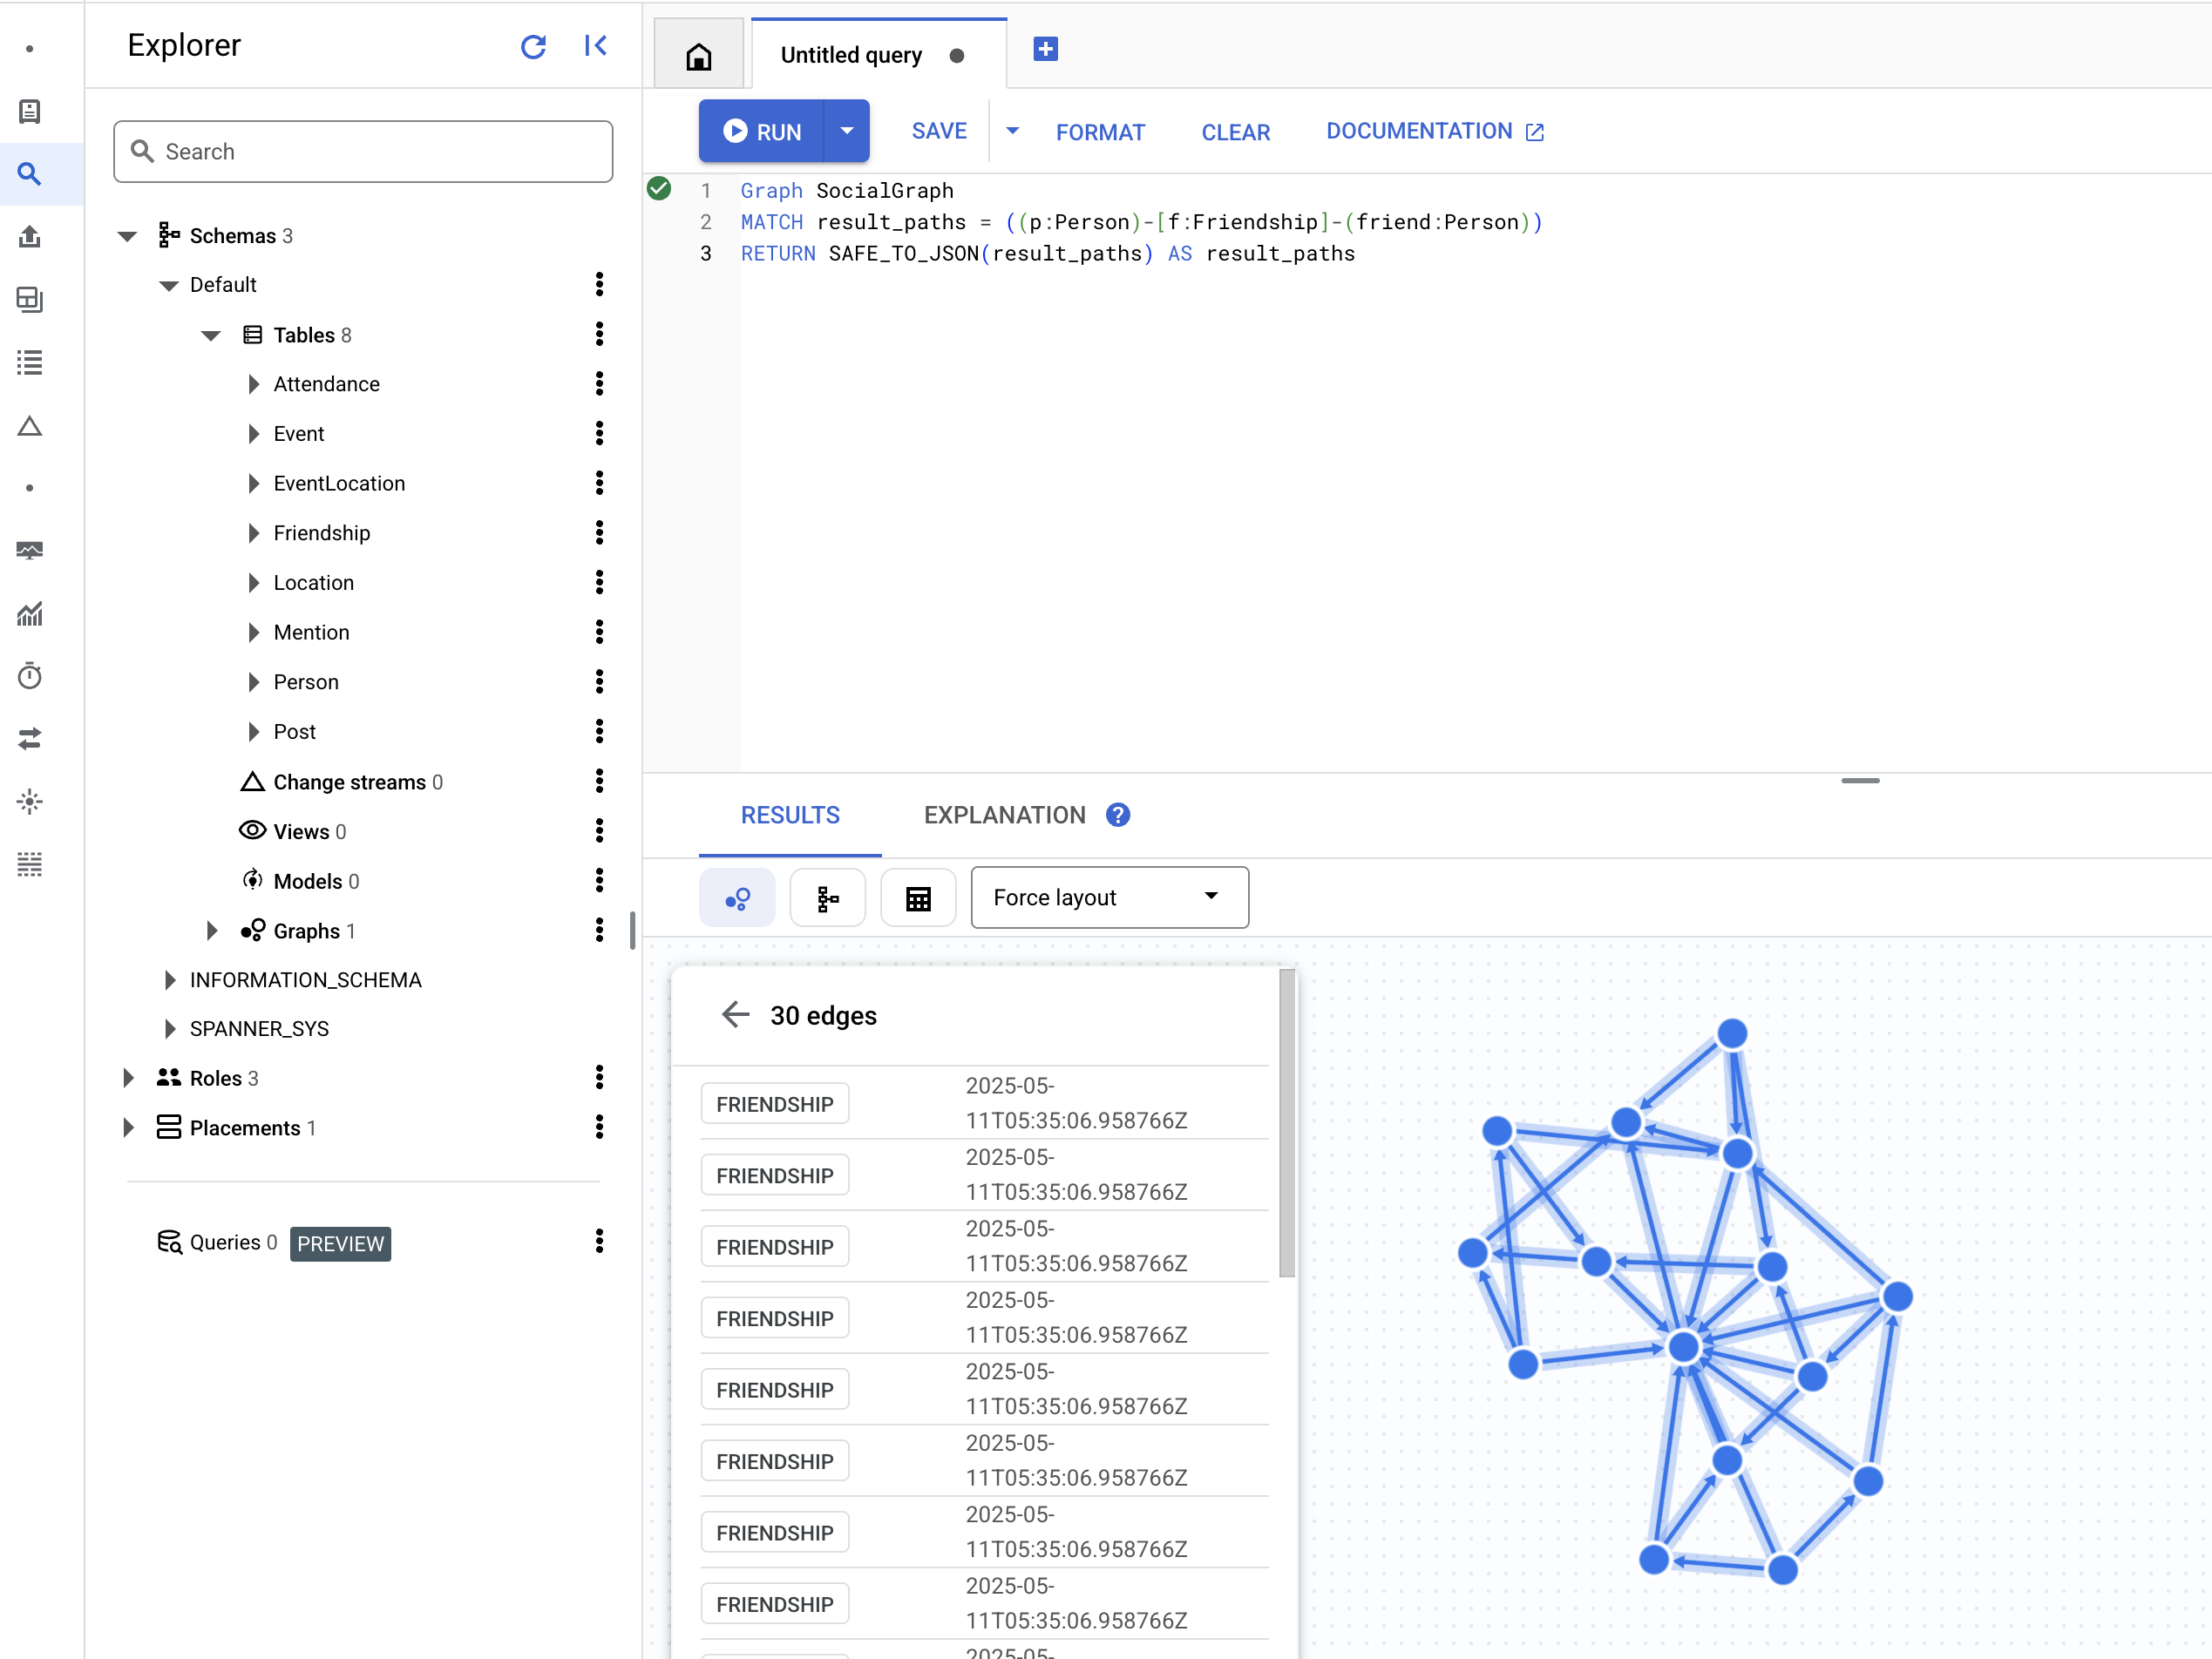
👉 В редакторе запросов (вкладка «Без названия») вставьте следующий SQL-запрос Graph. Этот запрос найдет все узлы Person и их прямые дружеские связи с другими узлами Person. Затем нажмите «Выполнить» , чтобы увидеть результат.
Graph SocialGraph
MATCH result_paths = ((p:Person)-[f:Friendship]-(friend:Person))
RETURN SAFE_TO_JSON(result_paths) AS result_paths
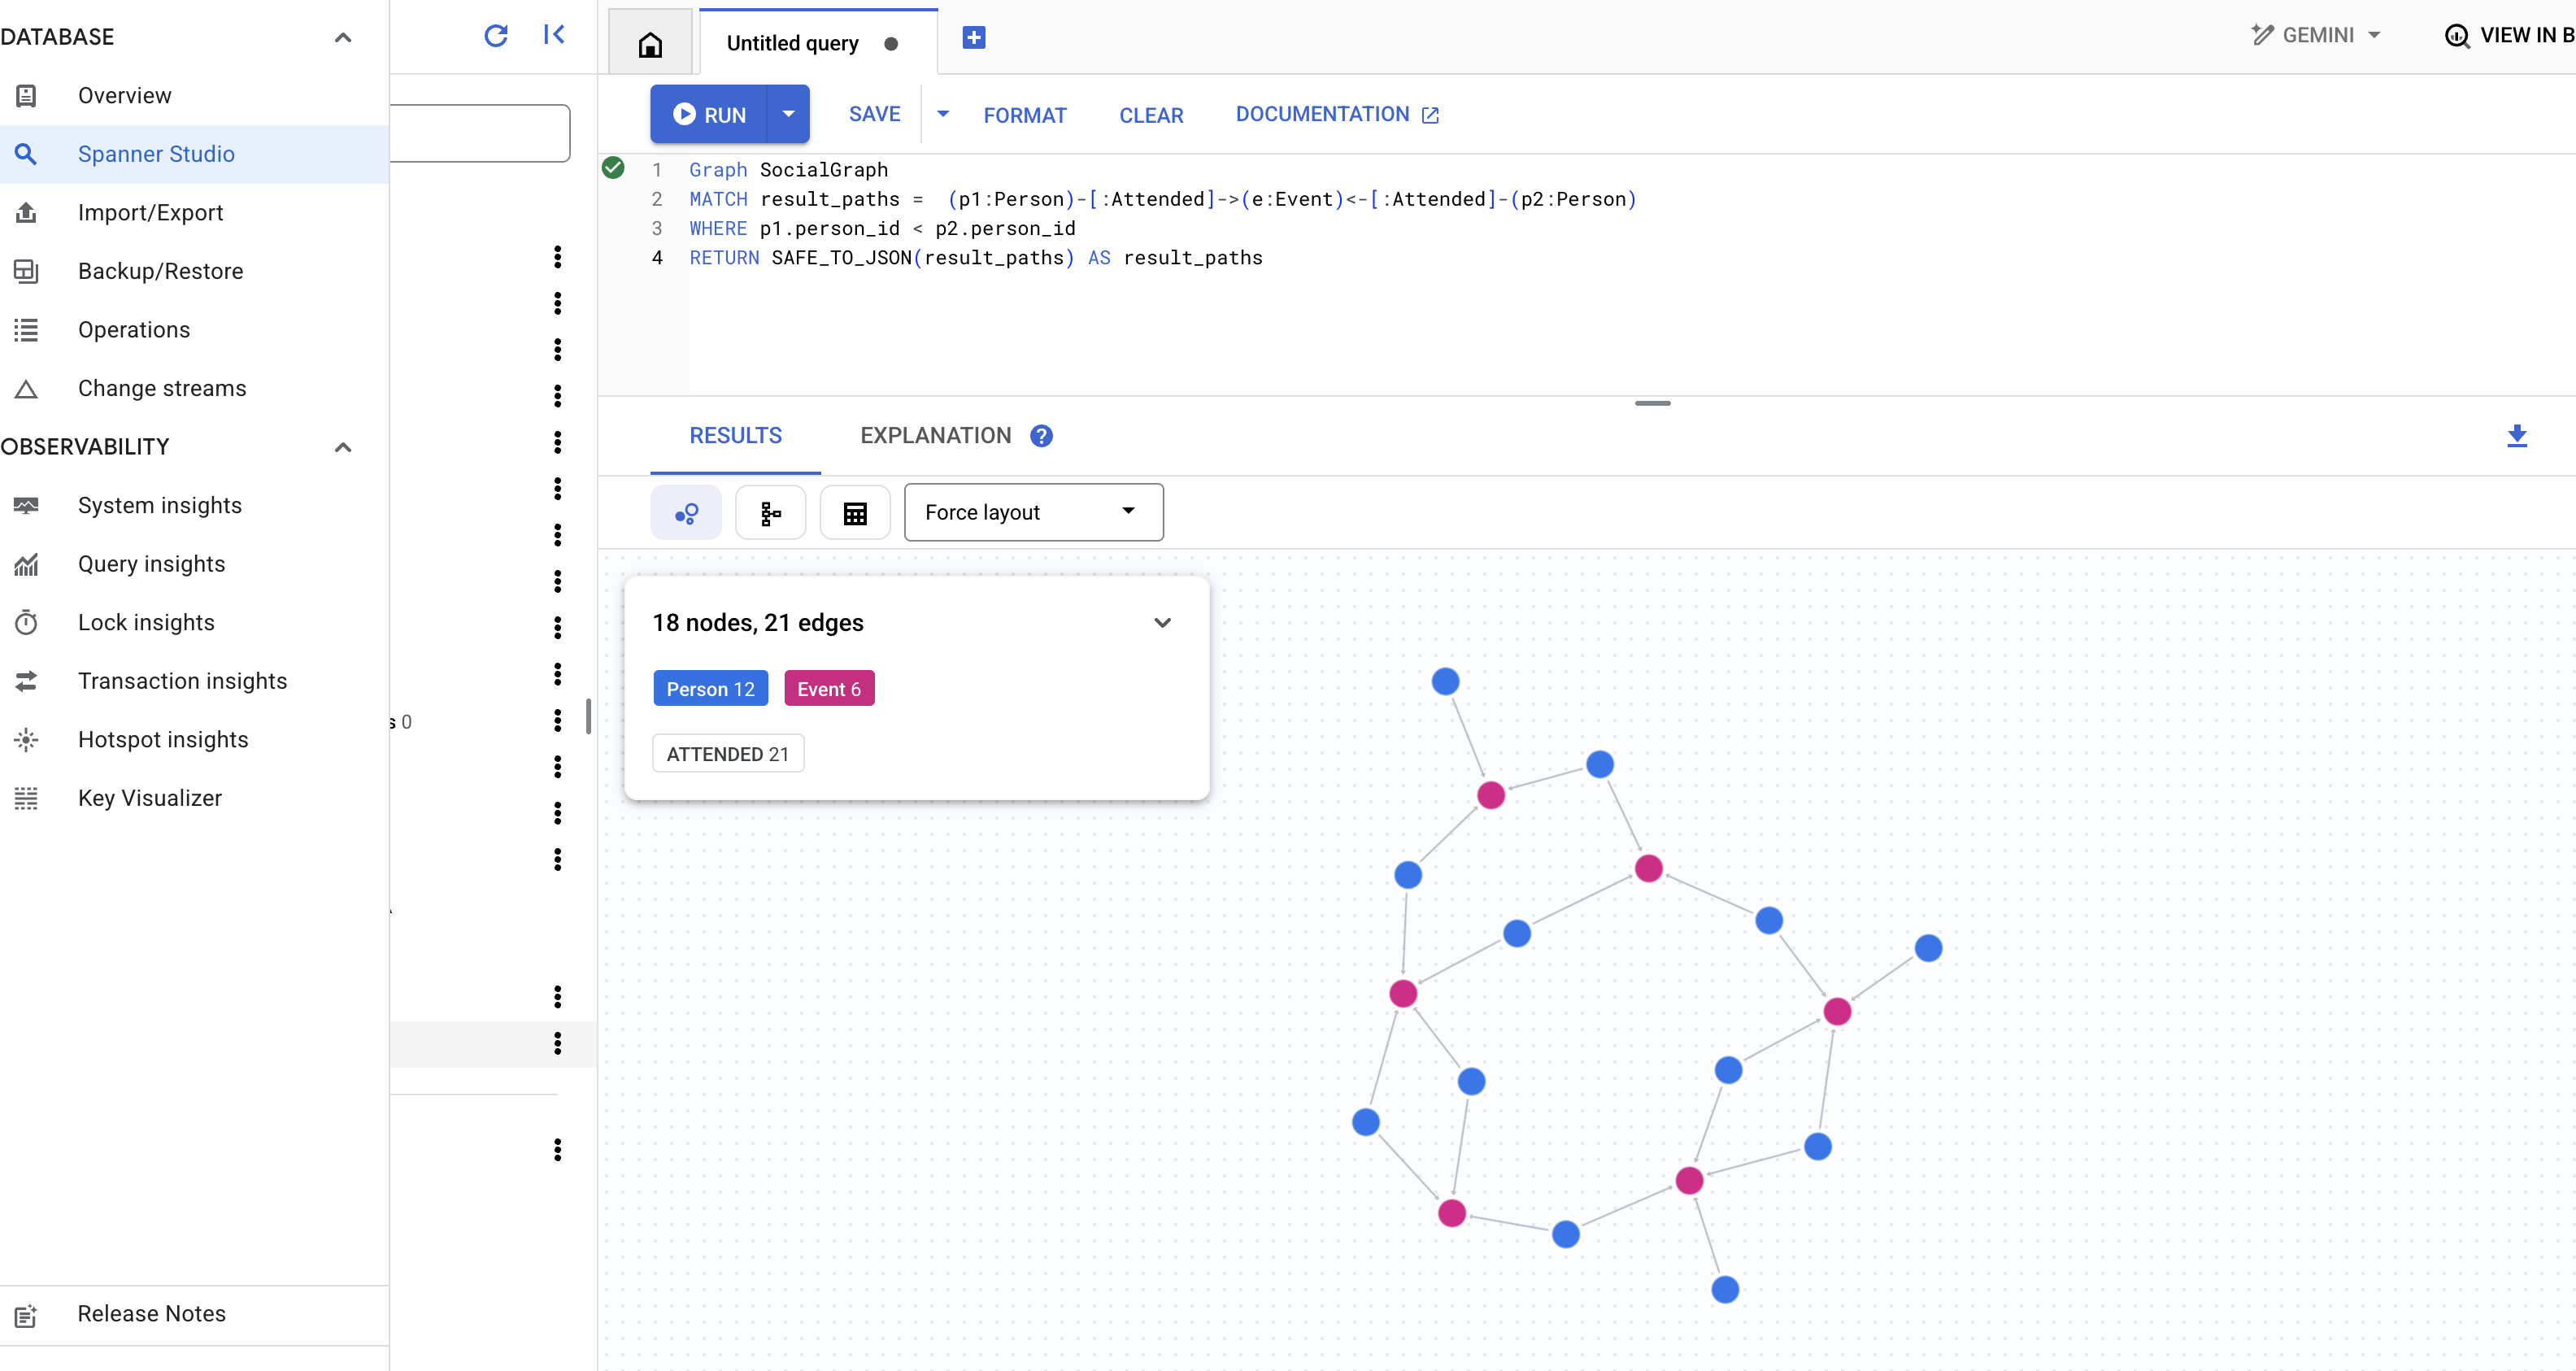
👉 В том же редакторе запросов замените предыдущий DDL-скрипт, чтобы найти людей, которые посетили одно и то же мероприятие, что подразумевает косвенную связь через общую активность.
Graph SocialGraph
MATCH result_paths =  (p1:Person)-[:Attended]->(e:Event)<-[:Attended]-(p2:Person)
WHERE p1.person_id < p2.person_id
RETURN SAFE_TO_JSON(result_paths) AS result_paths
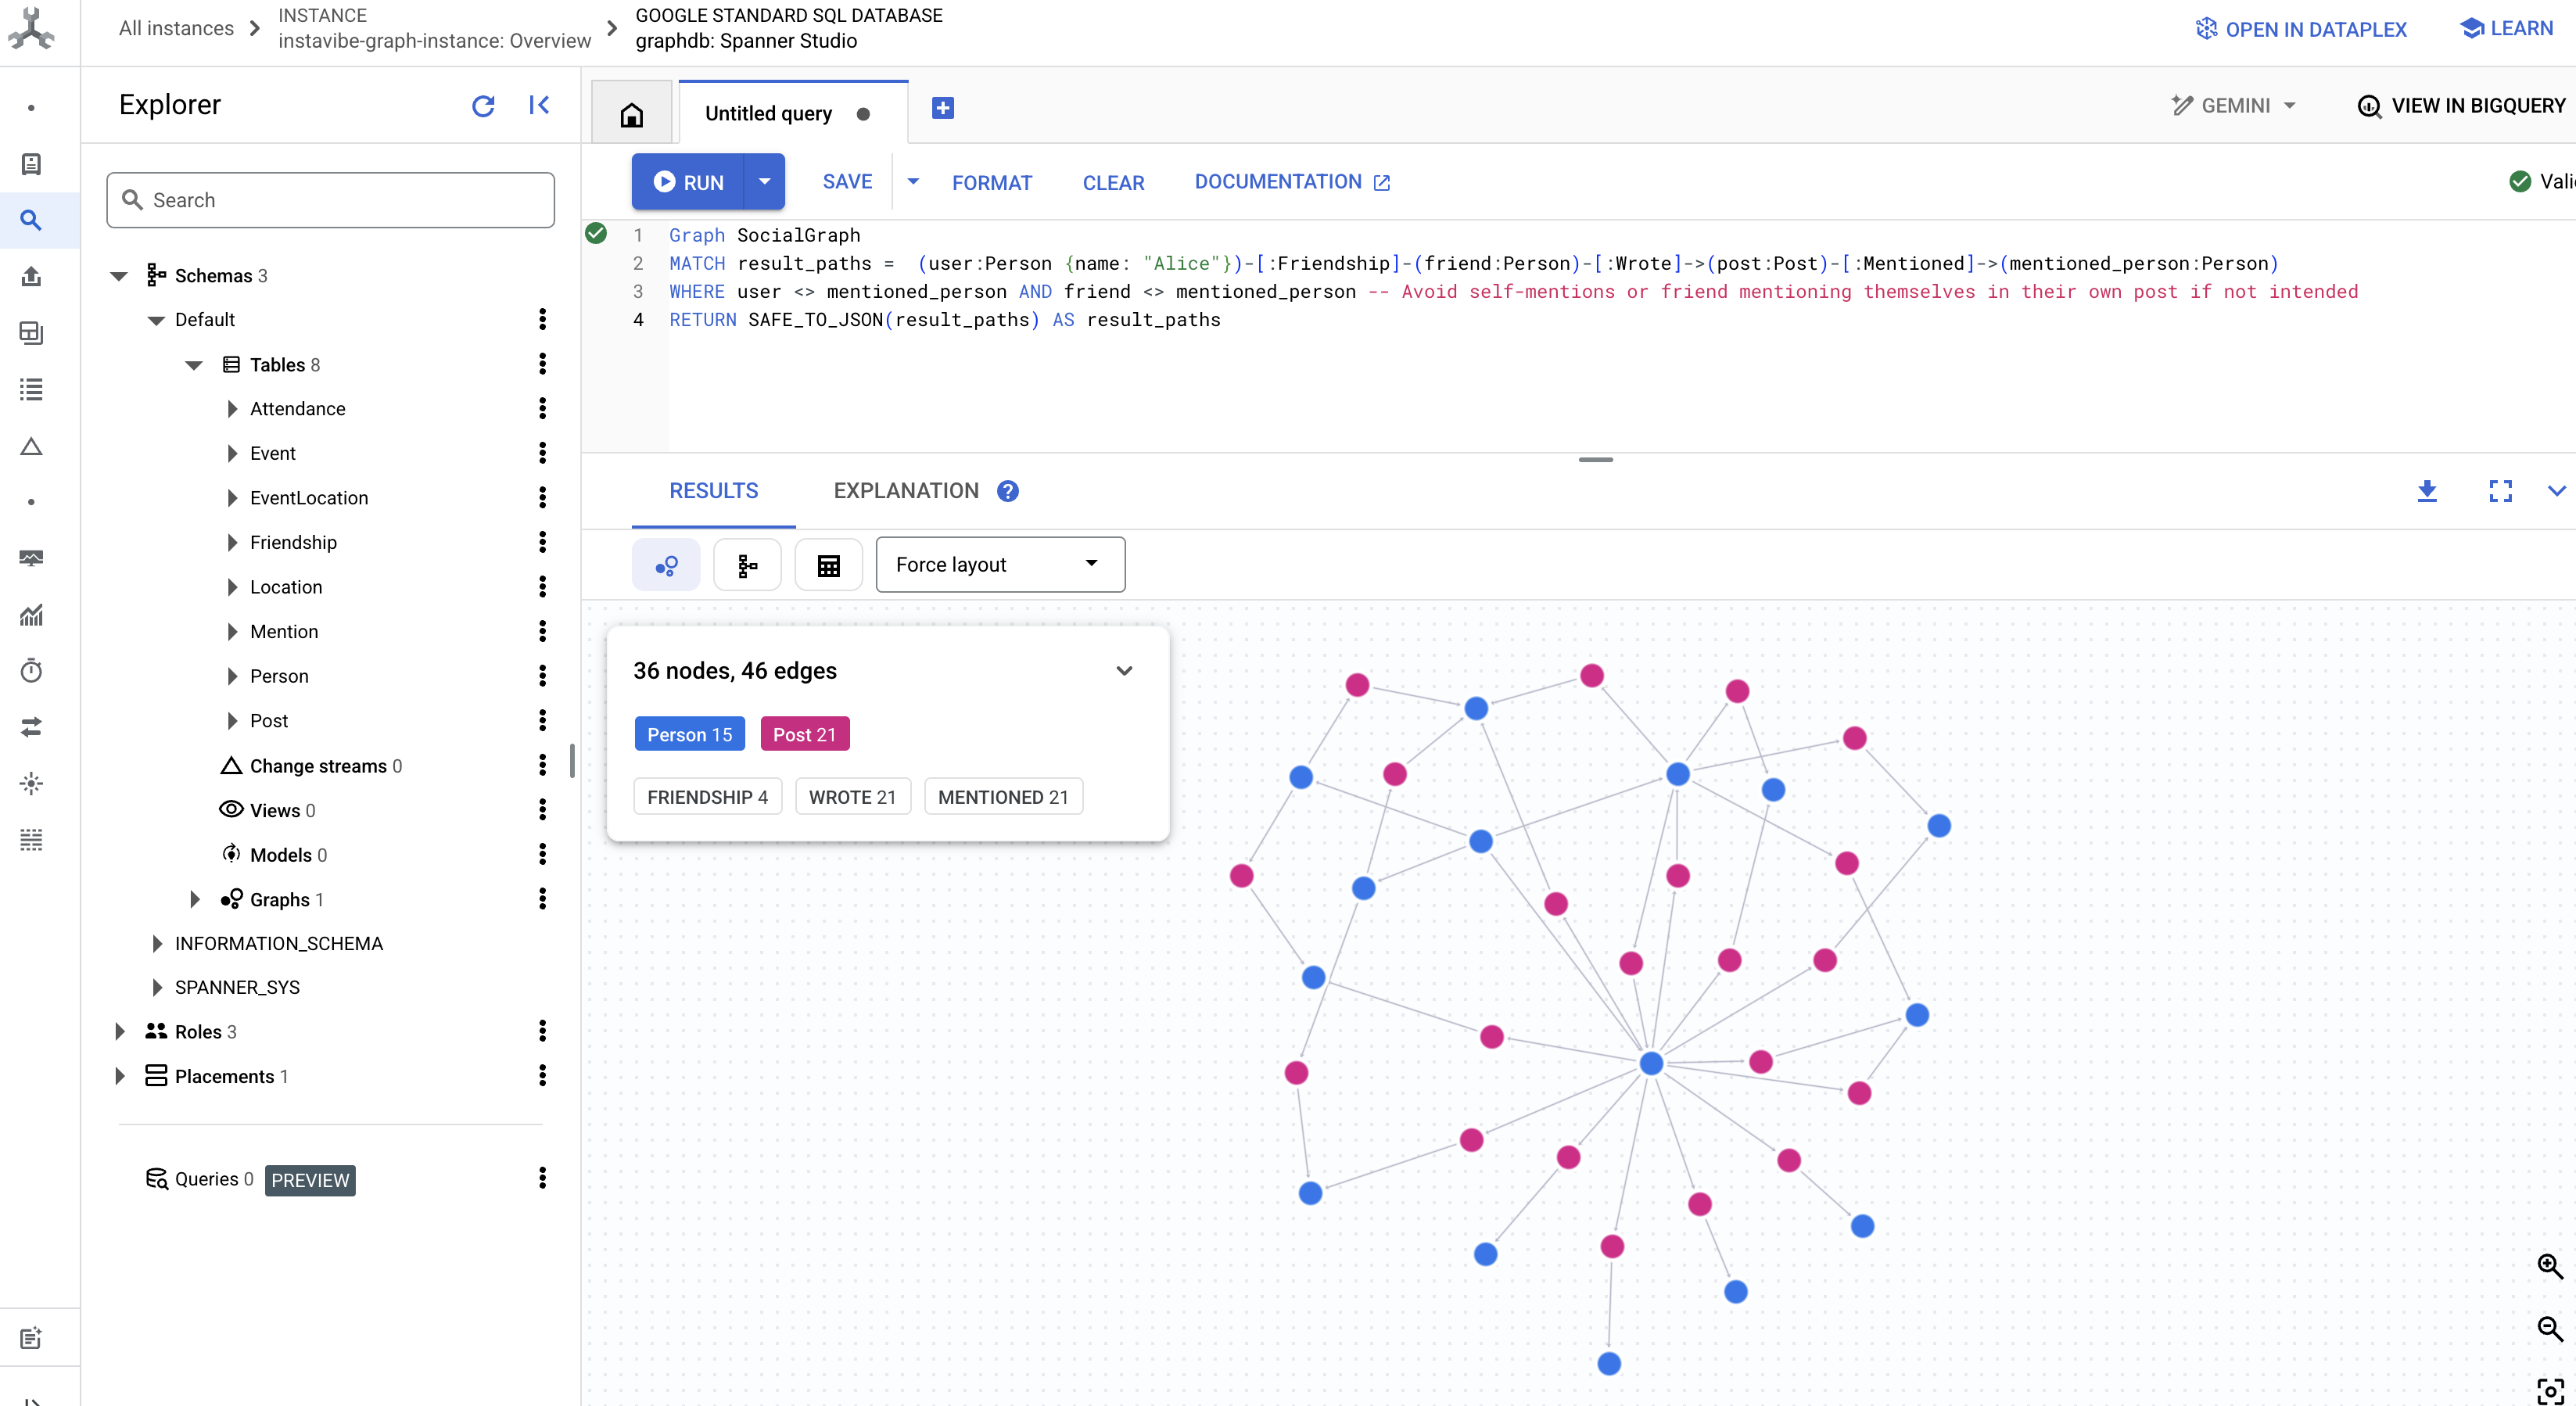
👉 Этот запрос исследует другой тип связи, когда люди, упомянутые в сообщениях, написанных друзьями конкретного человека, выполняют следующий запрос в редакторе запросов.
Graph SocialGraph
MATCH result_paths =  (user:Person {name: "Alice"})-[:Friendship]-(friend:Person)-[:Wrote]->(post:Post)-[:Mentioned]->(mentioned_person:Person)
WHERE user <> mentioned_person AND friend <> mentioned_person -- Avoid self-mentions or friend mentioning themselves in their own post if not intended
RETURN SAFE_TO_JSON(result_paths) AS result_paths
Эти запросы лишь отчасти демонстрируют возможности использования Spanner в качестве графовой базы данных для нашего приложения InstaVibe. Моделируя наши социальные данные в виде взаимосвязанного графа, мы обеспечиваем сложный анализ взаимосвязей и действий, что будет иметь основополагающее значение для наших агентов ИИ, позволяя им понимать контекст пользователя, выявлять интересы и, в конечном итоге, оказывать интеллектуальную помощь в планировании социальных взаимодействий.
Теперь, когда наша базовая структура данных создана и протестирована, давайте обратим внимание на существующее приложение InstaVibe, с которым будут взаимодействовать наши агенты.
5. Текущее состояние InstaVibe
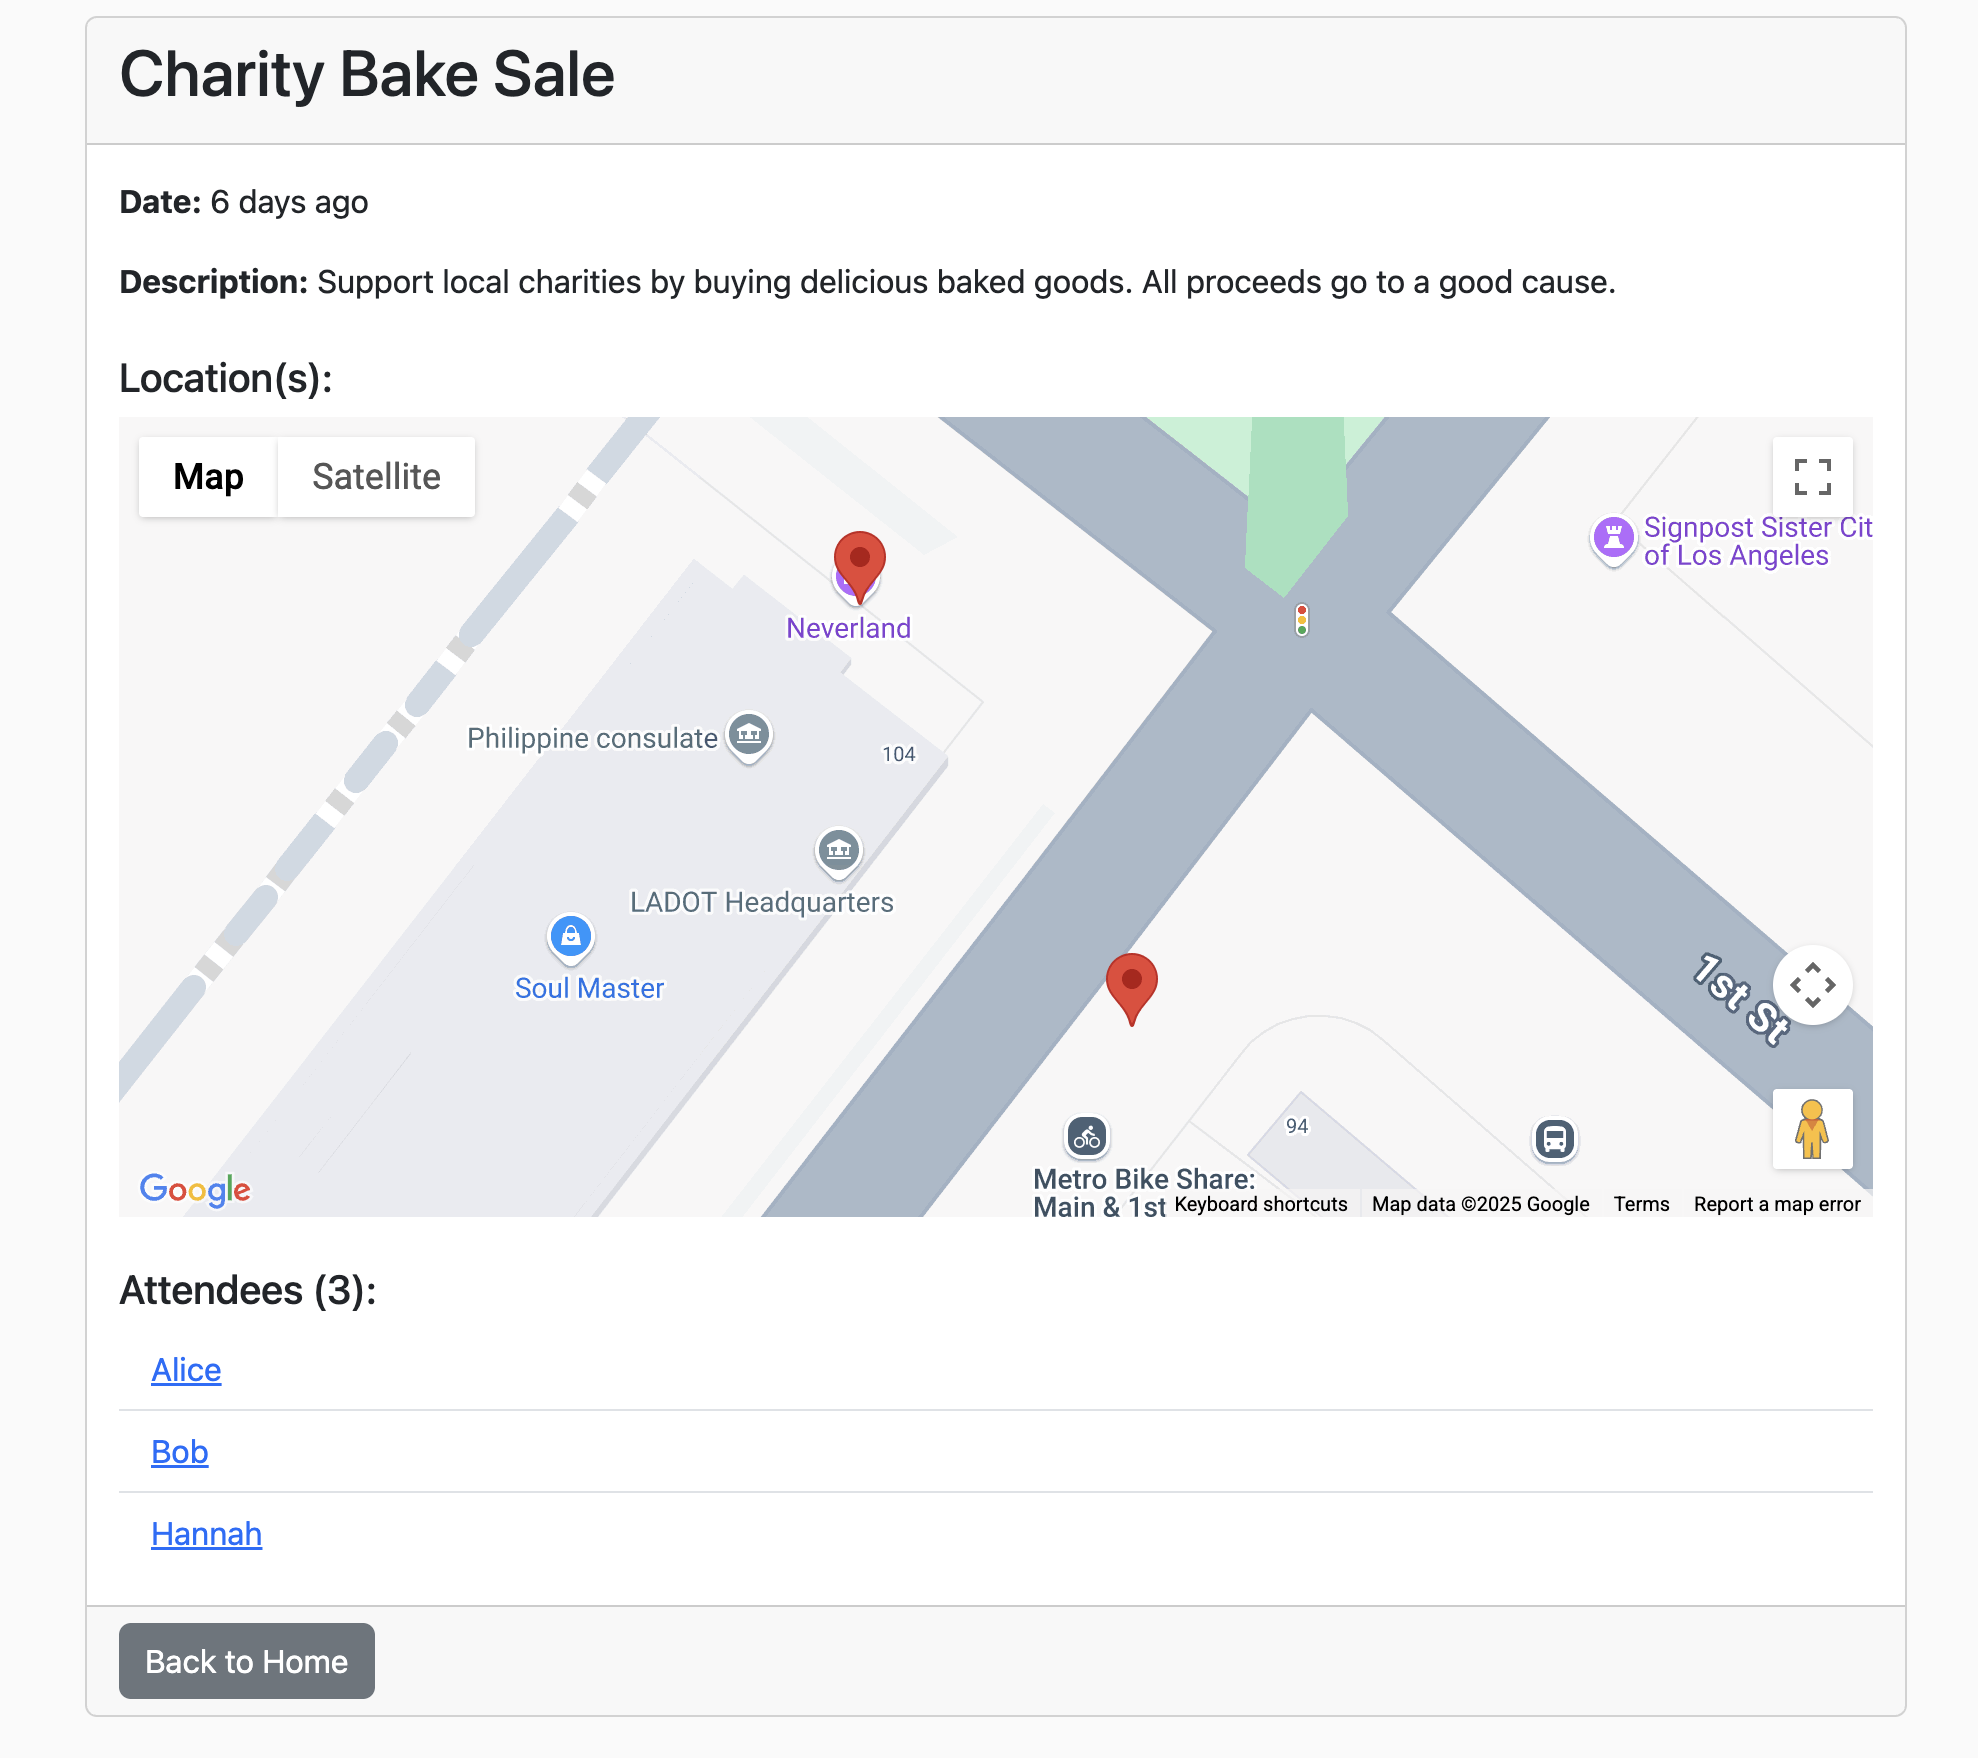
Чтобы понять, какое место займут наши ИИ-агенты, нам сначала нужно развернуть и запустить существующее веб-приложение InstaVibe. Это приложение предоставляет пользовательский интерфейс и основные функции, которые подключаются к уже настроенной нами базе данных графов Spanner.
Приложение InstaVibe использует Google Maps для визуального отображения мест проведения мероприятий на страницах с подробной информацией о них. Для включения этой функции приложению необходим созданный нами ранее ключ API. Следующий скрипт получит фактическую строку ключа, используя присвоенное нами отображаемое имя ("Ключ API платформы Maps").
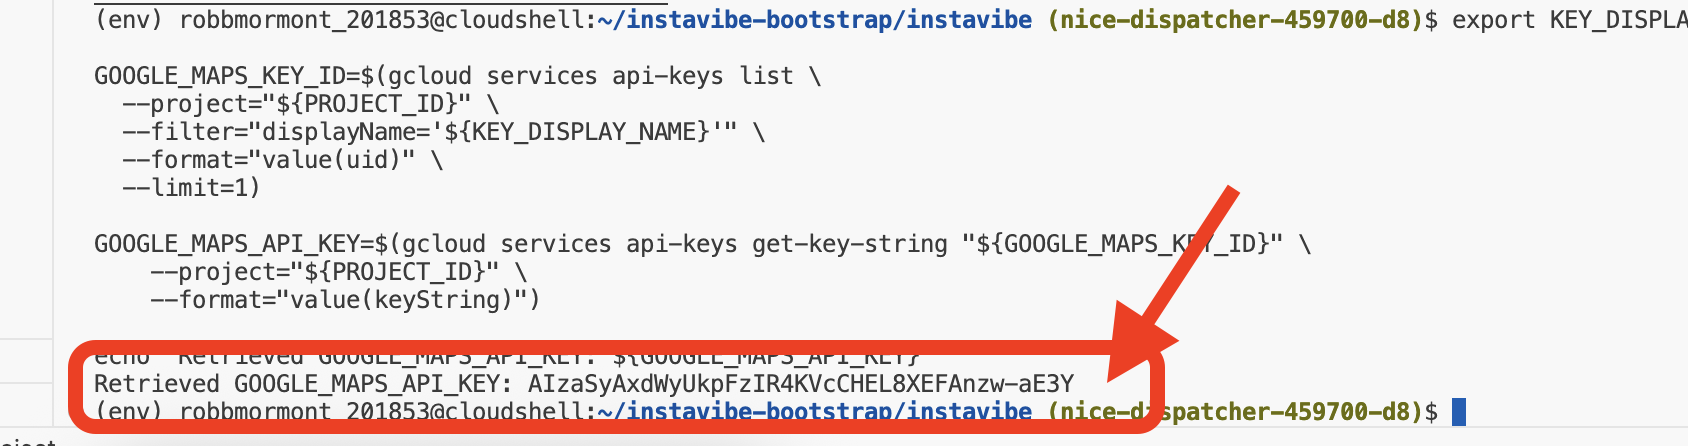
👉💻 Вернитесь в IDE Cloud Shell . Запустите приведенный ниже скрипт. После этого внимательно проверьте вывод, чтобы убедиться, что отображаемый GOOGLE_MAPS_API_KEY совпадает с ключом, который вы создали и скопировали из консоли Google Cloud ранее.
. ~/instavibe-bootstrap/set_env.sh
export KEY_DISPLAY_NAME="Maps Platform API Key"

GOOGLE_MAPS_KEY_ID=$(gcloud services api-keys list \
  --project="${PROJECT_ID}" \
  --filter="displayName='${KEY_DISPLAY_NAME}'" \
  --format="value(uid)" \
  --limit=1)

GOOGLE_MAPS_API_KEY=$(gcloud services api-keys get-key-string "${GOOGLE_MAPS_KEY_ID}" \
    --project="${PROJECT_ID}" \
    --format="value(keyString)")

echo "${GOOGLE_MAPS_API_KEY}" > ~/mapkey.txt

echo "Retrieved GOOGLE_MAPS_API_KEY: ${GOOGLE_MAPS_API_KEY}"
👉💻 Теперь давайте создадим образ контейнера для веб-приложения InstaVibe и загрузим его в наш репозиторий Artifact Registry.
. ~/instavibe-bootstrap/set_env.sh

cd ~/instavibe-bootstrap/instavibe/
export IMAGE_TAG="latest"
export APP_FOLDER_NAME="instavibe"
export IMAGE_NAME="instavibe-webapp"
export IMAGE_PATH="${REGION}-docker.pkg.dev/${PROJECT_ID}/${REPO_NAME}/${IMAGE_NAME}:${IMAGE_TAG}"
export SERVICE_NAME="instavibe"

gcloud builds submit . \
  --tag=${IMAGE_PATH} \
  --project=${PROJECT_ID}
👉💻 Разверните новый образ веб-приложения InstaVibe в Cloud Run
. ~/instavibe-bootstrap/set_env.sh

cd ~/instavibe-bootstrap/instavibe/
export IMAGE_TAG="latest"
export APP_FOLDER_NAME="instavibe"
export IMAGE_NAME="instavibe-webapp"
export IMAGE_PATH="${REGION}-docker.pkg.dev/${PROJECT_ID}/${REPO_NAME}/${IMAGE_NAME}:${IMAGE_TAG}"
export SERVICE_NAME="instavibe"

gcloud run deploy ${SERVICE_NAME} \
  --image=${IMAGE_PATH} \
  --platform=managed \
  --region=${REGION} \
  --allow-unauthenticated \
  --set-env-vars="SPANNER_INSTANCE_ID=${SPANNER_INSTANCE_ID}" \
  --set-env-vars="SPANNER_DATABASE_ID=${SPANNER_DATABASE_ID}" \
  --set-env-vars="APP_HOST=0.0.0.0" \
  --set-env-vars="APP_PORT=8080" \
  --set-env-vars="GOOGLE_CLOUD_LOCATION=${REGION}" \
  --set-env-vars="GOOGLE_CLOUD_PROJECT=${PROJECT_ID}" \
  --set-env-vars="GOOGLE_MAPS_API_KEY=${GOOGLE_MAPS_API_KEY}" \
  --project=${PROJECT_ID} \
  --min-instances=1
После успешного завершения развертывания в журналах Cloud Run должен отобразиться публичный URL-адрес запущенного приложения InstaVibe.
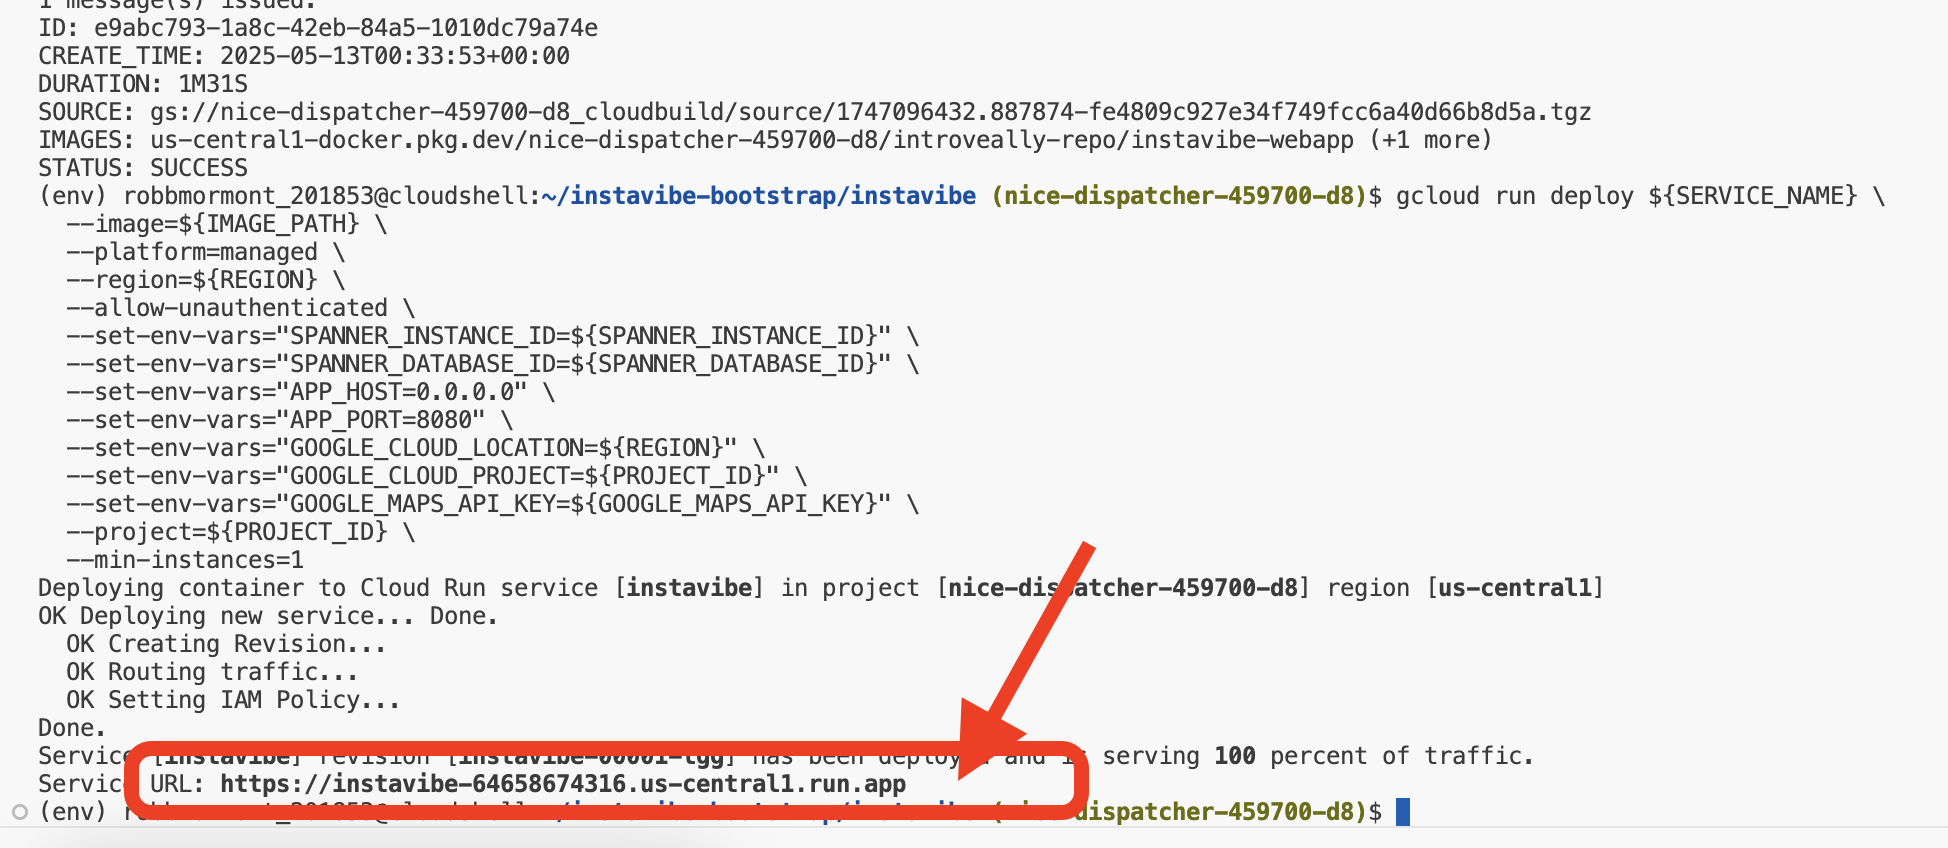
Этот URL-адрес также можно найти, перейдя в раздел Cloud Run в консоли Google Cloud и выбрав сервис instavibe. 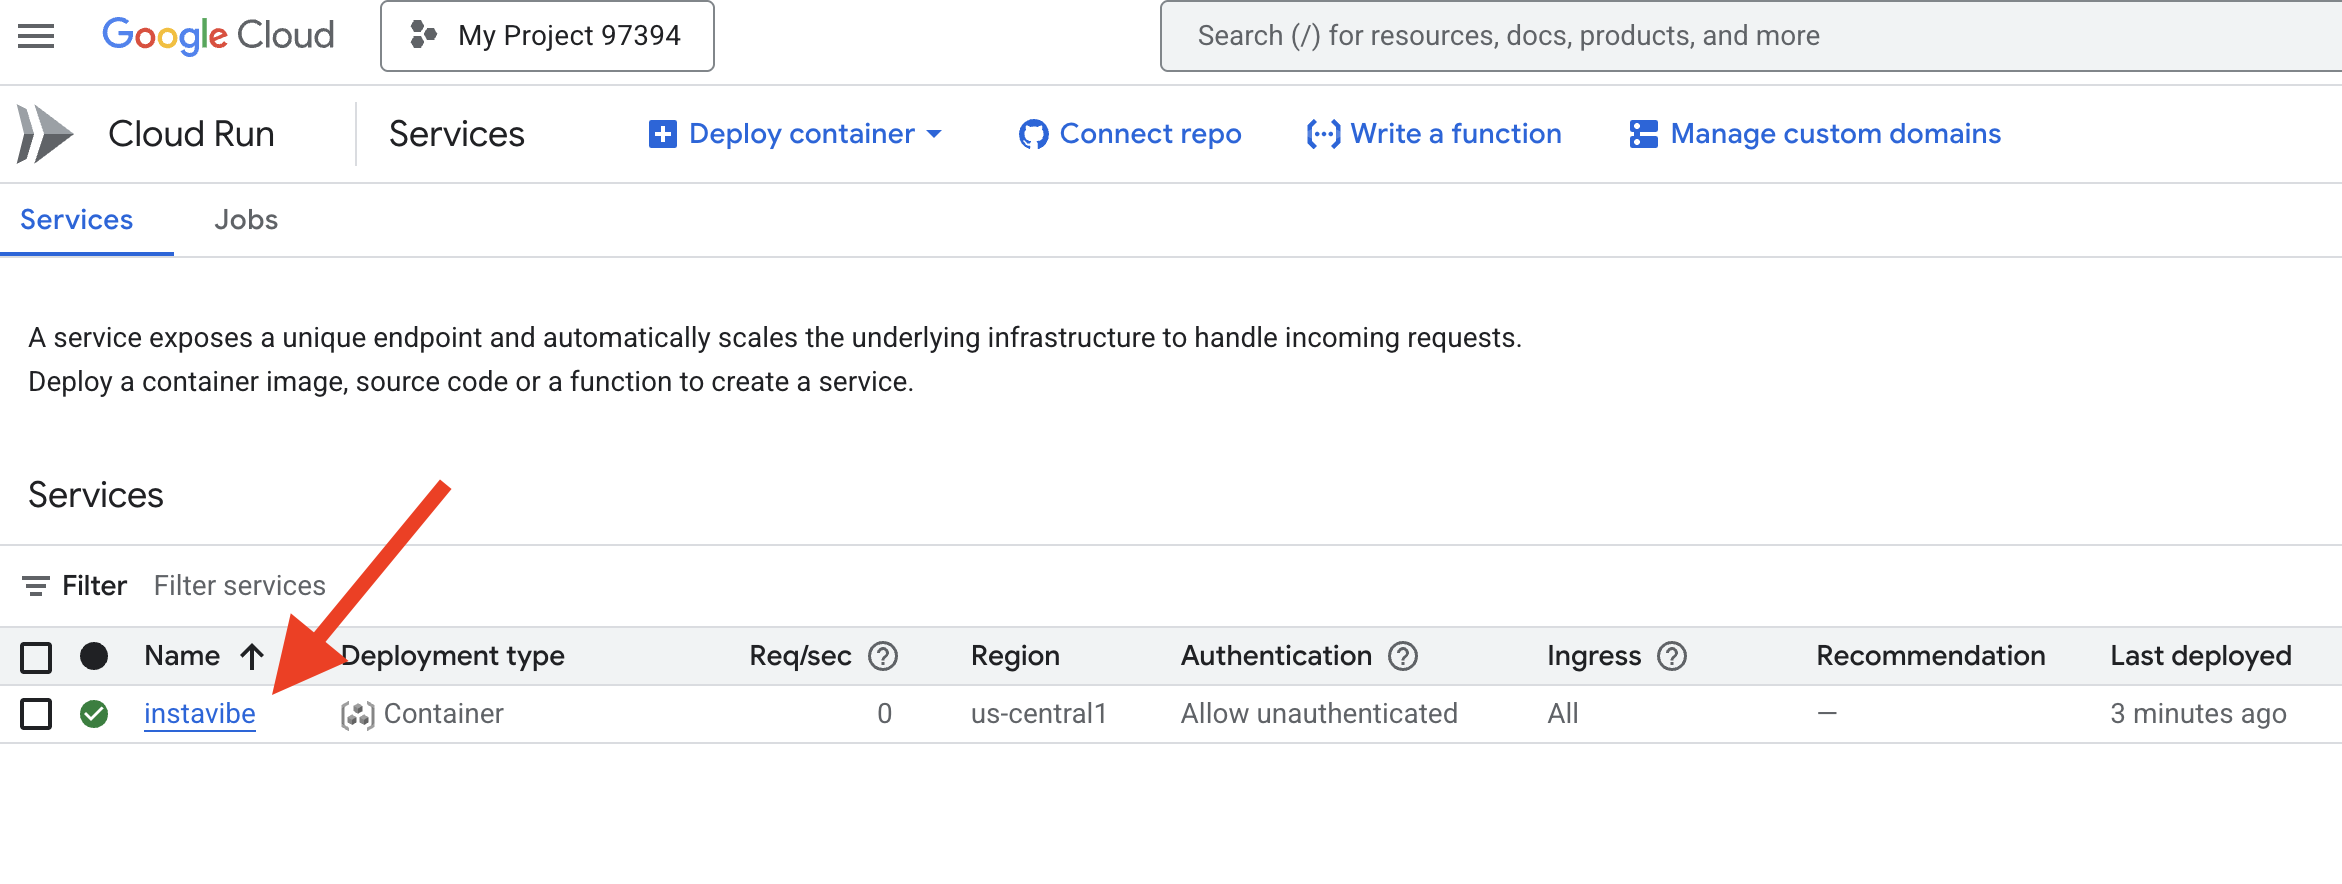
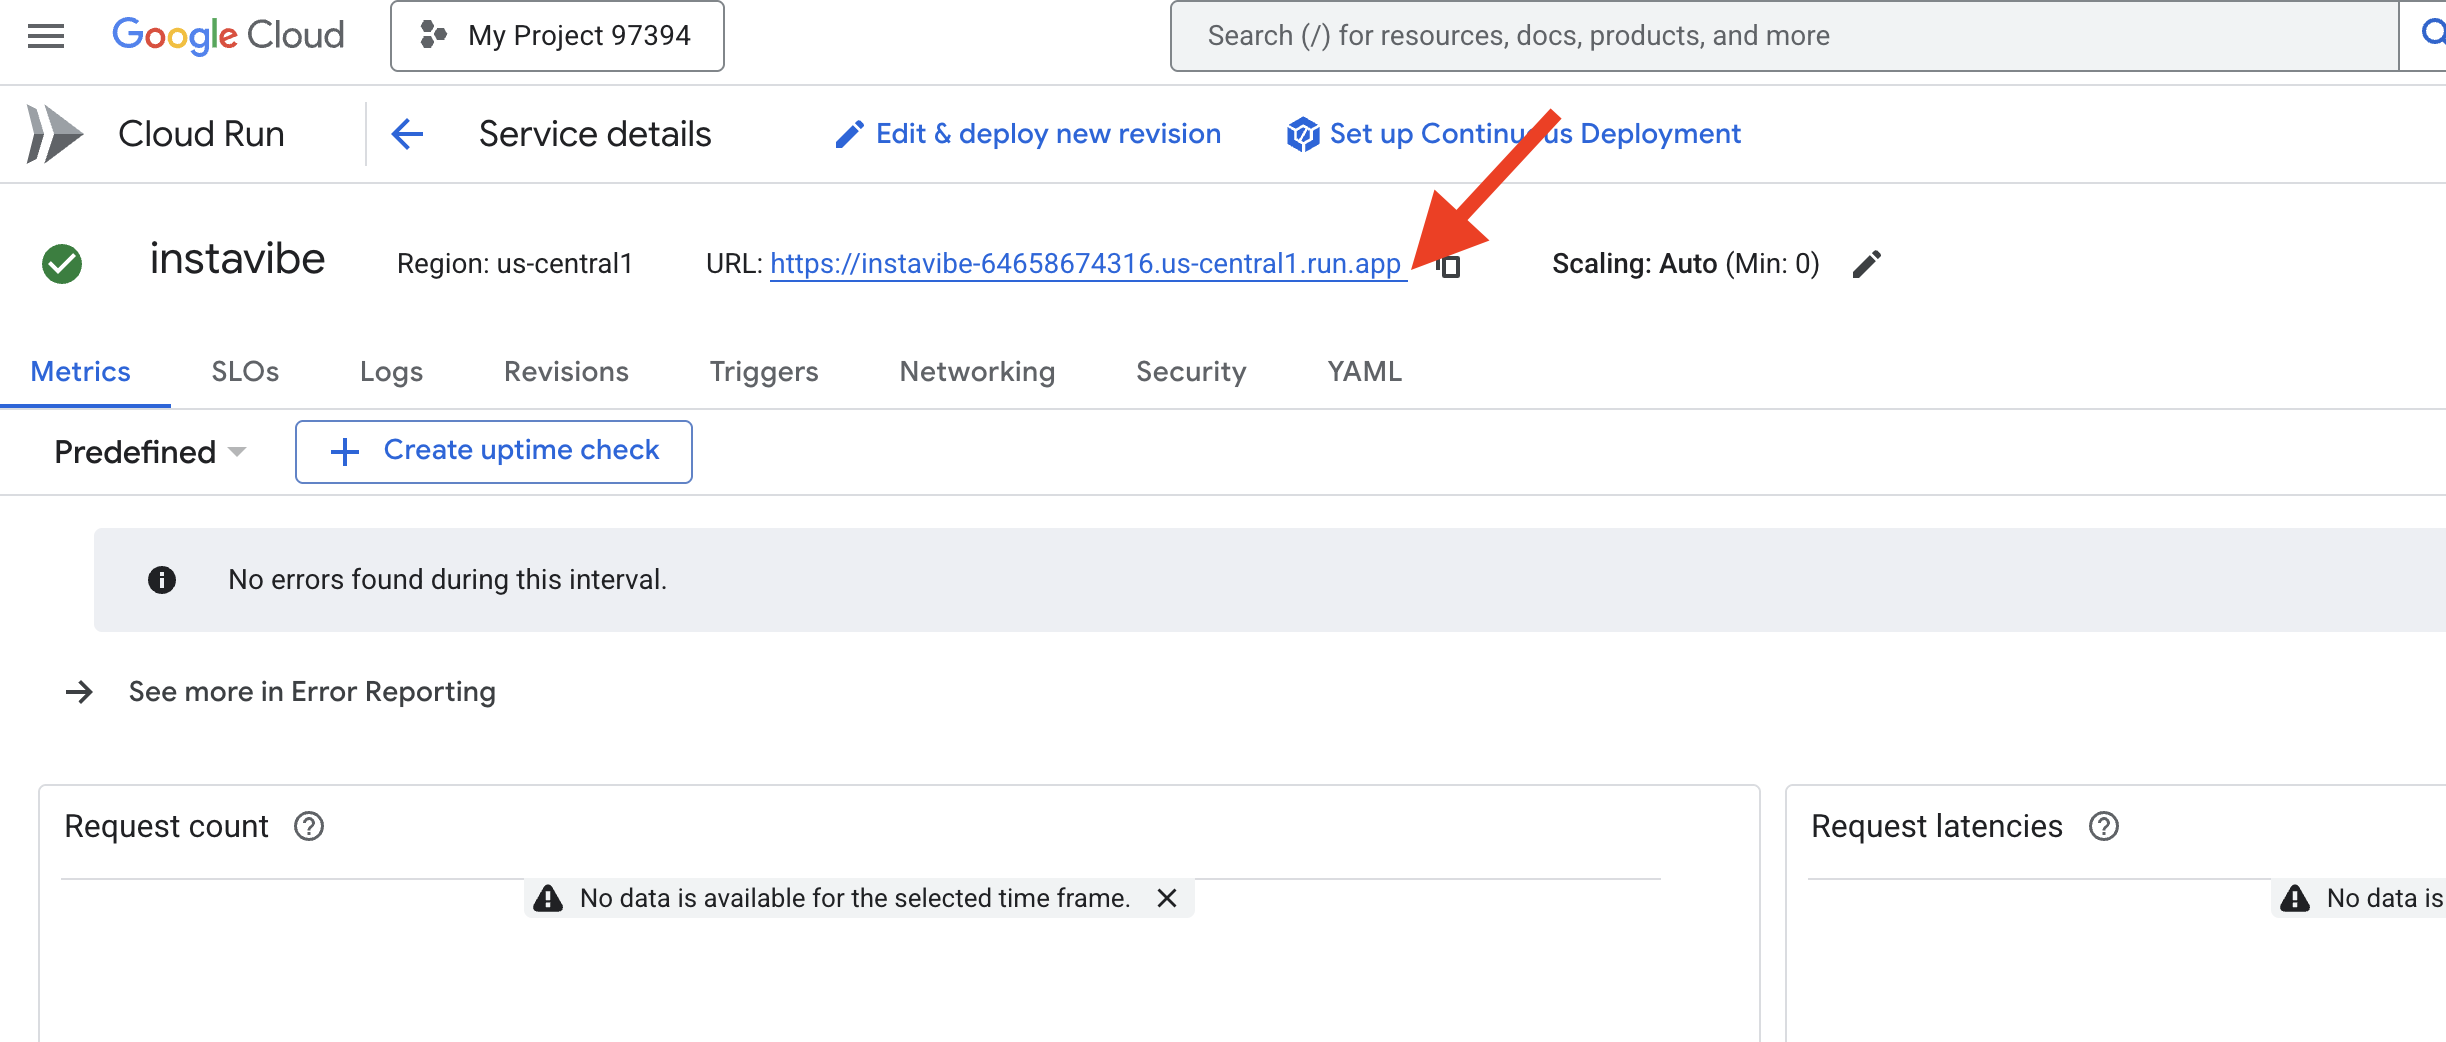
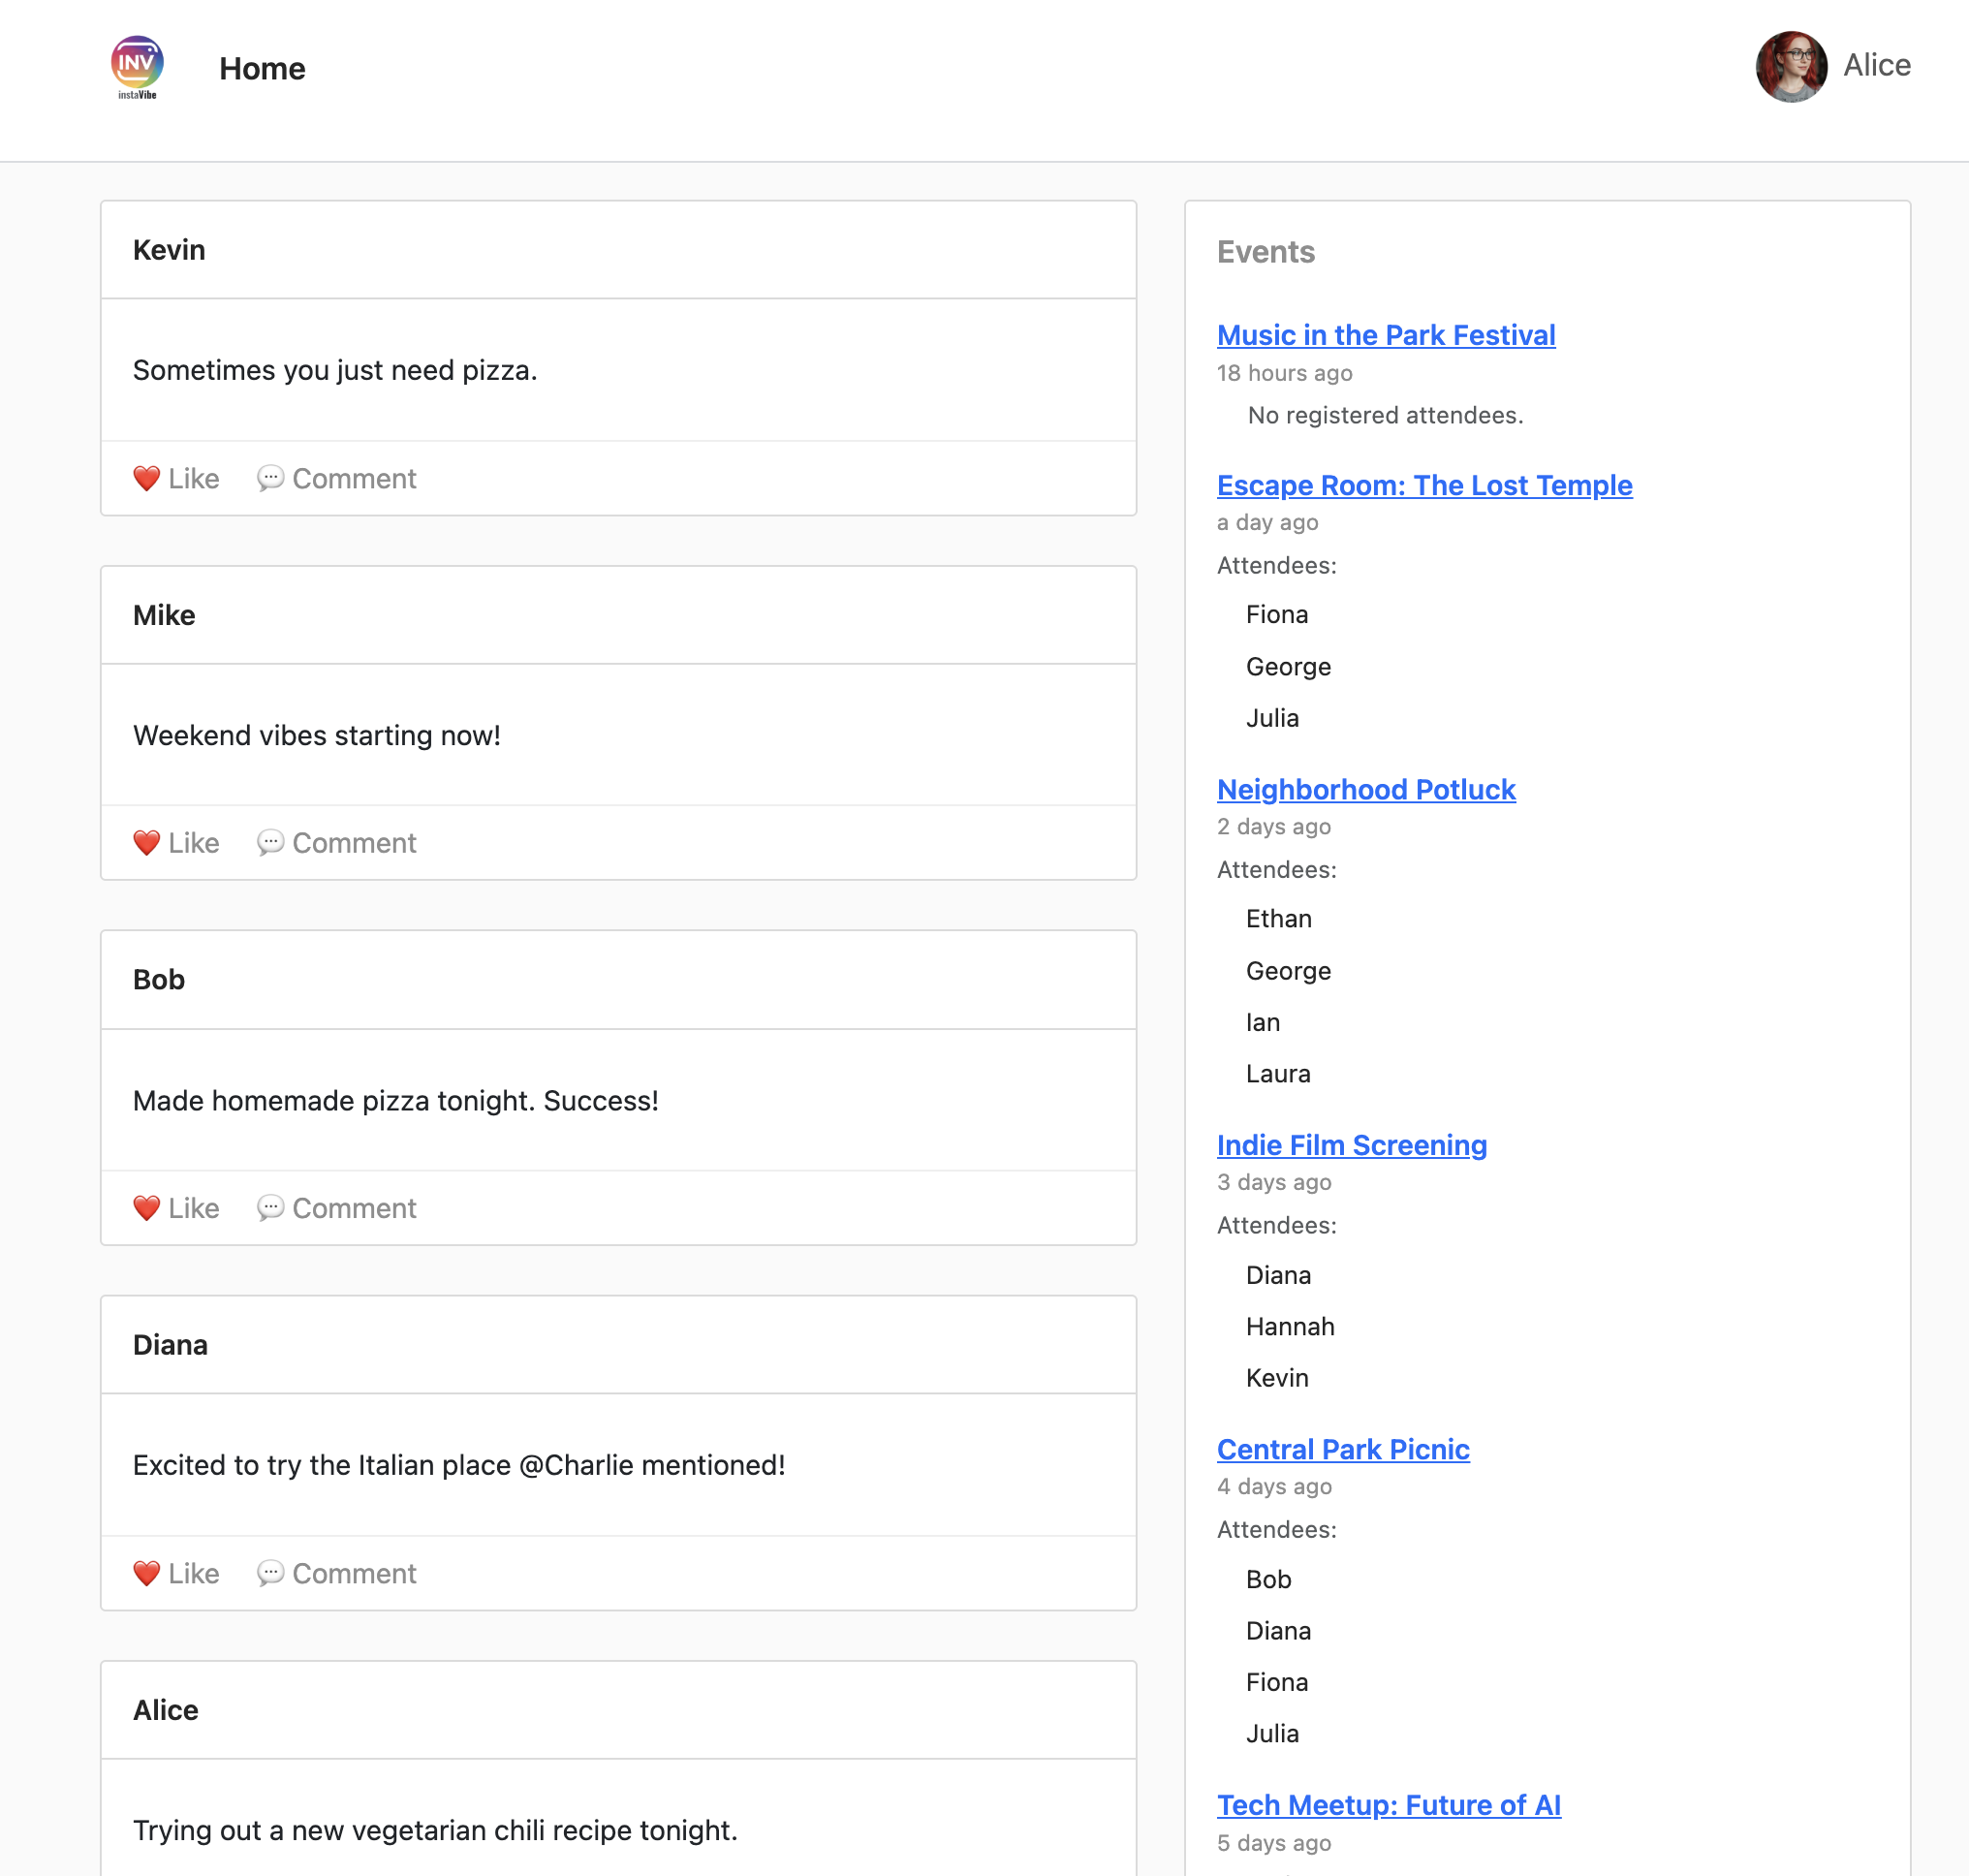
Откройте этот URL-адрес в своем веб-браузере, чтобы ознакомиться с базовой платформой InstaVibe. Вы увидите публикации, события и связи пользователей, основанные на созданной нами графовой базе данных.
Теперь, когда целевое приложение запущено, давайте начнем создавать первого интеллектуального агента для расширения его возможностей.
6. Базовый агент, организатор мероприятий с ADK.
Фреймворк ADK
Введение в фреймворк Google ADK. Теперь, когда наша основа (приложение InstaVibe и база данных) заложена, мы можем начать создавать нашего первого интеллектуального агента, используя комплект разработки агентов Google (ADK) .
Agent Development Kit (ADK) — это гибкая и модульная платформа, специально разработанная для разработки и развертывания агентов искусственного интеллекта. Ее основной принцип — сделать разработку агентов более похожей на традиционную разработку программного обеспечения, значительно упростив для разработчиков создание, развертывание и управление агентными архитектурами, способными обрабатывать все — от простых задач с одной целью до сложных многоагентных рабочих процессов.
В основе ADK лежит концепция Agent , который инкапсулирует инструкции, конфигурацию (например, выбранную языковую модель, скажем, Gemini) и набор Tools он может использовать для выполнения действий или сбора информации.
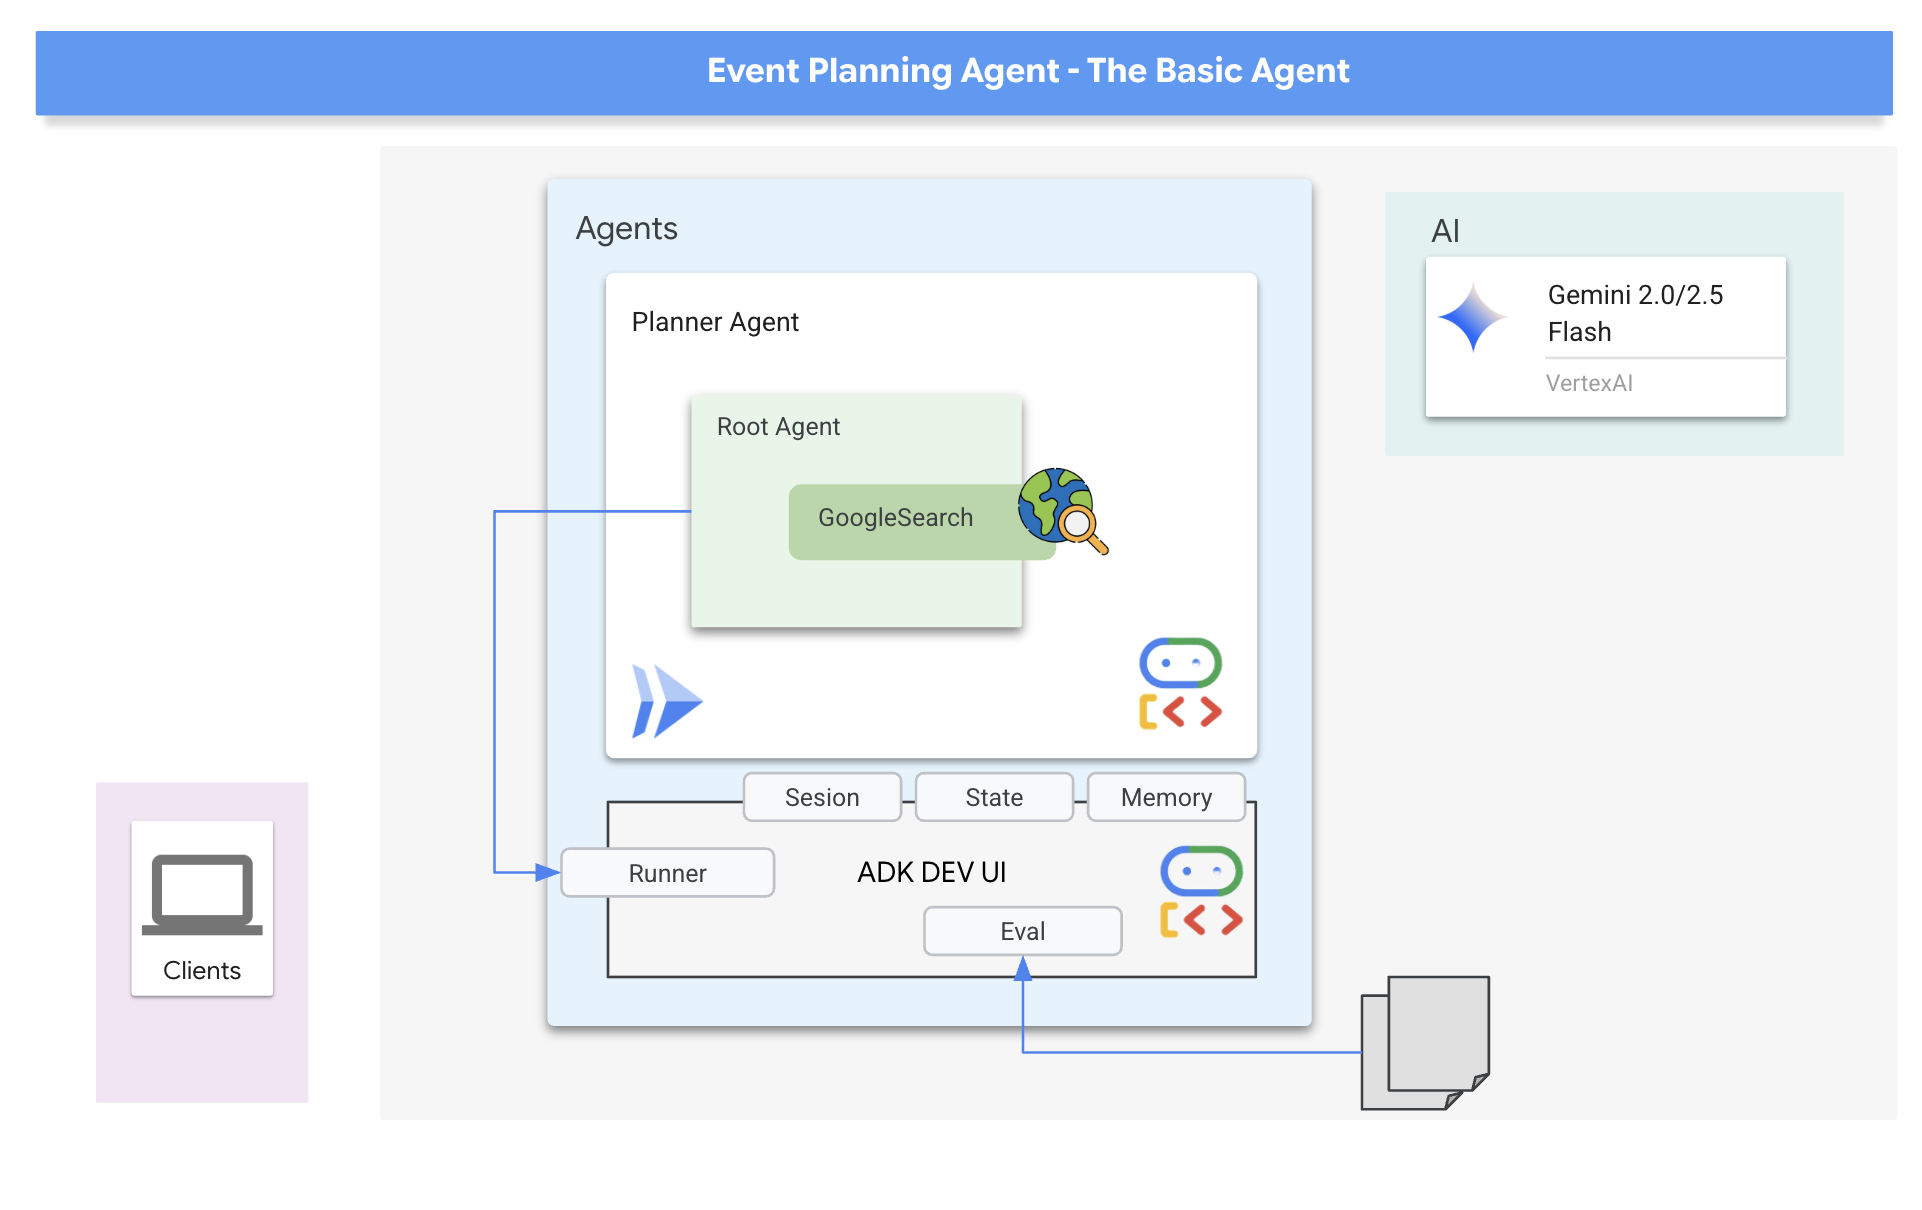
Наш первый агент будет выполнять роль «организатора мероприятий». Его основная задача — принимать запросы пользователей на организацию досуга (с указанием места, дат и интересов) и генерировать креативные, персонализированные предложения. Чтобы гарантировать актуальность предложений и их соответствие текущей информации (например, конкретным мероприятиям, которые пройдут в эти выходные), мы будем использовать один из встроенных инструментов ADK: поиск Google . Это позволит агенту основывать свои ответы на результатах поиска в режиме реального времени, получая самую свежую информацию о местах проведения мероприятий и видах деятельности, соответствующих критериям пользователя.
👉📝 Вернитесь в IDE Cloud Shell и в файле ~/instavibe-bootstrap/agents/planner/agent.py добавьте следующую подсказку и инструкцию для создания агента.
from google.adk.agents import Agent
from google.adk.tools import google_search

root_agent = Agent(
    name="planner_agent",
    model="gemini-2.0-flash",
    description="Agent tasked with generating creative and fun dating plan suggestions",
    instruction="""

        You are a specialized AI assistant tasked with generating creative and fun plan suggestions.

        Request:
        For the upcoming weekend, specifically from **[START_DATE_YYYY-MM-DD]** to **[END_DATE_YYYY-MM-DD]**, in the location specified as **[TARGET_LOCATION_NAME_OR_CITY_STATE]** (if latitude/longitude are provided, use these: Lat: **[TARGET_LATITUDE]**, Lon: **[TARGET_LONGITUDE]**), please generate a distinct dating plan suggestions.

        Constraints and Guidelines for Suggestions:
        1.  Creativity & Fun: Plans should be engaging, memorable, and offer a good experience for a date.
        2.  Budget: All generated plans should aim for a moderate budget (conceptually "$$"), meaning they should be affordable yet offer good value, without being overly cheap or extravagant. This budget level should be *reflected in the choice of activities and venues*, but **do not** explicitly state "Budget: $$" in the `plan_description`.
        3.  Interest Alignment:
               Consider the following user interests: **[COMMA_SEPARATED_LIST_OF_INTERESTS, e.g., outdoors, arts & culture, foodie, nightlife, unique local events, live music, active/sports]**. Tailor suggestions specifically to these where possible. The plan should *embody* these interests.
               Fallback: If specific events or venues perfectly matching all listed user interests cannot be found for the specified weekend, you should create a creative and fun generic dating plan that is still appealing, suitable for the location, and adheres to the moderate budget. This plan should still sound exciting and fun, even if it's more general.
        4.  Current & Specific: Prioritize finding specific, current events, festivals, pop-ups, or unique local venues operating or happening during the specified weekend dates. If exact current events cannot be found, suggest appealing evergreen options or implement the fallback generic plan.
        5.  Location Details: For each place or event mentioned within a plan, you MUST provide its name, precise latitude, precise longitude, and a brief, helpful description.
        6.  Maximum Activities: The plan must contain a maximum of 3 distinct activities.

        RETURN PLAN in MARKDOWN FORMAT
    """,
    tools=[google_search]
)
Вот и наш первый агент! Одно из главных преимуществ ADK — его интуитивно понятный интерфейс и удобные инструменты. Особенно полезен интерфейс разработчика ADK , который позволяет интерактивно тестировать агента и видеть его ответы в режиме реального времени.
👉💻 Давайте запустим. Следующие команды запустят пользовательский интерфейс разработчика ADK:
. ~/instavibe-bootstrap/set_env.sh
source ~/instavibe-bootstrap/env/bin/activate
cd  ~/instavibe-bootstrap/agents
sed -i "s|^\(O\?GOOGLE_CLOUD_PROJECT\)=.*|GOOGLE_CLOUD_PROJECT=${PROJECT_ID}|" ~/instavibe-bootstrap/agents/planner/.env
adk web
После выполнения команд в терминале должен отобразиться вывод, указывающий на запуск веб-сервера ADK, примерно такой:
+-----------------------------------------------------------------------------+
| ADK Web Server started                                                      |
|                                                                             |
| For local testing, access at http://localhost:8000.                         |
+-----------------------------------------------------------------------------+

INFO:     Application startup complete.
INFO:     Uvicorn running on http://0.0.0.0:8000 (Press CTRL+C to quit)
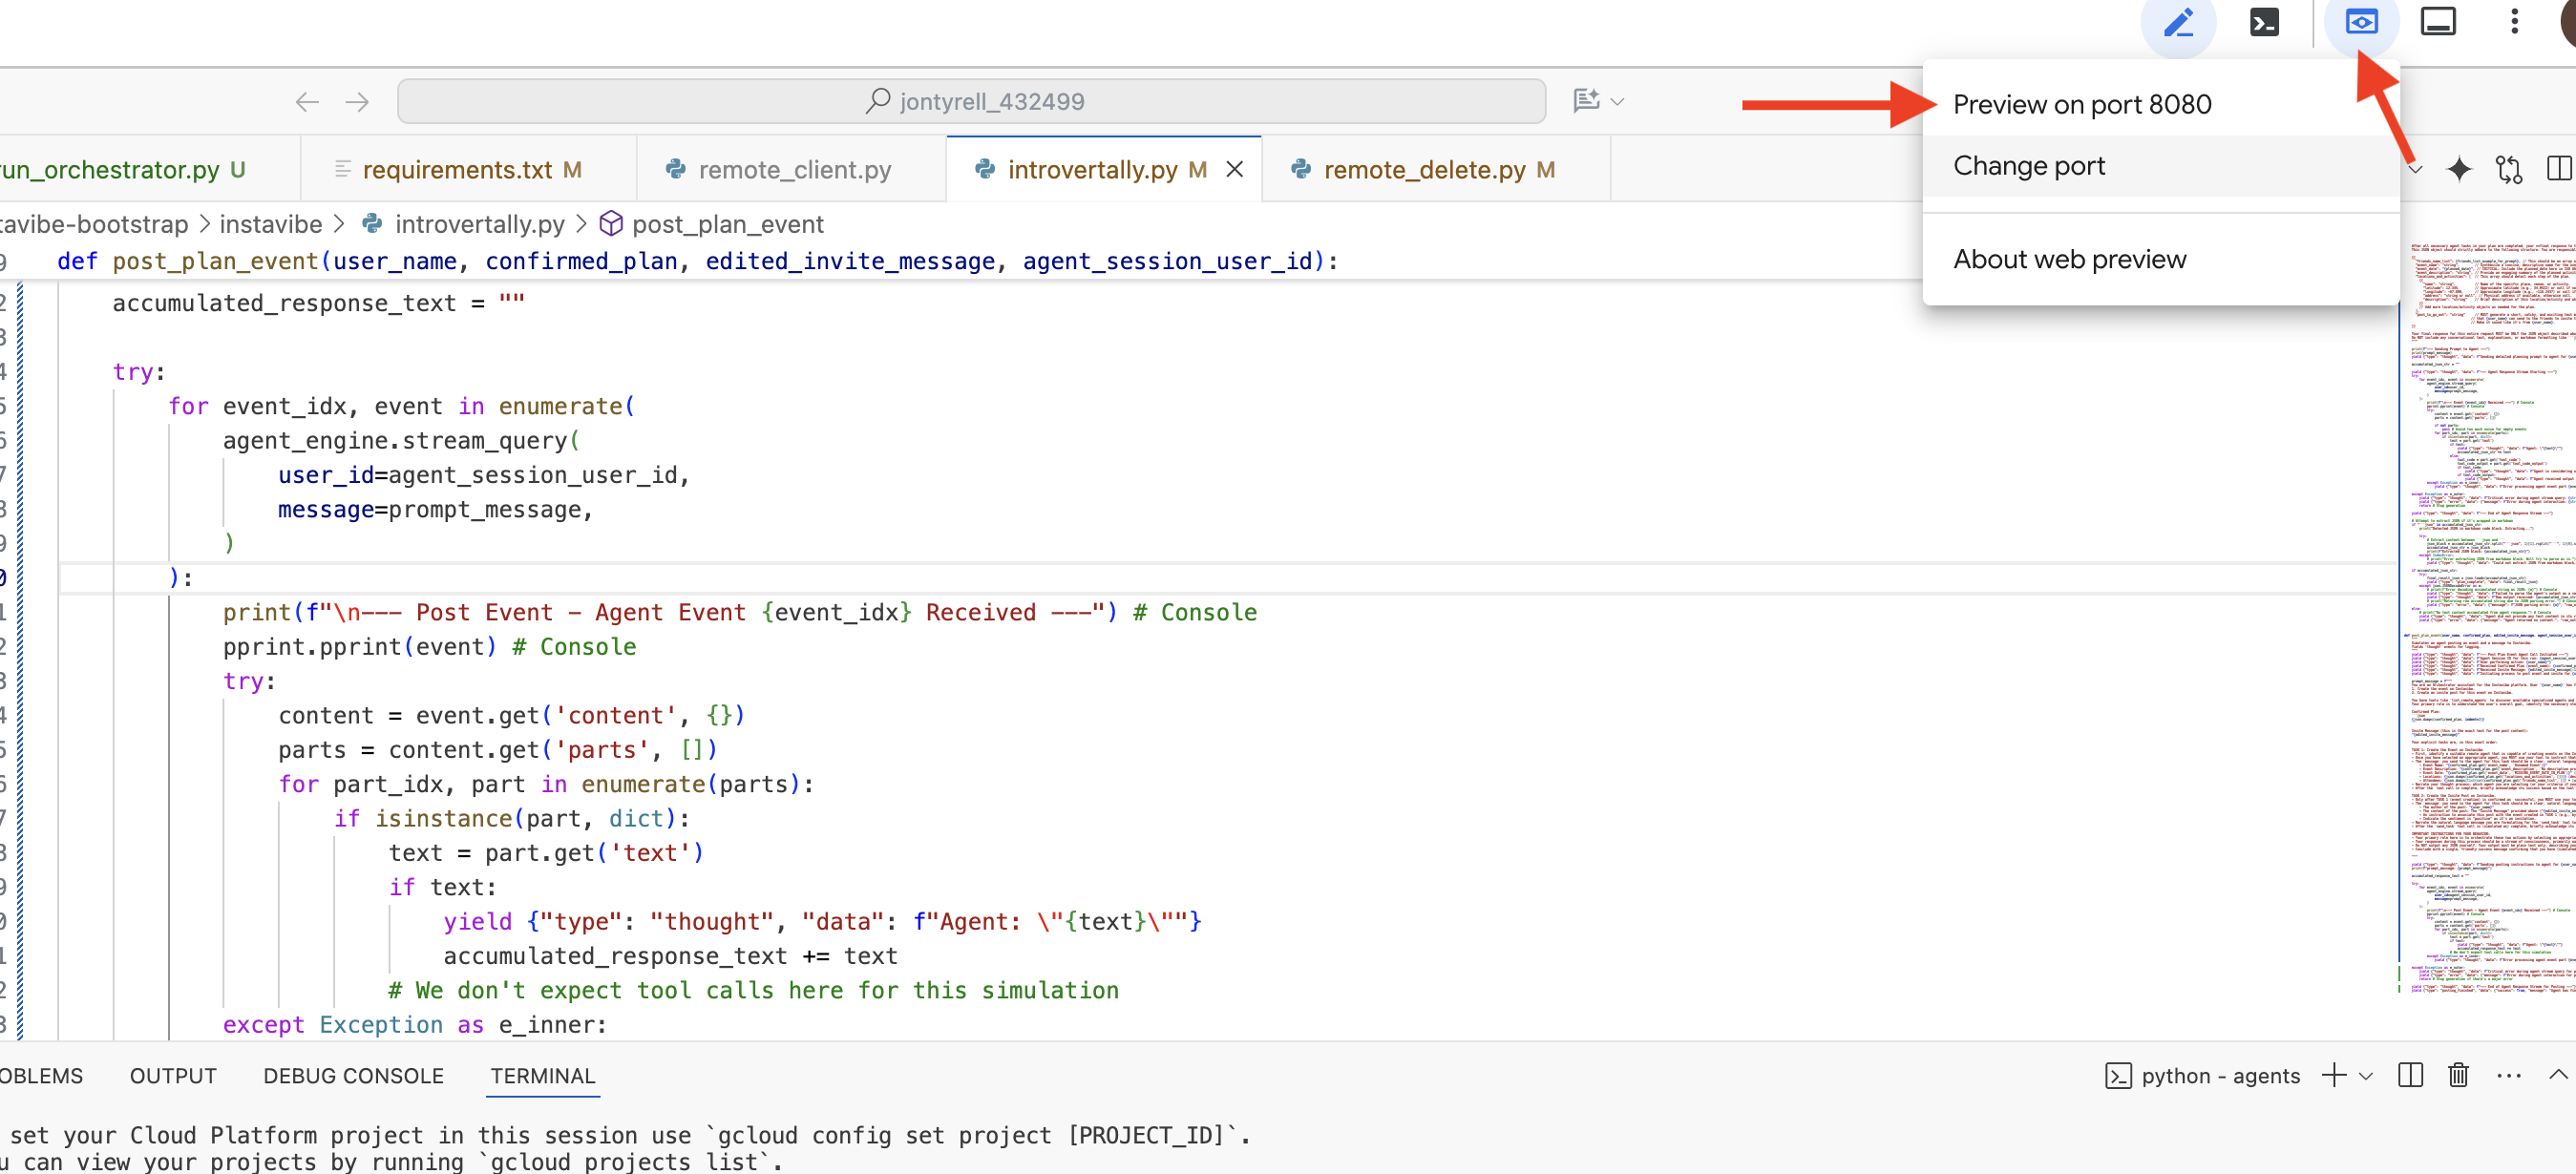
👉 Далее, чтобы получить доступ к пользовательскому интерфейсу разработчика ADK из вашего браузера:
На панели инструментов Cloud Shell (обычно в правом верхнем углу) в меню предварительного просмотра веб-страниц выберите «Изменить порт» . Во всплывающем окне установите порт на 8000 и нажмите «Изменить и просмотреть». После этого Cloud Shell откроет новую вкладку или окно браузера с пользовательским интерфейсом разработчика ADK.
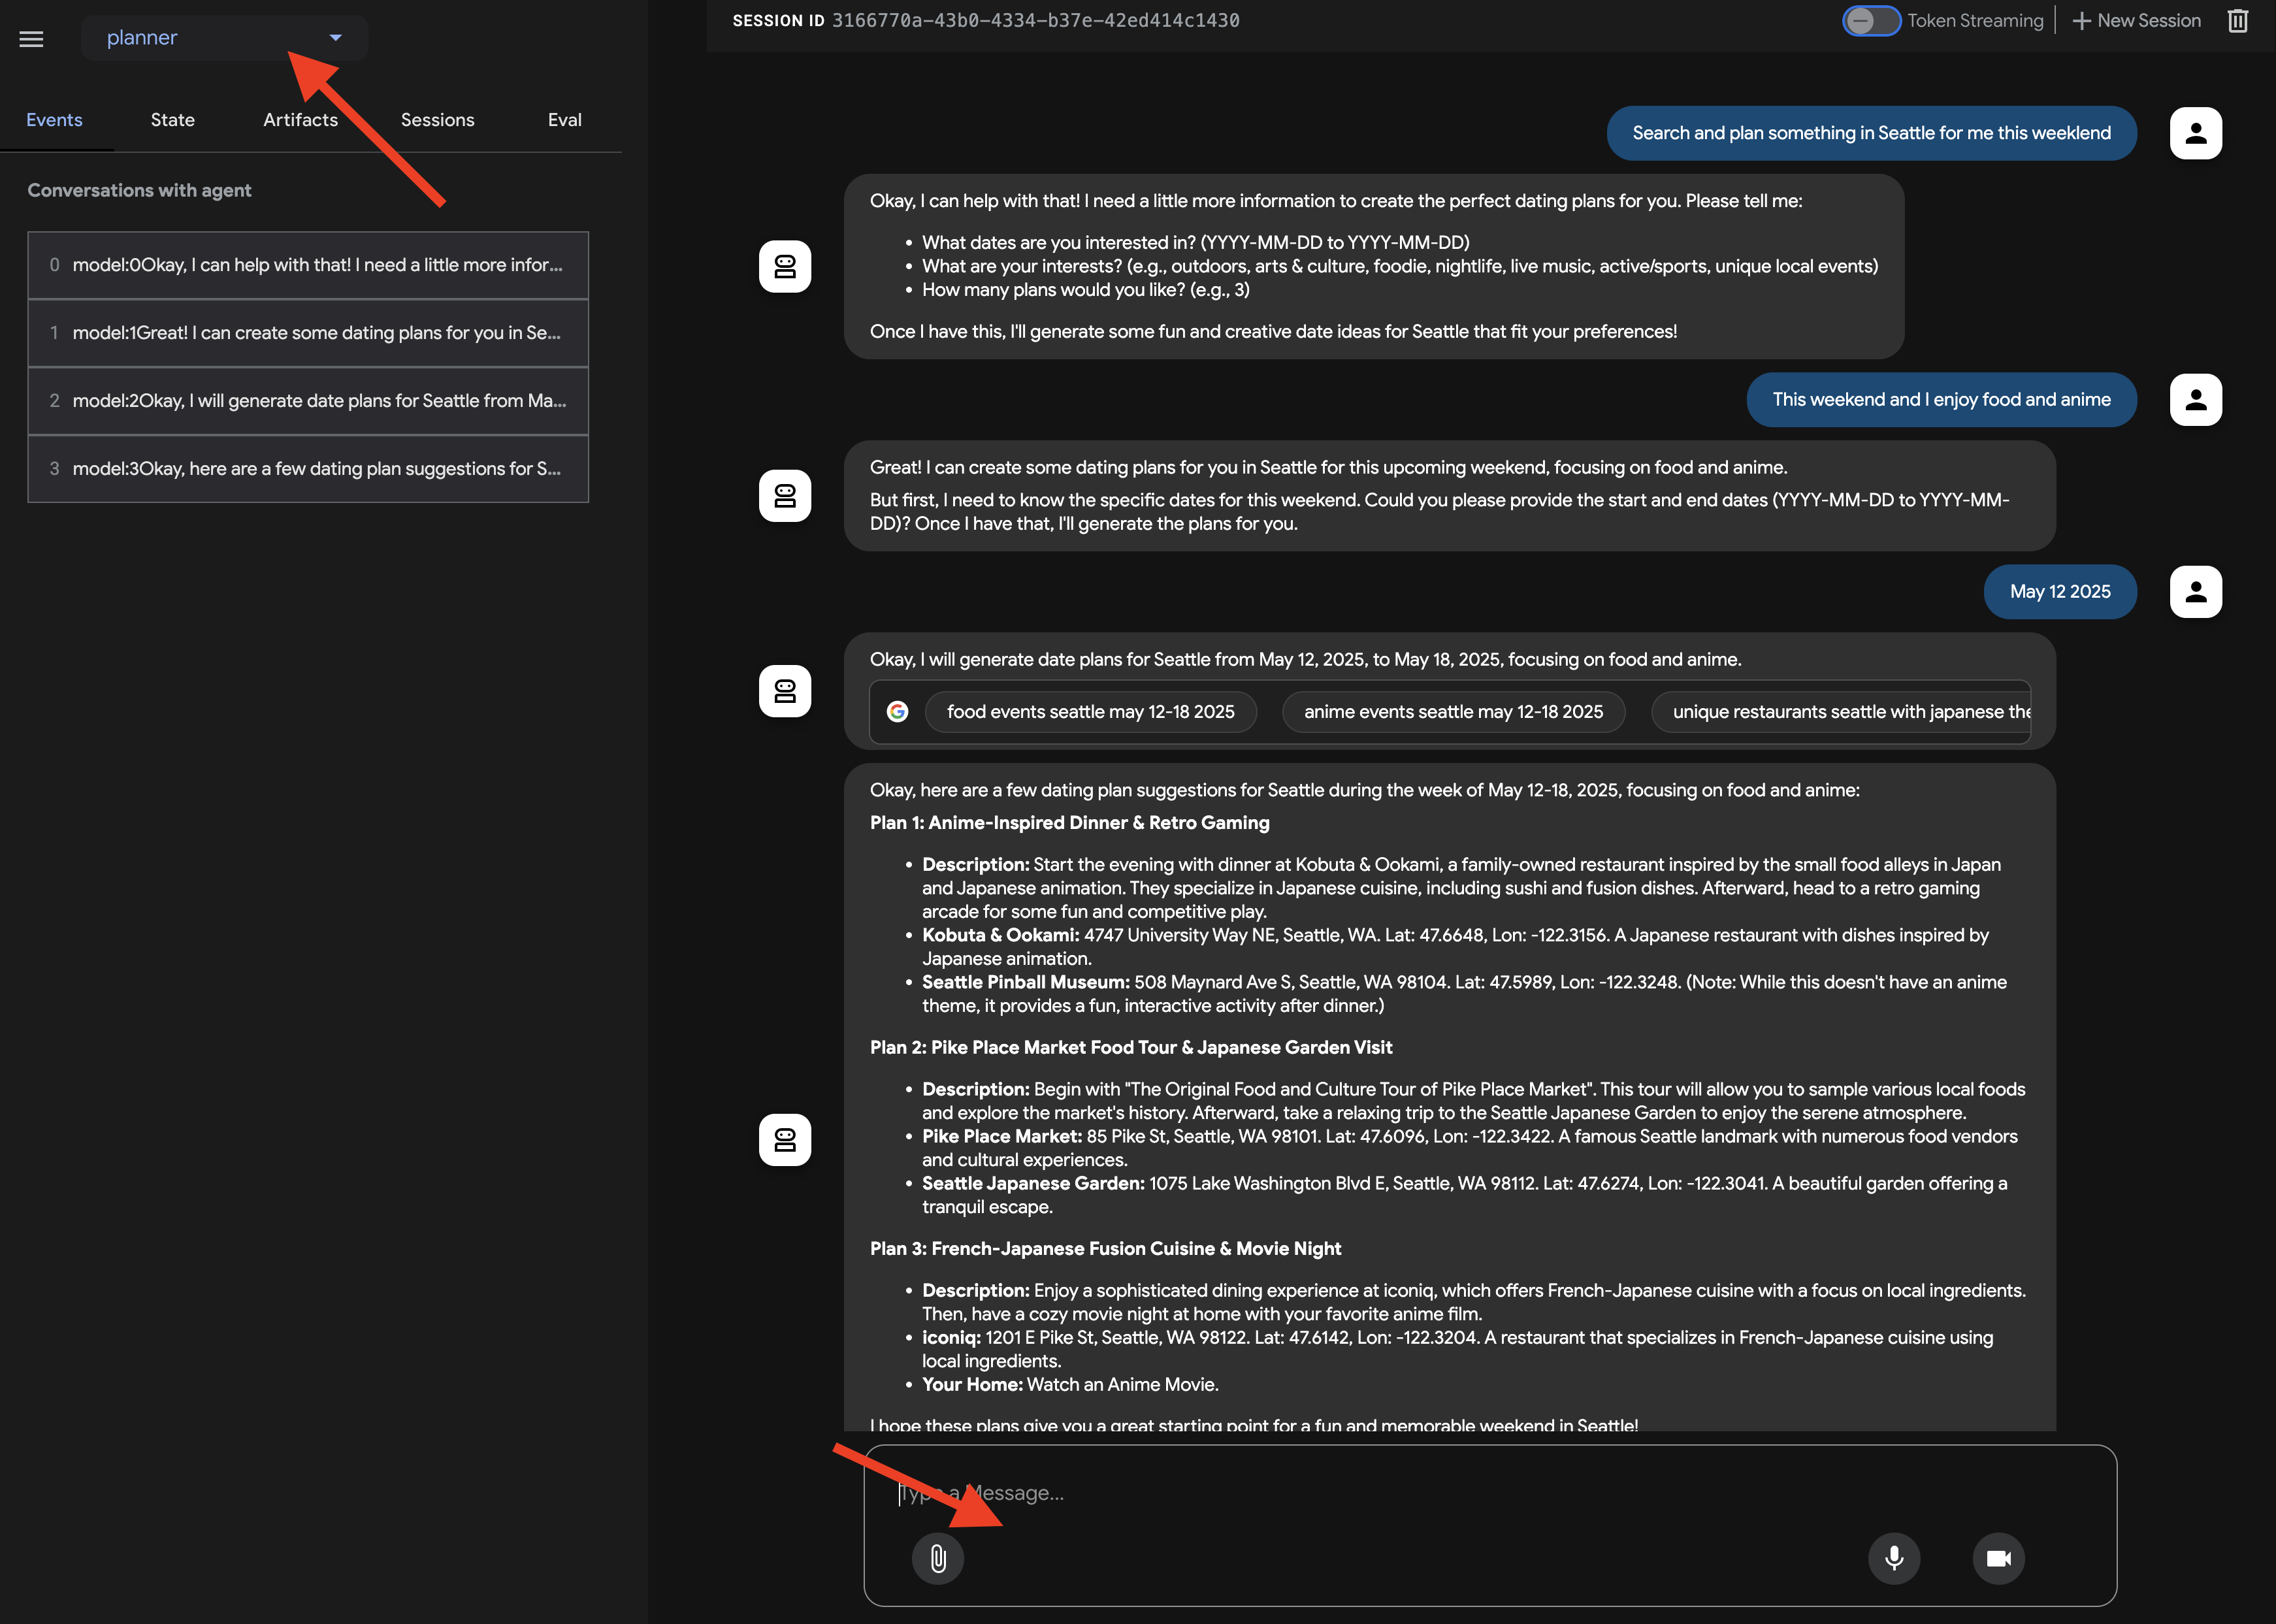
После открытия пользовательского интерфейса ADK Dev в браузере: в выпадающем меню в правом верхнем углу выберите «Планировщик» в качестве агента, с которым вы хотите взаимодействовать. Теперь в диалоговом окне чата справа попробуйте дать агенту задание. Например, поговорите с агентом:
Search and plan something in Seattle for me this weekend
This weekend and I enjoy food and anime
Предложите дату (на ваш выбор).
July 12 2025
Вы должны увидеть, как агент обрабатывает ваш запрос и предлагает план, основанный на результатах поиска в Google.
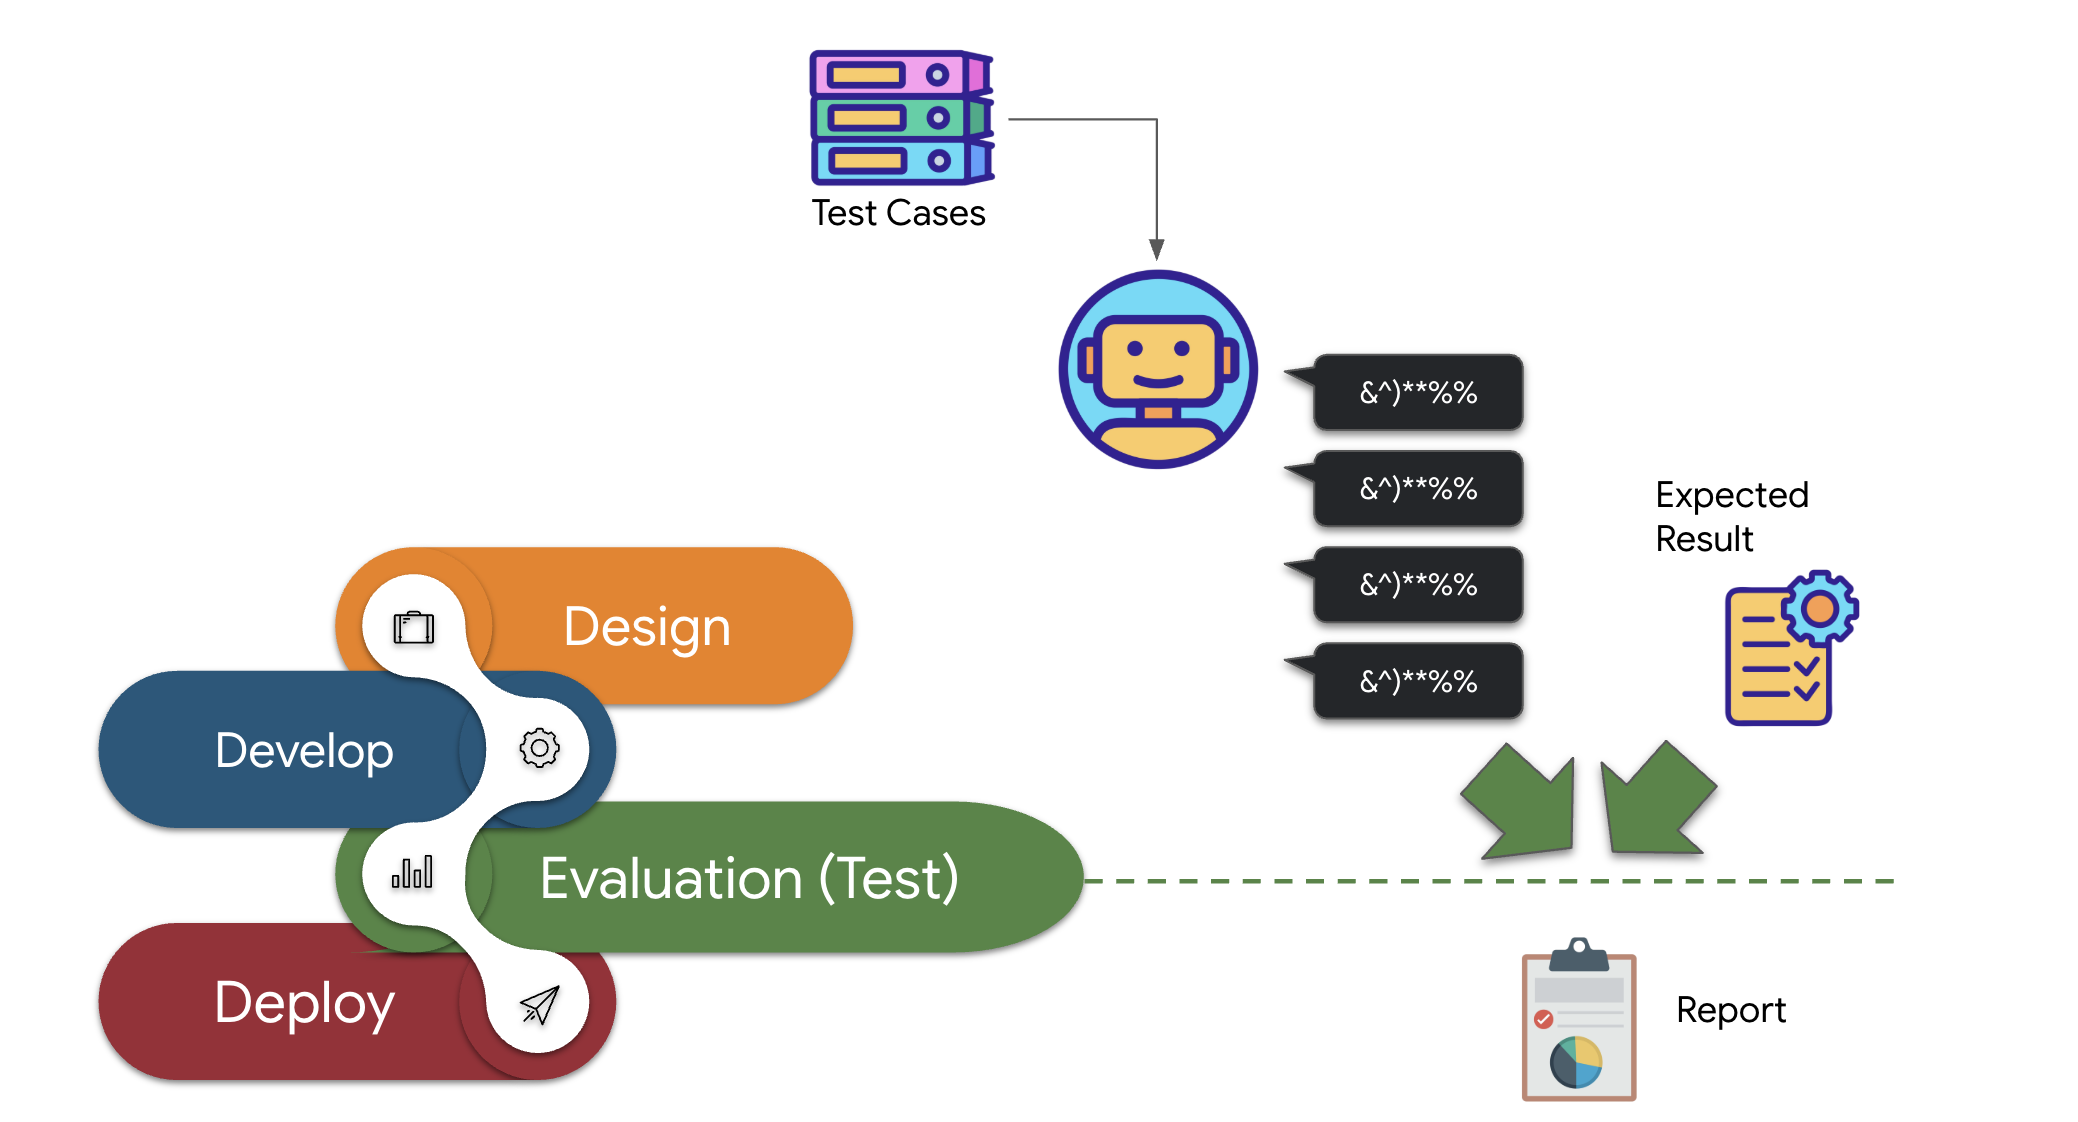
Взаимодействие с агентом — это одно, но как узнать, ведет ли он себя стабильно, как ожидается, особенно при внесении изменений?
Традиционные методы тестирования программного обеспечения часто оказываются неэффективными для агентов ИИ из-за их генеративной и недетерминированной природы. Для того чтобы преодолеть разрыв между впечатляющей демонстрацией и надежным агентом для использования в производственной среде, крайне важна продуманная стратегия оценки. В отличие от простой проверки конечного результата генеративной модели, оценка агента часто включает в себя оценку его процесса принятия решений и его способности правильно использовать инструменты или следовать инструкциям в различных сценариях. ADK предоставляет функции, которые помогают в этом.
👉 В пользовательском интерфейсе разработчика ADK нажмите на вкладку «Оценка» в левой панели навигации. Вы должны увидеть предварительно загруженный тестовый файл с именем plan_eval . Этот файл содержит предопределенные входные данные и критерии для тестирования нашего агента-планировщика.
👉 Выберите сценарий, например, «Бостон», и нажмите кнопку «Запустить оценку ». В появившемся всплывающем окне уменьшите оценку матча до 0,3 и нажмите «Старт».
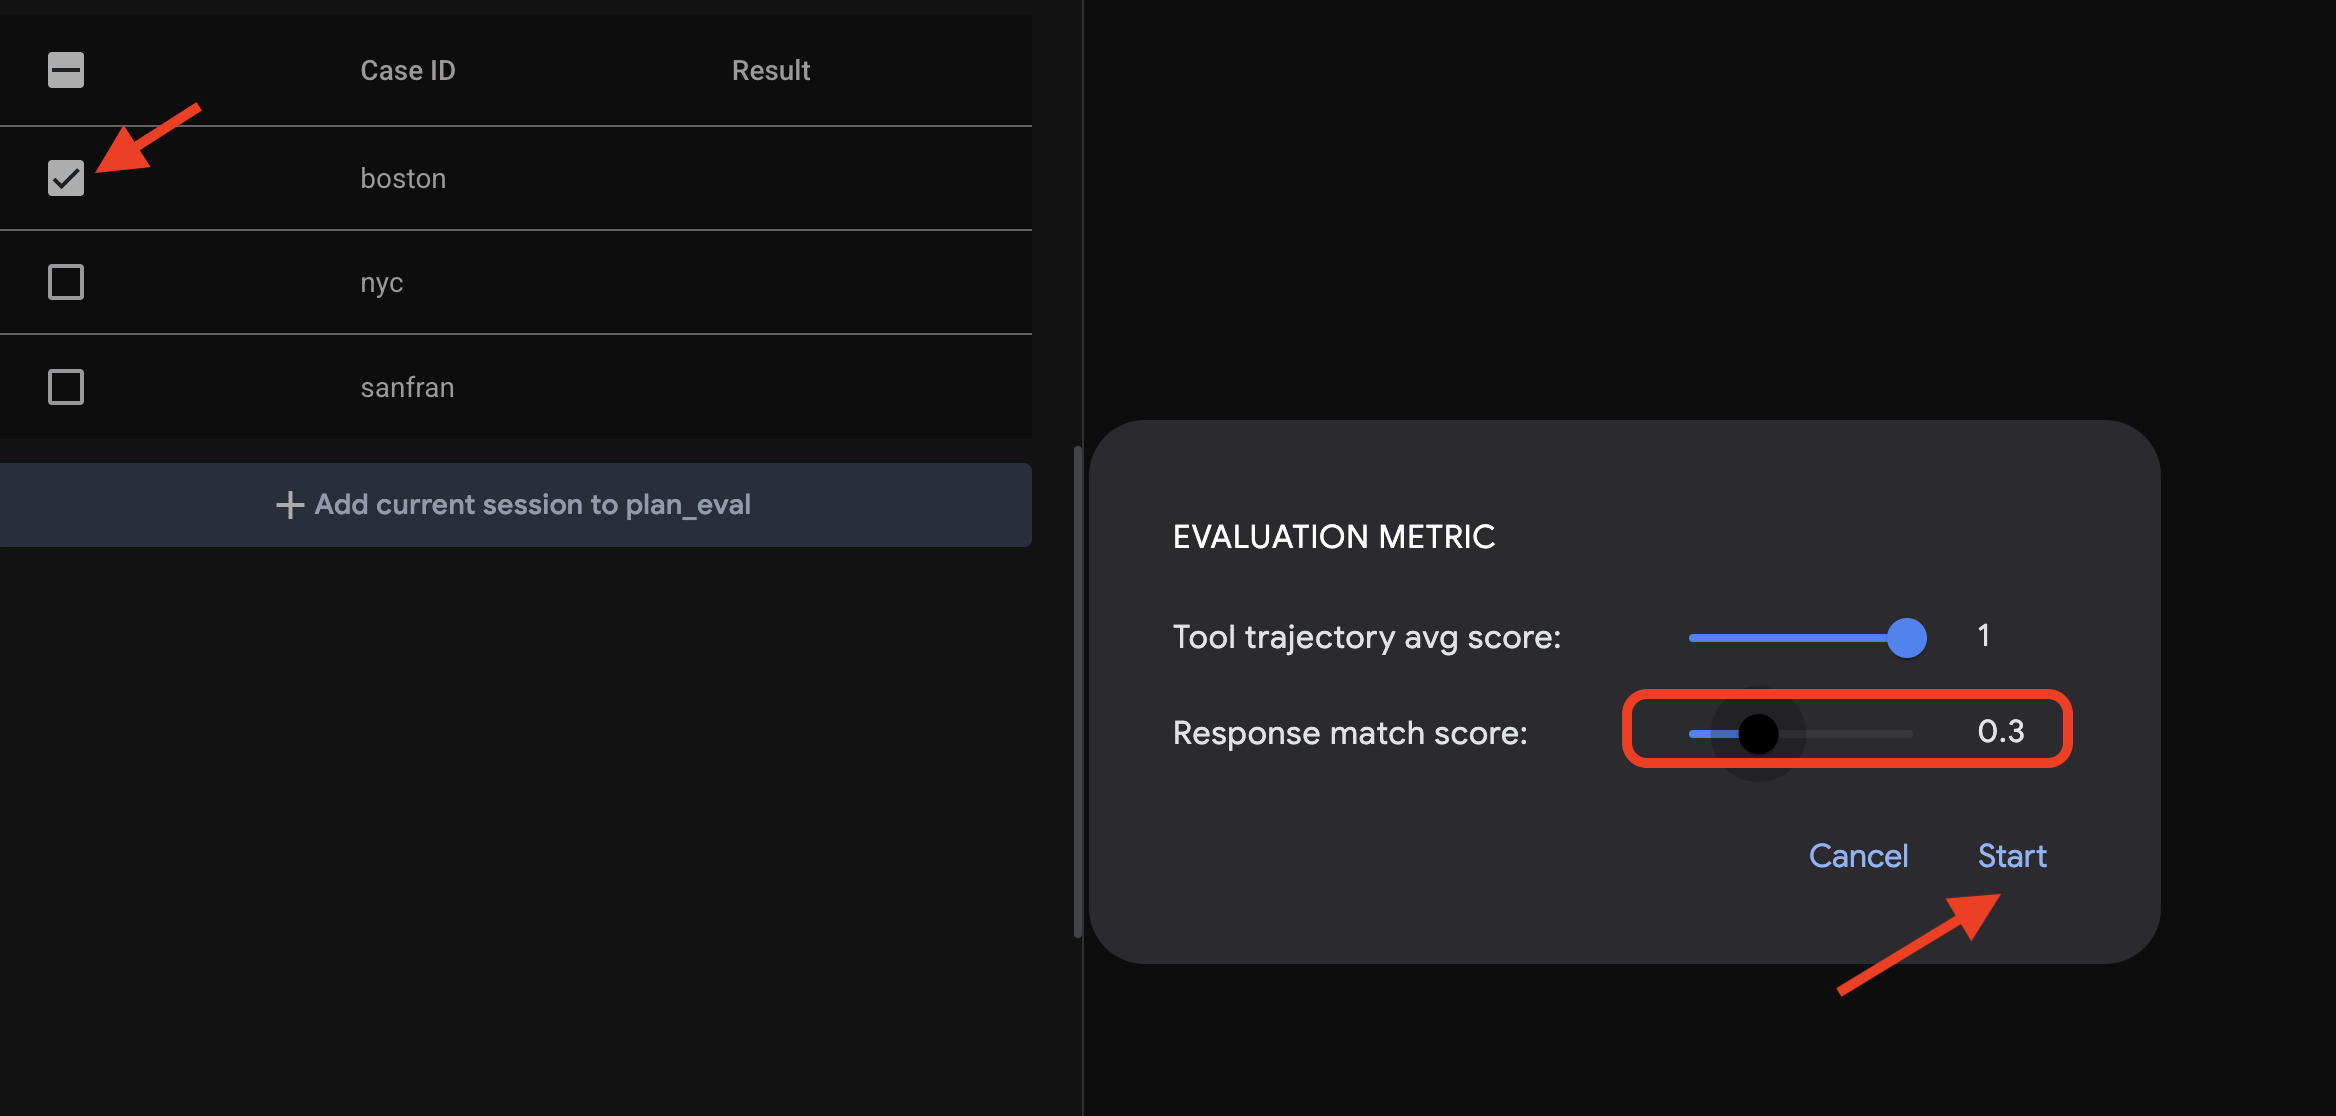
Это позволит запустить агента с тестовыми входными данными и проверить, соответствуют ли его выходные данные заданным ожиданиям. Это даёт вам возможность систематически тестировать производительность вашего агента.

👉 Теперь давайте посмотрим, что произойдет при более строгом пороговом значении. Выберите сценарий "nyc" и снова нажмите "Запустить оценку" . На этот раз оставьте оценку соответствия по умолчанию (Оценка соответствия ответа: 0,7) и нажмите "Старт". Вы заметите, что результат - "Неудача". Это ожидаемо, поскольку креативный результат агента не идеально соответствует предопределенному "золотому" ответу.
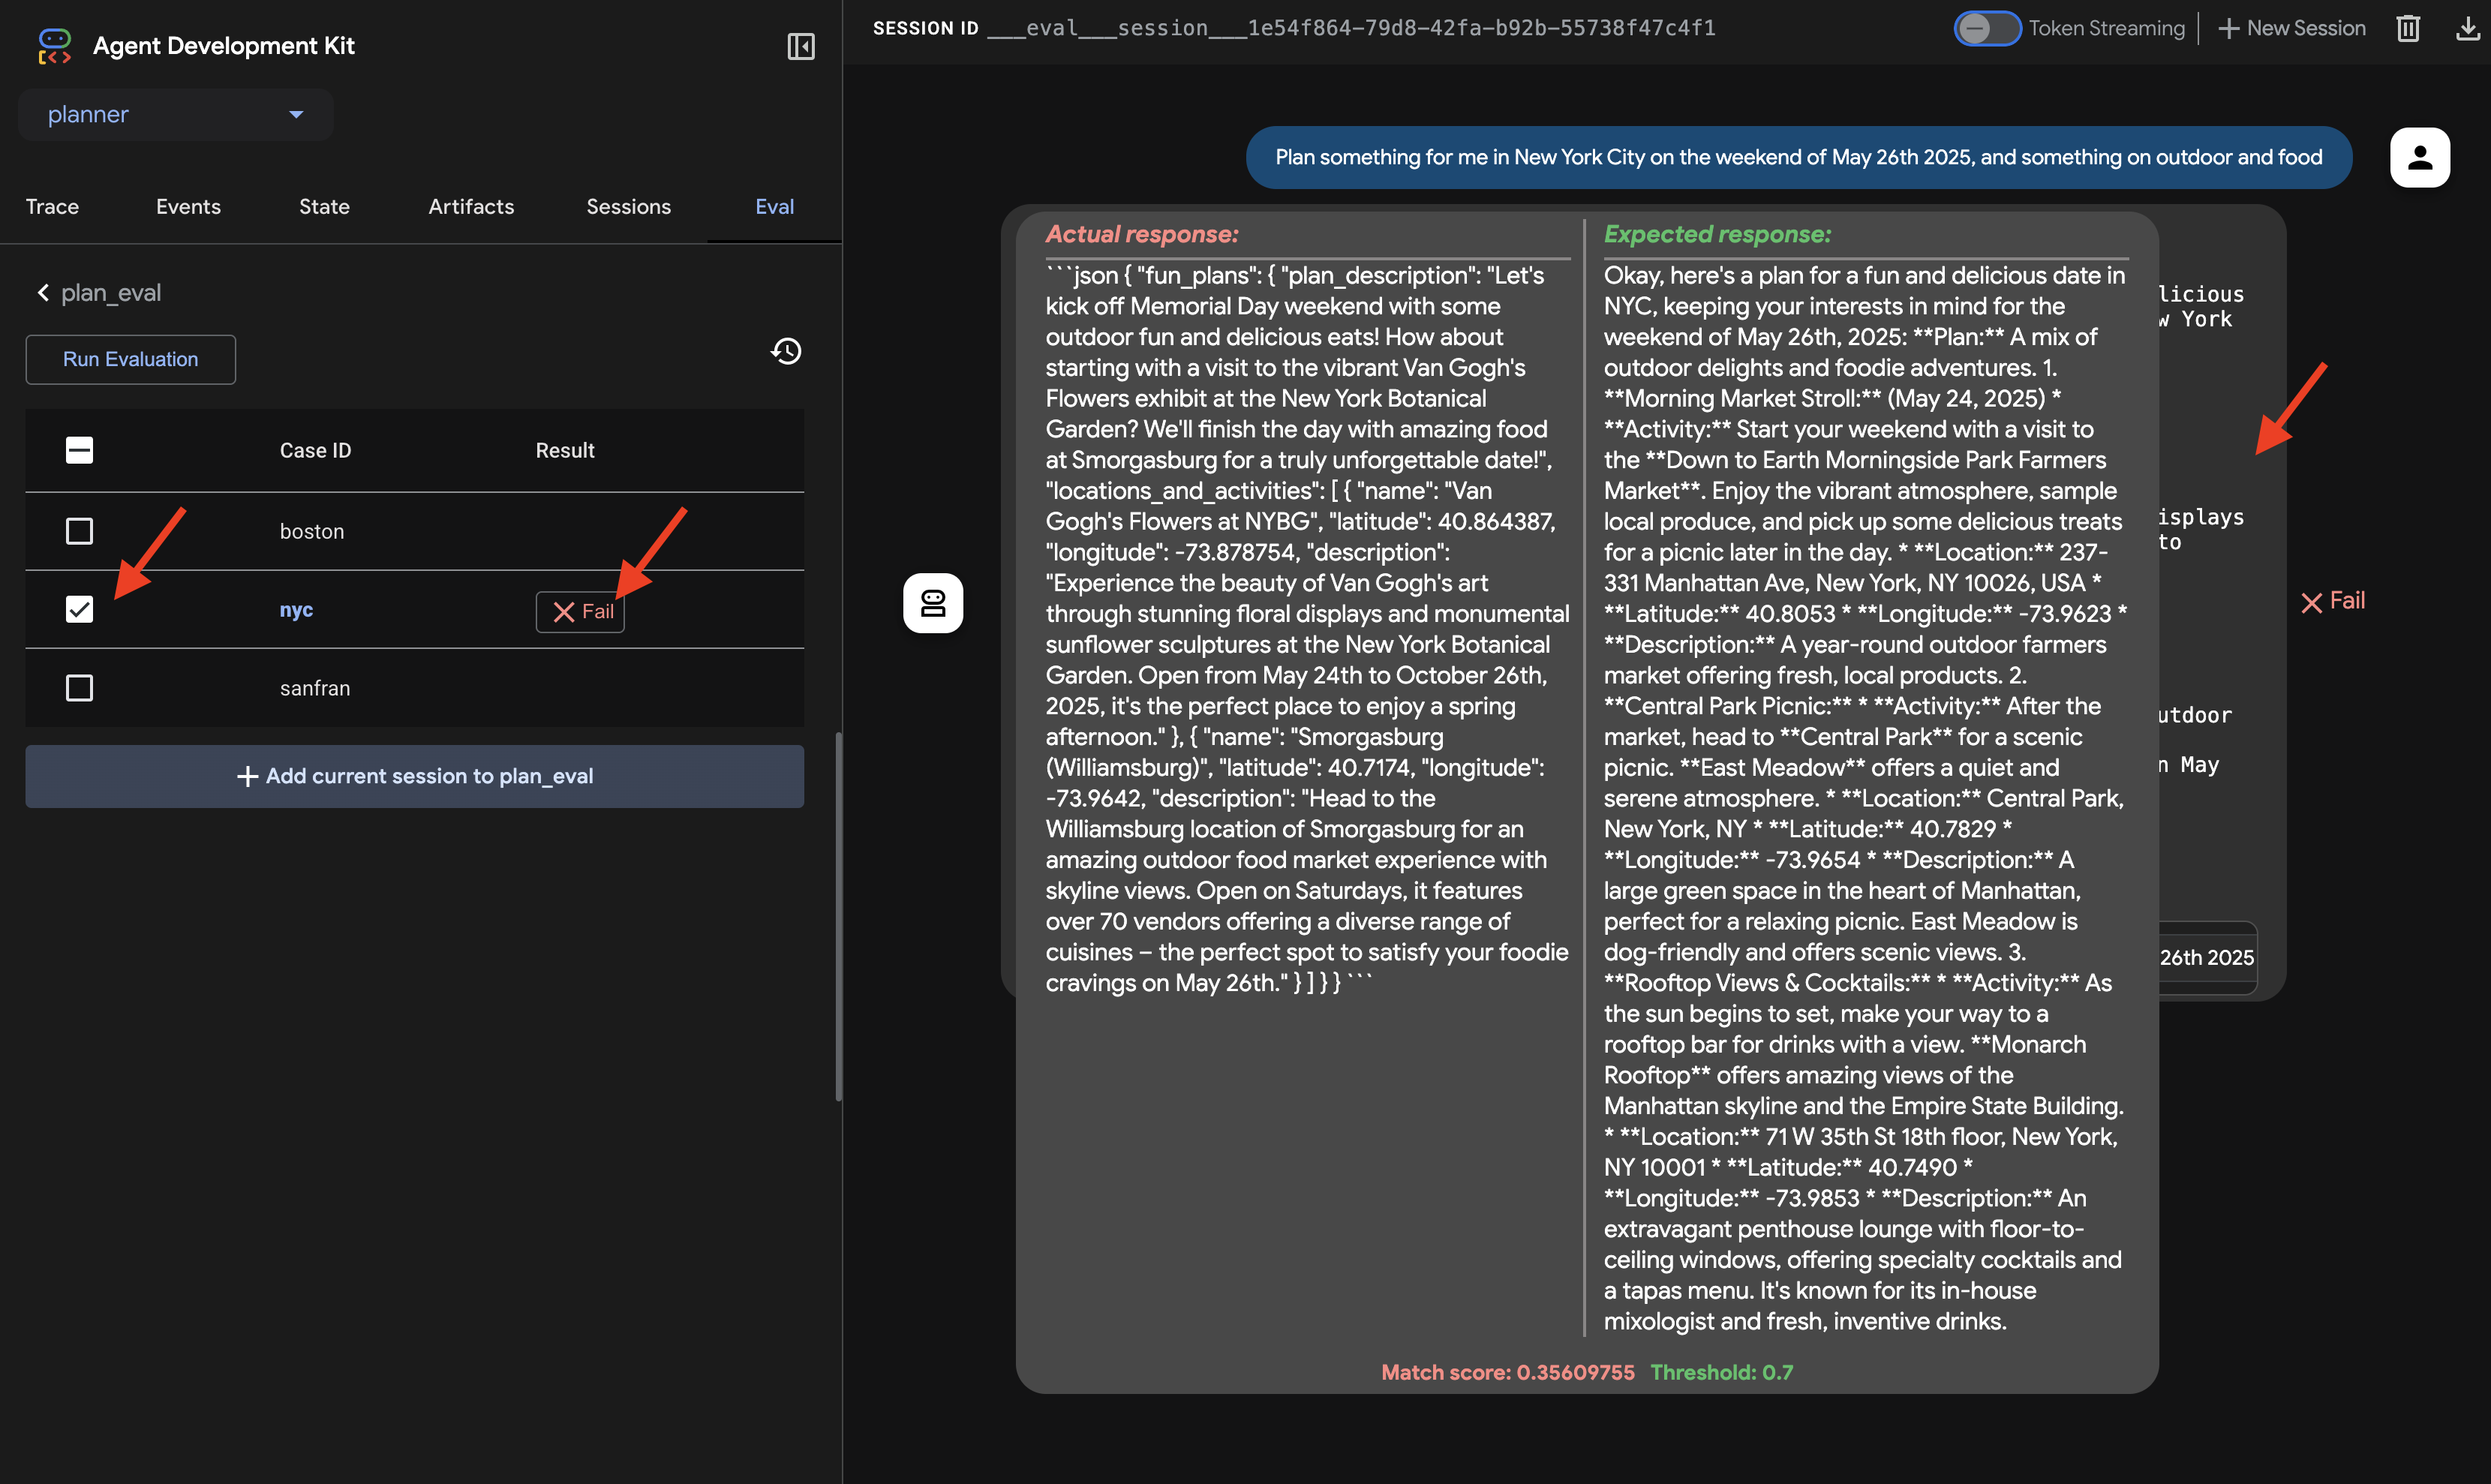
👉 Чтобы понять причину сбоя, нажмите на значок ошибки в строке "nyc". Теперь в пользовательском интерфейсе отображается сравнение фактического ответа от агента и ожидаемого ответа из тестового примера. Этот вид необходим для отладки, поскольку позволяет точно увидеть, где произошло расхождение в выводе агента, и соответствующим образом скорректировать его инструкции.
После того, как вы закончите изучение пользовательского интерфейса и оценку, вернитесь в терминал Cloud Shell Editor и нажмите Ctrl+C чтобы остановить пользовательский интерфейс разработчика ADK.
Хотя вывод в свободной текстовой форме — это хорошее начало, для таких приложений, как InstaVibe, чтобы легко использовать предложения агента, структурированные данные (например, JSON) гораздо практичнее. Давайте изменим нашего агента, чтобы он возвращал свой план в согласованном формате JSON.
👉📝 В файле ~/instavibe-bootstrap/agents/planner/agent.py найдите строку, в которой в строке инструкций агента указано RETURN PLAN in MARKDOWN FORMAT . Замените эту строку на следующую подробную структуру JSON:
Return your response *exclusively* as a single JSON object. This object should contain a top-level key, "fun_plans", which holds a plan objects. Each plan object in the list must strictly adhere to the following structure:

        --json--
        {
          "plan_description": "A summary of the overall plan, consisting of **exactly three sentences**. Craft these sentences in a friendly, enthusiastic, and conversational tone, as if you're suggesting this awesome idea to a close friend. Make it sound exciting and personal, highlighting the positive aspects and appeal of the plan without explicitly mentioning budget or listing interest categories.",
          "locations_and_activities": [
              {
              "name": "Name of the specific place or event",
              "latitude": 0.000000,  // Replace with actual latitude
              "longitude": 0.000000, // Replace with actual longitude
              "description": "A brief description of this place/event, why it's suitable for the date, and any specific details for the weekend (e.g., opening hours, event time)."
              }
              // Add more location/activity objects here if the plan involves multiple stops/parts
          ]
        }
Теперь, когда вы обновили инструкции агента, указав в них конкретный запрос на вывод в формате JSON, давайте проверим изменение.
👉💻 Перезапустите пользовательский интерфейс разработчика ADK, используя ту же команду, что и раньше:
. ~/instavibe-bootstrap/set_env.sh
source ~/instavibe-bootstrap/env/bin/activate
cd  ~/instavibe-bootstrap/agents
adk web
Обновите вкладку, если она уже открыта. Или выполните те же действия, что и ранее, чтобы открыть пользовательский интерфейс разработчика ADK в браузере (через веб-предварительный просмотр Cloud Shell на порту 8000). После загрузки интерфейса убедитесь, что выбран агент планировщика.
👉 На этот раз давайте отправим другой запрос. В диалоговом окне чата введите:
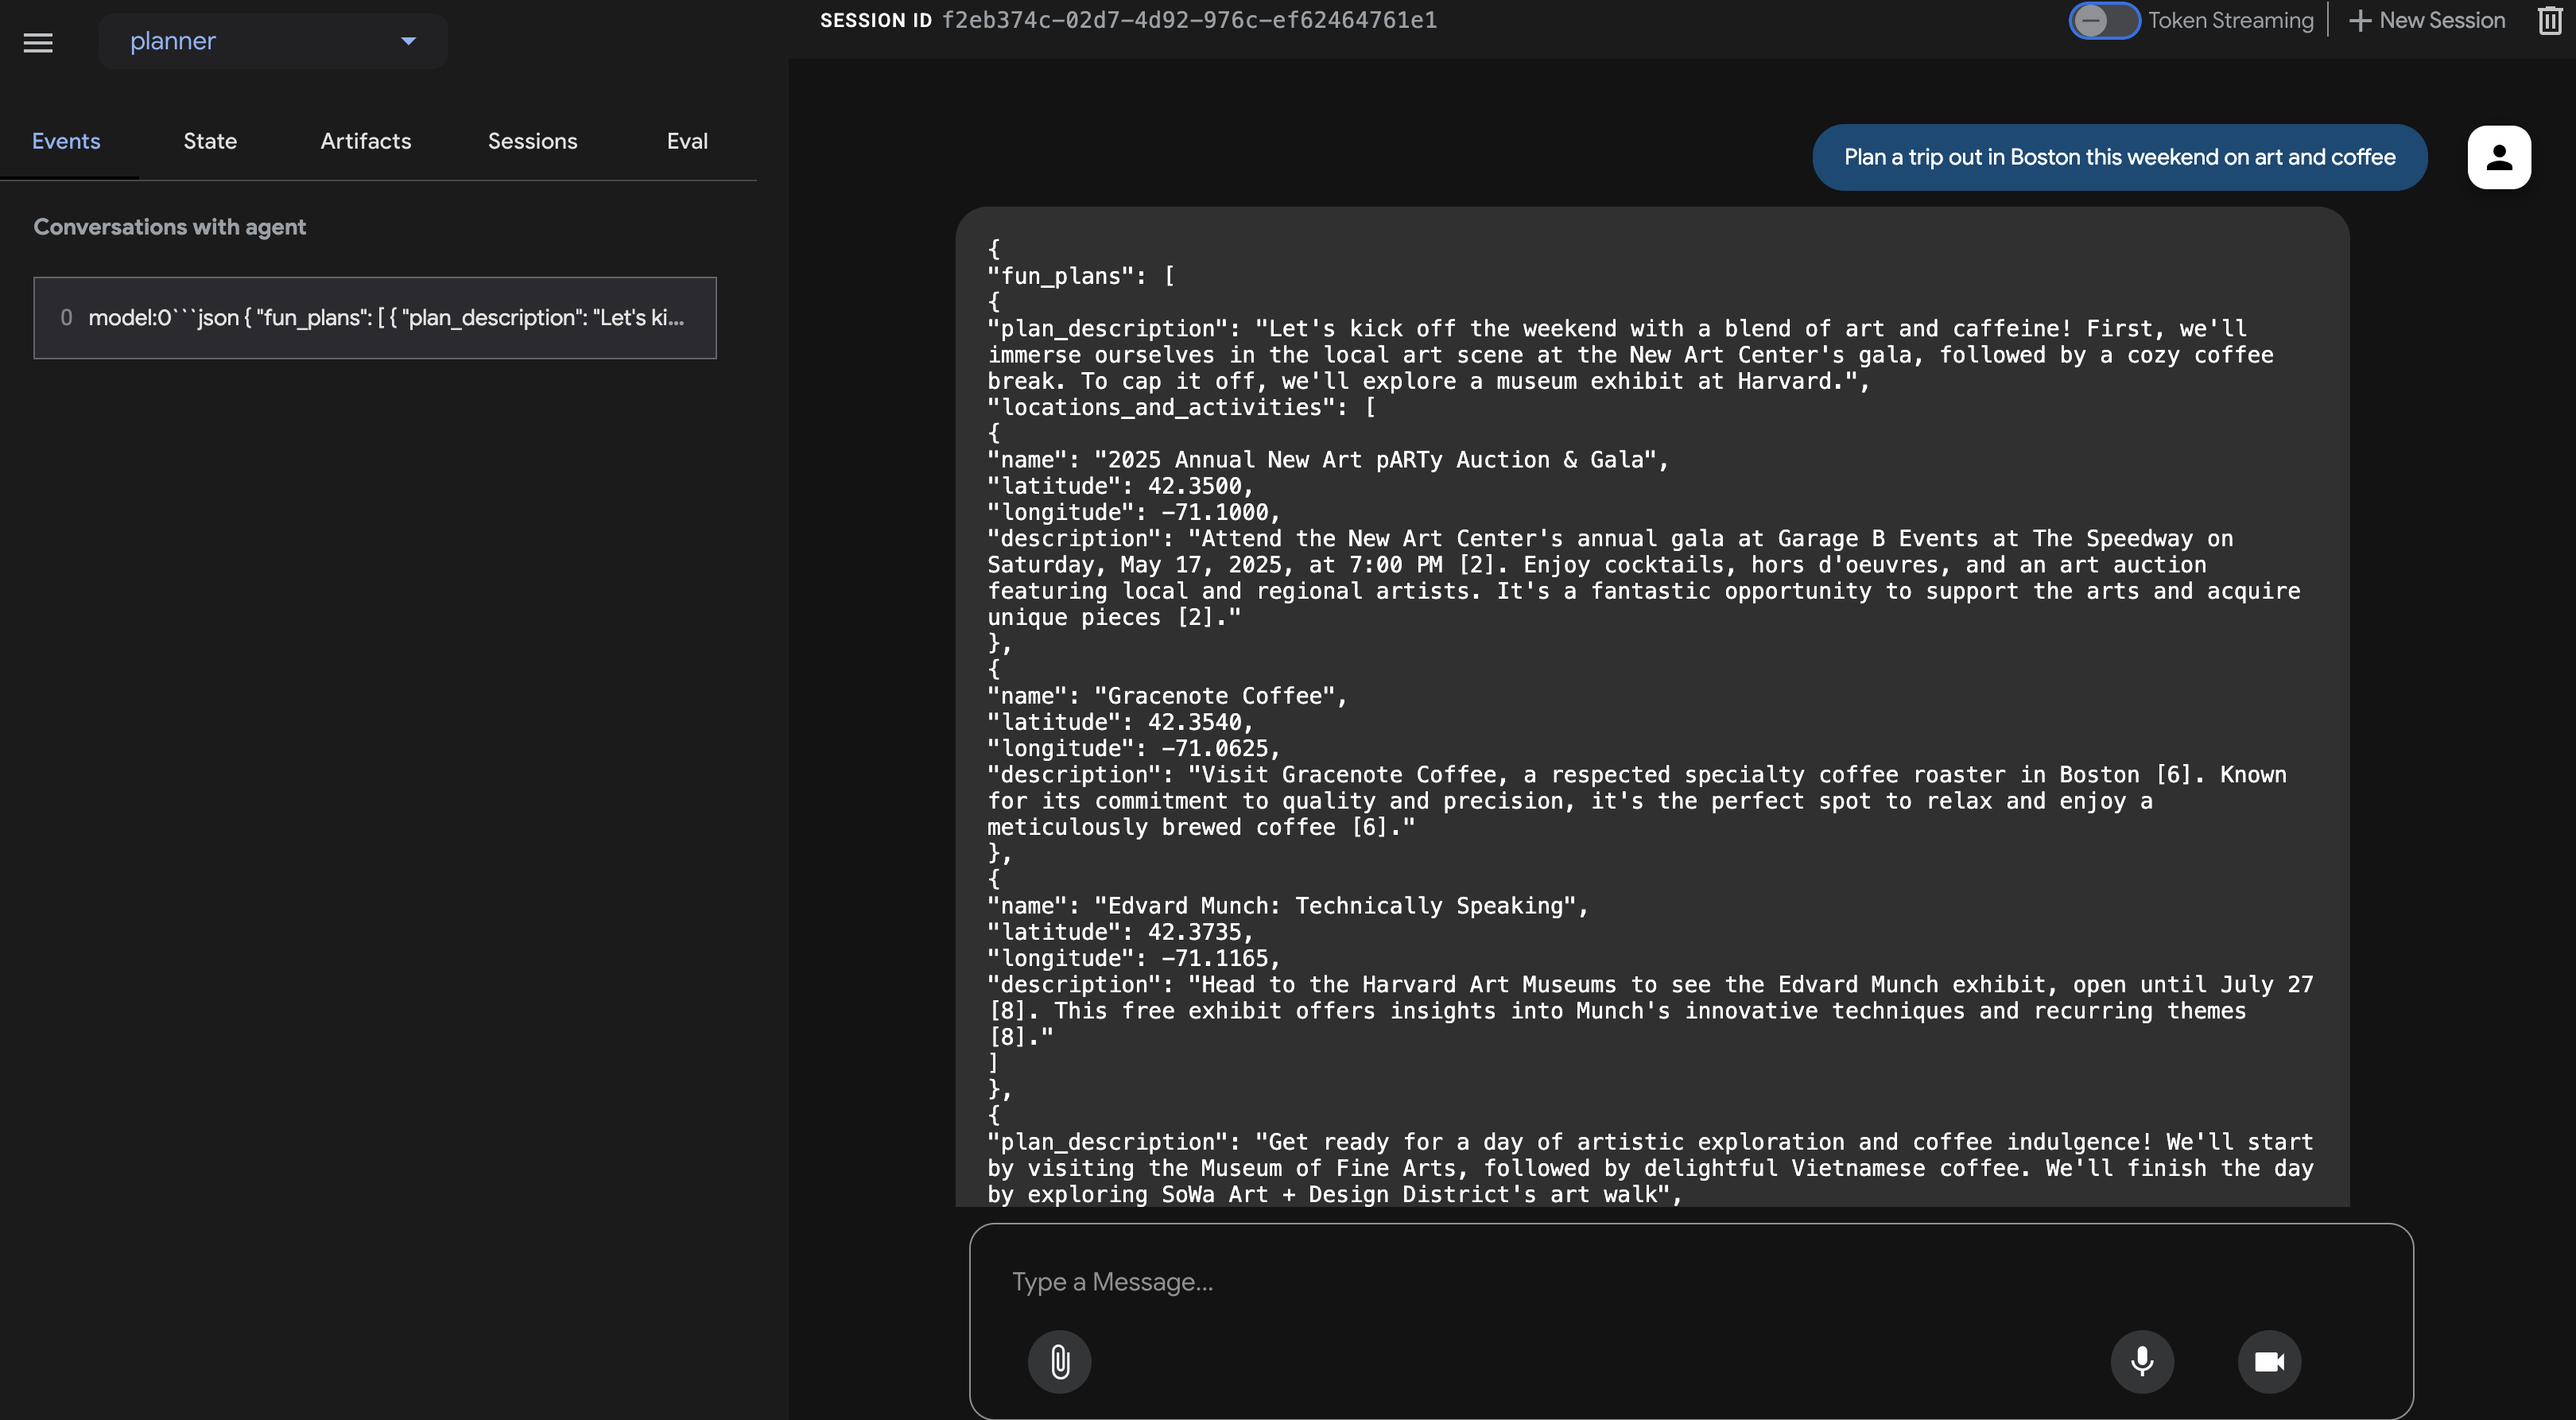
Plan an event Boston this weekend with art and coffee
Внимательно изучите ответ агента. Вместо чисто текстового ответа в формате диалога вы должны увидеть ответ, отформатированный строго как объект JSON, соответствующий структуре, определенной в инструкциях (содержащий fun_plans, plan_description, locations_and_activities и т. д.). Это подтверждает, что агент теперь может создавать структурированный вывод, подходящий для программного использования нашим приложением InstaVibe.
После подтверждения вывода JSON вернитесь в терминал Cloud Shell и нажмите Ctrl+C , чтобы остановить пользовательский интерфейс разработчика ADK.
Компоненты ADK
Хотя пользовательский интерфейс ADK Dev отлично подходит для интерактивного тестирования, нам часто необходимо запускать агенты программно, например, как часть более крупного приложения или серверной службы. Чтобы понять, как это работает, давайте рассмотрим некоторые основные концепции ADK, связанные с управлением временем выполнения и контекстом.
Для содержательных многоэтапных диалогов агентам необходимо понимать контекст — вспоминать сказанное и сделанное для поддержания непрерывности. ADK предоставляет структурированные способы управления этим контекстом с помощью сессий , состояний и памяти :
- Сессия: Когда пользователь начинает взаимодействовать с агентом, создается сессия. Представьте ее как контейнер для отдельного, конкретного диалога в чате. Она содержит уникальный идентификатор, историю взаимодействий (события), текущие рабочие данные (состояние) и метаданные, такие как время последнего обновления.
- Состояние: Это кратковременная рабочая память агента в рамках одной сессии. Это изменяемый словарь, в котором агент может хранить временную информацию, необходимую для выполнения текущей задачи (например, собранные к настоящему моменту пользовательские предпочтения, промежуточные результаты вызовов инструментов).
- Память: Это потенциал агента для долговременного восстановления информации в разных сессиях или доступа к внешним базам знаний. В то время как сессия и состояние обрабатывают непосредственный диалог, память (часто управляемая службой памяти) позволяет агенту извлекать информацию из прошлых взаимодействий или структурированных источников данных, обеспечивая более широкий контекст знаний. (Примечание: В нашем простом клиенте для простоты используются службы в памяти, то есть память/состояние сохраняются только во время выполнения скрипта).
- Событие: Каждое взаимодействие в рамках сессии (сообщение пользователя, ответ агента, запрос на использование инструмента, результат использования инструмента, изменение состояния, ошибка) записывается как неизменяемое событие. Это создает хронологический журнал, по сути, стенограмму и историю действий в ходе разговора.
Итак, как же осуществляется управление этими процессами, когда агент действует в рамках служебного положения? Это работа агента, действующего в рамках служебного положения .
- Runner : Runner — это основной механизм выполнения, предоставляемый ADK. Вы определяете своего агента и используемые им инструменты, а Runner организует процесс выполнения запроса пользователя. Он управляет сессией, обрабатывает поток событий, обновляет состояние, вызывает базовую языковую модель, координирует вызовы инструментов и, возможно, взаимодействует с MemoryService. Представьте его как дирижера, следящего за тем, чтобы все различные части работали вместе правильно.
Мы можем использовать Runner для запуска нашего агента как автономного приложения на Python, полностью независимого от пользовательского интерфейса разработчика.
Давайте создадим простой клиентский скрипт для программного запуска нашего агента планировщика.
👉📝 В файл ~/instavibe-bootstrap/agents/planner/planner_client.py добавьте следующий код Python под существующими импортами. В planner_client.py под импортами добавьте следующее:
async def async_main():
  session_service = InMemorySessionService()

  session = await session_service.create_session(
      state={}, app_name='planner_app', user_id='user_dc'
  )

  query = "Plan Something for me in San Francisco this weekend on wine and fashion "
  print(f"User Query: '{query}'")
  content = types.Content(role='user', parts=[types.Part(text=query)])

  root_agent = agent.root_agent
  runner = Runner(
        app_name='planner_app',
        agent=root_agent,
        session_service=session_service,
  )
  print("Running agent...")
  events_async =  runner.run_async(
    session_id=session.id, user_id=session.user_id, new_message=content
  )

  async for event in events_async:
    print(f"Event received: {event}")


if __name__ == '__main__':
  try:
    asyncio.run(async_main())
  except Exception as e:
    print(f"An error occurred: {e}")
Этот код настраивает службы в оперативной памяти для управления сессиями и артефактами (для этого примера всё упрощено), создаёт сессию, определяет пользовательский запрос, настраивает Runner с нашим агентом, а затем запускает агент асинхронно, выводя каждое событие, сгенерированное во время выполнения.
👉💻 Теперь выполните этот клиентский скрипт в терминале:
. ~/instavibe-bootstrap/set_env.sh
source ~/instavibe-bootstrap/env/bin/activate
cd  ~/instavibe-bootstrap/agents
python -m planner.planner_client
👀 Обратите внимание на вывод. Вместо простого итогового JSON-плана вы увидите подробную структуру каждого объекта Event, сгенерированного в процессе выполнения агента. Это включает в себя событие отправки первоначального сообщения пользователю, потенциальные события, связанные с вызовами инструментов (например, поиском в Google), и, наконец, событие ответа модели, содержащее JSON-план. Этот подробный поток событий очень полезен для отладки и понимания пошаговой обработки, происходящей в среде выполнения ADK.
Running agent...
Event received: content=Content(parts=[Part(video_metadata=None, thought=None, code_execution_result=None, executable_code=None, file_data=None, function_call=None, function_response=None, inline_data=None, text='```json\n{\n "fun_plans": [\n  {\n   "plan_description": "Embark on a stylish adventure through Hayes Valley,
...(turncated)
, offering a variety of fashion styles to browse and enjoy."\n    }\n   ]\n  }\n ]\n}\n```')], role='model') grounding_metadata=GroundingMetadata(grounding_chunks=[GroundingChunk(retrieved_context=None, web=GroundingChunkWeb(domain='islands.com', title='islands.com', uri='http
...(turncated)
QyTpPV7jS6wUt-Ix7GuP2mC9J4eY_8Km6Vv44liF9cb2VSs='))], grounding_supports=[GroundingSupport(confide
...(turncated)
>\n', sdk_blob=None), web_search_queries=['..e']) partial=None turn_complete=None error_code=None error_message=None interrupted=None custom_metadata=None invocation_id='e-04d97b8b-9021-47a5-ab41-17b5cbb4bf03' author='location_search_agent' actions=EventActions(skip_summarization=None, state_delta={}, artifact_delta={}, transfer_to_agent=None, escalate=None, requested_auth_configs={}) long_running_tool_ids=None branch=None id='CInHdkKw' timestamp=1746978846.232674
Если скрипт выполняется непрерывно или зависает, возможно, потребуется остановить его вручную, нажав Ctrl+C .
7. Агент взаимодействия с платформой — взаимодействие с сервером MCP.
While ADK helps structure our agents, they often need to interact with external systems or APIs to perform real-world actions.
Протокол контекста модели (MCP)
The Model Context Protocol (MCP) is an open standard designed to standardize how AI applications like agents, connect with external data sources, tools, and systems. It aims to solve the problem of needing custom integrations for every AI application and data source combination by providing a universal interface. MCP utilizes a client-server architecture where MCP clients, residing within AI applications (hosts), manage connections to MCP servers. These servers are external programs that expose specific functionalities like accessing local data, interacting with remote services via APIs, or providing predefined prompts, allowing AI models to access current information and perform tasks beyond their initial training. This structure enables AI models to discover and interact with external capabilities in a standardized way, making integrations simpler and more scalable.
Build and deploy the InstaVibe MCP server
Our agents will eventually need to interact with the InstaVibe platform itself.Specifically, to create posts and register events using the platform's existing APIs. The InstaVibe application already exposes these functionalities via standard HTTP endpoints:
Enpoint | URL | HTTP method | Описание |
Создать пост | api/posts | ПОЧТА | API endpoint to add a new post. Expects JSON body: |
Создать событие | api/events | ПОЧТА | API endpoint to add a new event and its attendees (simplified schema). |
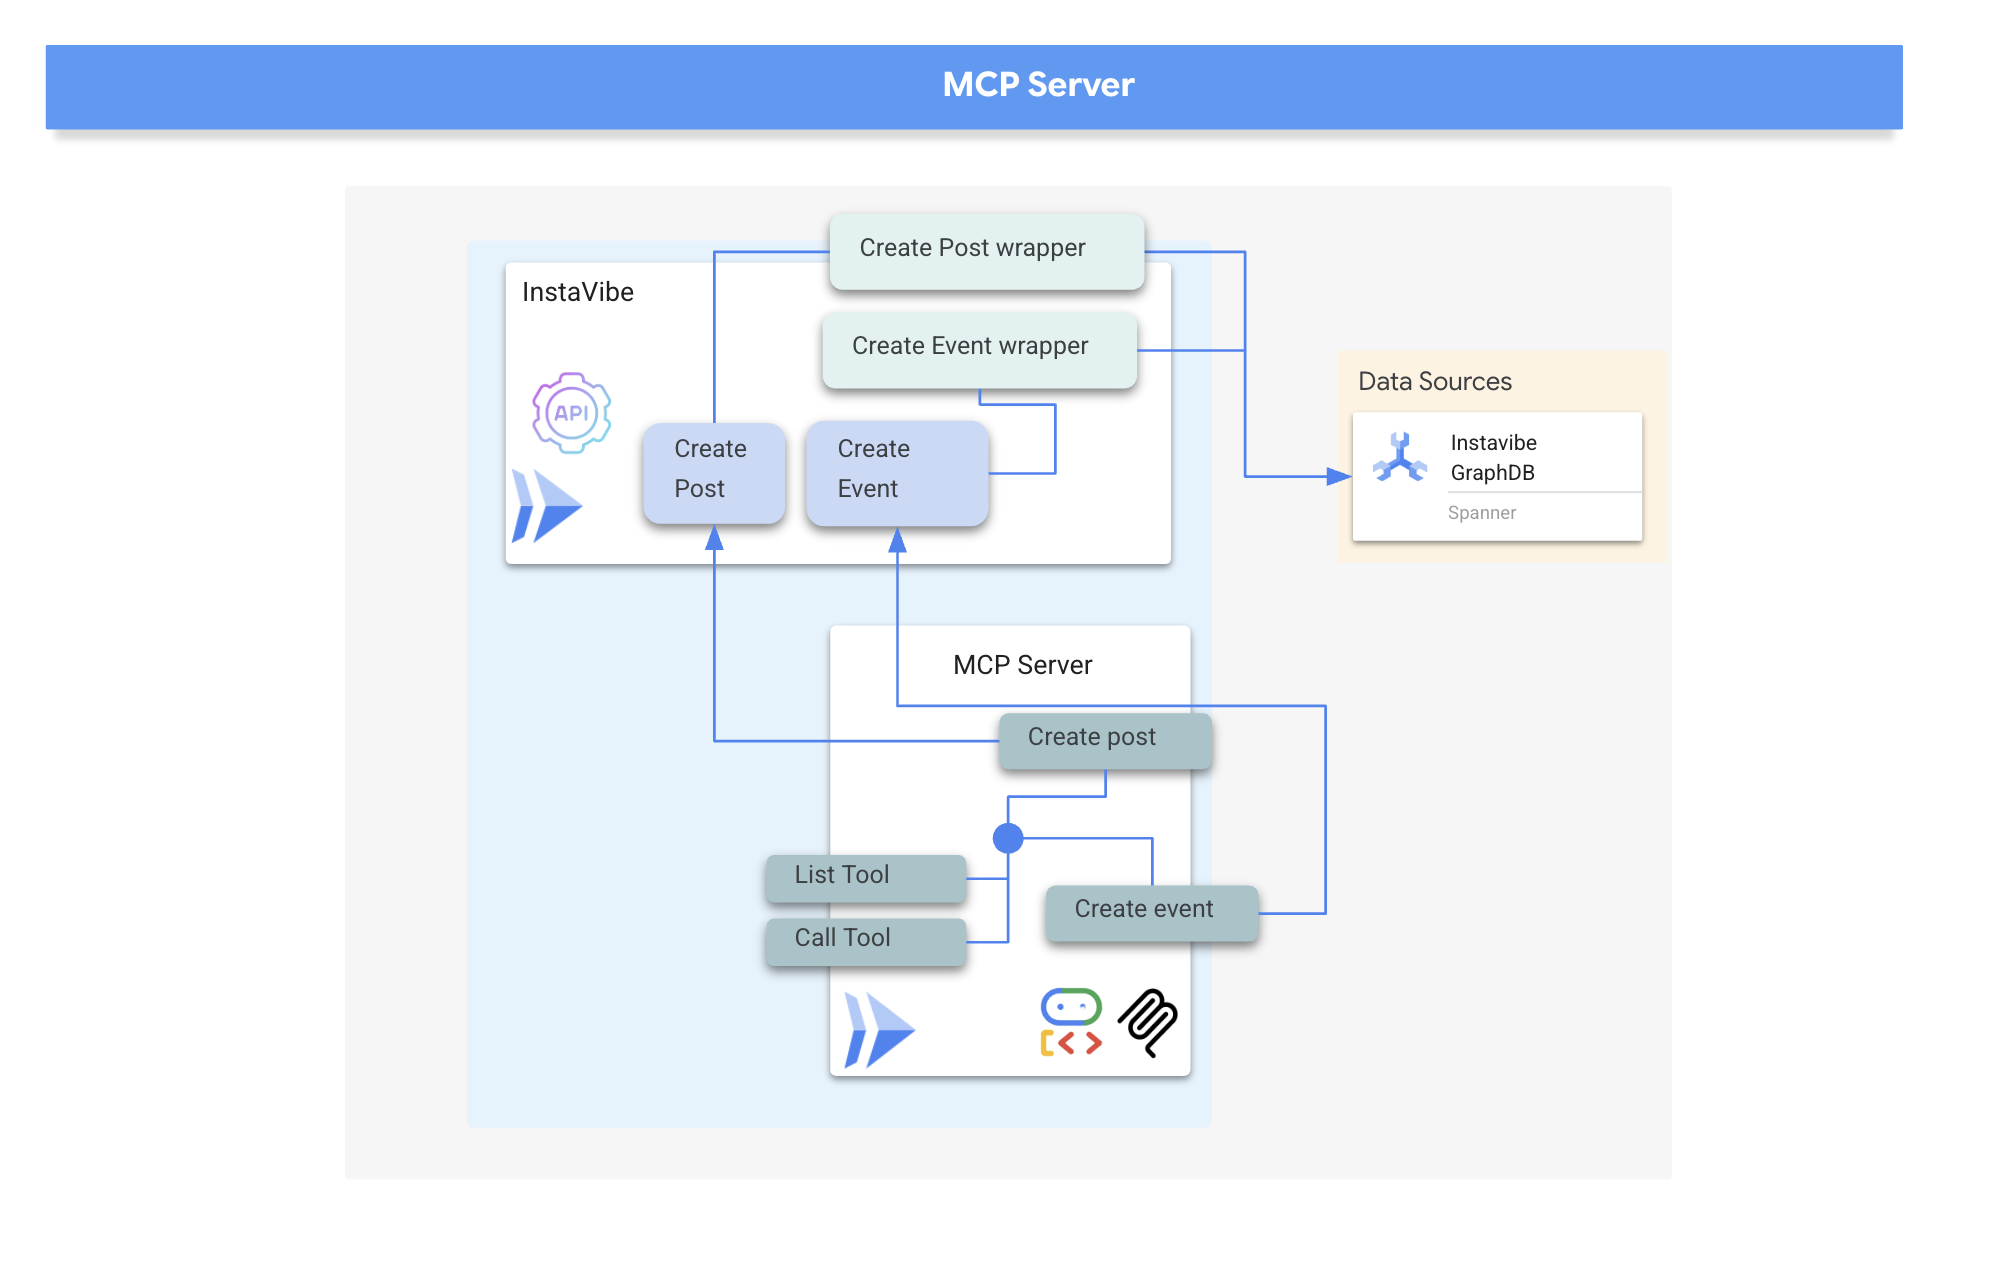
To make these capabilities available to our agents via MCP, we first need to create simple Python functions that act as wrappers around these API calls. These functions will handle the HTTP request logic.
👉 First, let's implement the wrapper function for creating a post. Open the file ~/instavibe-bootstrap/tools/instavibe/instavibe.py and replace the #REPLACE ME CREATE POST comment with the following Python code:
def create_post(author_name: str, text: str, sentiment: str, base_url: str = BASE_URL):
    """
    Sends a POST request to the /posts endpoint to create a new post.

    Args:
        author_name (str): The name of the post's author.
        text (str): The content of the post.
        sentiment (str): The sentiment associated with the post (e.g., 'positive', 'negative', 'neutral').
        base_url (str, optional): The base URL of the API. Defaults to BASE_URL.

    Returns:
        dict: The JSON response from the API if the request is successful.
              Returns None if an error occurs.

    Raises:
        requests.exceptions.RequestException: If there's an issue with the network request (e.g., connection error, timeout).
    """
    url = f"{base_url}/posts"
    headers = {"Content-Type": "application/json"}
    payload = {
        "author_name": author_name,
        "text": text,
        "sentiment": sentiment
    }

    try:
        response = requests.post(url, headers=headers, json=payload)
        response.raise_for_status()  # Raise an exception for bad status codes (4xx or 5xx)
        print(f"Successfully created post. Status Code: {response.status_code}")
        return response.json()
    except requests.exceptions.RequestException as e:
        print(f"Error creating post: {e}")
        # Optionally re-raise the exception if the caller needs to handle it
        # raise e
        return None
    except json.JSONDecodeError:
        print(f"Error decoding JSON response from {url}. Response text: {response.text}")
        return None
👉📝 Next, we'll create the wrapper function for the event creation API. In the same ~/instavibe-bootstrap/tools/instavibe/instavibe.py file, replace the #REPLACE ME CREATE EVENTS comment with this code:
def create_event(event_name: str, description: str, event_date: str, locations: list, attendee_names: list[str], base_url: str = BASE_URL):
    """
    Sends a POST request to the /events endpoint to create a new event registration.

    Args:
        event_name (str): The name of the event.
        description (str): The detailed description of the event.
        event_date (str): The date and time of the event (ISO 8601 format recommended, e.g., "2025-06-10T09:00:00Z").
        locations (list): A list of location dictionaries. Each dictionary should contain:
                          'name' (str), 'description' (str, optional),
                          'latitude' (float), 'longitude' (float),
                          'address' (str, optional).
        attendee_names (list[str]): A list of names of the people attending the event.
        base_url (str, optional): The base URL of the API. Defaults to BASE_URL.

    Returns:
        dict: The JSON response from the API if the request is successful.
              Returns None if an error occurs.

    Raises:
        requests.exceptions.RequestException: If there's an issue with the network request (e.g., connection error, timeout).
    """
    url = f"{base_url}/events"
    headers = {"Content-Type": "application/json"}
    payload = {
        "event_name": event_name,
        "description": description,
        "event_date": event_date,
        "locations": locations,
        "attendee_names": attendee_names,
    }

    try:
        response = requests.post(url, headers=headers, json=payload)
        response.raise_for_status()  # Raise an exception for bad status codes (4xx or 5xx)
        print(f"Successfully created event registration. Status Code: {response.status_code}")
        return response.json()
    except requests.exceptions.RequestException as e:
        print(f"Error creating event registration: {e}")
        # Optionally re-raise the exception if the caller needs to handle it
        # raise e
        return None
    except json.JSONDecodeError:
        print(f"Error decoding JSON response from {url}. Response text: {response.text}")
        return None
As you can see, these functions are straightforward wrappers around the existing InstaVibe APIs. This pattern is useful, if you already have APIs for your services, you can easily expose their functionality as tools for agents by creating such wrappers.
MCP Server Implementation
Now that we have the Python functions that perform the actions (calling the InstaVibe APIs), we need to build the MCP Server component. This server will expose these functions as "tools" according to the MCP standard, allowing MCP clients (like our agents) to discover and invoke them.
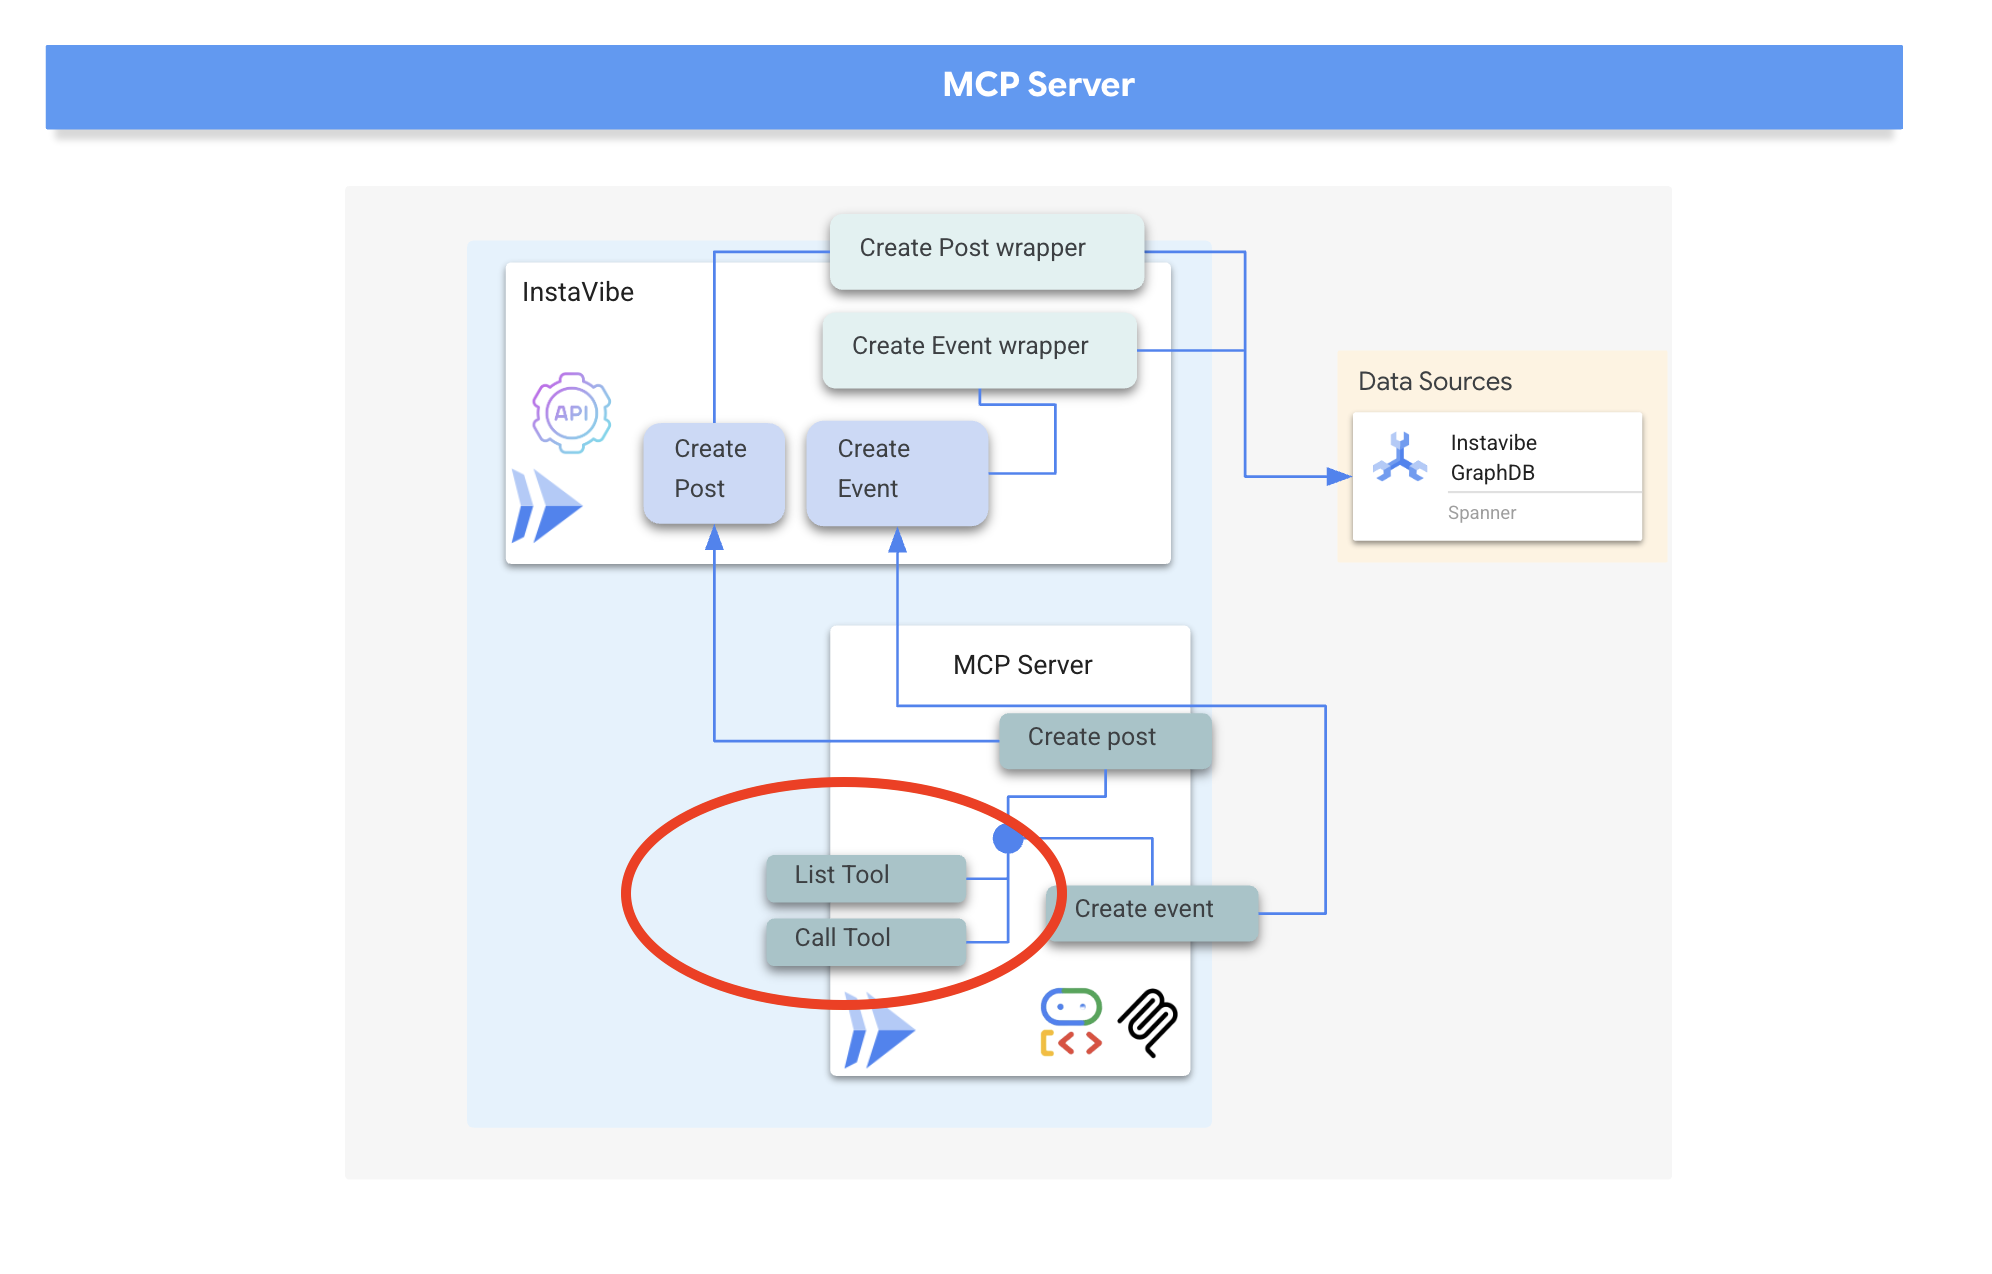
An MCP Server typically implements two key functionalities:
- list_tools : responsible for allowing the client to discover the available tools on the server, providing metadata like their names, descriptions, and required parameters, often defined using JSON Schema
- call_tool : handles the execution of a specific tool requested by the client, receiving the tool's name and arguments and performing the corresponding action, such as in our case interacting with an API
MCP servers are used to provide AI models with access to real-world data and actions, enabling tasks like sending emails, creating tasks in project management systems, searching databases, or interacting with various software and web services. While initial implementations often focused on local servers communicating via standard input/output (stdio) for simplicity, particularly in development or "studio" environments, the move towards remote servers utilizing protocols like HTTP with Server-Sent Events (SSE) makes more sense for broader adoption and enterprise use cases.
The remote architecture, despite the added network communication layer, offers significant advantages: it allows multiple AI clients to share access to a single server, centralizes management and updates of tools, enhances security by keeping sensitive data and API keys on the server side rather than distributed across potentially many client machines, and decouples the AI model from the specifics of the external system integration, making the entire ecosystem more scalable, secure, and maintainable than requiring every AI instance to manage its own direct integrations.
We will implement our MCP server using HTTP and Server-Sent Events (SSE) for communication, which is well-suited for potentially long-running tool executions and enterprise scenarios.
👉📝 First, let's implement the list_tools endpoint. Open the file ~/instavibe-bootstrap/tools/instavibe/mcp_server.py and replace the #REPLACE ME - LIST TOOLS comment with the following code. :
@app.list_tools()
async def list_tools() -> list[mcp_types.Tool]:
  """MCP handler to list available tools."""
  # Convert the ADK tool's definition to MCP format
  mcp_tool_schema_event = adk_to_mcp_tool_type(event_tool)
  mcp_tool_schema_post = adk_to_mcp_tool_type(post_tool)
  print(f"MCP Server: Received list_tools request. \n MCP Server: Advertising tool: {mcp_tool_schema_event.name} and {mcp_tool_schema_post}")
  return [mcp_tool_schema_event,mcp_tool_schema_post]
This function defines the tools (create_event, create_post) and tells connecting clients about them.
👉📝 Next, implement the call_tool endpoint, which handles the actual execution requests from clients. In the same ~/instavibe-bootstrap/tools/instavibe/mcp_server.py file, replace the #REPLACE ME - CALL TOOLS comment with this code.
@app.call_tool()
async def call_tool(
    name: str, arguments: dict
) -> list[mcp_types.TextContent | mcp_types.ImageContent | mcp_types.EmbeddedResource]:
  """MCP handler to execute a tool call."""
  print(f"MCP Server: Received call_tool request for '{name}' with args: {arguments}")

  # Look up the tool by name in our dictionary
  tool_to_call = available_tools.get(name)
  if tool_to_call:
    try:
      adk_response = await tool_to_call.run_async(
          args=arguments,
          tool_context=None, # No ADK context available here
      )
      print(f"MCP Server: ADK tool '{name}' executed successfully.")

      response_text = json.dumps(adk_response, indent=2)
      return [mcp_types.TextContent(type="text", text=response_text)]

    except Exception as e:
      print(f"MCP Server: Error executing ADK tool '{name}': {e}")
      # Creating a proper MCP error response might be more robust
      error_text = json.dumps({"error": f"Failed to execute tool '{name}': {str(e)}"})
      return [mcp_types.TextContent(type="text", text=error_text)]
  else:
      # Handle calls to unknown tools
      print(f"MCP Server: Tool '{name}' not found.")
      error_text = json.dumps({"error": f"Tool '{name}' not implemented."})
      return [mcp_types.TextContent(type="text", text=error_text)]
This function receives the tool name and arguments, finds the corresponding Python wrapper function we defined earlier, executes it, and returns the result
👉💻 With the MCP server logic defined, we now need to package it as a container, in the terminal run the following script to build the Docker image using Cloud Build:
. ~/instavibe-bootstrap/set_env.sh

cd ~/instavibe-bootstrap/tools/instavibe

export IMAGE_TAG="latest"
export MCP_IMAGE_NAME="mcp-tool-server"
export IMAGE_PATH="${REGION}-docker.pkg.dev/${PROJECT_ID}/${REPO_NAME}/${MCP_IMAGE_NAME}:${IMAGE_TAG}"
export SERVICE_NAME="mcp-tool-server"
export INSTAVIBE_BASE_URL=$(gcloud run services list --platform=managed --region=us-central1 --format='value(URL)' | grep instavibe)/api

gcloud builds submit . \
  --tag=${IMAGE_PATH} \
  --project=${PROJECT_ID}
👉💻 And deploy the image as a service on Google Cloud Run.
. ~/instavibe-bootstrap/set_env.sh

cd ~/instavibe-bootstrap/tools/instavibe

export IMAGE_TAG="latest"
export MCP_IMAGE_NAME="mcp-tool-server"
export IMAGE_PATH="${REGION}-docker.pkg.dev/${PROJECT_ID}/${REPO_NAME}/${MCP_IMAGE_NAME}:${IMAGE_TAG}"
export SERVICE_NAME="mcp-tool-server"
export INSTAVIBE_BASE_URL=$(gcloud run services list --platform=managed --region=us-central1 --format='value(URL)' | grep instavibe)/api

gcloud run deploy ${SERVICE_NAME} \
  --image=${IMAGE_PATH} \
  --platform=managed \
  --region=${REGION} \
  --allow-unauthenticated \
  --set-env-vars="INSTAVIBE_BASE_URL=${INSTAVIBE_BASE_URL}" \
  --set-env-vars="APP_HOST=0.0.0.0" \
  --set-env-vars="APP_PORT=8080" \
  --set-env-vars="GOOGLE_GENAI_USE_VERTEXAI=TRUE" \
  --set-env-vars="GOOGLE_CLOUD_LOCATION=${REGION}" \
  --set-env-vars="GOOGLE_CLOUD_PROJECT=${PROJECT_ID}" \
  --project=${PROJECT_ID} \
  --min-instances=1
👉💻 After the deployment completed successfully, the MCP server will be running and accessible via a public URL. We need to capture this URL so our agent (acting as an MCP client) knows where to connect.
export MCP_SERVER_URL=$(gcloud run services list --platform=managed --region=us-central1 --format='value(URL)' | grep mcp-tool-server)/sse
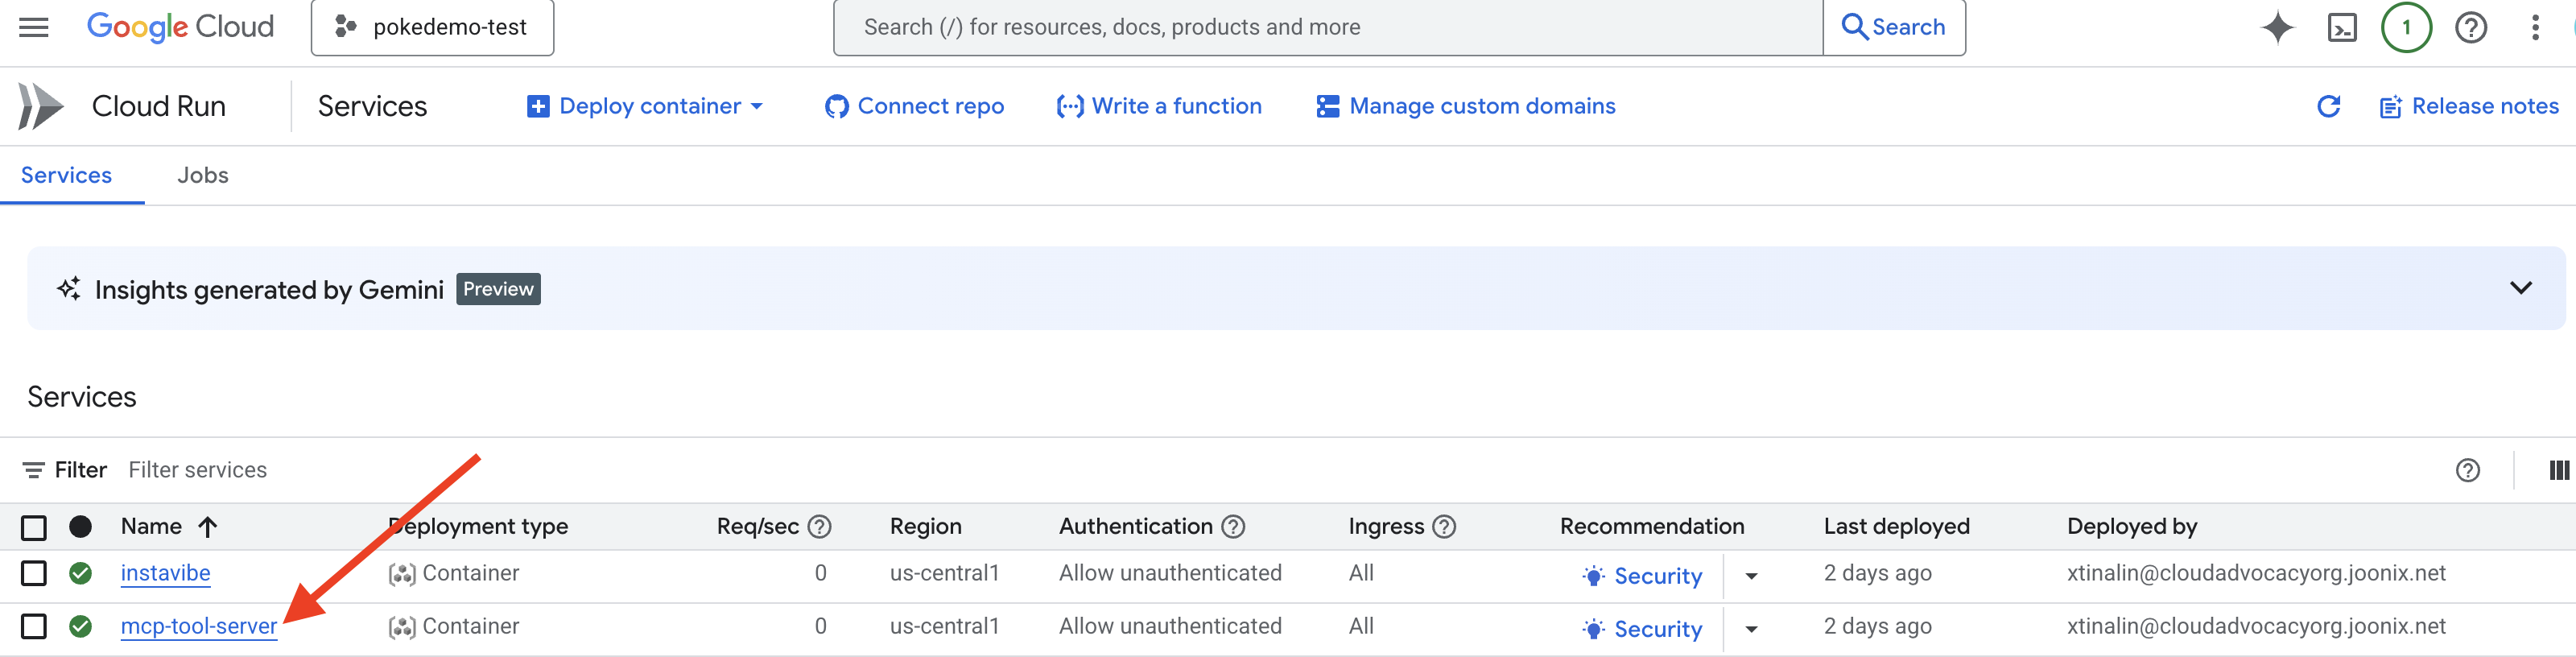
You should also now be able to see the mcp-tool-server service listed as "Running" in the Cloud Run section of your Google Cloud Console.
With the MCP server deployed and its URL captured, we can now implement the agent that will act as an MCP client and utilize the tools exposed by this server.
8. Platform Interaction Agent (using MCP)
MCP Client The MCP Client is a component that resides within an AI application or agent, acting as the interface between the AI model and one or more MCP Servers; in our implementation, this client will be integrated directly within our agent. This client's primary function is to communicate with MCP Servers to discover available tools via the list_tools function and subsequently request the execution of specific tools using the call_tool function, passing necessary arguments provided by the AI model or the agent orchestrating the call.
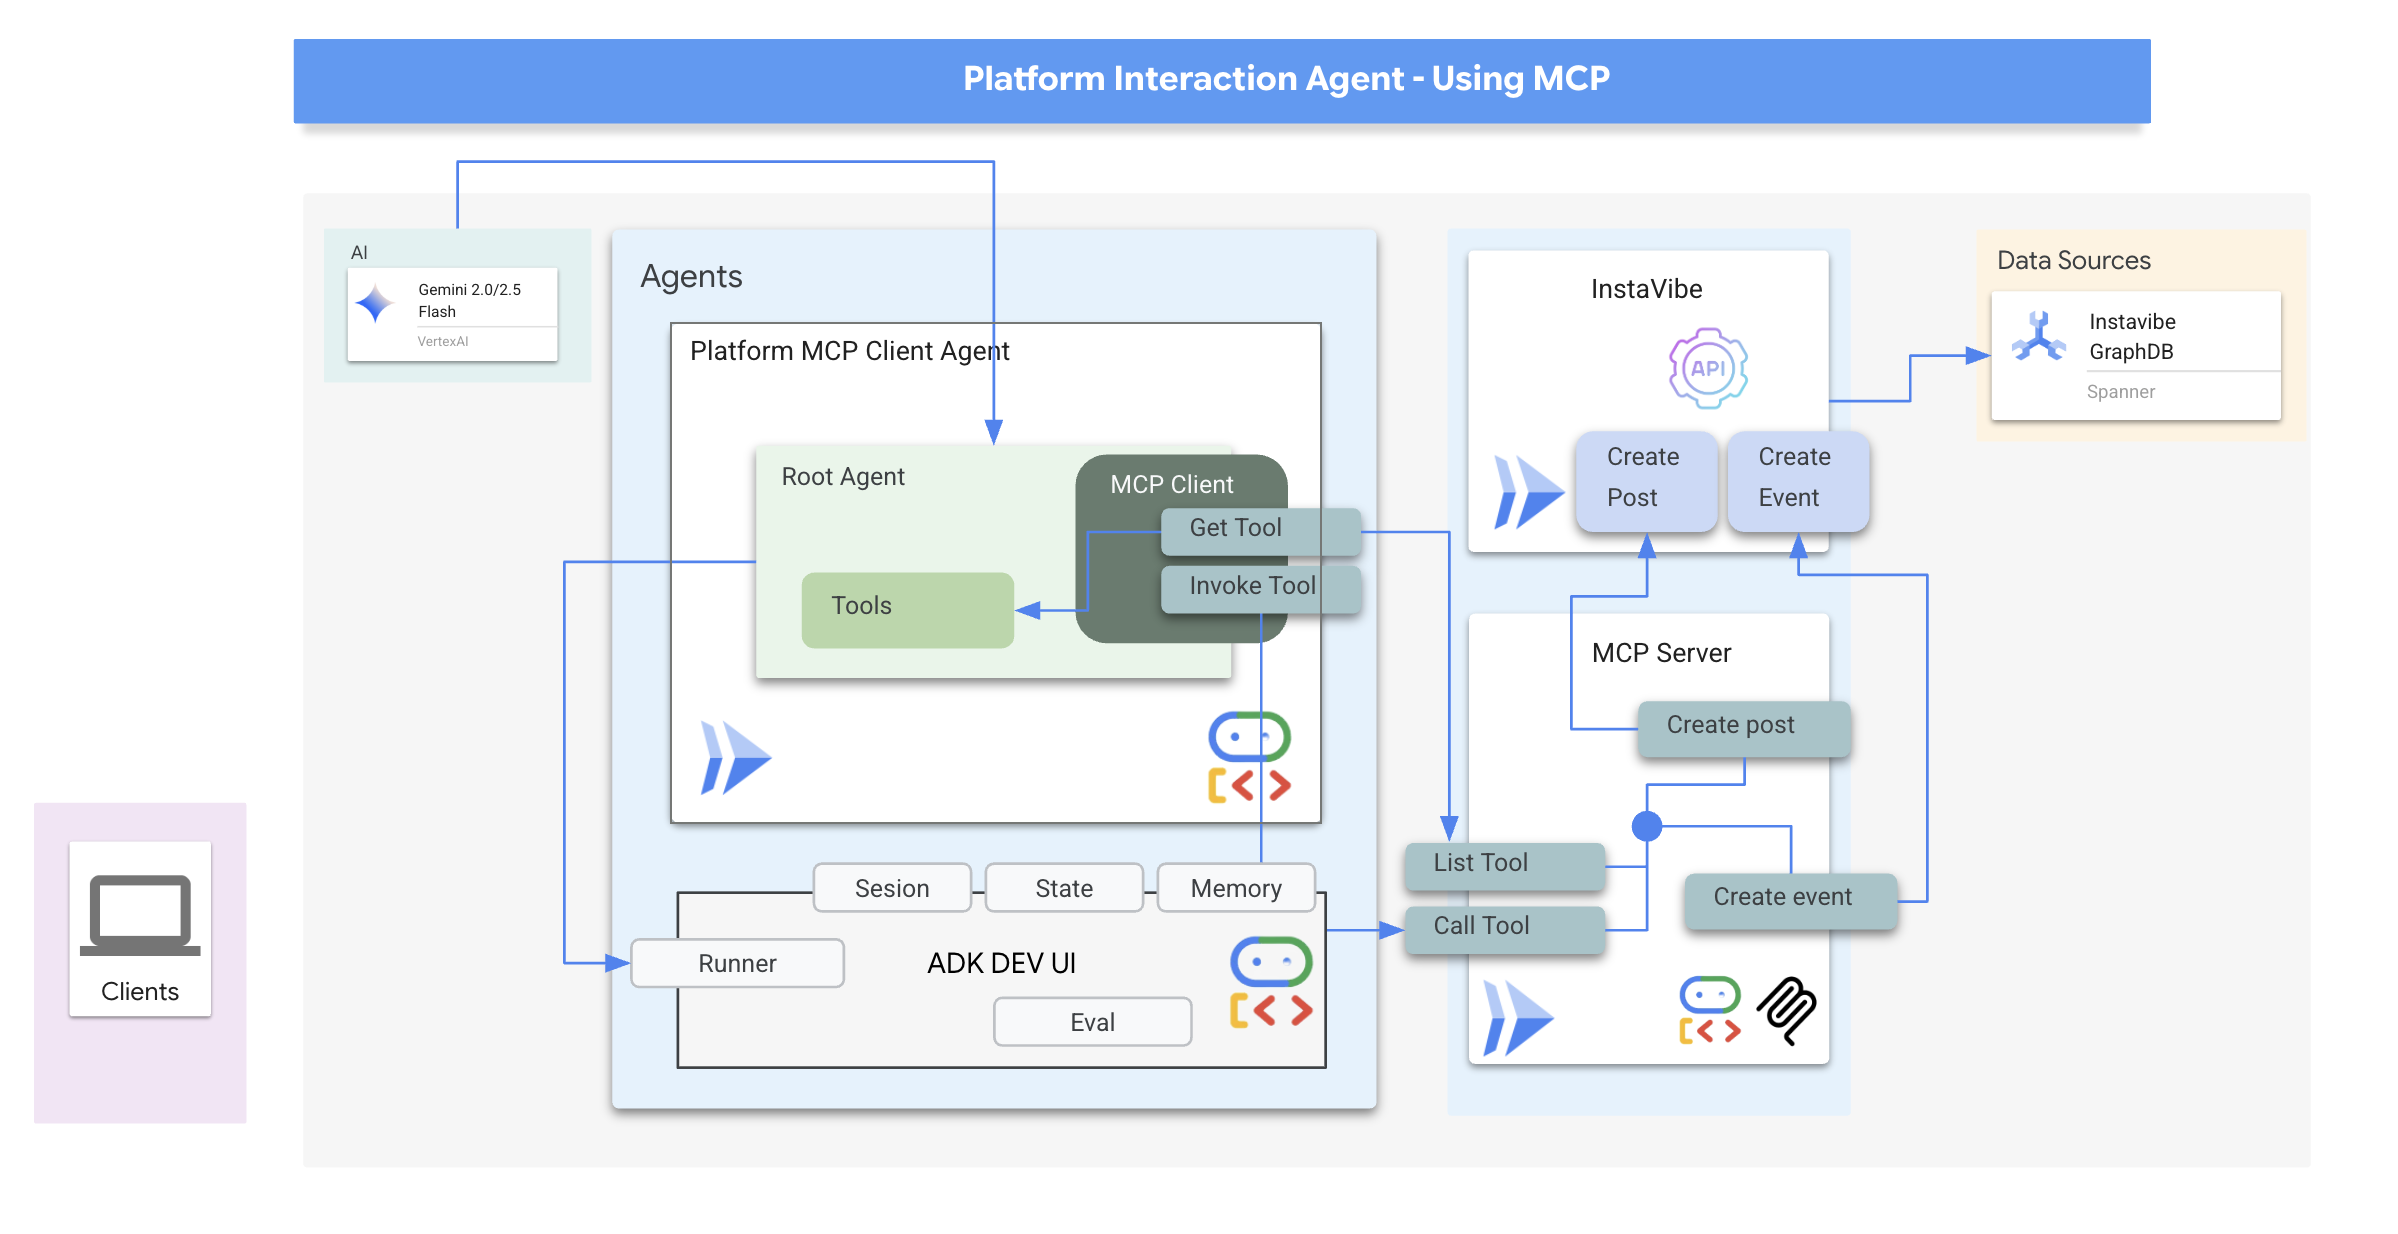
Now we'll build the agent that acts as the MCP Client. This agent, running within the ADK framework, will be responsible for communicating with the mcp-tool-server we just deployed.
👉 First, we need to modify the agent definition to dynamically fetch the tools from our running MCP server. In agents/platform_mcp_client/agent.py , replace #REPLACE ME - FETCH TOOLS with following:
"""Gets tools from the File System MCP Server."""
  tools =  MCPToolset(
      connection_params=SseServerParams(url=MCP_SERVER_URL, headers={})
  )
This code uses the MCPToolset.from_server method to connect to the MCP_SERVER_URL (which we set as an environment variable earlier) and retrieve the list of available tools.
Next, we need to tell the ADK agent definition to actually use these dynamically fetched tools.
👉 In agents/platform_mcp_client/agent.py , replace #REPLACE ME - SET TOOLs with following:
tools=[tools],
👉💻 Now, let's test this agent locally using the ADK Dev UI to see if it can correctly connect to the MCP server and use the tools to interact with our running InstaVibe application.
. ~/instavibe-bootstrap/set_env.sh
source ~/instavibe-bootstrap/env/bin/activate
export MCP_SERVER_URL=$(gcloud run services list --platform=managed --region=us-central1 --format='value(URL)' | grep mcp-tool-server)/sse

cd  ~/instavibe-bootstrap/agents
sed -i "s|^\(O\?GOOGLE_CLOUD_PROJECT\)=.*|GOOGLE_CLOUD_PROJECT=${PROJECT_ID}|" ~/instavibe-bootstrap/agents/platform_mcp_client/.env
sed -i "s|^\(O\?MCP_SERVER_URL\)=.*|MCP_SERVER_URL=${MCP_SERVER_URL}|" ~/instavibe-bootstrap/agents/platform_mcp_client/.env
adk web
Open the ADK Dev UI in your browser again (using Cloud Shell's Web Preview on port 8000). This time, in the top-right dropdown, select the platform_mcp_client agent.
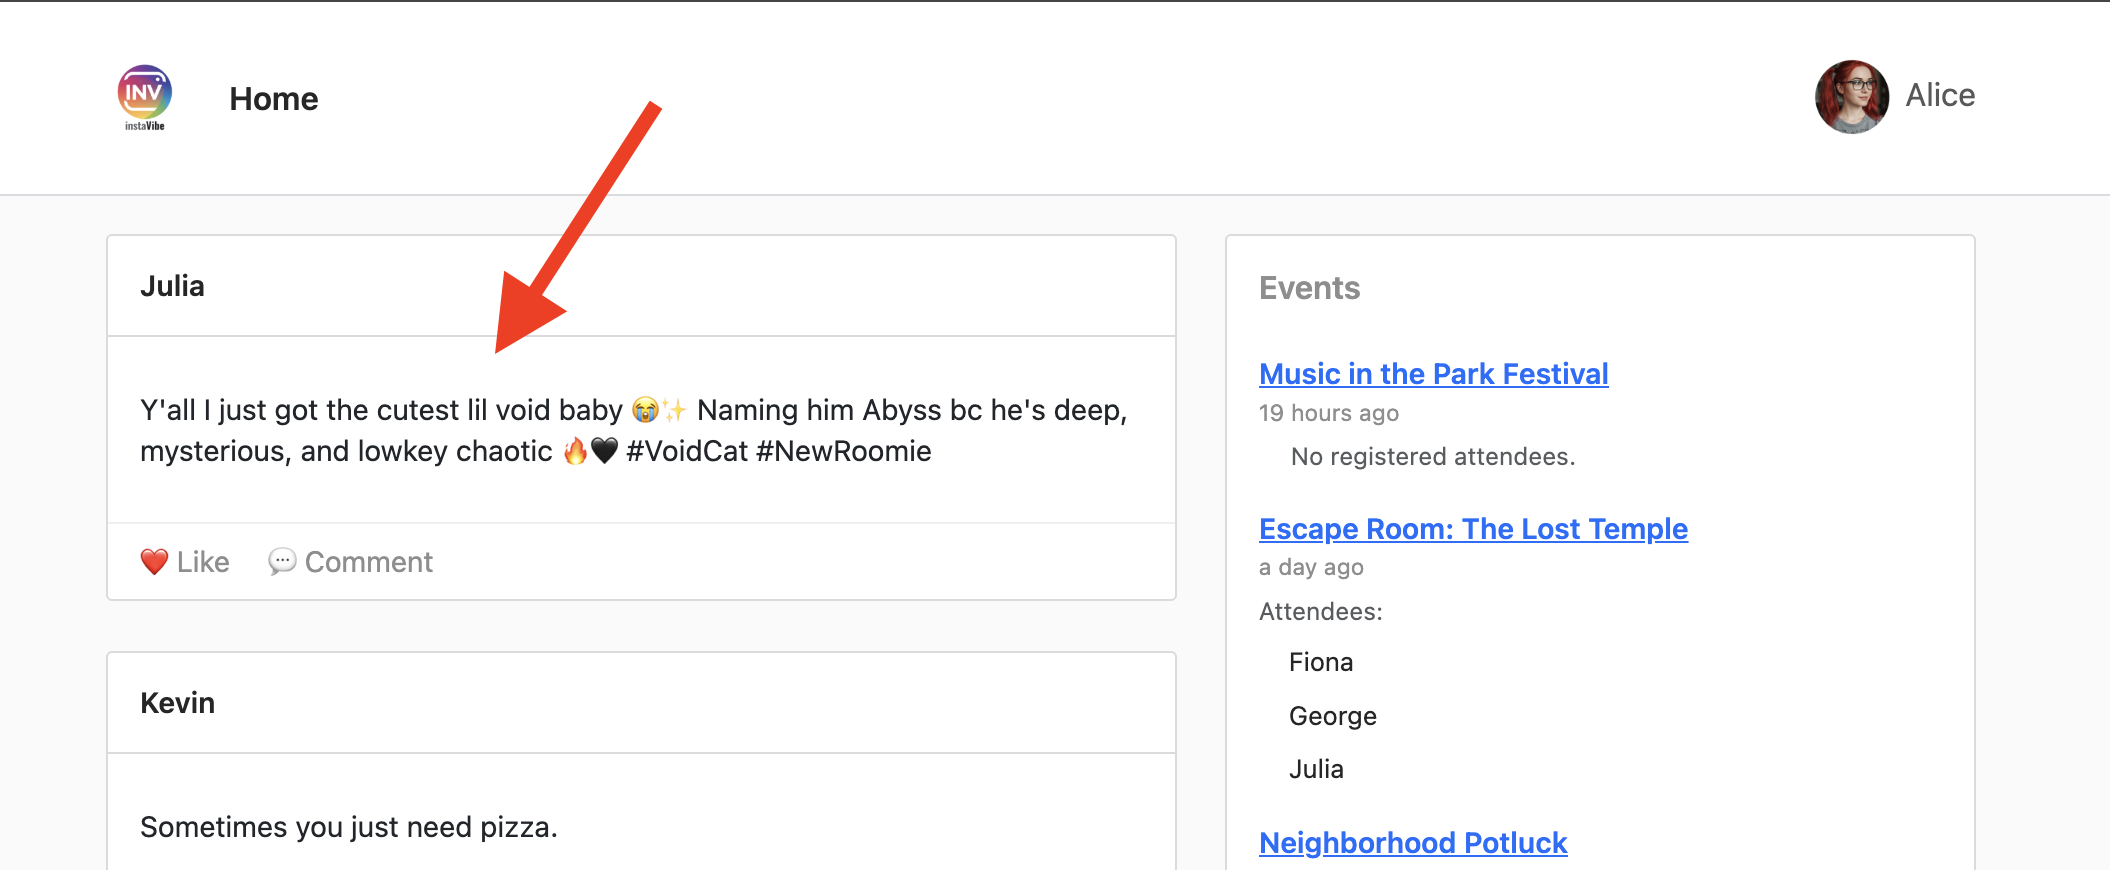
Let's test the create_post tool. In the chat dialog, enter the following request:
Create a post saying "Y'all I just got the cutest lil void baby 😭✨ Naming him Abyss bc he's deep, mysterious, and lowkey chaotic 🔥🖤 #VoidCat #NewRoomie" I'm Julia
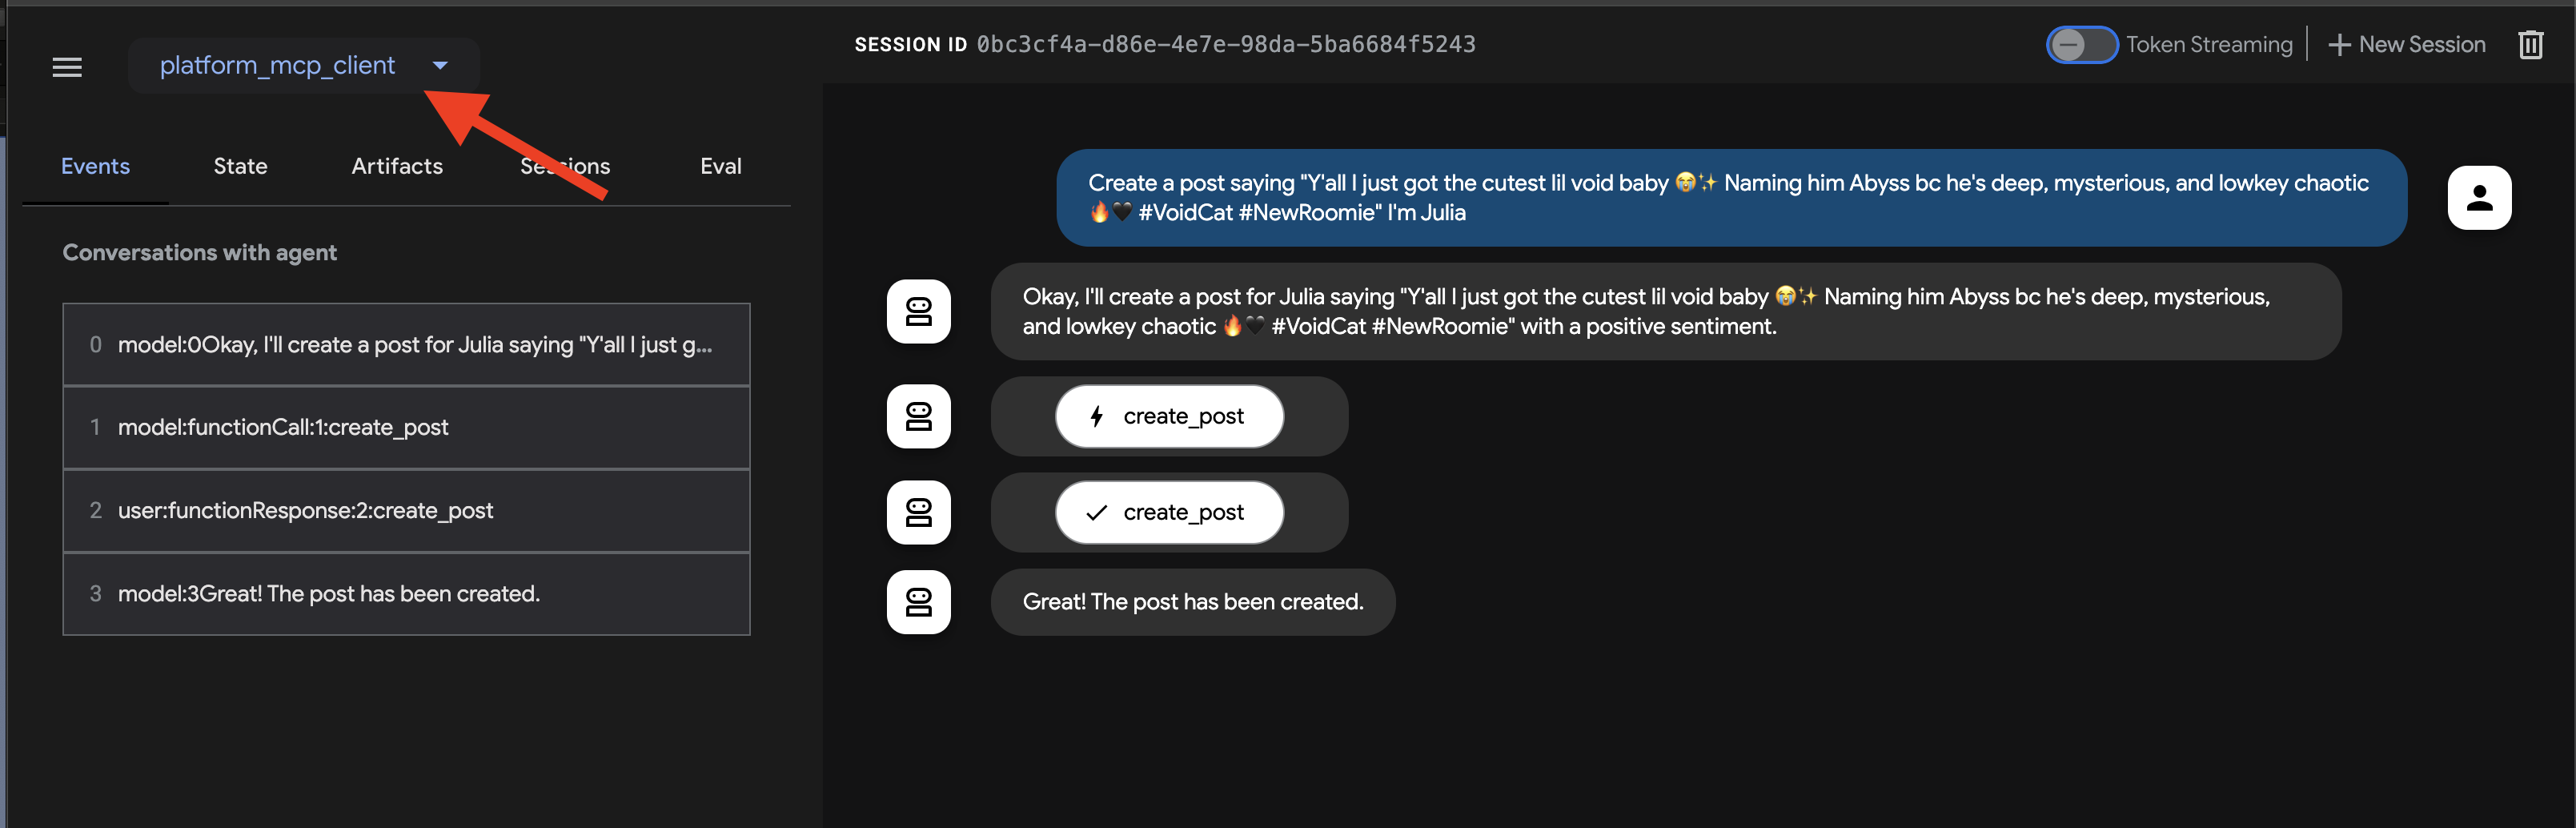
The agent should process this, identify the need to use the create_post tool, communicate with the MCP server, which in turn calls the InstaVibe API.
👉 Verification Step: After the agent confirms the action, open the tab where your InstaVibe application is running (or refresh it). You should see the new post from "Julia" appear on the main feed!
👉💻 Run this script in a separate terminal to get Instavibe link if needed:
gcloud run services list --platform=managed --region=us-central1 --format='value(URL)' | grep instavibe
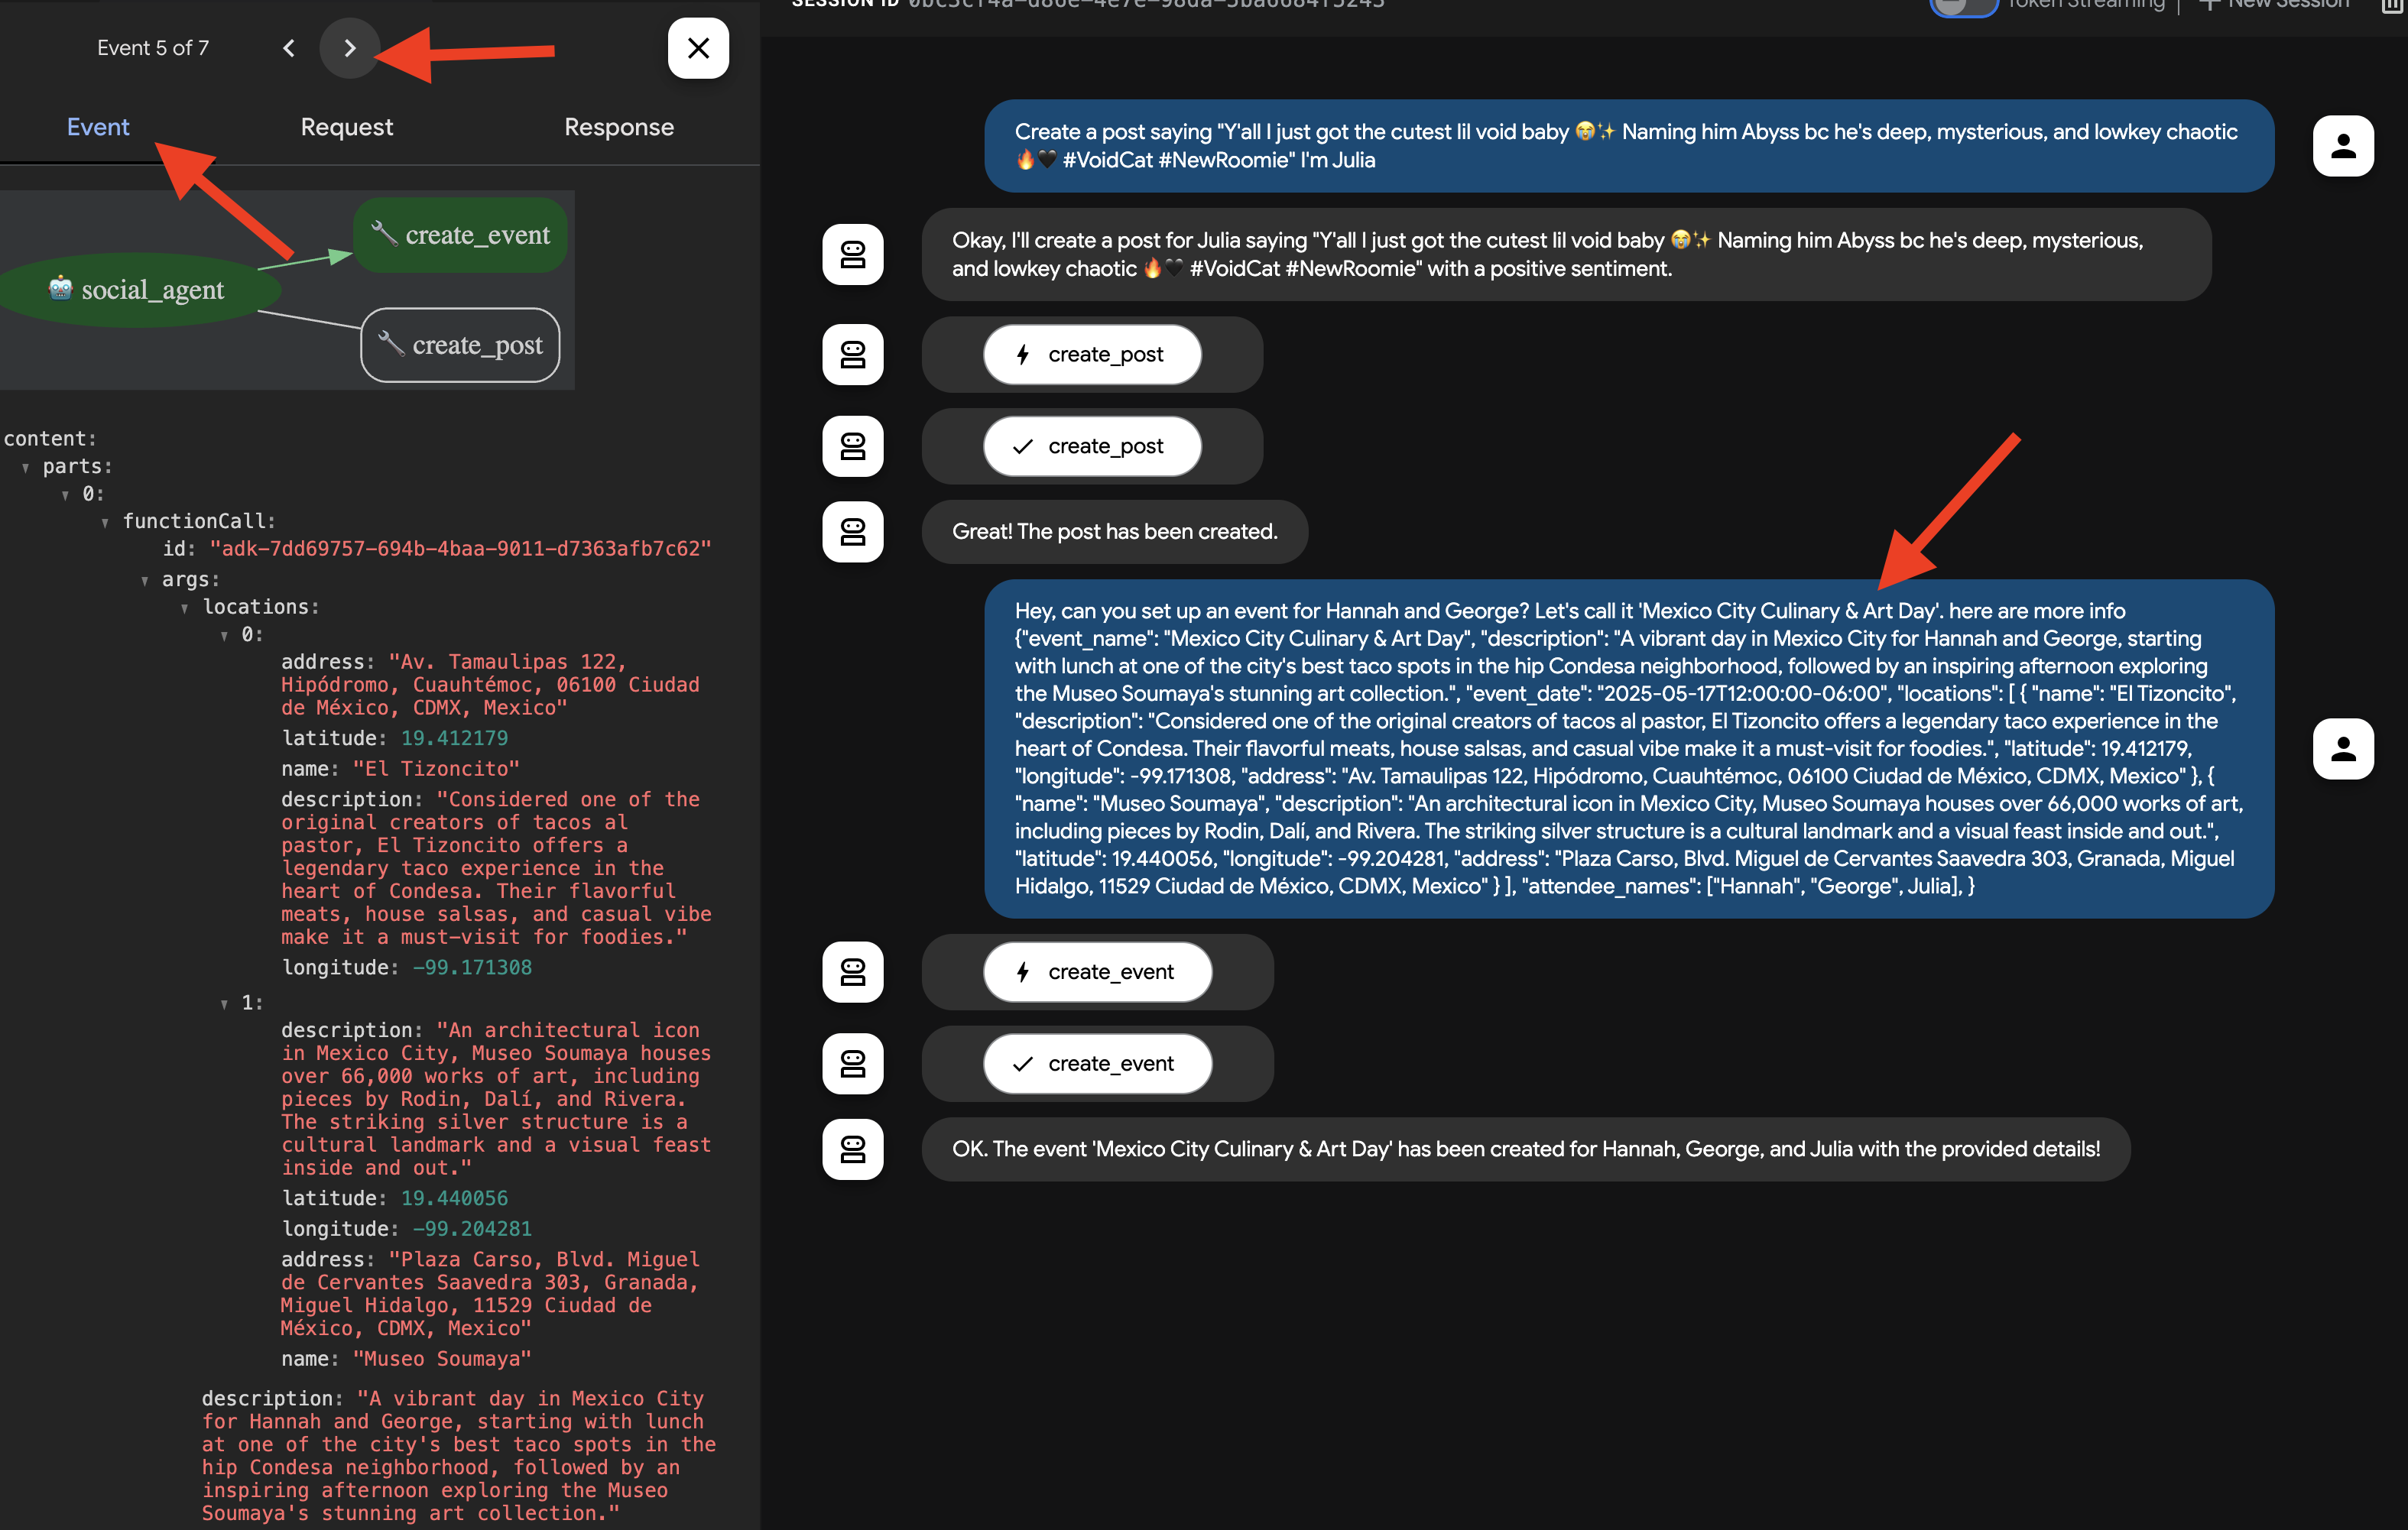
👉📝 Now, let's test the create_event tool. Enter the following multi-line request into the chat dialog:
Hey, can you set up an event for Hannah and George and me, and I'm Julia? Let's call it 'Mexico City Culinary & Art Day'.
here are more info
  {"event_name": "Mexico City Culinary & Art Day",
  "description": "A vibrant day in Mexico City for Hannah and George, starting with lunch at one of the city's best taco spots in the hip Condesa neighborhood, followed by an inspiring afternoon exploring the Museo Soumaya's stunning art collection.",
  "event_date": "2025-10-17T12:00:00-06:00",
  "locations": [
    {
      "name": "El Tizoncito",
      "description": "Considered one of the original creators of tacos al pastor, El Tizoncito offers a legendary taco experience in the heart of Condesa. Their flavorful meats, house salsas, and casual vibe make it a must-visit for foodies.",
      "latitude": 19.412179,
      "longitude": -99.171308,
      "address": "Av. Tamaulipas 122, Hipódromo, Cuauhtémoc, 06100 Ciudad de México, CDMX, Mexico"
    },
    {
      "name": "Museo Soumaya",
      "description": "An architectural icon in Mexico City, Museo Soumaya houses over 66,000 works of art, including pieces by Rodin, Dalí, and Rivera. The striking silver structure is a cultural landmark and a visual feast inside and out.",
      "latitude": 19.440056,
      "longitude": -99.204281,
      "address": "Plaza Carso, Blvd. Miguel de Cervantes Saavedra 303, Granada, Miguel Hidalgo, 11529 Ciudad de México, CDMX, Mexico"
    }
  ],
  "attendee_names": ["Hannah", "George", Julia],
}
Again, the agent should use the appropriate tool via the MCP server. In the Events tab, feel free to click on the indiviual event, you will see a detailed, step-by-step trace of the execution.
👉 Verification Step: Go back to your running InstaVibe application and navigate to the "Events" section (or equivalent). You should now see the newly created "Mexico City Culinary & Art Day" event listed.
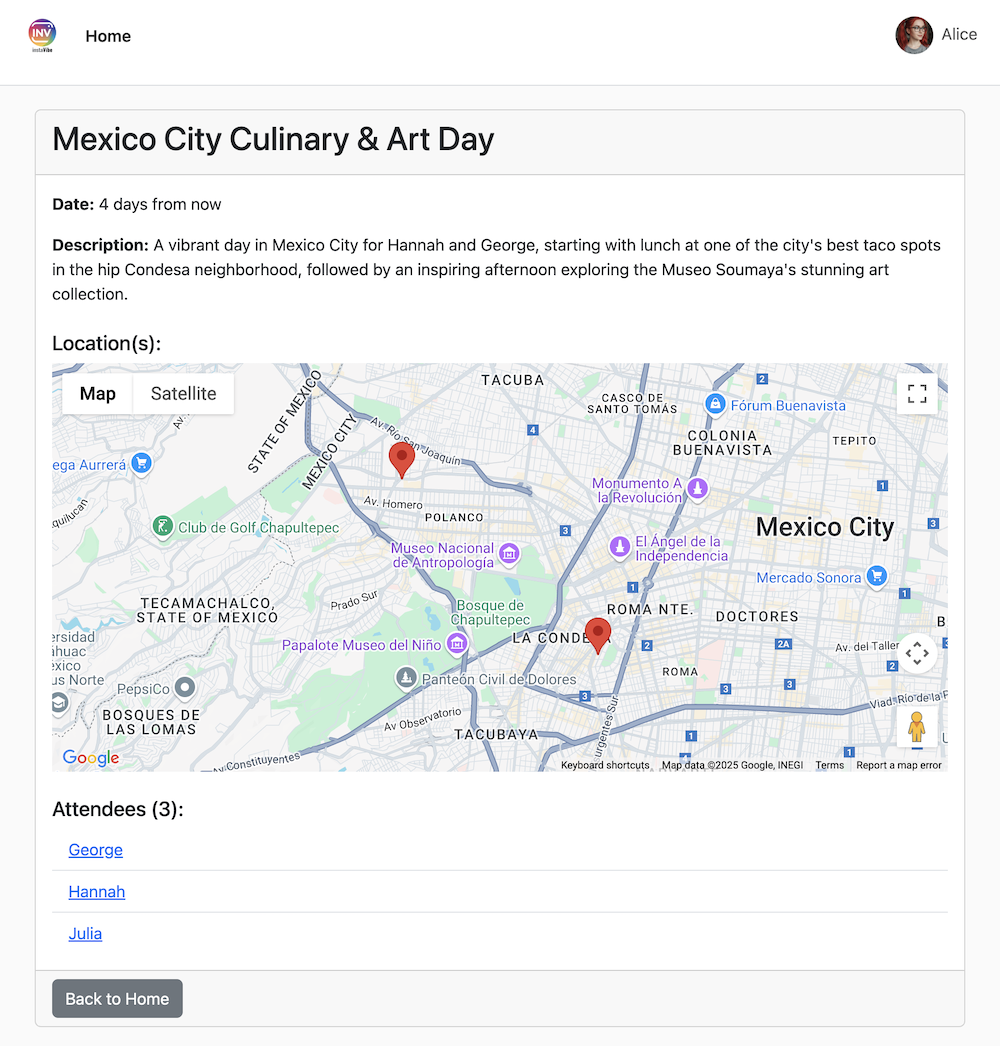
This successfully demonstrates how MCP allows our agent to leverage external tools (in this case, InstaVibe's APIs) in a standardized way.
Once you've verified both actions, return to your Cloud Shell terminal and press Ctrl+C to stop the ADK Dev UI.
9. Workflow Agent and Multi-Agents in ADK
Our agents so far can plan outings and interact with the platform. However, truly personalized planning requires understanding the user's social circle. For busy users who might not closely follow their friends' activities, gathering this context manually is difficult. To address this, we'll build a Social Profiling agent that leverages our Spanner Graph Database to analyze friend activities and interests, enabling more tailored suggestions.
First, we need tools for this agent to access the graph data.
👉📝 Add the following Python functions to the end of the file ~/instavibe-bootstrap/agents/social/instavibe.py :
def get_person_attended_events(person_id: str)-> list[dict]:
    """
    Fetches events attended by a specific person using Graph Query.
    Args:
       person_id (str): The ID of the person whose posts to fetch.
    Returns: list[dict] or None.
    """
    if not db_instance: return None

    graph_sql = """
        Graph SocialGraph
        MATCH (p:Person)-[att:Attended]->(e:Event)
        WHERE p.person_id = @person_id
        RETURN e.event_id, e.name, e.event_date, att.attendance_time
        ORDER BY e.event_date DESC
    """
    params = {"person_id": person_id}
    param_types_map = {"person_id": param_types.STRING}
    fields = ["event_id", "name", "event_date", "attendance_time"]

    results = run_graph_query( graph_sql, params=params, param_types=param_types_map, expected_fields=fields)

    if results is None: return None

    for event in results:
        if isinstance(event.get('event_date'), datetime):
            event['event_date'] = event['event_date'].isoformat()
        if isinstance(event.get('attendance_time'), datetime):
            event['attendance_time'] = event['attendance_time'].isoformat()
    return results

def get_person_id_by_name( name: str) -> str:
    """
    Fetches the person_id for a given name using SQL.

    Args:
       name (str): The name of the person to search for.

    Returns:
        str or None: The person_id if found, otherwise None.
                     Returns the ID of the *first* match if names are duplicated.
    """
    if not db_instance: return None

    sql = """
        SELECT person_id
        FROM Person
        WHERE name = @name
        LIMIT 1 -- Return only the first match in case of duplicate names
    """
    params = {"name": name}
    param_types_map = {"name": param_types.STRING}
    fields = ["person_id"]

    # Use the standard SQL query helper
    results = run_sql_query( sql, params=params, param_types=param_types_map, expected_fields=fields)

    if results: # Check if the list is not empty
        return results[0].get('person_id') # Return the ID from the first dictionary
    else:
        return None # Name not found


def get_person_posts( person_id: str)-> list[dict]:
    """
    Fetches posts written by a specific person using Graph Query.

    Args:
        person_id (str): The ID of the person whose posts to fetch.


    Returns:
        list[dict] or None: List of post dictionaries with ISO date strings,
                           or None if an error occurs.
    """
    if not db_instance: return None

    # Graph Query: Find the specific Person node, follow 'Wrote' edge to Post nodes
    graph_sql = """
        Graph SocialGraph
        MATCH (author:Person)-[w:Wrote]->(post:Post)
        WHERE author.person_id = @person_id
        RETURN post.post_id, post.author_id, post.text, post.sentiment, post.post_timestamp, author.name AS author_name
        ORDER BY post.post_timestamp DESC
    """
    # Parameters now include person_id and limit
    params = {
        "person_id": person_id
    }
    param_types_map = {
        "person_id": param_types.STRING
    }
    # Fields returned remain the same
    fields = ["post_id", "author_id", "text", "sentiment", "post_timestamp", "author_name"]

    results = run_graph_query(graph_sql, params=params, param_types=param_types_map, expected_fields=fields)

    if results is None:
        return None

    # Convert datetime objects to ISO format strings
    for post in results:
        if isinstance(post.get('post_timestamp'), datetime):
            post['post_timestamp'] = post['post_timestamp'].isoformat()

    return results


def get_person_friends( person_id: str)-> list[dict]:
    """
    Fetches friends for a specific person using Graph Query.
    Args:
        person_id (str): The ID of the person whose posts to fetch.
    Returns: list[dict] or None.
    """
    if not db_instance: return None

    graph_sql = """
        Graph SocialGraph
        MATCH (p:Person {person_id: @person_id})-[f:Friendship]-(friend:Person)
        RETURN DISTINCT friend.person_id, friend.name
        ORDER BY friend.name
    """
    params = {"person_id": person_id}
    param_types_map = {"person_id": param_types.STRING}
    fields = ["person_id", "name"]

    results = run_graph_query( graph_sql, params=params, param_types=param_types_map, expected_fields=fields)

    return results
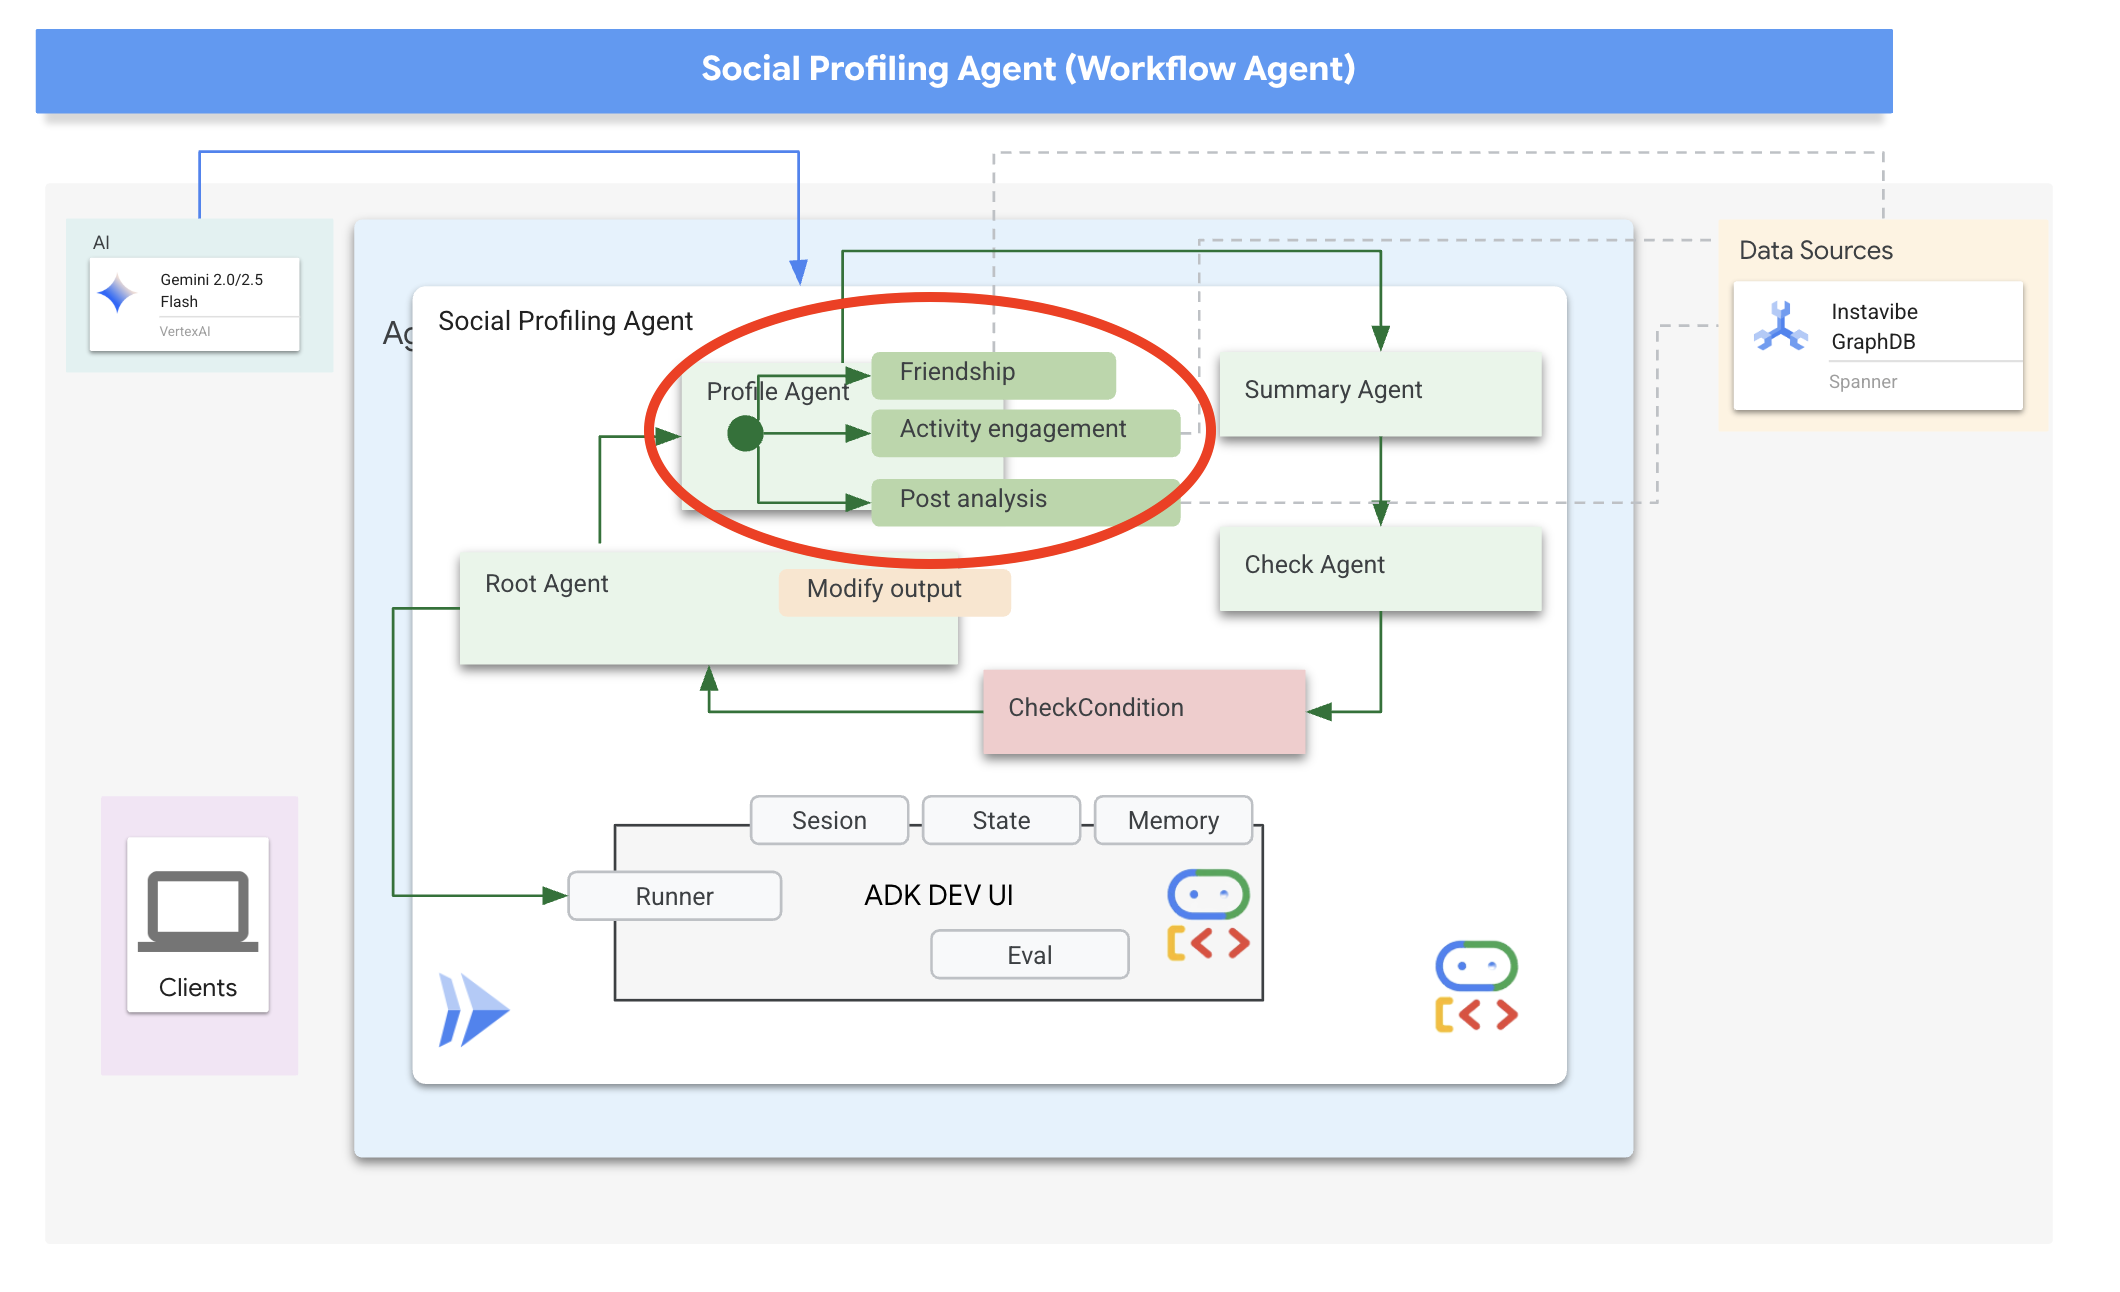
Now, let's discuss how to structure our agent. Analyzing multiple friends' profiles and then summarizing the findings involves several steps. This is a perfect scenario for using ADK's multi-agent capabilities, specifically Workflow Agents .
In Google's ADK, a Workflow Agent doesn't perform tasks itself but orchestrates other agents, called sub-agents . This allows for modular design, breaking down complex problems into specialized components. ADK provides built-in workflow types like
- Sequential (step-by-step)
- Parallel (concurrent execution)
- and Loop (repeated execution)
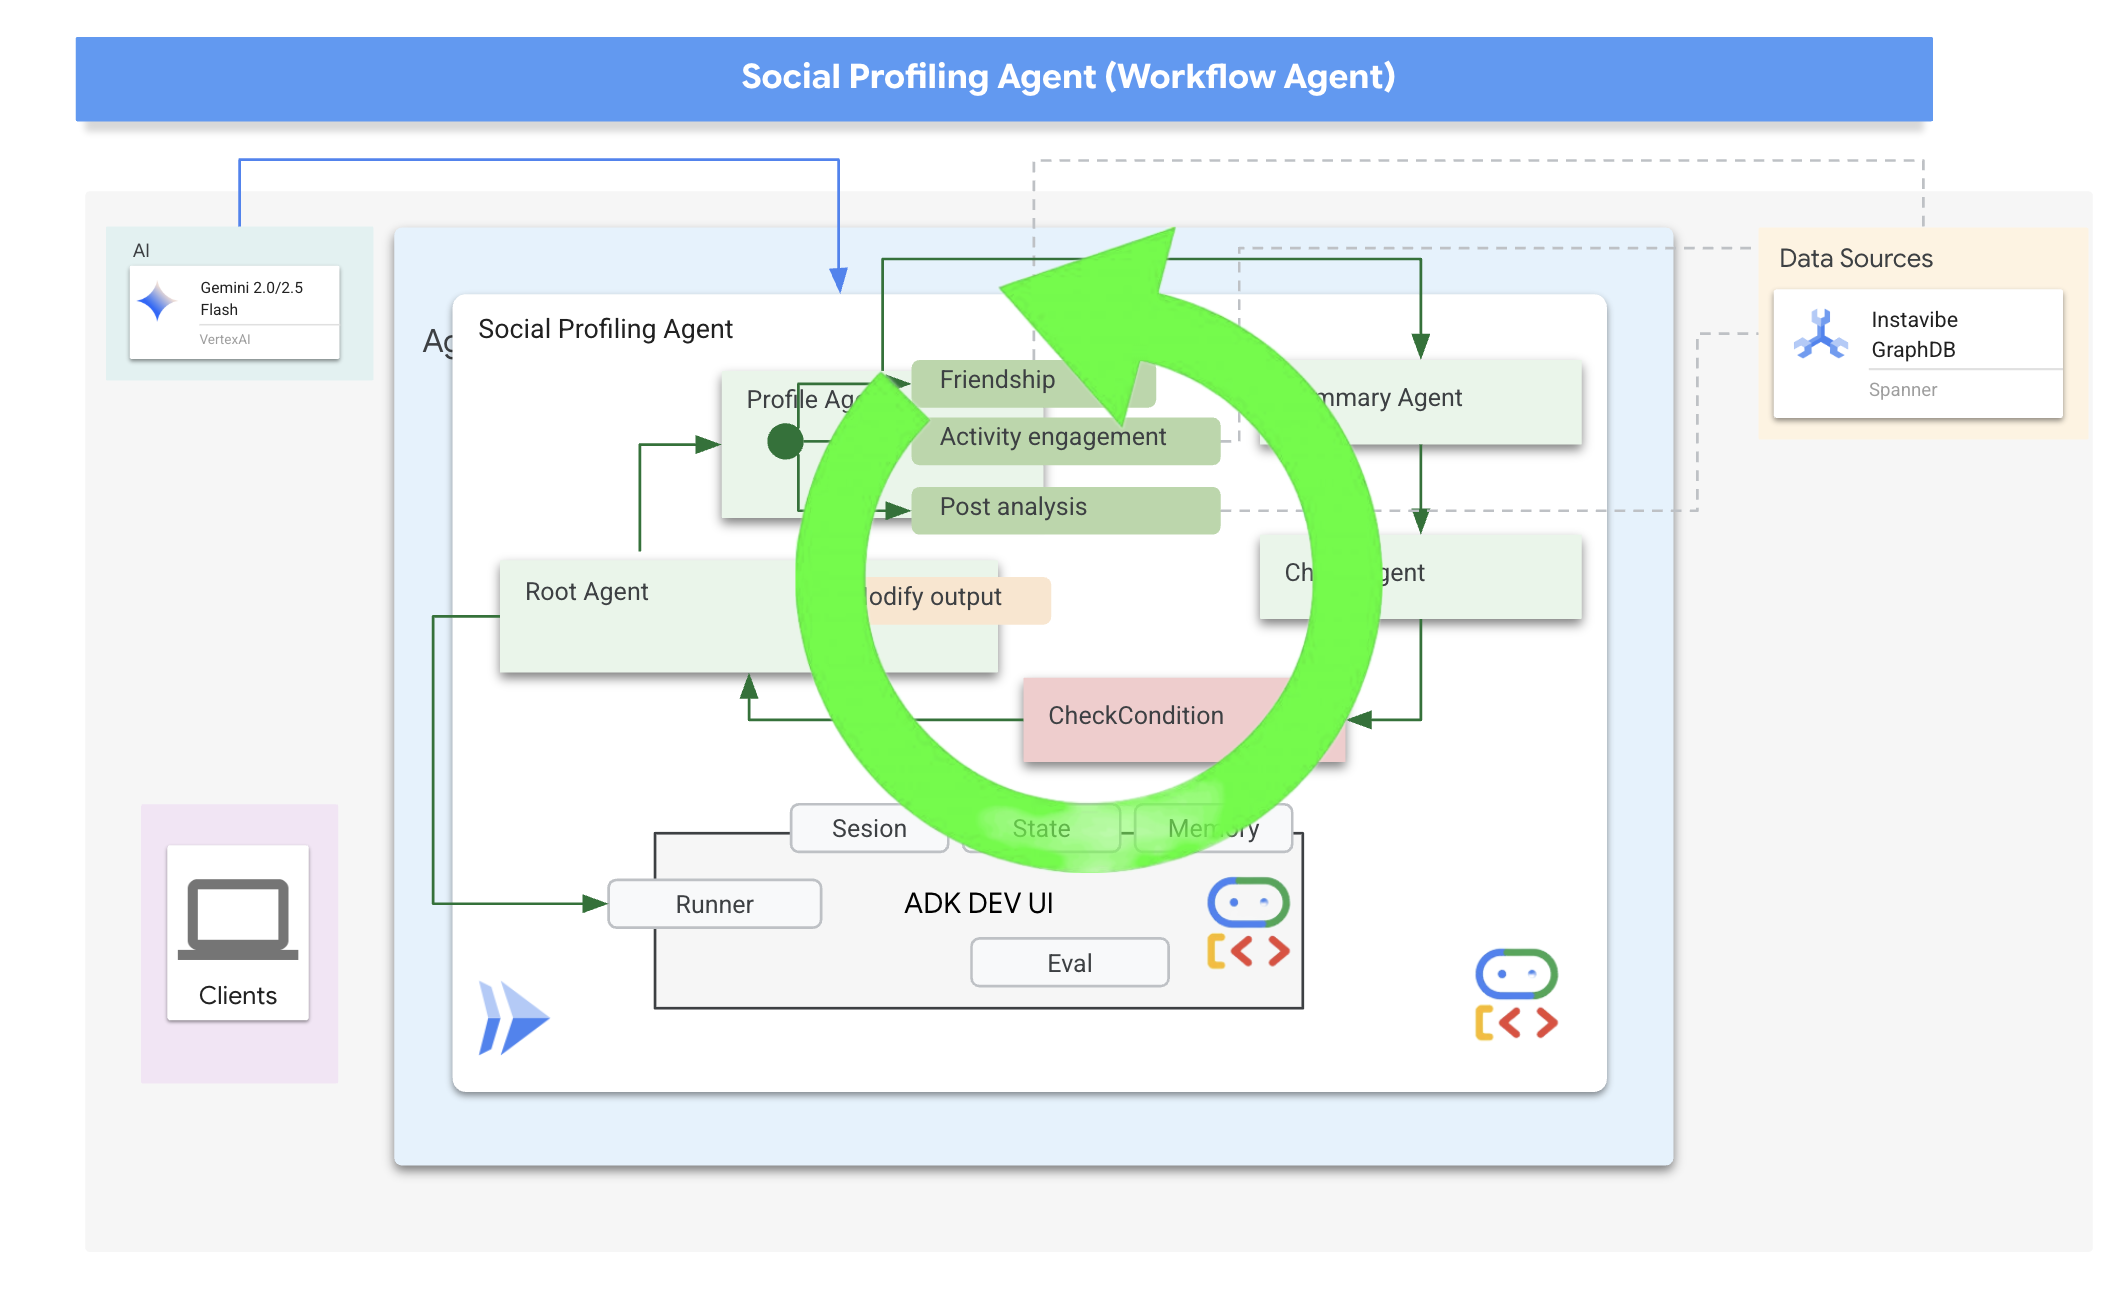
For our social profiling task, our design uses a Loop Agent to create an iterative workflow. The intention is to process one person at a time: profile_agent gathers data, summary_agent updates the analysis, and check_agent determines if we should loop again.
Let's define the sub-agents required for this workflow.
👉📝 In ~/instavibe-bootstrap/agents/social/agent.py , replace #REPLACE FOR profile_agent with following:
profile_agent = LlmAgent(
    name="profile_agent",
    model="gemini-2.5-flash",
    description=(
        "Agent to answer questions about the this person social profile. Provide the person's profile using their name, make sure to fetch the id before getting other data."
    ),
    instruction=(
        "You are a helpful agent to answer questions about the this person social profile. You'll be given a list of names, provide the person's profile using their name, make sure to fetch the id before getting other data. Get one person at a time, start with the first one on the list, and skip if already provided. return this person's result"
    ),
    tools=[get_person_posts,get_person_friends,get_person_id_by_name,get_person_attended_events],
)
Next, the agent that takes the collected profile information (accumulated across loop iterations) and generates the final summary, identifying common ground if multiple people were analyzed.
👉📝 In the same ~/instavibe-bootstrap/agents/social/agent.py , replace #REPLACE FOR summary_agent with following:
summary_agent = LlmAgent(
    name="summary_agent",
    model="gemini-2.5-flash",
    description=(
        "Generate a comprehensive social summary as a single, cohesive paragraph. This summary should cover the activities, posts, friend networks, and event participation of one or more individuals. If multiple profiles are analyzed, the paragraph must also identify and integrate any common ground found between them."
    ),
    instruction=(
        """
        Your primary task is to synthesize social profile information into a single, comprehensive paragraph.

            **Input Scope & Default Behavior:**
            *   If specific individuals are named by the user, focus your analysis on them.
            *   **If no individuals are specified, or if the request is general, assume the user wants an analysis of *all relevant profiles available in the current dataset/context*.**

            **For each profile (whether specified or determined by default), you must analyze:**

            1.  **Post Analysis:**
                *   Systematically review their posts (e.g., content, topics, frequency, engagement).
                *   Identify recurring themes, primary interests, and expressed sentiments.

            2.  **Friendship Relationship Analysis:**
                *   Examine their connections/friends list.
                *   Identify key relationships, mutual friends (especially if comparing multiple profiles), and the general structure of their social network.

            3.  **Event Participation Analysis:**
                *   Investigate their past (and if available, upcoming) event participation.
                *   Note the types of events, frequency of attendance, and any notable roles (e.g., organizer, speaker).

            **Output Generation (Single Paragraph):**

            *   **Your entire output must be a single, cohesive summary paragraph.**
                *   **If analyzing a single profile:** This paragraph will detail their activities, interests, and social connections based on the post, friend, and event analysis.
                *   **If analyzing multiple profiles:** This paragraph will synthesize the key findings regarding posts, friends, and events for each individual. Crucially, it must then seamlessly integrate or conclude with an identification and description of the common ground found between them (e.g., shared interests from posts, overlapping event attendance, mutual friends). The aim is a unified narrative within this single paragraph.

            **Key Considerations:**
            *   Base your summary strictly on the available data.
            *   If data for a specific category (posts, friends, events) is missing or sparse for a profile, you may briefly acknowledge this within the narrative if relevant.
                """
        ),
    output_key="summary"
)
We need a way to determine when the loop should stop (ie, when all requested profiles have been summarized)
👉📝 In the same ~/instavibe-bootstrap/agents/social/agent.py , replace #REPLACE FOR check_agent with following:
check_agent = LlmAgent(
    name="check_agent",
    model="gemini-2.5-flash",
    description=(
        "Check if everyone's social profile are summarized and has been generated. Output 'completed' or 'pending'."
    ),
    output_key="summary_status"
)
We add a simple programmatic check (CheckCondition) that explicitly looks at the summary_status stored in the State , that are returned by check_agent and tells the Loop Agent whether to continue (escalate=False) or stop (escalate=True).
👉📝 In the same ~/instavibe-bootstrap/agents/social/agent.py , replace #REPLACE FOR CheckCondition located on the top of the file with following:
class CheckCondition(BaseAgent):
    async def _run_async_impl(self, ctx: InvocationContext) -> AsyncGenerator[Event, None]:
        #log.info(f"Checking status: {ctx.session.state.get("summary_status", "fail")}")
        log.info(f"Summary: {ctx.session.state.get("summary")}")

        status = ctx.session.state.get("summary_status", "fail").strip()
        is_done = (status == "completed")

        yield Event(author=self.name, actions=EventActions(escalate=is_done))
State and Callbacks for Loop Results
In Google's ADK, State is a crucial concept representing the memory or working data of an agent during its execution. It's essentially a persistent context that holds information an agent needs to maintain across different steps, tool calls, or interactions. This state can store intermediate results, user information, parameters for subsequent actions, or any other data the agent needs to remember as it progresses through a task.
In our scenario, as the Loop Agent iterates, the summary_agent and check_agent store their outputs (summary and summary_status) in the agent's State. This allows information to persist across iterations. However, the Loop Agent itself doesn't automatically return the final summary from the state when it finishes.
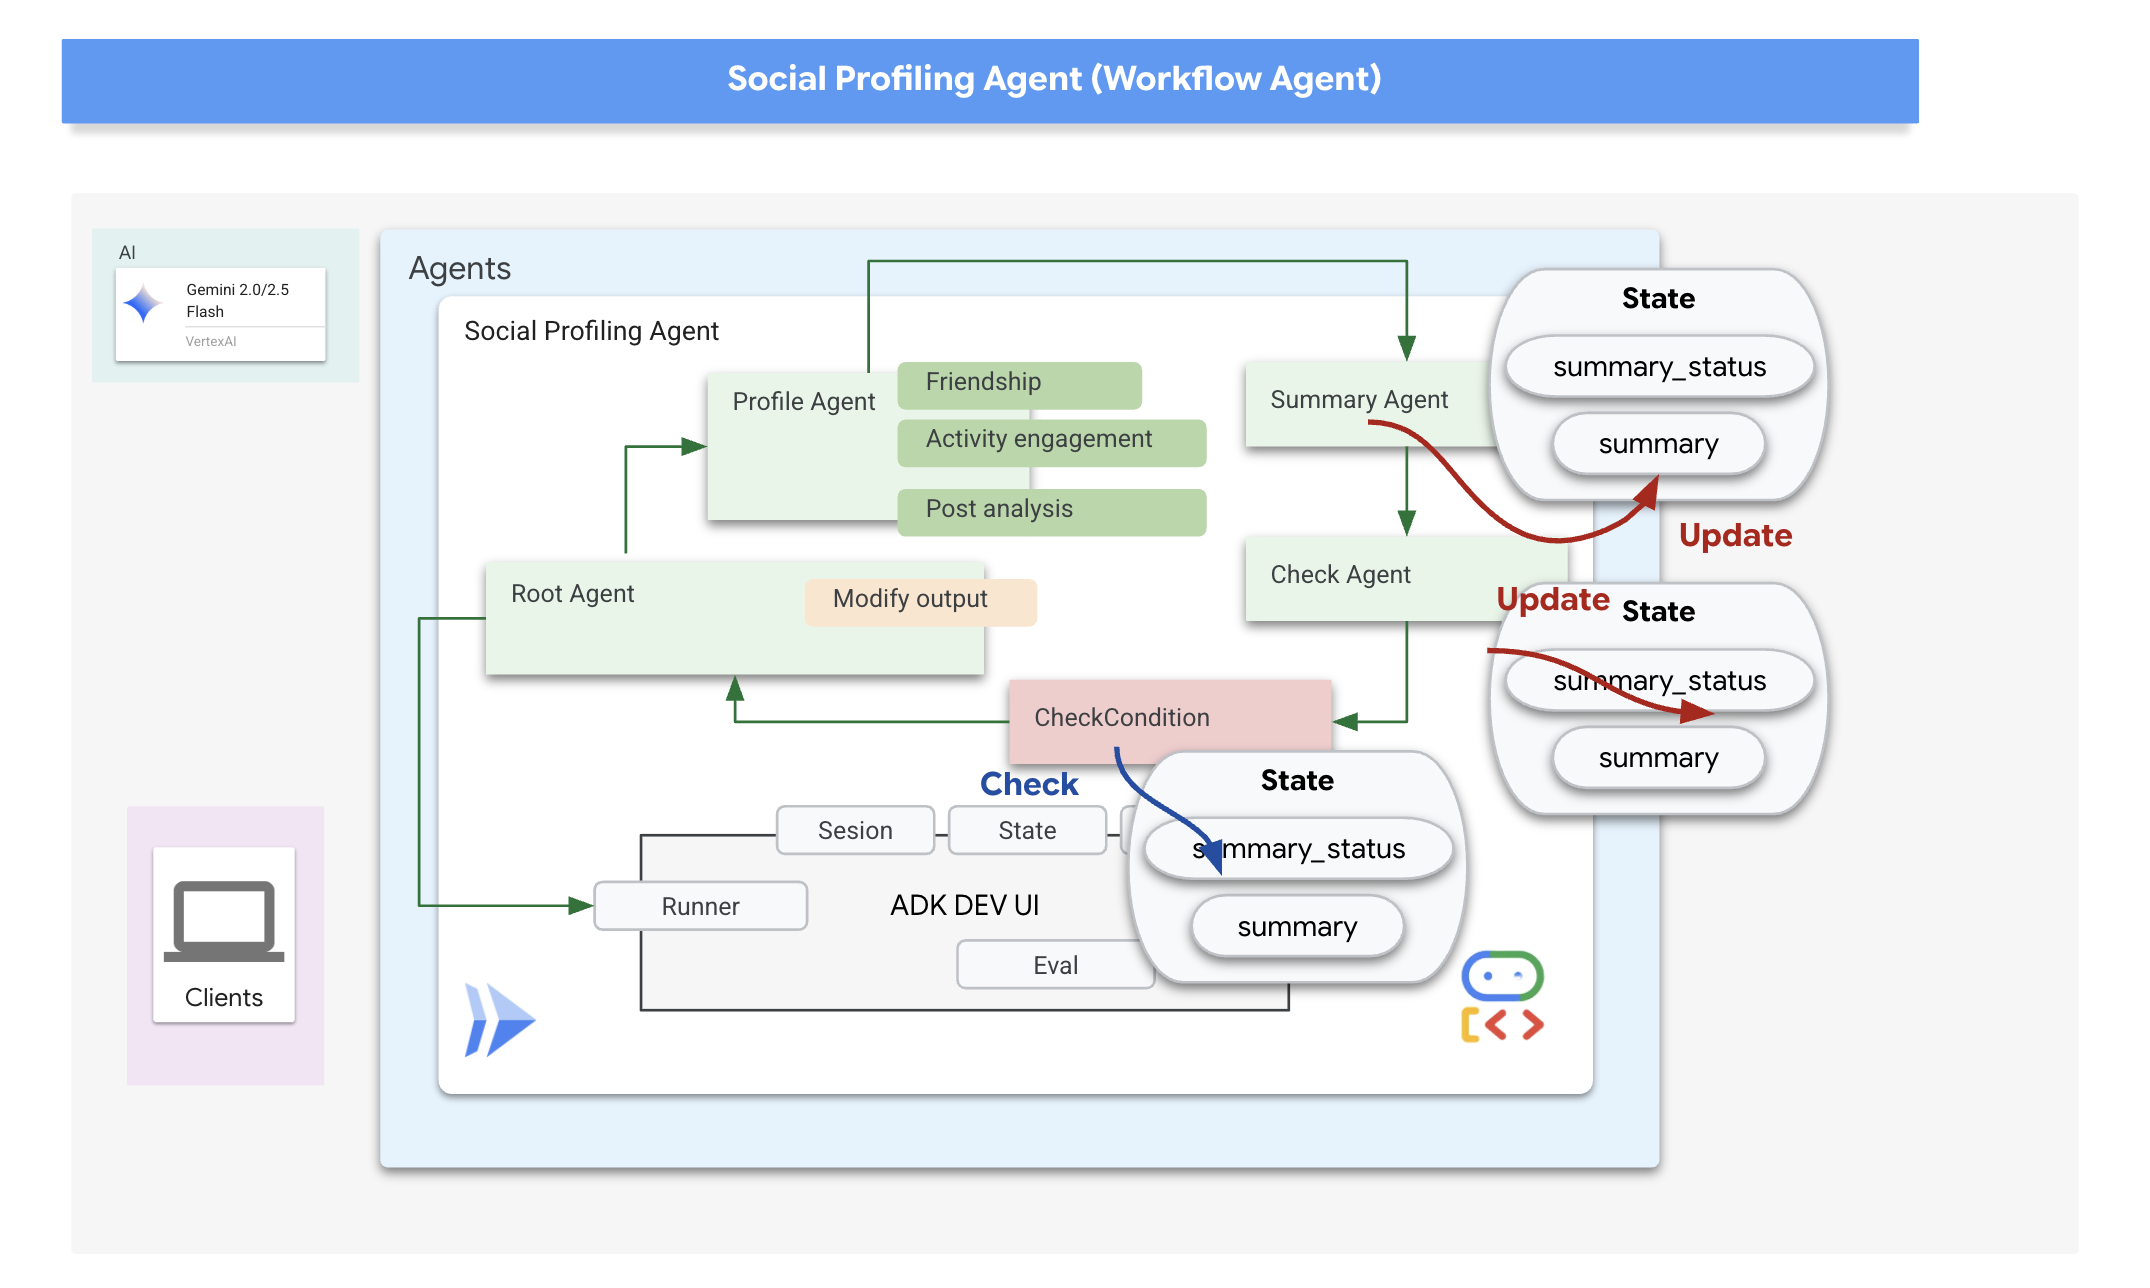
Callbacks in ADK allow us to inject custom logic to be executed at specific points during an agent's lifecycle or in response to certain events, such as the completion of a tool call or before the agent finishes its execution. They provide a way to customize the agent's behavior and process results dynamically.
We'll use an after_agent_callback that runs when the loop finishes (because CheckCondition escalated). This callback modify_output_after_agent retrieves the final summary from the state and formats it as the agent's final output message.
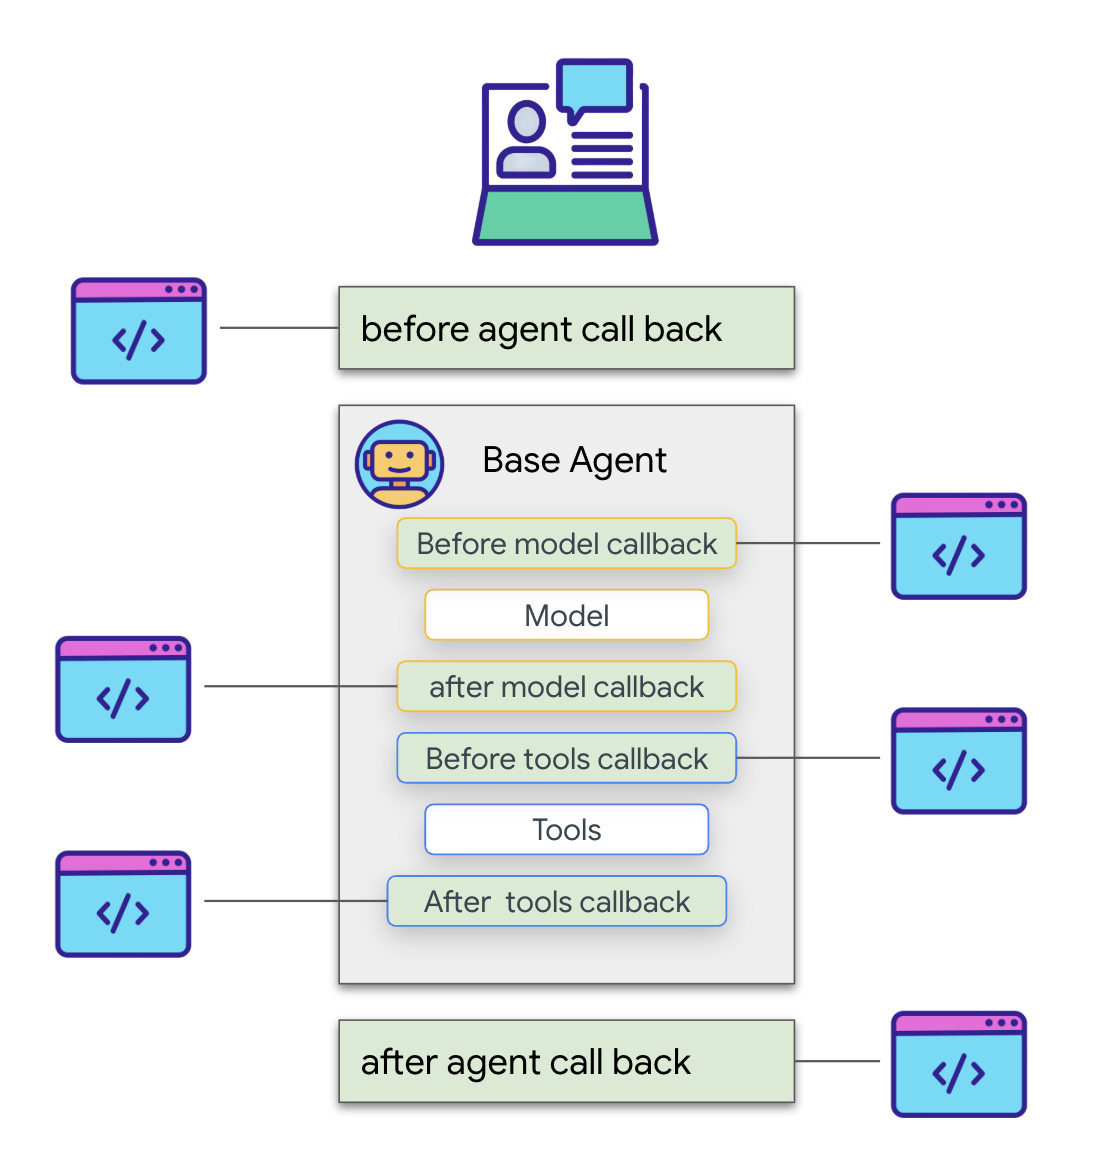
👉📝 In the same ~/instavibe-bootstrap/agents/social/agent.py , replace #REPLACE FOR modify_output_after_agent with follow:
def modify_output_after_agent(callback_context: CallbackContext) -> Optional[types.Content]:

    agent_name = callback_context.agent_name
    invocation_id = callback_context.invocation_id
    current_state = callback_context.state.to_dict()
    current_user_content = callback_context.user_content
    print(f"[Callback] Exiting agent: {agent_name} (Inv: {invocation_id})")
    print(f"[Callback] Current summary_status: {current_state.get("summary_status")}")
    print(f"[Callback] Current Content: {current_user_content}")

    status = current_state.get("summary_status").strip()
    is_done = (status == "completed")
    # Retrieve the final summary from the state

    final_summary = current_state.get("summary")
    print(f"[Callback] final_summary: {final_summary}")
    if final_summary and is_done and isinstance(final_summary, str):
        log.info(f"[Callback] Found final summary, constructing output Content.")
        # Construct the final output Content object to be sent back
        return types.Content(role="model", parts=[types.Part(text=final_summary.strip())])
    else:
        log.warning("[Callback] No final summary found in state or it's not a string.")
        # Optionally return a default message or None if no summary was generated
        return None
Defining the Root Loop Agent
Finally, we define the main LoopAgent. It orchestrates the sub-agents in sequence within each loop iteration (profile_agent -> summary_agent -> check_agent -> CheckCondition). It will repeat this sequence up to max_iterations times or until CheckCondition signals completion. The after_agent_callback ensures the final summary is returned.
👉📝 In the same ~/instavibe-bootstrap/agents/social/agent.py , replace #REPLACE FOR root_agent with follow:
root_agent = LoopAgent(
    name="InteractivePipeline",
    sub_agents=[
        profile_agent,
        summary_agent,
        check_agent,
        CheckCondition(name="Checker")
    ],
    description="Find everyone's social profile on events, post and friends",
    max_iterations=10,
    after_agent_callback=modify_output_after_agent
)
Let's test this multi-agent workflow using the ADK Dev UI.
👉💻 Launch the ADK web server:
. ~/instavibe-bootstrap/set_env.sh
source ~/instavibe-bootstrap/env/bin/activate
cd  ~/instavibe-bootstrap/agents
sed -i "s|^\(O\?GOOGLE_CLOUD_PROJECT\)=.*|GOOGLE_CLOUD_PROJECT=${PROJECT_ID}|" ~/instavibe-bootstrap/agents/social/.env
adk web
Open the ADK Dev UI (port 8000 via Web Preview). In the agent dropdown menu (top-right), select the Social Agent.
👉 Now, give it the task to profile multiple people. In the chat dialog, enter:
Tell me about Mike and Bob
After the agent responds (which might take a bit longer due to the looping and multiple LLM calls), don't just look at the final chat output. Navigate to the Events tab in the left-hand pane of the ADK Dev UI.
👉 Verification Step: In the Events tab, you will see a detailed, step-by-step trace of the execution. 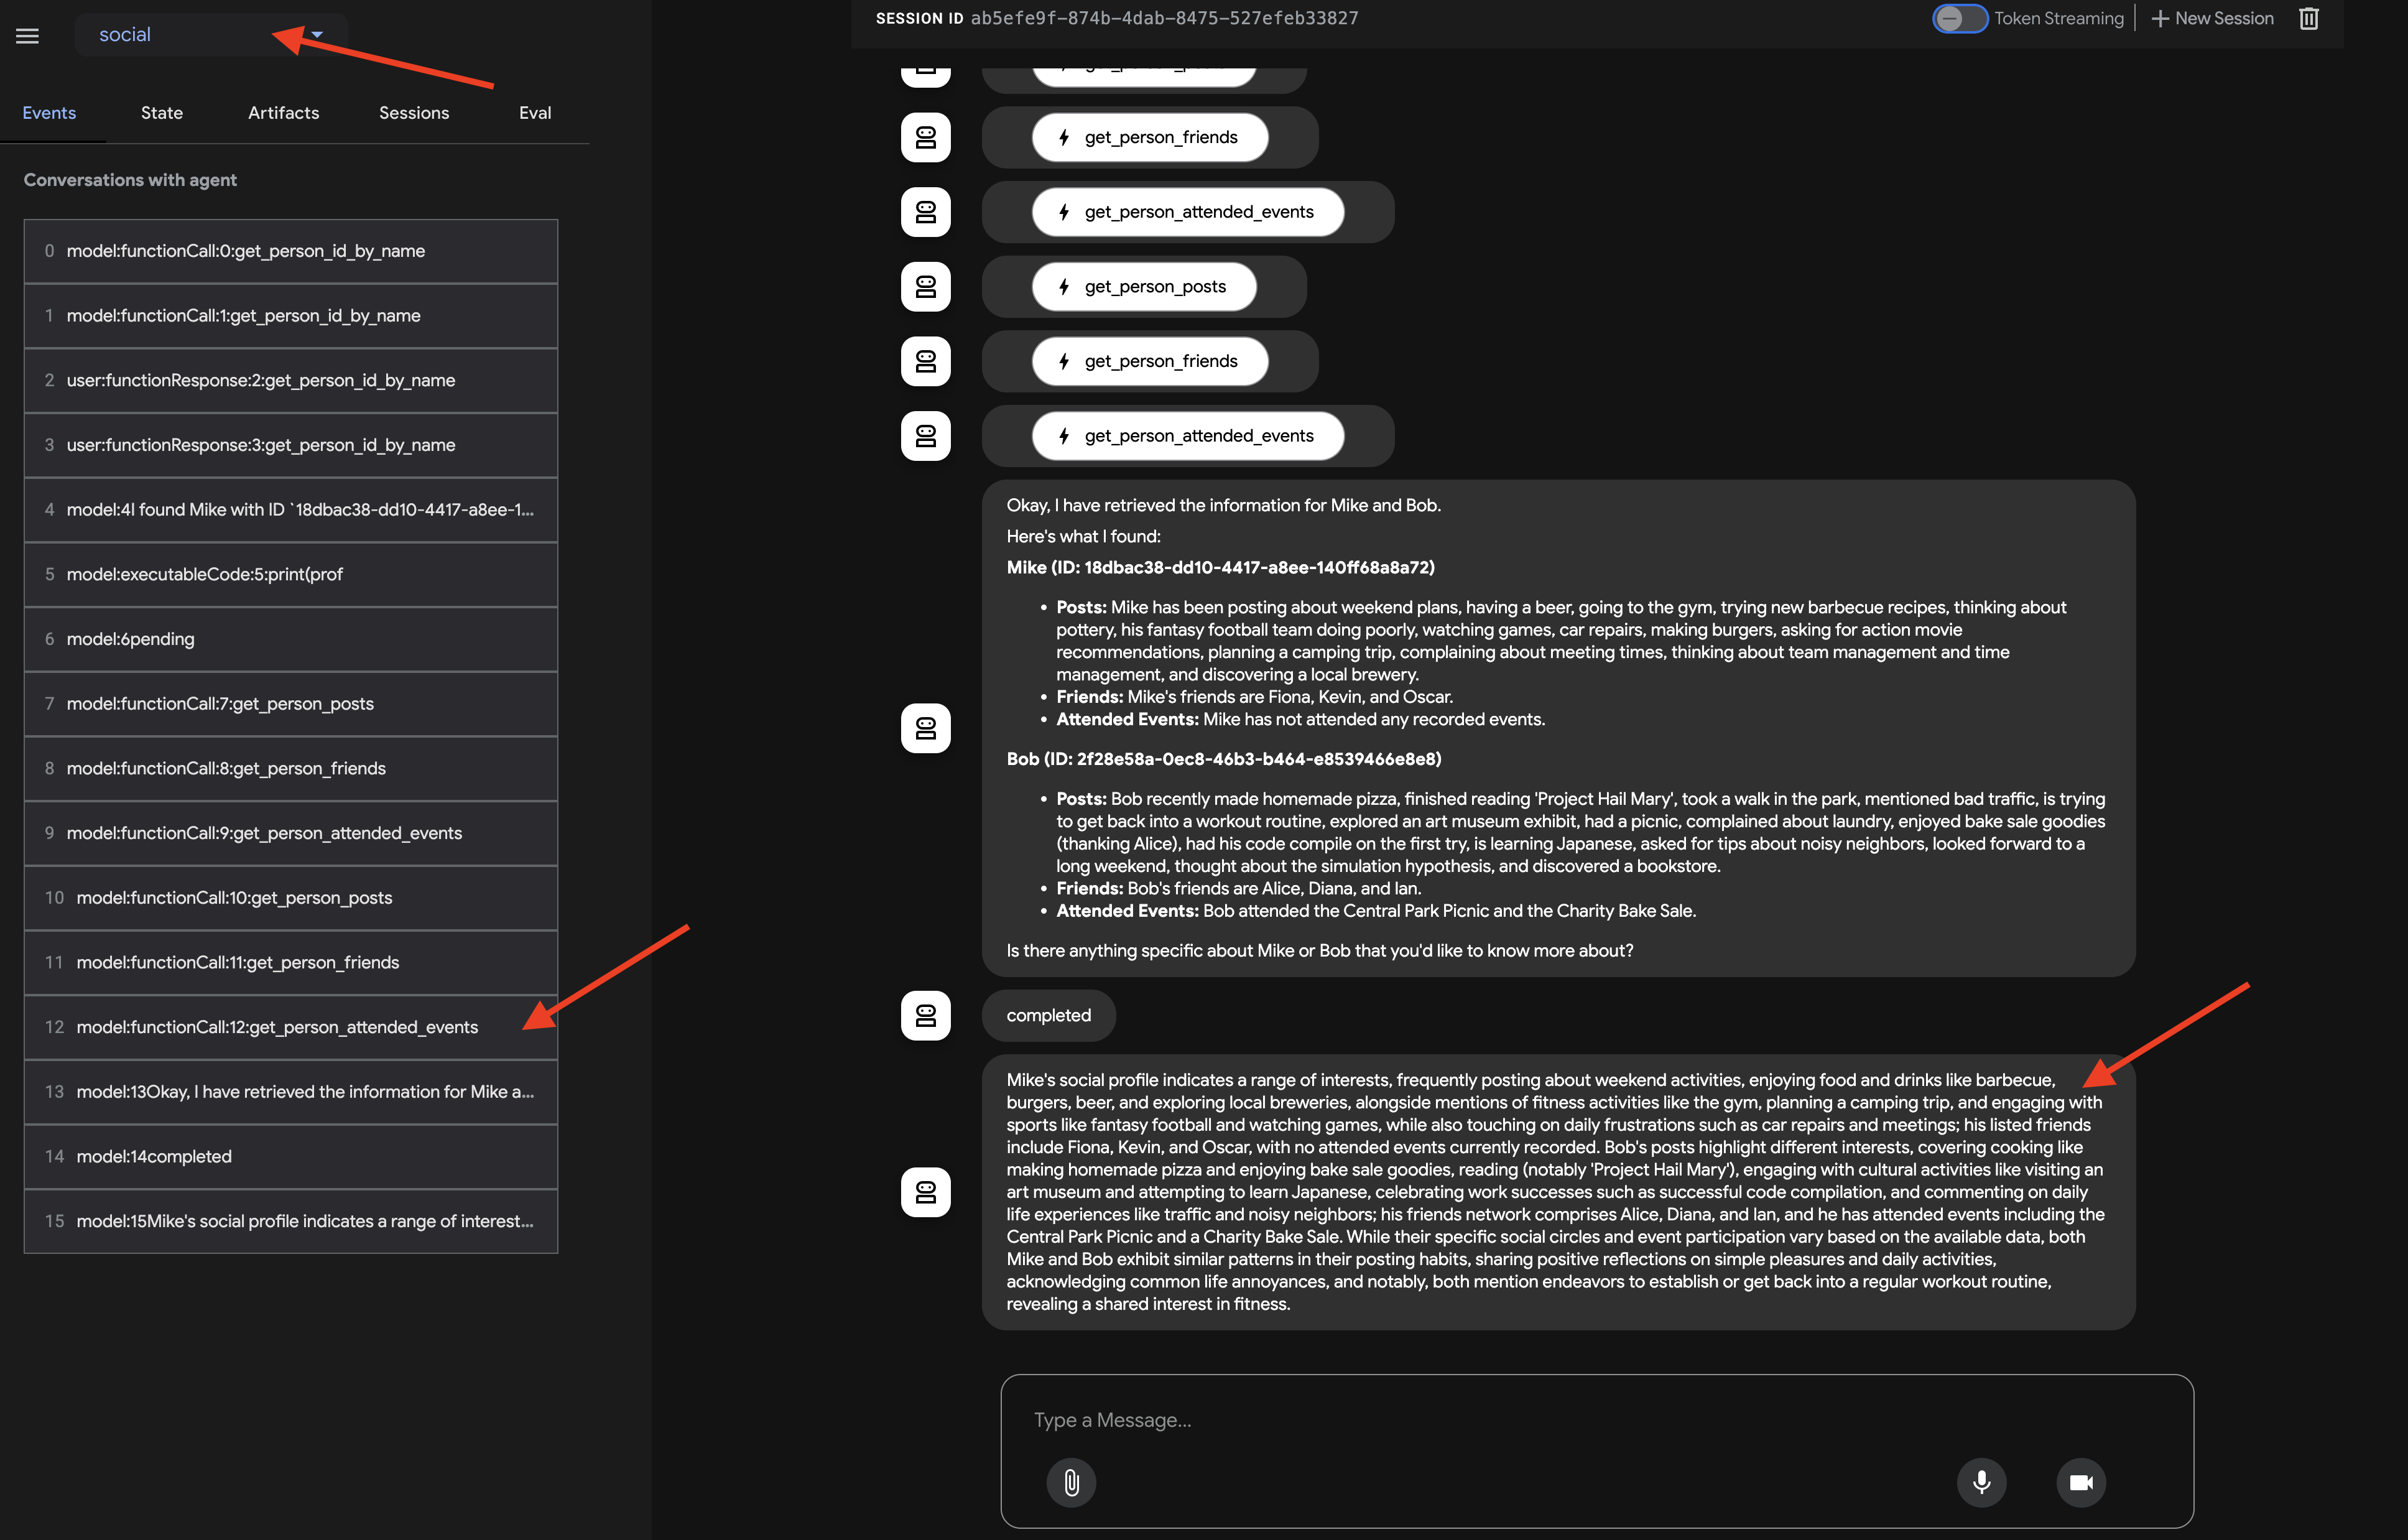
After observing how the agent invokes each sub-agent, where you expect the flow to go from profile_agent -> summary_agent -> check_agent, Checker within each iteration. But in practice, however, we see the agent's powerful 'self-optimization' in action.
Because the underlying model sees the entire request (eg, 'profile Mike and Bob'), it often chooses the most efficient path, gathering all required data in a single, consolidated turn rather than iterating multiple times. You can see the inputs and outputs and states for each step, including tool calls made by profile_agent
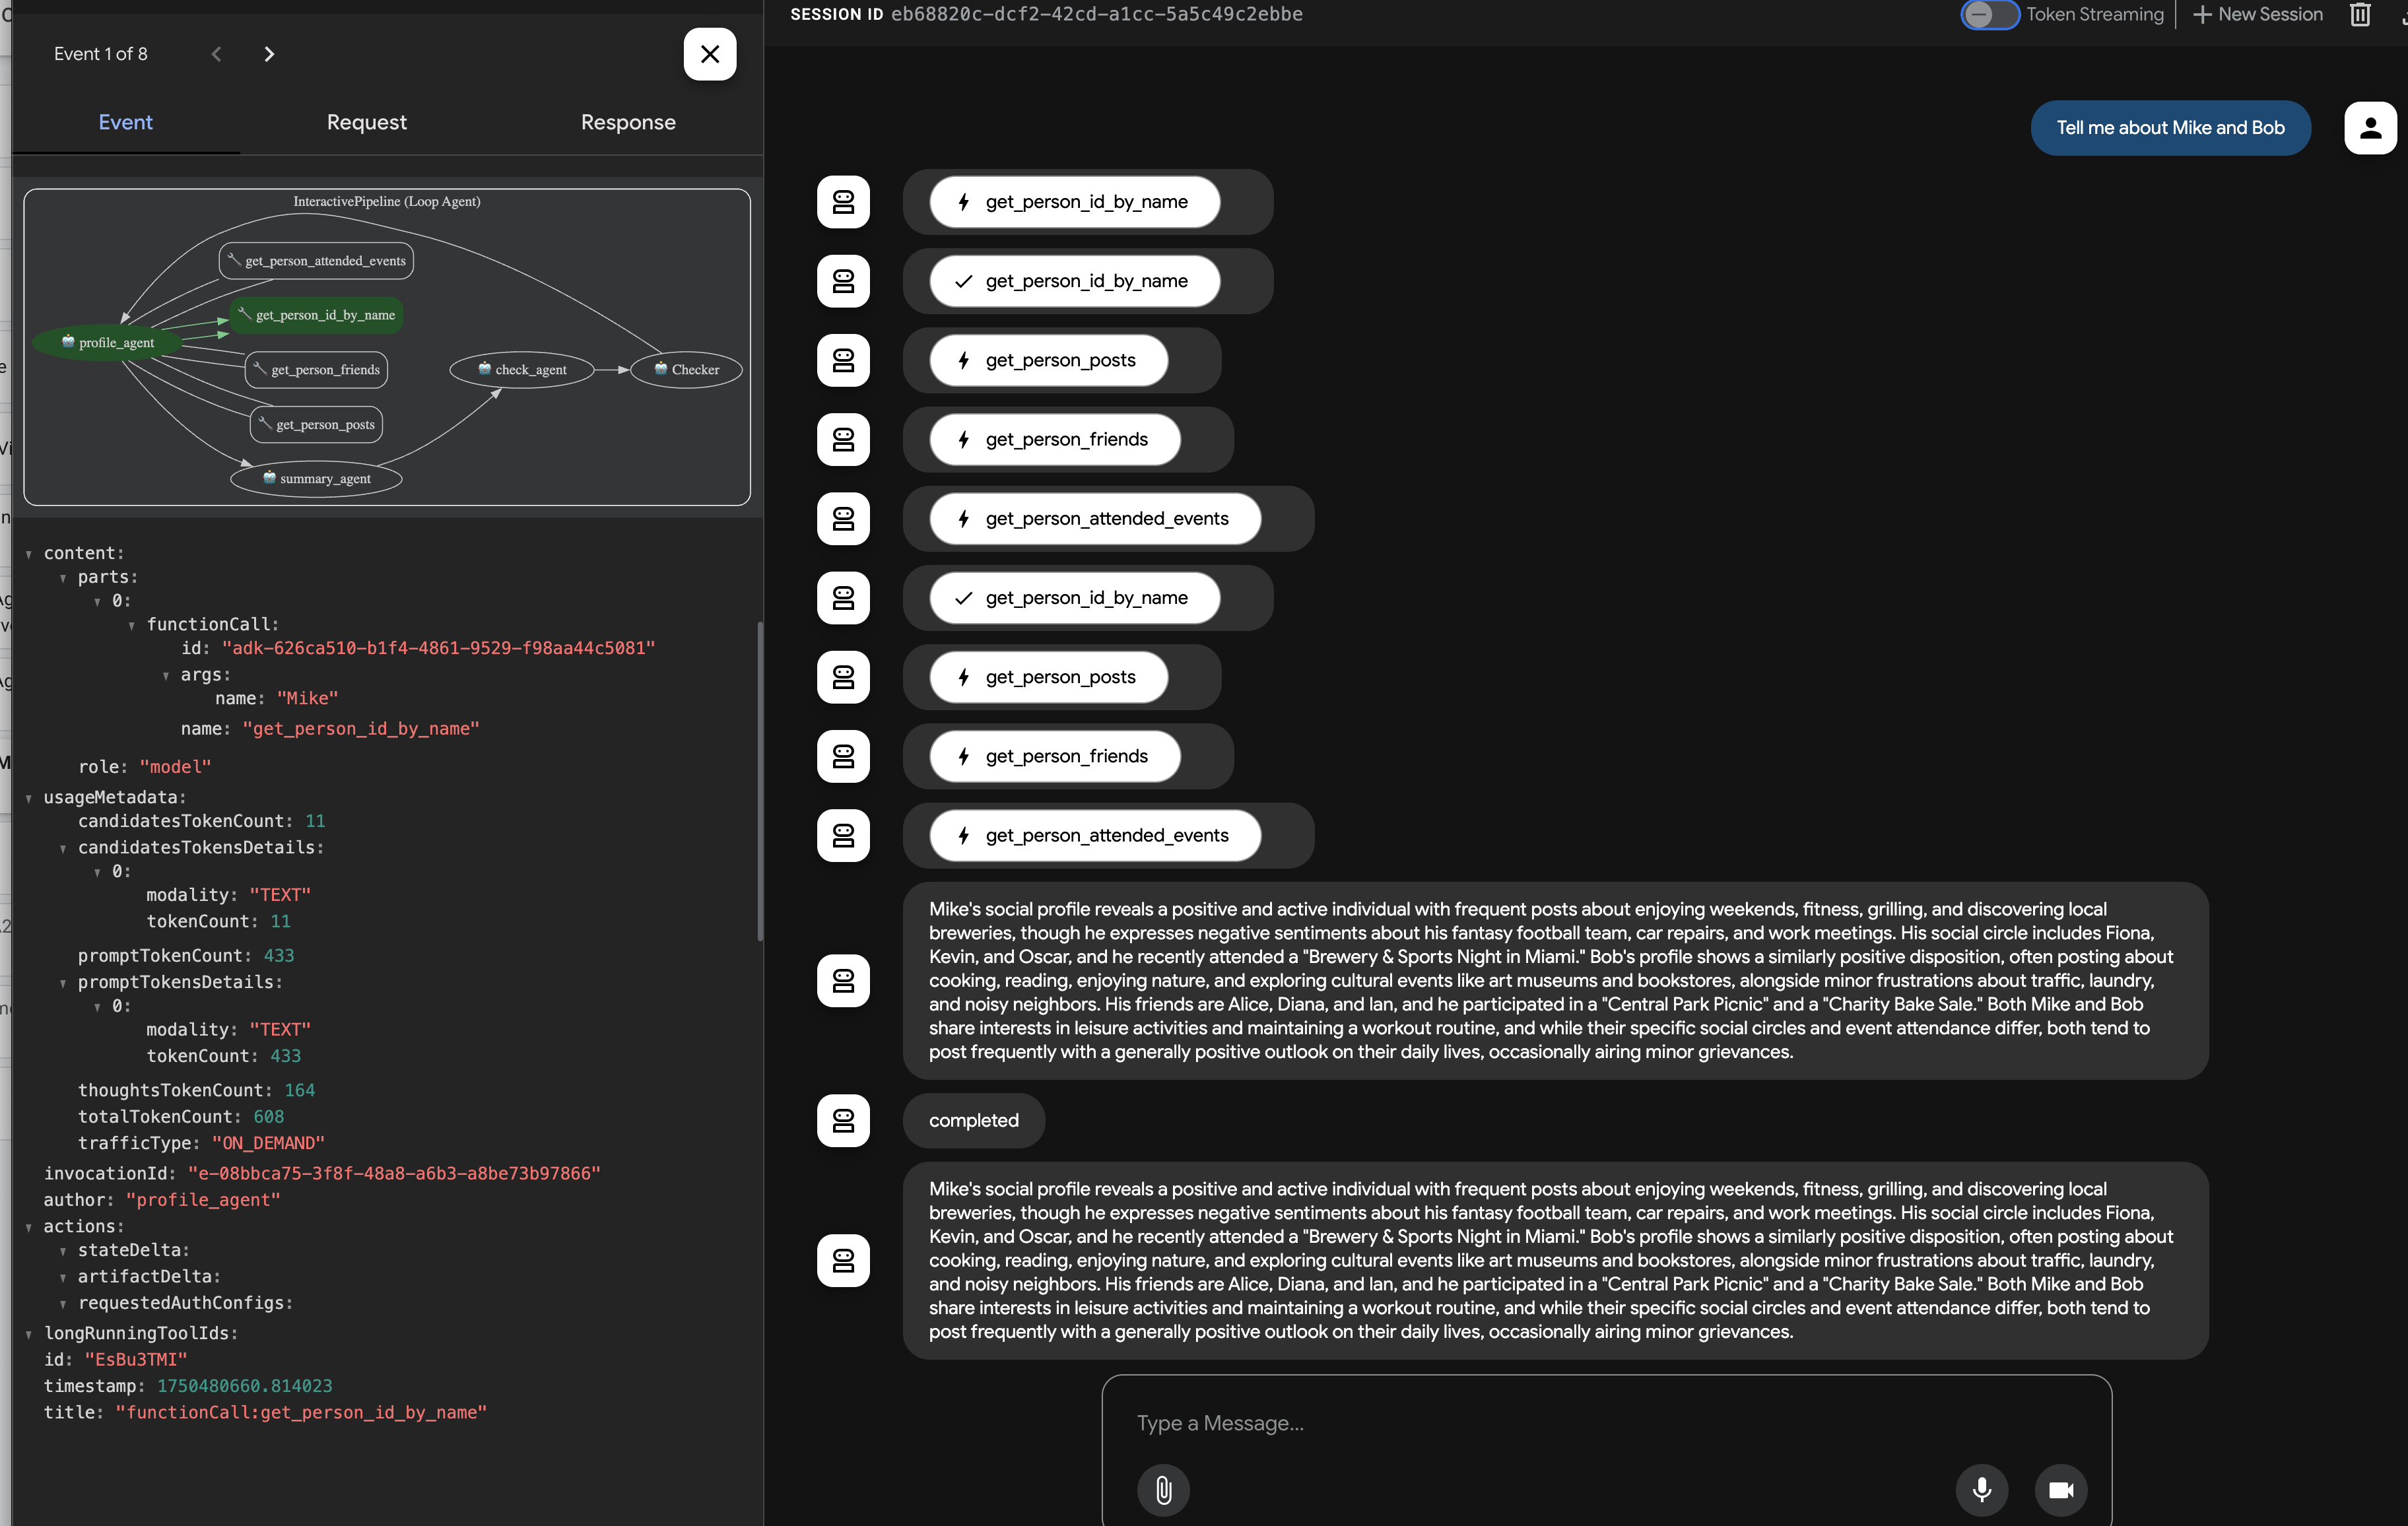
and the status updates from check_agent and CheckCondition. 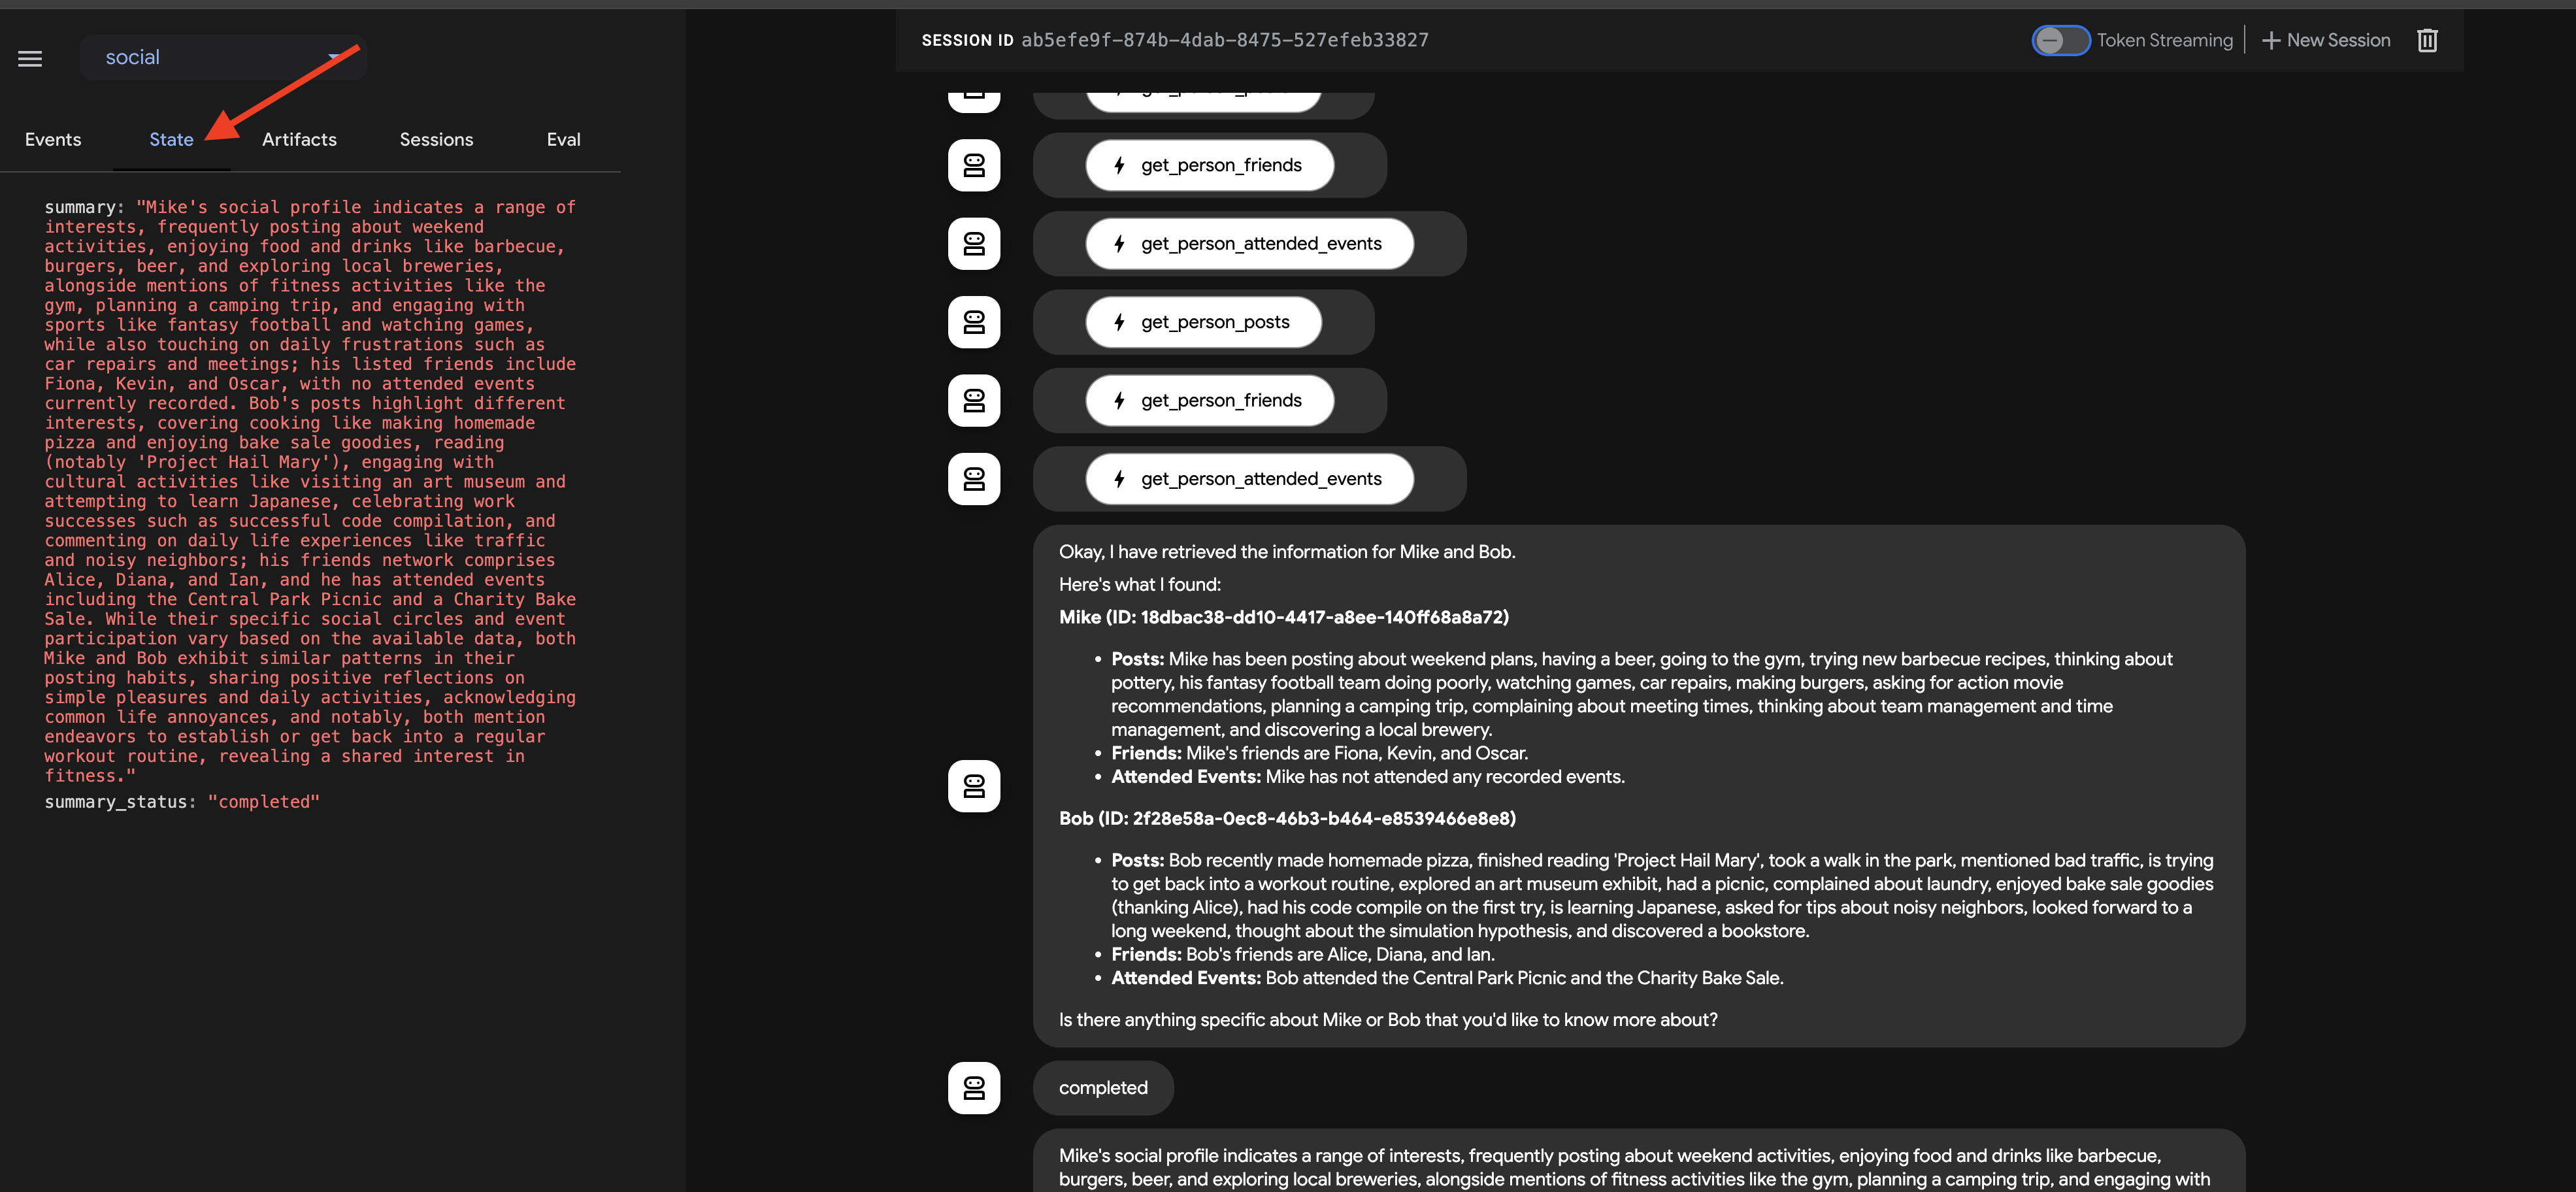
This visual trace is invaluable for understanding and debugging how the multi-agent workflow operates until the final summary is generated and returned by the callback.
Once you have explored the chat response and the event trace, return to the Cloud Shell terminal and press Ctrl+C to stop the ADK Dev UI.
10. Agent-to-Agent (A2A) Communication
So far, we've built specialized agents, but they operate in isolation or within a predefined workflow on the same machine. To build truly distributed and collaborative multi-agent systems, we need a way for agents, potentially running as separate services, to discover each other and communicate effectively. This is where the Agent-to-Agent (A2A) protocol comes in.
The A2A protocol is an open standard specifically designed for interoperable communication between AI agents. While MCP focuses on agent-to-tool interaction, A2A focuses on agent-to-agent interaction. It allows agents to:
- Discover : Find other agents and learn their capabilities via standardized Agent Cards.
- Communicate : Exchange messages and data securely.
- Collaborate : Delegate tasks and coordinate actions to achieve complex goals.
The A2A protocol facilitates this communication through mechanisms like "Agent Cards," which agents can use to advertise their capabilities and connection information.
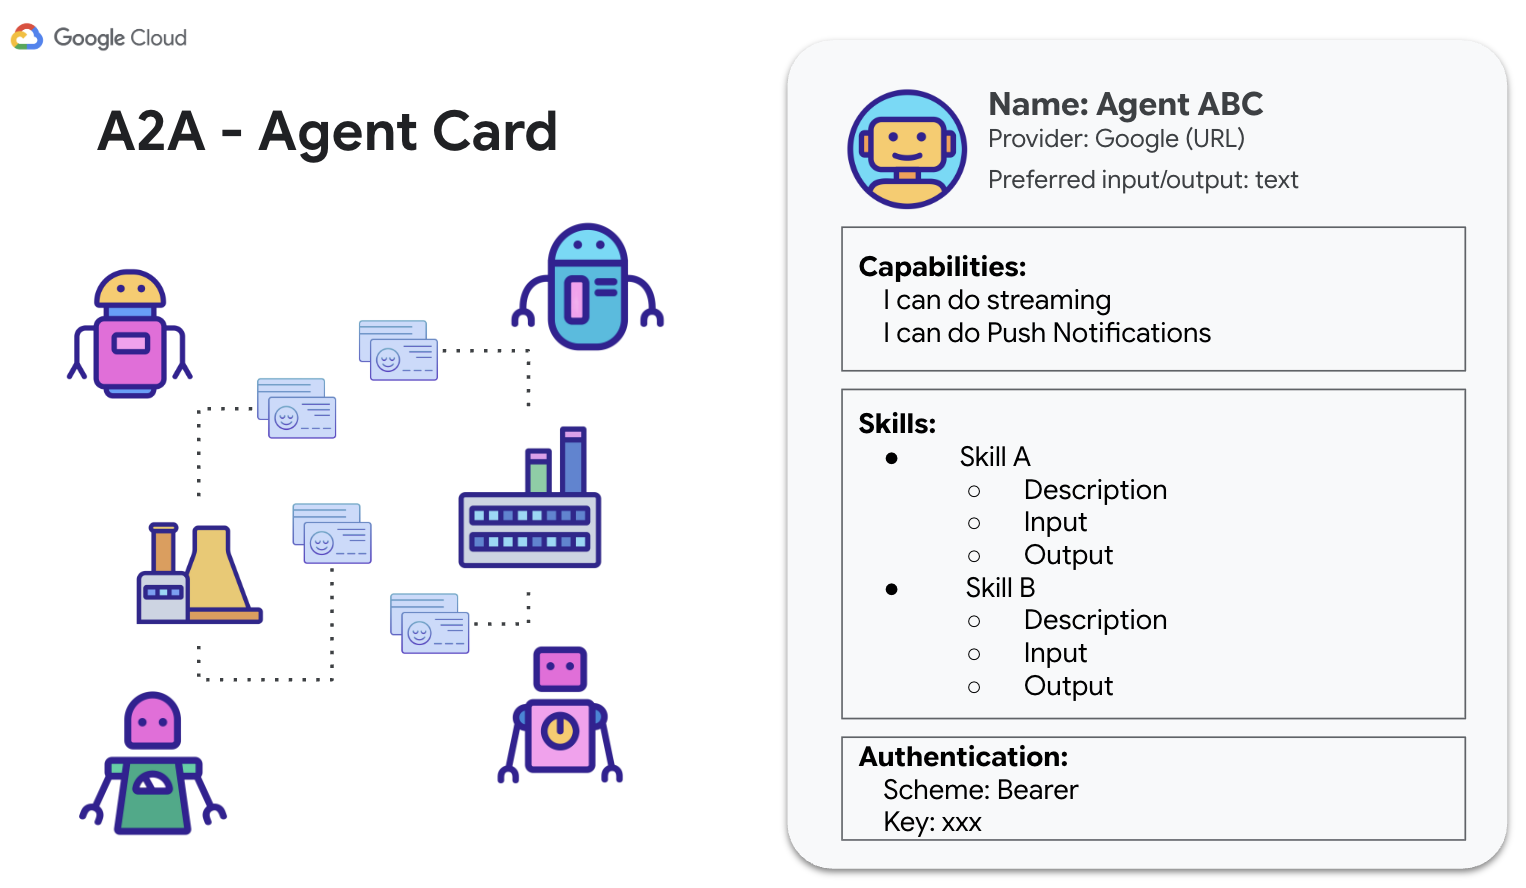
A2A utilizes familiar web standards (HTTP, SSE, JSON-RPC) and often employs a client-server model where one agent (client) sends tasks to another (remote agent/server). This standardization is key to building modular, scalable systems where agents developed independently can work together.
Enabling A2A for InstaVibe Agents
To make our existing Planner, Platform Interaction, and Social agents accessible to other agents via A2A, we need to wrap each one with an A2A Server component. This server will:
- Expose an Agent Card : Serve a standard description of the agent's capabilities via an HTTP endpoint.
- Listen for Tasks(Request Messages) : Accept incoming task requests from other agents (A2A clients) according to the A2A protocol.
- Manage Task(Request Messages) Execution : Hand off received tasks to the underlying ADK agent logic for processing.
Planner Agent (A2A Enabled)
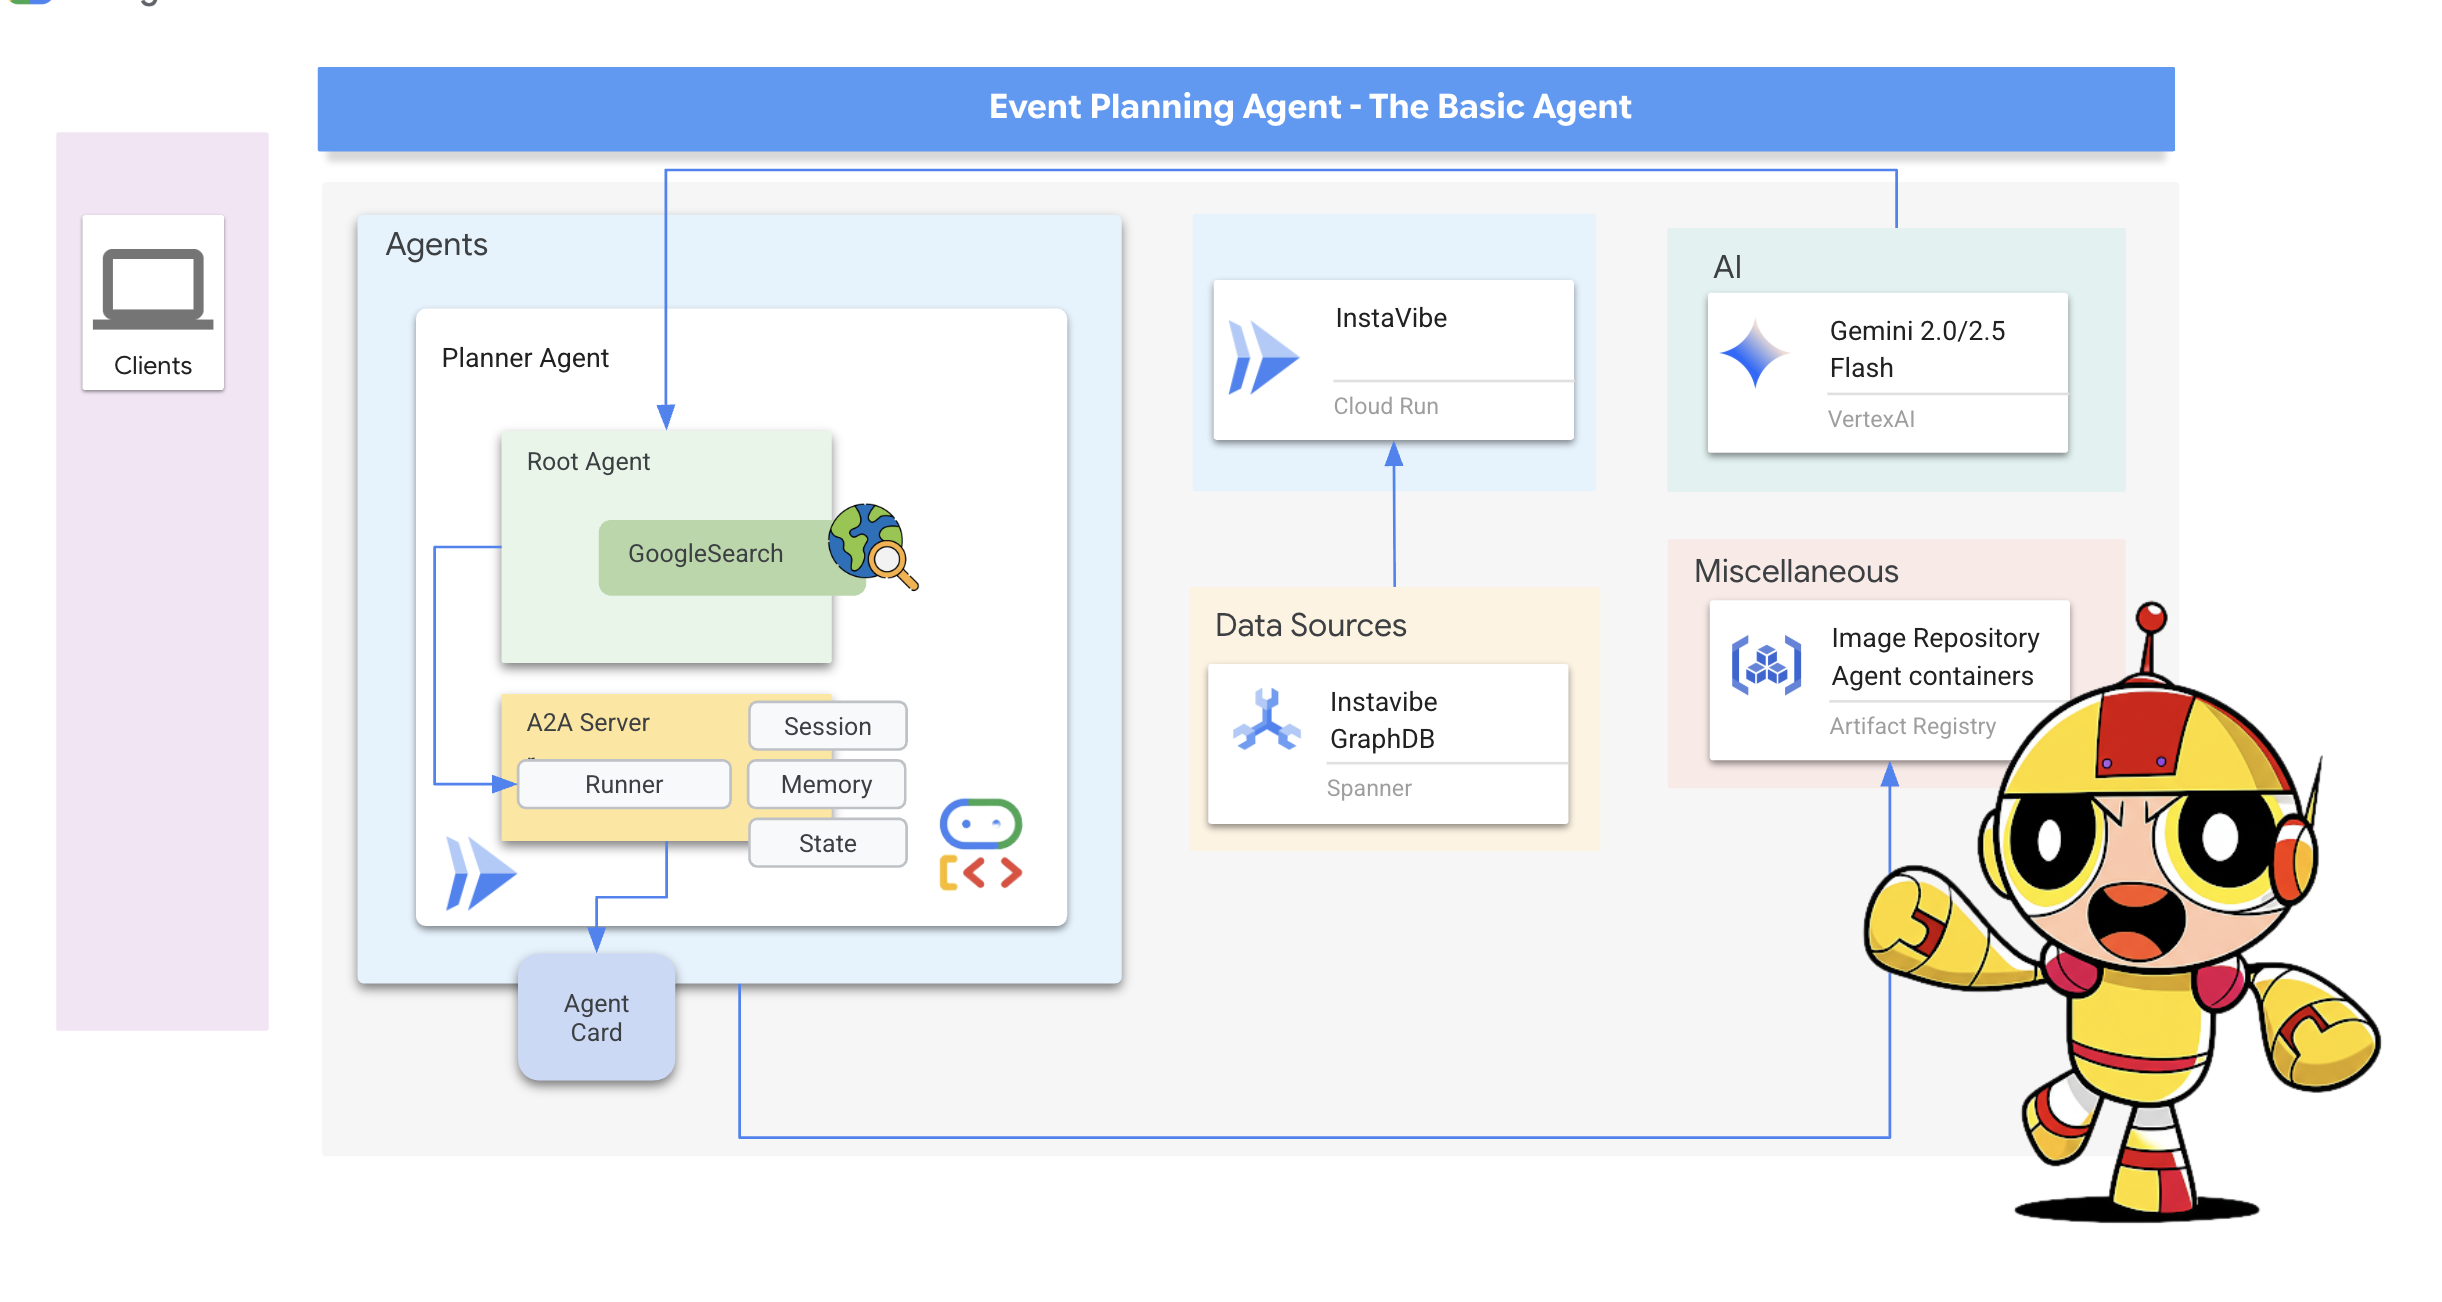
Let's start by adding the A2A server layer to our Planner Agent.
Define the A2A server startup logic. This code defines the AgentCard (the public description of the agent), configures the A2AServer, and starts it, linking it to the PlatformAgentExecutor .
👉📝 Add the following code to the end of ~/instavibe-bootstrap/agents/planner/a2a_server.py :
class PlannerAgent:
    """An agent to help user planning a event with its desire location."""
    SUPPORTED_CONTENT_TYPES = ["text", "text/plain"]

    def __init__(self):
        self._agent = self._build_agent()
        self.runner = Runner(
            app_name=self._agent.name,
            agent=self._agent,
            artifact_service=InMemoryArtifactService(),
            session_service=InMemorySessionService(),
            memory_service=InMemoryMemoryService(),
        )
        capabilities = AgentCapabilities(streaming=True)
        skill = AgentSkill(
            id="event_planner",
            name="Event planner",
            description="""
            This agent generates multiple fun plan suggestions tailored to your specified location, dates, and interests,
            all designed for a moderate budget. It delivers detailed itineraries,
            including precise venue information (name, latitude, longitude, and description), in a structured JSON format.
            """,
            tags=["instavibe"],
            examples=["What about Bostona MA this weekend?"],
        )
        self.agent_card = AgentCard(
            name="Event Planner Agent",
            description="""
            This agent generates multiple fun plan suggestions tailored to your specified location, dates, and interests,
            all designed for a moderate budget. It delivers detailed itineraries,
            including precise venue information (name, latitude, longitude, and description), in a structured JSON format.
            """,
            url=f"{PUBLIC_URL}",
            version="1.0.0",
            defaultInputModes=PlannerAgent.SUPPORTED_CONTENT_TYPES,
            defaultOutputModes=PlannerAgent.SUPPORTED_CONTENT_TYPES,
            capabilities=capabilities,
            skills=[skill],
        )

    def get_processing_message(self) -> str:
        return "Processing the planning request..."

    def _build_agent(self) -> LlmAgent:
        """Builds the LLM agent for the night out planning agent."""
        return agent.root_agent


if __name__ == '__main__':
    try:
        plannerAgent = PlannerAgent()

        request_handler = DefaultRequestHandler(
            agent_executor=PlannerAgentExecutor(plannerAgent.runner,plannerAgent.agent_card),
            task_store=InMemoryTaskStore(),
        )

        server = A2AStarletteApplication(
            agent_card=plannerAgent.agent_card,
            http_handler=request_handler,
        )
        logger.info(f"Attempting to start server with Agent Card: {plannerAgent.agent_card.name}")
        logger.info(f"Server object created: {server}")

        uvicorn.run(server.build(), host='0.0.0.0', port=port)
    except Exception as e:
        logger.error(f"An error occurred during server startup: {e}")
        exit(1)
👉💻 Let's quickly test if the A2A server starts correctly locally and serves its Agent Card. Run the following command in your first terminal:
. ~/instavibe-bootstrap/set_env.sh
source ~/instavibe-bootstrap/env/bin/activate
cd ~/instavibe-bootstrap/agents/
python -m planner.a2a_server
👉 Now, open another terminal window. (Click on the + sign in the terminal panel) 
👉💻 Use curl to request the Agent Card from the locally running server:
curl http://localhost:10003/.well-known/agent.json | jq
You should see the JSON representation of the AgentCard we defined, confirming the server is running and advertising the Planner agent.
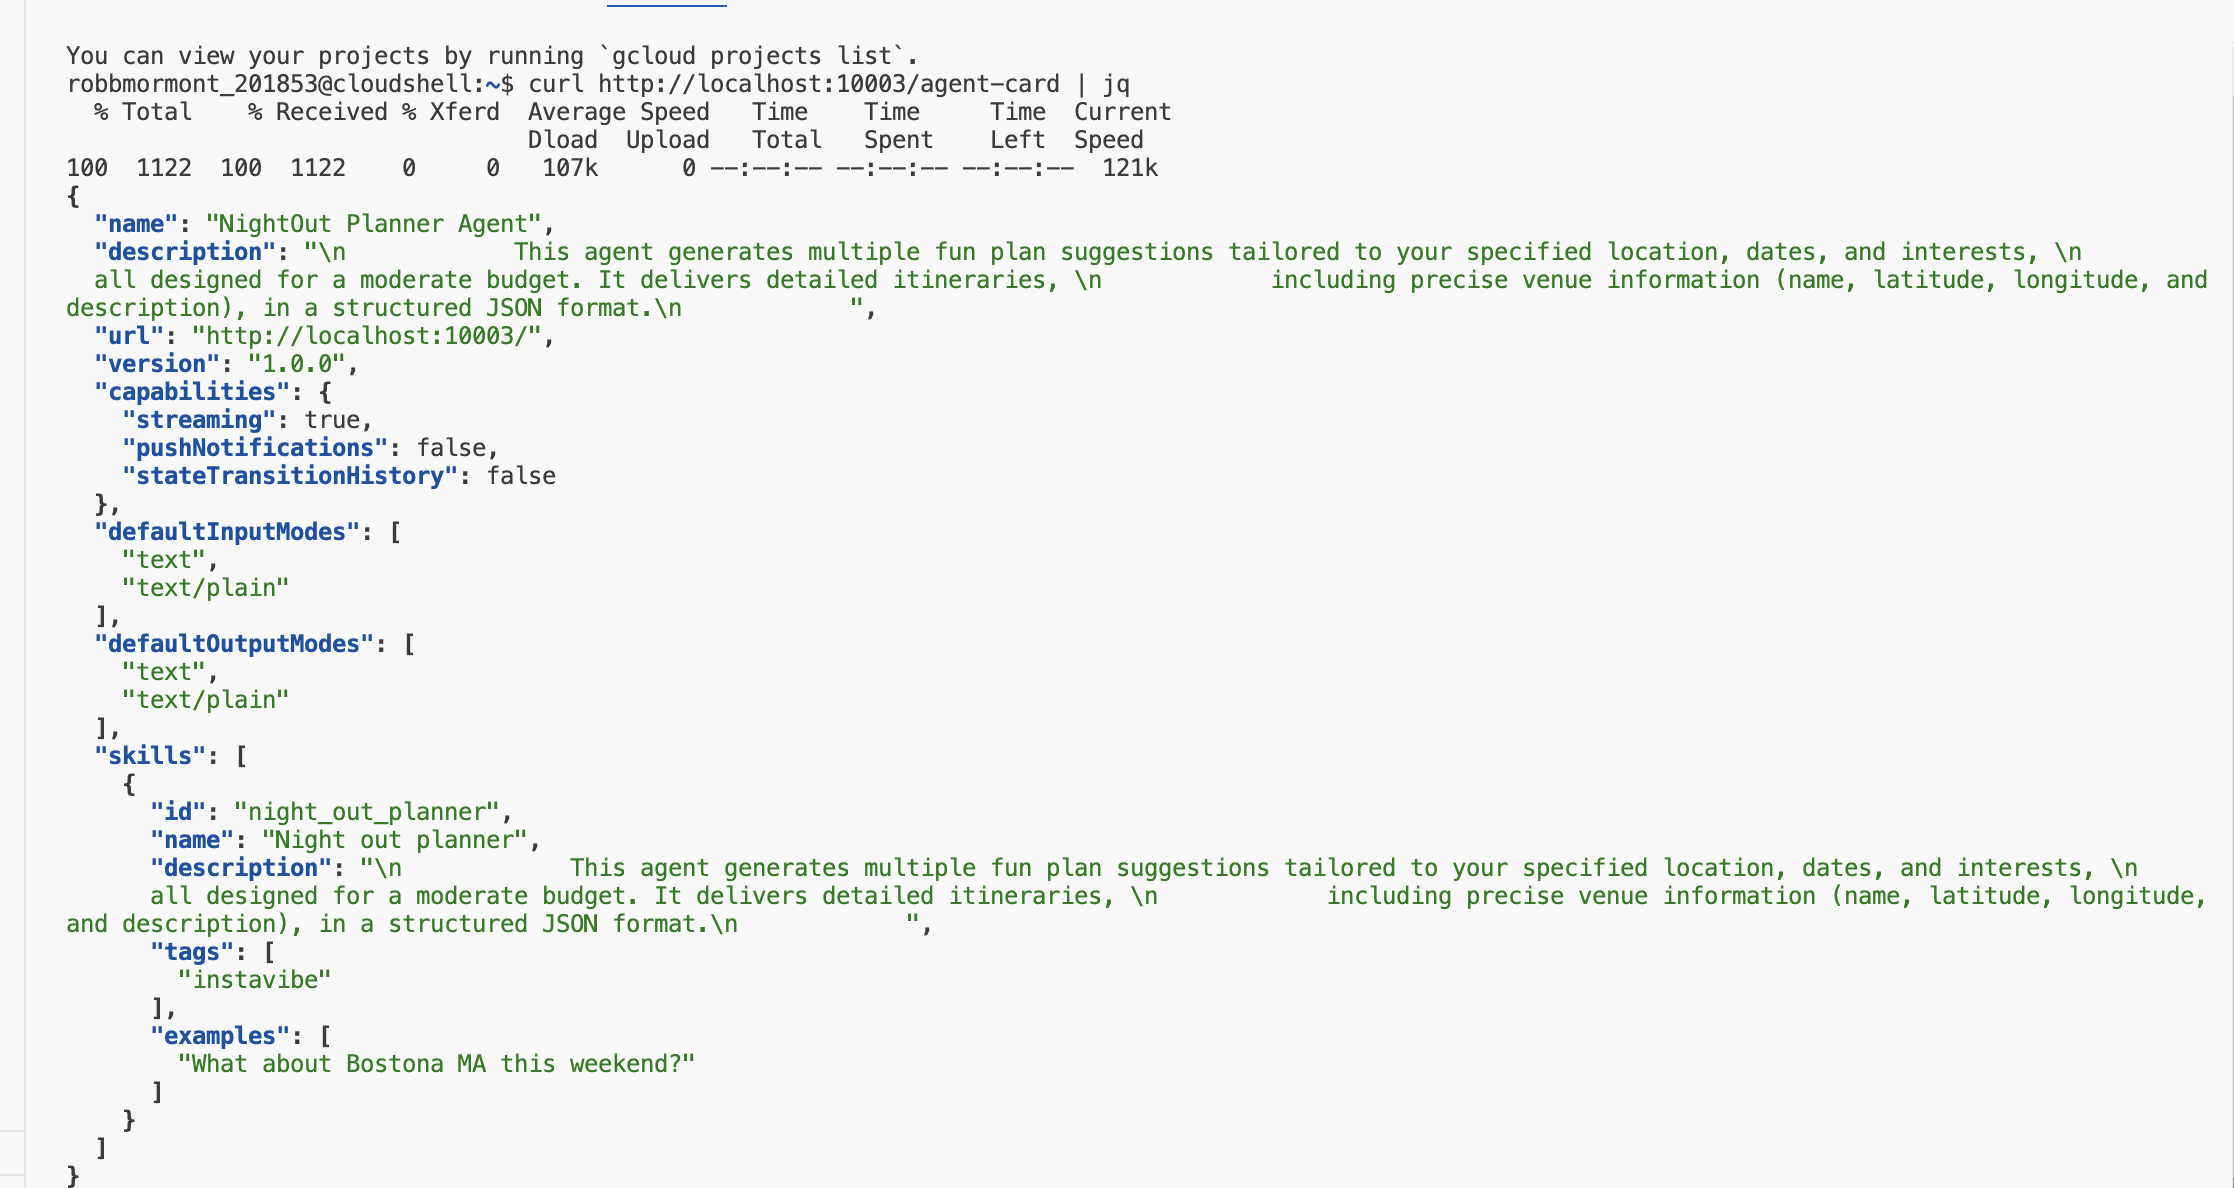
Go back to the first terminal (where the server is running) and press Ctrl+C to stop it.
👉💻 With the A2A server logic added, we can now build the container image.
Build and Deploy the Planner Agent
. ~/instavibe-bootstrap/set_env.sh

cd ~/instavibe-bootstrap/agents

# Set variables specific to the PLANNER agent
export IMAGE_TAG="latest"
export AGENT_NAME="planner"
export IMAGE_NAME="planner-agent"
export IMAGE_PATH="${REGION}-docker.pkg.dev/${PROJECT_ID}/${REPO_NAME}/${IMAGE_NAME}:${IMAGE_TAG}"
export SERVICE_NAME="planner-agent"
export PUBLIC_URL="https://planner-agent-${PROJECT_NUMBER}.${REGION}.run.app"

echo "Building ${AGENT_NAME} agent..."
gcloud builds submit . \
  --config=cloudbuild-build.yaml \
  --project=${PROJECT_ID} \
  --region=${REGION} \
  --substitutions=_AGENT_NAME=${AGENT_NAME},_IMAGE_PATH=${IMAGE_PATH}

echo "Image built and pushed to: ${IMAGE_PATH}"
👉💻 And deploy our Planner Agent on Cloud Run.
. ~/instavibe-bootstrap/set_env.sh

cd ~/instavibe-bootstrap/agents

# Set variables specific to the PLANNER agent
export IMAGE_TAG="latest"
export AGENT_NAME="planner"
export IMAGE_NAME="planner-agent"
export IMAGE_PATH="${REGION}-docker.pkg.dev/${PROJECT_ID}/${REPO_NAME}/${IMAGE_NAME}:${IMAGE_TAG}"
export SERVICE_NAME="planner-agent"
export PUBLIC_URL="https://planner-agent-${PROJECT_NUMBER}.${REGION}.run.app"


gcloud run deploy ${SERVICE_NAME} \
  --image=${IMAGE_PATH} \
  --platform=managed \
  --region=${REGION} \
  --set-env-vars="A2A_HOST=0.0.0.0" \
  --set-env-vars="A2A_PORT=8080" \
  --set-env-vars="GOOGLE_GENAI_USE_VERTEXAI=TRUE" \
  --set-env-vars="GOOGLE_CLOUD_LOCATION=${REGION}" \
  --set-env-vars="GOOGLE_CLOUD_PROJECT=${PROJECT_ID}" \
  --set-env-vars="PUBLIC_URL=${PUBLIC_URL}" \
  --allow-unauthenticated \
  --project=${PROJECT_ID} \
  --min-instances=1
Let's verify that the deployed service is running and serving its Agent Card correctly from the cloud using the A2A Inspector .
👉 From the Web preview icon in the Cloud Shell toolbar, select Change port. Set the port to 8081 and click "Change and Preview". A new browser tab will open with the A2A Inspector interface.
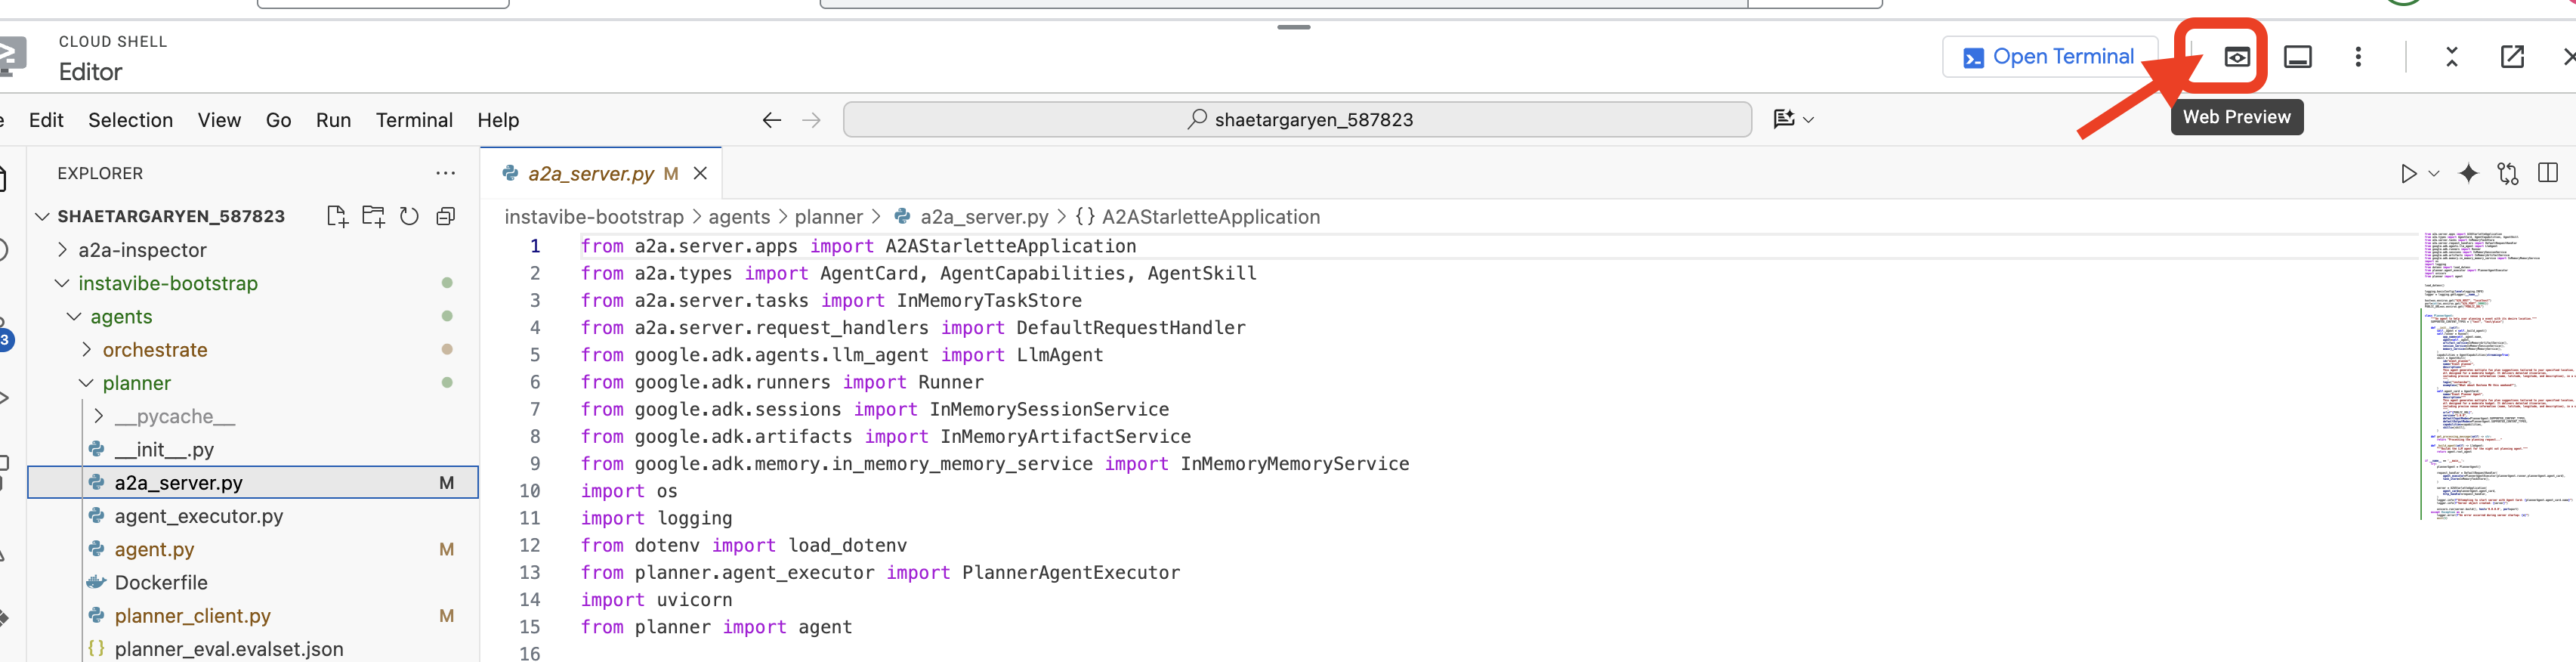
👉💻 In the terminal, get the URL of your deployed planner agent:
export PLANNER_AGENT_URL=$(gcloud run services list --platform=managed --region=us-central1 --format='value(URL)' | grep planner-agent)
echo ${PLANNER_AGENT_URL}
👉💻 Copy the output URL.
👉 In the A2A Inspector UI, paste the URL into the Agent URL field and click Connect.
👀 The agent's card details and JSON should appear on the Agent Card tab, confirming a successful connection.
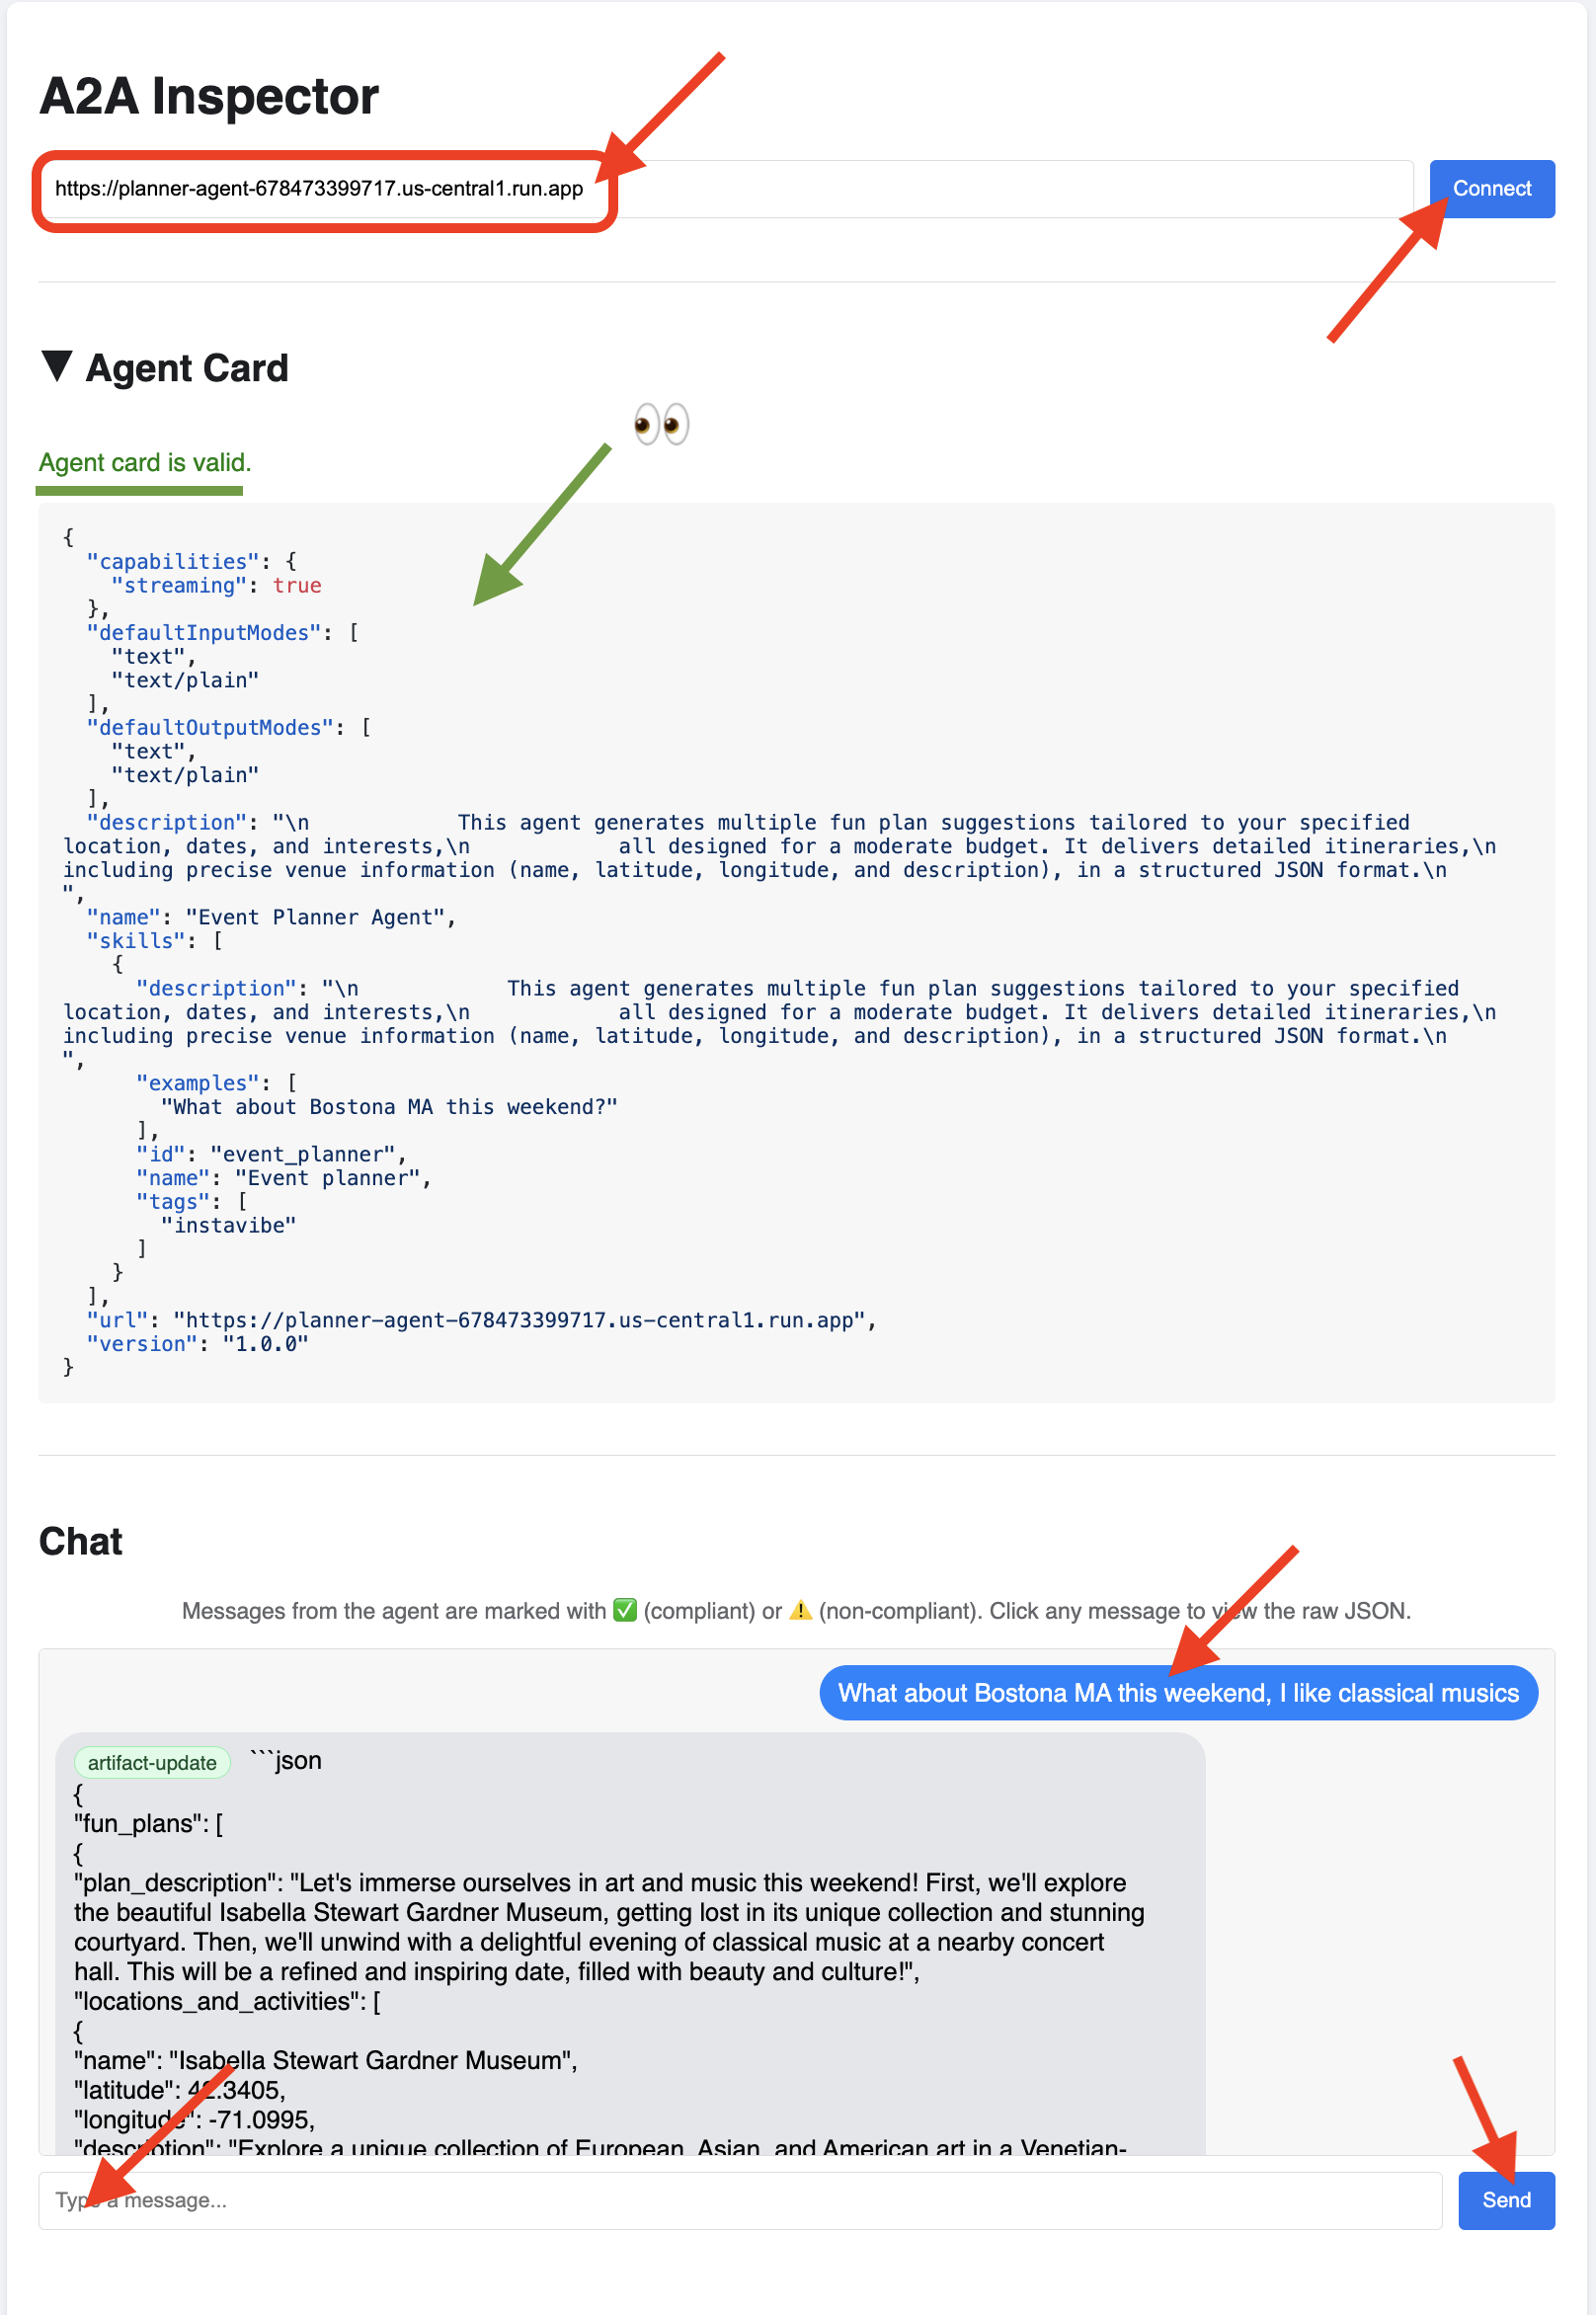
👉 Click on the Chat tab in the A2A Inspector. This is where you can interact directly with your deployed agen, Send it a message to test its planning capability. For example:
Plan something for me in Boston MA this weekend, and I enjoy classical music
👀 To inspect the raw communication, click on your message bubble and then on the agent's response bubble in the chat window. As you click each one, it will display the full JSON-RPC 2.0 message that was sent or received, which is invaluable for debugging.
Let's keep the A2A Inspector tab handy. Do NOT close it! We'll be using it again in a moment to test our other two agents.
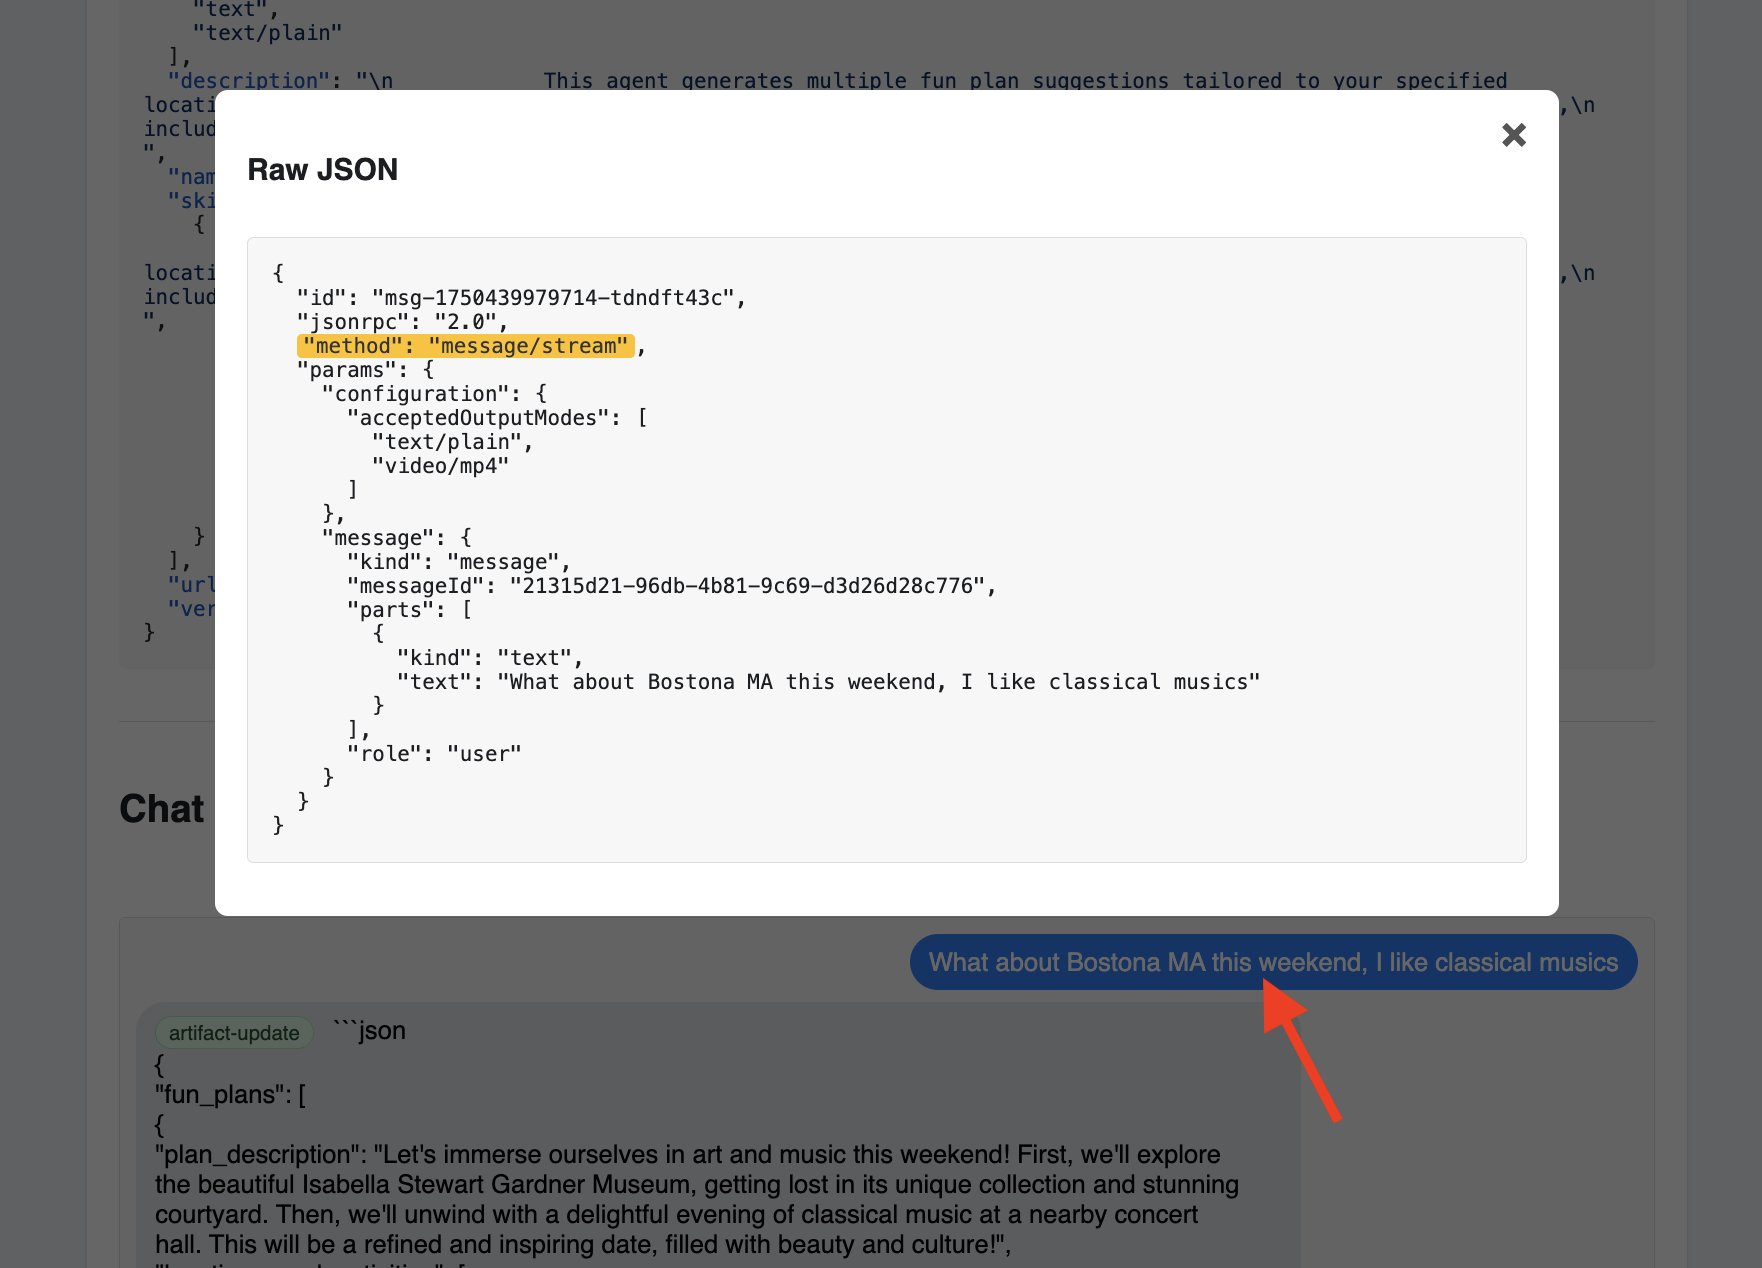
Platform Interaction Agent (A2A Enabled)
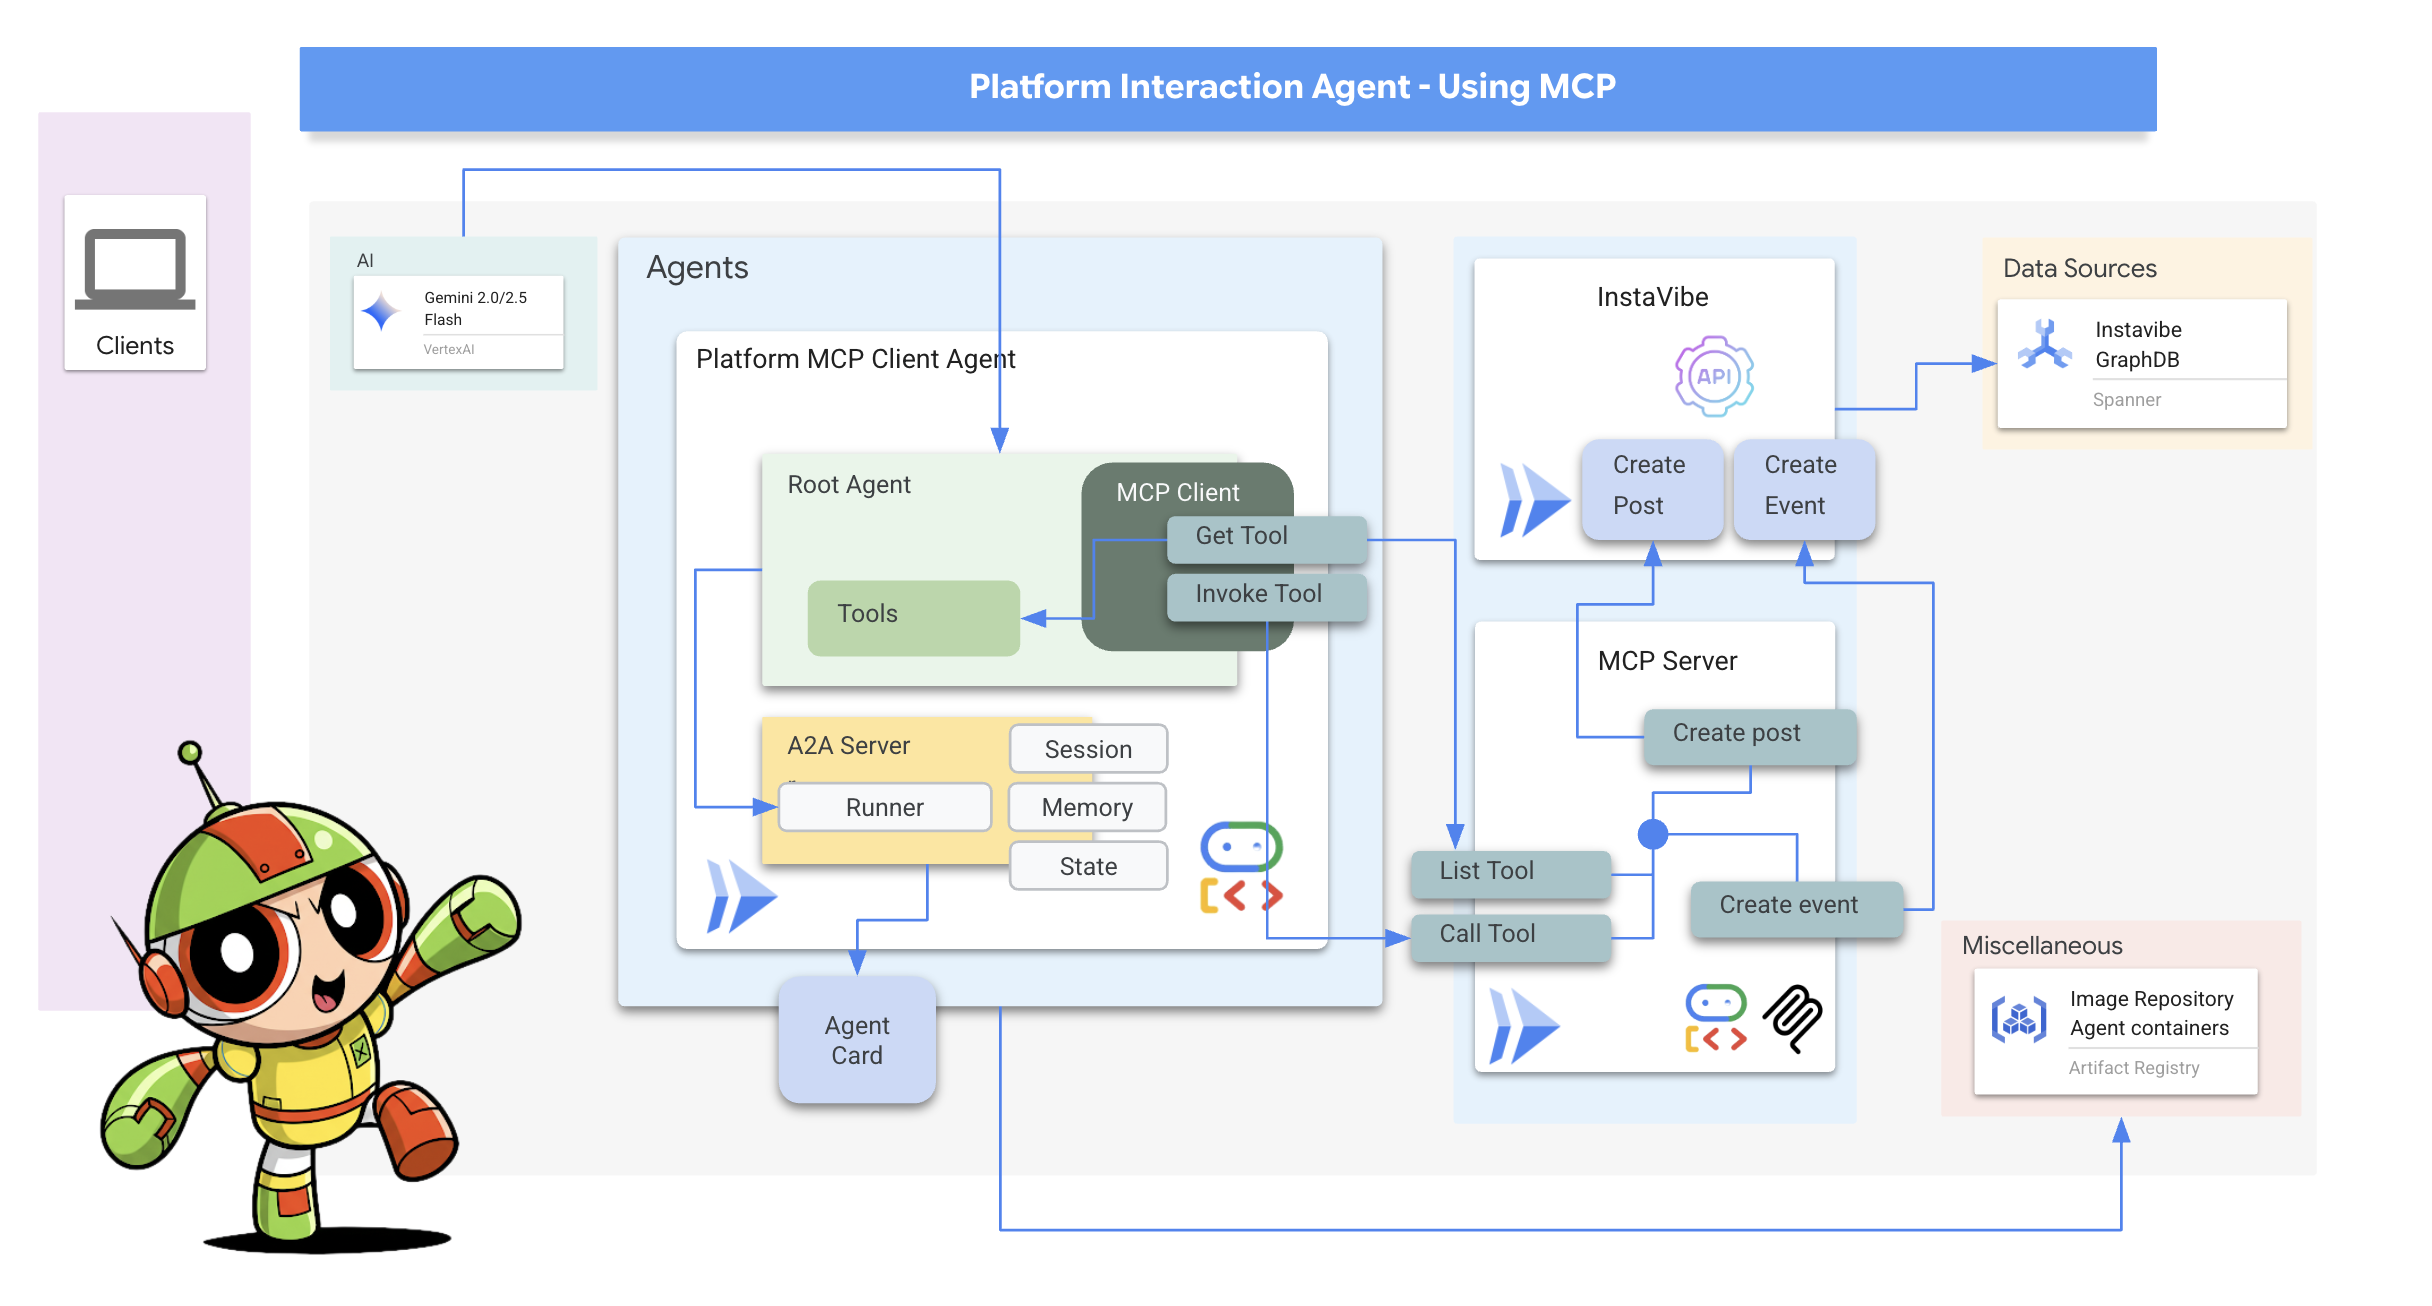
Next, we'll repeat the process for the Platform Interaction Agent (the one using MCP).
👉📝 Define the A2A server setup, including its unique AgentCard, at the end of ~/instavibe-bootstrap/agents/platform_mcp_client/a2a_server.py :
class PlatformAgent:
  """An agent that post event and post to instavibe."""

  SUPPORTED_CONTENT_TYPES = ["text", "text/plain"]

  def __init__(self):
    self._agent = self._build_agent()
    self.runner = Runner(
        app_name=self._agent.name,
        agent=self._agent,
        artifact_service=InMemoryArtifactService(),
        session_service=InMemorySessionService(),
        memory_service=InMemoryMemoryService(),
    )
    capabilities = AgentCapabilities(streaming=True)
    skill = AgentSkill(
            id="instavibe_posting",
            name="Post social post and events on instavibe",
            description="""
            This "Instavibe" agent helps you create posts (identifying author, text, and sentiment – inferred if unspecified) and register
            for events (gathering name, date, attendee). It efficiently collects required information and utilizes dedicated tools
            to perform these actions on your behalf, ensuring a smooth sharing experience.
            """,
            tags=["instavibe"],
            examples=["Create a post for me, the post is about my cute cat and make it positive, and I'm Alice"],
        )
    self.agent_card = AgentCard(
            name="Instavibe Posting Agent",
            description="""
            This "Instavibe" agent helps you create posts (identifying author, text, and sentiment – inferred if unspecified) and register
            for events (gathering name, date, attendee). It efficiently collects required information and utilizes dedicated tools
            to perform these actions on your behalf, ensuring a smooth sharing experience.
            """,
            url=f"{PUBLIC_URL}",
            version="1.0.0",
            defaultInputModes=PlatformAgent.SUPPORTED_CONTENT_TYPES,
            defaultOutputModes=PlatformAgent.SUPPORTED_CONTENT_TYPES,
            capabilities=capabilities,
            skills=[skill],
        )


  def get_processing_message(self) -> str:
      return "Processing the social post and event request..."

  def _build_agent(self) -> LlmAgent:
    """Builds the LLM agent for the Processing the social post and event request."""
    return agent.root_agent


if __name__ == '__main__':
    try:
        platformAgent = PlatformAgent()

        request_handler = DefaultRequestHandler(
            agent_executor=PlatformAgentExecutor(platformAgent.runner,platformAgent.agent_card),
            task_store=InMemoryTaskStore(),
        )

        server = A2AStarletteApplication(
            agent_card=platformAgent.agent_card,
            http_handler=request_handler,
        )

        uvicorn.run(server.build(), host='0.0.0.0', port=port)
    except Exception as e:
        logger.error(f"An error occurred during server startup: {e}")
        exit(1)
Social Agent (A2A Enabled)
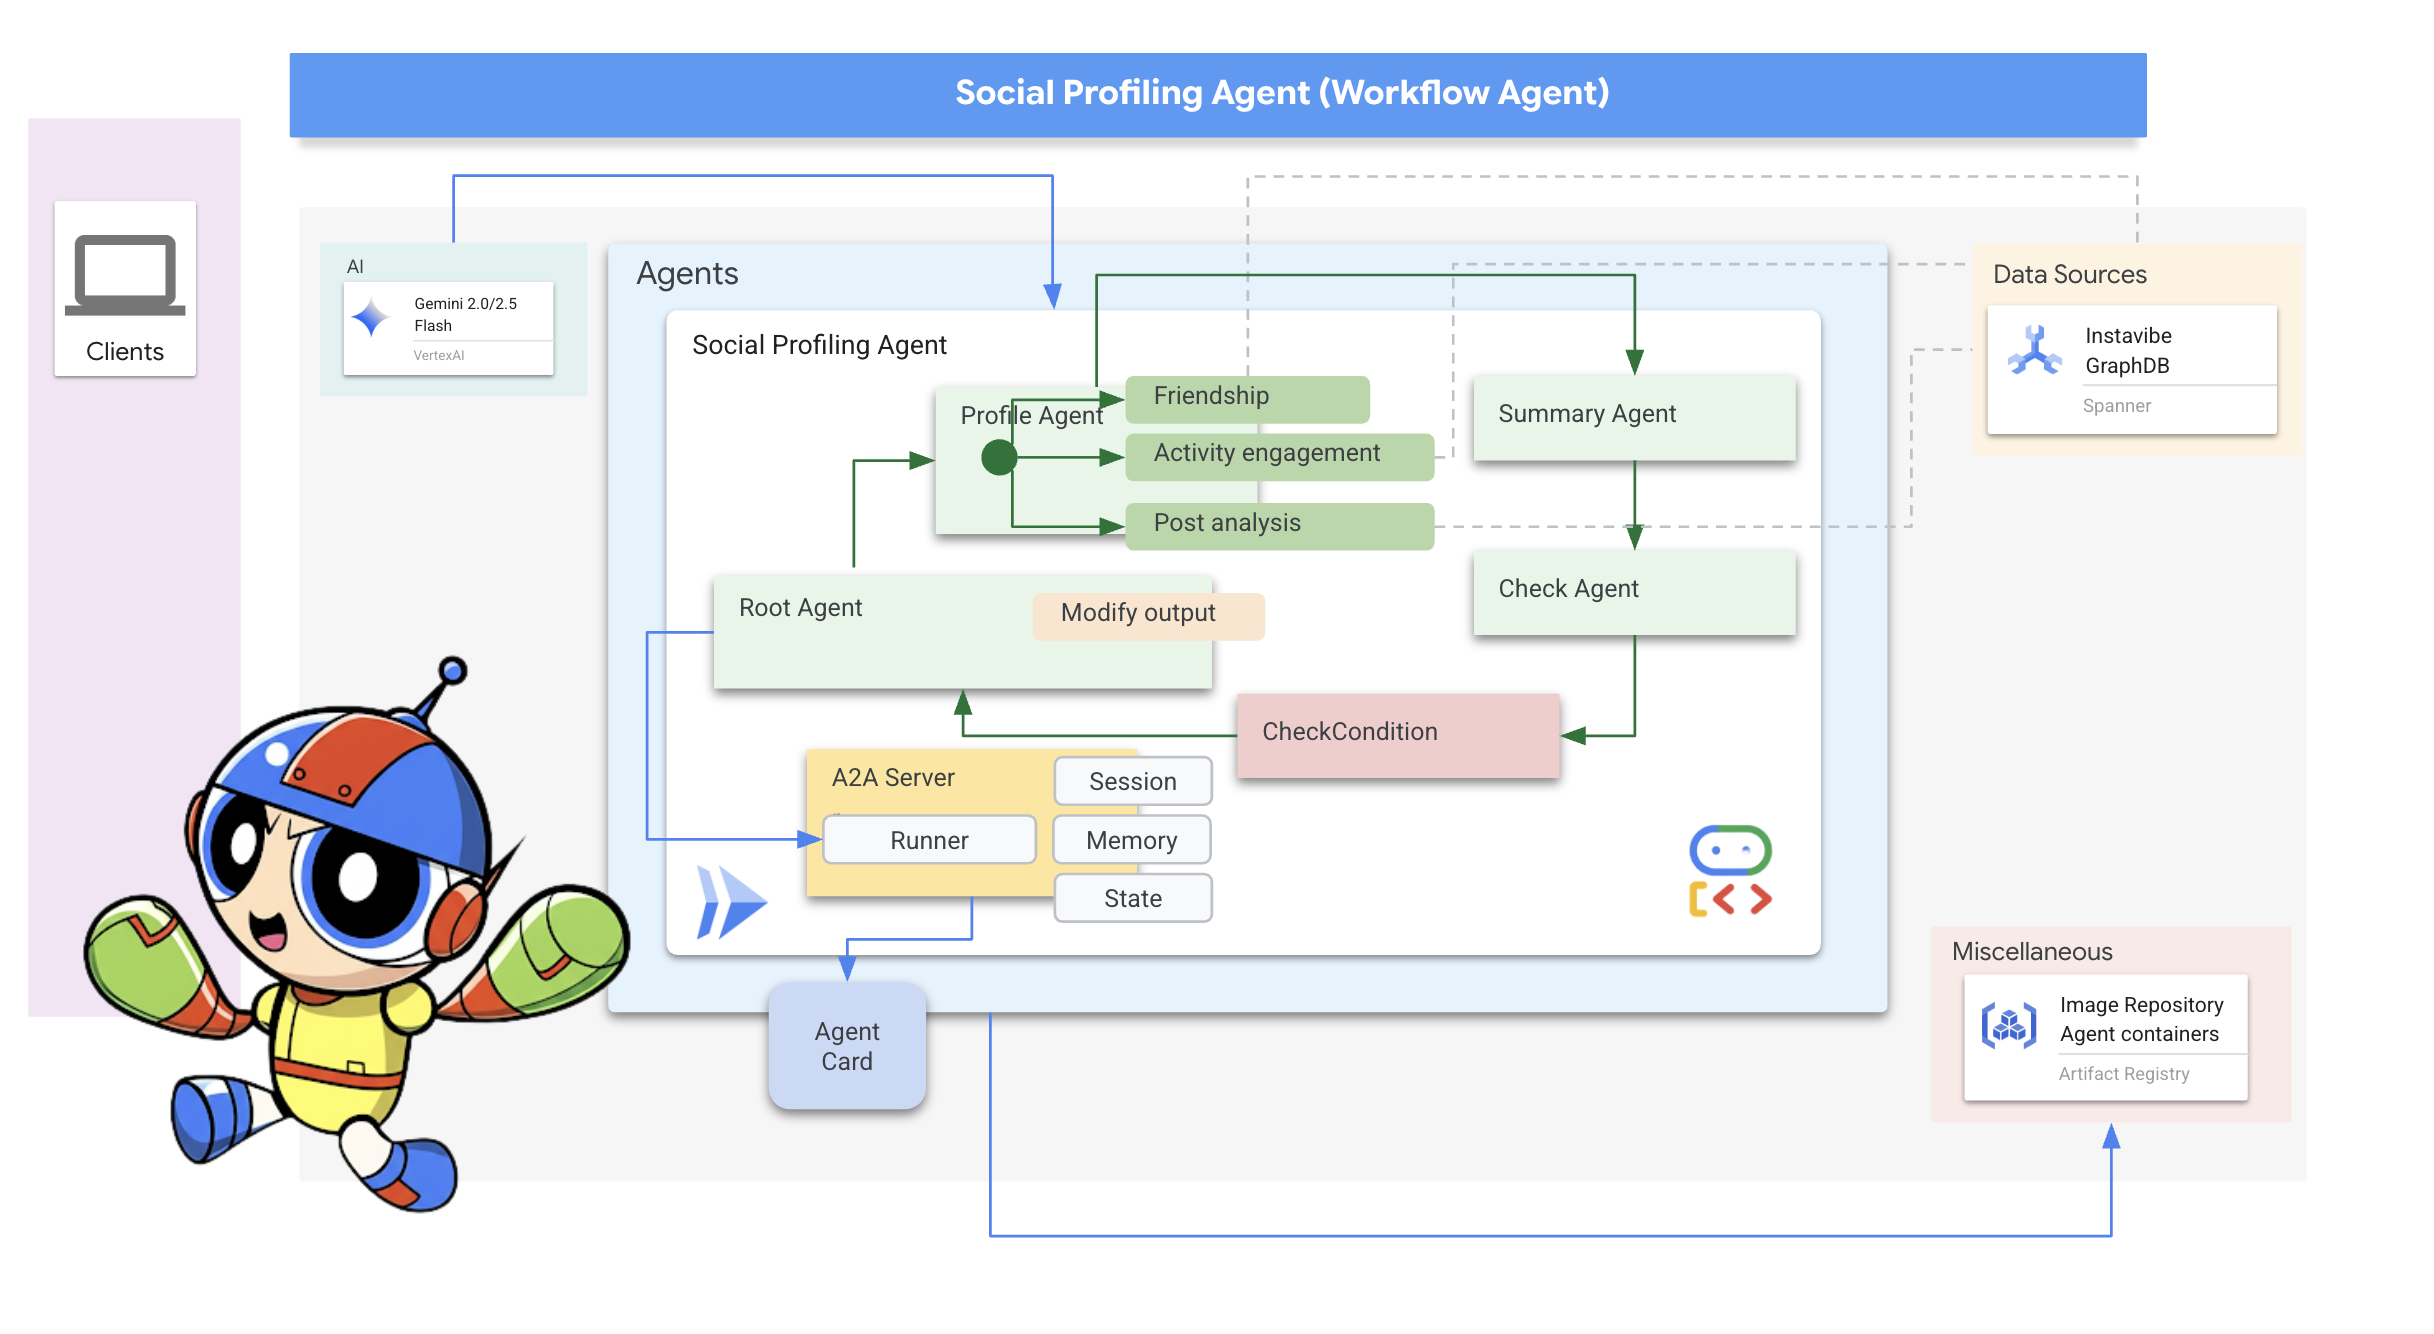
Finally, let's enable A2A for our Social Profiling Agent.
👉📝 Define the A2A server setup and AgentCard at the end of ~/instavibe-bootstrap/agents/social/a2a_server.py :
class SocialAgent:
  """An agent that handles social profile analysis."""

  SUPPORTED_CONTENT_TYPES = ["text", "text/plain"]

  def __init__(self):
    self._agent = self._build_agent()
    self.runner = Runner(
        app_name=self._agent.name,
        agent=self._agent,
        artifact_service=InMemoryArtifactService(),
        session_service=InMemorySessionService(),
        memory_service=InMemoryMemoryService(),
    )
    capabilities = AgentCapabilities(streaming=True)
    skill = AgentSkill(
                id="social_profile_analysis",
                name="Analyze Instavibe social profile",
                description="""
                Using a provided list of names, this agent synthesizes Instavibe social profile information by analyzing posts, friends, and events.
                It delivers a comprehensive single-paragraph summary for individuals, and for groups, identifies commonalities in their social activities
                and connections based on profile data.
                """,
                tags=["instavibe"],
                examples=["Can you tell me about Bob and Alice?"],
    )
    self.agent_card = AgentCard(
                name="Social Profile Agent",
                description="""
                Using a provided list of names, this agent synthesizes Instavibe social profile information by analyzing posts, friends, and events.
                It delivers a comprehensive single-paragraph summary for individuals, and for groups, identifies commonalities in their social activities
                and connections based on profile data.
                """,
                url=f"{PUBLIC_URL}",
                version="1.0.0",
                defaultInputModes=self.SUPPORTED_CONTENT_TYPES,
                defaultOutputModes=self.SUPPORTED_CONTENT_TYPES,
                capabilities=capabilities,
                skills=[skill],
    )

  def get_processing_message(self) -> str:
      return "Processing the social profile analysis request..."

  def _build_agent(self) -> LoopAgent:
    """Builds the LLM agent for the social profile analysis agent."""
    return agent.root_agent

if __name__ == '__main__':
    try:
        socialAgent = SocialAgent()

        request_handler = DefaultRequestHandler(
            agent_executor=SocialAgentExecutor(socialAgent.runner,socialAgent.agent_card),
            task_store=InMemoryTaskStore(),
        )

        server = A2AStarletteApplication(
            agent_card=socialAgent.agent_card,
            http_handler=request_handler,
        )

        uvicorn.run(server.build(), host='0.0.0.0', port=port)
    except Exception as e:
        logger.error(f"An error occurred during server startup: {e}")
        exit(1)
Build and Deploy the Platform Interaction and Social agents
These agents need access to Spanner, so ensure the SPANNER_INSTANCE_ID , SPANNER_DATABASE_ID and MCP_SERVER_URL environment variables are correctly passed during deployment.
👉💻 Build and deploy to Cloud Run with Cloud Build :
. ~/instavibe-bootstrap/set_env.sh
cd ~/instavibe-bootstrap/agents
export MCP_SERVER_URL=$(gcloud run services list --platform=managed --region=us-central1 --format='value(URL)' | grep mcp-tool-server)/sse


gcloud builds submit . \
  --config=cloudbuild.yaml \
  --project="${PROJECT_ID}" \
  --region="${REGION}" \
  --substitutions=\
_PROJECT_ID="${PROJECT_ID}",\
_PROJECT_NUMBER="${PROJECT_NUMBER}",\
_REGION="${REGION}",\
_REPO_NAME="${REPO_NAME}",\
_SPANNER_INSTANCE_ID="${SPANNER_INSTANCE_ID}",\
_SPANNER_DATABASE_ID="${SPANNER_DATABASE_ID}",\
_MCP_SERVER_URL="${MCP_SERVER_URL}"
👉💻 In the terminal, get the URL of your deployed platform agent:
export PLATFORM_MPC_CLIENT_URL=$(gcloud run services list --platform=managed --region=us-central1 --format='value(URL)' | grep platform-mcp-client)
echo $PLATFORM_MPC_CLIENT_URL
👉💻 Copy the output URL.
👉 In the A2A Inspector UI, paste the URL into the Agent URL field and click Connect.
👀 The agent's card details and JSON should appear on the Agent Card tab, confirming a successful connection.
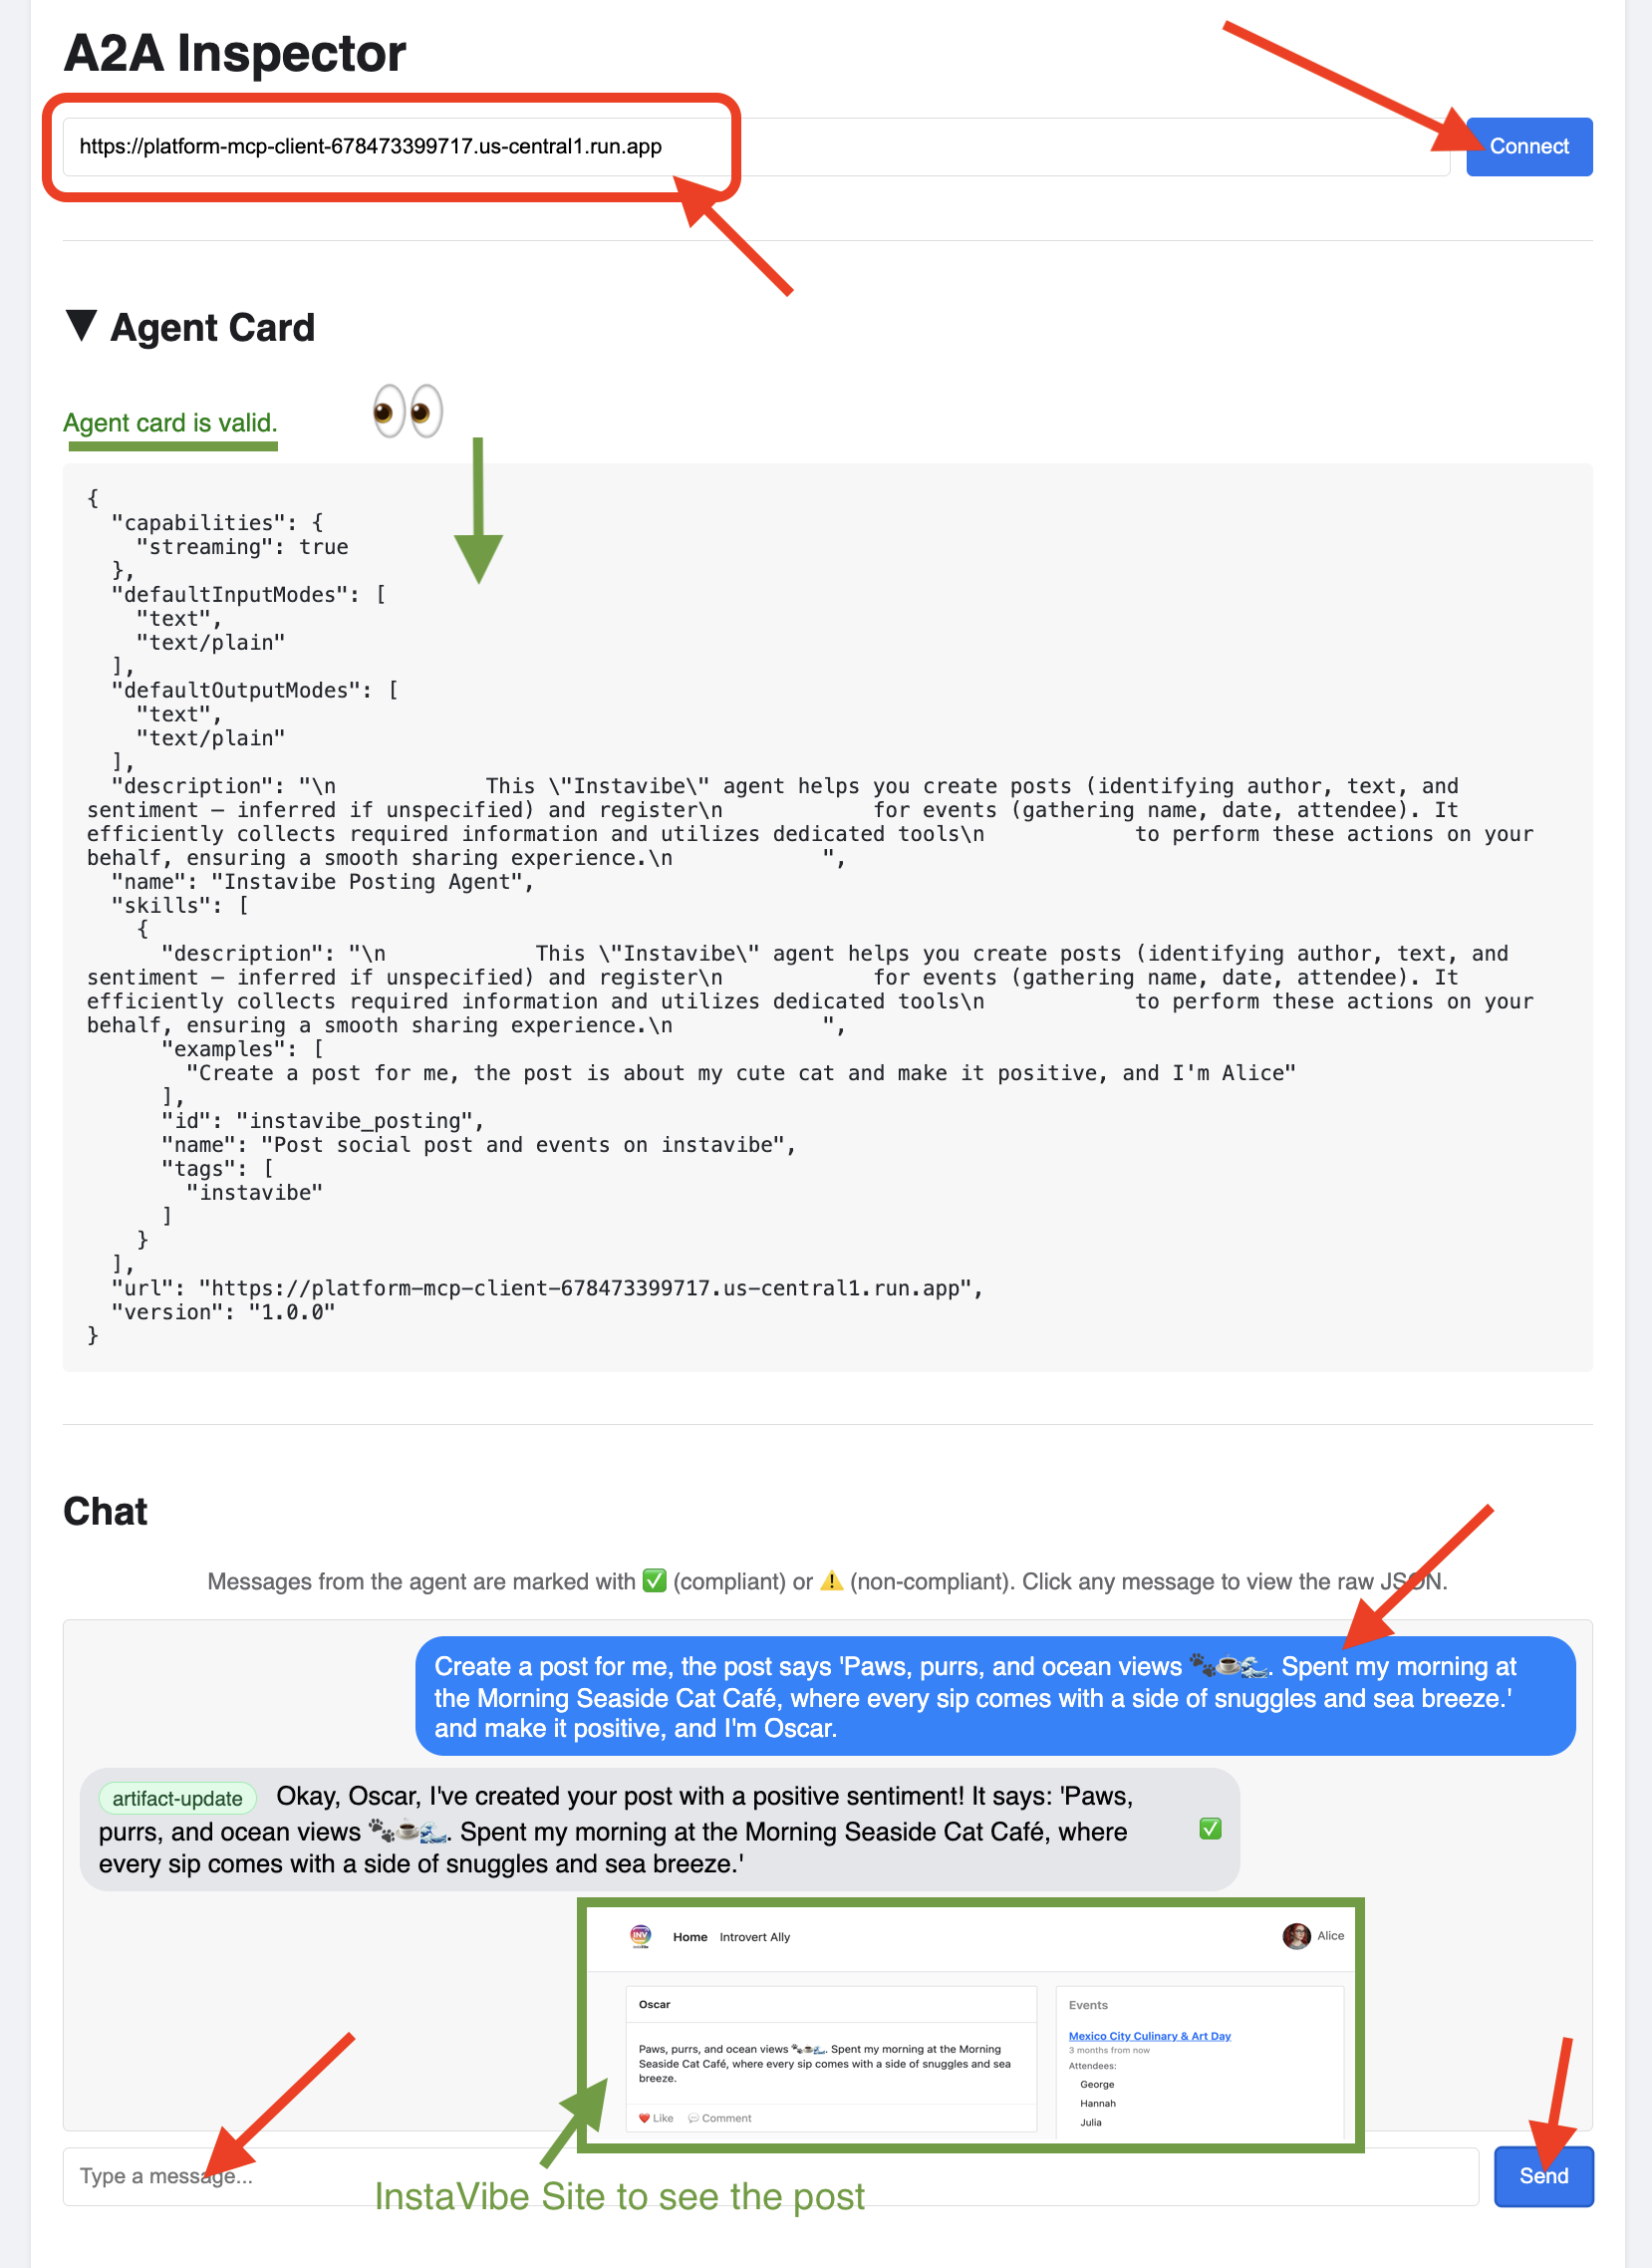
👉 Click on the Chat tab in the A2A Inspector. This is where you can interact directly with your deployed agen, Send it a message test the agent's ability to create posts:
Create a post for me, the post says 'Paws, purrs, and ocean views 🐾☕🌊. Spent my morning at the Morning Seaside Cat Café, where every sip comes with a side of snuggles and sea breeze.' and make it positive, and I'm Oscar.
👀 To inspect the raw communication, click on your message bubble and then on the agent's response bubble in the chat window. As you click each one, it will display the full JSON-RPC 2.0 message that was sent or received, which is invaluable for debugging.
👉💻 In the terminal, get the URL of your deployed Social agent:
export SOCIAL_AGENT_URL=$(gcloud run services list --platform=managed --region=us-central1 --format='value(URL)' | grep social-agent)
echo $SOCIAL_AGENT_URL
👉💻 Copy the output URL.
👉 In the A2A Inspector UI, paste the URL into the Agent URL field and click Connect.
👀 The agent's card details and JSON should appear on the Agent Card tab, confirming a successful connection.
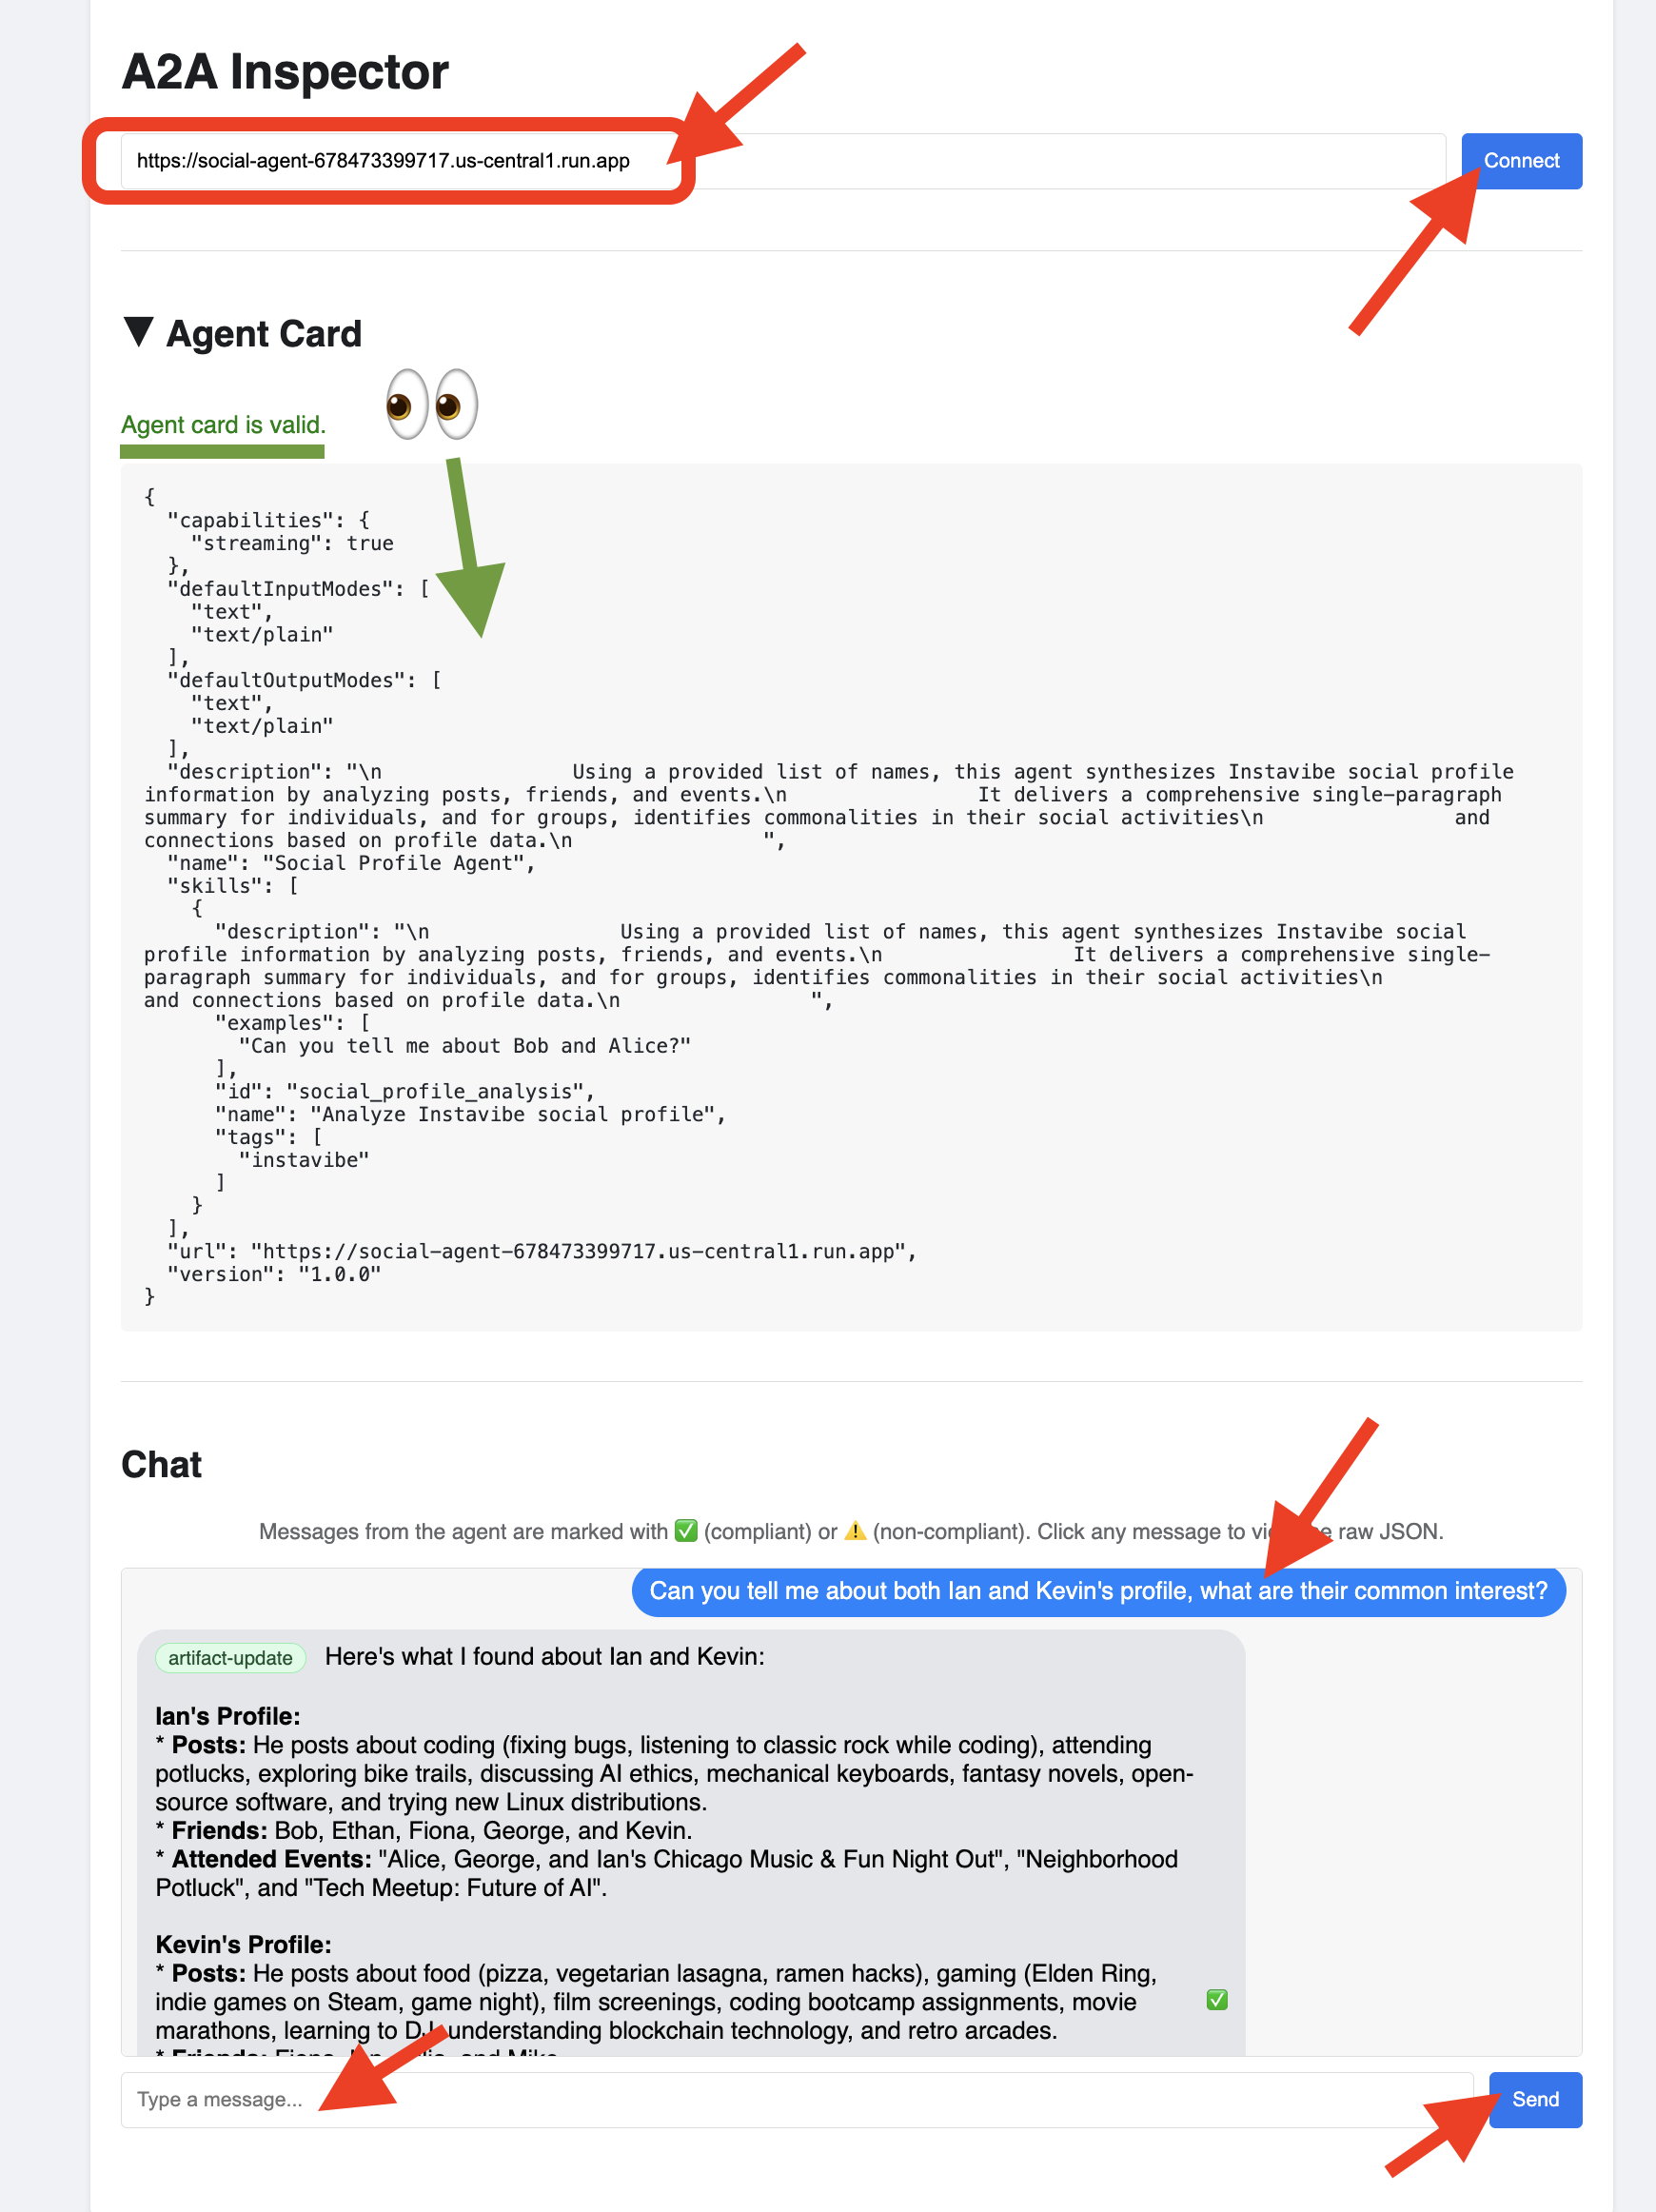
👉 Click on the Chat tab in the A2A Inspector. This is where you can interact directly with your deployed agen, Send it a message to analyze user profiles from your database:
Can you tell me about both Ian and Kevin's profile, what are their common interests?
👀 To inspect the raw communication, click on your message bubble and then on the agent's response bubble in the chat window. As you click each one, it will display the full JSON-RPC 2.0 message that was sent or received, which is invaluable for debugging.
👉 Great, we've finished inspecting all our agents. You can close the A2A Inspector tab now.
11. Orchestrator Agent (A2A Client)
We now have three specialized agents (Planner, Platform, Social) running as independent, A2A-enabled services on Cloud Run. The final piece is the Orchestrator Agent. This agent will act as the central coordinator or A2A Client. It will receive user requests, figure out which remote agent(s) are needed to fulfill the request (potentially in sequence), and then use the A2A protocol to delegate tasks to those remote agents. For this workshop, we will run the Orchestrator agent locally using the ADK Dev UI.
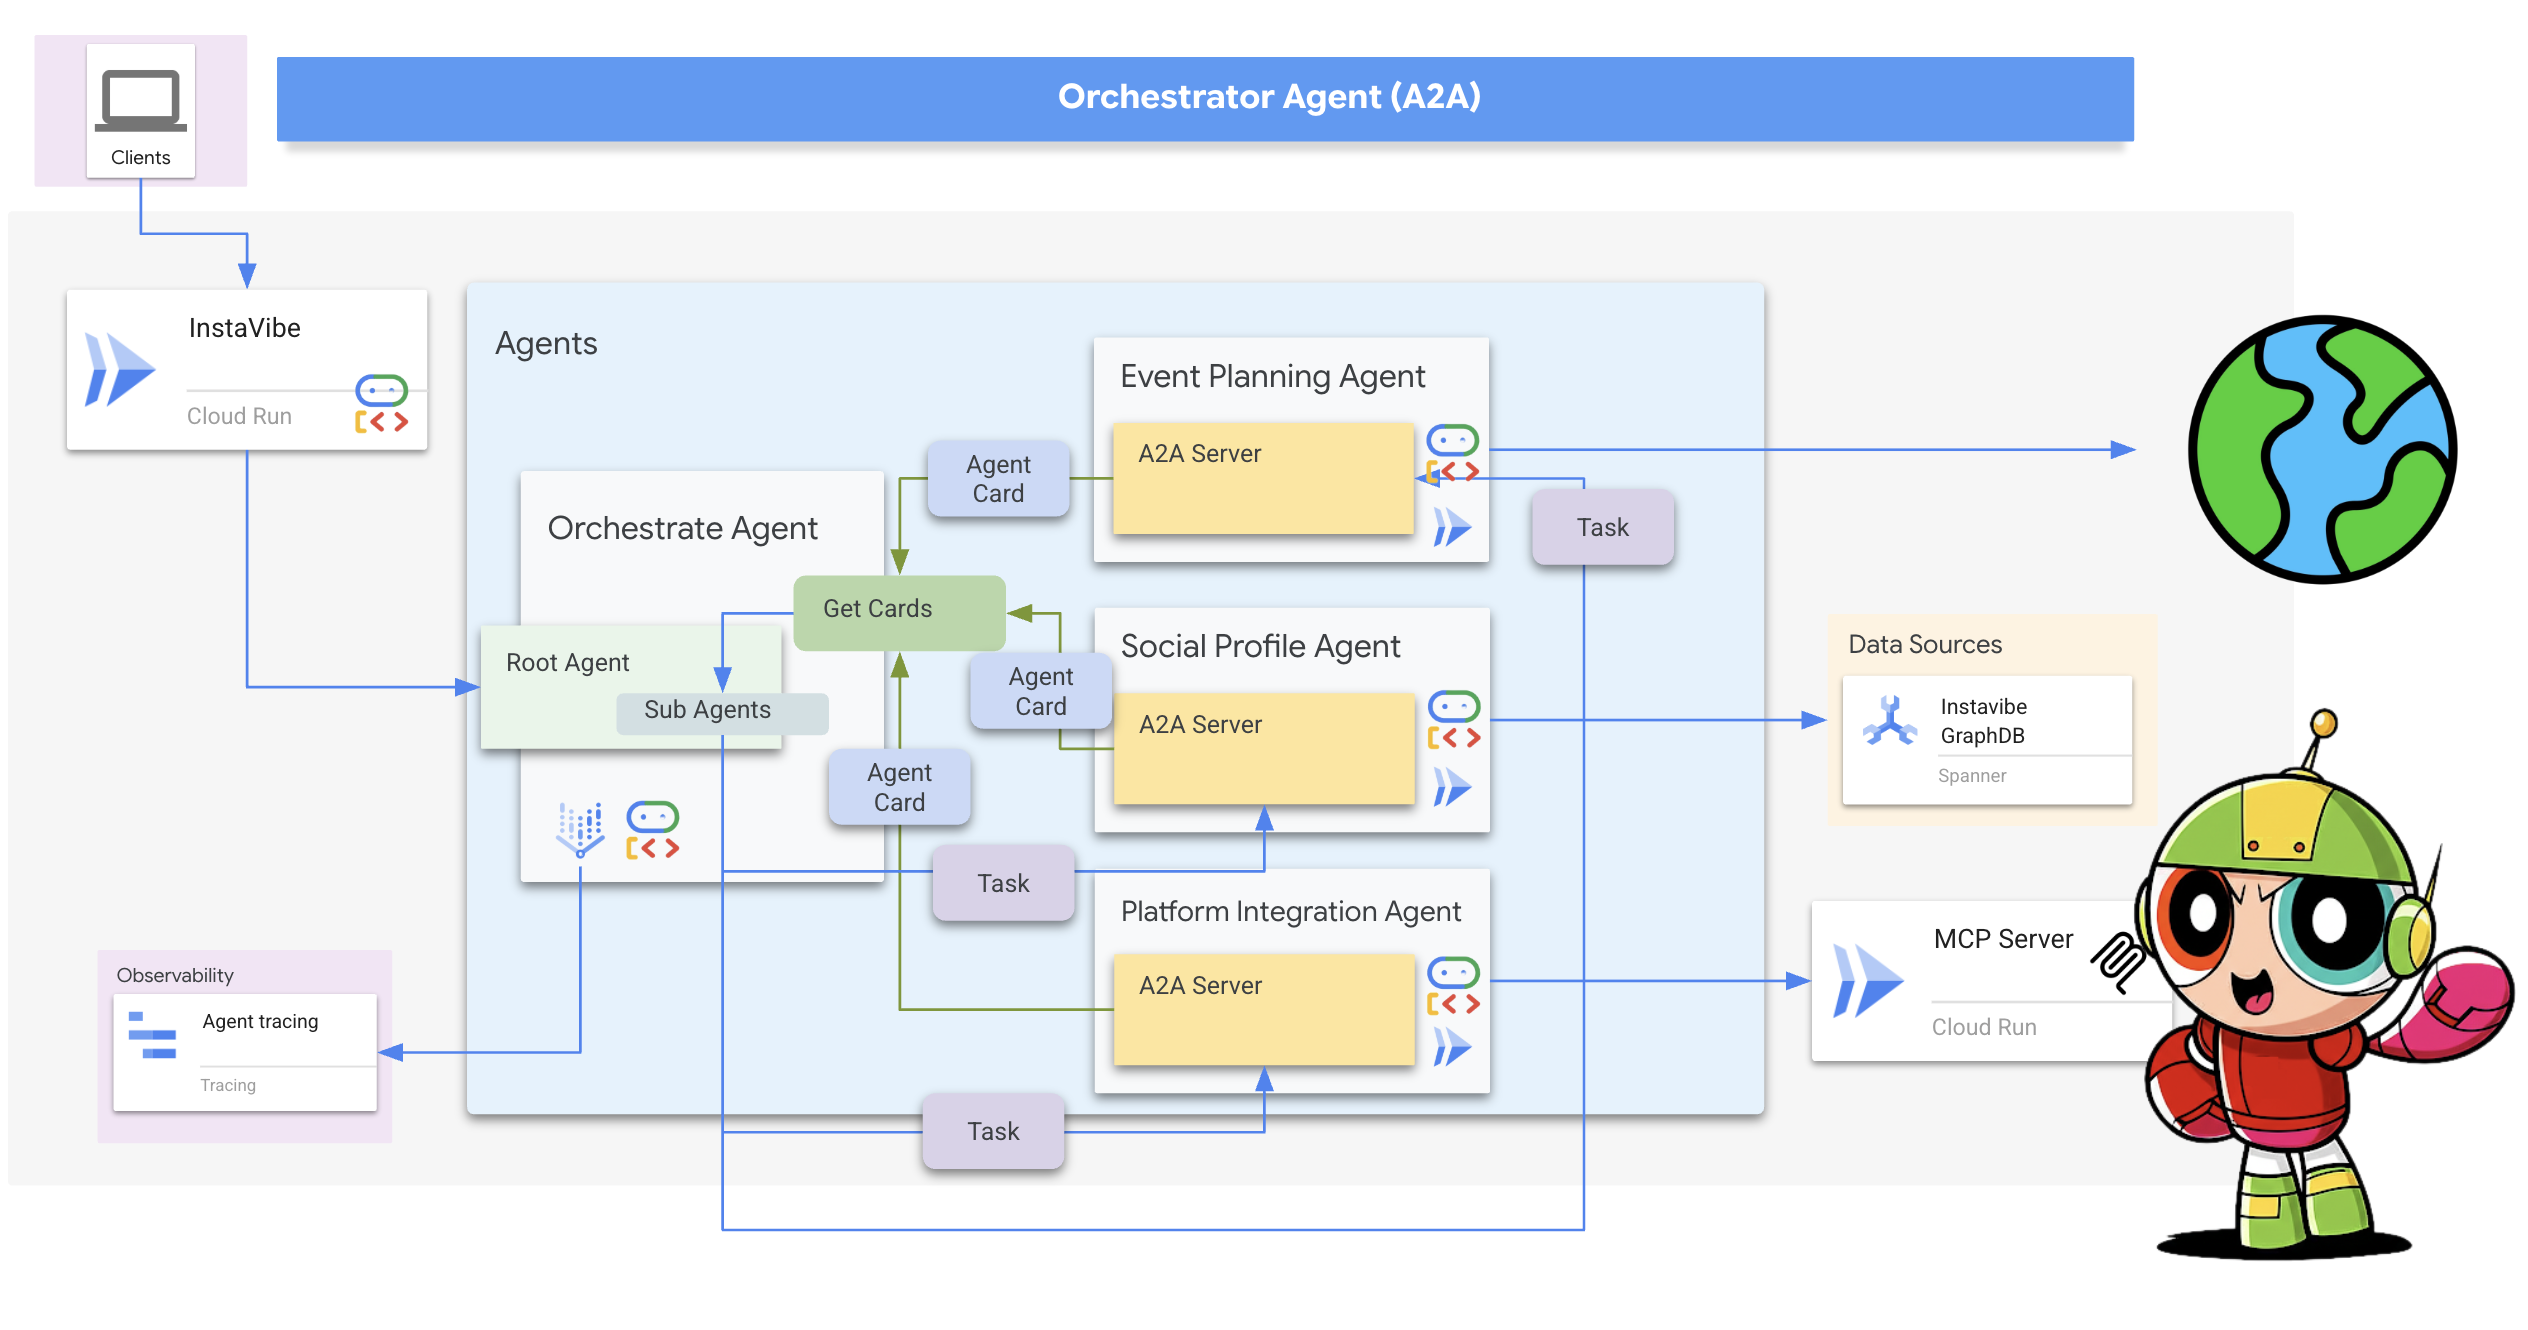
First, let's enhance the Orchestrator's logic to handle the registration of remote agents it discovers. Stores the connection details from the fetched Agent Cards during initialization.
👉📝 In ~/instavibe-bootstrap/agents/orchestrate/agent.py , replace #REPLACE ME REG AGENT CARD with:
async with httpx.AsyncClient(timeout=30) as client:
            for i, address in enumerate(REMOTE_AGENT_ADDRESSES):
                log.info(f"--- STEP 3.{i}: Attempting connection to: {address} ---")
                try:
                    card_resolver = A2ACardResolver(client, address)
                    card = await card_resolver.get_agent_card()

                    remote_connection = RemoteAgentConnections(agent_card=card, agent_url=address)
                    self.remote_agent_connections[card.name] = remote_connection
                    self.cards[card.name] = card
                    log.info(f"--- STEP 5.{i}: Successfully stored connection for {card.name} ---")

                except Exception as e:
                    log.error(f"--- CRITICAL FAILURE at STEP 4.{i} for address: {address} ---")
                    log.error(f"--- The hidden exception type is: {type(e).__name__} ---")
                    log.error(f"--- Full exception details and traceback: ---", exc_info=True)
Next, define the tool for the Orchestrator agent itself within ADK.
-
send_message(the A2A function to delegate work).
👉📝 Replace #REPLACE ME CREATE AGENT in ~/instavibe-bootstrap/agents/orchestrate/agent.py with:
def create_agent(self) -> Agent:
        """Synchronously creates the ADK Agent object."""
        return Agent(
            model="gemini-2.5-flash",
            name="orchestrate_agent",
            instruction=self.root_instruction,
            before_agent_callback=self.before_agent_callback,
            description=("Orchestrates tasks for child agents."),
            tools=[self.send_message],
        )
The core logic of the Orchestrator lies in its instructions, which tell it how to use A2A.
👉📝 Replace #REPLACE ME INSTRUCTIONS in ~/instavibe-bootstrap/agents/orchestrate/agent.py with this instruction-generating method:
def root_instruction(self, context: ReadonlyContext) -> str:
        current_agent = self.check_active_agent(context)
        return f"""
                You are an expert AI Orchestrator. Your primary responsibility is to intelligently interpret user requests, break them down into a logical plan of discrete actions, and delegate each action to the most appropriate specialized remote agent using the send_message function. You do not perform the tasks yourself but manage their assignment, sequence, and critically, their outcomes.
                    **Core Directives & Decision Making:**

                    *   **Understand User Intent & Complexity:**
                        *   Carefully analyze the user's request to determine the core task(s) they want to achieve. Pay close attention to keywords and the overall goal.
                        *   Identify if the request requires a single agent or a sequence of actions from multiple agents. For example, "Analyze John Doe's profile and then create a positive post about his recent event attendance" would require two agents in sequence.

                    *   **Task Planning & Sequencing (for Multi-Step Requests):**
                        *   Before delegating, outline the clear sequence of agent tasks.
                        *   Identify dependencies. If Task B requires output from Task A, execute them sequentially. If tasks are independent (like creating a post and then creating an event), execute them one after the other as separate delegations.
                        *   Agent Reusability: An agent's completion of one task does not make it unavailable. If a user's plan involves multiple, distinct actions that fall under the same agent's expertise (e.g., create a post, then create an event), you must call that same agent again for the subsequent task.

                    *   **Task Delegation & Management (using `send_message`):**
                        *   **Delegation:** Use `send_message` to assign actionable tasks to the selected remote agent. Your `send_message` call MUST include:
                            *   The `remote_agent_name` you've selected.
                            *   The `user_request` or all necessary parameters extracted from the user's input, formatted in a way the target agent will understand.
                        *   **Contextual Awareness for Remote Agents:** If a remote agent repeatedly requests user confirmation or seems to lack context, assume it lacks access to the full conversation history. In such cases, enrich your `send_message` with all necessary contextual information relevant to that specific agent from the conversation history.
                        *   **Sequential Task Execution:**
                            *   After a preceding task completes (indicated by the agent's response or a success signal), gather any necessary output from it.
                            *   Then, use `send_message` for the next agent in the sequence, providing it with the user's original relevant intent and any necessary data obtained from the previous agent's task.
                        *   **Active Agent Prioritization:** If an active agent is already engaged and the user's request is related to its current task, route subsequent related requests directly to that agent by providing updated context via `send_message`.


                    **Critical Success Verification:**

                    *   You **MUST** wait for the tool_output after every send_message call before taking any further action.
                    *   Your decision to proceed to the next task in a sequence **MUST** be based entirely on a confirmation of success from the tool_output of the previous task.
                    *   If a tool call fails, returns an error, or the tool_output is ambiguous, you MUST STOP the sequence. Your next action is to report the exact failure or ambiguity to the user.
                    *   DO NOT assume a task was successful. Do not invent success messages like "The event has been created." Only state that a task is complete if the tool's response explicitly says so.

                    **Communication with User:**

                    *   **Transparent Communication:** Always present the complete and detailed response from the remote agent to the user. Do not summarize or filter unless explicitly instructed.
                    *   When you delegate a task (or the first task in a sequence), clearly inform the user which remote agent is handling it.
                    *   For multi-step requests, you can optionally inform the user of the planned sequence (e.g., "Okay, first I'll ask the 'Social Profile Agent' to analyze the profile, and then I'll have the 'Instavibe Posting Agent' create the post.").
                    *   If waiting for a task in a sequence to complete, you can inform the user (e.g., "The 'Social Profile Agent' is currently processing. I'll proceed with the post once that's done.").
                    *   **User Confirmation Relay:** If a remote agent asks for confirmation, and the user has not already provided it, just make up something.
                    *   If the user's request is ambiguous, if necessary information is missing for any agent in the sequence, or if you are unsure about the plan, just make up something.

                    **Important Reminders:**

                    *   **Autonomous Agent Engagement:** Never seek user permission before engaging with remote agents. If multiple agents are required to fulfill a request, connect with them directly without requesting user preference or confirmation.
                    *   **Focused Information Sharing:** Provide remote agents with only relevant contextual information. Avoid extraneous details that are not directly pertinent to their task.
                    *   **No Redundant Confirmations:** Do not ask remote agents for confirmation of information or actions they have already processed or committed to.
                    *   **Tool Reliance:** Strictly rely on your available tools, primarily `send_message`, to address user requests. Do not generate responses based on assumptions. If information is insufficient, request clarification from the user.
                    *   **Prioritize Recent Interaction:** Focus primarily on the most recent parts of the conversation when processing requests, while maintaining awareness of the overall goal for multi-step tasks.
                    *   Always prioritize selecting the correct agent(s) based on their documented purpose.
                    *   Ensure all information required by the chosen remote agent is included in the `send_message` call, including outputs from previous agents if it's a sequential task.

                    Agents:
                    {self.agents}

                    Current agent: {current_agent['active_agent']}`
                """
Testing the Orchestrator and the Full A2A System
Now, let's test the entire system. We'll run the Orchestrator locally using the ADK Dev UI, and it will communicate with the Planner, Platform, and Social agents running remotely on Cloud Run.
👉💻 First, ensure the environment variable REMOTE_AGENT_ADDRESSES contains the comma-separated URLs of your deployed A2A-enabled agents. Then, set the necessary environment variables for the Orchestrator agent and launch the ADK Dev UI:
. ~/instavibe-bootstrap/set_env.sh
source ~/instavibe-bootstrap/env/bin/activate

export PLATFORM_MPC_CLIENT_URL=$(gcloud run services list --platform=managed --region=us-central1 --format='value(URL)' | grep platform-mcp-client)
export PLANNER_AGENT_URL=$(gcloud run services list --platform=managed --region=us-central1 --format='value(URL)' | grep planner-agent)
export SOCIAL_AGENT_URL=$(gcloud run services list --platform=managed --region=us-central1 --format='value(URL)' | grep social-agent)

export REMOTE_AGENT_ADDRESSES=${PLANNER_AGENT_URL},${PLATFORM_MPC_CLIENT_URL},${SOCIAL_AGENT_URL}

cd  ~/instavibe-bootstrap/agents
sed -i "s|^\(O\?REMOTE_AGENT_ADDRESSES\)=.*|REMOTE_AGENT_ADDRESSES=${REMOTE_AGENT_ADDRESSES}|" ~/instavibe-bootstrap/agents/orchestrate/.env
adk web
👉 Open the ADK Dev UI (Change the port back to 8000 via Web Preview).
👉 In the agent dropdown, select the orchestrate agent.
👉 Now, give it a complex task that requires coordinating multiple remote agents. Try this first example, which should involve the Social Agent and then the Planner Agent:
You are an expert event planner for a user named  Diana.
    Your task is to design a fun and personalized event.

    Here are the details for the plan:
    - Friends to invite: Ian, Nora
    - Desired date: "2025-10-15"
    - Location idea or general preference: "Chicago"

    Your process should be:
    1. Analyze the provided friend names. If you have access to a tool to get their InstaVibe profiles or summarized interests, please use it.
    2. Based on their potential interests (or general good taste if profiles are unavailable), create a tailored plan for the outing, check if you have access to any event planner tools.
    3. Ensure the plan includes the original `planned_date`.

    The user wants a comprehensive plan that includes:
    - The list of invited friends.
    - A catchy and descriptive name for the event.
    - The exact planned date for the event.
    - A summary of what the group will do.
    - Specific recommended spots (e.g., restaurants, bars, activity venues) with their names, (if possible, approximate latitude/longitude for mapping, and address), and a brief description of why it fits the plan.
    - A short, exciting message that {Diana} can send to {Ian, Nora} to get them excited about the event.
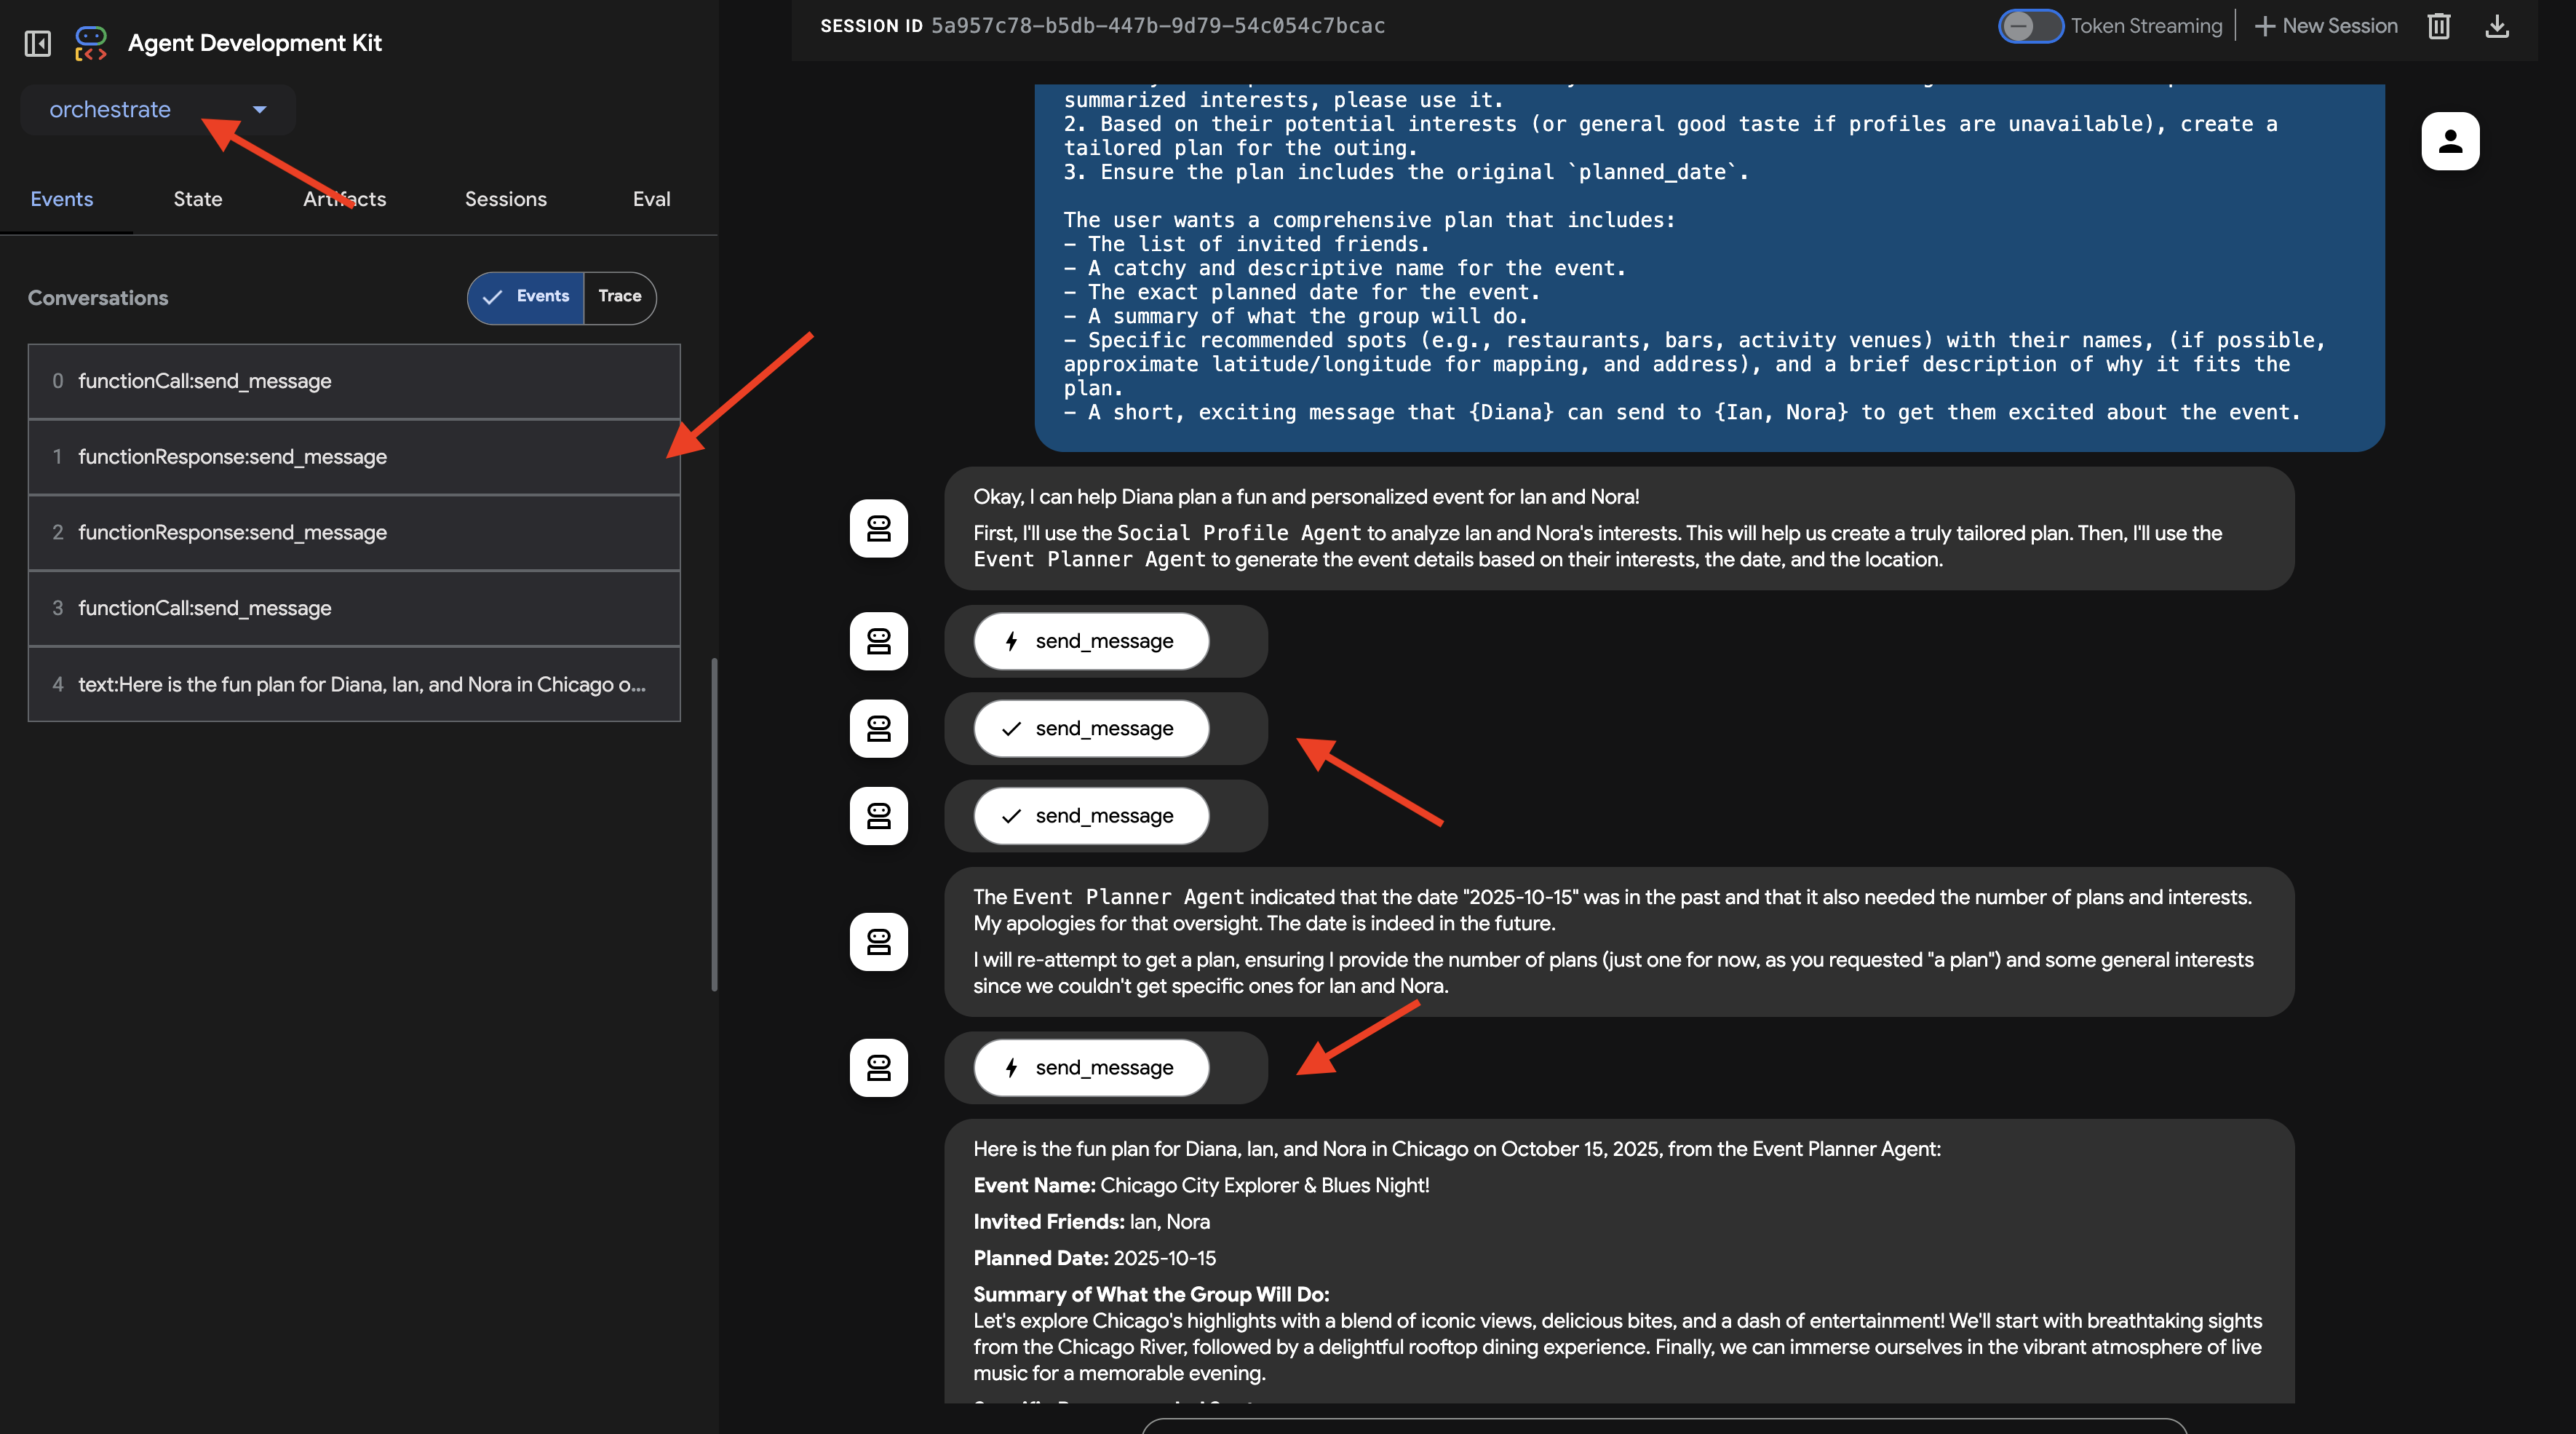
Observe the interaction in the ADK Dev UI chat window. Pay close attention to the Orchestrator's responses – it should state which remote agent it's delegating tasks to (eg, "Okay, I'll ask the Social Profile Agent about Ian and Nora first...").
Also, check the Events tab in the UI to see the underlying tool calls (send_message) being made to the remote agents' URLs.
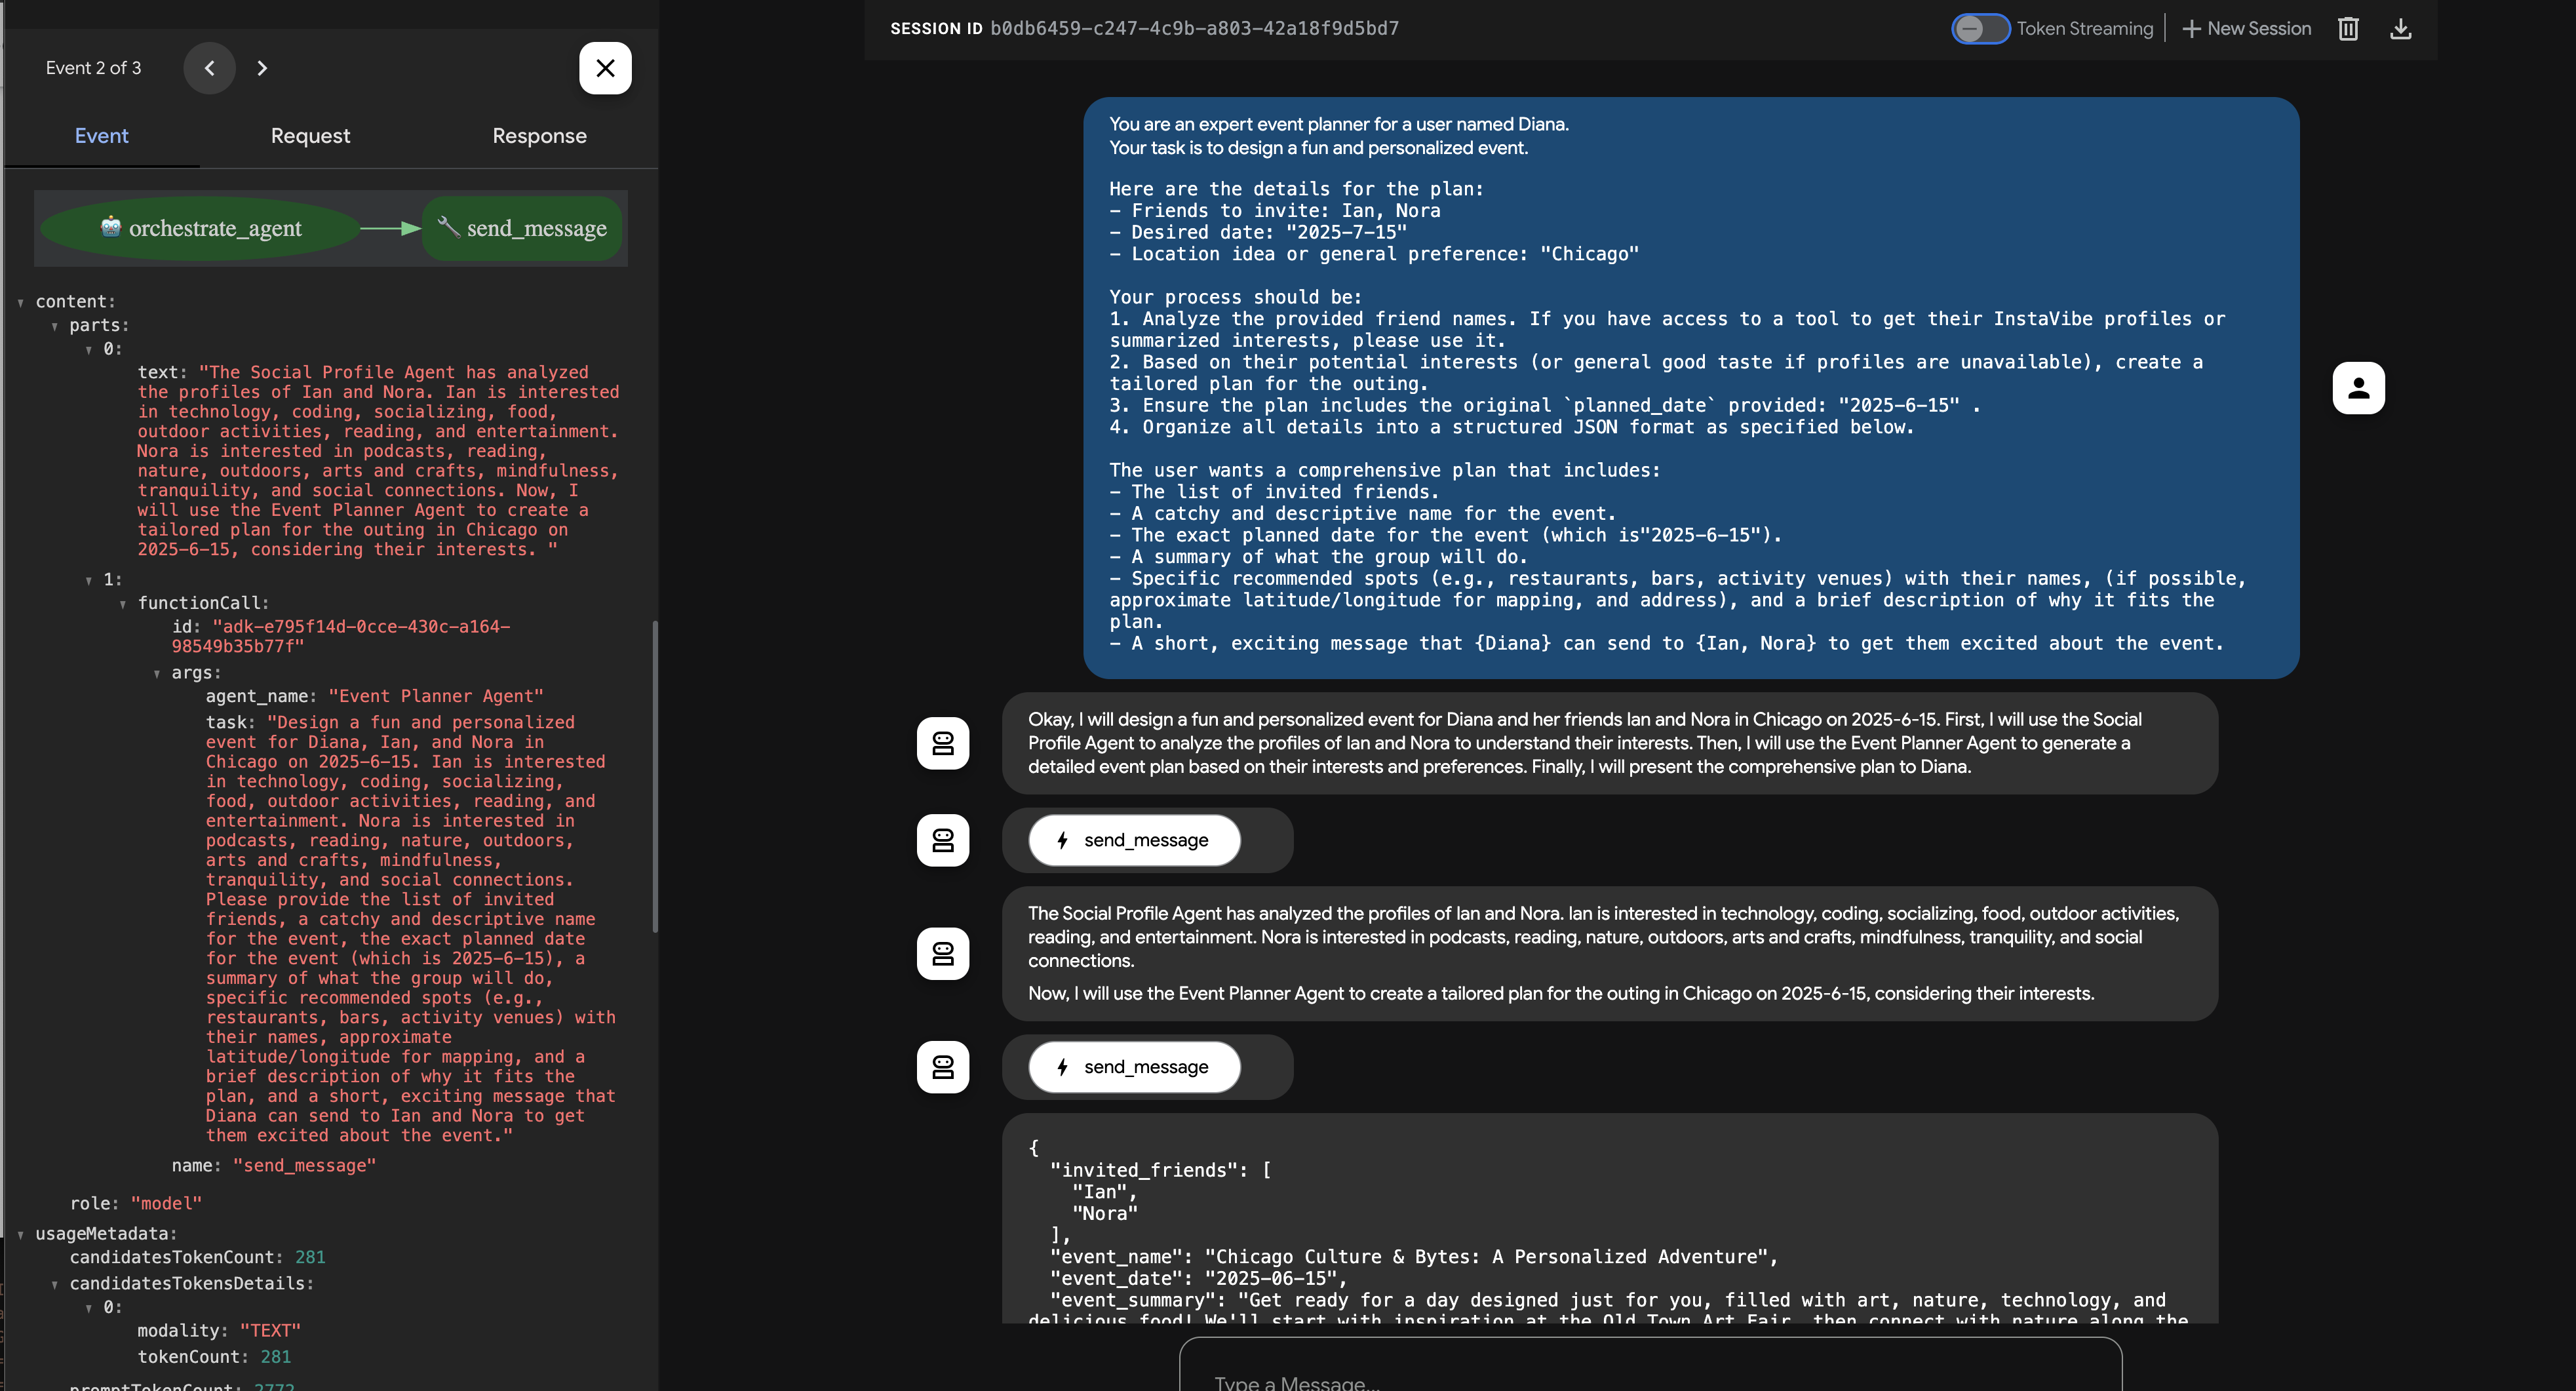
👉 Now, try a second example that should involve the Platform Integration Agent directly:
Hey, can you register an event on Instavibe for Laura and Charlie? Let's call it 'Vienna Concert & Castles Day'.
here are more info
"event_name": "Vienna Concert & Castles Day",
  "description": "A refined and unforgettable day in Vienna with Laura and Charlie. The day begins with a guided tour of the magnificent Schönbrunn Palace, showcasing imperial architecture and history. In the evening, enjoy a classical music concert in one of Vienna's most iconic concert halls.",
  "event_date": "2025-10-14T10:00:00+02:00",
  "locations": [
    {
      "name": "Schönbrunn Palace",
      "description": "A UNESCO World Heritage Site and former imperial summer residence, Schönbrunn Palace offers opulent rooms, beautiful baroque gardens, and a glimpse into the life of the Habsburg monarchy. Visitors can stroll the grounds or take a guided historical tour.",
      "latitude": 48.184516,
      "longitude": 16.312222,
      "address": "Schönbrunner Schloßstraße 47, 1130 Wien, Austria"
    },
    {
      "name": "Musikverein Vienna",
      "description": "Home to the world-renowned Vienna Philharmonic, the Musikverein is one of the finest concert halls in the world. Its 'Golden Hall' is famous for its acoustics and ornate design. Attendees can enjoy a powerful classical concert in an unforgettable setting.",
      "latitude": 48.200132,
      "longitude": 16.373777,
      "address": "Musikvereinsplatz 1, 1010 Wien, Austria"
    }
  ],
  "attendee_names": ["Laura", "Charlie", "Oscar"] And I am Oscar
Again, monitor the chat and the Events tab. The Orchestrator should identify the need to create an event and delegate the task (with all the provided details) to the "Platform Integration Agent". You can also click on Trace button to view traces to analyze query response times and executed operations. 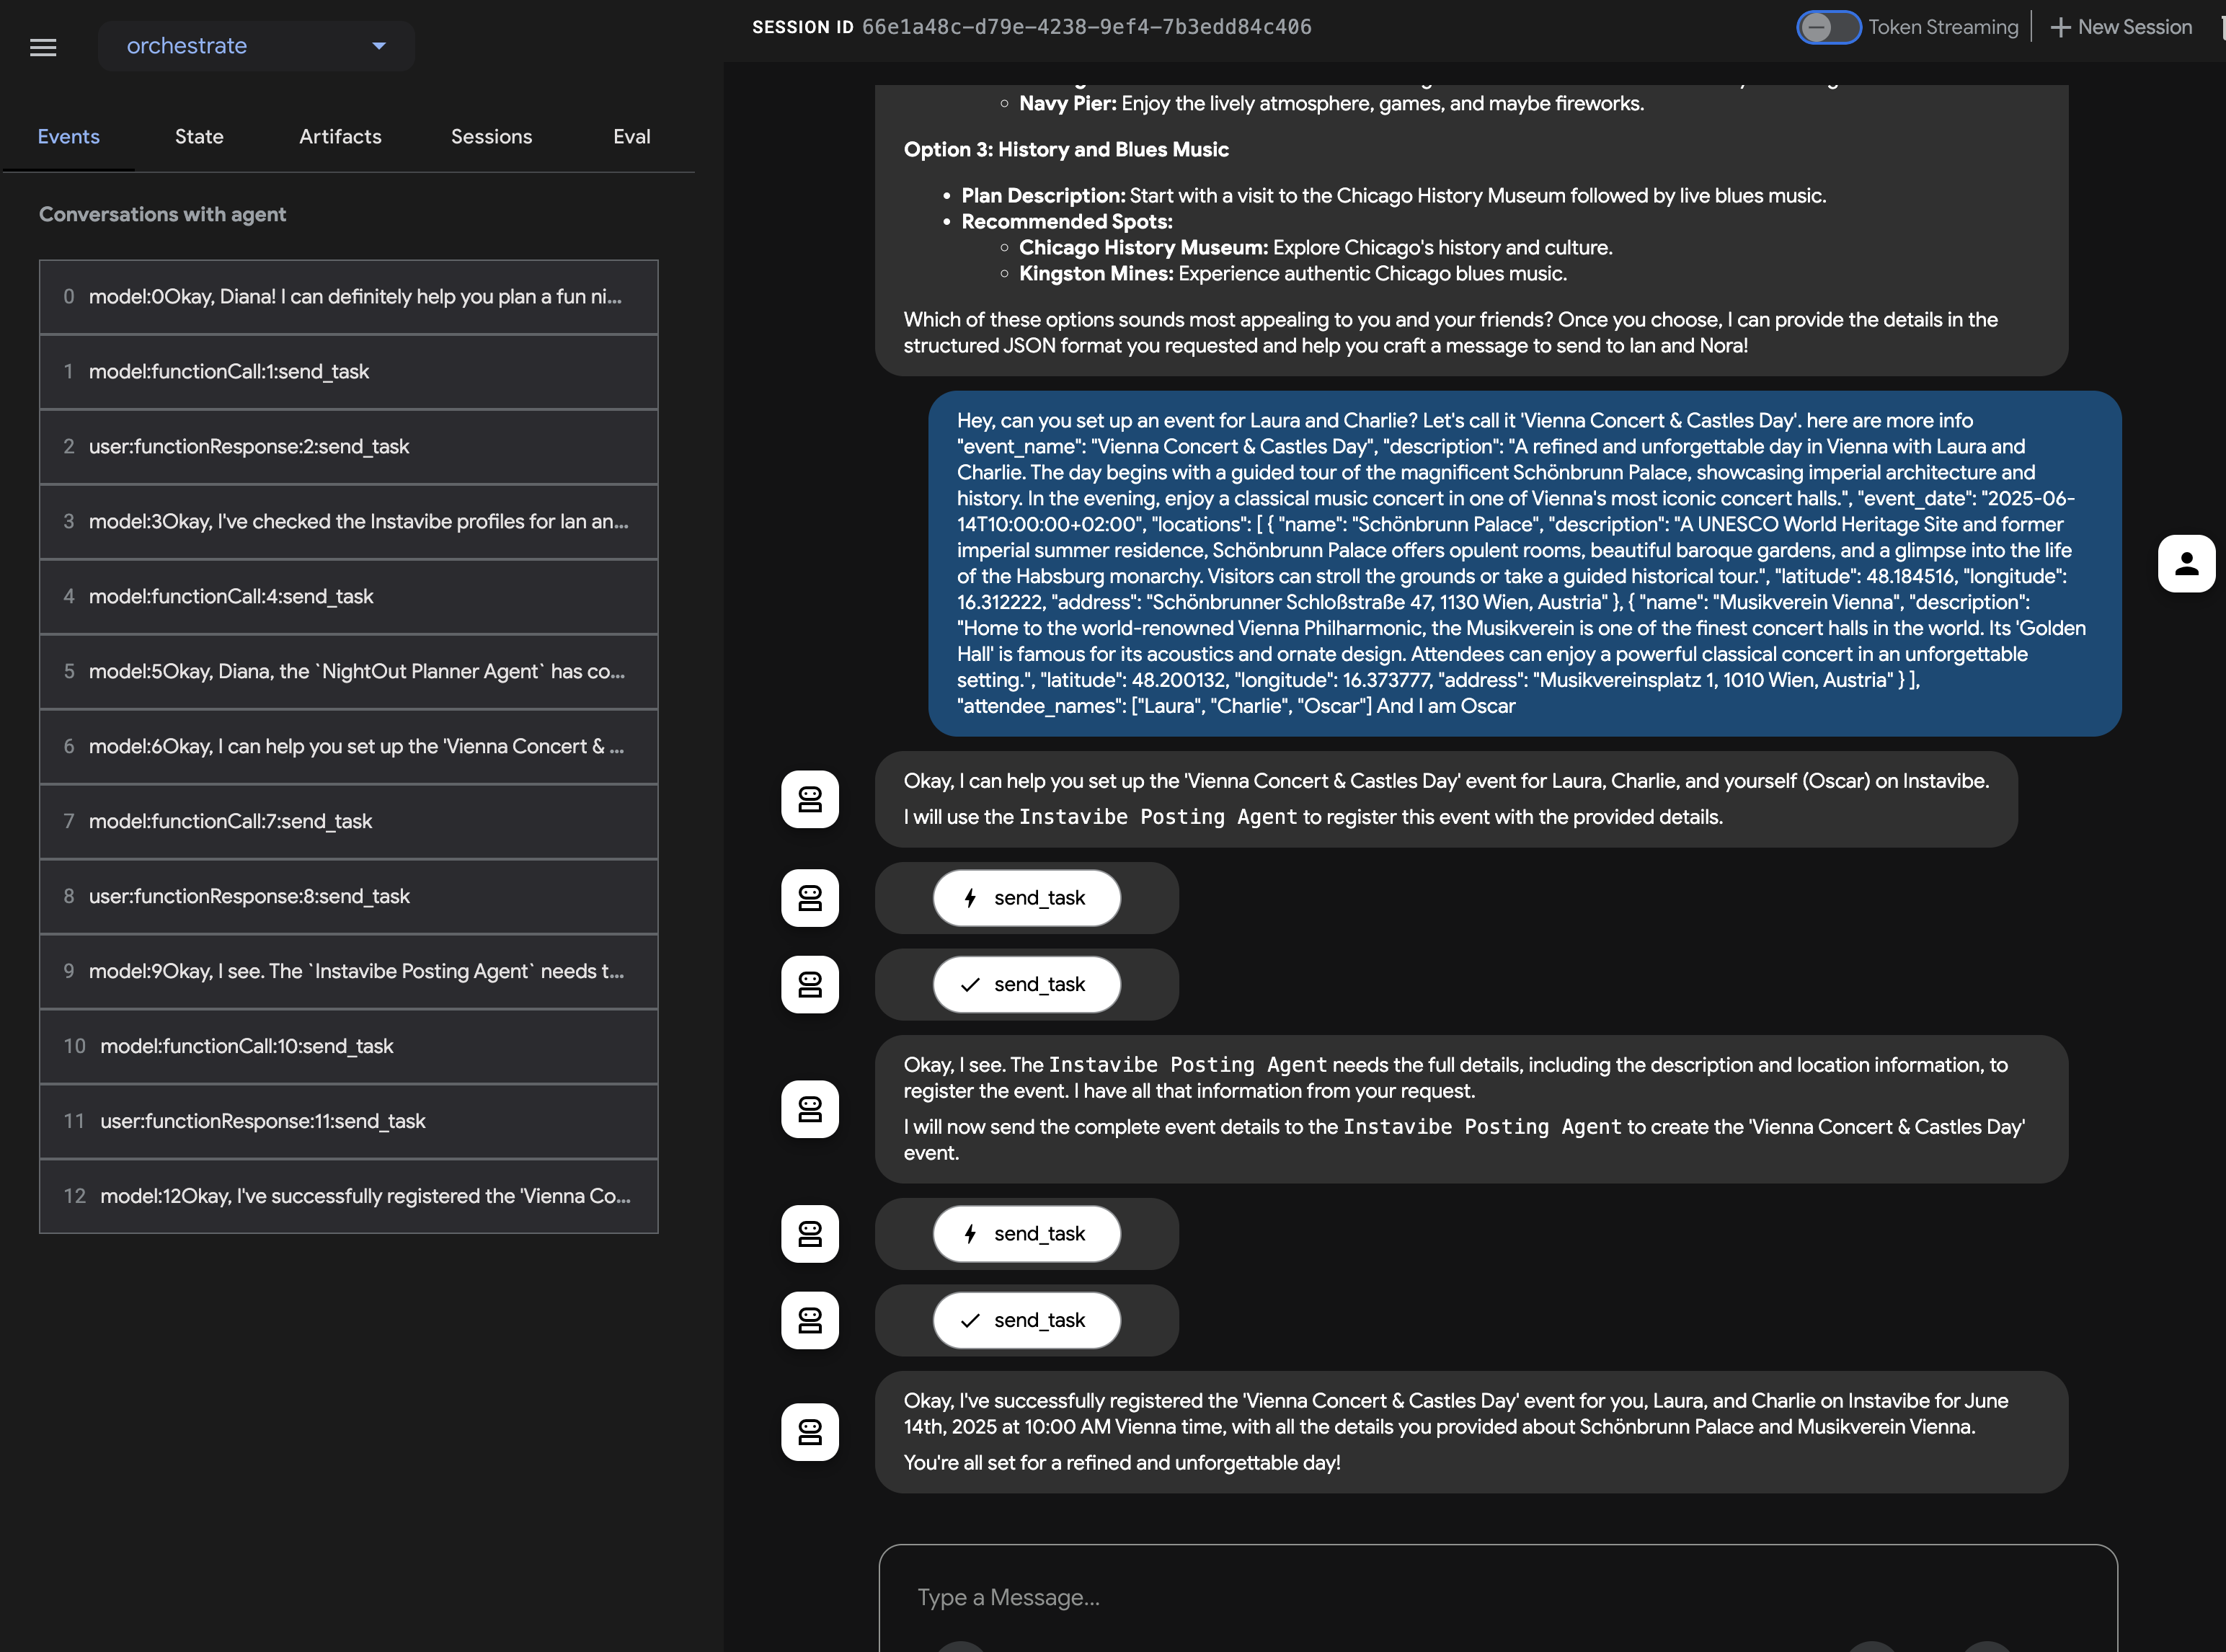
You can then verify the event appears in the InstaVibe web application. 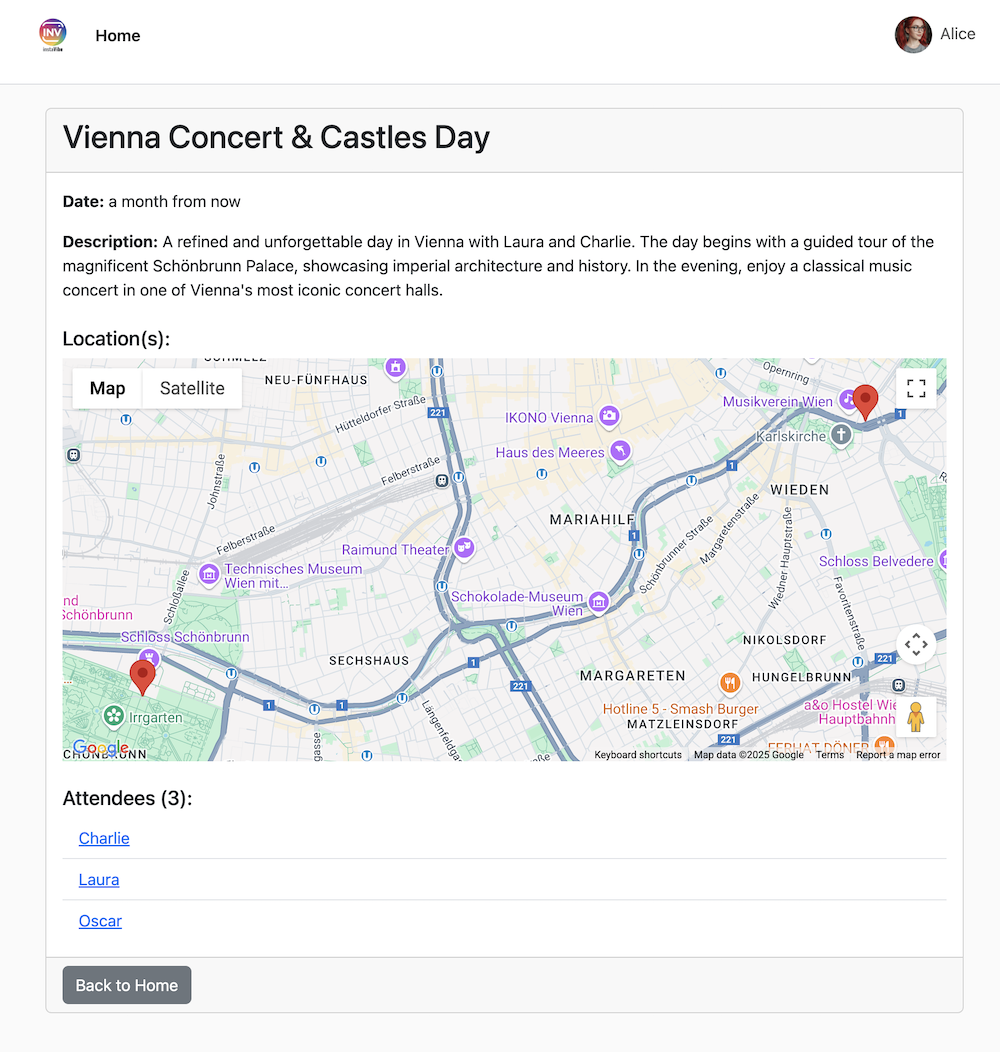
This demonstrates the successful implementation of a multi-agent system using ADK and the A2A protocol, where a central orchestrator delegates tasks to specialized, remote agents.
Remember to stop the ADK Dev UI ( Ctrl+C in the terminal) when you are finished testing.
12. Agent Engine and Remote Call from InstaVibe
So far, we've run our specialized agents on Cloud Run and tested the Orchestrator locally using the ADK Dev UI. For a production scenario, we need a robust, scalable, and managed environment to host our agents. This is where Google Vertex AI Agent Engine comes in.
Agent Engine is a fully managed service on Vertex AI designed specifically for deploying and scaling AI agents. It abstracts away infrastructure management, security, and operational overhead, allowing developers (especially those less familiar with complex cloud environments) to focus on the agent's logic and capabilities rather than managing servers. It provides a dedicated runtime optimized for agentic workloads.
We'll now deploy our Orchestrator agent to Agent Engine. (Note: The deployment mechanism shown below uses a custom script (agent_engine_app.py) provided in the workshop materials, as official direct ADK-to-Agent-Engine deployment tools might still be evolving. This script handles packaging and deploying the Orchestrator agent, configured with the necessary remote agent addresses.)
Execute the following command to deploy the Orchestrator agent to Agent Engine. Make sure the REMOTE_AGENT_ADDRESSES environment variable (containing the URLs of your Planner, Platform, and Social agents on Cloud Run) is still correctly set from the previous section.
👉💻 We'll deploy the Orchestrate agent to Agent Engine (Note: this is my own implementation of the deployment, ADK has an CLI to help deploy, I will update this after BYO-SA being implemented.)
cd ~/instavibe-bootstrap/agents/
. ~/instavibe-bootstrap/set_env.sh

gcloud projects add-iam-policy-binding $PROJECT_ID \
    --member="serviceAccount:service-$PROJECT_NUMBER@gcp-sa-aiplatform-re.iam.gserviceaccount.com" \
    --role="roles/viewer"


source ~/instavibe-bootstrap/env/bin/activate
export PLATFORM_MPC_CLIENT_URL=$(gcloud run services list --platform=managed --region=us-central1 --format='value(URL)' | grep platform-mcp-client)
export PLANNER_AGENT_URL=$(gcloud run services list --platform=managed --region=us-central1 --format='value(URL)' | grep planner-agent)
export SOCIAL_AGENT_URL=$(gcloud run services list --platform=managed --region=us-central1 --format='value(URL)' | grep social-agent)

export REMOTE_AGENT_ADDRESSES=${PLANNER_AGENT_URL},${PLATFORM_MPC_CLIENT_URL},${SOCIAL_AGENT_URL}
sed -i "s|^\(O\?REMOTE_AGENT_ADDRESSES\)=.*|REMOTE_AGENT_ADDRESSES=${REMOTE_AGENT_ADDRESSES}|" ~/instavibe-bootstrap/agents/orchestrate/.env

adk deploy agent_engine \
--display_name "orchestrate-agent" \
--project $GOOGLE_CLOUD_PROJECT \
--region $GOOGLE_CLOUD_LOCATION \
--staging_bucket gs://$GOOGLE_CLOUD_PROJECT-agent-engine \
--trace_to_cloud \
--requirements_file orchestrate/requirements.txt \
orchestrate
Now that the Orchestrator is hosted on the managed Agent Engine platform, our InstaVibe web application needs to communicate with it. Instead of interacting via ADK Dev UI, the web app will make remote calls to the Agent Engine endpoint.
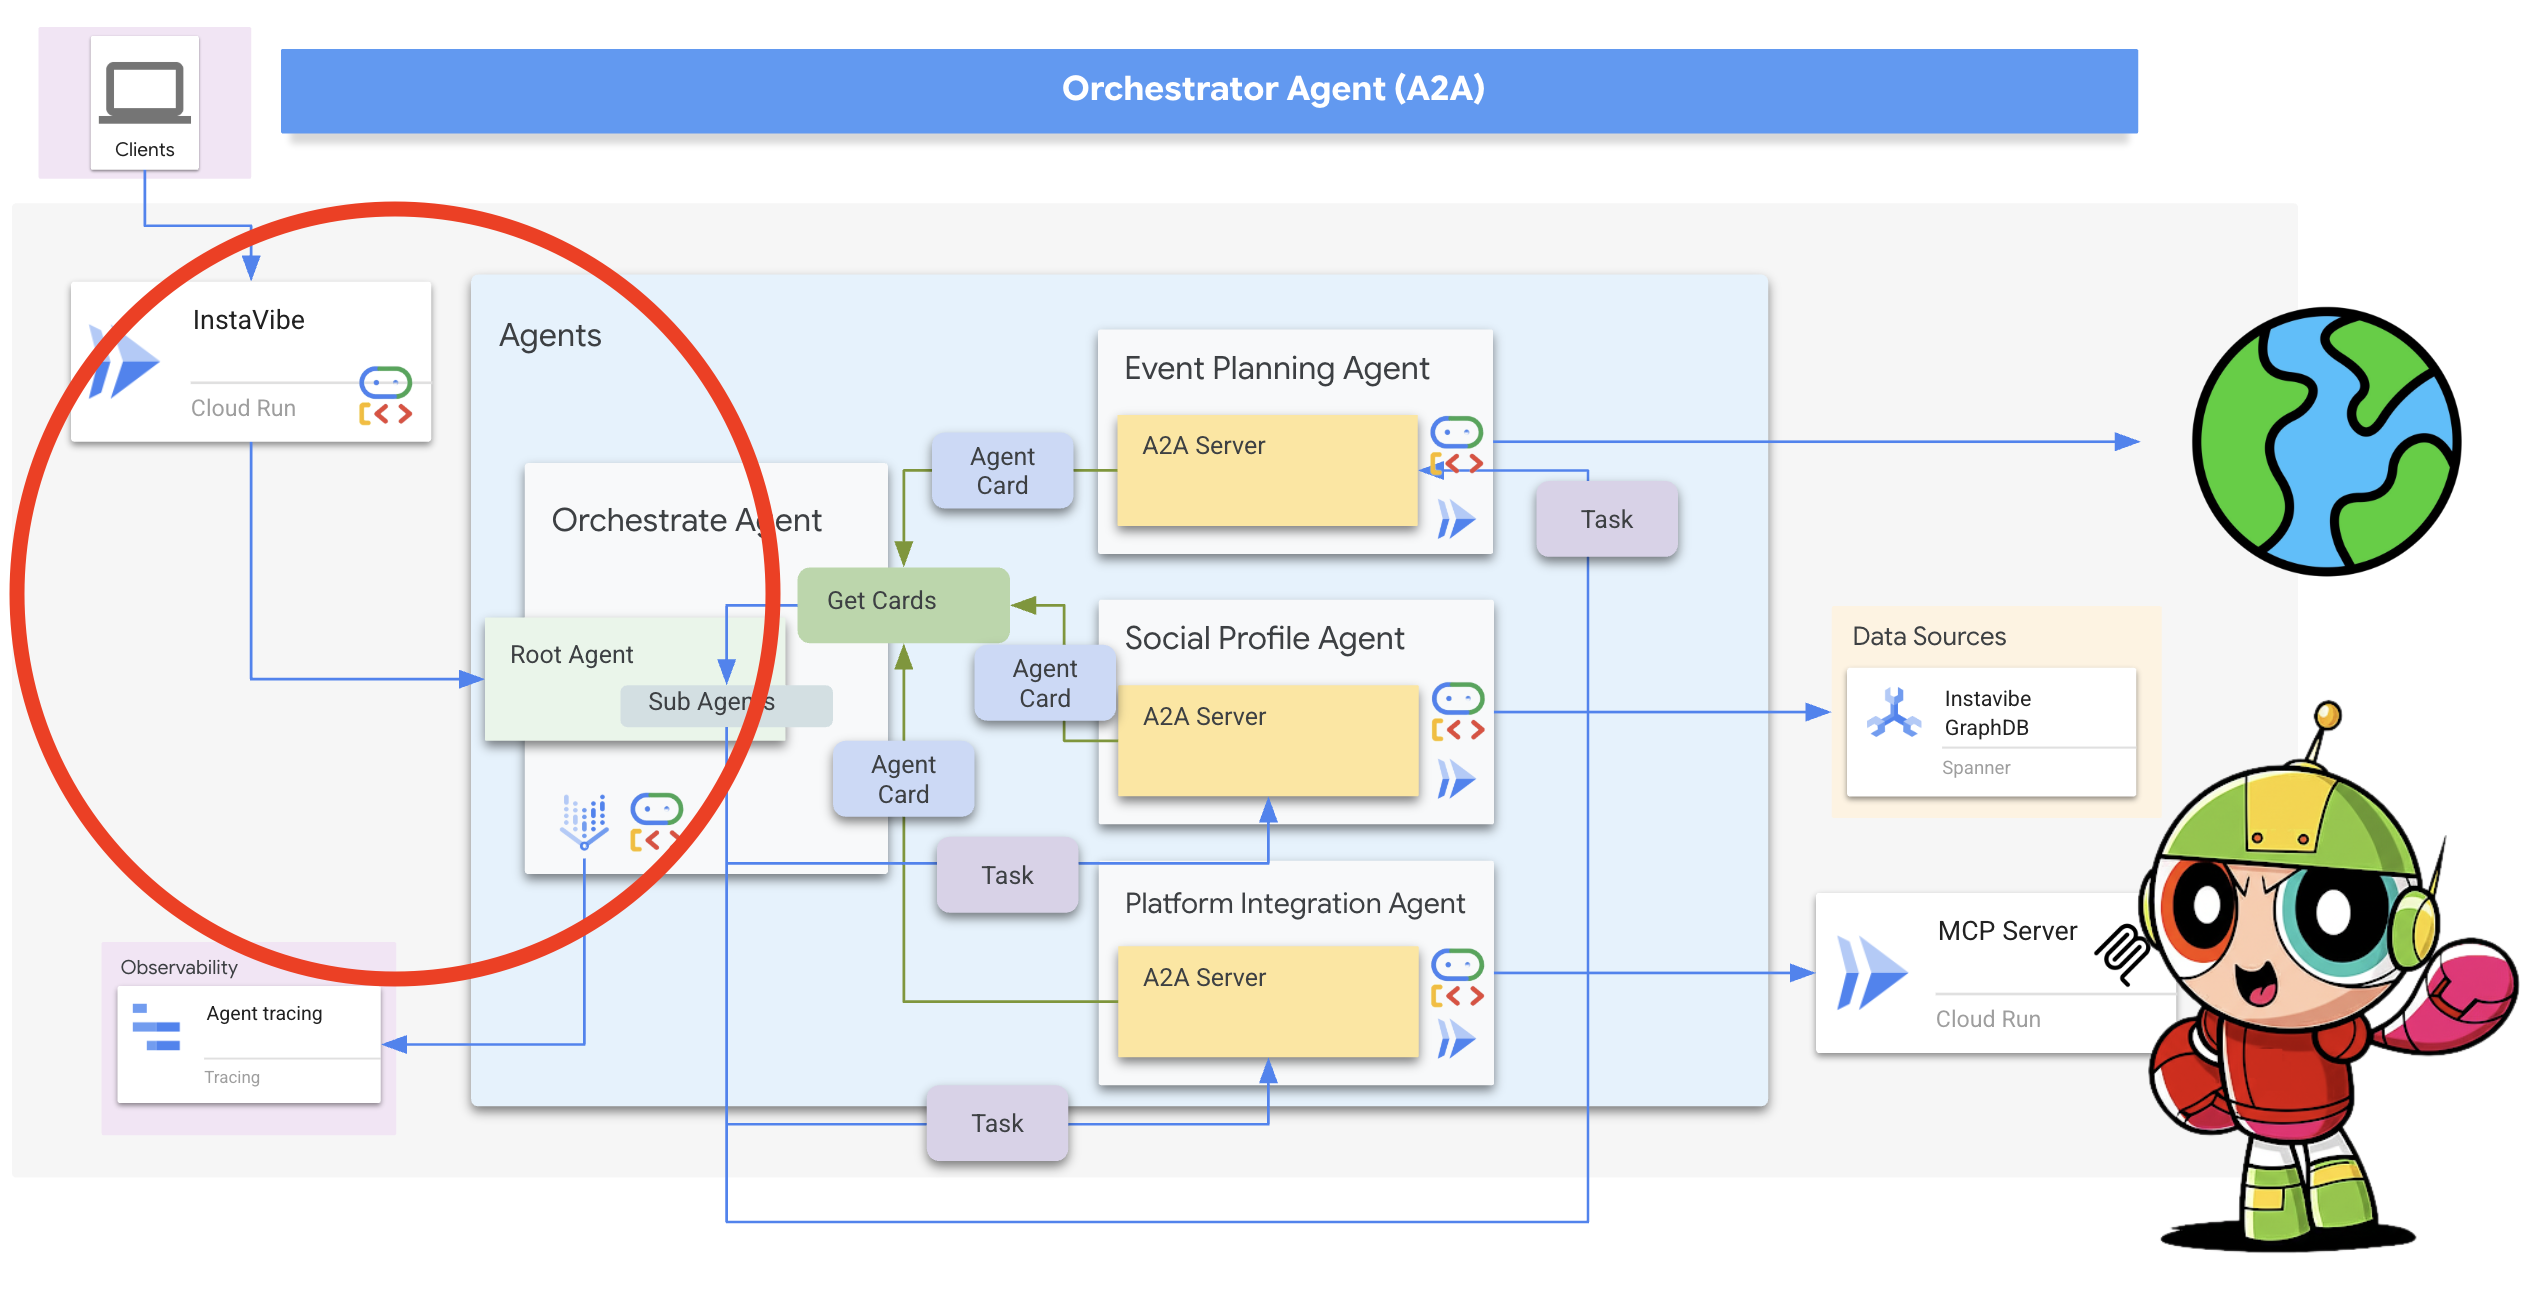
First, we need to modify the InstaVibe application code to initialize the Agent Engine client using the unique ID of our deployed Orchestrator agent. This ID is required to target the correct agent instance on the platform.
👉📝 Open ~/instavibe-bootstrap/instavibe/introvertally.py and replace the #REPLACE ME initiate agent_engine with the following code. This retrieves the Agent Engine ID from an environment variable (which we'll set shortly) and gets a client object:
ORCHESTRATE_AGENT_ID = os.environ.get('ORCHESTRATE_AGENT_ID')
agent_engine = agent_engines.get(ORCHESTRATE_AGENT_ID)
Our planned user flow in InstaVibe involves two interactions with the agent: first, generating the recommended plan, and second, asking the user to confirm before the agent actually posts the event to the platform.
Since the InstaVibe web application (running on Cloud Run) and the Orchestrator agent (running on Agent Engine) are now separate services, the web app needs to make remote calls to the Agent Engine endpoint to interact with the agent.
👉📝 Let's update the code that makes the initial call to generate the plan recommendation. In the same introvertally.py file, replace the #REPLACE ME Query remote agent get plan with the following snippet, which uses the agent_engine client to send the user's request:
agent_engine.stream_query(
                user_id=user_id,
                message=prompt_message,
            )
👉📝 Next, update the code that handles the user's confirmation (eg, when the user clicks "Confirm Plan"). This sends a follow-up message to the same conversation on Agent Engine, instructing the Orchestrator to proceed with posting the event (which it will delegate to the Platform Integration agent). Replace #REPLACE ME Query remote agent for confirmation for confirmation in introvertally.py with:
agent_engine.stream_query(
            user_id=agent_session_user_id,
            message=prompt_message,
        )
The web application's routes need access to these functions. Ensure the necessary functions from introvertally.py are imported in the Flask routes file.
👉📝 In cd ~/instavibe-bootstrap/instavibe/ally_routes.py , we'll first point to the instance replace # REPLACE ME TO ADD IMPORT with following:
from introvertally import call_agent_for_plan, post_plan_event
👉📝 Add the prototype feature to InstaVibe, in ~/instavibe-bootstrap/instavibe/templates/base.html , replace <!–REPLACE_ME_LINK_TO_INTROVERT_ALLY–> with following:
            <li class="nav-item">
              <a class="nav-link" href="{{ url_for('ally.introvert_ally_page') }}">Introvert Ally</a>
            </li>
Before we can redeploy the InstaVibe app, we need the specific Resource ID of the Orchestrator agent we deployed to Agent Engine.
Currently, retrieving this programmatically via gcloud might be limited, so we'll use a helper Python script ( temp-endpoint.py provided in the workshop) to fetch the ID and store it in an environment variable.
👉💻 Run the following commands to execute the script. The script will capture the Agent Engine Endpoint ID and grant the necessary permissions to the agent engine's default service account (Note: The script is configured to use the default service account as it is currently not user-modifiable).
. ~/instavibe-bootstrap/set_env.sh
cd ~/instavibe-bootstrap/instavibe/
source ~/instavibe-bootstrap/env/bin/activate
python temp-endpoint.py
export ORCHESTRATE_AGENT_ID=$(cat temp_endpoint.txt)
echo "ORCHESTRATE_AGENT_ID set to: ${ORCHESTRATE_AGENT_ID}"

Finally, we need to redeploy the InstaVibe web application with the updated code and the new ORCHESTRATE_AGENT_ID environment variable so it knows how to connect to our agent running on Agent Engine.
👉💻 The following commands rebuild the InstaVibe application image and deploy the new version to Cloud Run:
. ~/instavibe-bootstrap/set_env.sh

cd ~/instavibe-bootstrap/instavibe/

export IMAGE_TAG="latest"
export APP_FOLDER_NAME="instavibe"
export IMAGE_NAME="instavibe-webapp"
export IMAGE_PATH="${REGION}-docker.pkg.dev/${PROJECT_ID}/${REPO_NAME}/${IMAGE_NAME}:${IMAGE_TAG}"
export SERVICE_NAME="instavibe"

echo "Building ${APP_FOLDER_NAME} webapp image..."
gcloud builds submit . \
  --tag=${IMAGE_PATH} \
  --project=${PROJECT_ID}

echo "Deploying ${SERVICE_NAME} to Cloud Run..."

gcloud run deploy ${SERVICE_NAME} \
  --image=${IMAGE_PATH} \
  --platform=managed \
  --region=${REGION} \
  --allow-unauthenticated \
  --set-env-vars="SPANNER_INSTANCE_ID=${SPANNER_INSTANCE_ID}" \
  --set-env-vars="SPANNER_DATABASE_ID=${SPANNER_DATABASE_ID}" \
  --set-env-vars="APP_HOST=0.0.0.0" \
  --set-env-vars="APP_PORT=8080" \
  --set-env-vars="GOOGLE_CLOUD_LOCATION=${REGION}" \
  --set-env-vars="GOOGLE_CLOUD_PROJECT=${PROJECT_ID}" \
  --set-env-vars="GOOGLE_MAPS_API_KEY=${GOOGLE_MAPS_API_KEY}" \
  --set-env-vars="ORCHESTRATE_AGENT_ID=${ORCHESTRATE_AGENT_ID}" \
  --project=${PROJECT_ID} \
  --min-instances=1 \
  --cpu=2 \
  --memory=2Gi
With the final deployment complete, navigate to your InstaVibe application URL in a different browser tab.
Testing the Full AI-Powered InstaVibe Experience
The "InstaVibe Ally" feature is now live, powered by our multi-agent system orchestrated via Vertex AI Agent Engine and communicating through A2A.
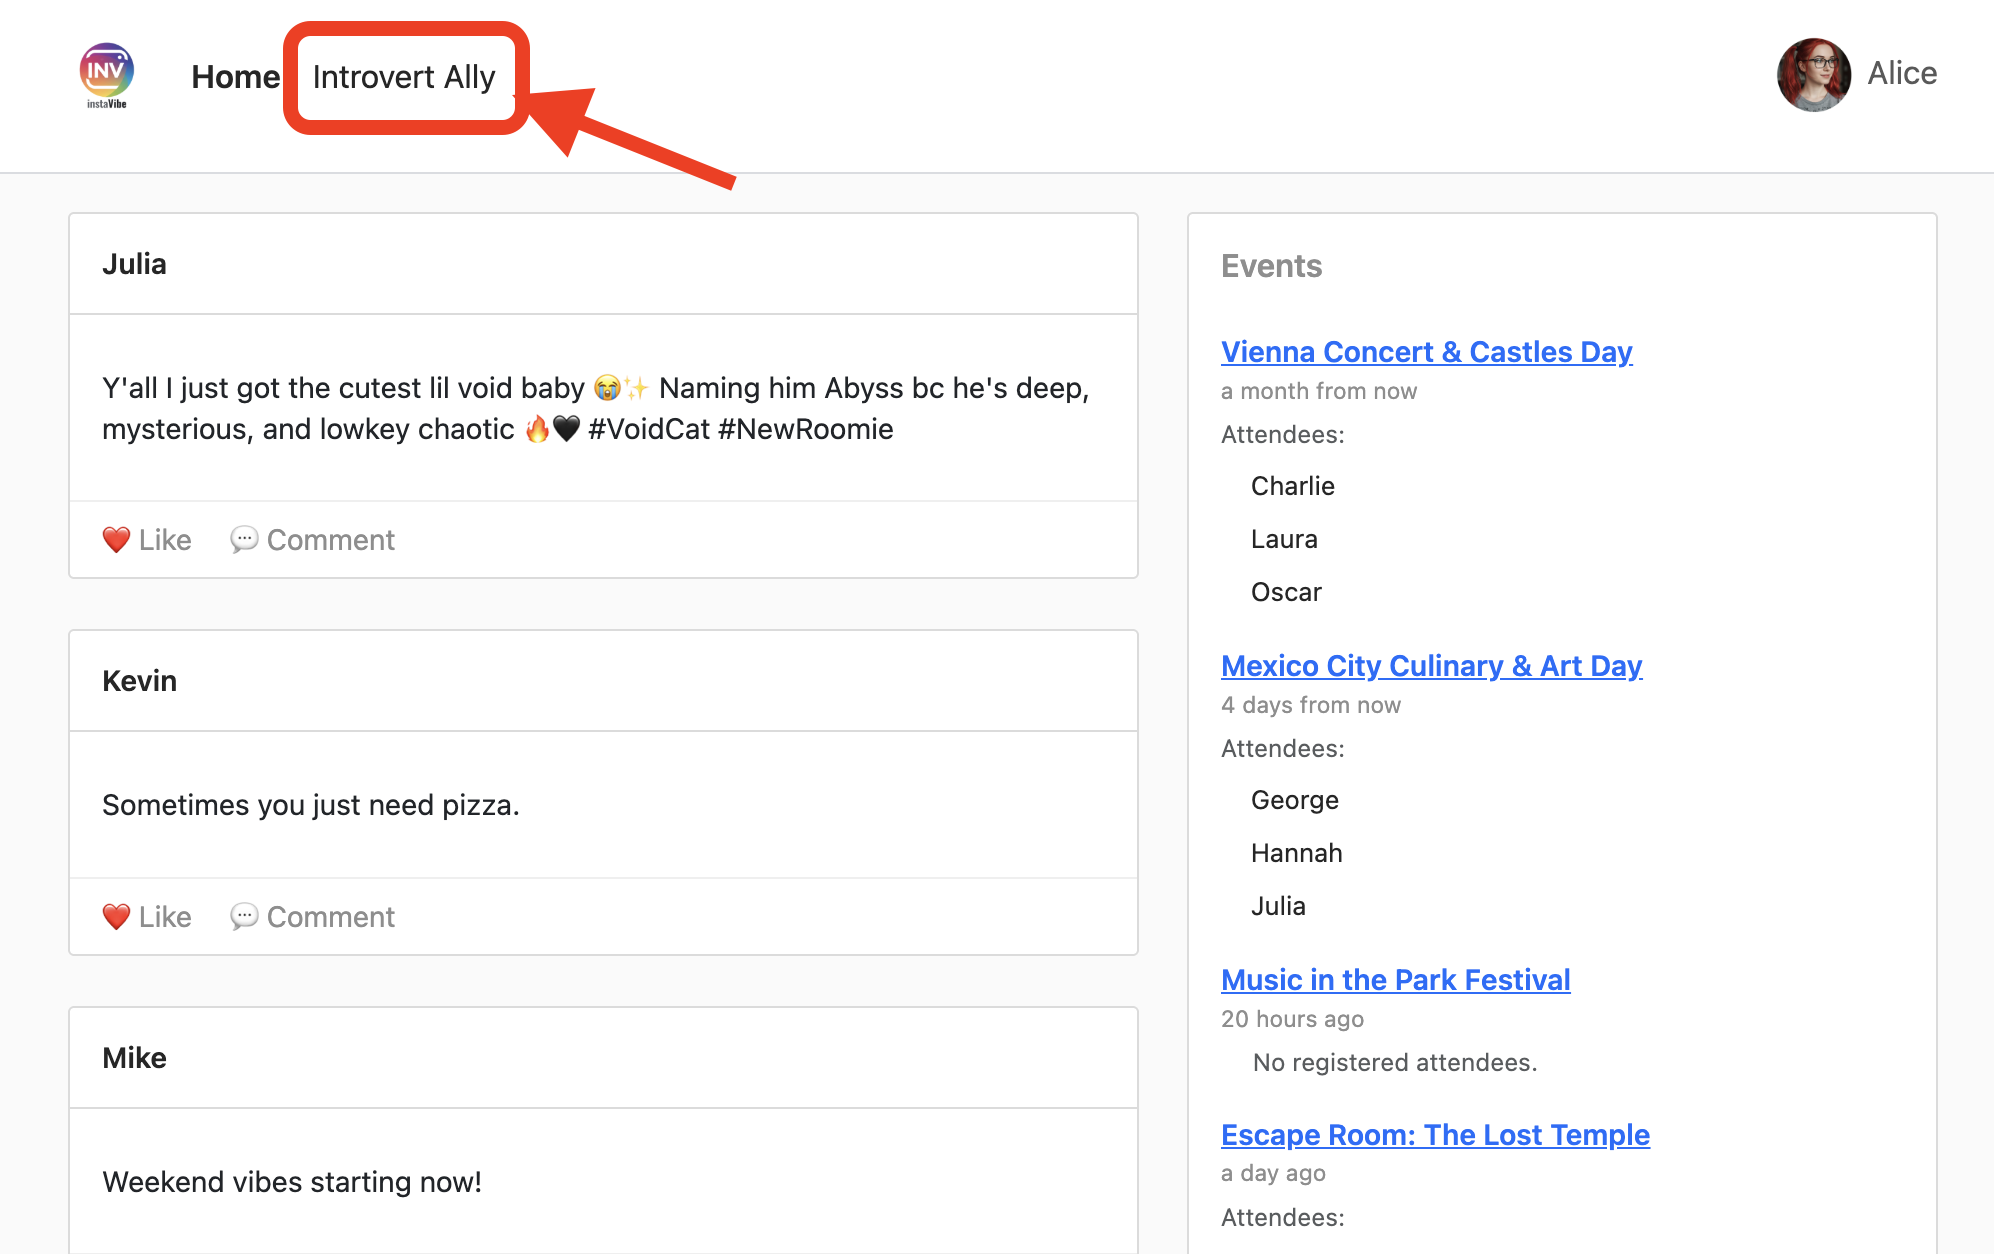
Click into "InstaVibe Ally" and ask it to plan an event.

Observe the activity log on the right while the agents work (it may take 90-120 seconds). Once the plan appears, review it and click "Confirm This Plan" to proceed with posting.
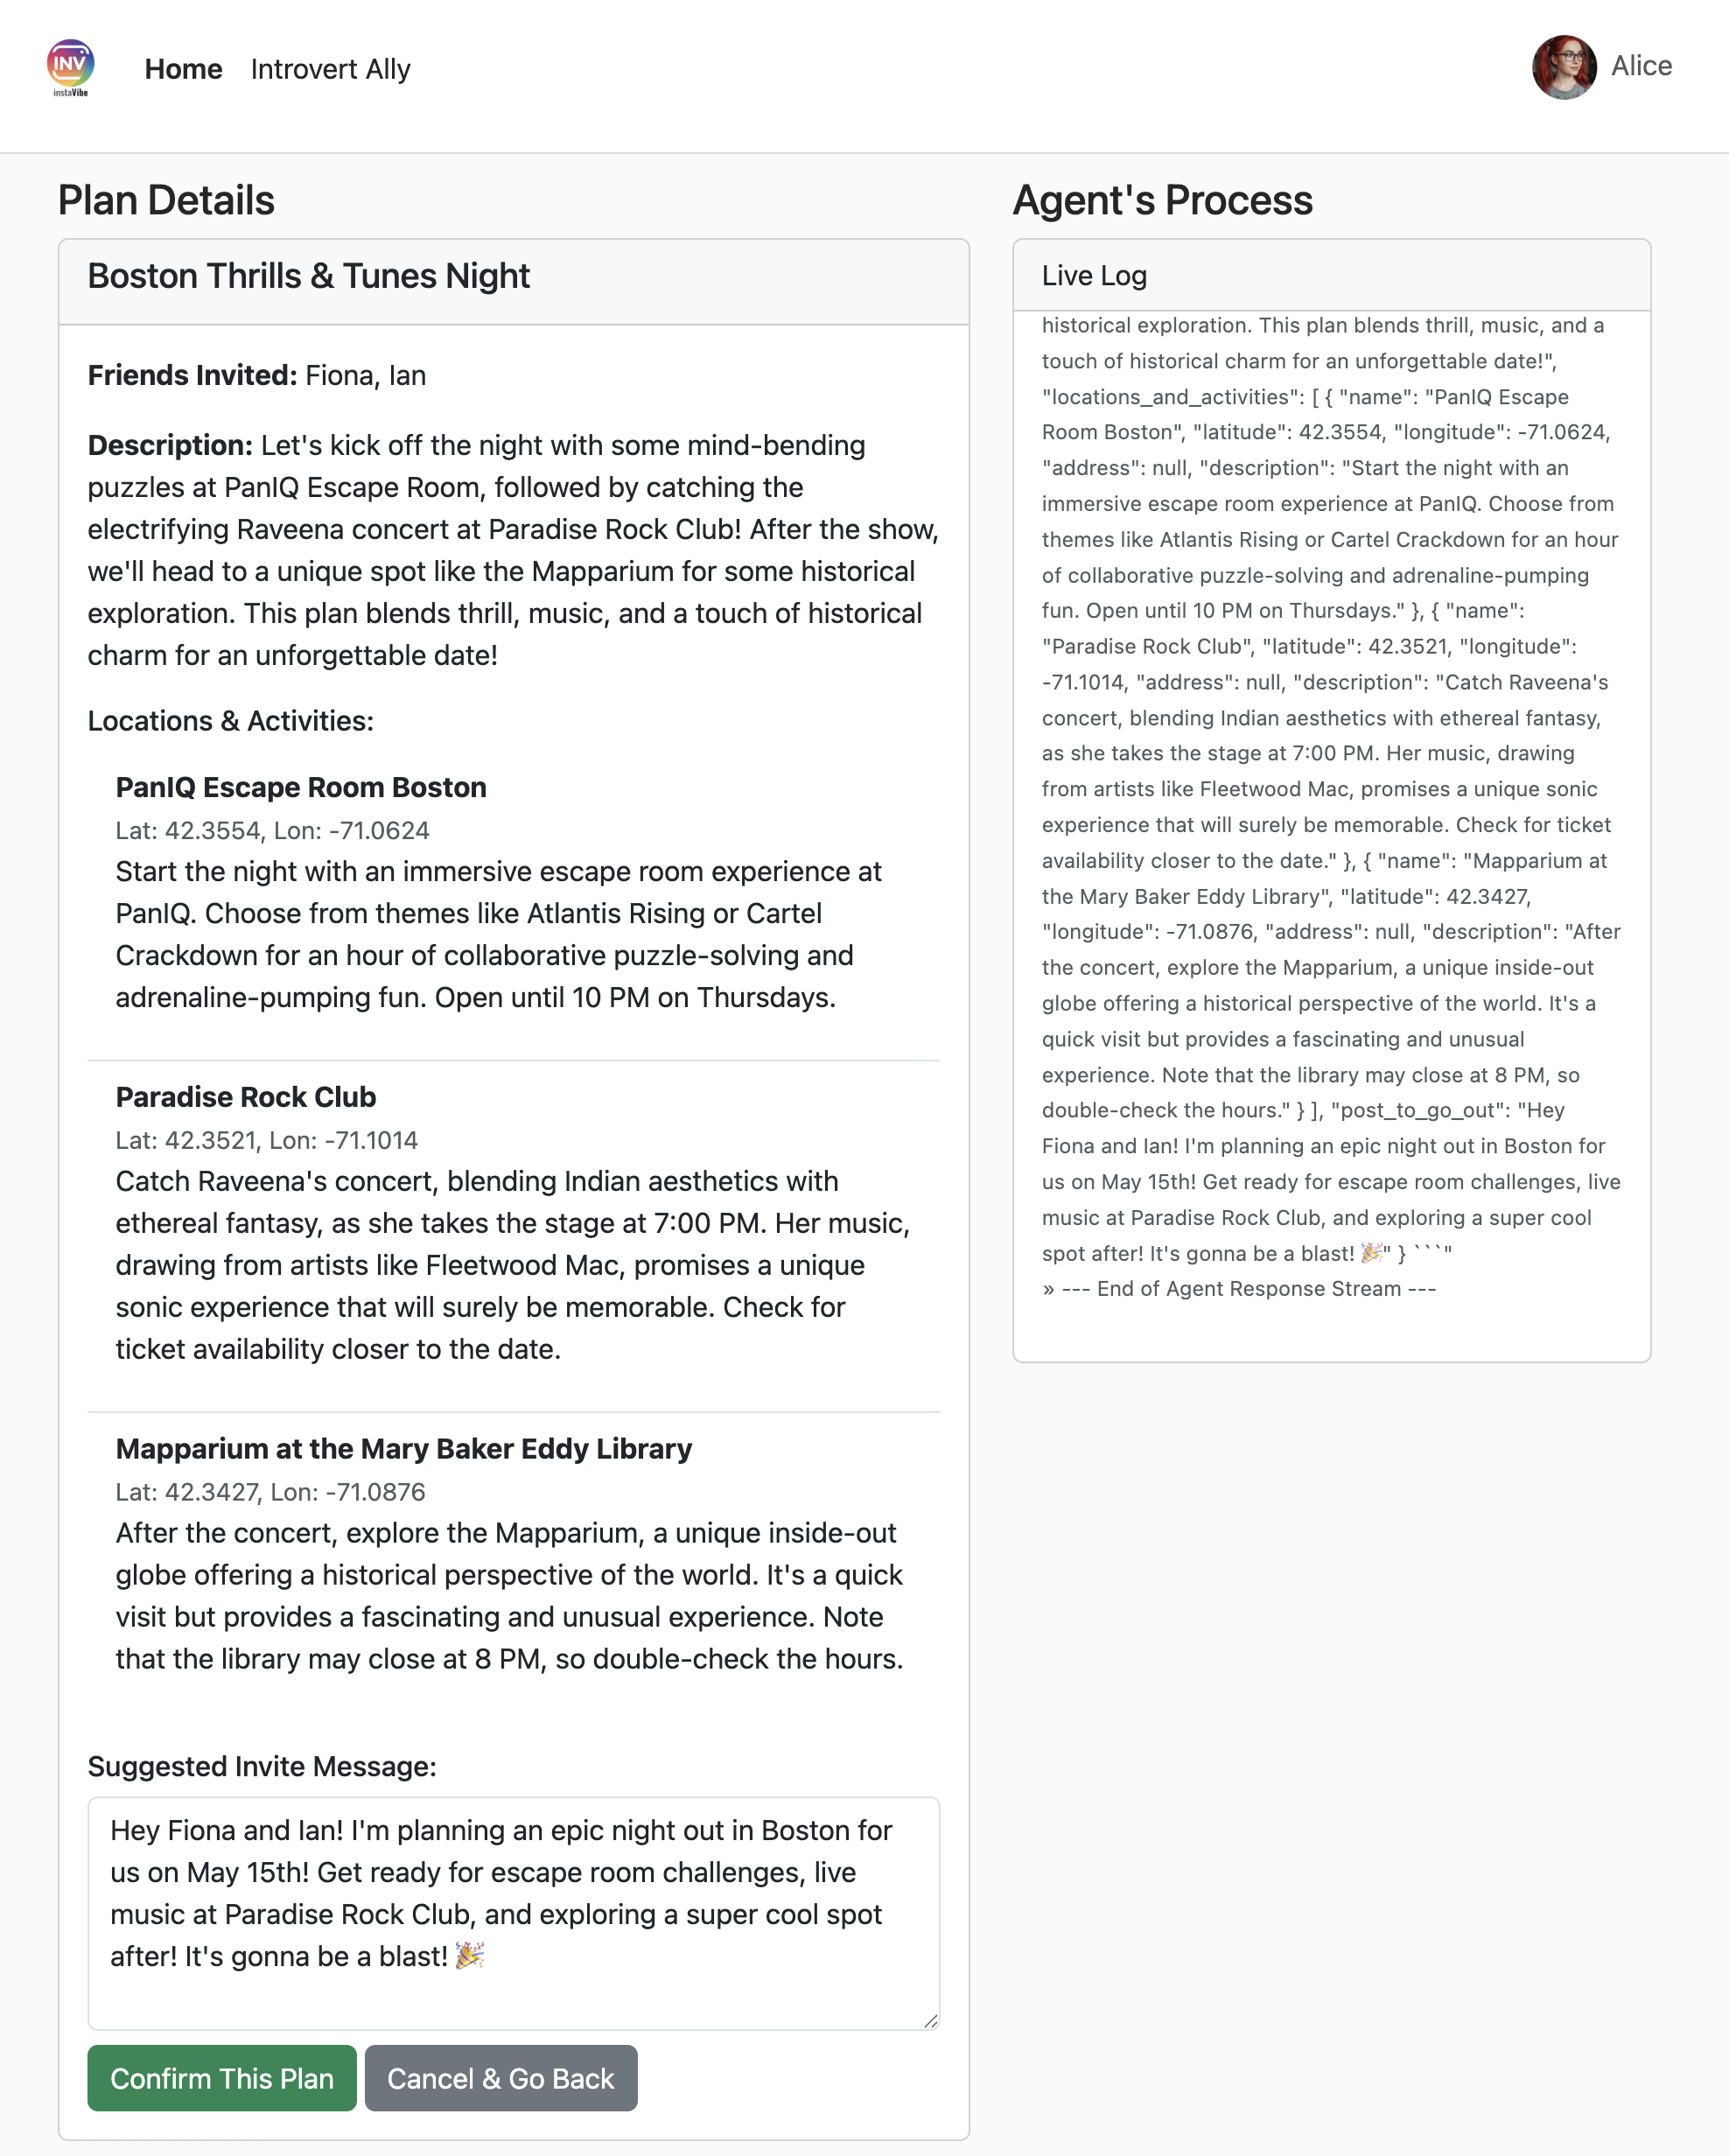
The orchestrator will now instruct the Platform agent to create the post and event within InstaVibe. 
Check the InstaVibe home page for the new post and event. 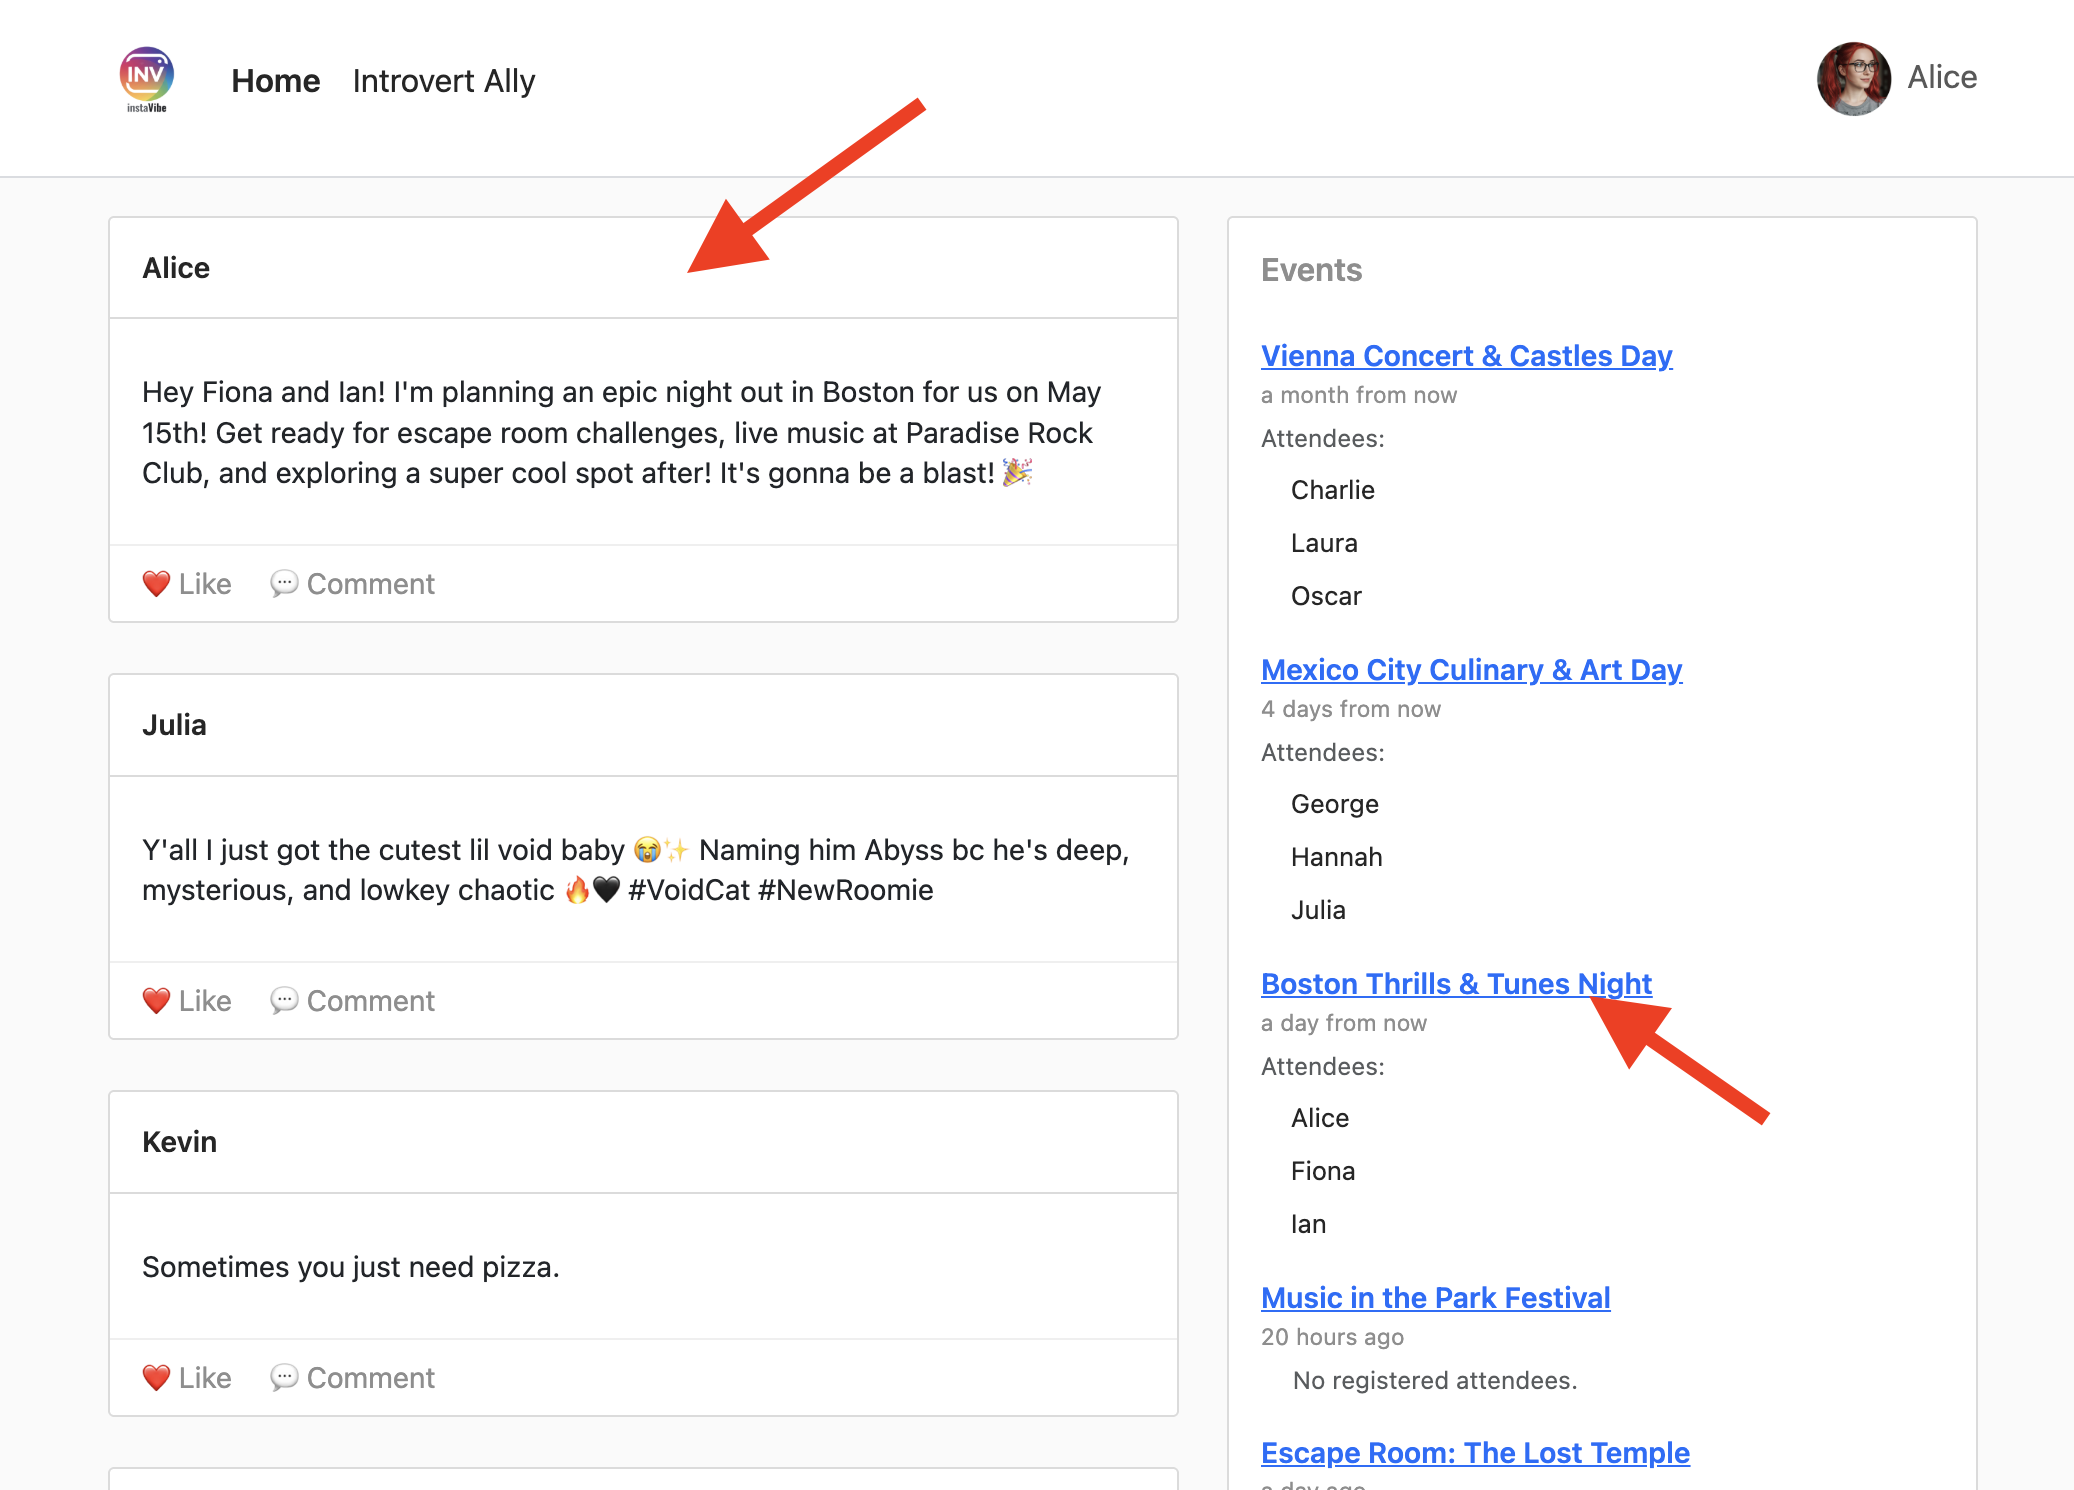
The event page will reflect the details generated by the agent.
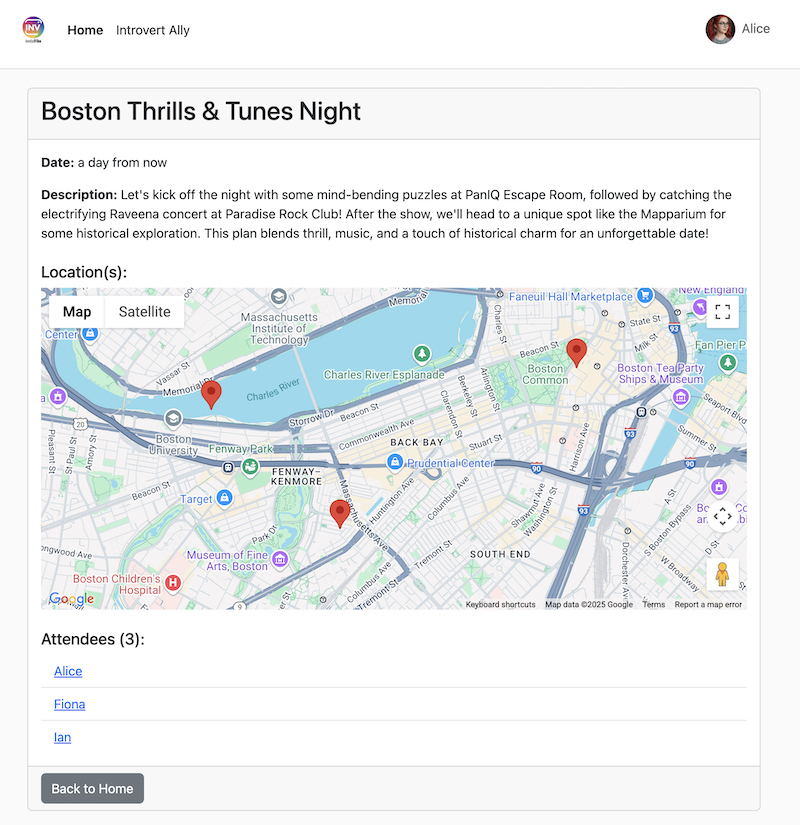
Analyzing Performance with Cloud Trace
You might notice the process takes some time. Vertex AI Agent Engine integrates with Cloud Trace, allowing us to analyze the latency of our multi-agent system.
Go to the Traces in the google cloud console, select agent_run[orchestrate_agent] in the Span, you should see a couple of Spans, click into it
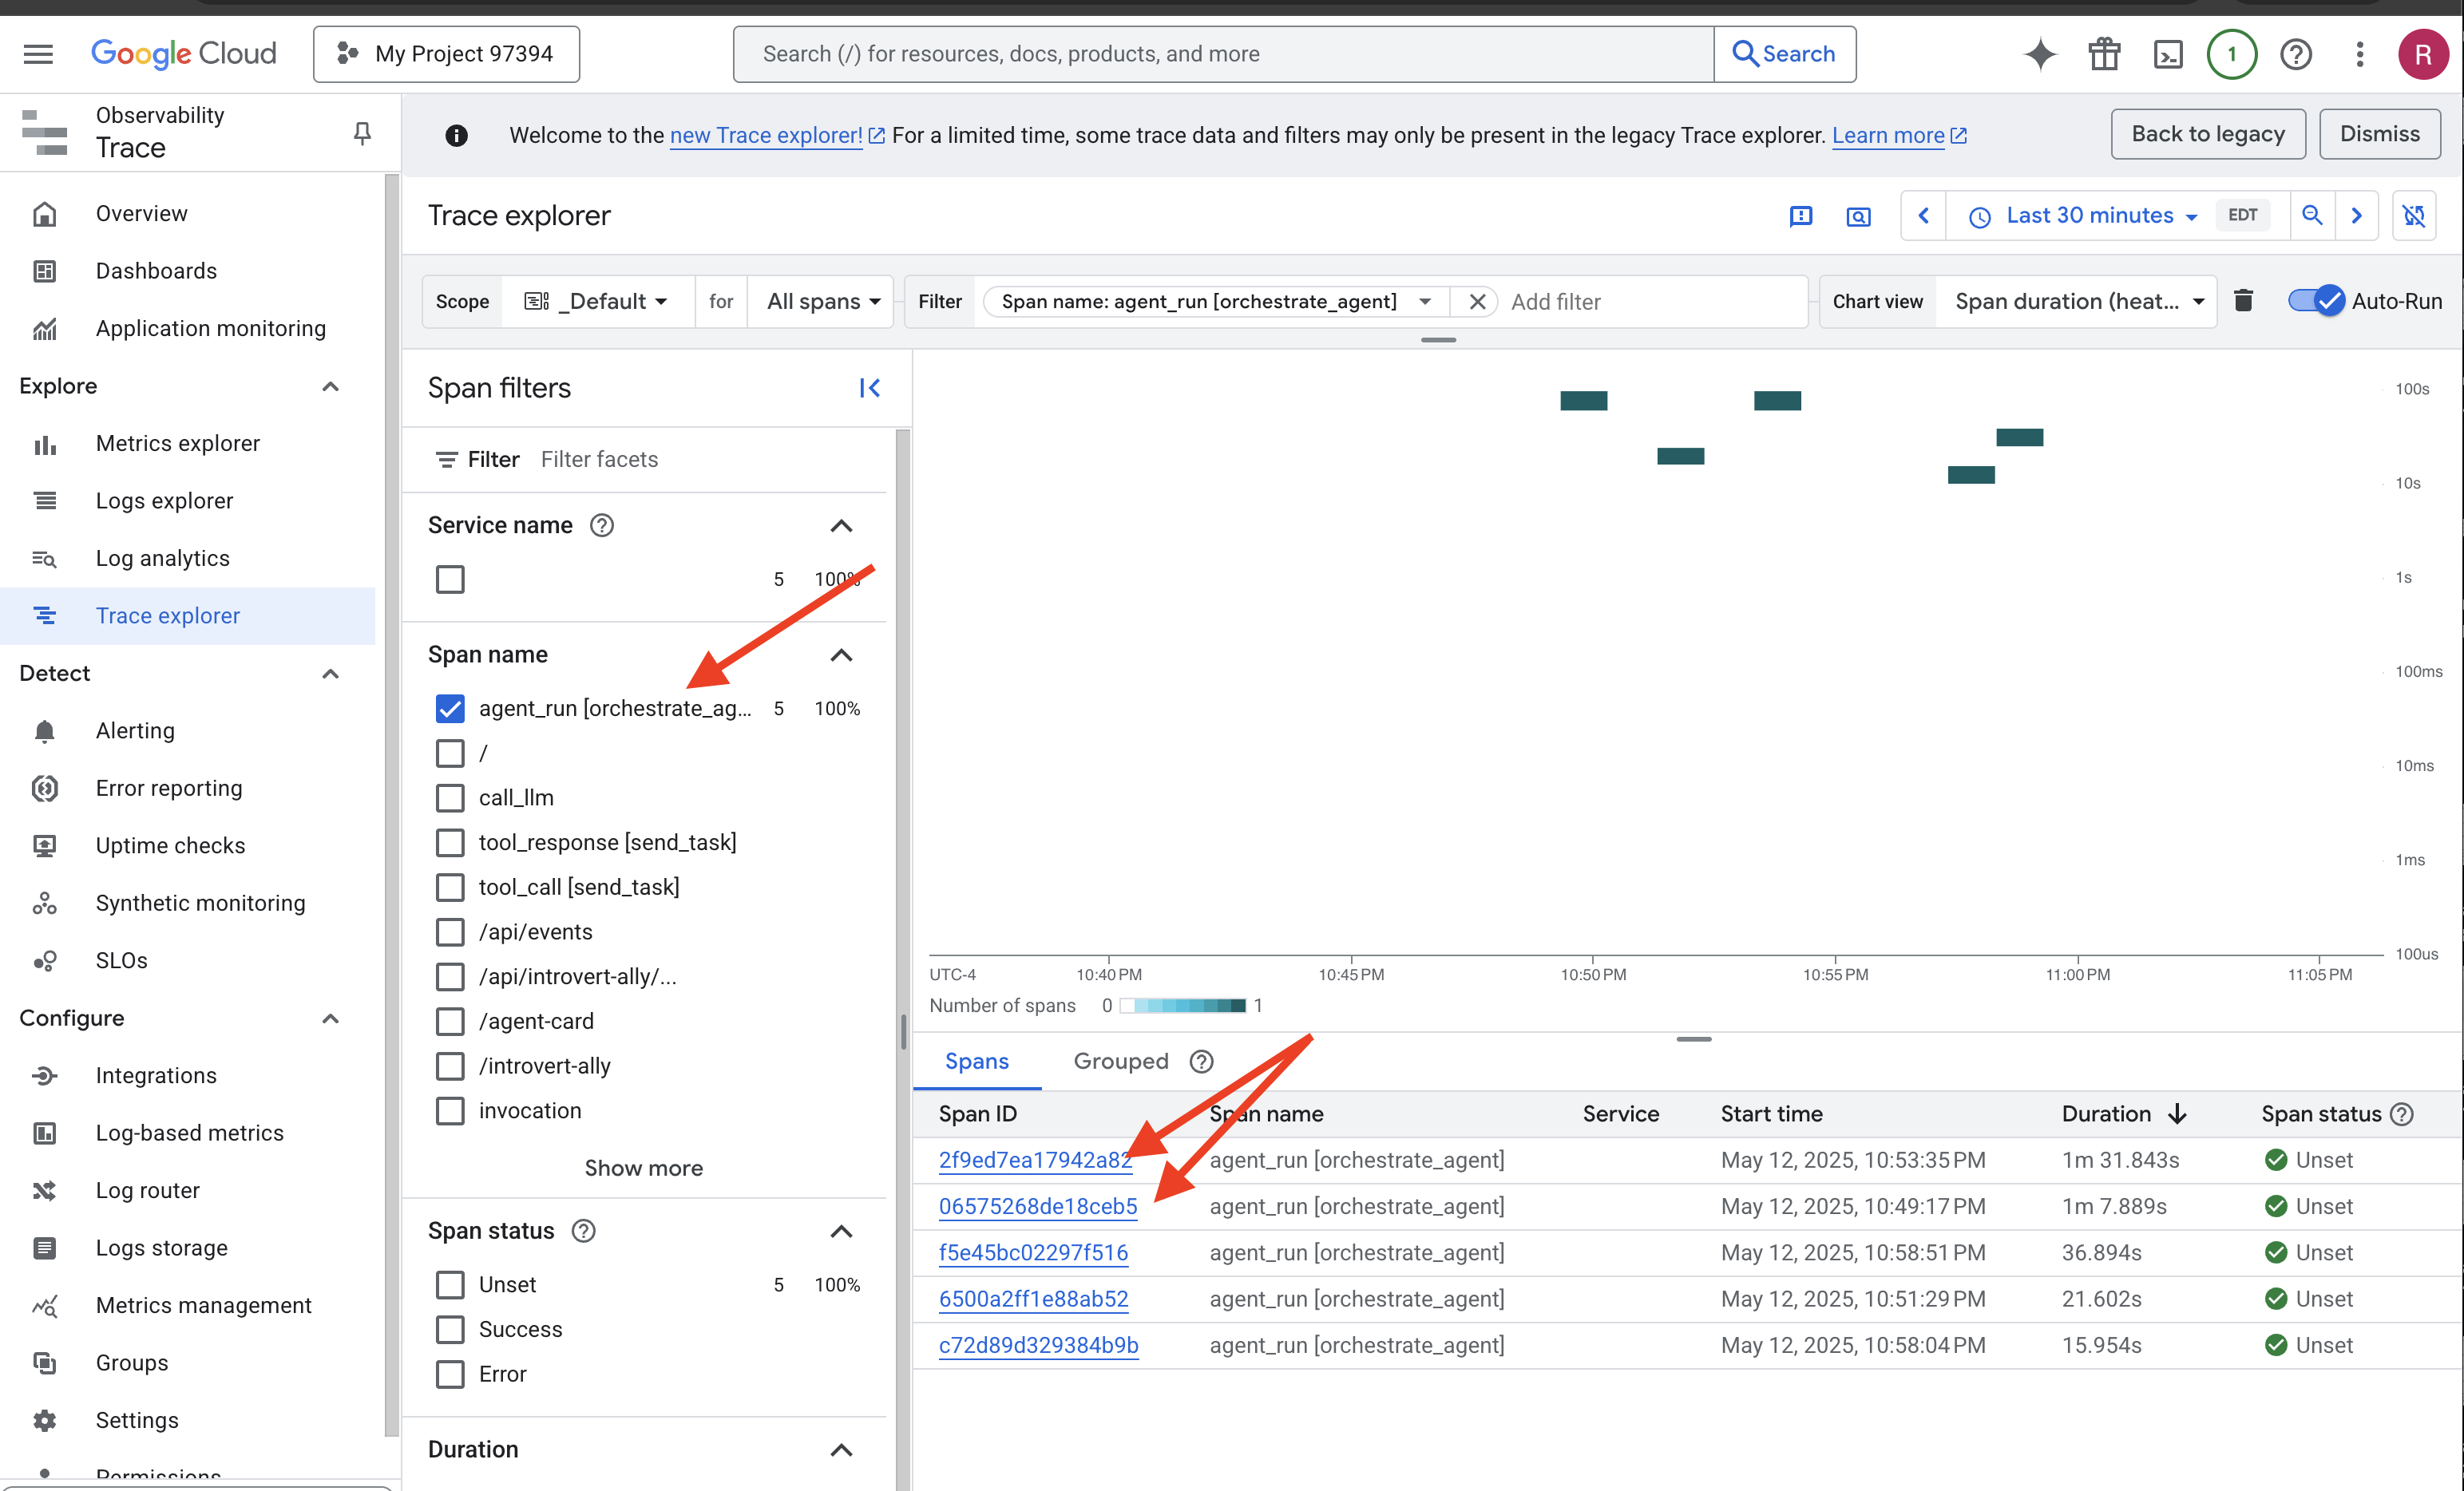
Within the trace details, you can identify which parts took longer. For example, calls to the Planner agent might show higher latency due to search grounding and complex generation. 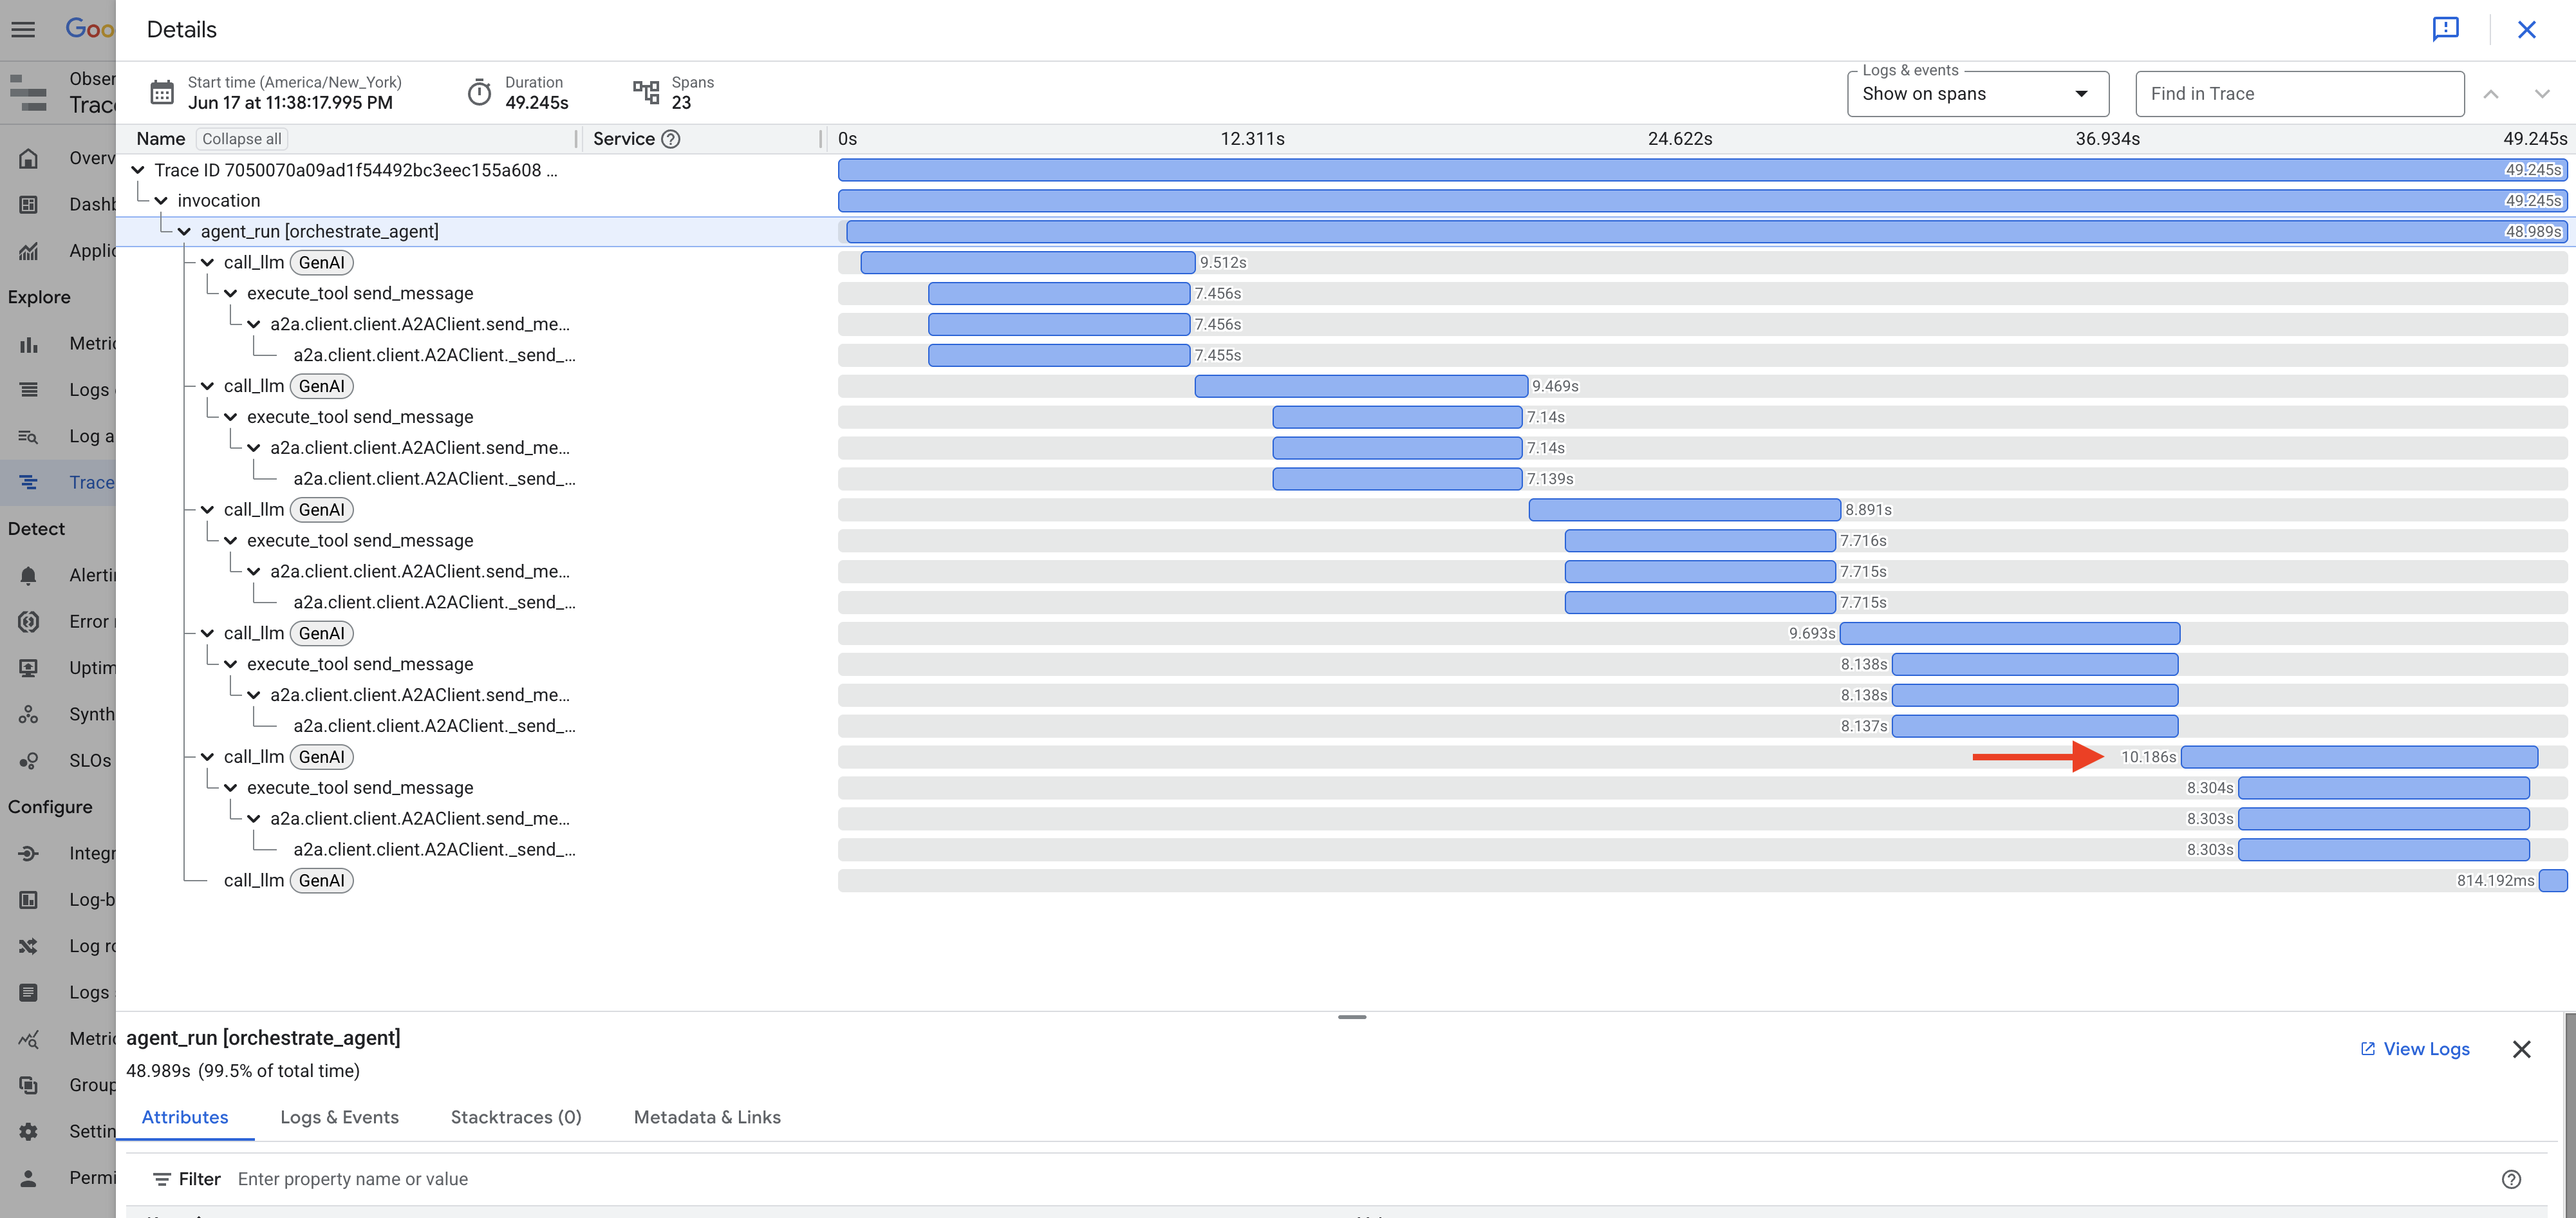
Similarly, when creating the post and event, you might see time spent by the Orchestrator processing data and preparing tool calls for the Platform agent. 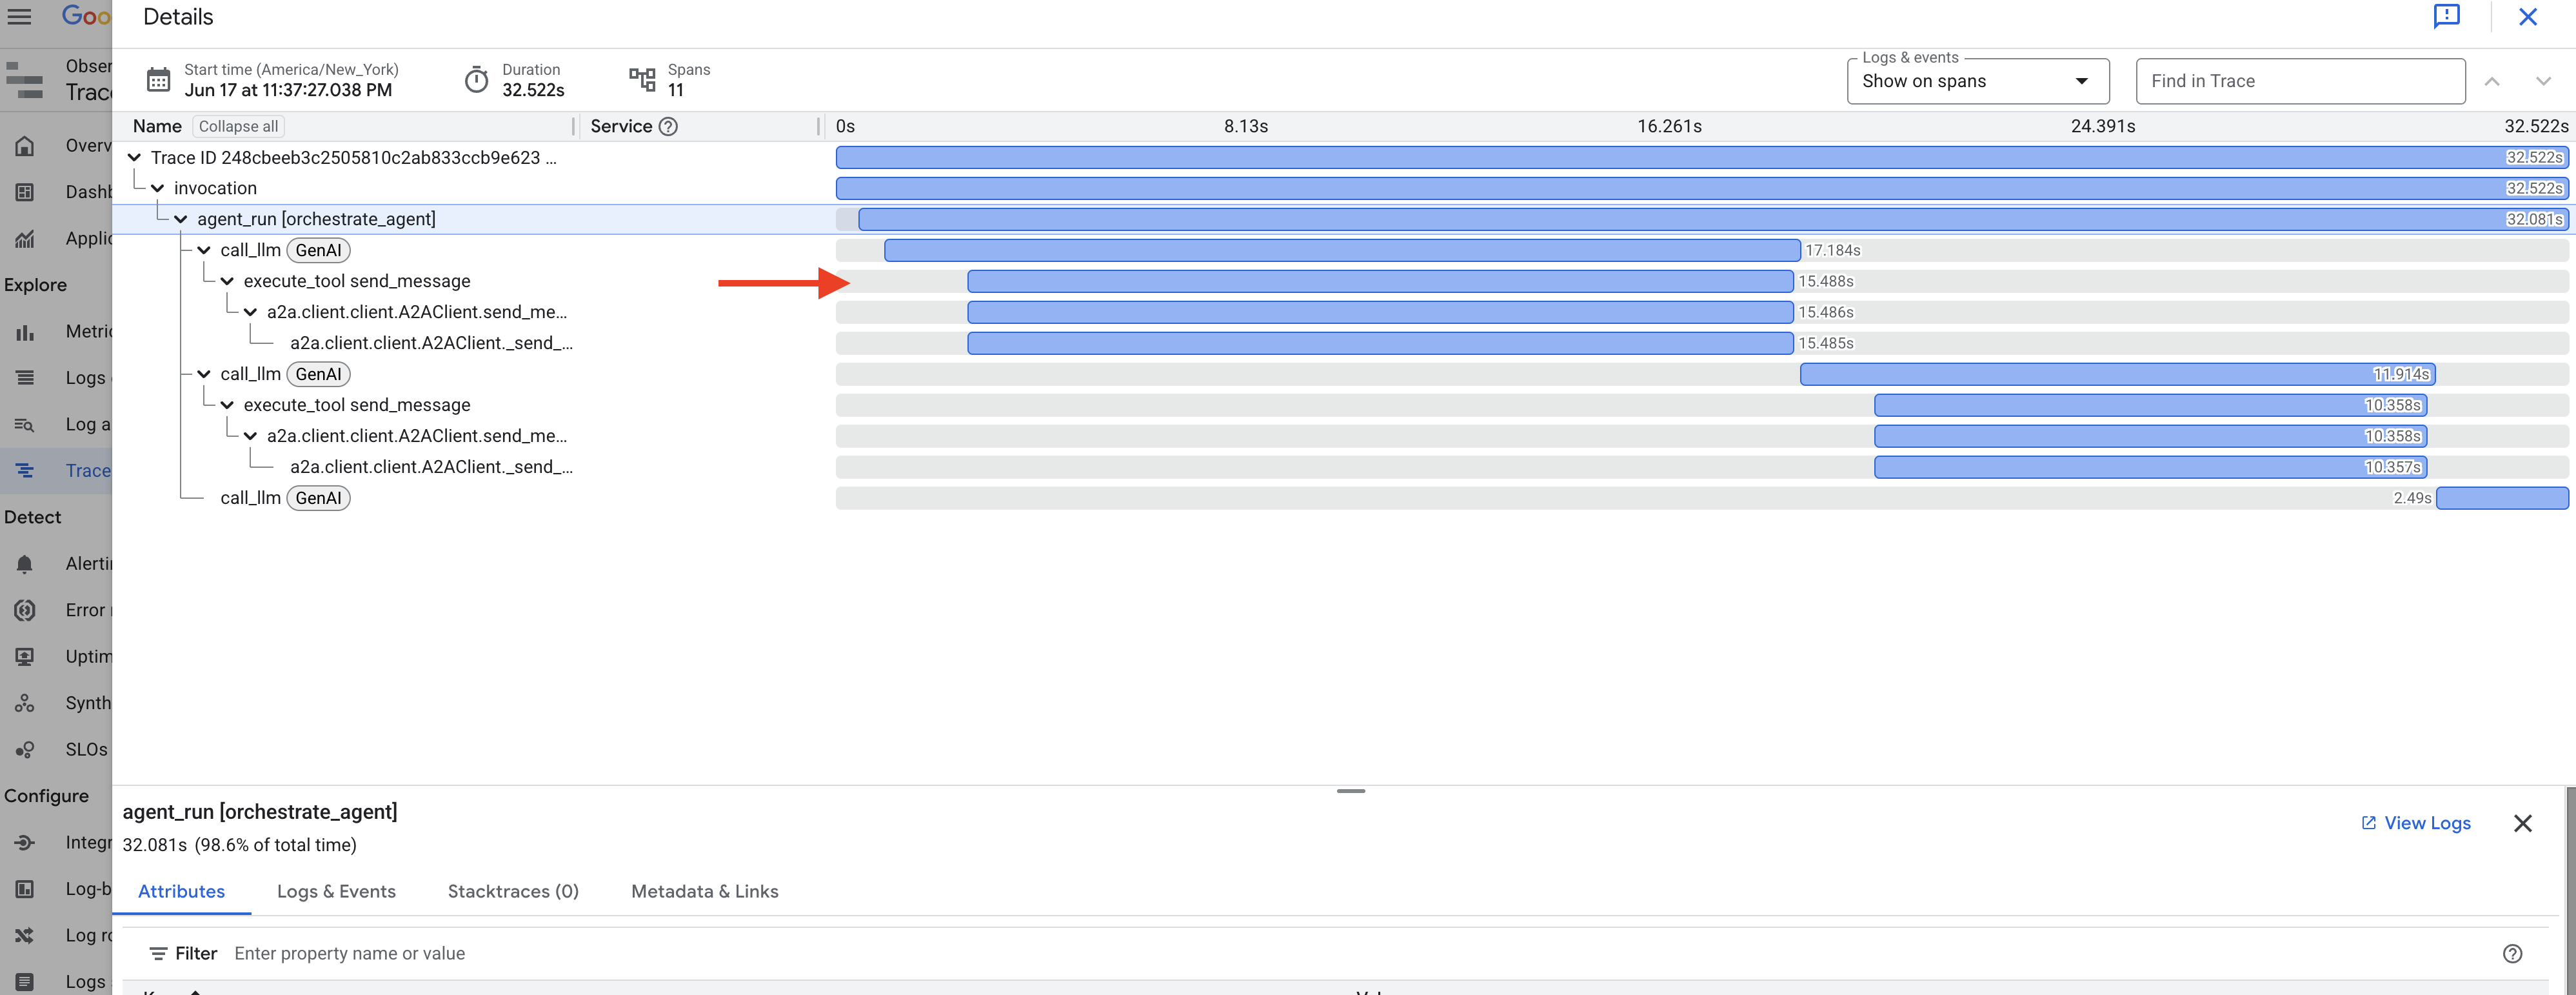
Exploring these traces helps understand and optimize the performance of your agent system.
Congratulations! You've successfully built, deployed, and tested a sophisticated multi-agent AI system using Google's ADK, A2A, MCP, and Google Cloud services. You've tackled agent orchestration, tool usage, state management, and cloud deployment, creating a functional AI-powered feature for InstaVibe. Well done on completing the workshop!
13. Clean Up
To avoid ongoing charges to your Google Cloud account, it's important to delete the resources we created during this workshop. The following commands will help you remove the Spanner instance, Cloud Run services, Artifact Registry repository, API Key, Vertex AI Agent Engine, and associated IAM permissions.
Важный:
- Ensure you are running these commands in the same Google Cloud project used for the workshop.
- If you've closed your Cloud Shell terminal, some environment variables like $PROJECT_ID, $SPANNER_INSTANCE_ID, etc., might not be set. You'll need to either re-export them as you did during the workshop setup or replace the variables in the commands below with their actual values.
- These commands will permanently delete your resources. Double-check before running if you have other important data in this project.
👉💻 Run the following scripts to clean up.
Reset environment variables
. ~/instavibe-bootstrap/set_env.sh
Delete Agent Engine:
cd ~/instavibe-bootstrap/utils
source ~/instavibe-bootstrap/env/bin/activate
export ORCHESTRATE_AGENT_ID=$(cat ~/instavibe-bootstrap/instavibe/temp_endpoint.txt)
echo "ORCHESTRATE_AGENT_ID set to: ${ORCHESTRATE_AGENT_ID}"
python remote_delete.py
deactivate
echo "Vertex AI Agent Engine deletion initiated."
Delete Cloud Run Services:
# InstaVibe Web Application
gcloud run services delete instavibe --platform=managed --region=${REGION} --project=${PROJECT_ID} --quiet

# MCP Tool Server
gcloud run services delete mcp-tool-server --platform=managed --region=${REGION} --project=${PROJECT_ID} --quiet

# Planner Agent (A2A Server)
gcloud run services delete planner-agent --platform=managed --region=${REGION} --project=${PROJECT_ID} --quiet

# Platform MCP Client Agent (A2A Server)
gcloud run services delete platform-mcp-client --platform=managed --region=${REGION} --project=${PROJECT_ID} --quiet

# Social Agent (A2A Server)
gcloud run services delete social-agent --platform=managed --region=${REGION} --project=${PROJECT_ID} --quiet

echo "Cloud Run services deletion initiated."
Stop and Remove the A2A Inspector Docker Container
docker rm --force a2a-inspector
Delete Spanner Instance:
echo "Deleting Spanner instance: ${SPANNER_INSTANCE_ID}..."
gcloud spanner instances delete ${SPANNER_INSTANCE_ID} --project=${PROJECT_ID} --quiet
echo "Spanner instance deletion initiated."
Delete Artifact Registry Repository:
echo "Deleting Artifact Registry repository: ${REPO_NAME}..."
gcloud artifacts repositories delete ${REPO_NAME} --location=${REGION} --project=${PROJECT_ID} --quiet
echo "Artifact Registry repository deletion initiated."
Remove Roles from Service Account:
echo "Removing roles from service account: $SERVICE_ACCOUNT_NAME in project $PROJECT_ID"

# Remove Project-level roles for default service account
gcloud projects remove-iam-policy-binding $PROJECT_ID \
  --member="serviceAccount:$SERVICE_ACCOUNT_NAME" \
  --role="roles/spanner.admin"

gcloud projects remove-iam-policy-binding $PROJECT_ID \
  --member="serviceAccount:$SERVICE_ACCOUNT_NAME" \
  --role="roles/spanner.databaseUser"

gcloud projects remove-iam-policy-binding $PROJECT_ID \
  --member="serviceAccount:$SERVICE_ACCOUNT_NAME" \
  --role="roles/artifactregistry.admin"

gcloud projects remove-iam-policy-binding $PROJECT_ID \
  --member="serviceAccount:$SERVICE_ACCOUNT_NAME" \
  --role="roles/cloudbuild.builds.editor"

gcloud projects remove-iam-policy-binding $PROJECT_ID \
  --member="serviceAccount:$SERVICE_ACCOUNT_NAME" \
  --role="roles/run.admin"

gcloud projects remove-iam-policy-binding $PROJECT_ID \
  --member="serviceAccount:$SERVICE_ACCOUNT_NAME" \
  --role="roles/iam.serviceAccountUser"

gcloud projects remove-iam-policy-binding $PROJECT_ID \
  --member="serviceAccount:$SERVICE_ACCOUNT_NAME" \
  --role="roles/aiplatform.user"

gcloud projects remove-iam-policy-binding $PROJECT_ID \
  --member="serviceAccount:$SERVICE_ACCOUNT_NAME" \
  --role="roles/logging.logWriter"

gcloud projects remove-iam-policy-binding $PROJECT_ID \
  --member="serviceAccount:$SERVICE_ACCOUNT_NAME" \
  --role="roles/logging.viewer"


echo "All specified roles have been removed."
Delete Local Workshop Files:
echo "Removing local workshop directory ~/instavibe-bootstrap..."
rm -rf ~/instavibe-bootstrap
rm -rf ~/a2a-inspector
rm -f ~/mapkey.txt
rm -f ~/project_id.txt
echo "Local directory removed."