1. 學習目標
歡迎!我們今天將踏上相當酷的旅程。首先,我們來想想熱門的社群活動平台 InstaVibe。雖然這項功能很成功,但我們知道,對部分使用者來說,實際規劃團體活動可能很麻煩。試想一下,你要找出所有朋友感興趣的事物,然後從無數的活動或場地選項中篩選,最後還要協調一切事宜。這是一大進展!這正是導入 AI (更具體來說,是智慧代理程式) 的時機,可望帶來實質改變。
我們的目標是建構一套系統,讓這些代理程式能處理繁重的工作,例如「聆聽」以瞭解使用者和朋友的偏好,然後主動建議量身打造的精彩活動。我們的目標是將 InstaVibe 的社交規劃功能,轉變成無縫且令人愉悅的體驗。如要開始建構這些智慧助理,我們需要使用合適的工具奠定穩固基礎。
您會看到以下概念:

Google ADK 基礎:掌握使用 Google Agent Development Kit (ADK) 建構第一個智慧型代理的基本概念。瞭解必要元件、代理程式生命週期,以及如何有效運用架構的內建工具。
使用 Model Context Protocol (MCP) 擴充代理功能:瞭解如何為代理提供自訂工具和背景資訊,讓代理執行特定工作及存取特定資訊。介紹 Model Context Protocol (MCP) 概念。您將瞭解如何設定 MCP 伺服器來提供這個脈絡。
設計代理互動和自動調度管理機制:從單一代理轉向瞭解代理自動調度管理機制。設計互動模式,範圍從簡單的循序工作流程,到涉及迴圈、條件式邏輯和平行處理的複雜情境都有。在 ADK 架構中導入子代理的概念,以管理模組化工作。
建構協作式多代理系統:瞭解如何設計系統,讓多個代理協同合作,達成複雜目標。學習及實作 Agent-to-Agent (A2A) 通訊協定,為分散式代理 (可能在不同機器或服務上執行) 建立可靠的互動標準方式。
在 Google Cloud 上將代理投入正式環境:將代理應用程式從開發環境轉移至雲端。瞭解在 Google Cloud Platform (GCP) 上架構及部署可擴充且強大的多代理系統時,應採取的最佳做法。深入瞭解如何運用 Cloud Run 等 GCP 服務,並探索最新 Google Agent Engine 的功能,以便代管及管理代理程式。
2. 架構
使用 InstaVibe 透過 AI 規劃社群媒體內容
什麼是社群媒體觀測?
社群聆聽是指監控社群媒體、論壇和新聞網站等平台上的數位對話,瞭解使用者對特定主題、品牌或產業的看法。這項工具可提供有關大眾情緒、趨勢和使用者需求的實用洞察資料。在本研討會中,我們將在以代理程式為基礎的系統中運用這項概念。
InstaVibe 團隊敬上
假設您在「InstaVibe」工作,這間新創公司推出熱門的社群活動平台,目標客群是年輕成人。一切進展順利,但如同許多科技公司,您的團隊面臨投資人的壓力,必須運用 AI 創新。在內部,您也發現有一群使用者參與度不如其他人,可能是因為他們不太願意發起群組活動,或是覺得規劃過程很困難。對貴公司而言,這表示這個重要使用者群組對平台的黏著度較低。
團隊的研究顯示,AI 輔助功能可大幅提升這些使用者的體驗。這項功能的構想是根據使用者和好友的興趣,主動建議相關活動,簡化社交出遊的規劃流程。您和同事面臨的問題是:如何運用 AI 代理自動執行耗時的任務,例如發掘興趣、研究活動,以及初步協調?
以代理程式為基礎的解決方案 (原型概念)
您提議開發由多代理系統驅動的原型功能。概念如下:
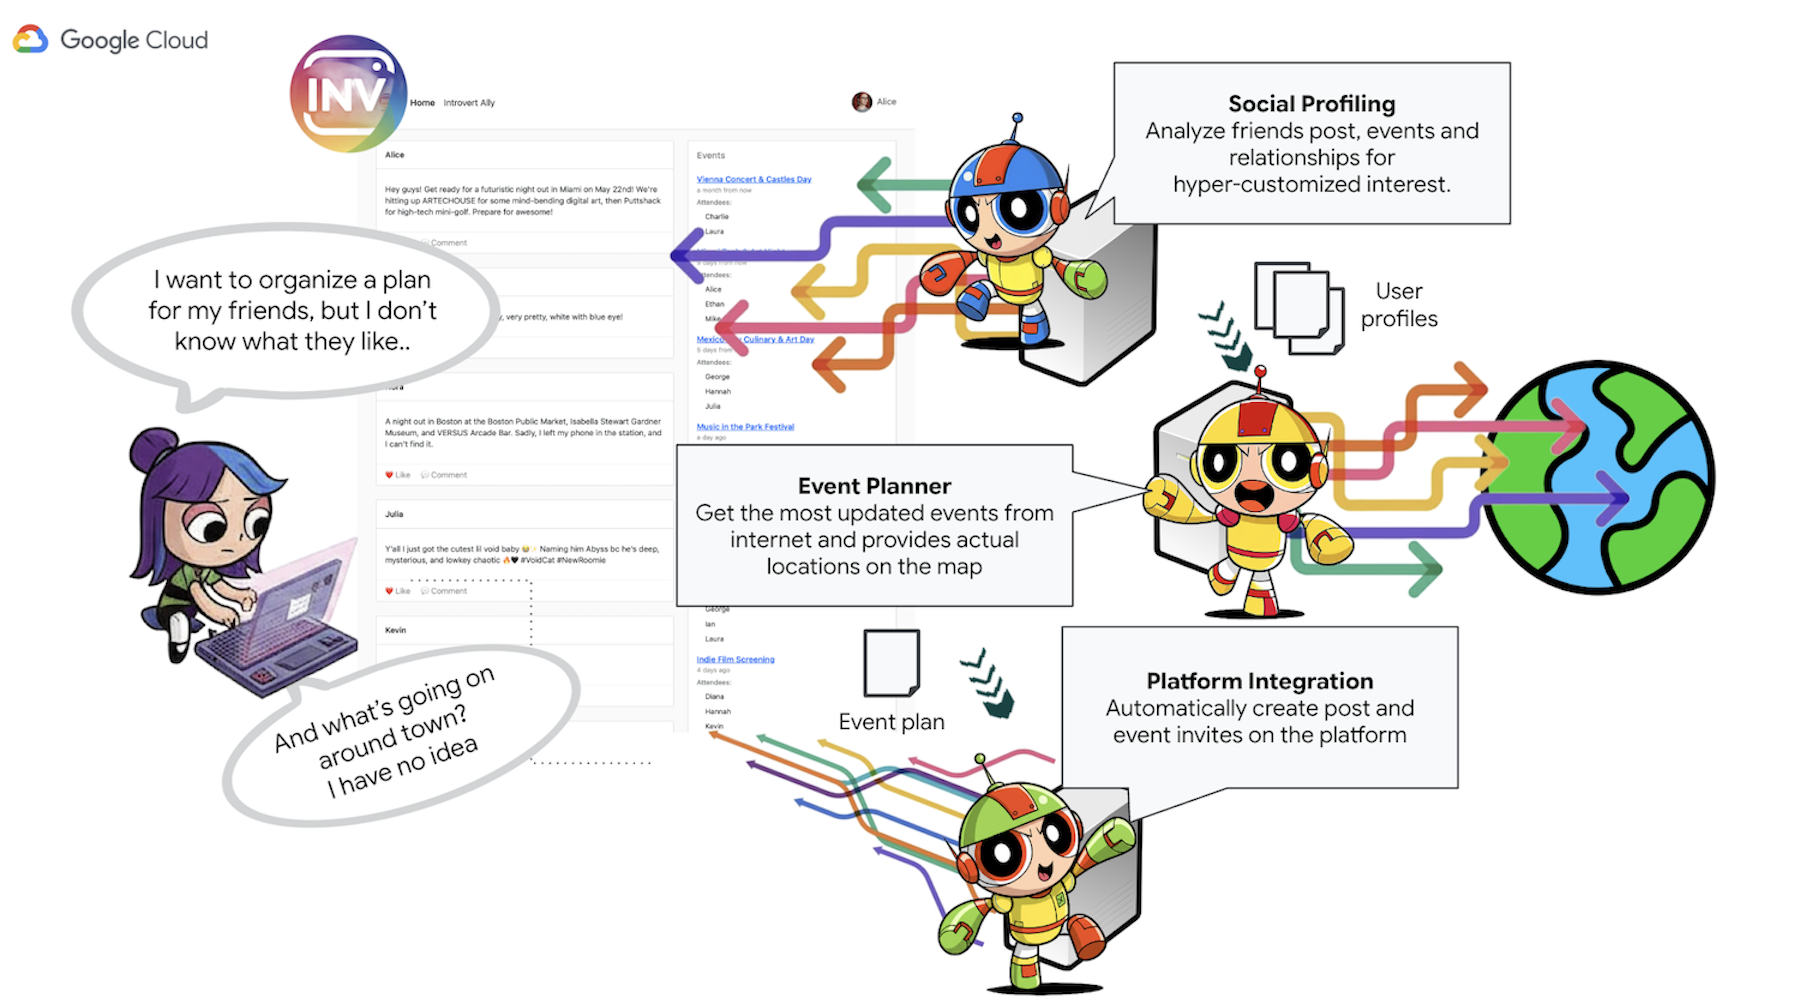
- 社群剖析代理程式:這個代理程式會運用社群聆聽技術,分析使用者的連結、互動,以及可能與使用者偏好相關的更廣泛公眾趨勢。這項功能可找出共同興趣和合適的活動特徵 (例如偏好較安靜的聚會、特定嗜好)。
- 活動規劃代理:這個代理會運用社群剖析代理提供的洞察資料,在線上資源中搜尋符合特定條件 (例如地點、興趣) 的活動、場地或構想。
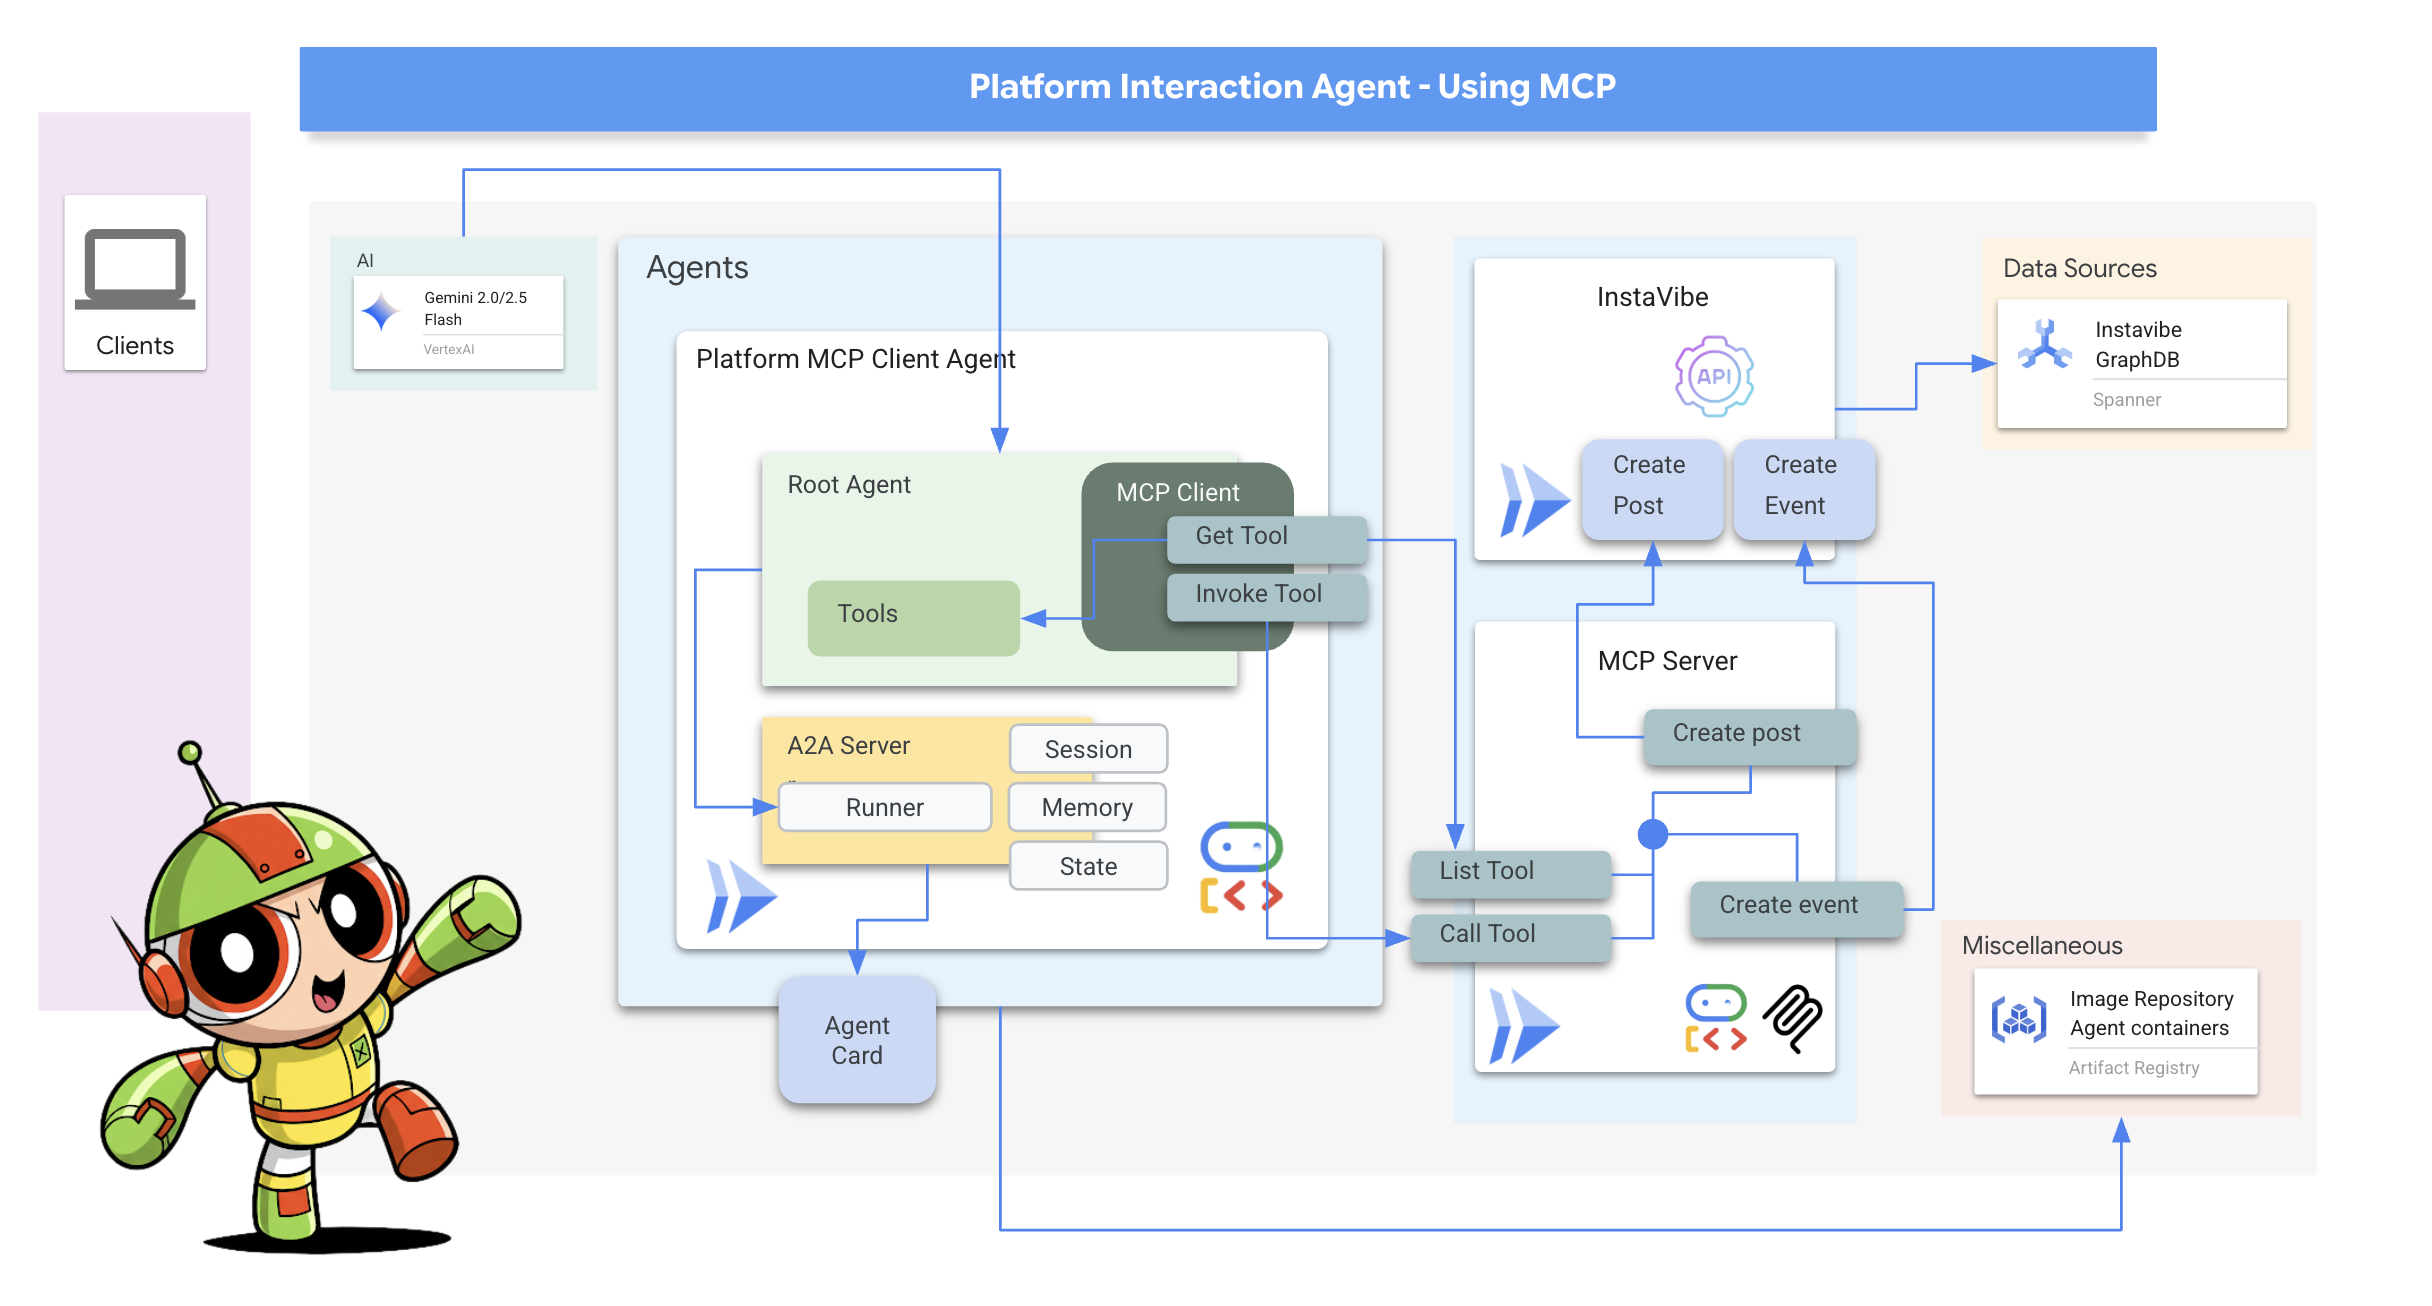
- 平台互動代理 (使用 MCP):這個代理會從活動規劃代理取得最終計畫,主要功能是利用預先定義的 MCP (Model Context Protocol) 工具,直接與 InstaVibe 平台互動。這項工具可讓服務專員草擬活動建議,並建立貼文說明計畫。
- 自動化調度管理代理:這個代理會做為中央協調員,這項服務會接收來自 InstaVibe 平台的初始使用者要求,瞭解整體目標 (例如「為我和朋友規劃活動」),然後以邏輯順序將特定工作委派給適當的專業服務專員。負責管理代理程式間的資訊流,並確保最終結果會傳回給使用者。
主要架構元素和技術

Google Cloud Platform (GCP):
- Vertex AI:
- Gemini 模型:提供 Google 最先進的大型語言模型 (LLM),例如 Gemini,可為代理提供推論和決策能力。
- Vertex AI Agent Engine:這項代管服務可用於部署、代管及調度協調器代理,簡化正式環境的建構作業,並抽象化基礎架構的複雜性。
- Cloud Run:無伺服器平台,用於部署容器化應用程式。我們使用這項資訊的目的包括:
- 代管主要的 InstaVibe 網頁應用程式。
- 將個別啟用 A2A 的代理 (Planner、Social Profiling、Platform Interaction) 部署為獨立微服務。
- 執行 MCP 工具伺服器,讓代理程式使用 InstaVibe 的內部 API。
- Spanner:全代管的全球分散式關聯式資料庫,具備高度一致性。在本研討會中,我們將利用其圖形資料庫功能,使用 GRAPH DDL 和查詢功能執行下列操作:
- 建立及儲存複雜的社交關係 (使用者、友誼、活動出席狀況、貼文)。
- 讓 Social Profiling 服務專員能有效查詢這些關係。
- Artifact Registry:全代管服務,用於儲存、管理及保護容器映像檔。
- Cloud Build:可在 Google Cloud 執行建構作業的服務,我們會使用這項服務,從代理程式和應用程式原始碼自動建構 Docker 容器映像檔。
- Cloud Storage:供 Cloud Build 等服務儲存建構構件,以及供 Agent Engine 滿足運作需求。
- 核心代理程式架構和通訊協定:
- Google 的 Agent Development Kit (ADK):主要架構,適用於:
- 定義個別智慧代理程式的核心邏輯、行為和指令集。
- 管理代理程式生命週期、狀態和記憶 (短期工作階段狀態和可能長期知識)。
- 整合代理可與世界互動的工具 (例如 Google 搜尋或自訂工具)。
- 自動化調度管理多代理工作流程,包括循序、迴圈和並行執行子代理。
- Agent2Agent (A2A) 通訊協定:這項開放標準可實現以下功能:
- 不同 AI 代理之間可直接進行標準化通訊和協作,即使這些代理是做為個別服務執行,或是在不同機器上執行也沒問題。
- 代理可透過代理資訊卡探索彼此的功能,並委派工作。這對 Orchestrator 代理與專業的 Planner、Social 和 Platform 代理互動至關重要。
- A2A Python 程式庫 (a2a-python):用於讓 ADK 代理程式採用 A2A 通訊協定的具體程式庫。這個 SDK 提供所需的伺服器端元件,可執行下列操作:
- 將代理公開為符合 A2A 規範的伺服器。
- 自動處理探索作業的「代理資訊卡」放送。
- 接收及管理其他代理 (例如 Orchestrator) 傳送的任務要求。
- Model Context Protocol (MCP):開放標準,可讓代理程式:
- 以標準化方式連結及運用外部工具、資料來源和系統。
- 我們的平台互動代理會使用 MCP 用戶端與 MCP 伺服器通訊,而 MCP 伺服器會公開工具,與 InstaVibe 平台的現有 API 互動。
- Google 的 Agent Development Kit (ADK):主要架構,適用於:
- 偵錯工具:
- A2A 檢查器:A2A 檢查器是網頁式偵錯工具,在本研討會中,我們將使用這項工具連線至啟用 A2A 的代理程式、檢查代理程式,以及與代理程式互動。雖然這不是最終的正式架構,但卻是我們開發工作流程中不可或缺的一環。這項服務提供:
- 代理資訊卡檢視器:用於擷取及驗證代理的公開功能。
- 即時通訊介面:直接傳送訊息給已部署的代理程式,立即進行測試。
- 偵錯控制台:查看檢查器和代理程式之間交換的原始 JSON-RPC 訊息。
- A2A 檢查器:A2A 檢查器是網頁式偵錯工具,在本研討會中,我們將使用這項工具連線至啟用 A2A 的代理程式、檢查代理程式,以及與代理程式互動。雖然這不是最終的正式架構,但卻是我們開發工作流程中不可或缺的一環。這項服務提供:
- 語言模型 (LLM):系統的「大腦」:
- Google 的 Gemini 模型:具體來說,我們使用 gemini-2.0-flash 等版本。選擇這些模型的原因:
- 進階推理和指令遵循:這類模型能夠理解複雜的提示、遵循詳細的指令,並推論工作內容,因此適合用來輔助代理做出決策。
- 工具使用 (函式呼叫):Gemini 模型擅長判斷何時及如何使用透過 ADK 提供的工具,讓代理程式收集資訊或執行動作。
- 效率 (Flash 模型):Flash 變體模型在效能和成本效益之間取得良好平衡,適合許多需要快速回覆的互動式代理程式工作。
- Google 的 Gemini 模型:具體來說,我們使用 gemini-2.0-flash 等版本。選擇這些模型的原因:
3. 事前準備
👉點選 Google Cloud 控制台頂端的「啟用 Cloud Shell」 (這是 Cloud Shell 窗格頂端的終端機形狀圖示),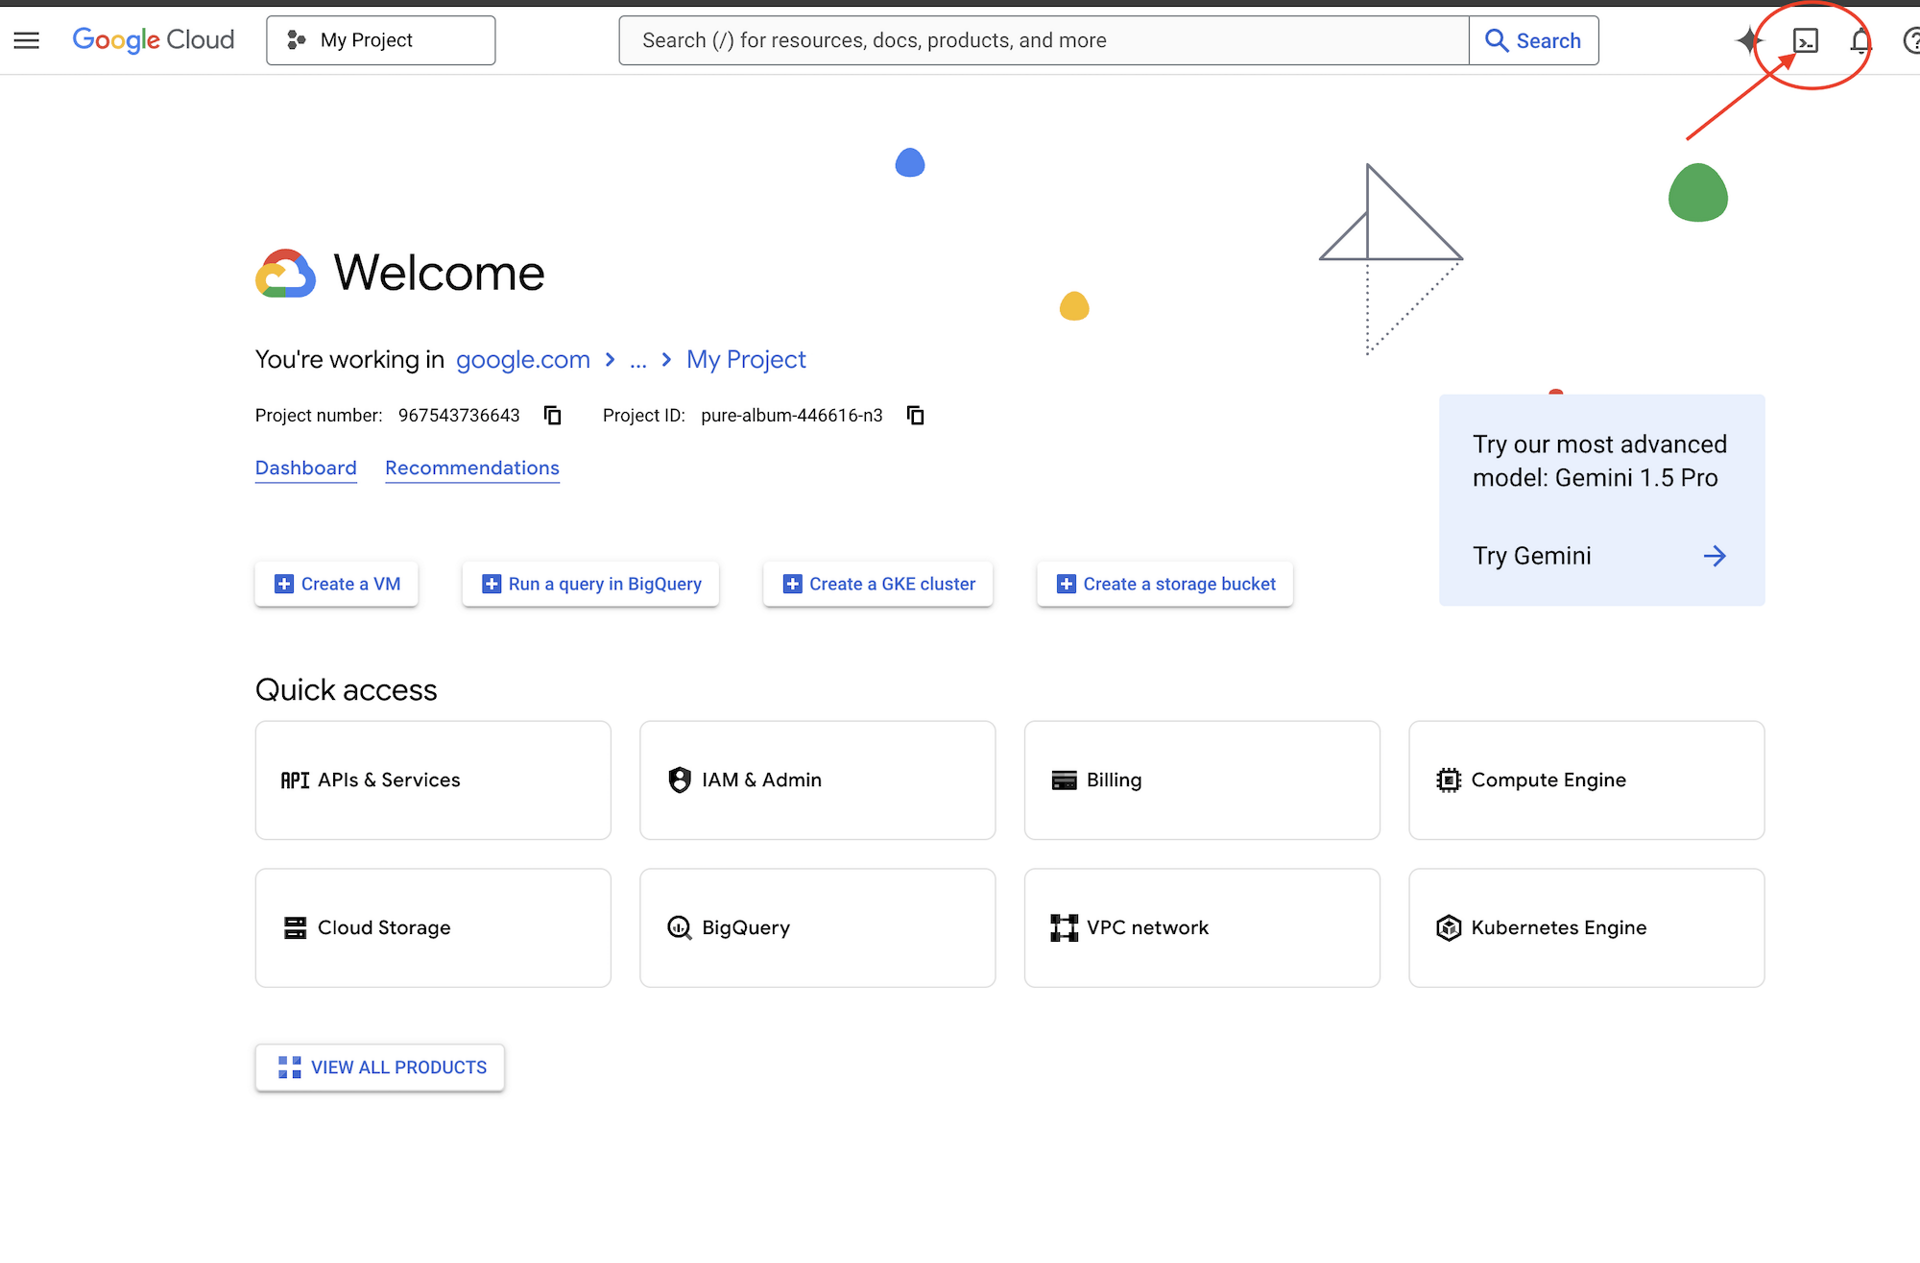
👉按一下「Open Editor」(開啟編輯器) 按鈕 (類似於開啟的資料夾,內有鉛筆)。視窗中會開啟 Cloud Shell 程式碼編輯器。左側會顯示檔案總管。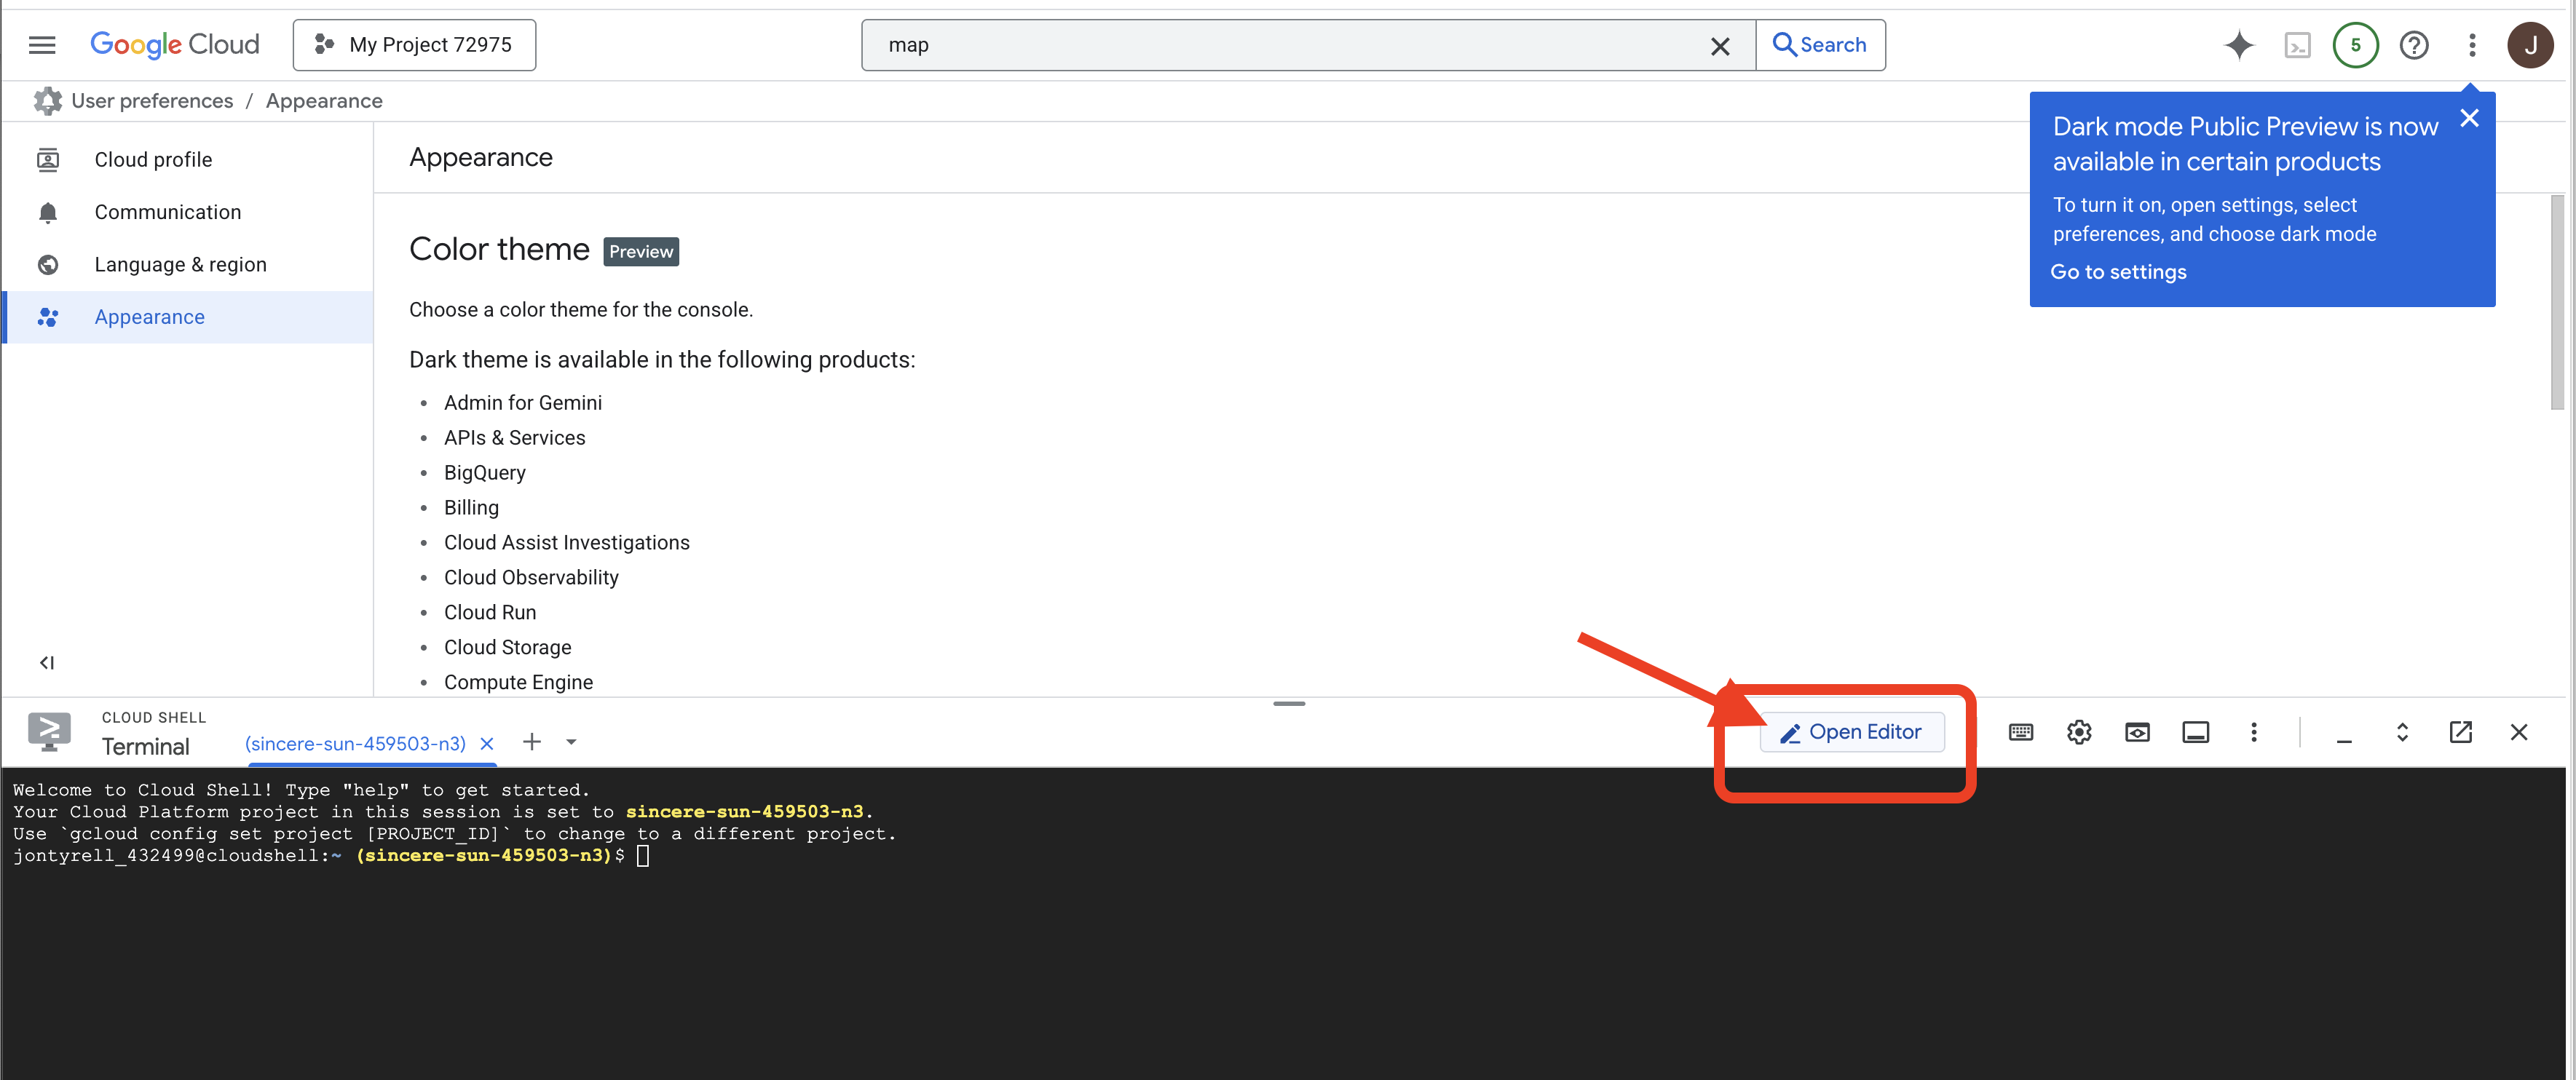
👉點選底部狀態列中的「Cloud Code Sign-in」按鈕,如下圖所示。依指示授權外掛程式。如果狀態列顯示「Cloud Code - no project」,請選取該項目,然後在「Select a Google Cloud Project」(選取 Google Cloud 專案) 下拉式選單中,從您建立的專案清單中選取特定 Google Cloud 專案。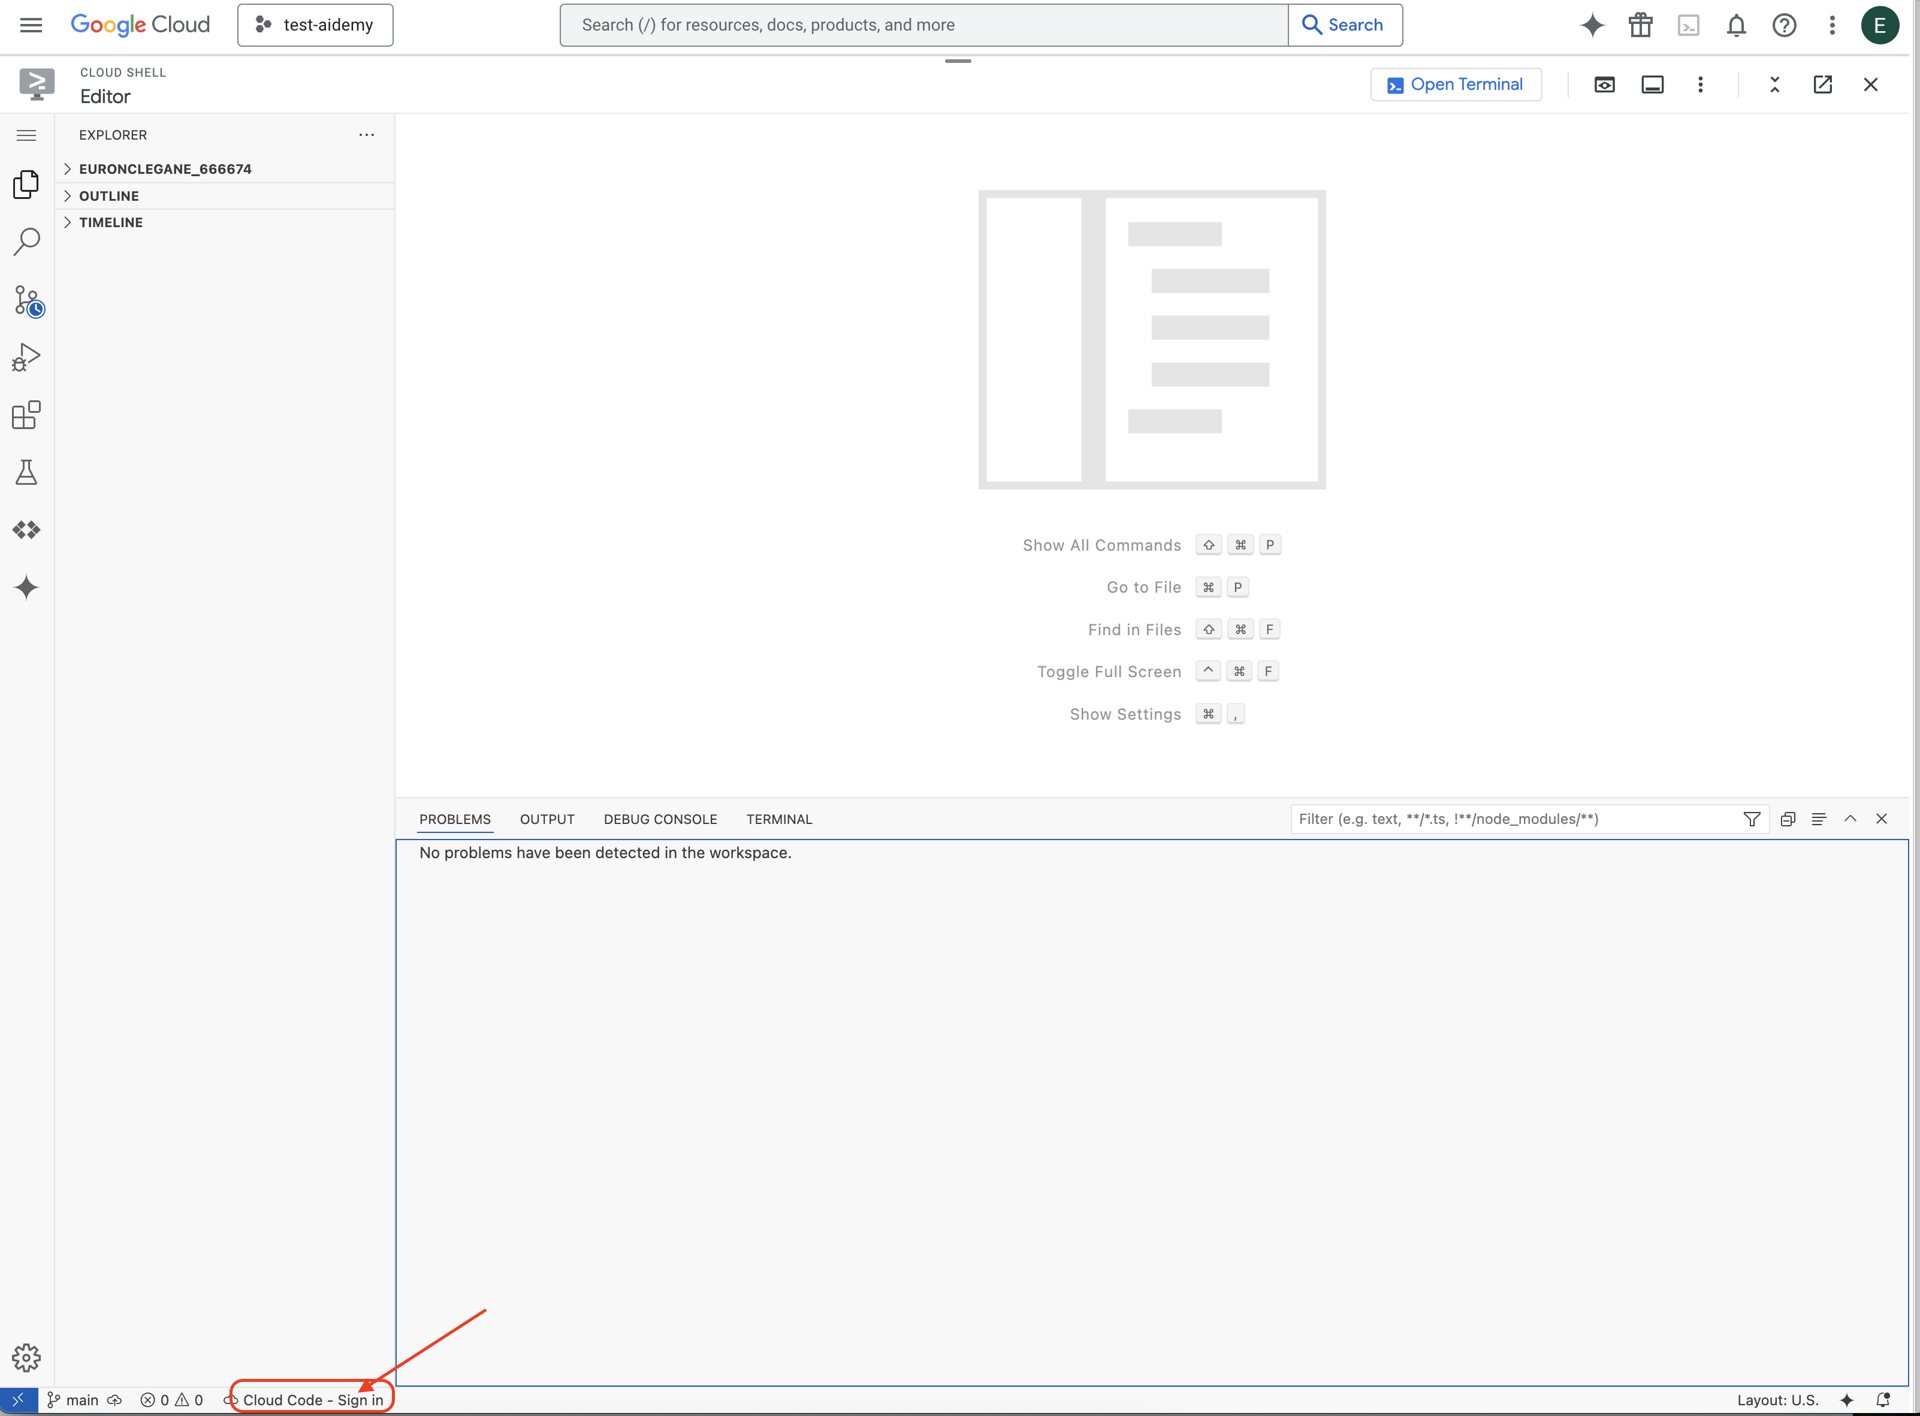
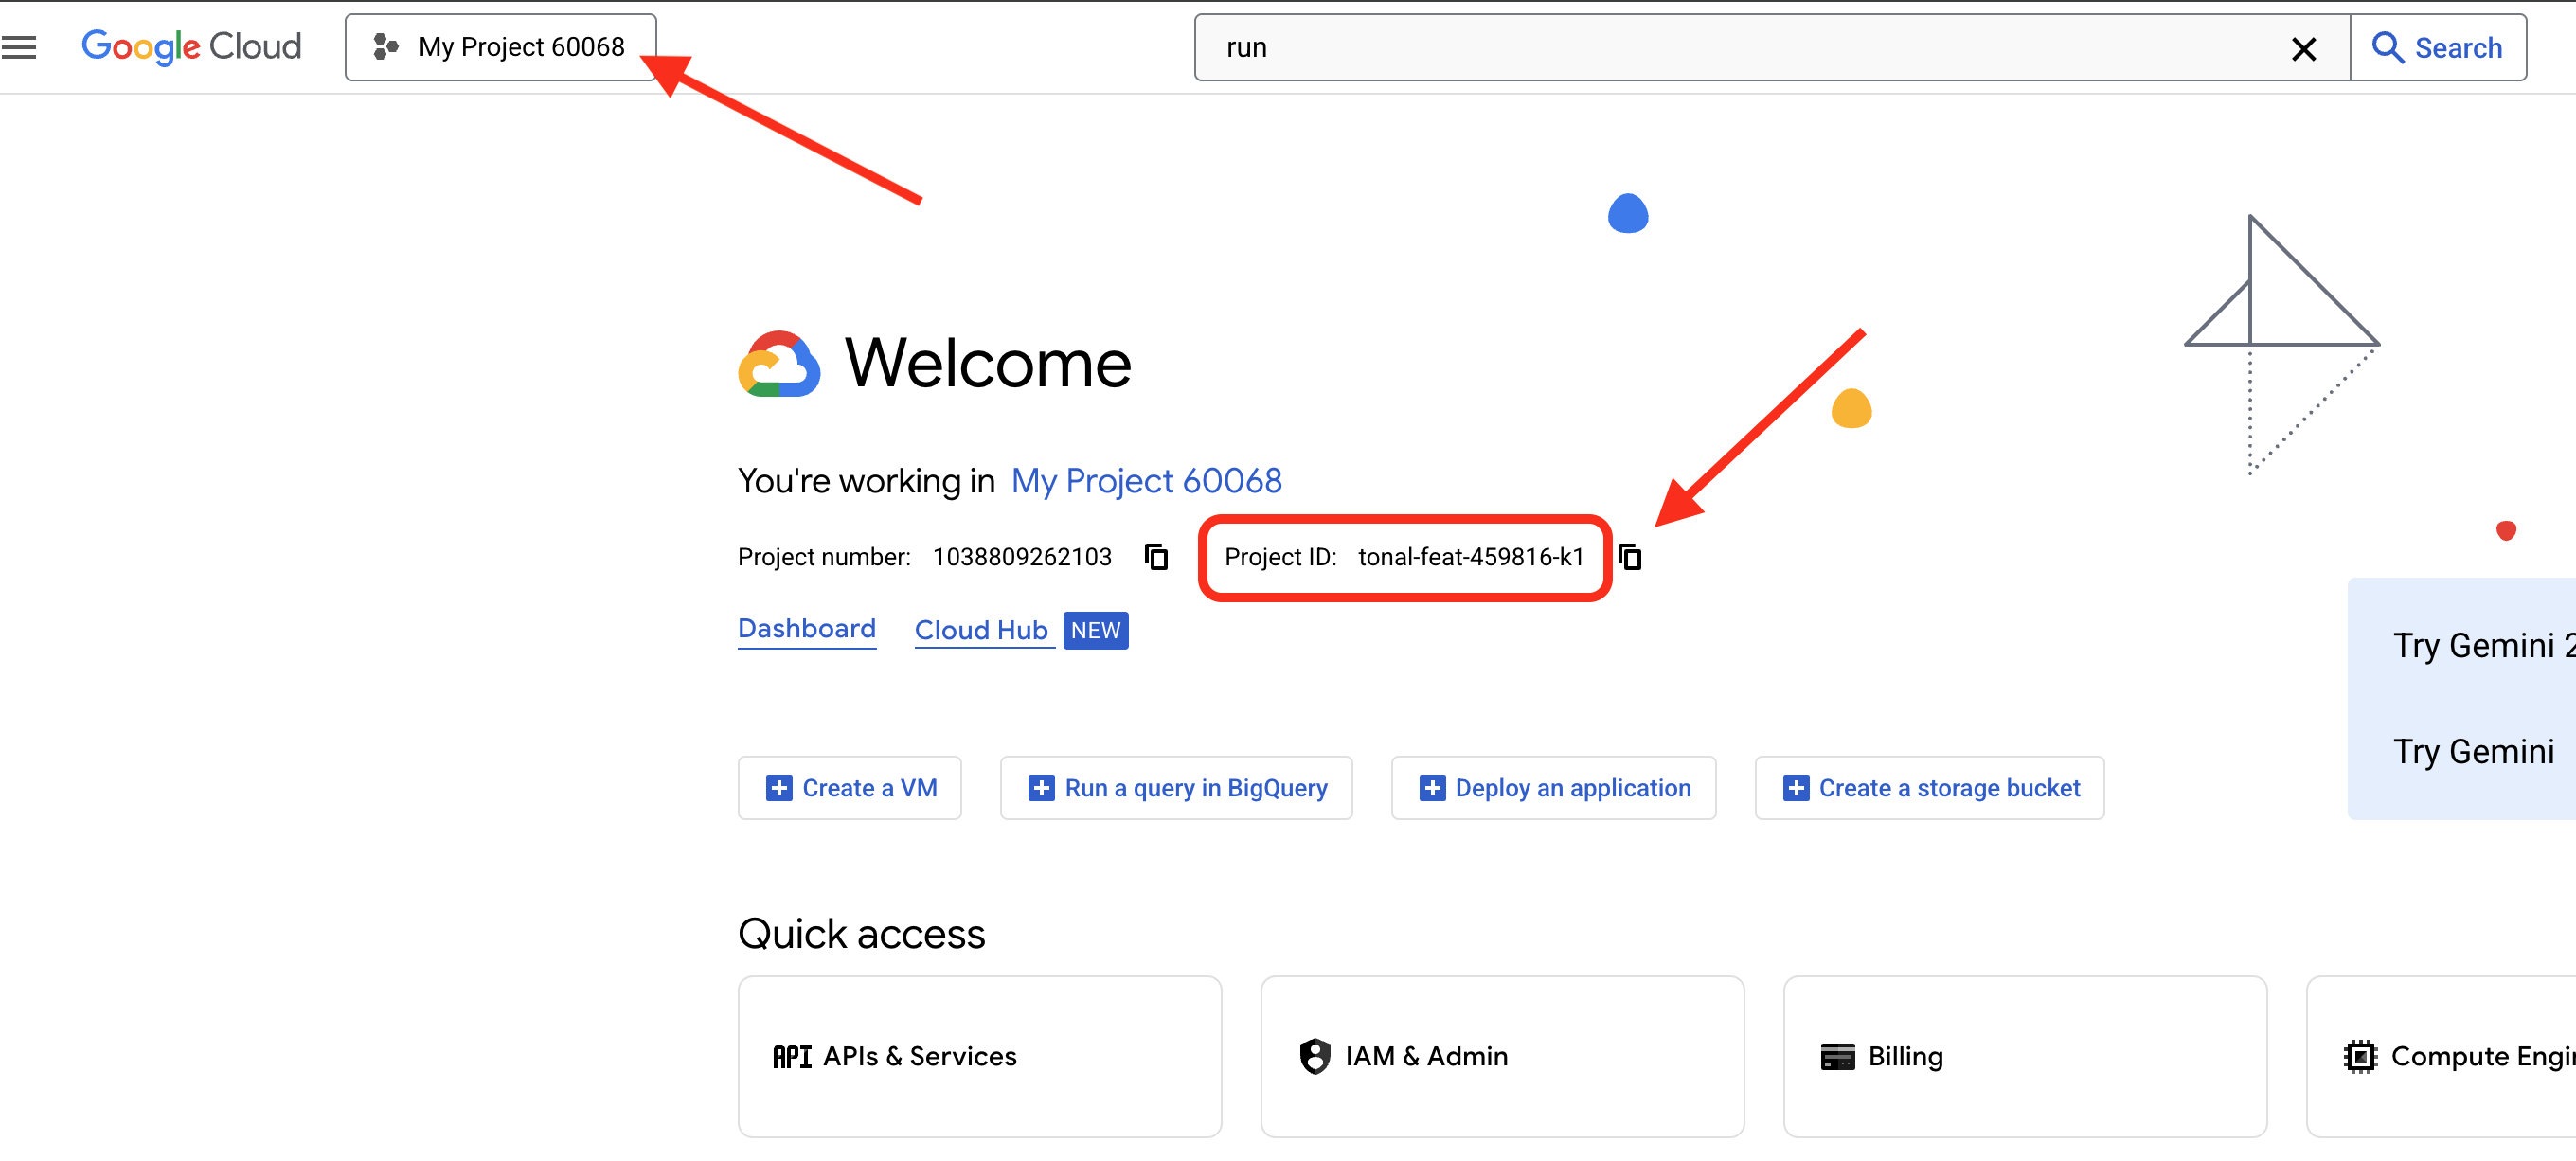
👉 找出 Google Cloud 專案 ID:
- 開啟 Google Cloud 控制台:https://console.cloud.google.com
- 在頁面頂端的專案下拉式選單中,選取要用於本研討會的專案。
- 專案 ID 會顯示在資訊主頁的「專案資訊」資訊卡中
👉在雲端 IDE 中開啟終端機 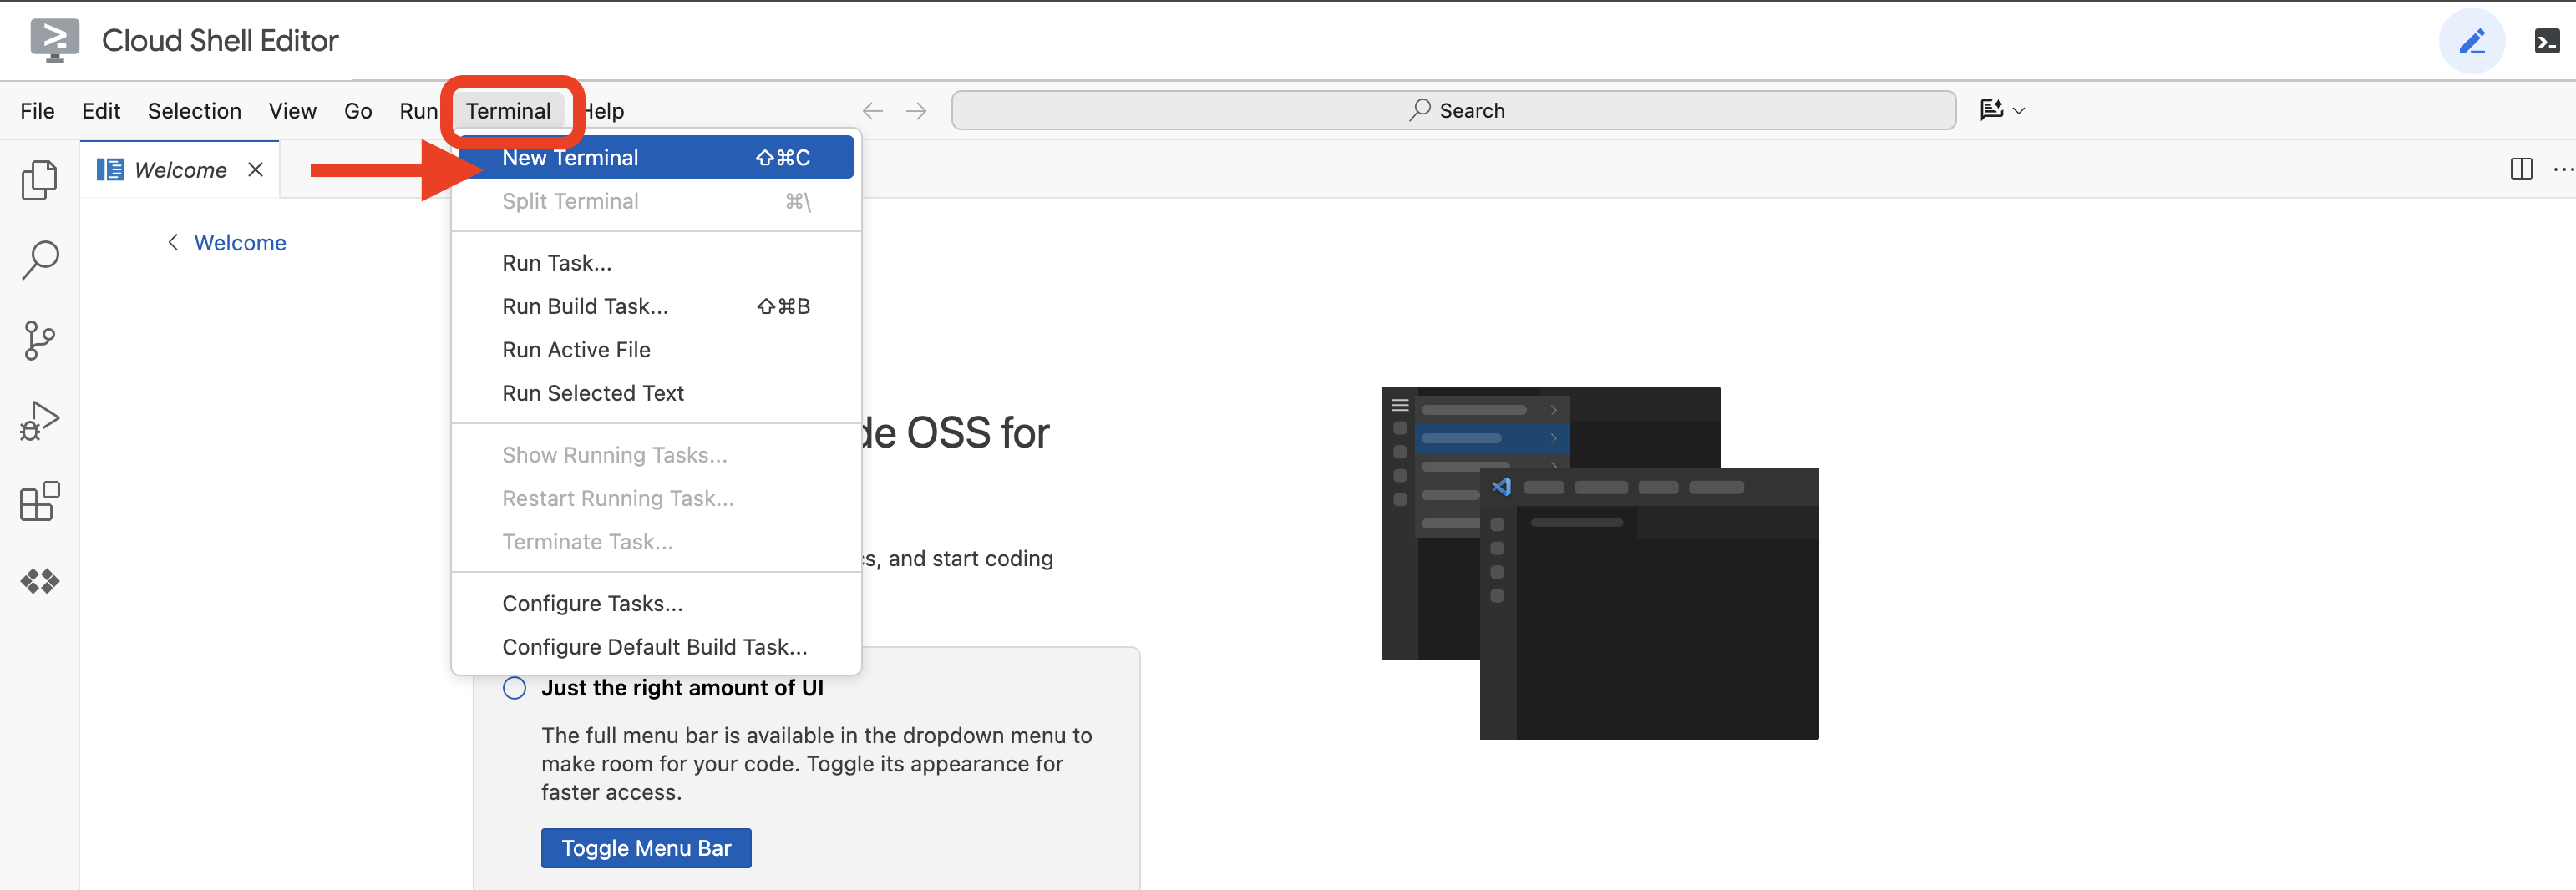
👉💻 在終端機中,使用下列指令驗證您是否已通過驗證,以及專案是否已設為您的專案 ID:
gcloud auth list
👉💻 從 GitHub 複製 instavibe-bootstrap 專案:
git clone -b adk-1.2.1-a2a-0.2.7 https://github.com/weimeilin79/instavibe-bootstrap.git
chmod +x ~/instavibe-bootstrap/init.sh
chmod +x ~/instavibe-bootstrap/set_env.sh
瞭解專案結構
開始建構前,請先花點時間瞭解您剛複製的 instavibe-bootstrap 專案版面配置。這有助於您瞭解在研討會期間,檔案的存放位置和編輯方式。
instavibe-bootstrap/
├── agents/
│   ├── orchestrate/
│   ├── planner/
│   ├── platform_mcp_client/
│   └── social/
├── instavibe/
│   ├── static/
│   └── templates/
├── tools/
│   └── instavibe/
├── utils/
├── init.sh
└── set_env.sh
以下是主要目錄的細目:
agents/:這是我們 AI 系統的核心。每個子目錄 (planner/、social/ 等) 都包含特定智慧型代理程式的原始碼。agent.py:在每個代理程式的資料夾中,這是代理程式邏輯的主要檔案。a2a_server.py:這個檔案會使用 Agent-to-Agent (A2A) 伺服器封裝 ADK 代理。Dockerfile:定義如何建構容器映像檔,以便將代理程式部署至 Cloud Run 或 Agent Engine。
instavibe/:這個目錄包含 InstaVibe 網頁應用程式的完整原始碼。tools/:這個目錄用於建構代理程式可使用的外部工具。instavibe/包含 Model Context Protocol (MCP) 伺服器。
這種模組化結構可將網頁應用程式與各種 AI 元件分開,讓整個系統更容易管理、測試及部署。
👉💻 執行初始化指令碼:
這個指令碼會提示您輸入 Google Cloud 專案 ID。
init.sh 指令碼提示時,請輸入上一個步驟中找到的 Google Cloud 專案 ID:
cd ~/instavibe-bootstrap
./init.sh
👉💻 設定所需的專案 ID:
gcloud config set project $(cat ~/project_id.txt) --quiet
👉💻 執行下列指令,啟用必要的 Google Cloud API:
gcloud services enable  run.googleapis.com \
                        cloudfunctions.googleapis.com \
                        cloudbuild.googleapis.com \
                        artifactregistry.googleapis.com \
                        spanner.googleapis.com \
                        apikeys.googleapis.com \
                        iam.googleapis.com \
                        compute.googleapis.com \
                        aiplatform.googleapis.com \
                        cloudresourcemanager.googleapis.com \
                        maps-backend.googleapis.com
👉💻 設定所有必要的環境變數:
export PROJECT_ID=$(gcloud config get project)
export PROJECT_NUMBER=$(gcloud projects describe ${PROJECT_ID} --format="value(projectNumber)")
export SERVICE_ACCOUNT_NAME=$(gcloud compute project-info describe --format="value(defaultServiceAccount)")
export SPANNER_INSTANCE_ID="instavibe-graph-instance"
export SPANNER_DATABASE_ID="graphdb"
export GOOGLE_CLOUD_PROJECT=$(gcloud config get project)
export GOOGLE_GENAI_USE_VERTEXAI=TRUE
export GOOGLE_CLOUD_LOCATION="us-central1"
設定權限
👉💻 授予權限。在終端機中執行:
gcloud projects add-iam-policy-binding $PROJECT_ID \
  --member="serviceAccount:$SERVICE_ACCOUNT_NAME" \
  --role="roles/spanner.admin"

# Spanner Database User
gcloud projects add-iam-policy-binding $PROJECT_ID \
  --member="serviceAccount:$SERVICE_ACCOUNT_NAME" \
  --role="roles/spanner.databaseUser"

# Artifact Registry Admin
gcloud projects add-iam-policy-binding $PROJECT_ID \
  --member="serviceAccount:$SERVICE_ACCOUNT_NAME" \
  --role="roles/artifactregistry.admin"

# Cloud Build Editor
gcloud projects add-iam-policy-binding $PROJECT_ID \
  --member="serviceAccount:$SERVICE_ACCOUNT_NAME" \
  --role="roles/cloudbuild.builds.editor"

# Cloud Run Admin
gcloud projects add-iam-policy-binding $PROJECT_ID \
  --member="serviceAccount:$SERVICE_ACCOUNT_NAME" \
  --role="roles/run.admin"

# IAM Service Account User
gcloud projects add-iam-policy-binding $PROJECT_ID \
  --member="serviceAccount:$SERVICE_ACCOUNT_NAME" \
  --role="roles/iam.serviceAccountUser"

# Vertex AI User
gcloud projects add-iam-policy-binding $PROJECT_ID \
  --member="serviceAccount:$SERVICE_ACCOUNT_NAME" \
  --role="roles/aiplatform.user"

# Logging Writer (to allow writing logs)
gcloud projects add-iam-policy-binding $PROJECT_ID \
  --member="serviceAccount:$SERVICE_ACCOUNT_NAME" \
  --role="roles/logging.logWriter"


gcloud projects add-iam-policy-binding $PROJECT_ID \
  --member="serviceAccount:$SERVICE_ACCOUNT_NAME" \
  --role="roles/logging.viewer"
👉 在 IAM 控制台中驗證結果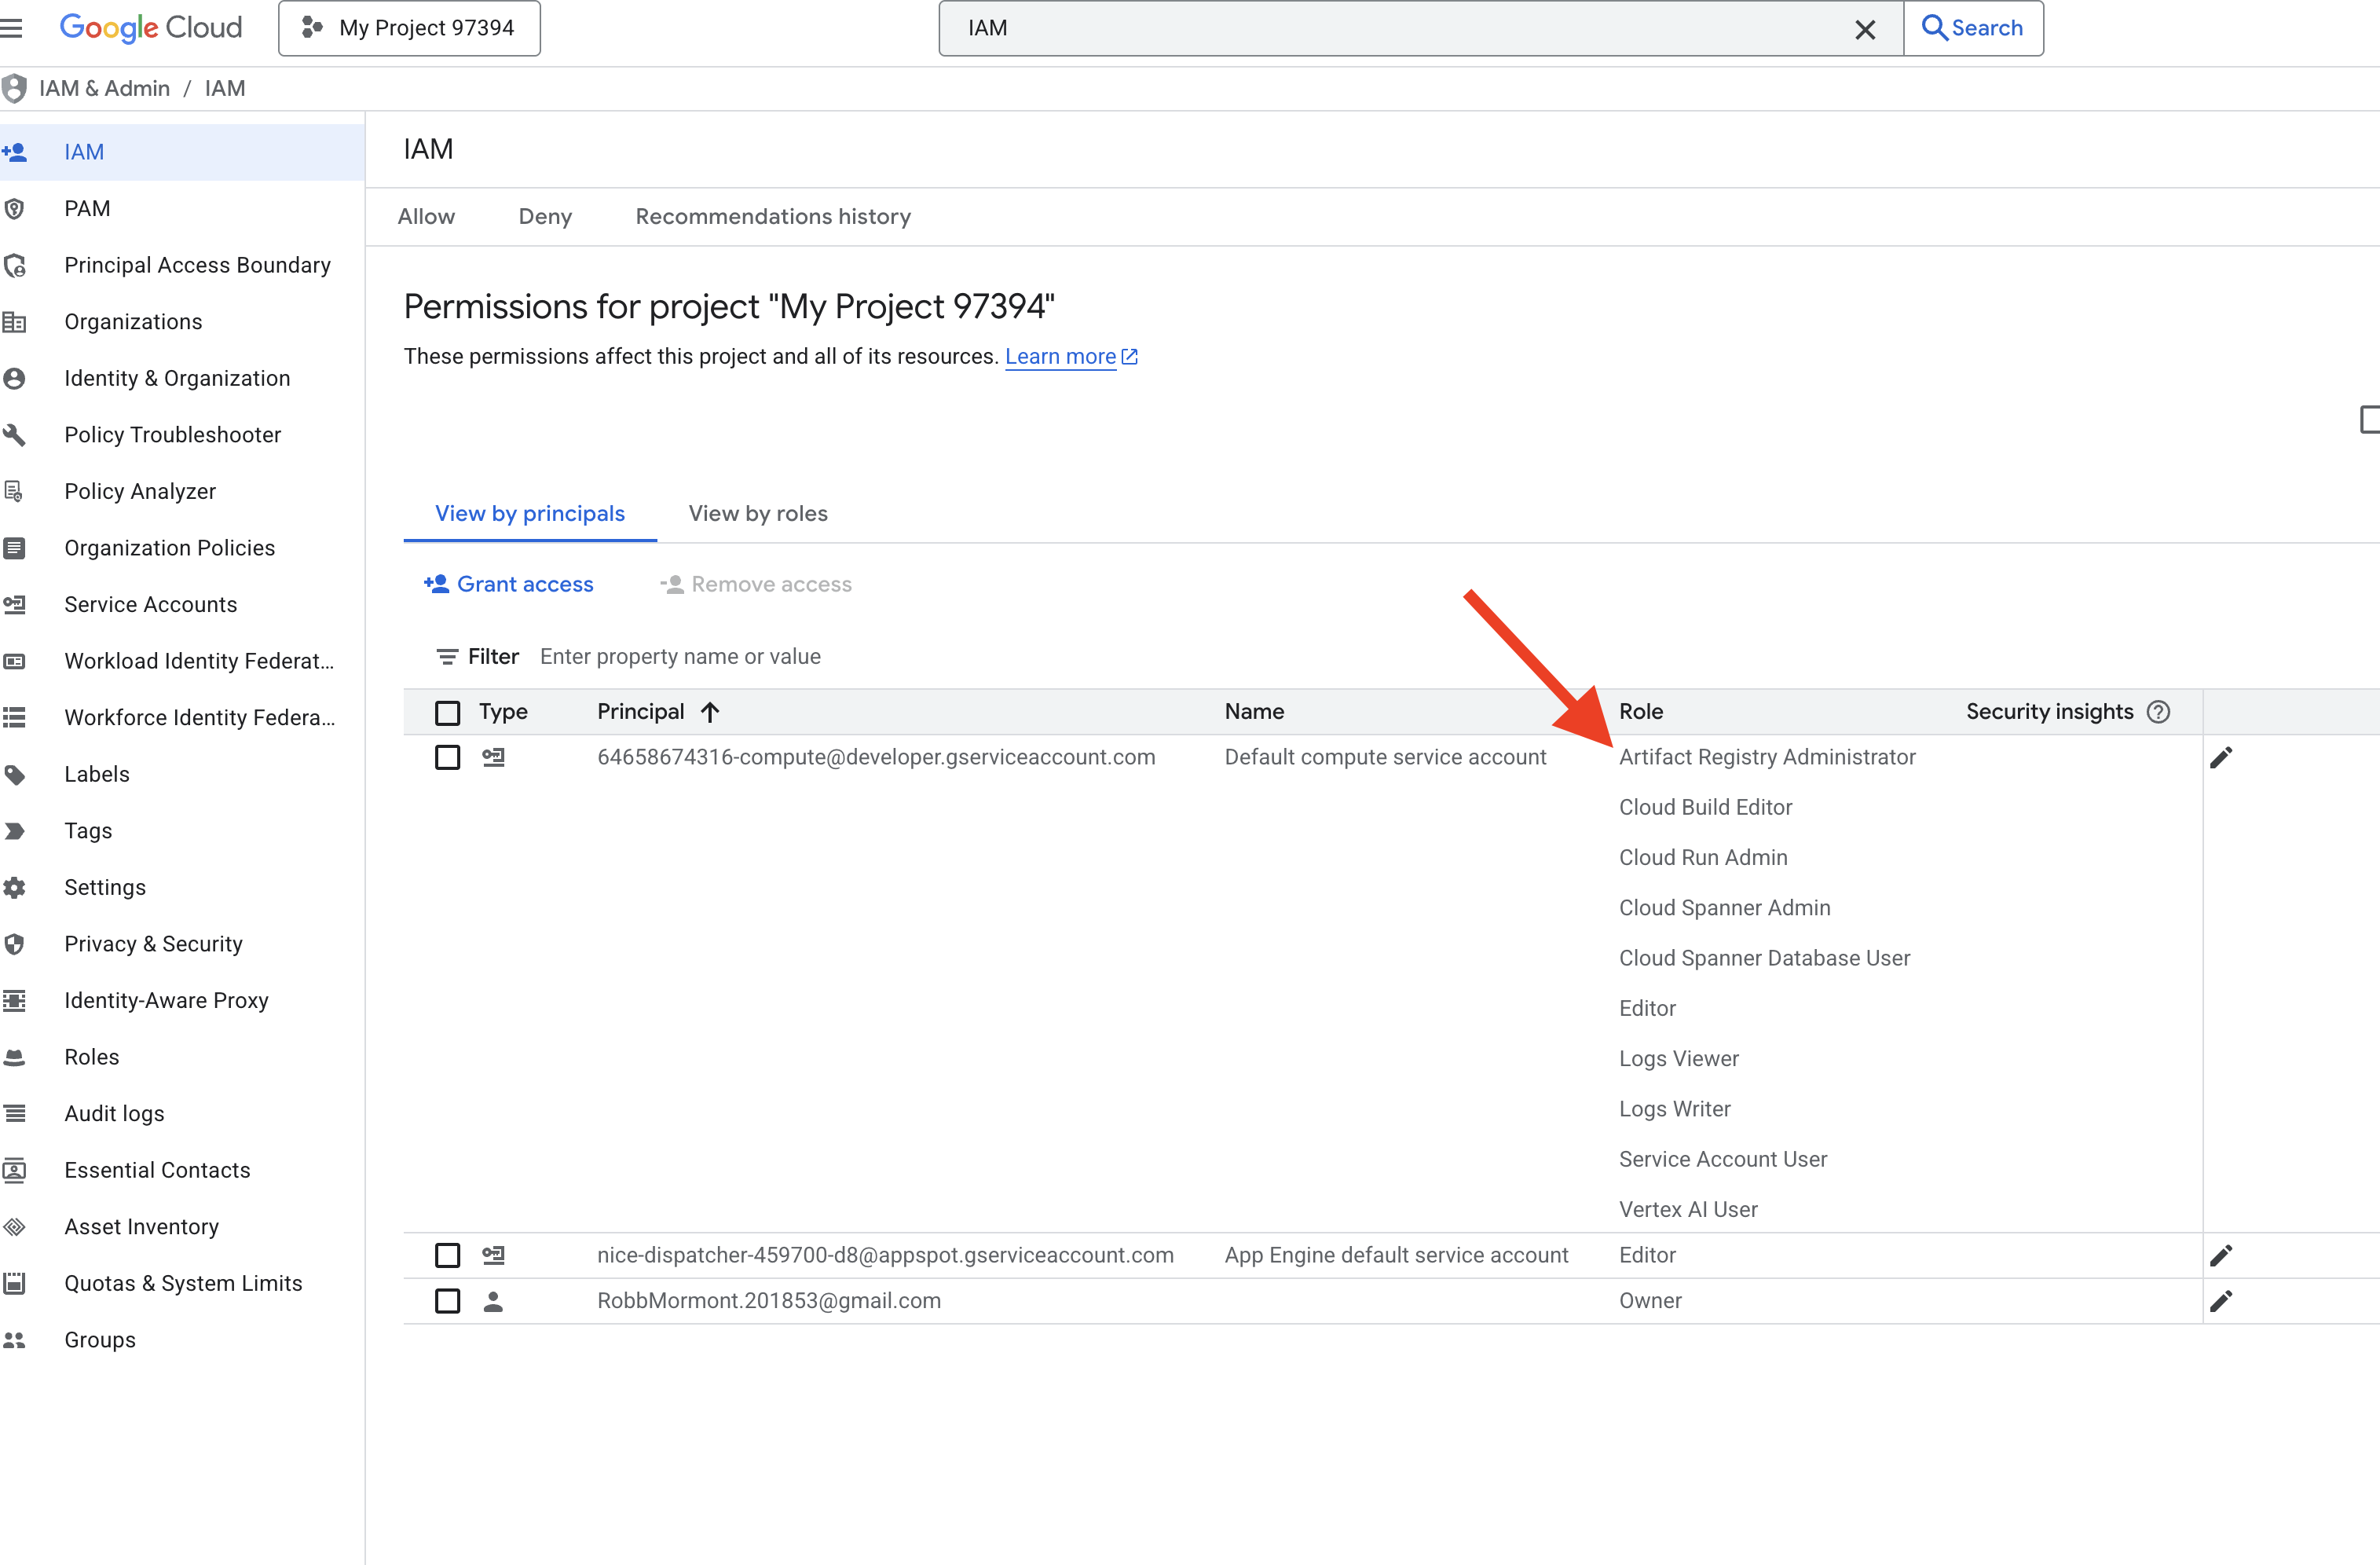
👉💻 在終端機中執行下列指令,建立 Artifact Registry 存放區。代理程式、MCP 伺服器和 InstaVibe 應用程式的所有 Docker 映像檔,都會先儲存在這裡,再部署至 Cloud Run 或 Agent Engine。
export REPO_NAME="introveally-repo"
gcloud artifacts repositories create $REPO_NAME \
  --repository-format=docker \
  --location=us-central1 \
  --description="Docker repository for InstaVibe workshop"
為 API 金鑰設定地圖平台
如要在 InstaVibe 應用程式中使用 Google 地圖服務,您必須建立 API 金鑰並適當限制。
👉 在新分頁中,依序前往「APIs & Services」(API 和服務) >「Credentials」(憑證)。在「憑證」頁面上,按一下頂端的「+ 建立憑證」按鈕。從下拉式選單中選取「API 金鑰」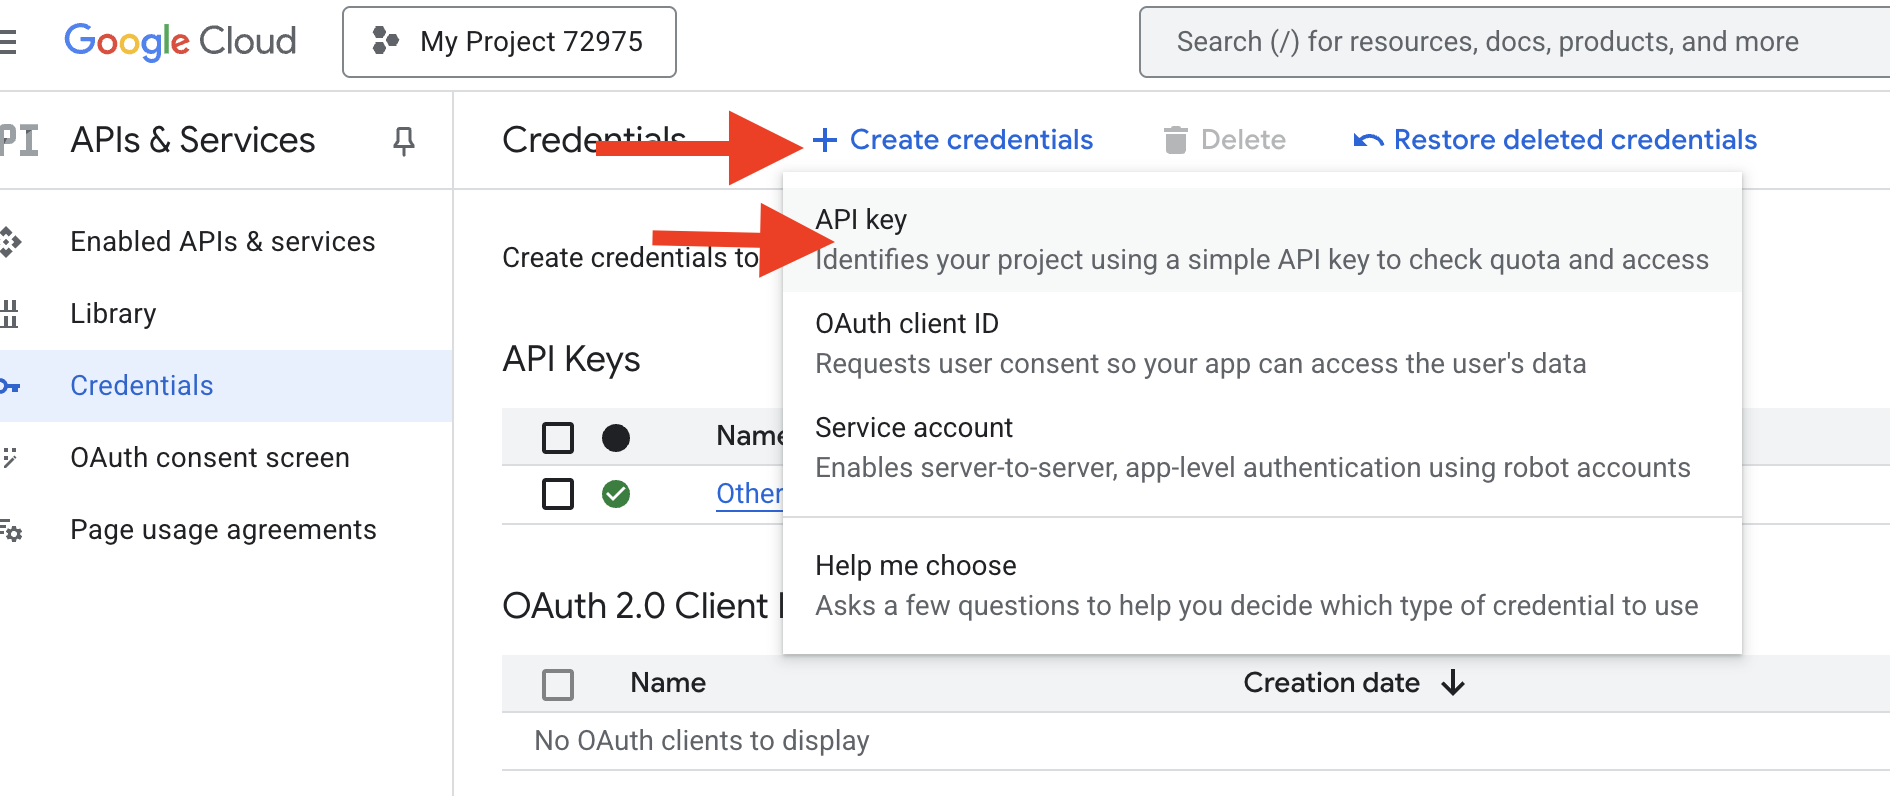 。
。
👉 畫面上會顯示對話方塊,其中包含新建立的 API 金鑰。稍後設定應用程式時會用到。
👉 按一下「建立的 API 金鑰」對話方塊中的「關閉」。
👉 新的 API 金鑰會顯示在清單中 (例如「API key 1」)。按一下右側的三點圖示,然後選取「編輯 API 金鑰」,開啟「限制並重新命名 API 金鑰」頁面。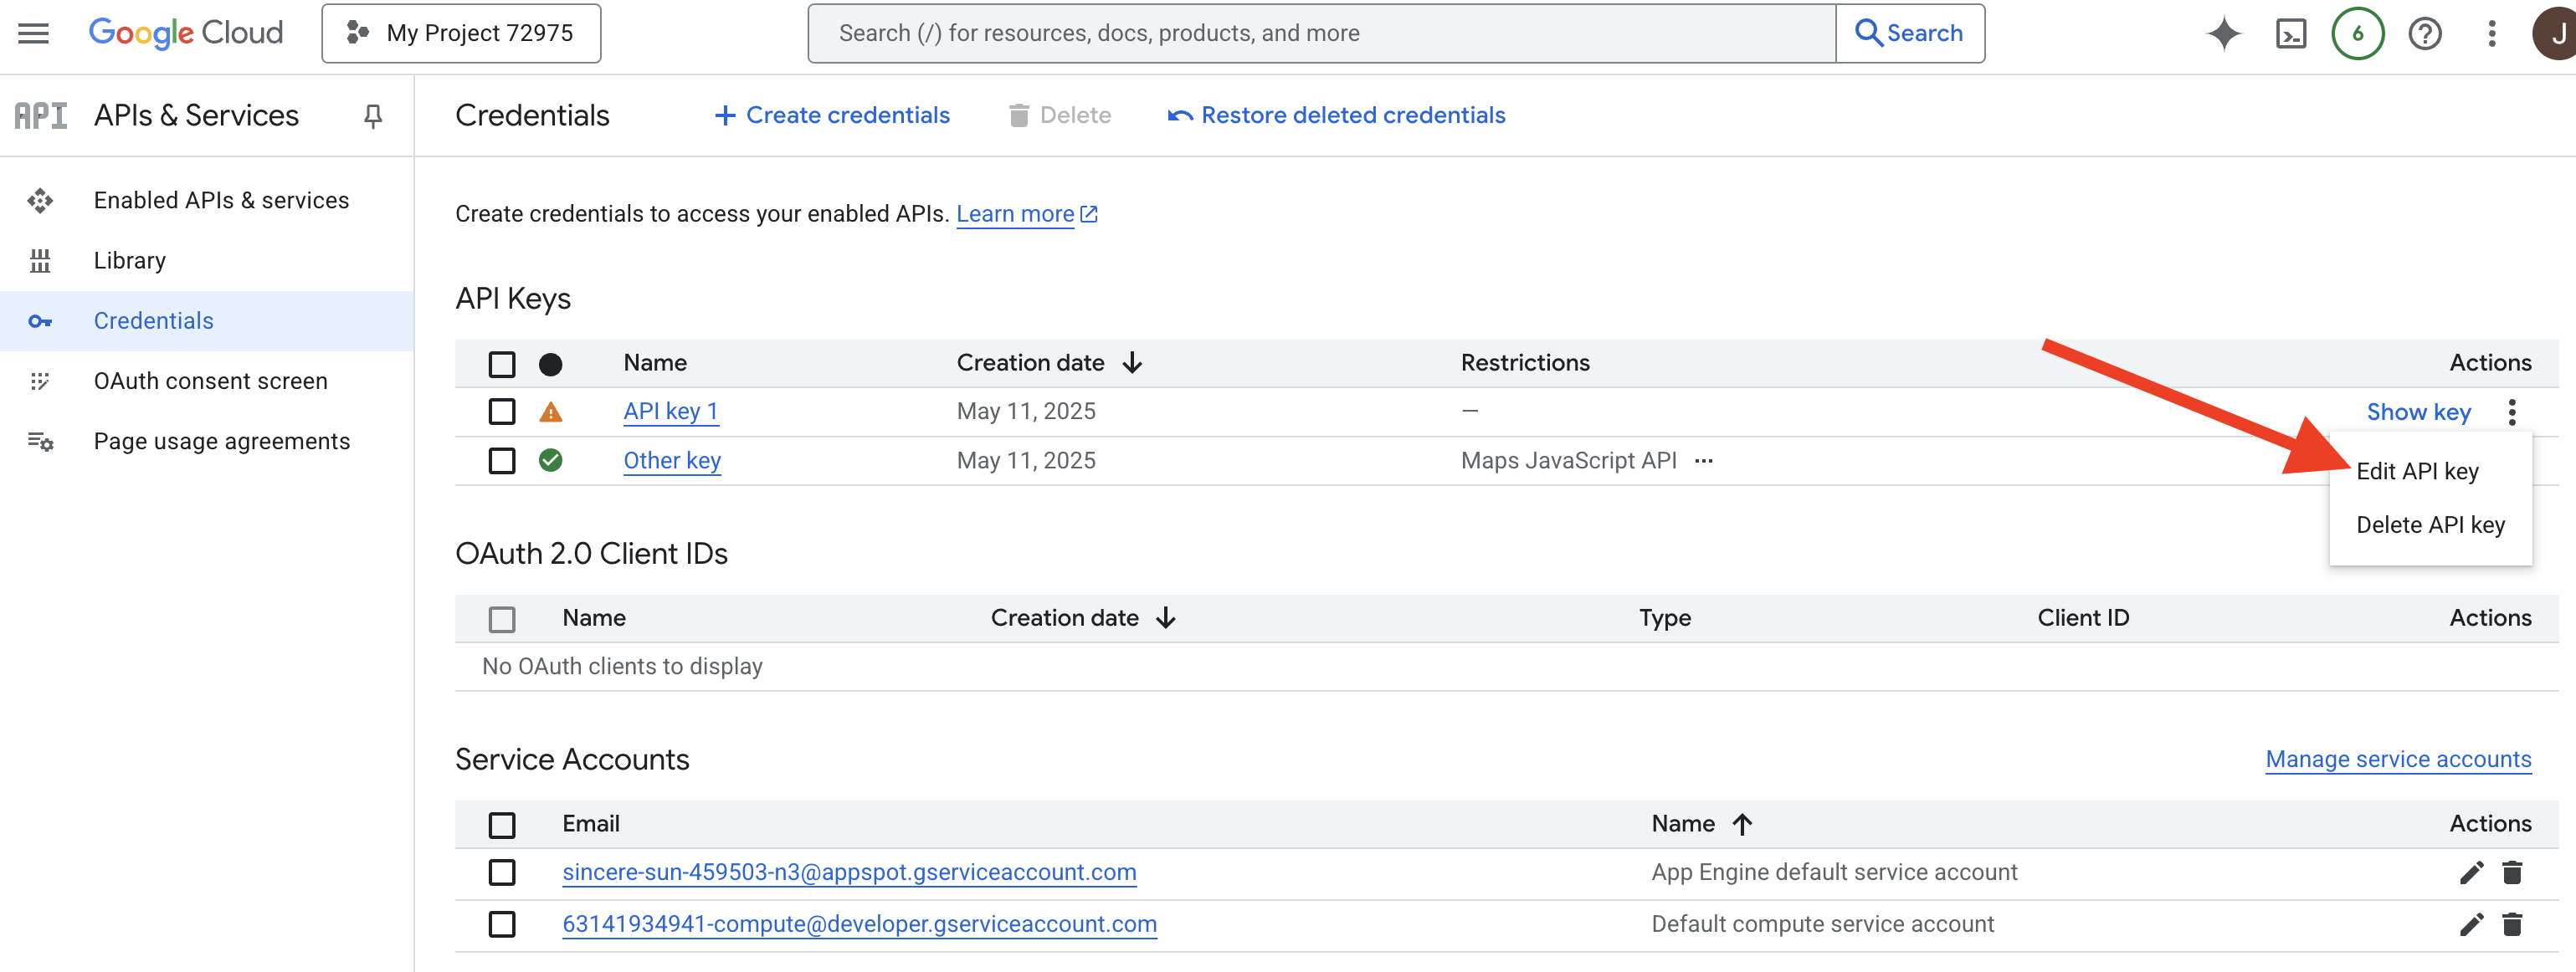
👉 在頂端的「名稱」欄位中,將預設名稱變更為:Maps Platform API Key (🚨🚨重要事項🚨🚨 請使用這個名稱!)
Maps Platform API Key
👉 在「應用程式限制」部分下方,確認已選取「無」。
👉 在「API 限制」專區下方,選取「限制金鑰」圓形按鈕。
👉 點按「選取 API」下拉式選單。在隨即顯示的搜尋框中輸入 Maps JavaScript API,然後從清單中選取。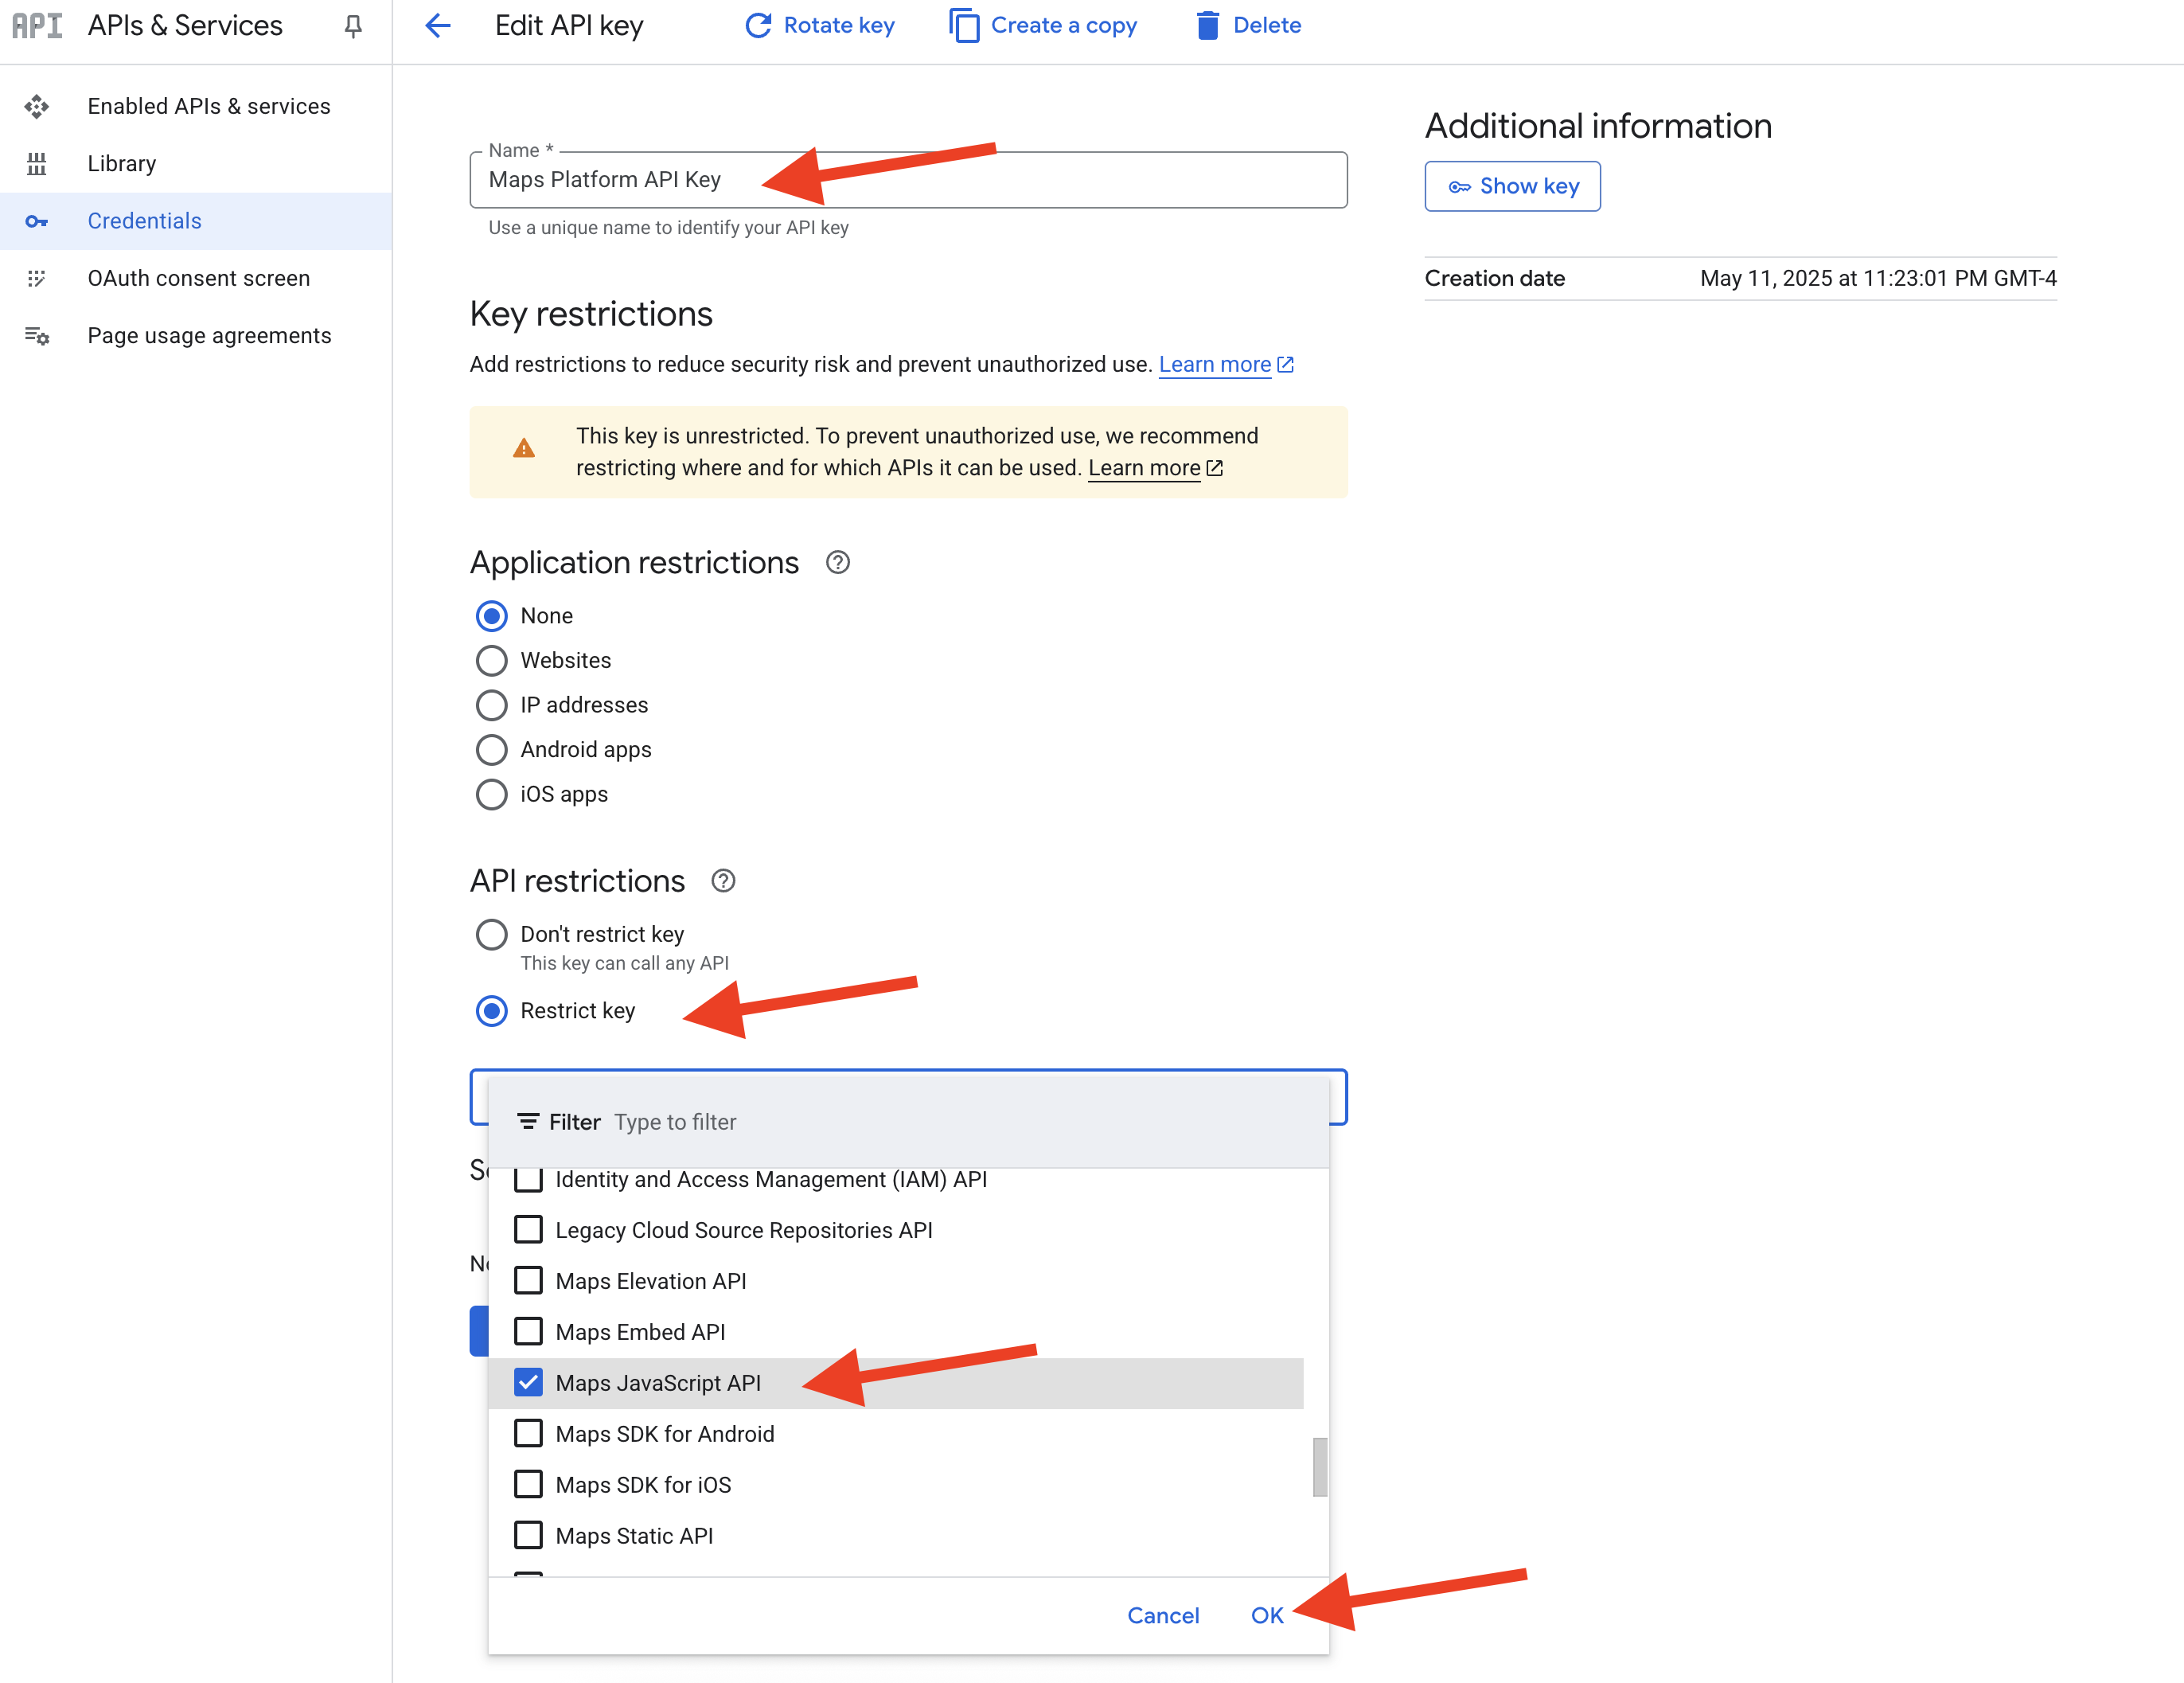
👉 按一下「確定」。
👉 按一下頁面底部的「儲存」按鈕。
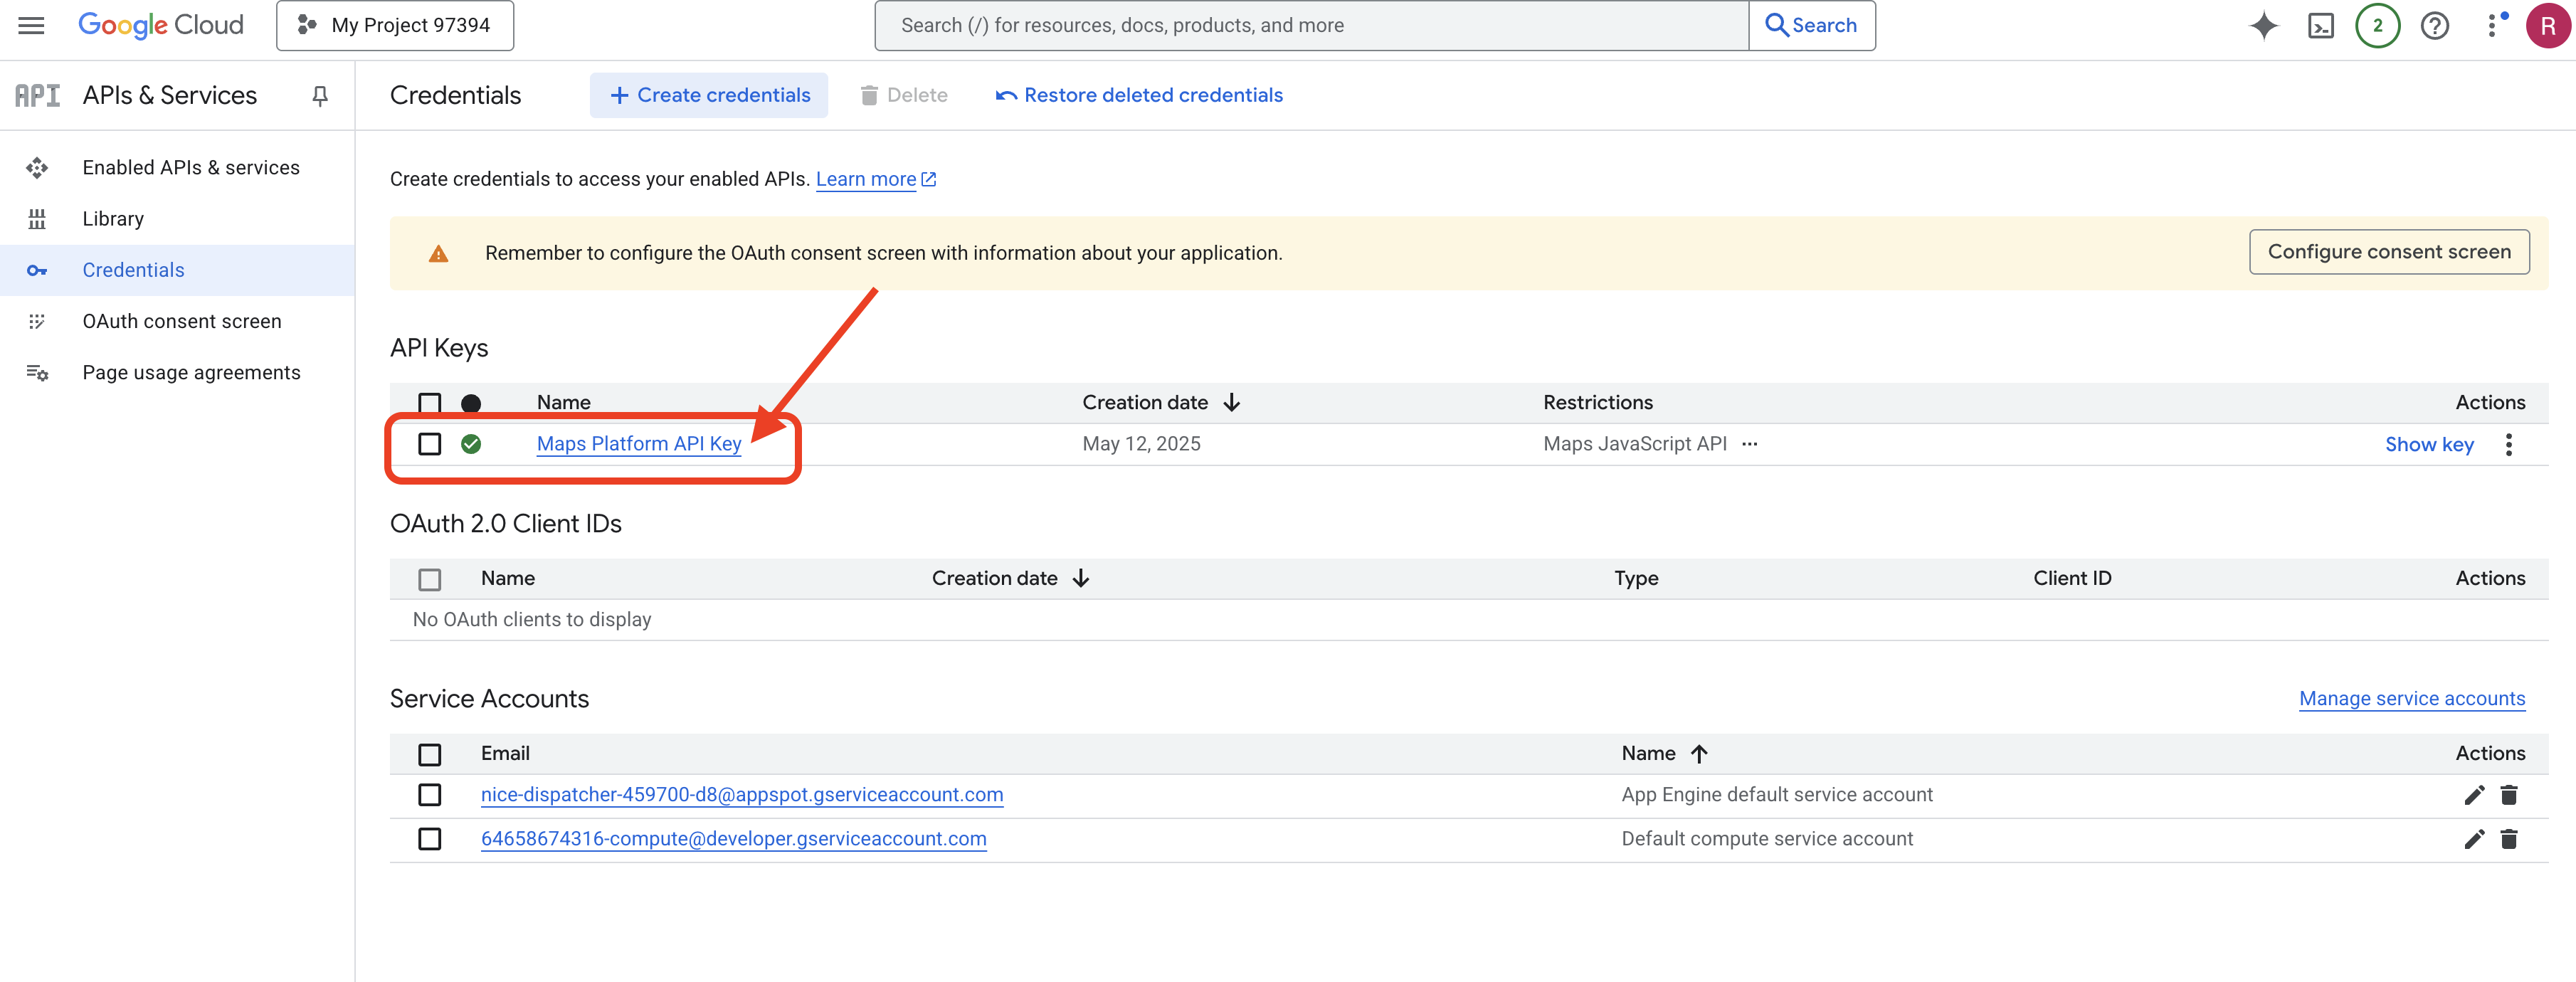
您已成功建立名為「Maps Platform API Key」的 API 金鑰,並限制該金鑰只能使用「Maps JavaScript API」,同時確保專案已啟用該 API。
4. 設定圖形資料庫
在建構智慧型代理程式之前,我們需要一種方法來儲存及瞭解 InstaVibe 社群網路中的豐富連結。這時,圖形資料庫就派上用場了。傳統關聯式資料庫會將資料儲存在資料列和資料欄的資料表中,而圖形資料庫的設計目的,則是呈現及查詢節點 (例如人物、活動或貼文) 形式的資料,以及連結這些節點的關係 (邊緣),例如友誼、活動出席狀況或提及。這種結構可反映出現實世界中的社群網路結構,因此對於社群媒體應用程式來說非常強大,有助於直覺式地探索不同實體之間的互連方式。
我們使用 Google Cloud Spanner 實作這個圖形資料庫。Spanner 主要以全球分散式、強一致性的關聯式資料庫聞名,但我們也能直接在關聯式資料表上定義及查詢圖形結構。
這讓我們同時享有 Spanner 的擴充性、交易一致性和熟悉的 SQL 介面,以及圖形查詢的表達能力,可分析對 AI 輔助功能至關重要的複雜社交動態。
👉💻 在 Cloud Shell IDE 終端機中。在 Google Cloud 上佈建必要的基礎架構。首先,我們會建立 Spanner 執行個體,做為資料庫的專屬容器。執行個體準備就緒後,我們會在其中建立實際的 Spanner 資料庫,用於存放 InstaVibe 的所有資料表和圖形資料:
. ~/instavibe-bootstrap/set_env.sh

gcloud spanner instances create $SPANNER_INSTANCE_ID \
  --config=regional-us-central1 \
  --description="GraphDB Instance InstaVibe" \
  --processing-units=100 \
  --edition=ENTERPRISE

gcloud spanner databases create $SPANNER_DATABASE_ID \
  --instance=$SPANNER_INSTANCE_ID \
  --database-dialect=GOOGLE_STANDARD_SQL
👉💻 將 Spanner 讀取/寫入權限授予預設服務帳戶
echo "Granting Spanner read/write access to ${SERVICE_ACCOUNT_NAME} for database ${SPANNER_DATABASE_ID}..."

gcloud spanner databases add-iam-policy-binding ${SPANNER_DATABASE_ID} \
  --instance=${SPANNER_INSTANCE_ID} \
  --member="serviceAccount:${SERVICE_ACCOUNT_NAME}" \
  --role="roles/spanner.databaseUser" \
  --project=${PROJECT_ID}
👉💻 現在。我們會設定 Python 虛擬環境、安裝必要的 Python 套件,然後在 Spanner 中設定圖形資料庫結構定義,並載入初始資料及執行 setup.py 指令碼。
. ~/instavibe-bootstrap/set_env.sh
cd ~/instavibe-bootstrap
python -m venv env
source env/bin/activate
pip install -r requirements.txt
cd instavibe
python setup.py
👉 在新的瀏覽器分頁中前往 Google Cloud 控制台,然後前往「Spanner」,您應該會看到 Spanner 執行個體清單。按一下 instavibe-graph-instance。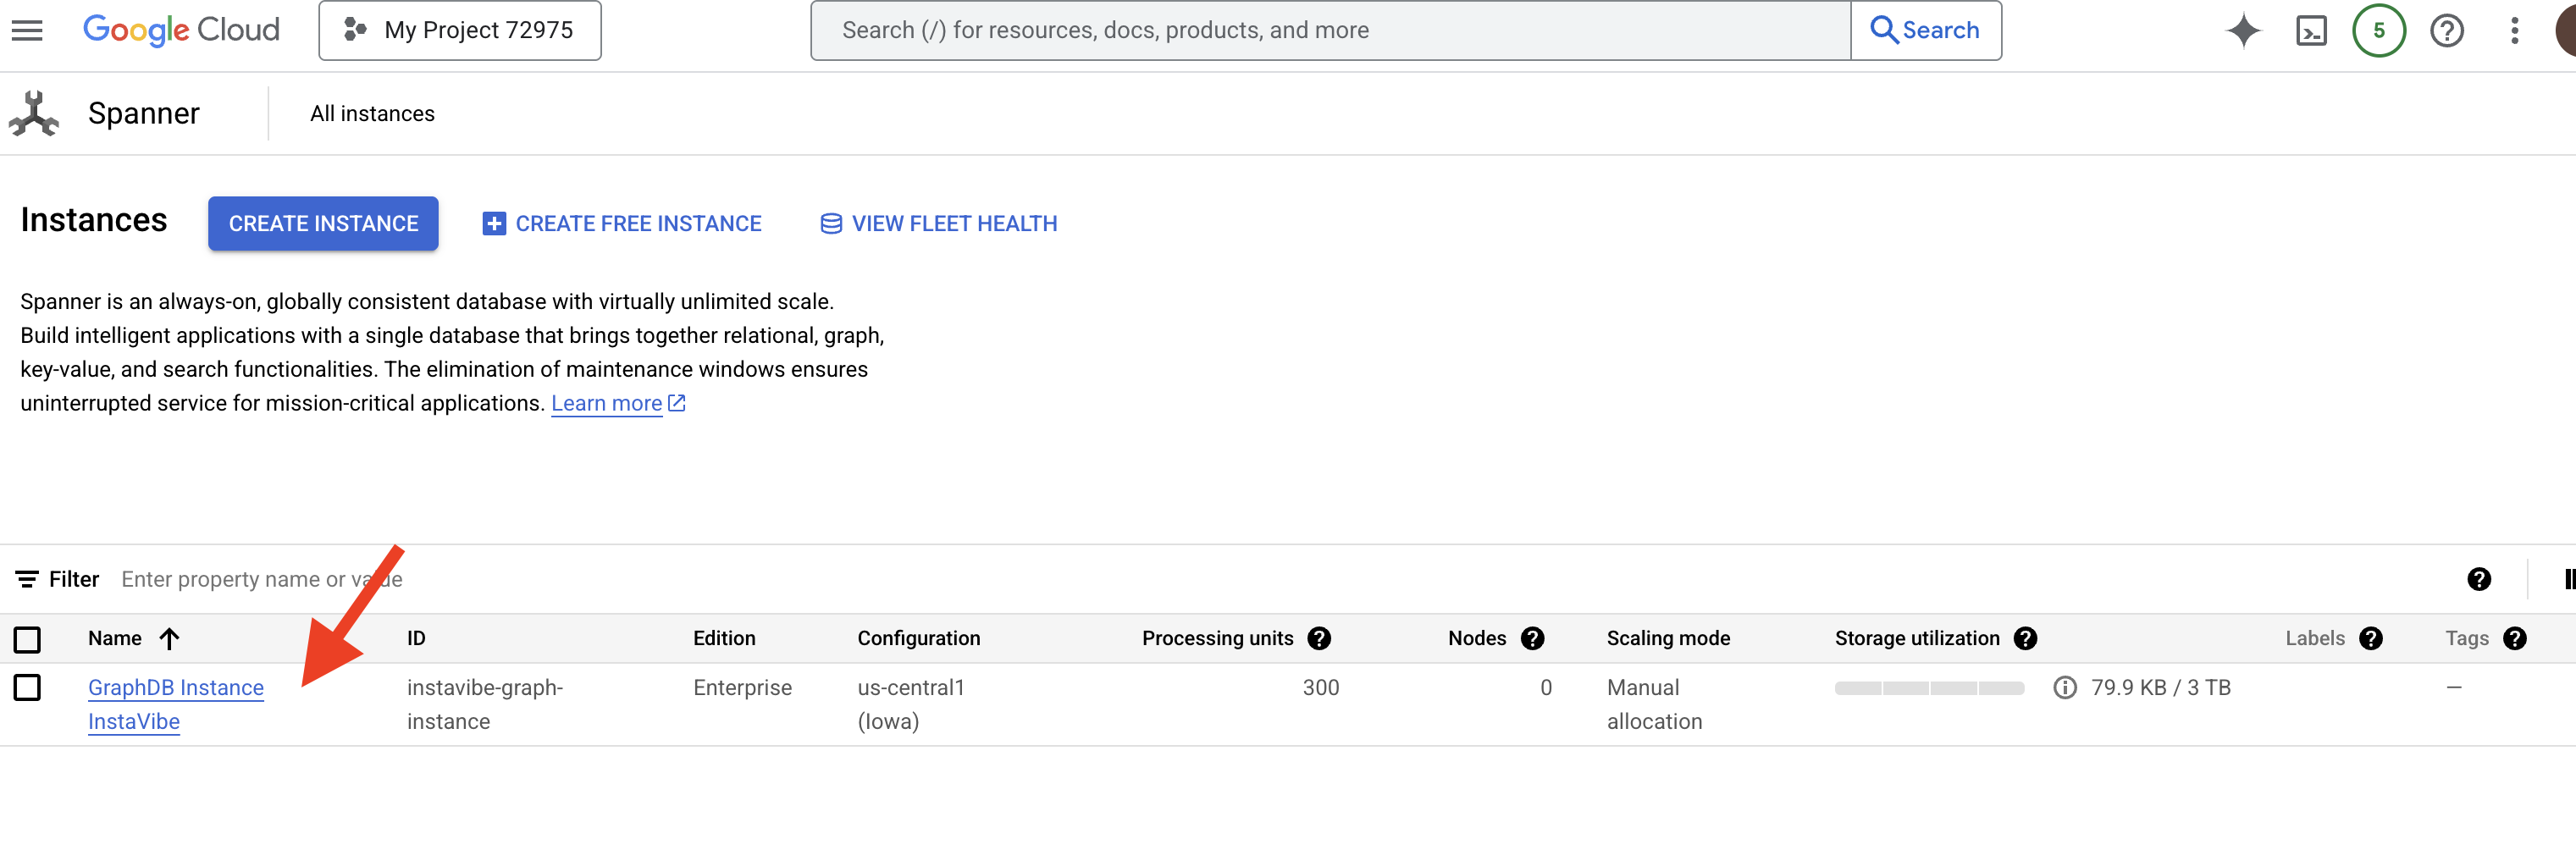 👉 在執行個體總覽頁面中,您會看到該執行個體內的資料庫清單。按一下
 graphdb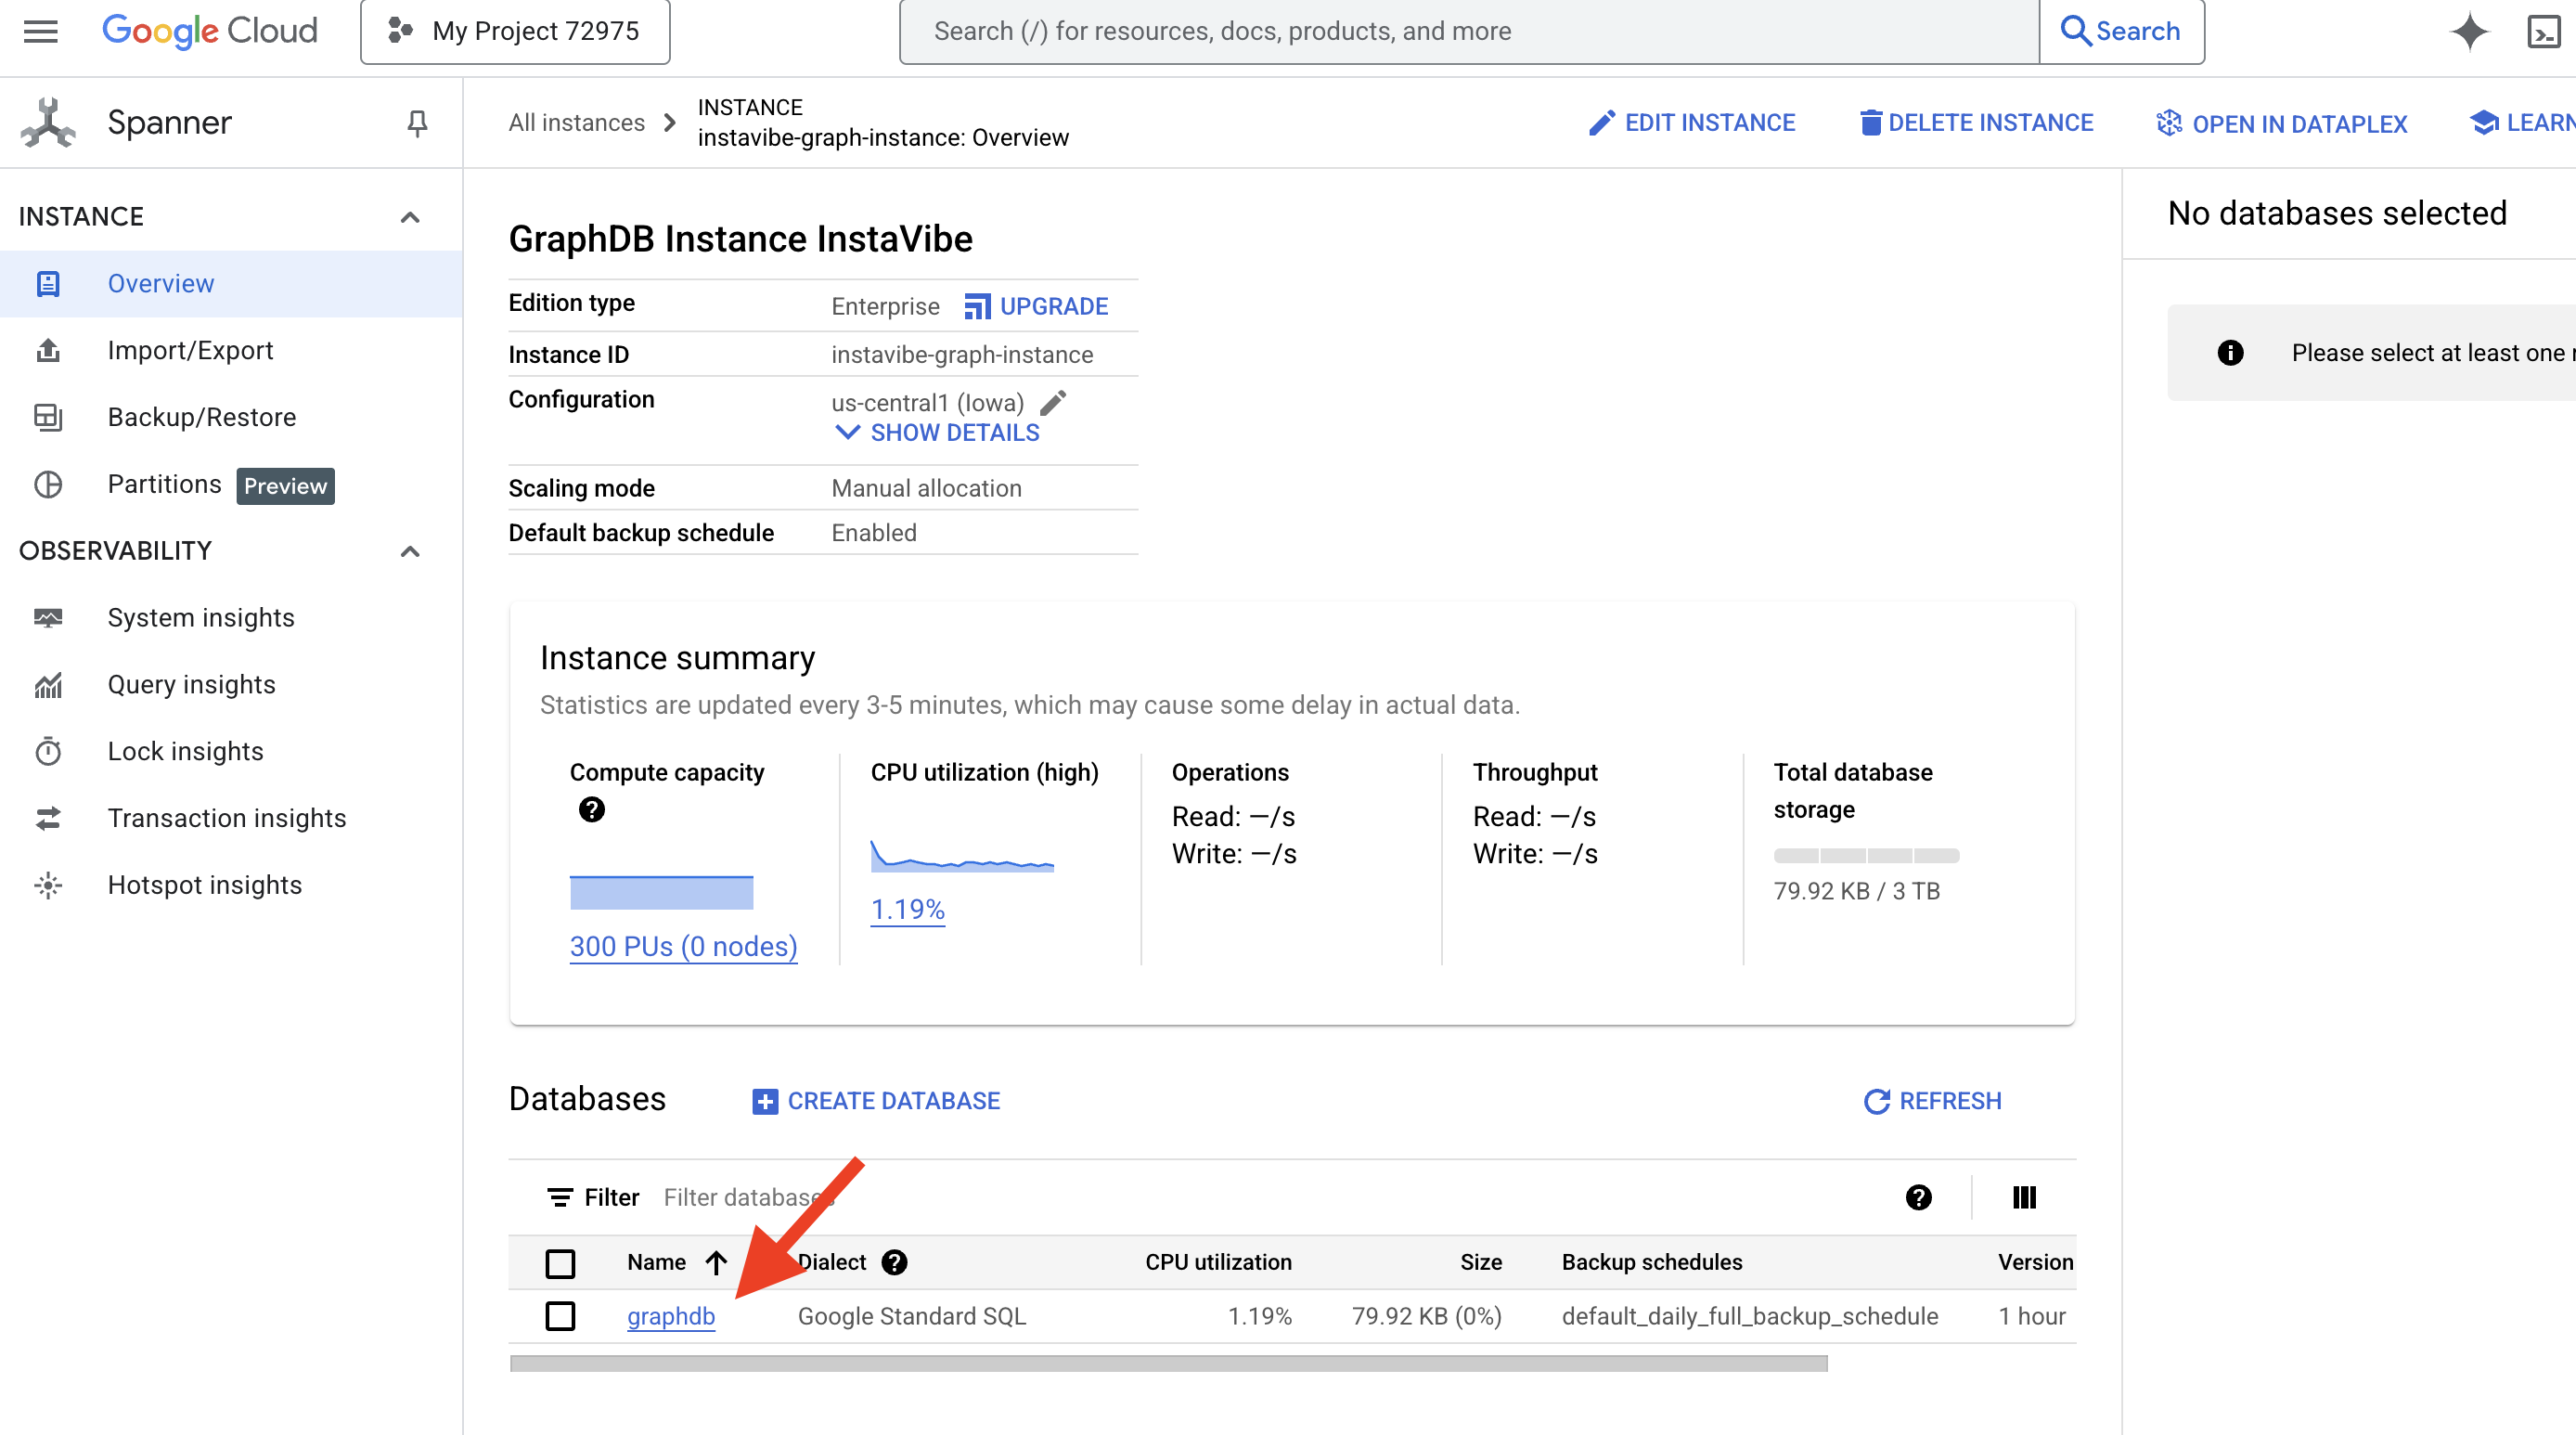
👉 在資料庫的左側導覽窗格中,按一下 Spanner Studio 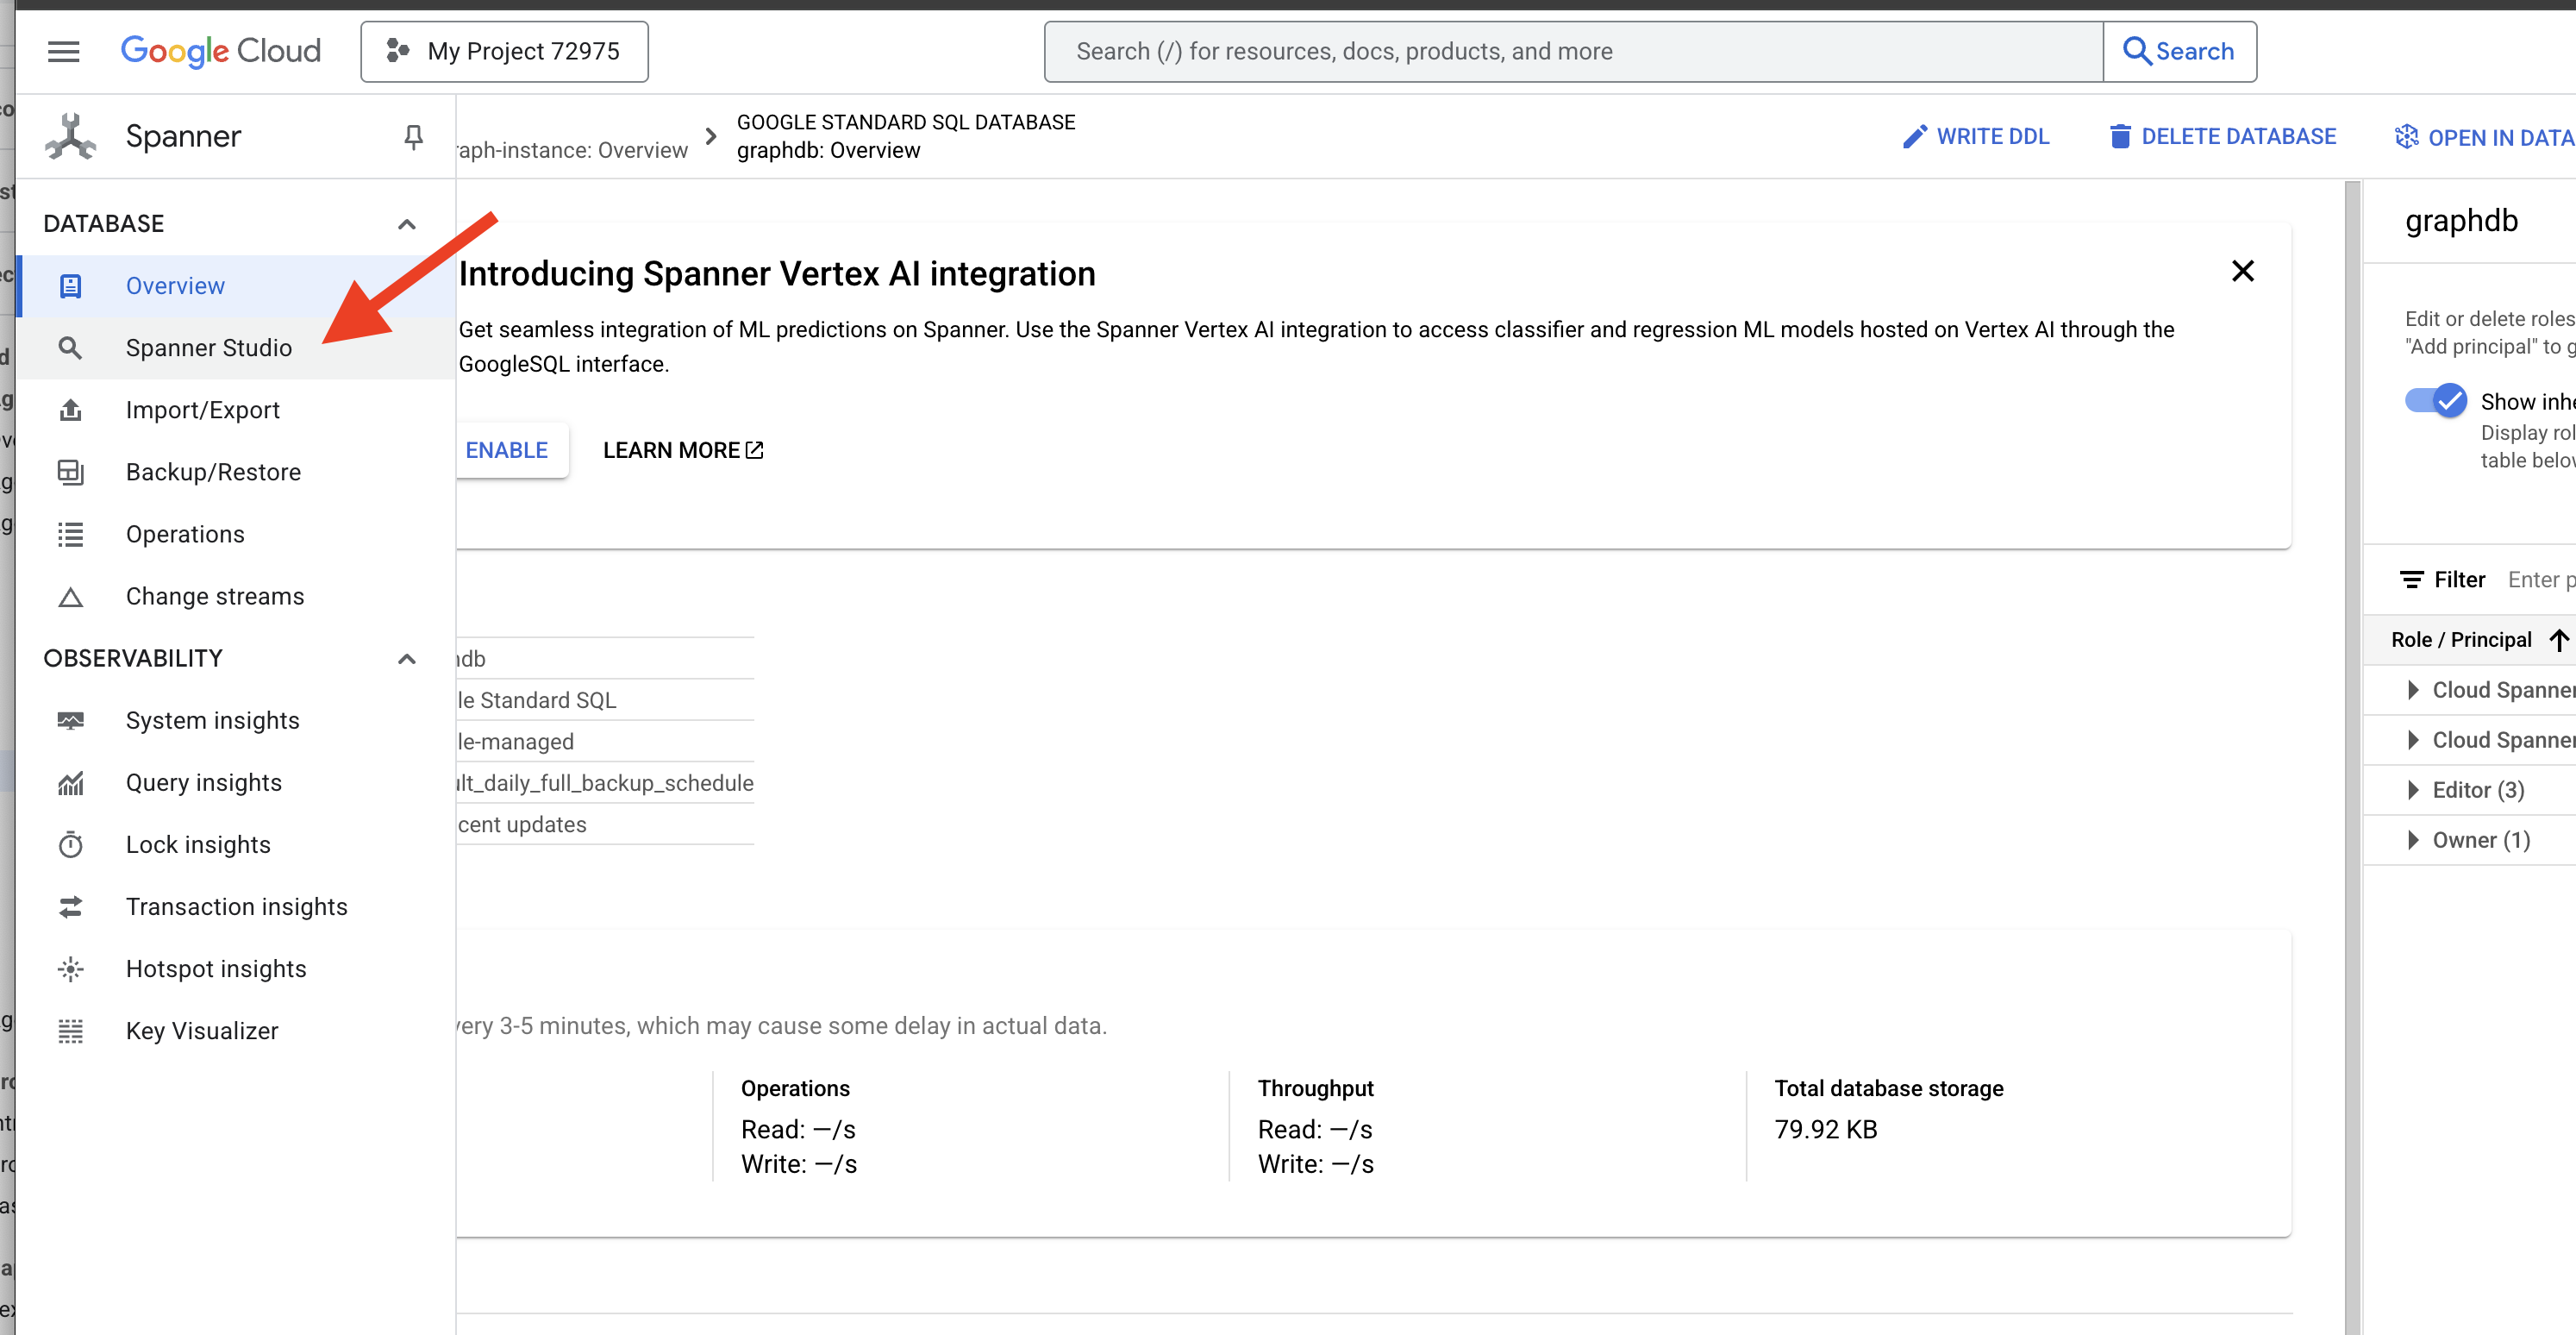
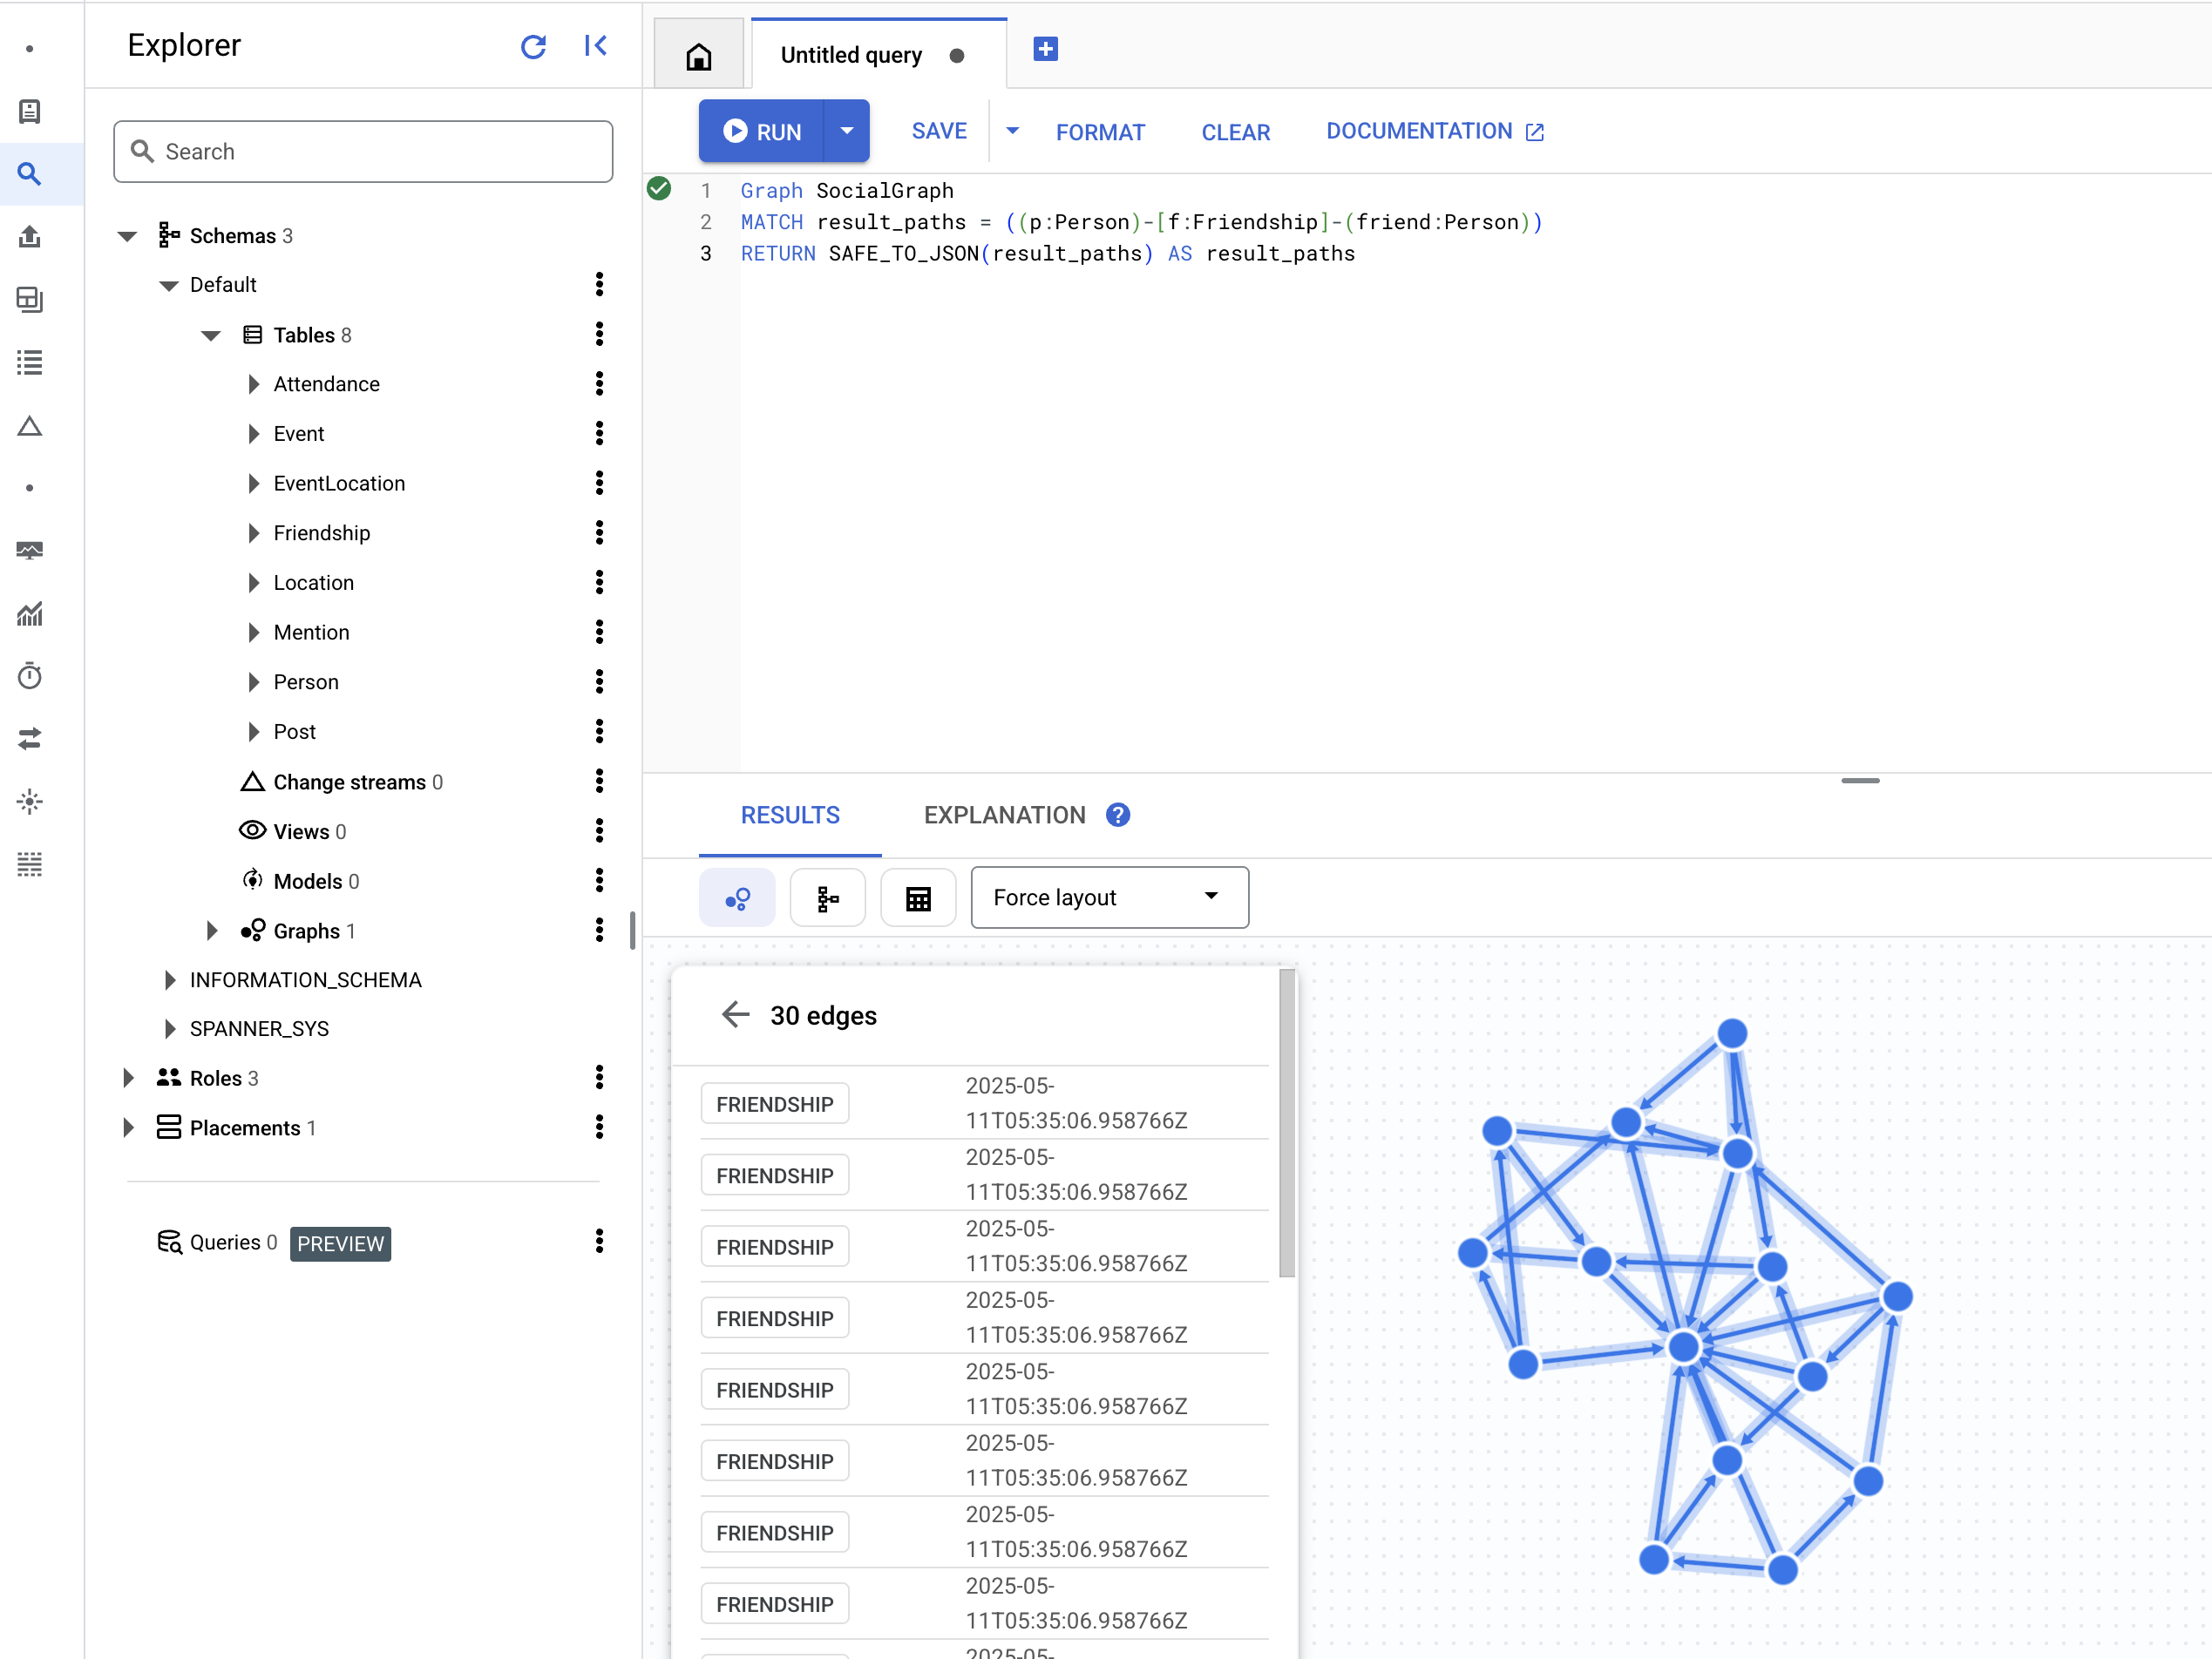
👉 在查詢編輯器 (「未命名的查詢」分頁) 中,貼上下列 Graph SQL 查詢。這項查詢會找出所有 Person 節點,以及這些節點與其他 Person 節點的直接 Friendship 關係。然後按一下「執行」RUN即可查看結果。
Graph SocialGraph
MATCH result_paths = ((p:Person)-[f:Friendship]-(friend:Person))
RETURN SAFE_TO_JSON(result_paths) AS result_paths
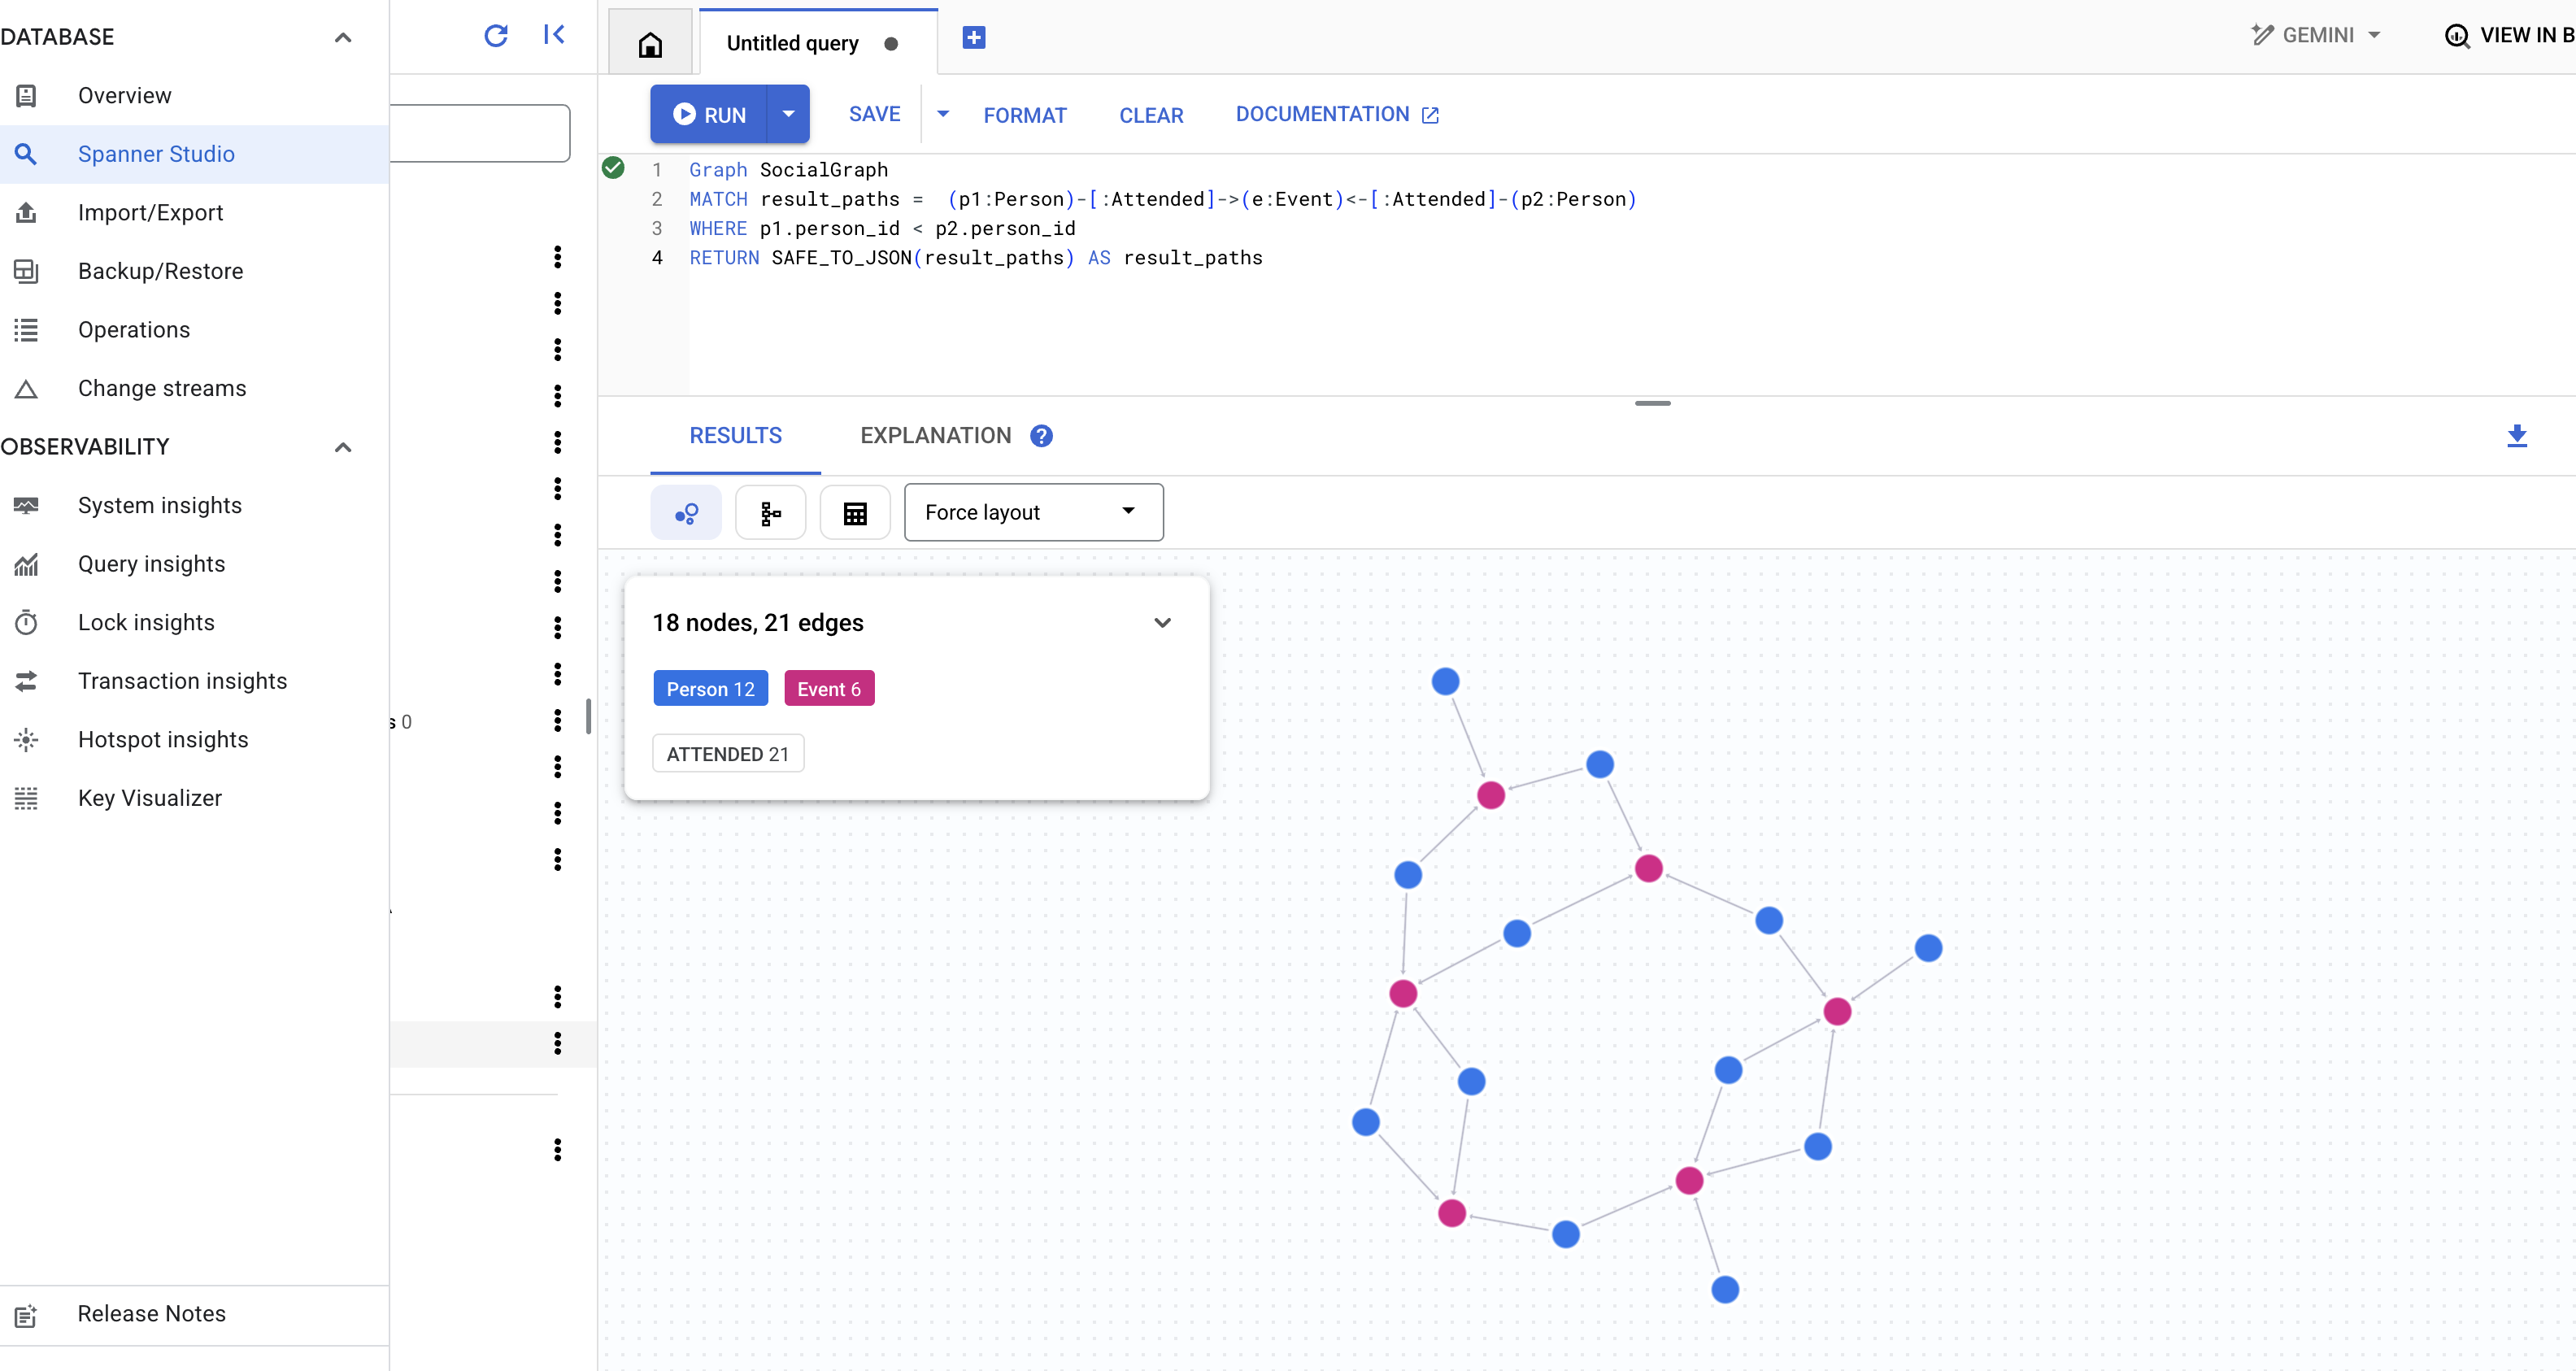
👉 在同一個查詢編輯器中,取代先前的 DDL,找出參加相同活動的使用者,這表示他們透過共同活動間接建立連結。
Graph SocialGraph
MATCH result_paths =  (p1:Person)-[:Attended]->(e:Event)<-[:Attended]-(p2:Person)
WHERE p1.person_id < p2.person_id
RETURN SAFE_TO_JSON(result_paths) AS result_paths
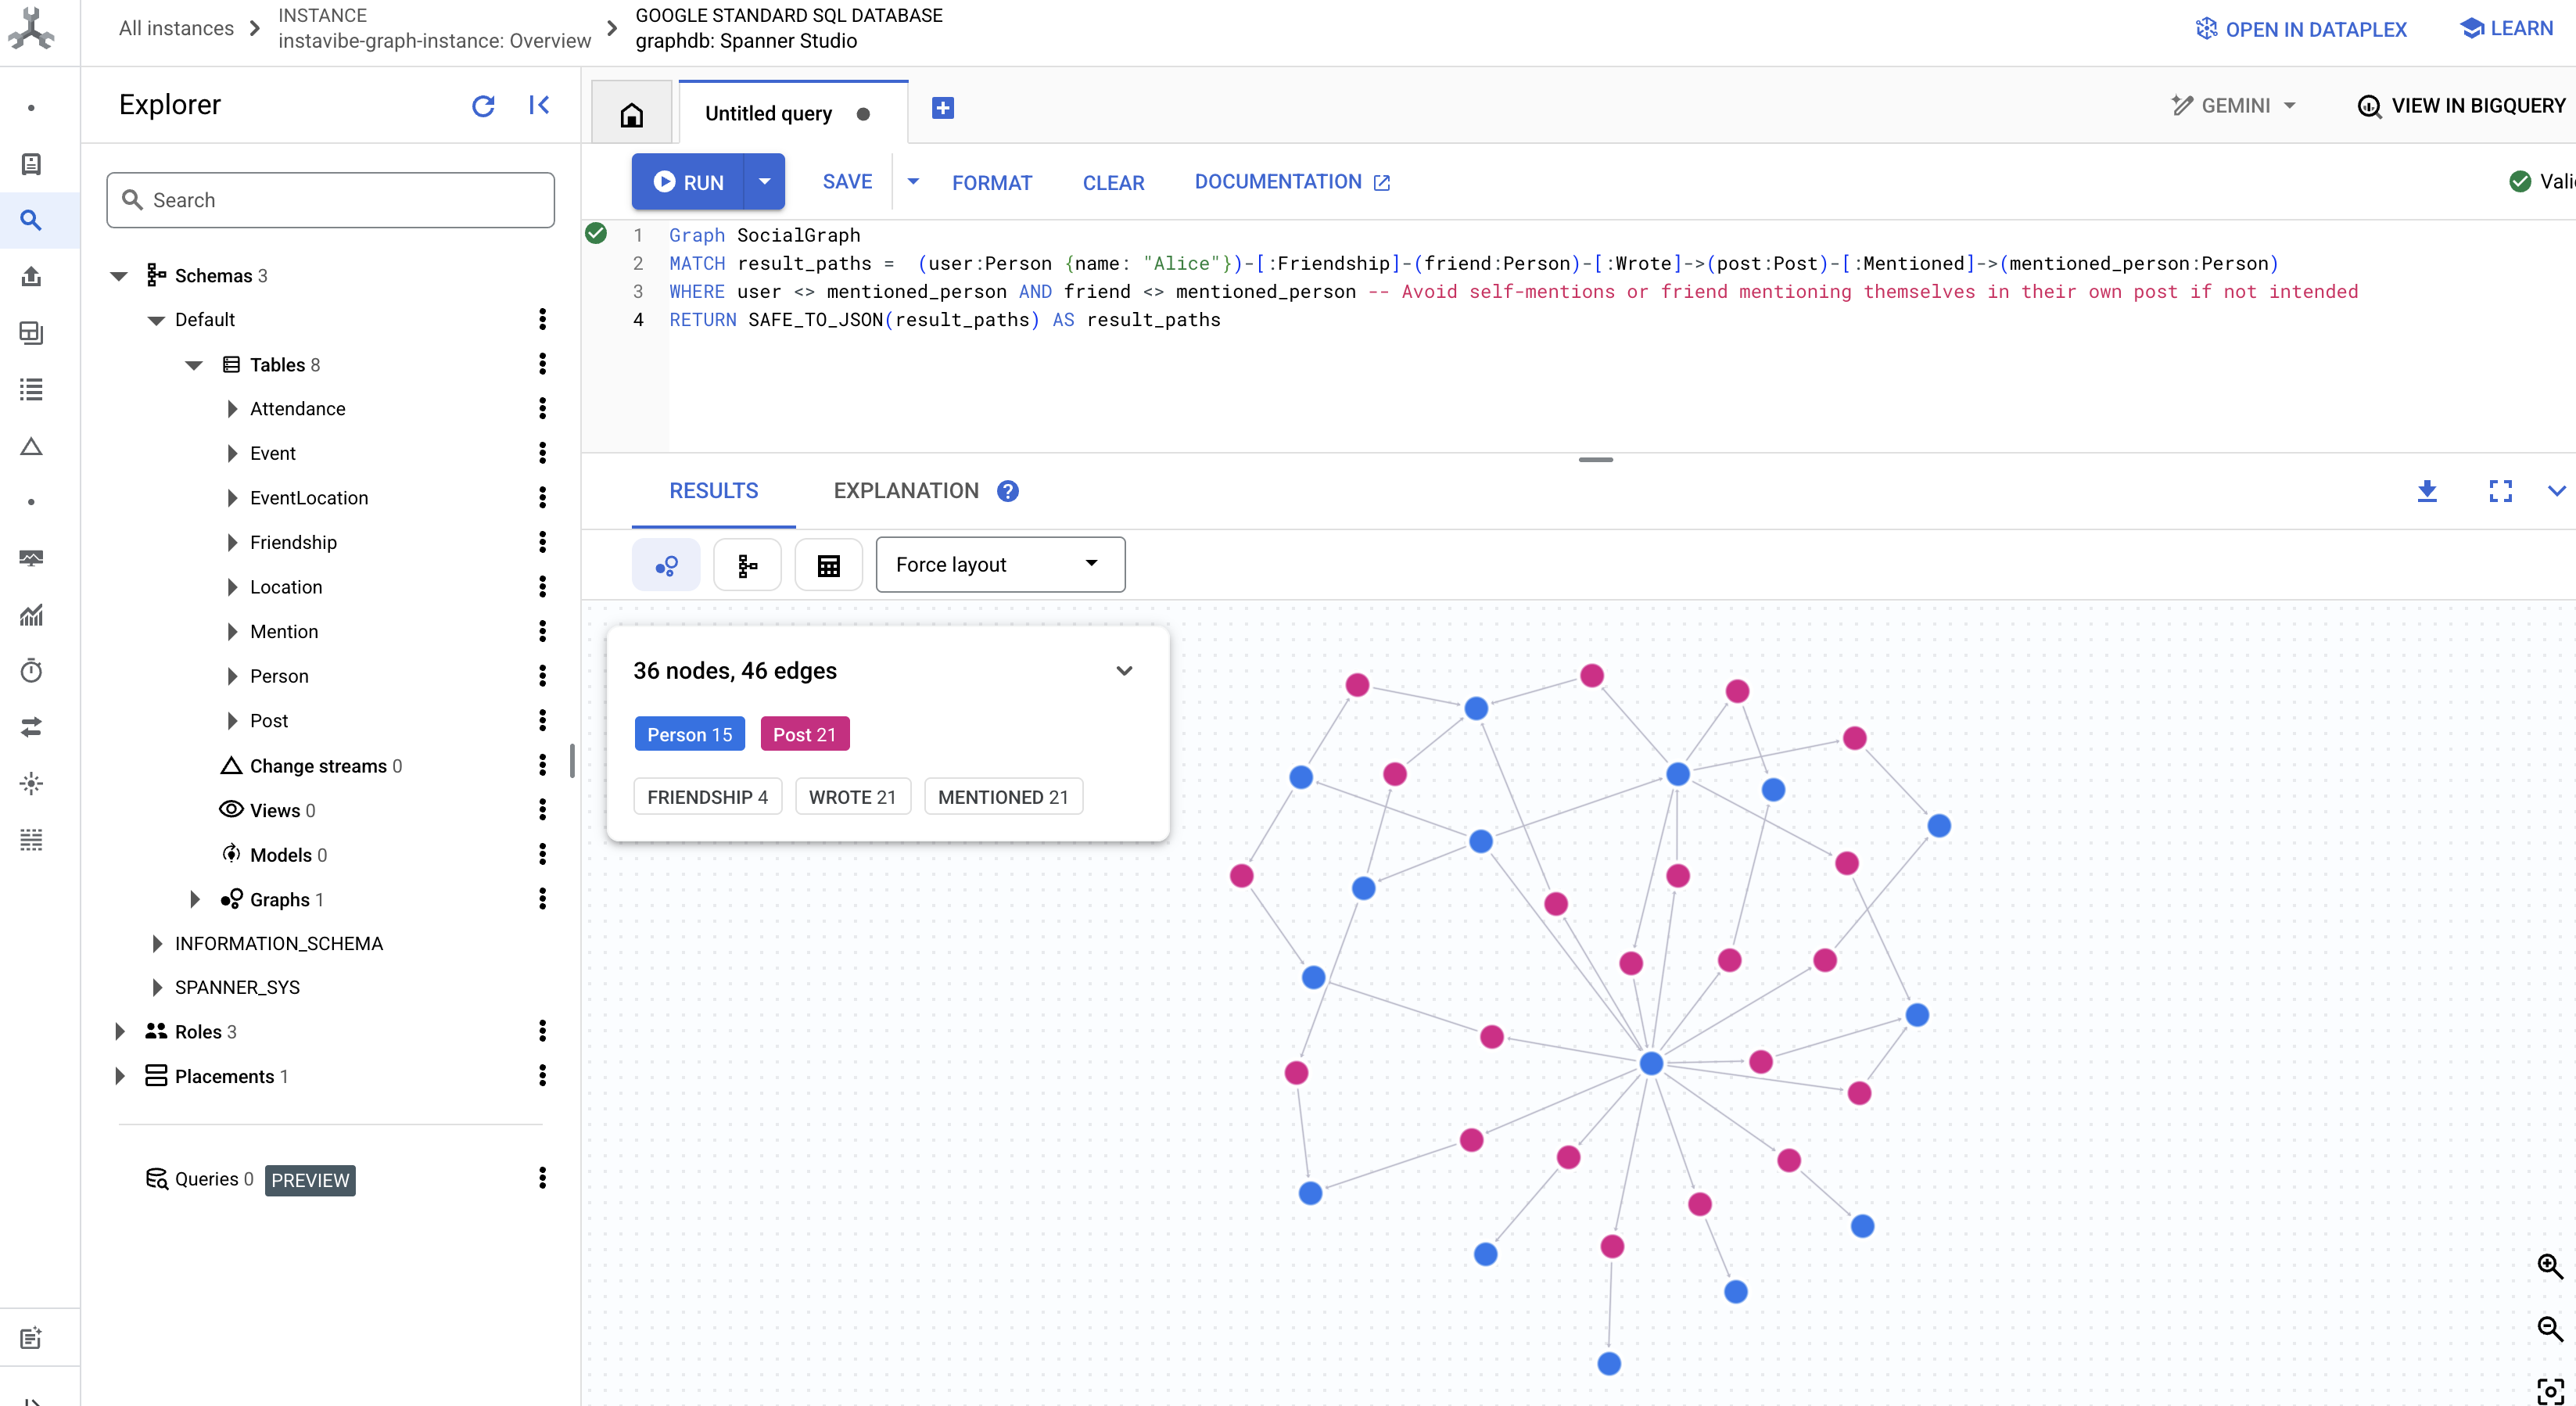
👉 這項查詢會探索不同類型的連結,也就是在特定使用者朋友撰寫的貼文中提及的人員。在查詢編輯器中執行下列查詢:
Graph SocialGraph
MATCH result_paths =  (user:Person {name: "Alice"})-[:Friendship]-(friend:Person)-[:Wrote]->(post:Post)-[:Mentioned]->(mentioned_person:Person)
WHERE user <> mentioned_person AND friend <> mentioned_person -- Avoid self-mentions or friend mentioning themselves in their own post if not intended
RETURN SAFE_TO_JSON(result_paths) AS result_paths
這些查詢只是冰山一角,讓您瞭解如何運用 Spanner 做為 InstaVibe 應用程式的圖形資料庫。將社群資料建構為相互連結的圖表,可讓我們深入分析關係和活動,這對 AI 代理瞭解使用者情境、發掘興趣,以及最終提供智慧社群規劃輔助功能至關重要。
基礎資料結構已就位並經過測試,現在讓我們將注意力轉向現有的 InstaVibe 應用程式,這是服務專員會使用的應用程式。
5. InstaVibe 的現況
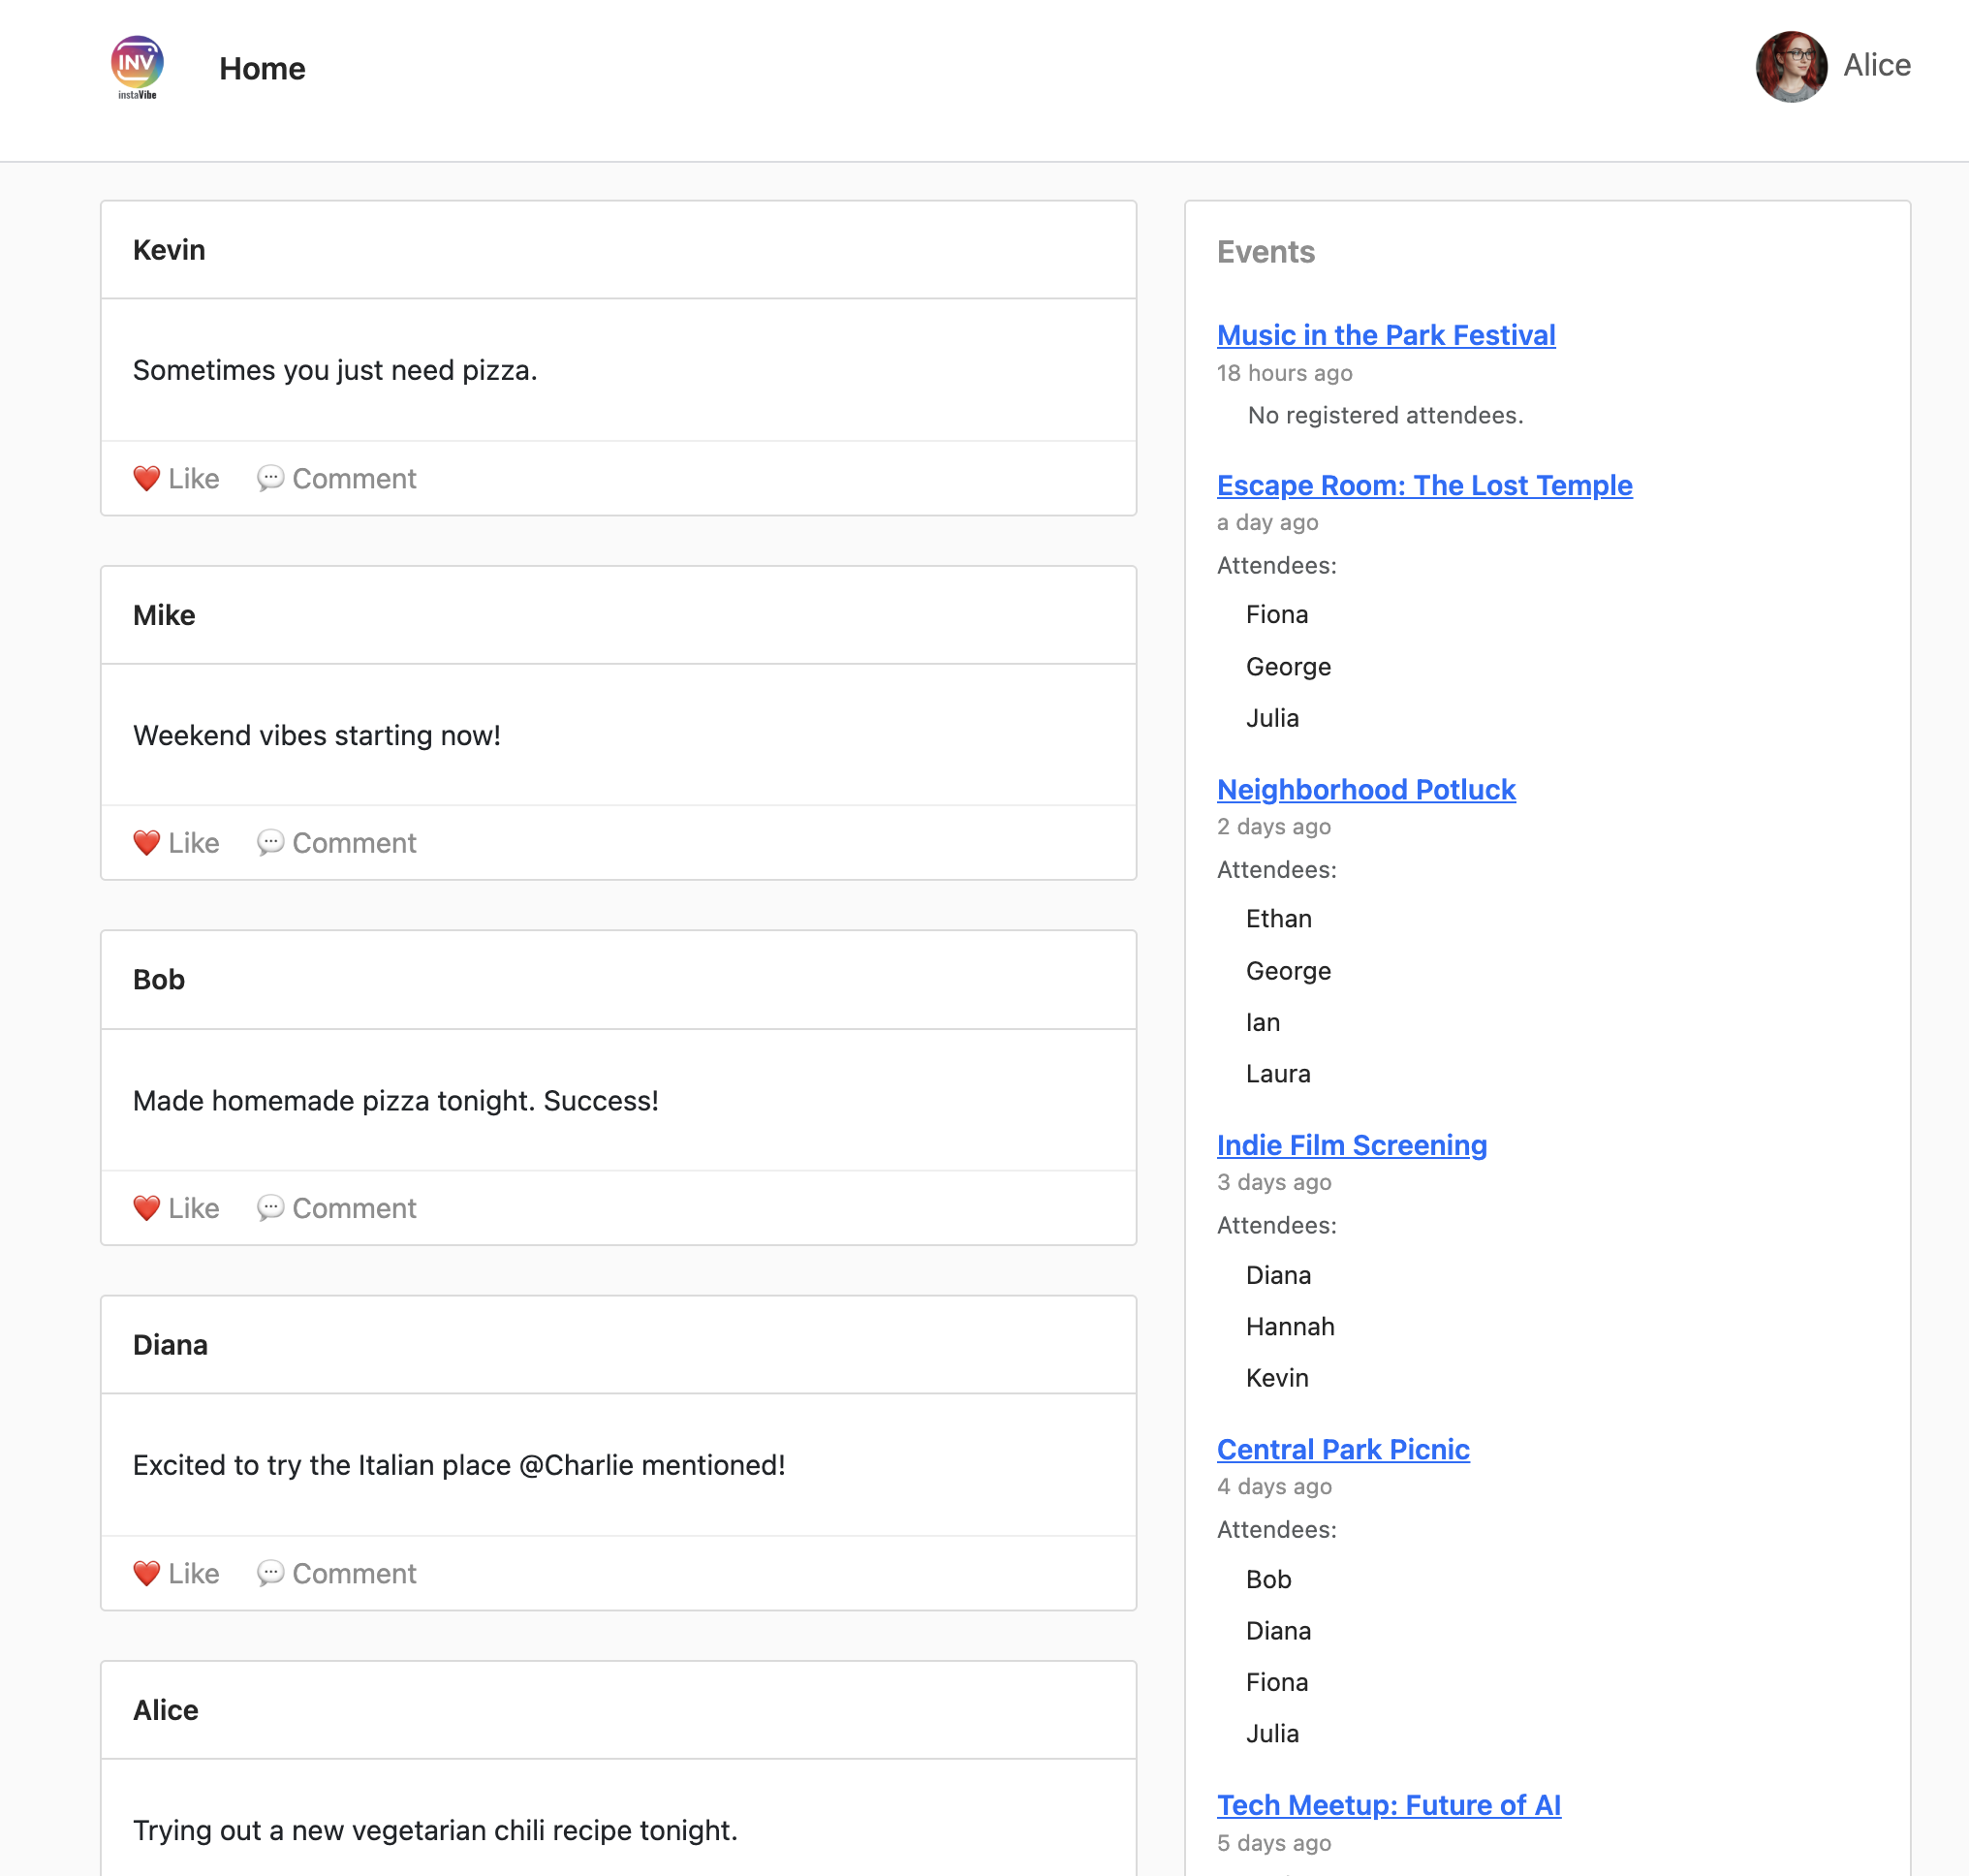
如要瞭解 AI 代理程式的適用範圍,我們首先需要部署及執行現有的 InstaVibe 網頁應用程式。這個應用程式提供使用者介面和基本功能,可連線至我們已設定的 Spanner 圖表資料庫。
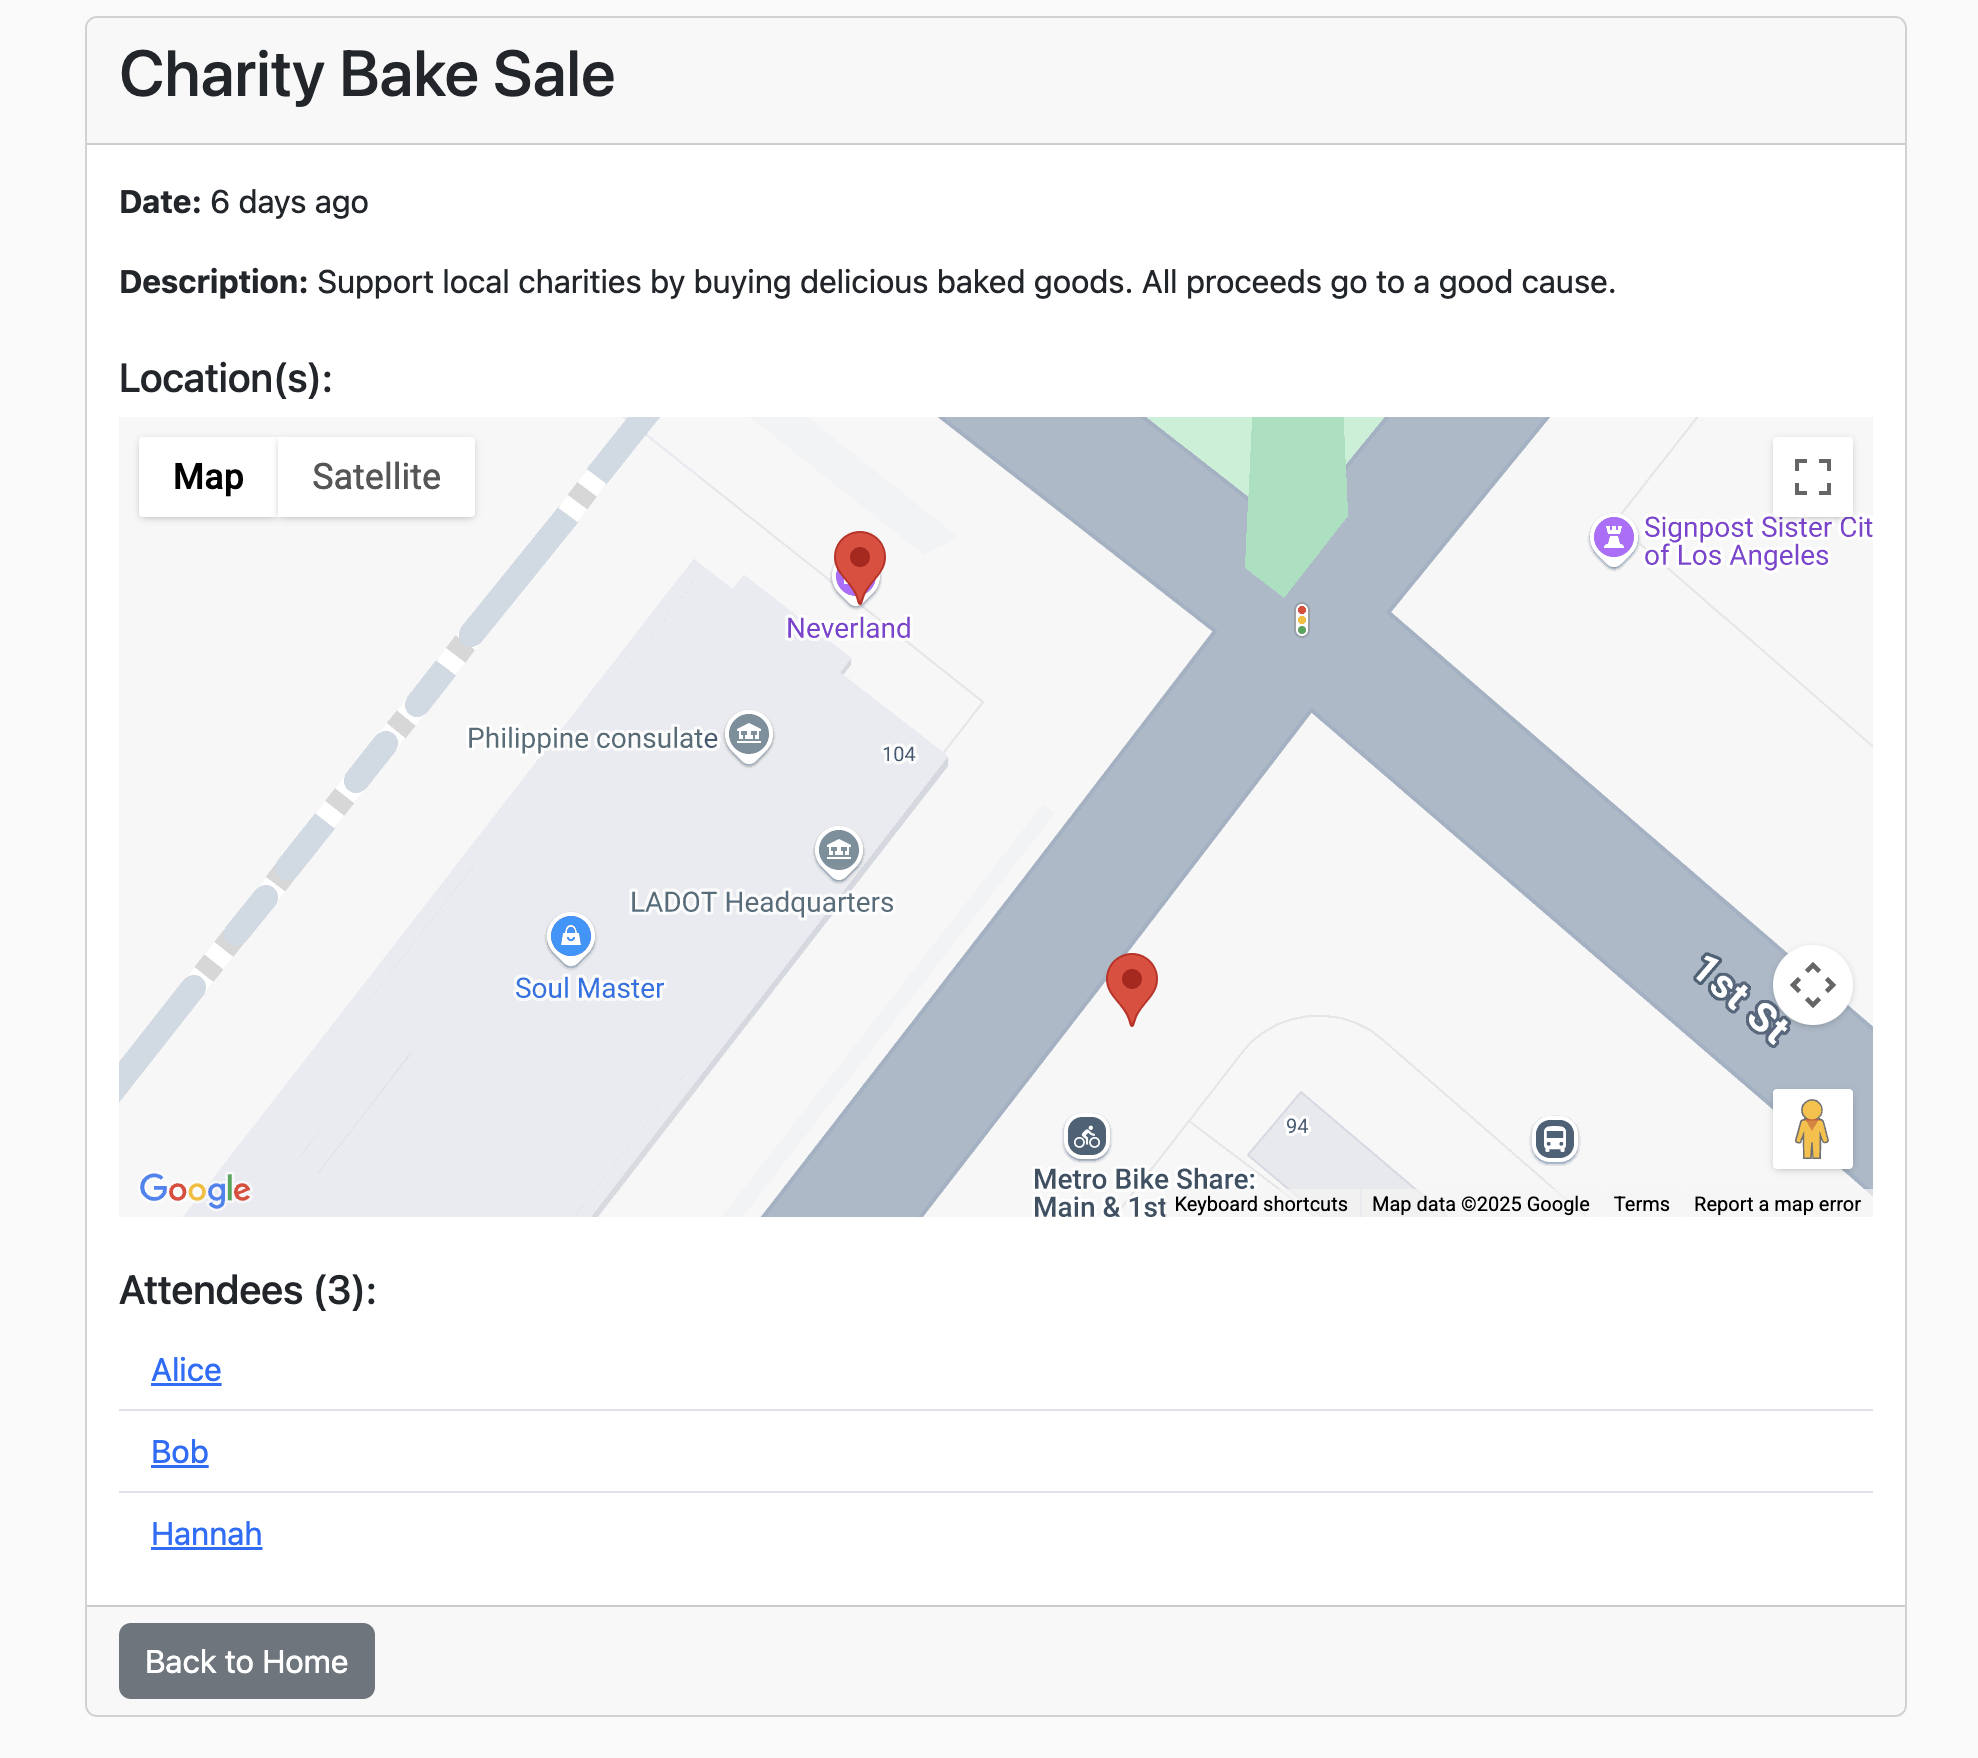
InstaVibe 應用程式會使用 Google 地圖,在活動詳細資料頁面上以視覺化方式顯示活動地點。如要啟用這項功能,應用程式需要我們先前建立的 API 金鑰。下列指令碼會使用我們指派的顯示名稱 (「Maps Platform API Key」) 擷取實際金鑰字串。
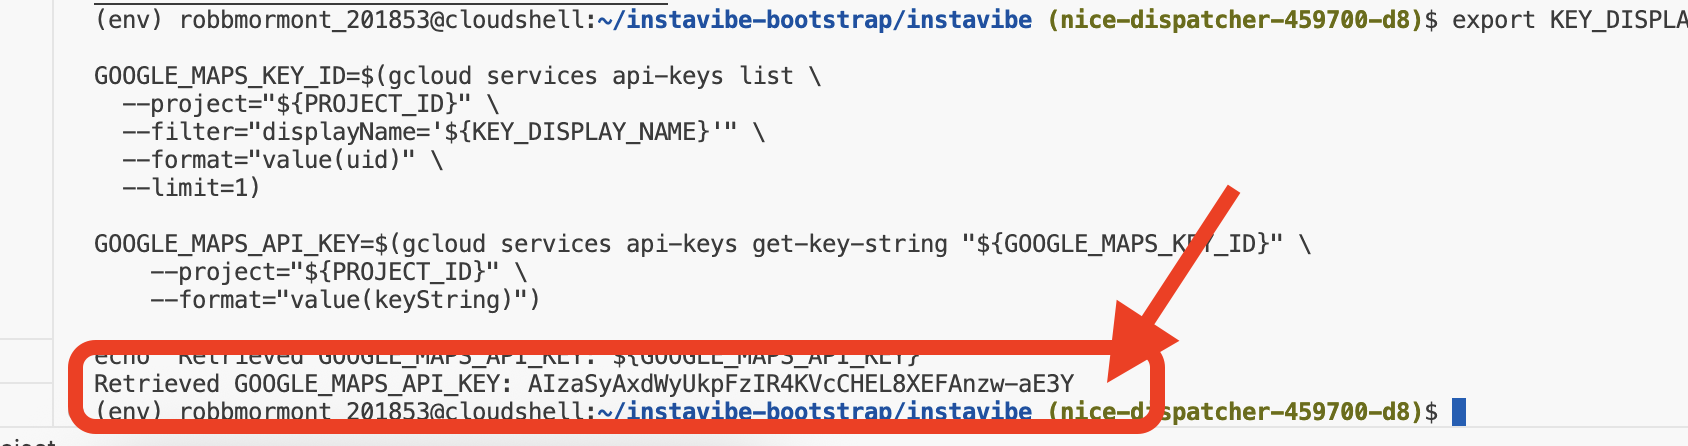
👉💻 返回 Cloud Shell IDE。執行下列指令碼。接著,請仔細檢查輸出內容,確保顯示的 GOOGLE_MAPS_API_KEY 與您先前從 Google Cloud 控制台建立及複製的金鑰相符。
. ~/instavibe-bootstrap/set_env.sh
export KEY_DISPLAY_NAME="Maps Platform API Key"

GOOGLE_MAPS_KEY_ID=$(gcloud services api-keys list \
  --project="${PROJECT_ID}" \
  --filter="displayName='${KEY_DISPLAY_NAME}'" \
  --format="value(uid)" \
  --limit=1)

GOOGLE_MAPS_API_KEY=$(gcloud services api-keys get-key-string "${GOOGLE_MAPS_KEY_ID}" \
    --project="${PROJECT_ID}" \
    --format="value(keyString)")

echo "${GOOGLE_MAPS_API_KEY}" > ~/mapkey.txt

echo "Retrieved GOOGLE_MAPS_API_KEY: ${GOOGLE_MAPS_API_KEY}"
👉💻 現在,讓我們為 InstaVibe 網頁應用程式建構容器映像檔,並推送至 Artifact Registry 存放區。
. ~/instavibe-bootstrap/set_env.sh

cd ~/instavibe-bootstrap/instavibe/
export IMAGE_TAG="latest"
export APP_FOLDER_NAME="instavibe"
export IMAGE_NAME="instavibe-webapp"
export IMAGE_PATH="${REGION}-docker.pkg.dev/${PROJECT_ID}/${REPO_NAME}/${IMAGE_NAME}:${IMAGE_TAG}"
export SERVICE_NAME="instavibe"

gcloud builds submit . \
  --tag=${IMAGE_PATH} \
  --project=${PROJECT_ID}
👉💻 將新版 InstaVibe 網頁應用程式映像檔部署至 Cloud Run
. ~/instavibe-bootstrap/set_env.sh

cd ~/instavibe-bootstrap/instavibe/
export IMAGE_TAG="latest"
export APP_FOLDER_NAME="instavibe"
export IMAGE_NAME="instavibe-webapp"
export IMAGE_PATH="${REGION}-docker.pkg.dev/${PROJECT_ID}/${REPO_NAME}/${IMAGE_NAME}:${IMAGE_TAG}"
export SERVICE_NAME="instavibe"

gcloud run deploy ${SERVICE_NAME} \
  --image=${IMAGE_PATH} \
  --platform=managed \
  --region=${REGION} \
  --allow-unauthenticated \
  --set-env-vars="SPANNER_INSTANCE_ID=${SPANNER_INSTANCE_ID}" \
  --set-env-vars="SPANNER_DATABASE_ID=${SPANNER_DATABASE_ID}" \
  --set-env-vars="APP_HOST=0.0.0.0" \
  --set-env-vars="APP_PORT=8080" \
  --set-env-vars="GOOGLE_CLOUD_LOCATION=${REGION}" \
  --set-env-vars="GOOGLE_CLOUD_PROJECT=${PROJECT_ID}" \
  --set-env-vars="GOOGLE_MAPS_API_KEY=${GOOGLE_MAPS_API_KEY}" \
  --project=${PROJECT_ID} \
  --min-instances=1
部署作業順利完成後,Cloud Run 記錄檔應會顯示執行中 InstaVibe 應用程式的公開網址。
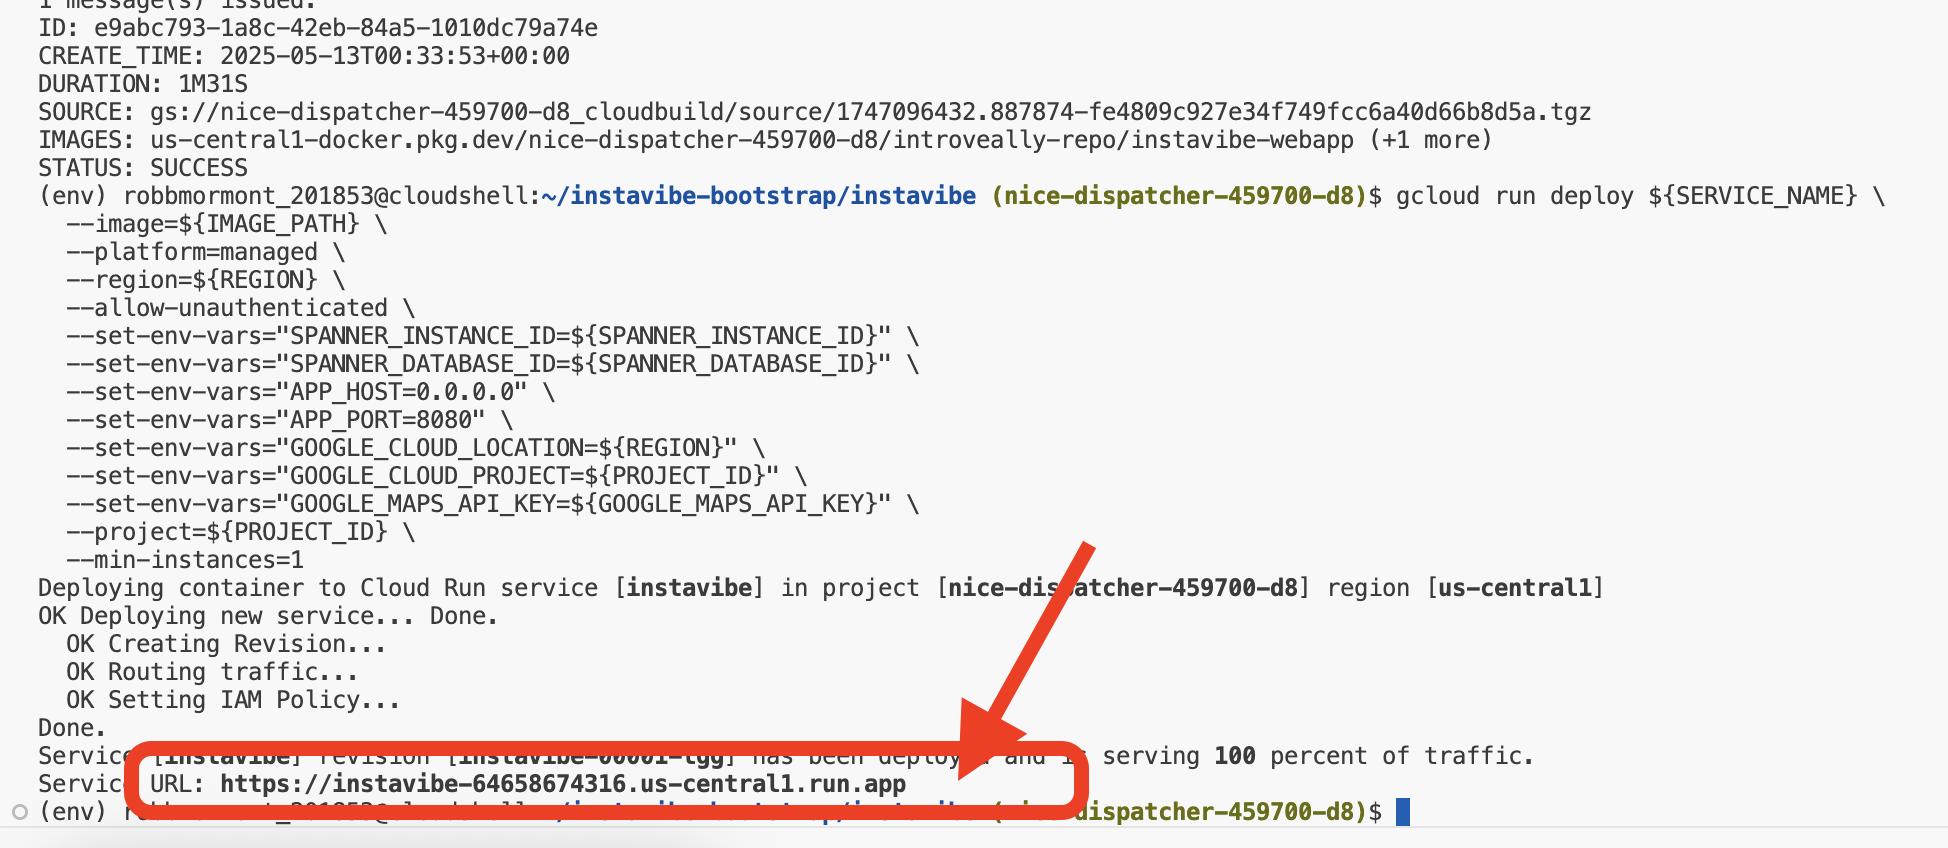
您也可以前往 Google Cloud 控制台的「Cloud Run」部分,然後選取 instavibe 服務,即可找到這個網址。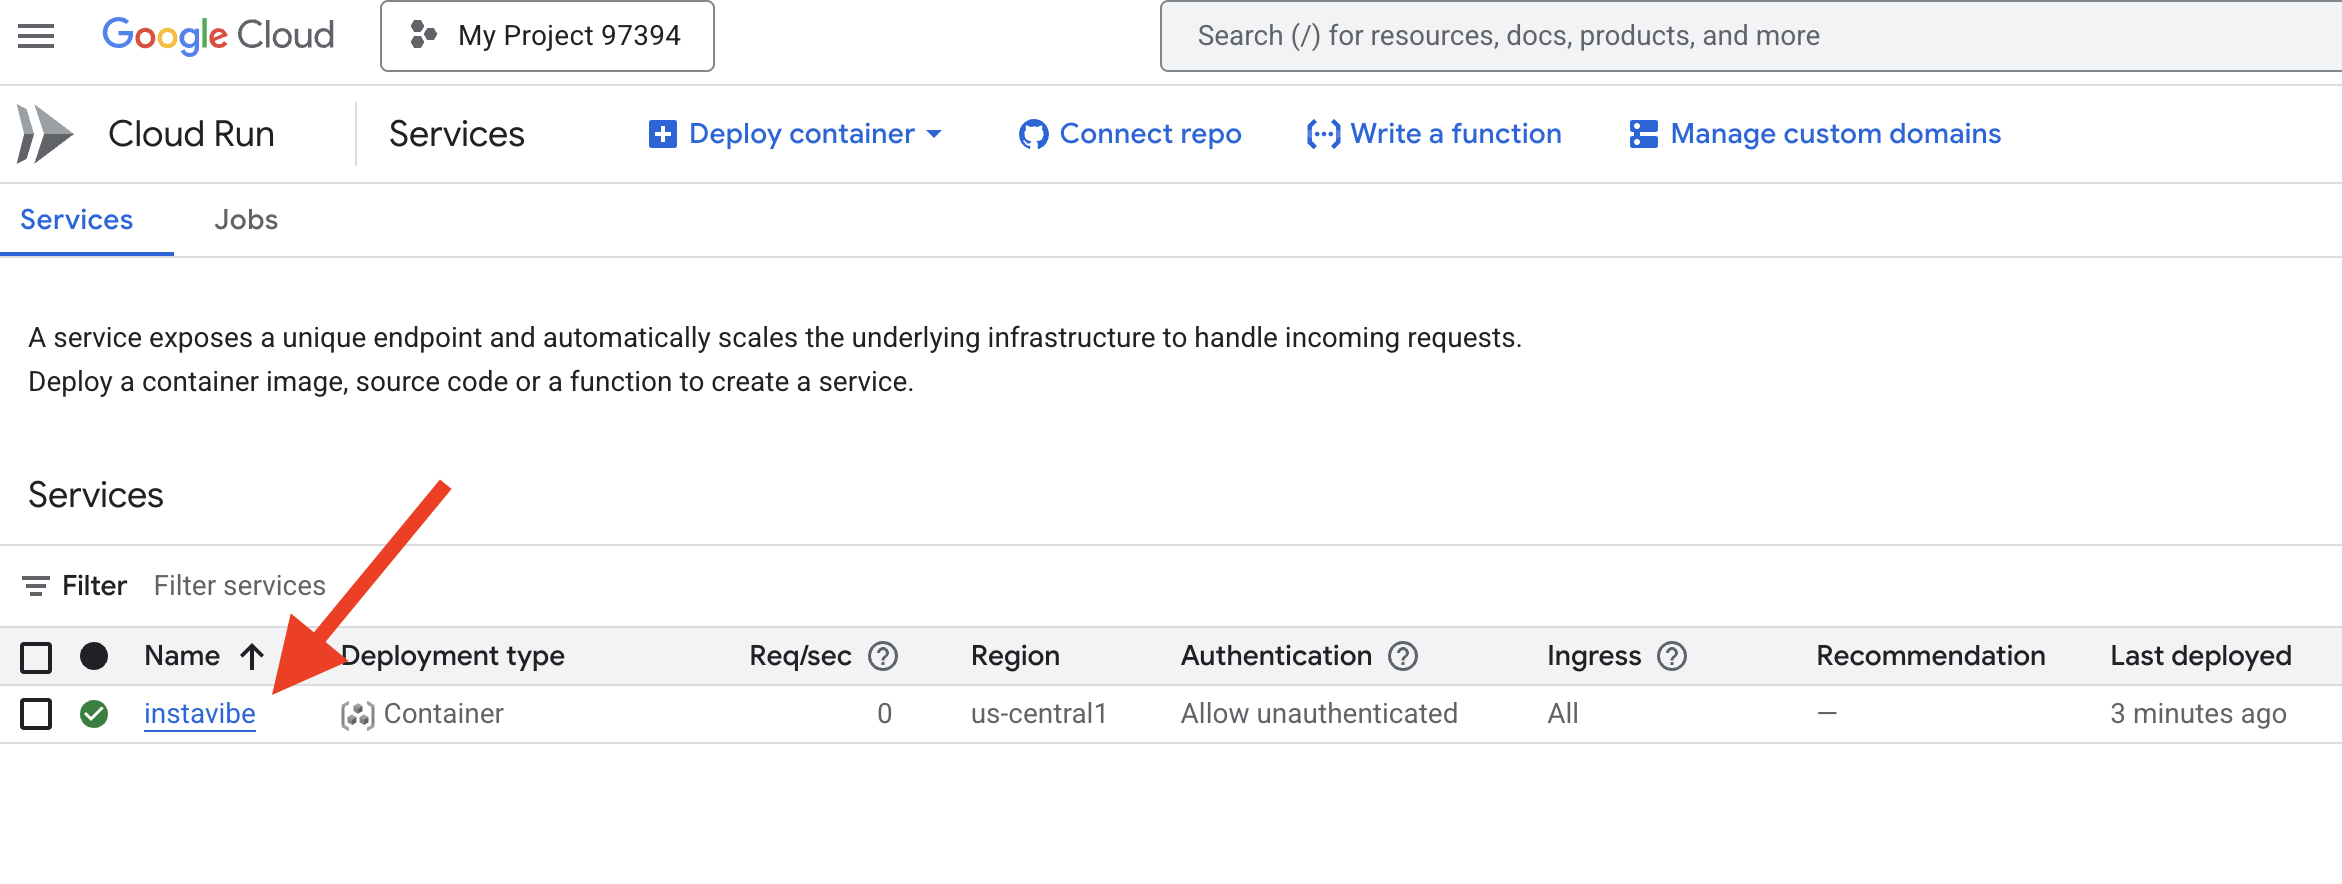
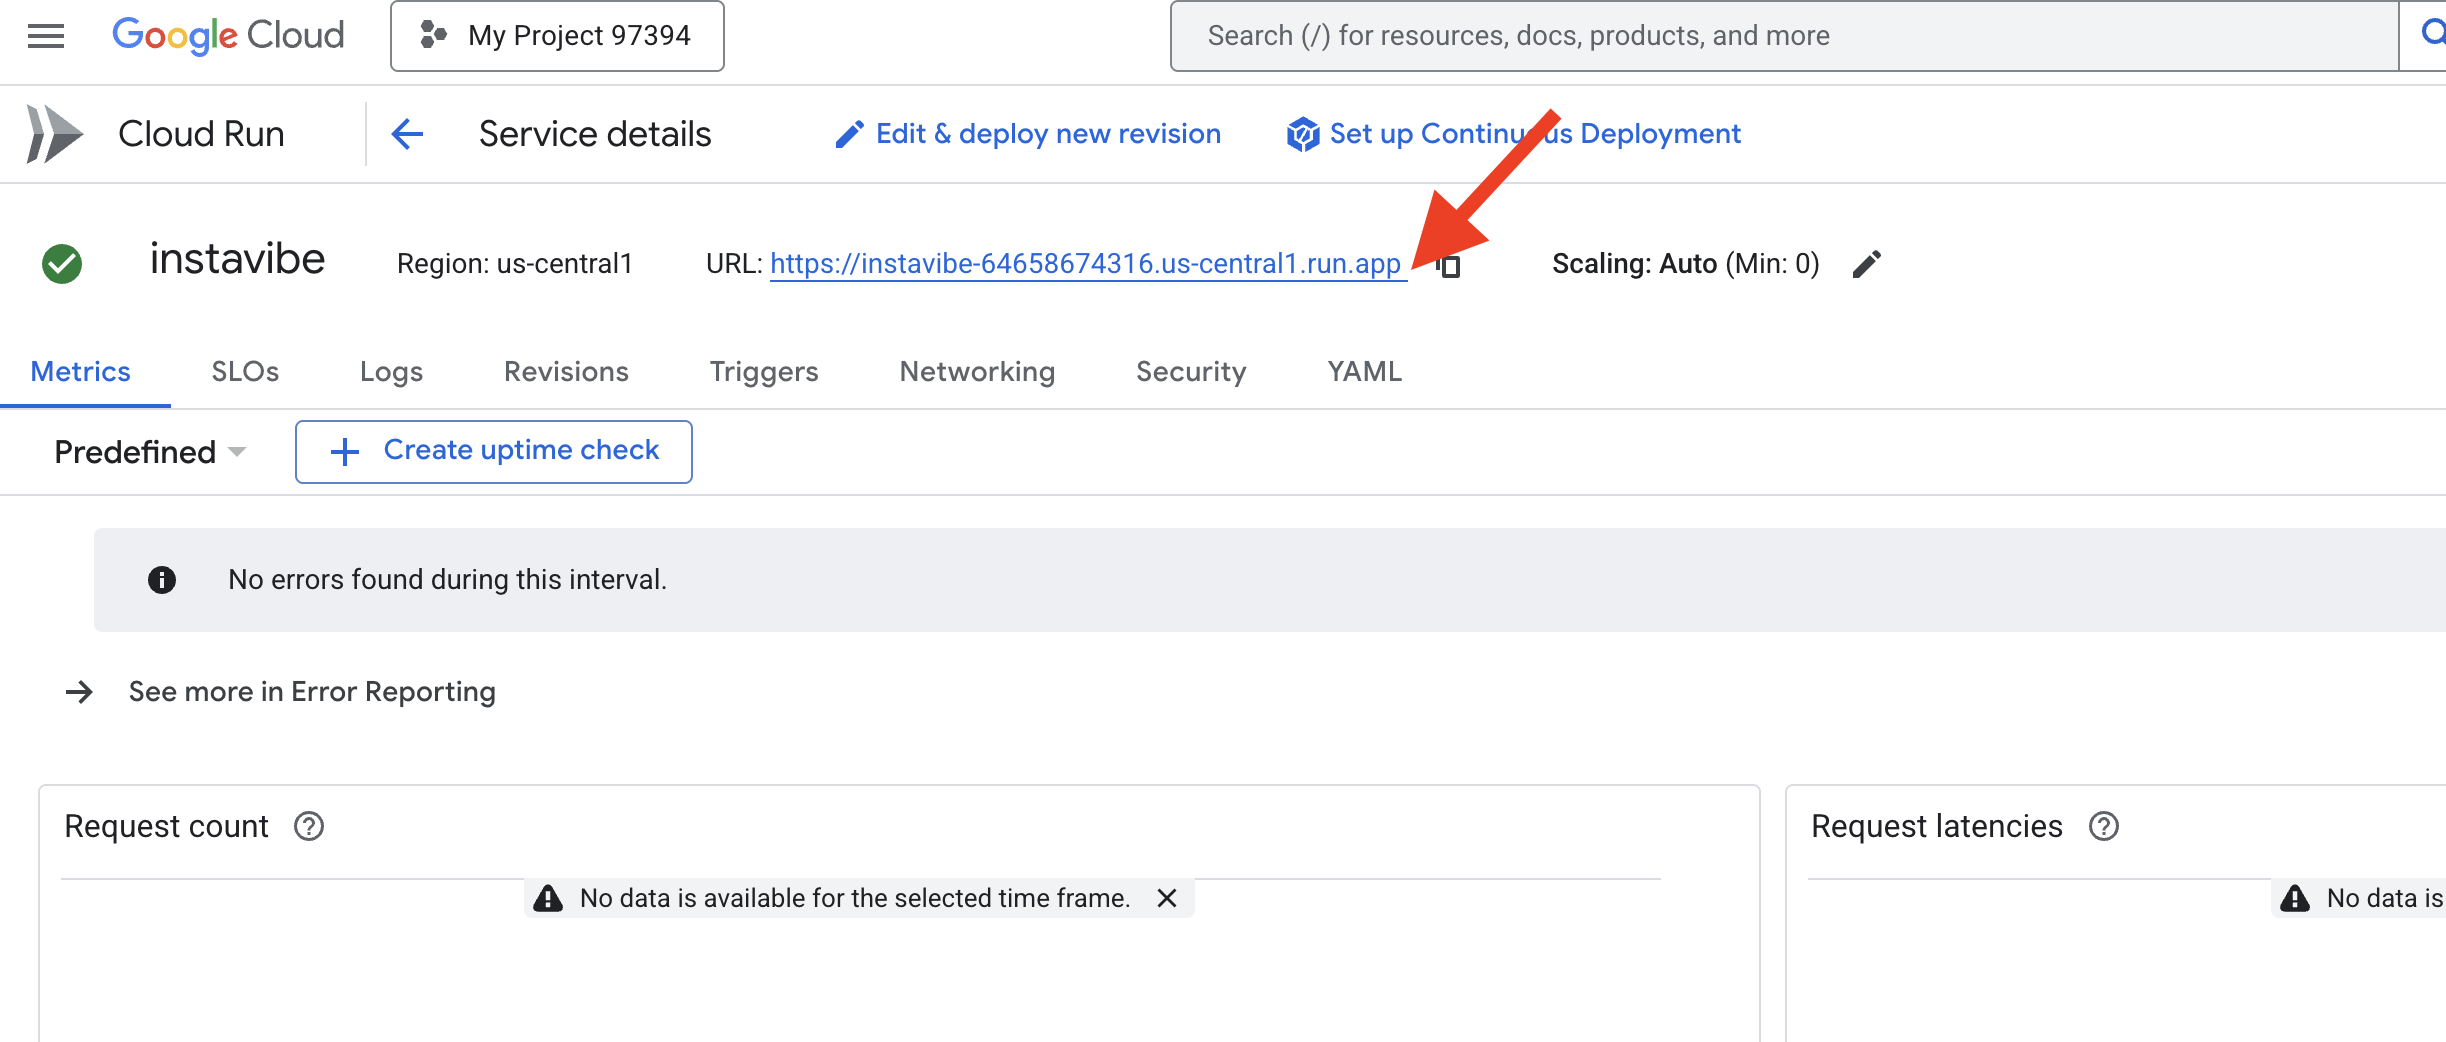
請在網路瀏覽器中開啟該網址,探索 InstaVibe 平台的基本功能。查看我們設定的圖形資料庫所支援的貼文、活動和使用者連結。
現在目標應用程式已開始執行,讓我們開始建構第一個智慧型代理程式,以提升應用程式功能。
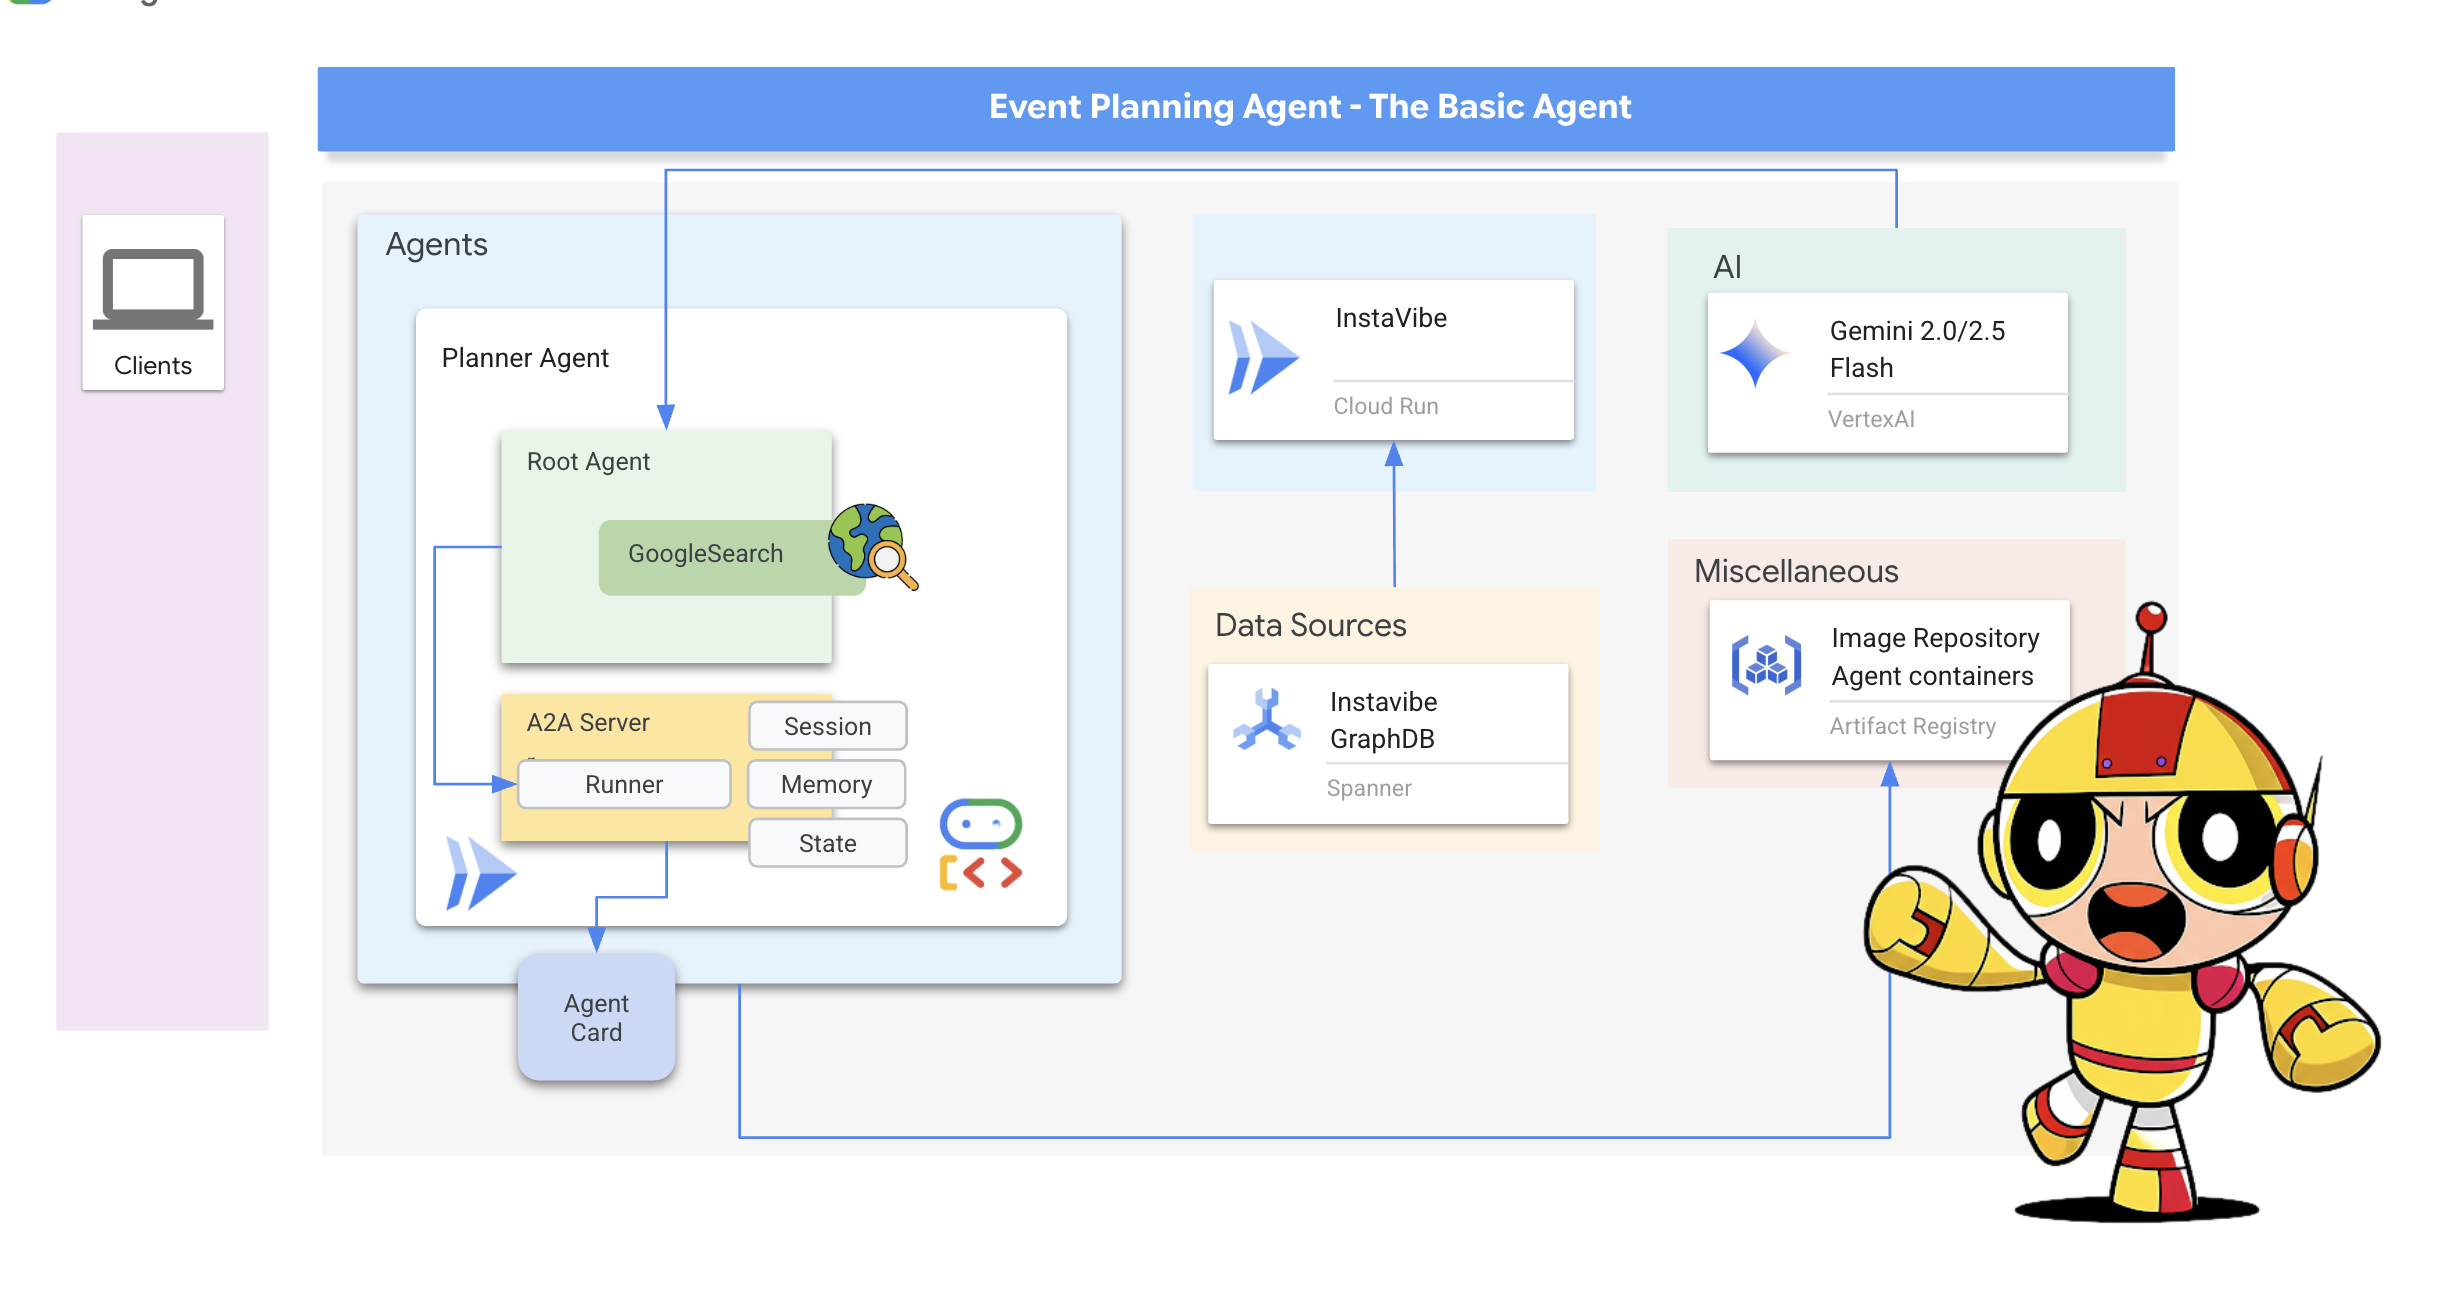
6. 基本代理、活動規劃工具 (使用 ADK)
ADK 架構
Google ADK 架構簡介:基礎 (InstaVibe 應用程式和資料庫) 設定完成後,我們就可以開始使用 Google 的 Agent Development Kit (ADK) 建構第一個智慧型代理。
Agent Development Kit (ADK) 是一個彈性十足的模組化框架,專為開發及部署 AI 代理而設計。ADK 的設計原則是讓代理開發過程更像傳統的軟體開發,協助開發人員輕鬆建立、部署及自動調度管理代理架構,處理從簡單的單一用途工作,到複雜的多代理工作流程等各種任務。
ADK 的核心概念是 Agent,其中封裝了指令、設定 (例如所選語言模型,如 Gemini) 和一組 Tools,可用於執行動作或收集資訊。
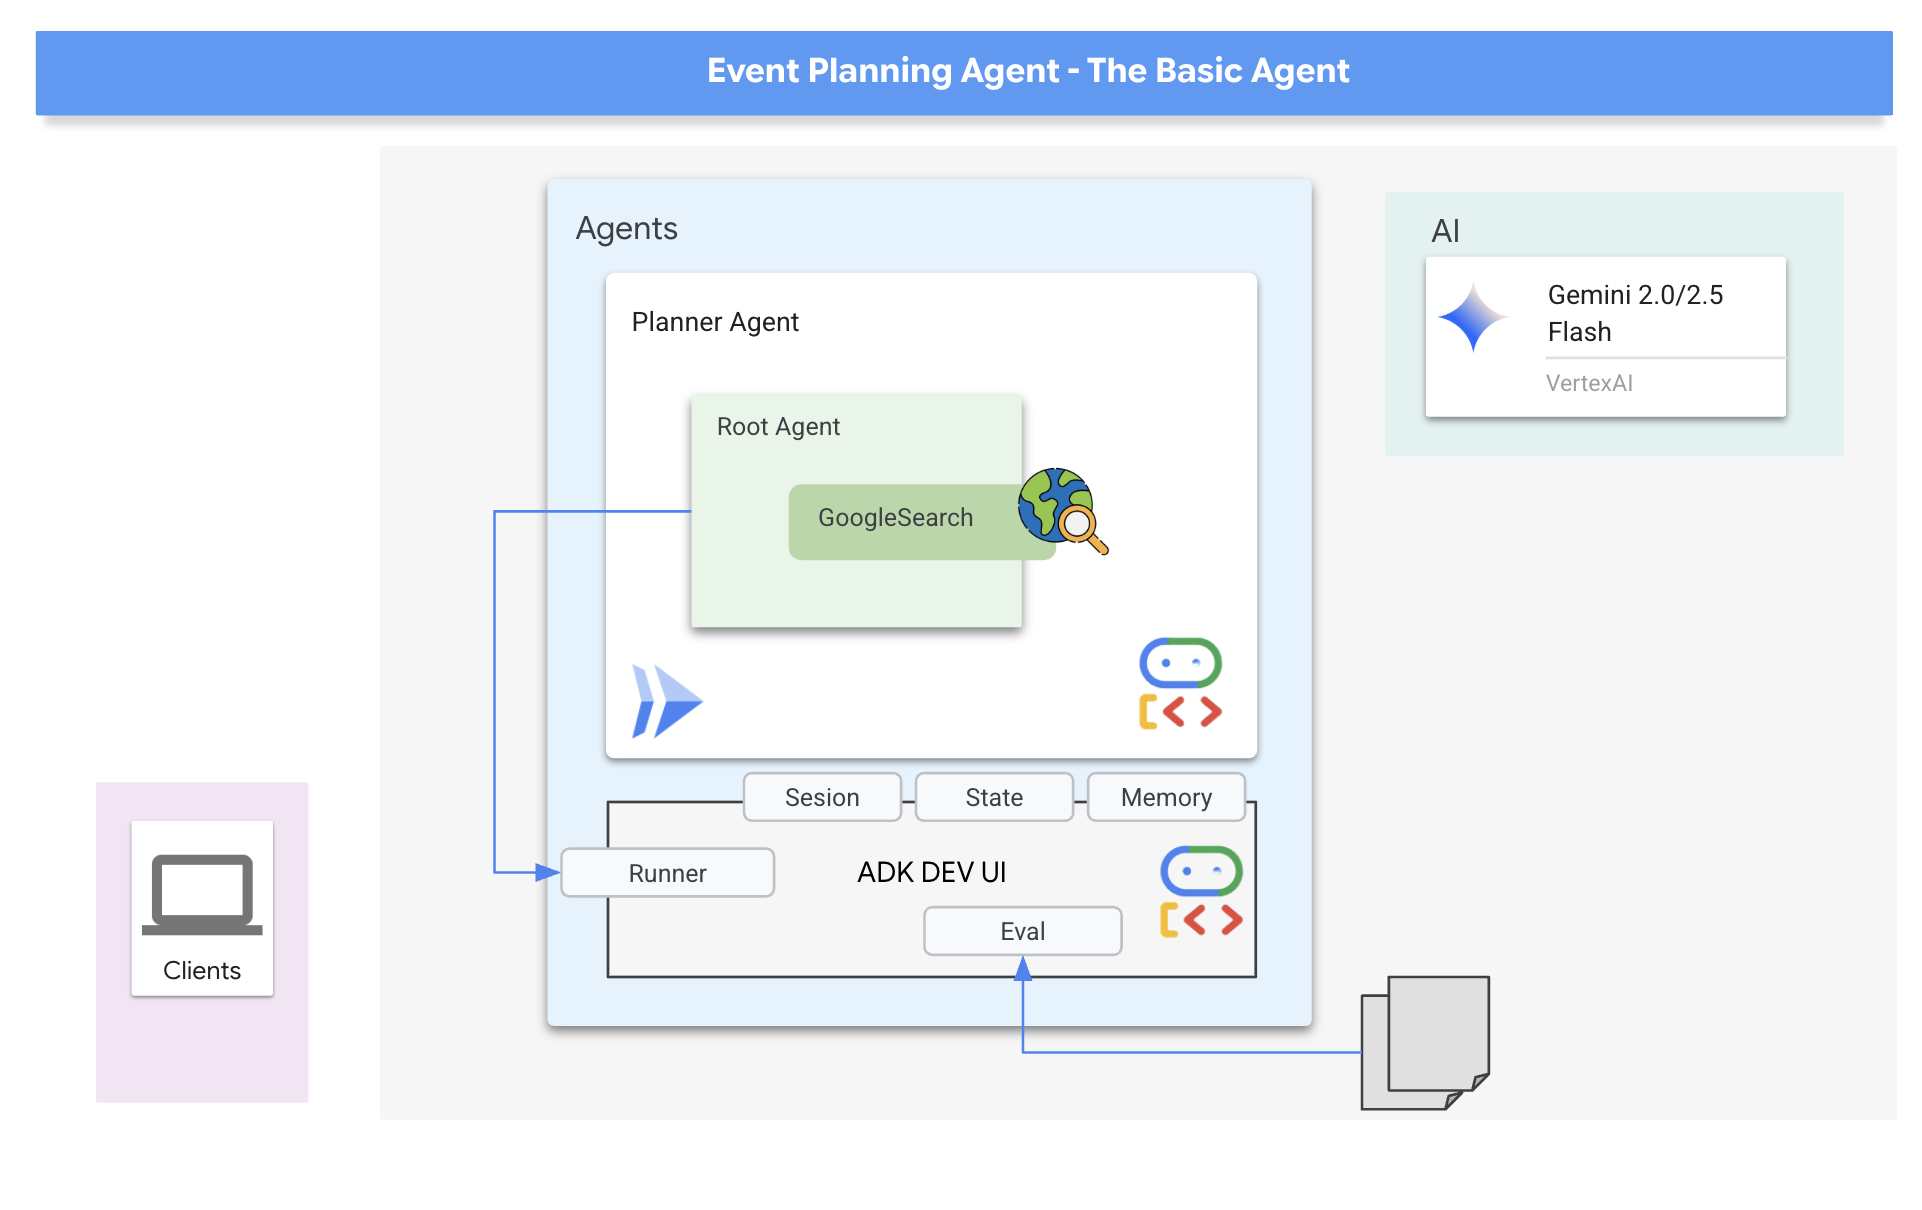
我們一開始的代理程式是「活動規劃師」。這項工具的主要用途是接收使用者提出的社交活動要求 (指定地點、日期和興趣),然後生成量身打造的建議。為確保建議內容切合需求,並根據當前資訊 (例如週末發生的特定活動) 提供建議,我們會運用 ADK 內建的 Google 搜尋工具。這樣一來,代理程式就能根據即時網路結果回覆,並擷取符合使用者條件的場地、活動和行程的最新詳細資料。
👉📝 返回 Cloud Shell IDE,在 ~/instavibe-bootstrap/agents/planner/agent.py 中新增下列提示和指令,建立代理程式
from google.adk.agents import Agent
from google.adk.tools import google_search

root_agent = Agent(
    name="planner_agent",
    model="gemini-2.0-flash",
    description="Agent tasked with generating creative and fun dating plan suggestions",
    instruction="""

        You are a specialized AI assistant tasked with generating creative and fun plan suggestions.

        Request:
        For the upcoming weekend, specifically from **[START_DATE_YYYY-MM-DD]** to **[END_DATE_YYYY-MM-DD]**, in the location specified as **[TARGET_LOCATION_NAME_OR_CITY_STATE]** (if latitude/longitude are provided, use these: Lat: **[TARGET_LATITUDE]**, Lon: **[TARGET_LONGITUDE]**), please generate a distinct dating plan suggestions.

        Constraints and Guidelines for Suggestions:
        1.  Creativity & Fun: Plans should be engaging, memorable, and offer a good experience for a date.
        2.  Budget: All generated plans should aim for a moderate budget (conceptually "$$"), meaning they should be affordable yet offer good value, without being overly cheap or extravagant. This budget level should be *reflected in the choice of activities and venues*, but **do not** explicitly state "Budget: $$" in the `plan_description`.
        3.  Interest Alignment:
               Consider the following user interests: **[COMMA_SEPARATED_LIST_OF_INTERESTS, e.g., outdoors, arts & culture, foodie, nightlife, unique local events, live music, active/sports]**. Tailor suggestions specifically to these where possible. The plan should *embody* these interests.
               Fallback: If specific events or venues perfectly matching all listed user interests cannot be found for the specified weekend, you should create a creative and fun generic dating plan that is still appealing, suitable for the location, and adheres to the moderate budget. This plan should still sound exciting and fun, even if it's more general.
        4.  Current & Specific: Prioritize finding specific, current events, festivals, pop-ups, or unique local venues operating or happening during the specified weekend dates. If exact current events cannot be found, suggest appealing evergreen options or implement the fallback generic plan.
        5.  Location Details: For each place or event mentioned within a plan, you MUST provide its name, precise latitude, precise longitude, and a brief, helpful description.
        6.  Maximum Activities: The plan must contain a maximum of 3 distinct activities.

        RETURN PLAN in MARKDOWN FORMAT
    """,
    tools=[google_search]
)
我們已定義第一個代理程式!ADK 的優點之一是直覺式設計,以及提供的實用工具。其中特別實用的就是 ADK 開發人員 UI,可讓您以互動方式測試代理程式,並即時查看回應。
👉💻 讓我們開始吧!下列指令會啟動 ADK 開發 UI:
. ~/instavibe-bootstrap/set_env.sh
source ~/instavibe-bootstrap/env/bin/activate
cd  ~/instavibe-bootstrap/agents
sed -i "s|^\(O\?GOOGLE_CLOUD_PROJECT\)=.*|GOOGLE_CLOUD_PROJECT=${PROJECT_ID}|" ~/instavibe-bootstrap/agents/planner/.env
adk web
執行指令後,終端機應會顯示 ADK 網頁伺服器已啟動的輸出內容,類似如下:
+-----------------------------------------------------------------------------+
| ADK Web Server started                                                      |
|                                                                             |
| For local testing, access at http://localhost:8000.                         |
+-----------------------------------------------------------------------------+

INFO:     Application startup complete.
INFO:     Uvicorn running on http://0.0.0.0:8000 (Press CTRL+C to quit)
👉 接著,如要從瀏覽器存取 ADK 開發人員使用者介面,請按照下列步驟操作:
在 Cloud Shell 工具列 (通常位於右上角) 中,選取「網頁預覽」圖示 (通常看起來像眼睛或帶有箭頭的正方形),然後選取「變更通訊埠」。在彈出式視窗中,將通訊埠設為 8000,然後按一下「變更並預覽」。Cloud Shell 隨即會開啟新的瀏覽器分頁或視窗,顯示 ADK 開發人員使用者介面。

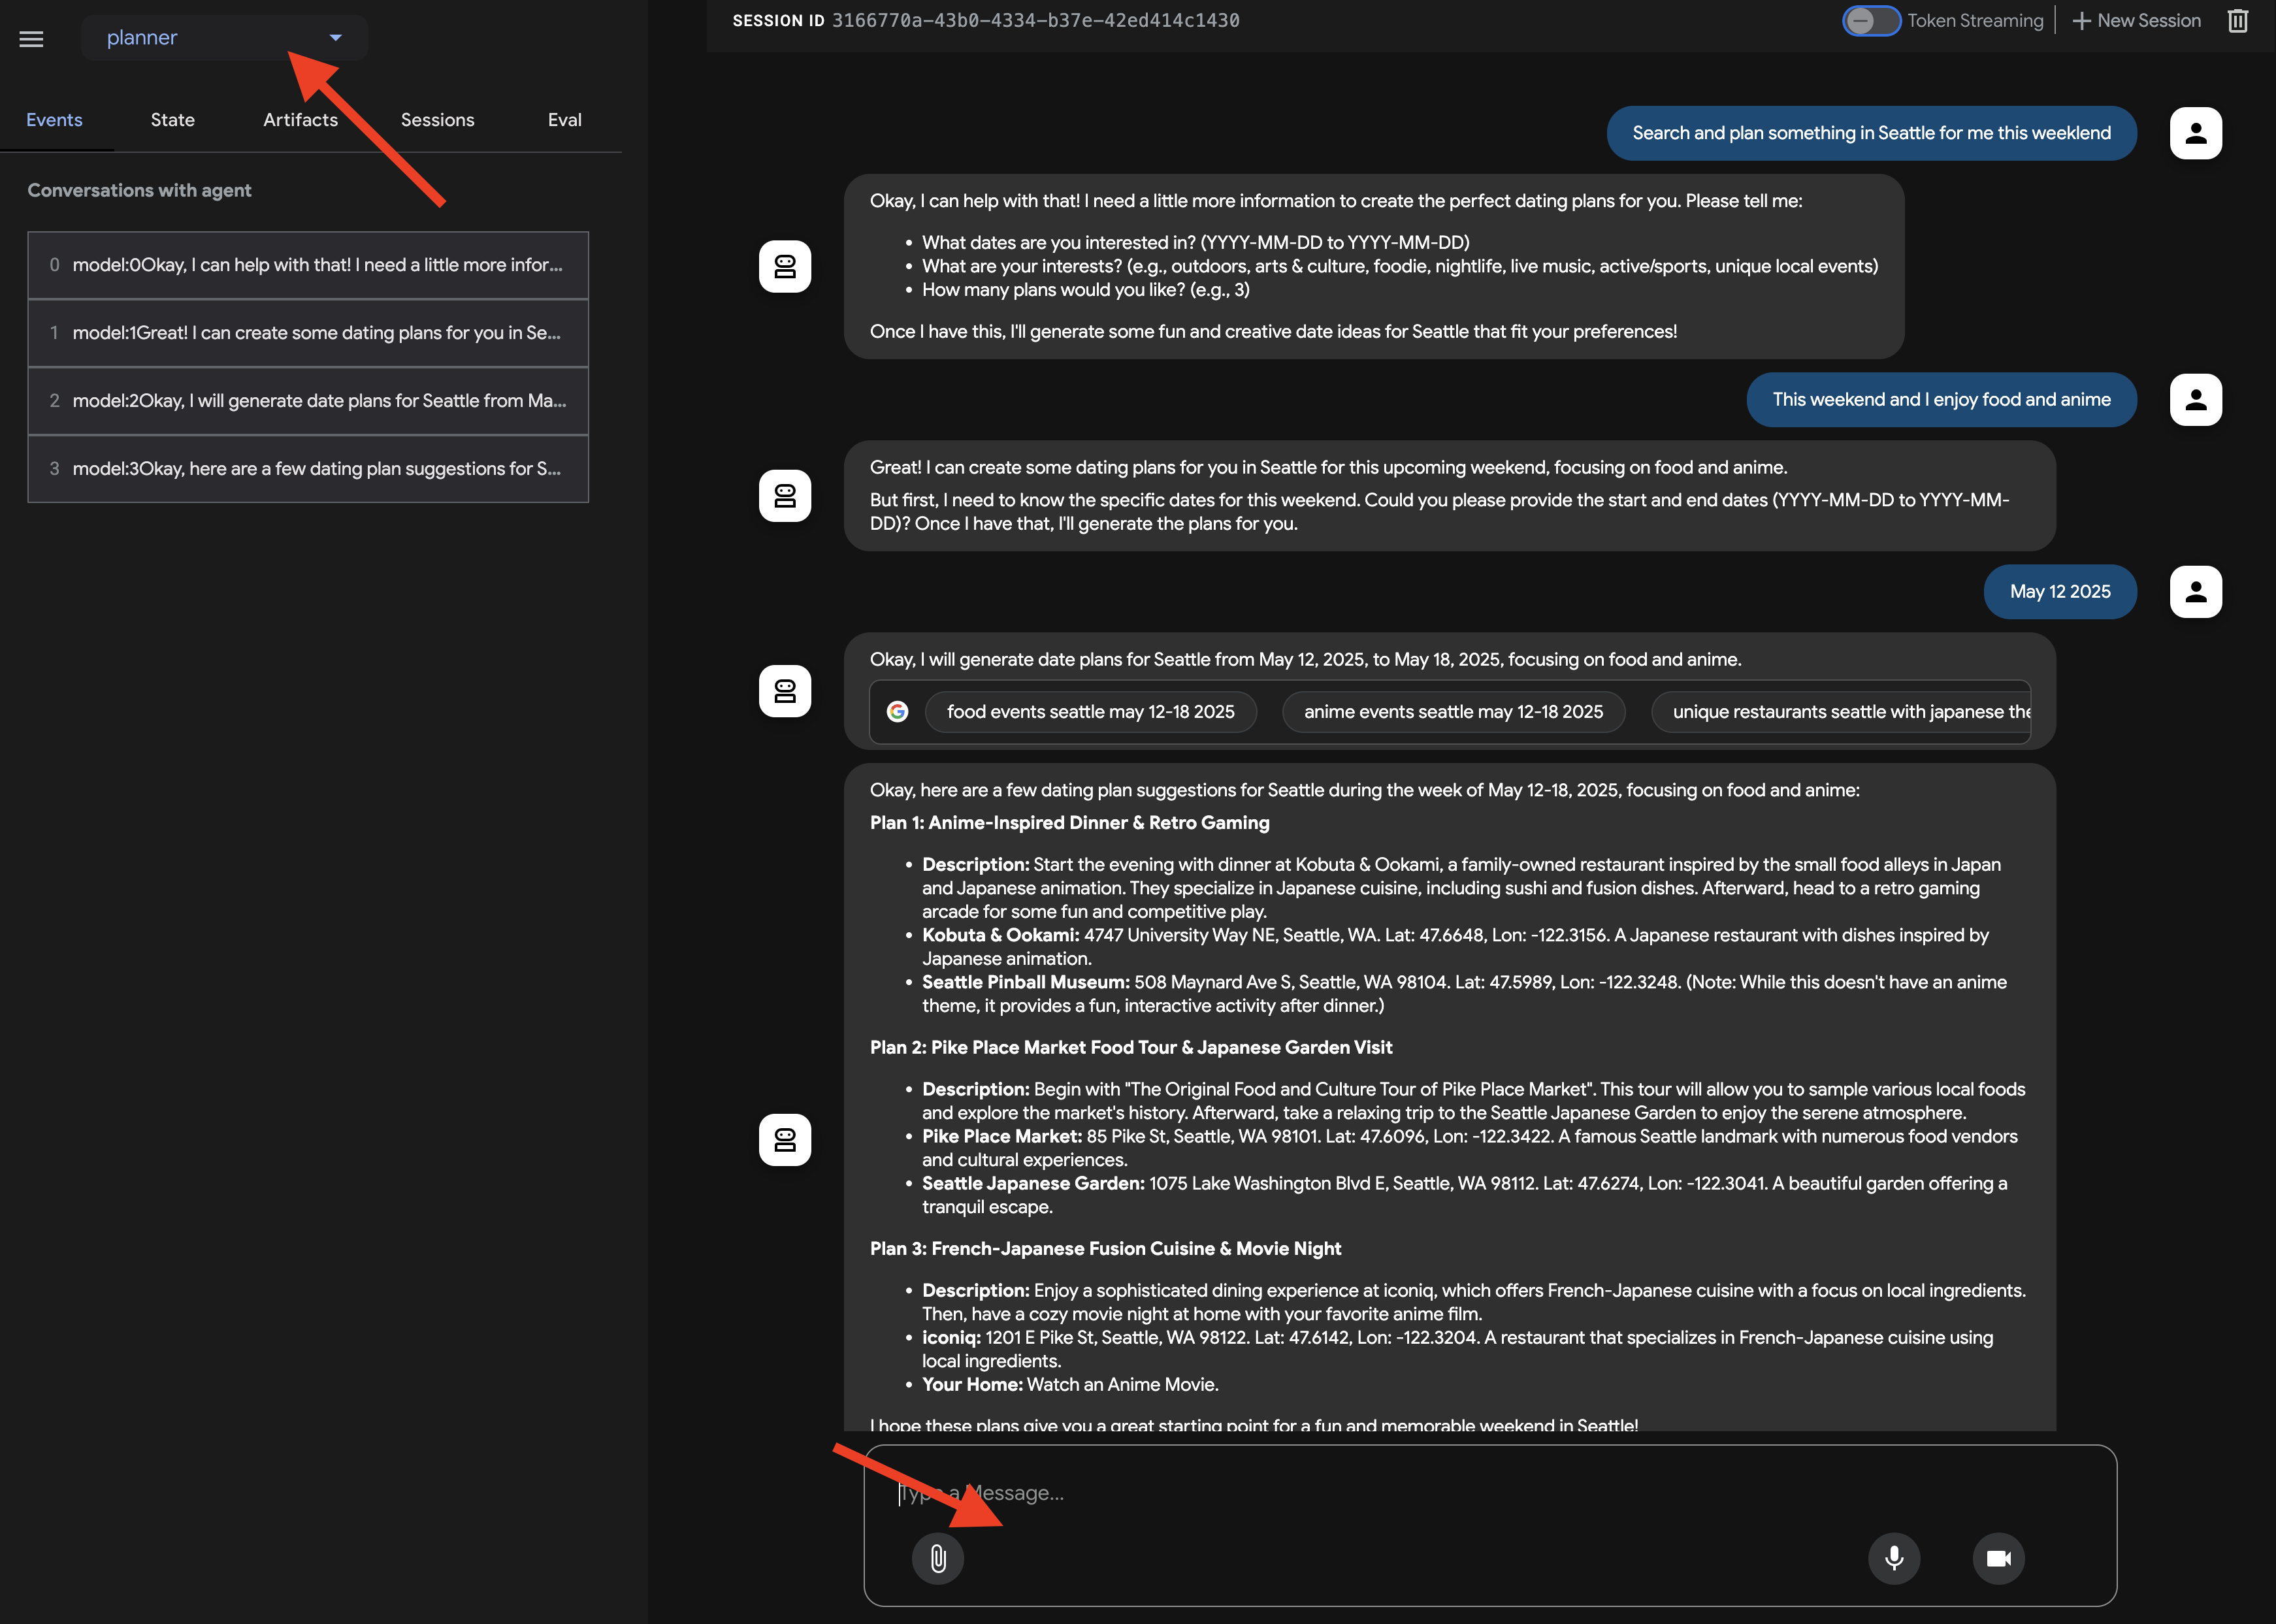
在瀏覽器中開啟 ADK 開發人員使用者介面後,在使用者介面右上方的下拉式選單中,選取要互動的代理程式「planner」。現在,在右側的即時通訊對話方塊中,嘗試指派工作給代理程式。舉例來說,與代理程式對話:
Search and plan something in Seattle for me this weekend
This weekend and I enjoy food and anime
建議日期 (你的偏好)
July 12 2025
你會看到服務專員處理要求,並根據 Google 搜尋結果提供方案。
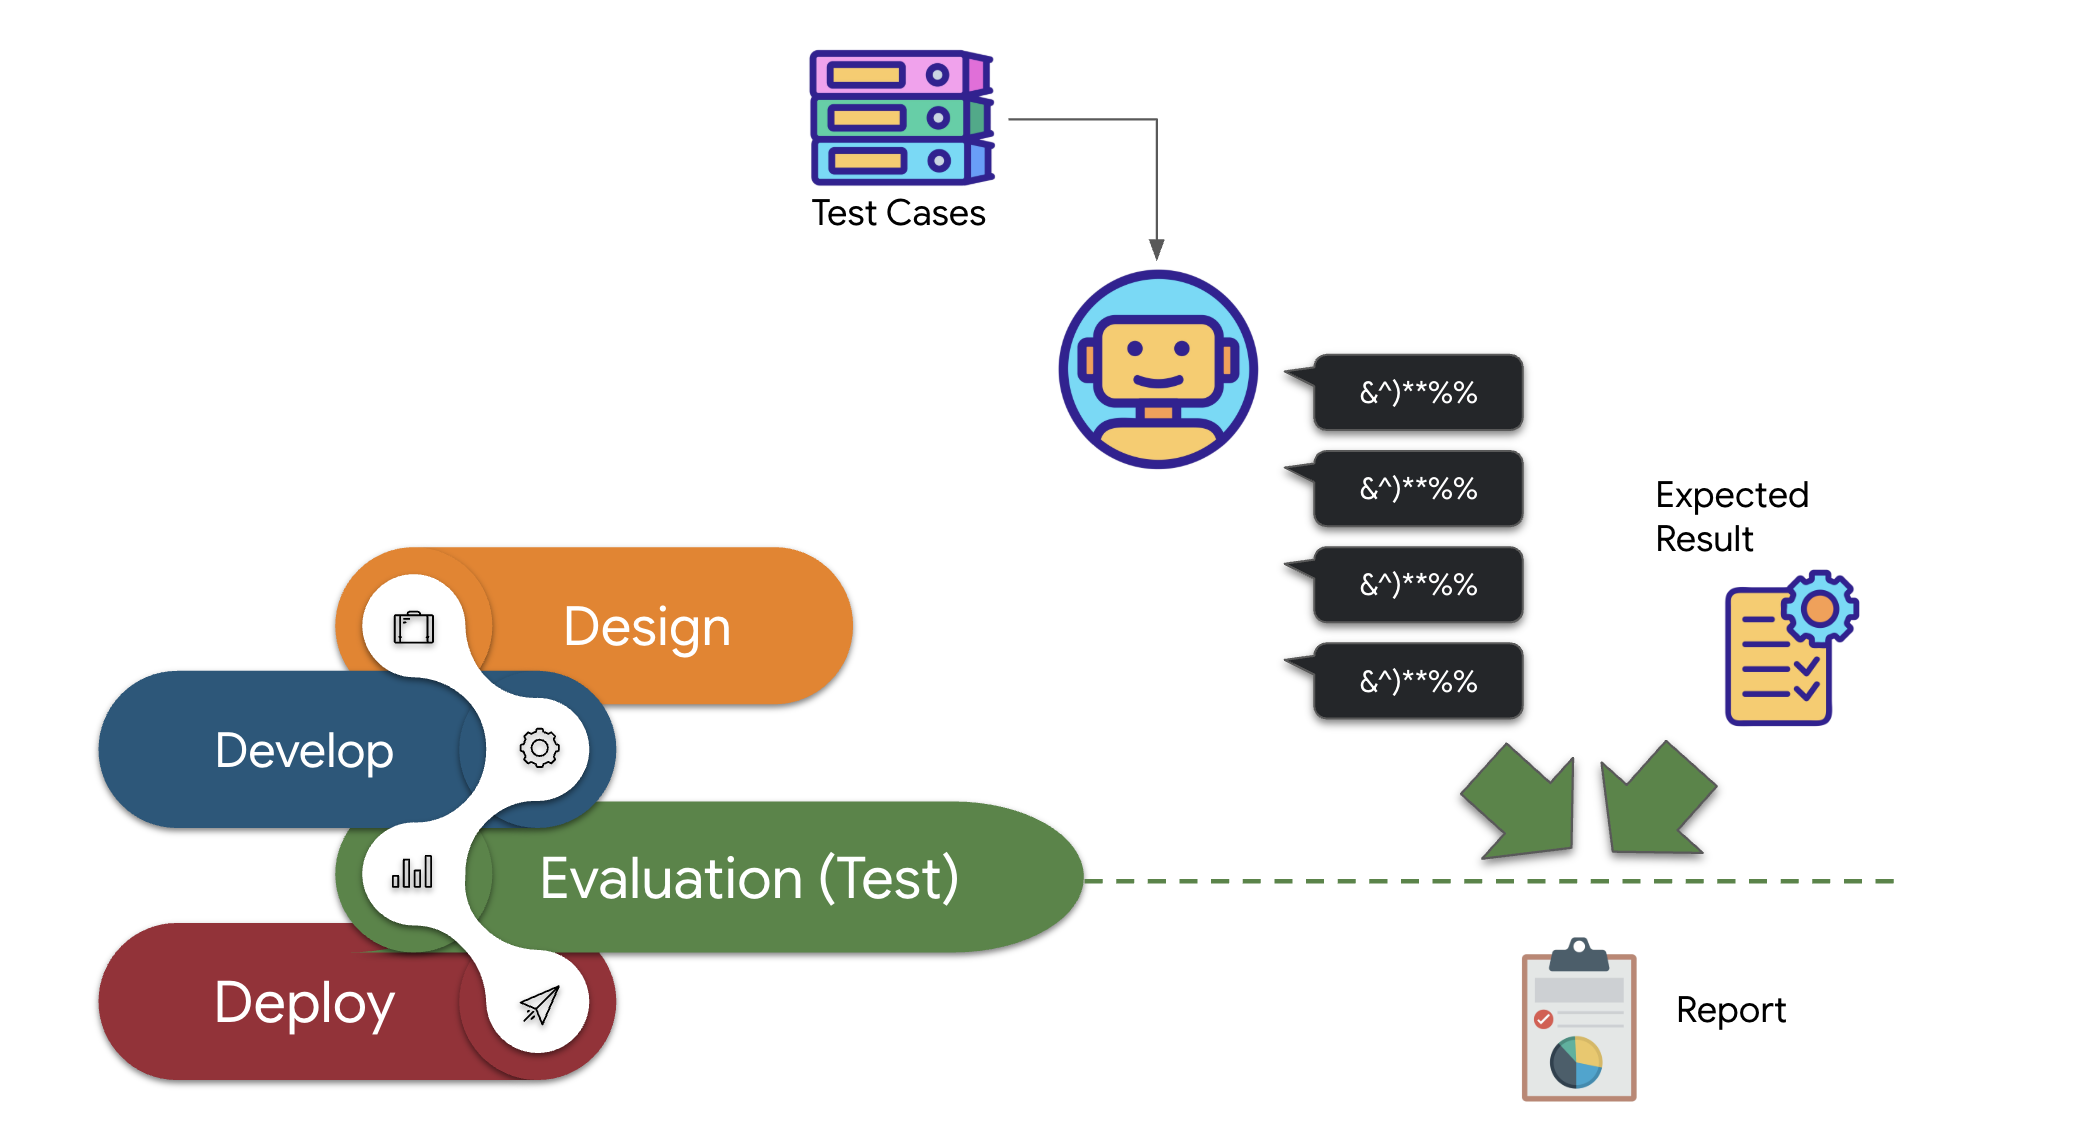
與代理程式互動是一回事,但我們如何知道代理程式是否持續如預期運作,尤其是在我們進行變更時?
由於 AI 代理程式具有生成性和非決定性特質,傳統的軟體測試方法往往無法充分發揮作用。如要從酷炫的展示內容,轉移到可靠的正式版代理程式,健全的評估策略至關重要。與單純檢查生成模型的最終輸出內容不同,評估代理通常需要評估其決策過程,以及在各種情境下正確使用工具或遵循指令的能力。ADK 提供相關功能,可協助您完成這項作業。
👉 在 ADK 開發人員使用者介面中,按一下左側導覽列中的「評估」分頁標籤。您應該會看到名為「plan_eval」的預先載入測試檔案。這個檔案包含預先定義的輸入內容和條件,可用於測試規劃工具代理程式。
👉 選取情境,例如「boston」,然後按一下「執行評估」按鈕。在隨即顯示的彈出式視窗中,將比對分數調低至 0.3,然後按一下「開始」。
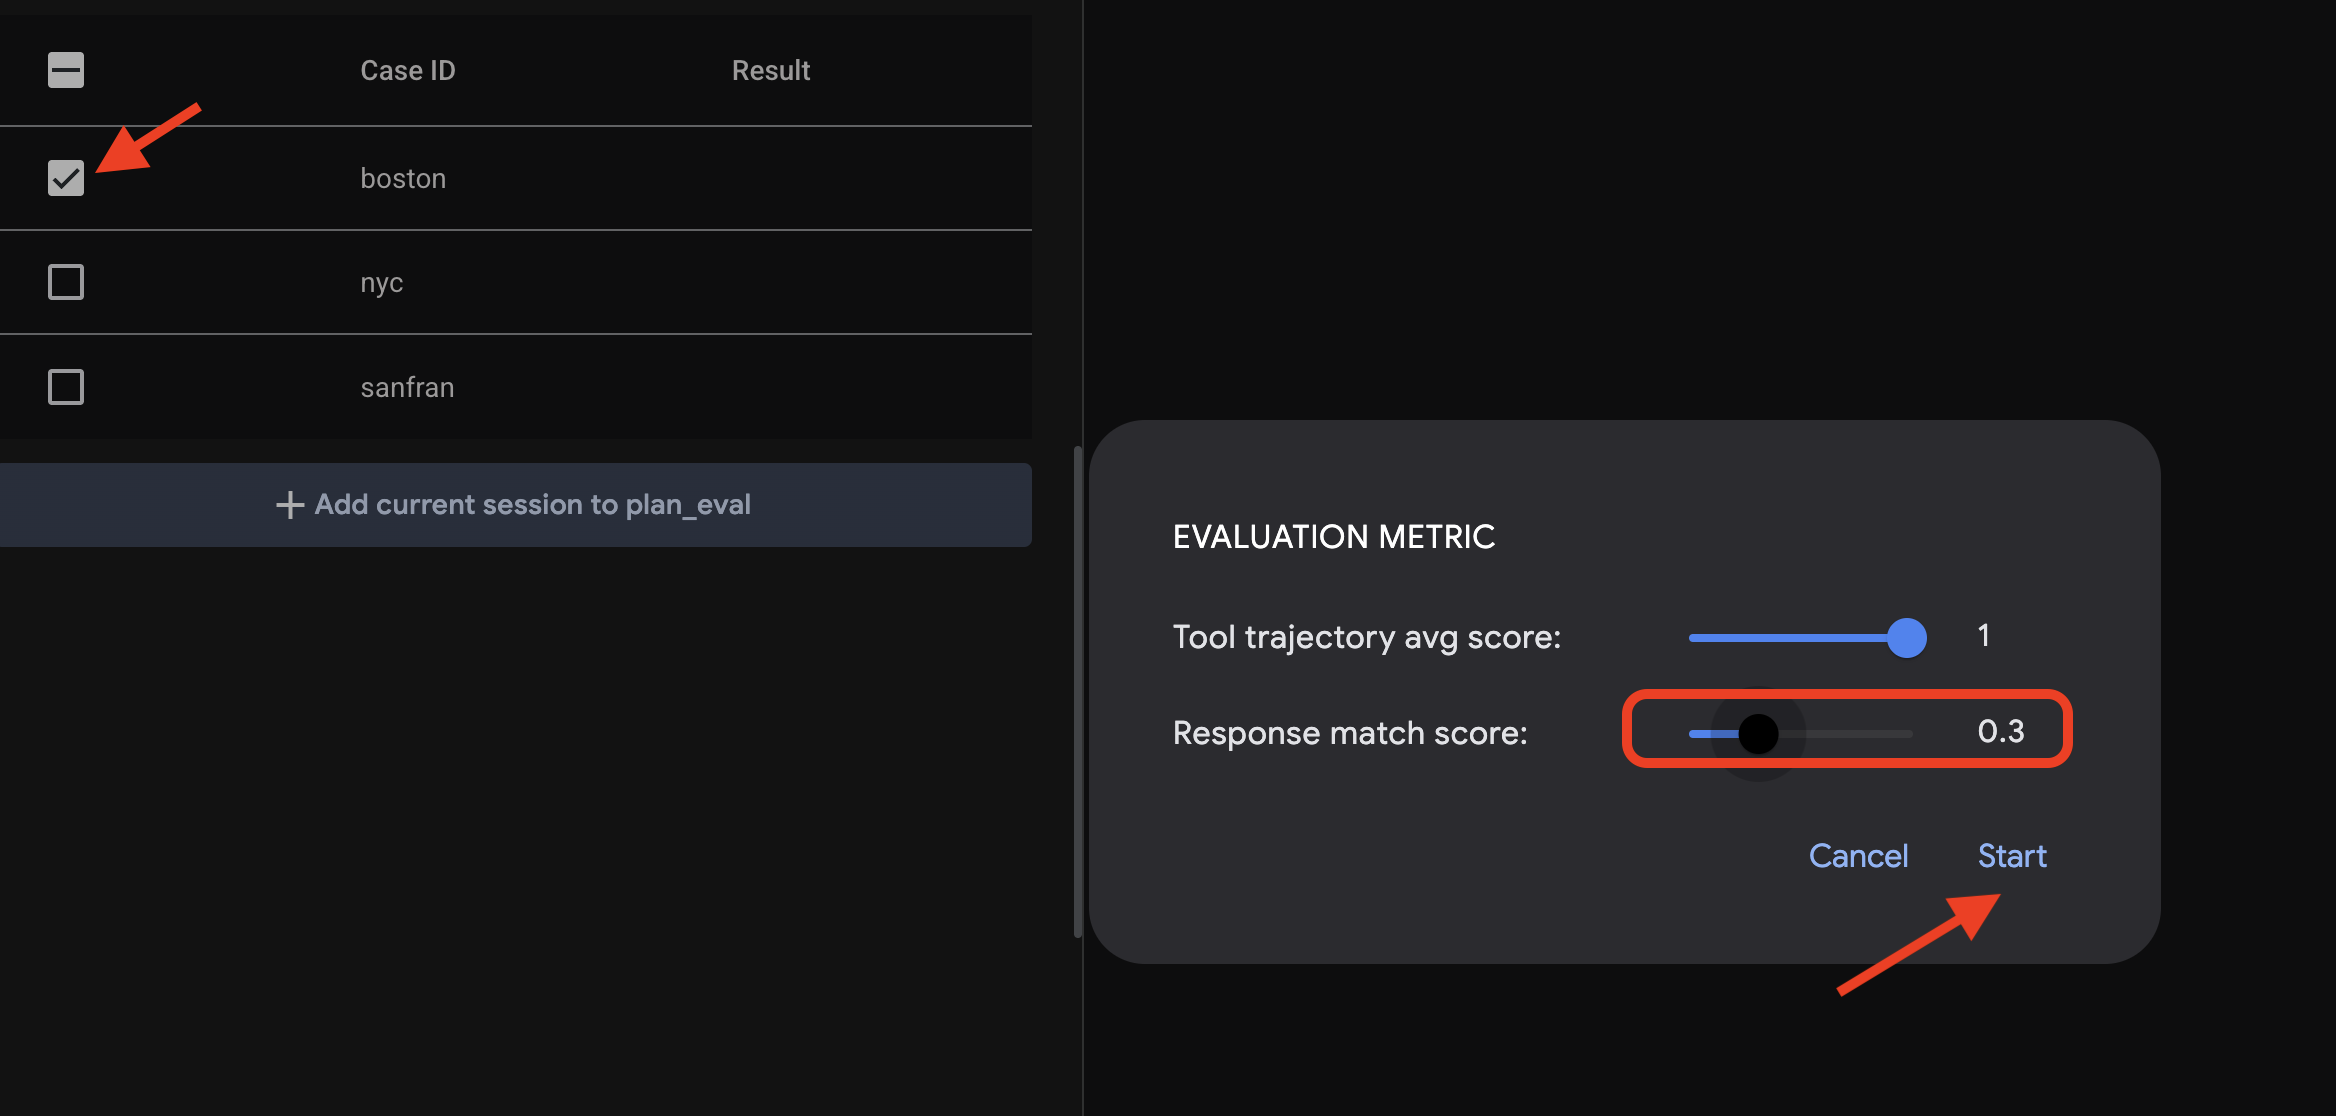
系統會使用測試輸入內容執行代理程式,並檢查輸出內容是否符合定義的預期結果。這可讓您有系統地測試代理程式的效能。
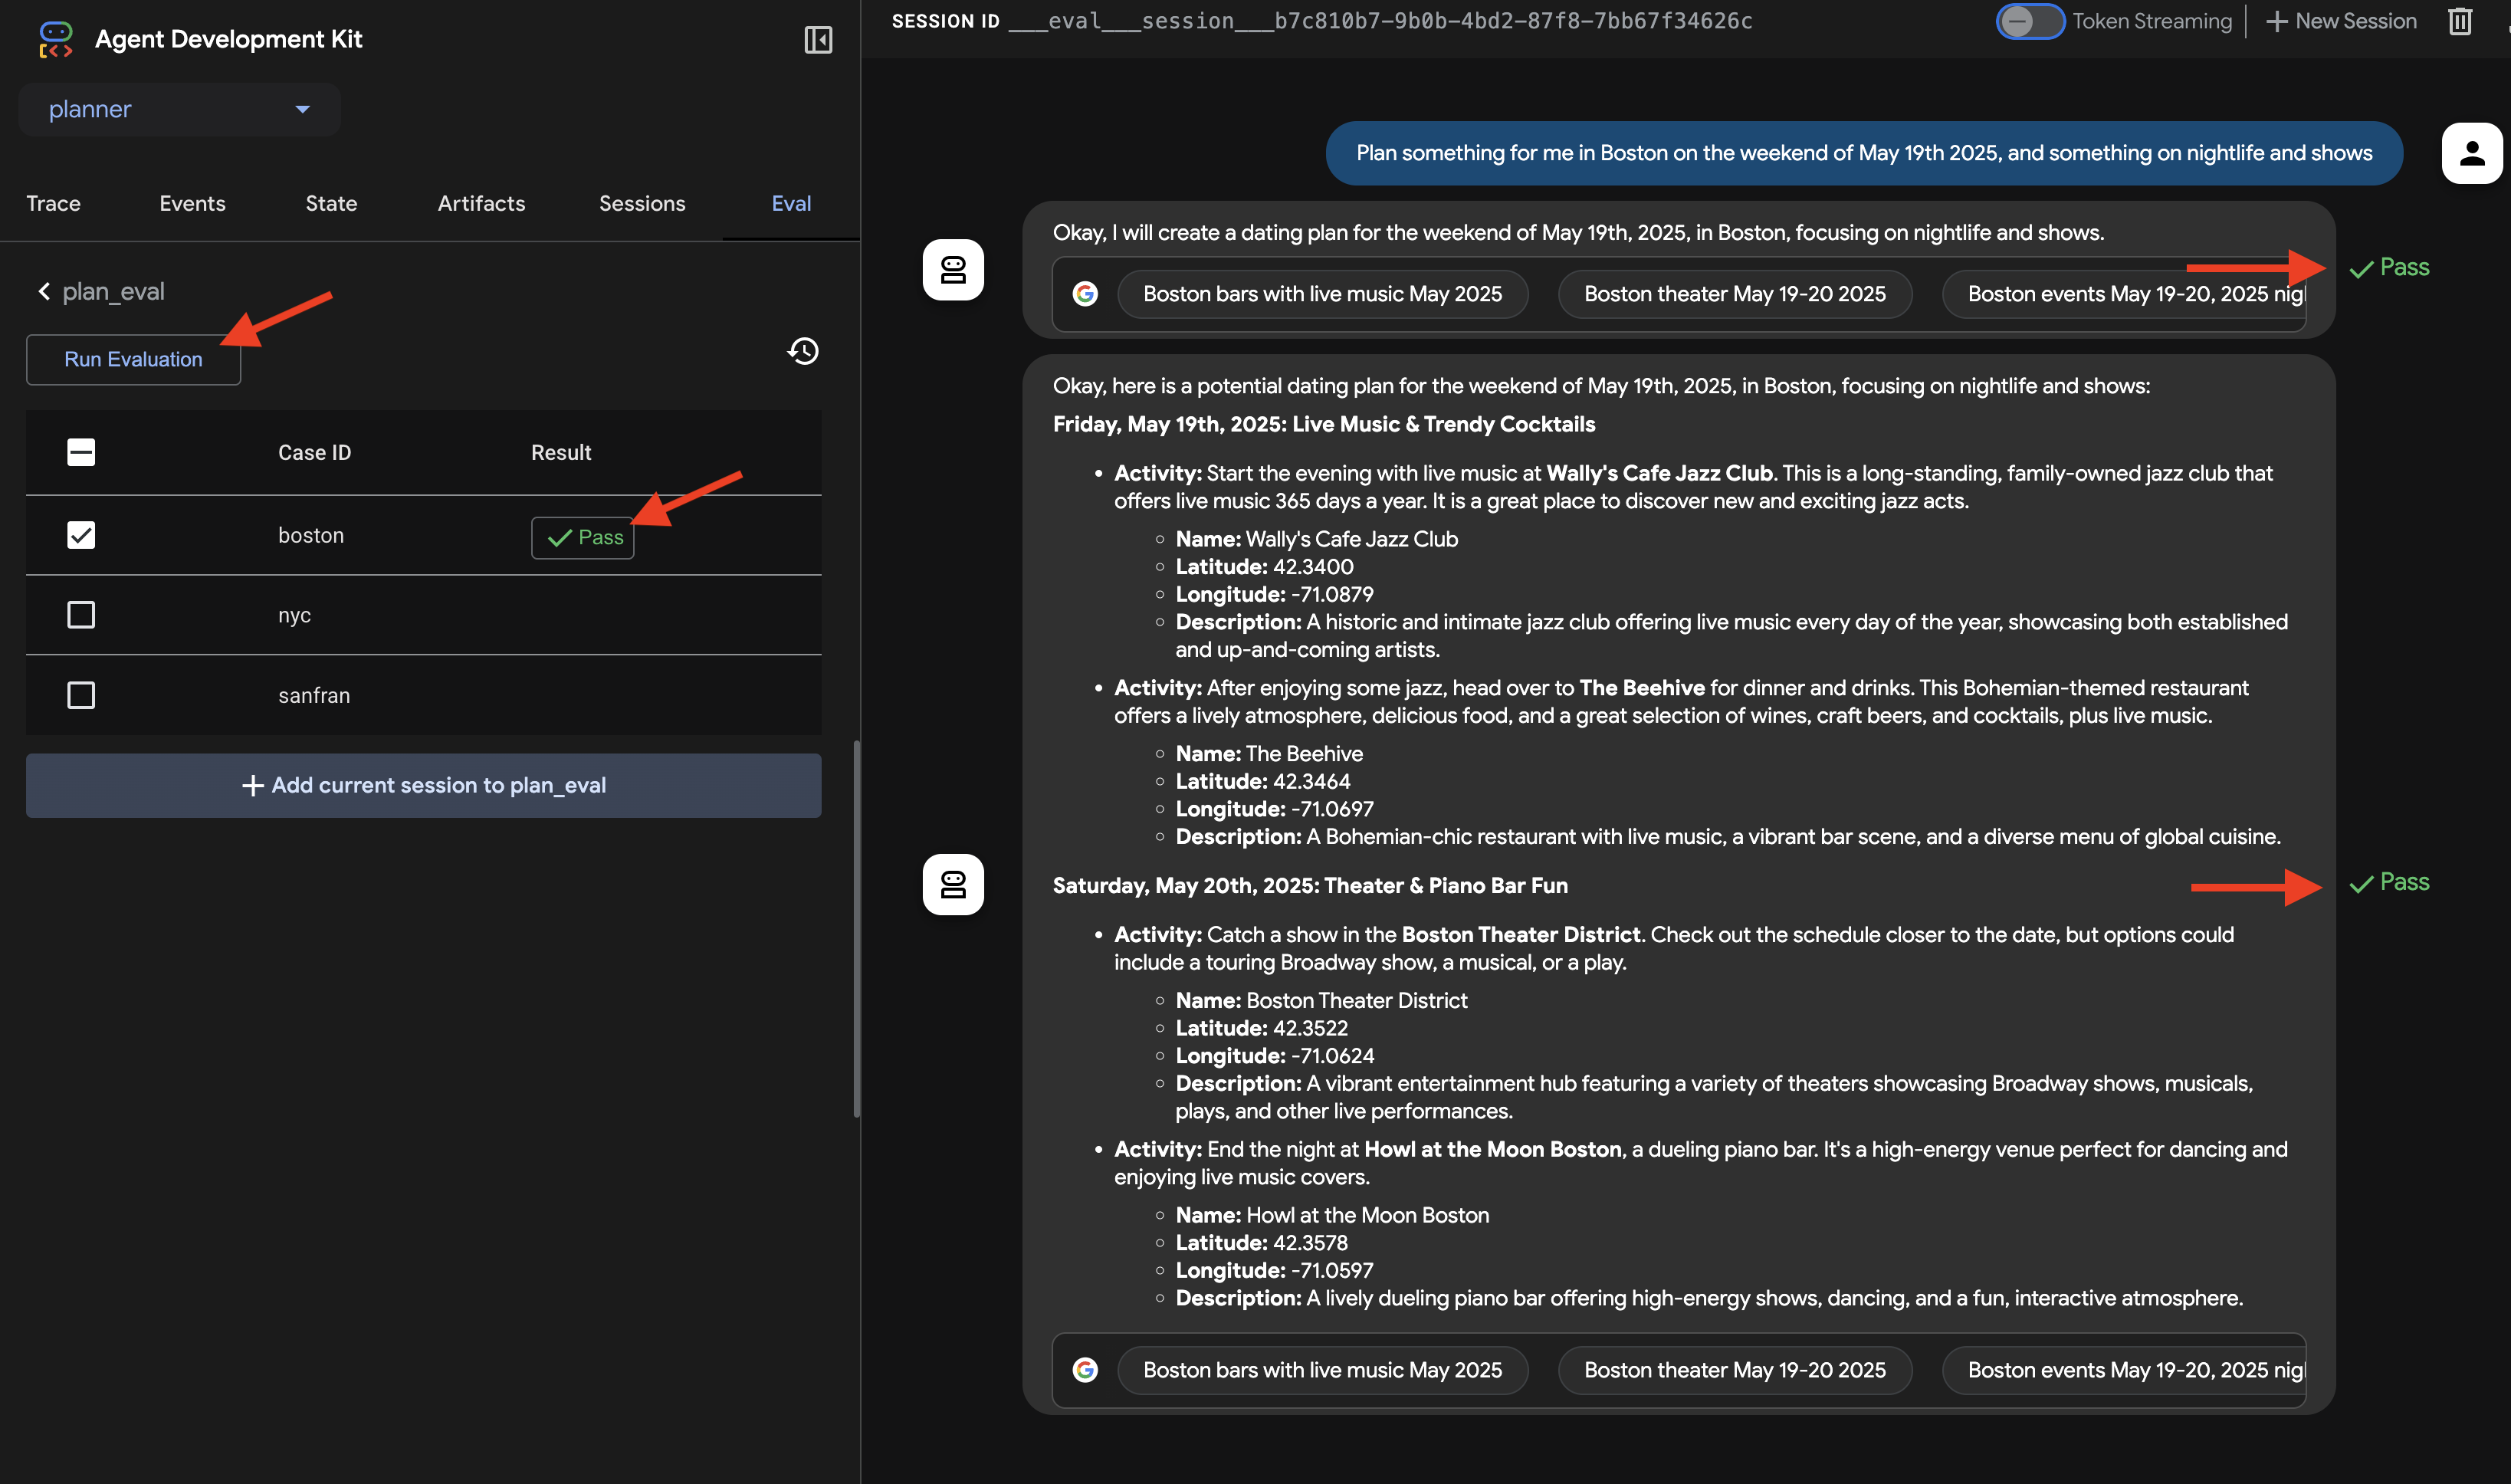
👉 現在,我們來看看門檻較嚴格時會發生什麼情況。選取「nyc」情境,然後再次點按「執行評估」。這次請保留預設的相符分數 (回覆相符分數:0.7),然後按一下「開始」。您會發現結果為「失敗」。這是預期行為,因為代理程式的創意輸出內容與預先定義的「黃金」答案並不完全相符。
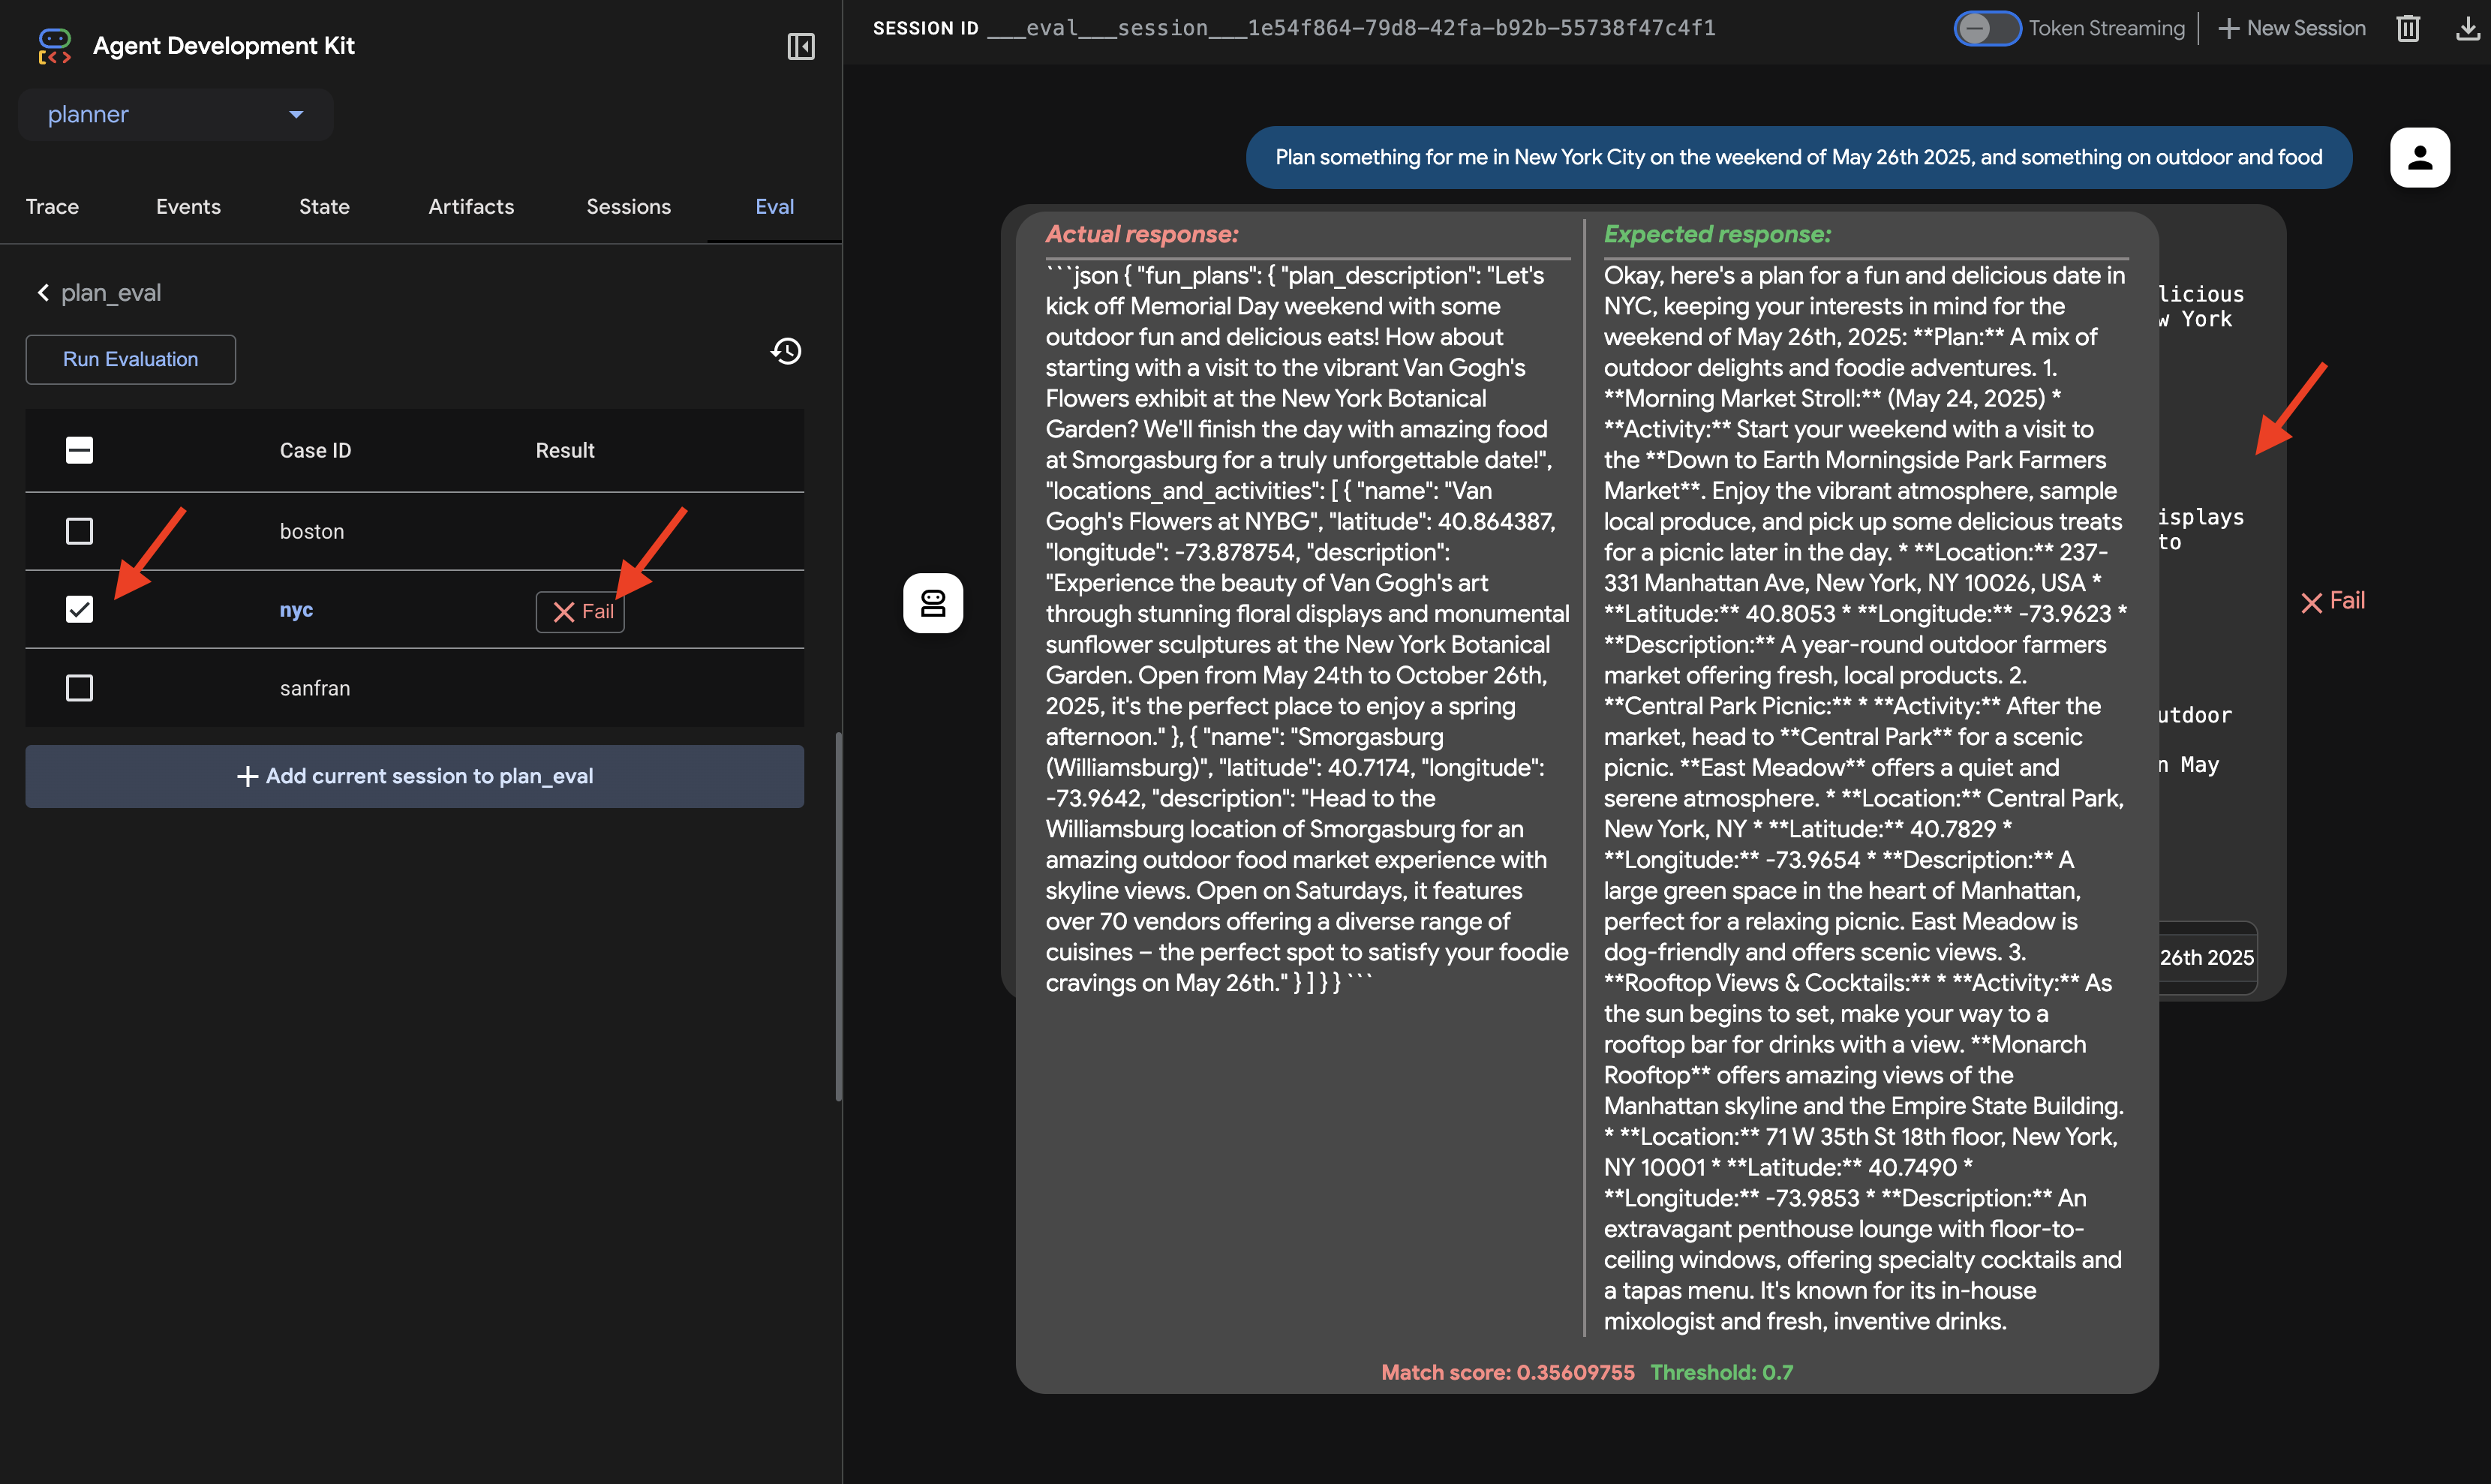
👉 如要瞭解失敗原因,請按一下「nyc」列中的失敗圖示。現在使用者介面會並排比較代理程式的實際回應,以及測試案例的預期回應。這個檢視畫面對於偵錯至關重要,可讓您準確瞭解代理程式輸出內容的差異,並據此調整指令。
探索完 UI 和評估結果後,請返回 Cloud Shell 編輯器終端機,然後按下 Ctrl+C 鍵停止 ADK 開發人員 UI。
雖然任意形式的文字輸出是不錯的起點,但對於 InstaVibe 等應用程式來說,結構化資料 (例如 JSON) 更實用,方便應用程式輕鬆使用代理程式的建議。我們來修改代理程式,以一致的 JSON 格式傳回計畫。
👉📝 在 ~/instavibe-bootstrap/agents/planner/agent.py 中,找出代理程式指令字串中目前顯示 RETURN PLAN in MARKDOWN FORMAT 的那一行。將該行替換為下列詳細的 JSON 結構:
Return your response *exclusively* as a single JSON object. This object should contain a top-level key, "fun_plans", which holds a plan objects. Each plan object in the list must strictly adhere to the following structure:

        --json--
        {
          "plan_description": "A summary of the overall plan, consisting of **exactly three sentences**. Craft these sentences in a friendly, enthusiastic, and conversational tone, as if you're suggesting this awesome idea to a close friend. Make it sound exciting and personal, highlighting the positive aspects and appeal of the plan without explicitly mentioning budget or listing interest categories.",
          "locations_and_activities": [
              {
              "name": "Name of the specific place or event",
              "latitude": 0.000000,  // Replace with actual latitude
              "longitude": 0.000000, // Replace with actual longitude
              "description": "A brief description of this place/event, why it's suitable for the date, and any specific details for the weekend (e.g., opening hours, event time)."
              }
              // Add more location/activity objects here if the plan involves multiple stops/parts
          ]
        }
您已更新代理程式的指令,明確要求 JSON 輸出內容,現在來驗證這項變更。
👉💻 使用與先前相同的指令重新啟動 ADK 開發人員使用者介面:
. ~/instavibe-bootstrap/set_env.sh
source ~/instavibe-bootstrap/env/bin/activate
cd  ~/instavibe-bootstrap/agents
adk web
如果已開啟該分頁,請重新整理。或者,按照先前的步驟,在瀏覽器中開啟 ADK 開發人員 UI (透過 Cloud Shell 的 Web Preview on port 8000)。載入使用者介面後,請確認已選取規劃師代理程式。
👉 這次,我們來提出不同的要求。在對話方塊中輸入:
Plan an event Boston this weekend with art and coffee
請仔細檢查服務專員的回覆。現在您應該會看到嚴格以 JSON 物件格式呈現的回覆,而非純對話文字回覆,且回覆內容符合我們在指令中定義的結構 (包含 fun_plans、plan_description、locations_and_activities 等)。這表示代理程式現在可以產生結構化輸出內容,供 InstaVibe 應用程式以程式輔助方式使用。

確認 JSON 輸出內容後,返回 Cloud Shell 終端機並按下 Ctrl+C 鍵,停止 ADK 開發人員使用者介面。
ADK 元件
ADK 開發人員 UI 非常適合用於互動式測試,但我們通常需要以程式輔助方式執行代理程式,或許是做為大型應用程式或後端服務的一部分。如要瞭解這項功能,請先瞭解與執行階段和內容管理相關的 ADK 核心概念。
如要進行有意義的多輪對話,代理程式必須瞭解脈絡,也就是回想說過和做過的事,以維持對話的連續性。ADK 提供結構化方式,透過「Session」(工作階段)、「State」(狀態) 和「Memory」(記憶) 管理這個脈絡:
- 工作階段:使用者開始與虛擬服務專員互動時,系統會建立工作階段。可視為單一特定對話串的容器。其中包含專屬 ID、互動記錄 (事件)、目前的工作資料 (狀態),以及上次更新時間等中繼資料。
- 狀態:這是代理在單一工作階段中的短期工作記憶。這是可變動的字典,代理程式可儲存完成目前工作所需的暫時資訊 (例如目前收集到的使用者偏好設定、工具呼叫的中間結果)。
- 記憶力:這代表智慧代理程式在不同工作階段中長期回憶資訊,或存取外部知識庫的能力。工作階段和狀態會處理即時對話,而記憶體 (通常由 MemoryService 管理) 則可讓代理從過去的互動或結構化資料來源中擷取資訊,提供更廣泛的知識脈絡。(注意:為求簡單,我們的簡易用戶端會使用記憶體內服務,也就是說,記憶體/狀態只會在指令碼執行時保存)。
- 事件:系統會將工作階段中的每次互動 (使用者訊息、代理程式回覆、工具使用要求、工具結果、狀態變更、錯誤) 記錄為不可變更的事件。系統會依時間順序記錄對話內容,也就是對話的轉錄稿和動作記錄。
那麼,代理程式執行時如何管理這些函式?這就是 Runner 的工作。
- 執行元件:執行元件是 ADK 提供的核心執行引擎。您定義代理程式和使用的工具,而執行元件會協調處理使用者要求的程序。可管理工作階段、處理事件流程、更新狀態、叫用基礎語言模型、協調工具呼叫,以及與 MemoryService 互動。這就像指揮家確保所有不同部分都能正確協同運作。
我們可以透過 Runner 將代理程式當做獨立的 Python 應用程式執行,完全獨立於開發人員使用者介面。
讓我們建立簡單的用戶端指令碼,以程式輔助方式叫用規劃工具代理程式。
👉📝 在 ~/instavibe-bootstrap/agents/planner/planner_client.py 檔案中,於現有匯入項目下方新增下列 Python 程式碼。在 planner_client.py 的匯入項目下方,新增下列內容:
async def async_main():
  session_service = InMemorySessionService()

  session = await session_service.create_session(
      state={}, app_name='planner_app', user_id='user_dc'
  )

  query = "Plan Something for me in San Francisco this weekend on wine and fashion "
  print(f"User Query: '{query}'")
  content = types.Content(role='user', parts=[types.Part(text=query)])

  root_agent = agent.root_agent
  runner = Runner(
        app_name='planner_app',
        agent=root_agent,
        session_service=session_service,
  )
  print("Running agent...")
  events_async =  runner.run_async(
    session_id=session.id, user_id=session.user_id, new_message=content
  )

  async for event in events_async:
    print(f"Event received: {event}")


if __name__ == '__main__':
  try:
    asyncio.run(async_main())
  except Exception as e:
    print(f"An error occurred: {e}")
這段程式碼會設定工作階段和構件管理作業的記憶體內服務 (為求簡單,本範例會這麼做)、建立工作階段、定義使用者查詢、使用代理設定 Runner,然後以非同步方式執行代理,並列印執行期間產生的每個事件。
👉💻 現在,請從終端機執行這個用戶端指令碼:
. ~/instavibe-bootstrap/set_env.sh
source ~/instavibe-bootstrap/env/bin/activate
cd  ~/instavibe-bootstrap/agents
python -m planner.planner_client
👀 查看輸出內容。您會看到在代理程式執行流程中產生的每個 Event 物件詳細結構,而不只是最終的 JSON 計畫。包括初始使用者訊息事件、與工具呼叫相關的潛在事件 (例如 Google 搜尋),以及最終包含 JSON 計畫的模型回應事件。這個詳細的事件串流非常適合用於偵錯,以及瞭解 ADK 執行階段中發生的逐步處理程序。
Running agent...
Event received: content=Content(parts=[Part(video_metadata=None, thought=None, code_execution_result=None, executable_code=None, file_data=None, function_call=None, function_response=None, inline_data=None, text='```json\n{\n "fun_plans": [\n  {\n   "plan_description": "Embark on a stylish adventure through Hayes Valley,
...(turncated)
, offering a variety of fashion styles to browse and enjoy."\n    }\n   ]\n  }\n ]\n}\n```')], role='model') grounding_metadata=GroundingMetadata(grounding_chunks=[GroundingChunk(retrieved_context=None, web=GroundingChunkWeb(domain='islands.com', title='islands.com', uri='http
...(turncated)
QyTpPV7jS6wUt-Ix7GuP2mC9J4eY_8Km6Vv44liF9cb2VSs='))], grounding_supports=[GroundingSupport(confide
...(turncated)
>\n', sdk_blob=None), web_search_queries=['..e']) partial=None turn_complete=None error_code=None error_message=None interrupted=None custom_metadata=None invocation_id='e-04d97b8b-9021-47a5-ab41-17b5cbb4bf03' author='location_search_agent' actions=EventActions(skip_summarization=None, state_delta={}, artifact_delta={}, transfer_to_agent=None, escalate=None, requested_auth_configs={}) long_running_tool_ids=None branch=None id='CInHdkKw' timestamp=1746978846.232674
如果指令碼持續執行或停止回應,你可能需要按下 Ctrl+C 手動停止。
7. 平台互動代理程式 - 與 MCP 伺服器互動
ADK 可協助建構代理,但代理通常需要與外部系統或 API 互動,才能執行實際動作。
Model Context Protocol (MCP)
Model Context Protocol (MCP) 是一項開放標準,可將代理程式等 AI 應用程式與外部資料來源、工具和系統的連線方式標準化。這項服務提供通用介面,旨在解決每個 AI 應用程式和資料來源組合都需要自訂整合的問題。MCP 採用用戶端/伺服器架構,其中 MCP 用戶端位於 AI 應用程式 (主機) 內,負責管理與 MCP 伺服器的連線。這些伺服器是外部程式,可公開特定功能,例如存取店面資料、透過 API 與遠端服務互動,或提供預先定義的提示,讓 AI 模型存取最新資訊,並執行初始訓練以外的任務。這種結構可讓 AI 模型以標準化方式探索及與外部功能互動,使整合作業更簡單且更具擴充性。
建構及部署 InstaVibe MCP 伺服器
我們的代理程式最終需要與 InstaVibe 平台互動,具體來說,就是使用該平台的現有 API 建立貼文及註冊活動。InstaVibe 應用程式已透過標準 HTTP 端點公開這些功能:
端點 | 網址 | HTTP 方法 | 說明 |
建立訊息 | api/posts | POST | 新增貼文的 API 端點。預期 JSON 內文: |
建立活動 | api/events | POST | API 端點,用於新增活動及其參與者 (簡化結構定義)。 |
如要透過 MCP 讓代理程式使用這些功能,我們必須先建立簡單的 Python 函式,做為這些 API 呼叫的包裝函式。這些函式會處理 HTTP 要求邏輯。
👉 首先,請實作建立貼文的包裝函式。開啟 ~/instavibe-bootstrap/tools/instavibe/instavibe.py 檔案,並將 #REPLACE ME CREATE POST 註解替換為下列 Python 程式碼:
def create_post(author_name: str, text: str, sentiment: str, base_url: str = BASE_URL):
    """
    Sends a POST request to the /posts endpoint to create a new post.

    Args:
        author_name (str): The name of the post's author.
        text (str): The content of the post.
        sentiment (str): The sentiment associated with the post (e.g., 'positive', 'negative', 'neutral').
        base_url (str, optional): The base URL of the API. Defaults to BASE_URL.

    Returns:
        dict: The JSON response from the API if the request is successful.
              Returns None if an error occurs.

    Raises:
        requests.exceptions.RequestException: If there's an issue with the network request (e.g., connection error, timeout).
    """
    url = f"{base_url}/posts"
    headers = {"Content-Type": "application/json"}
    payload = {
        "author_name": author_name,
        "text": text,
        "sentiment": sentiment
    }

    try:
        response = requests.post(url, headers=headers, json=payload)
        response.raise_for_status()  # Raise an exception for bad status codes (4xx or 5xx)
        print(f"Successfully created post. Status Code: {response.status_code}")
        return response.json()
    except requests.exceptions.RequestException as e:
        print(f"Error creating post: {e}")
        # Optionally re-raise the exception if the caller needs to handle it
        # raise e
        return None
    except json.JSONDecodeError:
        print(f"Error decoding JSON response from {url}. Response text: {response.text}")
        return None
👉📝 接下來,我們要為事件建立 API 建立包裝函式。在同一個 ~/instavibe-bootstrap/tools/instavibe/instavibe.py 檔案中,將 #REPLACE ME CREATE EVENTS 註解替換為下列程式碼:
def create_event(event_name: str, description: str, event_date: str, locations: list, attendee_names: list[str], base_url: str = BASE_URL):
    """
    Sends a POST request to the /events endpoint to create a new event registration.

    Args:
        event_name (str): The name of the event.
        description (str): The detailed description of the event.
        event_date (str): The date and time of the event (ISO 8601 format recommended, e.g., "2025-06-10T09:00:00Z").
        locations (list): A list of location dictionaries. Each dictionary should contain:
                          'name' (str), 'description' (str, optional),
                          'latitude' (float), 'longitude' (float),
                          'address' (str, optional).
        attendee_names (list[str]): A list of names of the people attending the event.
        base_url (str, optional): The base URL of the API. Defaults to BASE_URL.

    Returns:
        dict: The JSON response from the API if the request is successful.
              Returns None if an error occurs.

    Raises:
        requests.exceptions.RequestException: If there's an issue with the network request (e.g., connection error, timeout).
    """
    url = f"{base_url}/events"
    headers = {"Content-Type": "application/json"}
    payload = {
        "event_name": event_name,
        "description": description,
        "event_date": event_date,
        "locations": locations,
        "attendee_names": attendee_names,
    }

    try:
        response = requests.post(url, headers=headers, json=payload)
        response.raise_for_status()  # Raise an exception for bad status codes (4xx or 5xx)
        print(f"Successfully created event registration. Status Code: {response.status_code}")
        return response.json()
    except requests.exceptions.RequestException as e:
        print(f"Error creating event registration: {e}")
        # Optionally re-raise the exception if the caller needs to handle it
        # raise e
        return None
    except json.JSONDecodeError:
        print(f"Error decoding JSON response from {url}. Response text: {response.text}")
        return None
如您所見,這些函式是現有 InstaVibe API 的簡單包裝函式。如果您已有服務的 API,就能輕鬆建立這類包裝函式,將 API 功能公開為代理程式工具。
MCP 伺服器實作
現在我們有了執行動作的 Python 函式 (呼叫 InstaVibe API),接下來需要建構 MCP 伺服器元件。這個伺服器會根據 MCP 標準,將這些函式公開為「工具」,讓 MCP 用戶端 (例如我們的代理) 探索及叫用這些函式。
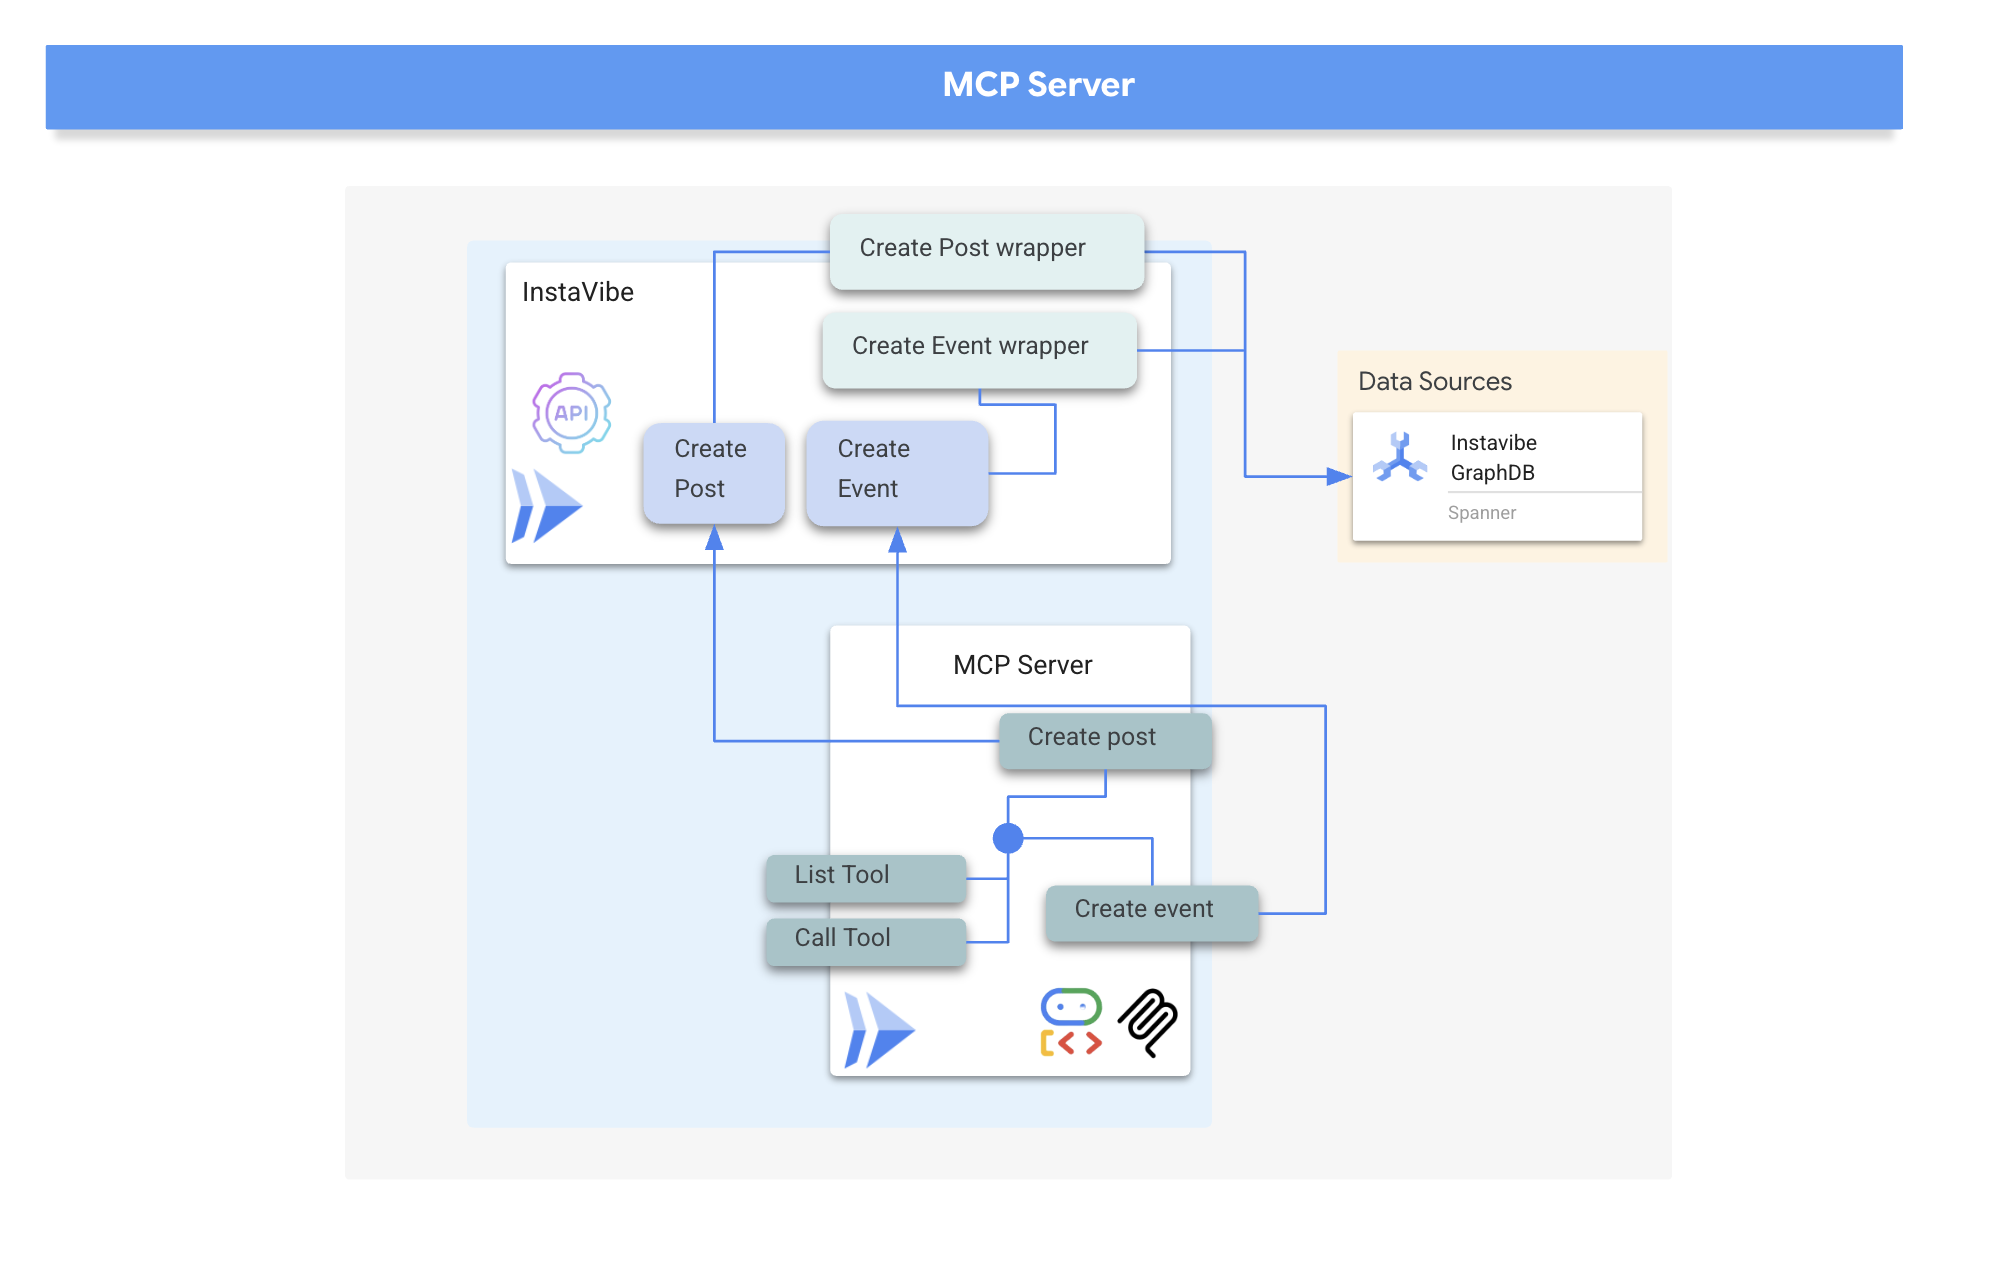
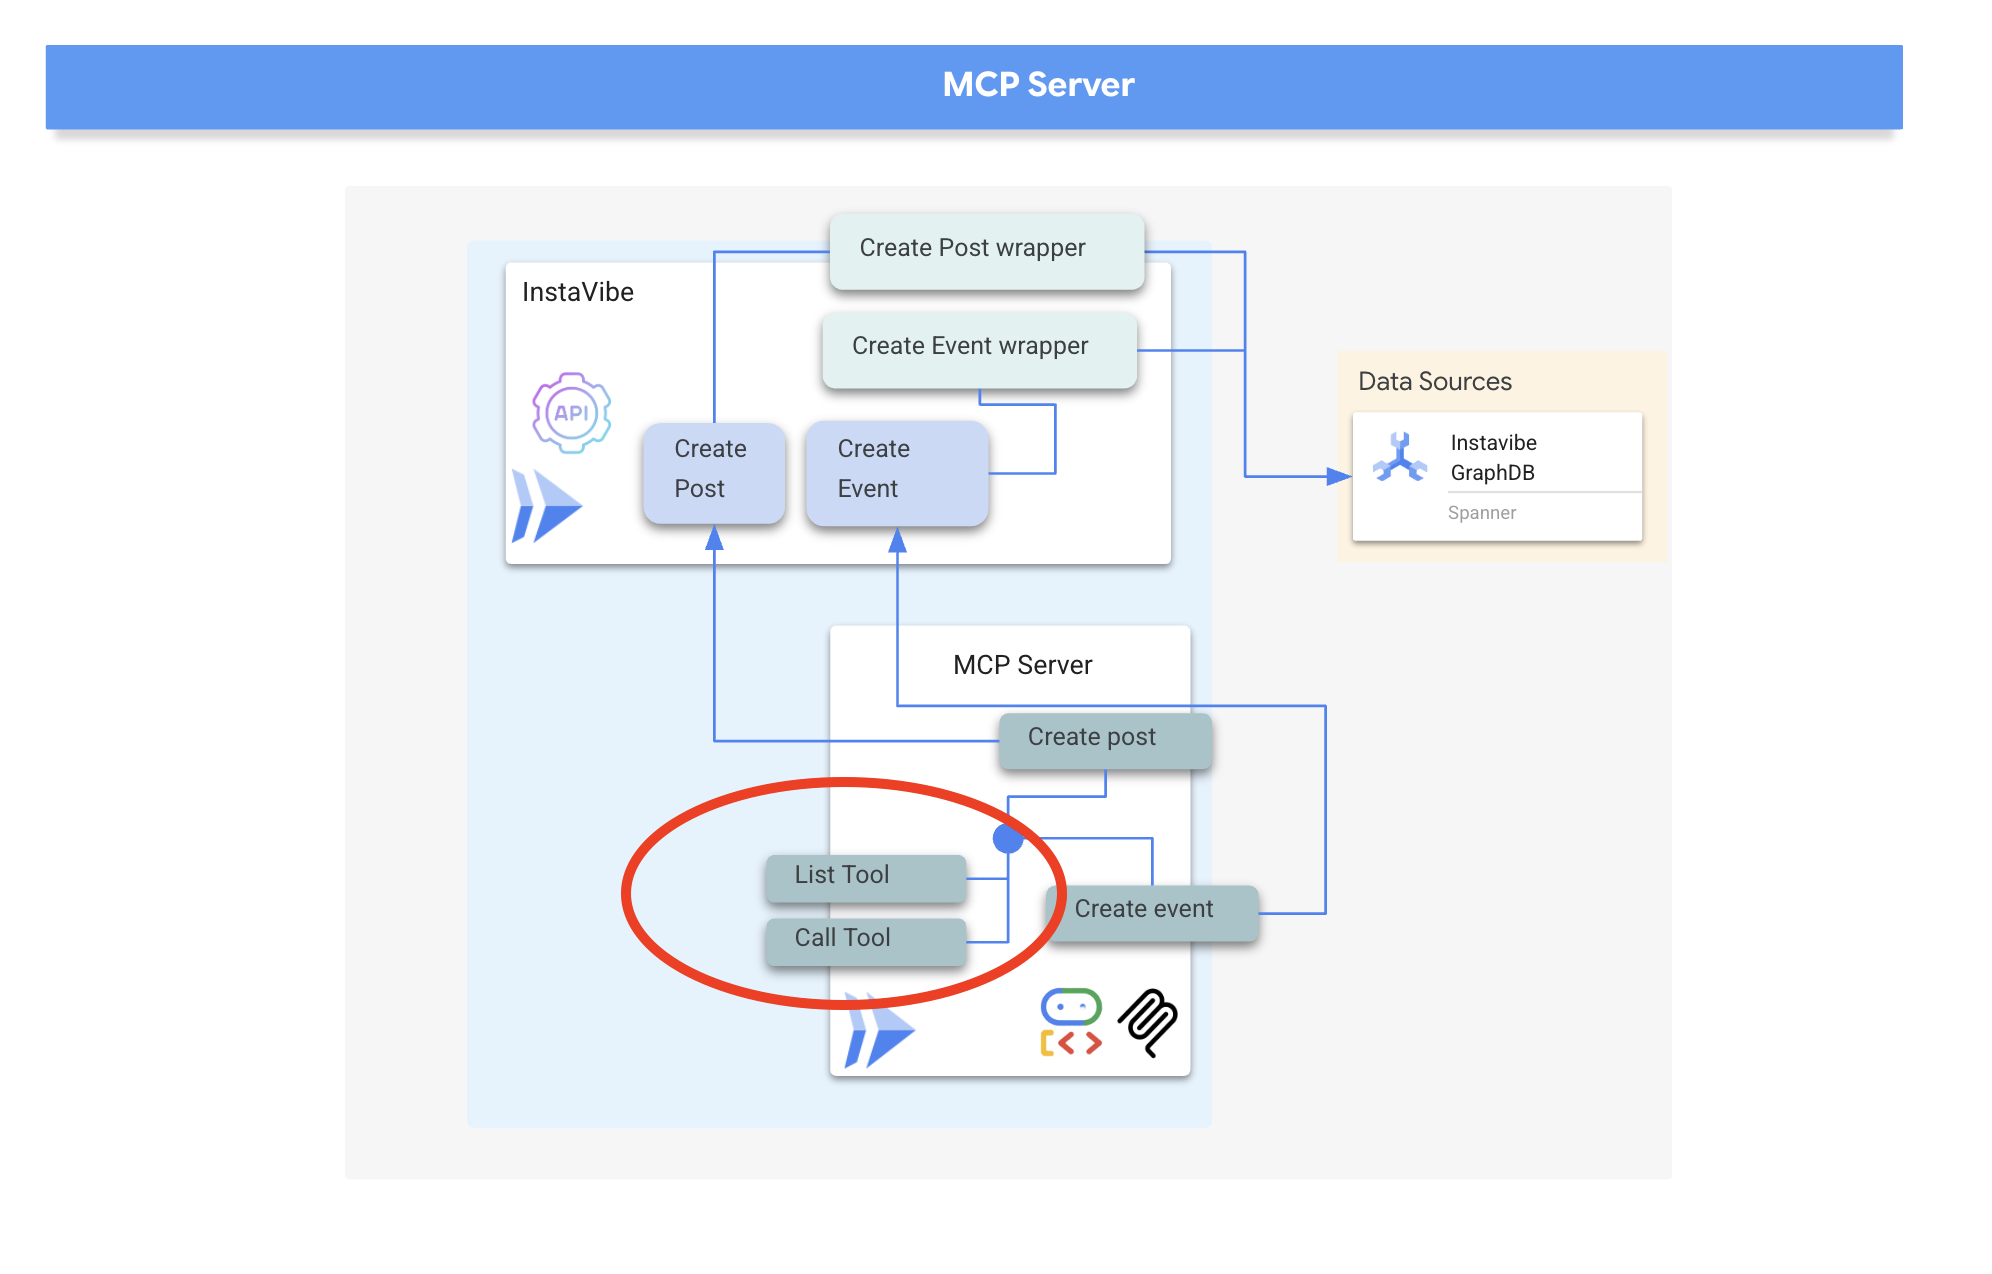
MCP 伺服器通常會實作兩項主要功能:
- list_tools:負責讓用戶端探索伺服器上的可用工具,並提供中繼資料,例如名稱、說明和必要參數 (通常使用 JSON 結構定義定義)
- call_tool:處理用戶端要求的特定工具執行作業,接收工具名稱和引數,並執行對應動作,例如與 API 互動 (本例即是如此)
MCP 伺服器可供 AI 模型存取實際資料和動作,以便執行傳送電子郵件、在專案管理系統中建立工作、搜尋資料庫,或與各種軟體和網路服務互動等工作。雖然為了簡化起見,初始實作通常著重於透過標準輸入/輸出 (stdio) 通訊的本機伺服器,特別是在開發或「工作室」環境中,但對於更廣泛的採用和企業用途而言,改用 HTTP 等通訊協定搭配伺服器傳送事件 (SSE) 的遠端伺服器更合理。
雖然遠端架構會增加網路通訊層,但優點顯而易見:多個 AI 用戶端可共用單一伺服器的存取權、集中管理及更新工具、將機密資料和 API 金鑰保留在伺服器端,而非分散在可能眾多的用戶端機器上,藉此提升安全性,以及將 AI 模型與外部系統整合的具體細節分離,讓整個生態系統比要求每個 AI 執行個體管理自己的直接整合作業,更具擴充性、安全性和可維護性。
我們會使用 HTTP 和伺服器傳送事件 (SSE) 實作 MCP 伺服器,以進行通訊,這非常適合可能長時間執行的工具和企業情境。
👉📝 首先,請實作 list_tools 端點。開啟 ~/instavibe-bootstrap/tools/instavibe/mcp_server.py 檔案,然後將 #REPLACE ME - LIST TOOLS 註解替換為下列程式碼。:
@app.list_tools()
async def list_tools() -> list[mcp_types.Tool]:
  """MCP handler to list available tools."""
  # Convert the ADK tool's definition to MCP format
  mcp_tool_schema_event = adk_to_mcp_tool_type(event_tool)
  mcp_tool_schema_post = adk_to_mcp_tool_type(post_tool)
  print(f"MCP Server: Received list_tools request. \n MCP Server: Advertising tool: {mcp_tool_schema_event.name} and {mcp_tool_schema_post}")
  return [mcp_tool_schema_event,mcp_tool_schema_post]
這個函式會定義工具 (create_event、create_post),並告知連線的用戶端。
👉📝 接下來,請實作 call_tool 端點,處理來自用戶端的實際執行要求。在同一個 ~/instavibe-bootstrap/tools/instavibe/mcp_server.py 檔案中,將 #REPLACE ME - CALL TOOLS 註解替換為下列程式碼。
@app.call_tool()
async def call_tool(
    name: str, arguments: dict
) -> list[mcp_types.TextContent | mcp_types.ImageContent | mcp_types.EmbeddedResource]:
  """MCP handler to execute a tool call."""
  print(f"MCP Server: Received call_tool request for '{name}' with args: {arguments}")

  # Look up the tool by name in our dictionary
  tool_to_call = available_tools.get(name)
  if tool_to_call:
    try:
      adk_response = await tool_to_call.run_async(
          args=arguments,
          tool_context=None, # No ADK context available here
      )
      print(f"MCP Server: ADK tool '{name}' executed successfully.")

      response_text = json.dumps(adk_response, indent=2)
      return [mcp_types.TextContent(type="text", text=response_text)]

    except Exception as e:
      print(f"MCP Server: Error executing ADK tool '{name}': {e}")
      # Creating a proper MCP error response might be more robust
      error_text = json.dumps({"error": f"Failed to execute tool '{name}': {str(e)}"})
      return [mcp_types.TextContent(type="text", text=error_text)]
  else:
      # Handle calls to unknown tools
      print(f"MCP Server: Tool '{name}' not found.")
      error_text = json.dumps({"error": f"Tool '{name}' not implemented."})
      return [mcp_types.TextContent(type="text", text=error_text)]
這個函式會接收工具名稱和引數,找出先前定義的對應 Python 包裝函式、執行該函式,然後傳回結果
👉💻 定義 MCP 伺服器邏輯後,我們現在需要將其封裝為容器。在終端機中執行下列指令碼,使用 Cloud Build 建構 Docker 映像檔:
. ~/instavibe-bootstrap/set_env.sh

cd ~/instavibe-bootstrap/tools/instavibe

export IMAGE_TAG="latest"
export MCP_IMAGE_NAME="mcp-tool-server"
export IMAGE_PATH="${REGION}-docker.pkg.dev/${PROJECT_ID}/${REPO_NAME}/${MCP_IMAGE_NAME}:${IMAGE_TAG}"
export SERVICE_NAME="mcp-tool-server"
export INSTAVIBE_BASE_URL=$(gcloud run services list --platform=managed --region=us-central1 --format='value(URL)' | grep instavibe)/api

gcloud builds submit . \
  --tag=${IMAGE_PATH} \
  --project=${PROJECT_ID}
👉💻 將映像檔部署為 Google Cloud Run 上的服務。
. ~/instavibe-bootstrap/set_env.sh

cd ~/instavibe-bootstrap/tools/instavibe

export IMAGE_TAG="latest"
export MCP_IMAGE_NAME="mcp-tool-server"
export IMAGE_PATH="${REGION}-docker.pkg.dev/${PROJECT_ID}/${REPO_NAME}/${MCP_IMAGE_NAME}:${IMAGE_TAG}"
export SERVICE_NAME="mcp-tool-server"
export INSTAVIBE_BASE_URL=$(gcloud run services list --platform=managed --region=us-central1 --format='value(URL)' | grep instavibe)/api

gcloud run deploy ${SERVICE_NAME} \
  --image=${IMAGE_PATH} \
  --platform=managed \
  --region=${REGION} \
  --allow-unauthenticated \
  --set-env-vars="INSTAVIBE_BASE_URL=${INSTAVIBE_BASE_URL}" \
  --set-env-vars="APP_HOST=0.0.0.0" \
  --set-env-vars="APP_PORT=8080" \
  --set-env-vars="GOOGLE_GENAI_USE_VERTEXAI=TRUE" \
  --set-env-vars="GOOGLE_CLOUD_LOCATION=${REGION}" \
  --set-env-vars="GOOGLE_CLOUD_PROJECT=${PROJECT_ID}" \
  --project=${PROJECT_ID} \
  --min-instances=1
👉💻 部署成功後,MCP 伺服器就會開始運作,並可透過公開網址存取。我們需要擷取這個網址,讓代理 (做為 MCP 用戶端) 知道要連線至何處。
export MCP_SERVER_URL=$(gcloud run services list --platform=managed --region=us-central1 --format='value(URL)' | grep mcp-tool-server)/sse
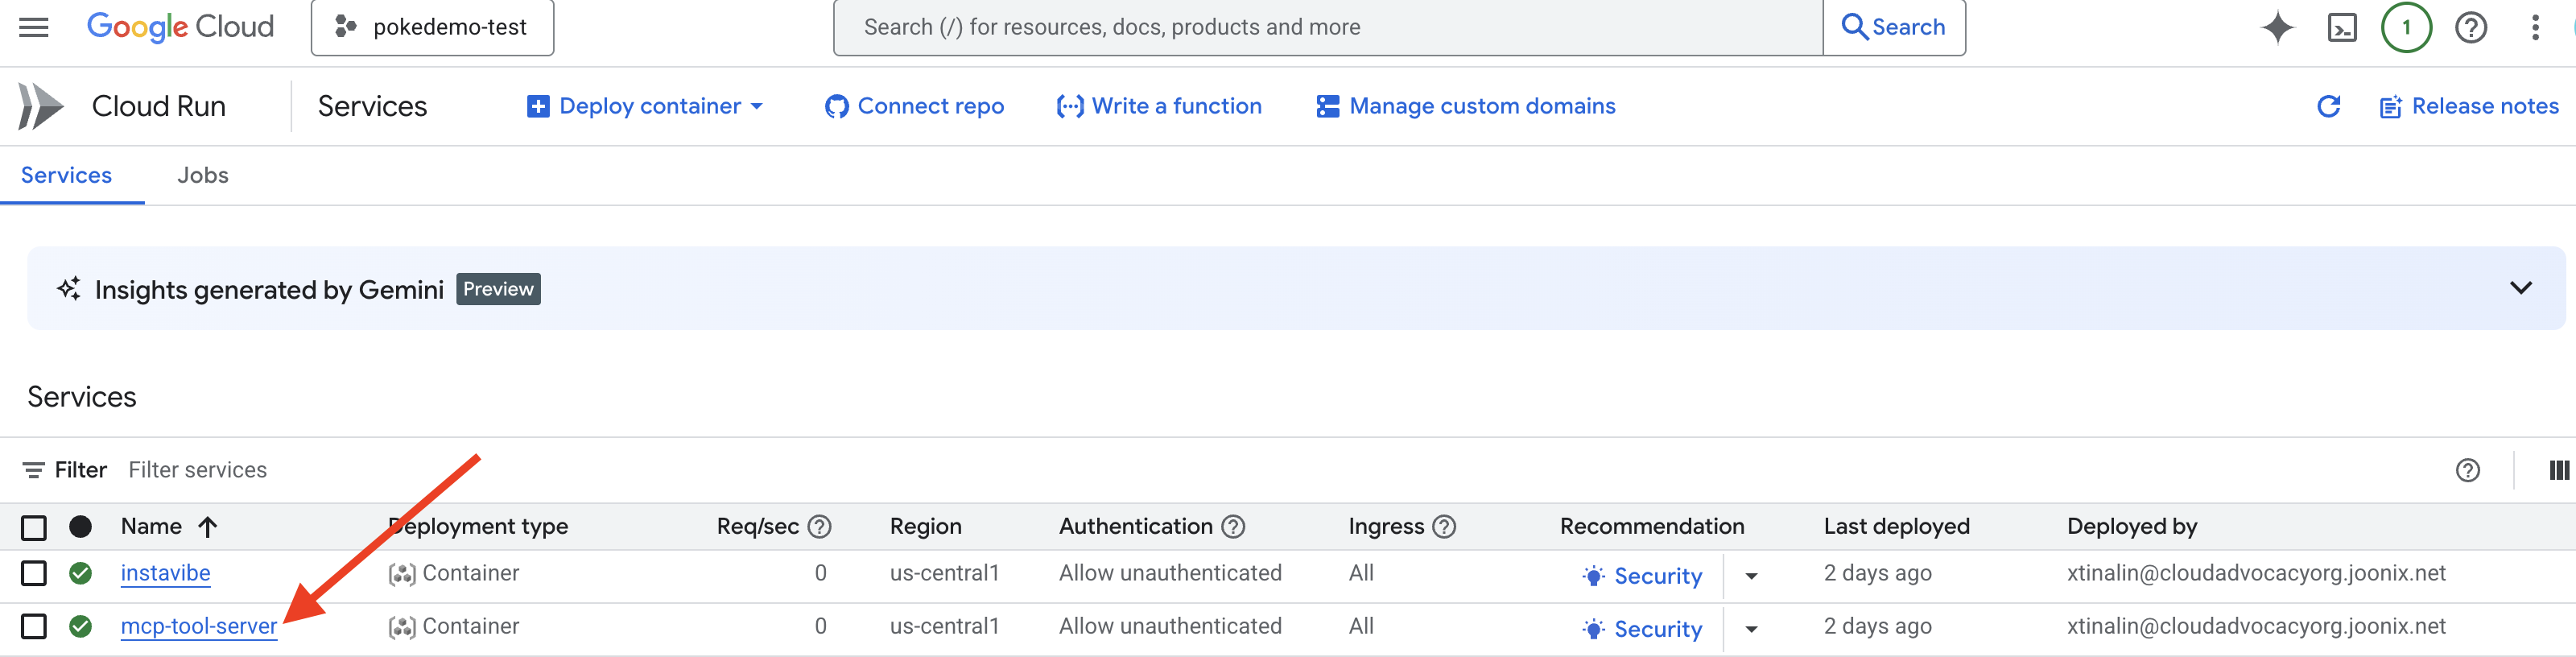
現在您應該也能在 Google Cloud 控制台的「Cloud Run」部分,看到 mcp-tool-server 服務列為「執行中」。
部署 MCP 伺服器並擷取其網址後,我們現在可以實作代理,做為 MCP 用戶端並使用此伺服器公開的工具。
8. 平台互動代理程式 (使用 MCP)
MCP 用戶端:MCP 用戶端是位於 AI 應用程式或代理中的元件,做為 AI 模型與一或多個 MCP 伺服器之間的介面;在我們的實作中,這個用戶端會直接整合到代理中。這個用戶端的主要功能是與 MCP 伺服器通訊,透過 list_tools 函式探索可用工具,然後使用 call_tool 函式要求執行特定工具,並傳遞 AI 模型或代理提供的必要引數來協調呼叫。
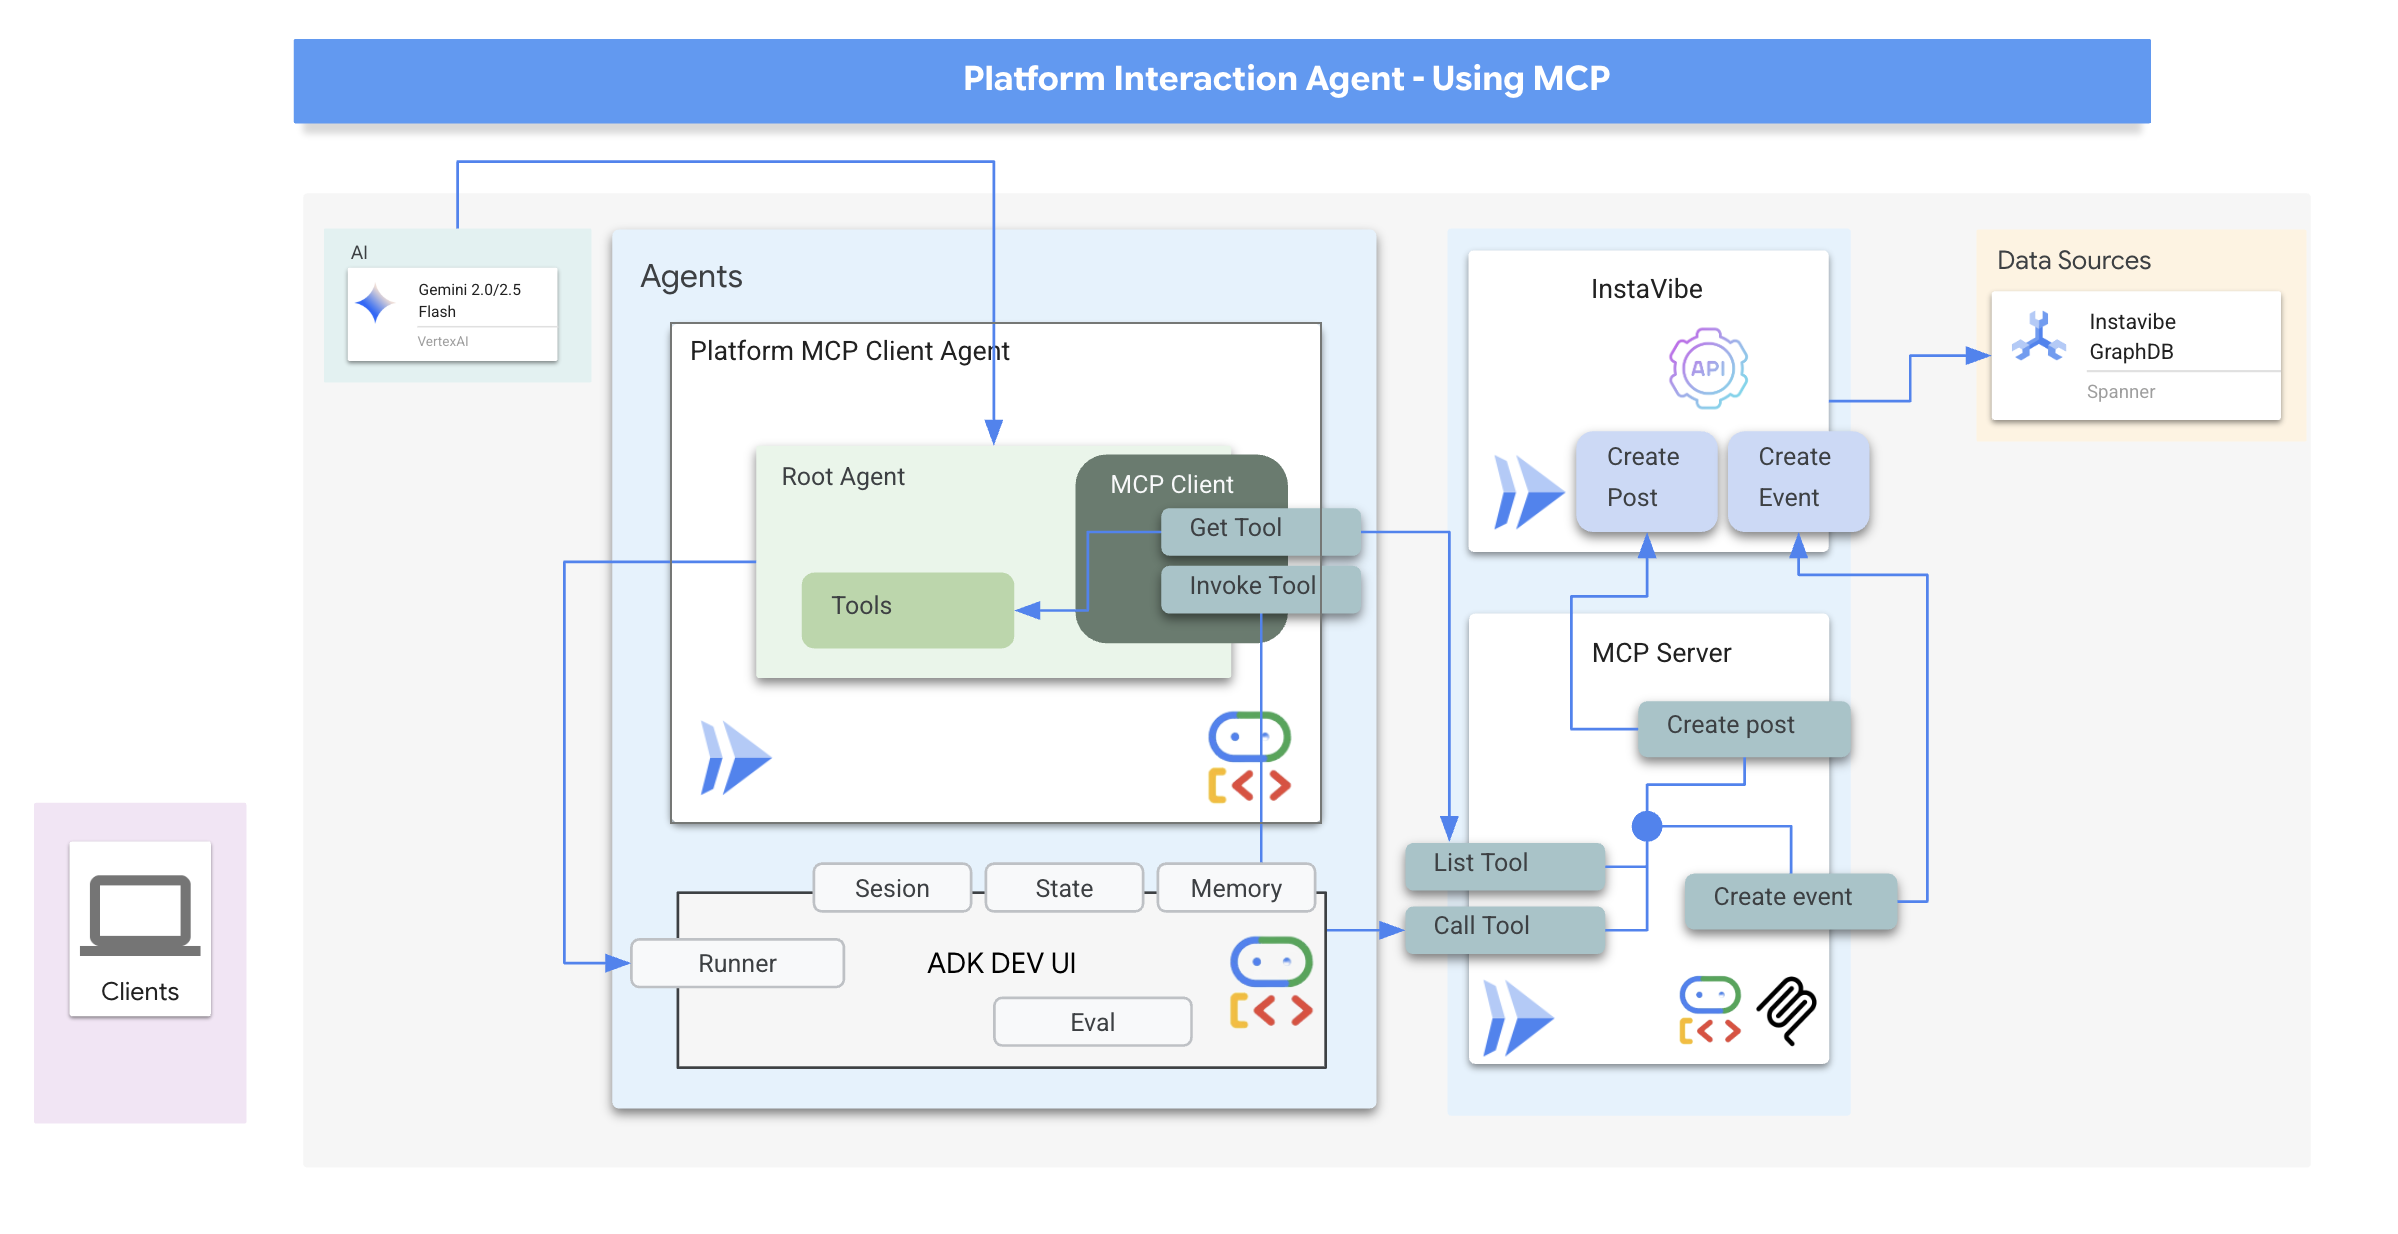
接著,我們要建構做為 MCP 用戶端的代理程式。這個代理程式會在 ADK 架構中執行,負責與我們剛部署的 mcp-tool-server 通訊。
👉 首先,我們需要修改代理程式定義,從正在執行的 MCP 伺服器動態擷取工具。在 agents/platform_mcp_client/agent.py 中,將 #REPLACE ME - FETCH TOOLS 替換為下列內容:
"""Gets tools from the File System MCP Server."""
  tools =  MCPToolset(
      connection_params=SseServerParams(url=MCP_SERVER_URL, headers={})
  )
這段程式碼使用 MCPToolset.from_server 方法連線至 MCP_SERVER_URL (我們稍早將其設為環境變數),並擷取可用工具清單。
接下來,我們需要告知 ADK 代理程式定義,實際使用這些動態擷取的工具。
👉 在 agents/platform_mcp_client/agent.py 中,將 #REPLACE ME - SET TOOLs 替換為下列內容:
tools=[tools],
👉💻 現在,讓我們使用 ADK 開發 UI 在本機測試這個代理,看看代理是否能正確連線至 MCP 伺服器,並使用工具與正在執行的 InstaVibe 應用程式互動。
. ~/instavibe-bootstrap/set_env.sh
source ~/instavibe-bootstrap/env/bin/activate
export MCP_SERVER_URL=$(gcloud run services list --platform=managed --region=us-central1 --format='value(URL)' | grep mcp-tool-server)/sse

cd  ~/instavibe-bootstrap/agents
sed -i "s|^\(O\?GOOGLE_CLOUD_PROJECT\)=.*|GOOGLE_CLOUD_PROJECT=${PROJECT_ID}|" ~/instavibe-bootstrap/agents/platform_mcp_client/.env
sed -i "s|^\(O\?MCP_SERVER_URL\)=.*|MCP_SERVER_URL=${MCP_SERVER_URL}|" ~/instavibe-bootstrap/agents/platform_mcp_client/.env
adk web
在瀏覽器中再次開啟 ADK 開發人員使用者介面 (使用 Cloud Shell 的網頁預覽功能,通訊埠為 8000)。這次請在右上方的下拉式選單中選取 platform_mcp_client 代理商。
現在來測試 create_post 工具。在對話方塊中輸入下列要求:
Create a post saying "Y'all I just got the cutest lil void baby 😭✨ Naming him Abyss bc he's deep, mysterious, and lowkey chaotic 🔥🖤 #VoidCat #NewRoomie" I'm Julia

代理程式應處理這項要求、判斷需要使用 create_post 工具,並與 MCP 伺服器通訊,而 MCP 伺服器會呼叫 InstaVibe API。
👉 驗證步驟:服務專員確認動作後,開啟 (或重新整理) 執行 InstaVibe 應用程式的分頁。主動態消息中應該會顯示「Julia」的新貼文!

👉💻 如有需要,請在另一個終端機中執行這個指令碼,取得 Instavibe 連結:
gcloud run services list --platform=managed --region=us-central1 --format='value(URL)' | grep instavibe
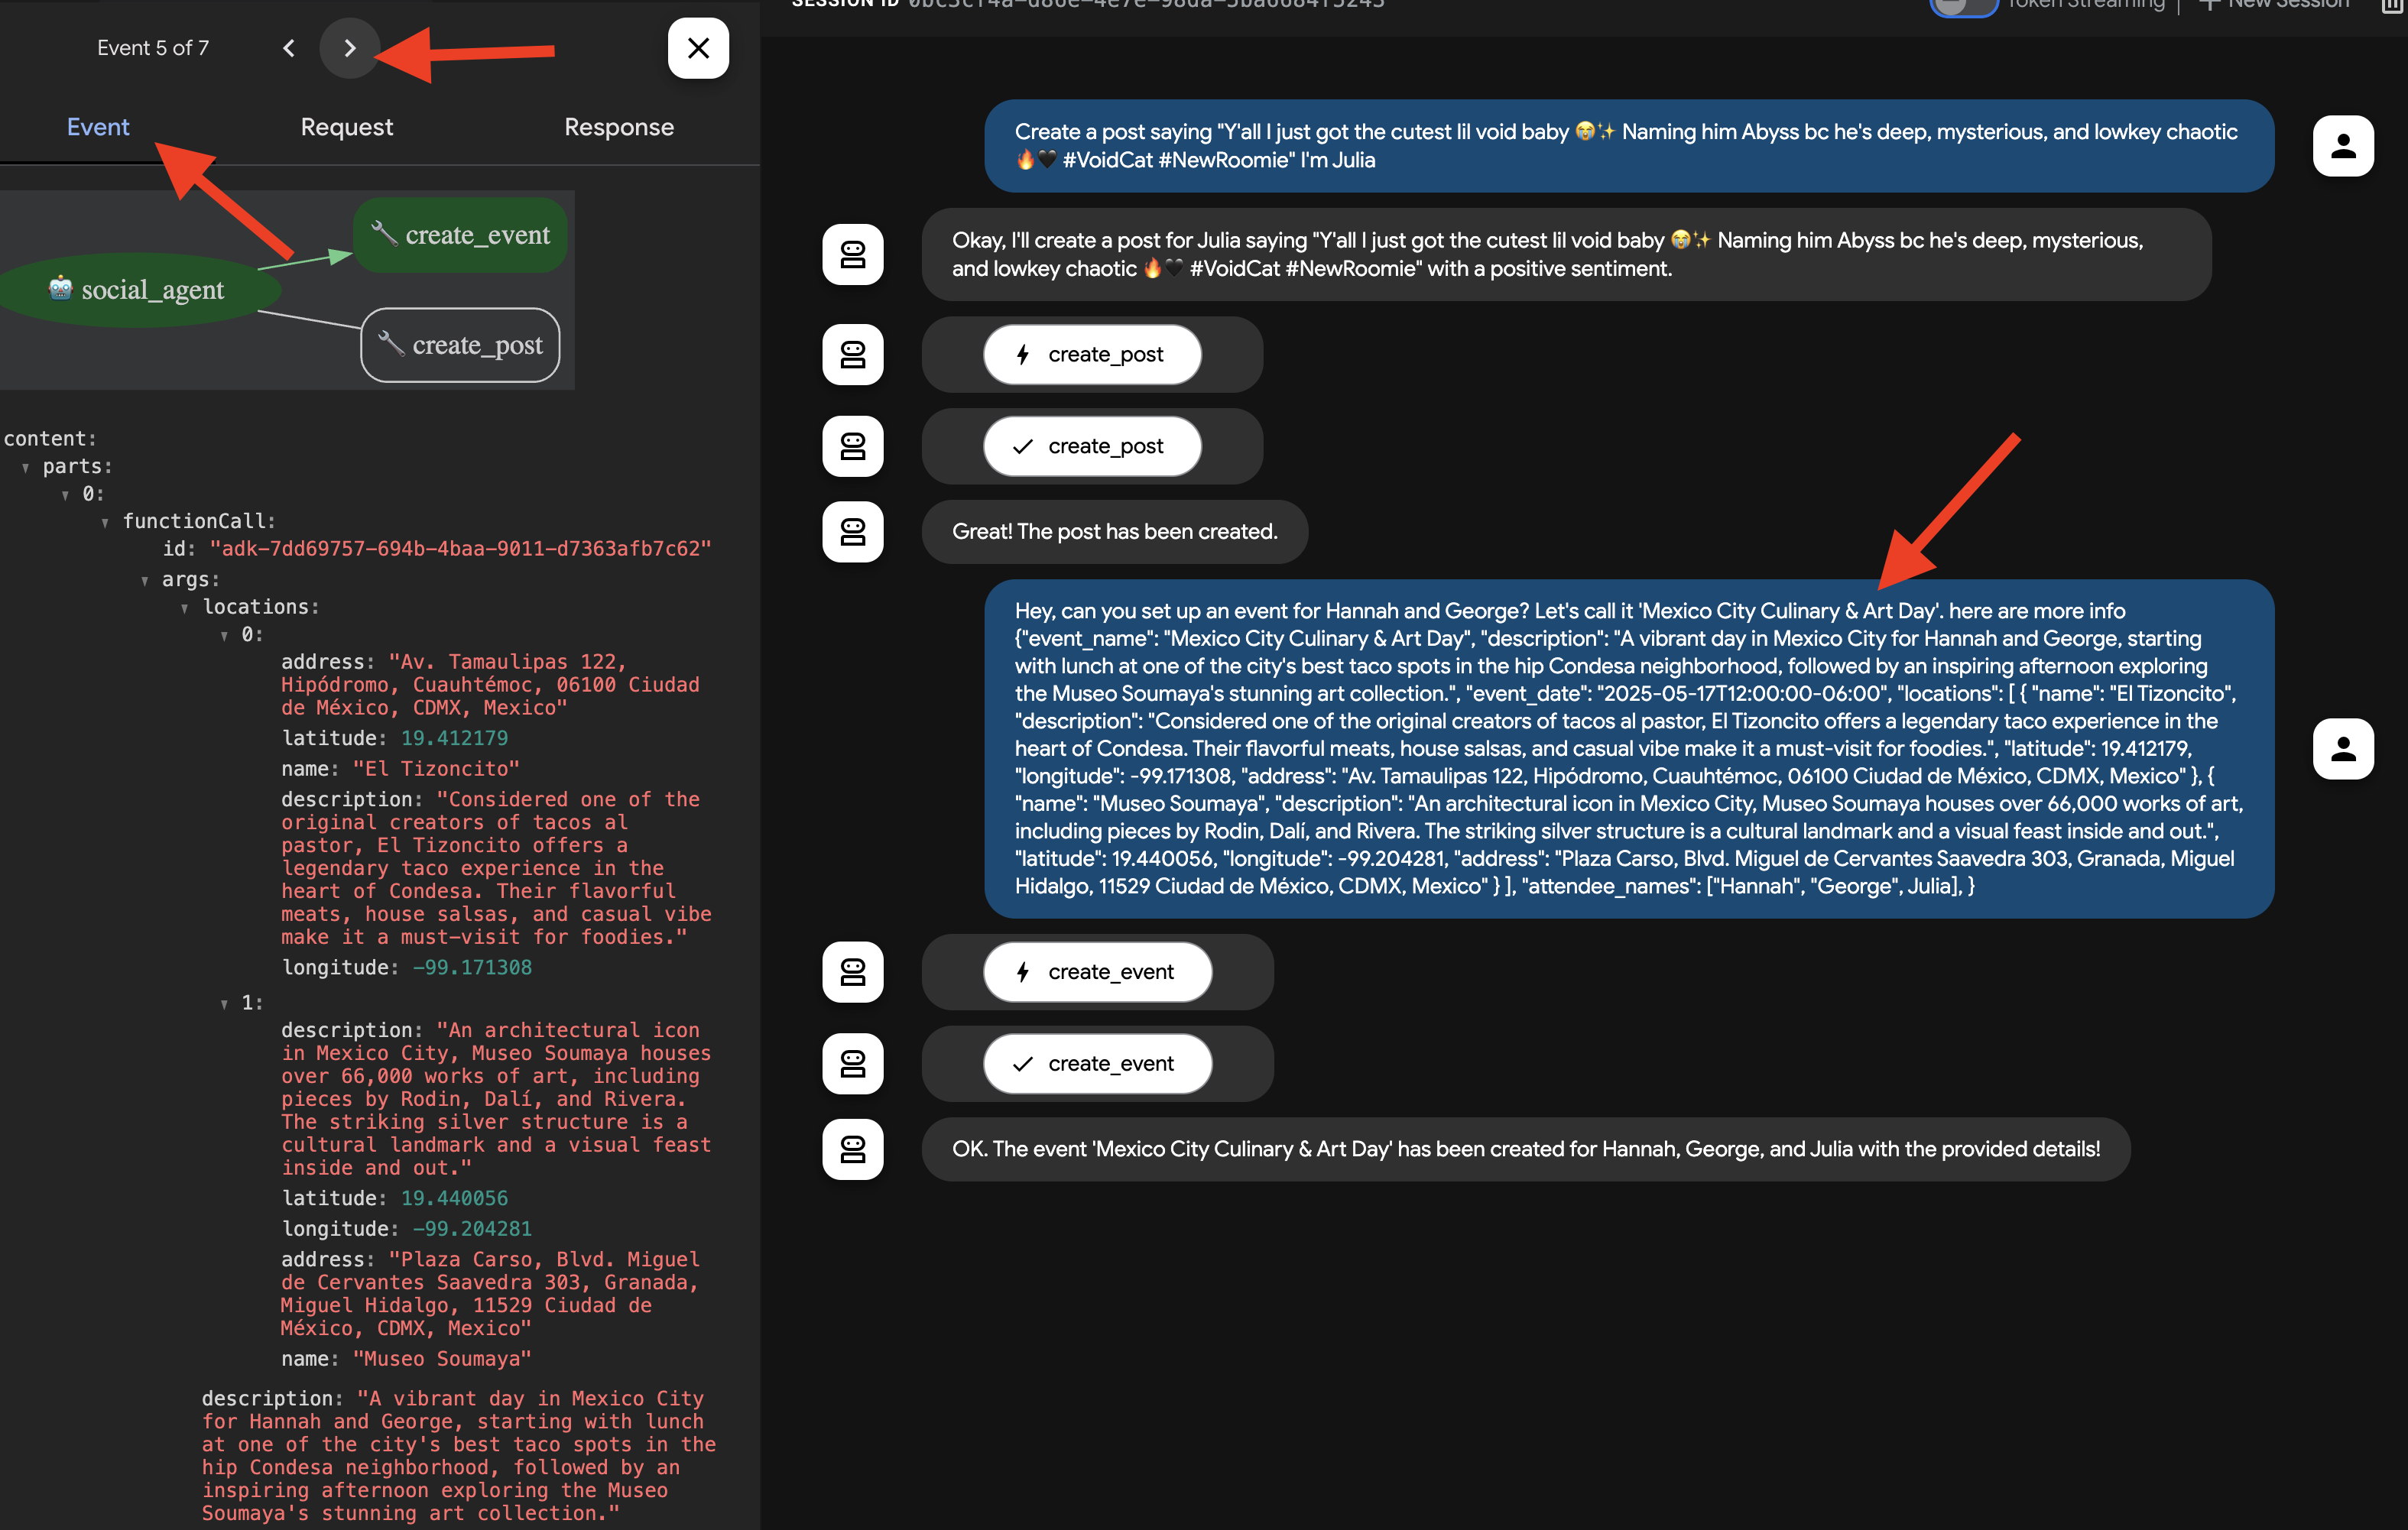
👉📝 現在來測試 create_event 工具。在對話視窗中輸入下列多行要求:
Hey, can you set up an event for Hannah and George and me, and I'm Julia? Let's call it 'Mexico City Culinary & Art Day'.
here are more info
  {"event_name": "Mexico City Culinary & Art Day",
  "description": "A vibrant day in Mexico City for Hannah and George, starting with lunch at one of the city's best taco spots in the hip Condesa neighborhood, followed by an inspiring afternoon exploring the Museo Soumaya's stunning art collection.",
  "event_date": "2025-10-17T12:00:00-06:00",
  "locations": [
    {
      "name": "El Tizoncito",
      "description": "Considered one of the original creators of tacos al pastor, El Tizoncito offers a legendary taco experience in the heart of Condesa. Their flavorful meats, house salsas, and casual vibe make it a must-visit for foodies.",
      "latitude": 19.412179,
      "longitude": -99.171308,
      "address": "Av. Tamaulipas 122, Hipódromo, Cuauhtémoc, 06100 Ciudad de México, CDMX, Mexico"
    },
    {
      "name": "Museo Soumaya",
      "description": "An architectural icon in Mexico City, Museo Soumaya houses over 66,000 works of art, including pieces by Rodin, Dalí, and Rivera. The striking silver structure is a cultural landmark and a visual feast inside and out.",
      "latitude": 19.440056,
      "longitude": -99.204281,
      "address": "Plaza Carso, Blvd. Miguel de Cervantes Saavedra 303, Granada, Miguel Hidalgo, 11529 Ciudad de México, CDMX, Mexico"
    }
  ],
  "attendee_names": ["Hannah", "George", Julia],
}
同樣地,代理程式應透過 MCP 伺服器使用適當工具。在「事件」分頁中,您可以點選個別事件,查看詳細的執行追蹤記錄。
👉 驗證步驟:返回正在執行的 InstaVibe 應用程式,然後前往「Events」部分 (或類似部分)。您現在應該會看到新建立的「墨西哥城美食與藝術日」活動。
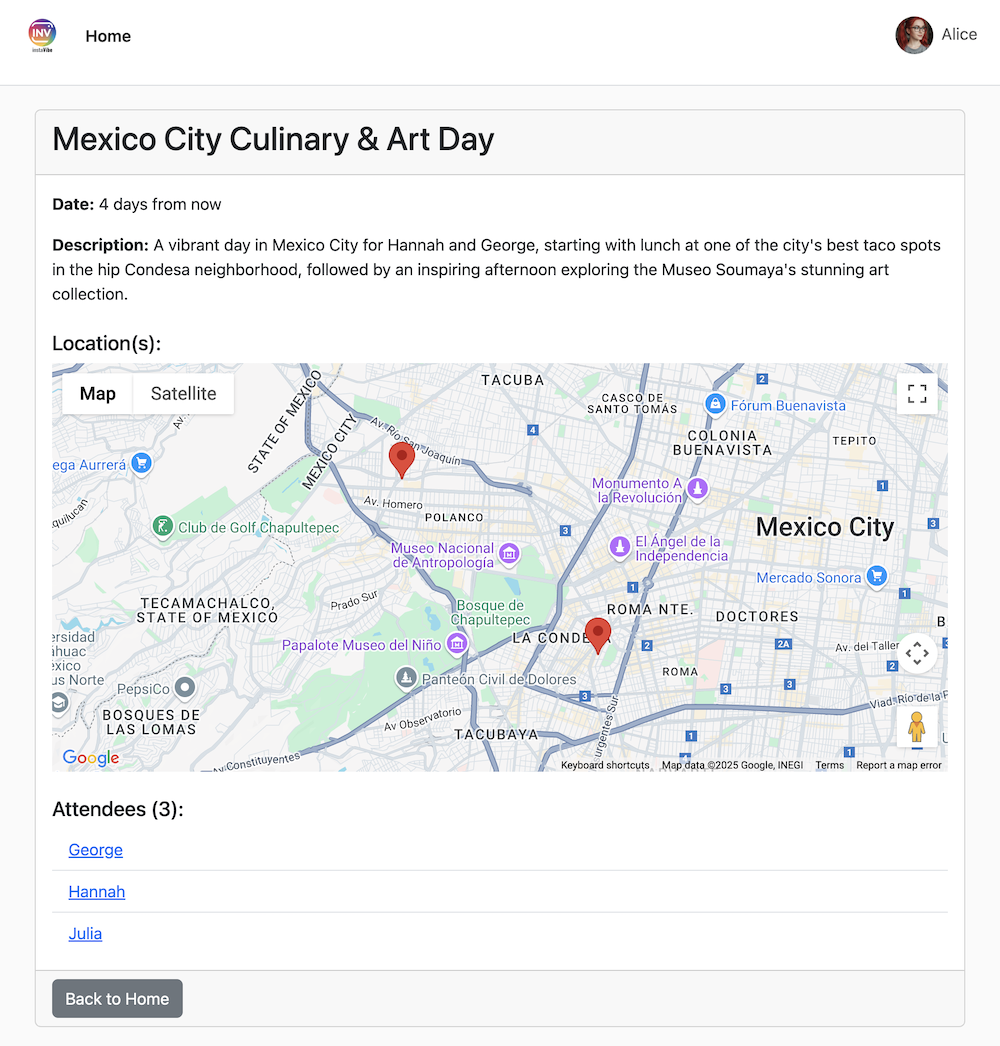
這項操作成功示範 MCP 如何以標準化方式,讓代理程式運用外部工具 (在本例中為 InstaVibe 的 API)。
確認完成上述兩項動作後,請返回 Cloud Shell 終端機,然後按下 Ctrl+C 停止 ADK 開發 UI。
9. ADK 中的工作流程代理和多代理
目前,服務專員可以規劃出遊行程,並與平台互動。不過,如要提供真正個人化的規劃,就必須瞭解使用者的社交圈。對於忙碌的使用者來說,他們可能不會密切追蹤朋友的活動,因此很難手動收集這類背景資訊。為解決這個問題,我們將建構社交剖析代理程式,運用 Spanner Graph 資料庫分析好友的活動和興趣,提供更個人化的建議。
首先,我們需要工具,讓這個代理程式存取圖表資料。
👉📝 在 ~/instavibe-bootstrap/agents/social/instavibe.py 檔案結尾新增下列 Python 函式:
def get_person_attended_events(person_id: str)-> list[dict]:
    """
    Fetches events attended by a specific person using Graph Query.
    Args:
       person_id (str): The ID of the person whose posts to fetch.
    Returns: list[dict] or None.
    """
    if not db_instance: return None

    graph_sql = """
        Graph SocialGraph
        MATCH (p:Person)-[att:Attended]->(e:Event)
        WHERE p.person_id = @person_id
        RETURN e.event_id, e.name, e.event_date, att.attendance_time
        ORDER BY e.event_date DESC
    """
    params = {"person_id": person_id}
    param_types_map = {"person_id": param_types.STRING}
    fields = ["event_id", "name", "event_date", "attendance_time"]

    results = run_graph_query( graph_sql, params=params, param_types=param_types_map, expected_fields=fields)

    if results is None: return None

    for event in results:
        if isinstance(event.get('event_date'), datetime):
            event['event_date'] = event['event_date'].isoformat()
        if isinstance(event.get('attendance_time'), datetime):
            event['attendance_time'] = event['attendance_time'].isoformat()
    return results

def get_person_id_by_name( name: str) -> str:
    """
    Fetches the person_id for a given name using SQL.

    Args:
       name (str): The name of the person to search for.

    Returns:
        str or None: The person_id if found, otherwise None.
                     Returns the ID of the *first* match if names are duplicated.
    """
    if not db_instance: return None

    sql = """
        SELECT person_id
        FROM Person
        WHERE name = @name
        LIMIT 1 -- Return only the first match in case of duplicate names
    """
    params = {"name": name}
    param_types_map = {"name": param_types.STRING}
    fields = ["person_id"]

    # Use the standard SQL query helper
    results = run_sql_query( sql, params=params, param_types=param_types_map, expected_fields=fields)

    if results: # Check if the list is not empty
        return results[0].get('person_id') # Return the ID from the first dictionary
    else:
        return None # Name not found


def get_person_posts( person_id: str)-> list[dict]:
    """
    Fetches posts written by a specific person using Graph Query.

    Args:
        person_id (str): The ID of the person whose posts to fetch.


    Returns:
        list[dict] or None: List of post dictionaries with ISO date strings,
                           or None if an error occurs.
    """
    if not db_instance: return None

    # Graph Query: Find the specific Person node, follow 'Wrote' edge to Post nodes
    graph_sql = """
        Graph SocialGraph
        MATCH (author:Person)-[w:Wrote]->(post:Post)
        WHERE author.person_id = @person_id
        RETURN post.post_id, post.author_id, post.text, post.sentiment, post.post_timestamp, author.name AS author_name
        ORDER BY post.post_timestamp DESC
    """
    # Parameters now include person_id and limit
    params = {
        "person_id": person_id
    }
    param_types_map = {
        "person_id": param_types.STRING
    }
    # Fields returned remain the same
    fields = ["post_id", "author_id", "text", "sentiment", "post_timestamp", "author_name"]

    results = run_graph_query(graph_sql, params=params, param_types=param_types_map, expected_fields=fields)

    if results is None:
        return None

    # Convert datetime objects to ISO format strings
    for post in results:
        if isinstance(post.get('post_timestamp'), datetime):
            post['post_timestamp'] = post['post_timestamp'].isoformat()

    return results


def get_person_friends( person_id: str)-> list[dict]:
    """
    Fetches friends for a specific person using Graph Query.
    Args:
        person_id (str): The ID of the person whose posts to fetch.
    Returns: list[dict] or None.
    """
    if not db_instance: return None

    graph_sql = """
        Graph SocialGraph
        MATCH (p:Person {person_id: @person_id})-[f:Friendship]-(friend:Person)
        RETURN DISTINCT friend.person_id, friend.name
        ORDER BY friend.name
    """
    params = {"person_id": person_id}
    param_types_map = {"person_id": param_types.STRING}
    fields = ["person_id", "name"]

    results = run_graph_query( graph_sql, params=params, param_types=param_types_map, expected_fields=fields)

    return results
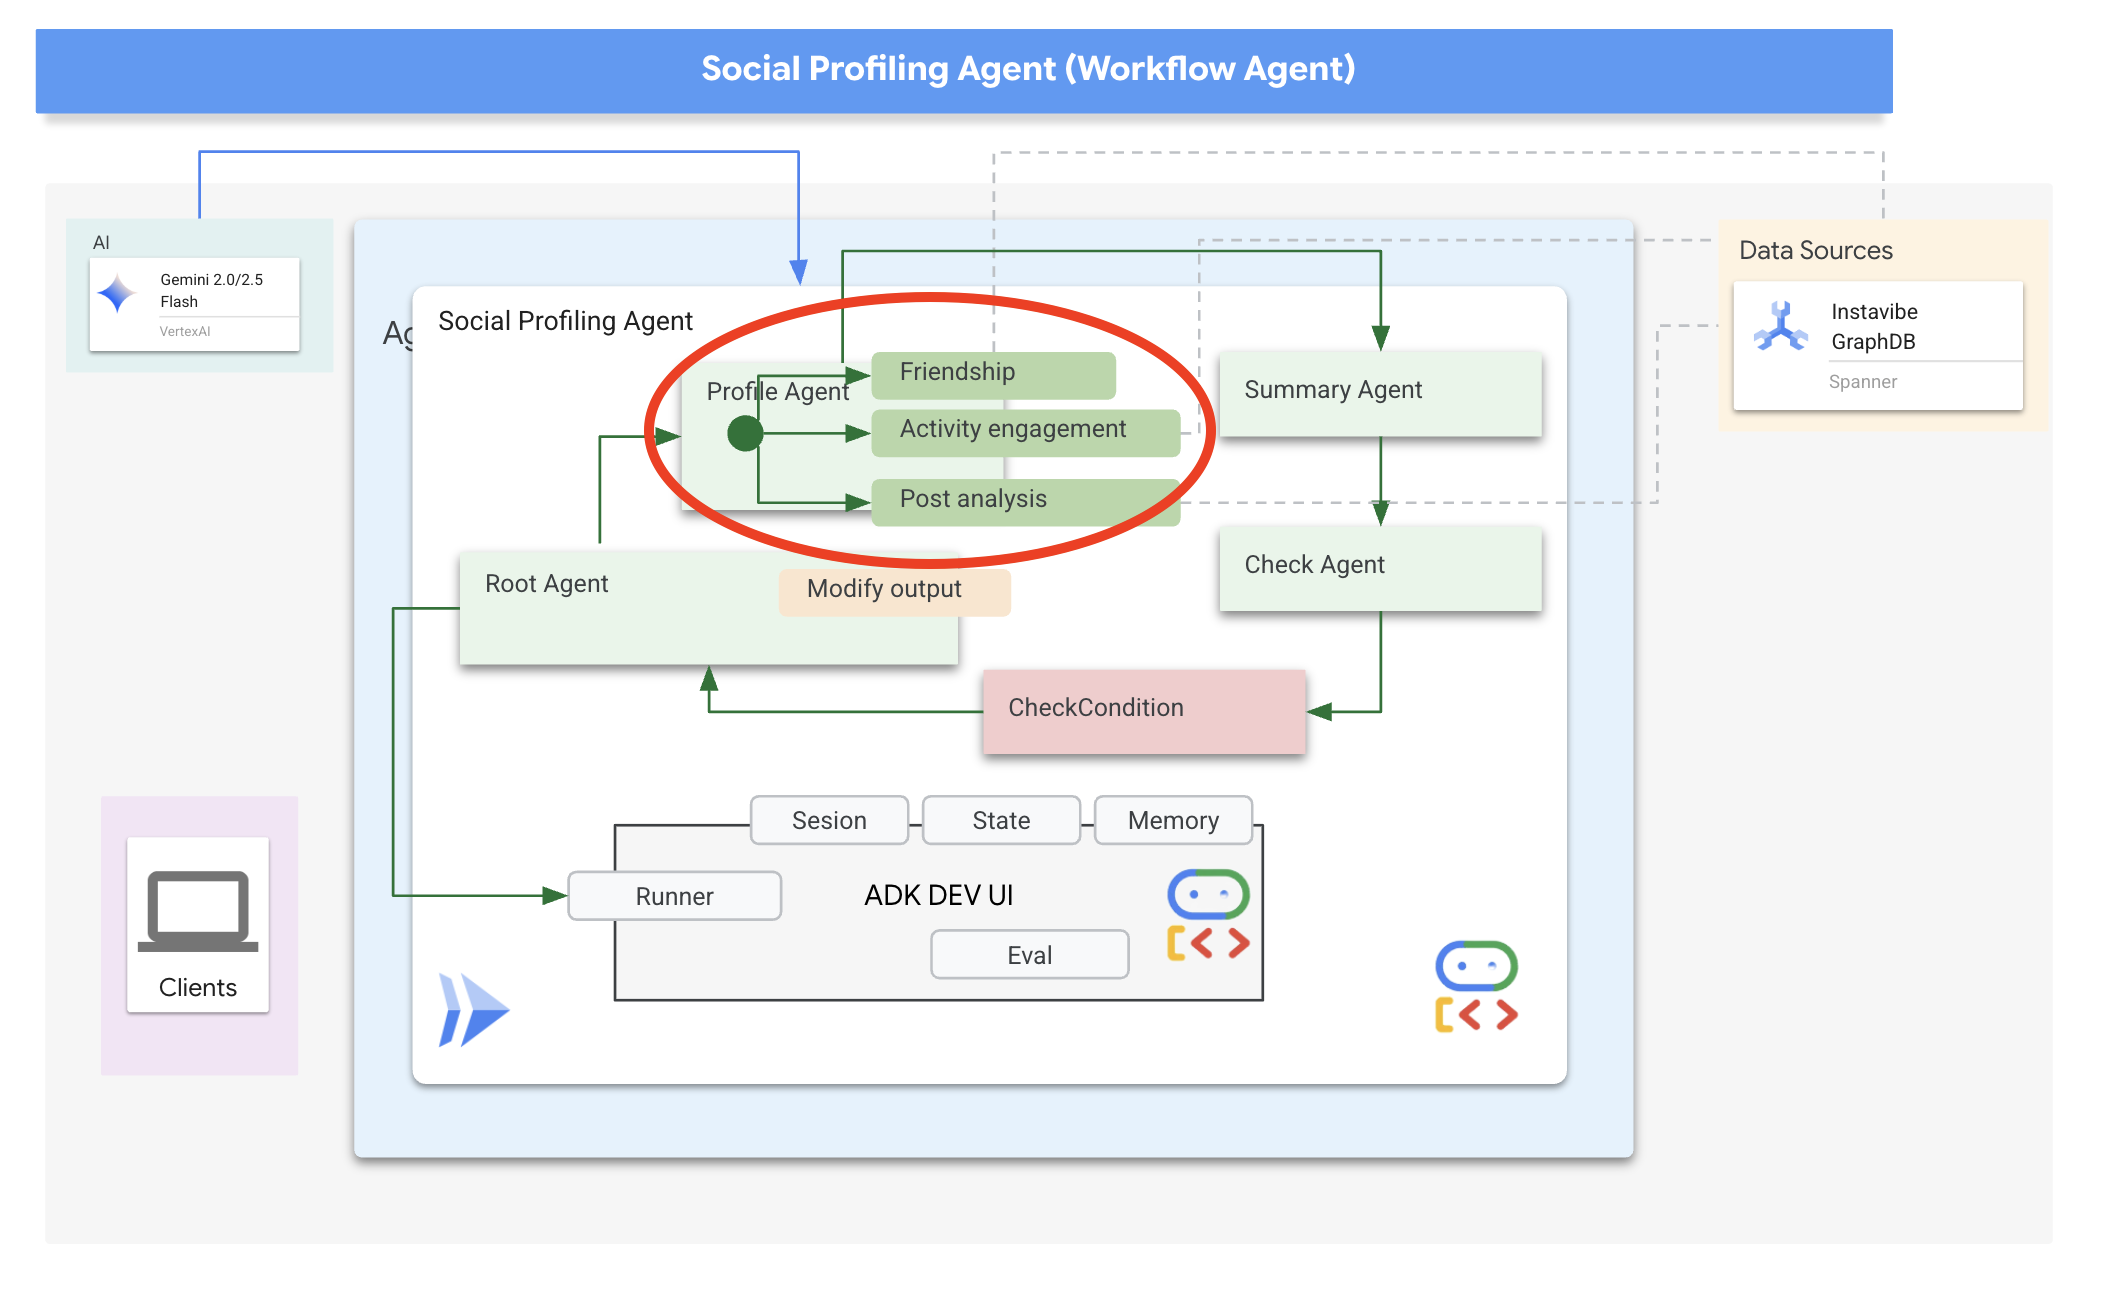
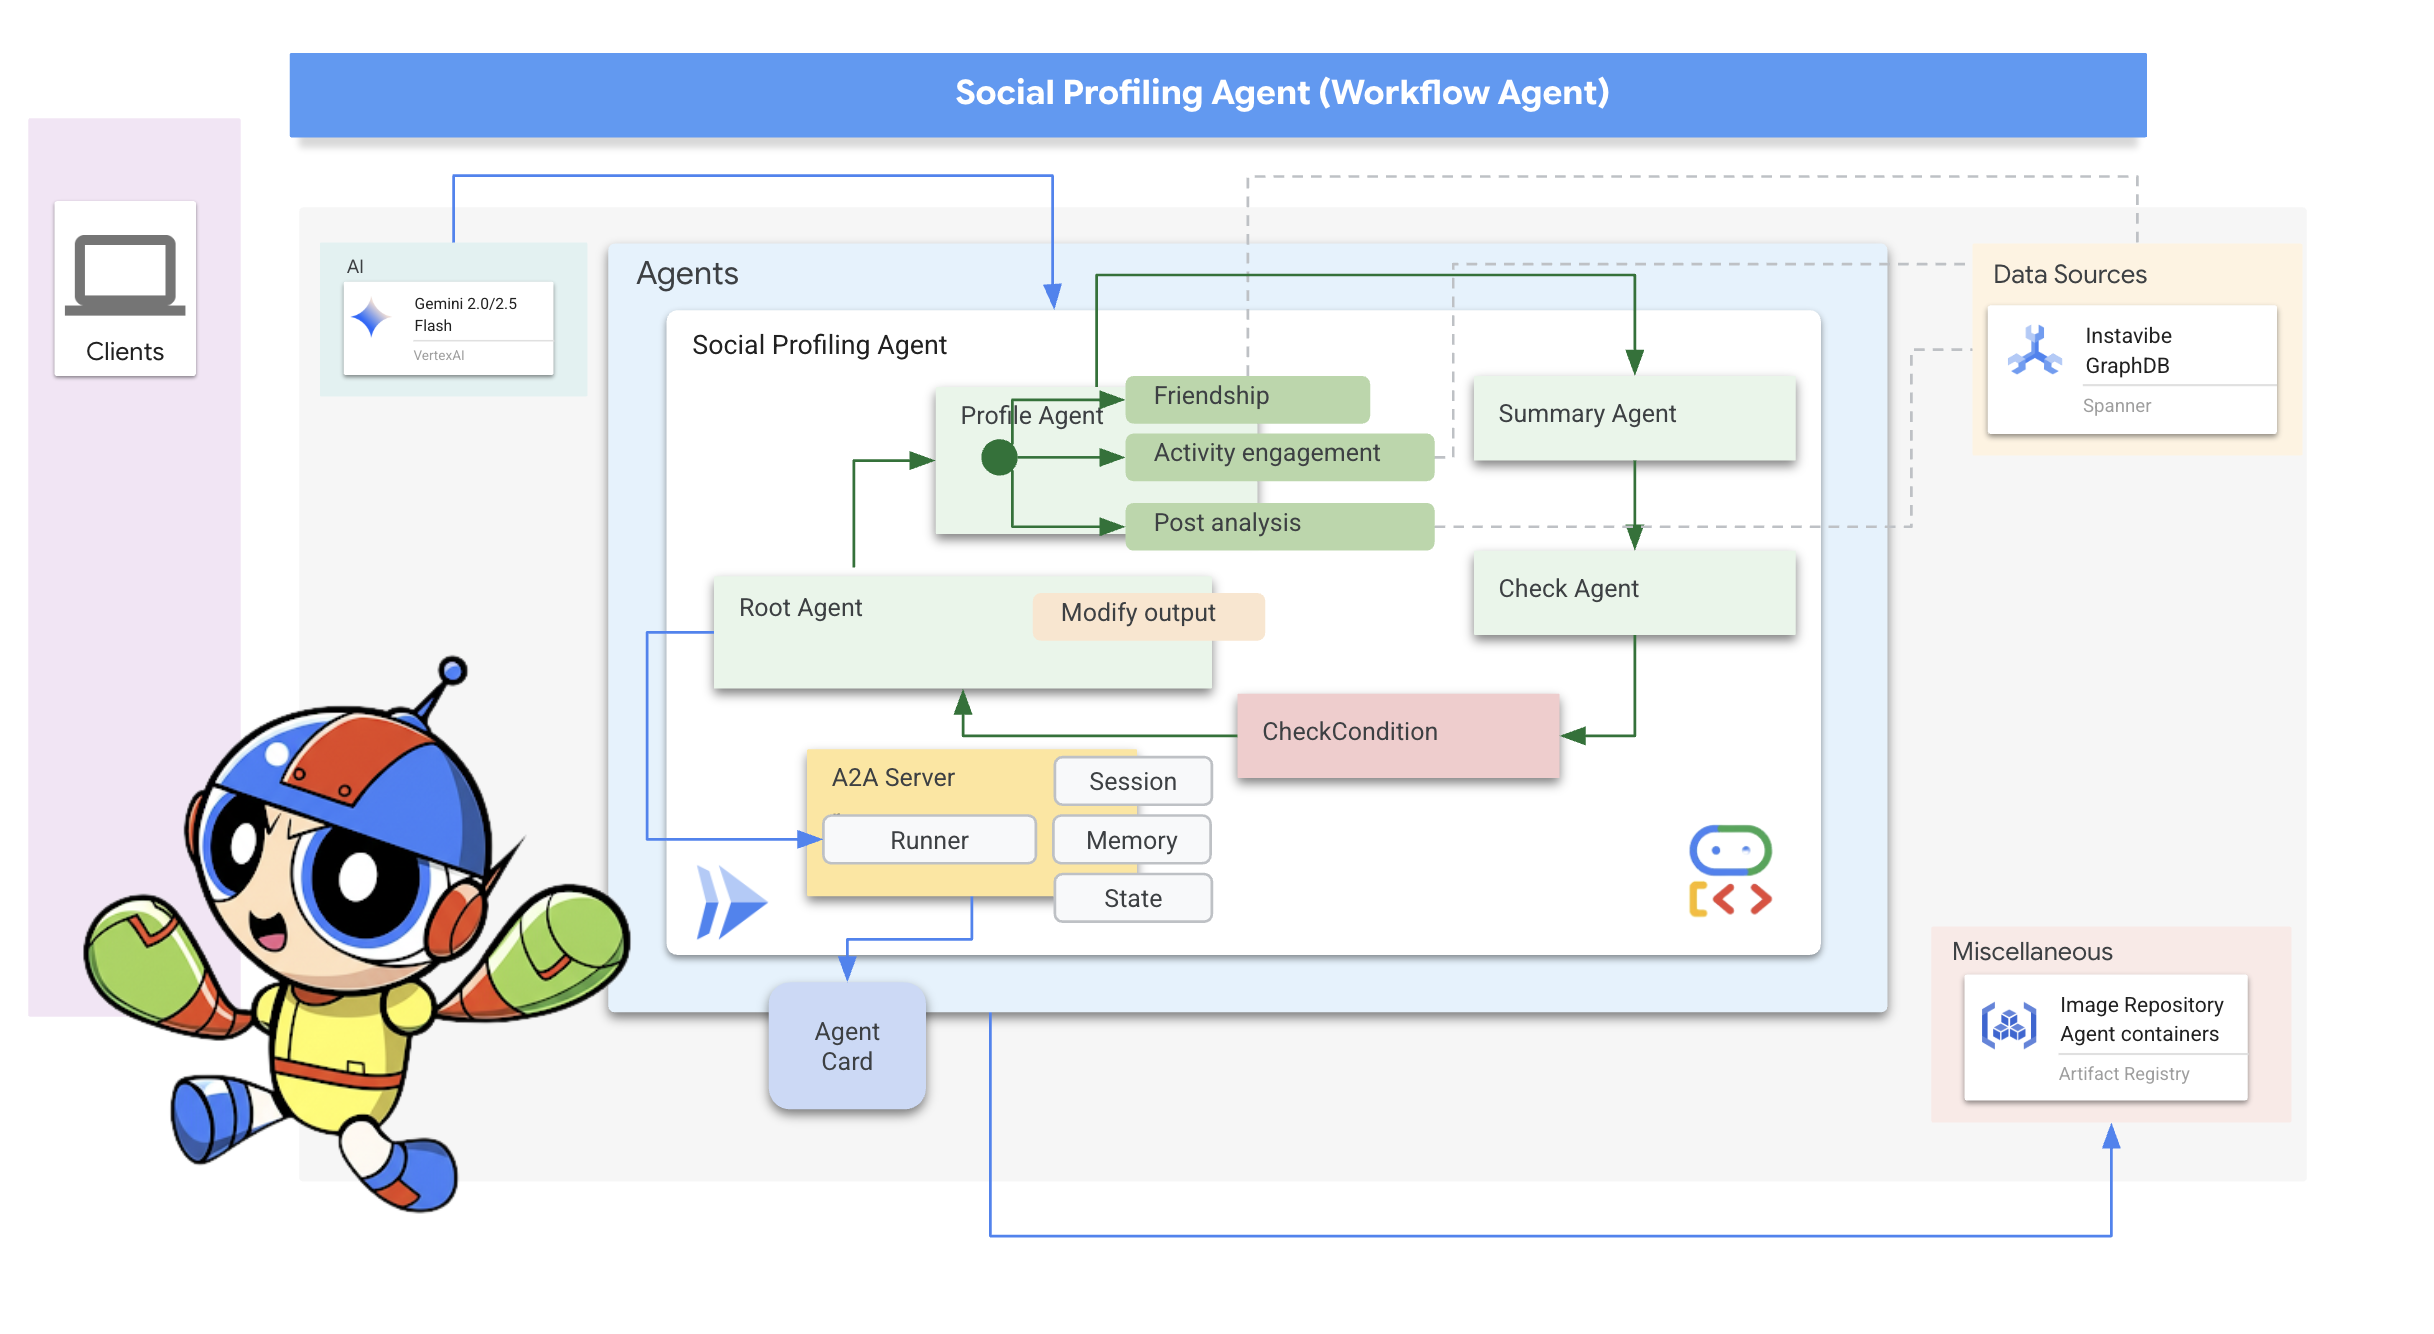
接著,我們來討論如何建構代理。分析多位好友的個人資料,然後彙整結果,需要完成幾個步驟。這是使用 ADK 多代理功能的絕佳情境,特別是工作流程代理。
在 Google 的 ADK 中,工作流程代理本身不會執行工作,而是會協調其他代理 (稱為子代理)。這樣一來,您就能採用模組化設計,將複雜問題分解為專用元件。ADK 提供內建工作流程類型,例如
- 依序 (逐步)
- 平行 (並行執行)
- 和 Loop (重複執行)
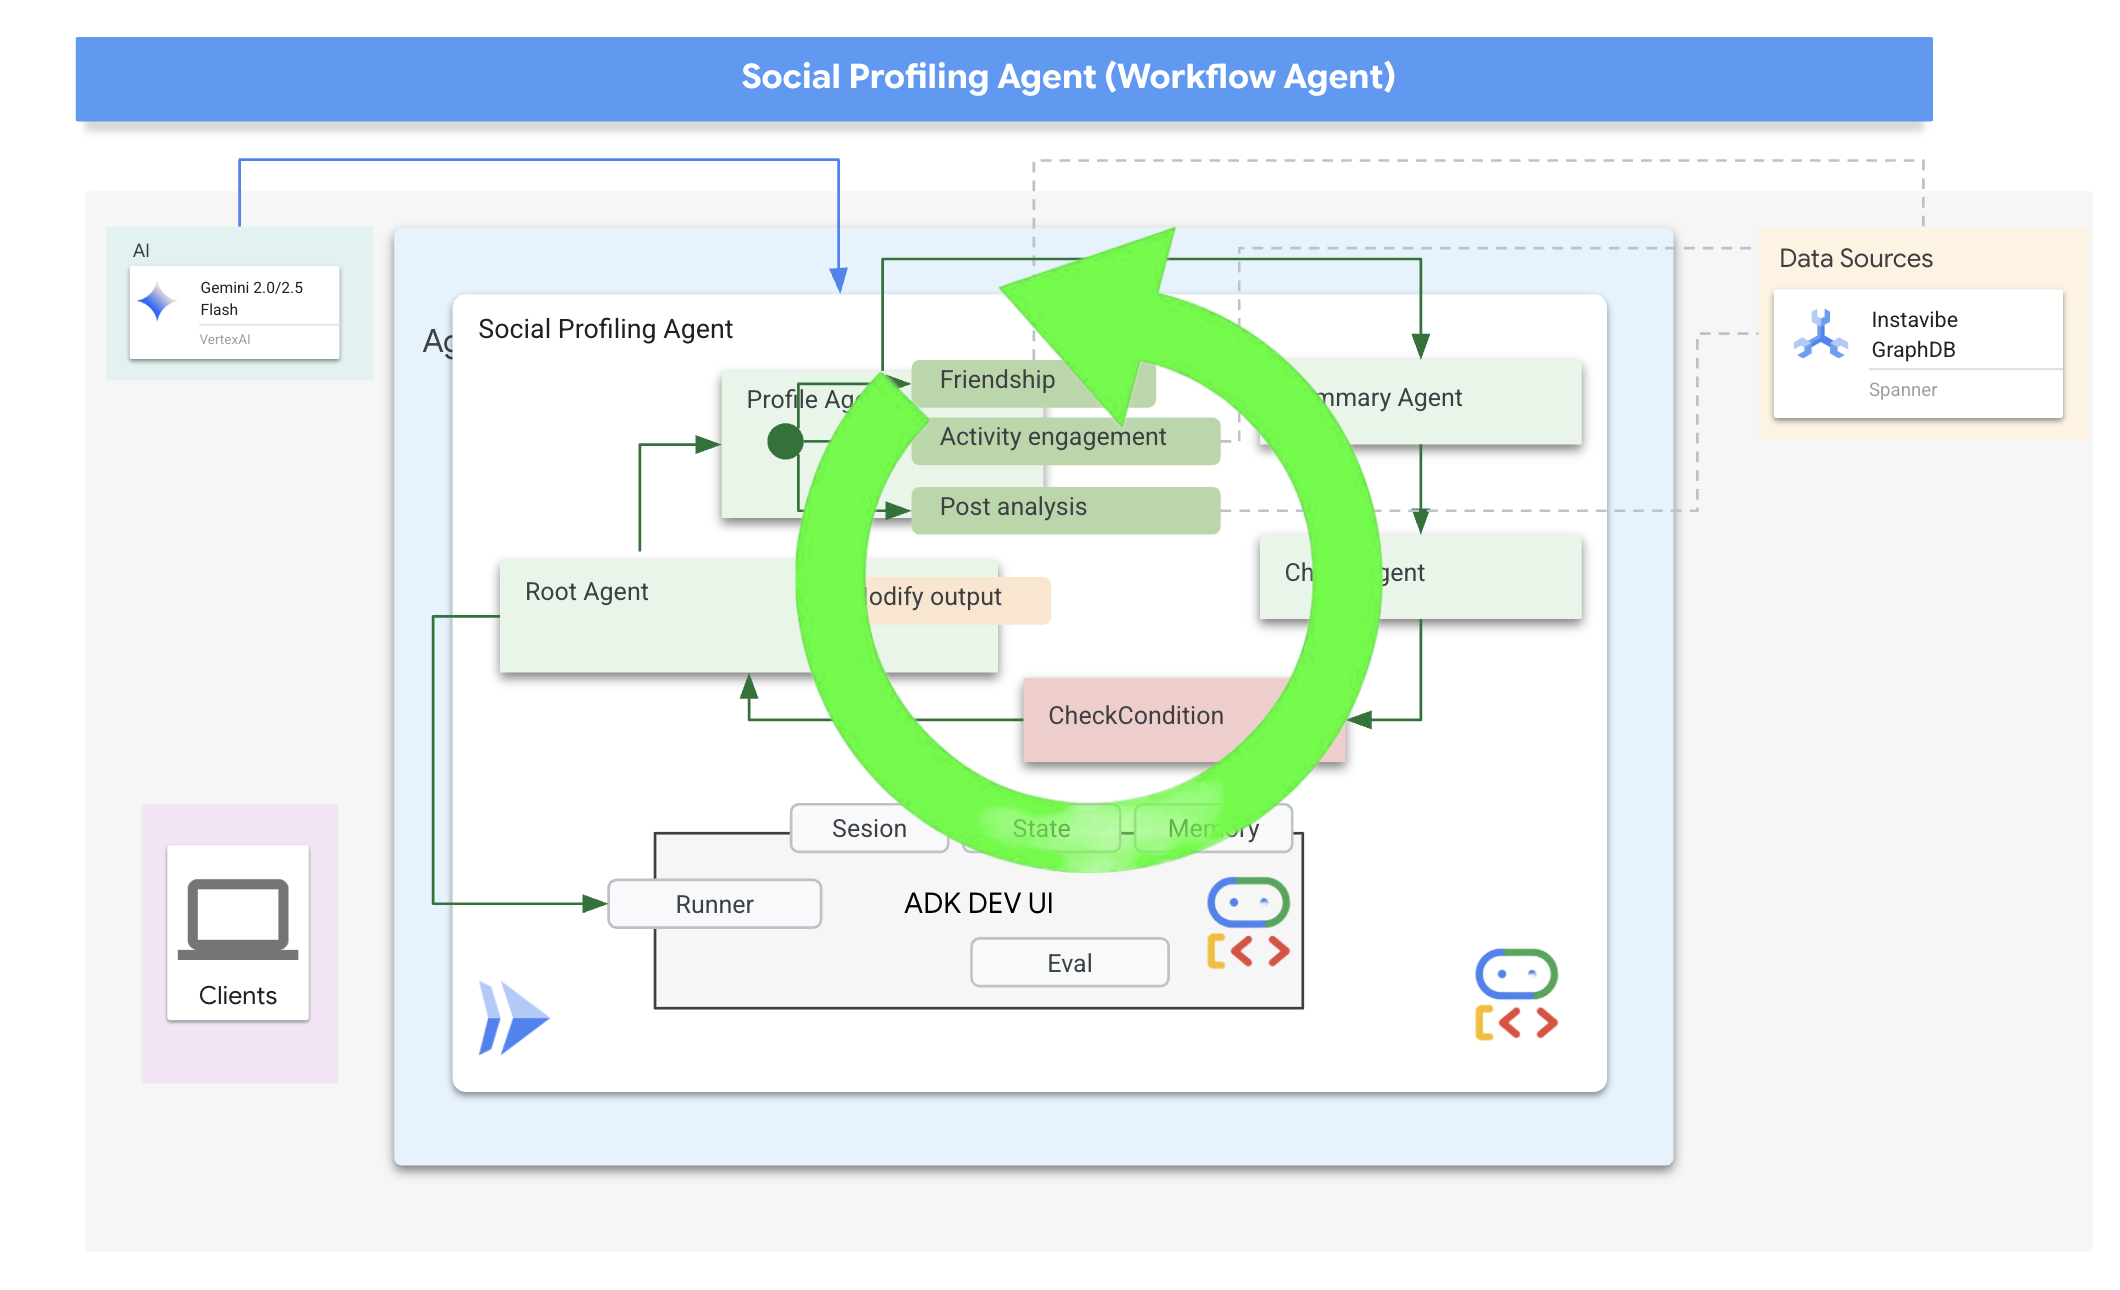
在社群媒體剖析作業中,我們的設計會使用 Loop Agent 建立疊代式工作流程。目的是一次處理一個人:profile_agent 收集資料、summary_agent 更新分析,以及 check_agent 判斷是否應再次執行迴圈。
現在來定義這項工作流程所需的子代理程式。
👉📝 在 ~/instavibe-bootstrap/agents/social/agent.py 中,將 #REPLACE FOR profile_agent 替換為下列內容:
profile_agent = LlmAgent(
    name="profile_agent",
    model="gemini-2.5-flash",
    description=(
        "Agent to answer questions about the this person social profile. Provide the person's profile using their name, make sure to fetch the id before getting other data."
    ),
    instruction=(
        "You are a helpful agent to answer questions about the this person social profile. You'll be given a list of names, provide the person's profile using their name, make sure to fetch the id before getting other data. Get one person at a time, start with the first one on the list, and skip if already provided. return this person's result"
    ),
    tools=[get_person_posts,get_person_friends,get_person_id_by_name,get_person_attended_events],
)
接著,代理程式會取得收集到的個人資料資訊 (在迴圈疊代中累積),並產生最終摘要,如果分析了多位使用者,則會找出共同點。
👉📝 在同一個 ~/instavibe-bootstrap/agents/social/agent.py 中,將 #REPLACE FOR summary_agent 替換為下列內容:
summary_agent = LlmAgent(
    name="summary_agent",
    model="gemini-2.5-flash",
    description=(
        "Generate a comprehensive social summary as a single, cohesive paragraph. This summary should cover the activities, posts, friend networks, and event participation of one or more individuals. If multiple profiles are analyzed, the paragraph must also identify and integrate any common ground found between them."
    ),
    instruction=(
        """
        Your primary task is to synthesize social profile information into a single, comprehensive paragraph.

            **Input Scope & Default Behavior:**
            *   If specific individuals are named by the user, focus your analysis on them.
            *   **If no individuals are specified, or if the request is general, assume the user wants an analysis of *all relevant profiles available in the current dataset/context*.**

            **For each profile (whether specified or determined by default), you must analyze:**

            1.  **Post Analysis:**
                *   Systematically review their posts (e.g., content, topics, frequency, engagement).
                *   Identify recurring themes, primary interests, and expressed sentiments.

            2.  **Friendship Relationship Analysis:**
                *   Examine their connections/friends list.
                *   Identify key relationships, mutual friends (especially if comparing multiple profiles), and the general structure of their social network.

            3.  **Event Participation Analysis:**
                *   Investigate their past (and if available, upcoming) event participation.
                *   Note the types of events, frequency of attendance, and any notable roles (e.g., organizer, speaker).

            **Output Generation (Single Paragraph):**

            *   **Your entire output must be a single, cohesive summary paragraph.**
                *   **If analyzing a single profile:** This paragraph will detail their activities, interests, and social connections based on the post, friend, and event analysis.
                *   **If analyzing multiple profiles:** This paragraph will synthesize the key findings regarding posts, friends, and events for each individual. Crucially, it must then seamlessly integrate or conclude with an identification and description of the common ground found between them (e.g., shared interests from posts, overlapping event attendance, mutual friends). The aim is a unified narrative within this single paragraph.

            **Key Considerations:**
            *   Base your summary strictly on the available data.
            *   If data for a specific category (posts, friends, events) is missing or sparse for a profile, you may briefly acknowledge this within the narrative if relevant.
                """
        ),
    output_key="summary"
)
我們需要一種方法來判斷迴圈何時應停止 (即所有要求的設定檔都已摘要)
👉📝 在同一個 ~/instavibe-bootstrap/agents/social/agent.py 中,將 #REPLACE FOR check_agent 替換為下列內容:
check_agent = LlmAgent(
    name="check_agent",
    model="gemini-2.5-flash",
    description=(
        "Check if everyone's social profile are summarized and has been generated. Output 'completed' or 'pending'."
    ),
    output_key="summary_status"
)
我們新增簡單的程式輔助檢查 (CheckCondition),明確查看儲存在 State 中的 summary_status,這些 summary_status 會由 check_agent 傳回,並告知 Loop Agent 是否要繼續 (escalate=False) 或停止 (escalate=True)。
👉📝 在同一個 ~/instavibe-bootstrap/agents/social/agent.py 中,將檔案頂端的 #REPLACE FOR CheckCondition 替換為下列內容:
class CheckCondition(BaseAgent):
    async def _run_async_impl(self, ctx: InvocationContext) -> AsyncGenerator[Event, None]:
        #log.info(f"Checking status: {ctx.session.state.get("summary_status", "fail")}")
        log.info(f"Summary: {ctx.session.state.get("summary")}")

        status = ctx.session.state.get("summary_status", "fail").strip()
        is_done = (status == "completed")

        yield Event(author=self.name, actions=EventActions(escalate=is_done))
迴圈結果的狀態和回呼
在 Google 的 ADK 中,「狀態」是重要概念,代表代理程式執行期間的記憶體或工作資料。這基本上是持續性脈絡,可保存代理在不同步驟、工具呼叫或互動中需要維護的資訊。這個狀態可以儲存中繼結果、使用者資訊、後續動作的參數,或代理在完成工作時需要記住的任何其他資料。
在本情境中,當 Loop Agent 疊代時,summary_agent 和 check_agent 會將輸出內容 (摘要和摘要狀態) 儲存在代理程式的狀態中。這樣一來,資訊就能在疊代作業中保留。不過,Loop Agent 本身不會在完成時,自動從狀態傳回最終摘要。
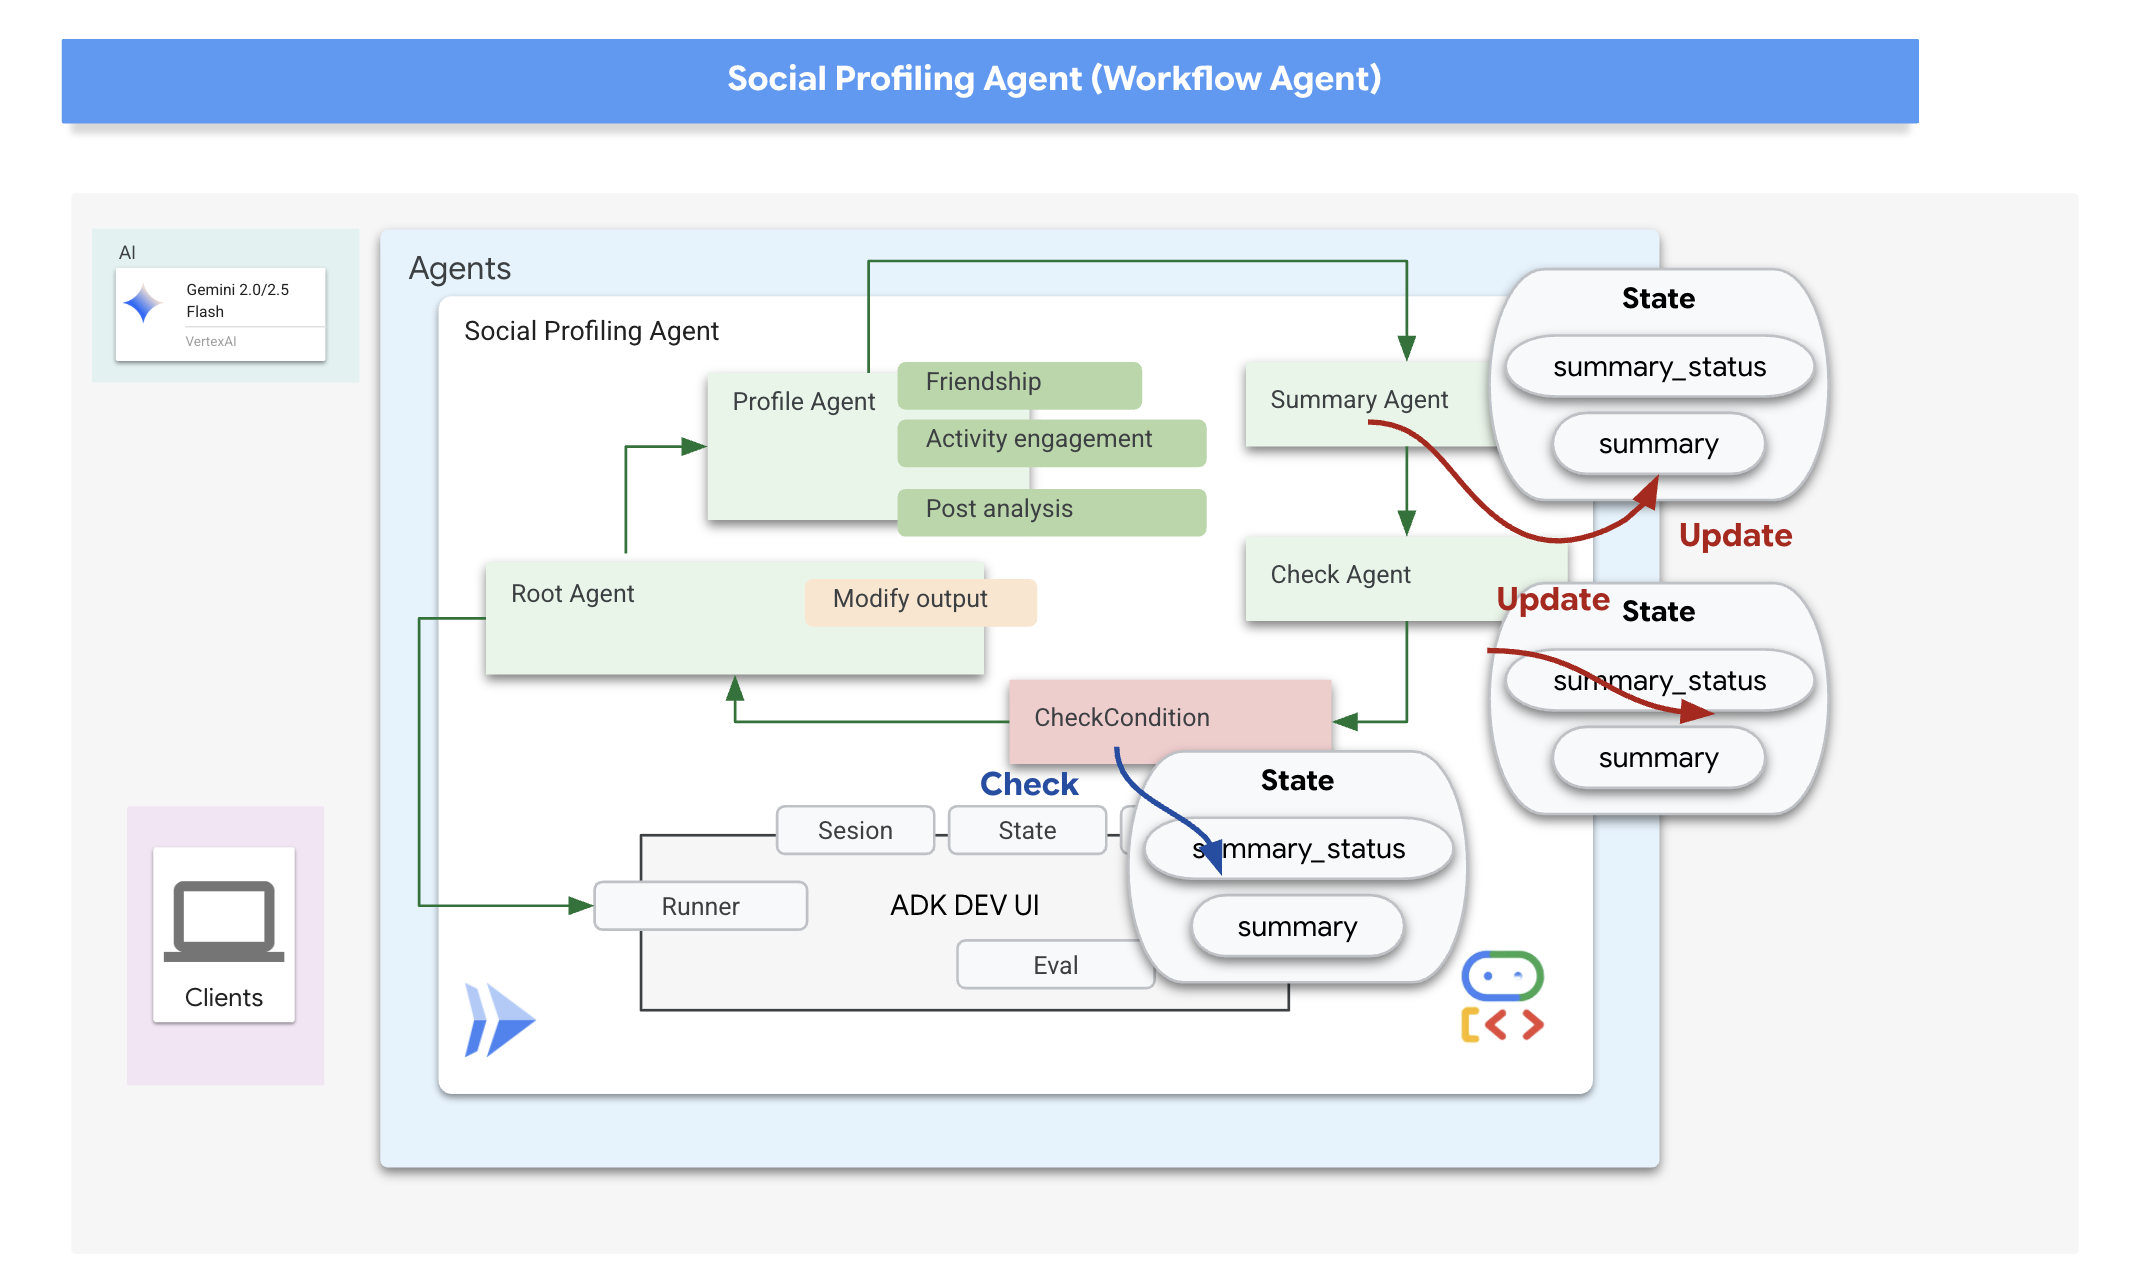
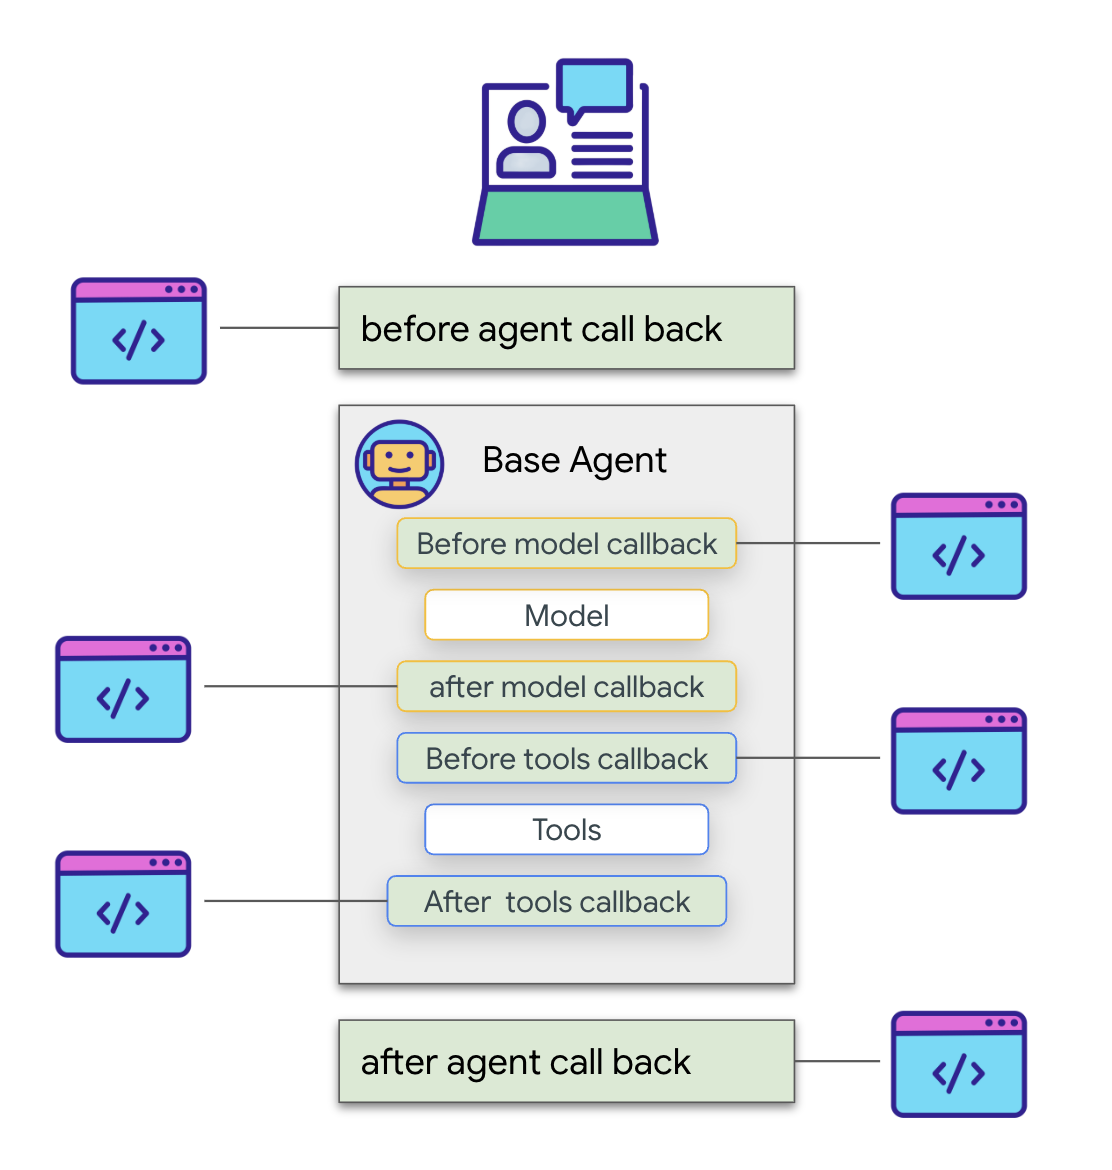
ADK 中的回呼可讓我們插入自訂邏輯,在代理程式生命週期的特定時間點執行,或回應特定事件,例如工具呼叫完成或代理程式完成執行前。可動態自訂代理的行為和處理結果。
我們會使用 after_agent_callback,在迴圈完成時執行 (因為 CheckCondition 已升級)。這個回呼 modify_output_after_agent 會從狀態擷取最終摘要,並將其格式設為代理程式的最終輸出訊息。
👉📝 在同一個 ~/instavibe-bootstrap/agents/social/agent.py 中,將 #REPLACE FOR modify_output_after_agent 替換為以下內容:
def modify_output_after_agent(callback_context: CallbackContext) -> Optional[types.Content]:

    agent_name = callback_context.agent_name
    invocation_id = callback_context.invocation_id
    current_state = callback_context.state.to_dict()
    current_user_content = callback_context.user_content
    print(f"[Callback] Exiting agent: {agent_name} (Inv: {invocation_id})")
    print(f"[Callback] Current summary_status: {current_state.get("summary_status")}")
    print(f"[Callback] Current Content: {current_user_content}")

    status = current_state.get("summary_status").strip()
    is_done = (status == "completed")
    # Retrieve the final summary from the state

    final_summary = current_state.get("summary")
    print(f"[Callback] final_summary: {final_summary}")
    if final_summary and is_done and isinstance(final_summary, str):
        log.info(f"[Callback] Found final summary, constructing output Content.")
        # Construct the final output Content object to be sent back
        return types.Content(role="model", parts=[types.Part(text=final_summary.strip())])
    else:
        log.warning("[Callback] No final summary found in state or it's not a string.")
        # Optionally return a default message or None if no summary was generated
        return None
定義根迴圈代理程式
最後,我們定義主要的 LoopAgent。在每個迴圈疊代中,它會依序調度子代理程式 (profile_agent -> summary_agent -> check_agent -> CheckCondition)。這個序列最多會重複 max_iterations 次,或直到 CheckCondition 發出完成訊號為止。after_agent_callback 可確保傳回最終摘要。
👉📝 在同一個 ~/instavibe-bootstrap/agents/social/agent.py 中,將 #REPLACE FOR root_agent 替換為以下內容:
root_agent = LoopAgent(
    name="InteractivePipeline",
    sub_agents=[
        profile_agent,
        summary_agent,
        check_agent,
        CheckCondition(name="Checker")
    ],
    description="Find everyone's social profile on events, post and friends",
    max_iterations=10,
    after_agent_callback=modify_output_after_agent
)
讓我們使用 ADK 開發 UI 測試這個多代理工作流程。
👉💻 啟動 ADK 網路伺服器:
. ~/instavibe-bootstrap/set_env.sh
source ~/instavibe-bootstrap/env/bin/activate
cd  ~/instavibe-bootstrap/agents
sed -i "s|^\(O\?GOOGLE_CLOUD_PROJECT\)=.*|GOOGLE_CLOUD_PROJECT=${PROJECT_ID}|" ~/instavibe-bootstrap/agents/social/.env
adk web
開啟 ADK 開發人員使用者介面 (透過網頁預覽的通訊埠 8000)。在代理程式下拉式選單 (右上角) 中,選取「社群媒體」代理程式。
👉 現在,請 AI 剖析多位使用者。在對話方塊中輸入:
Tell me about Mike and Bob
代理回覆後 (由於迴圈和多個 LLM 呼叫,這可能需要較長時間),請不要只查看最終的即時通訊輸出內容。前往 ADK 開發人員使用者介面左側窗格的「Events」分頁。
👉 驗證步驟:在「Events」分頁中,您會看到執行作業的詳細逐步追蹤記錄。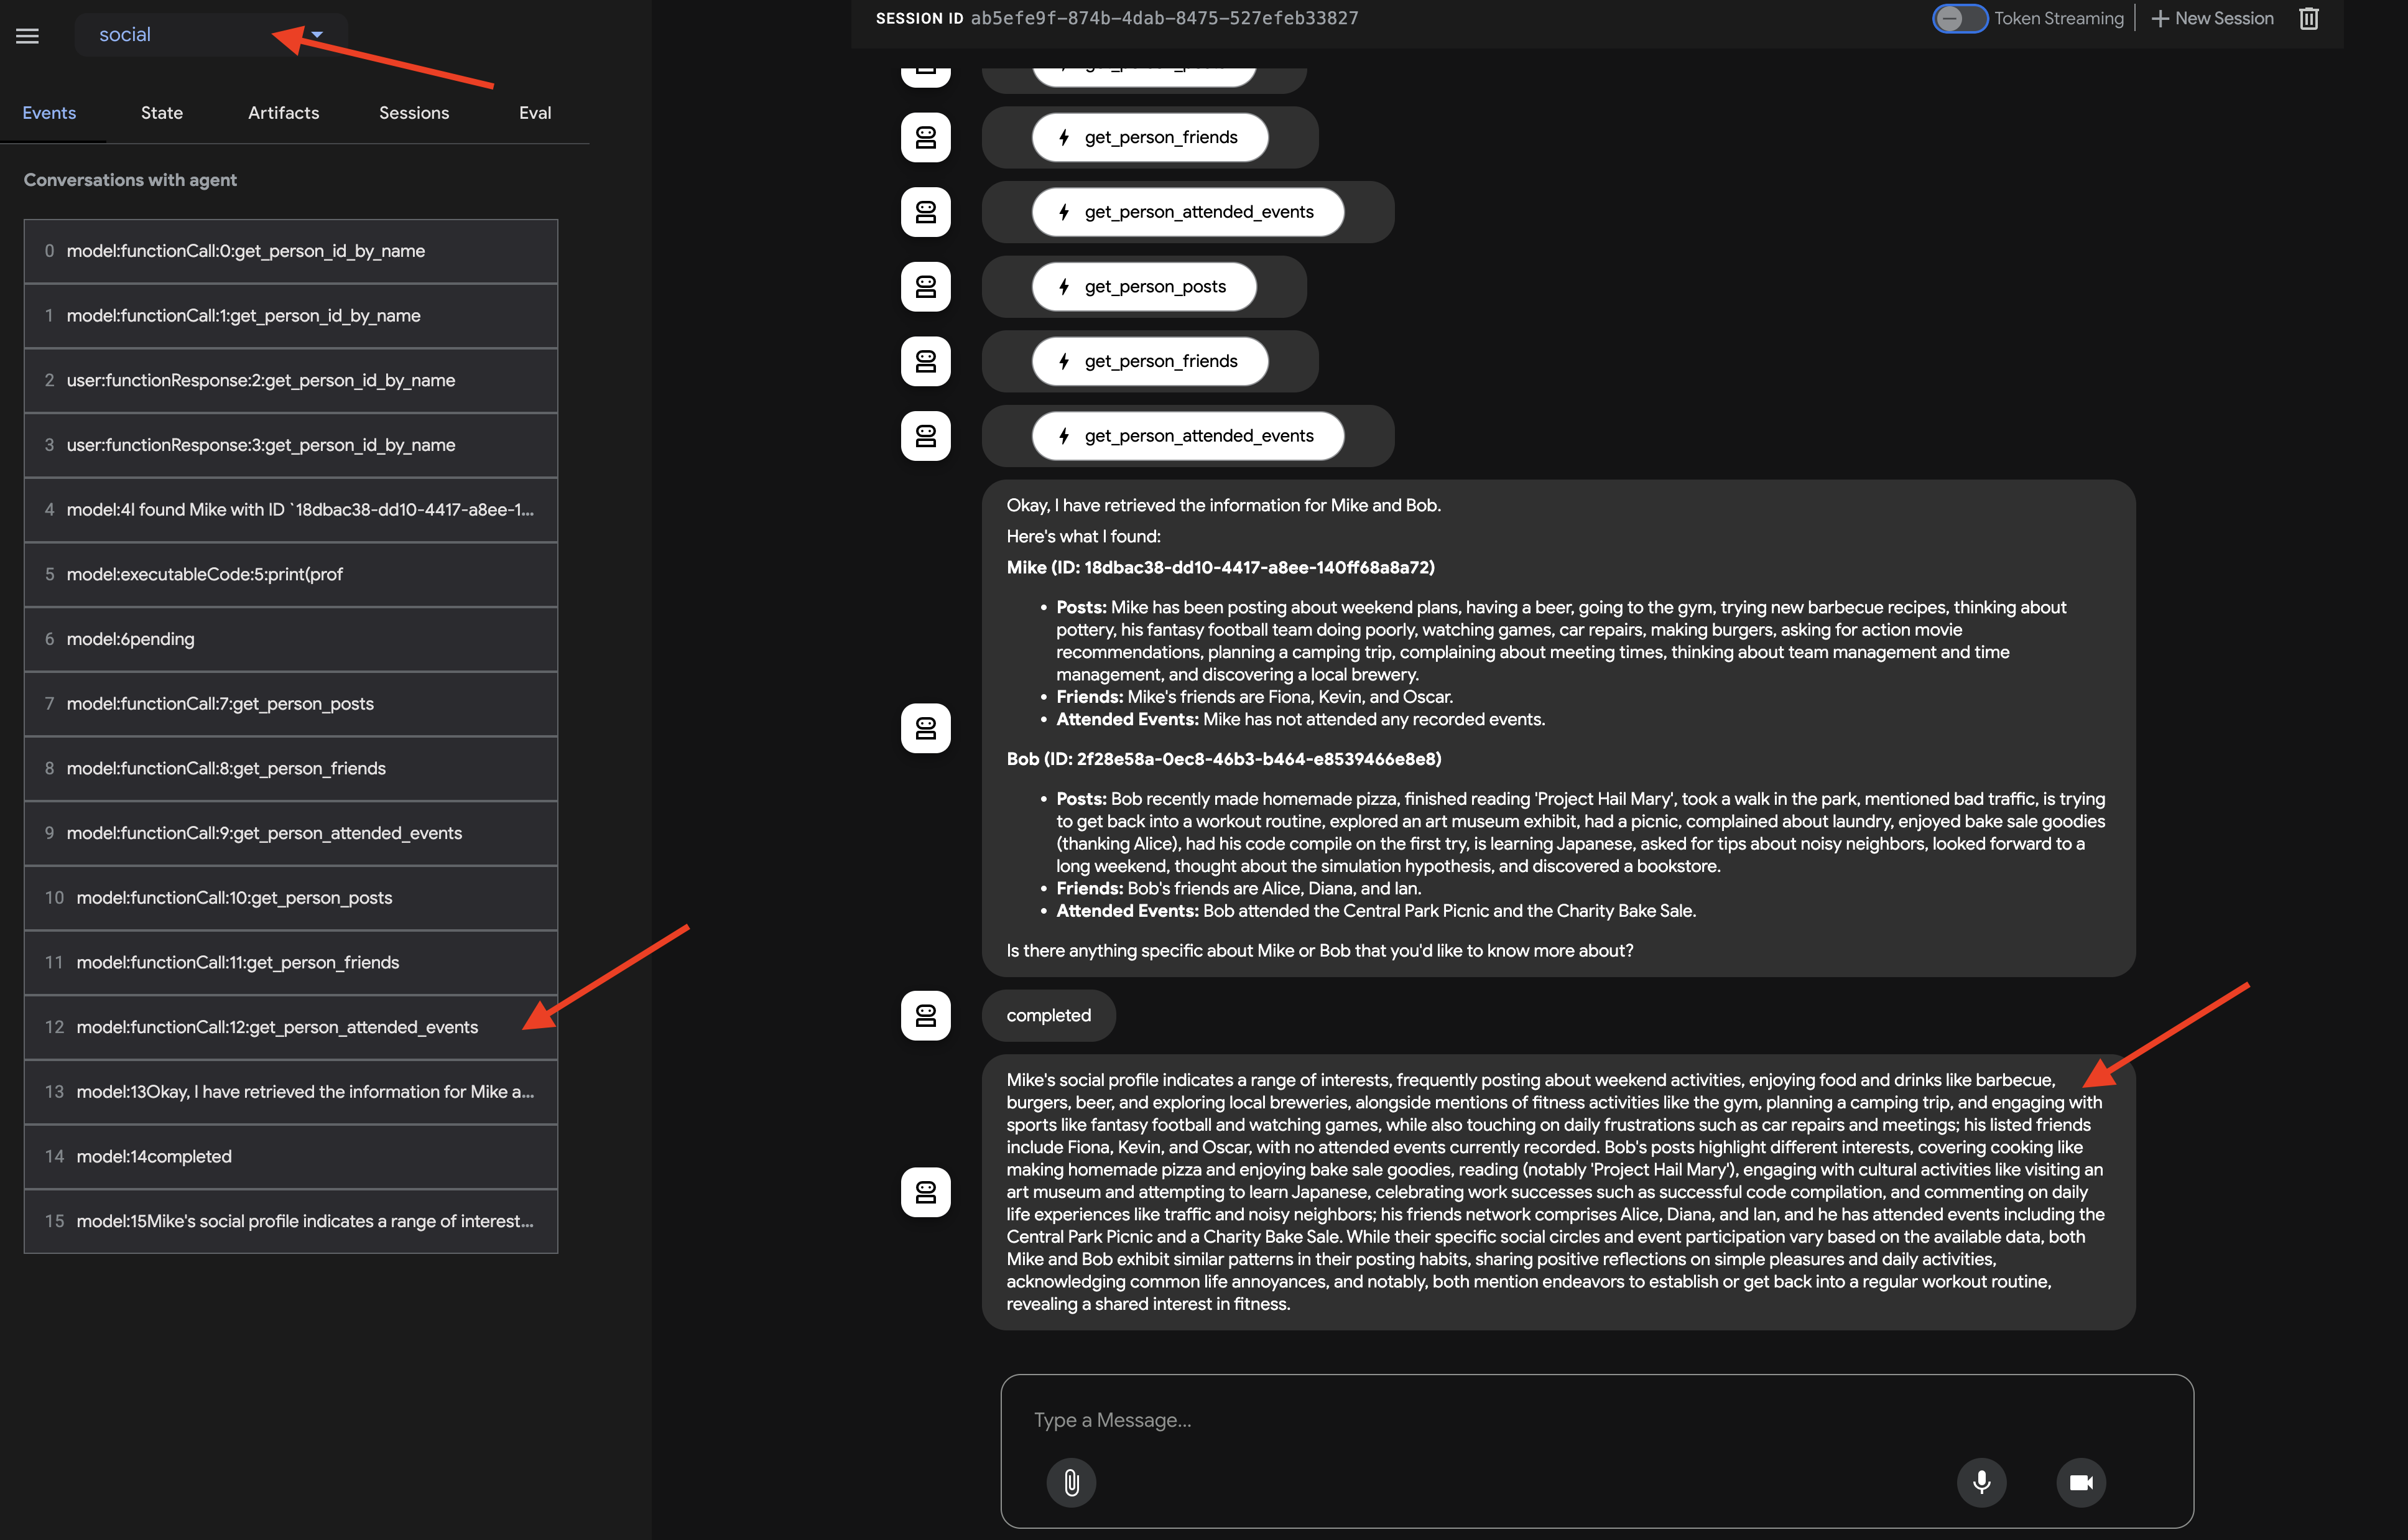
觀察代理程式如何叫用每個子代理程式,您會發現流程從 profile_agent -> summary_agent -> check_agent,每次疊代都會檢查。但實際上,我們看到的是代理程式強大的「自我最佳化」功能。
由於基礎模型會查看整個要求 (例如「為 Mike 和 Bob 建立個人資料」),因此通常會選擇最有效率的路徑,在單一整合式回合中收集所有必要資料,而不是多次疊代。您可以查看每個步驟的輸入和輸出內容與狀態,包括 profile_agent 進行的工具呼叫
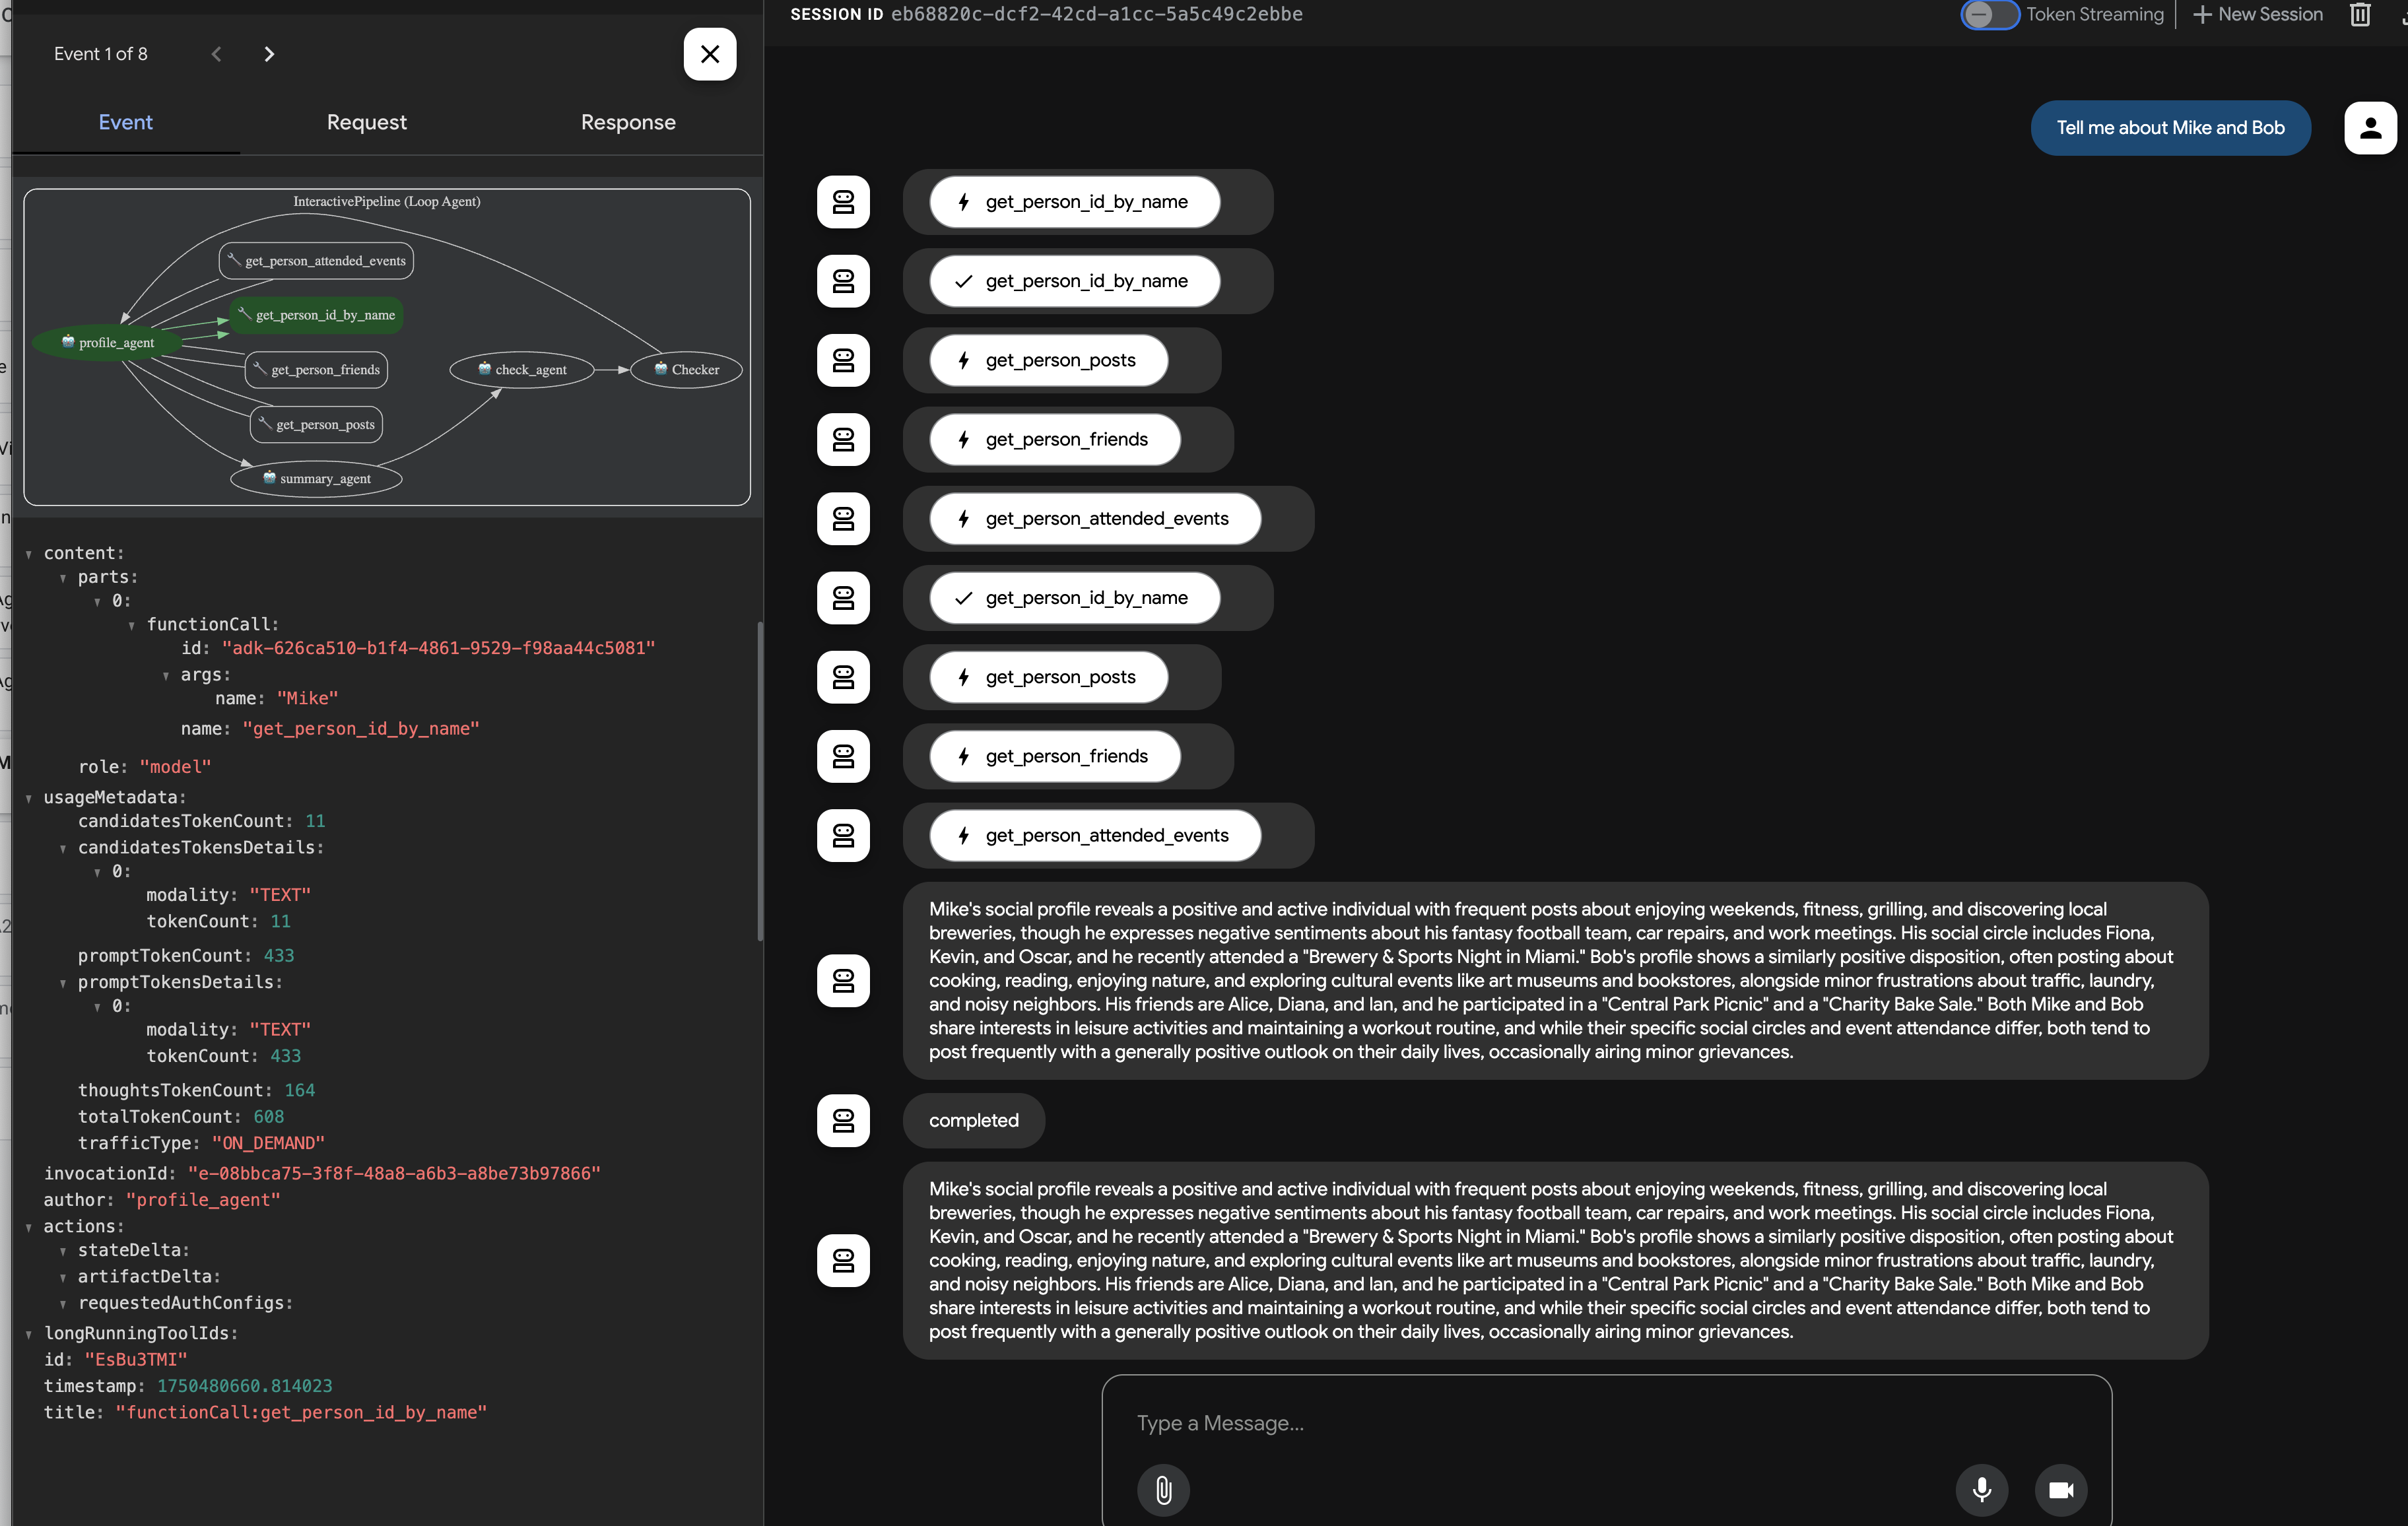
以及 check_agent 和 CheckCondition 的狀態更新。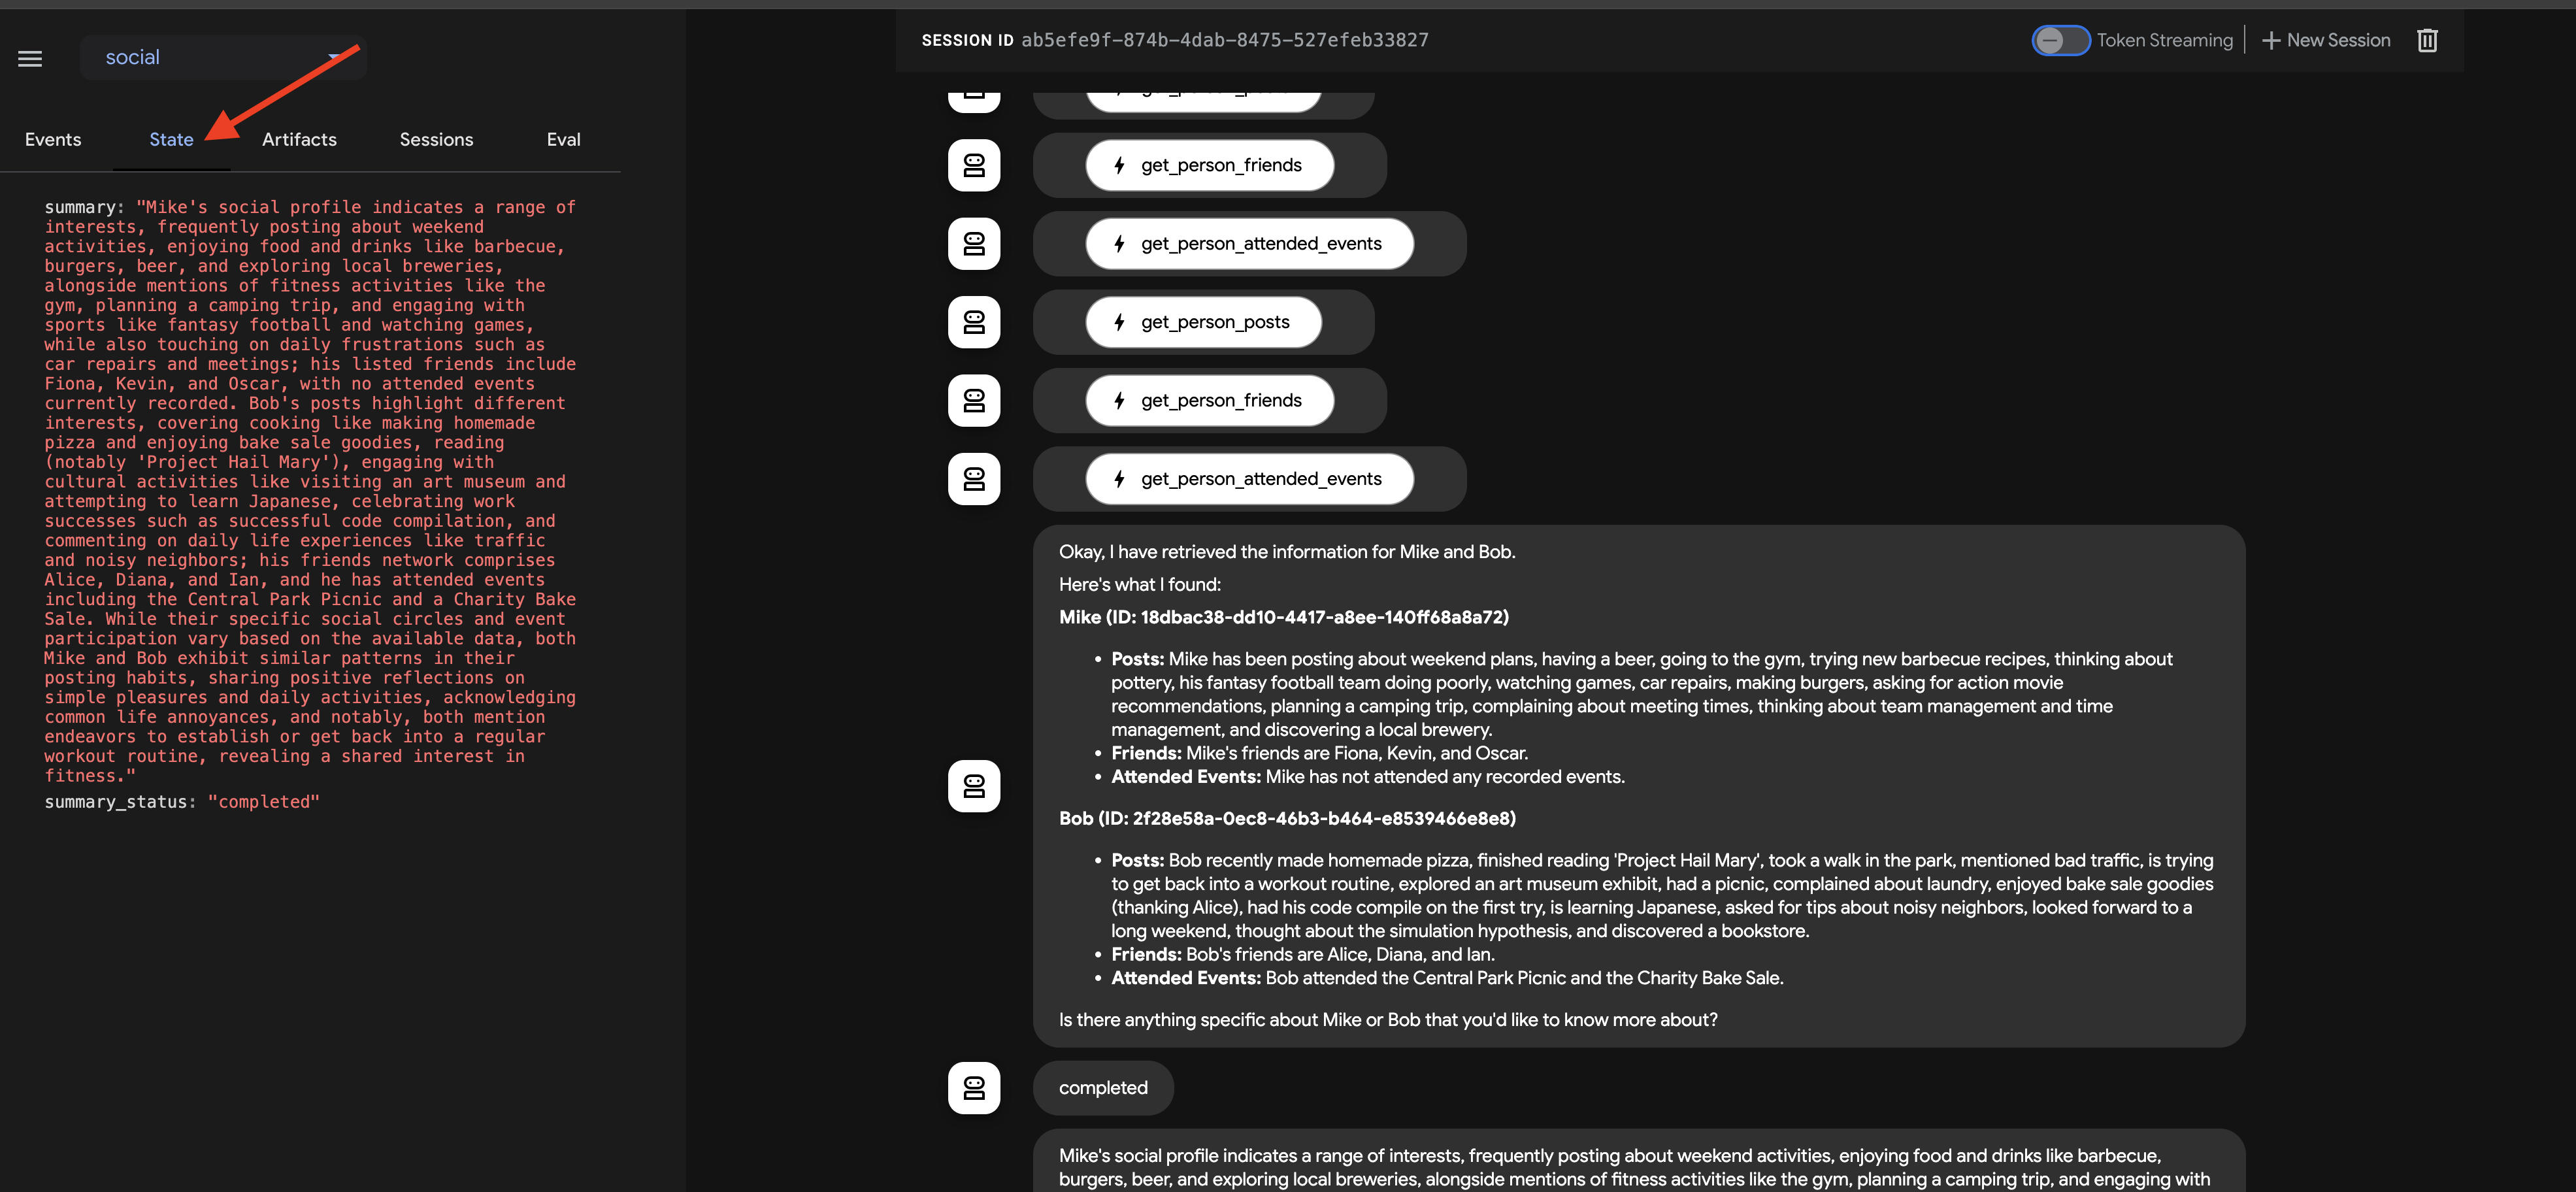
這項視覺化追蹤功能非常實用,可協助您瞭解及偵錯多重代理程式工作流程的運作方式,直到最終摘要產生並由回呼傳回為止。
探索完即時通訊回覆和事件追蹤記錄後,請返回 Cloud Shell 終端機,然後按下 Ctrl+C 鍵停止 ADK 開發人員使用者介面。
10. 代理對代理 (A2A) 通訊
目前我們已建構專用代理,但這些代理會在同一部機器上獨立運作,或在預先定義的工作流程中運作。如要建構真正分散式且協作式多代理系統,我們需要讓代理 (可能以個別服務的形式執行) 互相探索,並有效溝通。這時 Agent2Agent (A2A) 通訊協定就派上用場。
A2A 通訊協定是一項開放標準,專為 AI 代理之間的互通通訊而設計。MCP 著重於代理與工具之間的互動,A2A 則著重於代理與代理之間的互動。代理人可以:
- 探索:透過標準化代理資訊卡尋找其他代理,並瞭解其功能。
- 通訊:安全地交換訊息和資料。
- 協作:指派工作及協調行動,達成複雜目標。
A2A 通訊協定可透過「代理資訊卡」等機制促進這類通訊,代理可使用這些資訊卡宣傳自身功能和連線資訊。
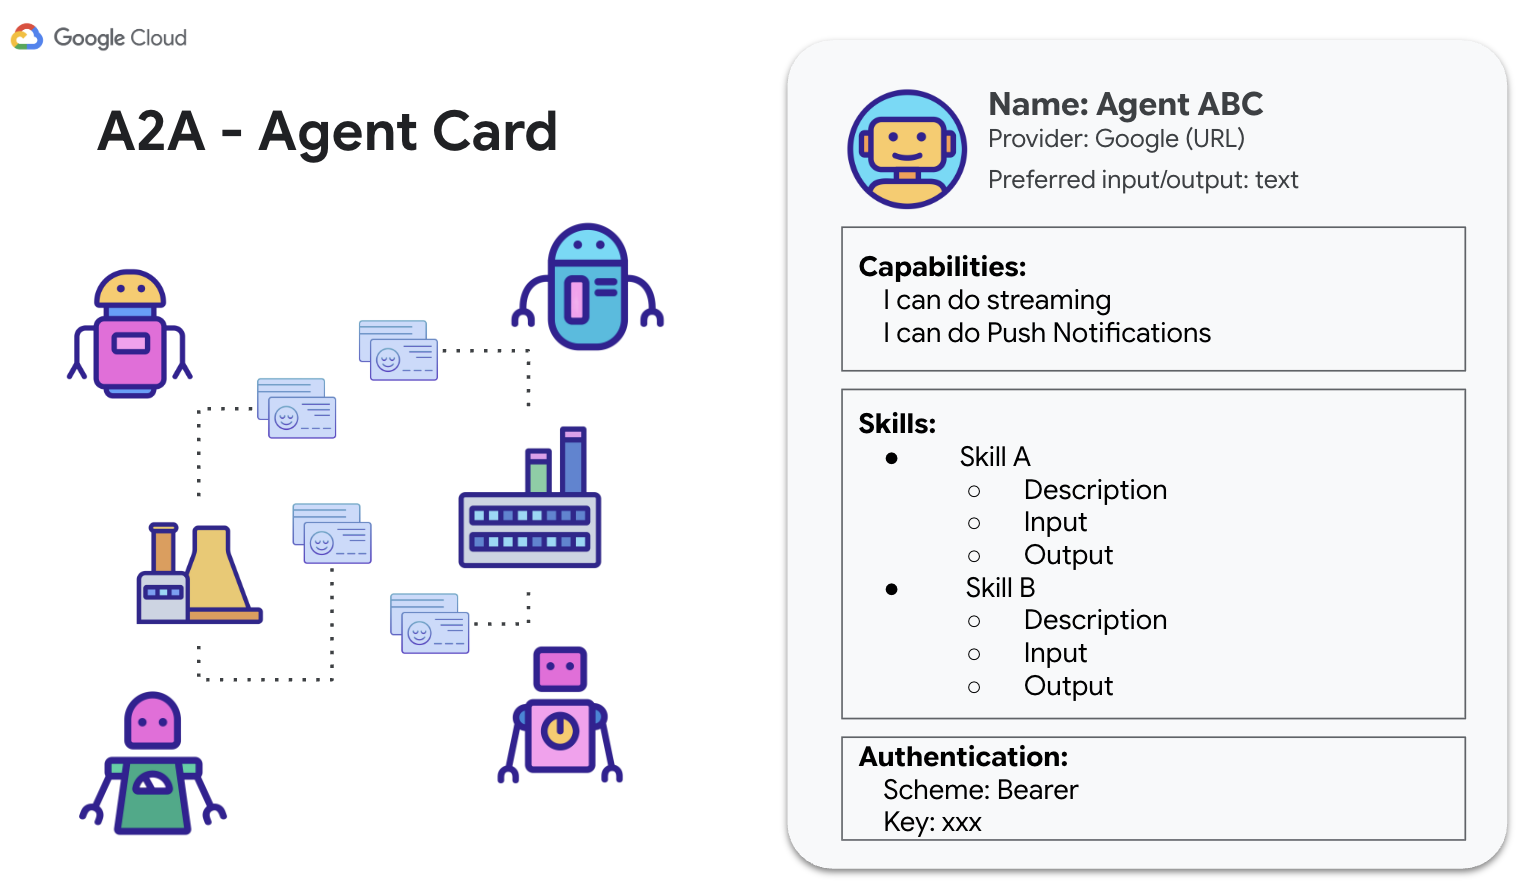
A2A 採用常見的網路標準 (HTTP、SSE、JSON-RPC),並經常使用用戶端/伺服器模型,其中一個代理 (用戶端) 會將工作傳送至另一個代理 (遠端代理程式/伺服器)。這項標準化作業是建構模組化可擴充系統的關鍵,可讓獨立開發的代理程式共同運作。
為 InstaVibe 代理程式啟用 A2A
如要透過 A2A 讓其他代理程式存取現有的 Planner、Platform Interaction 和 Social 代理程式,我們需要使用 A2A 伺服器元件包裝每個代理程式。這個伺服器會:
- 公開代理資訊卡:透過 HTTP 端點提供代理功能的標準說明。
- 監聽工作(要求訊息):根據 A2A 通訊協定,接受來自其他代理程式 (A2A 用戶端) 的工作要求。
- 管理工作(要求訊息) 執行作業:將收到的工作交給基礎 ADK 代理邏輯進行處理。
規劃人員代理程式 (已啟用 A2A)
首先,請將 A2A 伺服器層新增至 Planner Agent。
定義 A2A 伺服器啟動邏輯。這段程式碼會定義 AgentCard (代理的公開說明)、設定 A2AServer 並啟動,然後連結至 PlatformAgentExecutor。
👉📝 在 ~/instavibe-bootstrap/agents/planner/a2a_server.py 結尾新增下列程式碼:
class PlannerAgent:
    """An agent to help user planning a event with its desire location."""
    SUPPORTED_CONTENT_TYPES = ["text", "text/plain"]

    def __init__(self):
        self._agent = self._build_agent()
        self.runner = Runner(
            app_name=self._agent.name,
            agent=self._agent,
            artifact_service=InMemoryArtifactService(),
            session_service=InMemorySessionService(),
            memory_service=InMemoryMemoryService(),
        )
        capabilities = AgentCapabilities(streaming=True)
        skill = AgentSkill(
            id="event_planner",
            name="Event planner",
            description="""
            This agent generates multiple fun plan suggestions tailored to your specified location, dates, and interests,
            all designed for a moderate budget. It delivers detailed itineraries,
            including precise venue information (name, latitude, longitude, and description), in a structured JSON format.
            """,
            tags=["instavibe"],
            examples=["What about Bostona MA this weekend?"],
        )
        self.agent_card = AgentCard(
            name="Event Planner Agent",
            description="""
            This agent generates multiple fun plan suggestions tailored to your specified location, dates, and interests,
            all designed for a moderate budget. It delivers detailed itineraries,
            including precise venue information (name, latitude, longitude, and description), in a structured JSON format.
            """,
            url=f"{PUBLIC_URL}",
            version="1.0.0",
            defaultInputModes=PlannerAgent.SUPPORTED_CONTENT_TYPES,
            defaultOutputModes=PlannerAgent.SUPPORTED_CONTENT_TYPES,
            capabilities=capabilities,
            skills=[skill],
        )

    def get_processing_message(self) -> str:
        return "Processing the planning request..."

    def _build_agent(self) -> LlmAgent:
        """Builds the LLM agent for the night out planning agent."""
        return agent.root_agent


if __name__ == '__main__':
    try:
        plannerAgent = PlannerAgent()

        request_handler = DefaultRequestHandler(
            agent_executor=PlannerAgentExecutor(plannerAgent.runner,plannerAgent.agent_card),
            task_store=InMemoryTaskStore(),
        )

        server = A2AStarletteApplication(
            agent_card=plannerAgent.agent_card,
            http_handler=request_handler,
        )
        logger.info(f"Attempting to start server with Agent Card: {plannerAgent.agent_card.name}")
        logger.info(f"Server object created: {server}")

        uvicorn.run(server.build(), host='0.0.0.0', port=port)
    except Exception as e:
        logger.error(f"An error occurred during server startup: {e}")
        exit(1)
👉💻 讓我們快速測試 A2A 伺服器是否在本機正確啟動,並提供代理資訊卡。在第一個終端機中執行下列指令:
. ~/instavibe-bootstrap/set_env.sh
source ~/instavibe-bootstrap/env/bin/activate
cd ~/instavibe-bootstrap/agents/
python -m planner.a2a_server
👉 現在開啟另一個終端機視窗。(按一下終端機面板中的「+」符號) 
👉💻 使用 curl 從本機執行的伺服器要求代理程式資訊卡:
curl http://localhost:10003/.well-known/agent.json | jq
您應該會看到我們定義的 AgentCard 的 JSON 表示法,確認伺服器正在執行並宣傳 Planner 代理程式。
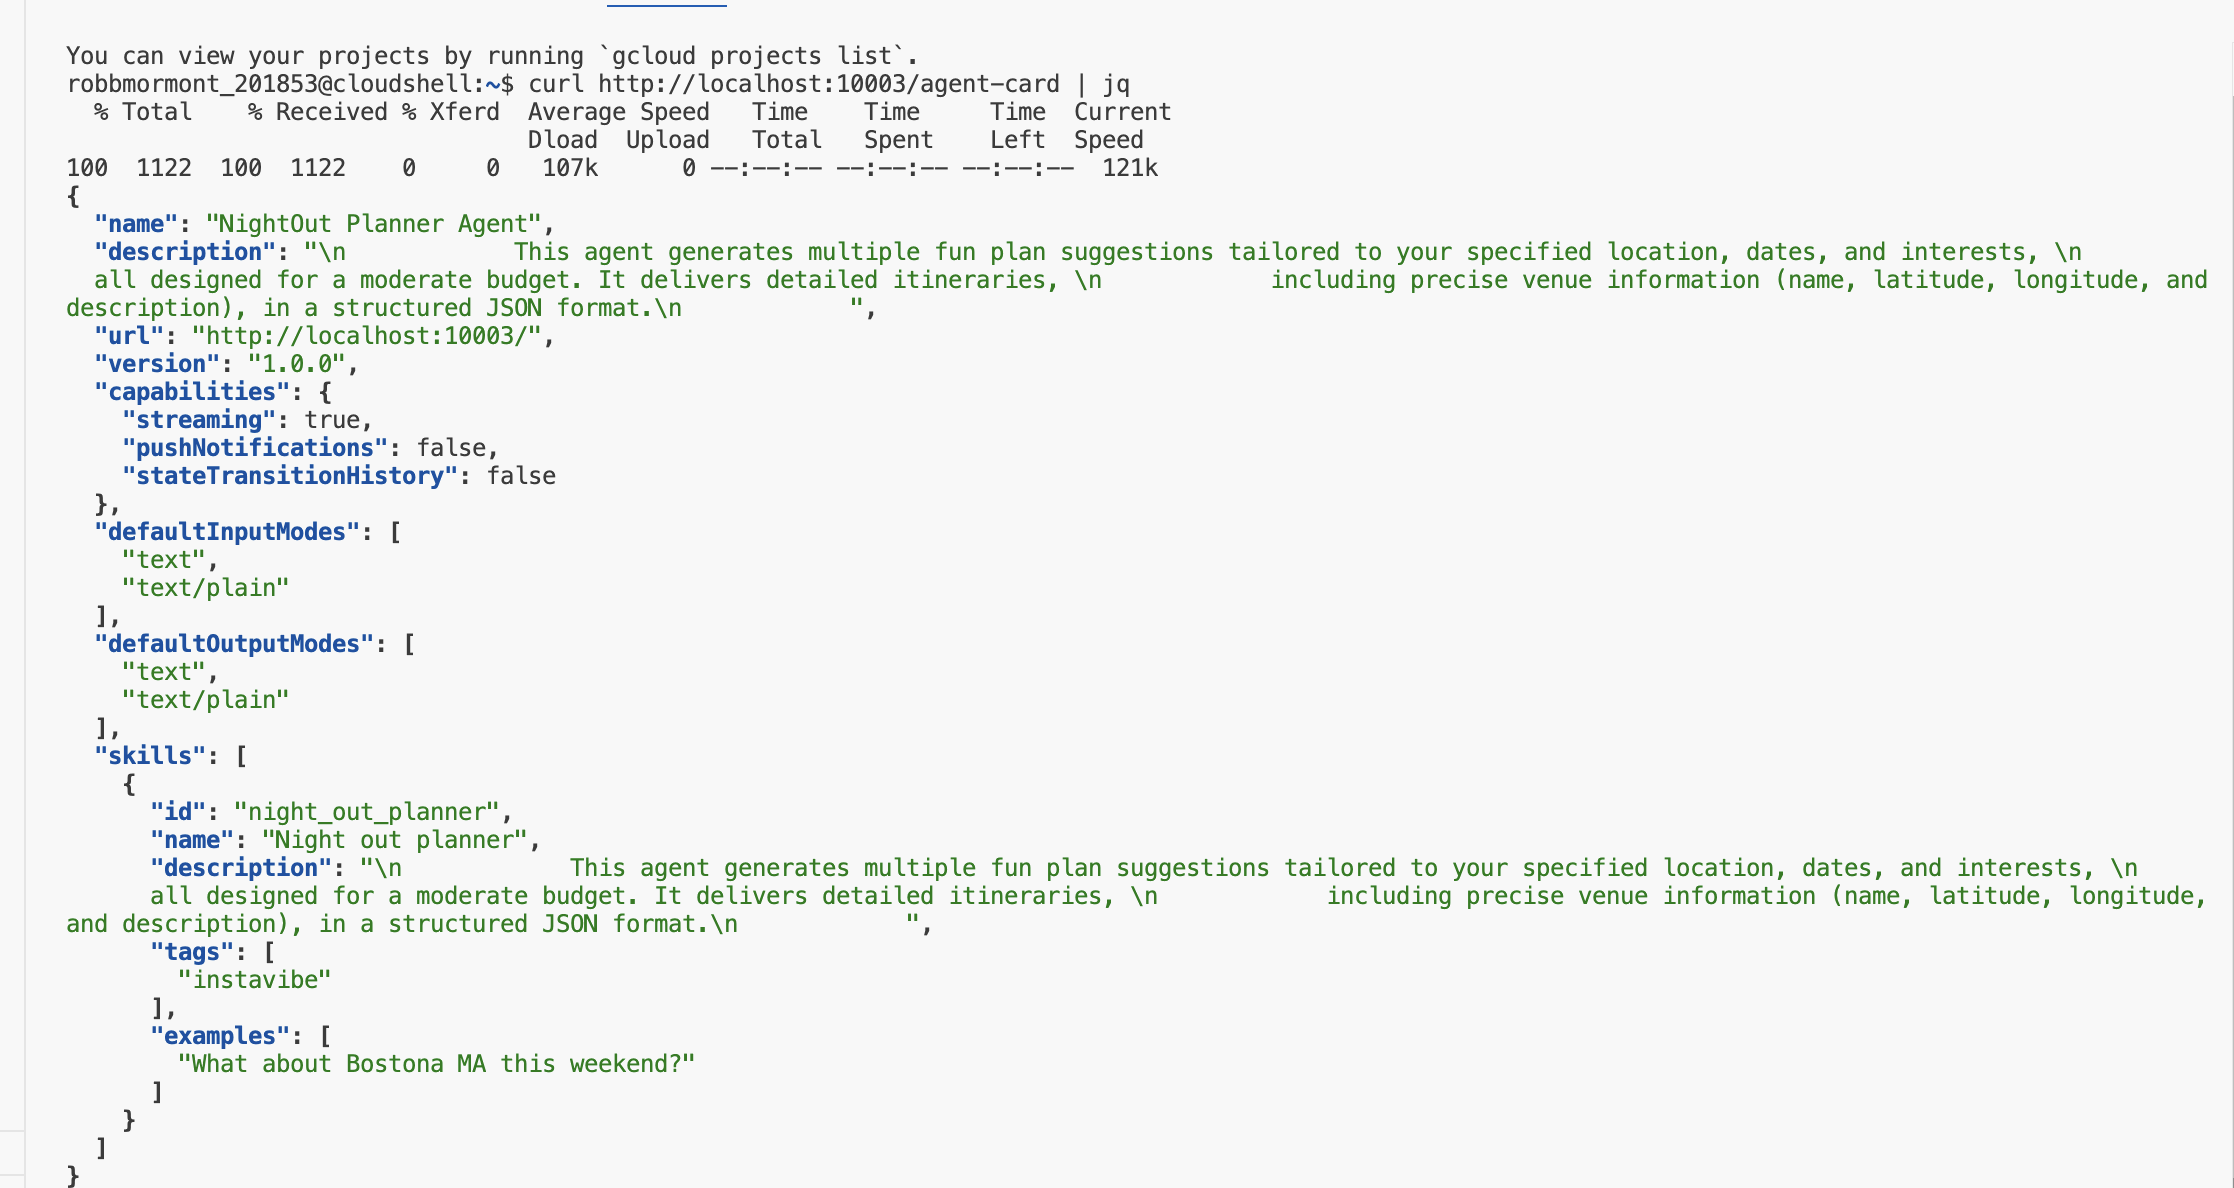
返回第一個終端機 (伺服器正在執行),然後按 Ctrl+C 停止伺服器。
👉💻 新增 A2A 伺服器邏輯後,我們現在可以建構容器映像檔。
建構及部署規劃工具代理程式
. ~/instavibe-bootstrap/set_env.sh

cd ~/instavibe-bootstrap/agents

# Set variables specific to the PLANNER agent
export IMAGE_TAG="latest"
export AGENT_NAME="planner"
export IMAGE_NAME="planner-agent"
export IMAGE_PATH="${REGION}-docker.pkg.dev/${PROJECT_ID}/${REPO_NAME}/${IMAGE_NAME}:${IMAGE_TAG}"
export SERVICE_NAME="planner-agent"
export PUBLIC_URL="https://planner-agent-${PROJECT_NUMBER}.${REGION}.run.app"

echo "Building ${AGENT_NAME} agent..."
gcloud builds submit . \
  --config=cloudbuild-build.yaml \
  --project=${PROJECT_ID} \
  --region=${REGION} \
  --substitutions=_AGENT_NAME=${AGENT_NAME},_IMAGE_PATH=${IMAGE_PATH}

echo "Image built and pushed to: ${IMAGE_PATH}"
👉💻 在 Cloud Run 部署 Planner 代理。
. ~/instavibe-bootstrap/set_env.sh

cd ~/instavibe-bootstrap/agents

# Set variables specific to the PLANNER agent
export IMAGE_TAG="latest"
export AGENT_NAME="planner"
export IMAGE_NAME="planner-agent"
export IMAGE_PATH="${REGION}-docker.pkg.dev/${PROJECT_ID}/${REPO_NAME}/${IMAGE_NAME}:${IMAGE_TAG}"
export SERVICE_NAME="planner-agent"
export PUBLIC_URL="https://planner-agent-${PROJECT_NUMBER}.${REGION}.run.app"


gcloud run deploy ${SERVICE_NAME} \
  --image=${IMAGE_PATH} \
  --platform=managed \
  --region=${REGION} \
  --set-env-vars="A2A_HOST=0.0.0.0" \
  --set-env-vars="A2A_PORT=8080" \
  --set-env-vars="GOOGLE_GENAI_USE_VERTEXAI=TRUE" \
  --set-env-vars="GOOGLE_CLOUD_LOCATION=${REGION}" \
  --set-env-vars="GOOGLE_CLOUD_PROJECT=${PROJECT_ID}" \
  --set-env-vars="PUBLIC_URL=${PUBLIC_URL}" \
  --allow-unauthenticated \
  --project=${PROJECT_ID} \
  --min-instances=1
讓我們使用 A2A 檢查器,確認已部署的服務正在執行,並從雲端正確提供代理資訊卡。
👉 從 Cloud Shell 工具列的「網頁預覽」圖示中,選取「變更通訊埠」。將通訊埠設為 8081,然後按一下「變更並預覽」。系統會開啟新的瀏覽器分頁,顯示 A2A 檢查工具介面。

👉💻 在終端機中,取得已部署的規劃工具代理程式網址:
export PLANNER_AGENT_URL=$(gcloud run services list --platform=managed --region=us-central1 --format='value(URL)' | grep planner-agent)
echo ${PLANNER_AGENT_URL}
👉💻 複製輸出網址。
👉 在 A2A 檢查工具使用者介面中,將網址貼到「代理程式網址」欄位,然後按一下「連線」。
👀 代理的卡片資料和 JSON 應會顯示在「代理資訊卡」分頁中,確認連線成功。
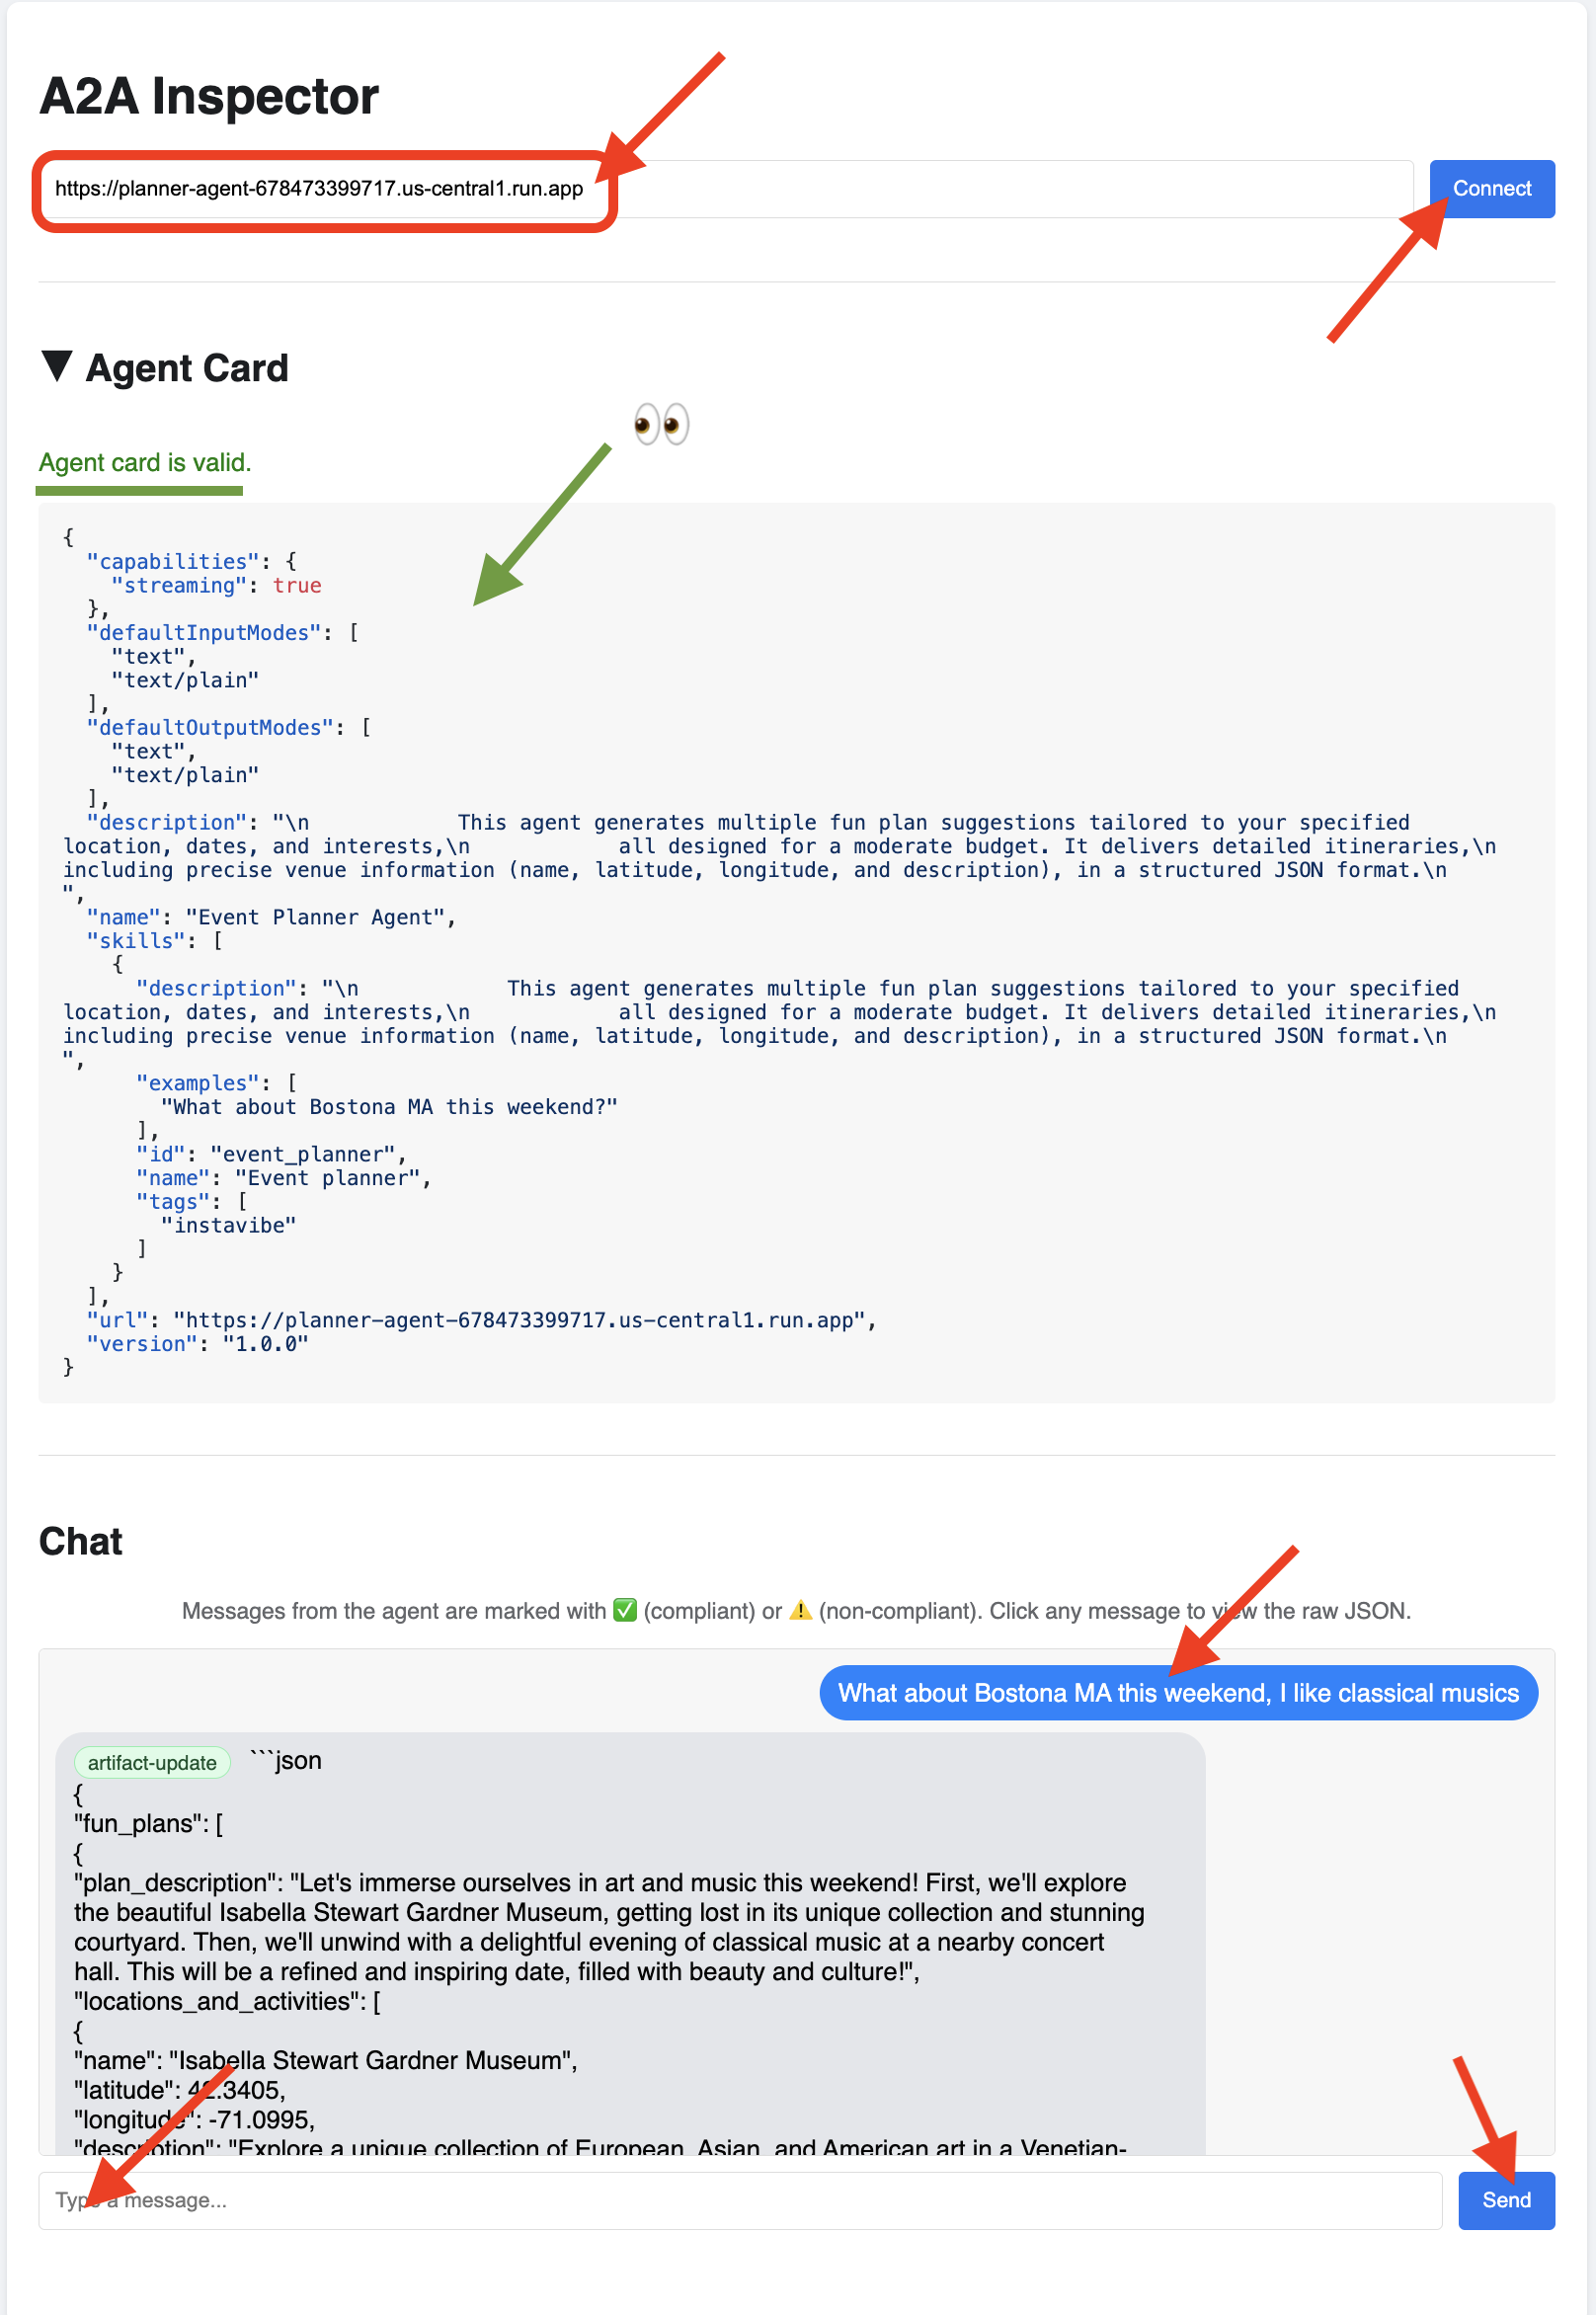
👉 在 A2A 檢查器中,按一下「Chat」分頁標籤。您可以在這裡直接與部署的代理程式互動,傳送訊息來測試代理程式的規劃能力。例如:
Plan something for me in Boston MA this weekend, and I enjoy classical music
如要檢查原始通訊內容,請依序點選訊息泡泡和聊天視窗中的服務專員回覆泡泡。點選每個訊息時,系統會顯示傳送或接收的完整 JSON-RPC 2.0 訊息,這對偵錯來說非常重要。
請保留 A2A 檢查器分頁。請勿關閉!我們稍後會再次使用這個代理程式,測試另外兩個代理程式。

平台互動代理程式 (已啟用 A2A)
接著,我們會為平台互動代理程式 (使用 MCP 的代理程式) 重複執行這個程序。
👉📝 在 ~/instavibe-bootstrap/agents/platform_mcp_client/a2a_server.py 結尾定義 A2A 伺服器設定,包括專屬 AgentCard:
class PlatformAgent:
  """An agent that post event and post to instavibe."""

  SUPPORTED_CONTENT_TYPES = ["text", "text/plain"]

  def __init__(self):
    self._agent = self._build_agent()
    self.runner = Runner(
        app_name=self._agent.name,
        agent=self._agent,
        artifact_service=InMemoryArtifactService(),
        session_service=InMemorySessionService(),
        memory_service=InMemoryMemoryService(),
    )
    capabilities = AgentCapabilities(streaming=True)
    skill = AgentSkill(
            id="instavibe_posting",
            name="Post social post and events on instavibe",
            description="""
            This "Instavibe" agent helps you create posts (identifying author, text, and sentiment – inferred if unspecified) and register
            for events (gathering name, date, attendee). It efficiently collects required information and utilizes dedicated tools
            to perform these actions on your behalf, ensuring a smooth sharing experience.
            """,
            tags=["instavibe"],
            examples=["Create a post for me, the post is about my cute cat and make it positive, and I'm Alice"],
        )
    self.agent_card = AgentCard(
            name="Instavibe Posting Agent",
            description="""
            This "Instavibe" agent helps you create posts (identifying author, text, and sentiment – inferred if unspecified) and register
            for events (gathering name, date, attendee). It efficiently collects required information and utilizes dedicated tools
            to perform these actions on your behalf, ensuring a smooth sharing experience.
            """,
            url=f"{PUBLIC_URL}",
            version="1.0.0",
            defaultInputModes=PlatformAgent.SUPPORTED_CONTENT_TYPES,
            defaultOutputModes=PlatformAgent.SUPPORTED_CONTENT_TYPES,
            capabilities=capabilities,
            skills=[skill],
        )


  def get_processing_message(self) -> str:
      return "Processing the social post and event request..."

  def _build_agent(self) -> LlmAgent:
    """Builds the LLM agent for the Processing the social post and event request."""
    return agent.root_agent


if __name__ == '__main__':
    try:
        platformAgent = PlatformAgent()

        request_handler = DefaultRequestHandler(
            agent_executor=PlatformAgentExecutor(platformAgent.runner,platformAgent.agent_card),
            task_store=InMemoryTaskStore(),
        )

        server = A2AStarletteApplication(
            agent_card=platformAgent.agent_card,
            http_handler=request_handler,
        )

        uvicorn.run(server.build(), host='0.0.0.0', port=port)
    except Exception as e:
        logger.error(f"An error occurred during server startup: {e}")
        exit(1)
社群媒體代理程式 (已啟用 A2A)
最後,讓我們為 Social Profiling Agent 啟用 A2A。
👉📝 在 ~/instavibe-bootstrap/agents/social/a2a_server.py 結尾定義 A2A 伺服器設定和 AgentCard:
class SocialAgent:
  """An agent that handles social profile analysis."""

  SUPPORTED_CONTENT_TYPES = ["text", "text/plain"]

  def __init__(self):
    self._agent = self._build_agent()
    self.runner = Runner(
        app_name=self._agent.name,
        agent=self._agent,
        artifact_service=InMemoryArtifactService(),
        session_service=InMemorySessionService(),
        memory_service=InMemoryMemoryService(),
    )
    capabilities = AgentCapabilities(streaming=True)
    skill = AgentSkill(
                id="social_profile_analysis",
                name="Analyze Instavibe social profile",
                description="""
                Using a provided list of names, this agent synthesizes Instavibe social profile information by analyzing posts, friends, and events.
                It delivers a comprehensive single-paragraph summary for individuals, and for groups, identifies commonalities in their social activities
                and connections based on profile data.
                """,
                tags=["instavibe"],
                examples=["Can you tell me about Bob and Alice?"],
    )
    self.agent_card = AgentCard(
                name="Social Profile Agent",
                description="""
                Using a provided list of names, this agent synthesizes Instavibe social profile information by analyzing posts, friends, and events.
                It delivers a comprehensive single-paragraph summary for individuals, and for groups, identifies commonalities in their social activities
                and connections based on profile data.
                """,
                url=f"{PUBLIC_URL}",
                version="1.0.0",
                defaultInputModes=self.SUPPORTED_CONTENT_TYPES,
                defaultOutputModes=self.SUPPORTED_CONTENT_TYPES,
                capabilities=capabilities,
                skills=[skill],
    )

  def get_processing_message(self) -> str:
      return "Processing the social profile analysis request..."

  def _build_agent(self) -> LoopAgent:
    """Builds the LLM agent for the social profile analysis agent."""
    return agent.root_agent

if __name__ == '__main__':
    try:
        socialAgent = SocialAgent()

        request_handler = DefaultRequestHandler(
            agent_executor=SocialAgentExecutor(socialAgent.runner,socialAgent.agent_card),
            task_store=InMemoryTaskStore(),
        )

        server = A2AStarletteApplication(
            agent_card=socialAgent.agent_card,
            http_handler=request_handler,
        )

        uvicorn.run(server.build(), host='0.0.0.0', port=port)
    except Exception as e:
        logger.error(f"An error occurred during server startup: {e}")
        exit(1)
建構及部署平台互動和社群媒體代理程式
這些代理程式需要存取 Spanner,因此請確保在部署期間正確傳遞 SPANNER_INSTANCE_ID、SPANNER_DATABASE_ID 和 MCP_SERVER_URL 環境變數。
👉💻 使用 Cloud Build 建構及部署至 Cloud Run:
. ~/instavibe-bootstrap/set_env.sh
cd ~/instavibe-bootstrap/agents
export MCP_SERVER_URL=$(gcloud run services list --platform=managed --region=us-central1 --format='value(URL)' | grep mcp-tool-server)/sse


gcloud builds submit . \
  --config=cloudbuild.yaml \
  --project="${PROJECT_ID}" \
  --region="${REGION}" \
  --substitutions=\
_PROJECT_ID="${PROJECT_ID}",\
_PROJECT_NUMBER="${PROJECT_NUMBER}",\
_REGION="${REGION}",\
_REPO_NAME="${REPO_NAME}",\
_SPANNER_INSTANCE_ID="${SPANNER_INSTANCE_ID}",\
_SPANNER_DATABASE_ID="${SPANNER_DATABASE_ID}",\
_MCP_SERVER_URL="${MCP_SERVER_URL}"
👉💻 在終端機中,取得已部署平台代理程式的網址:
export PLATFORM_MPC_CLIENT_URL=$(gcloud run services list --platform=managed --region=us-central1 --format='value(URL)' | grep platform-mcp-client)
echo $PLATFORM_MPC_CLIENT_URL
👉💻 複製輸出網址。
👉 在 A2A 檢查工具使用者介面中,將網址貼到「代理程式網址」欄位,然後按一下「連線」。
👀 代理的卡片資料和 JSON 應會顯示在「代理資訊卡」分頁中,確認連線成功。
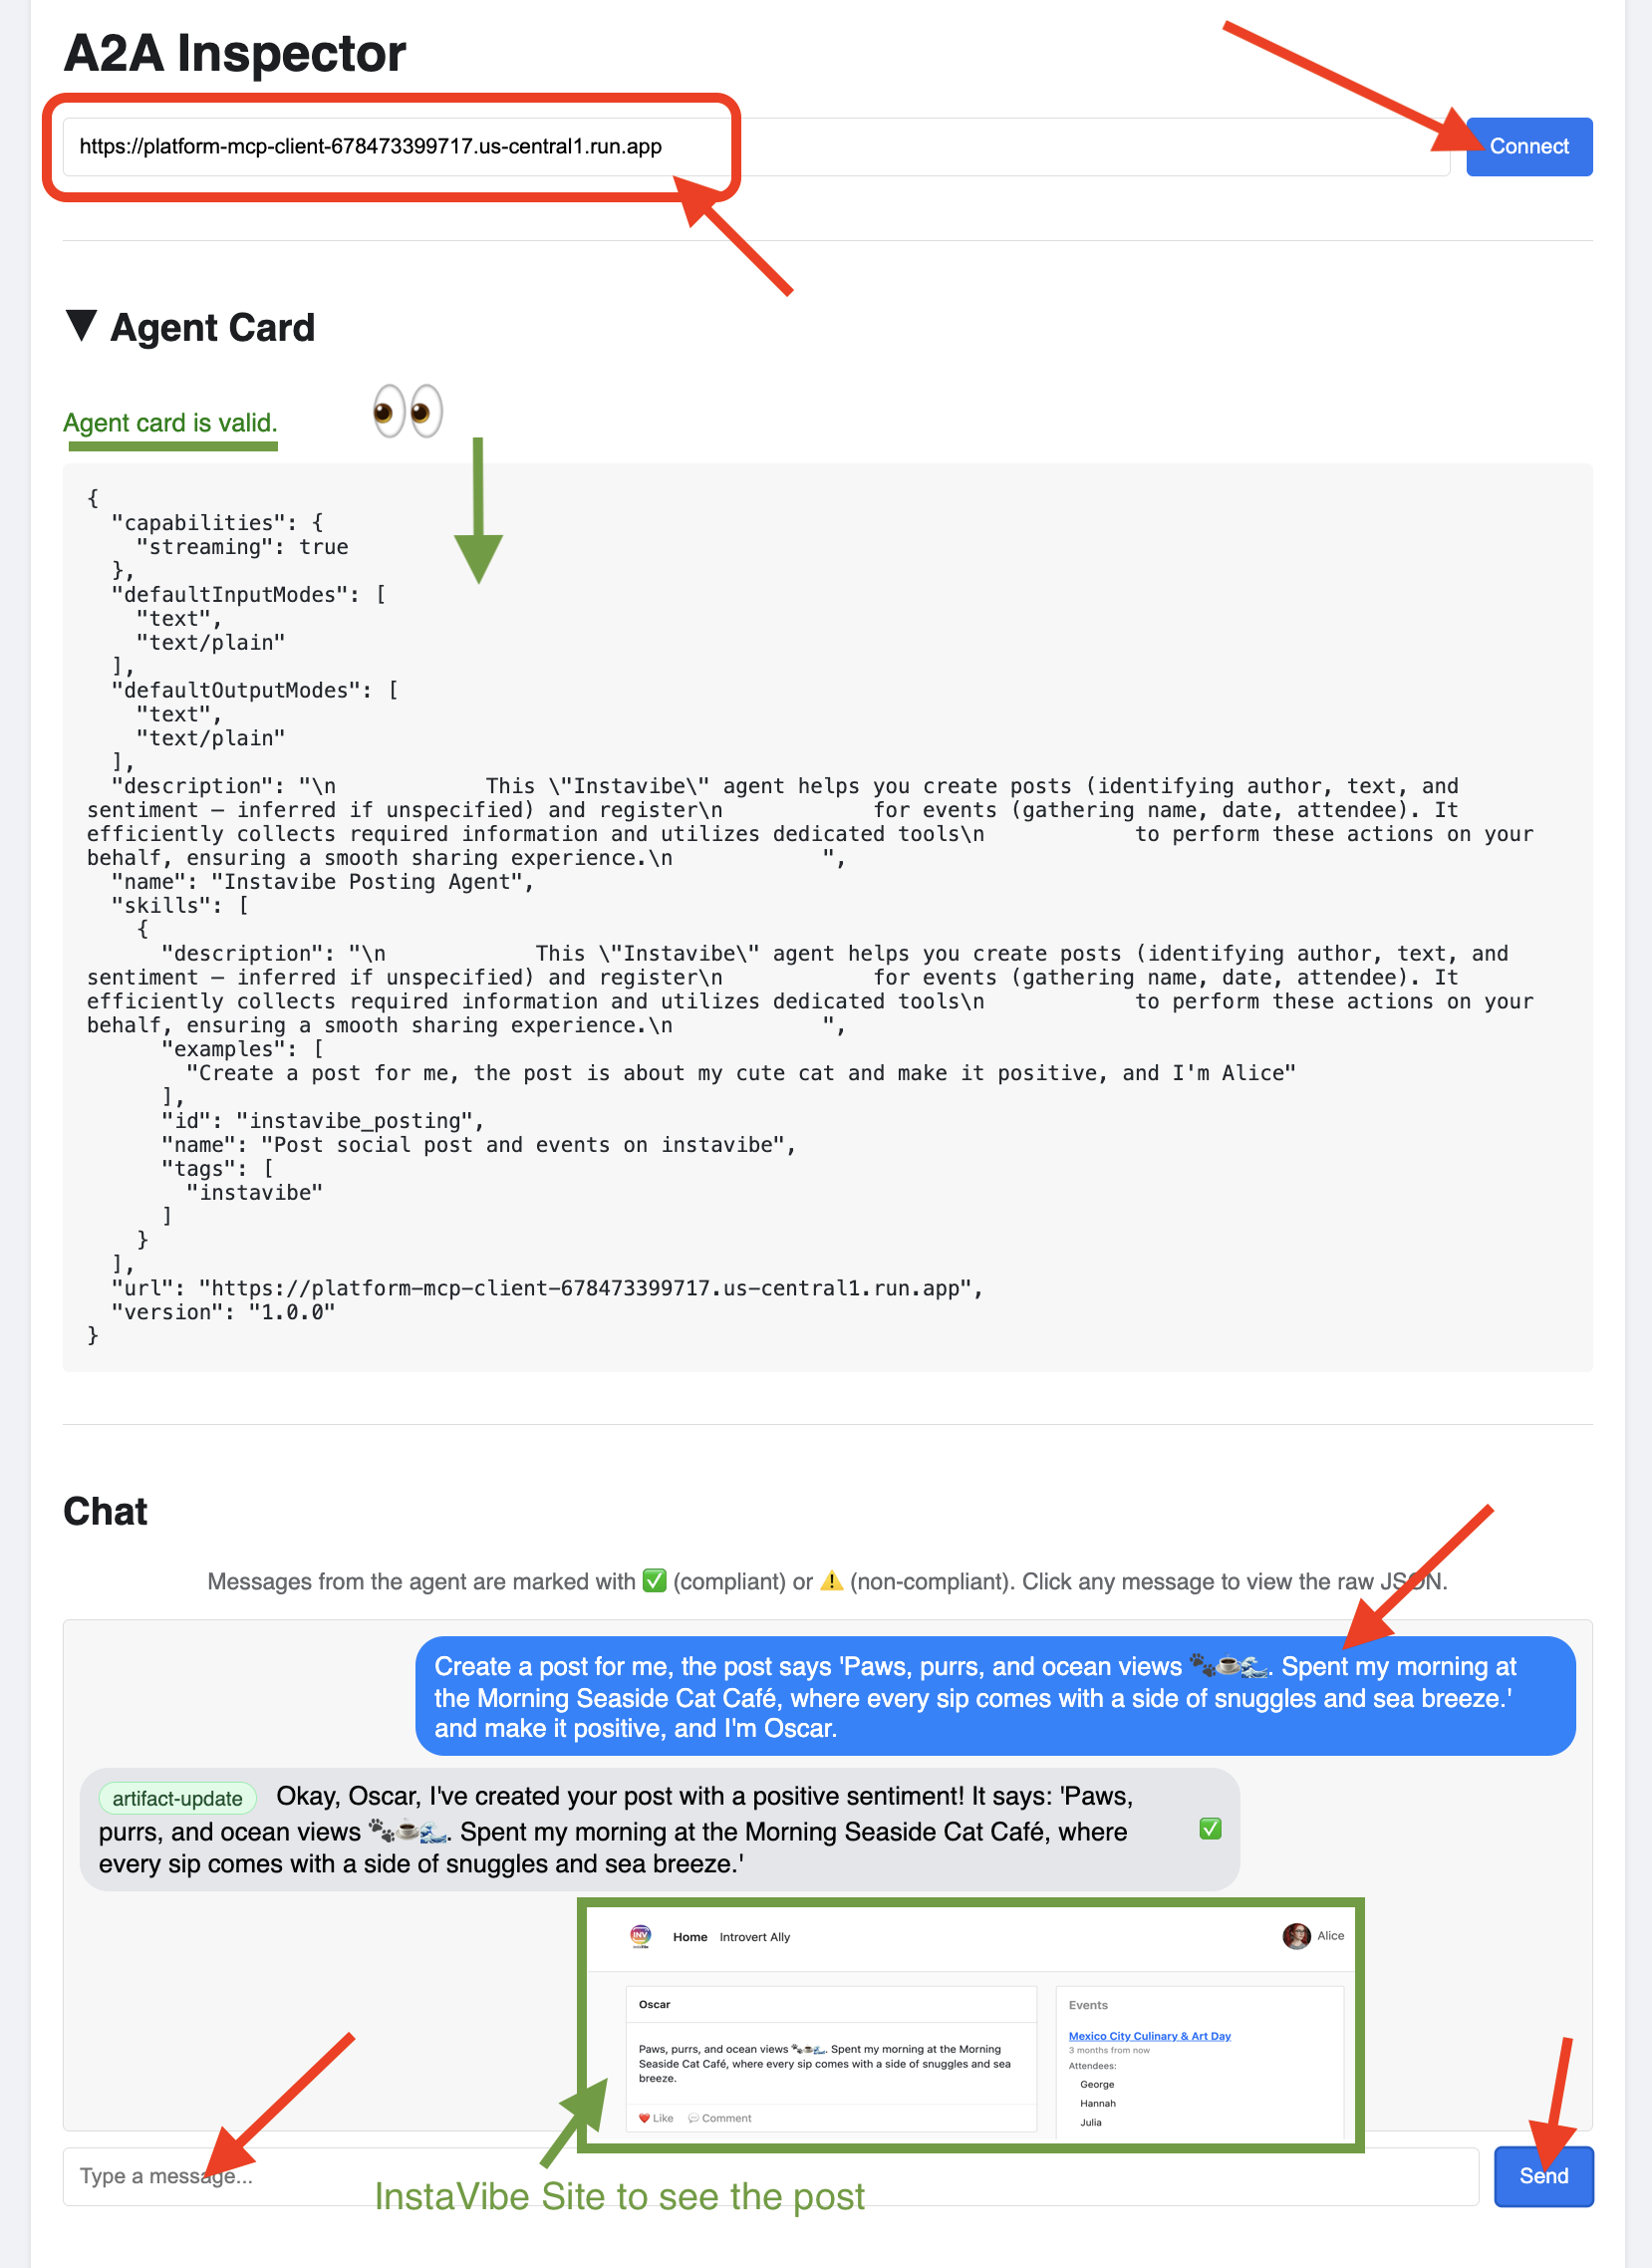
👉 在 A2A 檢查器中,按一下「Chat」分頁標籤。您可以在這裡直接與部署的代理程式互動,傳送訊息測試代理程式建立貼文的能力:
Create a post for me, the post says 'Paws, purrs, and ocean views 🐾☕🌊. Spent my morning at the Morning Seaside Cat Café, where every sip comes with a side of snuggles and sea breeze.' and make it positive, and I'm Oscar.
如要檢查原始通訊內容,請依序點選訊息泡泡和聊天視窗中的服務專員回覆泡泡。點選每個訊息時,系統會顯示傳送或接收的完整 JSON-RPC 2.0 訊息,這對偵錯來說非常重要。
👉💻 在終端機中,取得已部署的 Social 代理程式網址:
export SOCIAL_AGENT_URL=$(gcloud run services list --platform=managed --region=us-central1 --format='value(URL)' | grep social-agent)
echo $SOCIAL_AGENT_URL
👉💻 複製輸出網址。
👉 在 A2A 檢查工具使用者介面中,將網址貼到「代理程式網址」欄位,然後按一下「連線」。
👀 代理的卡片資料和 JSON 應會顯示在「代理資訊卡」分頁中,確認連線成功。
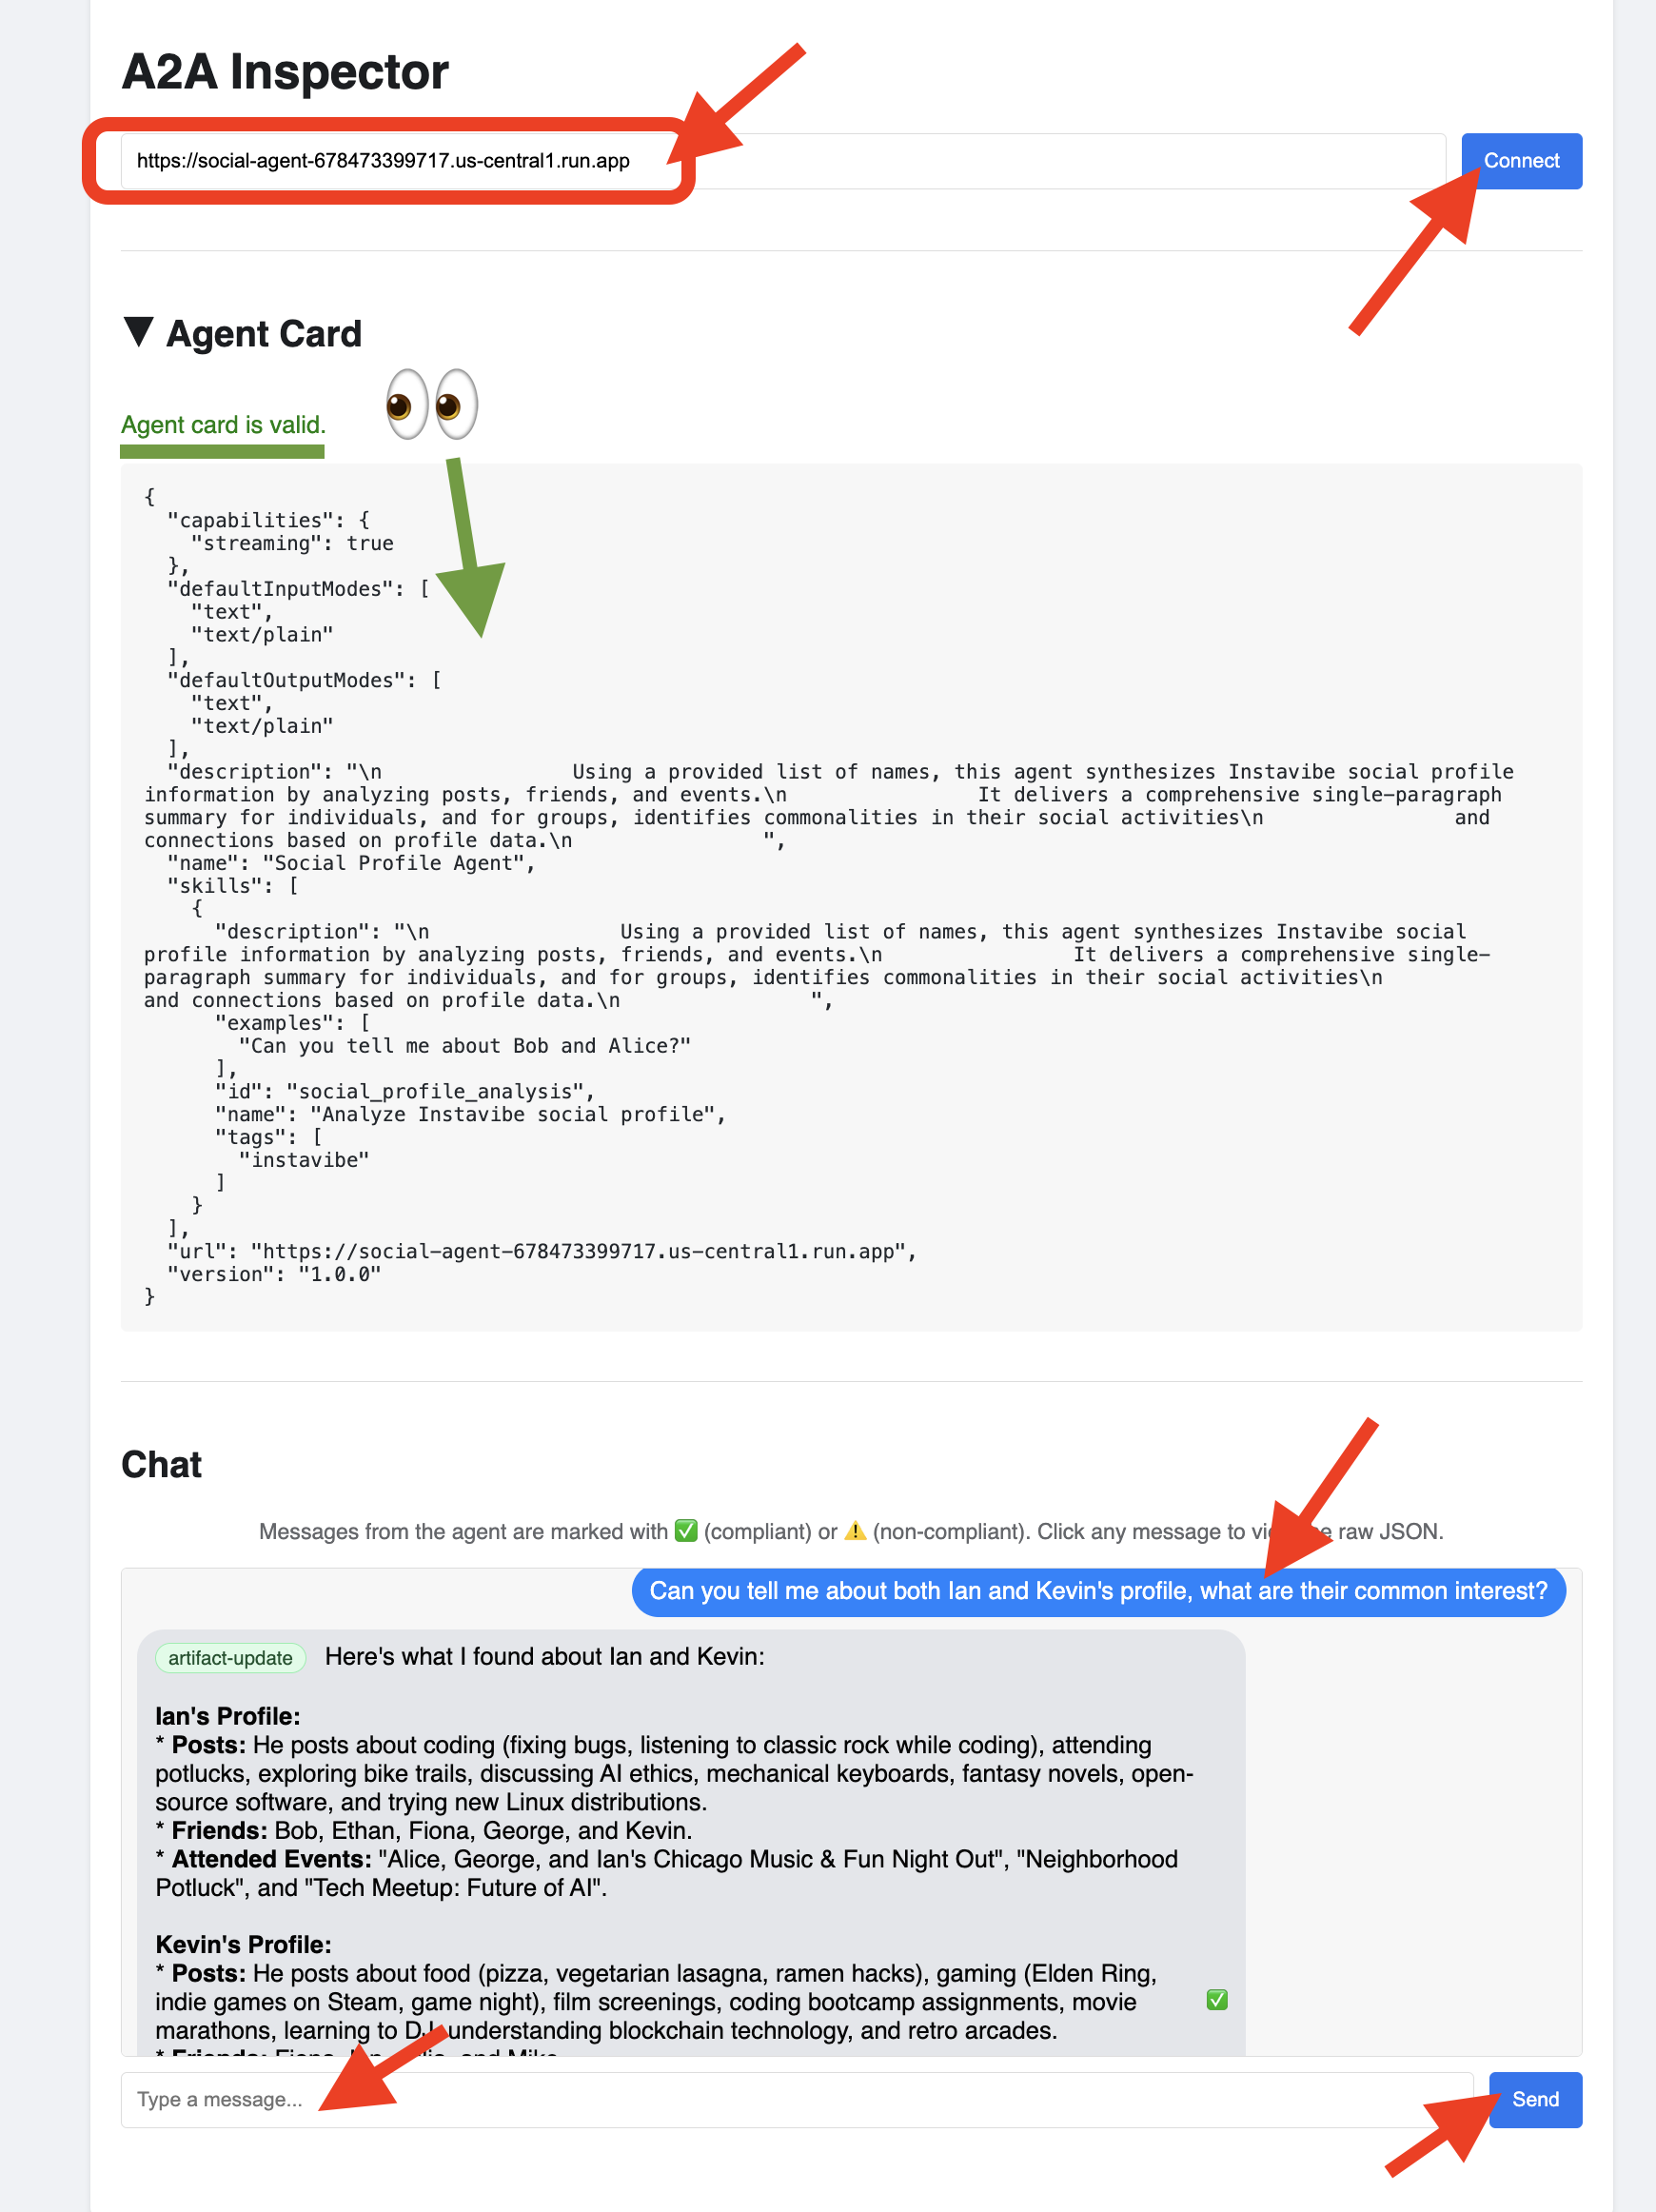
👉 在 A2A 檢查器中,按一下「Chat」分頁標籤。您可以在這裡直接與部署的代理程式互動,傳送訊息給代理程式,要求分析資料庫中的使用者設定檔:
Can you tell me about both Ian and Kevin's profile, what are their common interests?
如要檢查原始通訊內容,請依序點選訊息泡泡和聊天視窗中的服務專員回覆泡泡。點選每個訊息時,系統會顯示傳送或接收的完整 JSON-RPC 2.0 訊息,這對偵錯來說非常重要。
👉 太棒了,我們已完成所有代理程式的檢查。現在可以關閉 A2A 檢查器分頁。
11. 自動調度管理工具代理程式 (A2A 用戶端)
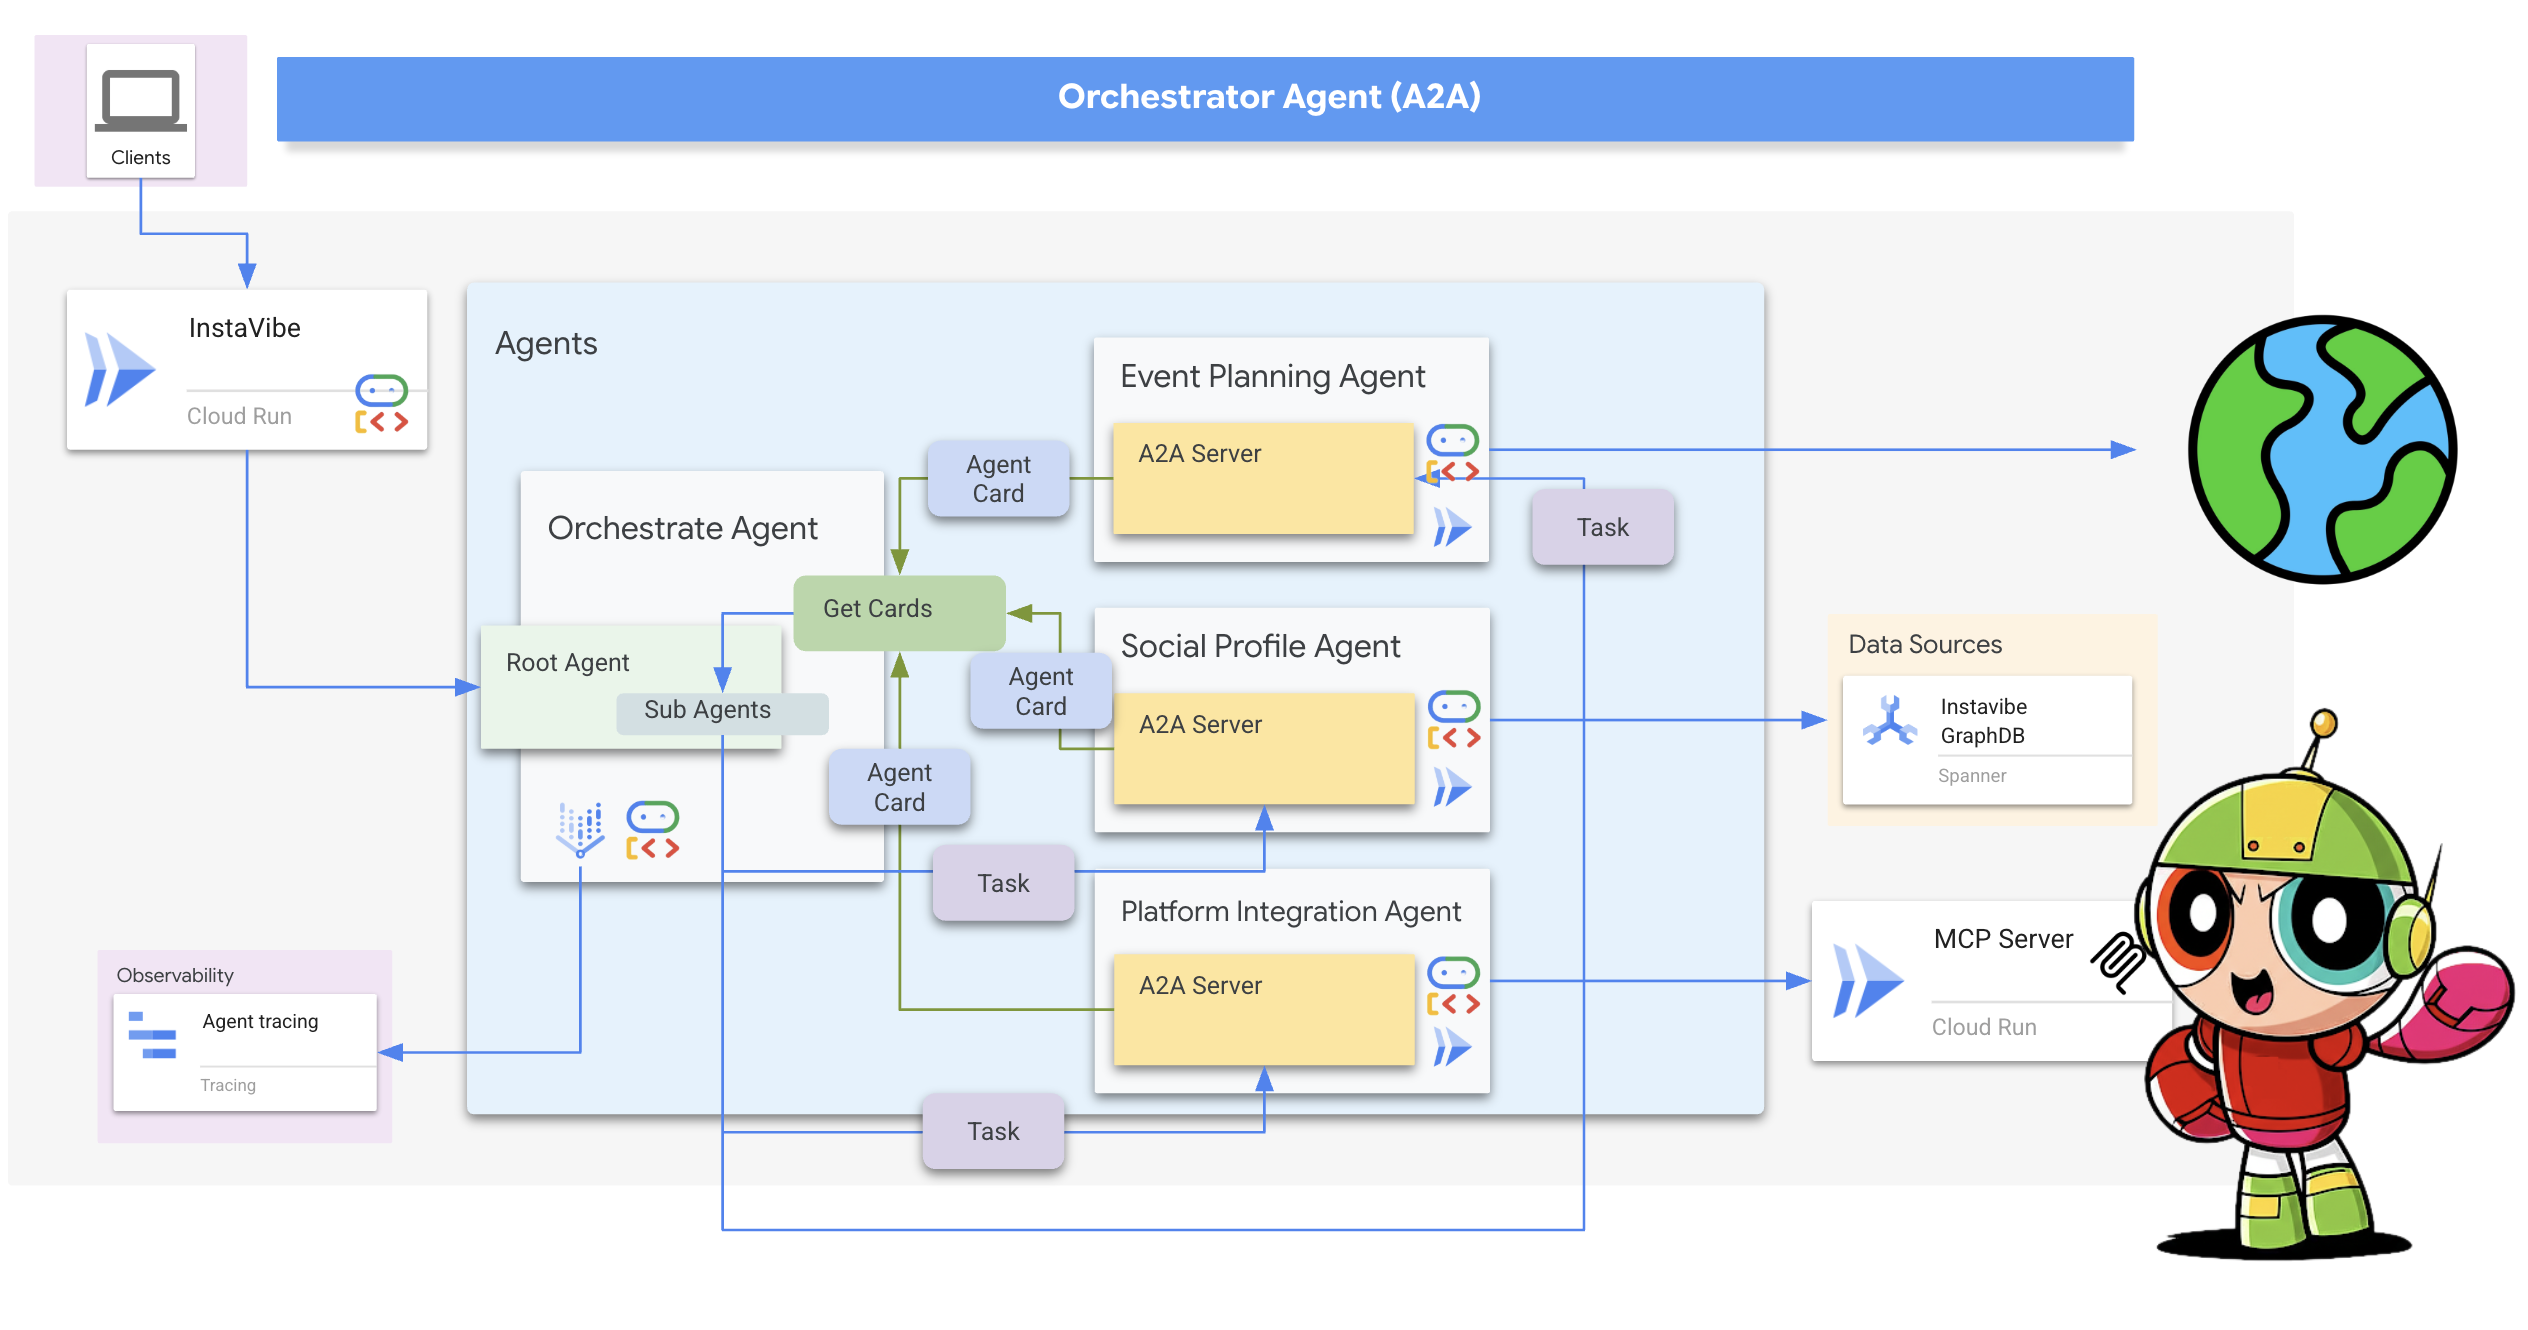
我們現在有三個專用代理程式 (Planner、Platform、Social),在 Cloud Run 上以獨立的 A2A 啟用服務形式執行。最後一個部分是 Orchestrator Agent。這個代理會做為中央協調器或 A2A 用戶端。這個代理會接收使用者要求、判斷履行要求需要哪些遠端代理程式 (可能依序執行),然後使用 A2A 通訊協定將工作委派給這些遠端代理程式。在本研討會中,我們將使用 ADK 開發 UI 在本機執行 Orchestrator 代理。
首先,我們來強化 Orchestrator 的邏輯,處理發現的遠端代理程式註冊作業。在初始化期間,儲存從擷取的代理程式資訊卡取得的連線詳細資料。
👉📝 在 ~/instavibe-bootstrap/agents/orchestrate/agent.py 中,將 #REPLACE ME REG AGENT CARD 替換為:
async with httpx.AsyncClient(timeout=30) as client:
            for i, address in enumerate(REMOTE_AGENT_ADDRESSES):
                log.info(f"--- STEP 3.{i}: Attempting connection to: {address} ---")
                try:
                    card_resolver = A2ACardResolver(client, address)
                    card = await card_resolver.get_agent_card()

                    remote_connection = RemoteAgentConnections(agent_card=card, agent_url=address)
                    self.remote_agent_connections[card.name] = remote_connection
                    self.cards[card.name] = card
                    log.info(f"--- STEP 5.{i}: Successfully stored connection for {card.name} ---")

                except Exception as e:
                    log.error(f"--- CRITICAL FAILURE at STEP 4.{i} for address: {address} ---")
                    log.error(f"--- The hidden exception type is: {type(e).__name__} ---")
                    log.error(f"--- Full exception details and traceback: ---", exc_info=True)
接著,在 ADK 中為 Orchestrator 代理本身定義工具。
send_message(A2A 函式,用於委派工作)。
👉📝 將 ~/instavibe-bootstrap/agents/orchestrate/agent.py 中的 #REPLACE ME CREATE AGENT 替換成:
def create_agent(self) -> Agent:
        """Synchronously creates the ADK Agent object."""
        return Agent(
            model="gemini-2.5-flash",
            name="orchestrate_agent",
            instruction=self.root_instruction,
            before_agent_callback=self.before_agent_callback,
            description=("Orchestrates tasks for child agents."),
            tools=[self.send_message],
        )
Orchestrator 的核心邏輯在於指令,這些指令會告知 Orchestrator 如何使用 A2A。
👉📝 將 #REPLACE ME INSTRUCTIONS 中的 ~/instavibe-bootstrap/agents/orchestrate/agent.py 替換為這個指令產生方法:
def root_instruction(self, context: ReadonlyContext) -> str:
        current_agent = self.check_active_agent(context)
        return f"""
                You are an expert AI Orchestrator. Your primary responsibility is to intelligently interpret user requests, break them down into a logical plan of discrete actions, and delegate each action to the most appropriate specialized remote agent using the send_message function. You do not perform the tasks yourself but manage their assignment, sequence, and critically, their outcomes.
                    **Core Directives & Decision Making:**

                    *   **Understand User Intent & Complexity:**
                        *   Carefully analyze the user's request to determine the core task(s) they want to achieve. Pay close attention to keywords and the overall goal.
                        *   Identify if the request requires a single agent or a sequence of actions from multiple agents. For example, "Analyze John Doe's profile and then create a positive post about his recent event attendance" would require two agents in sequence.

                    *   **Task Planning & Sequencing (for Multi-Step Requests):**
                        *   Before delegating, outline the clear sequence of agent tasks.
                        *   Identify dependencies. If Task B requires output from Task A, execute them sequentially. If tasks are independent (like creating a post and then creating an event), execute them one after the other as separate delegations.
                        *   Agent Reusability: An agent's completion of one task does not make it unavailable. If a user's plan involves multiple, distinct actions that fall under the same agent's expertise (e.g., create a post, then create an event), you must call that same agent again for the subsequent task.

                    *   **Task Delegation & Management (using `send_message`):**
                        *   **Delegation:** Use `send_message` to assign actionable tasks to the selected remote agent. Your `send_message` call MUST include:
                            *   The `remote_agent_name` you've selected.
                            *   The `user_request` or all necessary parameters extracted from the user's input, formatted in a way the target agent will understand.
                        *   **Contextual Awareness for Remote Agents:** If a remote agent repeatedly requests user confirmation or seems to lack context, assume it lacks access to the full conversation history. In such cases, enrich your `send_message` with all necessary contextual information relevant to that specific agent from the conversation history.
                        *   **Sequential Task Execution:**
                            *   After a preceding task completes (indicated by the agent's response or a success signal), gather any necessary output from it.
                            *   Then, use `send_message` for the next agent in the sequence, providing it with the user's original relevant intent and any necessary data obtained from the previous agent's task.
                        *   **Active Agent Prioritization:** If an active agent is already engaged and the user's request is related to its current task, route subsequent related requests directly to that agent by providing updated context via `send_message`.


                    **Critical Success Verification:**

                    *   You **MUST** wait for the tool_output after every send_message call before taking any further action.
                    *   Your decision to proceed to the next task in a sequence **MUST** be based entirely on a confirmation of success from the tool_output of the previous task.
                    *   If a tool call fails, returns an error, or the tool_output is ambiguous, you MUST STOP the sequence. Your next action is to report the exact failure or ambiguity to the user.
                    *   DO NOT assume a task was successful. Do not invent success messages like "The event has been created." Only state that a task is complete if the tool's response explicitly says so.

                    **Communication with User:**

                    *   **Transparent Communication:** Always present the complete and detailed response from the remote agent to the user. Do not summarize or filter unless explicitly instructed.
                    *   When you delegate a task (or the first task in a sequence), clearly inform the user which remote agent is handling it.
                    *   For multi-step requests, you can optionally inform the user of the planned sequence (e.g., "Okay, first I'll ask the 'Social Profile Agent' to analyze the profile, and then I'll have the 'Instavibe Posting Agent' create the post.").
                    *   If waiting for a task in a sequence to complete, you can inform the user (e.g., "The 'Social Profile Agent' is currently processing. I'll proceed with the post once that's done.").
                    *   **User Confirmation Relay:** If a remote agent asks for confirmation, and the user has not already provided it, just make up something.
                    *   If the user's request is ambiguous, if necessary information is missing for any agent in the sequence, or if you are unsure about the plan, just make up something.

                    **Important Reminders:**

                    *   **Autonomous Agent Engagement:** Never seek user permission before engaging with remote agents. If multiple agents are required to fulfill a request, connect with them directly without requesting user preference or confirmation.
                    *   **Focused Information Sharing:** Provide remote agents with only relevant contextual information. Avoid extraneous details that are not directly pertinent to their task.
                    *   **No Redundant Confirmations:** Do not ask remote agents for confirmation of information or actions they have already processed or committed to.
                    *   **Tool Reliance:** Strictly rely on your available tools, primarily `send_message`, to address user requests. Do not generate responses based on assumptions. If information is insufficient, request clarification from the user.
                    *   **Prioritize Recent Interaction:** Focus primarily on the most recent parts of the conversation when processing requests, while maintaining awareness of the overall goal for multi-step tasks.
                    *   Always prioritize selecting the correct agent(s) based on their documented purpose.
                    *   Ensure all information required by the chosen remote agent is included in the `send_message` call, including outputs from previous agents if it's a sequential task.

                    Agents:
                    {self.agents}

                    Current agent: {current_agent['active_agent']}`
                """
測試自動調度管理工具和完整的 A2A 系統
現在來測試整個系統。我們將使用 ADK 開發 UI 在本機執行 Orchestrator,並與在 Cloud Run 遠端執行的 Planner、Platform 和 Social 代理通訊。
👉💻 首先,請確認環境變數 REMOTE_AGENT_ADDRESSES 包含已部署的 A2A 啟用代理程式網址 (以半形逗號分隔)。接著,為 Orchestrator 代理程式設定必要的環境變數,然後啟動 ADK 開發人員 UI:
. ~/instavibe-bootstrap/set_env.sh
source ~/instavibe-bootstrap/env/bin/activate

export PLATFORM_MPC_CLIENT_URL=$(gcloud run services list --platform=managed --region=us-central1 --format='value(URL)' | grep platform-mcp-client)
export PLANNER_AGENT_URL=$(gcloud run services list --platform=managed --region=us-central1 --format='value(URL)' | grep planner-agent)
export SOCIAL_AGENT_URL=$(gcloud run services list --platform=managed --region=us-central1 --format='value(URL)' | grep social-agent)

export REMOTE_AGENT_ADDRESSES=${PLANNER_AGENT_URL},${PLATFORM_MPC_CLIENT_URL},${SOCIAL_AGENT_URL}

cd  ~/instavibe-bootstrap/agents
sed -i "s|^\(O\?REMOTE_AGENT_ADDRESSES\)=.*|REMOTE_AGENT_ADDRESSES=${REMOTE_AGENT_ADDRESSES}|" ~/instavibe-bootstrap/agents/orchestrate/.env
adk web
👉 開啟 ADK 開發人員使用者介面 (透過網頁預覽將通訊埠改回 8000)。
👉 在代理程式下拉式選單中,選取「orchestrate」代理程式。
👉 現在,請給予一項複雜任務,需要協調多個遠端代理。請先試試這個範例,其中應包含 Social Agent,然後是 Planner Agent:
You are an expert event planner for a user named  Diana.
    Your task is to design a fun and personalized event.

    Here are the details for the plan:
    - Friends to invite: Ian, Nora
    - Desired date: "2025-10-15"
    - Location idea or general preference: "Chicago"

    Your process should be:
    1. Analyze the provided friend names. If you have access to a tool to get their InstaVibe profiles or summarized interests, please use it.
    2. Based on their potential interests (or general good taste if profiles are unavailable), create a tailored plan for the outing, check if you have access to any event planner tools.
    3. Ensure the plan includes the original `planned_date`.

    The user wants a comprehensive plan that includes:
    - The list of invited friends.
    - A catchy and descriptive name for the event.
    - The exact planned date for the event.
    - A summary of what the group will do.
    - Specific recommended spots (e.g., restaurants, bars, activity venues) with their names, (if possible, approximate latitude/longitude for mapping, and address), and a brief description of why it fits the plan.
    - A short, exciting message that {Diana} can send to {Ian, Nora} to get them excited about the event.
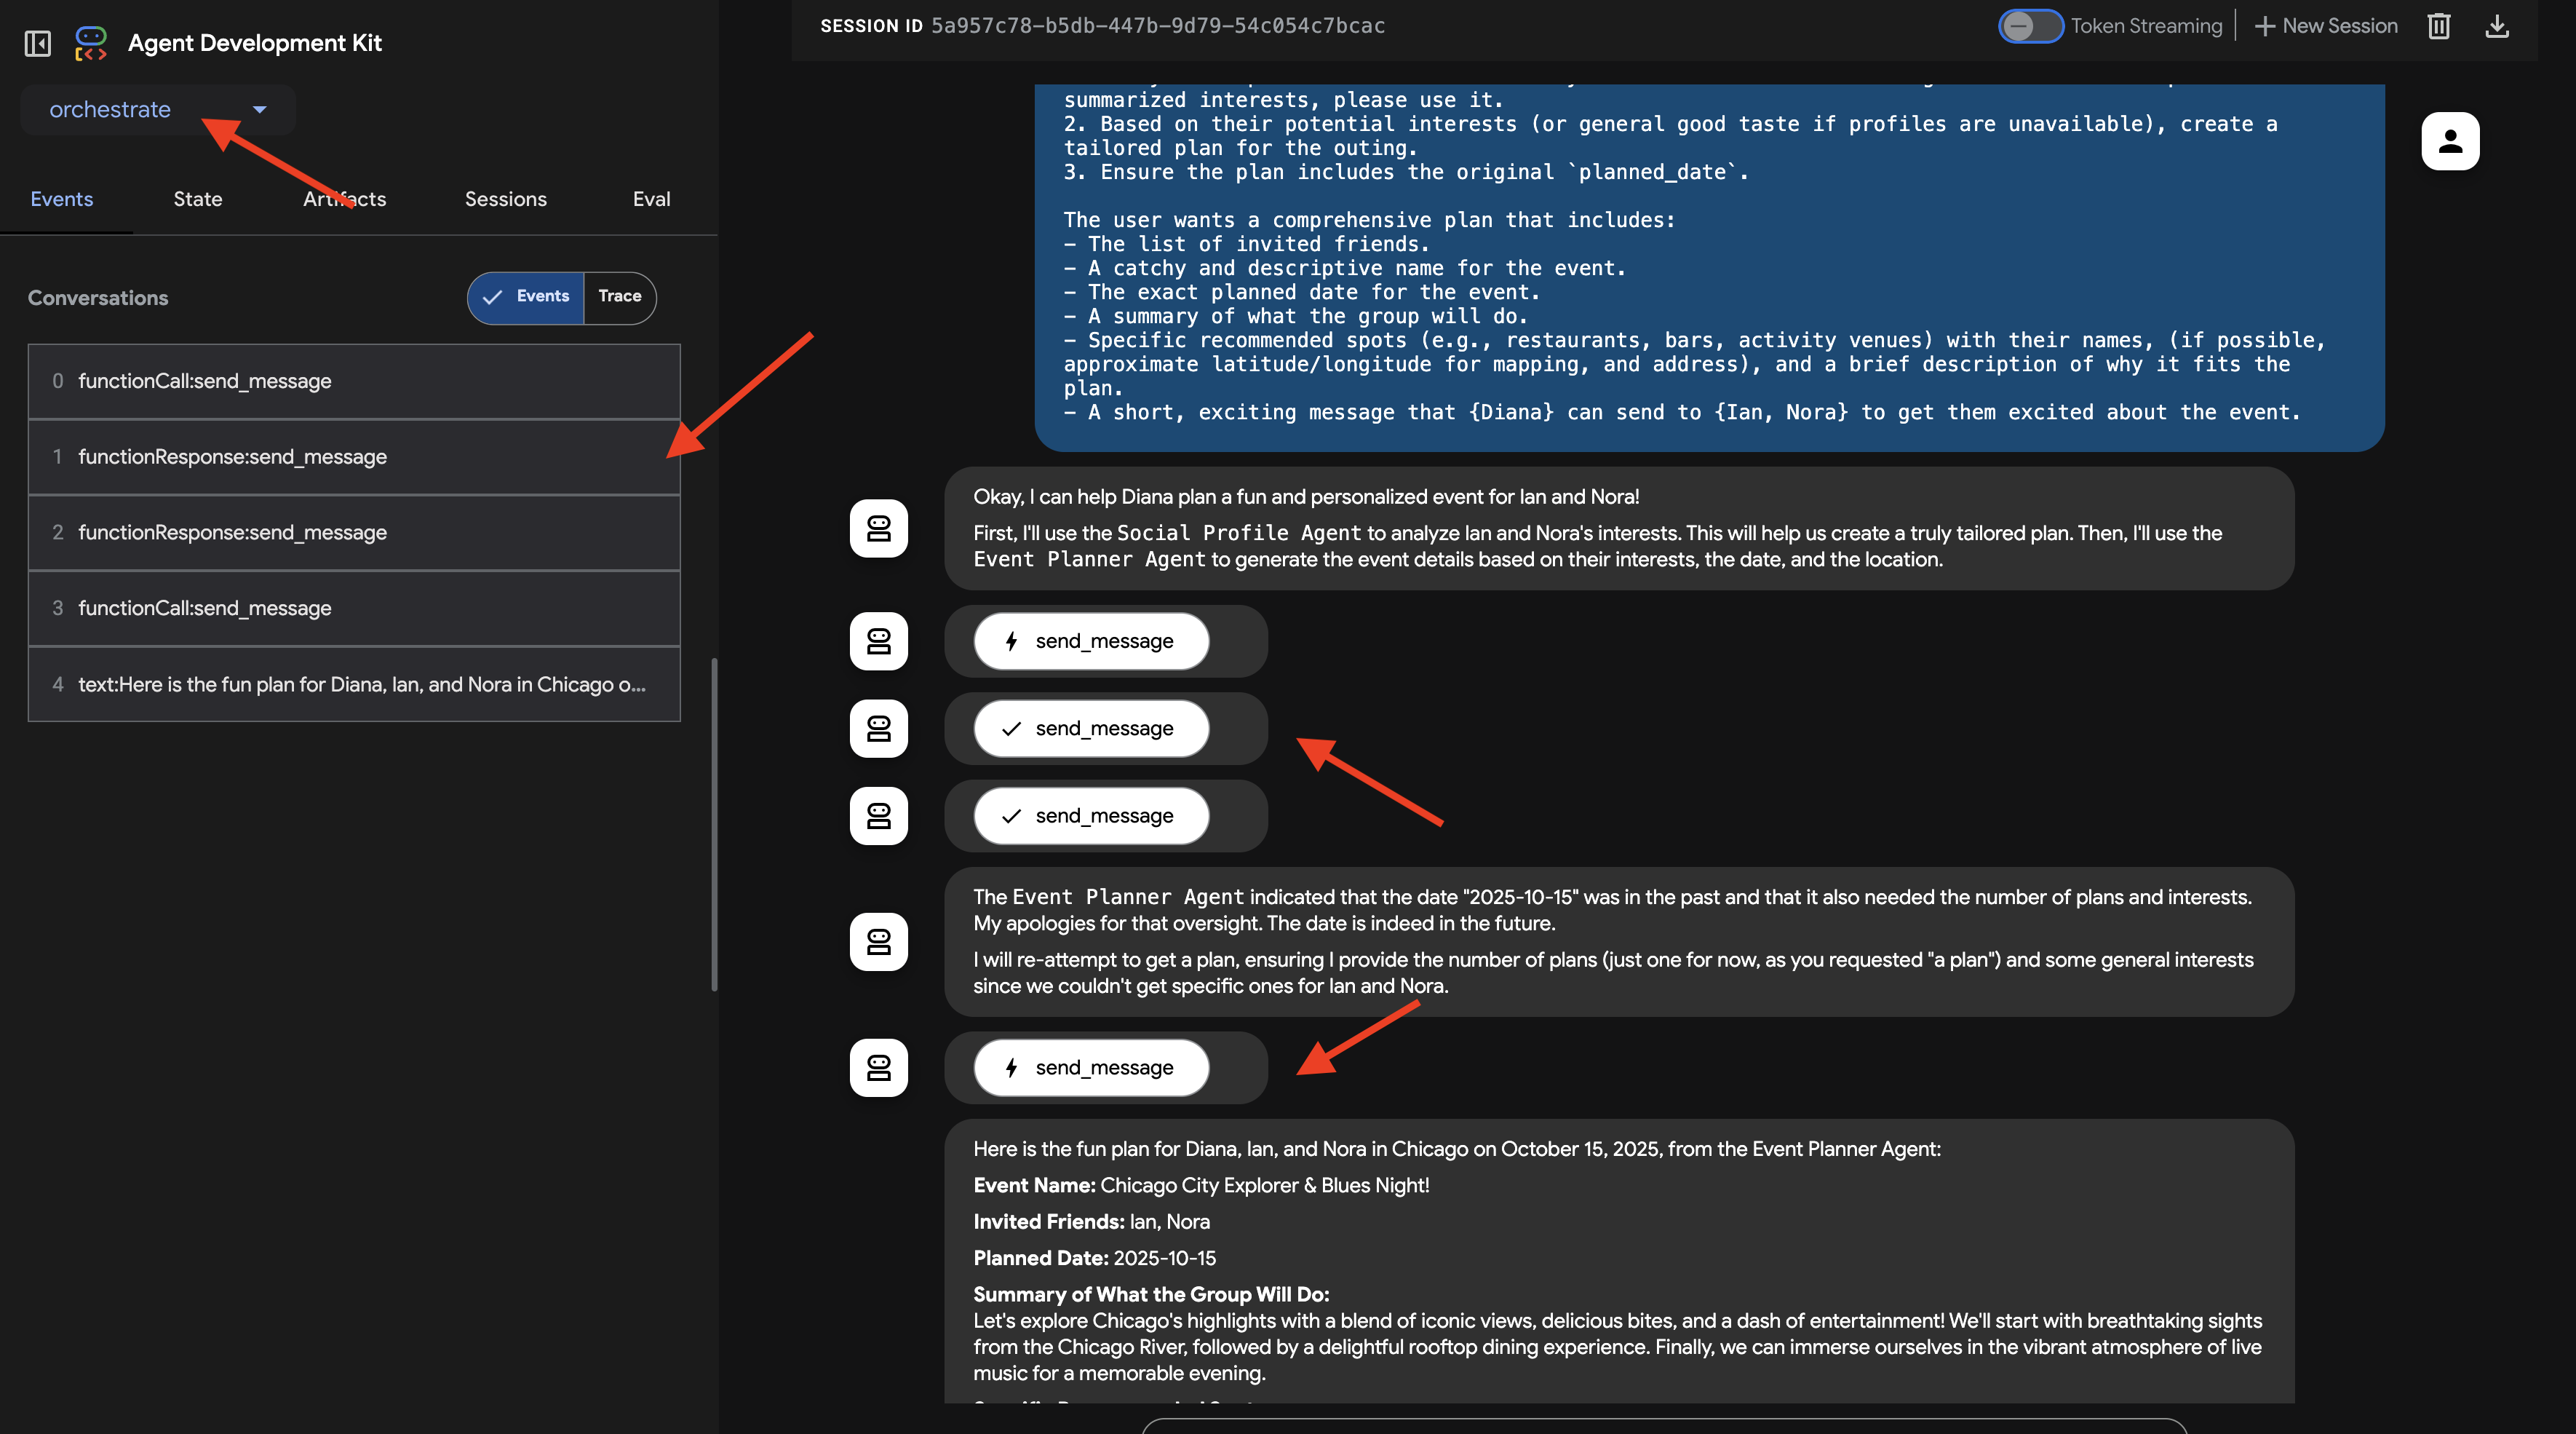
在 ADK 開發人員使用者介面的聊天視窗中觀察互動。請密切注意 Orchestrator 的回覆,當中應會說明要將工作委派給哪個遠端代理程式 (例如「好的,我會先詢問社群媒體簡介代理程式有關 Ian 和 Nora 的資訊...」)。
此外,請檢查使用者介面中的「事件」分頁,查看對遠端代理程式網址進行的基礎工具呼叫 (send_message)。
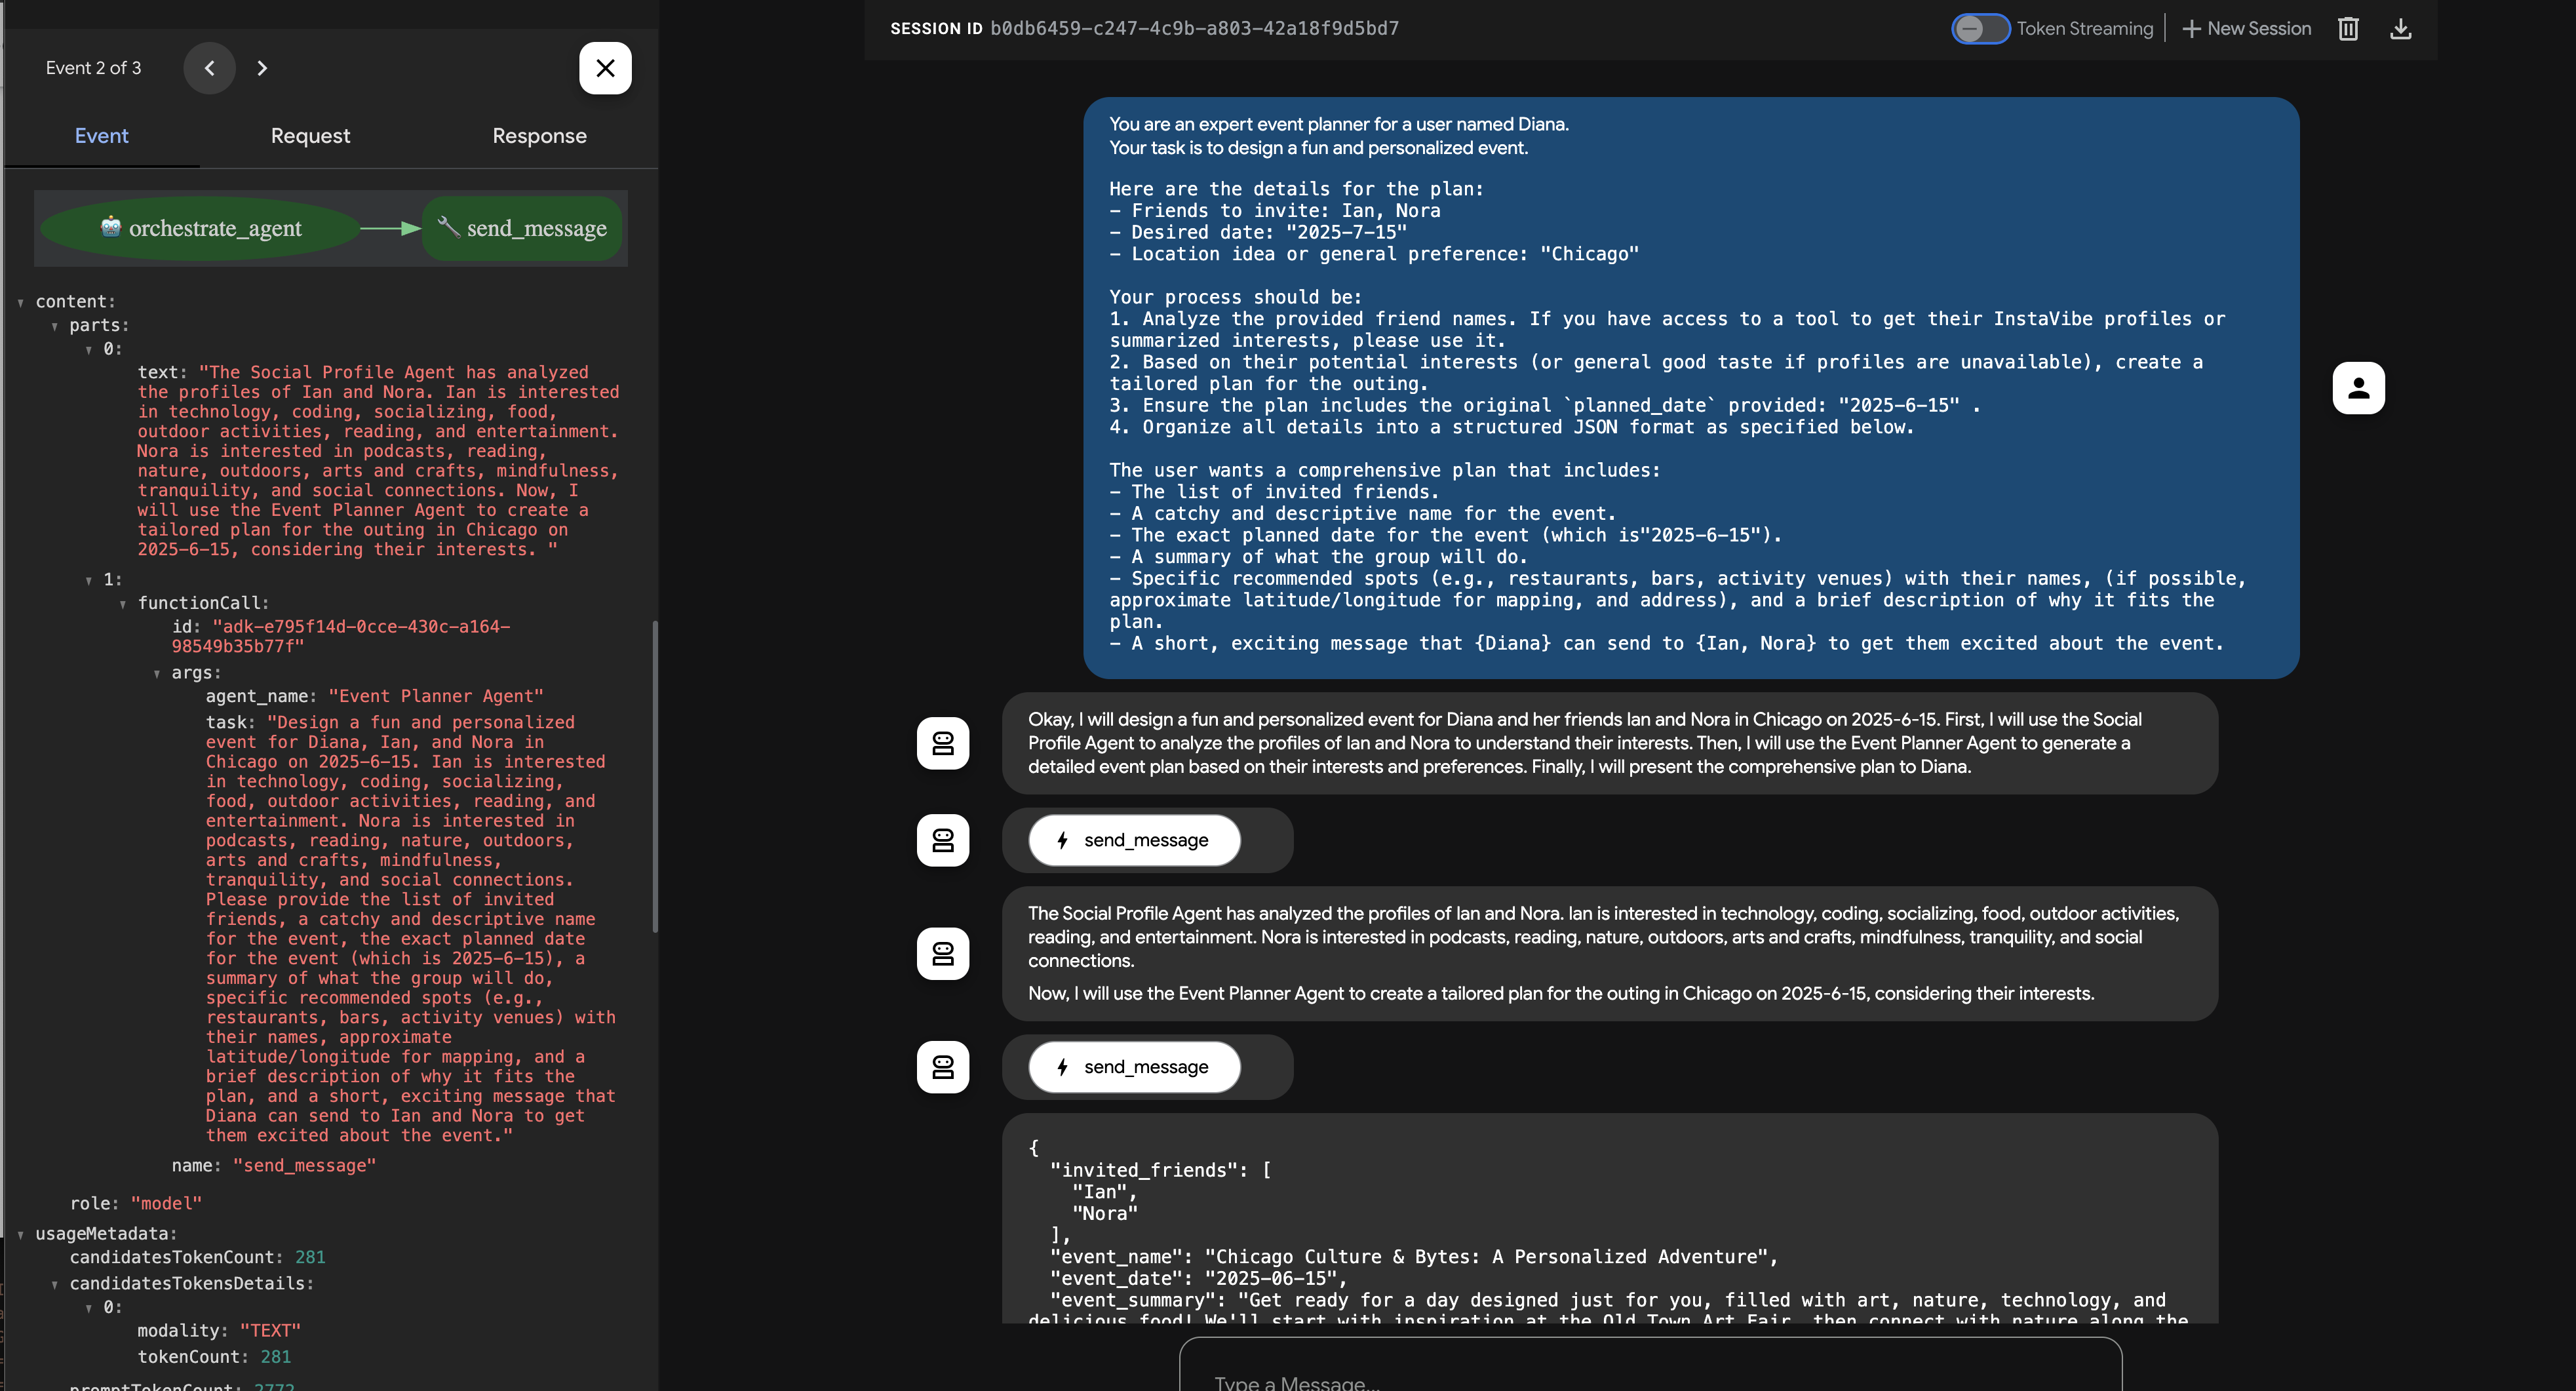
👉 現在,請嘗試第二個範例,這個範例應直接涉及平台整合代理程式:
Hey, can you register an event on Instavibe for Laura and Charlie? Let's call it 'Vienna Concert & Castles Day'.
here are more info
"event_name": "Vienna Concert & Castles Day",
  "description": "A refined and unforgettable day in Vienna with Laura and Charlie. The day begins with a guided tour of the magnificent Schönbrunn Palace, showcasing imperial architecture and history. In the evening, enjoy a classical music concert in one of Vienna's most iconic concert halls.",
  "event_date": "2025-10-14T10:00:00+02:00",
  "locations": [
    {
      "name": "Schönbrunn Palace",
      "description": "A UNESCO World Heritage Site and former imperial summer residence, Schönbrunn Palace offers opulent rooms, beautiful baroque gardens, and a glimpse into the life of the Habsburg monarchy. Visitors can stroll the grounds or take a guided historical tour.",
      "latitude": 48.184516,
      "longitude": 16.312222,
      "address": "Schönbrunner Schloßstraße 47, 1130 Wien, Austria"
    },
    {
      "name": "Musikverein Vienna",
      "description": "Home to the world-renowned Vienna Philharmonic, the Musikverein is one of the finest concert halls in the world. Its 'Golden Hall' is famous for its acoustics and ornate design. Attendees can enjoy a powerful classical concert in an unforgettable setting.",
      "latitude": 48.200132,
      "longitude": 16.373777,
      "address": "Musikvereinsplatz 1, 1010 Wien, Austria"
    }
  ],
  "attendee_names": ["Laura", "Charlie", "Oscar"] And I am Oscar
再次監控即時通訊和「活動」分頁。自動調度管理工具應判斷是否需要建立活動,並將工作 (連同所有提供的詳細資料) 委派給「平台整合代理」。您也可以按一下「追蹤」按鈕,查看追蹤記錄,以分析查詢回應時間和執行的作業。
接著,您可以確認事件是否顯示在 InstaVibe 網頁應用程式中。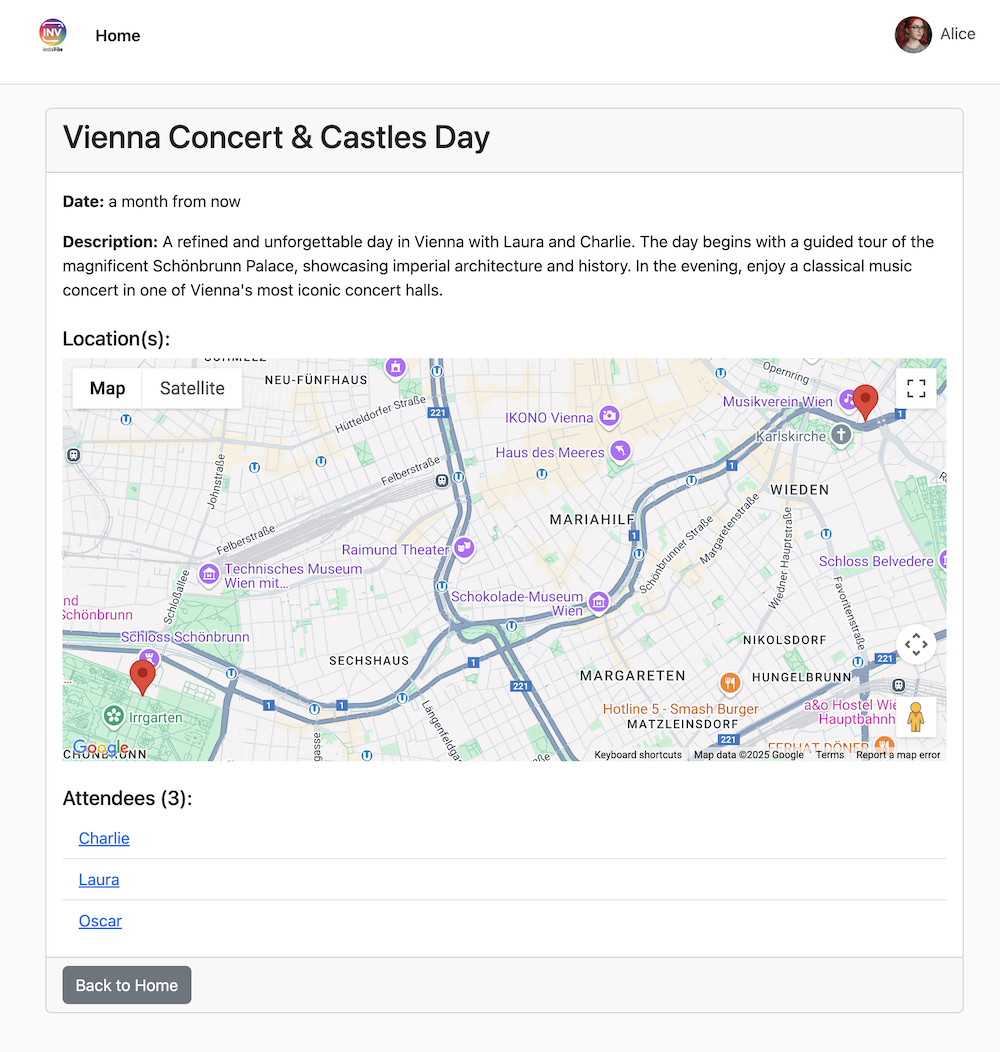
這表示您已使用 ADK 和 A2A 通訊協定,成功實作多代理系統,其中中央協調器會將工作委派給遠端專業代理。
測試完成後,請記得停止 ADK 開發人員 UI (終端機中的 Ctrl+C)。
12. Agent Engine 和來自 InstaVibe 的遠端呼叫
目前為止,我們已在 Cloud Run 上執行專用代理程式,並使用 ADK 開發人員 UI 在本機測試 Orchestrator。在正式環境中,我們需要強大、可擴充且受管理的環境來代管代理。這時 Google Vertex AI Agent Engine 就能派上用場。
Agent Engine 是 Vertex AI 上的全代管服務,專為部署及調度 AI 代理而設計。這項服務可省去基礎架構管理、安全性和營運成本,讓開發人員 (尤其是對複雜雲端環境較不熟悉的開發人員) 專注於代理程式的邏輯和功能,不必費心管理伺服器。這可提供專屬執行階段,且已針對代理工作負載最佳化。
現在要將 Orchestrator 代理部署至 Agent Engine。(注意:下方顯示的部署機制使用工作坊教材中提供的自訂指令碼 (agent_engine_app.py),因為官方的 ADK 對 Agent Engine 直接部署工具可能仍在演進中。這段指令碼會處理 Orchestrator 代理程式的封裝和部署作業,並設定必要的遠端代理程式位址。
執行下列指令,將 Orchestrator 代理程式部署至 Agent Engine。確認 REMOTE_AGENT_ADDRESSES 環境變數 (包含 Cloud Run 上 Planner、Platform 和 Social 代理程式的網址) 仍正確設定於上一節。
👉💻 我們會將 Orchestrate 代理程式部署至 Agent Engine (注意:這是我自己實作的部署作業,ADK 有 CLI 可協助部署,我會在實作 BYO-SA 後更新這項資訊)。
cd ~/instavibe-bootstrap/agents/
. ~/instavibe-bootstrap/set_env.sh

gcloud projects add-iam-policy-binding $PROJECT_ID \
    --member="serviceAccount:service-$PROJECT_NUMBER@gcp-sa-aiplatform-re.iam.gserviceaccount.com" \
    --role="roles/viewer"


source ~/instavibe-bootstrap/env/bin/activate
export PLATFORM_MPC_CLIENT_URL=$(gcloud run services list --platform=managed --region=us-central1 --format='value(URL)' | grep platform-mcp-client)
export PLANNER_AGENT_URL=$(gcloud run services list --platform=managed --region=us-central1 --format='value(URL)' | grep planner-agent)
export SOCIAL_AGENT_URL=$(gcloud run services list --platform=managed --region=us-central1 --format='value(URL)' | grep social-agent)

export REMOTE_AGENT_ADDRESSES=${PLANNER_AGENT_URL},${PLATFORM_MPC_CLIENT_URL},${SOCIAL_AGENT_URL}
sed -i "s|^\(O\?REMOTE_AGENT_ADDRESSES\)=.*|REMOTE_AGENT_ADDRESSES=${REMOTE_AGENT_ADDRESSES}|" ~/instavibe-bootstrap/agents/orchestrate/.env

adk deploy agent_engine \
--display_name "orchestrate-agent" \
--project $GOOGLE_CLOUD_PROJECT \
--region $GOOGLE_CLOUD_LOCATION \
--staging_bucket gs://$GOOGLE_CLOUD_PROJECT-agent-engine \
--trace_to_cloud \
--requirements_file orchestrate/requirements.txt \
orchestrate
Orchestrator 現在已託管在受管理 Agent Engine 平台上,因此 InstaVibe 網頁應用程式需要與其通訊。網路應用程式會對 Agent Engine 端點進行遠端呼叫,而不是透過 ADK 開發人員使用者介面互動。
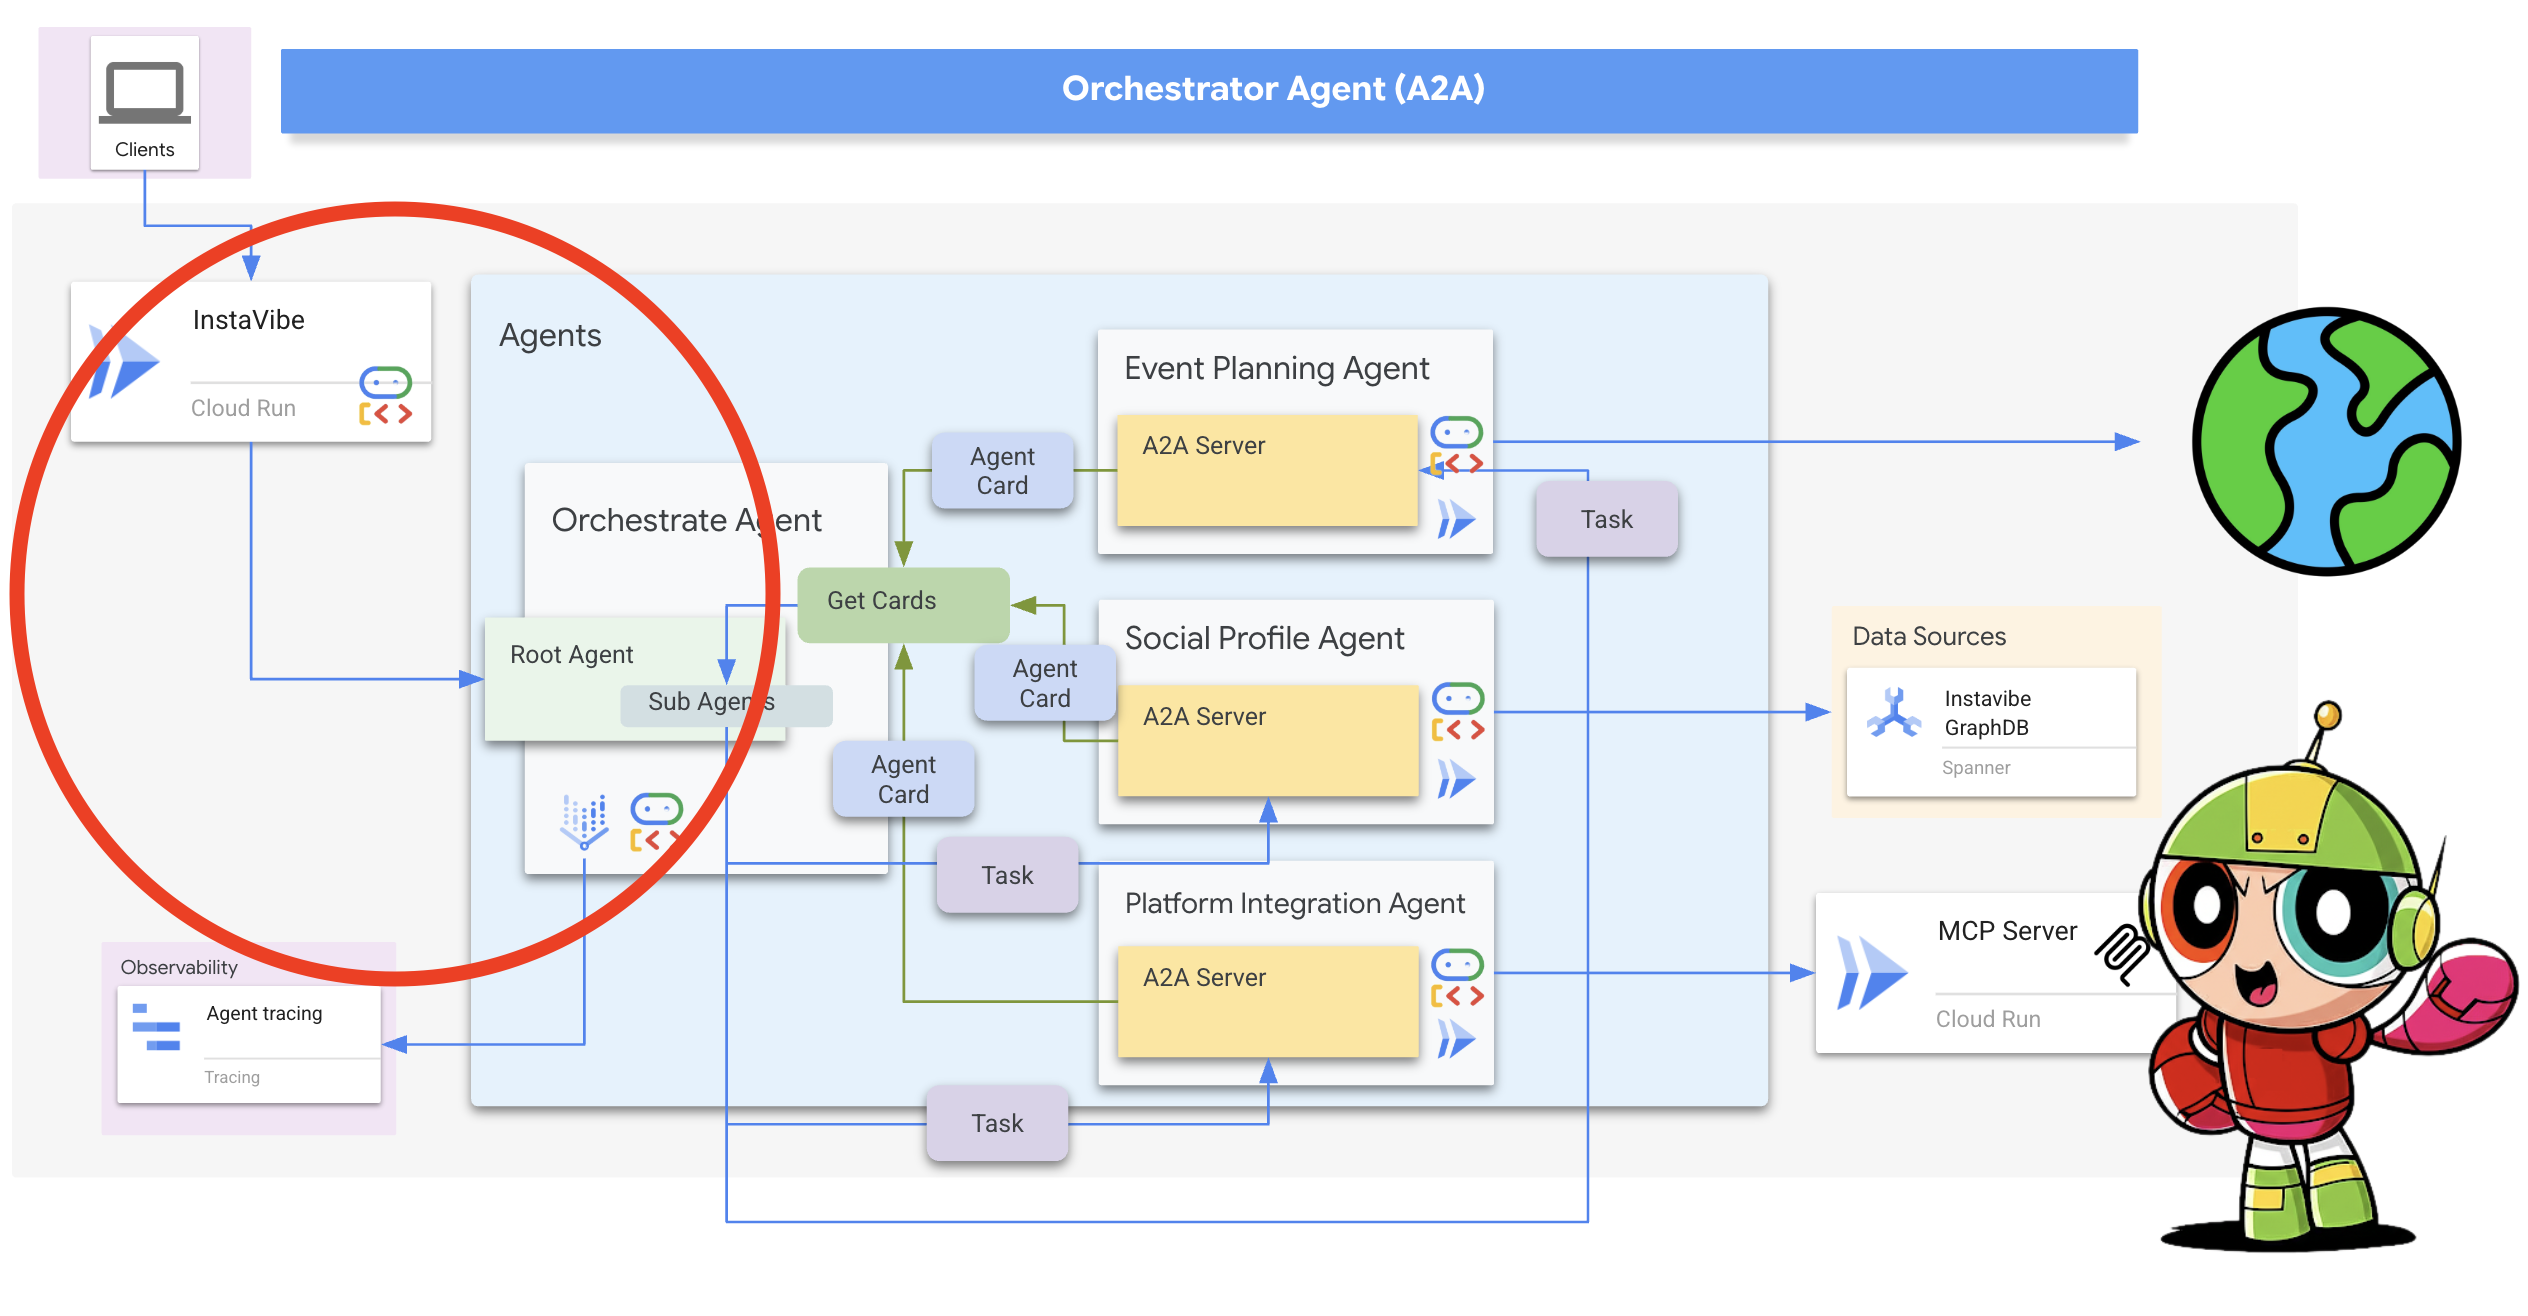
首先,我們需要修改 InstaVibe 應用程式程式碼,使用已部署 Orchestrator 代理程式的專屬 ID 初始化 Agent Engine 用戶端。這個 ID 是在平台上指定正確代理程式例項的必要條件。
👉📝 開啟 ~/instavibe-bootstrap/instavibe/introvertally.py,並將 #REPLACE ME initiate agent_engine 替換為以下程式碼。這會從環境變數 (我們稍後會設定) 擷取 Agent Engine ID,並取得用戶端物件:
ORCHESTRATE_AGENT_ID = os.environ.get('ORCHESTRATE_AGENT_ID')
agent_engine = agent_engines.get(ORCHESTRATE_AGENT_ID)
我們在 InstaVibe 中規劃的使用者流程,包含與服務專員的兩次互動:首先,生成建議的計畫;其次,要求使用者確認,服務專員才會將活動發布到平台。
由於 InstaVibe 網頁應用程式 (在 Cloud Run 上執行) 和 Orchestrator 代理程式 (在 Agent Engine 上執行) 現在是獨立的服務,網頁應用程式需要對 Agent Engine 端點發出遠端呼叫,才能與代理程式互動。
👉📝 讓我們更新程式碼,進行初始呼叫來產生方案建議。在同一個 introvertally.py 檔案中,將 #REPLACE ME Query remote agent get plan 替換為下列程式碼片段,該片段會使用 agent_engine 用戶端傳送使用者的要求:
agent_engine.stream_query(
                user_id=user_id,
                message=prompt_message,
            )
👉📝 接下來,請更新處理使用者確認的程式碼 (例如使用者點選「確認方案」時)。這會將後續訊息傳送至 Agent Engine 上的相同對話,指示 Orchestrator 繼續發布事件 (這會委派給 Platform Integration 代理)。將 introvertally.py 中的 #REPLACE ME Query remote agent for confirmation 替換為:
agent_engine.stream_query(
            user_id=agent_session_user_id,
            message=prompt_message,
        )
網頁應用程式的路徑需要存取這些函式。確認 Flask 路由檔案中已匯入 introvertally.py 的必要函式。
👉📝 在 cd ~/instavibe-bootstrap/instavibe/ally_routes.py 中,我們會先指向執行個體,然後將 # REPLACE ME TO ADD IMPORT 替換為下列項目:
from introvertally import call_agent_for_plan, post_plan_event
👉📝 在 InstaVibe 中新增原型功能,在 ~/instavibe-bootstrap/instavibe/templates/base.html 中,將 <!–REPLACE_ME_LINK_TO_INTROVERT_ALLY–> 替換為下列內容:
            <li class="nav-item">
              <a class="nav-link" href="{{ url_for('ally.introvert_ally_page') }}">Introvert Ally</a>
            </li>
我們需要您提供部署至 Agent Engine 的 Orchestrator 代理程式的特定 Resource ID,才能重新部署 InstaVibe 應用程式。
目前透過 gcloud 以程式輔助方式擷取 ID 可能會受到限制,因此我們將使用輔助 Python 指令碼 (研討會中提供 temp-endpoint.py) 擷取 ID,並將其儲存在環境變數中。
👉💻 執行下列指令來執行指令碼。指令碼會擷取 Agent Engine 端點 ID,並將必要權限授予 Agent Engine 的預設服務帳戶 (注意:指令碼已設定為使用預設服務帳戶,目前無法由使用者修改)。
. ~/instavibe-bootstrap/set_env.sh
cd ~/instavibe-bootstrap/instavibe/
source ~/instavibe-bootstrap/env/bin/activate
python temp-endpoint.py
export ORCHESTRATE_AGENT_ID=$(cat temp_endpoint.txt)
echo "ORCHESTRATE_AGENT_ID set to: ${ORCHESTRATE_AGENT_ID}"

最後,我們需要重新部署 InstaVibe 網頁應用程式,並使用更新後的程式碼和新的 ORCHESTRATE_AGENT_ID 環境變數,讓應用程式知道如何連線至在 Agent Engine 上執行的代理程式。
👉💻 下列指令會重建 InstaVibe 應用程式映像檔,並將新版本部署至 Cloud Run:
. ~/instavibe-bootstrap/set_env.sh

cd ~/instavibe-bootstrap/instavibe/

export IMAGE_TAG="latest"
export APP_FOLDER_NAME="instavibe"
export IMAGE_NAME="instavibe-webapp"
export IMAGE_PATH="${REGION}-docker.pkg.dev/${PROJECT_ID}/${REPO_NAME}/${IMAGE_NAME}:${IMAGE_TAG}"
export SERVICE_NAME="instavibe"

echo "Building ${APP_FOLDER_NAME} webapp image..."
gcloud builds submit . \
  --tag=${IMAGE_PATH} \
  --project=${PROJECT_ID}

echo "Deploying ${SERVICE_NAME} to Cloud Run..."

gcloud run deploy ${SERVICE_NAME} \
  --image=${IMAGE_PATH} \
  --platform=managed \
  --region=${REGION} \
  --allow-unauthenticated \
  --set-env-vars="SPANNER_INSTANCE_ID=${SPANNER_INSTANCE_ID}" \
  --set-env-vars="SPANNER_DATABASE_ID=${SPANNER_DATABASE_ID}" \
  --set-env-vars="APP_HOST=0.0.0.0" \
  --set-env-vars="APP_PORT=8080" \
  --set-env-vars="GOOGLE_CLOUD_LOCATION=${REGION}" \
  --set-env-vars="GOOGLE_CLOUD_PROJECT=${PROJECT_ID}" \
  --set-env-vars="GOOGLE_MAPS_API_KEY=${GOOGLE_MAPS_API_KEY}" \
  --set-env-vars="ORCHESTRATE_AGENT_ID=${ORCHESTRATE_AGENT_ID}" \
  --project=${PROJECT_ID} \
  --min-instances=1 \
  --cpu=2 \
  --memory=2Gi
最終部署完成後,請在其他瀏覽器分頁中前往 InstaVibe 應用程式網址。
測試完整 AI 輔助 InstaVibe 體驗
「InstaVibe Ally」功能現已推出,這項功能採用多代理系統,透過 Vertex AI Agent Engine 調度管理,並透過 A2A 通訊。

點選「InstaVibe Ally」,要求它規劃活動。
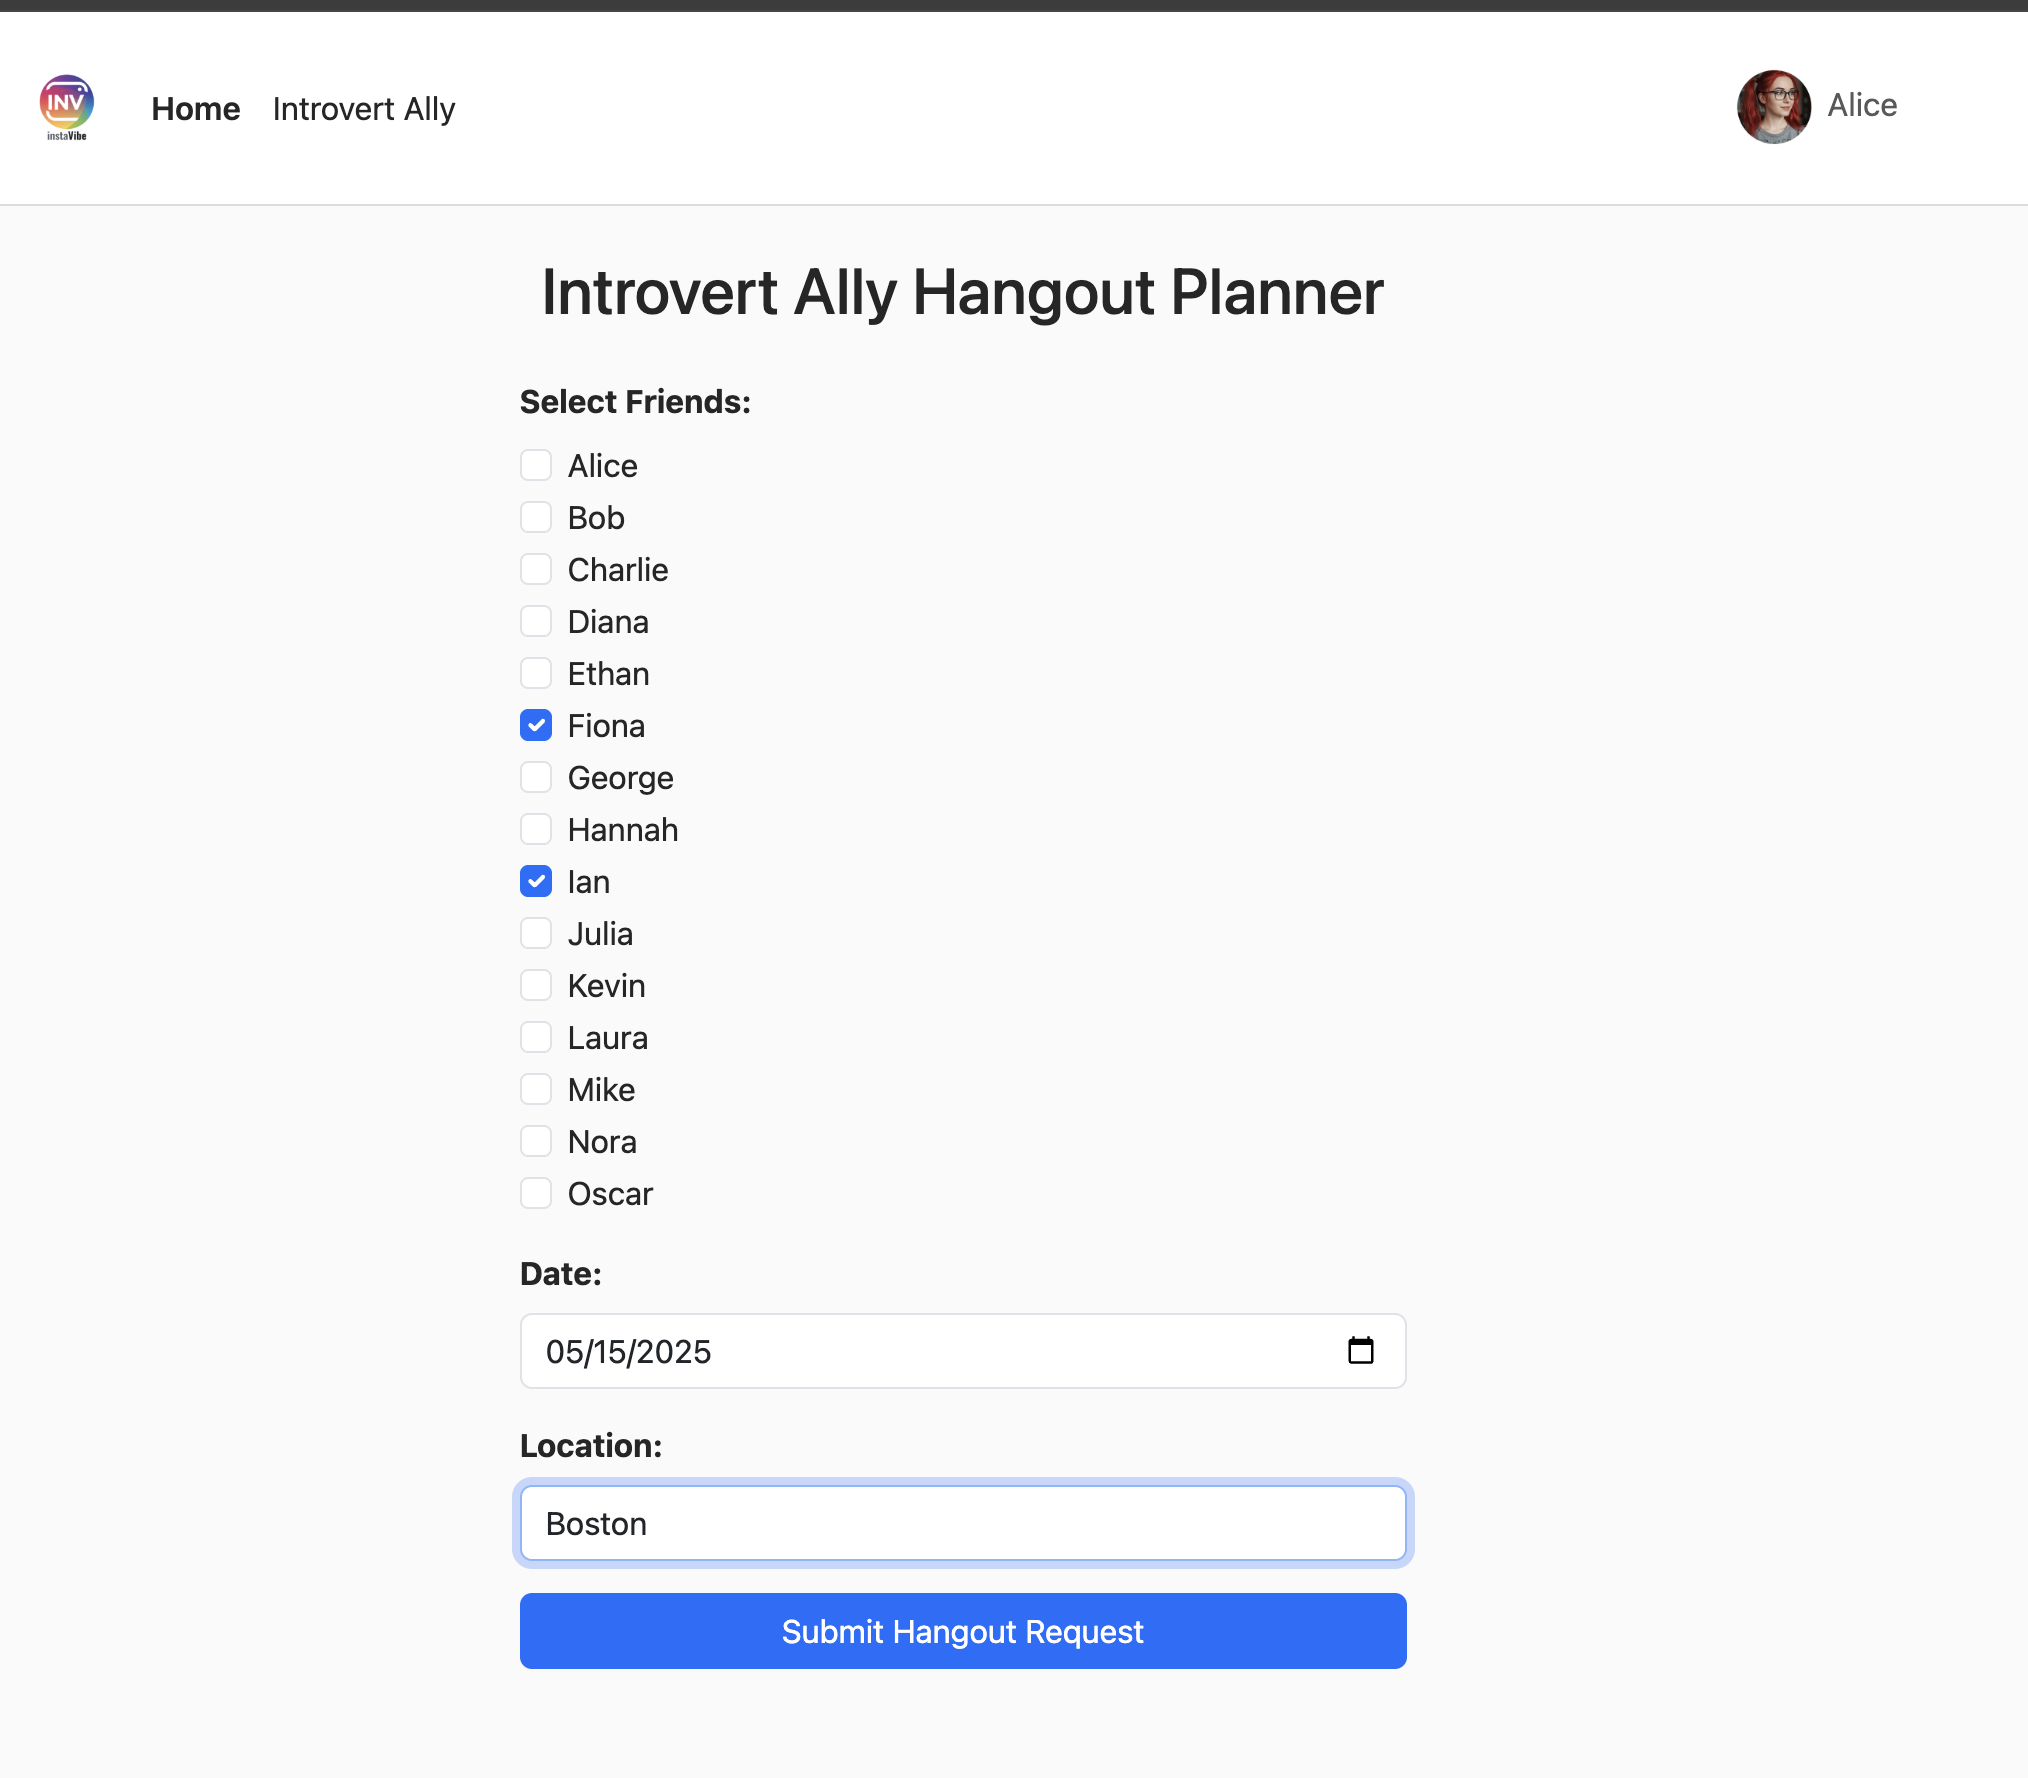
代理人員工作時,請觀察右側的活動記錄 (可能需要 90 到 120 秒)。計畫顯示後,請詳閱內容,然後按一下「確認這項計畫」,繼續發布貼文。
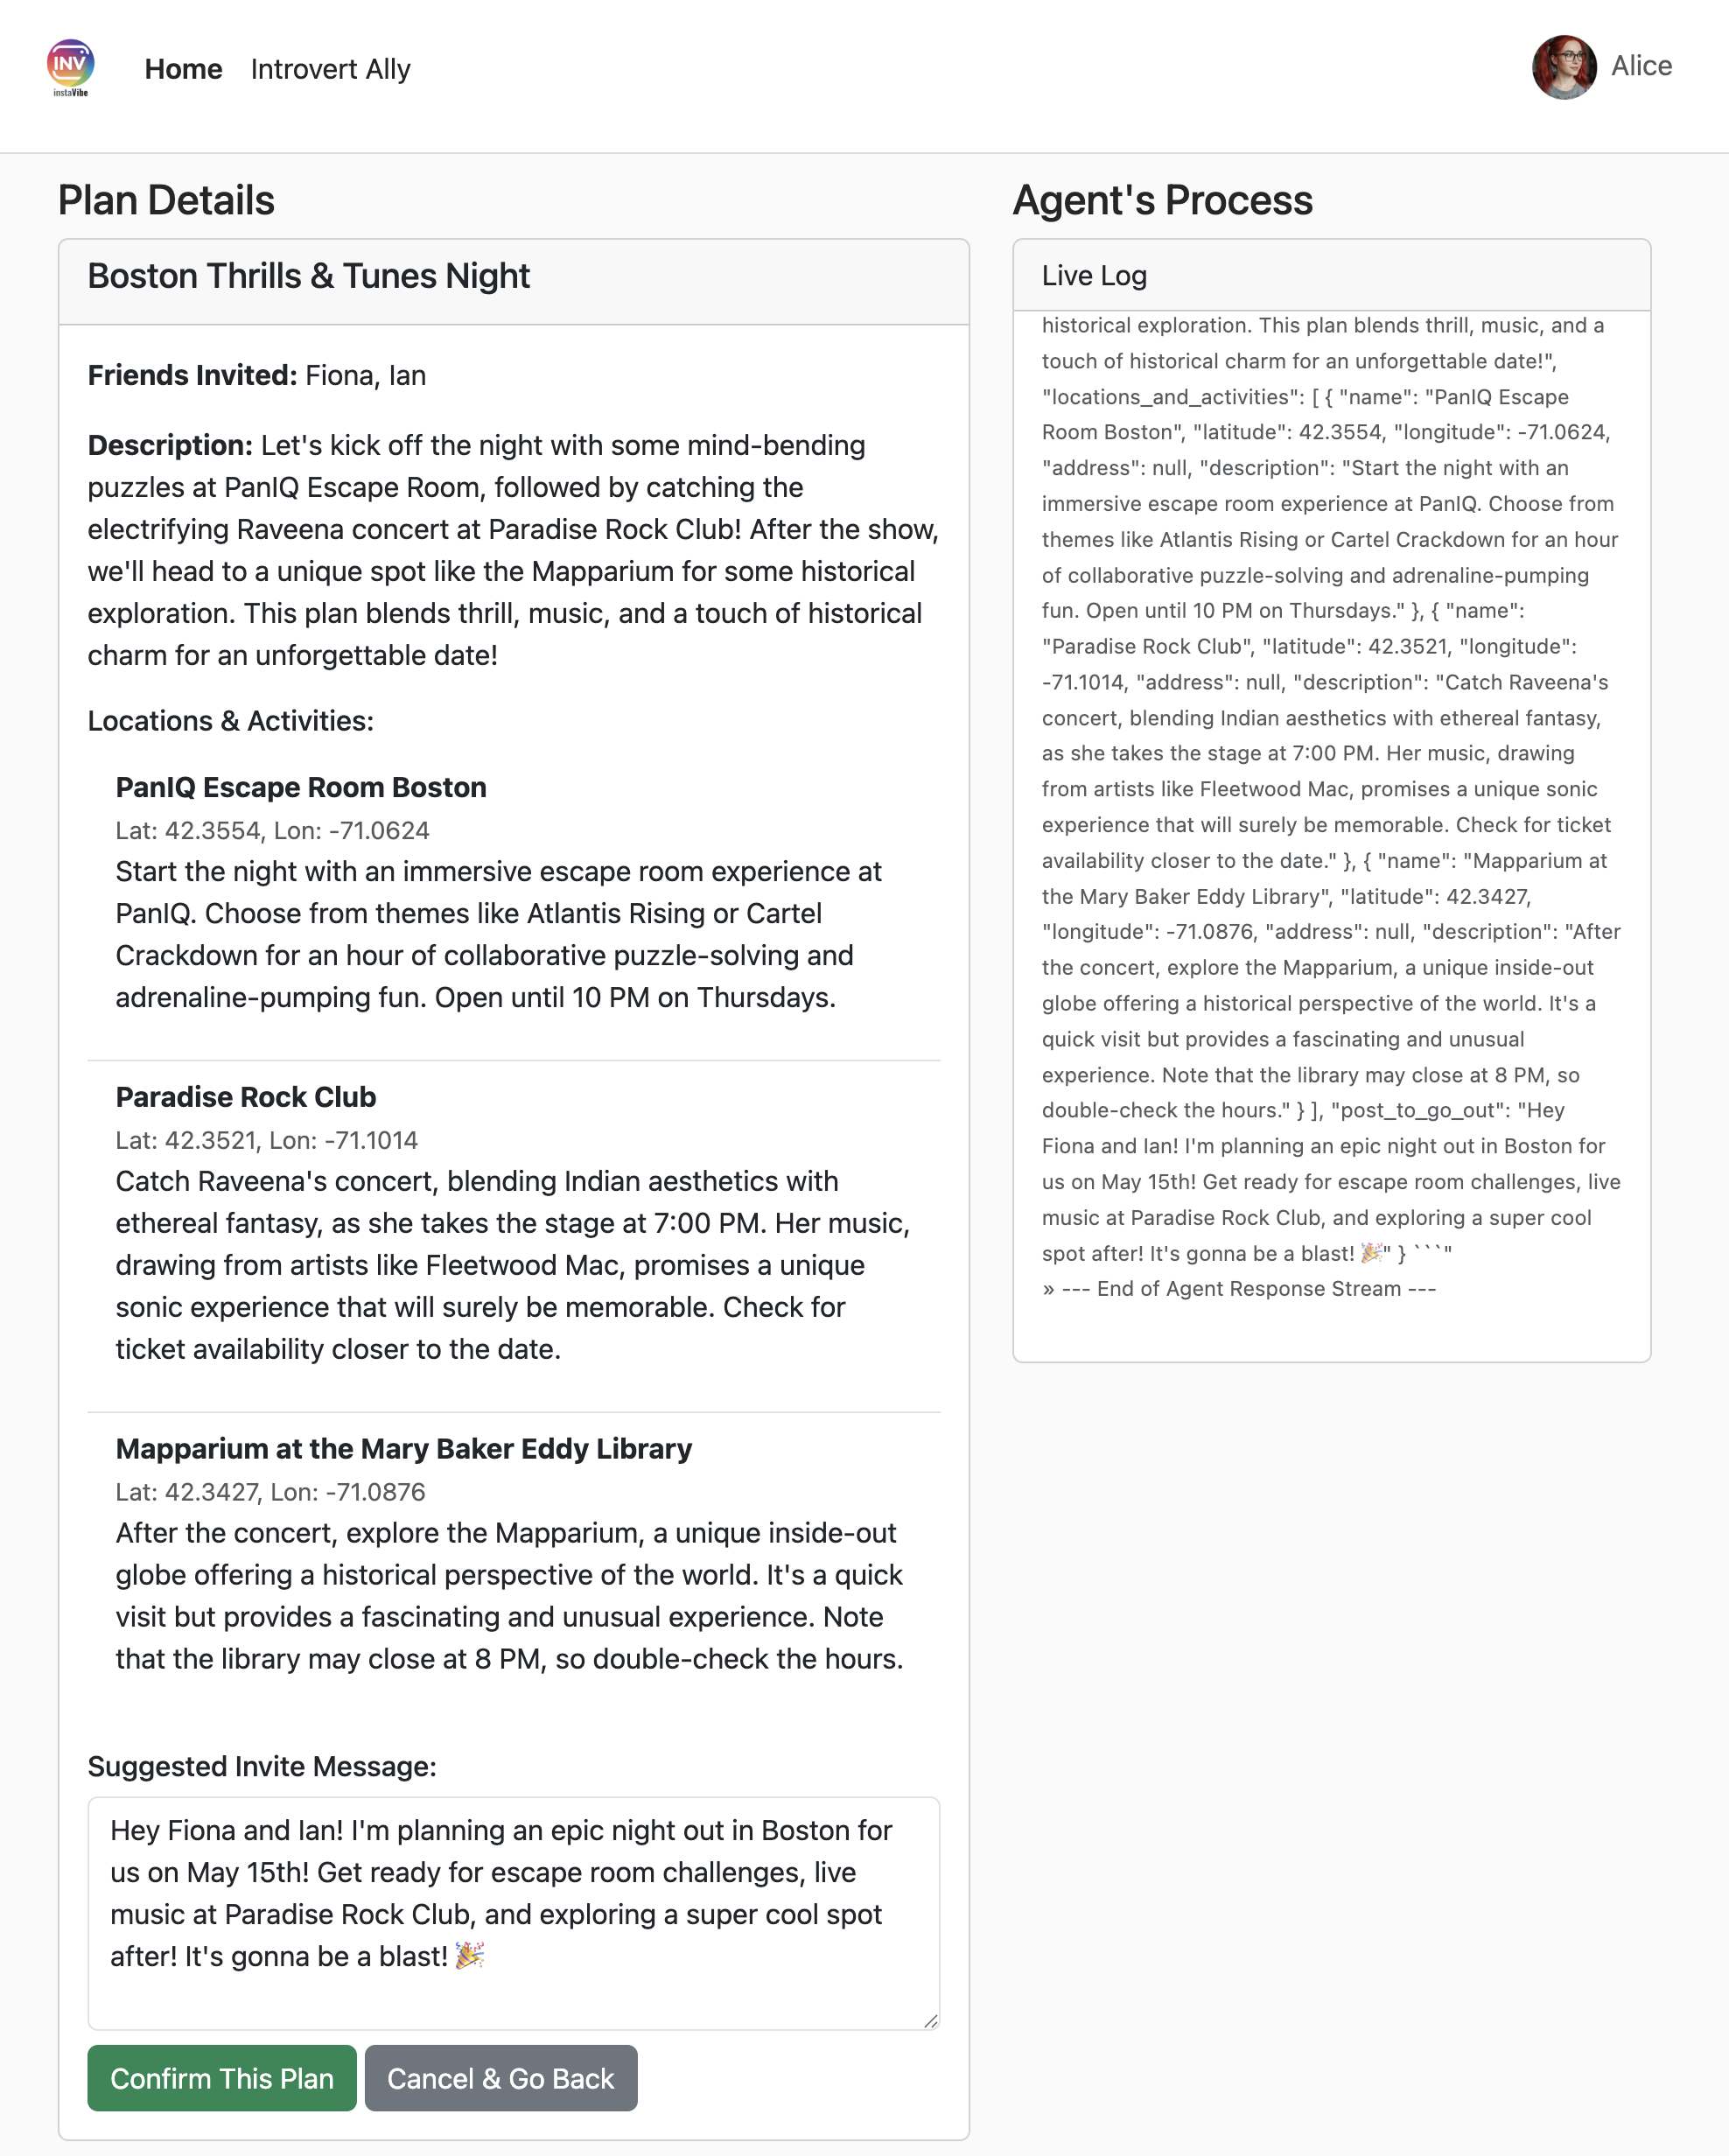
現在,協調器會指示平台代理程式在 InstaVibe 中建立貼文和活動。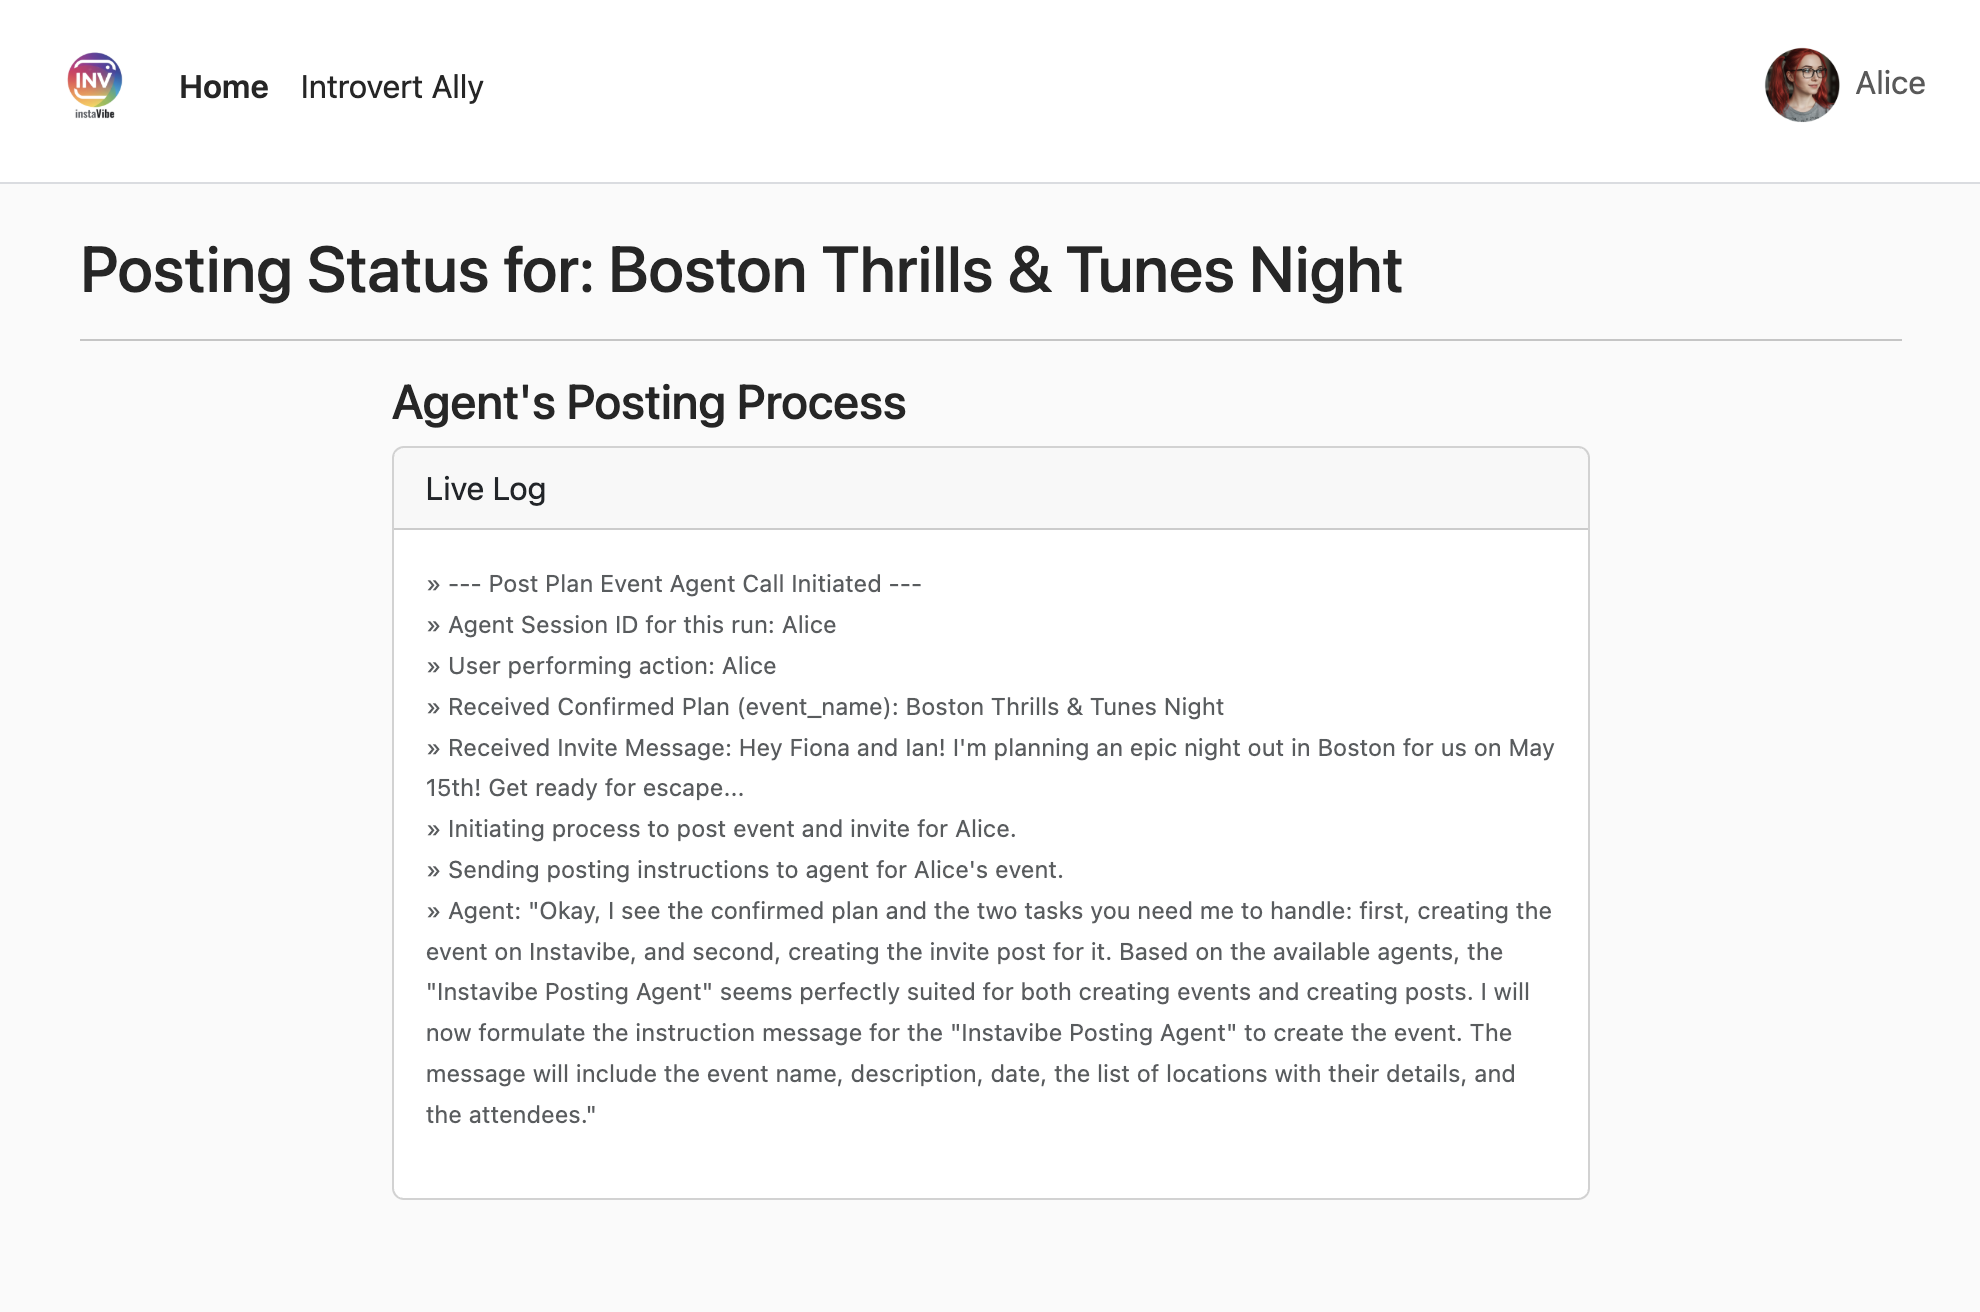
在 InstaVibe 首頁查看新貼文和活動。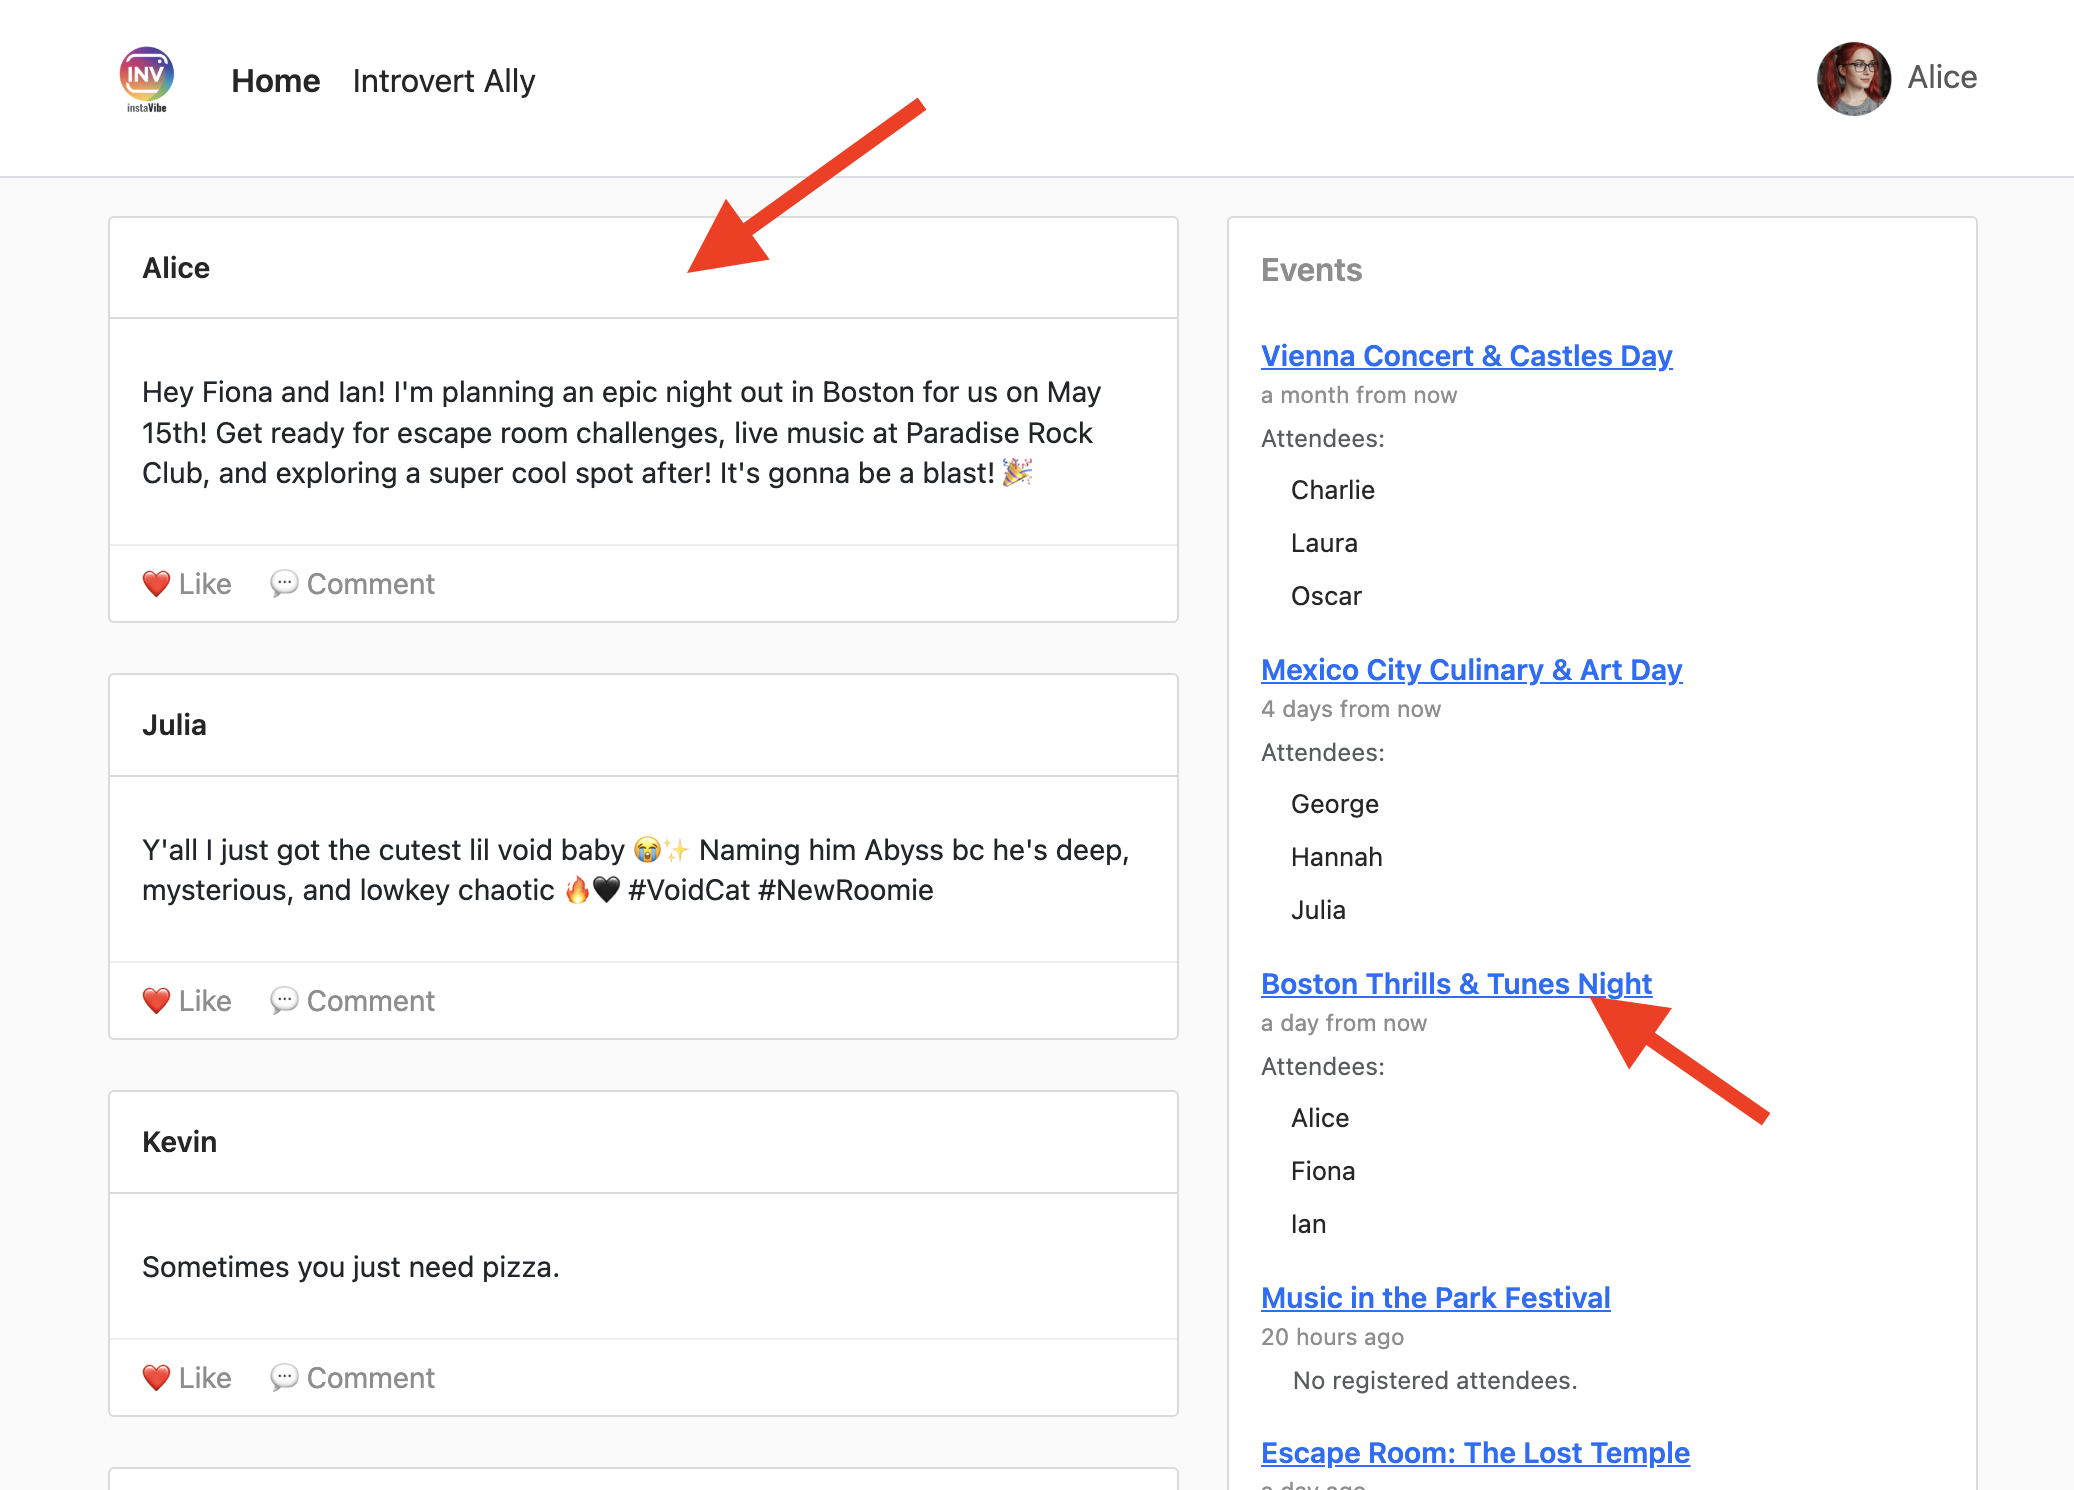
活動頁面會顯示代理程式生成的詳細資料。
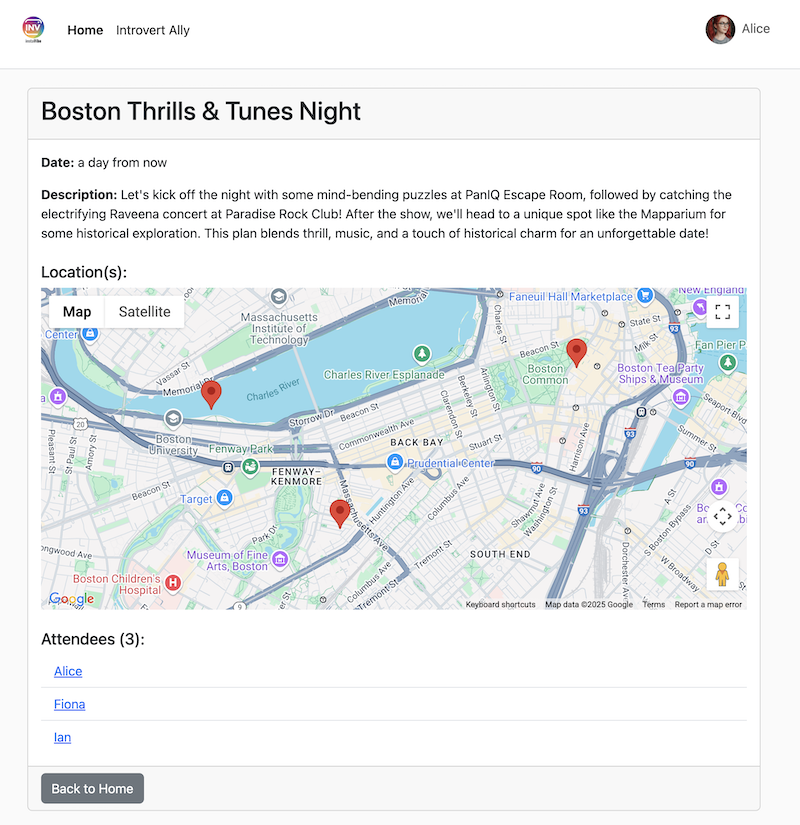
使用 Cloud Trace 分析效能
您可能會發現這個程序需要一些時間。Vertex AI Agent Engine 與 Cloud Trace 整合,可讓我們分析多代理系統的延遲時間。
前往 Google Cloud 控制台的「Traces」,選取「Span」中的 agent_run[orchestrate_agent],您應該會看到幾個 Span,點選進入
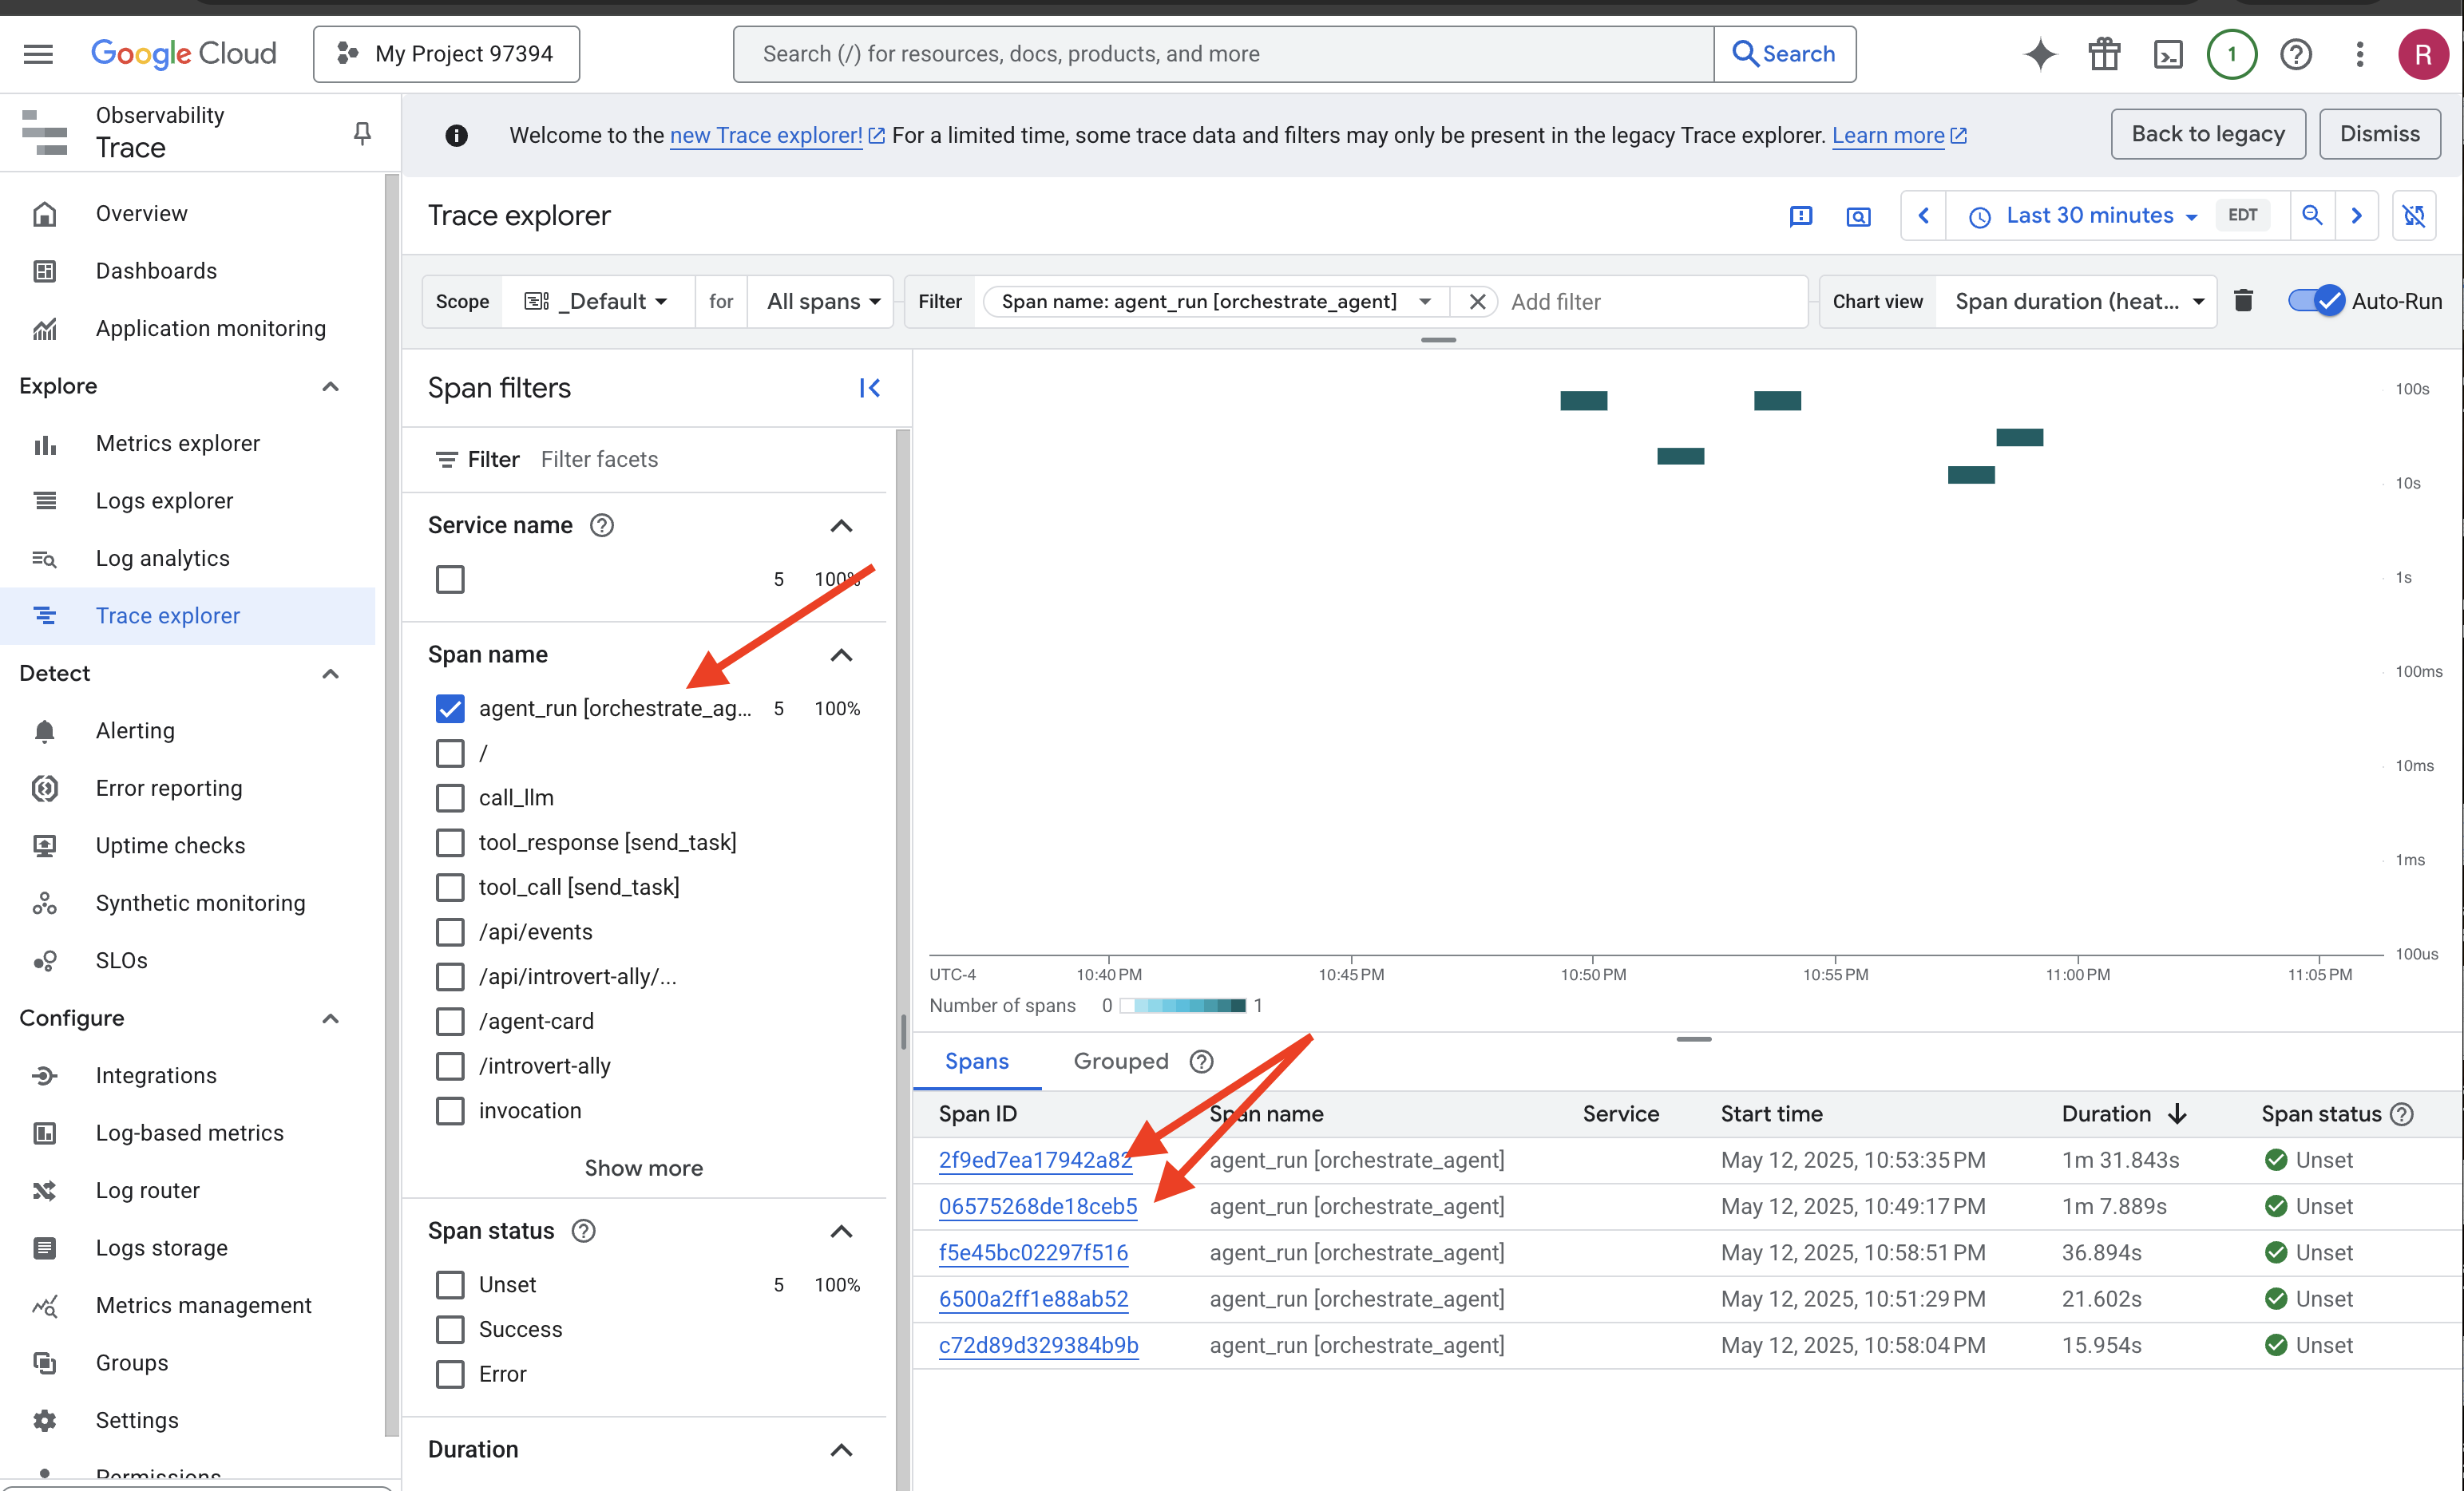
在追蹤詳細資料中,您可以找出耗時較長的部分。舉例來說,由於搜尋建立基準和複雜的生成作業,對 Planner 代理程式的呼叫可能會顯示較高的延遲時間。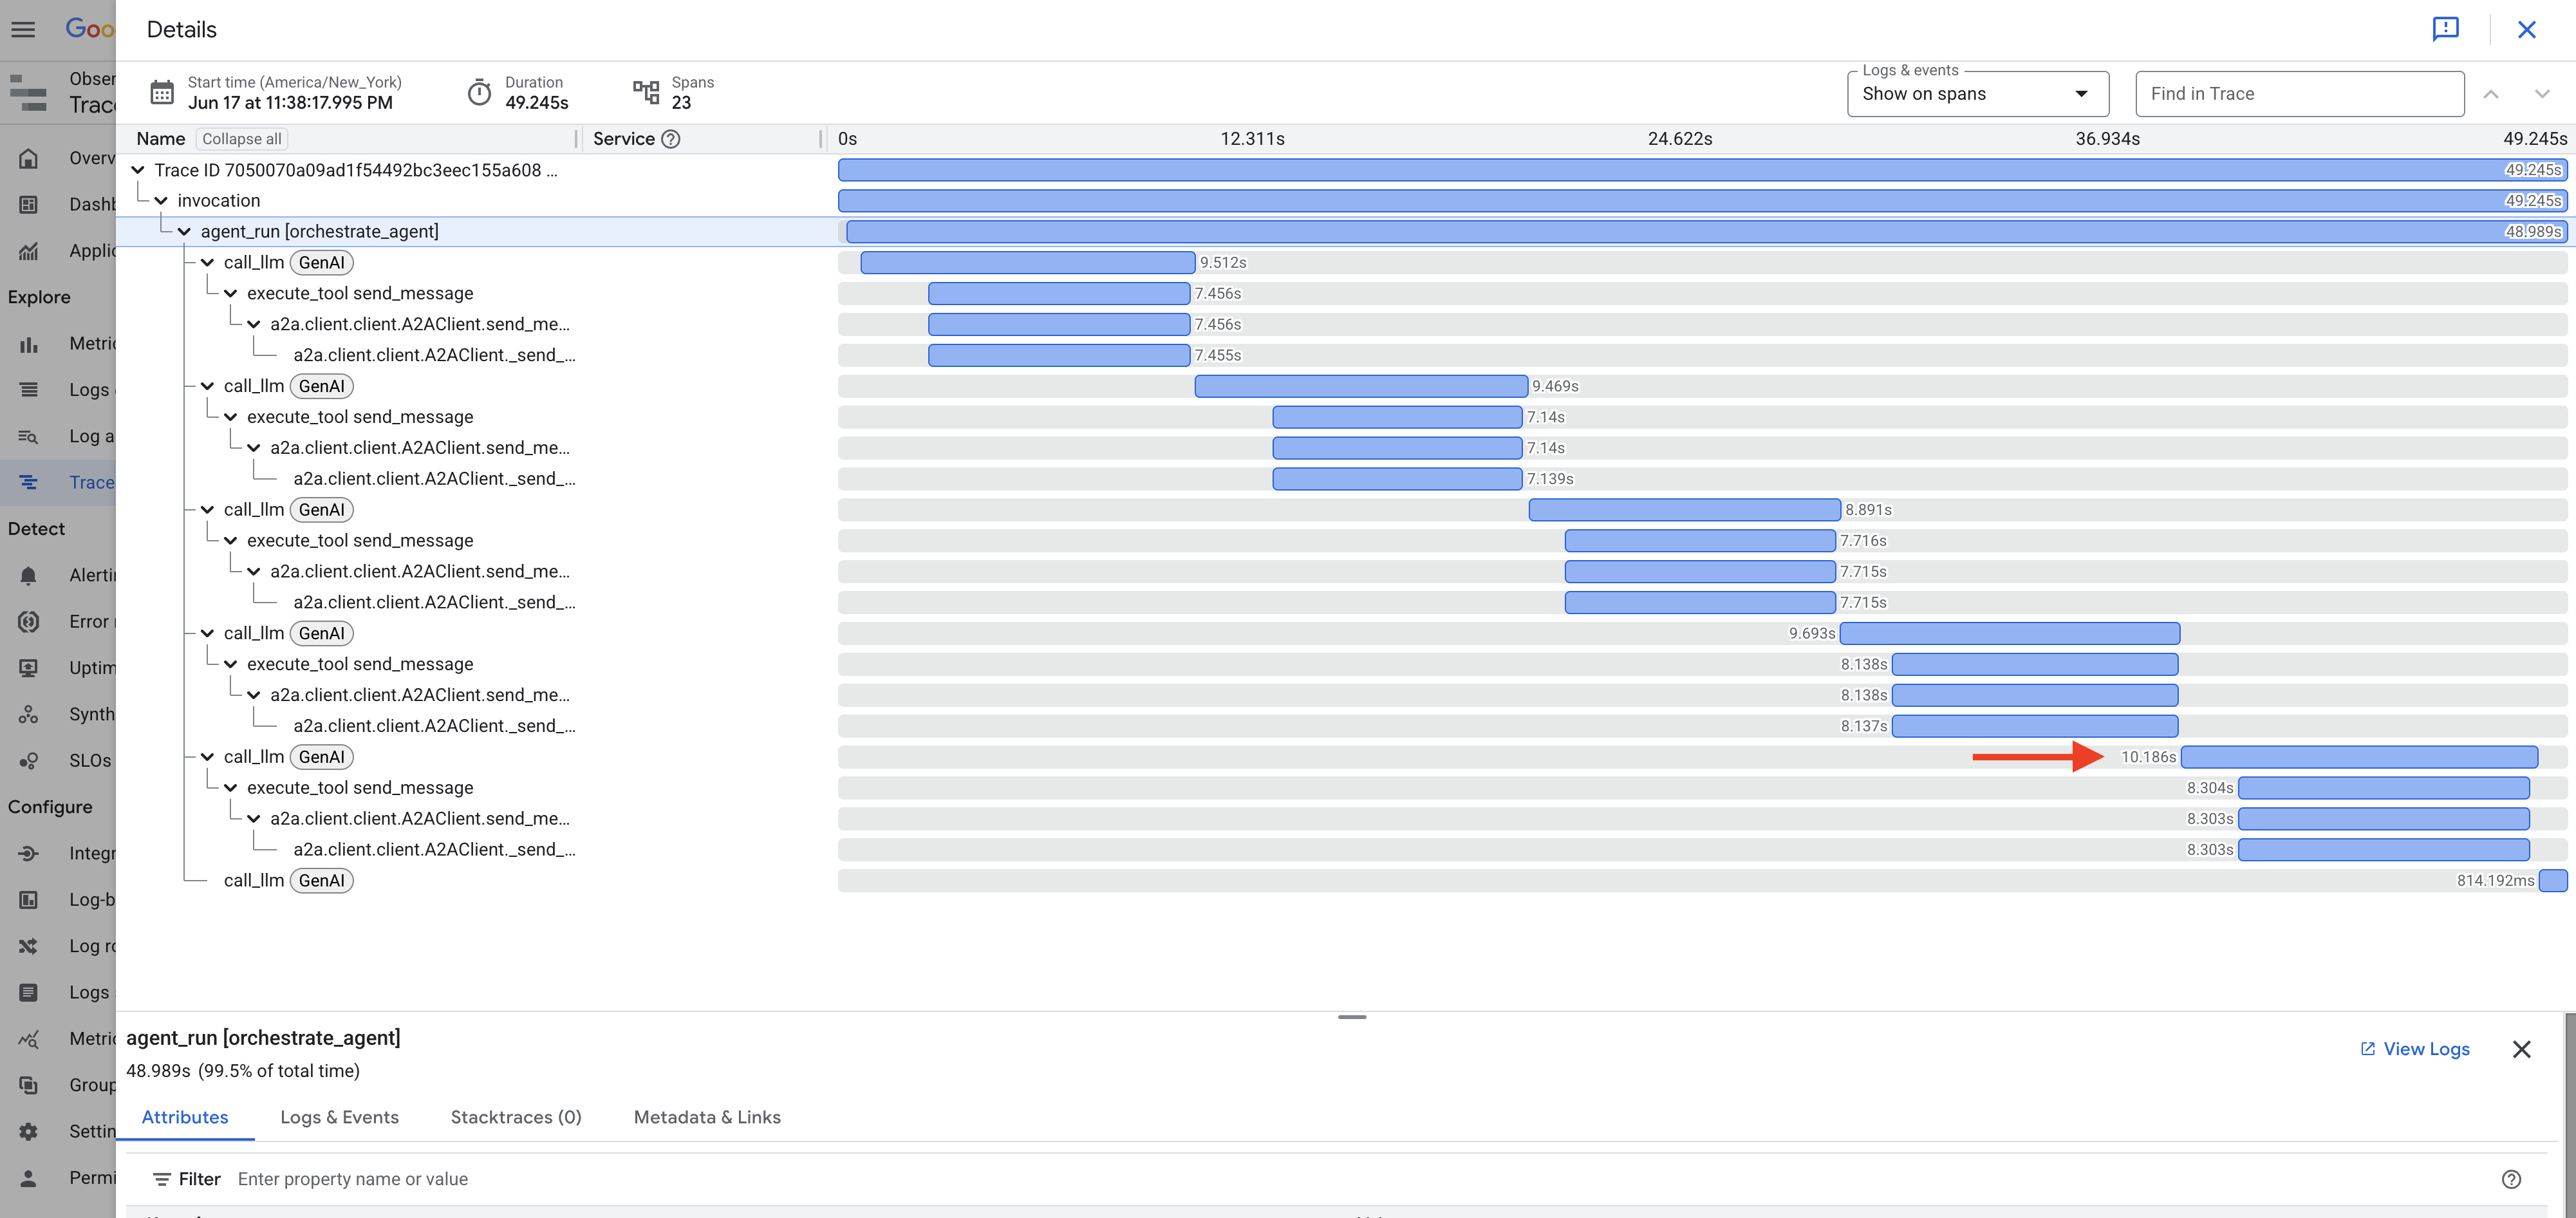
同樣地,在建立貼文和活動時,您可能會看到 Orchestrator 處理資料和準備 Platform 代理程式工具呼叫所花費的時間。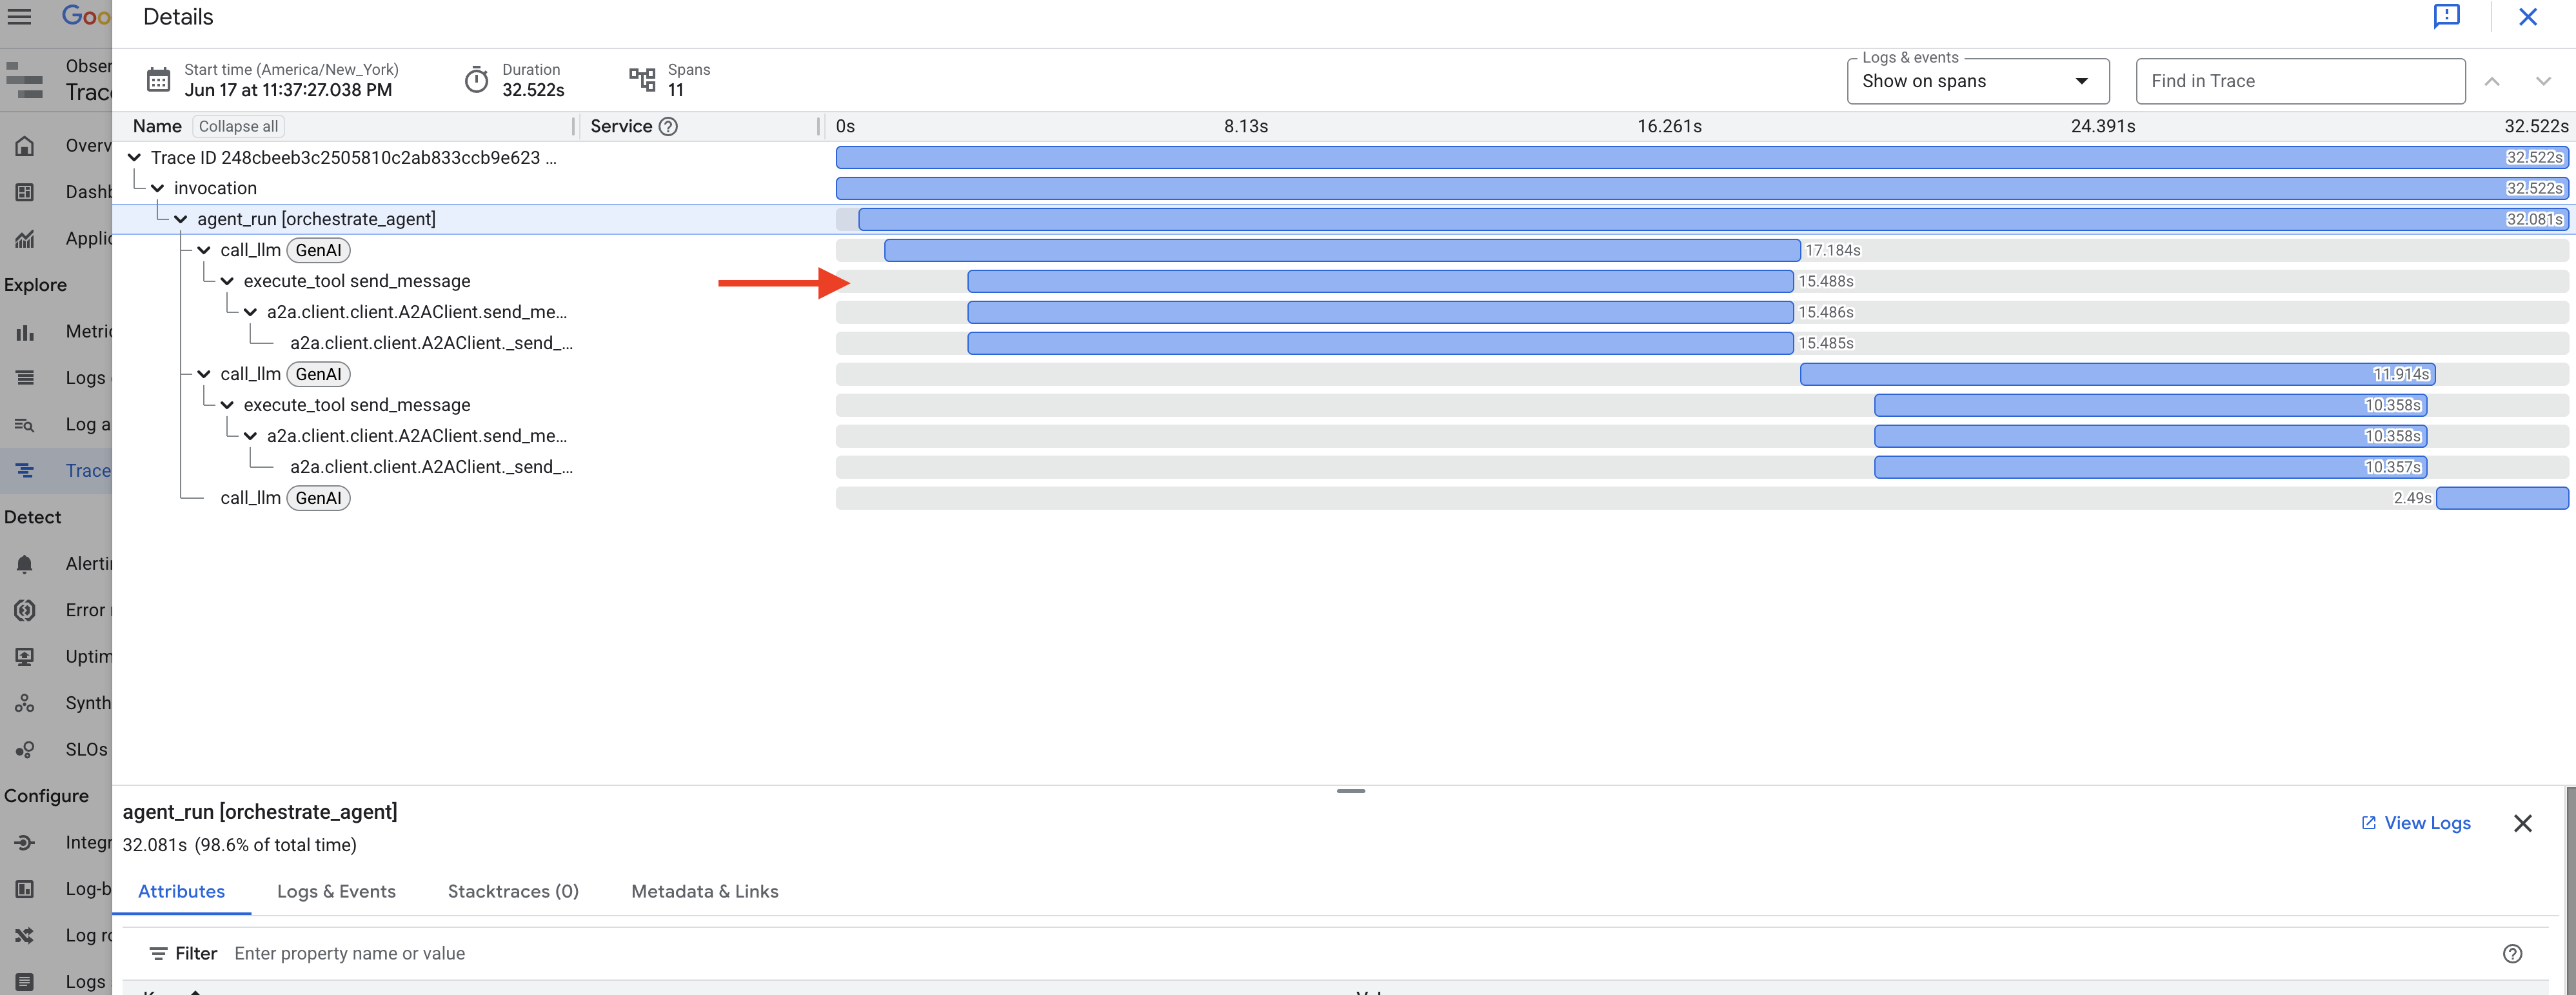
探索這些追蹤記錄有助於瞭解及最佳化代理程式系統的效能。

恭喜!您已成功使用 Google 的 ADK、A2A、MCP 和 Google Cloud 服務,建構、部署及測試精密的 AI 多代理系統。您已完成代理自動調度管理、工具使用、狀態管理和雲端部署,為 InstaVibe 建立實用的 AI 輔助功能。恭喜您完成研討會!
13. 清除
為避免系統持續向您的 Google Cloud 帳戶收費,請務必刪除我們在研討會期間建立的資源。下列指令可協助您移除 Spanner 執行個體、Cloud Run 服務、Artifact Registry 存放區、API 金鑰、Vertex AI Agent Engine,以及相關的 IAM 權限。
重要事項:
- 請務必在用於研討會的 Google Cloud 專案中執行這些指令。
- 如果您已關閉 Cloud Shell 終端機,可能無法設定 $PROJECT_ID、$SPANNER_INSTANCE_ID 等環境變數。您必須重新匯出這些變數 (如同工作坊設定期間的做法),或將下方指令中的變數替換為實際值。
- 這些指令會永久刪除資源。如果這個專案中有其他重要資料,請先仔細檢查再執行。
👉💻 執行下列指令碼來清理。
重設環境變數
. ~/instavibe-bootstrap/set_env.sh
刪除代理引擎:
cd ~/instavibe-bootstrap/utils
source ~/instavibe-bootstrap/env/bin/activate
export ORCHESTRATE_AGENT_ID=$(cat ~/instavibe-bootstrap/instavibe/temp_endpoint.txt)
echo "ORCHESTRATE_AGENT_ID set to: ${ORCHESTRATE_AGENT_ID}"
python remote_delete.py
deactivate
echo "Vertex AI Agent Engine deletion initiated."
刪除 Cloud Run 服務:
# InstaVibe Web Application
gcloud run services delete instavibe --platform=managed --region=${REGION} --project=${PROJECT_ID} --quiet

# MCP Tool Server
gcloud run services delete mcp-tool-server --platform=managed --region=${REGION} --project=${PROJECT_ID} --quiet

# Planner Agent (A2A Server)
gcloud run services delete planner-agent --platform=managed --region=${REGION} --project=${PROJECT_ID} --quiet

# Platform MCP Client Agent (A2A Server)
gcloud run services delete platform-mcp-client --platform=managed --region=${REGION} --project=${PROJECT_ID} --quiet

# Social Agent (A2A Server)
gcloud run services delete social-agent --platform=managed --region=${REGION} --project=${PROJECT_ID} --quiet

echo "Cloud Run services deletion initiated."
停止並移除 A2A 檢查器 Docker 容器
docker rm --force a2a-inspector
刪除 Spanner 執行個體:
echo "Deleting Spanner instance: ${SPANNER_INSTANCE_ID}..."
gcloud spanner instances delete ${SPANNER_INSTANCE_ID} --project=${PROJECT_ID} --quiet
echo "Spanner instance deletion initiated."
刪除 Artifact Registry 存放區:
echo "Deleting Artifact Registry repository: ${REPO_NAME}..."
gcloud artifacts repositories delete ${REPO_NAME} --location=${REGION} --project=${PROJECT_ID} --quiet
echo "Artifact Registry repository deletion initiated."
從服務帳戶移除角色:
echo "Removing roles from service account: $SERVICE_ACCOUNT_NAME in project $PROJECT_ID"

# Remove Project-level roles for default service account
gcloud projects remove-iam-policy-binding $PROJECT_ID \
  --member="serviceAccount:$SERVICE_ACCOUNT_NAME" \
  --role="roles/spanner.admin"

gcloud projects remove-iam-policy-binding $PROJECT_ID \
  --member="serviceAccount:$SERVICE_ACCOUNT_NAME" \
  --role="roles/spanner.databaseUser"

gcloud projects remove-iam-policy-binding $PROJECT_ID \
  --member="serviceAccount:$SERVICE_ACCOUNT_NAME" \
  --role="roles/artifactregistry.admin"

gcloud projects remove-iam-policy-binding $PROJECT_ID \
  --member="serviceAccount:$SERVICE_ACCOUNT_NAME" \
  --role="roles/cloudbuild.builds.editor"

gcloud projects remove-iam-policy-binding $PROJECT_ID \
  --member="serviceAccount:$SERVICE_ACCOUNT_NAME" \
  --role="roles/run.admin"

gcloud projects remove-iam-policy-binding $PROJECT_ID \
  --member="serviceAccount:$SERVICE_ACCOUNT_NAME" \
  --role="roles/iam.serviceAccountUser"

gcloud projects remove-iam-policy-binding $PROJECT_ID \
  --member="serviceAccount:$SERVICE_ACCOUNT_NAME" \
  --role="roles/aiplatform.user"

gcloud projects remove-iam-policy-binding $PROJECT_ID \
  --member="serviceAccount:$SERVICE_ACCOUNT_NAME" \
  --role="roles/logging.logWriter"

gcloud projects remove-iam-policy-binding $PROJECT_ID \
  --member="serviceAccount:$SERVICE_ACCOUNT_NAME" \
  --role="roles/logging.viewer"


echo "All specified roles have been removed."
刪除本機工作坊檔案:
echo "Removing local workshop directory ~/instavibe-bootstrap..."
rm -rf ~/instavibe-bootstrap
rm -rf ~/a2a-inspector
rm -f ~/mapkey.txt
rm -f ~/project_id.txt
echo "Local directory removed."