
1. 📖 Introduction
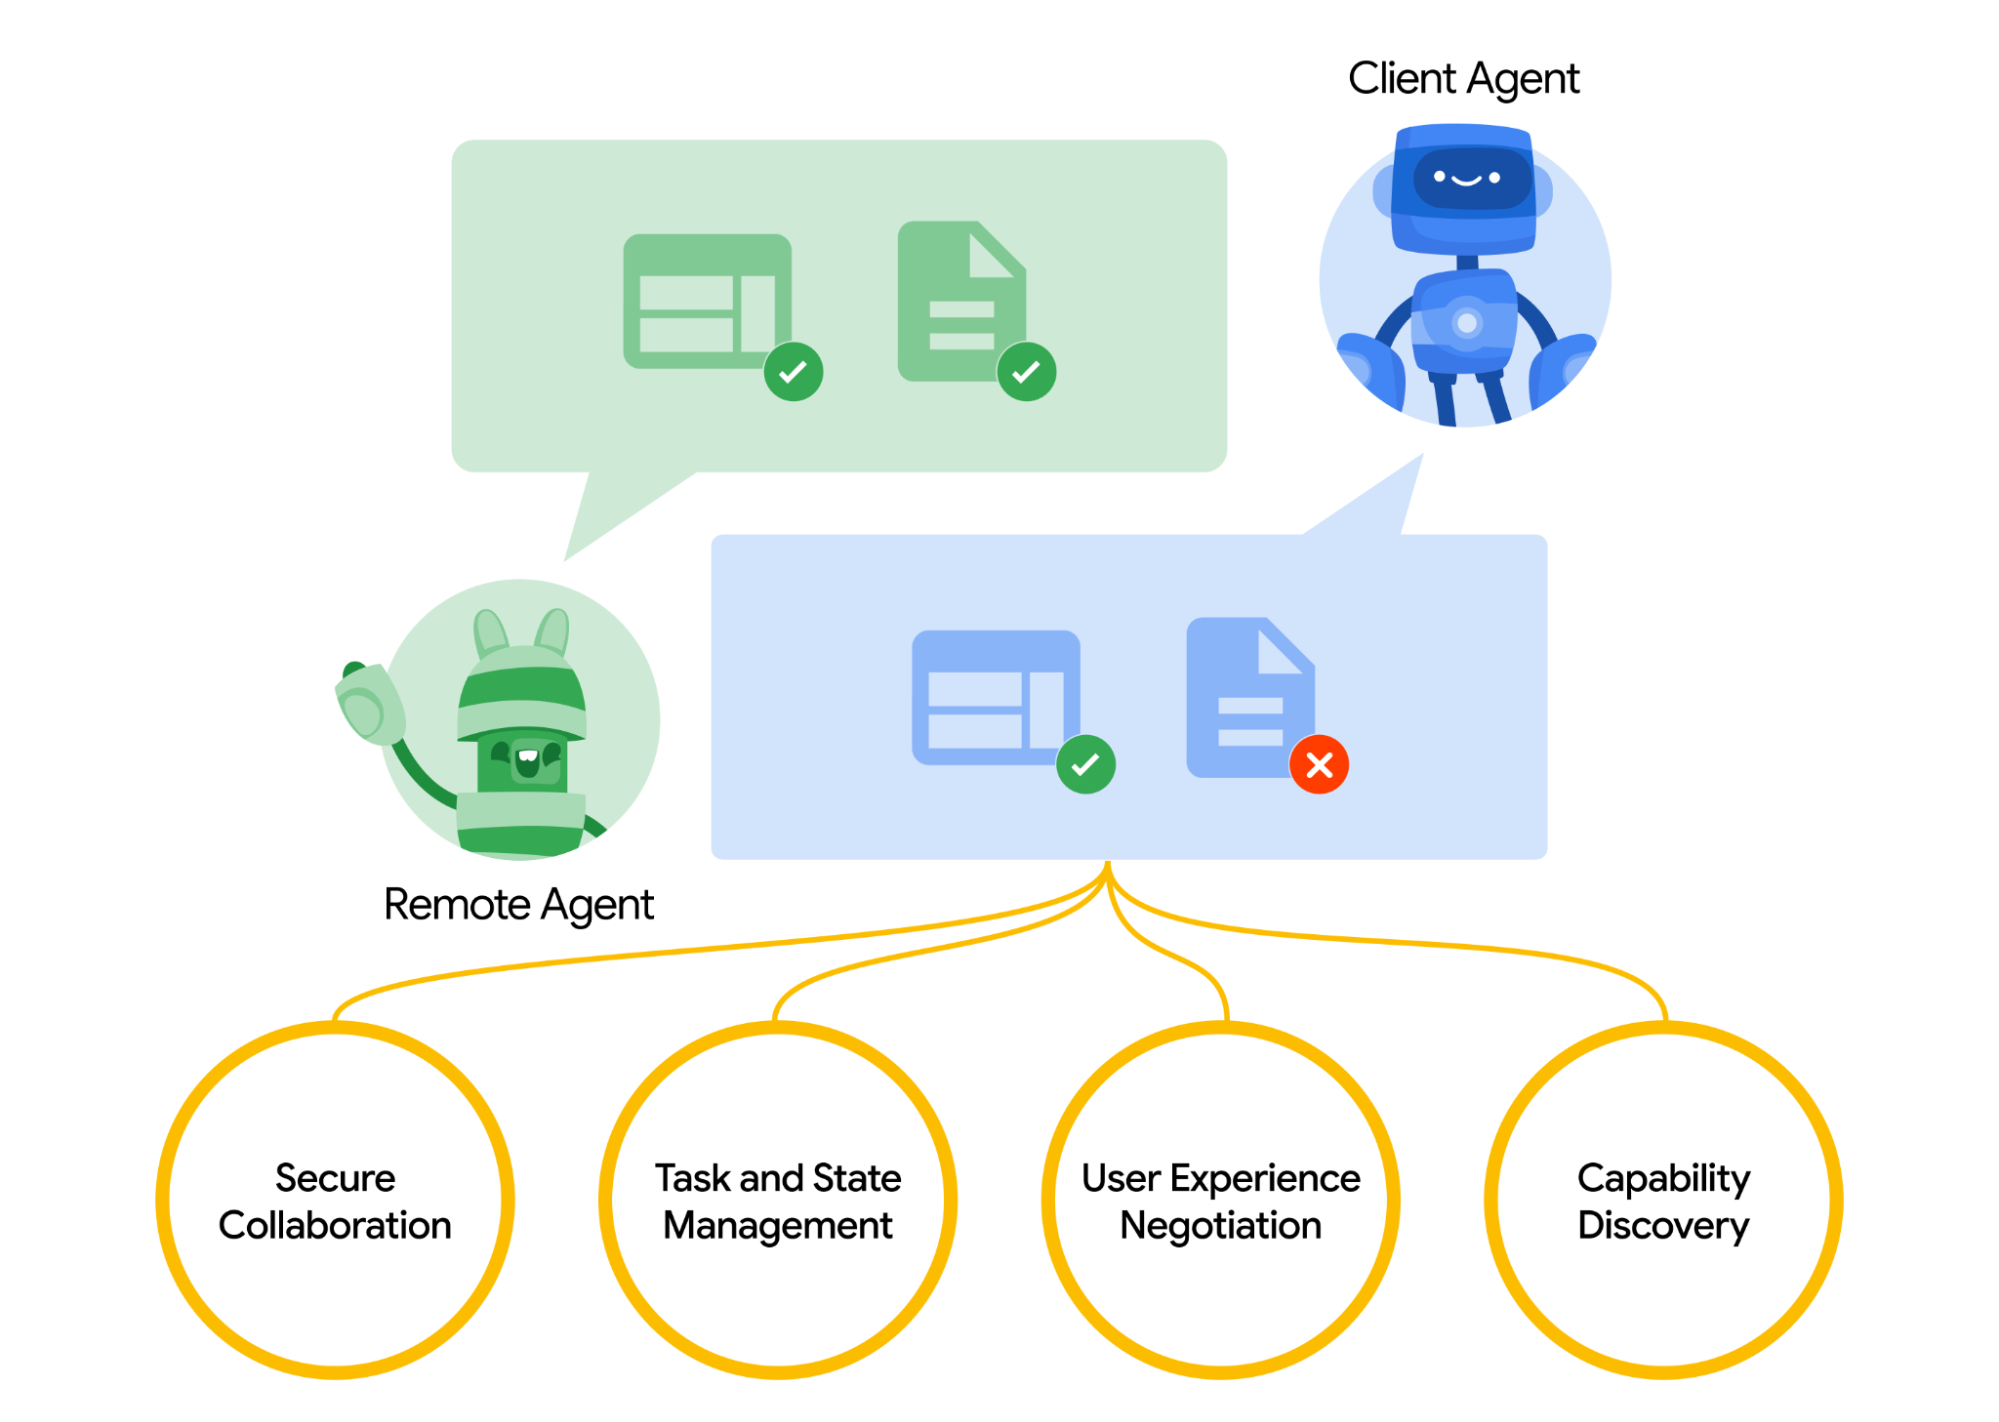
Agent2Agent (A2A) protocol is designed to standardize communication between AI agents, particularly for those which are deployed in external systems. Previously, such protocols were established for Tools called Model Context Protocol (MCP) which is an emerging standard to connect LLMs with data and resources. A2A tries to complement MCP where A2A is focused on a different problem, while MCP focuses on lowering complexity to connect agents with tools and data, A2A focuses on how to enable agents to collaborate in their natural modalities. It allows agents to communicate as agents (or as users) instead of as tools; for example, enable back-and-forth communication when you want to order something.
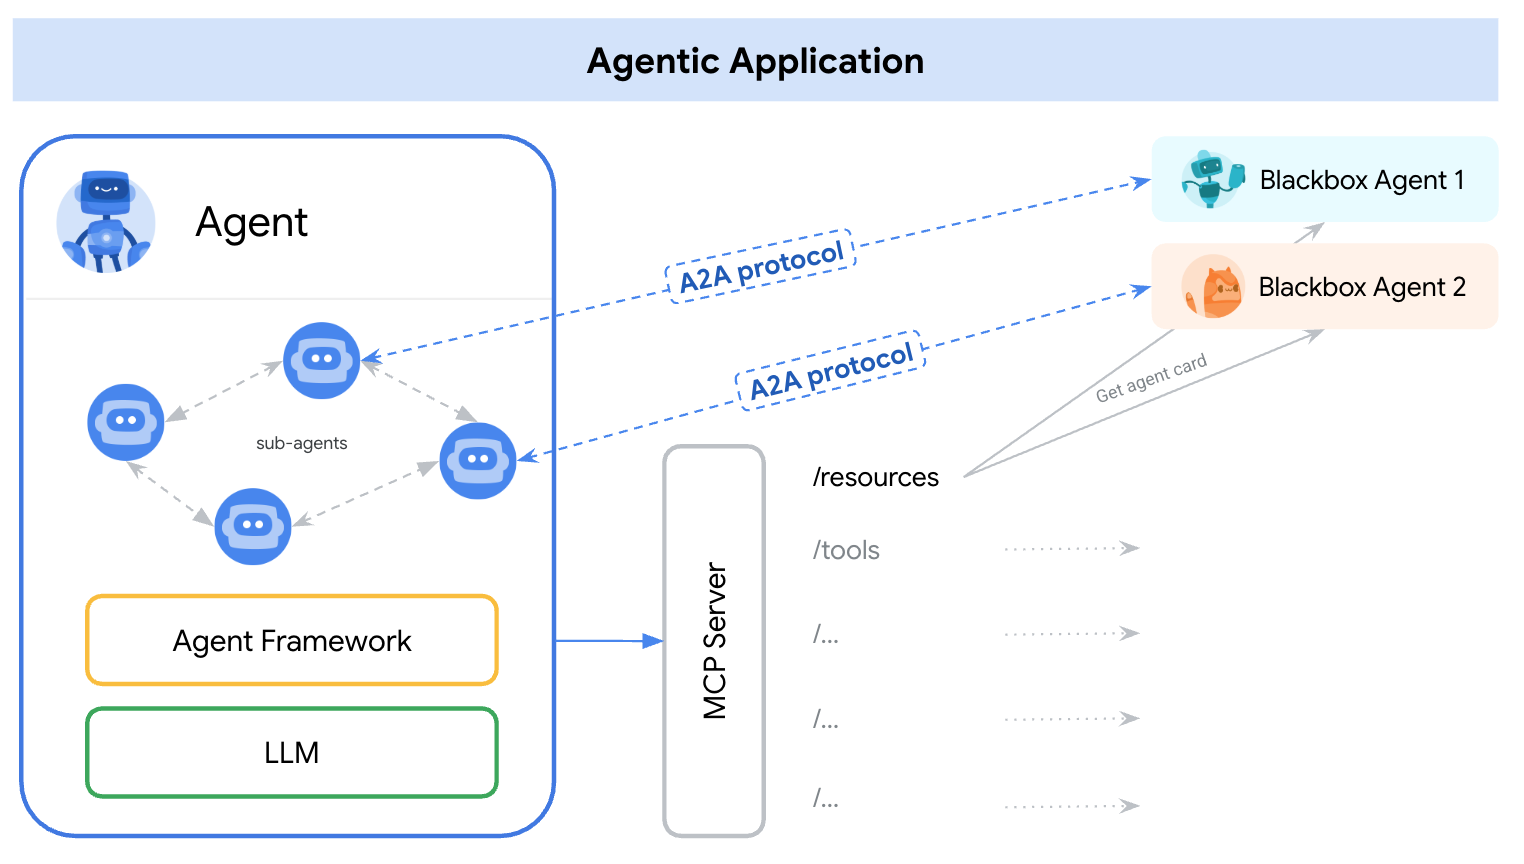
A2A is positioned to complement MCP, in the official documentation it is recommended that applications use MCP for tools and A2A for agents - represented by AgentCard ( We will discuss this later on ). The frameworks can then use A2A to communicate with their user, the remote agents, and other agents.
In this demo, we will start with implementation of A2A using its python SDK . We will explore a use case when we have a personal purchasing concierge which can help us to communicate with burger and pizza seller agents to handle our order.
A2A utilizes client-server principle. Here is the typical A2A flow that you will expect in this tutorial
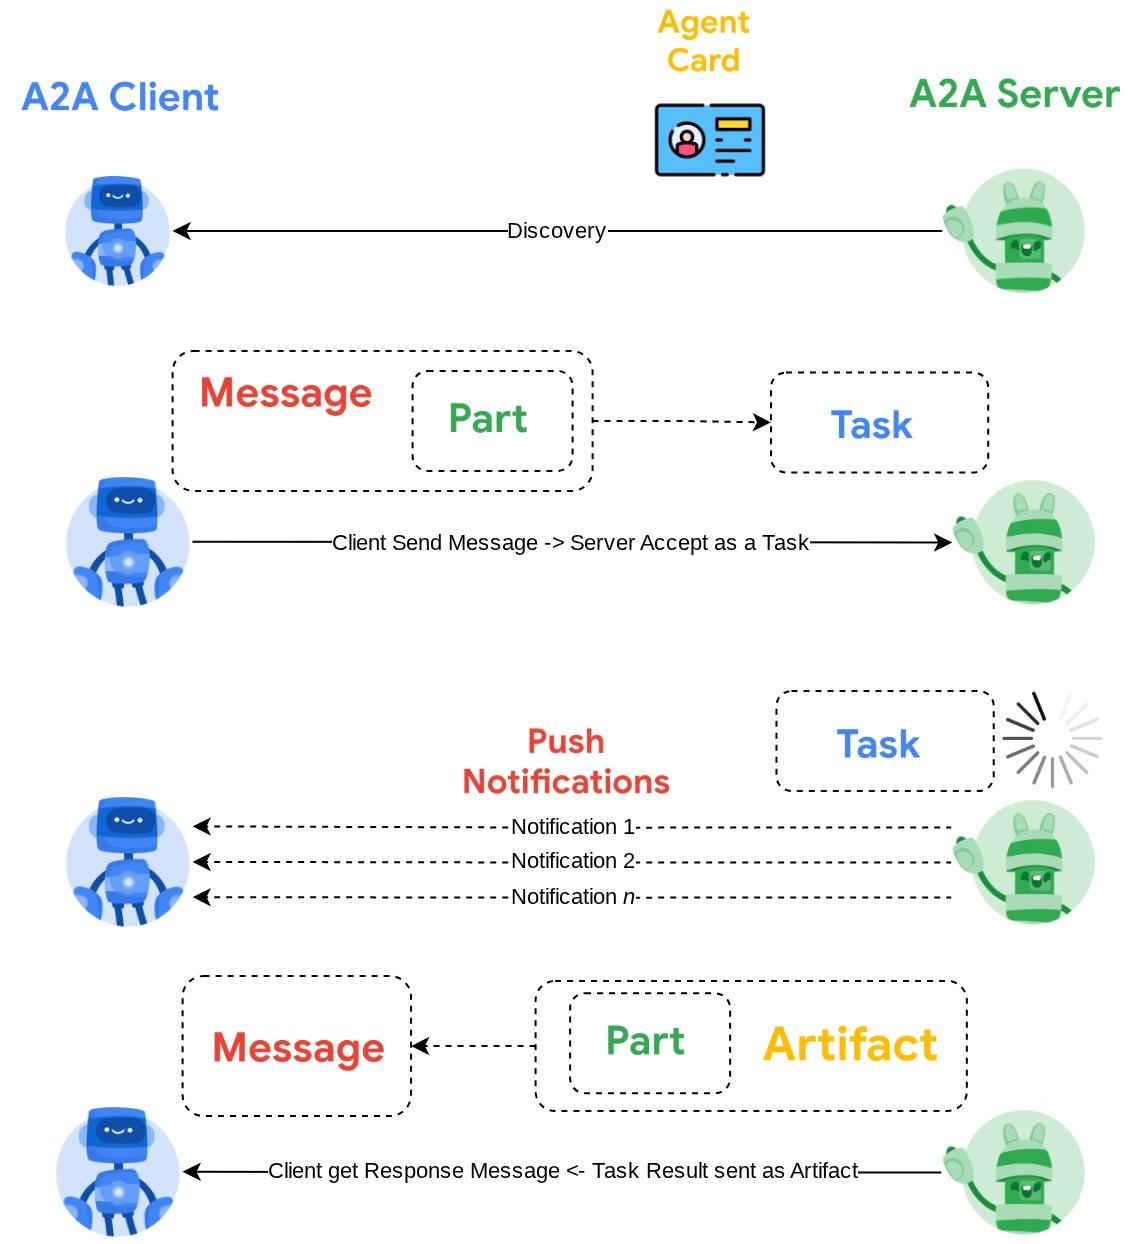
- A2A Client will first doing discovery on all accessible A2A Server agent card and utilize its information to build a connection client
- When required, A2A Client will send a message to the A2A Server, the server will evaluate this as a Task to be completed. If push notification receiver URL is configured on the A2A client and supported by A2A Server, the server will also capable to publish the state of the task progression to the receiving endpoint on the client
- After task finished, the A2A server will send the response artifact to the A2A Client
Through the codelab, you will employ a step by step approach as follows:
- آمادهسازی پروژه گوگل کلود
- Setup work directory for coding environment
- Deploy burger agent to Cloud Run
- Deploy pizza agent to Cloud Run
- Deploy purchasing concierge to Agent Engine
- Interact with the purchasing concierge via local interface
نمای کلی معماری
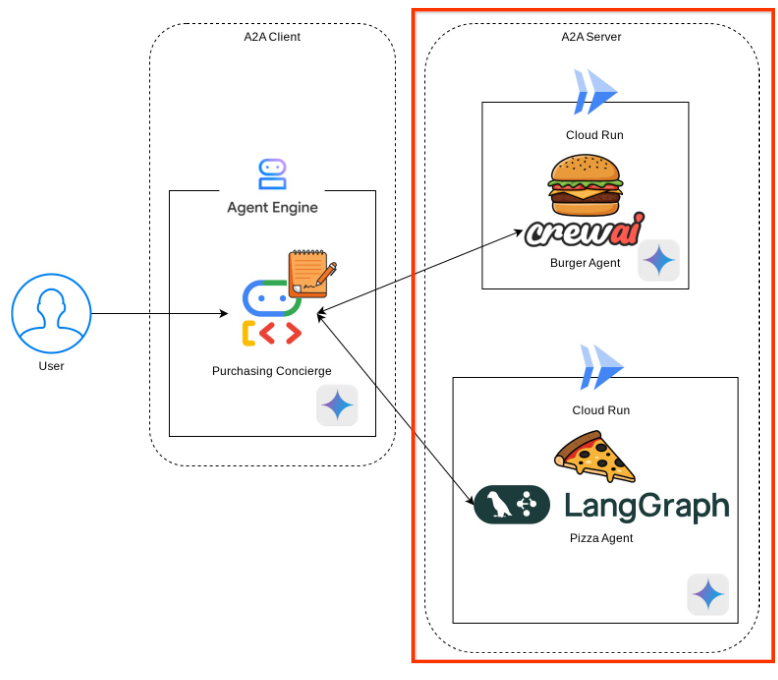
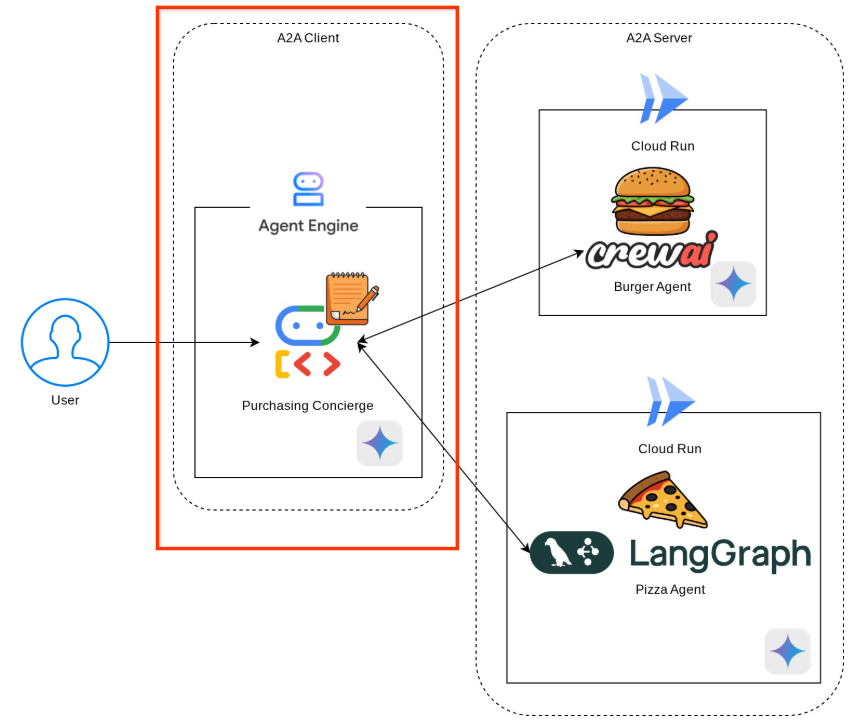
You will deploy the following service architecture

You will deploy 2 services which will act as A2A server, the Burger agent ( backed by CrewAI agent framework ) and Pizza agent ( backed by Langgraph agent framework ). The user will only directly interact with the Purchasing concierge which will be run using Agent Development Kit (ADK) framework which will act as A2A client.
Each of these agents will have their own environment and deployment on their own.
پیشنیازها
- کار راحت با پایتون
- An understanding of basic full-stack architecture using HTTP service
آنچه یاد خواهید گرفت
- Core structure of A2A Server
- Core structure of A2A Client
- Deploying agent service to Cloud Run
- Deploying agent service to Agent Engine
- How A2A Client connect to A2A Server
- Request and Response structure on non-streaming connection
آنچه نیاز دارید
- مرورگر وب کروم
- A Gmail account
- A Cloud Project with billing account enabled
This codelab, designed for developers of all levels (including beginners), uses Python in its sample application. However, Python knowledge isn't required for understanding the concepts presented.
2. 🚀 Preparing Workshop Development Setup
Step 1: Select Active Project in the Cloud Console
در کنسول گوگل کلود ، در صفحه انتخاب پروژه، یک پروژه گوگل کلود را انتخاب یا ایجاد کنید (به بخش بالا سمت چپ کنسول خود مراجعه کنید)

Click on it, and you will see list of all of your project like this example,
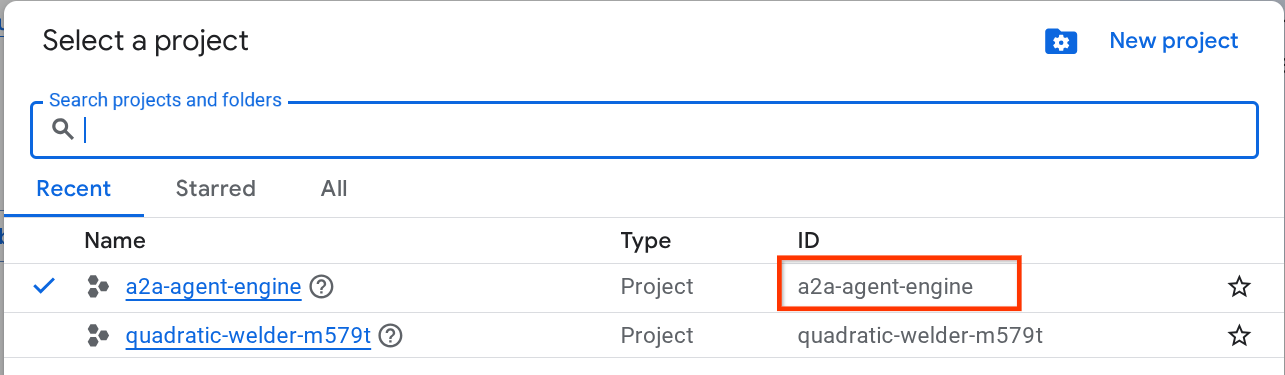
The value that is indicated by the red box is the PROJECT ID and this value will be used throughout the tutorial.
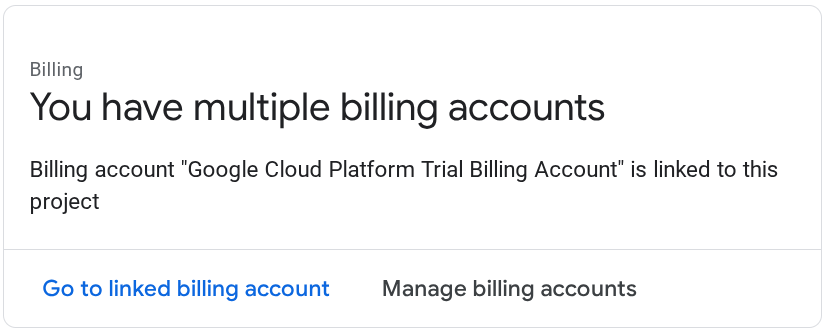
Make sure that billing is enabled for your Cloud project. To check this, click on the burger icon ☰ on your top left bar which shows the Navigation Menu and find the Billing menu

If you see the "Google Cloud Platform Trial Billing Account" is linked , your project is ready to be utilized for this tutorial. If not, go back to the start of this tutorial and redeem the billing account
Step 2: Familiarize with Cloud Shell
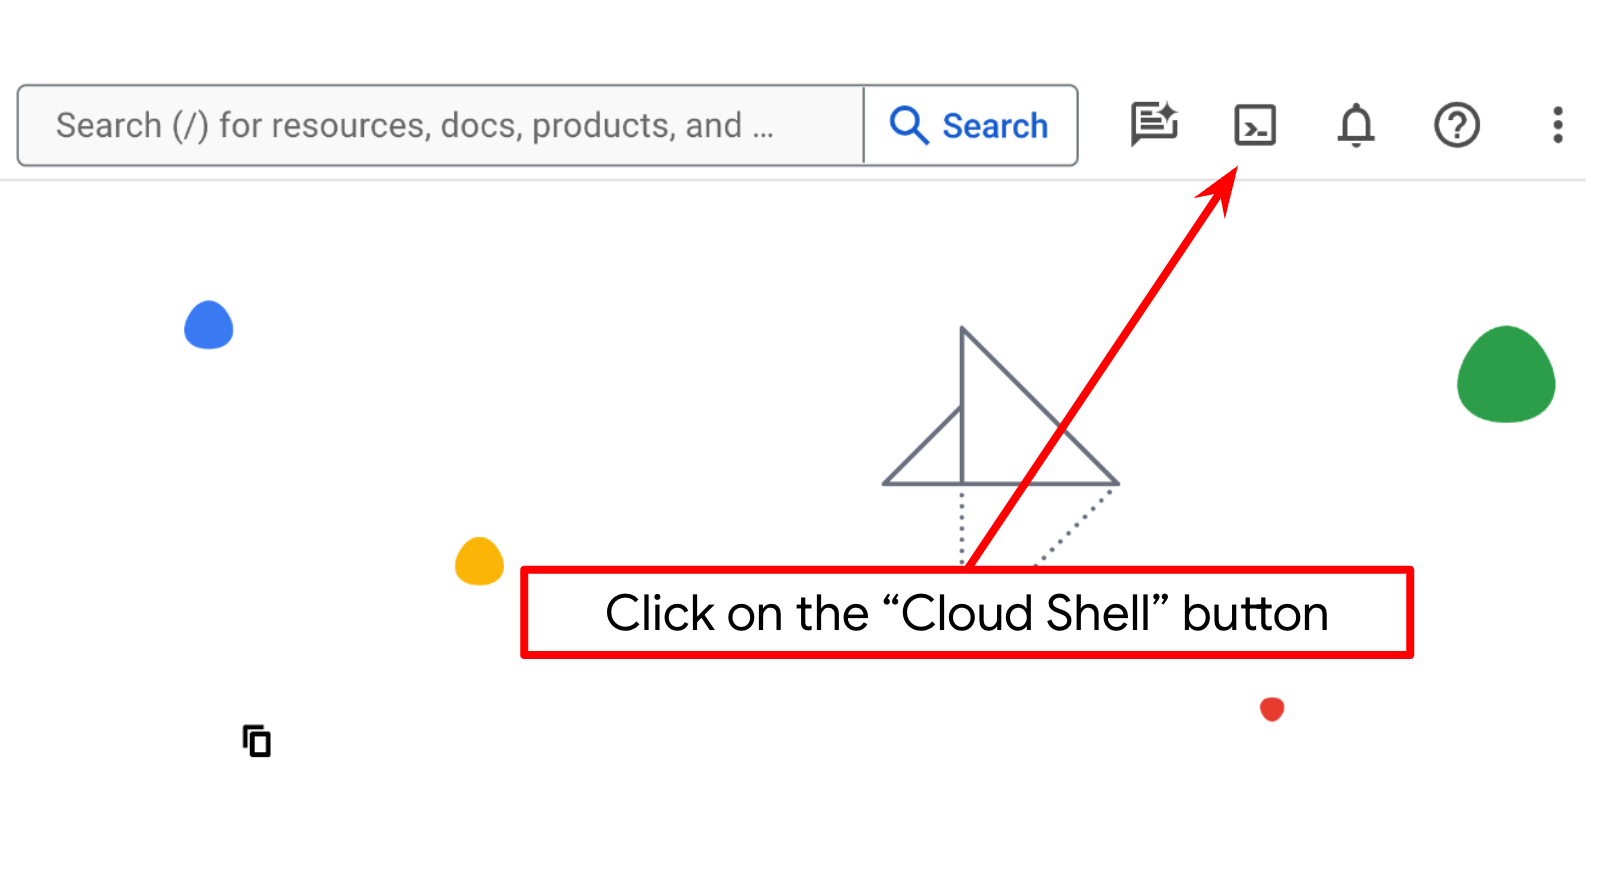
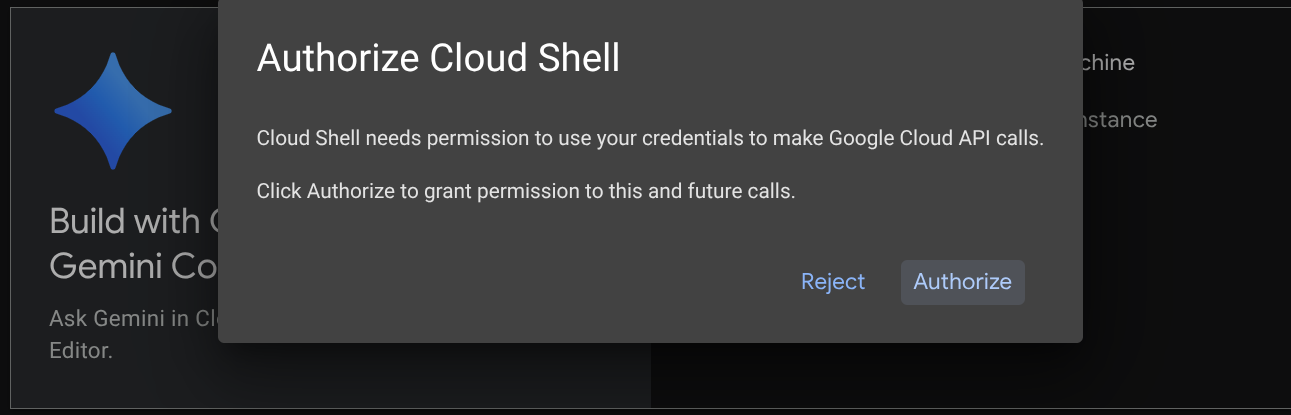
شما در بیشتر بخشهای آموزش از Cloud Shell استفاده خواهید کرد، روی Activate Cloud Shell در بالای کنسول Google Cloud کلیک کنید. اگر از شما درخواست تأیید کرد، روی Authorize کلیک کنید.
Once connected to Cloud Shell, we will need to check whether the shell ( or terminal ) is already authenticated with our account
gcloud auth list
If you see your personal gmail like below example output, all is good
Credentialed Accounts

ACTIVE: *
ACCOUNT: alvinprayuda@gmail.com

To set the active account, run:
    $ gcloud config set account `ACCOUNT`
If not, try refreshing your browser and ensure you click the Authorize when prompted ( it might be interrupted due to connection issue )
Next, we also need to check whether the shell is already configured to the correct PROJECT ID that you have, if you see there is value inside ( ) before the $ icon in the terminal ( in below screenshot, the value is "a2a-agent-engine" ) this value shows the configured project for your active shell session.

If the shown value is already correct , you can skip the next command . However if it's not correct or missing, run the following command
gcloud config set project <YOUR_PROJECT_ID>
Then, clone the template working directory for this codelab from Github, run the following command. It will create the working directory in the purchasing-concierge-a2a directory
git clone https://github.com/alphinside/purchasing-concierge-intro-a2a-codelab-starter.git purchasing-concierge-a2a
Step 3: Familiarize with Cloud Shell Editor and Setup Application Working Directory
Now, we can set up our code editor to do some coding stuff. We will use the Cloud Shell Editor for this
Click on the Open Editor button, this will open a Cloud Shell Editor 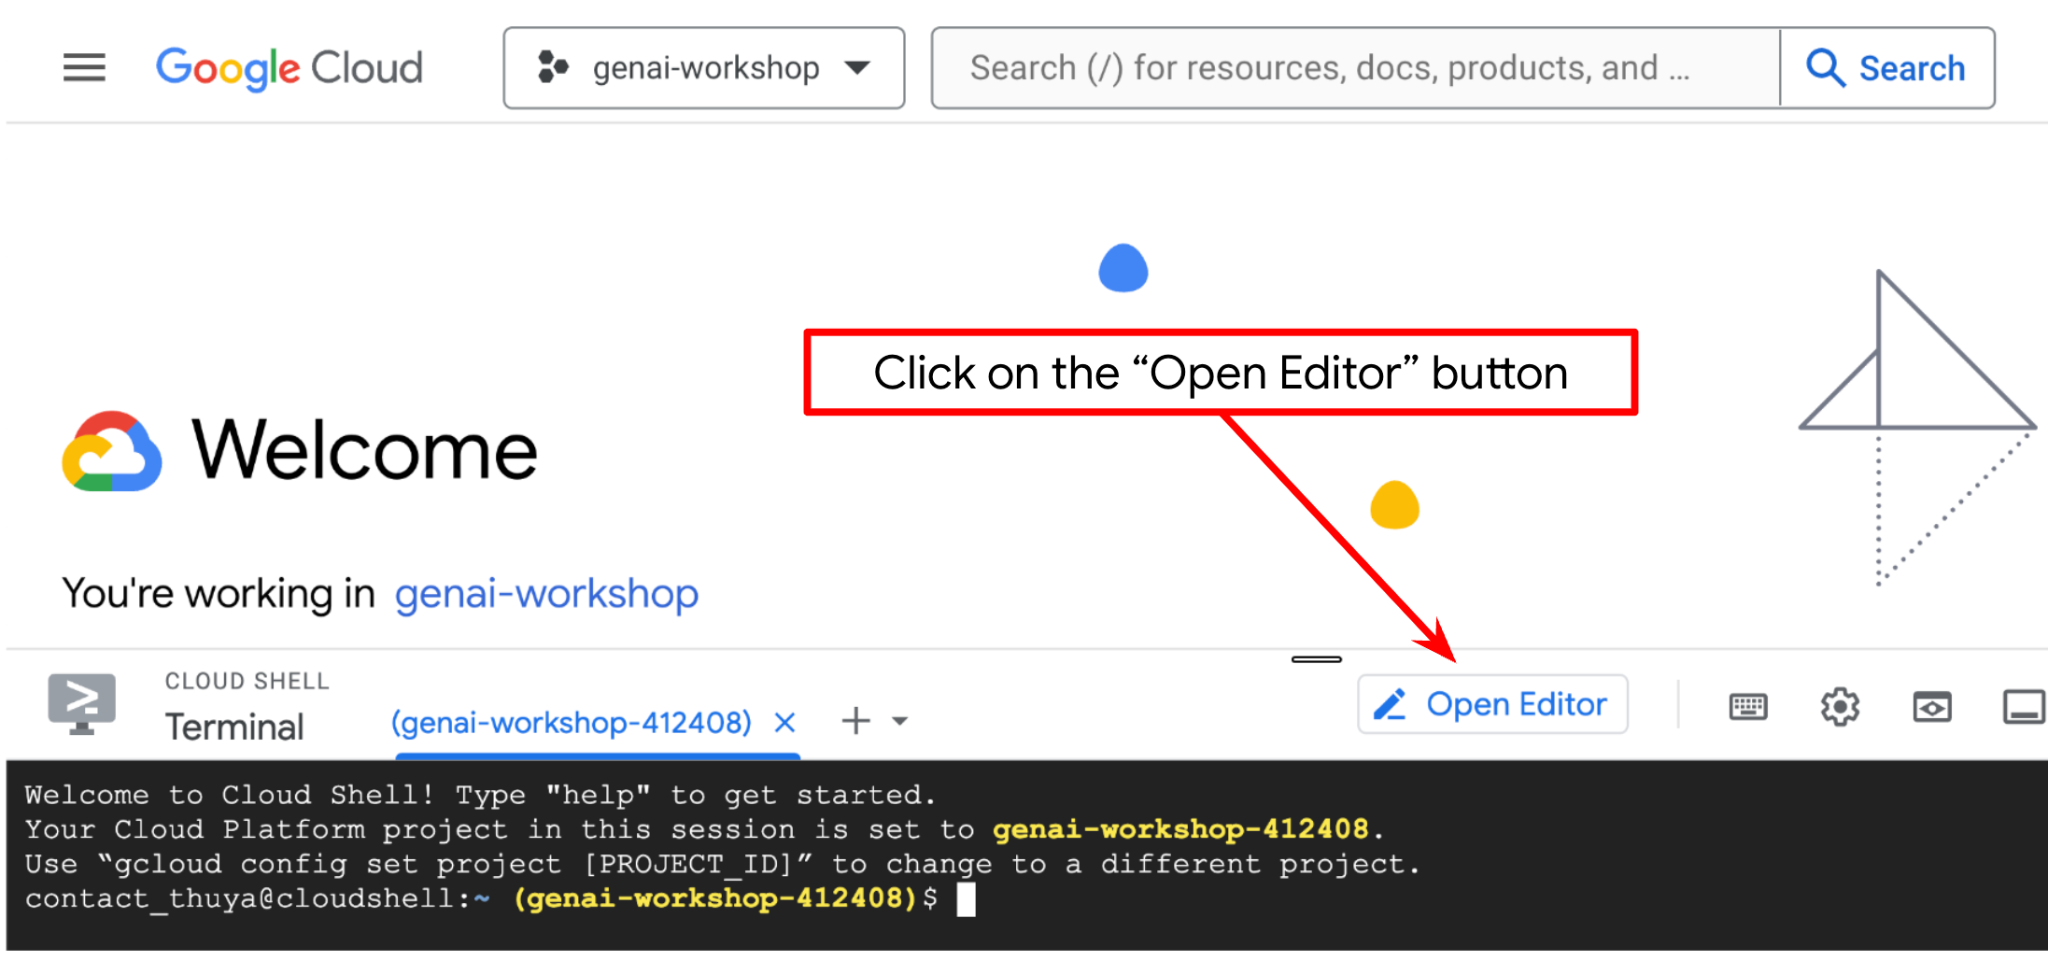
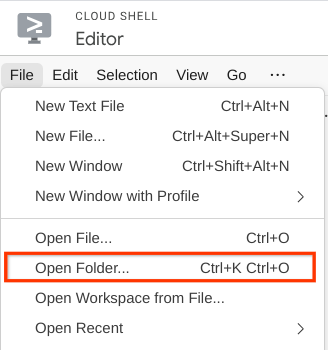
After that, go to the top section of the Cloud Shell Editor and click File->Open Folder, find your username directory and find the purchasing-concierge-a2a directory then click the OK button. This will make the chosen directory as the main working directory. In this example, the username is alvinprayuda , hence the directory path is shown below

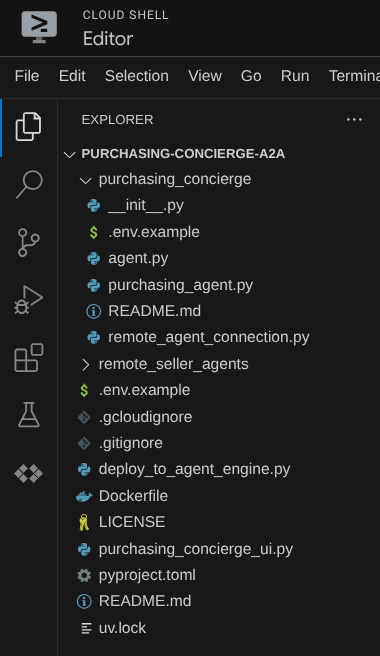
Now, your Cloud Shell Editor should look like this
Now, open the terminal for the editor. You can do it by clicking on Terminal -> New Terminal on the menu bar, or use Ctrl + Shift + C , it will open a terminal window on the bottom part of the browser

Your current active terminal should be inside the purchasing-concierge-a2a working directory. We will utilize Python 3.12 in this codelab and we will use uv python project manager to simplify the need of creating and managing python version and virtual environment. This uv package is already preinstalled on Cloud Shell.
Run this command to install the required dependencies to the virtual environment on the .venv directory
uv sync --frozen
Check the pyproject.toml to see the declared dependencies for this tutorial which are a2a-sdk, google-adk, and gradio .
Now, we will need to enable the required APIs via the command shown below. This could take a while.
gcloud services enable aiplatform.googleapis.com \
                       run.googleapis.com \
                       cloudbuild.googleapis.com \
                       cloudresourcemanager.googleapis.com
در صورت اجرای موفقیتآمیز دستور، باید پیامی مشابه آنچه در زیر نشان داده شده است را مشاهده کنید:
Operation "operations/..." finished successfully.
3. 🚀 Deploying A2A Server Remote Seller Agents to Cloud Run
In this step, we will deploy these two remote seller agents marked by the red box. The burger agent will be powered by CrewAI agent framework and the pizza agent will be powered by Langgraph agent
4. 🚀 Deploying Burger Seller Agent - A2A Server
The burger agent source code is under the remote_seller_agents/burger_agent directory.
All files that exist under remote_seller_agents/burger_agent directory are already sufficient to deploy our agent to Cloud Run so that it can be accessible as a service. Run the following command to deploy it
gcloud run deploy burger-agent \
    --source remote_seller_agents/burger_agent \
    --port=8080 \
    --allow-unauthenticated \
    --min 1 \
    --region us-central1 \
    --update-env-vars GOOGLE_CLOUD_LOCATION=us-central1 \
    --update-env-vars GOOGLE_CLOUD_PROJECT={your-project-id}
اگر از شما خواسته شد که یک مخزن کانتینر برای استقرار از منبع ایجاد شود، به Y پاسخ دهید. پس از استقرار موفقیتآمیز، گزارشی مانند این نشان داده خواهد شد.
Service [burger-agent] revision [burger-agent-xxxxx-xxx] has been deployed and is serving 100 percent of traffic.
Service URL: https://burger-agent-xxxxxxxxx.us-central1.run.app
The xxxx part here will be a unique identifier when we deploy the service.
Open a new browser tab and go to https://burger-agent-xxxxxxxxx.us-central1.run.app/.well-known/agent.json route of those deployed burger agent services via browser. This is the URL to access the deployed A2A server agent card.
If successfully deployed, you will see the response like shown below in your browser when accessing the agent card
این اطلاعات کارت برگر ایجنت است که باید برای اهداف اکتشافی قابل دسترسی باشد.
Notice that the url value is still set at http://0.0.0.0:8080/ here. This url value should be the main information for A2A Client to send messages from the outside world and it is not configured properly.
We need to update this value to the URL of our burger agent service by adding an additional environment variable HOST_OVERRIDE .
Updating the Burger Agent URL Value on Agent Card via Environment Variable
To add HOST_OVERRIDE to burger agent service, do the following steps
- Search Cloud Run on search bar on top of your cloud console

- Click on previously deployed burger-agent cloud run service
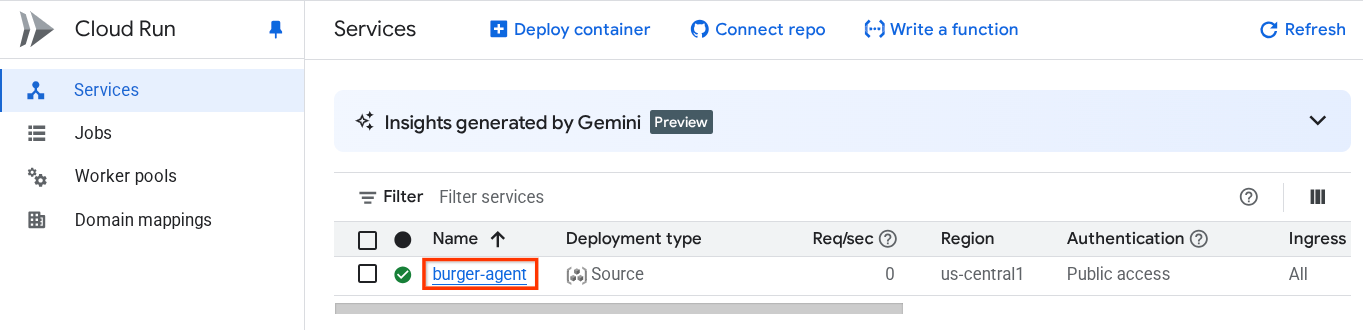
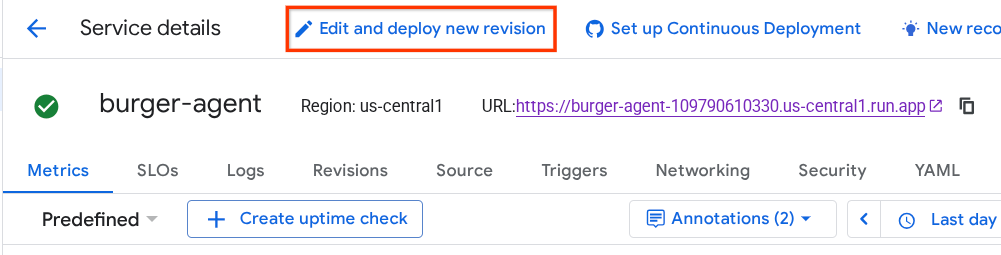
- Copy the burger-service URL, then click on the Edit and deploy new revision
- Then, click on Variable & Secrets section

- After that, click Add variable and set the
HOST_OVERRIDEthe value to the service URL ( the one withhttps://burger-agent-xxxxxxxxx.us-central1.run.apppattern )

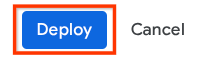
- Finally, click the deploy button to redeploy your service
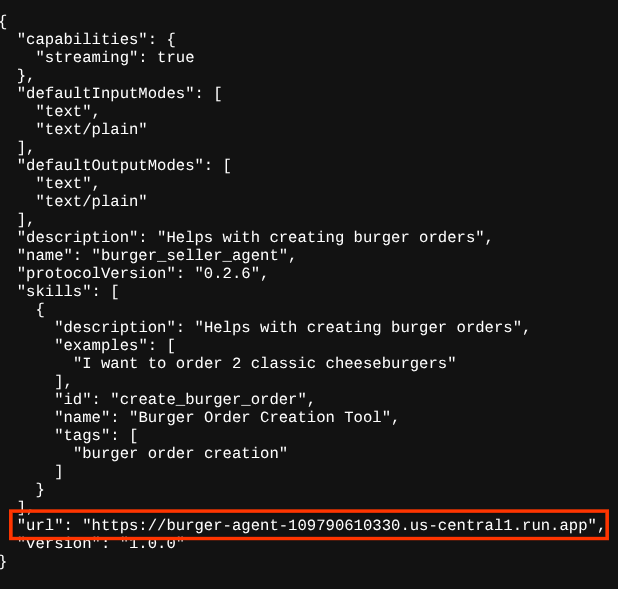
When you access the burger-agent agent card again in the browser https://burger-agent-xxxxxxxxx.us-central1.run.app/.well-known/agent.json , the url value will already be properly configured
5. 🚀 Deploying Pizza Seller Agent - A2A Server
Similarly, pizza agent source code is under the remote_seller_agents/pizza_agent directory.
Similar to the previous burger-agent deployment step, All files that exist under remote_seller_agents/pizza_agent directory are already sufficient to deploy our agent to Cloud Run so that it can be accessible as a service. Run the following command to deploy it
gcloud run deploy pizza-agent \
    --source remote_seller_agents/pizza_agent \
    --port=8080 \
    --allow-unauthenticated \
    --min 1 \
    --region us-central1 \
    --update-env-vars GOOGLE_CLOUD_LOCATION=us-central1 \
    --update-env-vars GOOGLE_CLOUD_PROJECT={your-project-id}
After successful deployment it will show a log like this.
Service [pizza-agent] revision [pizza-agent-xxxxx-xxx] has been deployed and is serving 100 percent of traffic.
Service URL: https://pizza-agent-xxxxxxxxx.us-central1.run.app
The xxxx part here will be a unique identifier when we deploy the service.
It's the same case with the burger agent, when you try to go to the https://pizza-agent-xxxxxxxxx.us-central1.run.app/.well-known/agent.json route of those deployed pizza agent services via browser to access the A2A server agent card, the pizza agent url value on its agent card is not properly configured yet. We also need to add HOST_OVERRIDE to its environment variable
Updating the Pizza Agent URL Value on Agent Card via Environment Variable
To add HOST_OVERRIDE to pizza agent service, do the following steps
- Search Cloud Run on search bar on top of your cloud console
- Click on previously deployed pizza-agent cloud run service
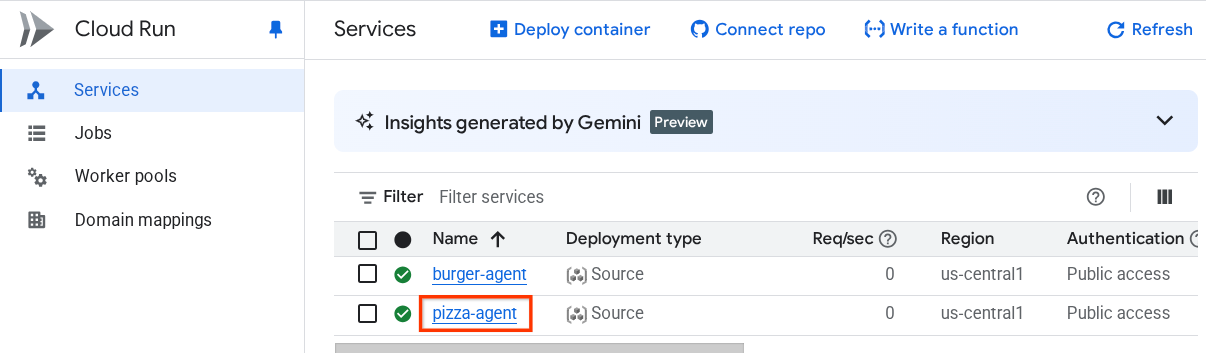
- Click on the Edit and deploy new revision

- Copy the pizza-service URL, then click on Variable & Secrets section

- پس از آن، روی افزودن متغیر کلیک کنید و مقدار
HOST_OVERRIDEرا برابر با آدرس اینترنتی سرویس (همان که الگویhttps://pizza-agent-xxxxxxxxx.us-central1.run.appدارد) قرار دهید.
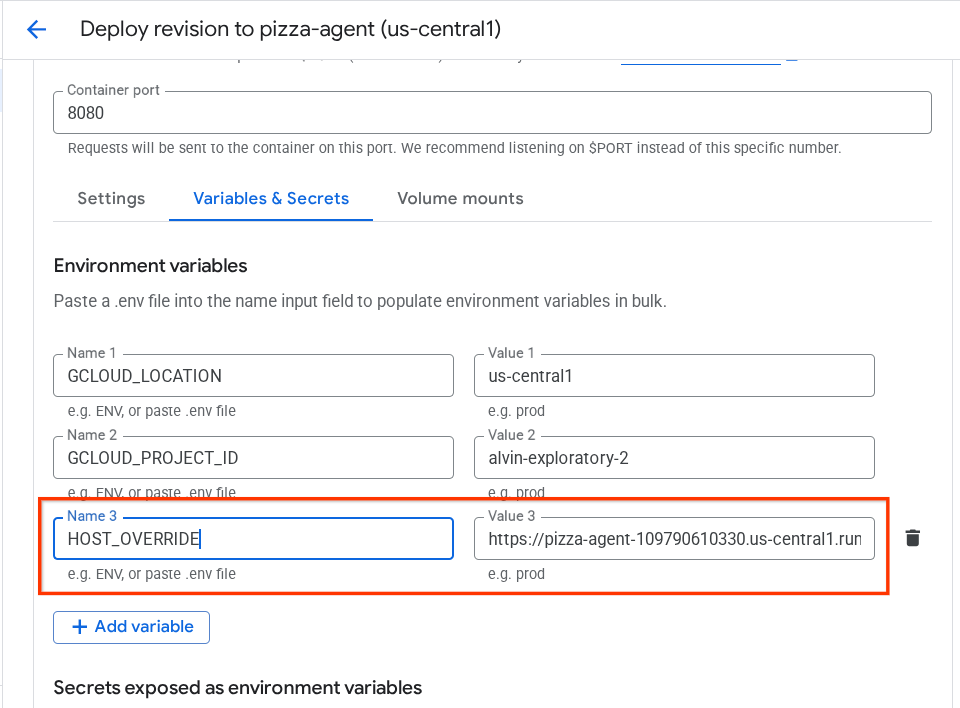
- Finally, click the deploy button to redeploy your service
حالا، وقتی دوباره در مرورگر https://pizza-agent-xxxxxxxxx.us-central1.run.app/.well-known/agent.json به کارت agent مربوط به pizza-agent دسترسی پیدا کنید، مقدار url از قبل به درستی پیکربندی شده است.
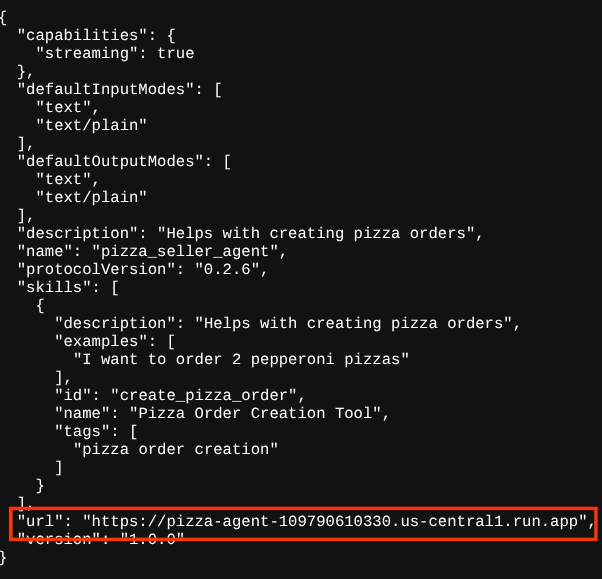
At this point, we already successfully deploy both burger and pizza services to Cloud Run.
6. 🚀 Deploying the Purchasing Concierge - A2A Client to Agent Engine
In this step, we will deploy the purchasing concierge agent. This agent is the one that we will interact with.
The source code of our purchasing concierge agent is under the purchasing_concierge directory. The agent initialization can be inspected on the purchasing_concierge/purchasing_agent.py script.
Follow this steps to deploy it :
- ابتدا، باید فضای ذخیرهسازی مرحلهای خود را در فضای ذخیرهسازی ابری ایجاد کنیم.
gcloud storage buckets create gs://purchasing-concierge-{your-project-id} --location=us-central1
- Now, we need to prepare the .env variable first, let's copy the .env.example into .env file
cp .env.example .env
- حالا فایل .env را باز کنید. محتوای زیر را مشاهده خواهید کرد.
GOOGLE_GENAI_USE_VERTEXAI=TRUE
GOOGLE_CLOUD_PROJECT={your-project-id}
GOOGLE_CLOUD_LOCATION=us-central1
STAGING_BUCKET=gs://purchasing-concierge-{your-project-id}
PIZZA_SELLER_AGENT_URL={your-pizza-agent-url}
BURGER_SELLER_AGENT_URL={your-burger-agent-url}
AGENT_ENGINE_RESOURCE_NAME={your-agent-engine-resource-name}
این عامل با عامل برگر و پیتزا ارتباط برقرار خواهد کرد، بنابراین باید اعتبارنامههای مناسب را برای هر دوی آنها ارائه دهیم. باید PIZZA_SELLER_AGENT_URL و BURGER_SELLER_AGENT_URL را با آدرس اینترنتی Cloud Run از مراحل قبلی بهروزرسانی کنیم.
اگر این را فراموش کردید، به کنسول Cloud Run مراجعه کنید. در نوار جستجوی بالای کنسول خود عبارت "Cloud Run" را تایپ کنید و روی آیکون Cloud Run کلیک راست کنید تا در یک تب جدید باز شود.
شما باید خدمات قبلی نماینده فروش از راه دور مستقر شده ما را مانند شکل زیر مشاهده کنید.

Now to see the public URL of those services, click on the one of the service and you'll be redirected to the Service details page. You can see the URL on the top area right beside the Region information

متغیر محیطی نهایی باید شبیه به این باشد
GOOGLE_GENAI_USE_VERTEXAI=TRUE
GOOGLE_CLOUD_PROJECT={your-project-id}
GOOGLE_CLOUD_LOCATION=us-central1
STAGING_BUCKET=gs://purchasing-concierge-{your-project-id}
PIZZA_SELLER_AGENT_URL=https://pizza-agent-xxxxx.us-central1.run.app
BURGER_SELLER_AGENT_URL=https://burger-agent-xxxxx.us-central1.run.app
AGENT_ENGINE_RESOURCE_NAME={your-agent-engine-resource-name}
- Now, we are ready to deploy our purchasing concierge agent. We will deploy it to the agent engine and the deployment code is inside
deploy_to_agent_engine.pyscript.
We can deploy it by running the script:
uv run deploy_to_agent_engine.py
پس از استقرار موفقیتآمیز، گزارشی مانند این نمایش داده میشود. نام منبع Agent Engine به صورت "projects/xxxx/locations/us-central1/reasoningEngines/yyyy" نمایش داده میشود.
AgentEngine created. Resource name: projects/xxxx/locations/us-central1/reasoningEngines/yyyy
To use this AgentEngine in another session:
agent_engine = vertexai.agent_engines.get('projects/xxxx/locations/us-central1/reasoningEngines/yyyy)
Deployed remote app resource: projects/xxxx/locations/us-central1/reasoningEngines/xxxx
و وقتی آن را در داشبورد موتور عامل بررسی میکنیم (در نوار جستجو عبارت "موتور عامل" را جستجو کنید) استقرار قبلی ما را نشان میدهد.
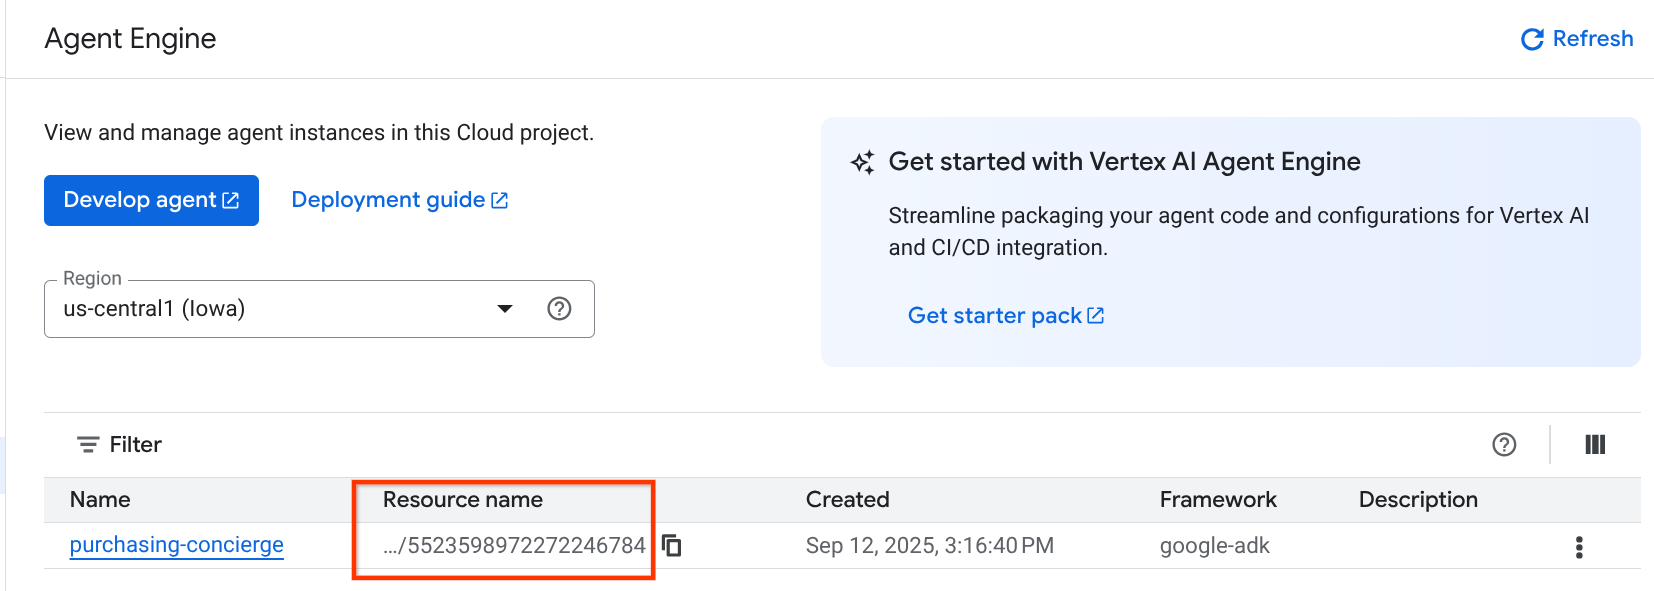
همچنین میتوانید بررسی کنید که نام منبع Agent Engine در آنجا نمایش داده شده است. سپس، میتوانیم از این نام منبع برای آزمایش آن استفاده کنیم.
پس از آن، مقدار AGENT_ENGINE_RESOURCE_NAME را در فایل .env با این مقدار بهروزرسانی کنید . مطمئن شوید که نام منبع موتور عامل (agent engine resource name) صحیح را وارد میکنید. فایل .env شما باید به شکل زیر باشد:
GOOGLE_GENAI_USE_VERTEXAI=TRUE
GOOGLE_CLOUD_PROJECT={your-project-id}
GOOGLE_CLOUD_LOCATION=us-central1
STAGING_BUCKET=gs://purchasing-concierge-{your-project-id}
PIZZA_SELLER_AGENT_URL=https://pizza-agent-xxxxx.us-central1.run.app
BURGER_SELLER_AGENT_URL=https://burger-agent-xxxxx.us-central1.run.app
AGENT_ENGINE_RESOURCE_NAME=projects/xxxx/locations/us-central1/reasoningEngines/yyyy
Testing the Deployed Agent on Agent Engine
تعامل با موتور عامل میتواند از طریق دستور curl و SDK انجام شود. برای مثال، دستور زیر را اجرا کنید تا تعامل با عامل مستقر شده را امتحان کنید.
میتوانید این کوئری را ارسال کنید تا بررسی کنید که آیا عامل با موفقیت مستقر شده است یا خیر. اسکریپت test_agent_engine.sh زیر را اجرا کنید.
bash test_agent_engine.sh
You can inspect the script, and see that we try to ask "List available burger menu please" to the agent
در صورت موفقیت، چندین رویداد پاسخ مانند این در کنسول شما پخش خواهد شد.
{
  "content": {
    "parts": [
      {
        "text": "Here is our burger menu:\n- Classic Cheeseburger: IDR 85K\n- Double Cheeseburger: IDR 110K\n- Spicy Chicken Burger: IDR 80K\n- Spicy Cajun Burger: IDR 85K"
      }
    ],
    "role": "model"
  },
  "usage_metadata": {
    "candidates_token_count": 51,
    "candidates_tokens_details": [
      {
        "modality": "TEXT",
        "token_count": 51
      }
    ],
    "prompt_token_count": 907,
    "prompt_tokens_details": [
      {
        "modality": "TEXT",
        "token_count": 907
      }
    ],
    "total_token_count": 958,
    "traffic_type": "ON_DEMAND"
  },
  "invocation_id": "e-14679918-af68-45f1-b942-cf014368a733",
  "author": "purchasing_agent",
  "actions": {
    "state_delta": {},
    "artifact_delta": {},
    "requested_auth_configs": {}
  },
  "id": "dbe7fc43-b82a-4f3e-82aa-dd97afa8f15b",
  "timestamp": 1754287348.941454
}
We will try using UI in the next step, however let's discuss what are the core components and typical flow of A2A clients first
7. 🚀 Integration Testing and Payload Inspection
Now let's inspect our purchasing concierge with the remote agent interaction using a web UI. Run the following command to deploy a Gradio app. Running this app require you to already filled the .env file correctly
uv run purchasing_concierge_ui.py
It will shown the following output if succeeded
* Running on local URL:  http://0.0.0.0:8080
* To create a public link, set `share=True` in `launch()`.
سپس، در ترمینال، Ctrl را نگه دارید و روی آدرس http://0.0.0.0:8080 کلیک کنید یا روی دکمه پیشنمایش وب کلیک کنید تا رابط کاربری وب باز شود.

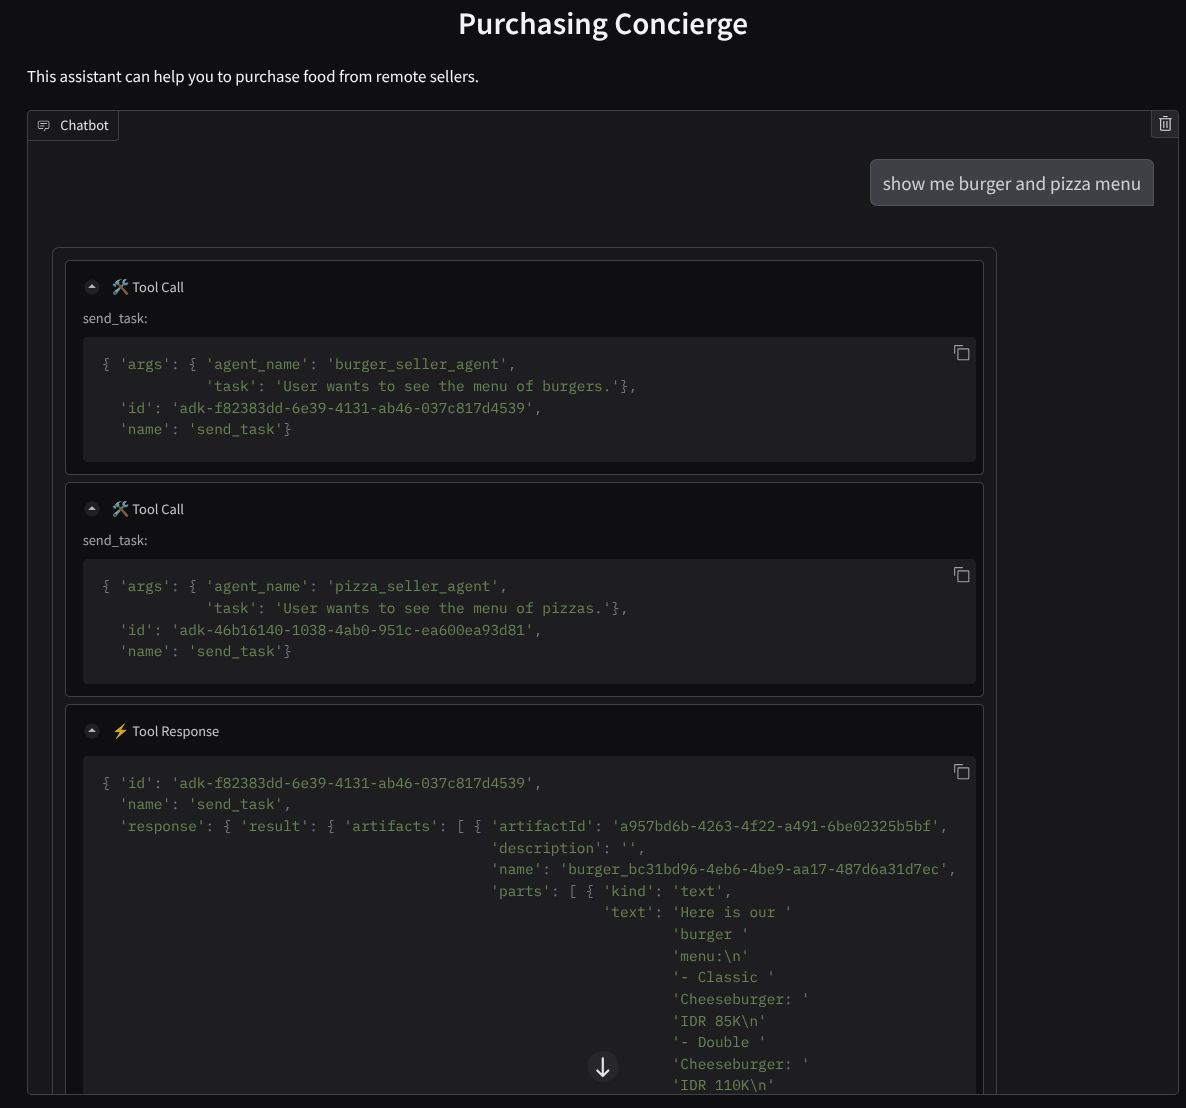
Try to have a conversation like this :
- Show me burger and pizza menu
- من میخواهم ۱ پیتزای مرغ باربیکیو و ۱ برگر کاجون تند سفارش دهم.
And continue the conversation until you finish the order. Inspect how the interaction is going and what is the tool call and response? The following image is an example of the interaction result.
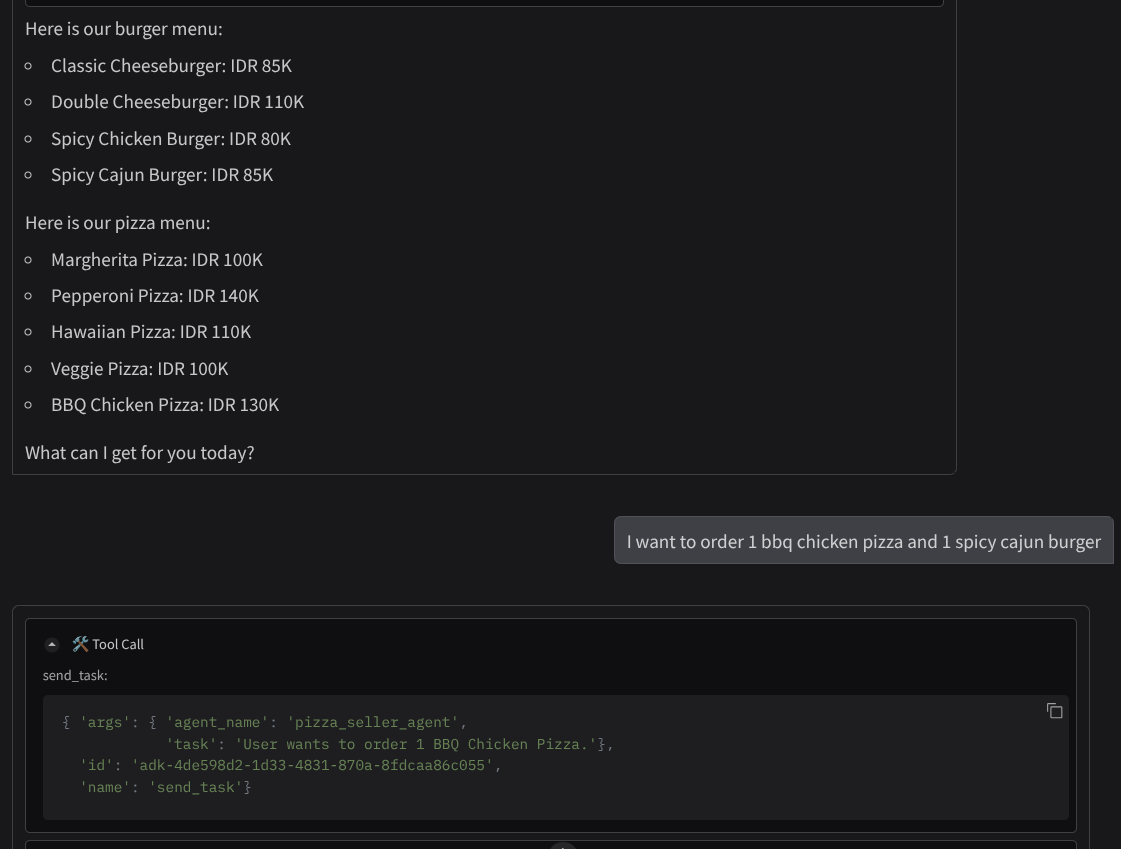
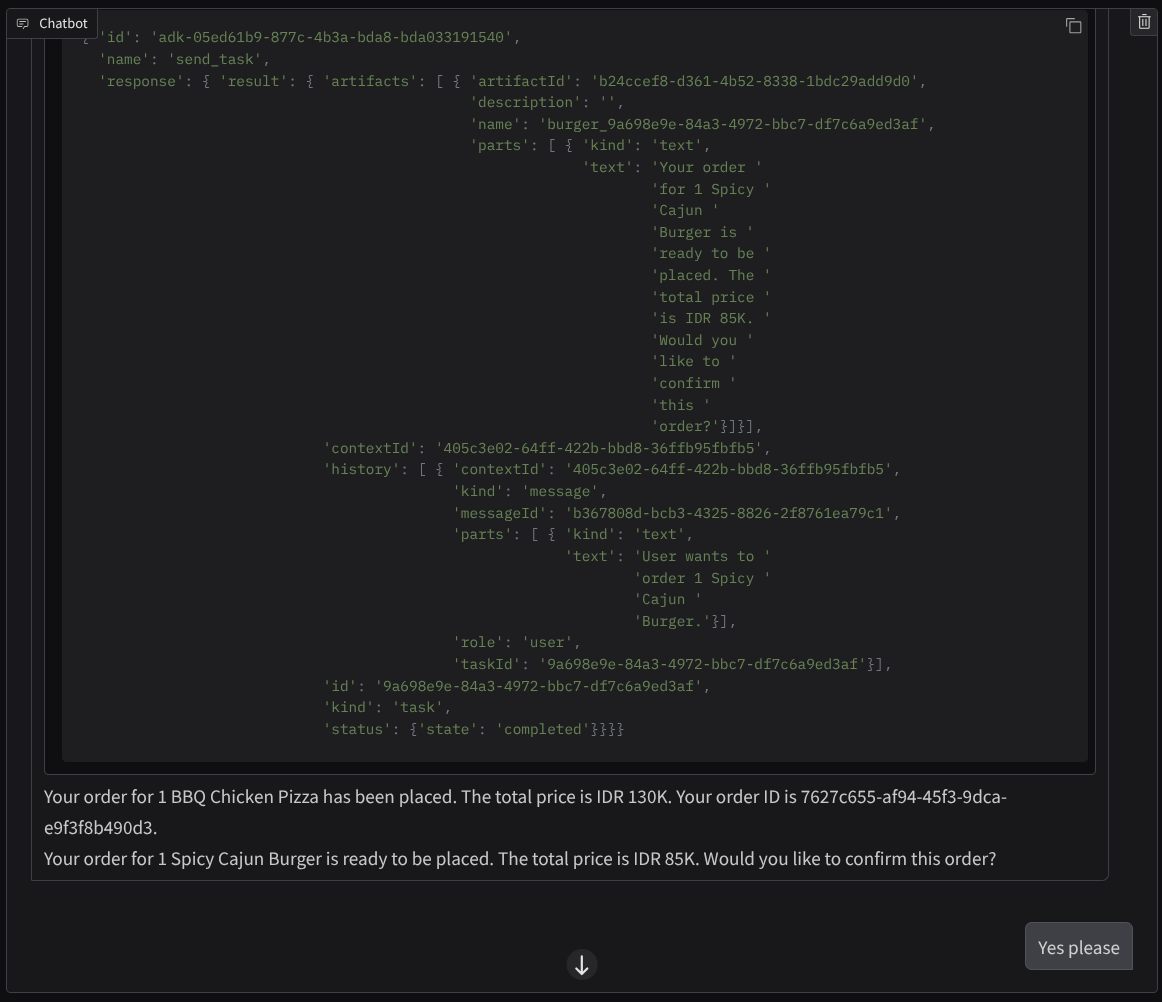
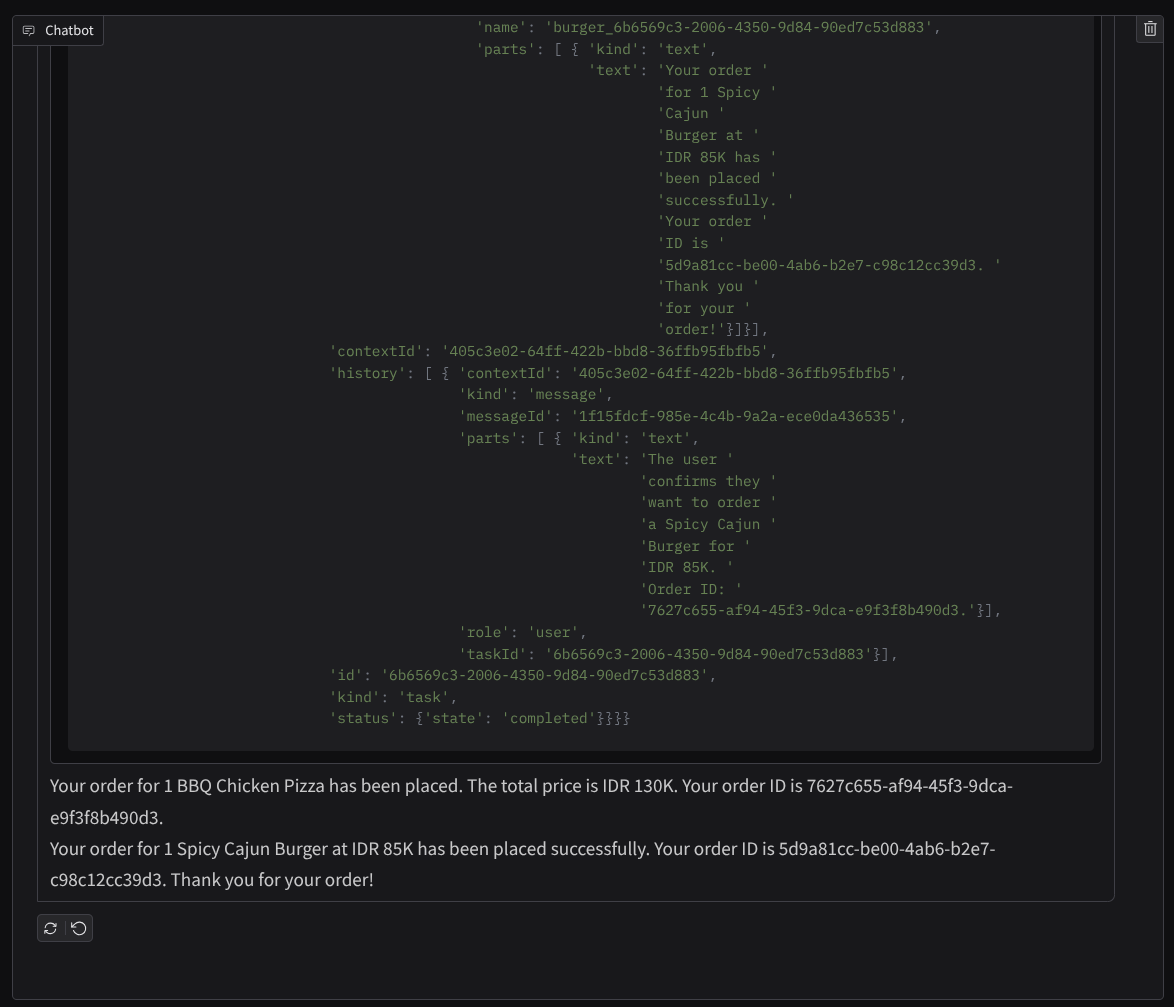
میتوانیم ببینیم که ارتباط با دو عامل مختلف، دو رفتار متفاوت را به همراه دارد و A2A میتواند این را به خوبی مدیریت کند. عامل فروشنده پیتزا مستقیماً درخواست عامل خرید ما را میپذیرد، در حالی که عامل برگر قبل از ادامه درخواست ما به تأیید ما نیاز دارد و پس از تأیید ما، عامل میتواند تأیید را به عامل برگر واگذار کند.
اکنون، مفاهیم اولیه A2A را به پایان رساندهایم و میبینیم که چگونه به عنوان معماری کلاینت و سرور پیادهسازی شده است.
۸. 💡 [توضیح کد] مفهوم و پیادهسازی سرور A2A
مقداردهی اولیهی عامل فروشندهی راه دور را میتوان در اسکریپت remote_seller_agents/*/agent.py بررسی کرد. در اینجا قطعه کد عاملهای فروشنده آمده است.
Burger Agent
from crewai import Agent, Crew, LLM, Task, Process
from crewai.tools import tool

...

       model = LLM(
            model="vertex_ai/gemini-2.5-flash-lite",  # Use base model name without provider prefix
        )
        burger_agent = Agent(
            role="Burger Seller Agent",
            goal=(
                "Help user to understand what is available on burger menu and price also handle order creation."
            ),
            backstory=("You are an expert and helpful burger seller agent."),
            verbose=False,
            allow_delegation=False,
            tools=[create_burger_order],
            llm=model,
        )

        agent_task = Task(
            description=self.TaskInstruction,
            agent=burger_agent,
            expected_output="Response to the user in friendly and helpful manner",
        )

        crew = Crew(
            tasks=[agent_task],
            agents=[burger_agent],
            verbose=False,
            process=Process.sequential,
        )

        inputs = {"user_prompt": query, "session_id": sessionId}
        response = crew.kickoff(inputs)
        return response

...
Pizza Agent
from langchain_google_vertexai import ChatVertexAI
from langgraph.prebuilt import create_react_agent

...

self.model = ChatVertexAI(
    model="gemini-2.5-flash-lite",
    location=os.getenv("GOOGLE_CLOUD_LOCATION"),
    project=os.getenv("GOOGLE_CLOUD_PROJECT"),
)
self.tools = [create_pizza_order]
self.graph = create_react_agent(
    self.model,
    tools=self.tools,
    checkpointer=memory,
    prompt=self.SYSTEM_INSTRUCTION,
)

...
As you can see, these 2 agents are built with completely different frameworks ( CrewAI and Langgraph ) compared to the client agent ( ADK ). With A2A this is not a problem, we don't need them to share their internal code to communicate with each other, it doesn't matter what frameworks are being used, what language is utilized, or where they are deployed.
Core Components of A2A Server
حالا بیایید در مورد مفهوم اصلی و اجزای سرور A2A بحث کنیم.
Agent Card
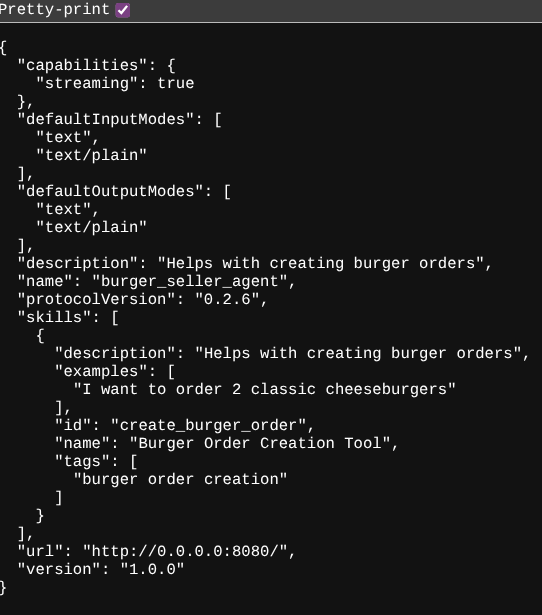
Each of A2A Server must have an agent card that is accessible on the /.well-known/agent.json resource. This is to support the discovery phase on the A2A Client, which should give complete information and contexts on how to access the agent and know all of its capabilities. It's kinda similar with well documented API documentation using Swagger or Postman.
این محتوای کارت مامور برگر مستقر ما است
{
  "capabilities": {
    "streaming": true
  },
  "defaultInputModes": [
    "text",
    "text/plain"
  ],
  "defaultOutputModes": [
    "text",
    "text/plain"
  ],
  "description": "Helps with creating burger orders",
  "name": "burger_seller_agent",
  "protocolVersion": "0.2.6",
  "skills": [
    {
      "description": "Helps with creating burger orders",
      "examples": [
        "I want to order 2 classic cheeseburgers"
      ],
      "id": "create_burger_order",
      "name": "Burger Order Creation Tool",
      "tags": [
        "burger order creation"
      ]
    }
  ],
  "url": "https://burger-agent-109790610330.us-central1.run.app",
  "version": "1.0.0"
}
این کارتهای عامل، بسیاری از مؤلفههای مهم، مانند مهارتهای عامل، قابلیتهای پخش جریانی، روشهای پشتیبانیشده، نسخه پروتکل و موارد دیگر را برجسته میکنند.
All of this information can be utilized to develop a proper communication mechanism so that the A2A client can communicate properly. The supported modality and authentication mechanism ensure the communication can be properly established, and the agent skills information can be embedded into A2A client system prompt to give the client's agent context about the remote agent capabilities and skills to be invoked. More detailed fields for this agent card can be found in this documentation .
در کد ما، پیادهسازی agent card با استفاده از sdk پایتون A2A برقرار شده است، برای پیادهسازی، قطعه کد remote_seller_agents/burger_agent/main.py زیر را بررسی کنید.
...

        capabilities = AgentCapabilities(streaming=True)
        skill = AgentSkill(
            id="create_burger_order",
            name="Burger Order Creation Tool",
            description="Helps with creating burger orders",
            tags=["burger order creation"],
            examples=["I want to order 2 classic cheeseburgers"],
        )
        agent_host_url = (
            os.getenv("HOST_OVERRIDE")
            if os.getenv("HOST_OVERRIDE")
            else f"http://{host}:{port}/"
        )
        agent_card = AgentCard(
            name="burger_seller_agent",
            description="Helps with creating burger orders",
            url=agent_host_url,
            version="1.0.0",
            defaultInputModes=BurgerSellerAgent.SUPPORTED_CONTENT_TYPES,
            defaultOutputModes=BurgerSellerAgent.SUPPORTED_CONTENT_TYPES,
            capabilities=capabilities,
            skills=[skill],
        )

...
We can see several fields there like:
-
AgentCapabilities: اعلان توابع اختیاری اضافی که توسط سرویس عامل پشتیبانی میشوند، مانند قابلیت پخش جریانی و/یا پشتیبانی از اعلانهای فوری -
AgentSkill: ابزارها یا عملکردهایی که توسط عامل پشتیبانی میشوند -
Input/OutputModes: نوع ورودی/خروجی که پشتیبانی میشود -
Url: Address to communicate with the agent
In this configuration we provide a dynamic agent host url creation, so that it is easier to switch between local testing and cloud deployment, thus why we need to add the HOST_OVERRIDE variable in the previous step.
Task Queue and Agent Executor
A2A server may be handling requests from different agents or users and be able to isolate each task perfectly. To better visualize the contexts of these, you can inspect the image below
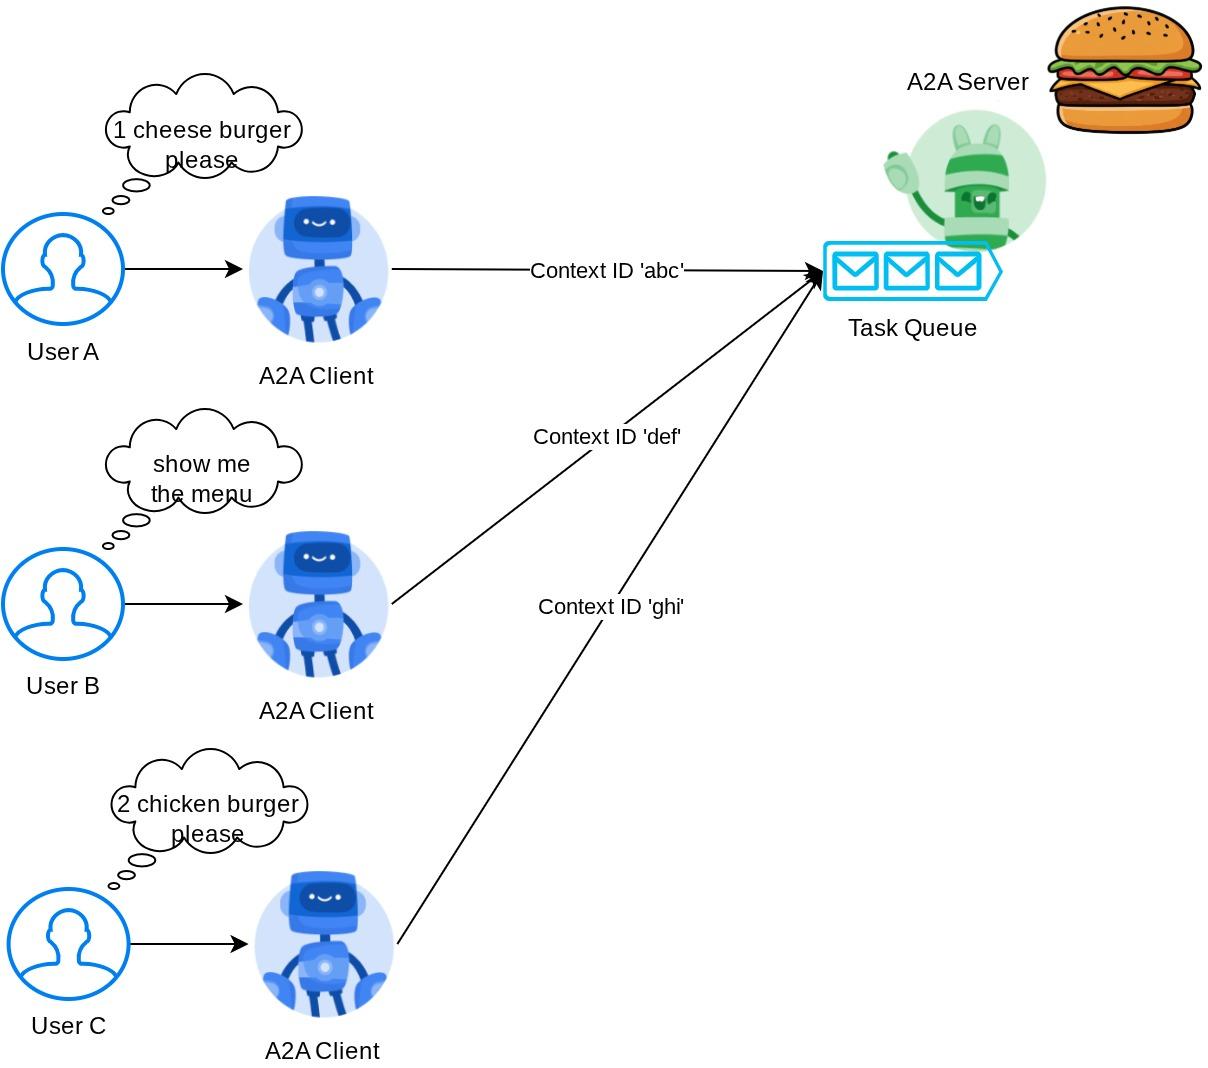
Thus, each A2A server should be able to track incoming tasks and store proper information about it. The A2A SDK provides modules to address this challenge in the A2A server. First, we can instantiate logic on how we want to handle the incoming request. By inheriting the AgentExecutor abstract class we can control how we want to manage task execution and cancellation. This example implementation can be inspected at remote_seller_agents/burger_agent/agent_executor.py module ( similar path for the pizza seller case )
...

class BurgerSellerAgentExecutor(AgentExecutor):
    """Burger Seller AgentExecutor."""

    def __init__(self):
        self.agent = BurgerSellerAgent()

    async def execute(
        self,
        context: RequestContext,
        event_queue: EventQueue,
    ) -> None:
        query = context.get_user_input()
        try:
            result = self.agent.invoke(query, context.context_id)
            print(f"Final Result ===> {result}")

            parts = [Part(root=TextPart(text=str(result)))]
            await event_queue.enqueue_event(
                completed_task(
                    context.task_id,
                    context.context_id,
                    [new_artifact(parts, f"burger_{context.task_id}")],
                    [context.message],
                )
            )
        except Exception as e:
            print("Error invoking agent: %s", e)
            raise ServerError(error=ValueError(f"Error invoking agent: {e}")) from e

    async def cancel(
        self, request: RequestContext, event_queue: EventQueue
    ) -> Task | None:
        raise ServerError(error=UnsupportedOperationError())

...
در کد بالا، ما یک طرح پردازش اولیه پیادهسازی کردهایم که در آن، عامل هنگام دریافت درخواست مستقیماً فراخوانی میشود و رویدادهای وظیفه تکمیلشده را پس از اتمام فراخوانی ارسال میکند. با این حال، ما روش لغو را در اینجا پیادهسازی نکردیم زیرا به عنوان یک عملیات کوتاهمدت در نظر گرفته میشود.
پس از ساخت اجراکننده، میتوانیم مستقیماً از DefaultRequestHandler، InMemoryTaskStore و A2AStarletteApplication داخلی برای راهاندازی سرور HTTP استفاده کنیم. این پیادهسازی را میتوان در remote_seller_agents/burger_agent/__main__.py بررسی کرد.
...

        request_handler = DefaultRequestHandler(
            agent_executor=BurgerSellerAgentExecutor(),
            task_store=InMemoryTaskStore(),
        )
        server = A2AStarletteApplication(
            agent_card=agent_card, http_handler=request_handler
        )

        uvicorn.run(server.build(), host=host, port=port)

...
این ماژول پیادهسازی مسیر /.well-known/agent.json را برای دسترسی به کارت عامل و همچنین نقطه پایانی POST را برای پشتیبانی از پروتکل A2A در اختیار شما قرار میدهد.
خلاصه
به طور خلاصه، تاکنون سرور A2A ما با استفاده از SDK پایتون مستقر شده است که میتواند از دو قابلیت زیر پشتیبانی کند:
- انتشار کارت عامل در مسیر
/.well-known/agent.json - مدیریت درخواستهای JSON-RPC با صفبندی وظایف در حافظه
The entry point on starting these functionalities can be inspected on the __main__.py script ( on the remote_seller_agents/burger_agent or remote_seller_agents/pizza_agent ) .
۹. 💡 [توضیح کد] استقرار موتور عامل
قطعه کد مربوط به مسئول خرید در فایل purchase_concierge/purchasing_agent.py به صورت زیر است:
from google.adk import Agent

...

def create_agent(self) -> Agent:
        return Agent(
            model="gemini-2.5-flash-lite",
            name="purchasing_agent",
            instruction=self.root_instruction,
            before_model_callback=self.before_model_callback,
            before_agent_callback=self.before_agent_callback,
            description=(
                "This purchasing agent orchestrates the decomposition of the user purchase request into"
                " tasks that can be performed by the seller agents."
            ),
            tools=[
                self.send_task,
            ],
        )

...
این عامل با استفاده از ADK ساخته شده و روی موتور عامل مستقر شده است.
Vertex AI Agent Engine is a set of services that enables developers to deploy, manage, and scale AI agents in production. It handles the infrastructure to scale agents in production so we can focus on creating applications. You can read more about this in this document . If previously we need to prepare files needed to deploy our agent service (such as main server script and Dockerfile), in this case we can deploy our agent directly from python script without the need of developing our own backend service by using a combination of ADK and Agent Engine.
در این آموزش ما با استفاده از اسکریپت deploy_to_agent_engine.py که محتوای آن در زیر نشان داده شده است، عملیات استقرار را انجام میدهیم.
import vertexai
from vertexai.preview import reasoning_engines
from vertexai import agent_engines
from dotenv import load_dotenv
import os
from purchasing_concierge.agent import root_agent

load_dotenv()

PROJECT_ID = os.getenv("GOOGLE_CLOUD_PROJECT")
LOCATION = os.getenv("GOOGLE_CLOUD_LOCATION")
STAGING_BUCKET = os.getenv("STAGING_BUCKET")

vertexai.init(
    project=PROJECT_ID,
    location=LOCATION,
    staging_bucket=STAGING_BUCKET,
)

adk_app = reasoning_engines.AdkApp(
    agent=root_agent,
)

remote_app = agent_engines.create(
    agent_engine=adk_app,
    display_name="purchasing-concierge",
    requirements=[
        "google-cloud-aiplatform[adk,agent_engines]",
        "a2a-sdk==0.2.16",
    ],
    extra_packages=[
        "./purchasing_concierge",
    ],
    env_vars={
        "GOOGLE_GENAI_USE_VERTEXAI": os.environ["GOOGLE_GENAI_USE_VERTEXAI"],
        "PIZZA_SELLER_AGENT_URL": os.environ["PIZZA_SELLER_AGENT_URL"],
        "BURGER_SELLER_AGENT_URL": os.environ["BURGER_SELLER_AGENT_URL"],
    },
)

print(f"Deployed remote app resource: {remote_app.resource_name}")
This is the steps needed to deploy our ADK agent to the agent engine. First, we need to create an AdkApp object from our ADK root_agent . Then we can run the agent_engines.create method by providing the adk_app object, specifying the requirements in the requirements field, specifying the agent directory path in the extra_packages ( you also can provide other directories and files if needed here ) and providing necessary env variables.
۱۰. 💡 [توضیح کد] مفهوم و پیادهسازی کلاینت A2A
تصویر بالا جریان معمول تعاملات A2A را نشان میدهد:
- کلاینت سعی خواهد کرد هر کارت عامل منتشر شده را در URL عامل راه دور ارائه شده در مسیر
/.well-known/agent.jsonپیدا کند. - سپس، در صورت لزوم، پیامی را به آن عامل ارسال میکند که حاوی پیام و پارامترهای فراداده لازم (مثلاً شناسه جلسه، پیشینه تاریخی و غیره) است. سرور این پیام را به عنوان یک وظیفه (task) که باید تکمیل شود، در نظر میگیرد.
- سرور A2A درخواست را پردازش میکند، اگر سرور از اعلانهای فوری پشتیبانی کند، قادر به انتشار برخی اعلانها در طول پردازش وظیفه نیز خواهد بود (این قابلیت خارج از محدوده این آزمایشگاه کد است)
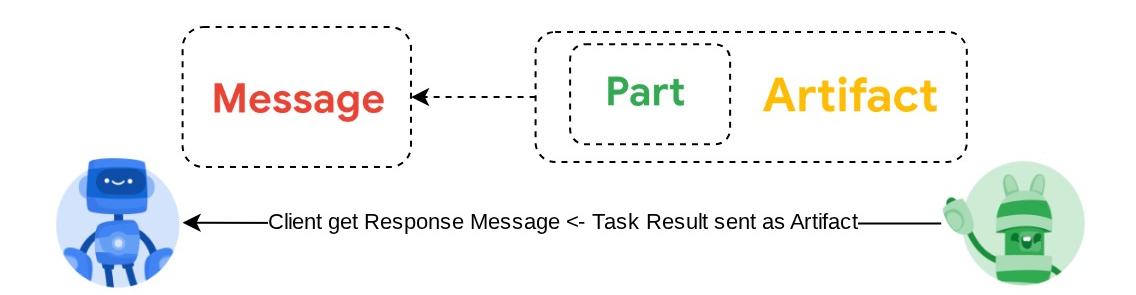
- پس از اتمام، سرور A2A پاسخ مصنوع را به کلاینت ارسال میکند.
برخی از اشیاء اصلی برای تعاملات فوق این موارد هستند (جزئیات بیشتر را میتوانید اینجا بخوانید ):
- پیام: یک نوبت ارتباطی بین مشتری و یک نماینده از راه دور
- وظیفه : واحد کاری اساسی که توسط A2A مدیریت میشود و با یک شناسه منحصر به فرد مشخص میشود.
- مصنوع: خروجی (مثلاً یک سند، تصویر، دادههای ساختاریافته) تولید شده توسط عامل در نتیجه یک کار، متشکل از بخشهایی
- بخش (Part): کوچکترین واحد محتوا در یک پیام یا مصنوع. بخش میتواند متن، تصویر، ویدیو، فایل و غیره باشد.
Card Discovery
وقتی سرویس کلاینت A2A راهاندازی میشود، فرآیند معمول این است که سعی شود اطلاعات کارت اپراتور دریافت و ذخیره شود تا در صورت نیاز به راحتی به آن دسترسی پیدا کرد. در این آزمایشگاه کد، ما آن را روی before_agent_callback پیادهسازی میکنیم، میتوانید پیادهسازی را در purchasing_concierge/purchasing_agent.py مشاهده کنید. قطعه کد زیر را ببینید.
...

async def before_agent_callback(self, callback_context: CallbackContext):
        if not self.a2a_client_init_status:
            httpx_client = httpx.AsyncClient(timeout=httpx.Timeout(timeout=30))
            for address in self.remote_agent_addresses:
                card_resolver = A2ACardResolver(
                    base_url=address, httpx_client=httpx_client
                )
                try:
                    card = await card_resolver.get_agent_card()
                    remote_connection = RemoteAgentConnections(
                        agent_card=card, agent_url=card.url
                    )
                    self.remote_agent_connections[card.name] = remote_connection
                    self.cards[card.name] = card
                except httpx.ConnectError:
                    print(f"ERROR: Failed to get agent card from : {address}")
            agent_info = []
            for ra in self.list_remote_agents():
                agent_info.append(json.dumps(ra))
            self.agents = "\n".join(agent_info)

...
در اینجا، ما سعی میکنیم با استفاده از ماژول داخلی A2ACardResolver کلاینت A2A به تمام کارتهای عامل موجود دسترسی پیدا کنیم، سپس اتصال مورد نیاز برای ارسال پیام به عامل را جمعآوری میکنیم، پس از آن نیز باید تمام عاملهای موجود و مشخصات آنها را در اعلان لیست کنیم تا عامل ما بداند که میتواند با این عاملها ارتباط برقرار کند.
Prompt and Send Task Tool
این ابزار و اعلانی است که ما در اینجا به نماینده ADK خود ارائه میدهیم.
...

def root_instruction(self, context: ReadonlyContext) -> str:
    current_agent = self.check_active_agent(context)
    return f"""You are an expert purchasing delegator that can delegate the user product inquiry and purchase request to the
appropriate seller remote agents.

Execution:
- For actionable tasks, you can use `send_task` to assign tasks to remote agents to perform.
- When the remote agent is repeatedly asking for user confirmation, assume that the remote agent doesn't have access to user's conversation context.
So improve the task description to include all the necessary information related to that agent
- Never ask user permission when you want to connect with remote agents. If you need to make connection with multiple remote agents, directly
connect with them without asking user permission or asking user preference
- Always show the detailed response information from the seller agent and propagate it properly to the user.
- If the remote seller is asking for confirmation, rely the confirmation question to the user if the user haven't do so.
- If the user already confirmed the related order in the past conversation history, you can confirm on behalf of the user
- Do not give irrelevant context to remote seller agent. For example, ordered pizza item is not relevant for the burger seller agent
- Never ask order confirmation to the remote seller agent

Please rely on tools to address the request, and don't make up the response. If you are not sure, please ask the user for more details.
Focus on the most recent parts of the conversation primarily.

If there is an active agent, send the request to that agent with the update task tool.

Agents:
{self.agents}

Current active seller agent: {current_agent["active_agent"]}
"""

...

async def send_task(self, agent_name: str, task: str, tool_context: ToolContext):
        """Sends a task to remote seller agent

        This will send a message to the remote agent named agent_name.

        Args:
            agent_name: The name of the agent to send the task to.
            task: The comprehensive conversation context summary
                and goal to be achieved regarding user inquiry and purchase request.
            tool_context: The tool context this method runs in.

        Yields:
            A dictionary of JSON data.
        """
        if agent_name not in self.remote_agent_connections:
            raise ValueError(f"Agent {agent_name} not found")
        state = tool_context.state
        state["active_agent"] = agent_name
        client = self.remote_agent_connections[agent_name]
        if not client:
            raise ValueError(f"Client not available for {agent_name}")
        session_id = state["session_id"]
        task: Task
        message_id = ""
        metadata = {}
        if "input_message_metadata" in state:
            metadata.update(**state["input_message_metadata"])
            if "message_id" in state["input_message_metadata"]:
                message_id = state["input_message_metadata"]["message_id"]
        if not message_id:
            message_id = str(uuid.uuid4())

        payload = {
            "message": {
                "role": "user",
                "parts": [
                    {"type": "text", "text": task}
                ],  # Use the 'task' argument here
                "messageId": message_id,
                "contextId": session_id,
            },
        }

        message_request = SendMessageRequest(
            id=message_id, params=MessageSendParams.model_validate(payload)
        )
        send_response: SendMessageResponse = await client.send_message(
            message_request=message_request
        )
        print(
            "send_response",
            send_response.model_dump_json(exclude_none=True, indent=2),
        )

        if not isinstance(send_response.root, SendMessageSuccessResponse):
            print("received non-success response. Aborting get task ")
            return None

        if not isinstance(send_response.root.result, Task):
            print("received non-task response. Aborting get task ")
            return None

        return send_response.root.result

...
در اعلان، نام و توضیحات مربوط به تمام عوامل راه دور موجود را به مسئول خرید خود میدهیم و در ابزار self.send_task مکانیزمی را برای بازیابی کلاینت مناسب جهت اتصال به عامل و ارسال فرادادههای مورد نیاز با استفاده از شیء SendMessageRequest فراهم میکنیم.
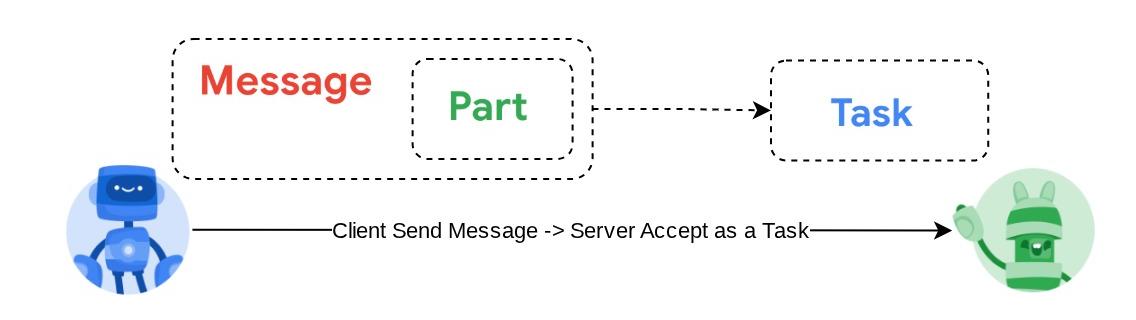
The Communication Protocols
The Task definition is a domain that is owned by the A2A server. However, from the perspective of the A2A client, they see it as a Message that is sent to the server, it is up to the server how to define incoming messages from the client as which task and whether completing the task needs the interaction from the client, you can read more details about task lifecycle in this documentation . The higher level concept of this can be visualized below:
این تبادل پیام -> وظیفه با استفاده از قالب بار داده (payload) بر روی استاندارد JSON-RPC پیادهسازی میشود، همانطور که در مثال زیر از پروتکل message/send نشان داده شده است:
{
  # identifier for this request
  "id": "abc123",
  # version of JSON-RPC protocol
  "jsonrpc": "2.0",
  # method name
  "method": "message/send",
  # parameters/arguments of the method
  "params": {
    "message": "hi, what can you help me with?"
  }
}
روشهای مختلفی وجود دارد، به عنوان مثال برای پشتیبانی از انواع مختلف ارتباط (مثلاً همگامسازی، پخش جریانی، ناهمگام) یا برای پیکربندی اعلانها برای وضعیت وظیفه. سرور A2A را میتوان به صورت انعطافپذیری پیکربندی کرد تا این استانداردهای تعریف وظیفه را مدیریت کند. جزئیات این روشها را میتوانید در این سند مطالعه کنید.
11. 🎯 Challenge
حالا، آیا میتوانید فایل لازم را آماده کنید و برنامه Gradio را در فضای ابری که خودتان اداره میکنید، مستقر کنید؟ وقت آن است که چالش را بپذیرید!
12. 🧹 Clean up
برای جلوگیری از تحمیل هزینه به حساب Google Cloud خود برای منابع استفاده شده در این codelab، این مراحل را دنبال کنید:
- در کنسول گوگل کلود، به صفحه مدیریت منابع بروید.
- در لیست پروژهها، پروژهای را که میخواهید حذف کنید انتخاب کنید و سپس روی «حذف» کلیک کنید.
- در کادر محاورهای، شناسه پروژه را تایپ کنید و سپس برای حذف پروژه، روی خاموش کردن کلیک کنید.
- همچنین میتوانید به Cloud Run و Agent Engine در کنسول بروید، سرویسی را که اخیراً مستقر کردهاید انتخاب کرده و حذف کنید.