
1. 📖 簡介
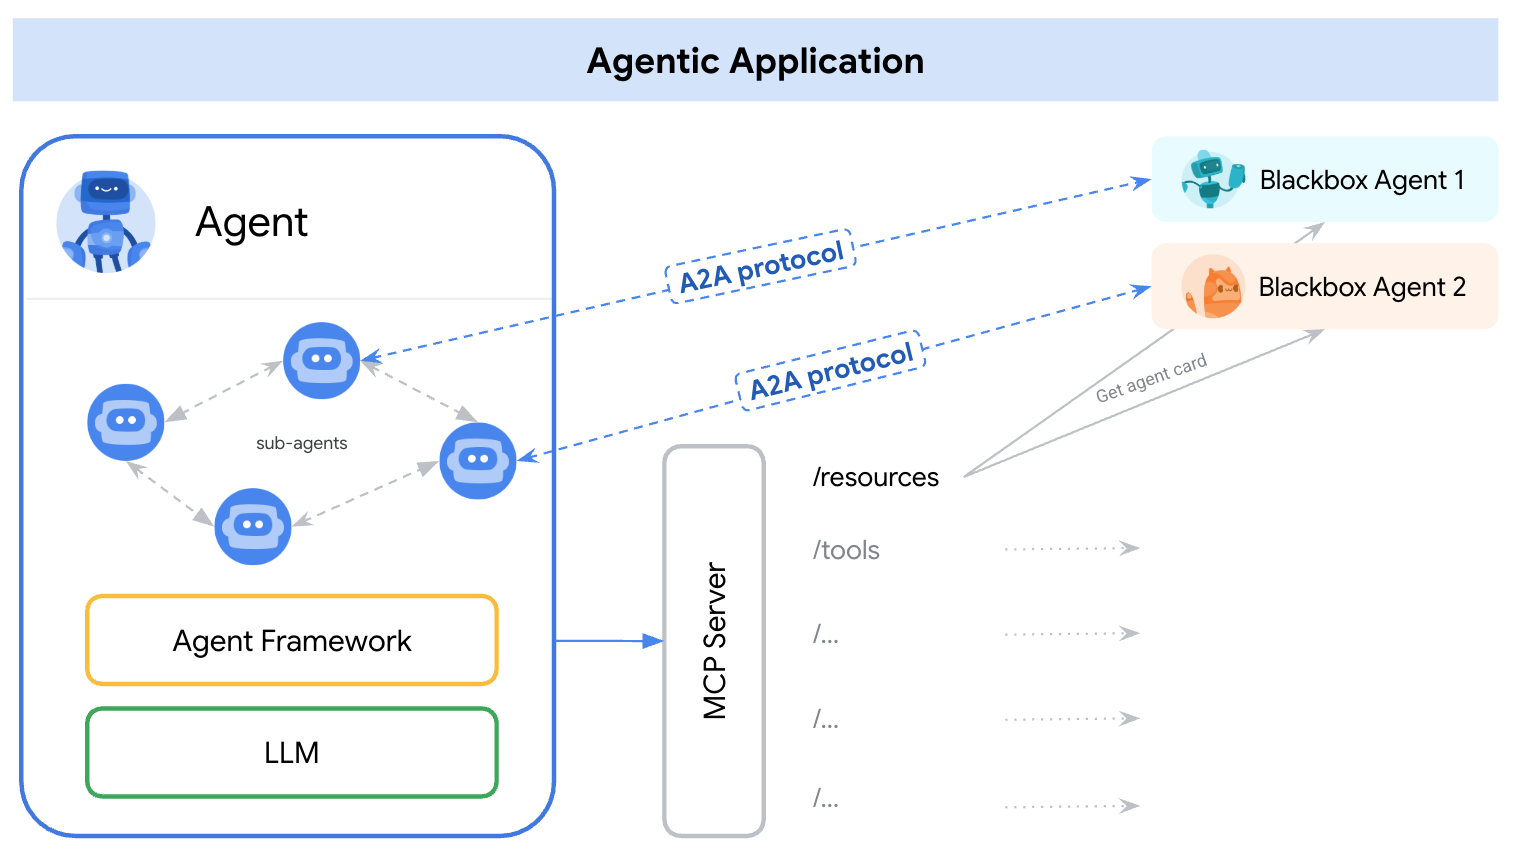
Agent2Agent (A2A) 通訊協定旨在將 AI 代理之間的通訊標準化,特別是部署在外部系統中的代理。先前,我們為工具建立了這類通訊協定,稱為 Model Context Protocol (MCP),這項新興標準可將 LLM 連線至資料和資源。A2A 著重於解決不同問題,因此可與 MCP 相輔相成。MCP 著重於降低代理與工具和資料連結的複雜度,而 A2A 則著重於如何讓代理以自然模式協作。讓服務專員以服務專員 (或使用者) 的身分進行溝通,而非以工具的身分;舉例來說,當你想訂購某樣東西時,可以啟用來回通訊。
A2A 的定位是與 MCP 相輔相成,官方文件建議應用程式使用 MCP 處理工具,並使用 A2A 處理代理 ( 以 AgentCard 表示,我們稍後會討論這點)。架構隨後可使用 A2A 與使用者、遠端代理和其他代理通訊。
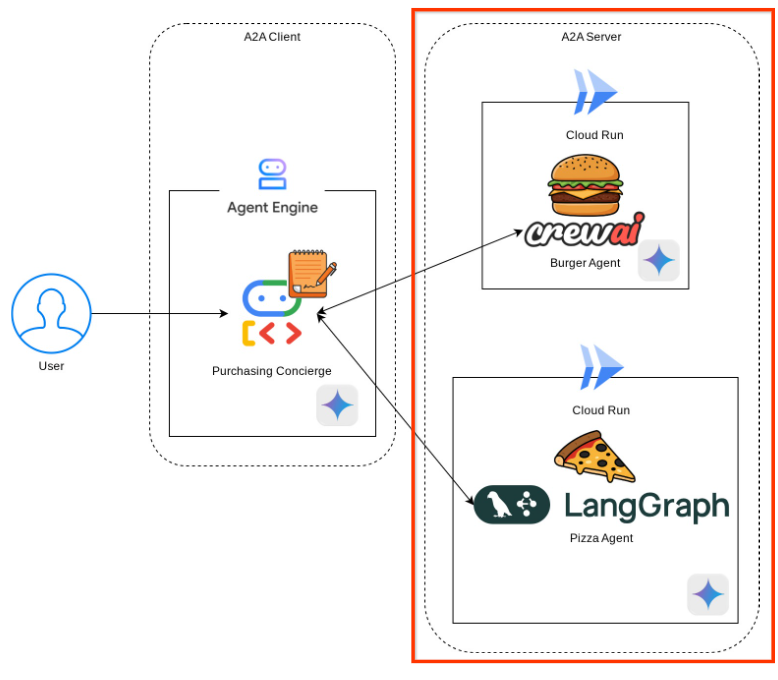
在本示範中,我們將使用 Python SDK 實作 A2A。我們將探討一個使用案例,假設我們有個人購物服務專員,可協助我們與漢堡和披薩賣家代理人溝通,處理訂單。
A2A 採用用戶端伺服器原則。本教學課程中,您會看到典型的 A2A 流程
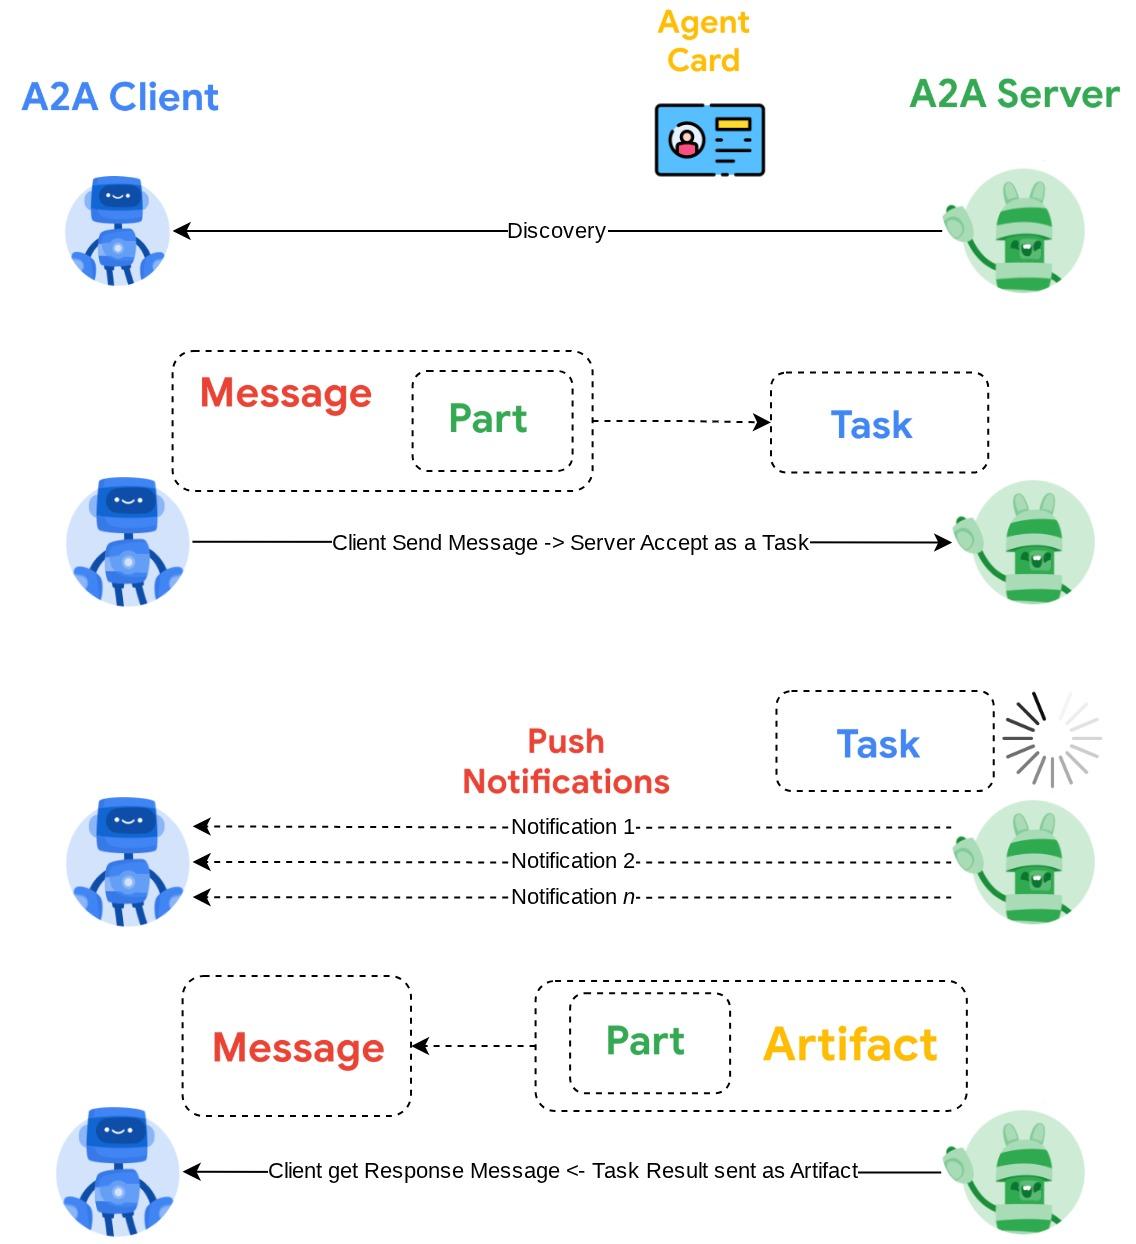
- A2A 用戶端會先探索所有可存取的 A2A 伺服器代理程式資訊卡,並利用這些資訊建立連線用戶端
- 如有需要,A2A 用戶端會將訊息傳送至 A2A 伺服器,伺服器會將此訊息評估為待完成的工作。如果 A2A 用戶端已設定推播通知接收網址,且 A2A 伺服器支援這項設定,伺服器也能將工作進度狀態發布至用戶端的接收端點
- 工作完成後,A2A 伺服器會將回應構件傳送至 A2A 用戶端
在本程式碼研究室中,您將逐步完成下列步驟:
- 準備 Google Cloud 專案
- 設定程式碼環境的工作目錄
- 將漢堡代理部署至 Cloud Run
- 將披薩代理程式部署至 Cloud Run
- 將購買服務專員部署至 Agent Engine
- 透過當地介面與購物服務專員互動
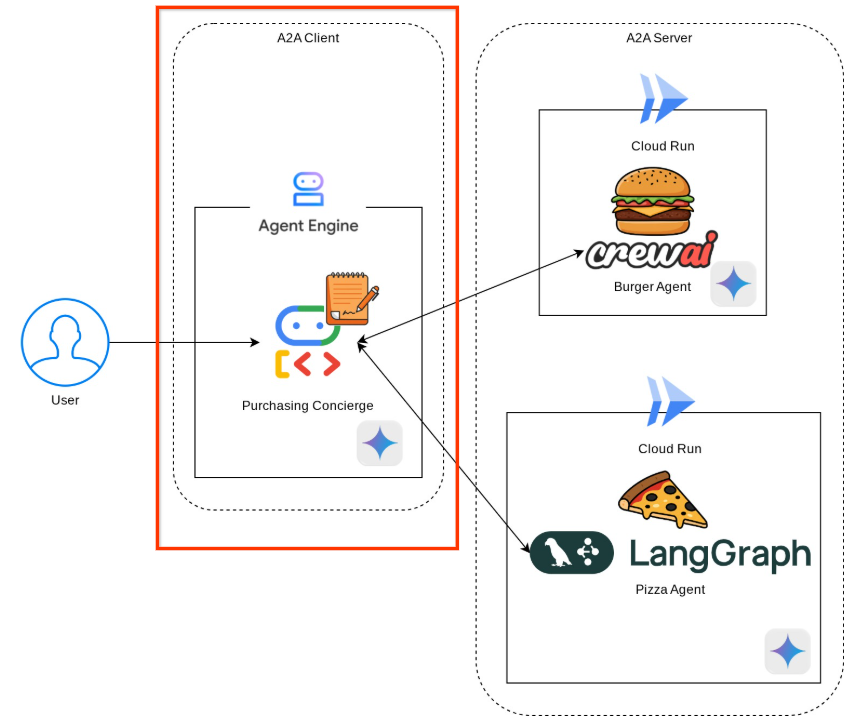
架構總覽
您將部署下列服務架構
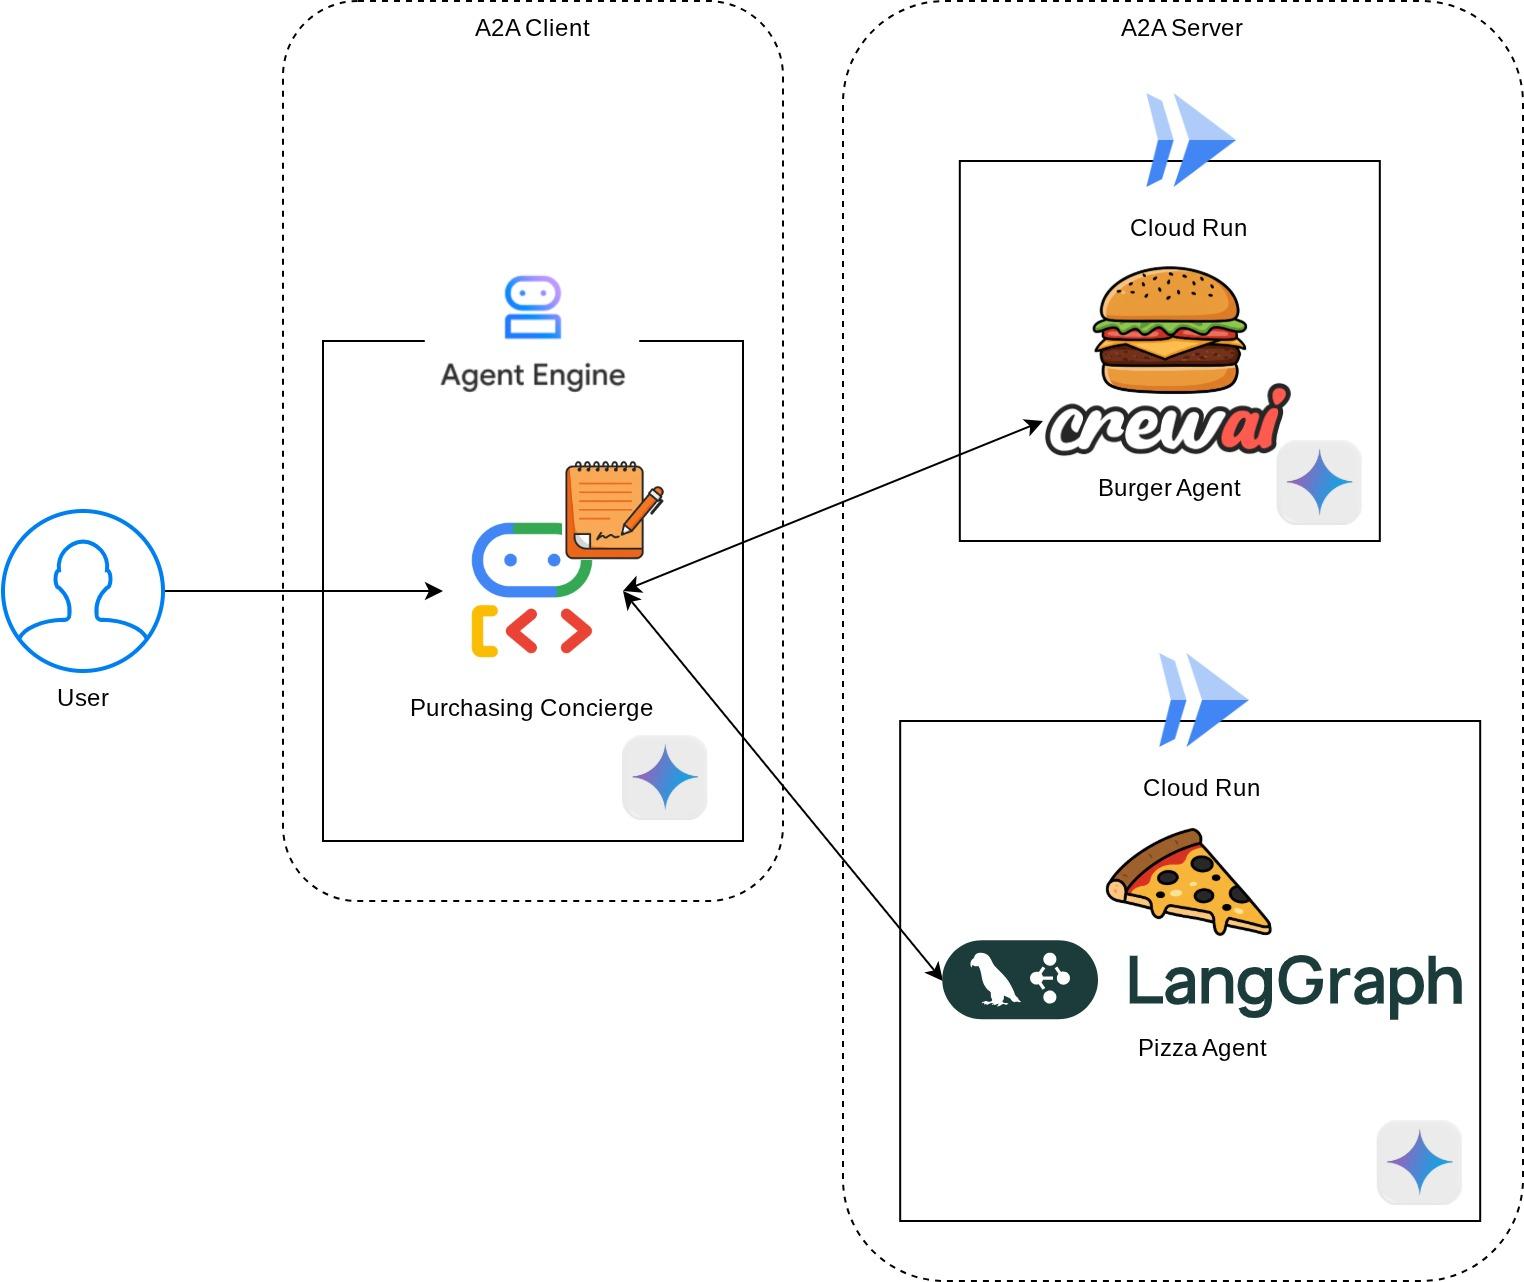
您將部署 2 項服務做為 A2A 伺服器,分別是 Burger 代理 ( 以 CrewAI 代理架構為基礎) 和 Pizza 代理 ( 以 Langgraph 代理架構為基礎)。使用者只會直接與購買 Concierge 互動,該 Concierge 會使用 Agent Development Kit (ADK) 架構執行,做為 A2A 用戶端。
每個代理程式都有自己的環境,並自行部署。
必要條件
- 熟悉 Python
- 瞭解使用 HTTP 服務的基本全端架構
課程內容
- A2A 伺服器的核心結構
- A2A 用戶端的核心結構
- 將代理程式服務部署至 Cloud Run
- 將代理服務部署至 Agent Engine
- A2A 用戶端如何連線至 A2A 伺服器
- 非串流連線的要求和回應結構
軟硬體需求
- Chrome 網路瀏覽器
- Gmail 帳戶
- 已啟用帳單帳戶的 Cloud 專案
本程式碼研究室適合各種程度的開發人員 (包括初學者),並使用 Python 撰寫範例應用程式。不過,您不需要具備 Python 知識,也能瞭解本文介紹的概念。
2. 🚀 準備工作坊開發設定
步驟 1:在 Cloud 控制台中選取有效專案
在 Google Cloud 控制台的專案選取器頁面中,選取或建立 Google Cloud 專案 (請參閱控制台左上方的部分)

點選該按鈕後,您會看到所有專案的清單,如下例所示:
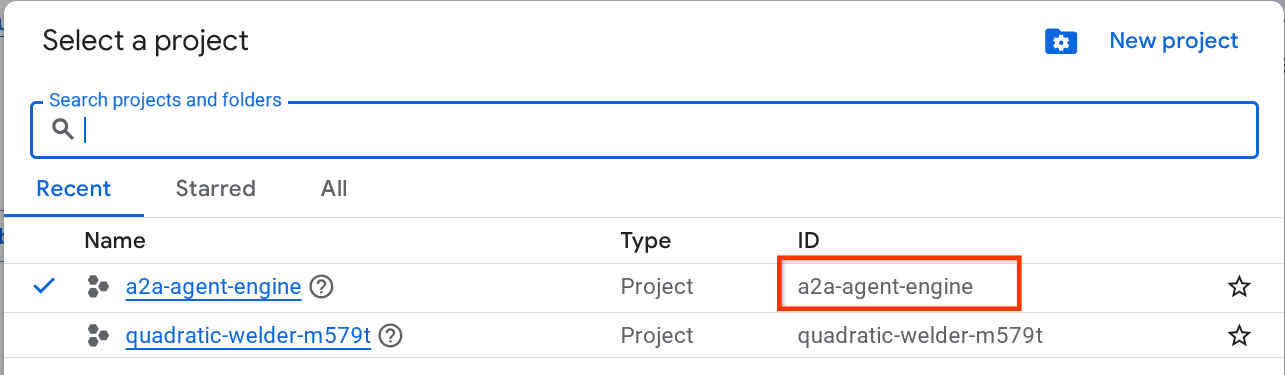
紅框標示的值是專案 ID,本教學課程會使用這個值。
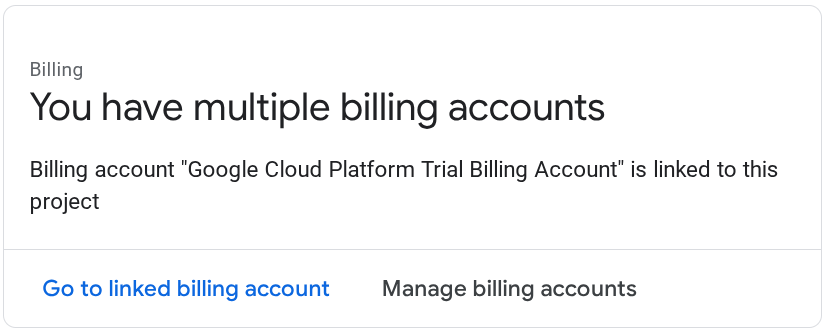
確認 Cloud 專案已啟用計費功能。如要確認,請按一下左上列的漢堡圖示 ☰,顯示「導覽選單」,然後找出「帳單」選單

如果看到「已連結『Google Cloud Platform 試用帳單帳戶』」,表示專案已準備就緒,可供本教學課程使用。如果沒有,請返回本教學課程的開頭,兌換帳單帳戶
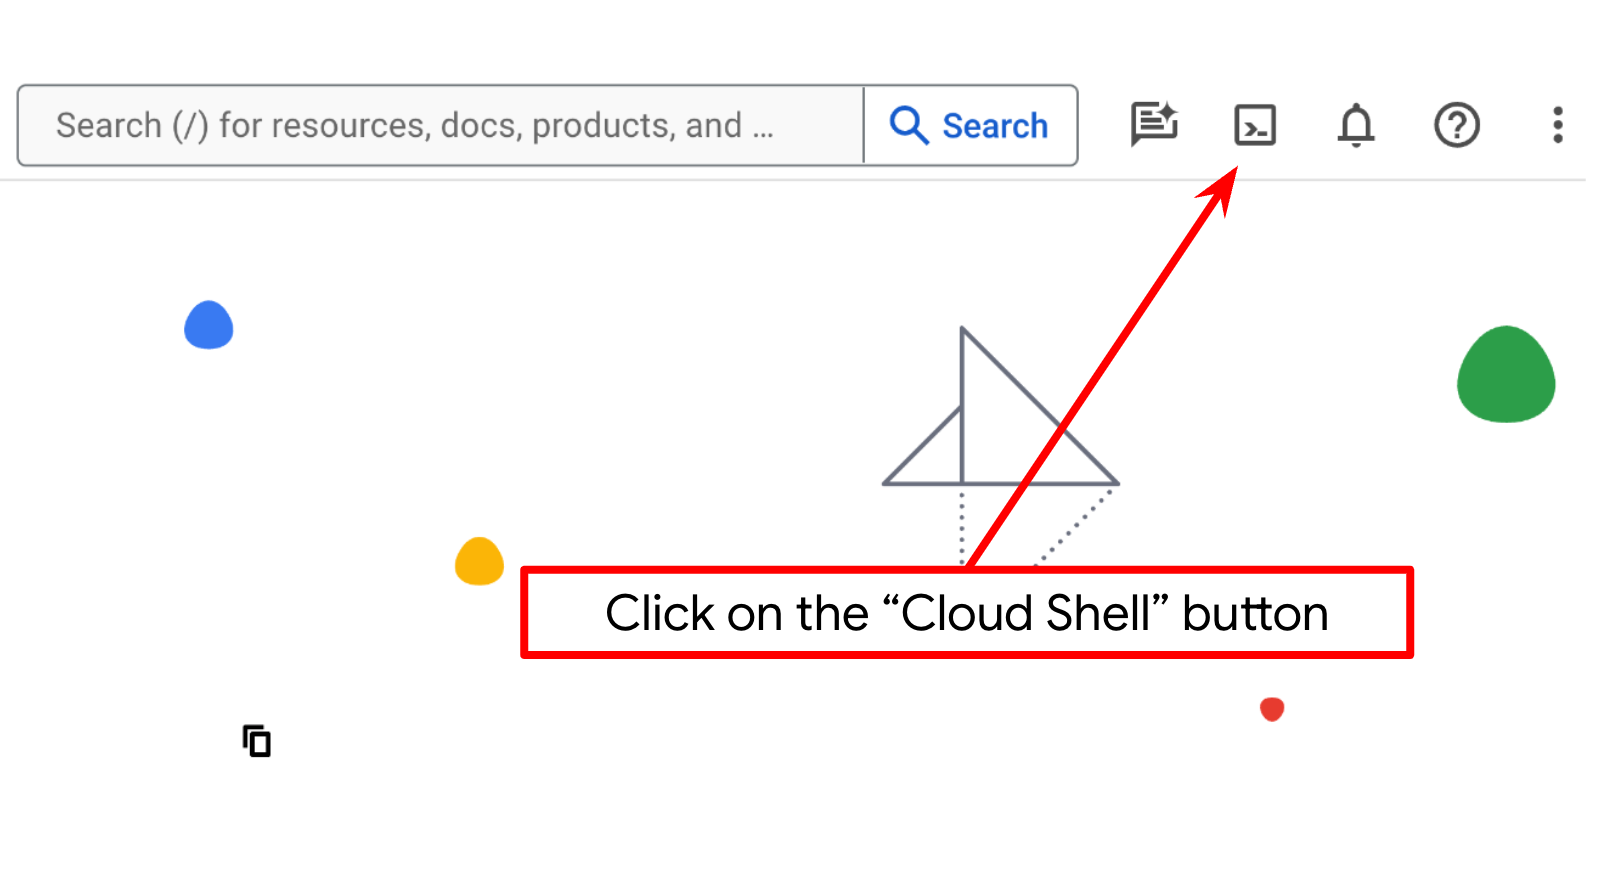
步驟 2:熟悉 Cloud Shell
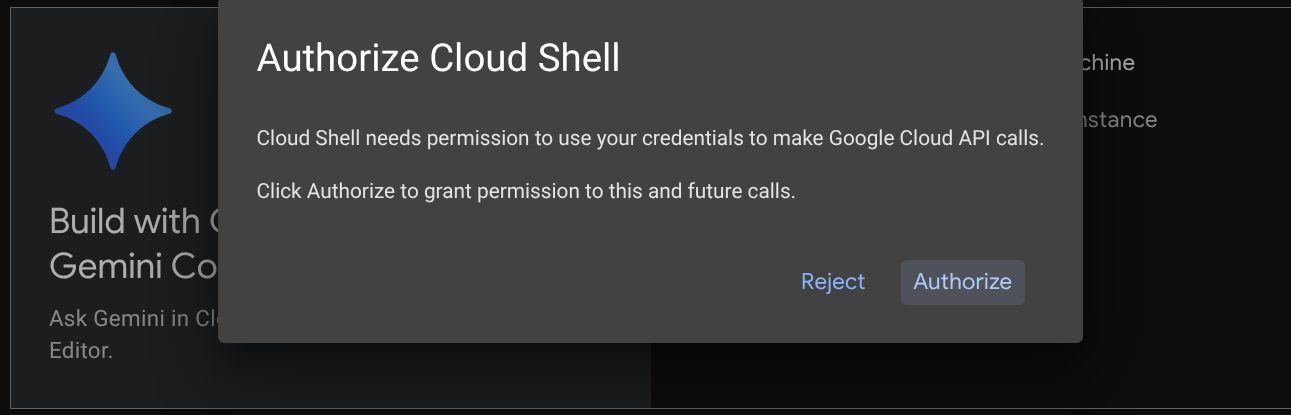
您將在教學課程的大部分環節中使用 Cloud Shell,請點選 Google Cloud 控制台頂端的「啟用 Cloud Shell」。如果系統提示您授權,請點選「授權」。
連至 Cloud Shell 後,我們需要檢查 Shell ( 或終端機) 是否已通過帳戶驗證
gcloud auth list
如果看到如下列範例輸出內容的個人 Gmail,表示一切正常
Credentialed Accounts

ACTIVE: *
ACCOUNT: alvinprayuda@gmail.com

To set the active account, run:
    $ gcloud config set account `ACCOUNT`
如果沒有,請嘗試重新整理瀏覽器,並確保在系統提示時點選「授權」 ( 連線問題可能會導致授權中斷)。
接著,我們也需要檢查 Shell 是否已設定為正確的 PROJECT ID。如果終端機的 $圖示前有 ( ) 內的值 ( 在下方螢幕截圖中,該值為「a2a-agent-engine」),則表示已為目前 Shell 工作階段設定專案。

如果顯示的值正確無誤,可以略過下一個指令。但如果該值不正確或遺失,請執行下列指令
gcloud config set project <YOUR_PROJECT_ID>
接著,從 Github 複製本程式碼研究室的範本工作目錄,執行下列指令。系統會在 purchasing-concierge-a2a 目錄中建立工作目錄
git clone https://github.com/alphinside/purchasing-concierge-intro-a2a-codelab-starter.git purchasing-concierge-a2a
步驟 3:熟悉 Cloud Shell 編輯器並設定應用程式工作目錄
現在,我們可以設定程式碼編輯器,進行一些程式設計工作。我們會使用 Cloud Shell 編輯器執行這項操作
按一下「Open Editor」(開啟編輯器) 按鈕,開啟 Cloud Shell 編輯器 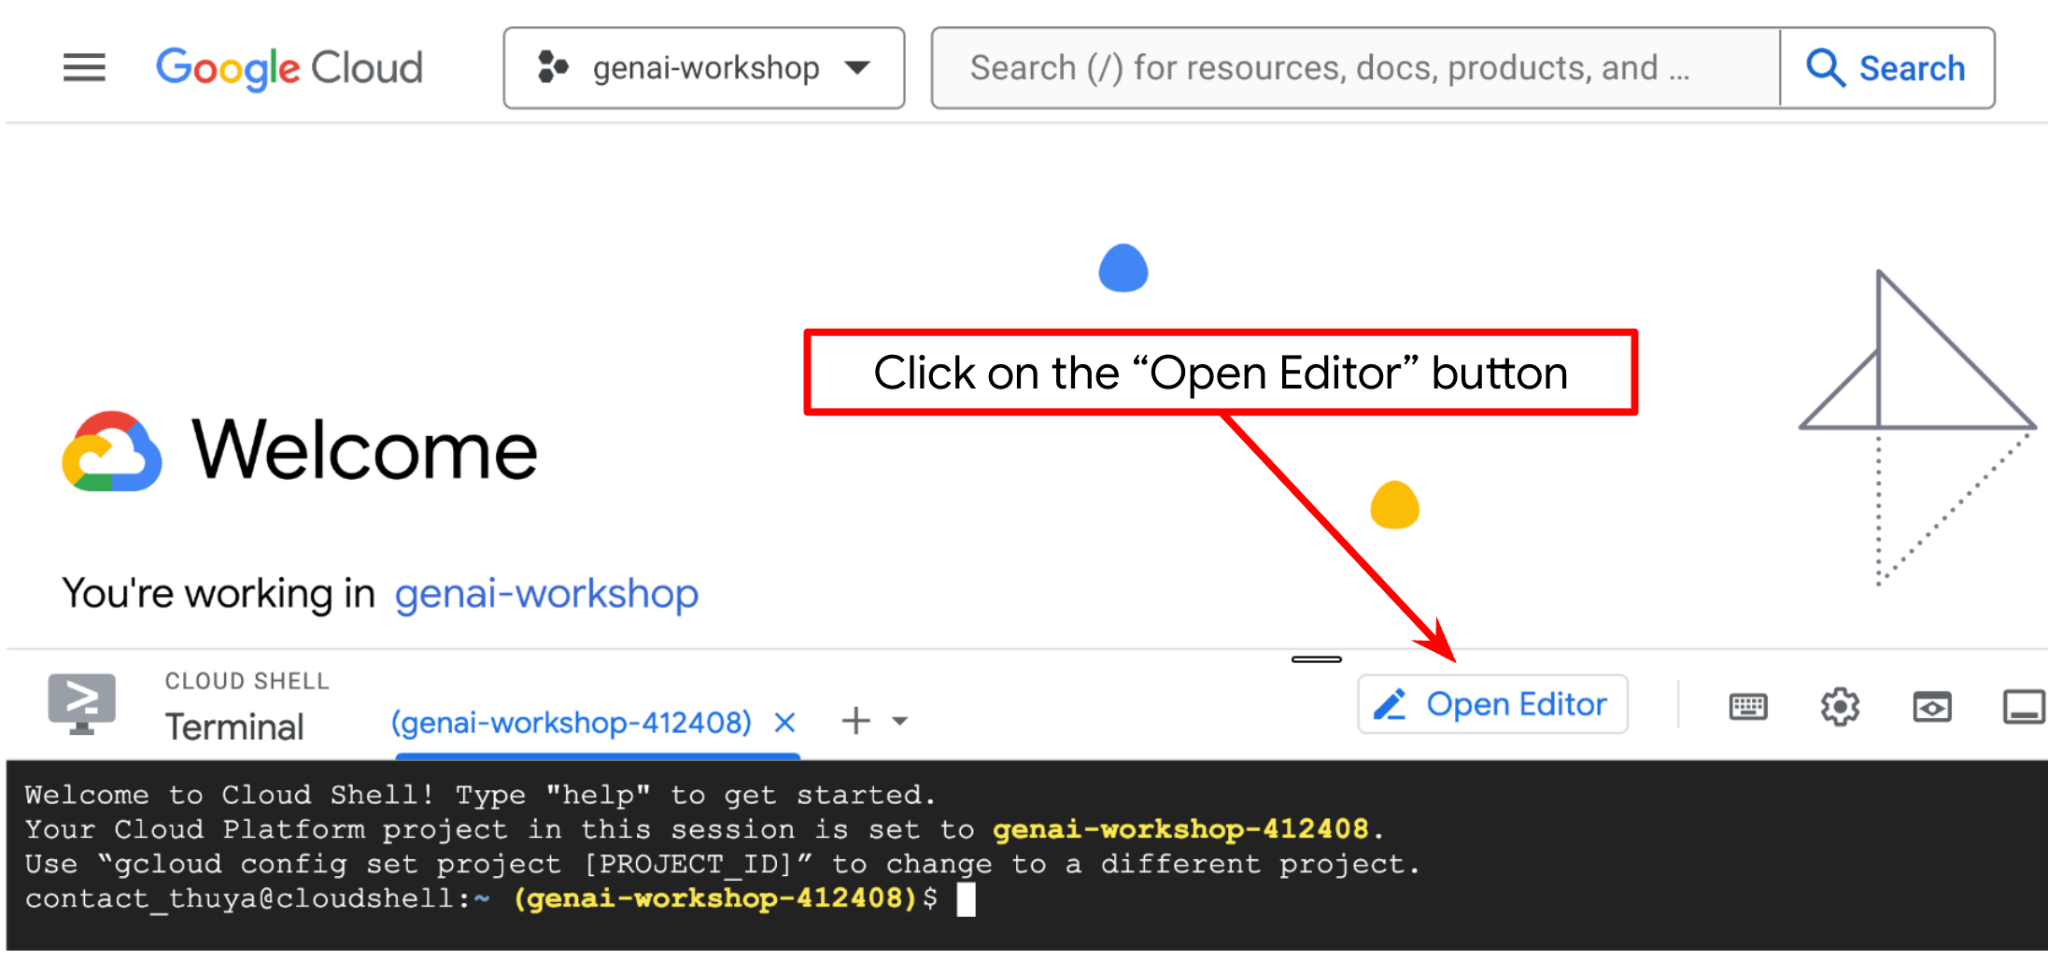
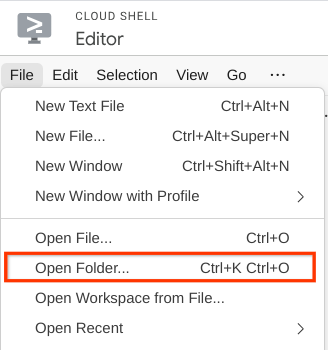
完成後,前往 Cloud Shell 編輯器頂端,依序點選「File」->「Open Folder」,找出「username」目錄,然後找出「purchasing-concierge-a2a」目錄,點選「OK」按鈕。這會將所選目錄設為主要工作目錄。在本範例中,使用者名稱為 alvinprayuda,因此目錄路徑如下所示

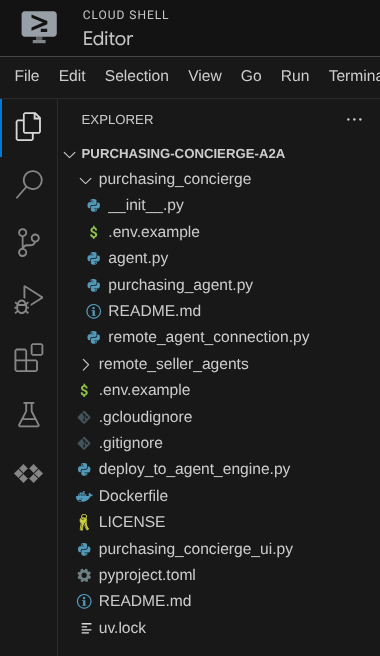
現在,Cloud Shell 編輯器應如下所示
現在,請開啟編輯器的終端機。方法是在選單列中依序點選「Terminal」->「New Terminal」,或使用 Ctrl + Shift + C 鍵盤快速鍵,瀏覽器底部就會開啟終端機視窗。

目前使用的有效終端機應位於 purchasing-concierge-a2a 工作目錄中。在本程式碼研究室中,我們將使用 Python 3.12,並使用 uv Python 專案管理工具,簡化建立及管理 Python 版本和虛擬環境的需求。Cloud Shell 已預先安裝 uv 套件。
執行此指令,將必要的依附元件安裝至 .venv 目錄的虛擬環境
uv sync --frozen
查看 pyproject.toml,瞭解本教學課程中宣告的依附元件 (即 a2a-sdk, google-adk, and gradio)。
現在,我們需要透過下列指令啟用必要的 API。這可能需要一些時間。
gcloud services enable aiplatform.googleapis.com \
                       run.googleapis.com \
                       cloudbuild.googleapis.com \
                       cloudresourcemanager.googleapis.com
成功執行指令後,您應該會看到類似下方的訊息:
Operation "operations/..." finished successfully.
3. 🚀 將 A2A 伺服器遠端銷售人員代理部署至 Cloud Run
在這個步驟中,我們會部署以紅框標示的這兩個遠端賣家代理。漢堡代理會採用 CrewAI 代理架構,披薩代理則會採用 Langgraph 代理
4. 🚀 部署 Burger Seller Agent - A2A 伺服器
漢堡代理的原始碼位於 remote_seller_agents/burger_agent 目錄下。
remote_seller_agents/burger_agent 目錄下的所有檔案都已足夠,可將代理程式部署至 Cloud Run,做為可存取的服務。執行下列指令來部署
gcloud run deploy burger-agent \
    --source remote_seller_agents/burger_agent \
    --port=8080 \
    --allow-unauthenticated \
    --min 1 \
    --region us-central1 \
    --update-env-vars GOOGLE_CLOUD_LOCATION=us-central1 \
    --update-env-vars GOOGLE_CLOUD_PROJECT={your-project-id}
如果系統提示要建立容器存放區,以便從來源部署,請回答 Y。部署成功後,系統會顯示類似以下的記錄。
Service [burger-agent] revision [burger-agent-xxxxx-xxx] has been deployed and is serving 100 percent of traffic.
Service URL: https://burger-agent-xxxxxxxxx.us-central1.run.app
部署服務時,xxxx 部分會是專屬 ID。
開啟新的瀏覽器分頁,然後透過瀏覽器前往已部署的 Burger 代理程式服務的 https://burger-agent-xxxxxxxxx.us-central1.run.app/.well-known/agent.json 路由。這是用來存取已部署 A2A 伺服器代理資訊卡的網址。
如果部署成功,存取代理程式資訊卡時,瀏覽器中會顯示如下所示的回應

這是漢堡代理商資訊卡,應可供探索。
請注意,url 值在這裡仍設為 http://0.0.0.0:8080/。這個 url 值應是 A2A 用戶端從外部世界傳送訊息的主要資訊,但設定不正確。
我們需要新增額外的環境變數 HOST_OVERRIDE,將這個值更新為漢堡代理程式服務的網址。
透過環境變數更新代理資訊卡上的 Burger Agent 網址值
如要將 HOST_OVERRIDE 新增至漢堡代理程式服務,請按照下列步驟操作:
- 在 Cloud 控制台頂端的搜尋列中搜尋 Cloud Run

- 按一下先前部署的 burger-agent Cloud Run 服務
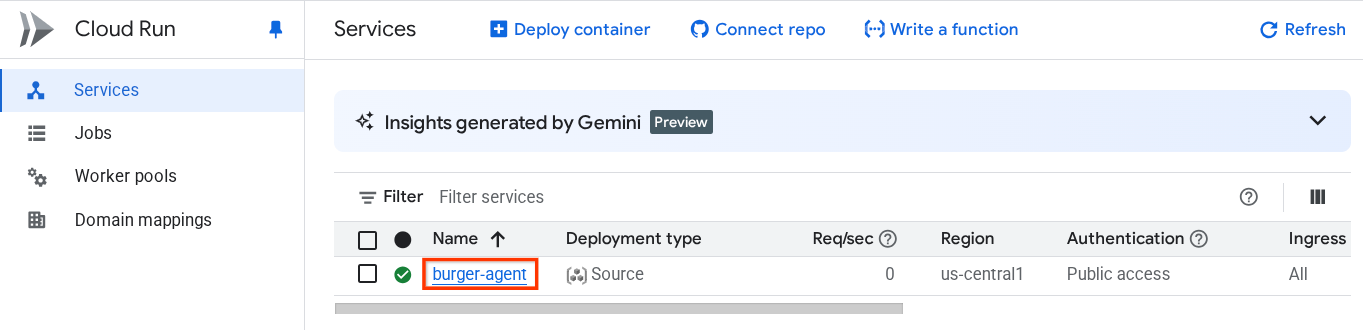
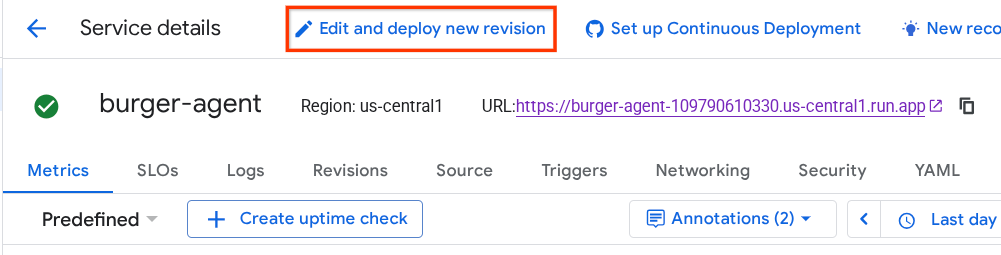
- 複製 burger-service 網址,然後按一下「Edit and deploy new revision」(編輯及部署新的修訂版本)。
- 然後按一下「變數與密鑰」部分
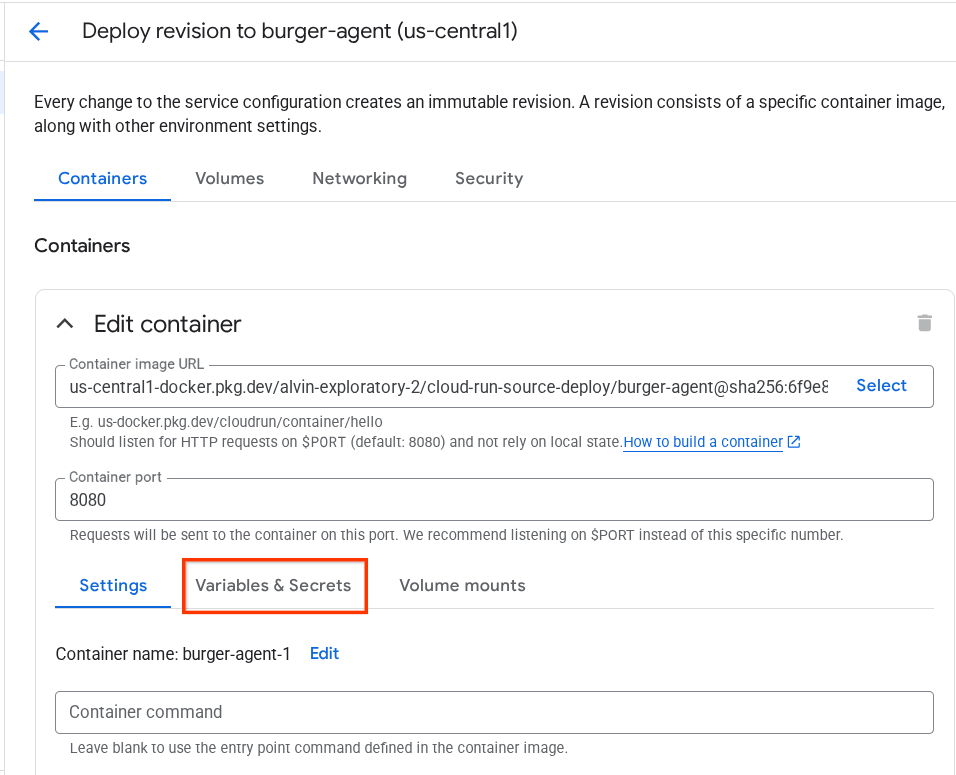
- 然後按一下 新增變數,並將
HOST_OVERRIDE值設為服務網址 ( 具有https://burger-agent-xxxxxxxxx.us-central1.run.app模式的網址)。

- 最後,按一下「部署」按鈕,重新部署服務

當您在瀏覽器 https://burger-agent-xxxxxxxxx.us-central1.run.app/.well-known/agent.json 中再次存取 burger-agent 代理程式資訊卡時,url 值已正確設定
5. 🚀 部署披薩賣家代理 - A2A 伺服器
同樣地,披薩代理程式原始碼位於 remote_seller_agents/pizza_agent 目錄下。
與先前的 burger-agent 部署步驟類似,remote_seller_agents/pizza_agent 目錄下的所有檔案都已足夠,可將代理程式部署至 Cloud Run,以便做為服務存取。執行下列指令來部署
gcloud run deploy pizza-agent \
    --source remote_seller_agents/pizza_agent \
    --port=8080 \
    --allow-unauthenticated \
    --min 1 \
    --region us-central1 \
    --update-env-vars GOOGLE_CLOUD_LOCATION=us-central1 \
    --update-env-vars GOOGLE_CLOUD_PROJECT={your-project-id}
部署成功後,系統會顯示類似以下的記錄。
Service [pizza-agent] revision [pizza-agent-xxxxx-xxx] has been deployed and is serving 100 percent of traffic.
Service URL: https://pizza-agent-xxxxxxxxx.us-central1.run.app
部署服務時,xxxx 部分會是專屬 ID。
漢堡代理也是如此,當您嘗試透過瀏覽器前往已部署的披薩代理服務的 https://pizza-agent-xxxxxxxxx.us-central1.run.app/.well-known/agent.json 路由,存取 A2A 伺服器代理資訊卡時,代理資訊卡上的披薩代理 url 值尚未正確設定。我們也需要將 HOST_OVERRIDE 新增至環境變數
透過環境變數更新代理資訊卡上的 Pizza 代理網址值
如要將 HOST_OVERRIDE 新增至披薩店服務代理程式,請按照下列步驟操作:
- 在 Cloud 控制台頂端的搜尋列中搜尋 Cloud Run
- 按一下先前部署的 pizza-agent Cloud Run 服務

- 按一下「編輯及部署新的修訂版本」
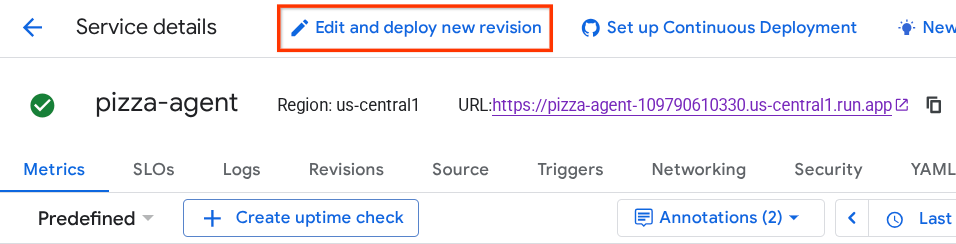
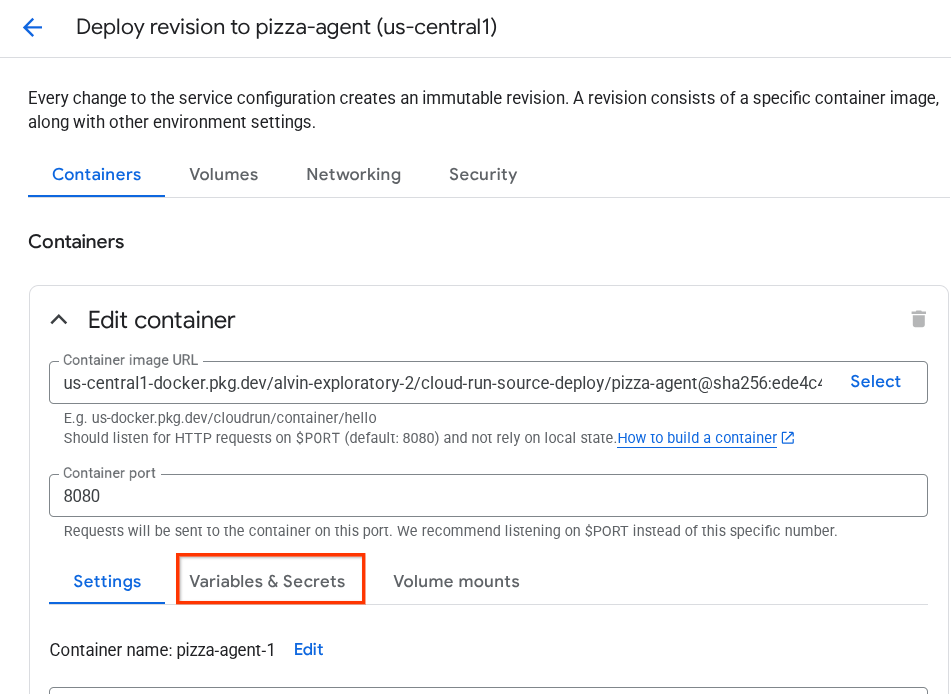
- 複製 pizza-service 網址,然後按一下「Variable & Secrets」(變數與密鑰) 部分
- 然後按一下 新增變數,並將
HOST_OVERRIDE值設為服務網址 ( 具有https://pizza-agent-xxxxxxxxx.us-central1.run.app模式的網址)。
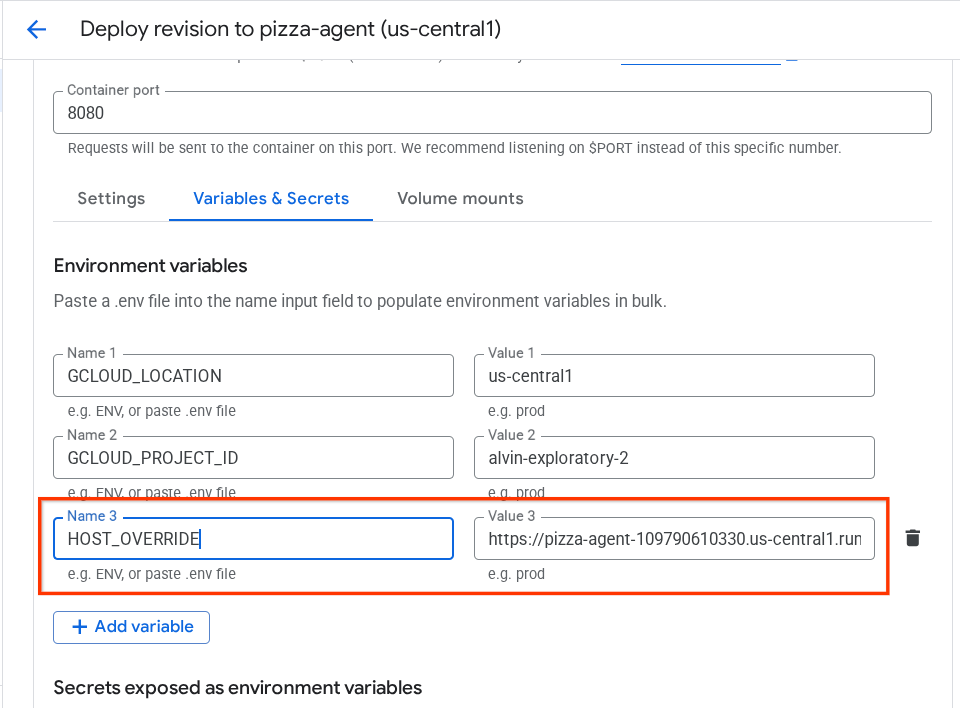
- 最後,按一下「部署」按鈕,重新部署服務
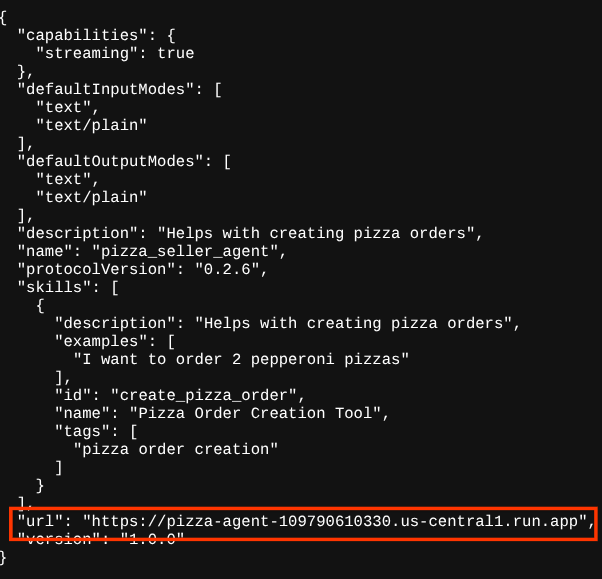
現在,當您在瀏覽器中再次存取 pizza-agent 代理程式資訊卡 https://pizza-agent-xxxxxxxxx.us-central1.run.app/.well-known/agent.json 時,url 值已正確設定
此時,我們已成功將漢堡和披薩服務部署至 Cloud Run。
6. 🚀 將購買服務專員 - A2A 用戶端部署至 Agent Engine
在本步驟中,我們將部署購買服務專員。我們將與這個代理程式互動。
購買服務專員代理的原始碼位於 purchasing_concierge 目錄下。您可以在 purchasing_concierge/purchasing_agent.py 指令碼中檢查代理程式初始化作業。
請按照下列步驟部署:
- 首先,我們需要在 Cloud Storage 中建立暫存儲存空間
gcloud storage buckets create gs://purchasing-concierge-{your-project-id} --location=us-central1
- 現在,我們需要先準備 .env 變數,請將 .env.example 複製到 .env 檔案
cp .env.example .env
- 現在開啟 .env 檔案,您會看到下列內容
GOOGLE_GENAI_USE_VERTEXAI=TRUE
GOOGLE_CLOUD_PROJECT={your-project-id}
GOOGLE_CLOUD_LOCATION=us-central1
STAGING_BUCKET=gs://purchasing-concierge-{your-project-id}
PIZZA_SELLER_AGENT_URL={your-pizza-agent-url}
BURGER_SELLER_AGENT_URL={your-burger-agent-url}
AGENT_ENGINE_RESOURCE_NAME={your-agent-engine-resource-name}
這個代理程式會與漢堡和披薩代理程式通訊,因此我們需要為兩者提供適當的憑證。我們需要使用先前步驟中的 Cloud Run 網址,更新 PIZZA_SELLER_AGENT_URL 和 BURGER_SELLER_AGENT_URL。
如果忘記,請前往 Cloud Run 控制台。在控制台頂端的搜尋列中輸入「Cloud Run」,然後按一下滑鼠右鍵點選 Cloud Run 圖示,在新分頁中開啟
您應該會看到先前部署的遠端賣家代理程式服務,如下所示

如要查看這些服務的公開網址,請點選其中一項服務,系統會將您重新導向至「服務詳細資料」頁面。網址會顯示在頂端區域,緊鄰「區域」資訊

最終環境變數應如下所示
GOOGLE_GENAI_USE_VERTEXAI=TRUE
GOOGLE_CLOUD_PROJECT={your-project-id}
GOOGLE_CLOUD_LOCATION=us-central1
STAGING_BUCKET=gs://purchasing-concierge-{your-project-id}
PIZZA_SELLER_AGENT_URL=https://pizza-agent-xxxxx.us-central1.run.app
BURGER_SELLER_AGENT_URL=https://burger-agent-xxxxx.us-central1.run.app
AGENT_ENGINE_RESOURCE_NAME={your-agent-engine-resource-name}
- 現在,我們準備好部署購物服務專員代理程式。我們會將其部署至代理程式引擎,而部署程式碼位於
deploy_to_agent_engine.py指令碼中。
執行下列指令碼即可部署:
uv run deploy_to_agent_engine.py
部署成功後,系統會顯示類似這樣的記錄。畫面上會顯示 Agent Engine 資源名稱,例如「projects/xxxx/locations/us-central1/reasoningEngines/yyyy」"projects/xxxx/locations/us-central1/reasoningEngines/yyyy"。
AgentEngine created. Resource name: projects/xxxx/locations/us-central1/reasoningEngines/yyyy
To use this AgentEngine in another session:
agent_engine = vertexai.agent_engines.get('projects/xxxx/locations/us-central1/reasoningEngines/yyyy)
Deployed remote app resource: projects/xxxx/locations/us-central1/reasoningEngines/xxxx
在 Agent Engine 資訊主頁中檢查時 (在搜尋列中搜尋「Agent Engine」),系統會顯示先前的部署作業
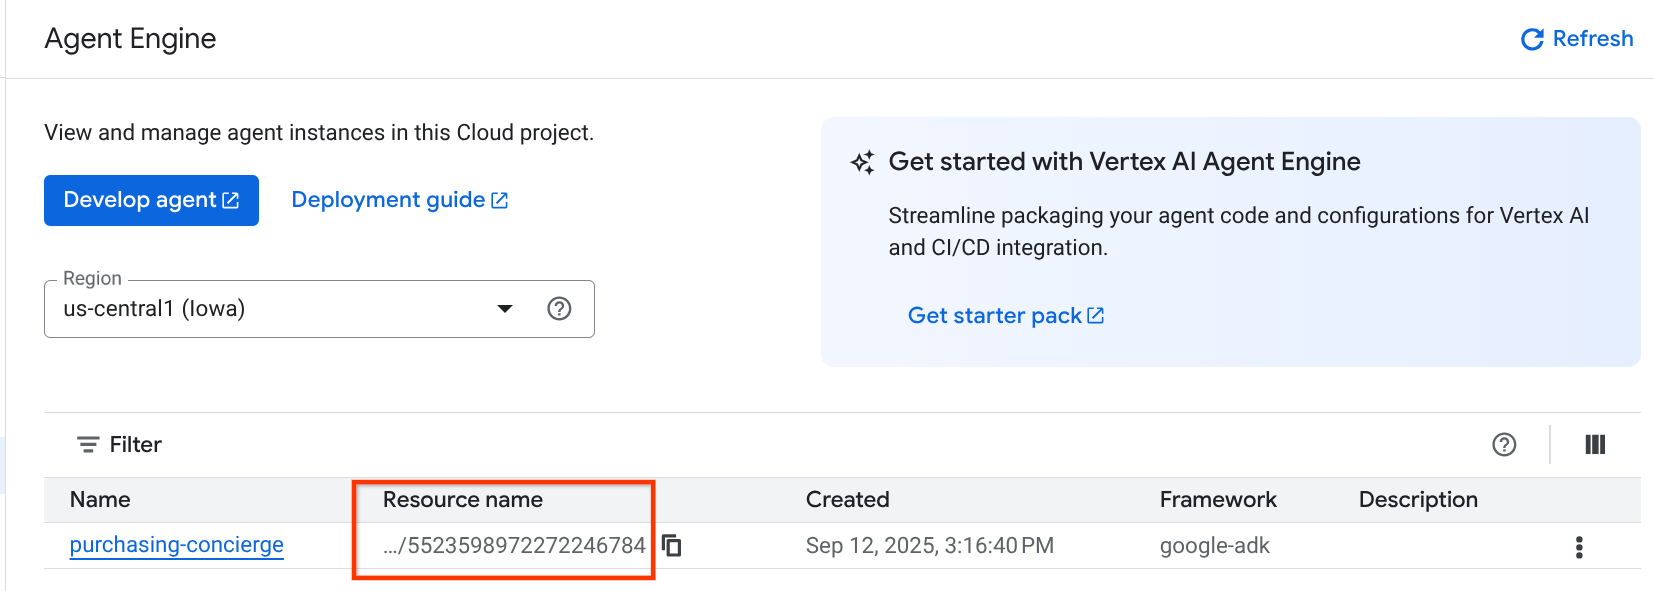
您也可以檢查 Agent Engine 資源名稱是否顯示在該處。接著,我們就能利用這個資源名稱進行測試
接著,請使用這個值更新 .env 檔案中的 AGENT_ENGINE_RESOURCE_NAME。請務必提供正確的代理程式引擎資源名稱。您的 .env 檔案看起來會像這樣:
GOOGLE_GENAI_USE_VERTEXAI=TRUE
GOOGLE_CLOUD_PROJECT={your-project-id}
GOOGLE_CLOUD_LOCATION=us-central1
STAGING_BUCKET=gs://purchasing-concierge-{your-project-id}
PIZZA_SELLER_AGENT_URL=https://pizza-agent-xxxxx.us-central1.run.app
BURGER_SELLER_AGENT_URL=https://burger-agent-xxxxx.us-central1.run.app
AGENT_ENGINE_RESOURCE_NAME=projects/xxxx/locations/us-central1/reasoningEngines/yyyy
在 Agent Engine 上測試已部署的代理
您可以透過 curl 指令和 SDK 與代理程式引擎互動。舉例來說,執行下列指令,嘗試與已部署的代理互動。
您可以嘗試傳送這項查詢,確認代理程式是否已順利部署。執行下列 test_agent_engine.sh 指令碼
bash test_agent_engine.sh
您可以檢查指令碼,並發現我們嘗試向代理詢問「List available burger menu please」
如果成功,控制台會顯示多個串流回應事件,如下所示:
{
  "content": {
    "parts": [
      {
        "text": "Here is our burger menu:\n- Classic Cheeseburger: IDR 85K\n- Double Cheeseburger: IDR 110K\n- Spicy Chicken Burger: IDR 80K\n- Spicy Cajun Burger: IDR 85K"
      }
    ],
    "role": "model"
  },
  "usage_metadata": {
    "candidates_token_count": 51,
    "candidates_tokens_details": [
      {
        "modality": "TEXT",
        "token_count": 51
      }
    ],
    "prompt_token_count": 907,
    "prompt_tokens_details": [
      {
        "modality": "TEXT",
        "token_count": 907
      }
    ],
    "total_token_count": 958,
    "traffic_type": "ON_DEMAND"
  },
  "invocation_id": "e-14679918-af68-45f1-b942-cf014368a733",
  "author": "purchasing_agent",
  "actions": {
    "state_delta": {},
    "artifact_delta": {},
    "requested_auth_configs": {}
  },
  "id": "dbe7fc43-b82a-4f3e-82aa-dd97afa8f15b",
  "timestamp": 1754287348.941454
}
我們會在下一個步驟中嘗試使用 UI,但首先要討論 A2A 用戶端的核心元件和典型流程
7. 🚀 整合測試和酬載檢查
現在,讓我們使用網頁介面,檢查與遠端代理程式互動的購買服務專員。執行下列指令來部署 Gradio 應用程式。執行這個應用程式前,請先正確填寫 .env 檔案
uv run purchasing_concierge_ui.py
如果成功,系統會顯示下列輸出內容:
* Running on local URL:  http://0.0.0.0:8080
* To create a public link, set `share=True` in `launch()`.
接著,按住 Ctrl 鍵並點選終端機上的 http://0.0.0.0:8080 網址,或點選網頁預覽按鈕開啟網頁 UI

試著進行類似以下的對話:
- 顯示漢堡和披薩菜單
- 我想訂購 1 份 BBQ 雞肉披薩和 1 份香辣肯瓊漢堡
然後繼續對話,直到完成訂單為止。檢查互動情形,以及工具呼叫和回應內容。下圖為互動結果範例。
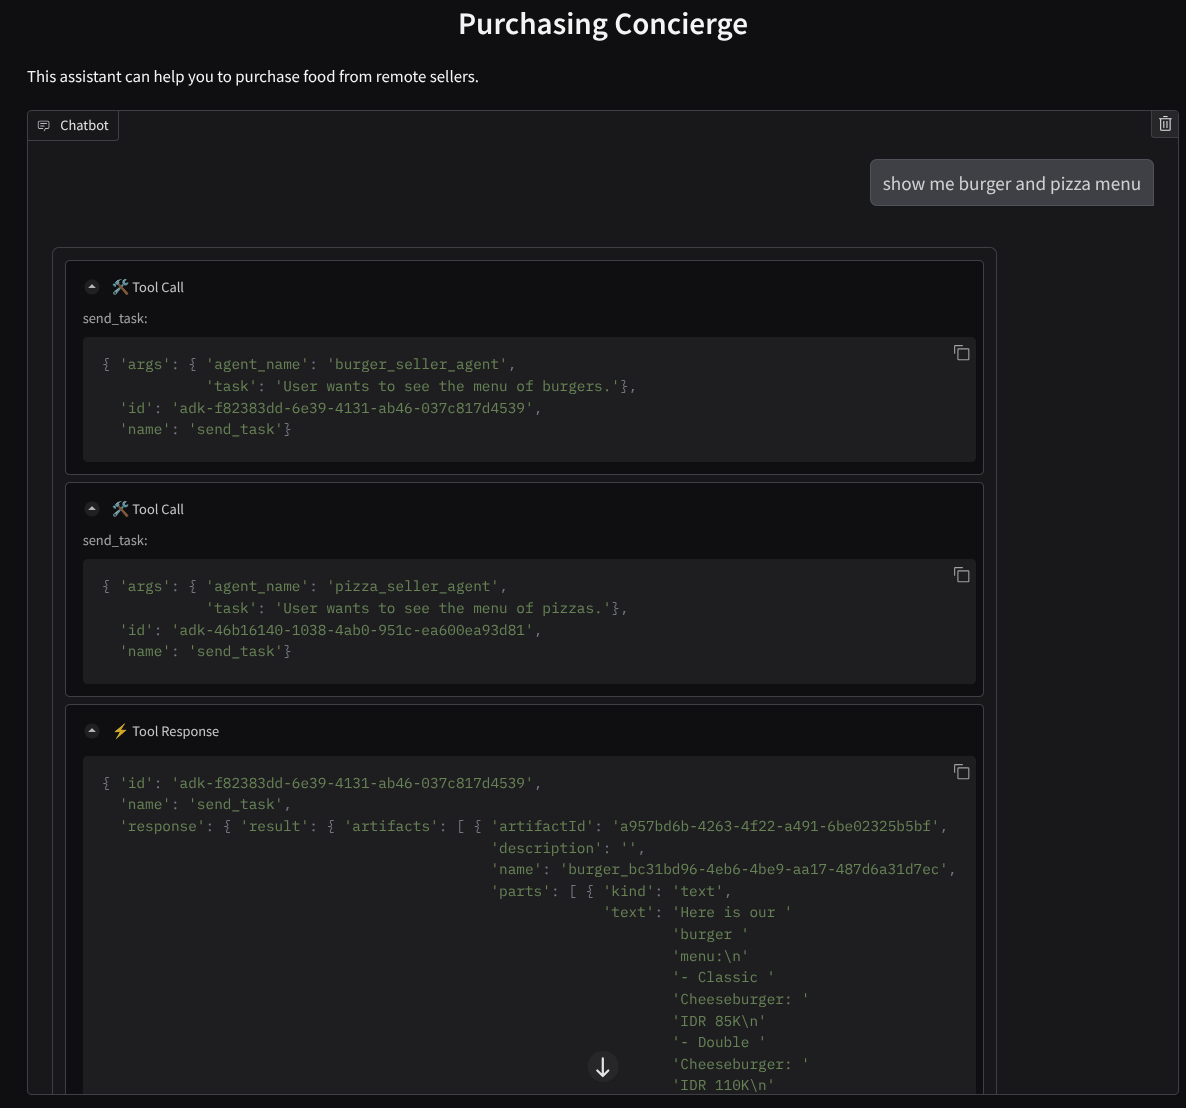
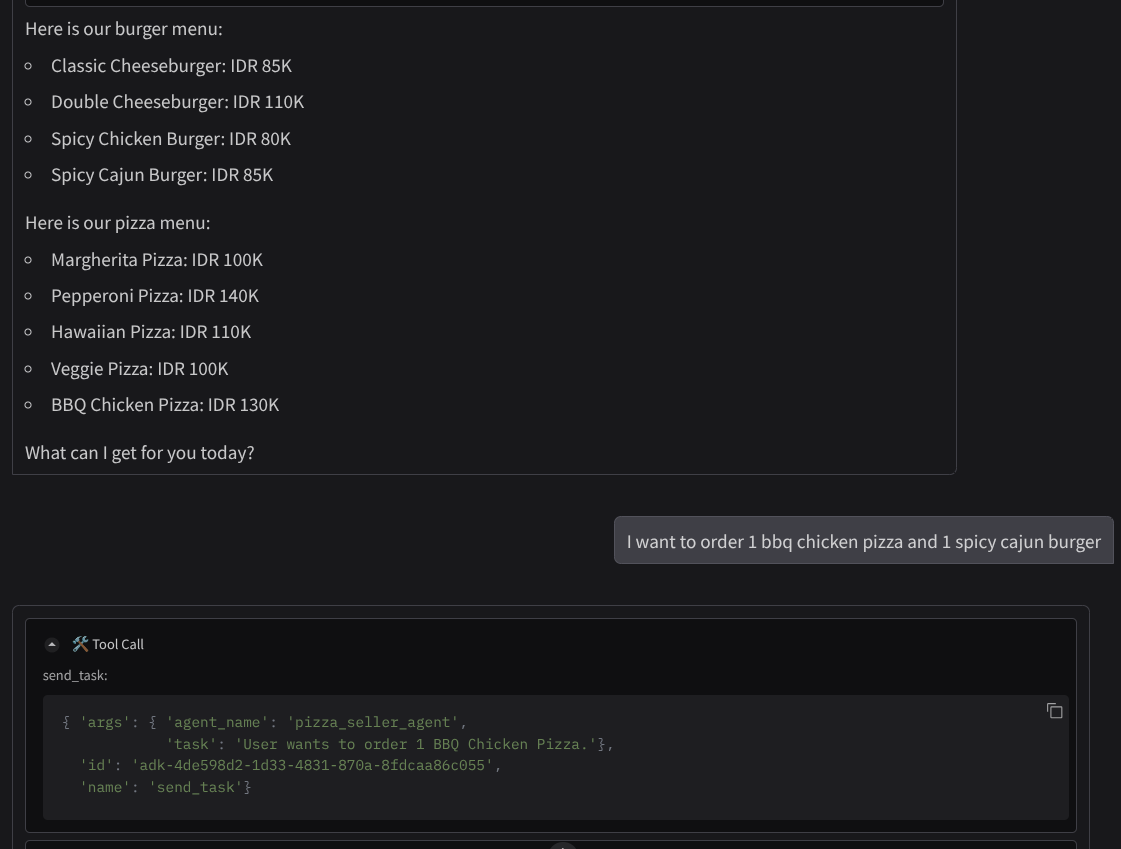
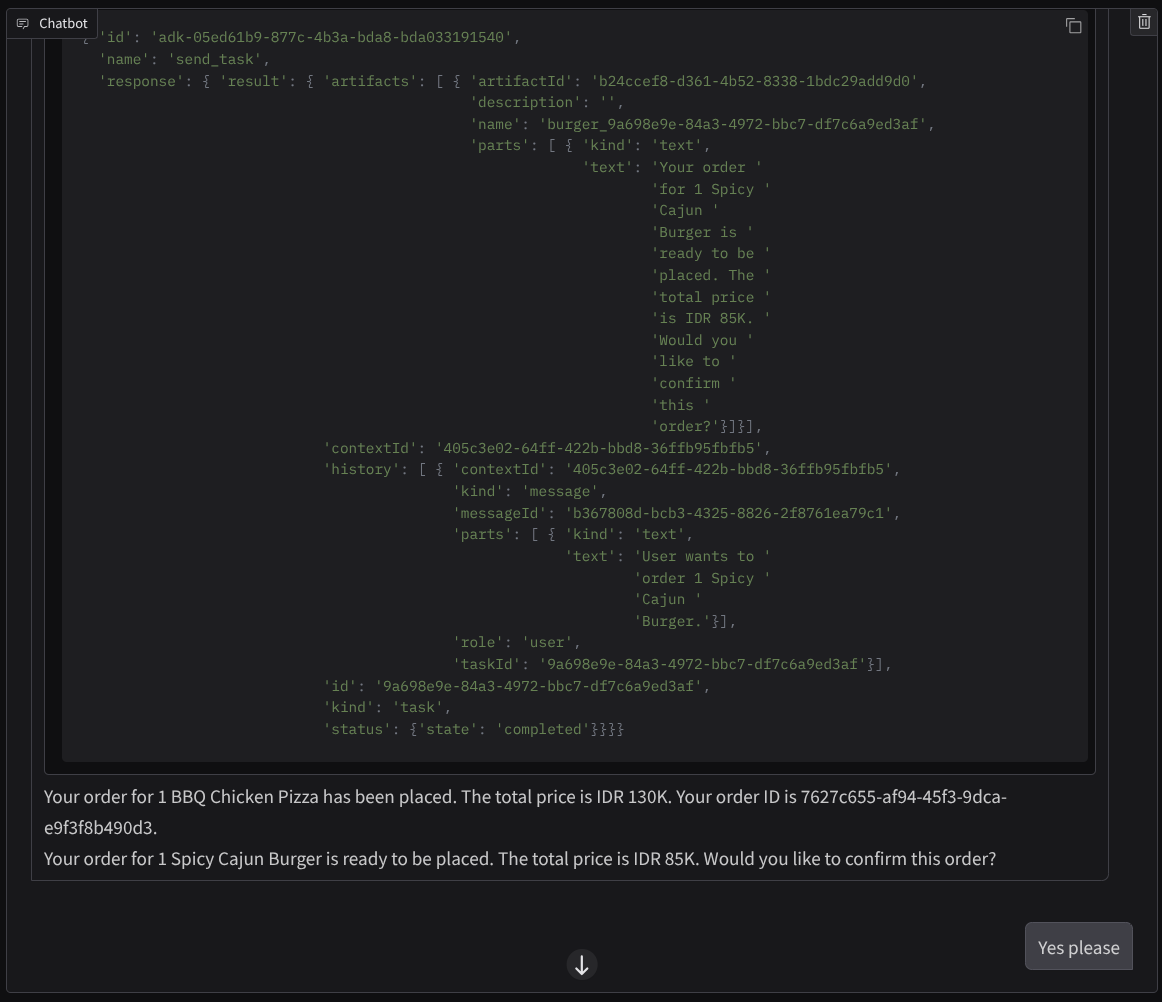
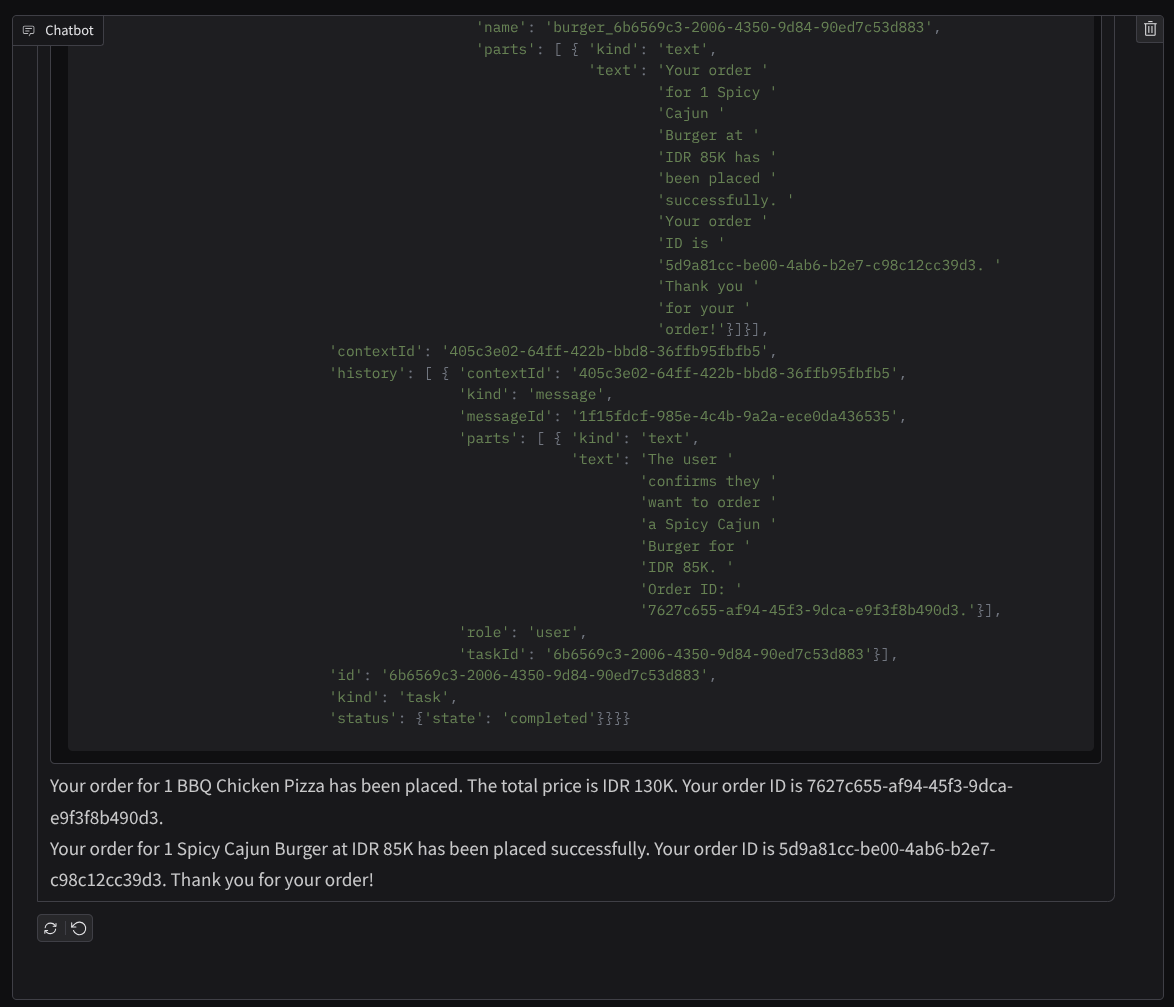
我們可以看到,與 2 個不同的代理程式通訊會產生 2 種不同的行為,而 A2A 可以妥善處理這項問題。披薩賣家服務專員會直接接受我們的購買服務專員要求,但漢堡服務專員需要我們確認後,才會繼續處理要求,而我們確認後,服務專員可以將確認訊息轉達給漢堡服務專員
我們已介紹完 A2A 的基本概念,接下來看看如何以用戶端和伺服器架構實作
8. 💡 [程式碼說明] A2A 伺服器概念和實作方式
您可以在 remote_seller_agents/*/agent.py 指令碼中檢查遠端賣家代理程式的初始化作業。以下是賣家代理商的程式碼片段。
Burger Agent
from crewai import Agent, Crew, LLM, Task, Process
from crewai.tools import tool

...

       model = LLM(
            model="vertex_ai/gemini-2.5-flash-lite",  # Use base model name without provider prefix
        )
        burger_agent = Agent(
            role="Burger Seller Agent",
            goal=(
                "Help user to understand what is available on burger menu and price also handle order creation."
            ),
            backstory=("You are an expert and helpful burger seller agent."),
            verbose=False,
            allow_delegation=False,
            tools=[create_burger_order],
            llm=model,
        )

        agent_task = Task(
            description=self.TaskInstruction,
            agent=burger_agent,
            expected_output="Response to the user in friendly and helpful manner",
        )

        crew = Crew(
            tasks=[agent_task],
            agents=[burger_agent],
            verbose=False,
            process=Process.sequential,
        )

        inputs = {"user_prompt": query, "session_id": sessionId}
        response = crew.kickoff(inputs)
        return response

...
Pizza Agent
from langchain_google_vertexai import ChatVertexAI
from langgraph.prebuilt import create_react_agent

...

self.model = ChatVertexAI(
    model="gemini-2.5-flash-lite",
    location=os.getenv("GOOGLE_CLOUD_LOCATION"),
    project=os.getenv("GOOGLE_CLOUD_PROJECT"),
)
self.tools = [create_pizza_order]
self.graph = create_react_agent(
    self.model,
    tools=self.tools,
    checkpointer=memory,
    prompt=self.SYSTEM_INSTRUCTION,
)

...
如您所見,這 2 個代理是使用與用戶端代理 ( ADK) 完全不同的架構 ( CrewAI 和 Langgraph) 建構而成。有了 A2A,這不是問題,我們不需要讓代理共用內部程式碼來彼此通訊,使用的架構、語言或部署位置都不重要。
A2A 伺服器的核心元件
現在讓我們討論 A2A 伺服器的核心概念和元件
代理商資訊卡
每個 A2A 伺服器都必須有代理資訊卡,可透過 /.well-known/agent.json 資源存取。這是為了支援 A2A 用戶端的探索階段,提供完整的資訊和背景,說明如何存取代理程式並瞭解其所有功能。這與使用 Swagger 或 Postman 記錄完善的 API 說明文件類似。
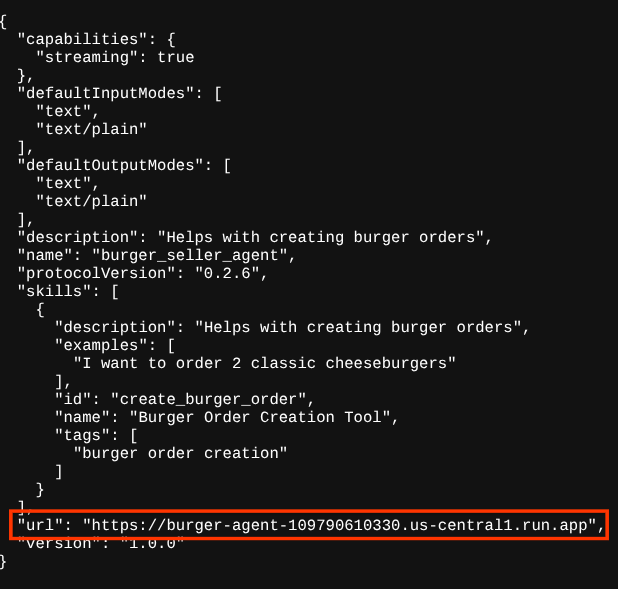
這是我們部署的漢堡代理代理資訊卡內容
{
  "capabilities": {
    "streaming": true
  },
  "defaultInputModes": [
    "text",
    "text/plain"
  ],
  "defaultOutputModes": [
    "text",
    "text/plain"
  ],
  "description": "Helps with creating burger orders",
  "name": "burger_seller_agent",
  "protocolVersion": "0.2.6",
  "skills": [
    {
      "description": "Helps with creating burger orders",
      "examples": [
        "I want to order 2 classic cheeseburgers"
      ],
      "id": "create_burger_order",
      "name": "Burger Order Creation Tool",
      "tags": [
        "burger order creation"
      ]
    }
  ],
  "url": "https://burger-agent-109790610330.us-central1.run.app",
  "version": "1.0.0"
}
這些代理程式資訊卡會顯示許多重要元件,例如代理程式技能、串流功能、支援的模式、通訊協定版本和其他項目。
所有這些資訊都可用來開發適當的通訊機制,確保 A2A 用戶端能正常通訊。支援的模式和驗證機制可確保通訊正常建立,且代理程式 skills 資訊可嵌入 A2A 用戶端系統提示,為用戶端代理程式提供遠端代理程式功能和技能的脈絡,以便叫用。如要查看這個代理程式資訊卡的詳細欄位,請參閱這份說明文件。
在我們的程式碼中,代理資訊卡的實作是使用 A2A Python SDK 建立,請參閱下方的 remote_seller_agents/burger_agent/main.py 片段瞭解實作方式
...

        capabilities = AgentCapabilities(streaming=True)
        skill = AgentSkill(
            id="create_burger_order",
            name="Burger Order Creation Tool",
            description="Helps with creating burger orders",
            tags=["burger order creation"],
            examples=["I want to order 2 classic cheeseburgers"],
        )
        agent_host_url = (
            os.getenv("HOST_OVERRIDE")
            if os.getenv("HOST_OVERRIDE")
            else f"http://{host}:{port}/"
        )
        agent_card = AgentCard(
            name="burger_seller_agent",
            description="Helps with creating burger orders",
            url=agent_host_url,
            version="1.0.0",
            defaultInputModes=BurgerSellerAgent.SUPPORTED_CONTENT_TYPES,
            defaultOutputModes=BurgerSellerAgent.SUPPORTED_CONTENT_TYPES,
            capabilities=capabilities,
            skills=[skill],
        )

...
我們可以看到幾個欄位,例如:
AgentCapabilities:聲明代理程式服務支援的其他選用功能,例如串流功能和/或推播通知支援AgentSkill:代理支援的工具或函式Input/OutputModes:支援的輸入/輸出類型模態Url:與代理程式通訊的位址
在這個設定中,我們會提供動態代理主機網址建立作業,方便您在本地測試和雲端部署之間切換,因此我們需要在上一個步驟中新增 HOST_OVERRIDE 變數。
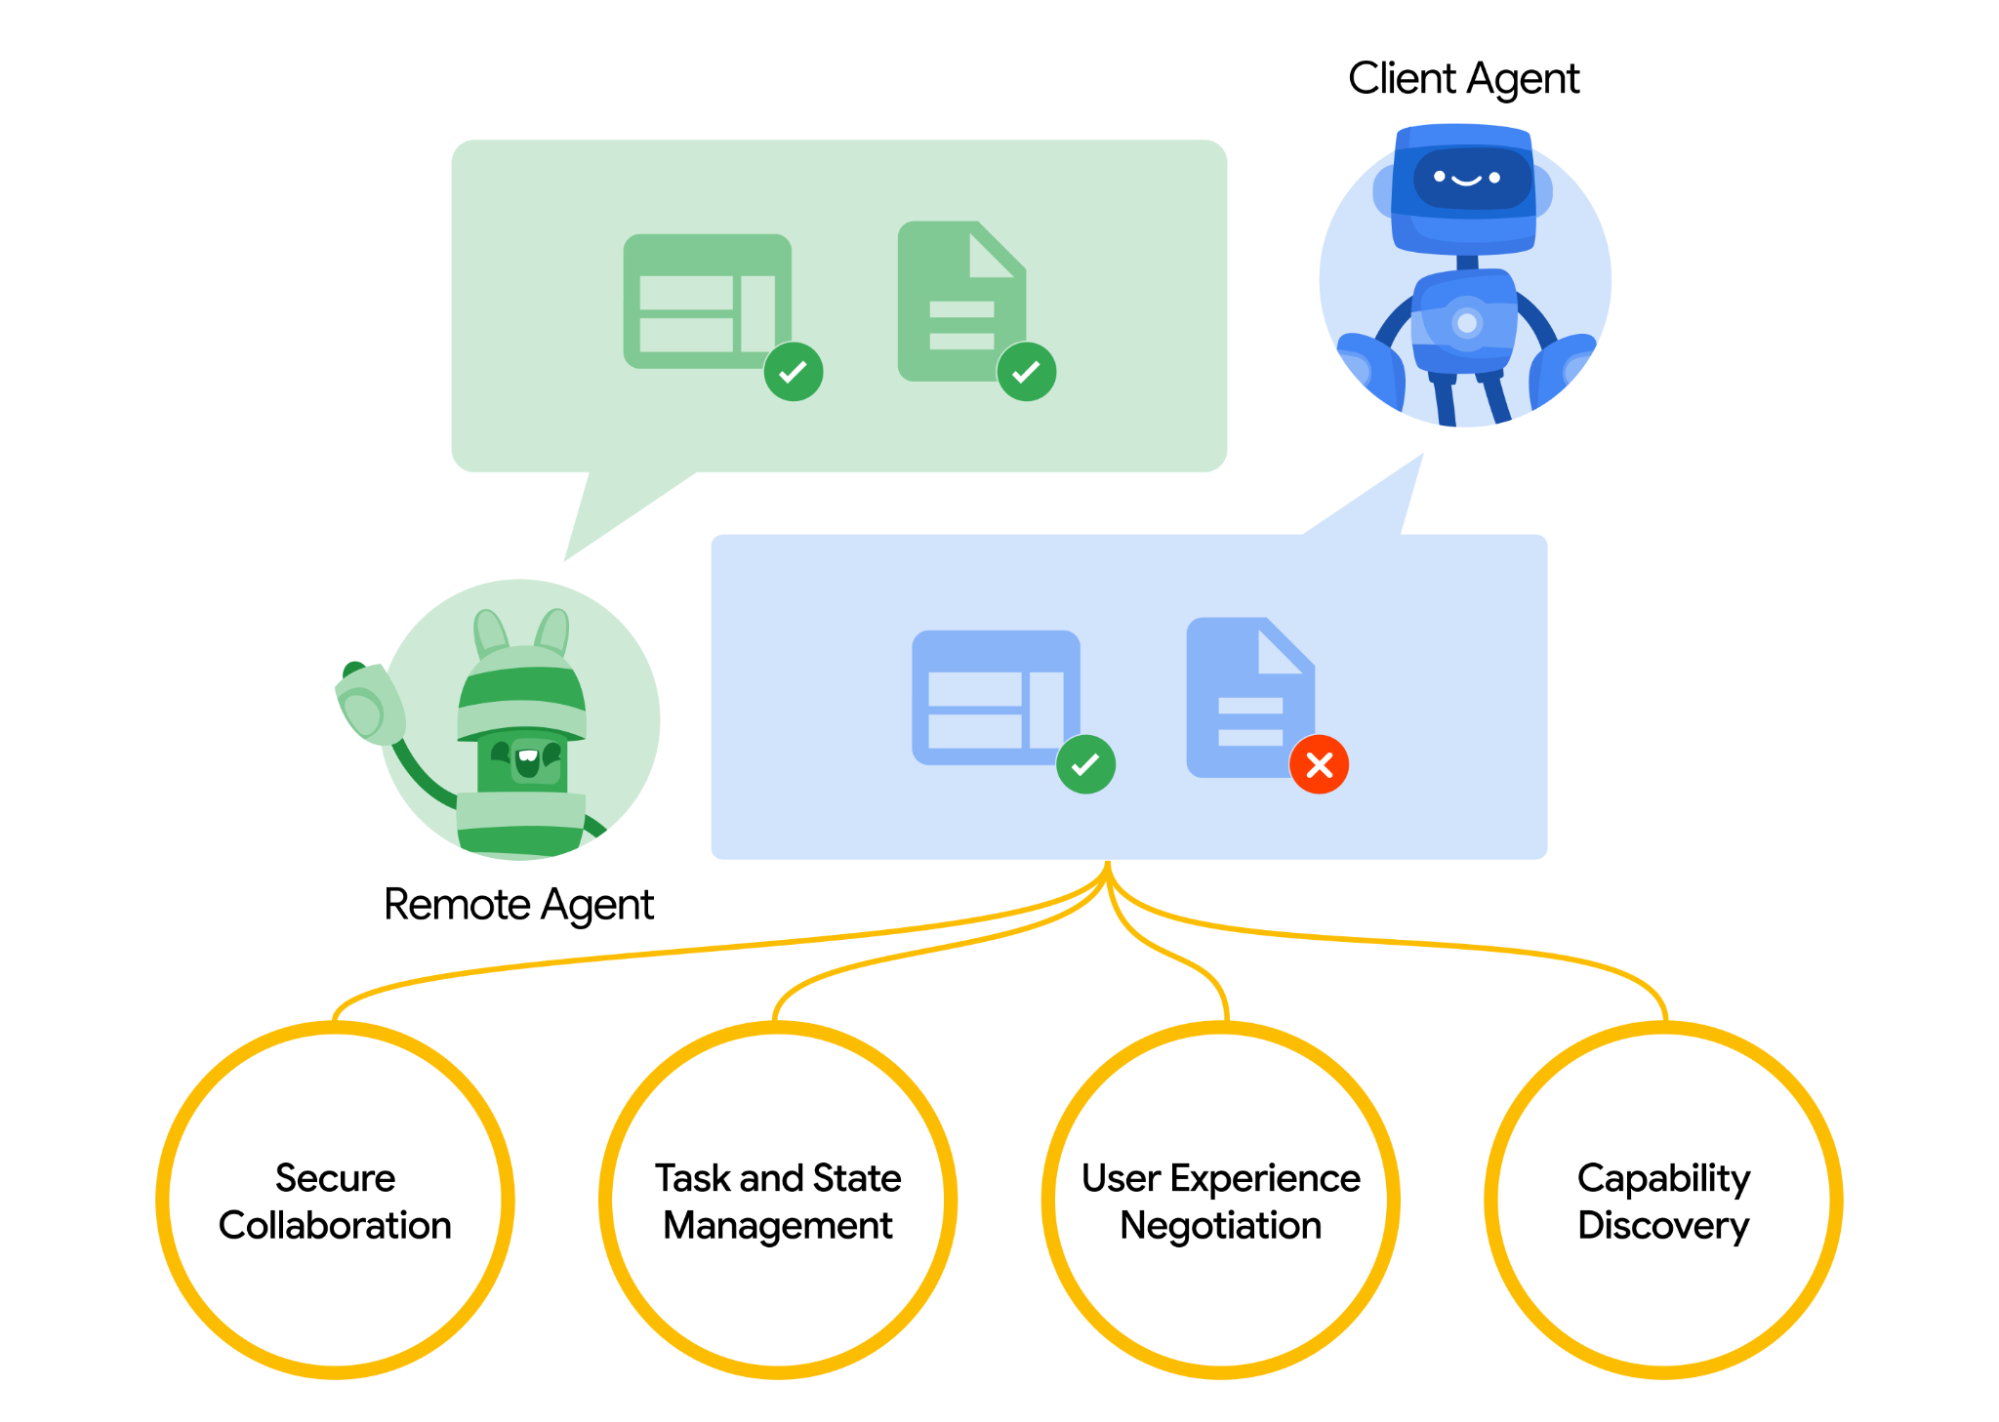
工作佇列和代理程式執行器
A2A 伺服器可能會處理來自不同代理商或使用者的要求,並能完美隔離每項工作。如要更清楚瞭解這些內容的脈絡,請查看下圖
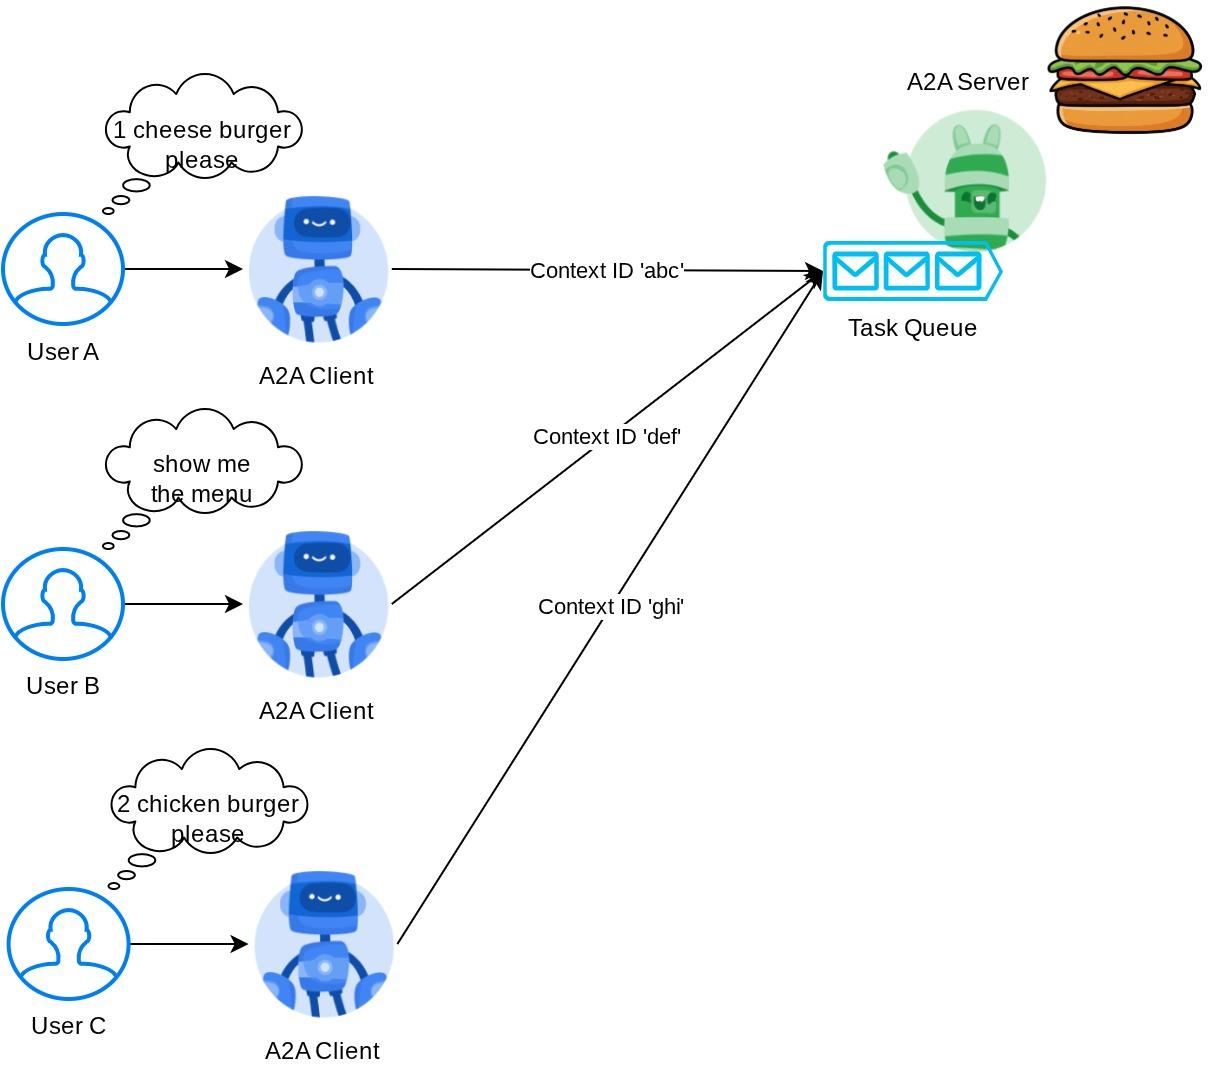
因此,每個 A2A 伺服器都應能追蹤傳入的工作,並儲存相關資訊。A2A SDK 提供模組,可在 A2A 伺服器中解決這項挑戰。首先,我們可以例項化邏輯,說明如何處理傳入要求。只要繼承 AgentExecutor 抽象類別,就能控管工作執行和取消作業的管理方式。您可以在 remote_seller_agents/burger_agent/agent_executor.py 模組中檢查這個範例實作 ( 披薩賣家案例的路徑類似)
...

class BurgerSellerAgentExecutor(AgentExecutor):
    """Burger Seller AgentExecutor."""

    def __init__(self):
        self.agent = BurgerSellerAgent()

    async def execute(
        self,
        context: RequestContext,
        event_queue: EventQueue,
    ) -> None:
        query = context.get_user_input()
        try:
            result = self.agent.invoke(query, context.context_id)
            print(f"Final Result ===> {result}")

            parts = [Part(root=TextPart(text=str(result)))]
            await event_queue.enqueue_event(
                completed_task(
                    context.task_id,
                    context.context_id,
                    [new_artifact(parts, f"burger_{context.task_id}")],
                    [context.message],
                )
            )
        except Exception as e:
            print("Error invoking agent: %s", e)
            raise ServerError(error=ValueError(f"Error invoking agent: {e}")) from e

    async def cancel(
        self, request: RequestContext, event_queue: EventQueue
    ) -> Task | None:
        raise ServerError(error=UnsupportedOperationError())

...
在上述程式碼中,我們實作基本處理機制,當要求傳入時,系統會直接叫用代理程式,並在叫用完成後傳送完成的工作事件。不過,我們並未在此處實作取消方法,因為這項作業的執行時間很短。
建構執行器後,我們可以直接使用內建的 DefaultRequestHandler、InMemoryTaskStore 和 A2AStarletteApplication,啟動 HTTP 伺服器。您可以在 remote_seller_agents/burger_agent/__main__.py 中檢查這項導入作業
...

        request_handler = DefaultRequestHandler(
            agent_executor=BurgerSellerAgentExecutor(),
            task_store=InMemoryTaskStore(),
        )
        server = A2AStarletteApplication(
            agent_card=agent_card, http_handler=request_handler
        )

        uvicorn.run(server.build(), host=host, port=port)

...
本模組會提供 /.well-known/agent.json 路由的實作項目,方便您存取代理資訊卡,以及支援 A2A 通訊協定的 POST 端點
摘要
簡而言之,目前我們使用 Python SDK 部署的 A2A 伺服器可支援下列 2 項功能:
- 在
/.well-known/agent.json路由上發布代理程式資訊卡 - 使用記憶體內工作佇列處理 JSON-RPC 要求
您可以在 __main__.py 指令碼 ( 位於 remote_seller_agents/burger_agent 或 remote_seller_agents/pizza_agent) 中檢查啟動這些功能的進入點。
9. 💡 [程式碼說明] Agent Engine 部署
以下是 purchasing_concierge/purchasing_agent.py: 中購買服務專員代理的程式碼片段:
from google.adk import Agent

...

def create_agent(self) -> Agent:
        return Agent(
            model="gemini-2.5-flash-lite",
            name="purchasing_agent",
            instruction=self.root_instruction,
            before_model_callback=self.before_model_callback,
            before_agent_callback=self.before_agent_callback,
            description=(
                "This purchasing agent orchestrates the decomposition of the user purchase request into"
                " tasks that can be performed by the seller agents."
            ),
            tools=[
                self.send_task,
            ],
        )

...
這個代理是使用 ADK 建構而成,並部署在 Agent Engine 上。
Vertex AI Agent Engine 是一組服務,可讓開發人員在正式環境中部署、管理及擴充 AI 代理。這項服務會處理基礎架構,在正式環境調度代理,讓您專心打造應用程式。詳情請參閱這份文件 。先前我們需要準備部署代理程式服務所需的檔案 (例如 main 伺服器指令碼和 Dockerfile),但現在只要結合 ADK 和 Agent Engine,即可直接從 Python 指令碼部署代理程式,不必自行開發後端服務。
在本教學課程中,我們會使用指令碼 deploy_to_agent_engine.py 進行部署,內容如下所示
import vertexai
from vertexai.preview import reasoning_engines
from vertexai import agent_engines
from dotenv import load_dotenv
import os
from purchasing_concierge.agent import root_agent

load_dotenv()

PROJECT_ID = os.getenv("GOOGLE_CLOUD_PROJECT")
LOCATION = os.getenv("GOOGLE_CLOUD_LOCATION")
STAGING_BUCKET = os.getenv("STAGING_BUCKET")

vertexai.init(
    project=PROJECT_ID,
    location=LOCATION,
    staging_bucket=STAGING_BUCKET,
)

adk_app = reasoning_engines.AdkApp(
    agent=root_agent,
)

remote_app = agent_engines.create(
    agent_engine=adk_app,
    display_name="purchasing-concierge",
    requirements=[
        "google-cloud-aiplatform[adk,agent_engines]",
        "a2a-sdk==0.2.16",
    ],
    extra_packages=[
        "./purchasing_concierge",
    ],
    env_vars={
        "GOOGLE_GENAI_USE_VERTEXAI": os.environ["GOOGLE_GENAI_USE_VERTEXAI"],
        "PIZZA_SELLER_AGENT_URL": os.environ["PIZZA_SELLER_AGENT_URL"],
        "BURGER_SELLER_AGENT_URL": os.environ["BURGER_SELLER_AGENT_URL"],
    },
)

print(f"Deployed remote app resource: {remote_app.resource_name}")
這是將 ADK 代理部署至代理引擎所需的步驟。首先,我們需要從 ADK root_agent 建立 AdkApp 物件。接著,我們可以提供 adk_app 物件、在 requirements 欄位中指定需求、在 extra_packages 中指定代理目錄路徑 ( 您也可以視需要在此提供其他目錄和檔案),並提供必要的環境變數,藉此執行 agent_engines.create 方法。
10. 💡 [程式碼說明] A2A 用戶端概念和實作方式
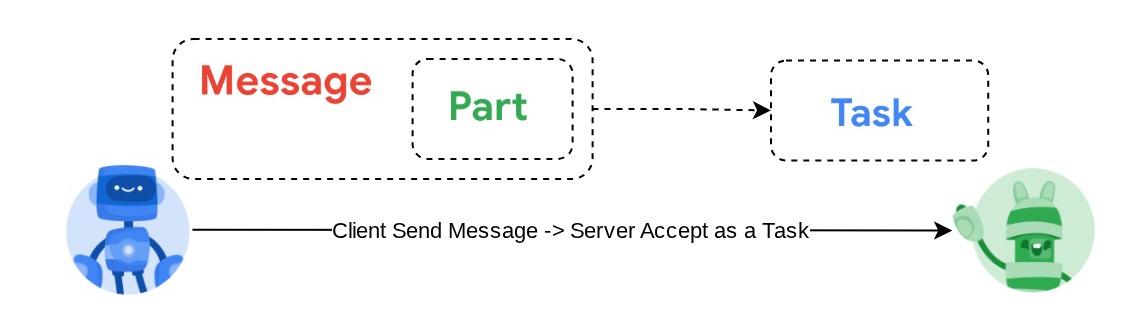
上圖顯示 A2A 互動的一般流程:
- 用戶端會嘗試在路徑
/.well-known/agent.json中提供的遠端代理程式網址中,尋找任何已發布的服務專員資訊卡。 - 然後,伺服器會在必要時將訊息和必要的中繼資料參數 ( 例如工作階段 ID、歷來脈絡等) 傳送給該代理程式。伺服器會將這則訊息視為待完成的工作
- A2A 伺服器會處理要求,如果伺服器支援推播通知,也能在處理工作期間發布通知 ( 這項功能不在本程式碼研究室的範圍內)
- 完成後,A2A 伺服器會將回應構件傳回給用戶端
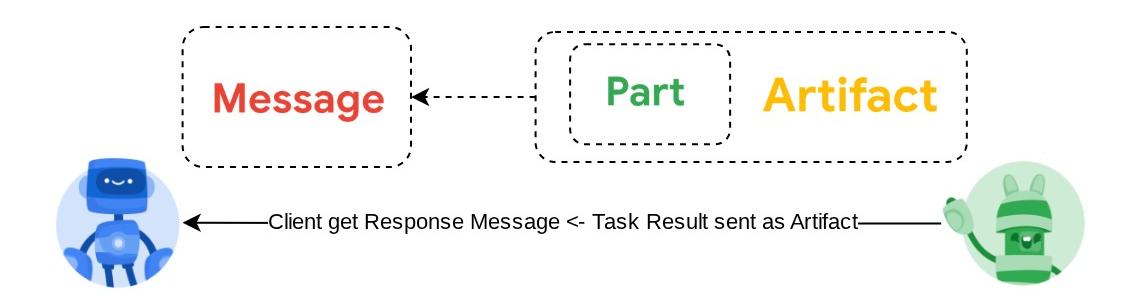
上述互動的部分核心物件如下 (詳情請參閱這篇文章):
- 訊息:用戶端與遠端代理程式之間的通訊回合
- 工作:A2A 管理的基本作業單位,由專屬 ID 識別
- 構件:代理程式執行工作後產生的輸出內容 (例如文件、圖片、結構化資料),由「部分」組成
- 部分:訊息或構件中最小的內容單位。可以是文字、圖片、影片、檔案等。
資訊卡探索
啟動 A2A 用戶端服務時,一般程序是嘗試取得代理程式卡片資訊並儲存,以便在需要時輕鬆存取。在本程式碼研究室中,我們會在 before_agent_callback 上實作這項功能,您可以在 purchasing_concierge/purchasing_agent.py 中查看實作方式,請參閱下方程式碼片段
...

async def before_agent_callback(self, callback_context: CallbackContext):
        if not self.a2a_client_init_status:
            httpx_client = httpx.AsyncClient(timeout=httpx.Timeout(timeout=30))
            for address in self.remote_agent_addresses:
                card_resolver = A2ACardResolver(
                    base_url=address, httpx_client=httpx_client
                )
                try:
                    card = await card_resolver.get_agent_card()
                    remote_connection = RemoteAgentConnections(
                        agent_card=card, agent_url=card.url
                    )
                    self.remote_agent_connections[card.name] = remote_connection
                    self.cards[card.name] = card
                except httpx.ConnectError:
                    print(f"ERROR: Failed to get agent card from : {address}")
            agent_info = []
            for ra in self.list_remote_agents():
                agent_info.append(json.dumps(ra))
            self.agents = "\n".join(agent_info)

...
在這裡,我們會嘗試使用內建的 A2A 用戶端 A2ACardResolver 模組存取所有可用的代理資訊卡,然後收集傳送訊息給代理所需的連線,之後我們也需要將所有可用的代理及其規格列入提示中,讓代理知道可以與這些代理通訊
提示和傳送工作工具
這是我們在此提供給 ADK 代理的提示和工具
...

def root_instruction(self, context: ReadonlyContext) -> str:
    current_agent = self.check_active_agent(context)
    return f"""You are an expert purchasing delegator that can delegate the user product inquiry and purchase request to the
appropriate seller remote agents.

Execution:
- For actionable tasks, you can use `send_task` to assign tasks to remote agents to perform.
- When the remote agent is repeatedly asking for user confirmation, assume that the remote agent doesn't have access to user's conversation context.
So improve the task description to include all the necessary information related to that agent
- Never ask user permission when you want to connect with remote agents. If you need to make connection with multiple remote agents, directly
connect with them without asking user permission or asking user preference
- Always show the detailed response information from the seller agent and propagate it properly to the user.
- If the remote seller is asking for confirmation, rely the confirmation question to the user if the user haven't do so.
- If the user already confirmed the related order in the past conversation history, you can confirm on behalf of the user
- Do not give irrelevant context to remote seller agent. For example, ordered pizza item is not relevant for the burger seller agent
- Never ask order confirmation to the remote seller agent

Please rely on tools to address the request, and don't make up the response. If you are not sure, please ask the user for more details.
Focus on the most recent parts of the conversation primarily.

If there is an active agent, send the request to that agent with the update task tool.

Agents:
{self.agents}

Current active seller agent: {current_agent["active_agent"]}
"""

...

async def send_task(self, agent_name: str, task: str, tool_context: ToolContext):
        """Sends a task to remote seller agent

        This will send a message to the remote agent named agent_name.

        Args:
            agent_name: The name of the agent to send the task to.
            task: The comprehensive conversation context summary
                and goal to be achieved regarding user inquiry and purchase request.
            tool_context: The tool context this method runs in.

        Yields:
            A dictionary of JSON data.
        """
        if agent_name not in self.remote_agent_connections:
            raise ValueError(f"Agent {agent_name} not found")
        state = tool_context.state
        state["active_agent"] = agent_name
        client = self.remote_agent_connections[agent_name]
        if not client:
            raise ValueError(f"Client not available for {agent_name}")
        session_id = state["session_id"]
        task: Task
        message_id = ""
        metadata = {}
        if "input_message_metadata" in state:
            metadata.update(**state["input_message_metadata"])
            if "message_id" in state["input_message_metadata"]:
                message_id = state["input_message_metadata"]["message_id"]
        if not message_id:
            message_id = str(uuid.uuid4())

        payload = {
            "message": {
                "role": "user",
                "parts": [
                    {"type": "text", "text": task}
                ],  # Use the 'task' argument here
                "messageId": message_id,
                "contextId": session_id,
            },
        }

        message_request = SendMessageRequest(
            id=message_id, params=MessageSendParams.model_validate(payload)
        )
        send_response: SendMessageResponse = await client.send_message(
            message_request=message_request
        )
        print(
            "send_response",
            send_response.model_dump_json(exclude_none=True, indent=2),
        )

        if not isinstance(send_response.root, SendMessageSuccessResponse):
            print("received non-success response. Aborting get task ")
            return None

        if not isinstance(send_response.root.result, Task):
            print("received non-task response. Aborting get task ")
            return None

        return send_response.root.result

...
在提示中,我們提供所有可用的遠端服務專員姓名和說明給購買服務專員,並在工具 self.send_task 中提供機制,以擷取適當的用戶端來連線至服務專員,並使用 SendMessageRequest 物件傳送必要的中繼資料。
通訊協定
工作定義是 A2A 伺服器擁有的網域。不過,從 A2A 用戶端的角度來看,這會視為傳送至伺服器的 訊息。伺服器會定義來自用戶端的收到的訊息屬於哪項工作,以及完成工作是否需要用戶端互動。如要進一步瞭解工作生命週期,請參閱這份文件。這個概念的較高層級可透過下圖呈現:
訊息 -> 工作互換作業是使用 JSON-RPC 標準頂端的酬載格式實作,如下列 message/send 通訊協定 的範例所示:
{
  # identifier for this request
  "id": "abc123",
  # version of JSON-RPC protocol
  "jsonrpc": "2.0",
  # method name
  "method": "message/send",
  # parameters/arguments of the method
  "params": {
    "message": "hi, what can you help me with?"
  }
}
例如,支援不同類型的通訊 (例如同步、串流、非同步),或設定工作狀態的通知。您可以彈性設定 A2A 伺服器,處理這些工作定義標準。如要瞭解這些方法的詳細資訊,請參閱這份文件。
11. 🎯 挑戰
現在,您是否可以自行準備必要檔案,並將 Gradio 應用程式部署到 Cloud Run?現在就接受挑戰吧!
12. 🧹 清理
如要避免系統向您的 Google Cloud 帳戶收取本程式碼研究室所用資源的費用,請按照下列步驟操作: