
1. Overview
Welcome to ‘Day Two'. While building an app and hitting ‘Publish' is magic, real-world traffic brings real-world failures. Instead of spending your days wrestling with YAML or hunting through logs, you can build a swarm of specialized agents to manage the operational plumbing for you. This codelab shows you how Google Cloud's unified stack (Eventarc, Cloud Run, Firestore, Cloud Build, BigQuery) makes it easy for agents to securely fetch secrets, stream logs, and remediate issues out-of-the-box.
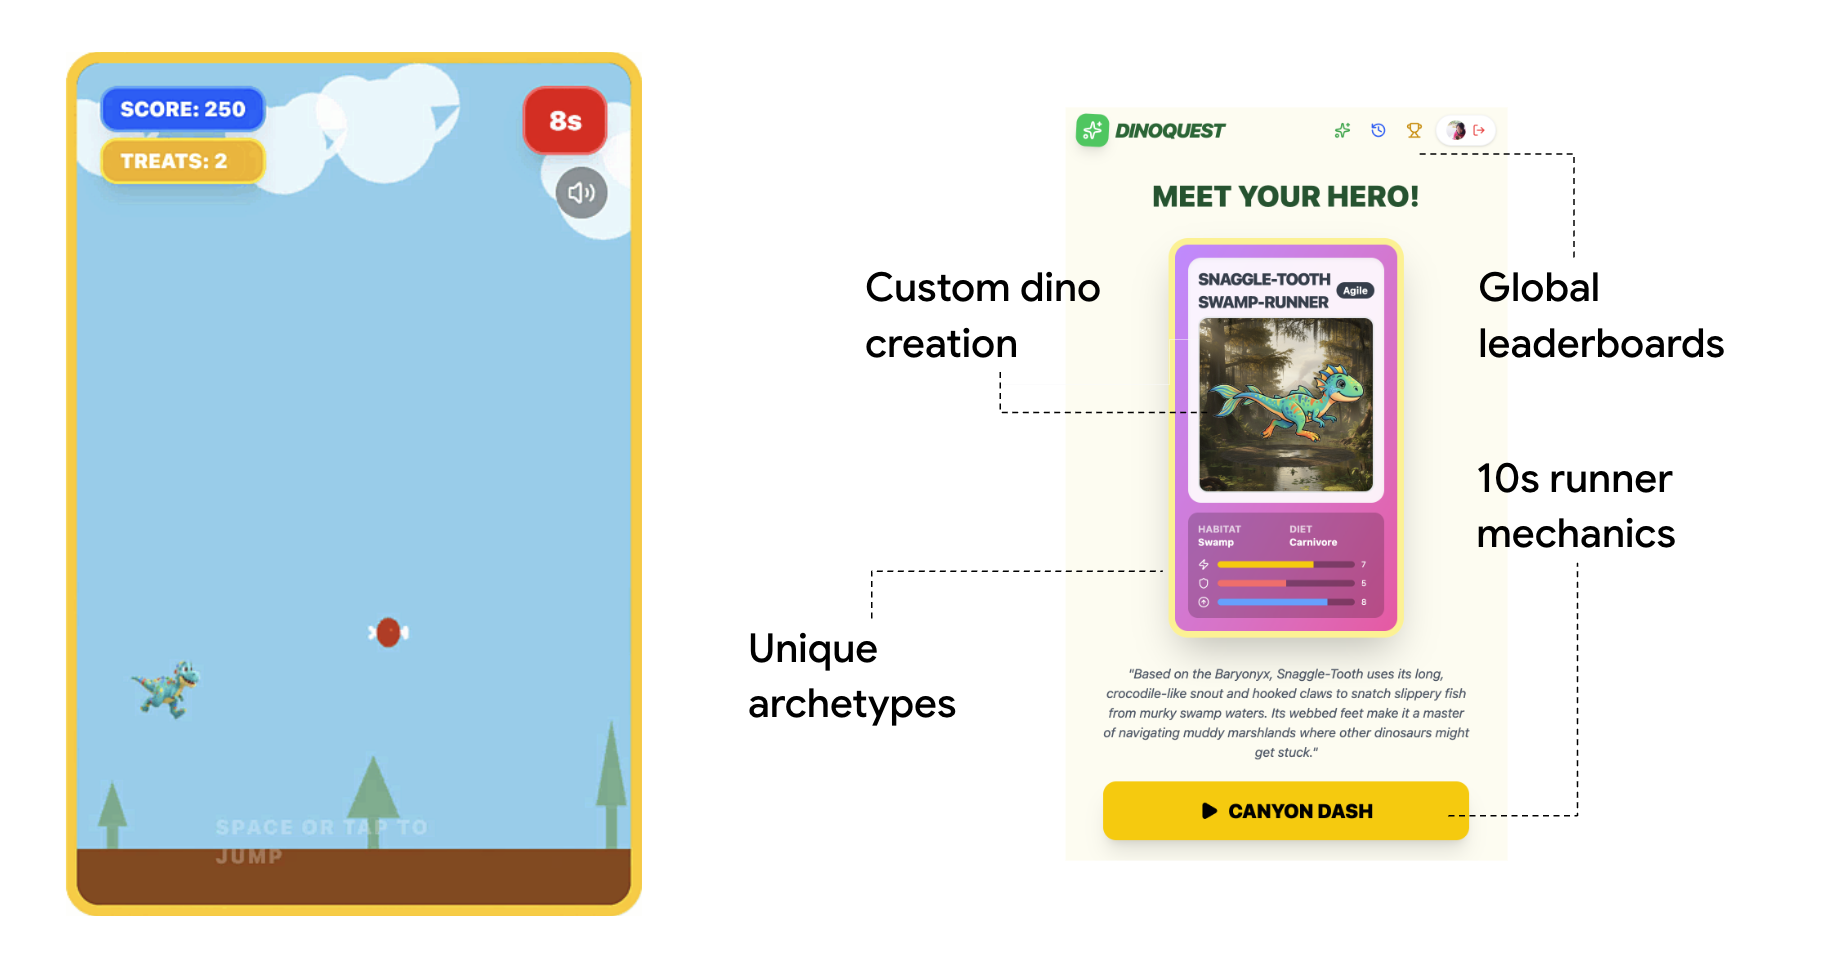
In this codelab you will build DinoQuest — a Gemini-powered dinosaur adventure game — from the ground up and wire it to a fully agentic CI/CD pipeline. By the end you will have:
- A working DinoQuest web app running on Cloud Run (service name:
dinoquest) - A log analytics pipeline that streams Cloud Run logs into BigQuery and generates an interactive game-insights dashboard
- Remediation Agent (
remediation-agent) — an ADK remediation agent that watches for Cloud Run errors and auto-fixes them, deployed as its own Cloud Run service triggered by Eventarc - An CI Agent (
ci-agent) that reads your PR diff, scopes tests intelligently, builds a Docker image via Cloud Build, and posts a commit status back to GitHub - An CD Agent that scores deployment risk, splits traffic, monitors metrics, and promotes or rolls back automatically
What you'll learn
- How to deploy a full-stack Vite + FastAPI app on Cloud Run as a single container
- How to configure Firebase Auth and Firestore for a React app
- How to build and deploy an ADK agent that reacts to Pub/Sub events via Eventarc
- How to route Cloud Run logs to BigQuery and query game analytics
- How to write agentic skills for CI and canary deployment
What you'll need
- A Google Cloud project with billing enabled
- A Firebase project (can be the same GCP project)
- A GitHub account and a fork of the DinoQuest repo
- Access to Antigravity with Gemini (Google's agent runner)
gcloudCLI installed and authenticated — see install instructions belownode≥ 18 andnpmpython3≥ 3.11gitandgh(GitHub CLI)
Install the gcloud CLI
macOS
brew install --cask google-cloud-sdk
Or download the installer from cloud.google.com/sdk/docs/install.
Windows
winget install Google.CloudSDK
Or download the Windows installer (.exe) from cloud.google.com/sdk/docs/install and run it.
After installing, initialise and authenticate:
gcloud init
gcloud auth login
gcloud auth application-default login
2. Set up Firebase
Every agent needs data to reason about. DinoQuest uses Firestore and Firebase Auth to provide a production-ready data layer that our agents will later discover, explore, and update using natural language.
Since this app was generated via AI Studio, it is heavily integrated with Firebase. Using Firebase offers several advantages, chief among them being a pre-secured architecture and managed data access out-of-the-box, ensuring your game's state is protected from day one.
A. Create a Firebase project
- Go to console.firebase.google.com
- Click Add project (It's hidden in the create a new project option ) → select your existing GCP project (or create a new one)
- Disable Google Analytics if prompted → Create project (Or feel free to go for the default setting)
B. Enable Google Authentication
- In the Firebase console, go to Security → Authentication (Get started) → Sign-in method
- Click Google → toggle Enable → save your support email → Save
C. Add localhost as an authorized domain
- Still in Authentication, click the Settings tab
- Under Authorized domains, confirm
localhostis listed (it should be by default)
D. Create a Firestore database
- Go to Database & Storage → Firestore Database → Create database
- Choose Standard Edition → Next
- Select region
us-central1(or match your Cloud Run region) - Choose Start in production mode → Create
Once created, note your Database ID — it will look like (default) unless you named it.
E. Set Firebase Security Rules
In Firestore Database → Rules, replace the default rules with:
rules_version = '2';
service cloud.firestore {
  match /databases/{database}/documents {
    // ===============================================================
    // Helper Functions
    // ===============================================================
    function isAuthenticated() {
      return request.auth != null;
    }

    function isOwner(userId) {
      return isAuthenticated() && request.auth.uid == userId;
    }

    function isValidUser(data) {
      return data.keys().hasAll(['uid', 'email']) &&
             data.uid is string && data.uid.size() > 0 &&
             (data.email == null || (data.email is string && data.email.matches("^[a-zA-Z0-9._%+-]+@[a-zA-Z0-9.-]+\\.[a-zA-Z]{2,}$")));
    }

    function isValidDinosaur(data) {
      return data.keys().hasAll(['userId', 'name', 'type']) &&
             data.userId == request.auth.uid &&
             data.name is string && data.name.size() > 0 && data.name.size() < 50 &&
             data.type in ['Speedy', 'Tank', 'Balanced', 'Agile'];
    }

    function isValidGame(data) {
      return data.keys().hasAll(['userId', 'score']) &&
             data.userId == request.auth.uid &&
             data.score is number && data.score >= 0;
    }


    match /users/{userId} {
      allow read: if isOwner(userId);
      allow create: if isOwner(userId) && isValidUser(request.resource.data);
      allow update: if isOwner(userId) && isValidUser(request.resource.data);

      match /dinosaurs/{dinoId} {
        allow read: if isOwner(userId);
        allow create: if isOwner(userId) && isValidDinosaur(request.resource.data);
        allow update: if isOwner(userId) && isValidDinosaur(request.resource.data);
      }

      match /games/{gameId} {
        allow read: if isOwner(userId);
        allow create: if isOwner(userId) && isValidGame(request.resource.data);
      }

      match /seenAnnouncements/{announcementId} {
        allow read, create: if isOwner(userId);
      }
    }

    match /announcements/{announcementId} {
      allow read: if isAuthenticated();
    }

    // Default deny
    match /{document=**} {
      allow read, write: if false;
    }

    match /scores/{scoreId} {
      allow read: if true;
      allow create: if isAuthenticated();
      allow update: if false;
    }
  }
}
Click Publish.
F. Add a web app and get the config
- Go to Project settings (gear icon) → General tab
- Scroll to Your apps → click Add app → choose the Web icon (
) - Name it
dinoquest→ Register app - Copy the
firebaseConfigobject shown — you'll need it in a moment
3. Running the Game
Agent Role: The Environment. Before we can set our agents to work, we need a world for them to manage. In this step, we'll deploy the "Day One" version of DinoQuest. This creates the live service, logs, and state that our swarm will later discover and manage.
Choose one of the two options below. Either produces a GEMINI_API_KEY you use identically in every later step — no other changes needed.
A. Set up Gemini API key
Option A — Vertex AI Gemini API key (recommended if you have a GCP project)
Vertex AI lets you create a Gemini API key tied directly to your GCP project and billed to it, using the project's default service account — no separate AI Studio account needed.
- Export your GCP project ID:
export PROJECT_ID=<YOUR_PROJECT_ID> - Enable the required APIs and grant the necessary permissions to the Compute Engine default service account:
gcloud auth application-default set-quota-project $PROJECT_ID gcloud config set project $PROJECT_ID # Enable Vertex AI, Compute Engine, and Generative Language APIs gcloud services enable aiplatform.googleapis.com \ compute.googleapis.com \ generativelanguage.googleapis.com # Grant Vertex AI User role to the default compute service account PROJECT_NUMBER=$(gcloud projects describe $PROJECT_ID --format="value(projectNumber)") gcloud projects add-iam-policy-binding $PROJECT_ID \ --member="serviceAccount:${PROJECT_NUMBER}-compute@developer.gserviceaccount.com" \ --role="roles/aiplatform.user" \ --condition=None - Open the Vertex AI API keys page in the Cloud Console
- Click Create Credentials → select API Key
- In the creation dialog:
- Name the key
Dino_Key - Check the Authenticate API calls through a service account box
- Under Service account, select the default compute service account (
PROJECT_NUMBER-compute@developer.gserviceaccount.com) - Back in the Select API restrictions, check GEMINI API
- Click Create
- Name the key
- Copy the generated key.
Option B — AI Studio (quickest for local dev)
- Open aistudio.google.com
- Click Get API key in the left sidebar
- Click Create API key → choose your GCP project → copy the key
Either key is set as GEMINI_API_KEY in the steps that follow — the backend treats them identically.
Clone the repository
The course repository sits in https://github.com/gca-americas/dinoquest. Please fork it to your own GitHub account first. We'll have the agent work on your repo instead.
After forking, clone the main branch of your forked DinoQuest repo and enter the project directory:
git clone https://github.com/YOUR_GITHUB_USERNAME/dinoquest.git
cd dinoquest
B. Set up Environment Variables
In every new bash terminal you open during this codelab, make sure to set these essential environment variables. Replace the placeholder values with your actual project details:
First, export your GitHub repository URL:
export GITHUB_REPO_URL=https://github.com/YOUR_GITHUB_USERNAME/dinoquest
Then export the remaining environment variables:
export PROJECT_ID=your-project-id
export GOOGLE_CLOUD_PROJECT=$PROJECT_ID
export CLOUD_RUN_REGION=us-central1
export GOOGLE_GENAI_USE_VERTEXAI=True
export HARNESS_EVENTS_TOPIC=projects/$PROJECT_ID/topics/harness-events
export CLOUD_BUILD_REPO=<YOUR_GITHUB_USERNAME>-dinoquest
Confirm the structure looks right:
dinoquest/
├── backend/          # FastAPI backend (serves frontend + Gemini API calls)
├── frontend/         # React/Vite frontend
├── skills/           # Agentic CI/CD skill files
├── Dockerfile        # Multi-stage build (React → Python)
├── start.sh          # Local dev launcher
└── README.md
B. Create the backend environment file
First, export your Gemini API key:
export GEMINI_API_KEY=YOUR_GEMINI_API_KEY_FROM_STEP_2
Then create the .env file:
cat > backend/.env <<EOF
GEMINI_API_KEY=$GEMINI_API_KEY
GOOGLE_GENAI_USE_VERTEXAI=False
GOOGLE_CLOUD_PROJECT=$PROJECT_ID
EOF
C. Enable Firebase App Check / Service Account (for Cloud Run)
When running on Cloud Run, the backend uses Application Default Credentials to talk to Firebase — no service account key file needed. The firebase_admin.initialize_app() call in backend/main.py picks this up automatically.
For local development, authenticate once:
gcloud auth application-default login
D. Create the Firebase app config file
In the frontend/ directory, create firebase-applet-config.json with your config from previous step:
{
  "apiKey": "YOUR_API_KEY",
  "authDomain": "YOUR_PROJECT_ID.firebaseapp.com",
  "projectId": "YOUR_PROJECT_ID",
  "storageBucket": "YOUR_PROJECT_ID.appspot.com",
  "messagingSenderId": "YOUR_SENDER_ID",
  "appId": "YOUR_APP_ID",
  "firestoreDatabaseId": "(default)"
}
Note: firestoreDatabaseId should match the database ID you created in previous step. If you used the default, leave it as "(default)".
Commit the changes back to your repository:
git add frontend/firebase-applet-config.json
git commit -m "chore: add firebase config"
git push origin main
C. Run DinoQuest locally
1. Enable required APIs
gcloud services enable \
  run.googleapis.com \
  cloudbuild.googleapis.com \
  artifactregistry.googleapis.com \
  secretmanager.googleapis.com \
  firestore.googleapis.com \
  logging.googleapis.com \
  pubsub.googleapis.com \
  eventarc.googleapis.com \
  aiplatform.googleapis.com \
  bigquery.googleapis.com \
  aiplatform.googleapis.com
2. Start DinoQuest
The start.sh script builds the React frontend and hands the terminal to the FastAPI backend, which serves the compiled static files:
cd backend
python3 -m venv .venv
source .venv/bin/activate
pip install -r requirements.txt -q

cd ..
# Force-remove the Vertex AI flag from the current terminal session to avoid conflicts
unset GOOGLE_GENAI_USE_VERTEXAI
./start.sh
Open http://localhost:8000 in your browser. You should see the DinoQuest title screen. Sign in with Google, generate your first dinosaur, and confirm it saves to Firestore.
Troubleshooting: If you see a blank page or Firebase auth errors, double-check that frontend/firebase-applet-config.json has the correct values and that localhost is in the authorized domains list.
E. Deploy DinoQuest to Cloud Run
1. Set your project
export PROJECT_ID=$(gcloud config get-value project)
3. Create an Artifact Registry repository
gcloud artifacts repositories create dinoquest \
  --repository-format=docker \
  --location=$CLOUD_RUN_REGION \
  --description="DinoQuest container images"
4. Store the Gemini API key in Secret Manager
echo -n $GEMINI_API_KEY | \
  gcloud secrets create gemini-api-key --data-file=-

# Grant the default compute service account access to the secret
PROJECT_NUMBER=$(gcloud projects describe $PROJECT_ID --format="value(projectNumber)")
gcloud secrets add-iam-policy-binding gemini-api-key \
  --member="serviceAccount:${PROJECT_NUMBER}-compute@developer.gserviceaccount.com" \
  --role="roles/secretmanager.secretAccessor"
5. Build the container image with Cloud Build
gcloud builds submit \
  --tag $CLOUD_RUN_REGION-docker.pkg.dev/$PROJECT_ID/dinoquest/app:latest .
This runs the multi-stage Dockerfile: it builds the React app first, then packages the output into the FastAPI image. Takes about 3–5 minutes.
6. Deploy to Cloud Run
First, export your admin email:
export ADMIN_EMAIL=<YOUR_TEST_ACCOUNT_EMAIL>
Then deploy the service:
gcloud run deploy dinoquest \
  --image=$CLOUD_RUN_REGION-docker.pkg.dev/$PROJECT_ID/dinoquest/app:latest \
  --region=$CLOUD_RUN_REGION \
  --platform=managed \
  --allow-unauthenticated \
  --memory=128Mi \
  --set-secrets="GEMINI_API_KEY=gemini-api-key:latest" \
  --set-env-vars="ADMIN_EMAILS=$ADMIN_EMAIL" \
  --set-env-vars="GOOGLE_GENAI_USE_VERTEXAI=False" \
  --set-env-vars="GOOGLE_CLOUD_PROJECT=$PROJECT_ID"
When the command completes, Cloud Run prints a Service URL. Copy this URL — you will need it to authorize the domain in Firebase.
7. Authorize the Cloud Run domain in Firebase
To allow users to sign in from your deployed app, you must add the Cloud Run URL to Firebase's authorized domains:
- Go back to the Firebase console → Authentication → Settings → Authorized domains
- Click Add domain
- Paste your Cloud Run service URL (e.g.,
dinoquest-xxxxx.us-central1.run.app) — remove thehttps://prefix - Click Save
8. Seed the Leaderboard Data
To give your game some initial "life" and ensure your agents have data, you can seed the leaderboard with some starting scores.
- Ensure you are in the
dinoquestroot directory:cd ~/dinoquest - Create and activate a virtual environment:
python3 -m venv venv source venv/bin/activate - Install the required Firestore dependency:
pip install google-cloud-firestore - Run the seeding script:
python3 prep/seed_scores.py - Deactivate the virtual environment:
deactivate
Now you can open the Service URL in your browser — DinoQuest is fully live!
4. Setup Dino Theater
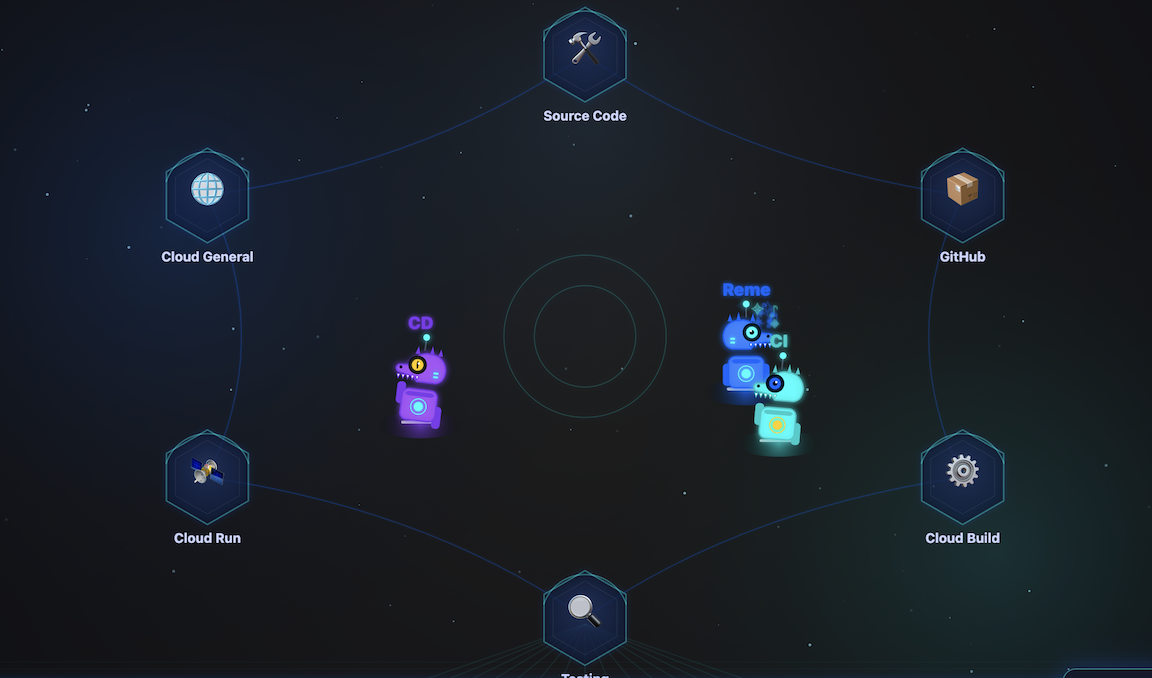
Agent Role: Visualizer. How do you monitor an autonomous agent team? Dino Theater provides a real-time window into the mind of your agent swarm. Instead of staring at terminal logs, you can watch as your agents reason, call each other, and execute tasks across the cloud in a live, visual dashboard.
A. Deploy Dino Theater to Cloud Run
First, go back to your home directory and clone the Dino Theater code:
cd ~
git clone https://github.com/gca-americas/dinoquest-theater.git
cd dinoquest-theater
- Build and push the container:
gcloud builds submit --tag $CLOUD_RUN_REGION-docker.pkg.dev/$PROJECT_ID/dinoquest/dino-theater:latest . - Set up Service Account & Permissions:
# Create the service account gcloud iam service-accounts create dino-theater # Create the Pub/Sub topic (if you haven't yet) gcloud pubsub topics create harness-events # Create the subscription gcloud pubsub subscriptions create harness-events-theater \ --topic=harness-events # Grant subscriber role gcloud pubsub subscriptions add-iam-policy-binding harness-events-theater \ --member="serviceAccount:dino-theater@${PROJECT_ID}.iam.gserviceaccount.com" \ --role="roles/pubsub.subscriber" - Deploy the application:
gcloud run deploy dino-theater \ --image $CLOUD_RUN_REGION-docker.pkg.dev/$PROJECT_ID/dinoquest/dino-theater:latest \ --region=$CLOUD_RUN_REGION \ --service-account=dino-theater@${PROJECT_ID}.iam.gserviceaccount.com \ --set-env-vars="GOOGLE_CLOUD_PROJECT=$PROJECT_ID" \ --allow-unauthenticated \ --min-instances=1--min-instances=1is recommended to keep the SSE connection alive between events. - Verify it works: Open the deployed Service URL in your browser (e.g.,
https://dino-theater-xxx-uc.a.run.app/demo).
5. Agentic DevOps in the IDE
Agent Role: Native Antigravity. To bridge the gap between your IDE and the cloud, we connect Antigravity to Google Cloud's Managed MCP servers. This gives your native agent ‘eyes' into your project, allowing it to parse logs, check metrics, and reason about infrastructure without you having to juggle API keys or context-switch to the console.
Before running any skills, you need to configure Antigravity's access to Google Cloud and load the DinoQuest skill playbooks.
A. Install Google's Managed MCP service
Google's Managed MCP service provides access to all Google Cloud APIs through a single hosted endpoint.
Authenticate using Application Default Credentials:
gcloud auth application-default login
B. Configure mcp_config.json
Create or update mcp_config.json in your Antigravity config directory (usually ~/.gemini/antigravity/mcp_config.json). or from the console. This gives Antigravity access to the Google Cloud and GitHub tools the skills need:
{
  "mcpServers": {
    "google-developer-knowledge": {
      "serverUrl": "https://developerknowledge.googleapis.com/mcp",
      "authProviderType": "google_credentials"
    },
    "google-bigquery": {
      "serverUrl": "https://bigquery.googleapis.com/mcp",
      "authProviderType": "google_credentials"
    },
    "google-cloud-logging": {
      "serverUrl": "https://logging.googleapis.com/mcp",
      "authProviderType": "google_credentials"
    },
    "google-cloud-monitoring": {
      "serverUrl": "https://monitoring.googleapis.com/mcp",
      "authProviderType": "google_credentials",
      "disabledTools": [
        "get_dashboard",
        "list_dashboards"
      ]
    },
    "google-cloud-run": {
      "serverUrl": "https://run.googleapis.com/mcp",
      "authProviderType": "google_credentials",
      "disabledTools": [
        "deploy_service_from_image",
        "deploy_service_from_archive",
        "deploy_service_from_file_contents"
      ]
    },
    "google-cloud-sql": {
      "serverUrl": "https://sqladmin.googleapis.com/mcp",
      "authProviderType": "google_credentials",
      "disabled": true
    },
    "google-cloud-trace": {
      "serverUrl": "https://cloudtrace.googleapis.com/mcp",
      "authProviderType": "google_credentials"
    },
    "google-error-reporting": {
      "serverUrl": "https://clouderrorreporting.googleapis.com/mcp",
      "authProviderType": "google_credentials"
    },
    "google-firestore": {
      "serverUrl": "https://firestore.googleapis.com/mcp",
      "authProviderType": "google_credentials"
    },
    "google-resource-manager": {
      "serverUrl": "https://cloudresourcemanager.googleapis.com/mcp",
      "authProviderType": "google_credentials"
    },
    "gemini-cloud-assist": {
      "serverUrl": "https://geminicloudassist.googleapis.com/mcp",
      "authProviderType": "google_credentials"
    }
  }
}
C. Load skills into Antigravity (Optional)
Antigravity discovers skills in specific standard directories. Copy the DinoQuest skills from your cloned repository to the global Antigravity skills folder:
# Create the standard skills directory if it doesn't exist
mkdir -p ~/.gemini/antigravity/skills

# Copy all DinoQuest skills into the global skills folder
cp -r skills/* ~/.gemini/antigravity/skills/
D. Restart Antigravity(Optional)
To apply the mcp_config.json changes and load the newly copied skills, restart the Antigravity application.
Once restarted:
- Verify google and github MCP servers show a green "Connected" status in Settings.
- Verify the DinoQuest skills appear in your skills list.
Note: Each skill has a ## Configuration table at the top of its SKILL.md. After copying, you should update the values in ~/.gemini/antigravity/skills/ to match your project.
E. Remediate cloud service in local IDE
- Trigger the error: Open your deployed DinoQuest URL (from last step) in your browser.
- Go to the Leaderboard: Click on the Leaderboard button. The current leaderboard implementation is intentionally inefficient—it will attempt to load a massive amount of data into memory, triggering an Out-Of-Memory (OOM) error.
- In Antigravity Agent Manager (Agent HUB), ask it to help recover the error and possibly fix the root cause.
- prompt 1: Find out what's wrong with dinoquest.
- prompt 2: Can you look at the code for the Dinoquest game and fix what caused the out of memory error?
6. Stream logs to BigQuery and generate analytics
Agent Role: Data Agent. Transforming raw logs into actionable product strategy shouldn't take hours of manual data plumbing. Using the Data Agent Kit and BigQuery MCP, we create a ‘Zero ETL' pipeline that streams logs directly into BigQuery, allowing the agent to generate a premium analytics dashboard in under two minutes.
The log-router-bq-report skill sets up a Cloud Logging sink that continuously streams DinoQuest's Cloud Run logs into BigQuery, then queries the data to produce traffic reports and game-analytics insights.
A. Configure the skill variables
Open skills/log-router-bq-report/SKILL.md in your DinoQuest repo and update the Configuration section at the top:
| Variable      | Your Value         |
|---------------|--------------------|
| SERVICE_NAME  | dinoquest          |
| BQ_DATASET    | dinoquest_logs     |
| LOG_SINK_NAME | dinoquest-bq-sink  |
B. Run the skill in Antigravity
Open Antigravity with the DinoQuest repo as context and tell Gemini:
Run the log-router-bq-report skill
The skill will:
- Resolve your GCP project automatically
- Check if the BigQuery sink already exists — if not, it will create the dataset and sink.
- Grant IAM permissions: It will grant the sink's
writerIdentitythe BigQuery Data Editor role on the dataset.
Note: Just like the Eventarc sink, you might see a warning from gcloud during this process: "Please remember to grant serviceAccount:service-... the BigQuery Data Editor role on the dataset." The skill handles this automatically.
C. Using Antigravity to generate the report
Simply ask Antigravity to "set up the BigQuery log sink and generate the analytics report". The agent will:
- Configure Infrastructure: Create the BigQuery dataset and Cloud Logging sink.
- Manage Permissions: Automatically grant the necessary IAM roles to the sink's writer identity.
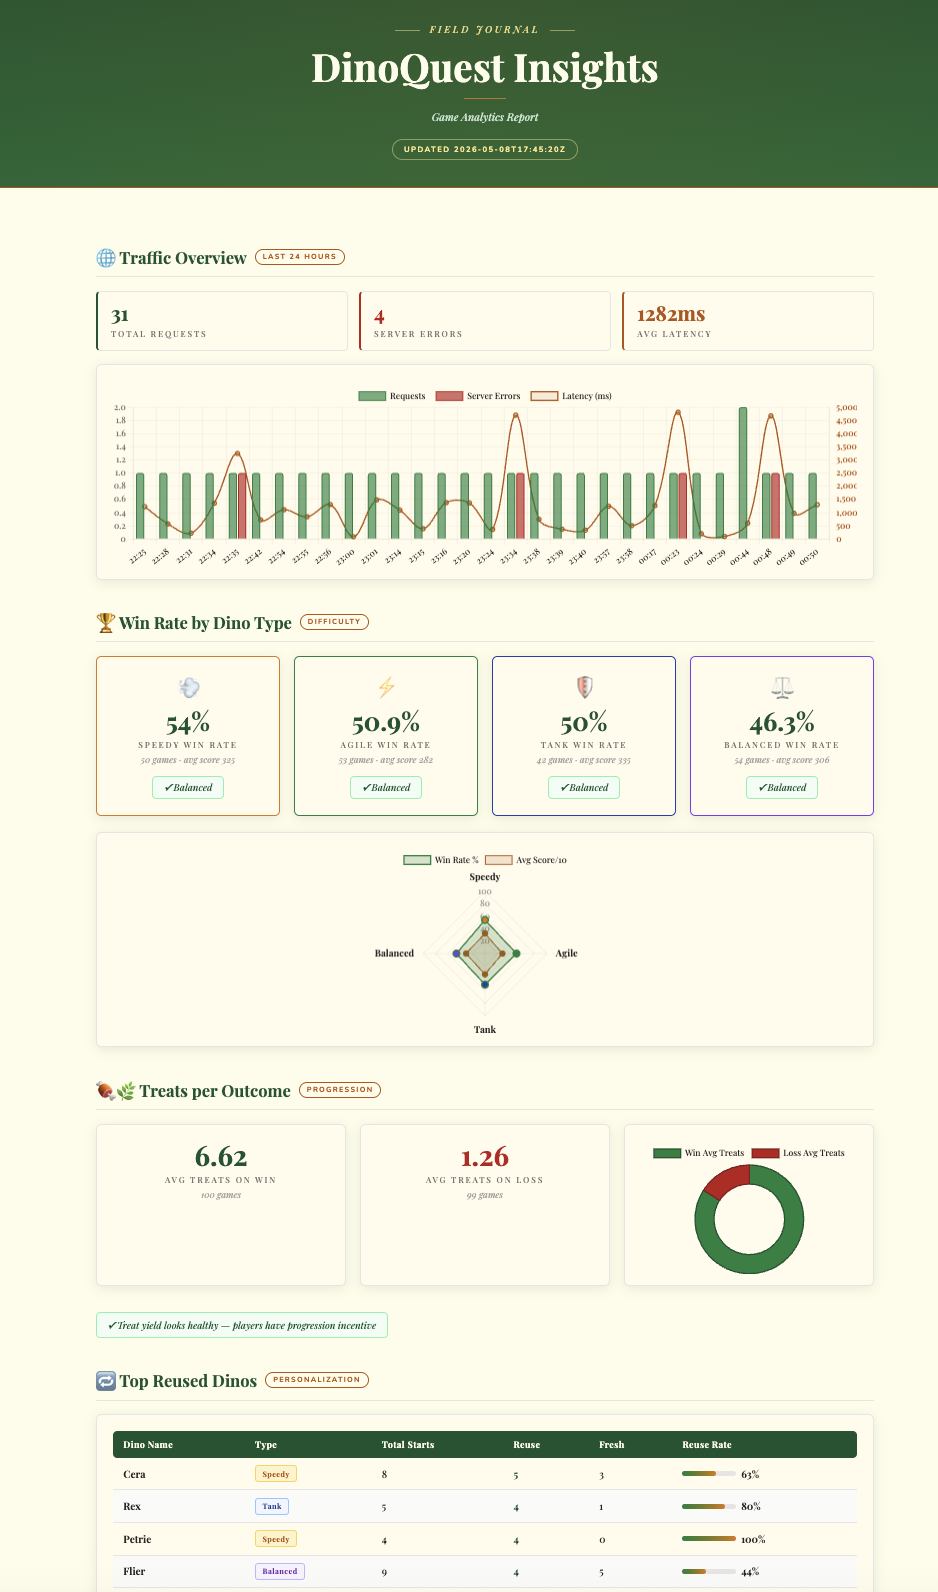
- Generate Insights: Analyze the logs and produce a premium, interactive HTML dashboard with game telemetry and win-rate analysis.
7. Self-Healing Remediation Agent
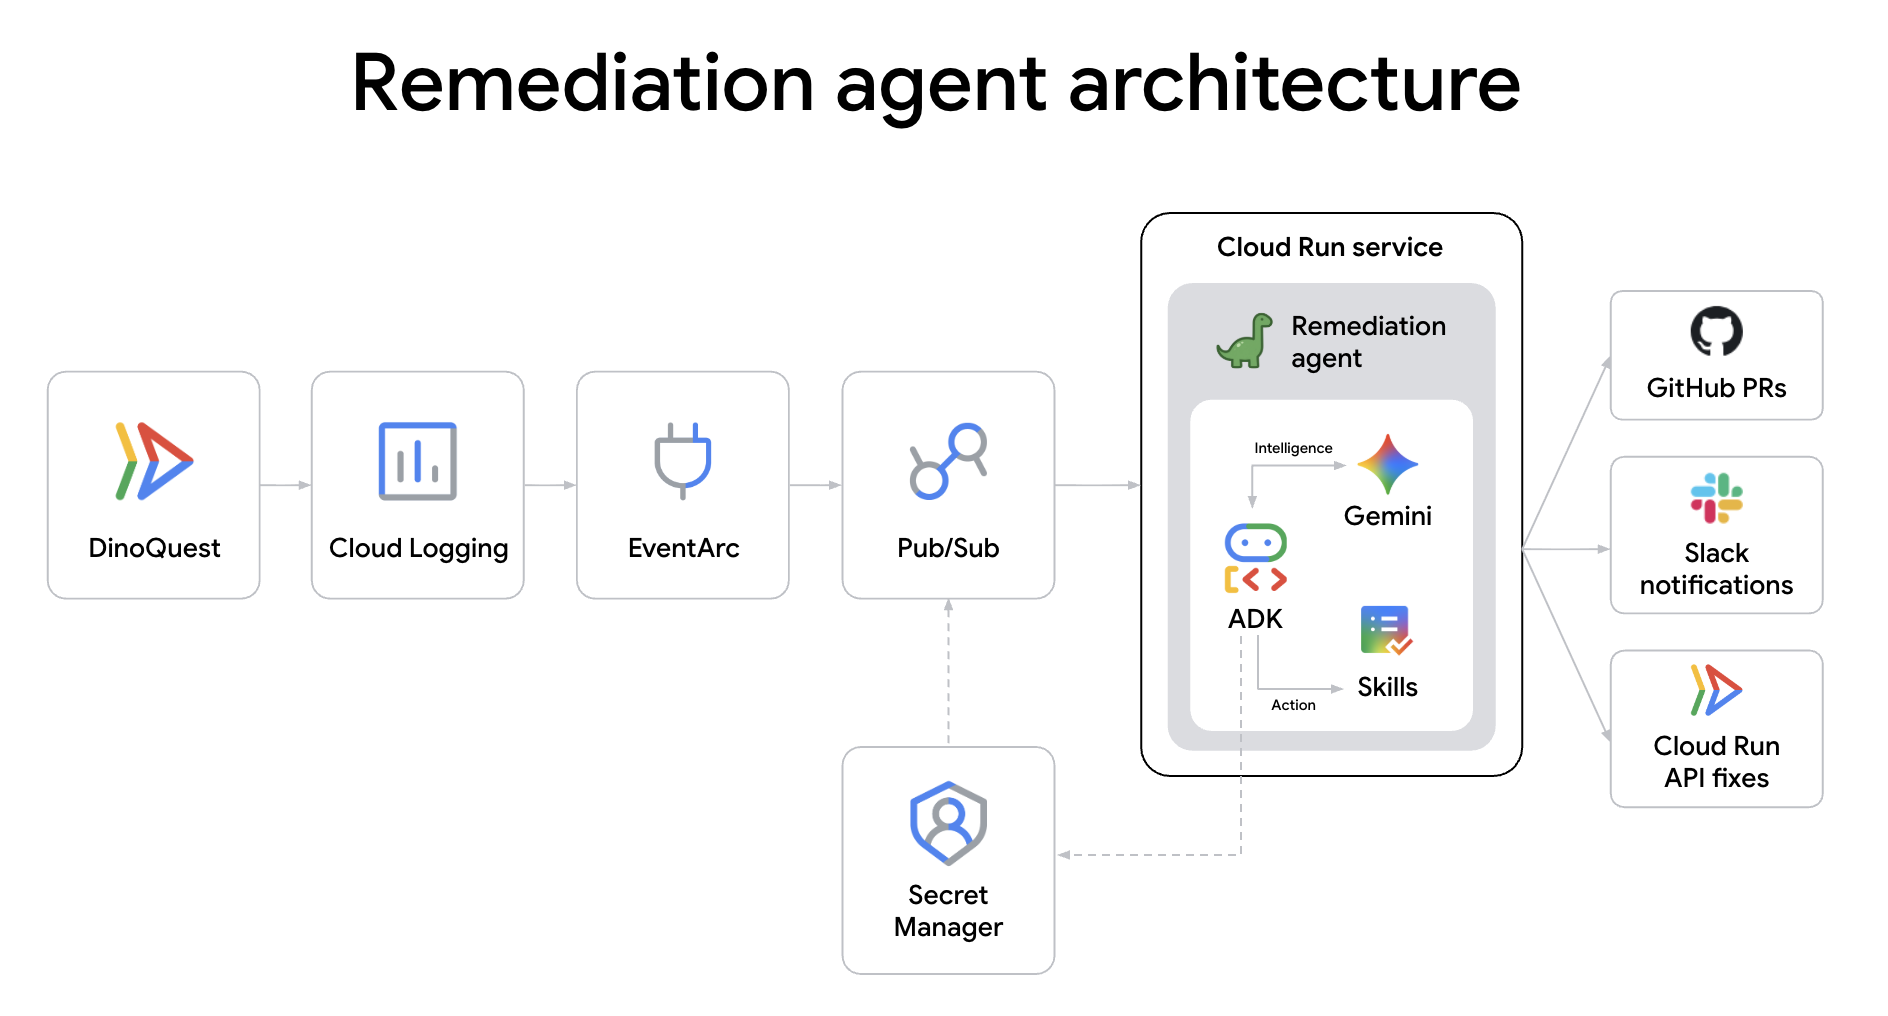
Agent Role: SRE Agent. When a production service fails at 2 AM, you shouldn't have to wake up. This agent acts as your first responder. Triggered by Cloud Run error logs via Eventarc, it automatically analyzes the crash, proposes a fix, and kicks off a remediation pipeline—all before you've even logged in to the console.
DinoAgent is an ADK agent that listens for Cloud Run error logs via Eventarc, diagnoses the root cause, and automatically remediates — either by bumping memory, rolling back traffic, or filing a code-fix PR on GitHub.
A. Clone the Remediation Agent repository
cd ~
git clone https://github.com/gca-americas/dinoquest-reme-agent.git
cd dinoquest-reme-agent
The project structure:
dinoquest-reme-agent/
├── main.py              # Service entrypoint — receives Eventarc HTTP POST, runs agent
├── runner.py            # ADK Runner + session service
├── agent.py             # LlmAgent definition, loads skill from file
├── tools.py             # Cloud Run v2 API tools (list/get/rollback/update)
├── skills/
│   └── remediation/
│       ├── SKILL.md     # Agent playbook — edit this to change behavior
│       └── scripts/     # Shell scripts for the code-fix track
│           ├── clone_repo.sh
│           ├── read_file.sh
│           ├── apply_fix.sh
│           ├── commit_branch.sh
│           ├── open_pr.sh
│           └── rollback_fix.sh
├── requirements.txt
└── Dockerfile
B. Set up GitHub access (code-fix track)
The code-fix track clones your DinoQuest repo, reads source files, applies patches, and opens PRs. It needs a GitHub Personal Access Token with repo scope.
- Go to github.com/settings/tokens → Generate new token (classic)
- Give it a name, select the
reposcope → Generate token → copy it
Store it in Secret Manager:
First, export your GitHub token:
export GH_TOKEN=ghp_YOUR_TOKEN_HERE
Then create the secret:
echo -n $GH_TOKEN | \
  gcloud secrets create github-token --data-file=-
C. Set up Slack notifications (optional)
When a remediation completes, DinoAgent posts a summary to a Slack channel.
- Go to api.slack.com/apps → Create New App → From scratch
- Name it
DinoAgent, select your workspace → Create App - Under Features → Incoming Webhooks → toggle on
- Click Add New Webhook to Workspace → choose a channel → Allow
- Copy the webhook URL (
https://hooks.slack.com/services/...)
Store it in Secret Manager:
export SLACK_TOKEN=YOUR_SLACK_WEBHOOK
echo -n "https://hooks.slack.com/services/$SLACK_TOKEN" | \
  gcloud secrets create slack-webhook --data-file=-
D. Create the DinoAgent service account
gcloud iam service-accounts create remediation-agent \
  --display-name="Cloud Run Remediation Agent"

export SA="remediation-agent@${PROJECT_ID}.iam.gserviceaccount.com"

for ROLE in \
  roles/run.admin \
  roles/iam.serviceAccountUser \
  roles/eventarc.eventReceiver \
  roles/aiplatform.user \
  roles/artifactregistry.reader \
  roles/secretmanager.secretAccessor \
  roles/pubsub.publisher \
  roles/logging.viewer; do
  gcloud projects add-iam-policy-binding $PROJECT_ID \
    --member="serviceAccount:${SA}" --role="$ROLE" \
    --condition=None
done
Grant it access to the secrets:
for SECRET in github-token slack-webhook; do
  gcloud secrets add-iam-policy-binding $SECRET \
    --member="serviceAccount:${SA}" \
    --role="roles/secretmanager.secretAccessor"
done
E. Build and deploy DinoAgent to Cloud Run
# Get Project Number for the CIAgent URL
PROJECT_NUMBER=$(gcloud projects describe $PROJECT_ID --format="value(projectNumber)")
export CIAGENT_URL=https://ci-agent-${PROJECT_NUMBER}.${CLOUD_RUN_REGION}.run.app
export SA="remediation-agent@${PROJECT_ID}.iam.gserviceaccount.com"
export GITHUB_REPO_URL=https://github.com/YOUR_REPO
HARNESS_EVENTS_TOPIC=projects/$PROJECT_ID/topics/harness-events


AGENT_IMAGE="$CLOUD_RUN_REGION-docker.pkg.dev/${PROJECT_ID}/dinoquest/remediation-agent:latest"
gcloud builds submit --tag $AGENT_IMAGE .


gcloud run deploy remediation-agent \
  --image=$AGENT_IMAGE \
  --region=$CLOUD_RUN_REGION \
  --service-account=$SA \
  --memory=2Gi \
  --set-env-vars="GOOGLE_CLOUD_PROJECT=${PROJECT_ID},GOOGLE_GENAI_USE_VERTEXAI=True" \
  --set-env-vars="GITHUB_REPO_URL=${GITHUB_REPO_URL}" \
  --set-secrets="SLACK_WEBHOOK_URL=slack-webhook:latest" \
  --set-env-vars="HARNESS_EVENTS_TOPIC=${HARNESS_EVENTS_TOPIC}" \
  --set-env-vars="CIAGENT_URL=${CIAGENT_URL}" \
  --set-secrets="GITHUB_TOKEN=github-token:latest" \
  --no-allow-unauthenticated \
  --min-instances=1 \
  --no-cpu-throttling \
  --timeout=300
F. Wire up the Eventarc trigger
Create a Pub/Sub topic to receive Cloud Run error logs:
gcloud pubsub topics create cloud-run-errors
Create a Cloud Logging sink that filters error logs from your dinoquest service and routes them to the topic:
export SERVICE_NAME=dinoquest
FILTER="resource.type=\"cloud_run_revision\" resource.labels.service_name=\"$SERVICE_NAME\" severity=ERROR NOT logName=~\"cloudaudit\" NOT httpRequest.requestUrl=~\"/_ah/health\""

gcloud logging sinks create cloud-run-errors-sink \
  pubsub.googleapis.com/projects/${PROJECT_ID}/topics/cloud-run-errors \
  --log-filter="$FILTER"
Note: When you run the command above, gcloud will print an Info message saying: "Please remember to grant serviceAccount:service-... the Pub/Sub Publisher role on the topic." The next step handles exactly that.
Grant the sink's writer identity (the service account mentioned in the warning) permission to publish:
SINK_SA=$(gcloud logging sinks describe cloud-run-errors-sink \
  --format='value(writerIdentity)')

gcloud pubsub topics add-iam-policy-binding cloud-run-errors \
  --member="${SINK_SA}" --role="roles/pubsub.publisher"
Verify it's active:
gcloud eventarc triggers describe remediation-trigger --location=$CLOUD_RUN_REGION
Grant Eventarc permission to invoke the remediation agent:
gcloud run services add-iam-policy-binding remediation-agent \
  --region=$CLOUD_RUN_REGION \
  --member="serviceAccount:${SA}" \
  --role="roles/run.invoker"
Create the Eventarc trigger:
gcloud eventarc triggers create remediation-trigger \
  --location=$CLOUD_RUN_REGION \
  --destination-run-service=remediation-agent \
  --destination-run-region=$CLOUD_RUN_REGION \
  --event-filters="type=google.cloud.pubsub.topic.v1.messagePublished" \
  --transport-topic=projects/${PROJECT_ID}/topics/cloud-run-errors \
  --service-account=${SA}
The remediation is now fully automated. Beyond just scaling infrastructure, DinoAgent performs a deep root-cause analysis on the application code, applies a semantic patch, and uses Agent-to-Agent (A2A) communication to hand off the fix to the CI Agent for verification and deployment. You can explore the implementation details in the reme-agent codebase.
8. Set up the CI agent
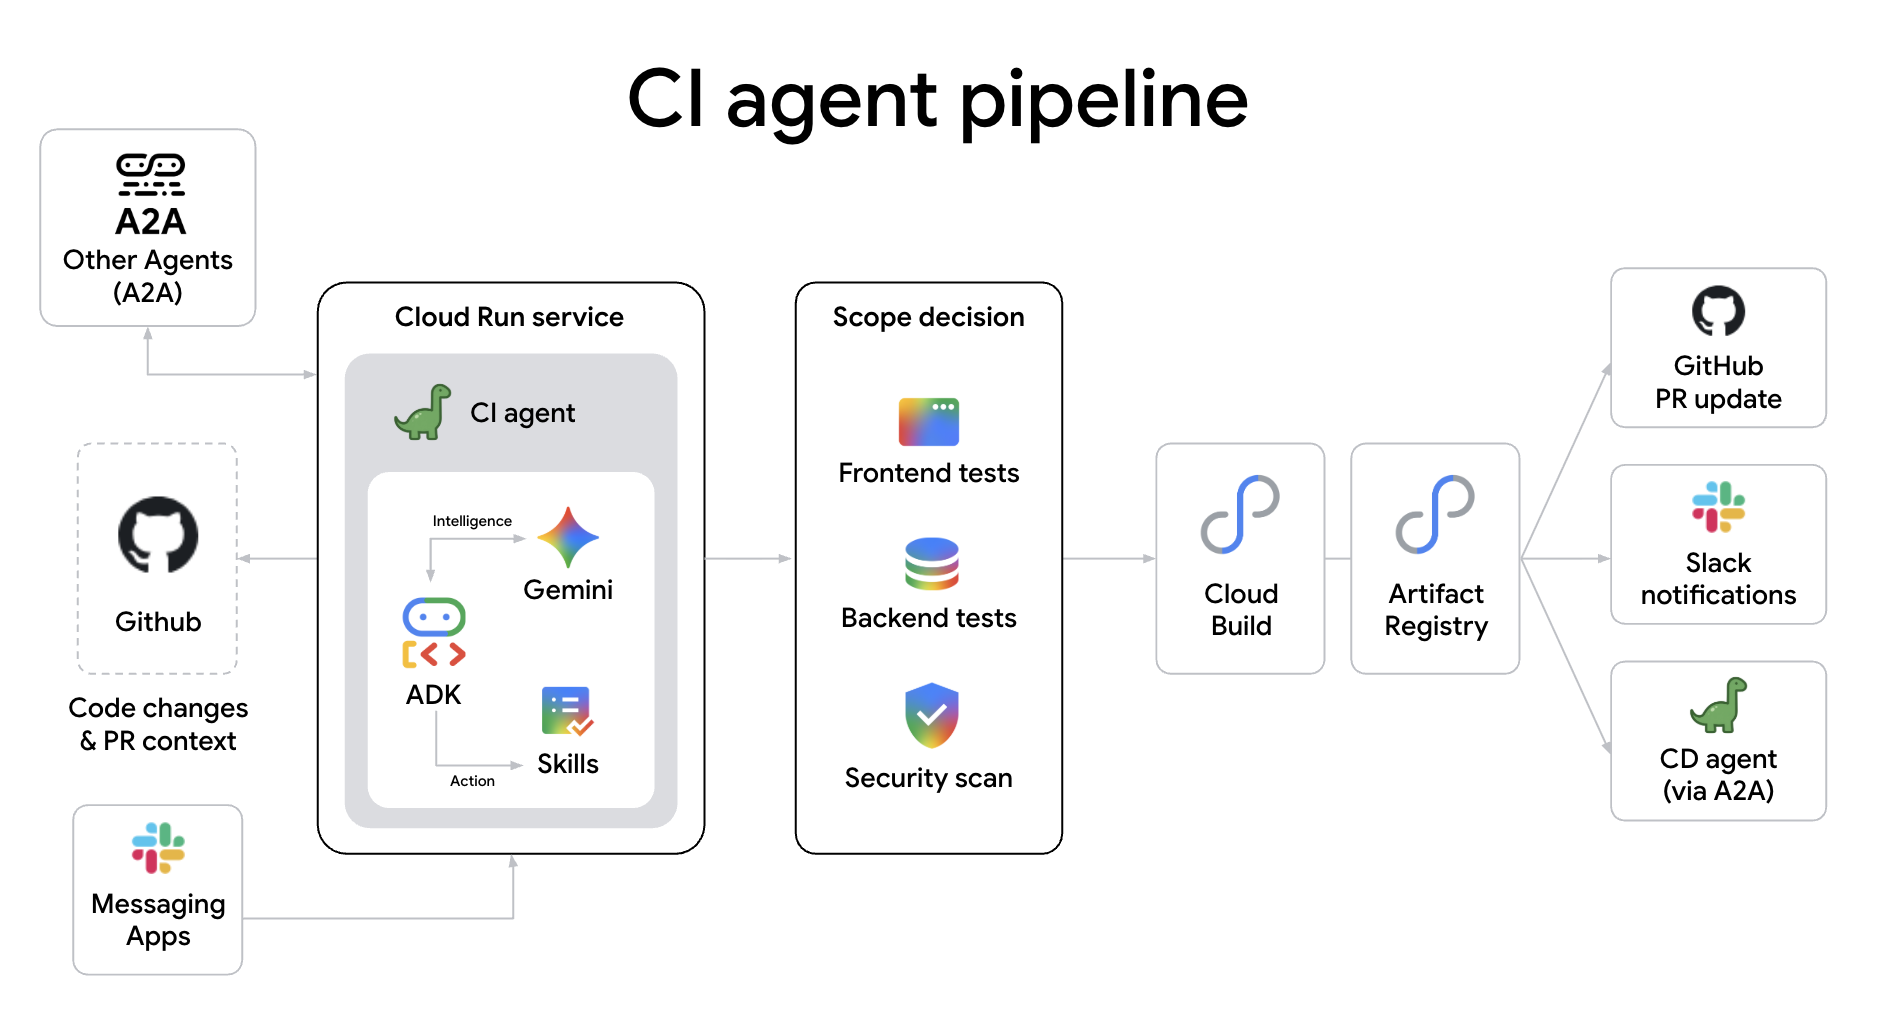
Agent Role: CI pipeline. Stop wrestling with complex YAML files and manual build scripts. This agent manages the operational plumbing of your PRs. It reads your code changes, understands the context, scopes the necessary tests, and builds your Docker images via Cloud Build, ensuring every commit is "agent-approved" before it reaches the main branch.
The ci-agent is an autonomous CI pipeline agent deployed as a Cloud Run service. It submits Docker builds to Cloud Build, polls for completion, verifies the image in Artifact Registry, and reports to GitHub.
Why use an agent for your CI pipeline? Unlike traditional static scripts, an agentic CI pipeline provides:
- Cognitive Scope Classification: It intelligently determines the required test depth—switching between type-checks, unit tests, or full integration suites—based on the semantic impact of your code changes.
- Autonomous PR Management: The agent can automatically create PRs, post detailed summaries of changes, and even manage secret scanning and security audits without human intervention.
- Real-time Failure Diagnosis: When a build fails, the agent doesn't just show logs; it analyzes the stack trace, identifies the likely cause, and posts a human-readable diagnosis directly to the PR.
A. Clone the CIAgent repository
cd ~
git clone https://github.com/gca-americas/dinoquest-ci-agent.git
cd dinoquest-ci-agent
B. Create the CIAgent service account
gcloud iam service-accounts create ci-agent \
  --display-name="CIAgent CI Pipeline"

export SA="ci-agent@${PROJECT_ID}.iam.gserviceaccount.com"

# Grant necessary roles to the service account
for ROLE in \
  roles/cloudbuild.builds.editor \
  roles/cloudbuild.builds.builder \
  roles/artifactregistry.reader \
  roles/artifactregistry.writer \
  roles/aiplatform.user \
  roles/secretmanager.secretAccessor \
  roles/pubsub.publisher \
  roles/developerconnect.admin; do
  gcloud projects add-iam-policy-binding $PROJECT_ID \
    --member="serviceAccount:${SA}" --role="$ROLE" \
    --condition=None
done


# ci-agent needs to act as itself when running build steps
gcloud iam service-accounts add-iam-policy-binding $SA \
  --member="serviceAccount:${SA}" \
  --role="roles/iam.serviceAccountUser"
C. Connect GitHub repo to Cloud Build
CIAgent submits builds via repoSource, which requires the GitHub repo to be connected to Cloud Build Developer Connect.
- Go to the GCP Console → Cloud Build → Repositories
- Click Connect Repository
- Select GitHub (Cloud Build GitHub App)
- Authorize and select your
YOUR_GITHUB_USERNAME/dinoquestrepository - Click Connect and Skip when prompted to create a trigger.
- Make note of your connection name (default is usually your GitHub username or similar).
D. Grant CIAgent access to secrets
We will reuse the secrets created earlier for DinoAgent:
gcloud secrets add-iam-policy-binding github-token \
  --member="serviceAccount:${SA}" \
  --role="roles/secretmanager.secretAccessor"

gcloud secrets add-iam-policy-binding slack-webhook-ci \
  --member="serviceAccount:${SA}" \
  --role="roles/secretmanager.secretAccessor"
E. Build and deploy CIAgent to Cloud Run
# Set up required variables for orchestration
PROJECT_NUMBER=$(gcloud projects describe $PROJECT_ID --format="value(projectNumber)")
export CDAGENT_URL=https://cd-agent-${PROJECT_NUMBER}.${CLOUD_RUN_REGION}.run.app
export CI_AGENT_URL=ci-agent-${PROJECT_NUMBER}.${CLOUD_RUN_REGION}.run.app
export GITHUB_OWNER="YOUR_GITHUB_USERNAME"
export CLOUD_BUILD_CONNECTION="YOUR_CONNECTION_NAME"  # Update this if your connection name is different
export CLOUD_BUILD_REPO="YOUR_GITHUB_USERNAME-dinoquest" # Update this if your connection name is different

export SLACK_TOKEN=YOUR_SLACK_WEBHOOK
echo -n "https://hooks.slack.com/services/$SLACK_TOKEN" | \
  gcloud secrets create slack-webhook-ci --data-file=-

export SA="ci-agent@${PROJECT_ID}.iam.gserviceaccount.com"
AGENT_IMAGE="$CLOUD_RUN_REGION-docker.pkg.dev/${PROJECT_ID}/dinoquest/ci-agent:latest"
gcloud builds submit --tag $AGENT_IMAGE .

gcloud run deploy ci-agent \
  --image=$AGENT_IMAGE \
  --region=$CLOUD_RUN_REGION \
  --service-account=$SA \
  --memory=1Gi \
  --timeout=600 \
  --allow-unauthenticated \
  --min-instances=1 \
  --set-env-vars="GOOGLE_CLOUD_PROJECT=${PROJECT_ID},GOOGLE_GENAI_USE_VERTEXAI=True" \
  --set-env-vars="HARNESS_EVENTS_TOPIC=${HARNESS_EVENTS_TOPIC}" \
  --set-env-vars="HOST=${CI_AGENT_URL},PROTOCOL=https" \
  --set-secrets="SLACK_WEBHOOK_URL=slack-webhook-ci:latest" \
  --set-env-vars="GITHUB_OWNER=${GITHUB_OWNER},GITHUB_REPO=dinoquest" \
  --set-env-vars="CLOUD_BUILD_CONNECTION=${CLOUD_BUILD_CONNECTION},CLOUD_BUILD_REPO=${CLOUD_BUILD_REPO},CLOUD_BUILD_REGION=${CLOUD_RUN_REGION}" \
  --set-env-vars="CDAGENT_URL=${CDAGENT_URL}" \
  --set-secrets="GITHUB_TOKEN=github-token:latest" \
  --min-instances=1
F. Slack slash command setup
- Go to api.slack.com/apps → Create New App → From scratch
- Name it
CIAgent, pick your workspace → Create App - Under Features → Slash Commands → Create New Command
- Command:
/runci - Request URL: your CIAgent Cloud Run URL from above with
/slackappended (e.g.https://ci-agent-xxx-.us-central1.run.app/slack) - Short description:
Trigger CI - Save
- Under Settings → Install App, click Install to Workspace and Allow.
The CI agent acts as a "brain" sitting atop robust Google Cloud services like Cloud Build and Artifact Registry. Once the build is verified, it triggers the final deployment phase by calling the CD Agent via A2A, ensuring a seamless handoff between the build and release cycles.
9. Set up Deployment
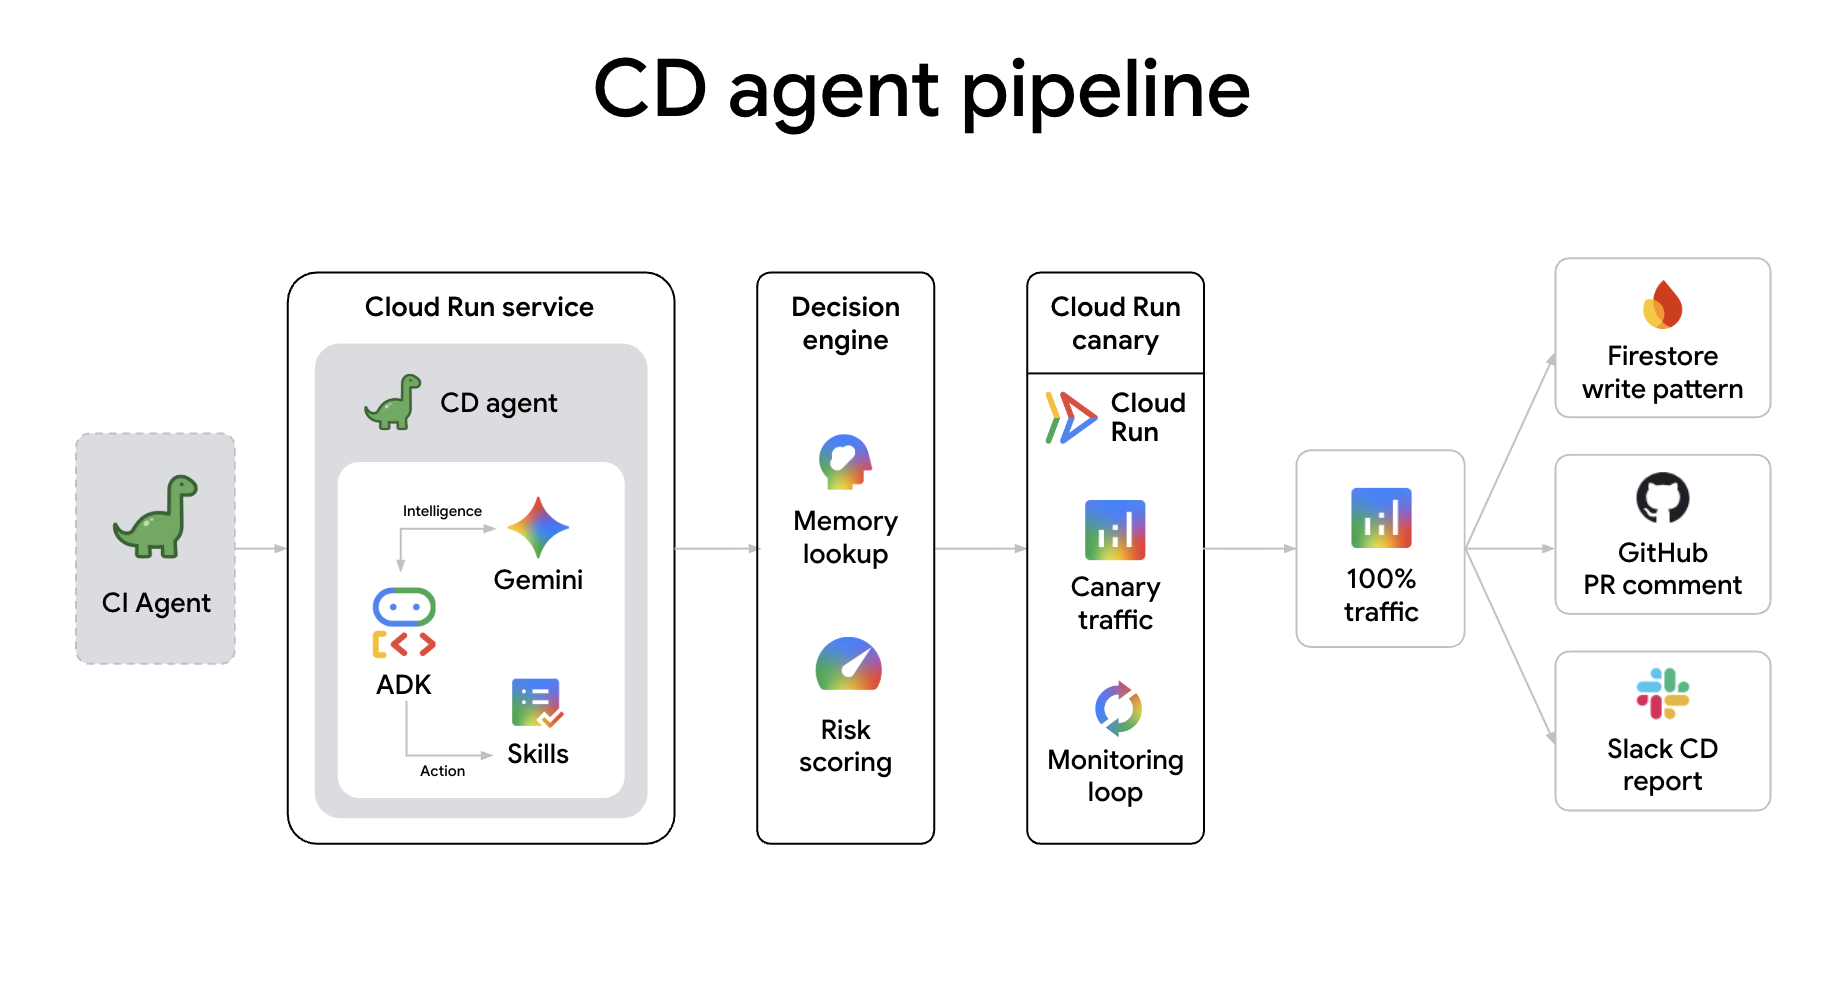
Agent Role: CD Agent. Deployment shouldn't be a leap of faith. This agent manages the risk for you. It scores deployment safety, manages canary traffic splits, and monitors real-time metrics to decide whether to promote a release or roll it back. It's the final gatekeeper in your autonomous agent swarm.
The cd-agent is an autonomous canary deployment agent deployed as a Cloud Run service. It receives A2A deploy requests from ci-agent, computes a risk score, sets a risk-calibrated canary percentage, monitors metrics, and promotes or rolls back automatically. It also learns from past deployments using Firestore.
Connecting agents directly creates a "cognitive pipeline" where each handoff is a rich transfer of intent and context. Unlike traditional webhooks, A2A communication allows:
- Intelligent Context Sharing: Agents pass entire session memories, PR diffs, and risk scores, ensuring the next agent has the full "why" before starting work.
- Cognitive Handshakes: Agents can negotiate gates. For example, the CD Agent can request specific smoke tests from the CI Agent during a canary rollout to verify a fix in real-time.
- Collaborative Remediation: If a deployment fails, the CD Agent can proactively notify the Remediation Agent with failing metrics, initiating an autonomous root-cause analysis before a human is even paged.
- Resource Negotiation: Agents can negotiate infrastructure needs. For instance, the CI Agent can ask the Remediation Agent to provision more build capacity if it detects a large-scale refactor, or the CD Agent can suggest scaling the production cluster before a major release.
- Multi-Agent Consensus: For high-risk changes, multiple agents (e.g., Security Agent and CD Agent) can perform a "joint sign-off" via A2A, ensuring that code not only builds and deploys but also adheres to security policies before hitting production.
A. Clone the CDAgent repository
cd ~
git clone https://github.com/gca-americas/dinoquest-cd-agent.git
cd dinoquest-cd-agent
B. Create the Firestore Database
CDAgent stores its deployment memory patterns in Firestore:
gcloud firestore databases create \
  --region=$CLOUD_RUN_REGION \
  --project=$PROJECT_ID
(If you already created a database in this project, you can skip this step.)
C. Create the CDAgent service account
gcloud iam service-accounts create cd-agent \
  --display-name="CDAgent Canary Deployer"

export SA="cd-agent@${PROJECT_ID}.iam.gserviceaccount.com"

# Grant necessary roles
for ROLE in \
  roles/run.developer \
  roles/iam.serviceAccountUser \
  roles/artifactregistry.reader \
  roles/artifactregistry.writer \
  roles/monitoring.viewer \
  roles/datastore.user \
  roles/aiplatform.user \
  roles/run.admin \
  roles/pubsub.publisher; do
  gcloud projects add-iam-policy-binding $PROJECT_ID \
    --member="serviceAccount:${SA}" --role="$ROLE" \
    --condition=None
done
D. Grant CDAgent access to secrets
We will reuse the GitHub token and Slack webhook from earlier, and grant the Cloud Run compute service account access to the Gemini API Key so the deployed app can use it:
gcloud secrets add-iam-policy-binding github-token \
  --member="serviceAccount:${SA}" \
  --role="roles/secretmanager.secretAccessor"

gcloud secrets add-iam-policy-binding slack-webhook-cd \
  --member="serviceAccount:${SA}" \
  --role="roles/secretmanager.secretAccessor"

# Grant the compute service account access to Gemini API key
PROJECT_NUMBER=$(gcloud projects describe $PROJECT_ID --format="value(projectNumber)")
gcloud secrets add-iam-policy-binding gemini-api-key \
  --project=$PROJECT_ID \
  --member="serviceAccount:${PROJECT_NUMBER}-compute@developer.gserviceaccount.com" \
  --role="roles/secretmanager.secretAccessor"
E. Build and deploy CDAgent to Cloud Run
export GITHUB_OWNER="YOUR_GITHUB_USERNAME"

export CD_AGENT_URL=cd-agent-${PROJECT_NUMBER}.${CLOUD_RUN_REGION}.run.app

export SLACK_TOKEN=YOUR_SLACK_WEBHOOK
echo -n "https://hooks.slack.com/services/$SLACK_TOKEN" | \
  gcloud secrets create slack-webhook-cd --data-file=-

AGENT_IMAGE="$CLOUD_RUN_REGION-docker.pkg.dev/${PROJECT_ID}/dinoquest/cd-agent:latest"
gcloud builds submit --tag $AGENT_IMAGE .


export SA="cd-agent@${PROJECT_ID}.iam.gserviceaccount.com"


gcloud run deploy cd-agent \
  --image=$AGENT_IMAGE \
  --region=$CLOUD_RUN_REGION \
  --service-account=$SA \
  --memory=1Gi \
  --set-env-vars="GOOGLE_CLOUD_PROJECT=${PROJECT_ID}" \
  --set-env-vars="GOOGLE_GENAI_USE_VERTEXAI=True" \
  --set-env-vars="HOST=${CD_AGENT_URL},PROTOCOL=https" \
  --set-env-vars="CD_TARGET_SERVICE=dinoquest" \
  --set-env-vars="HARNESS_EVENTS_TOPIC=${HARNESS_EVENTS_TOPIC}" \
  --set-env-vars="GITHUB_OWNER=${GITHUB_OWNER}" \
  --set-env-vars="GITHUB_REPO=dinoquest" \
  --set-env-vars="DEMO_MODE=true" \
  --set-env-vars="LEADERBOARD_ENABLED=true" \
  --set-secrets="SLACK_WEBHOOK_URL=slack-webhook-cd:latest" \
  --set-secrets="GITHUB_TOKEN=github-token:latest" \
  --allow-unauthenticated \
  --min-instances=1 \
  --no-cpu-throttling \
  --timeout=300
Note: --min-instances=1 --no-cpu-throttling keeps the instance warm so it can quickly respond to Slack and A2A commands.
The CD Agent is the final gatekeeper of your production environment. It evaluates the risk of each deployment, executes a risk-calibrated canary, and monitors real-time metrics. If any anomalies are detected, it initiates an automatic rollback.
10. Scaling Up: Unlocking Level 2 with the Agent Swarm
A. Test the Full Swarm
- Trigger the error: Open your deployed DinoQuest URL (from last step) in your browser.
- Go to the Leaderboard: Click on the Leaderboard button. The current leaderboard implementation is intentionally inefficient—it will attempt to load a massive amount of data into memory, triggering an Out-Of-Memory (OOM) error.
- Wait for the Agent: Within about 60 seconds, the
remediation-agentwill receive the error event via Eventarc and begin its diagnosis. - Check Slack: You should see a notification in your Slack channel that looks like this:DinoAgent Remediation Summary
- Service: dinoquest
- Failing revision: dinoquest-xxxx-xxxx
- Evidence: "Memory limit of 128 MiB exceeded with 13x MiB used."
- Why this revision was bad: The
/api/leaderboardendpoint was inefficiently xxxxx, causing an OOM error. - Action taken: Increased memory from xMi to yGi for service
dinoquest. A new revision was created. - Root-cause PR: https://github.com/YOUR_USERNAME/DinoQuest/pull/x
- Verify the fixes:
- GitHub: Check your repository for a new branch and a Pull Request. The agent has patched the application code to fix the underlying memory leak.
- Cloud Run: In the GCP Console, you will see a new revision of the
dinoquestservice with the updated memory allocation. - Leaderboard: Try the leaderboard again—it should now load successfully thanks to the increased memory and eventual code fix.
B. Evolution: Implementing Level 2 Game Logic
You will add a substantial new feature: Level 2 (Asteroid Destroyer). This allows high-score dinosaurs to progress to a new game mode.
- Go back to your dinoquest repository:
cd ~/dinoquest - Create and switch to a new branch:
git checkout -b level_2 - Apply the Level 2 patch: Run the provided script to patch your local codebase with Level 2 assets, components, and game logic:
bash level_2_backup/levelup.sh - Commit and push the changes:
git add .
git commit -m "feat: add Level 2"
git push origin level_2
Instead of using curl to manually trigger the agent, we will use the Slack Slash Command you configured earlier. This is how you interact with your autonomous CI pipeline in a real-world scenario.
- Open Slack and navigate to any channel where the
CIAgentapp is installed. - Trigger the CI build by typing the following command:
/runci run ci on branch level_2 - Monitor the progress:
- Slack: The agent will acknowledge your command and post updates as the build progresses.
- Dino Theater: Watch the "thought bubbles" as the agent classifies the change, submits the Cloud Build job, and communicates with the CD agent.
- GitHub: Check your
level_2PR; you'll see the agent posting commit statuses and a full CI report comment.
- Watch the process:
- Check Dino Theater to see the CI Agent thinking, classifying the change, and running the pipeline.
- Check your GitHub PR to see the CI Agent post the commit status and final report.
11. Conclusion
You've built a complete agentic DevOps stack on Google Cloud:
Component | What it does |
DinoQuest (Cloud Run | Gemini-powered game — React frontend + FastAPI backend |
Firebase Auth + Firestore | User authentication and dinosaur profile storage |
Remediation Agent (Cloud Run + Eventarc) | SRE agent that auto-remediates OOM errors and code bugs |
log-router-bq-report | Data agent that streams logs to BigQuery and generates insights |
CIAgent (Cloud Run) | CI agent that scopes tests, builds images, and calls CD via A2A |
CDAgent (Cloud Run) | CD agent that runs risk-scored canary deploys with auto-rollback |
All Agent behavior lives in the skills/ directory as Markdown playbooks — change the behavior by editing the skill, not the code. Skills run on Antigravity with Gemini and are invoked by telling the agent which skill to run.