
1. Introduction
I've always been captivated by the intensity of the courtroom, imagining myself deftly navigating its complexities and delivering powerful closing arguments. While my career path has led me elsewhere, I'm excited to share that with the help of AI, we might all be closer to realizing that courtroom dream.
Today, we're diving into how to use Google's powerful AI tools—like Vertex AI, Firestore, and Cloud Run Functions to process and understand legal data, perform lightning-fast searches, and maybe, just maybe, help your imaginary client (or yourself) out of a sticky situation.
You might not be cross-examining a witness, but with our system, you'll be able to sift through mountains of information, generate clear summaries, and present the most relevant data in seconds.
2. Architecture
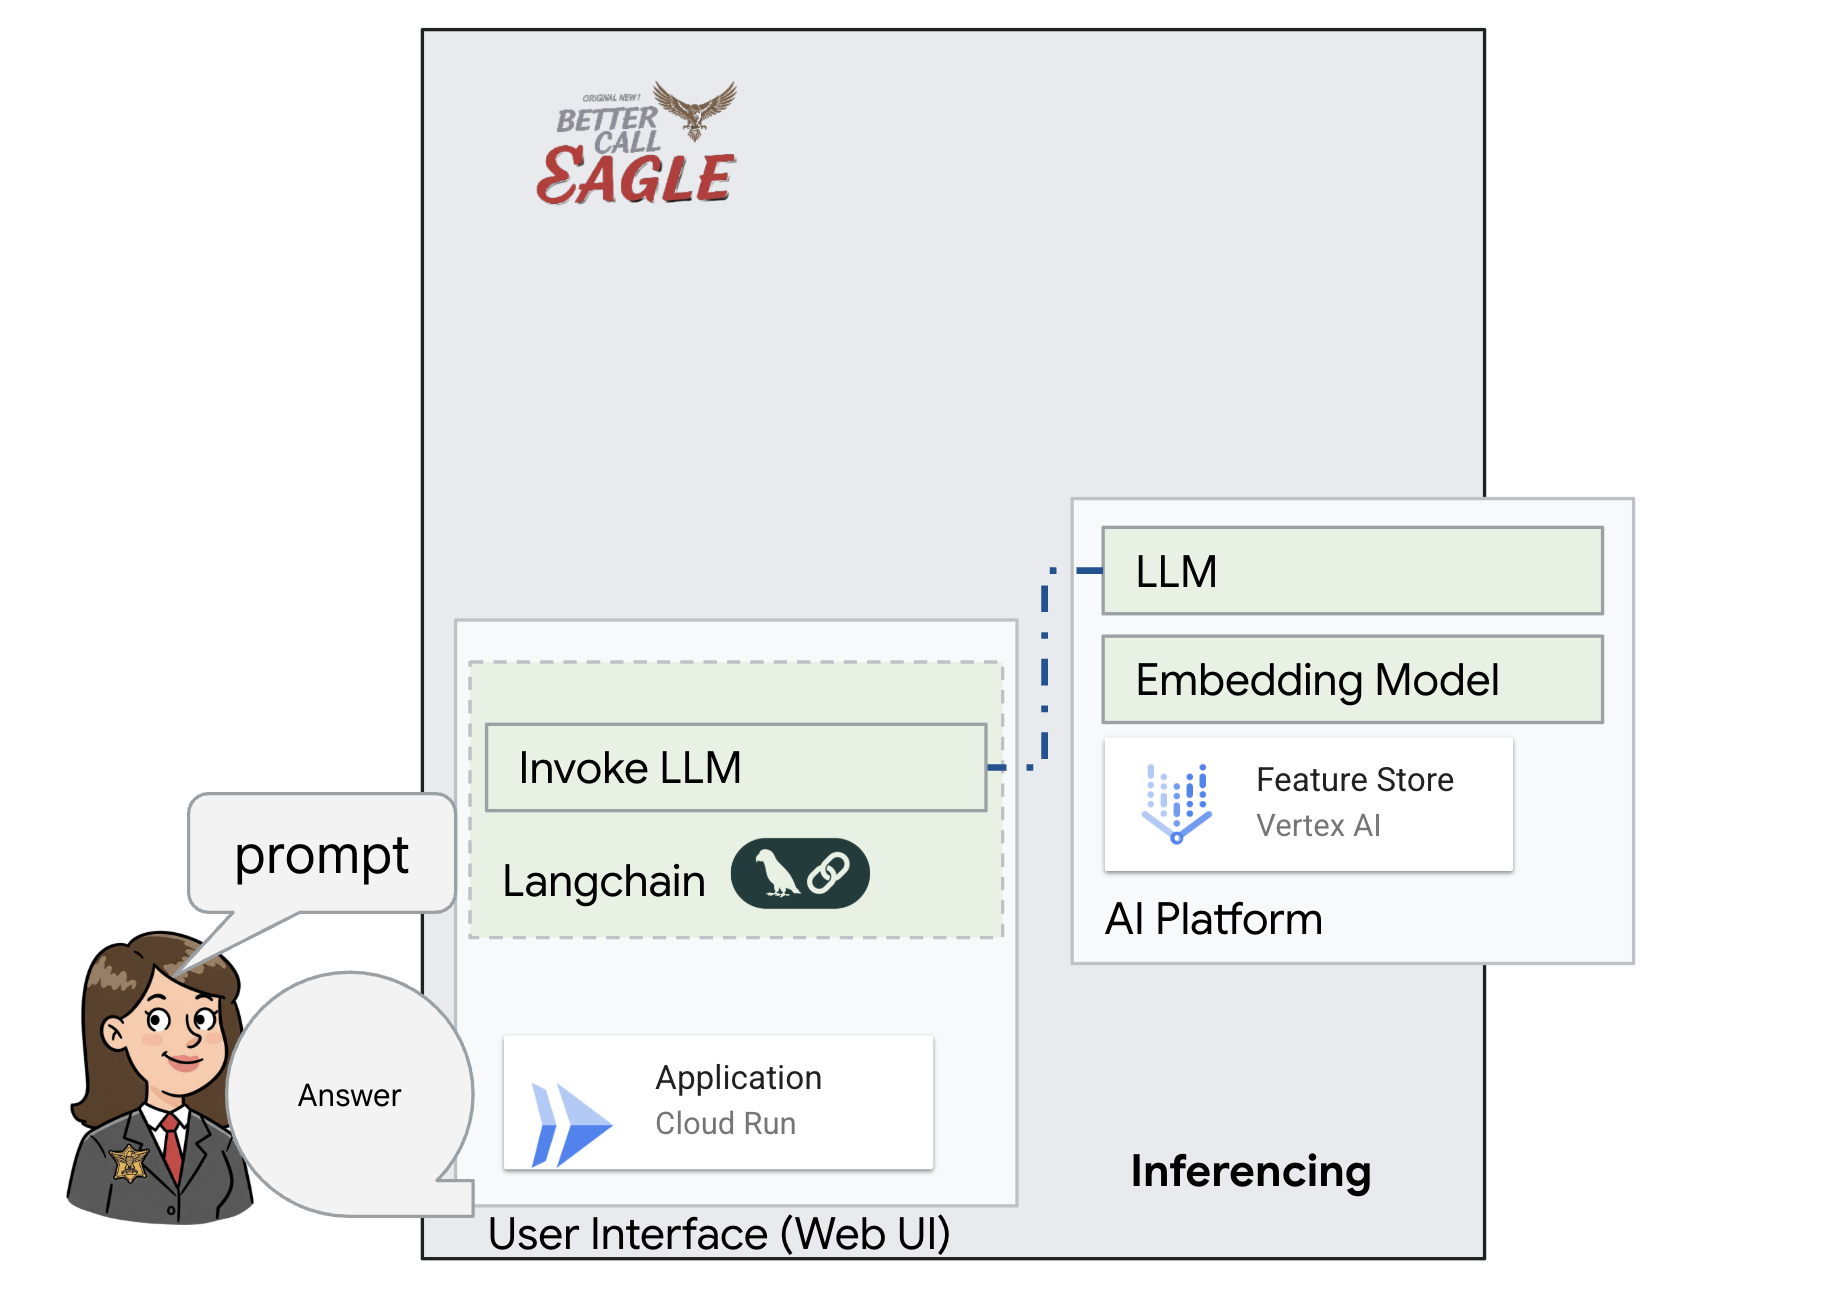
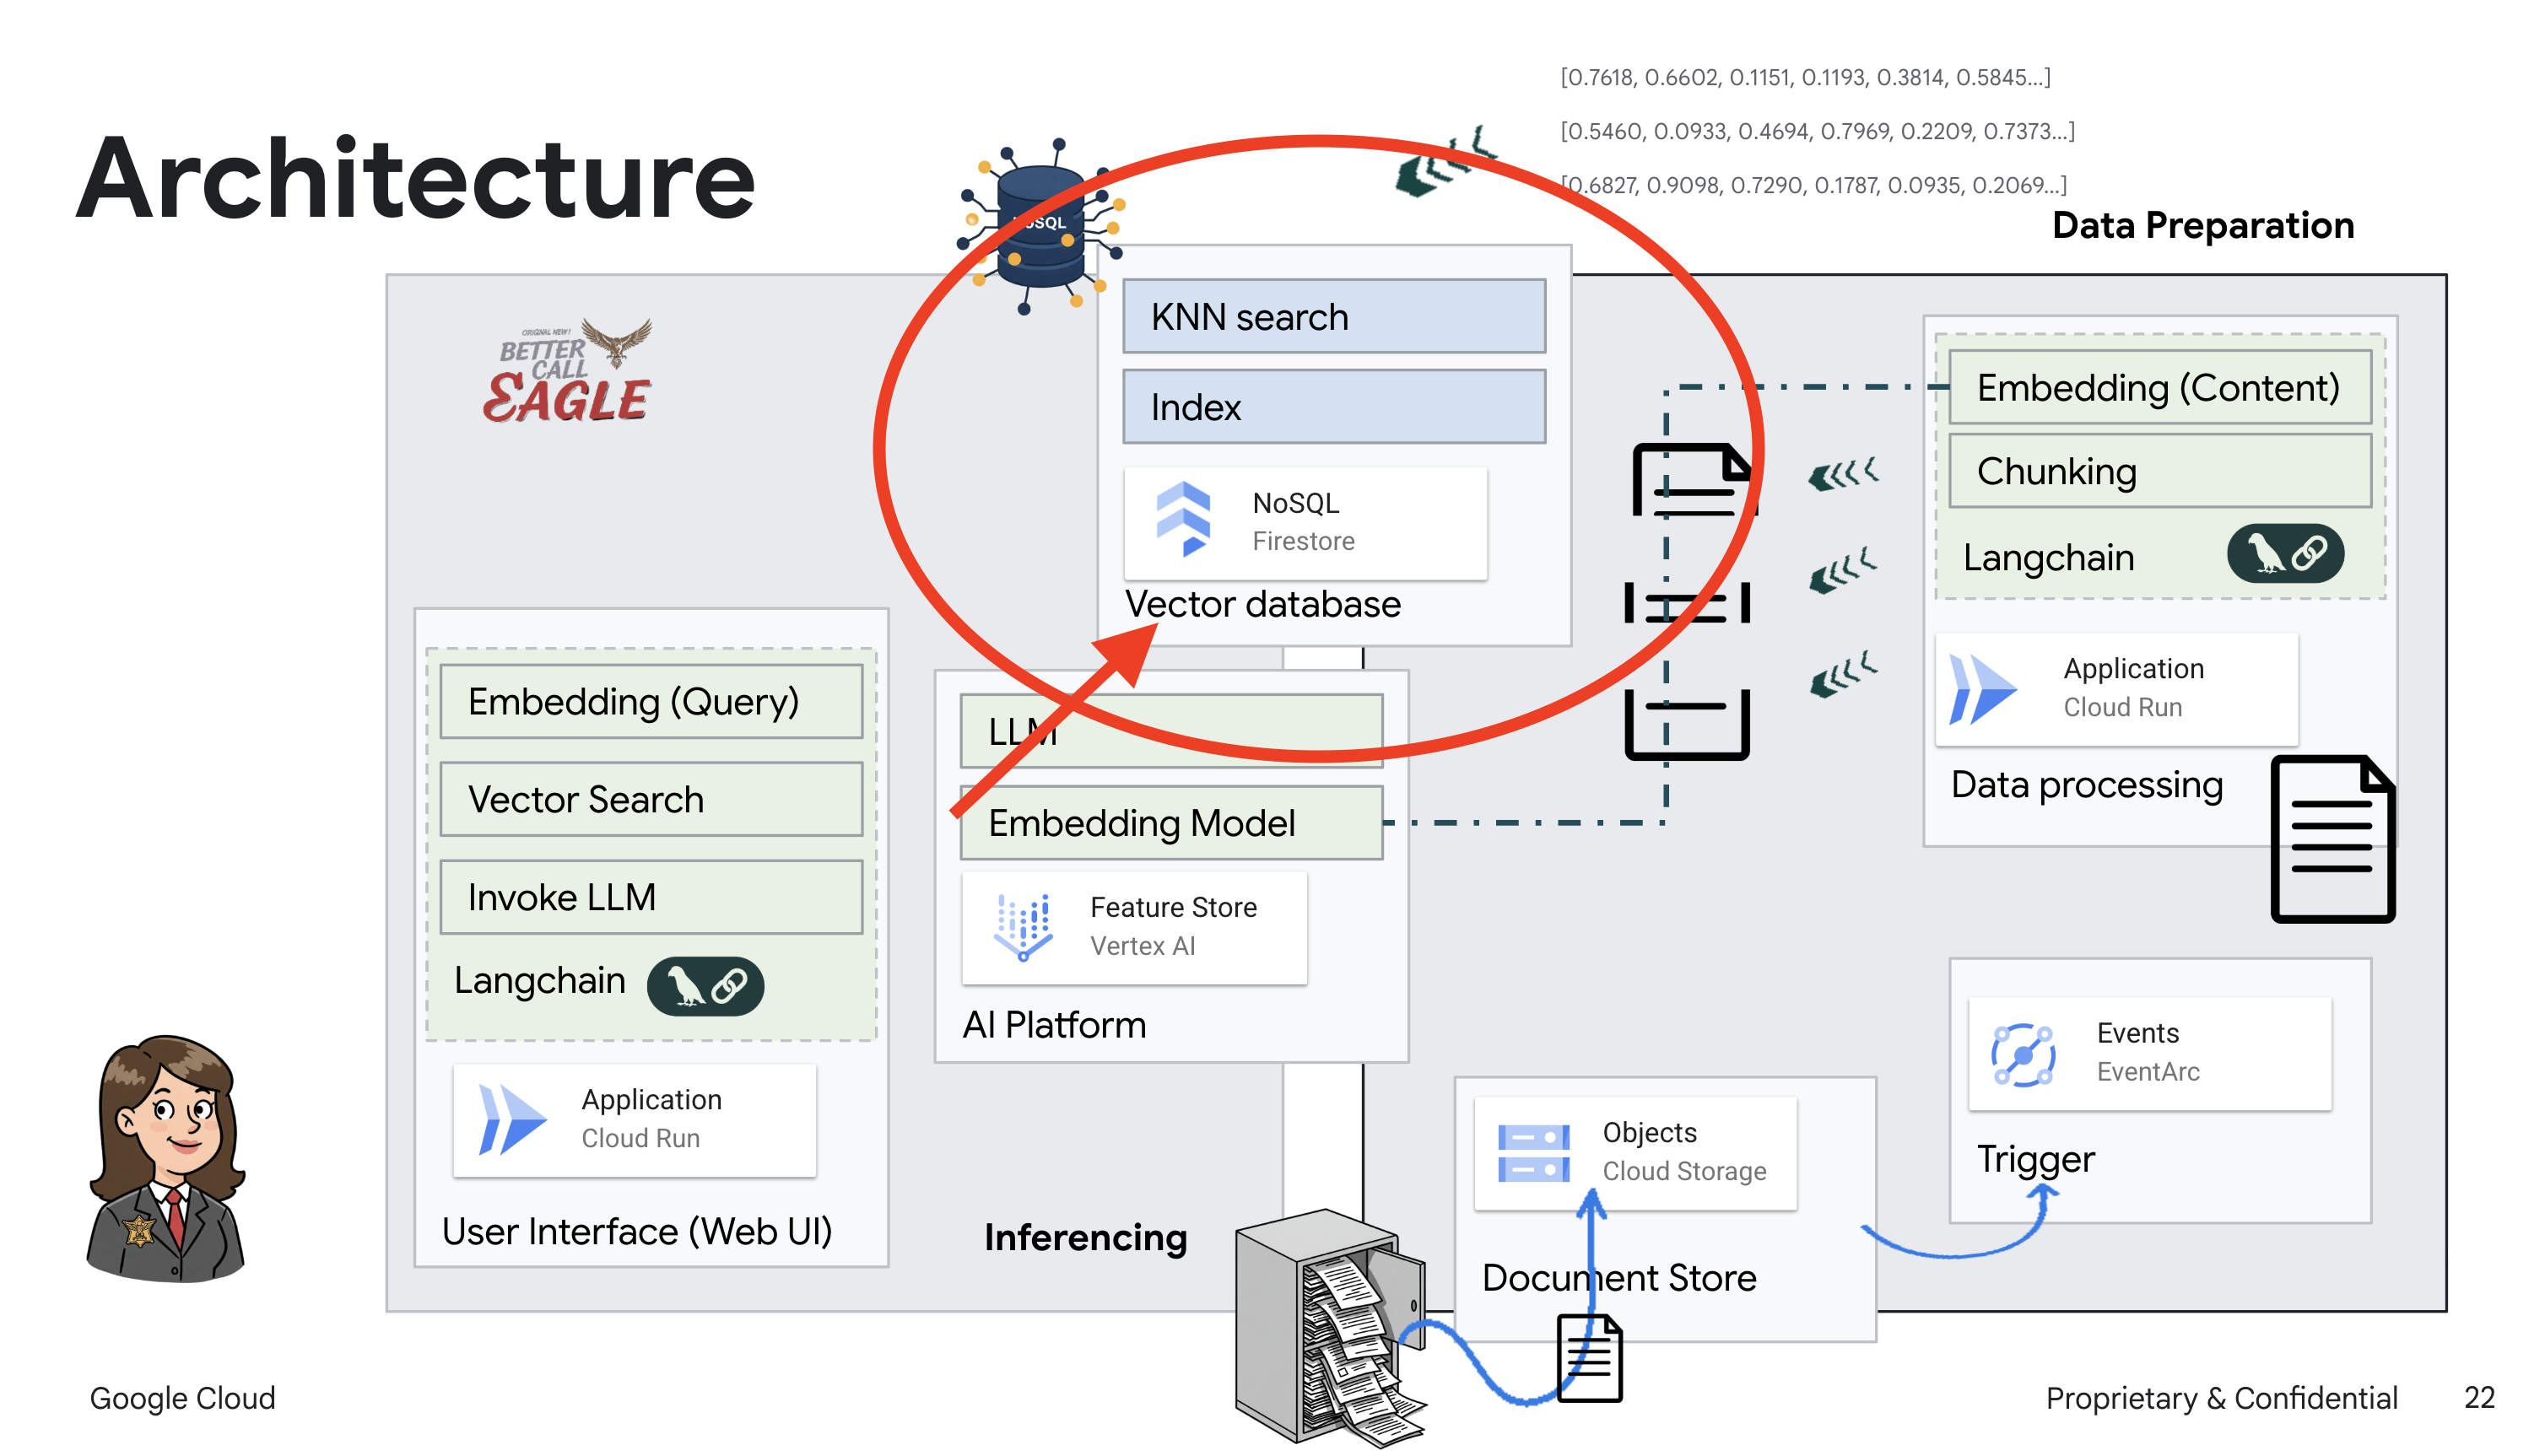
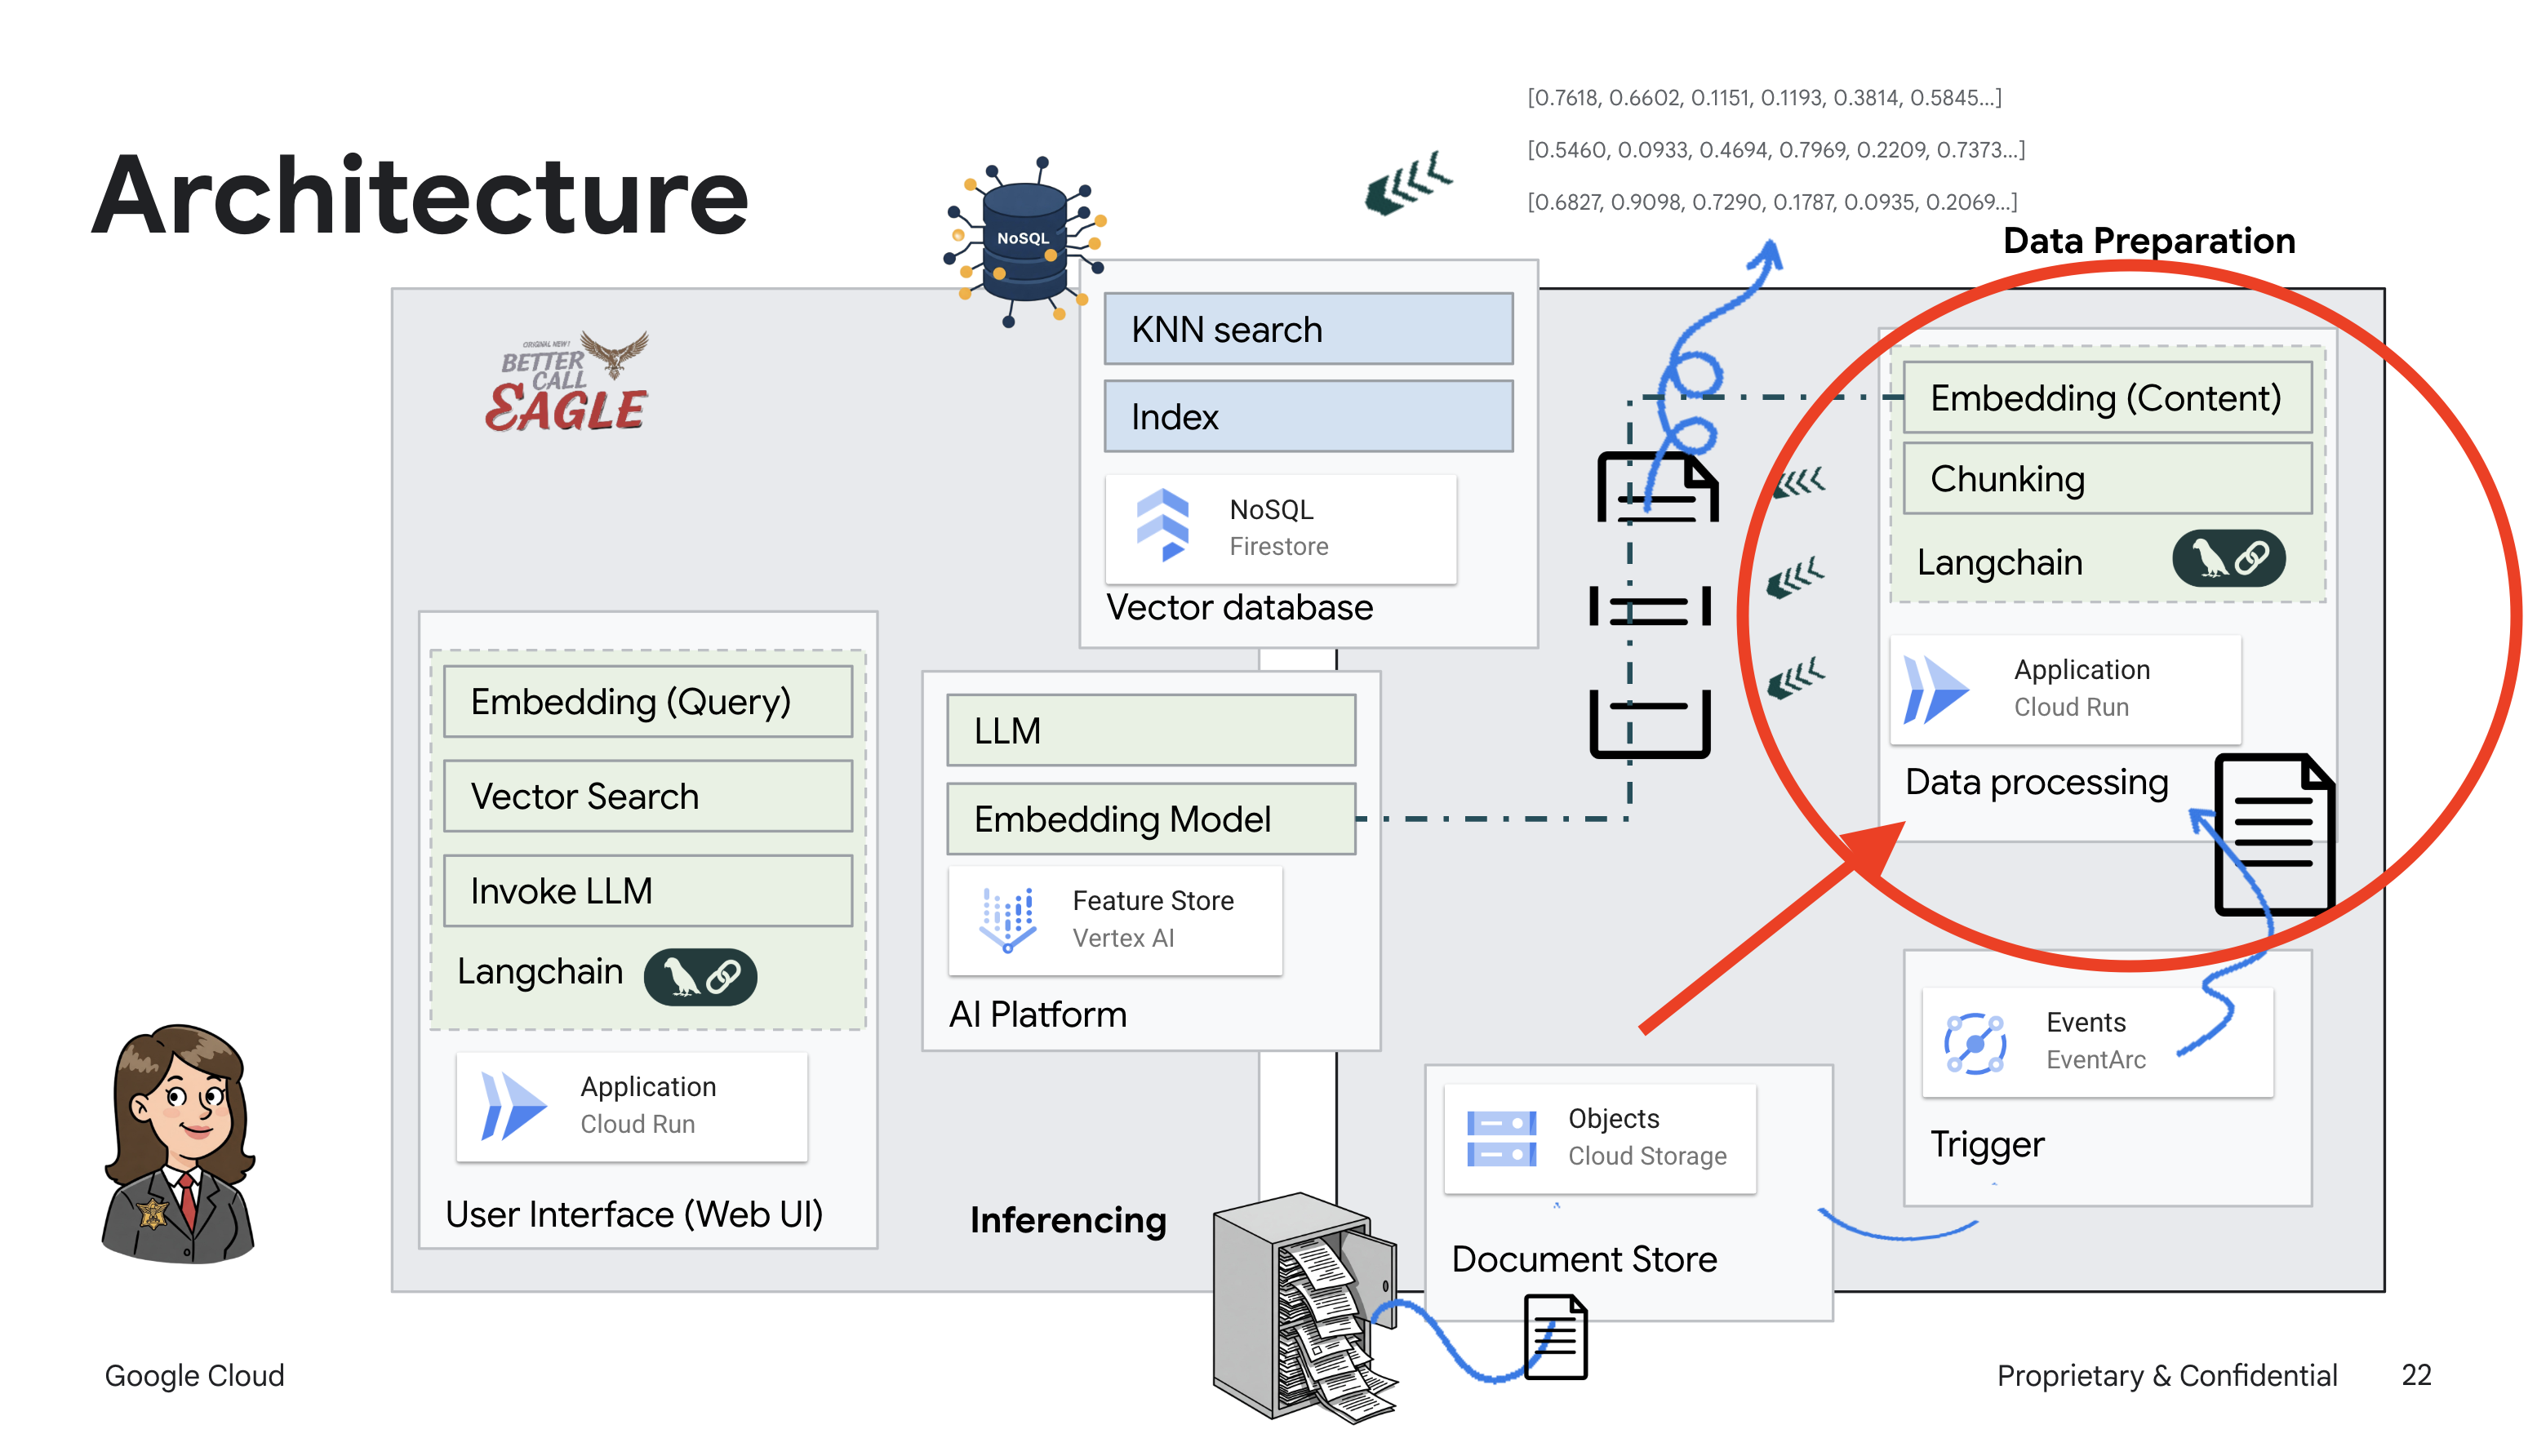
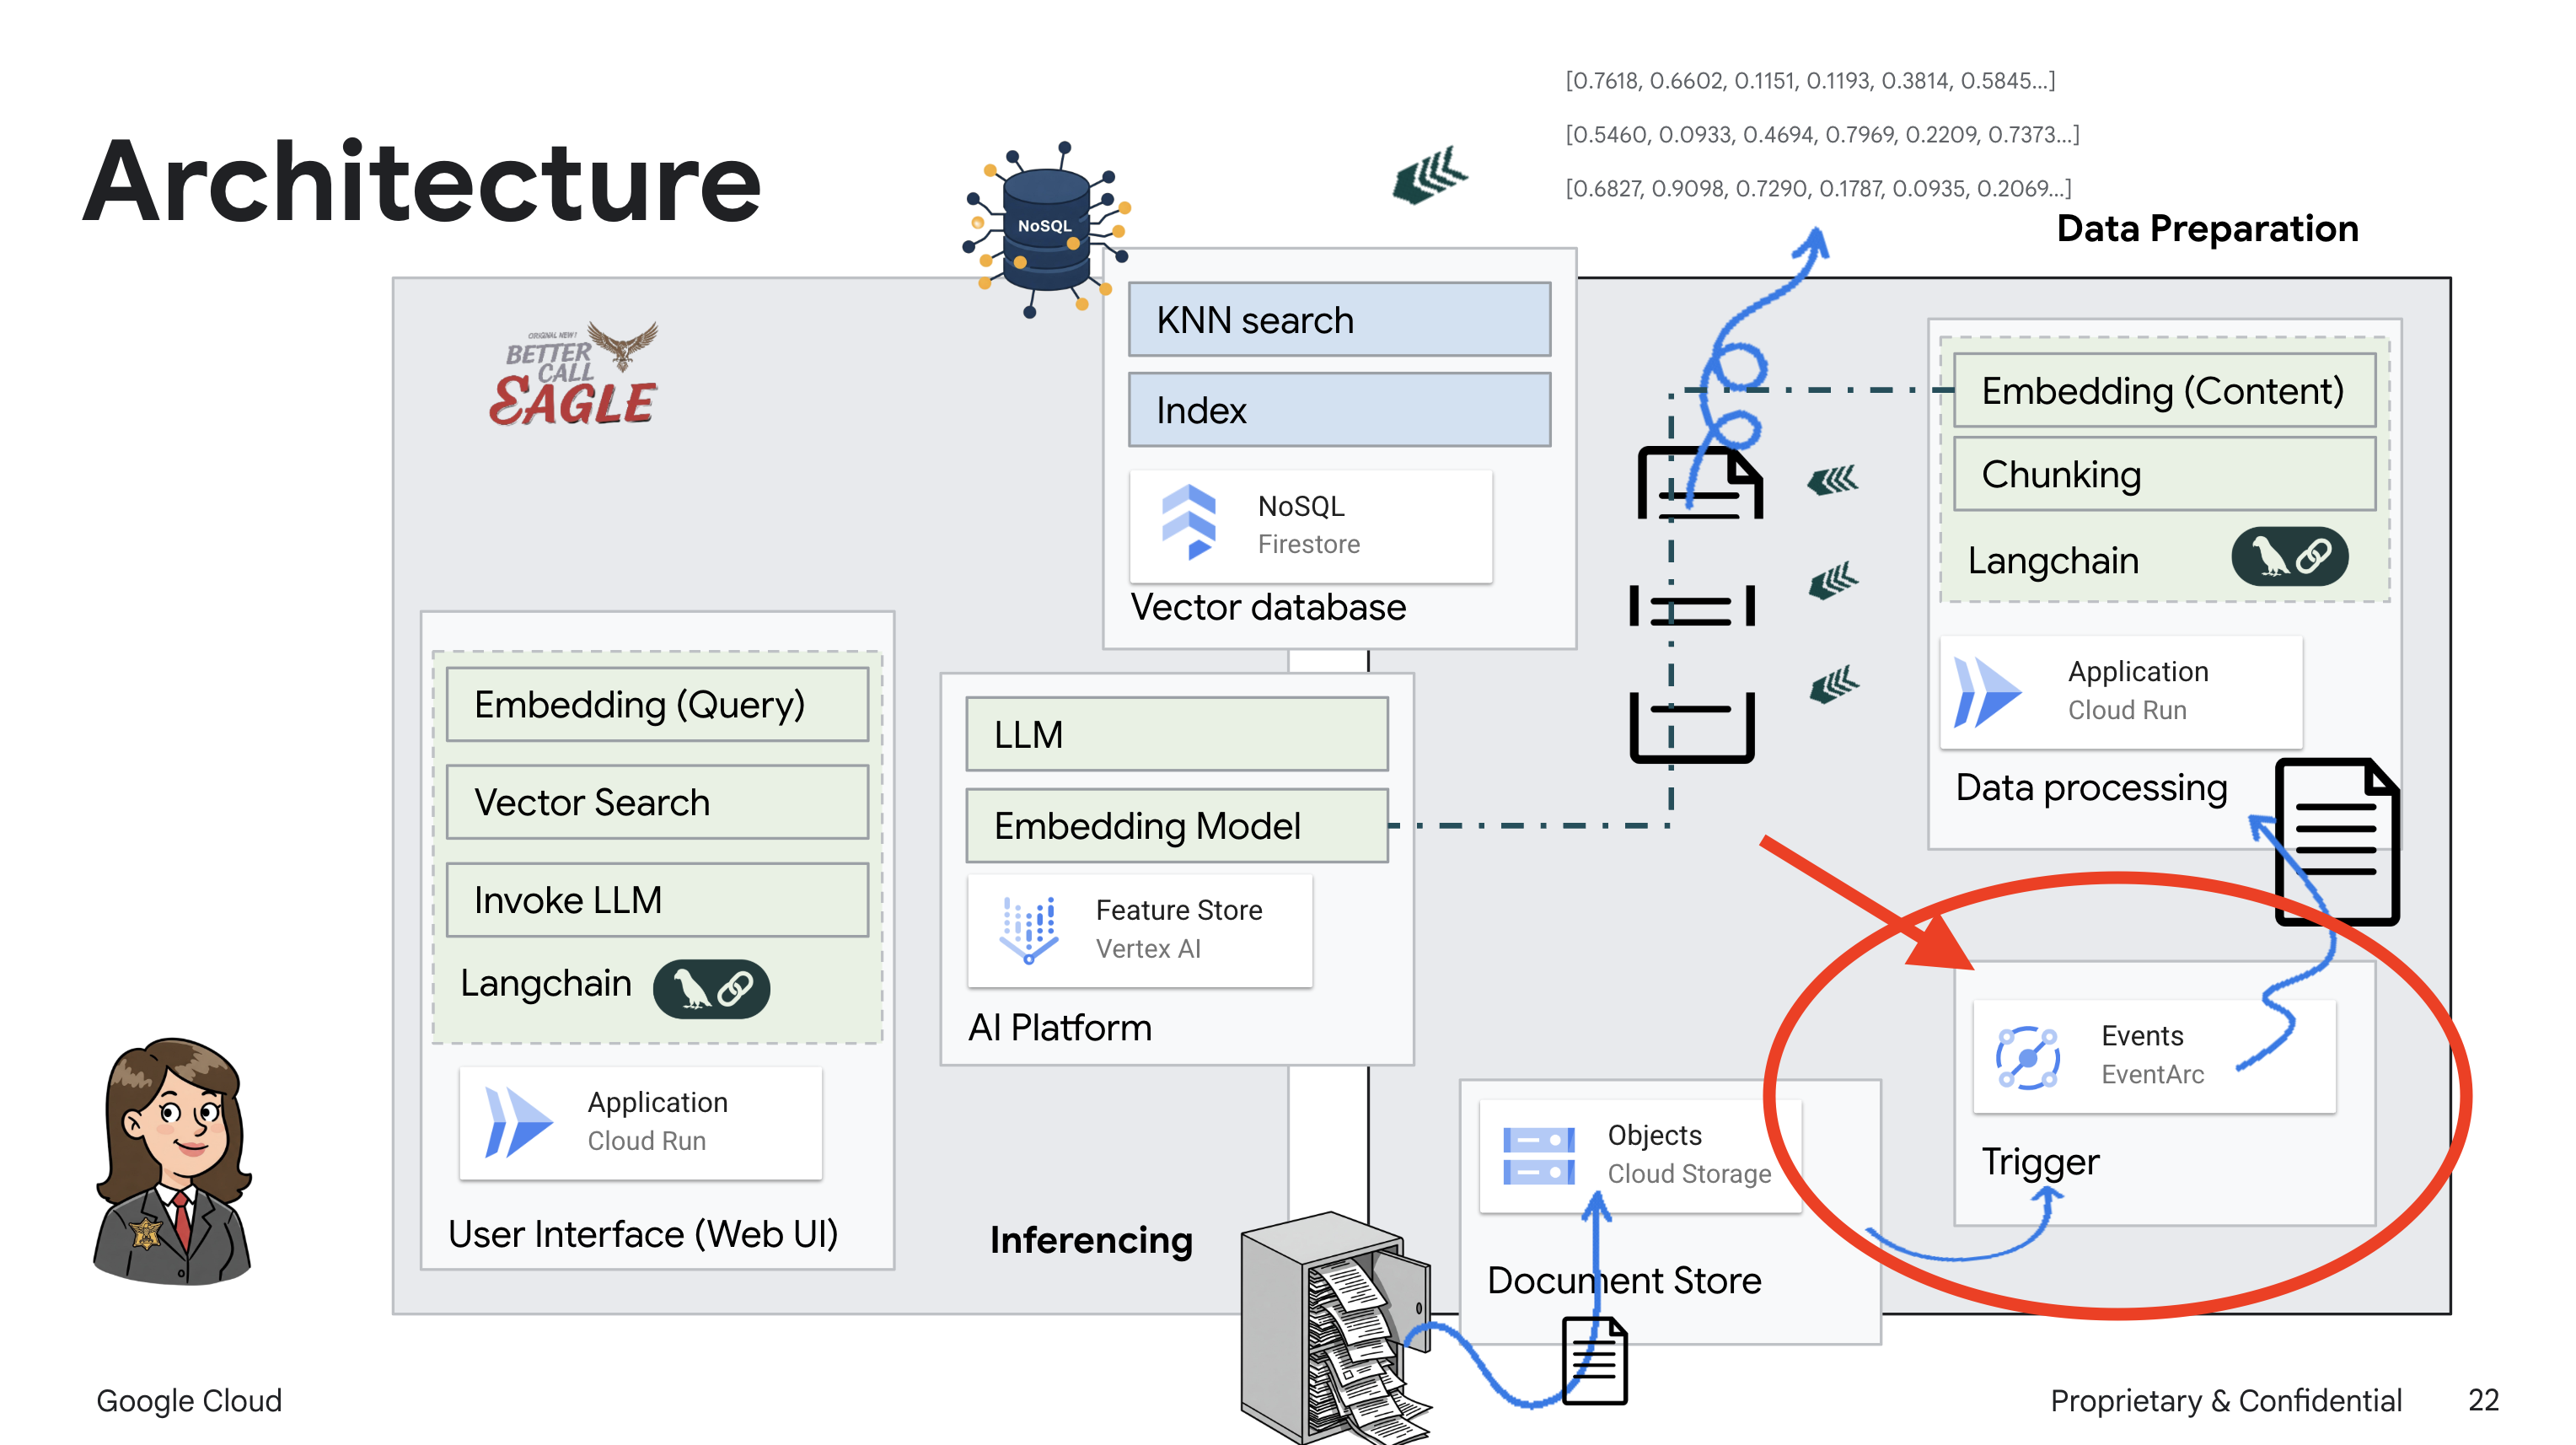
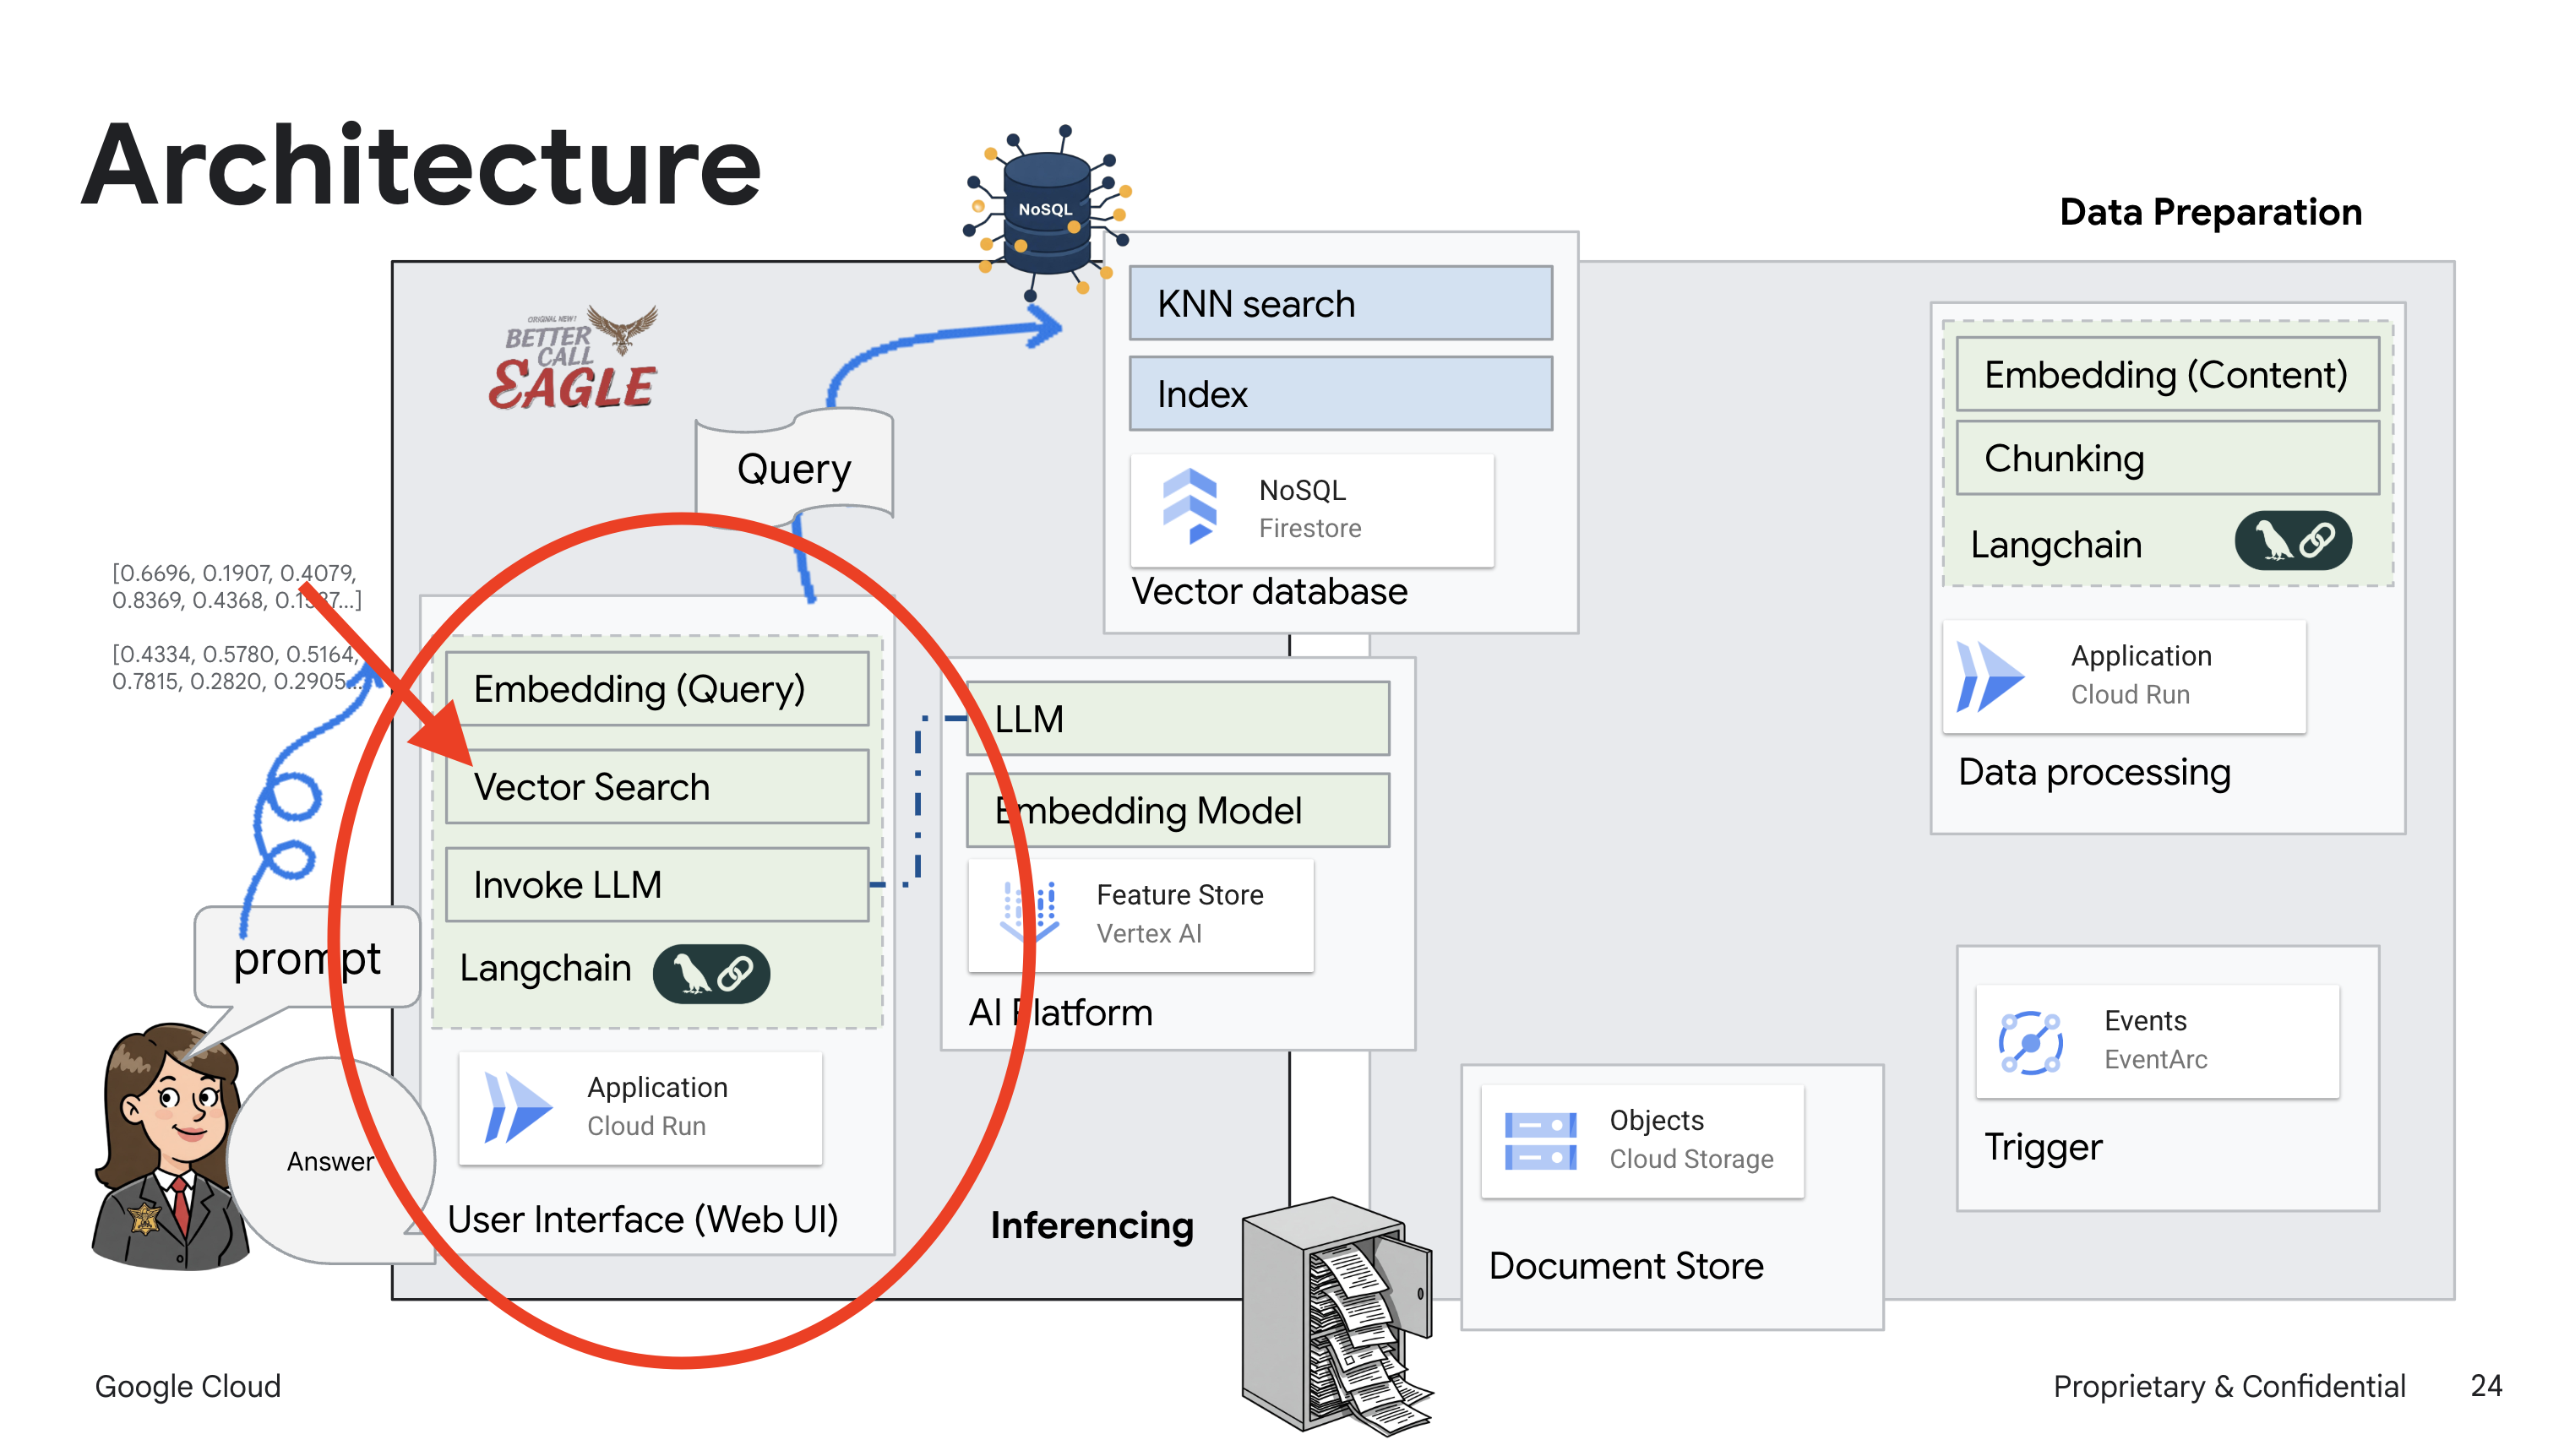
This project focuses on building a legal assistant using Google Cloud AI tools, emphasizing how to process, understand, and search legal data. The system is designed to sift through large amounts of information, generate summaries, and present relevant data quickly. The architecture of the legal assistant involves several key components:
Building a Knowledge base from unstructured data: Google Cloud Storage (GCS) is used to store legal documents. Firestore, a NoSQL database, functions as a vector store, holding document chunks and their corresponding embeddings. Vector Search is enabled in Firestore to allow for similarity searches. When a new legal document is uploaded to GCS, Eventarc triggers a Cloud Run function. This function processes the document by splitting it into chunks and generating embeddings for each chunk using Vertex AI's text embedding model. These embeddings are then stored in Firestore alongside the text chunks. 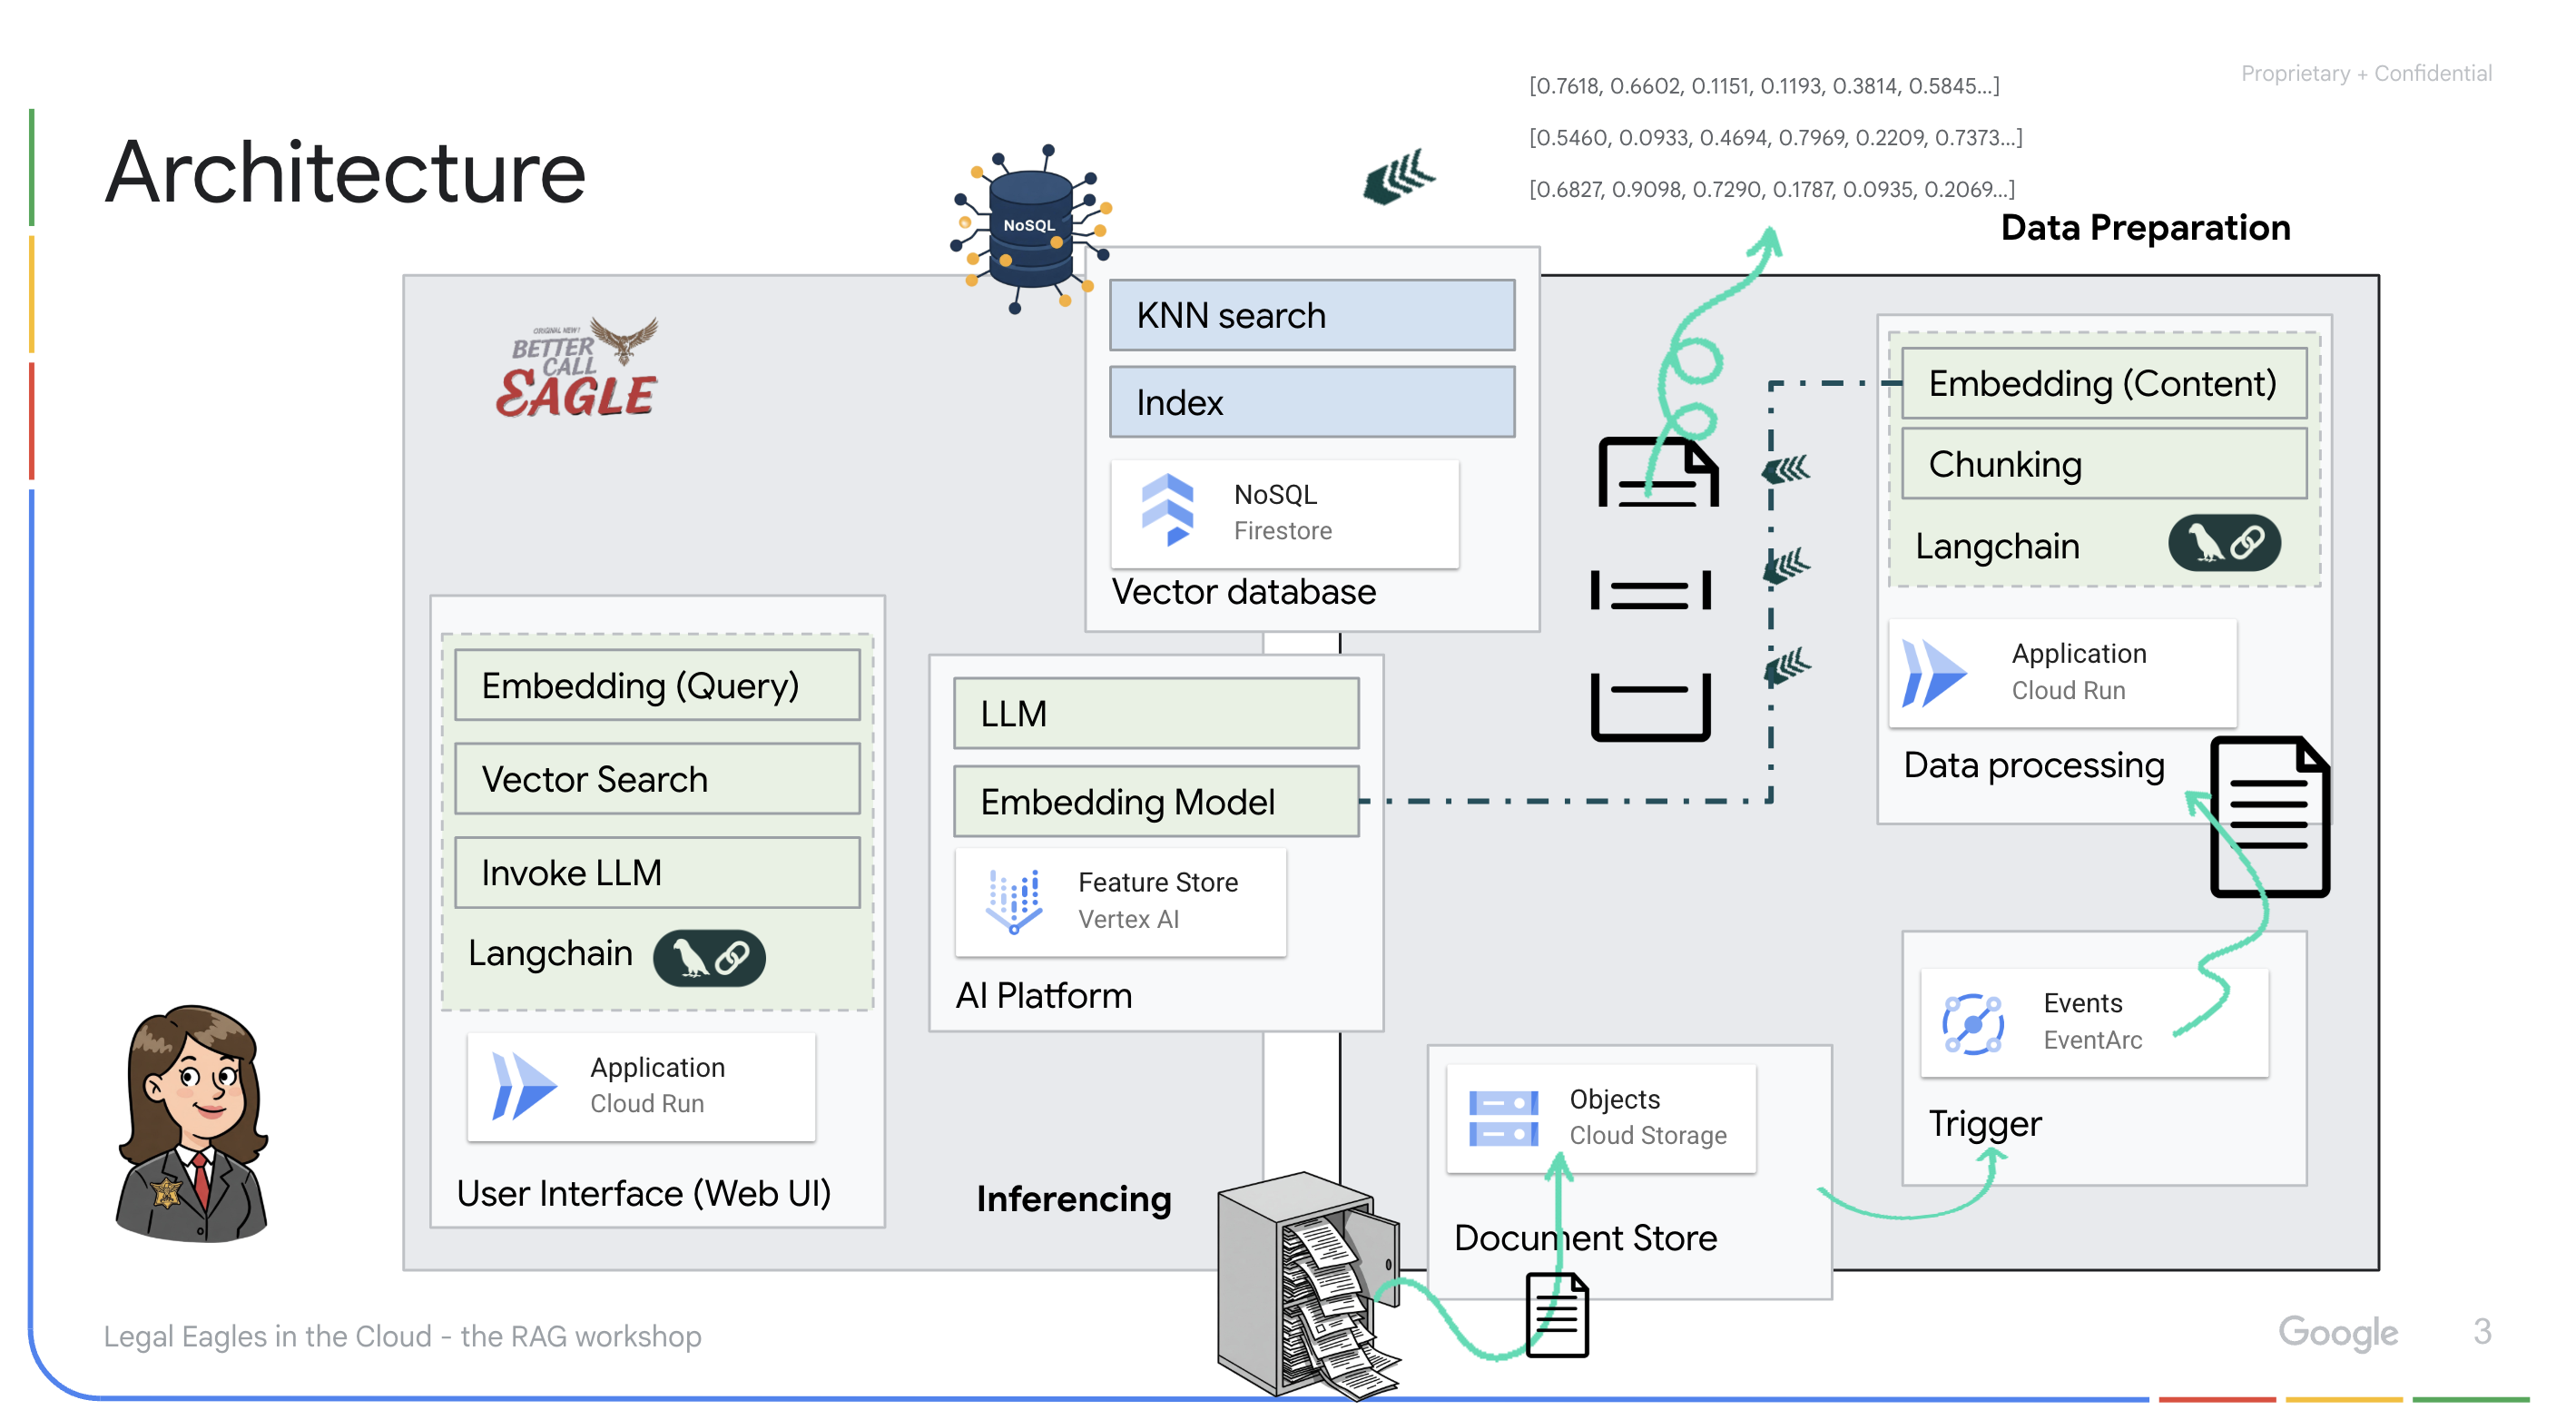
Application powered by LLM & RAG : The core of the question-answering system is the ask_llm function, which uses the langchain library to interact with a Vertex AI Gemini Large Language Model. It creates a HumanMessage from the user's query, and includes a SystemMessage that instructs the LLM to act as a helpful legal assistant. The system uses a Retrieval-Augmented Generation (RAG) approach, where, before answering a query, the system uses the search_resource function to retrieve relevant context from the Firestore vector store. This context is then included in the SystemMessage to ground the LLM's answer in the provided legal information. 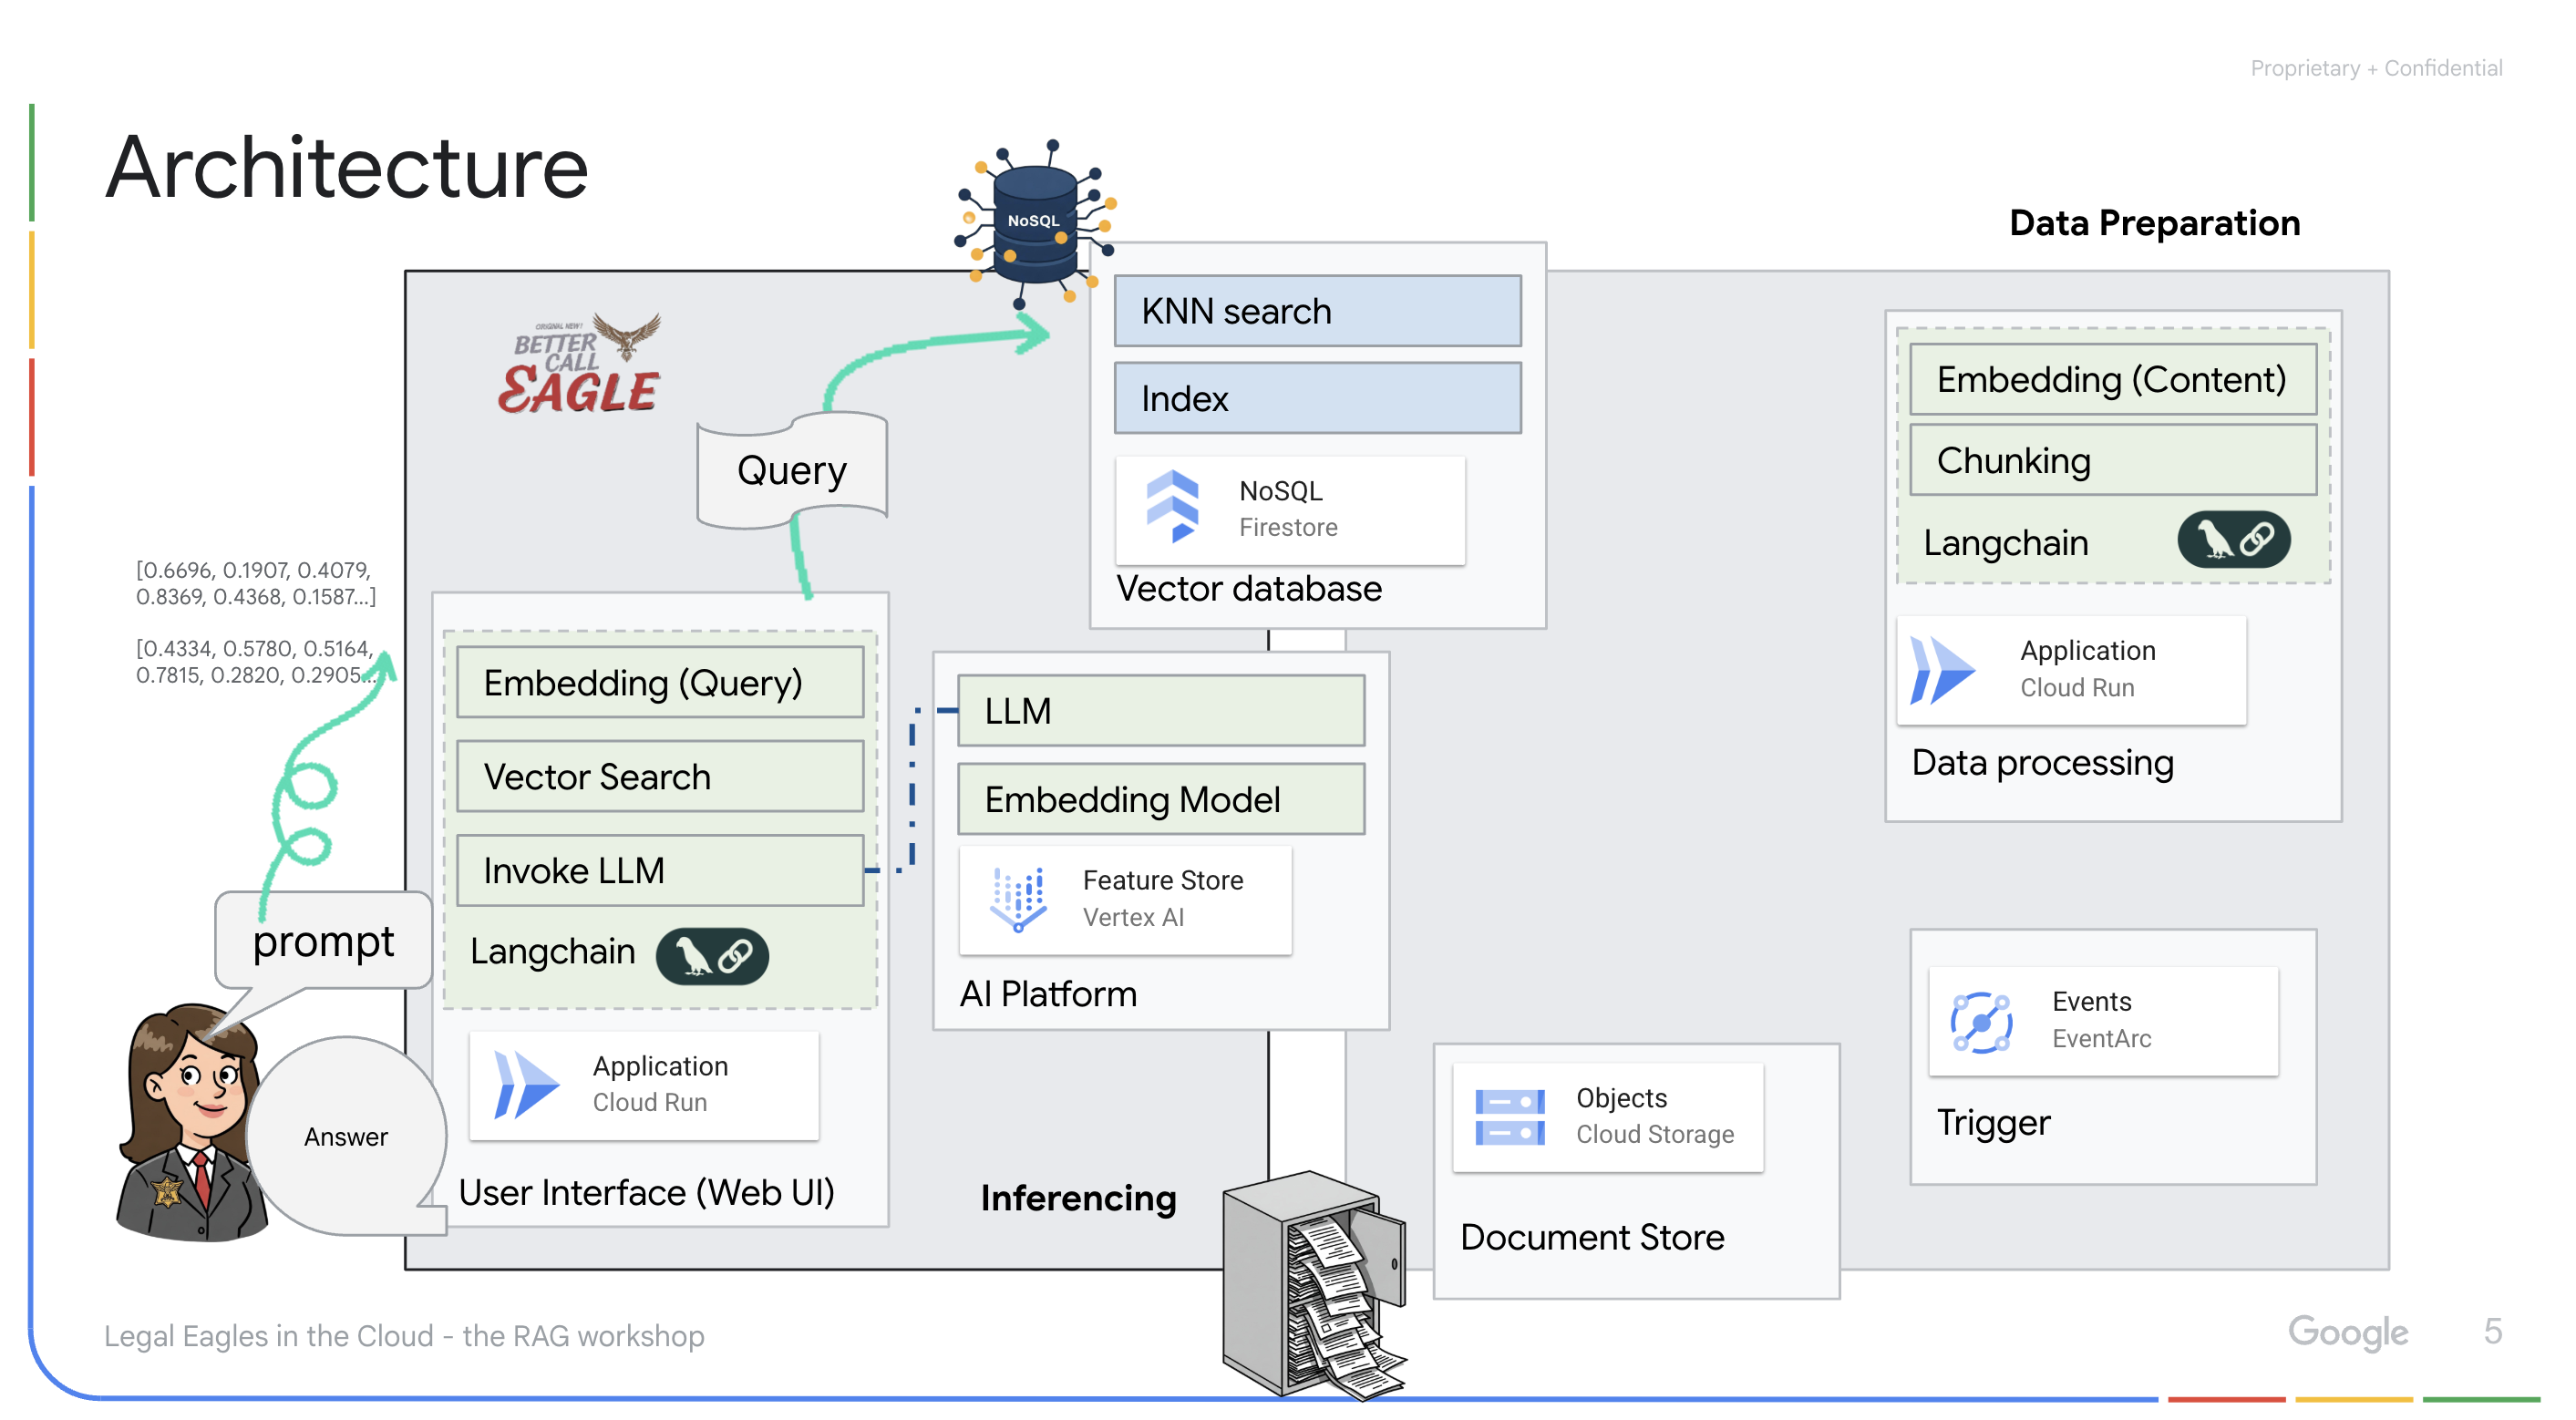
The project aims to move away from LLMs' "creative interpretations" by using RAG, which first retrieves relevant information from a trusted legal source before generating an answer. This results in more accurate, informed responses based on actual legal information. The system is built using various Google Cloud services, such as Google Cloud Shell, Vertex AI, Firestore, Cloud Run, and Eventarc.
3. Before you begin
In the Google Cloud Console, on the project selector page, select or create a Google Cloud project. Make sure that billing is enabled for your Cloud project. Learn how to check if billing is enabled on a project.
Enable Gemini Code Assist in Cloud Shell IDE
👉 In the Google Cloud console, go to the Gemini Code Assist Tools, enable the Gemini Code Assist at no cost by agreeing with the terms and condition.

Ignore the permission setup, leave this page.
Work on Cloud Shell Editor
👉 Click Activate Cloud Shell at the top of the Google Cloud console (It's the terminal shape icon at the top of the Cloud Shell pane)
👉 Click on the "Open Editor" button (it looks like an open folder with a pencil). This will open the Cloud Shell Editor in the window. You'll see a file explorer on the left side.

👉 Click on the Cloud Code Sign-in button in the bottom status bar as shown. Authorize the plugin as instructed. If you see Cloud Code - no project in the status bar, select that then in the drop down ‘Select a Google Cloud Project' and then select the specific Google Cloud Project from the list of projects that you plan to work with.

👉 Open the terminal in the cloud IDE, 
👉 In the new terminal, verify that you're already authenticated and that the project is set to your project ID using the following command:
gcloud auth list
👉 Click Activate Cloud Shell at the top of the Google Cloud console.
gcloud config set project <YOUR_PROJECT_ID>
👉 Run the following command to enable the necessary Google Cloud APIs:
gcloud services enable storage.googleapis.com  \
                        run.googleapis.com  \
                        artifactregistry.googleapis.com  \
                        aiplatform.googleapis.com \
                        eventarc.googleapis.com \
                        cloudresourcemanager.googleapis.com \
                        firestore.googleapis.com \
                        cloudaicompanion.googleapis.com
In the Cloud Shell toolbar (at the top of the Cloud Shell pane), click on the "Open Editor" button (it looks like an open folder with a pencil). This will open the Cloud Shell Code Editor in the window. You'll see a file explorer on the left side.
👉 In the terminal download the Bootstrap Skeleton Project:
git clone https://github.com/weimeilin79/legal-eagle.git
OPTIONAL: SPANISH VERSION
👉 Existe una versión alternativa en español. Por favor, utilice la siguiente instrucción para clonar la versión correcta.
git clone -b spanish https://github.com/weimeilin79/legal-eagle.git
After running this command in the Cloud Shell terminal, a new folder with the repository name legal-eagle will be created in your Cloud Shell environment.
4. Writing the Inference Application with Gemini Code Assist
In this section, we'll focus on building the core of our legal assistant – the web application that receives user questions and interacts with the AI model to generate answers. We'll leverage Gemini Code Assist to help us write the Python code for this inference part.
Initially, we'll create a Flask application that uses the LangChain library to communicate directly with the Vertex AI Gemini model. This first version will act as a helpful legal assistant based on the model's general knowledge, but it won't yet have access to our specific court case documents. This will allow us to see the baseline performance of the LLM before we enhance it with RAG later.
In the Cloud Code Editor's Explorer pane (usually on the left side), you should now see the folder that was created when you cloned the Git repository legal-eagle, Open the root folder of your project in the Explorer. You'll find a webapp subfolder within it, open that as well. 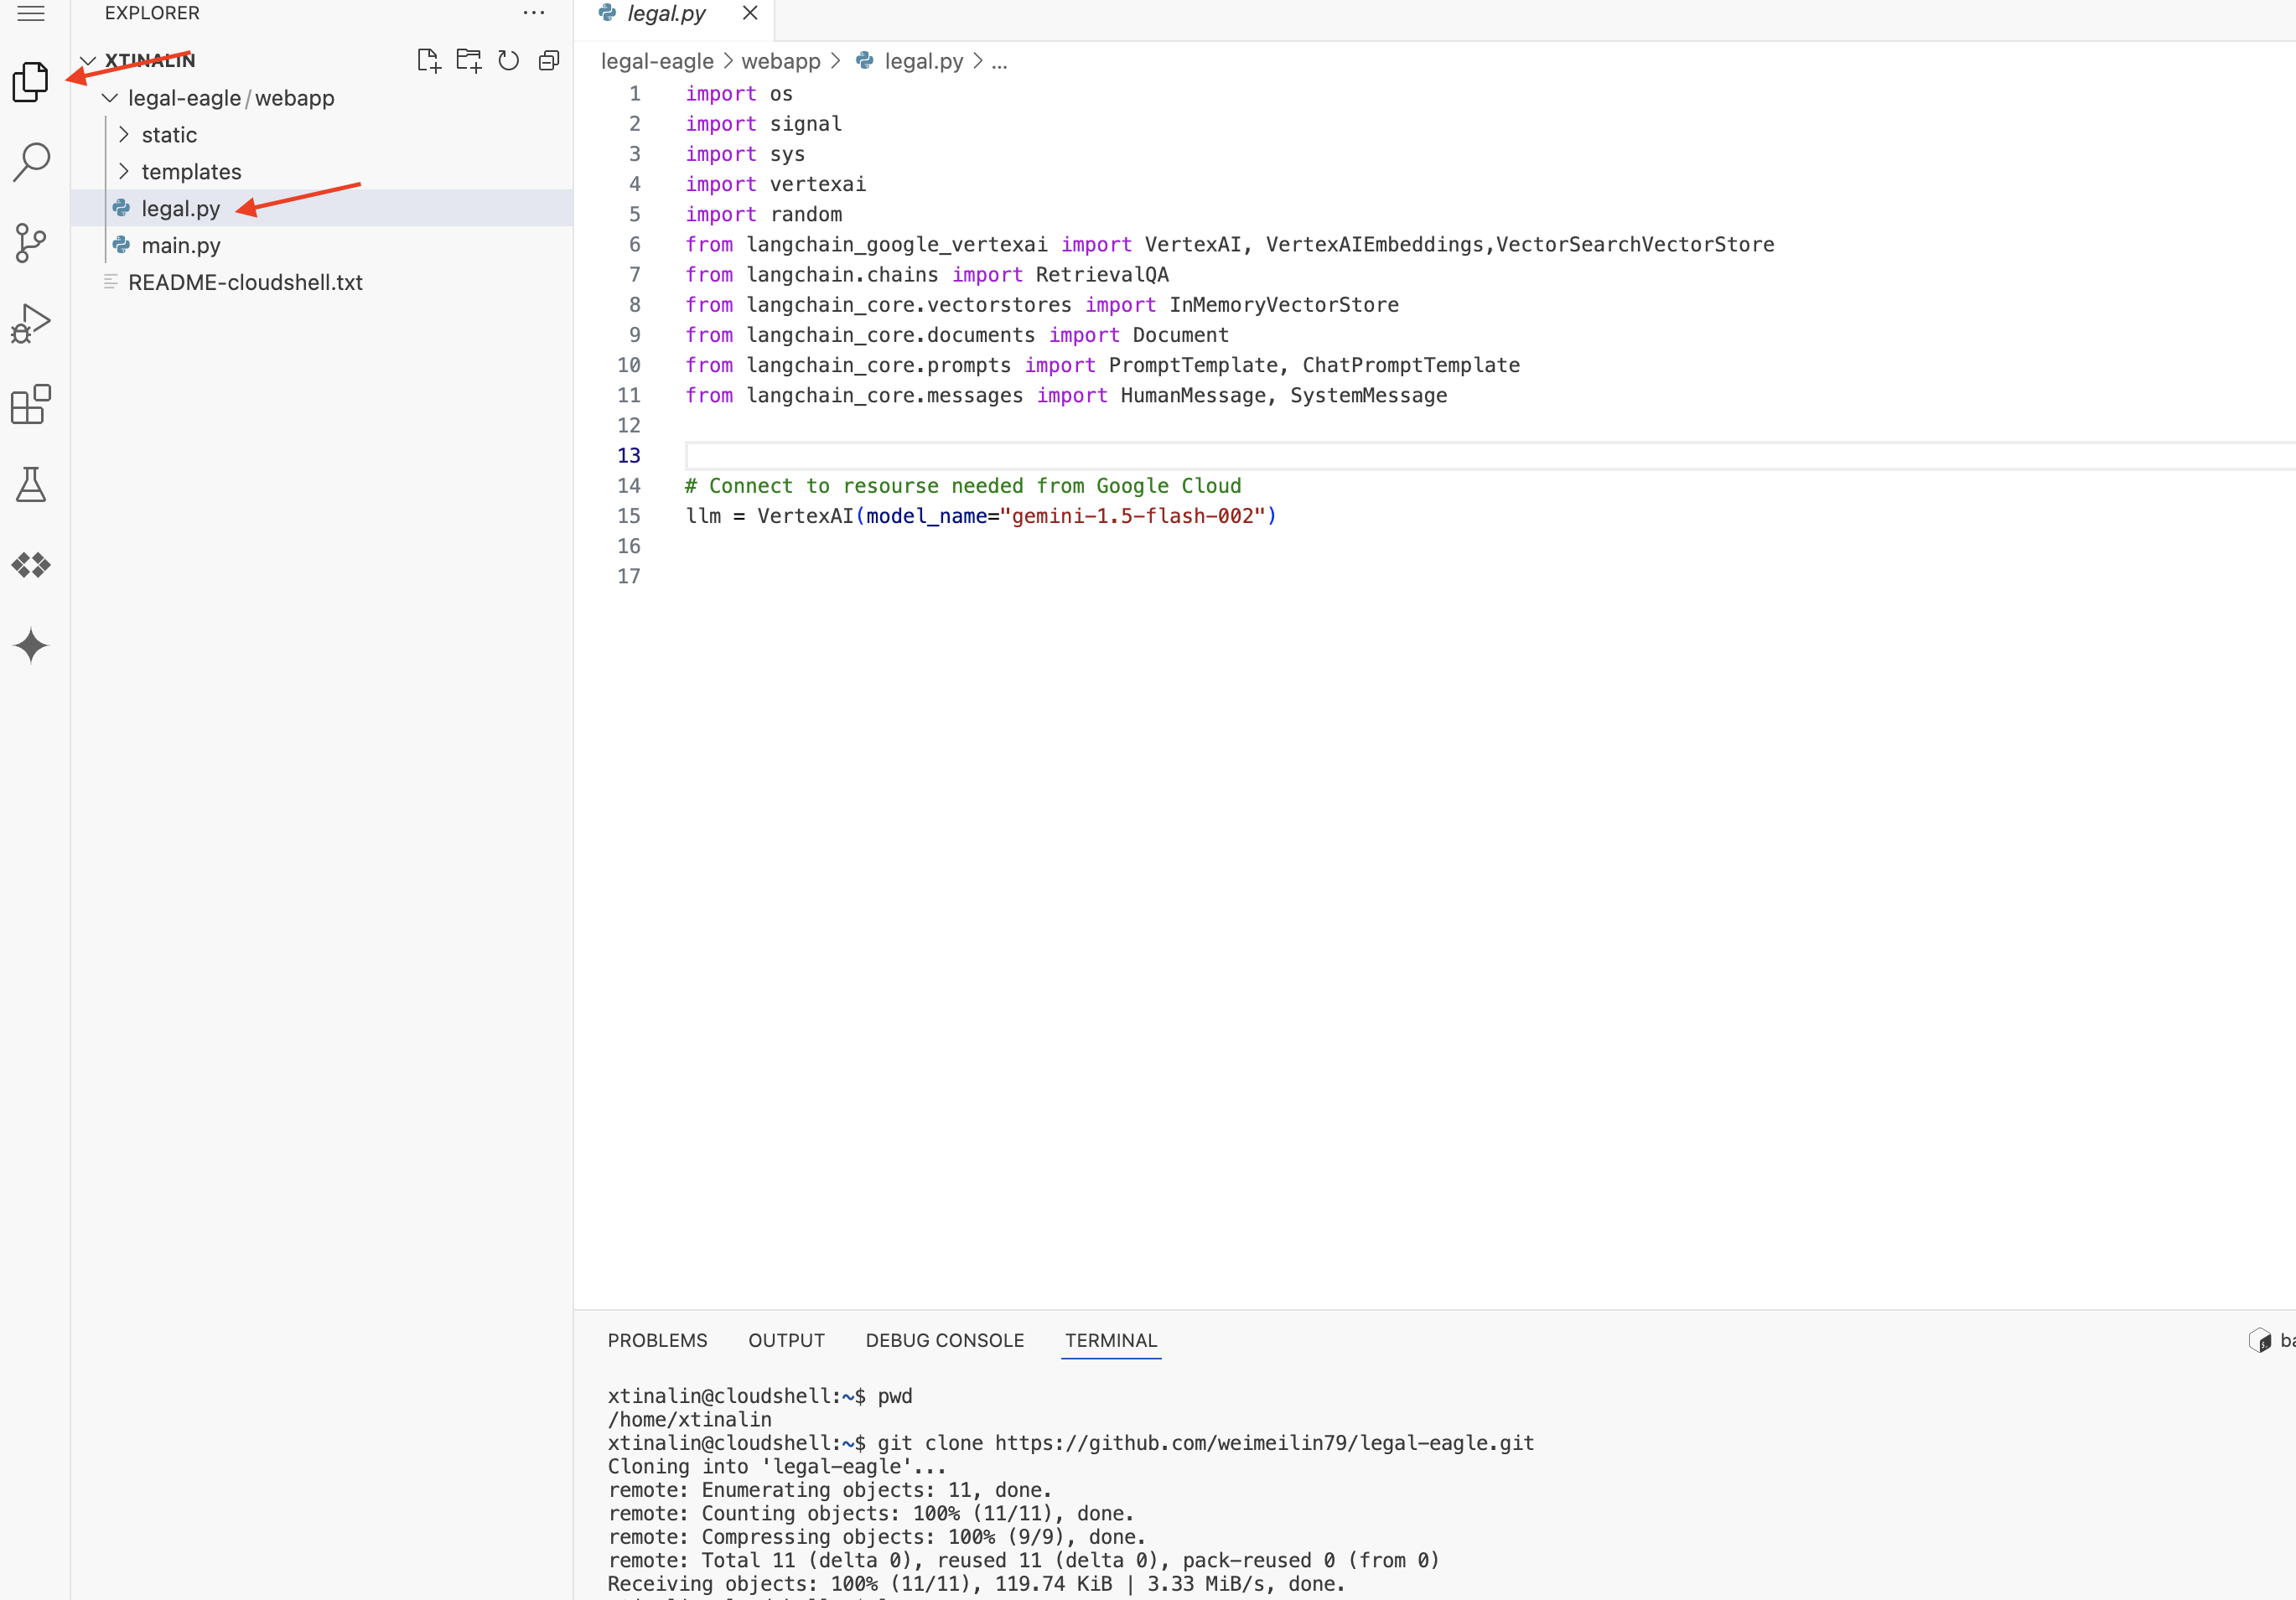
👉 Edit legal.py file in the Cloud Code Editor, you can use different methods to prompt Gemini Code Assist.
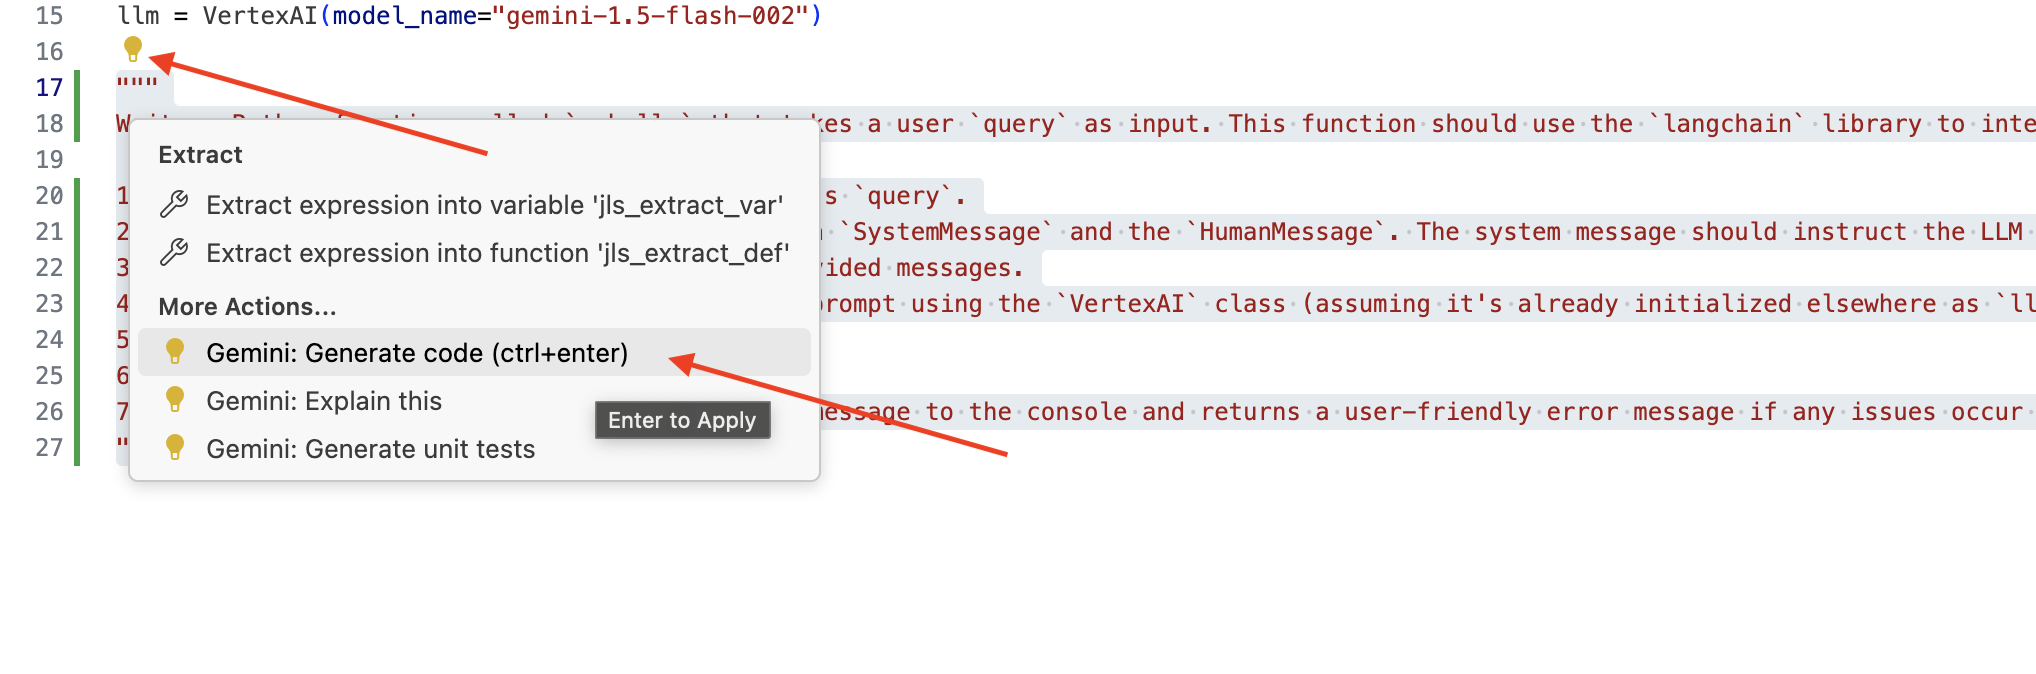
👉 Copy the following prompt to the bottom of legal.py that clearly describes what you want Gemini Code Assist to generate, click on the light bulb 💡 icon appeared and selecte Gemini: Generate Code (the exact menu item might vary slightly depending on the Cloud Code version).
"""
Write a Python function called `ask_llm` that takes a user `query` as input. This function should use the `langchain` library to interact with a Vertex AI Gemini Large Language Model.  Specifically, it should:
1.  Create a `HumanMessage` object from the user's `query`.
2.  Create a `ChatPromptTemplate` that includes a `SystemMessage` and the `HumanMessage`. The system message should instruct the LLM to act as a helpful assistant in a courtroom setting, aiding an attorney by providing necessary information. It should also specify that the LLM should respond in a high-energy tone, using no more than 100 words, and offer a humorous apology if it doesn't know the answer.
3.  Format the `ChatPromptTemplate` with the provided messages.
4.  Invoke the Vertex AI LLM with the formatted prompt using the `VertexAI` class (assuming it's already initialized elsewhere as `llm`).
5.  Print the LLM's `response`.
6.  Return the `response`.
7.  Include error handling that prints an error message to the console and returns a user-friendly error message if any issues occur during the process.  The Vertex AI model should be "gemini-2.0-flash".
"""
Carefully review the generated code
- Does it roughly follow the steps you outlined in the comment?
- Does it create a
ChatPromptTemplatewithSystemMessageandHumanMessage? - Does it include basic error handling (
try...except)?
If the generated code is good and mostly correct, you can accept it (Press Tab or Enter for inline suggestions, or by clicking "Accept" for larger code blocks).
If the generated code isn't exactly what you want, or has errors, don't worry! Gemini Code Assist is a tool to assist you, not to write perfect code on the first try.
Edit and modify the generated code to refine it, correct errors, and better match your requirements. You can further prompt Gemini Code Assist by adding more comments or asking specific questions in the Code Assist chat panel.
And if you are still new to the SDK, here is a working example.
👉 Copy & paste and REPLACE following code into your legal.py:
import os
import signal
import sys
import vertexai
import random
from langchain_google_vertexai import VertexAI
from langchain_core.prompts import PromptTemplate, ChatPromptTemplate
from langchain_core.messages import HumanMessage, SystemMessage
# Connect to resourse needed from Google Cloud
llm = VertexAI(model_name="gemini-2.0-flash")
def ask_llm(query):
    try:
        query_message = {
            "type": "text",
            "text": query,
        }

        input_msg = HumanMessage(content=[query_message])
        prompt_template = ChatPromptTemplate.from_messages(
            [
                SystemMessage(
                    content=(
                        "You are a helpful assistant, and you are with the attorney in a courtroom, you are helping him to win the case by providing the information he needs "
                        "Don't answer if you don't know the answer, just say sorry in a funny way possible"
                        "Use high engergy tone, don't use more than 100 words to answer"
                       # f"Here is some past conversation history between you and the user {relevant_history}"
                       # f"Here is some context that is relevant to the question {relevant_resource} that you might use"
                    )
                ),
                input_msg,
            ]
        )
        prompt = prompt_template.format()
        response = llm.invoke(prompt)
        print(f"response: {response}")
        return response
    except Exception as e:
        print(f"Error sending message to chatbot: {e}") # Log this error too!
        return f"Unable to process your request at this time. Due to the following reason: {str(e)}"
👉 OPTIONAL: SPANISH VERSION
Sustituye el siguiente texto como se indica: You are a helpful assistant, to You are a helpful assistant that speaks Spanish,
Next, create a function to handle a route that will respond to user's questions.
Open main.py in the Cloud Shell Editor. Similar to how you generated ask_llm in legal.py, use Gemini Code Assist to Generate Flask Route and ask_question Function. Type in the following PROMPT as a comment in main.py: (Make sure it is added before you start the Flask app at if __name__ == "__main__":)
.....
@app.route('/',methods=['GET'])
def index():
    return render_template('index.html')


"""
PROMPT:
Create a Flask endpoint that accepts POST requests at the '/ask' route.
The request should contain a JSON payload with a 'question' field. Extract the question from the JSON payload.
Call a function named ask_llm (located in a file named legal.py) with the extracted question as an argument.
Return the result of the ask_llm function as the response with a 200 status code.
If any error occurs during the process, return a 500 status code with the error message.
"""

# Add this block to start the Flask app when running locally
if __name__ == "__main__":
.....
Accept ONLY if the generated code is good and mostly correct. If you are not familiar with Python.Here is a working example, copy & paste this into your main.py under the code that is already there.
👉 Make sure you paste the following BEFORE start of the web application (if name == "main":)
@app.route('/ask', methods=['POST'])
def ask_question():
    data = request.get_json()
    question = data.get('question')
    try:
        # call the ask_llm in legal.py
        answer_markdown = legal.ask_llm(question)

        print(f"answer_markdown: {answer_markdown}")
        # Return the Markdown as the response
        return answer_markdown, 200
    except Exception as e:
        return f"Error: {str(e)}", 500  # Handle errors appropriately
By following these steps, you should be able to successfully enable Gemini Code Assist, set up your project, and use it to generate the ask function in your main.py file.
5. Local Testing in Cloud Editor
👉 In the editor's terminal,install dependent libraries and start the Web UI locally.
cd ~/legal-eagle/webapp
python -m venv env
source env/bin/activate
export PROJECT_ID=$(gcloud config get project)
pip install -r requirements.txt
python main.py
Look for startup messages in the Cloud Shell terminal output. Flask usually prints messages indicating that it's running and on what port.
- Running on http://127.0.0.1:8080
The application needs to keep running to serve requests.
👉 From the "Web preview" menu,choose Preview on port 8080. Cloud Shell will open a new browser tab or window with the web preview of your application. 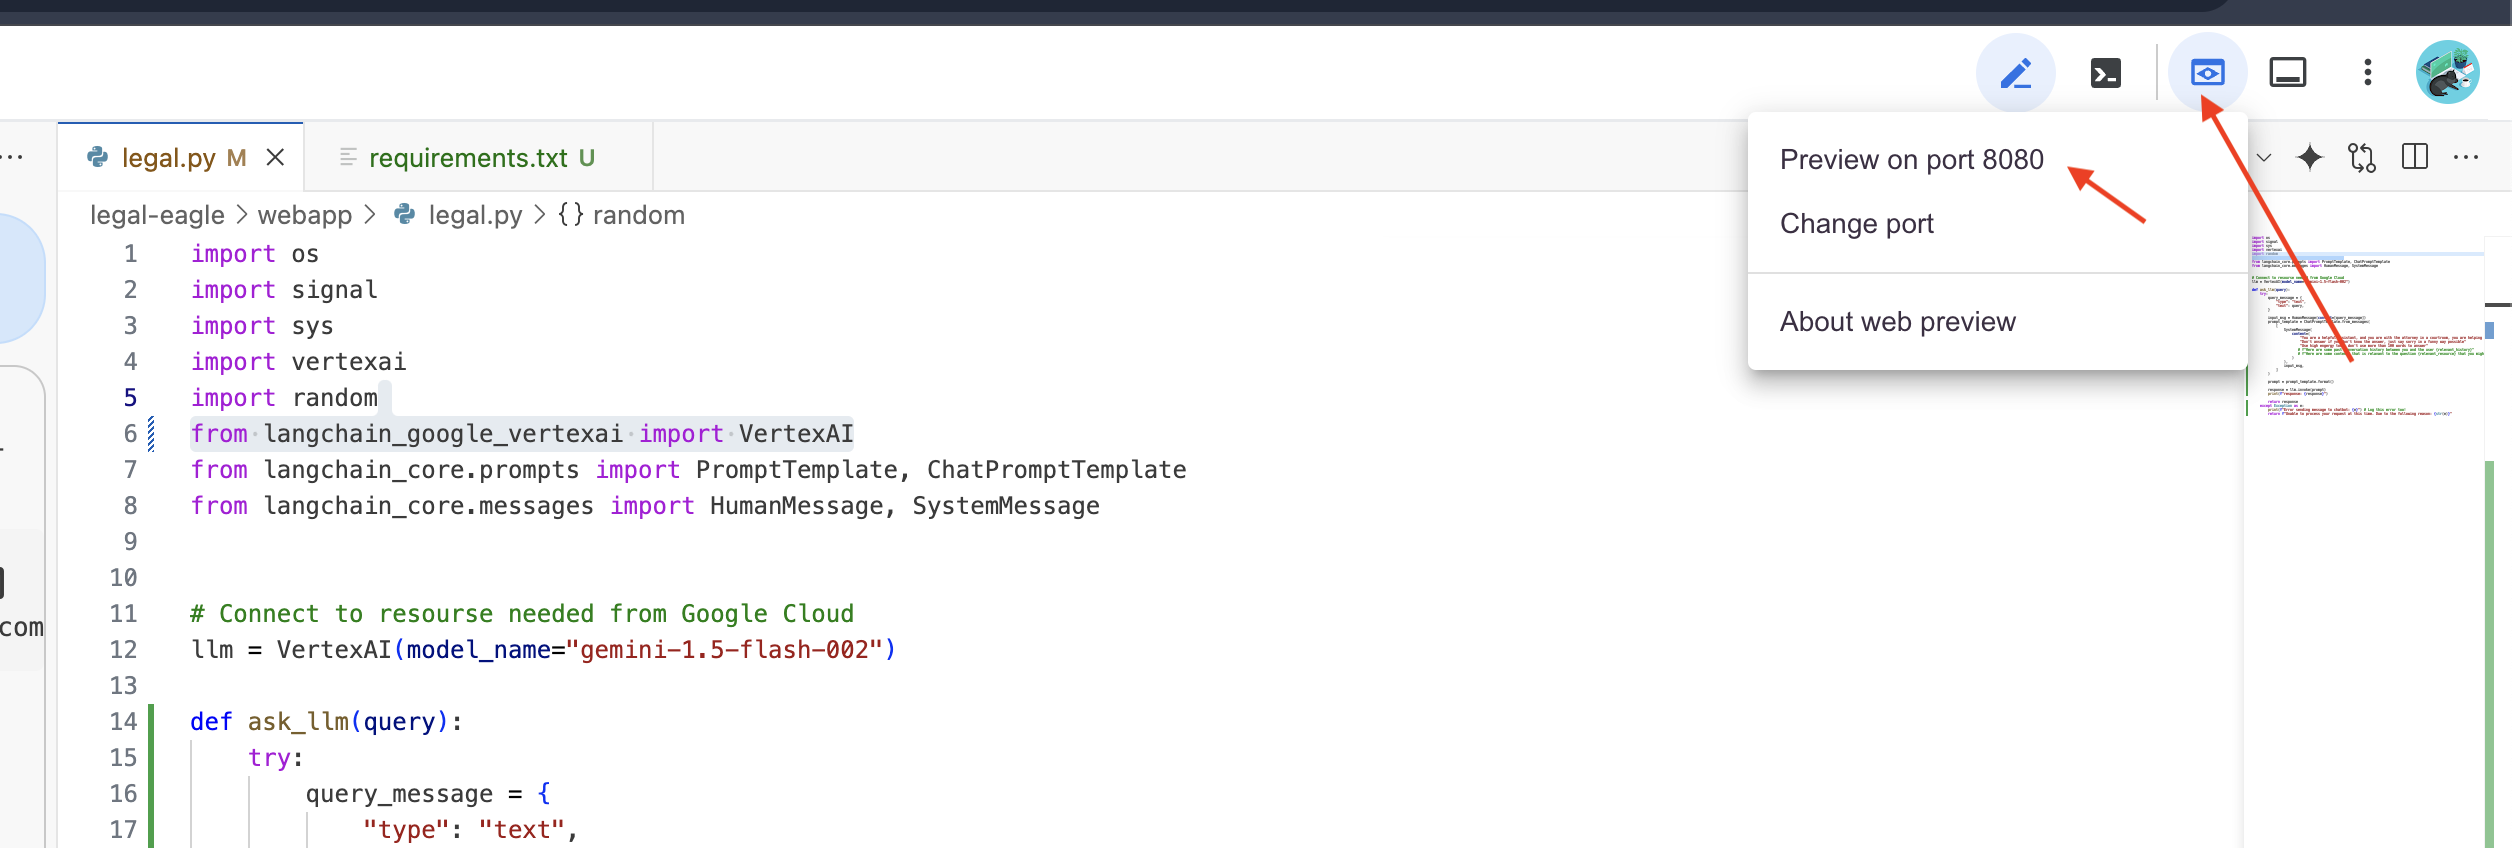
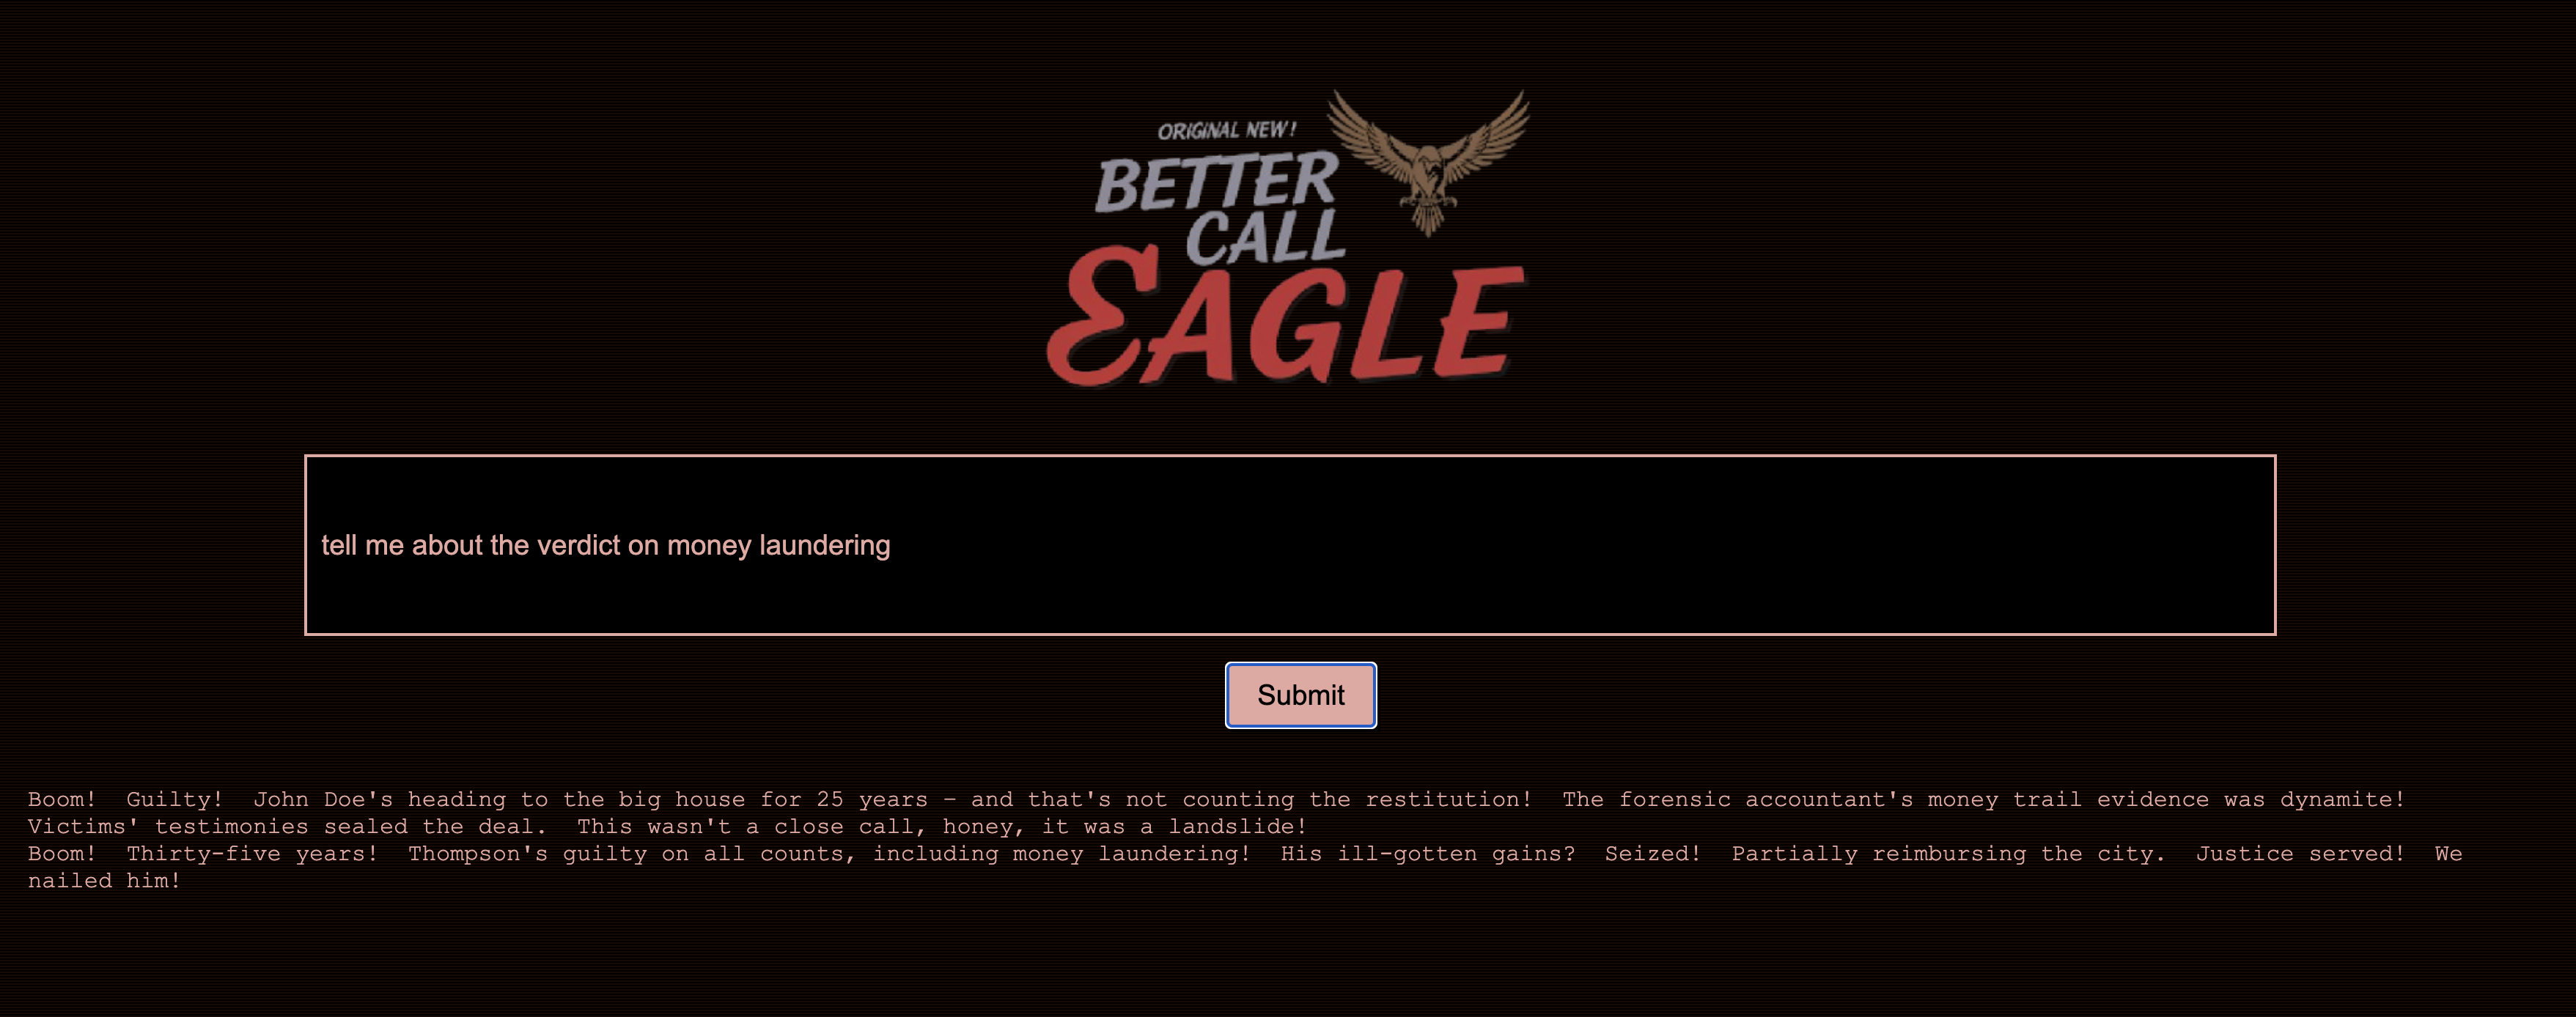
👉 In the application interface, type in a few questions specifically related to legal case references and see how the LLM responds. For example, you could try:
- How many years in prison was Michael Brown sentenced to?
- How much money in unauthorized charges was generated as a result of Jane Smith's actions?
- What role did the neighbors' testimonies play in the investigation of the case on Emily White?
👉 OPTIONAL: SPANISH VERSION
- ¿A cuántos años de prisión fue sentenciado Michael Brown?
- ¿Cuánto dinero en cargos no autorizados se generó como resultado de las acciones de Jane Smith?
- ¿Qué papel jugaron los testimonios de los vecinos en la investigación del caso de Emily White?
If you look closely at the answers, you'll likely notice that the model may hallucinate, be vague or generic, and sometimes misinterpret your questions, especially since it doesn't yet have access to specific legal documents.
👉 Go ahead and stop the script by pressing Ctrl+C.
👉 Exit virtual environment, in the terminal run:
deactivate
6. Setting up the Vector Store
Time to put an end to these LLM ‘creative interpretations' of the law.That's where Retrieval-Augmented Generation (RAG) comes to the rescue! Think of it like giving our LLM access to a super-powered legal library right before it answers your questions. Instead of relying solely on its general knowledge (which can be fuzzy or outdated depending on the model), RAG first fetches relevant information from a trusted source – in our case, legal documents – and then uses that context to generate a much more informed and accurate answer. It's like the LLM doing its homework before stepping into the courtroom!
To build our RAG system, we need a place to store all those legal documents and, importantly, make them searchable by meaning. That's where Firestore comes in! Firestore is Google Cloud's flexible, scalable NoSQL document database.
We're going to use Firestore as our vector store. We'll store chunks of our legal documents in Firestore, and for each chunk, we'll also store its embedding – that numerical representation of its meaning.
Then, when you ask our Legal Eagle a question, we'll use Firestore's vector search to find the chunks of legal text that are most relevant to your query. This retrieved context is what RAG uses to give you answers that are grounded in actual legal information, not just LLM imagination!
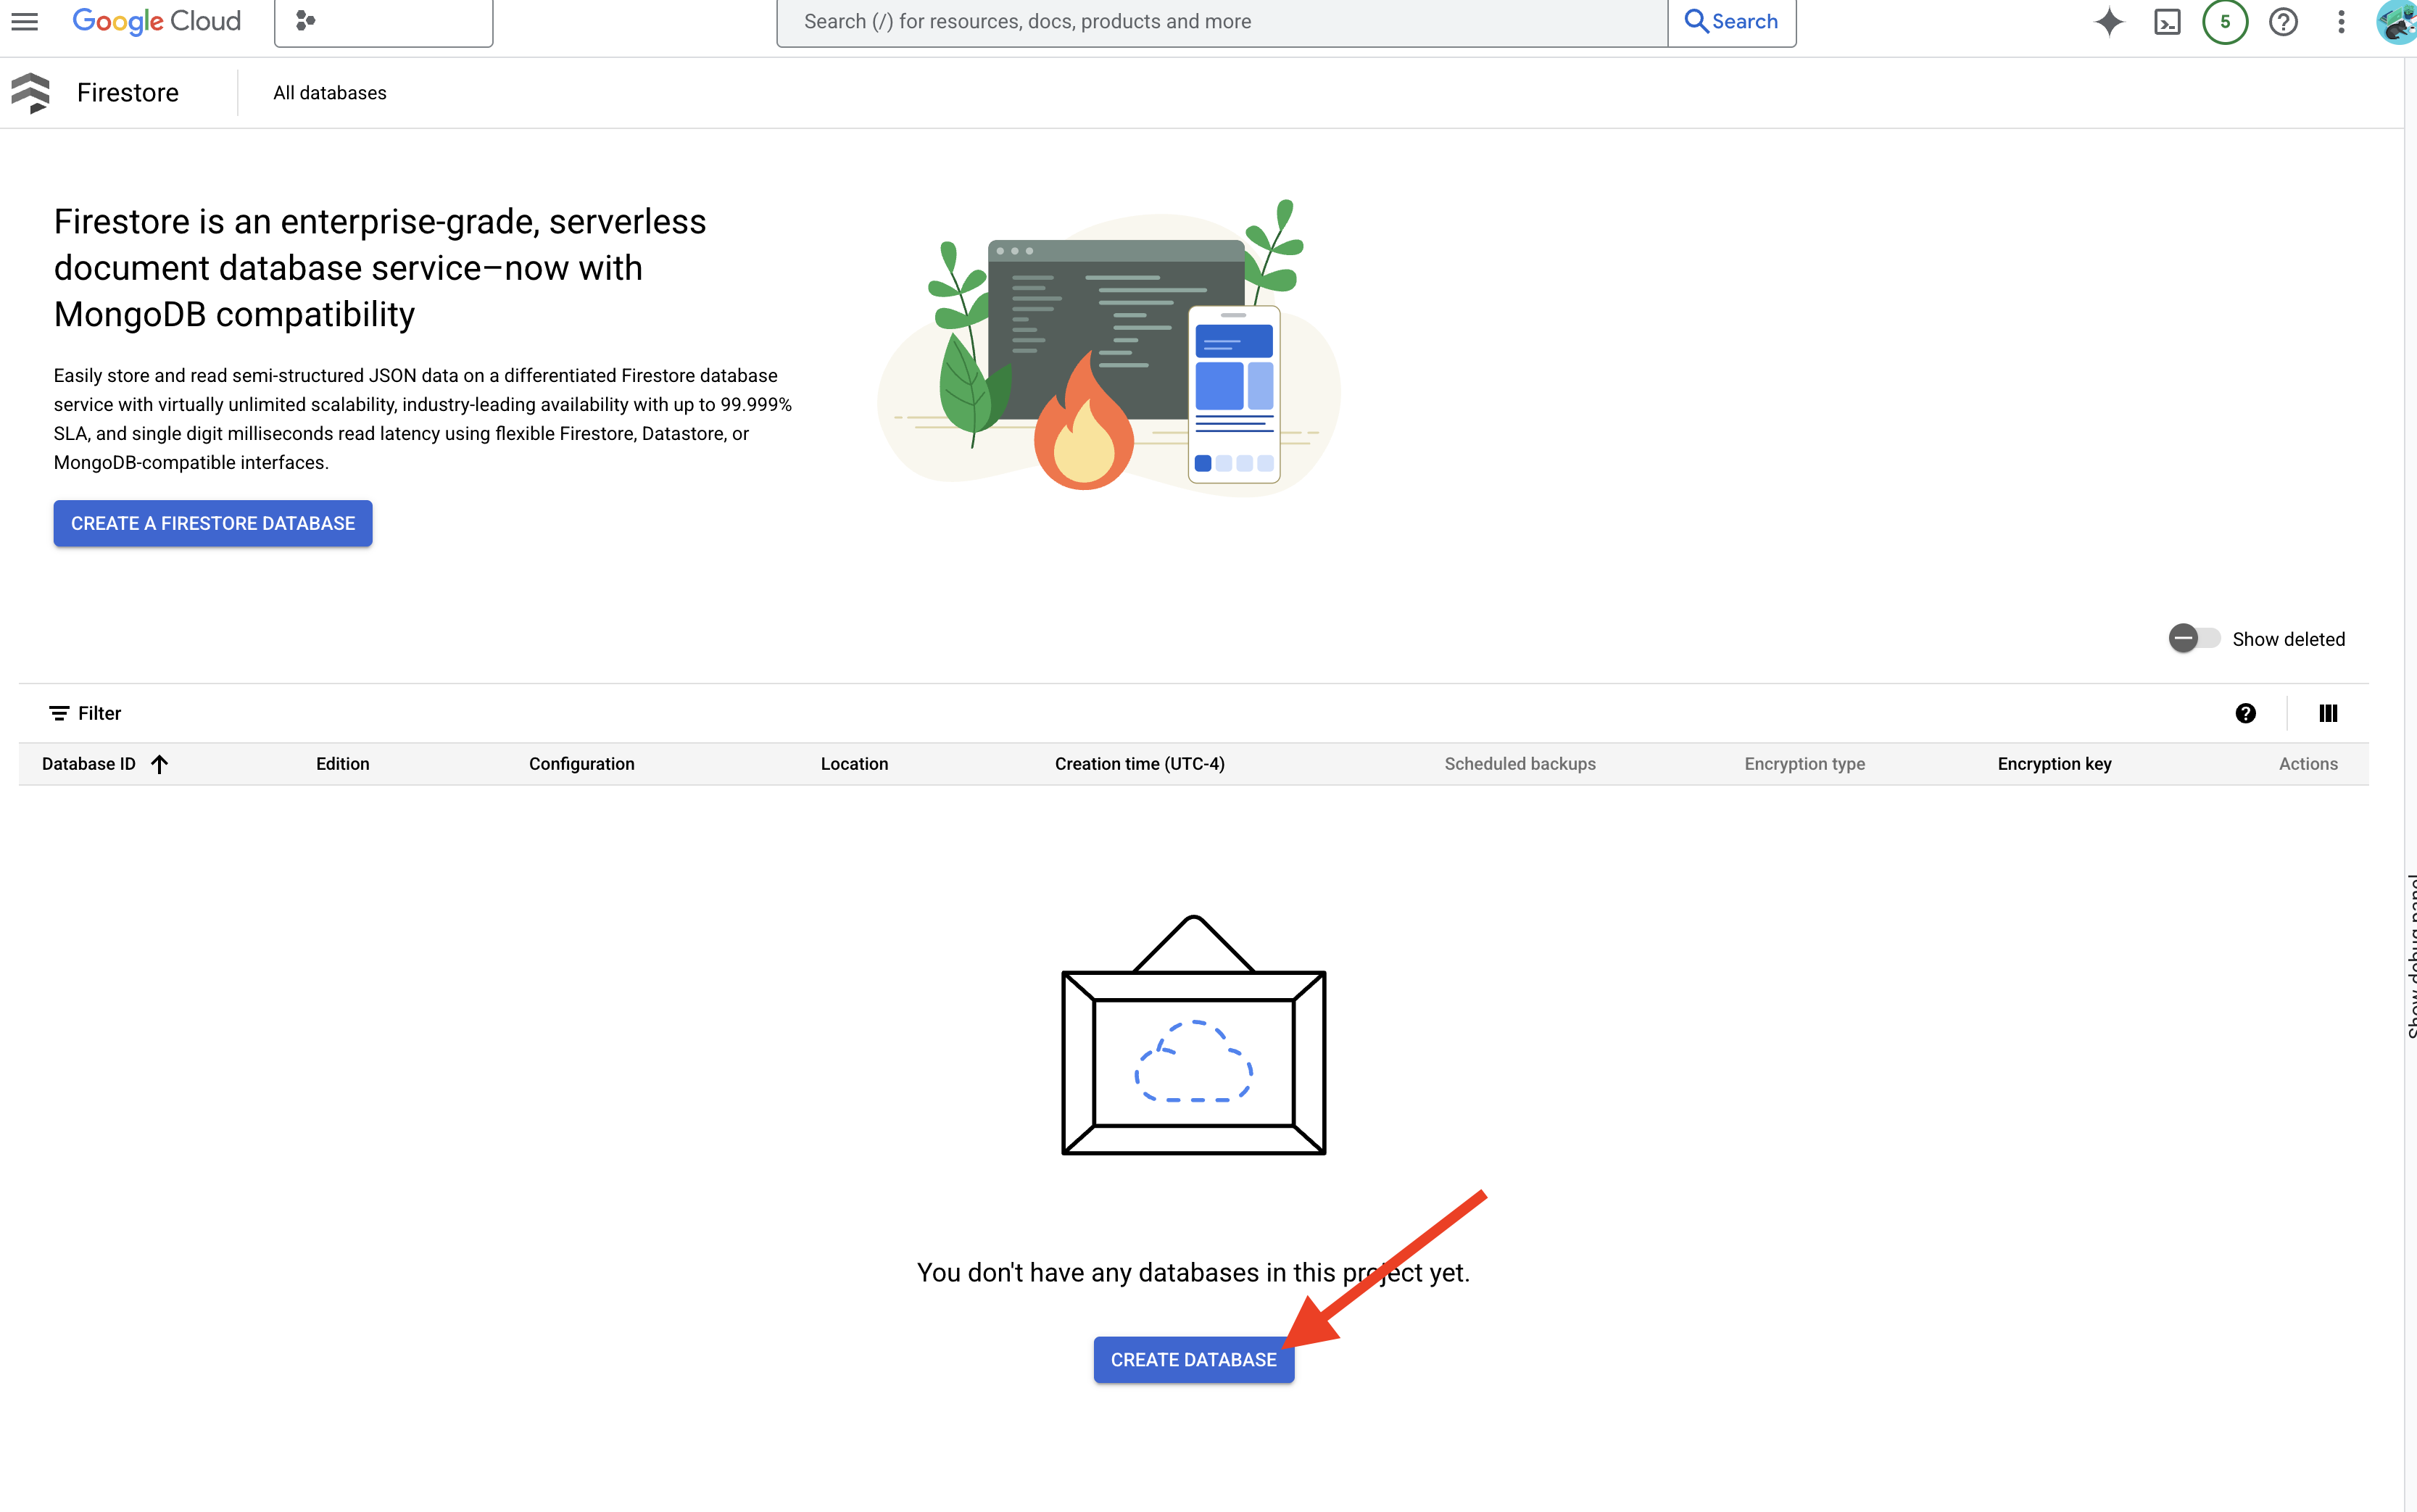
👉 In a new tab/window, go to the Firestore in Google Cloud console.
👉 Click Create Database
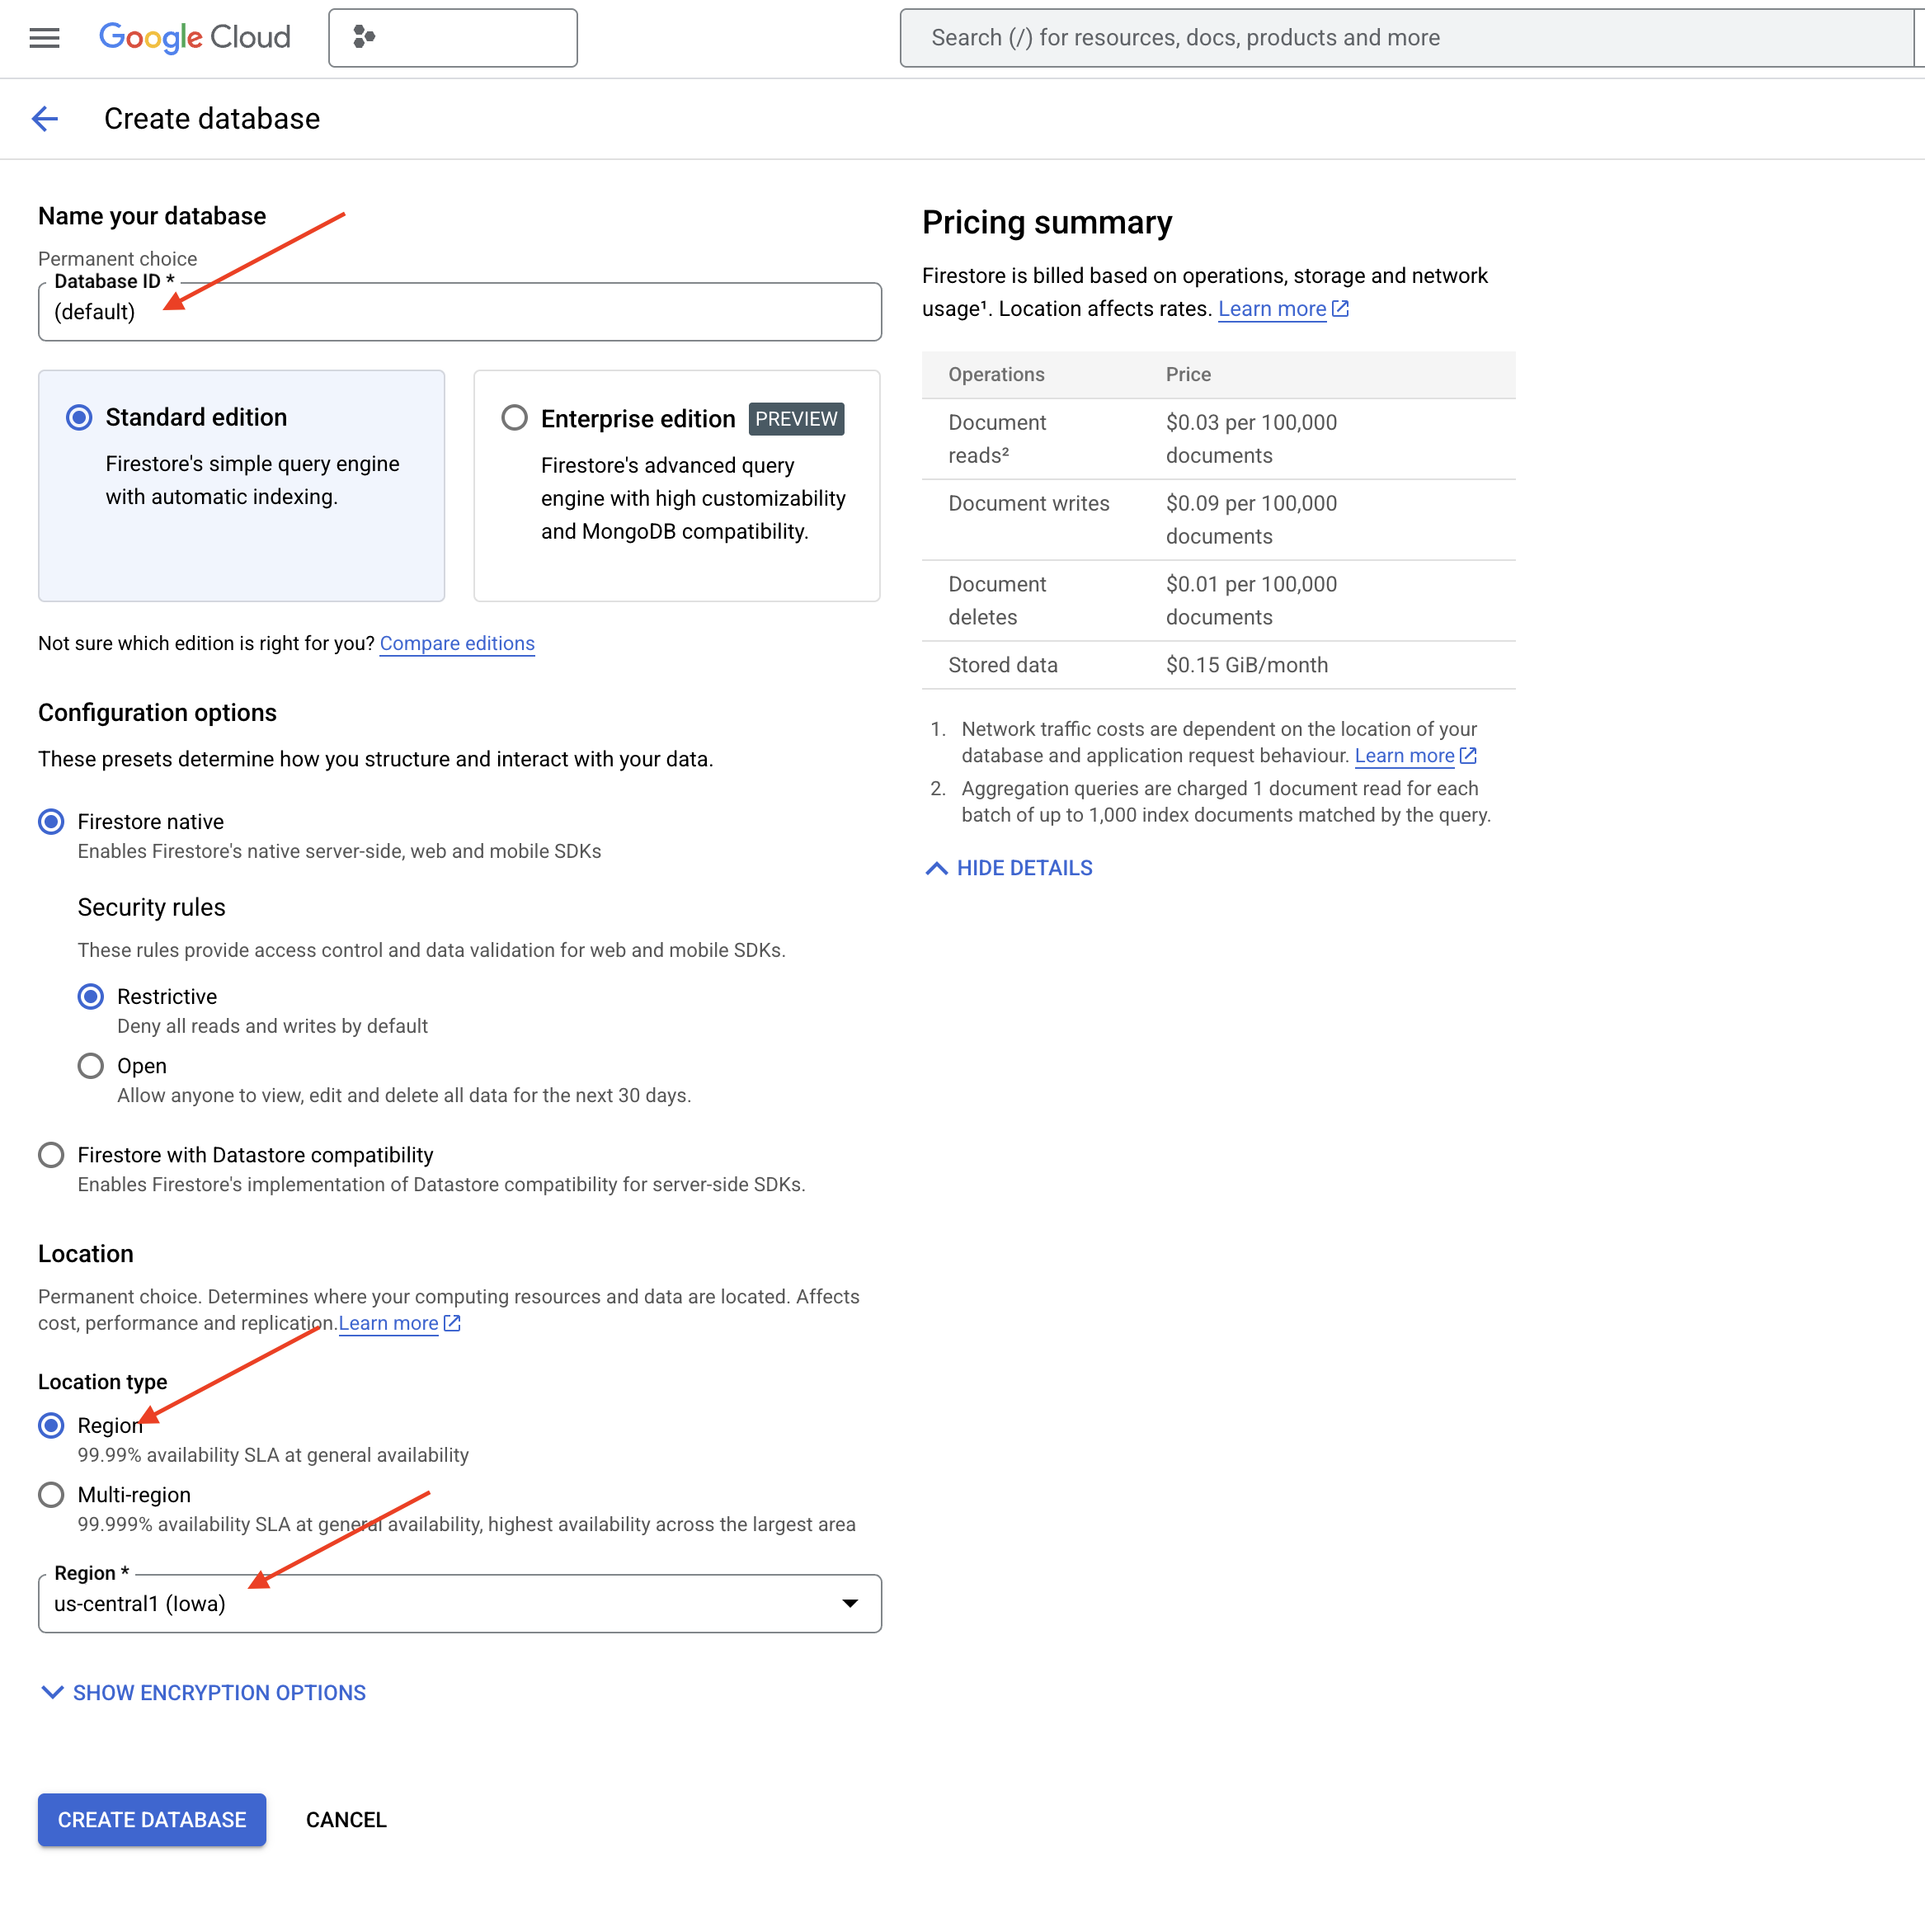
👉 Choose Native mode and database name as (default).
👉 Select single region: us-central1 , and cick Create Database. Firestore will provision your database, which might take a few moments.
👉 Back in the Cloud IDE's terminal - create a Vector Index on the embedding_vector field, to enable vector search in your legal_documents collection.
export PROJECT_ID=$(gcloud config get project)
gcloud firestore indexes composite create \
--collection-group=legal_documents \
--query-scope=COLLECTION \
--field-config field-path=embedding,vector-config='{"dimension":"768", "flat": "{}"}' \
--project=${PROJECT_ID}
Firestore will start creating the vector index. Index creation can take some time, especially for larger datasets. You'll see the index in a "Creating" state, and it will transition to "Ready" when it's built. 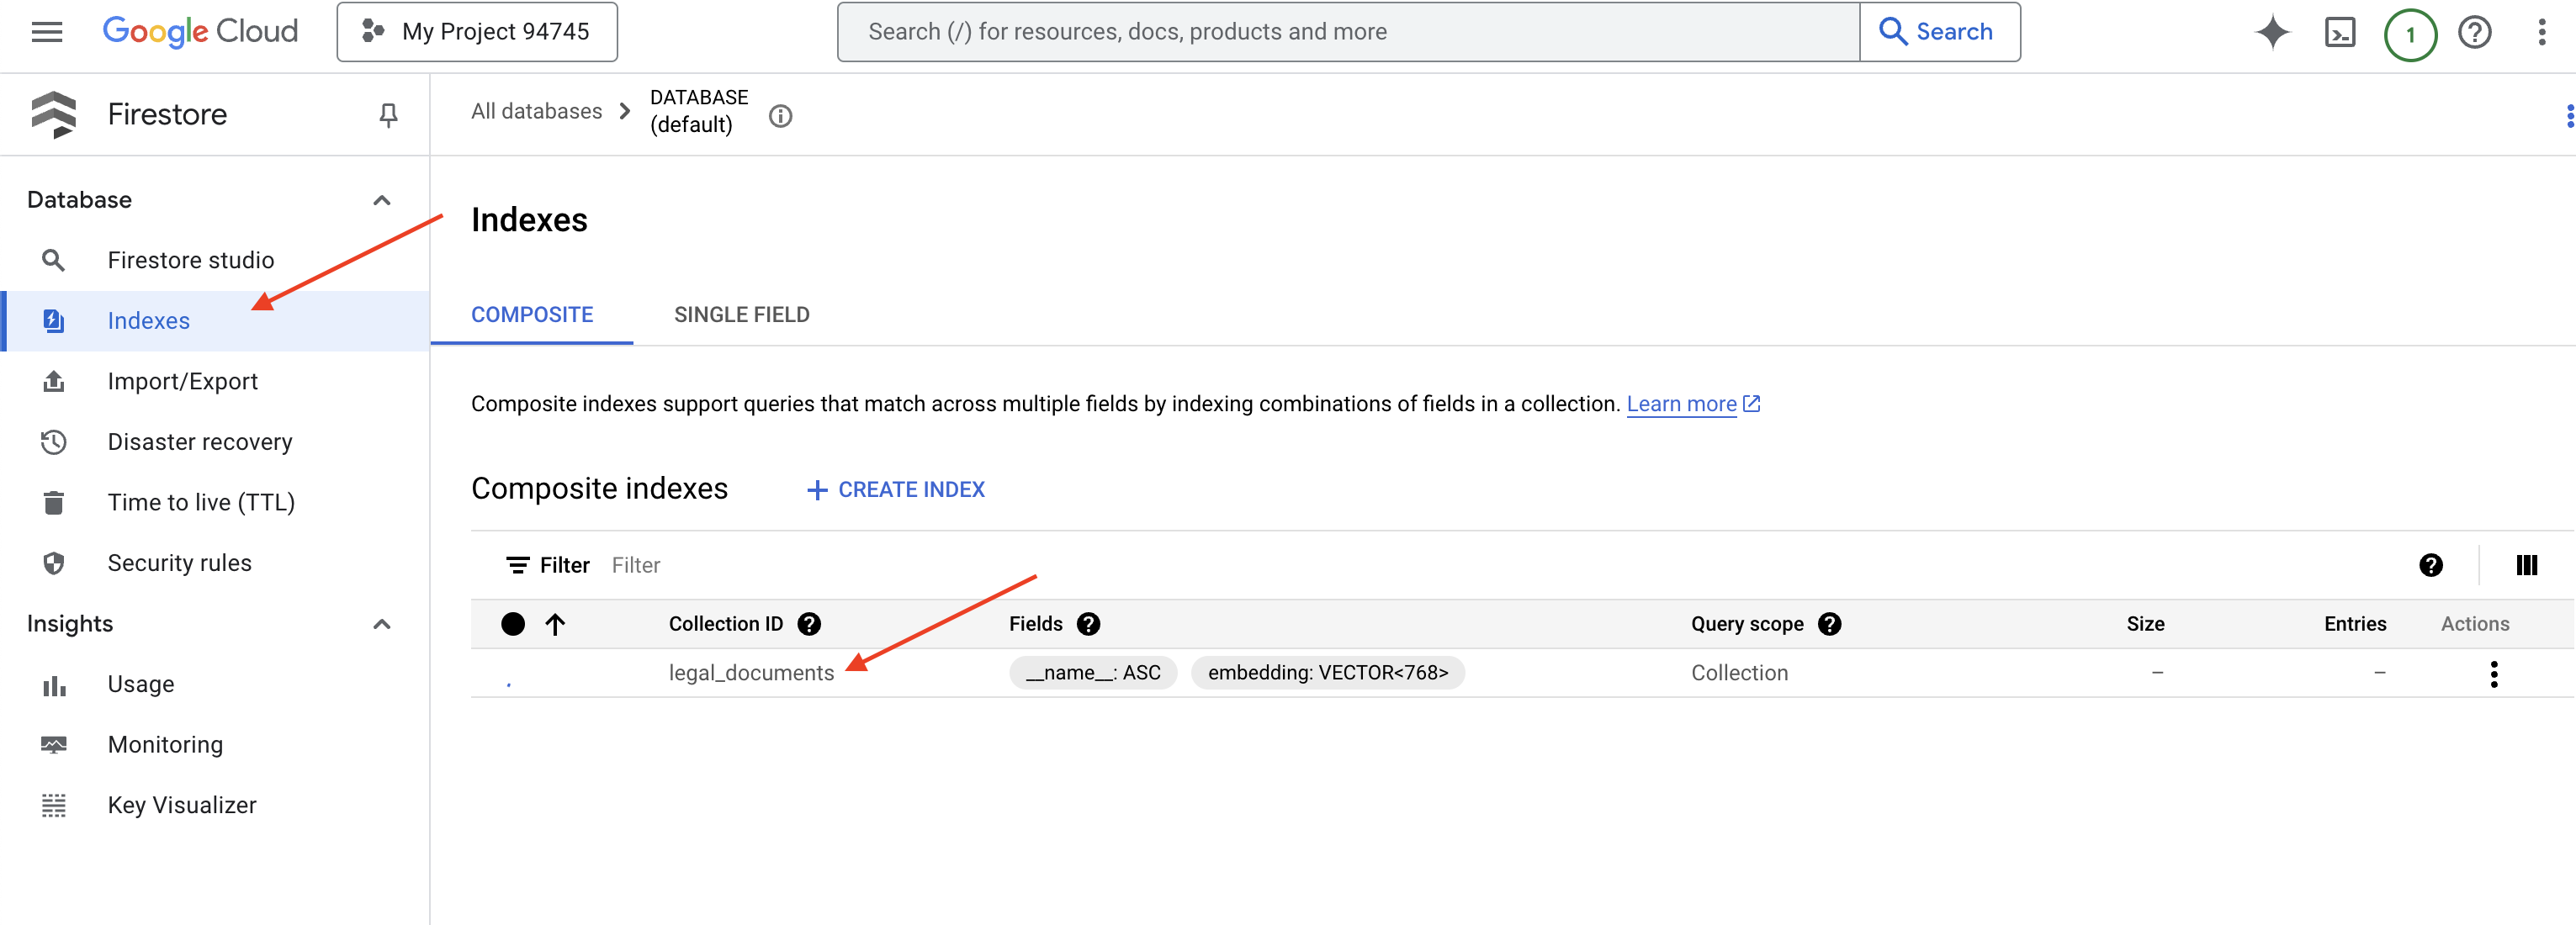
7. Loading Data into the Vector Store
Now that we understand RAG and our vector store, it's time to build the engine that populates our legal library! So, how do we make legal documents ‘searchable by meaning'? The magic is in embeddings! Think of embeddings as converting words, sentences, or even whole documents into numerical vectors – lists of numbers that capture their semantic meaning. Similar concepts get vectors that are ‘close' to each other in vector space. We use powerful models (like those from Vertex AI) to perform this conversion.
And to automate our document loading, we'll use Cloud Run functions and Eventarc. Cloud Run Functions is a lightweight, serverless container that runs your code only when needed. We'll package our document processing Python script into a container and deploy it as a Cloud Run Function.
👉 In a new tab/window, go to the Cloud Storage.
👉 Click on "Buckets" in the left-hand menu.
👉 Click on the "+ CREATE" button at the top.
👉 Configure your bucket (Important settings):
- bucket name: ‘yourprojectID'-doc-bucket (YOU MUST have the -doc-bucket suffix at the end)
- region: Select the
us-central1region. - Storage class: "Standard". Standard is suitable for frequently accessed data.
- Access control: Leave the default "Uniform access control" selected. This provides consistent, bucket-level access control.
- Advanced options: For this tutorial, the default settings are usually sufficient.
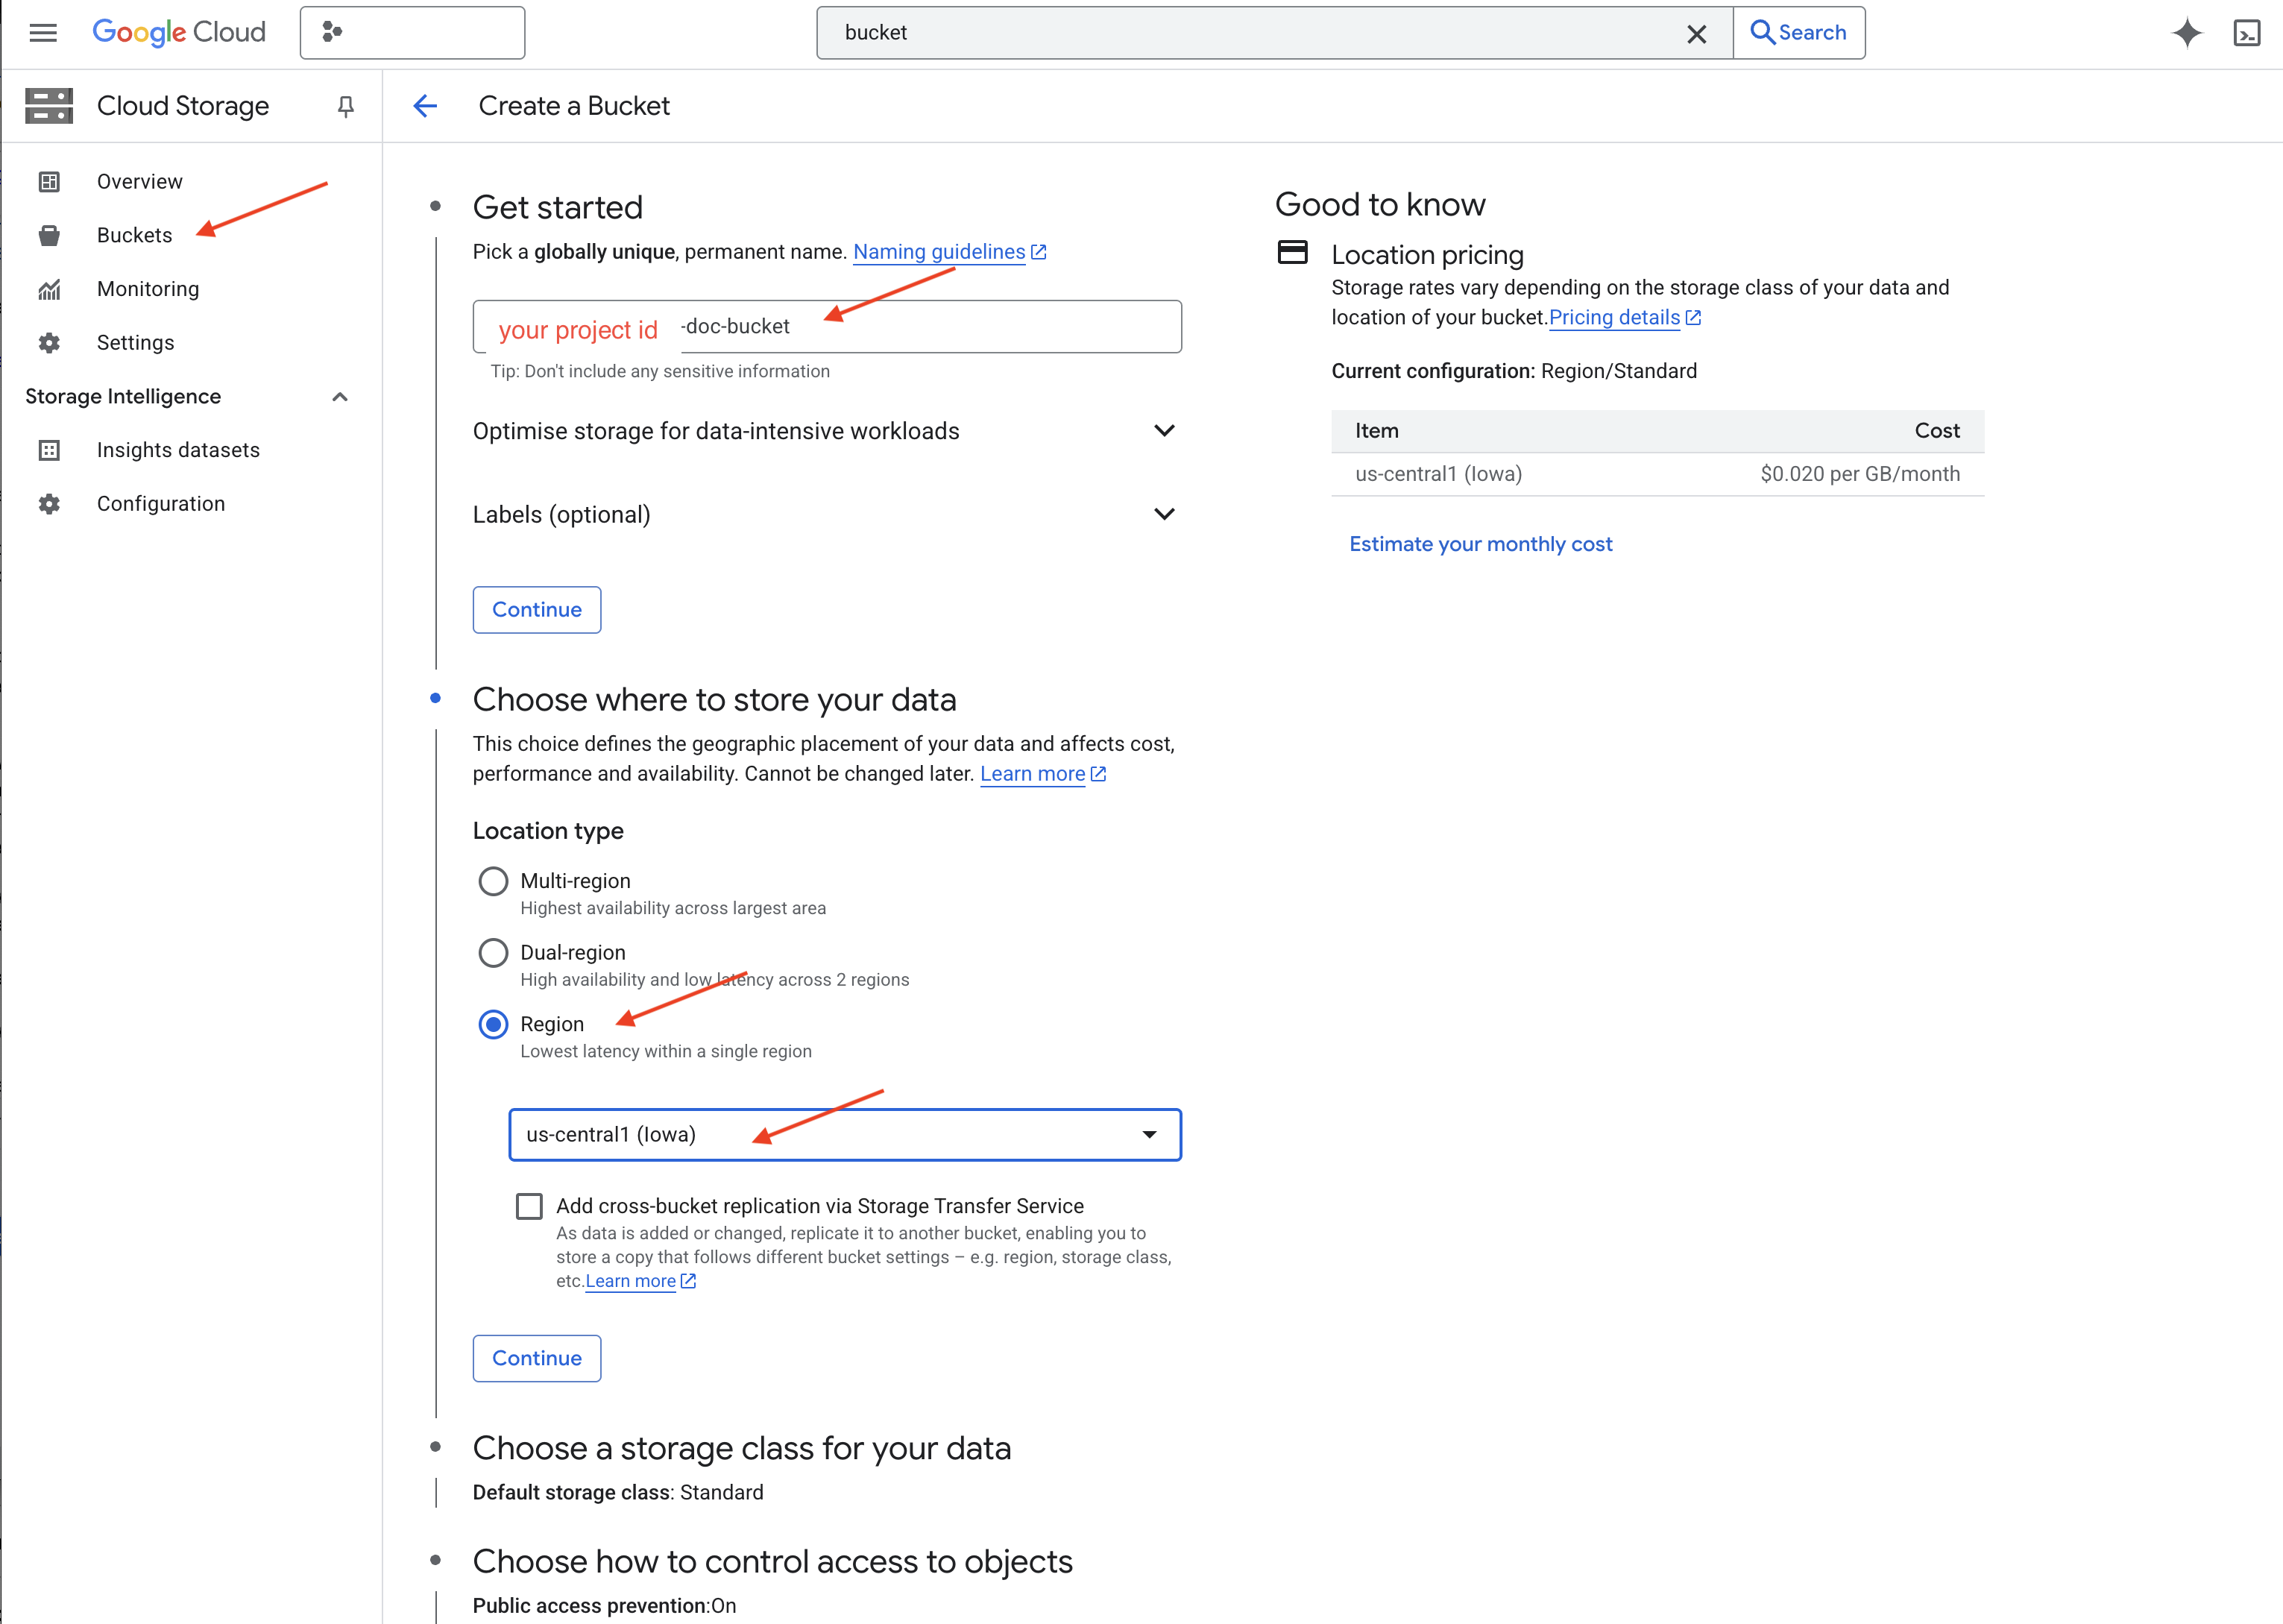
👉 Click the CREATE button to create your bucket.
👉 You may see a pop up about public access prevention. Leave the box checked and click ‘Confirm'.
You will now see your newly created bucket in the Buckets list. Remember your bucket name, you'll need it later.
8. Set up a Cloud Run Function
👉 In the Cloud Shell Code Editor, navigate to the working directory legal-eagle: Use cd command in the Cloud Editor terminal to create the folder.
cd ~/legal-eagle
mkdir loader
cd loader
👉 Create main.py,requirements.txt, and Dockerfile files. In the Cloud Shell terminal, use the touch command to create the files:
touch main.py requirements.txt Dockerfile
You'll see the newly created folder called *loader and the three files.
👉 Edit main.py under the loader folder. In the file explorer on the left, navigate to the directory where you created the files and double-click on main.py to open it in the editor.
Paste the following Python code into main.py:
This application processes new files uploaded to the GCS bucket, splits the text into chunks, generates embeddings for each chunk, and stores the chunks and their embeddings in Firestore.
import os
import json
from google.cloud import storage
import functions_framework
from langchain_google_vertexai import VertexAI, VertexAIEmbeddings
from langchain_google_firestore import FirestoreVectorStore
from langchain.text_splitter import RecursiveCharacterTextSplitter
import vertexai
PROJECT_ID = os.environ.get("GOOGLE_CLOUD_PROJECT")  # Get project ID from env
embedding_model = VertexAIEmbeddings(
    model_name="text-embedding-004" ,
    project=PROJECT_ID,)
COLLECTION_NAME = "legal_documents"
# Create a vector store
vector_store = FirestoreVectorStore(
    collection="legal_documents",
    embedding_service=embedding_model,
    content_field="original_text",
    embedding_field="embedding",
)
@functions_framework.cloud_event
def process_file(cloud_event):
    print(f"CloudEvent received: {cloud_event.data}")  # Print the parsed event data

    """Triggered by a Cloud Storage event.
       Args:
            cloud_event (functions_framework.CloudEvent): The CloudEvent
                containing the Cloud Storage event data.
    """
    try:
        event_data = cloud_event.data
        bucket_name = event_data['bucket']
        file_name = event_data['name']
    except (json.JSONDecodeError, AttributeError, KeyError) as e:  # Catch JSON errors
        print(f"Error decoding CloudEvent data: {e} - Data: {cloud_event.data}")
        return "Error processing event", 500  # Return an error response

    print(f"New file detected in bucket: {bucket_name}, file: {file_name}")
    storage_client = storage.Client()
    bucket = storage_client.bucket(bucket_name)
    blob = bucket.blob(file_name)
    try:
        # Download the file content as string (assuming UTF-8 encoded text file)
        file_content_string = blob.download_as_string().decode("utf-8")
        print(f"File content downloaded. Processing...")
        # Split text into chunks using RecursiveCharacterTextSplitter
        text_splitter = RecursiveCharacterTextSplitter(
            chunk_size=500,
            chunk_overlap=100,
            length_function=len,
        )
        text_chunks = text_splitter.split_text(file_content_string)
        print(f"Text split into {len(text_chunks)} chunks.")

        # Add the docs to the vector store
        vector_store.add_texts(text_chunks)
        print(f"File processing and Firestore upsert complete for file: {file_name}")
        return "File processed successfully", 200  #  Return success response
    except Exception as e:
        print(f"Error processing file {file_name}: {e}")
Edit requirements.txt.Paste the following lines into the file:
Flask==2.3.3
requests==2.31.0
google-generativeai>=0.2.0
langchain
langchain_google_vertexai
langchain-community
langchain-google-firestore
google-cloud-storage
functions-framework
9. Test and build Cloud Run Function
👉 We'll run this in a virtual environment and install the necessary Python libraries for the Cloud Run function.
cd ~/legal-eagle/loader
python -m venv env
source env/bin/activate
pip install -r requirements.txt
👉 Start a local emulator for the Cloud Run function
functions-framework --target process_file --signature-type=cloudevent --source main.py
👉 Keep the last terminal running, open a new terminal, and run the command to upload a file to the bucket.
export DOC_BUCKET_NAME=$(gcloud storage buckets list --format="value(name)" | grep doc-bucket)
gsutil cp ~/legal-eagle/court_cases/case-01.txt gs://$DOC_BUCKET_NAME/

👉 While the emulator is running, you can send test CloudEvents to it. You'll need a separate termnial in the IDE for this.
curl -X POST -H "Content-Type: application/json" \
     -d "{
       \"specversion\": \"1.0\",
       \"type\": \"google.cloud.storage.object.v1.finalized\",
       \"source\": \"//storage.googleapis.com/$DOC_BUCKET_NAME\",
       \"subject\": \"objects/case-01.txt\",
       \"id\": \"my-event-id\",
       \"time\": \"2024-01-01T12:00:00Z\",
       \"data\": {
         \"bucket\": \"$DOC_BUCKET_NAME\",
         \"name\": \"case-01.txt\"
       }
     }" http://localhost:8080/
It should return OK.
👉 You'll verify Data in Firestore, go to the Google Cloud Console and navigate to "Databases" then "Firestore" and select the "Data" tab and then the legal_documents collection. You'll see new documents have been created in your collection, each representing a chunk of the text from the uploaded file. 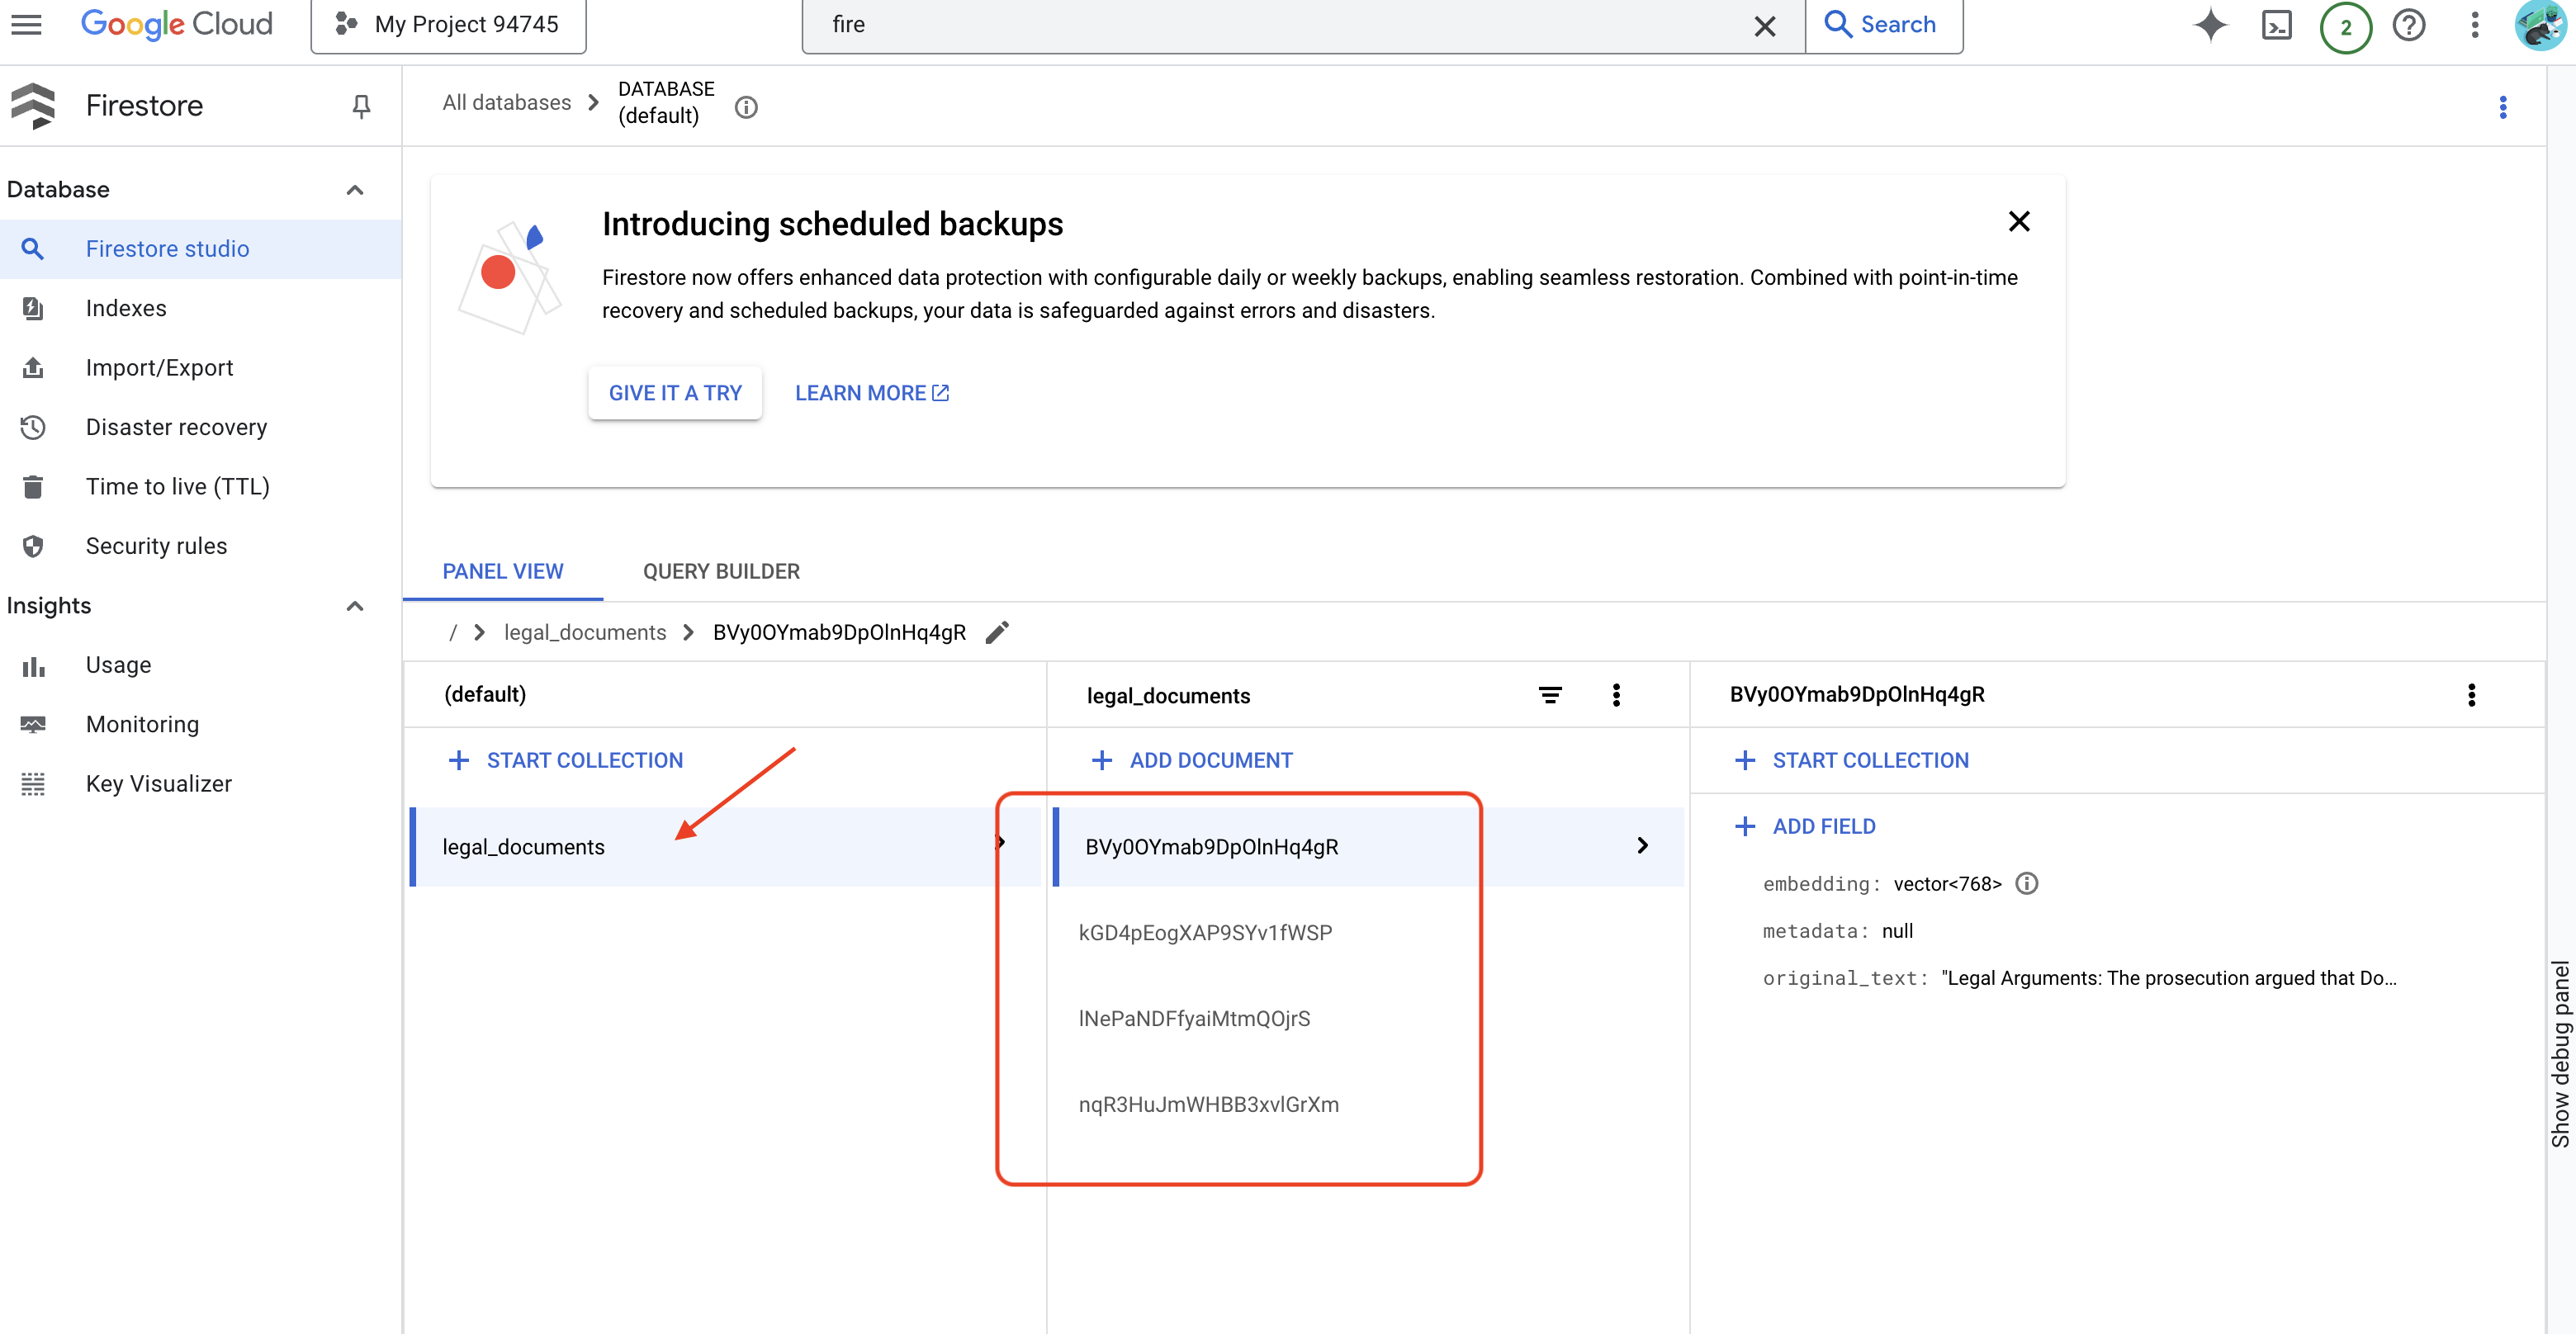
👉 In the terminal running the emulator, type Ctrl+C to exit. And close the secound terminal.
👉 Run deactivate to exit the virtual environment.
deactivate
10. Build container image and push to Artifacts repositories
👉 Time to deploy this to the cloud. In the file explorer, double-click on Dockerfile. Ask Gemini to generate the dockerfile for you, open the Gemini Code Assist and use the following prompt to generate the file.
In the loader folder,
Generate a Dockerfile for a Python 3.12 Cloud Run service that uses functions-framework. It needs to:
1. Use a Python 3.12 slim base image.
2. Set the working directory to /app.
3. Copy requirements.txt and install Python dependencies.
4. Copy main.py.
5. Set the command to run functions-framework, targeting the 'process_file' function on port 8080
For best practice, it's recommend to click on the Diff with Open File(two arrows with opposite directions, and accept the changes.) 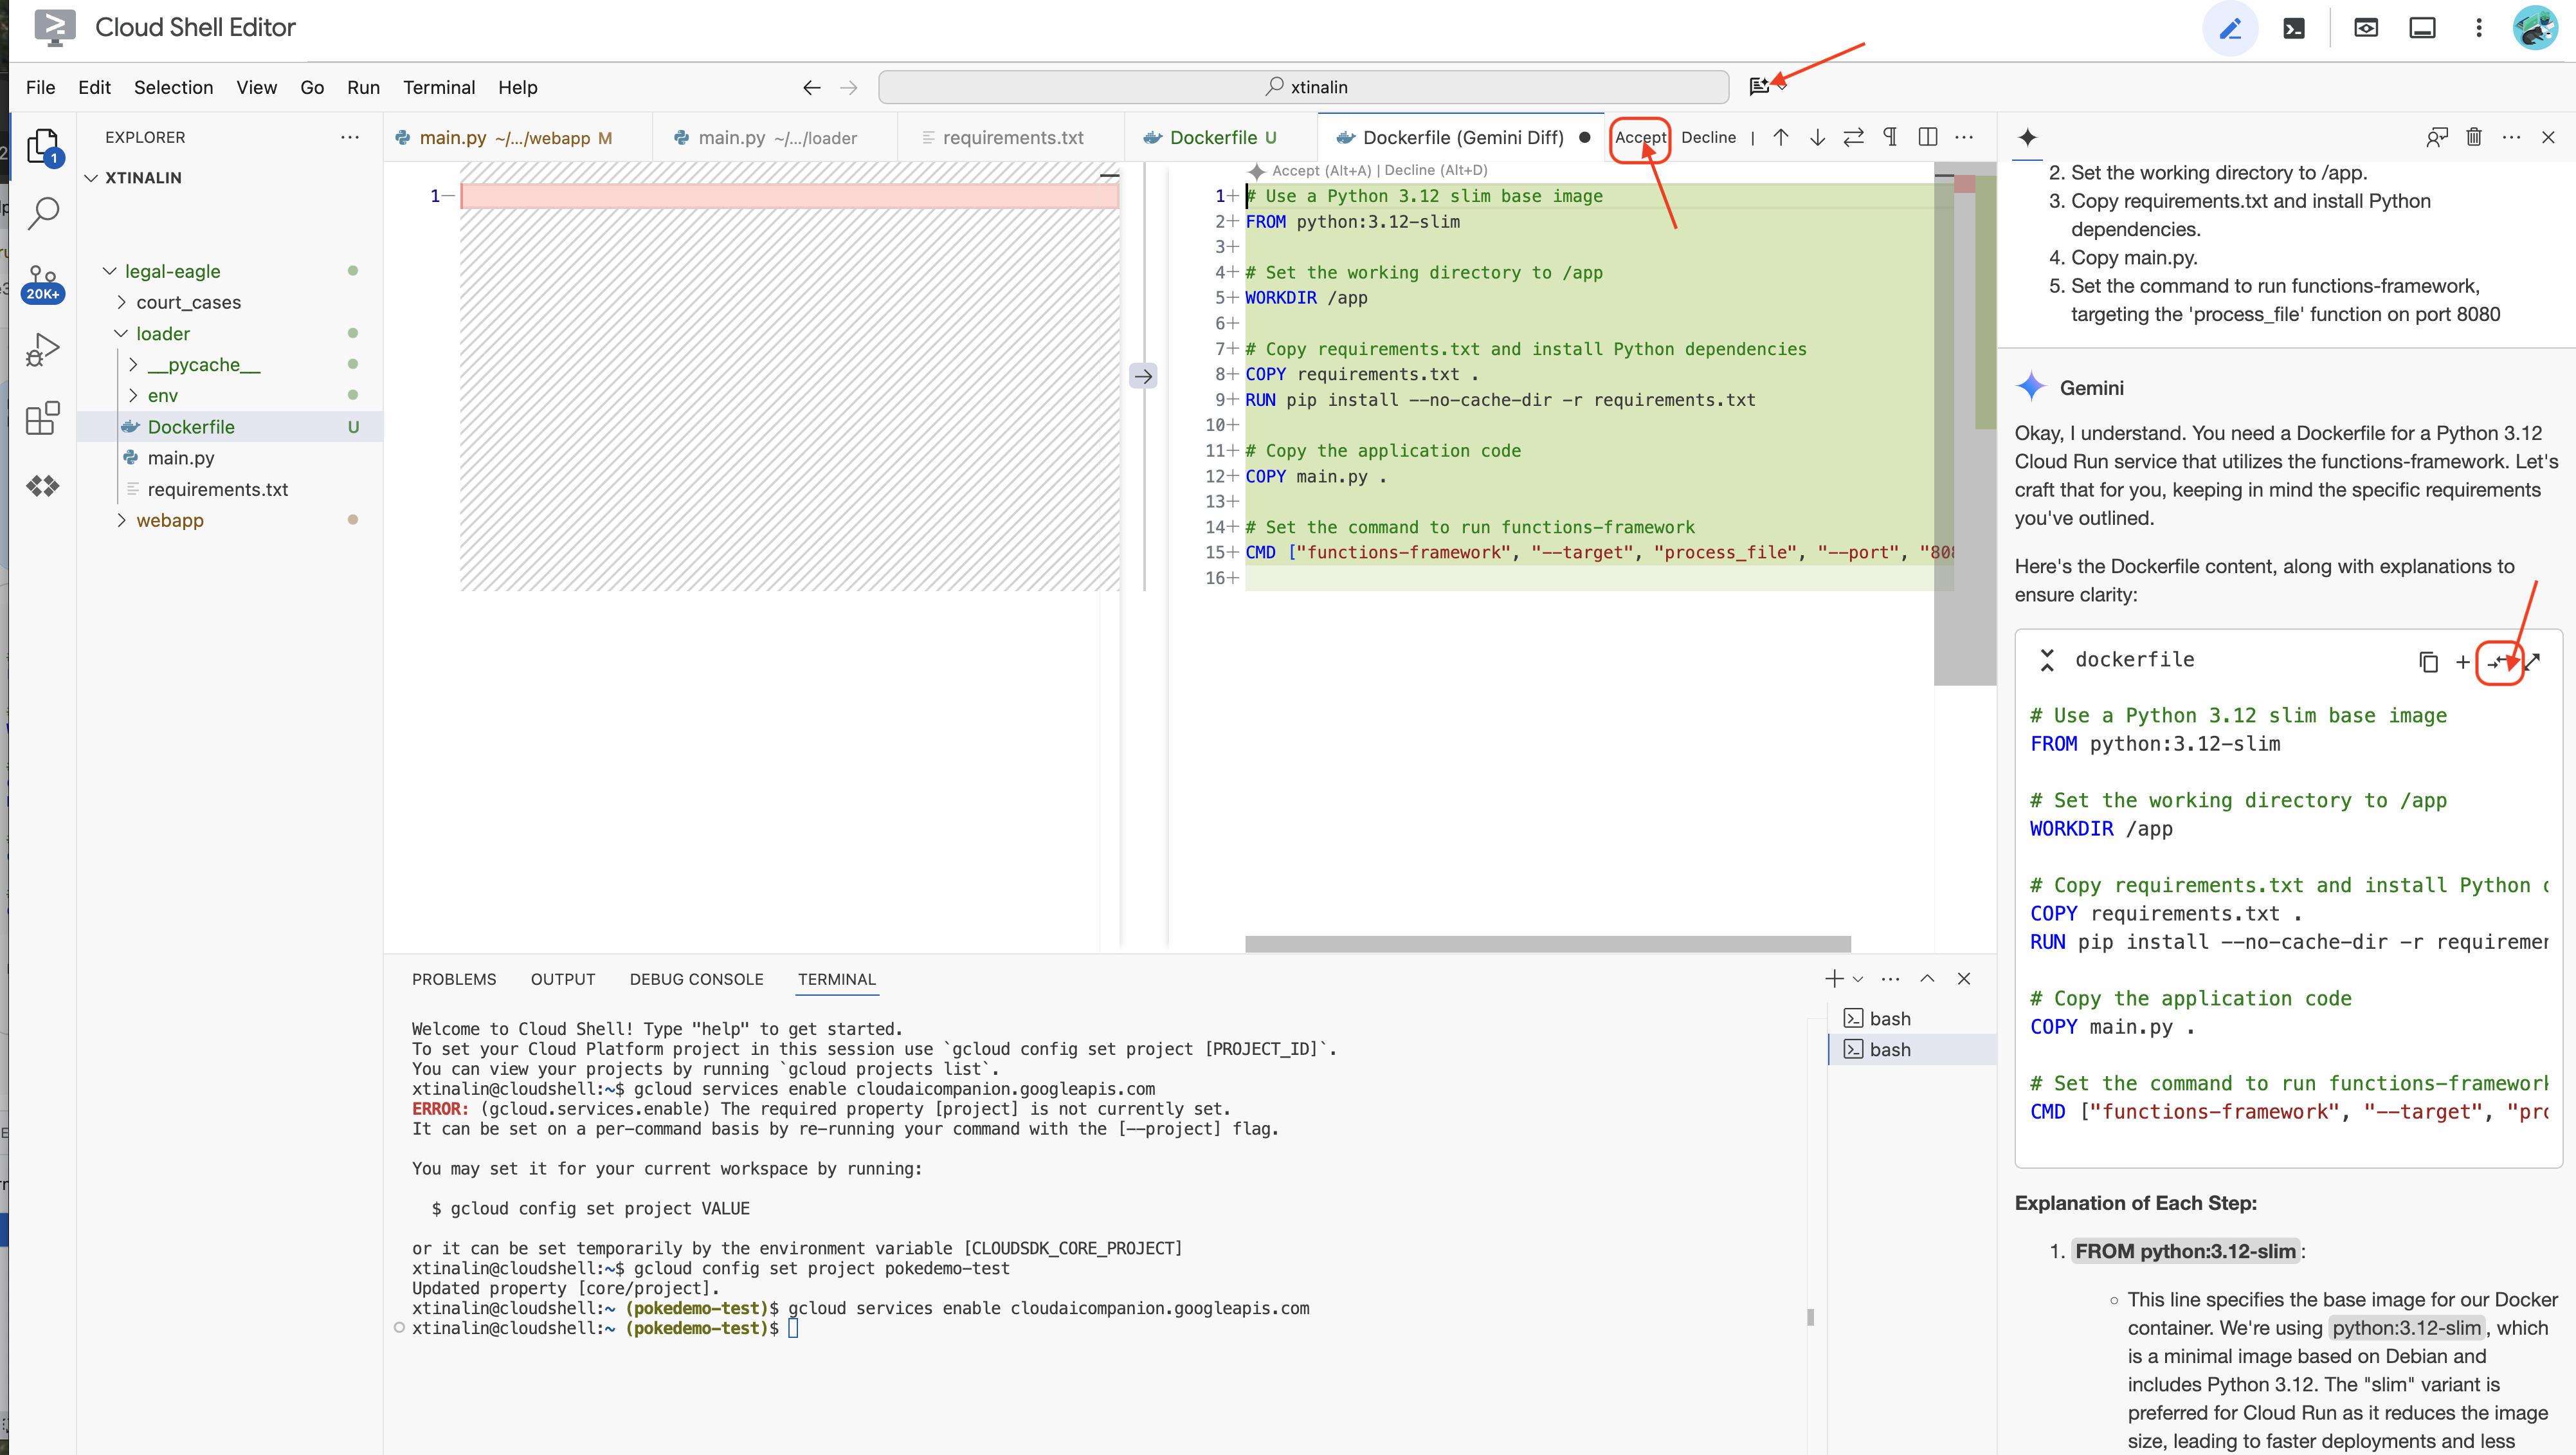
👉 If you are new to Containers, here is a working example:
# Use a Python 3.12 slim base image
FROM python:3.12-slim
# Set the working directory to /app
WORKDIR /app
# Copy requirements.txt and install Python dependencies
COPY requirements.txt .
RUN pip install --no-cache-dir -r requirements.txt
# Copy main.py
COPY main.py .
# Set the command to run functions-framework
CMD ["functions-framework", "--target", "process_file", "--port", "8080"]
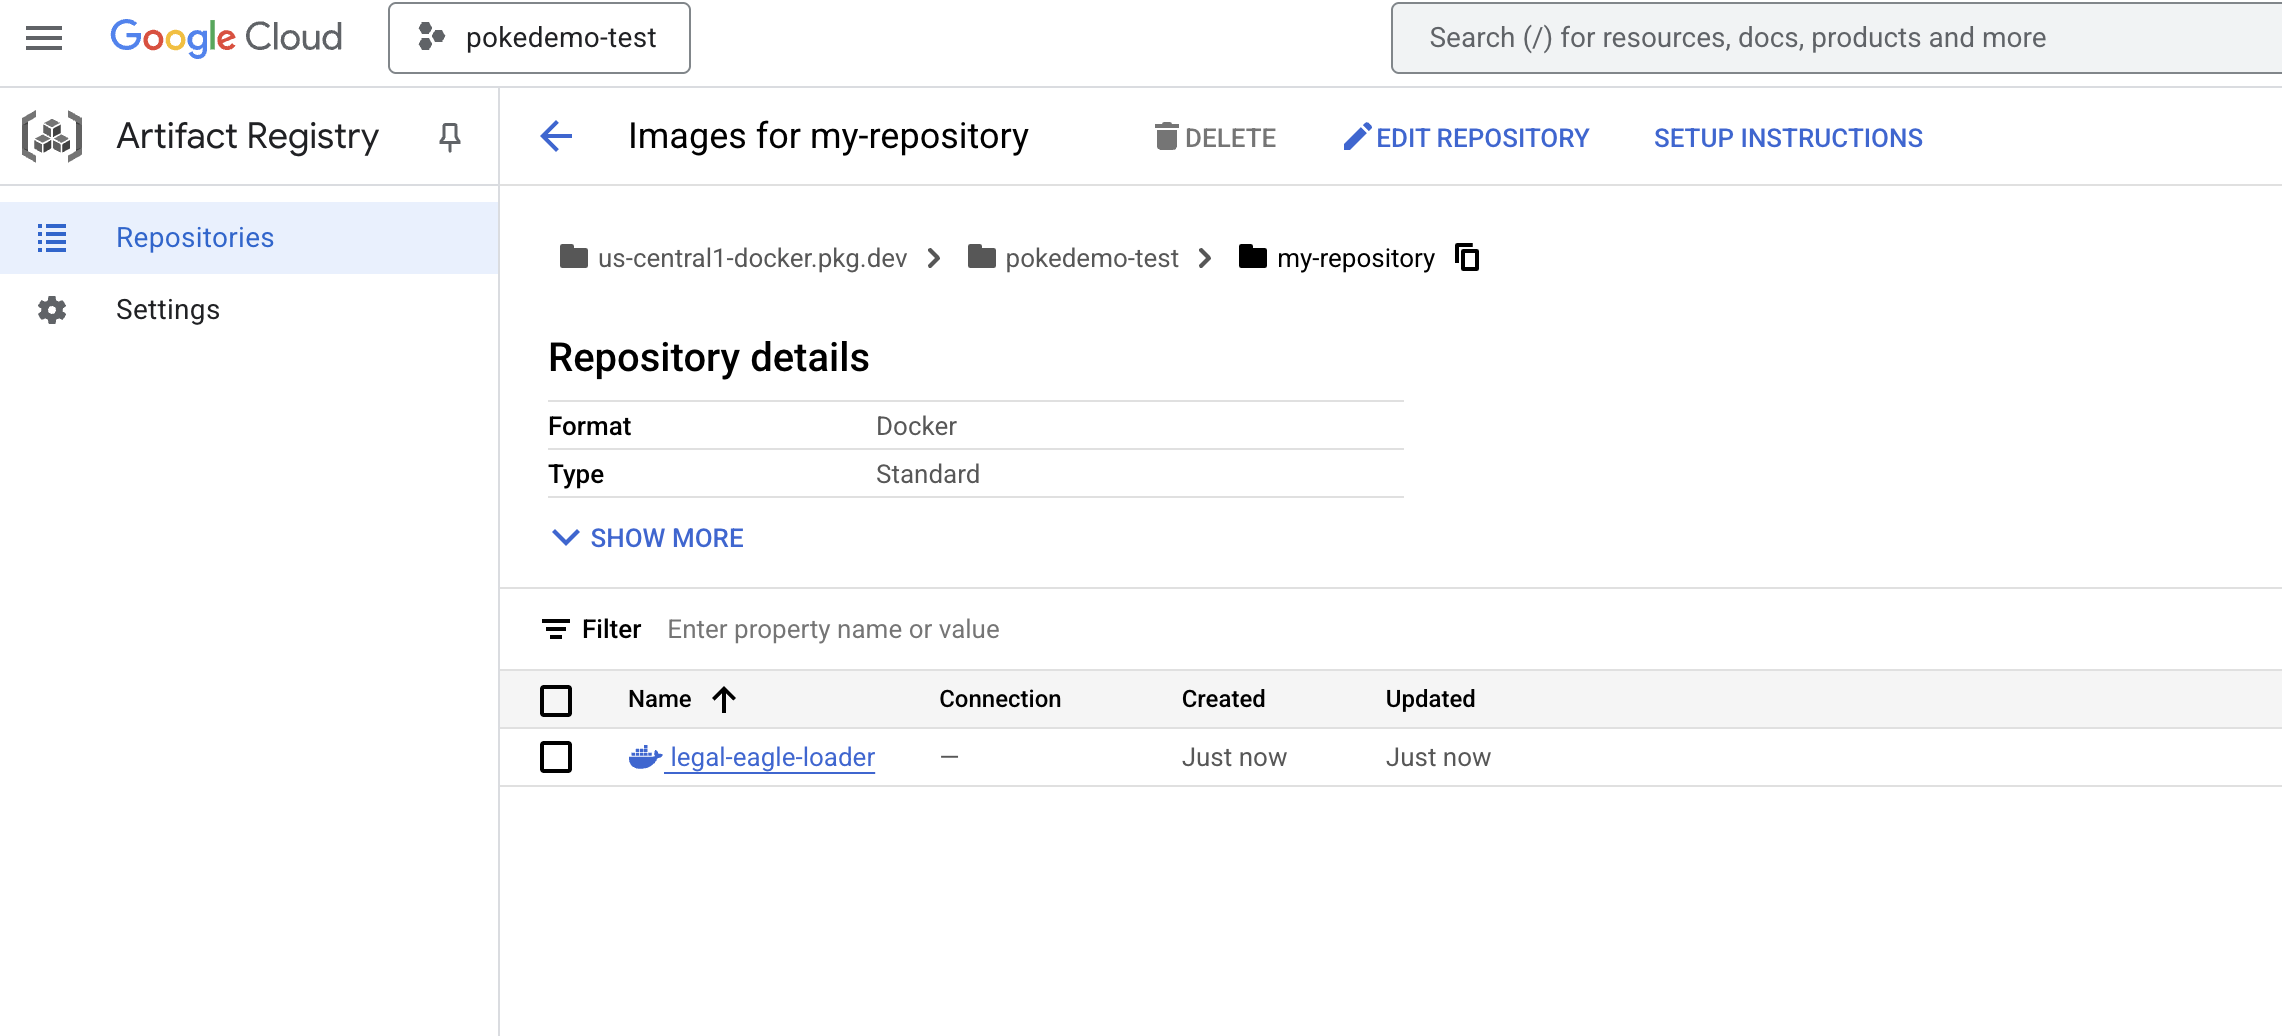
👉 In the terminal, create an artifacts repository to store the docker image we are going to build.
gcloud artifacts repositories create my-repository \
    --repository-format=docker \
    --location=us-central1 \
    --description="My repository"
You should see Created repository [my-repository].
👉 Run the following command to build the Docker image.
cd ~/legal-eagle/loader
export PROJECT_ID=$(gcloud config get project)
docker build -t gcr.io/${PROJECT_ID}/legal-eagle-loader .
👉 You'll push that to the registry now
export PROJECT_ID=$(gcloud config get project)
docker tag gcr.io/${PROJECT_ID}/legal-eagle-loader us-central1-docker.pkg.dev/${PROJECT_ID}/my-repository/legal-eagle-loader
docker push us-central1-docker.pkg.dev/${PROJECT_ID}/my-repository/legal-eagle-loader
The Docker image is now available in the my-repository Artifacts Repository.
11. Create the Cloud Run function and set up Eventarc trigger
Before diving into the specifics of deploying our legal document loader, let's briefly understand the components involved: Cloud Run is a fully managed serverless platform that allows you to deploy containerized applications quickly and easily. It abstracts away the infrastructure management, letting you focus on writing and deploying your code.
We'll be deploying our document loader as a Cloud Run service. Now, let's proceed with setting up our Cloud Run function:
👉 In the Google Cloud Console, navigate to Cloud Run.
👉 Go to Deploy Container and in the drop down click on SERVICE.
👉 Configure your Cloud Run service:
- Container image: Click "Select" in the URL field. Find the image URL you pushed to Artifact Registry (e.g., us-central1-docker.pkg.dev/your-project-id/my-repository/legal-eagle-loader/yourimage).
- Service name:
legal-eagle-loader - Region: Select the
us-central1region. - Authentication: For the purpose of this workshop, you can allow "Allow unauthenticated invocations". For production, you'll likely want to restrict access.
- Container, Networking, Security : default.
👉 Click CREATE. Cloud Run will deploy your service. 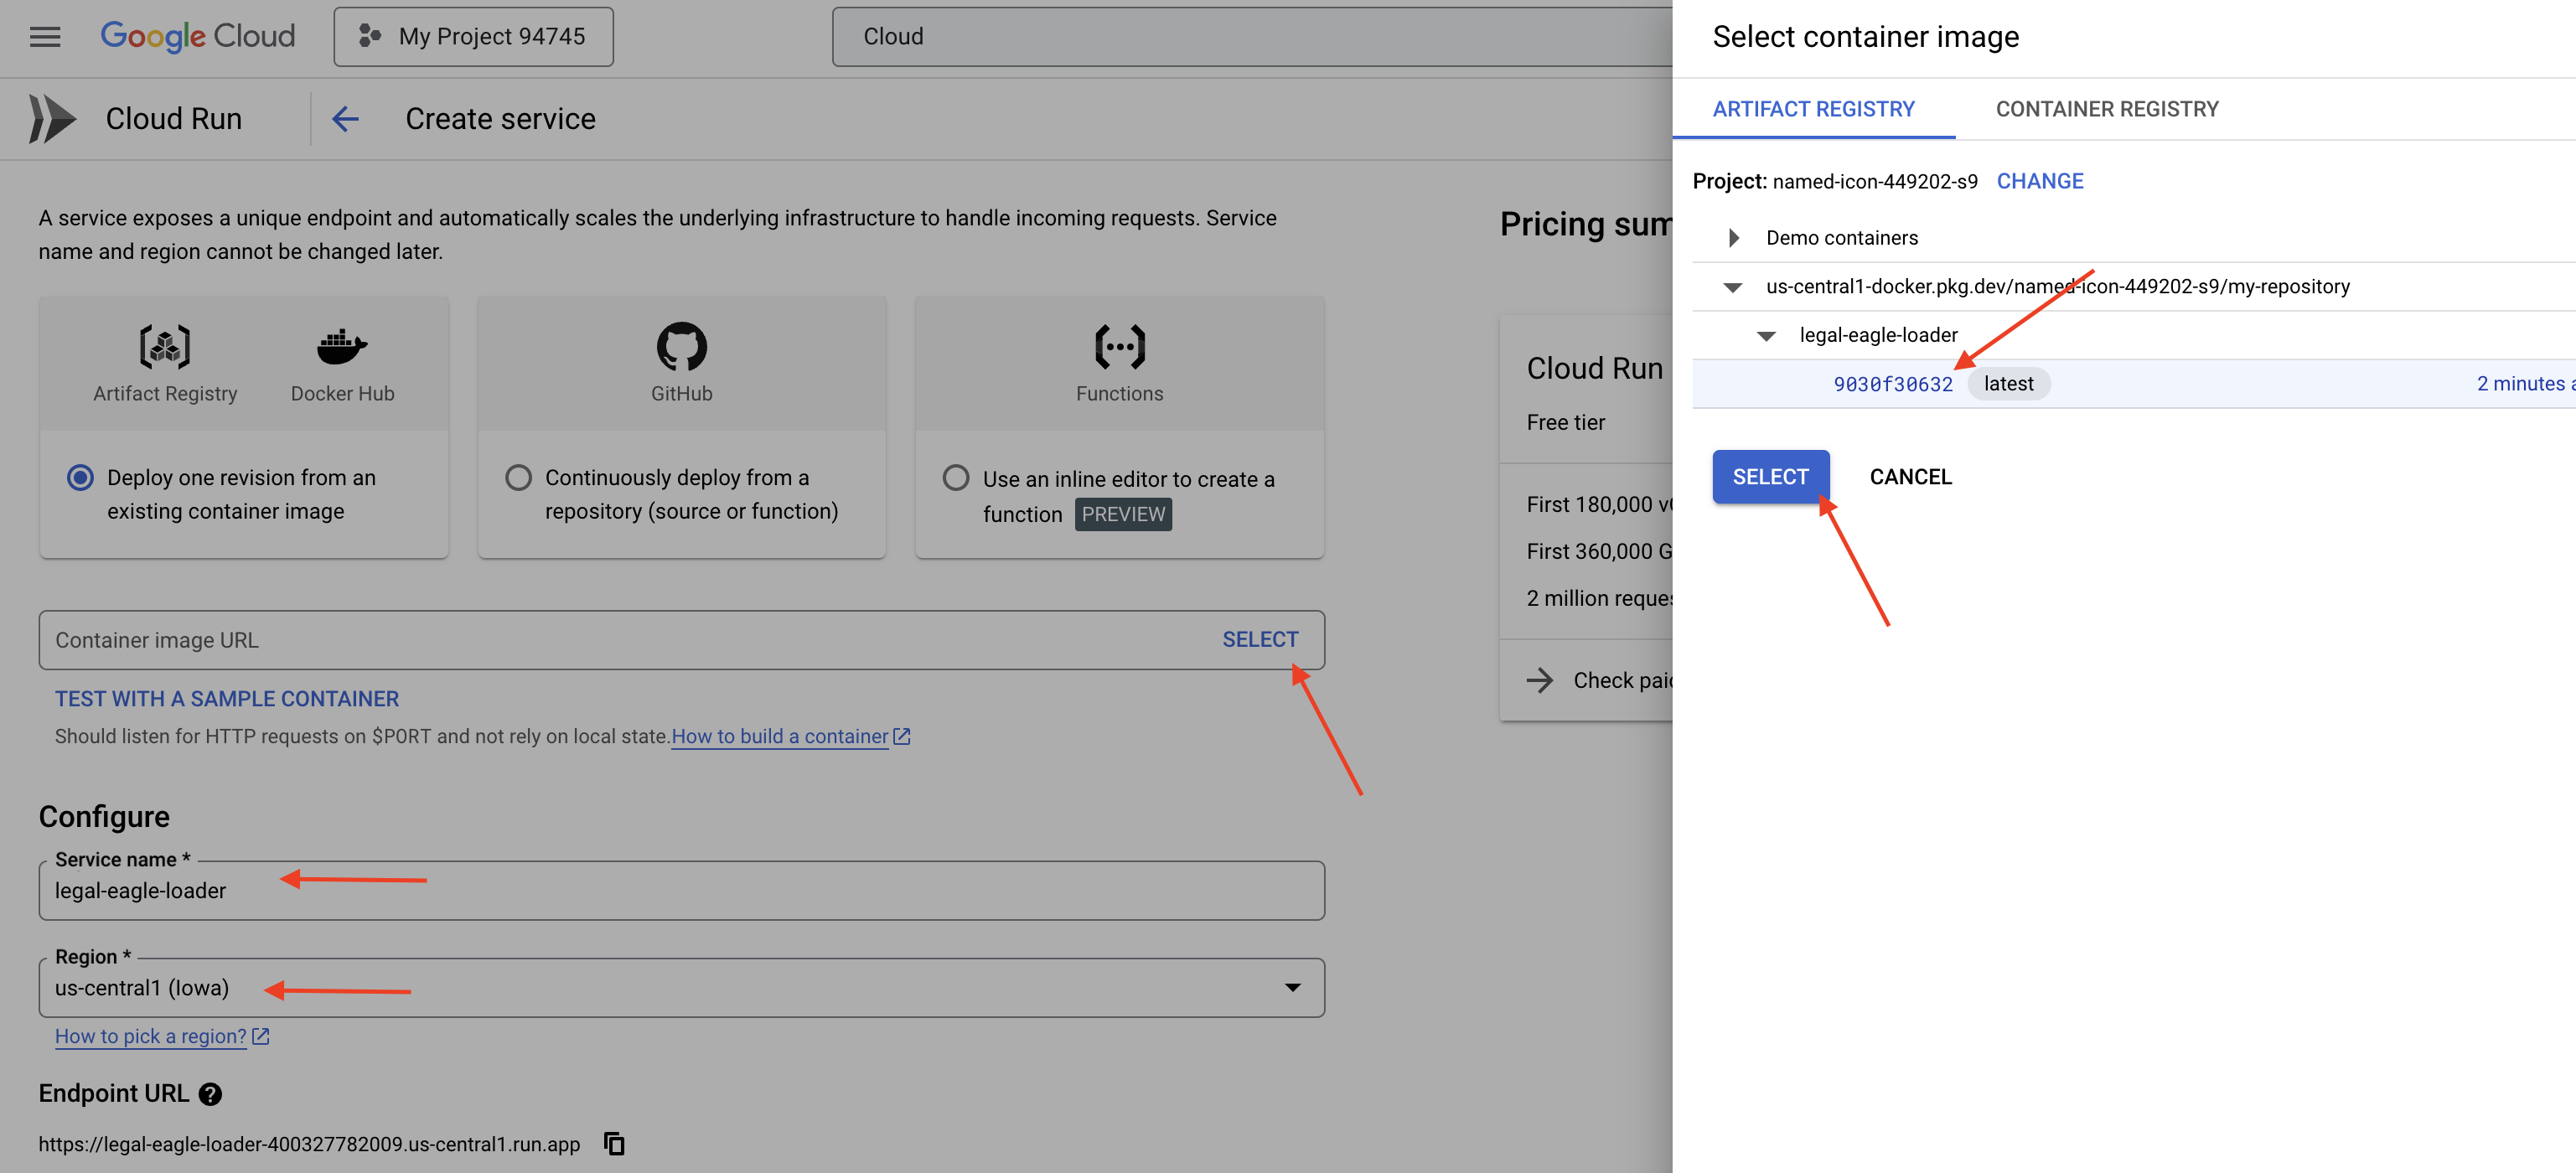
To trigger this service automatically when new files are added to our storage bucket, we will use Eventarc. Eventarc allows you to create event-driven architectures by routing events from various sources to your services.
By setting up Eventarc, our Cloud Run service will automatically load the newly added documents into Firestore as soon as they are uploaded, enabling real-time data updates for our RAG application.
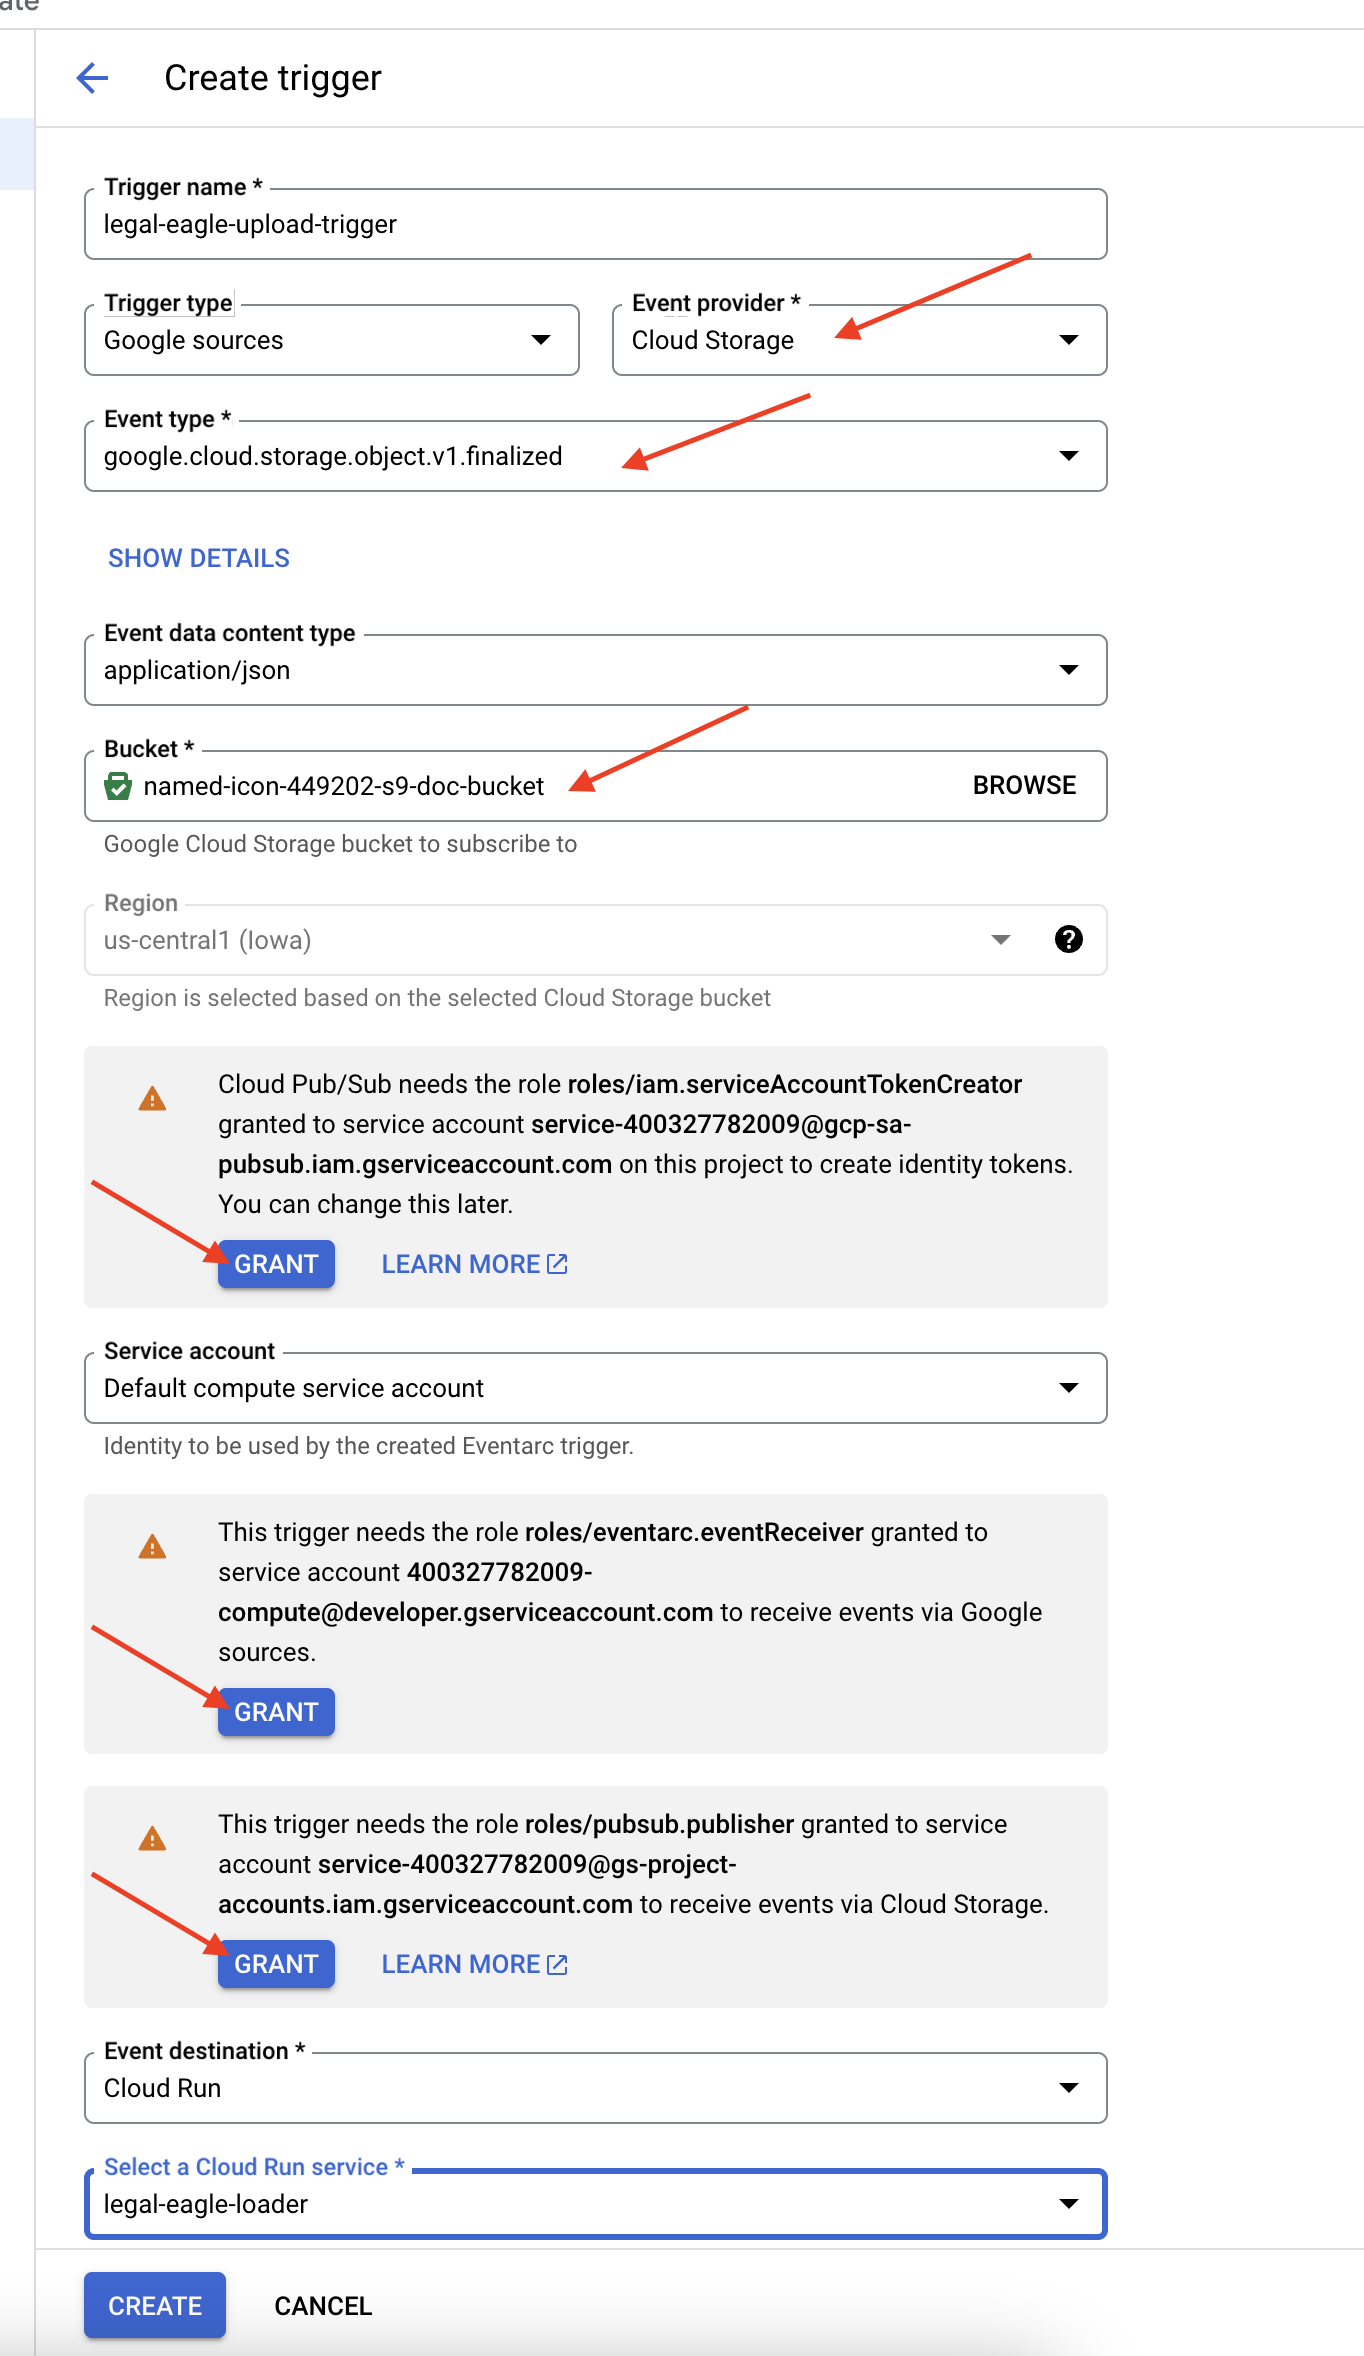
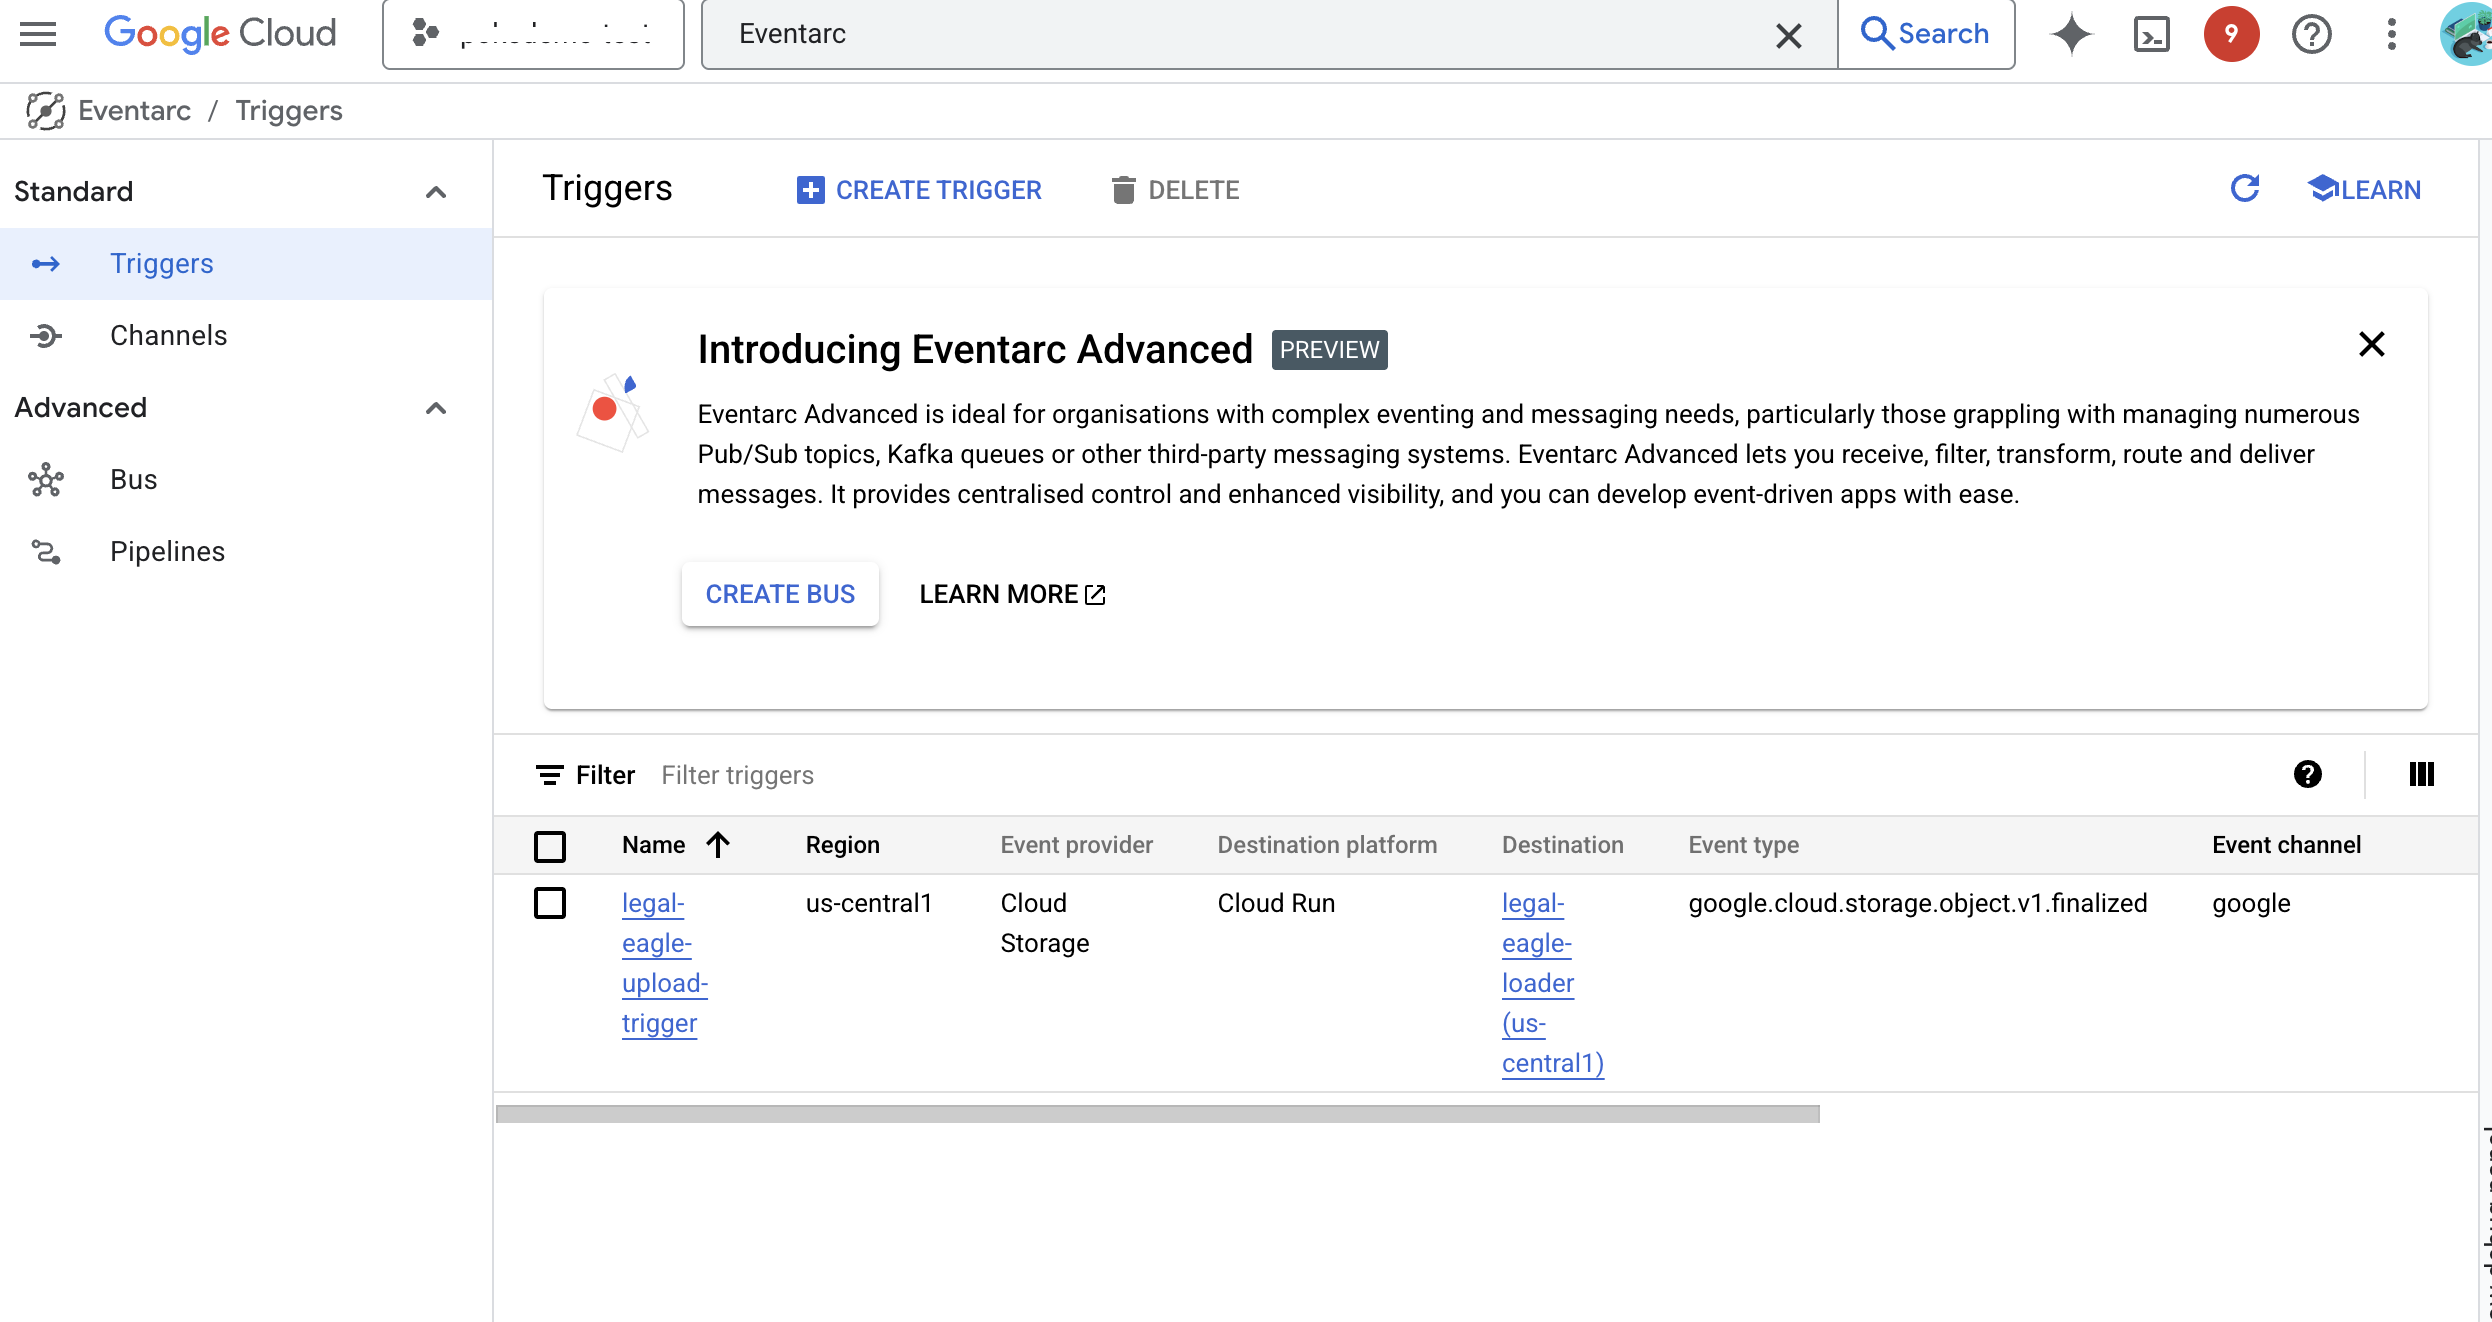
👉 In the Google Cloud Console, navigate to Triggers under EventArc. Click on "+ CREATE TRIGGER". 👉 Configure Eventarc Trigger:
- Trigger name:
legal-eagle-upload-trigger. - TriggerType: Google Sources
- Event provider: Select Cloud Storage.
- Event type: Choose
google.cloud.storage.object.v1.finalized - Cloud Storage Bucket: Select your GCS bucket from the dropdown.
- Destination type: "Cloud Run service".
- Service: Select
legal-eagle-loader. - Region:
us-central1 - Path: Leave this blank for now .
- Grant all the permission it prompted on the page
👉 Click CREATE. Eventarc will now set up the trigger.
The Cloud Run service needs permission to read files from various components. We need to grant the service's service account permission it needs.
12. Upload legal documents to the GCS bucket
👉 Upload the court case file to your GCS bucket. Remember, to replace your bucket name.
export DOC_BUCKET_NAME=$(gcloud storage buckets list --format="value(name)" | grep doc-bucket)
gsutil cp ~/legal-eagle/court_cases/case-02.txt gs://$DOC_BUCKET_NAME/
gsutil cp ~/legal-eagle/court_cases/case-03.txt gs://$DOC_BUCKET_NAME/
gsutil cp ~/legal-eagle/court_cases/case-06.txt gs://$DOC_BUCKET_NAME/
Monitor Cloud Run Service Logs, go to Cloud Run -> your service legal-eagle-loader -> "Logs". check the logs for successful processing messages, including:
xxx
POST200130 B8.3 sAPIs-Google; (+https://developers.google.com/webmasters/APIs-Google.html) https://legal-eagle-loader-bmngrueyta-uc.a.run.app/?__GCP_CloudEventsMode=GCS_NOTIFICATION
xxx
POST200130 B520 msAPIs-Google; (+https://developers.google.com/webmasters/APIs-Google.html) https://legal-eagle-loader-bmngrueyta-uc.a.run.app/?__GCP_CloudEventsMode=GCS_NOTIFICATION
xxx
POST200130 B514 msAPIs-Google; (+https://developers.google.com/webmasters/APIs-Google.html) https://legal-eagle-loader-bmngrueyta-uc.a.run.app/?__GCP_CloudEventsMode=GCS_NOTIFICATION
And depends on how fast the logging was setup, you'll also see more detail logs here too
    "CloudEvent received:"
    "New file detected in bucket:"
    "File content downloaded. Processing..."
    "Text split into ... chunks."
    "File processing and Firestore upsert complete..."
Look for any error messages in the logs and troubleshoot if necessary. 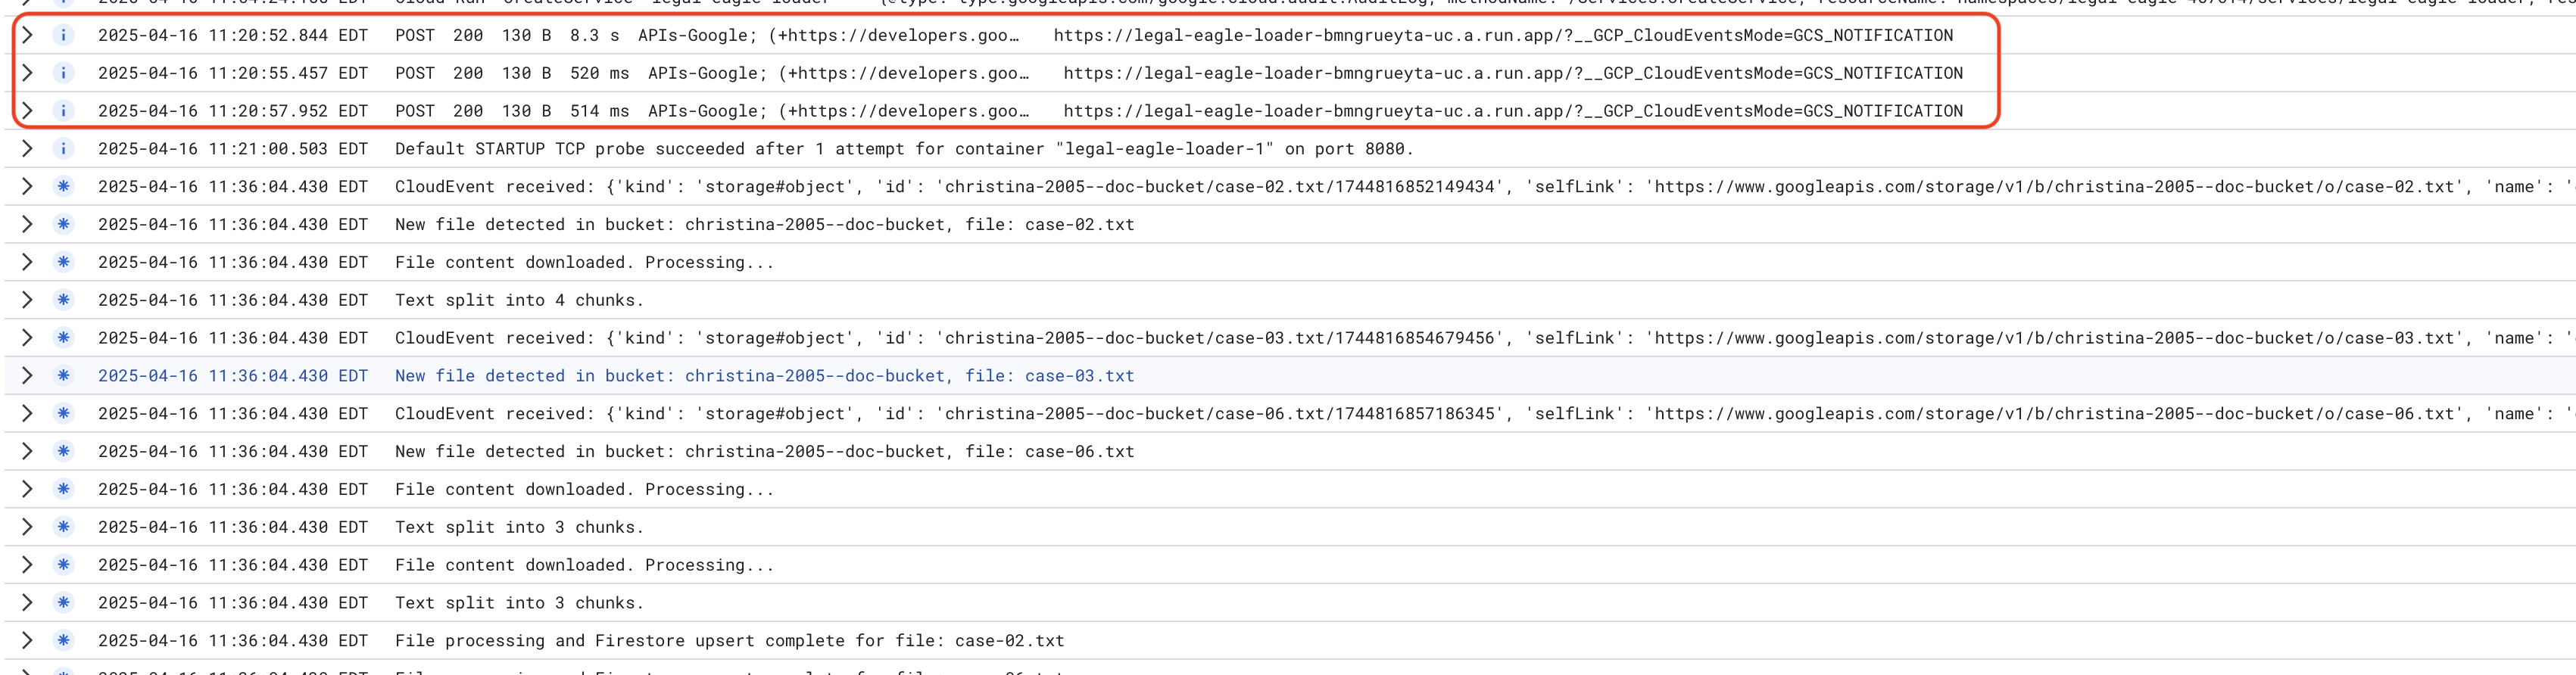
👉 Verify Data in Firestore. And open your legal_documents collection.
👉 You should see new documents created in your collection. Each document will represent a chunk of the text from the file you uploaded and will contain:
metadata: currently empty
original_text_chunk: The text chunk content.
embedding_: A list of floating-point numbers (the Vertex AI embedding).

13. Implementing RAG
LangChain is a powerful framework designed to streamline the development of applications powered by large language models (LLMs). Instead of directly wrestling with the intricacies of LLM APIs, prompt engineering, and data handling, LangChain provides a high-level abstraction layer. It offers pre-built components and tools for tasks like connecting to various LLMs (like those from OpenAI, Google, or others), building complex chains of operations (e.g., data retrieval followed by summarization), and managing conversational memory.
For RAG specifically, Vector stores in LangChain are essential for enabling the retrieval aspect of RAG. They are specialized databases designed to efficiently store and query vector embeddings, where semantically similar pieces of text are mapped to points close together in vector space. LangChain takes care of the low-level plumbing, allowing developers to focus on the core logic and functionality of their RAG application. This significantly reduces development time and complexity, allowing you to rapidly prototype and deploy RAG-based applications while leveraging the robustness and scalability of Google Cloud infrastructure.
With LangChain explained, you will now need to update your legal.py file under the webapp folder for the RAG implementation. This will enable the LLM to search relevant documents in Firestore before providing an answer.
👉 Import FirestoreVectorStore and other required modules from langchain and vertexai. Add following to the current legal.py
from langchain_google_vertexai import VertexAIEmbeddings
from langchain_google_firestore import FirestoreVectorStore
👉 Initialize the Vertex AI and the embedding model.You'll be using text-embedding-004. Add the following code right after importing the modules.
PROJECT_ID = os.environ.get("GOOGLE_CLOUD_PROJECT")  # Get project ID from env
embedding_model = VertexAIEmbeddings(
    model_name="text-embedding-004" ,
    project=PROJECT_ID,)
👉 Create a FirestoreVectorStore pointing to the legal_documents collection, using the initialized embedding model and specifying the content and embedding fields. Add this right after previous embedding model code.
COLLECTION_NAME = "legal_documents"
# Create a vector store
vector_store = FirestoreVectorStore(
    collection="legal_documents",
    embedding_service=embedding_model,
    content_field="original_text",
    embedding_field="embedding",
)
👉 Define a function called search_resource that takes a query, performs a similarity search using vector_store.similarity_search, and returns the combined results.
def search_resource(query):
    results = []
    results = vector_store.similarity_search(query, k=5)

    combined_results = "\n".join([result.page_content for result in results])
    print(f"==>{combined_results}")
    return combined_results
👉 REPLACE ask_llm function and use the search_resource function to retrieve relevant context based on the user's query.
def ask_llm(query):
    try:
        query_message = {
            "type": "text",
            "text": query,
        }
        relevant_resource = search_resource(query)

        input_msg = HumanMessage(content=[query_message])
        prompt_template = ChatPromptTemplate.from_messages(
            [
                SystemMessage(
                    content=(
                        "You are a helpful assistant, and you are with the attorney in a courtroom, you are helping him to win the case by providing the information he needs "
                        "Don't answer if you don't know the answer, just say sorry in a funny way possible"
                        "Use high engergy tone, don't use more than 100 words to answer"
                        f"Here is some context that is relevant to the question {relevant_resource} that you might use"
                    )
                ),
                input_msg,
            ]
        )
        prompt = prompt_template.format()

        response = llm.invoke(prompt)
        print(f"response: {response}")
        return response
    except Exception as e:
        print(f"Error sending message to chatbot: {e}") # Log this error too!
        return f"Unable to process your request at this time. Due to the following reason: {str(e)}"
👉 OPTIONAL: SPANISH VERSION
Sustituye el siguiente texto como se indica: You are a helpful assistant, to You are a helpful assistant that speaks Spanish,
👉 After implementing RAG in legal.py, you should test it locally before deploying, run the application with the command:
cd ~/legal-eagle/webapp
source env/bin/activate
python main.py
👉 Use webpreview to access the application, talk to the assistance and type ctrl+c to exit the locally run process. and run deactivate to exit the virtual environment.
deactivate
👉 To deploy the web application to Cloud Run, it's be similar to the loader function. You will build, tag and push the Docker image to the Artifact Registry:
export PROJECT_ID=$(gcloud config get project)
docker build -t gcr.io/${PROJECT_ID}/legal-eagle-webapp .
docker tag gcr.io/${PROJECT_ID}/legal-eagle-webapp us-central1-docker.pkg.dev/${PROJECT_ID}/my-repository/legal-eagle-webapp
docker push us-central1-docker.pkg.dev/${PROJECT_ID}/my-repository/legal-eagle-webapp
👉 It's time to deploy the web application to Google Cloud. In the terminal, run these commands:
export PROJECT_ID=$(gcloud config get project)
gcloud run deploy legal-eagle-webapp \
  --image us-central1-docker.pkg.dev/$PROJECT_ID/my-repository/legal-eagle-webapp \
  --region us-central1 \
  --set-env-vars=GOOGLE_CLOUD_PROJECT=${PROJECT_ID}  \
  --allow-unauthenticated
Verify deployment by going Cloud Run in the Google Cloud Console.You should see a new service named legal-eagle-webapp listed.
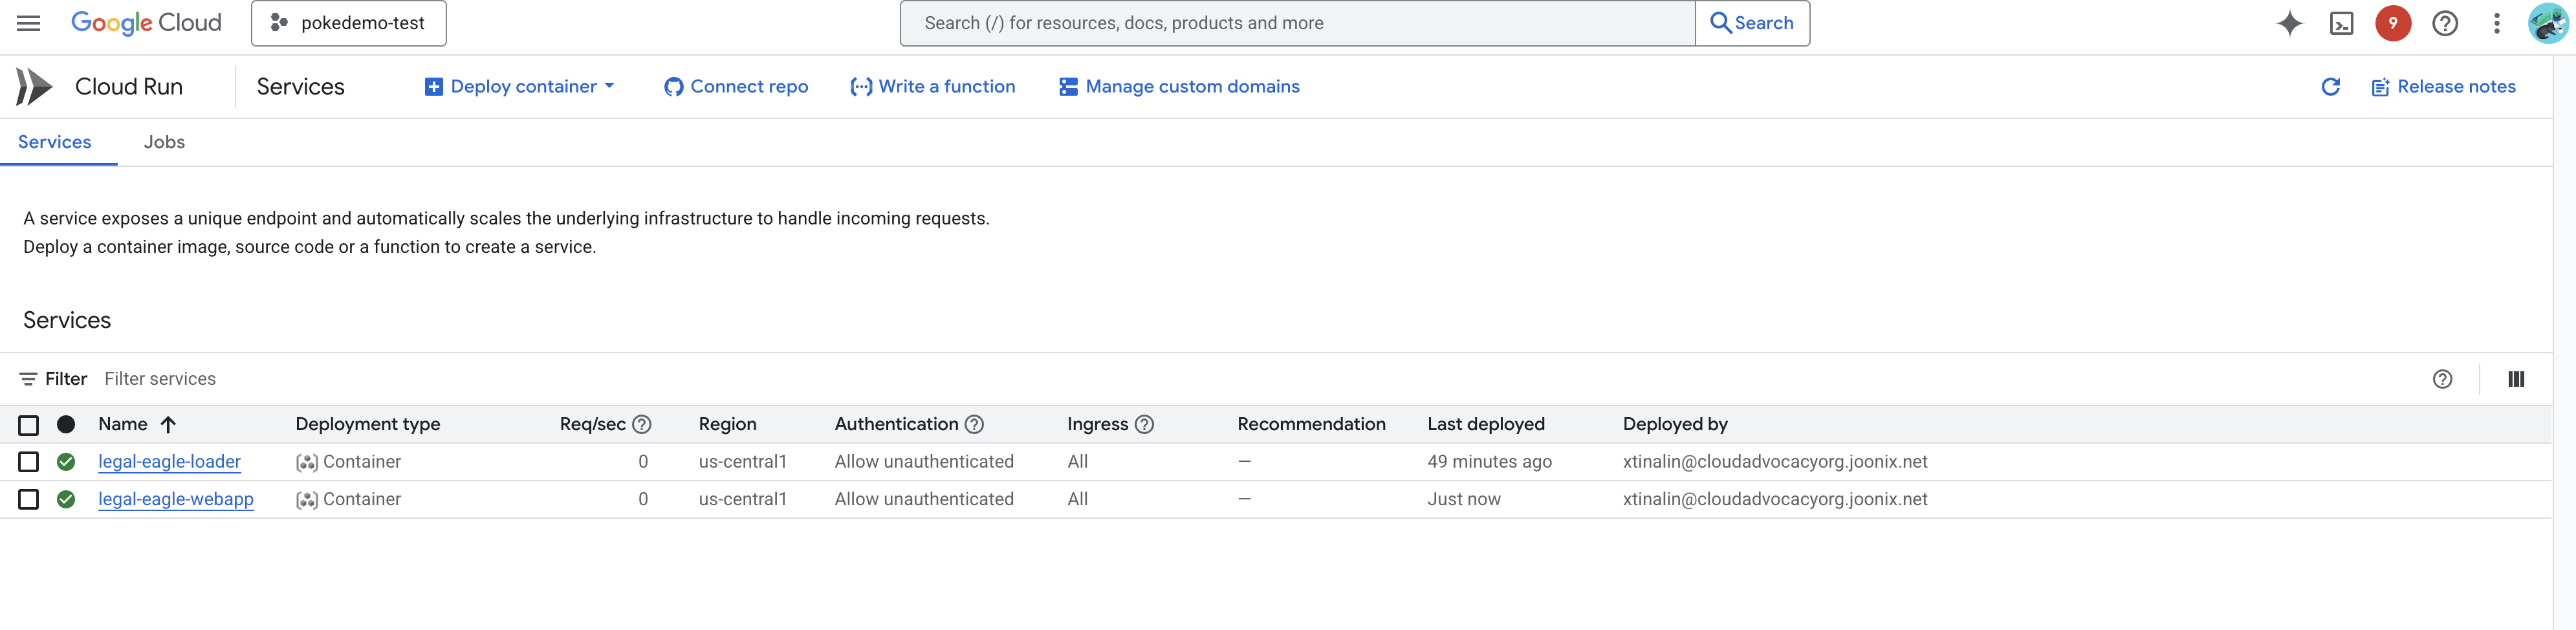
Click on the service to its detail page, you can find the deployed URL available on the top. 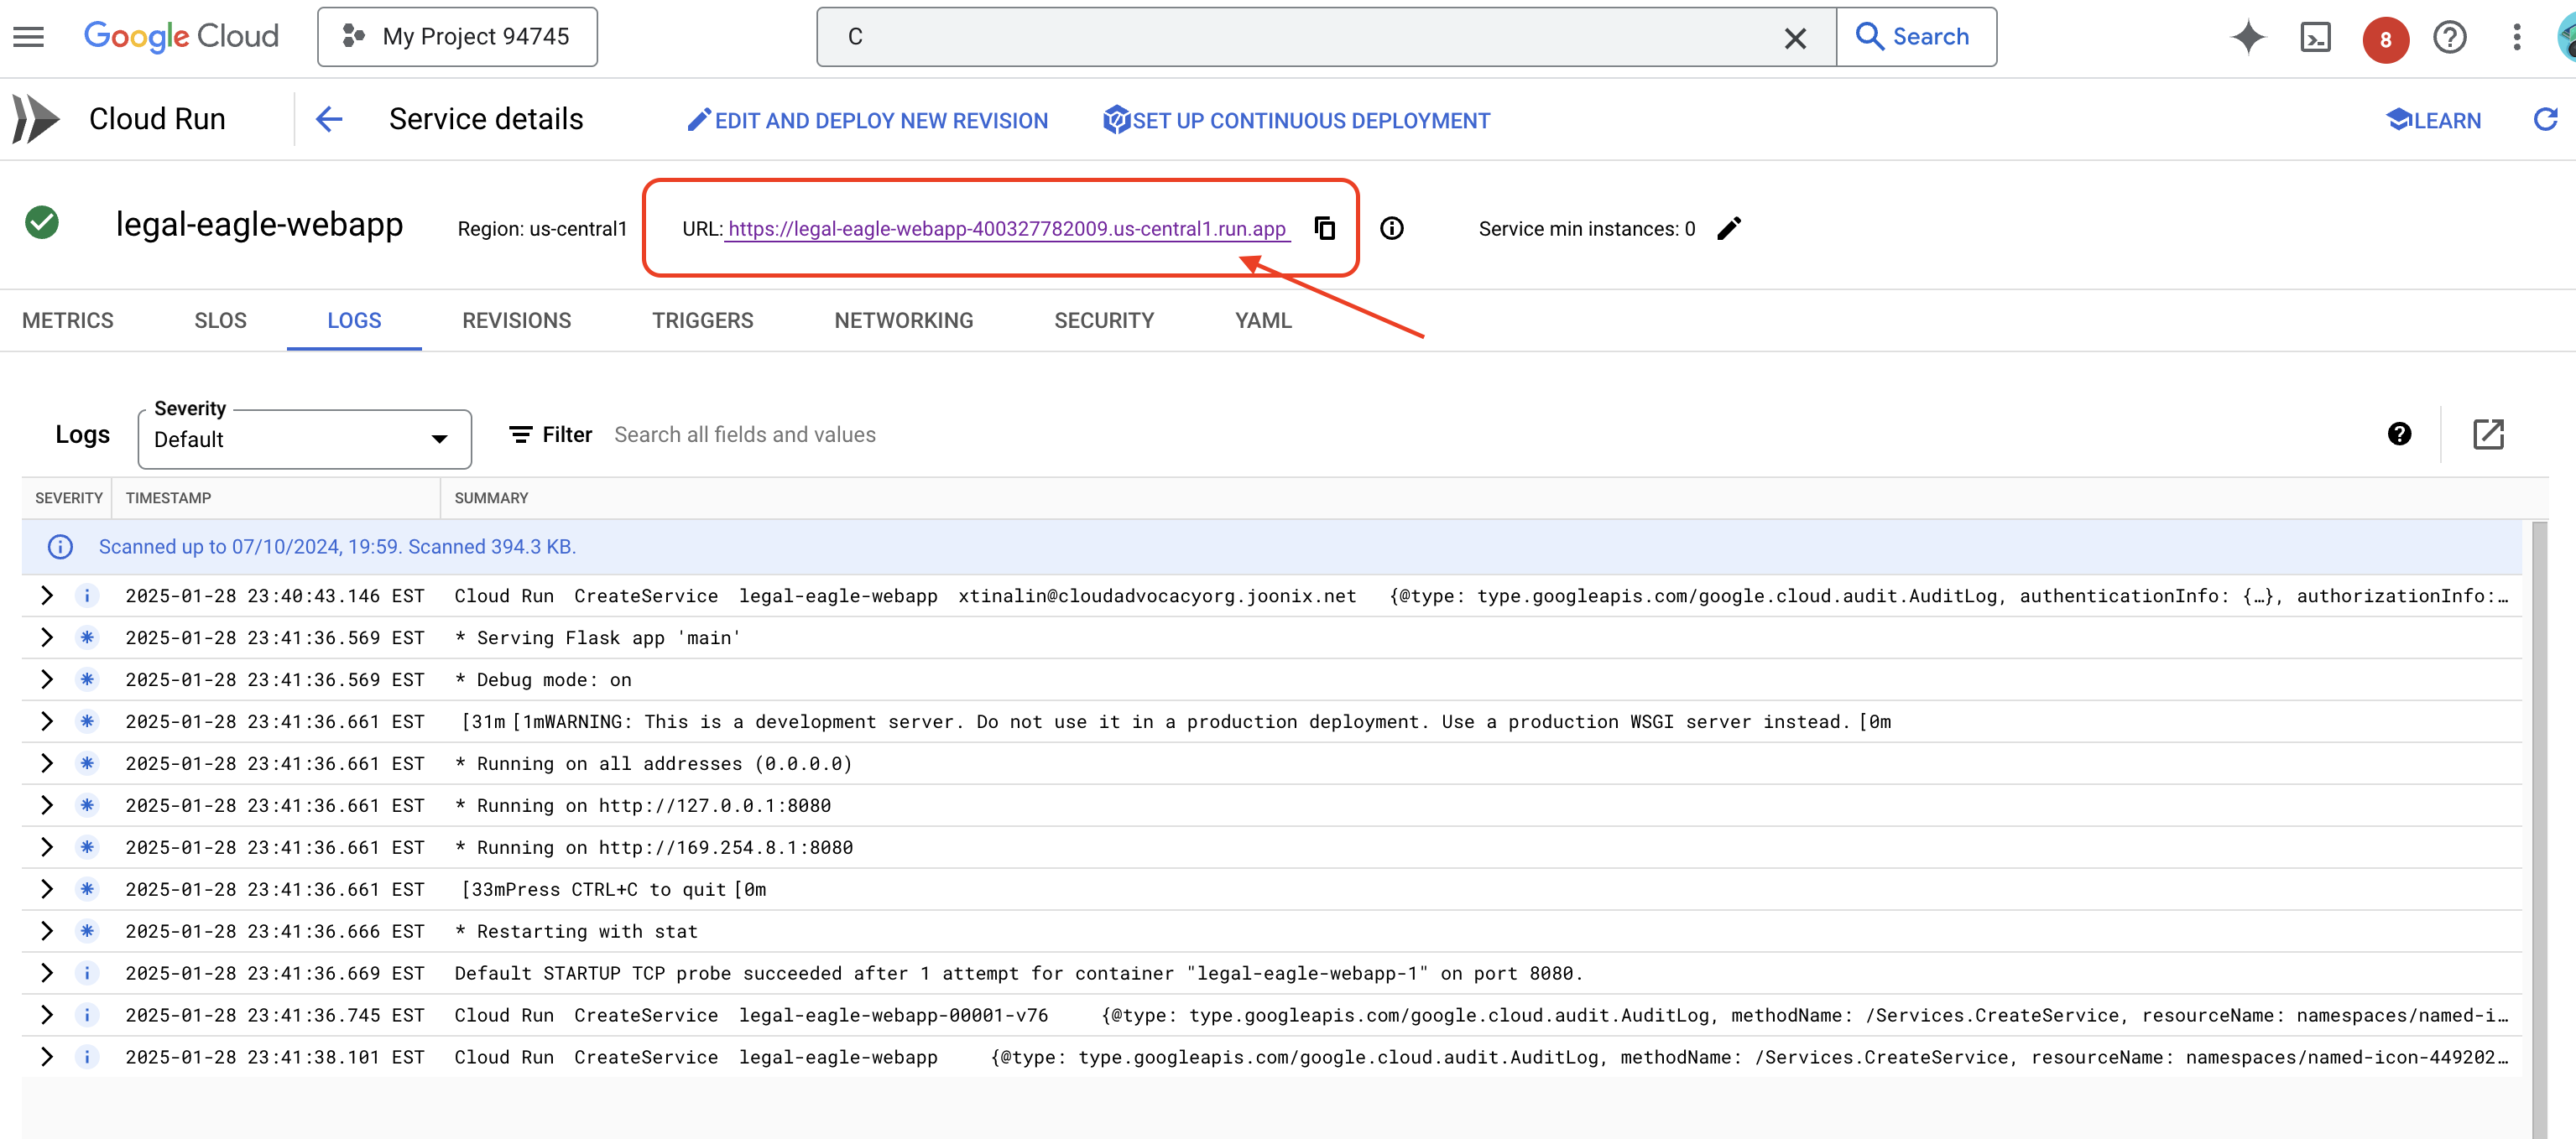
👉 Now, open the deployed URL in a new browser tab. You can interact with the legal assistant and ask questions related to the court cases you have loaded(under court_cases folder):
- How many years in prison was Michael Brown sentenced to?
- How much money in unauthorized charges was generated as a result of Jane Smith's actions?
- What role did the neighbors' testimonies play in the investigation of the case on Emily White?
👉 OPTIONAL: SPANISH VERSION
- ¿A cuántos años de prisión fue sentenciado Michael Brown?
- ¿Cuánto dinero en cargos no autorizados se generó como resultado de las acciones de Jane Smith?
- ¿Qué papel jugaron los testimonios de los vecinos en la investigación del caso de Emily White?
You should notice that the responses are now more accurate and grounded in the content of the legal documents that you have uploaded, showcasing the power of RAG!
Congratulations on completing the workshop!! You've successfully built and deployed a legal document analysis application using LLMs, LangChain, and Google Cloud. You've learned how to ingest and process legal documents, augment LLM responses with relevant information using RAG, and deploy your application as a serverless service. This knowledge and the application built will help you further explore the power of LLMs for legal tasks. Well done!"
14. Challenge
Diverse Media Types::
How to ingest and process diverse media types such as court videos and audio recordings, and extract relevant text.
Online Assets:
How to process online assets like web pages live.