
1. はじめに
法廷の緊張感にいつも魅了されてきました。複雑な状況を巧みに乗りこなし、力強い最終弁論を行う自分の姿を想像していました。私のキャリアは別の方向に進みましたが、AI の助けを借りて、法廷での夢の実現に近づけるかもしれません。
今回は、Vertex AI、Firestore、Cloud Run Functions などの Google の強力な AI ツールを使用して、法律データを処理して理解し、高速検索を実行する方法について詳しく説明します。また、架空のクライアント(または自分自身)が困難な状況から抜け出す方法についても説明します。
証人を尋問するわけではありませんが、Google のシステムを使用すると、大量の情報をふるい分け、明確な要約を生成し、最も関連性の高いデータを数秒で提示できます。
2. アーキテクチャ
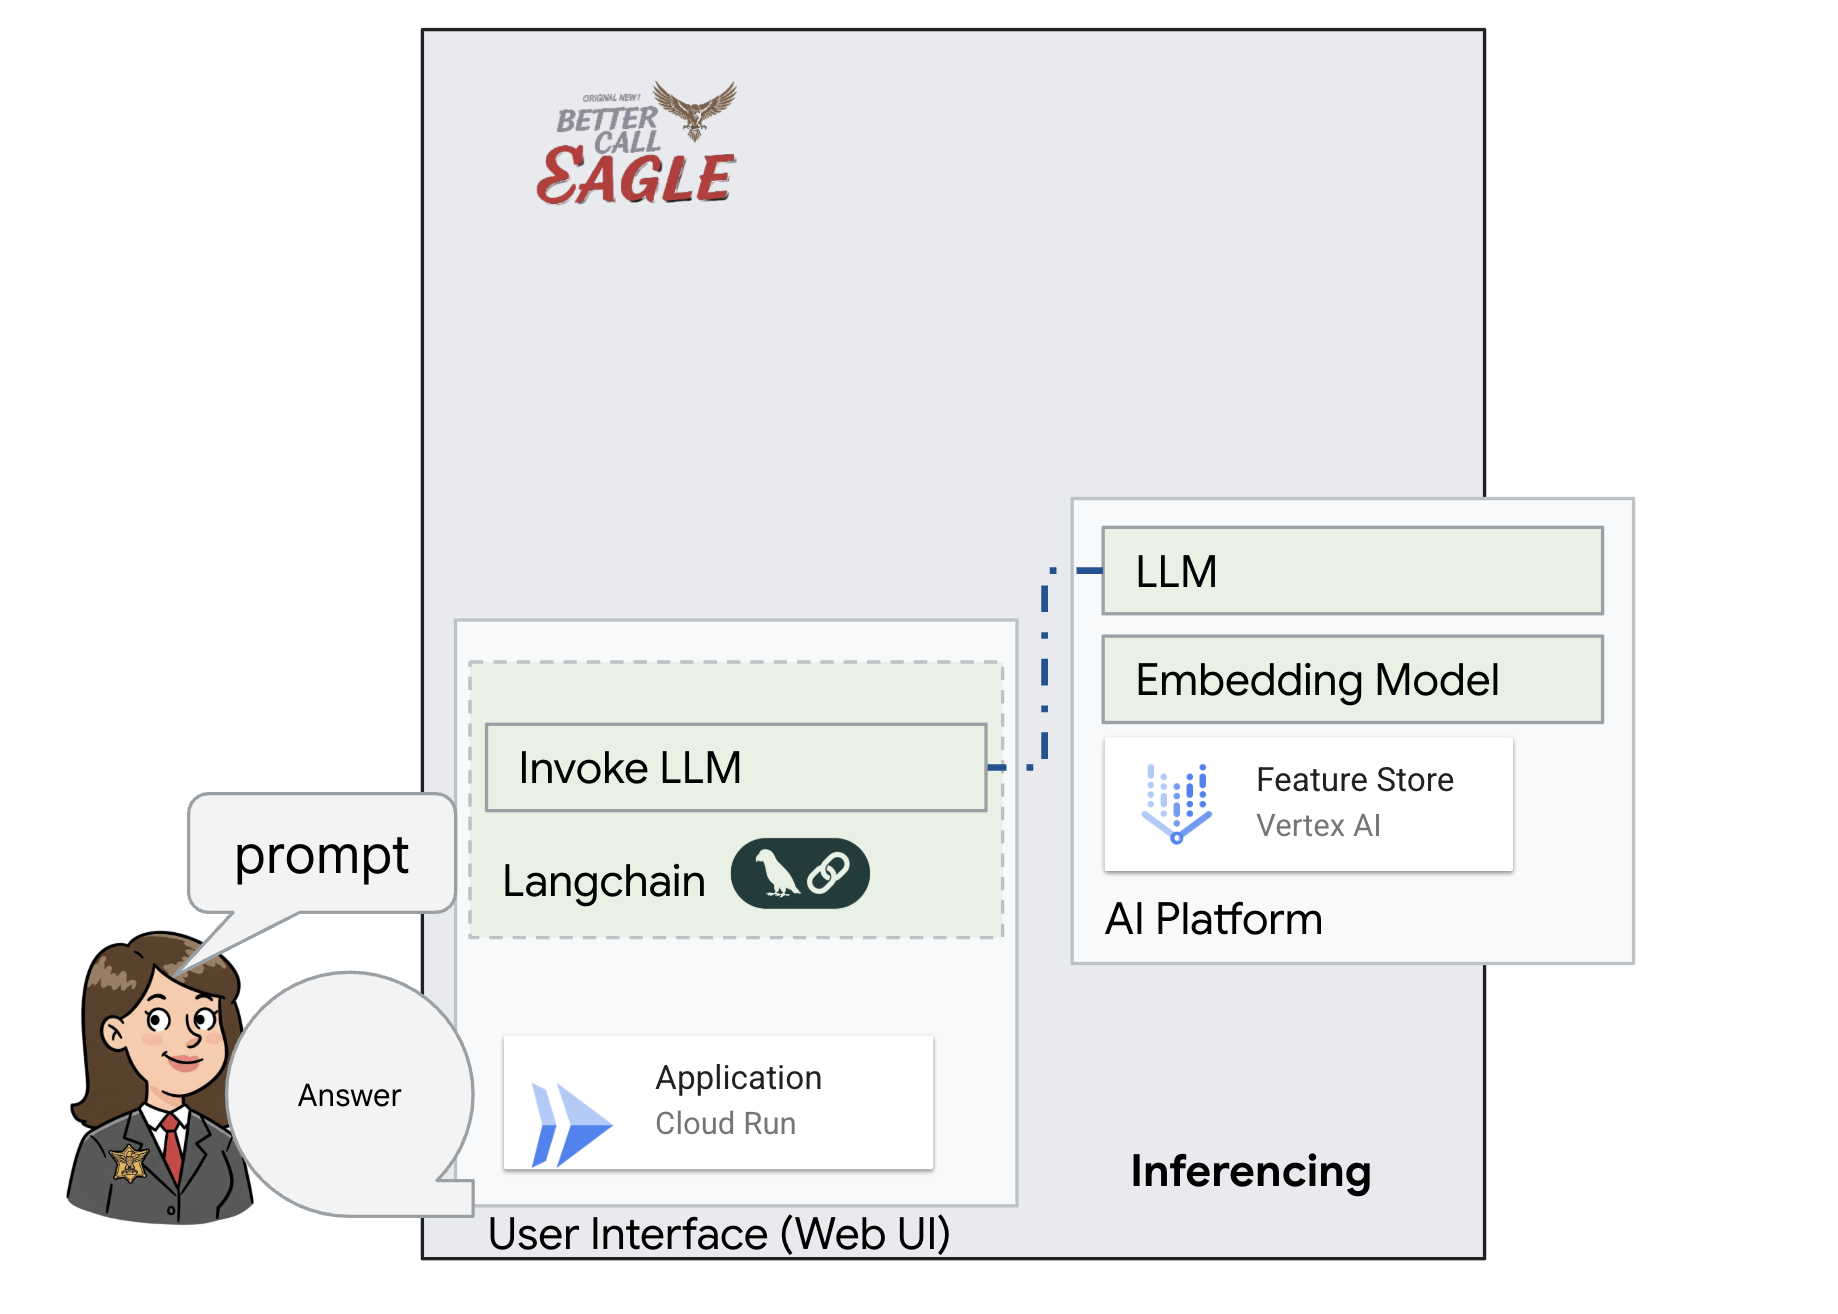
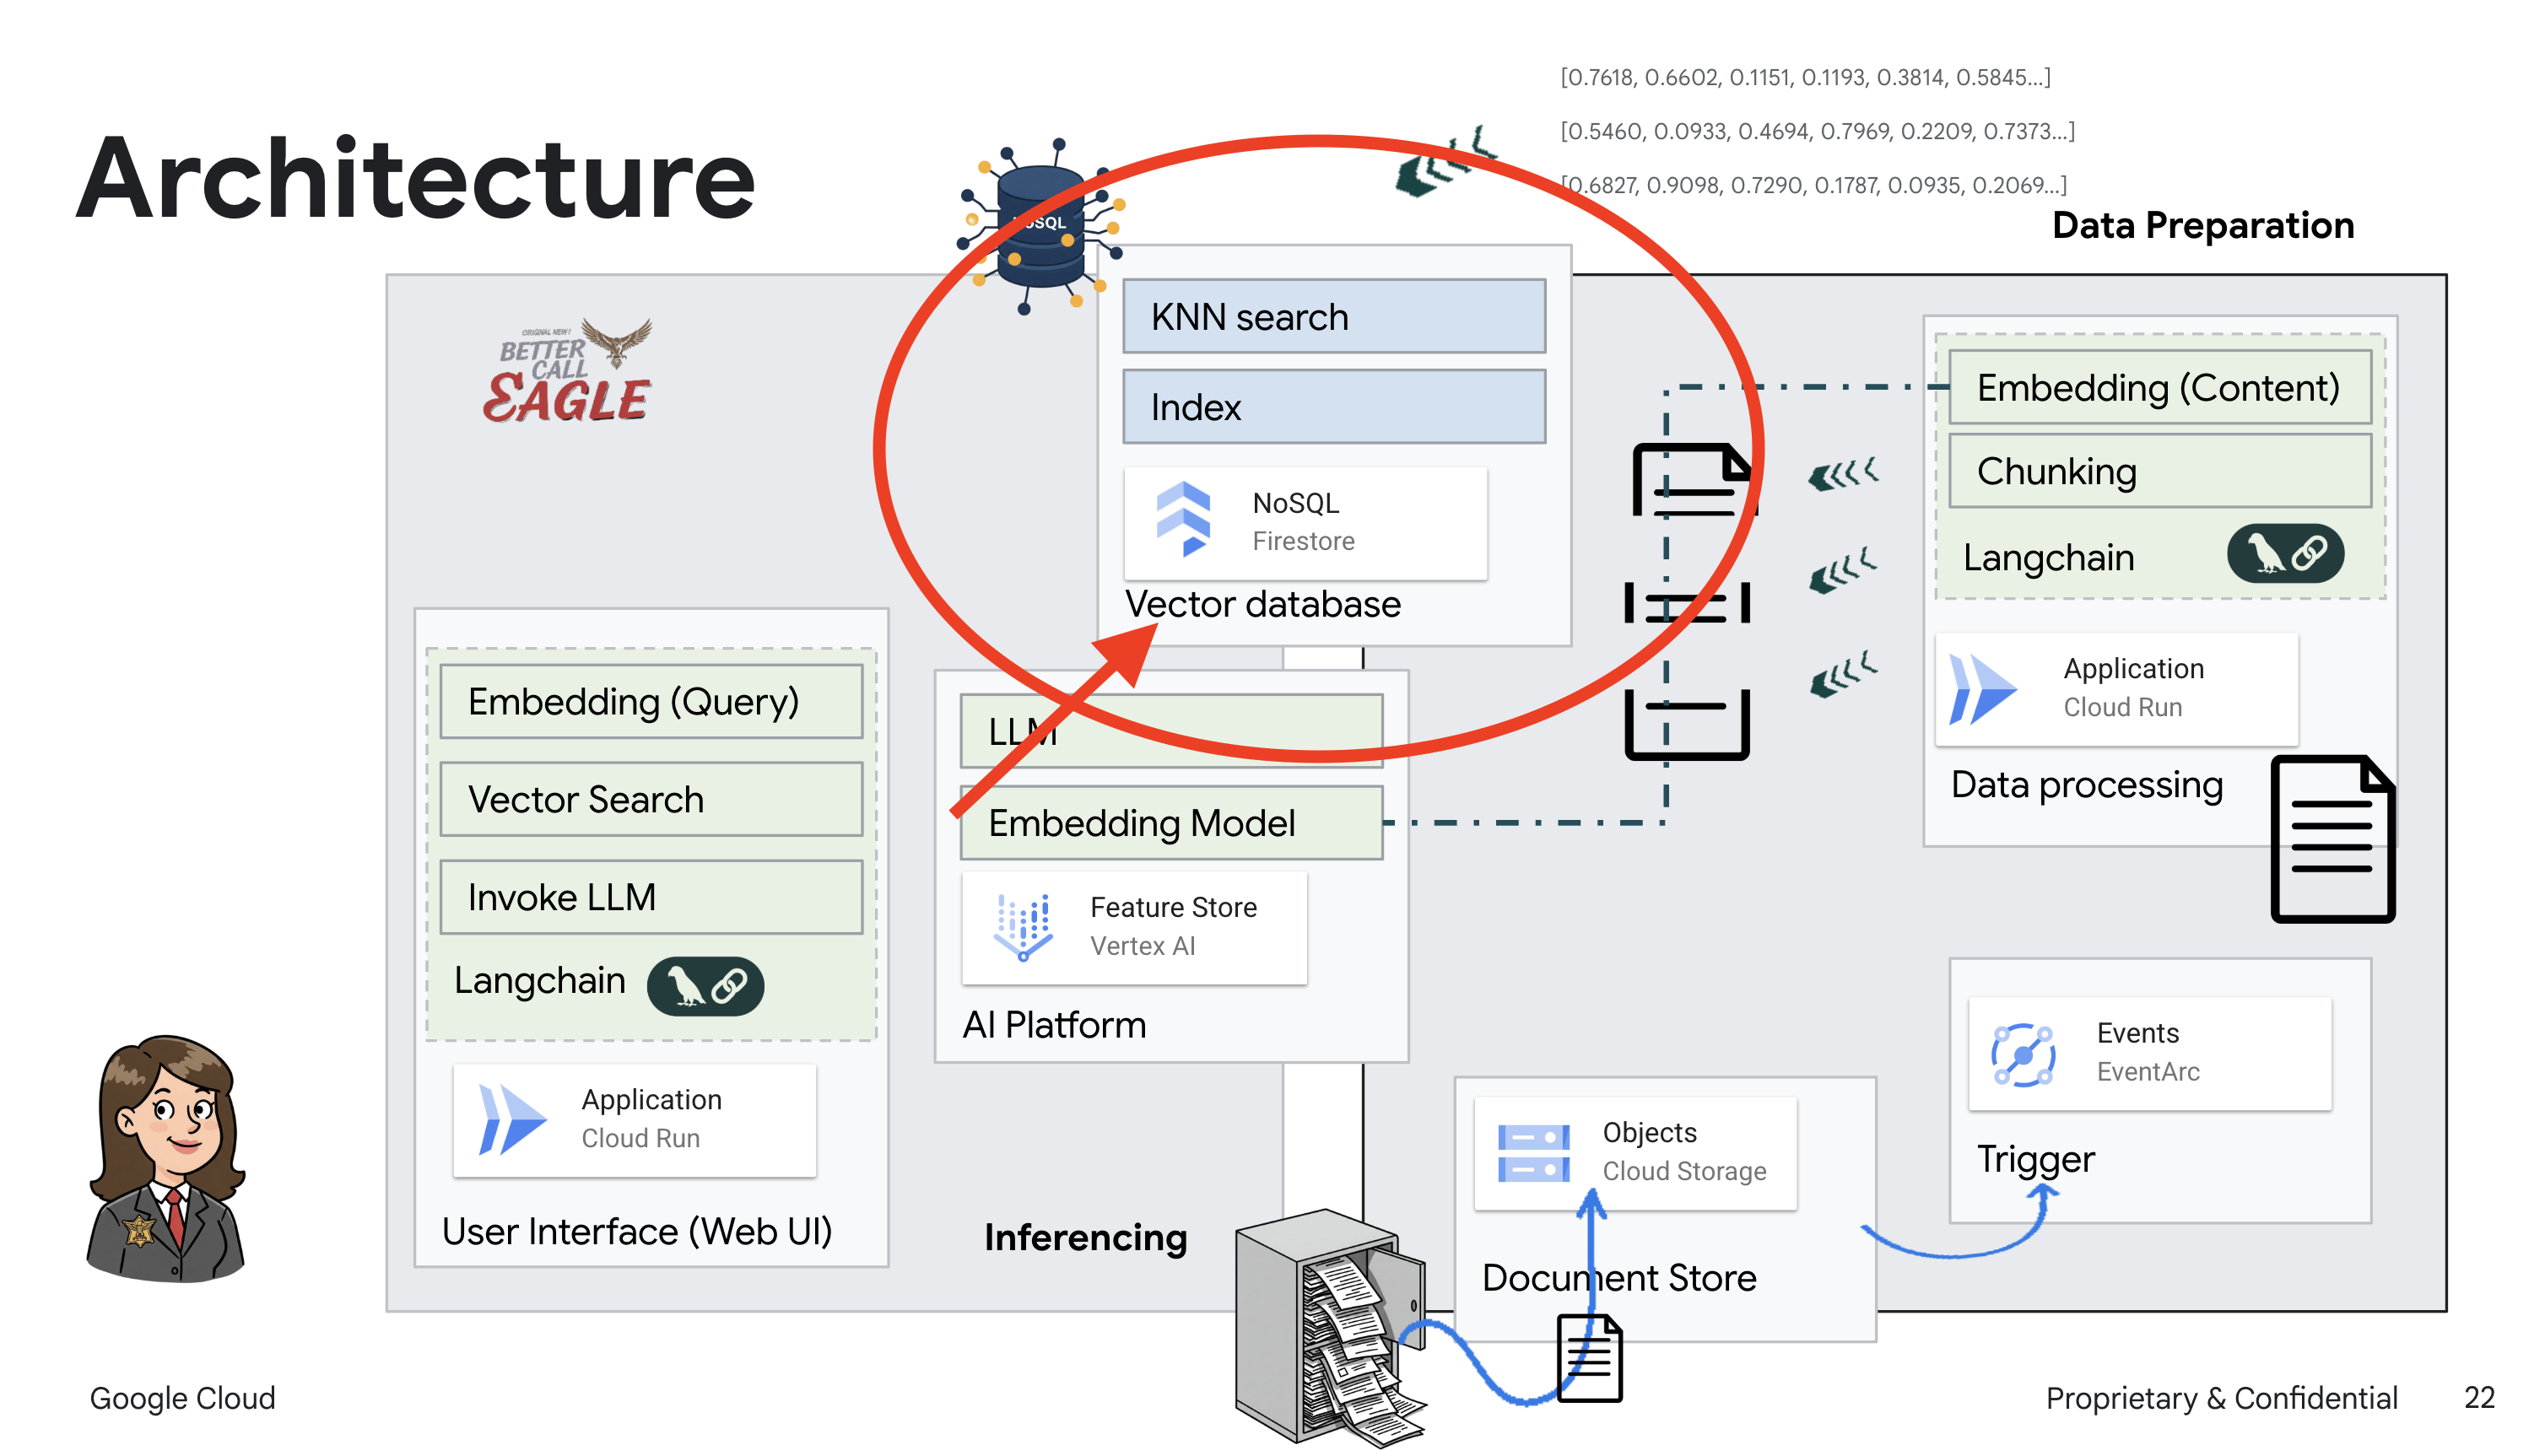
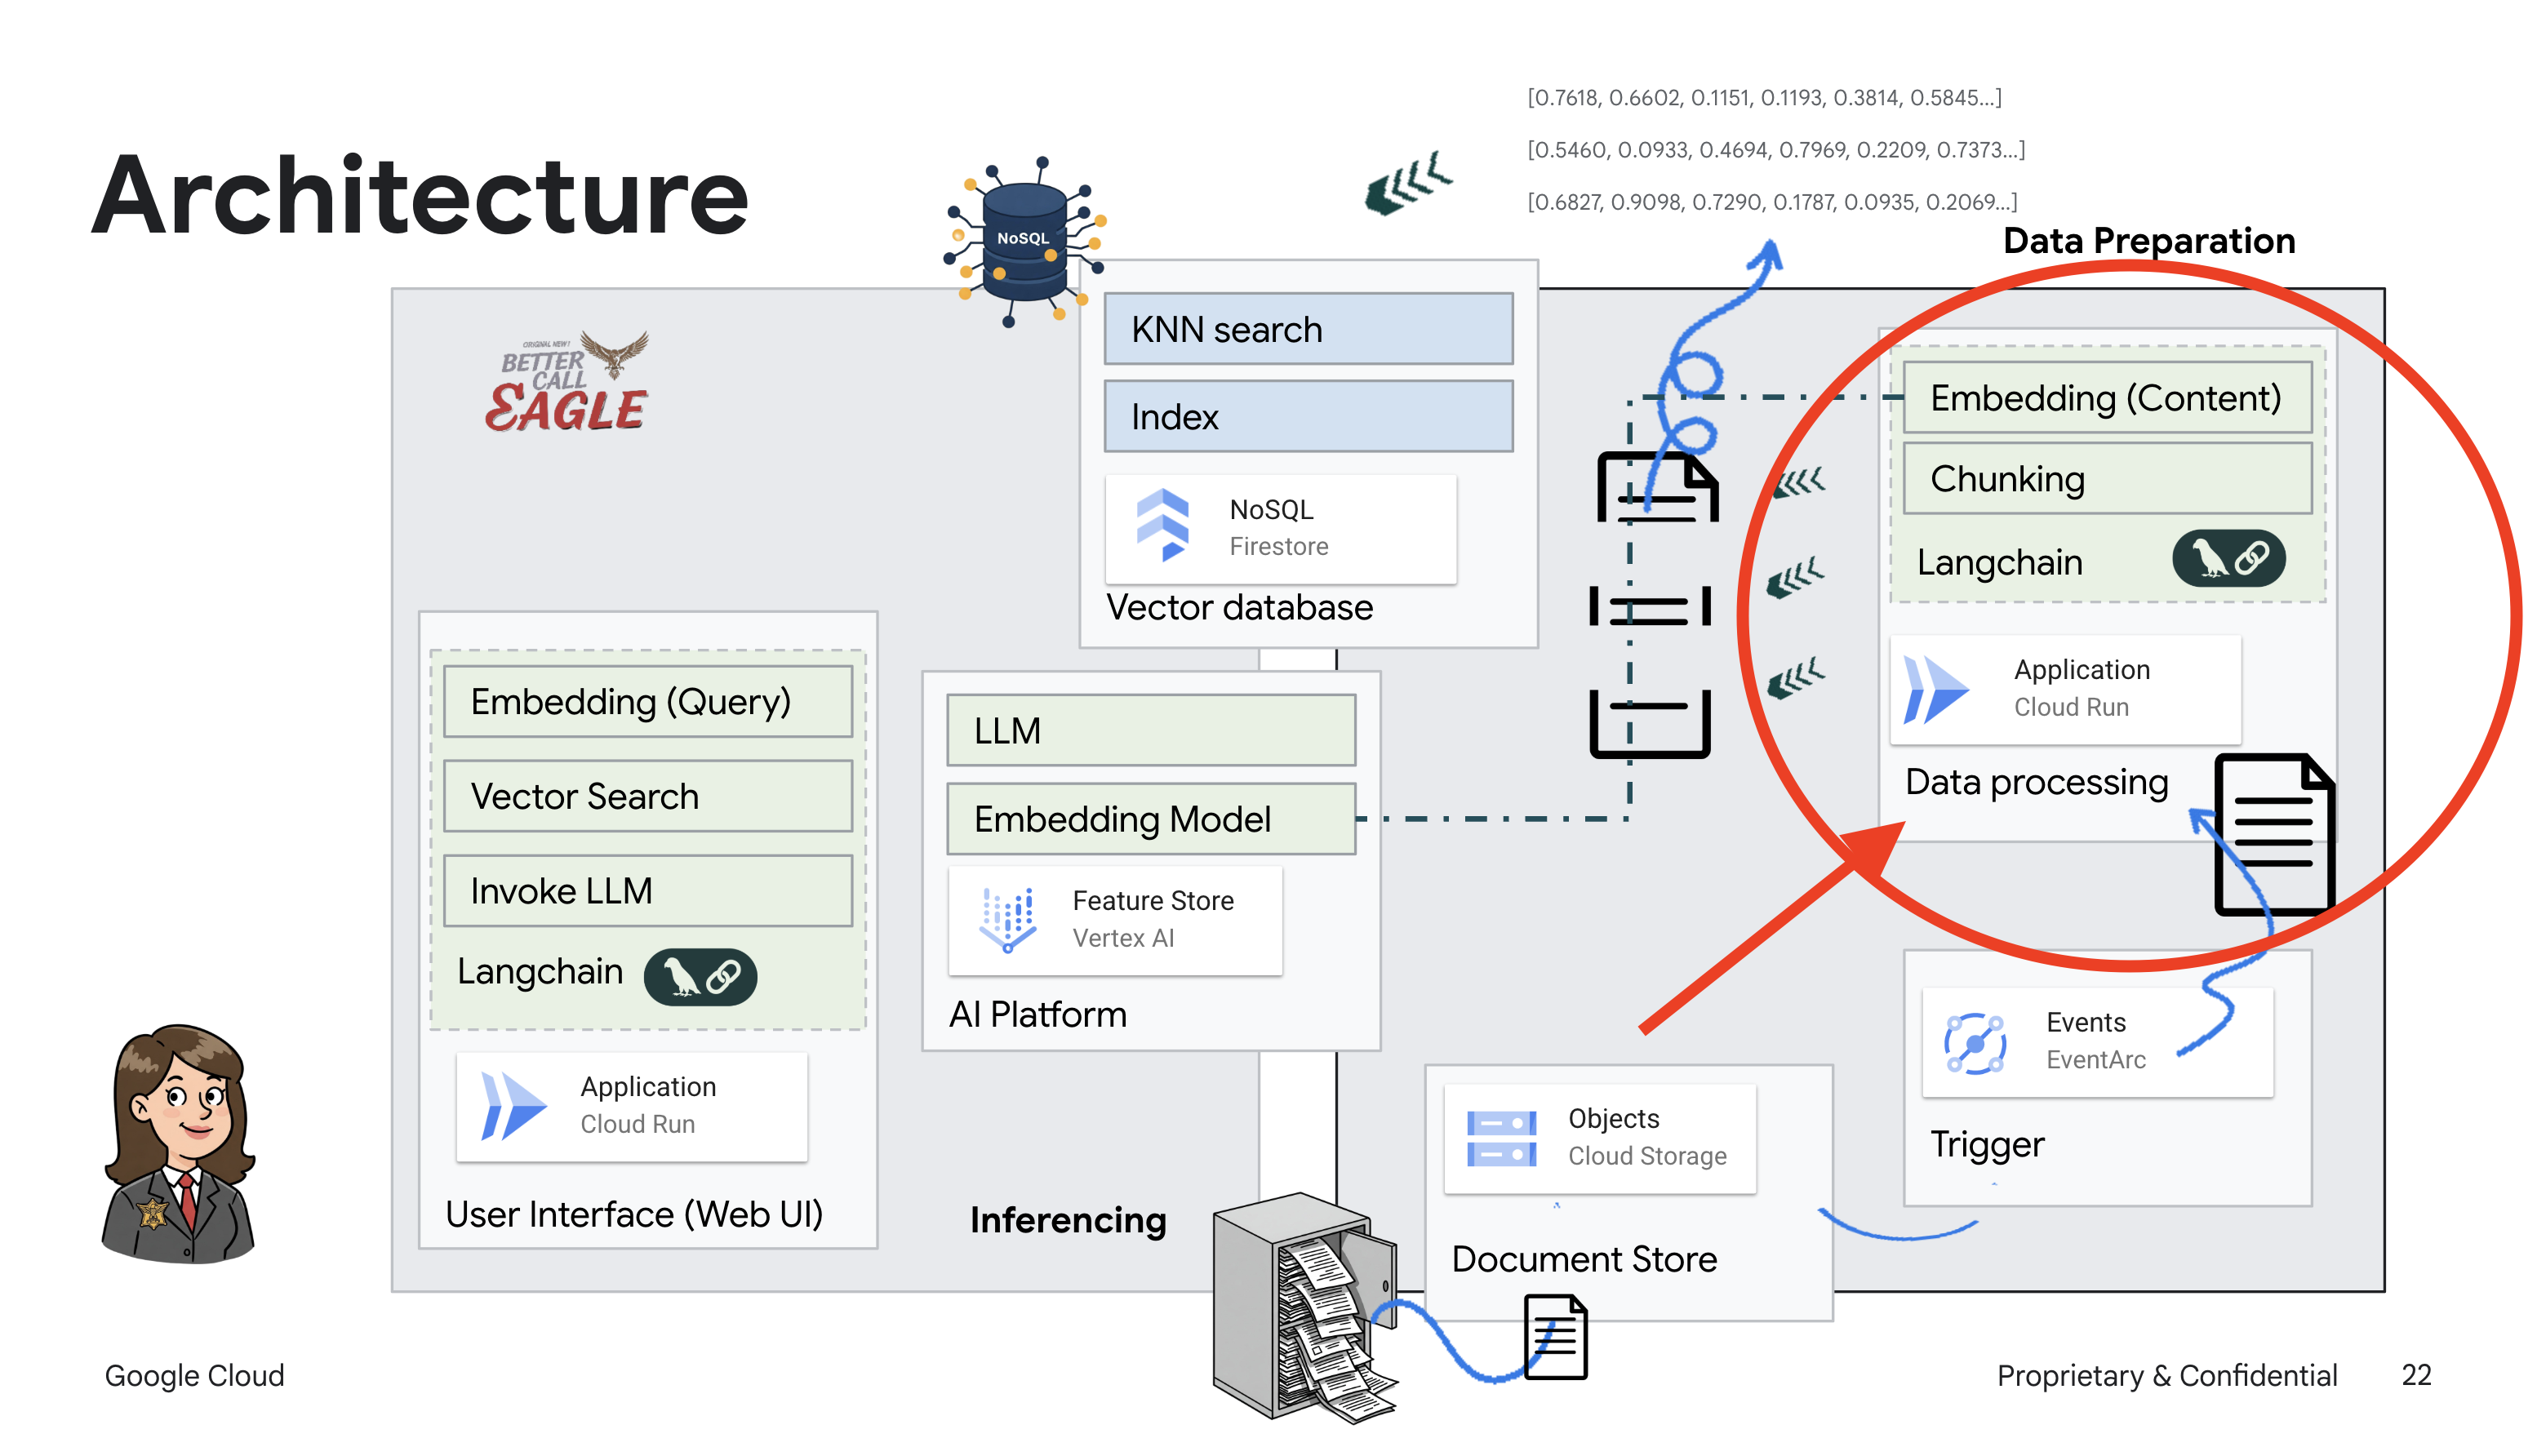
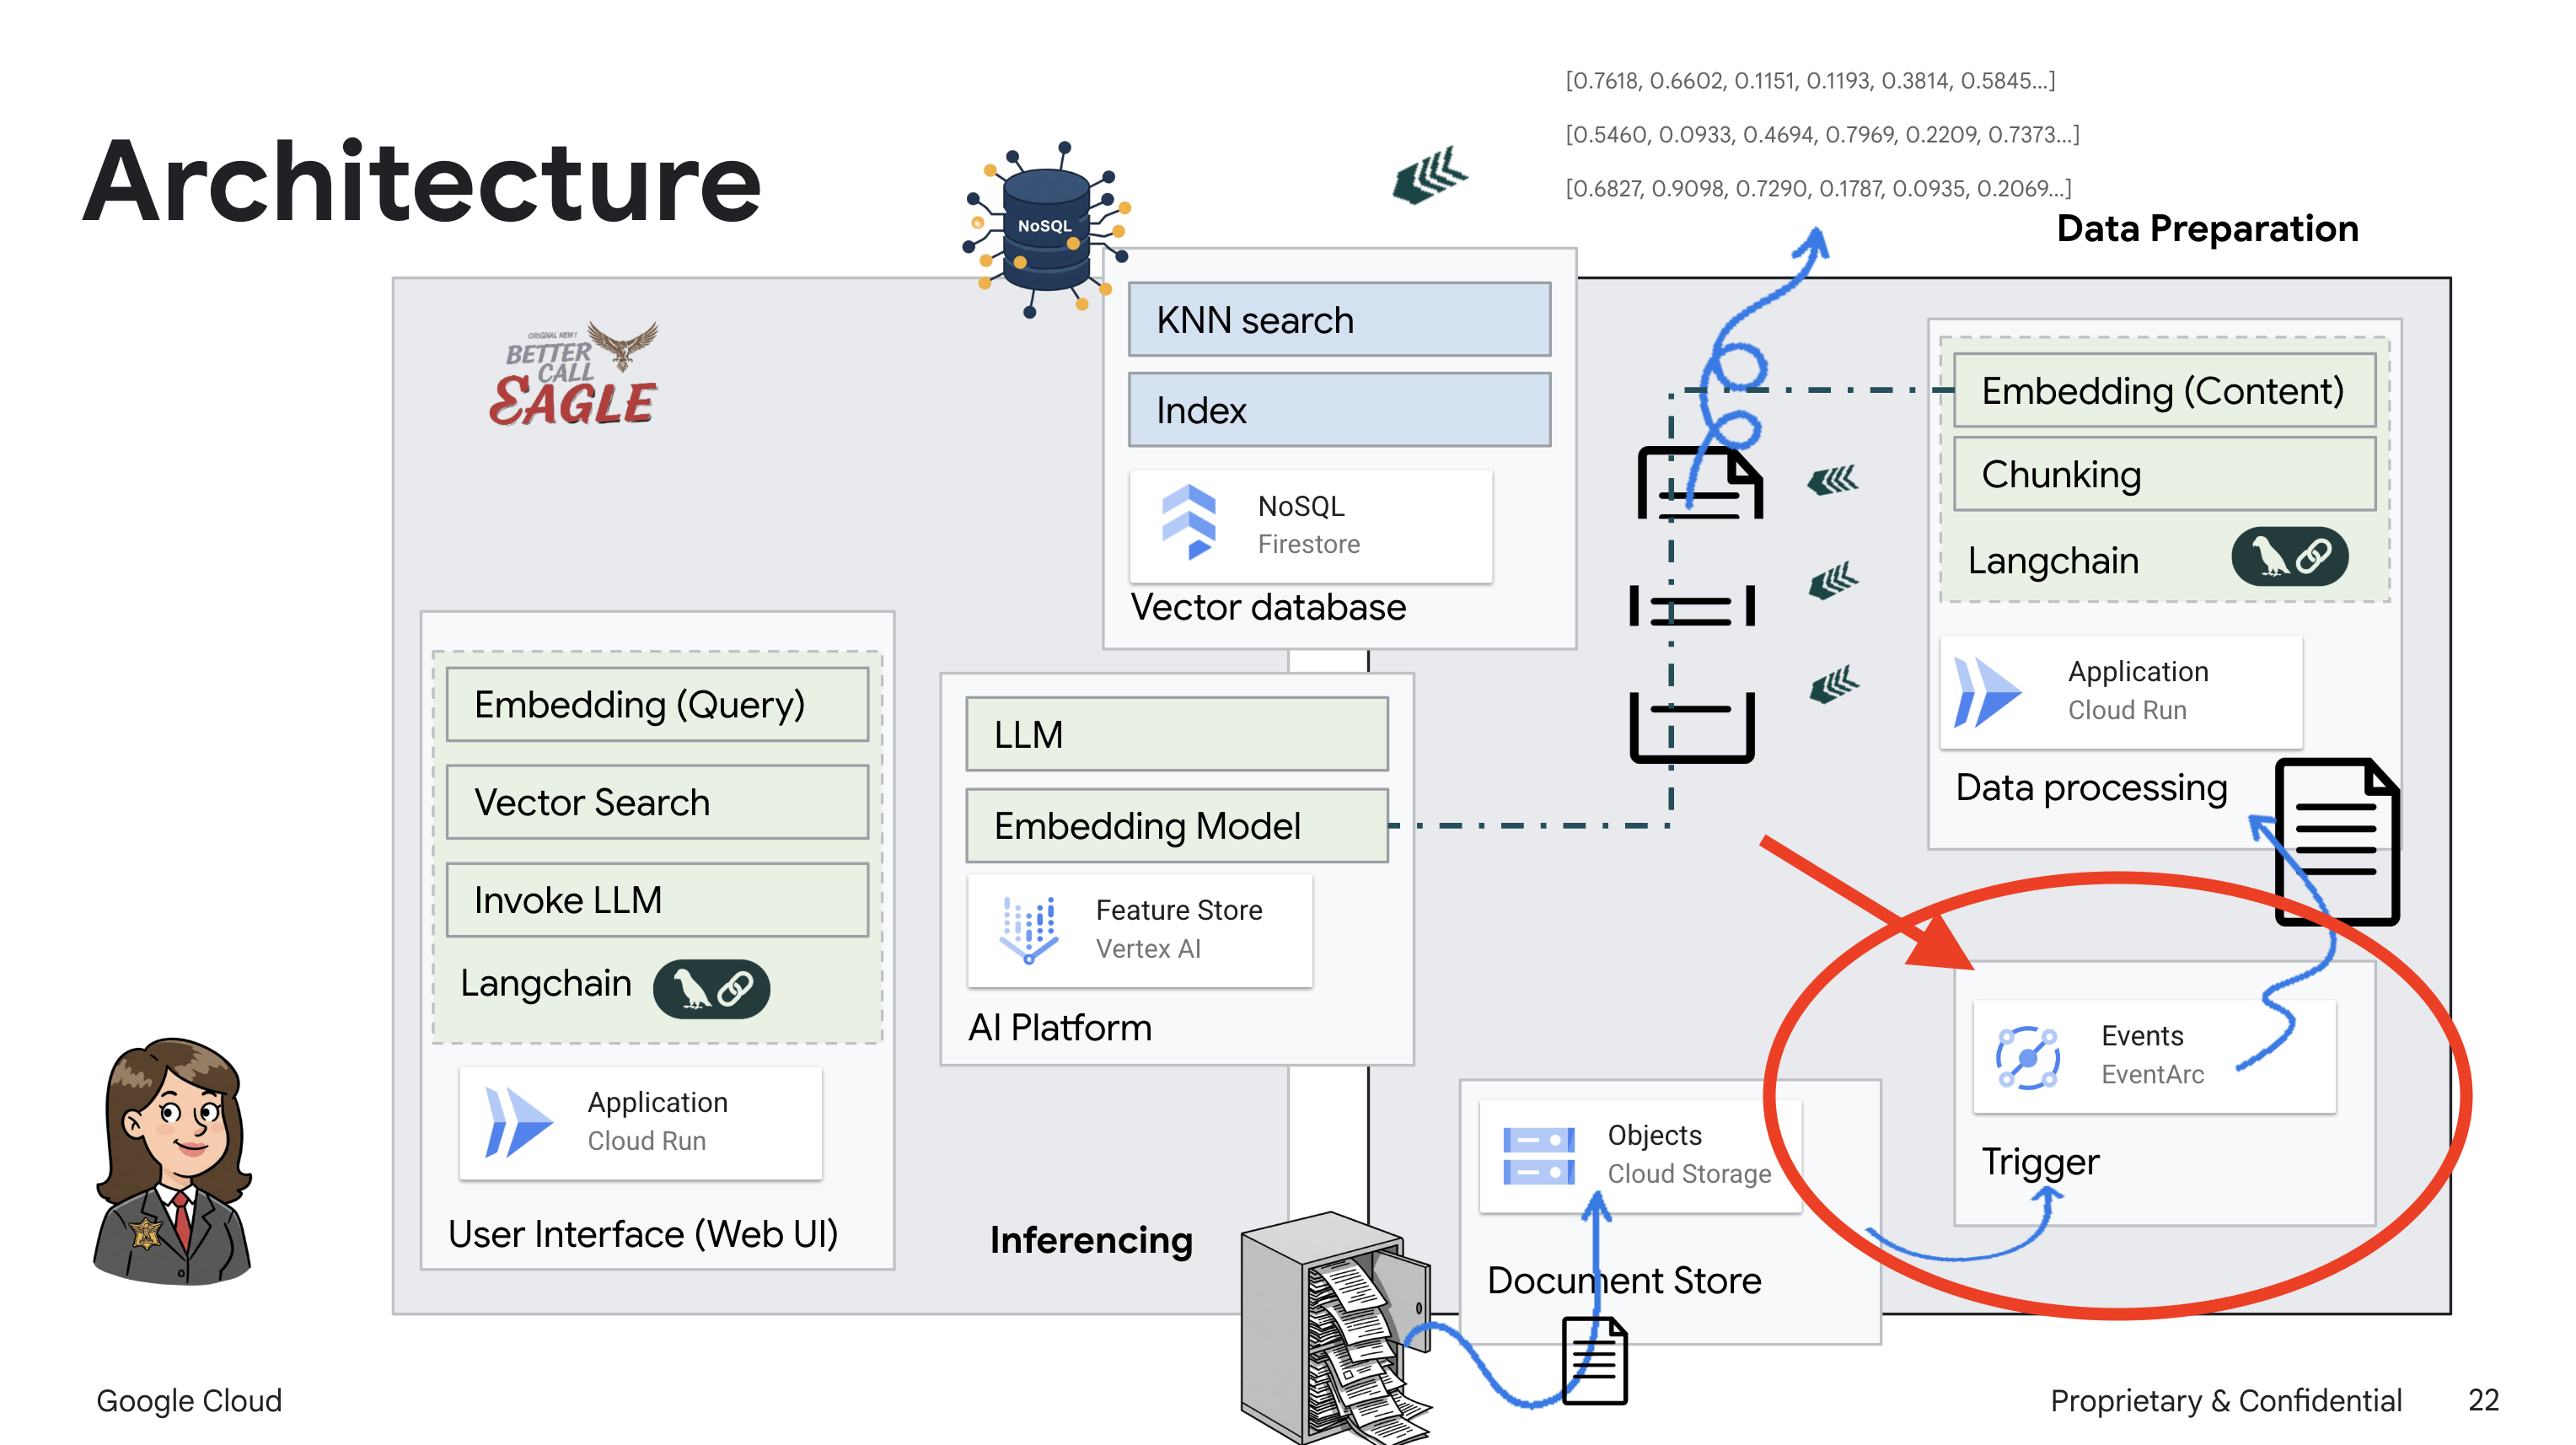
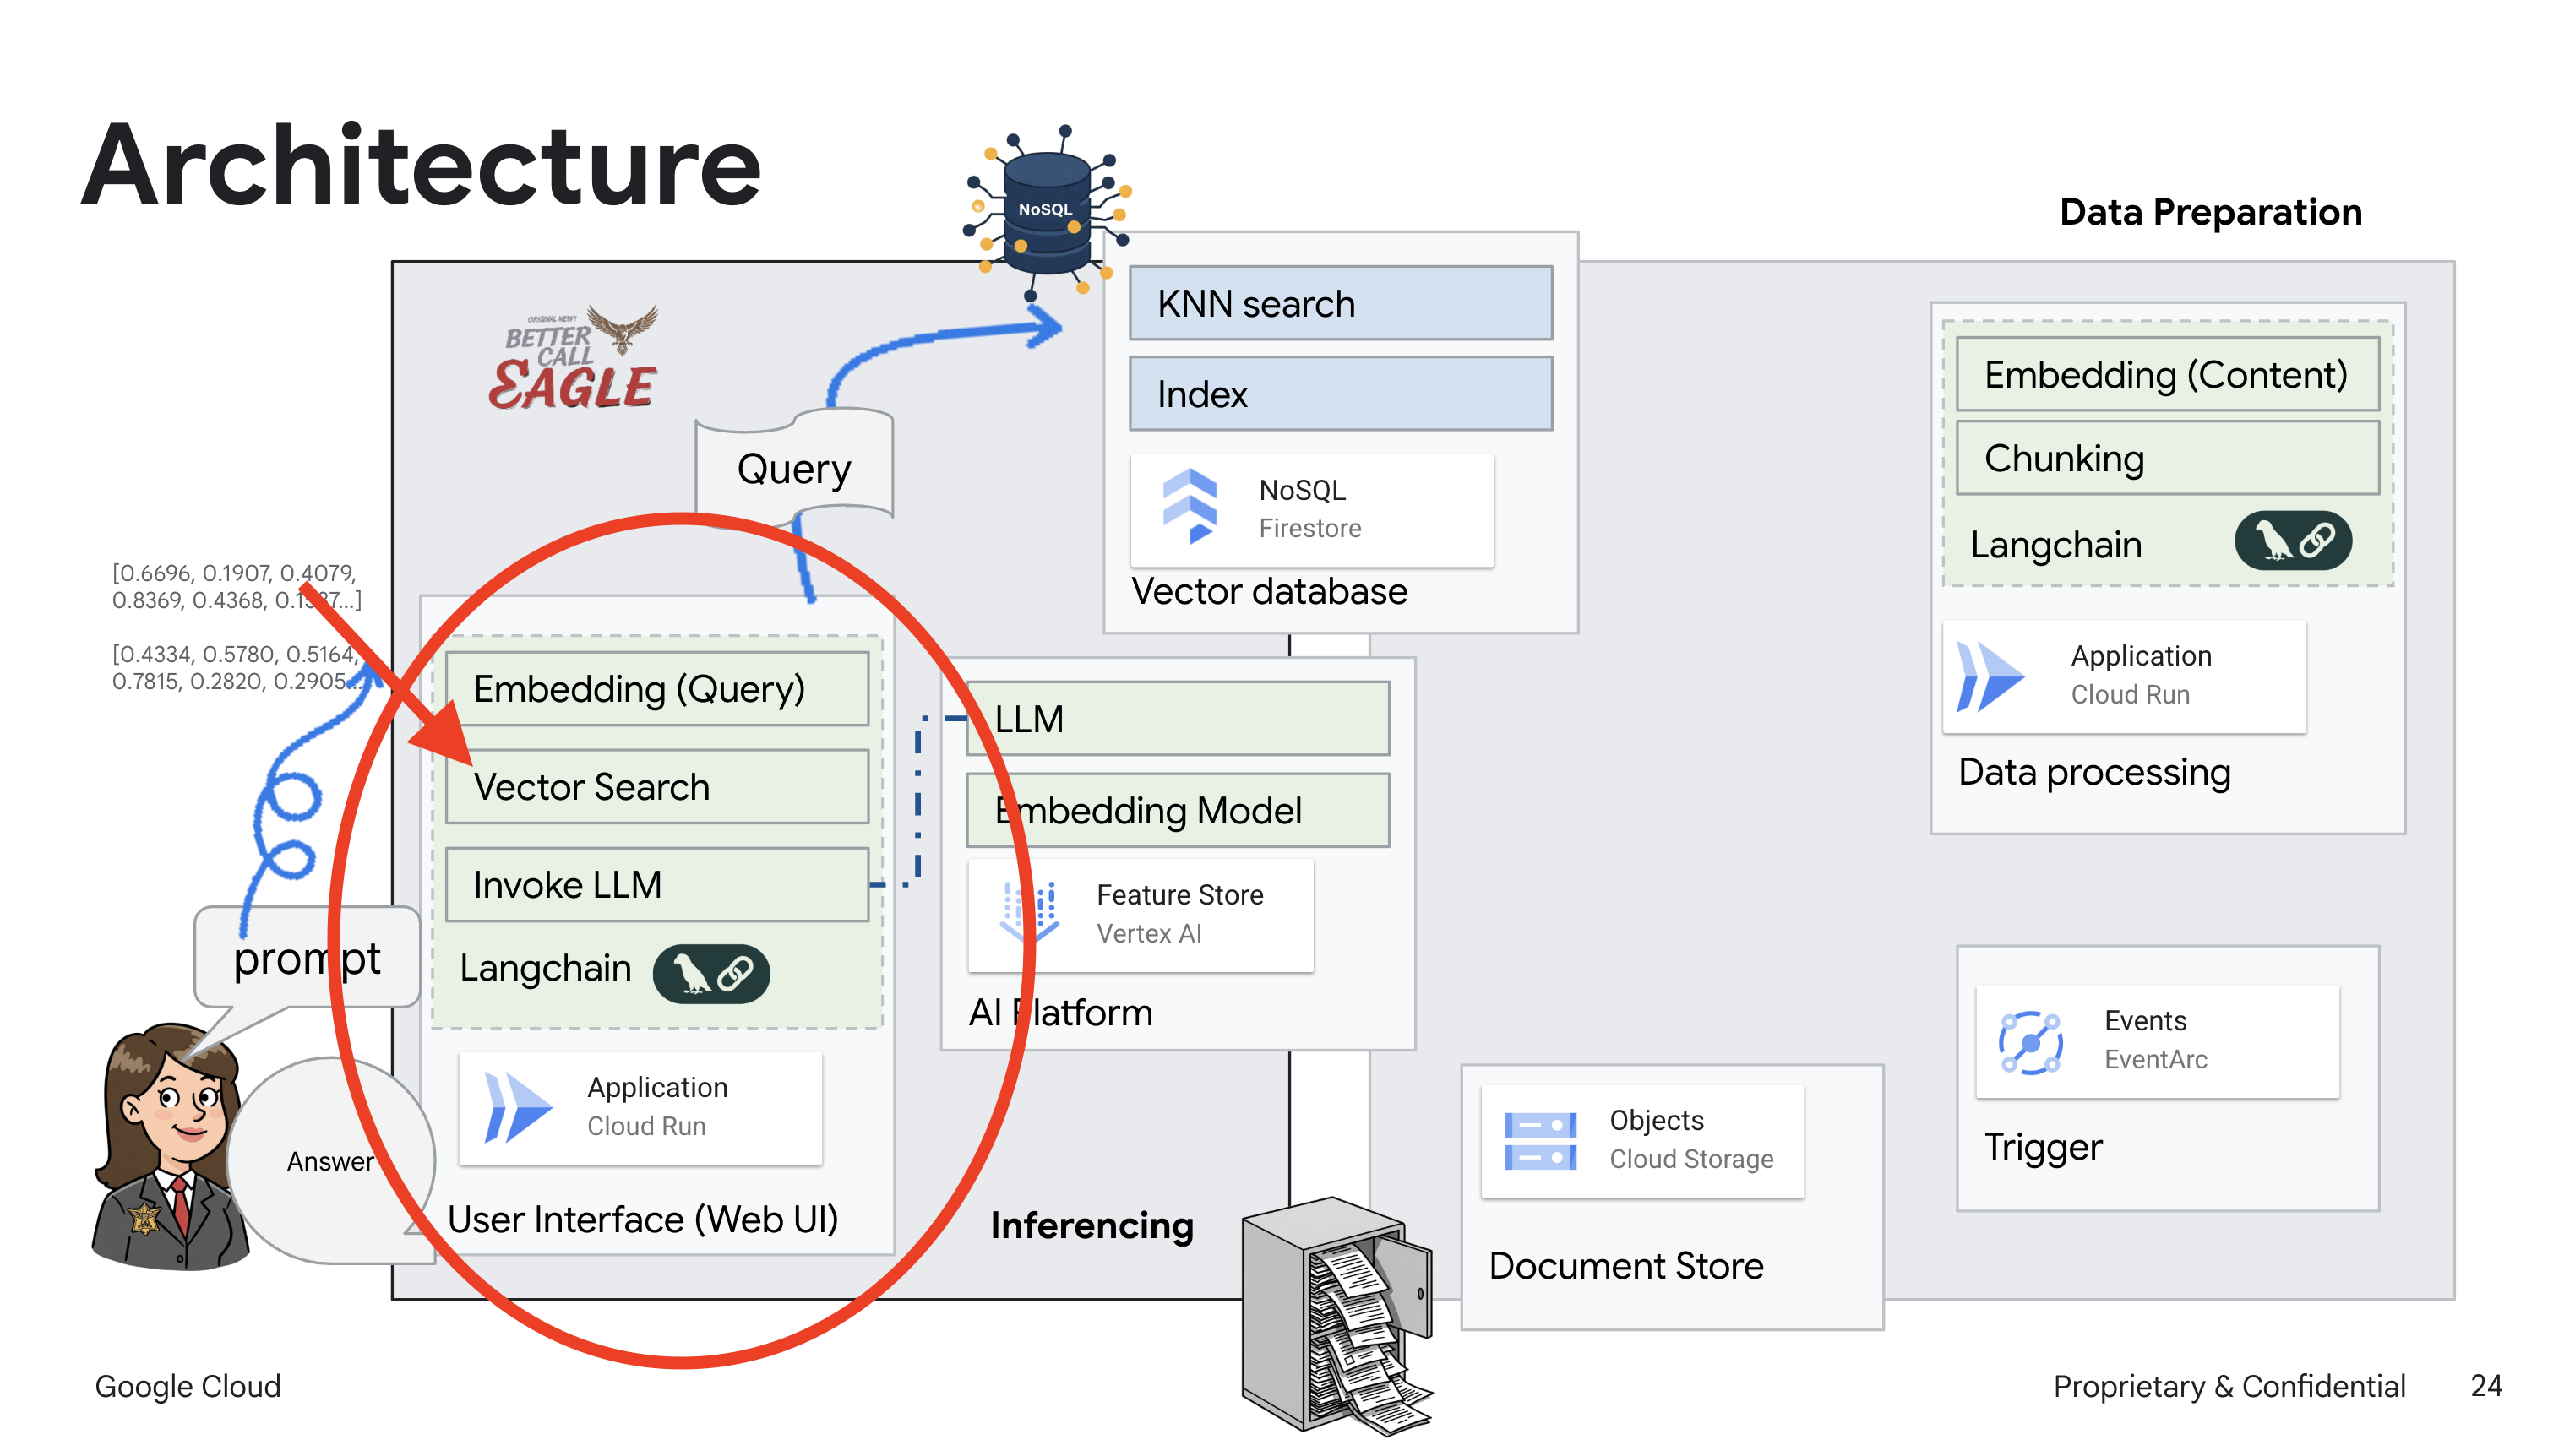
このプロジェクトでは、Google Cloud AI ツールを使用して法律アシスタントを構築することに重点を置き、法律データの処理、理解、検索の方法について説明します。このシステムは、大量の情報をふるい分け、要約を生成し、関連性の高いデータを迅速に提示するように設計されています。リーガル アシスタントのアーキテクチャには、いくつかの主要なコンポーネントが含まれます。
非構造化データからナレッジベースを構築する: Google Cloud Storage(GCS)を使用して法的文書を保存します。NoSQL データベースである Firestore は、ベクトル ストアとして機能し、ドキュメント チャンクと対応するエンベディングを保持します。類似性検索を可能にするため、Firestore でベクトル検索が有効になっています。新しい法的文書が GCS にアップロードされると、Eventarc が Cloud Run 関数をトリガーします。この関数は、ドキュメントをチャンクに分割し、Vertex AI のテキスト エンベディング モデルを使用して各チャンクのエンベディングを生成することで、ドキュメントを処理します。これらのエンベディングは、テキスト チャンクとともに Firestore に保存されます。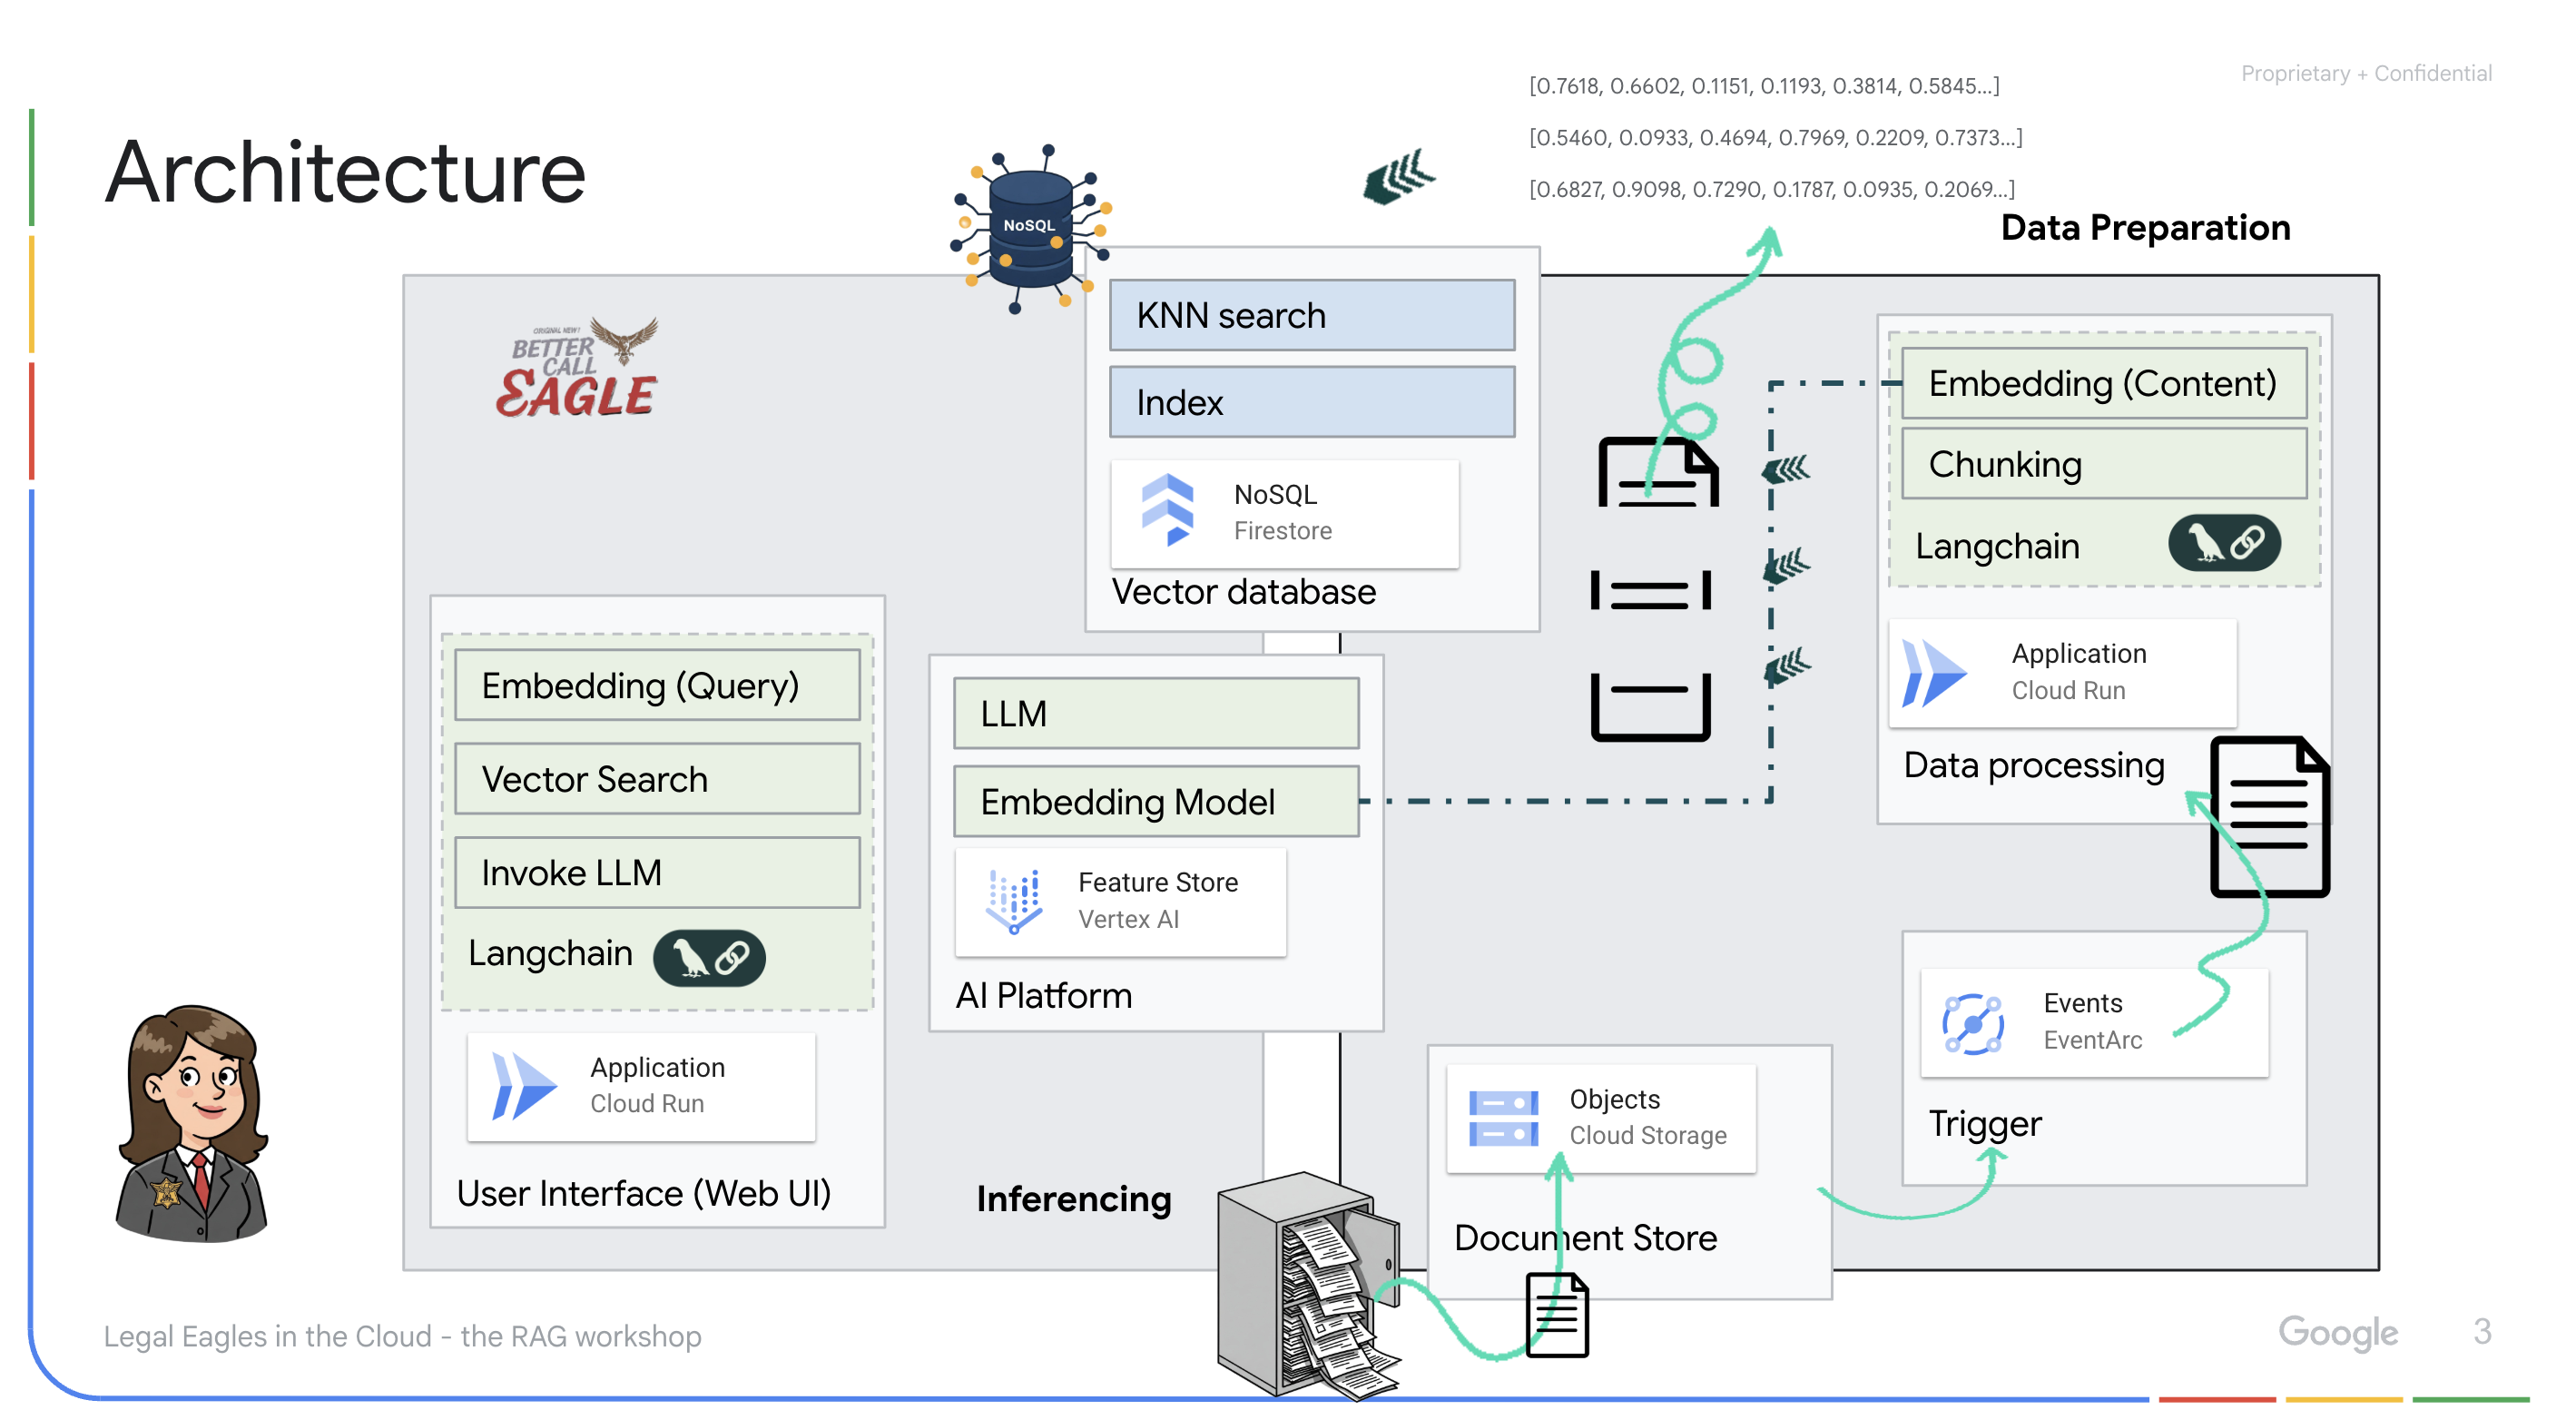
LLM と RAG を活用したアプリケーション : 質問応答システムのコアは ask_llm 関数です。この関数は、langchain ライブラリを使用して Vertex AI Gemini 大規模言語モデルとやり取りします。ユーザーのクエリから HumanMessage を作成し、LLM に有益な法律アシスタントとして機能するように指示する SystemMessage を含めます。このシステムは、検索拡張生成(RAG)アプローチを使用します。クエリに回答する前に、search_resource 関数を使用して Firestore ベクトルストアから関連するコンテキストを取得します。このコンテキストは SystemMessage に含まれ、LLM の回答が提供された法律情報に基づいてグラウンディングされます。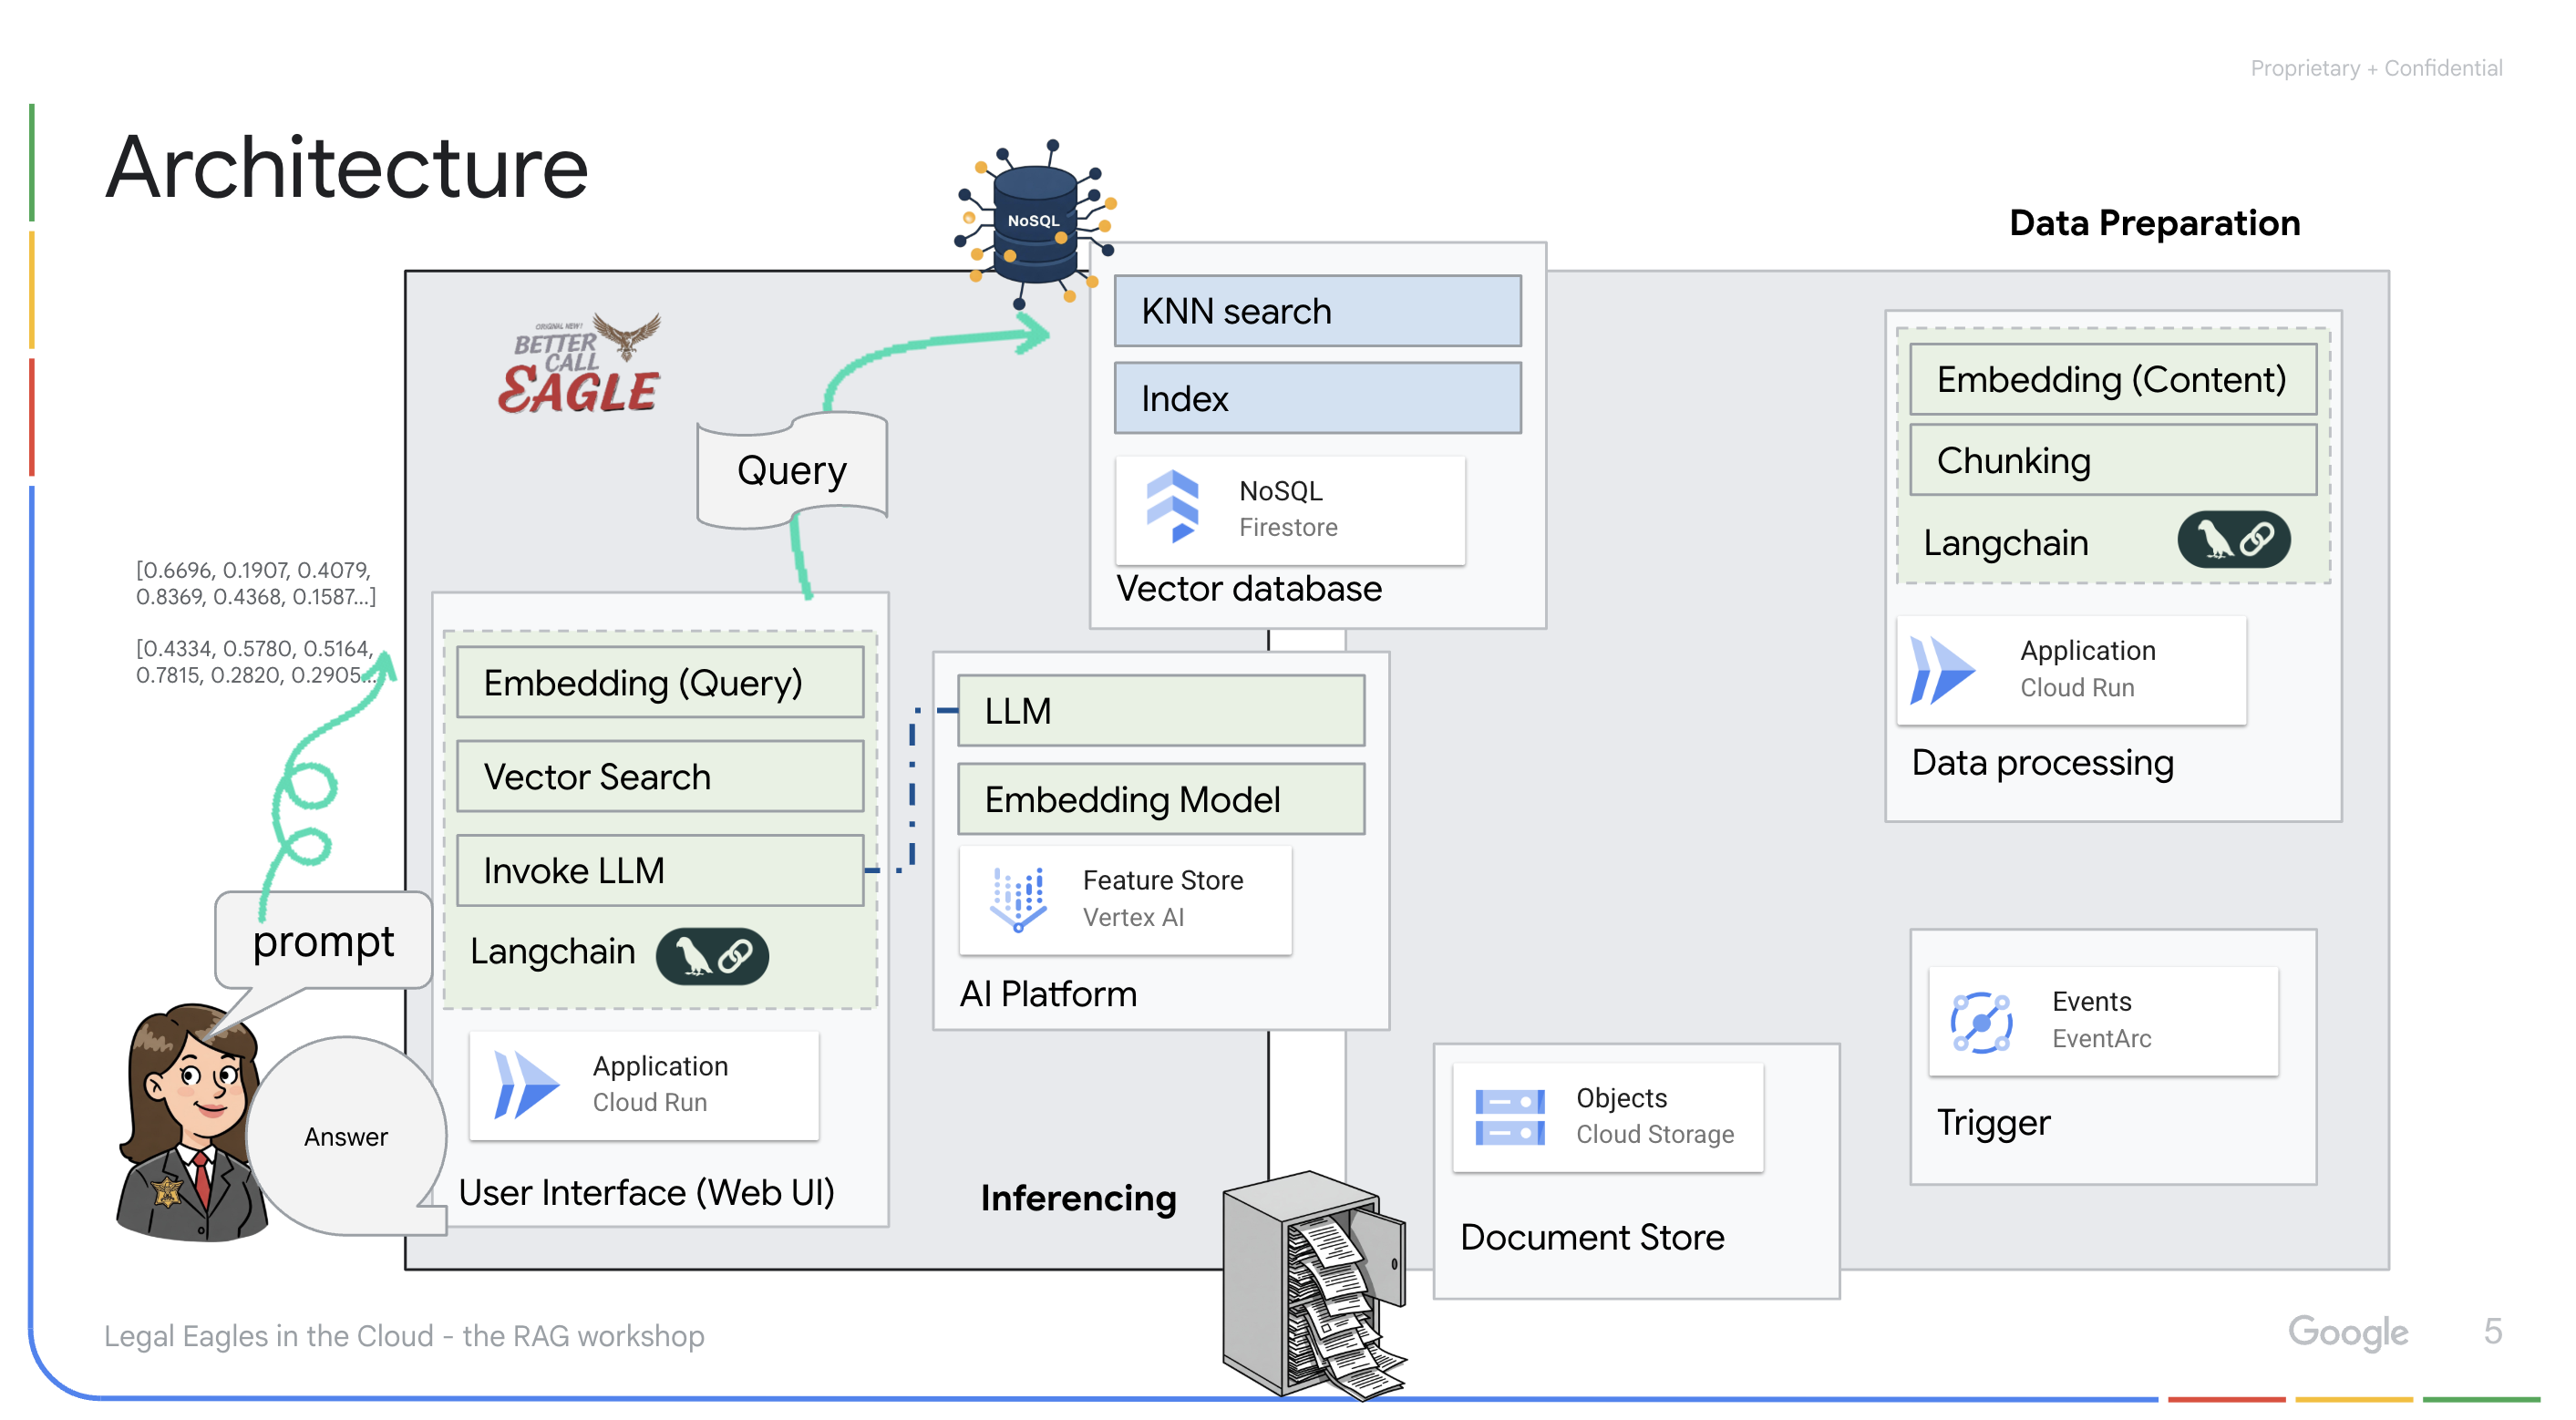
このプロジェクトは、RAG を使用して LLM の「創造的な解釈」から脱却することを目的としています。RAG は、回答を生成する前に、信頼できる法的情報源から関連情報を取得します。これにより、実際の法律情報に基づいた、より正確で情報に基づいた回答が得られます。このシステムは、Google Cloud Shell、Vertex AI、Firestore、Cloud Run、Eventarc などのさまざまな Google Cloud サービスを使用して構築されています。
3. 始める前に
Google Cloud コンソールのプロジェクト選択ページで、Google Cloud プロジェクトを選択または作成します。Cloud プロジェクトに対して課金が有効になっていることを確認します。プロジェクトで課金が有効になっているかどうかを確認する方法をご覧ください。
Cloud Shell IDE で Gemini Code Assist を有効にする
👉 Google Cloud コンソールで、Gemini Code Assist ツールに移動し、利用規約に同意して Gemini Code Assist を無料で有効にします。
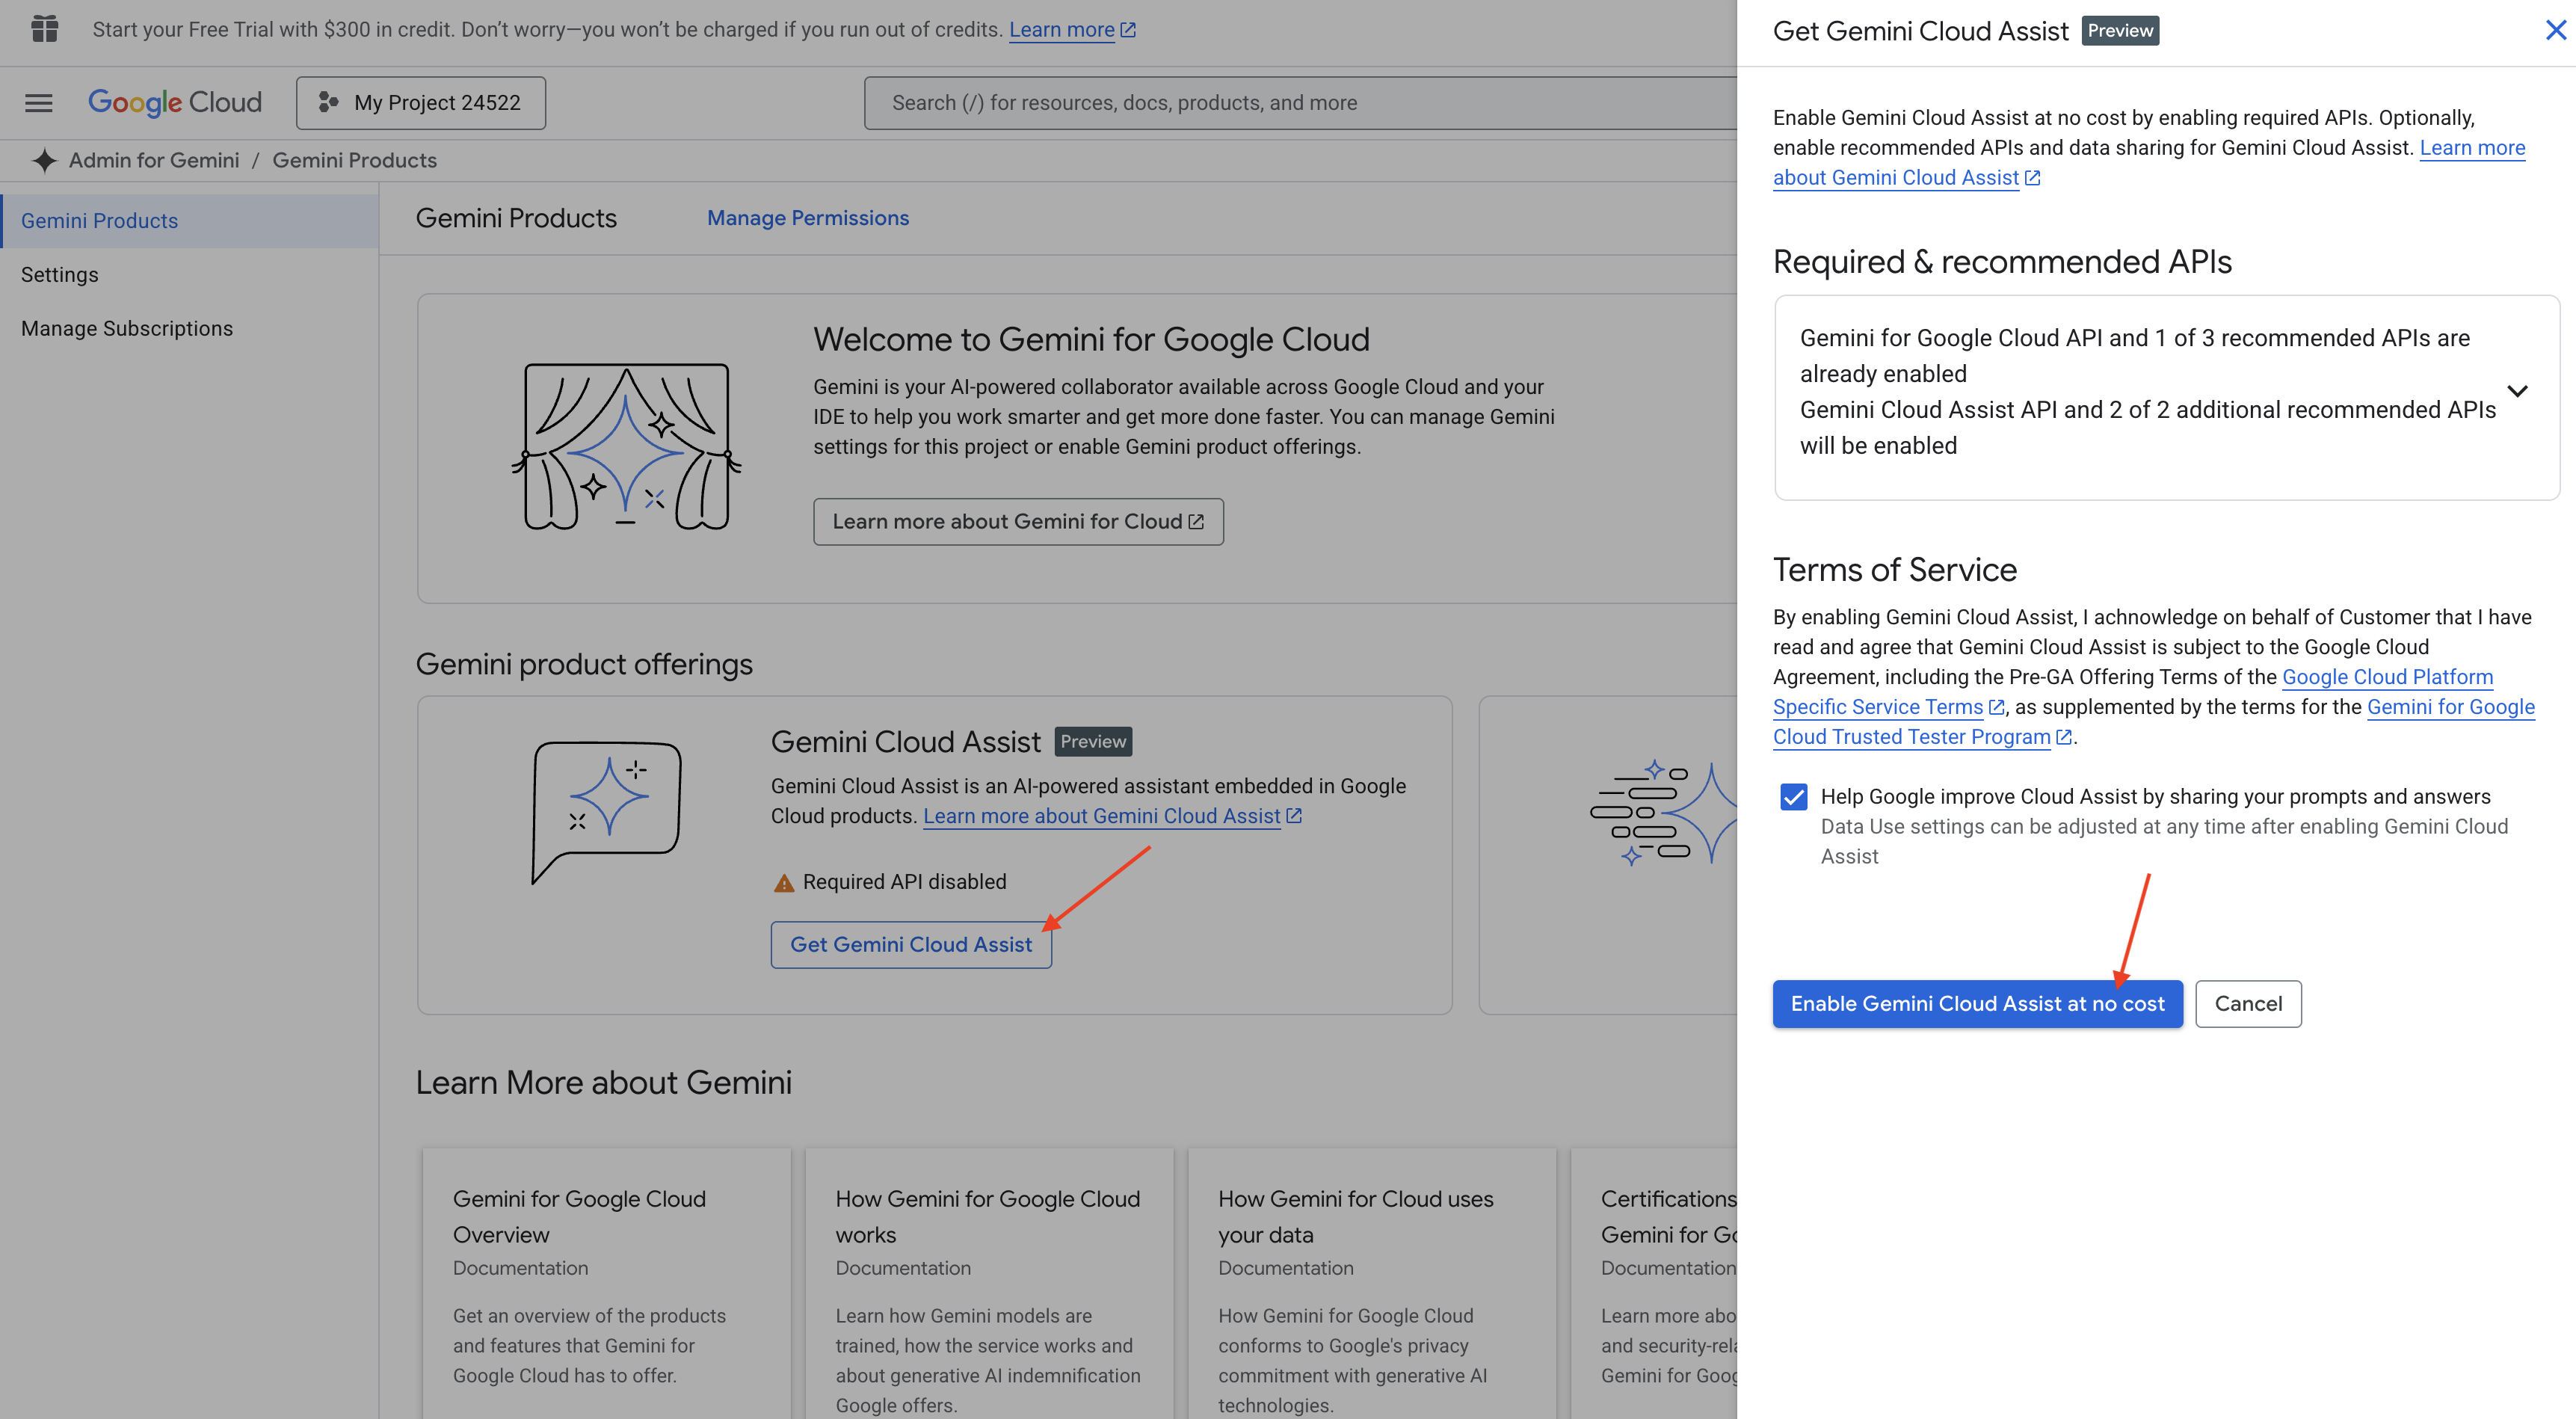
権限の設定を無視して、このページを離れます。
Cloud Shell エディタで作業する
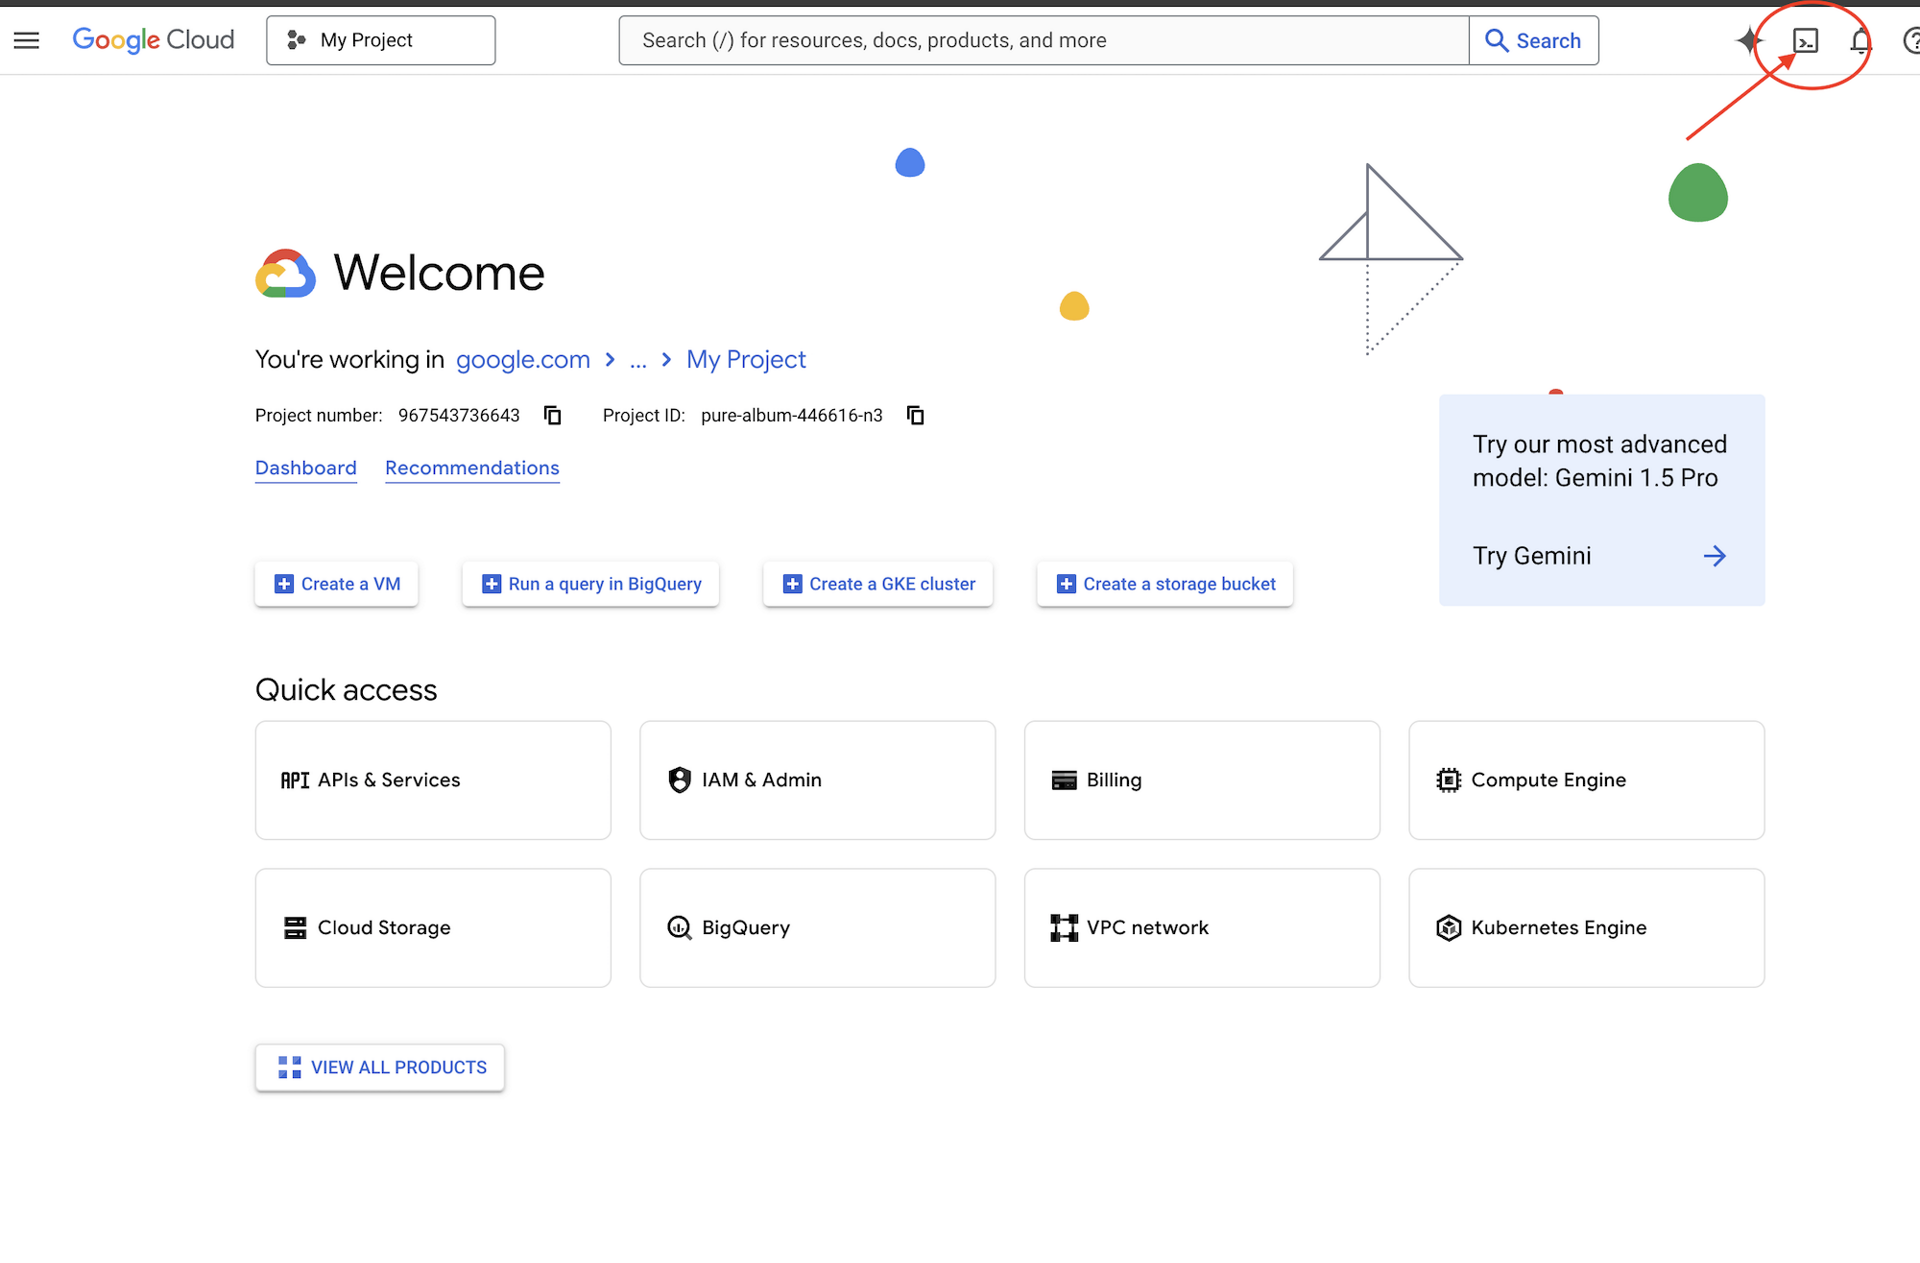
👉 Google Cloud コンソールの上部にある [Cloud Shell をアクティブにする] をクリックします(Cloud Shell ペインの上部にあるターミナル型のアイコンです)。
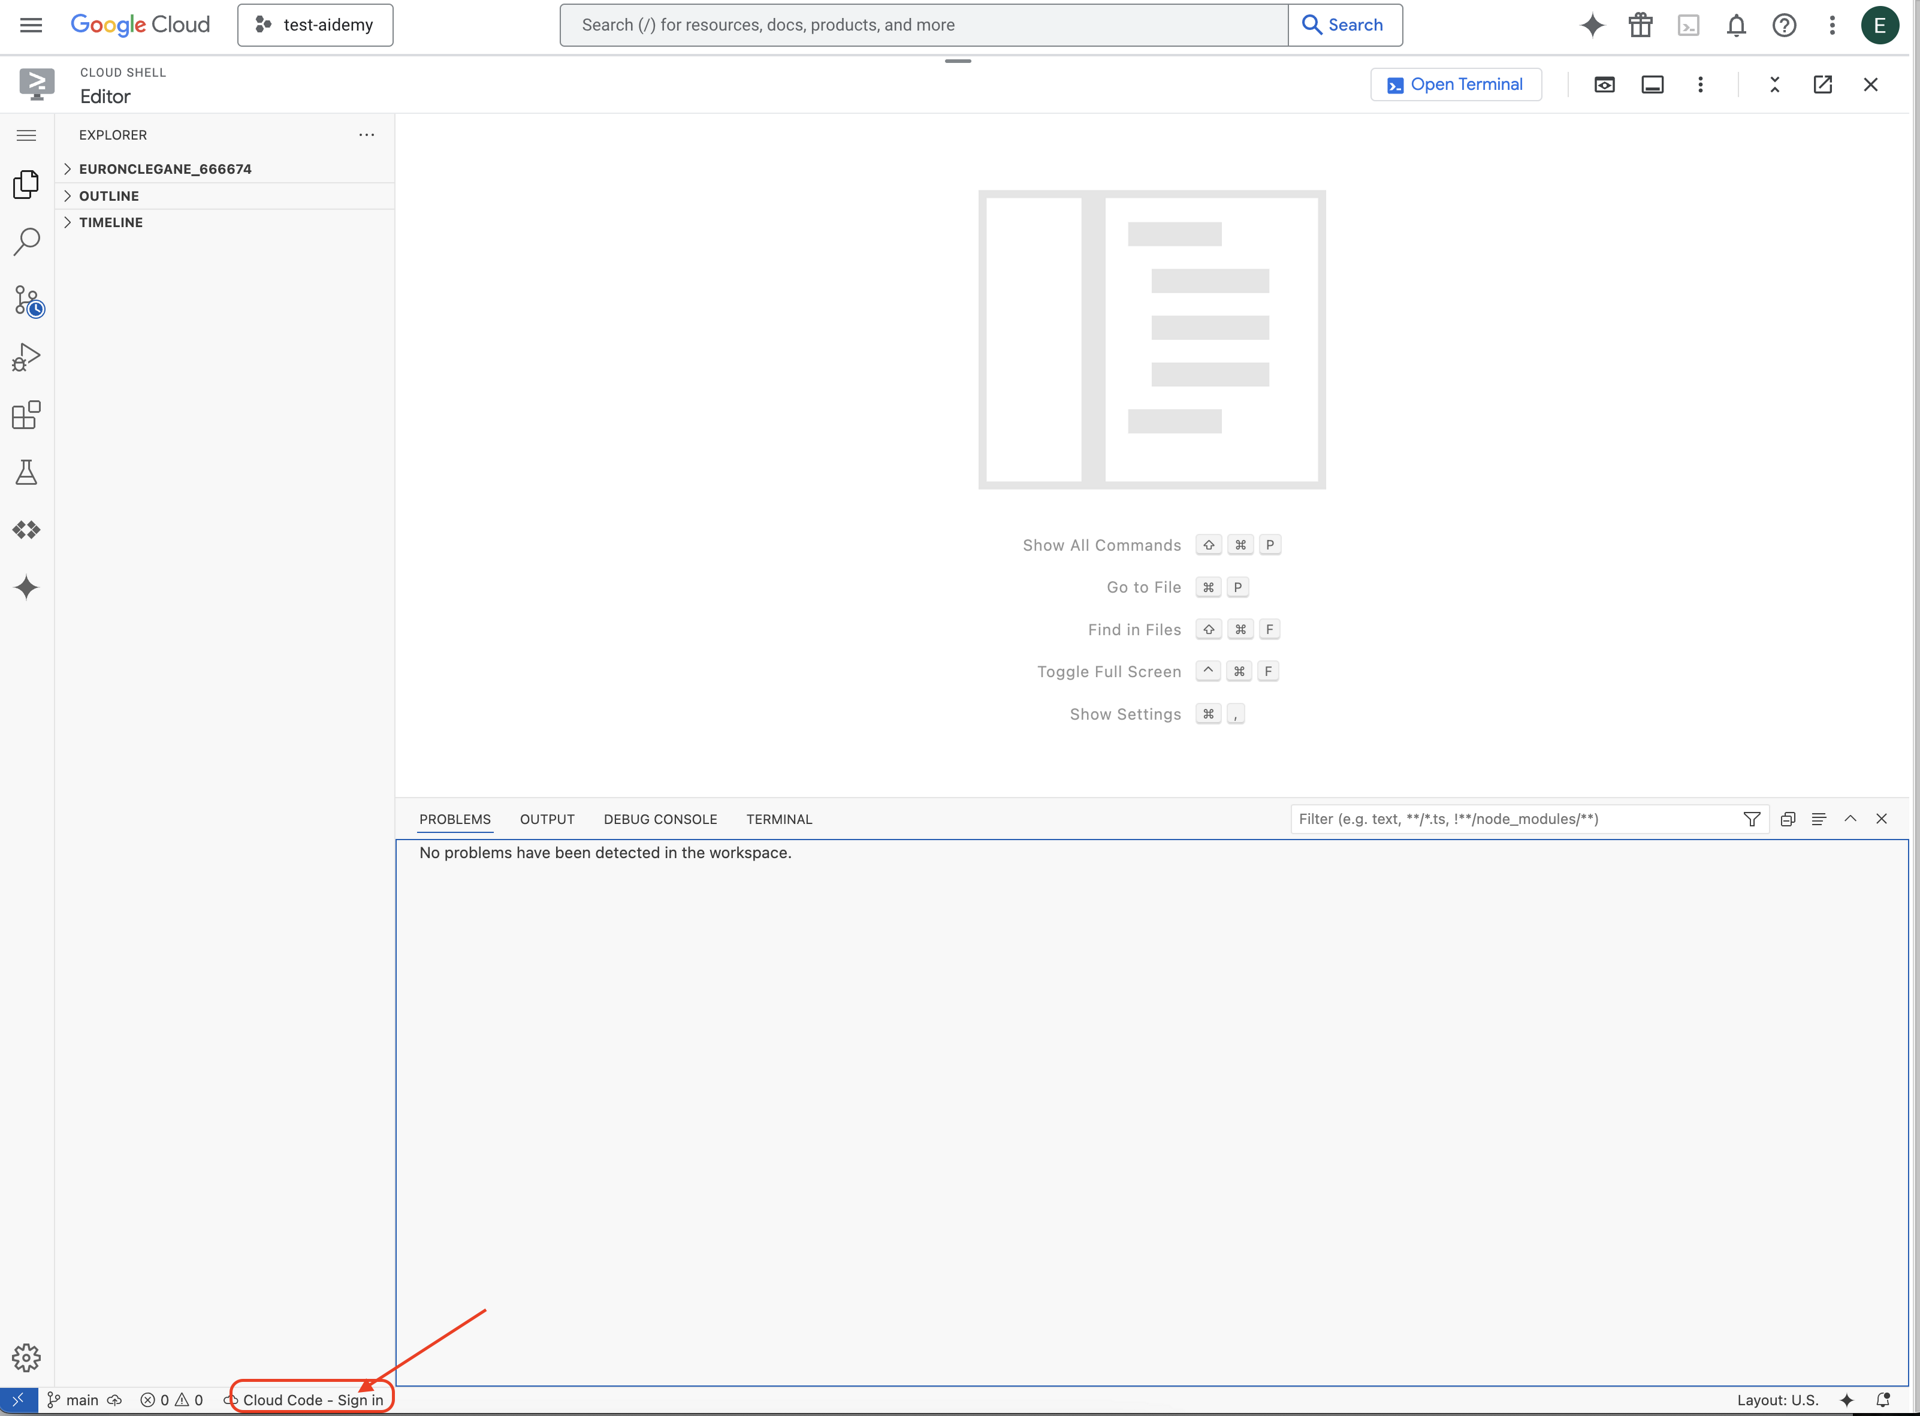
👉 [エディタを開く] ボタン(開いたフォルダと鉛筆のアイコン)をクリックします。ウィンドウに Cloud Shell エディタが開きます。左側にファイル エクスプローラが表示されます。

👉 下のステータスバーにある [Cloud Code Sign-in] ボタンをクリックします。指示に従ってプラグインを承認します。ステータスバーに「Cloud Code - no project」と表示されている場合は、それを選択し、[Google Cloud プロジェクトを選択] プルダウンで、使用するプロジェクトのリストから特定の Google Cloud プロジェクトを選択します。
👉 クラウド IDE でターミナルを開く: 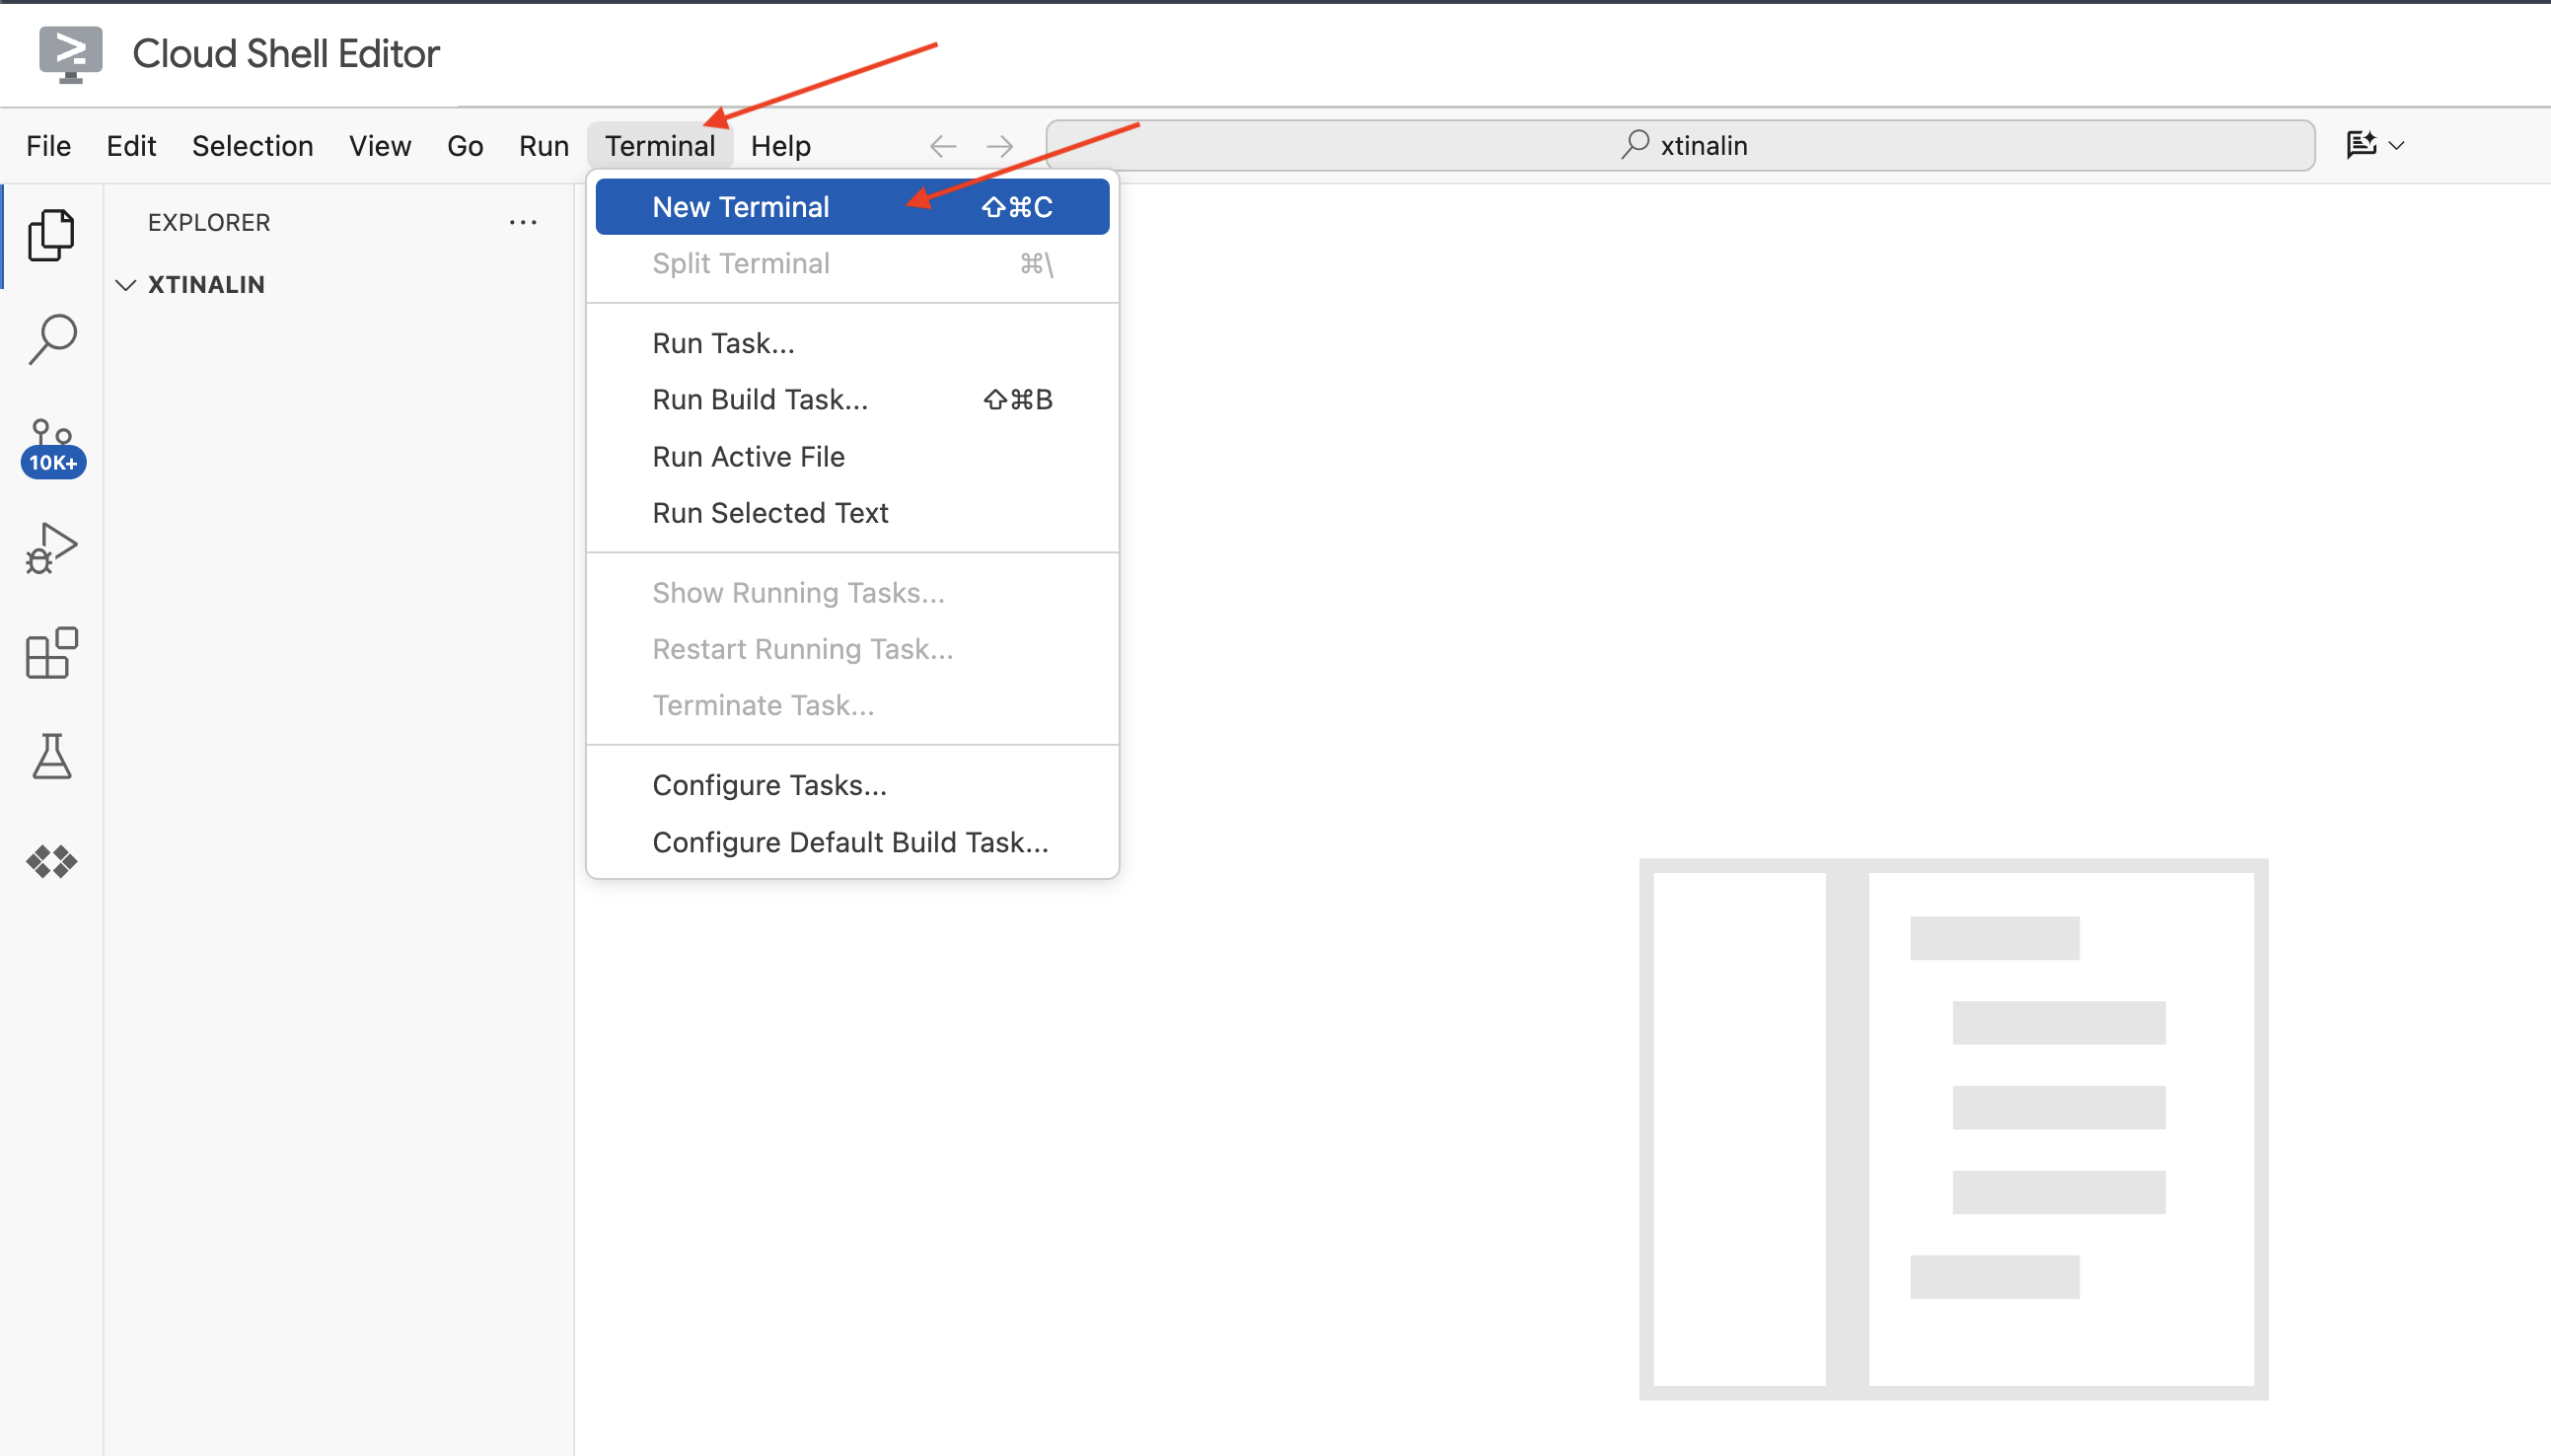
👉 新しいターミナルで、次のコマンドを使用して、すでに認証済みであることと、プロジェクトがプロジェクト ID に設定されていることを確認します。
gcloud auth list
👉 Google Cloud コンソールの上部にある [Cloud Shell をアクティブにする] をクリックします。
gcloud config set project <YOUR_PROJECT_ID>
👉 次のコマンドを実行して、必要な Google Cloud API を有効にします。
gcloud services enable storage.googleapis.com  \
                        run.googleapis.com  \
                        artifactregistry.googleapis.com  \
                        aiplatform.googleapis.com \
                        eventarc.googleapis.com \
                        cloudresourcemanager.googleapis.com \
                        firestore.googleapis.com \
                        cloudaicompanion.googleapis.com
Cloud Shell ツールバー(Cloud Shell ペインの上部)で、[エディタを開く] ボタン(鉛筆の付いた開いたフォルダのアイコン)をクリックします。ウィンドウに Cloud Shell コードエディタが開きます。左側にファイル エクスプローラが表示されます。
👉 ターミナルで Bootstrap スケルトン プロジェクトをダウンロードします。
git clone https://github.com/weimeilin79/legal-eagle.git
省略可: スペイン語版
👉 Existe una versión alternativa en español. Por favor, utilice la siguiente instrucción para clonar la versión correcta.
git clone -b spanish https://github.com/weimeilin79/legal-eagle.git
Cloud Shell ターミナルでこのコマンドを実行すると、Cloud Shell 環境にリポジトリ名 legal-eagle の新しいフォルダが作成されます。
4. Gemini Code Assist を使用して推論アプリケーションを記述する
このセクションでは、リーガル アシスタントのコアとなる、ユーザーからの質問を受け取り、AI モデルとやり取りして回答を生成するウェブ アプリケーションの構築に焦点を当てます。Gemini Code Assist を活用して、この推論部分の Python コードを作成します。
まず、LangChain ライブラリを使用して Vertex AI Gemini モデルと直接通信する Flask アプリケーションを作成します。この最初のバージョンは、モデルの一般的な知識に基づいて役立つ法律アシスタントとして機能しますが、特定の裁判事件の書類にはまだアクセスできません。これにより、後で RAG で強化する前に、LLM のベースライン パフォーマンスを確認できます。
Cloud Code エディタの [エクスプローラ] ペイン(通常は左側)に、Git リポジトリ legal-eagle のクローンを作成したときに作成されたフォルダが表示されます。エクスプローラでプロジェクトのルートフォルダを開きます。その中に webapp サブフォルダがあるので、それも開きます。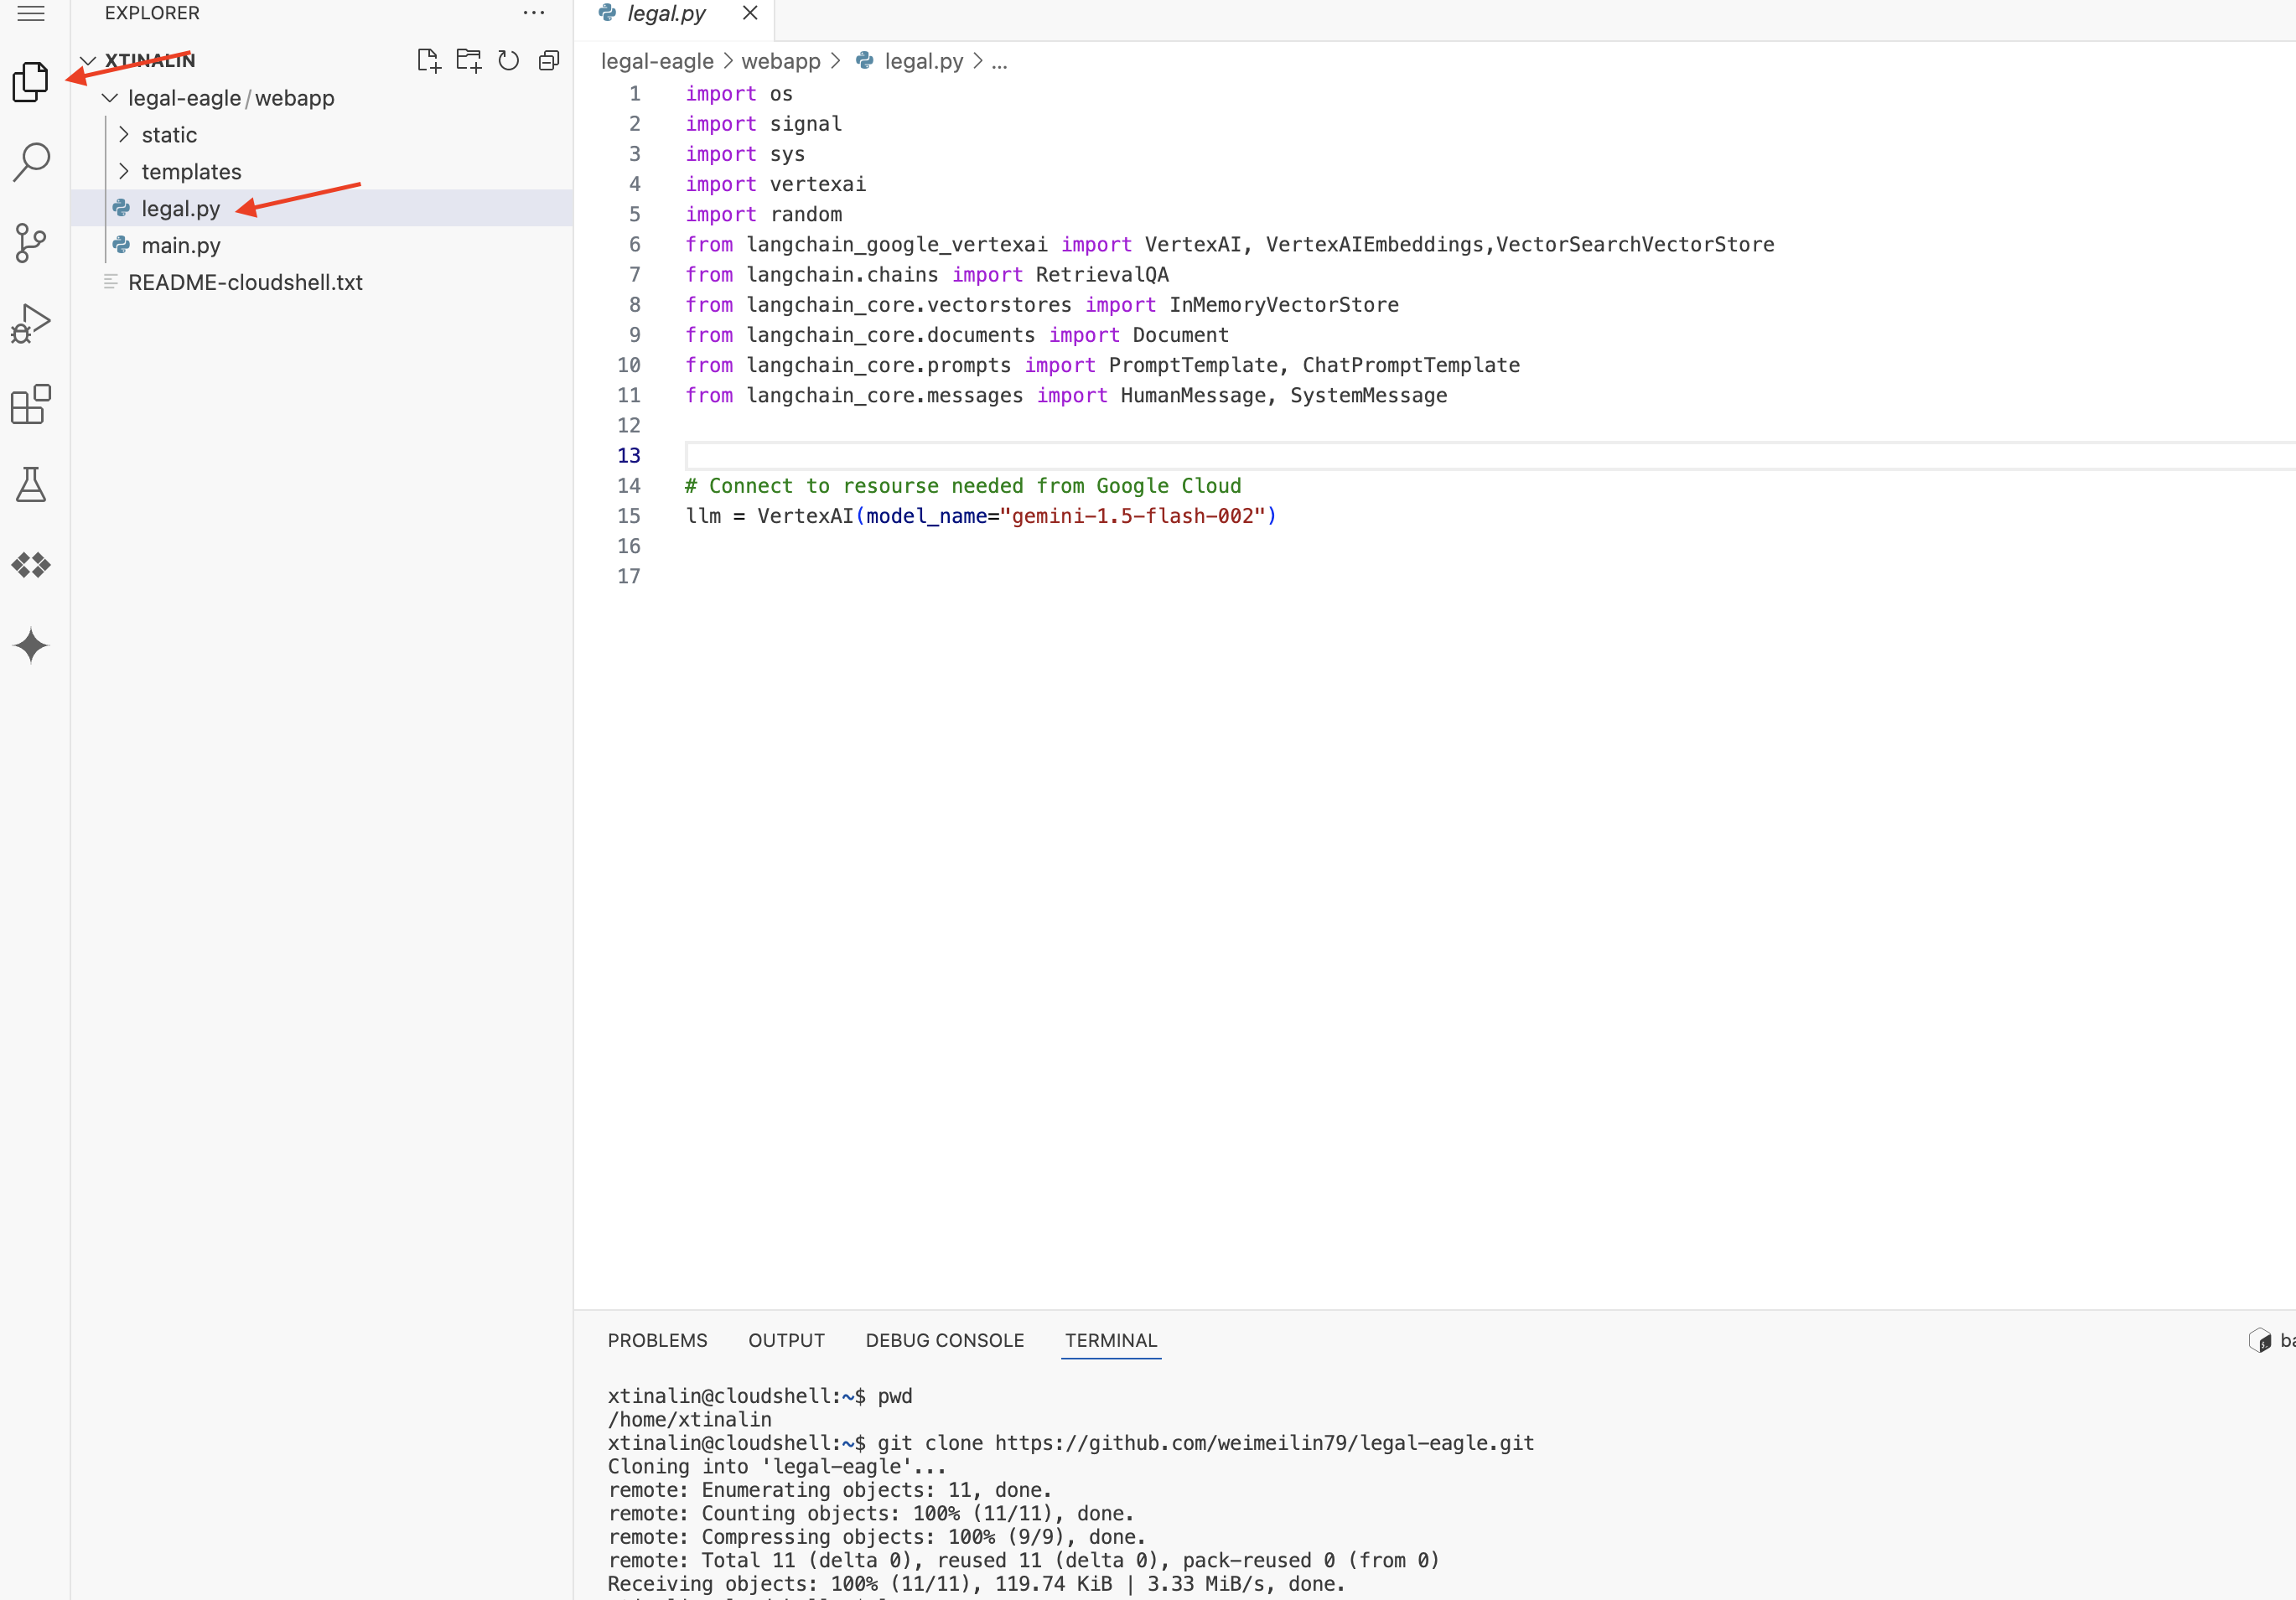
👉 Cloud Code エディタで legal.py ファイルを編集する場合は、さまざまな方法で Gemini Code Assist にプロンプトを送信できます。
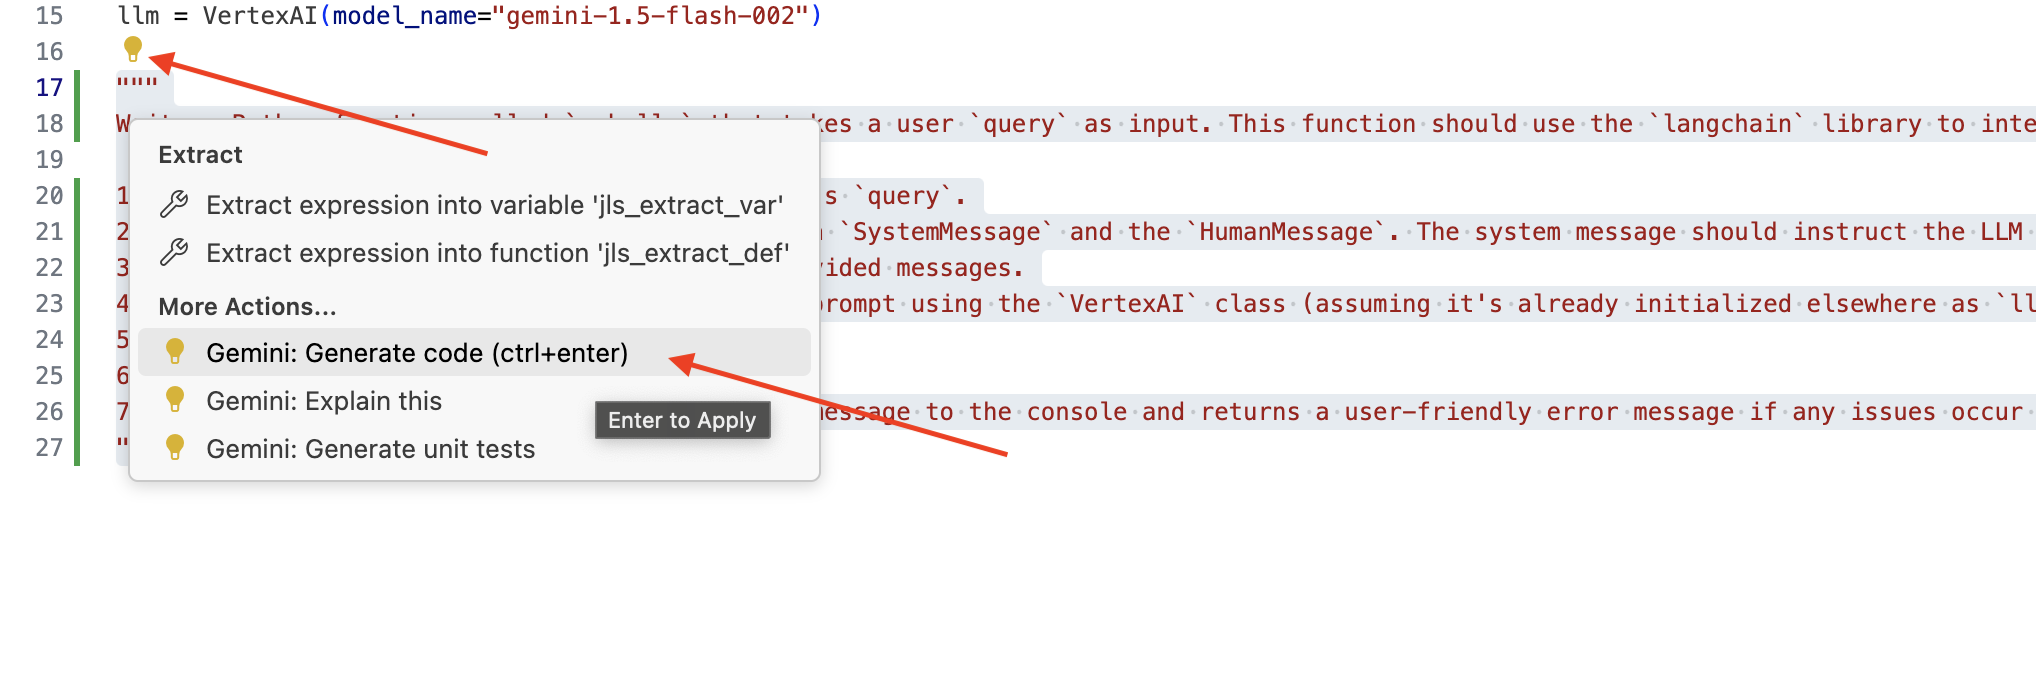
👉 次のプロンプトを legal.py の下部にコピーして、Gemini Code Assist に生成してほしい内容を明確に記述し、表示された電球アイコン 💡 をクリックして [Gemini: Generate Code] を選択します(正確なメニュー項目は Cloud Code のバージョンによって若干異なる場合があります)。
"""
Write a Python function called `ask_llm` that takes a user `query` as input. This function should use the `langchain` library to interact with a Vertex AI Gemini Large Language Model.  Specifically, it should:
1.  Create a `HumanMessage` object from the user's `query`.
2.  Create a `ChatPromptTemplate` that includes a `SystemMessage` and the `HumanMessage`. The system message should instruct the LLM to act as a helpful assistant in a courtroom setting, aiding an attorney by providing necessary information. It should also specify that the LLM should respond in a high-energy tone, using no more than 100 words, and offer a humorous apology if it doesn't know the answer.
3.  Format the `ChatPromptTemplate` with the provided messages.
4.  Invoke the Vertex AI LLM with the formatted prompt using the `VertexAI` class (assuming it's already initialized elsewhere as `llm`).
5.  Print the LLM's `response`.
6.  Return the `response`.
7.  Include error handling that prints an error message to the console and returns a user-friendly error message if any issues occur during the process.  The Vertex AI model should be "gemini-2.0-flash".
"""
生成されたコードを慎重に確認する
- コメントで説明した手順に沿って操作しましたか?
SystemMessageとHumanMessageを含むChatPromptTemplateを作成しますか?- 基本的なエラー処理(
try...except)は含まれていますか?
生成されたコードが適切で、ほぼ正しい場合は、コードを採用できます(インライン候補の場合は Tab キーまたは Enter キーを押し、大きなコードブロックの場合は [採用] をクリックします)。
生成されたコードがご希望どおりでない場合や、エラーが含まれている場合でも、ご心配はいりません。Gemini Code Assist は、完璧なコードを最初に記述するのではなく、ユーザーを支援するツールです。
生成されたコードを編集して変更し、コードを調整してエラーを修正し、要件に合わせて調整します。Code Assist チャット パネルでコメントを追加したり、具体的な質問をしたりすることで、Gemini Code Assist にさらにプロンプトを送信できます。
SDK をまだ使い慣れていない場合は、こちらに動作する例があります。
👉 次のコードをコピーして legal.py に貼り付け、置き換えます。
import os
import signal
import sys
import vertexai
import random
from langchain_google_vertexai import VertexAI
from langchain_core.prompts import PromptTemplate, ChatPromptTemplate
from langchain_core.messages import HumanMessage, SystemMessage
# Connect to resourse needed from Google Cloud
llm = VertexAI(model_name="gemini-2.0-flash")
def ask_llm(query):
    try:
        query_message = {
            "type": "text",
            "text": query,
        }

        input_msg = HumanMessage(content=[query_message])
        prompt_template = ChatPromptTemplate.from_messages(
            [
                SystemMessage(
                    content=(
                        "You are a helpful assistant, and you are with the attorney in a courtroom, you are helping him to win the case by providing the information he needs "
                        "Don't answer if you don't know the answer, just say sorry in a funny way possible"
                        "Use high engergy tone, don't use more than 100 words to answer"
                       # f"Here is some past conversation history between you and the user {relevant_history}"
                       # f"Here is some context that is relevant to the question {relevant_resource} that you might use"
                    )
                ),
                input_msg,
            ]
        )
        prompt = prompt_template.format()
        response = llm.invoke(prompt)
        print(f"response: {response}")
        return response
    except Exception as e:
        print(f"Error sending message to chatbot: {e}") # Log this error too!
        return f"Unable to process your request at this time. Due to the following reason: {str(e)}"
👉 省略可: スペイン語版
Sustituye el siguiente texto como se indica: You are a helpful assistant, to You are a helpful assistant that speaks Spanish,
次に、ユーザーの質問に回答するルートを処理する関数を作成します。
Cloud Shell エディタで main.py を開きます。legal.py で ask_llm を生成したときと同様に、Gemini Code Assist を使用して Flask ルートと ask_question 関数を生成します。main.py のコメントとして次のプロンプトを入力します(if __name__ == "__main__": で Flask アプリを起動する前に追加されていることを確認してください)。
.....
@app.route('/',methods=['GET'])
def index():
    return render_template('index.html')


"""
PROMPT:
Create a Flask endpoint that accepts POST requests at the '/ask' route.
The request should contain a JSON payload with a 'question' field. Extract the question from the JSON payload.
Call a function named ask_llm (located in a file named legal.py) with the extracted question as an argument.
Return the result of the ask_llm function as the response with a 200 status code.
If any error occurs during the process, return a 500 status code with the error message.
"""

# Add this block to start the Flask app when running locally
if __name__ == "__main__":
.....
生成されたコードが適切で、ほぼ正しい場合にのみ承認します。Python に慣れていない場合は、次の実行可能な例を コピーして貼り付け、既存のコードの下の main.py に追加してください。
👉 ウェブ アプリケーションの開始前(if name == "main": の前)に、必ず以下を貼り付けてください。
@app.route('/ask', methods=['POST'])
def ask_question():
    data = request.get_json()
    question = data.get('question')
    try:
        # call the ask_llm in legal.py
        answer_markdown = legal.ask_llm(question)

        print(f"answer_markdown: {answer_markdown}")
        # Return the Markdown as the response
        return answer_markdown, 200
    except Exception as e:
        return f"Error: {str(e)}", 500  # Handle errors appropriately
これらの手順に沿って操作すると、Gemini Code Assist を有効にしてプロジェクトを設定し、それを使用して main.py ファイルで ask 関数を生成できます。
5. Cloud エディタでのローカルテスト
👉 エディタのターミナルで、依存ライブラリをインストールし、ウェブ UI をローカルで起動します。
cd ~/legal-eagle/webapp
python -m venv env
source env/bin/activate
export PROJECT_ID=$(gcloud config get project)
pip install -r requirements.txt
python main.py
Cloud Shell ターミナルの出力で起動メッセージを探します。通常、Flask は実行中であることと、どのポートで実行されているかを示すメッセージを出力します。
- Running on http://127.0.0.1:8080
リクエストを処理するには、アプリケーションを継続的に実行する必要があります。
👉 [ウェブでプレビュー] メニューから、[ポート 8080 でプレビュー] を選択します。Cloud Shell で、アプリケーションのウェブ プレビューが新しいブラウザタブまたはウィンドウで開きます。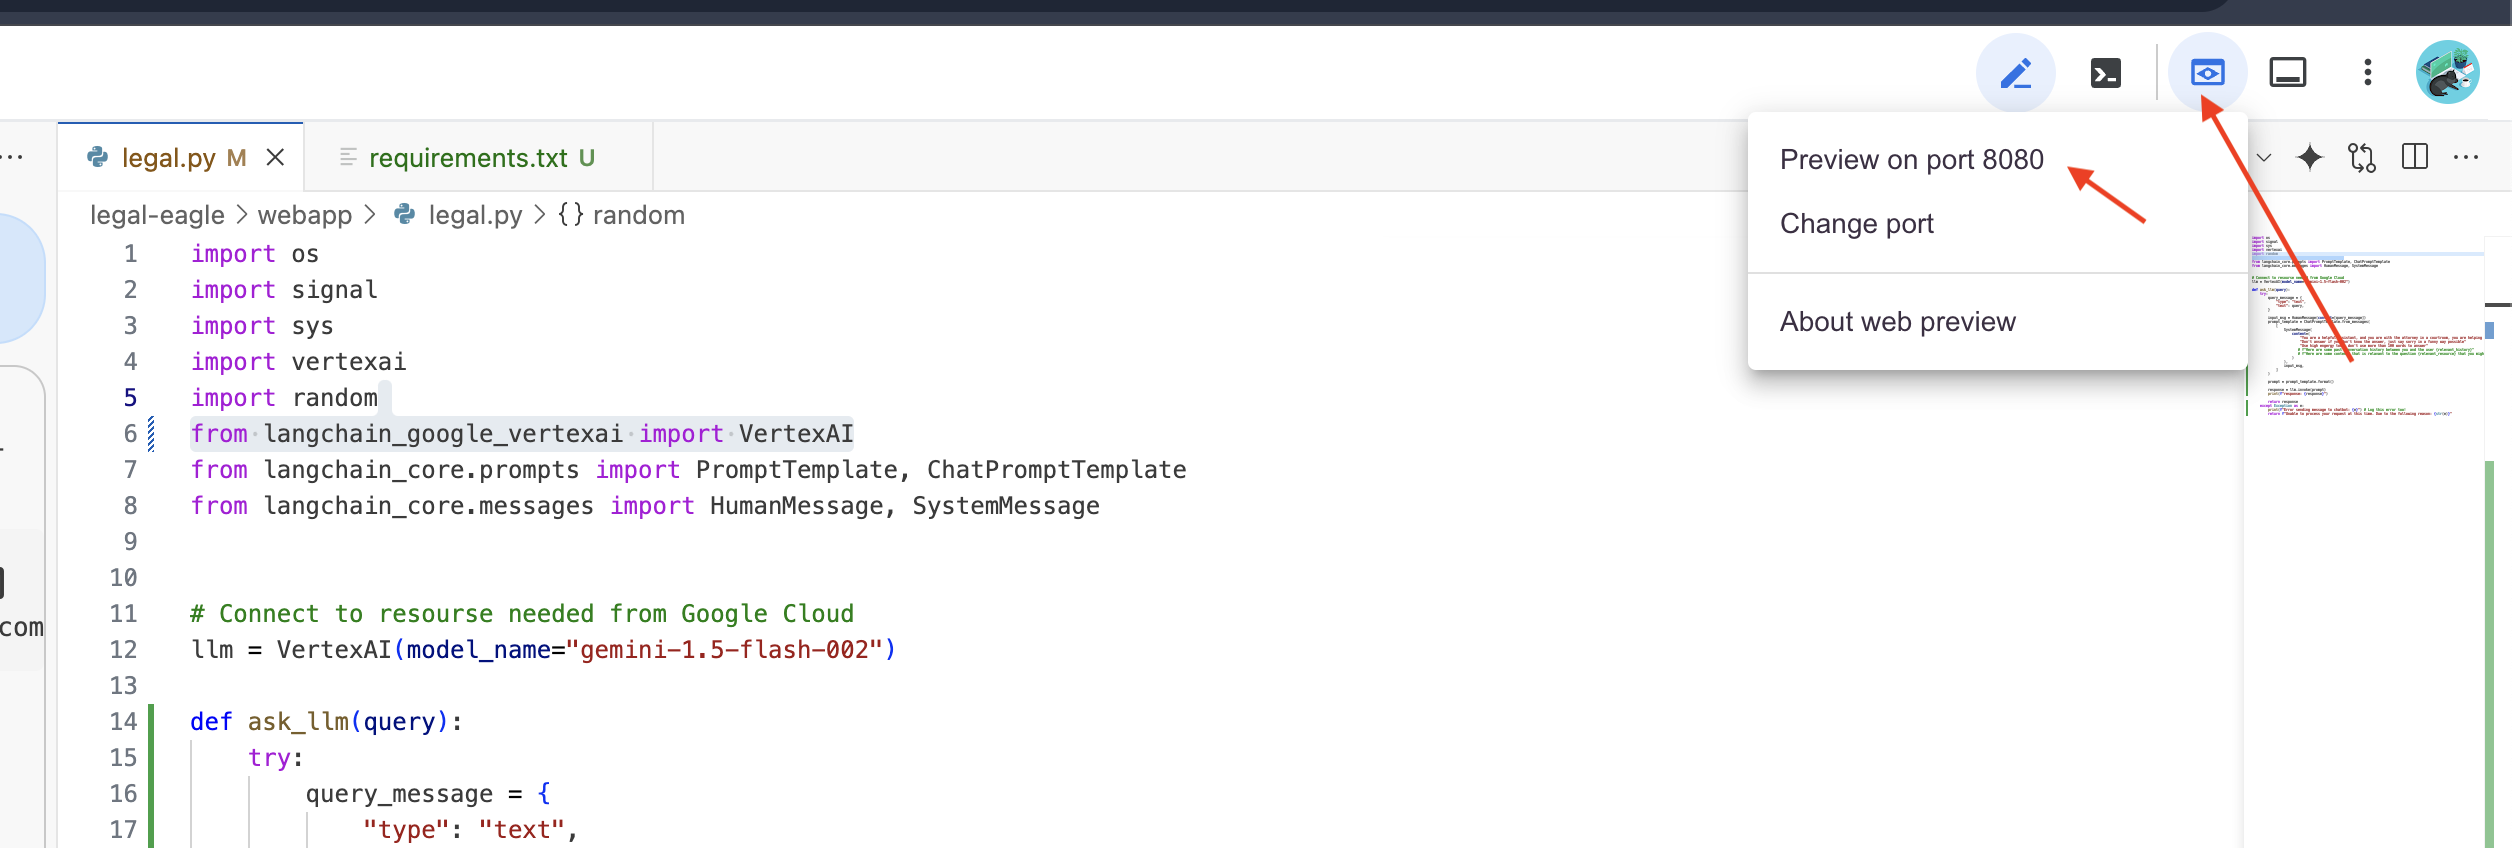
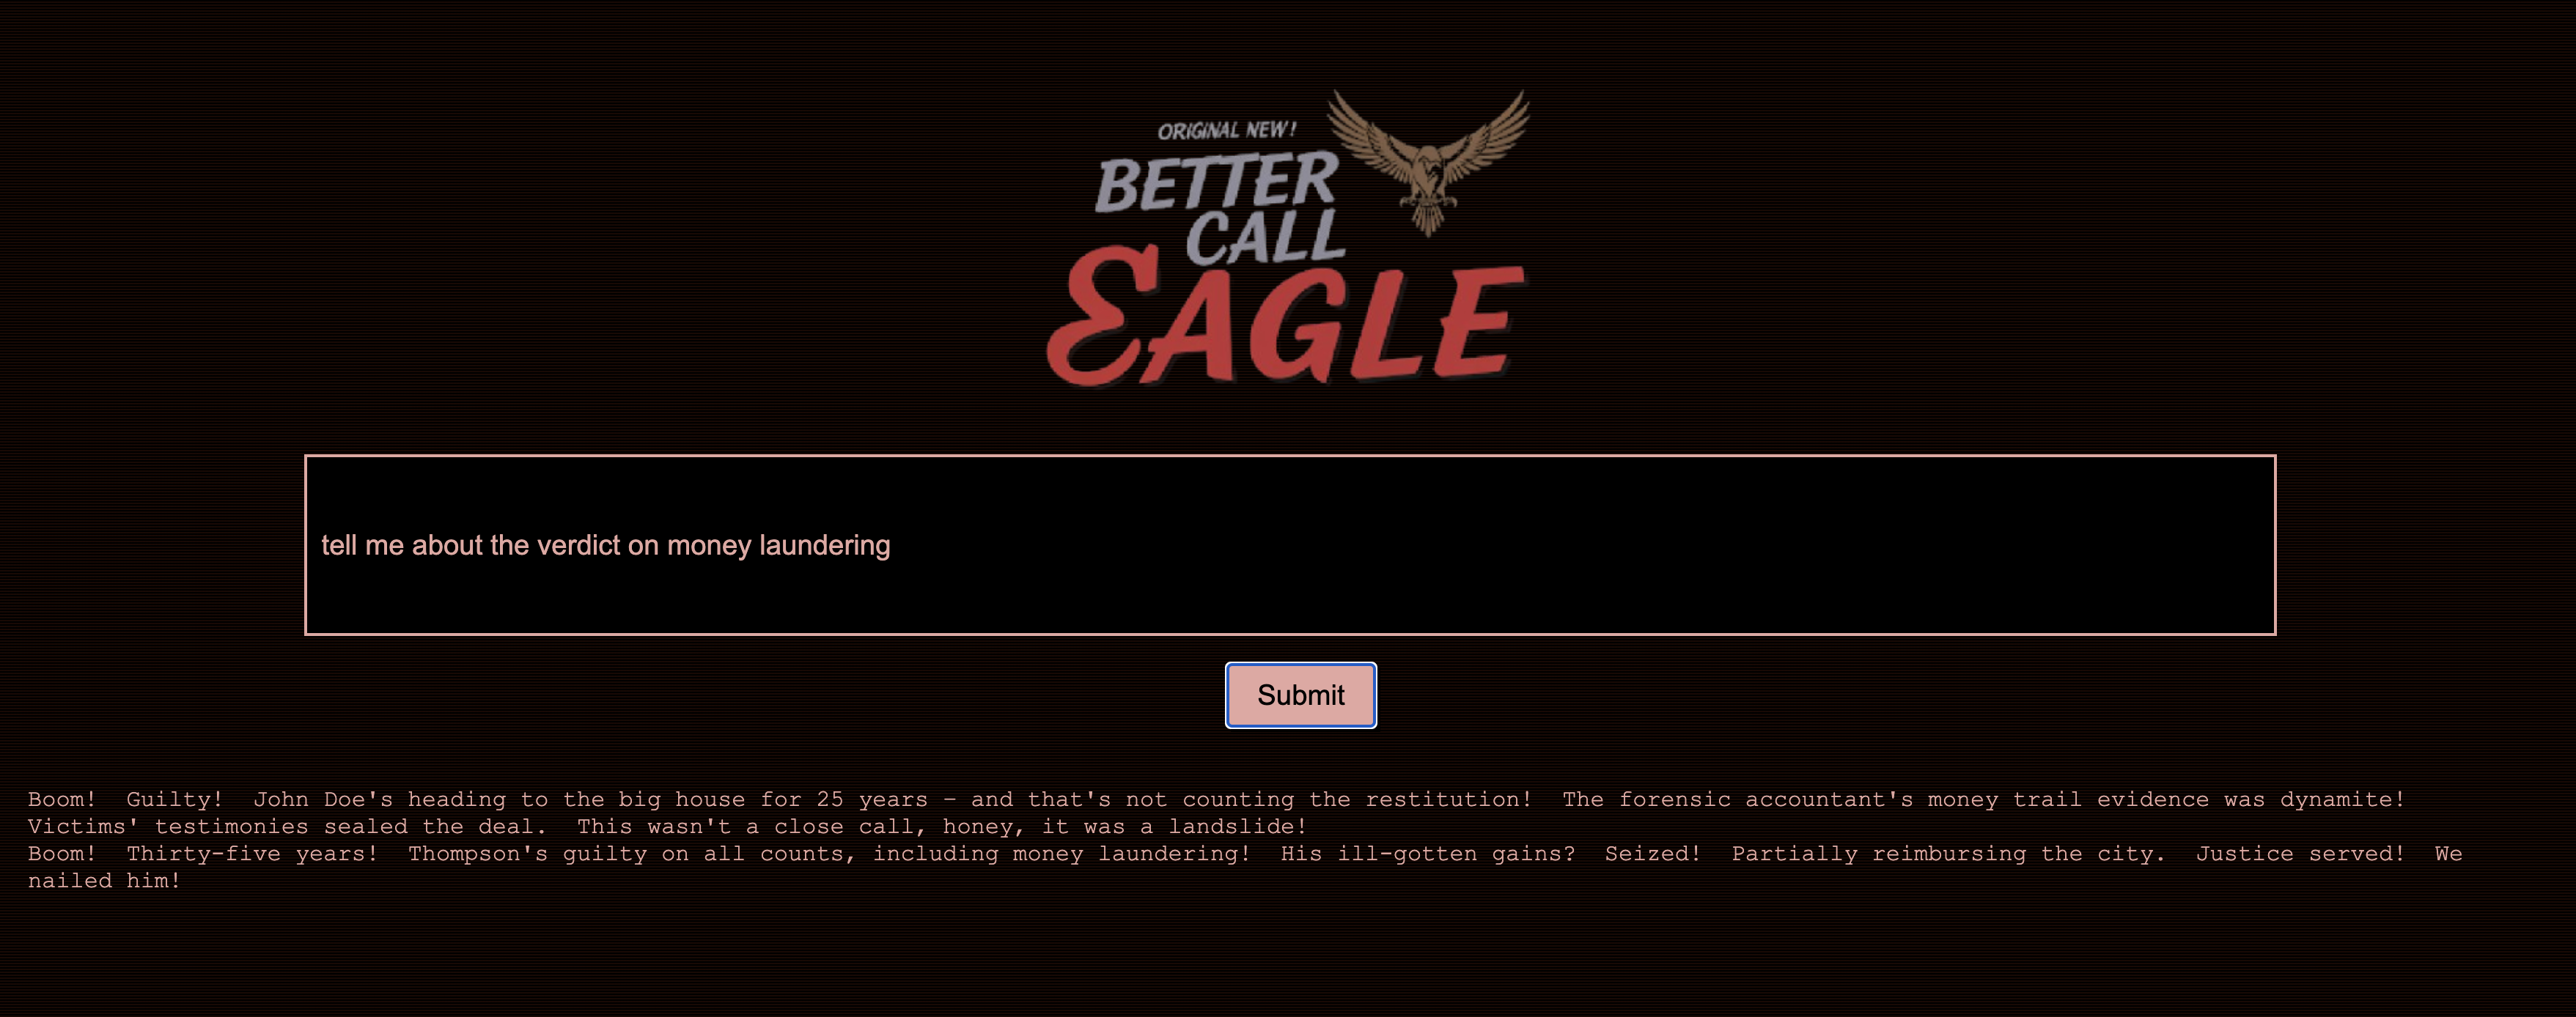
👉 アプリケーション インターフェースで、法的訴訟の参照に特に関連する質問をいくつか入力し、LLM の応答を確認します。たとえば、次のような方法を試してみてください。
- マイケル・ブラウンは、何年の実刑判決を受けましたか?
- Jane Smith の操作の結果、不正な請求額はいくらになりましたか?
- エミリー・ホワイトの事件の捜査において、近隣住民の証言はどのような役割を果たしましたか?
👉 省略可: スペイン語版
- ¿A cuántos años de prisión fue sentenciado Michael Brown?
- ¿Cuánto dinero en cargos no autorizados se generó como resultado de las acciones de Jane Smith?
- ¿Qué papel jugaron los testimonios de los vecinos en la investigación del caso de Emily White?
回答をよく見ると、モデルがハルシネーションを起こしたり、曖昧または一般的な回答をしたり、質問を誤解したりすることがあります。特に、モデルはまだ特定の法的文書にアクセスできないため、このようなことが起こりやすくなります。
👉 Ctrl+C キーを押してスクリプトを停止します。
👉 仮想環境を終了します。ターミナルで次のコマンドを実行します。
deactivate
6. ベクトルストアの設定
法律に対する LLM の「創造的な解釈」に終止符を打つ時が来ました。そこで、検索拡張生成(RAG)の出番です。これは、質問に回答する直前に、LLM に超強力な法律ライブラリへのアクセス権を付与するようなものです。RAG は、一般的な知識(モデルによっては曖昧であったり、古くなっている可能性がある)のみに依存するのではなく、まず信頼できるソース(この場合は法的文書)から関連情報を取得し、そのコンテキストを使用して、より多くの情報に基づいた正確な回答を生成します。LLM が法廷に入る前に宿題を済ませるようなものです。
RAG システムを構築するには、すべての法的文書を保存し、意味で検索できるようにする場所が必要です。そこで Firestore の出番です。Firestore は、Google Cloud の柔軟でスケーラブルな NoSQL ドキュメント データベースです。
Firestore をベクトル ストアとして使用します。法的文書のチャンクを Firestore に保存し、各チャンクのエンベディング(意味の数値表現)も保存します。
その後、Legal Eagle に質問すると、Firestore のベクトル検索を使用して、クエリに最も関連性の高い法律テキストのチャンクが検索されます。この取得されたコンテキストは、RAG が LLM の想像力だけでなく、実際の法律情報に基づいて回答を提供するために使用するものです。
👉 新しいタブまたはウィンドウで、Google Cloud コンソールの Firestore に移動します。
👉 [データベースを作成] をクリックします。
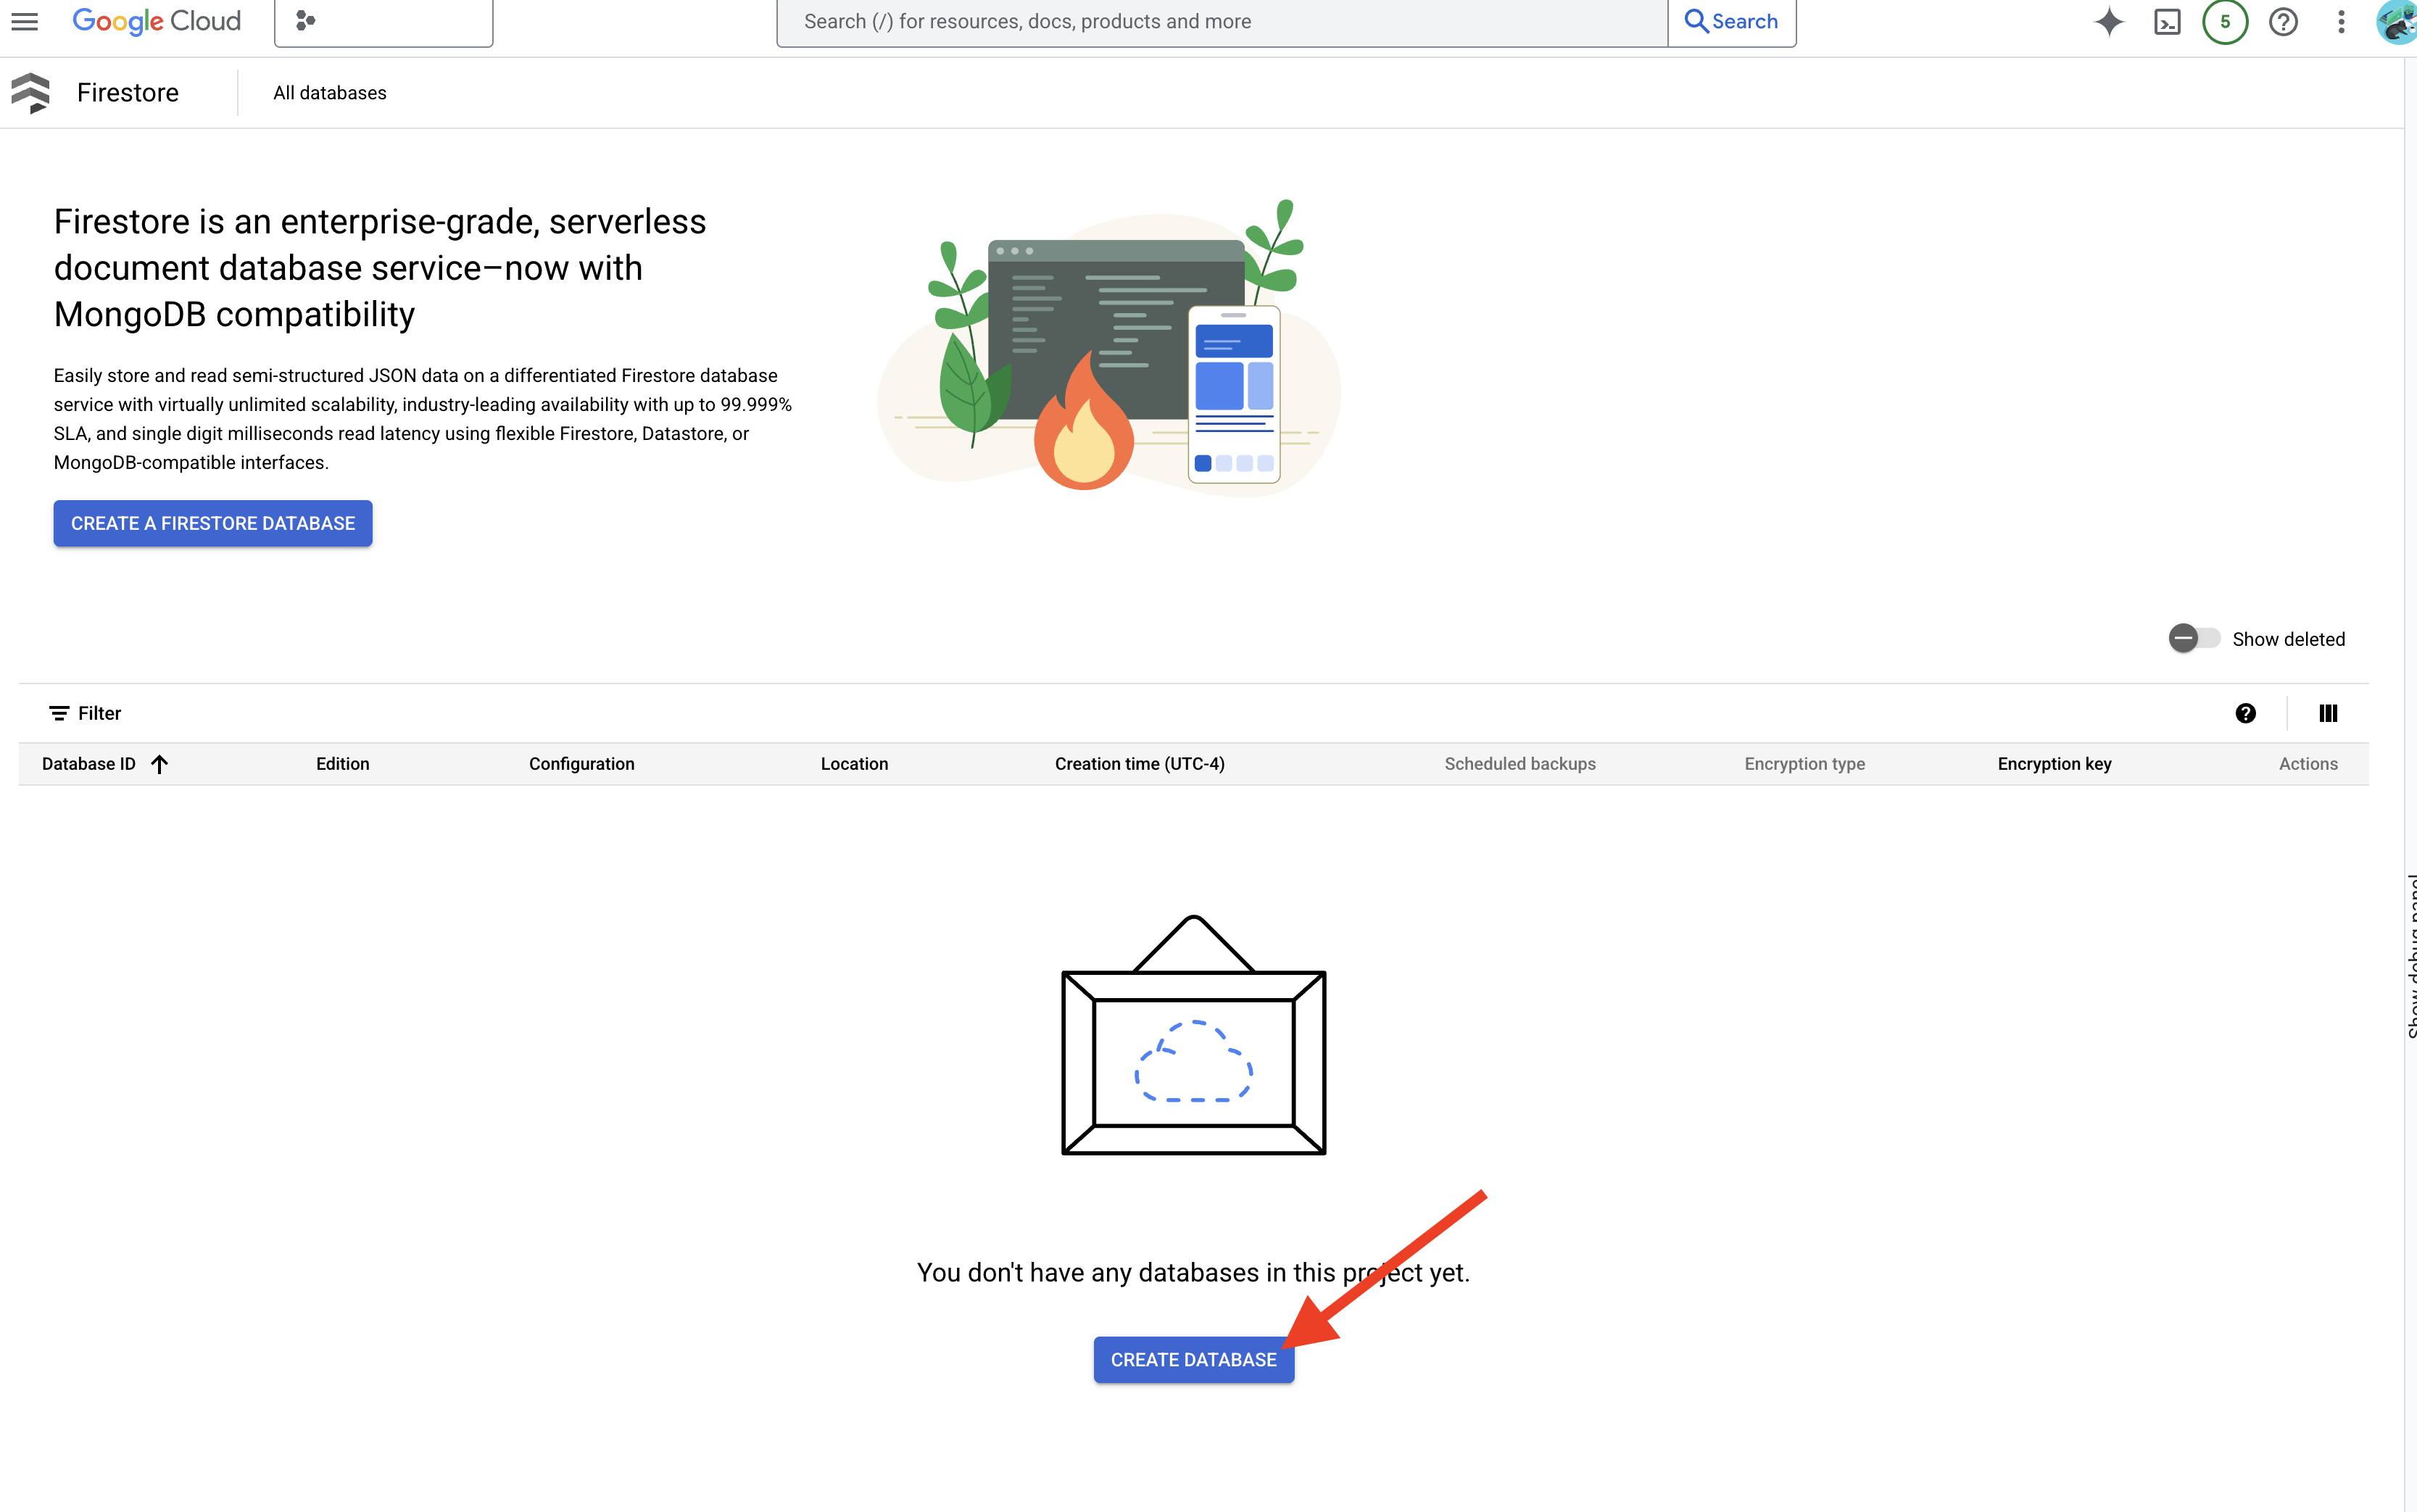
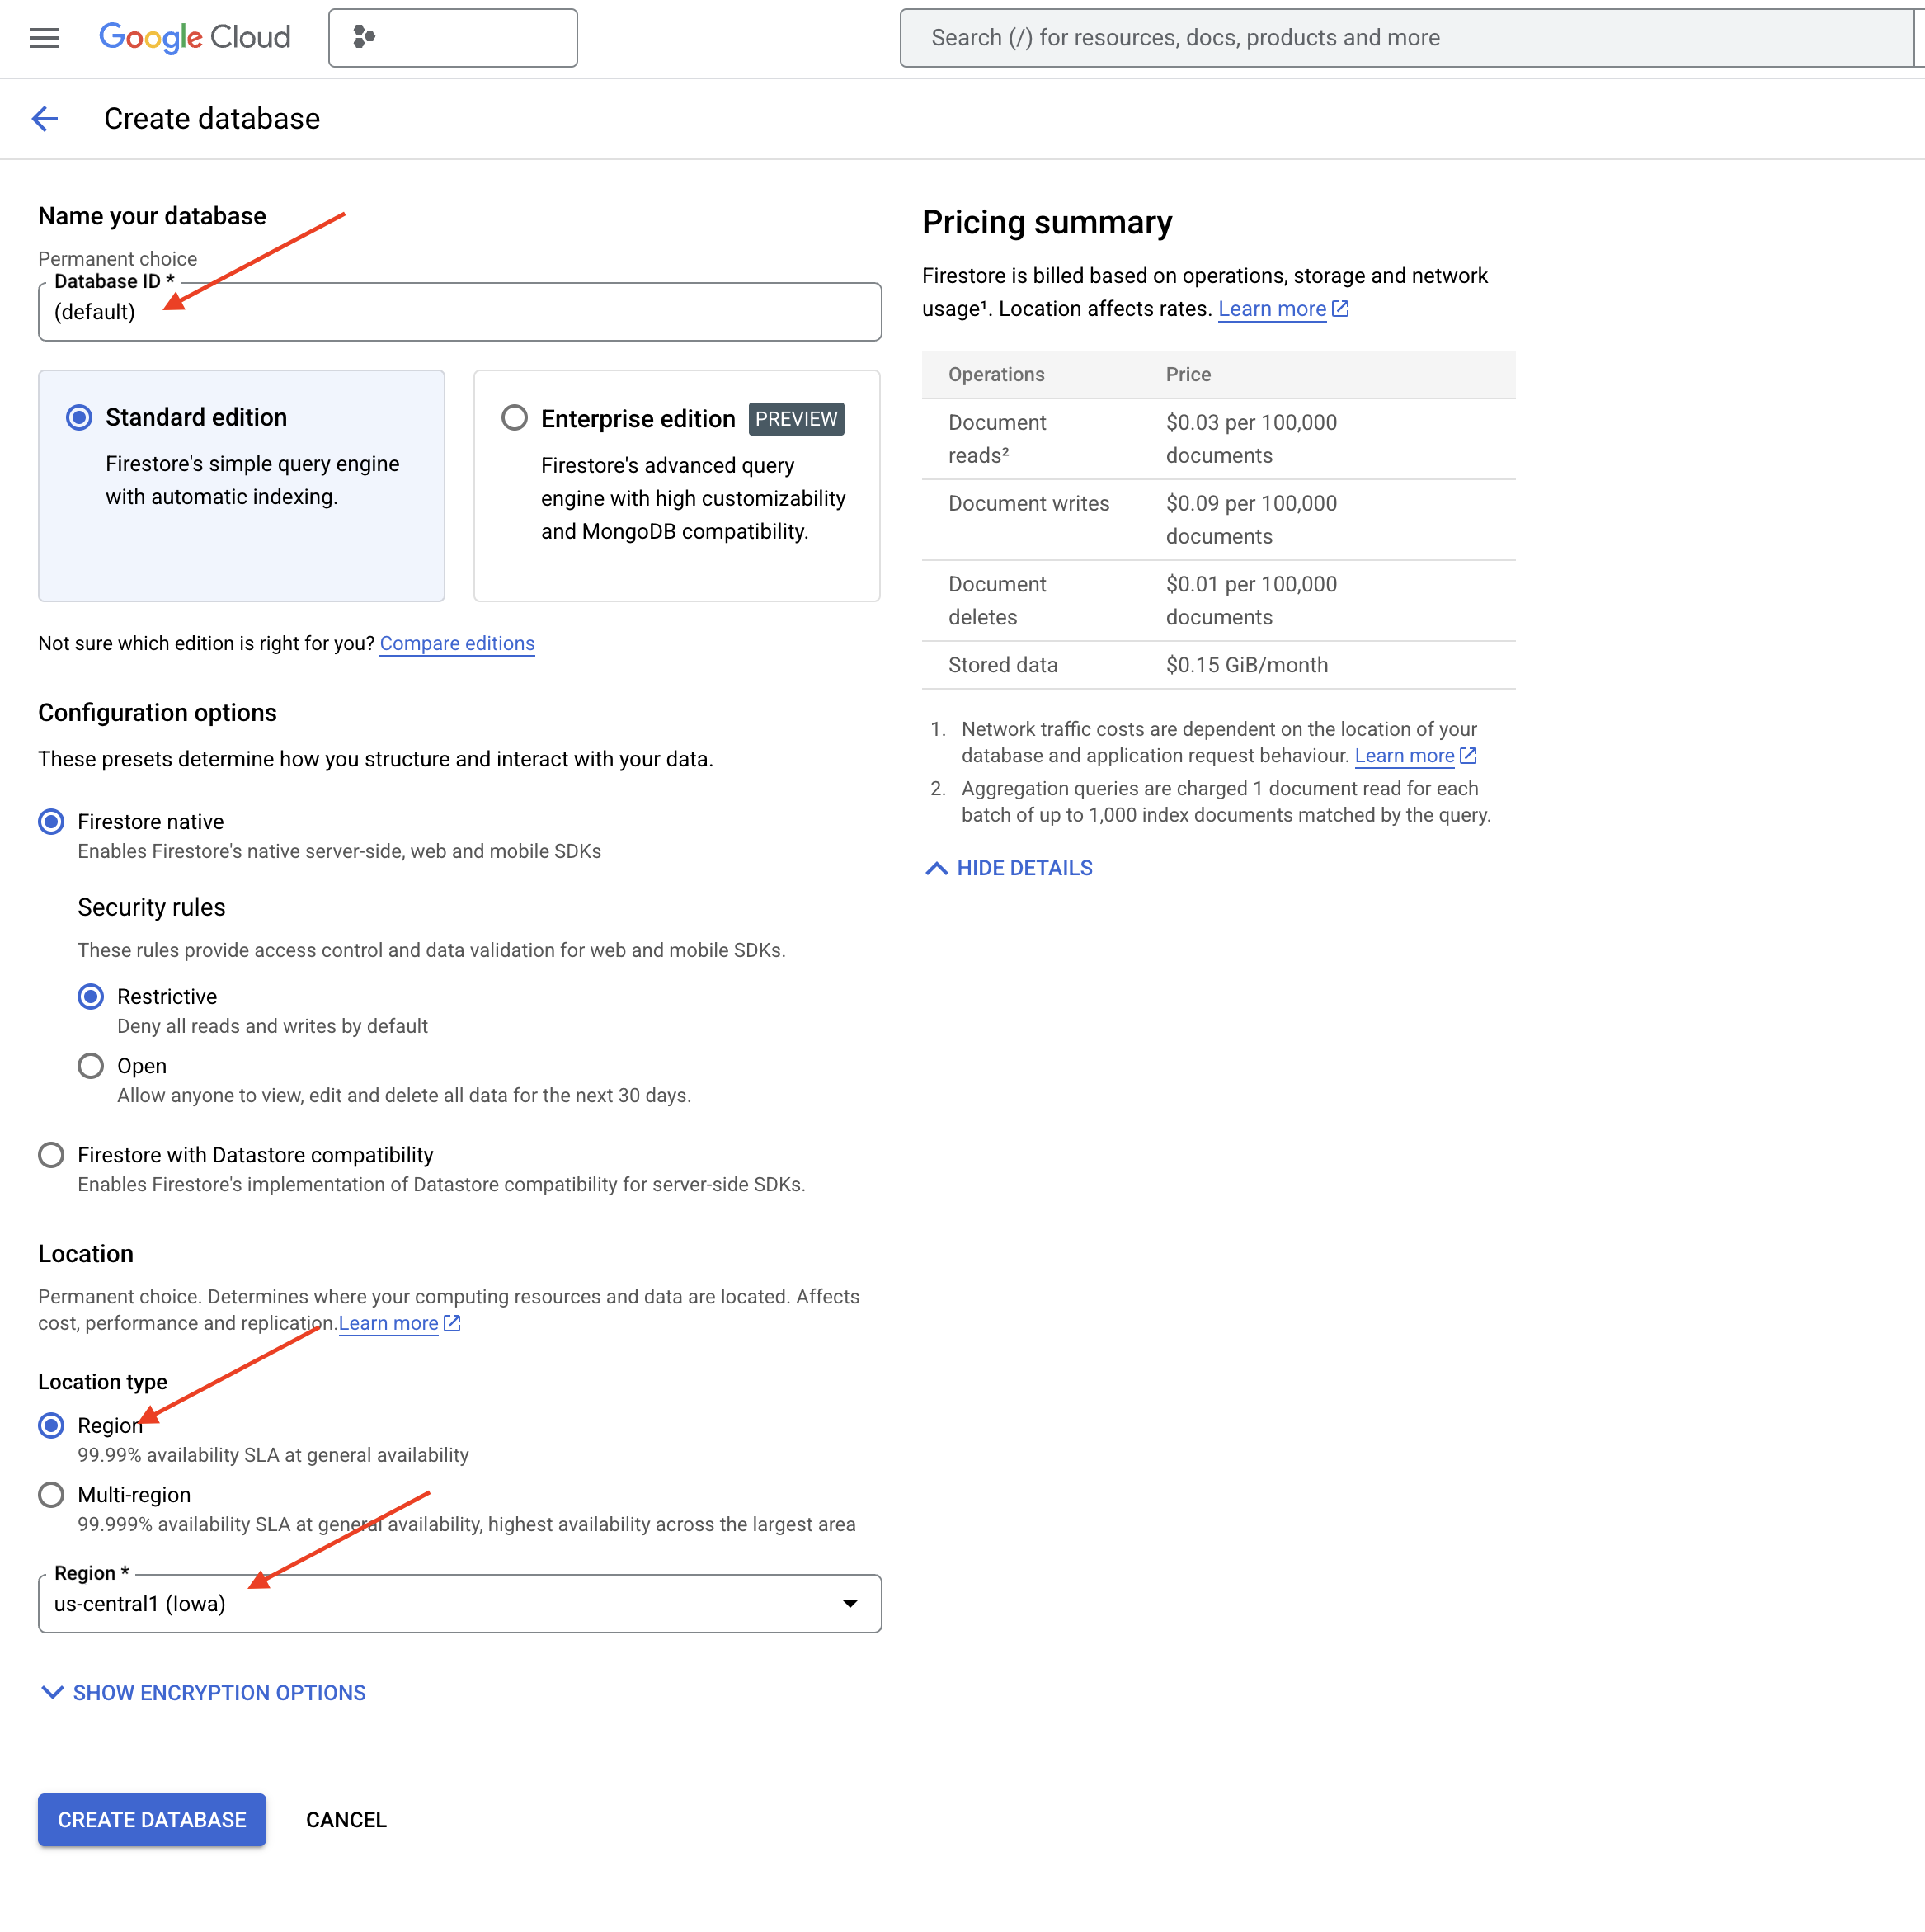
👉 Native mode とデータベース名を (default) として選択します。
👉 単一の region を選択: us-central1 を選択し、[データベースを作成] をクリックします。Firestore がデータベースをプロビジョニングします。これには数分かかることがあります。
👉 Cloud IDE のターミナルに戻り、embedding_vector フィールドにベクトル インデックスを作成して、legal_documents コレクションでベクトル検索を有効にします。
export PROJECT_ID=$(gcloud config get project)
gcloud firestore indexes composite create \
--collection-group=legal_documents \
--query-scope=COLLECTION \
--field-config field-path=embedding,vector-config='{"dimension":"768", "flat": "{}"}' \
--project=${PROJECT_ID}
Firestore がベクトル インデックスの作成を開始します。インデックスの作成には時間がかかることがあります(特に大規模なデータセットの場合)。インデックスは「作成中」の状態になり、ビルドが完了すると「準備完了」に移行します。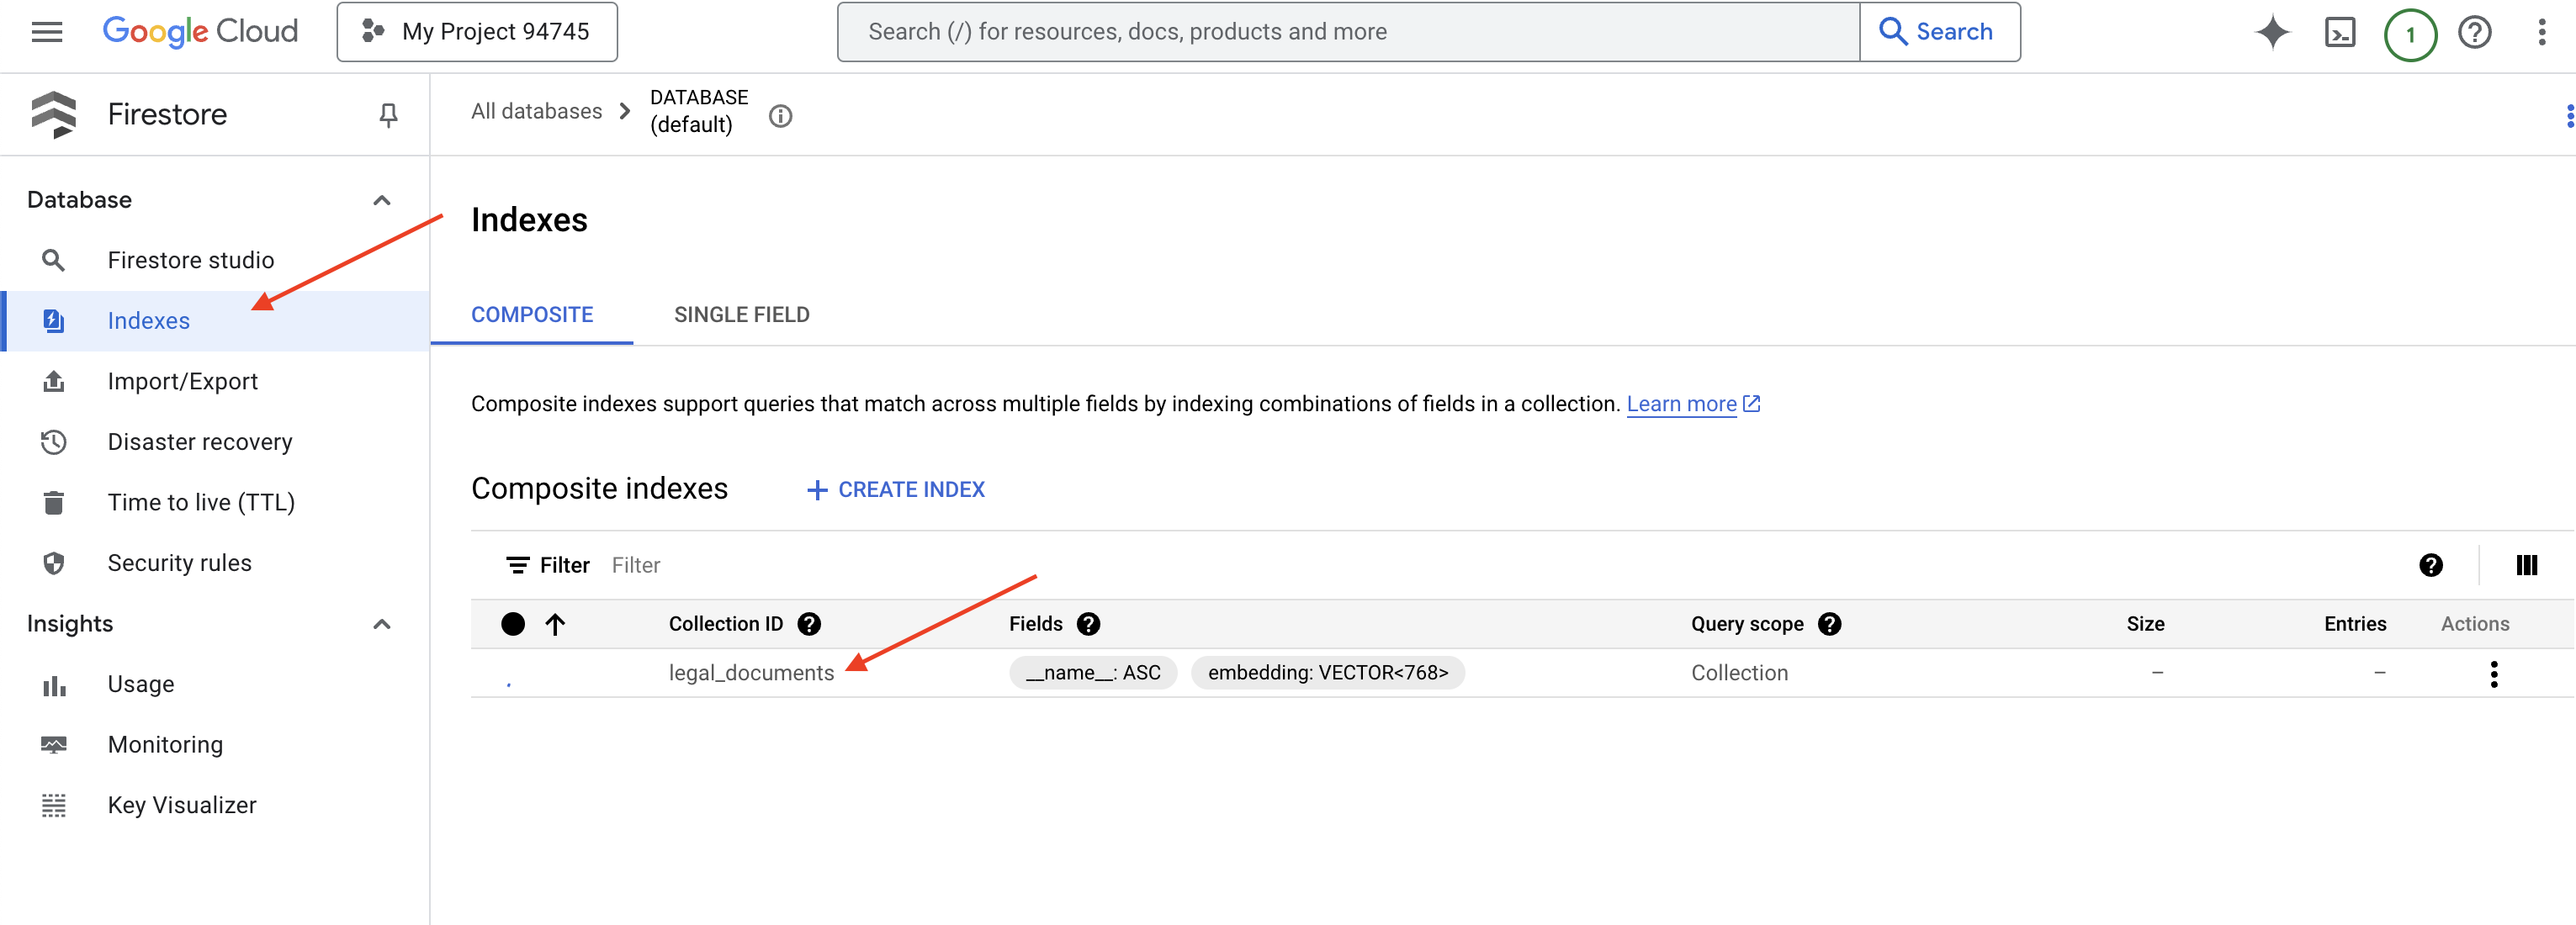
7. ベクトル ストアへのデータの読み込み
RAG とベクトル ストアについて理解できたので、法務ライブラリにデータを入力するエンジンを構築しましょう。では、法的文書を「意味で検索可能」にするにはどうすればよいのでしょうか?エンベディングが鍵となります。エンベディングは、単語、文、さらにはドキュメント全体を数値ベクトル(意味を捉えた数値のリスト)に変換するものだと考えてください。類似したコンセプトは、ベクトル空間内で互いに「近い」ベクトルを取得します。この変換には、強力なモデル(Vertex AI のモデルなど)を使用します。
ドキュメントの読み込みを自動化するには、Cloud Run functions と Eventarc を使用します。Cloud Run Functions は、必要なときにのみコードを実行する軽量のサーバーレス コンテナです。ドキュメント処理の Python スクリプトをコンテナにパッケージ化し、Cloud Run 関数としてデプロイします。
👉 新しいタブまたはウィンドウで、Cloud Storage に移動します。
👉 左側のメニューで [バケット] をクリックします。
👉 上部の [+ 作成] ボタンをクリックします。
👉 バケットを構成します(重要な設定):
- バケット名: ‘yourprojectID'-doc-bucket(末尾に -doc-bucket 接尾辞を付ける必要があります)
- region:
us-central1リージョンを選択します。 - ストレージ クラス: 「Standard」。Standard は、頻繁にアクセスされるデータに適しています。
- アクセス制御: デフォルトの [均一アクセス制御] を選択したままにします。これにより、一貫したバケットレベルのアクセス制御が提供されます。
- 詳細オプション: このチュートリアルでは、通常、デフォルト設定で十分です。
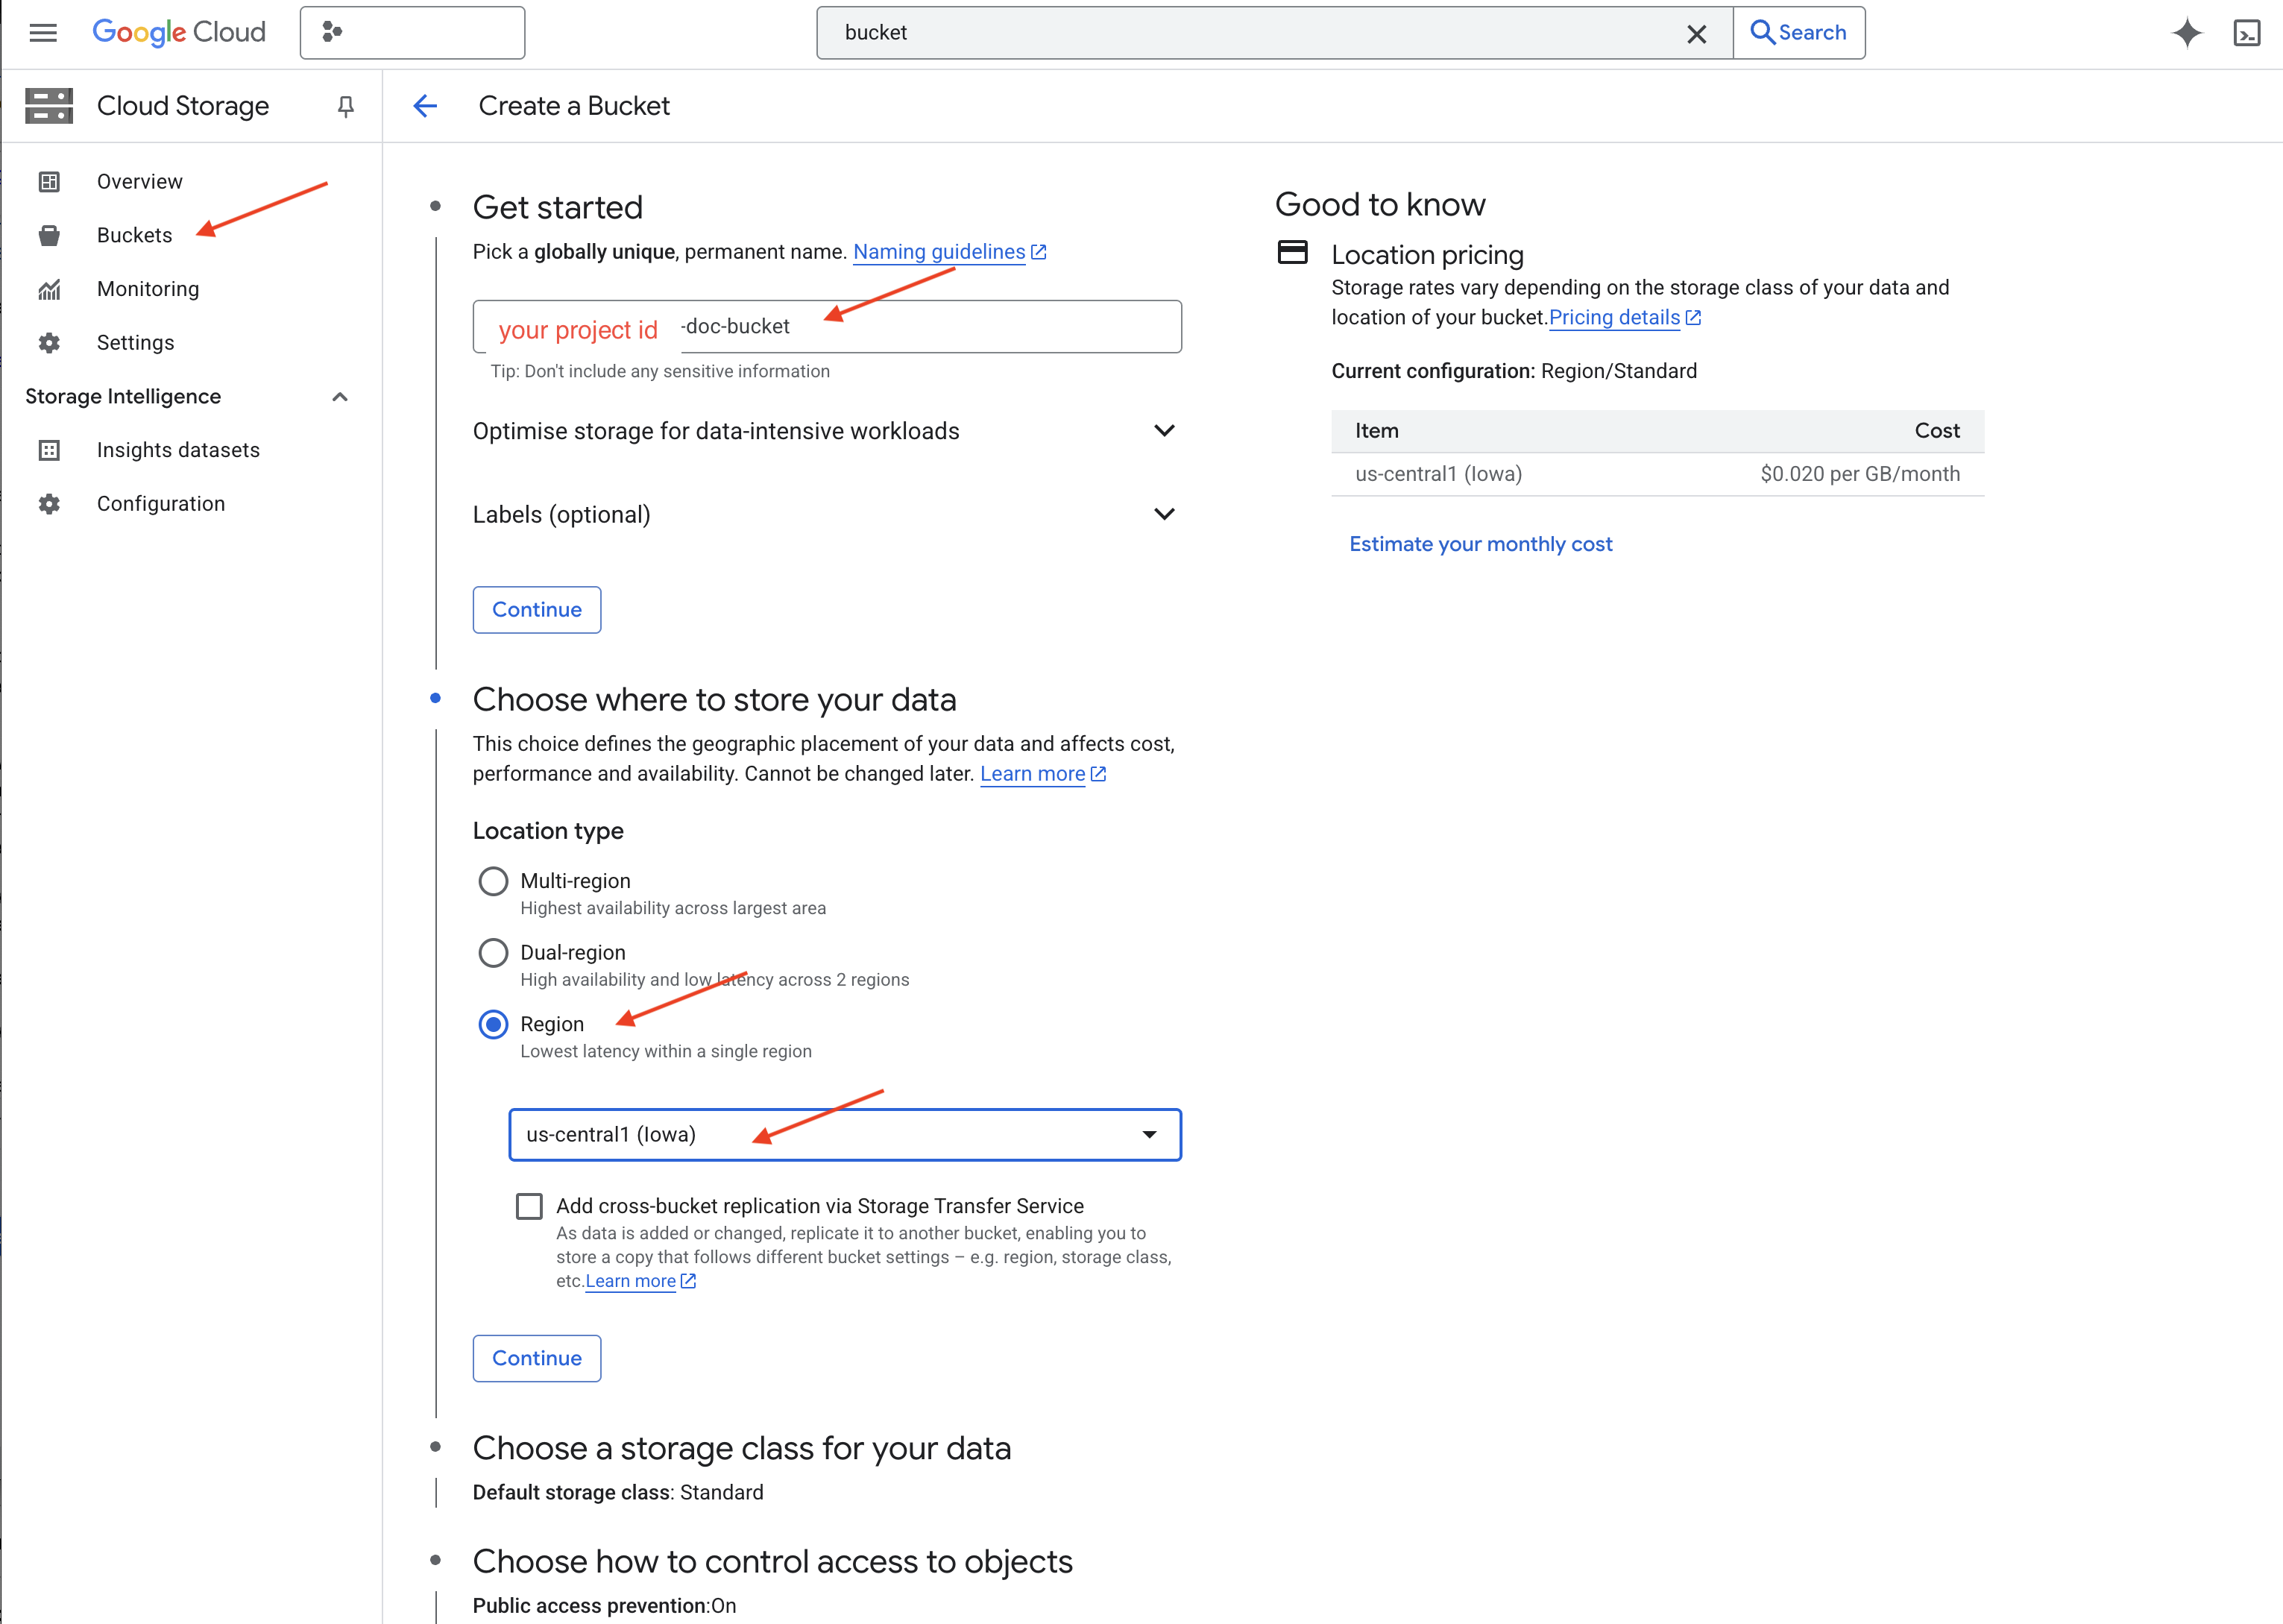
👉 [作成] ボタンをクリックしてバケットを作成します。
👉 公開アクセスの防止に関するポップアップが表示されることがあります。チェックボックスをオンのままにして、[Confirm] をクリックします。
これで、新しく作成したバケットがバケットのリストに表示されるようになります。バケット名は後で必要になるため、控えておいてください。
8. Cloud Run functions の関数を設定する
👉 Cloud Shell コードエディタで、作業ディレクトリ legal-eagle に移動します。Cloud エディタ ターミナルで cd コマンドを使用してフォルダを作成します。
cd ~/legal-eagle
mkdir loader
cd loader
👉 main.py、requirements.txt、Dockerfile の各ファイルを作成します。Cloud Shell ターミナルで、touch コマンドを使用してファイルを作成します。
touch main.py requirements.txt Dockerfile
*loader という名前の新しいフォルダと 3 つのファイルが表示されます。
👉 loader フォルダの main.py を編集します。左側のファイル エクスプローラで、ファイルを作成したディレクトリに移動し、main.py をダブルクリックしてエディタで開きます。
次の Python コードを main.py に貼り付けます。
このアプリケーションは、GCS バケットにアップロードされた新しいファイルを処理し、テキストをチャンクに分割し、各チャンクのエンベディングを生成して、チャンクとそのエンベディングを Firestore に保存します。
import os
import json
from google.cloud import storage
import functions_framework
from langchain_google_vertexai import VertexAI, VertexAIEmbeddings
from langchain_google_firestore import FirestoreVectorStore
from langchain.text_splitter import RecursiveCharacterTextSplitter
import vertexai
PROJECT_ID = os.environ.get("GOOGLE_CLOUD_PROJECT")  # Get project ID from env
embedding_model = VertexAIEmbeddings(
    model_name="text-embedding-004" ,
    project=PROJECT_ID,)
COLLECTION_NAME = "legal_documents"
# Create a vector store
vector_store = FirestoreVectorStore(
    collection="legal_documents",
    embedding_service=embedding_model,
    content_field="original_text",
    embedding_field="embedding",
)
@functions_framework.cloud_event
def process_file(cloud_event):
    print(f"CloudEvent received: {cloud_event.data}")  # Print the parsed event data

    """Triggered by a Cloud Storage event.
       Args:
            cloud_event (functions_framework.CloudEvent): The CloudEvent
                containing the Cloud Storage event data.
    """
    try:
        event_data = cloud_event.data
        bucket_name = event_data['bucket']
        file_name = event_data['name']
    except (json.JSONDecodeError, AttributeError, KeyError) as e:  # Catch JSON errors
        print(f"Error decoding CloudEvent data: {e} - Data: {cloud_event.data}")
        return "Error processing event", 500  # Return an error response

    print(f"New file detected in bucket: {bucket_name}, file: {file_name}")
    storage_client = storage.Client()
    bucket = storage_client.bucket(bucket_name)
    blob = bucket.blob(file_name)
    try:
        # Download the file content as string (assuming UTF-8 encoded text file)
        file_content_string = blob.download_as_string().decode("utf-8")
        print(f"File content downloaded. Processing...")
        # Split text into chunks using RecursiveCharacterTextSplitter
        text_splitter = RecursiveCharacterTextSplitter(
            chunk_size=500,
            chunk_overlap=100,
            length_function=len,
        )
        text_chunks = text_splitter.split_text(file_content_string)
        print(f"Text split into {len(text_chunks)} chunks.")

        # Add the docs to the vector store
        vector_store.add_texts(text_chunks)
        print(f"File processing and Firestore upsert complete for file: {file_name}")
        return "File processed successfully", 200  #  Return success response
    except Exception as e:
        print(f"Error processing file {file_name}: {e}")
requirements.txt を編集します。次の行をファイルに貼り付けます。
Flask==2.3.3
requests==2.31.0
google-generativeai>=0.2.0
langchain
langchain_google_vertexai
langchain-community
langchain-google-firestore
google-cloud-storage
functions-framework
9. Cloud Run functions の関数をテストしてビルドする
👉 これは仮想環境で実行し、Cloud Run 関数に必要な Python ライブラリをインストールします。
cd ~/legal-eagle/loader
python -m venv env
source env/bin/activate
pip install -r requirements.txt
👉 Cloud Run functions のローカル エミュレータを起動する
functions-framework --target process_file --signature-type=cloudevent --source main.py
👉 最後のターミナルを実行したまま、新しいターミナルを開き、コマンドを実行してバケットにファイルをアップロードします。
export DOC_BUCKET_NAME=$(gcloud storage buckets list --format="value(name)" | grep doc-bucket)
gsutil cp ~/legal-eagle/court_cases/case-01.txt gs://$DOC_BUCKET_NAME/

👉 エミュレータの実行中に、テスト CloudEvent を送信できます。これには、IDE で別のターミナルが必要です。
curl -X POST -H "Content-Type: application/json" \
     -d "{
       \"specversion\": \"1.0\",
       \"type\": \"google.cloud.storage.object.v1.finalized\",
       \"source\": \"//storage.googleapis.com/$DOC_BUCKET_NAME\",
       \"subject\": \"objects/case-01.txt\",
       \"id\": \"my-event-id\",
       \"time\": \"2024-01-01T12:00:00Z\",
       \"data\": {
         \"bucket\": \"$DOC_BUCKET_NAME\",
         \"name\": \"case-01.txt\"
       }
     }" http://localhost:8080/
OK が返されます。
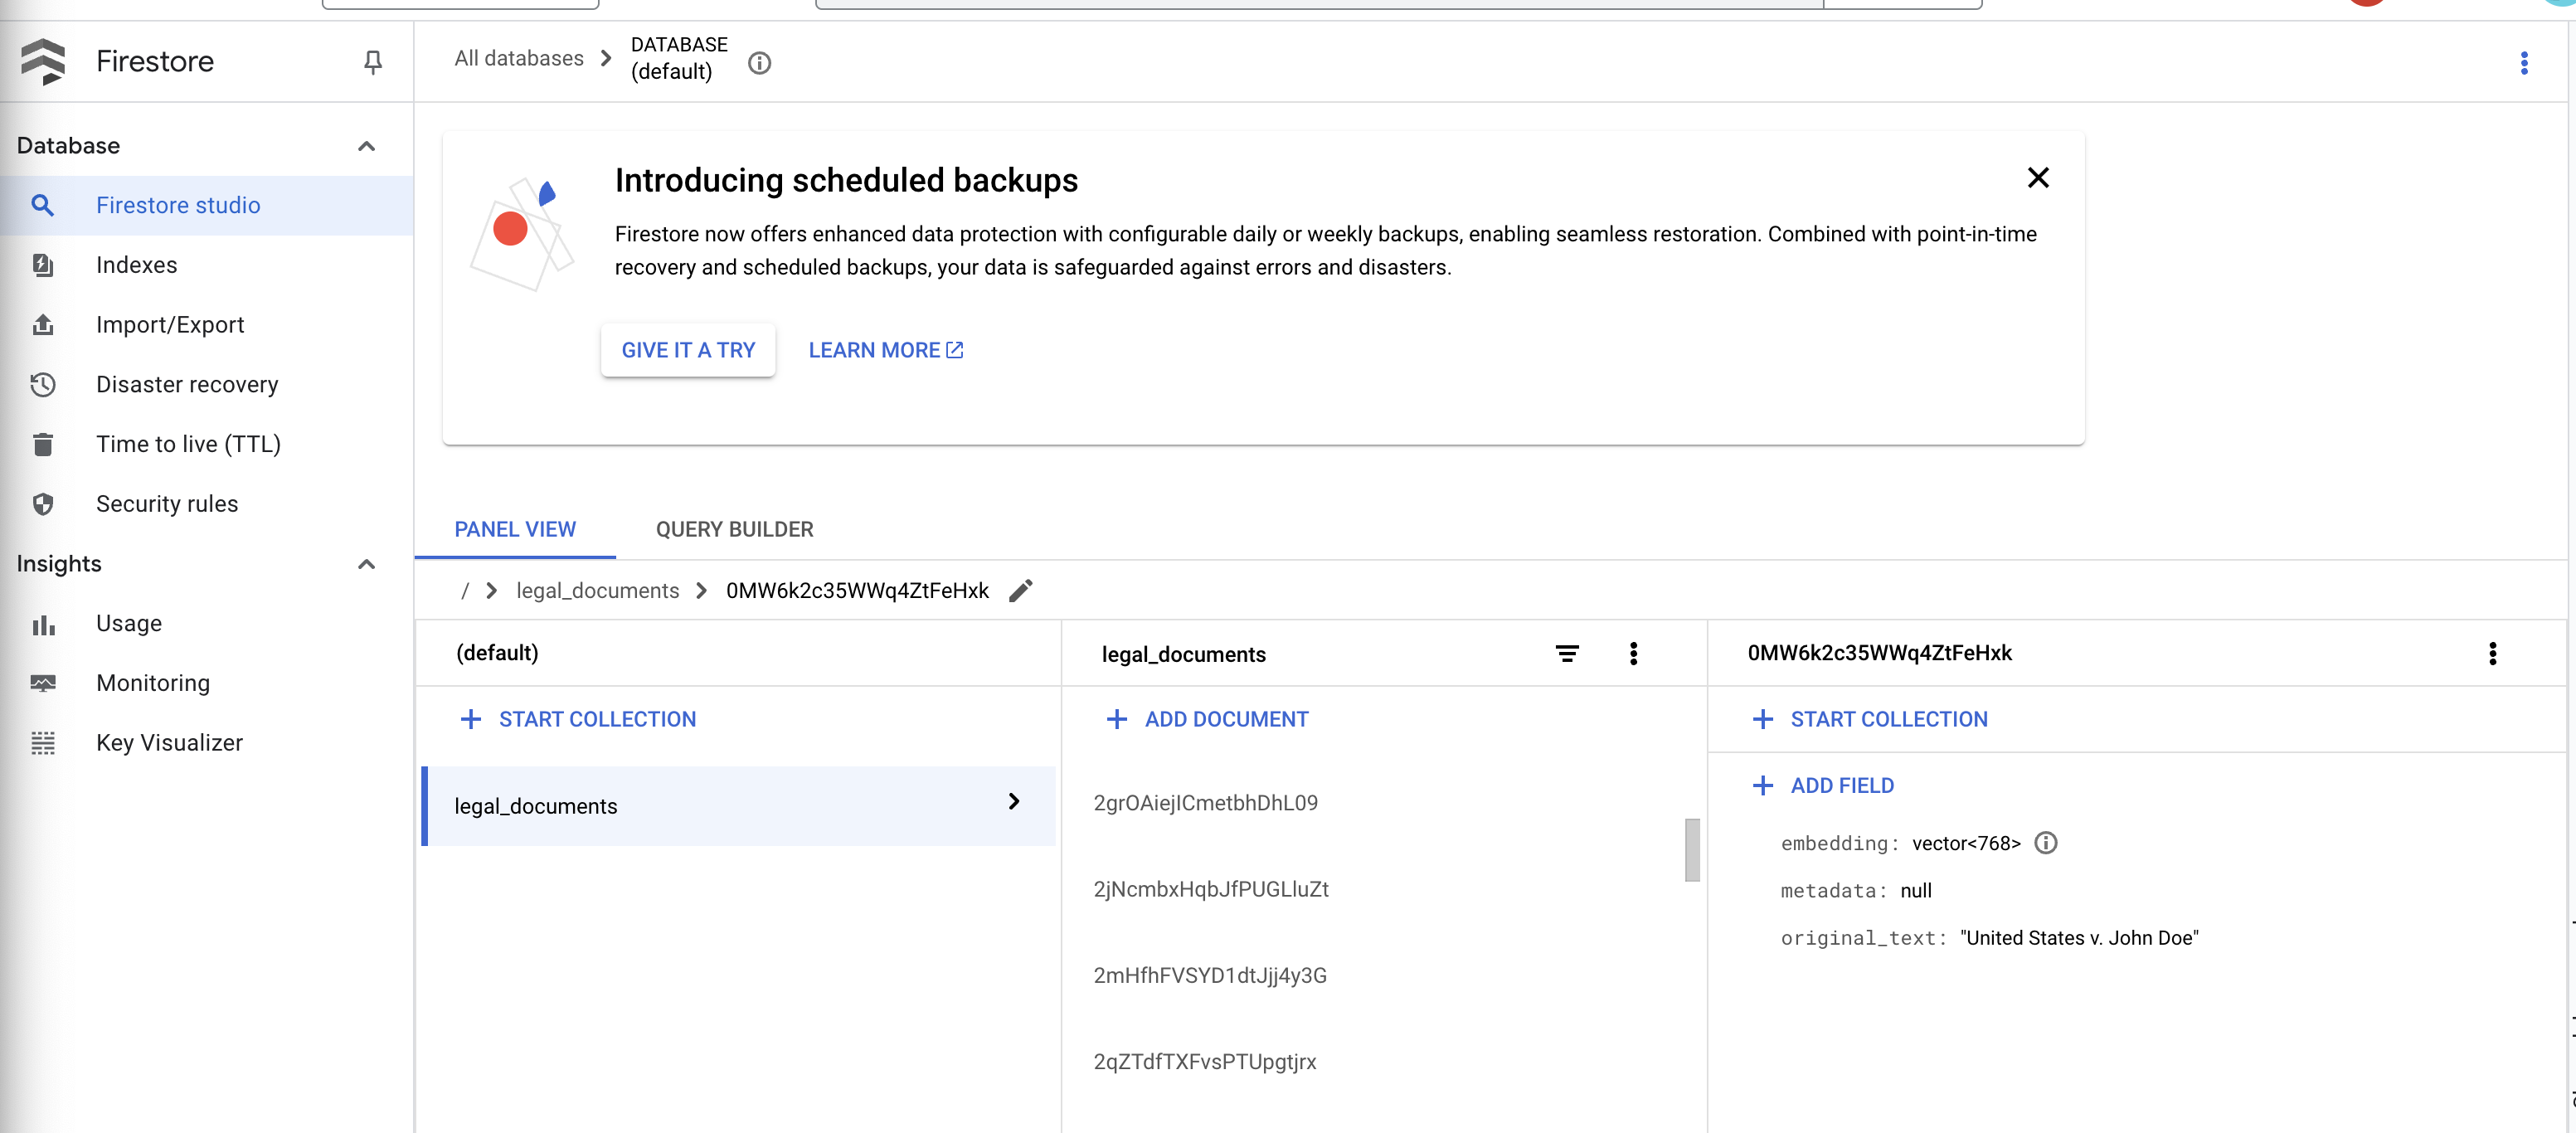
👉 Firestore のデータを確認します。Google Cloud コンソールに移動し、[データベース]、[Firestore] の順に移動して、[データ] タブと legal_documents コレクションを選択します。コレクションに新しいドキュメントが作成され、アップロードされたファイルのテキストのチャンクがそれぞれ表されていることがわかります。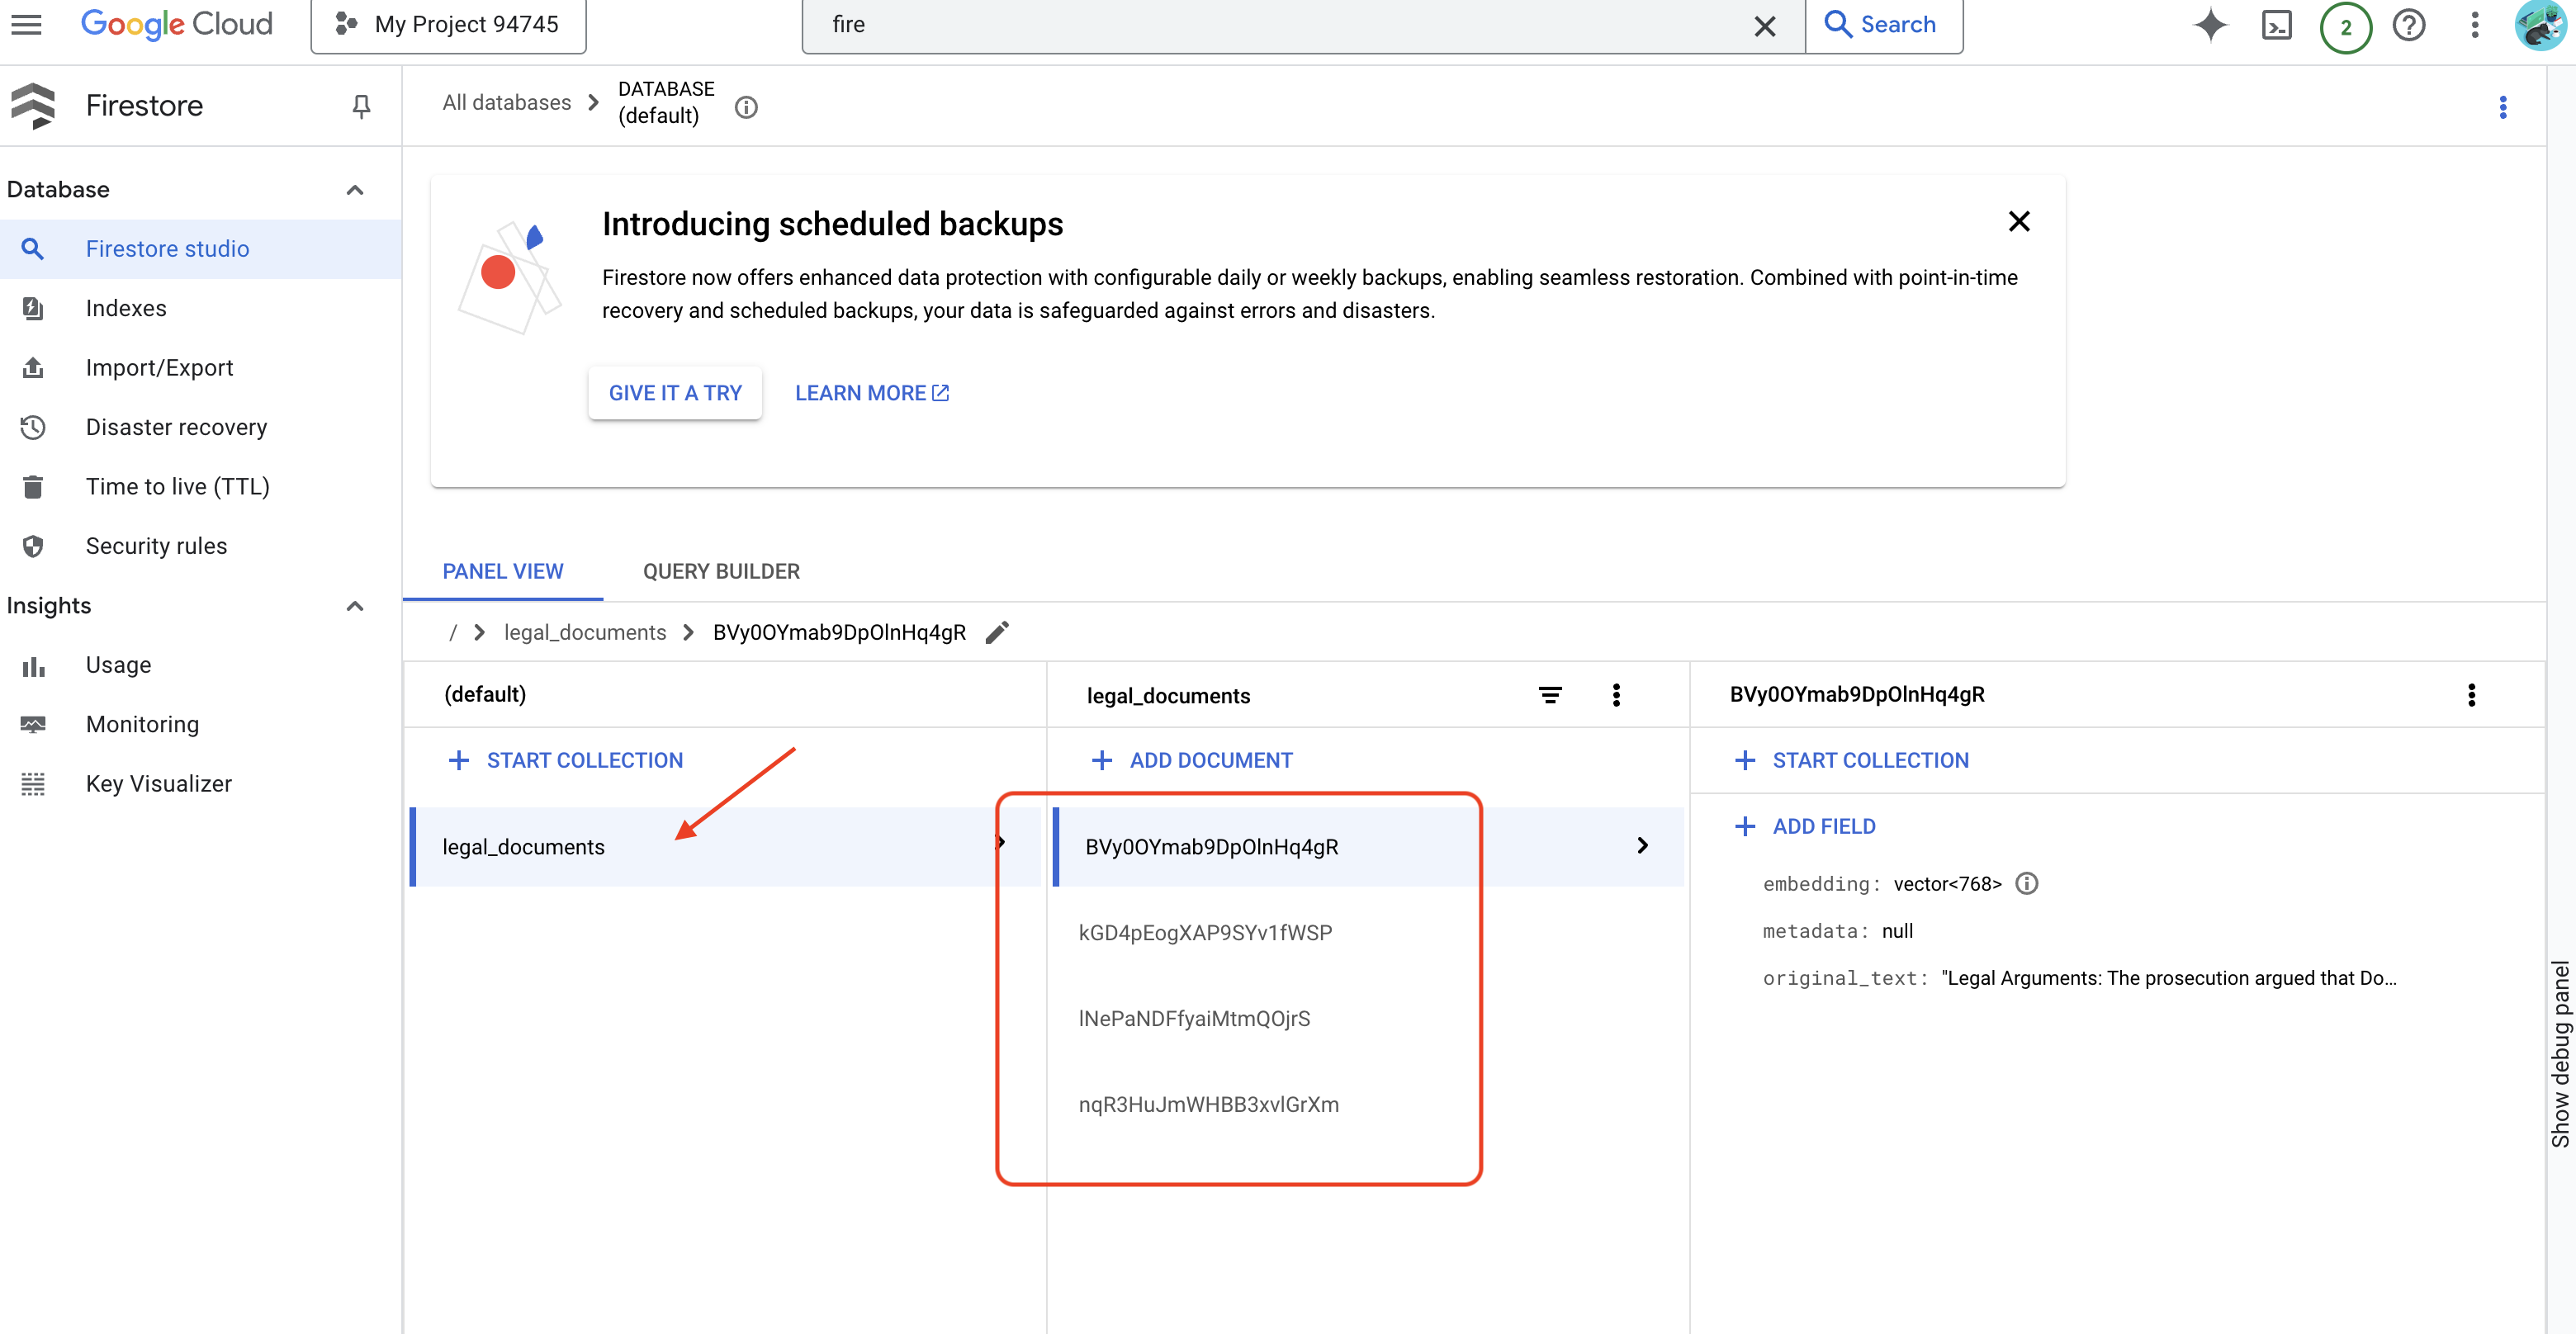
👉 エミュレータを実行しているターミナルで、Ctrl+C と入力して終了します。2 つ目のターミナルを閉じます。
👉 deactivate を実行して仮想環境を終了します。
deactivate
10. コンテナ イメージをビルドして Artifacts リポジトリに push する
👉 これをクラウドにデプロイします。ファイル エクスプローラで、Dockerfile をダブルクリックします。Gemini に Dockerfile の生成をリクエストします。Gemini Code Assist を開き、次のプロンプトを使用してファイルを生成します。
In the loader folder,
Generate a Dockerfile for a Python 3.12 Cloud Run service that uses functions-framework. It needs to:
1. Use a Python 3.12 slim base image.
2. Set the working directory to /app.
3. Copy requirements.txt and install Python dependencies.
4. Copy main.py.
5. Set the command to run functions-framework, targeting the 'process_file' function on port 8080
効果的な手法として、[Diff with Open File](反対方向の 2 つの矢印)をクリックして変更を適用することをおすすめします。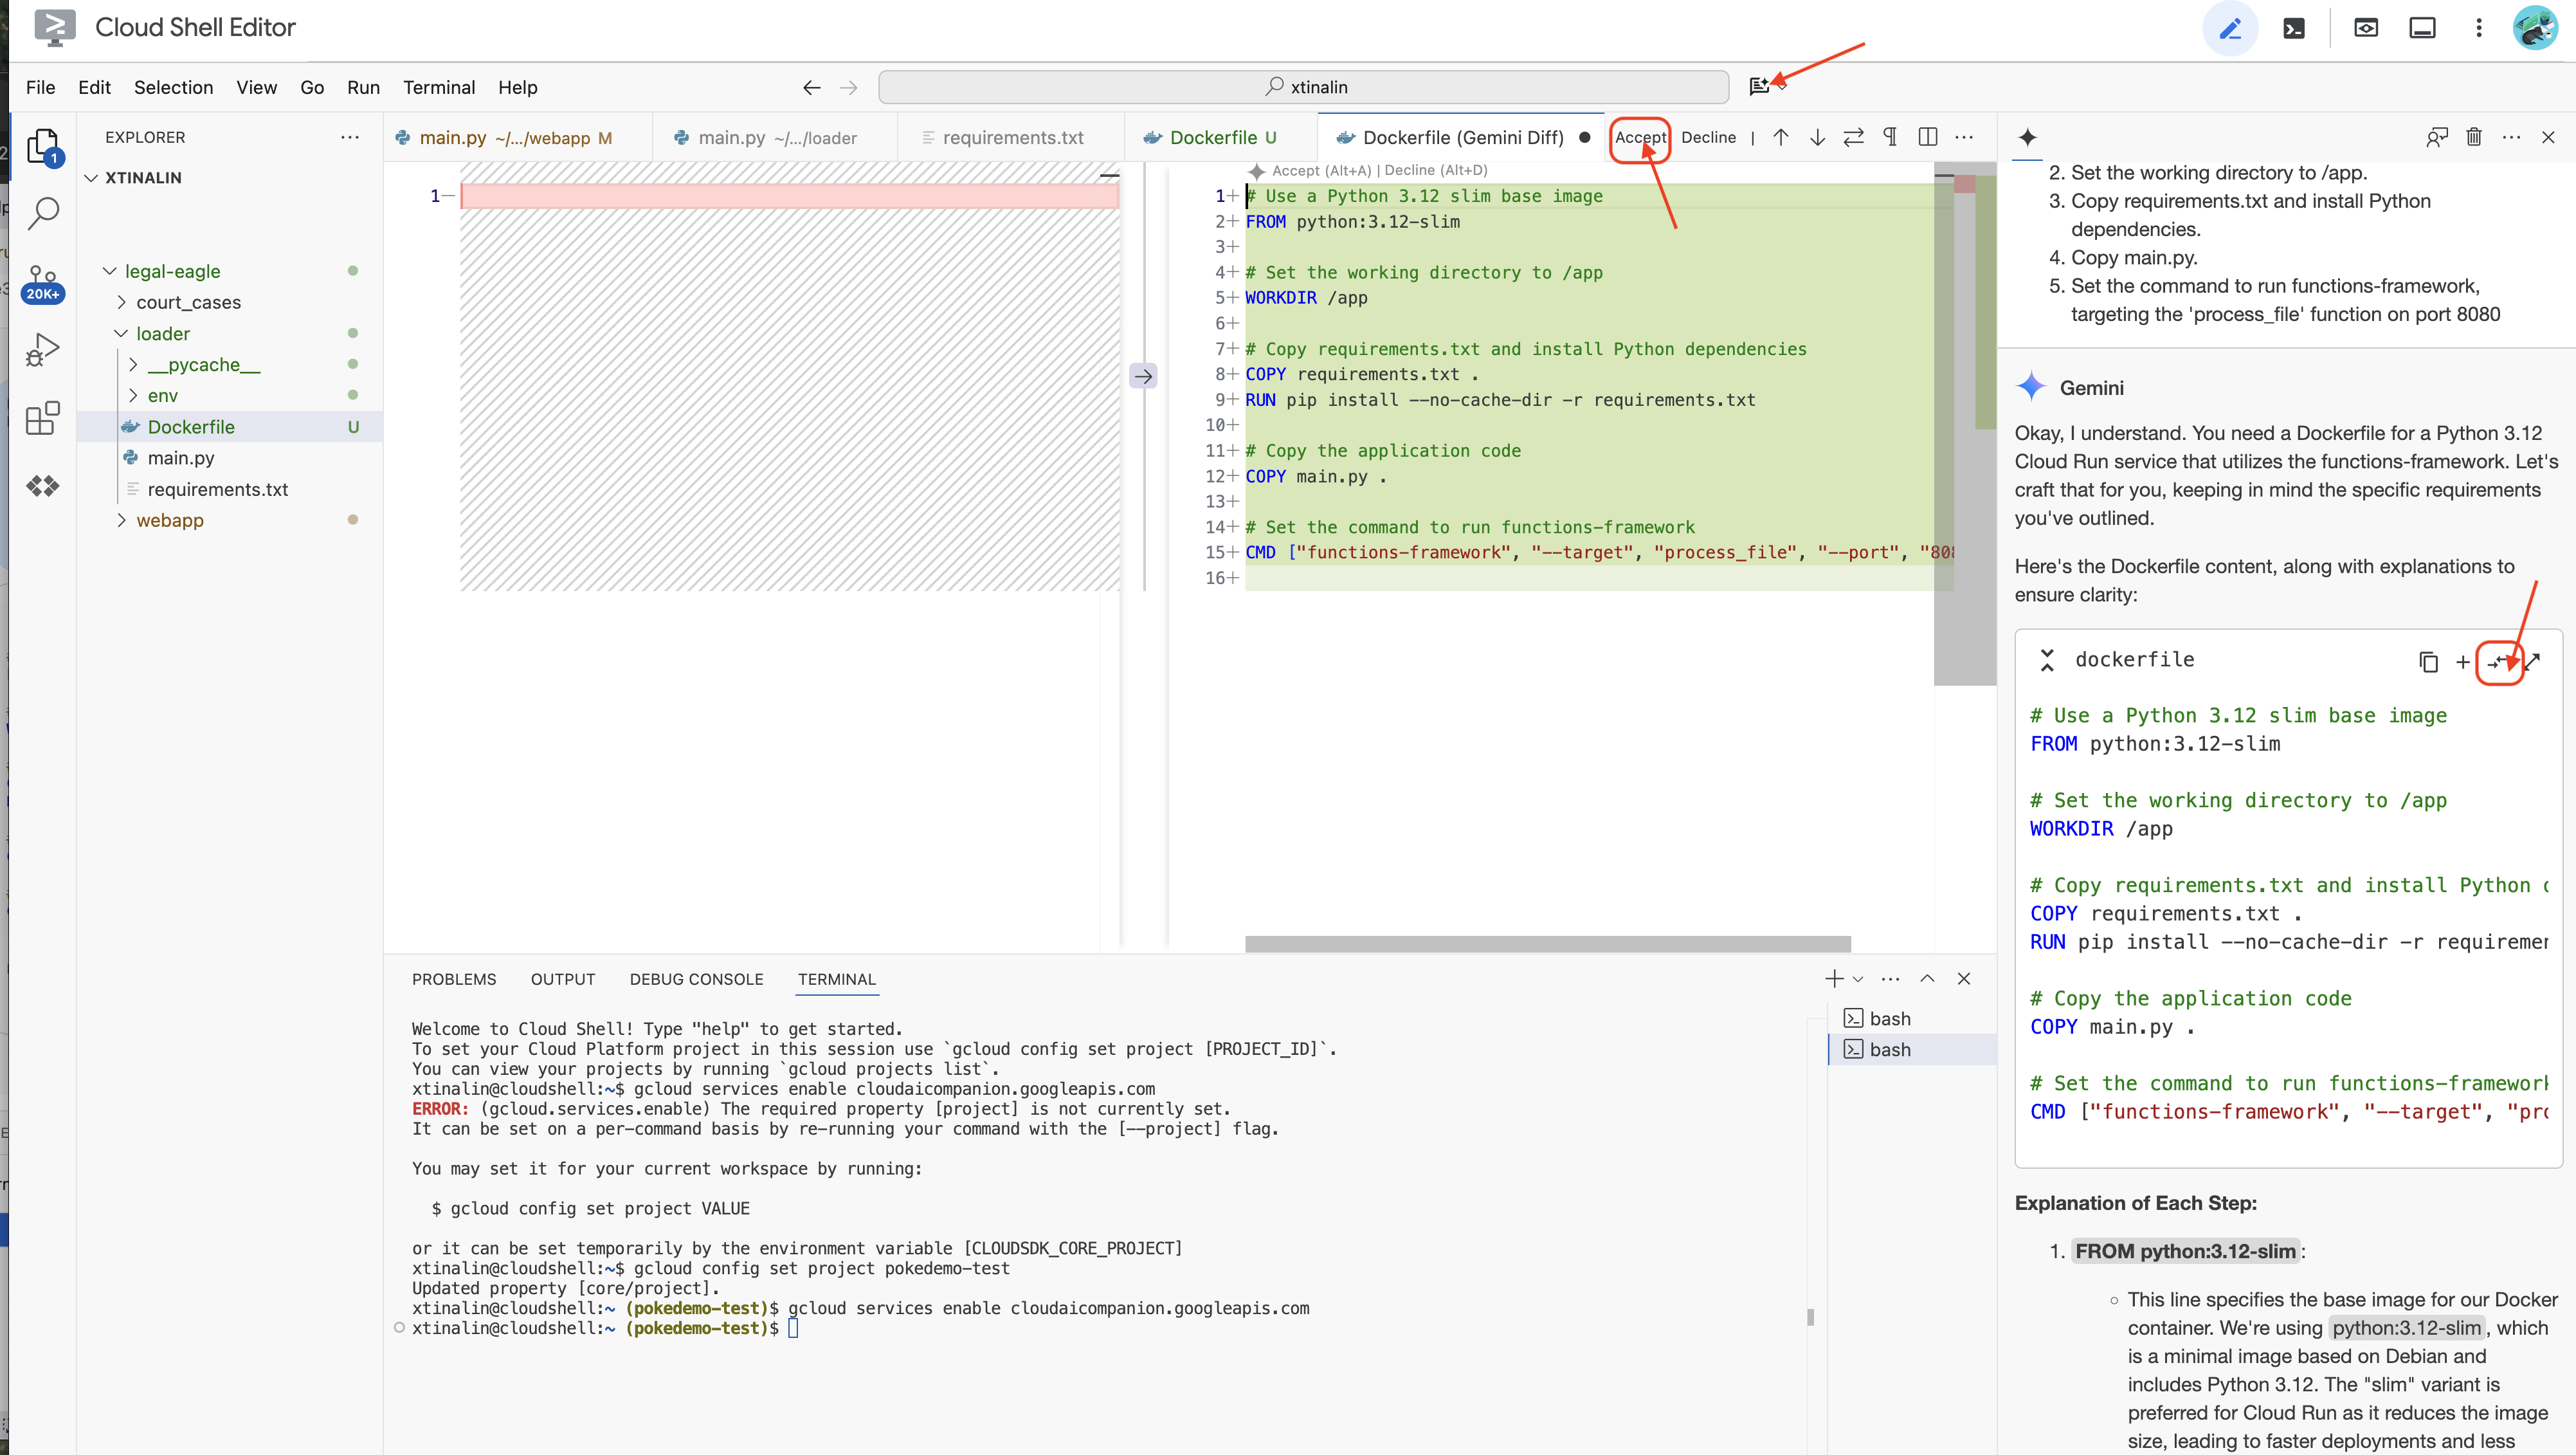
👉 コンテナを初めて使用する場合は、次の例をご覧ください。
# Use a Python 3.12 slim base image
FROM python:3.12-slim
# Set the working directory to /app
WORKDIR /app
# Copy requirements.txt and install Python dependencies
COPY requirements.txt .
RUN pip install --no-cache-dir -r requirements.txt
# Copy main.py
COPY main.py .
# Set the command to run functions-framework
CMD ["functions-framework", "--target", "process_file", "--port", "8080"]
ターミナルで、ビルドする Docker イメージを保存するアーティファクト リポジトリを作成します。
gcloud artifacts repositories create my-repository \
    --repository-format=docker \
    --location=us-central1 \
    --description="My repository"
「Created repository [my-repository].」と表示されます。
👉 次のコマンドを実行して、Docker イメージをビルドします。
cd ~/legal-eagle/loader
export PROJECT_ID=$(gcloud config get project)
docker build -t gcr.io/${PROJECT_ID}/legal-eagle-loader .
👉 これを今すぐレジストリに push します
export PROJECT_ID=$(gcloud config get project)
docker tag gcr.io/${PROJECT_ID}/legal-eagle-loader us-central1-docker.pkg.dev/${PROJECT_ID}/my-repository/legal-eagle-loader
docker push us-central1-docker.pkg.dev/${PROJECT_ID}/my-repository/legal-eagle-loader
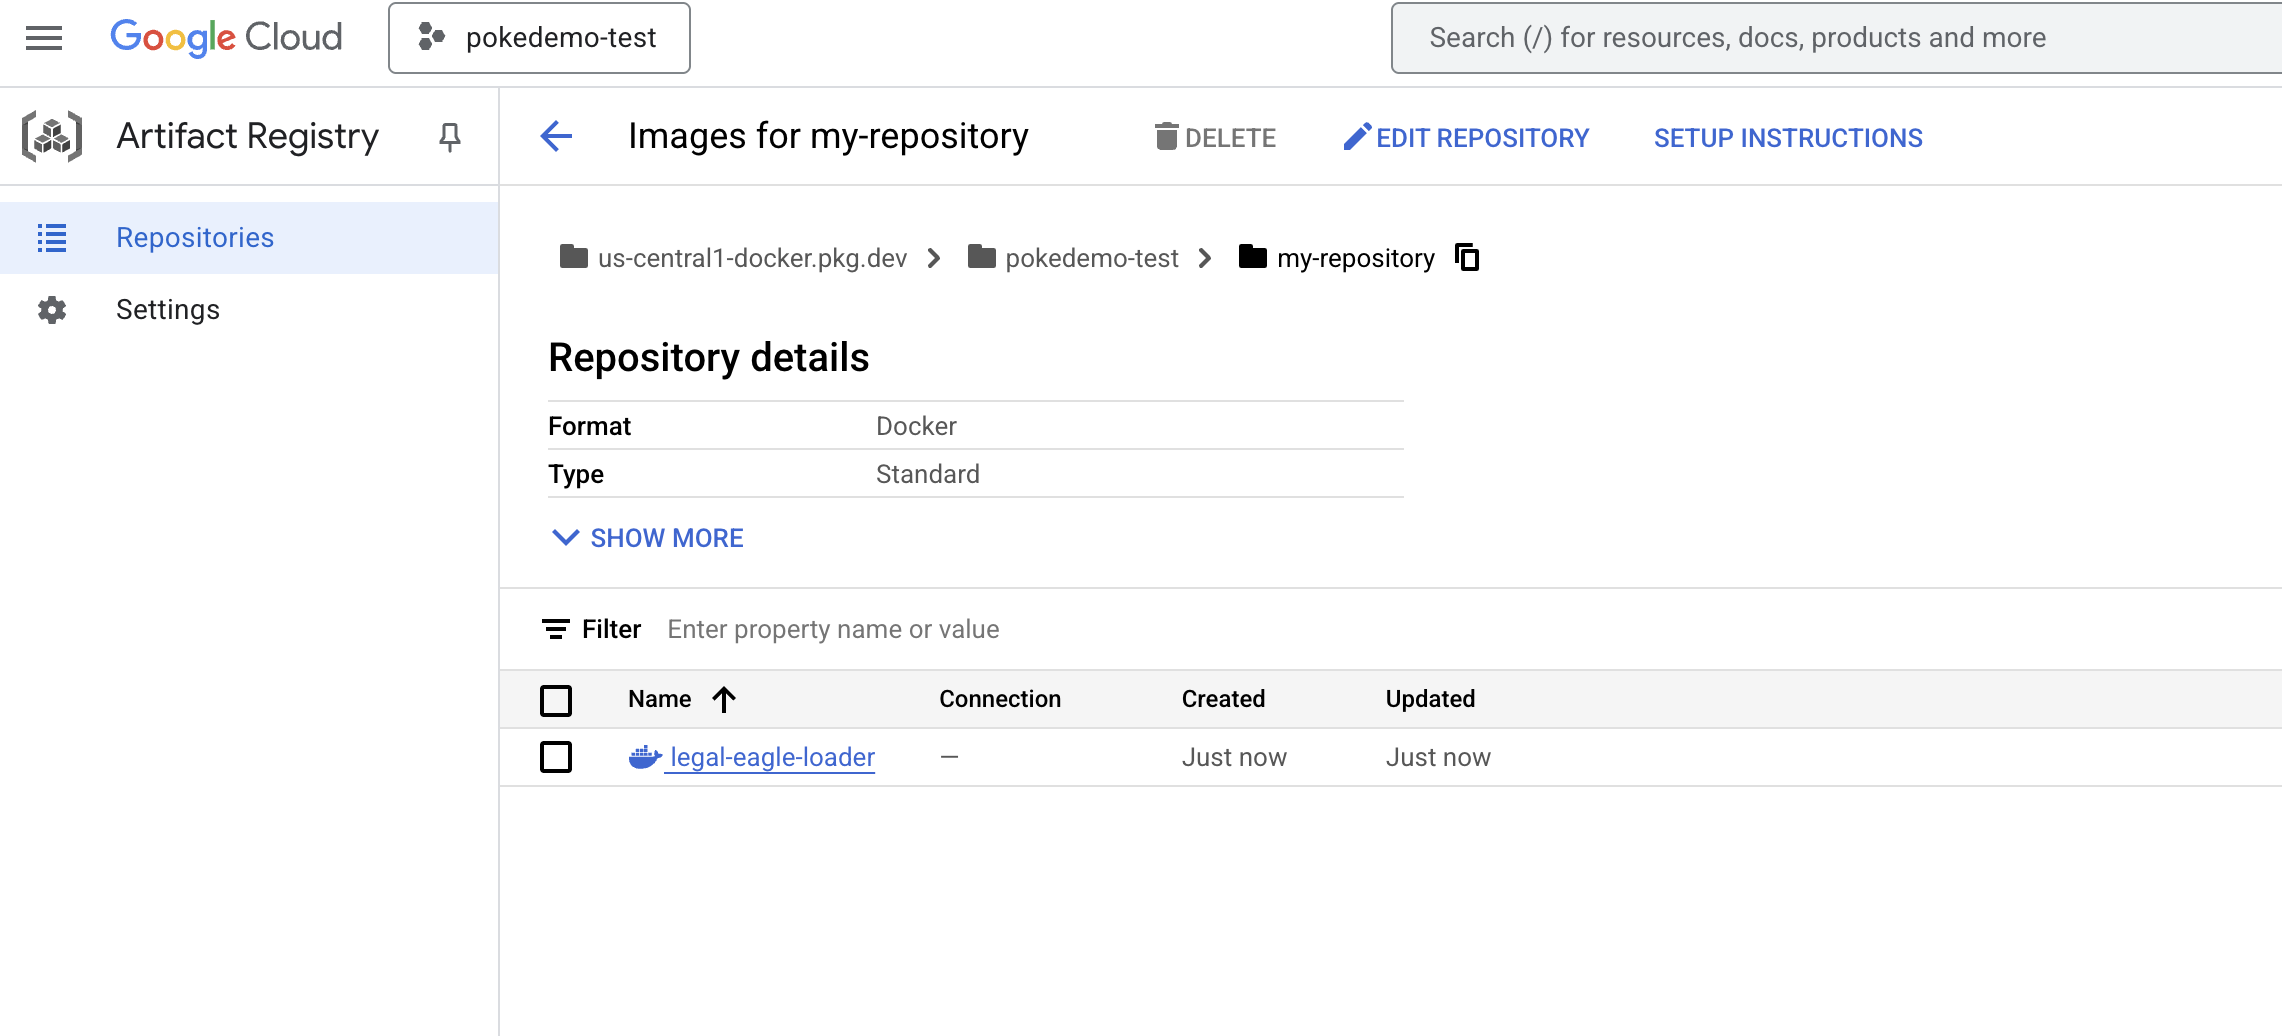
Docker イメージが my-repository Artifacts リポジトリで使用できるようになりました。
11. Cloud Run functions を作成し、Eventarc トリガーを設定する
法的文書ローダーのデプロイの詳細に入る前に、関連するコンポーネントについて簡単に説明します。Cloud Run は、コンテナ化されたアプリケーションを迅速かつ簡単にデプロイできるフルマネージドのサーバーレス プラットフォームです。インフラストラクチャ管理が抽象化されるため、コードの作成とデプロイに集中できます。
ドキュメント ローダーは Cloud Run サービスとしてデプロイします。それでは、Cloud Run functions の設定に進みましょう。
👉 Google Cloud コンソールで、[Cloud Run] に移動します。
👉 [コンテナをデプロイ] に移動し、プルダウンで [サービス] をクリックします。
👉 Cloud Run サービスを構成します。
- コンテナ イメージ: URL フィールドで [選択] をクリックします。Artifact Registry に push したイメージの URL を見つけます(例: us-central1-docker.pkg.dev/your-project-id/my-repository/legal-eagle-loader/yourimage)。
- サービス名:
legal-eagle-loader - リージョン:
us-central1リージョンを選択します。 - 認証: このワークショップでは、[未認証の呼び出しを許可] を選択できます。本番環境では、アクセスを制限することが望ましいでしょう。
- コンテナ、ネットワーキング、セキュリティ : デフォルト。
👉 [作成] をクリックします。Cloud Run がサービスをデプロイします。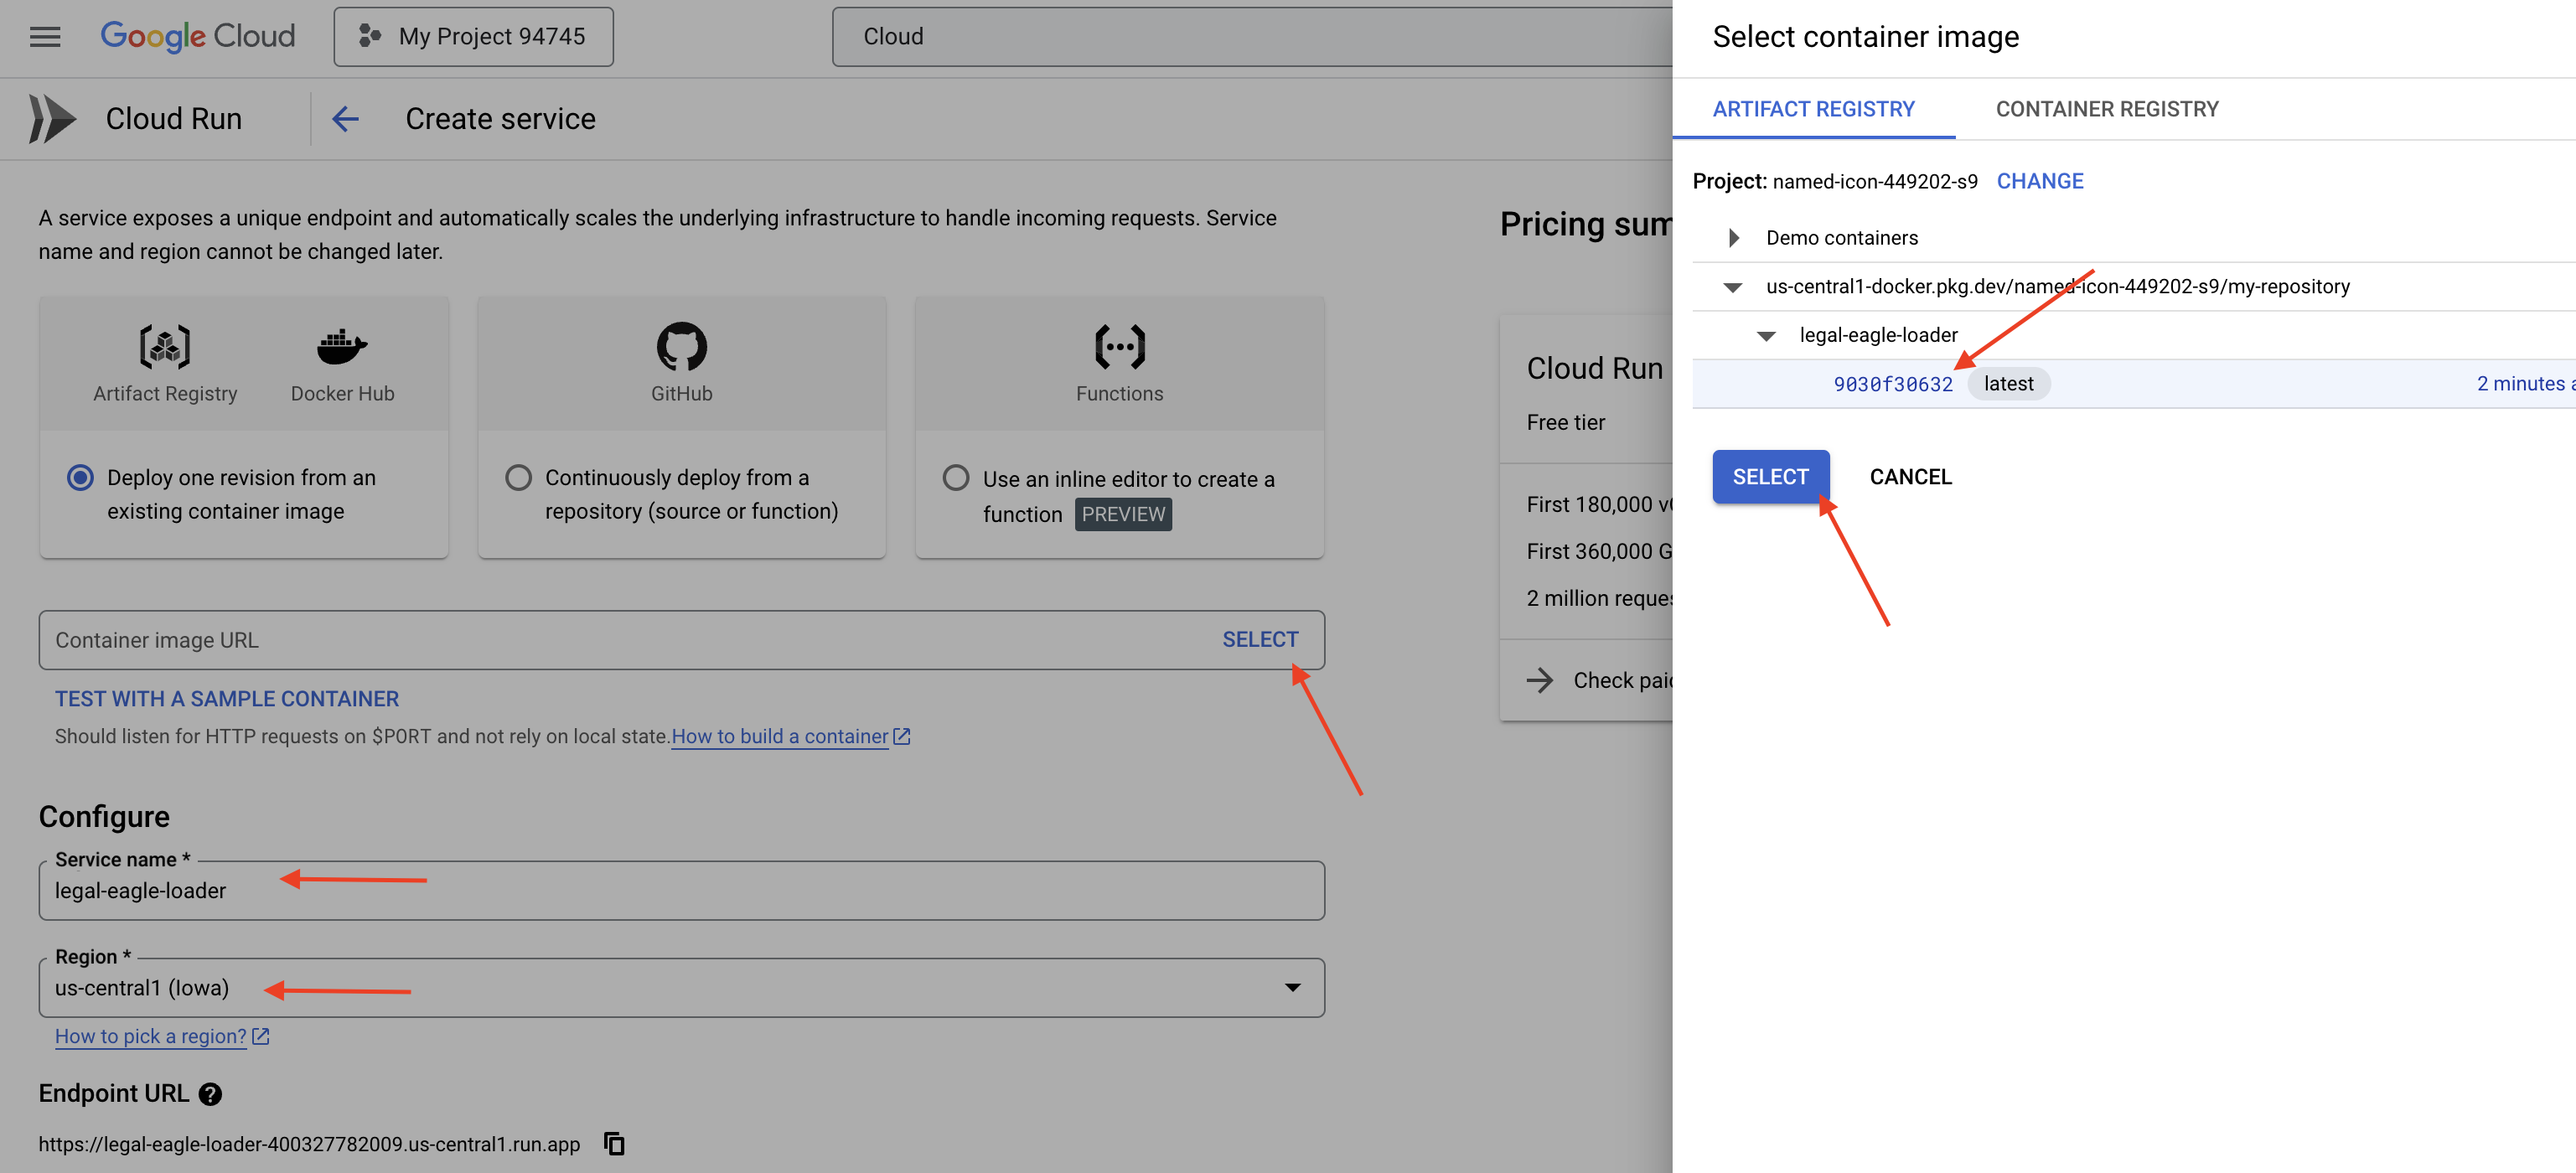
新しいファイルがストレージ バケットに追加されたときにこのサービスを自動的にトリガーするには、Eventarc を使用します。Eventarc を使用すると、さまざまなソースからサービスにイベントをルーティングして、イベント ドリブン アーキテクチャを作成できます。
Eventarc を設定すると、Cloud Run サービスは、新しいドキュメントがアップロードされるとすぐに Firestore に自動的に読み込み、RAG アプリケーションのリアルタイム データ更新を可能にします。
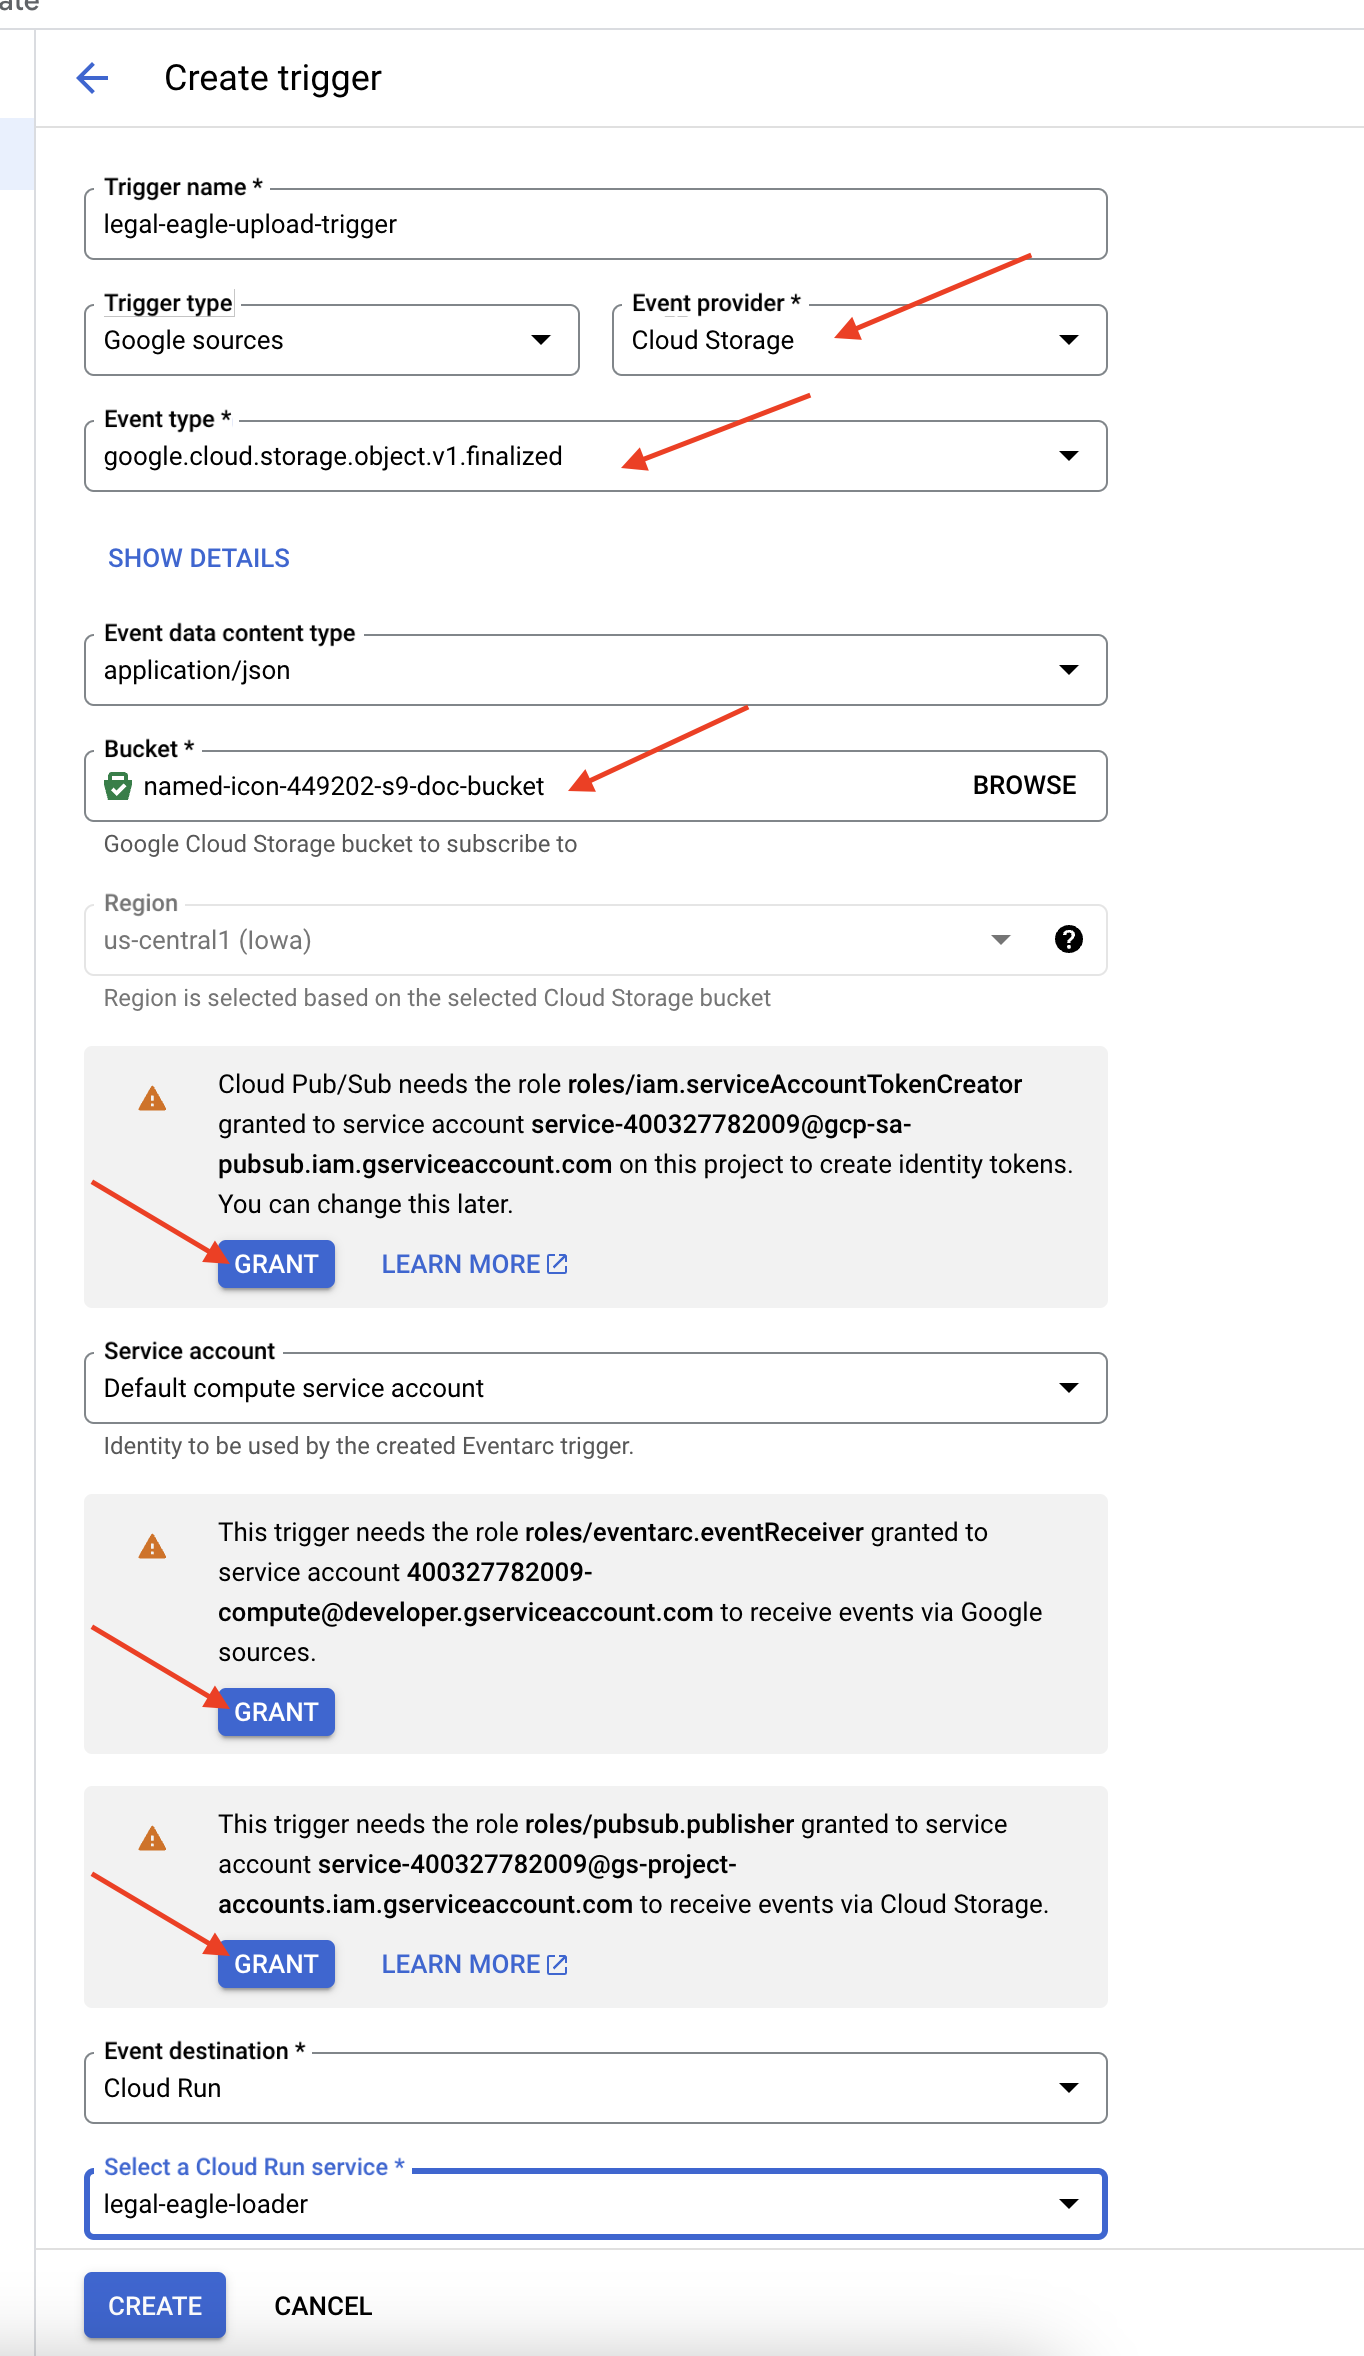
👉 Google Cloud コンソールで、EventArc の [トリガー] に移動します。[+ トリガーを作成] をクリックします。👉 Eventarc トリガーを構成します。
- トリガー名:
legal-eagle-upload-trigger。 - TriggerType: Google のソース
- イベント プロバイダ: [Cloud Storage] を選択します。
- イベントタイプ:
google.cloud.storage.object.v1.finalizedを選択します。 - Cloud Storage バケット: プルダウンから GCS バケットを選択します。
- 宛先タイプ: 「Cloud Run サービス」。
- サービス:
legal-eagle-loaderを選択します。 - リージョン:
us-central1 - パス: この段階では空白のままにしておきます。
- ページに表示されたすべての権限を付与する
👉 [作成] をクリックします。Eventarc がトリガーを設定します。
Cloud Run サービスには、さまざまなコンポーネントからファイルを読み取る権限が必要です。サービスに必要な権限をサービスのサービス アカウントに付与する必要があります。

12. 法的文書を GCS バケットにアップロードする
👉 裁判所事件ファイルを GCS バケットにアップロードします。バケット名を置き換えてください。
export DOC_BUCKET_NAME=$(gcloud storage buckets list --format="value(name)" | grep doc-bucket)
gsutil cp ~/legal-eagle/court_cases/case-02.txt gs://$DOC_BUCKET_NAME/
gsutil cp ~/legal-eagle/court_cases/case-03.txt gs://$DOC_BUCKET_NAME/
gsutil cp ~/legal-eagle/court_cases/case-06.txt gs://$DOC_BUCKET_NAME/
Cloud Run サービスログをモニタリングします。[Cloud Run] -> サービス legal-eagle-loader -> [ログ] に移動します。次のメッセージを含む、処理が成功したメッセージのログを確認します。
xxx
POST200130 B8.3 sAPIs-Google; (+https://developers.google.com/webmasters/APIs-Google.html) https://legal-eagle-loader-bmngrueyta-uc.a.run.app/?__GCP_CloudEventsMode=GCS_NOTIFICATION
xxx
POST200130 B520 msAPIs-Google; (+https://developers.google.com/webmasters/APIs-Google.html) https://legal-eagle-loader-bmngrueyta-uc.a.run.app/?__GCP_CloudEventsMode=GCS_NOTIFICATION
xxx
POST200130 B514 msAPIs-Google; (+https://developers.google.com/webmasters/APIs-Google.html) https://legal-eagle-loader-bmngrueyta-uc.a.run.app/?__GCP_CloudEventsMode=GCS_NOTIFICATION
ロギングの設定速度によっては、詳細なログもここに表示されます。
    "CloudEvent received:"
    "New file detected in bucket:"
    "File content downloaded. Processing..."
    "Text split into ... chunks."
    "File processing and Firestore upsert complete..."
ログにエラー メッセージがないか確認し、必要に応じてトラブルシューティングを行います。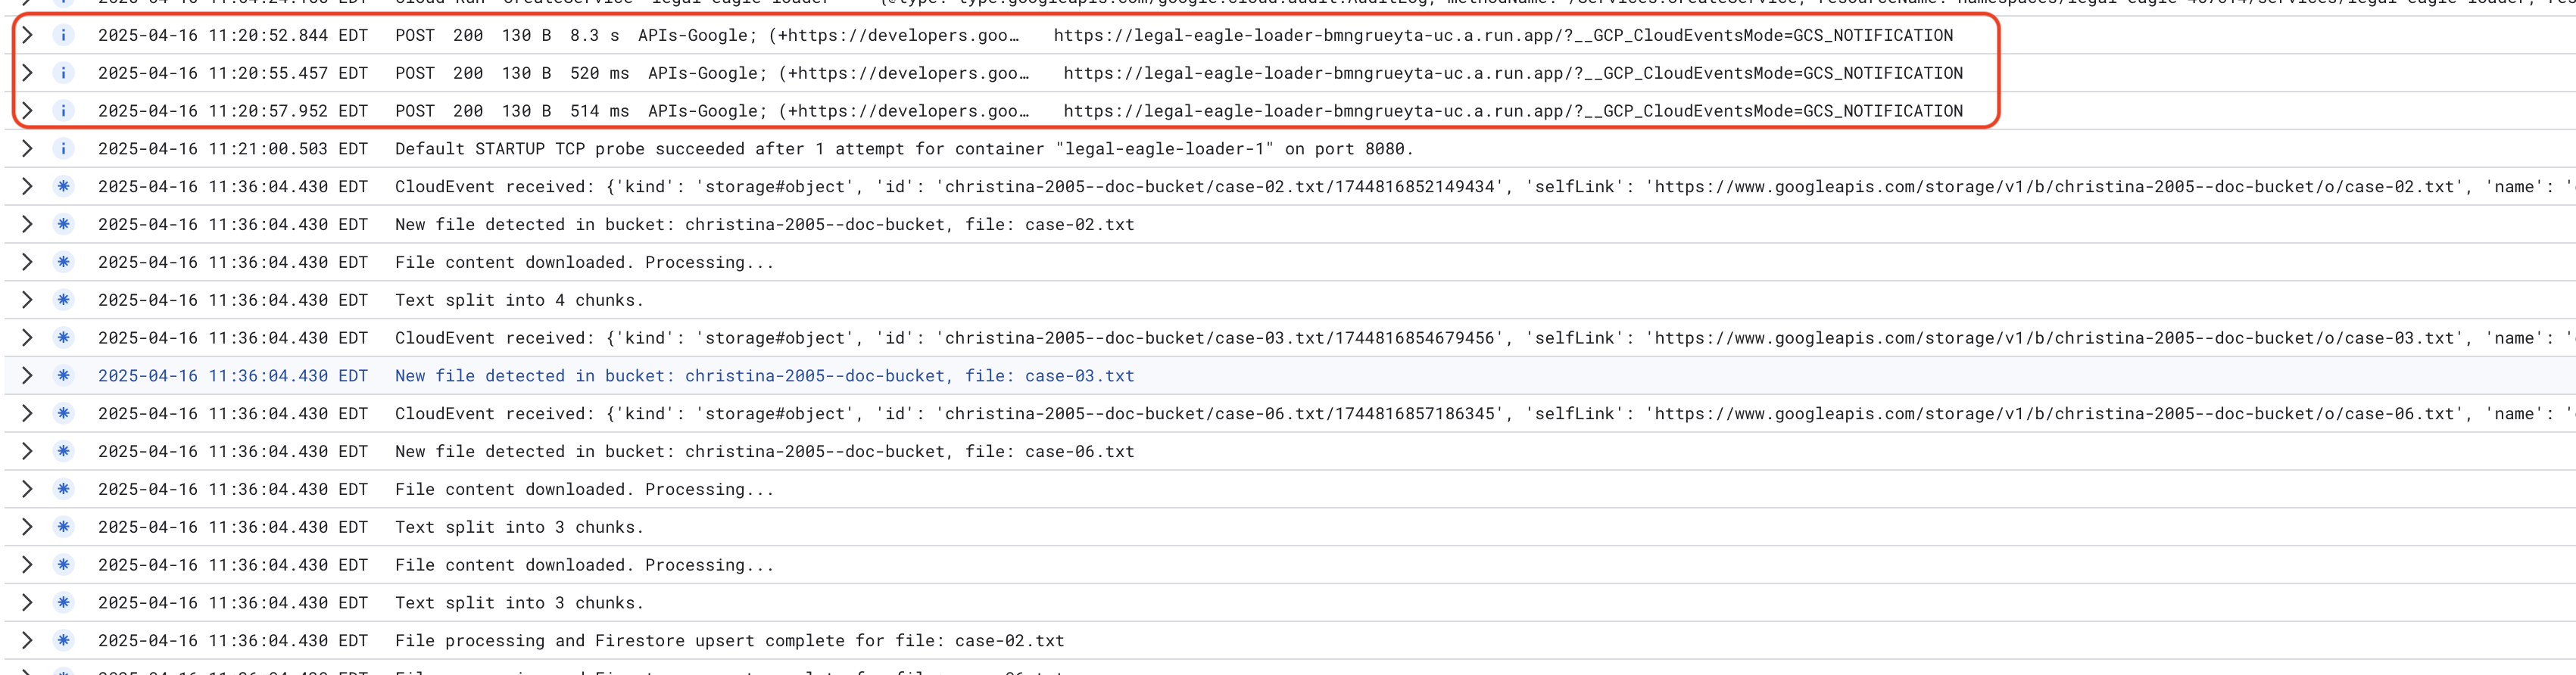
👉 Firestore でデータを確認します。legal_documents コレクションを開きます。
👉 コレクションに新しいドキュメントが作成されているはずです。各ドキュメントは、アップロードしたファイルからテキストのチャンクを表し、次のものを含みます。
metadata: currently empty
original_text_chunk: The text chunk content.
embedding_: A list of floating-point numbers (the Vertex AI embedding).
13. RAG の実装
LangChain は、大規模言語モデル(LLM)を活用したアプリケーションの開発を効率化するために設計された強力なフレームワークです。LangChain は、LLM API、プロンプト エンジニアリング、データ処理の複雑さを直接扱うのではなく、高レベルの抽象化レイヤを提供します。さまざまな LLM(OpenAI、Google など)への接続、複雑なオペレーション チェーン(データの取得と要約など)の構築、会話メモリの管理などのタスクに対応する事前構築済みのコンポーネントとツールが用意されています。
特に RAG の場合、LangChain のベクトルストアは RAG の検索機能を有効にするために不可欠です。これらは、ベクトル エンベディングを効率的に保存してクエリするように設計された専用のデータベースです。意味的に類似したテキストは、ベクトル空間内の近い点にマッピングされます。LangChain は低レベルの配管処理を行うため、デベロッパーは RAG アプリケーションのコアロジックと機能に集中できます。これにより、開発時間と複雑さが大幅に軽減され、Google Cloud インフラストラクチャの堅牢性とスケーラビリティを活用しながら、RAG ベースのアプリケーションを迅速にプロトタイピングしてデプロイできます。
LangChain について説明したので、RAG 実装用に webapp フォルダの legal.py ファイルを更新する必要があります。これにより、LLM は回答を提供する前に Firestore で関連するドキュメントを検索できます。
👉 langchain と vertexai から FirestoreVectorStore とその他の必要なモジュールをインポートします。現在の legal.py に以下を追加します。
from langchain_google_vertexai import VertexAIEmbeddings
from langchain_google_firestore import FirestoreVectorStore
👉 Vertex AI とエンベディング モデルを初期化します。text-embedding-004 を使用します。モジュールをインポートした直後に次のコードを追加します。
PROJECT_ID = os.environ.get("GOOGLE_CLOUD_PROJECT")  # Get project ID from env
embedding_model = VertexAIEmbeddings(
    model_name="text-embedding-004" ,
    project=PROJECT_ID,)
👉 初期化されたエンベディング モデルを使用して、legal_documents コレクションを指す FirestoreVectorStore を作成し、コンテンツ フィールドとエンベディング フィールドを指定します。これは、前のエンベディング モデルコードの直後に追加します。
COLLECTION_NAME = "legal_documents"
# Create a vector store
vector_store = FirestoreVectorStore(
    collection="legal_documents",
    embedding_service=embedding_model,
    content_field="original_text",
    embedding_field="embedding",
)
👉 クエリを受け取り、vector_store.similarity_search を使用して類似性検索を実行し、結合された結果を返す search_resource という関数を定義します。
def search_resource(query):
    results = []
    results = vector_store.similarity_search(query, k=5)

    combined_results = "\n".join([result.page_content for result in results])
    print(f"==>{combined_results}")
    return combined_results
👉 ask_llm 関数を置き換え、search_resource 関数を使用して、ユーザーのクエリに基づいて関連するコンテキストを取得します。
def ask_llm(query):
    try:
        query_message = {
            "type": "text",
            "text": query,
        }
        relevant_resource = search_resource(query)

        input_msg = HumanMessage(content=[query_message])
        prompt_template = ChatPromptTemplate.from_messages(
            [
                SystemMessage(
                    content=(
                        "You are a helpful assistant, and you are with the attorney in a courtroom, you are helping him to win the case by providing the information he needs "
                        "Don't answer if you don't know the answer, just say sorry in a funny way possible"
                        "Use high engergy tone, don't use more than 100 words to answer"
                        f"Here is some context that is relevant to the question {relevant_resource} that you might use"
                    )
                ),
                input_msg,
            ]
        )
        prompt = prompt_template.format()

        response = llm.invoke(prompt)
        print(f"response: {response}")
        return response
    except Exception as e:
        print(f"Error sending message to chatbot: {e}") # Log this error too!
        return f"Unable to process your request at this time. Due to the following reason: {str(e)}"
👉 省略可: スペイン語版
Sustituye el siguiente texto como se indica: You are a helpful assistant, to You are a helpful assistant that speaks Spanish,
👉 legal.py で RAG を実装したら、デプロイする前にローカルでテストし、次のコマンドでアプリケーションを実行します。
cd ~/legal-eagle/webapp
source env/bin/activate
python main.py
👉 webpreview を使用してアプリケーションにアクセスし、アシスタンスと会話します。ctrl+c と入力してローカルで実行されているプロセスを終了し、deactivate を実行して仮想環境を終了します。
deactivate
👉 ウェブ アプリケーションを Cloud Run にデプロイするには、ローダー関数と同様の手順を行います。Docker イメージをビルドしてタグ付けし、Artifact Registry に push します。
export PROJECT_ID=$(gcloud config get project)
docker build -t gcr.io/${PROJECT_ID}/legal-eagle-webapp .
docker tag gcr.io/${PROJECT_ID}/legal-eagle-webapp us-central1-docker.pkg.dev/${PROJECT_ID}/my-repository/legal-eagle-webapp
docker push us-central1-docker.pkg.dev/${PROJECT_ID}/my-repository/legal-eagle-webapp
👉 ウェブ アプリケーションを Google Cloud にデプロイします。ターミナルで次のコマンドを実行します。
export PROJECT_ID=$(gcloud config get project)
gcloud run deploy legal-eagle-webapp \
  --image us-central1-docker.pkg.dev/$PROJECT_ID/my-repository/legal-eagle-webapp \
  --region us-central1 \
  --set-env-vars=GOOGLE_CLOUD_PROJECT=${PROJECT_ID}  \
  --allow-unauthenticated
Google Cloud コンソールの Cloud Run に移動して、デプロイを確認します。legal-eagle-webapp という名前の新しいサービスが表示されます。
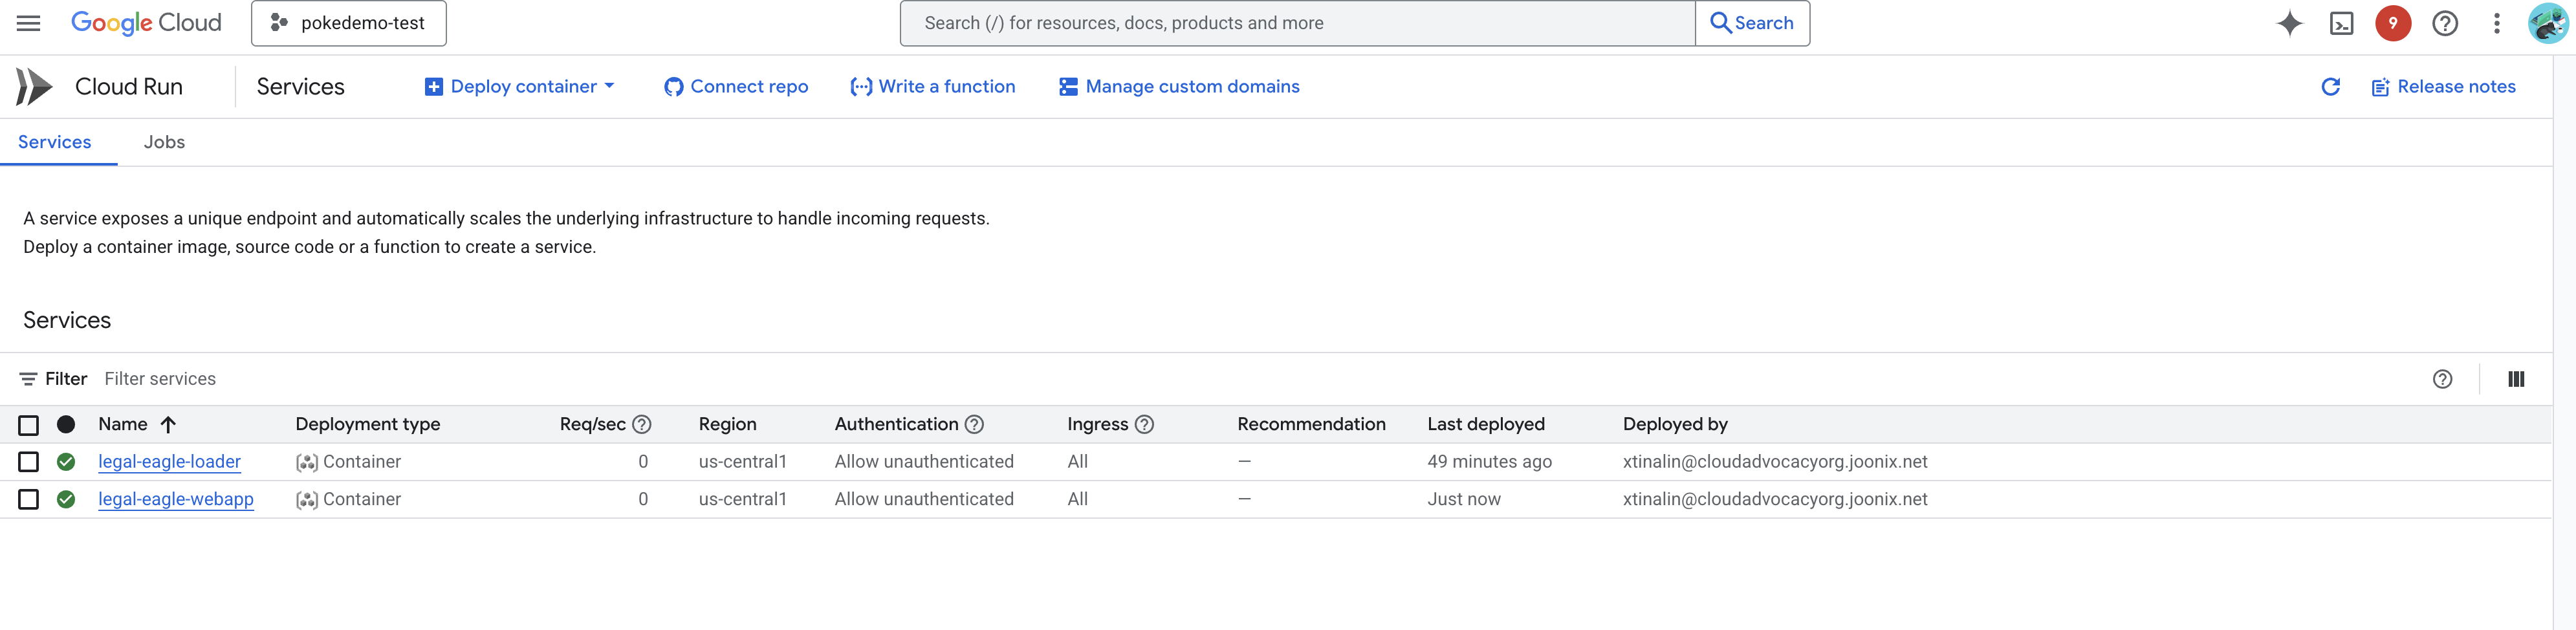
サービスをクリックして詳細ページに移動すると、上部にデプロイされた URL が表示されます。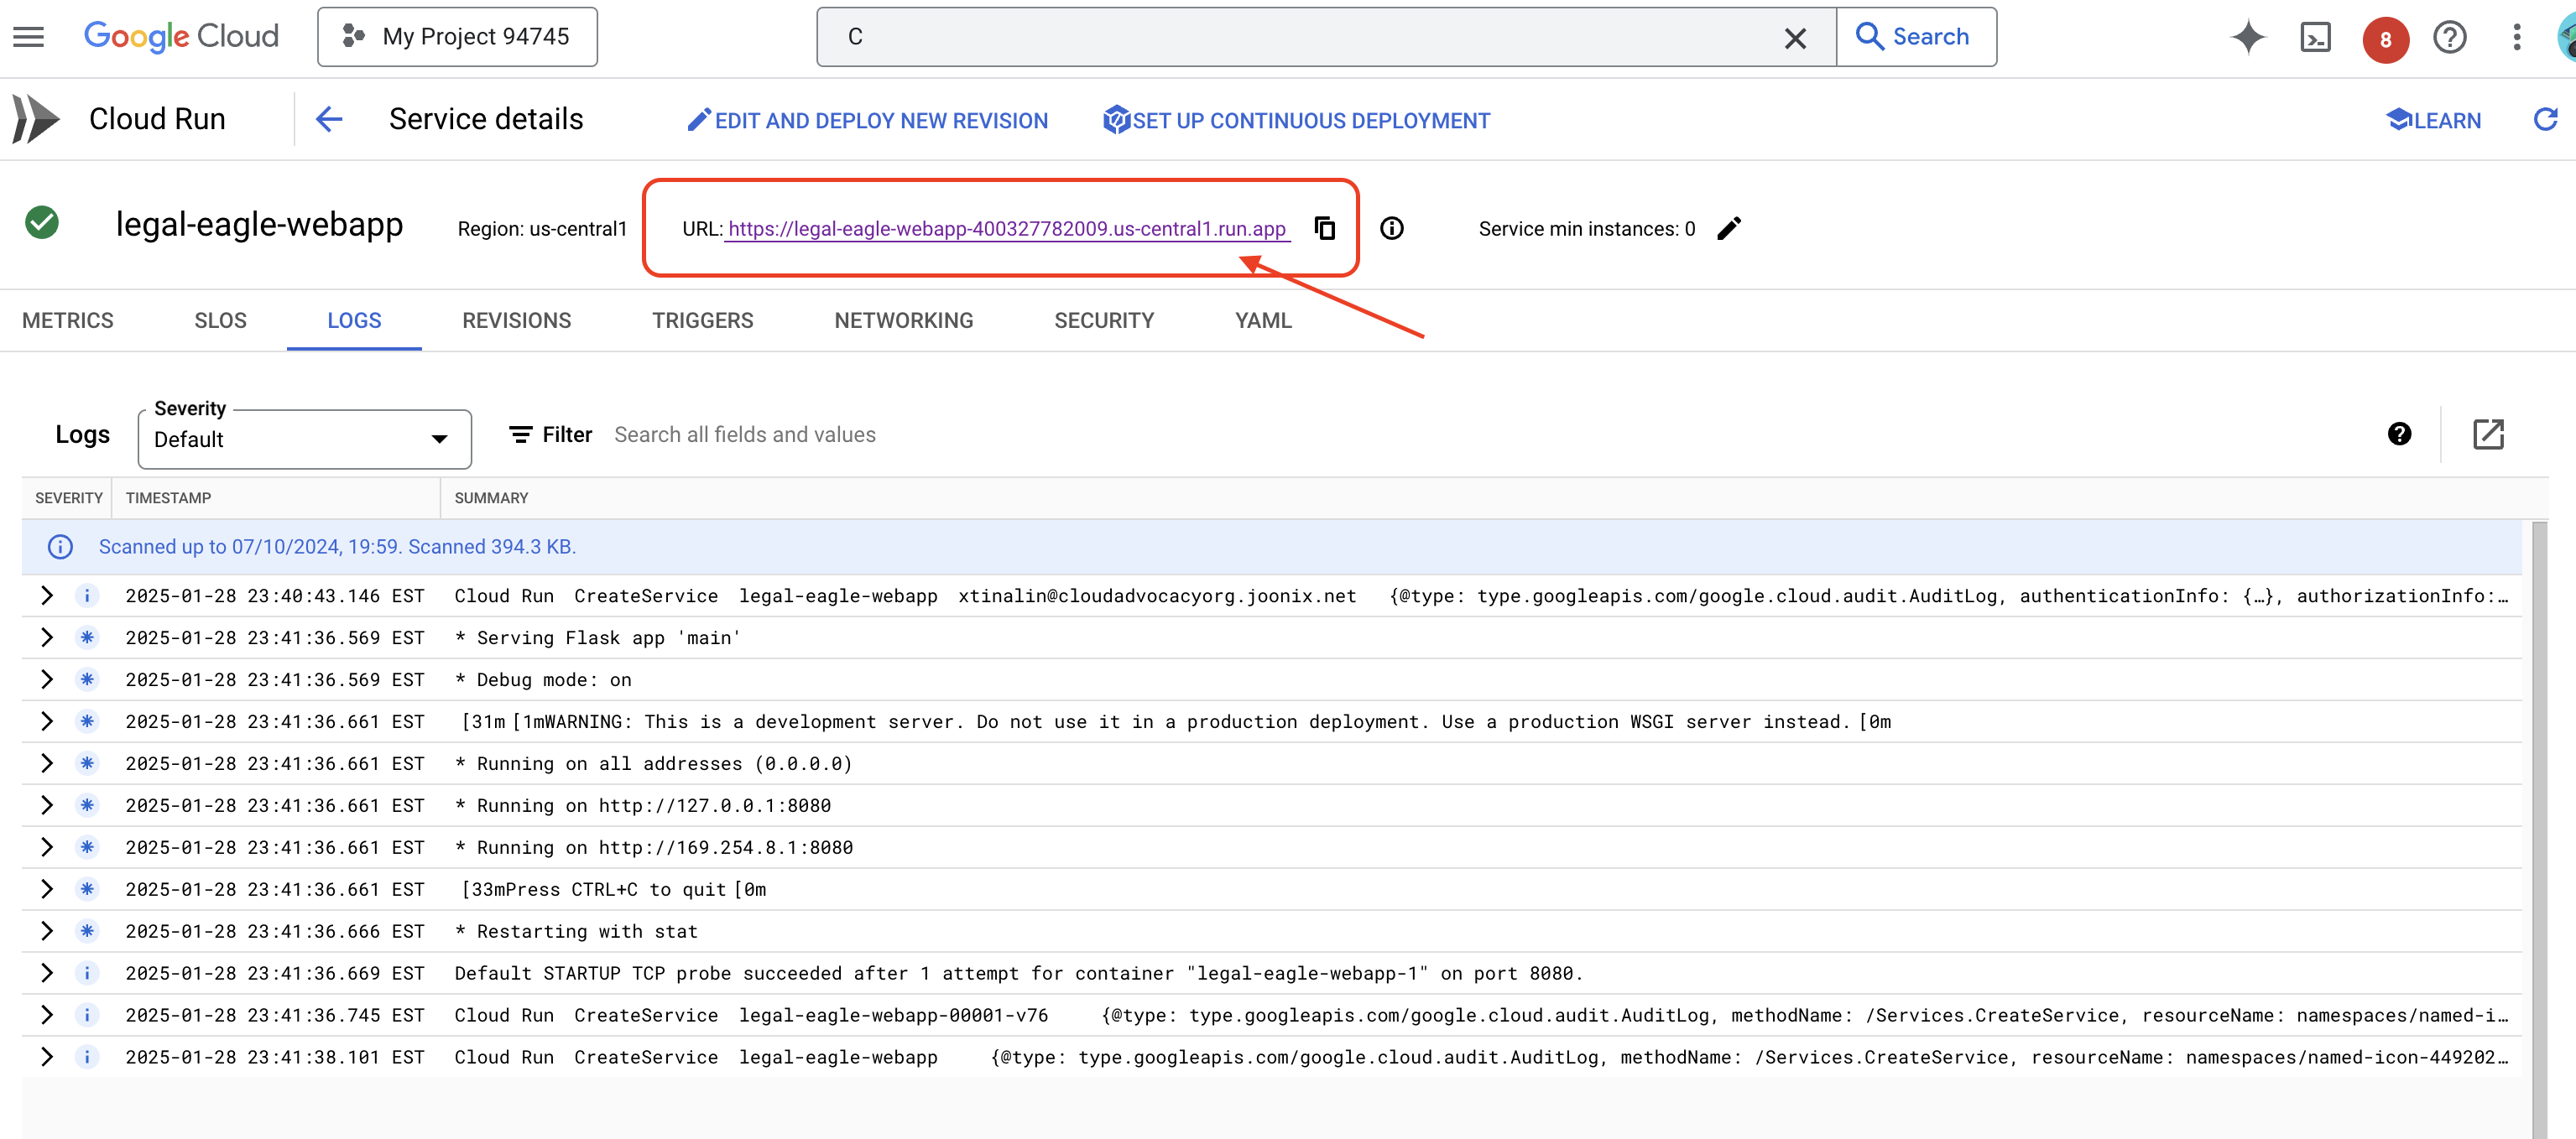
👉 デプロイされた URL を新しいブラウザタブで開きます。法律アシスタントとやり取りして、読み込んだ裁判所事件(court_cases フォルダ内)に関連する質問をすることができます。
- マイケル・ブラウンは、何年の実刑判決を受けましたか?
- Jane Smith の操作の結果、不正な請求額はいくらになりましたか?
- エミリー・ホワイトの事件の捜査において、近隣住民の証言はどのような役割を果たしましたか?
👉 省略可: スペイン語版
- ¿A cuántos años de prisión fue sentenciado Michael Brown?
- ¿Cuánto dinero en cargos no autorizados se generó como resultado de las acciones de Jane Smith?
- ¿Qué papel jugaron los testimonios de los vecinos en la investigación del caso de Emily White?
回答がより正確になり、アップロードした法的文書の内容に基づいていることがわかります。これが RAG の力です。
ワークショップの完了おめでとうございます。LLM、LangChain、Google Cloud を使用して、法的文書分析アプリケーションの構築とデプロイに成功しました。このチュートリアルでは、法的文書の取り込みと処理、RAG を使用した関連情報による LLM レスポンスの拡張、アプリケーションのサーバーレス サービスとしてのデプロイについて学習しました。この知識と構築したアプリケーションは、法律関連のタスクで LLM の能力をさらに探求するのに役立ちます。よくできました。」
14. 課題
多様なメディアタイプ::
裁判所の動画や音声録音などのさまざまなメディアタイプを取り込んで処理し、関連するテキストを抽出する方法。
オンライン アセット:
ウェブページなどのオンライン アセットをライブで処理する方法。