
1. 简介
我一直很着迷于法庭的紧张氛围,想象自己能巧妙地应对各种复杂情况,并发表强有力的结案陈词。虽然我的职业道路已将我带向其他方向,但我很高兴地告诉大家,借助 AI,我们或许都能更接近实现那个法庭梦想。
今天,我们将深入探讨如何使用 Google 强大的 AI 工具(例如 Vertex AI、Firestore 和 Cloud Run Functions)来处理和理解法律数据、执行快速搜索,或许还能帮助您的虚拟客户(或您自己)摆脱困境。
您可能不会盘问证人,但借助我们的系统,您将能够过滤海量信息、生成清晰的摘要,并在几秒钟内呈现最相关的数据。
2. 架构
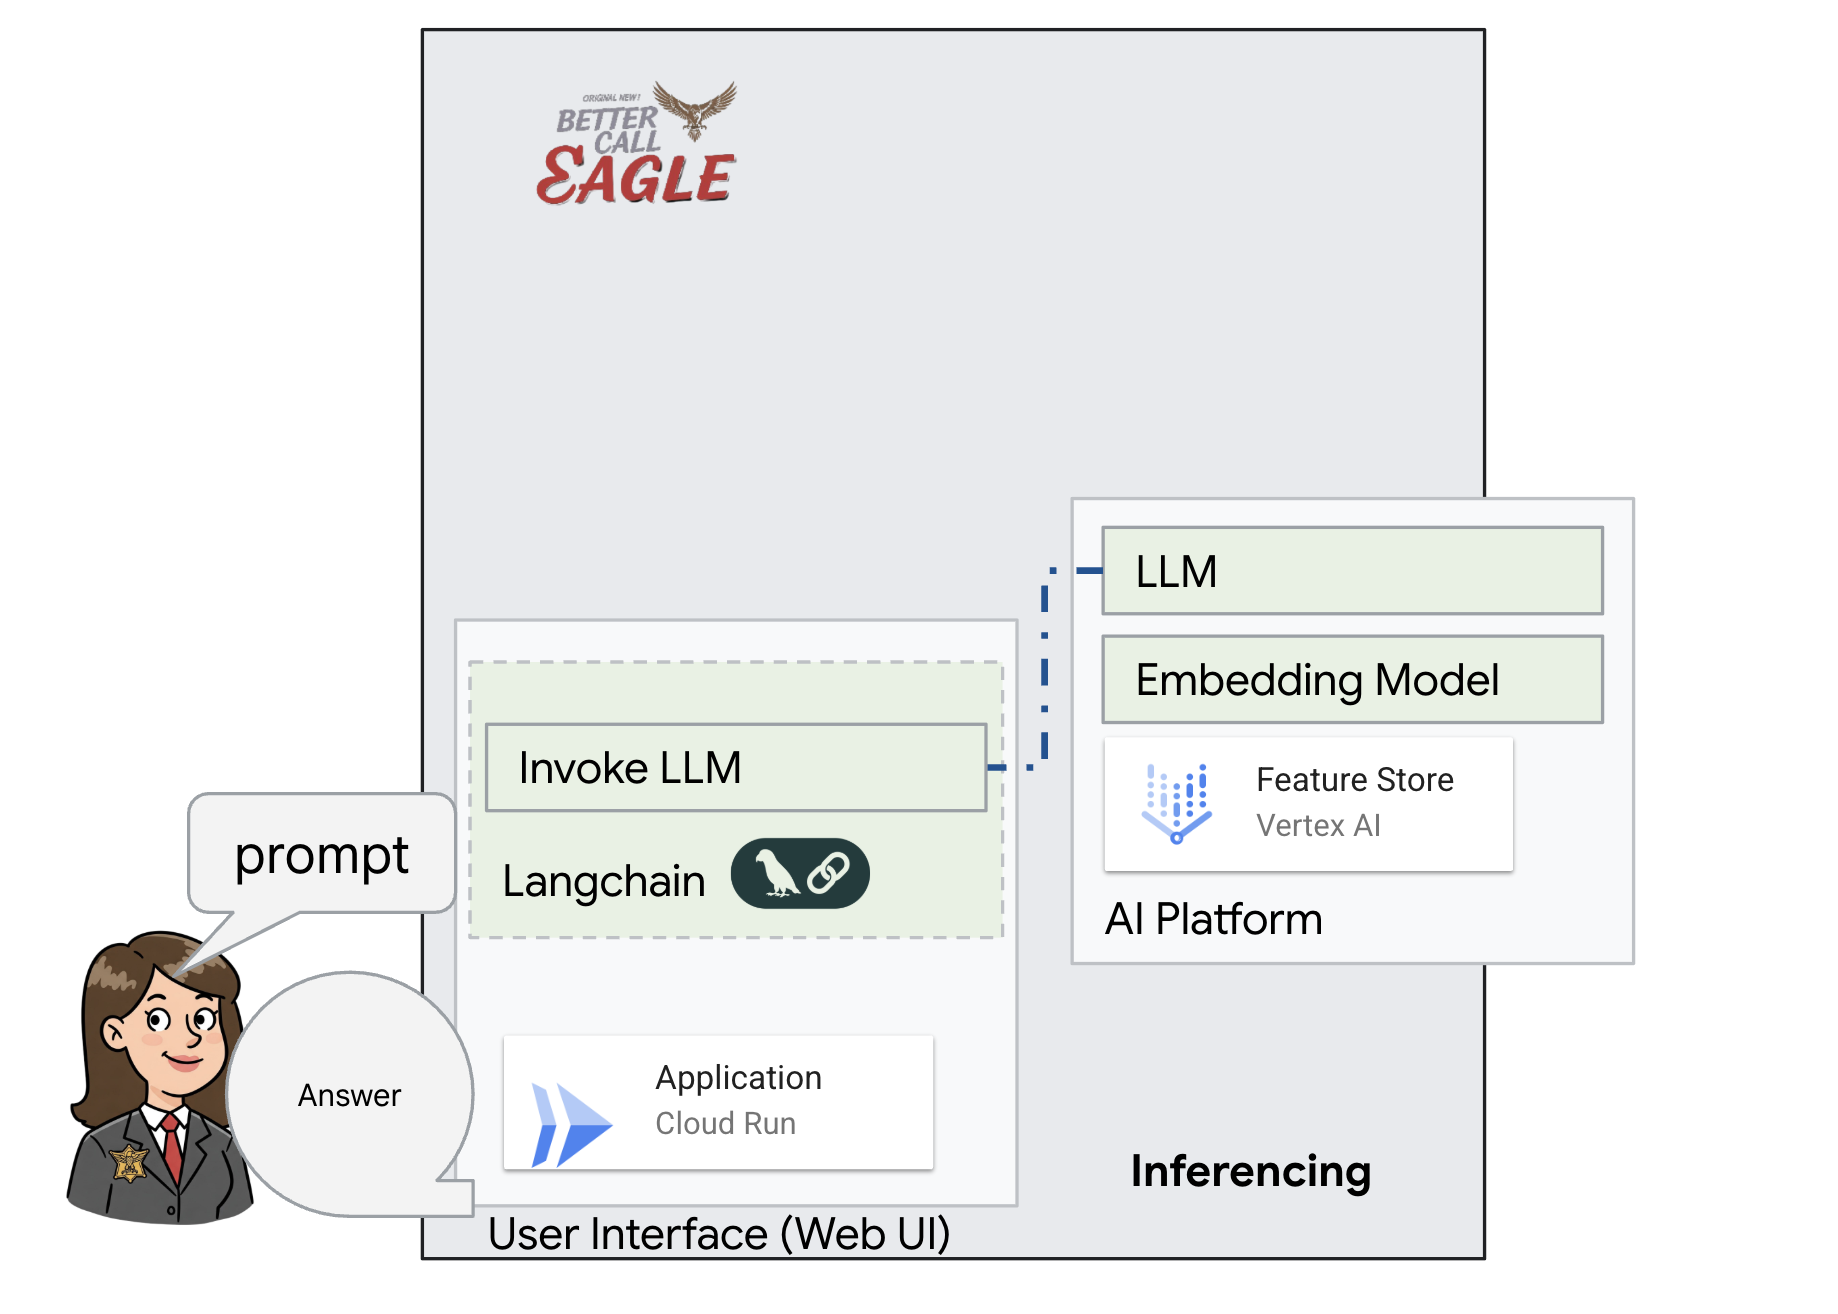
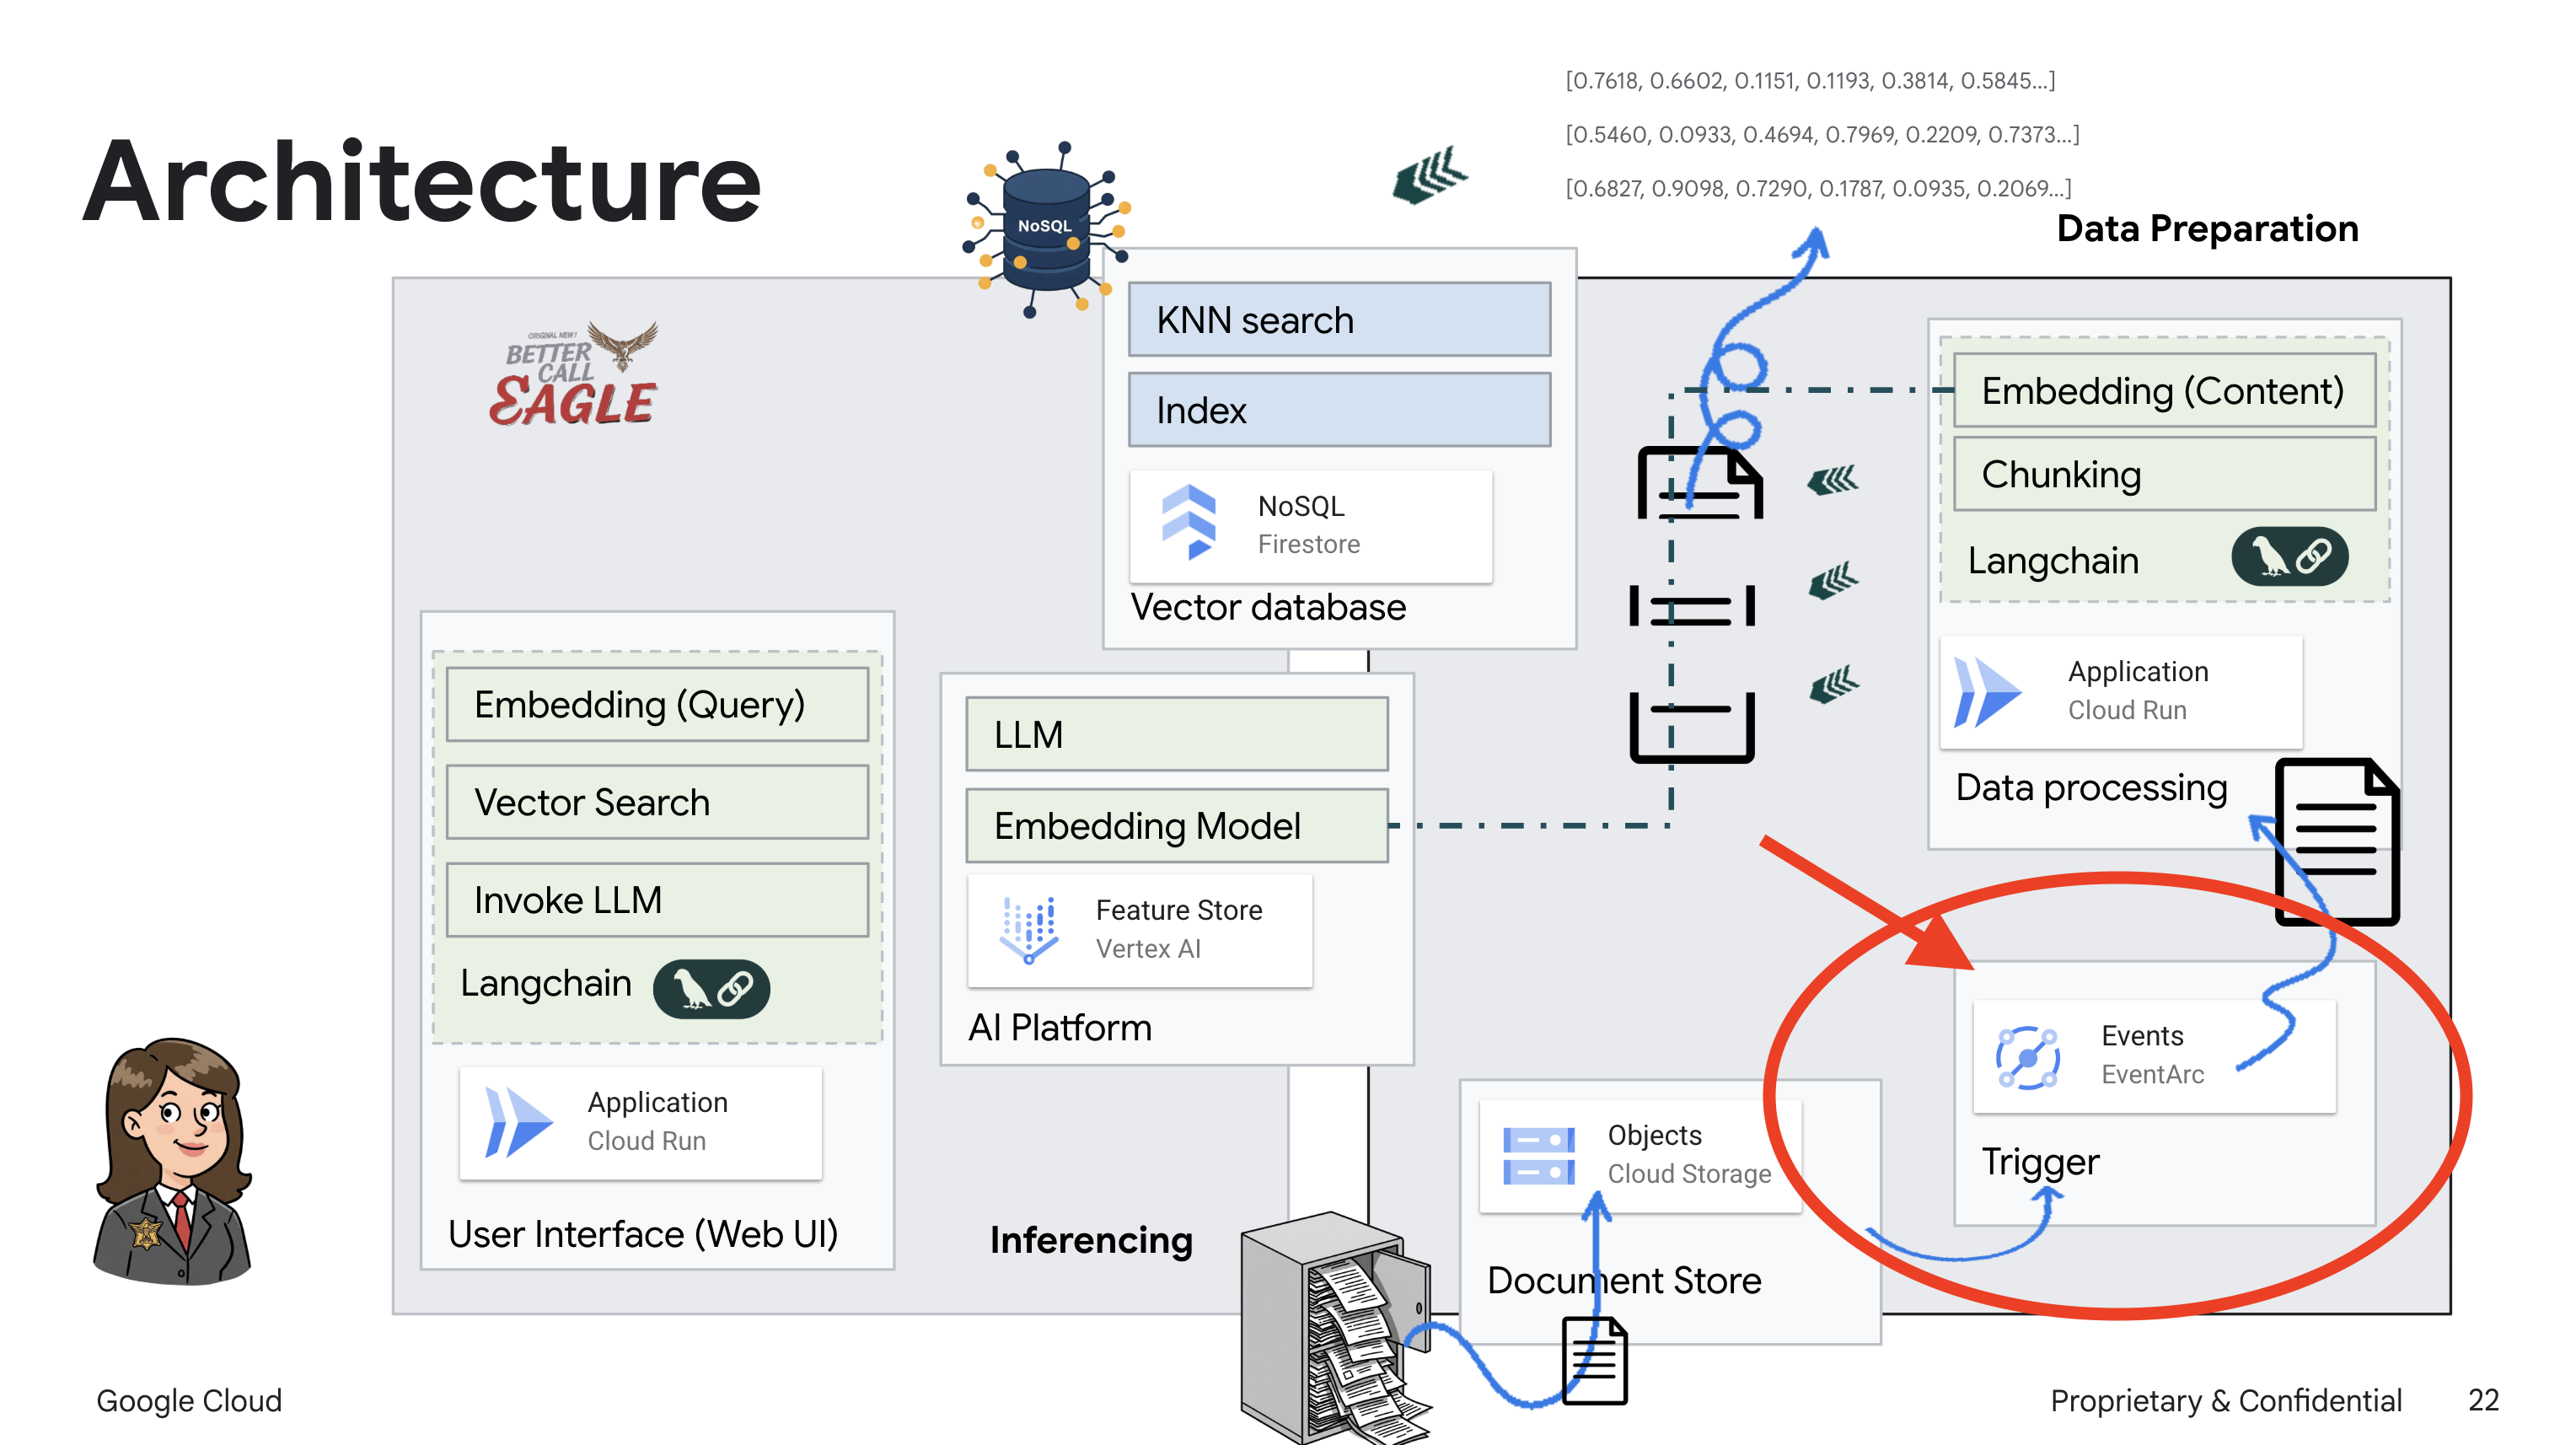
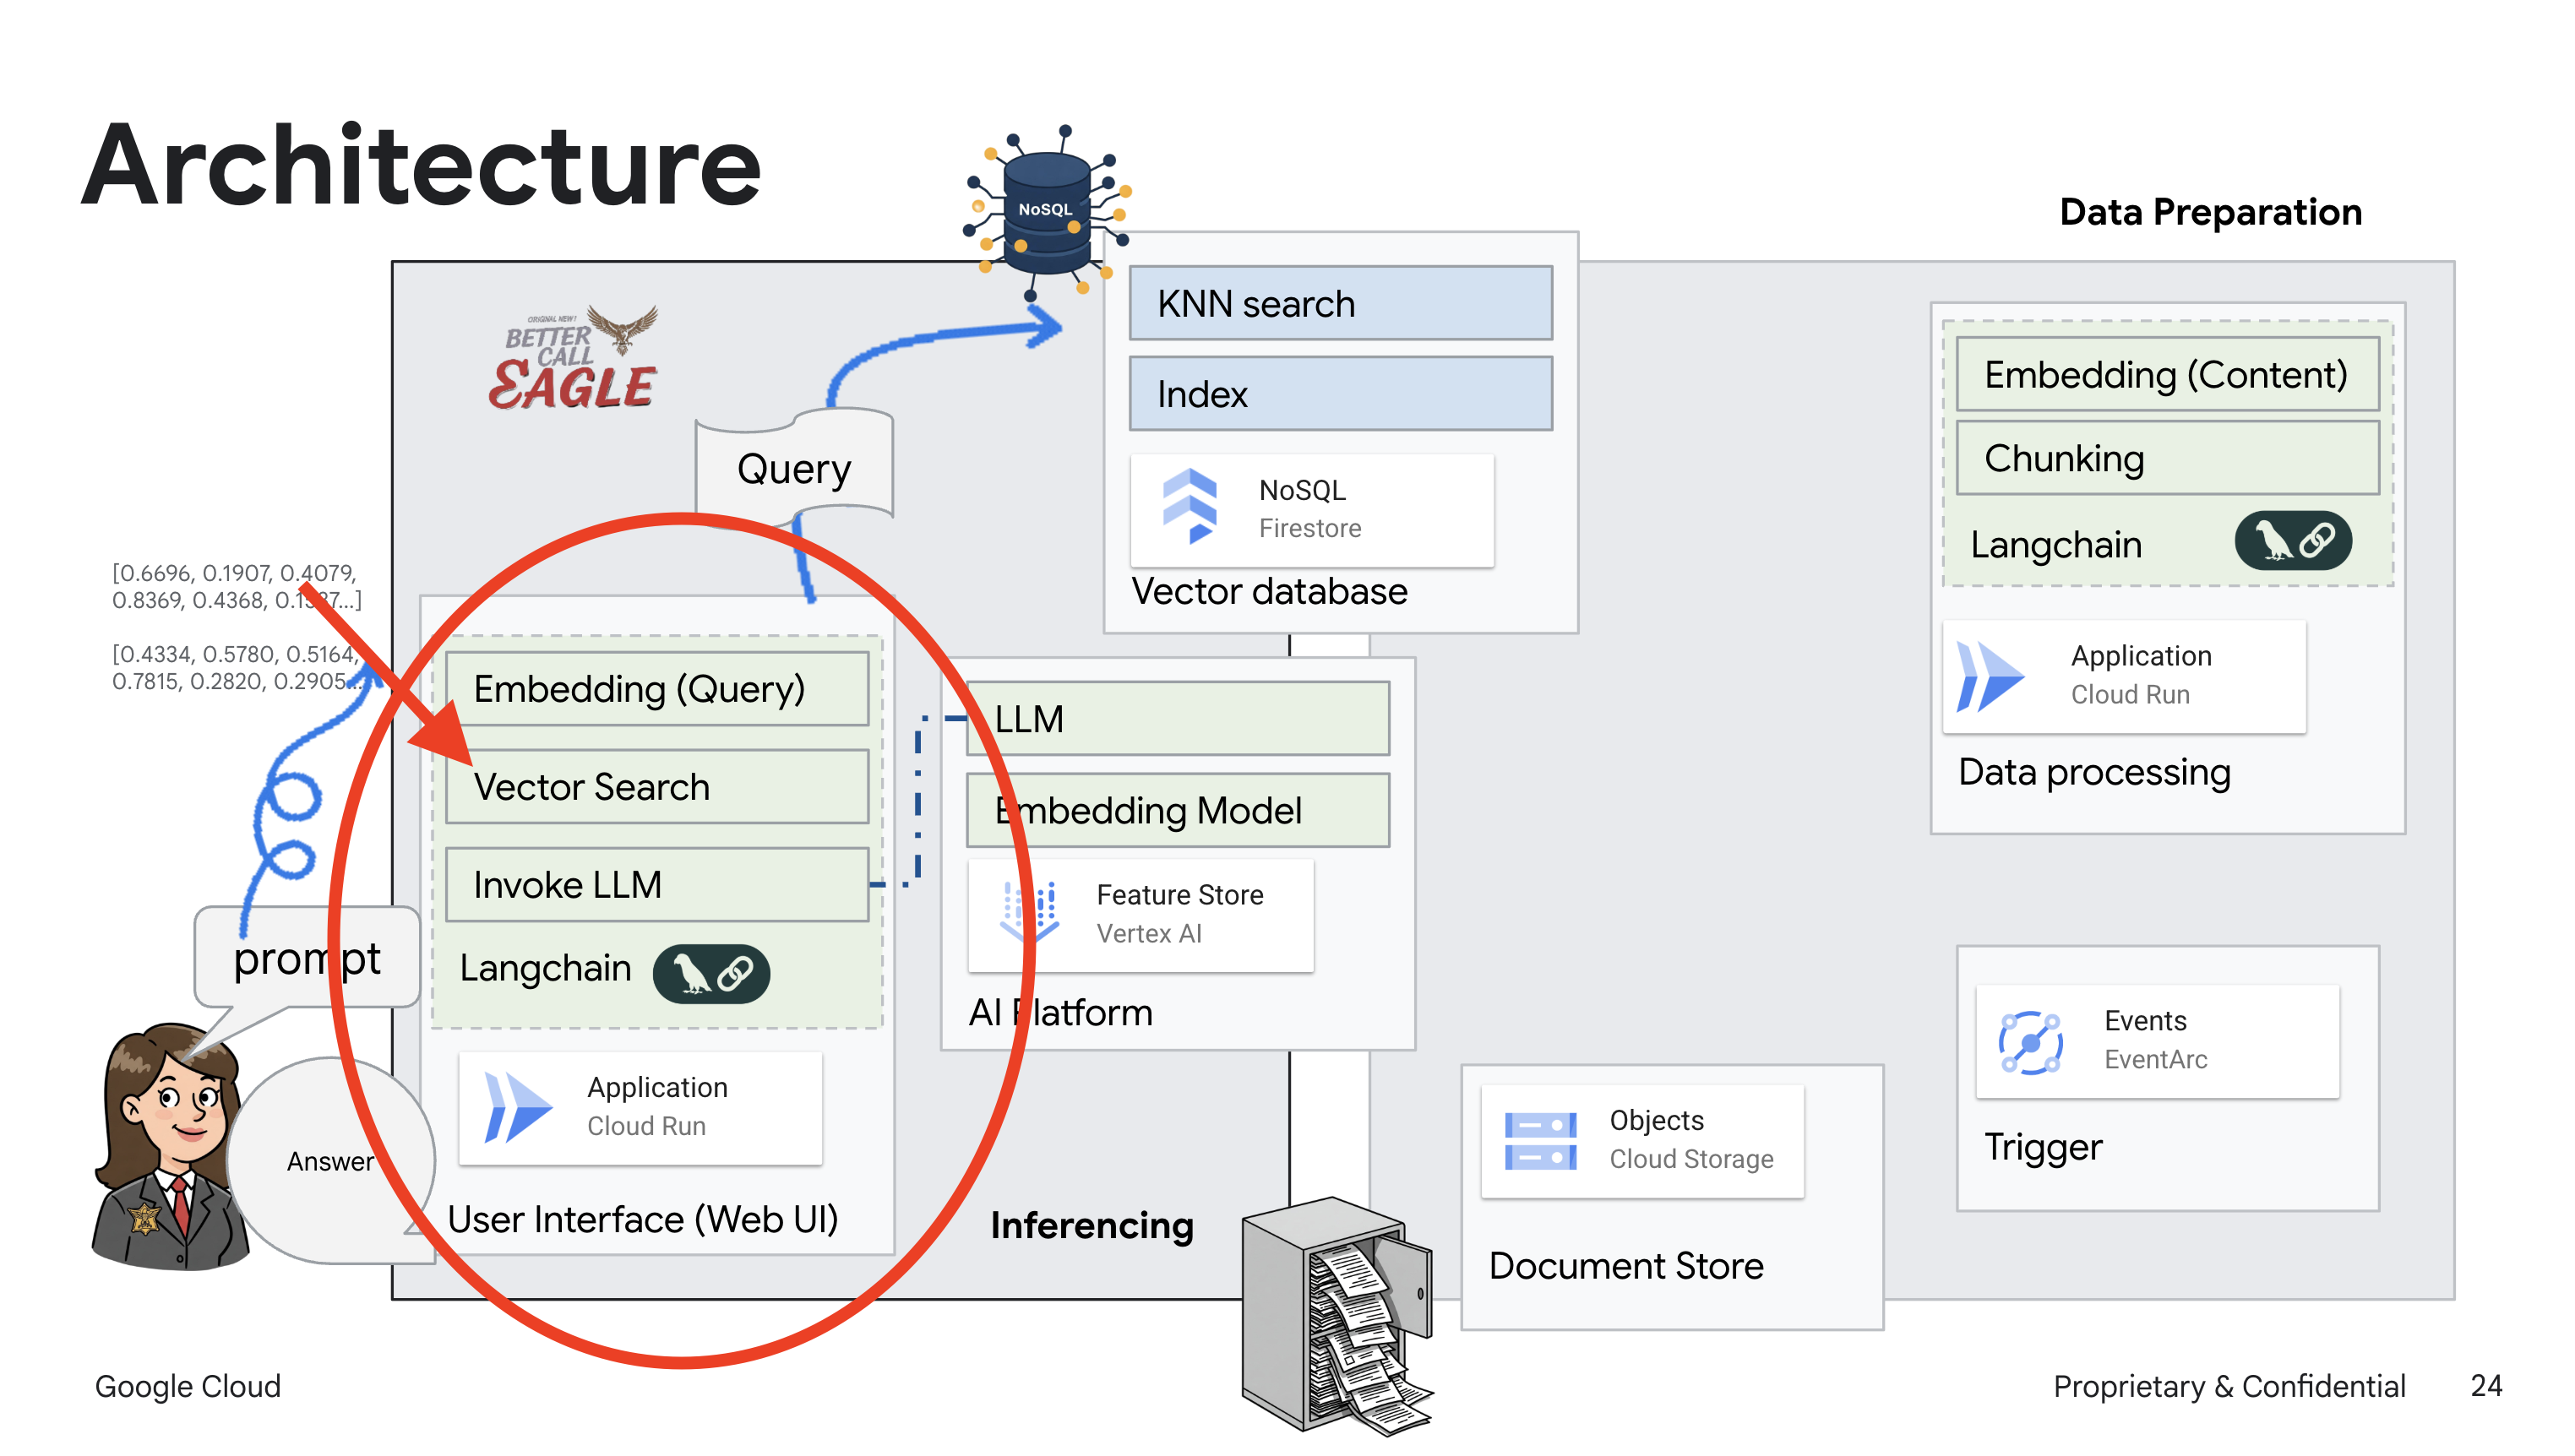
此项目侧重于使用 Google Cloud AI 工具构建法律助理,重点介绍如何处理、理解和搜索法律数据。该系统旨在过滤大量信息、生成摘要并快速呈现相关数据。法律助理的架构涉及多个关键组件:
从非结构化数据构建知识库:Google Cloud Storage (GCS) 用于存储法律文件。Firestore 是一种 NoSQL 数据库,可作为向量存储区,用于存储文档块及其对应的嵌入内容。Firestore 中已启用向量搜索,以支持相似度搜索。当新法律文件上传到 GCS 时,Eventarc 会触发 Cloud Run 函数。此函数通过以下方式处理文档:将其拆分为多个块,并使用 Vertex AI 的文本嵌入模型为每个块生成嵌入。然后,这些嵌入会与文本块一起存储在 Firestore 中。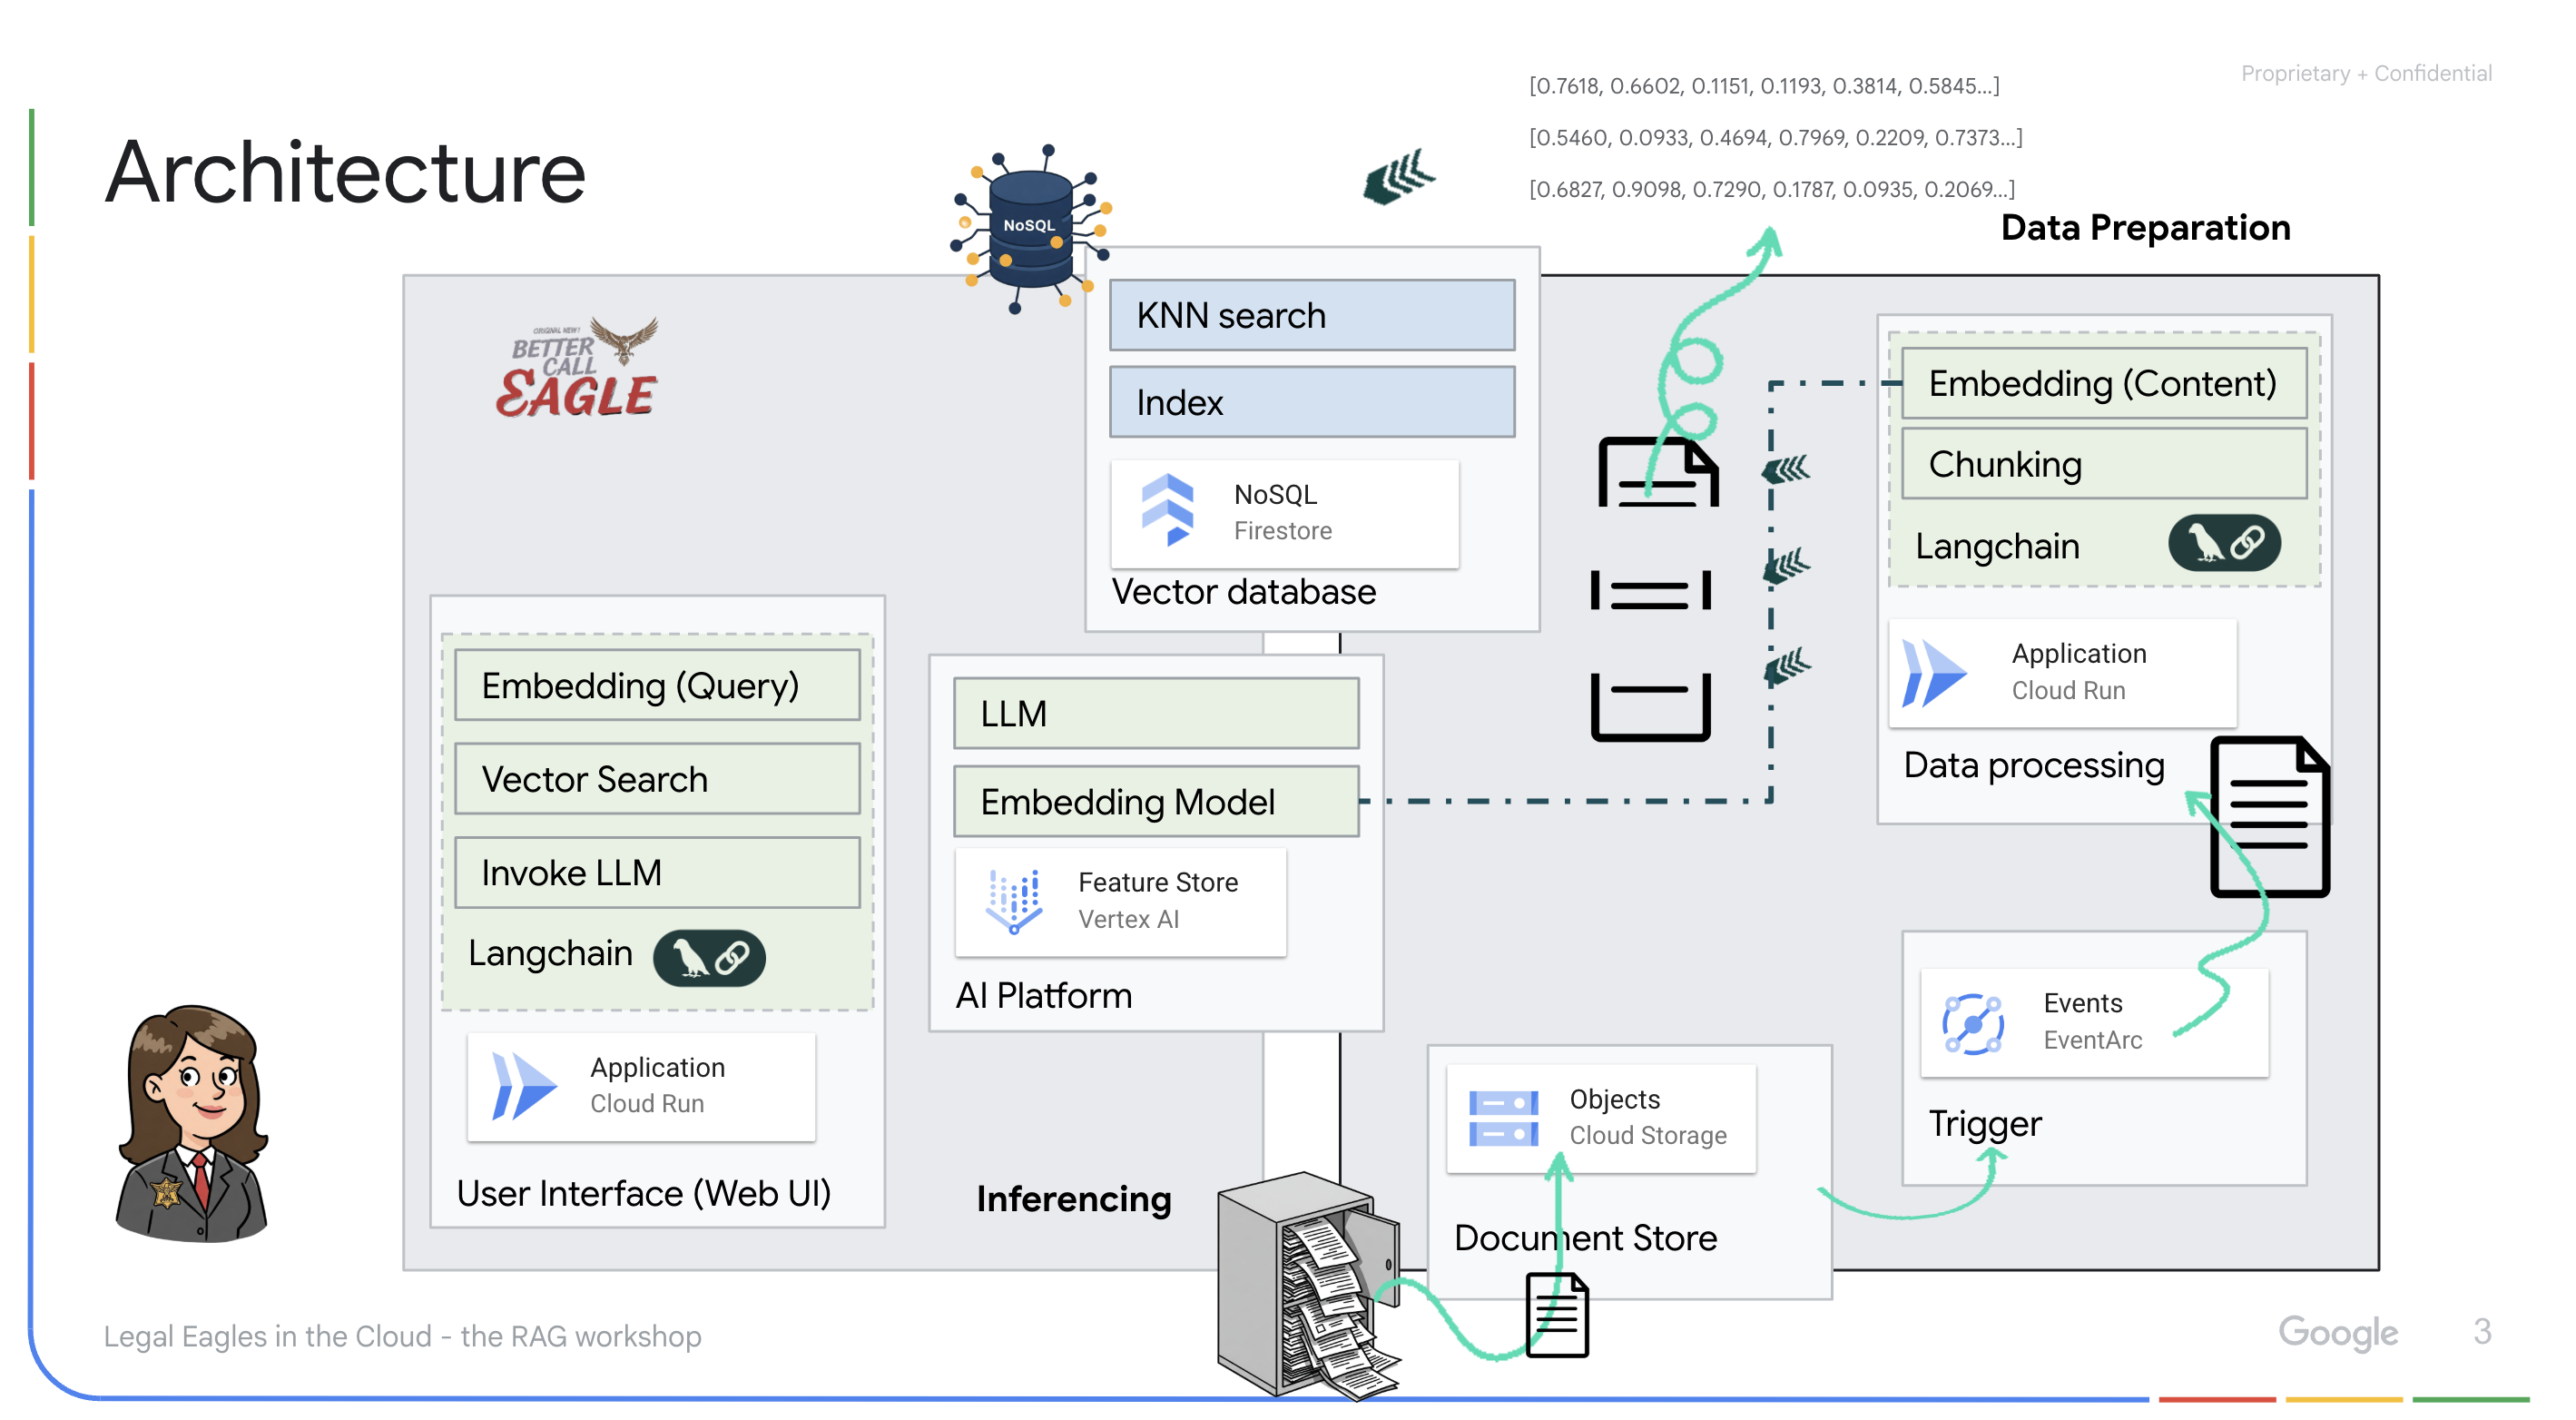
由 LLM 和 RAG 提供支持的应用:问答系统的核心是 ask_llm 函数,该函数使用 Langchain 库与 Vertex AI Gemini 大语言模型进行交互。它会根据用户的查询创建 HumanMessage,并包含一条 SystemMessage,指示 LLM 充当有用的法律助理。该系统采用检索增强生成 (RAG) 方法,即在回答查询之前,使用 search_resource 函数从 Firestore 向量存储区检索相关上下文。然后,将此上下文包含在 SystemMessage 中,以便 LLM 的回答基于所提供的法律信息。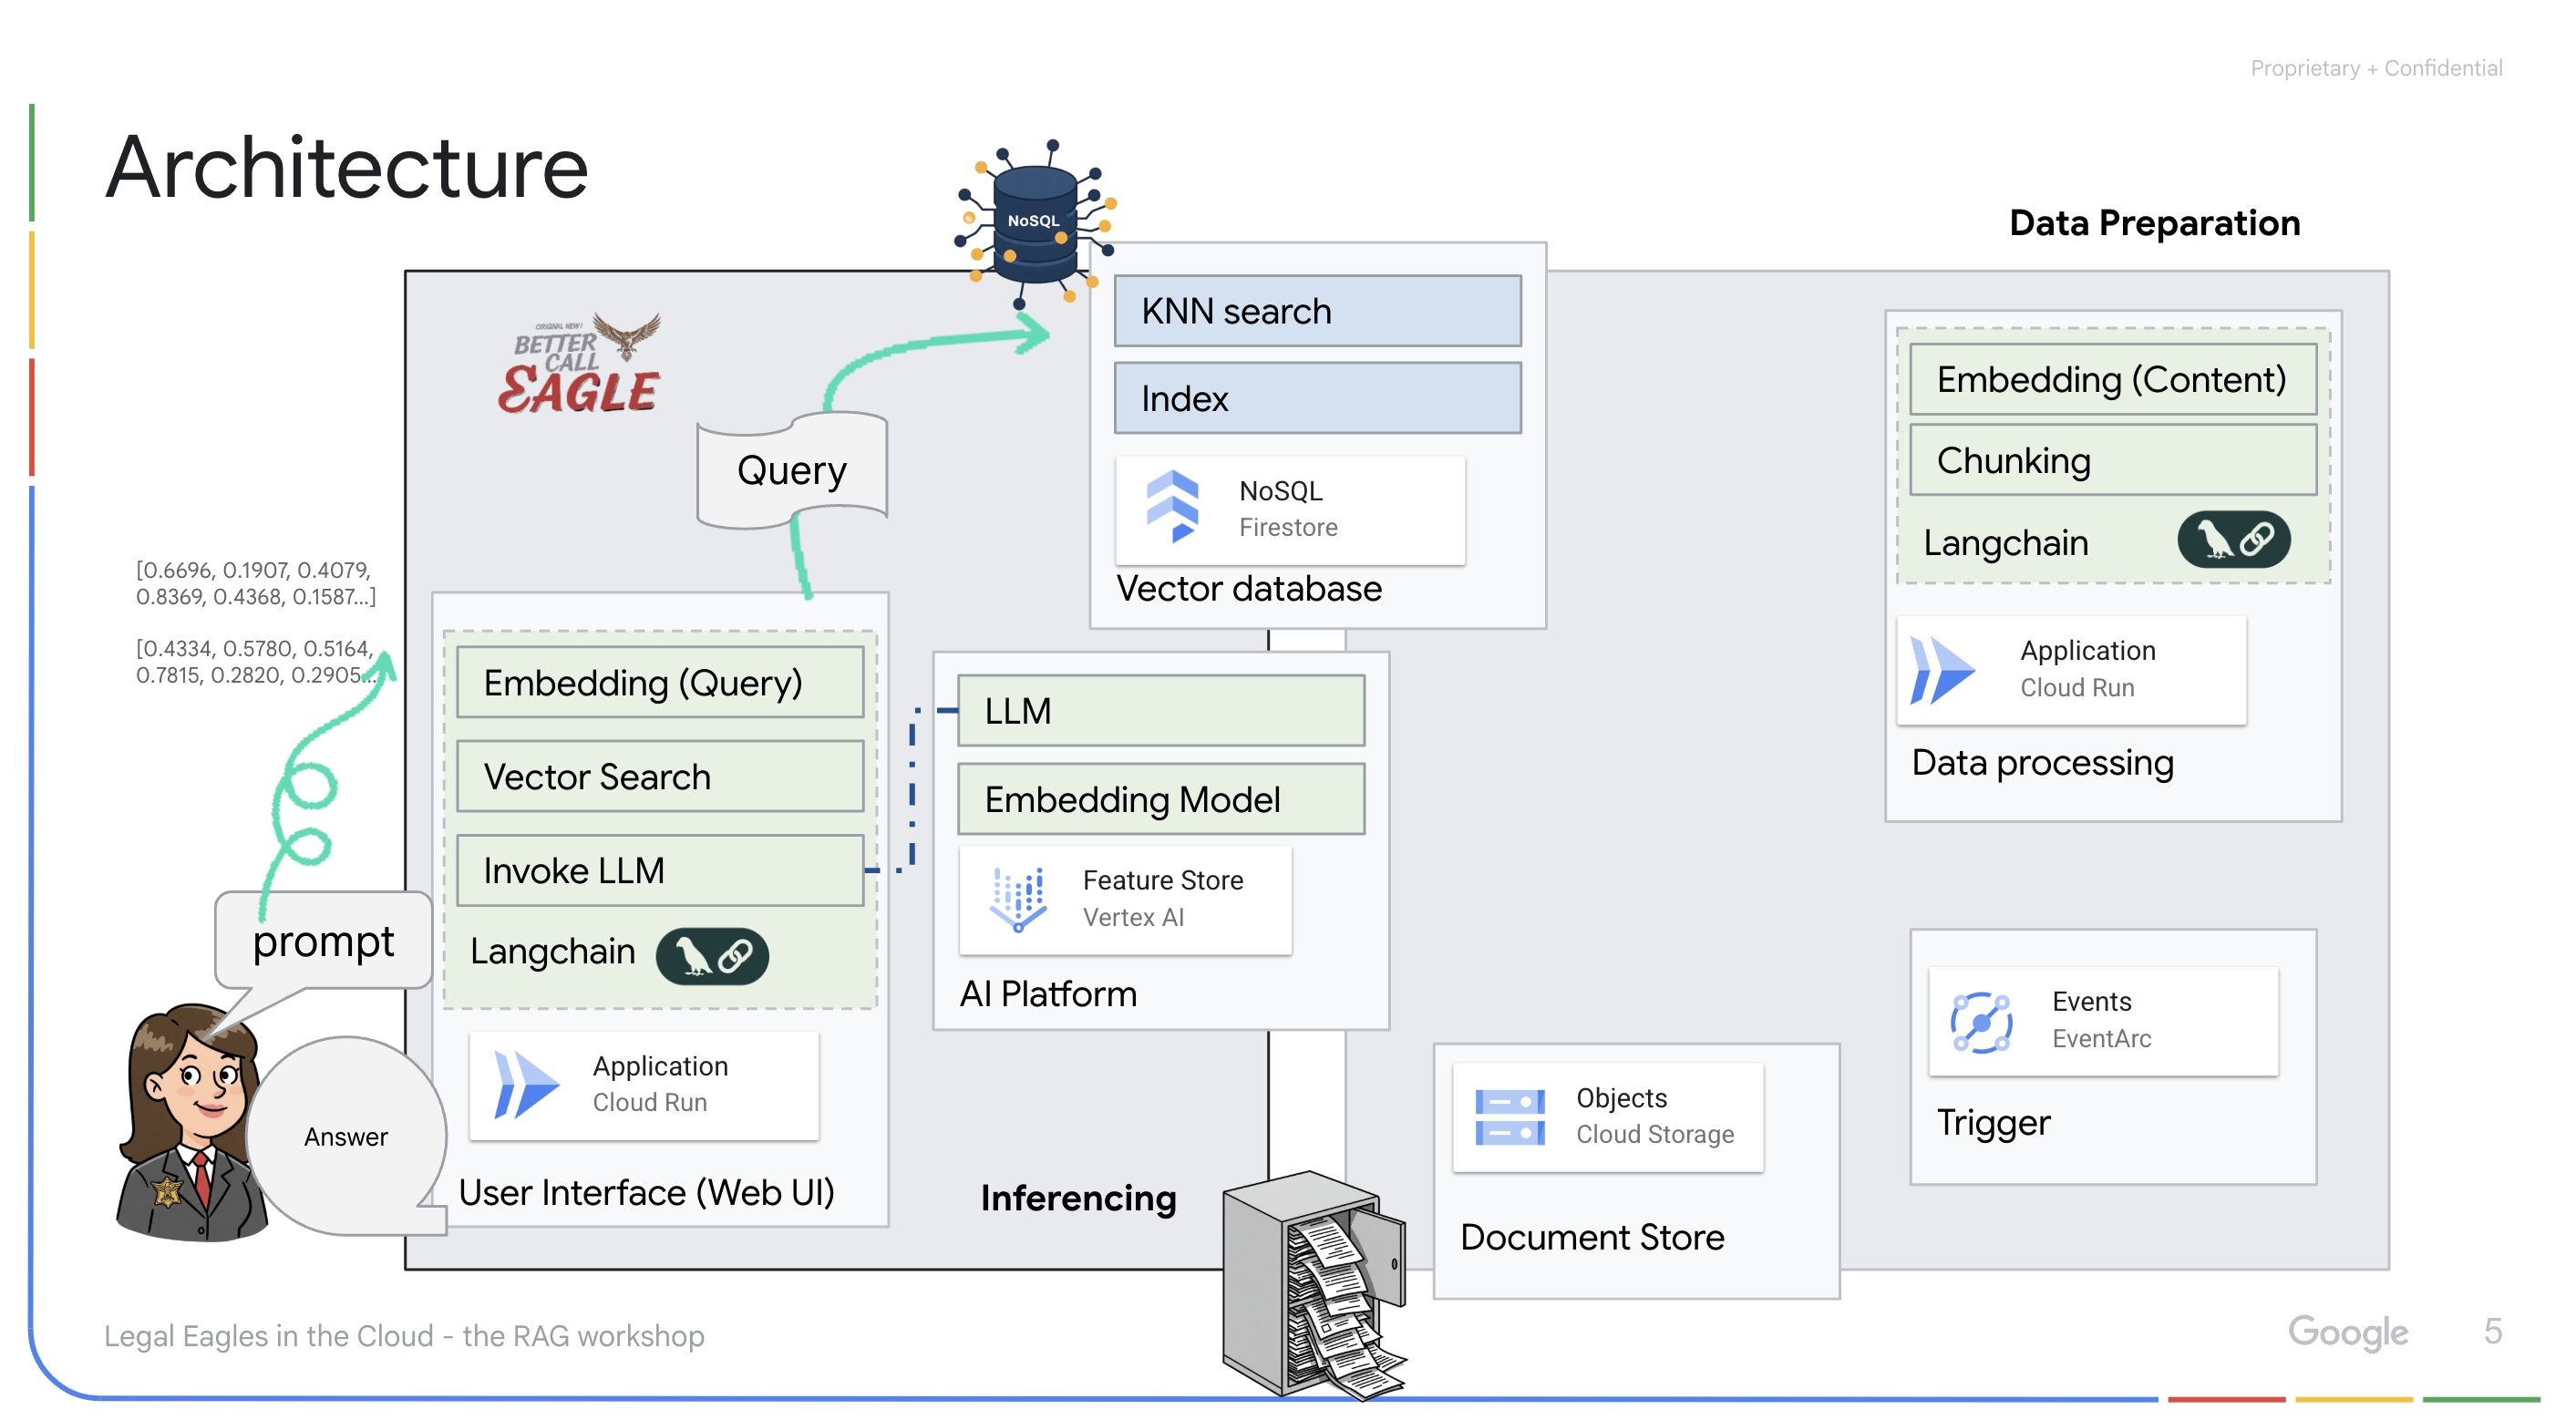
该项目旨在通过使用 RAG 来摆脱 LLM 的“创造性解读”,RAG 会先从可信的法律来源检索相关信息,然后再生成回答。这样一来,模型就能根据实际的法律信息生成更准确、更翔实的回答。该系统使用各种 Google Cloud 服务构建而成,例如 Google Cloud Shell、Vertex AI、Firestore、Cloud Run 和 Eventarc。
3. 准备工作
在 Google Cloud 控制台的项目选择器页面上,选择或创建一个 Google Cloud 项目。确保您的 Cloud 项目已启用结算功能。了解如何检查项目是否已启用结算功能。
在 Cloud Shell IDE 中启用 Gemini Code Assist
👉 在 Google Cloud 控制台中,前往 Gemini Code Assist 工具,同意相关条款及条件,即可免费启用 Gemini Code Assist。
忽略权限设置,离开此页面。
在 Cloud Shell 编辑器中工作
👉 点击 Google Cloud 控制台顶部的“激活 Cloud Shell”(这是 Cloud Shell 窗格顶部的终端形状图标)
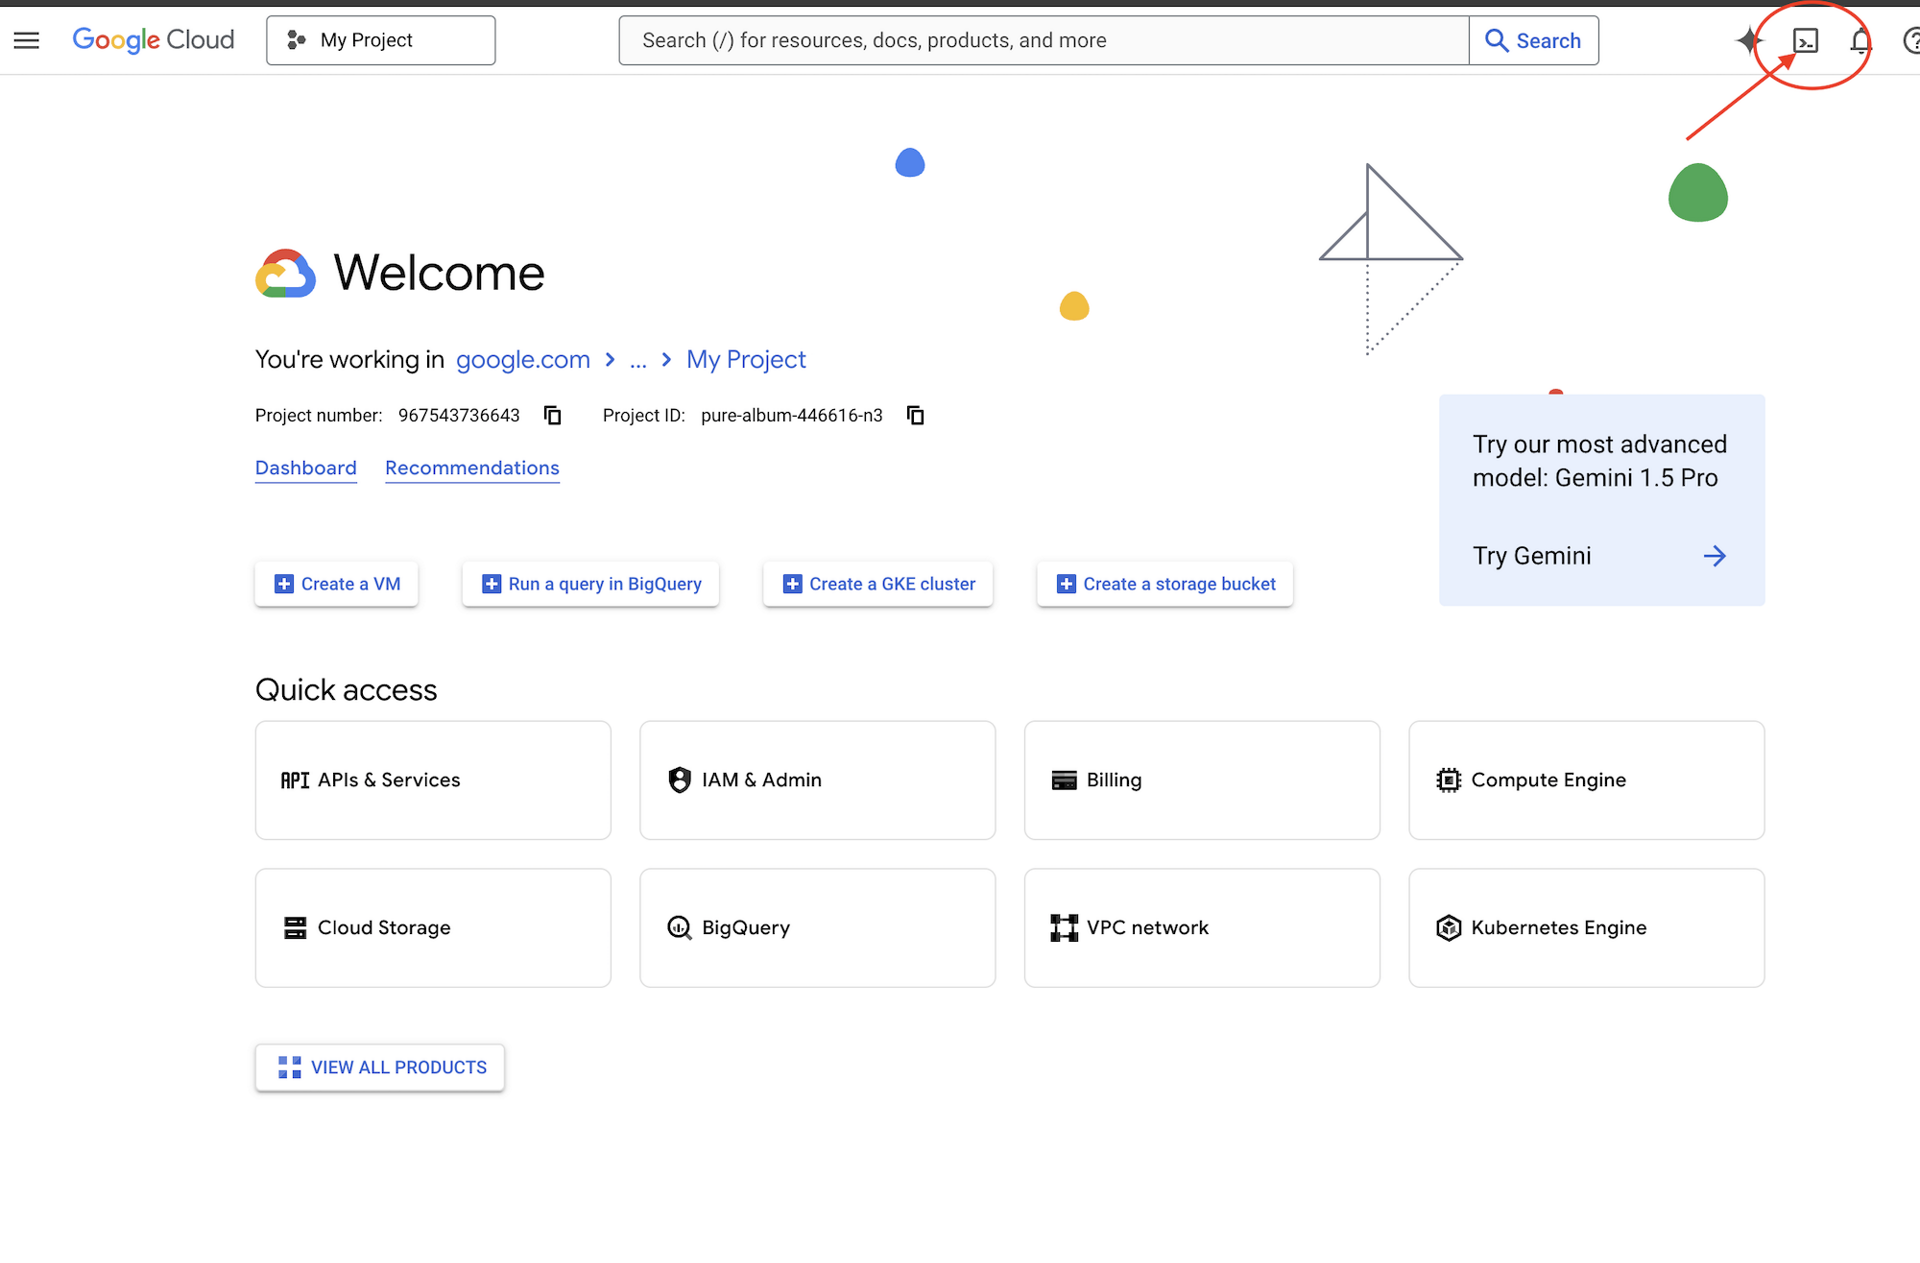
👉 点击“打开编辑器”按钮(看起来像一个打开的文件夹,上面有一支铅笔)。此操作会在窗口中打开 Cloud Shell 编辑器。您会在左侧看到文件资源管理器。

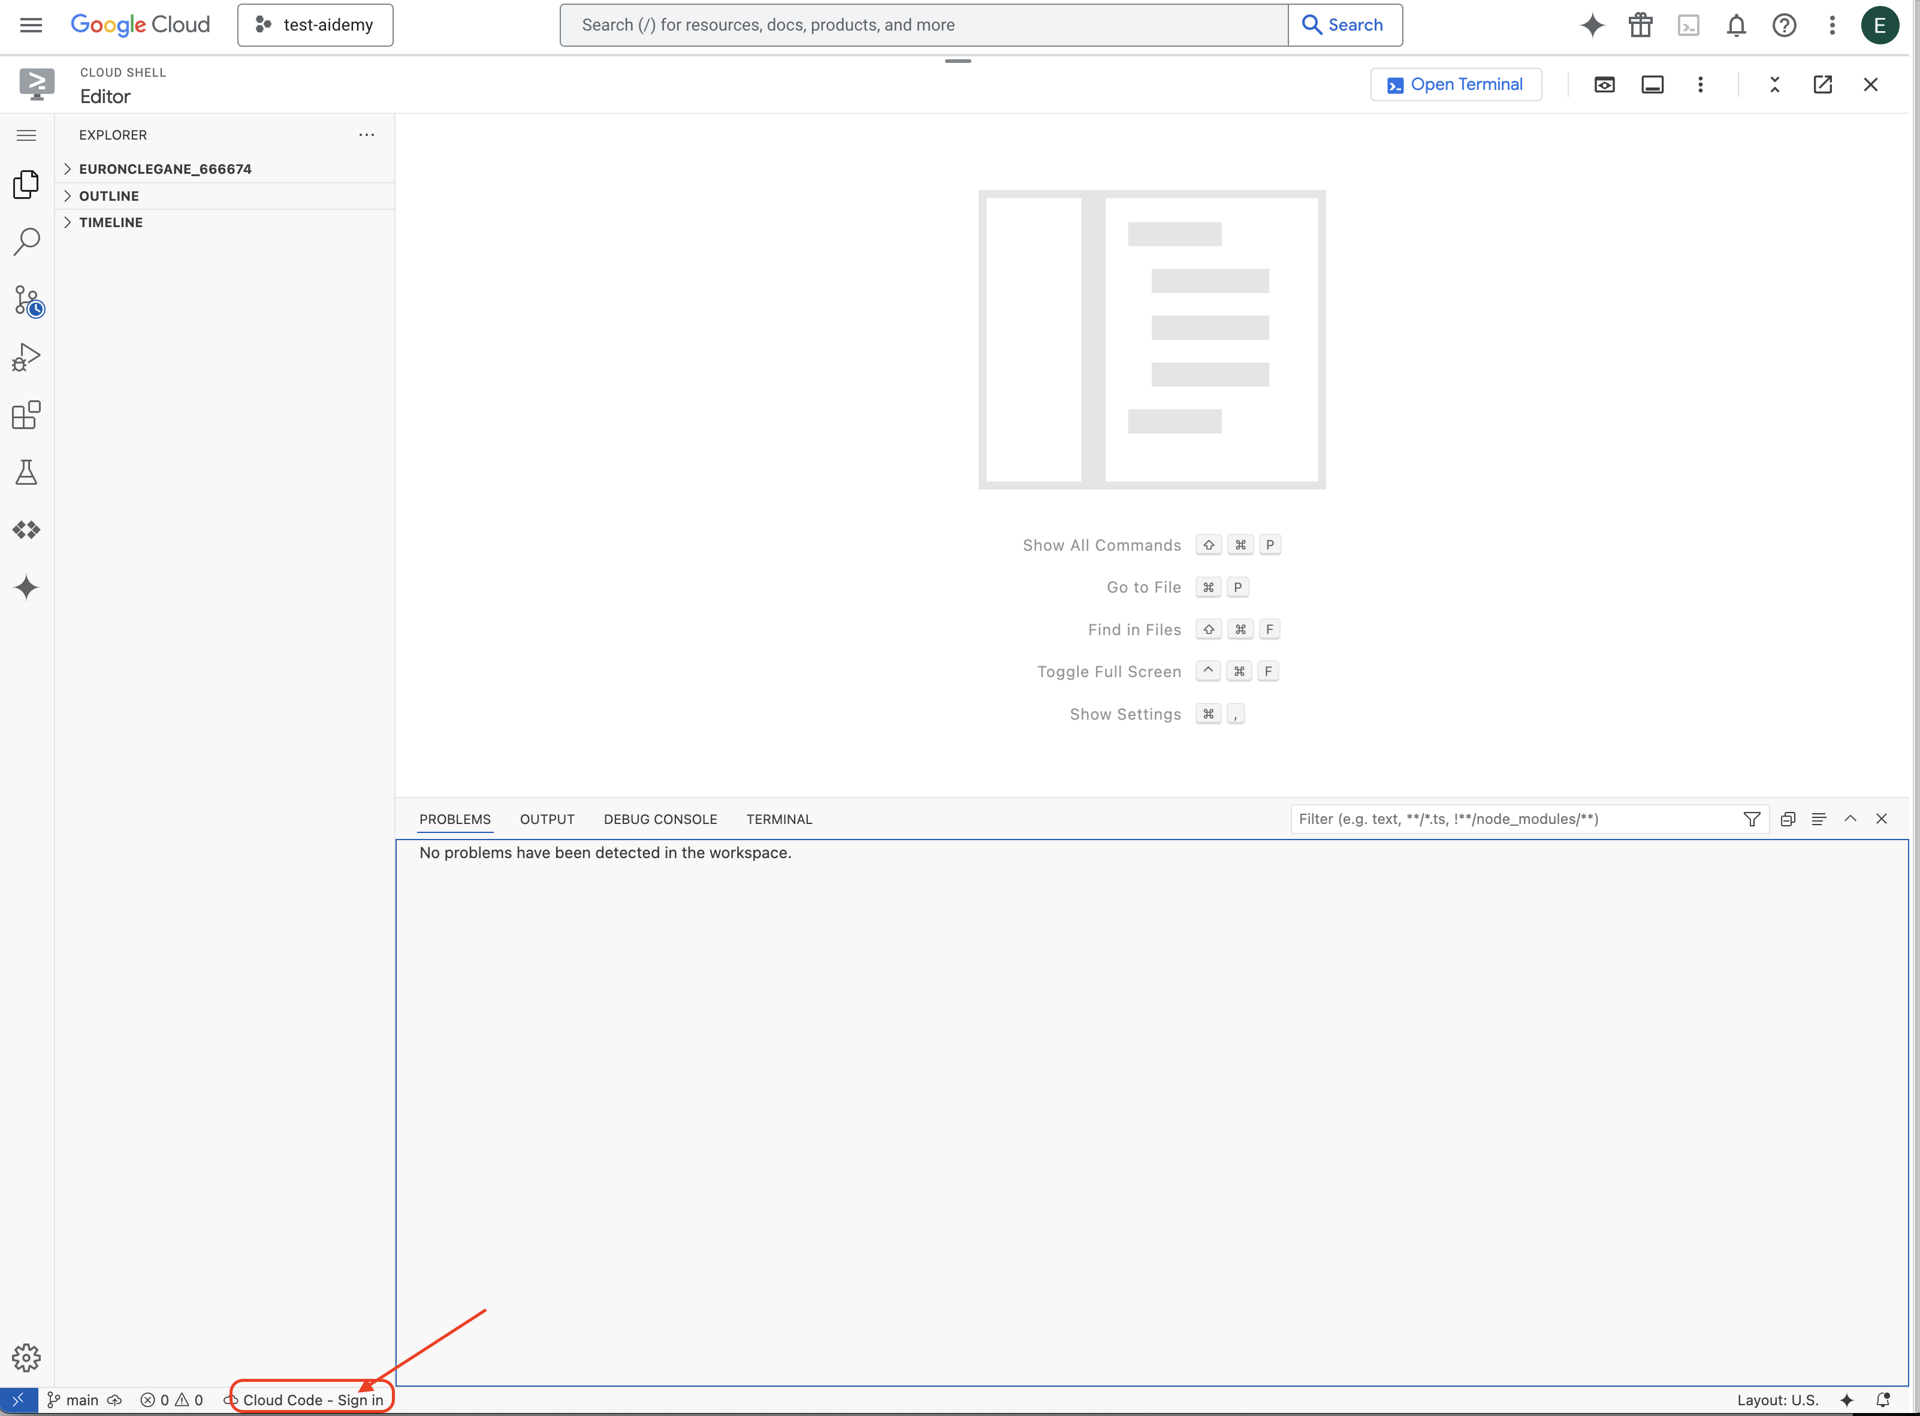
👉 如图所示,点击底部状态栏中的 Cloud Code 登录按钮。按照说明对插件进行授权。如果您在状态栏中看到 Cloud Code - no project,请选择该选项,然后在下拉菜单中选择“选择 Google Cloud 项目”,然后从项目列表中选择您打算使用的 Google Cloud 项目。
👉 在云 IDE 中打开终端,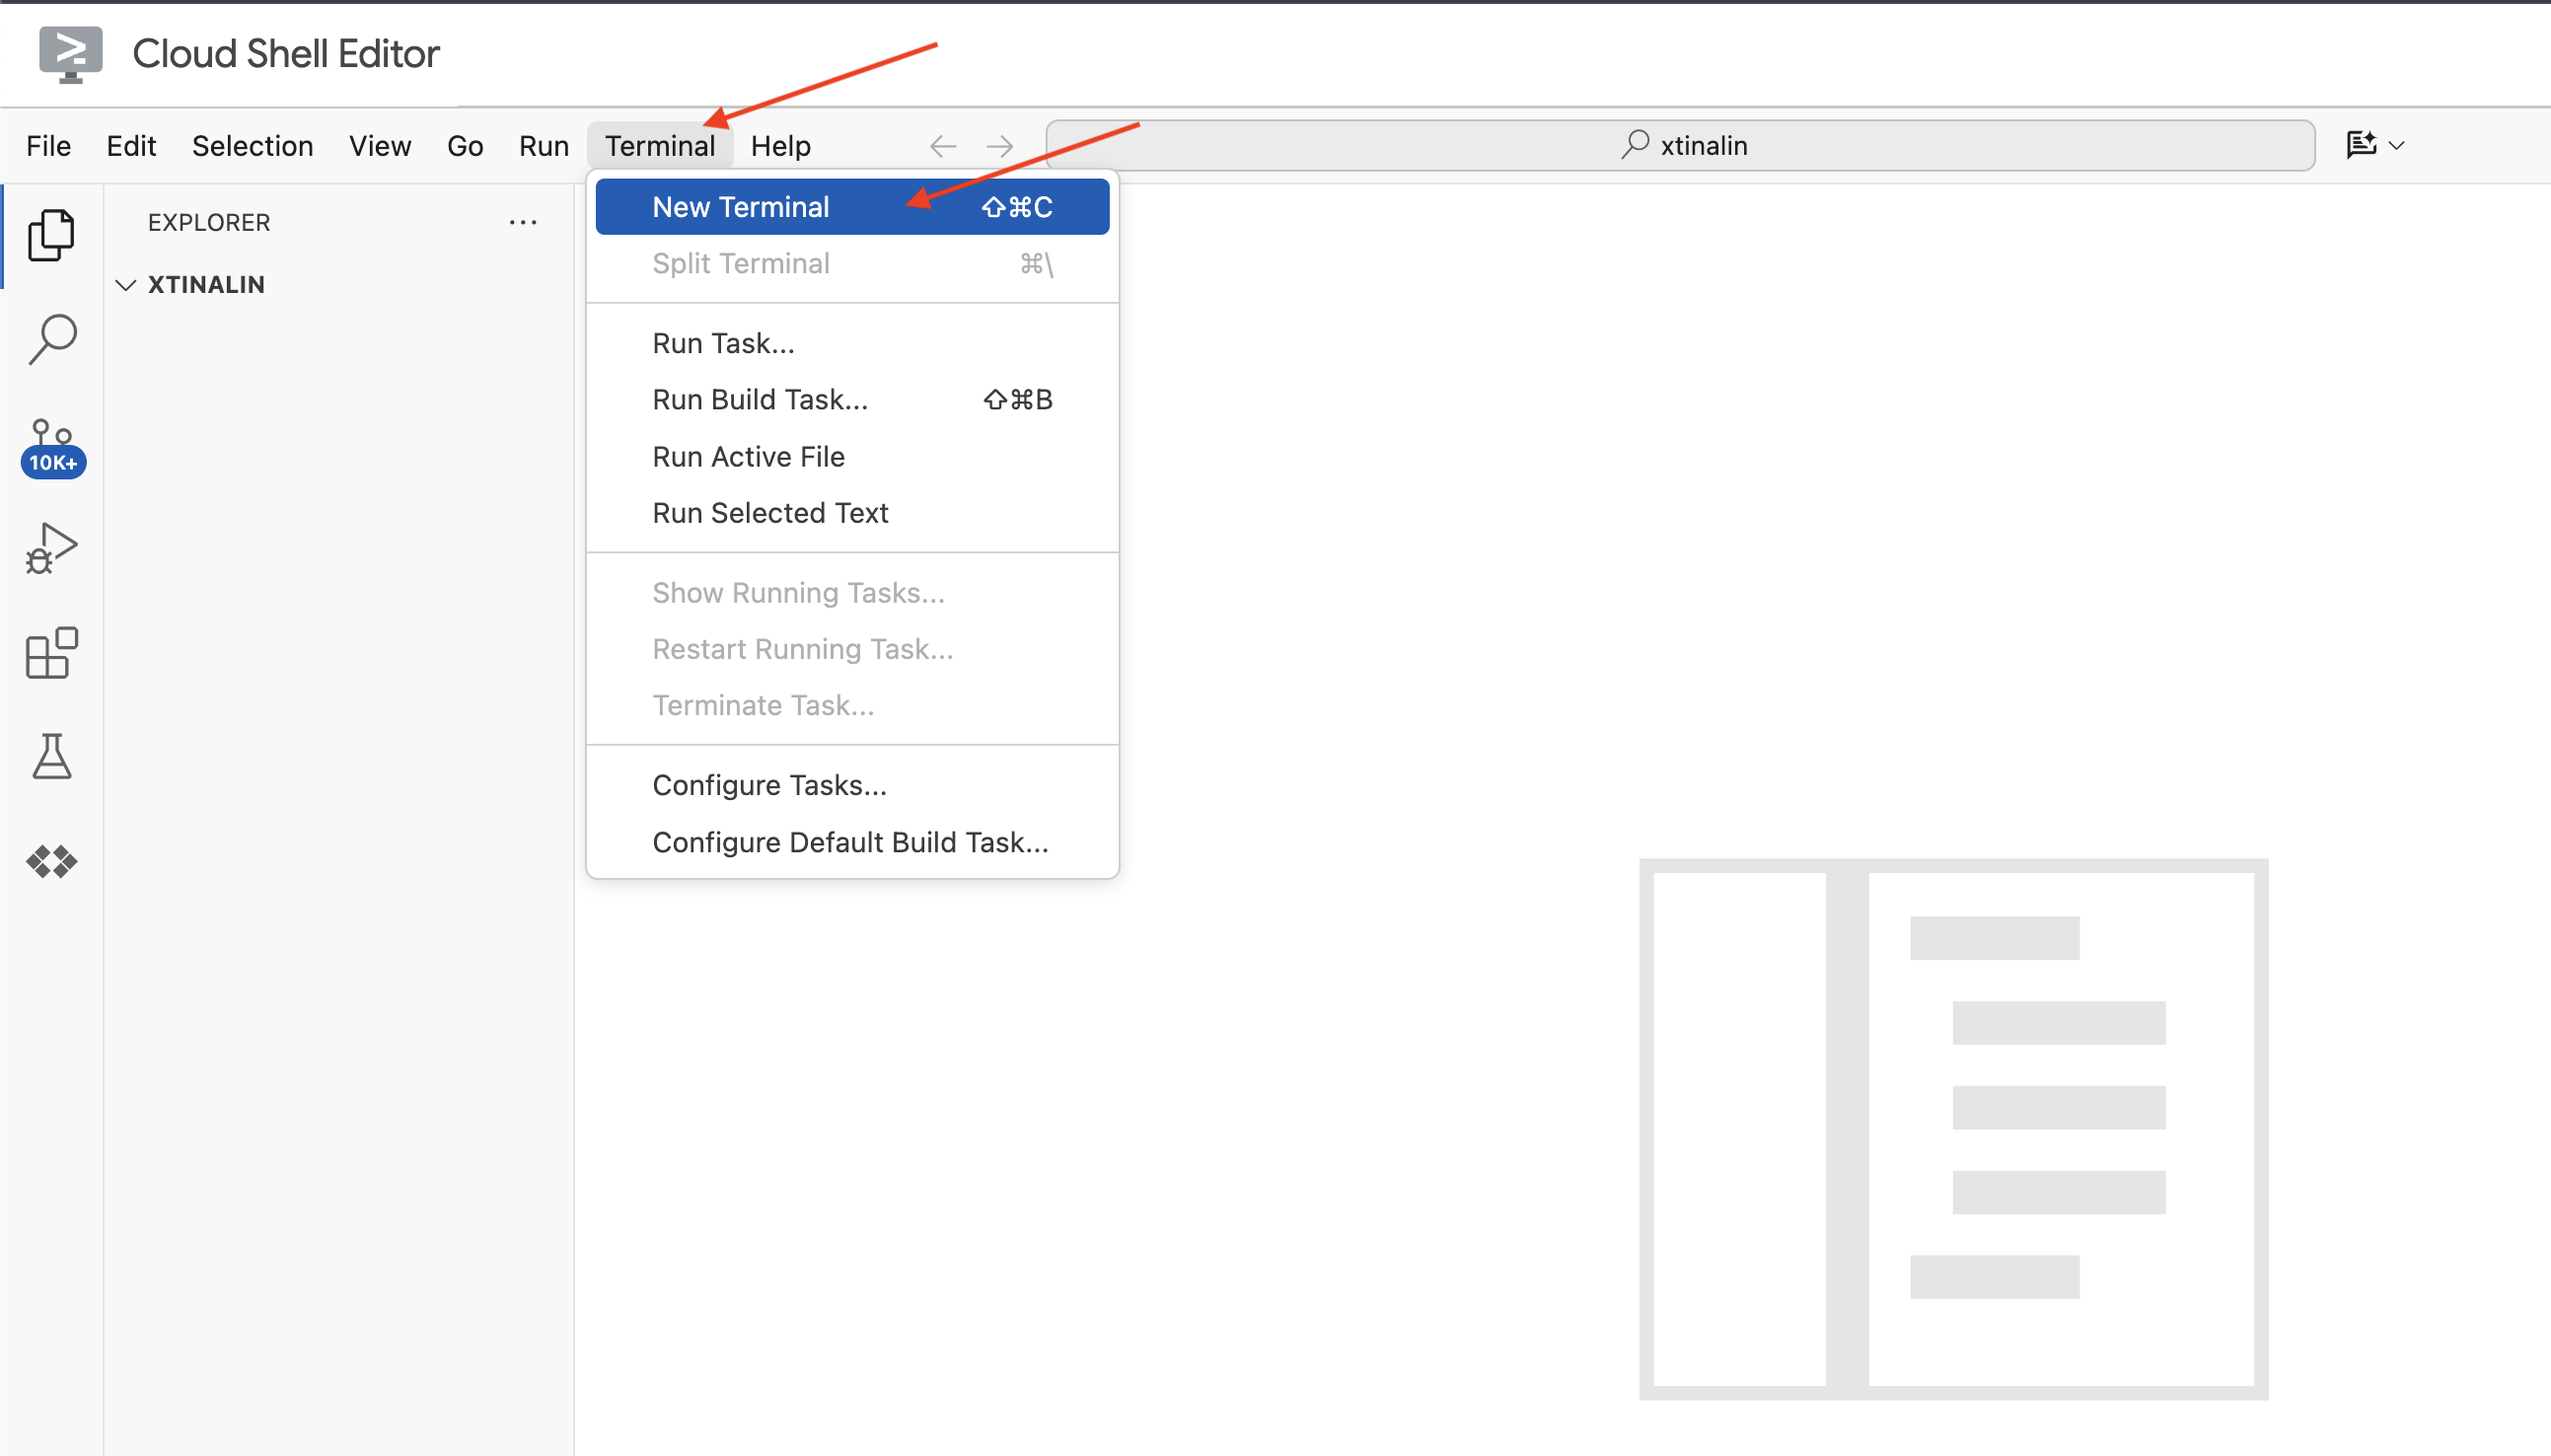
👉 在新终端中,使用以下命令验证您是否已通过身份验证,以及项目是否已设置为您的项目 ID:
gcloud auth list
👉 点击 Google Cloud 控制台顶部的激活 Cloud Shell。
gcloud config set project <YOUR_PROJECT_ID>
👉 运行以下命令以启用必要的 Google Cloud API:
gcloud services enable storage.googleapis.com  \
                        run.googleapis.com  \
                        artifactregistry.googleapis.com  \
                        aiplatform.googleapis.com \
                        eventarc.googleapis.com \
                        cloudresourcemanager.googleapis.com \
                        firestore.googleapis.com \
                        cloudaicompanion.googleapis.com
在 Cloud Shell 工具栏(位于 Cloud Shell 窗格顶部)中,点击“打开编辑器”按钮(看起来像一个带有铅笔的打开的文件夹)。此操作会在窗口中打开 Cloud Shell 代码编辑器。您会在左侧看到文件资源管理器。
👉 在终端中下载 Bootstrap 框架项目:
git clone https://github.com/weimeilin79/legal-eagle.git
可选:西班牙语版本
👉 Existe una versión alternativa en español. Utilice la siguiente instrucción para clonar la versión correcta.
git clone -b spanish https://github.com/weimeilin79/legal-eagle.git
在 Cloud Shell 终端中运行此命令后,系统会在 Cloud Shell 环境中创建一个名为 legal-eagle 的新文件夹。
4. 使用 Gemini Code Assist 编写推理应用
在本部分中,我们将重点构建法律助理的核心部分,即接收用户问题并与 AI 模型互动以生成答案的 Web 应用。我们将利用 Gemini Code Assist 帮助我们编写此推理部分的 Python 代码。
首先,我们将创建一个使用 LangChain 库直接与 Vertex AI Gemini 模型通信的 Flask 应用。此初始版本将基于模型的通用知识充当有用的法律助理,但尚无法访问我们的特定法院诉讼文件。这样,我们就可以在稍后使用 RAG 增强大语言模型之前,先了解大语言模型的基准性能。
在 Cloud Code 编辑器的“探索器”窗格(通常位于左侧)中,您现在应该会看到克隆 Git 代码库时创建的文件夹 legal-eagle。在探索器中打开项目的根文件夹。您会在其中看到一个 webapp 子文件夹,也请打开该文件夹。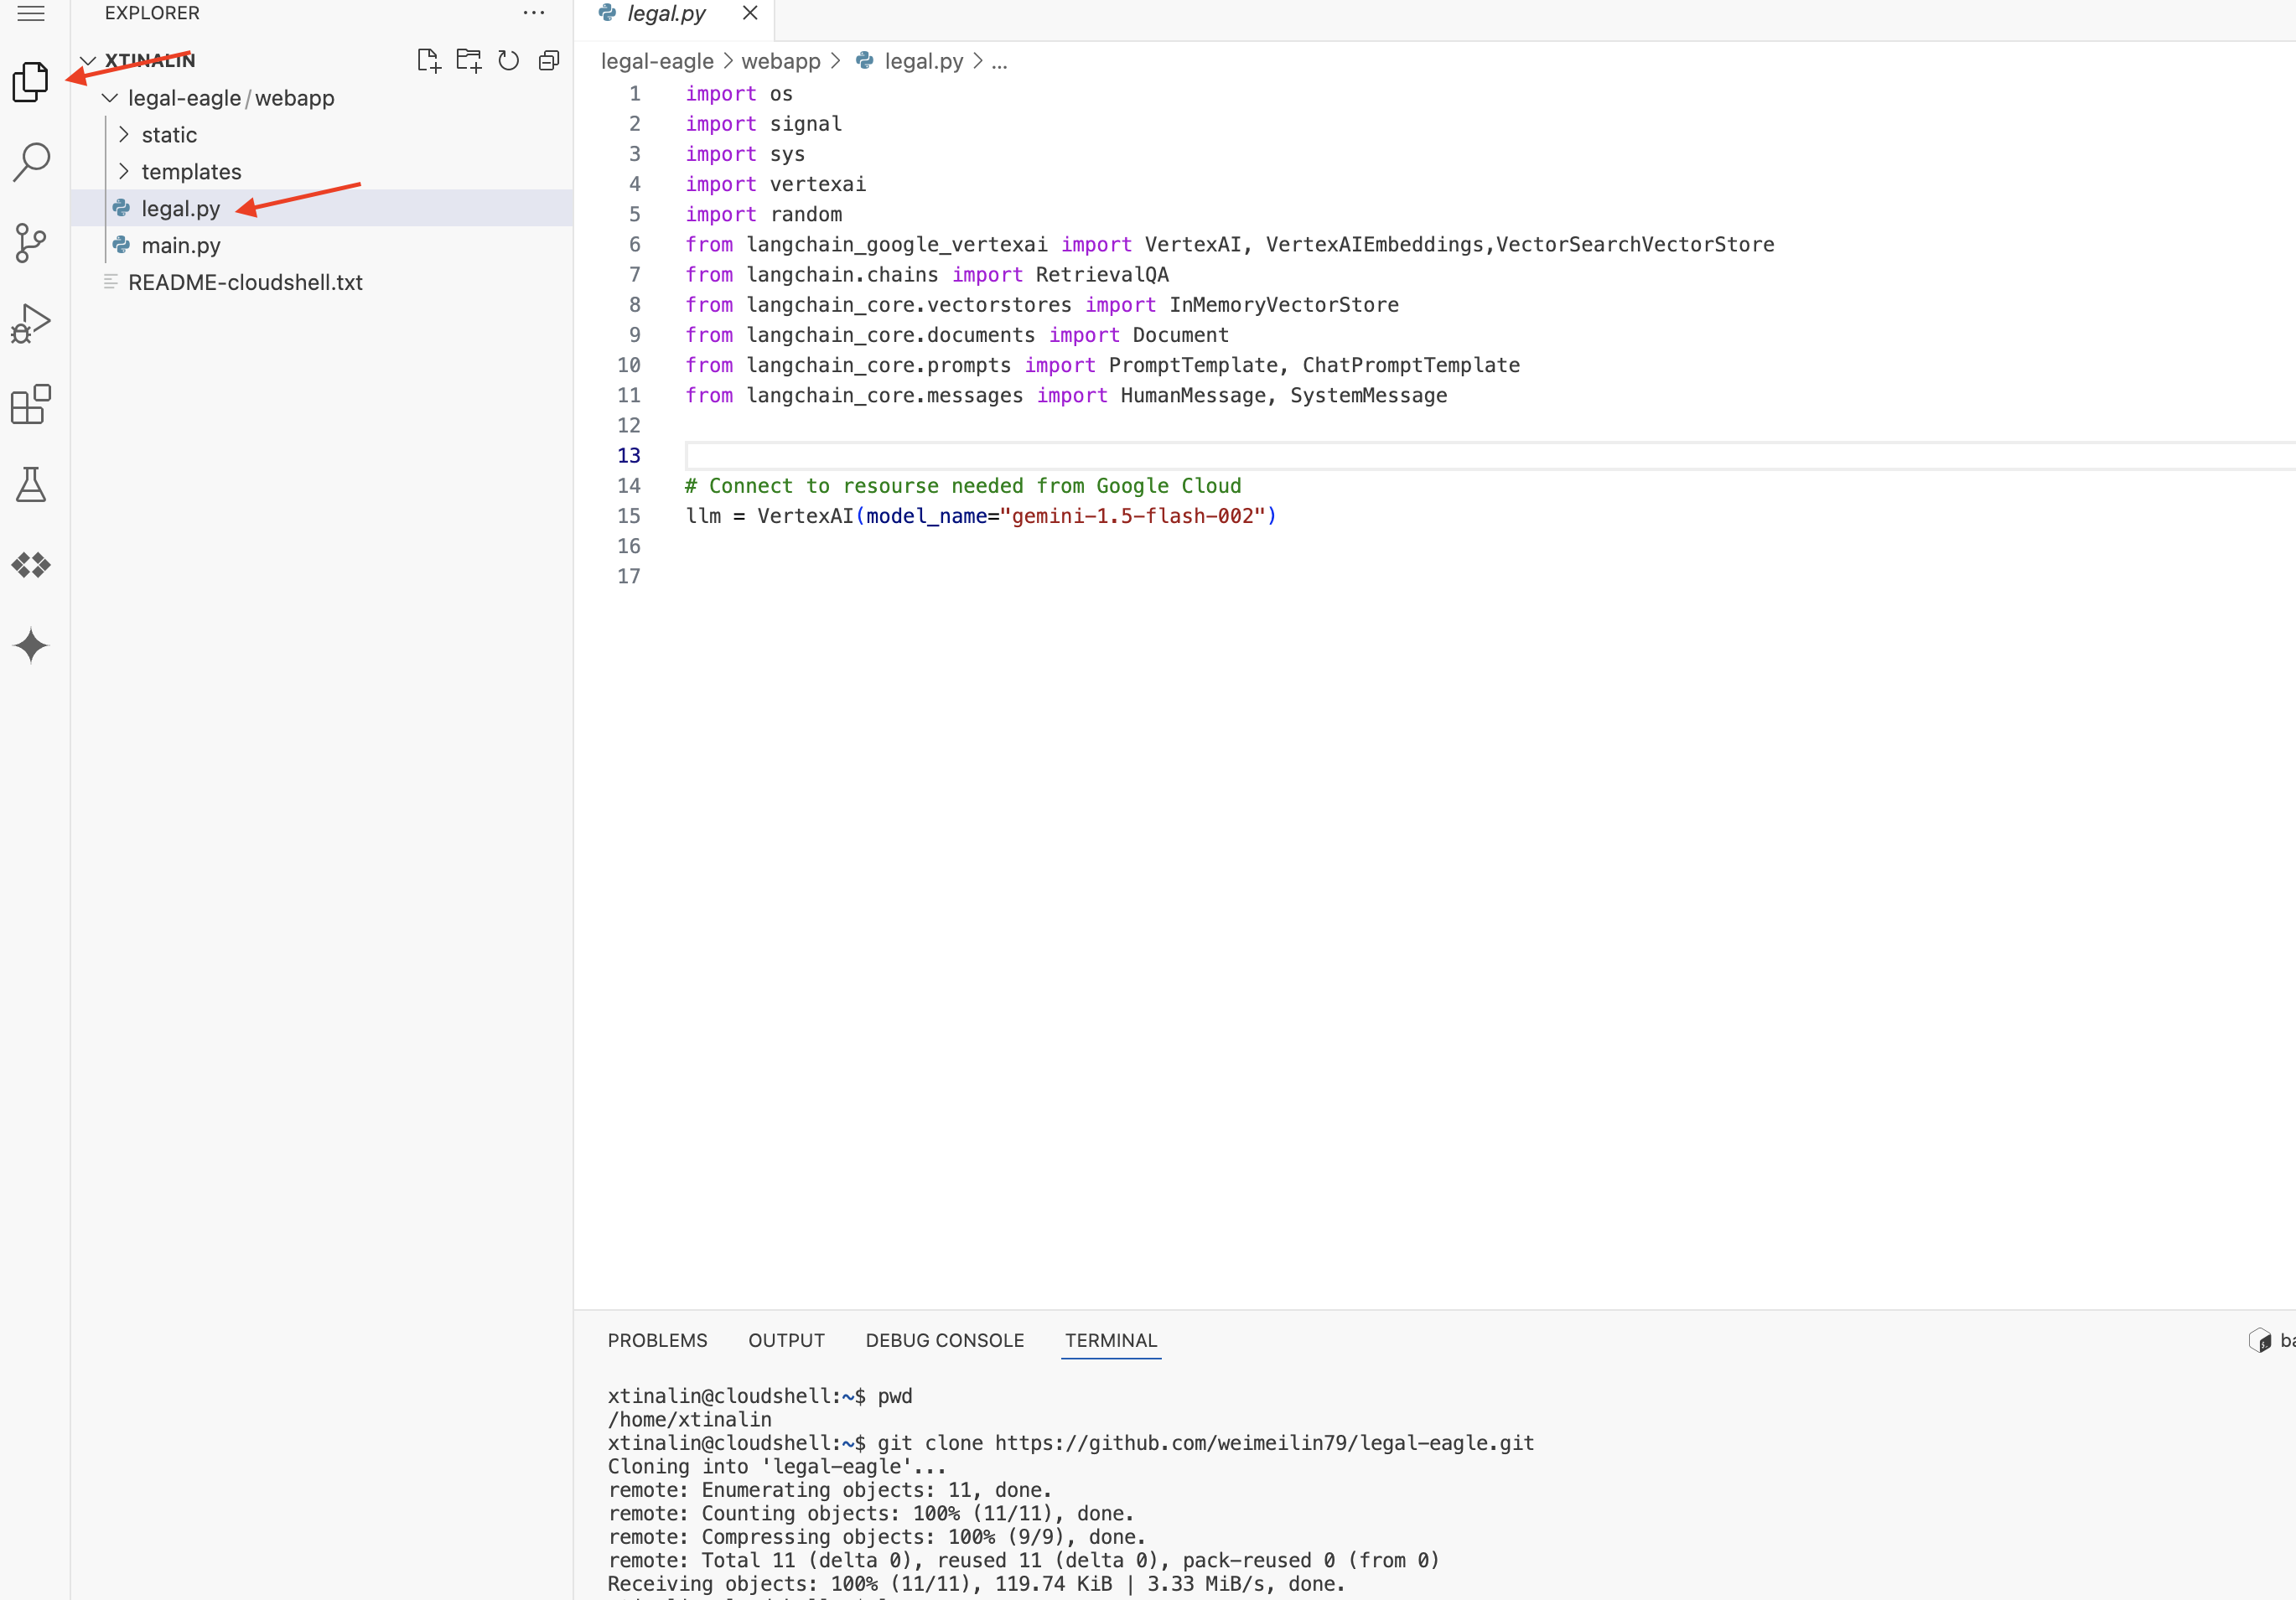
👉 在 Cloud Code 编辑器中修改 legal.py 文件时,您可以使用不同的方法提示 Gemini Code Assist。
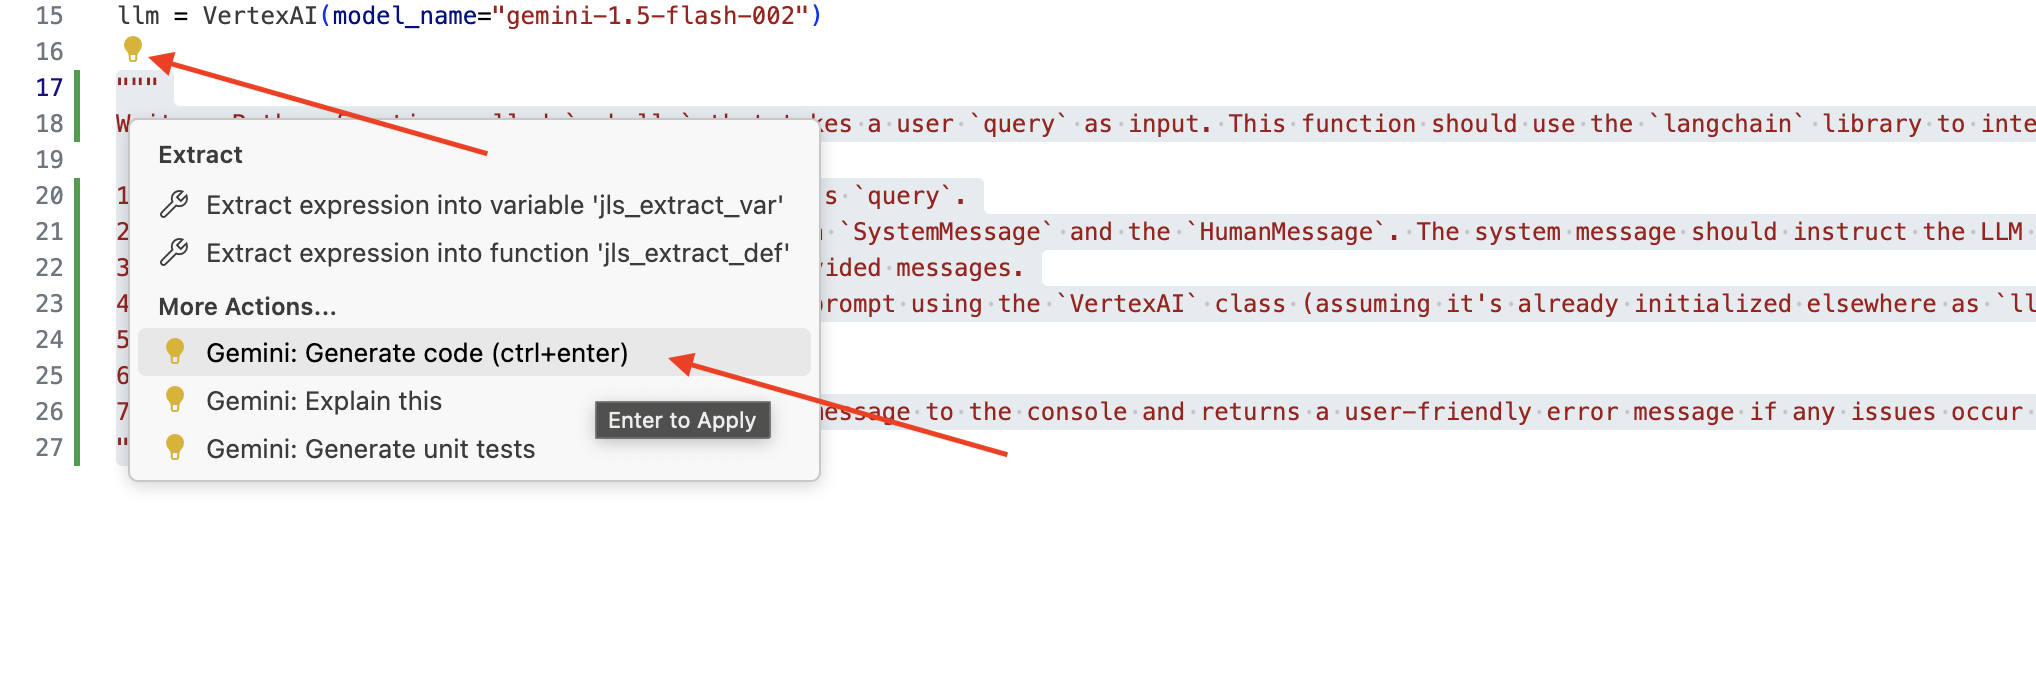
👉 将以下提示复制到 legal.py 的底部,清楚地描述您希望 Gemini Code Assist 生成的内容,点击显示的灯泡 💡 图标,然后选择 Gemini: Generate Code(确切的菜单项可能会因 Cloud Code 版本而略有不同)。
"""
Write a Python function called `ask_llm` that takes a user `query` as input. This function should use the `langchain` library to interact with a Vertex AI Gemini Large Language Model.  Specifically, it should:
1.  Create a `HumanMessage` object from the user's `query`.
2.  Create a `ChatPromptTemplate` that includes a `SystemMessage` and the `HumanMessage`. The system message should instruct the LLM to act as a helpful assistant in a courtroom setting, aiding an attorney by providing necessary information. It should also specify that the LLM should respond in a high-energy tone, using no more than 100 words, and offer a humorous apology if it doesn't know the answer.
3.  Format the `ChatPromptTemplate` with the provided messages.
4.  Invoke the Vertex AI LLM with the formatted prompt using the `VertexAI` class (assuming it's already initialized elsewhere as `llm`).
5.  Print the LLM's `response`.
6.  Return the `response`.
7.  Include error handling that prints an error message to the console and returns a user-friendly error message if any issues occur during the process.  The Vertex AI model should be "gemini-2.0-flash".
"""
仔细检查生成的代码
- 它是否大致遵循了您在评论中概述的步骤?
- 它是否会创建包含
SystemMessage和HumanMessage的ChatPromptTemplate? - 是否包含基本错误处理 (
try...except)?
如果生成的代码良好且基本正确,您可以接受它(按 Tab 键或 Enter 键接受内嵌建议,或点击“接受”接受较大的代码块)。
如果您生成的代码不完全符合您的需求或存在错误,请不要担心!Gemini Code Assist 是一款辅助工具,而不是能让您在首次尝试时就编写出完美代码的工具。
修改生成的代码以对其进行优化、修正错误并更好地满足您的要求。您可以在 Code Assist 聊天面板中添加更多注释或提出具体问题,进一步提示 Gemini Code Assist。
如果您仍不熟悉该 SDK,可以参考以下有效示例。
👉 复制并粘贴以下代码,然后将其替换到您的 legal.py 中:
import os
import signal
import sys
import vertexai
import random
from langchain_google_vertexai import VertexAI
from langchain_core.prompts import PromptTemplate, ChatPromptTemplate
from langchain_core.messages import HumanMessage, SystemMessage
# Connect to resourse needed from Google Cloud
llm = VertexAI(model_name="gemini-2.0-flash")
def ask_llm(query):
    try:
        query_message = {
            "type": "text",
            "text": query,
        }

        input_msg = HumanMessage(content=[query_message])
        prompt_template = ChatPromptTemplate.from_messages(
            [
                SystemMessage(
                    content=(
                        "You are a helpful assistant, and you are with the attorney in a courtroom, you are helping him to win the case by providing the information he needs "
                        "Don't answer if you don't know the answer, just say sorry in a funny way possible"
                        "Use high engergy tone, don't use more than 100 words to answer"
                       # f"Here is some past conversation history between you and the user {relevant_history}"
                       # f"Here is some context that is relevant to the question {relevant_resource} that you might use"
                    )
                ),
                input_msg,
            ]
        )
        prompt = prompt_template.format()
        response = llm.invoke(prompt)
        print(f"response: {response}")
        return response
    except Exception as e:
        print(f"Error sending message to chatbot: {e}") # Log this error too!
        return f"Unable to process your request at this time. Due to the following reason: {str(e)}"
👉 可选:西班牙语版本
Sustituye el siguiente texto como se indica: You are a helpful assistant, to You are a helpful assistant that speaks Spanish,
接下来,创建一个函数来处理将响应用户问题的路由。
在 Cloud Shell Editor 中打开 main.py。与您在 legal.py 中生成 ask_llm 的方式类似,使用 Gemini Code Assist 生成 Flask 路由和 ask_question 函数。在 main.py 中以注释的形式输入以下提示:(请确保在您于 if __name__ == "__main__": 启动 Flask 应用之前添加此提示)
.....
@app.route('/',methods=['GET'])
def index():
    return render_template('index.html')


"""
PROMPT:
Create a Flask endpoint that accepts POST requests at the '/ask' route.
The request should contain a JSON payload with a 'question' field. Extract the question from the JSON payload.
Call a function named ask_llm (located in a file named legal.py) with the extracted question as an argument.
Return the result of the ask_llm function as the response with a 200 status code.
If any error occurs during the process, return a 500 status code with the error message.
"""

# Add this block to start the Flask app when running locally
if __name__ == "__main__":
.....
仅当生成的代码良好且基本正确时才接受。如果您不熟悉 Python,请将此有效示例复制并粘贴到 main.py 中已有的代码下方。
👉 请确保您在 Web 应用启动之前粘贴了以下代码(如果名称为“main”:)
@app.route('/ask', methods=['POST'])
def ask_question():
    data = request.get_json()
    question = data.get('question')
    try:
        # call the ask_llm in legal.py
        answer_markdown = legal.ask_llm(question)

        print(f"answer_markdown: {answer_markdown}")
        # Return the Markdown as the response
        return answer_markdown, 200
    except Exception as e:
        return f"Error: {str(e)}", 500  # Handle errors appropriately
按照这些步骤操作后,您应该能够成功启用 Gemini Code Assist、设置项目,并使用它在 main.py 文件中生成 ask 函数。
5. 在 Cloud 编辑器中进行本地测试
👉 在编辑器的终端中,安装依赖库并在本地启动 Web 界面。
cd ~/legal-eagle/webapp
python -m venv env
source env/bin/activate
export PROJECT_ID=$(gcloud config get project)
pip install -r requirements.txt
python main.py
在 Cloud Shell 终端输出中查找启动消息。Flask 通常会打印消息,指明它正在运行以及运行在哪个端口上。
- Running on http://127.0.0.1:8080
应用需要保持运行状态才能处理请求。
👉 从“网页预览”菜单中选择在端口 8080 上预览。Cloud Shell 将打开一个新的浏览器标签页或窗口,其中包含应用的 Web 预览。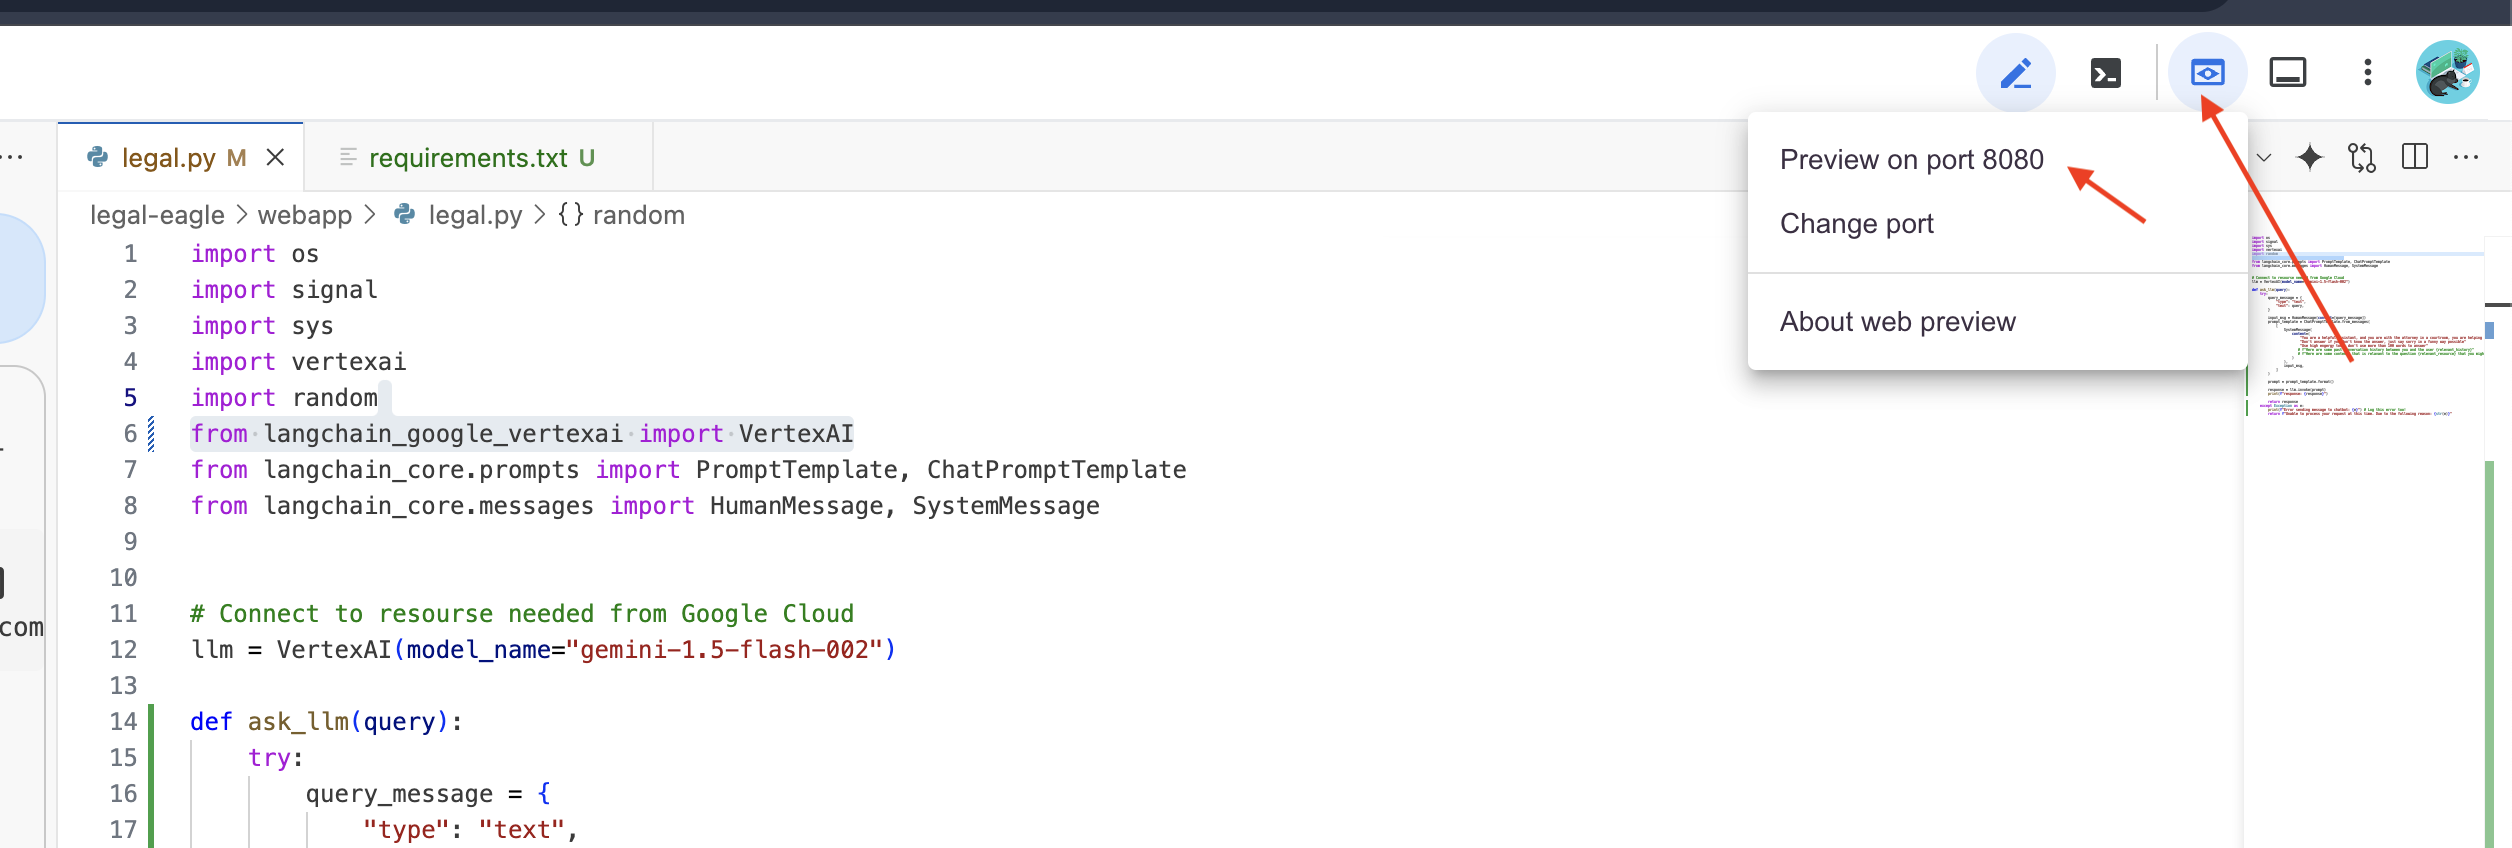
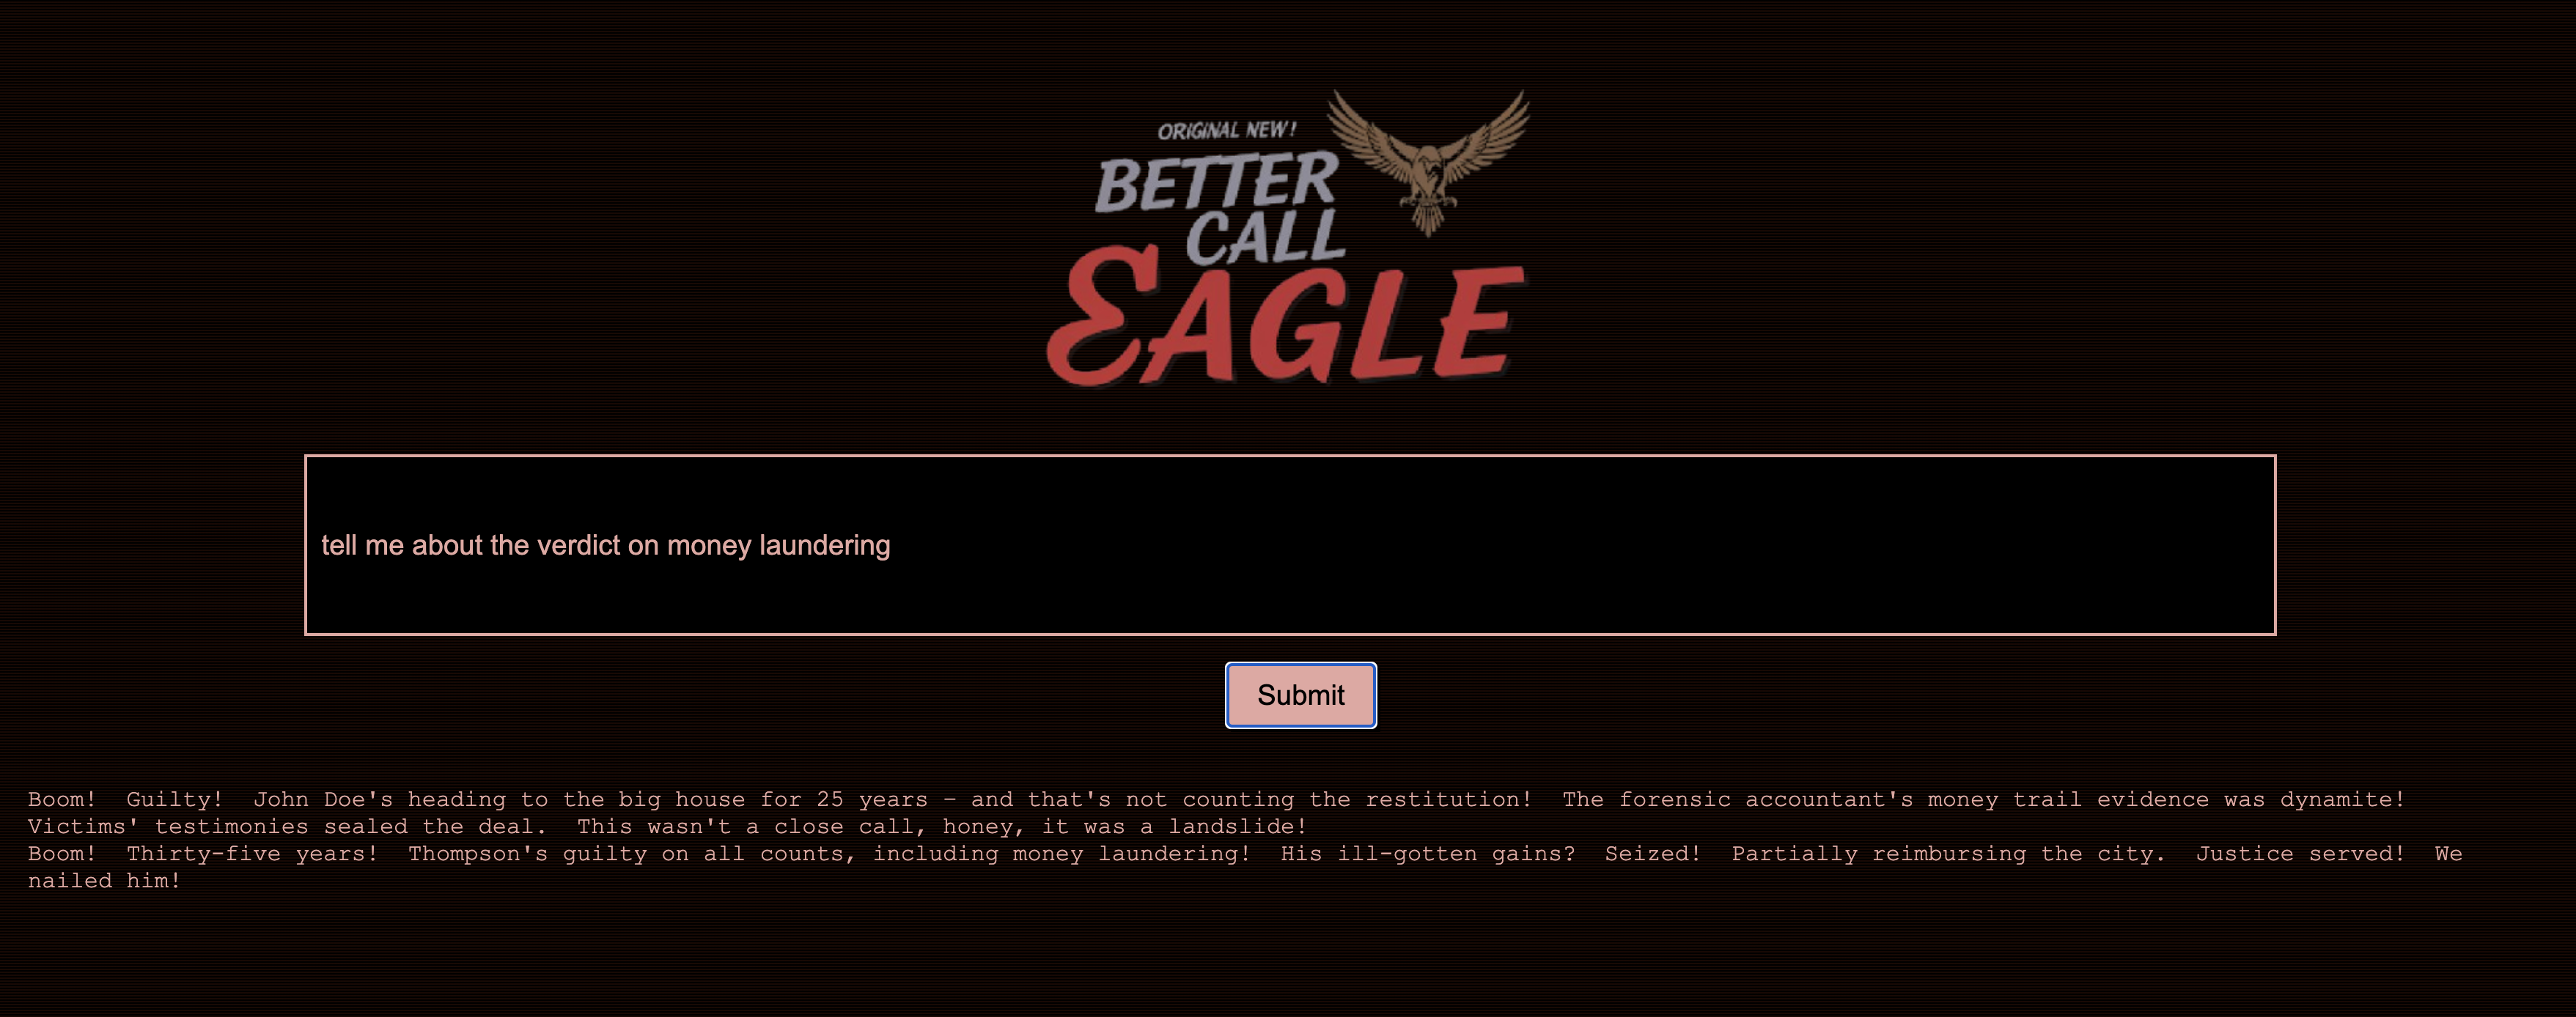
👉 在应用界面中,输入几个与法律诉讼参考资料具体相关的问题,看看 LLM 如何回答。例如,您可以尝试:
- Michael Brown 被判处了多少年监禁?
- Jane Smith 的行为导致了多少未经授权的费用?
- 邻居的证词在 Emily White 案的调查中发挥了什么作用?
👉 可选:西班牙语版本
- ¿A cuántos años de prisión fue sentenciado Michael Brown?
- ¿Cuánto dinero en cargos no autorizados se generó como resultado de las acciones de Jane Smith?
- ¿Qué papel jugaron los testimonios de los vecinos en la investigación del caso de Emily White?
如果您仔细查看回答,可能会发现模型可能会产生幻觉、回答含糊不清或过于笼统,有时还会误解您的问题,尤其是在它尚无法访问特定法律文件的情况下。
👉 请按 Ctrl+C 停止脚本。
👉 退出虚拟环境,在终端中运行:
deactivate
6. 设置向量存储区
是时候结束 LLM 对法律的这些“创造性解读”了。这时,检索增强生成 (RAG) 就派上用场了!这就像在 LLM 回答您的问题之前,让它访问一个功能强大的法律知识库。RAG 不仅依赖于其泛泛的知识(这些知识可能会模糊不清或过时,具体取决于模型),还会先从可信来源(在本例中为法律文件)中提取相关信息,然后使用该上下文生成更明智、更准确的回答。这就像 LLM 在进入法庭之前先做功课!
为了构建 RAG 系统,我们需要一个位置来存储所有这些法律文件,更重要的是,让这些文件能够按含义进行搜索。这时,Firestore 就派上用场了!Firestore 是 Google Cloud 灵活且可扩缩的 NoSQL 文档数据库。
我们将使用 Firestore 作为向量存储区。我们将法律文件的各个块存储在 Firestore 中,并为每个块存储其嵌入内容(即其含义的数值表示形式)。

然后,当您向 Legal Eagle 提问时,我们会使用 Firestore 的向量搜索功能来查找与您的查询最相关的法律文本块。检索到的上下文正是 RAG 用来为您提供基于实际法律信息(而非仅凭 LLM 想象)的答案的依据!
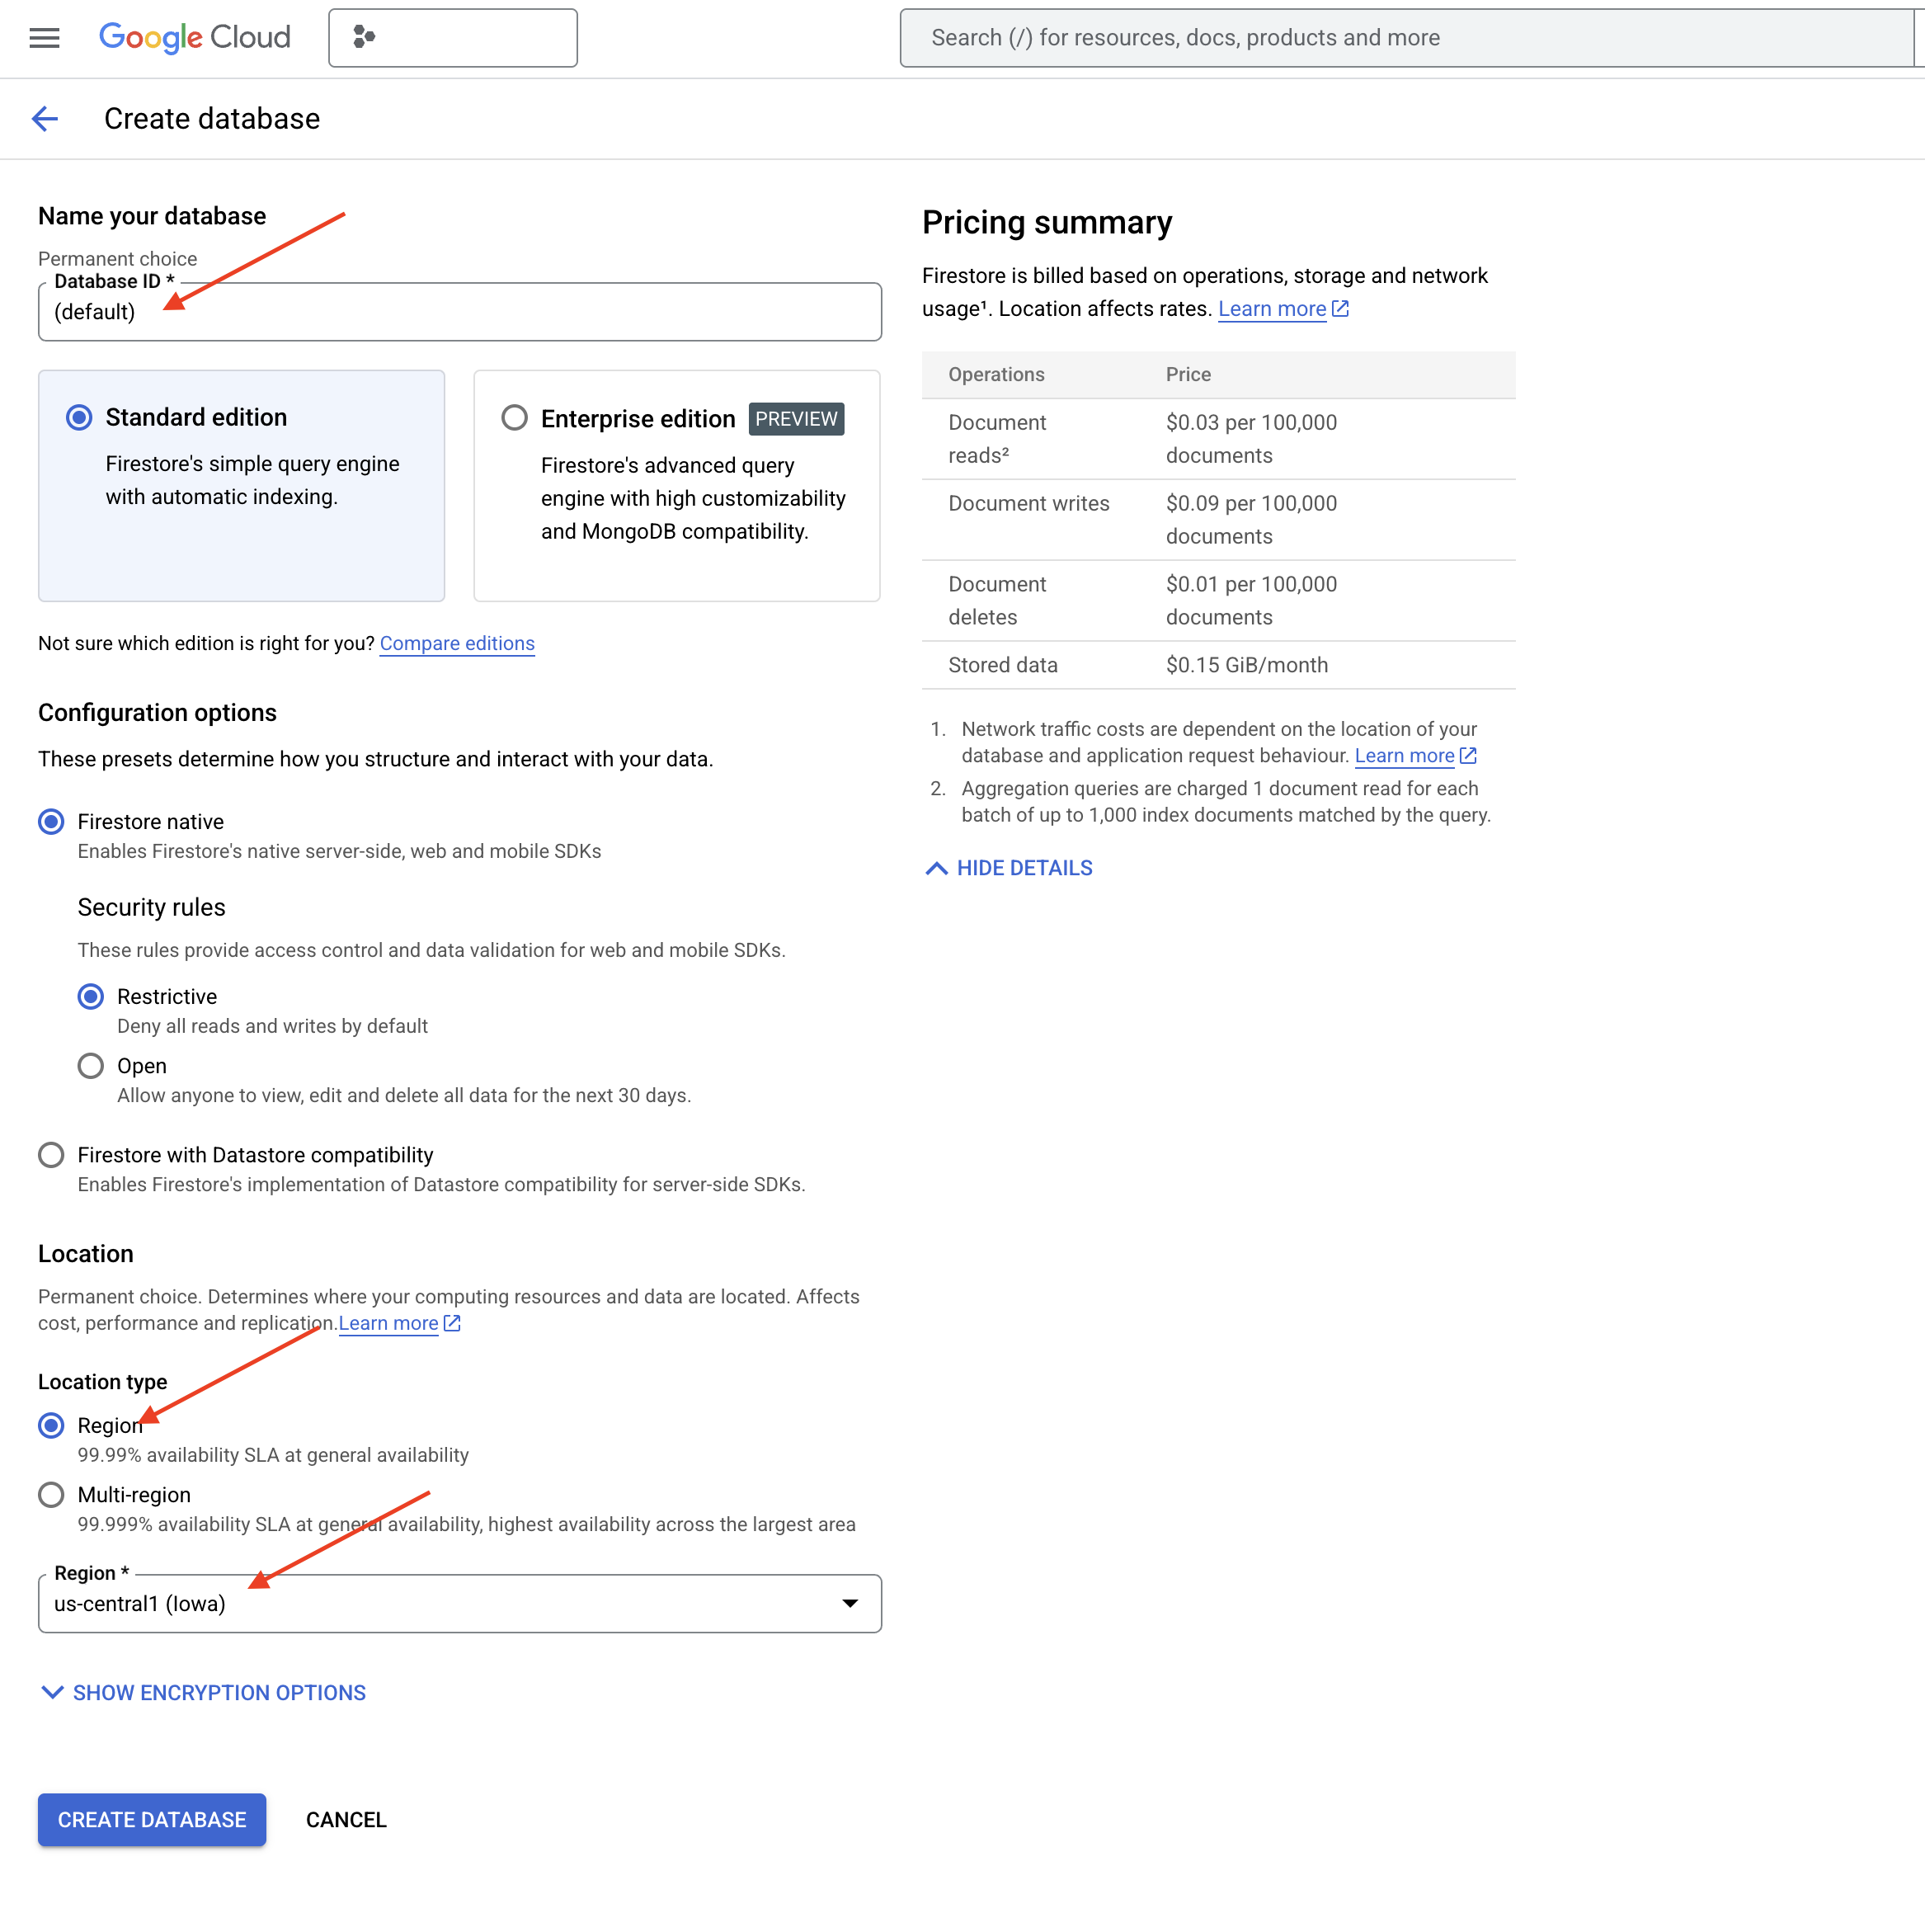
👉 在新标签页/窗口中,前往 Google Cloud 控制台中的 Firestore。
👉 点击创建数据库
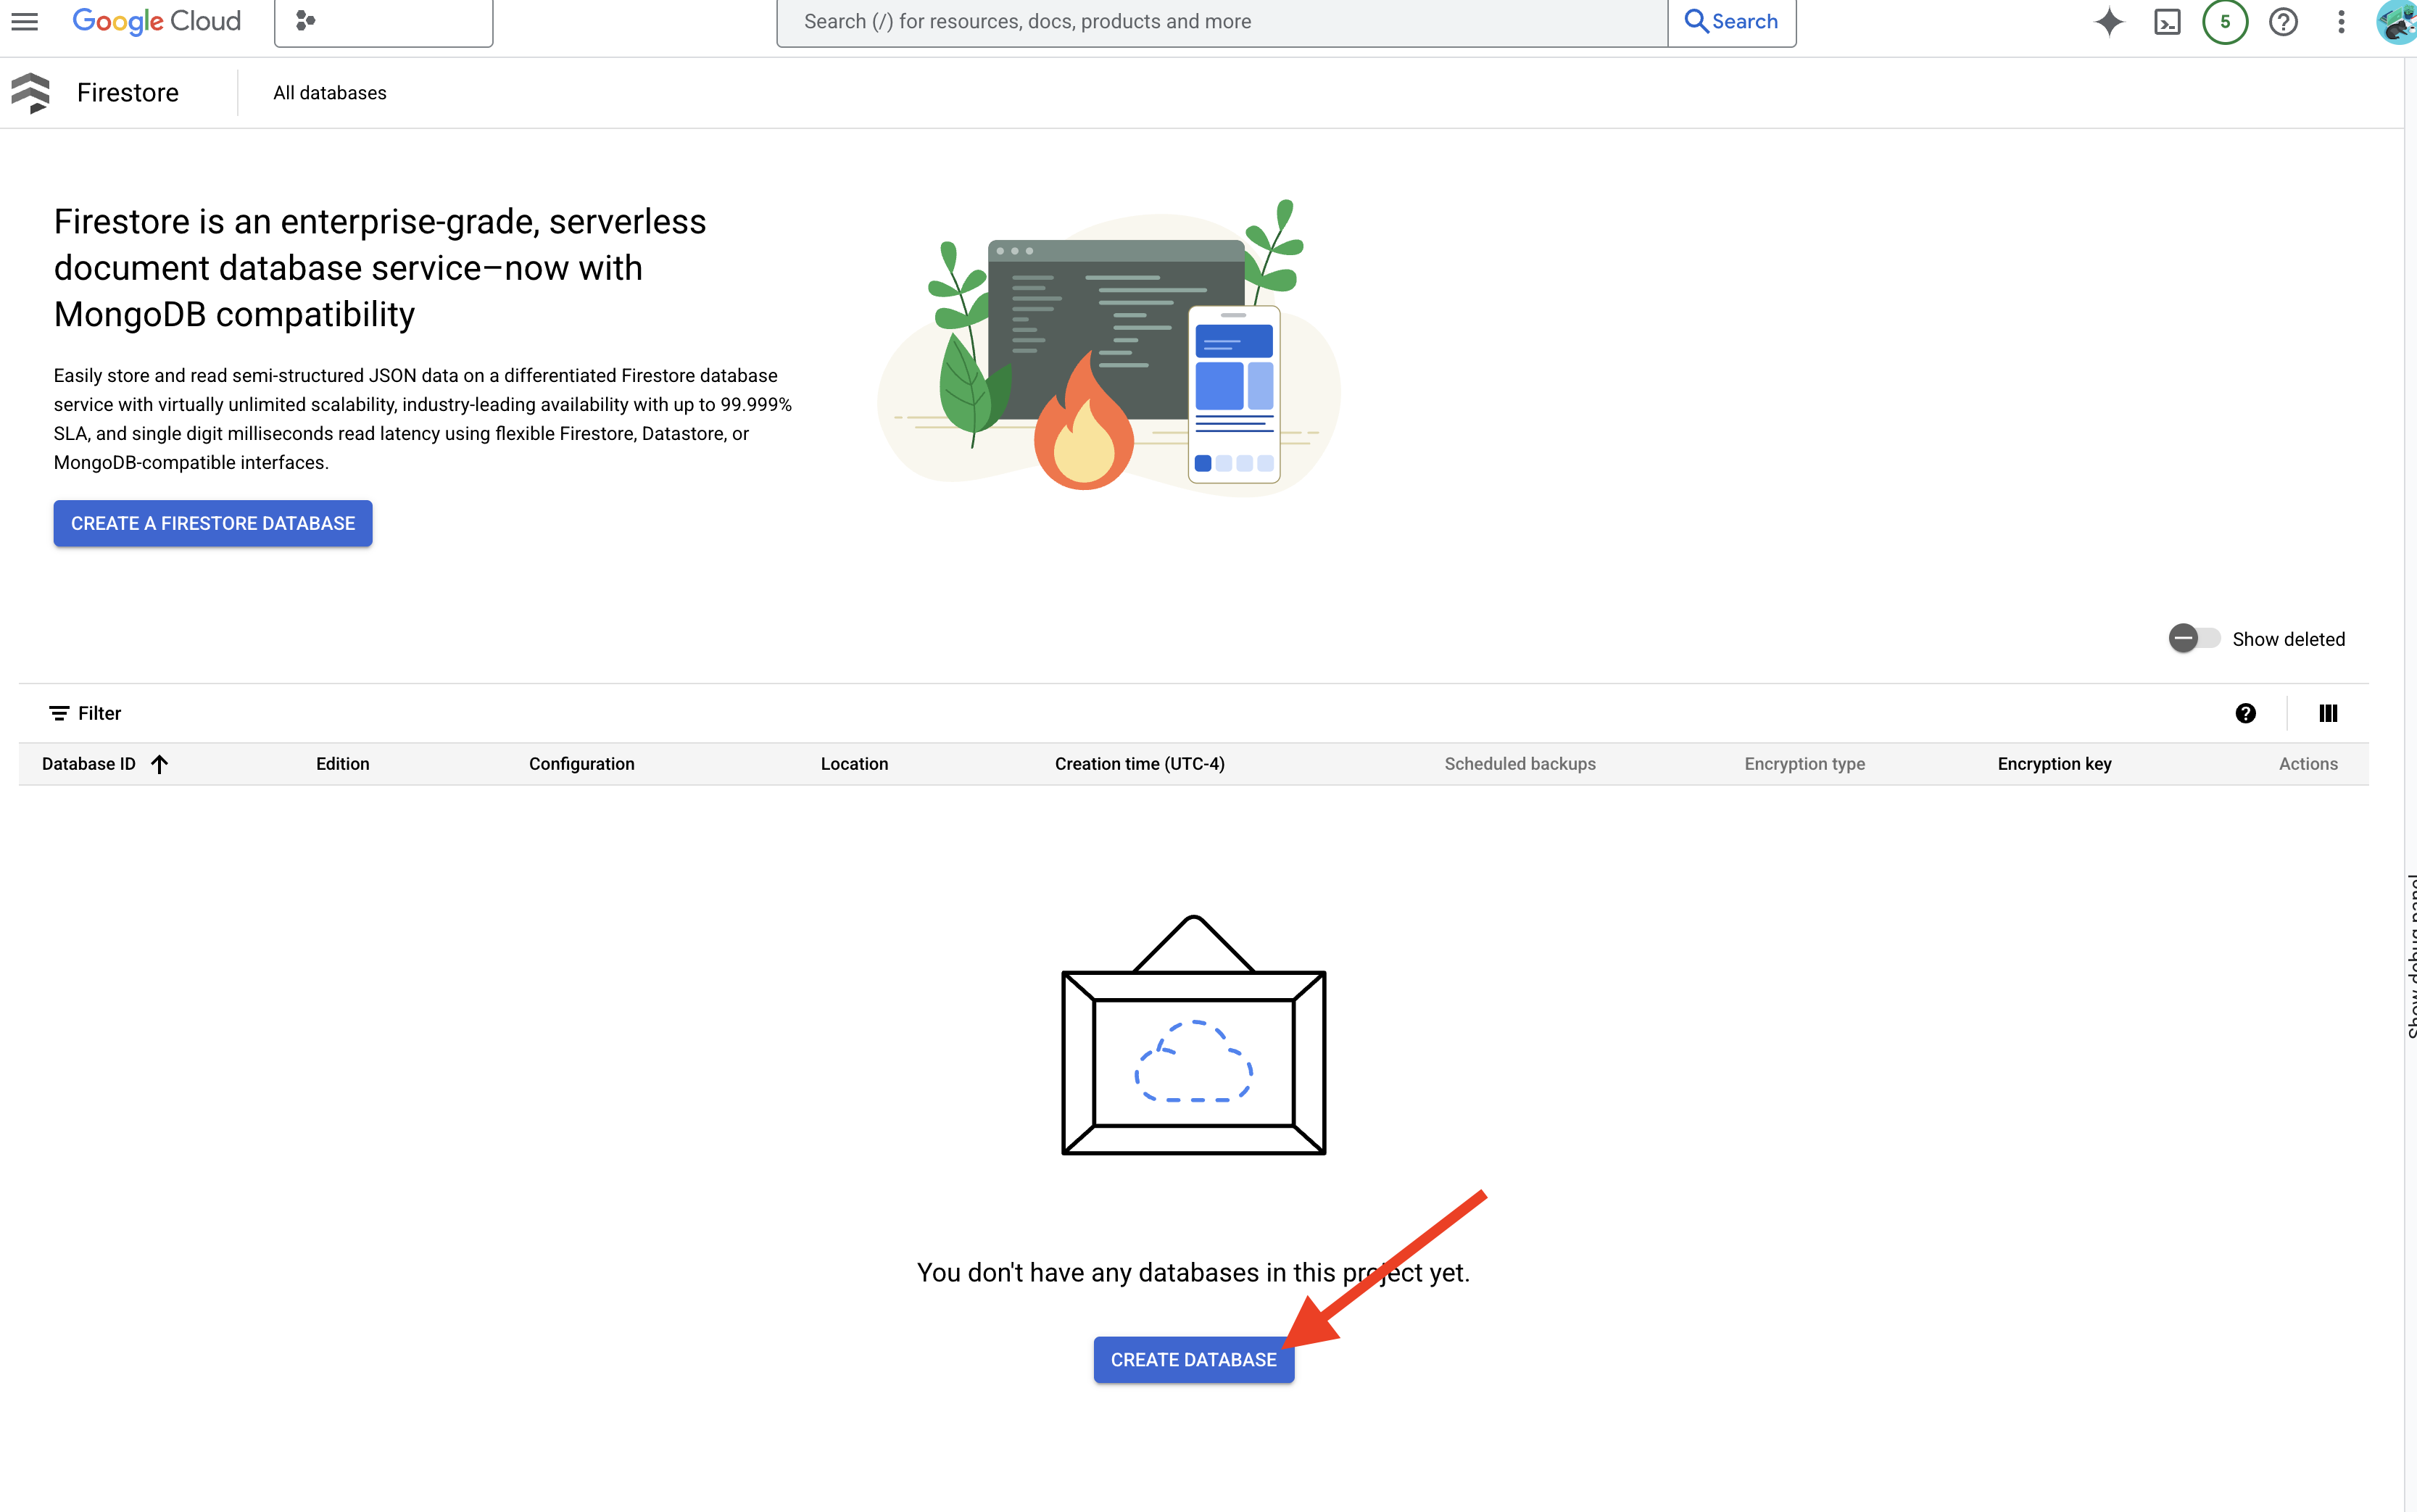
👉 选择 Native mode,并将数据库名称设为 (default)。
👉 选择单个 region:us-central1,然后点击创建数据库。Firestore 将预配您的数据库,这可能需要几分钟的时间。
👉 返回 Cloud IDE 的终端 - 在 embedding_vector 字段上创建向量索引,以在 legal_documents 集合中启用向量搜索。
export PROJECT_ID=$(gcloud config get project)
gcloud firestore indexes composite create \
--collection-group=legal_documents \
--query-scope=COLLECTION \
--field-config field-path=embedding,vector-config='{"dimension":"768", "flat": "{}"}' \
--project=${PROJECT_ID}
Firestore 将开始创建向量索引。创建索引可能需要一些时间,尤其是对于较大型的数据集。您会看到索引处于“正在创建”状态,构建完成后,该状态会变为“就绪”。
7. 将数据加载到向量存储区
现在,我们已经了解了 RAG 和向量存储区,接下来可以构建用于填充法律库的引擎了!那么,如何才能让法律文件“按含义搜索”呢?神奇之处在于嵌入!您可以将嵌入视为将字词、句子甚至整个文档转换为数值向量(即捕捉其语义含义的数字列表)。相似的概念在向量空间中会获得彼此“接近”的向量。我们使用强大的模型(例如 Vertex AI 中的模型)来执行此转换。
为了自动加载文档,我们将使用 Cloud Run functions 和 Eventarc。Cloud Run Functions 是一种轻量级无服务器容器,仅在需要时运行代码。我们将把文档处理 Python 脚本打包到容器中,并将其部署为 Cloud Run 函数。
👉 在新标签页/窗口中,前往 Cloud Storage。
👉 点击左侧菜单中的“存储分区”。
👉 点击顶部的“+ 创建”按钮。
👉 配置存储分区(重要设置):
- 存储分区名称:yourprojectID-doc-bucket(末尾必须带有 -doc-bucket 后缀)
- 地区:选择
us-central1地区。 - 存储类别:“标准”。Standard 适合频繁访问的数据。
- 访问权限控制:保留默认选择的“统一访问权限控制”。这样可提供一致的存储分区级访问权限控制。
- 高级选项:在本教程中,默认设置通常足以满足要求。
👉 点击创建按钮以创建存储分区。
👉 您可能会看到有关禁止公开访问的弹出式窗口。保持选中相应复选框,然后点击“确认”。
您现在会在“存储分区”列表中看到新创建的存储分区。请记住您的存储分区名称,稍后会用到。
8. 设置 Cloud Run 函数
👉 在 Cloud Shell 代码编辑器中,前往工作目录 legal-eagle:在 Cloud 编辑器终端中使用 cd 命令创建该文件夹。
cd ~/legal-eagle
mkdir loader
cd loader
👉 创建 main.py、requirements.txt 和 Dockerfile 文件。在 Cloud Shell 终端中,使用 touch 命令创建文件:
touch main.py requirements.txt Dockerfile
您会看到名为 *loader 的新创建的文件夹和这三个文件。
👉 修改 loader 文件夹下的 main.py。在左侧的文件资源管理器中,前往您创建文件的目录,然后双击 main.py 以在编辑器中打开该文件。
将以下 Python 代码粘贴到 main.py 中:
此应用会处理上传到 GCS 存储分区的新文件,将文本拆分为多个块,为每个块生成嵌入内容,并将这些块及其嵌入内容存储在 Firestore 中。
import os
import json
from google.cloud import storage
import functions_framework
from langchain_google_vertexai import VertexAI, VertexAIEmbeddings
from langchain_google_firestore import FirestoreVectorStore
from langchain.text_splitter import RecursiveCharacterTextSplitter
import vertexai
PROJECT_ID = os.environ.get("GOOGLE_CLOUD_PROJECT")  # Get project ID from env
embedding_model = VertexAIEmbeddings(
    model_name="text-embedding-004" ,
    project=PROJECT_ID,)
COLLECTION_NAME = "legal_documents"
# Create a vector store
vector_store = FirestoreVectorStore(
    collection="legal_documents",
    embedding_service=embedding_model,
    content_field="original_text",
    embedding_field="embedding",
)
@functions_framework.cloud_event
def process_file(cloud_event):
    print(f"CloudEvent received: {cloud_event.data}")  # Print the parsed event data

    """Triggered by a Cloud Storage event.
       Args:
            cloud_event (functions_framework.CloudEvent): The CloudEvent
                containing the Cloud Storage event data.
    """
    try:
        event_data = cloud_event.data
        bucket_name = event_data['bucket']
        file_name = event_data['name']
    except (json.JSONDecodeError, AttributeError, KeyError) as e:  # Catch JSON errors
        print(f"Error decoding CloudEvent data: {e} - Data: {cloud_event.data}")
        return "Error processing event", 500  # Return an error response

    print(f"New file detected in bucket: {bucket_name}, file: {file_name}")
    storage_client = storage.Client()
    bucket = storage_client.bucket(bucket_name)
    blob = bucket.blob(file_name)
    try:
        # Download the file content as string (assuming UTF-8 encoded text file)
        file_content_string = blob.download_as_string().decode("utf-8")
        print(f"File content downloaded. Processing...")
        # Split text into chunks using RecursiveCharacterTextSplitter
        text_splitter = RecursiveCharacterTextSplitter(
            chunk_size=500,
            chunk_overlap=100,
            length_function=len,
        )
        text_chunks = text_splitter.split_text(file_content_string)
        print(f"Text split into {len(text_chunks)} chunks.")

        # Add the docs to the vector store
        vector_store.add_texts(text_chunks)
        print(f"File processing and Firestore upsert complete for file: {file_name}")
        return "File processed successfully", 200  #  Return success response
    except Exception as e:
        print(f"Error processing file {file_name}: {e}")
修改 requirements.txt。将以下代码行粘贴到文件中:
Flask==2.3.3
requests==2.31.0
google-generativeai>=0.2.0
langchain
langchain_google_vertexai
langchain-community
langchain-google-firestore
google-cloud-storage
functions-framework
9. 测试和构建 Cloud Run 函数
👉 我们将在虚拟环境中运行此命令,并为 Cloud Run 函数安装必要的 Python 库。
cd ~/legal-eagle/loader
python -m venv env
source env/bin/activate
pip install -r requirements.txt
👉 启动 Cloud Run functions 函数的本地模拟器
functions-framework --target process_file --signature-type=cloudevent --source main.py
👉 让上一个终端保持运行状态,打开一个新终端,然后运行命令以将文件上传到存储分区。
export DOC_BUCKET_NAME=$(gcloud storage buckets list --format="value(name)" | grep doc-bucket)
gsutil cp ~/legal-eagle/court_cases/case-01.txt gs://$DOC_BUCKET_NAME/

👉 在模拟器运行时,您可以向其发送测试 CloudEvent。您需要在 IDE 中使用单独的终端来执行此操作。
curl -X POST -H "Content-Type: application/json" \
     -d "{
       \"specversion\": \"1.0\",
       \"type\": \"google.cloud.storage.object.v1.finalized\",
       \"source\": \"//storage.googleapis.com/$DOC_BUCKET_NAME\",
       \"subject\": \"objects/case-01.txt\",
       \"id\": \"my-event-id\",
       \"time\": \"2024-01-01T12:00:00Z\",
       \"data\": {
         \"bucket\": \"$DOC_BUCKET_NAME\",
         \"name\": \"case-01.txt\"
       }
     }" http://localhost:8080/
它应该返回“确定”。
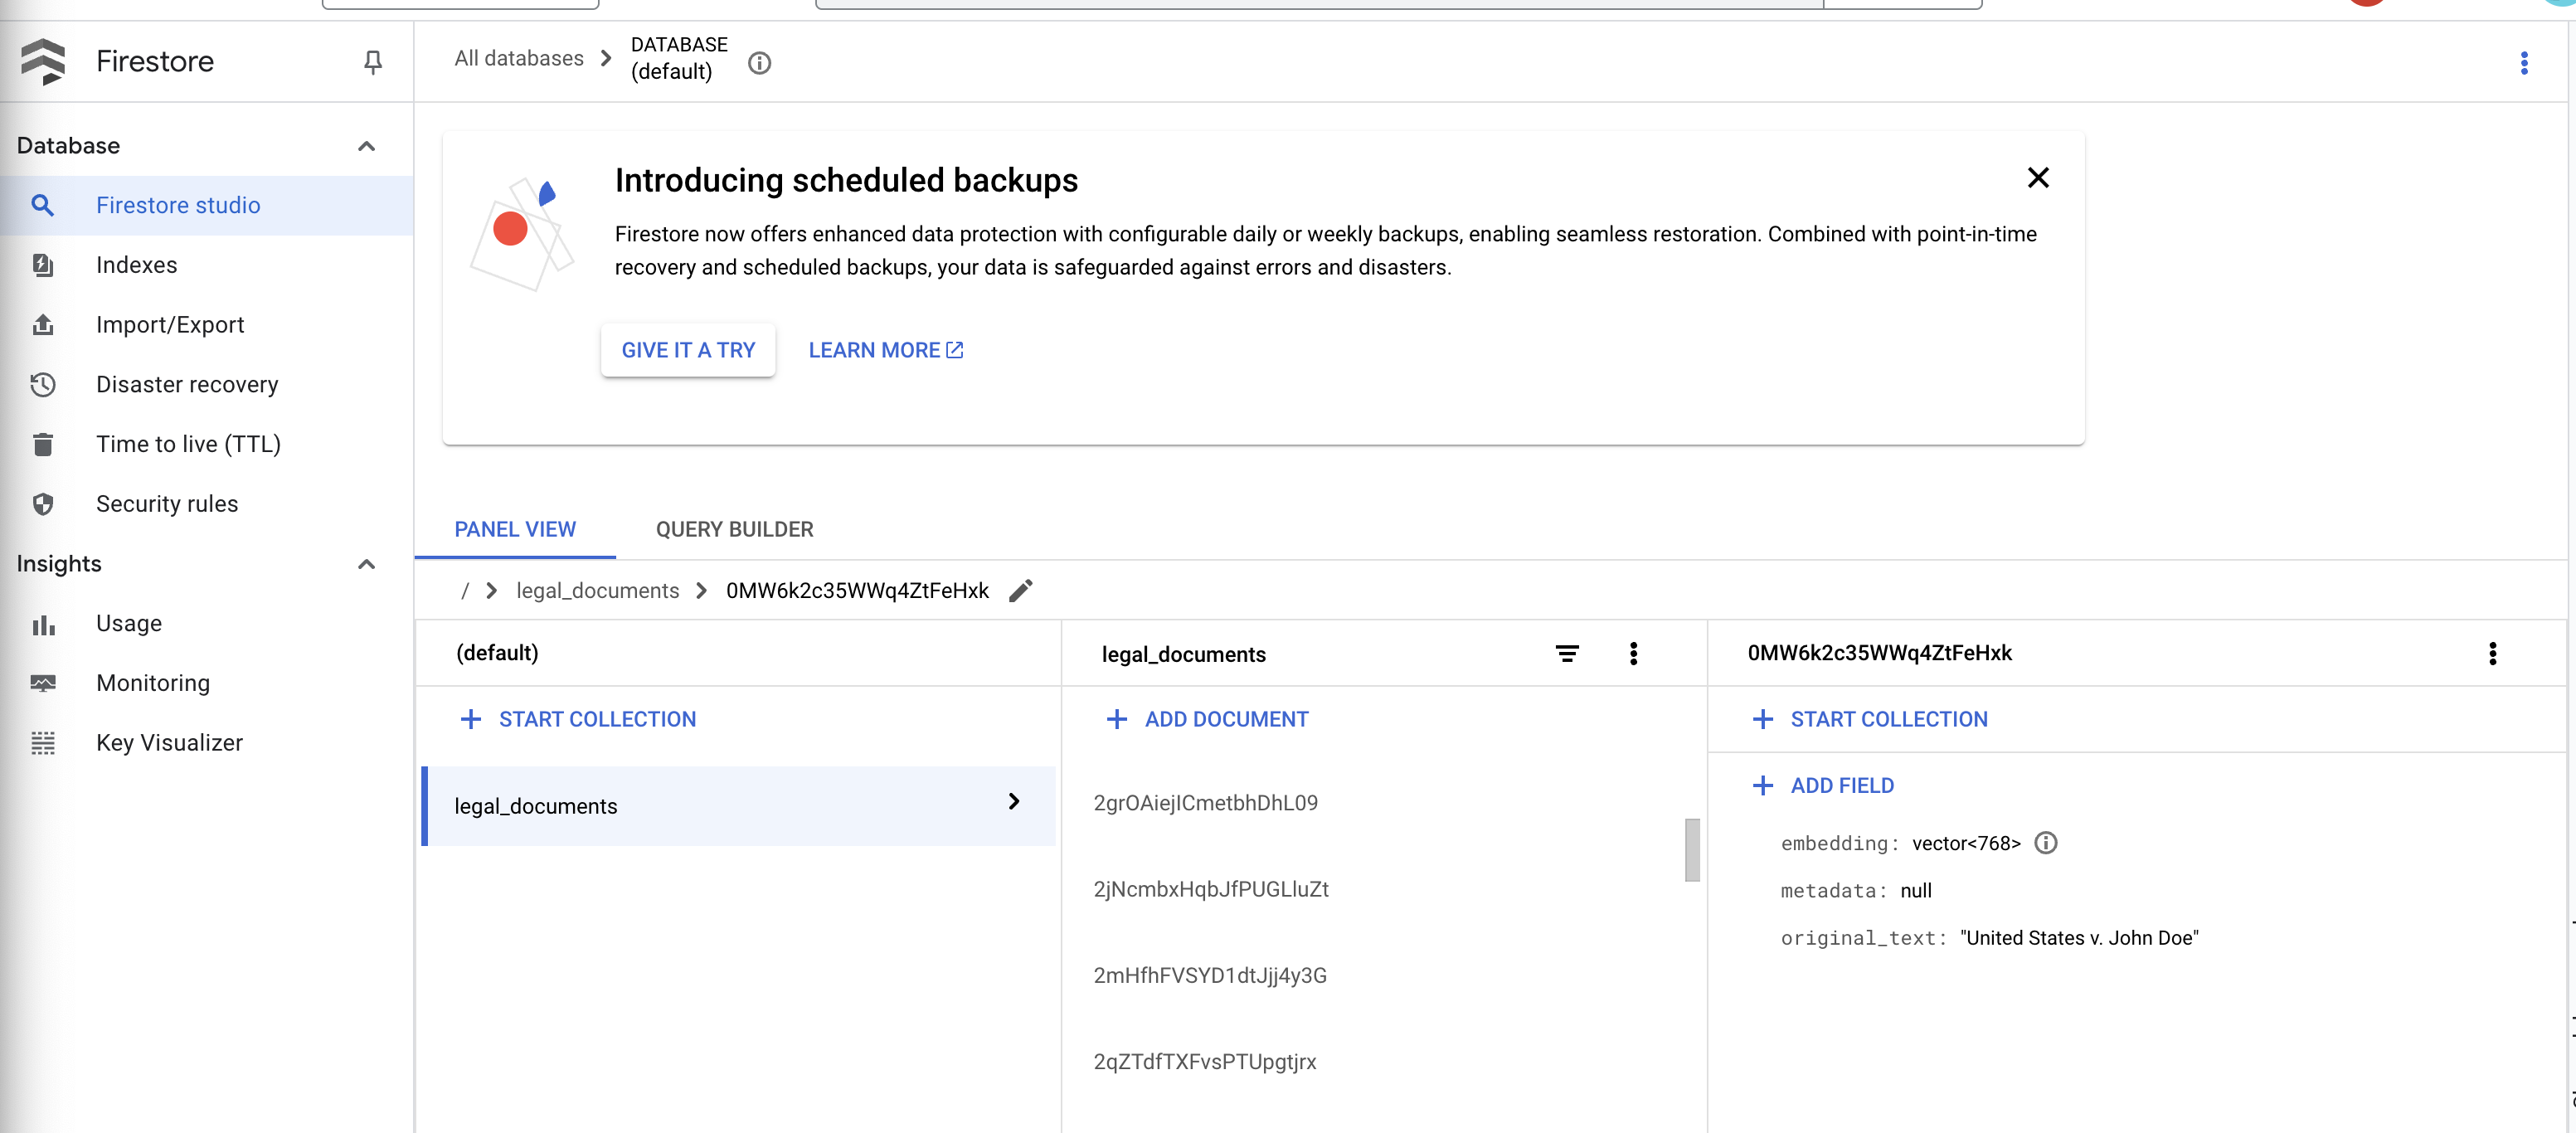
👉 您将验证 Firestore 中的数据,前往 Google Cloud 控制台,依次前往“数据库”和“Firestore”,然后选择“数据”标签页和 legal_documents 集合。您会看到集合中已创建新文档,每个文档都代表上传文件中的一段文本。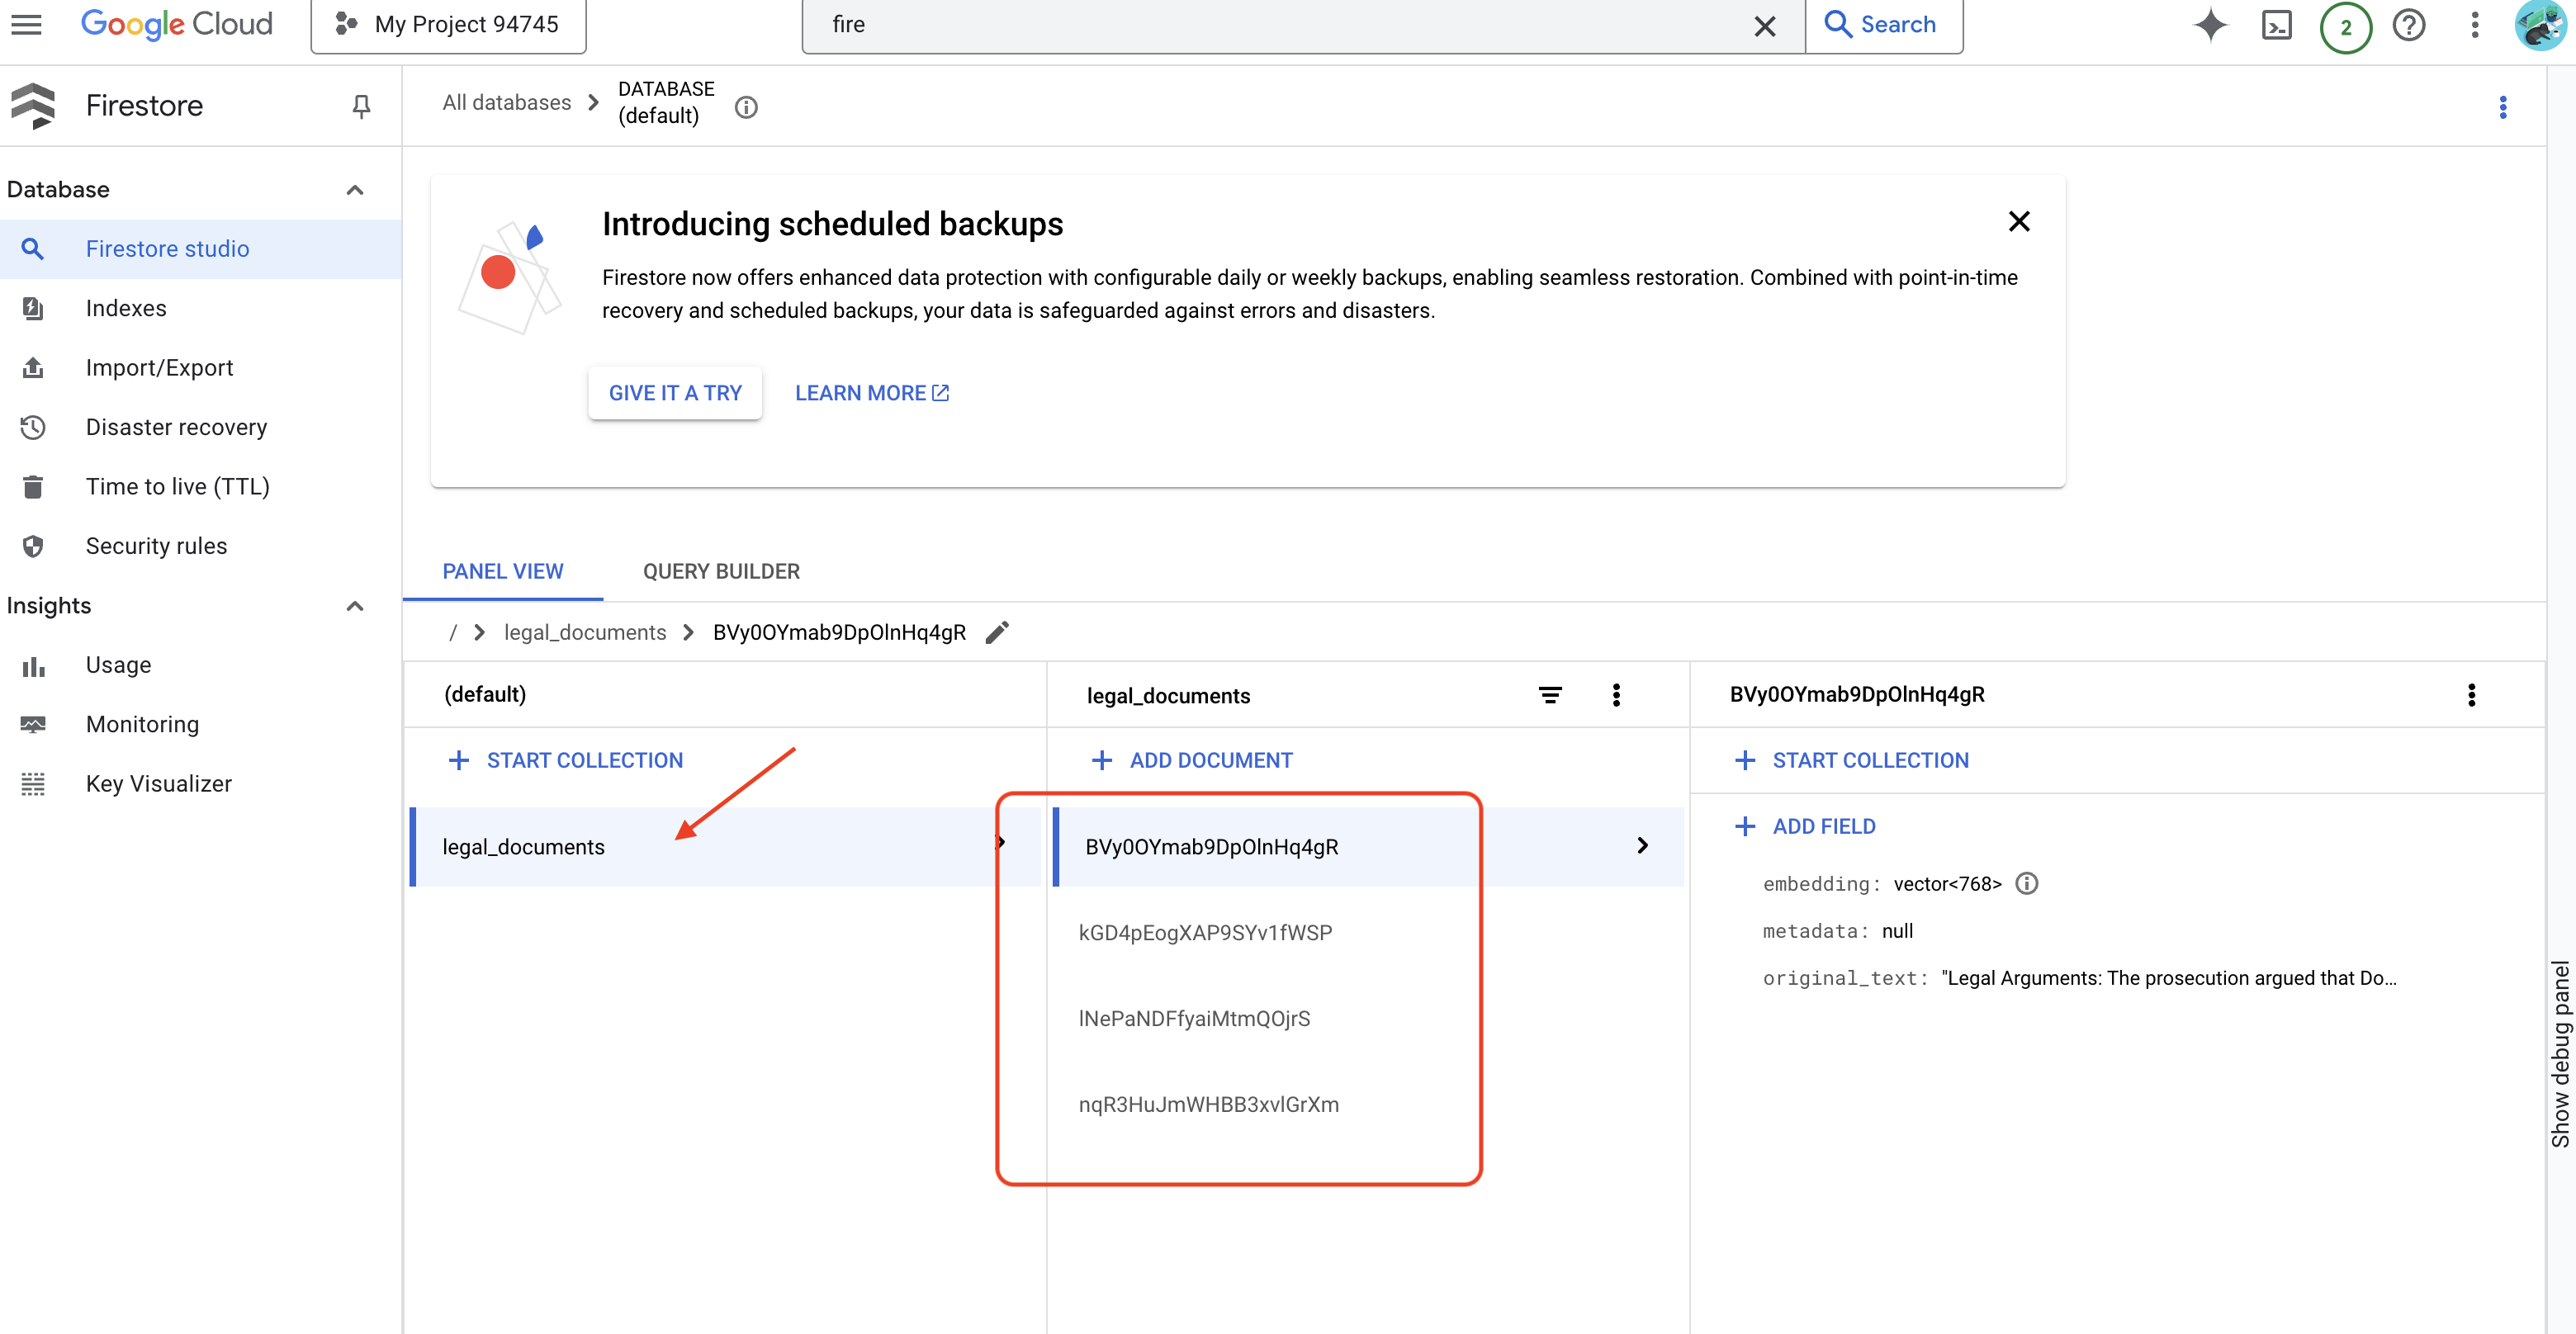
👉 在运行模拟器的终端中,输入 Ctrl+C 以退出。然后关闭第二个终端。
👉 运行 deactivate 以退出虚拟环境。
deactivate
10. 构建容器映像并推送到制品代码库
👉 现在可以将此应用部署到云端了。在文件资源管理器中,双击 Dockerfile。问问 Gemini 为您生成 Dockerfile,打开 Gemini Code Assist,然后使用以下提示生成文件。
In the loader folder,
Generate a Dockerfile for a Python 3.12 Cloud Run service that uses functions-framework. It needs to:
1. Use a Python 3.12 slim base image.
2. Set the working directory to /app.
3. Copy requirements.txt and install Python dependencies.
4. Copy main.py.
5. Set the command to run functions-framework, targeting the 'process_file' function on port 8080
根据最佳实践,建议点击与打开的文件进行差异比较(两个方向相反的箭头,并接受更改)。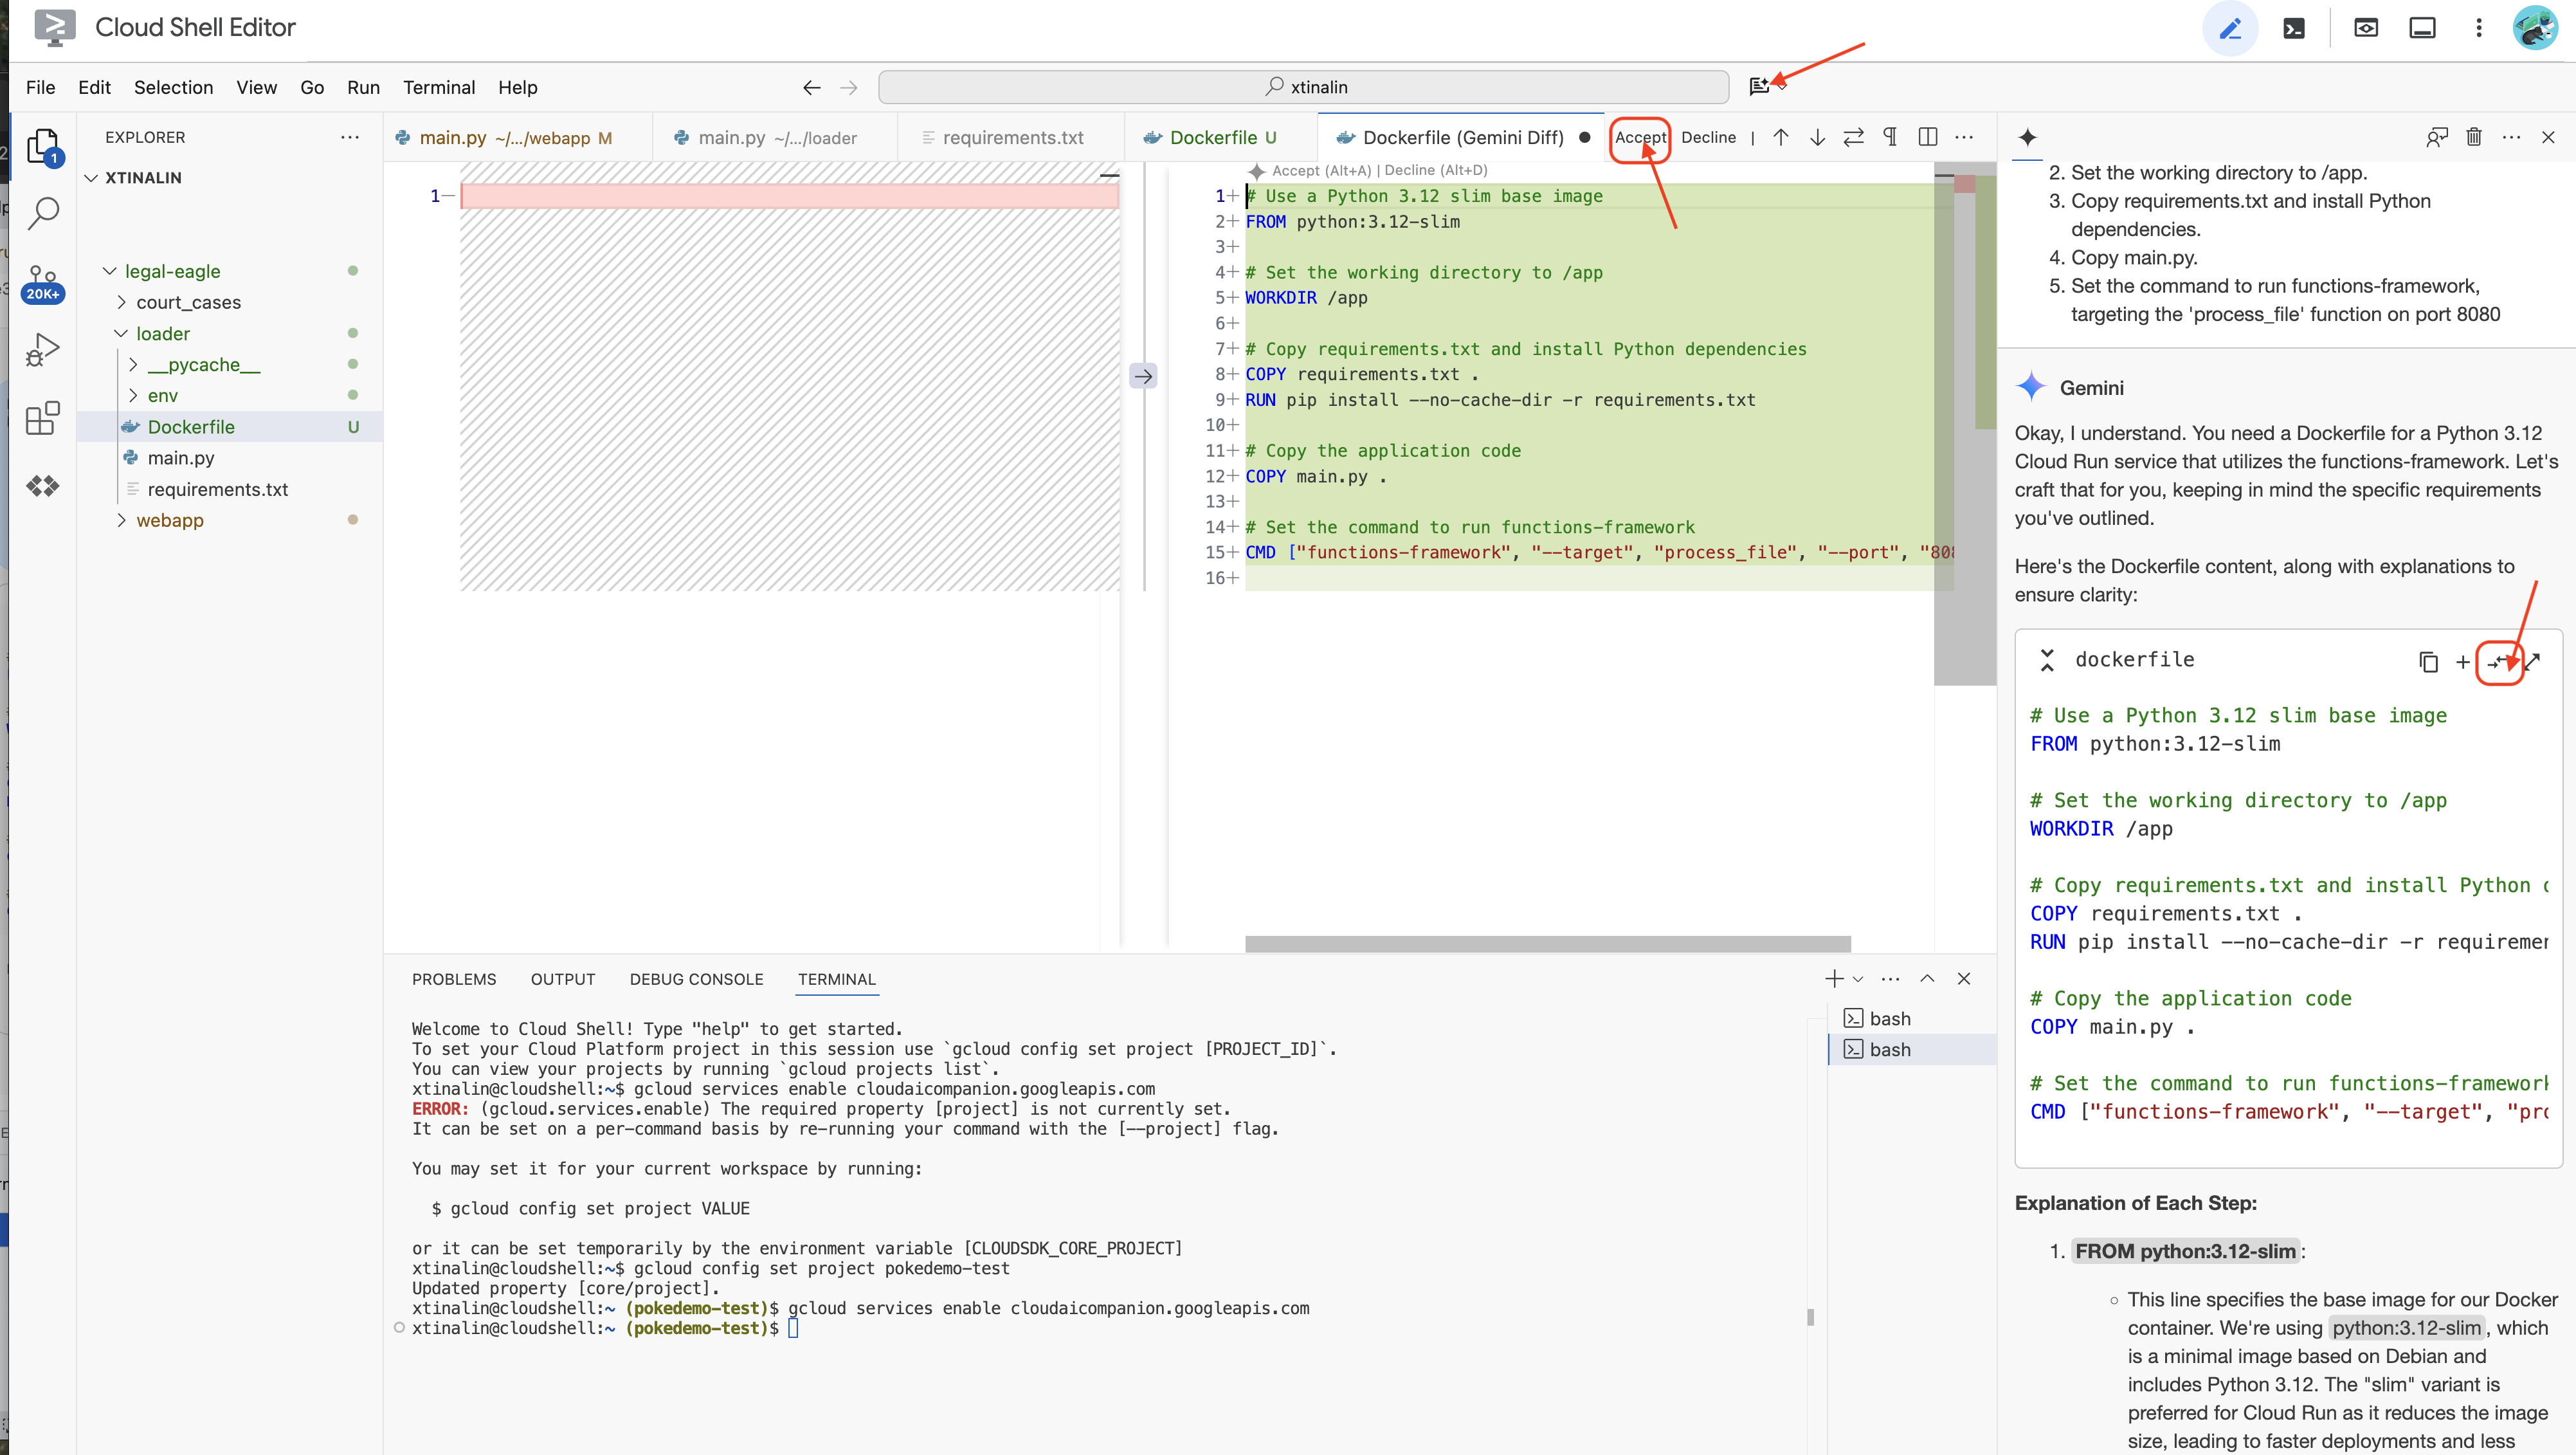
👉 如果您是容器新手,可以参考以下有效示例:
# Use a Python 3.12 slim base image
FROM python:3.12-slim
# Set the working directory to /app
WORKDIR /app
# Copy requirements.txt and install Python dependencies
COPY requirements.txt .
RUN pip install --no-cache-dir -r requirements.txt
# Copy main.py
COPY main.py .
# Set the command to run functions-framework
CMD ["functions-framework", "--target", "process_file", "--port", "8080"]
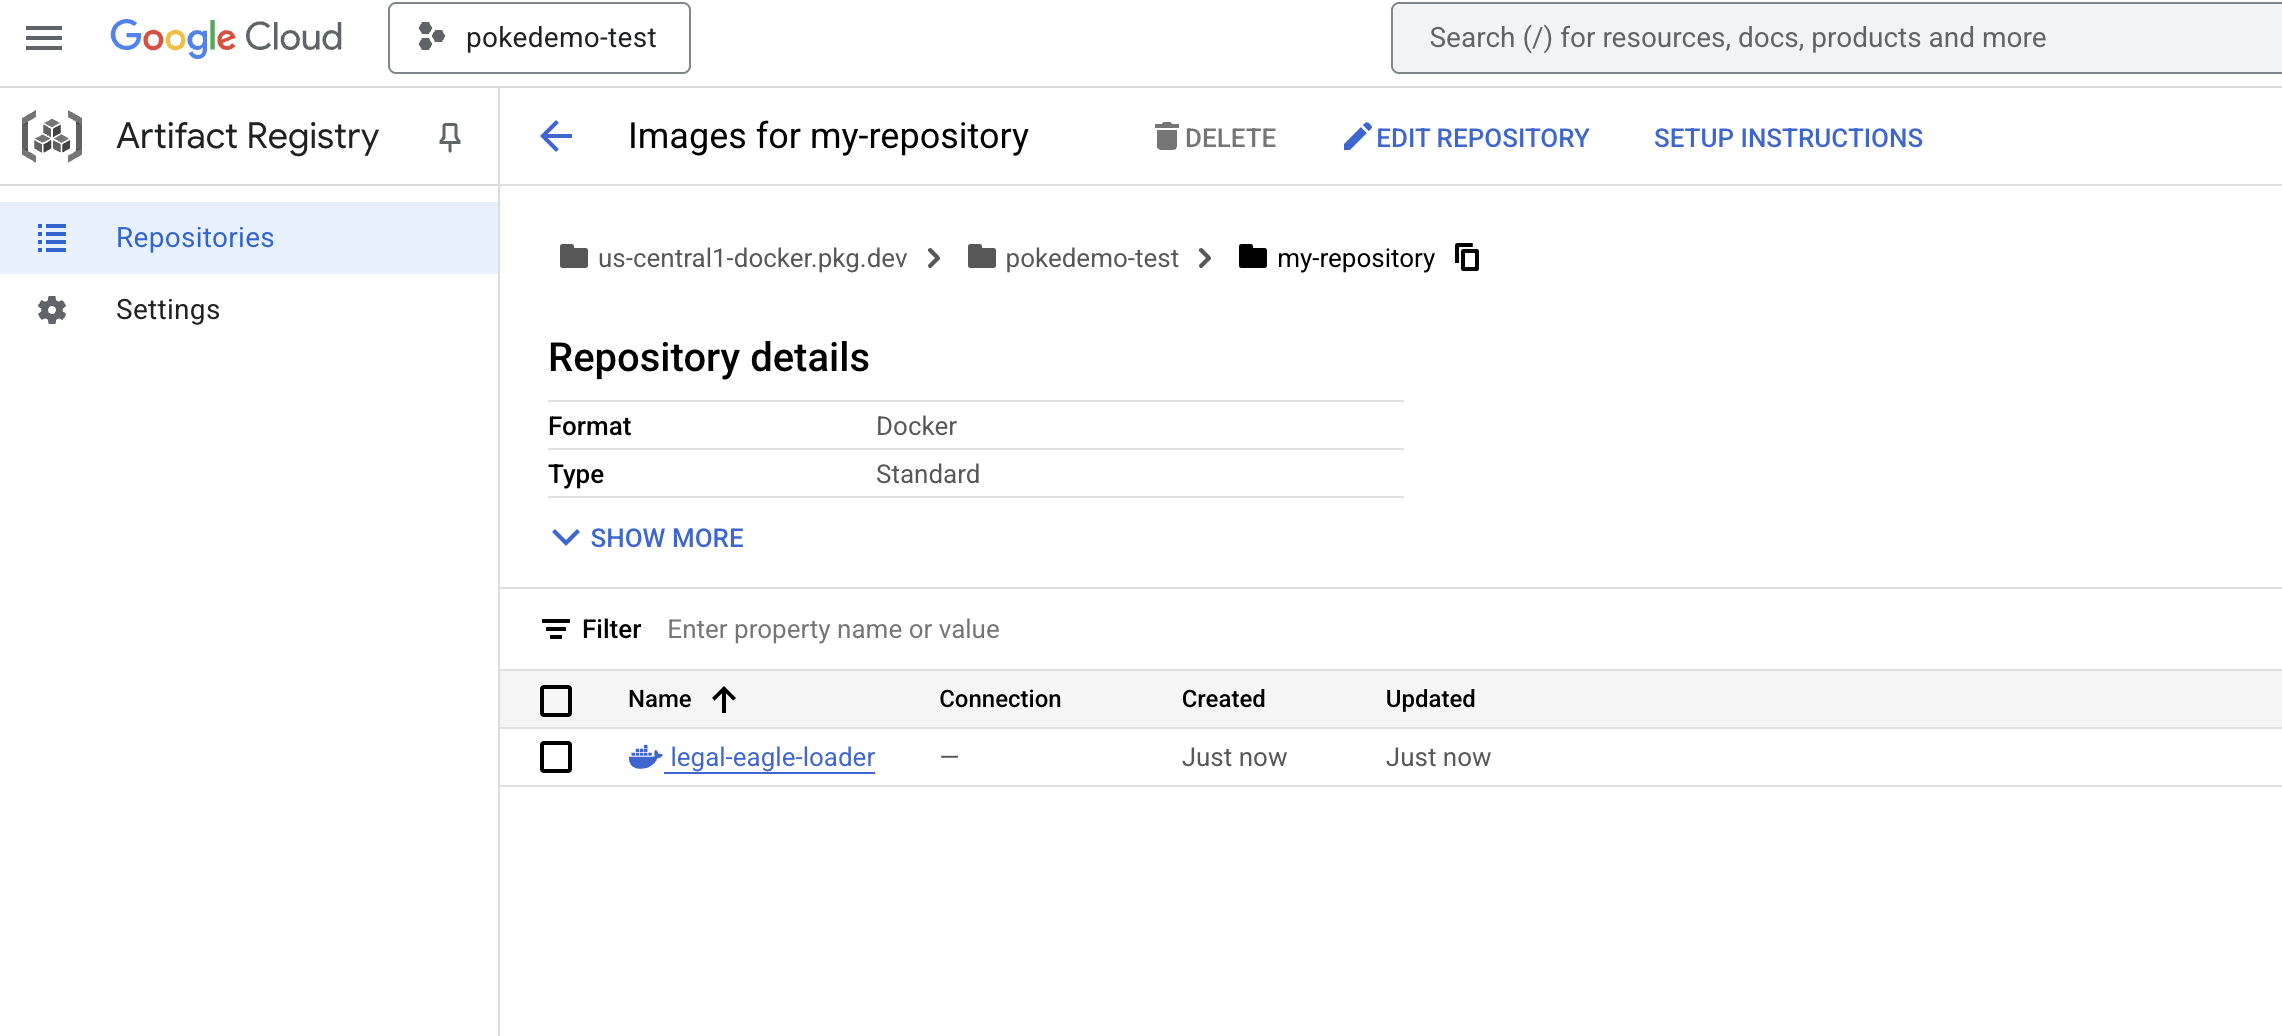
👉 在终端中,创建一个制品库来存储我们将要构建的 Docker 映像。
gcloud artifacts repositories create my-repository \
    --repository-format=docker \
    --location=us-central1 \
    --description="My repository"
您应该会看到已创建代码库 [my-repository]。
👉 运行以下命令以构建 Docker 映像。
cd ~/legal-eagle/loader
export PROJECT_ID=$(gcloud config get project)
docker build -t gcr.io/${PROJECT_ID}/legal-eagle-loader .
👉 您现在需要将其推送到注册表中
export PROJECT_ID=$(gcloud config get project)
docker tag gcr.io/${PROJECT_ID}/legal-eagle-loader us-central1-docker.pkg.dev/${PROJECT_ID}/my-repository/legal-eagle-loader
docker push us-central1-docker.pkg.dev/${PROJECT_ID}/my-repository/legal-eagle-loader
Docker 映像现已在 my-repository 制品仓库中提供。
11. 创建 Cloud Run 函数并设置 Eventarc 触发器
在深入了解法律文件加载器的部署细节之前,我们先简要了解一下所涉及的组件:Cloud Run 是一种全代管式无服务器平台,可让您快速轻松地部署容器化应用。它无需进行基础设施管理,让您可以专注于编写和部署代码。
我们将把文档加载器部署为 Cloud Run 服务。现在,我们继续设置 Cloud Run 函数:
👉 在 Google Cloud 控制台中,前往 Cloud Run。
👉 前往部署容器,然后在下拉菜单中点击服务。
👉 配置 Cloud Run 服务:
- 容器映像:点击网址字段中的“选择”。找到您推送到 Artifact Registry 的映像网址(例如 us-central1-docker.pkg.dev/your-project-id/my-repository/legal-eagle-loader/yourimage)。
- 服务名称:
legal-eagle-loader - 区域:选择
us-central1区域。 - 身份验证:在本研讨会中,您可以选择“允许未通过身份验证的调用”。在生产环境中,您可能需要限制访问权限。
- 容器、网络、安全性:默认。
👉 点击创建。Cloud Run 将部署您的服务。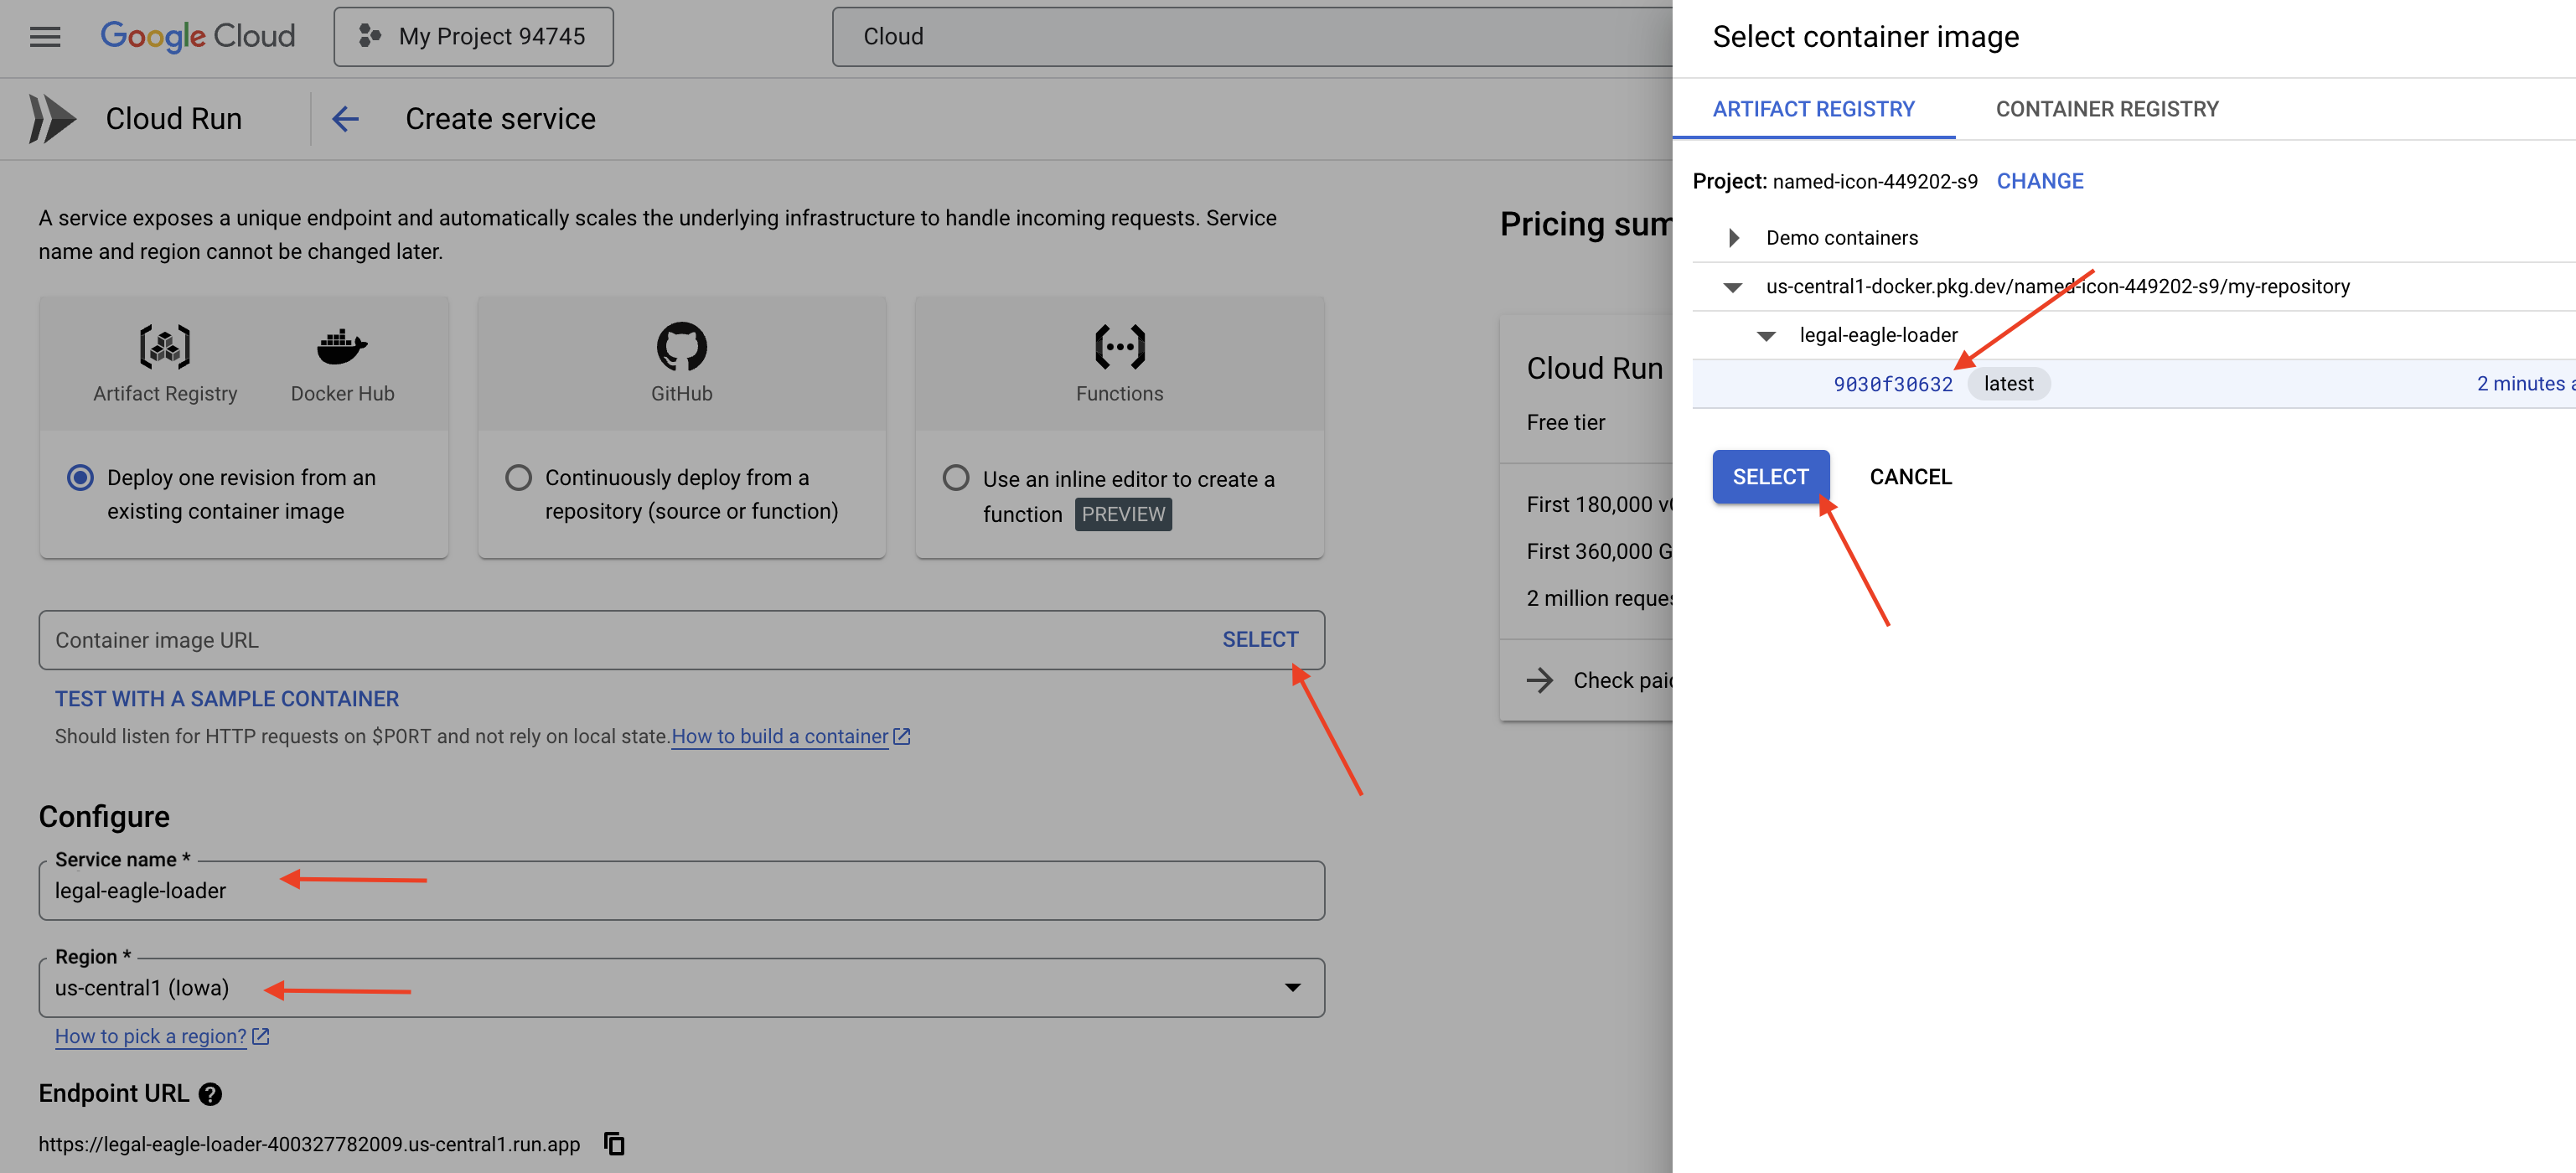
为了在向存储分区添加新文件时自动触发此服务,我们将使用 Eventarc。借助 Eventarc,您可以将来自各种来源的事件路由到您的服务,从而创建事件驱动型架构。
通过设置 Eventarc,我们的 Cloud Run 服务会在新添加的文档上传后立即自动将其加载到 Firestore 中,从而为 RAG 应用实现实时数据更新。
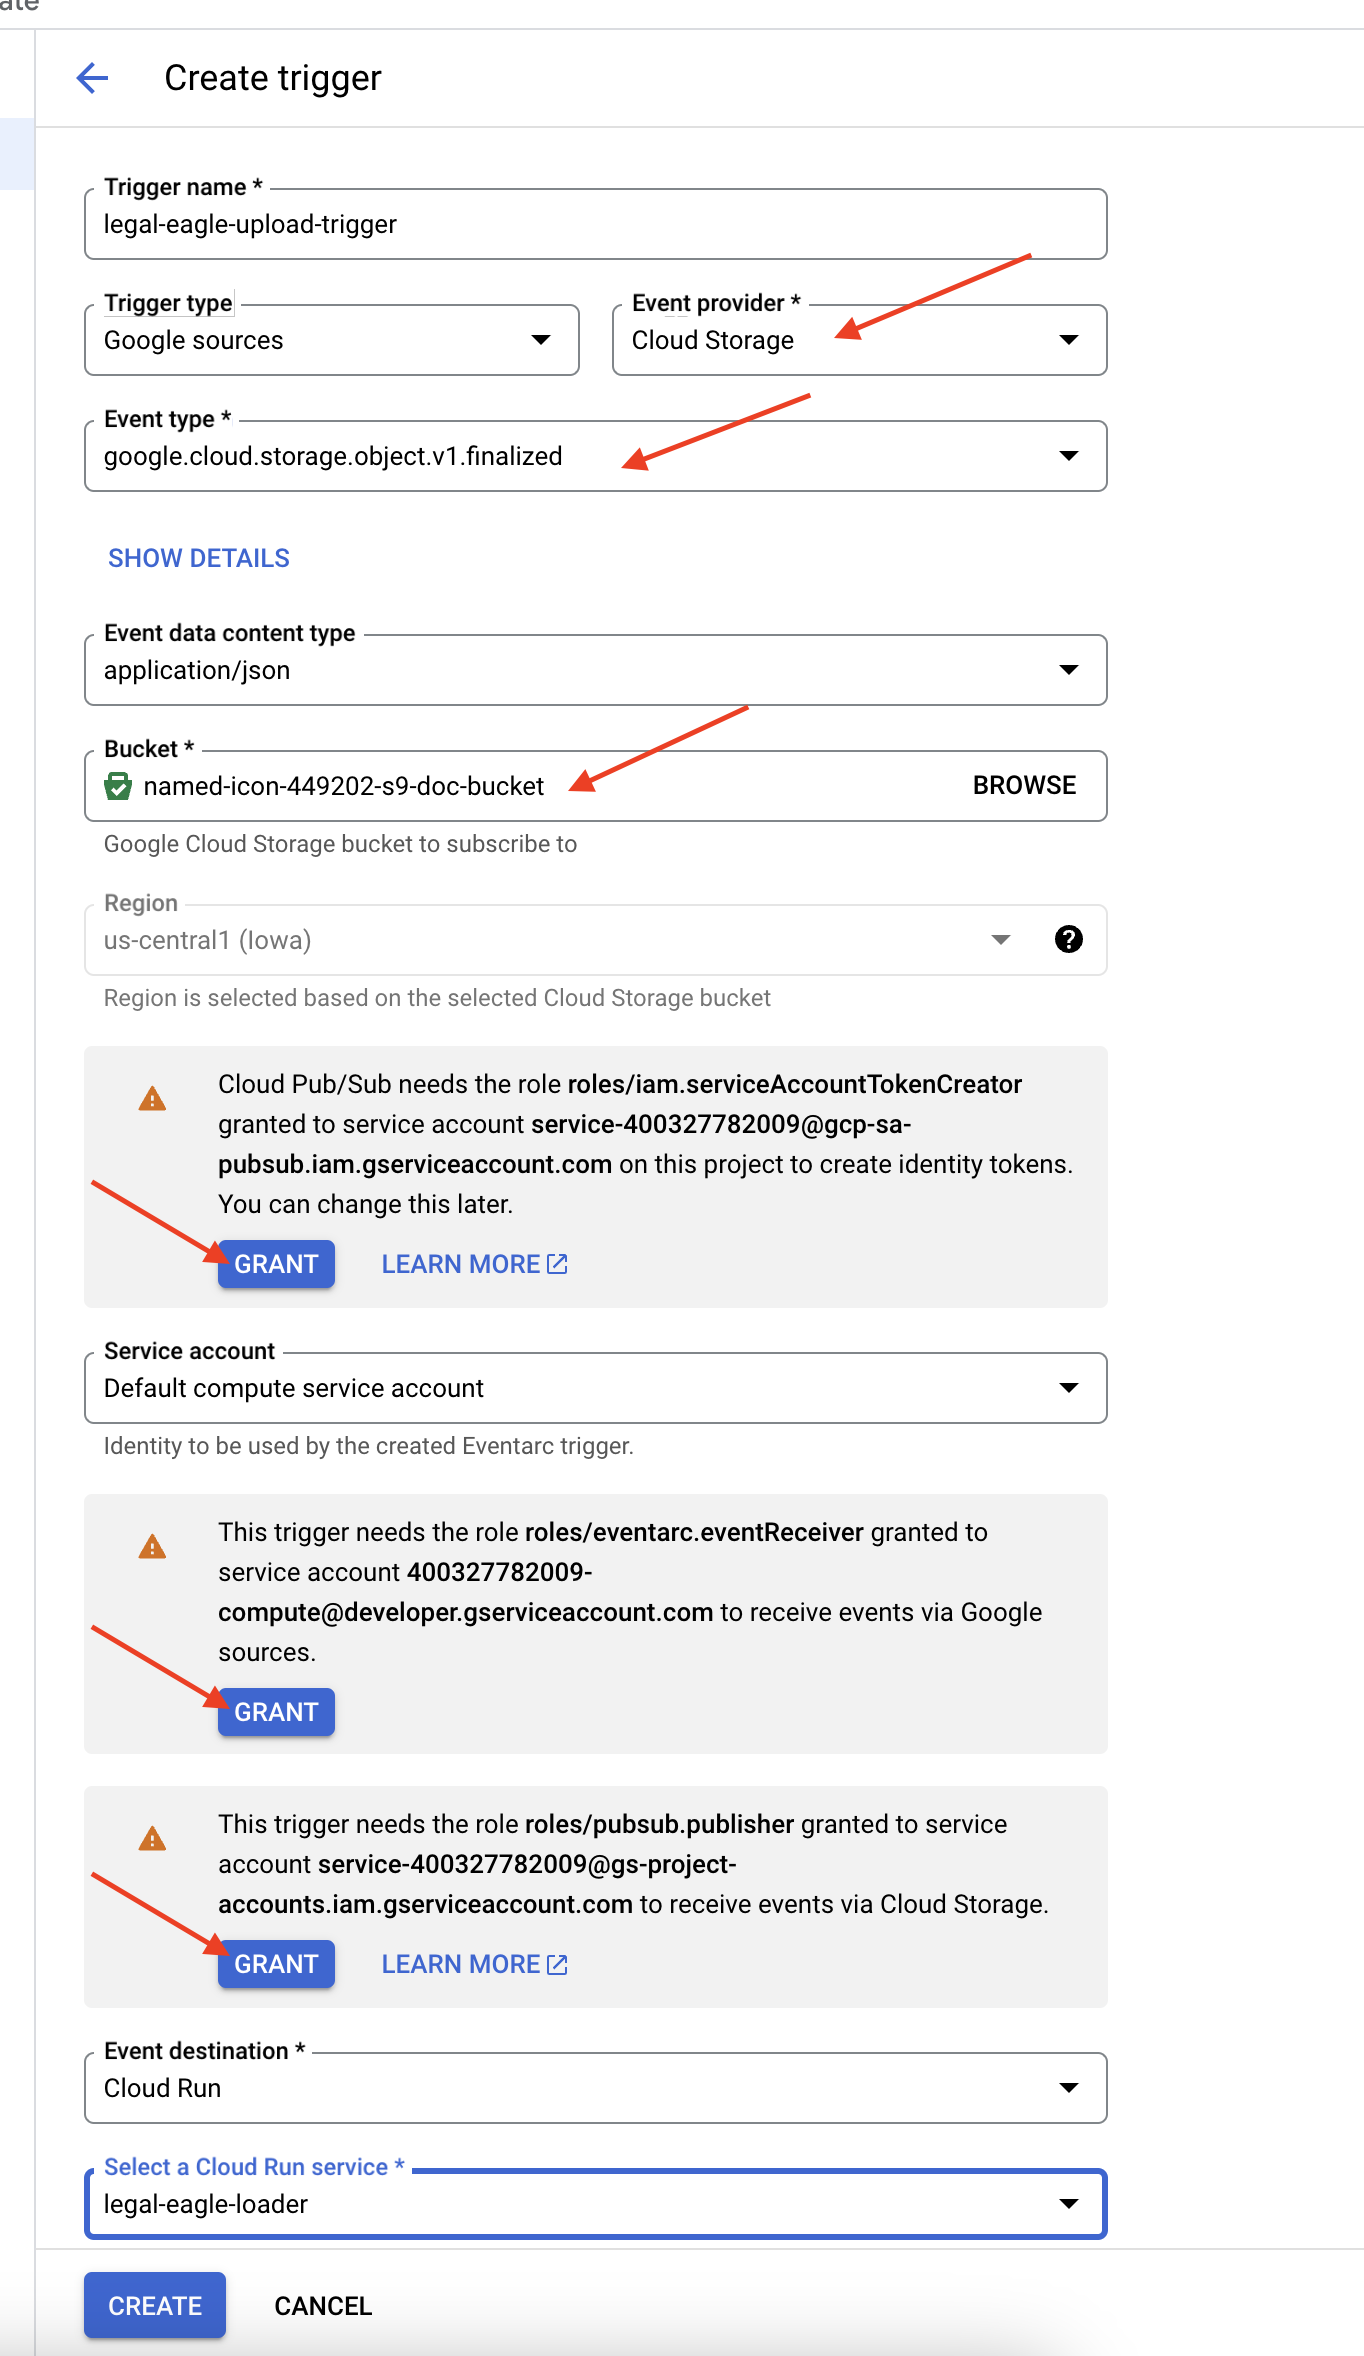
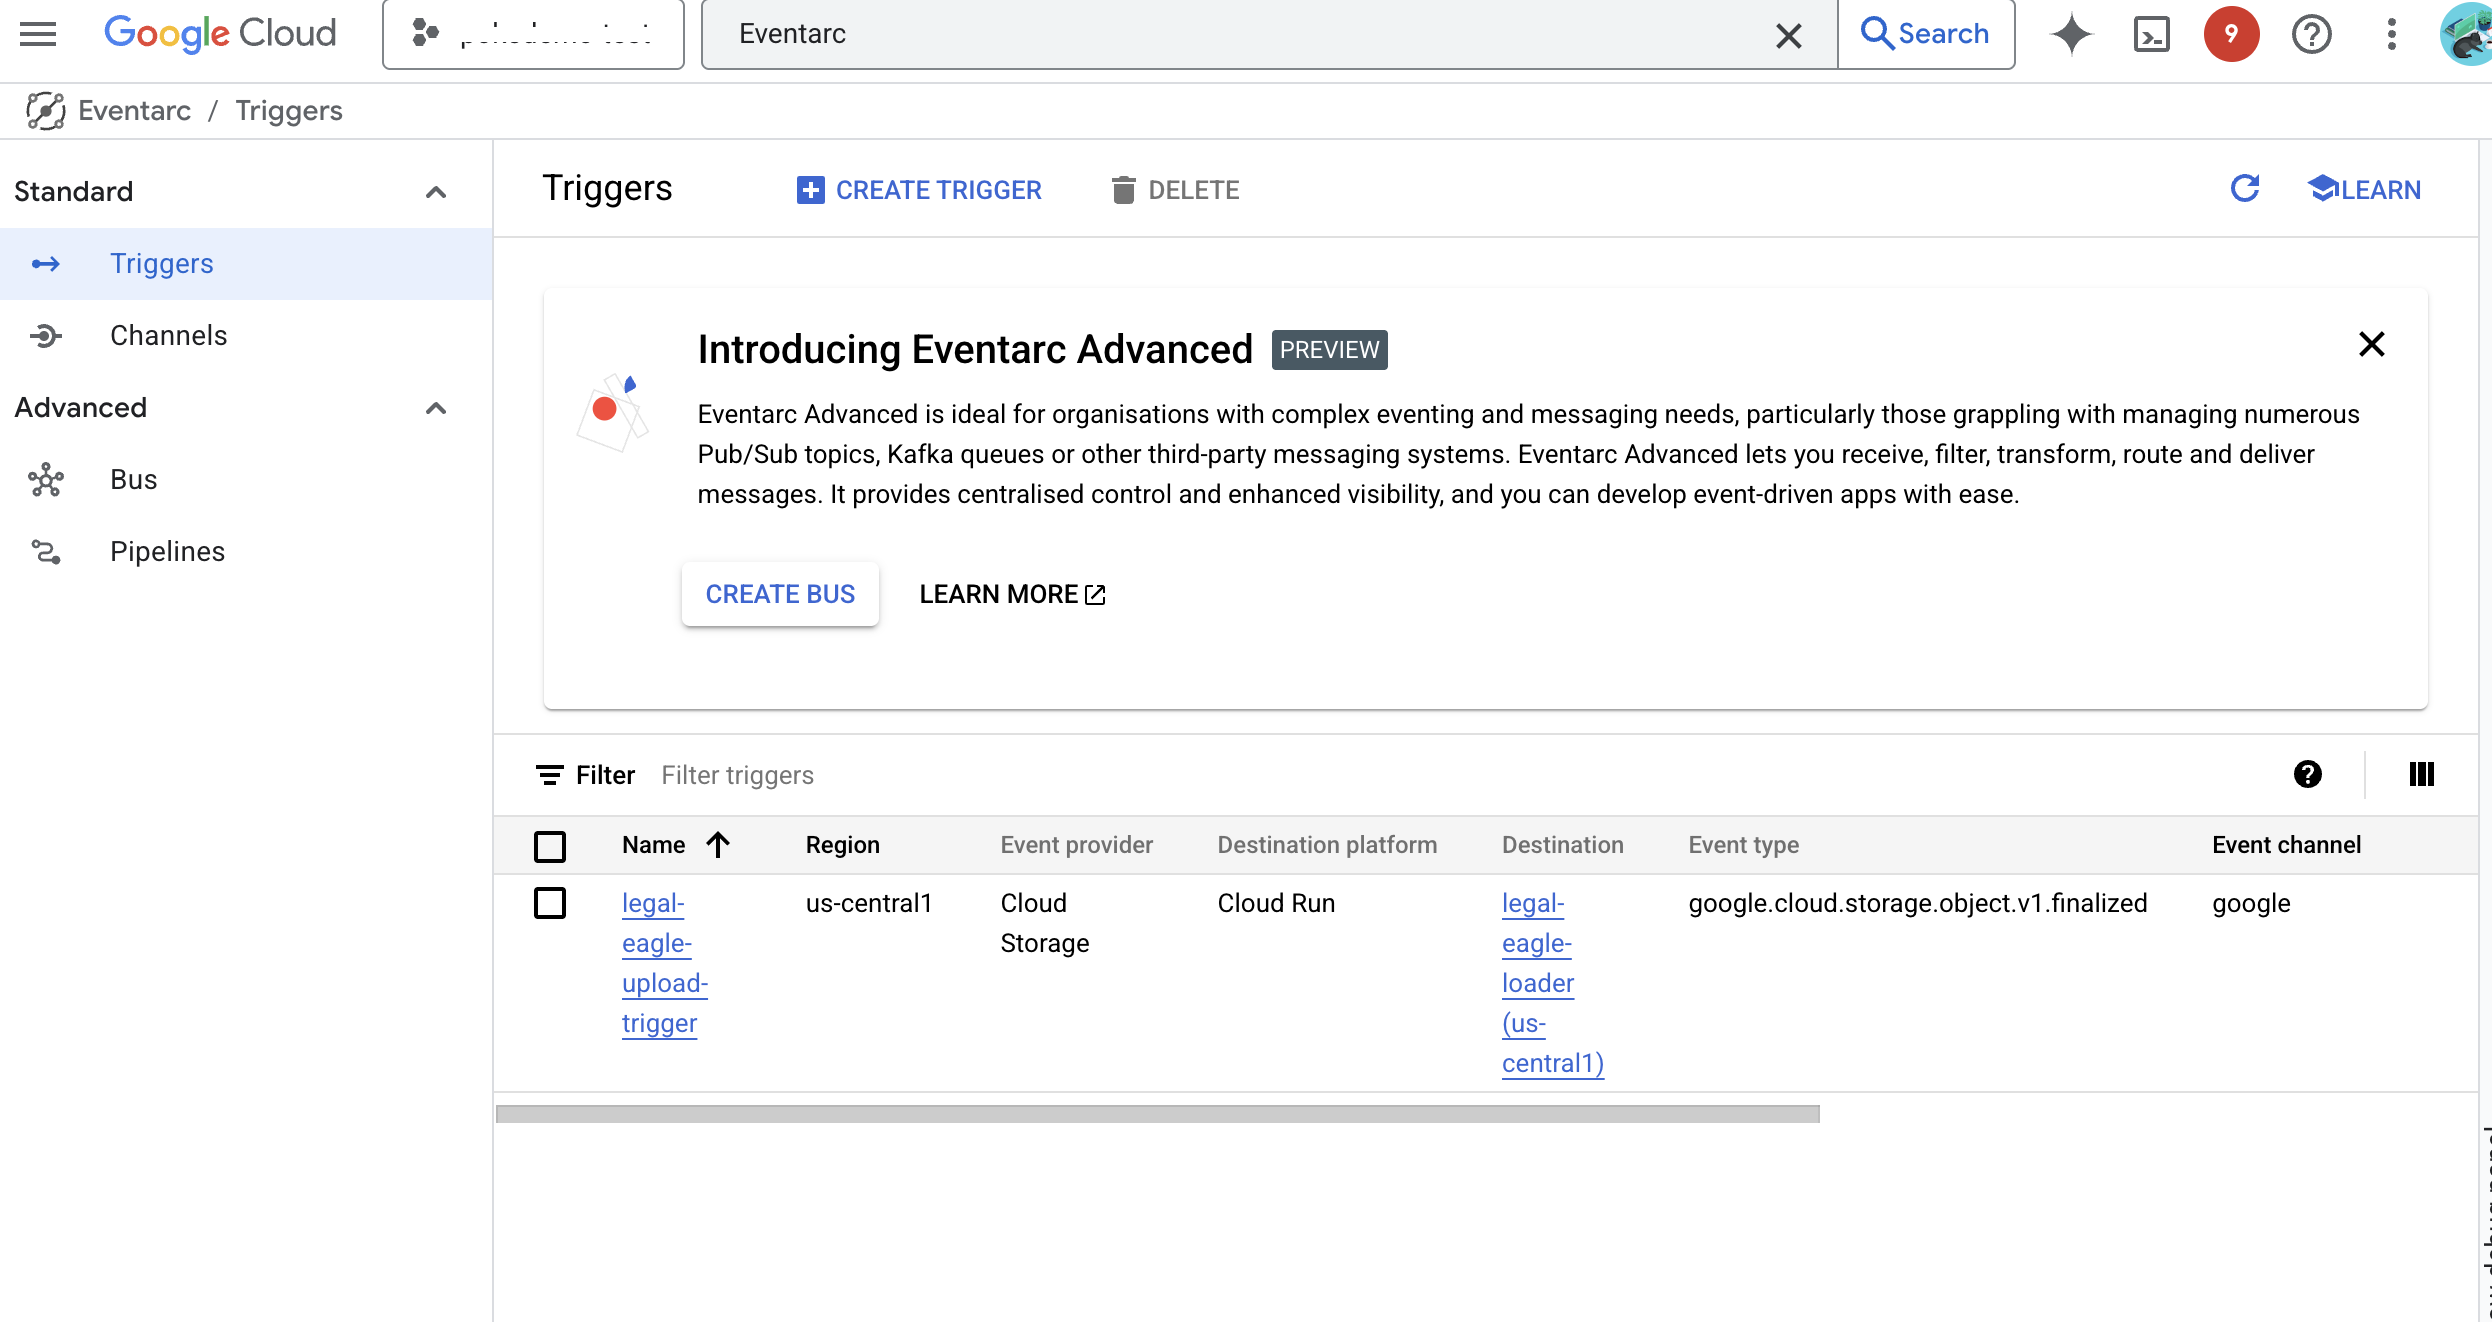
👉 在 Google Cloud 控制台中,前往 EventArc 下的触发器。点击“+ 创建触发器”。👉 配置 Eventarc 触发器:
- 触发器名称:
legal-eagle-upload-trigger。 - TriggerType:Google 来源
- 事件提供方:选择 Cloud Storage。
- 活动类型:选择
google.cloud.storage.object.v1.finalized - Cloud Storage 存储分区:从下拉菜单中选择您的 GCS 存储分区。
- 目标类型:“Cloud Run 服务”。
- 服务:选择
legal-eagle-loader。 - 区域:
us-central1 - 路径:暂时将此项留空。
- 授予页面上提示的所有权限
👉 点击创建。Eventarc 现在将设置触发器。
Cloud Run 服务需要获得从各种组件读取文件的权限。我们需要向该服务的服务账号授予其所需的权限。
12. 将法律文件上传到 GCS 存储分区
👉 将法院诉讼案文件上传到您的 GCS 存储分区。请记得替换为您的存储分区名称。
export DOC_BUCKET_NAME=$(gcloud storage buckets list --format="value(name)" | grep doc-bucket)
gsutil cp ~/legal-eagle/court_cases/case-02.txt gs://$DOC_BUCKET_NAME/
gsutil cp ~/legal-eagle/court_cases/case-03.txt gs://$DOC_BUCKET_NAME/
gsutil cp ~/legal-eagle/court_cases/case-06.txt gs://$DOC_BUCKET_NAME/
监控 Cloud Run 服务日志,前往 Cloud Run -> 您的服务 legal-eagle-loader ->“日志”。检查日志中是否包含成功处理消息,包括:
xxx
POST200130 B8.3 sAPIs-Google; (+https://developers.google.com/webmasters/APIs-Google.html) https://legal-eagle-loader-bmngrueyta-uc.a.run.app/?__GCP_CloudEventsMode=GCS_NOTIFICATION
xxx
POST200130 B520 msAPIs-Google; (+https://developers.google.com/webmasters/APIs-Google.html) https://legal-eagle-loader-bmngrueyta-uc.a.run.app/?__GCP_CloudEventsMode=GCS_NOTIFICATION
xxx
POST200130 B514 msAPIs-Google; (+https://developers.google.com/webmasters/APIs-Google.html) https://legal-eagle-loader-bmngrueyta-uc.a.run.app/?__GCP_CloudEventsMode=GCS_NOTIFICATION
根据日志记录设置的速度,您还可以在此处看到更详细的日志
    "CloudEvent received:"
    "New file detected in bucket:"
    "File content downloaded. Processing..."
    "Text split into ... chunks."
    "File processing and Firestore upsert complete..."
在日志中查找任何错误消息,并根据需要进行问题排查。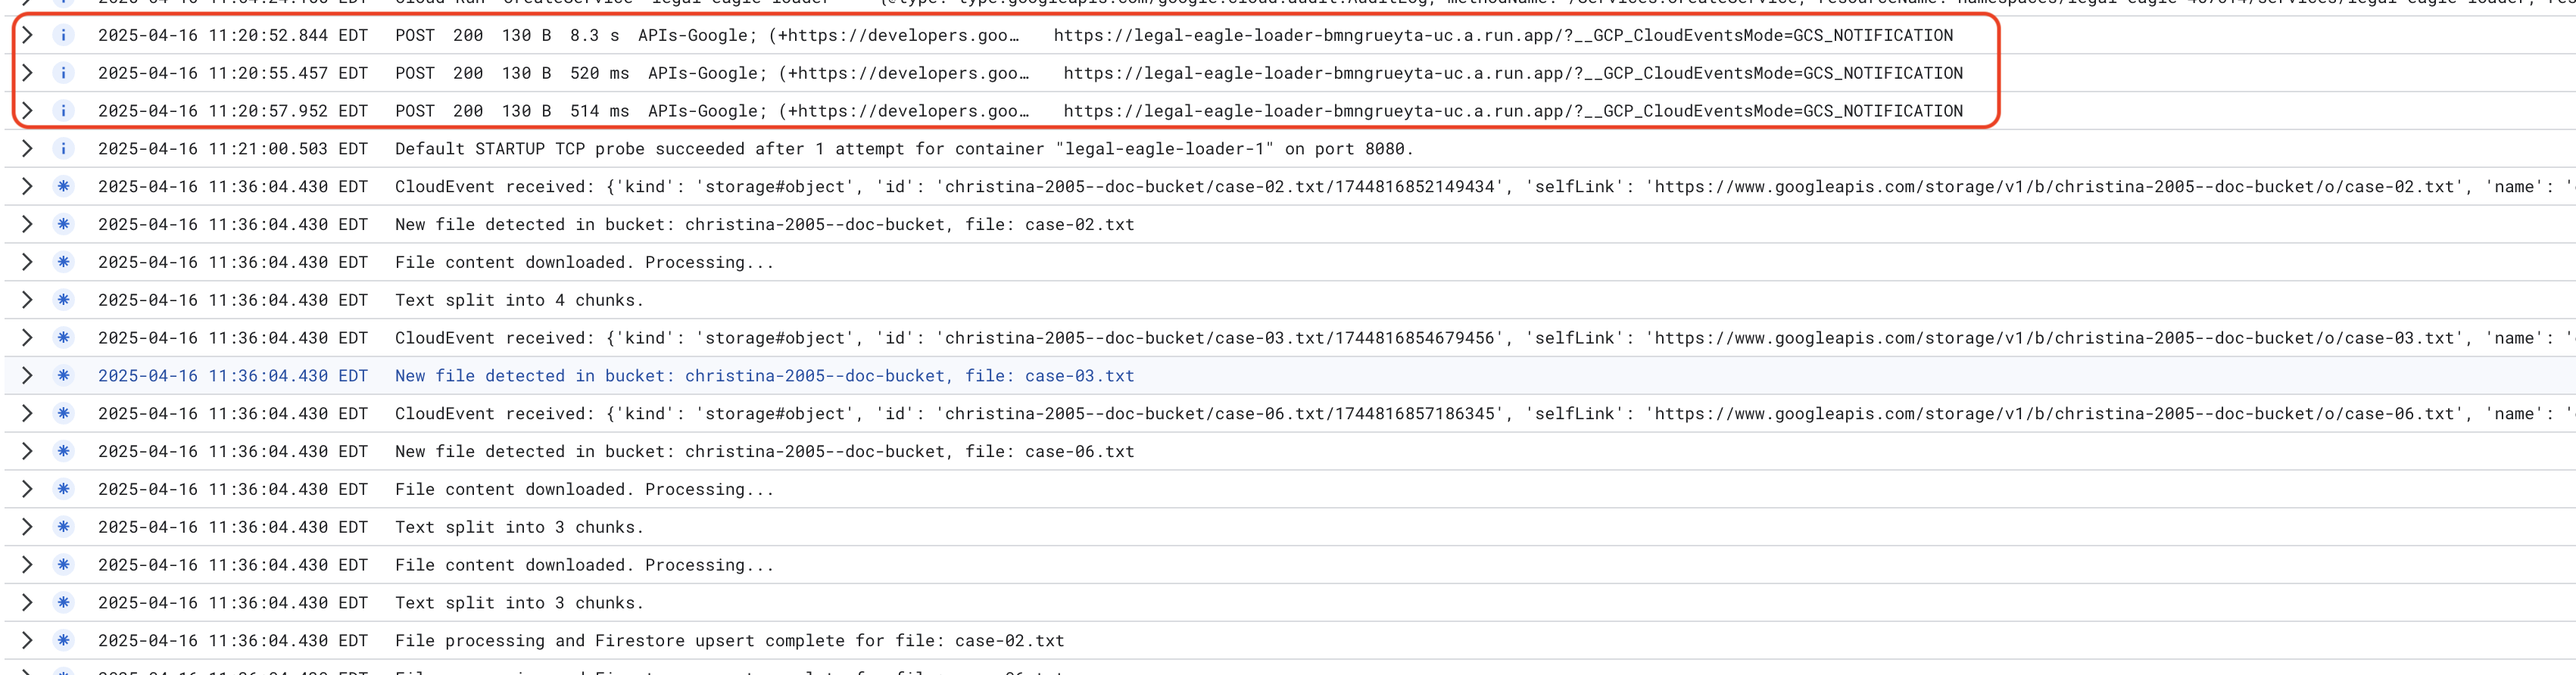
👉 验证 Firestore 中的数据。然后打开 legal_documents 集合。
👉 您应该会在集合中看到新创建的文档。每个文档将代表您上传的文件中的一段文本,并包含:
metadata: currently empty
original_text_chunk: The text chunk content.
embedding_: A list of floating-point numbers (the Vertex AI embedding).
13. 实现 RAG
LangChain 是一个功能强大的框架,旨在简化依托大语言模型 (LLM) 的应用开发流程。LangChain 提供了一个高级别抽象层,让您无需直接处理 LLM API、提示工程和数据处理的复杂性。它提供预构建的组件和工具,用于执行以下任务:连接到各种 LLM(例如 OpenAI、Google 或其他公司的 LLM)、构建复杂的操作链(例如先检索数据再进行总结),以及管理对话记忆。
对于 RAG 而言,LangChain 中的向量存储区对于实现 RAG 的检索方面至关重要。它们是专门设计的数据库,可高效存储和查询向量嵌入,其中语义上相似的文本会映射到向量空间中彼此接近的点。LangChain 会处理底层管道,让开发者能够专注于 RAG 应用的核心逻辑和功能。这可显著缩短开发时间并降低开发复杂性,让您能够快速设计原型并部署基于 RAG 的应用,同时充分利用 Google Cloud 基础架构的稳健性和可伸缩性。
了解 LangChain 后,您现在需要更新 webapp 文件夹下的 legal.py 文件,以实现 RAG。这样一来,LLM 便能够在提供回答之前在 Firestore 中搜索相关文档。
👉 从 langchain 和 vertexai 导入 FirestoreVectorStore 和其他必需的模块。将以下内容添加到当前 legal.py
from langchain_google_vertexai import VertexAIEmbeddings
from langchain_google_firestore import FirestoreVectorStore
👉 初始化 Vertex AI 和嵌入模型。您将使用 text-embedding-004。在导入模块后立即添加以下代码。
PROJECT_ID = os.environ.get("GOOGLE_CLOUD_PROJECT")  # Get project ID from env
embedding_model = VertexAIEmbeddings(
    model_name="text-embedding-004" ,
    project=PROJECT_ID,)
👉 创建指向 legal_documents 集合的 FirestoreVectorStore,使用已初始化的嵌入模型并指定内容和嵌入字段。将此代码添加到之前的嵌入模型代码之后。
COLLECTION_NAME = "legal_documents"
# Create a vector store
vector_store = FirestoreVectorStore(
    collection="legal_documents",
    embedding_service=embedding_model,
    content_field="original_text",
    embedding_field="embedding",
)
👉 定义一个名为 search_resource 的函数,该函数接受查询,使用 vector_store.similarity_search 执行相似度搜索,并返回合并后的结果。
def search_resource(query):
    results = []
    results = vector_store.similarity_search(query, k=5)

    combined_results = "\n".join([result.page_content for result in results])
    print(f"==>{combined_results}")
    return combined_results
👉 替换 ask_llm 函数,并使用 search_resource 函数根据用户查询检索相关上下文。
def ask_llm(query):
    try:
        query_message = {
            "type": "text",
            "text": query,
        }
        relevant_resource = search_resource(query)

        input_msg = HumanMessage(content=[query_message])
        prompt_template = ChatPromptTemplate.from_messages(
            [
                SystemMessage(
                    content=(
                        "You are a helpful assistant, and you are with the attorney in a courtroom, you are helping him to win the case by providing the information he needs "
                        "Don't answer if you don't know the answer, just say sorry in a funny way possible"
                        "Use high engergy tone, don't use more than 100 words to answer"
                        f"Here is some context that is relevant to the question {relevant_resource} that you might use"
                    )
                ),
                input_msg,
            ]
        )
        prompt = prompt_template.format()

        response = llm.invoke(prompt)
        print(f"response: {response}")
        return response
    except Exception as e:
        print(f"Error sending message to chatbot: {e}") # Log this error too!
        return f"Unable to process your request at this time. Due to the following reason: {str(e)}"
👉 可选:西班牙语版本
Sustituye el siguiente texto como se indica: You are a helpful assistant, to You are a helpful assistant that speaks Spanish,
👉 在 legal.py 中实现 RAG 后,您应先在本地对其进行测试,然后再进行部署,使用以下命令运行应用:
cd ~/legal-eagle/webapp
source env/bin/activate
python main.py
👉 使用 webpreview 访问应用,与助理对话,然后输入 ctrl+c 以退出本地运行的进程。运行 deactivate 以退出虚拟环境。
deactivate
👉 将 Web 应用部署到 Cloud Run 的方式与加载器函数类似。您将构建 Docker 映像、为其添加标记并将其推送到 Artifact Registry:
export PROJECT_ID=$(gcloud config get project)
docker build -t gcr.io/${PROJECT_ID}/legal-eagle-webapp .
docker tag gcr.io/${PROJECT_ID}/legal-eagle-webapp us-central1-docker.pkg.dev/${PROJECT_ID}/my-repository/legal-eagle-webapp
docker push us-central1-docker.pkg.dev/${PROJECT_ID}/my-repository/legal-eagle-webapp
👉 现在,您可以将 Web 应用部署到 Google Cloud 了。在终端中,运行以下命令:
export PROJECT_ID=$(gcloud config get project)
gcloud run deploy legal-eagle-webapp \
  --image us-central1-docker.pkg.dev/$PROJECT_ID/my-repository/legal-eagle-webapp \
  --region us-central1 \
  --set-env-vars=GOOGLE_CLOUD_PROJECT=${PROJECT_ID}  \
  --allow-unauthenticated
在 Google Cloud 控制台中前往 Cloud Run,验证部署。您应该会看到列出了一个名为 legal-eagle-webapp 的新服务。
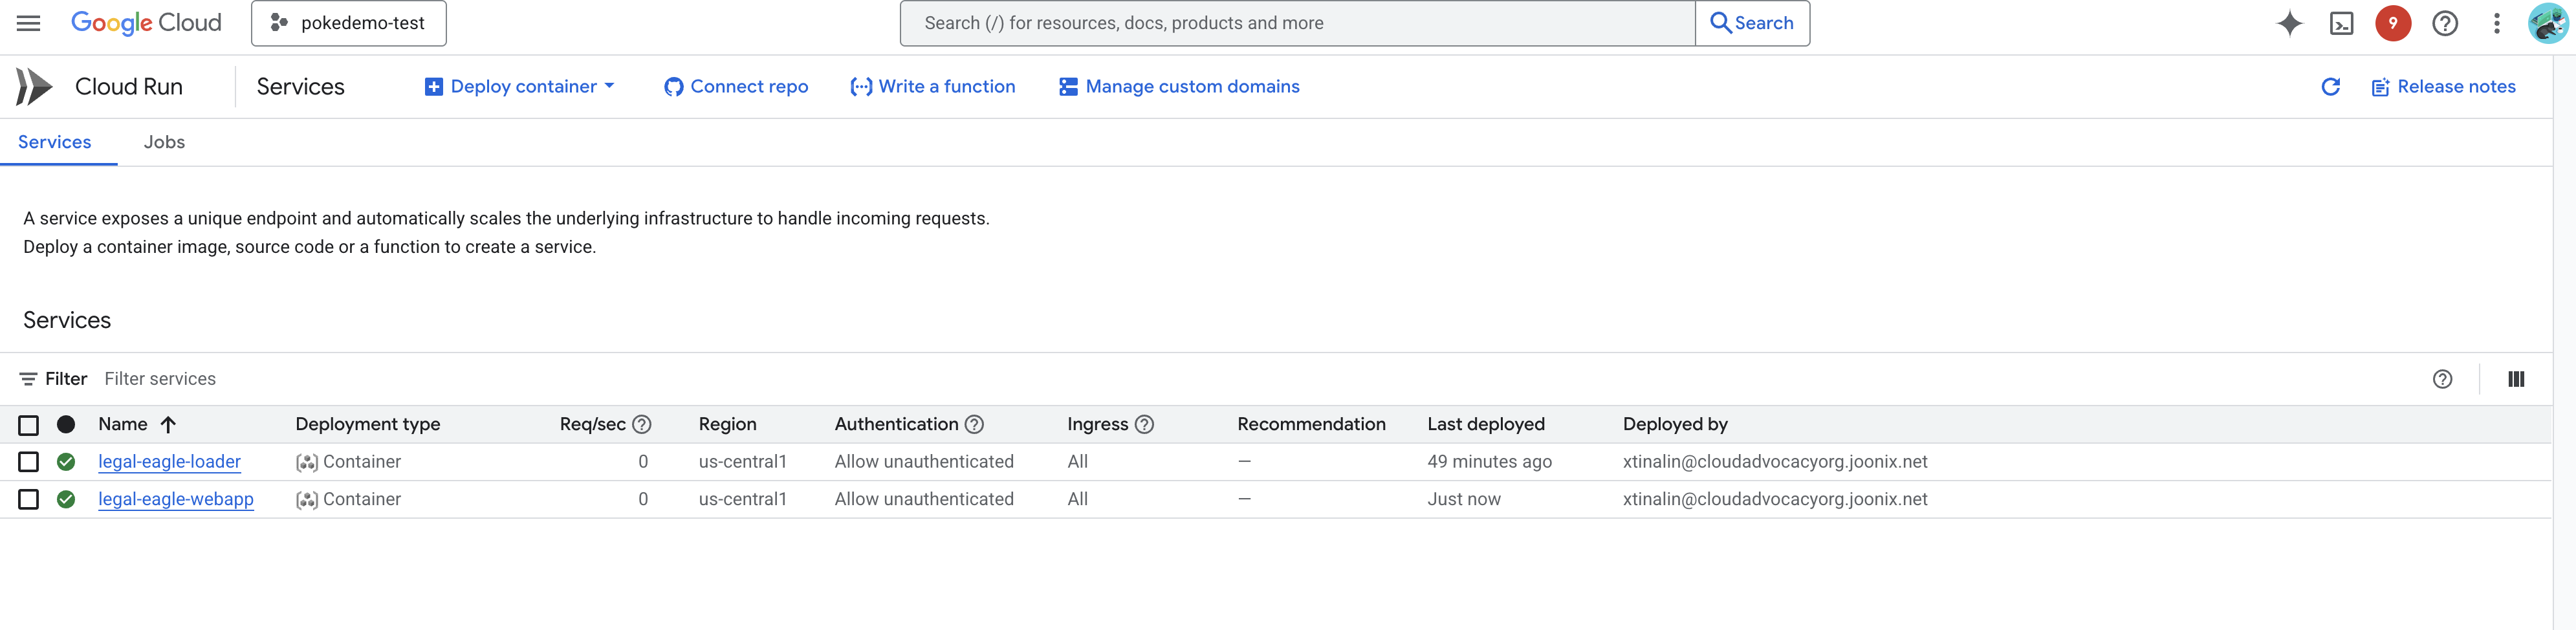
点击服务进入其详情页面,您可以在顶部找到已部署的网址。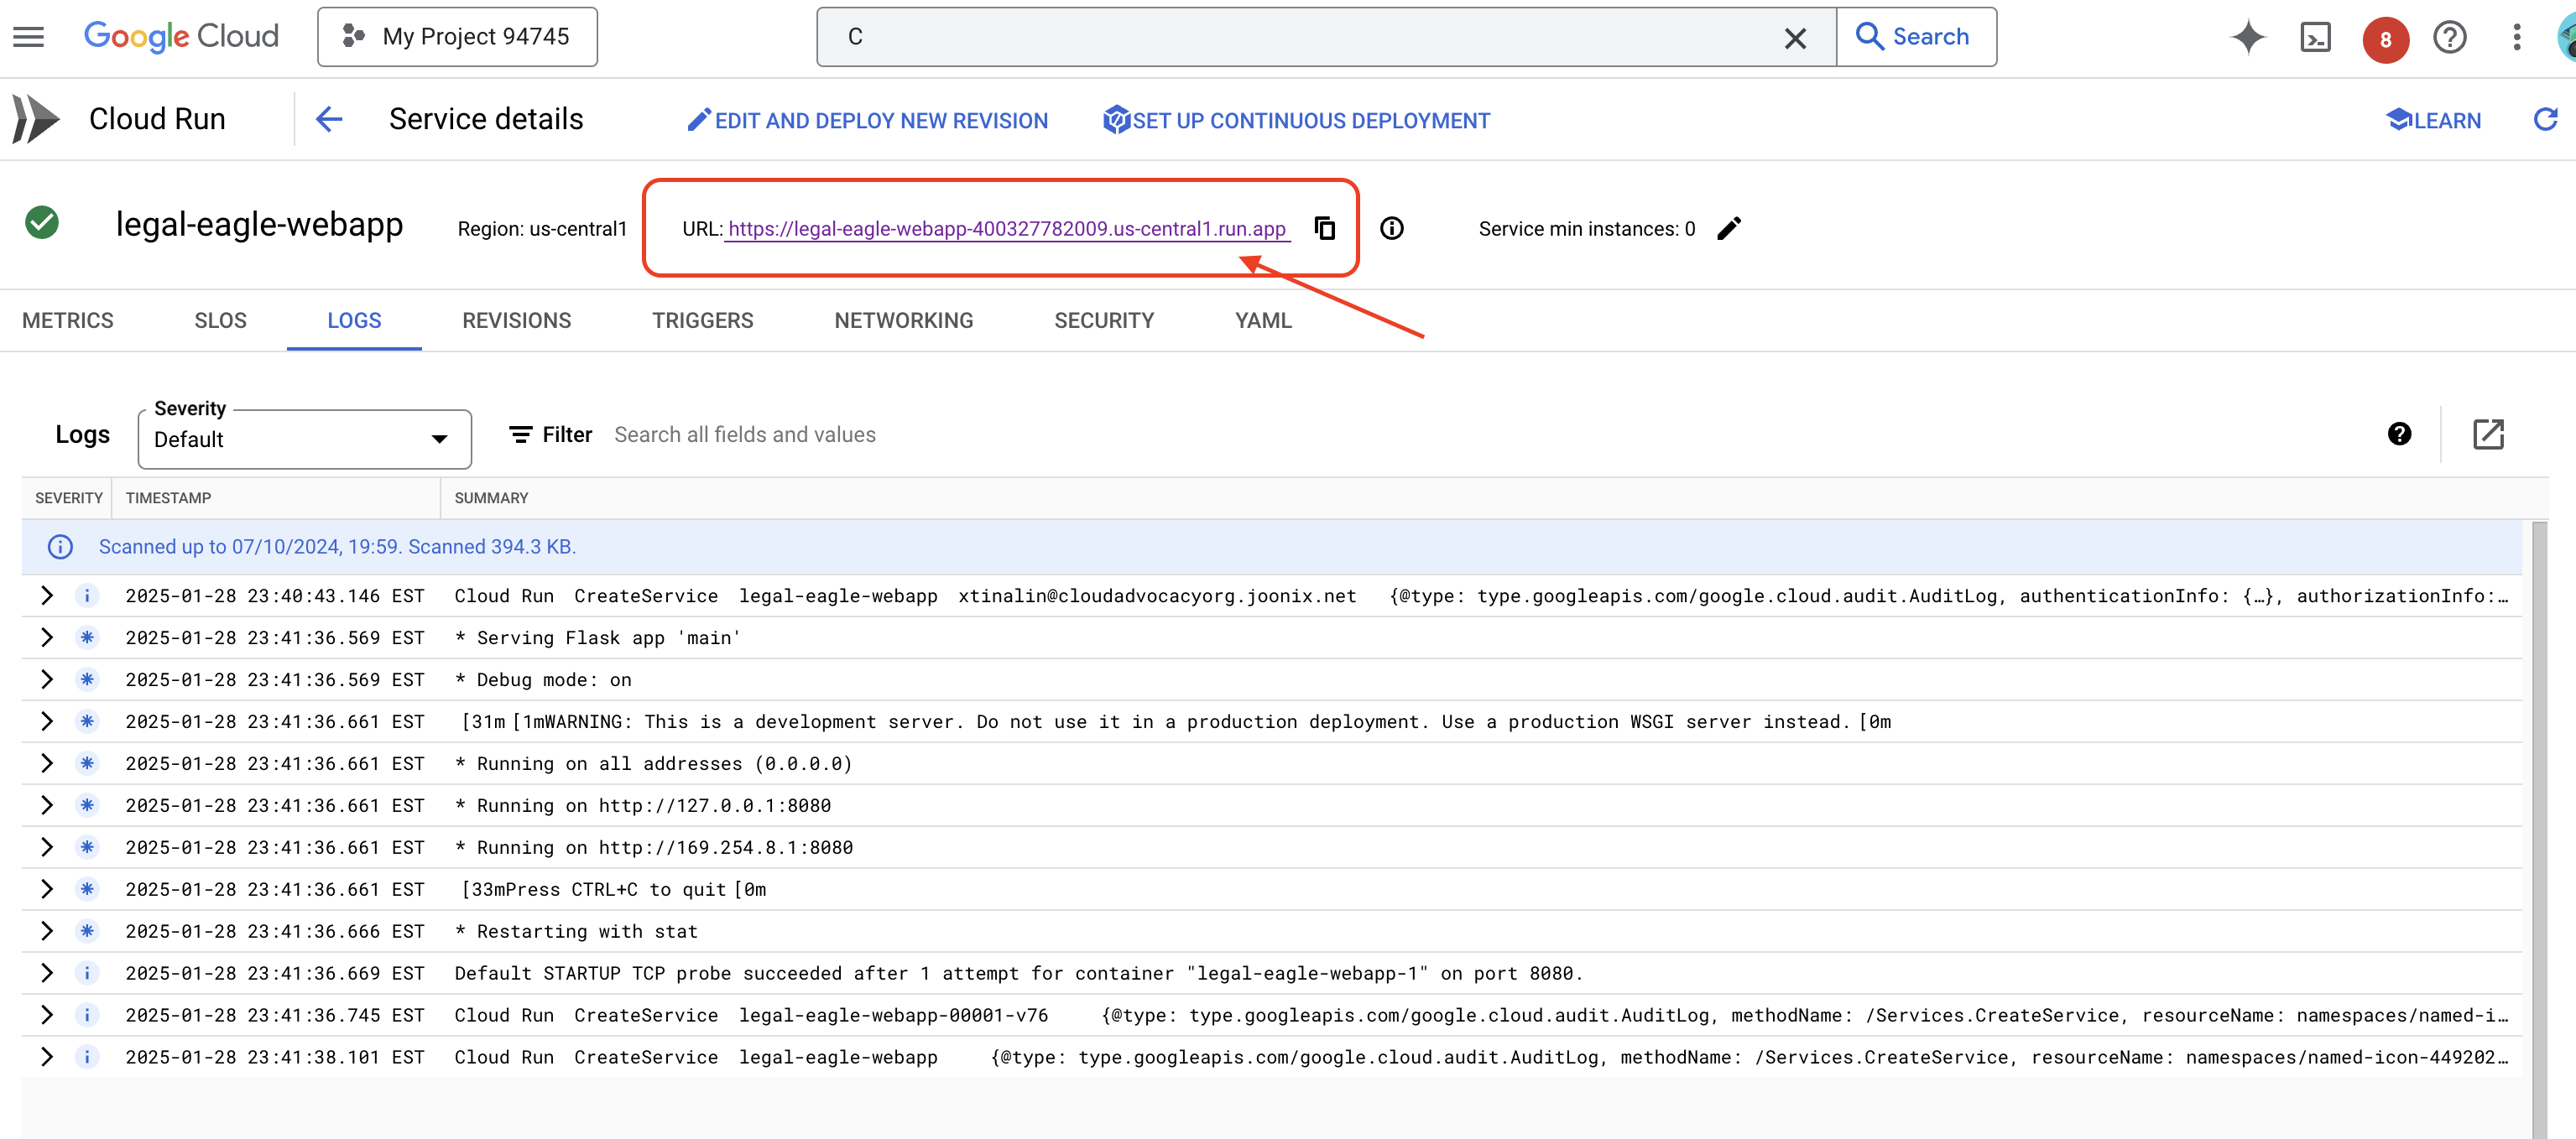
👉 现在,在新浏览器标签页中打开已部署的网址。您可以与法律助理互动,并询问与您已加载的诉讼案(位于 court_cases 文件夹下)相关的问题:
- Michael Brown 被判处了多少年监禁?
- Jane Smith 的行为导致了多少未经授权的费用?
- 邻居的证词在 Emily White 案的调查中发挥了什么作用?
👉 可选:西班牙语版本
- ¿A cuántos años de prisión fue sentenciado Michael Brown?
- ¿Cuánto dinero en cargos no autorizados se generó como resultado de las acciones de Jane Smith?
- ¿Qué papel jugaron los testimonios de los vecinos en la investigación del caso de Emily White?
您应该会注意到,回答现在更加准确,并且基于您上传的法律文件的内容,这充分展示了 RAG 的强大功能!
恭喜您完成本工作坊!您已成功使用 LLM、LangChain 和 Google Cloud 构建并部署了法律文件分析应用。您已了解如何提取和处理法律文件、使用 RAG 通过相关信息增强 LLM 回答,以及将应用部署为无服务器服务。这些知识和构建的应用将帮助您进一步探索 LLM 在法律任务方面的强大功能。做得好!”
14. 挑战
多种媒体类型::
如何注入和处理各种媒体类型(例如庭审视频和录音),并提取相关文本。
线上资源:
如何实时处理网页等在线资源。