
1. Introduction
What is MediaPipe?
MediaPipe Solutions lets you apply machine-learning (ML) solutions to your apps. It provides a framework for configuring prebuilt processing pipelines that deliver immediate, engaging, and useful output to users. You can even customize these solutions with MediaPipe Model Maker to update the default models.
Image classification is one of several ML vision tasks that MediaPipe Solutions has to offer. MediaPipe Tasks is available for Android, iOS, Python (including the Raspberry Pi!), and the web.
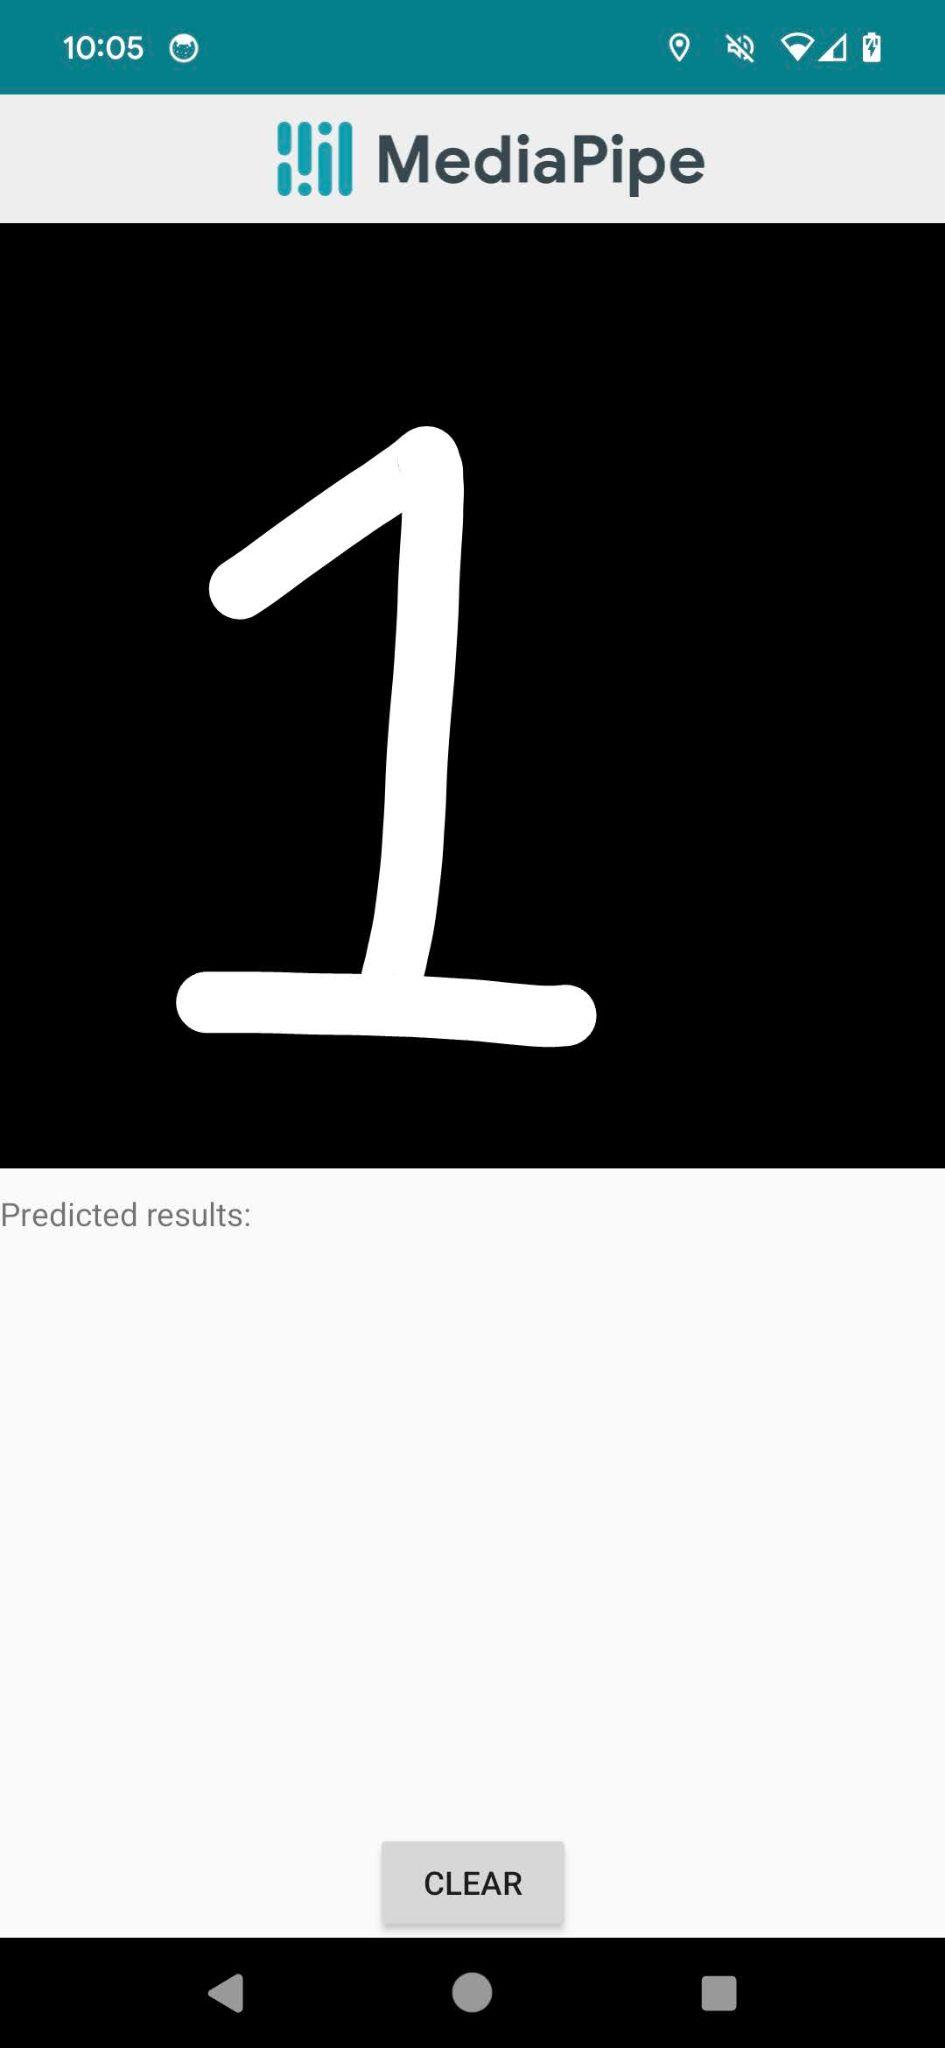
In this Codelab, you will start with an Android app that lets you draw out numerical digits on the screen, then you will add functionality that classifies those drawn digits as a single value from 0 to 9.
What you'll learn
- How to incorporate an image classification task in an Android app with MediaPipe Tasks.
What you'll need
- An installed version of Android Studio (this codelab was written and tested with Android Studio Giraffe).
- An Android device or emulator for running the app.
- Basic knowledge of Android development (this isn't "Hello World", but it's not too far off!).
2. Add MediaPipe Tasks to the Android app
Download the Android starter app
This codelab will start with a pre-made sample that lets you draw on the screen. You can find that starting app in the official MediaPipe Samples repo here. Clone the repo or download the zipfile by clicking Code > Download ZIP.
Import the app to Android Studio
- Open Android Studio.
- From the Welcome to Android Studio screen, select Open in the top right corner.

- Navigate to where you cloned or downloaded the repository and open the codelabs/digitclassifier/android/start directory.
- Verify that everything opened correctly by clicking on the green run arrow (
 ) in the top right of Android Studio
 - You should see the app open up with a black screen that you can draw on, as well as a Clear button to reset that screen. While you can draw on that screen, it doesn't do much else, so we'll start fixing that now.
Model
When you first run the app, you might notice that a file named mnist.tflite is downloaded and stored in your app's assets directory. For the sake of simplicity, we have already taken a known model, MNIST, which classifies digits, and added it to the app through the use of the download_models.gradle script in the project. If you decide to train your own custom model, such as one for handwritten letters, then you would remove the download_models.gradle file, delete the reference to it in your app level build.gradle file, and change the name of the model later in the code (specifically in the DigitClassifierHelper.kt file).
Update build.gradle
Before you can start using MediaPipe Tasks, you need to import the library.
- Open the build.gradle file located in your app module, then scroll down to the dependencies block.
- You should see a comment at the bottom of that block that says // STEP 1 Dependency Import.
- Replace that line with the following implementation
implementation("com.google.mediapipe:tasks-vision:latest.release")
- Click on the Sync Now button that appears in the banner at the top of Android Studio to download this dependency.
3. Create a MediaPipe Tasks digit classifier helper
For the next step you will fill in a class that will do the heavy lifting for your machine learning classification. Open the DigitClassifierHelper.kt and let's get started!
- Find the comment at the top of the class that says // STEP 2 Create listener
- Replace that line with the following code. This will create a listener that will be used to pass results from the DigitClassifierHelper class back to wherever is listening for those results (in this case it will be your DigitCanvasFragment class, but we'll get there soon)
// STEP 2 Create listener

interface DigitClassifierListener {
    fun onError(error: String)
    fun onResults(
        results: ImageClassifierResult,
        inferenceTime: Long
    )
}
- You will also need to accept a DigitClassifierListener as an optional parameter for the class:
class DigitClassifierHelper(
    val context: Context,
    val digitClassifierListener: DigitClassifierListener?
) {
- Going down to the line that says // STEP 3 define classifier, add the following line to create a placeholder for the ImageClassifier that will be used for this app:
// STEP 3 define classifier
private var digitClassifier: ImageClassifier? = null
- Add the following function where you see the comment // STEP 4 set up classifier:
// STEP 4 set up classifier
private fun setupDigitClassifier() {

    val baseOptionsBuilder = BaseOptions.builder()
        .setModelAssetPath("mnist.tflite")

    // Describe additional options
    val optionsBuilder = ImageClassifierOptions.builder()
        .setRunningMode(RunningMode.IMAGE)
        .setBaseOptions(baseOptionsBuilder.build())

    try {
        digitClassifier =
            ImageClassifier.createFromOptions(
                context,
                optionsBuilder.build()
            )
    } catch (e: IllegalStateException) {
        digitClassifierListener?.onError(
            "Image classifier failed to initialize. See error logs for " +
                    "details"
        )
        Log.e(TAG, "MediaPipe failed to load model with error: " + e.message)
    }
}
There's a few things going on in the above section, so let's look at smaller parts to really understand what's happening.
val baseOptionsBuilder = BaseOptions.builder()
    .setModelAssetPath("mnist.tflite")

// Describe additional options
val optionsBuilder = ImageClassifierOptions.builder()
    .setRunningMode(RunningMode.IMAGE)
    .setBaseOptions(baseOptionsBuilder.build())
This block will define the parameters used by the ImageClassifier. This includes the model stored within your app (mnist.tflite) under BaseOptions and the RunningMode under ImageClassifierOptions, which in this case is IMAGE, but VIDEO and LIVE_STREAM are additional available options. Other available parameters are MaxResults, which limits the model to returning a maximum number of results, and the ScoreThreshold, which sets the minimum confidence the model needs to have in a result before returning it.
try {
    digitClassifier =
        ImageClassifier.createFromOptions(
            context,
            optionsBuilder.build()
        )
} catch (e: IllegalStateException) {
    digitClassifierListener?.onError(
        "Image classifier failed to initialize. See error logs for " +
                "details"
    )
    Log.e(TAG, "MediaPipe failed to load model with error: " + e.message)
}
After creating your configuration options, you can create your new ImageClassifier by passing in a context and the options. If something goes wrong with that initialization process, an error will be returned through your DigitClassifierListener.
- Since we will want to initialize the ImageClassifier before it's used, you can add an init block to call setupDigitClassifier().
init {
    setupDigitClassifier()
}
- Finally, scroll down to the comment that says // STEP 5 create classify function and add the following code. This function will accept a Bitmap, which in this case is the drawn digit, convert it to a MediaPipe Image object (MPImage), and then classify that image using the ImageClassifier, as well as record how long inference takes, before returning those results over the DigitClassifierListener.
// STEP 5 create classify function
fun classify(image: Bitmap) {
    if (digitClassifier == null) {
        setupDigitClassifier()
    }

    // Convert the input Bitmap object to an MPImage object to run inference.
    // Rotating shouldn't be necessary because the text is being extracted from
    // a view that should always be correctly positioned.
    val mpImage = BitmapImageBuilder(image).build()

    // Inference time is the difference between the system time at the start and finish of the
    // process
    val startTime = SystemClock.uptimeMillis()

    // Run image classification using MediaPipe Image Classifier API
    digitClassifier?.classify(mpImage)?.also { classificationResults ->
        val inferenceTimeMs = SystemClock.uptimeMillis() - startTime
        digitClassifierListener?.onResults(classificationResults, inferenceTimeMs)
    }
}
And that's it for the helper file! In the next section you will fill in the final steps to start classifying your drawn numbers.
4. Run inference with MediaPipe Tasks
You can start this section by opening the DigitCanvasFragment class in Android Studio, which is where all of the work will happen.
- At the very bottom of this file you should see a comment that says // STEP 6 Set up listener. You will add the onResults() and onError() functions associated with the listener here.
// STEP 6 Set up listener
override fun onError(error: String) {
    activity?.runOnUiThread {
        Toast.makeText(requireActivity(), error, Toast.LENGTH_SHORT).show()
        fragmentDigitCanvasBinding.tvResults.text = ""
    }
}

override fun onResults(
    results: ImageClassifierResult,
    inferenceTime: Long
) {
    activity?.runOnUiThread {
        fragmentDigitCanvasBinding.tvResults.text = results
            .classificationResult()
            .classifications().get(0)
            .categories().get(0)
            .categoryName()

        fragmentDigitCanvasBinding.tvInferenceTime.text = requireActivity()
            .getString(R.string.inference_time, inferenceTime.toString())
    }
}
onResults() is particularly important as it will display the results received from the ImageClassifier. As this callback is triggered from a background thread, you will also need to run your UI updates on Android's UI thread.
- As you are adding new functions from an interface in the step above, you will also need to add the implementation declaration at the top of the class.
class DigitCanvasFragment : Fragment(), DigitClassifierHelper.DigitClassifierListener
- Towards the top of the class you should see a comment that says // STEP 7a Initialize classifier. This is where you will place the declaration for the DigitClassifierHelper.
// STEP 7a Initialize classifier.
private lateinit var digitClassifierHelper: DigitClassifierHelper
- Moving down to // STEP 7b Initialize classifier, you can initialize digitClassifierHelper within the onViewCreated() function.
// STEP 7b Initialize classifier
// Initialize the digit classifier helper, which does all of the
// ML work. This uses the default values for the classifier.
digitClassifierHelper = DigitClassifierHelper(
    context = requireContext(), digitClassifierListener = this
)
- For the last steps, find the comment // STEP 8a*: classify* and add the following code to call a new function that you will add in a moment. This code block will trigger classification when you lift your finger from the drawing area in the app.
// STEP 8a: classify
classifyDrawing()
- Finally, look for the comment // STEP 8b classify to add the new classifyDrawing() function. This will extract a bitmap from the canvas, then pass it to the DigitClassifierHelper to perform classification to receive the results in the onResults() interface function.
// STEP 8b classify
private fun classifyDrawing() {
    val bitmap = fragmentDigitCanvasBinding.digitCanvas.getBitmap()
    digitClassifierHelper.classify(bitmap)
}
5. Deploy and test the app
After all of that, you should have a working app that can classify drawn digits on the screen! Go ahead and deploy the app to either an Android Emulator or a physical Android device to test it.
- Click Run ( ) in the Android Studio toolbar to run the app.
- Draw any digit to the drawing pad and see if the app can recognize it. It should both display the digit that the model believes was drawn, as well as how long it took to predict that digit.
6. Congratulations!
You did it! In this codelab you have learned how to add image classification to an Android app, and specifically how to classify hand drawn digits using the MNIST model.
Next steps
- Now that you can classify digits, you may want to train your own model to classify drawn letters, or to classify animals, or an endless number of other items. You can find the documentation for training a new image classification model with MediaPipe Model Maker on the developers.google.com/mediapipe page.
- Learn about the other MediaPipe Tasks that are available for Android, including Face Landmark Detection, Gesture Recognition, and Audio Classification.
We're looking forward to all of the cool things you make!