
1. Introduction
In this tutorial, you'll build ClarityCam, a hands-free, voice-driven AI agent that can see the world and explain it to you. While ClarityCam is designed with accessibility at its core—providing a powerful tool for blind and low-vision users—the principles you'll learn are essential for creating any modern, general-purpose voice application.

This project is built on a powerful design philosophy called the Natively Adaptive Interface (NAI). Instead of treating accessibility as an afterthought, NAI makes it the foundation. With this approach, the AI agent is the interface—it adapts to different users, handles multimodal input like voice and vision, and proactively guides people based on their unique needs.
Building Your First AI Agent with NAI:

By the end of this session, you will be able to:
- Design with Accessibility as the Default: Apply Natively Adaptive Interface (NAI) principles to create AI systems that provide equivalent experiences for all users.
- Classify User Intent: Build a robust intent classifier that translates natural language commands into structured actions for your agent.
- Maintain Conversational Context: Implement short-term memory to enable your agent to understand follow-up questions and referential commands (e.g., "What color is it?").
- Engineer Effective Prompts: Craft focused, context-rich prompts for a multimodal model like Gemini to ensure accurate and reliable image analysis.
- Handle Ambiguity and Guide the User: Design graceful error handling for out-of-scope requests and proactively onboard users to build trust and confidence.
- Orchestrate a Multi-Agent System: Structure your application using a collection of specialized agents that collaborate to handle complex tasks like voice processing, analysis, and speech synthesis.
2. High-Level Design
At its core, ClarityCam is designed to be simple for the user but is powered by a sophisticated system of collaborating AI agents. Let's break down the architecture.

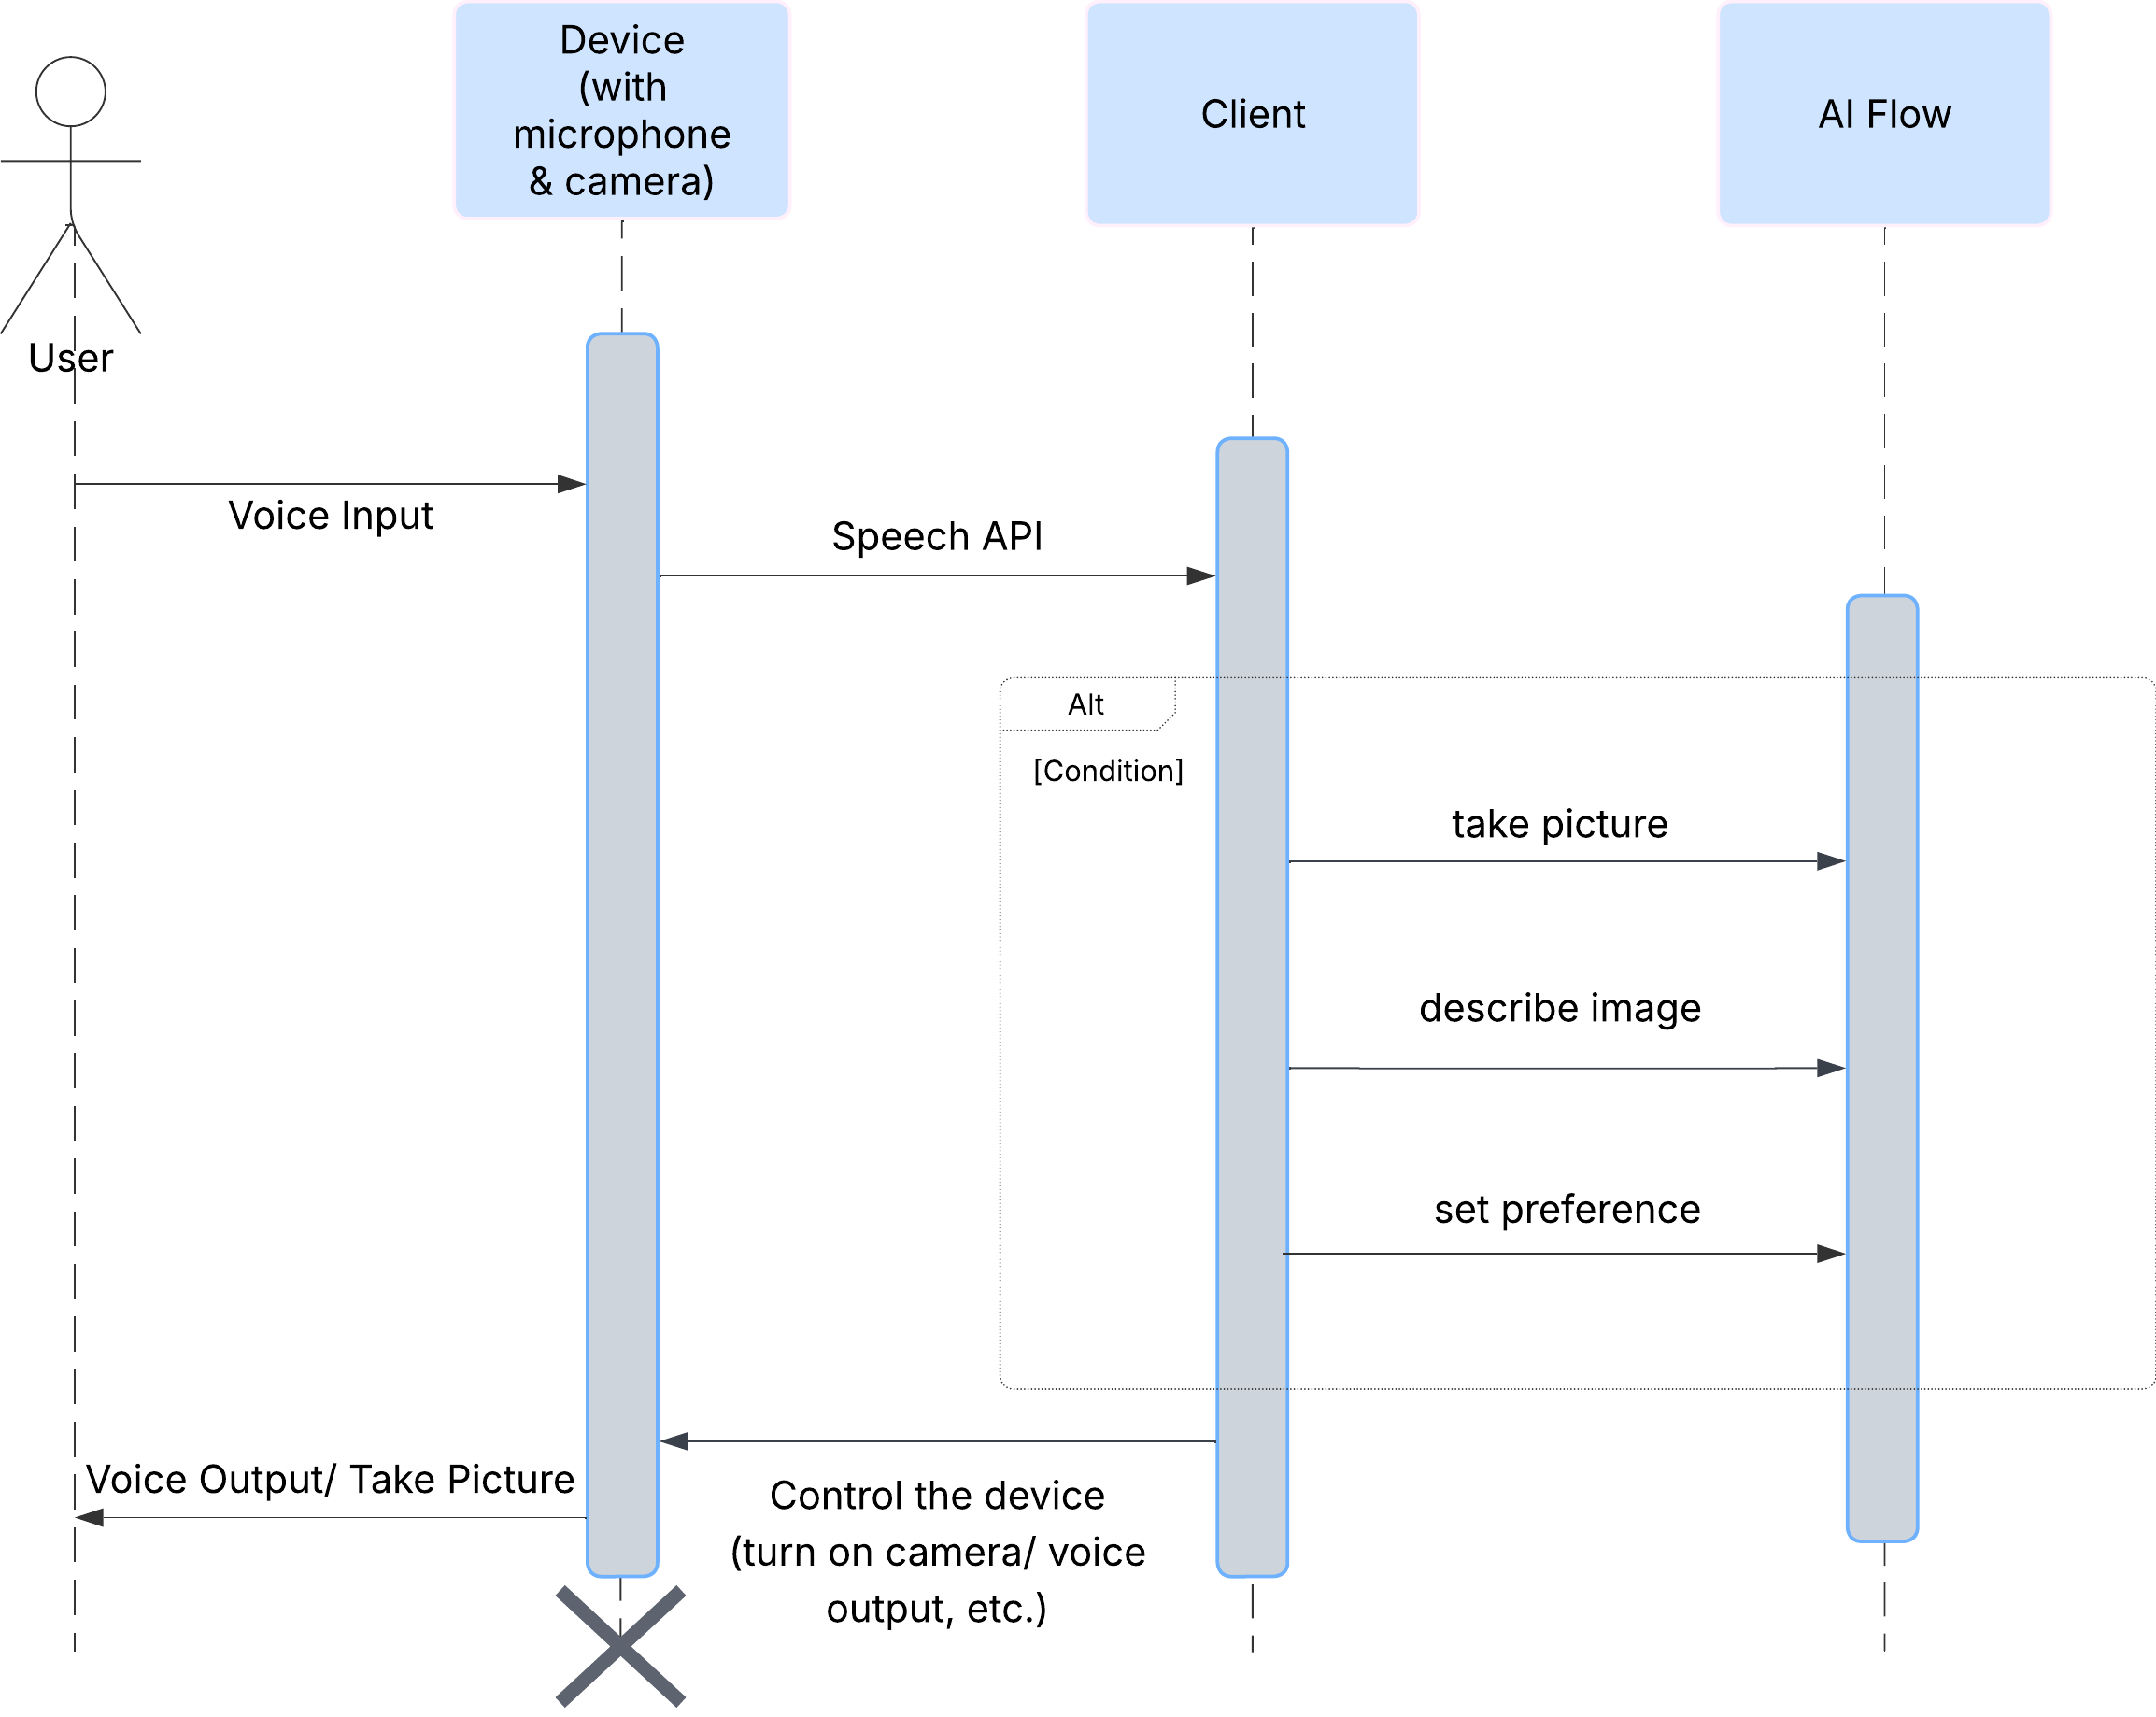
User Experience
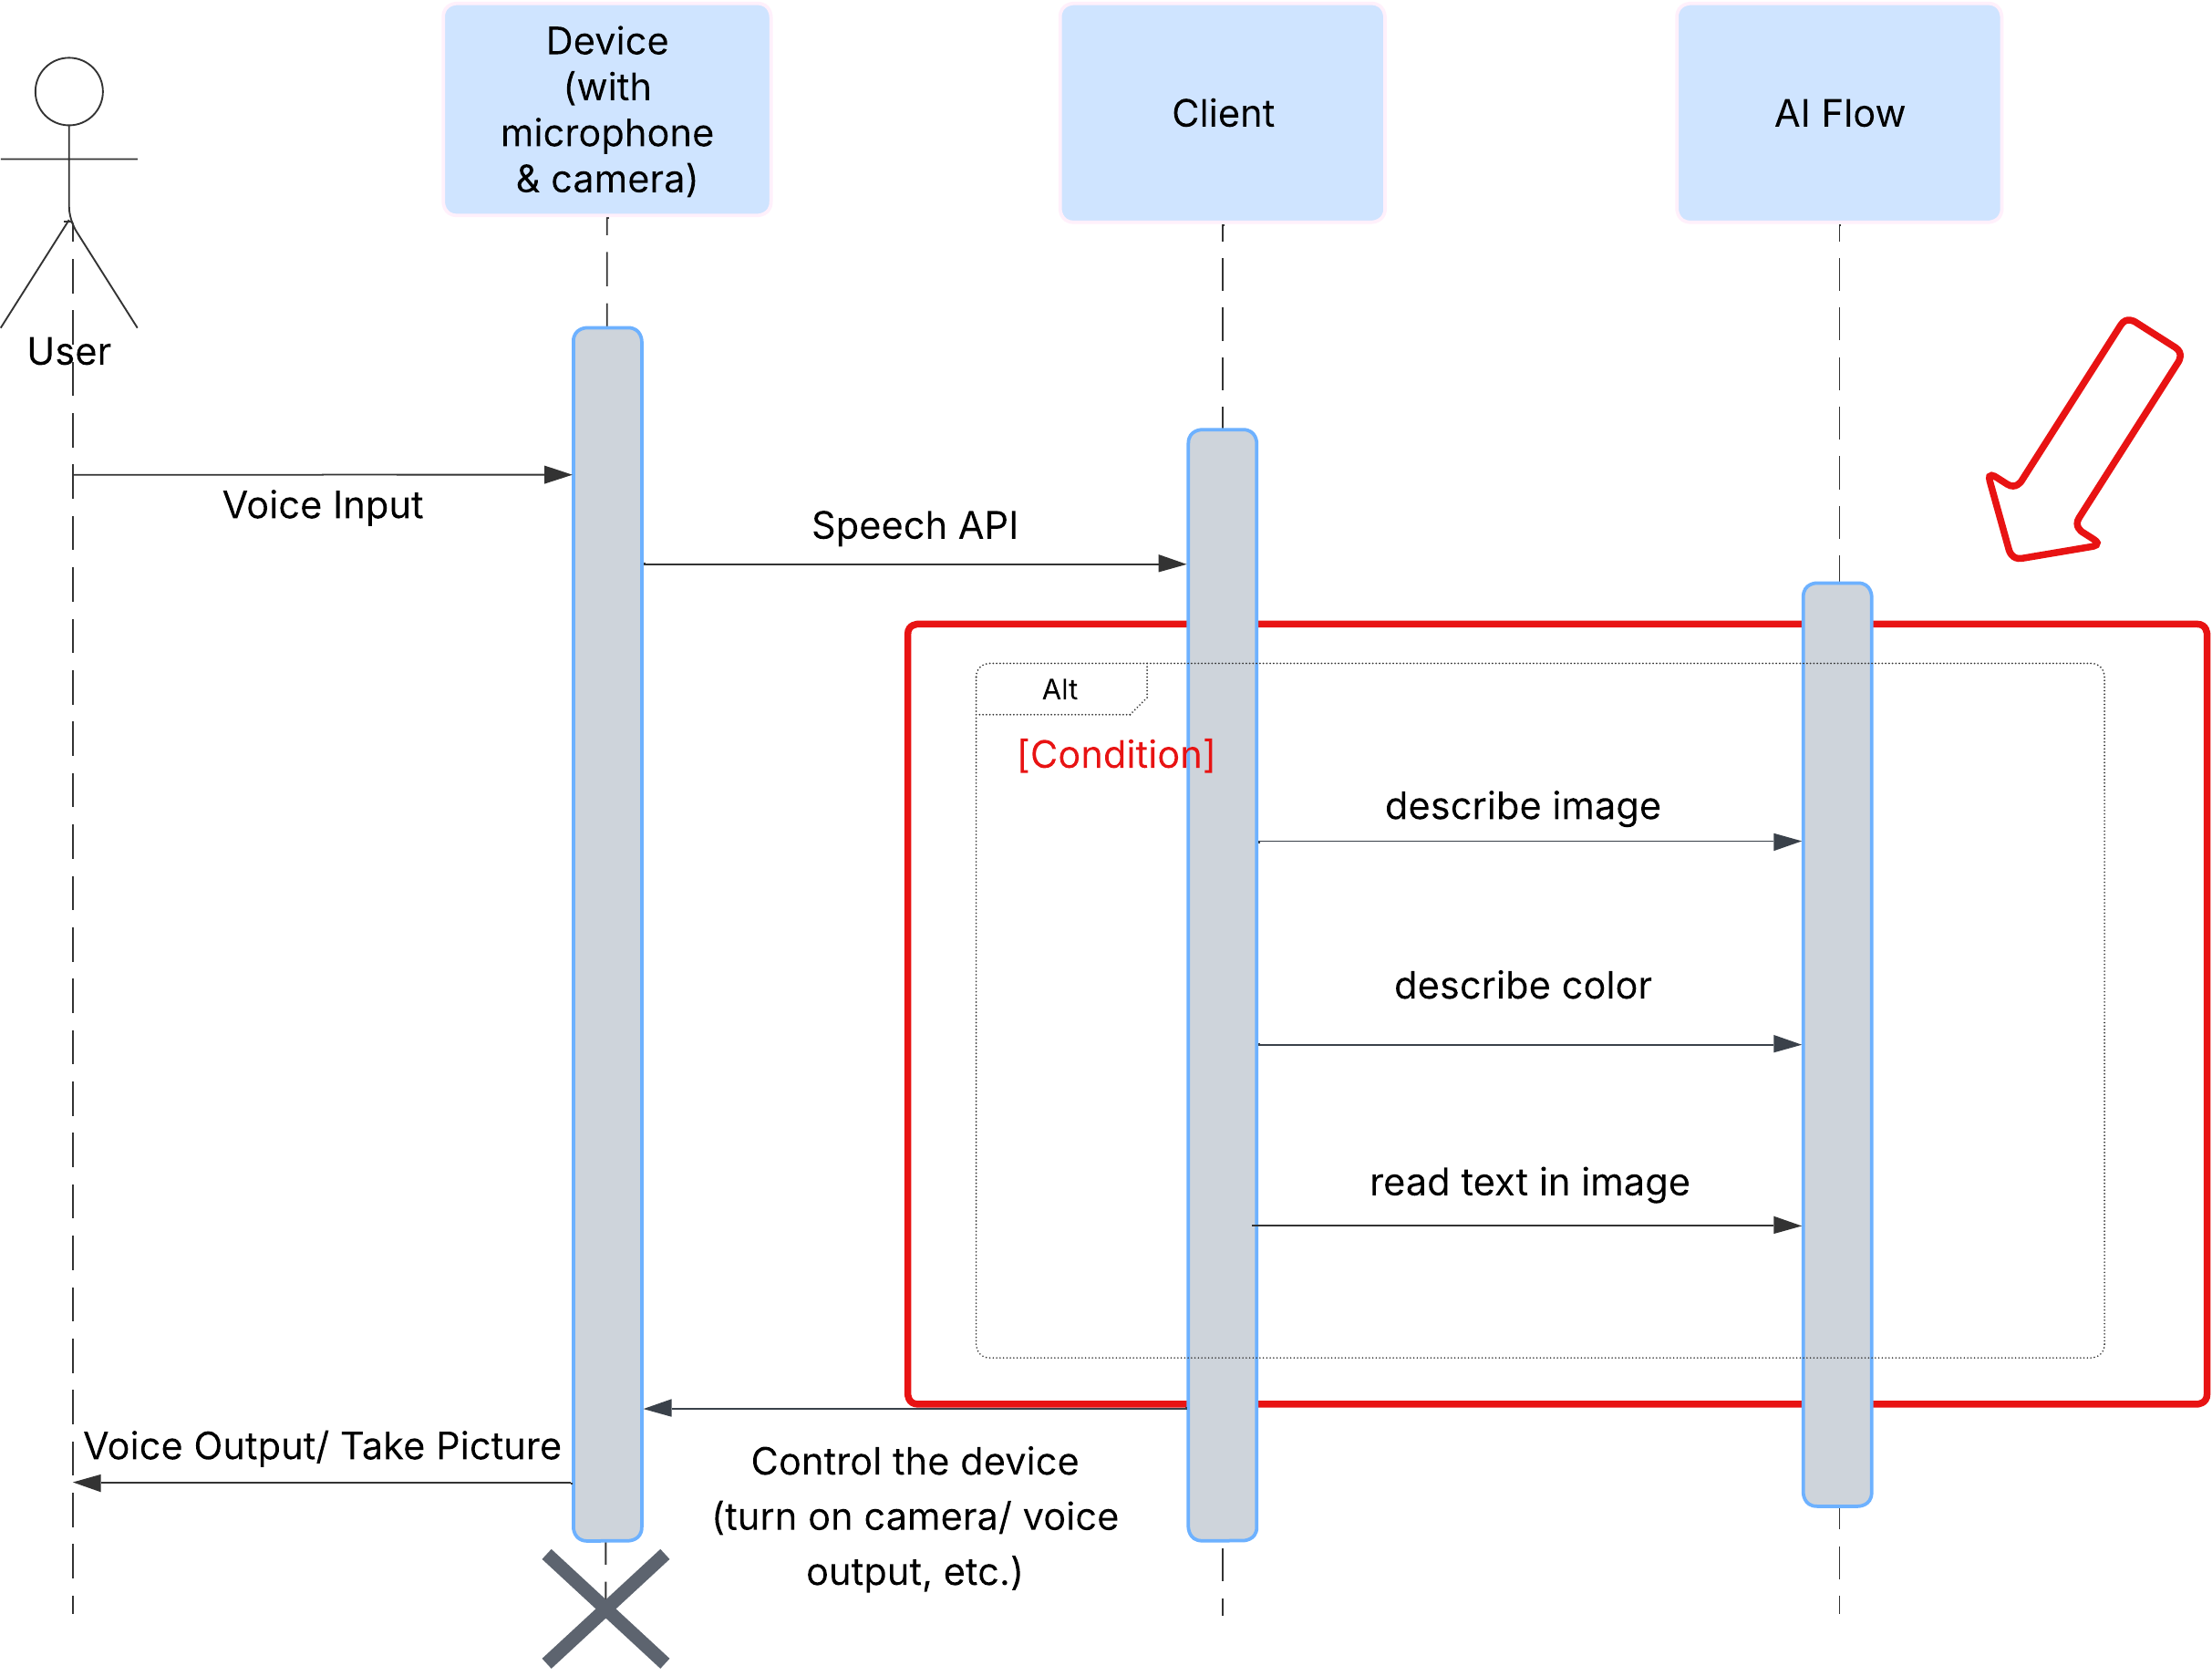
First, let's look at how a user interacts with ClarityCam. The entire experience is hands-free and conversational. The user speaks a command, and the agent responds with a spoken description or action. This sequence diagram shows a typical interaction flow, from the user's initial voice command to the final audio response from the device.
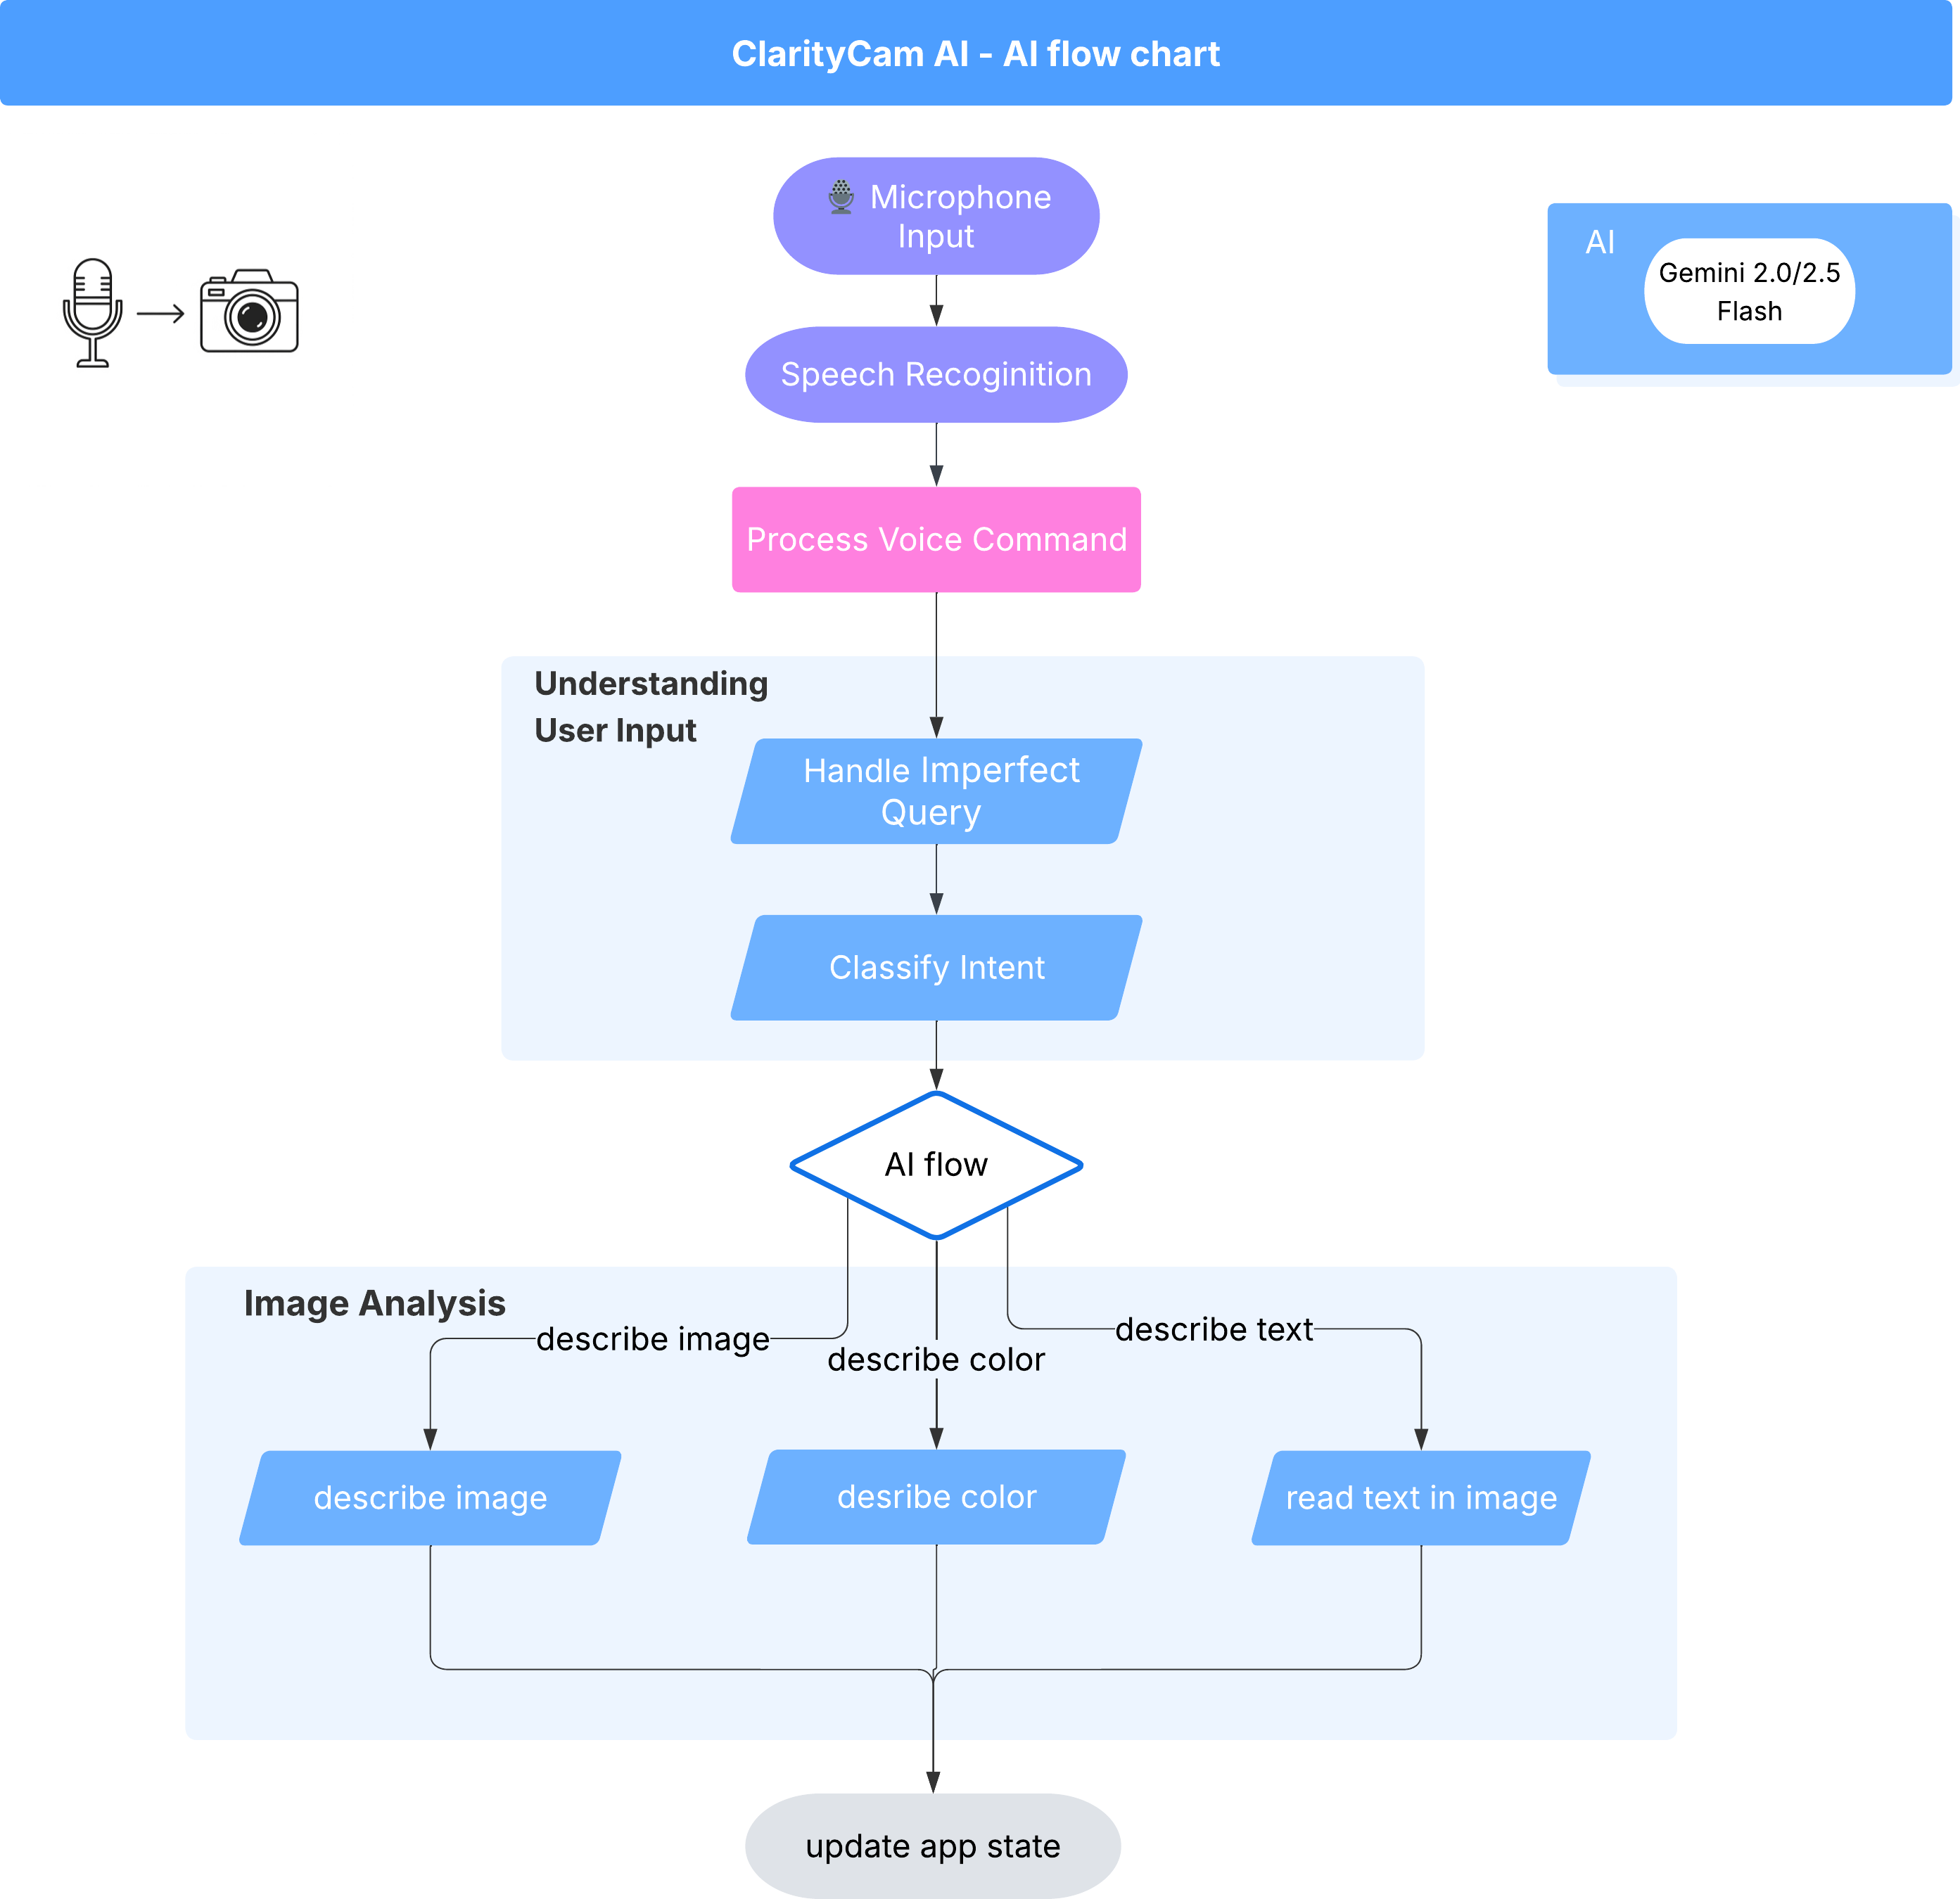
The AI Agent Architecture
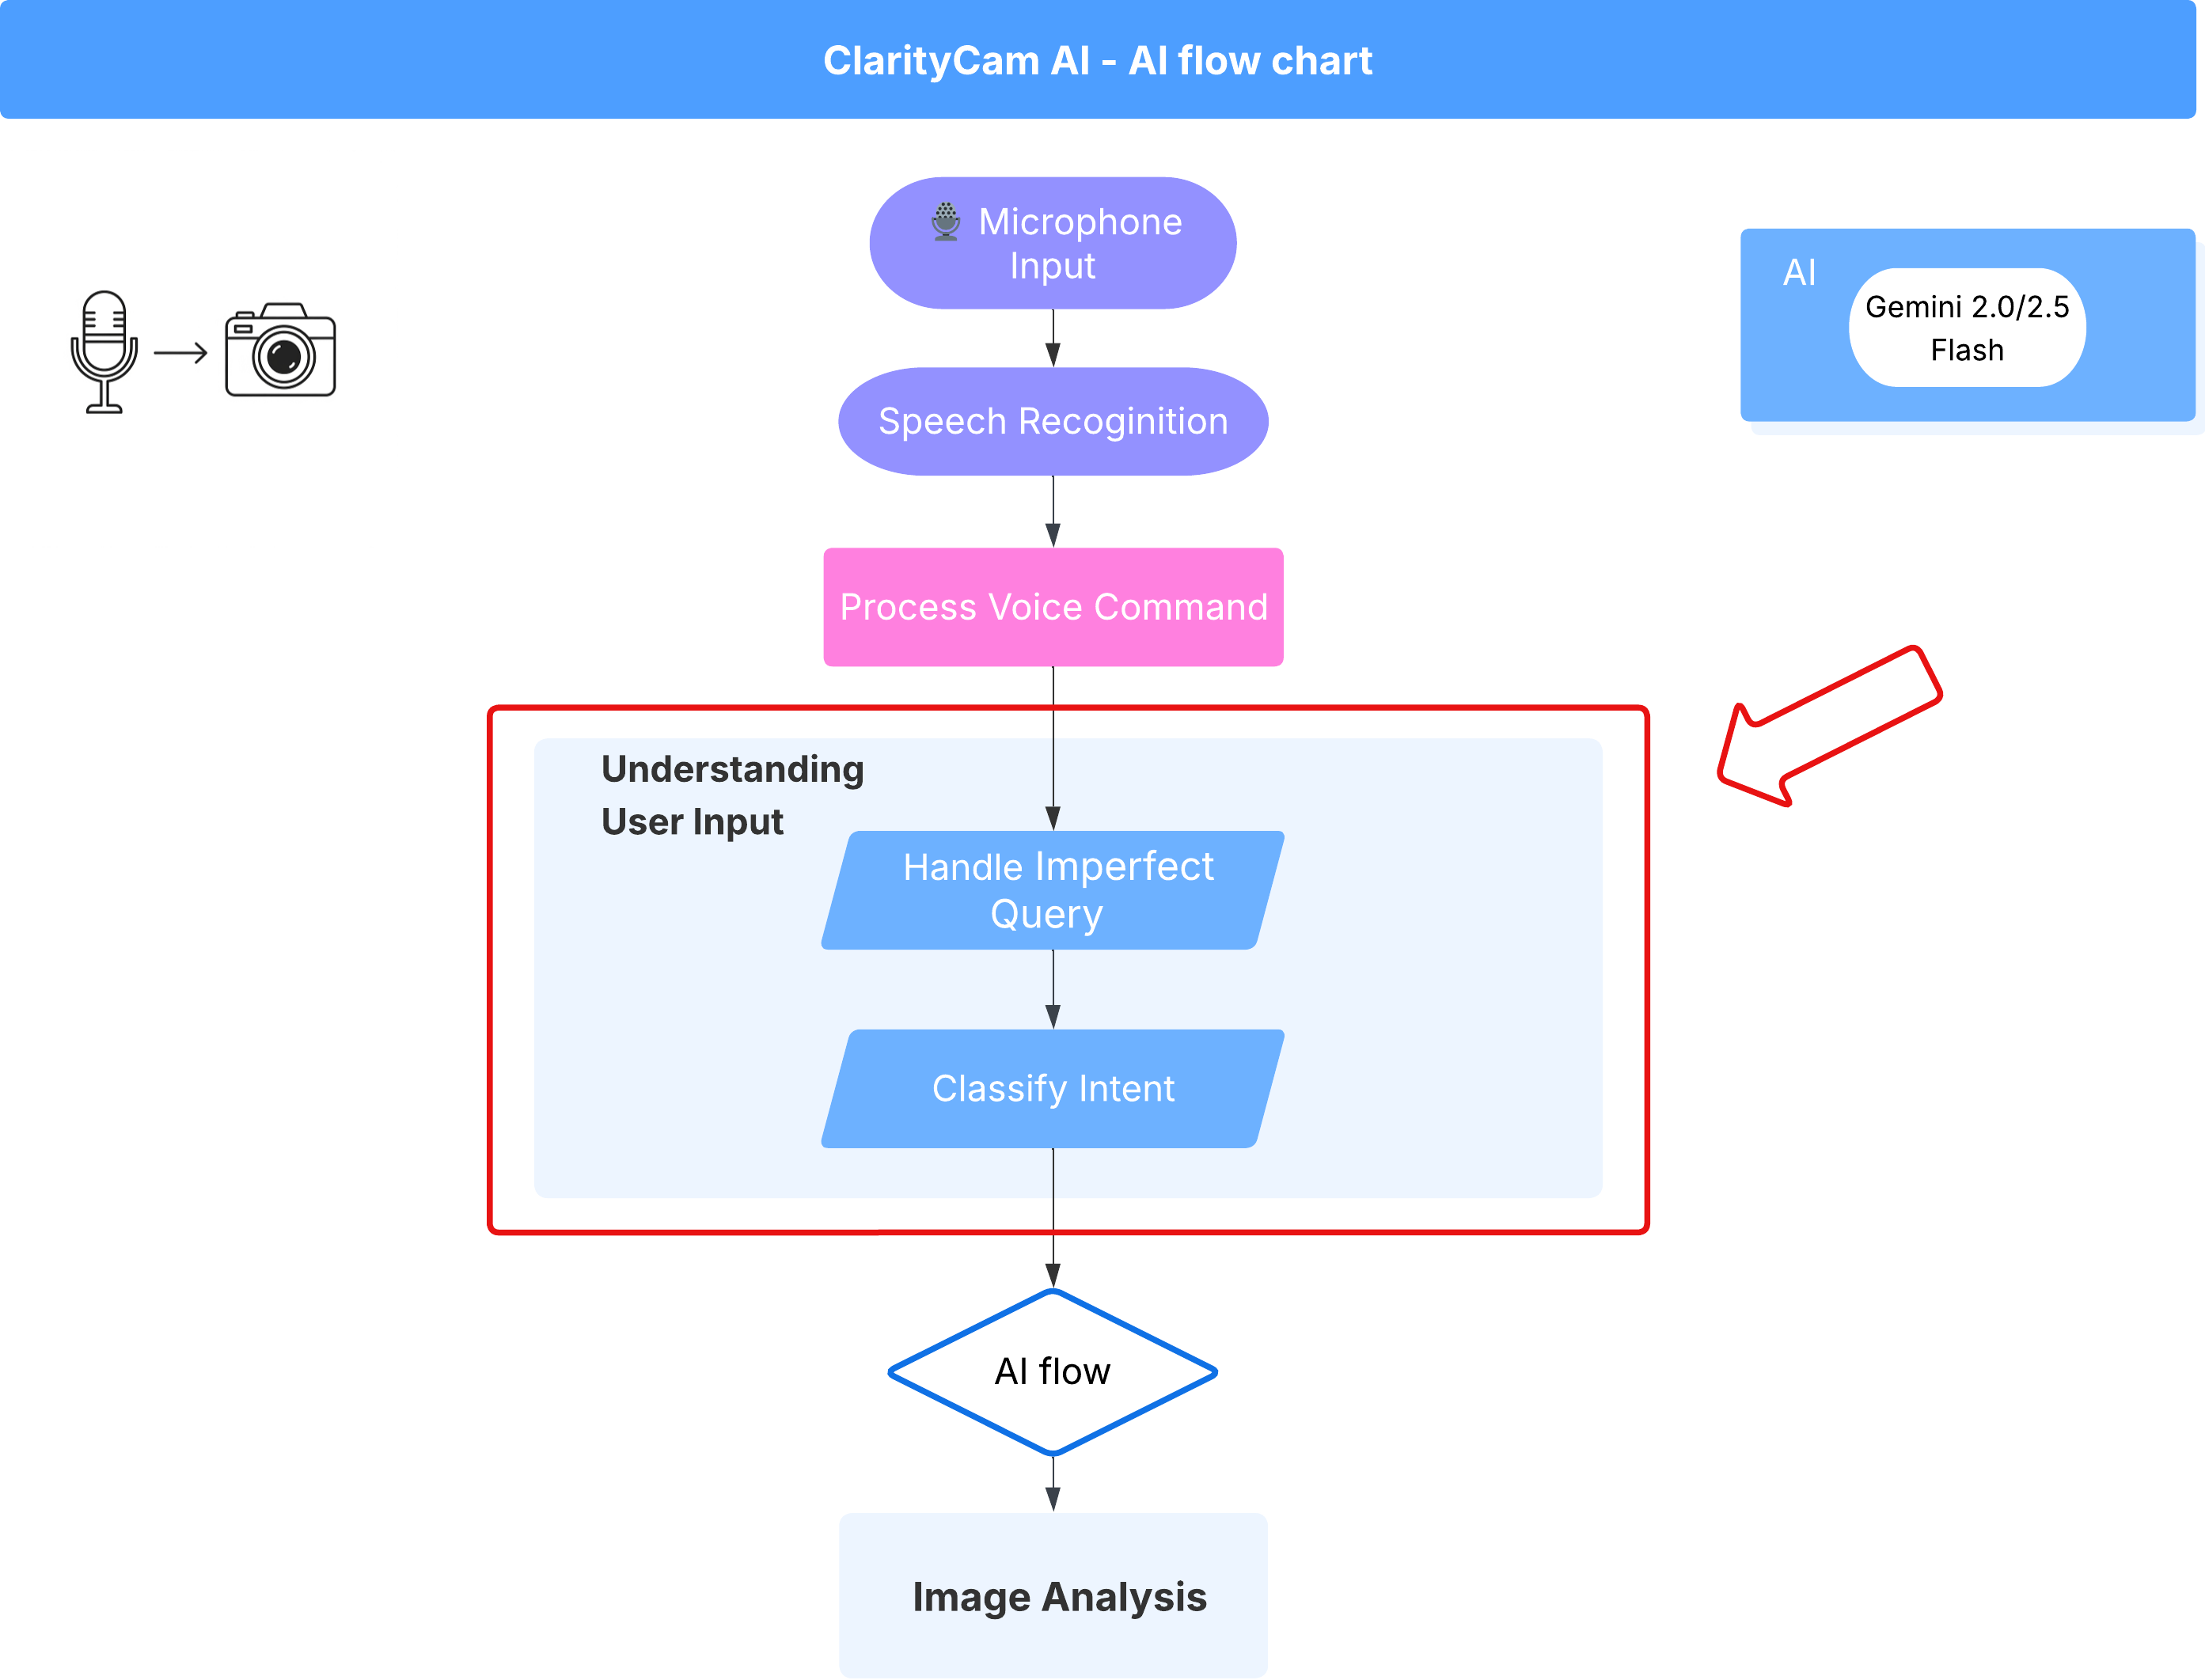
Beneath the surface, a multi-agent system works in concert to bring the experience to life. When a command is received, a central Orchestrator agent delegates tasks to specialized agents responsible for understanding intent, analyzing images, and forming a response. This AI flow diagram provides a deep dive into how these agents collaborate. We will implement this architecture in the following sections.
A Quick Tour of the Project Files
Before we start writing code, let's get familiar with our project's file structure. It might look like there are a lot of files, but you only need to focus on two specific areas for this entire tutorial!
Here is a simplified map of our project.
accessibilityAI/src/
├── 📁 app/
│   ├── layout.tsx      # An overall page shell (you can ignore this).
│   └── page.tsx        # ⬅️ MODIFY THIS: The main user interface for our app.
│
├── 📁 ai/
│   ├── 📁flows         # ⬅️ MODIFY THIS: The core AI logic and server functions.
│   └── intent-classifier.ts     # ⬅️ MODIFY THIS: Where we'll edit our AI prompts.
|   └── ai-instance.ts
|   └── dev.ts
│
├── 📁 components/       # Contains pre-built UI components (ignore this).
│
├── 📁 hooks/
│
├── 📁 lib/
│
└── 📁 types/
The Technology Stack
Our system is built on a modern, scalable tech stack that combines powerful cloud services and state-of-the-art AI models. These are the key components we'll be using:
- Google Cloud Platform (GCP): Provides the serverless infrastructure for our agents.
- Cloud Run: Deploys our individual agents as containerized, scalable microservices.
- Artifact Registry: Securely stores and manages the Docker images for our agents.
- Secret Manager: Safely handles sensitive credentials and API keys.
- Large Language Models (LLMs): Act as the "brains" of the system.
- Google's Gemini Models: We use the powerful multimodal capabilities of the Gemini family for everything from classifying user intent to analyzing image content and providing intelligent descriptions.
3. Setup and Prerequisites
Enable Billing Account To run this codelab, you need a billing account with some credit. Use the credits from the banner at the top of this codelab to get started. If you are already connected to a billing account, you can skip this step.
Create A New GCP Project
- Go to Google Cloud Console and create a new project.
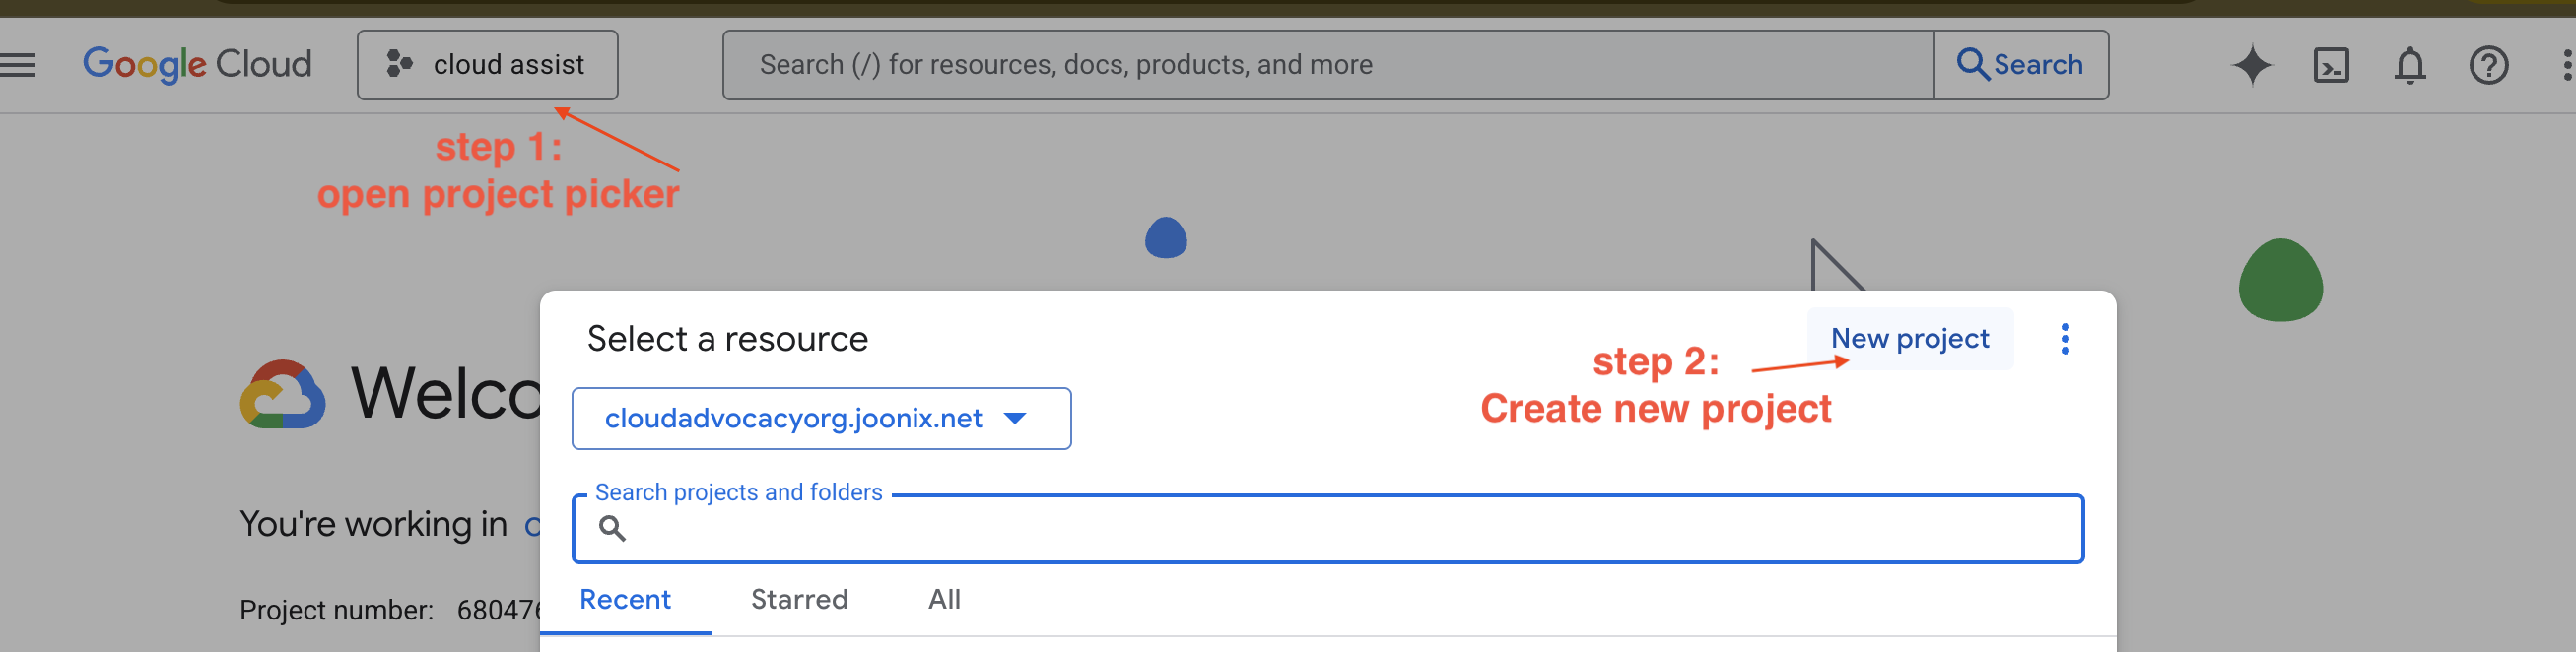
- Go to Google Cloud Console and create a new project.
- Open left panel, click
Billing, check whether the billing account is linked to this gcp account.
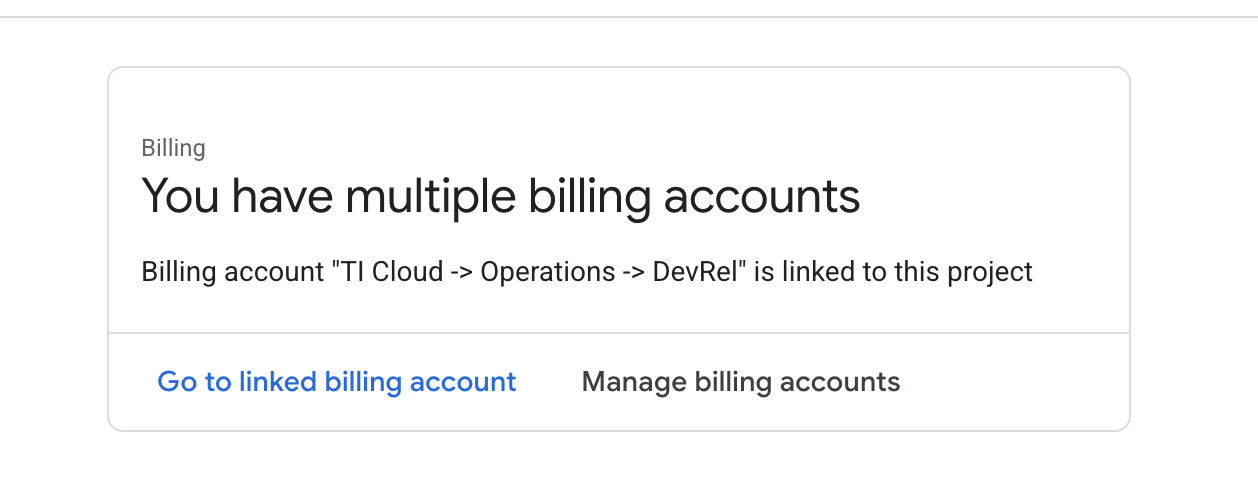
If you see this page, check the manage billing account, choose the Google Cloud Trial One and linked to it.
Create Your Gemini API Key
Before you can secure the key, you need to have one.
- Navigate to the Google AI Studio : https://aistudio.google.com/
- Sign in with your Google account.
- Click on the "Get API key" button, usually found on the left-hand navigation pane or in the top-right corner.
- In the "API keys" dialog, click "Create API key in new project".
- A new API key will be generated for you. Copy this key immediately and store it somewhere safe temporarily (like a password manager or a secure note). This is the value you will use in the next steps.
The Local Development Workflow (Testing on Your Machine)
You need to be able to run npm run dev and have your app work. This is where .env comes in.
- Add the API Key to the file: Create a new file called
.envand add the following line to this file.
Make sure to replace YOUR_API_KEY_HERE with the key you got from AI Studio and saved it to .env:
GOOGLE_GENAI_API_KEY="YOUR_API_KEY_HERE"
[Optional] Set up IDE&Environment
For this tutorial, you can work in a familiar development environment like VS Code or IntelliJ with your local terminal. However, we highly recommend using Google Cloud Shell to ensure a standardized, pre-configured environment.
The following steps are written for the Cloud Shell context. If you choose to use your local environment instead, please ensure you have git, nvm, npm, and gcloud installed and properly configured.
Work on Cloud Shell Editor
👉Click Activate Cloud Shell at the top of the Google Cloud console (It's the terminal shape icon at the top of the Cloud Shell pane), 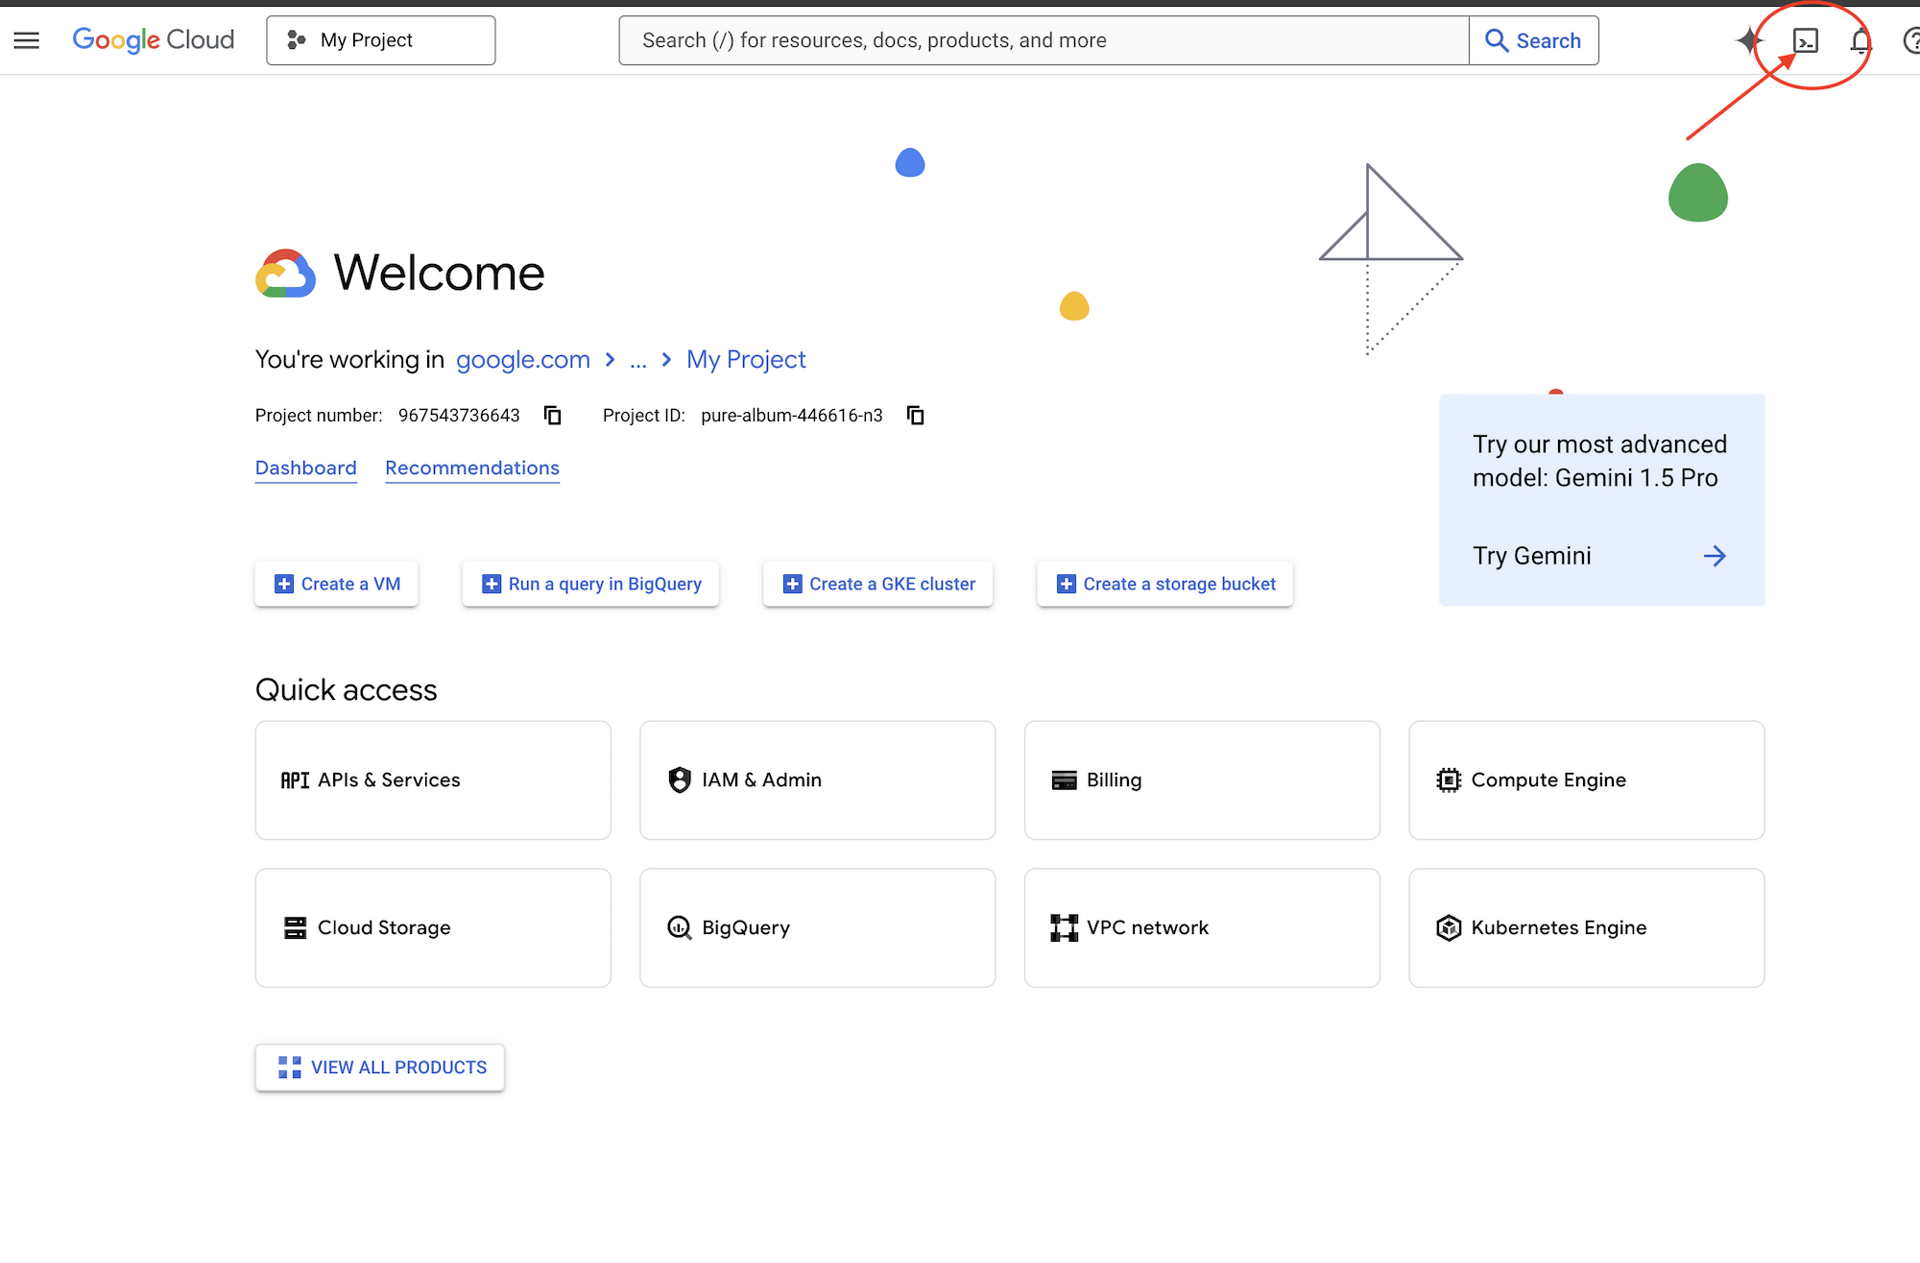
👉Click on the "Open Editor" button (it looks like an open folder with a pencil). This will open the Cloud Shell Code Editor in the window. You'll see a file explorer on the left side. 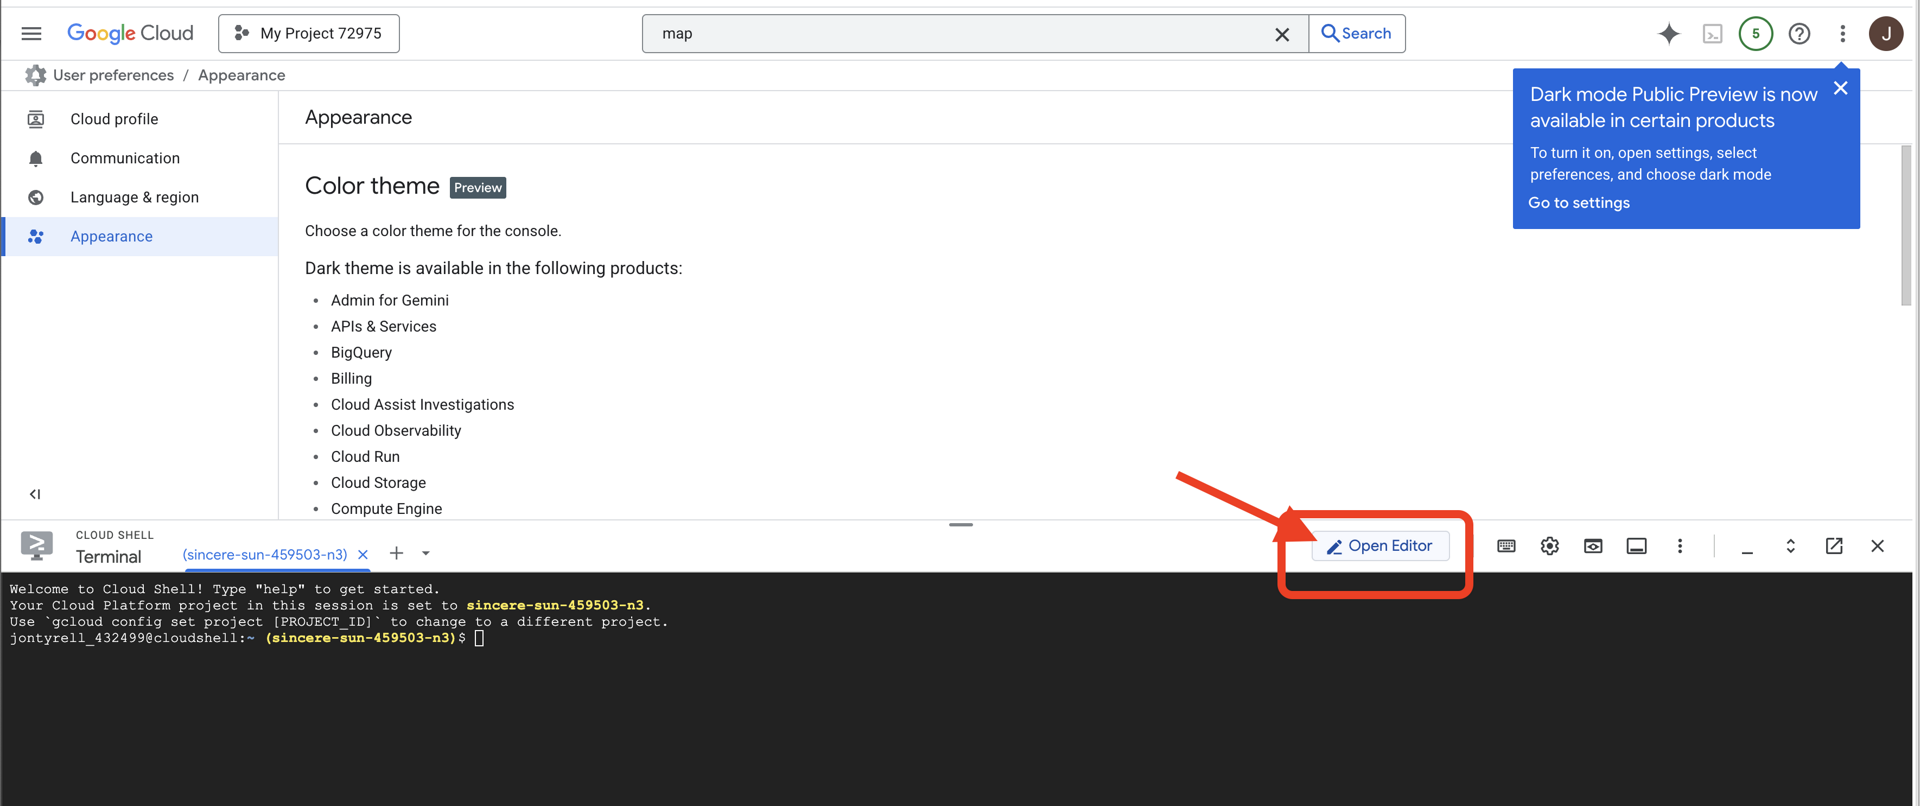
👉Click on the Cloud Code Sign-in button in the bottom status bar as shown. Authorize the plugin as instructed. If you see Cloud Code - no project in the status bar, select that then in the drop down ‘Select a Google Cloud Project' and then select the specific Google Cloud Project from the list of projects that you created. 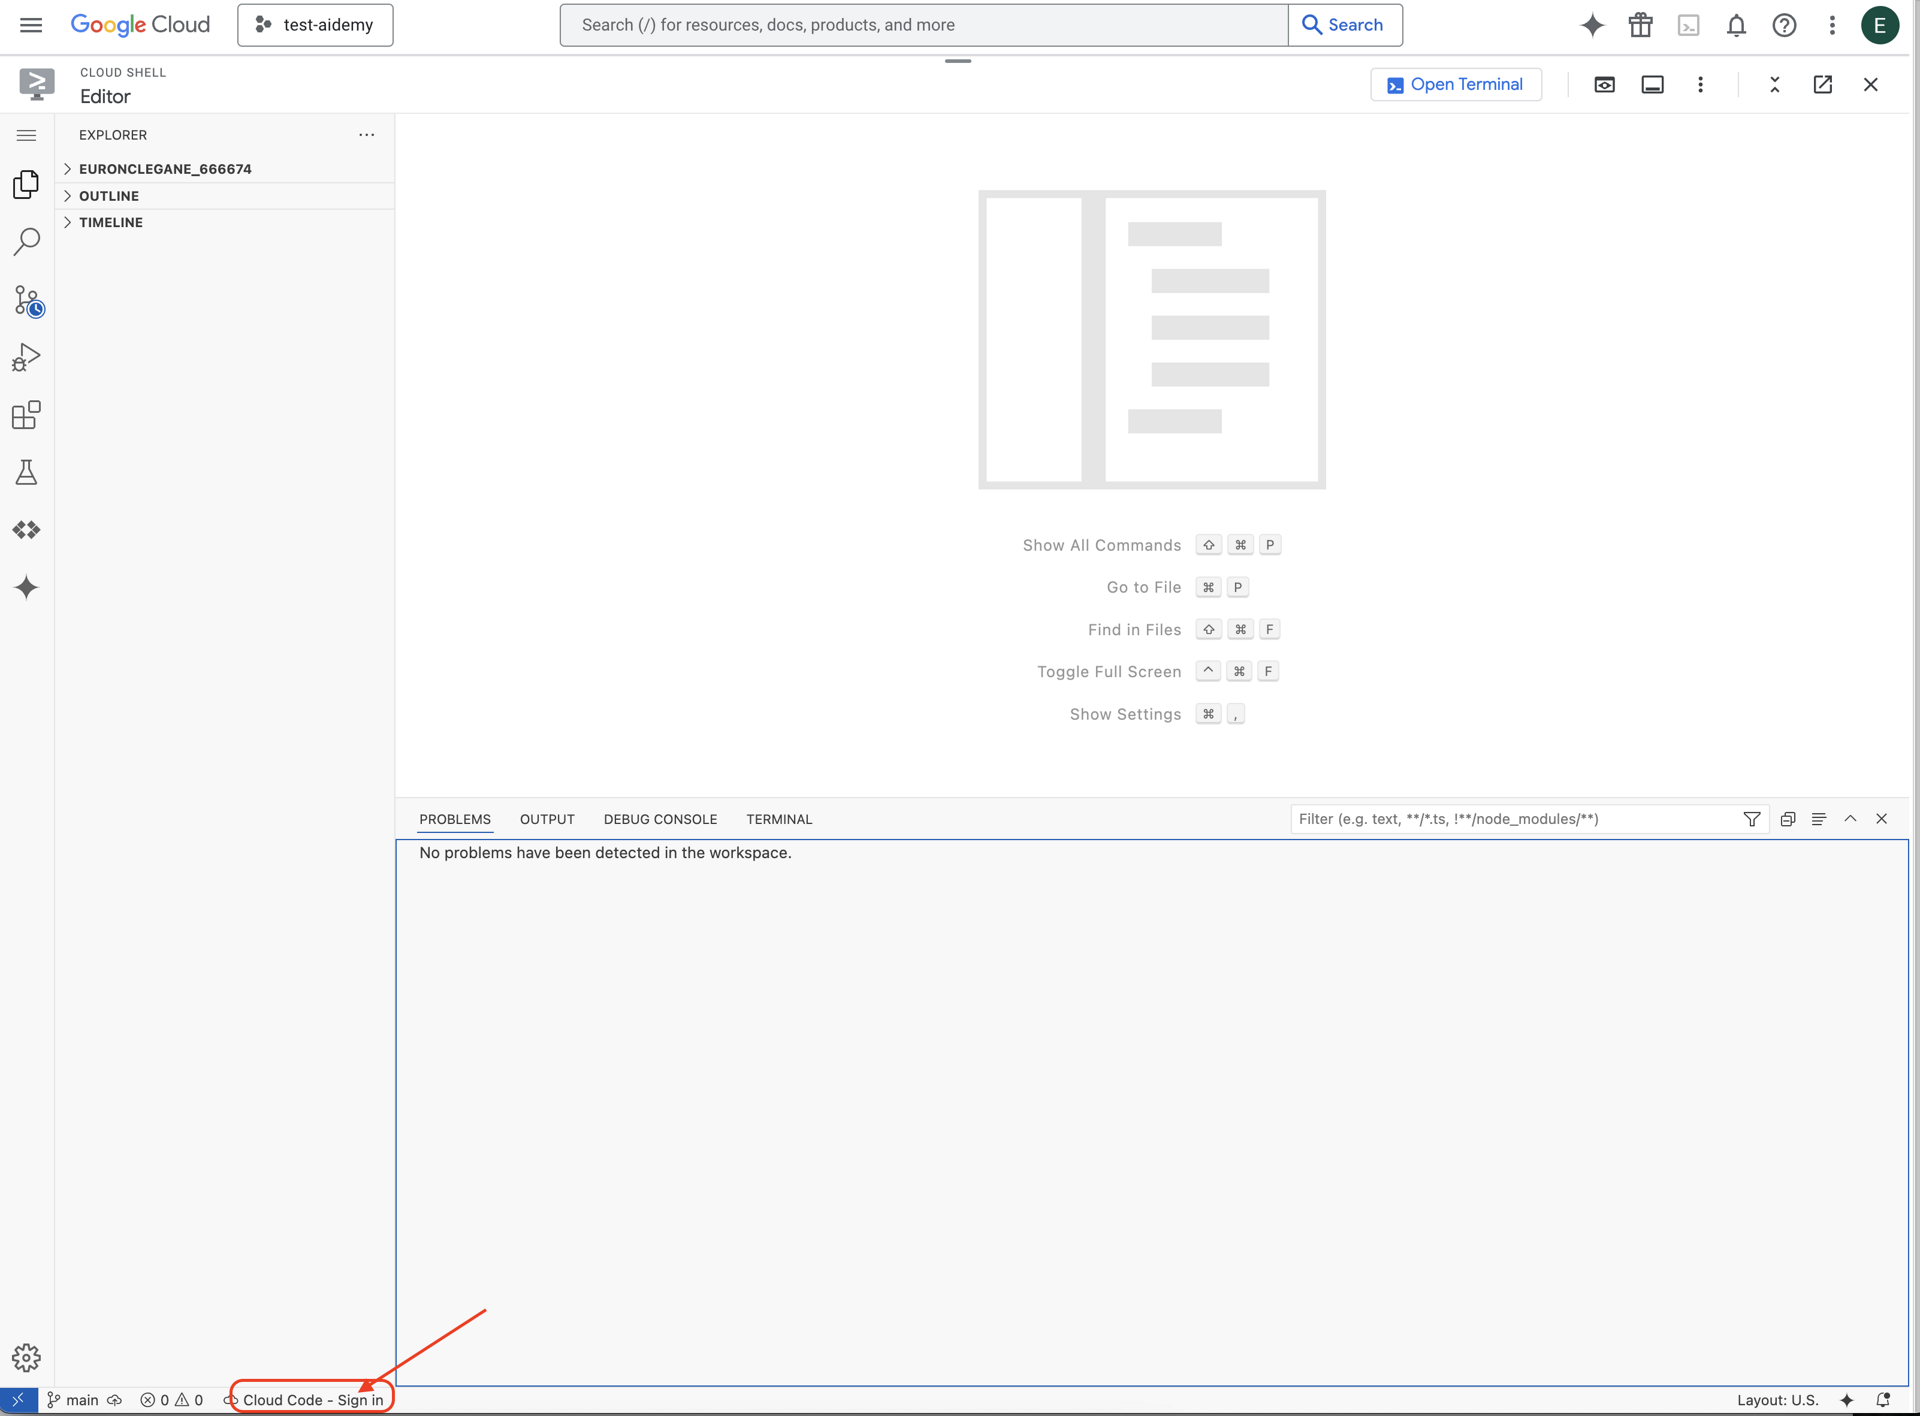
👉Open the terminal in the cloud IDE, 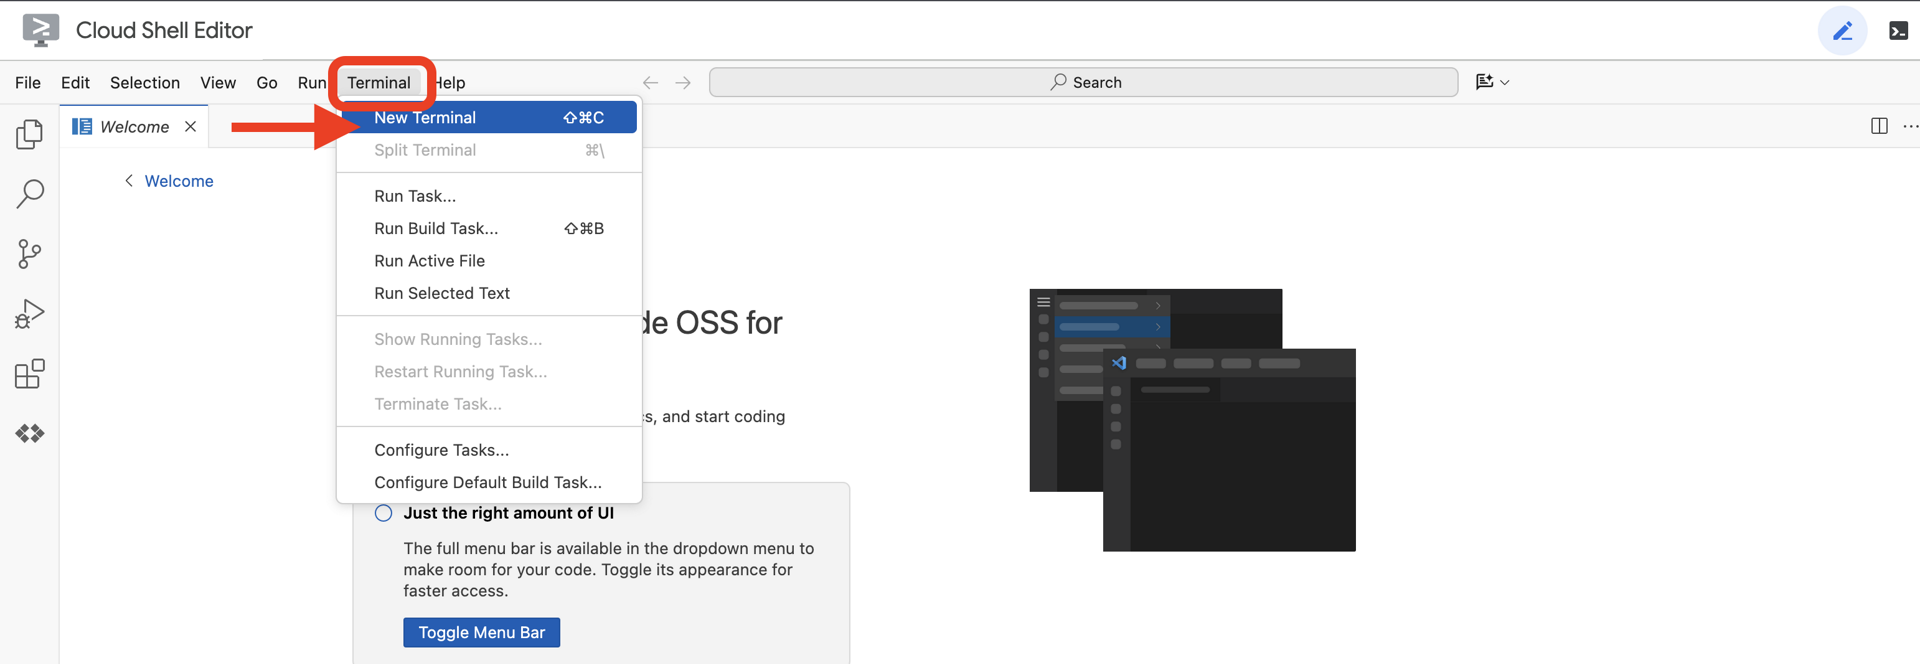
👉In the terminal, verify that you're already authenticated and that the project is set to your project ID using the following command:
gcloud auth list
👉 Clone the natively-accessible-interface project from GitHub:
git clone https://github.com/cuppibla/AccessibilityAgent.git
👉And run make sure to replace <YOUR_PROJECT_ID> with your project ID (you can find your project id in google cloud console, project part, ❗️❗️make sure not mix project id VS project number❗️❗️):
echo <YOUR_PROJECT_ID> > ~/project_id.txt
gcloud config set project $(cat ~/project_id.txt)
👉Run the following command to enable the necessary Google Cloud APIs: (This might take around 2 minutes to run)
gcloud services enable compute.googleapis.com  \
                        storage.googleapis.com  \
                        run.googleapis.com  \
                        artifactregistry.googleapis.com  \
                        aiplatform.googleapis.com \
                        eventarc.googleapis.com \
                        sqladmin.googleapis.com \
                        secretmanager.googleapis.com \
                        cloudbuild.googleapis.com \
                        cloudresourcemanager.googleapis.com \
                        cloudfunctions.googleapis.com \
                        cloudaicompanion.googleapis.com
This may take a couple of minutes..
Setting up permission
👉Setup service account permission. In the terminal, run :
gcloud config set project $(cat ~/project_id.txt)
export PROJECT_ID=$(gcloud config get project)
export SERVICE_ACCOUNT_NAME=$(gcloud compute project-info describe --format="value(defaultServiceAccount)")

echo "Here's your SERVICE_ACCOUNT_NAME $SERVICE_ACCOUNT_NAME"
👉 Grant Permissions. In the terminal, run :
#Cloud Storage (Read/Write):
gcloud projects add-iam-policy-binding $PROJECT_ID \
  --member="serviceAccount:$SERVICE_ACCOUNT_NAME" \
  --role="roles/storage.objectAdmin"

#Pub/Sub (Publish/Receive):
gcloud projects add-iam-policy-binding $PROJECT_ID \
  --member="serviceAccount:$SERVICE_ACCOUNT_NAME" \
  --role="roles/pubsub.publisher"

gcloud projects add-iam-policy-binding $PROJECT_ID \
  --member="serviceAccount:$SERVICE_ACCOUNT_NAME" \
  --role="roles/pubsub.subscriber"


#Cloud SQL (Read/Write):
gcloud projects add-iam-policy-binding $PROJECT_ID \
  --member="serviceAccount:$SERVICE_ACCOUNT_NAME" \
  --role="roles/cloudsql.editor"


#Eventarc (Receive Events):
gcloud projects add-iam-policy-binding $PROJECT_ID \
  --member="serviceAccount:$SERVICE_ACCOUNT_NAME" \
  --role="roles/iam.serviceAccountTokenCreator"

gcloud projects add-iam-policy-binding $PROJECT_ID \
  --member="serviceAccount:$SERVICE_ACCOUNT_NAME" \
  --role="roles/eventarc.eventReceiver"

#Vertex AI (User):
gcloud projects add-iam-policy-binding $PROJECT_ID \
  --member="serviceAccount:$SERVICE_ACCOUNT_NAME" \
  --role="roles/aiplatform.user"

#Secret Manager (Read):
gcloud projects add-iam-policy-binding $PROJECT_ID \
  --member="serviceAccount:$SERVICE_ACCOUNT_NAME" \
  --role="roles/secretmanager.secretAccessor"
4. Understanding User Input - Intent Classifier
Before our AI agent can act, it must first accurately understand what the user wants. Real-world input is often messy—it can be vague, include typos, or use conversational language.
In this section, we'll build the critical "listening" components that transform raw user input into a clear, actionable command.
Adding an Intent Classifier
We will now define the AI logic that powers our classifier.
👉 Action: In your Cloud Shell IDE, navigate to the ~/src/ai/intent-classifier/ directory
Step 1: Define the Agent's Vocabulary (IntentCategory)
First, we need to create a definitive list of every possible action our agent can perform.
👉 Action: Replace the placeholder // REPLACE ME PART 1: add IntentCategory here with the following code:
👉 with the code below:
export type IntentCategory =
  // Image Analysis Intents
  | "DescribeImage"
  | "AskAboutImage"
  | "ReadTextInImage"
  | "IdentifyColorsInImage"
  // Control Intents
  | "TakePicture"
  | "StartCamera"
  | "SelectImage"
  | "StopSpeaking"
  // Preference Intents
  | "SetDescriptionDetailed"
  | "SetDescriptionConcise"
  // Fallback Intents
  | "GeneralInquiry"       // User has a general question about the agent's functions or polite interaction
  | "OutOfScopeRequest"    // User's request is clearly outside the agent's defined capabilities
  | "Unknown";             // Intent could not be determined with confidence
Explanation
This TypeScript code creates a custom type called IntentCategory. It's a strict list that defines every possible action, or "intent," that our agent can understand. This is a crucial first step because it transforms a potentially infinite number of user phrases ("tell me what you see," "what's in the pic?") into a clean, predictable set of commands. The goal of our classifier is to map any user query to one of these specific categories.
Step 2
To make accurate decisions, our AI needs to know its own capabilities and limitations. We'll provide this information as a detailed text block.
👉 Action: Replace the placeholder REPLACE ME PART 2: add AGENT_CAPABILITIES_AND_LIMITATIONS here with the following code:
Replace the code below: // REPLACE ME PART 2: add AGENT_CAPABILITIES_AND_LIMITATIONS here:
👉 with the code below
const AGENT_CAPABILITIES_AND_LIMITATIONS = `
**Core Capabilities (What the Agent CAN DO):**
* **Image Analysis:**
    * DescribeImage: Provide a general description of the current image.
    * AskAboutImage: Answer a specific question about the visual content of the current image (e.g., "Is there a dog?", "What color is the car?").
    * ReadTextInImage: Read any text found in the current image.
    * IdentifyColorsInImage: Identify the dominant colors of the current image.
* **Image Input Control:**
    * TakePicture: Capture an image using the currently active camera stream.
    * StartCamera: Activate the camera (e.g., "use camera", "take another picture").
    * SelectImage: Allow the user to choose an image file from their device.
* **Voice & Audio Control:**
    * StopSpeaking: Stop the current text-to-speech output.
* **Preference Management:**
    * SetDescriptionDetailed: Make future image descriptions more detailed.
    * SetDescriptionConcise: Make future image descriptions less detailed or concise.
* **General Interaction:**
    * GeneralInquiry: Handle conversational phrases (e.g., "hello", "thank you") or questions about its own capabilities (e.g., "what can you do?", "help").

**Limitations (What the Agent CANNOT DO and should be classified as OutOfScopeRequest):**
* Cannot generate or create new images.
* Cannot edit or modify existing images (e.g., "remove background," "make the car blue").
* Cannot analyze video files or live video beyond capturing a single frame.
* Cannot provide general knowledge or answer questions unrelated to the provided image's visual content (e.g., "What's the weather?", "Who is the president?", "Tell me a joke", "What time is it?").
* Cannot perform mathematical calculations or complex data analysis.
* Cannot translate languages as a primary function.
* Cannot remember information from past images or vastly different previous queries in the same session.
* Cannot control other device settings or applications.
* Cannot perform web searches.
`;
Why it's important:
This text isn't for the user to read, it's for our AI model. We will feed this "job description" directly into our prompt (in the next step) to give the Language Model (LLM) the context it needs to make accurate decisions. Without this context, the LLM might incorrectly classify "what's the weather?" as AskAboutImage. With this context, it knows that weather is not a visual element in the image and correctly classifies it as out of scope.
Step 3
Now we'll write the complete set of instructions that the Gemini model will follow to perform the classification.
👉 Action: Replace the // REPLACE ME PART 3 - classifyIntentPrompt with the following code:
with the code below
const classifyIntentPrompt = ai.definePrompt({
  name: 'classifyIntentPrompt',
  input: { schema: ClassifyIntentInputSchema },
  output: { schema: ClassifyIntentOutputSchema },
  prompt: `You are classifying the user's intent for ClarityCam, a voice-controlled AI application focused on image analysis.
Analyze the user query: '{userQuery}'.

First, understand ClarityCam's capabilities and limitations:
${AGENT_CAPABILITIES_AND_LIMITATIONS}

Now, classify the user's PRIMARY intent into ONE of the following categories:
* **DescribeImage**: User wants a general description of the current image.
* **AskAboutImage**: User is asking a specific question directly related to the visual content of the current image.
* **ReadTextInImage**: User wants any text read from the current image.
* **IdentifyColorsInImage**: User wants the dominant colors of the current image.
* **TakePicture**: User wants to capture an image using an active camera.
* **StartCamera**: User wants to activate the camera.
* **SelectImage**: User wants to choose an image file.
* **StopSpeaking**: User wants the current text-to-speech output to stop.
* **SetDescriptionDetailed**: User wants future image descriptions to be more detailed.
* **SetDescriptionConcise**: User wants future image descriptions to be less detailed.
* **GeneralInquiry**: The query is a simple conversational filler (e.g., "hello", "thanks"), a polite closing, or a direct question about the agent's functions (e.g., "what can you do?", "how does this work?", "help").
* **OutOfScopeRequest**: The query asks the agent to perform an action clearly listed under its "Limitations" or otherwise demonstrably outside its defined image analysis and control functions. Examples: "Tell me a joke," "What's the weather in London?", "Generate an image of a cat," "Can you edit my photo to make it brighter?", "Send this image to my friends","Translate 'hello' to Spanish."

Output ONLY the category name.
If the query is ambiguous but seems generally related to polite interaction or asking about the agent itself, prefer 'GeneralInquiry'.
If the query is clearly asking for something the agent CANNOT do, use 'OutOfScopeRequest'.
If truly unclassifiable even with these guidelines, use 'Unknown'.`,
  config: {
    temperature: 0.05, // Very low temperature for highly deterministic classification
  }
});
This prompt is where the magic happens. It's the "brain" of our classifier, telling the AI its role, providing the necessary context, and defining the desired output. Note these key prompt engineering techniques:
- Role-Playing: It begins with "You are classifying..." to set a clear task.
- Context Injection: It dynamically inserts the
AGENT_CAPABILITIES_AND_LIMITATIONSvariable into the prompt. - Strict Output Formatting: The instruction "Output ONLY the category name" is critical for getting a clean, predictable response that we can easily use in our code.
- Low Temperature: For classification, we want deterministic, logical answers, not creative ones. Setting the temperature to a very low value (0.05) ensures the model is highly focused and consistent.
Step 4: Connect the App to the AI Flow
Finally, let's call our new AI classifier from the main application file.
👉 Action: Navigate to your ~/src/app/page.tsx file. Inside the processVoiceCommand function, replace // REPLACE ME PART 1: add classificationResult here with the following:
const classificationResult = await classifyIntentFlow({ userQuery: commandToProcess });
        intent = classificationResult.intent as IntentCategory;
This code is the crucial bridge between your frontend application and your backend AI logic. It takes the user's voice command (commandToProcess), sends it to the classifyIntentFlow you just built, and waits for the2 AI to return the classified intent.
The intent variable now holds a clean, structured command (like DescribeImage). This result will be used in the switch statement that follows to drive the application's logic and decide which action to take next. It's how the AI's "thinking" gets turned into the app's "doing."
Launching the User Interface
It's time to see our application in action! Let's start the development server.
👉 In your terminal, run the following command: npm run dev Note: You may need to run npm install before running npm run dev
After a moment, you'll see output similar to this, which means the server is running successfully:
   ▲ Next.js 15.2.3 (Turbopack)
   - Local:        http://localhost:9003
   - Network:      http://10.88.0.4:9003
   - Environments: .env

 ✓ Starting...
 ✓ Ready in 1512ms
 ○ Compiling / ...
 ✓ Compiled / in 26.6s
Now, click on the local URL (http://localhost:9003) to open the application in your browser.
You should see the SightGuide user interface! For now, the buttons aren't hooked up to any logic, so clicking them won't do anything. That's exactly what we expect at this stage. We'll bring them to life in the next section!
Now that you've seen the UI, return to your terminal and press Ctrl + C to stop the development server before we continue
5. Understanding User Input - Imperfect Query Check
Adding Imperfect Query Check
Part 1: Defining the Prompt (The "What")
First, let's define the instructions for our AI. The prompt is the "recipe" for our AI call—it tells the model exactly what we want it to do.
👉 Action: In your IDE, navigate to ~/src/ai/flows/check_typo/.
Replace the code below: // REPLACE ME PART 1: add prompt here:
👉 with the code below
const prompt = ai.definePrompt({
  name: 'checkTypoPrompt',
  input: {
    schema: CheckTypoInputSchema,
  },
  output: {
    schema: CheckTypoOutputSchema,
  },
  prompt: `You are a helpful AI assistant that checks user text for typos and suggests corrections.
- If you find typos, respond with the corrected text.
- If there are no typos, or if you are unsure about a correction, respond with the original text unchanged.

User text: {text}

Corrected text:
`,
});
This code block defines a reusable template for our AI called checkTypoPrompt. The input and output schemas define the data contract for this task. This prevents errors and makes our system predictable.
Part 2: Creating the Flow (The "How")
Now that we have our "recipe" (the prompt), we need to create a function that can actually execute it. In Genkit, this is called a flow. A flow wraps our prompt in an executable function that the rest of our application can easily call.
👉 Action: In the same ~/src/ai/flows/check_typo/ file, replace the code below: // REPLACE ME PART 2: add flow here:
👉 with the code below
const checkTypoFlow = ai.defineFlow<
  typeof CheckTypoInputSchema,
  typeof CheckTypoOutputSchema
>(
  {
    name: 'checkTypoFlow',
    inputSchema: CheckTypoInputSchema,
    outputSchema: CheckTypoOutputSchema,
  },
  async input => {
    const {output} = await prompt(input);
    return output!;
  }
);
Part 3: Putting the Typo Checker to Work
With our AI flow complete, we can now integrate it into our application's main logic. We will call it right after receiving the user's command, ensuring the text is clean before any further processing.
👉Action: Navigate to ~/src/app/ai/flows/check-typo.ts and find the export async function checkTypo function. Uncomment the return statement:
Instead of return; Do return checkTypoFlow(input);
👉Action: Navigate to ~/src/app/page.tsx and find the processVoiceCommand function. Replace the code below: REPLACE ME PART 2: add typoResult here:
👉 with the code below
const typoResult = await checkTypo({ text: rawCommand });
        if (typoResult && typoResult.correctedText && typoResult.correctedText.trim().length > 0) {
            const originalTrimmedLower = rawCommand.trim().toLowerCase();
            const correctedTrimmedLower = typoResult.correctedText.trim().toLowerCase();
            if (correctedTrimmedLower !== originalTrimmedLower) {
                commandToProcess = typoResult.correctedText;
                typoCorrectionAnnouncement = `I think you said: ${commandToProcess}. `;
            }
        }
With this change, we have created a more robust data processing pipeline for every user command.
Voice Command Flow (Read Only, No Action Needed)
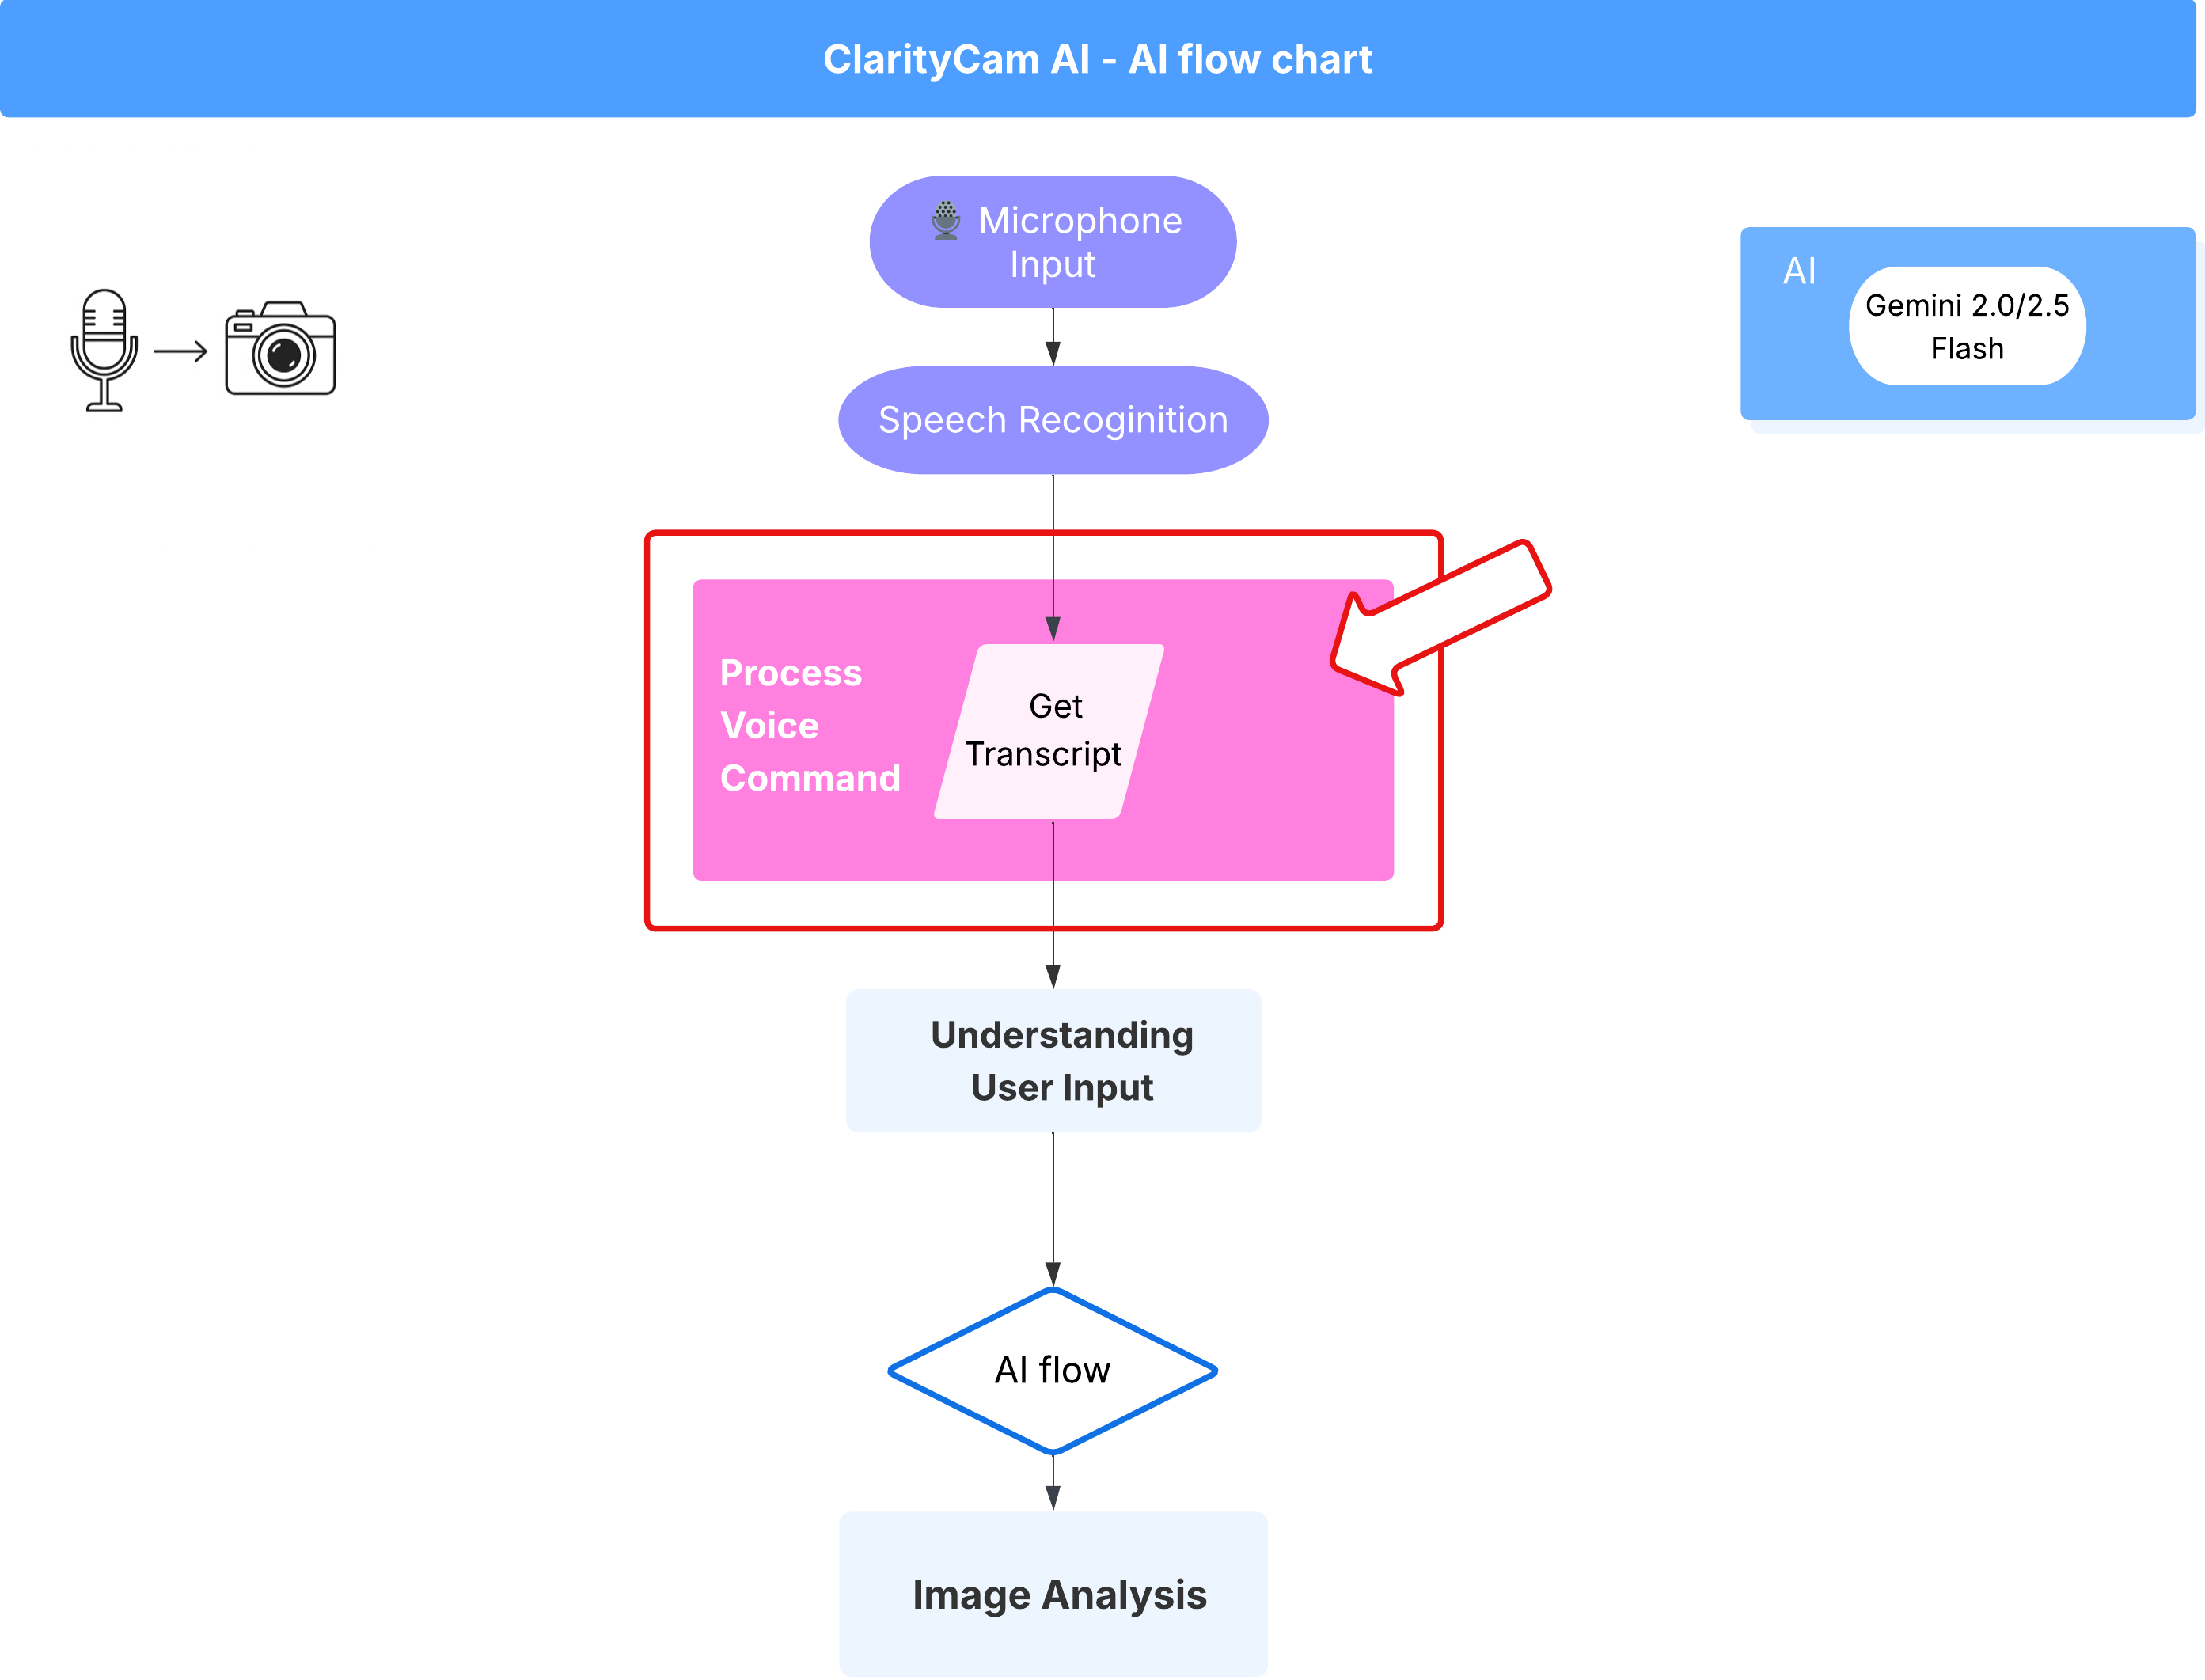
Now that we have our core "understanding" components (the Typo Checker and the Intent Classifier), let's see how they fit into the application's main voice processing logic.
Everything starts when the user speaks. The browser's Web Speech API listens for speech and, once the user finishes talking, provides a text transcript of what it heard. The following code handles this process.
👉Read Only: Navigate to ~/src/app/page.tsx and inside handleResult function. Find the code below:
for (let i = event.resultIndex; i < event.results.length; ++i) {
        if (event.results[i].isFinal) {
          finalTranscript += event.results[i][0].transcript;
        }
      }
      if (finalTranscript) {
        console.log("Final Transcript:", finalTranscript);
        processVoiceCommand(finalTranscript);
      }
Putting Our Typo Correction to the Test
Now for the fun part! Let's see how our new typo correction feature handles both perfect and imperfect voice commands.
Start the Application
First, let's get the development server running again. In your terminal, run: npm run dev
Open the App
Once the server is ready, open your browser and navigate to the local address (e.g., http://localhost:9003).
Activate Voice Commands
Click the Start Listening button. Your browser will likely ask for permission to use your microphone. Please click Allow.
Test an Imperfect Command
Now, let's intentionally give it a slightly flawed command to see if our AI can figure it out. Speak clearly into your microphone:
"Picture take of me"
Observe the Result
This is where the magic happens! Even though you said "Picture take of me," you should see the application correctly activate the camera. The checkTypo flow corrects your phrase to "take a picture" behind the scenes, and the classifyIntentFlow then understands the corrected command.
This confirms our typo correction feature is working perfectly, making the app much more robust and user-friendly! When you're done, you can stop the camera by taking a picture or simply stop the server in your terminal (Ctrl + C).
6. AI-Powered Image Analysis - Describe Image
Now that our agent can understand requests, it's time to give it eyes. In this section, we will build out the capabilities of our Vision Agent, the core component responsible for all image analysis. We'll start with its most important feature—describing an image—and then add the ability to read text.
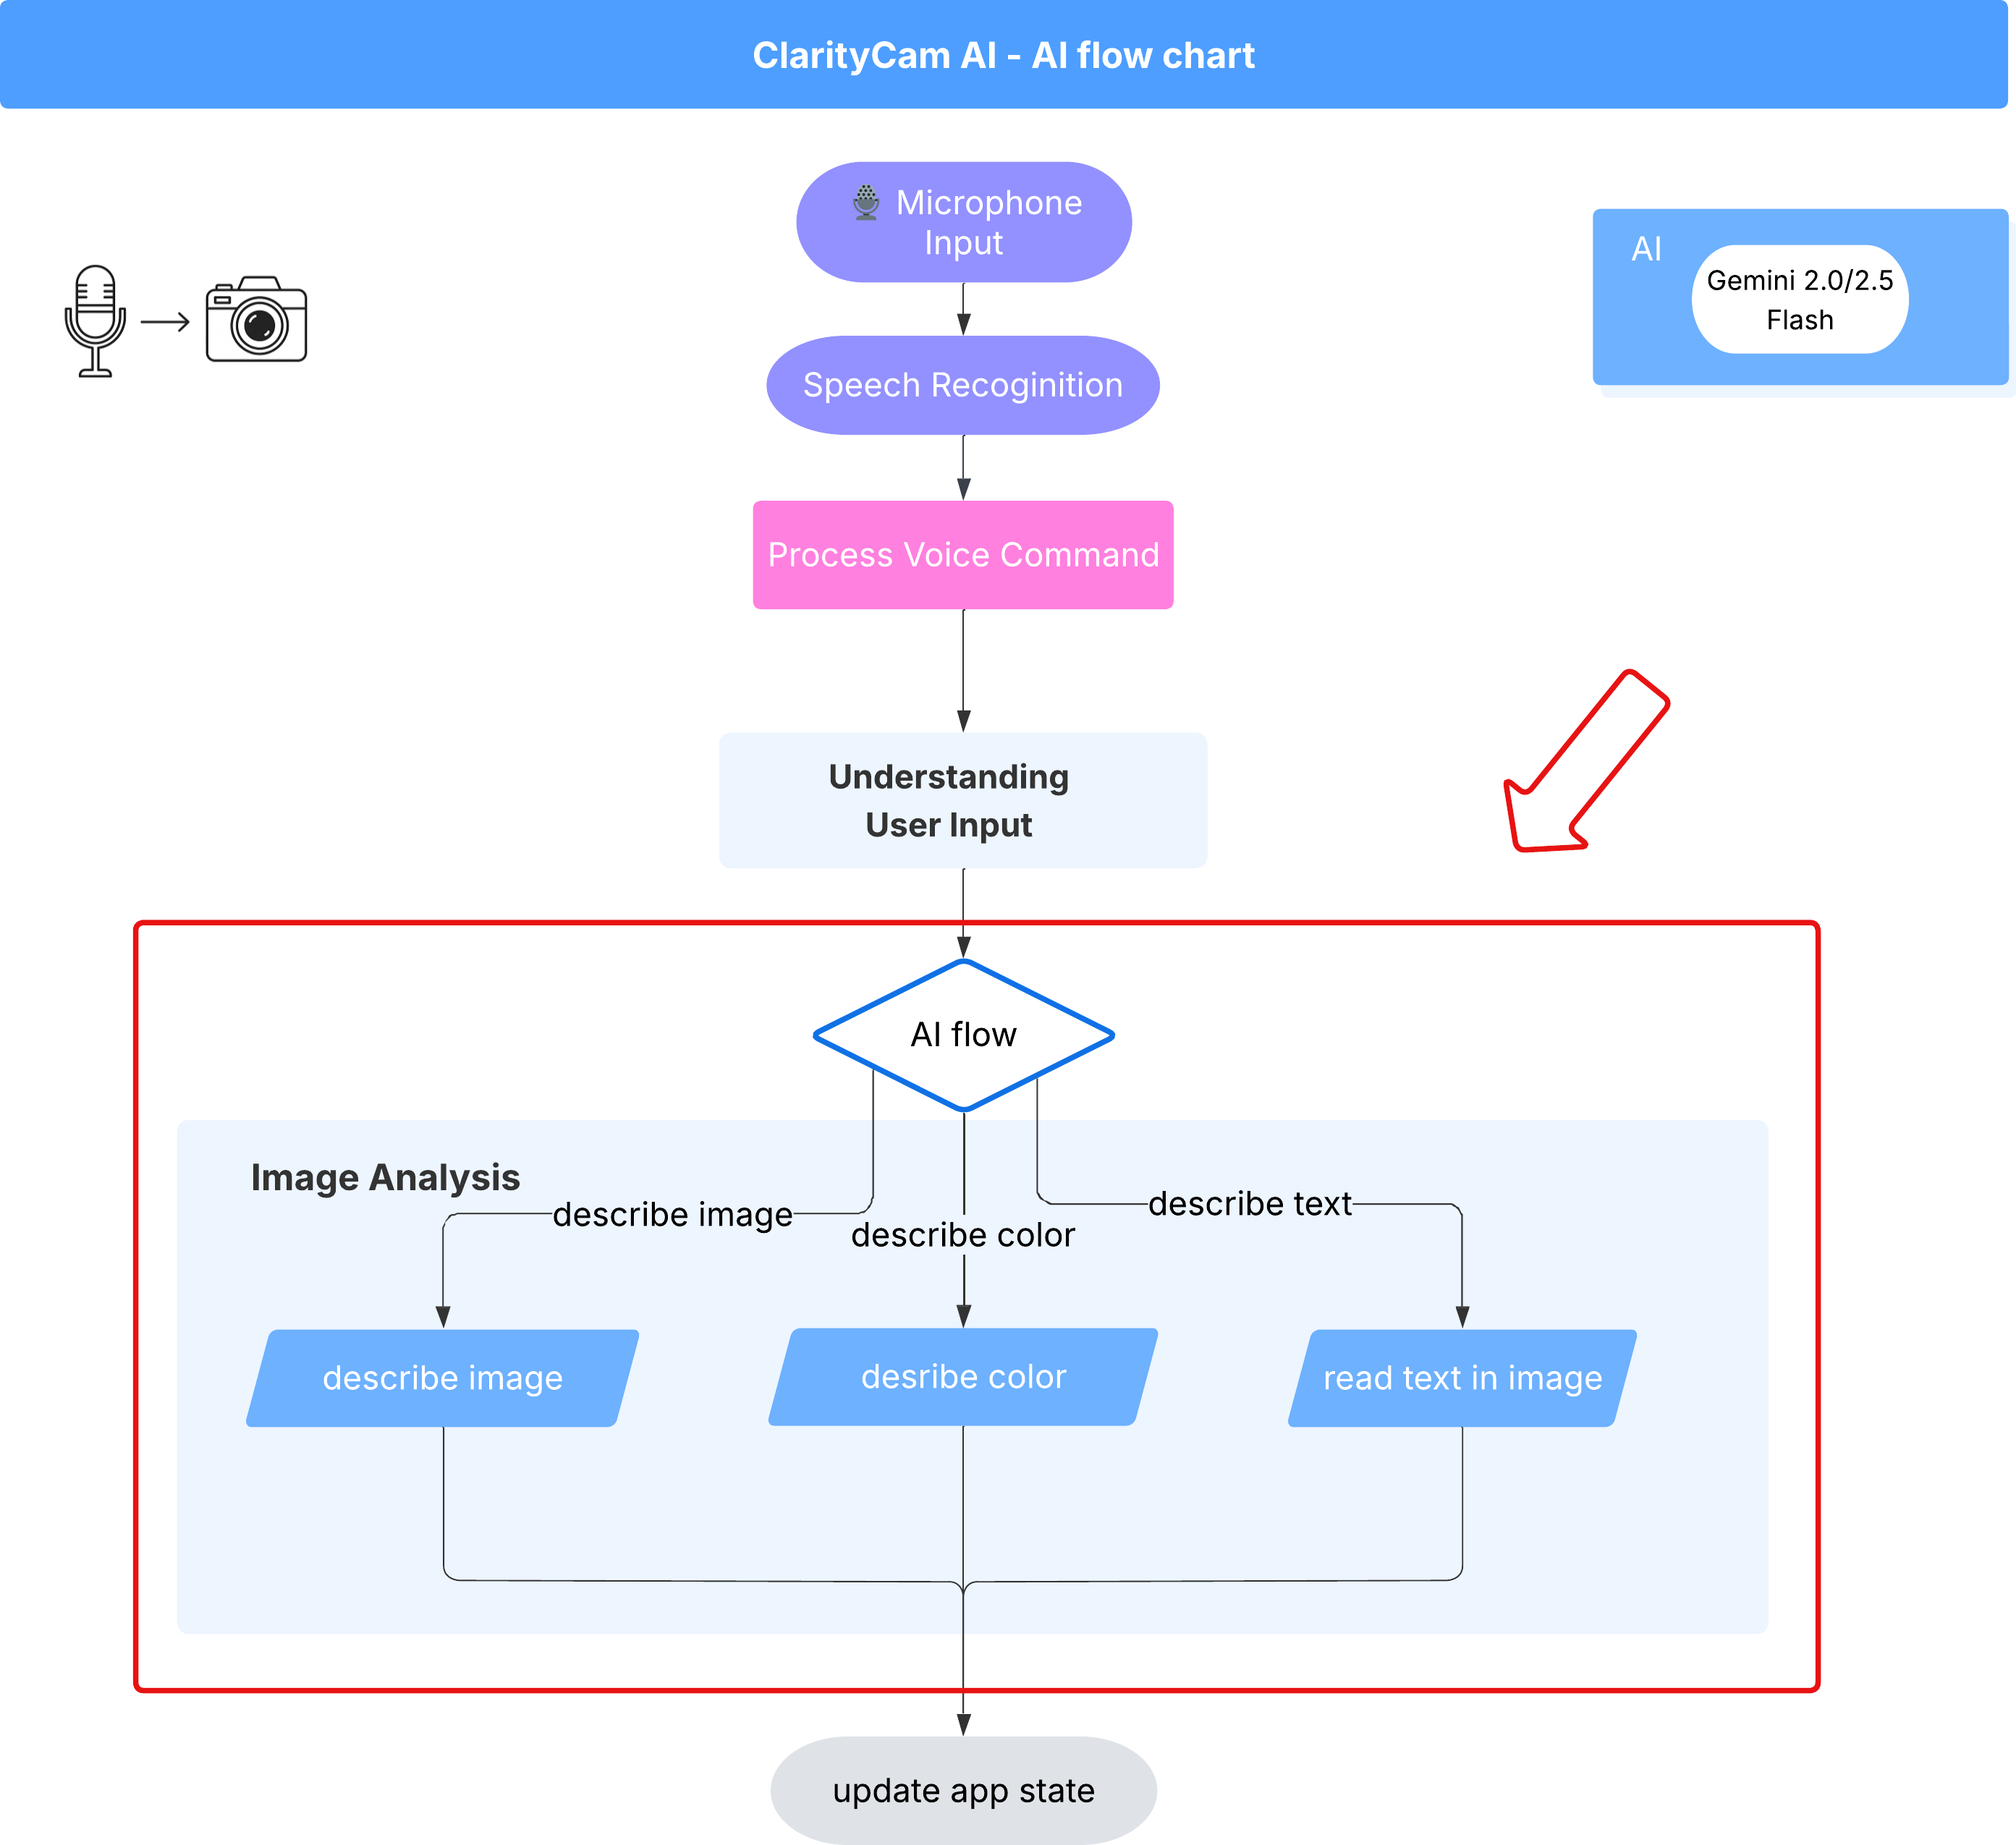
Feature 1: Describing an Image
This is the agent's primary function. We won't just generate a static description; we'll build a dynamic flow that can adapt its level of detail based on user preferences. This is a key part of the Natively Adaptive Interface (NAI) philosophy.
👉 Action: In your Cloud Shell IDE, navigate to the ~/src/ai/flows/describe_image/ file and uncomment the following code.
Step 1: Building a Dynamic Prompt Template
First, we'll create a sophisticated prompt template that can change its instructions based on the input it receives.
Uncomment the code below
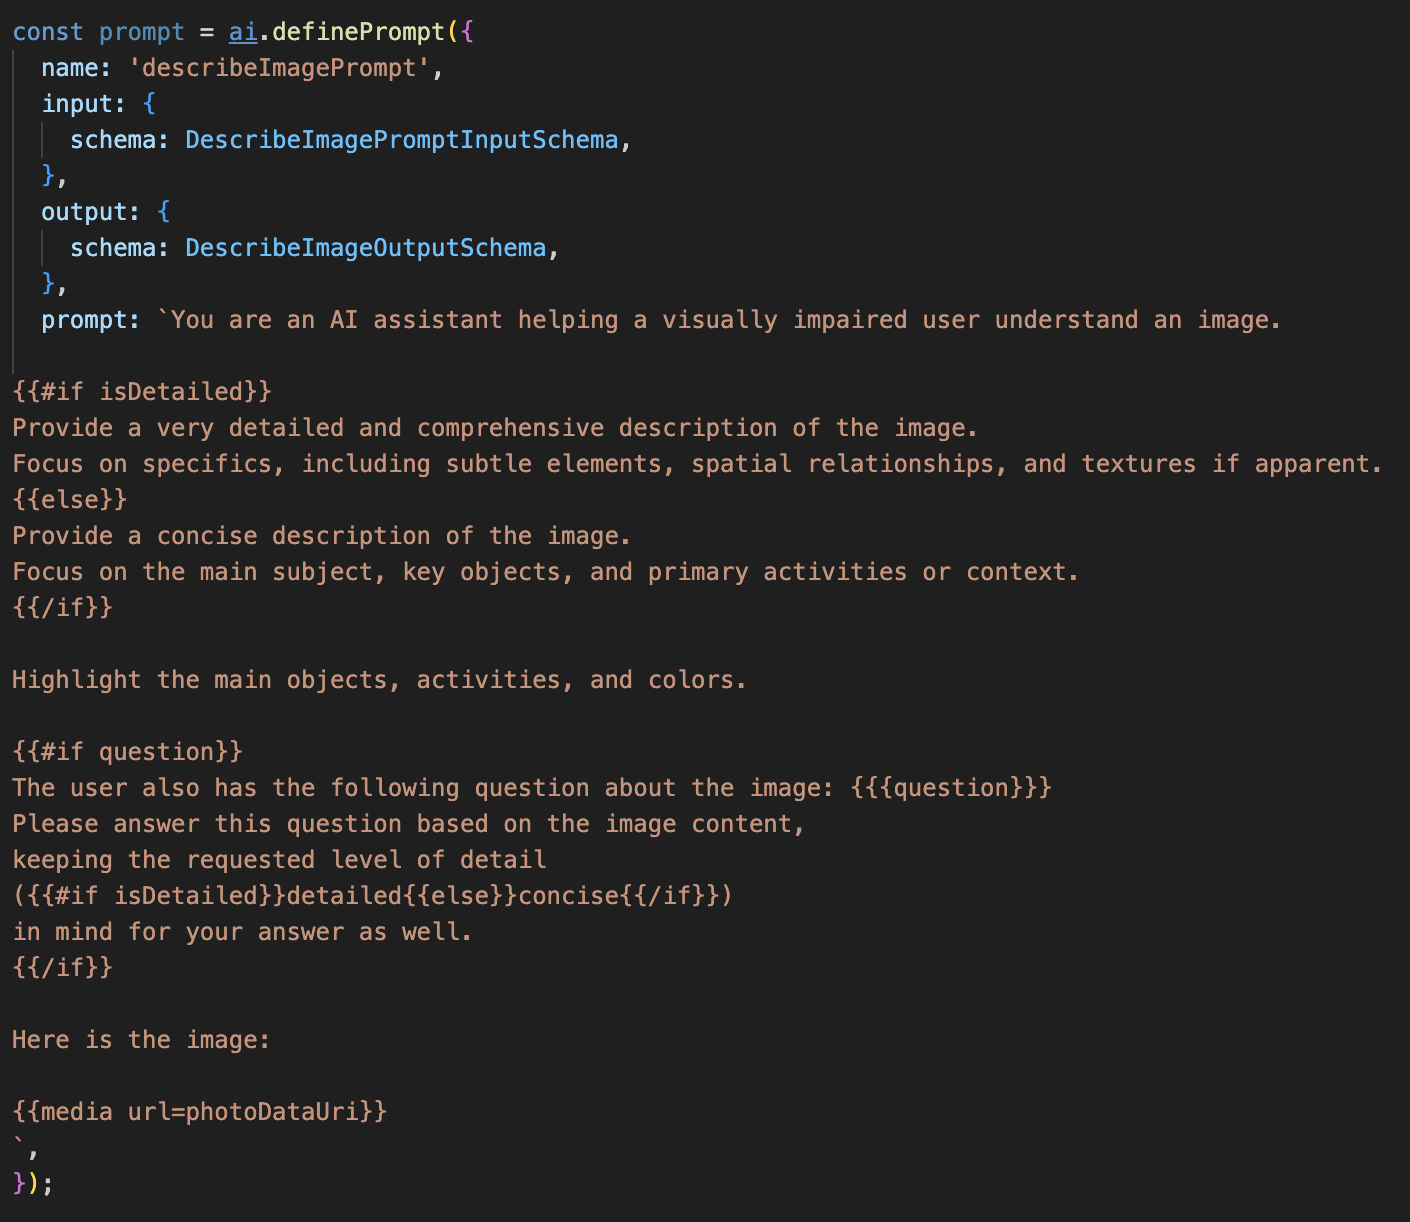
This code defines a string variable, prompt, that uses a template language called Dot-Mustache. This allows us to embed conditional logic directly into our prompt.
{#if isDetailed}...{else}...{/if}: This is a conditional block. If the input data we send to this prompt contains a property isDetailed: true, the AI will receive the "very detailed" set of instructions. Otherwise, it will receive the "concise" instructions. This is how our agent adapts to user preference.
{#if question}...{/if}: This block will only be included if our input data contains a question property. This allows us to use the same powerful prompt for both general descriptions and specific questions.
{media url=photoDataUri}: This is the special Genkit syntax for embedding image data directly into the prompt for the multimodal model to analyze.
Step 2: Creating the Smart Flow
Next, we define the prompt and the flow that will use our new template. This flow contains a bit of logic to translate the user's preference into a boolean that our template can understand.
👉 Action: In your Cloud Shell IDE, at the same ~/src/ai/flows/describe_image/ file, replace the following code. // REPLACE ME PART 1: add flow here
👉 With the code below:
// Define the prompt using the template from Step 1
const prompt = ai.definePrompt({
  name: 'describeImagePrompt',
  input: { schema: DescribeImagePromptInputSchema },
  output: { schema: DescribeImageOutputSchema },
  prompt: promptTemplate,
});

// Define the flow
const describeImageFlow = ai.defineFlow<
  typeof DescribeImageInputSchema,
  typeof DescribeImageOutputSchema
>(
  {
    name: 'describeImageFlow',
    inputSchema: DescribeImageInputSchema,
    outputSchema: DescribeImageOutputSchema,
  },
  async (pageInput) => {
    const preference = pageInput.detailPreference || "concise";

    // Prepare the input for the prompt, including the new boolean flag
    const promptInputData = {
      ...pageInput,
      isDetailed: preference === "detailed",
    };

    const { output } = await prompt(promptInputData);
    return output!;
  }
);
This acts as a smart intermediary between the frontend and the AI prompt.
- It receives
pageInputfrom our application, which includes the user's preference as a string (e.g.,"detailed"). - It then creates a new object,
promptInputData. - The most important line is
isDetailed: preference === "detailed". This line does the crucial work of creating atrueorfalseboolean value based on the preference string. - Finally, it calls the
promptwith this enhanced data. The prompt template from Step 1 can now use theisDetailedboolean to dynamically change the instructions sent to the AI.
Step 3: Connecting the Frontend
Now, let's trigger this flow from our user interface in page.tsx.
👉Action: Navigate to ~/src/app/ai/flows/describe-image.ts and find the export async function describeImage function. Uncomment the return statement:
Instead of return; Do return describeImageFlow(input);
👉Action: In ~/src/app/page.tsx, find the handleAnalyze function, replace the code // REPLACE ME PART 2: DESCRIBE IMAGE
👉 with the following code:
case "description":
    result = await describeImage({
        photoDataUri,
        question,
        detailPreference: descriptionPreference
    });
    outputText = question ? `Answer: ${result.description}` : `Description: ${result.description}`;
    break;
When a user's intent is to get a description, this code is executed. It calls our describeImage flow, passing along the image data and, crucially, the descriptionPreference state variable from our React component. This is the final piece of the puzzle, connecting the user's preference stored in the UI directly to the AI flow that will adapt its behavior accordingly.
Testing the Image Description Feature
Let's see our image description functionality in action, from capturing a photo to hearing what the AI sees.
Start the Application
First, let's get the development server running again. 👉 In your terminal, run the following command: npm run dev Note: You may need to run npm install before running npm run dev
Open the App
Once the server is ready, open your browser and navigate to the local address (e.g., http://localhost:9003).
Activate the Camera
Click the Start Listening button and grant microphone access if prompted. Then, say your first command:
"Take a picture"
The application will activate your device's camera. You should now see the live video feed on the screen.
Capture the Photo
With the camera active, position it at whatever you want to describe. Now, say the command a second time to capture the image:
"Take a picture"
The live video will be replaced by the static photo you just took.
Ask for the Description
With your new photo on the screen, give the final command:
"Describe the picture"
Listen to the Result
The app will show a processing status, and then you'll hear the AI-generated description of your image! The text will also appear in the "Status & Result" card.
When you're done, you can stop the camera by taking a picture or simply stop the server in your terminal (Ctrl + C).
7. AI-Powered Image Analysis - Describe Text (OCR)
Next, we'll add Optical Character Recognition (OCR) capability to our Vision Agent. This allows it to read text from any image.
👉 Action: In your IDE, navigate to ~/src/ai/flows/read-text-in-image/, Uncomment the code below:
👉 Action: In your IDE, in the same ~/src/ai/flows/read-text-in-image/ file, replace // REPLACE ME: Creating Prmopt
👉 with the code below:
const readTextInImageFlow = ai.defineFlow<
  typeof ReadTextInImageInputSchema,
  typeof ReadTextInImageOutputSchema
>(
  {
    name: 'readTextInImageFlow',
    inputSchema: ReadTextInImageInputSchema,
    outputSchema: ReadTextInImageOutputSchema,
  },
  async input => {
    const {output} = await prompt(input);
    return output!;
  }
);
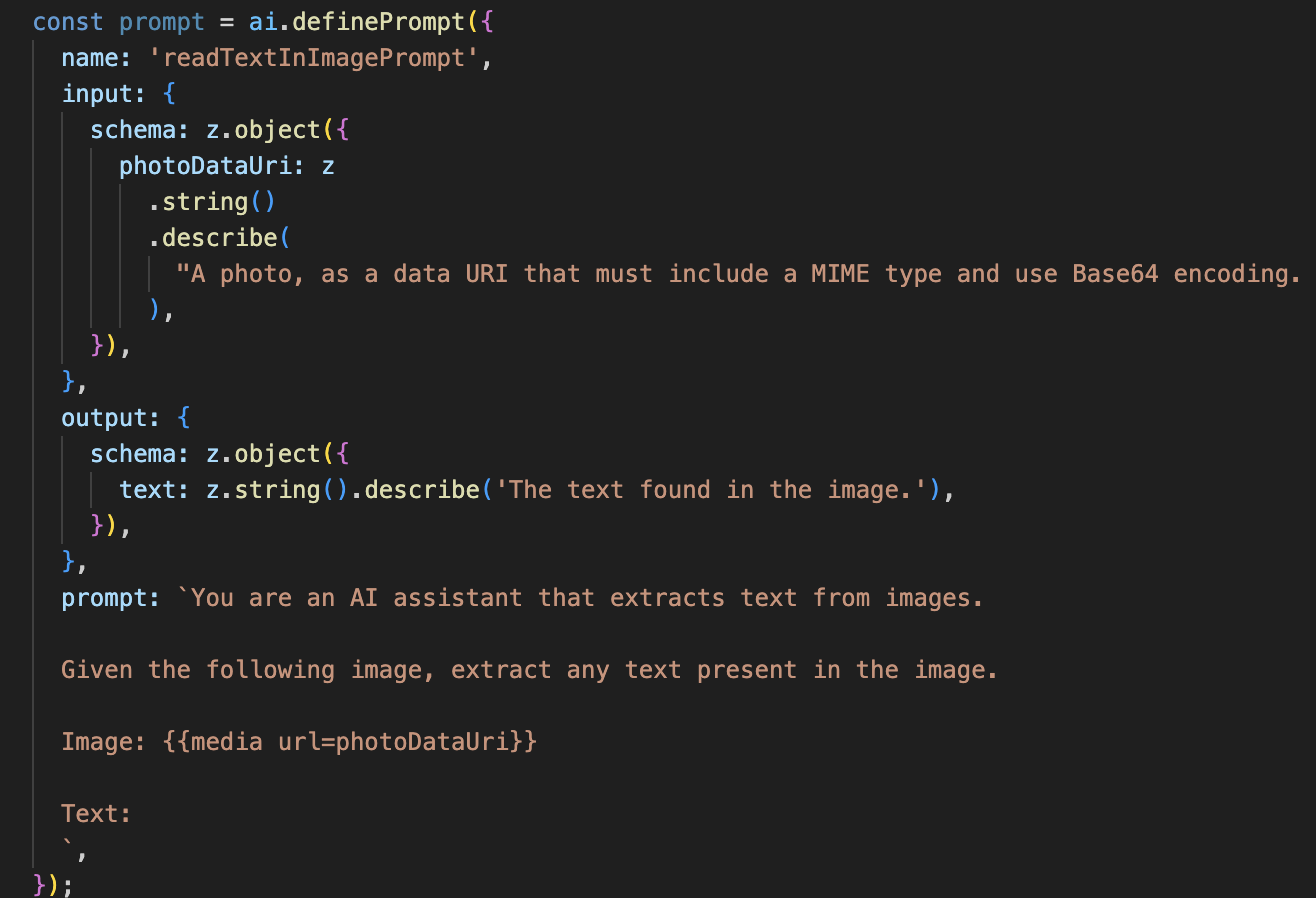
This AI flow is much simpler, highlighting the principle of using focused tools for specific jobs.
- The Prompt: Unlike our description prompt, this one is static and highly specific. Its only job is to instruct the AI to act as an OCR engine: "extract any text present in the image."
- The Schemas: The input and output schemas are also simple, expecting an image and returning a single string of text.
Connecting the Frontend for OCR
Finally, let's connect this new capability in page.tsx.
👉Action: Navigate to ~/src/app/ai/flows/read-text-in-image.ts and find the export async function readTextInImage function. Uncomment the return statement:
Instead of return; Do return readTextInImageFlow(input);
👉 Action: In ~/src/app/page.tsx, find the handleAnalyze function and around the switch statement.
Replace REPLACE ME PART 3: READ TEXT
with the code below:
 case "text":
            result = await readTextInImage({ photoDataUri });
            outputText = result.text ? `Text Found: ${result.text}` : "No text found.";
            break;
When the user's intent is ReadTextInImage, this code is triggered. It calls our simple readTextInImage flow. The line result.text ? ... : ... is a clean way to handle the output, providing a helpful message to the user if the AI was unable to find any text in the image.
Testing the Read Text (OCR) Feature
Follow these steps to test the text-reading feature. Remember to aim your camera at an object with clear text.
- Run the application with
npm run devand open it in your browser. - Click Start Listening and grant microphone access when prompted.
- Activate the camera. Say the command: "Take a picture" You should see the live video feed appear on the screen.
- Capture the photo. Aim your camera at the text you want to read, and say the command again: "Take a picture" The video will be replaced by a static photo.
- Ask for the text. Now that a photo is captured, give the final command: "What is the text in the image?"
- Check the Result After a moment, the app will analyze the photo and speak the detected text aloud. If it can't find any text, it will let you know.
This confirms the powerful OCR feature is working! When you're done, stop the server with Ctrl + C.
8. Advanced AI Enhancements - Read Only ✨
A good AI agent can follow instructions. A great AI agent feels intuitive, trustworthy, and helpful. In this section, we'll focus on three advanced enhancements that elevate our agent's capabilities.
We will explore how to:
Add Context & Memoryto handle natural, conversational follow-ups.Reduce Hallucinationto build a more reliable and trustworthy agent.Make the Agent Proactiveto provide a more accessible and user-friendly experience.Add preference settingto customize the image description
Enhancement 1: Context & Memory
A natural conversation isn't a series of isolated commands; it flows. If a user asks, "What's in the picture?" and the agent replies, "A red car," the user's natural follow-up might be, "What color is it?" without saying "car" again. Our agent needs short-term memory to understand this context.
How We Implemented It (Recap)
We already built this capability into our describeImage flow. This section is a recap of how that pattern works. When we call our describeImage function from page.tsx, we pass it the conversational history.
👉 Code Showcase (from page.tsx):
const result = await describeImage({
    photoDataUri,
    question: commandToProcess,
    detailPreference: descriptionPreference,
    previousUserQueryOnImage: lastUserQuery ?? undefined,
    previousAIResponseOnImage: lastAIResponse ?? undefined,
});
previousUserQueryOnImage&previousAIResponseOnImage: These two properties are our agent's short-term memory. By passing the last interaction to the AI, we give it the context needed to understand vague or referential follow-up questions.- The Adaptive Prompt: This context is used by the prompt in our describe_image flow. The prompt is designed to consider the previous conversation when forming a new answer, allowing the agent to respond intelligently.
Enhancement 2: Reducing Hallucination
An AI "hallucinates" when it invents facts or claims to have capabilities it doesn't possess. To build user trust, it's critical that our agent knows its own limits and can gracefully decline out-of-scope requests.
How We Implemented It (Recap)
The most effective way to prevent hallucination is by giving the model clear boundaries. We achieved this when we built our Intent Classifier.
👉 Code Showcase (from the intent-classifier flow):
// Define Agent Capabilities and Limitations for the prompt
const AGENT_CAPABILITIES_AND_LIMITATIONS = `
**Core Capabilities (What the Agent CAN DO):**
* **Image Analysis:**
    * DescribeImage: Provide a general description of the current image...

**Limitations (What the Agent CANNOT DO...):**
* Cannot generate or create new images.
* Cannot provide general knowledge or answer questions unrelated to the image...
* Cannot perform web searches.
`;
This constant acts as a "job description" that we feed to the AI in the classification prompt.
- Grounding the Model: By explicitly telling the AI what it cannot do, we "ground" it in reality. When it sees a query like "What's the weather?", it can confidently match it to its list of limitations and classify the intent as OutOfScopeRequest.
- Building Trust: An agent that can honestly say, "I can't help with that," is far more trustworthy than one that tries to guess and gets it wrong. This is a fundamental principle of safe and reliable AI design. `
Enhancement 3: Creating a Proactive Agent
For an accessibility-first application, we can't rely on visual cues. When a user activates the listening mode, they need immediate, non-visual confirmation that the agent is ready and waiting for a command. We'll now add a proactive introduction to provide this crucial feedback.
Step 1: Add a State to Track the First Listen
First, we need a way to know if this is the very first time the user has pressed the "Start Listening" button during their session.
👉 In ~/src/app/page.tsx, see the following new state variable near the top of your ClarityCam component.
export default function ClarityCam() {
  // ... other state variables
  const [descriptionPreference, setDescriptionPreference] = useState<DescriptionPreference>("concise");

  // Add this new line
  const [isFirstListen, setIsFirstListen] = useState(true);

  // ... rest of the component
}
We've introduced a new state variable, isFirstListen, and initialized it to true. We will use this flag to trigger our one-time welcome message.
Step 2: Update the toggleListening Function
Now, let's modify the function that handles the microphone to play our greeting.
👉 In ~/src/app/page.tsx, find the toggleListening function and see the following if block.
const toggleListening = useCallback(() => {
    // ... existing logic to setup speech recognition

    if (isListening || isAttemptingStart) {
        // ... existing logic to stop listening
    } else {
        stopSpeaking(); // Stop any ongoing TTS

        // Add this new block
        if (isFirstListen) {
            setIsFirstListen(false);
            const introMessage = "Hello! I am ClarityCam, your AI assistant. I'm now listening. You can ask me to 'describe the image', 'read text', 'take a picture', or ask questions about what's in an image.";
            speakText(introMessage);
        } else {
            speakText("Listening..."); // Optional: provide feedback on subsequent clicks
        }

        // ... rest of the logic to start listening
    }
}, [/*...existing dependencies...*/, isFirstListen]); // Don't forget to add isFirstListen to the dependency array!
- Check the Flag: The if (isFirstListen) block checks if this is the first activation.
- Prevent Repetition: The first thing it does inside the block is call setIsFirstListen(false). This ensures the introductory message will only ever play once per session.
- Provide Guidance: The introMessage is carefully crafted to be as helpful as possible. It greets the user, identifies the agent by name, confirms it's now active ("I'm now listening"), and provides clear examples of voice commands they can use.
- Auditory Feedback: Finally, speakText(introMessage) delivers this crucial information, providing immediate assurance and guidance without requiring the user to see the screen.
Enhancement 4: Adapting to User Preferences (Recap)
A truly smart agent doesn't just respond; it learns and adapts to the user's needs. One of the most powerful features we built is the ability for the user to change the verbosity of the image descriptions on the fly with commands like "Be more detailed."
How We Implemented It (Recap) This capability is powered by the dynamic prompt we created for our describeImage flow. It uses conditional logic to change the instructions sent to the AI based on the user's preference.
👉 Code Showcase (the promptTemplate from describe_image):
const settingPreferenceTemplate = `
{#if isDetailed}
Provide a very detailed and comprehensive description of the image. Focus on specifics, including subtle elements, spatial relationships, and textures if apparent.
{else}
Provide a concise description of the image. Focus on the main subject, key objects, and primary activities or context.
{/if}

Highlight the main objects, activities, and colors.
...
`;
- Conditional Logic: The
{#if isDetailed}...{else}...{/if}block is the key. When our describeImageFlow receives the detailPreference from the frontend, it creates an isDetailed boolean (true or false). - Adaptive Instructions: This boolean flag determines which set of instructions the AI model receives. If isDetailed is true, the model is instructed to be highly descriptive. If it's false, it's instructed to be concise.
- User Control: This pattern directly connects a user's voice command (e.g., "make descriptions concise," which is classified as the SetDescriptionConcise intent) to a fundamental change in the AI's behavior, making the agent feel truly responsive and personalized.
9. Deployment to the Cloud
Build the Docker Image using Google Cloud Build
gcloud builds submit . --tag gcr.io/$PROJECT_ID/accessibilityai-nextjs-app:latest
accessibilityai-nextjs-appis a suggested image name.- The . uses the current directory (
accessibilityAI/) as the build source.
Deploy the Image to Google Cloud Run
- Ensure your API keys and other secrets are ready in Secret Manager. For example,
GOOGLE_GENAI_API_KEY.
Replace this YOUR_ACTUAL_GOOGLE_AI_KEY_VALUE with your actual Gemini API key value.
echo "YOUR_ACTUAL_GOOGLE_AI_KEY_VALUE" | gcloud secrets create GOOGLE_GENAI_API_KEY --data-file=- --project=YOUR_PROJECT_ID
Grant your Cloud Run service's runtime service account (e.g., PROJECT_NUMBER-compute@developer.gserviceaccount.com or a dedicated one) the "Secret Manager Secret Accessor" role for this secret.
- Deploy command:
gcloud run deploy accessibilityai-app-service \
  --image gcr.io/$PROJECT_ID/accessibilityai-nextjs-app:latest \
  --platform managed \
  --region us-central1 \
  --allow-unauthenticated \
  --port 3000 \
  --set-secrets=GOOGLE_GENAI_API_KEY=GOOGLE_GENAI_API_KEY:latest \
  --set-env-vars NODE_ENV="production"